Loading ...
Loading ...
3
2. Die Schiene längs zu den Führungsstäben nach
hinten führen und beide Halterungen jeweils auf
den unteren Stab aufschieben. Dabei mit der hin-
teren Halterung den senkrechten Stab umgrei-
fen.
→Abb.
3. PUSH gedrückt halten und die Auszugsschiene
nach innen schwenken , bis die Halterung in
den unteren Stab eingehängt ist.
→Abb.
4. PUSH loslassen.
→Abb.
a Die Halterung rastet ein.
5. Die Auszugsschiene bis zum Anschlag herauszie-
hen und wieder einschieben.
Tipp
Weitere Informationen:
Auszugsschiene aushängen
WARNUNG‒Verbrennungsgefahr!
Die Gestelle werden sehr heiß
▶ Nie die heißen Gestelle berühren.
▶ Das Gerät immer abkühlen lassen.
▶ Kinder fernhalten.
ACHTUNG!
Die selbstreinigenden Flächen im Garraum können
durch das Aushängen und Einhängen der Auszugs-
schienen beschädigt werden.
▶ Die Gestelle zuerst aushängen, bevor Sie die Aus-
zugsschienen aushängen oder einhängen.
1. Seitlich der Schiene auf PUSH drücken und die
Schiene nach hinten schieben.
→Abb.
2. PUSH gedrückt halten und die Schiene nach
außen schwenken , bis die vordere Halterung
ausgehängt ist.
→Abb.
3. Die Schiene nach vorne herausziehen.
→Abb.
4. Die Auszugsschiene entfernen.
→Abb.
5. Die Auszugsschiene reinigen.
Tipp
Weitere Informationen:
en
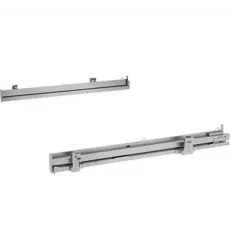
Pull-out rails
The pull-out rails are not compatible with all appli-
ances. When purchasing accessories, always quote
the exact product number (E no.) of your appliance.
Notes
¡ The pull-out rails are not suitable for appliances
with a microwave function.
¡ Use the pull-out rails with enamelled accessories
and stainless steel accessories.
¡ Depending on the appliance type, you must
change the basic settings for the telescopic rails
for appliances with rails and pull-out rails.
¡ The pull-out rails can be installed at any level as
required.
¡ If necessary, you can equip all levels with a pull-
out rail.
ATTENTION!
The self-cleaning surfaces in the cooking compart-
ment may be damaged by detaching and attaching
the pull-out rails.
▶ Detach the rails before detaching or attaching the
pull-out rails.
Attaching the pull-out rail
Note:The pull-out rails only fit on the right or left.
Make sure when you fit them that you can pull them
out towards the front.
1. Guide the pull-out rail with the rear retainer from
below behind the two guide rods for the required
shelf position and keep it horizontal.
→Fig.
2. Guide the rail lengthways to the rear to the guide
rods, and slide both retainers onto each lower rod.
In doing so, use the rear retainer to grip the ver-
tical rod.
→Fig.
3. Press and hold PUSH and swing the pull-out
rail inwards until the retainer is attached in
the lower rod.
→Fig.
4. Release the PUSH tab.
→Fig.
a The retainer clicks into place.
5. Pull the pull-out rail out as far as it will go and
slide it back in.
Tip
Further information:
Removing the pull-out rail
WARNING‒Risk of burns!
The shelf supports get very hot
▶ Never touch the shelf supports when hot.
▶ Always allow the appliance to cool down.
▶ Keep children at a safe distance.
ATTENTION!
The self-cleaning surfaces in the cooking compart-
ment may be damaged by detaching and attaching
the pull-out rails.
▶ Detach the rails before detaching or attaching the
pull-out rails.
1. Push on the side of the tab marked PUSH behind
the rail, and push the rail to the rear.
→Fig.
2. Press and hold PUSH and swing the rail out-
wards until the front retainer is detached.
→Fig.
3. Pull the rail out towards the front.
→Fig.
4. Remove the pull-out rail.
→Fig.
Loading ...
Loading ...
Loading ...