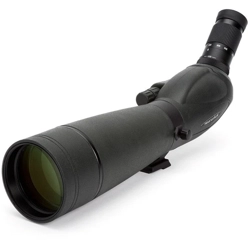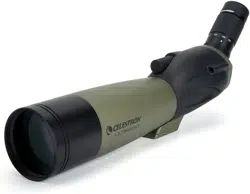
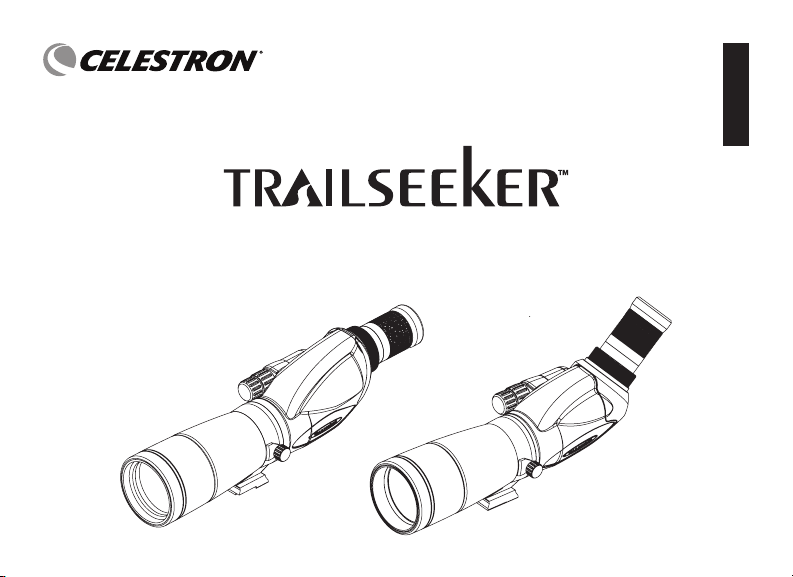
SPOTTING SCOPE
INSTRUCTION MANUAL
ENGLISH
2 I ENGLISH
Thank you for purchasing a Celestron TrailSeeker spotting scope. We trust that this spotting scope will provide you with
years of enjoyment and faithful service. Please read the instructions carefully before using your spotting scope to ensure
proper use and care.
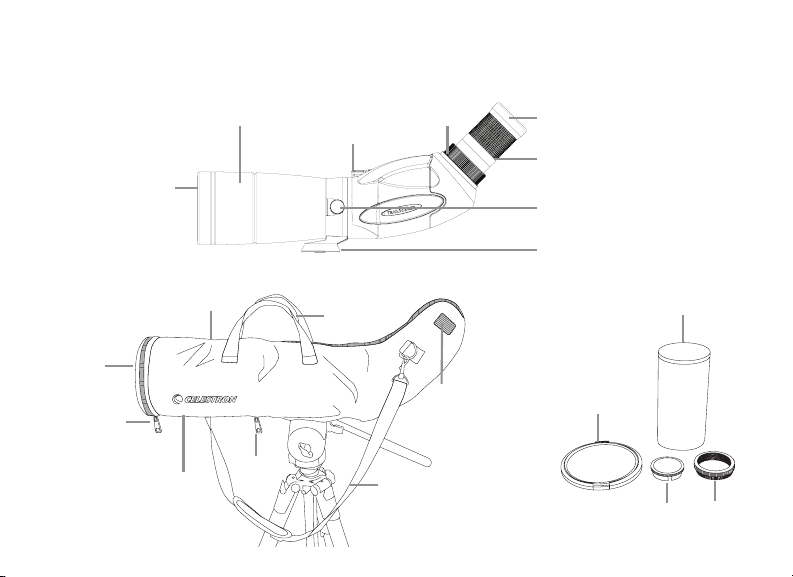
Objective
Lens Cap
Eyepiece Mount Cap T-Adapter
Step Ring
Eyepiece Cover
Eyepiece Lock Collar
Objective Lens
Lens Shade Focus Knob
(Coarse/Fine)
Tripod Mount Rotation Lock Screw
Tripod Mount (Rotating)
Eyecup
Eyepiece
Carrying Straps
Velcro Tabs (2)
(1 on each side)
Velcro Tab
Velcro Tab
Shoulder Strap
Zipper
Zipper
Zipper

ENGLISH I 3
WARNING
Never look at the Sun while using your spotting scope.
Looking at the Sun can cause permanent eye damage.
BEFORE USE
Attach your spotting scope to a sturdy tripod before viewing as
the size and power of the spotting scope requires a solid tripod
for stability to achieve clear, sharp images (Fig. 2).
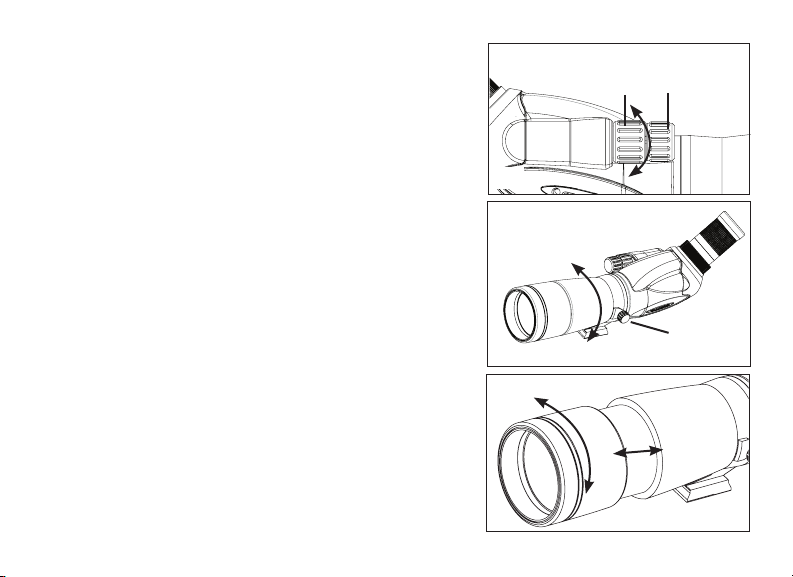
ATTACHING THE EYEPIECE
To attach the eyepiece to the spotting scope, turn the eyepiece
lock collar counterclockwise until it is loose and remove the
eyepiece mount cover if inserted. Make sure that the protective
lens cap is removed from the eyepiece and slide it into the
eyepiece mount (Fig. 3a). When the eyepiece is fully seated, turn
the lock collar clockwise to secure the eyepiece and hold it in
place (Fig. 3b). Do not attempt to attach or remove the eyepiece
without first loosening the lock collar as it can cause damage to
the eyepiece and/or the spotting scope.
Fig. 2
Fig. 3b
Fig. 3a

4 I ENGLISH
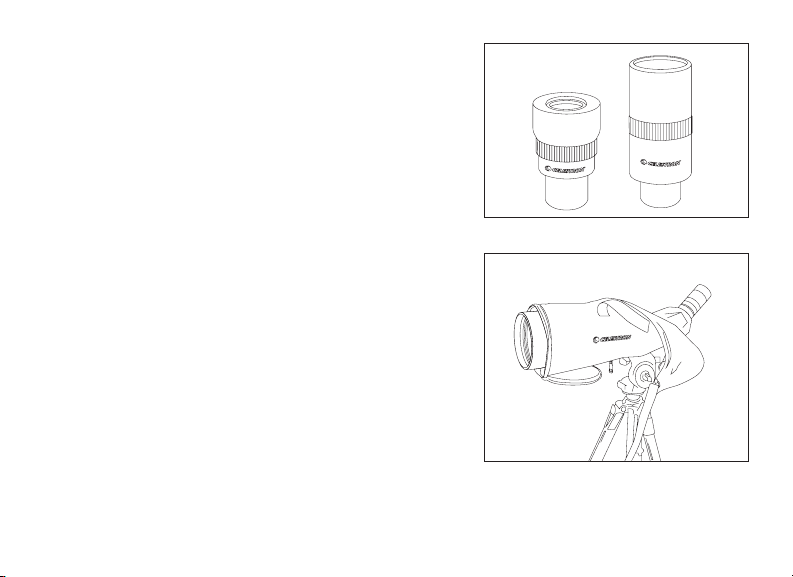
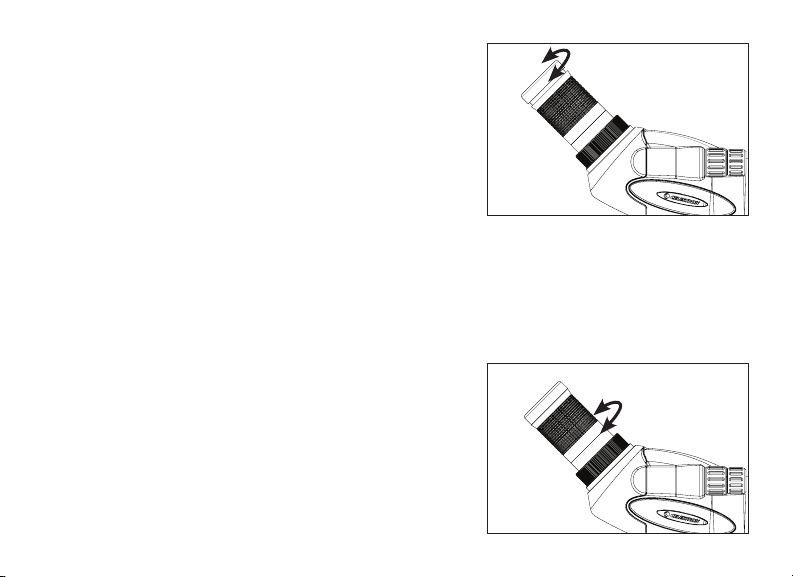
EYECUP ADJUSTMENT
Zoom and Wide Angle Eyepiece
The zoom/wide angle eyepiece of the TrailSeeker features
a twist-up eyecup to accommodate both eyeglass and non-
eyeglass wearers (Fig. 4). If you do not wear eyeglasses, twist
the eyecup clockwise until it reaches the up position. If you
wear eyeglasses, make sure that the eyecup is in the down
position to obtain the maximum field of view. The eyecup can
be set at positions between fully up and down which may suit
some users better.
Long Eye Relief (LER) Eyepiece
The LER eyepiece features a rubber eyecup to accommodate
eyeglass and non-eyeglass wearers. If you do not wear
eyeglasses simply position your eye behind the eyecup. If you
wear eyeglasses you will need to remove the eyecup to obtain
the maximum field of view. To remove the eyecup, simply pull
it towards you and off of the eyepiece.
CHANGING THE MAGNIFICATION (ZOOM EYEPIECE)
To change the magnification of the zoom eyepiece simply rotate
the eyepiece in the counterclockwise direction to increase the
magnification and clockwise to decrease the magnification
(Fig. 5). When changing magnification the scope will need to
be refocused. The largest field of view and brightest images
will always be at the lowest magnification.
Fig. 4
Fig. 5

ENGLISH I 5
Coarse Focus Knob
Fine
Focus Knob
FOCUSING
To ensure a crisp, sharp image the spotting scope must be
focused. The TrailSeeker features a dual focus system that
includes a coarse and a fine focus (Fig. 6). To focus the spotting
scope, slowly rotate the coarse focus knob until the image in
the eyepiece is clear and sharp. For fine adjustment slowly
rotate the fine focus knob (located in front of the coarse focus
knob) until the image in the eyepiece is clear and sharp. When
the focus knob will not rotate any further, turn the wheel in the
opposite direction.
ROTATING TRIPOD MOUNT
The TrailSeeker features a rotating tripod mount that rotates
a full 360° and allows the eyepiece to be set in any viewing
position. To change the position of the eyepiece, loosen the
lock screw located on the tripod mount and turn the scope to
the desired position (Fig. 7). Tighten the lock screw and view
through the eyepiece.
LENS SHADE
The lens shade of the TrailSeeker will slide away from the body
to protect the lens from exposure to rain or to keep unwanted
glare from entering the spotting scope and degrading your
image (Fig. 8).
Fig. 6
Fig. 8
Fig. 7
Lock Screw

6 I ENGLISH
OPTIONAL EYEPIECES
Celestron offers two fixed magnification eyepieces designed for
use with the TrailSeeker Series spotting scopes; the 82001 and
82002. The 82001 is a wide angle eyepiece and the 82002 is
a long eye relief (LER) eyepiece. In addition to these eyepieces
the TrailSeeker is designed to use standard 1.25” astronomical
eyepieces. Celestron offers a wide selection of 1.25” astronomical
eyepieces for use on your spotting scope to achieve higher
magnifications, wider fields of view, etc.
STAY-ON CARRYING CASE
The TrailSeeker Series spotting scopes come with a stay-on
carrying case that protects your spotting scope from bumps,
scratches and the elements. The zipper at the bottom of the case
allows your spotting scope to be attached to a tripod without
removing it from the case and zippers in the front and back allow
your scope to be viewed through while still in the case. When the
front and back flaps are unzipped the objective lens and eyepiece
is exposed.
The flaps are folded over and held out of the way with velcro tabs
to prevent them from interfering with your view and allow access
to the focus knobs and tripod mount locking screw. The case has
built in carrying straps and a detachable shoulder strap to easily
carry your scope when in the case.
Fig. 10
Fig. 9
ENGLISH I 7
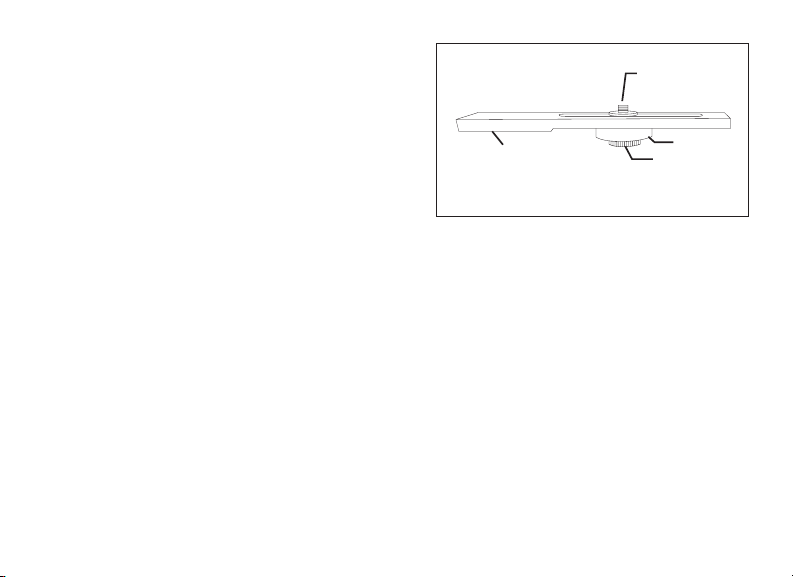
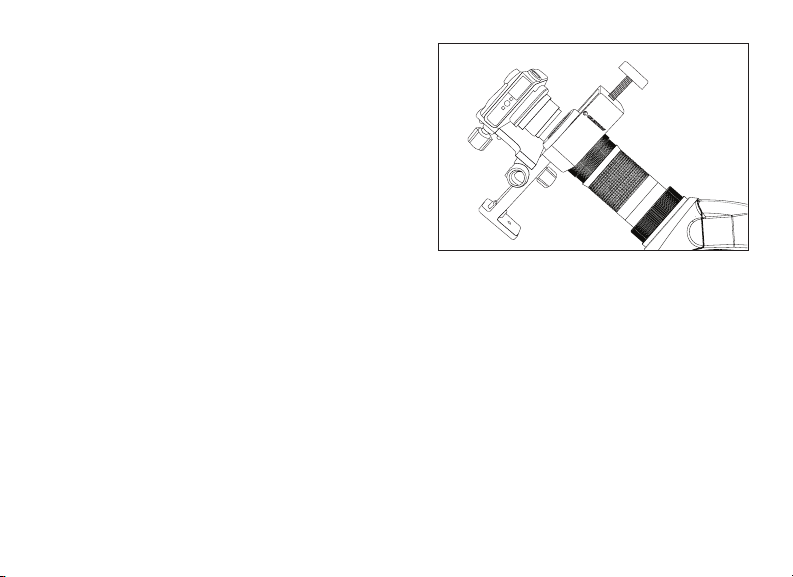
BALANCE PLATE (FOR THE 100 MM MODEL)
The TrailSeeker 100 mm spotting scope comes with a balance
plate to properly balance the spotting scope when attached to a
tripod (Fig. 11). To use the balance plate, mount it to the tripod’s
¼”-20 mounting screw using the ¼”-20 threaded hole located on
the bottom of the plate. Attach the spotting scope to the balance
plate using the ¼”-20 mounting screw located on the top of the
plate and thread it into the spotting scope as far as it will go.
Slide the spotting scope along the slotted portion of the plate
until the spotting scope is balanced on the tripod. Tighten the
locking ring to hold the spotting scope in the desired position.
DIGISCOPING
The TrailSeeker spotting scopes can be used for digiscoping
with SLR cameras and point-and-shoot digital cameras. Please
note that not all cameras are compatible for digiscoping and in
some cameras vignetting (a circular image surrounded by black)
will occur. Point-and-shoot cameras with an optical zoom of 3x
or 4x tend to be the most compatible with the least amount of
vignetting. When using a zoom eyepiece, photographs will be
the sharpest and brightest when the eyepiece is set at the lowest
magnification.
Fig. 11
¼”-20
Mounting Screw
¼”-20
Threaded Hole
(not shown)
Locking Ring
Mounting Screw

8 I ENGLISH
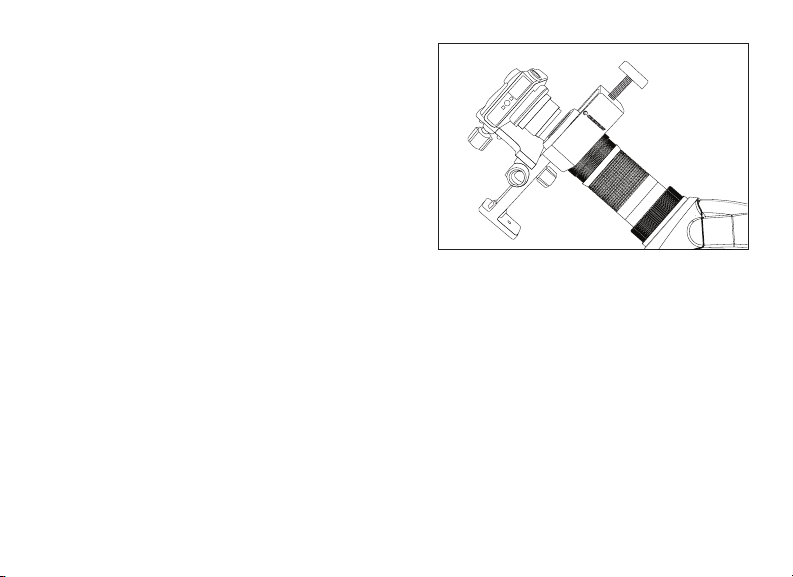
SLR PHOTOGRAPHY
To use an SLR camera and your spotting scope for photography, you will shoot
through the eyepiece while it is attached to the spotting scope. To prevent damage
to the spotting scope, eyepiece or camera make sure the eyepiece lock collar is
secure during each stage of the setup.
1. Remove the eyecup from the zoom/wide angle eyepiece. With the eyecup
down, rotate it counterclockwise to remove it from the eyepiece. This will
expose the threads under the eyecup (Fig. 12a).
Note: Simply pull the rubber eyecup off of the LER eyepiece to expose the threads.
2. Thread the included T-adapter step ring to the threads exposed on the
zoom/wide angle eyepiece in step one above (Fig. 12b).
Note: The T-adapter step ring is not necessary when using the LER eyepiece.
3. Thread an optional T-ring for your make and model of camera onto the
T-adapter step ring (Fig. 12c).
Note: When using the LER eyepiece, thread the T-ring directly to the threads of the eyepiece.
4. Attach your SLR camera body to the T-ring (Fig. 12d).
The TrailSeeker spotting scopes have fixed apertures and as a result fixed f/ratios.
To achieve the proper exposure for your photographs you need to set the shutter
speed accordingly. Most cameras offer through-the-lens metering which will let
you know if your picture is under or overexposed. Consult your camera manual for
specific information on metering, changing shutter speeds and other settings.
Fig. 12a
Fig. 12b
Fig. 12c
Fig. 12d

ENGLISH I 9
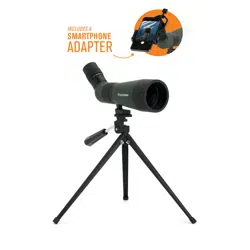
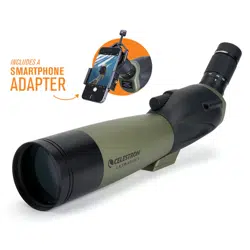
POINT-AND-SHOOT PHOTOGRAPHY
A variety of point-and-shoot cameras can be used to digiscope
with the TrailSeeker spotting scopes utilizing the Universal Camera
Adapter (#93626) offered by Celestron (Fig. 13). This adapter
attaches to the spotting scope’s eyepiece and allows the camera
lens to be centered behind the eyepiece. Please note that not all
cameras are compatible with this adapter as there is not enough
adjustment to center the lens behind the eyepiece when
the position of the lens is low in the camera body or when the
camera does not have adequate height.
WATERPROOF / FOGPROOF
The TrailSeeker Series spotting scopes are waterproof and filled with
dry nitrogen gas to prevent the housing from fogging internally.
CARE AND STORAGE
Your Celestron spotting scope will provide you years of dependable service if it is cared for and stored properly.
1. Protect the spotting scope from impact and do not force any of the moving parts beyond their limits.
2. Protect the optics of your spotting scope by putting on all lens caps when not in use.
3. Store your spotting scope in a cool, dry place whenever possible.
4. When storing for an extended period of time, place the spotting scope in a plastic bag or airtight container
with a desiccant.
5. Do not leave the spotting scope in a car on a hot/sunny day or near anything that generates heat as this
may cause damage.
6. Clean any dust, dirt or water that may get on the spotting scope or inside moving parts as soon as possible
to prevent any unforeseen damage.
Fig. 13

10 I ENGLISH
CLEANING
Proper lens cleaning is essential to maintaining the optical integrity of your spotting scope. Dirty lenses diminish the amount
of light transmitted through the spotting scope and your overall viewing experience.
1. Remove any dust on the lenses with a soft lens brush or can of pressurized air.
2. Remove any fingerprints, stains or smudges from the lens surface with a soft, clean lens cloth or lens tissue
by rubbing in a circular motion. Start in the middle of the lens and work your way to the edges. Breathe
lightly on the lens to provide moisture if needed.
3. For a more thorough cleaning we recommend the use of a lens/optics cleaning kit available at most photo
or optical shops. Follow the directions supplied with the cleaning kit for best results.
SERVICE AND REPAIR
If warranty problems arise or repairs are necessary, contact the Celestron customer service department if you live in the
United States or Canada. If you live outside of these countries, please contact the dealer you purchased your spotting scope
from or the Celestron distributor in your country. A list of our distributors can be found on our website.
WARRANTY
Your spotting scope is covered under the Celestron Limited Lifetime Warranty. Celestron warrants the spotting scope to be free
from defects in materials and workmanship for the spotting scope’s usable lifetime to the original owner. Celestron will repair or
replace the spotting scope which, upon inspection by Celestron, is found to be defective in materials or workmanship and within the
definitions of the limits described below. This warranty does not cover products that have been subject to abuse, misuse, physically
damaged, altered, or had unauthorized repairs or modifications. This warranty does not cover defects due to normal wear and tear
and other conditions. This warranty is valid to U.S.A. and Canadian customers who have purchased their spotting scope from an
authorized Celestron dealer in the U.S.A. or Canada. For products purchased outside of the U.S.A. or Canada please contact your
local Celestron Distributor or authorized Dealer for applicable warranty information. Additional warranty information and eligibility
details can be found on the Celestron website.
Celestron spotting scopes are designed and intended for those 14 years of age and older.
Product design and specifications are subject to change without prior notification.
For complete specifications and product information:
www.celestron.com • ©2013 Celestron • All rights reserved • 2835 Columbia Street • Torrance, CA 90503 U.S.A. • Telephone: 800.421.9649 • Printed in China 1213

FRANÇAIS I 11
TÉLESCOPE D’OBSERVATION
MODE D’EMPLOI
FRANÇAIS

12 I FRANÇAIS
Nous vous remercions d’avoir acheté un télescope d’observation TrailSeeker de Celestron. Nous espérons que ce
télescope d’observation vous donnera des années de satisfaction et de loyaux services. Veuillez lire attentivement les
instructions avant d’utiliser votre télescope d’observation pour vous assurer d’une utilisation adéquate.
Bouchon
d’objectifs
Oculaire Mont Cap Bague d’adaptation
Couverture d’oculaire
Bouton de focalisation
(Général/détaillé)
Sangles de
transport
Bandes Velcro (2) —
(1 de chaque côté)
Bandoulière
Fermetures à
glissière
Fermetures à glissière
Fermetures
à glissière
Bande Velcro
Bande Velcro
Collier de verrouillage
de l’oculaire
Objectif
Pare-soleil
Vis de blocage de rotation du support
de trépied
Support de trépied (rotatif)
Œilleton
Oculaire

FRANÇAIS I 13
AVERTISSEMENT
Ne jamais regarder le soleil pendant l’utilisation de vos télescope
d’observation. Regarder vers le soleil peut causer des lésions oculaires
permanentes.
AVANT L’UTILISATION
Fixez votre télescope d’observation sur un trépied robuste avant
l’observation étant donné que la taille et la puissance du télescope
d’observation nécessite un trépied solide pour la stabilité afin
d’obtenir des images claires et nettes (Fig. 2).
FIXATION DE L’OCULAIRE
Pour fixer l’oculaire au télescope d’observation, tournez le collier
de verrouillage de l’oculaire dans le sens antihoraire jusqu’à
ce qu’il soit desserré et retirez le couvercle du support oculaire.
Assurez-vous que le bouchon d’objectifs soit retiré de l’oculaire
et glissez-le dans le support oculaire (Fig. 3a). Lorsque l’oculaire
est complètement logé, tournez le collier de verrouillage dans
le sens horaire pour fixer l’oculaire et le maintenir en place
(Fig. 3b). Ne pas essayer de fixer ou retirer l’oculaire sans avoir
préalablement desserré le collier de verrouillage car cela pourrait
causer des dommages à l’oculaire ou le télescope d’observation.
Fig. 2
Fig. 3b
Fig. 3a

14 I FRANÇAIS
RÉGLAGE DE L’ŒILLETON
Oculaire Zoom et Grand-angulaire
L’oculaire zoom/grand-Angulaire du TrailSeeker dispose d’un œilleton
rotatif pour accueillir les porteurs de lunettes et ceux qui n’en portent
pas (Fig. 4). Si vous ne portez pas de lunettes, tournez l’œilleton à
droite jusqu’à ce qu’il atteigne la position relevée. Si vous portez des
lunettes, assurez-vous que l’œilleton est en position baissée pour
obtenir le champ de vision maximum. L’œilleton peut être réglé dans
des positions entre complètement relevée et complètement abaissée
qui peut mieux convenir à certains utilisateurs.
Oculaire à grand dégagement
L’oculaire à grand dégagement est équipé d’œilletons en caoutchouc
pour le confort des utilisateurs avec et sans lunettes. Si vous ne
portez pas de lunettes, placez simplement votre œil derrière l’œilleton.
Si vous portez des lunettes, vous aurez à retirer les œilletons pour
obtenir le champ de vision maximal. Pour enlever l’œilleton, tirez-le
simplement vers vous et retirez-le de l’oculaire.
CHANGEMENT DU GROSSISSEMENT (OCULAIRE ZOOM)
Pour modifier le grossissement de l’oculaire zoom, il suffit de tourner
l’oculaire vers la gauche pour augmenter le grossissement et vers
la droite pour diminuer le grossissement (Fig. 5). Lors de la
modification du grossissement, le télescope devra être refocalisé.
Le plus grand champ de vision et les plus brillantes images seront
toujours atteintes avec le grossissement le plus faible.
Fig. 4
Fig. 5

FRANÇAIS I 15
MISE AU POINT
Pour vous assurer d’une image nette, la mise au point du télescope
d’observation doit être effectuée. Le TrailSeeker dispose d’un système
de focalisation double qui inclut une focalisation générale et détaillée
(Fig. 6). Pour la mise au point du télescope d’observation, faites tourner
lentement le bouton de focalisation général (coarse) jusqu’à ce que
l’image dans l’oculaire soit claire et nette. Pour le réglage détaillé, faites
tourner lentement le bouton de focalisation détaillé (fine) (situé en
face du bouton de focalisation général) jusqu’à ce que l’image dans
l’oculaire soit claire et nette. Lorsque le bouton de focalisation ne
tourne plus, faites tourner le bouton dans le sens inverse.
SUPPORT DE TRÉPIED ROTATIF
Le TrailSeeker dispose d’un support de trépied rotatif qui pivote
complètement à 360° et permet à l’oculaire d’être réglé dans une
position de visionnement. Pour modifier la position de l’oculaire,
desserrez la vis de verrouillage située sur le support de trépied et
tournez le télescope à la position souhaitée (Fig. 7). Serrez la
vis de blocage et regardez à travers l’oculaire.
PARE-SOLEIL
Le pare-soleil du TrailSeeker glissera vers l’extérieur du corps pour
protéger l’objectif contre la pluie ou afin d’éviter que des reflets
indésirables pénètrent dans le télescope d’observation et dégradent
ainsi votre image (Fig. 8).
Bouton de focalisation
général (coarse)
Bouton de focalisation
détaillé (fine)
Fig. 6
Fig. 8
Fig. 7
Vis de blocage

16 I FRANÇAIS
OCULAIRES OFFERTS EN OPTION
Celestron offre deux oculaires de grossissement fixe qui sont conçus
pour être utilisés avec les télescopes d’observation de la série
TrailSeeker; le 82001 et le 82002. Le 82001 est un oculaire grand-
angulaire et le 82002 est un oculaire à grand dégagement. En plus
de ces oculaires le TrailSeeker est conçu pour utiliser les oculaires
astronomiques standard 1,25 po. Celestron offre un grand choix
d’oculaires astronomiques de 1,25 po à utiliser sur votre télescope
d’observation pour obtenir des grossissements plus élevés, des champs
de vision élargis, etc.
ÉTUI DE TRANSPORT INCORPORÉ
Les télescopes d’observation de la série TrailSeeker sont dotés d’un
étui de transport incorporé qui protège votre télescope des chocs,
rayures et éléments. La fermeture à glissière au bas de l’étui vous
permet de fixer votre télescope à un trépied sans le retirer de l’étui et
les fermetures à glissière à l’avant et arrière vous permettent de voir au
travers de votre télescope alors qu’il est toujours dans son étui. Lorsque
les fermetures à glissière des rabats avant et arrière sont ouvertes,
l’objectif et l’oculaire sont exposés. Les rabats sont repliés et sont tenus
à l’écart à l’aide de bandes Velcro pour les empêcher d’interférer avec
votre vue et pour vous permettre d’accéder aux molettes de mise au
point et à la vis de verrouillage du support de trépied. L’étui est doté
de sangles de transport intégrées et d’une bandoulière amovible pour
transporter facilement votre télescope lorsqu’il est dans l’étui.
Fig. 10
Fig. 9

FRANÇAIS I 17
PLATEAU D’ÉQUILIBRAGE (POUR LE MODÈLE 100 MM)
Le télescope d’observation TrailSeeker 100 mm est livré
avec une plaque d’équilibrage pour équilibrer correctement
le télescope d’observation lorsqu’il est fixé sur un trépied
(Fig. 11). Pour utiliser la plaque d’équilibrage, la fixer sur la
vis de fixation de ¼ po-20 à l’aide du trou fileté de ¼ po-20
situé sur la partie inférieure de la plaque. Fixez le télescope
d’observation à la plaque d’équilibrage en utilisant la vis de
fixation de ¼ po-20 située sur la partie supérieure de la
plaque et la visser dans le télescope d’observation aussi loin
que possible. Faites glisser le télescope d’observation le
long de la partie fendue de la plaque jusqu’à ce que le télescope d’observation soit en équilibre sur le trépied. Serrez
la
bague de verrouillage pour maintenir le télescope d’observation
dans la position désirée.
DIGISCOPIE
Les télescopes d’observation TrailSeeker peuvent être utilisés pour la digiscopie avec les appareils reflex et appareils
photo numériques compacts. Veuillez noter que ce ne sont pas toutes les appareils photo qui sont compatibles pour la
digiscopie et qu’avec certains appareils photo du vignettage (une image circulaire entourée de noir) se produira. Les
appareils photo compacts avec un zoom optique de 3x ou 4x ont tendance à être le plus compatibles avec le moins de
vignettage. Avec l’utilisation d’un oculaire zoom, les photos seront plus nettes et plus brillantes lorsque l’oculaire est réglé
avec le grossissement le plus faible.
Fig. 11
Vis de montage
¼ po-20
Trou fileté
(non illustré)
¼ po-20
Bague de
verrouillage
Vis de fixation

18 I FRANÇAIS
PHOTOGRAPHIE AVEC APPAREIL PHOTO REFLEX (SLR)
Pour utiliser un appareil photo reflex et votre télescope d’observation pour la
photographie, vous allez photographier à travers l’oculaire alors qu’il est attaché au
télescope d’observation. Pour éviter d’endommager le télescope d’observation,
l’oculaire ou la caméra, assurez-vous que le collier de verrouillage de l’oculaire
est fixé solidement pendant chaque étape du réglage.
1. Retirez l’œilleton de l’oculaire zoom/grand-angulaire. L’œilleton vers le bas,
tournez-le dans le sens antihoraire pour l’enlever de l’oculaire. Cela exposera
les filets sous l’œilleton (Fig. 12a).
Remarque : Tirez simplement sur l’œilleton en caoutchouc hors de l’oculaire à grand dégagement pour exposer
le filetage.
2. Enfilez l’anneau adaptateur en T bague d’adaptation inclus dans les filets
exposés sur zoom/grand-angulaire l’oculaire à l’étape 1 ci-dessus (Fig. 12b).
Remarque : La bague d’adaptation en T n’est pas nécessaire lorsque vous utilisez l’oculaire à grand dégagement.
3. Enfilez un anneau en T facultatif pour votre marque et modèle de caméra sur
l’anneau adaptateur en T (Fig. 12c).
Remarque : Lorsque vous utilisez l’oculaire à grand dégagement, vissez la bague en T directement sur le filetage de
l’oculaire.
4. Fixez votre caméra reflex à l’anneau en T (Fig. 12d).
Les télescopes d’observation TrailSeeker ont des ouvertures fixes et par le fait
même des rapports/f fixes. Pour obtenir l’exposition adéquate pour vos photos,
vous devez définir la vitesse d’obturation en conséquence. La plupart des appareils
photo offrent une fonction de posemètre qui vous permettra de déterminer si votre
image est sous-exposée ou surexposée. Consultez le manuel de votre appareil
photo pour des informations spécifiques sur les posemètres, le changement des
vitesses d’obturation et d’autres paramètres.
Fig. 12a
Fig. 12b
Fig. 12c
Fig. 12d

FRANÇAIS I 19
PHOTOGRAPHIE AVEC APPAREIL PHOTO COMPACT (POINT-AND-SHOOT)
Une variété d’appareils photo compacts peuvent être utilisés
pour effectuer de la digiscopie avec les télescopes d’observation
TrailSeeker en utilisant l’adaptateur universel de caméra (#93626)
offert par Celestron (Fig. 13). Cet adaptateur se fixe à l’oculaire du
télescope d’observation et permet à la lentille de la caméra d’être
centrée derrière l’oculaire. Veuillez remarquer que ce ne sont pas
tous les appareils qui sont compatibles avec cet adaptateur, car il
n’y a pas assez de réglages pour centrer la lentille derrière l’oculaire
lorsque la position de la lentille est trop basse dans le boîtier de
l’appareil ou lorsque l’appareil n’est pas à une hauteur appropriée.
ÉTANCHE/ANTIBUÉE
Les télescopes d’observation de la série TrailSeeker sont étanches et remplis d’azote sec pour éviter toute buée à l’intérieur
du boîtier.
ENTRETIEN ET RANGEMENT
Votre télescope d’observation Celestron vous fournira des années de service fiable s’il est bien entretenu et entreposé
correctement.
1. Protégez votre télescope d’observation de tout impact et ne forcez pas toute pièce en mouvement u-delà de sa limite.
2. Protégez l’optique de votre télescope d’observation en mettant tous les bouchons d’objectif en place lorsque vous ne
l’utilisez pas.
3. Entreposez votre télescope d’observation dans un endroit frais et sec si possible.
4. Lors de l’entreposage pendant une période prolongée de temps, placez le télescope d’observation dans un sac en
plastique ou un récipient hermétique avec déshydratant.
5. Ne pas laisser le télescope d’observation dans une voiture lors d’une journée chaude et ensoleillée ou à proximité
de tout ce qui génère de la chaleur car cela pourrait causer des dommages.
6. Nettoyez toute poussière, saleté ou eau qui peut s’accumuler sur le télescope d’observation ou à l’intérieur de pièces
en mouvement dès que possible afin d’éviter tout dommage imprévu.
Fig. 13

20 I FRANÇAIS
Pour connaître les spécifications complètes et informations sur le produit :
www.celestron.com • ©2013 Celestron • Tous droits réservés.
2835 Columbia Street Torrance, CA 90503 É.-U. • Téléphone: 800,421,9649 • Imprimé en Chine 1213
NETTOYAGE
Les nettoyage approprié des lentilles est essentiel au maintien de l’intégrité optique de votre télescope d’observation. Des lentilles
sales diminuent la quantité de lumière transmise à travers le télescope d’observation et votre expérience de visionnement.
1. Enlevez toute poussière des lentilles avec une brosse à lentilles souples ou aérosol d’air pressurisé.
2. Retirez toute empreinte, tache ou bavure de la surface de la lentille avec un tissu doux de nettoyage de
lentilles en frottant d’un mouvement circulaire. Commencez au milieu de la lentille en vous dirigeant
lentement vers les bords. Soufflez légèrement sur l’objectif afin de fournir de l’humidité si nécessaire.
3. Pour un nettoyage plus en profondeur, nous recommandons l’utilisation d’une trousse de nettoyage de
lentilles/optique disponible dans la plupart des boutiques de photos ou des magasins optiques. Suivez
les instructions fournies avec la trousse de nettoyage pour de meilleurs résultats.
SERVICE ET RÉPARATION
Si des problèmes de garantie survenaient ou des réparations s’avéraient nécessaires, contactez le département de service à la
clientèle de Celestron si vous résidez aux États-Unis ou au Canada. Si vous habitez à l’extérieur de ces pays, veuillez contacter le
revendeur où vous avez acheté votre télescope d’observation ou le distributeur Celestron de votre pays. Vous trouverez une liste
de nos distributeurs sur notre site Web.
GARANTIE
Votre télescope d’observation est couvert par la garantie à vie limitée Celestron. Celestron garantit que ce télescope d’observation
est exempt de tout défaut de matériaux ou de fabrication pour la durée de vie utile de celui-ci pour le propriétaire original. Celestron
réparera ou remplacera le télescope d’observation qui, après inspection par Celestron, présente des défauts de matériaux ou de
fabrication et dans les définitions des limites décrites ci-dessous. Cette garantie ne couvre pas les produits qui ont fait l’objet d’abus,
de mauvaise utilisation, qui sont physiquement endommagés, altérés ou n’avaient pas reçu les autorisations nécessaires pour les
réparations ou les modifications. Cette garantie ne couvre pas les défauts dus à une usure normale et d’autres conditions.
Cette garantie est valable pour les clients aux États-Unis d’Amérique et au Canada qui ont acheté leur télescope d’observation chez
un revendeur Celestron agréé aux États-Unis ou au Canada. Pour les produits achetés en dehors des États-Unis ou au Canada,
veuillez contacter votre distributeur local de Celestron ou revendeur agréé pour toute information de garantie applicable. Des
informations additionnelles de garantie et de détails d’admissibilité se trouvent sur le site Web de Celestron.
Les télescopes d’observation Celestron sont conçus et destinés pour les personnes de 14 ans et plus.
La conception des produits et les spécifications sont sujettes à modification sans notification préalable.

DEUTSCH I 21
SPEKTIV
BEDIENUNGSANLEITUNG
DEUTSCH

22 I DEUTSCH
Vielen Dank für den Kauf eines TrailSeeker-Spektivs von Celestron. Wir sind davon überzeugt, dass Ihnen dieses
Spektiv jahrelang Freude bereiten und zuverlässige Dienste leisten wird. Bitte lesen Sie die Bedienungsanleitung vor
Gebrauch des Spektivs sorgfältig durch, um eine sichere Handhabung und Pflege sicherzustellen.
Objektivlinsenkappe
Okularfassung Cap
Stufenring
Okularabdeckung
Fokussierknopf
(schnell/fein)
Trageriemen
Klettverschlüsse (2) –
(1, auf beiden Seiten)
Klettverschlüsse
Klettverschlüsse
Schulterriemen
Reißverschlüsse
Reißverschlüsse
Reißverschlüsse
Okular-
Verriegelungsrosette
Objektivlinse
Störlichtblende
Stativhalterungs-
Drehverriegelungsschraube
Stativhalterung (drehbar)
Augenmuschel
Okular

DEUTSCH I 23
WARNUNG
Schauen Sie mit dem Spektiv keinesfalls in die Sonne.
Das Schauen in die Sonne kann zu permanenten
Sehschäden führen.
VOR DEM GEBRAUCH
Bringen Sie Ihr Spektiv vor dem Betrachten an einem stabilen
Stativ an, da Größe und Leistung des Spektivs ein solides Stativ
erfordern, das für Stabilität sorgt, damit klare, scharfe Bilder
erreicht werden (Abb. 2).
ANBRINGEN DES OKULARS
Drehen Sie zum Anbringen des Okulars an das Spektiv die
Okular-Verriegelungsrosette gegen den Uhrzeigersinn, bis es
sich löst, und nehmen Sie die Okularhalterungsabdeckung ab.
Vergewissern Sie sich, dass die Linsenschutzkappe vom Okular
entfernt wurde, und schieben Sie es in die Okularhalterung
(Abb. 3a). Wenn das Okular vollständig positioniert ist, drehen
Sie die Verriegelungsrosette im Uhrzeigersinn, um das Okular zu
sichern und in Position zu halten (Abb. 3b). Versuchen Sie nicht,
das Okular ohne vorheriges Lösen der Verriegelungsrosette
anzubringen oder abzunehmen, da dies zu Schäden am Okular
und/oder Spektiv führen kann.
Abb. 2
Abb. 3b
Stufenring
Abb. 3a

24 I DEUTSCH
AUGENMUSCHEL-EINSTELLUNG
Zoom und Weitwinkelokular
Das Zoom/Weitwinkel-Okular des TrailSeeker ist mit einer drehbaren
Augenmuschel ausgestattet, um für Brillenträger und Nicht-Brillenträger
geeignet zu sein (Abb. 4). Wenn Sie keine Brille tragen, drehen Sie
das Okular im Uhrzeigersinn, bis sie die höchste Position erreicht.
Wenn Sie eine Brille tragen, stellen Sie bitte sicher, dass sich die
Augenmuschel in der tiefsten Position befindet, damit Sie ein maximales
Sichtfeld erreichen. Die Augenmuschel kann auf Positionen zwischen
der höchsten und tiefsten Position eingestellt werden, was für einige
Benutzer geeigneter sein könnte.
Okular mit großer Austrittspupille (LER für Long Eye Relief)
Das LER-Okular verfügt über eine Augenmuschel aus Gummi und ist
damit für Brillenträger und Nicht-Brillenträger geeignet. Wenn Sie keine
Brille tragen, befindet sich Ihr Augen einfach hinter der Augenmuschel.
Wenn Sie eine Brille tragen, müssen Sie die Augenmuschel abnehmen,
um ein maximales Blickfeld zu erhalten. Dazu wird die Augenmuschel
einfach vom Okular zu Ihnen hin abgezogen.
ÄNDERN DER VERGRÖSSERUNG (OKULAR-ZOOM)
Drehen Sie zum Ändern der Vergrößerung des Zoom-Okulars
einfach das Okular gegen den Uhrzeigersinn, um die Vergrößerung
zu erhöhen und im Uhrzeigersinn, um die Vergrößerung zu verringern
(Abb. 5). Wenn die Vergrößerung geändert wird, muss das Spektiv neu
fokussiert werden. Das größte Sichtfeld und hellste Bild wird immer bei
niedrigster Vergrößerung erreicht.
Abb. 4
Abb. 5

DEUTSCH I 25
FOKUSSIEREN
Um ein gestochen scharfes Bild zu gewährleisten, muss das
Spektiv fokussiert werden. Das TrailSeeker verfügt über ein duales
Fokussystem, das eine Schnell- und eine Feinfokussierung ermöglicht
(Abb. 6). Drehen Sie zum Fokussieren des Spektivs langsam am
Schnellfokusknopf, bis das Bild im Okular klar und scharf ist. Drehen
Sie zur Feineinstellung langsam am Feinfokusknopf (vor dem
Schnellfokusknopf angebracht), bis das Bild im Okular klar und scharf
ist. Drehen Sie das Rad in die entgegengesetzte Richtung, wenn sich
der Fokusknopf nicht weiter drehen lässt.
DREHBARE STATIVHALTERUNG
Das TrailSeeker ist mit einer um volle 360° drehbaren Stativhalterung
ausgestattet, durch die sich das Okular in jede beliebige Position
bringen lässt. Lösen Sie zum Ändern der Okular-Position die Schraube
an der Stativhalterung und drehen Sie das Stativ in die gewünschte
Position (Abb. 7). Ziehen Sie die Feststellschraube an und schauen Sie
durch das Okular.
STÖRLICHTBLENDE
Die Störlichtblende des TrailSeeker wird vom Spektivkörper
weggeschoben, um die Linse vor Regen zu schützen oder um ein
Eindringen von unerwünschtem Blendlicht in das Spektiv zu verhindern,
was das Bild verschlechtern würde (Abb. 8).
Schnellfokusknopf Feinfokusknopf
Abb. 6
Abb. 8
Abb. 7
Feststellschraube
26 I DEUTSCH
OPTIONALE OKULARE
Celestron stellt zwei Okulare mit feststehender Vergrößerung zur
Verfügung, die zusammen mit den Spektiven 82001 und 82002 der
TrailSeeker Serie verwendet werden können. Beim 82001 handelt es
sich um ein Weitwinkelokular und beim 82002 um ein LER-Okular
mit großer Austrittspupille. Darüber hinaus kann zusammen mit dem
TrailSeeker ein standardmäßiges 1,25-Zoll-Astronomieokular verwendet
werden. Celestron bietet eine breite Palette von 1,25-Zoll-Okularen für
Ihr Spektiv an, um höhere Vergrößerungen, weitere Sichtfelder etc. zu
erreichen.
FIXE TRAGEBOX
Das Spektiv der TrailSeeker Serie verfügt über eine fest angebrachte
Tragebox, die Ihr Spektiv gegen Stöße, Kratzer und die Elemente schützt.
Dank des Reißverschlusses auf der Unterseite der Box können Sie Ihr
Spektiv an einem Stativ anbringen, ohne die Box abnehmen zu müssen,
und die Reißverschlüsse an der Vorder- und Rückseite ermöglichen
Ihnen eine Betrachtung durch das Spektiv, während sich dieses in der
Box befindet. Bei geöffneten vorder- und rückwärtigen Reißverschlüssen
sind Objektiv und Okular zugänglich. Die Klappen hinter den
Reißverschlüssen können mithilfe von Klettverschlüssen fixiert werden,
damit diese bei einer Betrachtung nicht stören und freier Zugang zu den
Fokussierknöpfen und zur Feststellschraube der Stativhalterung möglich
ist. Die Box ist mit Trageriemen und einem abnehmbaren Schulterriemen
ausgestattet, damit das Stativ in der Box leicht mitgeführt werden kann.
Abb. 10
Abb. 9

DEUTSCH I 27
AUSGLEICHSPLATTE (FÜR DAS 100 MM-MODELL)
Dem TrailSeeker 100 mm Spektiv ist eine Ausgleichsplatte
beigefügt, um das auf einem Stativ angebrachte
Spektiv korrekt auszubalancieren (Abb. 11). Um die
Ausgleichsplatte zu verwenden, wird diese unter
Verwendung der ¼ Zoll-20-Gewindebohrung unter der
Platte an die ¼ Zoll-20-Montageschraube angebracht.
Bringen Sie das Spektiv an der Ausgleichsplatte an, indem
Sie die ¼ Zoll-20-Montageschraube auf der Platte so weit
wie möglich in das Spektiv eindrehen. Schieben Sie das
Spektiv entlang der Plattenschlitze, bis das Spektiv auf
dem Stativ ausbalanciert ist. Ziehen Sie den Verschlussring
an, damit das Spektiv in der gewünschten Position gehalten wird.
DIGISKOPIE
Das TrailSeeker-Spektiv kann für die Digiskopie mit SLR- und digitale Kompaktkameras verwendet werden. Bitte
beachten Sie, dass nicht alle Kameras für die Digiskopie geeignet sind und dass es bei manchen Kameras zu
einer Vignettierung (einem runden Bild mit schwarzer Umrandung) kommen kann. Kompaktkameras mit einem
3- oder 4-fachen optischen Zoom scheinen am kompatibelsten zu sein, da es bei diesen in den wenigsten Fällen
zu einer Vignettierung kommt. Werden Fotos mi einem Zoom-Objektiv aufgenommen, werden diese bei niedrigster
Vergrößerung am schärfsten und hellsten.
SLR-FOTOGRAFIE
Um eine SLR-Kamera zusammen mit Ihrem Spektiv für die Fotografie zu verwenden, machen Sie Aufnahmen durch das
Okular, während dieses am Spektiv angebracht ist. Vergewissern Sie sich bitte zur Vermeidung von Schäden am Spektiv,
Okular oder der Kamera, dass die Okular-Verriegelungsrosette während jedes Montageschrittes
gesichert ist.
Abb. 11
¼ Zoll-20-Montageschraube
¼ Zoll-20-Gewindebohrung
(nicht dargestellt)
Verschlussring
Montageschraube

28 I DEUTSCH
1. Nehmen Sie die Augenmuschel vom Zoom/Weitwinkel-Okular ab.
Drehen Sie die Augenmuschel in tiefster Position gegen
den Uhrzeigersinn, um sie vom Okular abzunehmen Auf diese Weise werden
die Schrauben unter der Augenmuschel zugänglich (Abb. 12a).
Hinweis: Ziehen Sie zum Freilegen des Gewindes einfach die Augenmuschel aus Gummi vom LER-Okular ab.
2. Drehen Sie den inbegriffenen T-Adapterring auf die Okularschrauben, die im
oben erwähnten Schritt eins freigelegt wurden (Abb. 12b).
Hinweis: Bei der Verwendung des LER-Okulars ist der T-Adapter für den Stufenring nicht nötig.
3. Drehen Sie einen optionalen T-Ring für die Machart und das Modell Ihrer
Kamera auf den T-Adapterring (Abb.12c).
Hinweis: Wird das LER-Okular verwendet, wird der T-Ring direkt auf das Okulargewinde gedreht.
4. Bringen Sie den Korpus Ihrer SLR-Kamera auf dem T-Ring an (Abb. 12d).
Das TrailSeeker-Spektiv verfügt über fixe Aperturen und daher über fixe
Fokalverhältnisse. Um die korrekte Belichtung für Ihre Fotos zu erreichen, muss
die Auslösergeschwindigkeit entsprechend eingestellt werden. Die meisten
Kameras bieten ein Messen durch die Linse, wodurch Sie erkennen, ob Ihr
Bild unter- oder überbelichtet ist. Schlagen Sie in der Bedienungsanleitung
Ihrer Kamera nach, um spezifische Informationen über Messungen,
Auslösergeschwindigkeiten und andere Einstellungen zu erhalten.
EINFACHE FOTOGRAFIE
Eine Vielzahl von Kompaktkameras kann für die Digiskopie zusammen mit dem
TrailSeeker-Spektiv verwendet werden, indem der Universal-Kameraadapter
(Nr. 93626) von Celestron genutzt wird (Abb. 13). Dieser Adapter wird an das
Spektivokular angebracht und ermöglicht so, dass die Kameralinse hinter dem
Okular zentriert werden kann. Beachten Sie bitte, dass nicht alle Kameras mit diesem
Adapter kompatibel sind, da keine ausreichende Anpassung zum Zentrieren hinter
Abb. 12a
Abb. 12b
Abb. 12c
Abb. 12d
DEUTSCH I 29
dem Okular möglich ist, wenn die Linse im Kamerakorpus zu tief
sitzt oder wenn die Kamera nicht über eine ausreichend Höhe
verfügt.
WASSERDICHT/KEIN BESCHLAGEN
Spektive der TrailSeeker-Serie sind wasserdicht und mit trockenem
Stickstoff gefüllt, damit das Gehäuse innen nicht beschlägt.
PFLEGE UND AUFBEWAHRUNG
Ihr Celestron-Spektiv wird Ihnen jahrelang zuverlässige Dienste
leisten, wenn es ordnungsgemäß gepflegt und aufbewahrt wird.
1. Schützen Sie das Spektiv vor Stößen und beanspruchen Sie
die beweglichen Teile nicht über deren Grenzen hinaus.
2. Schützen Sie die optischen Teile Ihres Spektivs, indem Sie bei Nicht-Verwendung alle Objektiv-Kappen anbringen.
3. Bewahren Sie Ihr Spektiv, wann immer möglich, an einem kühlen, trockenen Ort auf.
4. Legen Sie das Spektiv für eine Aufbewahrung über einen längeren Zeitraum zusammen mit einem
Trockenmittel in einen Plastikbeutel oder einen luftdichten Behälter.
5. Lassen Sie das Spektiv an einem heißen/sonnigen Tag nicht im Auto liegen und legen Sie es nicht in die
Nähe einer Wärmequelle, da dies zu Schäden führen könnte.
6. Entfernen Sie Staub, Schmutz oder Wasser so schnell wie möglich, da diese in das Spektiv oder die
internen beweglichen Teile eindringen können und unvorhergesehene Schäden verursachen können.
REINIGUNG
Die ordnungsgemäße Objektivreinigung ist für die Aufrecherhaltung der optischen Integrität Ihres Spektivs unerlässlich.
Verschmutzte Objektive reduzieren die Lichtmenge, die durch das Spektiv geleitet wird, und somit Ihr gesamtes
Betrachtungserlebnis.
1. Entfernen Sie Staub mithilfe einer weichen Objektivbürste oder einer Druckluftdose von den Objektiven.
2. Entfernen Sie von den Objektiv-Oberflächen Fingerabdrücke, Flecken oder Verschmutzungen mit einem
Abb.. 13

30 I DEUTSCH
Für vollständige technische Daten und Produktinformationen:
www.celestron.com • ©2013 Celestron • Alle Rechte vorbehalten
2835 Columbia Street • Torrance, CA 90503 USA
Telefon: 800.421.9649 • Gedruckt in China 1213
weichen Tuch oder Linsenreinigungstuch, indem Sie in kreisenden Bewegungen darüber reiben. Beginnen
Sie in der Mitte des Objektivs und arbeiten Sie sich an die Ränder vor. Hauchen sie die Objektive leicht an,
um wenn nötig Feuchtigkeit aufzubringen.
3. Für eine gründlichere Reinigung empfehlen wir die Verwendung eines Reinigungs-Kits für Linsen/
Objektive, das in den meisten Foto- oder Optik-Geschäften erhältlich ist. Befolgen Sie für optimale
Ergebnisse die Anleitung, die dem Reinigungs-Kit beiliegt.
WARTUNG UND REPARATUR
Treten Garantiefälle auf oder sind Reparaturen nötig, wenden Sie sich bitte, wenn Sie in den Vereinigten Staaten oder Kanada leben,
an die Celestron-Kundendienstabteilung. Leben Sie außerhalb dieser Länder, wenden Sie sich bitte an den Händler, bei dem Sie Ihr
Spektiv erworben haben oder an den Celestron-Vertrieb in Ihrem Land. Eine Liste unserer Vertreiber finden Sie auf unserer Website.
GARANTIE
Ihr Spektiv ist durch die eingeschränkte, lebenslange Garantie von Celestron abgedeckt. Celestron gewährleistet dem
ursprünglichen Besitzer, dass diese Spektive für die für Spektive übliche Nutzungs-Lebensdauer frei von Material- und
Herstellungsfehlern sind. Celestron wird eine Reparatur oder einen Austausch des Spektivs, bei dem aufgrund einer Überprüfung
durch Celestron ein Material- oder Herstellungsfehler gefunden wird, innerhalb der Definitionen der unten beschriebenen Grenzen
durchführen. Diese Garantie gilt nicht für Produkte, die Gegenstand von Missbrauch oder unsachgemäßer Verwendung waren
oder physikalisch beschädigt bzw. verändert wurden oder an denen unautorisierte Reparaturen oder Modifikationen vorgenommen
wurden. Diese Garantie deckt keine Defekte aufgrund von normalem Verschleiß und anderen Bedingungen ab.
Diese Garantie ist für Kunden in den USA und Kanada gültig, die ihr Spektiv von einem autorisierten Celestron-Händler in den USA
oder Kanada gekauft haben. Wenden Sie sich für geltende Garantieinformationen bezüglich Produkte, die außerhalb der USA oder
Kanada gekauft wurden, bitte an Ihren Celestron-Vertreiber oder autorisierten Händler vor Ort. Zusätzliche Garantieinformationen
und Einzelheiten über Ansprüche finden Sie auf der Celestron-Website.
Celestron-Spektive wurden für 14 Jahre und älter entworfen und vorgesehen. Produktdesign und technische Daten können ohne Vorankündigung geändert werden.

ESPAÑOL I 31
TELESCOPIO
MANUAL DE INSTRUCCIONES
ESPAÑOL

32 I ESPAÑOL
Gracias por adquirir un telescopio TrailSeeker de Celestron. Confiamos en que este telescopio le ofrecerá años
de servicio y satisfacción. Lea atentamente las instrucciones antes de usar su telescopio para garantizar un uso
y cuidados adecuados.
Tapa de lente de
objetivo
Tapa de montura del ocular
Arandela de paso
Tapa del ocular
Correas de
transporte
Pestañas con velcro (2)
(1, en cada lateral)
Correa para el
hombro
Cremalleras
Cremalleras
Cremalleras
Pestañas
con velcro
Pestañas
con velcro
Mando de enfoque
(grueso/preciso)
Arandela de bloqueo
de ocular
Lente de
objetivo
Parasol de lente
Tornillo de bloqueo de rotación del
soporte para trípode
Soporte para trípode
(rotatorio)
Almohadilla
Ocular

ESPAÑOL I 33
Fig. 3b
ATENCIÓN
No mire nunca al sol cuando use el telescopio.
Mirar al sol puede provocar daños permanentes a la vista.
ANTES DEL USO
Fije el telescopio a un trípode resistente antes de observar, ya que
el tamaño y potencia del telescopio precisa de un trípode sólido
para obtener estabilidad y conseguir imágenes claras y definidas
(Fig. 2).
FIJACIÓN DEL OCULAR
Para fijar el ocular al telescopio, gire hacia la izquierda la arandela
de bloqueo del ocular hasta que esté suelto y saque la tapa del
soporte del ocular. Asegúrese de que la tapa protectora de la
lente se haya sacado del ocular y deslícelo en el soporte del
ocular (Fig. 3a). Cuando el ocular esté totalmente asentado
gire la arandela de bloqueo a la derecha para fijar el ocular y
mantenerlo en su lugar (Fig. 3b). No intente fijar ni sacar el ocular
sin aflojar primero la arandela de bloqueo, podría dañar el ocular
y/o el telescopio.
Fig. 2
Fig. 3a

34 I ESPAÑOL
AJUSTE DE LA ALMOHADILLA
Ocular de zoom y gran angular
El ocular de zoom/gran angular del TrailSeeker una almohadilla
desplegable para adaptarse a usuarios tanto con gafas como
sin ellas (Fig. 4). Si no lleva gafas, gire las almohadillas hacia
la izquierda hasta que queden en la posición derecho. Si lleva
gafas, asegúrese de que la almohadilla esté bajada para obtener
el máximo campo de visión. Las almohadillas pueden ponerse
en posiciones intermedias entre totalmente elevada y totalmente
bajada, lo que puede adaptarse mejor a ciertos usuarios.
Ocular de descanso prolongado del ojo (LER)
El ocular LER incluye una almohadilla de goma para adaptarse
a usuarios con gafas y sin ellas. Si no lleva gafas, coloque el ojo
tras la almohadilla. Si lleva gafas, deberá sacar la almohadilla
para obtener el máximo campo de visión. Para sacar la
almohadilla, tire de ella hacia usted y sáquela del ocular.
CAMBIAR EL AUMENTO (OCULAR DE ZOOM)
Para cambiar el aumento del ocular del zoom, fire el ocular hacia
la izquierda para aumentarlo y a la derecha para reducirlo
(Fig. 5). Cuando cambie el aumento el telescopio deberá volver
a enfocarse. Con el aumento más bajo se obtendrá siempre el
mayor campo de visión y las imágenes más claras.
Fig. 4
Fig. 5
ESPAÑOL I 35
ENFOQUE
Para garantizar una imagen clara y definida debe enfocarse el
telescopio. El TrailSeeker incluye un sistema de doble enfoque
que incluye un enfoque amplio y uno preciso (Fig. 6). Para enfocar
el telescopio, gire lentamente el mando de enfoque amplio hasta
que la imagen sea clara y definida. Para un ajuste preciso gire
lentamente el mando de enfoque preciso (situado delante del
mando de enfoque amplio) hasta que la imagen del ocular esté
clara y definida. Cuando el mando de enfoque ya no gire más, gire
la rueda en dirección opuesta.
SOPORTE PARA TRÌPODE ROTATORIO
El TrailSeeker incluye un soporte para trípode rotatorio que puede
girar 360º y permite poner el ocular en cualquier posición. Para
cambiar la posición del ocular, afloje el tornillo de bloqueo situado
en el soporte del trípode y gire el telescopio hasta la posición
deseada (Fig. 7). Apriete el tornillo de fijación y observe por el
ocular.
PARASOL DE LENTE
El parasol de la lente del TrailSeeker se separa del chasis
para proteger la lente de exposiciones a lluvia o para evitar que
un resplandor no deseado entre en el telescopio y afecte a la
imagen (Fig. 8).
Mando de enfoque
amplio
Mando de enfoque
preciso
Fig. 6
Fig. 8
Fig. 7
Tornillo de bloqueo

36 I ESPAÑOL
OCULARES OPCIONALES
Celestron ofrece dos oculares de aumento fijo diseñados para
usarse con los catalejos de gama TrailSeeker; el 82001 y el 82002.
El 82001 es un ocular de gran angular y el 82002 es un ocular de
descanso prolongado del ojo (LER). Además de estos oculares, el
TrailSeeker está diseñado para usar oculares astronómicos estándar
de 1,25”. Celestron ofrece una amplia selección de oculares
astronómicos de 1,25” para usarlos en su catalejo y obtener mayores
aumentos, campos de visión más amplios, etc.
FUNDA DE TRANSPORTE DE PERMANENCIA
La gama de catalejos TrailSeeker incluye una funda de transporte
de permanencia que protege su catalejo de golpes, rayadas y los
elementos. La cremallera de la parte inferior de la funda le permite
fijar el catalejo a un trípode sin sacarlo de la funda, y las cremalleras
delantera y trasera permiten observar por el catalejo mientras aún se
encuentra en la funda. Cuando están desabrochadas las cubiertas
delantera y trasera quedan expuestas la lente del objetivo y del
ocular. Las cubiertas se pliegan y mantienen apartadas con pestañas
con velcro para evitar que interfieran en la observación y permiten
acceder a los mandos de enfoque y el tornillo de bloqueo del soporte
para trípode. La funda tiene correas de transporte integradas y una
correa para el hombro desmontable para transportar con facilidad el
catalejo cuando esté en la funda.
Fig. 10
Fig. 9

ESPAÑOL I 37
Fig. 11
Tornillo de montaje de
¼”-20
Agujero estriado (no
mostrado) de ¼”-20
Arandela de
bloqueo
Tornillo de montaje
PLACA DE EQUILIBRADO (PARA EL MODELO DE 100 MM)
El telescopio de 100 mm TrailSeeker incluye una placa de
equilibrado para equilibrar adecuadamente el telescopio
al fijarlo a un trípode (Fig. 11). Para usar la placa de
equilibrado, móntela en el tornillo de montaje de ¼”-20
del trípode usando el hueco estriado de ¼”-20 mm
situado en la parte inferior de la placa.
Fije el telescopio a la placa de equilibrado usando el
tornillo de montaje de ¼”-20 situado en la parte superior
de la placa y páselo por el telescopio hasta el fondo.
Deslice el telescopio por la sección con ranura de la placa
hasta que el telescopio esté equilibrado sobre el trípode.
Apriete la arandela de fijación para mantener el telescopio
en la posición deseada.
FOTOGRAFÍA AUMENTADA
Los telescopios TrailSeeker pueden usarse para fotografía a
distancia con cámaras digitales réflex y directas. Observe que no
todas las cámaras son compatibles con la fotografía a distancia,
y en algunas se producirá estampado (imagen circular rodeada
de negro). Las cámaras directas con un zoom óptico de 3x o
4x acostumbran a ser las más compatibles, con el menor nivel
de estampado. La mayoría de fotografías serán más definidas y
claras cuando se use el aumento más pequeño del ocular con zoom.

38 I ESPAÑOL
FOTOGRAFÍA REFLEX
Para usar una cámara reflex y el telescopio para fotografiar, disparará por el ocular
cuando esté fijado al telescopio. Para evitar dañar el telescopio, el ocular o la
cámara, asegúrese de que la arandela de bloqueo del ocular esté fijada durante cada
estadio de la instalación.
1. Saque la almohadilla del ocular con zoom/gran angular. Con la almohadilla
bajada, gírela hacia la izquierda para sacarla del ocular. Se mostrarán las
estrías bajo la almohadilla (Fig. 12a).
Nota: Saque la almohadilla de goma del ocular LER para descubrir las estrías.
2. Pase la arandela del adaptador estriado incluido por las ranuras expuestas del
ocular en el paso uno anterior (Fig. 12b).
Nota: La arandela de paso con adaptador en T no es necesaria cuando se use el ocular LER.
3. Pase una arandela estriada opcional para la marca y modelo de cámara en la
arandela adaptadora estriada (Fig. 12c).
Nota: Cuando use el ocular LER, coloque la arandela en T directamente sobre las estrías del ocular.
4. Fije el chasis de la cámara reflex a la arandela estriada (Fig. 12d).
Los telescopios TrailSeeker tienen aperturas fijas, y por tanto relaciones de f/
fijas. Para garantizar una exposición adecuada de sus fotografías debe adaptar
la velocidad del obturador de la forma correspondiente. La mayoría de cámaras
ofrecen una medición por la lente que le permite saber si la imagen está
poco o demasiado expuesta. Consulte el manual de su cámara para obtener
información específica sobre medición, cambio de velocidad del obturador y otras
configuraciones.
FOTOGRAFÍA DIRECTA
Pueden usarse diversas cámaras directas para realizar fotografía aumentada con
los telescopios TrailSeeker usando el adaptador de cámara universal (#93626)
Fig. 12a
Fig. 12b
Fig. 12c
Fig. 12d

ESPAÑOL I 39
ofrecido por Celestron (Fig. 13). Este adaptador se fija al ocular
del telescopio y permite a la lente de la cámara centrarse tras el
ocular. Observe que no todas las cámaras son compatibles con este
adaptador, ya que no se dispone del ajuste suficiente para centrar
la lente tras el ocular cuando su posición sea baja en el chasis de la
cámara o cuando la cámara no tenga una altura adecuada.
RESISTENCIA AL AGUA / NIEBLA
Los telescopios de la gama TrailSeeker son impermeables y están
llenos de gas de nitrógeno para evitar que el chasis se empañe
internamente.
CUIDADOS Y ALMACENAMIENTO
Su telescopio Celestron le ofrecerá años de servicio fiable si se cuida y guarda adecuadamente.
1. Proteja el telescopio de impactos y no fuerce ninguna pieza móvil más allá de sus límites.
2. Proteja la óptica del telescopio poniendo todas las tapas de lentes cuando no lo use.
3. Guarde su telescopio en un lugar fresco y seco siempre que sea posible.
4. Cuando lo guarde durante un periodo prolongado, coloque el telescopio en una bolsa de plástico o un recipiente
hermético con desecante.
5. No deje el telescopio en un coche en un día cálido/soleado ni cerca de nada que genere calor, podría dañarlo.
6. Limpie el polvo, la suciedad o el agua que pueda estar sobre el telescopio o en las piezas móviles en cuanto sea
posible para evitar posibles daños.
LIMPIEZA
Es crucial una limpieza correcta de la lente para mantener la integridad óptica del telescopio. Las lentes sucias reducen la
cantidad de luz que se transmite por el telescopio y su experiencia de observación global.
Fig. 13

40 I ESPAÑOL
Para especificaciones e información completa del producto:
www.celestron.com • ©2013 Celestron • Todos los derechos reservados.
2835 Columbia Street • Torrance, CA 90503 EE.UU.
Teléfono: 800.421.9649 • Impreso en China 1213
1. Saque el polvo de las lentes con un cepillo suave para lentes o un bote de aire comprimido.
2. Elimine cualquier huella dactilar, mancha o suciedad de la superficie de la lente con una gamuza suave y limpia para
lentes frotándola con un movimiento circular. Comience por el centro de la lente y avance hacia los bordes. Aliente
ligeramente sobre la lente para proporcionar humedad si es necesario.
3. Para una limpieza más completa recomendamos usar un kit de limpieza de lente/óptica, disponible en la mayoría de
tiendas de fotografía u óptica. Siga las instrucciones incluidas en el kit de limpieza para obtener los mejores resultados
.
SERVICIO Y REPARACIÓN
Si se presentan problemas de garantía o reparaciones, contacte con el departamento de servicio al cliente de Celestron
si vive en Estados Unidos o Canadá. Si vive en otro país, contacte con el vendedor en el que adquirió el telescopio o el
distribuidor de Celestron de su país. Puede encontrar una lista de distribuidores en nuestro sitio web.
GARANTÍA
Su telescopio está cubierto por la garantía limitada de por vida de Celestron. Celestron garantiza que estos binoculares
están libres de defectos de materiales y mano de obra durante la vida útil de los binoculares para el propietario original.
Celestron reparará o sustituirá los binoculares que, al ser inspeccionados por Celestron, muestren defectos de materiales o
mano de obra y estén dentro de las definiciones de los límites descritos a continuación.
Esta garantía no cubre productos que hayan sido sometidos a abuso, mal uso, danos físicos, alteraciones, reparaciones o
modificaciones no autorizadas. Esta garantía no cubre defectos por desgaste normal y otras condiciones.
Esta garantía tiene validez para clientes de EE.UU. y Canadá que hayan adquirido su telescopio en un vendedor autorizado
de Celestron en EE.UU. y Canadá. Para productos adquiridos fuera de EE.UU. o Canadá, contacte con su distribuidor local
de Celestron o un vendedor autorizado para obtener la información de garantía aplicable. Puede encontrar información
adicional de garantía y eligibilidad en el sitio web de Celestron.
Los telescopios de Celestron están disenados y pretendidos para personas de 14 o más años de edad.
El diseño y las especificaciones del producto están sujetos a cambios sin notificación previa.

ITALIANO I 41
CANNOCCHIALE
MANUALE D’ISTRUZIONI
ITALIANO

42 I ITALIANO
Grazie per aver acquistato un cannocchiale TrailSeeker di Celestron. Siamo sicuri che questo cannocchiale offrirà anni
di divertimento e di servizio affidabile. Leggere attentamente le istruzioni prima di utilizzare il cannocchiale al fine di
garantire l’uso e la cura corretti.
Tappo delle lenti
obiettivo
Oculare montaggio tappo
Anello adattatore
Oculare di copertura
Cinghie per
trasporto
Strappi in velcro:
(1, su ciascun lato)
Strappi
in velcro
Strappi
in velcro
Cinghia a tracolla
Cerniere lampo
Cerniere lampo
Cerniere
lampo
Manopola di messa a fuoco
(macrometrica/micrometrica)
Collare di blocco
dell’oculare
Lente de
objetivo
Parasol de lente
Vite di bloccaggio della rotazione del
montaggio del treppiede
Montaggio per treppiede
(rotazione)(rotatorio)
Conchiglia oculare
Oculare

ITALIANO I 43
ATTENZIONE
Mai guardare in direzione del Sole utilizzando il cannocchiale.
Guardare in direzione del Sole può causare danni permanenti
agli occhi.
PRIMA DELL’USO
Collegare il cannocchiale a un treppiede robusto prima
dell’osservazione in quanto la dimensione e la potenza del
cannocchiale richiedono un treppiede robusto per la stabilità al
fine di ottenere immagini chiare e nitide (Fig. 2).
COLLEGARE L’OCULARE
Per collegare l’oculare al cannocchiale, ruotare il collare di
bloccaggio dell’oculare in senso antiorario fino ad allentarlo e
rimuovere la copertura del montaggio dell’oculare. Assicurarsi
che il tappo di protezione delle lenti sia rimosso dall’oculare e
farlo scorrere nel montaggio per l’oculare (Fig. 3a). Una volta che
l’oculare sarà completamente in posizione, ruotare il collare di
bloccaggio in senso orario per serrare l’oculare e mantenerlo in
posizione (Fig. 3b). Non tentare di collegare o rimuovere l’oculare
senza prima aver allentato il collare di bloccaggio in quanto ciò
potrebbe causare danni all’oculare stesso e/o al cannocchiale.
Fig. 2
Fig. 3b
Fig. 3a
44 I ITALIANO
REGOLAZIONE DELLA CONCHIGLIA OCULARE
Zoom e Oculare Grandangolare
L’oculare con zoom/grandangolare TrailSeeker presenta conchiglie
oculari ad avvitamento per adattarsi ad utenti con o senza occhiali
(Fig. 4). Se non si indossano occhiali, ruotare le conchiglie oculari in
senso orario fino a raggiungere la posizione sollevata. Se si indossano
occhiali, assicurarsi che le conchiglie oculari siano in posizione
abbassata per ottenere il massimo campo visivo. Le conchiglie oculari
possono essere impostate in posizioni che si trovano tra la posizione
completamente sollevata e quella completamente abbassata che
potrebbero meglio adattarsi ad alcuni utenti.
Oculare LER (Long Eye Relief)
L’oculare LER è dotato di conchiglia oculare in gomma, per consentirne
l’uso sia a chi indossa occhiali da vista sia a chi non li necessita. Se non
si utilizzano occhiali posizionare l’occhio dietro l’oculare. Se si utilizzano
occhiali è necessario rimuovere la conchiglia oculare per avere il
massimo campo visivo. Per rimuovere la conchiglia oculare è sufficiente
tirarla verso di sé.
MODIFICARE L’INGRANDIMENTO (OCULARE ZOOM)
Per modificare l’ingrandimento dell’oculare per zoom, ruotare
semplicemente l’oculare in direzione antioraria per aumentare
l’ingrandimento e in direzione oraria per diminuire l’ingrandimento
(Fig. 5). Al momento della modifica dell’ingrandimento, il telescopio
dovrà essere rimesso a fuoco. Il più grande campo visivo e le
immagini più luminose si otterranno sempre all’ingrandimento minore.
Fig. 4
Fig. 5

ITALIANO I 45
MESSA A FUOCO
Per garantire immagini chiare e nitide, il cannocchiale deve essere
messo a fuoco. Il TrailSeeker presenta un sistema di doppia messa
a fuoco che include una messa a fuoco macrometrica e micrometrica
(Fig. 6). Per la messa a fuoco del cannocchiale, ruotare lentamente la
manopola della messa a fuoco macrometrica fino a quando l’immagine
nell’oculare risulterà chiara e nitida. Per la regolazione di precisione,
ruotare lentamente la manopola della messa a fuoco micrometrica
(posta di fronte alla manopola della messa a fuoco micrometrica) fino a
quando l’immagine nell’oculare sarà chiara e nitida. In caso la manopola
della messa a fuoco non ruoti oltre, ruotarla nella direzione opposta.
ROTAZIONE DEL MONTAGGIO PER TREPPIEDE
Il TrailSeeker presenta di un montaggio per treppiede rotante
che ruota completamente a 360° e consente di Impostare l’oculare
in qualsiasi posizione di osservazione. Per modificare la posizione
dell’oculare, allentare la vite di bloccaggio situata sul montaggio per
treppiede e ruotare il telescopio alla direzione desiderata (Fig. 7).
Serrare la vite di bloccaggio e osservare attraverso l’oculare.
PARALUCE
Il paraluce del TrailSeeker scorrerà lontano dal corpo del cannocchiale
per proteggere le lenti dall’esposizione alla pioggia o per tenere lontani
riflessi indesiderati dal telescopio in modo da evitare il degradamento
dell’immagine (Fig. 8).
Manopola di
messa a fuoco
macrometrica
Manopola di
messa a fuoco
micrometrica
Fig. 6
Fig. 8
Fig. 7
Vite di bloccaggio

46 I ITALIANO
OCULARI OPZIONALI
Celestron offre due oculari a ingrandimento fisso, l’82001 e l’82002,
progettati per l’uso con i cannocchiali TrailSeeker. L’82001 è un oculare
grandangolare e l’82002 è un oculare LER. Inoltre, i cannocchiali
TrailSeeker sono compatibili con oculari standard da 1,25”. Celestron
dispone di un’ampia gamma di oculari da 1,25” da utilizzare su cannocchiali,
per raggiungere maggiori livelli di ingrandimento, campi visivi più ampi ecc.
CUSTODIA PERMANENTE DA TRASPORTO
I cannocchiali TrailSeeker sono accompagnati da custodia permanente
da trasporto per la protezione da colpi, graffiature e agenti atmosferici.
La cerniera lampo sul fondo della custodia consente il collegamento del
cannocchiale al treppiede senza necessità di estrarlo dalla custodia, mentre
le cerniere lampo anteriore e posteriore rendono possibile l’osservazione
mediante il cannocchiale senza necessità di estrarlo dalla custodia.
Quando le cerniere dei lembi anteriore e posteriore sono aperte lenti e
oculare sono esposti. I lembi possono essere piegati e fermati in posizione
utilizzando gli strappi in velcro, per evitare che ostacolino l’osservazione e
per rendere accessibili le manopole di messa a fuoco e la vite di bloccaggio
del montante per treppiede. La custodia è dotata di cinghie per il trasporto
integrate e di una cinghia a tracolla rimovibile per rendere il trasporto
agevole.
Fig. 10
Fig. 9

ITALIANO I 47
Fig. 11
¼”-20
Vite di montaggio
¼”-20
Foro filettato (non
mostrato)
Anello di bloccaggio
Vite di montaggio
PIASTRA DI BILANCIAMENTO (PER IL MODELLO 100 MM)
Il cannocchiale TrailSeeker 100 mm è fornito con una
piastra di bilanciamento per bilanciare correttamente
il cannocchiale quando collegato a un treppiede (Fig.
11). Per utilizzare la piastra di bilanciamento, montarla sulla
vite di montaggio da 20-1/4” del treppiede utilizzando il
foro filettato da 20-1/4” situato sulla parte inferiore della
piastra stessa. Collegare il cannocchiale alla piastra di
bilanciamento utilizzando la vite di montaggio da 20-1/4”
situata sulla parte superiore della piastra e avvitarla al
cannocchiale fino in fondo. Far scorrere il cannocchiale
lungo la porzione scanalata della piastra fino a quando il
cannocchiale sarà bilanciato sul treppiede. Serrare l’anello di
serraggio per tenere il cannocchiale nella posizione desiderata.
DIGISCOPING
I cannocchiali TrailSeeker possono essere utilizzati per il digiscoping
con fotocamere SLR e fotocamere digitali point-and-shoot. Notare
che non tutte le fotocamere sono compatibili per Il digiscoping e in
alcune fotocamere potrebbe verificarsi il fenomeno di vignettatura
(immagine circolare circondata di nero). Le fotocamere point-
and-shoot con zoom ottico di 3x o 4x tendono ad essere le più
compatibili con la più bassa quantità di vignettatura. La maggior
parte delle fotografie risulteranno più nitide e luminose utilizzando
l’ingrandimento inferiore sull’oculare per zoom.

48 I ITALIANO
FOTOGRAFIA SLR
Per utilizzare una fotocamera SLR e il proprio cannocchiale per scattare foto,
si dovrà scattare attraverso l’oculare per mentre è collegato al cannocchiale.
Per evitare danni al cannocchiale, all’oculare o alla fotocamera, assicurarsi che
il collare di bloccaggio dell’oculare sia serrato durante ciascuna fare della
configurazione.
1. Rimuovere la conchiglia oculare dall’oculare per zoom/grandangolo.
Con la conchiglia abbassata, ruotarla in senso antiorario per rimuoverla
dall’oculare. Ciò esporrà le filettature sotto l’oculare (Fig. 12a).
Nota: semplicemente rimuovere la conchiglia oculare di gomma dell’oculare LER per esporre le filettature.
2. Avvitare l’anello con l’adattatore a T in dotazione alle filettature esposte
sull’oculare nella fase uno di cui sopra (Fig. 12b).
Nota: l’anello adattatore T non è necessario quando si utilizza un oculare LER.
3. Avvitare un anello a T opzionale per il proprio modello di fotocamera
nell’anello dell’adattatore a T (Fig. 12c).
Nota: quando si utilizza un oculare LER agganciare l’anello adattatore T direttamente mediante le filettature
sull’oculare.
4. Collegare il corpo della fotocamera SLR all’anello a T (Fig. 12d).
I cannocchiali TrailSeeker presentano aperture fisse e, di conseguenza,
rapporti /f fissi. Per raggiungere l’esposizione corretta per le proprie foto, sarà
necessario impostare la velocità dell’otturatore di conseguenza. La maggior parte
delle fotocamere offre un sistema di misurazione through the lens (TTL) che
consente di sapere se l’immagine è sotto o sovra esposta. Consultare il manuale
della fotocamera per informazioni specifiche sulla misurazione, sulla modifica
delle velocità dell’otturatore e su altre impostazioni.
Fig. 12a
Fig. 12b
Fig. 12c
Fig. 12d
ITALIANO I 49
Fig. 13
FOTOGRAGIA POINT-AND-SHOOT
Per il digiscoping, possono essere utilizzate una varietà di fotocamere
point-and-shoot con i cannocchiali TrailSeeker utilizzando l’adattatore
universale per fotocamere (n.93626) offerto da Celestron (Fig.
13). Questo adattatore si collega all’oculare del cannocchiale
e consente alle lenti della fotocamera di essere centrate dietro
all’oculare. Notare che non tutte le fotocamere sono compatibili con
questo adattatore in quanto non esiste una regolazione sufficiente
per centrare le lenti dietro all’oculare quando la posizione delle lenti
è bassa nel corpo della fotocamera o quando la fotocamera non
presenta un’altezza adeguata.
IMPERMEABILE/ANTIAPPANNAMENTO
I cannocchiali della serie TrailSeeker sono impermeabili e riempiti di
gas azoto secco per impedire l’appannamento interno dell’involucro.
CURA E CONSERVAZIONE
Il cannocchiale Celestron offrirà anni di servizio affidabile se curato e conservato correttamente.
1. Proteggere il cannocchiale dagli urti e non forzare nessuna parte movibile oltre i suoi limiti.
2. Proteggere le parti ottiche del cannocchiale applicando tutti i tappi per le lenti quando non in uso.
3. Conservare il cannocchiale in un luogo fresco e asciutto ogniqualvolta ciò sia possibile.
4. In caso di conservazione per un lungo periodo di tempo, inserire il cannocchiale in un sacchetto di plastica o un
contenitore a chiusura ermetica con un essiccante.
5. Non lasciare il cannocchiale all’interno dell’auto in giornate calde/soleggiate o in prossimità di qualsiasi oggetto
che generi calore, in quanto ciò potrebbe danneggiare l’apparecchio.
6. Pulire qualsiasi pulviscolo, sporcizia o acqua che potrebbe trovarsi sul telescopio o all’interno delle parti movibili
non appena possibile al fine di evitare danni imprevisti.

50 I ITALIANO
Per le specifiche e le informazioni di prodotto complete:
www.celestron.com • ©2013 Celestron • Tutti i diritti riservati.
2835 Columbia Street • Torrance, CA 90503 U.S.A. • Telefono: 800.421.9649 • Stampato in Cina 1213
PULIZIA
È essenziale una corretta pulizia delle lenti per mantenere l’integrità ottica del cannocchiale. Le lenti sporche
diminuiscono la quantità di luce trasmessa attraverso il cannocchiale e l’esperienza di osservazione complessiva.
1. Rimuovere eventuali pulviscoli sulle lenti con un pennello soffice per lenti o una bomboletta di aria compressa.
2. Rimuovere eventuali impronte, macchie o sbavature dalla superficie delle lenti con un panno per lenti soffice e
pulito o un tessuto per lenti, strofinando con movimenti circolari. Iniziare dal centro delle lenti e proseguire verso i
bordi. Alitare leggermente sulle lenti per applicare umidità, se necessario.
3. Per una pulizia più completa si consiglia di utilizzare il kit di pulizia per componenti ottici/lenti disponibile nei principali
negozi di ottica o fotografici. Seguire le istruzioni fornite con il kit di pulizia per risultati ottimali.
ASSISTENZA E RIPARAZIONE
In caso di problemi di garanzia o di necessità di riparazione, contattare il reparto di assistenza clienti Celestron se si risiede negli
Stati Uniti o in Canada. Se si risiede al di fuori di tali Paesi, contattare il rivenditore da cui si è acquistato il cannocchiale oppure il
distributore Celestron del proprio Paese. Un elenco dei nostri distributori può essere consultato sul nostro sito Internet.
GARANZIA
Il cannocchiale è coperto dalla Garanzia limitata a vita di Celestron. Celestron garantisce che questi cannocchiali sono privi di difetti
nei materiali e di fabbricazione per tutta la vita utile del cannocchiale per il proprietario originale. Celestron riparerà o sostituirà i
cannocchiali che, dopo un’analisi da parte di Celestron, risultino presentare difetti nei materiali o nella fabbricazione e che rientrino
nelle definizioni dei limiti descritti qui di seguito. La presente garanzia non copre prodotti che sono stati oggetto di abuso, uso
improprio, danni o alterazioni fisiche o che sono stati sottoposti a modifiche o riparazioni non autorizzate. La presente garanzia non
copre i difetti dovuti alla normale usura e ad altre condizioni. La presente garanzia è valida per i clienti di Stati Uniti e Canada che
hanno acquistato il proprio cannocchiale da un rivenditore Celestron autorizzato negli Stati Uniti o in Canada. Per i prodotti acquistati
al di fuori degli Stati Uniti o del Canada, contattare il proprio distributore Celestron o il rivenditore autorizzato per le informazioni sulla
garanzia applicabili. Ulteriori informazioni di garanzia e criteri di idoneità possono essere trovati sul sito Internet di Celestron.
I cannocchiali Celestron sono progettati e destinati all’uso di persone di età pari o superiore ai 14 anni.
Il design del prodotto e le specifiche sono soggette a modifiche senza previa notifica.