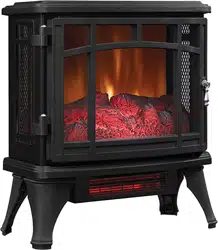
MODELS: DFI-5018-01, DFI-5018-02, DFI-5018-03, DFI-5018-04, DFI-5018-05,DFI-5018-07
Made in China
© 2018, Twin-Star International,Inc.
VOLTAGE
120 VAC, 60 Hz
AMPS 12.5 Amps
WATTS 1500 Watts
PRODUCT SPECIFICATIONS
OPERATING INSTRUCTIONS
ASSEMBLY INSTRUCTIONS
For Customer Service:
tsicustomerservice.com
(+1) 888-674-7517
8:30 a.m.-5:30 p.m., EST, Monday-Friday
Manufactured and distributed by Twin-Star
International, Inc., under license from Duraflame,
Inc. duraflame, the flame symbol and logo are
registered trademarks of Duraflame, Inc.
Twin-Star International, Inc.
Delray Beach, FL 33445
Made in China • Printed in China
Note: When first running the heater there may
be an odor. This is normal as the heater has a
surface coating on the internal parts. For the
first several hours of operation, the coating
reacts with the internal parts to permanently
protect them. The odor is safe; if you are
sensitive to the odor, it is recommended
to run the heater in a well-ventilated area until
the odor dissipates.
Warning: This is an unvented, electric appliance.
DO NOT attempt to burn wood or manufactured
firelogs in or on this appliance or grate.
Go to tsicustomerservice.com for product warranty registration
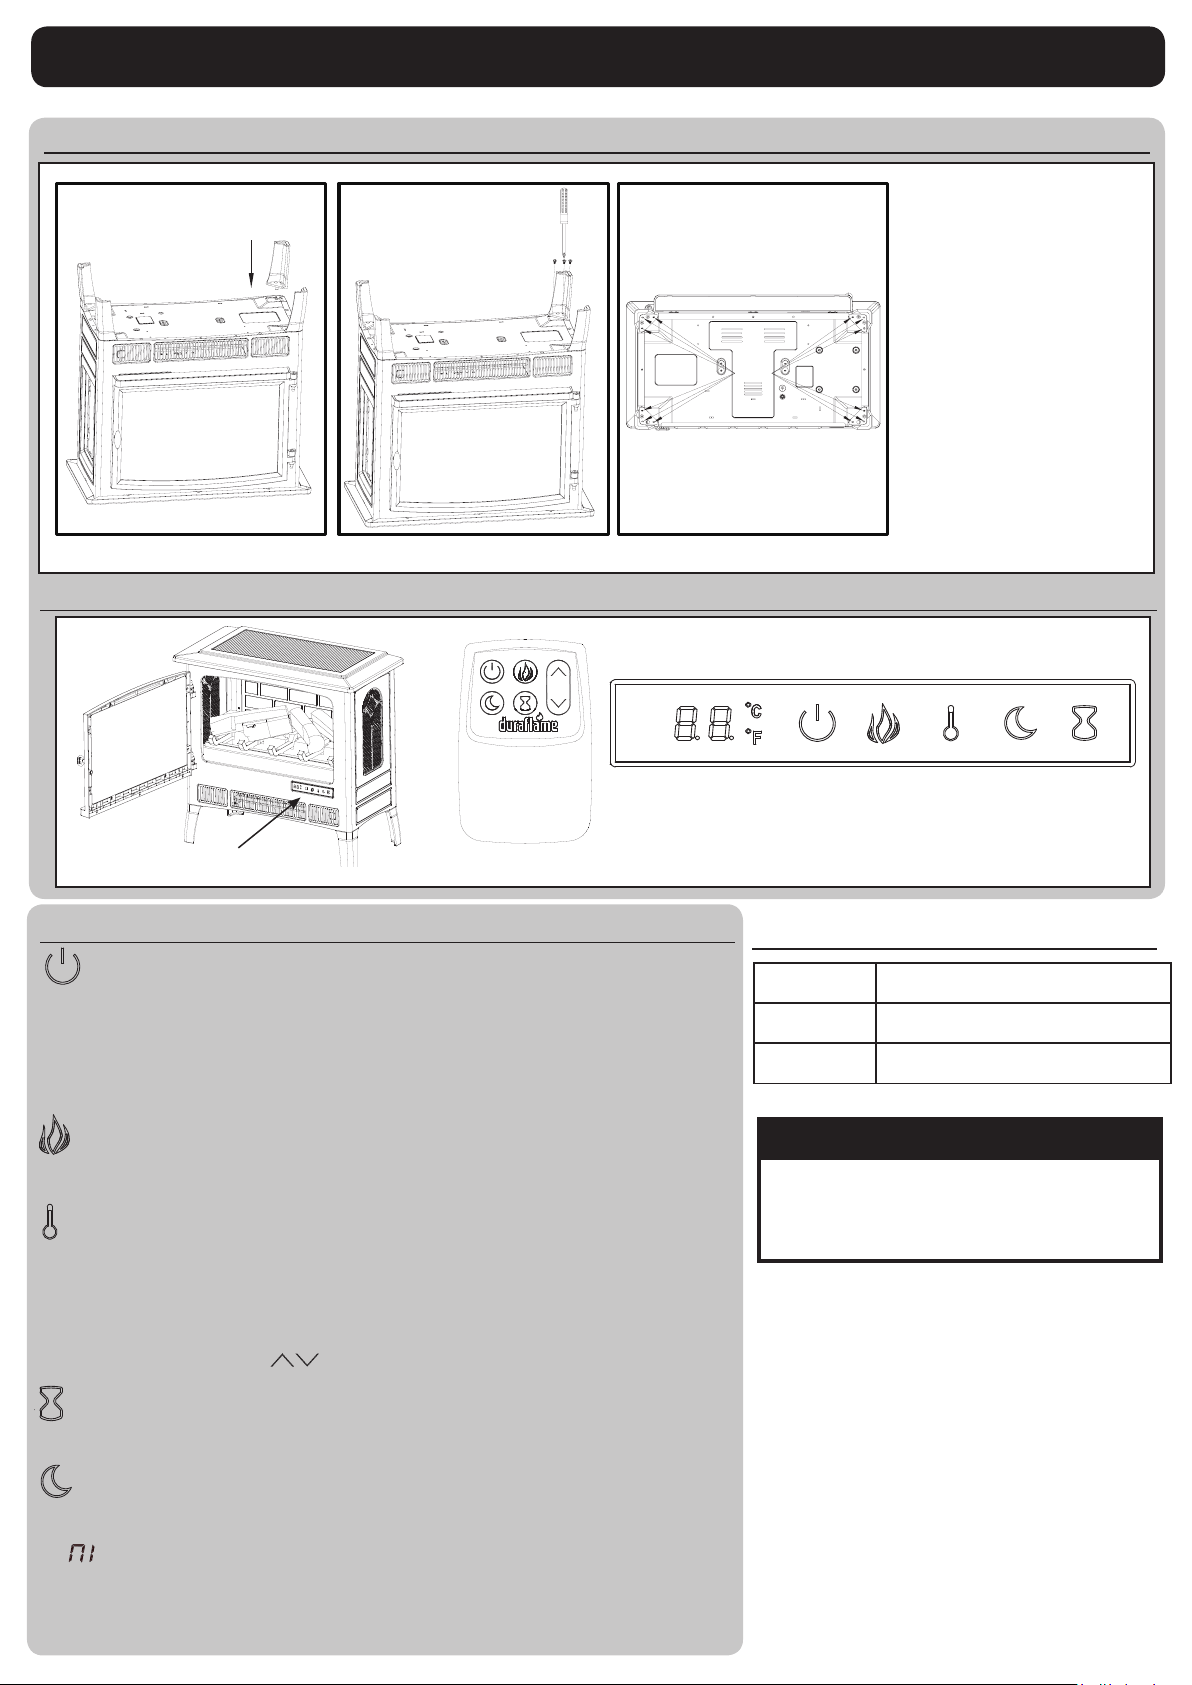
Remote Control
Control Panel Location
-- POWER
-- FLAME
-- HEATER
-- TIMER
-- NIGHT MODE
1.The power button supplies power to all of the fireplace functions. The power button
will put the insert in a standby mode. This will turn off all functions at once, but will
hold the settings in the memory. By pressing the Power button again, the unit will turn
on with the retained settings.
2.With the power on, press and hold the Power button on the control panel for 10
seconds to disable or re-enable the heater function. Once disabled or re-enabled, the
ember bed lights will flash multiple times.
OPERATING INSTRUCTIONS
1. There are 5 brightness levels that can be selected and OFF (00) setting.
2. Settings F5 - F1 decrease in brightness.
Screw
1
2 3
MOUNTING THE LEGS
1) Align the mounting tab
into the bracket and
lower the leg into place.
2) Fasten the leg to the
bracket using the
included screws,
3 per leg.
3) Fasten the other 3 legs
to the bracket.
Control Panel
1. The stove contains a fan forced infrared element heater.
2. The thermostat setting range is 62°F - 82°F (17°C - 27°C) or continously ON or OFF(00).
3. The thermostat is adjustable by 2°F or 1°C increments by pressing the HEATER button
on the control panel.
4. To change between °F and °C press and hold the HEATER button on the control panel
for 3 seconds.
5. The up and down buttons “ “ on the remote will increase/decrease temperature
setting.
1. Pressing the timer button will cycle through the timer settings: 30 minutes, 1 Hour,
2H, 3H, 4H, 5H, 6H, 7H, 8H, 9H and off (00).
1. Pressing this button will turn on/off the night mode setting.Turning on night mode
reduces the halogen and reduces the brightness of the heater for night use.
“ ” will appear on the display.
The manufacturer warrants that your new Electric Stove is free from manufacturing and material defects for a period of one year from date of puchase, subject to
the following conditions and limitations.
1. Install and operate this Electric Stove in accordance with the installation and operating instructions furnished with the product at all times. Any unauthorized
repair, alteration, willful abuse, accident, or misuse of the product shall nullify this warranty.
2. This warranty is non-transferable, and is made to the original owner, provided that the purchase was made through an authorized supplier of the product.
3. The warranty is limited to the repair or replacement of part(s) found to be defective in material or workmanship, provided that such part(s) have been subjected
to normal conditions of use and service, after said defect is confirmed by the manufacturer’s inspection.
4. The manufacturer may, at its discretion, fully discharge all obligations with respect to this warranty by refunding the wholesale price of the defective part(s).
5. Any installation, labor, construction, transportation, or other related costs/expenses arising from defective part(s), repair, replacement, or otherwise of same, will
not be covered by this warranty, nor shall the manufacturer assume responsibility for same.
6. The owner/user assumes all other risks, if any, including the risk of any direct, indirect or consequential loss or damage arising out of the use, or inability to use
the product, except as provided by law.
7. All other warranties – expressed or implied –with respect to the product, its components and accessories, or any obligations/liabilities on the part of the manu-
facturer are hereby expressly excluded.
8. The manufacturer neither assumes, nor authorizes any third party to assume on its behalf, any other liabilities with respect to the sale of the product.
9. The warranties as outlined within this document do not apply to non accessories used in conjunction with the installation of this product.
10.This warranty gives you specific legal rights, and you may also have other rights which vary from state to state.
This warranty is void if:
a. The fireplace is subjected to prolonged periods of dampness or condensation.
b. Any unauthorized alteration, willful abuse, accident, or misuse of the product.
c. You do not have the original receipt of purchase.
IF WARRANTY SERVICE IS NEEDED
Contact the manufacturer by calling customer service department at 1-888-674-7517, 7 days a week 24 hours a day
at our toll-free help line. Our Consumer Service department is available Monday – Friday 8:30 am – 5:30 pm EST.
Make sure you have your warranty, your sales receipt, location of purchase and the model/serial number of
your product.
IMPORTANT INSTRUCTIONS
1. The battery compartment is located on the back end of the remote
control.
2. Press and slide the battery door open and remove the old battery.
3. Insert 2 AAA batteries, checking that the + and - sides of the battery
match inside the battery compartment.
4. Replace the battery compartment door.
Caution:
• For best results, use 2pcs AAA alkaline batteries.
• Install only new batteries of the same type in your product.
• Failure to insert batteries in the correct polarity, as indicated in the
battery compartment, may shorten the life of the batteries or cause
batteries to leak.
• Do not mix old and new batteries.
• Do not mix Alkaline, Standard (Carbon-Zinc) or Rechargeable (Nickel
Cadmium) or (Nickel Metal Hydride) batteries.
• Danger of explosion if battery is incorrectly replaced.
• Do not ingest batteries.
• Batteries should be recycled or disposed of as per state and local
guidelines.
DISPOSAL OF USED BATTERIES
Battery may contain hazardous substances which could endanger the
enviroment and human health. Used batteries shall not be treated as
municipal waste, but left at the appropriate collection point for recycling.
For more information about collection and recycling of used batteries,
please contact your local municipality or waste disposal service.
SAVE THESE
INSTRUCTIONS
Battery Replacement
When using electrical appliances, basic precautions should always be followed to reduce the risk of fire, electrical shock, and injury to persons including the following:
1. Read all instructions before using this appliance.
2. This appliance is hot when in use. To avoid burns, do not let bare skin touch hot
surfaces. If provided, use handles when moving this appliance. Keep
combustible materials, such as furniture, pillows, bedding, papers, clothes and
curtains at least 3 feet (0.9 m) from the front of this appliance and keep away
from the sides and the rear.
WARNING: In order to avoid overheating, do not cover the heater.
3. CAUTION: Never leave the heater operating unattended. Extreme caution is
necessary if unsupervised children or invalids are nearby.
4. The appliance is not to be used by children or persons with reduced physical,
sensory or mental capabilities, or lack of experience and knowledge, unless
they have been given supervision or instruction.
5. Always unplug this appliance when not in use.
6. Do not operate any heater with a damaged cord or plug or after the appliance
malfunctions, or if it has been dropped or damaged in any manner.
7. If the supply cord is damaged, it must be replaced by the manufacturer, its
service agent or similarly qualified persons in order to avoid a hazard.
8. Do not use outdoors.
9. This heater is not intended for use in bathrooms, laundry areas and similar
indoor locations. Never locate this appliance where it may fall into a bathtub or
other water container.
10. Do not run cord under carpeting. Do not cover cord with throw rugs, runners,
or similar coverings. Do not route cord under furniture or appliances. Arrange
cord away from traffic area and where it will not be tripped over.
11. To disconnect this appliance, turn controls to the off position, then remove
plug from outlet.
12. Do not insert or allow foreign objects to enter any ventilation or exhaust
opening as this may cause an electric shock or fire, or damage the
appliance.
13. To prevent a possible fire, do not block air intakes or exhaust in any
manner. Do not use on soft surfaces, like a bed, where opening may
become blocked.
14. This appliance has hot and arcing or sparking parts inside. Do not use it
in areas where gasoline, paint or flammable liquids are used or stored.
This stove should not be used as a drying rack for clothing. Christmas
stockings or decorations should not be hung in the area of it.
15. Use this appliance only as described in the manual. Any other use not
recommended by the manufacturer may cause fire, electric shock or
injury to persons.
16. This appliance, when installed, must be electrically grounded in
accordance with local codes or, in the absence of local codes, with
the current CSA C22.1 Canadian Electrical Code or for U.S.A.
installations, follow local codes and the National Electrical Code,
ANSI/NFPA NO.70.
17. This product is equipped with a polarized plug (one blade is wider than
the other blade). To reduce the risk of electrical shock, this plug will fit into
a polarized outlet only one way. This is a safety feature. If you are unable
to insert the plug into the electrical outlet, try reversing the plug. If the plug
still does not fit, contact a qualified electrician. Avoid the use of an
extension cord because the extension cord may overheat and cause risk of
fire. However, if you have to use an extension cord, the cord must be
No.14 AWG minimum size and rated not less than 1875 Watts. The
extension cord must be a three wire cord with grounding type plug and
cord connection. The extension cord shall not be more than 20 feet (6 m)
in length.
18. This heater may include a visual alarm to warn that parts of the heater
are getting excessively hot. If the alarm flashes immediately turn the
heater off and inspect for any objects on or adjacent to the heater that
may cause high temperatures.
DO NOT OPERATE THE HEATER WITH THE ALARM FLASHING!
1-YEAR LIMITED WARRANTY
A653
Note:
Battery disposal
Please always dispose of batteries
at a suitable recycling point.
AAA 1.5V
AAA 1.5V

MODELS: DFI-5018-01, DFI-5018-02, DFI-5018-03, DFI-5018-04, DFI-5018-05,DFI-5018-07
Made in China
© 2018, Twin-Star International,Inc.
VOLTAGE
120 VAC, 60 Hz
AMPS 12.5 Amps
WATTS 1500 Watts
PRODUCT SPECIFICATIONS
OPERATING INSTRUCTIONS
ASSEMBLY INSTRUCTIONS
For Customer Service:
tsicustomerservice.com
(+1) 888-674-7517
8:30 a.m.-5:30 p.m., EST, Monday-Friday
Manufactured and distributed by Twin-Star
International, Inc., under license from Duraflame,
Inc. duraflame, the flame symbol and logo are
registered trademarks of Duraflame, Inc.
Twin-Star International, Inc.
Delray Beach, FL 33445
Made in China • Printed in China
Note: When first running the heater there may
be an odor. This is normal as the heater has a
surface coating on the internal parts. For the
first several hours of operation, the coating
reacts with the internal parts to permanently
protect them. The odor is safe; if you are
sensitive to the odor, it is recommended
to run the heater in a well-ventilated area until
the odor dissipates.
Warning: This is an unvented, electric appliance.
DO NOT attempt to burn wood or manufactured
firelogs in or on this appliance or grate.
Go to tsicustomerservice.com for product warranty registration
Remote Control
Control Panel Location
-- POWER
-- FLAME
-- HEATER
-- TIMER
-- NIGHT MODE
1.The power button supplies power to all of the fireplace functions. The power button
will put the insert in a standby mode. This will turn off all functions at once, but will
hold the settings in the memory. By pressing the Power button again, the unit will turn
on with the retained settings.
2.With the power on, press and hold the Power button on the control panel for 10
seconds to disable or re-enable the heater function. Once disabled or re-enabled, the
ember bed lights will flash multiple times.
OPERATING INSTRUCTIONS
1. There are 5 brightness levels that can be selected and OFF (00) setting.
2. Settings F5 - F1 decrease in brightness.
Screw
1
2 3
MOUNTING THE LEGS
1) Align the mounting tab
into the bracket and
lower the leg into place.
2) Fasten the leg to the
bracket using the
included screws,
3 per leg.
3) Fasten the other 3 legs
to the bracket.
Control Panel
1. The stove contains a fan forced infrared element heater.
2. The thermostat setting range is 62°F - 82°F (17°C - 27°C) or continously ON or OFF(00).
3. The thermostat is adjustable by 2°F or 1°C increments by pressing the HEATER button
on the control panel.
4. To change between °F and °C press and hold the HEATER button on the control panel
for 3 seconds.
5. The up and down buttons “ “ on the remote will increase/decrease temperature
setting.
1. Pressing the timer button will cycle through the timer settings: 30 minutes, 1 Hour,
2H, 3H, 4H, 5H, 6H, 7H, 8H, 9H and off (00).
1. Pressing this button will turn on/off the night mode setting.Turning on night mode
reduces the halogen and reduces the brightness of the heater for night use.
“ ” will appear on the display.
The manufacturer warrants that your new Electric Stove is free from manufacturing and material defects for a period of one year from date of puchase, subject to
the following conditions and limitations.
1. Install and operate this Electric Stove in accordance with the installation and operating instructions furnished with the product at all times. Any unauthorized
repair, alteration, willful abuse, accident, or misuse of the product shall nullify this warranty.
2. This warranty is non-transferable, and is made to the original owner, provided that the purchase was made through an authorized supplier of the product.
3. The warranty is limited to the repair or replacement of part(s) found to be defective in material or workmanship, provided that such part(s) have been subjected
to normal conditions of use and service, after said defect is confirmed by the manufacturer’s inspection.
4. The manufacturer may, at its discretion, fully discharge all obligations with respect to this warranty by refunding the wholesale price of the defective part(s).
5. Any installation, labor, construction, transportation, or other related costs/expenses arising from defective part(s), repair, replacement, or otherwise of same, will
not be covered by this warranty, nor shall the manufacturer assume responsibility for same.
6. The owner/user assumes all other risks, if any, including the risk of any direct, indirect or consequential loss or damage arising out of the use, or inability to use
the product, except as provided by law.
7. All other warranties – expressed or implied –with respect to the product, its components and accessories, or any obligations/liabilities on the part of the manu-
facturer are hereby expressly excluded.
8. The manufacturer neither assumes, nor authorizes any third party to assume on its behalf, any other liabilities with respect to the sale of the product.
9. The warranties as outlined within this document do not apply to non accessories used in conjunction with the installation of this product.
10.This warranty gives you specific legal rights, and you may also have other rights which vary from state to state.
This warranty is void if:
a. The fireplace is subjected to prolonged periods of dampness or condensation.
b. Any unauthorized alteration, willful abuse, accident, or misuse of the product.
c. You do not have the original receipt of purchase.
IF WARRANTY SERVICE IS NEEDED
Contact the manufacturer by calling customer service department at 1-888-674-7517, 7 days a week 24 hours a day
at our toll-free help line. Our Consumer Service department is available Monday – Friday 8:30 am – 5:30 pm EST.
Make sure you have your warranty, your sales receipt, location of purchase and the model/serial number of
your product.
IMPORTANT INSTRUCTIONS
1. The battery compartment is located on the back end of the remote
control.
2. Press and slide the battery door open and remove the old battery.
3. Insert 2 AAA batteries, checking that the + and - sides of the battery
match inside the battery compartment.
4. Replace the battery compartment door.
Caution:
• For best results, use 2pcs AAA alkaline batteries.
• Install only new batteries of the same type in your product.
• Failure to insert batteries in the correct polarity, as indicated in the
battery compartment, may shorten the life of the batteries or cause
batteries to leak.
• Do not mix old and new batteries.
• Do not mix Alkaline, Standard (Carbon-Zinc) or Rechargeable (Nickel
Cadmium) or (Nickel Metal Hydride) batteries.
• Danger of explosion if battery is incorrectly replaced.
• Do not ingest batteries.
• Batteries should be recycled or disposed of as per state and local
guidelines.
DISPOSAL OF USED BATTERIES
Battery may contain hazardous substances which could endanger the
enviroment and human health. Used batteries shall not be treated as
municipal waste, but left at the appropriate collection point for recycling.
For more information about collection and recycling of used batteries,
please contact your local municipality or waste disposal service.
SAVE THESE
INSTRUCTIONS
Battery Replacement
When using electrical appliances, basic precautions should always be followed to reduce the risk of fire, electrical shock, and injury to persons including the following:
1. Read all instructions before using this appliance.
2. This appliance is hot when in use. To avoid burns, do not let bare skin touch hot
surfaces. If provided, use handles when moving this appliance. Keep
combustible materials, such as furniture, pillows, bedding, papers, clothes and
curtains at least 3 feet (0.9 m) from the front of this appliance and keep away
from the sides and the rear.
WARNING: In order to avoid overheating, do not cover the heater.
3. CAUTION: Never leave the heater operating unattended. Extreme caution is
necessary if unsupervised children or invalids are nearby.
4. The appliance is not to be used by children or persons with reduced physical,
sensory or mental capabilities, or lack of experience and knowledge, unless
they have been given supervision or instruction.
5. Always unplug this appliance when not in use.
6. Do not operate any heater with a damaged cord or plug or after the appliance
malfunctions, or if it has been dropped or damaged in any manner.
7. If the supply cord is damaged, it must be replaced by the manufacturer, its
service agent or similarly qualified persons in order to avoid a hazard.
8. Do not use outdoors.
9. This heater is not intended for use in bathrooms, laundry areas and similar
indoor locations. Never locate this appliance where it may fall into a bathtub or
other water container.
10. Do not run cord under carpeting. Do not cover cord with throw rugs, runners,
or similar coverings. Do not route cord under furniture or appliances. Arrange
cord away from traffic area and where it will not be tripped over.
11. To disconnect this appliance, turn controls to the off position, then remove
plug from outlet.
12. Do not insert or allow foreign objects to enter any ventilation or exhaust
opening as this may cause an electric shock or fire, or damage the
appliance.
13. To prevent a possible fire, do not block air intakes or exhaust in any
manner. Do not use on soft surfaces, like a bed, where opening may
become blocked.
14. This appliance has hot and arcing or sparking parts inside. Do not use it
in areas where gasoline, paint or flammable liquids are used or stored.
This stove should not be used as a drying rack for clothing. Christmas
stockings or decorations should not be hung in the area of it.
15. Use this appliance only as described in the manual. Any other use not
recommended by the manufacturer may cause fire, electric shock or
injury to persons.
16. This appliance, when installed, must be electrically grounded in
accordance with local codes or, in the absence of local codes, with
the current CSA C22.1 Canadian Electrical Code or for U.S.A.
installations, follow local codes and the National Electrical Code,
ANSI/NFPA NO.70.
17. This product is equipped with a polarized plug (one blade is wider than
the other blade). To reduce the risk of electrical shock, this plug will fit into
a polarized outlet only one way. This is a safety feature. If you are unable
to insert the plug into the electrical outlet, try reversing the plug. If the plug
still does not fit, contact a qualified electrician. Avoid the use of an
extension cord because the extension cord may overheat and cause risk of
fire. However, if you have to use an extension cord, the cord must be
No.14 AWG minimum size and rated not less than 1875 Watts. The
extension cord must be a three wire cord with grounding type plug and
cord connection. The extension cord shall not be more than 20 feet (6 m)
in length.
18. This heater may include a visual alarm to warn that parts of the heater
are getting excessively hot. If the alarm flashes immediately turn the
heater off and inspect for any objects on or adjacent to the heater that
may cause high temperatures.
DO NOT OPERATE THE HEATER WITH THE ALARM FLASHING!
1-YEAR LIMITED WARRANTY
A653
Note:
Battery disposal
Please always dispose of batteries
at a suitable recycling point.
AAA 1.5V
AAA 1.5V
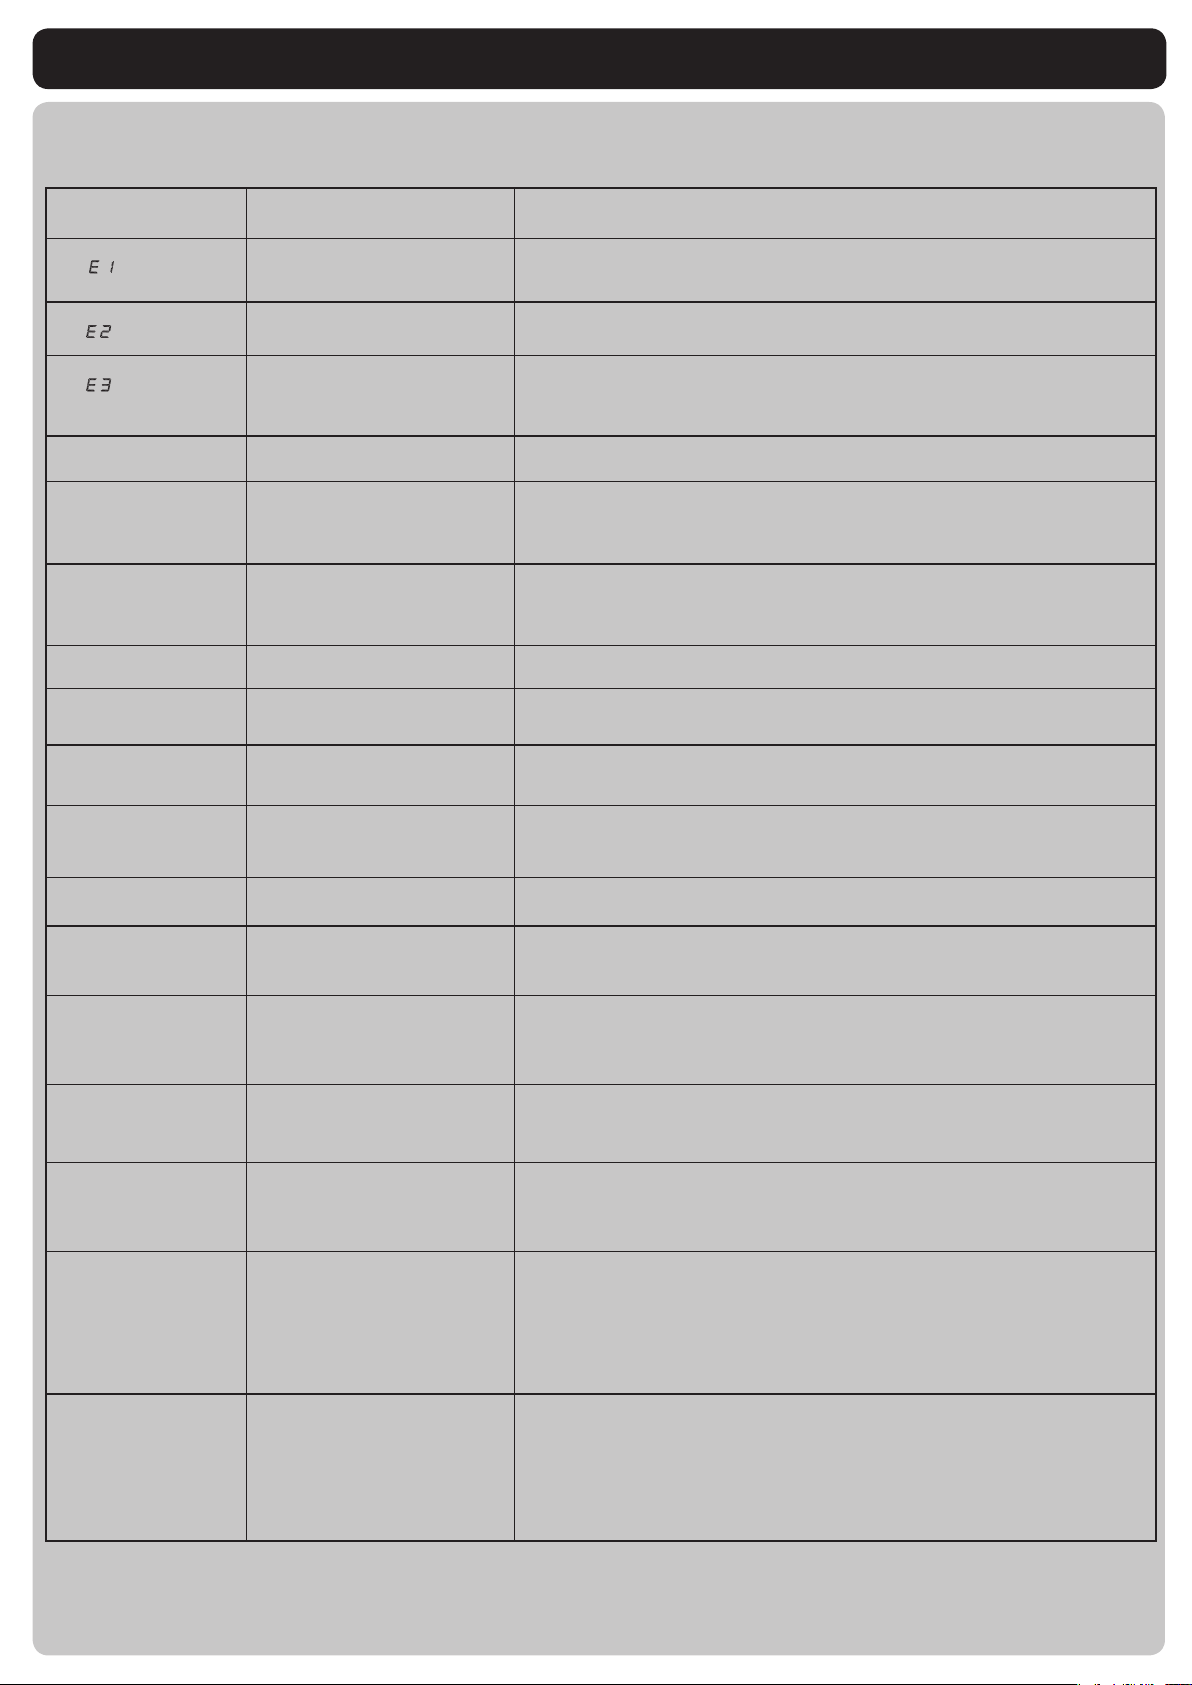
TROUBLESHOOTING GUIDE
MODELS: DFI-5018-01, DFI-5018-02, DFI-5018-03, DFI-5018-04, DFI-5018-05, DFI-5018-07
Problem Root Cause Corrective Action
1. Display shows
“ ”
1. e thermostat sensor is
broken or disconnected.
1. Unplug the stove, remove the back panel of the stove and check that the thermostat
is plugged into the main circuit board. If this does not solve the problem contact
customer service for a replacement thermostat sensor.
2. Display shows
“ ”
2. e thermostat sensor is
broken.
2. Contact customer service for a replacement thermostat sensor.
3. Display shows
“ ”
3. Manual Reset overheat
protection has triggered.
3. Inspect the heater and check that the air inlets and outlets are not blocked as this
may cause overheating. Unplug the heater for 30 minutes and allow it to cool down.
Replug and operate, but monitor the heater for signs of overheating. If the problem
persist discontinue use of the heater and contact customer service.
4. No power, buttons
do not light up.
4. Power cord was not plugged
into the outlet.
4. Check that unit is plugged directly into a standard 120 volt outlet.
5. Stove does not
turn on manually.
5a. No incoming power from the
electrical wall socket or buttons.
5b. Improper operation.
5c. Defective button
5a. Check circuit breakers and move unit to another outlet.
5b. Manually press main power button from front of unit.
5c. Replace control panel circuit board.
6. Flames are not
moving.
6a. Defective ame generator drive
motor.
6b. Spinner detached from the
motor.
6a. Replace ame generator drive motor.
6b. Remove the back panel/ emberbed/ metal bracket and check to see if “spinner” is
correctly mounted to the motor.
7. Logs glow, but no
ame eect.
7. Flame eect turned o 7. Press ame button several times.
8. Heater does not
blow warm air.
8. ermostat setting is
preventing heater from
turning on.
8. Adjust the temperature settings to ensure that the thermostat is set
higher than the current room temperature.
9. Heater is not
turning on.
9a. Improper operation
9b. Defective heater/blower
assembly.
9a. Manually press main power button on front of unit.
9b. Replace heater/blower assembly.
10. Not producing
enough heat.
10a. Power strip/surge protector/
extension cord being used
10b. Location of unit.
10a. Plug unit directly into the wall.
10b. Make sure unit is located on an interior wall.
11. Unit blows cool or
cold air.
11. Defective heater blower
assembly.
11. Replace heater blower assembly.
12. Noise with
heater on.
12a. Dirty heater blower motor
12b. Defective heater/blower
assembly.
12a. Gently vacuum heater blower vents.
12b. Replace heater/blower assembly.
13. Noise with ames
on and heater o.
13a. Defective ame generator
drive motor.
13b. Dented back panel
13c. Warped spinner sha
13a. Replace ame generator drive motor.
13b. Refer to TSI customer service.
13c. Refer to TSI customer service.
14. Is it safe to place
unit on carpet?
14. Product Inquriy 14. It is safe to place unit on carpet but make sure any ammable
items are at least 3 feet away from front and sides of the unit.
15. How many square
feet will my unit
warm up?
15. Product Inquriy 15. Provides supplemental heat up to 1000 square feet
16. Flame eect works
but heater
function does not
and the ember bed
ashes when
the heater button
is pressed.
16. e heater is disabled. 16. With the power on press and hold the POWER button on the
control panel for 10 seconds. Once re-enabled the emberbed
lights will ash multiple times.
17. Remote control is
not working when
buttons are
pressed.
17a. No batteries or battery power.
17b. Poor signal
17c. Distance
17a. Change the remote batteries.
17b. Operate remote transmitter at a slow measured pace. Press the remote control
buttons with an even motion and gentle pressure.
Repeatedly pressing buttons in rapid succession may cause the transmitter to
malfunction.
17c. Operate the remote at a distance less than 20 feet from the front of the appliance;
point the remote at the control panel.
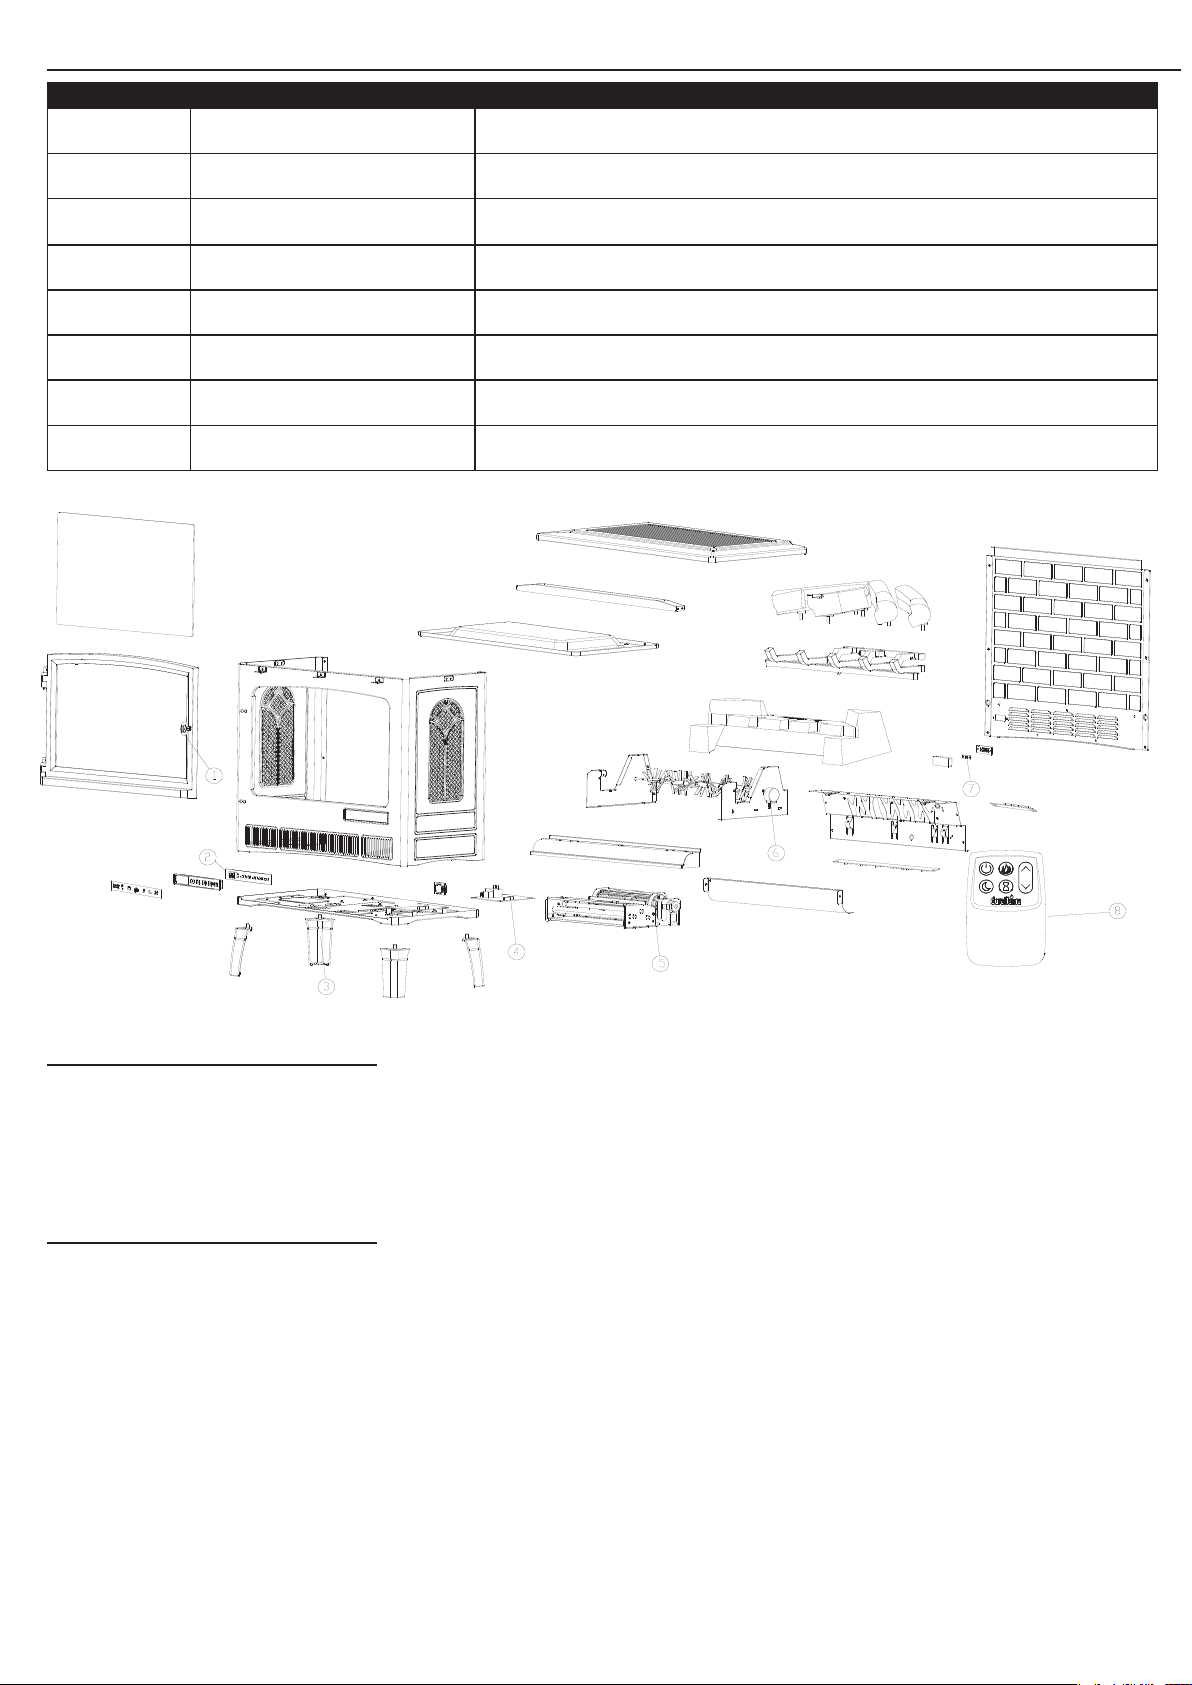
EXPLODED VIEW
FCC/IC INFORMATION
CARE AND MAINTENANCE
Warning: Changes or modifications to this unit not expressly approved by the party responsible for compliance could void user’s authority to operate the
equipment.
NOTE: This equipment has been tested and found to comply with the limits for Class B digital device, pursuant to part 15 of the FCC Rules. These limits are
designed to provide reasonable protection against harmful interference in a residential installation. This equipment generates, uses, and can radiate radio
frequency energy and, if not installed and used in accordance with the instructions, may cause harmful interference to radio communications.
However, there is no guarantee that interference will not occur in a particular installation. if this equipment does cause harmful interference to radio or television
reception, which can be determined by turning the equipment off and on, the user is encouraged to try to correct the interference by one or more of the
following measures.
•Reorientorrelocatethereceivingantenna.
•Increasetheseparationbetweentheequipmentandthereceiver.
•Connecttheequipmentintoanoutletonacircuitdifferentfromthattowhichthereceiverisconnected.
•Consultthedealeroranexperiencedradio/TVtechnicianforhelp.
This device complies with Part 15 of the FCC Rules. Operation is subject to the following two conditions:
(1) This device may not cause harmful interference, and
(2) this device must accept any interference received, including interference that may cause undesired operation.
This Class B digital apparatus complies with Canadian ICES-003.
•Cleanthetrimusingasoftcloth,slightlydampenedwithcitrusoilbasedproductandbuffwithacleansoftcloth.
•DONOTusebrasspolishorhouseholdcleanersastheseproductswilldamagethemetaltrim.Citrusoilbasedproductscanbeobtainedatsupermarketsor
hardware stores.
•WARNING:Electricaloutletwiringmustcomplywithlocalbuildingcodesandotherapplicableregulationstoreducetheriskofre,electricalshockandinjury
to persons.
•Warning:Disconnectpowerbeforeattemptinganymaintenanceorcleaningtoreducetheriskofre,electricalshockorpersonalinjury.
A653
Part Part Name Part Number
1 Door Pull Y18-S259-RH
2 Control Panel Circuit Board Y18-S259-P32
3 Stove legs SL-5018-01/SL-5018-02/SL-5018-03/SL-5018-04/SL-5018-05/SL-5018-07
4 Main Circuit Board Y18-S259-P15
5 Heater/Blower Assembly Y18-S259-P01
6 Flame Generator Drive Motor Y18-S259-P10
7 Thermostat Sensor NTC-5010
8 Remote control P171
TROUBLESHOOTING GUIDE
MODELS: DFI-5018-01, DFI-5018-02, DFI-5018-03, DFI-5018-04, DFI-5018-05, DFI-5018-07
Problem Root Cause Corrective Action
1. Display shows
“ ”
1. e thermostat sensor is
broken or disconnected.
1. Unplug the stove, remove the back panel of the stove and check that the thermostat
is plugged into the main circuit board. If this does not solve the problem contact
customer service for a replacement thermostat sensor.
2. Display shows
“ ”
2. e thermostat sensor is
broken.
2. Contact customer service for a replacement thermostat sensor.
3. Display shows
“ ”
3. Manual Reset overheat
protection has triggered.
3. Inspect the heater and check that the air inlets and outlets are not blocked as this
may cause overheating. Unplug the heater for 30 minutes and allow it to cool down.
Replug and operate, but monitor the heater for signs of overheating. If the problem
persist discontinue use of the heater and contact customer service.
4. No power, buttons
do not light up.
4. Power cord was not plugged
into the outlet.
4. Check that unit is plugged directly into a standard 120 volt outlet.
5. Stove does not
turn on manually.
5a. No incoming power from the
electrical wall socket or buttons.
5b. Improper operation.
5c. Defective button
5a. Check circuit breakers and move unit to another outlet.
5b. Manually press main power button from front of unit.
5c. Replace control panel circuit board.
6. Flames are not
moving.
6a. Defective ame generator drive
motor.
6b. Spinner detached from the
motor.
6a. Replace ame generator drive motor.
6b. Remove the back panel/ emberbed/ metal bracket and check to see if “spinner” is
correctly mounted to the motor.
7. Logs glow, but no
ame eect.
7. Flame eect turned o 7. Press ame button several times.
8. Heater does not
blow warm air.
8. ermostat setting is
preventing heater from
turning on.
8. Adjust the temperature settings to ensure that the thermostat is set
higher than the current room temperature.
9. Heater is not
turning on.
9a. Improper operation
9b. Defective heater/blower
assembly.
9a. Manually press main power button on front of unit.
9b. Replace heater/blower assembly.
10. Not producing
enough heat.
10a. Power strip/surge protector/
extension cord being used
10b. Location of unit.
10a. Plug unit directly into the wall.
10b. Make sure unit is located on an interior wall.
11. Unit blows cool or
cold air.
11. Defective heater blower
assembly.
11. Replace heater blower assembly.
12. Noise with
heater on.
12a. Dirty heater blower motor
12b. Defective heater/blower
assembly.
12a. Gently vacuum heater blower vents.
12b. Replace heater/blower assembly.
13. Noise with ames
on and heater o.
13a. Defective ame generator
drive motor.
13b. Dented back panel
13c. Warped spinner sha
13a. Replace ame generator drive motor.
13b. Refer to TSI customer service.
13c. Refer to TSI customer service.
14. Is it safe to place
unit on carpet?
14. Product Inquriy 14. It is safe to place unit on carpet but make sure any ammable
items are at least 3 feet away from front and sides of the unit.
15. How many square
feet will my unit
warm up?
15. Product Inquriy 15. Provides supplemental heat up to 1000 square feet
16. Flame eect works
but heater
function does not
and the ember bed
ashes when
the heater button
is pressed.
16. e heater is disabled. 16. With the power on press and hold the POWER button on the
control panel for 10 seconds. Once re-enabled the emberbed
lights will ash multiple times.
17. Remote control is
not working when
buttons are
pressed.
17a. No batteries or battery power.
17b. Poor signal
17c. Distance
17a. Change the remote batteries.
17b. Operate remote transmitter at a slow measured pace. Press the remote control
buttons with an even motion and gentle pressure.
Repeatedly pressing buttons in rapid succession may cause the transmitter to
malfunction.
17c. Operate the remote at a distance less than 20 feet from the front of the appliance;
point the remote at the control panel.
EXPLODED VIEW
FCC/IC INFORMATION
CARE AND MAINTENANCE
Warning: Changes or modifications to this unit not expressly approved by the party responsible for compliance could void user’s authority to operate the
equipment.
NOTE: This equipment has been tested and found to comply with the limits for Class B digital device, pursuant to part 15 of the FCC Rules. These limits are
designed to provide reasonable protection against harmful interference in a residential installation. This equipment generates, uses, and can radiate radio
frequency energy and, if not installed and used in accordance with the instructions, may cause harmful interference to radio communications.
However, there is no guarantee that interference will not occur in a particular installation. if this equipment does cause harmful interference to radio or television
reception, which can be determined by turning the equipment off and on, the user is encouraged to try to correct the interference by one or more of the
following measures.
•Reorientorrelocatethereceivingantenna.
•Increasetheseparationbetweentheequipmentandthereceiver.
•Connecttheequipmentintoanoutletonacircuitdifferentfromthattowhichthereceiverisconnected.
•Consultthedealeroranexperiencedradio/TVtechnicianforhelp.
This device complies with Part 15 of the FCC Rules. Operation is subject to the following two conditions:
(1) This device may not cause harmful interference, and
(2) this device must accept any interference received, including interference that may cause undesired operation.
This Class B digital apparatus complies with Canadian ICES-003.
•Cleanthetrimusingasoftcloth,slightlydampenedwithcitrusoilbasedproductandbuffwithacleansoftcloth.
•DONOTusebrasspolishorhouseholdcleanersastheseproductswilldamagethemetaltrim.Citrusoilbasedproductscanbeobtainedatsupermarketsor
hardware stores.
•WARNING:Electricaloutletwiringmustcomplywithlocalbuildingcodesandotherapplicableregulationstoreducetheriskofre,electricalshockandinjury
to persons.
•Warning:Disconnectpowerbeforeattemptinganymaintenanceorcleaningtoreducetheriskofre,electricalshockorpersonalinjury.
A653
Part Part Name Part Number
1 Door Pull Y18-S259-RH
2 Control Panel Circuit Board Y18-S259-P32
3 Stove legs SL-5018-01/SL-5018-02/SL-5018-03/SL-5018-04/SL-5018-05/SL-5018-07
4 Main Circuit Board Y18-S259-P15
5 Heater/Blower Assembly Y18-S259-P01
6 Flame Generator Drive Motor Y18-S259-P10
7 Thermostat Sensor NTC-5010
8 Remote control P171