Loading ...
Loading ...
8
6. DESCRIPTION
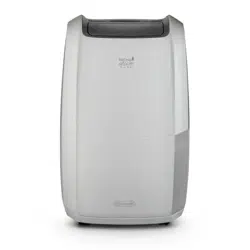
6.1 Description of appliance (A)
A1. Air outlet louver
A2. Lifting handles
A3. Room sensor air intake
A4. Castors
A5. Water level viewing window
A6. Condensate collection tank
A7. HEPA-type (E12)* lter
A8. Silver ion dust lter
A9. Filter housing cover
A10. Continuous drain cap
A11. Condensate drain hose
6.2 Description of control panel (B)
B1. ON/STAND-BY button
B2. Ventilation button
B3. Dehumidifying button
B4. Wi-Fi button
B5. Swing button
B6. Dry button
B7. Timer button
6.3 Description of display(C)
C1. Full tank alarm
C2. HEPA-type (E12)* lter present symbol
C3. Ventilation mode active
C4. % Relative Humidity
C5. Wi-Fi symbol
C6. App control symbol
C7. Dry mode active
C8. Hours
C9. Dehumidifying mode active
C10. Low temperature alarm
C11. Remote timer symbol
C12. Local timer symbol
7. DOWNLOAD THE APP!
This appliance can also be used with the "De'Longhi Comfort
APP" that is available on Google Play or can be downloaded
from the App Store®.
To gain access to all functions, a Wi-Fi local network (Home
WLAN) with Internet access is required. Moreover, check that
there are no impediments to Internet access: Firewall, Proxy,
authentications, etc.
8. DRAINING THE CONDENSATE WATER
The condensate can be drained in 2 ways:
8.1 Draining into the tank
The condensate is drained directly into the tank (A6).
When the tank is full, the appliance stops and the display (C)
shows the tank alarm (C1). Proceed as follows:
1. Remove the tank (g. 1) and empty it into a sink or bathtub.
2. Replace the tank in its housing, making sure the handle is
properly positioned (g. 2).
8.2 Continuous external draining
If the appliance is used for long periods of time without the
possibility to regularly empty the tank, the continuous drain
function should be used.
Proceed as follows:
1. Remove the continuous drain cap (A10) from the spout,
turning it in an anti-clockwise direction (g. 3) (Watch out
for any leaking water!)
2. Attach the condensate drain hose (A11) to the spout (g.
4).
3) Make sure the hose is positioned below the spout (g. 5) or
the water will ow back into the tank of the appliance.
Also make sure there are no kinks in the hose.
9. MODE SELECTION
Connect the appliance to the mains supply. Upon rst use, the
symbol will appear on the display and at the same time,
an acoustic signal will sound to indicate that the appliance is in
stand-by mode.
1. To turn the appliance on, touch the button (B1).
The appliance will operate in the previously set mode and
the air outlet louver (A1) will open in a preset position (g.
6).
2. If there is a blackout, when the power is restored the
appliance will resume operation in the previously set
operating mode.
Please note:
If the
symbol (C1) appears on the display, the tank (A6)
needs to be emptied or properly positioned (see paragraph “3.1
Draining into the tank”).
Loading ...
Loading ...
Loading ...