Write the model and serial
numbers here:
Model # _________________
Serial # _________________
You can find them on the label
on the front of the frame.
GE is a trademark of the General Electric Company. Manufactured under trademark license.
OWNER’S MANUAL
TRASH
COMPACTORS
49-55111-1 09-19 GEA
ENGLISH/FRANÇAIS
UCG1500 Series
UCG1600 Series
SAFETY INFORMATION .........3
USING THE TRASH COMPACTOR
Getting Started ........................5
CARE AND CLEANING ...........8
TROUBLESHOOTING TIPS ......10
LIMITED WARRANTY ........... 11
CONSUMER SUPPORT ..........12

2 49-55111-1
THANK YOU FOR MAKING GE APPLIANCES A PART OF YOUR HOME.
Whether you grew up with GE Appliances, or this is your first, we’re happy to have you in the family.
We take pride in the craftsmanship, innovation and design that goes into every GE Appliances
product, and we think you will too. Among other things, registration of your appliance ensures that we
can deliver important product information and warranty details when you need them.
Register your GE appliance now online. Helpful websites and phone numbers are available in the
Consumer Support section of this Owner’s Manual. You may also mail in the pre-printed registration
card included in the packing material.
49-55111-1 3
READ AND SAVE THESE INSTRUCTIONS
IMPORTANT SAFETY INFORMATION
READ ALL INSTRUCTIONS BEFORE USING THE APPLIANCE
SAFETY INFORMATION
WARNING
For your safety, the information in this manual must be followed to minimize
the risk of fire, explosion, electric shock, and to prevent property damage, personal injury,
or death.
WARNING
WHEN USING ELECTRICAL APPLIANCES, BASIC SAFETY PRECAUTIONS
SHOULD BE FOLLOWED, INCLUDING THE FOLLOWING:
Ŷ 7KLVFRPSDFWRULVIRUKRXVHKROGXVHRQO\8VHWKLV
appliance only for its intended purpose as described
in this Owner’s Manual. Do not use other than
manufacturer’s attachments.
Ŷ &ORVHVXSHUYLVLRQLVQHFHVVDU\ZKHQDQ\DSSOLDQFH
is operated near children. Do not allow the
compactor to be used as a toy, or to run unattended
at any time. Lock key switch when not in use and
store key out of reach of children.
Ŷ CHILD LOCK-OUT INSTRUCTIONS: 7XUQWKHNQRE
to OFF and remove it when not compacting trash.
7KLVZLOOKHOSSUHYHQWDQ\RQHIURPWDPSHULQJZLWK
the compactor or children from operating it.
Ŷ 'RQRWSXVKWUDVKLQWRWKHGUDZHUZLWKKDQGVRUIHHW
7UDVKPLJKWFRQWDLQEURNHQJODVVVKDUSSLHFHVRI
metal, or other sharp objects that might cause injury.
Ŷ :KHQUHPRYLQJRUFDUU\LQJWKHWUDVKEDJNHHSWKH
bag away from your body. Sharp objects may have
pierced it.
Ŷ %HFDUHIXOZKHQFOHDQLQJWKHLQVLGHRIWKHFDELQHWRU
trash drawer. Glass fragments may be stuck to the
ram, imbedded in the drawer surface or lying in the
bottom of the cabinet.
Ŷ 'RQRWLQVWDOORUVWRUHFRPSDFWRUZKHUHLWZLOOEH
exposed to outside conditions.
Ŷ 0DNHVXUHWKHFRPSDFWRULVSURSHUO\LQVWDOOHGDQG
leveled on a floor that can support its weight.
Ŷ 'RQRWWRXFKPRYLQJSDUWV
Ŷ 'RQRWFRPSDFWIRRGZDVWHVXFKDVUDZPHDWDQG
fish, rinds, personal hygiene items and disposable
GLDSHUV7KHVHLWHPVFUHDWHYHU\VWURQJRGRUVDQG
should not go into the compactor.
Ŷ 'RQRWXVHDVDIUHHVWDQGLQJXQLW8VHRQO\DVD
built-in unit.
PRECAUTIONS AGAINST UNREASONABLE USE OF
YOUR COMPACTOR:
Ŷ 1HYHUFRPSDFWVKRWJXQVKHOOVFDUWULGJHVIRU
firearms, fireworks, etc., which are highly explosive.
Ŷ 1HYHUFRPSDFWIODPPDEOHPDWHULDOVVXFKDVSDLQW
oil- or gasoline-saturated rags, engine starting
fluid cans, paint thinner cans, etc.—spontaneous
combustion or explosive vapor concentrations could
occur.
Ŷ 1HYHUFRPSDFWFRQWDLQHUVRIWR[LFFKHPLFDOVVXFK
as strong insecticides or other poisonous materials—
compaction could release hazardous fumes.
Ŷ 1HYHUFRPSDFWDHURVROFDQVFRQWDLQLQJH[SORVLYHRU
highly toxic chemicals. (If you are sure the aerosol
cans contain non-hazardous materials such as
shaving cream, cheese spread and whipped cream,
they may be compacted.)
Ŷ 'RQRWFRPSDFWOLWFLJDUHWWHVFLJDUVRURWKHUKRWRU
burning items.
Ŷ 'RQRWVWRUHRUXVHJDVROLQHRURWKHUIODPPDEOH
vapors and liquids in the vicinity of this or any other
appliance.
Ŷ 'RQRWRYHUORDG\RXUDSSOLDQFH
Ŷ +DQGOHDORDGHGWUDVKEDJZLWKFDUH6KDUSREMHFWV
can pierce the bag and cause injury. Do not overload
trash bag with heavy material such as glass.
4 49-55111-1
SAFETY INFORMATION
READ AND SAVE THESE INSTRUCTIONS
IMPORTANT SAFETY INFORMATION
READ ALL INSTRUCTIONS BEFORE USING THE APPLIANCE
WARNING
PROPER INSTALLATION AND MAINTENANCE
7KLVFRPSDFWRUPXVWEHSURSHUO\LQVWDOOHGDQGORFDWHGLQDFFRUGDQFHZLWKWKH,QVWDOODWLRQ,QVWUXFWLRQVEHIRUHLWLV
used. If you did not receive an Installation Instructions with your compactor, you can receive one by visiting our
Website at GEAppliances.com. In Canada, visit www.GEAppliances.ca.
WARNING
WHEN USING ELECTRICAL APPLIANCES, BASIC SAFETY PRECAUTIONS
SHOULD BE FOLLOWED, INCLUDING THE FOLLOWING:
Ŷ
7RSUHYHQWKD]DUGRIHOHFWULFDOVKRFNWKLVFRPSDFWRU
must be properly installed and grounded in
accordance with the Installation Instructions before it
is used.
Ŷ
Do not operate with a damaged cord set, plug, motor,
or after damage in any manner. Have the appliance
examined, repaired, or adjusted by an authorized
service technician.
Ŷ
Do not take apart this appliance. Incorrect
reassembly can cause electric shock when
subsequently used.
Ŷ
8QSOXJWKHFRPSDFWRUEHIRUHPDNLQJDQ\UHSDLUV
NOTE: We strongly recommend that any servicing be
performed by a qualified person.
Ŷ
Do not use an adapter plug or an extension cord with
this appliance.
Ŷ
)ROORZWKHODWHVWHGLWLRQRI1DWLRQDO(OHFWULF&RGHV
DQGSUHYDLOLQJORFDOFRGHVDQGRUGLQDQFHV7KLV
appliance must have a fused electrical supply of
120V, 60Hz, AC only, properly grounded 15 or 20
amp circuit.
Ŷ
If the electric supply provided does not meet the
above requirements, call a licensed electrician.
Ŷ
We recommend that a separate circuit serving only
this appliance be provided.
Ŷ
Do not, under any circumstances, cut or remove the
third grounding prong from the power cord.
Ŷ
7KLVDSSOLDQFHPXVWEHJURXQGHG,QWKHHYHQWRI
a malfunction or breakdown, grounding will reduce
the risk of electric shock by providing a path of least
resistance for electric current.
Ŷ
7KLVDSSOLDQFHLVHTXLSSHGZLWKDFRUGKDYLQJDQ
equipment grounding conductor and a grounding
SOXJ7KHSOXJPXVWEHSOXJJHGLQWRDQDSSURSULDWH
outlet that is properly installed and grounded in
accordance with local codes and ordinances.
Ŷ
Improper connection of the equipment grounding
conductor can result in a risk of electric shock.
Check with a qualified electrician if you are in doubt
as to whether the appliance is properly grounded.
Ŷ
Do not modify the plug with this appliance. If it
will not fit the outlet installed, have a proper outlet
installed by a qualified electrician.
49-55111-1 5
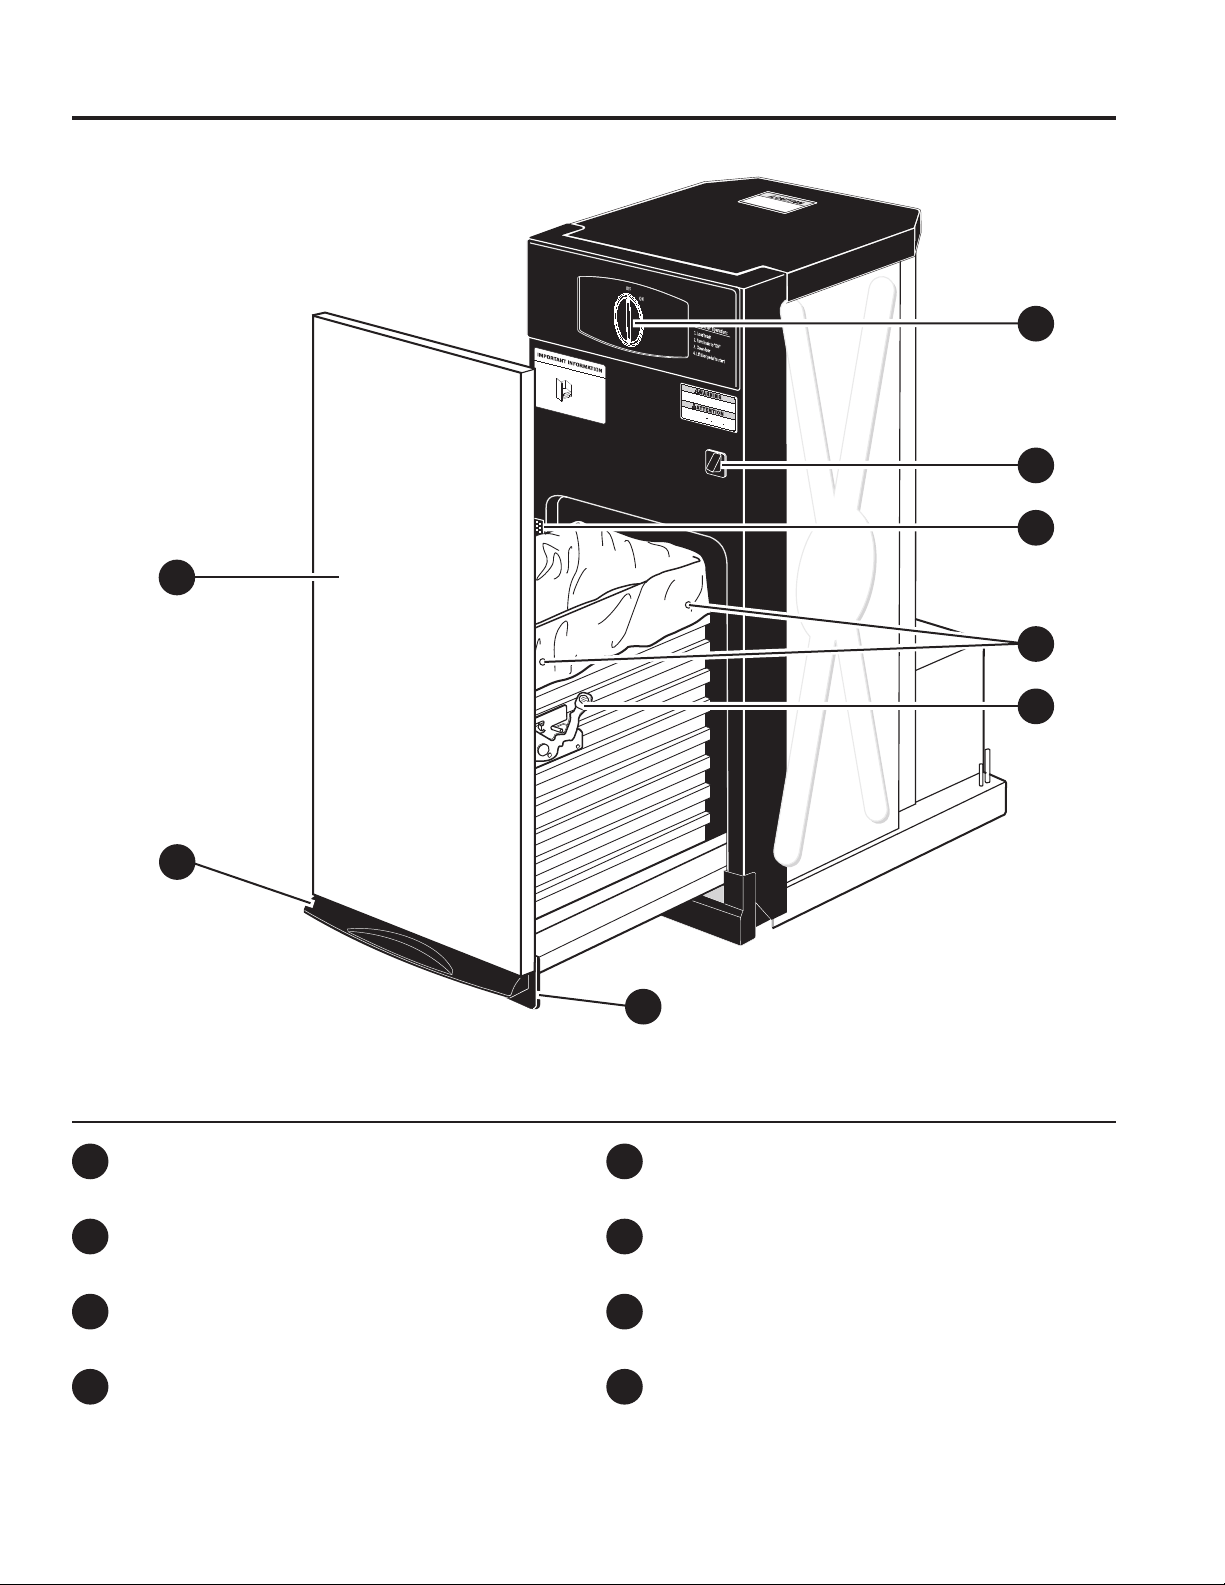
USING THE COMPACTOR
Getting started
%
A
C
D
E
F
H
G
Features
'2253$1(/
)2273('$/'5$:(523(1(5$1'
&203$&725$&7,9$7,21
72(.,&.
212)).12%
'5$:(56$)(7<6:,7&+
02'(/$1'6(5,$/180%(5/$%(/
%$*5(7$,1(5%877216
029($%/(6,'('225/$7&+
A
%
C
D
E
F
G
H
Features and appearance will vary throughout this manual
6 49-55111-1
Getting started
USING THE COMPACTOR
What It Does and How It Works
ON/OFF Knob
7KHUHPRYDEOHNQRELVSURYLGHGIRU\RXUSURWHFWLRQDV
a safety measure. When the knob switch is in the OFF
position, the compactor will not operate.
Child Lockout Instructions:
Lock the compactor when it is not in use, by removing
WKHNQRE7KLVZLOONHHSFKLOGUHQIURPRSHUDWLQJWKH
compactor and prevent anyone from tampering with it.
Your compactor reduces household trash to as little as one-fourth of its original volume.
It compacts most refuse, including paper, cans, bottles, jars, plastic containers, wrappings, sweepings and some
food wastes.
Drop trash into the disposable bag (designed for compactor use) that lines the compactor trash drawer and close the
drawer. When you start the compactor, an electrically-operated ram moves down into the drawer, compacts trash,
moves back up again—and the compactor shuts off automatically.
NOTE:7KHWUDVKGUDZHUPXVWEHDWOHDVWIXOOEHIRUH\RXZLOOQRWLFHFRPSDFWLRQEHFDXVHWKHUDPGRHVQRWWUDYHODOOWKH
ZD\GRZQLQWRWKHGUDZHU%\DGGLQJWUDVKFRPSDFWLRQLVWUDQVIHUUHGWRWKHLWHPVEHORZXQWLODOOWUDVKLVFRPSDFWHG
Damage may occur if door is opened during cycle.
Trash Bag Installation
Before installing a new bag, be sure that:
1
7KHVLGHGRRUODWFKLVVHFXUHO\ORFNHG,IWKHVLGH
door is open, push to close it.
2
7KHFRQWDLQHULVFOHDQDQGIUHHRIVKDUSGHEULVWKDWPD\
puncture the bag.
Reinforced plastic bags came with your compactor and are
ready to be installed.
You must use the specially designed heavy-duty trash
bags included with your compactor.7KHVHEDJVDUH
available from
your dealer or Factory Service Center. Ask for
catalog number WC60X5017.
To order bags, call toll-free:
US: 877.959.8688 or GEApplianceparts.com
Canada: 800.661.1616 or www.GEAppliances.ca
To install a new bag:
1
Place the bag into the drawer. Open the bag and pull
the top edges over the drawer top.
2
Lock the bag in place by pulling
the four prepunched holes over
the bag retainer buttons. Holes
will expand over the buttons
without harming the bag.
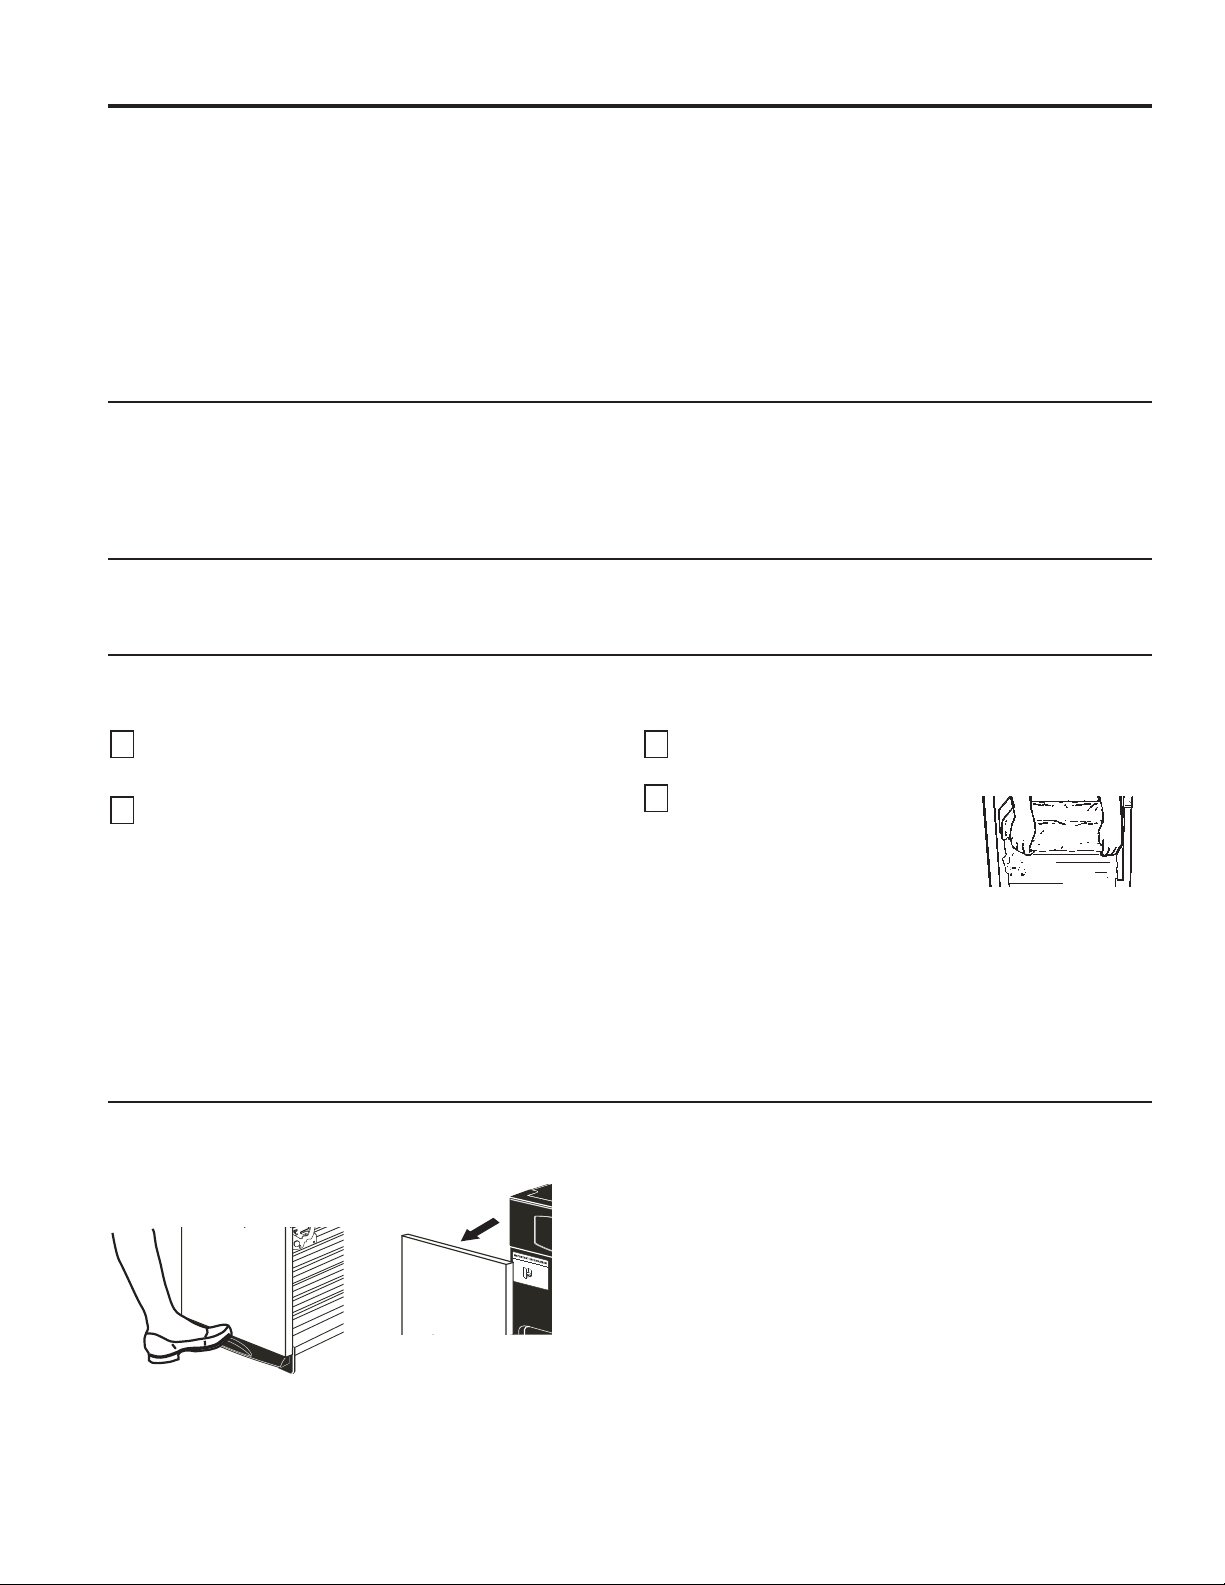
Loading
Press the foot pedal and pull the drawer out. Remember:
Ŷ
7RKHOSNHHSWKHUDPFOHDQZKHQFRPSDFWLQJPHVV\
food waste, place a couple of folded sheets of
newspaper on top of the load to be compacted.
Ŷ
Items too bulky to go into the drawer can be folded to
fit. If it cannot be folded to fit into the drawer, do not
attempt to force it.
Ŷ
Folded newspaper is also helpful when compacting a
large glass bottle, or several bottles or jars, or any other
items that might shatter.
Ŷ
Although it is not necessary to compact until the drawer
is full or nearly full, we suggest that, for maximum
compaction, you start the compactor each time a
significant amount of trash is added.
Drawer Safety Switch
7KHFRPSDFWRUKDVWZRVDIHW\VZLWFKHVWRHQVXUHWKDWWKHGUDZHULVLQLWVIXOO\FORVHGSRVLWLRQIRURSHUDWLRQ7KHFRPSDFWRU
will not cycle without the drawer being fully closed.
49-55111-1 7
USING THE COMPACTOR
Getting started
Compacting
To start the compactor:
1
7XUQWKHNQREWRON.
2
Make sure the drawer is fully closed.
3
Lift the foot pedal up until you hear the cycle start.
Release the foot pedal and the compactor will complete
the cycle automatically.
7KHUDPWUDYHOVGRZQZDUGLQWRWKHGUDZHUFRPSDFWLQJ
the trash. At the bottom of the stroke, the ram
automatically reverses direction, retracts out of the
drawer, returns to its starting position, and the compactor
shuts off automatically.
7KHF\FOHWDNHVOHVVWKDQVHFRQGV$VWKHWUDVK
drawer fills with trash, cycle time gets progressively
shorter.
NOTES:
Ŷ<RXZLOOQRWVHHFRPSDFWLQJRIWUDVKWKHILUVW
few times you load.7KHFRPSDFWRUGUDZHUVKRXOG
EHDERXWIXOOEHIRUHWKHFRPSDFWRUFDQEHJLQWR
compress the load.
Ŷ
Glass bottles can make a loud noise when they
break during compaction.7KLVLVQRUPDO$OVR
bottles in the trash drawer will not always break during
WKHILUVWF\FOH%UHDNLQJJODVVDQGDVVRFLDWHGQRLVH
may occur several cycles later, depending on the type
and volume of the trash.
Ŷ
When bottles and cans are compacted, small tears
in the bag may occur.7KLVLVQRUPDODQGLQQRZD\
DIIHFWVWKHSHUIRUPDQFHRIWKHFRPSDFWRU.HHSWKH
bag away from your body to prevent injury from sharp
objects that may have pierced the bag.
IMPORTANT:
Ŷ
Do not apply too much force when turning the
knob.7KHNQREVKRXOGDOZD\VURWDWHHDVLO\)RUFLQJ
may break the knob and damage the switch.
Ŷ
When emptying waste baskets into the trash
drawer, some items may spill into the compactor
behind the drawer. Items behind the drawer could
prevent it from closing completely and prevent the
FRPSDFWRUIURPRSHUDWLQJ7RUHPRYHVXFKLWHPVIURP
behind the drawer, open the drawer and remove it to
clean them out. See the Care and Cleaning section.
To stop the compactor:
7KHFRPSDFWRUPD\EHVWRSSHGDWDQ\WLPH
1
Attempting to open the drawer while the ram is moving
ZLOOVWRSWKHUDP7KHVDIHW\VZLWFKZLOODFWLYDWH
2
Close the drawer completely and the ram will travel
EDFNWRWKH83SRVLWLRQ
3
Open the drawer fully and turn the knob to OFF.
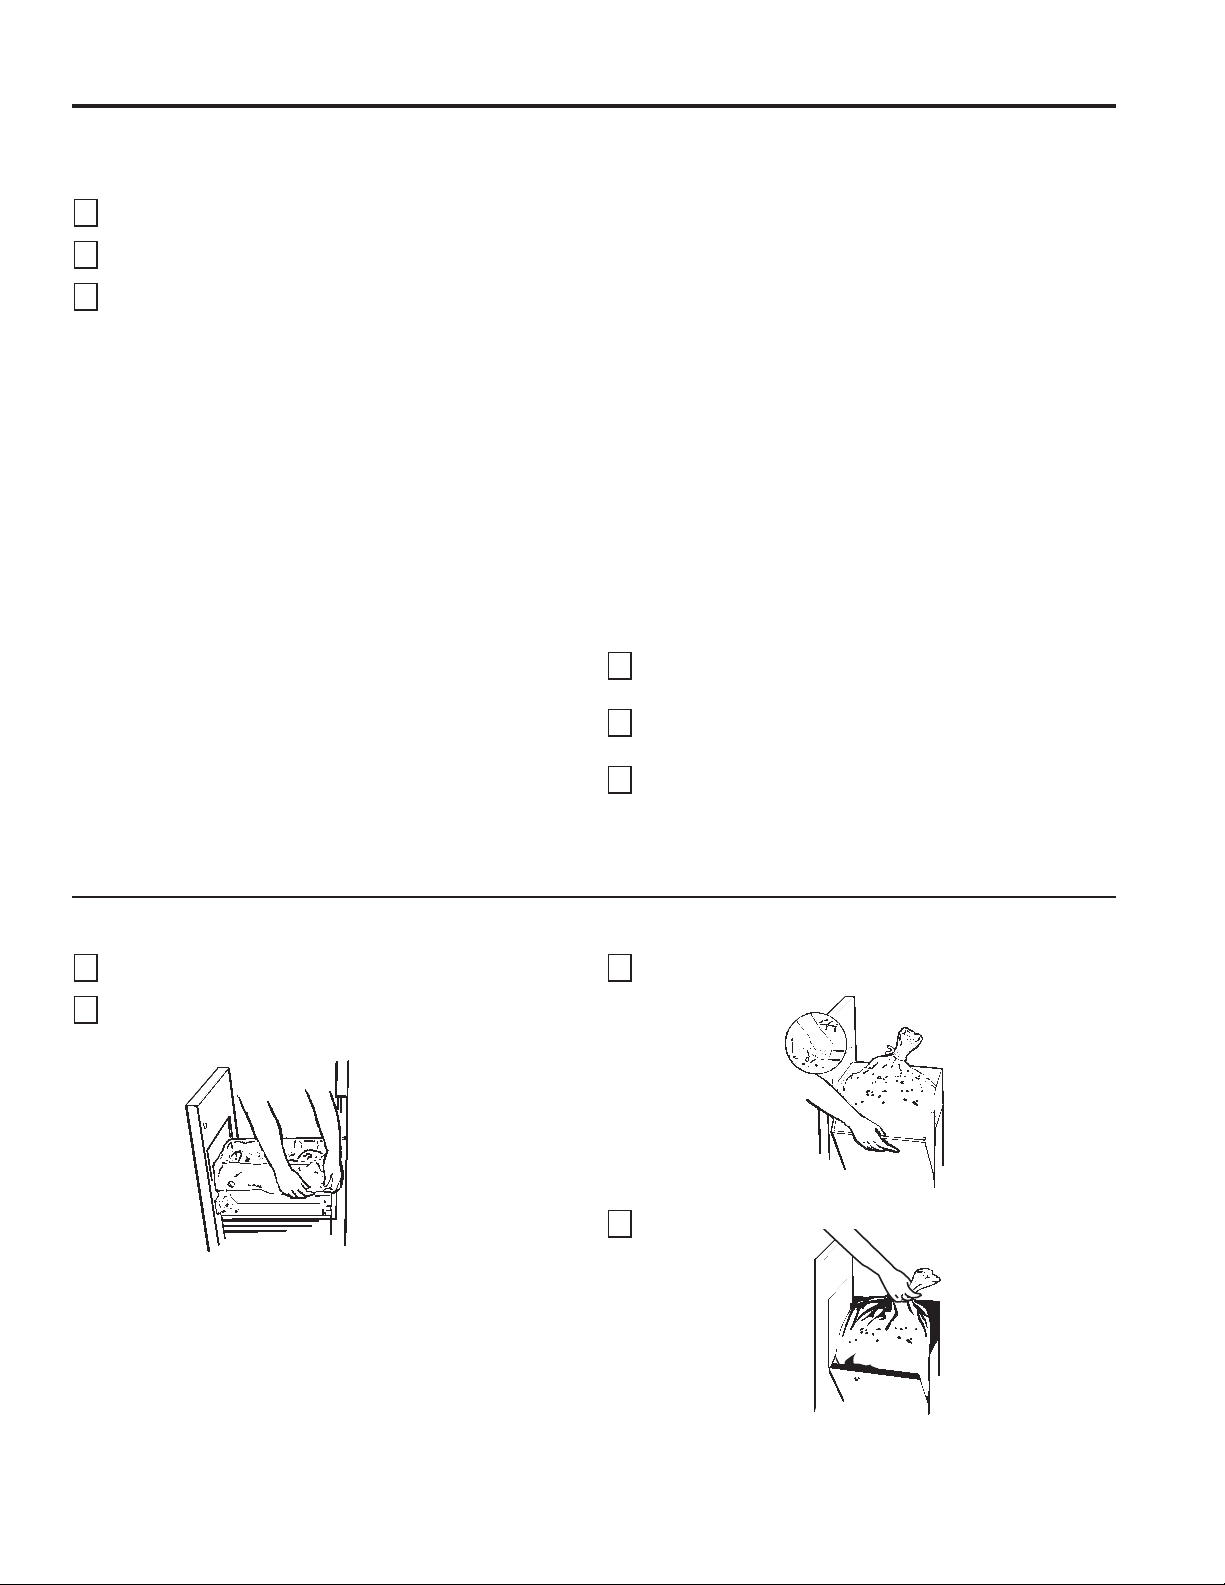
Removing a Full Trash Bag
1
Open the drawer by depressing the foot pedal.
2
Remove the top of the bag from the bag retainer
buttons. Pull up all four bag cuffs.
3
Push the side door latch down and tilt the drawer
side open.
4
Lift the bag out.
8 49-55111-1
Care and cleaning
CARE AND CLEANING
To clean the outside:
Wipe with a clean damp cloth.
Painted panels:
$SSO\DFRDWRINLWFKHQDSSOLDQFHZD[ZKHQWKH
compactor is new, and then several times a year.
Stainless steel panels:
Stainless steel panels can be cleaned with Cerama
%U\WHRUDVLPLODUSURGXFWXVLQJDFOHDQVRIWFORWK
&HUDPD%U\WHLVDYDLODEOHIURP*($SSOLDQFHVE\FDOOLQJ
877.959.868886RU800.661.1616 (Canada).
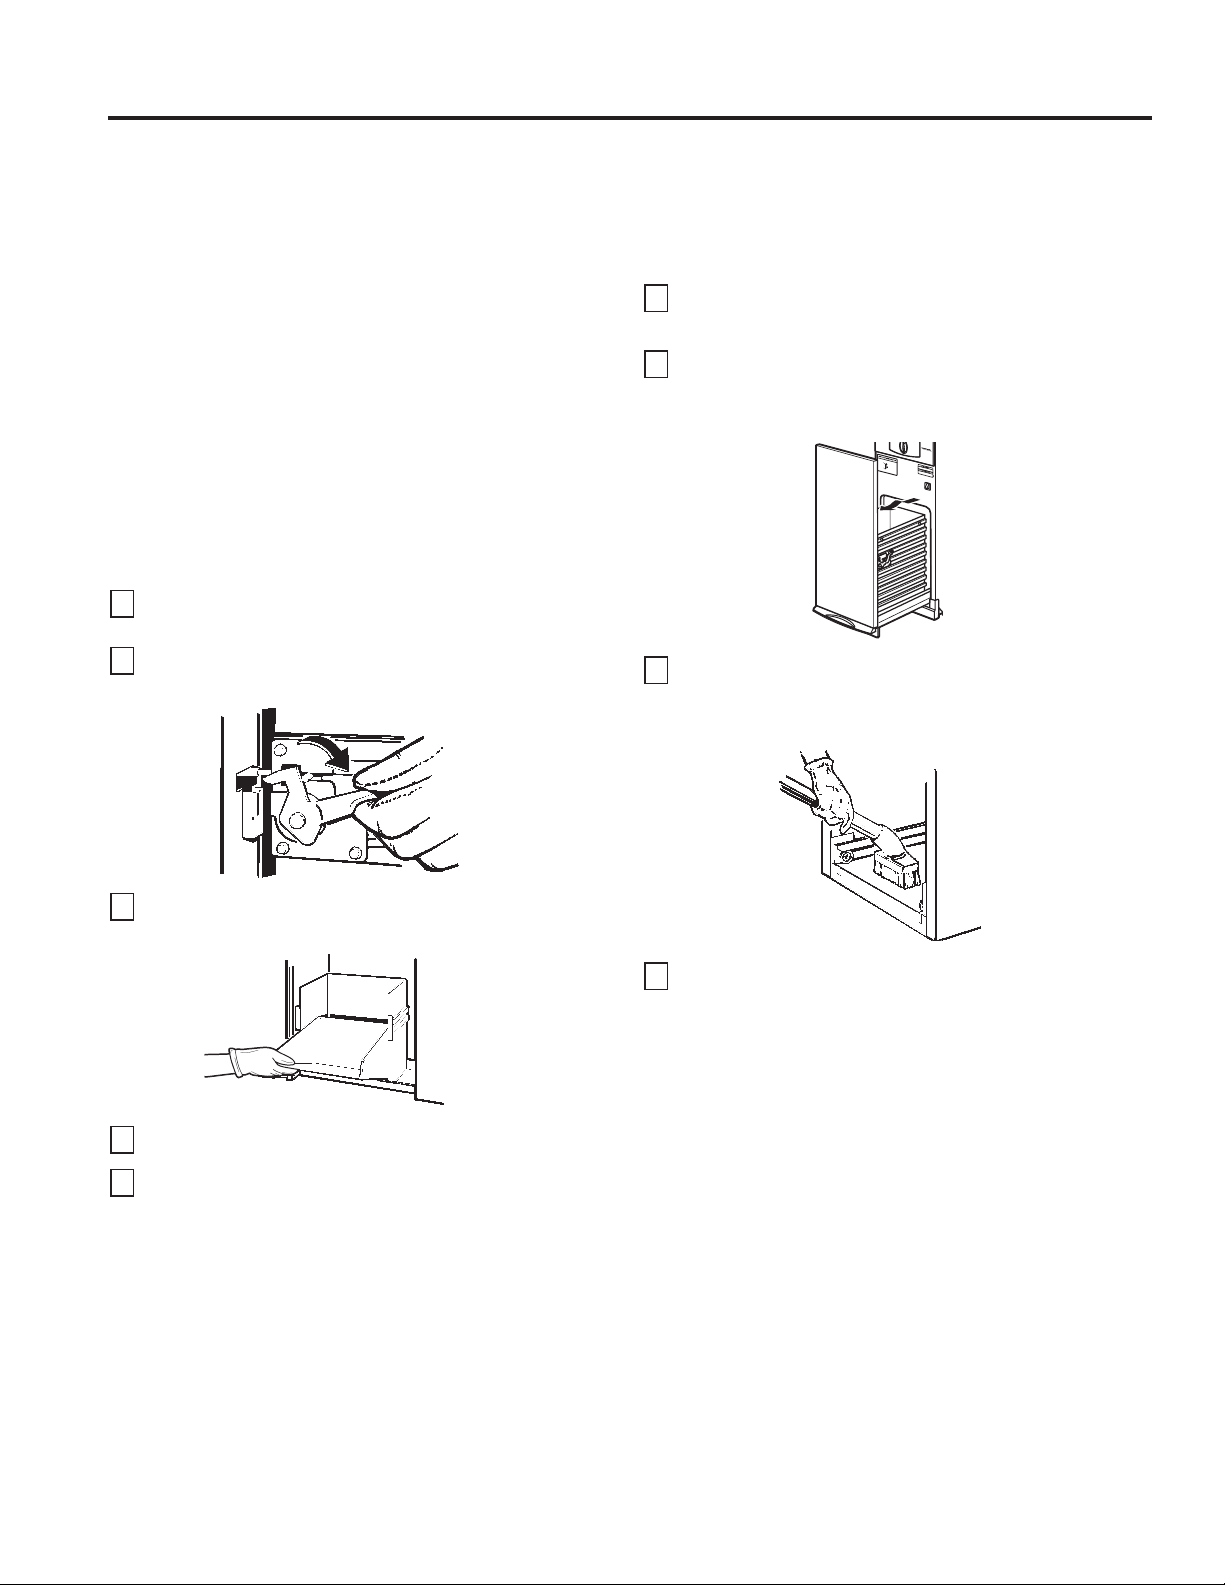
To clean the drawer interior:
1
Remove the bag. See the Removing a Full Trash Bag
section.
2
:HDUSURWHFWLYHJORYHV7KHUHPD\EHELWVRIJODVVLQ
the drawer. Press the side door latch down.
3
Hold the side door latch down and tilt the side of the
drawer until the latch clears the drawer front.
4
Wipe with a damp cloth.
5
Press the side door latch down while pressing the side
to the upright position. Lock the side door latch.
To clean the cabinet interior:
1
3XOOWKHGUDZHURXWXQWLOLWVWRSV1RWHWKHWUDFNVLQ
which the drawer rollers move.
2
Wear protective gloves. Lift the front to clear the drawer
stops. Grab the drawer on both sides. Pull it out the rest
of the way and set it aside.
3
Vacuum inside of the cabinet. Liquid spills or wet trash
should be cleaned up by hand, or use a vacuum
designed to pick up liquid.
4
Wash, rinse and dry the inside.
Cleaning the Unit
$VLVWUXHRIPRVWDSSOLDQFHVSURSHUFDUHLVQHHGHGWRJLYH\RXFRQWLQXHGVDWLVIDFWLRQ%HIRUHFOHDQLQJWKHFRPSDFWRUWXUQ
the knob to the OFF position and remove it. If you will be away for more than a couple of days, remove the compactor bag.
Lock the compactor by removing the knob and store it in a safe place.

49-55111-1 9
Notes
NOTES
10 49-55111-1
TROUBLESHOOTING TIPS
Troubleshooting Tips... %HIRUH\RXFDOOIRUVHUYLFH
Problem Possible Causes What To Do
Compactor won’t
operate
Compactor is unplugged Make sure the cord is plugged securely into a working
outlet.
Circuit breaker/fuse is
tripped/blown
&KHFNKRXVHFLUFXLWEUHDNHUVIXVHV5HSODFHIXVHVRUUHVHW
breaker.
Knob switch may not be in
the ON position
Make sure the switch is in the ON position.
Foot pedal may not be lifted
up long enough to start
cycle
Lift foot pedal up momentarily until compaction cycle starts.
Drawer may not be closed Check to make sure the drawer is firmly closed.
Compactor has an
automatic thermal motor
reset
If you have just compacted repeatedly, this protector may
have opened the motor circuit. Wait a few minutes and
the motor reset will reclose automatically.
Drawer is hard to
close
Trash may have fallen
behind the drawer
Remove any trash.
Drawer will not
open
The ram is not all the way
up
Lift up on the foot pedal and release to allow ram to
complete a cycle.
Little or no apparent
compaction
Drawer is not full enough 7KHGUDZHUPXVWEHDWOHDVWIXOORIWUDVKEHIRUH\RXZLOO
VHHDQ\DPRXQWRIFRPSDFWLQJ7KHUDPGRHVQRWWUDYHODOO
WKHZD\WRWKHERWWRP7UDVKLQWKHERWWRPRIWKHGUDZHUZLOO
be crushed during later cycles.
Trash is stuck between ram
and basket
Remove any trash.
49-55111-1 11
LIMITED WARRANTY
GE Appliances Compactor Limited Warranty
Staple your receipt here. Proof of the original purchase
date is needed to obtain service under the warranty.
GEAppliances.com
All warranty service is provided by our Factory Service Centers, or an authorized Customer Care
WHFKQLFLDQ7RVFKHGXOH
service online, visit us at GEAppliances.com/service, or call GE Appliances at 800.GE.CARES (800.432.2737). Please
have your serial number and your model number available when calling for service.
6HUYLFLQJ\RXUDSSOLDQFHPD\UHTXLUHWKHXVHRIWKHRQERDUGGDWDSRUWIRUGLDJQRVWLFV7KLVJLYHVD*($SSOLDQFHVIDFWRU\
service technician the ability to quickly diagnose any issues with your appliance and helps GE Appliances improve its
products by providing GE Appliances with information on your appliance. If you do not want your appliance data to be
sent to GE Appliances, please advise your technician not to submit the data to GE Appliances at the time of service.
Extended Warranties: Purchase a GE Appliances extended warranty and learn about special discounts that are
available while your warranty is still in effect. You can purchase it online anytime at
GEAppliances.com/extended-warranty
or call 800.626.2224 during normal business hours. GE Appliances Service will still be there after your warranty expires.
In the United States:
7KLVOLPLWHGZDUUDQW\LVH[WHQGHGWRWKHRULJLQDOSXUFKDVHUDQGDQ\VXFFHHGLQJRZQHUIRUSURGXFWVSXUFKDVHGIRUKRPHXVH
ZLWKLQWKH86$,IWKHSURGXFWLVORFDWHGLQDQDUHDZKHUHVHUYLFHE\D*($SSOLDQFHV$XWKRUL]HG6HUYLFHULVQRWDYDLODEOH
you may be responsible for a trip charge or you may be required to bring the product to an Authorized GE Appliances
Service location for service. In Alaska, the limited warranty excludes the cost of shipping or service calls to your home.
6RPHVWDWHVGRQRWDOORZWKHH[FOXVLRQRUOLPLWDWLRQRILQFLGHQWDORUFRQVHTXHQWLDOGDPDJHV7KLVOLPLWHGZDUUDQW\
JLYHV\RXVSHFLILFOHJDOULJKWVDQG\RXPD\DOVRKDYHRWKHUULJKWVZKLFKYDU\IURPVWDWHWRVWDWH7RNQRZZKDW\RXU
legal rights are, consult your local or state consumer affairs office or your state’s Attorney General.
Warrantor: GE Appliances, a Haier Company
Louisville, KY 40225
EXCLUSION OF IMPLIED WARRANTIES
Your sole and exclusive remedy is product repair as provided in this Limited Warranty. Any implied warranties,
including the implied warranties of merchantability or fitness for a particular purpose, are limited to one year or the
shortest period allowed by law.
In Canada:
7KLVOLPLWHGZDUUDQW\LVH[WHQGHGWRWKHRULJLQDOSXUFKDVHUDQGDQ\VXFFHHGLQJRZQHUIRUSURGXFWVSXUFKDVHGLQ&DQDGD
for home use within Canada. If the product is located in an area where service by a GE Appliances Authorized Servicer is
not available, you may be responsible for a trip charge or you may be required to bring the product to an Authorized
GE Appliances Service location.
6RPHSURYLQFHVGRQRWDOORZWKHH[FOXVLRQRUOLPLWDWLRQRILQFLGHQWDORUFRQVHTXHQWLDOGDPDJHV7KLVOLPLWHGZDUUDQW\
JLYHV\RXVSHFLILFOHJDOULJKWVDQG\RXPD\DOVRKDYHRWKHUULJKWVZKLFKYDU\IURPSURYLQFHWRSURYLQFH7RNQRZZKDW
your legal rights are, consult your local or provincial consumer affairs office.
Warrantor: MC Commercial Inc., Burlington, ON, L7R 5B6
For the period of: We will replace:
One year
From the date of the
original purchase
Any part of the com[actor which fails due to a defect in materials or workmanship.
During this limited one-year warranty, we will also provide, free of charge, all labor
and related service to replace the defective part.
What is not covered:
Ŷ
Service trips to your home to teach you how to use
the product.
Ŷ
Improper installation, delivery or maintenance.
Ŷ
Failure of the product if it is abused, misused, or used for
other than the intended purpose or used commercially.
Ŷ
Replacement of house fuses or resetting of circuit
breakers.
Ŷ
Products which are not defective or broken, or which
are working as described in the Owner’s Manual.
Ŷ
Damage to the product caused by accident, fire,
floods or acts of God.
Ŷ
Incidental or consequential damage caused by
possible defects with this appliance.
Ŷ
Defects or damage due to operation in freezing
temperatures.
Ŷ
Damage caused after delivery.
Ŷ
Product not accessible to provide required service.

12 49-55111-1
CONSUMER SUPPORT
Consumer Support
GE Appliances Website
+DYHDTXHVWLRQRUQHHGDVVLVWDQFHZLWK\RXUDSSOLDQFH"7U\WKH*($SSOLDQFHV:HEVLWHKRXUVDGD\DQ\GD\
of the year! You can also shop for more great GE Appliances products and take advantage of all our on-line support
VHUYLFHVGHVLJQHGIRU\RXUFRQYHQLHQFH,QWKH86GEAppliances.com.
,Q&DQDGDGEAppliances.ca.
Register Your Appliance
5HJLVWHU\RXUQHZDSSOLDQFHRQOLQHDW\RXUFRQYHQLHQFH7LPHO\SURGXFWUHJLVWUDWLRQZLOODOORZIRUHQKDQFHG
communication and prompt service under the terms of your warranty, should the need arise. You may also mail in
WKHSUHSULQWHGUHJLVWUDWLRQFDUGLQFOXGHGLQWKHSDFNLQJPDWHULDO,QWKH86GEAppliances.com/register.
,Q&DQDGDProdsupport.mabe.ca/crm/Products/ProductRegistration.aspx.
Schedule Service
Expert GE Appliances repair service is only one step away from your door. Get on-line and schedule your service at
\RXUFRQYHQLHQFHDQ\GD\RIWKH\HDU,QWKH86GEAppliances.com/service or call 800.432.2737 during normal
business hours.
,Q&DQDGDGEAppliances.ca/en/support/service-request or call 800.561.3344.
Extended Warranties
Purchase a GE Appliances extended warranty and learn about special discounts that are available while your
warranty is still in effect. You can purchase it on-line anytime. GE Appliances Services will still be there after your
ZDUUDQW\H[SLUHV,QWKH86GEAppliances.com/extended-warranty or call 800.626.2224 during normal business
hours.
,Q&DQDGDGEAppliances.ca/en/support/purchase-extended-warranty or call 866.277.9842.
Parts and Accessories
Individuals qualified to service their own appliances can have parts or accessories sent directly to their homes
(VISA, MasterCard and Discover cards are accepted). Order on-line today 24 hours every day.
,QWKH86GEApplianceparts.com or by phone at 877.959.8688 during normal business hours.
,Q&DQDGDGEAppliances.ca/en/products/parts-filters-accessories or call 800.661.1616.
Instructions contained in this manual cover procedures to be performed by any user. Other servicing
generally should be referred to qualified service personnel. Caution must be exercised, since improper
servicing may cause unsafe operation.
Contact Us
If you are not satisfied with the service you receive from GE Appliances, contact us on our Website with all the
GHWDLOVLQFOXGLQJ\RXUSKRQHQXPEHURUZULWHWR
,QWKH86*HQHUDO0DQDJHU&XVWRPHU5HODWLRQV_*($SSOLDQFHV$SSOLDQFH3DUN_/RXLVYLOOH.<
GEAppliances.com/contact.
,Q&DQDGD'LUHFWRU&RQVXPHU5HODWLRQV0&&200(5&,$/,1&_6XLWH)DFWRU\/DQH_0RQFWRQ1%(&0
GEAppliances.ca/en/contact-us.
Printed in China