
TABLE OF CONTENTS
◆ INSTALLATION & OPERATION ...................................................................... 1
Cabinet location and installation guidelines ......................................................... 1
Electrical .............................................................................................................. 4
◆ SAFETY / WARNINGS...................................................................................... 6
◆ REGULAR MAINTENANCE ............................................................................ 7
Cleaning the condenser coil ................................................................................ 7
Cleaning the fan blade and motor ....................................................................... 8
Cleaning the interior of unit ................................................................................. 8
◆ TROUBLE SHOOTING .................................................................................... 9
IMPORTANT SAFETY INSTRUCTIONS.
READ CAREFULLY AND KEEP FOR FUTURE REFERENCE

1
INSTALLATION & OPERATION
IMPORTANT!!! PLEASE READ BEFORE
INSTALLATION
■ If the unit has recently been transported, please let unit stand still for a
minimum of 24 hours before plugging it in.
■ Make sure that the unit drops down to the desired temperature before
loading the unit with product.
■ Make sure that there is proper ventilation around the unit in the area
where it will operate.
■ Make sure all accessories are installed (i.e. shelves, shelf clips, casters)
before plugging the unit in.
■ Please read through the Operation / Owner’s Manual in its entirety
before installation.
CABINET LOCATION AND INSTALLATION
GUIDELINES
■ Install the unit on strong and leveled surfaces.
■ Unit may make noises if the surface is uneven.
■ Unit may malfunction if the surface is uneven.
■ If the floor is not flat, please use something to make sure the base
of this unit on horizontal level.
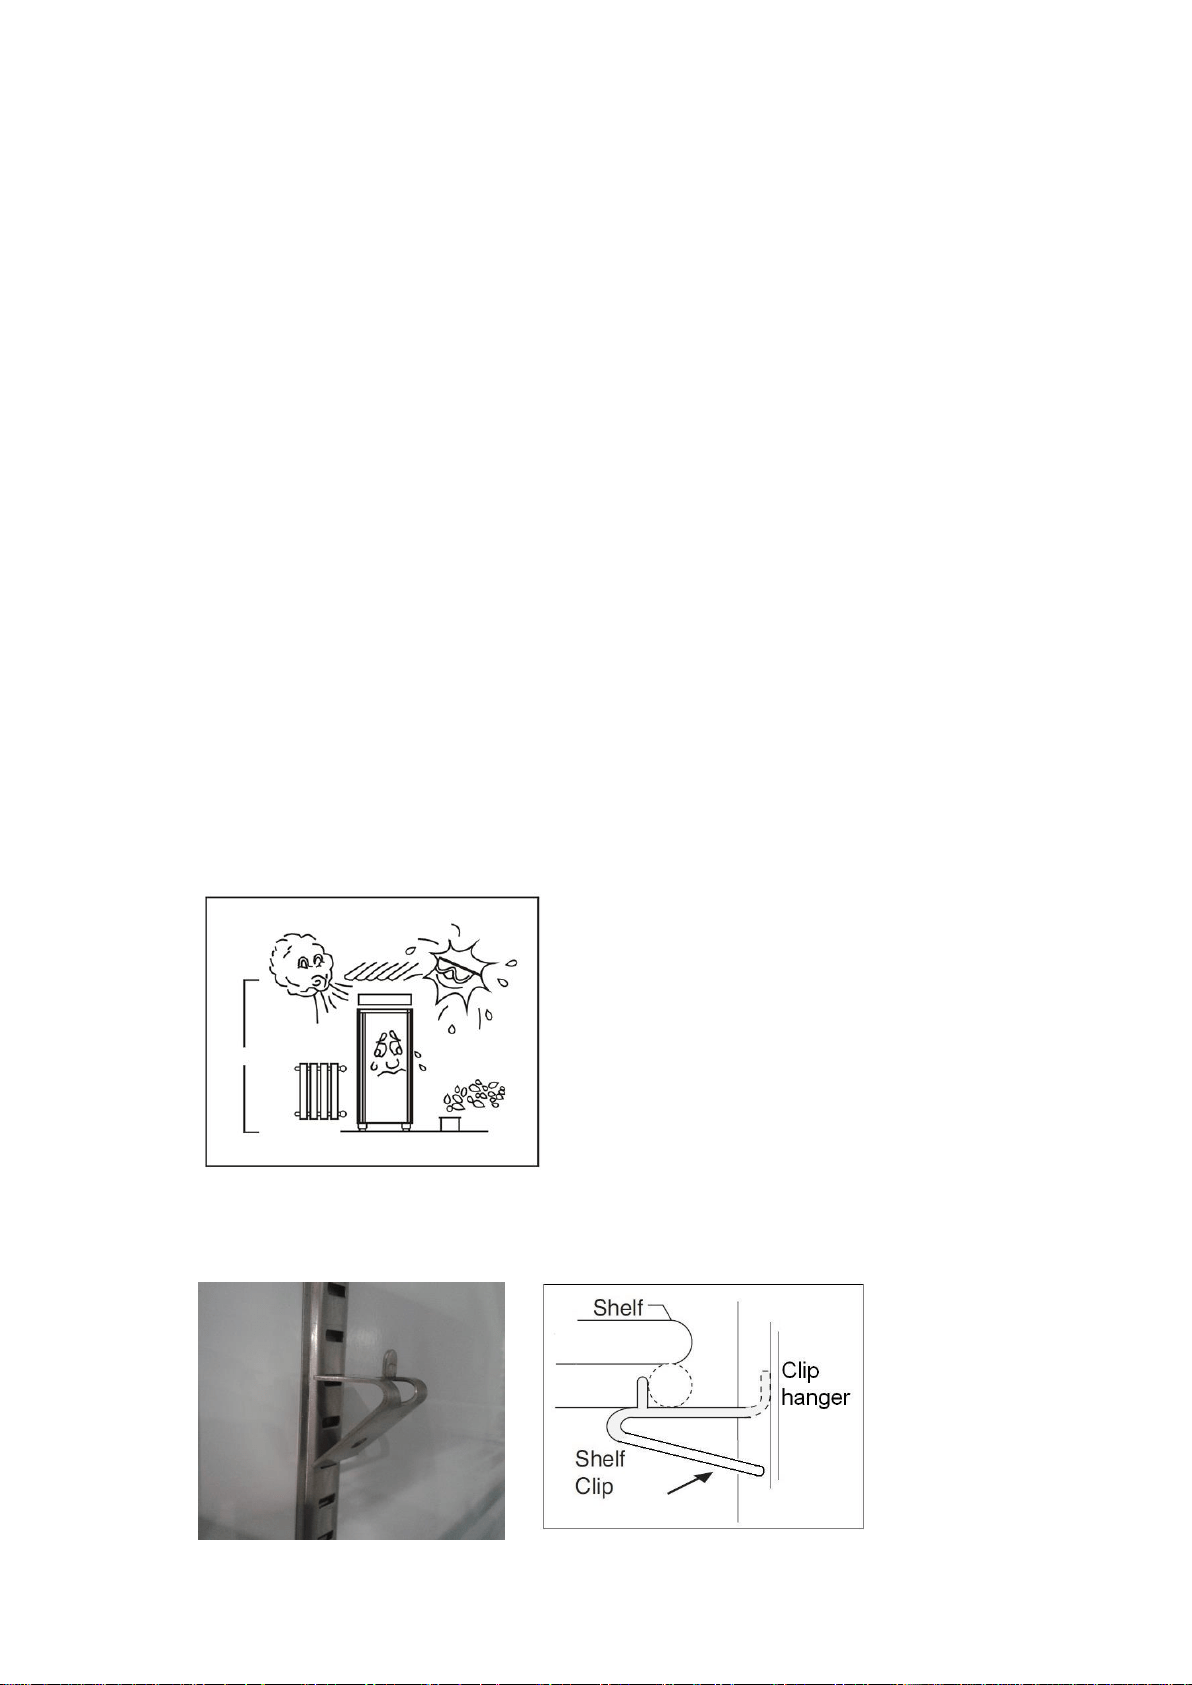
■ Install the unit in an indoor, well-ventilated area.
■ Unit performs more efficiently in a well-ventilated area.
■ For best performance, please maintain clearance of 4” on the back
of the unit, 12” on the top of the unit, and at least 4” space around
the unit
2
■ Outdoor use may cause decreased efficiency and damage to the
unit
■ Avoid installation in a high humidity and/or dusty area.
■ Humidity could cause unit to rust and decrease efficiency of the
unit.
■ Dust collected on condenser coil will cause unit to malfunction.
Clean the condenser at least once a month with a brush or a clean
cloth.
■ Select a location away from heat and moisture-generating
equipment.
■ High environmental temperature will cause the compressor to
overwork, leading to higher electrical bills and gradual breakdown
of the unit.
■ The appliance shall not be exposed to rain or sun.
CAUTION: PROBLEMS CAUSED BY
UNPROPER POSITION OF UNITS ARE
NOT COVERED BY THE WARRANTY
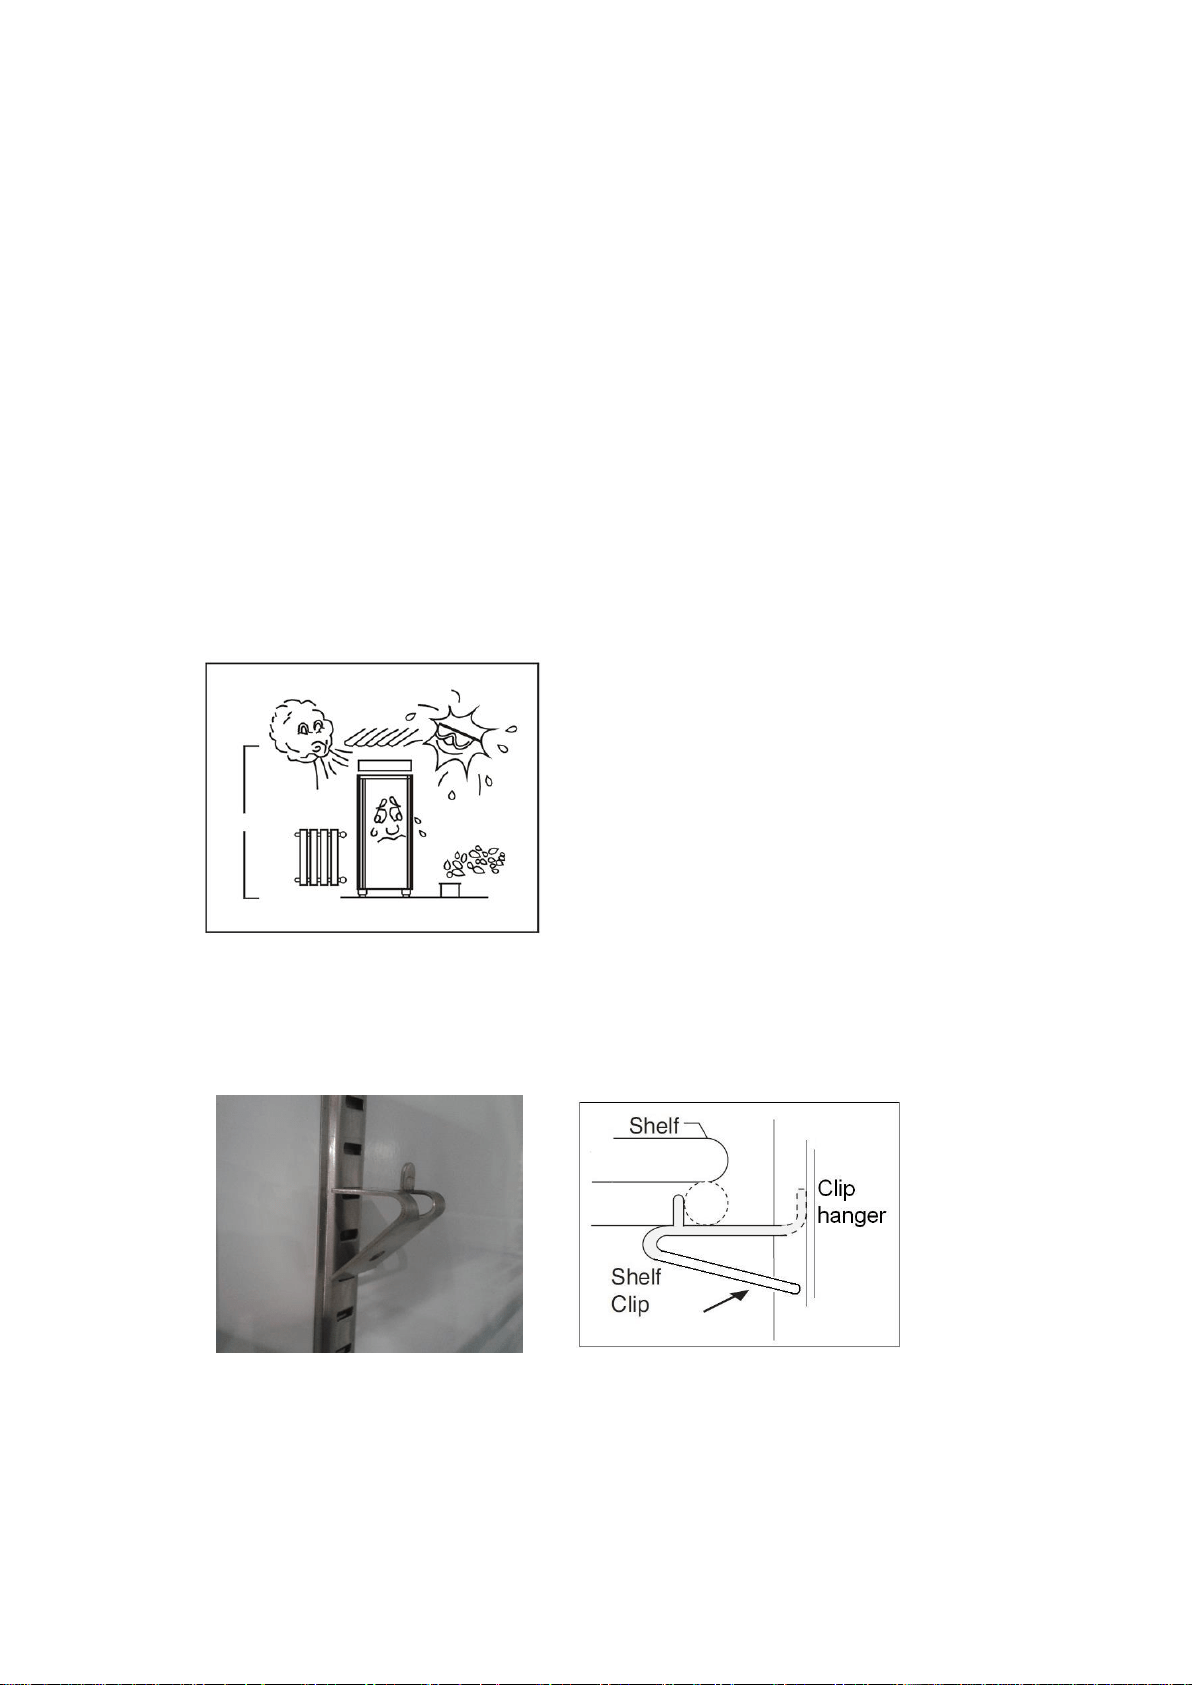
■ Shelf installation
A. Hook shelf clips onto clip hanger
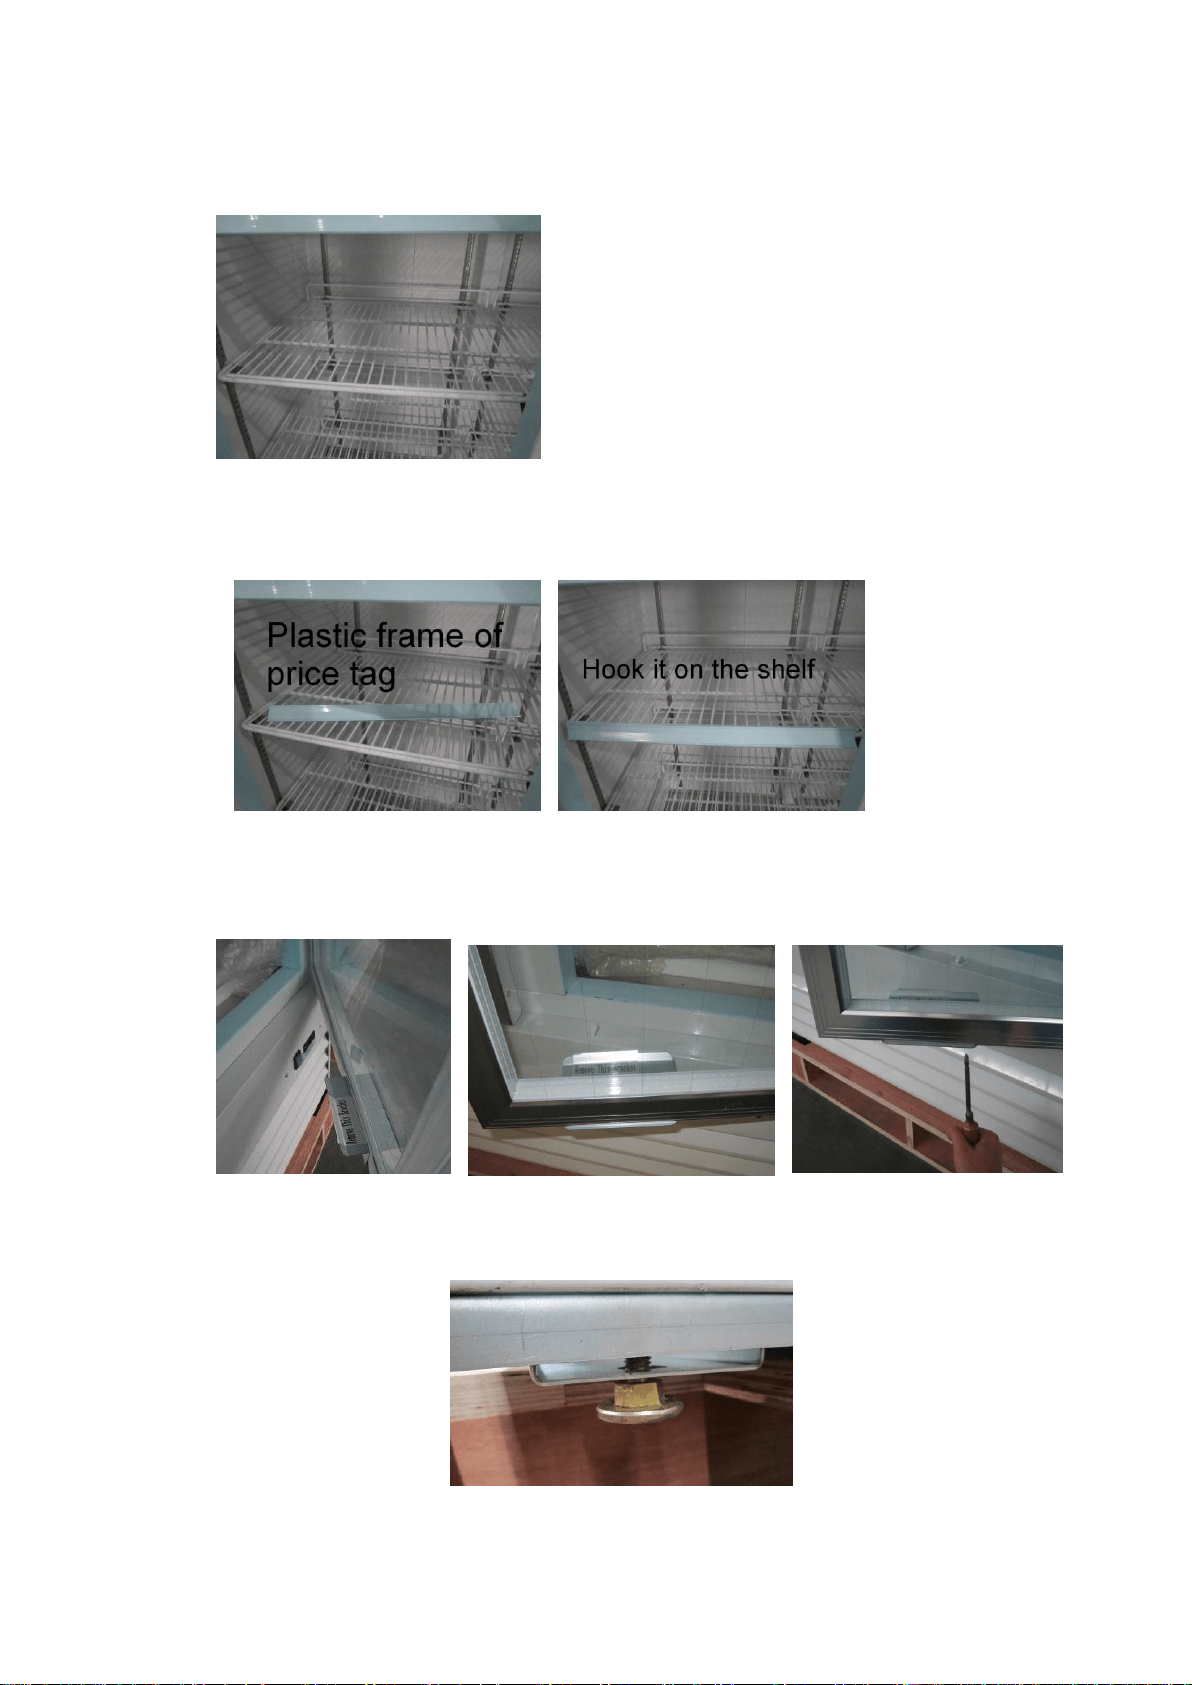
3
B. Place shelves on shelf clips making sure all corners are seated properly
C. Hook the plastic frame of price tag on shelves
Remove the glass door bracket from the door before use
■ Casters or adjustable feet are available for the units
-- Adjustable feet

4
-- Caster with brake
The caster has a brake. Turning it to different sides can lock or unlock the
caster.
ELECTRICAL
■ Please ensure that the required voltage of the compressor is being
supplied at all times
CAUTION: Low or high voltage can detrimentally affect the refrigeration
unit.
■ All units should be plugged into a grounded and properly-sized
electrical outlet with appropriate surge protection. Please refer to the
electrical requirement on the nameplate.
NEMA plugs
NEMA 5-15P NEMA 5-20P
If you do not have the right outlet, have a certified electrician install the correct
power source.
5
■ Please make sure that your unit has its own dedicated outlet. Do not
use an extension cord.
After proper installation, please plug the cord and turn on the power switch.
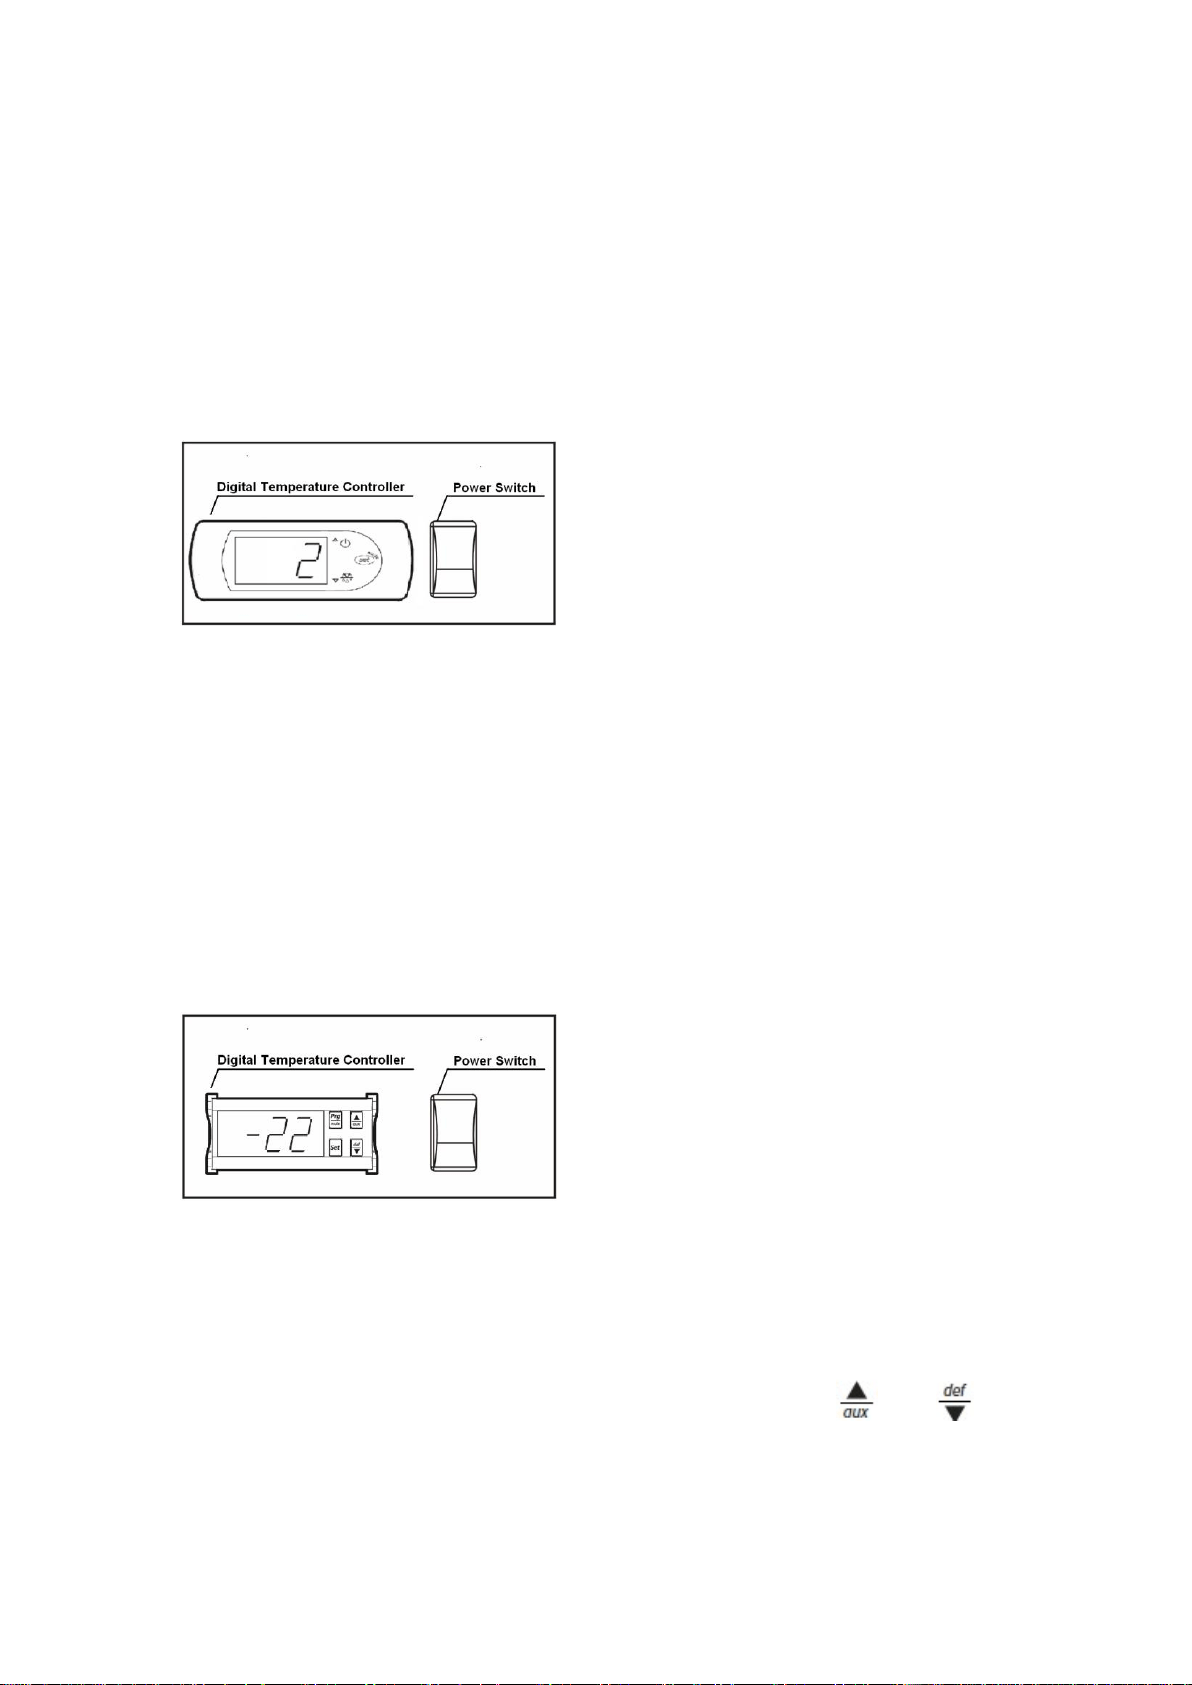
Temperature controller operation instructions
-Cooler model
Setting the set point (desired temperature value)
To display or set the set point, proceed as follows:
1) Press SET for 1s, the set value will start flashing after a few moments;
2) Increase or decrease the value using UP or DOWN;
3) Press the SET button again to confirm the new value.
-Freezer model
Setting the set point (desired temperature value)
To display or set the set point, proceed as follows:
1) Press the SET button for more than 1 second to display the set point;
2) Increase or decrease the value of the set point, using the and respectively,
until reaching the desired value;
3) Press the SET button again to confirm the new value.

6
SAFETY / WARNINGS
Please pay close attention to the safety notices in this section.
Disregarding these notices may lead to serious injury and/or
damage to the unit.
ATTENTION
■ To minimize shock and fire hazards, be sure not to overload outlet. Please
designate one outlet exclusively for your unit.
■ Do not use extension cords.
■ When the unit will not be in use for a long period of time, please unplug the
unit from the outlet.
■ After unplugging the unit, wait at least 10 minutes before re-plugging it.
Failure to do so could cause damage to the compressor.
UNPLUG CORD
■ To minimize shock and fire hazards, please do not plug or unplug the cord
with wet hands.
■ During maintenance and cleaning, please unplug the unit.
PROPER GROUNDING REQUIRED
■ To minimize shock and fire hazards, make sure that the unit is properly
grounded.
WARNING
■ Do not attempt to remove or repair any component unless instructed by
factory.
■ Make sure that the unit is not resting on or against the electrical cord or
7
plug.
■ To minimize personal injury, do not hang on the doors.
■ Do not store any flammable or explosive gas or liquids inside the unit.
■ Do not attempt to alter or tamper with the electrical cord.
SAVE THESE INSTRUCTIONS
REGULAR MAINTENANCE
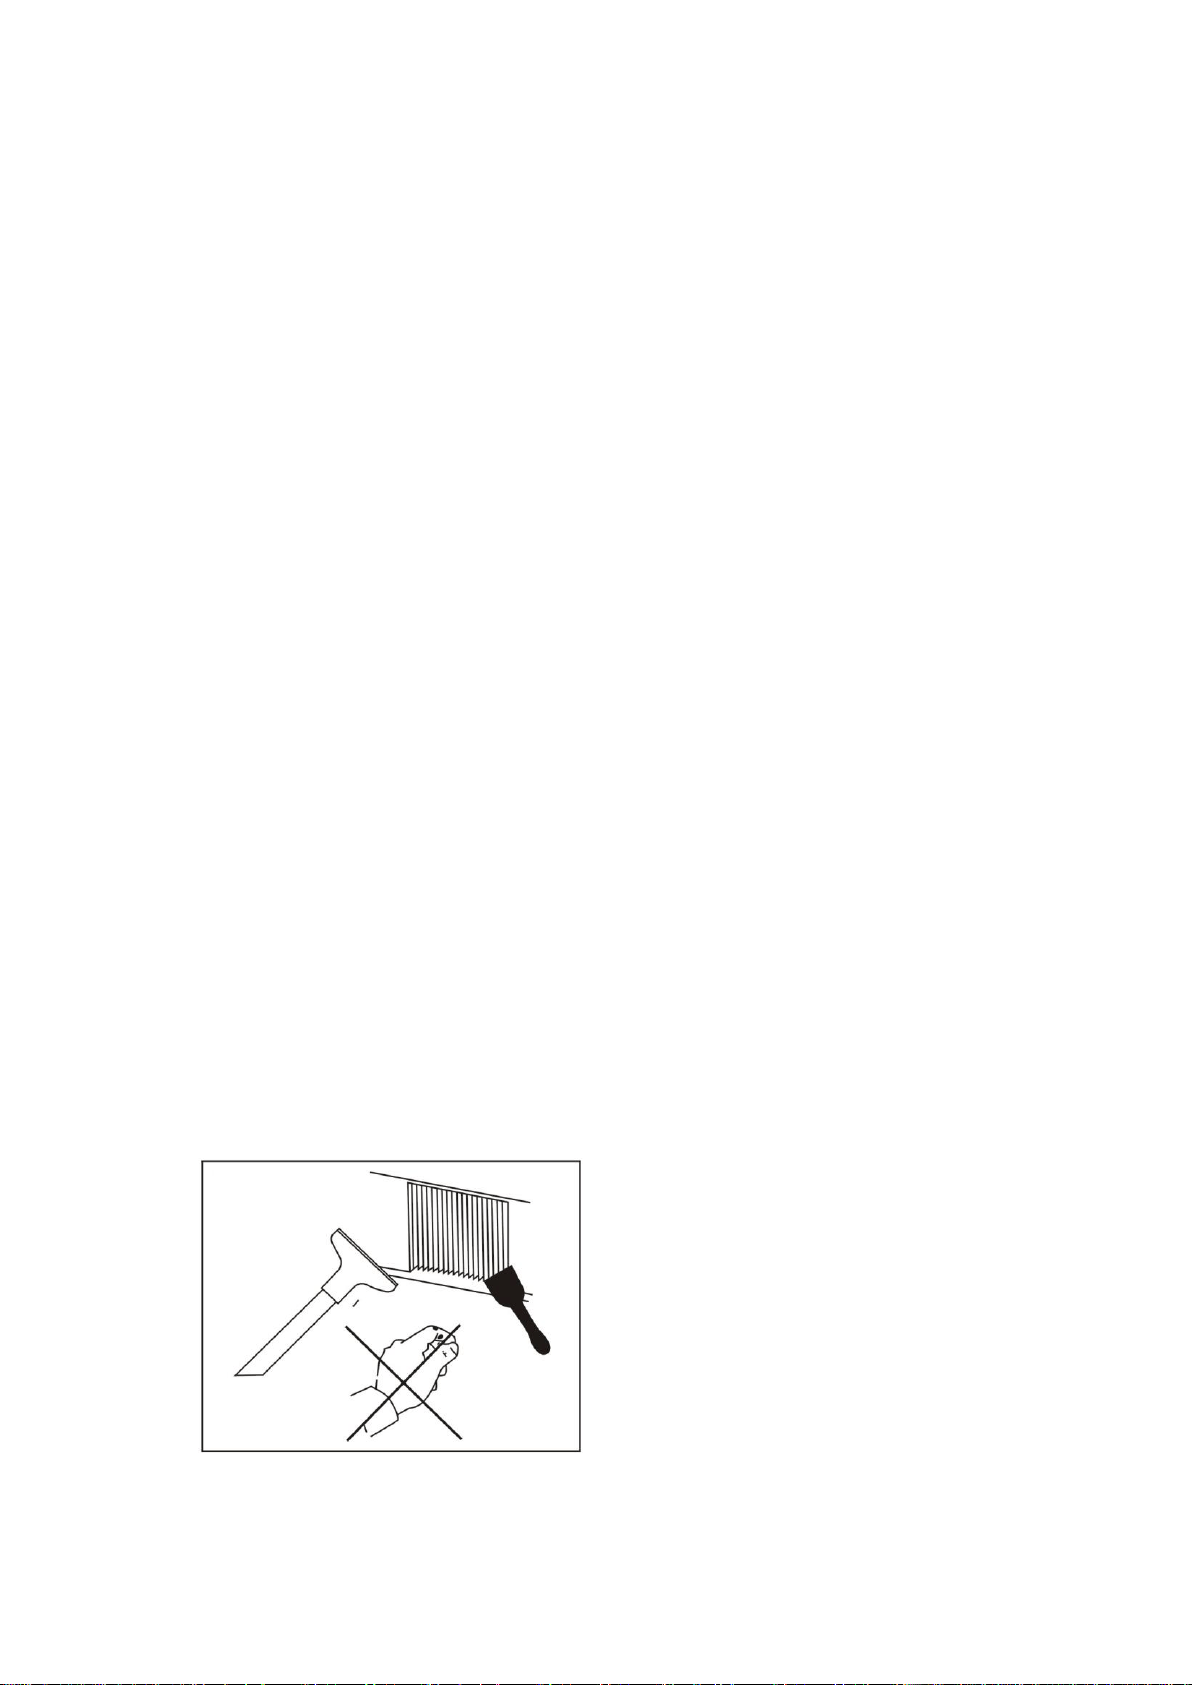
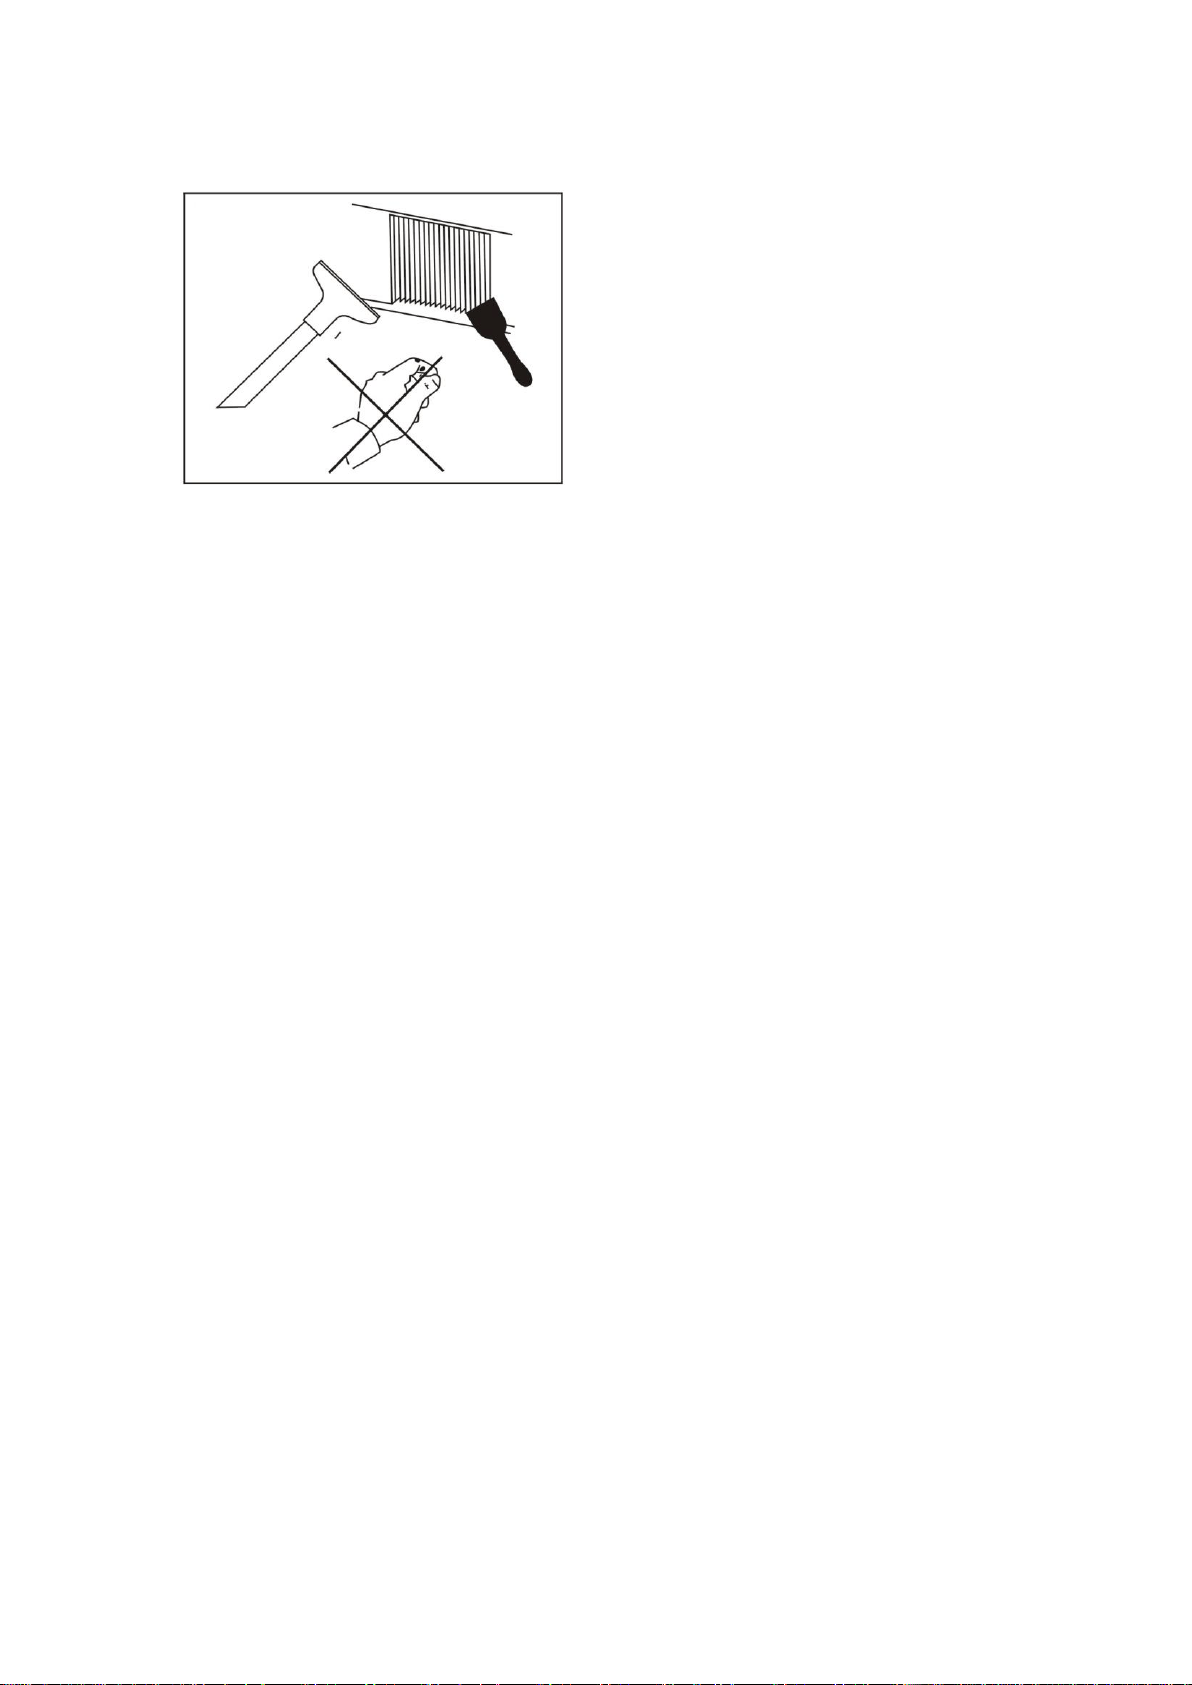
CLEANING THE CONDENSER COIL
■ For efficient operation, it is important that the condenser surface is kept free
of dust, dirt, and lint.
■ We recommend cleaning the condenser coil and fins at least once per
month.
■ Clean with a commercial condenser coil cleaner, available from any kitchen
equipment retailer. Brush the condenser fins from top to bottom, not side to
side.
■ After cleaning, straighten any bent condenser fins with a fine comb.

8
CLEANING THE FAN BLADE AND MOTOR
■ If necessary, clean the fan blades and motor with a soft cloth. If it is
necessary to wash the fan blades, cover the fan motor to prevent moisture
damage.
CLEANING THE INTERIOR OF UNIT
■ When cleaning the cabinet interior, use a solution of warm water and mild
soap.
■ Do not use steel wool, caustic soap, abrasive cleaners, or bleach that may
damage the stainless steel surface.
■ Wash door gaskets on a regular basis, preferably weekly. Simply remove
the door gasket from the frame of the door, soak in warm water and soap
for thirty (30) minutes, dry with soft cloth, and replace.
■ Check door gaskets for proper seal after they are replaced.
■ Periodically remove the shelves and pilasters from the unit and clean them
with mild soap and warm water. To remove the pilasters, first remove the
shelves and shelf brackets. Then, simply lift the pilaster up and out.
WARNING
Disconnect power cord before cleaning any parts of the unit.
9
TROUBLE SHOOTING
Before requesting any service on your unit, please check the following points.
Please note that this guide serves only as a reference for solutions to common
problems.
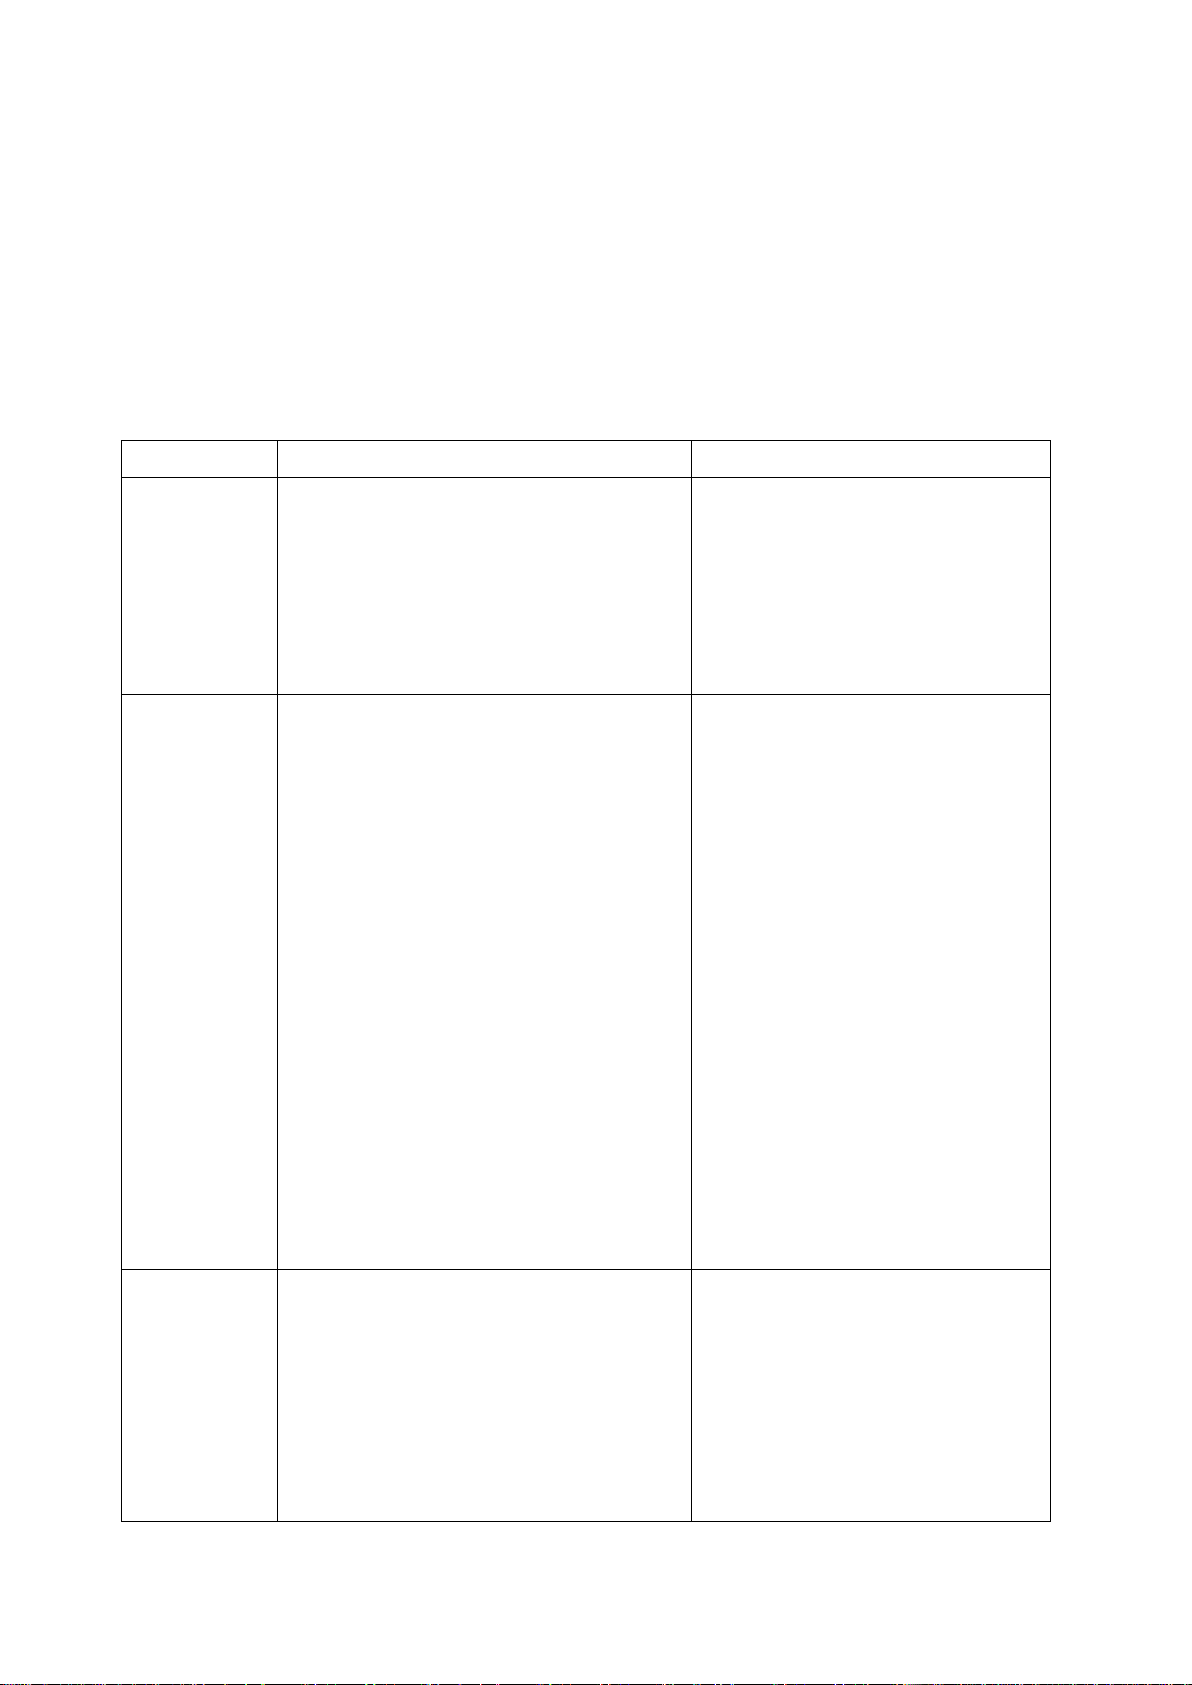
SYMPTOM
POSSIBLE CAUSE
CORRECTIVE ACTION
Compressor
not running.
Fuse blown or circuit breaker tripped.
Power cord unplugged.
Thermostat set too high.
Cabinet in defrost cycle.
Replace fuse or reset circuit
breaker.
Plug in power cord.
Set thermostat to lower
temperature.
Wait for defrost cycle to finish.
Condensing
unit runs for
long periods
of time.
Excessive amount of warm product
placed in cabinet.
Prolonged door opening or door ajar.
Door gasket(s) not sealing properly.
Dirty condenser coil.
Evaporator coil iced over.
Allow adequate time for product
to cool down.
Ensure doors are closed when
not in use. Avoid opening doors
for long periods of time.
Ensure gaskets are snapped in
completely. Remove gasket
and wash with soap and water.
Check condition of gasket and
replace if necessary.
Clean the condenser coil.
Unplug unit and allow coil to
defrost. Make sure thermostat
is not set too cold. Ensure that
door gasket(s) are sealing
properly.
Cabinet
temperature
is too warm.
Thermostat set too warm.
Blocking air flow.
Excessive amount of warm product
Set thermostat to lower
temperature.
Re-arrange product to allow for
proper air flow. Make sure there
are at least four inches of
clearance from evaporator.
Allow adequate time for product
10
placed in cabinet.
Fuse blown or circuit breaker tripped.
Dirty condenser coil.
Prolonged door opening or door ajar.
Evaporator coil iced over.
to cool down.
Replace fuse or reset circuit
breaker.
Clean the condenser coil.
Ensure doors are closed when
not in use. Avoid opening doors
for long periods of time.
(see above)
Cabinet is
noisy.
Loose part(s).
Tubing vibration.
Locate and tighten loose
part(s).
Ensure tubing is free from
contact with other tubing or
components.

11
CONTENIDO
◆ INSTALACION Y OPERACION ....................................................................... 12
Ubicación del gabinete y guía de instalación ...................................................... 12
Electricidad .......................................................................................................... 15
◆ SEGURIDAD / ADVERTENCIAS ...................................................................... 17
◆ MANTENIMIENTO REGULAR ......................................................................... 18
Limpieza del Condensador .................................................................................. 18
Limpieza de las hojas del ventilador y el motor ................................................... 19
Limpieza del interior de la unidad ........................................................................ 19
◆ RESOLUCION DE PROBLEMAS .................................................................... 20
INSTRUCCIONES IMPORTANTES DE SEGURIDAD.
LEA CUIDADOSAMENTE Y CONSERVE PARA FUTURAS
CONSULTAS

12
INSTALACION / OPERACION
IMPORTANTE! FAVOR LEER ANTES DE LA INSTALACION
■ Si la unidad ha sido transportada recientemente, por favor, permita que
la unidad este inmóvil por un mínimo de 24 horas antes de conectarla.
■ Asegúrese de que la unidad llegue a la temperatura deseada antes de
cargar la unidad con el producto.
■ Asegúrese de que existe una ventilación adecuada alrededor de la
unidad en la zona donde operará.
■ Asegúrese de que todos los accesorios están instalados (por ejemplo,
estantes, abrazaderas de repisa, ruedas) antes de enchufar la unidad.
■ Por favor, lea el Manual de Operación / Manual del Propietario en su
totalidad antes de la instalación.
GUIA PARA LA UBICACION DEL GABINETE
■ Instale la unidad sobre una superficie fuerte y nivelada.
■ La unidad puede hacer ruidos si la superficie es irregular.
■ La unidad puede funcionar incorrectamente si la superficie es
irregular.
■ Si el piso no es plano, por favor use algo para asegurarse de que la
base de la unidad esta nivelada horizontalmente.
■ Instale la unidad en una zona cubierta y bien ventilada.
■ La unidad trabaja más eficientemente en un área bien ventilada.
■ Para un mejor rendimiento, mantenga una distancia de 4" en la
parte posterior de la unidad.
■ El uso al aire libre puede causar daño y disminución de la eficiencia
a la unidad.
■ Evite la instalación en una zona de humedad alta o polvorienta.
■ La humedad puede causar oxido o moho a la unidad y reducirá la
13
eficiencia de la misma.
■ El polvo que se acumula en la tubería del condensador hará que la
unidad funcione mal. Limpie el condensador al menos una vez al
mes con un cepillo o un paño limpio.
■ Seleccione un lugar alejado del calor y de equipos que generen
humedad.
■ Una temperatura ambiental alta hará que el compresor trabaje más,
generando facturas eléctricas más altas y un daño gradual a la
unidad.
■ Este equipo no debe exponerse a la lluvia o al sol.
PRECAUCIÓN: LOS PROBLEMAS
CAUSADOS POR UNA INSTALACION
INADECUADA DE LA UNIDAD NO
ESTÁN CUBIERTOS POR LA
GARANTÍA
■ Instalación de los estantes
A. Enganche las abrazaderas en el colgador para tramos

14
B. Coloque los estantes sobre los ganchos correspondientes, asegurándose
que todas las esquinas quedan debidamente asentadas
C. Enganche el marco plástico para etiquetas de precio en los estantes.
Retire el soporte de la puerta de cristal de la puerta antes de su uso
■ Están disponibles ruedas o pies ajustables para la unidades
-- Pies ajustables

15
-- Rueda con frenos
La rueda tiene un freno. Girándolo de un lado a otro se bloquea y
desbloquea la rueda.
ELECTRICIDAD
■ Por favor, asegúrese que el voltaje requerido del compresor está
siendo alimentado en todo momento
ATENCION: Una tensión baja o alta puede afectar negativamente la
unidad de refrigeración.
■ Todas las unidades deben enchufarse en un tomacorriente
conectado a tierra y correctamente dimensionado con protección
contra sobretensiones eléctricas. Consulte los requisitos
eléctricos en la placa de características.
Enchufes NEMA
NEMA 5-15P NEMA 5-20P
Si no tiene la salida correcta, haga que un electricista certificado instale la

16
fuente de alimentación correcta.
■ Por favor, asegúrese de que su unidad tiene su propia toma de
corriente dedicada. No utilice un cable de extensión.
Después de la instalación, conecte el cable y encienda el interruptor de
alimentación.
Instrucciones del control de temperatura
-Modelo refrigerador
Ajuste de temperatura (valor deseado)
Para mostrar o establecer el punto de ajuste, proceda como sigue:
1) Pulse SET por 1s, el valor comenzará a parpadear después de unos momentos;
2) Aumente o disminuya el valor con las teclas UP (arriba) o DOWN (abajo);
3) Pulse el botón SET para confirmar el nuevo valor.
-Modelo Congelador
Ajuste de temperatura (valor deseado)
Para mostrar o establecer el punto de ajuste, proceda como sigue:
1) Pulse SET por más de 1s para mostrar la temperatura programada.
2) Aumente o disminuya el valor usando las teclas y respectivamente, hasta

17
llegar al valor deseado.
3) Presione el botón SET nuevamente para confirmar el nuevo valor.
SEGURIDAD / ADVERTENCIA
Por favor preste atención especial a los avisos de seguridad
en esta sección. Hacer caso omiso de estos avisos puede
conducir a lesiones graves o daños a la unidad.
ATENCION
■ Para minimizar riesgos de choque eléctrico y de incendio, asegúrese de no
sobrecargar el enchufe. Favor designar un enchufe exclusivo para su
unidad.
■ No utilice cables de extensión.
■ No ponga las manos debajo de la unidad cuando vaya a moverla.
■ Cuando la unidad no vaya a ser usada por un tiempo prolongado, por favor
desenchufe la unidad del tomacorriente.
■ Después de desconectar la unidad, espere al menos 10 minutos antes de
volver a enchufarla. No hacerlo podría causar daños en el compresor.
DESCONEXION DEL CABLE
■ Para minimizar el riesgo de choque eléctrico y de incendio, por favor, no
conecte o desconecte el cable con las manos mojadas.
■ Durante el mantenimiento y limpieza, por favor, desenchufe la unidad.
SE NECESITA UNA CONEXION ADECUADA A TIERRA

18
■ Para minimizar el riesgo choque eléctrico y de incendio, asegúrese de que
la unidad esté correctamente conectada a tierra.
ADVERTENCIA
■ No intente quitar ni reparar ningún componente a menos que sea ordenado
por la fábrica.
■ Asegúrese de que la unidad no descansa sobre o contra el cable eléctrico
o el enchufe.
■ Para minimizar lesiones personales, no se cuelgue de las puertas.
■ No almacene líquidos ni gases inflamables o explosivos dentro de la
unidad.
■ No intente alterar o manipular el cable eléctrico.
GUARDE ESTAS INSTRUCCIONES
MANTENIMIENTO REGULAR
LIMPIEZA DEL CONDENSADOR
■ Para una operación eficiente, es importante que la superficie del
condensador se mantenga libre de polvo, suciedad y pelusas.
■ Recomendamos limpiar la tubería del condensador y las aletas por lo
menos una vez al mes.
■ Limpie con un limpiador comercial para tuberías de condensador,
disponible en cualquier distribuidor de equipos de cocina. Cepille las aletas
del condensador de arriba hacia abajo, no de lado a lado.
■ Después de limpiar, enderece las aletas dobladas del condensador con un
peine fino.
19
LIMPIEZA DE LAS ASPAS DEL VENTILADOR Y EL MOTOR
■ Si es necesario, limpie las aspas del ventilador y el motor con un paño
suave. Si es necesario lavar las aspas del ventilador, cubra y proteja el
motor del ventilador para evitar daños por humedad.
LIMPIEZA DEL INTERIOR DE LA UNIDAD
■ Cuando limpie el interior del gabinete, use una solución de agua tibia y
jabón suave.
■ No utilice esponjas de acero, jabón de sosa cáustica, limpiadores o
blanqueadores que puedan dañar la superficie de acero inoxidable.
■ Lave los empaques de la puerta regularmente, preferiblemente una vez por
semana. Simplemente retire el empaque del marco de la puerta, remoje en
agua tibia y jabón durante treinta minutos, seque con un paño suave y
vuelva a colocar.
■ Revise que los empaques de la puerta cierren bien después de que sean
reemplazados.
■ Periódicamente, retire los estantes y las columnas de la unidad y limpie
con jabón suave y agua tibia. Para quitar las columnas, primero quite los
estantes y los soportes de estante. Luego, simplemente levante la columna
y hacia arriba.
20
ADVERTENCIA
Desconecte el cable de alimentación antes de limpiar
cualquier parte de la unidad.
RESOLUCION DE PROBLEMAS
Antes de solicitar cualquier servicio en su unidad, por favor, compruebe los
puntos siguientes. Tenga en cuenta que esta guía sirve sólo como referencia
para soluciones a problemas comunes.
SINTOMA
CAUSA POSIBLE
ACCION CORRECTIVA
Compresor no
funciona.
Fusible fundido o breaker
disparado.
Está desenchufado el cable de
alimentación.
Termostato regulado demasiado
alto.
Gabinete en el ciclo de
descongelación.
Reemplace el fusible o
restablezca el breaker.
Enchufe el cable de
alimentación.
Ajuste el termostato a más
baja temperatura.
Espere a que termine el ciclo
de descongelación.
Unidad
condensadora
funciona por
períodos de
tiempo largos.
Cantidad excesiva de producto
caliente colocado en el gabinete.
Puerta entreabierta o apertura
prolongada de la puerta.
Apertura de la puerta no sellan
correctamente.
Tubería del condensador sucio.
Permita un tiempo adecuado
para que el producto se enfríe.
Asegúrese de que las puertas
están cerradas cuando no esté
en uso. Evite abrir las
puertas por largos períodos de
tiempo.
Asegúrese de que los
empaques están bien
instalados. Remueva el
empaque y lave con agua y
jabón. Verifique el estado del
empaque y reemplace si es
necesario.
Limpie la tubería del
21
Tubería del evaporador congelado.
condensador.
Desenchufe la unidad y
permita que la tubería se
descongele. Asegúrese de que
el termostato no esté
demasiado frío. Asegúrese de
que los empaques de las
puertas cierran
herméticamente.
Temperatura
es demasiado
alta.
Termostato en una posición
demasiado caliente.
Bloqueo del flujo de aire.
Cantidad excesiva de producto
caliente colocado en el gabinete.
Fusible fundido o breaker
disparado.
Tubería del condensador sucio.
Puerta entreabierta o apertura
prolongada de la puerta.
Tubería del evaporador congelado.
Ajuste el termostato a una
temperatura más baja.
Reacomode el producto para
permitir la circulación de aire
apropiada.
Asegúrese de que hay al
menos cuatro pulgadas de
espacio libre alrededor del
evaporador.
Permita un tiempo adecuado
para el producto se enfríe.
Reemplace el fusible o
restablezca el breaker.
Limpie la tubería del
condensador.
Asegúrese de que las puertas
están cerradas cuando no esté
en uso. Evite abrir las
puertas por largos períodos de
tiempo.
(ver arriba)
Gabinete
ruidoso.
Piezas sueltas.
Vibración de la tubería.
Localice y apriete la pieza
suelta.
Asegúrese de que la tubería
no esté en contacto con otras
tuberías o componentes.

22