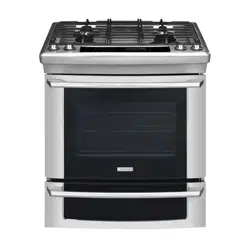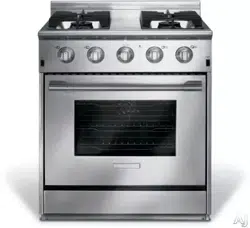
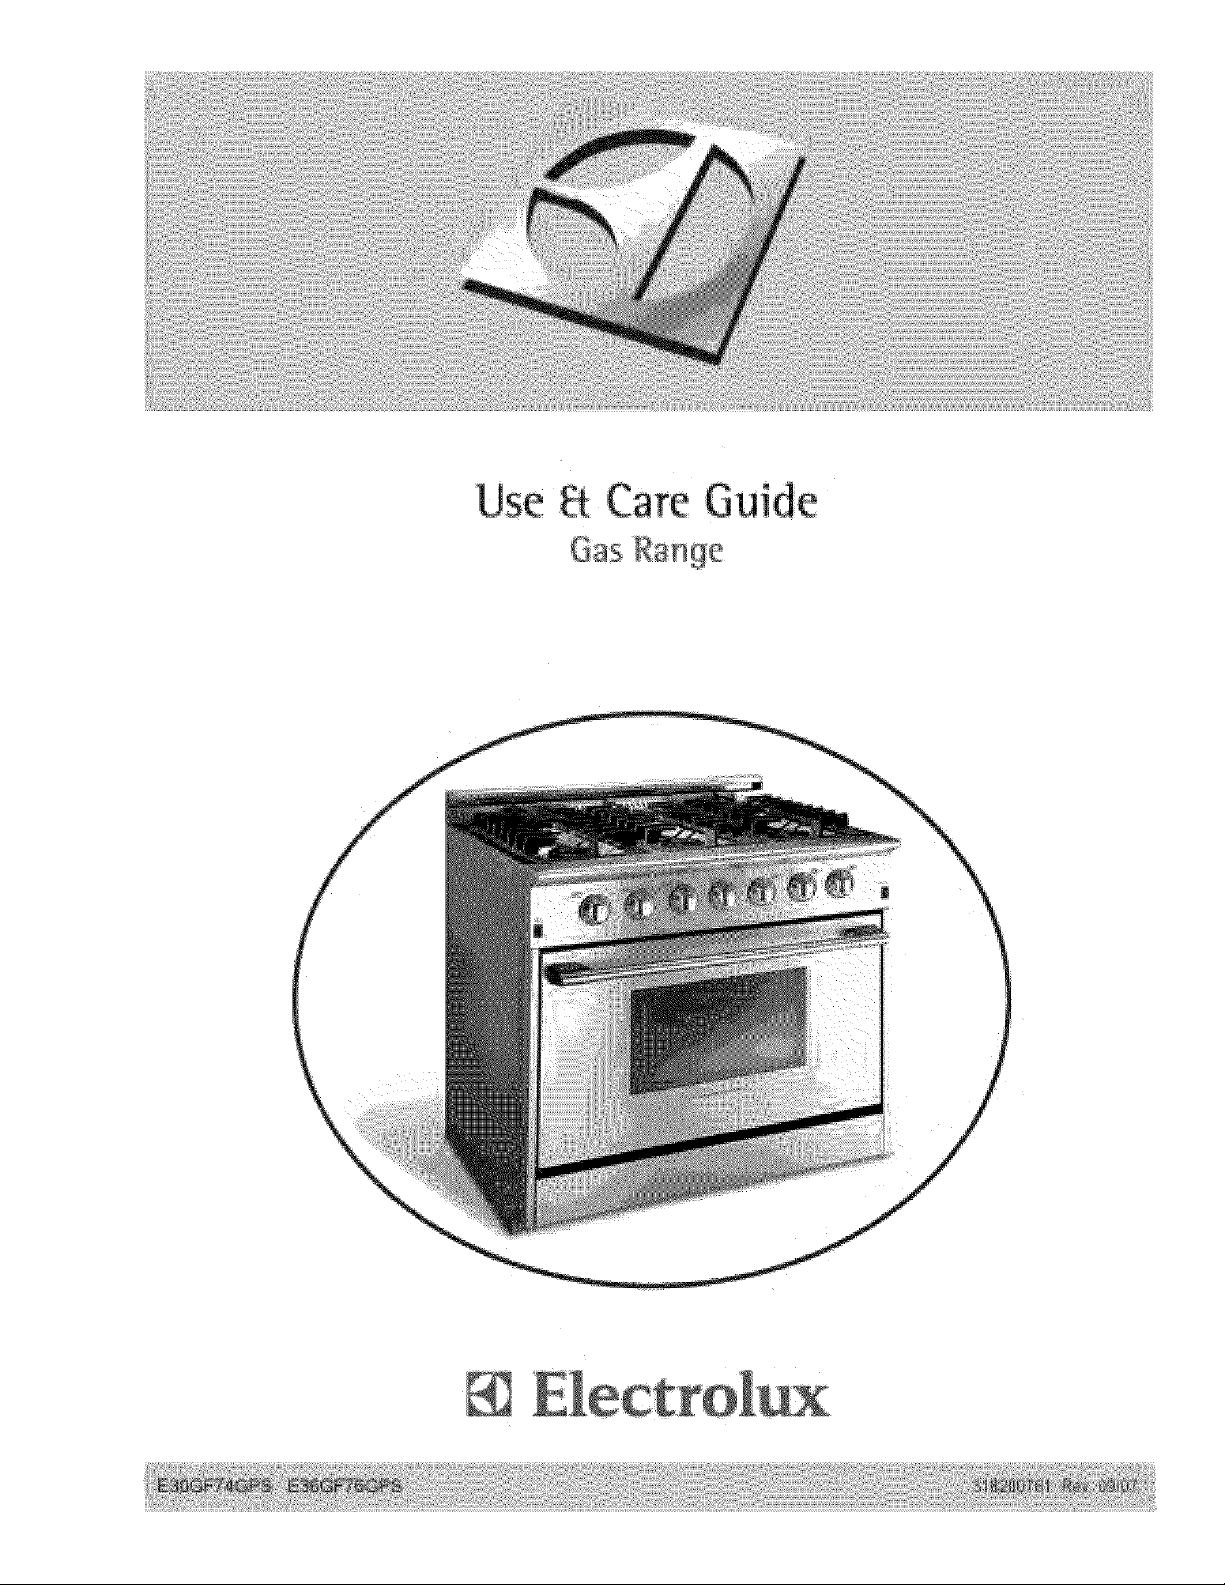
Use a Care Gu de
Gas Range
\
Finding Information
PLEASEREADANDSAVETHiSGUIDE
[] [] [] [] [] [] [] [] [] [] [] [] [] [] [] [] [] [] [] [] []
Thank you for choosing Electrolux, the new premium brand in home appliances.
This Use & Care Guide is part of our commitment to customer satisfaction and
product quality throughout the service life of your new appliance.
We view your purchase as the beginning of a relationship. To ensure our ability to
continue serving you, please use this page to record key product information.
Once you have your appliance installed, we suggest you keep this manual in a
safe place for future reference. Should any problems occur, refer to the
Troubleshooting section of this manual. This information wilt help you quickly
identify a problem and get it remedied. In the event you require assistance, please
contact the dealer where you purchased your appliance.
MAKEA RECORDFORQUICKREFERENCE
[] [] [] [] [] [] [] [] [] [] [] [] [] [] [] [] [] [] [] [] []
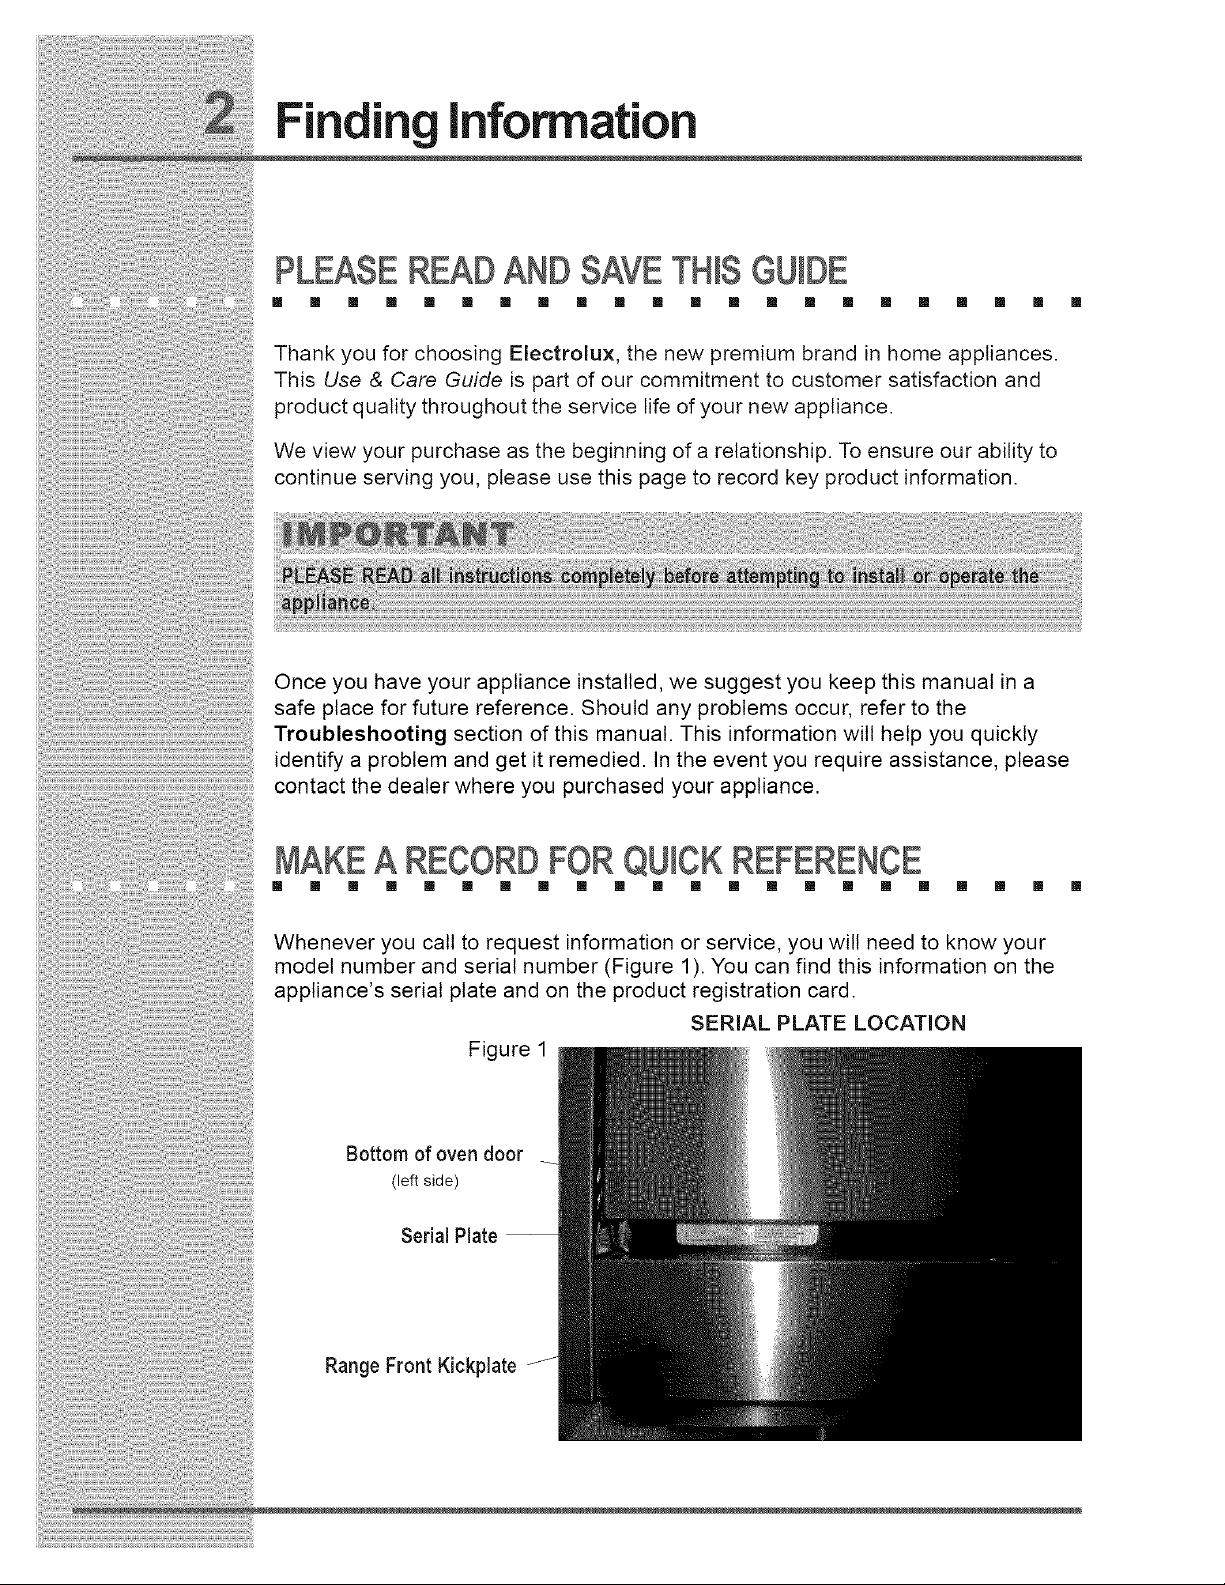
Whenever you call to request information or service, you will need to know your
model number and serial number (Figure 1). You can find this information on the
appliance's serial plate and on the product registration card.
SERIAL PLATE LOCATION
Figure 1
Bottom of oven door
(left side)
Serial Plate --
Range Front Kickplate
Finding Information
PRODUCT REGIST TIONCARD
[] [] [] [] [] [] [] [] [] [] [] [] [] [] [] [] [] [] [] [] []
The package containing this manual also includes your product registration
information. Warranty coverage begins at the time your Electrolux appliance was
purchased.
If you received a damaged product, immediately contact your dealer or builder. Do
not install or use a damaged appliance.
Please record the purchase date of your Electrotux appliance and your dealer's
name, address and telephone number.
Purchase Date
Electrolux Model Number
Electrolux Serial Number
Dealer Name
Dealer Address
Dealer Telephone
Keep this manual and the sales receipt together in a safe place for further
reference.
[] [] [] [] [] [] [] [] [] [] [] [] [] [] [] [] [] [] [] [] [] []
For toll-free telephone support in the U.S. and Canada:
1=877= 4ELECTROLUX (1=877=435=3287)
For online support and Intemet product information:
www.electroluxusa.com
Finding Information
TABLE OF CONTENTS
[] [] [] [] [] [] [] [] [] [] [] []
Finding Information...........................................2
PleaseReadAndSaveThisGuide...................2
MakeARecordForQuickReference................2
Questions..........................................................3
TableOfContents..............................................4
Safety...................................................................5
ImportantSafetyInstructions..............................5
GeneralPrecautions..........................................6
FeatureOverview ..............................................10
Cooktop Features..............................................11
ProperBurnerAdjustments...............................11
BurnerLocations..............................................11
SealedBurnerConfigurations.........................12
BurnerRings..................................................12
BurnerIgniters................................................12
ControlKnobs .................................................13
Placementof BurnerGrates.............................I3
SurfaceCooking ...............................................13
FlameAdjustment.............................................13
UtensilsforBestPerformance..........................14
UsingtheAccessoryGriddle............................14
Usingthe IntegratedGriddle.............................15
UsingtheWokStand .......................................16
UsingtheSimmerPlate......................................17
Operation...........................................................18
BeforeCooking...............................................18
SettingSurfaceControls....................................18
OperatingtheControlValves...........................18
SettingtheBurnerFlameHeight......................20
EnergySavingTips..........................................20
[] [] [] [] [] [] [] [] [] []
Getting Started.................................................21
BeforeSettingOvenControls..........................21
ArrangingOvenRacks.....................................22
SettingOven Controls .....................................23
SelectorKnobFunction...................................23
OvenFunctions...............................................23
Cooking Instructions.......................................24
Baking.............................................................24
BakingProblems.............................................25
ConvectionBaking/Roasting............................25
Broiling............................................................29
Careand Cleaning............................................31
ChangingOvenLightBulb.................................31
CleaningTips ..................................................32
CleaningStainlessSteelSurfaces....................35
CleaningPorcelainGrates...............................35
CleaningKnobsandBezels............................36
CleaningBurnerBases ...................................36
CleaningBurnerRings....................................37
CleaningBurnerIgniters..................................37
CleaningGeneral..............................................38
Troubleshooting ...............................................39
Warranty............................................................40
IMPORTANTSAFE_ INSTRUCTIONS
[] [] [] [] [] [] [] [] [] [] [] [] [] [] [] [] [] [] [] [] [] []
Safety Precautions
Do not attempt to install or operate your appliance until you have read the safety
precautions in this manual. Safety items throughout this manual are labeled with a
Warning or Caution based on the risk type.
Definitions
Thisisthesafetyalertsymbol.Itisusedtoalertyoutopotentialpersonal
injury hazards. Obey all safety messages that follow this symbol to avoid possible
injury or death.
iii_i_;!_!!i!!!i!!ii_!iii_i:ii_:_ii_ii!_ii_ii!_ii_i!i;_i!_!i!_!!i_i!_!_!_!i_;;_!;_i:;;;!i_;;i!i(iiiiiii!i!ii!;!ii!i!ii!;!i_!!i_!!_i!i!_i!i!_i!i!_i!i!_i!!_i¸ii:;ii¸;!I_ili;i;::_i_:il;::_i_:il;::_i_:il;::i!i!;il¸il;;ii:i!!_i_i!_i_i!_i_i!_ii!i_ii¸!iiii;¸iii!i;:;i_ii;¸i_i_ii;¸i_i!i!i!;i!¸;_i!;_ii_;_!_!_!_!i;_!i!i;i_i_i!%!i;_iii!;:_!_i!;i_i!;ill!i!;ii!!i_!_!!!_!!i!_i!!i!i;!_i;;i_i_¸i!_iiii:;iii:;iiiii!iiiii;;i;i;ilili_i_i_i_i_i_i_i_ii;i:;i;i:;i;i:;!i!i¸!i!i!i;i_iii!;_iiii!;_ii!;!i;iii:;i!il;i;i_i!i!i_i_!!ii_iii_i!i¸i!!i¸i!ii;ii;iiiii!;!il;ii!ii;i;!!i;ii!ii;i;!!i;il;:ii!;!;iil;i;iii!ii;ii!i!ii;!!!i¸ii_i!iii!!!i!;ili!ii;i¸i;i;ii!_i_iil¸iiiii!_i_iil¸iiiii!_i_iii_il;;!!!!!iii:iii!i;i!i;i!i;i!i_i;i!i_i;i!i_i;i!i_i;i!i:ii_;!i¸i;;¸i;;;¸i;;;¸i;;;¸ilil¸;ii_;[ili;_i_i;!i!ii;iii¸!_!i!!i!i_i!i!ii!!!i!i_i!il;ii!_!ii;iiii¸!I¸!_i_!_;!_i!_i_i!_i_i!_i_i!_i_i!_ii_i;ii;!ii;!ii;!ii;!!_!i!!!i_;!!_¸i!:!i_iiii!i¸I¸i;iii!;ii!_i!_!i!_!i!_!il;_il;!:!iiiiiii!iiii:!i!¸I
Safety
Safety
GENE_L PRECAUTIONS
m [] [] [] [] [] [] [] [] [] m [] [] [] [] [] m m [] [] [] []
GENE_L PRECAUTIONS
[] [] [] [] [] [] [] [] [] [] [] [] [] [] [] [] [] [] [] [] [] m
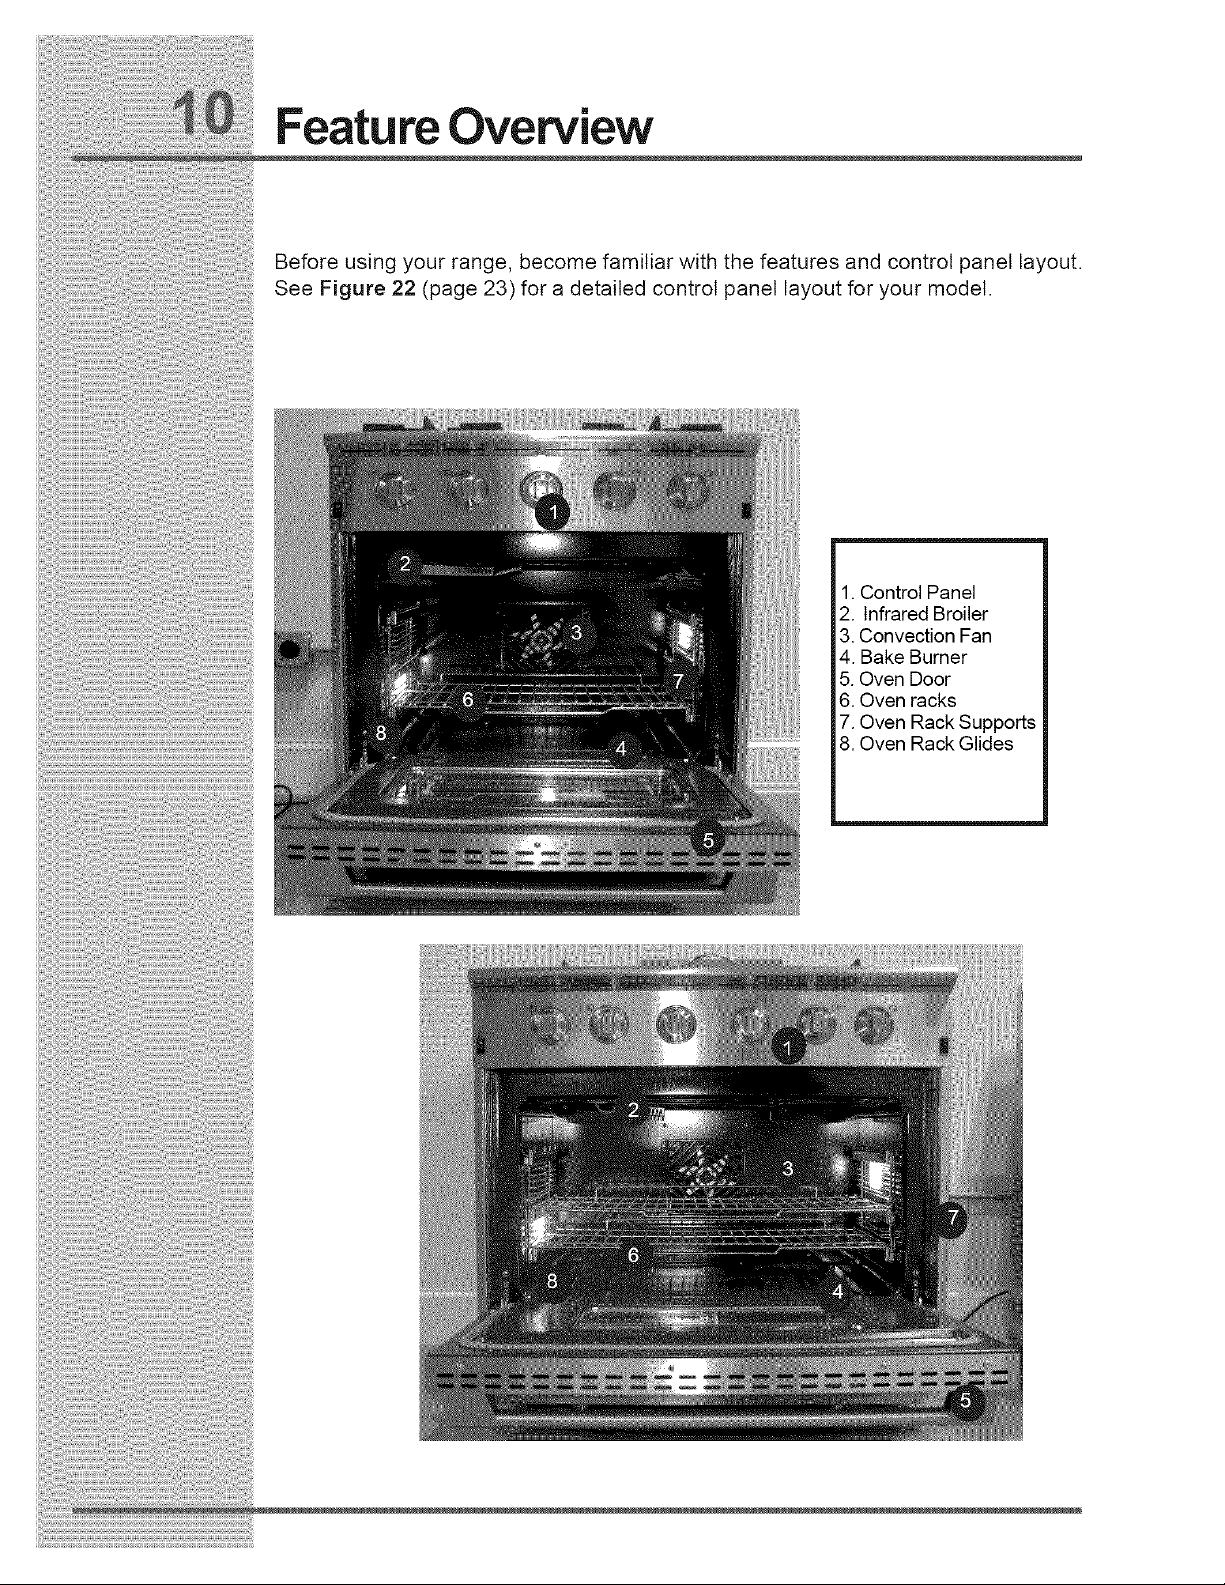
Feature Overview
Before using your range, become familiar with the features and control panel layout.
See Figure 22 (page 23)for a detailed control panel layout for your model.
1. Control Panel
2. Infrared Broiler
3. Convection Fan
4. Bake Burner
5. Oven Door
6. Oven racks
7. Oven Rack Supports
8. Oven Rack Glides

Cooktop
PROPERBURNERADJUSTMENTS
[] [] [] [] [] [] [] [] [] [] [] [] [] [] [] [] [] [] [] [] [] []
The color of the flame is the key to proper burner adjustment. A good flame is clear,
blue and hardly visible in a well-lighted room. Each cone of flame should be steady
and sharply defined. Adjust or clean burner if flame is yellow-orange. To clean
burner, see instructions under Care & Cleaning.
[] [] [] [] [] [] [] [] [] [] [] [] [] [] [] [] [] [] [] [] [] []
All Etectrolux Icon range cooktops are equipped with
sealed burners. See Figure 2 for a detailed burner
layout for your model.
Figure 2
Burner Configurations
E36GF75GPS
E30GF74GPS
E36GF76GPS
Cooktop Features
SEALEDBURNERCONFIGU TION
Im [] [] II [] [] [] II [] [] [] II [] [] [] II [] [] [] II [] []
On ICON all-gas ranges, there are a total of four (4) or six (6) burners, all rated with
a maximum of 15K btu. Additionally, all burners are equipped with a stow simmer
setting rated at 620 btu.
On ICON 36" all-gas ranges (Model EGF76GPS), there is a central griddle rated at
18.5K btu. The same 15K btu top burners are equipped with the low simmer
settings of 620 btu on this model.
BURNERBASE,HEAD& CAPS
[] [] [] [] [] [] [] [] [] [] [] [] [] [] [] [] [] [] [] [] [] []
The burner heads spread the flame evenly around the burner perimeters. The
burner heads must seat properly in the burner bases to enable proper cooktop
operation. To ensure proper seating, the burner heads are keyed using a hole
which aligns with the ignitor.
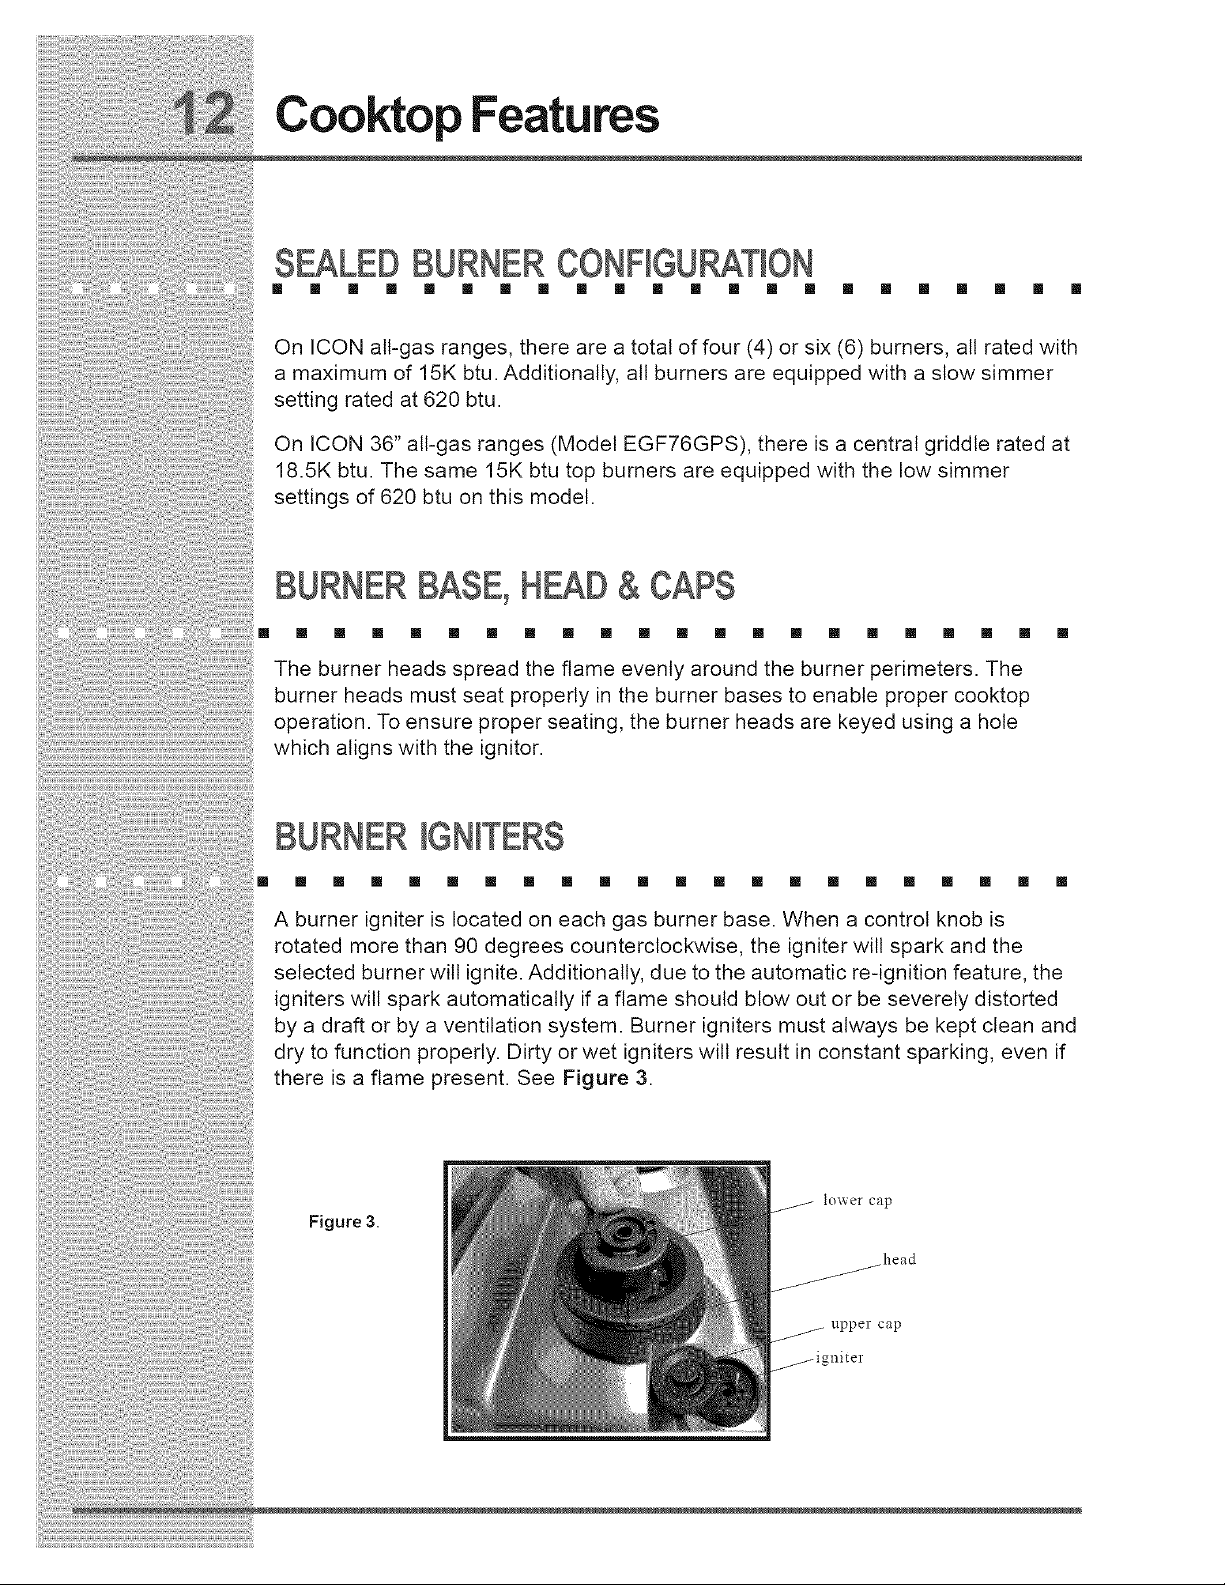
BURNERIGNFERS
[] [] [] [] [] [] [] [] [] [] [] [] [] [] [] [] [] [] [] [] [] []
A burner igniter is located on each gas burner base. When a control knob is
rotated more than 90 degrees counterclockwise, the igniter will spark and the
selected burner will ignite. Additionally, due to the automatic re-ignition feature, the
igniters will spark automatically if a flame should blow out or be severely distorted
by a draft or by a ventilation system. Burner igniters must always be kept clean and
dry to function properly. Dirty or wet igniters wilt result in constant sparking, even if
there is a flame present. See Figure 3.
Figure 3.
lower cap
head
upper cap
" niter
Cooktop FeaturesiSurfaceCooking
CONTROL KNOBS
[] [] [] [] [] [] [] [] [] [] [] [] [] [] [] [] [] [] [] [] [] []
The control knobs provided with this cooktop are designed for ease of use and
longevity. The "D" shaped design of the knob shaft ensures proper orientation when
reinstalling the knob. Located beneath each knob is a bezel ring that mounts to the
control panel.
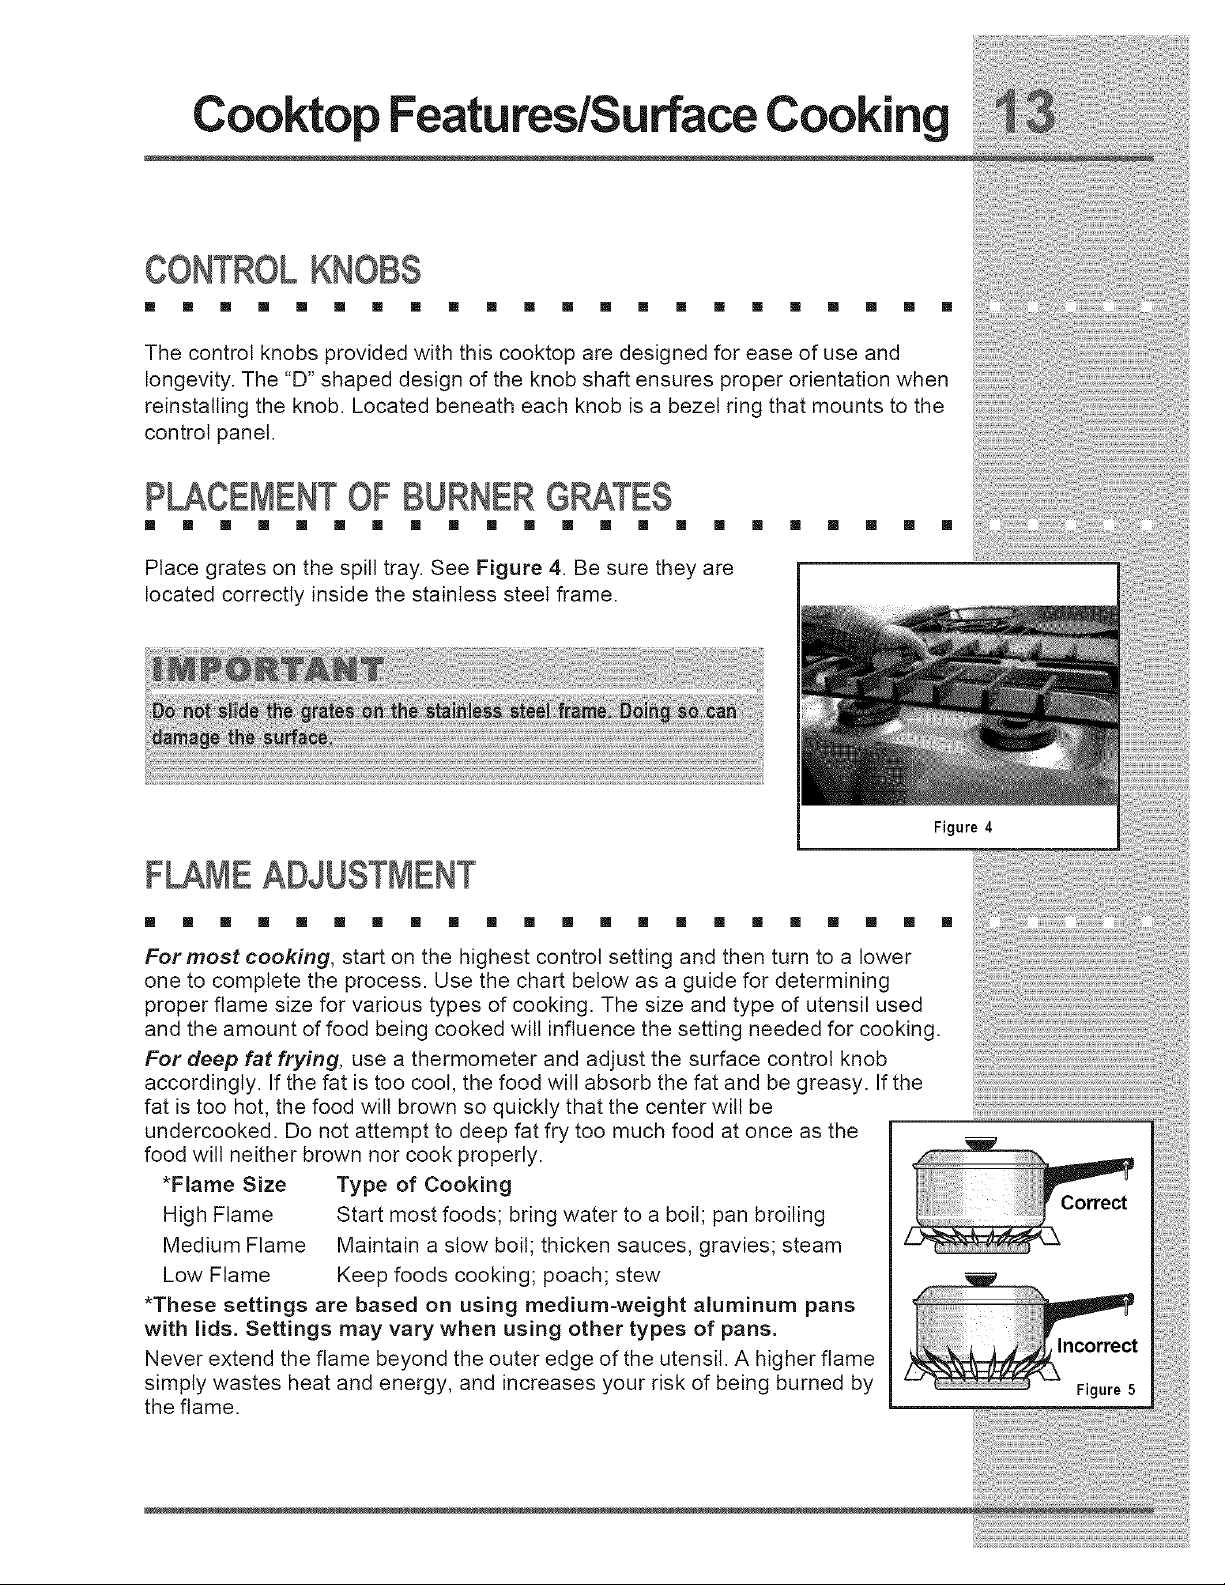
P CEMENT OFBURNERG TES
[] [] [] [] [] [] [] [] [] [] [] [] [] [] [] []
Place grates on the spill tray. See Figure 4. Be sure they are
located correctly inside the stainless steel frame.
[] [] [] [] [] []
F ME ADJUSTMENT
[] [] [] [] [] [] [] [] [] [] [] [] [] [] [] [] [] [] [] [] []
For most cooking, start on the highest control setting and then turn to a lower
one to complete the process. Use the chart below as a guide for determining
proper flame size for various types of cooking. The size and type of utensil used
and the amount of food being cooked will influence the setting needed for cooking.
For deep fat frying, use a thermometer and adjust the surface control knob
accordingly. If the fat is too coot, the food will absorb the fat and be greasy. If the
fat is too hot, the food will brown so quickly that the center will be
undercooked. Do not attempt to deep fat fry too much food at once as the
food wilt neither brown nor cook properly.
*Flame Size Type of Cooking
High Flame Start most foods; bring water to a boil; pan broiling
Medium Flame Maintain a stow boil; thicken sauces, gravies; steam
Low Flame Keep foods cooking; poach; stew
*These settings are based on using medium-weight aluminum pans
with lids. Settings may vary when using other types of pans.
Never extend the flame beyond the outer edge of the utensil. A higher flame
simply wastes heat and energy, and increases your risk of being burned by
the flame.
Correct
Incorrect
Figure 5

Surface
SURFACECOOKING UTENSILS
[] [] [] [] [] [] [] [] [] [] [] [] [] [] [] [] [] [] [] [] [] []
*GOOD POOR
• Curved and warped pan bottoms.
Flat bottom and straight
sides.
• Tightfitting lids.
• Weight of handle does not tilt
pan. Pan is well balanced.
• Pan sizes match the amount
of food to be prepared and the
size of burner.
Made of material that
conducts heat well.
Easy to clean.
• Pan overhangs cooktop by more
than 2.5 cm (1").
• Heaw handle tilts pan.
• Flame extends beyond cooktop.
Note: Always use a utensilfor itsintended purpose. Follow manufactureCs
instructions. Some utensils were not made to be used in the oven or on the cooktop.
USINGTHE ACCESSORYGRIDDLE(SOMEMODELS)
[] [] [] [] [] [] [] [] [] [] [] [] [] [] [] [] [] [] [] [] [] []
Figure 7
Flat Side
Figure 6
Side with grill
The griddle is intended for direct food cooking and can be used on both sides
(Figures 6 and 7). Do not use pans or other cookware on the griddle. Doing so
could damage the finish. With the grate in position over the burner, set the
griddle on top of the grate positioning the notches in the griddle over the grate
fingers.
surfaceCooking
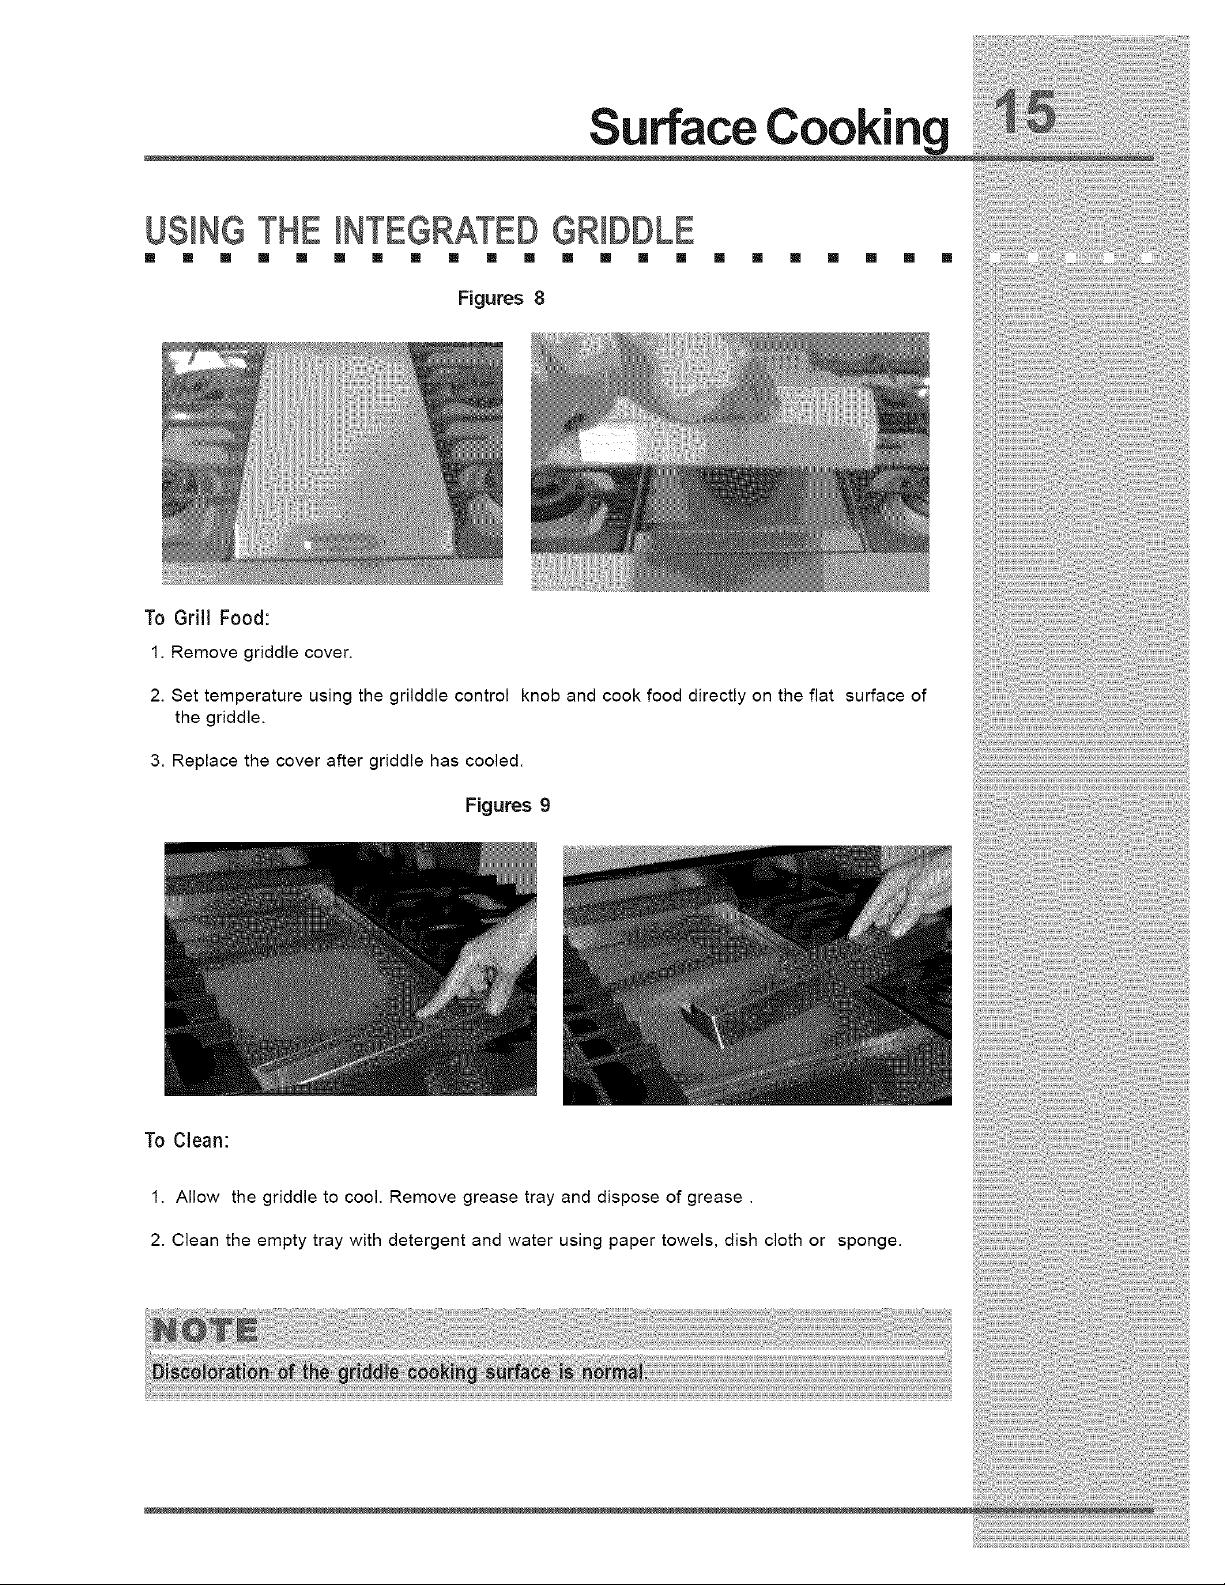
.LJSIN=GTHE !NTE=GR.ATEDG=R!DD.L.E, , • • • •
°o°
}
I i!_ t ::
To GrillFood:
I.Removegriddlecover.
2.Settemperature_s_ngthegr_dd_econtro_knobandcookfoodd_rect_yonthef_ats_aceof
3. Replace the cover after griddle has cooled. ....
Figures 9
To Clean:
1. Allow the griddle to cool. Remove grease tray and dispose of grease.
2. Clean the empty tray with detergent and water using paper towels, dish cloth or sponge.

Surface Cooking
US)NGTHE WOK STAND
[] [] [] [] [] [] [] [] [] [] [] [] [] [] [] [] [] [] [] [] [] []
The Wok Stand provided with your cooktop is designed to allow round-bottomed
woks to be used. It is recommended that you use a 14 inch diameter (35.5
cm) or (ess Wok. Also, using the front burners with the wok stand will produce
the best results. If properly posit(oned, the Wok Stand wil( not slide off the grate.
To Proper(y Position the Wok Stand:
With the grate in position over the burner, set the Wok Stand on top of the grate
positioning the center of the Wok Stand over the center of the cooktop grate fingers
(See Figure 10).
F(at-bottom woks with large flat
bottoms may also be used on your
cooktop Surface Burner Grates
without the Wok Stand. Insure the
stability of the flat-bottom wok
before cooking without the Wok
Stand. If unstable, DO NOT use the
flat-bottom wok without the Wok
Stand.
Round-bottom woks (with a
support ring) should NOT be
used. The supporting ring was not
designed for proper or stable use
on the Surface Burner Grates.
Figure 10
Surface Cooking
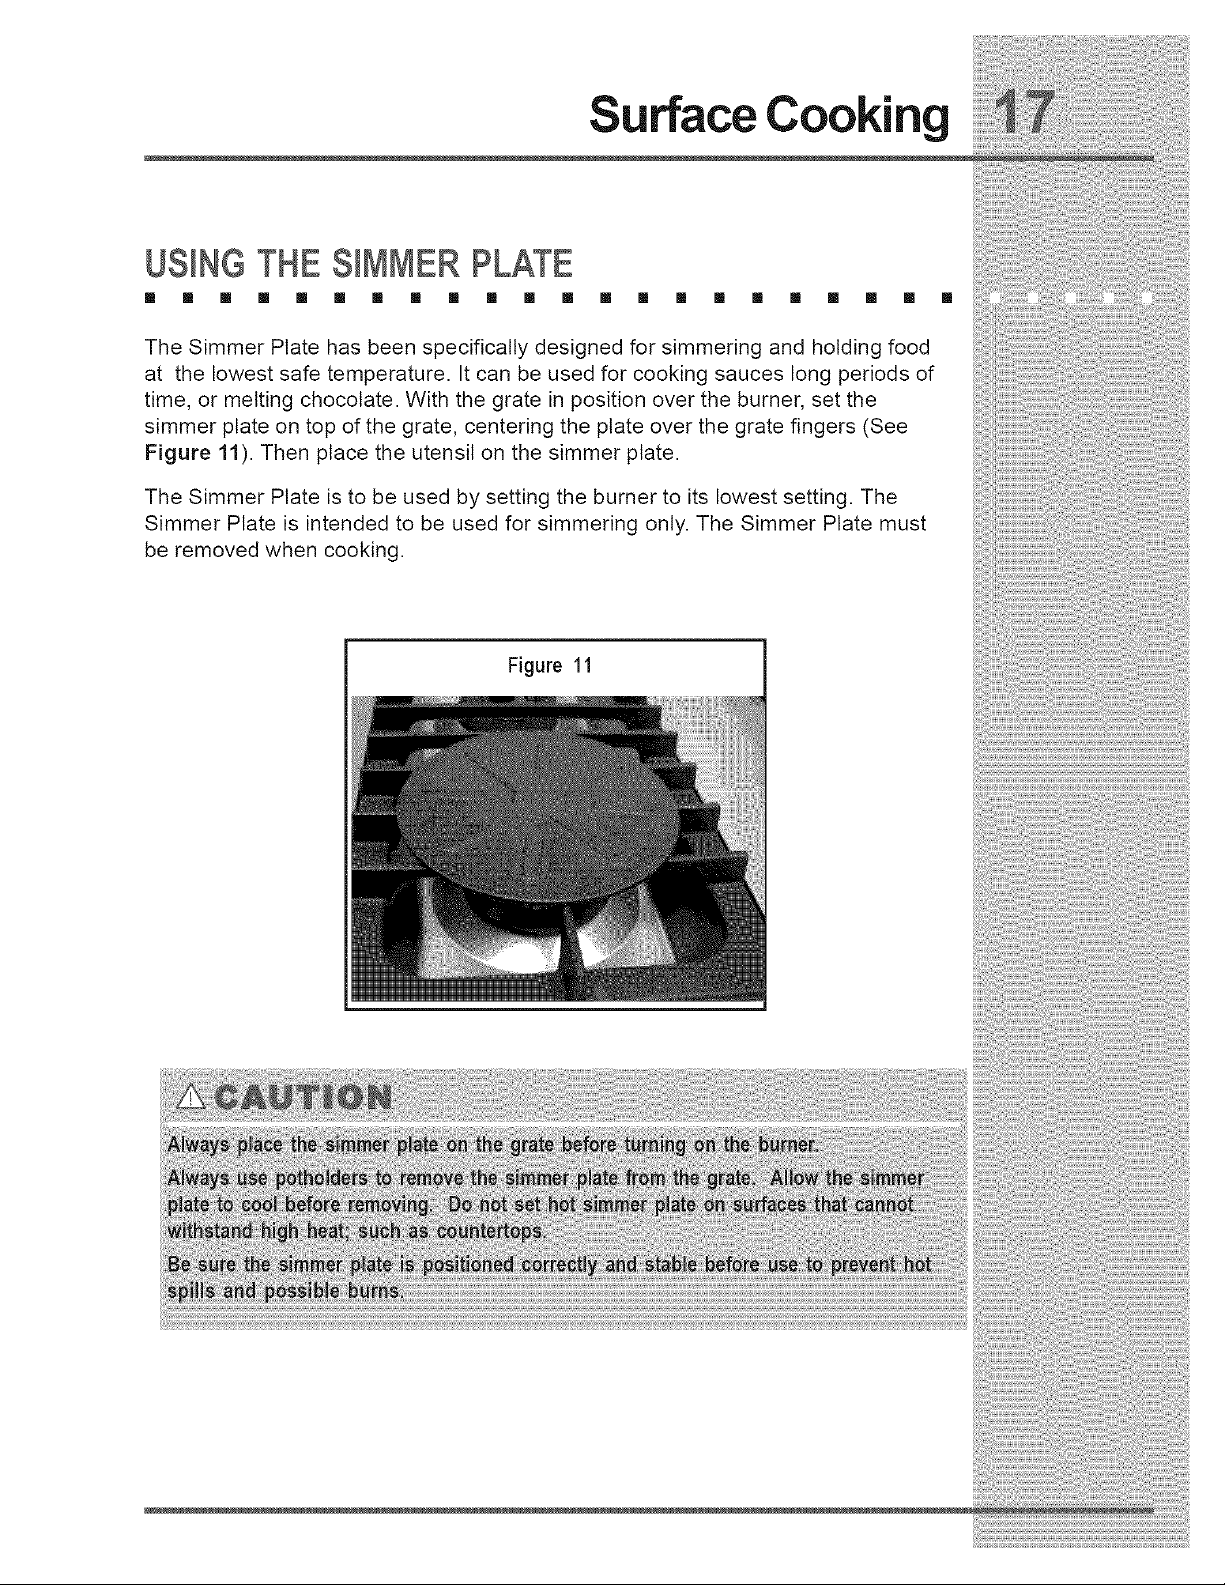
USINGTHE SIMMER PLATE
[] [] [] [] [] [] [] [] [] [] [] [] [] [] [] [] [] [] [] [] []
The Simmer Plate has been specifically designed for simmering and holding food
at the lowest safe temperature. It can be used for cooking sauces long periods of
time, or melting chocolate. With the grate in position over the burner, set the
simmer plate on top of the grate, centering the plate over the grate fingers (See
Figure 11). Then place the utensil on the simmer plate.
The Simmer Plate is to be used by setting the burner to its lowest setting. The
Simmer Plate is intended to be used for simmering only. The Simmer Plate must
be removed when cooking.
Figure 11
Operation
BEFORECOOKING
[] [] [] [] [] [] [] [] [] [] [] [] [] [] [] [] [] [] [] [] []
Ensure that the range has been installed by a qualified individual who has tested
the operation of the cooktop and oven in accordance with the Installation
Instructions. The burner rings, burner caps, grates, and knobs must be in place
for the cooktop to operate properly. All cooktop components must be clean. Be
certain that the gas and electrical power supplies to the range are operational.
Read this Use and Care Manual in its entirety prior to operating the cooktop and
oven.
SETTINGSURFACECONTROLS
[] [] [] [] [] [] [] [] [] [] [] [] [] [] [] [] [] [] [] [] []
Your range is equipped with burners which allow high, standard, and simmer
cooking.
Simmer Setting Burner: best used for simmering delicate sauces, etc.
Standard Setting Burner: used for most all surface cooking needs.
Always select a utensil that is suitable for the amount and type of food being
prepared. Select a flame size appropriate to the pan. Never allow flames to extend
beyond the outer edge of the pan.
Your cooktop is also equipped with 240 ° rotation flame control valves. These valves
provide enhanced control of the burner flame. Each burner bights automatically
from an electric igniter when its control knob is turn counter clockwise from the
"OFF" position to the "hi" position.
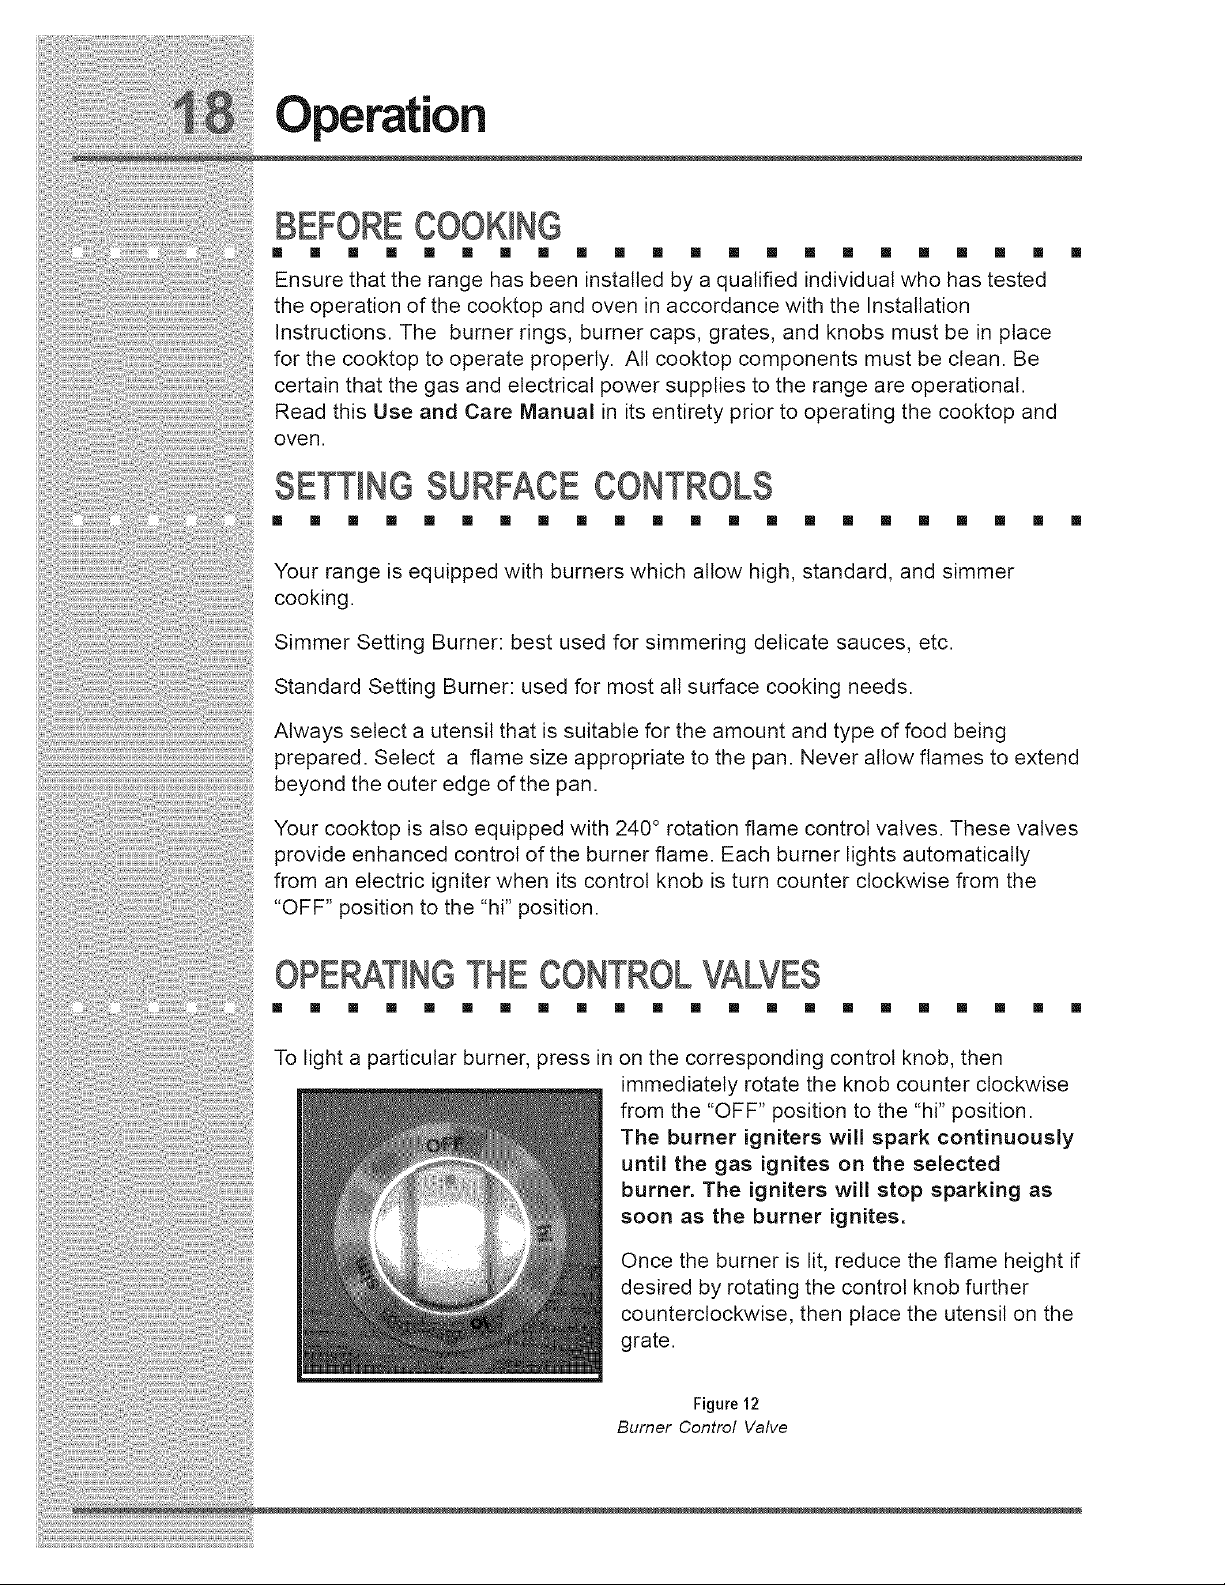
OPE TING THECONTROLVALVES
[] [] [] [] [] [] [] [] [] [] [] [] [] [] [] [] [] [] [] [] [] []
To light a particular burner, press in on the corresponding control knob, then
immediately rotate the knob counter clockwise
from the "OFF" position to the "hi" position.
The burner igniters will spark continuously
until the gas ignites on the selected
burner. The igniters will stop sparking as
soon as the burner ignites.
Once the burner is lit, reduce the flame height if
desired by rotating the control knob further
counterclockwise, then place the utensil on the
grate.
Figure 12
Burner Control Valve
Operation
Operation
SE ING THE BURNERF ME HEIGHT
[] [] [] [] [] [] [] [] [] [] [] [] [] [] [] [] [] [] [] [] [] []
Setting the proper burner flame height for the desired cooking process and
selected utensil will result in superior cooking performance, while also saving time
and energy. Follow these recommendations for best results:
1. Use low or medium flame heights when cooking in utensils that are poor
conductors of heat, such as glass, ceramic, and cast iron cooking vessels.
Reduce the flame height until it covers approximately 1/3 of the utensil
diameter. This will ensure even heating within the utensil and reduce the
likelihood of burning or scorching of food.
2. Reduce the flame if it is extending beyond the bottom of the utensil. A flame
that extends up the sides of the utensil is potentially dangerous, heats the
utensil handle and kitchen instead of the food, and wastes energy.
3. Reduce the flame height to the minimum level necessary to perform the
desired cooking process. Remember that food cooks just as quickly at a
gentle boil as it does at a vigorous, rolling boil. Maintaining a higher boil than is
necessary wastes energy, cooks away moisture, and causes a loss in food
flavor and nutrient level.
ENERGYSAVINGTIPS
[] [] [] [] [] [] [] [] [] [] [] [] [] [] [] [] [] [] [] [] [] []
* Always use utensils with flat, smooth bottoms and tight-fitting lids to retain
heat and moisture.
* Minimize the amount of liquid or fat to reduce cooking times.
* Select cookware of the proper size, material and construction for the cooking
process being performed.
* Adjust the flame height to fit the utensil size.
* After liquid reaches a boil, reduce the heat to maintain a simmer rather than a
rolling boil.
* Use a timer rather than repeatedly removing the lid to check food.
* Thaw foods prior to cooking to reduce cooking time.
i!ii!i!ii!i!ii!i!i;!!ililil;il;il;il;iiiiiiiiil;!i;!i!i;;i!i;;i;;i;;iiiiii!;¸i¸¸;ii¸¸¸¸¸_¸¸¸¸¸_¸¸¸¸¸_;¸¸¸!ii!!__¸¸¸¸¸_;;_;¸¸i!:_ __ _ .....
Getting Started
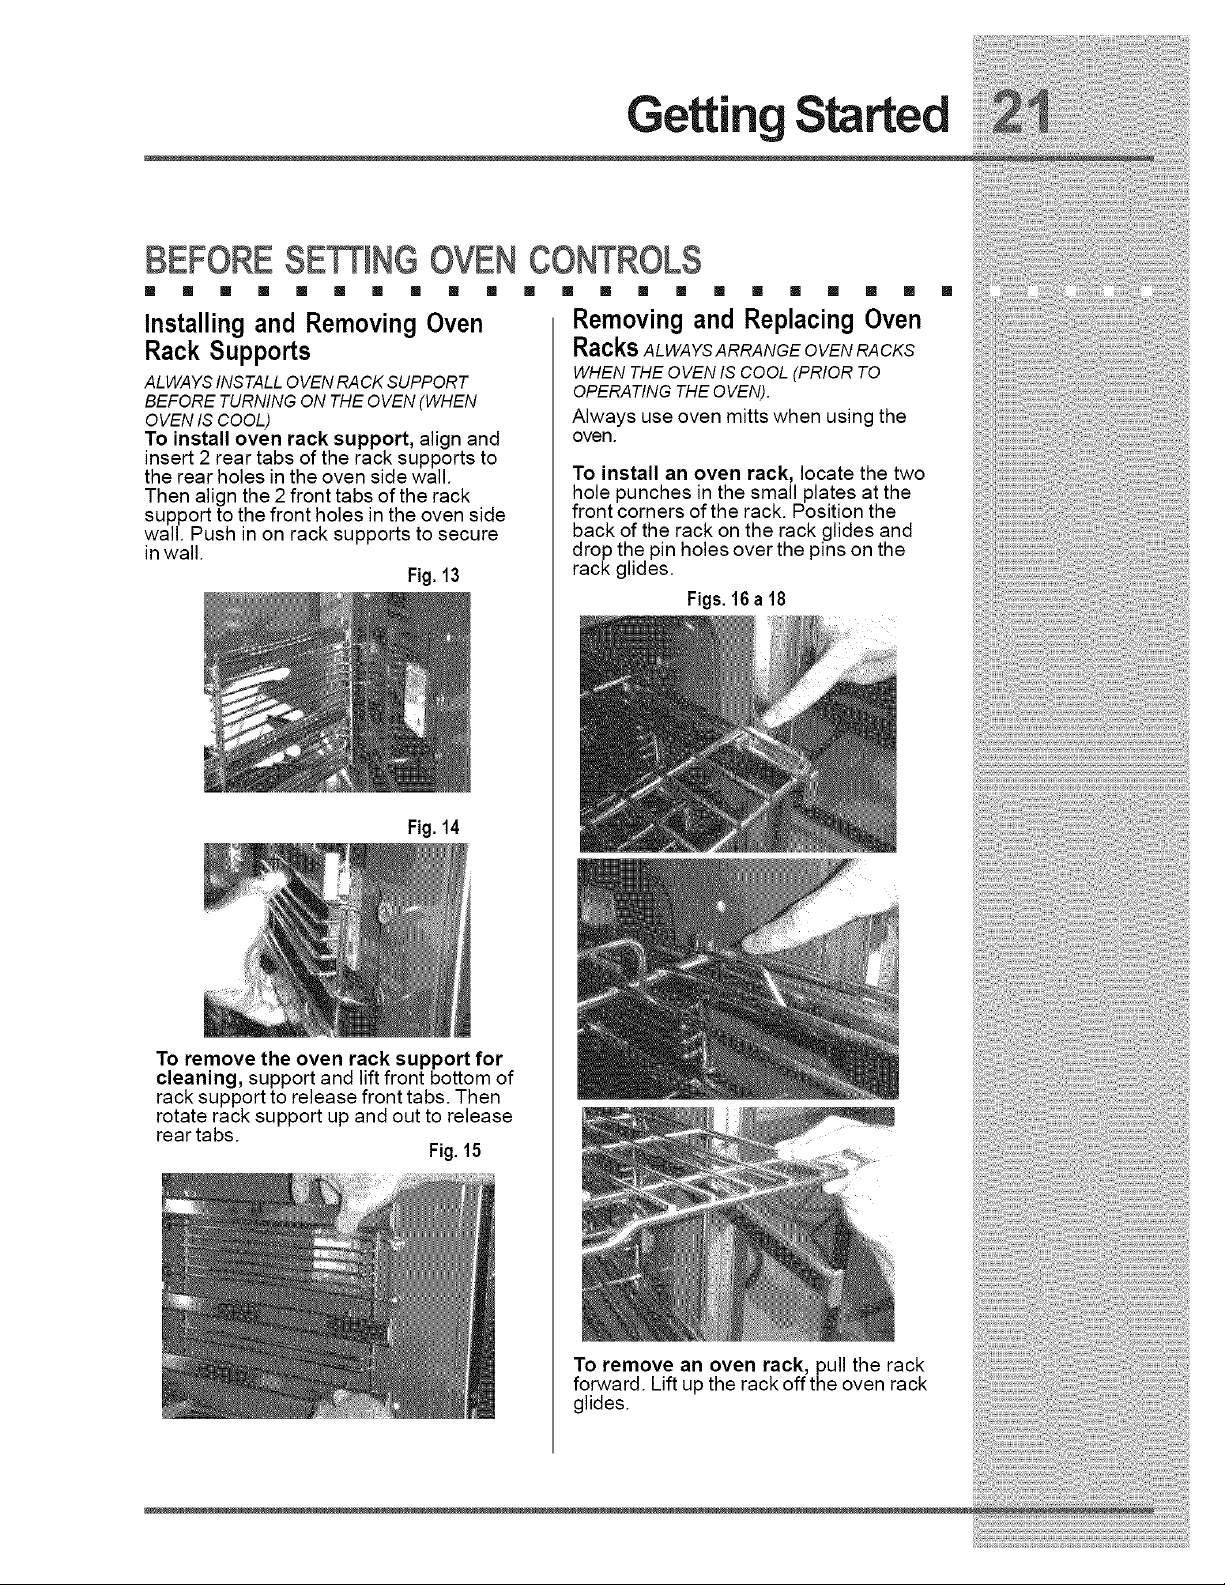
BEFORESEeiNG OVENCONTROLS
[] [] [] [] [] [] [] [] [] [] [] [] [] [] [] [] [] [] [] [] [] []
Installing and Removing Oven Removing and Replacing Oven
Rack Supports RacksALWAYSARRANGEOVENRACKS
WHEN THE OVEN IS COOL (PRIOR TO
ALWAYS INSTALL OVEN RACK SUPPORT OPERATING THE OVEN).
BEFORE TURNING ON THE OVEN (WHEN
OVENIS COOL) Always use oven mitts when using the
To install oven rack support, align and oven.
insert 2 rear tabs of the rack supports to
the rear holes in the oven side wall. To install an oven rack, locate the two
Then align the 2 front tabs of the rack hole punches in the small plates at the
support to the front holes in the oven side front corners of the rack. Position the
wall. Push in on rack supports to secure back of the rack on the rack glides and
in wall. drop the pin holes over the pins on the
Fig. 13 rack glides.
Figs. 16a 18
Fig. 14
To remove the oven rack support for
cleaning, support and lift front bottom of
rack support to release front tabs. Then
rotate rack support up and out to release
rear tabs.
Fig. 15
To remove an oven rack, pull the rack
forward. Lift up the rack off the oven rack
glides.
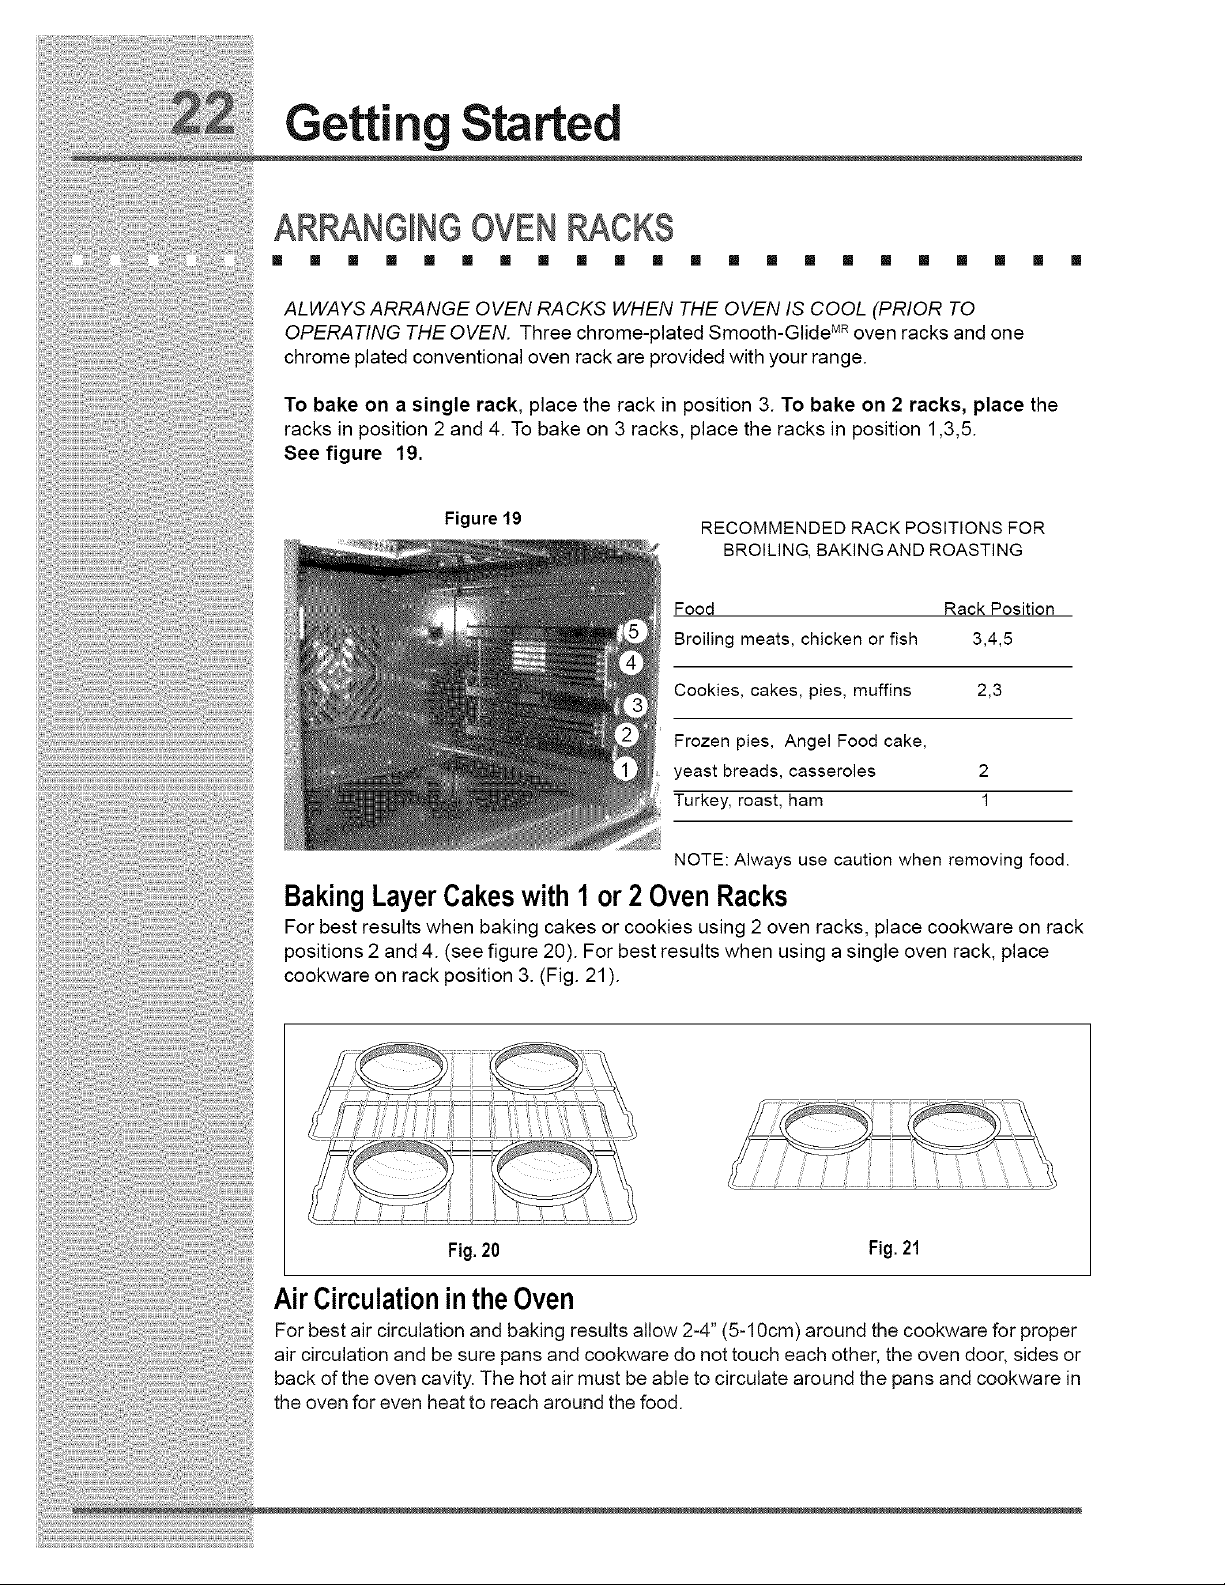
NOTE: Always use caution when removing food.
Baking Layer Cakes with 1 or 2 Oven Racks
For best results when baking cakes or cookies using 2 oven racks, place cookware on rack
positions 2 and 4. (see figure 20). For best results when using a single oven rack, place
cookware on rack position 3. (Fig. 21 ).
Fig.20 Fig. 21
AirCirculationin theOven
For best air circulation and baking results allow 2-4" (5-10cm) around the cookware for proper
air circulation and be sure pans and cookware do not touch each other, the oven door, sides or
back of the oven cavity. The hot air must be able to circulate around the pans and cookware in
the oven for even heat to reach around the food.
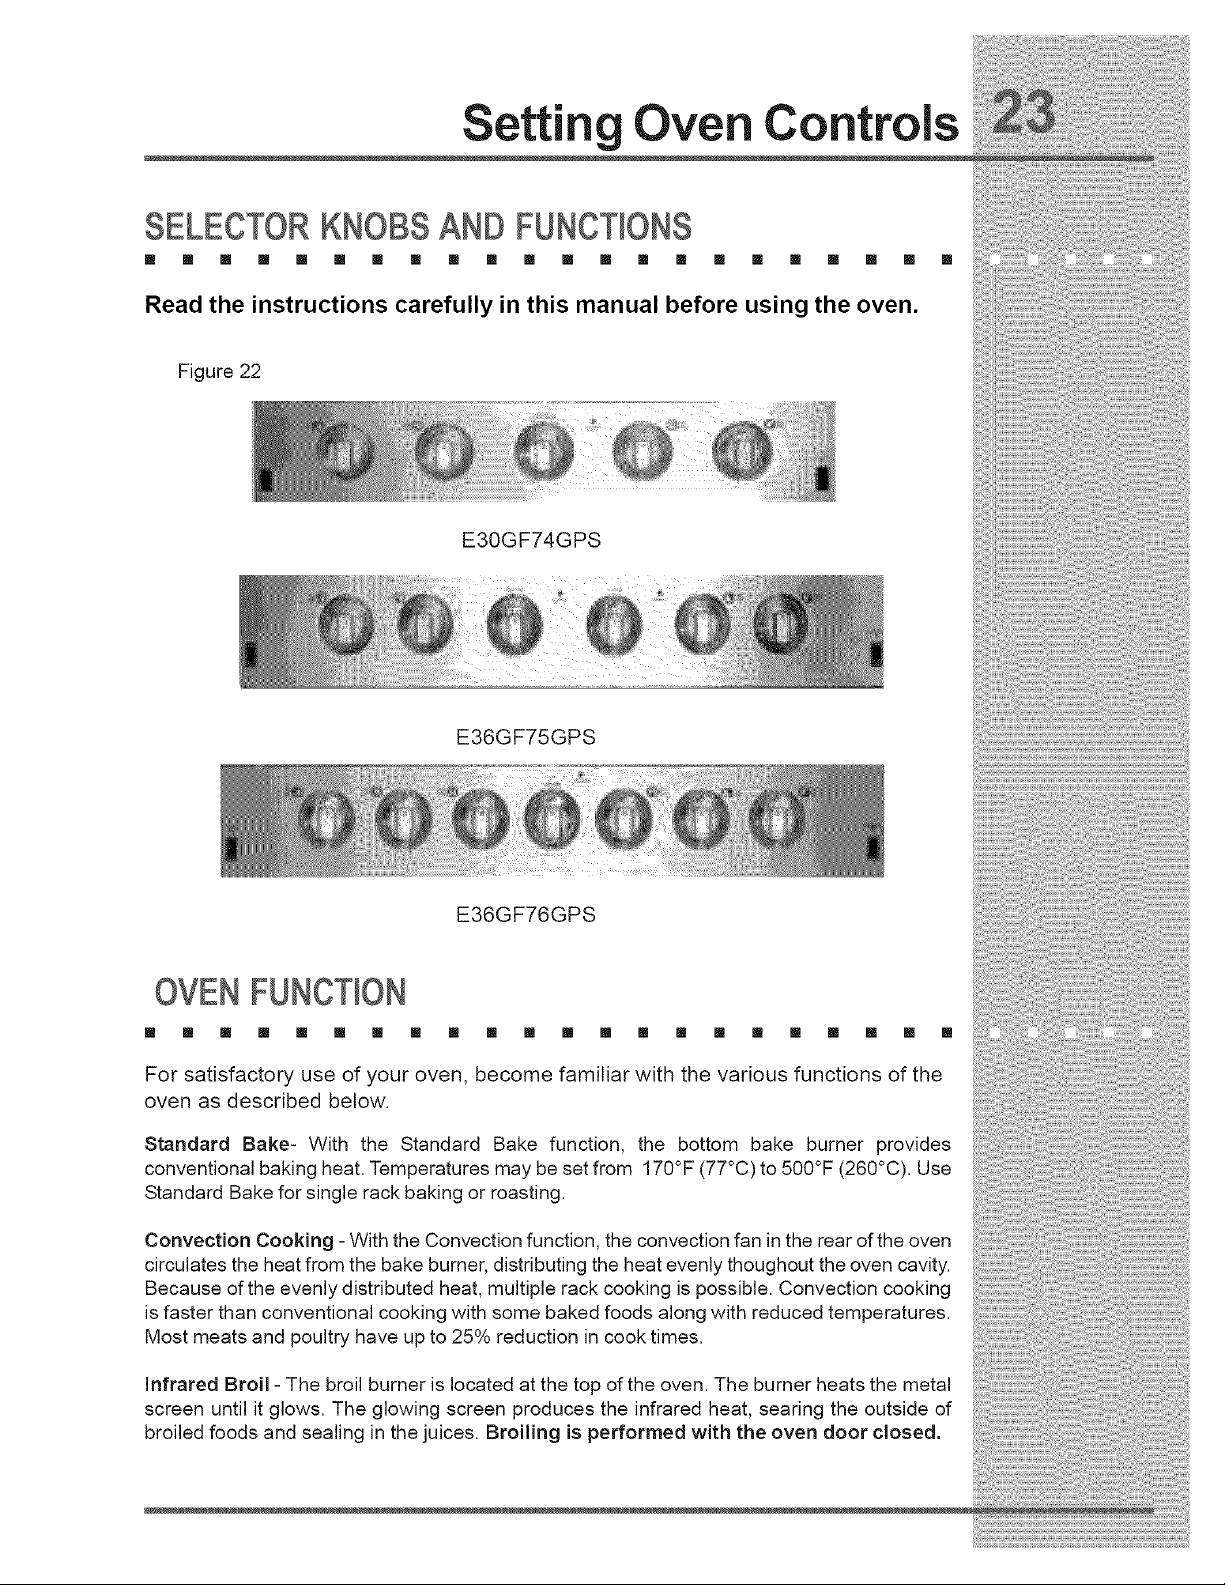
Setti Oven Controls
SELECTORKNOBSAND FUNCTIONS
[] [] [] [] [] [] [] [] [] [] [] [] [] [] [] [] [] [] [] [] []
Read the instructions carefully in this manual before using the oven.
Figure 22
E30GF74GPS
E36GF75GPS
E36GF76GPS
OVEN FUNCTION
[] [] [] [] [] [] [] [] [] [] [] [] [] [] [] [] [] [] [] [] [] []
For satisfactory use of your oven, become familiar with the various functions of the
oven as described below.
Standard Bake- With the Standard Bake function, the bottom bake burner provides
conventional baking heat. Temperatures may be set from 170°F (77°C) to 500°F (260°C). Use
Standard Bake for single rack baking or roasting.
Convection Cooking - With the Convection function, the convection fan in the rear of the oven
circulates the heat from the bake burner, distributing the heat evenly thoughout the oven cavity.
Because of the evenly distributed heat, multiple rack cooking is possible. Convection cooking
is faster than conventional cooking with some baked foods along with reduced temperatures.
Most meats and poultry have up to 25% reduction in cook times.
Infrared Broil - The broil burner is located at the top of the oven. The burner heats the metal
screen until it glows. The glowing screen produces the infrared heat, searing the outside of
broiled foods and sealing in the juices. Broiling is performed with the oven door closed.
Cooking instructions
[] [] [] I!= [] [] [] I!= [] [] [] I!= [] [] [] I!= [] [] [] I!= [] []
This cooking mode is for normal baking, roasting or warming. The temperature
control knob can be set at any temperature from 170°F (77°C) to 500°F (260°C).
To set the Bake temperature to 350°F:
1. Arrange interior oven racks to desired positions..
2. Turn "Oven" selector knob to 350°F.
3. The oven indicator light will turn on, and the oven will begin to preheat. Once
the oven temperature reaches 350°F the oven indicator light will turn off.
The oven indicator light will cycle on and off until the Bake selector knob is turned
to the "OFF" position.
To change the baking temperature (example 350°F to 425°F):
1 After the oven is already been set at 350°F, and the oven temperature needs
to be changed to 425°F, turn the temperature control knob to 425°F. The oven
indicator light wilt turn off when the oven temperature reaches 425°F.
OVEN VENT
Do not block the duct at the rear of the range when cooking in the oven. It is
important that the flow of hot air from the oven and fresh air into the oven burner
never be interrupted. Avoid touching the vent openings or nearby surfaces during
oven or broiler operation - they may become hot.
Cooking instructions
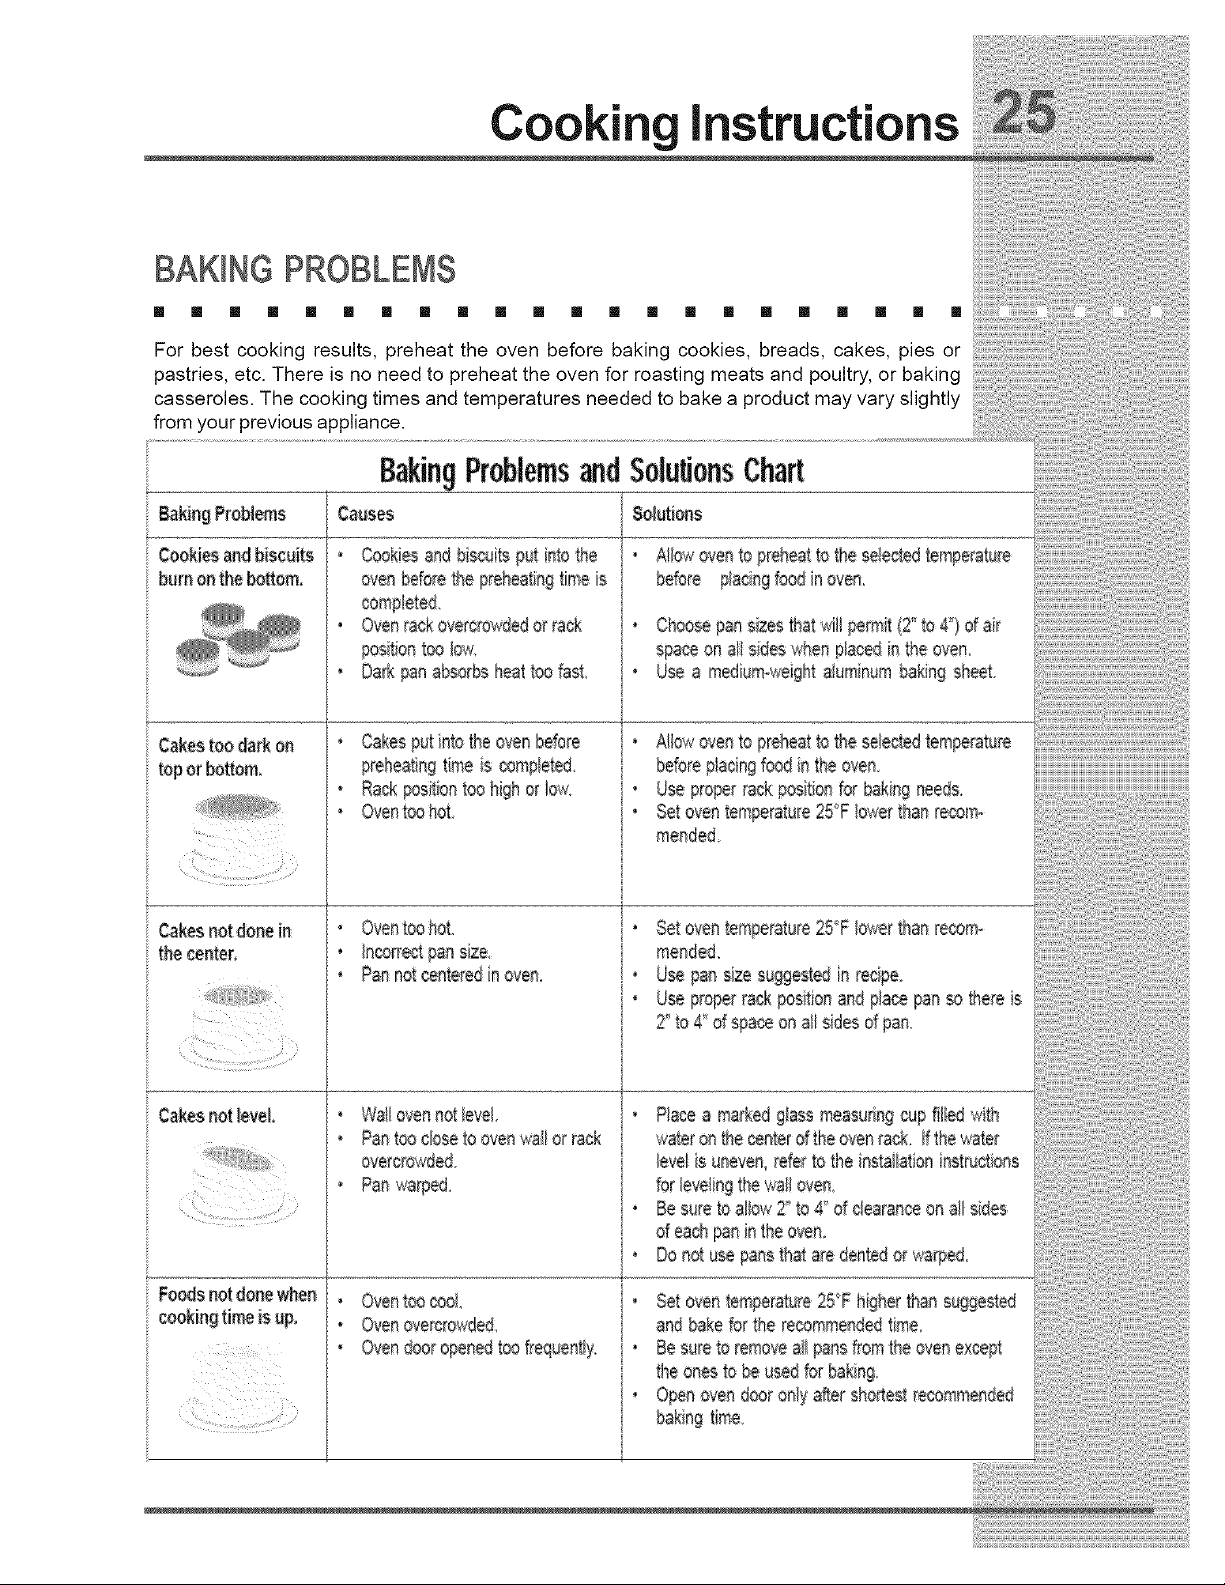
BAKINGPROBLEMS
[] [] [] [] [] [] [] [] [] [] [] [] [] [] [] [] [] [] [] [] [] []
For best cooking results, preheat the oven before baking cookies, breads, cakes, pies or
pastries, etc. There is no need to preheat the oven for roasting meats and poultry, or baking
casseroles. The cooking times and temperatures needed to bake a product may vary slightly
from your previous appliance.
Cakestoodarkon
toporbottom,
Bakin9 Pr lems SoluUonsChart
Causes
, CookiesandbiscuS put intothe
ovenbeforethe preheatingtime s
, Ovenrackovercrowdedor rack
_sition too bw:
, Darkpanabsorbsheattoo fast
* Cakesputnto theovenbefore
preheatingtimeis completed
, Rackposit:iontoo highor low.
, @entoo,hot,
Oventoohal
/ncor_e_pansize,
Pannotcenteredin oven.
Wallovennotlevel
Pantoo cbse to ovenwalior rack
overcrowded.
Pan warped
Oven too cool
Oven overcrowded
Oven door opened too frequently,
, AiI:owovento preheatto the s@etedtemperature
_fo_e
, Ch®se pansizesthatwil! permit(2 to 4_')of air
spaceon all sideswhen placedin theoven.
, Use a medum-weightalumnum bakingsheet
A{Io,7_ovento preheatto the selectedtem_ratare
beforeplacingfoodinthe oven,
• Useproperrack positionfor bakng needs.
• Setoventemperature25F towerthanre@too
men@&
, Set oventemperature25'_Flowerthanrecomo
mended.
, U_ pan s}zesuggestedin recpe.
, U_ properrack positionand placepan so _ere s
2_to 4" d spaceon airsidesd pan_
* Ptacea markedglassmeasuringcup flied wi_
wateronthe_nter tithe ovenrack. if thewater
_evelis uneven,referto the installationinstru@ons
for BeveBingthe wa_oven
* Besureto allowZ* to 4' of clearanceon aHsides
d eachpanin theoven.
* Donot usepansthatare dentedor warped.
Setoventemperature25_Fhigherthan suggested
and bakeforthe recommendedtime.
* Bes_reto removeall pansfromthe ovenexcept
the onesto be usedfor baking.
, Openoven dooronly after shortestrecommended
bakingt_me.
Cooking instructions
CONVECT)ONBAK)NGAND ROAST)NG
[] [] [] I!= [] [] [] I!= [] [] [] I!= [] [] [] I!= [] [] [] I!= [] []
As a general rule, convect(on baking wilt allow preparation of most foods at reduced
temperatures for shorter periods of time. while aliowing superior results.
Typically, you can reduce the standard bake temperature the recipe recommends
by 25°F (approx. 15°C). In addition, the recipe's recommended cook time can also
be reduced 10% to 25%.
In the convection mode, the convection fan located in the rear of the oven cavity
draws a(r from the oven chamber, and directs the heated a(r back into the chamber
through the convection baffle. The baffle distributes the a(r evenly to ensure uniform
results. Temperatures may be set from 170°F (77°C) to 500°F (260°C).
GeneralConvectioninstructionsfor Baking
1 When baking with the convection mode, start by decreasing your recipe's
recommended cooking temperature by 25°F. Then, decrease your recipe's
recommended cooking time by 25%.
Time reductions will vary depending on the amount and type of food to be cooked.
2 Baking pans with no sides or very low sides should be used to bake on so heated air
can be allowed to circulate around the food. Food baked on a pan with a darker finish
will cook faster.
To set oven for baking with the convection mode, using a recipe requiring 350°F :
1. Arrange oven racks to desired position.
2. Turn the "Oven" selector knob to 325°F.
3. The oven indicator light will turn on, and the oven will begin to preheat.Once the oven
temperature reaches 325°F the oven indicator light will turn off.
4. Press fan switch to the "On" position to begin convection cooking..
The oven indicator )ight wilt cycle on and off until the "Oven" selector knob is turned
to the "OFF" position.
To change the Convection Bake temperature (example 325°F to 400°F):
1 After the oven has already been set to 325°F, and the oven temperature needs to be
changed to 400°F, turn the Bake selector knob to 400°E When the oven temperature
reaches 400°F, the oven indicator light will turn off.
aking Problems
CONVECTIONBAKINGAND ROASTING
[] [] [] [] [] [] [] [] [] [] [] [] [] [] [] [] [] [] [] [] [] []
To roast meats and poultry, the Convection mode is recommended to produce
meats and poultry that are deliciously seared on the outside and succulently juicy on
the inside in record time
Foods that are exceptional when prepared with the Convection mode include: beef,
pork, ham, lamb, chicken, turkey and Cornish hens.
When preparing meats for convection cooking, use the broiler pan and insert which
comes with your range. Placing the food on the top of the pan insert will allow the
heat to circulate around the food.
General Convection Instructions for Roasting
1. When roasting with the convection mode, set the oven temperature to your recipe's
recommended cooking temperature. Start by decreasing your recipe's recommended
cooking time by 25%, adding more cooking time if needed for your desired
Time reductions will vary depending on the size and type of food to be cooked.
2. When roasting meats, always roast meats fat side up. Always use a pan that fits the
size of the food being prepared, in most cases, the broiler pan and insert can be used.
No basting is required when the fat side is up. Do not add water to the pan. it will cause
a steamed effect. Roasting is a dry heat process.
3. Poultry should be placed breast side up, in a shallow pan that fits the size of the food.
Again, your broiler pan and insert accompanying the range can be used. Poultry can be
basted with butter, margarine or oil before and during roasting.
4. When roasting with the Convection mode, pans with tall sides are not recommended.
They interfere with the circulation of heated air over the food.
5. When using a meat thermometer, insert the probe half way into the center of the thickest
portion of the meat. (For poultry, insert the thermometer probe between the body and leg
into the thickest part of the inner thigh) To ensure an accurate reading, the tip of the probe
should not touch the bone, fat or grisle. Check the meat thermometer 2/3 of the way
through the recommended roasting time. After reading the meat thermometer once, insert
it 1/2 inch further, then take a second reading. If second reading registers lower than the
first, continue cooking the meat.
6. Remove meats from the oven when the thermometer registers 5°F to 10°F below the
desired temperature. The meat will continue to cook after removal. Allow 15 to 20
minutes after roasting in order to make carving easier.
Cooking instructions
CONVECT)ONBAK(NGAND ROAST)NG
[] [] [] [] [] [] [] [] [] [] [] [] [] [] [] [] [] [] [] [] [] []
7 The Convection mode is not recommended for meats or poultry cooked with a cooking
bag, foil tent or other cover. Food cooked with these methods will produce better results
when using the standard Bake mode.
8 Roasting times will always vary according to the size, shape and quality of meats and
poultry. Less tender cuts of meat are best prepared in the standard Bake mode. and may
require moist cooking techniques. Follow your favorite cookbook recipes.
9 Reduce splatter by lining the bottom of the roasting pan with lightly crushed aluminum
foil.
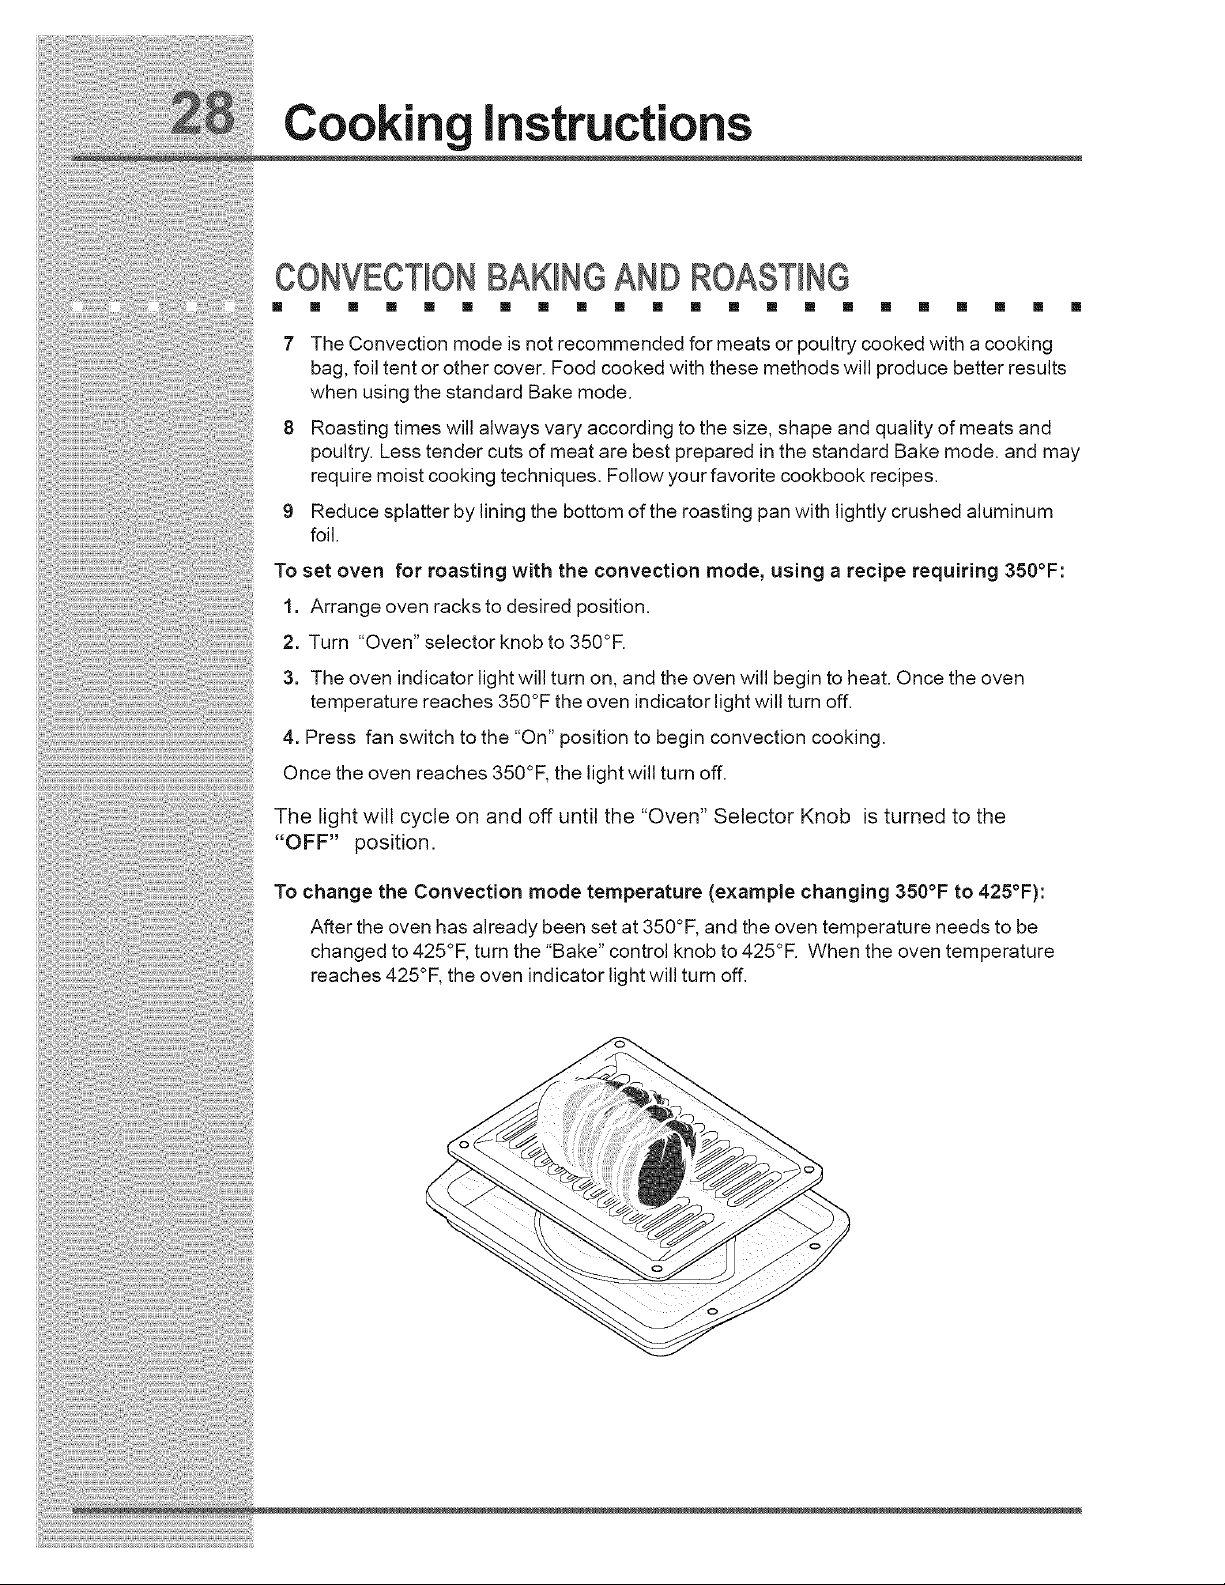
To set oven for roasting with the convection mode, using a recipe requiring 350°F:
1. Arrange oven racks to desired position.
2. Turn "Oven" selector knob to 350°R
3. The oven indicator light will turn on, and the oven will begin to heat. Once the oven
temperature reaches 350°F the oven indicator light will turn off.
4. Press fan switch to the "On" position to begin convection cooking.
Once the oven reaches 350°F, the light will turn off.
The light will cycle on and off until the "Oven" Selector Knob is turned to the
"OFF" position.
To change the Convection mode temperature (example changing 350°F to 425°F):
After the oven has already been set at 350°F, and the oven temperature needs to be
changed to 425°E turn the "Bake" control knob to 425°R When the oven temperature
reaches 425°F, the oven indicator light will turn off.
ililiiiiil;iiiiii!i!iilii!i!i!i!!!i!i!i!iiiiii!iiiiiiiillii!iiiiii!iiiiii!iiiiiiiiiiii!!!i
i ! i!ii!iiiii! i i!!i!ii1i !i i Lq i ii! iiii !ii ! i! ii! i i !ii !ii!!ii ! !i ! ! iii ii iiiiiiiiiiiiiii!ii !iii!ii!
Cook|rig" Instr'uct|ol3s"
BROILING
[] [] [] [] [] [] [] [] [] [] [] [] [] [] [] [] [] [] [] [] [] []
Broiling is a method of cooking tender cuts of meat directly under the infrared
broiler in the oven. Broiling in the oven is accomplished with the oven door closed.
It is normal and necessary for some smoke to be present to give the food a broiled
fl avo r.
Preheating
Preheating is suggested when searing rare steaks (Remove the broiler pan before preheating ::::
with the infrared broiler. Foods will stick on hot metal). To preheat, turn the 'Oven selector
knob to the'Broil position. Wait for the burner to become hot, approximately 2 minutes.
Prehea ting is not ne cessa ry whe n broll ing meat we ll-done. ::
To Broil
Broil one side until the food is browned turn and cook on the second side. Season and
serve. Always pull the rack out to the 'stop position before turning or removing food.
Set!ing Broil ::
The'Oven selector knob controls the Broil feature. When broiling, heat radiates downward
from the oven broilerforeven coverage. The Broil feature temperature is h00 F (260 C).
The broil pan and insert used together allow dripping grease to drain and be kept away from
the high heat of the oven broiler. DO NOT use the broil pan without the insert. DO NOT
cover the broil pan insert with foil. The exposed grease could catch fire.
Tosetthe ovento Broil:
1. Place the broiler pan insert on the broiler pan. Then place the food on the broiler pan
insert. DO NOT use the broiler pan without the insert. DO NOT cover the broiler insert
with foil. The exposed grease could catch fire.
2. Arrange the interior oven rack and place the broiler pan on rack. Be sure to center the
broiler pan and position directly under the broil burner. If preheating the broil burner
first, position the broiler pan after the broil burner is preheated.
3. Turn selector knob to Broil.
The oven indicator light will remain on until the selector knob is turned to the off position or
the temperature control cycles off.
Cooking instructions
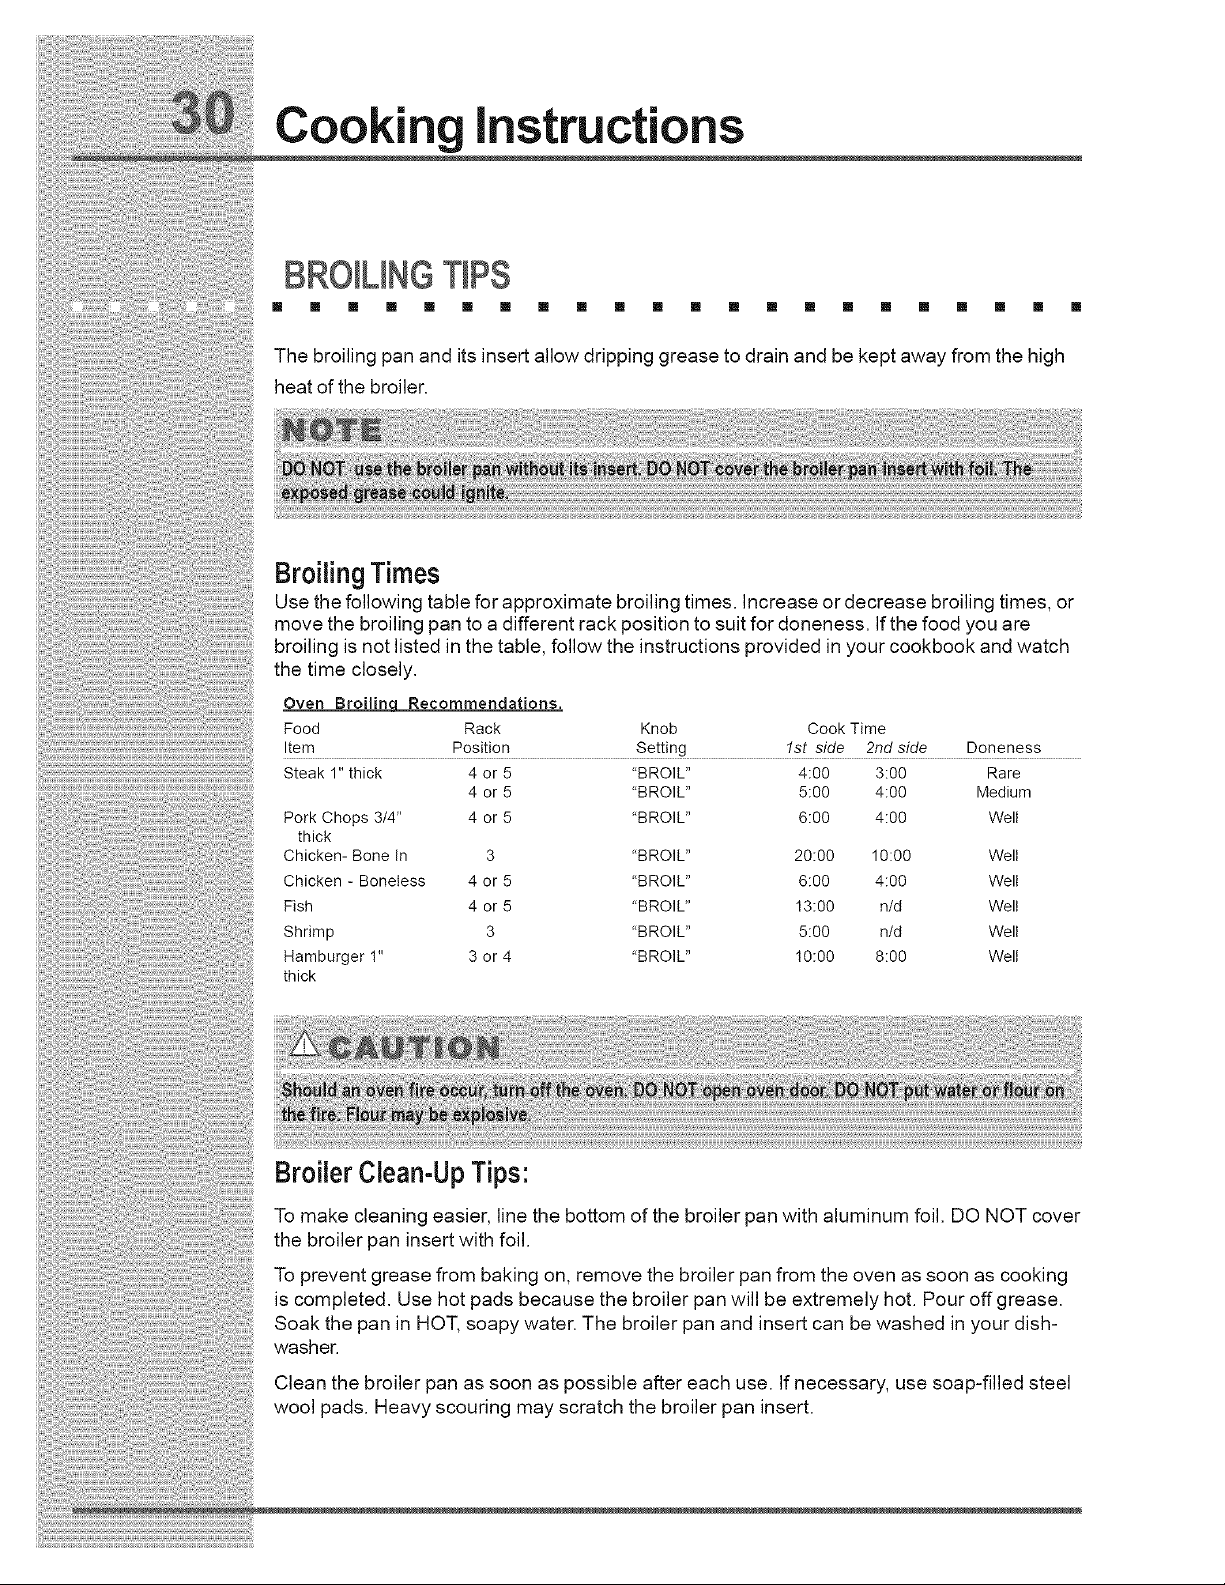
BROILINGTIPS
[] [] [] Ill [] [] [] Ill [] [] [] Ill [] [] [] Ill [] [] [] Ill []
The broiling pan and its insert allow dripping grease to drain and be kept away from the high
heat of the broiler.
Broiling Times
Use the following table for approximate broiling times. Increase or decrease broiling times, or
move the broiling pan to a different rack position to suit for doneness. If the food you are
broiling is not listed in the table, follow the instructions provided in your cookbook and watch
the time closely.
Oven Broilinq Recommendations.
Food Rack Knob Cook Time
!tfi m..............................................................................eos!t!Rn .........................................................................Sett!% ........................................................l-_t £!de 2r_d _Si0_e.......................E)°neness .......................
Steak 1" thick 4 or 5 "BROIL" 4:00 3:00 Rare
4 or 5 "BROIL" 5:00 4:00 Medium
Pork Chops 3/4" 4 or 5 "BROIL" 6:00 4:00 Well
thick
Chicken- Bone In 3 "BROIL" 20:00 10:00 Well
Chicken - Boneless 4 or 5 "BROIL" 6:00 4:00 Well
Fish 4 or 5 "BROIL" 13:00 n/d Well
Shrimp 3 _'BROIL" 5:00 n/d Well
Hamburger I" 3 or 4 _'BROIL" 10:00 8:00 Well
thick
Broiler Clean-UpTips:
To make cleaning easier, line the bottom of the broiler pan with aluminum foil. DO NOT cover
the broiler pan insert with foil.
To prevent grease from baking on, remove the broiler pan from the oven as soon as cooking
is completed. Use hot pads because the broiler pan will be extremely hot. Pour off grease.
Soak the pan in HOT, soapy water. The broiler pan and insert can be washed in your dish-
washer.
Clean the broiler pan as soon as possible after each use. If necessary, use soap-filled steel
wool pads. Heavy scouring may scratch the broiler pan insert.
Careand
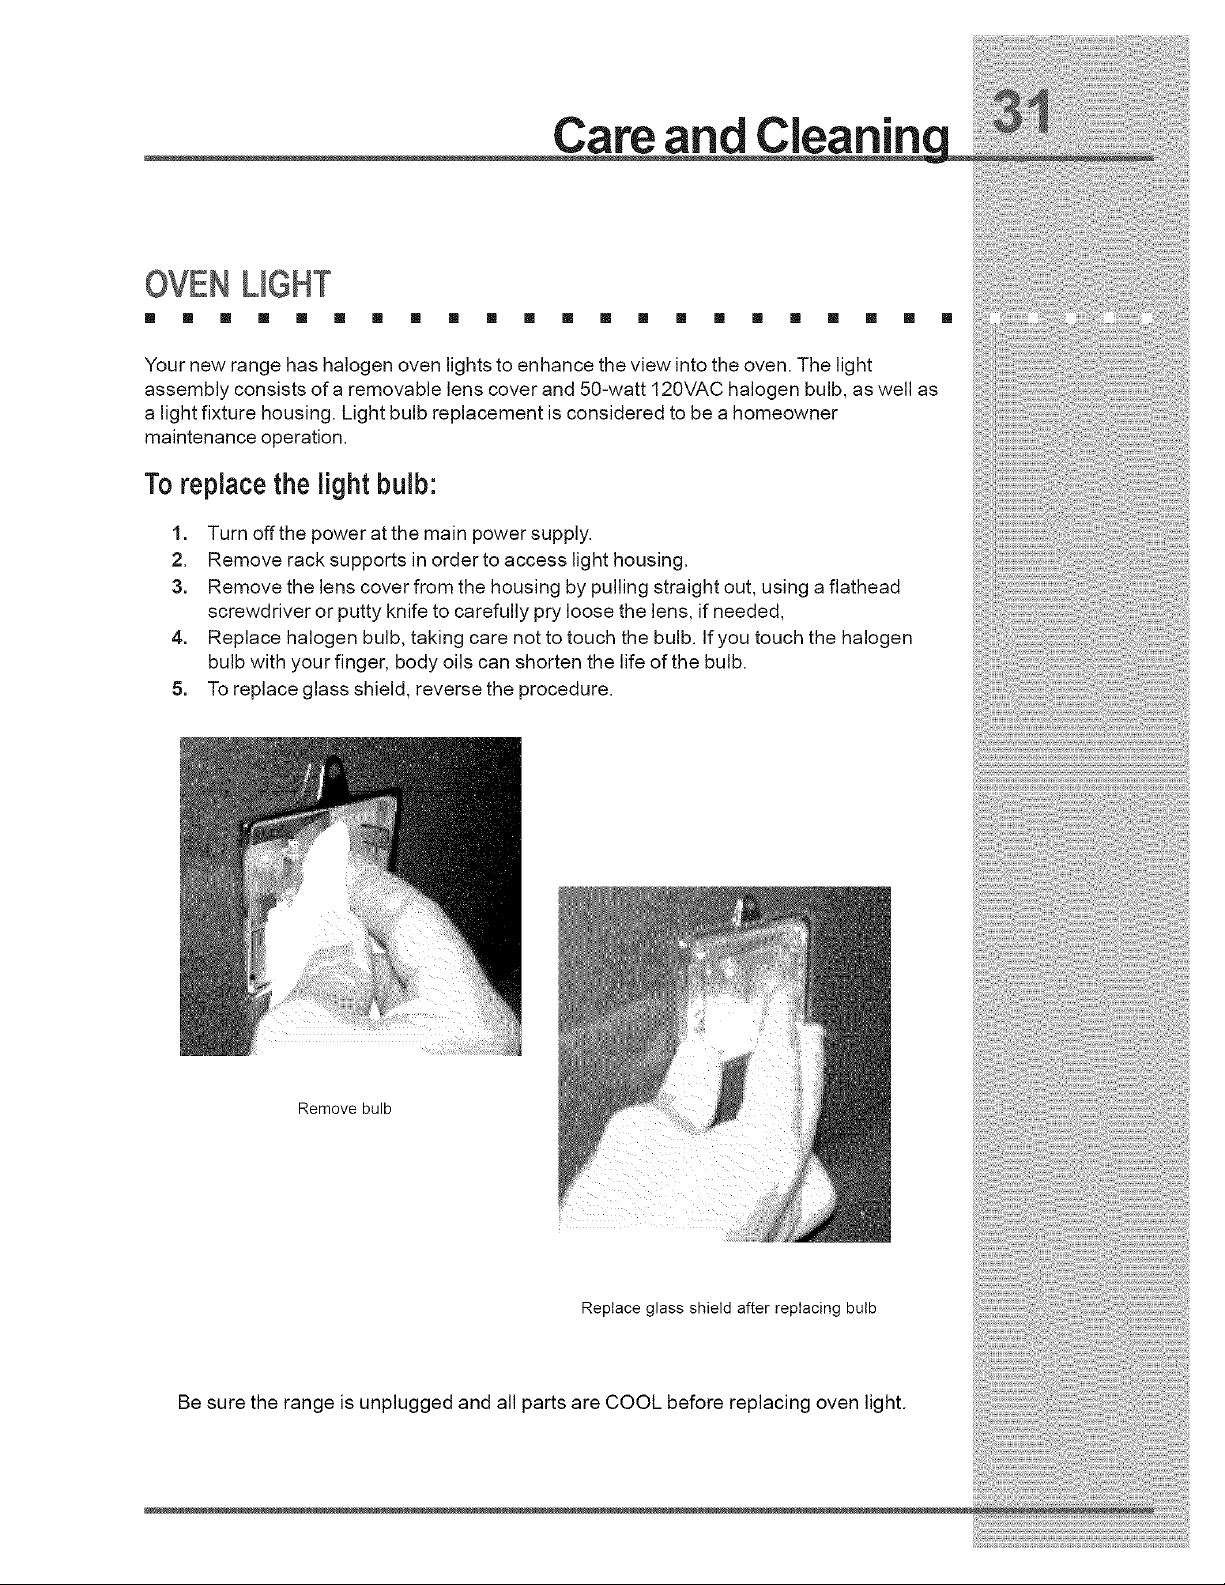
OVENLIGHT
[] [] [] [] [] [] [] [] [] [] [] [] [] [] [] [] [] [] [] [] [] []
Your new range has halogen oven lights to enhance the view into the oven. The light
assembly consists of a removable lens cover and 50-watt 120VAC halogen bulb, as well as
a light fixture housing. Light bulb replacement is considered to be a homeowner
maintenance operation.
To replace the light bulb:
1. Turn off the power at the main power supply.
2. Remove rack supports in order to access light housing.
3. Remove the lens cover from the housing by pulling straight out, using a fiathead
screwdriver or putty knife to carefully pry loose the lens, if needed,
4. Replace halogen bulb, taking care not to touch the bulb. If you touch the halogen
bulb with your finger, body oils can shorten the life of the bulb.
5. To replace glass shield, reverse the procedure.
Remove bulb
Replace glass shield after replacing bulb
Be sure the range is unplugged and all parts are COOL before replacing oven light.
Care &
CLEANINGTIPS FOR NGE OVEN
[] [] [] [] [] [] [] [] [] [] [] [] [] [] [] [] [] [] [] [] [] []
PorcelainEnamelOven
The oven interior is porcelain on steel and it is safe to clean using oven cleaners.
GeneralCleaning
Remove soils using hot, soapy water. Do not allow food spills with a high sugar or acid
content (such as milk, tomatoes, sauerkraut, fruit juices or pie filling) to remain on the
surface as they may cause a dull spot even after cleaning.
To Remove Heavy Soil:
1. Allow a dish of ammonia to sit in the oven overnight or for several hours with the oven door
closed. Clean softened dirt spots using hot, soapy water. Rinse well with water and a clean
cloth.
2. If soil remains, use a soap-filled scouring pad or a nonabrasive cleaner. If necessary, use
an oven cleaner following manufacturer's instructions. DO NOT mix ammonia with other
cleaners.
3. Clean any soil from the oven frame, the door liner outside the oven door gasket and the
small area at the front center of the oven bottom. Clean with hot, soapy water. Rinse well
using clean water and a cloth.
Adhere to the following precautions when using oven cleaners:
1. DO NOT spray cleaner on the electrical controls or switches because it could cause a
short circuit and result in sparking or fire.
2. DO NOT allow a film from the cleaner to build up on the temperature sensing bulb; it could
cause the oven to heat improperly. (The bulb is located on the left interior wall of the oven.)
Carefully wipe the bulb clean after each oven cleaning, being careful not to move the bulb. A
change in its position could affect how the oven bakes. Avoid bending the bulb and capillary
tube.
3. DO NOT spray any cleaner on the oven door trim or gasket, broiler drawer glides, handles
or any exterior surfaces of the range, plastic or painted surfaces. The cleaner can damage
these surfaces.
Cteaningthe OvenBottom
The oven bottom is porcelain enamel and can be removed for easier cleaning. Clean using
hot, soapy water, a mild abrasive cleanser, a soap-filled abrasive pad or oven cleaner
following manufacturer's instructions.
Careand
CLEANINGT(PSFOR NGE COOKTOP
[] [] [] [] [] [] [] [] [] [] [] [] [] [] [] [] [] [] [] [] []
No maintenance, other than the Care and Cleaning identified in this Use & Care
Manual, should be attempted by the owner/operator. All other maintenance and
service must be performed by a qualified appliance technician.
Read and follow the Care and Cleaning instructions to ensure that proper cooktop
operation and appearance will be maintained throughout the lifetime of the product.
Several materials and finishes are used in the cooktop. Each material and finish
must be properly cleaned according to the following recommendations. Failure to
follow these recommendations may result in permanent damage to the cooktop.
Proper cleaning is necessary to maintain cooktop performance and appearance,
while also ensuring safe operation. The cleaning effort necessary to maintain the
cooktop varies according to the type and amount of cooking. For example, more
frequent cleaning is required if the cooktop is used often for frying or other high
temperature operations.
Clean the cooktop thoroughly prior to operating it the first time. For initial and
everyday cleaning, use a soft cloth or sponge lightly dampened with a solution of
warm water and hand dishwashing liquid to clean all components.
Care and Cleaning
CLEANINGTIPS FOR NGE COOKTOP
[] [] [] [] [] [] [] m [] [] [] m [] [] [] m [] [] [] m [] []
Recommendations for cleaning and care of specific cooktop
components of the range are summarized below:
Treating the porcelain components with care wilt stow the natural deterioration that
takes place with cooktop use. Please follow these guidelines to keep the porcelain
parts looking their best:
1 Do not use utensils having rough bottoms, as this can result in permanent
damage to the top surfaces of the porcelain grates.
2 Do not drop utensils onto the grates or drag heavy pots across the tops of the
grates.
3 Set the grates into the cooktop gently. Do not drop the grates into place.
4 Use caution when cooking to avoid spills as much as possible. Porcelain is
acid-resistant but not acid-proof, so some foods can cause permanent
damage if allowed to remain on porcelain surfaces.
Daily cleaning of the grates, burner heads, burner base and burner caps is best
accomplished with a soft cloth or sponge dampened in a solution of warm water
and hand dishwashing liquid. Grates are dishwasher safe. Burner caps should not
be cleaned in the dishwasher.
Stubborn stains may be removed by applying full-strength, all purpose cleaning
sprays. (If you are unable to locate these cleaning compounds, please phone the
Electrolux Customer Service Department for a referral.)
Careand
CLEANINGSTAINLESSSTEELSURFACES
[] [] [] [] [] [] [] [] [] [] [] [] [] [] [] [] [] [] [] [] [] []
Clean these surfaces with the provided Stainless Steel Cleaner. Rinse and dry with
a soft lint-free cloth.
Always wipe stainless steel surfaces with the grain.
CLEANINGPORCE_IN G_TES
[] [] [] [] [] [] [] [] [] [] [] [] [] [] [] [] [] [] [] [] [] []
Clean the porcelain grates with a solution of mild detergent and hot water. Rinse
with a soft cloth. Do not use abrasives or commercial oven cleaners.
Stubborn stains may be removed by washing the grates in a dishwasher, using
normal dishwashing detergent.
Care and Cleaning
CLEANINGKNOBSAND KNOBBEZELS
[] [] [] [] [] [] [] [] [] [] [] [] [] [] [] [] [] [] [] [] [] []
The control knobs provided with this appliance are designed for ease of use and
longevity. The "D" shaped design of the knob shaft ensures proper orientation
when reinstalling the knob.
The knobs and knob bezels are made of a composite plastic. These components
should be washed regularly in warm, soapy water. Hand dishwashing liquid is
excellent for this task. Knobs should be removed by gently pulling them straight out
and off of the valve shafts. Use caution to avoid introduction of moisture into the
control panel behind the bezels. To replace knobs, align the "D-shaped" opening at
the bottom of the knob with the "D-shaped" valve shaft, then carefully press the
knob onto the valve.
CLEANINGBURNERBASES
[] [] [] [] [] [] [] [] [] [] [] [] [] [] [] [] [] [] [] [] [] []
The base should be wiped clean using a soft cloth or sponge that has been lightly
dampened with warm water and hand dishwashing liquid. Thoroughly clean and dry
the igniters to prevent constant sparking of the re-ignition system. Refer to the
Cleaning the Burner Igniters section for cleaning tips.
Care and Cleaning
CLEANINGBURNERHEADSORBURNERCAPS
[] [] [] [] [] [] [] [] [] [] [] [] [] [] [] [] [] [] [] []
The burner heads spread the flame evenly around the burner perimeters. The
burner heads must seat properly in the burner bases to enable proper cooktop
operation.
To remove the burner head, first remove the grate, then lift off the burner cap. The
burner head may then be removed from the burner base. Soak the burner heads
and burner caps in a warm solution of hand dishwashing liquid and water, then
rinse welt with clean water. Dry the burner thoroughly.
Stubborn stains may be removed by applying a metal polishing compound. (If you
are unable to locate this type of polishing compound, please phone the Electrolux
Customer Service Department for a referral.)
[] []
CLEANINGTHEBURNERIGNFERS
[] [] [] [] [] [] [] [] [] [] [] [] [] [] [] [] [] [] [] [] [] []
Under certain cooking or cleaning conditions, your cooktop igniters may become
coated with or corroded, by food deposits, splattered grease or cleaning agents.
This condition can cause erratic or continuous sparking. Keeping the igniters
clean and dry will help to reduce this problem. To avoid unnecessary and costly
service calls, the homeowner should perform periodic cleaning of the igniters.
To clean the igniters:
i
2
Be sure the burners are cool to the touch. Remove the grate, burner cap and
burner heads.
Clean completely around the igniter, including over and under the edge of the
metal cap and base. Use care while cleaning here. Parts of the igniter are
porcelain and can be fragile.
3 DO NOT USE WATER when cleaning the igniters. If a liquid must be used to
clean the igniter effectively, use only a small amount of rubbing alcohol.
4 After cleaning, reinstall the burner ring, burner cap and grate. Make sure the
brass burner ring is properly seated into the burner base.
5 Test the burners. If erratic clicking is still present, make sure the igniter is
completely dry.
Care & Cleaning
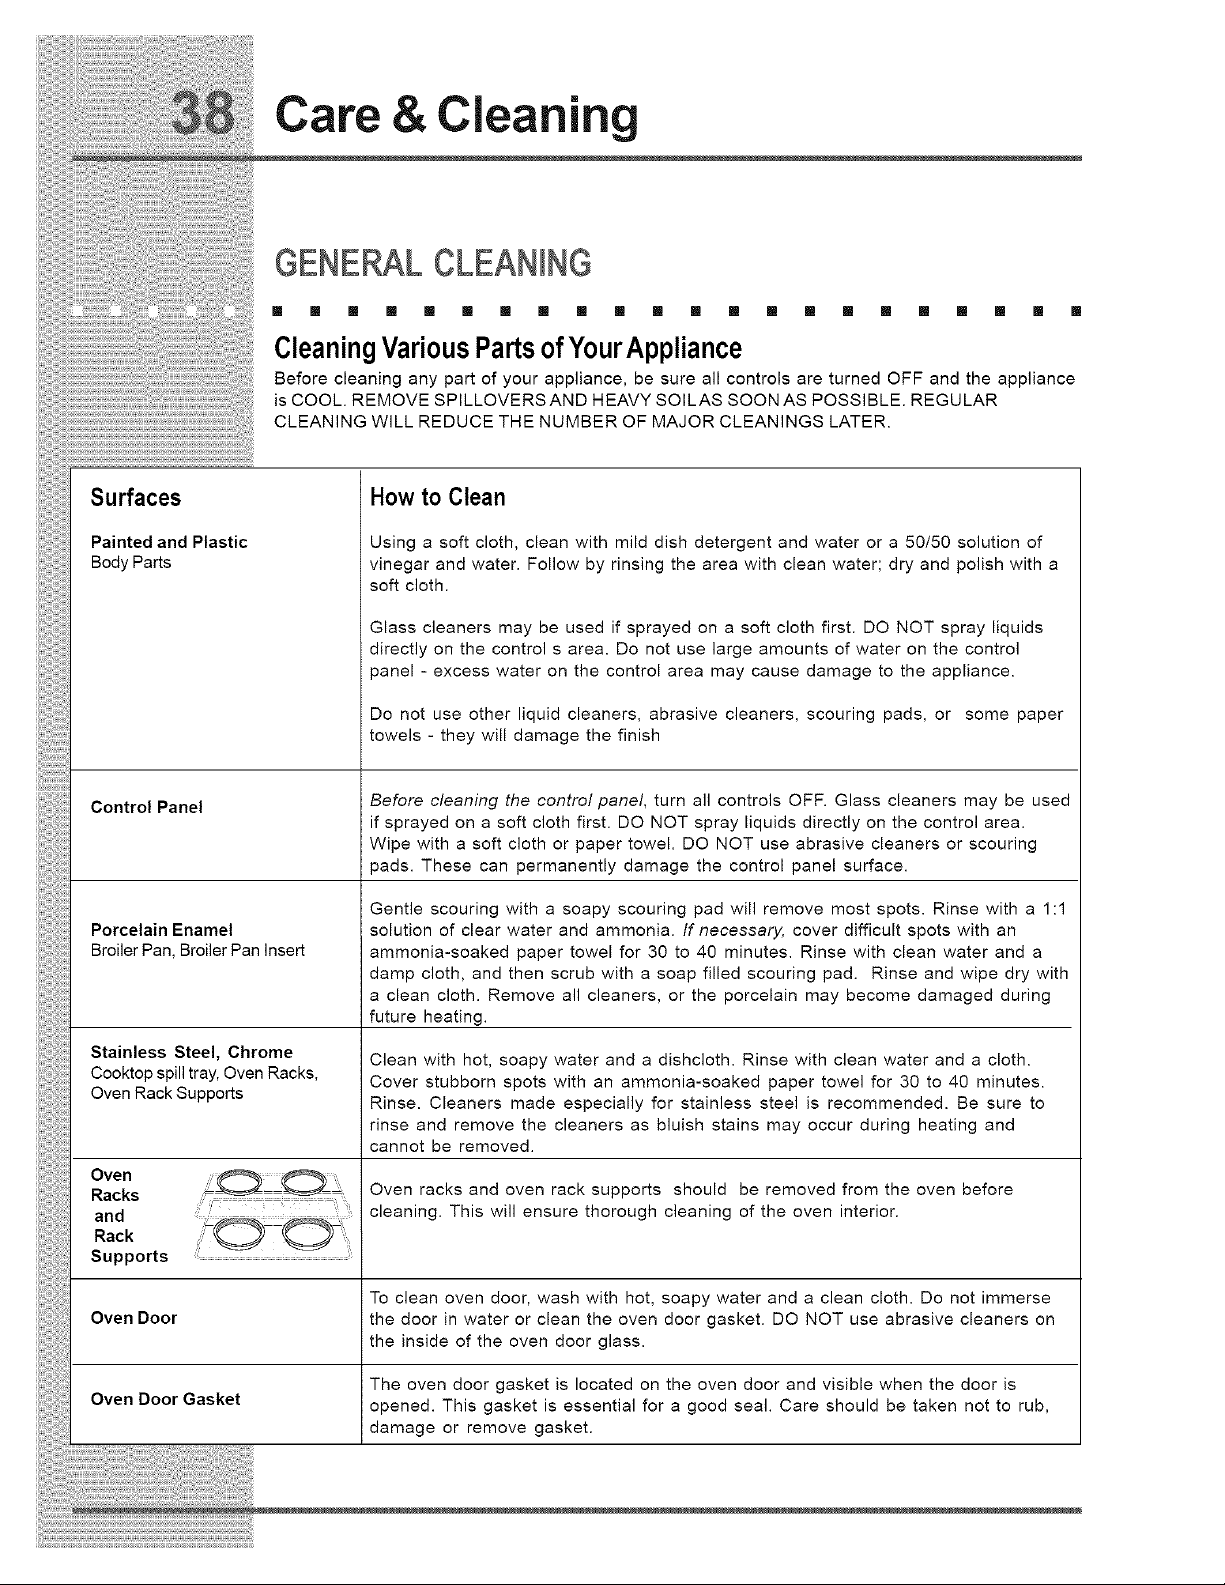
GENE L CLEANING
m [] [] [] [] [] [] [] [] [] [] [] [] [] [] [] [] [] [] [] [] []
CleaningVariousPartsofYourAppliance
Before cleaning any part of your appliance, be sure all controls are turned OFF and the appliance
is COOL. REMOVE SPILLOVERSAND HEAVY SOILAS SOON AS POSSIBLE. REGULAR
CLEANING WILL REDUCE THE NUMBER OF MAJOR CLEANINGS LATER.
Surfaces
Painted and Plastic
Body Parts
Control Panel
Porcelain Enamel
Broiler Pan, Broiler Pan Insert
Stainless Steel, Chrome
Cooktop spill tray, Oven Racks,
Oven Rack Supports
How to Clean
Using a soft cloth, clean with mild dish detergent and water or a 50/50 solution of
vinegar and water. Follow by rinsing the area with clean water; dry and polish with a
soft cloth.
Glass cleaners may be used if sprayed on a soft cloth first. DO NOT spray liquids
directly on the control s area. Do not use large amounts of water on the control
)anel - excess water on the control area may cause damage to the appliance.
Do not use other liquid cleaners, abrasive cleaners, scouring pads, or some paper
towels - they will damage the finish
Before cleaning the control panel, turn all controls OFF. Glass cleaners may be used
if sprayed on a soft cloth first. DO NOT spray liquids directly on the control area.
Wipe with a soft cloth or paper towel. DO NOT use abrasive cleaners or scouring
)ads. These can permanently damage the control panel surface.
Gentle scouring with a soapy scouring pad will remove most spots. Rinse with a 1:1
solution of clear water and ammonia. If necessary, cover difficult spots with an
ammonia-soaked paper towel for 30 to 40 minutes. Rinse with clean water and a
damp cloth, and then scrub with a soap filled scouring pad. Rinse and wipe dry with
a clean cloth. Remove all cleaners, or the porcelain may become damaged during
future heating.
Clean with hot, soapy water and a dishcloth. Rinse with clean water and a cloth.
Cover stubborn spots with an ammonia-soaked paper towel for 30 to 40 minutes.
Rinse. Cleaners made especially for stainless steel is recommended. Be sure to
Oven
Racks
and
Rack
Supports
nnse and remove the cleaners as bluish stains may occur during heating and
cannot be removed.
Oven racks and oven rack supports should be removed from the oven before
cleaning. This will ensure thorough cleaning of the oven interior.
To clean oven door, wash with hot, soapy water and a clean cloth. Do not immerse
Oven Door the door in water or clean the oven door gasket. DO NOT use abrasive cleaners on
the inside of the oven door glass.
The oven door gasket is located on the oven door and visible when the door is
Oven Door Gasket opened. This gasket is essential for a good seal. Care should be taken not to rub,
damage or remove gasket.
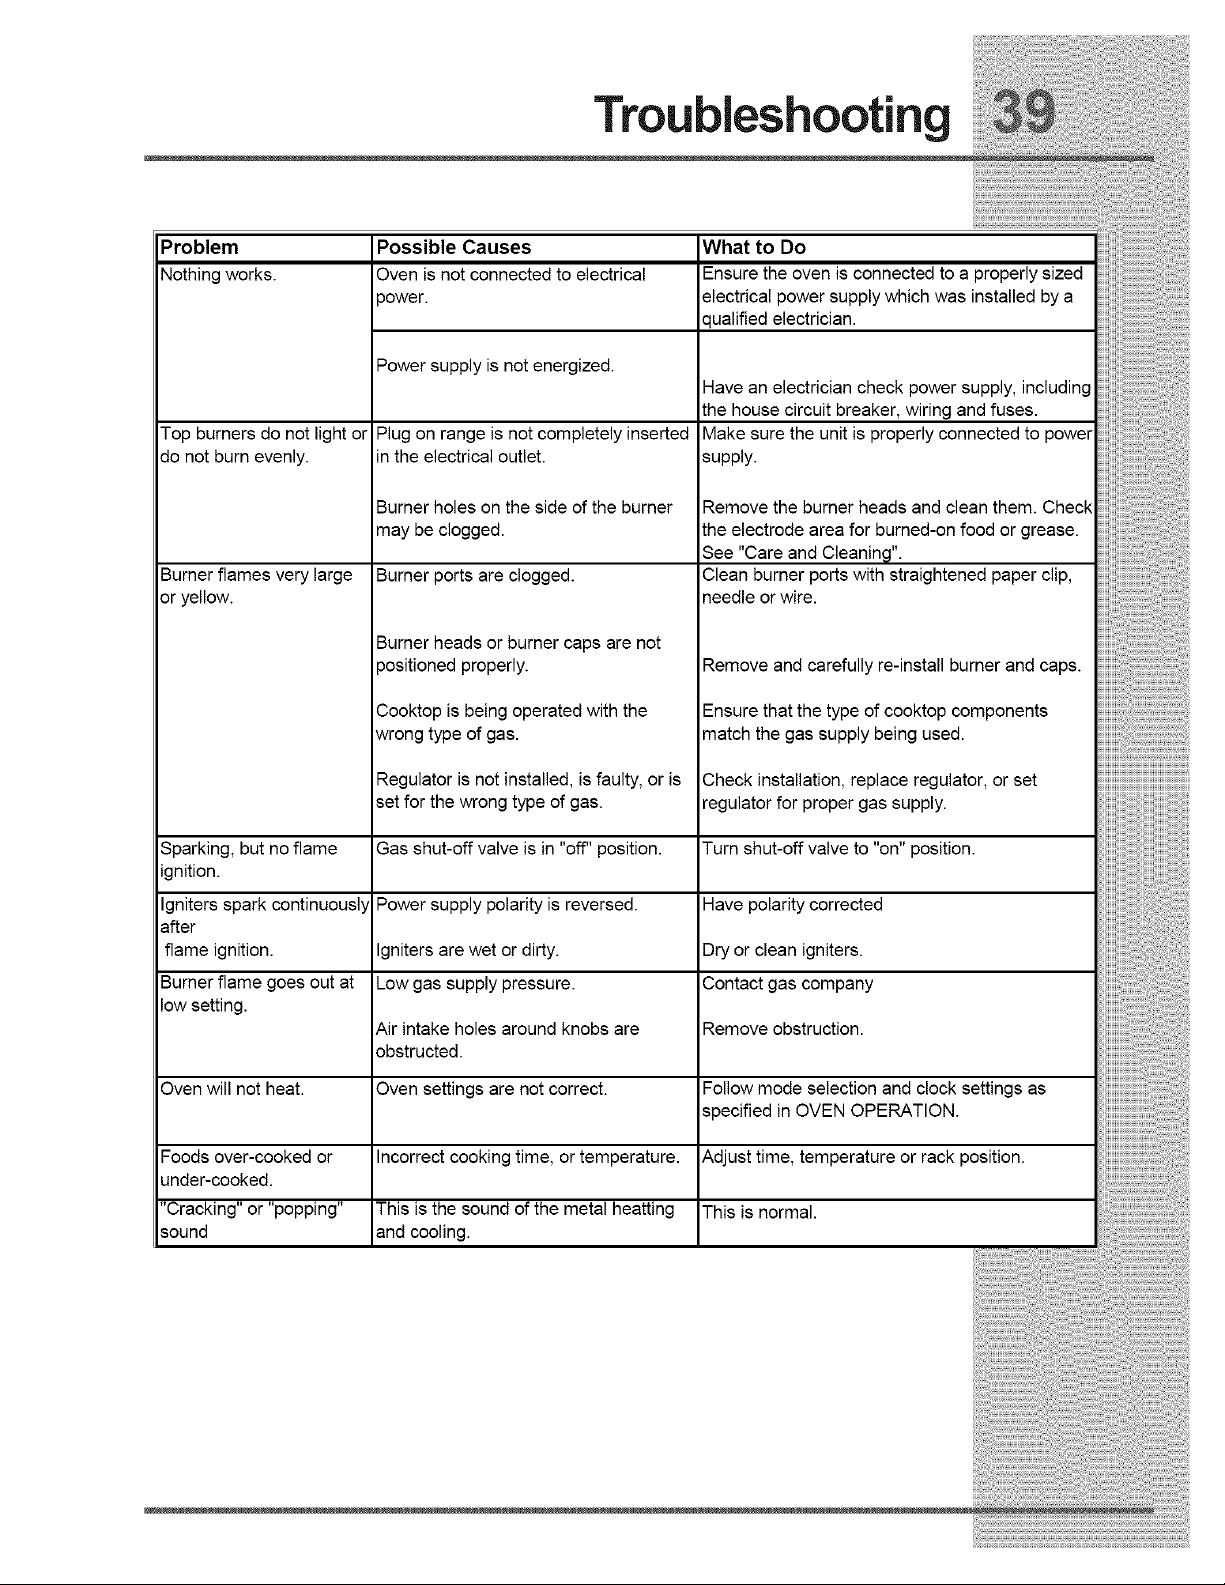
Troubleshooting
Problem Possible Causes What to Do
Nothing works. Oven is not connected to electrical Ensure the oven is connected to a properly sized
3ower. electrical power supply which was installed by a
qualified electrician.
Power supply is not energized.
Top burners do not light or
do not burn evenly.
Burner flames very large
or yellow.
Sparking, but no flame
ignition.
Igniters spark continuously
after
flame ignition.
Burner flame goes out at
low setting.
Plug on range is not completely inserted
inthe electrical outlet.
Burner holes on the side of the burner
may be clogged.
Burner ports are clogged.
Burner heads or burner caps are not
3ositioned properly.
Cooktop is being operated with the
wrong type of gas.
Regulator is not installed, is faulty, or is
set for the wrong type of gas.
Gas shut-off valve is in "off" position.
Power supply polarity is reversed.
Igniters are wet or dirty.
Low gas supply pressure.
Air intake holes around knobs are
obstructed.
Oven settings are not correct.
Have an electrician check power supply, including
the house circuit breaker, wiring and fuses.
Make sure the unit is properly connected to power
supply.
Remove the burner heads and clean them. Check
the electrode area for burned-on food or grease.
See "Care and Cleaning".
Clean burner ports with straightened paper clip,
needle or wire.
Remove and carefully re-install burner and caps.
Ensure that the type of cooktop components
match the gas supply being used.
Check installation, replace regulator, or set
regulator for proper gas supply.
Turn shut-off valve to "on" position.
Have polarity corrected
Dry or clean igniters.
Contact gas company
Remove obstruction.
Oven will not heat. Follow mode selection and clock settings as
specified in OVEN OPERATION.
Foods over-cooked or Incorrect cooking time, or temperature. Adjust time, temperature or rack position.
under-cooked.
"Cracking" or "popping" This is the sound of the metal heatting This is normal.
sound and cooling.
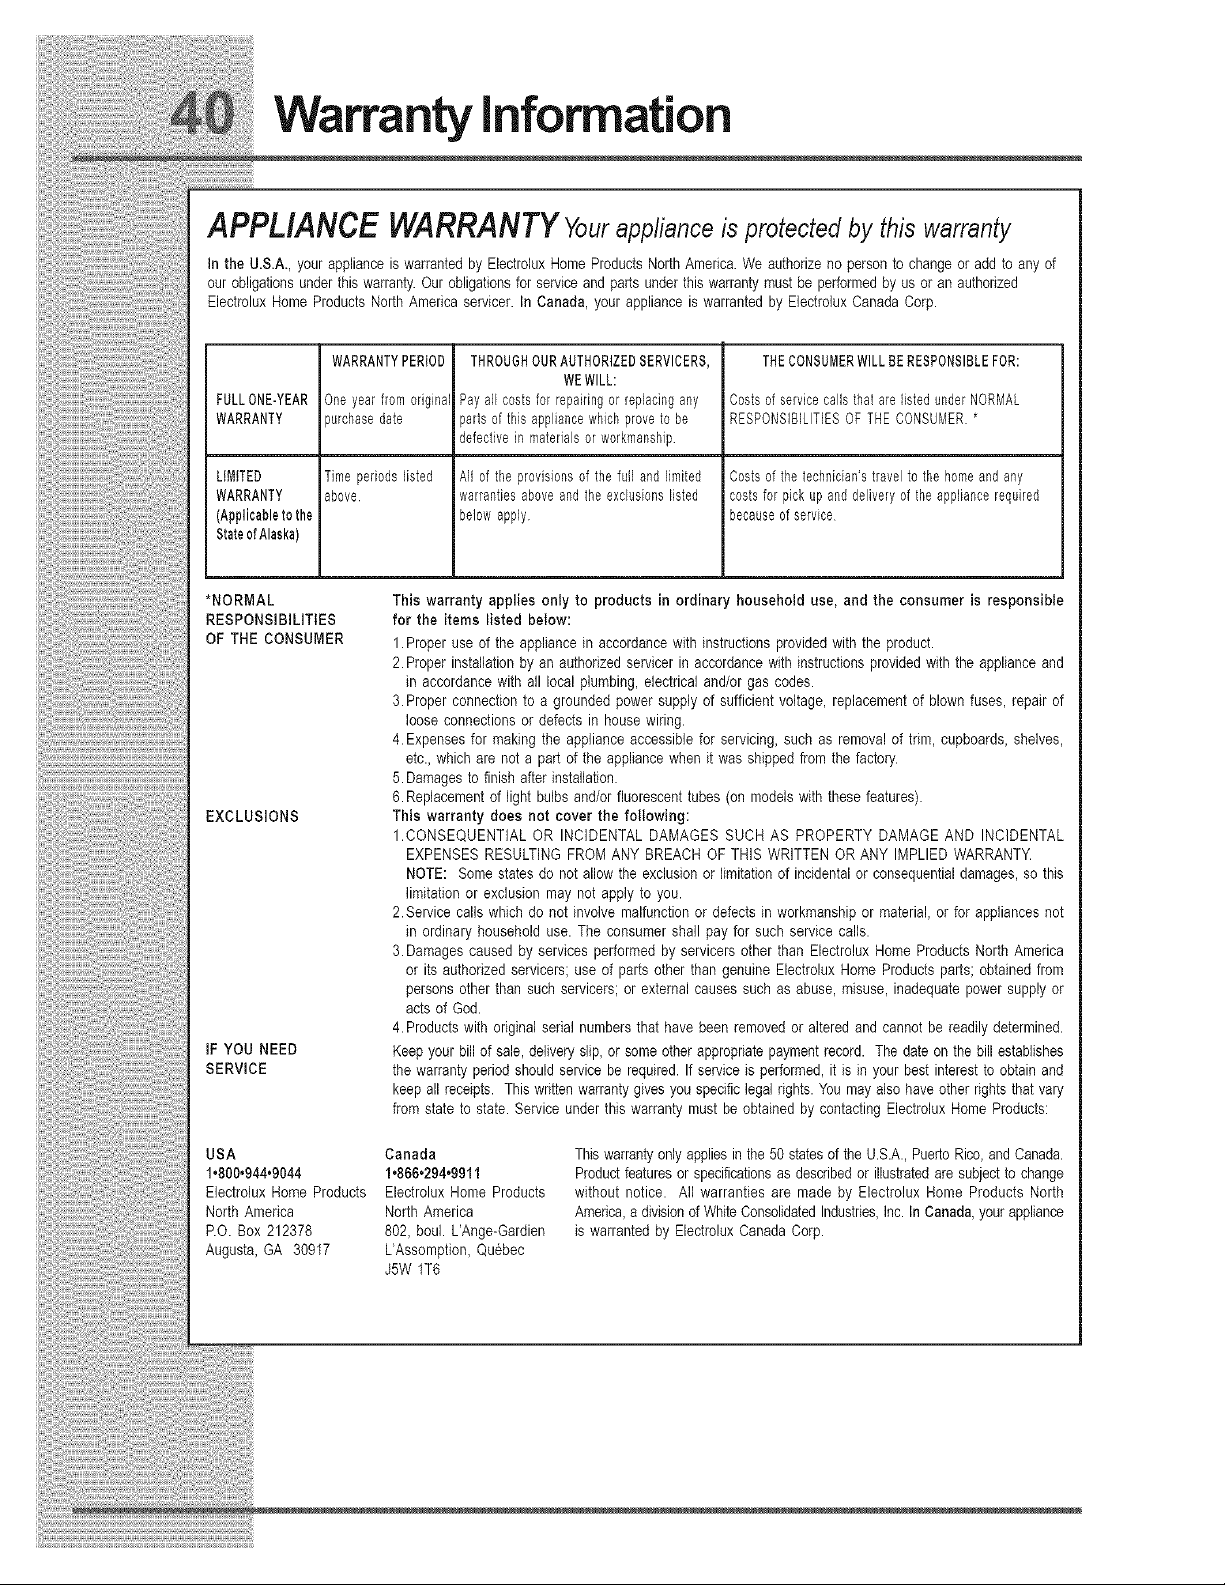
i Warranty Information
:iiiiiiii iiiiiii iii!iii..................
_'_i!i!iiiii!iiiii!iiiii!i
APPLIANCE WARRANTY your appliance is protectedby this warranty
in the U.S.A., your appliance is warranted by Electro]ux Home Products North America.We authorize no personto change or add to any of
our obligationsunder this warranty.Our obligationsfor serviceand parts under this warranty must be performedby us or an authorized
Electrolux Home Products North America servicer. In Canada, your appliance is warranted by Electrolux Canada Corp.
WARRANTYPERIOD THROUGHOURAUTHORIZEDSERVICERS, THECONSUMERWILLBERESPONSIBLEFOR:
WEWILL:
FULLONE-YEAR Oneyear fromodginal Pay all costsfor repairingor replaciagany Costsof servicecalls that are listedunderNORMAL
WARRANTY purchasedate partsof this appliancewhichproveto be RESPONSIBILITIESOF THECONSUMER.*
defectiveinmaterialsor workmanship
LiMiTED Timeperiodslisted All of the provisionsof the full and limited Costsof the technician'stravel to the homeandany
WARRANTY above warrantiesaboveand the exclusionsHsted costsfor pickup anddeliveryof the appliancerequired
(Applicableto the belowapply becauseof service
StateofAlaska) I I
•NORMAL This warranty applies only to products in ordinary household use, and the consumer is responsible
RESPONSIBILITIES for the items listed below:
OF THE CONSUMER 1. Proper use of the appliance in accordancewith instructionsprovided with the product.
2. Proper instaflationby an authorized servicer in accordancewith instructionsprovided with the appliance and
in accordance with all local plumbing,electrical and/or gas codes.
3. Proper connection to a grounded power supply of sufficient voltage, replacementof blown fuses, repair of
looseconnections or defects in house wiring.
4.Expenses for making the appliance accessible for servicing, such as removal of trim, cupboards, shelves,
etc., which are not a part of the appliance when it was shipped from the factory.
5. Damagesto finish after installation.
6. Replacementof lightbulbs and/or fluorescent tubes (on models with these features).
EXCLUSIONS
IF YOU NEED
SERVICE
USA Canada
1.800.944.9044 1.868.294.9911
Eiectrolux Home Products Electrolux Home Products
North America North America
P.O. Box 212378 802, bou]. L'Ange-Gardien
Augusta, GA 30917 L'Assomption, Quebec
J5W 1T6
This warranty does not cover the following:
1.CONSEQUENTIAL OR INCIDENTAL DAMAGES SUCH AS PROPERTY DAMAGE AND INCIDENTAL
EXPENSES RESULTING FROM ANY BREACH OF THIS WRITTEN OR ANY IMPLIED WARRANTY.
NOTE: Somestates do not allow the exclusion or limitationof incidentalor consequentialdamages, so this
]imitationor exclusion may not apply to you.
2. Service calls which do not involve malfunction or defects in workmanship or material, or for appliances not
in ordinary household use. The consumer shall pay for such service calls.
3.Damages caused by services performed by servicers other than Electrolux Home Products North America
or its authorized servicers; use of parts other than genuine Electrolux Home Products parts; obtained from
persons other than such servicers; or external causes such as abuse, misuse, inadequate power supply or
acts of God.
4. Productswith original serial numbersthat have been removed or altered and cannot be readily determined.
Keepyour bill of sale, delivery slip, or some other appropriatepaymentrecord. The date on the bill establishes
the warranty period should service be required. If service is performed, it is in your best interest to obtain and
keep all receipts. This written warranty gives you specific legalrights. You mayalso have other rights that vary
from state to state. Service under this warranty must be obtained by contacting Electrolux Home Products:
Thiswarrantyonly appliesinthe 50 statesof the U.S.A.,Puerto Rico,and Canada.
Product featuresor specificationsas describedor illustratedare subjectto change
without notice. All warranties are made by Electrolux Home Products North
America,a divisiond White ConsolidatedIndustries,Inc. In Canada,yourappliance
is warranted by Electrolux Canada Corp.