Loading ...
Loading ...
-2-
F21379-11
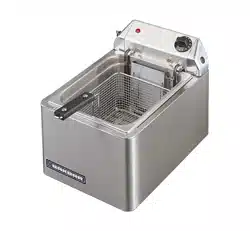
GENERAL
This unit is constructed of stainless steel and due to the removable spashback, element
assembly is easy to clean. Removing the elements allows easy obstruction-free access
when cleaning the inside of the tank.
A removable basket support covers the elements, serving the purpose of supporting the
baskets, protecting the elements from damage, and preventing fish, etc, sticking to the
element when not using a basket. Inside the back of the tank there is a support on
which the fryer baskets may be hooked to allow excess fat to be drained from the chips
or fish after cooking. The fat drained off is returned directly to the tank.
OPERATION
This unit is designed for deep frying food in oils or fats. A separate thermostat controls
each tank. The red indicator light indicates when the power to the unit is ‘On’. DO NOT
remove element assembly from the tank if light is ‘On’. The amber indicator light is
a heating indicator. The amber light is ‘On’ when the element is heating, and ‘Off’ when
the fryer is up to temperature.
Filling Tank: Maximum and minimum fill level marks are provided on the rear of the
tank. Maximum is for hot oil / fat, minimum is for cold oil / fat.
Solid Fats: Remove the element cover and pack fat around and over the elements.
Elements should be fully covered. Set the thermostat to 80°C (175°F). If over night the
fat solidifies around the element in the tank, re-melt the fat slowly at 80°C (175°F).
When fat has melted, set the thermostat to the desired temperature, normally between
180°C and 190°C (360°F-375°F). Do not over fill the tank, and always drain water from
baskets of wet chips etc before they are carefully lowered into the oil or fat. This will
reduce foaming and reduce the risk of spillovers.
DO NOT operate the fryer until the elements are immersed in the oil or fat. Failure to
observe this precaution can result in damage to the elements or risk of fire.
WARNING
DANGER OF FIRE EXISTS IF THE OIL LEVEL IS BELOW THE MINIMUM MARK.
DO NOT USE OLD OIL AS IT WILL HAVE A REDUCED FLASH-POINT AND IS MORE
PRONE TO SURGE BOILING.
MAXIMUM BATCH SIZE 0.5Kg PER BASKET
Always switch ‘Off’ power and disconnect supply before taking elements out of the tank.
-3-
F21379-11
The life of the cooking medium can be considerably prolonged if the tank is drained
every night and filtered through a fine mesh to remove the small particles of foreign
matter. If not filtered, the oil or fat will break down rapidly, and considerably shorten its
effective life.
NOTE - Setting the thermostat to maximum will NOT shorten heat up time, but may
shorten the life of the oil.
- With the thermostat at the minimum setting, the element and amber
heating indicator may still come on briefly when the power to the fryer is
switched on if the fryer has been left overnight or longer in an excessively
cold room. This is normal operation and the heating indicator will shortly go
off again once the oil has been warmed slightly.
CAUTION - EMPTYING THE TANK
For reasons of safety and convenience, DO NOT try to lift a full tank of oil out of the
fryer. Remove most of the oil by ladle or pump first. Turn the power ‘Off’ and
disconnect from power supply at wall before lifting elements out of tank, pour out
remaining oil, and the tank can now be cleaned.
The power supply must remain disconnected from wall at all times when tank is
empty or removed.
NOTE - The over temperature cut-out is pre-set to operate at approximately 220°C
(450°F). When this control operates, there is a fault that must be serviced.
To reset the cut-out, cool the oil and press the cut-out reset button
(accessed through the back of the splashback).
DISCONNECT POWER SUPPLY BEFORE RESETTING OVERTEMP
SERVICING
DISCONNECT POWER SUPPLY BEFORE SERVICING
Lift out element/splashback. Remove base of splashback (2 screws from back, 1 from
underside).
Elements: Unscrew the wires from the element tails. Remove the capillary clips and the
bulb clamps from the element. Remove the two nuts securing the element to the
splashback front. Pull element straight out of the splashback. Fit new element, nuts,
wires, capillary clips and bulb clamps.
Thermostat or Over Temperature Thermostat: Disconnect the wiring to the thermostat.
Pull off the knob (fryer thermostat only) and undo thermostat from splashback (2 screws
under knob or at rear). Remove the appropriate capillary clips and bulb clamp from the
element. Undo the gland nut completely (inside the splashback). Undo gland retaining
nut and remove gland from splashback. Withdraw the capillary and bulb through the
gland. Fit new thermostat in reverse order, ensuring that excess capillary is coiled and
cable tied inside the splashback to prevent shorting out against electrical connections.
Indicator Light: Remove wires. Squeeze tabs and push out. Fit replacement in same
manner and re-attach wires.
Loading ...