
Loading ...
Loading ...
Loading ...
11
English
Cleaning
WARNING: Blow dirt and dust out of all air vents with
clean, dry air at least once a week. To minimize the risk
of eye injury, always wear ANSI Z87.1 approved eye
protection when performingthisprocedure.
WARNING: Never use solvents or other harsh
chemicals for cleaning the non-metallic parts of
the tool. These chemicals may weaken the plastic
materials used in these parts. Use a cloth dampened
only with water and mild soap. Never let any liquid
Tool Care
• Keep your machine as clean as possible by wiping with
a clean cloth and blowing through it with air after every
5 hours ofuse.
• Don’t use harsh chemicals or solvents to clean the tool.
These chemicals could seriously damage theplastic.
• Avoid overloading your sander. Overloading will result
in a considerable reduction in speed and efficiency and
the unit will become hot. In this event, run sander at a
“no load” condition for a minute ortwo.
Fig. J
13
3
MAINTENANCE
WARNING: To reduce the risk of serious personal
injury, turn unit off and remove the battery pack
before making any adjustments or removing/
installing attachments or accessories. An
accidental start-up can causeinjury.
Sander Operation (Fig. H)
WARNING: Let the tool work at its own pace. Do
notoverload.
NOTICE: This sander is not to be used in
drywallapplications.
To operate your sander, grasp it as shown in Figure H
and turn it on. Move it in long, sweeping strokes along
the surface being sanded, letting the sander do the work.
Pushing down on the tool while sanding actually slows
the removal rate and produces an inferior quality surface.
Be sure to check your work often, this sander is capable of
removing material rapidly, especially with coarsepaper.
Your sander is designed to sand flush on three sides for
sanding in corners, and its small size and light weight make
it ideal for overheadwork.
The orbital action of your sander allows you to sand with
the grain or at any angle across it for most sanding jobs. On
the final sanding steps, as discussed below, a better finish
will result if you sand only with the grain.
To produce the best finish possible, start with coarse grit
abrasive paper and change gradually to finer and finer
paper. A final sanding with a piece of well-worn fine
abrasive paper will produce a professional-looking finish
that in many cases will need no hand sanding at all. The rate
at which the dust collection bag will fill up will vary with the
type of material being sanded and the coarseness of the
abrasive paper. For best results, empty the bag frequently
and check the opening forclogging.
When sanding painted surfaces, you may find that the
abrasive paper loads up and clogs with paint. A heat gun
will work much better to remove paint before sanding.
FOLLOW ALL SAFETY INSTRUCTIONS IN HEAT GUN
INSTRUCTIONMANUAL.
Fig.I
7
12
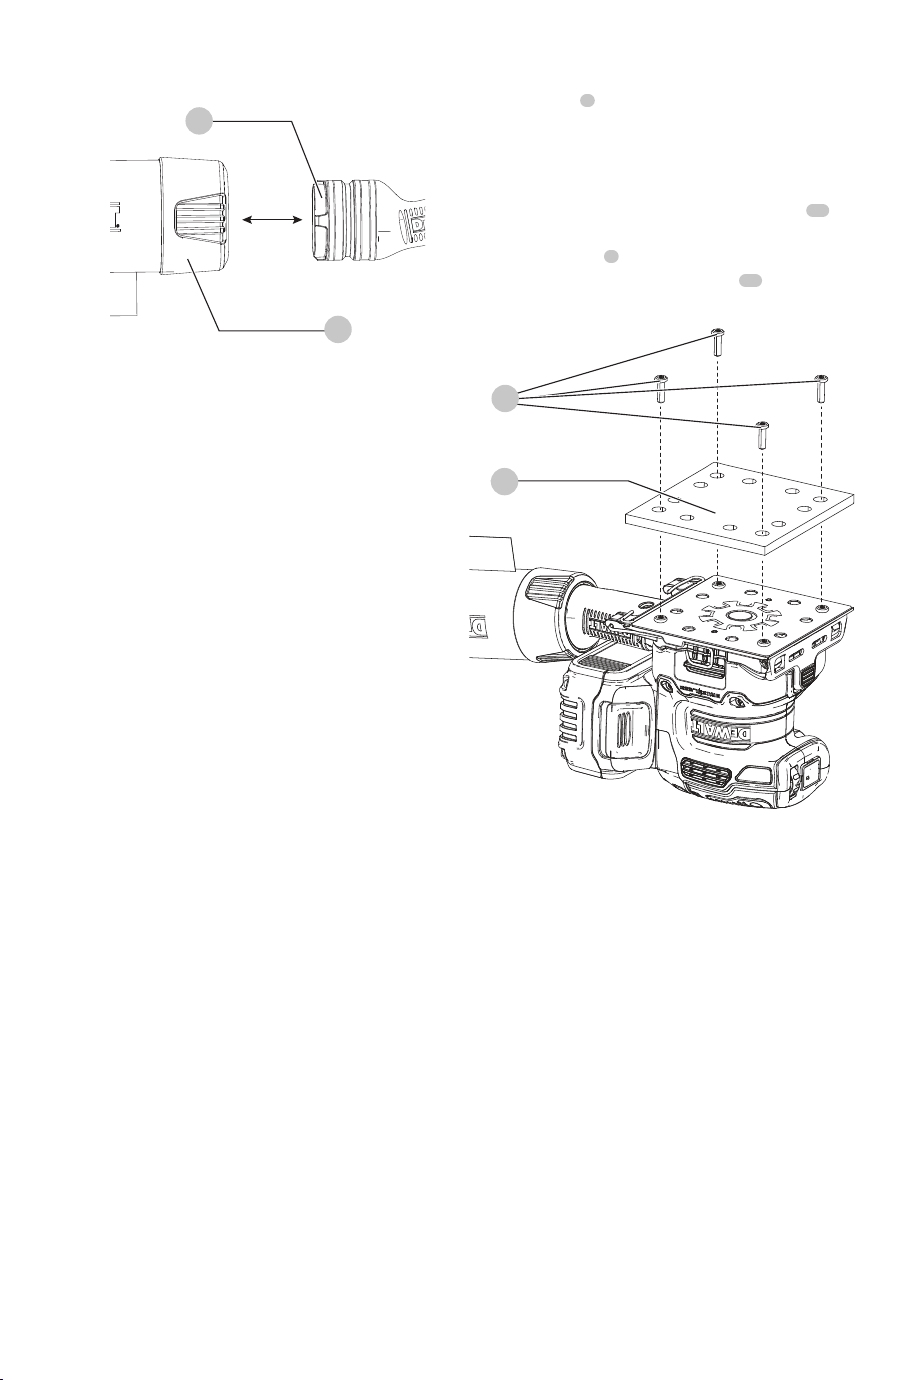
Replacing the Sanding Pad (Fig.J)
The sanding pad
3
is designed to be a consumable part
and will occasionally need to be replaced. The sanding pad
needs replacement when signs of wear become evident.
Sanding pads are available at extra cost from your local
dealer or authorized
DEWALT
servicecenter.
1. Holding the base firmly, remove the four screws
13
from the bottom of thepad.
2. Remove the pad
3
.
3. Reinstall pad. Replace the four screws
13
. Be careful not
to over-tightenscrews.
Loading ...
Loading ...
Loading ...