ST224,ST227P,ST230P,ST224P
Default Operator'smanual 2-25
ES-MX Manualdelusuario 26-51
FR-CA Manueld’utilisation 52-77
www.husqvarna.com
Originalinstructions
Instruccionesoriginales
Instructionsd’origine
1159957-49
2018-06-29

694-002- 7
C
Introduction..................................................................... 3
Safety..............................................................................5
Assembly........................................................................ 8
Operation......................................................................11
Maintenance................................................................. 15
Troubleshooting............................................................ 22
Transportation,storageanddisposal........................... 24
Technicaldata.............................................................. 25
694-002-

I
8 22
23
25
24
14
16
15
17
18
19
20
21
1 2
3
4
5
7
8
9
10
11
13
12
6
26
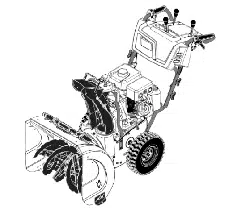
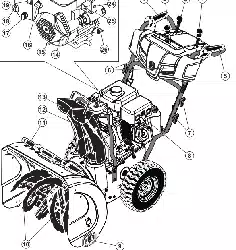
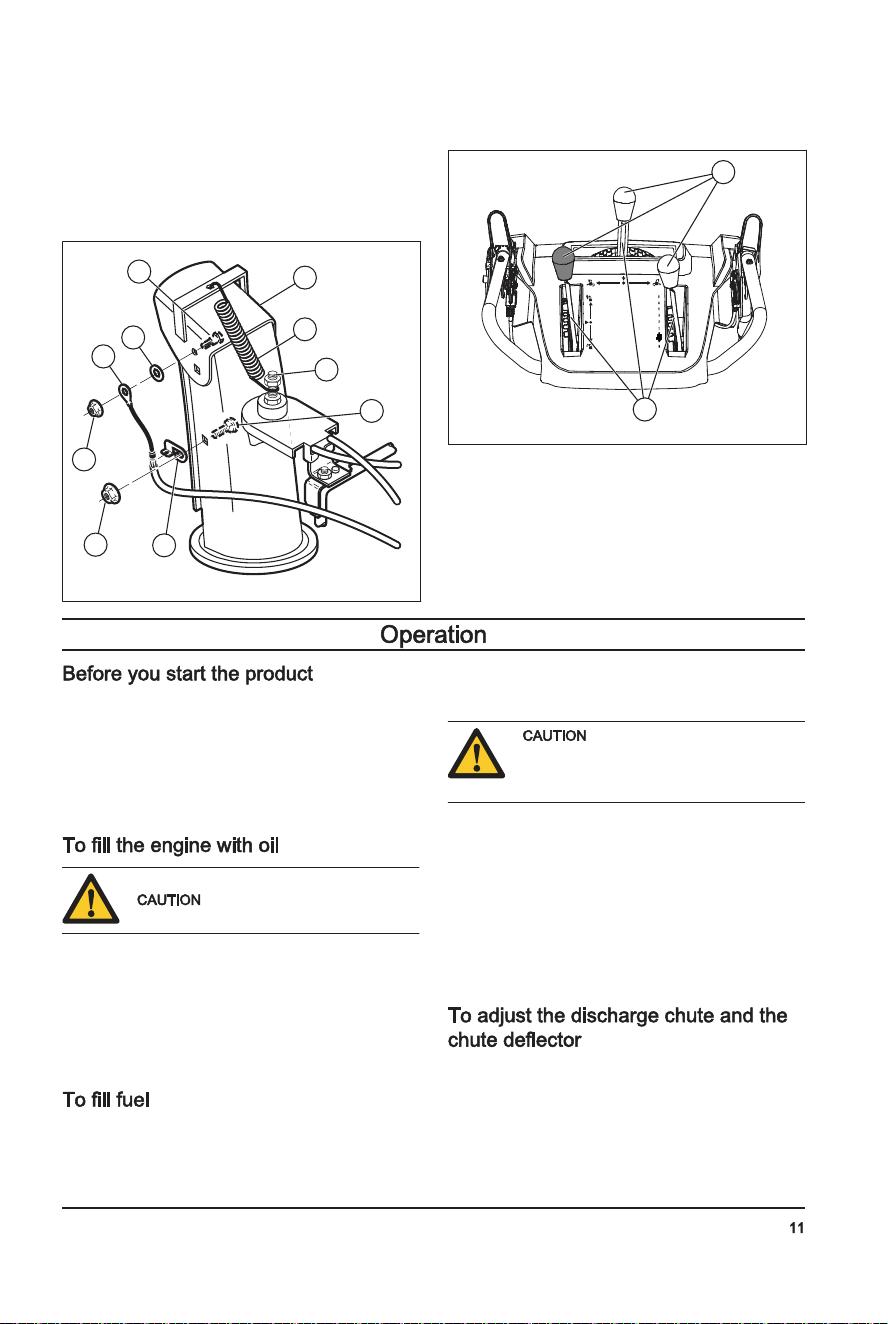
1. Augerengagement
2. Dischargechutecontrollever
3. Drivespeedcontrollever
4. Deflectorremotecontrollever
694-002-7 694-002-
T
• Pourlestockageetletransportduproduitetdu
carburant,s’assurerqu’iln’yapasdefuiteoude
vapeur.Lesétincellesoulesflammesnues,par
exempleavecdesappareilsélectriquesoudes
chaudières,peuventdémarrerunincendie.
• Utilisertoujoursdescontenantsagrééspour
entreposeroutransporterlecarburant.
• Viderleréservoirdecarburantavantderangerle
produitpourunepériodeprolongée.Mettreaurebut
lecarburantàunemplacementdemiseaurebut
adéquat
• Immobiliserleproduitensécuritépendantle
transportpourévitertoutdommageouaccident.
• Garderleproduitdansunendroitverrouilléhorsde
portéedesenfantsetdespersonnesnonautorisées.
• Conserverleproduitdansunendroitsecàl’abridu
gel.
• Respecterlesexigenceslocalesenmatièrede
recyclageetlaréglementationenvigueur.
• Mettreaurebuttouslesproduitschimiques,telque
lemoteurd’huileoudecarburant,dansuncentrede
serviceouàunemplacementdemiseaurebut
adéquat.
• Lorsqu’onn’utiliseplusleproduit,l’envoyeràun
détaillantHusqvarnaoulemettreaurebutàun
emplacementderecyclage.
Touteslesdonnées,lesimagesetles
spécificationssontreprésentativesetpourréférence
uniquement,etellespeuventêtremodifiéessans
préavisenraisond'améliorationsapportéesauproduit.
Poids,lb/kg 198,6/90 212/96 237,8/108 198,6/90
Pressiond’utilisationmaximaledespneus,
lb/po2
18 18 20 18
Marqueetmodèle
Husqvarna Husqvarna Husqvarna Husqvarna
Cylindrée(cc) 208 254 291 208
Typedecarburant Réguliersans-plomb(maximum10%d’éthanol)
Capacitéduréservoirdecarburant(gal/l) 0,31/1,17 0,35/1,33 0,62/2,35 0,31/1,17
Huile SAE5W-30(endessousde0°C/32°F)
Capacitéduréservoird’huile(oz/l) 16/0,47 20/0,59 32/0,95 16/0,47
Bougied’allumage F6RTC
Écartementdesélectrodesdesbougies
(po/mm)
0,030/0762mm
694-002-
5. Driveengagement
6. Light
7. Handleknob
8. Muffler
9. Skidplate
10. Augers
11. Clean-outtool
12. Dischargechute
13. Chutedeflector
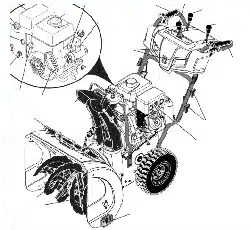
14. Starterropehandle
15. Oildrainplug
16. Fuelswitch
17. ON/OFFkey
18. Primer
19. ON/OFFswitch
20. Throttlecontrol
21. Choke
22. Gasolinefillercap
23. Oilfill(ST227P,ST230P),Dipstick(ST227P)
24. Electricstartbutton
25. Connection,electricstart
26. Oilfill(ST224,ST224P),Dipstick(ST224,ST
230P,ST224P)
P
Theproductisawheeledsnowthrowerthatisusedto
removesnowfromtheground.
Thisproductcanbeusedtoremovesnowfromfields,
roads,walkwaysanddriveways.Donotuseitonslopes
thataregreaterthan20°.Donotusetheproductin
areaswherethereismuchdebris,dirtandprotruding
stones.
Ifthedecalsontheproductaredamaged,contact
thedistributortoreplacethem.
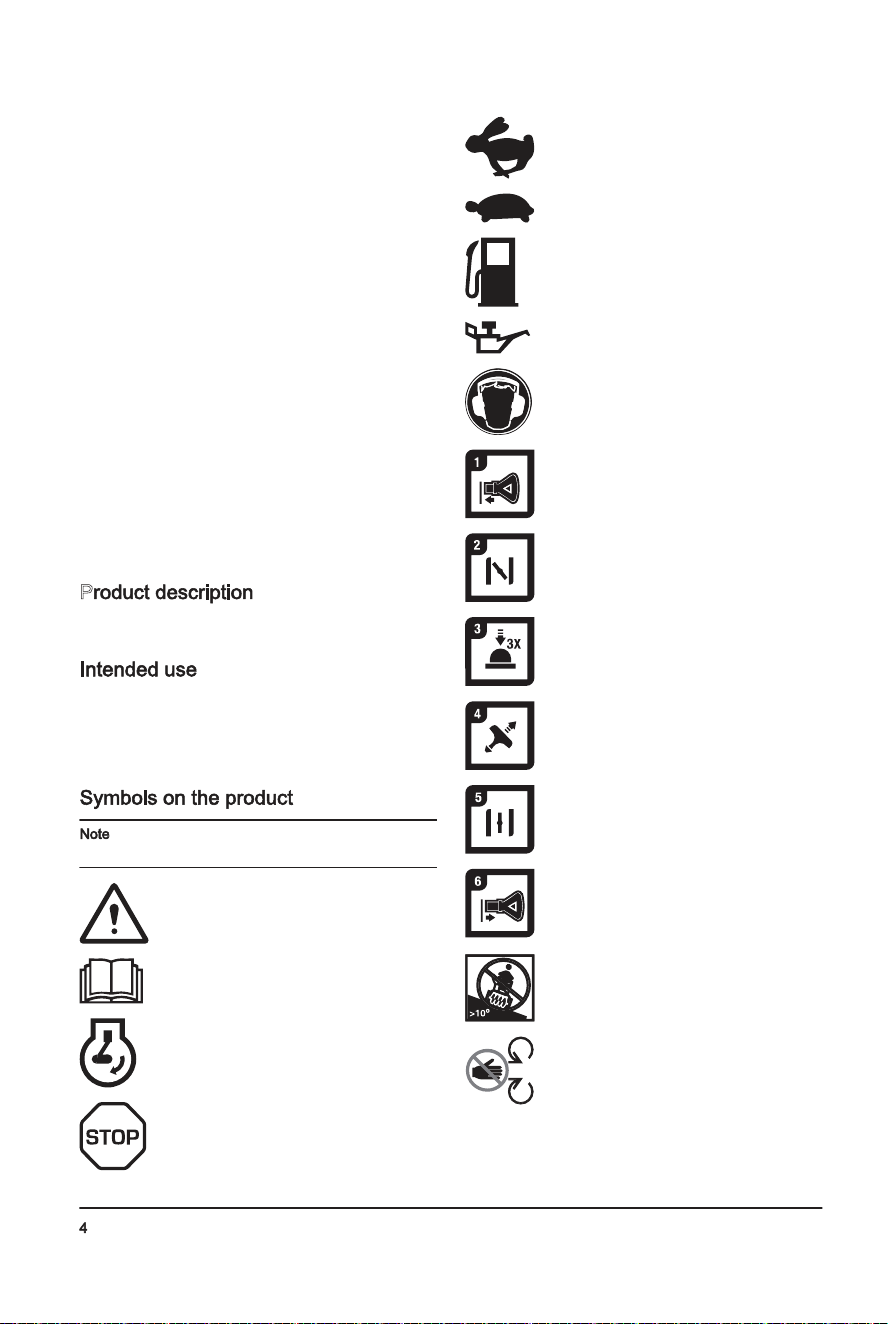
Warning.
Readtheoperator'smanual.
Engineon
Engineoff.
Fast.
Slow.
Fuel.
Oil.
Earprotectionrecommended.
ON/OFFkey.Inserttostartandrun.
Chokeclosed(start).
Primer.
Pullstarterropehandletostart.
Chokeopen(run).
ON/OFFkey.Pullouttostop.
Nooperationonslopesmorethan10
degrees.
Donotremoveshieldswhileengineis
running.
694-002-
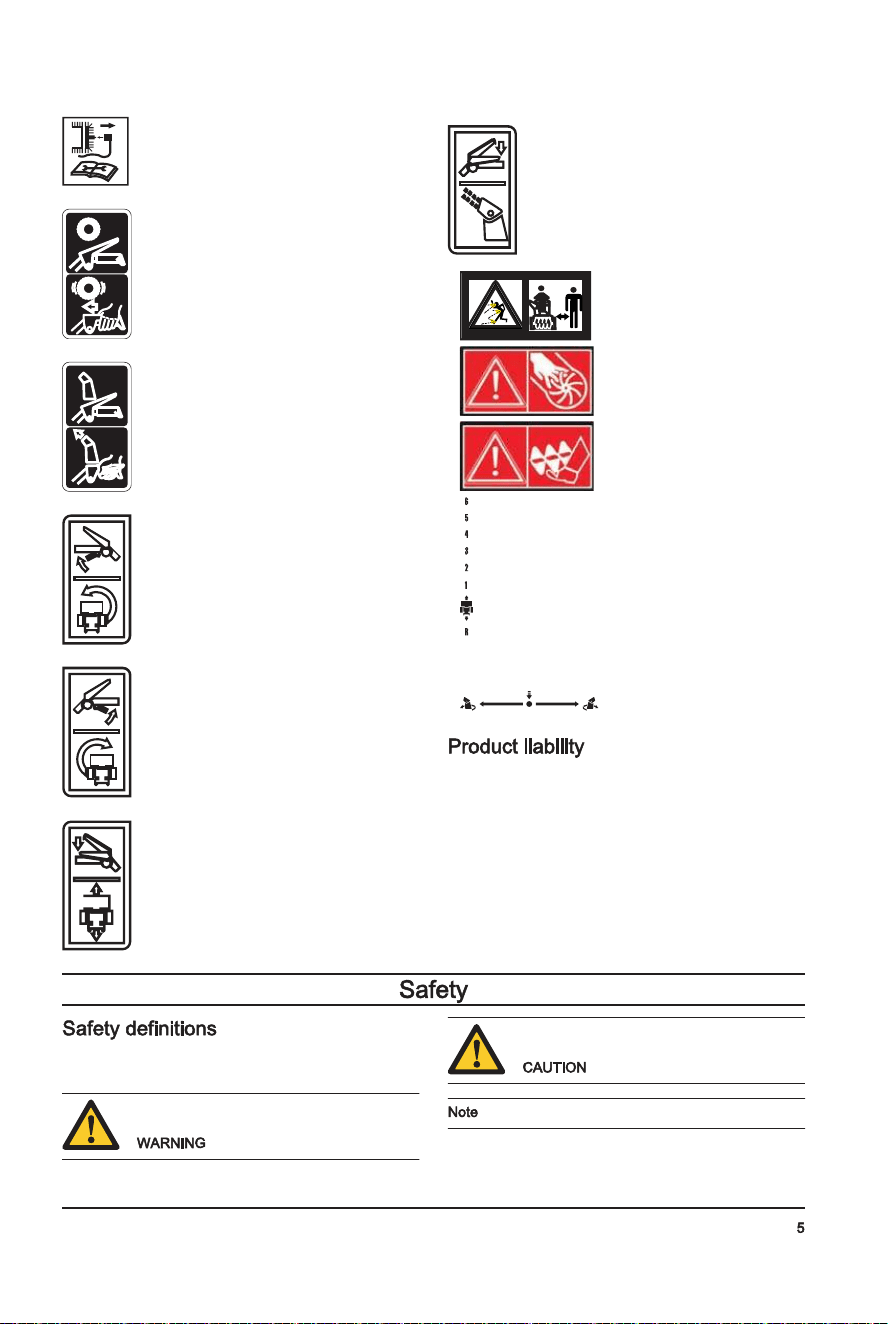
Removesparkplugcablebefore
maintenance.
Tractiondriveoff/on.
Snowdischargeoff/on.
Steerleft.
Steerright.
Tractiondrivecontrol.
Snowdischarge.
Bewareofthrownobjects-
keepbystandersaway.
Warning,keephands
away.
Warning,keepfeetaway.
Forward/reverse.
Rotateleft/pushdown/
rotateright.
Asreferredtointheproductliabilitylaws,wearenot
liablefordamagesthatourproductcausesif:
• theproductisincorrectlyrepaired.
• theproductisrepairedwithpartsthatarenotfrom
themanufacturerornotapprovedbythe
manufacturer.
• theproducthasanaccessorythatisnotfromthe
manufacturerornotapprovedbythemanufacturer.
• theproductisnotrepairedatanapprovedservice
centerorbyanapprovedauthority.
Thedefinitionsbelowgivethelevelofseverityforeach
signalword.
Injurytopersons.
Damagetotheproduct.
Thisinformationmakestheproducteasiertouse.
694-002-
P
Pertedetraction/ralen-
tissementdelavitesse
d’entraînement
Pertededéchargeoura-
lentissementdeladé-
chargedeneige
Lacourroieglisse. Réglerlecâble.Réglerlacourroie.
Lacourroieestusée. Vérifier/remplacerlacourroie.Régler
lapoulie.
Lacourroieestsortiedelapoulie. Vérifier/réinstallerlacourroie.Régler
lapoulie.
Ledéflecteurdegoulotteestobstrué. Nettoyerledéflecteurdegoulotte.
Descorpsétrangersobstruentlestarières. Retirerlesdébrisoulecorpsétrang-
erdestarières.
Lagoupilledetonteestbrisée. Remplacerlagoupilledetontebri-
sée.
Accumulationexcessivedeneigeetdeglace
entrelescomposantsdelachenille.
Retirerlaneigeetlaglaceentreles
composantsdelachenille.
Laroued’entraînementdefrictionestusée. Communiqueravecuncentrederép-
arationagréé.
Ledisquedefrictionesthumide Laisserledisquedefrictionsécher
Échecderotationdela
tarièreaprèslerelâche-
mentdelapoignée
Lacourroied’entraînementn’estpasalignée. Réglerlacourroied’entraînement.
Ledéflecteurd’éjectionn’estpasaligné. Réglerledéflecteurd’éjection.
L’éclairagen’estpas
aligné(selonl’équipe-
ment)
Lemoteurnetournepas. Démarrerlemoteur.
Lebranchementducâbleestdesserré. Vérifierlesbranchementsélectriques
auniveaudumoteuretdesfeux.
LaDELestbrûlée. Remplacerlemoduled’éclairageà
DEL.Iln’estpaspossibledere-
mplacerdesDELdistinctes.
Lerotateurdegoulotteest
difficileàdéplacer
Ilyadesdébrisdanslemécanismedurotateur
degoulotte.
Nettoyerlapartieinterneduméca-
nismedurotateurderéception.
Câblesdéformésouendommagés. S’assurerquelescâblesnesontpas
endommagés.Remplacerlescâbles
endommagés.
Leproduittourned’un
seulcôté
Lapressiondespneusn’estpaségale. Réglerlapressiondespneusetgon-
flerlepneu.
Leproduitestentraînéparuneseuleroue. Inspecterlagoupilledeblocagedes
pneus.
Réglageirrégulierdutraîneau. Réglerlesplaquesdeprotectionetle
traîneau.
Réglageirrégulierdesplaquesdeprotection. Réglerlesplaquesdeprotectionetle
traîneau.
694-002-
P
Puissanceréduite Lefildelabougied’allumagen’estpascon-
necté.
Connecterlefilàlabougied’allu-
mage.
Leproduitrejettetropdeneige. Réduirelavitesseetlalargeurde
l’andain.
Lecouvercleduréservoirdecarburantestre-
couvertdeglaceoudeneige.
Retirerlaglaceetlaneigesuretau-
tourducouvercleduréservoirdecar-
burant.
Lesilencieuxestsaleoubouché. Nettoyerouremplacerlesilencieux.
Mauvaiselongueurdecâble. Réglerlecâble.
Lesilencieuxestobstrué. Vérifierquelemoteurestfroid.Retir-
erl’obstruction.
Laprised’aird’admissionducarburateurestob-
struée.
Vérifierquelemoteurestfroid.Retir-
erl’obstruction.
Lemoteurtourneaura-
lentiouronfle
LevoletdedépartestàlapositionON(marche,
complètementouvert).
Déplacerlevoletdedépartàlaposi-
tionOFF(arrêt,fermé).
Laconduitedecarburantestobstruée. Nettoyerlaconduitedecarburant.
Ilyadel’eaudanslecarburantoulecarburant
esttropvieux.
Viderleréservoirdecarburantetle
carburateur.Remplirleréservoirde
carburantavecdel’essencefraîche
etpropre.
Lecarburateurdoitêtreremplacé. Communiqueravecuncentrederép-
arationagréé.
Lacourroieesttendue. Remplacerlacourroietrapézoïdale
delatarière.
Vibrations/Mouvements
excessifsdelapoignée
Certainespiècessontdesserrées.Lestarières
sontendommagées.
Serrertoutlematérieldefixation.Re-
mplacerlespiècesendommagées.Si
lavibrationpersiste,communiquer
avecuncentredeserviceagréé.
Lespoignéesnesontpascorrectementposi-
tionnées.
Assurez-vousquelespoignéessont
verrouilléesenposition.
Lesécrousdulevierderéglagesontdesserrés. Serrerlesécrousjusqu’àcequela
poignéesoitsécuritaire.
Lapoignéedulanceurest
difficileàtirer
Lapoignéedulanceurestgelée. Tirerautantquepossiblesurcorde
dulanceur,puisrelâcherlapoignée.
Silemoteurnedémarrepas,répéter
laprocédureouutiliserledémarreur
électrique.
Lacordeinterfèreaveclescomposants. Lacordedulanceurnedoittoucher
aucuncâblenituyau.
694-002-
G
• Usetheproductcorrectly.Injuryordeathisa
possibleresultofincorrectuse.Onlyusetheproduct
forthetasksfoundinthismanual.Donotusethe
productforothertasks.
• Obeytheinstructionsinthismanual.Obeythesafety
symbolsandthesafetyinstructions.Iftheoperator
doesnotobeytheinstructionsandthesymbols,
injury,damageordeathisapossibleresult.
• Donotdiscardthismanual.Usetheinstructionsto
assemble,tooperateandtokeepyourproductin
goodcondition.Usetheinstructionsforcorrect
installationofattachmentsandaccessories.Only
useapprovedattachmentsandaccessories.
• Donotuseadamagedproduct.Obeythe
maintenanceschedule.Onlydothemaintenance
workthatyoufindaninstructionaboutinthis
manual.Anapprovedservicecentermustdoall
othermaintenancework.
• Thismanualcannotincludeallsituationsthatcan
occurwhenyouusetheproduct.Becarefulanduse
yourcommonsense.Donotoperatetheproductor
domaintenancetotheproductifyouarenotsure
aboutofthesituation.Speaktoaproductexpert,
yourdealer,serviceagentorapprovedservice
centerforinformation.
• Disconnectthesparkplugcablebeforeyou
assembletheproduct,puttheproductintostorageor
domaintenance.
• Donotusetheproductifitischangedfromitsinitial
specification.Donotchangeapartoftheproduct
withoutapprovalfromthemanufacturer.Onlyuse
partsthatareapprovedbythemanufacturer.Injury
ordeathisapossibleresultofincorrect
maintenance.
• Donotbreatheinthefumesfromtheengine.Long
terminhalationoftheengine'sexhaustfumesisa
healthrisk.
• Donotstarttheproductindoorsornearflammable
material.Theexhaustfumesarehotandcancontain
asparkwhichcanstartafire.Notsufficientairflow
cancauseinjuryordeathbecauseofasphyxiationor
carbonmonoxide.
• Whenyouusethisproducttheenginemakesan
electromagneticfield.Theelectromagneticfieldcan
causedamagetomedicalimplants.Speaktoyour
physicianandmedicalimplantmanufacturerbefore
youoperatetheproduct.
• Donotletachildoperatetheproduct.Donotleta
person,withoutknowledgeoftheinstructions
operatetheproduct.
• Makesurethatyoualwaysmonitoraperson,with
decreasedphysicalcapacityormentalcapacity,that
usestheproduct.Aresponsibleadultmustbethere
atalltimes.
• Locktheproductinanareathatchildrenand
unapprovedpersonscannotaccess.
• Theproductcanejectobjectsandcauseinjuries.
Obeythesafetyinstructionstodecreasetheriskof
injuryordeath.
• Donotgoawayfromtheproductwhentheengineis
on.
• Theoperatoroftheproductisresponsibleifan
accidentoccurs.
• Beforeandwhileyouwalkrearward,lookbehindand
downforsmallchildren,animalsorotherrisksthat
cancauseyoutofall.
• Makesurethatpartsarenotdamagedbeforeyou
usetheproduct.
• Makesurethatyouareataminimum15m(50ft)
awayfromotherpersonsoranimalsbeforeyouuse
theproduct.Makesurethatapersoninadjacent
areaknowsthatyouwillusetheproduct.
• Refertonationalorlocallaws.Theycanpreventor
decreasetheoperationoftheproductinsome
conditions.
• Donotputhandsorfeetnearorunderrotatingparts.
Keepclearofthedischargeopeningatalltimes.
• Exerciseextremecautionwhenoperatingonor
crossinggraveldrives,walks,orroads.Stayalertfor
hiddenhazardsortraffic.
• Afterstrikingaforeignobject,stoptheengine
(motor),removethewirefromthesparkplug,
disconnectthecordonelectricmotors,thoroughly
inspecttheproductforanydamage,andrepairthe
damagebeforerestartingandoperatingtheproduct.
• Iftheproductstartstovibrateabnormally,stopthe
engine(motor)andcheckimmediatelyforthecause.
Vibrationisgenerallyawarningoftrouble.
• Stoptheengine(motor)wheneveryouleavethe
operatingposition,beforeuncloggingtheauger
housingorchutedeflector,andwhenmakingany
repairs,adjustmentsorinspections.
• Whencleaning,repairingorinspectingtheproduct,
stoptheengineandmakecertaintheaugersandall
movingpartshavestopped.Disconnectthespark
plugwireandkeepthewireawayfromtheplugto
preventsomeonefromaccidentallystartingthe
engine.
• Donotruntheengineindoors,exceptwhenstarting
theengineandfortransportingtheproductinorout
ofthebuilding.Opentheoutsidedoors;exhaust
fumesaredangerous.
• Exerciseextremecautionwhenoperatingonslopes.
• Neveroperatetheproductwithoutproperguards,
andothersafetyprotectivedevicesinplaceand
working.
• Neverdirectthechutedeflectortowardpeopleor
areaswherepropertydamagecanoccur.Keep
childrenandothersaway.
• Donotoverloadtheproductcapacitybyattempting
toclearsnowattoofastarate.
694-002-
• Neveroperatetheproductathightransportspeeds
onslipperysurfaces.Lookbehindandusecare
whenoperatinginreverse.
• Disengagepowertotheaugerswhentheproductis
transportedornotinuse.
• Useonlyattachmentsandaccessoriesapprovedby
themanufactureroftheproduct(suchaswheel
weights,counterweights,orcabs).
• Neveroperatetheproductwithoutgoodvisibilityor
light.Alwaysbesureofyourfooting,andkeepafirm
holdonthehandles.Walk;neverrun.
• Nevertouchahotengineormuffler.
W
• Thoroughlyinspecttheareawheretheequipmentis
tobeusedandremovealldoormats,sleds,boards,
wires,andotherforeignobjects.
• Disengageallclutchesandshiftintoneutralbefore
startingtheengine(motor).
• Donotoperatetheproductwithoutwearing
adequatewintergarments.Avoidloosefitting
clothingthatcangetcaughtinmovingparts.Wear
footwearthatwillimprovefootingonslippery
surfaces.
• Handlefuelwithcare;itishighlyflammable.
• Useanapprovedfuelcontainer.
• Neveraddfueltoarunningengineorhotengine.
• Fillfueltankoutdoorswithextremecare.Never
fillfueltankindoors.
• Neverfillcontainersinsideavehicleoronatruck
ortrailerbedwithaplasticliner.Alwaysplace
containersontheground,awayfromyour
vehicle,beforefilling.
• Whenpractical,removegas-poweredequipment
fromthetruckortrailerandrefuelitonthe
ground.Ifthisisnotpossible,thenrefuelsuch
equipmentonatrailerwithaportablecontainer,
ratherthanfromagasolinedispensernozzle.
• Keepthenozzleincontactwiththerimofthefuel
tankorcontaineropeningatalltimes,until
refuelingiscomplete.Donotuseanozzlelock-
opendevice.
• Replacegasolinecapsecurelyandwipeup
spilledfuel.
• Iffuelisspilledonclothing,changeclothing
immediately.
• Useextensioncordsandreceptaclesasspecifiedby
themanufacturerforallunitswithelectricdrive
motorsorelectricstartingmotors.
• Adjusttheaugerhousingheighttocleargravelor
crushedrocksurface.
• Neverattempttomakeanyadjustmentswhilethe
engine(motor)isrunning(exceptwhenspecifically
recommendedbythemanufacturer).
• Alwayswearsafetyglassesoreyeshieldsduring
operationorwhileperforminganadjustmentor
repairtoprotecteyesfromforeignobjectsthatmay
bethrownfromthemachine.
Alwaysusethecorrectpersonalprotectiveequipment
whenyouoperatetheproduct.Thisincludes,at
minimum,sturdyfootwear,eyeprotectionandhearing
protection.Personalprotectiveequipmentdoesnot
erasetheriskofinjurybutmaydecreasethegradeof
injuryifanaccidentoccurs.
• Alwayswearsafetyglassesoreyeprotectionwhile
youoperatetheproductordomaintenanceor
repairs.
• Alwayswearappropriatewintergarmentswhenyou
operatetheproduct.
• Alwaysuseheavy-dutyslip-resistantbootswithgood
anklesupportwhileyouoperatetheproduct.
• Donotwearloosefittingclothingthatcangetcaught
inmovingparts.
• Useapprovedprotectivegloves,ifnecessary.For
example,whenattaching,examiningorcleaningthe
blade.
• Alwaysuseapprovedearprotectionwhileyou
operatetheproduct.Noiseforalongperiodcan
causenoise-inducedhearingloss.
• Makesurethatyouregularlydothemaintenanceto
theproduct.
• Thelifeoftheproductincreases.
• Theriskofaccidentsdecreases.
Letanapproveddealeroranapprovedservice
centerregularlyexaminetheproducttodo
adjustmentsorrepairs.
• Donotuseaproductwithdamagedprotective
equipment.Iftheproductisdamaged,speaktoan
approvedservicecenter.
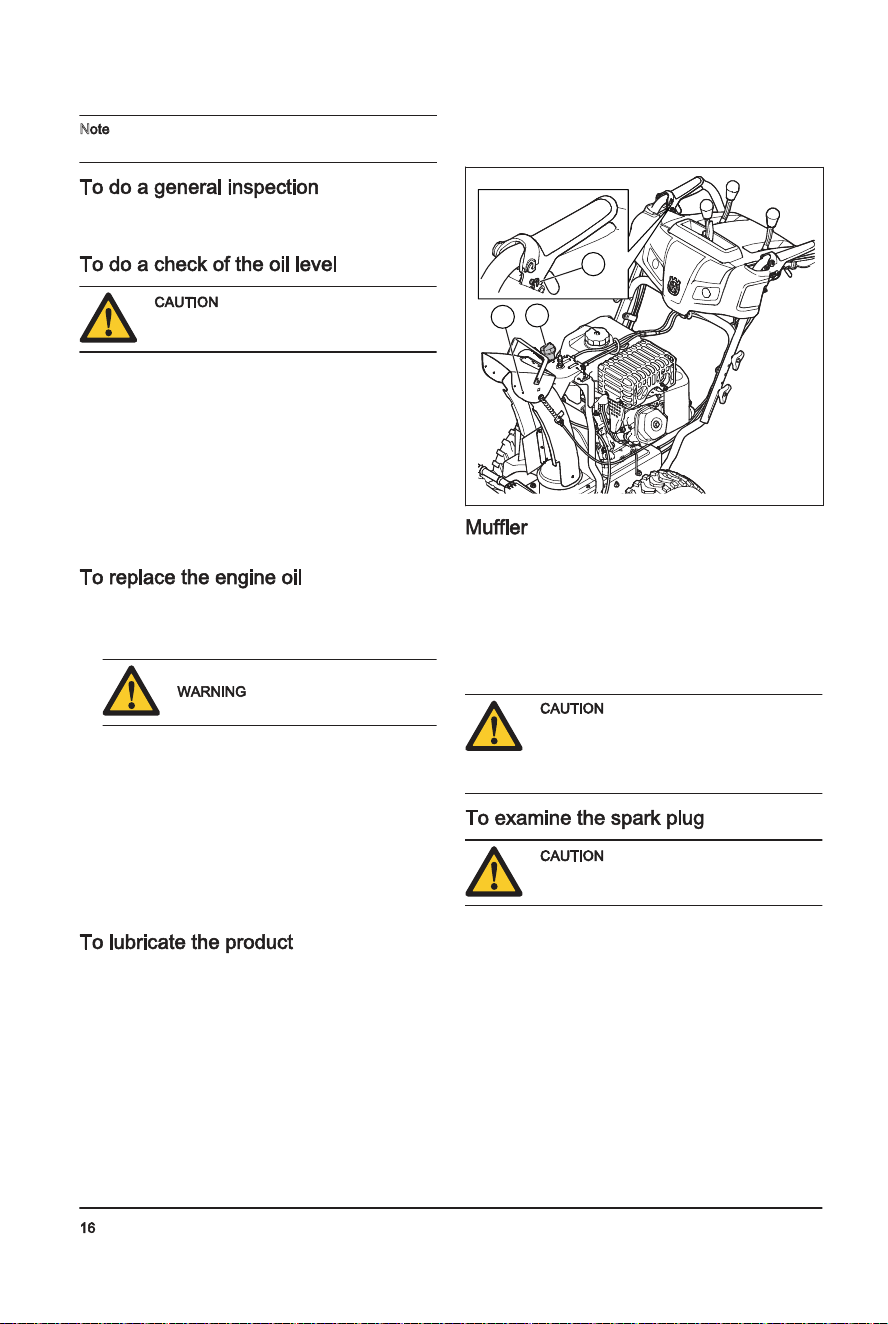
Themufflerkeepsthenoiselevelstoaminimumand
sendstheexhaustfumesawayfromtheoperator.
Donotusetheproductifthemufflerismissingor
defective.Adefectivemufflerincreasesthenoiselevel
andtheriskoffire.
Examinethemufflerregularlytomakesurethatitis
attachedcorrectlyandnotdamaged.
Themufflerbecomesveryhot
duringandafteruseandwhentheengine
operatesatidlespeed.Becarefulnear
flammablematerialsand/orfumestoprevent
fire.
Readthewarninginstructions
thatfollowbeforeyouusetheproduct.
694-002-
D
L’outilnedémarrepas Laclédedémarragedesécuritén’estpasinsér-
ée.
Insérerlaclédedémarragedesé-
curité.
Leproduitestenpannedecarburant. Remplirleréservoirdecarburant
avecdel’essencefraîcheetpropre.
LacléON/OFF(marche/arrêt)estàlaposition
OFF(arrêt).
PlacerlacléON/OFF(marche/arrêt)
àlapositionON(marche).
LevoletdedépartestàlapositionOFF(arrêt,
fermé).
Déplacerlevoletdedépartàlaposi-
tionON(marche,complètementou-
vert).
L’amorceurn’estpasenfoncé. Appuyersurl’amorceur.
Lemoteurestnoyé. Attendrequelquesminutesavantde
redémarrer,NEPASpurger.
Redémarrerlemoteuràpleinrégime
aveclevoletdedépartàlaposition
OFF(arrêt,fermé).
Lefildelabougied’allumagen’estpascon-
necté.
Connecterlefilàlabougied’allu-
mage.
Labougied’allumageestdéfectueuse. Remplacerlabougied’allumage.
Ilyadel’eaudanslecarburantoulecarburant
esttropvieux.
Viderleréservoirdecarburantetle
carburateur.Remplirleréservoirde
carburantavecdel’essencefraîche
etpropre.
Ilyadelavapeurdanslaconduitedecarbur-
ant.
S’assurerquetoutelaconduited’ali-
mentationencarburantestendes-
sousdelasortieduréservoirdecar-
burant.Laconduited’alimentationen
carburantdoitfonctionnerenperma-
nenceentreleréservoirdecarburant
etlecarburateur.
Autrescauses. Lireattentivementlesméthodesde
démarragedecemanuel.
Lecommutateurdecarburant(selonl’équipe-
ment)estàlapositionCLOSE(arrêt).
Placerlecommutateurdedémarrage
dumoteuràlapositionON(marche).
Lacommanded’accélérationestàlaposition
STOP(Arrêt).
Déplacerlacommanded’accéléra-
teuràlapositionFAST(Rapide).
694-002-
2. Enleverlarouedel’arbre(C).
A
B
C
• Nettoyerlespiècesenplastiqueàl’aided’unchiffon
propreetsec.
• Nepasutiliserdenettoyeuràhautepressionpour
nettoyerlatondeuse.
• Nepasverserdel’eaudirectementsurlemoteur.
• Utiliserunebrossepourenleverlesfeuilles,l’herbe
etlasaleté.
694-002-
• Donotstarttheproductifthereisfuelorengineoil
ontheproduct.Removetheunwantedfuel/oilandlet
theproductdry.
• Ifyouspillfuelonyourclothing,changeclothing
immediately.
• Donotgetfuelonyourbody,itcancauseinjury.If
yougetfuelonyourbody,usesoapandwaterto
removethefuel.
• Donotstarttheproductiftheenginehasaleak.
Examinetheengineforleaksregularly.
• Becarefulwithfuel.Fuelisflammableandthefumes
areexplosiveandcancauseinjuriesordeath.
• Donotbreatheinthefuelfumes,itcancauseinjury.
Makesurethatthereisasufficientairflow.
• Donotsmokenearthefuelortheengine.
• Donotputwarmobjectsnearthefuelortheengine.
• Donotaddthefuelwhentheengineison.
• Makesurethattheengineiscoolbeforeyourefuel.
• Beforeyourefuel,openthefueltankcapslowlyand
releasethepressurecarefully.
• Donotaddfueltotheengineinanindoorarea.Not
sufficientairflowcancauseinjuryordeathbecause
ofasphyxiationorcarbonmonoxide.
• Tightenthefueltankcapfully.Ifthefueltankcapis
nottightened,thereisariskoffire.
• Movetheproductaminimumof3m(10ft)fromthe
positionwhereyoufilledthetankbeforeastart.
• Donotputtoomuchfuelinthefueltank.
P
WARNING
The engine exhaust from this product
contains chemicals known to the State of
California to cause cancer, birth defects
or other reproductive harm.
Readthewarninginstructions
thatfollowbeforeyouusetheproduct.
• Theexhaustfumesfromtheenginecontaincarbon
monoxide,anodorless,poisonousandvery
dangerousgas.Donotstarttheengineindoorsorin
closedspaces.
• Beforeyoudothemaintenanceontheproduct,stop
theengineandremovetheignitioncablefromthe
sparkplug.
• Useprotectivegloveswhenyoudomaintenanceon
theblades.Thebladesareverysharpandcutscan
easilyoccur.
• Accessoriesandchangestotheproductthatarenot
approvedbythemanufacturer,cancauseserious
injuryordeath.Donotchangetheproduct.Always
useaccessoriesthatareapprovedbythe
manufacturer.
• Ifthemaintenanceisnotdonecorrectlyand
regularly,theriskofinjuryanddamagetothe
productincreases.
• Onlydothemaintenanceasgiveninthisoperator's
manual.Allotherservicingmustbedonebyan
approvedserviceagent.
• Letanapprovedserviceagentdoservicingonthe
productregularly.
• Replacedamaged,wornorbrokenparts.
1. Removeloosepartsincludedwiththeproduct.Cut
thefourcornersofthecartonandputtheendpanels
downflat.
2. Removethetwoscrewsthatattachtheauger
housingtothepallet.Removethesteelbrackets
fromtheskidplatesiftheyhaveit.
3. Cutthecabletiesthatholdtheproducttothepallet
andremovethem.
4. Removeallpackagematerials.
5. Removetheproductfromthecartonandmakesure
noloosepartsareleftinthecarton.
Knob(3)
694-002-
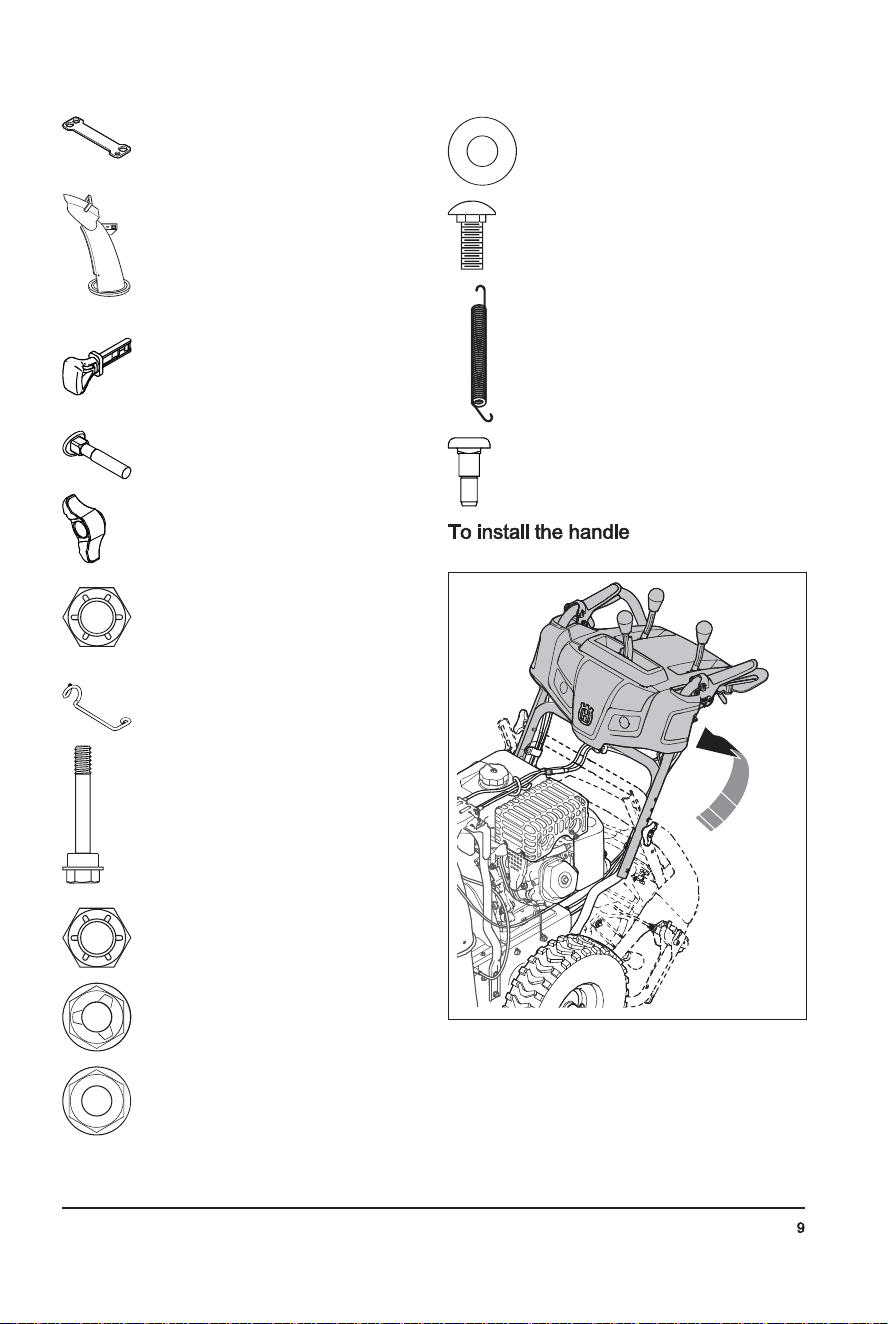
Multi-wrench(1)
Dischargechute(1)
ON/OFFkey(s)
Carriagebolts5/16-18x2¼”(2)
Handleknobs(2)
Locknut3/8(1)
Cableguide(1)
Shearpins¼-20x1-¾(6)
Locknuts¼-20(6)
Locknut5/16-18(1)
Locknut¼-20(1)
Nylonwasher(1)
Carriagebolt5/16-18x5/8(1)
Spring(1)
Shoulderbolt¼-20(1)
1. Raisetheupperhandletotheoperatingposition.
694-002-
5. Installerlesboulonsde5/16po(A),(C)etlesserrer
(8à12lb/po2/11à16Nm).
B
C
A
6. Installerlesboulonsde¼po(B)etlesserrer(4à
6lb/po2/5à8Nm).
7. Installerlacourroiedelatarièresurlapouliedu
moteur.S’assurerquelacourroieestcorrectement
placéesurlapouliefolleetcorrectementinstallée
danslarainuredelapouliedumoteur.
8. Actionnertouteslescommandesafindes’assurer
quelacourroiedelatarièreestcorrectement
installéeetquetouslescomposantssedéplacent
correctement.
1. Desserrerlesécrousdeblocage(B)afinderéglerla
tensionducâbledelagoulotted’éjectionadjacente
audispositifderéglagedutendeur(A).
A B
C
2. Tenirfermementlasectioncourteettournerla
sectionlongueafind’allongerletendeur.
3. Procéderàunajustementjusqu’àcequelecâbledu
déflecteurdelagoulotted’éjection(C)soitbien
serré.Serrerlesécrousdeblocage.
Sivousnevoussentezpasàl’aisedefaire
ceréglagevous-même,veuillezcommuniqueravecun
centred’entretienautorisé.Silarotationdelatarièreest
ralentielorsquelelevierdecommandeestengagéousi
lacourroieaétéremplacée,ilestpossiblequ’unréglage
soitnécessaire.
1. Desserrerlesécrousdeblocage(B)àcôtédu
tendeur(A)pourréglerlatensionducâblede
commandedelatarière(D).
A B
D
2. Tenirlasectioncourteetfairetournerlasection
longue.Latournersur360degrés.
3. Vérifierl’engagementdelatarière.Répéterle
réglagejusqu’àcequ’ilnerestequ’unefaible
tensiondanslecâblelorsquelelevierest
désengagé.
4. Serrerl’écroudeblocageinférieurafindele
verrouillerentension.
5. Demanderàunassistantdesetenirà3mètres/
10piedsdevantleproduit,surlecôtéopposédela
goulotte.L’assistantdoitobserverlarotationdela
tarièreetcalculerletempsnécessairepourl’arrêtde
larotationaprèsavoirrelâchélelevier.Silatarière
cessedetourneraprès5secondes,réglerla
longueurducâbleenfaisanttournerlecylindre
centralsur360degréspourrétracterledispositifde
réglage.Vérifierlatarièreetcalculerletempsà
nouveau.Silatarièrecessedetournerenmoinsde
5secondes,passeràl’étapesuivante.
6. Serrerlecontre-écrousurlecâbledelatarière.
Sileréglageducâblenerèglepasle
problème,remplacerlacourroiedelatarière.Voir
Retraitdelacourroiedetarièreàlapage71
.
1. Déposerl’axedelaroue(A)etl’axederetenue(B).
694-002-
rainuredelapoulied’entraînementavantd’abaisser
leplateauderotation.
3. Installeretserrerleboulonsupérieur(I).
4. Placerlacourroied’entraînementdanslarainurede
lapouliedumoteur(G)avantdel’installersurl’arbre
dumoteur.
5. Installerleboulondelapoulie(F)etl’attacherla
pouliedumoteursurlemoteur.Serrerleboulonde
lapoulie(de30à35pi-lb/de41à47Nm).
6. Installerlelevierdutendeurdecourroie
d’entraînement(B)etserrerleboulondulevier(E)
surlemoteur.
7. Installerleressortderappel(C)surleplateaude
rotation.
8. Installerleressortdutendeur(A)surlelevierdu
tendeur.
9. Actionnertouteslescommandespours’assurerque
lacourroied’entraînementestcorrectementinstallée
etquetouslescomposantssedéplacent
correctement.
I
1. Installerlecarterdelacourroie(B)surlechâssis(C)
etserrerlesdeuxvis(A).
C A
B
2. Installerlagoulottededécharge.
1. Retirerlesboulons5/16po(A)etlesboulons¼po
inférieurs(B)des2côtésduchâssis.Conserverles
boulons.
B
C
A
2. Desserrer,sansretirer,lesboulonsde5/16po
inférieurs(C)des2côtésduchâssis.
3. Retirerlacourroiedetarièredelapouliedumoteur.
4. Inclinerlapartiearrièreverslebas.Lapartieavant
s’inclineversl’avantparlamêmeoccasion.Le
bouloninférieur(C)sertdecharnièreentreles
sectionsavantetarrière.
5. Placerunecaleenboissouslepointdecharnière
afindemettreleproduitenpositionrepliée.
6. Déplacerlelevierdutendeurdecourroiedela
tarièreetretirerlacourroiedelatarièredulevier.
1. Déplacerlelevierdutendeurdecourroieetplacerla
courroiedetarièredanslarainuredelapouliede
tarière.
S’assurerquela
courroien’estpascoincéeentrele
châssisetlecarterdelatarièrelorsque
vousassemblezl’unité.
2. Retirerleblocdeboisàpartirdelapartieinférieure
duproduit.
3. Tournerlapoignéepourinclinerlapartiearrièrevers
lehaut.Lapartieavants’inclineraversl’arrièreet
pivoteraafindefixerlapartiearrière.
4. S’assurerquelacourroieestcorrectement
positionnéedanslarainuredelapouliedetarière.
694-002-
2. Adjustthehandlepositiontooneofthemounting
holes(B)andtightenthehandleknobs(C)withthe
carriagebolts(D).
B
C
D
3. Installmorecarriagebolts(D)andhandleknobs(C)
tosecuretheupperhandle(A)tothelowerhandle
(E).
D
E
A
C
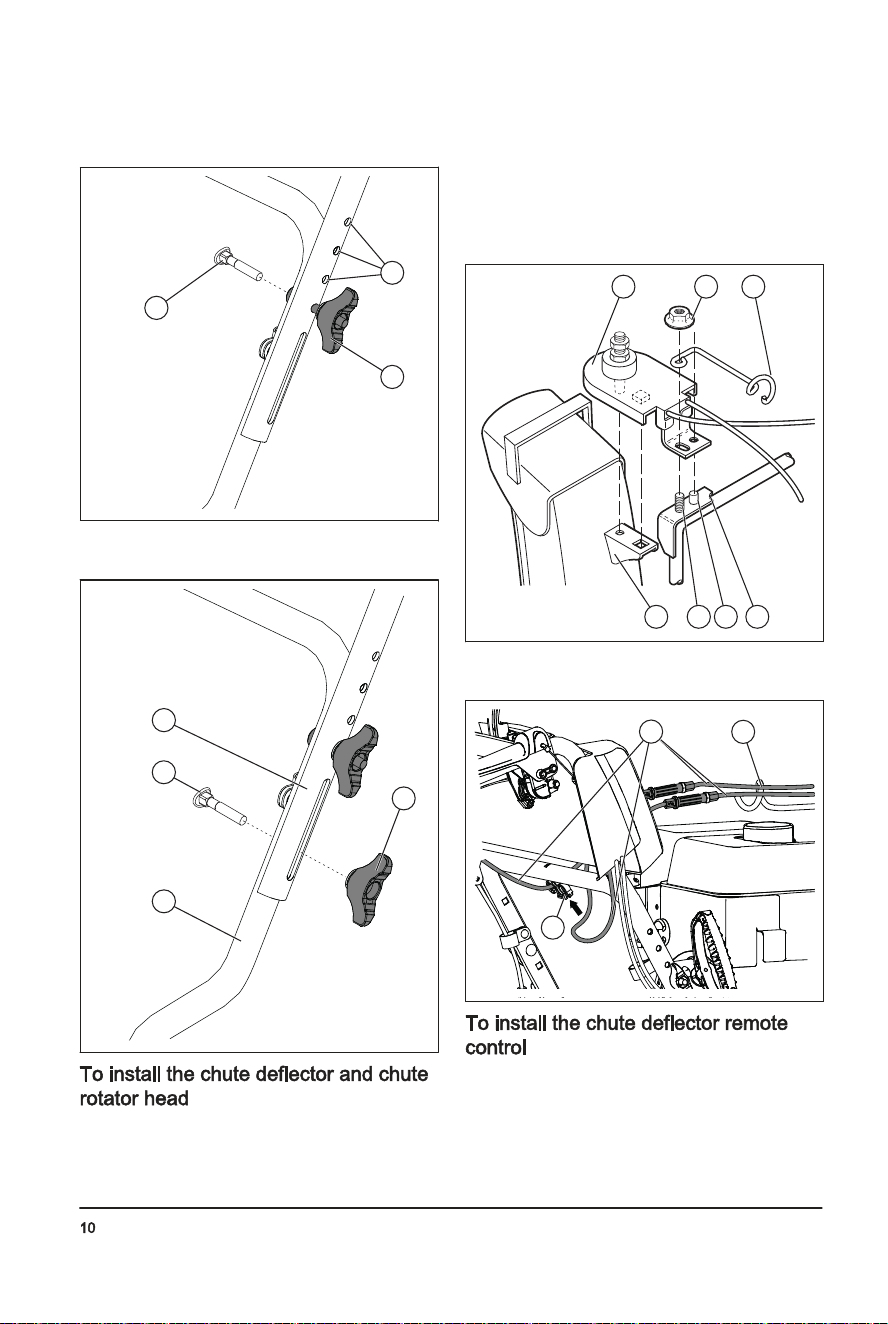
1. Putthechutedeflectorassemblyonthetopofthe
chutebasewiththedischargeopeninginthe
directionofthefrontoftheproduct.
2. Putthechuterotatorhead(A)onthechutebracket
(B).Rotatethechuteassemblytoalignthepins
underthechuterotatorheadwiththeholesinthe
chutebracketifitisnecessary.
3. Putthechuterotatorheadonthepin(C)andthe
threadedstud(D)onthemountingbracket(E).
4. Attachalocknut(G)onthethreadedstudand
tighten.
A
B CD E
FG
5. Putthecablesthroughthecableguide(F)andthe
doubleclip(I)toattachtherotatorcable(H)tothe
lowerhandle.
FH
I
1. Attachtheremotecablebracket(A)tothedischarge
chutewithacarriagebolt(B)anda5/16-18locknut
(D).Tightenthebolt.
694-002-
2. Installtheremotecableeyelet(E)tothechute
deflector(F)withashoulderbolt(G),anylonwasher
(C),andtightenwitha¼-20locknut(K).Thecable
eyeletwillbelooseontheshoulderbolt.
3. Attachthespring(L)betweenthehexnut(M)onthe
chuterotatorheadandtheholeonthechute
deflector.
F
L
M
B
A
D
K
C
E
G
4. Attachthelevercontrolknobs(N)bypressingthem
downonthecontrollevers(O).
O
N
• Keeppersonsandanimalsawayfromtheworkarea.
• Dodailymaintenance.See
Maintenanceschedule
onpage15
.
• Makesuretheignitionleadfitscorrectlyonthespark
plug.
• Addoilorgasoline,ifnecessary.See
Technicaldata
onpage25
.
Donotrotatethedipstickwhen
youchecktheoil.Donotfillabovethemark.
1. Removetheoilcapandcleanthedipstick.See
Productoverviewonpage3
forthelocationofthe
dipstick.
2. Addoiltothetopmarkonthedipstick.Usethe
dipsticktodoacheckoftheoillevelatregular
intervals.
3. Puttheoilcapback.
Ifavailable,uselow-emission/alkylategasoline.Iflow-
emission/alkylategasolineisnotavailable,usegood
qualityunleadedgasolineorleadedgasoline.Use
gasolinewithanoctanenumberof90RONoutofNorth
America(87AKIinNorthAmerica)orhigher,andwitha
maximumof10%ethanol(E10).
Donotusegasolinewithan
octanenumberlessthan90RONoutof
NorthAmerica(87AKIinNorthAmerica).
Thiscancausedamagetotheproduct.
1. Openthefueltankcapslowlytoreleasethe
pressure.
2. Fillslowlywithafuelcan.Ifyouspillfuel,removeit
withaclothandletremainingfueldryoff.
3. Cleantheareaaroundthefueltankcap.
4. Tightenthefueltankcapfully.Ifthefueltankcapis
nottightened,thereisariskoffire.
5. Movetheproductaminimumof3m(10ft)fromthe
positionwhereyoufilledthetank,beforeastart.
1. Toadjustthedischargechuteposition,movethe
dischargechutecontrollever(A)backandtotheleft
orrightdirection.
694-002-
2. Desserrerlecontre-écrou(A)quifixelatêtedu
rotateurdegoulotte(B)ausupportdemontage(C)
afinderetirerlagoulotted’éjection.
B
A
C
3. Desserrerlesdeuxvis(A)quimaintiennentlecarter
delacourroie(B)surlechâssis(C)etenleverle
carterdelacourroie.
C A
B
1. Retirerlacourroiedetarière.Voir
Retraitdela
courroiedetarièreàlapage71
.
2. Déposerleressortdutendeur(A)fixésurlelevierdu
tendeurdecourroied’entraînement(B).
A
B
C
D
E
H
FG
I
J
3. Déposerleressortderappel(C)quimaintientle
plateauderotation(D)enplace.
4. Déposerleboulondulevier(E)etlelevierdu
tendeurdecourroie.
5. Retirerleboulondelapoulie(F),lapouliedumoteur
(G)etlacourroied’entraînement(H)dumoteur.
6. Retirerleboulonsupérieur(I)quimaintientle
plateauderotationsurlechâssis
7. Pivoteretmaintenirleplateauderotationàl’écartdu
produitetretirerlacourroied’entraînementdela
poulied’entraînement(J).
1. Pivoteretmaintenirleplateauderotation(D)à
l’écartduproduit.
A
B
C
D
E
H
FG
I
J
2. Placerlacourroied’entraînement(H)surlapoulie
d’entraînement(J).
S’assurerquelacourroie
d’entraînementestacheminéecorrectementdansla
694-002-
4. Installeruncontre-écrou¼-20(D)surlagoupillede
tonteetserrer.
A C B
D
5. InsérerlacléON/OFF(marche/arrêt)dansle
contact,puisbrancherlecâbled’allumagedela
bougie.
• Maintenirlespneusexemptsdecarburantetd’huile
pouréviterd’endommagerlecaoutchouc.
• Maintenirlespneusàl’écartdesouches,depierres,
d’ornières,d’objetspointusetdetoutautreobjet
pouvantlesendommager.
• Maintenirlapressioncorrectedespneus,voir
Donnéestechniquesàlapage77
.
Nepasdéboucherledéflecteurdegoulotteavantde
réaliserlesopérationssuivantes.
1. Relâchersimultanémentl’engagementdelatarière
etceluidel’entraînement.
2. Attendre10secondespours’assurerquelestarières
sontarrêtées.
3. Mettreleproduithorstension.
4. Utiliserl’outildenettoyage(aumoins38cm[15po]
delong,inclusaveccertainsmodèles)pourretirer
l’obstruction.
Nepasplacerles
mainsdansledéflecteurdegoulotteou
àl’intérieurducarterdetarière.
1. Placerlabarrederacleur(A)danslaposition
inverséelorsqu’elleestuséeducôtéducarter.
A
2. Remplacerlabarrederacleursielleestuséedes
deuxcôtésousielleestendommagée.
LescourroiesenVsont
spécialementconçuespourleproduitet
doiventêtreremplacéespardespiècesdu
fabricantd’originedisponiblesauprèsde
votrecentredeservicesleplusproche.
L’utilisationdecourroiesautresquecelles
dufabricantd’originepeutcauserdes
blessurespersonnellesouendommagerle
produit.
Leremplacementdela
courroienécessiteledémontageduproduit.
Pourséparerlecarterdelatarièredu
châssis,ilestimportantqu’unassistantse
tiennedeboutdanslapositionde
fonctionnementetqu’iltiennelespoignées
duproduit.Desblessurescorporellesgraves
ouunendommagementduproduit
pourraientseproduiresileproduitest
échappépendantleremplacementdela
courroie.
Iln’estpaspossibled’ajusterlacourroiede
latarièreetlacourroied’entraînement.Remplacerles
courroiessiellessontendommagéesousielles
commencentàglisserenraisondel’usure.Ilest
recommandédefaireremplacerlescourroiesparun
centrederéparationagréé.
Ilestrecommandéderemplacerlacourroie
d’entraînementainsiquelacourroiedelatarière.
1. Retirerlecarburantduréservoirdecarburant.
694-002-
2. Toadjustthesnowthrowingdistanceofthechute
deflector,movethedeflectorremotecontrollever(B)
downtodecreasethedistanceanduptoincrease
thedistance.
AB
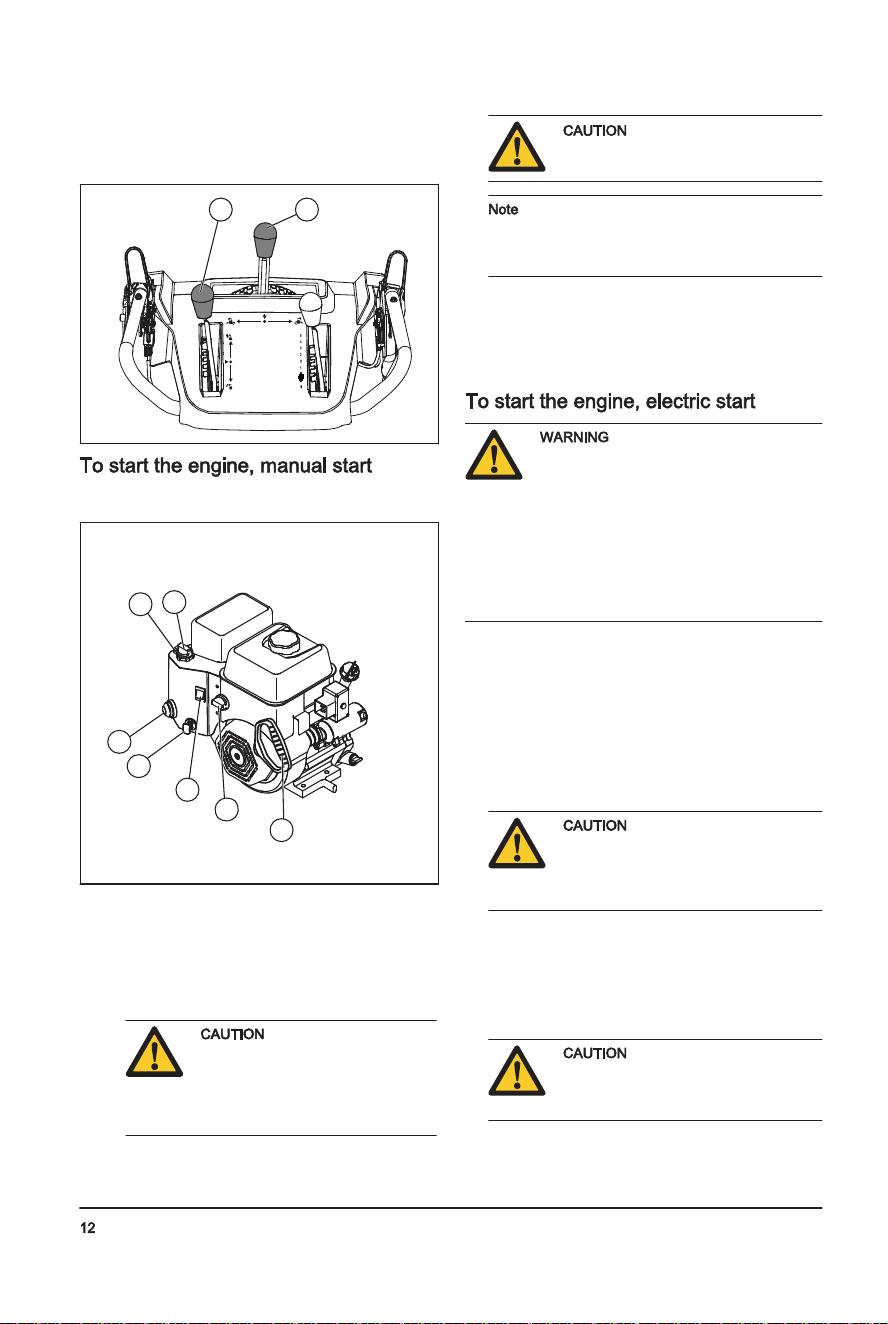
1. InserttheON/OFFkey(A)intotheignitionslotuntilit
clicks.Donotturnthekey.
G
F
C
A
E
B
D
2. TurnthefuelON/OFFswitch(F)totheONposition.
3. Putthethrottlecontrol(B)totheFASTposition.
4. PuttheON/OFFswitch(C)totheONposition.
a) Iftheengineiscold,rotatethechoke(D)tothe
FULLpositionandpushtheprimer(E)three
times.
Donotoverprimethe
engine.Itcanpreventtheengine
fromstarting.Iftheengineisover
primed,waitafewminutesbefore
attemptingtostartanddonotpush
theprimer.
5. Pullthestarterropehandle(G).
Donotreleasethegrip
quickly.Moveitbacktothestartposition
slowly.
Iftheropestarterhasfrozen,slowlypulloutas
muchropeoutofthestarteraspossibleandrelease
thestarterropehandle.Iftheenginedoesnotstart,
repeattheprocedureorusetheelectricstarter.
6. Ifthechokewasusedtostarttheengine,slowly
movethechoke(D)totheOFFposition.
7. Runtheengine2-3minutesatidlingspeedbefore
youstarttothrowsnow.
8. Iftheenginedoesnotrunasitshould,turnitoff.
Theproducthasa120VA.C.
electricstarter.Donotusetheelectric
starterifyourhouseisnota120VA.C.
three-wiregroundedsystem.Serious
personalinjuryordamagetotheproduct
couldoccur.Theelectricstarterhasathree-
wirepowerplug,andisdesignedtouse120
VA.C.householdcurrent.Makesurethat
yourhouseisa120VA.C.three-wire
groundedsystem.Ifyouareuncertain,aska
licensedelectrician.
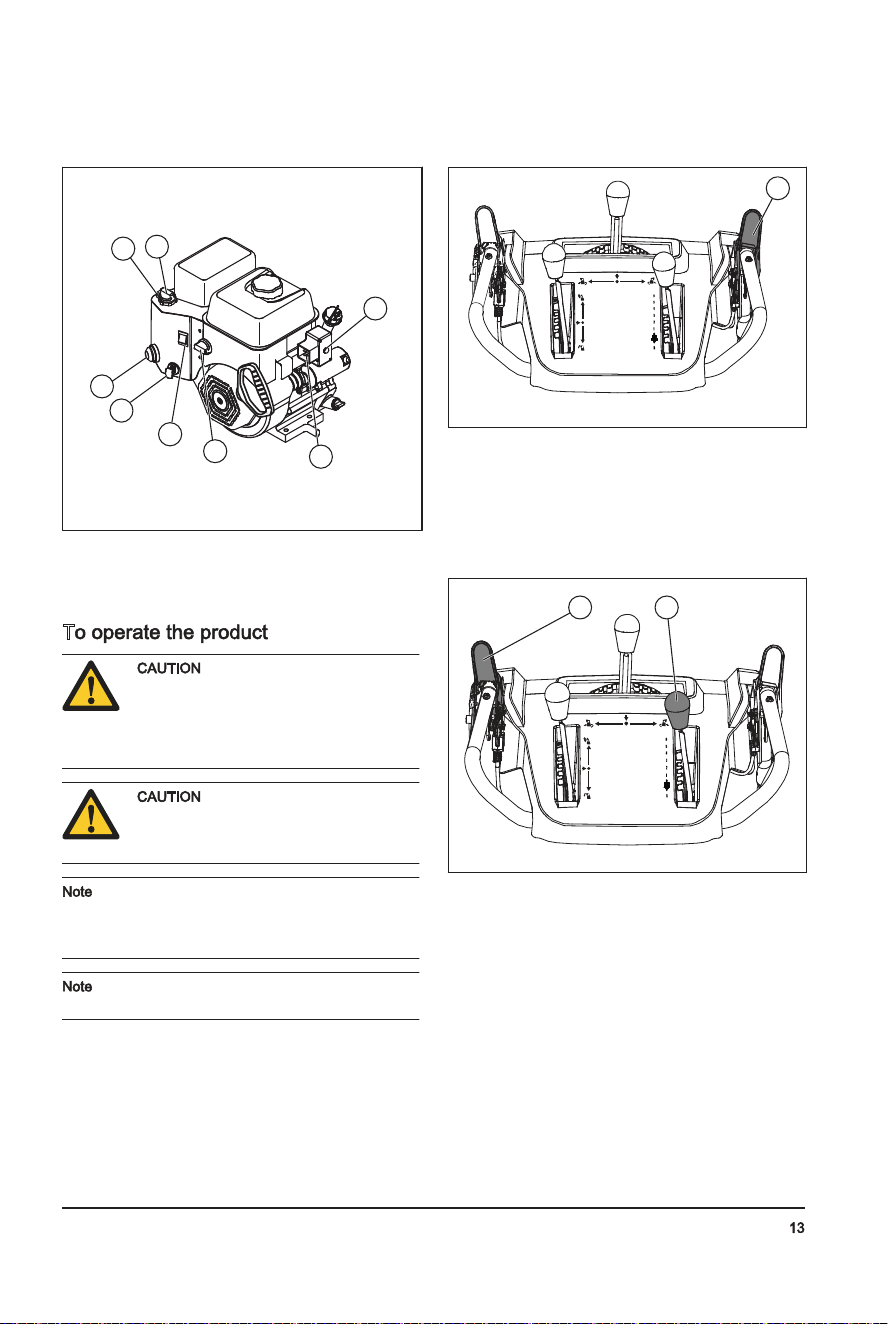
1. InserttheON/OFFkey(A)intotheignitionslotuntilit
clicks.Donotturnthekey.
2. TurnthefuelON/OFFswitch(F)totheONposition.
3. Putthethrottlecontrol(B)totheFASTposition.
4. PuttheON/OFFswitch(C)totheONposition.
a) Iftheengineiscold,turnthechoke(D)tothe
FULLposition.
5. Pushtheprimer(E)threetimes.
Donotoverprimetheengine.
Itcanpreventtheenginefromstarting.If
theengineisoverprimed,waitafew
minutesbeforetryingtostartanddonot
pushtheprimer.
6. Connecttheextensioncordtotheconnectoronthe
engine(G).
7. Connecttheotherendoftheextensioncordintoa
three-holegrounded120VA.C.receptacle.
8. Pushtheelectricstartbutton(H)untiltheengine
starts.
Donotcranktheenginemore
thanfivecontinuoussecondsbetween
eachtimeyoutrytostart.Wait5to10
secondsbetweeneachtry.
694-002-
9. Ifthechokewasusedtostarttheengine,releasethe
electricstartbuttonandslowlymovethechoke(D)
totheOFFposition.
H
C
A
E
B
D
G
F
10. Disconnecttheextensioncordfromthereceptacle
firstandthenfromtheengine.
11. Runtheengine2-3minutesatidlingspeedbefore
youstarttothrowsnow.
T
Donotoperatewithoutsnowor
watertolubricatetheaugerblades.Incorrect
usecancausehightemperaturesinthe
augerblades,especiallyiftheproductis
new.Thiscancausedamagetotheauger
bladesandscraperbar.
Donotpartiallyengagedriveor
augerleversforanextendedperiodoftime;
thiscanleadtoprematurewearorburning
ofthebelts.
Whenboththedriveengagementandauger
engagementareengaged,thedriveengagementwill
locktheaugerengagementinposition.Usetheright
handtocontrolthesnowdischargechute.
Donotchangethespeedwhentheaugersare
engaged.Thiscancausedamagetothetransmission.
1. Toengagetheaugerblades,pushtheauger
engagement(A)tothehandletoengagetheauger
andthrowsnow.
A
2. Raisethedrivespeedcontrollever(B)fromthe
middlepositiontomaketheproductmoveforward
whenthedriveengagement(C)isengaged.Donot
changethespeedwhentheaugersareengaged.
Thiscancausedamagetothetransmission.
3. Lowerthedrivespeedcontrolleverfromthemiddle
positiontomaketheproductmoverearwardwhen
thedriveengagementisengaged.
C B
4. Tomaketheproductmoveintheselecteddirection,
holdthedriveengagementagainstthehandle.
694-002-
V
Toujoursutiliserune
bougied’allumagedutyperecommandé.
Unebougied’allumagedetypeinapproprié
peutendommagerleproduit.
• Examinerlabougied’allumagesilemoteurmanque
depuissance,démarredifficilementounefonctionne
pascorrectementaurégimederalenti.
• Afinderéduirelerisquedematériauindésirablesur
lesélectrodesdelabougie,respecterlesconsignes
suivantes:
a) Vérifierquelerégimederalentiestrégléde
façonadéquate.
b) Vérifierquelemélangedecarburantestcorrect.
c) Vérifierquelefiltreàairestpropre.
• Silabougied’allumageestsale,lanettoyeret
s’assurerquel’écartementdesélectrodesest
correct,voirlafigure
Donnéestechniquesàlapage
77
.
• Remplacerlabougied’allumageaubesoin.
1. Avantchaqueutilisation,vérifierlatarièreetlabarre
deracleurpourdétectertoutsigned’usure.
2. Sileborddelabarrederacleurestusé,inverserla
barrederacleur.Silabarrederacleurest
endommagéeouestuséedesdeuxcôtés,la
remplacer.
3. Silesbordsdelatarièresontusés,communiquer
avecuncentredeserviceagréépourlesremplacer.
Lagoupilledetonteprotègeleproduitcontreles
dommages.Lesgoupillesdetontedelatarièrepeuvent
sebrisersiunobjetestinsérédanslespiècesmobiles.
N’utiliserqueles
goupillesdetontelivréesavecleproduit.
1. Encasdebrisd’unegoupilledetontedelatarière,
arrêterlemoteuretattendrequelespiècesmobiles
soientimmobiles.
2. RetirerlacléON/OFF(marche/arrêt)etdébrancher
lecâbled’allumage.
3. Alignerletroudumoyeudelatarière(B)avecletrou
dansl’arbredelatarière(C)etinstallerunenouvelle
goupilledetonte¼-20x2(A).
4. Installeruncontre-écrou¼-20(D)etleserrer.
A B
C
DB
5. InsérerlacléON/OFF(marche/arrêt)dansle
contact,puisbrancherlecâbled’allumagedela
bougie.
Lagoupilledetontedelaroueàailettesprotègele
produitcontrelesdommages.Lesgoupillesdetontede
laroueàailettespeuventsebrisersiunobjetestinséré
danslespiècesmobiles.
N’utiliserqueles
goupillesdetontelivréesavecleproduit.
1. Encasdebrisd’unegoupilledetontedelaroueà
ailettes,arrêterlemoteuretattendrequelespièces
mobilessoientimmobiles.
2. RetirerlacléON/OFF(marche/arrêt)etdébrancher
lecâbled’allumage.
3. Alignerletroudumoyeudelaroueàailettes(A)
aveclestrousdel’arbredelaroueàailettes(B)et
installerunenouvellegoupilledetonte¼-20(C).
694-002-

E
Vérifierlapression
despneus
8
X
Inspecteretremplac-
erlabougie
9
X
Iln’estpasnécessaired’ajouterdela
graisseoud’effectuerd’autresentretienssurlaboîtede
vitesses.
• S’assurerquelesécrousetlesvissurleproduitsont
serrés.
Unniveaud’huiletrop
faiblepeutcauserdesdommagesau
moteur.Vérifierleniveaud’huileavant
d’utiliserleproduit.
1. Placerleproduitsurunsolplat.
2. Retirerlebouchonduréservoird’huileaveclajauge
d’huile.
3. Nettoyerl’huilesurlajauged’huile.
4. Insérerentièrementlajaugedansleréservoird’huile
pourobteniruneestimationappropriéeduniveau
d’huile.
5. Retirerlajauged’huile.
6. Examinerleniveaud’huilesurlajauged’huile.
7. Sileniveaud’huileesttropbas,rempliravecde
l’huilemoteuretvérifierdenouveauleniveau
d’huile.
1. Fairetournerlemoteurquelquesminutespourfaire
chaufferl’huile.L’huilechaudes’écouleplus
facilementetemporteavecelleplusde
contaminants.
L’huilemoteurest
chaude.Évitertoutcontactentrelapeau
etl’huilemoteurusagée.
2. Placerleproduitsurunsolplat.
3. RetirerlacléON/OFF(marche/arrêt).
4. Placerunrécipientsouslebouchondevidange
d’huile.
5. Retirerlebouchondevidanged’huile,basculerle
produitetvidangerl’huileusagéedansleconteneur.
6. Replacerleproduitàlapositiondefonctionnement.
7. Installerlebouchondevidanged’huileetleserrerà
lamain.
8. Remplirlemoteurd’huile,voir
Remplissagedu
moteuravecdel’huileàlapage62
.
• Lubrifierlespointspivots(A)avecdel’huile.
• Lubrifierlemoteur(B)avecdel’huile.
• Appliquerunepetitequantitédegraisseaulithium
aumécanismedeverrouillageBoss(C)audébutde
chaquesaisonoutoutesles25heuresd’utilisation.
A
B
C
Lesilencieuxmaintientleniveaudebruitauminimumet
dirigelesgazd’échappementloindel’utilisateur.
Nepasutiliserl’outilsilesilencieuxestmanquantou
défectueux.Unsilencieuxdéfectueuxaugmentele
niveausonoreetlerisqued’incendie.
Examinerrégulièrementlesilencieuxpours’assurerqu’il
estcorrectementraccordéetenbonétat.
Lesilencieuxdevient
trèschaudpendantetaprèsutilisationet
lorsquelemoteurtourneauralenti.Faire
attentionàproximitédesmatériaux
inflammablesoudesfuméesafind’éviter
toutrisqued’incendie.
8
Voirlasectionsurlescaractéristiquestechniquespourconnaîtrelabonnepressiondespneus.
9
Contrôleretnettoyerlabougieavantl’utilisationchaqueannée.
694-002-
5. Iftheproducthaspowersteering,holdtheleft
steeringtrigger(D)toturnleft.Holdtherightsteering
triggertoturnright.
D
1. MovetheON/OFFswitchtotheOFFposition.
2. RemovetheON/OFFkey.
• Turnthethrottlecontrol(A)tochangetheamountof
fuelused.Alwaysoperatetheengineatfullthrottle.
C
HO
K
E
C
ON
TR
O
L
T
R
U
CT
I
ON
S
A
• Turnthefuelswitchtoopenorclosethefuelvalve.
OperatetheproductwiththefuelswitchintheOPEN
position.
OFF
ON
F
U
E
L
C
ON
T
R
O
L
IN
S
T
R
U
C
T
IO
N
S
• Turnthechoke(A)toopenorclosethechokevalve.
Usethechoketostartacoldengine.
C
H
O
K
E
C
ONTR
O
L
T
R
U
CT
I
ON
S
A
Noadjustmentisrequiredfornormalinstallation.
1. Whenthelocknut(B)islooseortheskidplate(A)is
nothighenoughfromtheground,unlockthelocknut
(B)witha13mmopen-endedwrench,tomovethe
skidplateupordown.
2. Onflatsurfaces,likeasphaltroads,raisetheskid
plates(A)5-6mm(0.2-0.25in)offtheground.On
unevensurfaces,likegravelroads,makethe
clearancebetweenthegroundandtheproduct
largerwiththeskidplatestogetthescraperbar
abovethetopofthegravel.Makesurethatthe
gravelandstonesdonotenterintotheproduct.It
cancausepersonalinjuriesifobjectsareejectedat
highspeed.
3. Tightenthelocknut(B).
B
A
Controlsandmovingpartscanbeblockedbyice.
Donotapplymuchforcetothecontrols.Ifyoucannot
operateacontrolorapart,starttheengineandletit
operateforsomeminutes.
1. Starttheengineandletitoperateforsomeminutes.
Stoptheengineandwaitforallmovingpartstostop.
694-002-
2. Removesnowandlooseicefromtheproduct.
3. Removesnowandlooseicefromthebaseofthe
chute.
4. Turnthechutedeflectortotheleftdirectionandto
therightdirectiontoremoveiceandwater.
5. Setthekeytothe"OFF"position.
6. Iftheproductdoesnothaveanelectricstarter,pull
thestarterropehandleseveraltimestoremoveice
andwater.
7. Iftheproducthasanelectricstarter,connectthe
producttopowerandpushthestartbuttononceto
removeiceandwater.
T
• Alwaysruntheengineatfullthrottleornearfull
throttle.
• Alwaysadaptthespeedoftheproducttothesnow
situationandadjustthespeedwiththedrivespeed
controllever.Makesurethattheproductthrows
snowevenly.
• Itiseasierandmoreefficienttoremovesnow
immediatelyafteritfalls.
• Alwaysthrowsnowdownwindwheneverpossible.
• Onflatsurfaces,likeasphaltroads,raisetheskid
platesupto5-6mm(0.2-0.25in)offtheground.
• Thescraperbarisreversible.Whenitbecomesworn
almosttotheedgeofthehousing,reverseit.
Replacethescraperbarifitisdamaged,orifboth
sidesareworn.
• Donotdispatchthechutedeflectorifitisclogged.
• Iftheproductdoesnotmoveforwarddueto
unforeseencircumstances,releasethedrive
engagementimmediatelyorpullouttheON/OFFkey
toOFFposition.
Whentheproductisinuse,boltscanloosenand
componentscanbecomeworn.Thiscancause
malfunctionlikeincorrecttoleranceclearance,increased
oilconsumption,ormisalignmentofvarious
components.Doregularmaintenanceontheproductto
preventmalfunction.
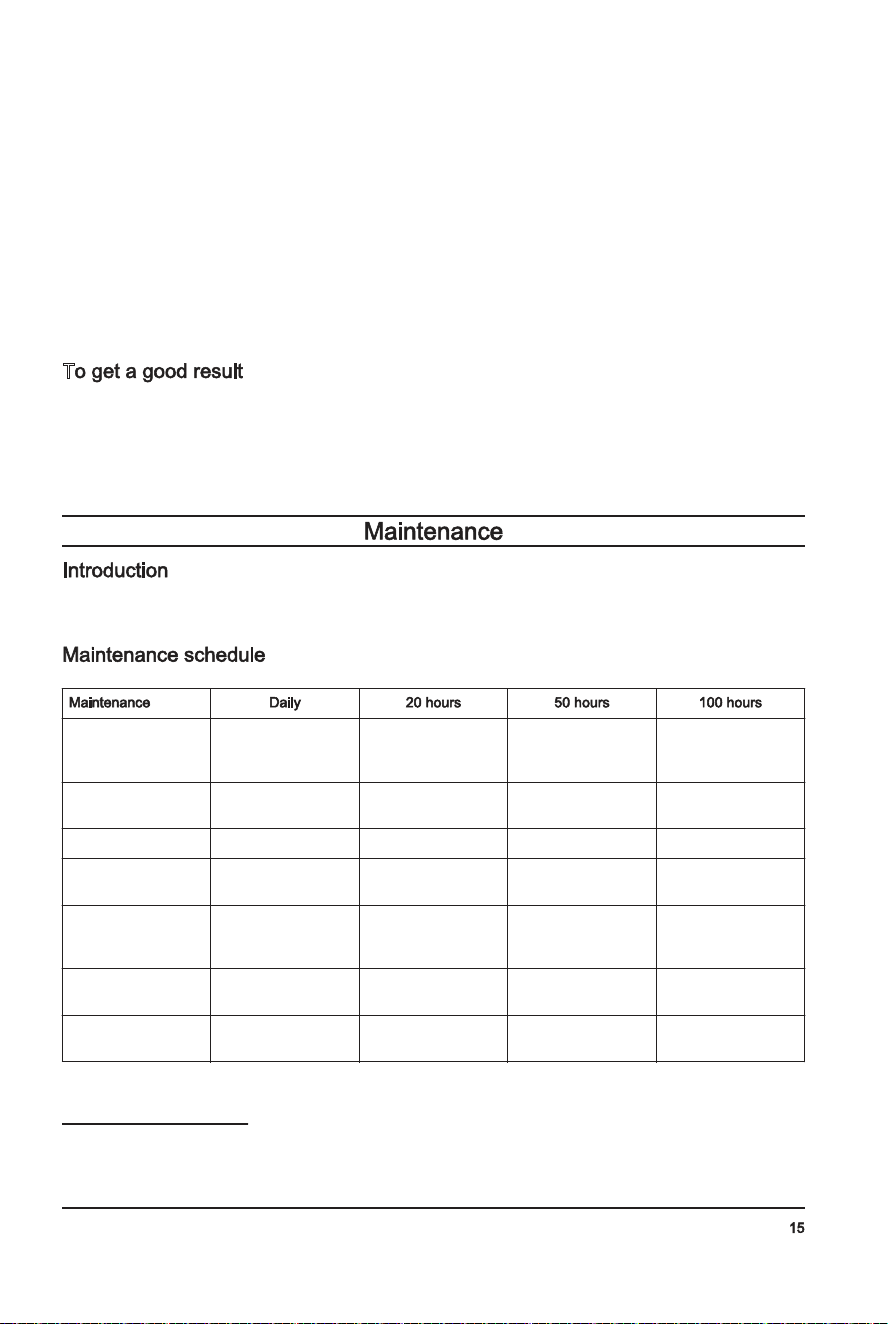
Makesurethatnuts
andscrewsaretight-
ened
X
Doacheckoftheen-
gineoillevel
X
Replaceoil
1
X X X
Makesurethereare
nofueloroilleaks
X
Removeclogging,
foreignobjectsin
auger
X
Inspectthetirepres-
sure
2
X
Inspectandchange
thesparkplug
3
X
1
Replacetheoilafterthefirst20h,50h,100handthenevery100h.
2
SeeTechnicaldataforcorrecttirepressure.
3
Checkandcleansparkplugbeforeuseeachyear.
694-002-
P
Lescommandesetlespiècesmobiles
peuventêtrebloquéesparlaglace.Nepasappliquer
uneforceexcessiveauxcommandes.S’iln’estpas
possibled’actionnerunecommandeoudemanœuvrer
unepièce,démarrerlemoteuretlelaisserfonctionner
pendantquelquesminutes.
1. Démarrerlemoteuretlelaissertournerauralenti
pendantquelquesminutes.Arrêterlemoteuret
attendrequetouteslespiècesmobilessoient
immobilisées.
2. Retirerlaneigeetlesmorceauxdeglaceduproduit.
3. Retirerlaneigeetlesmorceauxdeglaceàlabase
delagoulotte.
4. Tournerledéflecteurdegoulotteverslagaucheet
versladroitepourenleverlaglaceetdel’eau.
5. MettrelacléàlapositionOFF(arrêt).
6. Sileproduitn’estpasdotéd’undémarreur
électrique,tirerlapoignéedulanceuràplusieurs
reprisesafinderetirerlaglaceetl’eau.
7. Sileproduitdisposed’undémarreurélectrique,
brancherleproduitàl’alimentationetappuyersurle
boutondedémarrageunefoisafinderetirerlaglace
etl’eau.
• Toujoursfairetournerlemoteuràpleinrégimeou
presqueàpleinrégime.
• Toujoursadapterlavitesseduproduitaux
circonstancesrelativesàlaneigeetadapterla
vitesseaumoyendulevierdecommandedevitesse
d’entraînement.S’assurerqueleproduitprojettela
neigedefaçonuniforme.
• Ilestplusfacileetplusefficaced’éliminerlaneige
immédiatementaprèslachute.
• Toujoursprojeterlaneigedansladirectionduvent
autantquepossible.
• Surlessurfacesplanes,commelesroutes
asphaltées,releverlabarredeprotectionde5à
6mm(de0,2à0,25po)àpartirdusol.
• Labarrederacleurestréversible.Quandelleest
uséeets’approchedel’extrémitéducarter,
l’inverser.Remplacerlabarrederacleursielleest
endommagéeousilesdeuxcôtéssontusés.
• Nepasréglerledéflecteurdegoulottes’ilest
encrassé.
• Sileproduitnesedéplacepasversl’avantenraison
decirconstancesexceptionnelles,relâcher
immédiatementl’engagementdel’entraînementou
tirerlacléON/OFF(marche/arrêt)àlapositionOFF
(arrêt).
Lorsqueleproduitestenutilisation,lesboulonspeuvent
sedesserreretdescomposantspeuvents’user.Cela
peutentraînerundysfonctionnement,commeun
mauvaisespacement,uneaugmentationdela
consommationd’huileouunproblèmed’alignementde
différentséléments.Procéderàunentretienrégulierdu
produitafind’évitertoutdysfonctionnement.
S’assurerqueles
écrousetlesvissont
serrés
X
Vérifierleniveau
d’huilemoteur
X
Remplacerl’huile
7
X X X
S’assurerqu’iln’ya
pasdefuitesdecar-
burantoud’huile
X
Retirerlesobstruc-
tionsetlescorps
étrangersdelatar-
ière
X
7
Remplacerl’huileaprèsles20,50et100premièresheurespuistoutesles100heures.
694-002-
U
• Tournerlacommanded’accélération(A)pour
modifierlaquantitédecarburantutilisé.Toujours
fairetournerlemoteuràpleinrégime.
CHO
K
E
C
ONTR
O
L
T
R
U
CT
I
ON
S
A
• Tournerlecommutateurdecarburantoufermerle
robinetdecarburant.Utiliserleproduitlorsquele
commutateurdecarburantsetrouveàlaposition
OPEN(ouvert).
OFF
ON
F
U
E
L
C
O
NT
R
O
L
I
N
S
T
R
U
C
T
I
O
N
S
• Tournerlacommandeduvoletdedépart(A)afin
d’ouvriroudefermerlasoupapeduvoletdedépart.
Utiliserlevoletdedépartpourdémarrerlemoteur
lorsqu’ilestfroid.
C
H
O
KE
C
O
N
T
R
O
L
T
R
U
CT
I
ON
S
A
Aucunréglagen’estrequispourl’installationnormale.
1. Silecontre-écrou(B)estlâcheoulaplaquede
protection(A)n’estpassuffisammentélevéedusol,
déverrouillerlecontre-écrou(B)àl’aided’unecléde
13mmàextrémitéouverteafindedéplacerla
plaquedeprotectionverslehautouverslebas.
2. Surlessurfacesplanes,commelesroutes
asphaltées,releverlabarredeprotection(A)de5à
6mm(de0,2à0,25po)àpartirdusol.Surles
surfacesinégales,commelegravier,s’assurerque
l’espacemententrelesoletleproduitestplusgrand
aumoyendesplaquesdeprotectionafinquela
barreduracleursetrouveau-dessusdugravier.
Assurez-vousquelegravieretlespierresn’entrent
pasdansleproduit.Desblessurespersonnelles
peuventsurvenirsidesobjetssontéjectésàgrande
vitesse.
3. Fixerlecontre-écrou(B).
B
A
694-002-
N Itisnotnecessarytoaddgreaseortodoother
maintenancetothegearbox.
• Makesurethatthenutsandscrewsontheproduct
aretightened.
Atoolowoillevelcandodamage
totheengine.Doacheckoftheoillevel
beforeyoustarttheproduct.
1. Puttheproductonlevelground.
2. Removetheoiltankcapwiththeattacheddipstick.
3. Cleantheoilfromthedipstick.
4. Putthedipstickfullyintotheoiltanktogiveacorrect
pictureoftheoillevel.
5. Removethedipstick.
6. Examinetheoillevelonthedipstick.
7. Iftheoillevelislow,fillwithengineoilanddoa
checkoftheoillevelagain.
1. Runtheengineafewminutestomaketheoilwarm.
Warmoilflowsbetterandincludesmore
contaminants.
Theengineoilishot.Avoid
skincontactwiththeusedengineoil.
2. Puttheproductonlevelground.
3. RemovetheON/OFFkey.
4. Putacontainerbelowtheoildrainplug.
5. Removetheoildrainplug,tiptheproductanddrain
theusedoilinthecontainer.
6. Puttheproductbacktotheoperatingposition.
7. Installtheoildrainplugandtightenitbyhand.
8. Filltheenginewithoil,see
Tofilltheenginewithoil
onpage11
.
• Lubricatethepivotpoints(A)withoil.
• Lubricatetheengine(B)withoil.
• Applyasmallamountoflithiumgreasetothe
interlockbosses(C)atthebeginningofeachseason
orevery25hoursofuse.
A
B
C
Themufflerkeepsthenoiselevelstoaminimumand
sendstheexhaustfumesawayfromtheoperator.
Donotusetheproductifthemufflerismissingor
defective.Adefectivemufflerincreasesthenoiselevel
andtheriskoffire.
Examinethemufflerregularlytomakesurethatitis
attachedcorrectlyandnotdamaged.
Themufflerbecomesveryhot
duringandafteruseandwhentheengine
operatesatidlespeed.Becarefulnear
flammablematerialsand/orfumestoprevent
fire.
Alwaysusetherecommended
sparkplugtype.Incorrectsparkplugtype
cancausedamagetotheproduct.
• Examinethesparkplugiftheengineislowon
power,isnoteasytostartordoesnotoperate
correctlyatidlespeed.
• Todecreasetheriskofunwantedmaterialonthe
sparkplugelectrodes,obeytheseinstructions:
a) Makesurethattheidlespeediscorrectly
adjusted.
b) Makesurethatthefuelmixtureiscorrect.
c) Makesurethattheairfilterisclean.
694-002-
• Ifthesparkplugisdirty,cleanitandmakesurethat
theelectrodegapiscorrect,see
Technicaldataon
page25
.
• Replacethesparkplugifitisnecessary.
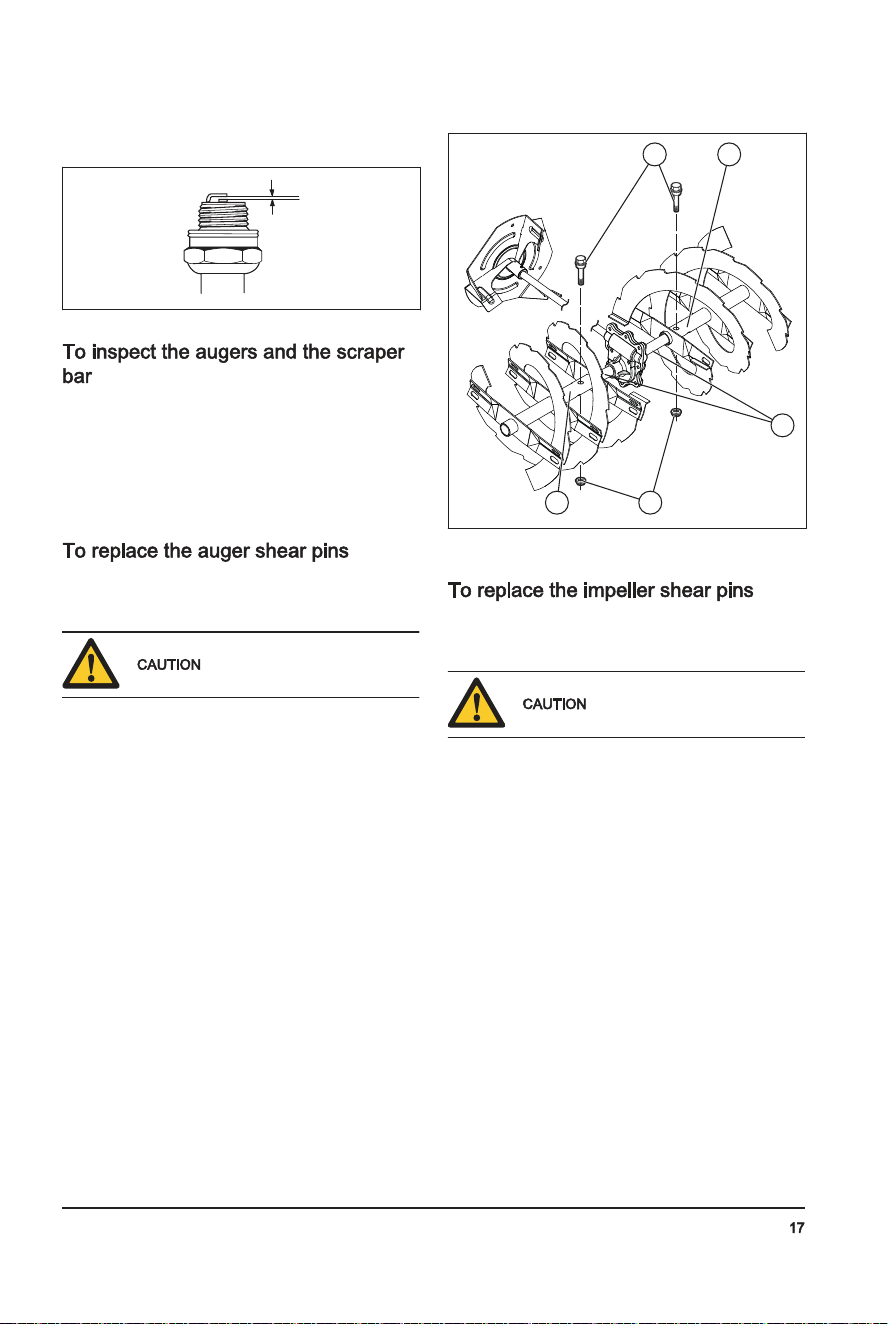
1. Beforeeachuse,inspecttheaugersandthescraper
barforwear.
2. Iftheedgeofthescraperbarisworn,reversethe
scraperbar.Ifthescraperbarhasdamagesoris
wornonbothedges,replaceit.
3. Iftheedgesoftheaugersareworn,contactan
authorizedservicecentertoreplacethem.
Theaugershearpinsprotecttheproductfromdamage.
Theaugershearpinsbreakifanobjectcomesintothe
movingparts.
Useonlyoriginalequipment
shearpinssuppliedwiththeproduct.
1. Ifanaugershearpinbreaks,stoptheengineand
waitforthemovingpartstostop.
2. RemovetheON/OFFkeyanddisconnectthespark
plugcable.
3. Aligntheholeintheaugerhub(B)withtheholein
theaugershaft(C)andinstallanew¼-20x2
shearpin(A)
4. Installa¼-20locknut(D)andtighten.
A B
C
DB
5. PuttheON/OFFkeyintheignitionandconnectthe
sparkplugcabletothesparkplug.
Theimpellershearpinsprotecttheproductfrom
damage.Theimpellershearpinsbreakifanobject
comesintothemovingparts.
Useonlyoriginalequipment
shearpinssuppliedwiththeproduct.
1. Ifanimpellershearpinbreaks,stoptheengineand
waitforthemovingpartstostop.
2. RemovetheON/OFFkeyanddisconnectthespark
plugcable.
3. Aligntheholeintheimpellerhub(A)withtheholes
intheimpellershaft(B)andinstallanew¼-20shear
pin(C).
694-002-
U
Nepasfairefonctionner
lamachinesansneigeousanseaupour
lubrifierleslamesdelatarière.Une
mauvaiseutilisationpeutmeneràune
températureélevéedeslamesdelatarière,
surtoutsileproduitestneuf.Celapeut
endommagerleslamesdelatarièreetla
barrederacleur.
Nepasengager
partiellementlesleviersd’entraînementou
delatarièrependantuneduréeprolongée,
carcelarisqued’entraîneruneusure
prématuréedescourroies.
Lorsquel’engagementdel’entraînementet
l’engagementdelatarièresontactionnés,l’engagement
del’entraînementverrouillelatarièreenplace.Utiliserla
maindroitepourmanœuvrerlagoulotted’éjectionà
neige.
Nepasmodifierlavitesselorsquelatarière
estengagée.Celapourraitendommagerla
transmission.
1. Pourengagerleslamesdelatarière,poussersurla
poignéed’engagementdelatarièreafind’engagerla
tarièreetdeprojeterlaneige.
A
2. Releverlelevierdecommandedevitesse
d’entraînement(B)delapositioncentraleafinquele
produitpuissesedéplacerversl’avantlorsque
l’engagementdel’entraînement(C)estengagé.Ne
pasmodifierlavitesselorsquelatarièreest
engagée.Celapourraitendommagerla
transmission.
3. Abaisserlelevierdecommandedevitesse
d’entraînementdelapositioncentraleafinquele
produitpuissesedéplacerversl’arrièrelorsque
l’engagementdel’entraînementestengagé.
C B
4. Pourqueleproduitsedéplacedansladirection
sélectionnée,maintenirl’engagementde
l’entraînementcontrelapoignée.
5. Sileproduitestéquipéd’unedirectionassistée,
maintenirlelevierdedirectiongauche(D)pour
tourneràgauche.Maintenirlelevierdedirection
droitpourtourneràdroite.
D
1. Placerl’interrupteurON/OFF(marche/arrêt)en
positionOFF(arrêt).
2. RetirerlacléON/OFF(marche/arrêt).
694-002-
3. Déplacerlacommanded’accélération(B)àla
positionFAST(rapide).
4. Mettrel’interrupteurdemarche/arrêt(C)àlaposition
ON(marche).
a) Silemoteurestfroid,tournerlevoletdedépart
(D)àlapositionFULL(plein)etappuyersurla
pomped’amorçage(E)troisfois.
M Nepastrop
amorcerlemoteur.Celapeutnuire
audémarragedumoteur.Sile
moteurestsuramorcé,attendre
quelquesminutesavantdetenterle
démarrageetneparamorcerle
moteurparlasuite.
5. Tirerlapoignéeàcordedulanceur(G).
Nepasrelâcherla
prisetroprapidement.Laramener
délicatementàlapositiondedépart.
Silapoignéedulanceurgèle,tirer
doucementsurlacordedulanceuretrelâcherla
poignéedulanceur.Silemoteurnedémarrepas,
répéterlaprocédureouutiliserledémarreur
électrique.
6. Silacommandedestarteraétéutiliséepour
démarrerlemoteur,déplacerlentementlevoletde
départ(D)àlapositionOFF(arrêt).
7. Fairetournerlemoteur2à3minutesauralenti
avantdecommenceràprojeterlaneige.
8. Silemoteurnedémarrepascommeilsedoit,
l’éteindre.
Leproduitestdotéd’un
120Vdémarreurélectriquec.a.Nepas
utiliserledémarreurélectriquesivotre
maisonn’estpaséquipéed’un120V
systèmedemiseàlaterreàtroisbroches
c.a.Desblessuresgravesoudes
dommagesauproduitpourraientsurvenir.
Ledémarreurélectriqueestéquipéd’une
prised’alimentationàtroisbrochesetest
conçupourun120Vcourantdomestique
c.a.Assurez-vousquevotremaisondispose
d’un120Vsystèmedemiseàlaterreàtrois
brochesc.a.Encasdedoute,consulterun
électricienagréé.
1. InsérerlacléON/OFF(marche/arrêt)(A)dansla
fented’allumagejusqu’àcequ’elles’enclenche.Ne
pastournerlaclé.
2. Placerl’interrupteurdemarche/arrêtducarburant(F)
àlapositionON(marche).
3. Déplacerlacommanded’accélération(B)àla
positionFAST(rapide).
4. Mettrel’interrupteurdemarche/arrêt(C)àlaposition
ON(marche).
a) Silemoteurestfroid,tournerlevoletdedépart
(D)àlapositionFULL(plein).
5. Appuyersurl’amorce(3)troisfois.
Nepastropamorcer
lemoteur.Celapeutnuireaudémarrage
dumoteur.Silemoteurestsuramorcé,
attendrequelquesminutesavantde
tenterledémarrageetneparamorcerle
moteurparlasuite.
6. Brancherlarallongedansleconnecteurdumoteur
(G).
7. Brancherl’autreextrémitédelarallongesurla120
Vprised’alimentationàtroistrousc.a.dotéed’une
miseàlaterre.
8. Appuyersurleboutondedémarrageélectrique(H)
jusqu’àcequelemoteurdémarre.
Nepastenterde
démarrerlemoteurpendantplusdecinq
secondescontinuesentrechaque
tentativededémarrage.Attendre5à
10secondesentrechaquetentative.
9. Silevoletdedépartaétéutilisépourdémarrerle
moteur,relâcherleboutondedémarrageélectrique
etdéplacerlentementlevoletdedépart(D)àla
positionOFF(arrêt).
H
C
A
E
B
D
G
F
10. Débrancherlarallonge,toutd’abordàlaprise,puis
aumoteur.
11. Fairetournerlemoteur2à3minutesauralenti
avantdecommenceràprojeterlaneige.
694-002-
4. Installa¼-20locknut(D)ontheshearpinand
tighten.
A C B
D
5. PuttheON/OFFkeyintheignitionandconnectthe
sparkplugcabletothesparkplug.
• Keepthetiresfreeoffuel,oilandchemicalsto
preventdamagetotherubber.
• Keepthetiresawayfromstumps,stones,ruts,sharp
objectsandotherobjectswhichcancausedamage
tothetires.
• Keepthetirepressurecorrect,see
Technicaldata
onpage25
.
Donotunclogthechutedeflectorbeforethefollowing
operationsaremade.
1. Releasetheaugerengagementandthedrive
engagementatthesametime.
2. Wait10secondstomakesurethattheaugershave
stopped.
3. Stoptheproduct.
4. Usetheclean-outtool(atleast15"long,includedin
somemodels)toremovetheclog.
Donotputyourhandsinto
thechutedeflectororinsidetheauger
housing.
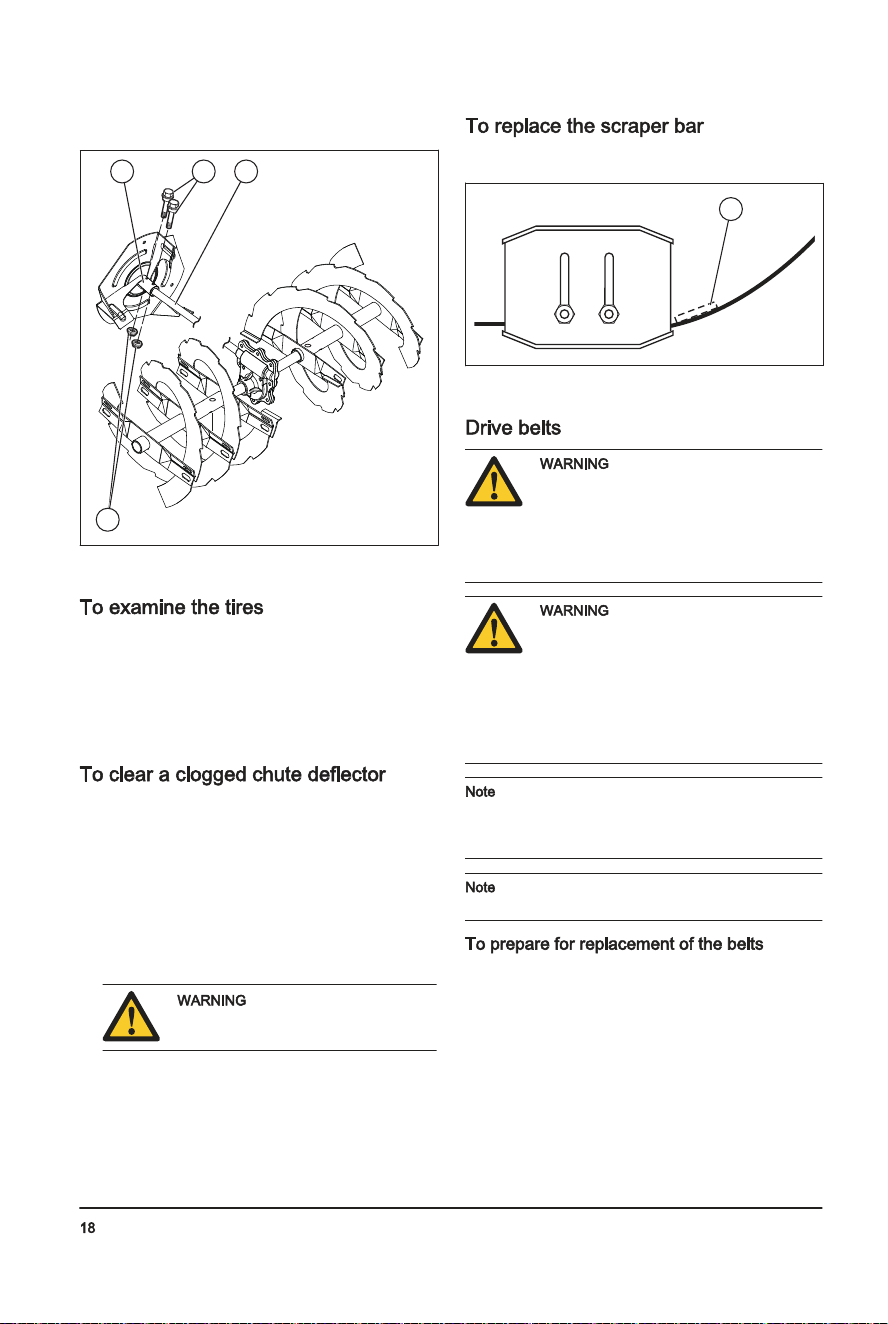
1. Putthescraperbar(A)inareversedpositionwhenit
isworntotheedgeofthehousing.
A
2. Replacethescraperbarifitiswornonbothsidesor
ifitisdamaged.
Thev-beltsonyourproductare
ofspecialconstructionandshouldbe
replacedbyoriginalequipmentmanufacturer
(OEM)beltsavailablefromyournearest
servicecenter.UsingotherthanOEMbelts
cancausepersonalinjuryordamagetothe
product.
Thebeltreplacementrequires
separationoftheproduct.Whileseparating
theaugerhousingfromtheframe,itis
importantthatanassistantstandsinthe
operatingpositionandholdstheproduct
handles.Seriouspersonalinjuryand/or
damagetotheproductcouldoccurifthe
productfallsduringthebeltreplacement
process.
Theaugerandtractiondrivebeltsarenot
adjustable.Replacethebeltsiftheyaredamagedor
begintoslipfromwear.Itisrecommendedtohavethe
beltsreplacedbyaqualifiedservicecenter.
Itisrecommendedtoreplacethedrivebeltand
augerbeltatthesametime.
1. Removethefuelfromthefueltank.
694-002-
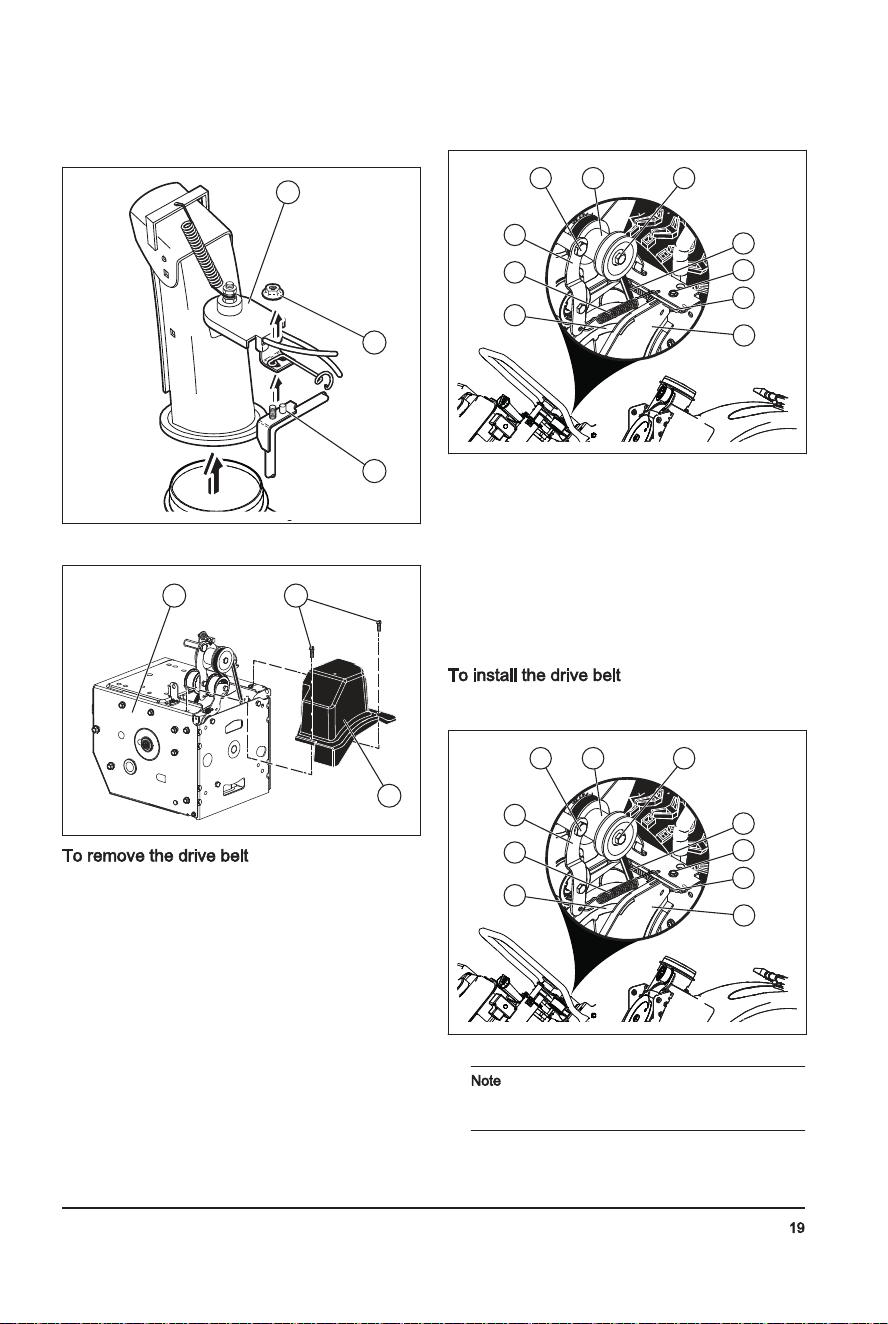
2. Loosenthelocknut(A)thatsecuresthechute
rotatorhead(B)tothemountingbracket(C)to
removethedischargechute.
B
A
C
3. Loosenthetwoscrews(A)thatsecurethebeltcover
(B)totheframe(C)andremovethebeltcover.
C A
B
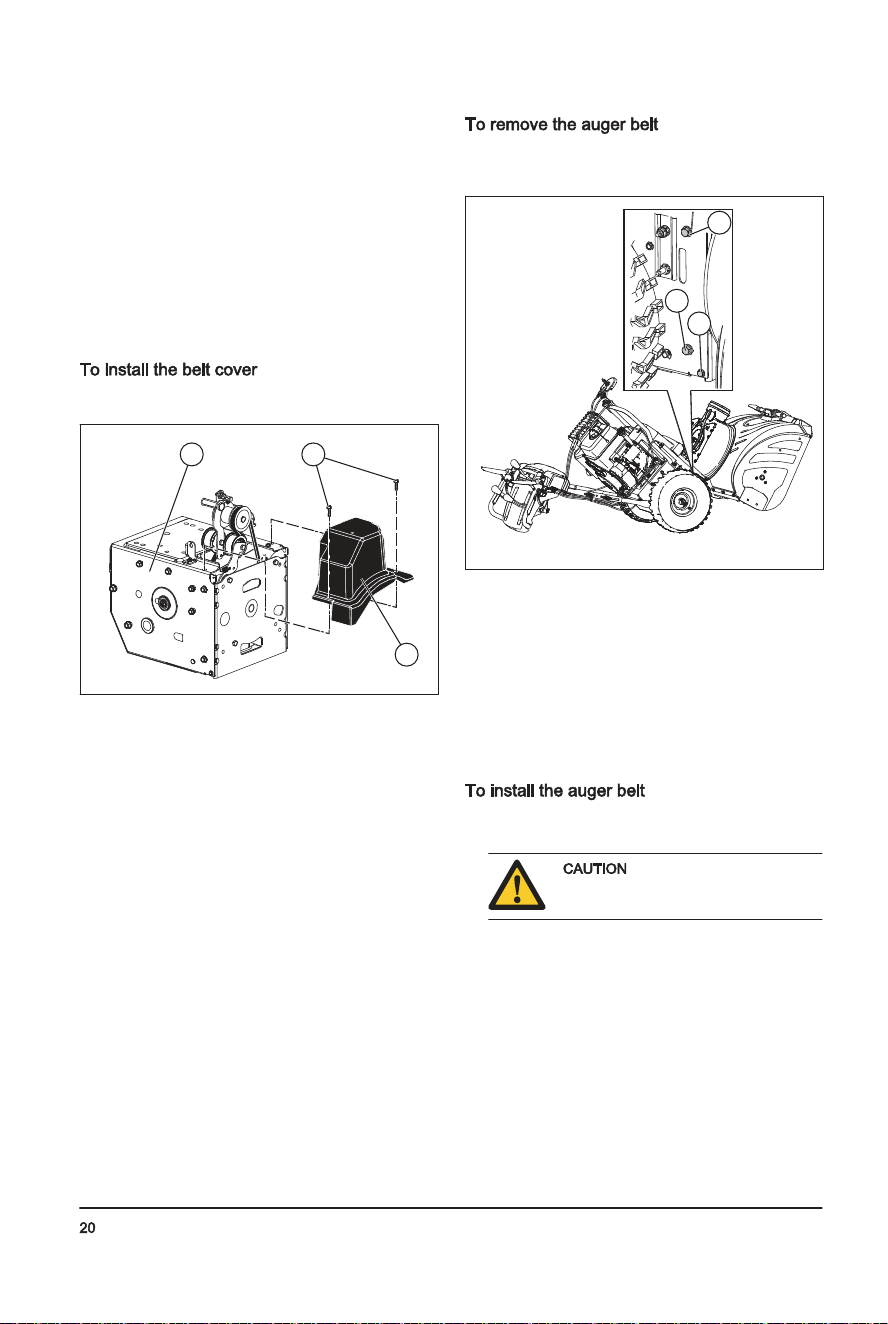
1. Removetheaugerbelt.See
Toremovetheauger
beltonpage20
.
2. Removethetensionerspring(A)attachedtothe
drivebelttensionerarm(B).
A
B
C
D
E
H
FG
I
J
3. Removethereturnspring(C)holdingtheswingplate
(D)inplace.
4. Removethearmbolt(E)anddrivebelttensioner
arm.
5. Removethepulleybolt(F),enginepulley(G)and
drivebelt(H)fromtheengine.
6. Removethetopbolt(I)holdingtheswingplatetothe
frame
7. Pivotandholdtheswingplateawayfromtheproduct
andremovethedrivebeltfromthedrivepulley(J).
1. Pivotandholdtheswingplate(D)awayfromthe
product.
A
B
C
D
E
H
FG
I
J
2. Putthedrivebelt(H)ontothedrivepulley(J).
Makesurethatthedrivebeltisroutedinthe
drivepulleygrooveproperlybeforeyoulowerthe
swingplate.
3. Installandtightenthetopbolt(I).
694-002-
F
• Tenirlespersonnesetlesanimauxàl’écartdela
zonedetravail.
• Effectuerl’entretienquotidien.Voir
Calendrier
d’entretienàlapage66
.
• S’assurerquelecâbled’allumageseloge
correctementsurlabougie.
• Ajouterdel’huileoudel’essence,aubesoin.Voir
Donnéestechniquesàlapage77
.
Nepastournerlajauge
d’huilelorsqu’onvérifiel’huile.Nepas
remplirau-dessusdurepère.
1. Retirerlebouchond’huileetnettoyerlajauge
d’huile.Voir
Présentationdelamachineàlapage53
pourl’emplacementdelajauge.
2. Remplird’huilejusqu’àlamarquesupérieuredela
jauged’huile.Utiliserlajaugepourvérifierleniveau
d’huilepériodiquement.
3. Remettrelebouchonduréservoird’huileenplace.
Sidisponible,utiliserdel’essenceàfaiblesémissionsou
unalkylat.Siuneessenceàfaiblesémissionsouun
alkylatn’estpasdisponible,utiliserdel’essencesans
plomboudel’essenceauplombdebonnequalité.
Utiliserdel’essenceavecunindiced’octanede90RON
horsdel’AmériqueduNord(87AKIenAmériquedu
Nord)ouplusélevé,etavecunmaximumde10%
d’éthanol(E10).
Nepasutiliser
d’essenceavecunindiced’octaneinférieur
à90RONhorsdel’AmériqueduNord(87
AKIenAmériqueduNord).Celapourrait
endommagerleproduit.
1. Ouvrirlebouchonduréservoirdecarburant
lentementpourlibérerlapression.
2. Remplirleréservoirlentementavecunbidonde
carburant.Encasdedéversementdecarburant,le
nettoyeravecunchiffonetlaisserlerestedu
carburantsécher.
3. Nettoyerlazoneautourdubouchonduréservoirde
carburant.
4. Serrerfermementlecouvercleduréservoirde
carburant.Silecouvercleduréservoirdecarburant
n’estpasbienserré,ilyaunrisqued’incendie.
5. Avantdedémarrerl’outil,ledéplaceràaumoins3m
(10pi)delapositionoùlepleindecarburantaété
fait.
1. Pourréglerlapositiondelagoulotted’éjection,
déplacerlelevierdecommandedelagoulotte
d’éjection(A)versl’arrière,verslagaucheouversla
droite.
2. Pourréglerladistancedelafraiseàneigedu
déflecteurdegoulotte,déplacerlelevierde
télécommandedudéflecteur(B)verslebaspour
diminuerladistanceouverslehautpouraugmenter
ladistance.
AB
1. InsérerlacléON/OFF(marche/arrêt)(A)dansla
fented’allumagejusqu’àcequ’elles’enclenche.Ne
pastournerlaclé.
G
F
C
A
E
B
D
2. Placerl’interrupteurdemarche/arrêtducarburant(F)
àlapositionON(marche).
694-002-
2. Placerlatêtedurotateurdegoulotte(A)surle
supportdelagoulotte(B).Tournerl’assemblagede
lagoulottepouralignerlesgoupillessouslatêtedu
rotateurdegoulotteaveclestrousdusupportde
goulotte,sinécessaire.
3. Placerlatêtedurotateurdelagoulottesurla
goupille(C)etlegoujonfileté(D)dusupportde
montage(E).
4. Fixeruncontre-écrou(G)surlegoujonfiletéet
serrer.
A
B CD E
FG
5. Insérerlescâblesdansleguidedecâbles(F)etle
collierdouble(I)pourfixerlecâbledurotateur(H)
surlapoignéeinférieure.
F
H
I
1. Fixerlaconsoleducâble(A)surlagoulotte
d’éjectionaumoyend’unboulondecarrosserie(B)
etd’uncontre-écrou5/16-18(D).Serrerleboulon.
2. Installerl’œilletducâbledetélécommande(E)surle
déflecteurdegoulotte(F)avecunboulonà
épaulement(G)etunerondelleennylon(C),puis
serrer-letoutaumoyend’uncontre-écrou¼-20(K).
L’œilletducâbleneserapasserrésurleboulonà
épaulement.
3. Fixerleressort(L)entrel’écrouhexagonal(M)dela
têtedurotateurdelagoulotteetletroududéflecteur
degoulotte.
F
L
M
B
A
D
K
C
E
G
4. Fixerlesboutonsdulevierdecommande(N)enles
poussantverslebasdanslesleviersdecommande
(O).
O
N
694-002-
4. Putthedrivebeltinthegroveoftheenginepulley
(G)beforeinstallingontheengineshaft.
5. Installthepulleybolt(F)andattachtheenginepulley
ontheengine.Tightenthepulleybolt(30-35Ft.
Lbs./41-47Nm).
6. Installthedrivebelttensionerarm(B)andtighten
thearmbolt(E)ontheengine.
7. Installthereturnspring(C)ontheswingplate.
8. Installthetensionerspring(A)onthetensionerarm.
9. Operateallcontrolstomakesurethatthedrivebelt
isinstalledcorrectlyandthatallcomponentsare
movingcorrectly.
T
1. Installthebeltcover(B)ontheframe(C)andtighten
thetwoscrews(A).
C A
B
2. Installthedischargechute.
1. Removethe5/16''bolts(A)andthelower¼"bolts
(B)fromthe2sidesoftheframeassembly.Donot
discardthebolts.
B
C
A
2. Loosenbutdonotremovethelower5/16"bolts(C)
onthe2sidesoftheframeassembly.
3. Removetheaugerbeltfromtheenginepulley.
4. Tilttherearsectiondown.Thefrontsectionistilted
forwardatthesametime.Thebottombolt(C)isa
hingebetweenthefrontandrearsections.
5. Putawoodenblockbelowthehingepointtosetthe
productinthetiltedposition.
6. Movetheaugerbelttensionerarmandremovethe
augerbeltfromaroundthearm.
1. Movethebelttensionerarmandputtheaugerbelt
aroundandinthegrooveoftheaugerpulley.
Makesurethatthebeltisnot
caughtbetweentheframeandauger
housingasyouputtheunittogether.
2. Removethewoodenblockfrombelowtheproduct.
3. Liftthehandletotilttherearsectionup.Thefront
sectionwilltiltbackandpivottoattachtherear
section.
4. Makesurethatthebeltisputintheaugerpulley
groovecorrectly.
694-002-
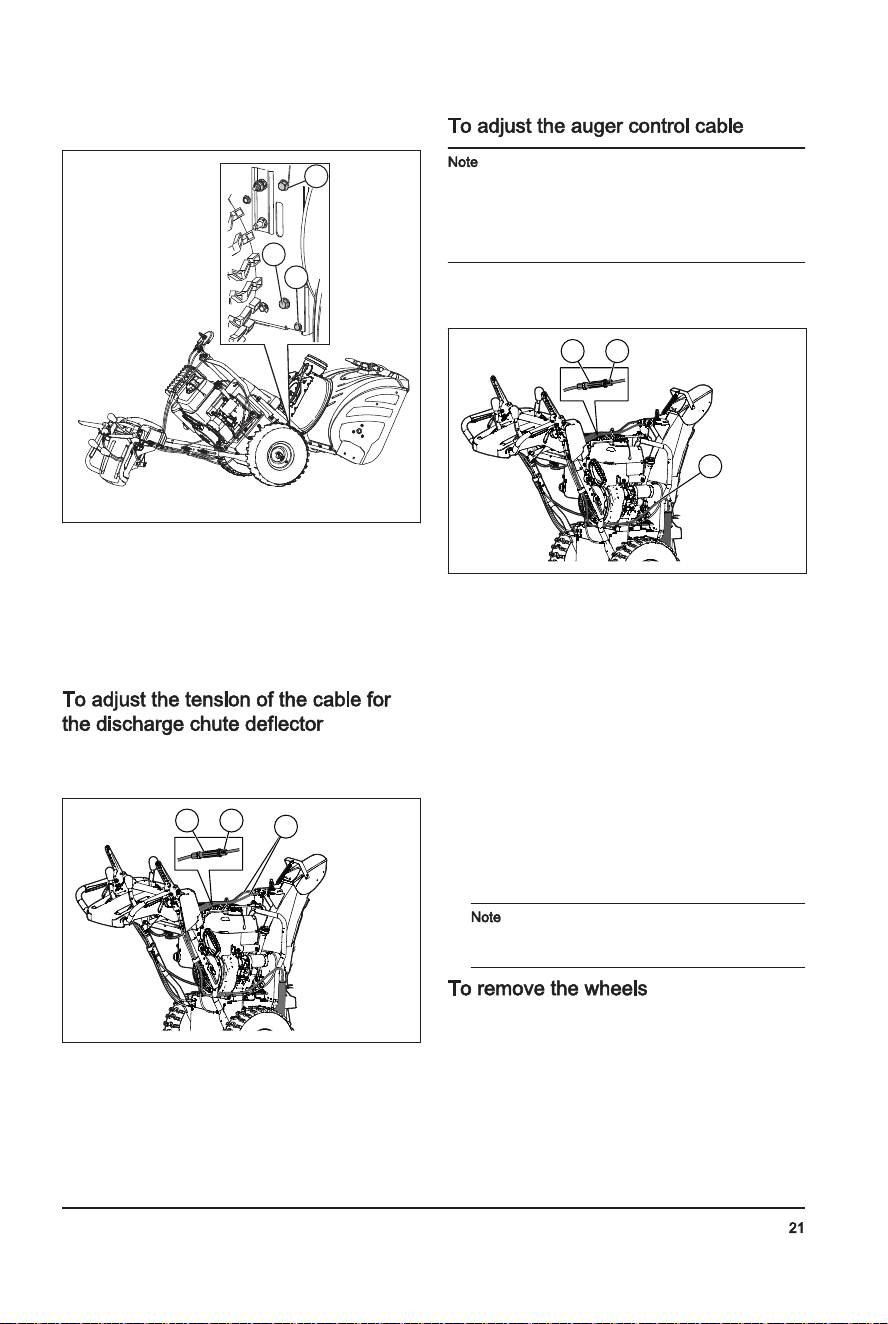
5. Installthe5/16''bolts(A),(C)andtighten(8-12
Ft.Lbs/11-16Nm).
B
C
A
6. Installthe¼''bolts(B)andtighten(4-6Ft.Lbs/5-8
Nm).
7. Installtheaugerbeltontheenginepulley.Makesure
thatthebeltisputcorrectlyaroundtheidlerpulley
andinstalledcorrectlyintheenginepulleygroove.
8. Operateallcontrolstomakesurethattheaugerbelt
isinstalledcorrectlyandthatallcomponentsare
movingcorrectly.
1. Loosenthejamnuts(B)toadjustthetensionofthe
cableforthedischargechuteadjacenttothe
adjusterturnbuckle(A).
A B
C
2. Holdtheshortsectionandturnthelongsectionto
increasetheadjuster.
3. Adjustuntilthecableforthedischargechute
deflector(C)hasatightfit.Tightenthejamnuts.
Ifyoudonotfeelcomfortablemakingthis
adjustmentyourself,pleasecontactanauthorized
servicecenter.Adjustmentscanbeneededifthe
impellerandaugerrotationissluggishwhenengaging
theaugercontrollever,oriftheaugerbelthasbeen
replaced.
1. Loosenthejamnuts(B)nexttotheturnbuckle(A)to
adjustthecabletensionintheaugercontrolcable
(D).
A B
D
2. Holdtheshortsectionandturnthelongsection.
Turnit360degrees.
3. Testtheaugerengagement.Repeattheadjustment
untilonlyasmallamountoftensionremainsinthe
cablewhentheleverisdisengaged.
4. Tightenthebottomjamnuttolockinthetension.
5. Askanassistanttostand10feet/3metersinfront
oftheproduct,ontheoppositesideofthechute.The
assistantobservestherotationoftheaugerand
measuresthetimeittakesfortheaugertostop
rotatingaftertheleverisreleased.Iftheaugerstops
rotatingafter5seconds,adjustthecablebyrotating
thecenterbarrel360degrees,tocontractthe
adjuster.Testtheaugerengagementandmeasure
thestoptimeagain.Iftheaugerstopsrotatinginless
than5seconds,continuewiththenextstep.
6. Tightenthejamnutontheaugercable.
Iftheadjustmentdoesnotresolvetheproblem,
replacetheaugerbelt.See
Toremovetheaugerbelt
onpage20
.
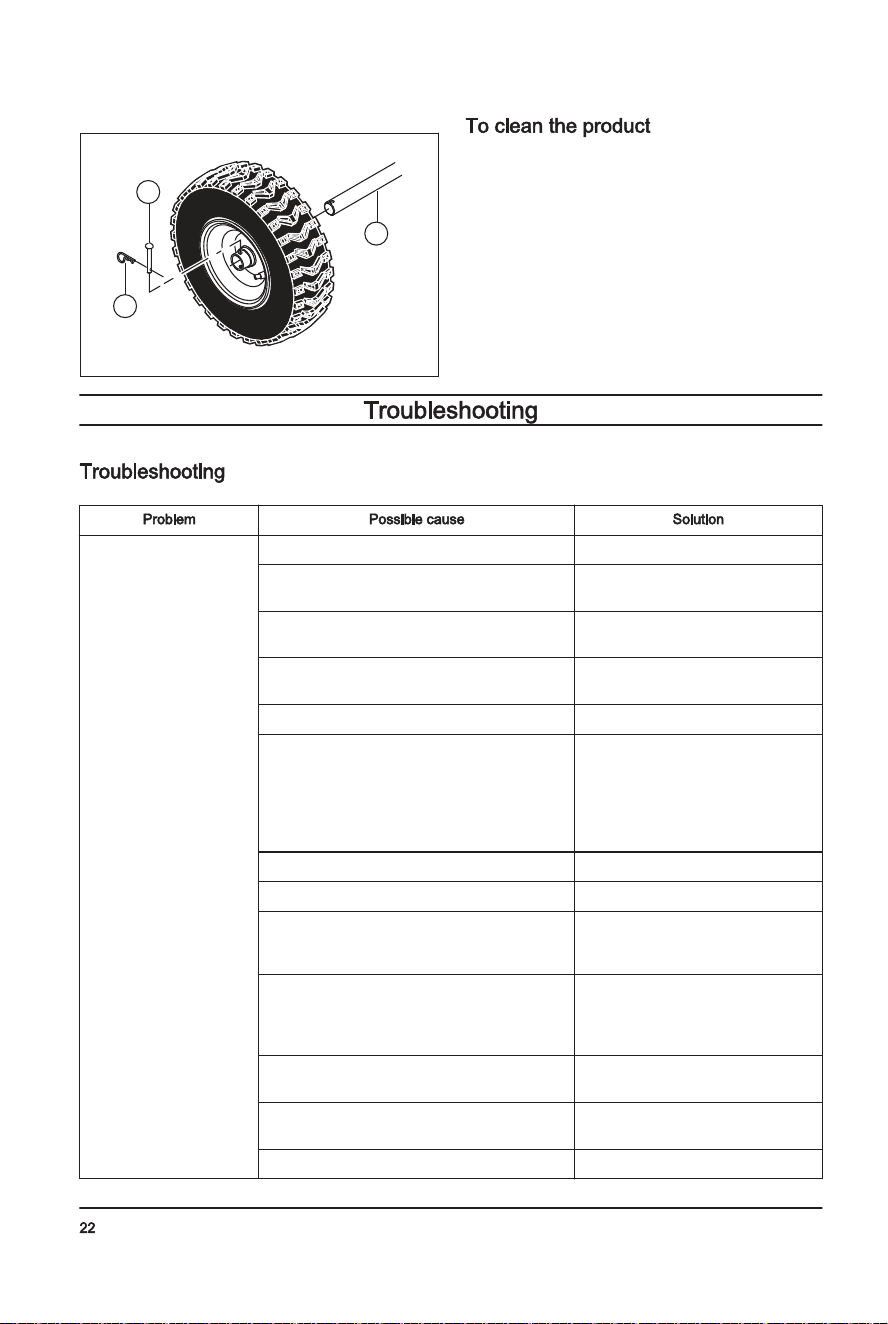
1. Removethewheelpin(A)andtheretainerpin(B).
694-002-
Contre-écrou¼-20(1)
Rondelleennylon(1)
Boulondecarrosserie5/16-18x5/8(1)
Ressort(1)
Boulonàépaulement¼-20(1)
1. Déplacerlapoignéesupérieureàlaposition
d’utilisation.
2. Réglerlapositiondelapoignéeàl’undestrousde
montage(B)etserrerlesboutonsdepoignées(C)
aveclesboulonsdecarrosserie(D).
B
C
D
3. Installerlesboulonsdecarrosserie(D)etles
boutonsdepoignée(C)pourfixerlapoignée
supérieure(A)surlapoignéeinférieure(E).
D
E
A
C
1. Placerledéflecteurdegoulotteauhautdelabase
delagoulotteavecl’ouvertured’évacuationvers
l’avantduproduit.
694-002-
C
Lirelesmessages
d’avertissementquisuiventavantd’utiliser
l’outil.
• Lesgazd’échappementdumoteurcontiennentdu
monoxydedecarbone,ungazinodore,toxiqueet
trèsdangereux.Nepasdémarrerlemoteurà
l’intérieuroudansdesespacesfermés.
• Avantd’effectuerunentretiensurleproduit,arrêter
lemoteuretretirerlecâbled’allumagedelabougie.
• Utiliserdesgantsdeprotectionlorsdesopérations
d’entretiensurleproduit.Leslamessontaffûtéeset
descoupurespeuventseproduirefacilement.
• Lesaccessoiresetlesmodificationsapportéesau
produitquinesontpasapprouvésparlefabricant
peuventcauserdesblessuresgraves,voire
mortelles.Nepasmodifierl’outil.Toujoursutiliser
desaccessoireshomologuésparlefabricant.
• Sil’entretienn’estpaseffectuécorrectementet
régulièrement,lerisquedeblessuresetde
dommagessurl’outilaugmente.
• N’effectuerquelestravauxd’entretienindiquésdans
cemanueld’utilisation.Touslesautrestravaux
d’entretiendoiventêtreeffectuésparunagent
d’entretienagréé.
• Demanderàunagentd’entretienagrééd’effectuer
régulièrementl’entretiendel’outil.
• Remplacerlespiècesendommagées,uséesou
brisées.
1. Retirertouteslespiècesdesserréesinclusesavec
l’outil.Couperlesquatrecoinsducartonetplacer
lespanneauxd’extrémitéàplat.
2. Retirerlesdeuxvisquifixentlecarterdelatarièreà
lapalette.Retirerlessupportsenacierdesplaques
deprotection,lecaséchéant.
3. Couperlesattachesdecâblequimaintiennentle
produitàlapaletteetlesretirer.
4. Retirertouslesmatériauxd’emballage.
5. Retirerleproduitducartonets’assurerqu’aucune
piècelibren’estlaisséedanslecarton.
Boutonpapillonderéglage(3)
Multi-clé(1)
Couvercledegoulotted’éjection(1)
CléON/OFF(marche/arrêt)
Boulonsdecarrosserie5/16-18x2¼po(2)
Boutonsdepoignée(2)
Contre-écrou3/8(1)
Guidedecâble(1)
Goupillesdetonte¼-20x1-3/4(6)
Contre-écrous¼-20(6)
Contre-écrou5/16-18(1)
694-002-
2. Removethewheelfromtheaxle(C).
A
B
C
• Cleanplasticpartswithacleananddrycloth.
• Donotuseahighpressurewashertocleanthe
product.
• Donotflushwaterdirectlyonthemotor.
• Useabrushtoremoveleaves,grassanddirt.
Theproductdoesnotstart Thesafetyignitionkeyisnotinserted. Insertthesafetyignitionkey.
Theproductisoutoffuel. Fillthefueltankwithfresh,clean
gasoline.
TheON/OFFkeyisOFF. MovetheON/OFFkeytoONposi-
tion.
ThechokeisinOFF(CLOSE)position. MovethechoketoON(FULL,
OPEN)position.
Theprimerisnotdepressed. Presstheprimer.
Theengineisflooded. Waitafewminutesbeforerestarting,
DONOTprime.
Restarttheenginewhilefullthrottle
andthechokeinOFF(CLOSE)posi-
tion.
Thesparkplugcableisnotconnected. Connectthecabletothesparkplug.
Thesparkplugisbad. Replacethesparkplug.
Thereiswaterinthefuelorthefuelistooold. Emptythefueltankandcarburetor.
Fillthefueltankwithfresh,clean
gasoline.
Thereisvaporlockedinthefuelline. Makesurethatallthefuellineisbe-
lowtheoutletofthefueltank.The
fuellineshouldruncontinuously
downfromfueltanktocarburetor.
Othercauses. Inspectthestartingprocedurescare-
fullyinthismanual.
Thefuelswitch(ifequipped)isinCLOSE(OFF)
position.
TurnthefuelswitchtoOPEN(ON)
position.
ThethrottleisinSTOPposition. MovethethrottletoFASTposition.
694-002-
P
Decreasedpower Thesparkplugcableisnotconnected. Connectthecabletothesparkplug.
Theproductthrowstoomuchsnow. Decreasethespeedandthewidthof
theswath.
Thefueltankcapiscoveredwithiceorsnow. Removetheiceandthesnowonand
aroundthefueltankcap.
Themufflerisdirtyorclogged. Cleanorreplacethemuffler.
Impropercablelength. Adjustthecable.
Themufflerisblocked. Makesurethattheengineiscool.
Cleartheblockage.
Theairintakeofthecarburetorisblocked. Makesurethattheengineiscool.
Cleartheblockage.
Theengineidlesorruns
roughly
ThechokeisinON(FULL,OPEN)position. MovethechoketoOFF(CLOSE)po-
sition.
Thefuellineisblocked. Cleanthefuelline.
Thereiswaterinthefuelorthefuelistooold. Emptythefueltankandcarburetor.
Fillthefueltankwithfresh,clean
gasoline.
Thecarburetorneedstobereplaced. Contactanauthorizedservicecenter.
Thebeltisstretched. Replacetheaugerv-belt.
Excessivevibration/Han-
dlemovement
Somepartsareloose.Theaugersaredam-
aged.
Tightenallfasteners.Replacethe
damagedparts.Ifvibrationremains,
contactanauthorizedservicecenter.
Thehandlesarenotpositionedcorrectly. Makesurethatthehandlesare
lockedintoposition.
Theadjustmentlevernutsareloose. Tightenthenutsuntilthehandlefeels
safe.
Thestarterropehandleis
hardtopull
Thestarterropehandleisfrozen. Slowlypulloutasmuchropeoutof
thestarteraspossibleandrelease
thestarterropehandle.Iftheengine
doesnotstart,repeattheprocedure
orusetheelectricalstarter.
Thestarterropeisinterferingwithcomponents. Thestarterropeshouldnottouchany
cablesorhoses.
694-002-
D
• Fairerégulièrementl’entretiensurleproduit.
• Cetteprécautionaugmenteladuréedevieutile
duproduit.
• Cetteprécautionréduitlerisqued’accident.
Communiquerrégulièrementavecun
concessionnaireagrééouàuncentredeservice
après-venteagrééd’examinerleproduitpour
effectuerlesréglagesetlesréparations.
• Nepasutiliserunproduitavecunéquipementde
protectionendommagé.Sil’outilestendommagé,
communiqueravecuncentredeserviceaprès-vente
agréé.
Lesilencieuxmaintientleniveaudebruitauminimumet
dirigelesgazd’échappementloindel’utilisateur.
Nepasutiliserl’outilsilesilencieuxestmanquantou
défectueux.Unsilencieuxdéfectueuxaugmentele
niveausonoreetlerisqued’incendie.
Examinerrégulièrementlesilencieuxpours’assurerqu’il
estcorrectementraccordéetenbonétat.
Lesilencieuxdevient
trèschaudpendantetaprèsutilisationet
lorsquelemoteurtourneauralenti.Faire
attentionàproximitédesmatériaux
inflammablesoudesfuméesafind’éviter
toutrisqued’incendie.
Lirelesmessages
d’avertissementquisuiventavantd’utiliser
l’outil.
• Nepasdémarrerl’outils’ilyaducarburantoude
l’huilemoteursurl’outil.Nettoyerlecarburantou
l’huileetlaissersécherl’outil.
• Siducarburantsedéversesurlesvêtements,
changerimmédiatementdevêtement.
• Nepasdéverserducarburantsurlecorps;cela
pourraitcauserdesblessures.Siducarburantse
déversesurlecorps,senettoyerausavondouxetà
l’eau.
• Nepasdémarrerl’outilsilemoteurprésenteune
fuite.Vérifierrégulièrementlemoteuràlarecherche
defuites.
• Fairepreuvedeprudencelorsdelamanipulationdu
carburant.Celui-ciestinflammableetsesvapeurs
sontexplosivesetpeuventcauserdesblessuresou
lamort.
• Nepasrespirerlesvapeursdecarburant,carelles
peuventcauserdesblessures.Vérifierquela
ventilationestsuffisante.
• Nepasfumeràproximitéducarburantoudu
moteur.
• Nepasplacerdesobjetschaudsàproximitédu
carburantoudumoteur.
• Nepasfairelepleindecarburantlorsquelemoteur
tourne.
• Vérifierquelemoteurestfroidavantdefaireleplein.
• Avantdefaireleplein,ouvrirlentementlecouvercle
duréservoirdecarburantetrelâcherlapression
avecprécaution.
• Nepasfairelepleindansunepiècefermée.Un
débitd’airinsuffisantpeutentraînerdesblessuresou
lamortenraisond’uneasphyxieoudumonoxydede
carbone.
• Serrerfermementlecouvercleduréservoirde
carburant.Silecouvercleduréservoirdecarburant
n’estpasbienserré,ilyaunrisqued’incendie.
• Avantdedémarrerl’outil,ledéplaceràaumoins3m
(10pi)delapositionoùlepleindecarburantaété
fait.
• Nepasmettretropdecarburantdansleréservoirde
carburant.
ATTENTION!
694-002-
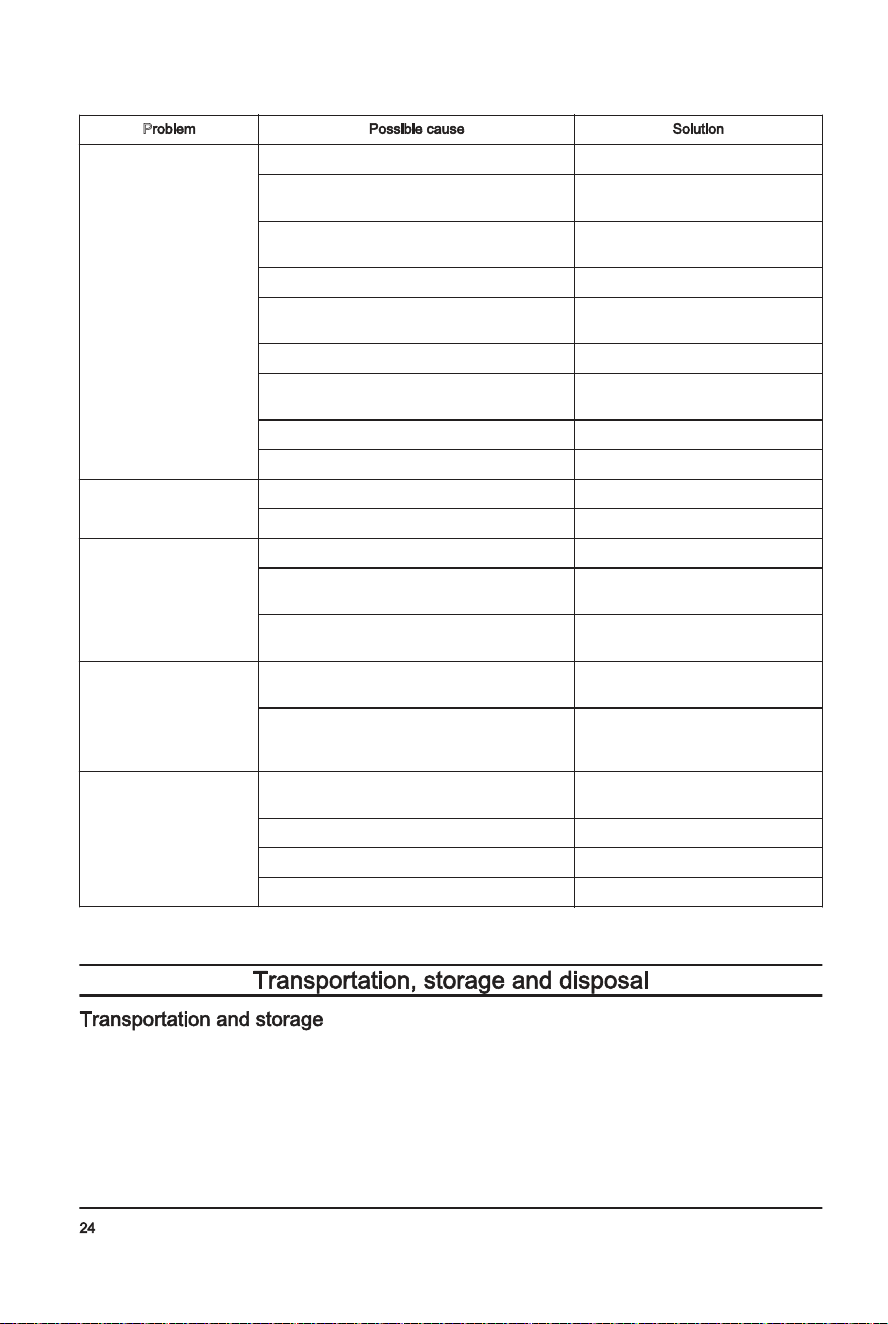
ettouteslespiècesenmouvements’arrêtent.
Débrancherlefildelabougieettenirlefilàl’écart
delabougiepourévitertoutdémarrageaccidentel.
• Nepasmettrelemoteurenmarcheàl’intérieur,sauf
lorsdudémarragedumoteuretletransportdu
produitdansouhorsdel’immeuble.Ouvrirles
portes;lesgazd’échappementdumoteursont
dangereux.
• Fairepreuved’extrêmeprudencelorsqu’ontravaille
danslespentes.
• Nejamaisfairefonctionnerlamachinesansses
grilles,plaquesetautresdispositifsdeprotectionen
placeetenbonétatdefonctionnement.
• Nejamaisdirigerledéflecteurdegoulotteversdes
personnesouversdesendroitsoùleséventuelles
projectionspourraientcauserdesdégâts.Tenirles
enfantsetautrespersonnesàl’écart.
• Nepasdépasserlacapacitéduproduitententantde
retirerlaneigetroprapidement.
• Nepasutiliserleproduitàdesvitessestropélevées
surdessurfacesglissantes.Lorsqu’onrecule,
regarderderrièresoietsedéplacerlentement.
• Désengagerl’alimentationdestarièreslorsquele
produitestencoursdetransportquandiln’estpas
encoursd’utilisation.
• Utiliserlesappareilsetaccessoiresapprouvésparle
fabricantduproduit(telsquelespoidsderoue,
contrepoidsoucabine).
• Nejamaisutiliserleproduitsansunebonnevisibilité
oulumière.Garderlespiedstoujoursbiend’aplomb
surlesolettenirlapoignéeavecfermeté.Toujours
marcher;nejamaiscourir.
• Nejamaistoucherlemoteuroulesilencieuxquandil
estchaud.
S
• Inspecterminutieusementl’endroitoùl’équipement
doitêtreutiliséetretirertoutpaillasson,traîneau,
planche,filouautreobjet.
• Désengagertouslesembrayagesetmettreaupoint
mortavantdedémarrerlemoteur.
• Nepasfairefonctionnerleproduitl’hiversansporter
desvêtementsadéquats.Éviterlesvêtements
amplespouvantseprendredanslespiècesen
mouvement.Leportdechaussuresadéquates
amélioreralastabilitésurdessurfacesglissantes.
• Manipulerl’essenceavecprécaution,carelleest
hautementinflammable.
• Utiliserdesrécipientsdecarburantapprouvés.
• Nejamaisfairel’appointenessencelorsquele
moteurestenmarcheouchaud.
• Remplirleréservoirdecarburantàl’extérieur
avecuneextrêmeprudence.Nejamaisfaire
l’appointenessenceàl’intérieur
• Nejamaisremplirdescontenantsdecarburantà
l’intérieurd’unvéhiculeousurlaplateformed’un
camionoud’uneremorqueavecunegarnitureen
plastique.Toujoursplacerlescontenantssurle
solloind’unvéhiculeavantleremplissage.
• Autantquepossible,retirertoutéquipementà
essenceducamionoudelaremorqueetfairele
remplissagesurlesol.Quandcelan’estpas
possible,faireleremplissagedetels
équipementssuruneremorqueàl’aided’un
bidonportableplutôtqu’àl’aided’unpistolet
distributeurd’essence.
• Garderlepistoletdistributeurencontactavecle
bordduréservoirdecarburantoudel’ouverture
dubidonàtoutmomentjusqu’àobtentiondu
plein.Nepasutiliserdedispositifàouverture
bloquéedupistoletdistributeur.
• Remettrelebouchondecarburantsolidementen
placeetnettoyerlecarburantdéversé.
• Encasdedéversementdecarburantsurles
vêtements,changerimmédiatementde
vêtement.
• Utiliserrallongesetréceptaclesconformesàcelles
spécifiéesparlefabricantpourtouslesappareilsà
moteurélectriqueouàdémarrageélectrique.
• Réglerlahauteurducarterdetarièreafind’éviterle
gravieretlespierresensurface.
• Nejamaisessayerdefairedesréglagespendant
quelemoteurestenmarche(sauflàoùspécifiépar
recommandationdufabricant).
• Toujoursporterdeslunettesouunmasquede
protectionpourlesyeuxpendantl’utilisationdela
machineoulorsqu’oneffectueunréglageouune
réparation,desorteàprotégerlesyeuxencasde
projectiondecorpsétrangers.
Toujourss’équiperd’unéquipementdeprotection
personnelleappropriélorsdel’utilisationdel’outil.Cela
comprend,àtoutlemoins,dessouliersrésistants,des
lunettesdesécuritéetunprotecteurauriculaire.Cet
équipementdeprotectionpersonnellen’éliminepasles
risquesdeblessures,maispeutréduirelagravitéencas
d’accident.
• Toujoursporterdeslunettesdesécuritéoutout
autredispositifdeprotectiondesyeuxlorsde
l’utilisationdel’outiloudesopérationsd’entretienou
deréparations.
• Toujoursporterdesvêtementshiverapproprié
lorsqu’onfaitfonctionnerleproduit.
• Utilisertoujoursdesbottesantidérapantesrobustes
quioffrentunbonsupportauxchevilleslorsde
l’utilisationduproduit.
• Nepasporterdevêtementsamplespouvantse
prendredanslespiècesenmouvement.
• Utiliserdesgantsdeprotectionhomologués,au
besoin.Parexemple,lorsdelafixation,del’examen
oudunettoyagedelalame.
• Toujoursutiliserundispositifdeprotection
homologuépourlesoreilleslorsqu’onutilisela
machine.Lefaitd’entendredubruitpendantune
longuepériodepeutengendreruneperteauditive.
694-002-
P
Lossoftractiondrive/
slowingofdrivespeed
Lossofsnowdischargeor
slowingofsnowdischarge
Thebeltslips. Adjustthecable.Adjustthebelt.
Thebeltisworn. Check/replacethebelt.Adjustthe
pulley.
Thebeltisoffthepulley. Check/reinstallthebelt.Adjustthe
pulley.
Thechutedeflectorisclogged. Cleanthechutedeflector.
Foreignobjectsclogtheaugers. Removethedebrisortheforeignob-
jectfromtheaugers.
Theshearpinisbroken. Replacethebrokenshearpin.
Excessivesnowandicebuildupinbetween
trackcomponents.
Removesnowandicebuildupfrom
inbetweentrackcomponents.
Thefrictiondrivewheelisworn. Contactanauthorizedservicecenter.
Thefrictiondisciswet Letthefrictiondiscdry
Failureofaugerrotation
afterthegripisreleased
Thedrivebeltisnotaligned. Adjustthedrivebelt.
Thedischargedeflectorisnotaligned. Adjustthedischargedeflector.
Thelightsarenoton(ifso
equipped)
Theengineisnotrunning. Starttheengine.
Thecableconnectionisloose. Checkthecableconnectionsatthe
engineandthelights.
TheLEDisburntout. ReplacetheLEDlightmodule.Indi-
vidualLEDscannotbereplaced.
Thechuterotatorisdiffi-
culttomove
Thereisdebrisinthechuterotatormechanism. Cleantheinternalpartsofthechute
rotatormechanism.
Thecablesarekinkedordamaged. Makesurethatthecablesarenot
kinked.Replacethecablesthatare
damaged.
Theproductturnstoone
side
Thetirepressureisnotequal. Adjustthetirepressureandfillthe
tire.
Theproductdriveswithonlyonewheel. Inspectthetirelockpin.
Unevensledadjustment. Adjusttheskidplatesandthesledge.
Unevenskidplatesadjustment. Adjusttheskidplatesandthesledge.
• Forstorageandtransportationoftheproductand
fuel,makesurethattherearenoleaksorfumes.
Sparksoropenflames,forexamplefromelectrical
devicesorboilers,canstartafire.
• Alwaysuseapprovedcontainersforstorageand
transportationoffuel.
• Emptythefueltankbeforeyouputtheproductin
storageforalongperiodoftime.Discardthefuelat
anapplicabledisposallocation
• Safelyattachtheproductduringtransportationto
preventdamageandaccidents.
• Keeptheproductinalockedareatopreventaccess
forchildrenorpersonsthatarenotapproved.
• Keeptheproductinadryandfrostfreearea.
694-002-
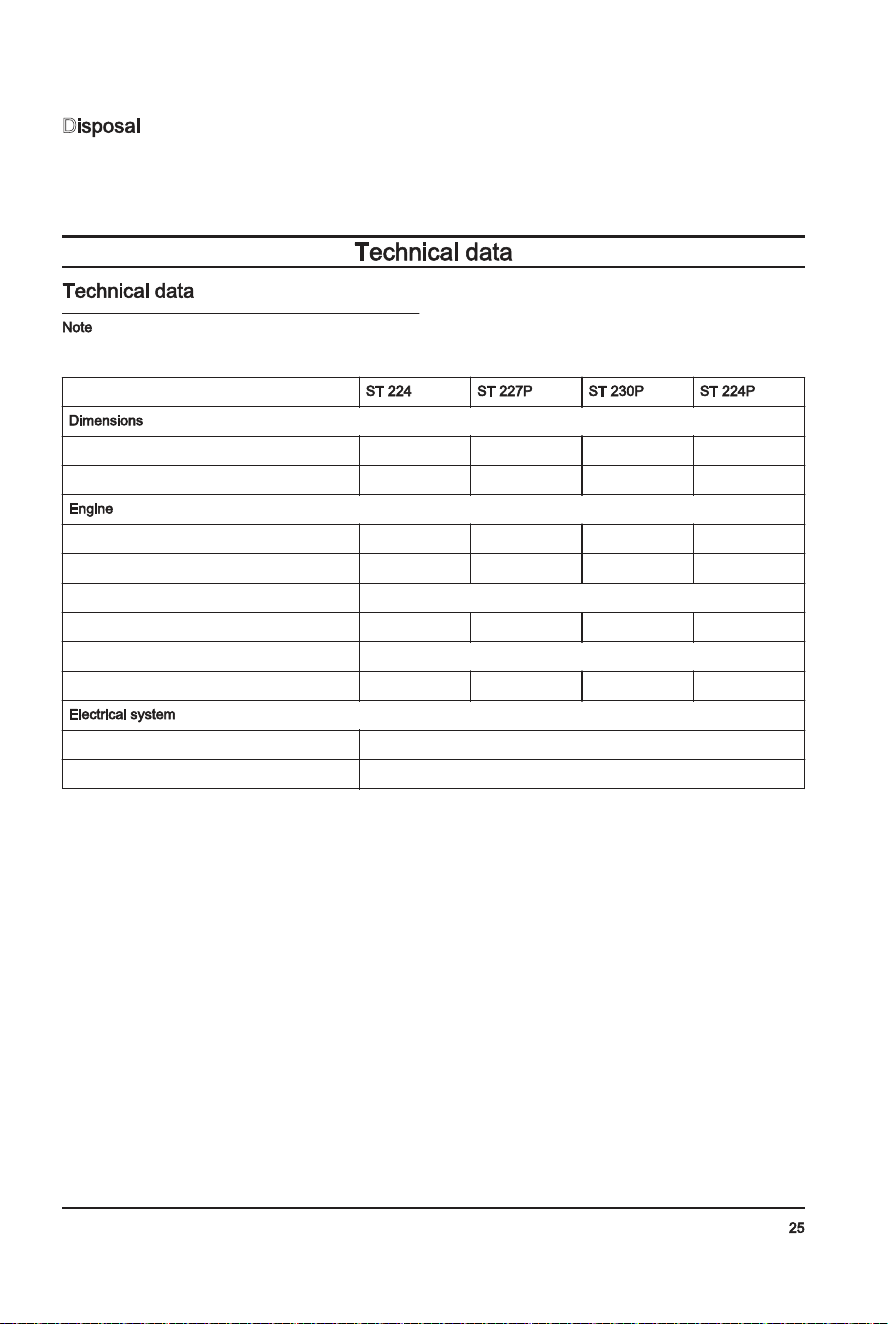
D
• Obeythelocalrecyclingrequirementsandapplicable
regulations.
• Discardallchemicals,suchasengineoilorfuel,ata
servicecenteroratanapplicabledisposallocation.
• Whentheproductisnolongerinuse,sendittoa
Husqvarnadealerordiscarditatarecycling
location.
Alldata,imagesandspecificationsaretypicaland
forreferenceonly,andmaybechangedduetoproduct
improvementwithoutpriornotice.
Weight,lb/kg 198.6/90 212/96 237.8/108 198.6/90
MaxOperatingTirePressure,PSI 18 18 20 18
Brand/Model
Husqvarna Husqvarna Husqvarna Husqvarna
Displacement,cc 208 254 291 208
Fueltype Unleadedregular(maximum10%ethanol)
Fuelcapacity,gallons/liters 0.31/1.17 0.35/1.33 0.62/2.35 0.31/1.17
Oil SAE5W30(below0°C(32°F))
Oilcapacityounces/liters 16/0.47 20/0.59 32/0.95 16/0.47
Sparkplug F6RTC
Sparkpluggap(in/mm) 0.030/0,762mm
694-002-
M Dommagescausésà
l'outil.
Cetteinformationfacilitel’utilisationde
l'outil.
• Utiliserl’outilcorrectement.Desblessuresgravesou
mortellespeuventrésulterd’uneutilisationnon
adéquate.Utiliserl’outilseulementpourlestâches
décritesdansleprésentmanuel.Nepasutilisercet
outilpourd’autrestâches.
• Suivrelesinstructionsdecemanuel.Respecterles
symbolesetlesinstructionsdesécurité.Si
l’opérateurnerespectepaslesinstructionsetles
symboles,ilpourraitenrésulterdesblessures,des
dommagesoulamort.
• Nepasjetercemanuel.Utiliserlesinstructionspour
assemblerl’outil,lefairefonctionneretleconserver
enbonétat.Suivrelesinstructionspourl’installation
correctedeséquipementsetaccessoires.Utiliser
uniquementdespiècesetaccessoireshomologués.
• Nepasutiliserl’outils’ilestendommagé.Respecter
lecalendrierd’entretien.N’effectuerquelestravaux
d’entretienprescritsdanscemanuel.Uncentre
agréédoiteffectuertouslesautrestravaux
d’entretien.
• Cemanuelnedécritpastouteslessituationsqui
peuventseproduirelorsqu’onutilisel’outil.Rester
prudentetfairepreuvedebonsens.Nepasfaire
fonctionnerl’outilnieffectuerunentretiensurl’outil
sivousn’êtespassûrdelasituation.Pourobtenir
plusd’information,s’adresseràunspécialistede
l’outil,àvotrerevendeur,àunatelierderéparation
ouàuncentredeserviceaprès-venteagréé.
• Débrancherlecâbled’allumageavantd’installer,de
stockeroudeprocéderàl’entretiendel’outil.
• Nepasutiliserl’outilsidesmodificationscontrairesà
sescaractéristiquesinitialesyontétéapportées.Ne
pasmodifierunepartiedel’outilsansl’approbation
dufabricant.Utiliserseulementdespièces
homologuéesparlefabricant.Desblessuresgraves
oumortellespeuventrésulterd’unentretiennon
adéquat.
• Nepasrespirerlesvapeursdumoteur.L’inhalationà
longtermedesproduitsd’échappementdumoteur
représenteundangerpourlasanté.
• Nepasdémarrerl’outildansunlocalclosouà
proximitédematériauxinflammables.Lesgaz
d’échappementsonttrèschaudsetpeuventcontenir
desétincellesquipeuventcauserunincendie.Un
débitd’airinsuffisantpeutentraînerdesblessuresou
lamortenraisond’uneasphyxieoudumonoxydede
carbone.
• Lorsdel’utilisationdeceproduit,lemoteurgénère
unchampélectromagnétique.Lechamp
électromagnétiquepeutendommagerlesimplants
médicaux.Parleràvotremédecinetaufabricantde
l’implantavantd’utiliserl’outil.
• Nepaslaisserunenfantutiliserl’outil.Nepaslaisser
unepersonneutiliserleproduitsansconnaîtreles
instructions.
• S’assurerdetoujourssurveillerlespersonnesavec
descapacitésphysiquesoumentalesréduitesqui
utilisentleproduit.Unadulteresponsabledoitêtre
présentàtoutmoment.
• Enfermerleproduitdansunendroitverrouilléauquel
lesenfantsetlespersonnesnonautoriséesne
peuventpasaccéder.
• Leproduitpeutprojeterdesobjetsetcauserdes
blessures.Respecterlesconsignesdesécuritéafin
deréduirelerisquedeblessuresgravesou
mortelles.
• Nepass’éloignerdel’outillorsquelemoteurest
soustension.
• Toutaccidentaveccetoutilengagelaresponsabilité
del’opérateur.
• Avantdereculer,regarderderrièreetverslebas
pourvérifierlaprésenceéventuelledepetitsenfants,
d’animauxouautresrisquesdechute.
• Avantd’utiliserl’outil,vérifierquelespiècesnesont
pasendommagées.
• S’assurerd’êtreàaumoins15m(50pi)d’autres
personnesoud’animauxavantd’utiliserleproduit.
S’assurerquetouteslespersonnesdansles
environsimmédiatssontinforméesquevousallez
utiliserleproduit.
• Consulterlesloisnationalesoulocales.Elles
peuventinterdireoulimiterl’utilisationdel’outildans
certainesconditions.
• Nepasplacerlesmainsoulespiedsprèsousous
lespiècesenrotation.Toujoursseteniràl’écartde
l’ouvertured’éjection.
• Fairepreuved’extrêmeprudenceàproximitédes
routes,desalléesoudescheminsengravier.Faire
attentionauxdangersnonévidentsetàla
circulation.
• Aprèsavoirheurtéunobjetétranger,arrêterle
moteur,enleverlecâbledelabougied’allumage(ou
débrancherlefildesappareilsélectriques),bien
inspecterleproduitpourvérifierqu’iln’yapasde
dommageetréparerladéfaillanceavantde
redémarreretd’utiliserleproduit.
• Sileproduitsemetàvibreranormalement,arrêterle
moteuretenrechercherimmédiatementlacause.
Lesvibrationsindiquentgénéralementl’existencede
problèmes.
• Arrêterlemoteuràchaquefoisqu’onquittelazone
detravail,avantdedébloquerlatarièreoule
déflecteurdegoulotte,etlorsqu’oneffectueun
réglage,uneréparationouuneinspectiondela
machine.
• Lorsqu’onveutnettoyer,réparerouinspecterle
produit,arrêterlemoteuretvérifierquelestarières
694-002-
Nepasretirerdeprotectionlorsquele
moteurtourne.
Déconnecterlecâbledelabougieavantde
commencerl’entretien.
Miseàl’arrêt/miseenmarchede
l’entraînementdelatraction.
Arrêt/démarragedel’éjectiondelaneige.
Virageverslagauche.
Virageversladroite.
Commanded’entraînementdelatraction.
Éjectiondelaneige.
Faireattentionàlaprojec-
tiond’objets;tenirtoute
personneàdistance.
Avertissement;garderles
mainsàl’écart.
Avertissement;garderles
piedsàl’écart.
Marcheavant/marchear-
rière.
Pivoterverslagauche/
pousserverslebas/pivot-
erversladroite.
Commeindiquédanslesloisenvigueursurla
responsabilitéconcernantlesproduits,nousneserons
pastenusresponsablesdesdommagesquenotre
produitcauseraitdanslessituationssuivantes:
• Leproduitn’estpasréparédefaçonadéquate.
• Leproduitestréparéavecdespiècesquinesont
pasfourniesouhomologuéesparlefabricant.
• Leproduitcomprendunaccessoirequin’estpas
fourniouhomologuéparlefabricant.
• Leproduitn’estpasréparéparuncentredeservice
après-venteagrééouparuneautoritéhomologuée.
Lesdéfinitionsci-dessousindiquentleniveaudegravité
pourchaquemotsignal.
Blessuresaux
personnes.
694-002-
C
Introducción.................................................................. 27
Seguridad..................................................................... 29
Montaje......................................................................... 33
Funcionamiento............................................................ 36
Mantenimiento.............................................................. 40
Solucióndeproblemas................................................. 48
Transporte,almacenamientoyeliminaciónde
residuos........................................................................ 50
Datostécnicos.............................................................. 51
694-002-
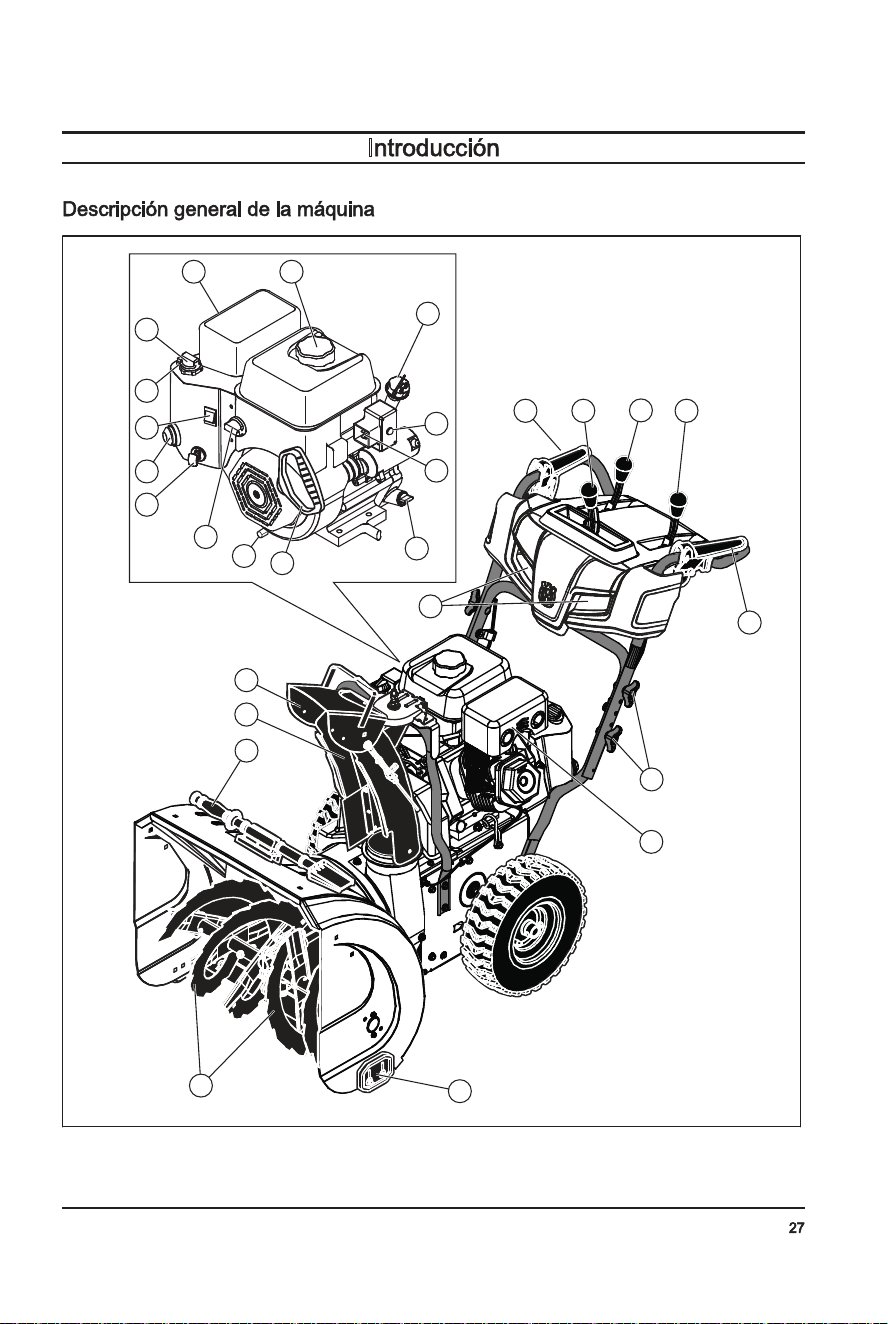
I
8 22
23
25
24
14
16
15
17
18
19
20
21
1 2
3
4
5
7
8
9
10
11
13
12
6
26
1. Acoplamientodelbarreno
2. Palancadecontroldelconductodeexpulsión
3. Palancadeajustedelrégimendevelocidad
4. Palancadelcontrolremotodeldeflector
694-002-
5. Engagementdel’entraînement
6. Témoin
7. Boutondepoignée
8. Silencieux
9. Plaquedeprotection
10. Tarière
11. Outildenettoyage
12. Goulottededécharge
13. Déflecteurdegoulotte
14. Cordedulanceur
15. Bouchondevidanged’huile
16. Commutateurdecarburant
17. CléON/OFF(marche/arrêt)
18. Poired’amorçage
19. InterrupteurON/OFF(marche/arrêt)
20. Commanded’accélérateur
21. Voletdedépart
22. Bouchonderemplissaged’essence
23. Remplissaged’huile(ST227P,ST230P),jauge(ST
227P)
24. Boutondedémarrageélectrique
25. Connexion,démarrageélectrique
26. Remplissaged’huile(ST224,ST224P),jauge(ST
224,ST230P,ST224P)
D
Leproduitestunesouffleuseàneigesurrouespour
déblayerlaneigedusol.
Cetappareilpeutêtreutilisépourretirerlaneigedes
champs,desroutes,desalléesetdestrottoirs.Nepas
l’utilisersurlespentessupérieuresà20°.Nepasutiliser
ceproduitdansdeszonesoùilyabeaucoupdedébris,
desaletéetdepierresquidépassent.
Silesautocollantssurleproduitsont
endommagés,communiqueravecleconcessionnaire
pourlesremplacer.
Avertissement.
Lirelemanueldel’opérateur.
Moteurenmarche
Arrêtdumoteur.
Rapide
Lent
Carburant
Huile
Protectiond’oreillesrecommandée
CléON/OFF(marche/arrêt)Insérerlaclé
pourdémarreretfairetournerlemoteur.
Étrangleurfermé(démarrage).
Amorceur.
Tirerlapoignéeducâbledulanceurpour
démarrer.
Étrangleurfermé(moteurenmarche).
CléON/OFF(marche/arrêt)Tirervers
l’extérieurpourarrêter.
Aucuneopérationsurdespentes
supérieuresà10°.
694-002-
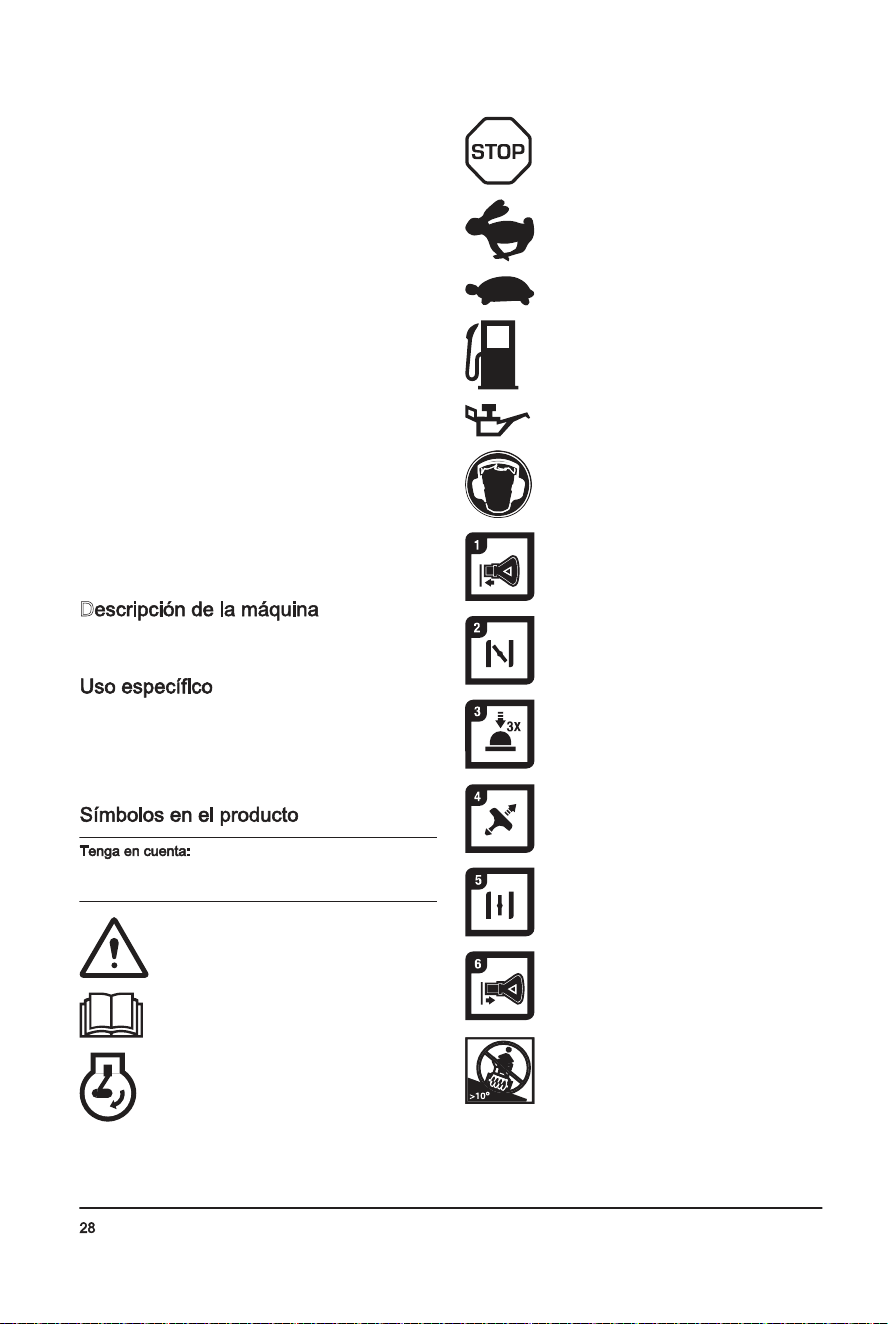
I
8 22
23
25
24
14
16
15
17
18
19
20
21
1 2
3
4
5
7
8
9
10
11
13
12
6
26
1. Engagementdetarière
2. Levierdecommandedelagoulotted’éjection
3. Levierdecommandedevitessedel’entraînement
4. Levierdecommandeàdistancedudéflecteur
694-002-
5. Acoplamientodelatransmisión
6. Luz
7. Perilladelmango
8. Silenciador
9. Planchaprotectora
10. Barrenos
11. Herramientadelimpieza
12. Conductodeexpulsión
13. Deflectordelconducto
14. Empuñaduradelacuerdadearranque
15. Tapóndevaciadodeaceite
16. Interruptordecombustible
17. Llavedeencendido/apagado(ON/OFF)
18. Cebador
19. InterruptorENCENDER/APAGAR
20. Controldelacelerador
21. Estrangulador
22. Tapóndellenadodegasolina
23. Llenadodelaceite(ST227P,ST230P),varillade
nivel(ST227P)
24. Botóndearranqueeléctrico
25. Conexión,arranqueeléctrico
26. Llenadodelaceite(ST224,ST224P),varillade
nivel(ST224,ST230P,ST224P)
D
Elproductoesunquitanievesconruedasqueseutiliza
pararetirarlanievedelsuelo.
Esteproductopuedeutilizarsepararetirarlanievede
campos,caminos,senderosyaccesos.Noloutiliceen
pendientessuperioresa20°.Noutiliceelproductoen
áreasconmuchosresiduos,suciedadypiedras
protuberantes.
Silasetiquetasdelproductoestán
dañadas,comuníqueseconeldistribuidorpara
sustituirlas.
¡Advertencia!
Leaelmanualdeinstrucciones.
Motorenmarcha
Motorapagado.
Rápido.
Lento.
Combustible.
Aceite.
Protectoresauricularesrecomendados.
Llaveparaencender/apagarlamáquina.
Colóquelaparaencenderlamáquinay
ponerlaenmarcha.
Estranguladorcerrado(arranque).
Cebador.
Tirelaempuñaduradecuerdadearranque
paraponerlamáquinaenmarcha.
Estranguladorabierto(puestaenmarcha).
Llaveparaencender/apagarlamáquina.
Sáquelaparadetenerlamáquina.
Sinfuncionamientoenpendientesdemás
de10grados.
694-002-
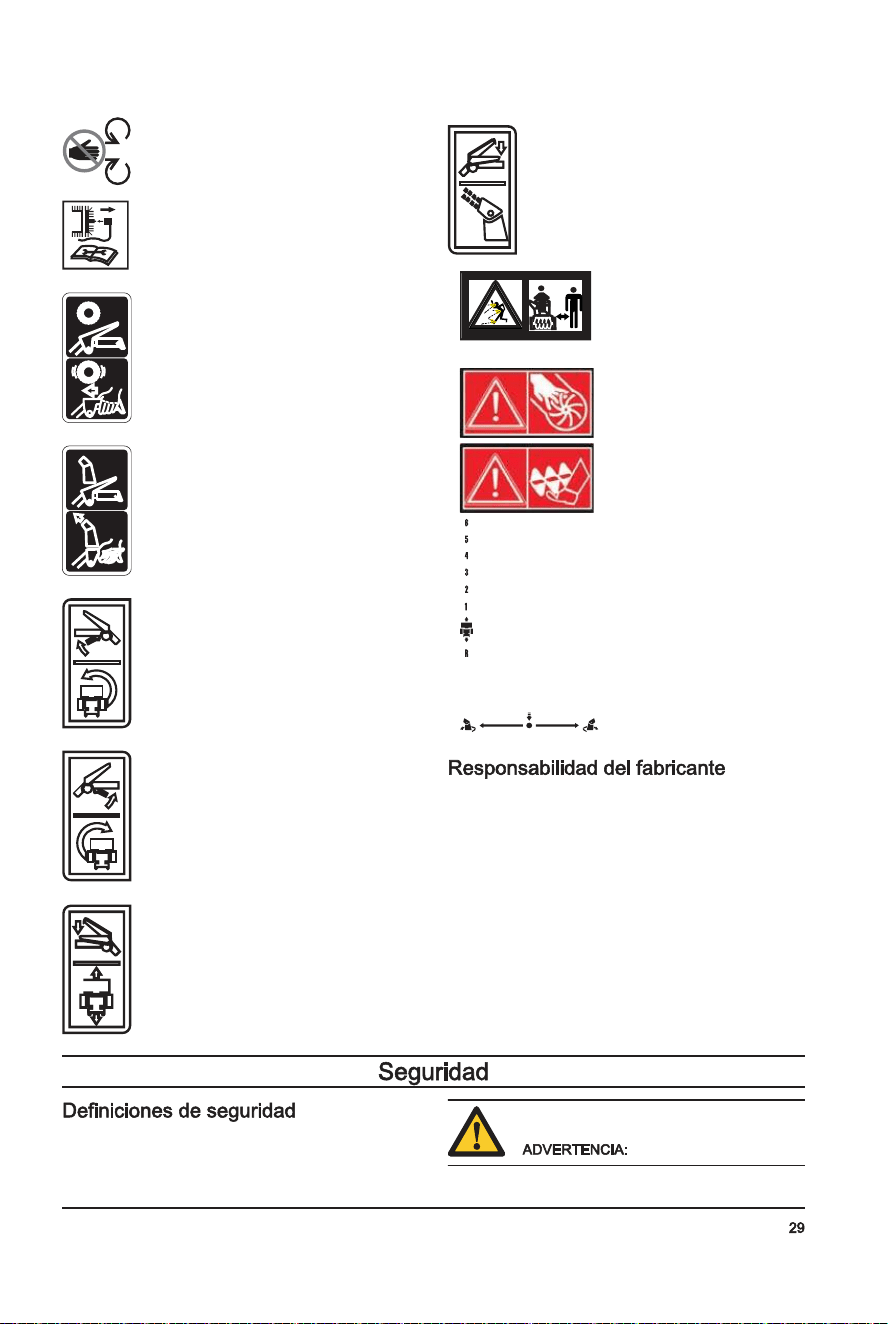
Noretirelasproteccionesmientraselmotor
seencuentrefuncionando.
Retireelcabledelabujíaantesdel
mantenimiento.
Tracciónactivada/desactivada.
Descargadenieveactivada/desactivada.
Giraralaizquierda.
Giraraladerecha.
Controldetracción.
Descargadenieve.
Tengacuidadoconlosob-
jetosquesalgandispara-
dos;mantengaalos
transeúnteslejosdela
máquina.
Advertencia:Mantenga
lasmanosalejadas.
Advertencia:Mantenga
lospiesalejados.
Marchahaciadelante/
atrás.
Giraralaizquierda/presio-
nar/giraraladerecha.
Comosemencionaenlasleyesderesponsabilidaddel
fabricante,nonoshacemosresponsablesdelosdaños
quecausenuestroproductosi:
• elproductosereparaincorrectamente
• elproductosereparaconpiezasquenosondel
fabricanteoqueestenoautoriza
• elproductotieneunaccesorioquenoesdel
fabricanteoqueestenoautoriza
• elproductonosereparaenuncentrodeservicio
autorizadooporunaautoridadaprobada.
Lassiguientesdefinicionesproporcionanelnivelde
gravedaddecadapalabraclave.
Lesionesapersonas.
694-002-
T
Introduction...................................................................53
Sécurité.........................................................................55
Montage........................................................................59
Fonctionnement............................................................ 62
Entretien....................................................................... 66
Dépannage................................................................... 74
Transport,entreposageetmiseaurebut......................77
Donnéestechniques..................................................... 77
694-002-
• Siempreusecontenedoresaprobadosparael
almacenamientoyeltransportedelcombustible.
• Vacíeeldepósitodecombustibleantesde
almacenarelproductoduranteunlargotiempo.
Desecheelcombustibleenunsitioadecuadopara
talpropósito.
• Asegurebienelproductoduranteeltransportepara
evitardañosyaccidentes.
• Mantengaelproductoenunáreacerradaparaevitar
quelosniñosuotraspersonassinautorización
puedanaccederaél.
• Mantengaelproductoenunlugarsecoysin
escarcha.
E
• Obedezcalasregulacionesvigentesyrequisitosde
reciclajelocales.
• Desechetodoslosproductosquímicos,comoel
combustibleoelaceitedelmotor,enuncentrode
serviciooenunsitioadecuadoparatalpropósito.
• Cuandoelproductosedejadeutilizar,envíeloaun
distribuidordeHusqvarnaodesécheloenunsitiode
reciclaje.
Todoslosdatos,lasimágenesylas
especificacionessoncomunesysoloseusanconfines
dereferencia.Además,sepodríancambiardebidoalas
actualizacionesdelproductosinprevioaviso.
Peso,lb/kg 198,6/90 212/96 237,8/108 198,6/90
Presióndefuncionamientomáximadelos
neumáticos,PSI
18 18 20 18
Marca/modelo
Husqvarna Husqvarna Husqvarna Husqvarna
Cilindrada,cc 208 254 291 208
Tipodecombustible Regularsinplomo(conunmáximodeun10%deetanol)
Capacidaddecombustible,galones/litros 0,31/1,17 0,35/1,33 0,62/2,35 0,31/1,17
Aceite SAE5W30(inferiora0°C[32°F])
Capacidaddeaceite,onzas/litros 16/0,47 20/0,59 32/0,95 16/0,47
Bujía F6RTC
Distanciadelabujía(pulg/mm) 0,030/0,762mm
694-002-
A Dañosenelproducto.
Estainformaciónhacequeel
productoseamásfácildeusar.
• Utiliceelproductocorrectamente.Laslesiones
gravesofatalessonunposibleresultadodeunuso
incorrecto.Soloutiliceelproductoparalastareas
queaparecenenestemanual.Noutiliceelproducto
paraotrastareas.
• Obedezcalasinstruccionescontenidaseneste
manual.Obedezcalossímbolosylasinstrucciones
deseguridad.Sielusuarionoobedecelas
instruccionesylossímbolos,esposiblequese
produzcandañosylesionestantogravescomo
fatales.
• Nodesecheestemanual.Utilicelasinstrucciones
paramontar,operarymantenerelproductoenbuen
estado.Utilicelasinstruccionesparalacorrecta
instalacióndepiezasyaccesorios.Utilicesolamente
piezasyaccesorioshomologados.
• Nouseunproductodañado.Cumplaconel
programademantenimiento.Realicesolamentelas
tareasdemantenimientoenlasquesedetallan
instruccionesenestemanual.Uncentrodeservicio
autorizadodeberealizartodoslosdemástrabajos
demantenimiento.
• Enestemanualnosepuedenabarcartodaslas
situacionesquepuedenocurrircuandoseutilizael
producto.Tengacuidadoyuseelsentidocomún.No
hagafuncionarelproductonirealicemantenimientos
sinoestáseguroacercadelasituación.Hablecon
unexpertoenelproducto,sudistribuidor,elagente
deservicioouncentrodeservicioautorizadopara
obtenermásinformación.
• Desconecteelcabledelabujíaantesdemontaro
almacenarelproducto,orealizartareasde
mantenimiento.
• Noutiliceelproductosicambiasuespecificación
inicial.Nocambieunapartedelproductosinla
aprobacióndelfabricante.Utilicesolamentelas
piezasqueestánaprobadasporelfabricante.Las
lesionesgravesofatalessonunposibleresultado
deunmantenimientoincorrecto.
• Norespireloshumosdelmotor.Lainhalación
prolongadadelosgasesdeescapeesunriesgo
paralasalud.
• Noenciendaelproductoeninterioresocercade
materialesinflamables.Losgasesdeescapeestán
muycalientesypuedencrearincendiosdebidoala
creacióndechispas.Unflujodeaireinsuficiente
puedecausarlesionesgravesofatalesporasfixiao
debidoalmonóxidodecarbono.
• Cuandoutiliceesteproducto,elmotorcreaun
campoelectromagnético.Elcampo
electromagnéticopuedecausardañosaimplantes
médicos.Hableconsumédicoyfabricantedel
implanteantesdeutilizarelproducto.
• Nodejequeunniñoutiliceelproducto.Nopermita
queunapersonaquenoconozcalasinstrucciones
utiliceelproducto.
• Asegúresedesupervisarsiempreaunapersonacon
capacidadesfísicasomentaleslimitadasqueutilice
elproducto.Debehaberunadultoresponsableen
todomomento.
• Mantengaelproductoenunáreaalacuallosniños
ylaspersonasnoautorizadasnopuedanacceder.
• Elproductopuedeexpulsarobjetosycausar
lesiones.Sigalasinstruccionesdeseguridadpara
reducirelriesgodelesionesgravesofatales.
• Nosealejedelproductocuandoelmotorestéen
marcha.
• Eloperadordelproductoesresponsableencasode
unaccidente.
• Antesdecaminarhaciaatrásymientraslohace,
mirehaciaatrásyhaciaabajoparacerciorarsede
quenohayaniñospequeños,animalesuotros
riesgosquepuedanprovocarcaídas.
• Asegúresedequelaspiezasnoesténdañadas
antesdeutilizarelproducto.
• Asegúresedeestaralmenos15m(50pies)de
distanciadeotraspersonasoanimalesantesde
utilizarelproducto.Asegúresedequeunapersona
eneláreaadyacentesepaqueutilizaráelproducto.
• Consultelasleyeslocalesonacionales.Estas
puedenevitarodisminuirelfuncionamientodel
productoenalgunascondiciones.
• Nopongalasmanosnilospiescercaodebajode
laspiezasgiratorias.Manténgasealejadodela
aberturadedescargaentodomomento.
• Tengaextremocuidadocuandotrabajeencaminos,
pasosoaccesosdegravaopaseporellos.
Manténgasealertaparadetectarriesgosocultoso
tránsito
• Despuésdegolpearunobjetoextraño,detengael
motor,desconecteelcabledelabujíaodesconecte
elhiloenlosmotoreseléctricos.Inspeccione
atentamentelamáquinaparadetectardañosy
repárelosantesdevolveraencenderyocuparel
producto.
• Sielequipocomienzaavibrardemaneraanormal,
detengaelmotoryrevisedeinmediatopara
encontrarlacausa.Lavibraciónesgeneralmente
unaadvertenciadeproblemas.
• Detengaelmotorsiemprequeabandonelaposición
deoperación,antesdedestaparlacarcasadel
barrenooeldeflectordelconductoytambién
cuandorealicereparaciones,ajustesoinspecciones.
• Cuandorealicelalimpieza,reparaciónoinspección
delproducto,detengaelmotoryasegúresedeque
694-002-
losbarrenosytodaslaspiezasmóvilesse
detuvieron.Desconecteelcabledelabujíay
manténgalolejosdelabujíaparaevitarquealguien
arranqueelmotoraccidentalmente.
• Nohagafuncionarelmotoreninteriores,excepto
cuandoarranqueelmotoryparaeltransportedel
productodentroofueradeledificio.Abralaspuertas
externas;losgasesdeescapesonpeligrosos.
• Pongaextremaatencióncuandotrabajeen
pendientes.
• Nuncahagafuncionarelproductosinlasdebidas
proteccionesnilosdispositivosprotectoresde
seguridadensulugaryenfuncionamiento.
• Nuncadirijaeldeflectordelconductohacialas
personasohaciazonasdondepuedanocurrirdaños
alapropiedad.Mantengaalejadosalosniñosya
otraspersonas.
• Nosobrecarguelacapacidaddelproducto
intentandoretirarnieveaunavelocidaddemasiado
rápida.
• Nuncahagafuncionarelproductoaunaalta
velocidaddetransporteensuperficiesresbaladizas.
Mirehaciaatrásytengacuidadocuandoretroceda.
• Desconectelaalimentacióndelosbarrenospara
transportarelproductoocuandonoestéenuso.
• Utilicesolamentelosimplementosyaccesorios
homologadosporelfabricantedelproducto,por
ejemplo,lospesosdelasruedas,contrapesoso
cabinas.
• Nuncahagafuncionarelproductosinbuena
visibilidadoluz.Presteatenciónmientrascaminay
mantengafirmeslasempuñaduras.Camine,nunca
corra.
• Nuncatoqueunmotorosilenciadorcalientes.
S
• Inspeccioneatentamenteeláreadondesevaa
utilizarelequipoyretiretodoslostapetes,trineos,
tablas,cablesyotrosobjetosextraños.
• Desacopletodoslosembraguesypongaelcambio
enneutroantesdearrancarelmotor.
• Nomanejeelproductosinusarlaindumentariade
inviernoadecuada.Eviteusarropaflojaquepueda
quedaratrapadaenlaspiezasmóviles.Utilice
calzadoquemejorelaposturaensuperficies
resbaladizas.
• Manipuleelcombustibleconcuidado;esaltamente
inflamable.
• Useunrecipientedecombustibleaprobado.
• Nuncaagreguecombustibleaunmotoren
marchaocaliente.
• Lleneeldepósitodecombustibleenelexterior,
conmáximocuidado.Nuncalleneeldepósitode
combustibleeninteriores
• Nuncallenelosrecipientesdecombustible
dentrodeunvehículo,enuncamiónosobrela
plataformadeunremolqueconrevestimiento
plástico.Siemprecoloquelosrecipientesenel
suelo,alejadosdelvehículo,antesderellenar.
• Cuandoseaposible,retireelequipoagasolina
delcamiónotráileryreabastézcaloenelsuelo.
Sinoesposible,entoncesreabastezcaelequipo
enuntráilerconunrecipienteportátil,enlugar
dehacerlodirectamenteconlaboquilladel
dispensadordegasolina.
• Mantengalaboquillaencontactoconelborde
deldepósitoorecipientedecombustible
abriéndolosiemprehastaqueelabastecimiento
decombustibleestécompleto.Nouseun
dispositivoquemantengaabiertoelsegurodela
boquilla.
• Vuelvaacolocarlatapadelagasolinacon
seguridadylimpietodoelcombustiblequese
hayaderramado.
• Sielcombustiblesederramasobrelaropa,
cámbieseladeinmediato.
• Utiliceloscablesdeextensiónyreceptáculos
especificadosporelfabricanteparatodaslas
unidadesconmotoresdetransmisióneléctricaode
arranqueeléctrico.
• Ajustelaalturadelacarcasadelbarrenopara
limpiarsuperficiesrocosasodegrava.
• Nuncaintenterealizarajustesconelmotoren
marcha,exceptosielfabricantelorecomienda
específicamente.
• Siempreutilicegafasprotectorasoprotectores
ocularesduranteelfuncionamientoocuandorealice
ajustesoreparacionesafindeprotegerlosojosde
objetosextrañosquepuedansereyectadosdela
máquina.
Utilicesiempreelequipodeprotecciónpersonal
adecuadocuandouseelproducto.Estoincluye,como
mínimo,calzadoresistente,protecciónoculary
protectoresauriculares.Elequipodeprotección
personalnoeliminaelriesgodelesiones,peropuede
disminuirelgradodelaslesionesencasodeaccidente.
• Siempreusegafasdeseguridadoprotecciónocular
cuandoopereelproductoorealicetareasde
mantenimientooreparación.
• Utilicesiempreindumentariadeinviernoadecuada
cuandoopereelproducto.
• Utilicesiemprebotasantideslizantesdeservicio
pesadoconbuensoportedetobilloduranteel
funcionamientodelproducto.
• Noutiliceropaflojaquepuedaquedaratrapadaen
laspiezasmóviles.
• Utiliceguantesprotectoreshomologados,sies
necesario.Porejemplo,alinstalar,examinaro
limpiarlacuchilla.
• Usesiempreprotectoresauricularesautorizados
cuandoutiliceelproducto.Escucharruidosdurante
unlargoperíodopuedeprovocarpérdidade
audicióninducidaporelruido.
694-002-
P
Pérdidadetracciónora-
lentizacióndelavelocidad
detransmisión.
Pérdidaoralentizaciónde
ladescargadenieve.
Lacorreapatina. Ajusteelcable.Ajustelacorrea.
Lacorreaestádesgastada. Reviseoreemplacelacorrea.Ajuste
lapolea.
Lacorreasesaliódelapolea. Reviseovuelvaainstalarlacorrea.
Ajustelapolea.
Eldeflectordelconductoestáobstruido. Limpieeldeflectordelconducto.
Objetosextrañosobstruyenlosbarrenos. Retirelasuciedadolosobjetosex-
trañosdelosbarrenos.
Elpasadorfusibleestároto. Reemplaceelpasadorfusibleroto.
Excesodehieloynieveacumuladosentrelos
componentesdelavía.
Retireelhieloynieveacumulados
entreloscomponentesdelavía.
Laruedamotrizdefricciónestádesgastada. Comuníqueseconuncentrodeser-
vicioautorizado.
Eldiscodefricciónestámojado Dejesecareldiscodefricción
Fallaenlarotacióndel
barrenodespuésdesoltar
laempuñadura.
Lacorreadetransmisiónnoestáalineada. Ajustelacorreadetransmisión.
Eldeflectordedescarganoestáalineado. Ajusteeldeflectordedescarga.
Laslucesnoestánencen-
didas(siestánequipadas)
Elmotornoestáenmarcha. Arranqueelmotor.
Laconexióndeloscablesestásuelta. Compruebelasconexionesdelos
cablesdelmotorylasluces.
ElLEDestáquemado. ReemplaceelmódulodeluzLED.
LosLEDindividualesnosepueden
reemplazar.
Esdifícilmoverelrotador
delconducto
Haysuciedadenelmecanismodelrotadordel
conducto.
Limpielaspiezasinternasdelmeca-
nismodelrotadordelconducto.
Loscablesestántorcidosodañados. Asegúresedequeloscablesnoes-
téntorcidos.Reemplaceloscables
dañados.
Elproductosegirahacia
unlado.
Lapresióndelosneumáticosnoesigual. Ajustelapresióndelosneumáticosy
llenelosneumáticos.
Elproductosemueveconunasolarueda. Inspeccioneelpasadordebloqueo
delosneumáticos.
Ajustedeltrineoirregular. Ajustelasplanchasprotectorasyel
trineo.
Planchasprotectorasconajustenouniforme. Ajustelasplanchasprotectorasyel
trineo.
• Paraelalmacenamientoyeltransportedelproducto
ydelcombustible,asegúresedequenohayafugas
ovapores.Laschispasollamas,porejemplo,de
dispositivoseléctricosocalderas,puedeniniciarun
incendio.
694-002-
P
Potenciareducida Elcabledelabujíanoestáconectado. Conecteelcablealabujía.
Elproductolanzademasiadanieve. Disminuyalavelocidadyelanchode
lahilera.
Latapadeldepósitodecombustibleestácu-
biertadehieloonieve.
Retireelhieloylanievedeltapóndel
depósitodecombustibleyalrededor
deél.
Elsilenciadorestásuciouobstruido. Limpieoreemplaceelsilenciador.
Longitudincorrectadelcable. Ajusteelcable.
Elsilenciadorestáobstruido. Asegúresedequeelmotorestéfrío.
Limpielaobstrucción.
Latomadeairedelcarburadorestáobstruida. Asegúresedequeelmotorestéfrío.
Limpielaobstrucción.
Elmotorfuncionaenra-
lentíodeformairregular
ElestranguladorestáenlaposiciónON(FULL,
OPEN)(Encendido[Máximo,Abierto]).
Pongaelestranguladorenlaposi-
cióndeOFF(CLOSE)(Apagado
[Cerrado]).
Latuberíadecombustibleestáobstruida. Limpielatuberíadecombustible.
Hayaguaenelcombustibleoelcombustiblees
demasiadoantiguo.
Vacíeeldepósitodecombustibleyel
carburador.Lleneeldepósitode
combustiblecongasolinanuevay
limpia.
Sedebereemplazarelcarburador. Comuníqueseconuncentrodeser-
vicioautorizado.
Lacorreaseencuentraestirada. ReemplacelacorreaenVdelbar-
reno.
Movimientodelmanillaro
vibraciónexcesiva
Algunaspiezasestánsueltas.Losbarrenoses-
tándañados.
Aprietetodaslassujeciones.Reem-
placetodaslaspiezasdañadas.Sila
vibraciónpersiste,comuníquesecon
uncentrodeservicioautorizado.
Losmanillaresnoestáncolocadosdemanera
correcta.
Asegúresedequelosmanillareses-
téntrabadosensuposición.
Lastuercasdelapalancadeajusteestánsuel-
tas.
Aprietelastuercashastaqueelman-
illarsesientafirme.
Cuestaextraerlaempu-
ñaduradelcordóndear-
ranque
Laempuñaduradelcordóndearranqueestá
congelada.
Tirelentamentehaciaafueralamay-
orcantidaddecordónposibledel
mecanismodearranqueysueltela
empuñaduradelcordóndearranque.
Sielmotornoarranca,repitaelpro-
cedimientooutiliceelmecanismode
arranqueeléctrico.
Elcordóndearranqueinterfiereenloscompo-
nentes.
Elcordóndearranquenodebetocar
cablesnimangueras.
694-002-
D
• Asegúresederealizarelmantenimientodelproducto
frecuentemente.
• Estoaumentalavidaútildelproducto.
• Disminuyeelriesgodeaccidentes.
Permitaqueunconcesionarioautorizadoouncentro
deservicioautorizadoexaminenfrecuentementeel
productopararealizarajustesoreparaciones.
• Nouseunproductoconequipodeprotección
dañado.Sielproductoestádañado,comuníquese
conuncentrodeservicioautorizado.
Elsilenciadormantienelosnivelesderuidoalmínimoy
envíalosgasesdeescapelejosdeloperador.
Noutiliceelproductosielsilenciadornoestáinstalado
oestádefectuoso.Unsilenciadordefectuosoaumenta
elnivelderuidoyelriesgodeincendio.
Examineelsilenciadorconregularidadparaasegurarse
dequeestáinstaladocorrectamenteyquenoesté
dañado.
Elsilenciadorsecalientamucho
duranteydespuésdelusoycuandoel
motorfuncionaenrégimenderalentí.Tenga
cuidadocercadematerialesovapores
inflamablesparaprevenirincendios.
Leaatentamentelas
instruccionesdeadvertenciasiguientes
antesdeusarelproducto.
• Noarranqueelproductosihaycombustibleoaceite
demotorenelproducto.Quiteelcombustibleo
aceitenodeseadoydejesecarelproducto.
• Siderramacombustibleensuropa,cámbiesela
ropainmediatamente.
• Nopermitaquelecaigacombustibleenelcuerpo,
yaquepuedecausarlesiones.Silecaecombustible
enelcuerpo,utilicejabónyaguaparaquitarlo.
• Noarranqueelproductosielmotortieneunafuga.
Examinefrecuentementeelmotorenbuscade
fugas.
• Tengacuidadoconelcombustible.Elcombustible
esinflamableylosgasessonexplosivosypueden
causarlesionesgravesofatales.
• Norespirelosgasesdelcombustible,yaque
puedencausarlesiones.Asegúresedequehaya
suficienteflujodeaire.
• Nofumecercadelcombustibleodelmotor.
• Nocoloqueobjetoscalientescercadelcombustible
odelmotor.
• Noagreguecombustiblecuandoelmotorestéen
marcha.
• Asegúresedequeelmotorseenfríeantesdellenar
eldepósitodecombustible.
• Antesdellenareldepósitodecombustible,abra
lentamentelatapadeldepósitodecombustibley
liberelapresiónconcuidado.
• Noagreguecombustiblealmotorenunáreainterior.
Unflujodeaireinsuficientepuedecausarlesiones
gravesofatalesporasfixiaodebidoalmonóxidode
carbono.
• Aprietebienlatapadeldepósitodecombustible.Si
noaprietalatapadeldepósitodecombustible,se
generaunriesgodeincendio.
• Muevaelproductoaunmínimode3m(10pies)de
laposiciónenlaquesellenóeldepósitoantesde
empezarausarlo.
• Nopongademasiadocombustibleeneldepósitode
combustible.
¡ADVERTENCIA!
694-002-
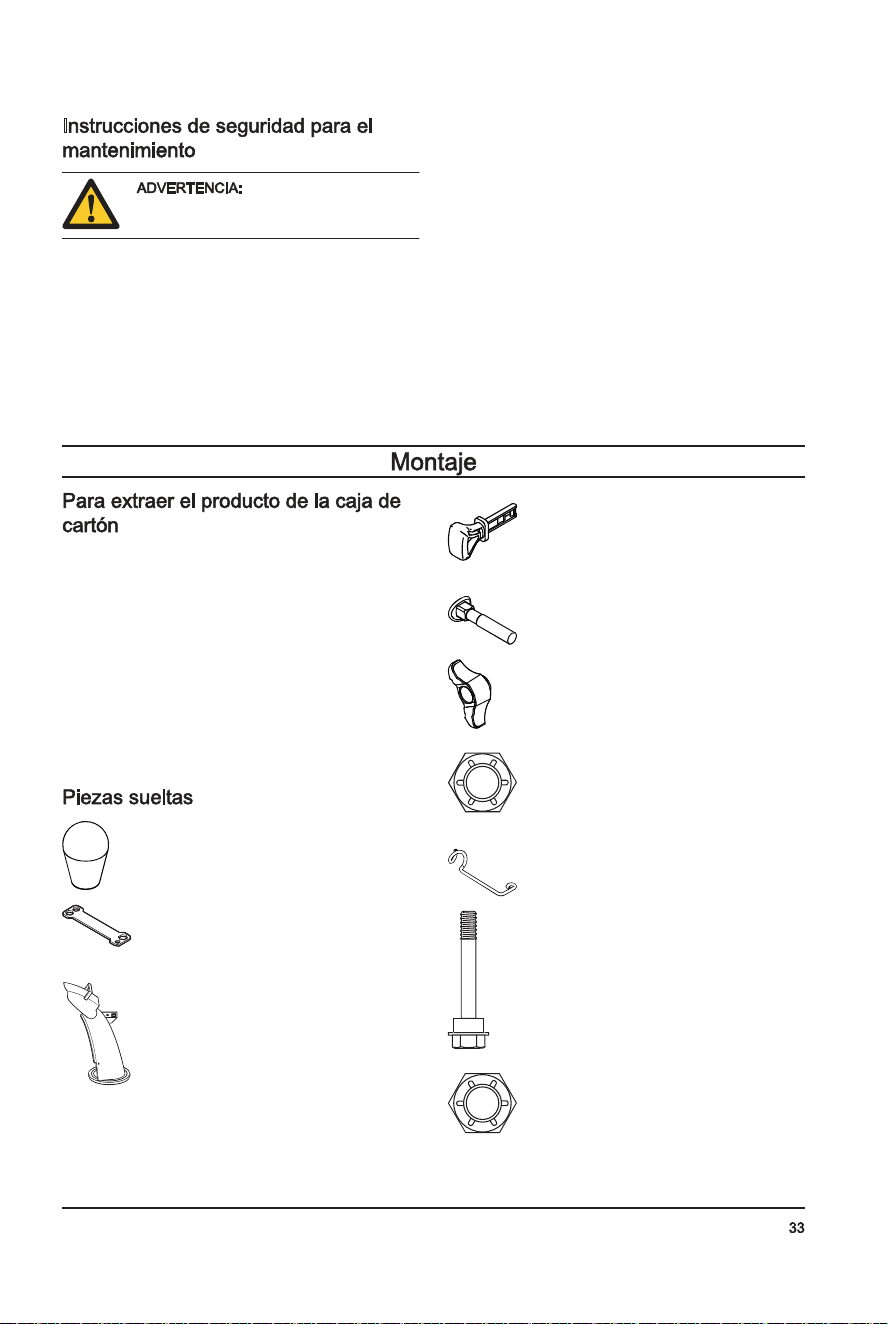
I
Leaatentamentelas
instruccionesdeadvertenciasiguientes
antesdeusarelproducto.
• Losgasesdeescapedelmotorcontienenmonóxido
decarbono,ungasinodoro,tóxicoymuypeligroso.
Noarranqueelmotoreninterioresoenespacios
cerrados.
• Antesderealizarelmantenimientodelproducto,
detengaelmotoryquiteelcabledeencendidodela
bujía.
• Utiliceguantesprotectorescuandorealicelastareas
demantenimientoenlascuchillas.Lascuchillasson
muyafiladasypuedenproducircortesconfacilidad.
• Accesoriosymodificacionesenelproductoqueno
esténaprobadosporelfabricantepuedencausar
lesionesgravesolamuerte.Nomodifiqueel
producto.Siempreutiliceaccesoriosaprobadospor
elfabricante.
• Sielmantenimientonoserealizademanera
correctayregular,aumentaelriesgodesufrir
lesionesycausardañosenelproducto.
• Solorealicetareasdemantenimientocomoseindica
enelpresentemanualdelusuario.Todaslasdemás
tareasdemantenimientosedebenrealizarenun
tallerdeservicioaprobado.
• Procurerealizarlastareasdemantenimientocon
regularidadenuntallerdeservicioaprobado.
• Cambielaspiezasdañadas,desgastadasorotas.
1. Retirelaspiezassueltasqueseincluyenconel
producto.Recortelascuatroesquinasdelacajay
coloquelospanelesdelextremoenunasuperficie
plana.
2. Extraigalosdostornillosquesujetanlacarcasadel
barrenoalpalé.Extraigalossoportesdeacerode
lasplanchasprotectoras,sitienen.
3. Cortelasbridasparacablequesujetanelproducto
alpaléysáquelas.
4. Retiretodoslosmaterialesdeembalaje.
5. Retireelproductodelacajayasegúresedequeno
quedenpiezassueltasenlacaja.
Perilla(3)
Llavemultiuso(1)
Conductodeexpulsión(1)
Llave(s)deencendido/apagado(ON/OFF)
Tornillode5/16-18x2¼"(2)
Perillasdelaempuñadura(2)
Contratuercade3/8(1)
Guíadelcable(1)
Pasadoresfusiblesde¼-20x1-¾(6)
Contratuercasde¼-20(6)
694-002-
S
Elproductonoarranca Lallavedeencendidodeseguridadnoseen-
cuentrainserta.
Insertelallavedeencendidodese-
guridad.
Elproductonotienecombustible. Lleneeldepósitodecombustiblecon
gasolinanuevaylimpia.
Lallavedeencendido/apagado(ON/OFF)está
enlaposiciónOFF(Apagado).
Muevalallavedeencendido/apaga-
do(ON/OFF)alaposiciónON(En-
cendido).
Elestranguladorseencuentraenlaposición
OFF(CLOSE)(Apagado[Cerrado]).
Muevaelestranguladoralaposición
ON(FULL,OPEN)(Encendido[Máxi-
mo,Abierto]).
Elcebadornoseencuentrapresionado. Presioneelcebador.
Elmotorestáinundado. Espereunosminutosantesdevolver
aarrancar,NOpresioneelcebador.
Vuelvaaarrancarelmotorconla
aceleraciónmáximayelestrangula-
dorenlaposiciónOFF(CLOSE)
(Apagado[Cerrado]).
Elcabledelabujíanoestáconectado. Conecteelcablealabujía.
Labujíaestádefectuosa. Reemplacelabujía.
Hayaguaenelcombustibleoelcombustiblees
demasiadoantiguo.
Vacíeeldepósitodecombustibleyel
carburador.Lleneeldepósitode
combustiblecongasolinanuevay
limpia.
Hayvaporenlatuberíadecombustible. Asegúresedequetodalatuberíade
combustibleestépordebajodela
salidadeldepósitodecombustible.
Latuberíadecombustibledebefluir
deformacontinuahaciaabajodesde
eldepósitodecombustiblehastael
carburador.
Otrascausas. Inspeccioneconcuidadolosprocedi-
mientosdearranquedeestemanual.
Elinterruptordecombustible(siestáequipado)
estáenlaposiciónCLOSE(Cerrado)(OFF
[Apagado]).
Coloqueelinterruptordecombustible
enlaposiciónOPEN(ON)(Abierto
[Encendido]).
ElaceleradorestáenlaposiciónSTOP(Deten-
ción).
Muevaelaceleradorhastalaposi-
ciónFAST(Rápido).
694-002-

P
1. Extraigaelpasadordelarueda(A)yelpasadorde
retención(B).
2. Quitelaruedadeleje(C).
A
B
C
• Limpielaspiezasdeplásticoconunpañolimpioy
seco.
• Nouselimpiadoresdealtapresiónparalimpiarel
producto.
• Noarrojeaguadirectamentesobreelmotor.
• Utiliceuncepillopararetirarlashojas,elcéspedyla
suciedad.
694-002-
Contratuercade5/16-18(1)
Contratuercade¼-20(1)
Arandeladenailon(1)
Tornillode5/16-18x5/8(1)
Muelle(1)
Pernodetopede¼-20(1)
1. Levantelaempuñadurasuperiorhastalaposición
defuncionamiento.
2. Ajustelaposicióndelaempuñaduraenunodelos
orificiosdemontaje(B)yaprietelasperillasdela
empuñadura(C)conlostornillos(D).
B
C
D
694-002-
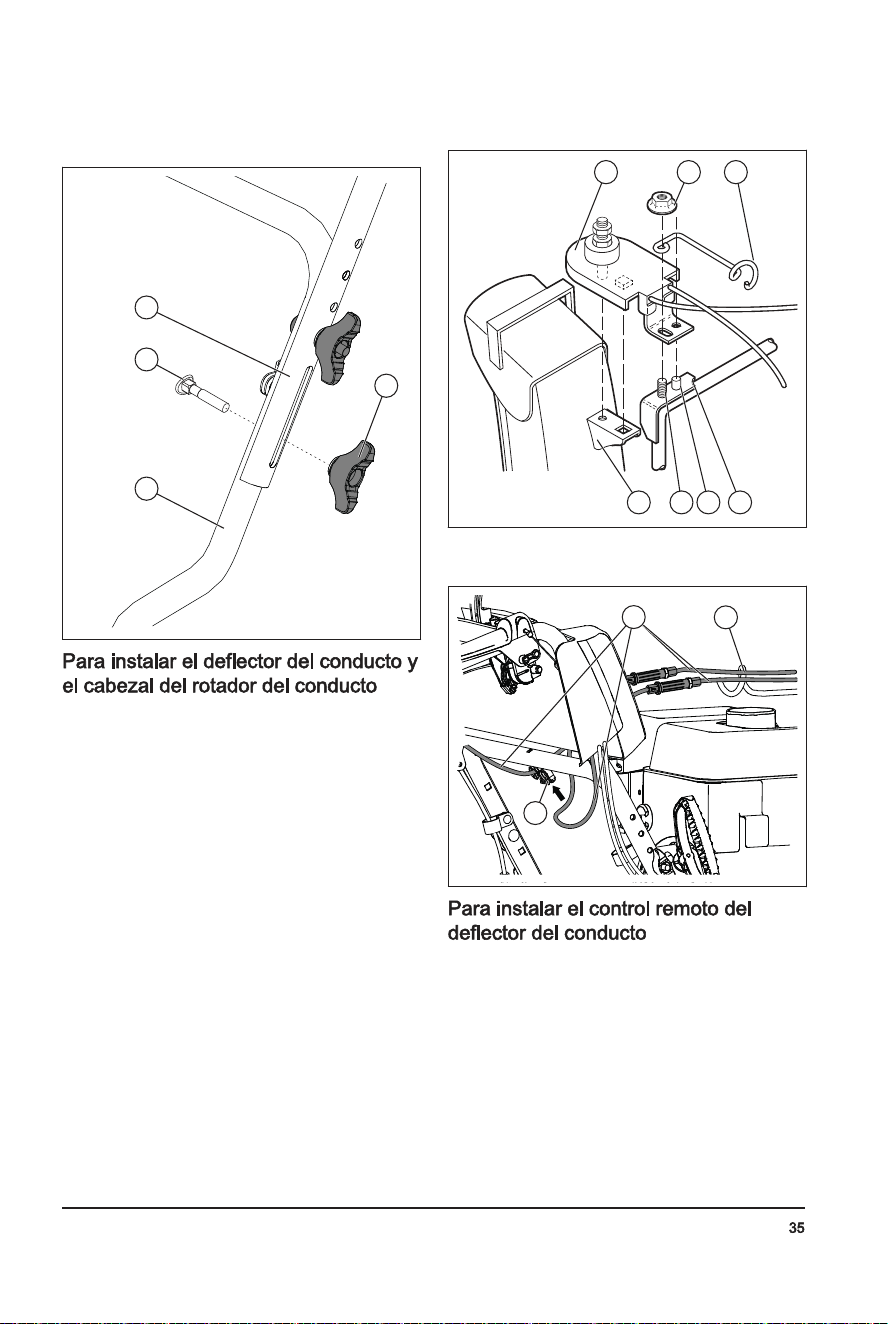
3. Instalemástornillos(D)yperillasdelaempuñadura
(C)parafijarlaempuñadurasuperior(A)ala
empuñadurainferior(E).
D
E
A
C
1. Coloqueelmontajedeldeflectordelconductoenla
partesuperiordelabasedelconductoconla
aperturadedescargaorientadahacialaparte
delanteradelproducto.
2. Coloqueelcabezaldelrotadordelconducto(A)en
elsoportedelconducto(B).Gireelmontajedel
conductoparaalinearlospasadoresbajoelcabezal
delrotadordelconductoconlosorificiosenel
soportedelconductosiesnecesario.
3. Coloqueelcabezaldelrotadordelconductoenel
pasador(C)yelespárragoroscado(D)enelsoporte
demontaje(E).
4. Fijeunacontratuerca(G)enelespárragoroscadoy
apriétela.
A
B CD E
FG
5. Coloqueloscablesatravésdelaguíadelcable(F)
ydelsujetadordoble(I)parafijarelcabledelrotador
(H)alaempuñadurainferior.
F
H
I
1. Fijeelsoportedelcableremoto(A)alconductode
expulsiónconuntornillo(B)yunacontratuercade
5/16-18(D).Aprieteelperno.
2. Instaleelojaldelcableremoto(E)eneldeflectordel
conducto(F)conunpernodetope(G)yuna
arandeladenailon(C),yaprieteconuna
contratuercade¼-20(K).Elojaldelcablese
aflojaráenelpernodetope.
694-002-
5. Instalelospernosde5/16''(A),(C)yapriételos(8a
12pies-libras/11a16Nm).
B
C
A
6. Instalelospernosde¼''(B)yapriételos(4a6pies-
libras/5a8Nm).
7. Instalelacorreadelbarrenoenlapoleadelmotor.
Asegúresedequelacorreasecoloque
correctamentealrededordelapoleatensorae
instaleadecuadamenteenlaranuradelapoleadel
motor.
8. Hagafuncionartodosloscontrolesparaasegurarse
dequelacorreadelbarrenoestécorrectamente
instaladaydequetodosloscomponentesse
muevancorrectamente.
1. Aflojelastuercasdeinmovilización(B)paraajustar
latensióndelcabledelconductodeexpulsión
adyacentealtorniquetedelajustador(A).
A B
C
2. Sostengalapartecortaygirelapartelargapara
aumentarelajustador.
3. Ajustehastaqueelcabledeldeflectordelconducto
deexpulsión(C)quedebienapretado.Aprietelas
tuercasdeinmovilización.
Sinosesientecómodohaciendoeste
ajuste,póngaseencontactoconuncentrodeservicio
autorizado.Esposiblequeserequieranajustessila
rotacióndelpropulsorydelbarrenoeslentacuandose
conectalapalancadecontroldelbarrenoosilacorrea
delbarrenosehareemplazado.
1. Sueltelastuercasdeinmovilización(B)juntoal
tensor(A)paraajustarlatensióndelcableenel
cabledecontroldelbarreno(D).
A B
D
2. Sostengalaseccióncortaygirelasecciónlarga.
Gírelaen360grados.
3. Pruebeelacoplamientodelbarreno.Repitaelajuste
hastaquelaholguradelcableseapocacuandola
palancaestédesacoplada.
4. Aprietelatuercadeinmovilizacióninferiorpara
bloquearlatensión.
5. Solicíteleaunapersonaquesepare10pies/
3metrosenfrentedelproductoenelladoopuesto
delconducto.Lapersonadebeobservarlarotación
delbarrenoymedireltiempoquetardaendejarde
girardespuésdequesesueltalapalanca.Siel
barrenodejadegirardespuésde5segundos,ajuste
elcablegirandoelcañóncentralen360gradospara
contraerelajustador.Pruebelaconexióndel
barrenoymidaeltiempodedetenciónnuevamente.
Sielbarrenodejadegirarenmenosde5segundos,
continúeconelsiguientepaso.
6. Aprietelatuercadeinmovilizaciónenelcabledel
barreno.
Sielajustenoresuelveel
problema,cambielacorreadelbarreno.Consulte
Paraquitarlacorreadelbarrenoenlapágina45
.
694-002-
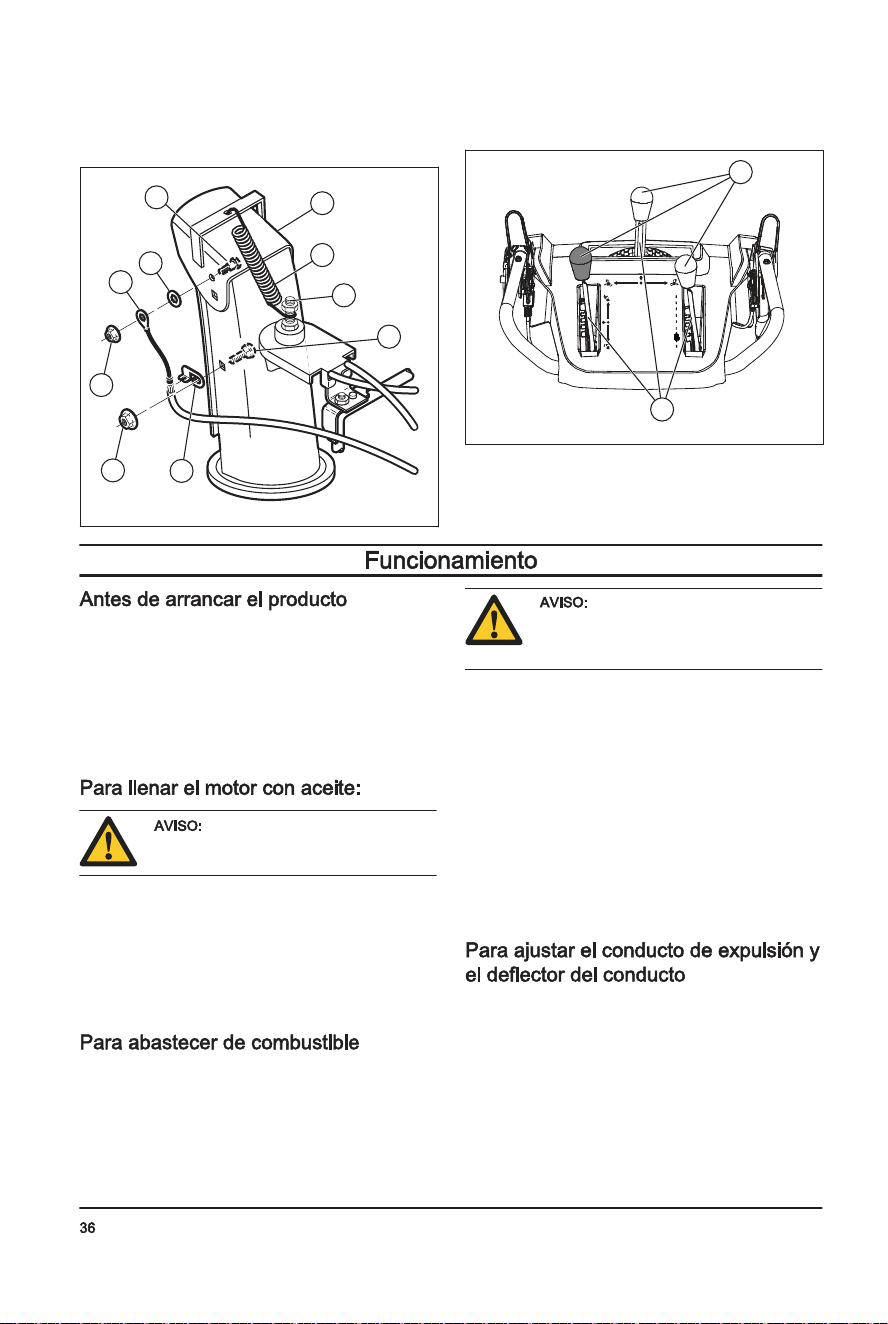
delapoleadetransmisiónantesdebajarlaplaca
oscilante.
3. Instaleyaprieteelpernosuperior(I).
4. Coloquelacorreadetransmisiónenlaranuradela
poleadelmotor(G)antesdeinstalarlaenelejedel
motor.
5. Instaleelpernodelapolea(F)yfijelapoleadel
motorenelmotor.Aprieteelpernodelapolea
(30-35pieslibras/41-47Nm).
6. Instaleelbrazodeltensordelacorreade
transmisión(B)yaprieteelpernodelbrazo(E)enel
motor.
7. Instaleelmuellederetorno(C)enlaplacaoscilante.
8. Instaleelmuelletensor(A)enelbrazodeltensor.
9. Hagafuncionartodosloscontrolesparaasegurarse
dequelacorreadetransmisiónestécorrectamente
instaladaydequetodosloscomponentesse
muevancorrectamente.
P
1. Instalelacubiertadelacorrea(B)enelbastidor(C)
yaprietelosdostornillos(A).
C A
B
2. Instaleelconductodeexpulsión.
1. Retirelospernosde5/16''(A)ylospernosinferiores
de¼"(B)delosdosladosdelconjuntodelbastidor.
Nobotelospernos.
B
C
A
2. Afloje,sinretirar,lospernosinferioresde5/16"(C)
delosdosladosdelconjuntodelbastidor.
3. Retirelacorreadelbarrenodelapoleadelmotor.
4. Inclinelaseccióntraserahaciaabajo.Lasección
delanteraseinclinaráhaciadelantealmismo
tiempo.Elpernoinferior(C)esunabisagraentrelas
seccionesdelanteraytrasera.
5. Coloqueunbloquedemaderadebajodelpuntode
bisagraparamantenerelproductoinclinado.
6. Muevaelbrazodelfrenodelbarrenoyretirela
correadelbarrenodealrededordelbrazo.
1. Muevaelbrazodeltensordecorreaycoloquela
correadelbarrenoalrededordelbrazoyenlaranura
delapoleadelbarreno.
Asegúresedequelacorreano
quedeatrapadaentreelbastidoryla
carcasadelbarrenocuandojuntela
unidad.
2. Retireelbloquedemaderadeabajodelproducto.
3. Levantelaempuñaduraparainclinarlasección
traserahaciaarriba.Laseccióndelanterase
inclinaráhaciaatrásygiraráparaunirsealasección
trasera.
4. Asegúresedecolocarcorrectamentelacorreaenla
ranuradelapoleadelbarreno.
694-002-
3. Instaleelmuelle(L)entrelatuercahexagonal(M)en
elcabezaldelrotadordelconductoyelorificioenel
deflectordelconducto.
F
L
M
B
A
D
K
C
E
G
4. Coloquelasperillasdecontroldelapalanca(N)
presionándolascontralaspalancasdecontrol(O).
O
N
• Mantengaalaspersonasyanimalesalejadosdela
zonadetrabajo.
• Realiceunmantenimientodiario.Consulte
Programa
demantenimientoenlapágina40
.
• Asegúresedequeelcabledeencendidoseajuste
correctamentealabujía.
• Agregueaceiteogasolina,siesnecesario.Consulte
Datostécnicosenlapágina51
.
Nogirelavarilladenivelcuando
reviseelaceite.Nolleneporencimadela
marca.
1. Retireeltapóndeaceiteylimpielavarilla.Consulte
Descripcióngeneraldelamáquinaenlapágina27
paraverlaubicacióndelavarilladenivel.
2. Lleneconaceitehastalamarcasuperiordelavarilla
denivel.Utilicelavarilladenivelparaexaminarel
niveldeaceiteenintervalosregulares.
3. Vuelvaacolocareltapóndelaceite.
Siesposible,utilicegasolinadebajasemisiones/
alquilato.Sinodisponedegasolinadebajasemisiones/
alquilato,utilicegasolinaconosinplomodebuena
calidad.Utilicegasolinaconunoctanajede90RON
fueradeEE.UU.(87AKIenEE.UU.)omás,yconun
máximode10%deetanol(E10).
Noutilicegasolinaconunoctanaje
inferiora90RONfueradeEE.UU.(87AKI
endeEE.UU.).Estopuedeprovocardaños
alproducto.
1. Abralentamentelatapadeldepósitodecombustible
paraliberarlapresión.
2. Llenelentamenteconunbidóndecombustible.Si
derramacombustible,límpieloconunpañoydeje
quesesequenlosrestos.
3. Limpieeláreaalrededordeltapóndeldepósitode
combustible.
4. Aprietebienlatapadeldepósitodecombustible.Si
noaprietalatapadeldepósitodecombustible,se
generaunriesgodeincendio.
5. Muevaelproductoaunmínimode3m(10pies)de
laposiciónenlaquellenóeldepósitoantesde
ponerloenmarcha.
1. Paraajustarlaposicióndelconductodeexpulsión,
muevalapalancadecontroldelconductode
expulsión(A)haciaatrásyhacialaizquierdao
derecha.
694-002-
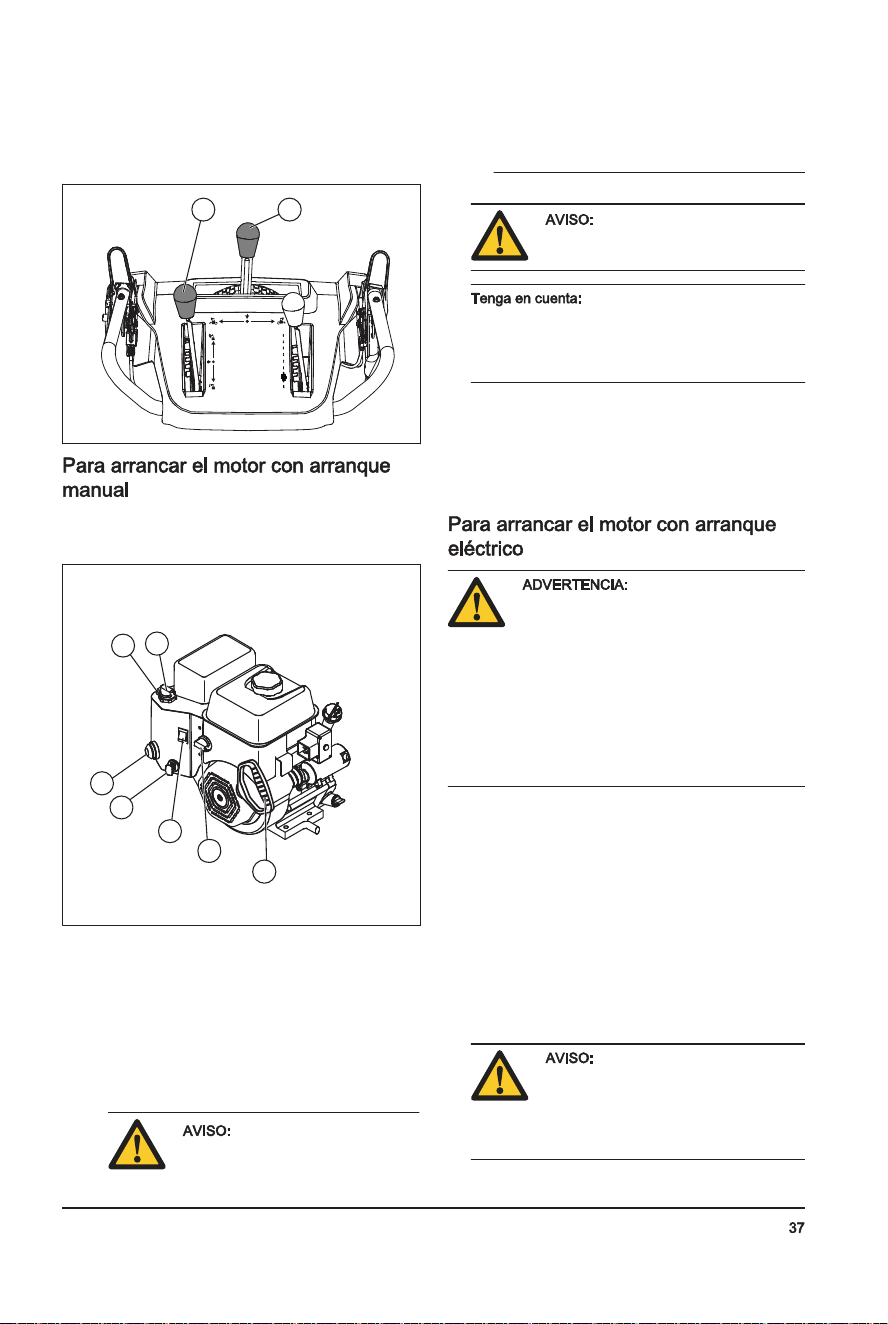
2. Paraajustarladistanciadelquitanievesdeldeflector
delconducto,muevalapalancadecontrolremoto
deldeflector(B)haciaabajoparadisminuirla
distanciayhaciaarribaparaaumentarla.
AB
1. Introduzcalallavedeencendido/apagado(ON/OFF)
(A)enlaranuradeencendidohastaqueencaje.No
girelallave.
G
F
C
A
E
B
D
2. Coloqueelinterruptordeencendido/apagado(ON/
OFF)decombustibleenlaposiciónON(Encendido).
3. Muevaelacelerador(B)hastalaposiciónFAST
(Rápido).
4. Muevaelinterruptordeencendido/apagado(ON/
OFF)(C)alaposiciónON(Encendido).
a) Sielmotorestáfrío,gireelestrangulador(D)
hastalaposiciónFULL(Máximo)ypresioneel
cebador(E)tresveces.
Nocebeenexcesoelmotor.
Estopuedeimpedirqueelmotor
arranque.Sielmotorsecebaen
exceso,espereunosminutosantes
deintentararrancarloynopresione
elcebador.
5. Tirelaempuñaduradelcordóndearranque(G).
Nosuelteelagarreconrapidez.
Vuelvaacolocarlaenlaposiciónde
arranquelentamente.
Sielarranquedecordónse
congeló,tirelentamentehaciaafueralamayor
cantidaddecordónposibleysueltelaempuñadura
delcordóndearranque.Sielmotornoarranca,
repitaelprocedimientooutiliceelarranqueeléctrico.
6. Siseusóelestranguladorparaarrancarelmotor,
muevalentamenteelestrangulador(D)alaposición
OFF(Apagado).
7. Hagafuncionarelmotorentre2y3minutosen
ralentíantesdecomenzaraquitarlanieve.
8. Sielmotornofuncionacomodebería,apáguelo.
Elproductotieneun
arranqueeléctricode120VCA.Noutiliceel
arranqueeléctricosisuhogarnocuentacon
unsistemaatierratrifilarde120VCA.
Puedenproducirsedañospersonales
gravesodañosalproducto.Elarranque
eléctricoconstadeunenchufetrifilaryestá
diseñadoparausarseconcorrientedeuso
domésticode120VCA.Asegúresedeque
suhogarcuenteconunsistemaatierra
trifilarde120VCA.Sitienedudas,consulte
aunelectricistaautorizado.
1. Introduzcalallavedeencendido/apagado(ON/OFF)
(A)enlaranuradeencendidohastaqueencaje.No
girelallave.
2. Coloqueelinterruptordeencendido/apagado(ON/
OFF)decombustibleenlaposiciónON(Encendido).
3. Muevaelacelerador(B)hastalaposiciónFAST
(Rápido).
4. Muevaelinterruptordeencendido/apagado(ON/
OFF)(C)alaposiciónON(Encendido).
a) Sielmotorestáfrío,gireelestrangulador(D)
hastalaposiciónFULL(Máximo).
5. Presioneelcebador(E)tresveces.
Nocebeenexcesoelmotor.
Estopuedeimpedirqueelmotor
arranque.Sielmotorsecebaen
exceso,espereunosminutosantesde
intentararrancarloynopresioneel
cebador.
694-002-
T Serecomiendareemplazarlacorrea
detransmisiónylacorreadelbarrenoalavez.
1. Vacíeelcombustibledeldepósitodecombustible.
2. Aflojelacontratuerca(A)quefijaelcabezaldel
rotadordelconducto(B)alsoportedemontaje(C)
pararetirarelconductodeexpulsión.
B
A
C
3. Aflojelosdostornillos(A)quefijanlacubiertadela
correa(B)albastidor(C)yretirelacubiertadela
correa.
C A
B
1. Retirelacorreadelbarreno.Consulte
Paraquitarla
correadelbarrenoenlapágina45
.
2. Retireelmuelletensor(A)fijadoalbrazodeltensor
delacorreadetransmisión(B).
A
B
C
D
E
H
FG
I
J
3. Retireelmuellederetorno(C)quesujetalaplaca
oscilante(D)ensusitio.
4. Retireelpernodelbrazo(E)yelbrazodeltensorde
lacorreadetransmisión.
5. Retireelpernodelapolea(F),lapoleadelmotor
(G)ylacorreadetransmisión(H)delmotor.
6. Retireelpernosuperior(I)quesujetalaplaca
oscilantealbastidor
7. Gireymantengalaplacaoscilantealejadadel
productoyretirelacorreadetransmisióndelapolea
detransmisión(J).
1. Gireymantengalaplacaoscilante(D)alejadadel
producto.
A
B
C
D
E
H
FG
I
J
2. Coloquelacorreadetransmisión(H)enlapoleade
transmisión(J).
Asegúresedequelacorreade
transmisiónsecoloquecorrectamenteenlaranura
694-002-
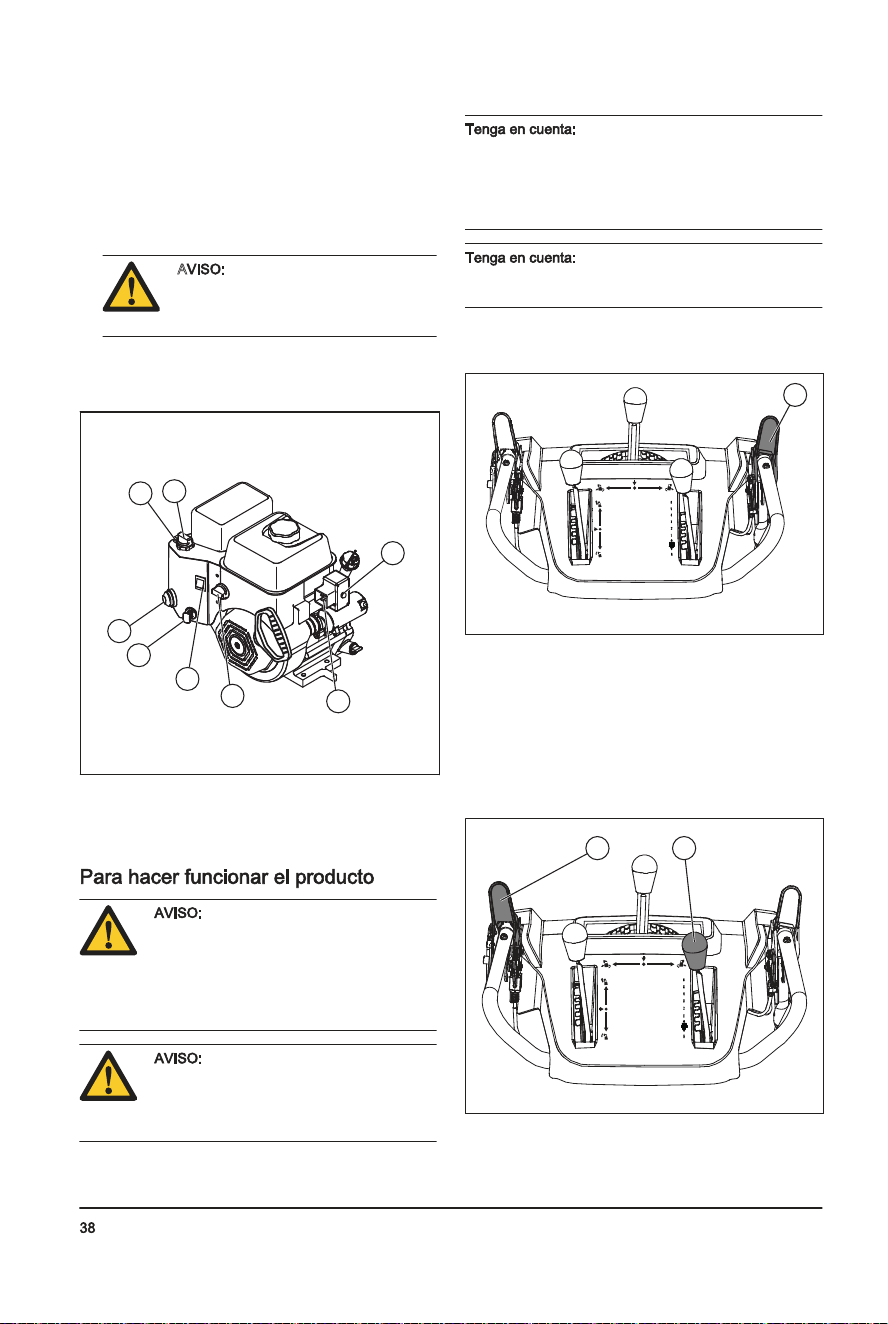
A Utiliceúnicamentelospasadores
fusiblesoriginalesquesesuministranconel
producto.
1. Siunpasadorfusibledelpropulsorserompe,
detengaelmotoryespereaquelaspiezasmóviles
sedetengan.
2. Retirelallavedeencendido/apagado(ON/OFF)y
desconecteelcabledelabujía.
3. Alineeelorificiodelcubodelpropulsor(A)conlos
orificiosdelejedelbarreno(B)einstaleunnuevo
pasadorfusiblede¼-20(C).
4. Instaleunacontratuercade¼-20(D)enelpasador
fusibleyapriétela.
A C B
D
5. Coloquelallavedeencendido/apagado(ON/OFF)
enelencendidoyconecteelcabledelabujíaala
bujía.
• Mantengalosneumáticoslibresdecombustible,
aceiteyproductosquímicosparaevitardañarel
caucho.
• Mantengalosneumáticosalejadosdetocones,
piedras,baches,objetosfilososyotrosobjetosque
puedandañarlos.
• Mantengalapresióndelosneumáticoscorrecta;
consulte
Datostécnicosenlapágina51
paraobtener
másinformación.
Noeliminelaobstruccióndeldeflectordelconductosin
haberrealizadolassiguientesoperaciones:
1. Libereelacoplamientodelbarrenoydela
transmisiónalmismotiempo.
2. Espere10segundosparaasegurarsedequelos
barrenossedetuvieron.
3. Detengalamáquina.
4. Utilicelaherramientadelimpieza(dealmenos
381mm[15"]delongitud,queseincluyeenalgunos
modelos)paraeliminarlaobstrucción.
Nopongalasmanos
eneldeflectordelconductooenel
interiordelacarcasadelbarreno.
1. Coloquelaespadadelraspador(A)invertidacuando
sehayadesgastadohastaelbordedelacarcasa.
A
2. Reemplacelaespadadelraspadorsiestá
desgastadaenambosladososiestádañada.
Lascorreastrapezoidales
delproductosondefabricaciónespecialy
debencambiarseporcorreasdelfabricante
delequipooriginal(OEM,porsusiglaen
inglés)disponiblesensucentrodeservicio
máscercano.Usarcorreasnofabricadas
porelOEMpuedeconllevaradaños
personalesodañosalproducto.
Parareemplazarlas
correas,esnecesariodesmontarel
producto.Aldesmontarlacarcasadel
barrenodelbastidor,esimportantequeun
ayudanteseubiqueenlaposiciónde
manipulacióndelproductoysostengalas
empuñaduras.Puedenproducirsedaños
personalesgravesodañosalproductosi
estesecaeduranteelreemplazodelas
correas.
Lascorreasdetransmisióndela
tracciónydelbarrenonosonajustables.Reemplacelas
correassiestándañadasosiempiezanadeslizarse
debidoaldesgaste.Serecomiendareemplazarlas
correasenuncentrodeserviciocalificado.
694-002-
6. Conecteelcabledeextensiónalconectordelmotor
(G).
7. Conecteelotroextremodelcabledeextensiónen
unreceptáculode120VCAconconexiónatierrade
tresclavijas.
8. Presioneelbotóndearranqueeléctrico(H)hasta
queelmotorarranque.
A Nohagagirarelmotormásde
cincosegundosseguidosentrecada
intentodearranque.Esperede5a
10segundosentrecadaintento.
9. Siseusóelestranguladorparaarrancarelmotor,
suelteelbotóndearranqueeléctricoymueva
lentamenteelestrangulador(D)alaposiciónOFF
(Apagado).
H
C
A
E
B
D
G
F
10. Desconecteelcabledeextensiónprimerodel
receptáculoy,después,delmotor.
11. Hagafuncionarelmotorentre2y3minutosen
ralentíantesdecomenzaraquitarlanieve.
Nohagafuncionarelequiposin
nieveoaguaparalubricarlashojasdel
barreno.Elusoincorrectopuedeprovocar
altastemperaturasenlashojasdelbarreno,
especialmentesielproductoesnuevo.Esto
puedecausardañosenlashojasdel
barrenoylaespadadelraspador.
Noacopleparcialmentelapalanca
delatransmisiónodelbarrenoduranteun
períodoprolongado,yaqueestopuede
provocarundesgasteprematurodelas
correasoqueestassequemen.
Cuandoseconectantantoel
acoplamientodelatransmisióncomoeldelbarreno,el
acoplamientodelatransmisiónbloquearáel
acoplamientodelbarrenoensuposición.Utilicelamano
derechaparamanipularelconductodeexpulsiónde
nieve.
Nocambielavelocidadcuandolos
barrenosesténacoplados.Estopuededañarla
transmisión.
1. Paraacoplarlashojasdelbarreno,presioneel
acoplamientodelbarreno(A)contralaempuñadura
paraconectarelbarrenoyquitarnieve.
A
2. Levantelapalancadecontroldevelocidaddela
transmisión(B)desdelaposicióncentralparamover
elproductohaciadelantecuandoestéconectadoel
acoplamientodelatransmisión(C).Nocambiela
velocidadcuandolosbarrenosesténacoplados.
Estopuededañarlatransmisión.
3. Bajelapalancadecontroldevelocidaddela
transmisióndesdelaposicióncentralparamoverel
productohaciaatráscuandoestéconectadoel
acoplamientodelatransmisión.
C B
4. Paraqueelproductosemuevaenladirección
seleccionada,sostengaelacoplamientodela
transmisióncontralaempuñadura.
694-002-
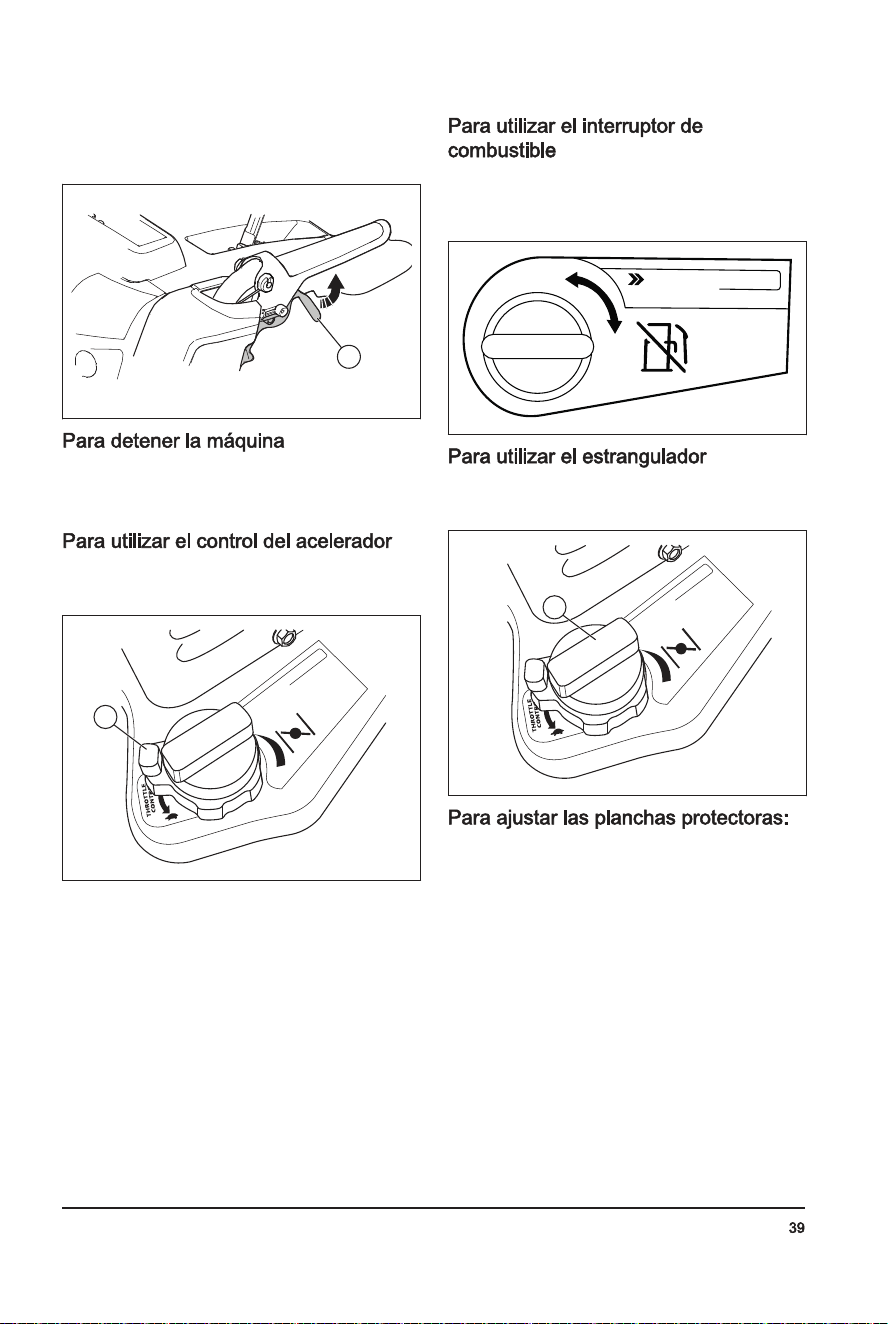
5. Sielproductocuentacondirecciónasistida,
sostengaelgatillodedirecciónizquierdo(D)para
girarhacialaizquierda.Sujeteelgatillodedirección
derechoparagirarhacialaderecha.
D
1. Muevaelinterruptordeencendido/apagado(ON/
OFF)alaposicióndeapagado(OFF).
2. Retirelallavedeencendido/apagado(ON/OFF).
• Gireelacelerador(A)paracambiarlacantidadde
combustibleutilizado.Siemprehagafuncionarel
motorenaceleraciónmáxima.
CH
O
K
E
C
O
N
T
R
O
L
T
R
U
CT
I
ON
S
A
• Gireelinterruptordecombustibleparaabrirocerrar
elpasodecombustible.Hagafuncionarelproducto
conelinterruptordecombustibleenlaposición
OPEN(Abierto).
OFF
ON
F
U
E
L
C
O
NT
R
O
L
I
N
S
T
R
U
C
T
IO
N
S
• Gireelestrangulador(A)paraabrirocerrarla
válvulaestranguladora.Useelestranguladorpara
arrancarelmotorenfrío.
C
H
O
KE
C
ONT
R
O
L
T
R
U
CT
I
ON
S
A
Noesnecesariorealizarajustesenelcasodeuna
instalaciónnormal.
1. Silacontratuerca(B)estásueltaolaplancha
protectora(A)noestálosuficientementealtadesde
elsuelo,destrabelacontratuerca(B)conunallave
abiertade13mm(0,51"),paramoverlaplancha
protectorahaciaarribaohaciaabajo.
2. Ensuperficiesplanas,comocaminosasfaltados,
levantelasplanchasprotectoras(A)entre5y6mm
(0,2y0,25")desdeelsuelo.Ensuperficies
irregulares,comocaminosdegrava,aumentela
separaciónentreelsueloyelproductoconlas
planchasprotectorasparasubirlaespadadel
raspadorporencimadelasuperficiedelagrava.
Asegúresedequenoentrenpiedrasogravaal
producto.Sepuedenproducirdañospersonalessi
estosobjetossaleneyectadosagranvelocidad.
694-002-
S
Elsilenciadormantienelosnivelesderuidoalmínimoy
envíalosgasesdeescapelejosdeloperador.
Noutiliceelproductosielsilenciadornoestáinstalado
oestádefectuoso.Unsilenciadordefectuosoaumenta
elnivelderuidoyelriesgodeincendio.
Examineelsilenciadorconregularidadparaasegurarse
dequeestáinstaladocorrectamenteyquenoesté
dañado.
Elsilenciadorsecalientamucho
duranteydespuésdelusoycuandoel
motorfuncionaenrégimenderalentí.Tenga
cuidadocercadematerialesovapores
inflamablesparaprevenirincendios.
Utilicesiempreeltipodebujía
recomendada.Eltipodebujíaincorrecto
puedecausardañosenelproducto.
• Examinelabujíasielmotortieneunapotencia
demasiadobaja,noarrancafácilmenteono
funcionacorrectamentealrégimenderalentí.
• Paradisminuirelriesgodematerialnodeseadoen
loselectrodosdelabujía,sigaestasinstrucciones:
a) Asegúresedequeelrégimenderalentíesté
ajustadocorrectamente.
b) Asegúresedequelamezcladecombustiblees
lacorrecta.
c) Asegúresedequeelfiltrodeaireestélimpio.
• Silabujíaestásucia,límpielayasegúresedequela
distanciaentreloselectrodosescorrecto,consulte
Datostécnicosenlapágina51
.
• Reemplacelabujíasiesnecesario.
1. Antesdecadauso,inspeccionelosbarrenosyla
espadadelraspadorparaversimuestrassignosde
desgaste.
2. Sielbordedelaespadadelraspadorestá
desgastado,úselaporelotrolado.Silaespadadel
raspadortienedañosodesgasteenambosbordes,
reemplácela.
3. Silosbordesdelosbarrenosestándesgastados,
comuníqueseconuncentrodeservicioautorizado
parareemplazarlos.
Lospasadoresfusiblesprotegenelproductodedaños.
Lospasadoresfusiblesdelbarrenoserompensiun
objetoentraencontactoconlaspiezasmóviles.
Utiliceúnicamentelospasadores
fusiblesoriginalesquesesuministranconel
producto.
1. Siunpasadorfusibledelbarrenoserompe,detenga
elmotoryespereaquelaspiezasmóvilesse
detengan.
2. Retirelallavedeencendido/apagado(ON/OFF)y
desconecteelcabledelabujía.
3. Alineeelorificiodelcubodelbarreno(B)conel
orificiodelejedelbarreno(C)einstaleunnuevo
pasadorfusiblede¼-20x2(A).
4. Instaleunacontratuercade¼-20(D)yapriétela.
A B
C
DB
5. Coloquelallavedeencendido/apagado(ON/OFF)
enelencendidoyconecteelcabledelabujíaala
bujía.
Lospasadoresfusiblesdelpropulsorprotegenel
productodedaños.Lospasadoresfusiblesdel
propulsorserompensiunobjetoentraencontactocon
laspiezasmóviles.
694-002-

M
Asegúresedequeno
hayafugasdecom-
bustibleoaceite
X
Retirelasuciedadu
otrosobjetosextra-
ñosdelbarreno
X
Reviselapresiónde
losneumáticos
5
X
Inspeccioneycambie
labujía
6
X
Noesnecesarioagregargrasao
realizarotrastareasdemantenimientoencajade
cambios.
• Asegúresedequelastuercasylostornillosenel
productoesténapretados.
Unniveldeaceitedemasiadobajo
puededañarelmotor.Reviseelnivelde
aceiteantesdeutilizarelproducto.
1. Coloqueelproductoenunterrenoplano.
2. Retireeltapóndeldepósitodeaceitejuntoconla
varilladenivelincluida.
3. Limpieelaceitedelavarilladenivel.
4. Vuelvaacolocarlavarilladenivelcompletaenel
depósitodeaceiteparatenerunaideacorrectadel
niveldeaceite.
5. Quitélavarilladenivel.
6. Examineelniveldeaceiteconlavarilladenivel.
7. Sielniveldeaceiteesbajo,lleneconaceitede
motoryrevisenuevamente.
1. Hagafuncionarelmotorduranteunosminutospara
entibiarelaceite.Elaceitetibiofluyemejory
transportamenoscontaminantes.
Elaceitedelmotorestá
caliente.Evitequeelaceitedemotor
usadoentreencontactoconlapiel.
2. Coloqueelproductoenunterrenoplano.
3. Retirelallavedeencendido/apagado(ON/OFF).
4. Coloqueunrecipientedebajodeltapóndevaciado
deaceite.
5. Quiteeltapóndevaciadodeaceite,inclineel
productoydreneelaceiteutilizadoenelrecipiente.
6. Vuelvaaponerelproductoenlaposiciónde
funcionamiento.
7. Coloqueeltapóndevaciadodeaceiteyapriételo
conlamano.
8. Lleneelmotorconaceite;consulte
Parallenarel
motorconaceite:enlapágina36
paraobtenermás
información.
• Lubriquelospuntosdepivote(A)conaceite.
• Lubriqueelmotor(B)conaceite.
• Apliqueunapequeñacantidaddegrasadelitioalos
cubosdeinterbloqueo(C)eneliniciodecada
temporadaocada25horasdeuso.
A
B
C
5
ConsulteDatostécnicosparaconocerlapresióncorrectadelosneumáticos.
6
Reviseylimpielabujíaantesdeutilizarlacadaaño.
694-002-
3. Aprietelacontratuerca(B).
B
A
P
Loscontrolesylaspiezasmóvilesse
puedenobstruirconelhielo.Noapliquedemasiada
fuerzaaloscontroles.Sinopuedemanipularuncontrol
ounapieza,arranqueelmotorydéjelofuncionar
duranteunosminutos.
1. Arranqueelmotorydéjelofuncionarduranteunos
minutos.Detengaelmotoryespereaquese
detengantodaslaspiezasmóviles.
2. Retirelanieveyelhielosueltodelproducto.
3. Retirelanieveyelhielosueltodelabasedel
conducto.
4. Gireeldeflectordelconductohacialaizquierday
hacialaderechaparaquitarelhieloyelagua.
5. Coloquelallaveenlaposicióndeapagado(OFF).
6. Sielproductonotienearranqueeléctrico,tirela
empuñaduradelcordóndearranquevariasveces
paraquitarelhieloyelagua.
7. Sielproductotienearranqueeléctrico,conecteel
productoalaalimentacióneléctricaypresioneel
botóndearranqueunavezparaquitarelhieloyel
agua.
• Siemprehagafuncionarelmotorenaceleración
máximaocercadelaaceleraciónmáxima.
• Adaptesiemprelavelocidaddelproductoala
situacióndelanieve.Ajustelavelocidadconla
palancadeajustedelrégimendevelocidad.
Asegúresedequeelproductolancelanievede
manerauniforme.
• Esmásfácilyeficienteretirarlanieve
inmediatamentedespuésdequecae.
• Siemprequeseaposible,arrojelanieveenla
direccióndelviento.
• Ensuperficiesplanas,comocaminosasfaltados,
levantelasplanchasprotectorasentre5y6mm(0,2
y0,25")desdeelsuelo.
• Laespadadelraspadoresreversible.Cuandose
desgastacasihastaelbordedelacarcasa,úsela
porelotrolado.Reemplacelaespadadelraspador
siestádañadaosiambosladosestándesgastados.
• Nodespacheeldeflectordelconductosiestá
obstruido.
• Sielproductonosemuevehaciadelantedebidoa
circunstanciasimprevistas,suelteelacoplamiento
delatransmisióninmediatamenteomuevalallave
deencendido/apagado(ON/OFF)alaposiciónOFF
(Apagado).
Cuandoelproductoestéenuso,lospernossepueden
aflojaryloscomponentessepuedendesgastar.Esto
puedecausaralteraciones,comounaholgurade
toleranciaincorrecta,mayorconsumodeaceiteola
alineaciónincorrectadelosdiversoscomponentes.
Realiceunmantenimientoperiódicoalproductopara
evitarquefuncionedemaneraincorrecta.
Asegúresedeque
lastuercasylostor-
nillosesténapreta-
dos
X
Compruebeelnivel
deaceitedelmotor
X
Cambiodelaceite
4
X X X
4
Cambieelaceitedespuésdelasprimeras20h,50hy100h,yluegocada100h.
694-002-
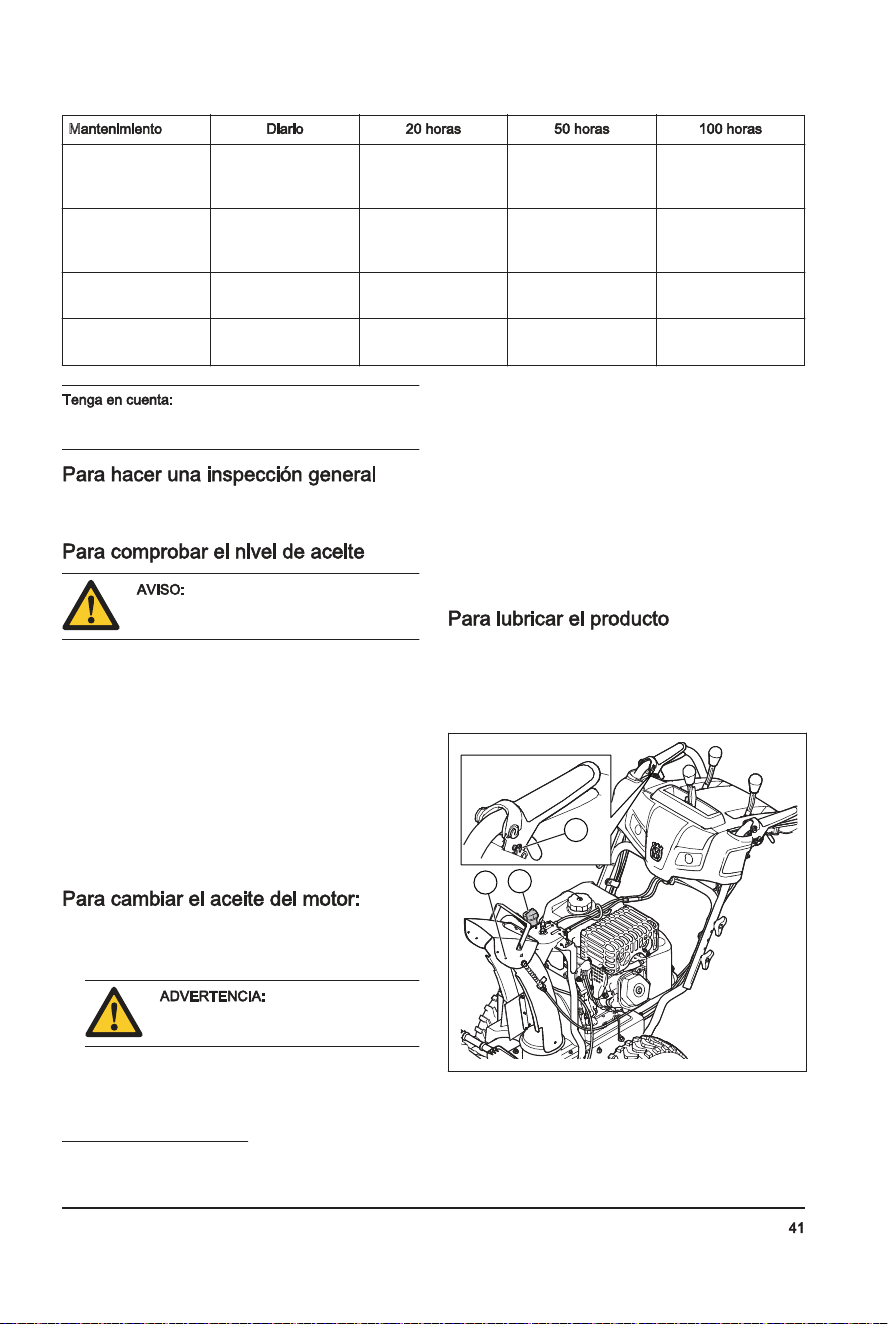
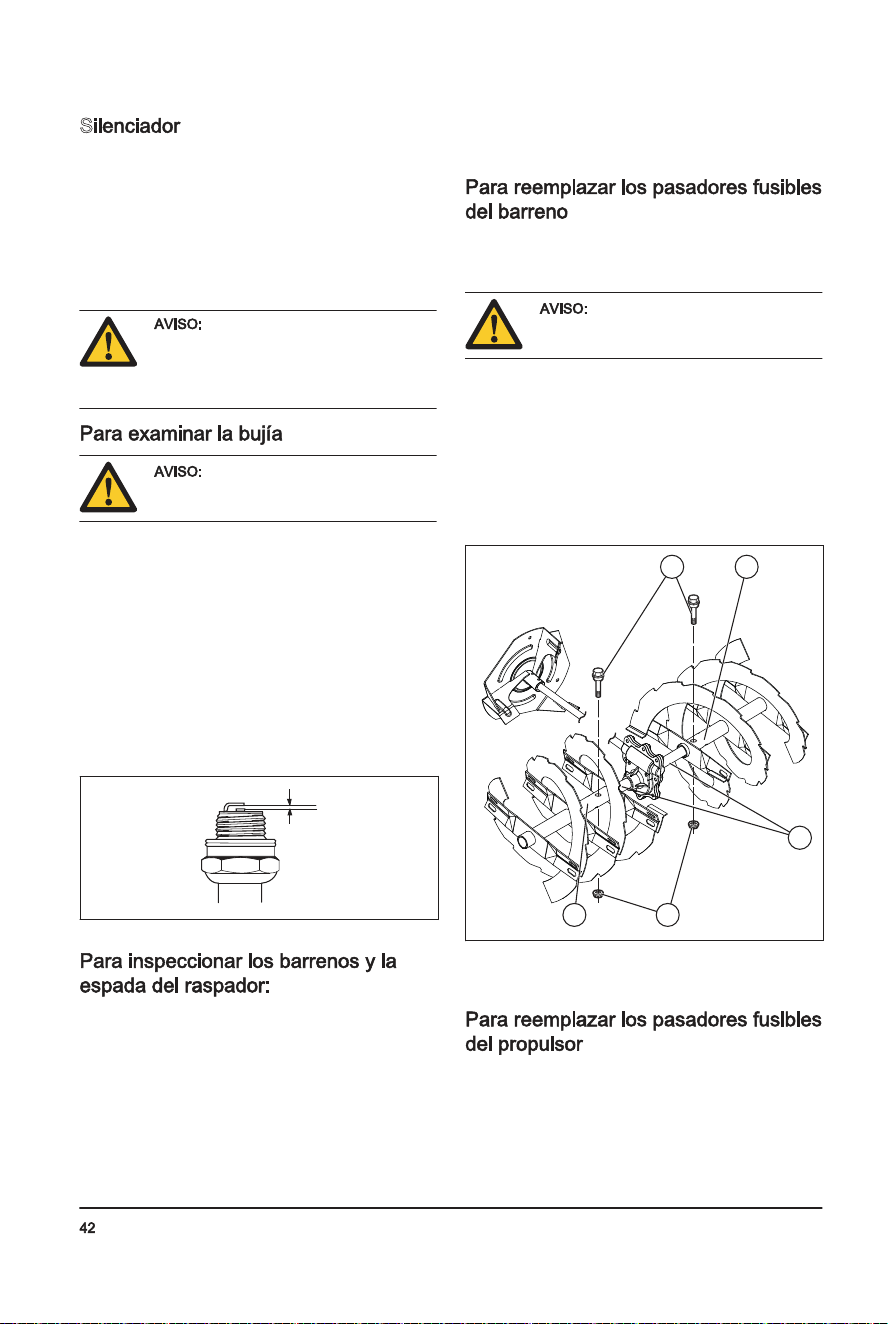
5. Sielproductocuentacondirecciónasistida,
sostengaelgatillodedirecciónizquierdo(D)para
girarhacialaizquierda.Sujeteelgatillodedirección
derechoparagirarhacialaderecha.
D
1. Muevaelinterruptordeencendido/apagado(ON/
OFF)alaposicióndeapagado(OFF).
2. Retirelallavedeencendido/apagado(ON/OFF).
• Gireelacelerador(A)paracambiarlacantidadde
combustibleutilizado.Siemprehagafuncionarel
motorenaceleraciónmáxima.
CH
O
K
E
C
O
N
T
R
O
L
T
R
U
CT
I
ON
S
A
• Gireelinterruptordecombustibleparaabrirocerrar
elpasodecombustible.Hagafuncionarelproducto
conelinterruptordecombustibleenlaposición
OPEN(Abierto).
OFF
ON
F
U
E
L
C
O
NT
R
O
L
I
N
S
T
R
U
C
T
IO
N
S
• Gireelestrangulador(A)paraabrirocerrarla
válvulaestranguladora.Useelestranguladorpara
arrancarelmotorenfrío.
C
H
O
KE
C
ONT
R
O
L
T
R
U
CT
I
ON
S
A
Noesnecesariorealizarajustesenelcasodeuna
instalaciónnormal.
1. Silacontratuerca(B)estásueltaolaplancha
protectora(A)noestálosuficientementealtadesde
elsuelo,destrabelacontratuerca(B)conunallave
abiertade13mm(0,51"),paramoverlaplancha
protectorahaciaarribaohaciaabajo.
2. Ensuperficiesplanas,comocaminosasfaltados,
levantelasplanchasprotectoras(A)entre5y6mm
(0,2y0,25")desdeelsuelo.Ensuperficies
irregulares,comocaminosdegrava,aumentela
separaciónentreelsueloyelproductoconlas
planchasprotectorasparasubirlaespadadel
raspadorporencimadelasuperficiedelagrava.
Asegúresedequenoentrenpiedrasogravaal
producto.Sepuedenproducirdañospersonalessi
estosobjetossaleneyectadosagranvelocidad.
694-002-
S
Elsilenciadormantienelosnivelesderuidoalmínimoy
envíalosgasesdeescapelejosdeloperador.
Noutiliceelproductosielsilenciadornoestáinstalado
oestádefectuoso.Unsilenciadordefectuosoaumenta
elnivelderuidoyelriesgodeincendio.
Examineelsilenciadorconregularidadparaasegurarse
dequeestáinstaladocorrectamenteyquenoesté
dañado.
Elsilenciadorsecalientamucho
duranteydespuésdelusoycuandoel
motorfuncionaenrégimenderalentí.Tenga
cuidadocercadematerialesovapores
inflamablesparaprevenirincendios.
Utilicesiempreeltipodebujía
recomendada.Eltipodebujíaincorrecto
puedecausardañosenelproducto.
• Examinelabujíasielmotortieneunapotencia
demasiadobaja,noarrancafácilmenteono
funcionacorrectamentealrégimenderalentí.
• Paradisminuirelriesgodematerialnodeseadoen
loselectrodosdelabujía,sigaestasinstrucciones:
a) Asegúresedequeelrégimenderalentíesté
ajustadocorrectamente.
b) Asegúresedequelamezcladecombustiblees
lacorrecta.
c) Asegúresedequeelfiltrodeaireestélimpio.
• Silabujíaestásucia,límpielayasegúresedequela
distanciaentreloselectrodosescorrecto,consulte
Datostécnicosenlapágina51
.
• Reemplacelabujíasiesnecesario.
1. Antesdecadauso,inspeccionelosbarrenosyla
espadadelraspadorparaversimuestrassignosde
desgaste.
2. Sielbordedelaespadadelraspadorestá
desgastado,úselaporelotrolado.Silaespadadel
raspadortienedañosodesgasteenambosbordes,
reemplácela.
3. Silosbordesdelosbarrenosestándesgastados,
comuníqueseconuncentrodeservicioautorizado
parareemplazarlos.
Lospasadoresfusiblesprotegenelproductodedaños.
Lospasadoresfusiblesdelbarrenoserompensiun
objetoentraencontactoconlaspiezasmóviles.
Utiliceúnicamentelospasadores
fusiblesoriginalesquesesuministranconel
producto.
1. Siunpasadorfusibledelbarrenoserompe,detenga
elmotoryespereaquelaspiezasmóvilesse
detengan.
2. Retirelallavedeencendido/apagado(ON/OFF)y
desconecteelcabledelabujía.
3. Alineeelorificiodelcubodelbarreno(B)conel
orificiodelejedelbarreno(C)einstaleunnuevo
pasadorfusiblede¼-20x2(A).
4. Instaleunacontratuercade¼-20(D)yapriétela.
A B
C
DB
5. Coloquelallavedeencendido/apagado(ON/OFF)
enelencendidoyconecteelcabledelabujíaala
bujía.
Lospasadoresfusiblesdelpropulsorprotegenel
productodedaños.Lospasadoresfusiblesdel
propulsorserompensiunobjetoentraencontactocon
laspiezasmóviles.
694-002-

A Utiliceúnicamentelospasadores
fusiblesoriginalesquesesuministranconel
producto.
1. Siunpasadorfusibledelpropulsorserompe,
detengaelmotoryespereaquelaspiezasmóviles
sedetengan.
2. Retirelallavedeencendido/apagado(ON/OFF)y
desconecteelcabledelabujía.
3. Alineeelorificiodelcubodelpropulsor(A)conlos
orificiosdelejedelbarreno(B)einstaleunnuevo
pasadorfusiblede¼-20(C).
4. Instaleunacontratuercade¼-20(D)enelpasador
fusibleyapriétela.
A C B
D
5. Coloquelallavedeencendido/apagado(ON/OFF)
enelencendidoyconecteelcabledelabujíaala
bujía.
• Mantengalosneumáticoslibresdecombustible,
aceiteyproductosquímicosparaevitardañarel
caucho.
• Mantengalosneumáticosalejadosdetocones,
piedras,baches,objetosfilososyotrosobjetosque
puedandañarlos.
• Mantengalapresióndelosneumáticoscorrecta;
consulte
Datostécnicosenlapágina51
paraobtener
másinformación.
Noeliminelaobstruccióndeldeflectordelconductosin
haberrealizadolassiguientesoperaciones:
1. Libereelacoplamientodelbarrenoydela
transmisiónalmismotiempo.
2. Espere10segundosparaasegurarsedequelos
barrenossedetuvieron.
3. Detengalamáquina.
4. Utilicelaherramientadelimpieza(dealmenos
381mm[15"]delongitud,queseincluyeenalgunos
modelos)paraeliminarlaobstrucción.
Nopongalasmanos
eneldeflectordelconductooenel
interiordelacarcasadelbarreno.
1. Coloquelaespadadelraspador(A)invertidacuando
sehayadesgastadohastaelbordedelacarcasa.
A
2. Reemplacelaespadadelraspadorsiestá
desgastadaenambosladososiestádañada.
Lascorreastrapezoidales
delproductosondefabricaciónespecialy
debencambiarseporcorreasdelfabricante
delequipooriginal(OEM,porsusiglaen
inglés)disponiblesensucentrodeservicio
máscercano.Usarcorreasnofabricadas
porelOEMpuedeconllevaradaños
personalesodañosalproducto.
Parareemplazarlas
correas,esnecesariodesmontarel
producto.Aldesmontarlacarcasadel
barrenodelbastidor,esimportantequeun
ayudanteseubiqueenlaposiciónde
manipulacióndelproductoysostengalas
empuñaduras.Puedenproducirsedaños
personalesgravesodañosalproductosi
estesecaeduranteelreemplazodelas
correas.
Lascorreasdetransmisióndela
tracciónydelbarrenonosonajustables.Reemplacelas
correassiestándañadasosiempiezanadeslizarse
debidoaldesgaste.Serecomiendareemplazarlas
correasenuncentrodeserviciocalificado.
694-002-
6. Conecteelcabledeextensiónalconectordelmotor
(G).
7. Conecteelotroextremodelcabledeextensiónen
unreceptáculode120VCAconconexiónatierrade
tresclavijas.
8. Presioneelbotóndearranqueeléctrico(H)hasta
queelmotorarranque.
A Nohagagirarelmotormásde
cincosegundosseguidosentrecada
intentodearranque.Esperede5a
10segundosentrecadaintento.
9. Siseusóelestranguladorparaarrancarelmotor,
suelteelbotóndearranqueeléctricoymueva
lentamenteelestrangulador(D)alaposiciónOFF
(Apagado).
H
C
A
E
B
D
G
F
10. Desconecteelcabledeextensiónprimerodel
receptáculoy,después,delmotor.
11. Hagafuncionarelmotorentre2y3minutosen
ralentíantesdecomenzaraquitarlanieve.
Nohagafuncionarelequiposin
nieveoaguaparalubricarlashojasdel
barreno.Elusoincorrectopuedeprovocar
altastemperaturasenlashojasdelbarreno,
especialmentesielproductoesnuevo.Esto
puedecausardañosenlashojasdel
barrenoylaespadadelraspador.
Noacopleparcialmentelapalanca
delatransmisiónodelbarrenoduranteun
períodoprolongado,yaqueestopuede
provocarundesgasteprematurodelas
correasoqueestassequemen.
Cuandoseconectantantoel
acoplamientodelatransmisióncomoeldelbarreno,el
acoplamientodelatransmisiónbloquearáel
acoplamientodelbarrenoensuposición.Utilicelamano
derechaparamanipularelconductodeexpulsiónde
nieve.
Nocambielavelocidadcuandolos
barrenosesténacoplados.Estopuededañarla
transmisión.
1. Paraacoplarlashojasdelbarreno,presioneel
acoplamientodelbarreno(A)contralaempuñadura
paraconectarelbarrenoyquitarnieve.
A
2. Levantelapalancadecontroldevelocidaddela
transmisión(B)desdelaposicióncentralparamover
elproductohaciadelantecuandoestéconectadoel
acoplamientodelatransmisión(C).Nocambiela
velocidadcuandolosbarrenosesténacoplados.
Estopuededañarlatransmisión.
3. Bajelapalancadecontroldevelocidaddela
transmisióndesdelaposicióncentralparamoverel
productohaciaatráscuandoestéconectadoel
acoplamientodelatransmisión.
C B
4. Paraqueelproductosemuevaenladirección
seleccionada,sostengaelacoplamientodela
transmisióncontralaempuñadura.
694-002-
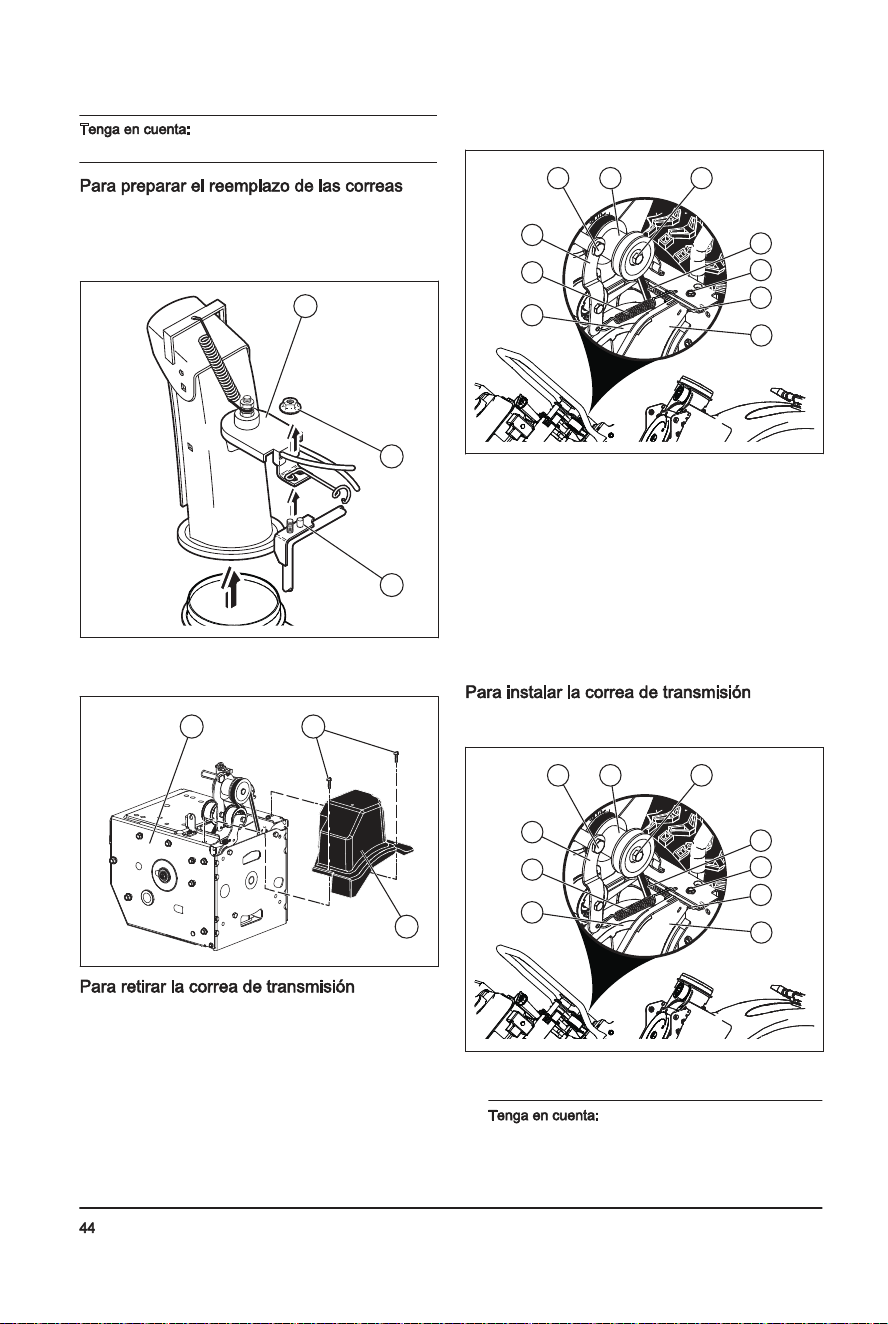
2. Paraajustarladistanciadelquitanievesdeldeflector
delconducto,muevalapalancadecontrolremoto
deldeflector(B)haciaabajoparadisminuirla
distanciayhaciaarribaparaaumentarla.
AB
1. Introduzcalallavedeencendido/apagado(ON/OFF)
(A)enlaranuradeencendidohastaqueencaje.No
girelallave.
G
F
C
A
E
B
D
2. Coloqueelinterruptordeencendido/apagado(ON/
OFF)decombustibleenlaposiciónON(Encendido).
3. Muevaelacelerador(B)hastalaposiciónFAST
(Rápido).
4. Muevaelinterruptordeencendido/apagado(ON/
OFF)(C)alaposiciónON(Encendido).
a) Sielmotorestáfrío,gireelestrangulador(D)
hastalaposiciónFULL(Máximo)ypresioneel
cebador(E)tresveces.
Nocebeenexcesoelmotor.
Estopuedeimpedirqueelmotor
arranque.Sielmotorsecebaen
exceso,espereunosminutosantes
deintentararrancarloynopresione
elcebador.
5. Tirelaempuñaduradelcordóndearranque(G).
Nosuelteelagarreconrapidez.
Vuelvaacolocarlaenlaposiciónde
arranquelentamente.
Sielarranquedecordónse
congeló,tirelentamentehaciaafueralamayor
cantidaddecordónposibleysueltelaempuñadura
delcordóndearranque.Sielmotornoarranca,
repitaelprocedimientooutiliceelarranqueeléctrico.
6. Siseusóelestranguladorparaarrancarelmotor,
muevalentamenteelestrangulador(D)alaposición
OFF(Apagado).
7. Hagafuncionarelmotorentre2y3minutosen
ralentíantesdecomenzaraquitarlanieve.
8. Sielmotornofuncionacomodebería,apáguelo.
Elproductotieneun
arranqueeléctricode120VCA.Noutiliceel
arranqueeléctricosisuhogarnocuentacon
unsistemaatierratrifilarde120VCA.
Puedenproducirsedañospersonales
gravesodañosalproducto.Elarranque
eléctricoconstadeunenchufetrifilaryestá
diseñadoparausarseconcorrientedeuso
domésticode120VCA.Asegúresedeque
suhogarcuenteconunsistemaatierra
trifilarde120VCA.Sitienedudas,consulte
aunelectricistaautorizado.
1. Introduzcalallavedeencendido/apagado(ON/OFF)
(A)enlaranuradeencendidohastaqueencaje.No
girelallave.
2. Coloqueelinterruptordeencendido/apagado(ON/
OFF)decombustibleenlaposiciónON(Encendido).
3. Muevaelacelerador(B)hastalaposiciónFAST
(Rápido).
4. Muevaelinterruptordeencendido/apagado(ON/
OFF)(C)alaposiciónON(Encendido).
a) Sielmotorestáfrío,gireelestrangulador(D)
hastalaposiciónFULL(Máximo).
5. Presioneelcebador(E)tresveces.
Nocebeenexcesoelmotor.
Estopuedeimpedirqueelmotor
arranque.Sielmotorsecebaen
exceso,espereunosminutosantesde
intentararrancarloynopresioneel
cebador.
694-002-
T Serecomiendareemplazarlacorrea
detransmisiónylacorreadelbarrenoalavez.
1. Vacíeelcombustibledeldepósitodecombustible.
2. Aflojelacontratuerca(A)quefijaelcabezaldel
rotadordelconducto(B)alsoportedemontaje(C)
pararetirarelconductodeexpulsión.
B
A
C
3. Aflojelosdostornillos(A)quefijanlacubiertadela
correa(B)albastidor(C)yretirelacubiertadela
correa.
C A
B
1. Retirelacorreadelbarreno.Consulte
Paraquitarla
correadelbarrenoenlapágina45
.
2. Retireelmuelletensor(A)fijadoalbrazodeltensor
delacorreadetransmisión(B).
A
B
C
D
E
H
FG
I
J
3. Retireelmuellederetorno(C)quesujetalaplaca
oscilante(D)ensusitio.
4. Retireelpernodelbrazo(E)yelbrazodeltensorde
lacorreadetransmisión.
5. Retireelpernodelapolea(F),lapoleadelmotor
(G)ylacorreadetransmisión(H)delmotor.
6. Retireelpernosuperior(I)quesujetalaplaca
oscilantealbastidor
7. Gireymantengalaplacaoscilantealejadadel
productoyretirelacorreadetransmisióndelapolea
detransmisión(J).
1. Gireymantengalaplacaoscilante(D)alejadadel
producto.
A
B
C
D
E
H
FG
I
J
2. Coloquelacorreadetransmisión(H)enlapoleade
transmisión(J).
Asegúresedequelacorreade
transmisiónsecoloquecorrectamenteenlaranura
694-002-
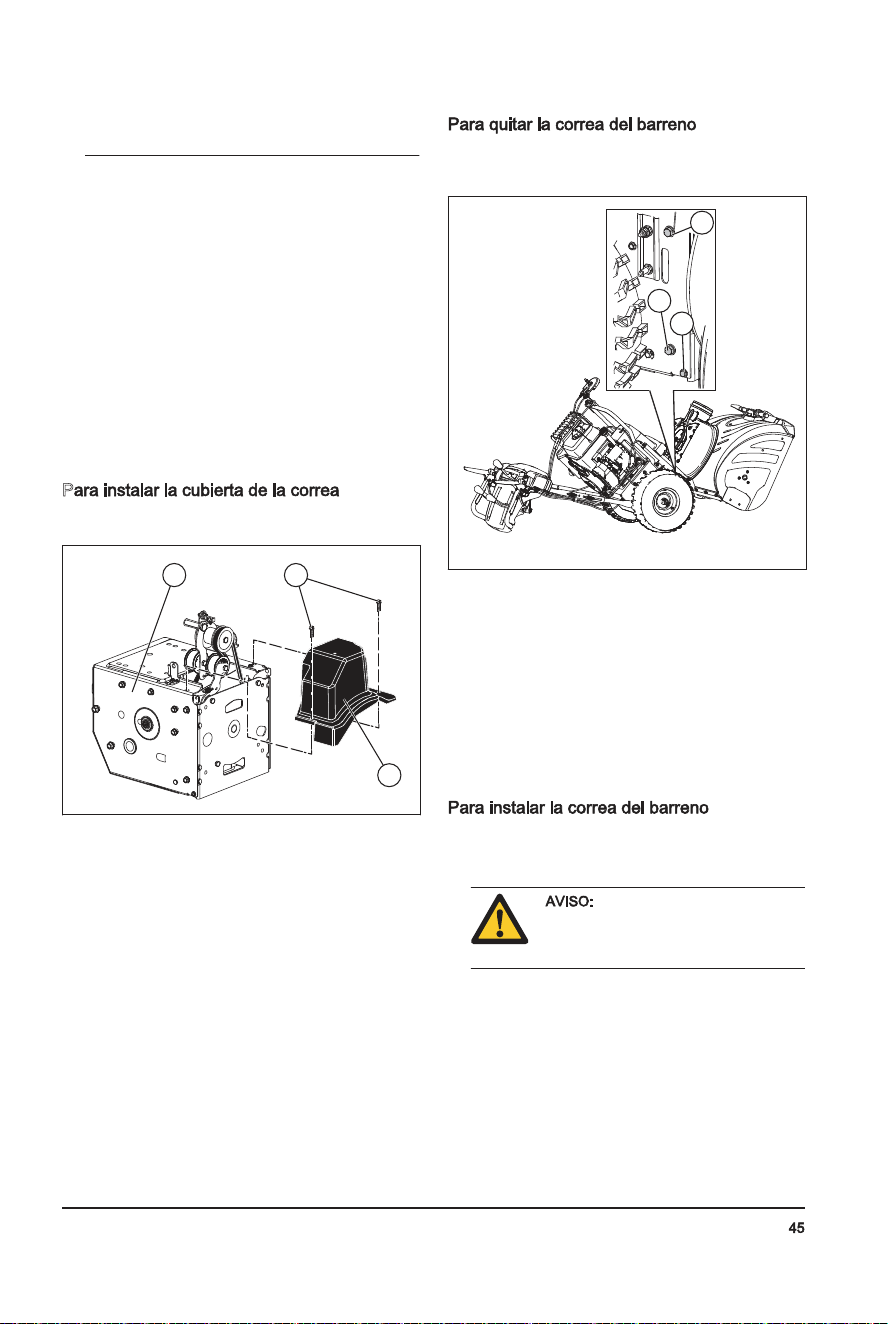
delapoleadetransmisiónantesdebajarlaplaca
oscilante.
3. Instaleyaprieteelpernosuperior(I).
4. Coloquelacorreadetransmisiónenlaranuradela
poleadelmotor(G)antesdeinstalarlaenelejedel
motor.
5. Instaleelpernodelapolea(F)yfijelapoleadel
motorenelmotor.Aprieteelpernodelapolea
(30-35pieslibras/41-47Nm).
6. Instaleelbrazodeltensordelacorreade
transmisión(B)yaprieteelpernodelbrazo(E)enel
motor.
7. Instaleelmuellederetorno(C)enlaplacaoscilante.
8. Instaleelmuelletensor(A)enelbrazodeltensor.
9. Hagafuncionartodosloscontrolesparaasegurarse
dequelacorreadetransmisiónestécorrectamente
instaladaydequetodosloscomponentesse
muevancorrectamente.
P
1. Instalelacubiertadelacorrea(B)enelbastidor(C)
yaprietelosdostornillos(A).
C A
B
2. Instaleelconductodeexpulsión.
1. Retirelospernosde5/16''(A)ylospernosinferiores
de¼"(B)delosdosladosdelconjuntodelbastidor.
Nobotelospernos.
B
C
A
2. Afloje,sinretirar,lospernosinferioresde5/16"(C)
delosdosladosdelconjuntodelbastidor.
3. Retirelacorreadelbarrenodelapoleadelmotor.
4. Inclinelaseccióntraserahaciaabajo.Lasección
delanteraseinclinaráhaciadelantealmismo
tiempo.Elpernoinferior(C)esunabisagraentrelas
seccionesdelanteraytrasera.
5. Coloqueunbloquedemaderadebajodelpuntode
bisagraparamantenerelproductoinclinado.
6. Muevaelbrazodelfrenodelbarrenoyretirela
correadelbarrenodealrededordelbrazo.
1. Muevaelbrazodeltensordecorreaycoloquela
correadelbarrenoalrededordelbrazoyenlaranura
delapoleadelbarreno.
Asegúresedequelacorreano
quedeatrapadaentreelbastidoryla
carcasadelbarrenocuandojuntela
unidad.
2. Retireelbloquedemaderadeabajodelproducto.
3. Levantelaempuñaduraparainclinarlasección
traserahaciaarriba.Laseccióndelanterase
inclinaráhaciaatrásygiraráparaunirsealasección
trasera.
4. Asegúresedecolocarcorrectamentelacorreaenla
ranuradelapoleadelbarreno.
694-002-
3. Instaleelmuelle(L)entrelatuercahexagonal(M)en
elcabezaldelrotadordelconductoyelorificioenel
deflectordelconducto.
F
L
M
B
A
D
K
C
E
G
4. Coloquelasperillasdecontroldelapalanca(N)
presionándolascontralaspalancasdecontrol(O).
O
N
• Mantengaalaspersonasyanimalesalejadosdela
zonadetrabajo.
• Realiceunmantenimientodiario.Consulte
Programa
demantenimientoenlapágina40
.
• Asegúresedequeelcabledeencendidoseajuste
correctamentealabujía.
• Agregueaceiteogasolina,siesnecesario.Consulte
Datostécnicosenlapágina51
.
Nogirelavarilladenivelcuando
reviseelaceite.Nolleneporencimadela
marca.
1. Retireeltapóndeaceiteylimpielavarilla.Consulte
Descripcióngeneraldelamáquinaenlapágina27
paraverlaubicacióndelavarilladenivel.
2. Lleneconaceitehastalamarcasuperiordelavarilla
denivel.Utilicelavarilladenivelparaexaminarel
niveldeaceiteenintervalosregulares.
3. Vuelvaacolocareltapóndelaceite.
Siesposible,utilicegasolinadebajasemisiones/
alquilato.Sinodisponedegasolinadebajasemisiones/
alquilato,utilicegasolinaconosinplomodebuena
calidad.Utilicegasolinaconunoctanajede90RON
fueradeEE.UU.(87AKIenEE.UU.)omás,yconun
máximode10%deetanol(E10).
Noutilicegasolinaconunoctanaje
inferiora90RONfueradeEE.UU.(87AKI
endeEE.UU.).Estopuedeprovocardaños
alproducto.
1. Abralentamentelatapadeldepósitodecombustible
paraliberarlapresión.
2. Llenelentamenteconunbidóndecombustible.Si
derramacombustible,límpieloconunpañoydeje
quesesequenlosrestos.
3. Limpieeláreaalrededordeltapóndeldepósitode
combustible.
4. Aprietebienlatapadeldepósitodecombustible.Si
noaprietalatapadeldepósitodecombustible,se
generaunriesgodeincendio.
5. Muevaelproductoaunmínimode3m(10pies)de
laposiciónenlaquellenóeldepósitoantesde
ponerloenmarcha.
1. Paraajustarlaposicióndelconductodeexpulsión,
muevalapalancadecontroldelconductode
expulsión(A)haciaatrásyhacialaizquierdao
derecha.
694-002-
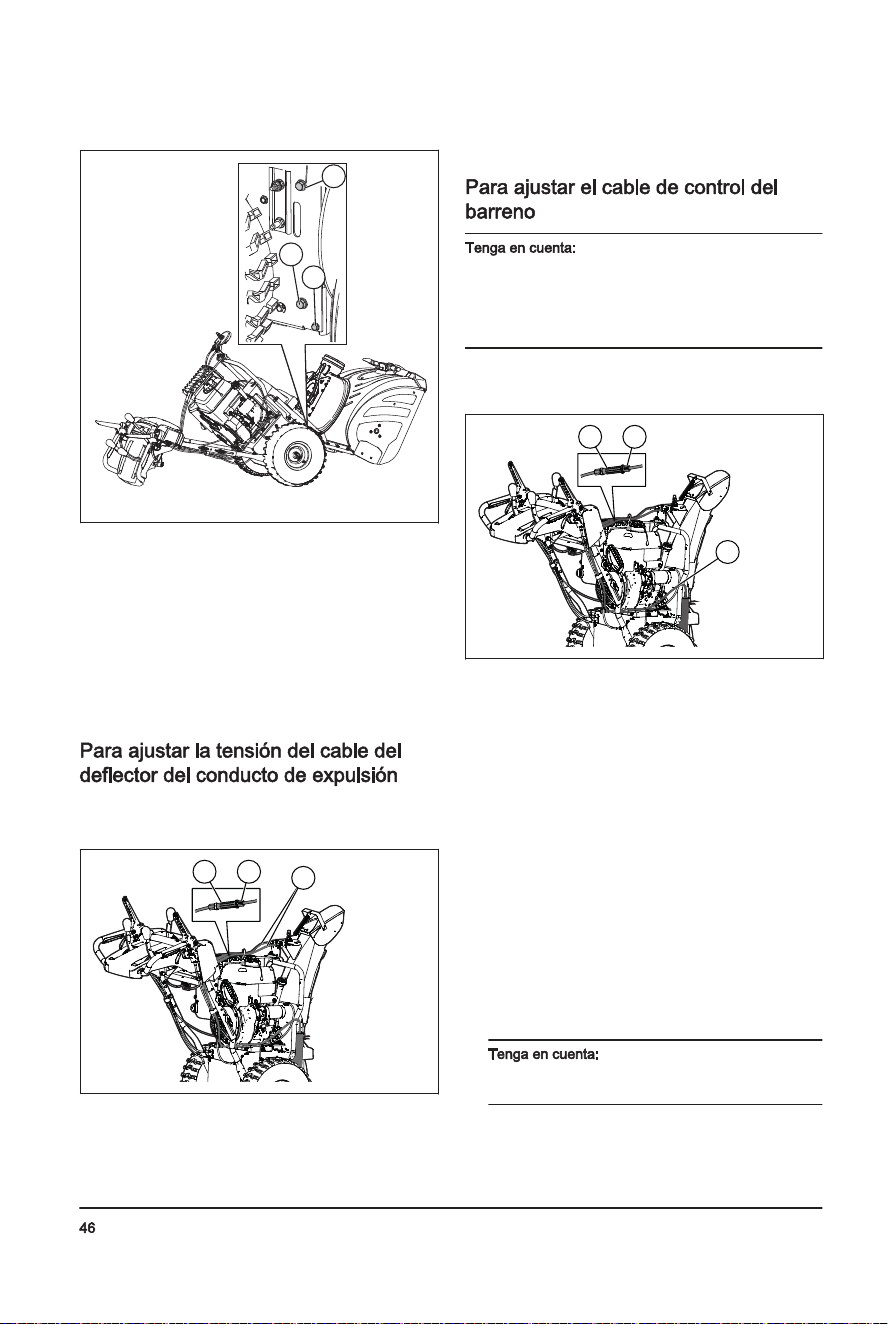
3. Instalemástornillos(D)yperillasdelaempuñadura
(C)parafijarlaempuñadurasuperior(A)ala
empuñadurainferior(E).
D
E
A
C
1. Coloqueelmontajedeldeflectordelconductoenla
partesuperiordelabasedelconductoconla
aperturadedescargaorientadahacialaparte
delanteradelproducto.
2. Coloqueelcabezaldelrotadordelconducto(A)en
elsoportedelconducto(B).Gireelmontajedel
conductoparaalinearlospasadoresbajoelcabezal
delrotadordelconductoconlosorificiosenel
soportedelconductosiesnecesario.
3. Coloqueelcabezaldelrotadordelconductoenel
pasador(C)yelespárragoroscado(D)enelsoporte
demontaje(E).
4. Fijeunacontratuerca(G)enelespárragoroscadoy
apriétela.
A
B CD E
FG
5. Coloqueloscablesatravésdelaguíadelcable(F)
ydelsujetadordoble(I)parafijarelcabledelrotador
(H)alaempuñadurainferior.
F
H
I
1. Fijeelsoportedelcableremoto(A)alconductode
expulsiónconuntornillo(B)yunacontratuercade
5/16-18(D).Aprieteelperno.
2. Instaleelojaldelcableremoto(E)eneldeflectordel
conducto(F)conunpernodetope(G)yuna
arandeladenailon(C),yaprieteconuna
contratuercade¼-20(K).Elojaldelcablese
aflojaráenelpernodetope.
694-002-
5. Instalelospernosde5/16''(A),(C)yapriételos(8a
12pies-libras/11a16Nm).
B
C
A
6. Instalelospernosde¼''(B)yapriételos(4a6pies-
libras/5a8Nm).
7. Instalelacorreadelbarrenoenlapoleadelmotor.
Asegúresedequelacorreasecoloque
correctamentealrededordelapoleatensorae
instaleadecuadamenteenlaranuradelapoleadel
motor.
8. Hagafuncionartodosloscontrolesparaasegurarse
dequelacorreadelbarrenoestécorrectamente
instaladaydequetodosloscomponentesse
muevancorrectamente.
1. Aflojelastuercasdeinmovilización(B)paraajustar
latensióndelcabledelconductodeexpulsión
adyacentealtorniquetedelajustador(A).
A B
C
2. Sostengalapartecortaygirelapartelargapara
aumentarelajustador.
3. Ajustehastaqueelcabledeldeflectordelconducto
deexpulsión(C)quedebienapretado.Aprietelas
tuercasdeinmovilización.
Sinosesientecómodohaciendoeste
ajuste,póngaseencontactoconuncentrodeservicio
autorizado.Esposiblequeserequieranajustessila
rotacióndelpropulsorydelbarrenoeslentacuandose
conectalapalancadecontroldelbarrenoosilacorrea
delbarrenosehareemplazado.
1. Sueltelastuercasdeinmovilización(B)juntoal
tensor(A)paraajustarlatensióndelcableenel
cabledecontroldelbarreno(D).
A B
D
2. Sostengalaseccióncortaygirelasecciónlarga.
Gírelaen360grados.
3. Pruebeelacoplamientodelbarreno.Repitaelajuste
hastaquelaholguradelcableseapocacuandola
palancaestédesacoplada.
4. Aprietelatuercadeinmovilizacióninferiorpara
bloquearlatensión.
5. Solicíteleaunapersonaquesepare10pies/
3metrosenfrentedelproductoenelladoopuesto
delconducto.Lapersonadebeobservarlarotación
delbarrenoymedireltiempoquetardaendejarde
girardespuésdequesesueltalapalanca.Siel
barrenodejadegirardespuésde5segundos,ajuste
elcablegirandoelcañóncentralen360gradospara
contraerelajustador.Pruebelaconexióndel
barrenoymidaeltiempodedetenciónnuevamente.
Sielbarrenodejadegirarenmenosde5segundos,
continúeconelsiguientepaso.
6. Aprietelatuercadeinmovilizaciónenelcabledel
barreno.
Sielajustenoresuelveel
problema,cambielacorreadelbarreno.Consulte
Paraquitarlacorreadelbarrenoenlapágina45
.
694-002-
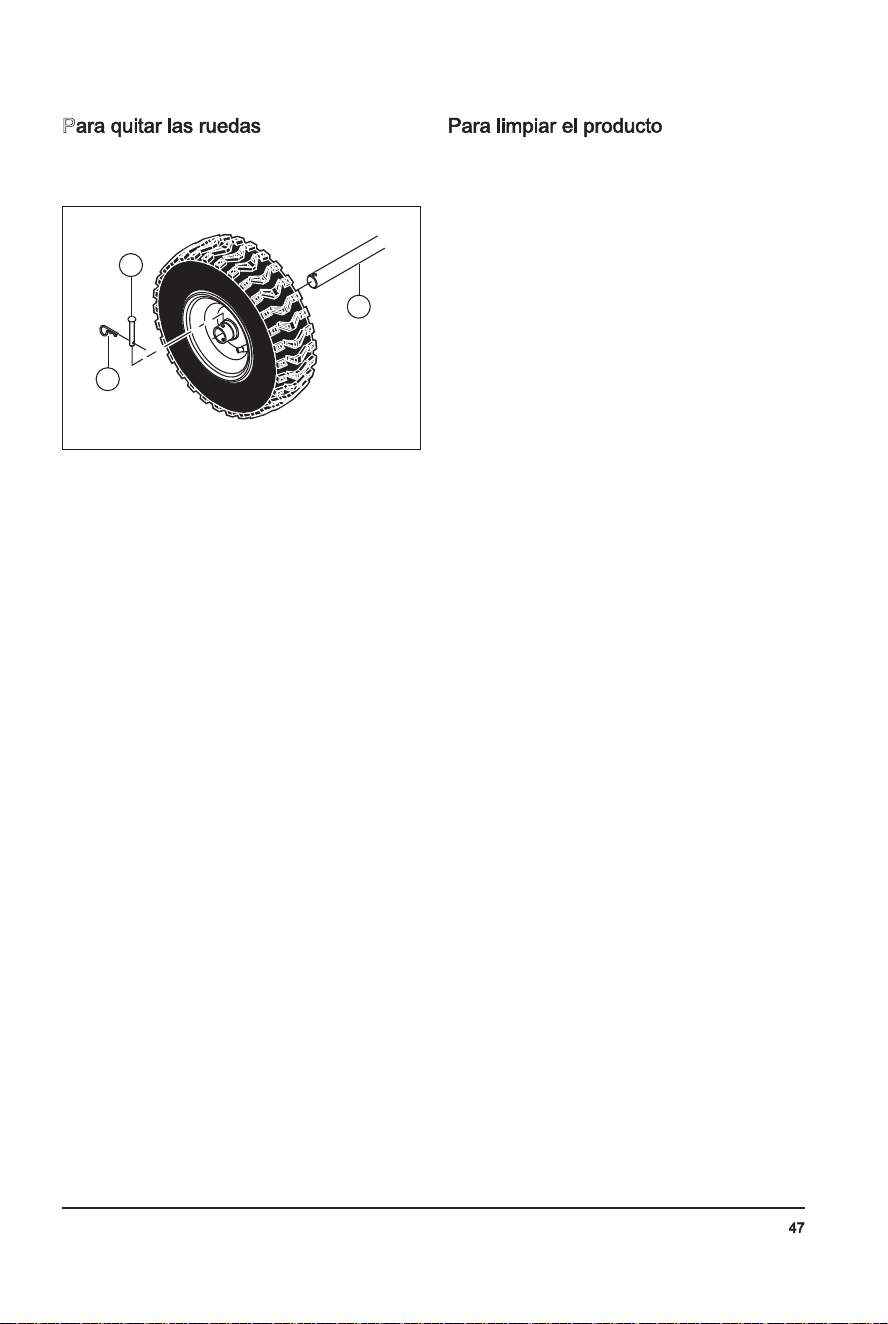
P
1. Extraigaelpasadordelarueda(A)yelpasadorde
retención(B).
2. Quitelaruedadeleje(C).
A
B
C
• Limpielaspiezasdeplásticoconunpañolimpioy
seco.
• Nouselimpiadoresdealtapresiónparalimpiarel
producto.
• Noarrojeaguadirectamentesobreelmotor.
• Utiliceuncepillopararetirarlashojas,elcéspedyla
suciedad.
694-002-
Contratuercade5/16-18(1)
Contratuercade¼-20(1)
Arandeladenailon(1)
Tornillode5/16-18x5/8(1)
Muelle(1)
Pernodetopede¼-20(1)
1. Levantelaempuñadurasuperiorhastalaposición
defuncionamiento.
2. Ajustelaposicióndelaempuñaduraenunodelos
orificiosdemontaje(B)yaprietelasperillasdela
empuñadura(C)conlostornillos(D).
B
C
D
694-002-
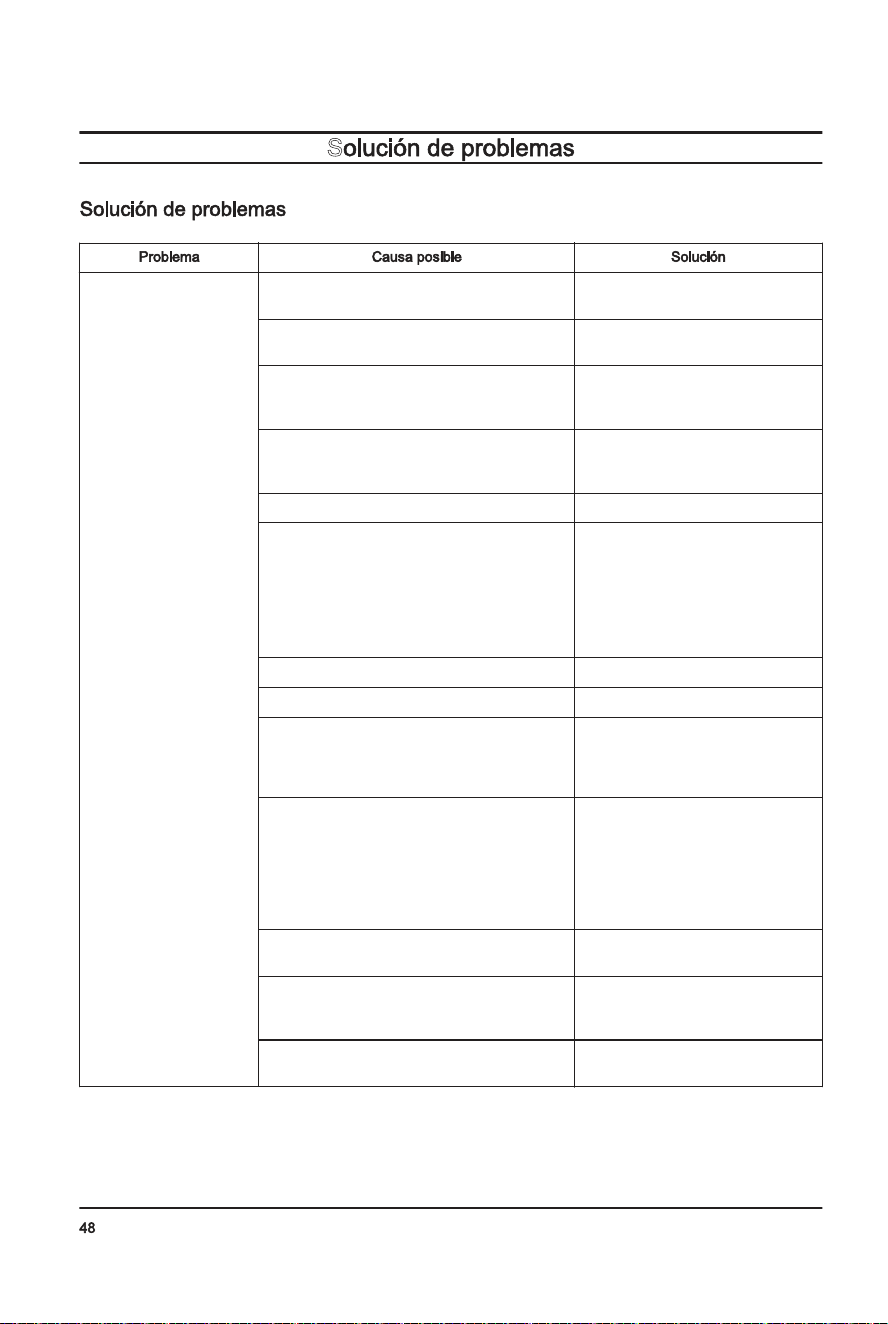
I
Leaatentamentelas
instruccionesdeadvertenciasiguientes
antesdeusarelproducto.
• Losgasesdeescapedelmotorcontienenmonóxido
decarbono,ungasinodoro,tóxicoymuypeligroso.
Noarranqueelmotoreninterioresoenespacios
cerrados.
• Antesderealizarelmantenimientodelproducto,
detengaelmotoryquiteelcabledeencendidodela
bujía.
• Utiliceguantesprotectorescuandorealicelastareas
demantenimientoenlascuchillas.Lascuchillasson
muyafiladasypuedenproducircortesconfacilidad.
• Accesoriosymodificacionesenelproductoqueno
esténaprobadosporelfabricantepuedencausar
lesionesgravesolamuerte.Nomodifiqueel
producto.Siempreutiliceaccesoriosaprobadospor
elfabricante.
• Sielmantenimientonoserealizademanera
correctayregular,aumentaelriesgodesufrir
lesionesycausardañosenelproducto.
• Solorealicetareasdemantenimientocomoseindica
enelpresentemanualdelusuario.Todaslasdemás
tareasdemantenimientosedebenrealizarenun
tallerdeservicioaprobado.
• Procurerealizarlastareasdemantenimientocon
regularidadenuntallerdeservicioaprobado.
• Cambielaspiezasdañadas,desgastadasorotas.
1. Retirelaspiezassueltasqueseincluyenconel
producto.Recortelascuatroesquinasdelacajay
coloquelospanelesdelextremoenunasuperficie
plana.
2. Extraigalosdostornillosquesujetanlacarcasadel
barrenoalpalé.Extraigalossoportesdeacerode
lasplanchasprotectoras,sitienen.
3. Cortelasbridasparacablequesujetanelproducto
alpaléysáquelas.
4. Retiretodoslosmaterialesdeembalaje.
5. Retireelproductodelacajayasegúresedequeno
quedenpiezassueltasenlacaja.
Perilla(3)
Llavemultiuso(1)
Conductodeexpulsión(1)
Llave(s)deencendido/apagado(ON/OFF)
Tornillode5/16-18x2¼"(2)
Perillasdelaempuñadura(2)
Contratuercade3/8(1)
Guíadelcable(1)
Pasadoresfusiblesde¼-20x1-¾(6)
Contratuercasde¼-20(6)
694-002-
S
Elproductonoarranca Lallavedeencendidodeseguridadnoseen-
cuentrainserta.
Insertelallavedeencendidodese-
guridad.
Elproductonotienecombustible. Lleneeldepósitodecombustiblecon
gasolinanuevaylimpia.
Lallavedeencendido/apagado(ON/OFF)está
enlaposiciónOFF(Apagado).
Muevalallavedeencendido/apaga-
do(ON/OFF)alaposiciónON(En-
cendido).
Elestranguladorseencuentraenlaposición
OFF(CLOSE)(Apagado[Cerrado]).
Muevaelestranguladoralaposición
ON(FULL,OPEN)(Encendido[Máxi-
mo,Abierto]).
Elcebadornoseencuentrapresionado. Presioneelcebador.
Elmotorestáinundado. Espereunosminutosantesdevolver
aarrancar,NOpresioneelcebador.
Vuelvaaarrancarelmotorconla
aceleraciónmáximayelestrangula-
dorenlaposiciónOFF(CLOSE)
(Apagado[Cerrado]).
Elcabledelabujíanoestáconectado. Conecteelcablealabujía.
Labujíaestádefectuosa. Reemplacelabujía.
Hayaguaenelcombustibleoelcombustiblees
demasiadoantiguo.
Vacíeeldepósitodecombustibleyel
carburador.Lleneeldepósitode
combustiblecongasolinanuevay
limpia.
Hayvaporenlatuberíadecombustible. Asegúresedequetodalatuberíade
combustibleestépordebajodela
salidadeldepósitodecombustible.
Latuberíadecombustibledebefluir
deformacontinuahaciaabajodesde
eldepósitodecombustiblehastael
carburador.
Otrascausas. Inspeccioneconcuidadolosprocedi-
mientosdearranquedeestemanual.
Elinterruptordecombustible(siestáequipado)
estáenlaposiciónCLOSE(Cerrado)(OFF
[Apagado]).
Coloqueelinterruptordecombustible
enlaposiciónOPEN(ON)(Abierto
[Encendido]).
ElaceleradorestáenlaposiciónSTOP(Deten-
ción).
Muevaelaceleradorhastalaposi-
ciónFAST(Rápido).
694-002-

P
Potenciareducida Elcabledelabujíanoestáconectado. Conecteelcablealabujía.
Elproductolanzademasiadanieve. Disminuyalavelocidadyelanchode
lahilera.
Latapadeldepósitodecombustibleestácu-
biertadehieloonieve.
Retireelhieloylanievedeltapóndel
depósitodecombustibleyalrededor
deél.
Elsilenciadorestásuciouobstruido. Limpieoreemplaceelsilenciador.
Longitudincorrectadelcable. Ajusteelcable.
Elsilenciadorestáobstruido. Asegúresedequeelmotorestéfrío.
Limpielaobstrucción.
Latomadeairedelcarburadorestáobstruida. Asegúresedequeelmotorestéfrío.
Limpielaobstrucción.
Elmotorfuncionaenra-
lentíodeformairregular
ElestranguladorestáenlaposiciónON(FULL,
OPEN)(Encendido[Máximo,Abierto]).
Pongaelestranguladorenlaposi-
cióndeOFF(CLOSE)(Apagado
[Cerrado]).
Latuberíadecombustibleestáobstruida. Limpielatuberíadecombustible.
Hayaguaenelcombustibleoelcombustiblees
demasiadoantiguo.
Vacíeeldepósitodecombustibleyel
carburador.Lleneeldepósitode
combustiblecongasolinanuevay
limpia.
Sedebereemplazarelcarburador. Comuníqueseconuncentrodeser-
vicioautorizado.
Lacorreaseencuentraestirada. ReemplacelacorreaenVdelbar-
reno.
Movimientodelmanillaro
vibraciónexcesiva
Algunaspiezasestánsueltas.Losbarrenoses-
tándañados.
Aprietetodaslassujeciones.Reem-
placetodaslaspiezasdañadas.Sila
vibraciónpersiste,comuníquesecon
uncentrodeservicioautorizado.
Losmanillaresnoestáncolocadosdemanera
correcta.
Asegúresedequelosmanillareses-
téntrabadosensuposición.
Lastuercasdelapalancadeajusteestánsuel-
tas.
Aprietelastuercashastaqueelman-
illarsesientafirme.
Cuestaextraerlaempu-
ñaduradelcordóndear-
ranque
Laempuñaduradelcordóndearranqueestá
congelada.
Tirelentamentehaciaafueralamay-
orcantidaddecordónposibledel
mecanismodearranqueysueltela
empuñaduradelcordóndearranque.
Sielmotornoarranca,repitaelpro-
cedimientooutiliceelmecanismode
arranqueeléctrico.
Elcordóndearranqueinterfiereenloscompo-
nentes.
Elcordóndearranquenodebetocar
cablesnimangueras.
694-002-
D
• Asegúresederealizarelmantenimientodelproducto
frecuentemente.
• Estoaumentalavidaútildelproducto.
• Disminuyeelriesgodeaccidentes.
Permitaqueunconcesionarioautorizadoouncentro
deservicioautorizadoexaminenfrecuentementeel
productopararealizarajustesoreparaciones.
• Nouseunproductoconequipodeprotección
dañado.Sielproductoestádañado,comuníquese
conuncentrodeservicioautorizado.
Elsilenciadormantienelosnivelesderuidoalmínimoy
envíalosgasesdeescapelejosdeloperador.
Noutiliceelproductosielsilenciadornoestáinstalado
oestádefectuoso.Unsilenciadordefectuosoaumenta
elnivelderuidoyelriesgodeincendio.
Examineelsilenciadorconregularidadparaasegurarse
dequeestáinstaladocorrectamenteyquenoesté
dañado.
Elsilenciadorsecalientamucho
duranteydespuésdelusoycuandoel
motorfuncionaenrégimenderalentí.Tenga
cuidadocercadematerialesovapores
inflamablesparaprevenirincendios.
Leaatentamentelas
instruccionesdeadvertenciasiguientes
antesdeusarelproducto.
• Noarranqueelproductosihaycombustibleoaceite
demotorenelproducto.Quiteelcombustibleo
aceitenodeseadoydejesecarelproducto.
• Siderramacombustibleensuropa,cámbiesela
ropainmediatamente.
• Nopermitaquelecaigacombustibleenelcuerpo,
yaquepuedecausarlesiones.Silecaecombustible
enelcuerpo,utilicejabónyaguaparaquitarlo.
• Noarranqueelproductosielmotortieneunafuga.
Examinefrecuentementeelmotorenbuscade
fugas.
• Tengacuidadoconelcombustible.Elcombustible
esinflamableylosgasessonexplosivosypueden
causarlesionesgravesofatales.
• Norespirelosgasesdelcombustible,yaque
puedencausarlesiones.Asegúresedequehaya
suficienteflujodeaire.
• Nofumecercadelcombustibleodelmotor.
• Nocoloqueobjetoscalientescercadelcombustible
odelmotor.
• Noagreguecombustiblecuandoelmotorestéen
marcha.
• Asegúresedequeelmotorseenfríeantesdellenar
eldepósitodecombustible.
• Antesdellenareldepósitodecombustible,abra
lentamentelatapadeldepósitodecombustibley
liberelapresiónconcuidado.
• Noagreguecombustiblealmotorenunáreainterior.
Unflujodeaireinsuficientepuedecausarlesiones
gravesofatalesporasfixiaodebidoalmonóxidode
carbono.
• Aprietebienlatapadeldepósitodecombustible.Si
noaprietalatapadeldepósitodecombustible,se
generaunriesgodeincendio.
• Muevaelproductoaunmínimode3m(10pies)de
laposiciónenlaquesellenóeldepósitoantesde
empezarausarlo.
• Nopongademasiadocombustibleeneldepósitode
combustible.
¡ADVERTENCIA!
694-002-
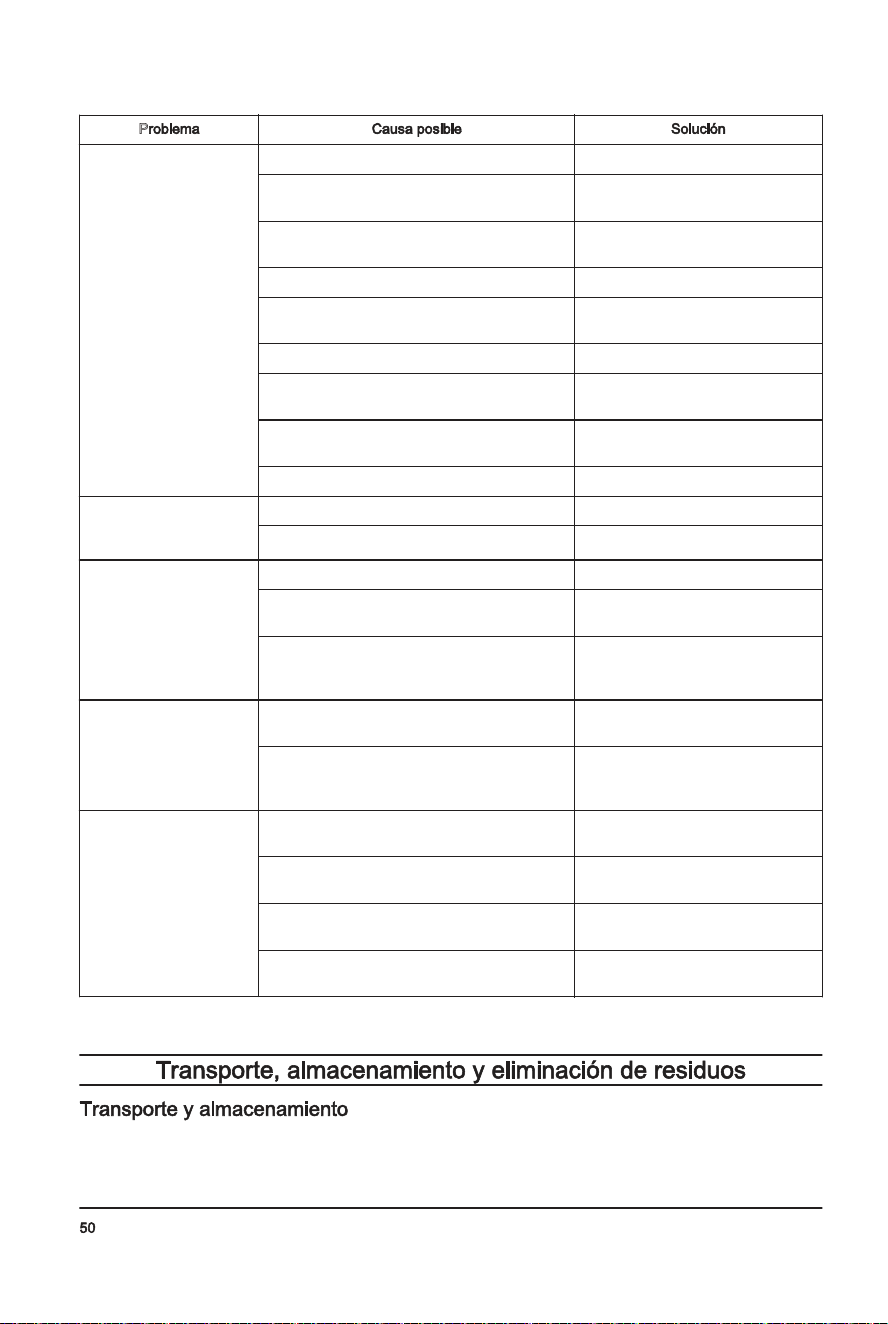
losbarrenosytodaslaspiezasmóvilesse
detuvieron.Desconecteelcabledelabujíay
manténgalolejosdelabujíaparaevitarquealguien
arranqueelmotoraccidentalmente.
• Nohagafuncionarelmotoreninteriores,excepto
cuandoarranqueelmotoryparaeltransportedel
productodentroofueradeledificio.Abralaspuertas
externas;losgasesdeescapesonpeligrosos.
• Pongaextremaatencióncuandotrabajeen
pendientes.
• Nuncahagafuncionarelproductosinlasdebidas
proteccionesnilosdispositivosprotectoresde
seguridadensulugaryenfuncionamiento.
• Nuncadirijaeldeflectordelconductohacialas
personasohaciazonasdondepuedanocurrirdaños
alapropiedad.Mantengaalejadosalosniñosya
otraspersonas.
• Nosobrecarguelacapacidaddelproducto
intentandoretirarnieveaunavelocidaddemasiado
rápida.
• Nuncahagafuncionarelproductoaunaalta
velocidaddetransporteensuperficiesresbaladizas.
Mirehaciaatrásytengacuidadocuandoretroceda.
• Desconectelaalimentacióndelosbarrenospara
transportarelproductoocuandonoestéenuso.
• Utilicesolamentelosimplementosyaccesorios
homologadosporelfabricantedelproducto,por
ejemplo,lospesosdelasruedas,contrapesoso
cabinas.
• Nuncahagafuncionarelproductosinbuena
visibilidadoluz.Presteatenciónmientrascaminay
mantengafirmeslasempuñaduras.Camine,nunca
corra.
• Nuncatoqueunmotorosilenciadorcalientes.
S
• Inspeccioneatentamenteeláreadondesevaa
utilizarelequipoyretiretodoslostapetes,trineos,
tablas,cablesyotrosobjetosextraños.
• Desacopletodoslosembraguesypongaelcambio
enneutroantesdearrancarelmotor.
• Nomanejeelproductosinusarlaindumentariade
inviernoadecuada.Eviteusarropaflojaquepueda
quedaratrapadaenlaspiezasmóviles.Utilice
calzadoquemejorelaposturaensuperficies
resbaladizas.
• Manipuleelcombustibleconcuidado;esaltamente
inflamable.
• Useunrecipientedecombustibleaprobado.
• Nuncaagreguecombustibleaunmotoren
marchaocaliente.
• Lleneeldepósitodecombustibleenelexterior,
conmáximocuidado.Nuncalleneeldepósitode
combustibleeninteriores
• Nuncallenelosrecipientesdecombustible
dentrodeunvehículo,enuncamiónosobrela
plataformadeunremolqueconrevestimiento
plástico.Siemprecoloquelosrecipientesenel
suelo,alejadosdelvehículo,antesderellenar.
• Cuandoseaposible,retireelequipoagasolina
delcamiónotráileryreabastézcaloenelsuelo.
Sinoesposible,entoncesreabastezcaelequipo
enuntráilerconunrecipienteportátil,enlugar
dehacerlodirectamenteconlaboquilladel
dispensadordegasolina.
• Mantengalaboquillaencontactoconelborde
deldepósitoorecipientedecombustible
abriéndolosiemprehastaqueelabastecimiento
decombustibleestécompleto.Nouseun
dispositivoquemantengaabiertoelsegurodela
boquilla.
• Vuelvaacolocarlatapadelagasolinacon
seguridadylimpietodoelcombustiblequese
hayaderramado.
• Sielcombustiblesederramasobrelaropa,
cámbieseladeinmediato.
• Utiliceloscablesdeextensiónyreceptáculos
especificadosporelfabricanteparatodaslas
unidadesconmotoresdetransmisióneléctricaode
arranqueeléctrico.
• Ajustelaalturadelacarcasadelbarrenopara
limpiarsuperficiesrocosasodegrava.
• Nuncaintenterealizarajustesconelmotoren
marcha,exceptosielfabricantelorecomienda
específicamente.
• Siempreutilicegafasprotectorasoprotectores
ocularesduranteelfuncionamientoocuandorealice
ajustesoreparacionesafindeprotegerlosojosde
objetosextrañosquepuedansereyectadosdela
máquina.
Utilicesiempreelequipodeprotecciónpersonal
adecuadocuandouseelproducto.Estoincluye,como
mínimo,calzadoresistente,protecciónoculary
protectoresauriculares.Elequipodeprotección
personalnoeliminaelriesgodelesiones,peropuede
disminuirelgradodelaslesionesencasodeaccidente.
• Siempreusegafasdeseguridadoprotecciónocular
cuandoopereelproductoorealicetareasde
mantenimientooreparación.
• Utilicesiempreindumentariadeinviernoadecuada
cuandoopereelproducto.
• Utilicesiemprebotasantideslizantesdeservicio
pesadoconbuensoportedetobilloduranteel
funcionamientodelproducto.
• Noutiliceropaflojaquepuedaquedaratrapadaen
laspiezasmóviles.
• Utiliceguantesprotectoreshomologados,sies
necesario.Porejemplo,alinstalar,examinaro
limpiarlacuchilla.
• Usesiempreprotectoresauricularesautorizados
cuandoutiliceelproducto.Escucharruidosdurante
unlargoperíodopuedeprovocarpérdidade
audicióninducidaporelruido.
694-002-
P
Pérdidadetracciónora-
lentizacióndelavelocidad
detransmisión.
Pérdidaoralentizaciónde
ladescargadenieve.
Lacorreapatina. Ajusteelcable.Ajustelacorrea.
Lacorreaestádesgastada. Reviseoreemplacelacorrea.Ajuste
lapolea.
Lacorreasesaliódelapolea. Reviseovuelvaainstalarlacorrea.
Ajustelapolea.
Eldeflectordelconductoestáobstruido. Limpieeldeflectordelconducto.
Objetosextrañosobstruyenlosbarrenos. Retirelasuciedadolosobjetosex-
trañosdelosbarrenos.
Elpasadorfusibleestároto. Reemplaceelpasadorfusibleroto.
Excesodehieloynieveacumuladosentrelos
componentesdelavía.
Retireelhieloynieveacumulados
entreloscomponentesdelavía.
Laruedamotrizdefricciónestádesgastada. Comuníqueseconuncentrodeser-
vicioautorizado.
Eldiscodefricciónestámojado Dejesecareldiscodefricción
Fallaenlarotacióndel
barrenodespuésdesoltar
laempuñadura.
Lacorreadetransmisiónnoestáalineada. Ajustelacorreadetransmisión.
Eldeflectordedescarganoestáalineado. Ajusteeldeflectordedescarga.
Laslucesnoestánencen-
didas(siestánequipadas)
Elmotornoestáenmarcha. Arranqueelmotor.
Laconexióndeloscablesestásuelta. Compruebelasconexionesdelos
cablesdelmotorylasluces.
ElLEDestáquemado. ReemplaceelmódulodeluzLED.
LosLEDindividualesnosepueden
reemplazar.
Esdifícilmoverelrotador
delconducto
Haysuciedadenelmecanismodelrotadordel
conducto.
Limpielaspiezasinternasdelmeca-
nismodelrotadordelconducto.
Loscablesestántorcidosodañados. Asegúresedequeloscablesnoes-
téntorcidos.Reemplaceloscables
dañados.
Elproductosegirahacia
unlado.
Lapresióndelosneumáticosnoesigual. Ajustelapresióndelosneumáticosy
llenelosneumáticos.
Elproductosemueveconunasolarueda. Inspeccioneelpasadordebloqueo
delosneumáticos.
Ajustedeltrineoirregular. Ajustelasplanchasprotectorasyel
trineo.
Planchasprotectorasconajustenouniforme. Ajustelasplanchasprotectorasyel
trineo.
• Paraelalmacenamientoyeltransportedelproducto
ydelcombustible,asegúresedequenohayafugas
ovapores.Laschispasollamas,porejemplo,de
dispositivoseléctricosocalderas,puedeniniciarun
incendio.
694-002-
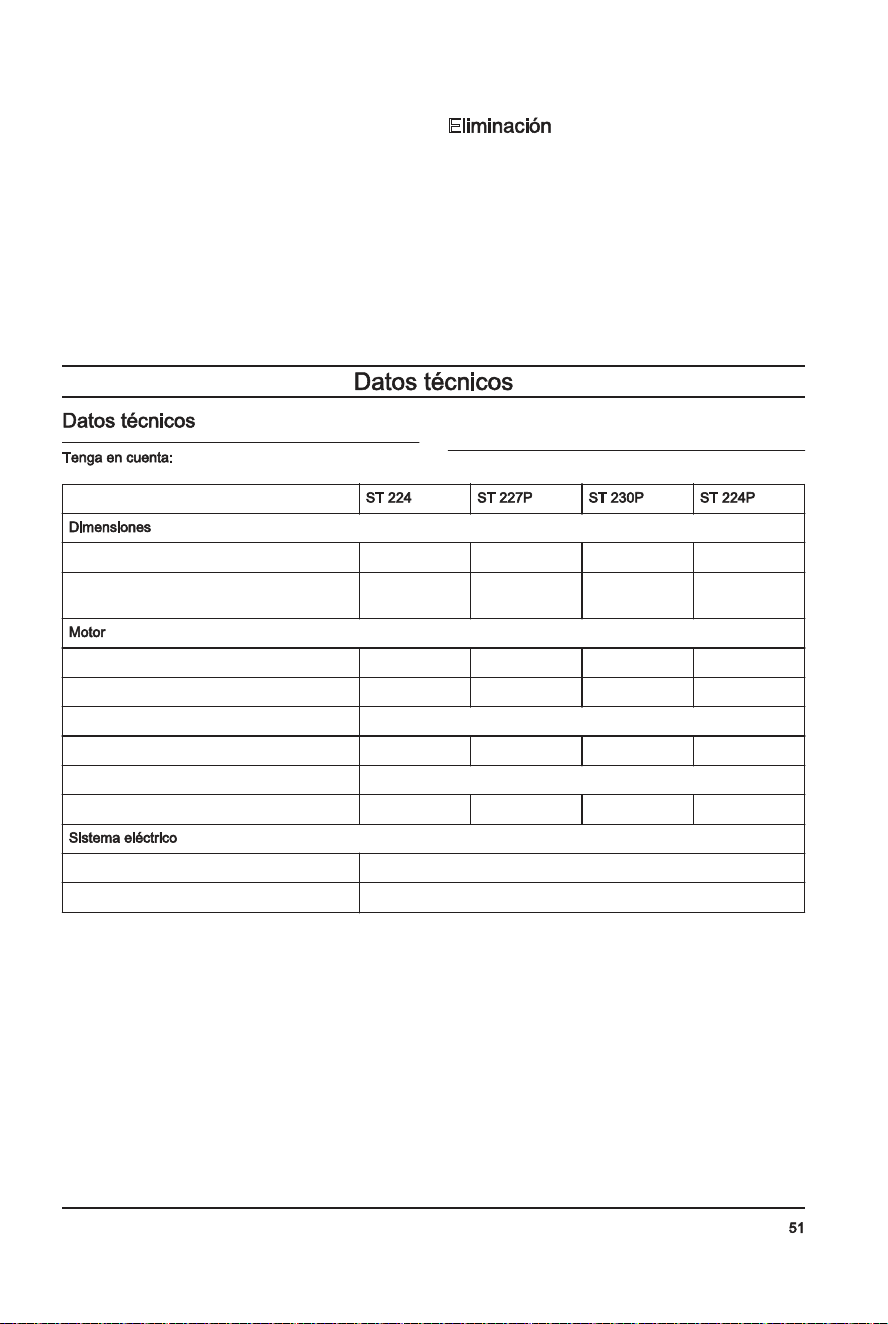
• Siempreusecontenedoresaprobadosparael
almacenamientoyeltransportedelcombustible.
• Vacíeeldepósitodecombustibleantesde
almacenarelproductoduranteunlargotiempo.
Desecheelcombustibleenunsitioadecuadopara
talpropósito.
• Asegurebienelproductoduranteeltransportepara
evitardañosyaccidentes.
• Mantengaelproductoenunáreacerradaparaevitar
quelosniñosuotraspersonassinautorización
puedanaccederaél.
• Mantengaelproductoenunlugarsecoysin
escarcha.
E
• Obedezcalasregulacionesvigentesyrequisitosde
reciclajelocales.
• Desechetodoslosproductosquímicos,comoel
combustibleoelaceitedelmotor,enuncentrode
serviciooenunsitioadecuadoparatalpropósito.
• Cuandoelproductosedejadeutilizar,envíeloaun
distribuidordeHusqvarnaodesécheloenunsitiode
reciclaje.
Todoslosdatos,lasimágenesylas
especificacionessoncomunesysoloseusanconfines
dereferencia.Además,sepodríancambiardebidoalas
actualizacionesdelproductosinprevioaviso.
Peso,lb/kg 198,6/90 212/96 237,8/108 198,6/90
Presióndefuncionamientomáximadelos
neumáticos,PSI
18 18 20 18
Marca/modelo
Husqvarna Husqvarna Husqvarna Husqvarna
Cilindrada,cc 208 254 291 208
Tipodecombustible Regularsinplomo(conunmáximodeun10%deetanol)
Capacidaddecombustible,galones/litros 0,31/1,17 0,35/1,33 0,62/2,35 0,31/1,17
Aceite SAE5W30(inferiora0°C[32°F])
Capacidaddeaceite,onzas/litros 16/0,47 20/0,59 32/0,95 16/0,47
Bujía F6RTC
Distanciadelabujía(pulg/mm) 0,030/0,762mm
694-002-
A Dañosenelproducto.
Estainformaciónhacequeel
productoseamásfácildeusar.
• Utiliceelproductocorrectamente.Laslesiones
gravesofatalessonunposibleresultadodeunuso
incorrecto.Soloutiliceelproductoparalastareas
queaparecenenestemanual.Noutiliceelproducto
paraotrastareas.
• Obedezcalasinstruccionescontenidaseneste
manual.Obedezcalossímbolosylasinstrucciones
deseguridad.Sielusuarionoobedecelas
instruccionesylossímbolos,esposiblequese
produzcandañosylesionestantogravescomo
fatales.
• Nodesecheestemanual.Utilicelasinstrucciones
paramontar,operarymantenerelproductoenbuen
estado.Utilicelasinstruccionesparalacorrecta
instalacióndepiezasyaccesorios.Utilicesolamente
piezasyaccesorioshomologados.
• Nouseunproductodañado.Cumplaconel
programademantenimiento.Realicesolamentelas
tareasdemantenimientoenlasquesedetallan
instruccionesenestemanual.Uncentrodeservicio
autorizadodeberealizartodoslosdemástrabajos
demantenimiento.
• Enestemanualnosepuedenabarcartodaslas
situacionesquepuedenocurrircuandoseutilizael
producto.Tengacuidadoyuseelsentidocomún.No
hagafuncionarelproductonirealicemantenimientos
sinoestáseguroacercadelasituación.Hablecon
unexpertoenelproducto,sudistribuidor,elagente
deservicioouncentrodeservicioautorizadopara
obtenermásinformación.
• Desconecteelcabledelabujíaantesdemontaro
almacenarelproducto,orealizartareasde
mantenimiento.
• Noutiliceelproductosicambiasuespecificación
inicial.Nocambieunapartedelproductosinla
aprobacióndelfabricante.Utilicesolamentelas
piezasqueestánaprobadasporelfabricante.Las
lesionesgravesofatalessonunposibleresultado
deunmantenimientoincorrecto.
• Norespireloshumosdelmotor.Lainhalación
prolongadadelosgasesdeescapeesunriesgo
paralasalud.
• Noenciendaelproductoeninterioresocercade
materialesinflamables.Losgasesdeescapeestán
muycalientesypuedencrearincendiosdebidoala
creacióndechispas.Unflujodeaireinsuficiente
puedecausarlesionesgravesofatalesporasfixiao
debidoalmonóxidodecarbono.
• Cuandoutiliceesteproducto,elmotorcreaun
campoelectromagnético.Elcampo
electromagnéticopuedecausardañosaimplantes
médicos.Hableconsumédicoyfabricantedel
implanteantesdeutilizarelproducto.
• Nodejequeunniñoutiliceelproducto.Nopermita
queunapersonaquenoconozcalasinstrucciones
utiliceelproducto.
• Asegúresedesupervisarsiempreaunapersonacon
capacidadesfísicasomentaleslimitadasqueutilice
elproducto.Debehaberunadultoresponsableen
todomomento.
• Mantengaelproductoenunáreaalacuallosniños
ylaspersonasnoautorizadasnopuedanacceder.
• Elproductopuedeexpulsarobjetosycausar
lesiones.Sigalasinstruccionesdeseguridadpara
reducirelriesgodelesionesgravesofatales.
• Nosealejedelproductocuandoelmotorestéen
marcha.
• Eloperadordelproductoesresponsableencasode
unaccidente.
• Antesdecaminarhaciaatrásymientraslohace,
mirehaciaatrásyhaciaabajoparacerciorarsede
quenohayaniñospequeños,animalesuotros
riesgosquepuedanprovocarcaídas.
• Asegúresedequelaspiezasnoesténdañadas
antesdeutilizarelproducto.
• Asegúresedeestaralmenos15m(50pies)de
distanciadeotraspersonasoanimalesantesde
utilizarelproducto.Asegúresedequeunapersona
eneláreaadyacentesepaqueutilizaráelproducto.
• Consultelasleyeslocalesonacionales.Estas
puedenevitarodisminuirelfuncionamientodel
productoenalgunascondiciones.
• Nopongalasmanosnilospiescercaodebajode
laspiezasgiratorias.Manténgasealejadodela
aberturadedescargaentodomomento.
• Tengaextremocuidadocuandotrabajeencaminos,
pasosoaccesosdegravaopaseporellos.
Manténgasealertaparadetectarriesgosocultoso
tránsito
• Despuésdegolpearunobjetoextraño,detengael
motor,desconecteelcabledelabujíaodesconecte
elhiloenlosmotoreseléctricos.Inspeccione
atentamentelamáquinaparadetectardañosy
repárelosantesdevolveraencenderyocuparel
producto.
• Sielequipocomienzaavibrardemaneraanormal,
detengaelmotoryrevisedeinmediatopara
encontrarlacausa.Lavibraciónesgeneralmente
unaadvertenciadeproblemas.
• Detengaelmotorsiemprequeabandonelaposición
deoperación,antesdedestaparlacarcasadel
barrenooeldeflectordelconductoytambién
cuandorealicereparaciones,ajustesoinspecciones.
• Cuandorealicelalimpieza,reparaciónoinspección
delproducto,detengaelmotoryasegúresedeque
694-002-
Noretirelasproteccionesmientraselmotor
seencuentrefuncionando.
Retireelcabledelabujíaantesdel
mantenimiento.
Tracciónactivada/desactivada.
Descargadenieveactivada/desactivada.
Giraralaizquierda.
Giraraladerecha.
Controldetracción.
Descargadenieve.
Tengacuidadoconlosob-
jetosquesalgandispara-
dos;mantengaalos
transeúnteslejosdela
máquina.
Advertencia:Mantenga
lasmanosalejadas.
Advertencia:Mantenga
lospiesalejados.
Marchahaciadelante/
atrás.
Giraralaizquierda/presio-
nar/giraraladerecha.
Comosemencionaenlasleyesderesponsabilidaddel
fabricante,nonoshacemosresponsablesdelosdaños
quecausenuestroproductosi:
• elproductosereparaincorrectamente
• elproductosereparaconpiezasquenosondel
fabricanteoqueestenoautoriza
• elproductotieneunaccesorioquenoesdel
fabricanteoqueestenoautoriza
• elproductonosereparaenuncentrodeservicio
autorizadooporunaautoridadaprobada.
Lassiguientesdefinicionesproporcionanelnivelde
gravedaddecadapalabraclave.
Lesionesapersonas.
694-002-
T
Introduction...................................................................53
Sécurité.........................................................................55
Montage........................................................................59
Fonctionnement............................................................ 62
Entretien....................................................................... 66
Dépannage................................................................... 74
Transport,entreposageetmiseaurebut......................77
Donnéestechniques..................................................... 77
694-002-

I
8 22
23
25
24
14
16
15
17
18
19
20
21
1 2
3
4
5
7
8
9
10
11
13
12
6
26
1. Engagementdetarière
2. Levierdecommandedelagoulotted’éjection
3. Levierdecommandedevitessedel’entraînement
4. Levierdecommandeàdistancedudéflecteur
694-002-
5. Acoplamientodelatransmisión
6. Luz
7. Perilladelmango
8. Silenciador
9. Planchaprotectora
10. Barrenos
11. Herramientadelimpieza
12. Conductodeexpulsión
13. Deflectordelconducto
14. Empuñaduradelacuerdadearranque
15. Tapóndevaciadodeaceite
16. Interruptordecombustible
17. Llavedeencendido/apagado(ON/OFF)
18. Cebador
19. InterruptorENCENDER/APAGAR
20. Controldelacelerador
21. Estrangulador
22. Tapóndellenadodegasolina
23. Llenadodelaceite(ST227P,ST230P),varillade
nivel(ST227P)
24. Botóndearranqueeléctrico
25. Conexión,arranqueeléctrico
26. Llenadodelaceite(ST224,ST224P),varillade
nivel(ST224,ST230P,ST224P)
D
Elproductoesunquitanievesconruedasqueseutiliza
pararetirarlanievedelsuelo.
Esteproductopuedeutilizarsepararetirarlanievede
campos,caminos,senderosyaccesos.Noloutiliceen
pendientessuperioresa20°.Noutiliceelproductoen
áreasconmuchosresiduos,suciedadypiedras
protuberantes.
Silasetiquetasdelproductoestán
dañadas,comuníqueseconeldistribuidorpara
sustituirlas.
¡Advertencia!
Leaelmanualdeinstrucciones.
Motorenmarcha
Motorapagado.
Rápido.
Lento.
Combustible.
Aceite.
Protectoresauricularesrecomendados.
Llaveparaencender/apagarlamáquina.
Colóquelaparaencenderlamáquinay
ponerlaenmarcha.
Estranguladorcerrado(arranque).
Cebador.
Tirelaempuñaduradecuerdadearranque
paraponerlamáquinaenmarcha.
Estranguladorabierto(puestaenmarcha).
Llaveparaencender/apagarlamáquina.
Sáquelaparadetenerlamáquina.
Sinfuncionamientoenpendientesdemás
de10grados.
694-002-

I
8 22
23
25
24
14
16
15
17
18
19
20
21
1 2
3
4
5
7
8
9
10
11
13
12
6
26
1. Acoplamientodelbarreno
2. Palancadecontroldelconductodeexpulsión
3. Palancadeajustedelrégimendevelocidad
4. Palancadelcontrolremotodeldeflector
694-002-
5. Engagementdel’entraînement
6. Témoin
7. Boutondepoignée
8. Silencieux
9. Plaquedeprotection
10. Tarière
11. Outildenettoyage
12. Goulottededécharge
13. Déflecteurdegoulotte
14. Cordedulanceur
15. Bouchondevidanged’huile
16. Commutateurdecarburant
17. CléON/OFF(marche/arrêt)
18. Poired’amorçage
19. InterrupteurON/OFF(marche/arrêt)
20. Commanded’accélérateur
21. Voletdedépart
22. Bouchonderemplissaged’essence
23. Remplissaged’huile(ST227P,ST230P),jauge(ST
227P)
24. Boutondedémarrageélectrique
25. Connexion,démarrageélectrique
26. Remplissaged’huile(ST224,ST224P),jauge(ST
224,ST230P,ST224P)
D
Leproduitestunesouffleuseàneigesurrouespour
déblayerlaneigedusol.
Cetappareilpeutêtreutilisépourretirerlaneigedes
champs,desroutes,desalléesetdestrottoirs.Nepas
l’utilisersurlespentessupérieuresà20°.Nepasutiliser
ceproduitdansdeszonesoùilyabeaucoupdedébris,
desaletéetdepierresquidépassent.
Silesautocollantssurleproduitsont
endommagés,communiqueravecleconcessionnaire
pourlesremplacer.
Avertissement.
Lirelemanueldel’opérateur.
Moteurenmarche
Arrêtdumoteur.
Rapide
Lent
Carburant
Huile
Protectiond’oreillesrecommandée
CléON/OFF(marche/arrêt)Insérerlaclé
pourdémarreretfairetournerlemoteur.
Étrangleurfermé(démarrage).
Amorceur.
Tirerlapoignéeducâbledulanceurpour
démarrer.
Étrangleurfermé(moteurenmarche).
CléON/OFF(marche/arrêt)Tirervers
l’extérieurpourarrêter.
Aucuneopérationsurdespentes
supérieuresà10°.
694-002-
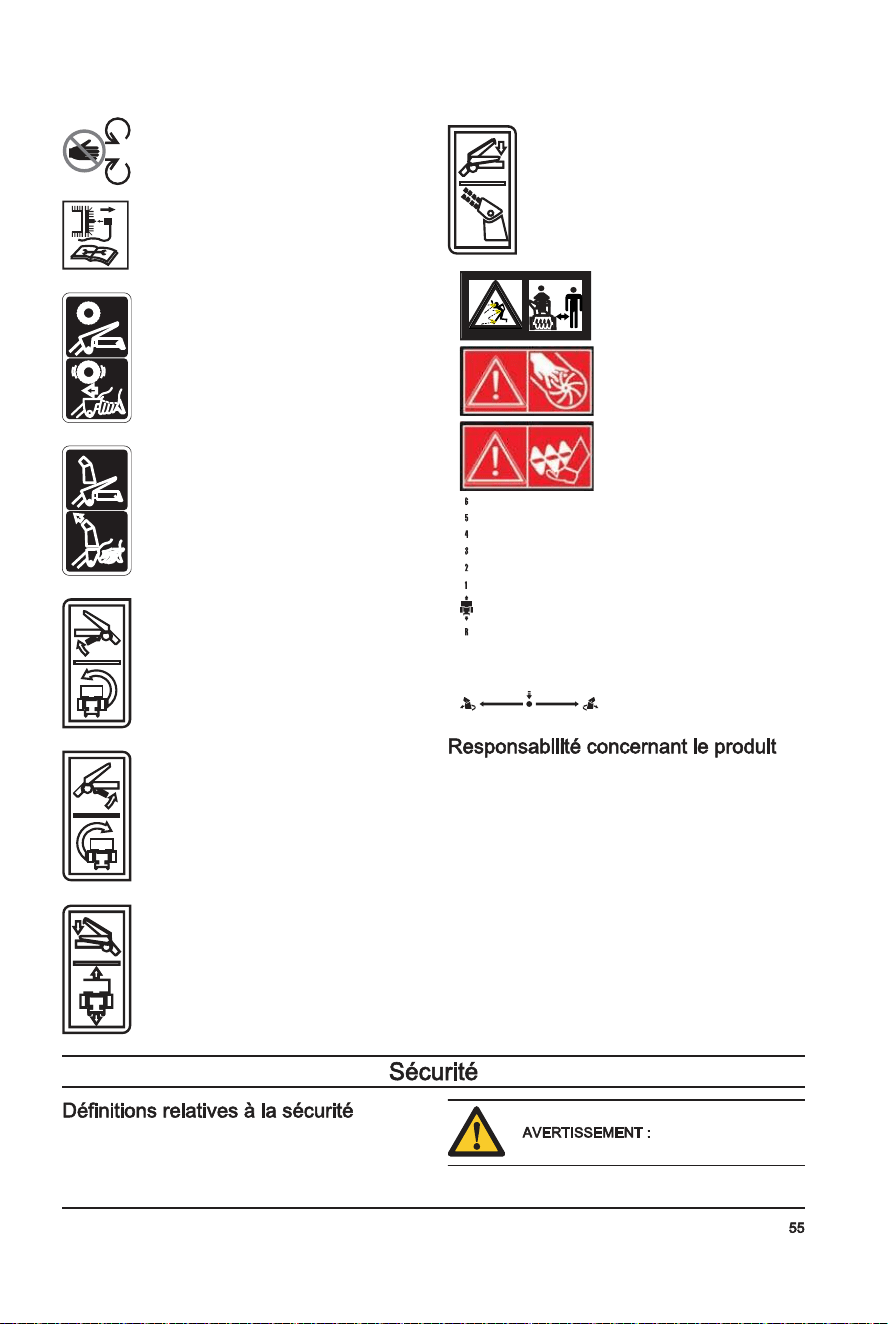
Nepasretirerdeprotectionlorsquele
moteurtourne.
Déconnecterlecâbledelabougieavantde
commencerl’entretien.
Miseàl’arrêt/miseenmarchede
l’entraînementdelatraction.
Arrêt/démarragedel’éjectiondelaneige.
Virageverslagauche.
Virageversladroite.
Commanded’entraînementdelatraction.
Éjectiondelaneige.
Faireattentionàlaprojec-
tiond’objets;tenirtoute
personneàdistance.
Avertissement;garderles
mainsàl’écart.
Avertissement;garderles
piedsàl’écart.
Marcheavant/marchear-
rière.
Pivoterverslagauche/
pousserverslebas/pivot-
erversladroite.
Commeindiquédanslesloisenvigueursurla
responsabilitéconcernantlesproduits,nousneserons
pastenusresponsablesdesdommagesquenotre
produitcauseraitdanslessituationssuivantes:
• Leproduitn’estpasréparédefaçonadéquate.
• Leproduitestréparéavecdespiècesquinesont
pasfourniesouhomologuéesparlefabricant.
• Leproduitcomprendunaccessoirequin’estpas
fourniouhomologuéparlefabricant.
• Leproduitn’estpasréparéparuncentredeservice
après-venteagrééouparuneautoritéhomologuée.
Lesdéfinitionsci-dessousindiquentleniveaudegravité
pourchaquemotsignal.
Blessuresaux
personnes.
694-002-
C
Introducción.................................................................. 27
Seguridad..................................................................... 29
Montaje......................................................................... 33
Funcionamiento............................................................ 36
Mantenimiento.............................................................. 40
Solucióndeproblemas................................................. 48
Transporte,almacenamientoyeliminaciónde
residuos........................................................................ 50
Datostécnicos.............................................................. 51
694-002-
D
• Obeythelocalrecyclingrequirementsandapplicable
regulations.
• Discardallchemicals,suchasengineoilorfuel,ata
servicecenteroratanapplicabledisposallocation.
• Whentheproductisnolongerinuse,sendittoa
Husqvarnadealerordiscarditatarecycling
location.
Alldata,imagesandspecificationsaretypicaland
forreferenceonly,andmaybechangedduetoproduct
improvementwithoutpriornotice.
Weight,lb/kg 198.6/90 212/96 237.8/108 198.6/90
MaxOperatingTirePressure,PSI 18 18 20 18
Brand/Model
Husqvarna Husqvarna Husqvarna Husqvarna
Displacement,cc 208 254 291 208
Fueltype Unleadedregular(maximum10%ethanol)
Fuelcapacity,gallons/liters 0.31/1.17 0.35/1.33 0.62/2.35 0.31/1.17
Oil SAE5W30(below0°C(32°F))
Oilcapacityounces/liters 16/0.47 20/0.59 32/0.95 16/0.47
Sparkplug F6RTC
Sparkpluggap(in/mm) 0.030/0,762mm
694-002-
M Dommagescausésà
l'outil.
Cetteinformationfacilitel’utilisationde
l'outil.
• Utiliserl’outilcorrectement.Desblessuresgravesou
mortellespeuventrésulterd’uneutilisationnon
adéquate.Utiliserl’outilseulementpourlestâches
décritesdansleprésentmanuel.Nepasutilisercet
outilpourd’autrestâches.
• Suivrelesinstructionsdecemanuel.Respecterles
symbolesetlesinstructionsdesécurité.Si
l’opérateurnerespectepaslesinstructionsetles
symboles,ilpourraitenrésulterdesblessures,des
dommagesoulamort.
• Nepasjetercemanuel.Utiliserlesinstructionspour
assemblerl’outil,lefairefonctionneretleconserver
enbonétat.Suivrelesinstructionspourl’installation
correctedeséquipementsetaccessoires.Utiliser
uniquementdespiècesetaccessoireshomologués.
• Nepasutiliserl’outils’ilestendommagé.Respecter
lecalendrierd’entretien.N’effectuerquelestravaux
d’entretienprescritsdanscemanuel.Uncentre
agréédoiteffectuertouslesautrestravaux
d’entretien.
• Cemanuelnedécritpastouteslessituationsqui
peuventseproduirelorsqu’onutilisel’outil.Rester
prudentetfairepreuvedebonsens.Nepasfaire
fonctionnerl’outilnieffectuerunentretiensurl’outil
sivousn’êtespassûrdelasituation.Pourobtenir
plusd’information,s’adresseràunspécialistede
l’outil,àvotrerevendeur,àunatelierderéparation
ouàuncentredeserviceaprès-venteagréé.
• Débrancherlecâbled’allumageavantd’installer,de
stockeroudeprocéderàl’entretiendel’outil.
• Nepasutiliserl’outilsidesmodificationscontrairesà
sescaractéristiquesinitialesyontétéapportées.Ne
pasmodifierunepartiedel’outilsansl’approbation
dufabricant.Utiliserseulementdespièces
homologuéesparlefabricant.Desblessuresgraves
oumortellespeuventrésulterd’unentretiennon
adéquat.
• Nepasrespirerlesvapeursdumoteur.L’inhalationà
longtermedesproduitsd’échappementdumoteur
représenteundangerpourlasanté.
• Nepasdémarrerl’outildansunlocalclosouà
proximitédematériauxinflammables.Lesgaz
d’échappementsonttrèschaudsetpeuventcontenir
desétincellesquipeuventcauserunincendie.Un
débitd’airinsuffisantpeutentraînerdesblessuresou
lamortenraisond’uneasphyxieoudumonoxydede
carbone.
• Lorsdel’utilisationdeceproduit,lemoteurgénère
unchampélectromagnétique.Lechamp
électromagnétiquepeutendommagerlesimplants
médicaux.Parleràvotremédecinetaufabricantde
l’implantavantd’utiliserl’outil.
• Nepaslaisserunenfantutiliserl’outil.Nepaslaisser
unepersonneutiliserleproduitsansconnaîtreles
instructions.
• S’assurerdetoujourssurveillerlespersonnesavec
descapacitésphysiquesoumentalesréduitesqui
utilisentleproduit.Unadulteresponsabledoitêtre
présentàtoutmoment.
• Enfermerleproduitdansunendroitverrouilléauquel
lesenfantsetlespersonnesnonautoriséesne
peuventpasaccéder.
• Leproduitpeutprojeterdesobjetsetcauserdes
blessures.Respecterlesconsignesdesécuritéafin
deréduirelerisquedeblessuresgravesou
mortelles.
• Nepass’éloignerdel’outillorsquelemoteurest
soustension.
• Toutaccidentaveccetoutilengagelaresponsabilité
del’opérateur.
• Avantdereculer,regarderderrièreetverslebas
pourvérifierlaprésenceéventuelledepetitsenfants,
d’animauxouautresrisquesdechute.
• Avantd’utiliserl’outil,vérifierquelespiècesnesont
pasendommagées.
• S’assurerd’êtreàaumoins15m(50pi)d’autres
personnesoud’animauxavantd’utiliserleproduit.
S’assurerquetouteslespersonnesdansles
environsimmédiatssontinforméesquevousallez
utiliserleproduit.
• Consulterlesloisnationalesoulocales.Elles
peuventinterdireoulimiterl’utilisationdel’outildans
certainesconditions.
• Nepasplacerlesmainsoulespiedsprèsousous
lespiècesenrotation.Toujoursseteniràl’écartde
l’ouvertured’éjection.
• Fairepreuved’extrêmeprudenceàproximitédes
routes,desalléesoudescheminsengravier.Faire
attentionauxdangersnonévidentsetàla
circulation.
• Aprèsavoirheurtéunobjetétranger,arrêterle
moteur,enleverlecâbledelabougied’allumage(ou
débrancherlefildesappareilsélectriques),bien
inspecterleproduitpourvérifierqu’iln’yapasde
dommageetréparerladéfaillanceavantde
redémarreretd’utiliserleproduit.
• Sileproduitsemetàvibreranormalement,arrêterle
moteuretenrechercherimmédiatementlacause.
Lesvibrationsindiquentgénéralementl’existencede
problèmes.
• Arrêterlemoteuràchaquefoisqu’onquittelazone
detravail,avantdedébloquerlatarièreoule
déflecteurdegoulotte,etlorsqu’oneffectueun
réglage,uneréparationouuneinspectiondela
machine.
• Lorsqu’onveutnettoyer,réparerouinspecterle
produit,arrêterlemoteuretvérifierquelestarières
694-002-
ettouteslespiècesenmouvements’arrêtent.
Débrancherlefildelabougieettenirlefilàl’écart
delabougiepourévitertoutdémarrageaccidentel.
• Nepasmettrelemoteurenmarcheàl’intérieur,sauf
lorsdudémarragedumoteuretletransportdu
produitdansouhorsdel’immeuble.Ouvrirles
portes;lesgazd’échappementdumoteursont
dangereux.
• Fairepreuved’extrêmeprudencelorsqu’ontravaille
danslespentes.
• Nejamaisfairefonctionnerlamachinesansses
grilles,plaquesetautresdispositifsdeprotectionen
placeetenbonétatdefonctionnement.
• Nejamaisdirigerledéflecteurdegoulotteversdes
personnesouversdesendroitsoùleséventuelles
projectionspourraientcauserdesdégâts.Tenirles
enfantsetautrespersonnesàl’écart.
• Nepasdépasserlacapacitéduproduitententantde
retirerlaneigetroprapidement.
• Nepasutiliserleproduitàdesvitessestropélevées
surdessurfacesglissantes.Lorsqu’onrecule,
regarderderrièresoietsedéplacerlentement.
• Désengagerl’alimentationdestarièreslorsquele
produitestencoursdetransportquandiln’estpas
encoursd’utilisation.
• Utiliserlesappareilsetaccessoiresapprouvésparle
fabricantduproduit(telsquelespoidsderoue,
contrepoidsoucabine).
• Nejamaisutiliserleproduitsansunebonnevisibilité
oulumière.Garderlespiedstoujoursbiend’aplomb
surlesolettenirlapoignéeavecfermeté.Toujours
marcher;nejamaiscourir.
• Nejamaistoucherlemoteuroulesilencieuxquandil
estchaud.
S
• Inspecterminutieusementl’endroitoùl’équipement
doitêtreutiliséetretirertoutpaillasson,traîneau,
planche,filouautreobjet.
• Désengagertouslesembrayagesetmettreaupoint
mortavantdedémarrerlemoteur.
• Nepasfairefonctionnerleproduitl’hiversansporter
desvêtementsadéquats.Éviterlesvêtements
amplespouvantseprendredanslespiècesen
mouvement.Leportdechaussuresadéquates
amélioreralastabilitésurdessurfacesglissantes.
• Manipulerl’essenceavecprécaution,carelleest
hautementinflammable.
• Utiliserdesrécipientsdecarburantapprouvés.
• Nejamaisfairel’appointenessencelorsquele
moteurestenmarcheouchaud.
• Remplirleréservoirdecarburantàl’extérieur
avecuneextrêmeprudence.Nejamaisfaire
l’appointenessenceàl’intérieur
• Nejamaisremplirdescontenantsdecarburantà
l’intérieurd’unvéhiculeousurlaplateformed’un
camionoud’uneremorqueavecunegarnitureen
plastique.Toujoursplacerlescontenantssurle
solloind’unvéhiculeavantleremplissage.
• Autantquepossible,retirertoutéquipementà
essenceducamionoudelaremorqueetfairele
remplissagesurlesol.Quandcelan’estpas
possible,faireleremplissagedetels
équipementssuruneremorqueàl’aided’un
bidonportableplutôtqu’àl’aided’unpistolet
distributeurd’essence.
• Garderlepistoletdistributeurencontactavecle
bordduréservoirdecarburantoudel’ouverture
dubidonàtoutmomentjusqu’àobtentiondu
plein.Nepasutiliserdedispositifàouverture
bloquéedupistoletdistributeur.
• Remettrelebouchondecarburantsolidementen
placeetnettoyerlecarburantdéversé.
• Encasdedéversementdecarburantsurles
vêtements,changerimmédiatementde
vêtement.
• Utiliserrallongesetréceptaclesconformesàcelles
spécifiéesparlefabricantpourtouslesappareilsà
moteurélectriqueouàdémarrageélectrique.
• Réglerlahauteurducarterdetarièreafind’éviterle
gravieretlespierresensurface.
• Nejamaisessayerdefairedesréglagespendant
quelemoteurestenmarche(sauflàoùspécifiépar
recommandationdufabricant).
• Toujoursporterdeslunettesouunmasquede
protectionpourlesyeuxpendantl’utilisationdela
machineoulorsqu’oneffectueunréglageouune
réparation,desorteàprotégerlesyeuxencasde
projectiondecorpsétrangers.
Toujourss’équiperd’unéquipementdeprotection
personnelleappropriélorsdel’utilisationdel’outil.Cela
comprend,àtoutlemoins,dessouliersrésistants,des
lunettesdesécuritéetunprotecteurauriculaire.Cet
équipementdeprotectionpersonnellen’éliminepasles
risquesdeblessures,maispeutréduirelagravitéencas
d’accident.
• Toujoursporterdeslunettesdesécuritéoutout
autredispositifdeprotectiondesyeuxlorsde
l’utilisationdel’outiloudesopérationsd’entretienou
deréparations.
• Toujoursporterdesvêtementshiverapproprié
lorsqu’onfaitfonctionnerleproduit.
• Utilisertoujoursdesbottesantidérapantesrobustes
quioffrentunbonsupportauxchevilleslorsde
l’utilisationduproduit.
• Nepasporterdevêtementsamplespouvantse
prendredanslespiècesenmouvement.
• Utiliserdesgantsdeprotectionhomologués,au
besoin.Parexemple,lorsdelafixation,del’examen
oudunettoyagedelalame.
• Toujoursutiliserundispositifdeprotection
homologuépourlesoreilleslorsqu’onutilisela
machine.Lefaitd’entendredubruitpendantune
longuepériodepeutengendreruneperteauditive.
694-002-
P
Lossoftractiondrive/
slowingofdrivespeed
Lossofsnowdischargeor
slowingofsnowdischarge
Thebeltslips. Adjustthecable.Adjustthebelt.
Thebeltisworn. Check/replacethebelt.Adjustthe
pulley.
Thebeltisoffthepulley. Check/reinstallthebelt.Adjustthe
pulley.
Thechutedeflectorisclogged. Cleanthechutedeflector.
Foreignobjectsclogtheaugers. Removethedebrisortheforeignob-
jectfromtheaugers.
Theshearpinisbroken. Replacethebrokenshearpin.
Excessivesnowandicebuildupinbetween
trackcomponents.
Removesnowandicebuildupfrom
inbetweentrackcomponents.
Thefrictiondrivewheelisworn. Contactanauthorizedservicecenter.
Thefrictiondisciswet Letthefrictiondiscdry
Failureofaugerrotation
afterthegripisreleased
Thedrivebeltisnotaligned. Adjustthedrivebelt.
Thedischargedeflectorisnotaligned. Adjustthedischargedeflector.
Thelightsarenoton(ifso
equipped)
Theengineisnotrunning. Starttheengine.
Thecableconnectionisloose. Checkthecableconnectionsatthe
engineandthelights.
TheLEDisburntout. ReplacetheLEDlightmodule.Indi-
vidualLEDscannotbereplaced.
Thechuterotatorisdiffi-
culttomove
Thereisdebrisinthechuterotatormechanism. Cleantheinternalpartsofthechute
rotatormechanism.
Thecablesarekinkedordamaged. Makesurethatthecablesarenot
kinked.Replacethecablesthatare
damaged.
Theproductturnstoone
side
Thetirepressureisnotequal. Adjustthetirepressureandfillthe
tire.
Theproductdriveswithonlyonewheel. Inspectthetirelockpin.
Unevensledadjustment. Adjusttheskidplatesandthesledge.
Unevenskidplatesadjustment. Adjusttheskidplatesandthesledge.
• Forstorageandtransportationoftheproductand
fuel,makesurethattherearenoleaksorfumes.
Sparksoropenflames,forexamplefromelectrical
devicesorboilers,canstartafire.
• Alwaysuseapprovedcontainersforstorageand
transportationoffuel.
• Emptythefueltankbeforeyouputtheproductin
storageforalongperiodoftime.Discardthefuelat
anapplicabledisposallocation
• Safelyattachtheproductduringtransportationto
preventdamageandaccidents.
• Keeptheproductinalockedareatopreventaccess
forchildrenorpersonsthatarenotapproved.
• Keeptheproductinadryandfrostfreearea.
694-002-
P
Decreasedpower Thesparkplugcableisnotconnected. Connectthecabletothesparkplug.
Theproductthrowstoomuchsnow. Decreasethespeedandthewidthof
theswath.
Thefueltankcapiscoveredwithiceorsnow. Removetheiceandthesnowonand
aroundthefueltankcap.
Themufflerisdirtyorclogged. Cleanorreplacethemuffler.
Impropercablelength. Adjustthecable.
Themufflerisblocked. Makesurethattheengineiscool.
Cleartheblockage.
Theairintakeofthecarburetorisblocked. Makesurethattheengineiscool.
Cleartheblockage.
Theengineidlesorruns
roughly
ThechokeisinON(FULL,OPEN)position. MovethechoketoOFF(CLOSE)po-
sition.
Thefuellineisblocked. Cleanthefuelline.
Thereiswaterinthefuelorthefuelistooold. Emptythefueltankandcarburetor.
Fillthefueltankwithfresh,clean
gasoline.
Thecarburetorneedstobereplaced. Contactanauthorizedservicecenter.
Thebeltisstretched. Replacetheaugerv-belt.
Excessivevibration/Han-
dlemovement
Somepartsareloose.Theaugersaredam-
aged.
Tightenallfasteners.Replacethe
damagedparts.Ifvibrationremains,
contactanauthorizedservicecenter.
Thehandlesarenotpositionedcorrectly. Makesurethatthehandlesare
lockedintoposition.
Theadjustmentlevernutsareloose. Tightenthenutsuntilthehandlefeels
safe.
Thestarterropehandleis
hardtopull
Thestarterropehandleisfrozen. Slowlypulloutasmuchropeoutof
thestarteraspossibleandrelease
thestarterropehandle.Iftheengine
doesnotstart,repeattheprocedure
orusetheelectricalstarter.
Thestarterropeisinterferingwithcomponents. Thestarterropeshouldnottouchany
cablesorhoses.
694-002-
D
• Fairerégulièrementl’entretiensurleproduit.
• Cetteprécautionaugmenteladuréedevieutile
duproduit.
• Cetteprécautionréduitlerisqued’accident.
Communiquerrégulièrementavecun
concessionnaireagrééouàuncentredeservice
après-venteagrééd’examinerleproduitpour
effectuerlesréglagesetlesréparations.
• Nepasutiliserunproduitavecunéquipementde
protectionendommagé.Sil’outilestendommagé,
communiqueravecuncentredeserviceaprès-vente
agréé.
Lesilencieuxmaintientleniveaudebruitauminimumet
dirigelesgazd’échappementloindel’utilisateur.
Nepasutiliserl’outilsilesilencieuxestmanquantou
défectueux.Unsilencieuxdéfectueuxaugmentele
niveausonoreetlerisqued’incendie.
Examinerrégulièrementlesilencieuxpours’assurerqu’il
estcorrectementraccordéetenbonétat.
Lesilencieuxdevient
trèschaudpendantetaprèsutilisationet
lorsquelemoteurtourneauralenti.Faire
attentionàproximitédesmatériaux
inflammablesoudesfuméesafind’éviter
toutrisqued’incendie.
Lirelesmessages
d’avertissementquisuiventavantd’utiliser
l’outil.
• Nepasdémarrerl’outils’ilyaducarburantoude
l’huilemoteursurl’outil.Nettoyerlecarburantou
l’huileetlaissersécherl’outil.
• Siducarburantsedéversesurlesvêtements,
changerimmédiatementdevêtement.
• Nepasdéverserducarburantsurlecorps;cela
pourraitcauserdesblessures.Siducarburantse
déversesurlecorps,senettoyerausavondouxetà
l’eau.
• Nepasdémarrerl’outilsilemoteurprésenteune
fuite.Vérifierrégulièrementlemoteuràlarecherche
defuites.
• Fairepreuvedeprudencelorsdelamanipulationdu
carburant.Celui-ciestinflammableetsesvapeurs
sontexplosivesetpeuventcauserdesblessuresou
lamort.
• Nepasrespirerlesvapeursdecarburant,carelles
peuventcauserdesblessures.Vérifierquela
ventilationestsuffisante.
• Nepasfumeràproximitéducarburantoudu
moteur.
• Nepasplacerdesobjetschaudsàproximitédu
carburantoudumoteur.
• Nepasfairelepleindecarburantlorsquelemoteur
tourne.
• Vérifierquelemoteurestfroidavantdefaireleplein.
• Avantdefaireleplein,ouvrirlentementlecouvercle
duréservoirdecarburantetrelâcherlapression
avecprécaution.
• Nepasfairelepleindansunepiècefermée.Un
débitd’airinsuffisantpeutentraînerdesblessuresou
lamortenraisond’uneasphyxieoudumonoxydede
carbone.
• Serrerfermementlecouvercleduréservoirde
carburant.Silecouvercleduréservoirdecarburant
n’estpasbienserré,ilyaunrisqued’incendie.
• Avantdedémarrerl’outil,ledéplaceràaumoins3m
(10pi)delapositionoùlepleindecarburantaété
fait.
• Nepasmettretropdecarburantdansleréservoirde
carburant.
ATTENTION!
694-002-
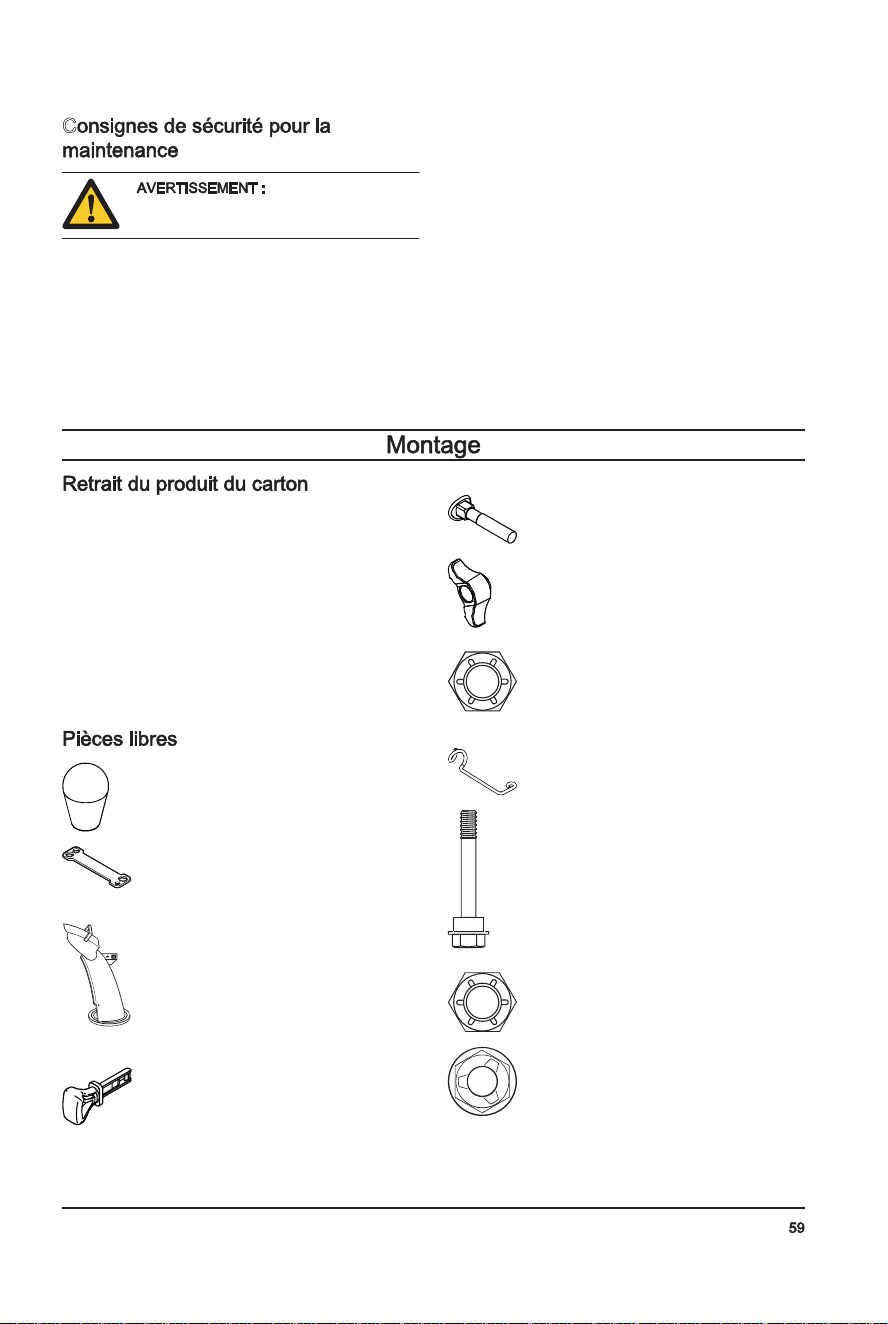
C
Lirelesmessages
d’avertissementquisuiventavantd’utiliser
l’outil.
• Lesgazd’échappementdumoteurcontiennentdu
monoxydedecarbone,ungazinodore,toxiqueet
trèsdangereux.Nepasdémarrerlemoteurà
l’intérieuroudansdesespacesfermés.
• Avantd’effectuerunentretiensurleproduit,arrêter
lemoteuretretirerlecâbled’allumagedelabougie.
• Utiliserdesgantsdeprotectionlorsdesopérations
d’entretiensurleproduit.Leslamessontaffûtéeset
descoupurespeuventseproduirefacilement.
• Lesaccessoiresetlesmodificationsapportéesau
produitquinesontpasapprouvésparlefabricant
peuventcauserdesblessuresgraves,voire
mortelles.Nepasmodifierl’outil.Toujoursutiliser
desaccessoireshomologuésparlefabricant.
• Sil’entretienn’estpaseffectuécorrectementet
régulièrement,lerisquedeblessuresetde
dommagessurl’outilaugmente.
• N’effectuerquelestravauxd’entretienindiquésdans
cemanueld’utilisation.Touslesautrestravaux
d’entretiendoiventêtreeffectuésparunagent
d’entretienagréé.
• Demanderàunagentd’entretienagrééd’effectuer
régulièrementl’entretiendel’outil.
• Remplacerlespiècesendommagées,uséesou
brisées.
1. Retirertouteslespiècesdesserréesinclusesavec
l’outil.Couperlesquatrecoinsducartonetplacer
lespanneauxd’extrémitéàplat.
2. Retirerlesdeuxvisquifixentlecarterdelatarièreà
lapalette.Retirerlessupportsenacierdesplaques
deprotection,lecaséchéant.
3. Couperlesattachesdecâblequimaintiennentle
produitàlapaletteetlesretirer.
4. Retirertouslesmatériauxd’emballage.
5. Retirerleproduitducartonets’assurerqu’aucune
piècelibren’estlaisséedanslecarton.
Boutonpapillonderéglage(3)
Multi-clé(1)
Couvercledegoulotted’éjection(1)
CléON/OFF(marche/arrêt)
Boulonsdecarrosserie5/16-18x2¼po(2)
Boutonsdepoignée(2)
Contre-écrou3/8(1)
Guidedecâble(1)
Goupillesdetonte¼-20x1-3/4(6)
Contre-écrous¼-20(6)
Contre-écrou5/16-18(1)
694-002-
2. Removethewheelfromtheaxle(C).
A
B
C
• Cleanplasticpartswithacleananddrycloth.
• Donotuseahighpressurewashertocleanthe
product.
• Donotflushwaterdirectlyonthemotor.
• Useabrushtoremoveleaves,grassanddirt.
Theproductdoesnotstart Thesafetyignitionkeyisnotinserted. Insertthesafetyignitionkey.
Theproductisoutoffuel. Fillthefueltankwithfresh,clean
gasoline.
TheON/OFFkeyisOFF. MovetheON/OFFkeytoONposi-
tion.
ThechokeisinOFF(CLOSE)position. MovethechoketoON(FULL,
OPEN)position.
Theprimerisnotdepressed. Presstheprimer.
Theengineisflooded. Waitafewminutesbeforerestarting,
DONOTprime.
Restarttheenginewhilefullthrottle
andthechokeinOFF(CLOSE)posi-
tion.
Thesparkplugcableisnotconnected. Connectthecabletothesparkplug.
Thesparkplugisbad. Replacethesparkplug.
Thereiswaterinthefuelorthefuelistooold. Emptythefueltankandcarburetor.
Fillthefueltankwithfresh,clean
gasoline.
Thereisvaporlockedinthefuelline. Makesurethatallthefuellineisbe-
lowtheoutletofthefueltank.The
fuellineshouldruncontinuously
downfromfueltanktocarburetor.
Othercauses. Inspectthestartingprocedurescare-
fullyinthismanual.
Thefuelswitch(ifequipped)isinCLOSE(OFF)
position.
TurnthefuelswitchtoOPEN(ON)
position.
ThethrottleisinSTOPposition. MovethethrottletoFASTposition.
694-002-
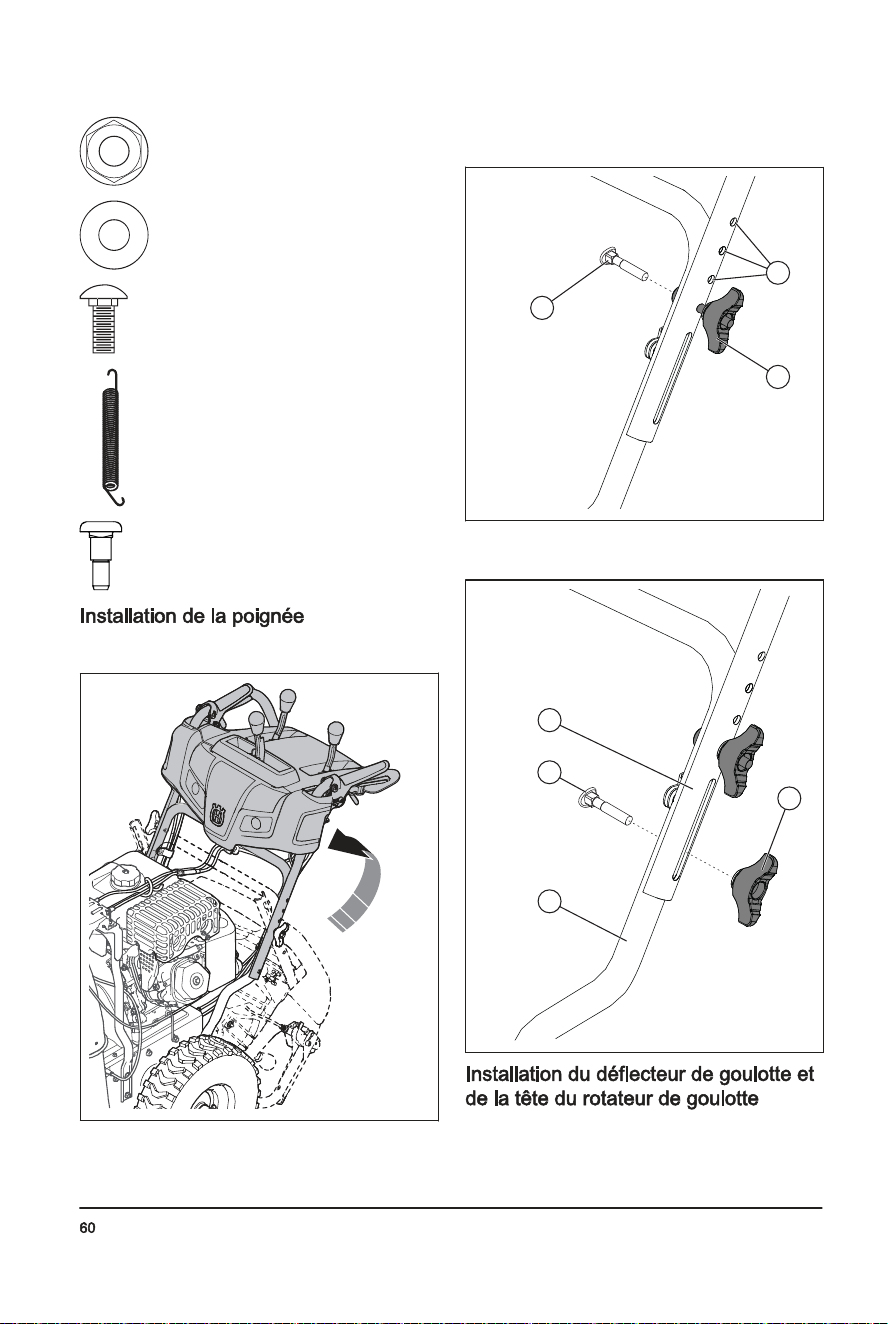
5. Installthe5/16''bolts(A),(C)andtighten(8-12
Ft.Lbs/11-16Nm).
B
C
A
6. Installthe¼''bolts(B)andtighten(4-6Ft.Lbs/5-8
Nm).
7. Installtheaugerbeltontheenginepulley.Makesure
thatthebeltisputcorrectlyaroundtheidlerpulley
andinstalledcorrectlyintheenginepulleygroove.
8. Operateallcontrolstomakesurethattheaugerbelt
isinstalledcorrectlyandthatallcomponentsare
movingcorrectly.
1. Loosenthejamnuts(B)toadjustthetensionofthe
cableforthedischargechuteadjacenttothe
adjusterturnbuckle(A).
A B
C
2. Holdtheshortsectionandturnthelongsectionto
increasetheadjuster.
3. Adjustuntilthecableforthedischargechute
deflector(C)hasatightfit.Tightenthejamnuts.
Ifyoudonotfeelcomfortablemakingthis
adjustmentyourself,pleasecontactanauthorized
servicecenter.Adjustmentscanbeneededifthe
impellerandaugerrotationissluggishwhenengaging
theaugercontrollever,oriftheaugerbelthasbeen
replaced.
1. Loosenthejamnuts(B)nexttotheturnbuckle(A)to
adjustthecabletensionintheaugercontrolcable
(D).
A B
D
2. Holdtheshortsectionandturnthelongsection.
Turnit360degrees.
3. Testtheaugerengagement.Repeattheadjustment
untilonlyasmallamountoftensionremainsinthe
cablewhentheleverisdisengaged.
4. Tightenthebottomjamnuttolockinthetension.
5. Askanassistanttostand10feet/3metersinfront
oftheproduct,ontheoppositesideofthechute.The
assistantobservestherotationoftheaugerand
measuresthetimeittakesfortheaugertostop
rotatingaftertheleverisreleased.Iftheaugerstops
rotatingafter5seconds,adjustthecablebyrotating
thecenterbarrel360degrees,tocontractthe
adjuster.Testtheaugerengagementandmeasure
thestoptimeagain.Iftheaugerstopsrotatinginless
than5seconds,continuewiththenextstep.
6. Tightenthejamnutontheaugercable.
Iftheadjustmentdoesnotresolvetheproblem,
replacetheaugerbelt.See
Toremovetheaugerbelt
onpage20
.
1. Removethewheelpin(A)andtheretainerpin(B).
694-002-
Contre-écrou¼-20(1)
Rondelleennylon(1)
Boulondecarrosserie5/16-18x5/8(1)
Ressort(1)
Boulonàépaulement¼-20(1)
1. Déplacerlapoignéesupérieureàlaposition
d’utilisation.
2. Réglerlapositiondelapoignéeàl’undestrousde
montage(B)etserrerlesboutonsdepoignées(C)
aveclesboulonsdecarrosserie(D).
B
C
D
3. Installerlesboulonsdecarrosserie(D)etles
boutonsdepoignée(C)pourfixerlapoignée
supérieure(A)surlapoignéeinférieure(E).
D
E
A
C
1. Placerledéflecteurdegoulotteauhautdelabase
delagoulotteavecl’ouvertured’évacuationvers
l’avantduproduit.
694-002-
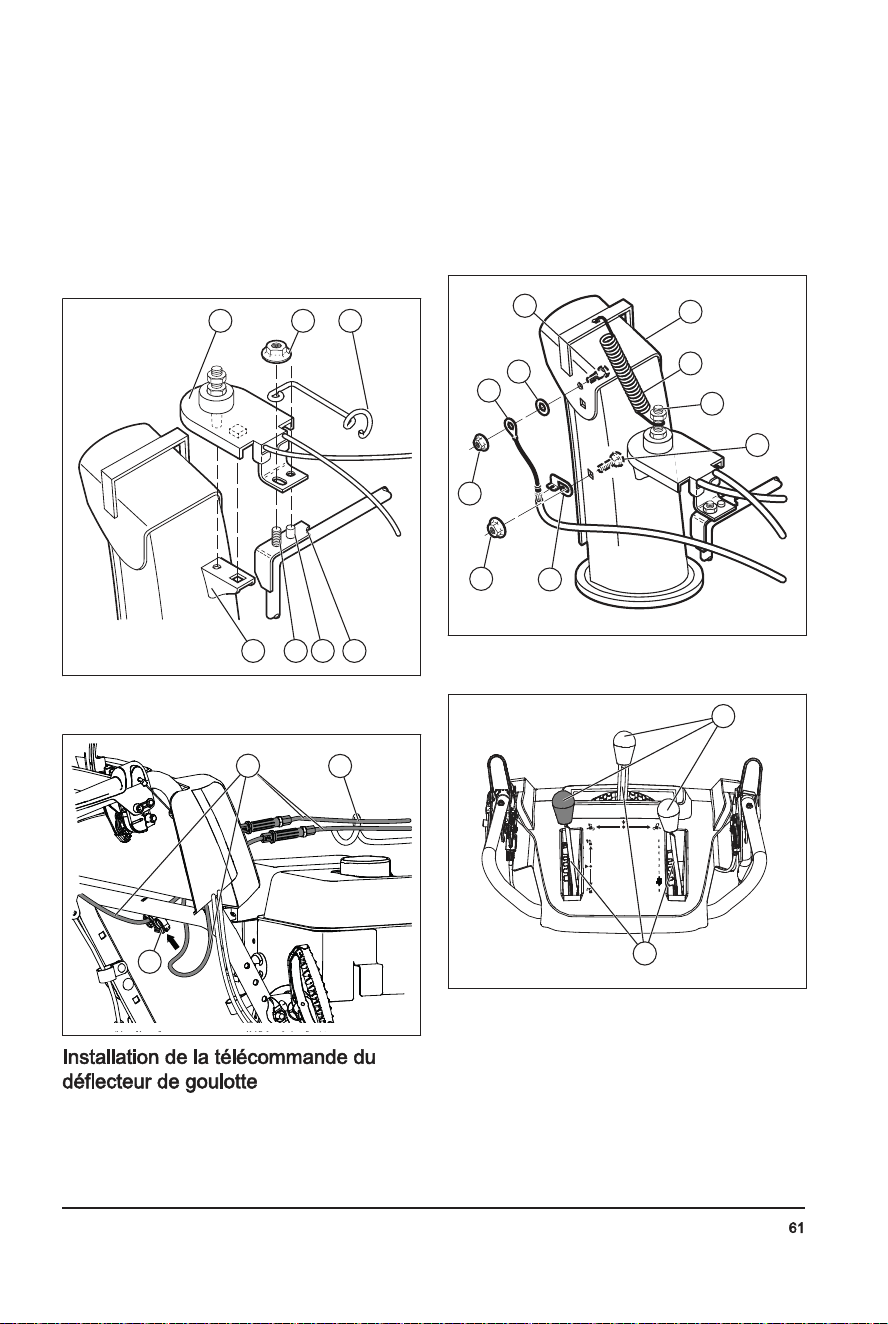
2. Placerlatêtedurotateurdegoulotte(A)surle
supportdelagoulotte(B).Tournerl’assemblagede
lagoulottepouralignerlesgoupillessouslatêtedu
rotateurdegoulotteaveclestrousdusupportde
goulotte,sinécessaire.
3. Placerlatêtedurotateurdelagoulottesurla
goupille(C)etlegoujonfileté(D)dusupportde
montage(E).
4. Fixeruncontre-écrou(G)surlegoujonfiletéet
serrer.
A
B CD E
FG
5. Insérerlescâblesdansleguidedecâbles(F)etle
collierdouble(I)pourfixerlecâbledurotateur(H)
surlapoignéeinférieure.
F
H
I
1. Fixerlaconsoleducâble(A)surlagoulotte
d’éjectionaumoyend’unboulondecarrosserie(B)
etd’uncontre-écrou5/16-18(D).Serrerleboulon.
2. Installerl’œilletducâbledetélécommande(E)surle
déflecteurdegoulotte(F)avecunboulonà
épaulement(G)etunerondelleennylon(C),puis
serrer-letoutaumoyend’uncontre-écrou¼-20(K).
L’œilletducâbleneserapasserrésurleboulonà
épaulement.
3. Fixerleressort(L)entrel’écrouhexagonal(M)dela
têtedurotateurdelagoulotteetletroududéflecteur
degoulotte.
F
L
M
B
A
D
K
C
E
G
4. Fixerlesboutonsdulevierdecommande(N)enles
poussantverslebasdanslesleviersdecommande
(O).
O
N
694-002-
4. Putthedrivebeltinthegroveoftheenginepulley
(G)beforeinstallingontheengineshaft.
5. Installthepulleybolt(F)andattachtheenginepulley
ontheengine.Tightenthepulleybolt(30-35Ft.
Lbs./41-47Nm).
6. Installthedrivebelttensionerarm(B)andtighten
thearmbolt(E)ontheengine.
7. Installthereturnspring(C)ontheswingplate.
8. Installthetensionerspring(A)onthetensionerarm.
9. Operateallcontrolstomakesurethatthedrivebelt
isinstalledcorrectlyandthatallcomponentsare
movingcorrectly.
T
1. Installthebeltcover(B)ontheframe(C)andtighten
thetwoscrews(A).
C A
B
2. Installthedischargechute.
1. Removethe5/16''bolts(A)andthelower¼"bolts
(B)fromthe2sidesoftheframeassembly.Donot
discardthebolts.
B
C
A
2. Loosenbutdonotremovethelower5/16"bolts(C)
onthe2sidesoftheframeassembly.
3. Removetheaugerbeltfromtheenginepulley.
4. Tilttherearsectiondown.Thefrontsectionistilted
forwardatthesametime.Thebottombolt(C)isa
hingebetweenthefrontandrearsections.
5. Putawoodenblockbelowthehingepointtosetthe
productinthetiltedposition.
6. Movetheaugerbelttensionerarmandremovethe
augerbeltfromaroundthearm.
1. Movethebelttensionerarmandputtheaugerbelt
aroundandinthegrooveoftheaugerpulley.
Makesurethatthebeltisnot
caughtbetweentheframeandauger
housingasyouputtheunittogether.
2. Removethewoodenblockfrombelowtheproduct.
3. Liftthehandletotilttherearsectionup.Thefront
sectionwilltiltbackandpivottoattachtherear
section.
4. Makesurethatthebeltisputintheaugerpulley
groovecorrectly.
694-002-
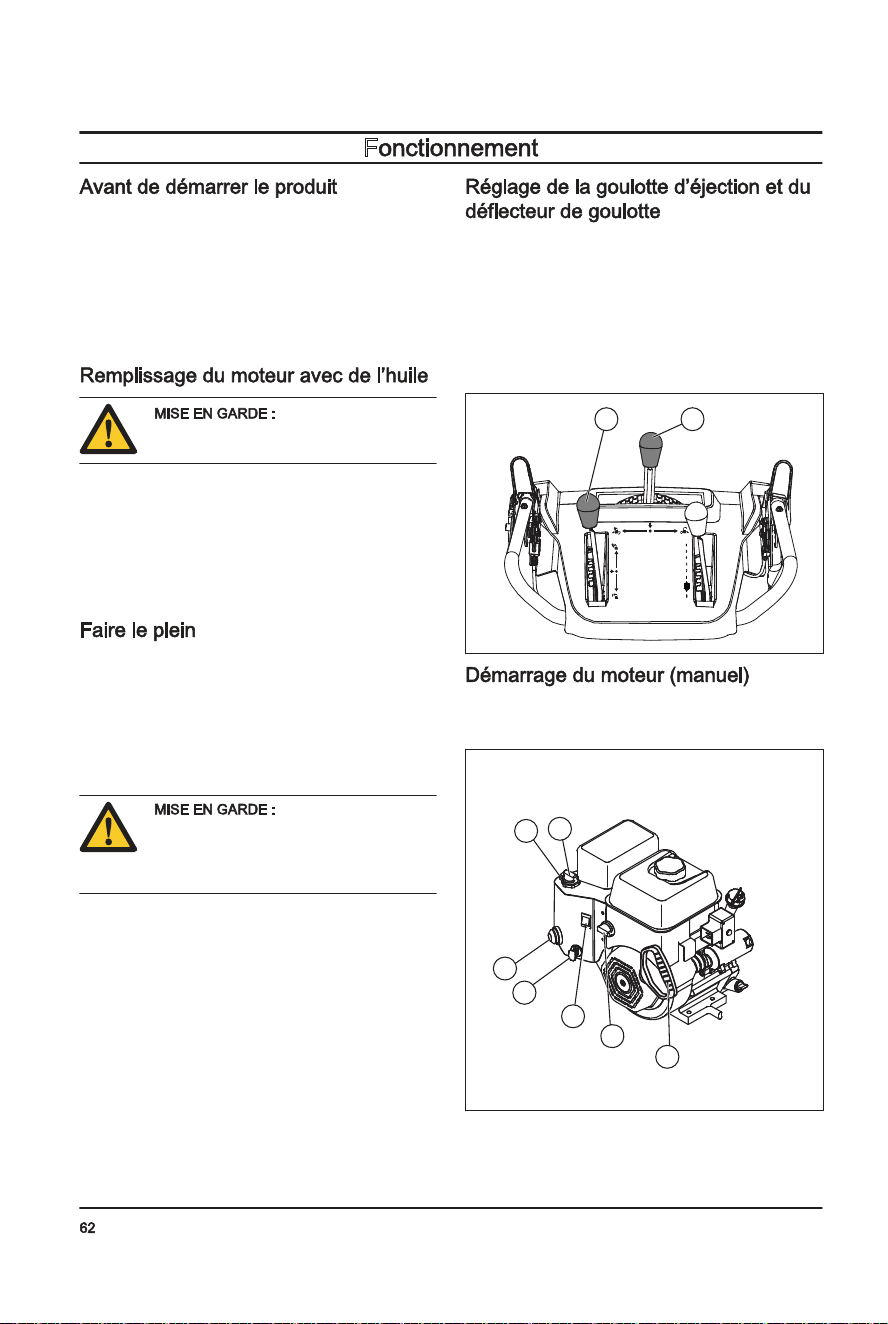
2. Loosenthelocknut(A)thatsecuresthechute
rotatorhead(B)tothemountingbracket(C)to
removethedischargechute.
B
A
C
3. Loosenthetwoscrews(A)thatsecurethebeltcover
(B)totheframe(C)andremovethebeltcover.
C A
B
1. Removetheaugerbelt.See
Toremovetheauger
beltonpage20
.
2. Removethetensionerspring(A)attachedtothe
drivebelttensionerarm(B).
A
B
C
D
E
H
FG
I
J
3. Removethereturnspring(C)holdingtheswingplate
(D)inplace.
4. Removethearmbolt(E)anddrivebelttensioner
arm.
5. Removethepulleybolt(F),enginepulley(G)and
drivebelt(H)fromtheengine.
6. Removethetopbolt(I)holdingtheswingplatetothe
frame
7. Pivotandholdtheswingplateawayfromtheproduct
andremovethedrivebeltfromthedrivepulley(J).
1. Pivotandholdtheswingplate(D)awayfromthe
product.
A
B
C
D
E
H
FG
I
J
2. Putthedrivebelt(H)ontothedrivepulley(J).
Makesurethatthedrivebeltisroutedinthe
drivepulleygrooveproperlybeforeyoulowerthe
swingplate.
3. Installandtightenthetopbolt(I).
694-002-
F
• Tenirlespersonnesetlesanimauxàl’écartdela
zonedetravail.
• Effectuerl’entretienquotidien.Voir
Calendrier
d’entretienàlapage66
.
• S’assurerquelecâbled’allumageseloge
correctementsurlabougie.
• Ajouterdel’huileoudel’essence,aubesoin.Voir
Donnéestechniquesàlapage77
.
Nepastournerlajauge
d’huilelorsqu’onvérifiel’huile.Nepas
remplirau-dessusdurepère.
1. Retirerlebouchond’huileetnettoyerlajauge
d’huile.Voir
Présentationdelamachineàlapage53
pourl’emplacementdelajauge.
2. Remplird’huilejusqu’àlamarquesupérieuredela
jauged’huile.Utiliserlajaugepourvérifierleniveau
d’huilepériodiquement.
3. Remettrelebouchonduréservoird’huileenplace.
Sidisponible,utiliserdel’essenceàfaiblesémissionsou
unalkylat.Siuneessenceàfaiblesémissionsouun
alkylatn’estpasdisponible,utiliserdel’essencesans
plomboudel’essenceauplombdebonnequalité.
Utiliserdel’essenceavecunindiced’octanede90RON
horsdel’AmériqueduNord(87AKIenAmériquedu
Nord)ouplusélevé,etavecunmaximumde10%
d’éthanol(E10).
Nepasutiliser
d’essenceavecunindiced’octaneinférieur
à90RONhorsdel’AmériqueduNord(87
AKIenAmériqueduNord).Celapourrait
endommagerleproduit.
1. Ouvrirlebouchonduréservoirdecarburant
lentementpourlibérerlapression.
2. Remplirleréservoirlentementavecunbidonde
carburant.Encasdedéversementdecarburant,le
nettoyeravecunchiffonetlaisserlerestedu
carburantsécher.
3. Nettoyerlazoneautourdubouchonduréservoirde
carburant.
4. Serrerfermementlecouvercleduréservoirde
carburant.Silecouvercleduréservoirdecarburant
n’estpasbienserré,ilyaunrisqued’incendie.
5. Avantdedémarrerl’outil,ledéplaceràaumoins3m
(10pi)delapositionoùlepleindecarburantaété
fait.
1. Pourréglerlapositiondelagoulotted’éjection,
déplacerlelevierdecommandedelagoulotte
d’éjection(A)versl’arrière,verslagaucheouversla
droite.
2. Pourréglerladistancedelafraiseàneigedu
déflecteurdegoulotte,déplacerlelevierde
télécommandedudéflecteur(B)verslebaspour
diminuerladistanceouverslehautpouraugmenter
ladistance.
AB
1. InsérerlacléON/OFF(marche/arrêt)(A)dansla
fented’allumagejusqu’àcequ’elles’enclenche.Ne
pastournerlaclé.
G
F
C
A
E
B
D
2. Placerl’interrupteurdemarche/arrêtducarburant(F)
àlapositionON(marche).
694-002-
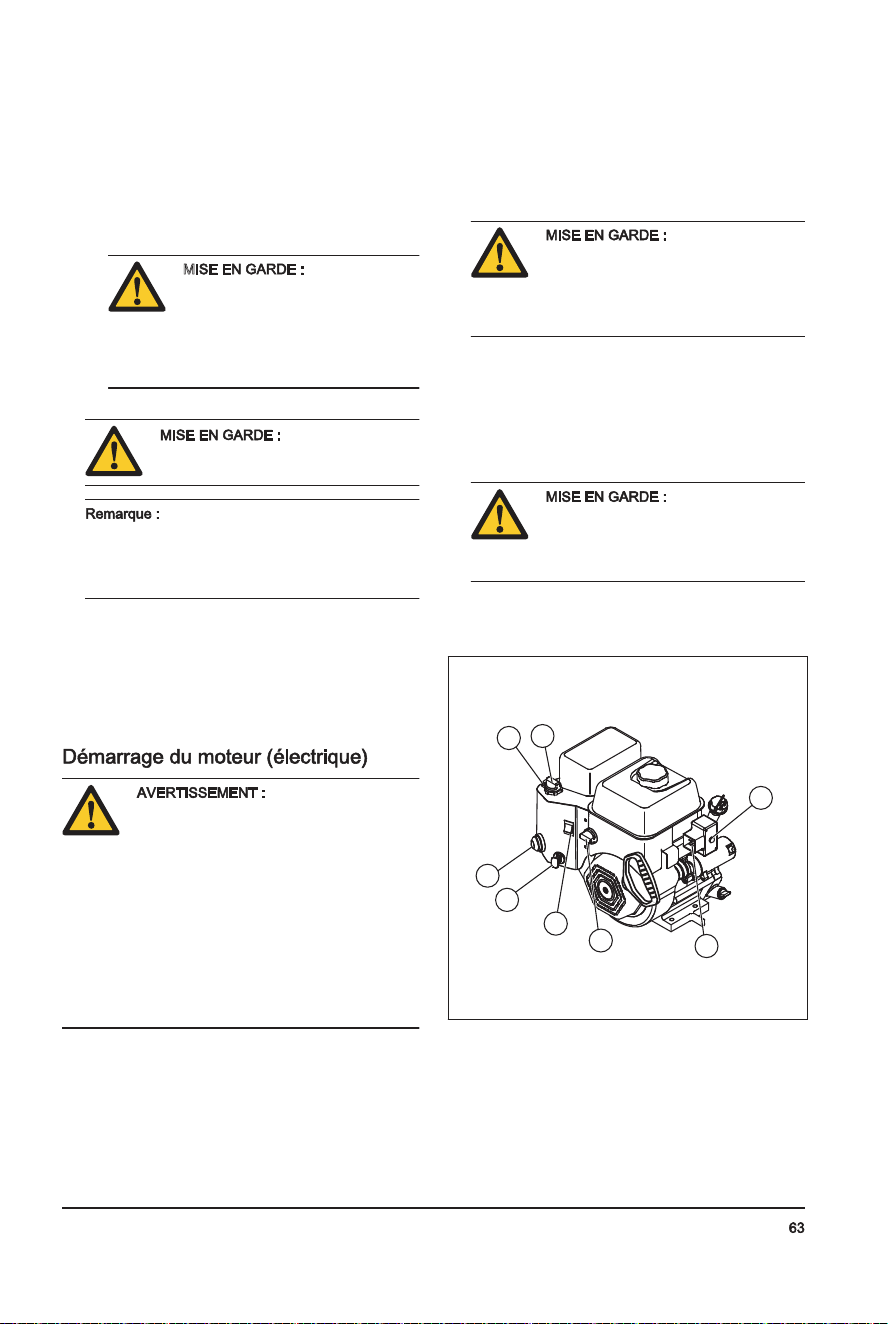
3. Déplacerlacommanded’accélération(B)àla
positionFAST(rapide).
4. Mettrel’interrupteurdemarche/arrêt(C)àlaposition
ON(marche).
a) Silemoteurestfroid,tournerlevoletdedépart
(D)àlapositionFULL(plein)etappuyersurla
pomped’amorçage(E)troisfois.
M Nepastrop
amorcerlemoteur.Celapeutnuire
audémarragedumoteur.Sile
moteurestsuramorcé,attendre
quelquesminutesavantdetenterle
démarrageetneparamorcerle
moteurparlasuite.
5. Tirerlapoignéeàcordedulanceur(G).
Nepasrelâcherla
prisetroprapidement.Laramener
délicatementàlapositiondedépart.
Silapoignéedulanceurgèle,tirer
doucementsurlacordedulanceuretrelâcherla
poignéedulanceur.Silemoteurnedémarrepas,
répéterlaprocédureouutiliserledémarreur
électrique.
6. Silacommandedestarteraétéutiliséepour
démarrerlemoteur,déplacerlentementlevoletde
départ(D)àlapositionOFF(arrêt).
7. Fairetournerlemoteur2à3minutesauralenti
avantdecommenceràprojeterlaneige.
8. Silemoteurnedémarrepascommeilsedoit,
l’éteindre.
Leproduitestdotéd’un
120Vdémarreurélectriquec.a.Nepas
utiliserledémarreurélectriquesivotre
maisonn’estpaséquipéed’un120V
systèmedemiseàlaterreàtroisbroches
c.a.Desblessuresgravesoudes
dommagesauproduitpourraientsurvenir.
Ledémarreurélectriqueestéquipéd’une
prised’alimentationàtroisbrochesetest
conçupourun120Vcourantdomestique
c.a.Assurez-vousquevotremaisondispose
d’un120Vsystèmedemiseàlaterreàtrois
brochesc.a.Encasdedoute,consulterun
électricienagréé.
1. InsérerlacléON/OFF(marche/arrêt)(A)dansla
fented’allumagejusqu’àcequ’elles’enclenche.Ne
pastournerlaclé.
2. Placerl’interrupteurdemarche/arrêtducarburant(F)
àlapositionON(marche).
3. Déplacerlacommanded’accélération(B)àla
positionFAST(rapide).
4. Mettrel’interrupteurdemarche/arrêt(C)àlaposition
ON(marche).
a) Silemoteurestfroid,tournerlevoletdedépart
(D)àlapositionFULL(plein).
5. Appuyersurl’amorce(3)troisfois.
Nepastropamorcer
lemoteur.Celapeutnuireaudémarrage
dumoteur.Silemoteurestsuramorcé,
attendrequelquesminutesavantde
tenterledémarrageetneparamorcerle
moteurparlasuite.
6. Brancherlarallongedansleconnecteurdumoteur
(G).
7. Brancherl’autreextrémitédelarallongesurla120
Vprised’alimentationàtroistrousc.a.dotéed’une
miseàlaterre.
8. Appuyersurleboutondedémarrageélectrique(H)
jusqu’àcequelemoteurdémarre.
Nepastenterde
démarrerlemoteurpendantplusdecinq
secondescontinuesentrechaque
tentativededémarrage.Attendre5à
10secondesentrechaquetentative.
9. Silevoletdedépartaétéutilisépourdémarrerle
moteur,relâcherleboutondedémarrageélectrique
etdéplacerlentementlevoletdedépart(D)àla
positionOFF(arrêt).
H
C
A
E
B
D
G
F
10. Débrancherlarallonge,toutd’abordàlaprise,puis
aumoteur.
11. Fairetournerlemoteur2à3minutesauralenti
avantdecommenceràprojeterlaneige.
694-002-
4. Installa¼-20locknut(D)ontheshearpinand
tighten.
A C B
D
5. PuttheON/OFFkeyintheignitionandconnectthe
sparkplugcabletothesparkplug.
• Keepthetiresfreeoffuel,oilandchemicalsto
preventdamagetotherubber.
• Keepthetiresawayfromstumps,stones,ruts,sharp
objectsandotherobjectswhichcancausedamage
tothetires.
• Keepthetirepressurecorrect,see
Technicaldata
onpage25
.
Donotunclogthechutedeflectorbeforethefollowing
operationsaremade.
1. Releasetheaugerengagementandthedrive
engagementatthesametime.
2. Wait10secondstomakesurethattheaugershave
stopped.
3. Stoptheproduct.
4. Usetheclean-outtool(atleast15"long,includedin
somemodels)toremovetheclog.
Donotputyourhandsinto
thechutedeflectororinsidetheauger
housing.
1. Putthescraperbar(A)inareversedpositionwhenit
isworntotheedgeofthehousing.
A
2. Replacethescraperbarifitiswornonbothsidesor
ifitisdamaged.
Thev-beltsonyourproductare
ofspecialconstructionandshouldbe
replacedbyoriginalequipmentmanufacturer
(OEM)beltsavailablefromyournearest
servicecenter.UsingotherthanOEMbelts
cancausepersonalinjuryordamagetothe
product.
Thebeltreplacementrequires
separationoftheproduct.Whileseparating
theaugerhousingfromtheframe,itis
importantthatanassistantstandsinthe
operatingpositionandholdstheproduct
handles.Seriouspersonalinjuryand/or
damagetotheproductcouldoccurifthe
productfallsduringthebeltreplacement
process.
Theaugerandtractiondrivebeltsarenot
adjustable.Replacethebeltsiftheyaredamagedor
begintoslipfromwear.Itisrecommendedtohavethe
beltsreplacedbyaqualifiedservicecenter.
Itisrecommendedtoreplacethedrivebeltand
augerbeltatthesametime.
1. Removethefuelfromthefueltank.
694-002-
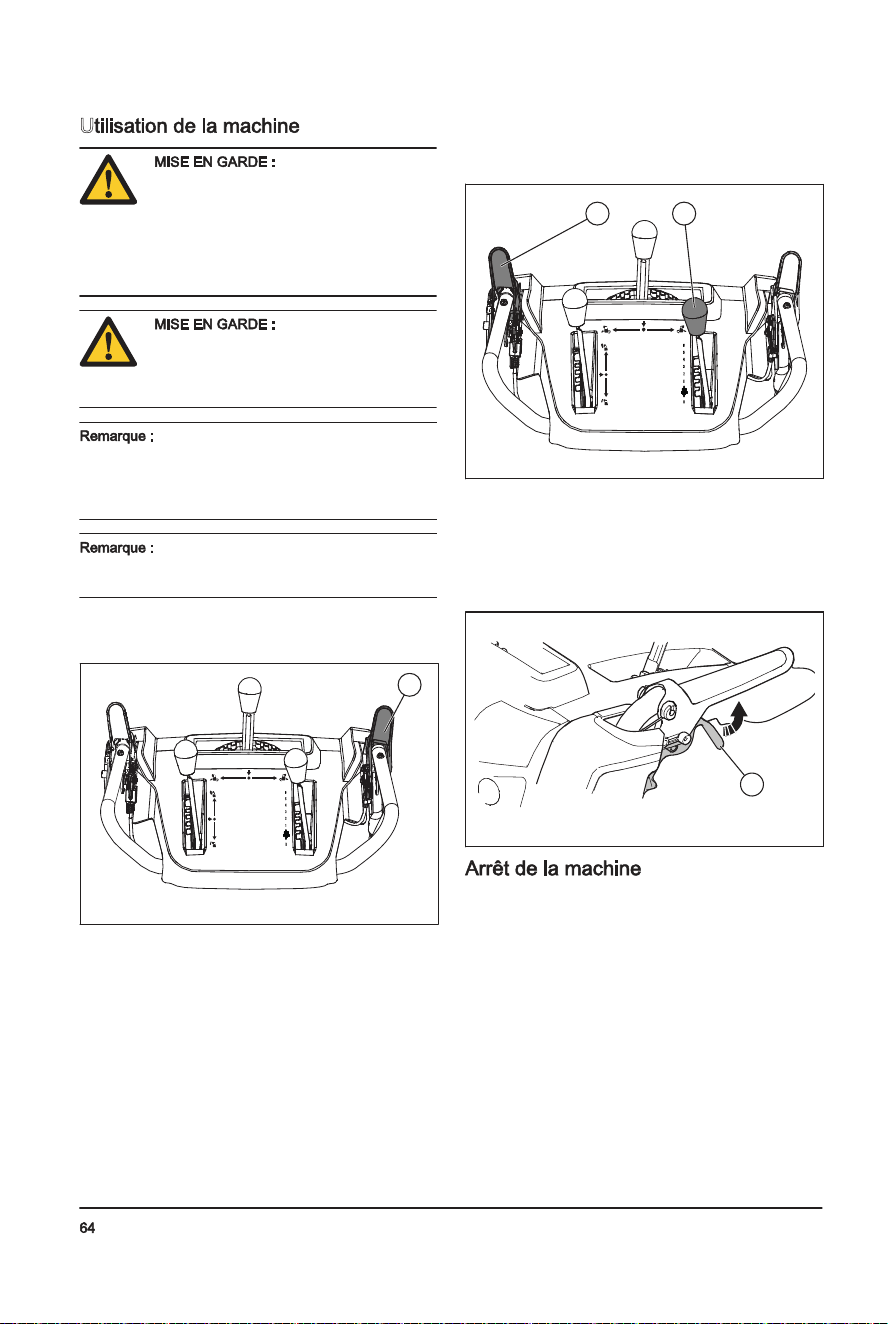
• Ifthesparkplugisdirty,cleanitandmakesurethat
theelectrodegapiscorrect,see
Technicaldataon
page25
.
• Replacethesparkplugifitisnecessary.
1. Beforeeachuse,inspecttheaugersandthescraper
barforwear.
2. Iftheedgeofthescraperbarisworn,reversethe
scraperbar.Ifthescraperbarhasdamagesoris
wornonbothedges,replaceit.
3. Iftheedgesoftheaugersareworn,contactan
authorizedservicecentertoreplacethem.
Theaugershearpinsprotecttheproductfromdamage.
Theaugershearpinsbreakifanobjectcomesintothe
movingparts.
Useonlyoriginalequipment
shearpinssuppliedwiththeproduct.
1. Ifanaugershearpinbreaks,stoptheengineand
waitforthemovingpartstostop.
2. RemovetheON/OFFkeyanddisconnectthespark
plugcable.
3. Aligntheholeintheaugerhub(B)withtheholein
theaugershaft(C)andinstallanew¼-20x2
shearpin(A)
4. Installa¼-20locknut(D)andtighten.
A B
C
DB
5. PuttheON/OFFkeyintheignitionandconnectthe
sparkplugcabletothesparkplug.
Theimpellershearpinsprotecttheproductfrom
damage.Theimpellershearpinsbreakifanobject
comesintothemovingparts.
Useonlyoriginalequipment
shearpinssuppliedwiththeproduct.
1. Ifanimpellershearpinbreaks,stoptheengineand
waitforthemovingpartstostop.
2. RemovetheON/OFFkeyanddisconnectthespark
plugcable.
3. Aligntheholeintheimpellerhub(A)withtheholes
intheimpellershaft(B)andinstallanew¼-20shear
pin(C).
694-002-
U
Nepasfairefonctionner
lamachinesansneigeousanseaupour
lubrifierleslamesdelatarière.Une
mauvaiseutilisationpeutmeneràune
températureélevéedeslamesdelatarière,
surtoutsileproduitestneuf.Celapeut
endommagerleslamesdelatarièreetla
barrederacleur.
Nepasengager
partiellementlesleviersd’entraînementou
delatarièrependantuneduréeprolongée,
carcelarisqued’entraîneruneusure
prématuréedescourroies.
Lorsquel’engagementdel’entraînementet
l’engagementdelatarièresontactionnés,l’engagement
del’entraînementverrouillelatarièreenplace.Utiliserla
maindroitepourmanœuvrerlagoulotted’éjectionà
neige.
Nepasmodifierlavitesselorsquelatarière
estengagée.Celapourraitendommagerla
transmission.
1. Pourengagerleslamesdelatarière,poussersurla
poignéed’engagementdelatarièreafind’engagerla
tarièreetdeprojeterlaneige.
A
2. Releverlelevierdecommandedevitesse
d’entraînement(B)delapositioncentraleafinquele
produitpuissesedéplacerversl’avantlorsque
l’engagementdel’entraînement(C)estengagé.Ne
pasmodifierlavitesselorsquelatarièreest
engagée.Celapourraitendommagerla
transmission.
3. Abaisserlelevierdecommandedevitesse
d’entraînementdelapositioncentraleafinquele
produitpuissesedéplacerversl’arrièrelorsque
l’engagementdel’entraînementestengagé.
C B
4. Pourqueleproduitsedéplacedansladirection
sélectionnée,maintenirl’engagementde
l’entraînementcontrelapoignée.
5. Sileproduitestéquipéd’unedirectionassistée,
maintenirlelevierdedirectiongauche(D)pour
tourneràgauche.Maintenirlelevierdedirection
droitpourtourneràdroite.
D
1. Placerl’interrupteurON/OFF(marche/arrêt)en
positionOFF(arrêt).
2. RetirerlacléON/OFF(marche/arrêt).
694-002-
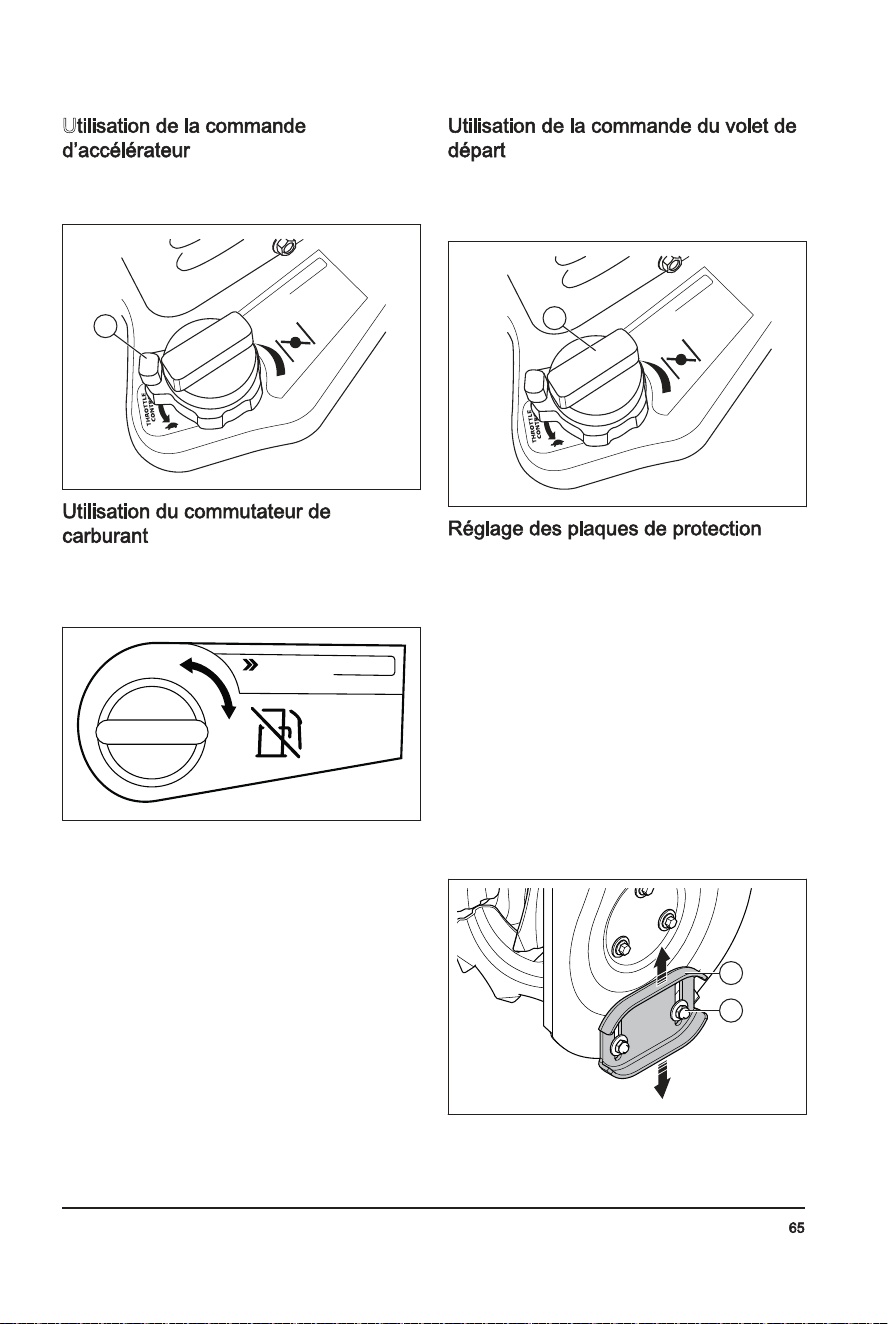
U
• Tournerlacommanded’accélération(A)pour
modifierlaquantitédecarburantutilisé.Toujours
fairetournerlemoteuràpleinrégime.
CHO
K
E
C
ONTR
O
L
T
R
U
CT
I
ON
S
A
• Tournerlecommutateurdecarburantoufermerle
robinetdecarburant.Utiliserleproduitlorsquele
commutateurdecarburantsetrouveàlaposition
OPEN(ouvert).
OFF
ON
F
U
E
L
C
O
NT
R
O
L
I
N
S
T
R
U
C
T
I
O
N
S
• Tournerlacommandeduvoletdedépart(A)afin
d’ouvriroudefermerlasoupapeduvoletdedépart.
Utiliserlevoletdedépartpourdémarrerlemoteur
lorsqu’ilestfroid.
C
H
O
KE
C
O
N
T
R
O
L
T
R
U
CT
I
ON
S
A
Aucunréglagen’estrequispourl’installationnormale.
1. Silecontre-écrou(B)estlâcheoulaplaquede
protection(A)n’estpassuffisammentélevéedusol,
déverrouillerlecontre-écrou(B)àl’aided’unecléde
13mmàextrémitéouverteafindedéplacerla
plaquedeprotectionverslehautouverslebas.
2. Surlessurfacesplanes,commelesroutes
asphaltées,releverlabarredeprotection(A)de5à
6mm(de0,2à0,25po)àpartirdusol.Surles
surfacesinégales,commelegravier,s’assurerque
l’espacemententrelesoletleproduitestplusgrand
aumoyendesplaquesdeprotectionafinquela
barreduracleursetrouveau-dessusdugravier.
Assurez-vousquelegravieretlespierresn’entrent
pasdansleproduit.Desblessurespersonnelles
peuventsurvenirsidesobjetssontéjectésàgrande
vitesse.
3. Fixerlecontre-écrou(B).
B
A
694-002-
N Itisnotnecessarytoaddgreaseortodoother
maintenancetothegearbox.
• Makesurethatthenutsandscrewsontheproduct
aretightened.
Atoolowoillevelcandodamage
totheengine.Doacheckoftheoillevel
beforeyoustarttheproduct.
1. Puttheproductonlevelground.
2. Removetheoiltankcapwiththeattacheddipstick.
3. Cleantheoilfromthedipstick.
4. Putthedipstickfullyintotheoiltanktogiveacorrect
pictureoftheoillevel.
5. Removethedipstick.
6. Examinetheoillevelonthedipstick.
7. Iftheoillevelislow,fillwithengineoilanddoa
checkoftheoillevelagain.
1. Runtheengineafewminutestomaketheoilwarm.
Warmoilflowsbetterandincludesmore
contaminants.
Theengineoilishot.Avoid
skincontactwiththeusedengineoil.
2. Puttheproductonlevelground.
3. RemovetheON/OFFkey.
4. Putacontainerbelowtheoildrainplug.
5. Removetheoildrainplug,tiptheproductanddrain
theusedoilinthecontainer.
6. Puttheproductbacktotheoperatingposition.
7. Installtheoildrainplugandtightenitbyhand.
8. Filltheenginewithoil,see
Tofilltheenginewithoil
onpage11
.
• Lubricatethepivotpoints(A)withoil.
• Lubricatetheengine(B)withoil.
• Applyasmallamountoflithiumgreasetothe
interlockbosses(C)atthebeginningofeachseason
orevery25hoursofuse.
A
B
C
Themufflerkeepsthenoiselevelstoaminimumand
sendstheexhaustfumesawayfromtheoperator.
Donotusetheproductifthemufflerismissingor
defective.Adefectivemufflerincreasesthenoiselevel
andtheriskoffire.
Examinethemufflerregularlytomakesurethatitis
attachedcorrectlyandnotdamaged.
Themufflerbecomesveryhot
duringandafteruseandwhentheengine
operatesatidlespeed.Becarefulnear
flammablematerialsand/orfumestoprevent
fire.
Alwaysusetherecommended
sparkplugtype.Incorrectsparkplugtype
cancausedamagetotheproduct.
• Examinethesparkplugiftheengineislowon
power,isnoteasytostartordoesnotoperate
correctlyatidlespeed.
• Todecreasetheriskofunwantedmaterialonthe
sparkplugelectrodes,obeytheseinstructions:
a) Makesurethattheidlespeediscorrectly
adjusted.
b) Makesurethatthefuelmixtureiscorrect.
c) Makesurethattheairfilterisclean.
694-002-
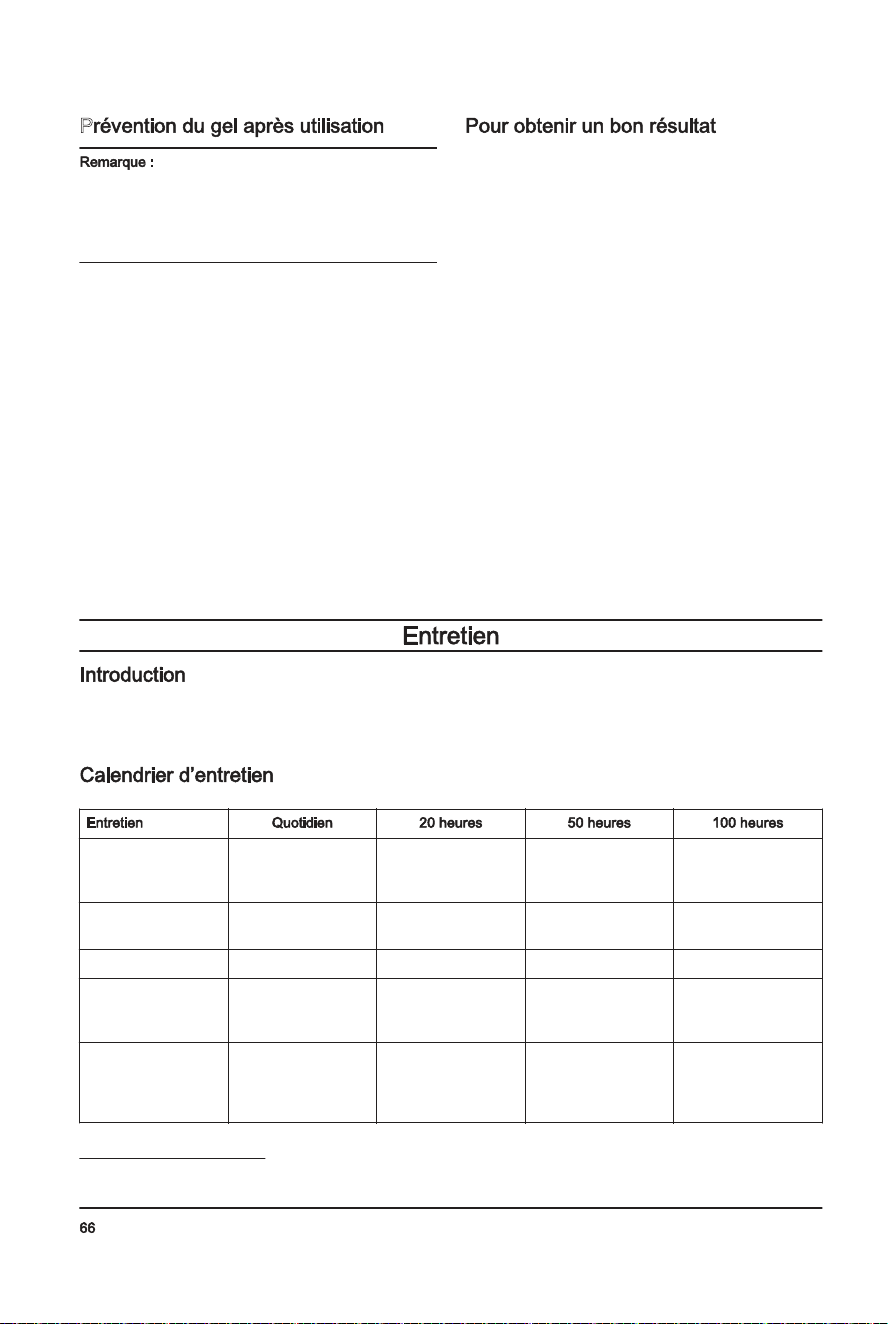
2. Removesnowandlooseicefromtheproduct.
3. Removesnowandlooseicefromthebaseofthe
chute.
4. Turnthechutedeflectortotheleftdirectionandto
therightdirectiontoremoveiceandwater.
5. Setthekeytothe"OFF"position.
6. Iftheproductdoesnothaveanelectricstarter,pull
thestarterropehandleseveraltimestoremoveice
andwater.
7. Iftheproducthasanelectricstarter,connectthe
producttopowerandpushthestartbuttononceto
removeiceandwater.
T
• Alwaysruntheengineatfullthrottleornearfull
throttle.
• Alwaysadaptthespeedoftheproducttothesnow
situationandadjustthespeedwiththedrivespeed
controllever.Makesurethattheproductthrows
snowevenly.
• Itiseasierandmoreefficienttoremovesnow
immediatelyafteritfalls.
• Alwaysthrowsnowdownwindwheneverpossible.
• Onflatsurfaces,likeasphaltroads,raisetheskid
platesupto5-6mm(0.2-0.25in)offtheground.
• Thescraperbarisreversible.Whenitbecomesworn
almosttotheedgeofthehousing,reverseit.
Replacethescraperbarifitisdamaged,orifboth
sidesareworn.
• Donotdispatchthechutedeflectorifitisclogged.
• Iftheproductdoesnotmoveforwarddueto
unforeseencircumstances,releasethedrive
engagementimmediatelyorpullouttheON/OFFkey
toOFFposition.
Whentheproductisinuse,boltscanloosenand
componentscanbecomeworn.Thiscancause
malfunctionlikeincorrecttoleranceclearance,increased
oilconsumption,ormisalignmentofvarious
components.Doregularmaintenanceontheproductto
preventmalfunction.
Makesurethatnuts
andscrewsaretight-
ened
X
Doacheckoftheen-
gineoillevel
X
Replaceoil
1
X X X
Makesurethereare
nofueloroilleaks
X
Removeclogging,
foreignobjectsin
auger
X
Inspectthetirepres-
sure
2
X
Inspectandchange
thesparkplug
3
X
1
Replacetheoilafterthefirst20h,50h,100handthenevery100h.
2
SeeTechnicaldataforcorrecttirepressure.
3
Checkandcleansparkplugbeforeuseeachyear.
694-002-
P
Lescommandesetlespiècesmobiles
peuventêtrebloquéesparlaglace.Nepasappliquer
uneforceexcessiveauxcommandes.S’iln’estpas
possibled’actionnerunecommandeoudemanœuvrer
unepièce,démarrerlemoteuretlelaisserfonctionner
pendantquelquesminutes.
1. Démarrerlemoteuretlelaissertournerauralenti
pendantquelquesminutes.Arrêterlemoteuret
attendrequetouteslespiècesmobilessoient
immobilisées.
2. Retirerlaneigeetlesmorceauxdeglaceduproduit.
3. Retirerlaneigeetlesmorceauxdeglaceàlabase
delagoulotte.
4. Tournerledéflecteurdegoulotteverslagaucheet
versladroitepourenleverlaglaceetdel’eau.
5. MettrelacléàlapositionOFF(arrêt).
6. Sileproduitn’estpasdotéd’undémarreur
électrique,tirerlapoignéedulanceuràplusieurs
reprisesafinderetirerlaglaceetl’eau.
7. Sileproduitdisposed’undémarreurélectrique,
brancherleproduitàl’alimentationetappuyersurle
boutondedémarrageunefoisafinderetirerlaglace
etl’eau.
• Toujoursfairetournerlemoteuràpleinrégimeou
presqueàpleinrégime.
• Toujoursadapterlavitesseduproduitaux
circonstancesrelativesàlaneigeetadapterla
vitesseaumoyendulevierdecommandedevitesse
d’entraînement.S’assurerqueleproduitprojettela
neigedefaçonuniforme.
• Ilestplusfacileetplusefficaced’éliminerlaneige
immédiatementaprèslachute.
• Toujoursprojeterlaneigedansladirectionduvent
autantquepossible.
• Surlessurfacesplanes,commelesroutes
asphaltées,releverlabarredeprotectionde5à
6mm(de0,2à0,25po)àpartirdusol.
• Labarrederacleurestréversible.Quandelleest
uséeets’approchedel’extrémitéducarter,
l’inverser.Remplacerlabarrederacleursielleest
endommagéeousilesdeuxcôtéssontusés.
• Nepasréglerledéflecteurdegoulottes’ilest
encrassé.
• Sileproduitnesedéplacepasversl’avantenraison
decirconstancesexceptionnelles,relâcher
immédiatementl’engagementdel’entraînementou
tirerlacléON/OFF(marche/arrêt)àlapositionOFF
(arrêt).
Lorsqueleproduitestenutilisation,lesboulonspeuvent
sedesserreretdescomposantspeuvents’user.Cela
peutentraînerundysfonctionnement,commeun
mauvaisespacement,uneaugmentationdela
consommationd’huileouunproblèmed’alignementde
différentséléments.Procéderàunentretienrégulierdu
produitafind’évitertoutdysfonctionnement.
S’assurerqueles
écrousetlesvissont
serrés
X
Vérifierleniveau
d’huilemoteur
X
Remplacerl’huile
7
X X X
S’assurerqu’iln’ya
pasdefuitesdecar-
burantoud’huile
X
Retirerlesobstruc-
tionsetlescorps
étrangersdelatar-
ière
X
7
Remplacerl’huileaprèsles20,50et100premièresheurespuistoutesles100heures.
694-002-
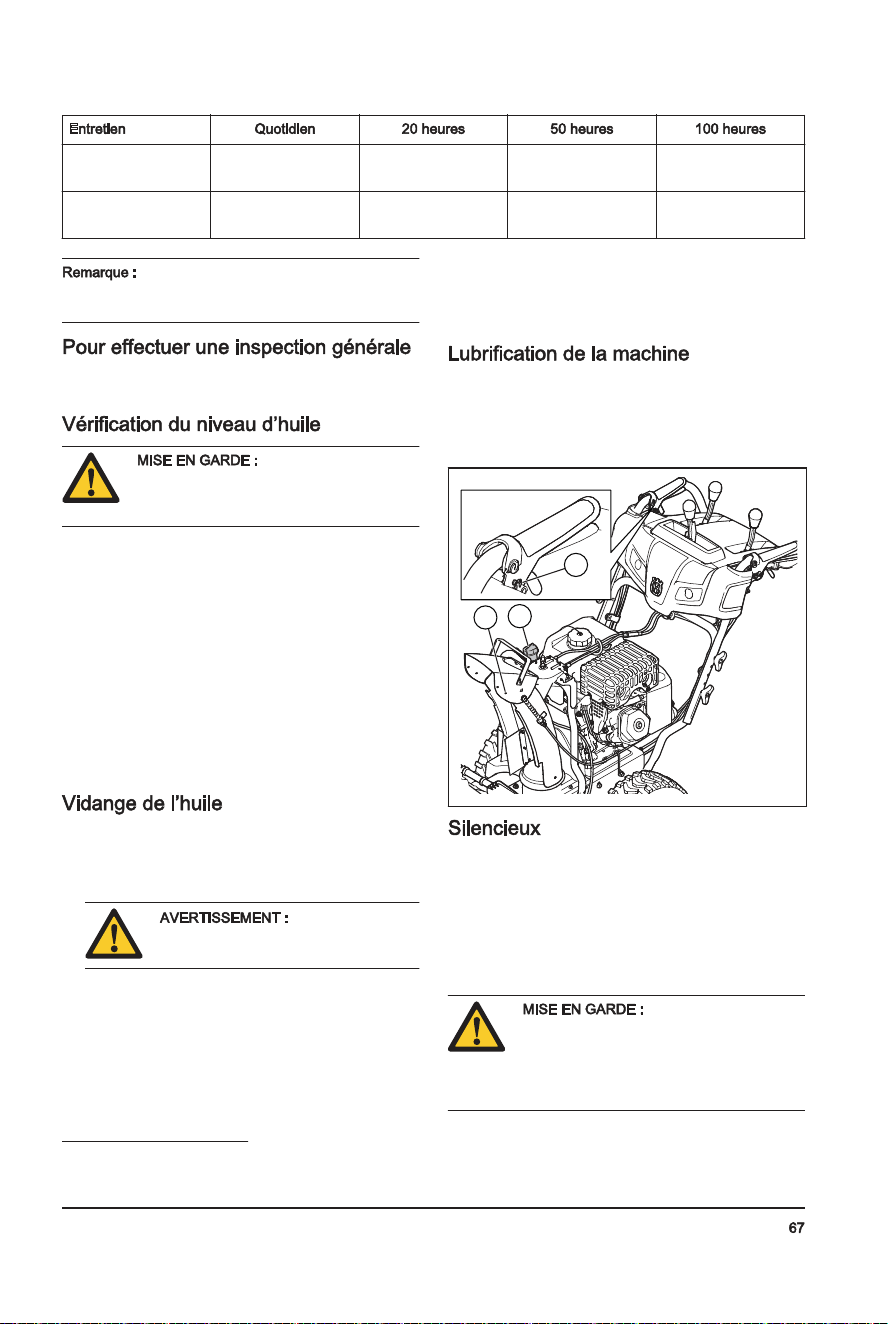
E
Vérifierlapression
despneus
8
X
Inspecteretremplac-
erlabougie
9
X
Iln’estpasnécessaired’ajouterdela
graisseoud’effectuerd’autresentretienssurlaboîtede
vitesses.
• S’assurerquelesécrousetlesvissurleproduitsont
serrés.
Unniveaud’huiletrop
faiblepeutcauserdesdommagesau
moteur.Vérifierleniveaud’huileavant
d’utiliserleproduit.
1. Placerleproduitsurunsolplat.
2. Retirerlebouchonduréservoird’huileaveclajauge
d’huile.
3. Nettoyerl’huilesurlajauged’huile.
4. Insérerentièrementlajaugedansleréservoird’huile
pourobteniruneestimationappropriéeduniveau
d’huile.
5. Retirerlajauged’huile.
6. Examinerleniveaud’huilesurlajauged’huile.
7. Sileniveaud’huileesttropbas,rempliravecde
l’huilemoteuretvérifierdenouveauleniveau
d’huile.
1. Fairetournerlemoteurquelquesminutespourfaire
chaufferl’huile.L’huilechaudes’écouleplus
facilementetemporteavecelleplusde
contaminants.
L’huilemoteurest
chaude.Évitertoutcontactentrelapeau
etl’huilemoteurusagée.
2. Placerleproduitsurunsolplat.
3. RetirerlacléON/OFF(marche/arrêt).
4. Placerunrécipientsouslebouchondevidange
d’huile.
5. Retirerlebouchondevidanged’huile,basculerle
produitetvidangerl’huileusagéedansleconteneur.
6. Replacerleproduitàlapositiondefonctionnement.
7. Installerlebouchondevidanged’huileetleserrerà
lamain.
8. Remplirlemoteurd’huile,voir
Remplissagedu
moteuravecdel’huileàlapage62
.
• Lubrifierlespointspivots(A)avecdel’huile.
• Lubrifierlemoteur(B)avecdel’huile.
• Appliquerunepetitequantitédegraisseaulithium
aumécanismedeverrouillageBoss(C)audébutde
chaquesaisonoutoutesles25heuresd’utilisation.
A
B
C
Lesilencieuxmaintientleniveaudebruitauminimumet
dirigelesgazd’échappementloindel’utilisateur.
Nepasutiliserl’outilsilesilencieuxestmanquantou
défectueux.Unsilencieuxdéfectueuxaugmentele
niveausonoreetlerisqued’incendie.
Examinerrégulièrementlesilencieuxpours’assurerqu’il
estcorrectementraccordéetenbonétat.
Lesilencieuxdevient
trèschaudpendantetaprèsutilisationet
lorsquelemoteurtourneauralenti.Faire
attentionàproximitédesmatériaux
inflammablesoudesfuméesafind’éviter
toutrisqued’incendie.
8
Voirlasectionsurlescaractéristiquestechniquespourconnaîtrelabonnepressiondespneus.
9
Contrôleretnettoyerlabougieavantl’utilisationchaqueannée.
694-002-
5. Iftheproducthaspowersteering,holdtheleft
steeringtrigger(D)toturnleft.Holdtherightsteering
triggertoturnright.
D
1. MovetheON/OFFswitchtotheOFFposition.
2. RemovetheON/OFFkey.
• Turnthethrottlecontrol(A)tochangetheamountof
fuelused.Alwaysoperatetheengineatfullthrottle.
C
HO
K
E
C
ON
TR
O
L
T
R
U
CT
I
ON
S
A
• Turnthefuelswitchtoopenorclosethefuelvalve.
OperatetheproductwiththefuelswitchintheOPEN
position.
OFF
ON
F
U
E
L
C
ON
T
R
O
L
IN
S
T
R
U
C
T
IO
N
S
• Turnthechoke(A)toopenorclosethechokevalve.
Usethechoketostartacoldengine.
C
H
O
K
E
C
ONTR
O
L
T
R
U
CT
I
ON
S
A
Noadjustmentisrequiredfornormalinstallation.
1. Whenthelocknut(B)islooseortheskidplate(A)is
nothighenoughfromtheground,unlockthelocknut
(B)witha13mmopen-endedwrench,tomovethe
skidplateupordown.
2. Onflatsurfaces,likeasphaltroads,raisetheskid
plates(A)5-6mm(0.2-0.25in)offtheground.On
unevensurfaces,likegravelroads,makethe
clearancebetweenthegroundandtheproduct
largerwiththeskidplatestogetthescraperbar
abovethetopofthegravel.Makesurethatthe
gravelandstonesdonotenterintotheproduct.It
cancausepersonalinjuriesifobjectsareejectedat
highspeed.
3. Tightenthelocknut(B).
B
A
Controlsandmovingpartscanbeblockedbyice.
Donotapplymuchforcetothecontrols.Ifyoucannot
operateacontrolorapart,starttheengineandletit
operateforsomeminutes.
1. Starttheengineandletitoperateforsomeminutes.
Stoptheengineandwaitforallmovingpartstostop.
694-002-
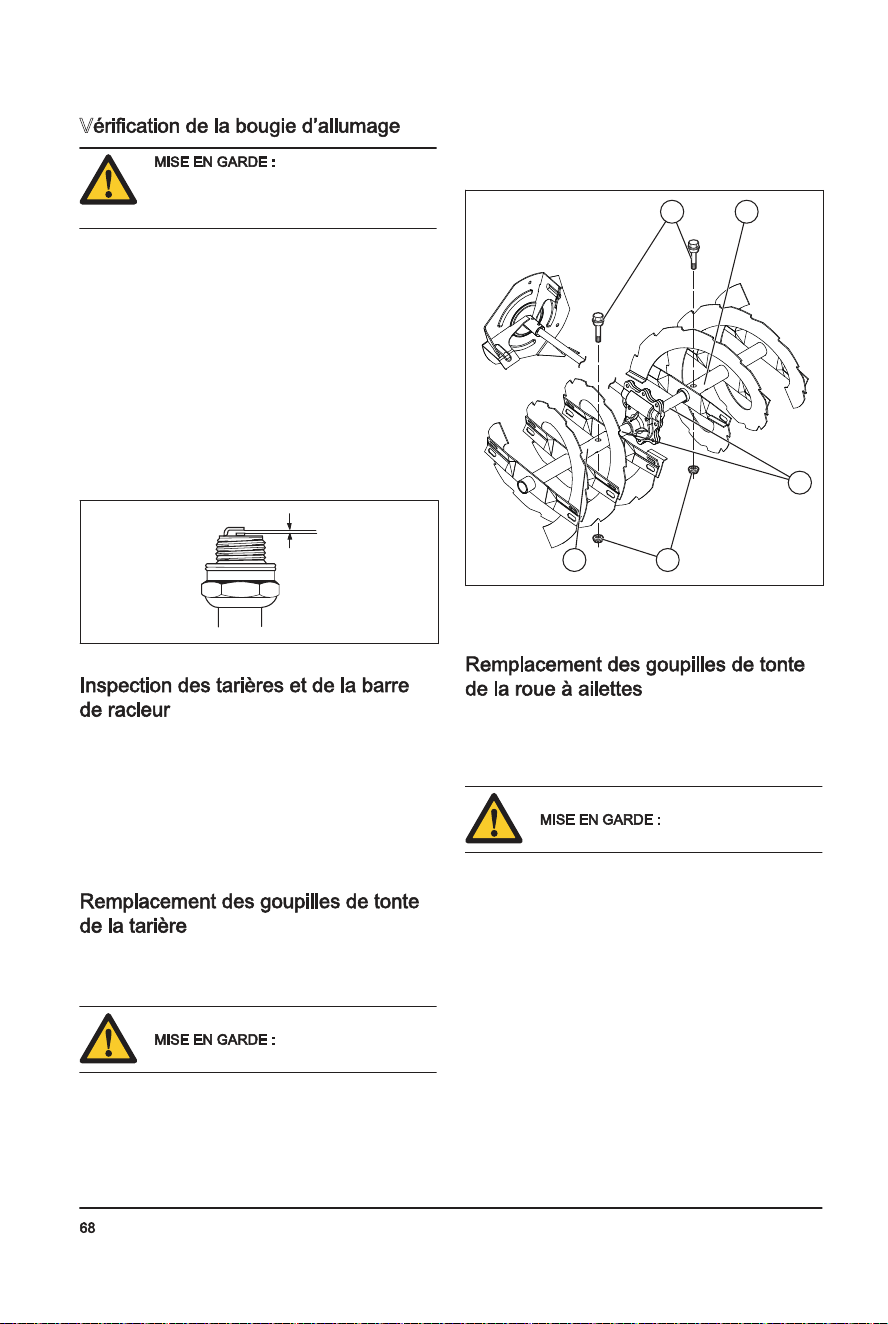
9. Ifthechokewasusedtostarttheengine,releasethe
electricstartbuttonandslowlymovethechoke(D)
totheOFFposition.
H
C
A
E
B
D
G
F
10. Disconnecttheextensioncordfromthereceptacle
firstandthenfromtheengine.
11. Runtheengine2-3minutesatidlingspeedbefore
youstarttothrowsnow.
T
Donotoperatewithoutsnowor
watertolubricatetheaugerblades.Incorrect
usecancausehightemperaturesinthe
augerblades,especiallyiftheproductis
new.Thiscancausedamagetotheauger
bladesandscraperbar.
Donotpartiallyengagedriveor
augerleversforanextendedperiodoftime;
thiscanleadtoprematurewearorburning
ofthebelts.
Whenboththedriveengagementandauger
engagementareengaged,thedriveengagementwill
locktheaugerengagementinposition.Usetheright
handtocontrolthesnowdischargechute.
Donotchangethespeedwhentheaugersare
engaged.Thiscancausedamagetothetransmission.
1. Toengagetheaugerblades,pushtheauger
engagement(A)tothehandletoengagetheauger
andthrowsnow.
A
2. Raisethedrivespeedcontrollever(B)fromthe
middlepositiontomaketheproductmoveforward
whenthedriveengagement(C)isengaged.Donot
changethespeedwhentheaugersareengaged.
Thiscancausedamagetothetransmission.
3. Lowerthedrivespeedcontrolleverfromthemiddle
positiontomaketheproductmoverearwardwhen
thedriveengagementisengaged.
C B
4. Tomaketheproductmoveintheselecteddirection,
holdthedriveengagementagainstthehandle.
694-002-
V
Toujoursutiliserune
bougied’allumagedutyperecommandé.
Unebougied’allumagedetypeinapproprié
peutendommagerleproduit.
• Examinerlabougied’allumagesilemoteurmanque
depuissance,démarredifficilementounefonctionne
pascorrectementaurégimederalenti.
• Afinderéduirelerisquedematériauindésirablesur
lesélectrodesdelabougie,respecterlesconsignes
suivantes:
a) Vérifierquelerégimederalentiestrégléde
façonadéquate.
b) Vérifierquelemélangedecarburantestcorrect.
c) Vérifierquelefiltreàairestpropre.
• Silabougied’allumageestsale,lanettoyeret
s’assurerquel’écartementdesélectrodesest
correct,voirlafigure
Donnéestechniquesàlapage
77
.
• Remplacerlabougied’allumageaubesoin.
1. Avantchaqueutilisation,vérifierlatarièreetlabarre
deracleurpourdétectertoutsigned’usure.
2. Sileborddelabarrederacleurestusé,inverserla
barrederacleur.Silabarrederacleurest
endommagéeouestuséedesdeuxcôtés,la
remplacer.
3. Silesbordsdelatarièresontusés,communiquer
avecuncentredeserviceagréépourlesremplacer.
Lagoupilledetonteprotègeleproduitcontreles
dommages.Lesgoupillesdetontedelatarièrepeuvent
sebrisersiunobjetestinsérédanslespiècesmobiles.
N’utiliserqueles
goupillesdetontelivréesavecleproduit.
1. Encasdebrisd’unegoupilledetontedelatarière,
arrêterlemoteuretattendrequelespiècesmobiles
soientimmobiles.
2. RetirerlacléON/OFF(marche/arrêt)etdébrancher
lecâbled’allumage.
3. Alignerletroudumoyeudelatarière(B)avecletrou
dansl’arbredelatarière(C)etinstallerunenouvelle
goupilledetonte¼-20x2(A).
4. Installeruncontre-écrou¼-20(D)etleserrer.
A B
C
DB
5. InsérerlacléON/OFF(marche/arrêt)dansle
contact,puisbrancherlecâbled’allumagedela
bougie.
Lagoupilledetontedelaroueàailettesprotègele
produitcontrelesdommages.Lesgoupillesdetontede
laroueàailettespeuventsebrisersiunobjetestinséré
danslespiècesmobiles.
N’utiliserqueles
goupillesdetontelivréesavecleproduit.
1. Encasdebrisd’unegoupilledetontedelaroueà
ailettes,arrêterlemoteuretattendrequelespièces
mobilessoientimmobiles.
2. RetirerlacléON/OFF(marche/arrêt)etdébrancher
lecâbled’allumage.
3. Alignerletroudumoyeudelaroueàailettes(A)
aveclestrousdel’arbredelaroueàailettes(B)et
installerunenouvellegoupilledetonte¼-20(C).
694-002-

4. Installeruncontre-écrou¼-20(D)surlagoupillede
tonteetserrer.
A C B
D
5. InsérerlacléON/OFF(marche/arrêt)dansle
contact,puisbrancherlecâbled’allumagedela
bougie.
• Maintenirlespneusexemptsdecarburantetd’huile
pouréviterd’endommagerlecaoutchouc.
• Maintenirlespneusàl’écartdesouches,depierres,
d’ornières,d’objetspointusetdetoutautreobjet
pouvantlesendommager.
• Maintenirlapressioncorrectedespneus,voir
Donnéestechniquesàlapage77
.
Nepasdéboucherledéflecteurdegoulotteavantde
réaliserlesopérationssuivantes.
1. Relâchersimultanémentl’engagementdelatarière
etceluidel’entraînement.
2. Attendre10secondespours’assurerquelestarières
sontarrêtées.
3. Mettreleproduithorstension.
4. Utiliserl’outildenettoyage(aumoins38cm[15po]
delong,inclusaveccertainsmodèles)pourretirer
l’obstruction.
Nepasplacerles
mainsdansledéflecteurdegoulotteou
àl’intérieurducarterdetarière.
1. Placerlabarrederacleur(A)danslaposition
inverséelorsqu’elleestuséeducôtéducarter.
A
2. Remplacerlabarrederacleursielleestuséedes
deuxcôtésousielleestendommagée.
LescourroiesenVsont
spécialementconçuespourleproduitet
doiventêtreremplacéespardespiècesdu
fabricantd’originedisponiblesauprèsde
votrecentredeservicesleplusproche.
L’utilisationdecourroiesautresquecelles
dufabricantd’originepeutcauserdes
blessurespersonnellesouendommagerle
produit.
Leremplacementdela
courroienécessiteledémontageduproduit.
Pourséparerlecarterdelatarièredu
châssis,ilestimportantqu’unassistantse
tiennedeboutdanslapositionde
fonctionnementetqu’iltiennelespoignées
duproduit.Desblessurescorporellesgraves
ouunendommagementduproduit
pourraientseproduiresileproduitest
échappépendantleremplacementdela
courroie.
Iln’estpaspossibled’ajusterlacourroiede
latarièreetlacourroied’entraînement.Remplacerles
courroiessiellessontendommagéesousielles
commencentàglisserenraisondel’usure.Ilest
recommandédefaireremplacerlescourroiesparun
centrederéparationagréé.
Ilestrecommandéderemplacerlacourroie
d’entraînementainsiquelacourroiedelatarière.
1. Retirerlecarburantduréservoirdecarburant.
694-002-
2. Toadjustthesnowthrowingdistanceofthechute
deflector,movethedeflectorremotecontrollever(B)
downtodecreasethedistanceanduptoincrease
thedistance.
AB
1. InserttheON/OFFkey(A)intotheignitionslotuntilit
clicks.Donotturnthekey.
G
F
C
A
E
B
D
2. TurnthefuelON/OFFswitch(F)totheONposition.
3. Putthethrottlecontrol(B)totheFASTposition.
4. PuttheON/OFFswitch(C)totheONposition.
a) Iftheengineiscold,rotatethechoke(D)tothe
FULLpositionandpushtheprimer(E)three
times.
Donotoverprimethe
engine.Itcanpreventtheengine
fromstarting.Iftheengineisover
primed,waitafewminutesbefore
attemptingtostartanddonotpush
theprimer.
5. Pullthestarterropehandle(G).
Donotreleasethegrip
quickly.Moveitbacktothestartposition
slowly.
Iftheropestarterhasfrozen,slowlypulloutas
muchropeoutofthestarteraspossibleandrelease
thestarterropehandle.Iftheenginedoesnotstart,
repeattheprocedureorusetheelectricstarter.
6. Ifthechokewasusedtostarttheengine,slowly
movethechoke(D)totheOFFposition.
7. Runtheengine2-3minutesatidlingspeedbefore
youstarttothrowsnow.
8. Iftheenginedoesnotrunasitshould,turnitoff.
Theproducthasa120VA.C.
electricstarter.Donotusetheelectric
starterifyourhouseisnota120VA.C.
three-wiregroundedsystem.Serious
personalinjuryordamagetotheproduct
couldoccur.Theelectricstarterhasathree-
wirepowerplug,andisdesignedtouse120
VA.C.householdcurrent.Makesurethat
yourhouseisa120VA.C.three-wire
groundedsystem.Ifyouareuncertain,aska
licensedelectrician.
1. InserttheON/OFFkey(A)intotheignitionslotuntilit
clicks.Donotturnthekey.
2. TurnthefuelON/OFFswitch(F)totheONposition.
3. Putthethrottlecontrol(B)totheFASTposition.
4. PuttheON/OFFswitch(C)totheONposition.
a) Iftheengineiscold,turnthechoke(D)tothe
FULLposition.
5. Pushtheprimer(E)threetimes.
Donotoverprimetheengine.
Itcanpreventtheenginefromstarting.If
theengineisoverprimed,waitafew
minutesbeforetryingtostartanddonot
pushtheprimer.
6. Connecttheextensioncordtotheconnectoronthe
engine(G).
7. Connecttheotherendoftheextensioncordintoa
three-holegrounded120VA.C.receptacle.
8. Pushtheelectricstartbutton(H)untiltheengine
starts.
Donotcranktheenginemore
thanfivecontinuoussecondsbetween
eachtimeyoutrytostart.Wait5to10
secondsbetweeneachtry.
694-002-
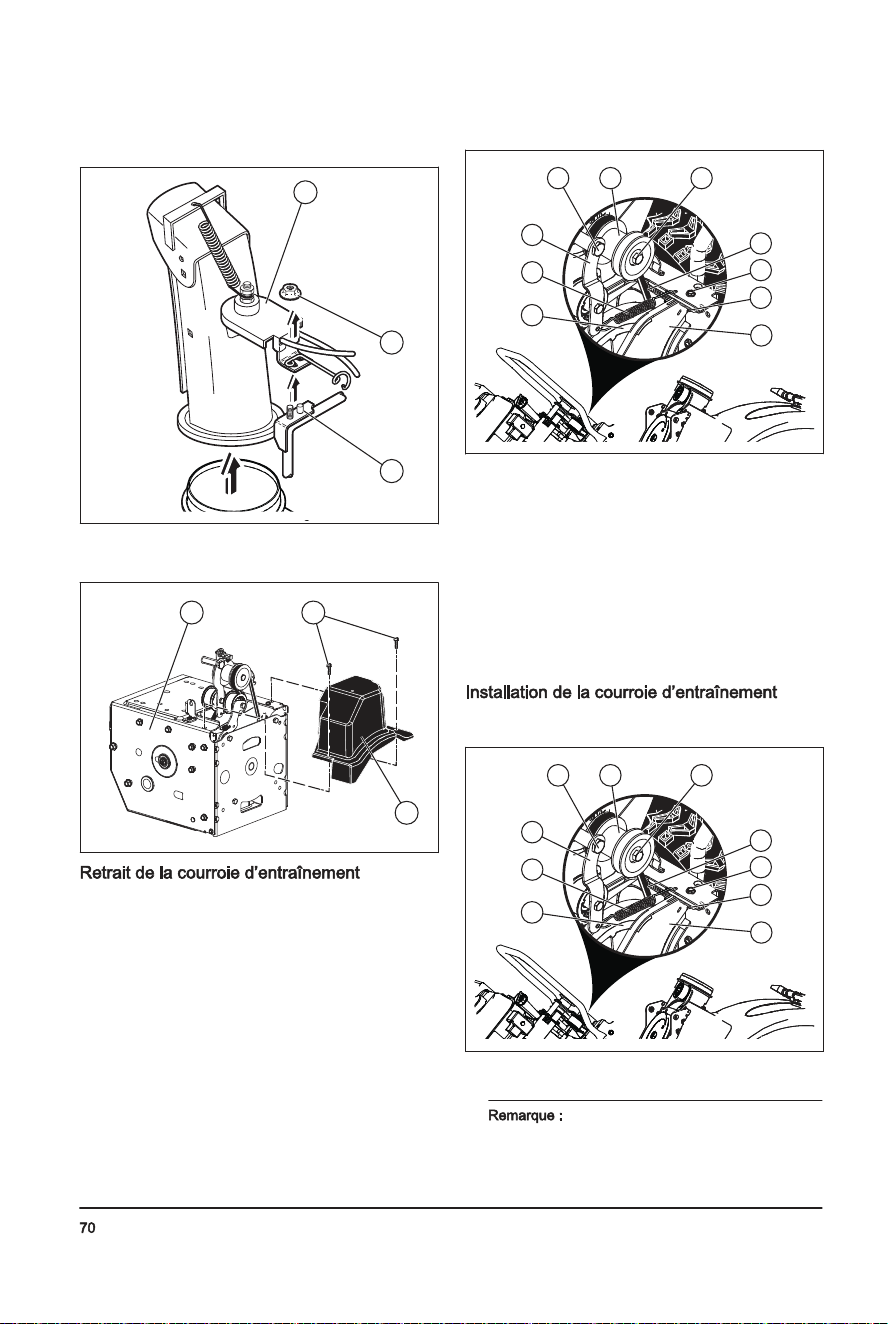
2. Installtheremotecableeyelet(E)tothechute
deflector(F)withashoulderbolt(G),anylonwasher
(C),andtightenwitha¼-20locknut(K).Thecable
eyeletwillbelooseontheshoulderbolt.
3. Attachthespring(L)betweenthehexnut(M)onthe
chuterotatorheadandtheholeonthechute
deflector.
F
L
M
B
A
D
K
C
E
G
4. Attachthelevercontrolknobs(N)bypressingthem
downonthecontrollevers(O).
O
N
• Keeppersonsandanimalsawayfromtheworkarea.
• Dodailymaintenance.See
Maintenanceschedule
onpage15
.
• Makesuretheignitionleadfitscorrectlyonthespark
plug.
• Addoilorgasoline,ifnecessary.See
Technicaldata
onpage25
.
Donotrotatethedipstickwhen
youchecktheoil.Donotfillabovethemark.
1. Removetheoilcapandcleanthedipstick.See
Productoverviewonpage3
forthelocationofthe
dipstick.
2. Addoiltothetopmarkonthedipstick.Usethe
dipsticktodoacheckoftheoillevelatregular
intervals.
3. Puttheoilcapback.
Ifavailable,uselow-emission/alkylategasoline.Iflow-
emission/alkylategasolineisnotavailable,usegood
qualityunleadedgasolineorleadedgasoline.Use
gasolinewithanoctanenumberof90RONoutofNorth
America(87AKIinNorthAmerica)orhigher,andwitha
maximumof10%ethanol(E10).
Donotusegasolinewithan
octanenumberlessthan90RONoutof
NorthAmerica(87AKIinNorthAmerica).
Thiscancausedamagetotheproduct.
1. Openthefueltankcapslowlytoreleasethe
pressure.
2. Fillslowlywithafuelcan.Ifyouspillfuel,removeit
withaclothandletremainingfueldryoff.
3. Cleantheareaaroundthefueltankcap.
4. Tightenthefueltankcapfully.Ifthefueltankcapis
nottightened,thereisariskoffire.
5. Movetheproductaminimumof3m(10ft)fromthe
positionwhereyoufilledthetank,beforeastart.
1. Toadjustthedischargechuteposition,movethe
dischargechutecontrollever(A)backandtotheleft
orrightdirection.
694-002-
2. Desserrerlecontre-écrou(A)quifixelatêtedu
rotateurdegoulotte(B)ausupportdemontage(C)
afinderetirerlagoulotted’éjection.
B
A
C
3. Desserrerlesdeuxvis(A)quimaintiennentlecarter
delacourroie(B)surlechâssis(C)etenleverle
carterdelacourroie.
C A
B
1. Retirerlacourroiedetarière.Voir
Retraitdela
courroiedetarièreàlapage71
.
2. Déposerleressortdutendeur(A)fixésurlelevierdu
tendeurdecourroied’entraînement(B).
A
B
C
D
E
H
FG
I
J
3. Déposerleressortderappel(C)quimaintientle
plateauderotation(D)enplace.
4. Déposerleboulondulevier(E)etlelevierdu
tendeurdecourroie.
5. Retirerleboulondelapoulie(F),lapouliedumoteur
(G)etlacourroied’entraînement(H)dumoteur.
6. Retirerleboulonsupérieur(I)quimaintientle
plateauderotationsurlechâssis
7. Pivoteretmaintenirleplateauderotationàl’écartdu
produitetretirerlacourroied’entraînementdela
poulied’entraînement(J).
1. Pivoteretmaintenirleplateauderotation(D)à
l’écartduproduit.
A
B
C
D
E
H
FG
I
J
2. Placerlacourroied’entraînement(H)surlapoulie
d’entraînement(J).
S’assurerquelacourroie
d’entraînementestacheminéecorrectementdansla
694-002-

rainuredelapoulied’entraînementavantd’abaisser
leplateauderotation.
3. Installeretserrerleboulonsupérieur(I).
4. Placerlacourroied’entraînementdanslarainurede
lapouliedumoteur(G)avantdel’installersurl’arbre
dumoteur.
5. Installerleboulondelapoulie(F)etl’attacherla
pouliedumoteursurlemoteur.Serrerleboulonde
lapoulie(de30à35pi-lb/de41à47Nm).
6. Installerlelevierdutendeurdecourroie
d’entraînement(B)etserrerleboulondulevier(E)
surlemoteur.
7. Installerleressortderappel(C)surleplateaude
rotation.
8. Installerleressortdutendeur(A)surlelevierdu
tendeur.
9. Actionnertouteslescommandespours’assurerque
lacourroied’entraînementestcorrectementinstallée
etquetouslescomposantssedéplacent
correctement.
I
1. Installerlecarterdelacourroie(B)surlechâssis(C)
etserrerlesdeuxvis(A).
C A
B
2. Installerlagoulottededécharge.
1. Retirerlesboulons5/16po(A)etlesboulons¼po
inférieurs(B)des2côtésduchâssis.Conserverles
boulons.
B
C
A
2. Desserrer,sansretirer,lesboulonsde5/16po
inférieurs(C)des2côtésduchâssis.
3. Retirerlacourroiedetarièredelapouliedumoteur.
4. Inclinerlapartiearrièreverslebas.Lapartieavant
s’inclineversl’avantparlamêmeoccasion.Le
bouloninférieur(C)sertdecharnièreentreles
sectionsavantetarrière.
5. Placerunecaleenboissouslepointdecharnière
afindemettreleproduitenpositionrepliée.
6. Déplacerlelevierdutendeurdecourroiedela
tarièreetretirerlacourroiedelatarièredulevier.
1. Déplacerlelevierdutendeurdecourroieetplacerla
courroiedetarièredanslarainuredelapouliede
tarière.
S’assurerquela
courroien’estpascoincéeentrele
châssisetlecarterdelatarièrelorsque
vousassemblezl’unité.
2. Retirerleblocdeboisàpartirdelapartieinférieure
duproduit.
3. Tournerlapoignéepourinclinerlapartiearrièrevers
lehaut.Lapartieavants’inclineraversl’arrièreet
pivoteraafindefixerlapartiearrière.
4. S’assurerquelacourroieestcorrectement
positionnéedanslarainuredelapouliedetarière.
694-002-
2. Adjustthehandlepositiontooneofthemounting
holes(B)andtightenthehandleknobs(C)withthe
carriagebolts(D).
B
C
D
3. Installmorecarriagebolts(D)andhandleknobs(C)
tosecuretheupperhandle(A)tothelowerhandle
(E).
D
E
A
C
1. Putthechutedeflectorassemblyonthetopofthe
chutebasewiththedischargeopeninginthe
directionofthefrontoftheproduct.
2. Putthechuterotatorhead(A)onthechutebracket
(B).Rotatethechuteassemblytoalignthepins
underthechuterotatorheadwiththeholesinthe
chutebracketifitisnecessary.
3. Putthechuterotatorheadonthepin(C)andthe
threadedstud(D)onthemountingbracket(E).
4. Attachalocknut(G)onthethreadedstudand
tighten.
A
B CD E
FG
5. Putthecablesthroughthecableguide(F)andthe
doubleclip(I)toattachtherotatorcable(H)tothe
lowerhandle.
FH
I
1. Attachtheremotecablebracket(A)tothedischarge
chutewithacarriagebolt(B)anda5/16-18locknut
(D).Tightenthebolt.
694-002-
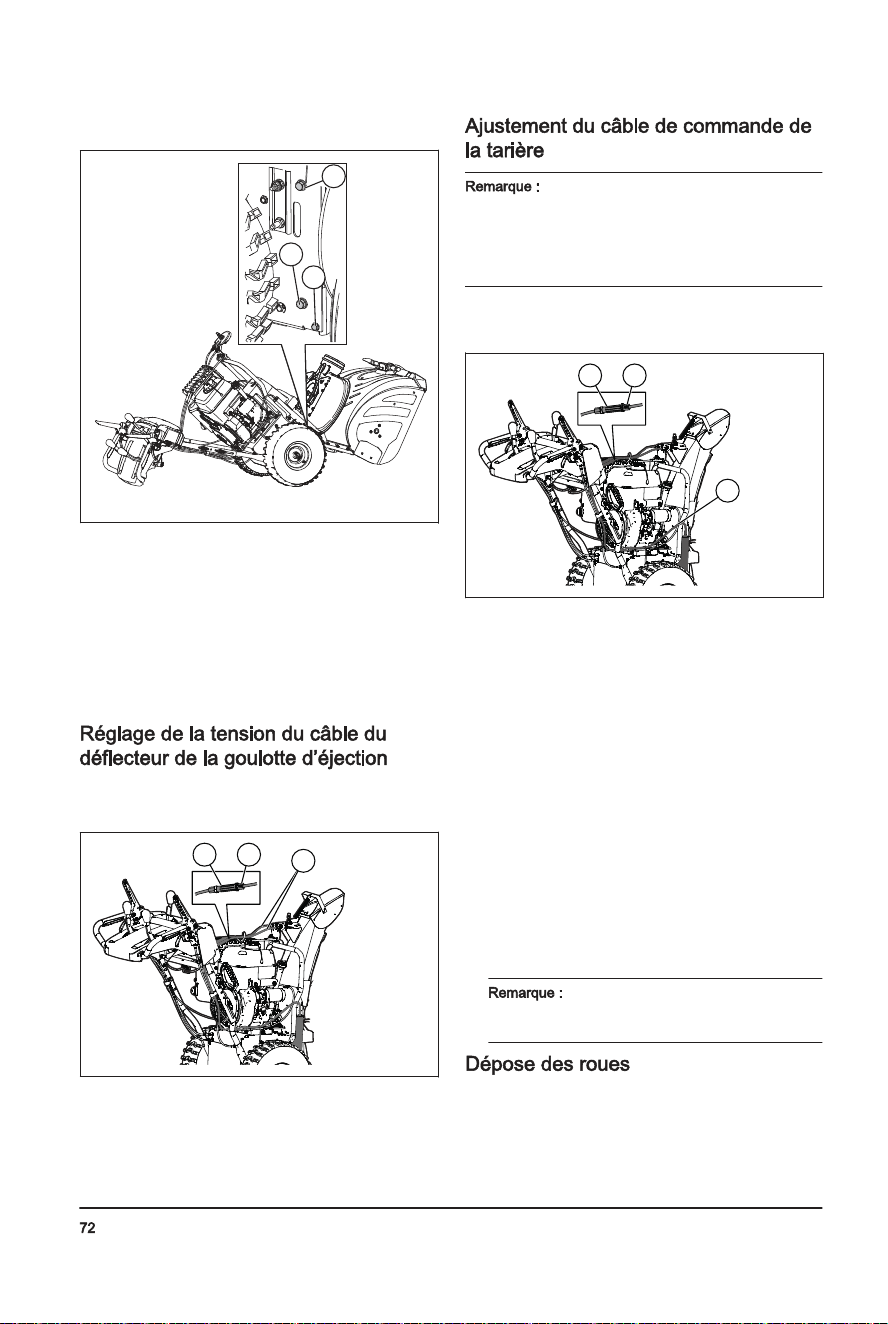
Multi-wrench(1)
Dischargechute(1)
ON/OFFkey(s)
Carriagebolts5/16-18x2¼”(2)
Handleknobs(2)
Locknut3/8(1)
Cableguide(1)
Shearpins¼-20x1-¾(6)
Locknuts¼-20(6)
Locknut5/16-18(1)
Locknut¼-20(1)
Nylonwasher(1)
Carriagebolt5/16-18x5/8(1)
Spring(1)
Shoulderbolt¼-20(1)
1. Raisetheupperhandletotheoperatingposition.
694-002-
5. Installerlesboulonsde5/16po(A),(C)etlesserrer
(8à12lb/po2/11à16Nm).
B
C
A
6. Installerlesboulonsde¼po(B)etlesserrer(4à
6lb/po2/5à8Nm).
7. Installerlacourroiedelatarièresurlapouliedu
moteur.S’assurerquelacourroieestcorrectement
placéesurlapouliefolleetcorrectementinstallée
danslarainuredelapouliedumoteur.
8. Actionnertouteslescommandesafindes’assurer
quelacourroiedelatarièreestcorrectement
installéeetquetouslescomposantssedéplacent
correctement.
1. Desserrerlesécrousdeblocage(B)afinderéglerla
tensionducâbledelagoulotted’éjectionadjacente
audispositifderéglagedutendeur(A).
A B
C
2. Tenirfermementlasectioncourteettournerla
sectionlongueafind’allongerletendeur.
3. Procéderàunajustementjusqu’àcequelecâbledu
déflecteurdelagoulotted’éjection(C)soitbien
serré.Serrerlesécrousdeblocage.
Sivousnevoussentezpasàl’aisedefaire
ceréglagevous-même,veuillezcommuniqueravecun
centred’entretienautorisé.Silarotationdelatarièreest
ralentielorsquelelevierdecommandeestengagéousi
lacourroieaétéremplacée,ilestpossiblequ’unréglage
soitnécessaire.
1. Desserrerlesécrousdeblocage(B)àcôtédu
tendeur(A)pourréglerlatensionducâblede
commandedelatarière(D).
A B
D
2. Tenirlasectioncourteetfairetournerlasection
longue.Latournersur360degrés.
3. Vérifierl’engagementdelatarière.Répéterle
réglagejusqu’àcequ’ilnerestequ’unefaible
tensiondanslecâblelorsquelelevierest
désengagé.
4. Serrerl’écroudeblocageinférieurafindele
verrouillerentension.
5. Demanderàunassistantdesetenirà3mètres/
10piedsdevantleproduit,surlecôtéopposédela
goulotte.L’assistantdoitobserverlarotationdela
tarièreetcalculerletempsnécessairepourl’arrêtde
larotationaprèsavoirrelâchélelevier.Silatarière
cessedetourneraprès5secondes,réglerla
longueurducâbleenfaisanttournerlecylindre
centralsur360degréspourrétracterledispositifde
réglage.Vérifierlatarièreetcalculerletempsà
nouveau.Silatarièrecessedetournerenmoinsde
5secondes,passeràl’étapesuivante.
6. Serrerlecontre-écrousurlecâbledelatarière.
Sileréglageducâblenerèglepasle
problème,remplacerlacourroiedelatarière.Voir
Retraitdelacourroiedetarièreàlapage71
.
1. Déposerl’axedelaroue(A)etl’axederetenue(B).
694-002-
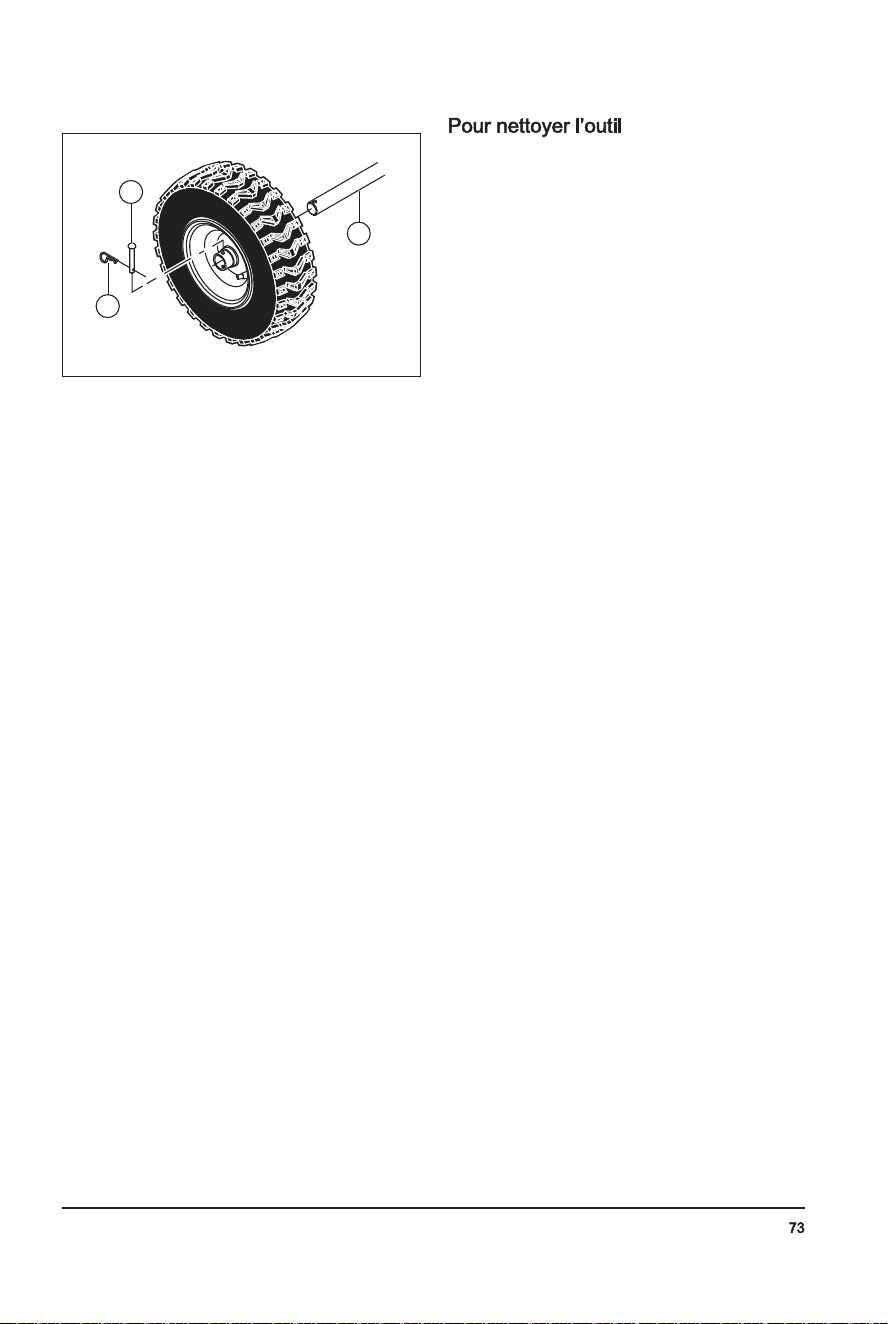
2. Enleverlarouedel’arbre(C).
A
B
C
• Nettoyerlespiècesenplastiqueàl’aided’unchiffon
propreetsec.
• Nepasutiliserdenettoyeuràhautepressionpour
nettoyerlatondeuse.
• Nepasverserdel’eaudirectementsurlemoteur.
• Utiliserunebrossepourenleverlesfeuilles,l’herbe
etlasaleté.
694-002-
• Donotstarttheproductifthereisfuelorengineoil
ontheproduct.Removetheunwantedfuel/oilandlet
theproductdry.
• Ifyouspillfuelonyourclothing,changeclothing
immediately.
• Donotgetfuelonyourbody,itcancauseinjury.If
yougetfuelonyourbody,usesoapandwaterto
removethefuel.
• Donotstarttheproductiftheenginehasaleak.
Examinetheengineforleaksregularly.
• Becarefulwithfuel.Fuelisflammableandthefumes
areexplosiveandcancauseinjuriesordeath.
• Donotbreatheinthefuelfumes,itcancauseinjury.
Makesurethatthereisasufficientairflow.
• Donotsmokenearthefuelortheengine.
• Donotputwarmobjectsnearthefuelortheengine.
• Donotaddthefuelwhentheengineison.
• Makesurethattheengineiscoolbeforeyourefuel.
• Beforeyourefuel,openthefueltankcapslowlyand
releasethepressurecarefully.
• Donotaddfueltotheengineinanindoorarea.Not
sufficientairflowcancauseinjuryordeathbecause
ofasphyxiationorcarbonmonoxide.
• Tightenthefueltankcapfully.Ifthefueltankcapis
nottightened,thereisariskoffire.
• Movetheproductaminimumof3m(10ft)fromthe
positionwhereyoufilledthetankbeforeastart.
• Donotputtoomuchfuelinthefueltank.
P
WARNING
The engine exhaust from this product
contains chemicals known to the State of
California to cause cancer, birth defects
or other reproductive harm.
Readthewarninginstructions
thatfollowbeforeyouusetheproduct.
• Theexhaustfumesfromtheenginecontaincarbon
monoxide,anodorless,poisonousandvery
dangerousgas.Donotstarttheengineindoorsorin
closedspaces.
• Beforeyoudothemaintenanceontheproduct,stop
theengineandremovetheignitioncablefromthe
sparkplug.
• Useprotectivegloveswhenyoudomaintenanceon
theblades.Thebladesareverysharpandcutscan
easilyoccur.
• Accessoriesandchangestotheproductthatarenot
approvedbythemanufacturer,cancauseserious
injuryordeath.Donotchangetheproduct.Always
useaccessoriesthatareapprovedbythe
manufacturer.
• Ifthemaintenanceisnotdonecorrectlyand
regularly,theriskofinjuryanddamagetothe
productincreases.
• Onlydothemaintenanceasgiveninthisoperator's
manual.Allotherservicingmustbedonebyan
approvedserviceagent.
• Letanapprovedserviceagentdoservicingonthe
productregularly.
• Replacedamaged,wornorbrokenparts.
1. Removeloosepartsincludedwiththeproduct.Cut
thefourcornersofthecartonandputtheendpanels
downflat.
2. Removethetwoscrewsthatattachtheauger
housingtothepallet.Removethesteelbrackets
fromtheskidplatesiftheyhaveit.
3. Cutthecabletiesthatholdtheproducttothepallet
andremovethem.
4. Removeallpackagematerials.
5. Removetheproductfromthecartonandmakesure
noloosepartsareleftinthecarton.
Knob(3)
694-002-
• Neveroperatetheproductathightransportspeeds
onslipperysurfaces.Lookbehindandusecare
whenoperatinginreverse.
• Disengagepowertotheaugerswhentheproductis
transportedornotinuse.
• Useonlyattachmentsandaccessoriesapprovedby
themanufactureroftheproduct(suchaswheel
weights,counterweights,orcabs).
• Neveroperatetheproductwithoutgoodvisibilityor
light.Alwaysbesureofyourfooting,andkeepafirm
holdonthehandles.Walk;neverrun.
• Nevertouchahotengineormuffler.
W
• Thoroughlyinspecttheareawheretheequipmentis
tobeusedandremovealldoormats,sleds,boards,
wires,andotherforeignobjects.
• Disengageallclutchesandshiftintoneutralbefore
startingtheengine(motor).
• Donotoperatetheproductwithoutwearing
adequatewintergarments.Avoidloosefitting
clothingthatcangetcaughtinmovingparts.Wear
footwearthatwillimprovefootingonslippery
surfaces.
• Handlefuelwithcare;itishighlyflammable.
• Useanapprovedfuelcontainer.
• Neveraddfueltoarunningengineorhotengine.
• Fillfueltankoutdoorswithextremecare.Never
fillfueltankindoors.
• Neverfillcontainersinsideavehicleoronatruck
ortrailerbedwithaplasticliner.Alwaysplace
containersontheground,awayfromyour
vehicle,beforefilling.
• Whenpractical,removegas-poweredequipment
fromthetruckortrailerandrefuelitonthe
ground.Ifthisisnotpossible,thenrefuelsuch
equipmentonatrailerwithaportablecontainer,
ratherthanfromagasolinedispensernozzle.
• Keepthenozzleincontactwiththerimofthefuel
tankorcontaineropeningatalltimes,until
refuelingiscomplete.Donotuseanozzlelock-
opendevice.
• Replacegasolinecapsecurelyandwipeup
spilledfuel.
• Iffuelisspilledonclothing,changeclothing
immediately.
• Useextensioncordsandreceptaclesasspecifiedby
themanufacturerforallunitswithelectricdrive
motorsorelectricstartingmotors.
• Adjusttheaugerhousingheighttocleargravelor
crushedrocksurface.
• Neverattempttomakeanyadjustmentswhilethe
engine(motor)isrunning(exceptwhenspecifically
recommendedbythemanufacturer).
• Alwayswearsafetyglassesoreyeshieldsduring
operationorwhileperforminganadjustmentor
repairtoprotecteyesfromforeignobjectsthatmay
bethrownfromthemachine.
Alwaysusethecorrectpersonalprotectiveequipment
whenyouoperatetheproduct.Thisincludes,at
minimum,sturdyfootwear,eyeprotectionandhearing
protection.Personalprotectiveequipmentdoesnot
erasetheriskofinjurybutmaydecreasethegradeof
injuryifanaccidentoccurs.
• Alwayswearsafetyglassesoreyeprotectionwhile
youoperatetheproductordomaintenanceor
repairs.
• Alwayswearappropriatewintergarmentswhenyou
operatetheproduct.
• Alwaysuseheavy-dutyslip-resistantbootswithgood
anklesupportwhileyouoperatetheproduct.
• Donotwearloosefittingclothingthatcangetcaught
inmovingparts.
• Useapprovedprotectivegloves,ifnecessary.For
example,whenattaching,examiningorcleaningthe
blade.
• Alwaysuseapprovedearprotectionwhileyou
operatetheproduct.Noiseforalongperiodcan
causenoise-inducedhearingloss.
• Makesurethatyouregularlydothemaintenanceto
theproduct.
• Thelifeoftheproductincreases.
• Theriskofaccidentsdecreases.
Letanapproveddealeroranapprovedservice
centerregularlyexaminetheproducttodo
adjustmentsorrepairs.
• Donotuseaproductwithdamagedprotective
equipment.Iftheproductisdamaged,speaktoan
approvedservicecenter.
Themufflerkeepsthenoiselevelstoaminimumand
sendstheexhaustfumesawayfromtheoperator.
Donotusetheproductifthemufflerismissingor
defective.Adefectivemufflerincreasesthenoiselevel
andtheriskoffire.
Examinethemufflerregularlytomakesurethatitis
attachedcorrectlyandnotdamaged.
Themufflerbecomesveryhot
duringandafteruseandwhentheengine
operatesatidlespeed.Becarefulnear
flammablematerialsand/orfumestoprevent
fire.
Readthewarninginstructions
thatfollowbeforeyouusetheproduct.
694-002-
D
L’outilnedémarrepas Laclédedémarragedesécuritén’estpasinsér-
ée.
Insérerlaclédedémarragedesé-
curité.
Leproduitestenpannedecarburant. Remplirleréservoirdecarburant
avecdel’essencefraîcheetpropre.
LacléON/OFF(marche/arrêt)estàlaposition
OFF(arrêt).
PlacerlacléON/OFF(marche/arrêt)
àlapositionON(marche).
LevoletdedépartestàlapositionOFF(arrêt,
fermé).
Déplacerlevoletdedépartàlaposi-
tionON(marche,complètementou-
vert).
L’amorceurn’estpasenfoncé. Appuyersurl’amorceur.
Lemoteurestnoyé. Attendrequelquesminutesavantde
redémarrer,NEPASpurger.
Redémarrerlemoteuràpleinrégime
aveclevoletdedépartàlaposition
OFF(arrêt,fermé).
Lefildelabougied’allumagen’estpascon-
necté.
Connecterlefilàlabougied’allu-
mage.
Labougied’allumageestdéfectueuse. Remplacerlabougied’allumage.
Ilyadel’eaudanslecarburantoulecarburant
esttropvieux.
Viderleréservoirdecarburantetle
carburateur.Remplirleréservoirde
carburantavecdel’essencefraîche
etpropre.
Ilyadelavapeurdanslaconduitedecarbur-
ant.
S’assurerquetoutelaconduited’ali-
mentationencarburantestendes-
sousdelasortieduréservoirdecar-
burant.Laconduited’alimentationen
carburantdoitfonctionnerenperma-
nenceentreleréservoirdecarburant
etlecarburateur.
Autrescauses. Lireattentivementlesméthodesde
démarragedecemanuel.
Lecommutateurdecarburant(selonl’équipe-
ment)estàlapositionCLOSE(arrêt).
Placerlecommutateurdedémarrage
dumoteuràlapositionON(marche).
Lacommanded’accélérationestàlaposition
STOP(Arrêt).
Déplacerlacommanded’accéléra-
teuràlapositionFAST(Rapide).
694-002-

P
Puissanceréduite Lefildelabougied’allumagen’estpascon-
necté.
Connecterlefilàlabougied’allu-
mage.
Leproduitrejettetropdeneige. Réduirelavitesseetlalargeurde
l’andain.
Lecouvercleduréservoirdecarburantestre-
couvertdeglaceoudeneige.
Retirerlaglaceetlaneigesuretau-
tourducouvercleduréservoirdecar-
burant.
Lesilencieuxestsaleoubouché. Nettoyerouremplacerlesilencieux.
Mauvaiselongueurdecâble. Réglerlecâble.
Lesilencieuxestobstrué. Vérifierquelemoteurestfroid.Retir-
erl’obstruction.
Laprised’aird’admissionducarburateurestob-
struée.
Vérifierquelemoteurestfroid.Retir-
erl’obstruction.
Lemoteurtourneaura-
lentiouronfle
LevoletdedépartestàlapositionON(marche,
complètementouvert).
Déplacerlevoletdedépartàlaposi-
tionOFF(arrêt,fermé).
Laconduitedecarburantestobstruée. Nettoyerlaconduitedecarburant.
Ilyadel’eaudanslecarburantoulecarburant
esttropvieux.
Viderleréservoirdecarburantetle
carburateur.Remplirleréservoirde
carburantavecdel’essencefraîche
etpropre.
Lecarburateurdoitêtreremplacé. Communiqueravecuncentrederép-
arationagréé.
Lacourroieesttendue. Remplacerlacourroietrapézoïdale
delatarière.
Vibrations/Mouvements
excessifsdelapoignée
Certainespiècessontdesserrées.Lestarières
sontendommagées.
Serrertoutlematérieldefixation.Re-
mplacerlespiècesendommagées.Si
lavibrationpersiste,communiquer
avecuncentredeserviceagréé.
Lespoignéesnesontpascorrectementposi-
tionnées.
Assurez-vousquelespoignéessont
verrouilléesenposition.
Lesécrousdulevierderéglagesontdesserrés. Serrerlesécrousjusqu’àcequela
poignéesoitsécuritaire.
Lapoignéedulanceurest
difficileàtirer
Lapoignéedulanceurestgelée. Tirerautantquepossiblesurcorde
dulanceur,puisrelâcherlapoignée.
Silemoteurnedémarrepas,répéter
laprocédureouutiliserledémarreur
électrique.
Lacordeinterfèreaveclescomposants. Lacordedulanceurnedoittoucher
aucuncâblenituyau.
694-002-
G
• Usetheproductcorrectly.Injuryordeathisa
possibleresultofincorrectuse.Onlyusetheproduct
forthetasksfoundinthismanual.Donotusethe
productforothertasks.
• Obeytheinstructionsinthismanual.Obeythesafety
symbolsandthesafetyinstructions.Iftheoperator
doesnotobeytheinstructionsandthesymbols,
injury,damageordeathisapossibleresult.
• Donotdiscardthismanual.Usetheinstructionsto
assemble,tooperateandtokeepyourproductin
goodcondition.Usetheinstructionsforcorrect
installationofattachmentsandaccessories.Only
useapprovedattachmentsandaccessories.
• Donotuseadamagedproduct.Obeythe
maintenanceschedule.Onlydothemaintenance
workthatyoufindaninstructionaboutinthis
manual.Anapprovedservicecentermustdoall
othermaintenancework.
• Thismanualcannotincludeallsituationsthatcan
occurwhenyouusetheproduct.Becarefulanduse
yourcommonsense.Donotoperatetheproductor
domaintenancetotheproductifyouarenotsure
aboutofthesituation.Speaktoaproductexpert,
yourdealer,serviceagentorapprovedservice
centerforinformation.
• Disconnectthesparkplugcablebeforeyou
assembletheproduct,puttheproductintostorageor
domaintenance.
• Donotusetheproductifitischangedfromitsinitial
specification.Donotchangeapartoftheproduct
withoutapprovalfromthemanufacturer.Onlyuse
partsthatareapprovedbythemanufacturer.Injury
ordeathisapossibleresultofincorrect
maintenance.
• Donotbreatheinthefumesfromtheengine.Long
terminhalationoftheengine'sexhaustfumesisa
healthrisk.
• Donotstarttheproductindoorsornearflammable
material.Theexhaustfumesarehotandcancontain
asparkwhichcanstartafire.Notsufficientairflow
cancauseinjuryordeathbecauseofasphyxiationor
carbonmonoxide.
• Whenyouusethisproducttheenginemakesan
electromagneticfield.Theelectromagneticfieldcan
causedamagetomedicalimplants.Speaktoyour
physicianandmedicalimplantmanufacturerbefore
youoperatetheproduct.
• Donotletachildoperatetheproduct.Donotleta
person,withoutknowledgeoftheinstructions
operatetheproduct.
• Makesurethatyoualwaysmonitoraperson,with
decreasedphysicalcapacityormentalcapacity,that
usestheproduct.Aresponsibleadultmustbethere
atalltimes.
• Locktheproductinanareathatchildrenand
unapprovedpersonscannotaccess.
• Theproductcanejectobjectsandcauseinjuries.
Obeythesafetyinstructionstodecreasetheriskof
injuryordeath.
• Donotgoawayfromtheproductwhentheengineis
on.
• Theoperatoroftheproductisresponsibleifan
accidentoccurs.
• Beforeandwhileyouwalkrearward,lookbehindand
downforsmallchildren,animalsorotherrisksthat
cancauseyoutofall.
• Makesurethatpartsarenotdamagedbeforeyou
usetheproduct.
• Makesurethatyouareataminimum15m(50ft)
awayfromotherpersonsoranimalsbeforeyouuse
theproduct.Makesurethatapersoninadjacent
areaknowsthatyouwillusetheproduct.
• Refertonationalorlocallaws.Theycanpreventor
decreasetheoperationoftheproductinsome
conditions.
• Donotputhandsorfeetnearorunderrotatingparts.
Keepclearofthedischargeopeningatalltimes.
• Exerciseextremecautionwhenoperatingonor
crossinggraveldrives,walks,orroads.Stayalertfor
hiddenhazardsortraffic.
• Afterstrikingaforeignobject,stoptheengine
(motor),removethewirefromthesparkplug,
disconnectthecordonelectricmotors,thoroughly
inspecttheproductforanydamage,andrepairthe
damagebeforerestartingandoperatingtheproduct.
• Iftheproductstartstovibrateabnormally,stopthe
engine(motor)andcheckimmediatelyforthecause.
Vibrationisgenerallyawarningoftrouble.
• Stoptheengine(motor)wheneveryouleavethe
operatingposition,beforeuncloggingtheauger
housingorchutedeflector,andwhenmakingany
repairs,adjustmentsorinspections.
• Whencleaning,repairingorinspectingtheproduct,
stoptheengineandmakecertaintheaugersandall
movingpartshavestopped.Disconnectthespark
plugwireandkeepthewireawayfromtheplugto
preventsomeonefromaccidentallystartingthe
engine.
• Donotruntheengineindoors,exceptwhenstarting
theengineandfortransportingtheproductinorout
ofthebuilding.Opentheoutsidedoors;exhaust
fumesaredangerous.
• Exerciseextremecautionwhenoperatingonslopes.
• Neveroperatetheproductwithoutproperguards,
andothersafetyprotectivedevicesinplaceand
working.
• Neverdirectthechutedeflectortowardpeopleor
areaswherepropertydamagecanoccur.Keep
childrenandothersaway.
• Donotoverloadtheproductcapacitybyattempting
toclearsnowattoofastarate.
694-002-

Removesparkplugcablebefore
maintenance.
Tractiondriveoff/on.
Snowdischargeoff/on.
Steerleft.
Steerright.
Tractiondrivecontrol.
Snowdischarge.
Bewareofthrownobjects-
keepbystandersaway.
Warning,keephands
away.
Warning,keepfeetaway.
Forward/reverse.
Rotateleft/pushdown/
rotateright.
Asreferredtointheproductliabilitylaws,wearenot
liablefordamagesthatourproductcausesif:
• theproductisincorrectlyrepaired.
• theproductisrepairedwithpartsthatarenotfrom
themanufacturerornotapprovedbythe
manufacturer.
• theproducthasanaccessorythatisnotfromthe
manufacturerornotapprovedbythemanufacturer.
• theproductisnotrepairedatanapprovedservice
centerorbyanapprovedauthority.
Thedefinitionsbelowgivethelevelofseverityforeach
signalword.
Injurytopersons.
Damagetotheproduct.
Thisinformationmakestheproducteasiertouse.
694-002-
P
Pertedetraction/ralen-
tissementdelavitesse
d’entraînement
Pertededéchargeoura-
lentissementdeladé-
chargedeneige
Lacourroieglisse. Réglerlecâble.Réglerlacourroie.
Lacourroieestusée. Vérifier/remplacerlacourroie.Régler
lapoulie.
Lacourroieestsortiedelapoulie. Vérifier/réinstallerlacourroie.Régler
lapoulie.
Ledéflecteurdegoulotteestobstrué. Nettoyerledéflecteurdegoulotte.
Descorpsétrangersobstruentlestarières. Retirerlesdébrisoulecorpsétrang-
erdestarières.
Lagoupilledetonteestbrisée. Remplacerlagoupilledetontebri-
sée.
Accumulationexcessivedeneigeetdeglace
entrelescomposantsdelachenille.
Retirerlaneigeetlaglaceentreles
composantsdelachenille.
Laroued’entraînementdefrictionestusée. Communiqueravecuncentrederép-
arationagréé.
Ledisquedefrictionesthumide Laisserledisquedefrictionsécher
Échecderotationdela
tarièreaprèslerelâche-
mentdelapoignée
Lacourroied’entraînementn’estpasalignée. Réglerlacourroied’entraînement.
Ledéflecteurd’éjectionn’estpasaligné. Réglerledéflecteurd’éjection.
L’éclairagen’estpas
aligné(selonl’équipe-
ment)
Lemoteurnetournepas. Démarrerlemoteur.
Lebranchementducâbleestdesserré. Vérifierlesbranchementsélectriques
auniveaudumoteuretdesfeux.
LaDELestbrûlée. Remplacerlemoduled’éclairageà
DEL.Iln’estpaspossibledere-
mplacerdesDELdistinctes.
Lerotateurdegoulotteest
difficileàdéplacer
Ilyadesdébrisdanslemécanismedurotateur
degoulotte.
Nettoyerlapartieinterneduméca-
nismedurotateurderéception.
Câblesdéformésouendommagés. S’assurerquelescâblesnesontpas
endommagés.Remplacerlescâbles
endommagés.
Leproduittourned’un
seulcôté
Lapressiondespneusn’estpaségale. Réglerlapressiondespneusetgon-
flerlepneu.
Leproduitestentraînéparuneseuleroue. Inspecterlagoupilledeblocagedes
pneus.
Réglageirrégulierdutraîneau. Réglerlesplaquesdeprotectionetle
traîneau.
Réglageirrégulierdesplaquesdeprotection. Réglerlesplaquesdeprotectionetle
traîneau.
694-002-
T
• Pourlestockageetletransportduproduitetdu
carburant,s’assurerqu’iln’yapasdefuiteoude
vapeur.Lesétincellesoulesflammesnues,par
exempleavecdesappareilsélectriquesoudes
chaudières,peuventdémarrerunincendie.
• Utilisertoujoursdescontenantsagrééspour
entreposeroutransporterlecarburant.
• Viderleréservoirdecarburantavantderangerle
produitpourunepériodeprolongée.Mettreaurebut
lecarburantàunemplacementdemiseaurebut
adéquat
• Immobiliserleproduitensécuritépendantle
transportpourévitertoutdommageouaccident.
• Garderleproduitdansunendroitverrouilléhorsde
portéedesenfantsetdespersonnesnonautorisées.
• Conserverleproduitdansunendroitsecàl’abridu
gel.
• Respecterlesexigenceslocalesenmatièrede
recyclageetlaréglementationenvigueur.
• Mettreaurebuttouslesproduitschimiques,telque
lemoteurd’huileoudecarburant,dansuncentrede
serviceouàunemplacementdemiseaurebut
adéquat.
• Lorsqu’onn’utiliseplusleproduit,l’envoyeràun
détaillantHusqvarnaoulemettreaurebutàun
emplacementderecyclage.
Touteslesdonnées,lesimagesetles
spécificationssontreprésentativesetpourréférence
uniquement,etellespeuventêtremodifiéessans
préavisenraisond'améliorationsapportéesauproduit.
Poids,lb/kg 198,6/90 212/96 237,8/108 198,6/90
Pressiond’utilisationmaximaledespneus,
lb/po2
18 18 20 18
Marqueetmodèle
Husqvarna Husqvarna Husqvarna Husqvarna
Cylindrée(cc) 208 254 291 208
Typedecarburant Réguliersans-plomb(maximum10%d’éthanol)
Capacitéduréservoirdecarburant(gal/l) 0,31/1,17 0,35/1,33 0,62/2,35 0,31/1,17
Huile SAE5W-30(endessousde0°C/32°F)
Capacitéduréservoird’huile(oz/l) 16/0,47 20/0,59 32/0,95 16/0,47
Bougied’allumage F6RTC
Écartementdesélectrodesdesbougies
(po/mm)
0,030/0762mm
694-002-
5. Driveengagement
6. Light
7. Handleknob
8. Muffler
9. Skidplate
10. Augers
11. Clean-outtool
12. Dischargechute
13. Chutedeflector
14. Starterropehandle
15. Oildrainplug
16. Fuelswitch
17. ON/OFFkey
18. Primer
19. ON/OFFswitch
20. Throttlecontrol
21. Choke
22. Gasolinefillercap
23. Oilfill(ST227P,ST230P),Dipstick(ST227P)
24. Electricstartbutton
25. Connection,electricstart
26. Oilfill(ST224,ST224P),Dipstick(ST224,ST
230P,ST224P)
P
Theproductisawheeledsnowthrowerthatisusedto
removesnowfromtheground.
Thisproductcanbeusedtoremovesnowfromfields,
roads,walkwaysanddriveways.Donotuseitonslopes
thataregreaterthan20°.Donotusetheproductin
areaswherethereismuchdebris,dirtandprotruding
stones.
Ifthedecalsontheproductaredamaged,contact
thedistributortoreplacethem.
Warning.
Readtheoperator'smanual.
Engineon
Engineoff.
Fast.
Slow.
Fuel.
Oil.
Earprotectionrecommended.
ON/OFFkey.Inserttostartandrun.
Chokeclosed(start).
Primer.
Pullstarterropehandletostart.
Chokeopen(run).
ON/OFFkey.Pullouttostop.
Nooperationonslopesmorethan10
degrees.
Donotremoveshieldswhileengineis
running.
694-002-

I
8 22
23
25
24
14
16
15
17
18
19
20
21
1 2
3
4
5
7
8
9
10
11
13
12
6
26
1. Augerengagement
2. Dischargechutecontrollever
3. Drivespeedcontrollever
4. Deflectorremotecontrollever
694-002-7 694-002-

694-002- 7
C
Introduction..................................................................... 3
Safety..............................................................................5
Assembly........................................................................ 8
Operation......................................................................11
Maintenance................................................................. 15
Troubleshooting............................................................ 22
Transportation,storageanddisposal........................... 24
Technicaldata.............................................................. 25
694-002-

ST224,ST227P,ST230P,ST224P
Default Operator'smanual 2-25
ES-MX Manualdelusuario 26-51
FR-CA Manueld’utilisation 52-77
www.husqvarna.com
Originalinstructions
Instruccionesoriginales
Instructionsd’origine
1159957-49
2018-06-29