DIY
®
Multi-Zone
3RD GEN Do-It-Yourself Ductless Mini-Split Heat Pump A/C
Easy Do-It-Yourself installation
with our Quick Connect
®
line set*
SMART CONTROLLER
Installing the MRCOOL DIY multi-zone does not require specialized tools
or training. It does require basic technical skills. You are assuming the risk
by handling materials containing refrigerants under pressure including
that if not handled properly, refrigerant can cause bodily injury. If you do
not feel comfortable conducting this installation process yourself, we
recommend you retain the services of a qualied HVAC professional.
www.mrcool.com
***************Note****************
This guide is for convenience. Please
refer to the installation manual for
more detailed instructions and
descriptions.
Version Date: 10-27-21
*Pat. https://mrcool.com/mrcool-patents/
STEP 1 - Inside STEP 3 - Inside
STEP 2 - Inside
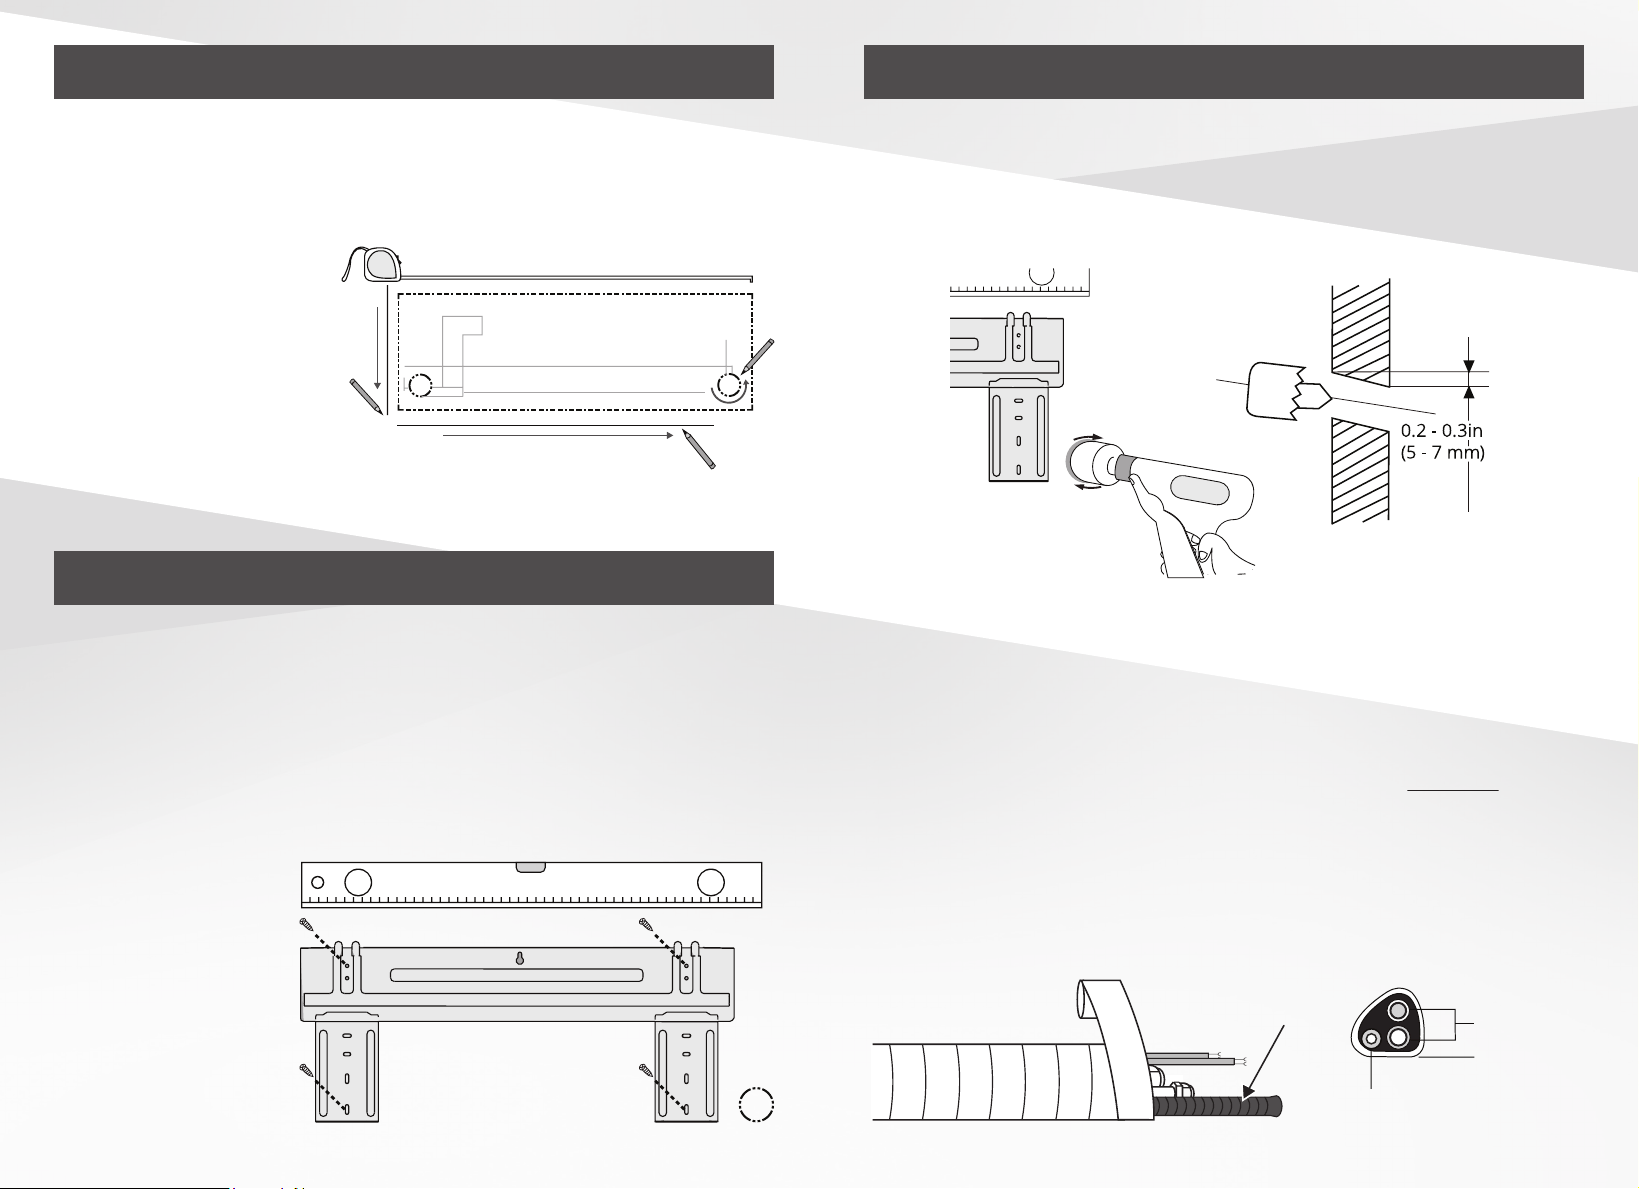
1. Drill screw holes at the indicated points into the wall studs.
2. Remove the mounting bracket from the rear of the interior
air handler by removing the screws holding it in place.
3. Screw the metal bracket to the wall according to the
template.
4. Use a level to
ensure the
mounting plate is
flush and level.
1. Locate the cardboard wall template.
2. Place the template on the wall at the installation location.
3. Use the template
to mark the location
of the drill points for
the mounting screws
and wall hole. Make
sure that the drill
points for the mounting
screws are located on wall studs.
4. Remove the template.
Wall
Indoor Outdoor
0.2 - 0.3in
(5 - 7 mm)
1. Drill a 3.5 inch diameter hole through the wall, at a slightly
downward angle (to ensure proper drainage), to
accommodate the line set, condensate drain line and
communication cable to the exterior condenser.
2. Carefully bend piping at the back of the air handler until it
is sticking straight out from behind the unit.
3. Using electrical tape, lightly tape the refrigerant piping &
condensate drain line at the back of the indoor unit into a
bundle (this will make it easier to pass through the wall
hole). The drain pipe MUST be on the bottom. DO NOT
wrap the end of the piping (connectors & drain hose)
you will need access to them for later steps.
4. Insert wall hole sleeve into wall hole.
5. Push the wires and piping bundle through the wall hole.
condensate
drain line
Refrigerant
piping
Drain hose
Tape
STEP 3 - Continued
STEP 4 - Outside
STEP 4 - Continued
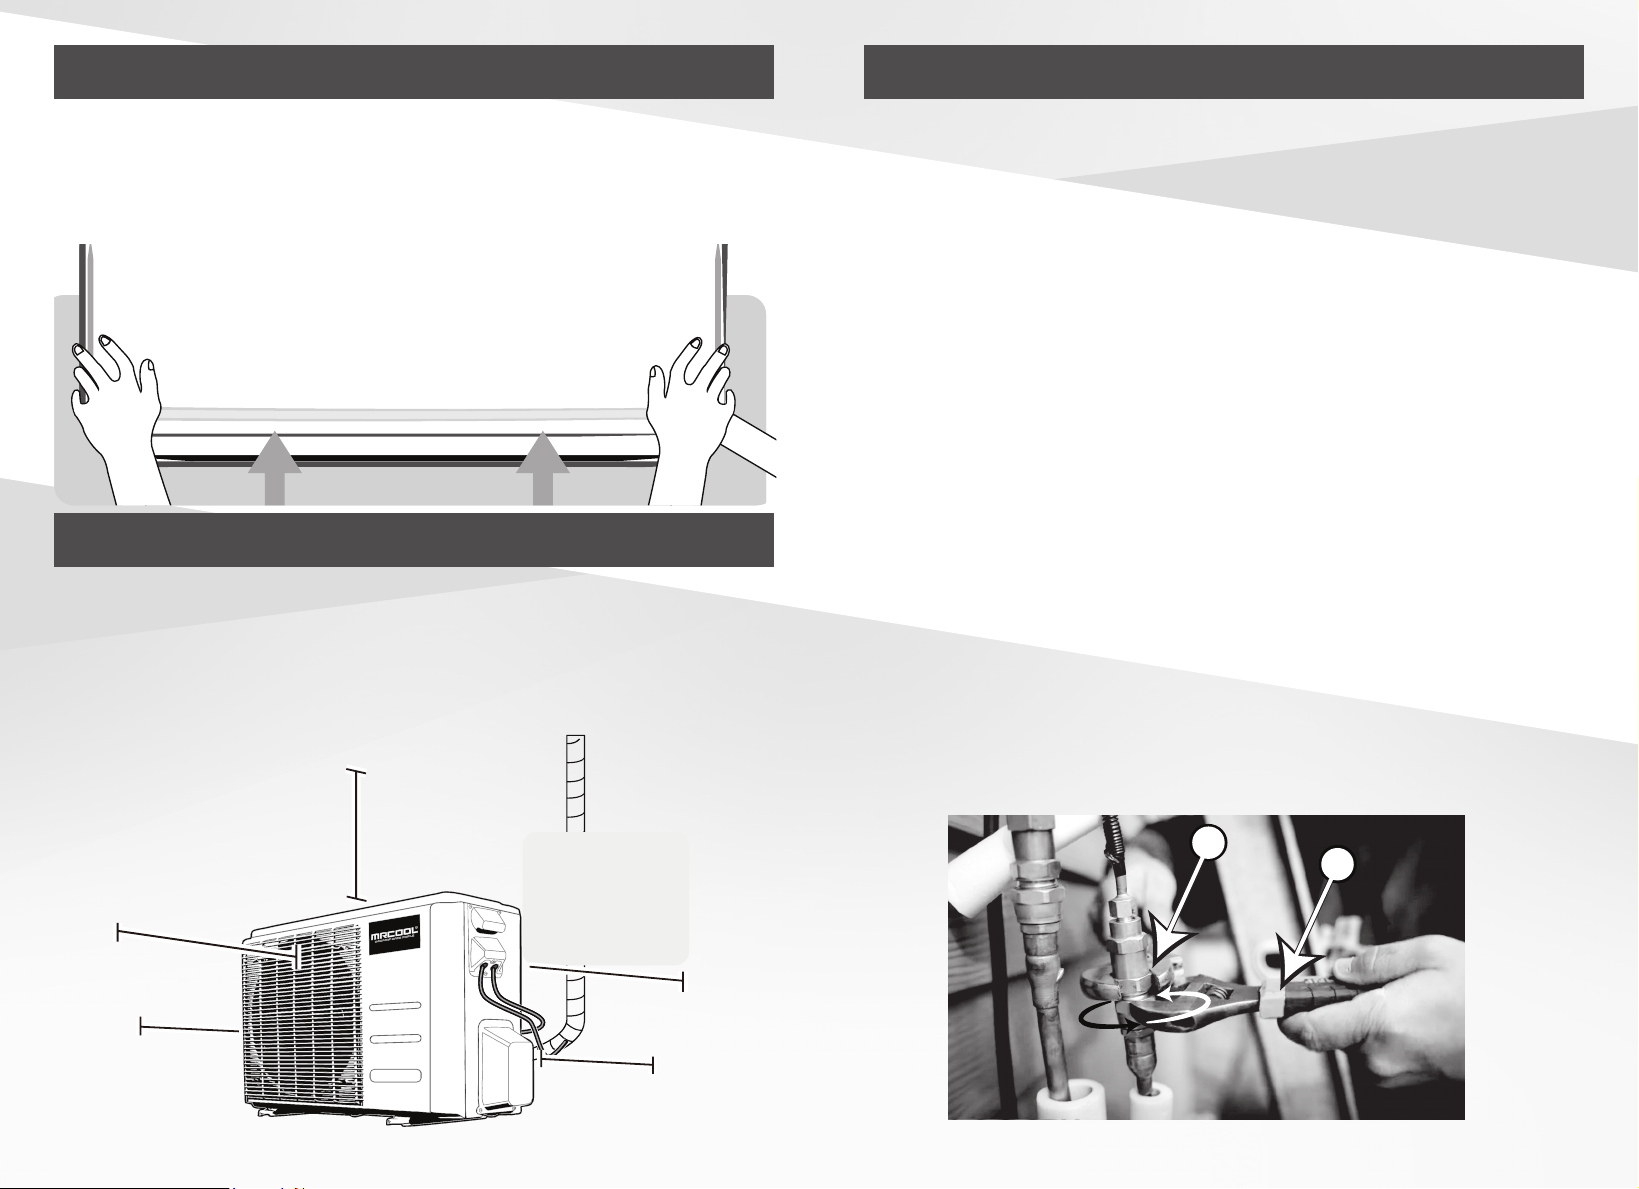
4. Snap the air handler onto the wall bracket by leaning the
top towards the wall and hooking it on the top of bracket.
Then, apply pressure to the bottom half to snap it to the
bracket.
1. Place outside condenser unit firmly on the ground or
attach it to a secure metal wall bracket or pad. A drain pipe
underneath the unit is not required unless the unit is
elevated. Please refer to the manual for more information.
2. Install the wall hole finishing cap/seal. Then, carefully
bend the piping coming out of the wall hole (from the
indoor unit) down towards the wall.
3. Remove the plastic seals from the indoor handler
refrigerant lines.
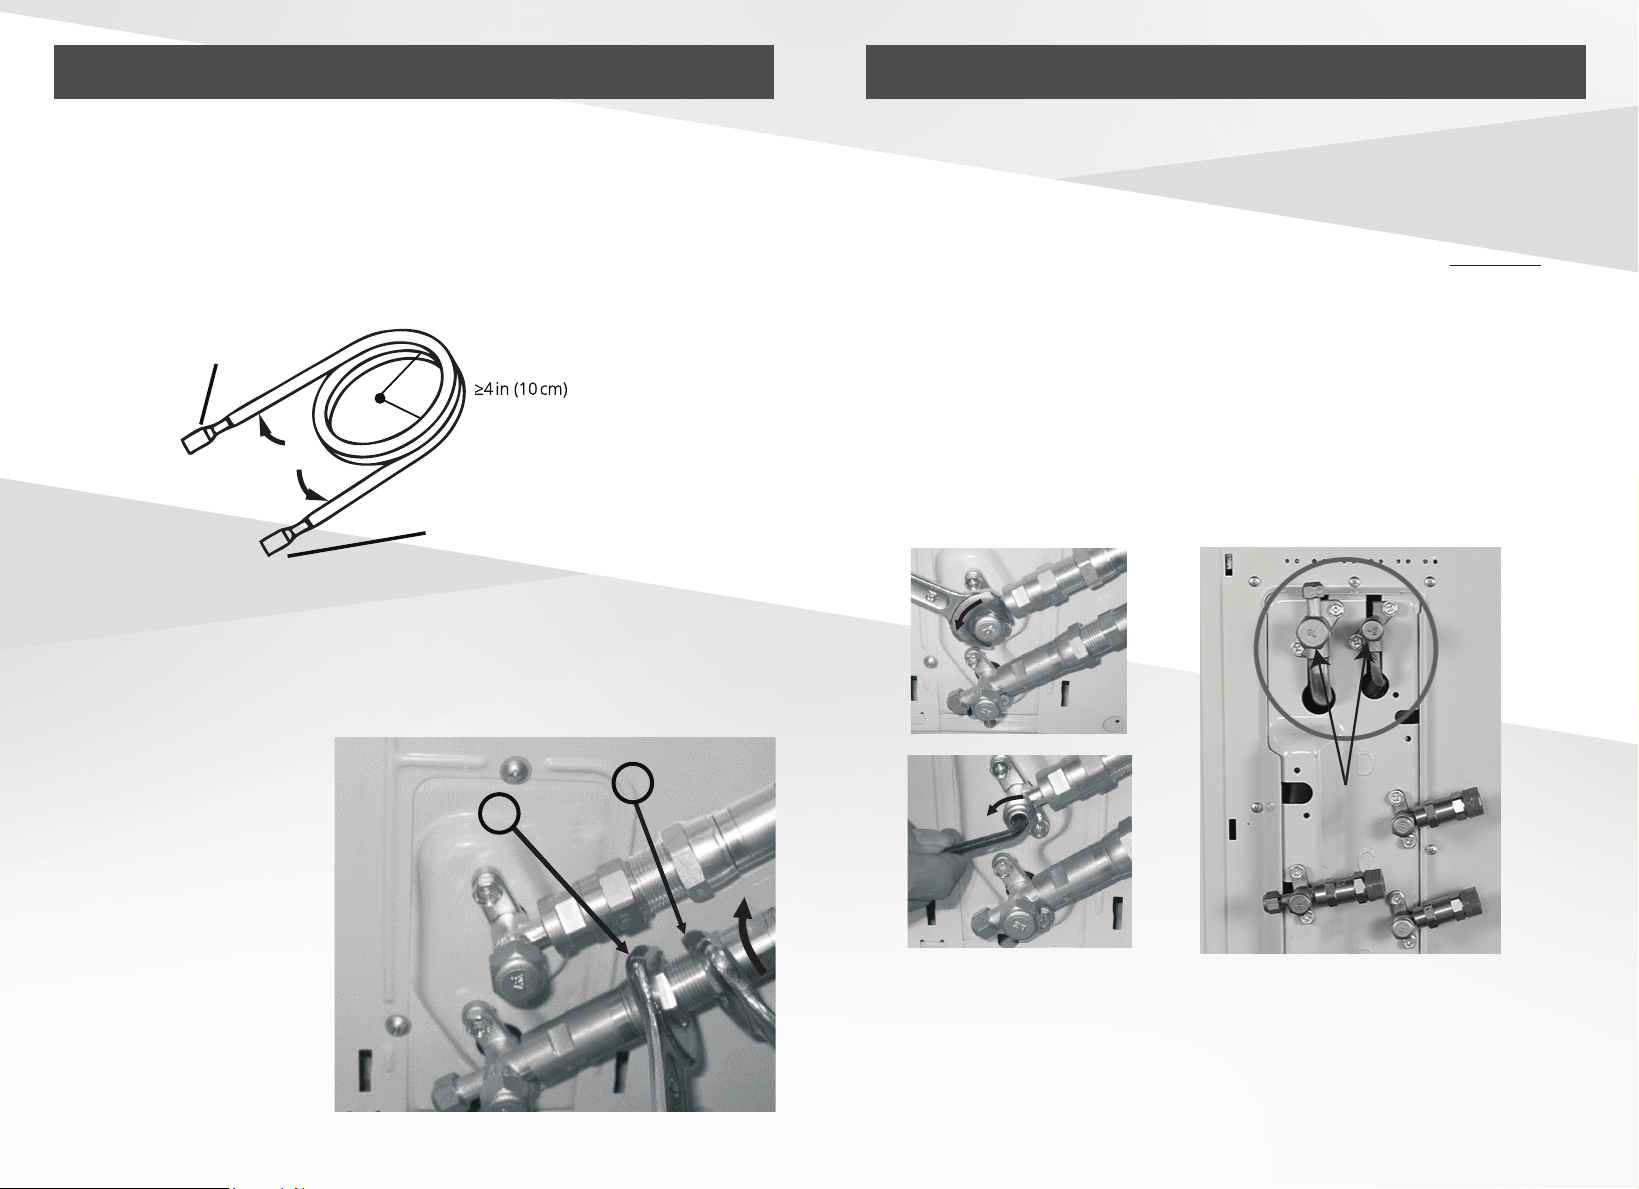
4. Carefully unroll one end of the Quick Connect® line set*.
Only unroll the amount needed to connect to the indoor
handler fittings. Leave the remainder coiled.
5. Align the Quick Connect® refrigerant lines to the
matching indoor handler fittings. Tighten the first few
threads by hand.
6. Using two open-ended wrenches, or crescent
(adjustable-type) wrenches, and the image below as a
guide: place the wrenches on points marked “1” & “2,” only
turning the nut at the point marked “2.” Ensure that the
screw connector does not become crooked while working
quickly to tighten it. Tighten the connector until snug.
7. Then, tighten the connector slightly beyond that point to
apply torque to the connector. Repeat the same steps for
the second line. Please refer to the manual for information
about torque requirements for the connectors.
Minimum Clearance between
the back of unit and wall:
**Ground Installed:
12 in (30 cm)
**Bracket Installed:
6 in (15 cm)
Minimum Clearance
in front of unit:
79 in (200 cm)
Minimum Clearance
on the left side of unit:
12 in (30 cm)
Minimum Clearance
above unit:
24 in (60 cm)
Minimum Clearance
on the right side of unit:
24 in (60 cm)
*Pat. https://mrcool.com/mrcool-patents/
1
2
1. Starting with the top valve, using an open-ended wrench,
or crescent (adjustable-type) wrench, remove the brass cap
from the valve on the outside unit.
2. Then, insert a 5 mm Allen wrench to open the valve by
turning it counter-clockwise until it stops turning. DO NOT
force it.
NOTE: When opening the valves you may hear a soft
hissing sound as a slight amount of R-410a refrigerant
exits the condenser.
3. Reinstall the cap and tighten securely. Then, repeat the
same steps for the bottom valve.
4. Now you will perform the same action for the two Main
Valves (King Valves) after all other valves have been opened.
5. Using soapy water (in a spray bottle or with a brush), or
leak detection spray, apply to the Quick Connect
®
fittings at
the indoor air handler and outdoor condenser to check for
leaks. If you see bubbles begin to form, this indicates there is
a leak. If so, re-tighten the connection accordingly until the
bubbles are gone. Please refer to the manual for more
detailed information on checking for leaks.
STEP 6 - outside
1. Carefully roll the excess tubing and place it behind the
condenser, lying flat on the ground.
2. Align the line set connectors to the outside condenser and
tighten the first few threads by hand. NOTE: Make sure the
piping connection to outside unit has plenty of slack and
line set is not stressed.
Carefully unroll to indoor
handler connection
Connect directly to
exterior condenser
Keep excess coiled
Radius
3. Using two open-ended wrenches, or crescent
(adjustable-type) wrenches, and the image below as a guide:
tighten the bottom screw connector. Place wrenches on
points marked “1” & “2,” only turning the nut at the point
marked “2.” Ensure the screw connector does not become
crooked as you work quickly to tighten it. Tighten the
connector until it is
snug.
4. Then, tighten the
connector slightly
beyond that point to
apply torque to the
connector. Please refer
to the manual for
information about
torque requirements.
Repeat the same steps
for the top screw
connector.
1
2
STEP 5 - Outside
King
Valves
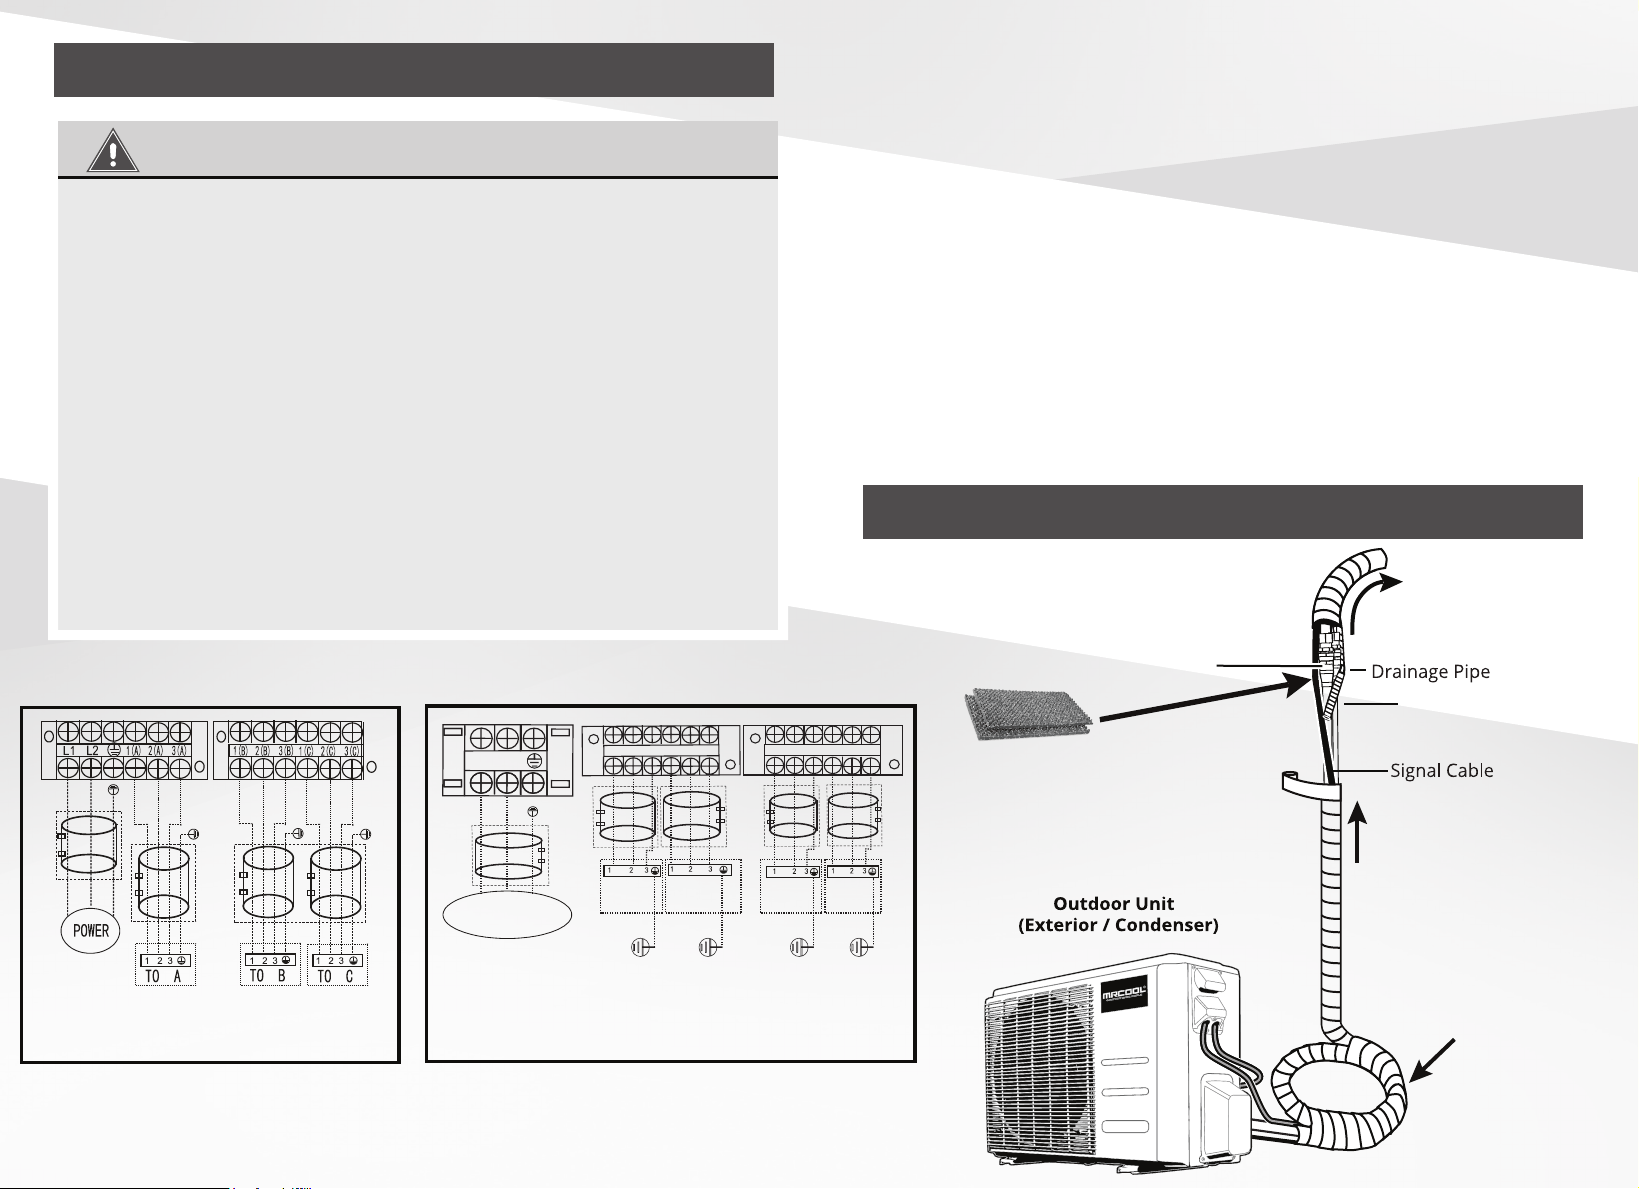
STEP 8 - Outside
1. Remove the electrical cover by removing the screws
holding it in place.
2. Wires and terminals that are numbered should be
matched and connected accordingly.
3. Terminal L1(A) of the outdoor unit must connect with
terminal 1 on the indoor unit. Continue to match zone to
zone for any additional connections.
4. Replace electrical cover and screw it back into place.
Refer to the diagrams / photo at the bottom left. For more
detailed instructions regarding the electrical connections,
please refer to the Installation Manual.
WARNING
BEFORE PERFORMING ANY ELECTRICAL WORK, TURN OFF ALL
POWER TO THE SYSTEM.
1. Wire colors of this series / model may differ from previous
models, other series and general conventions.
2. All wiring must be performed in accordance with the wiring
diagrams shown here and all municipal, state and federal
regulations.
4. This product is designed to run on 60Hz frequency which is
the North American standard.
5. A certified electrician is required to supply power from a
disconnect of an appropriate rating - see manual.
STEP 7 - outside
Quick Connect® Line Set
(refrigerant pipe)
Pat. https://mrcool.com/mrcool-patents/
wrap from
bottom to top
to ensure tape
overlap sheds
rain/water
wrap piping all the way to
exterior wall hole
Quick Connect
®
connections
keep line excess
bundled and coiled
then wrap together
Wrap the Quick Connect®
connections with the black
sound deadening pads. Then
place insulation over them
before line set is wrapped
Up to Three Zones
OPTIONAL
OPTIONAL
OPTIONAL
OPTIONAL
Up to Four Zones
L2
L1
LPPUS REWOP Y
L1(A)
L2(A)
S(A)
L1(B)
L2(B)
S(B)
1(C) 2(C) 3(C) 1(D) 2(D) 3(D)
TO A
TO B
TO D
TO C
OPTIONAL
OPTIONAL
OPTIONAL
OPTIONAL
OPTIONAL

Quick Connect® Line Set
(refrigerant pipe)
Pat. https://mrcool.com/mrcool-patents/
DIY
®
Multi-Zone
Do-It-Yourself Ductless Mini-Split Heat Pump A/C
1. Install the provided batteries into the remote control.
2. Press the Power button on the remote control.
3. The MRCOOL
®
DIY
®
Series should activate automatically.
4. To use the MRCOOL
®
Smartphone App, refer to the Smart
Controller Module instructions included in the box.
STEP 8 - Continued
STEP 9 - Inside
1. Pack the wall hole with the supplied Neoprene (or Spray
Foam), filling any space not taken up by the piping & lines, in
order to seal the hole.
2. To protect Quick Connect® connections and reduce
vibration, wrap them with the black sound deadening pads.
Then, install the white pipe insulation over the pads.
3. Now, starting at the outdoor condenser and working
your way up to the wall hole, you will wrap the exposed
line set, cables, and drain hose together tightly using the
supplied Non-adhesive U.V. tape. The drain pipe will need
to be at the bottom of the bundle. Refer to the diagram on
the previous page. DO NOT wrap the end of the drain
hose.
4. To further improve overall appearance and long-term
durability of the line set, it is recommended to install an
optional MRCOOL
®
LineGuard
®
(sold separately).