Loading ...
Loading ...
Loading ...
4
ninjakitchen.co.uk
5
ninjakitchen.co.uk
PARTS
To order replacement parts or additional accessories, visit ninjakitchen.co.uk
or contact customer service at 0800 862 0453
BEFORE FIRST USE
NOTE: For longest life, we recommend hand-washing the accessories.
For best results, remove the panini press from the grill tray and wash separately.
1 Remove and discard any packaging material and tape from the unit. Some stickers are
to be permanently kept on the unit, ONLY remove stickers with ‘peel here’.
2 Remove all accessories from the box and read this manual carefully. Please pay
particular attention to operational instructions, warnings and important safeguards to
avoid any injury or property damage.
3 Separate the panini press from the grill tray following the instructions listed in the
Converting the Panini Press into a Grill tray section. Then wash the panini press and grill
tray in warm, soapy water. Rinse and dry thoroughly. NEVER submerge the main unit
in water.
4 We recommend placing the grill tray inside the toaster and running it on GRILL HIGH for
10 minutes without adding food. Refer to section below FLIPPING TO GRILL POSITION for
how to use the toaster on GRILL mode. Make sure the area is well ventilated. This removes
any packaging residue and odour traces that may be present. This is completely safe and
not detrimental to the performance of the toaster.
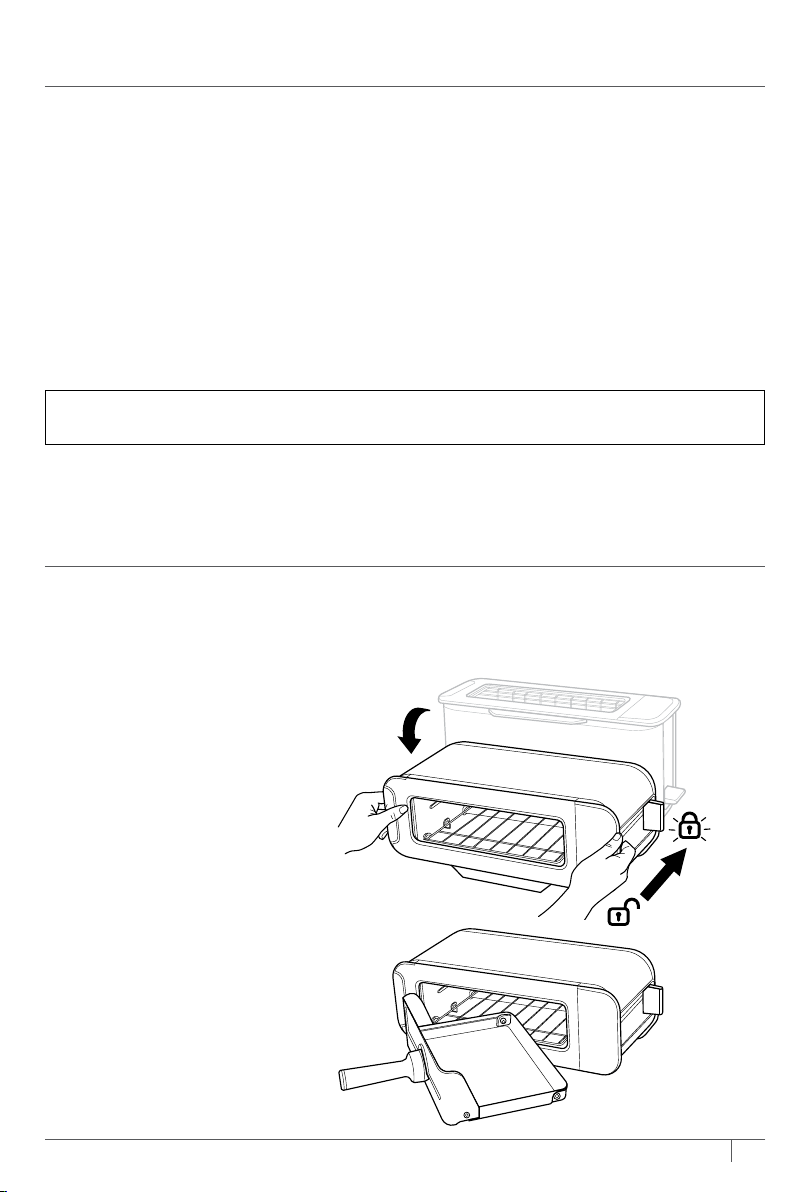
FLIPPING TO THE GRILL POSITION
1 Flip the unit down.
2 Push the toast lever back to open the cooking cavity. Lock icon: Lever must be pushed
all the way back to lock position. The lock icon will illuminate if the lever is locked and
flash if not locked.
3 Insert the grill tray to begin grilling.
1
2
3
“LOC”
Appears on the display when
the unit is in the horizontal
mode but the lever has not
been pushed back and locked
into place. There will be an
audible click when lever is
locked and LOC will disappear.
“NO PAN”
Appears on the display if
the grill tray is not inserted
and START/STOP has been
pressed to start cooking.
Insert pan correctly to begin
cooking.
The unit will auto shut o
if the grill tray has been
removed for 5 minutes.
A
Main Unit
(attached power cord
not shown)
Cooking cavity
Flip foot
Control panel
Lever
Converting the Panini Press into a Grill tray
1 Lift up top handle to separate the plates.
2 Push the PRESS tab on the left panini arm inward, sliding it o the grill tray pin.
3 Slide the right panini press arm o the grill tray pin.
4 Use as a grill tray for Grill, Bake and Reheat functions.
5 Re-attach top plate for Panini function.
NOTE: To re-attach the panini press, align right panini arm hole with right grill tray pin. Push
the PRESS tab and align the panini hole with the bake pin to slot in place.
PRESS
B
Dual grill
tray and
panini press
accessory
C
Non-
removable
crumb
tray
Loading ...
Loading ...
Loading ...