Download the complete instruction manual on
http:// docs. hotp oint . eu
or call the phone number
shown on the warranty booklet.
Before using the appliance, read these safety
instructions. Keep them nearby for future reference.
These instructions and the appliance itself provide
important safety warnings to be observed at all
times. The manufacturer declines any liability for
failure to observe these safety instructions, for
inappropriate use of the appliance or incorrect
setting of controls.
WARNING: If the hob surface is cracked, do not
use the appliance - risk of electric shock.
WARNING: Danger of re: Do not store items on
the cooking surfaces.
CAUTION: The cooking process has to be
supervised. A short cooking process has to be
supervised continuously.
WARNING: Unattended cooking on a hob with fat
or oil can be dangerous - risk of re. NEVER try to
extinguish a re with water: instead, switch o the
appliance and then cover ame e.g. with a lid or a
re blanket.
Do not use the hob as a work surface or support.
Keep clothes or other ammable materials away
from the appliance, until all the components have
cooled down completely - risk of re.
Metallic objects such as knives, forks, spoons and
lids should not be placed on the hob surface since
they can get hot.
Very young children (0-3 years) should be kept
away from the appliance. Young children (3-8years)
should be kept away from the appliance unless
continuously supervised. Children from 8years old
and above and persons with reduced physical,
sensory or mental capabilities or lack of experience
and knowledge can use this appliance only if they
are supervised or have been given instructions on
safe use and understand the hazards involved.
Children must not play with the appliance. Cleaning
and user maintenance must not be carried out by
children without supervision.
After use, switch o the hob element by its
control and do not rely on the pan detector.
WARNING: The appliance and its accessible parts
become hot during use. Care should be taken to
avoid touching heating elements. Children less than
8 years of age shall be kept away unless continuously
supervised.
PERMITTED USE
CAUTION: the appliance is not intended to be
operated by means of an external switching device,
such as a timer, or separate remote controlled system.
This appliance is intended to be used in household
and similar applications such as: sta kitchen areas
in shops, oces and other working environments;
farm houses; by clients in hotels, motels, bed &
breakfast and other residential environments.
No other use is permitted (e.g. heating rooms).
This appliance is not for professional use. Do not
use the appliance outdoors.
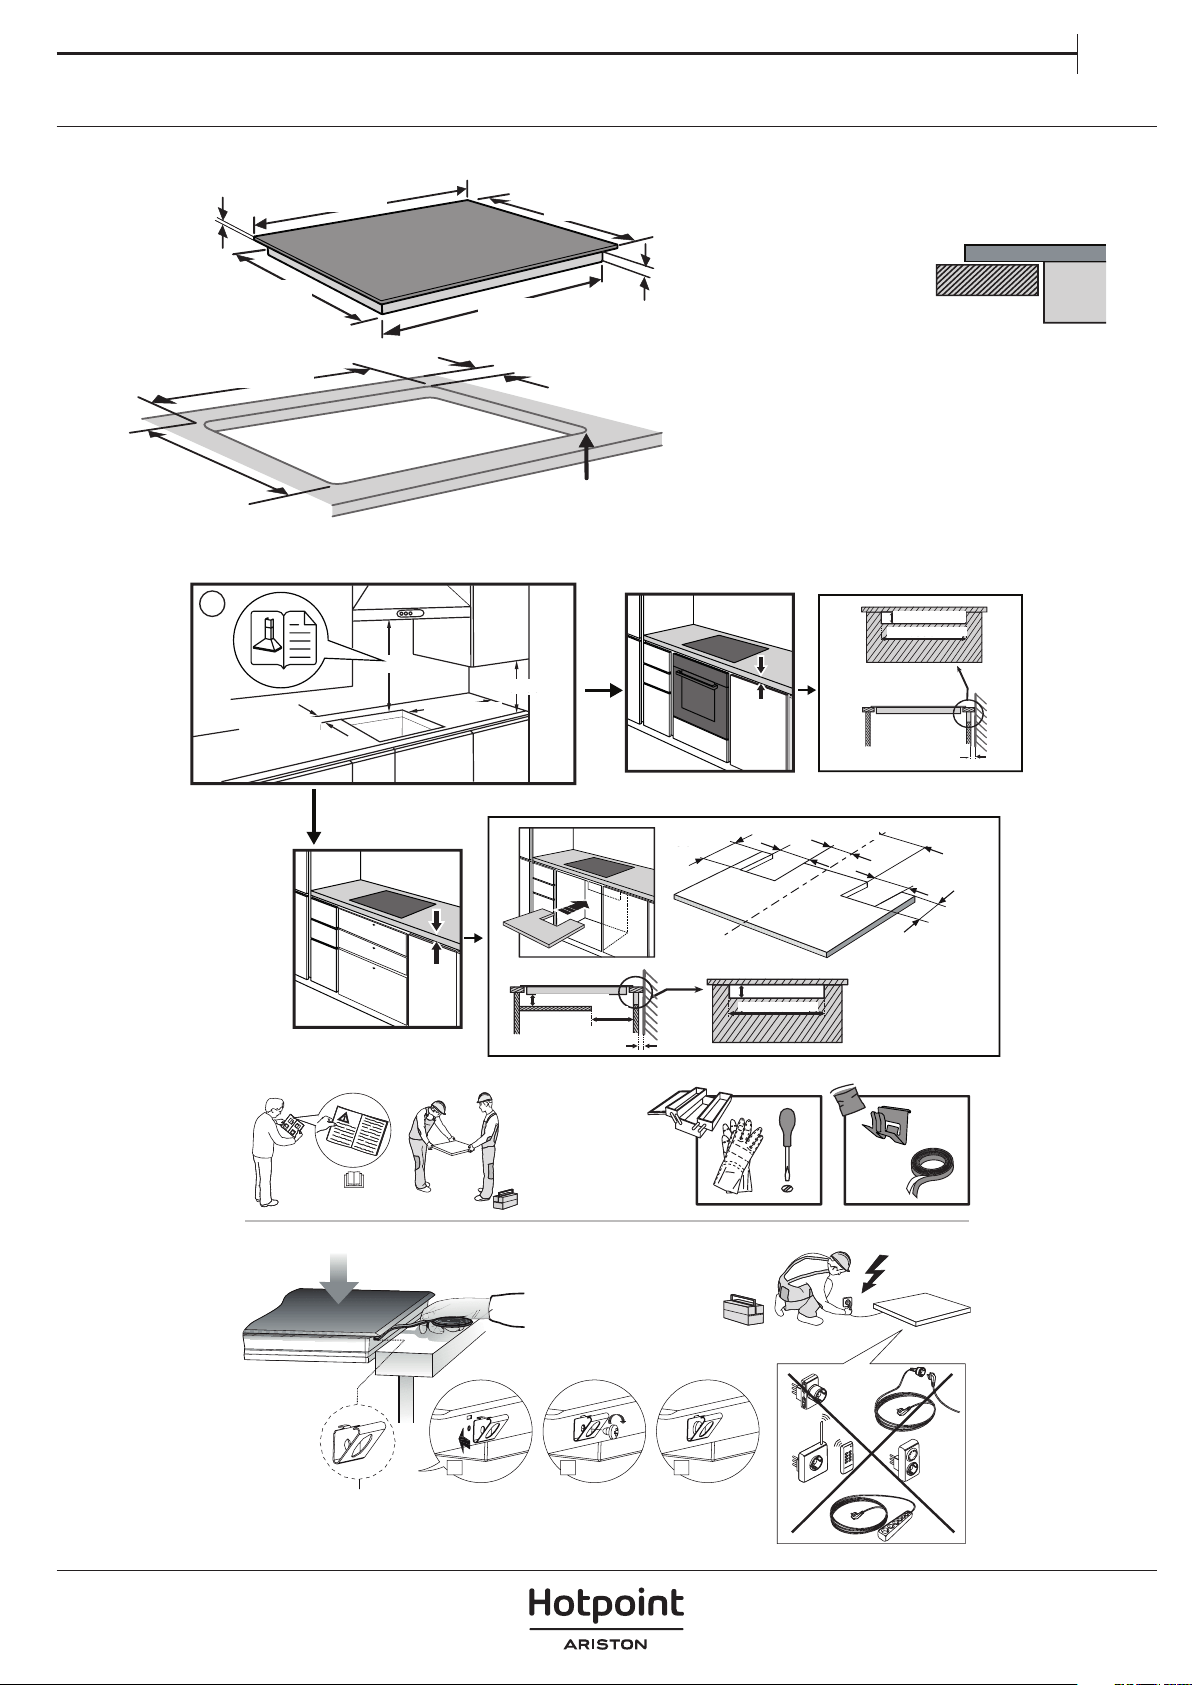
INSTALLATION
The appliance must be handled and installed by
two or more persons - risk of injury. Use protective
gloves to unpack and install - risk of cuts.
Installation, including water supply (if any),
electrical connections and repairs must be carried
out by a qualied technician. Do not repair or replace
any part of the appliance unless specically stated in
the user manual. Keep children away from the
installation site. After unpacking the appliance,
make sure that it has not been damaged during
transport. In the event of problems, contact the
dealer or your nearest After-sales Service. Once
installed, packaging waste (plastic, styrofoam parts
etc.) must be stored out of reach of children - risk of
suocation. The appliance must be disconnected
from the power supply before any installation
operation - risk of electric shock. During installation,
make sure the appliance does not damage the
power cable - risk of re or electric shock. Only
activate the appliance when the installation has
been completed.
Carry out all cabinet cutting operations before
tting the appliance and remove all wood chips and
sawdust.
If the appliance is not installed above an oven, a
separator panel (not included) must be installed in
the compartment under the appliance.
ELECTRICAL WARNINGS
It must be possible to disconnect the appliance
from the power supply by unplugging it if plug is
accessible, or by a multi-pole switch installed
upstream of the socket in accordance with the
wiring rules and the appliance must be earthed in
conformity with national electrical safety standards.
Do not use extension leads, multiple sockets or
adapters. The electrical components must not be
accessible to the user after installation. Do not use
the appliance when you are wet or barefoot. Do not
operate this appliance if it has a damaged power
cable or plug, if it is not working properly, or if it has
been damaged or dropped.
If the supply cord is damaged, it must be replaced
with an identical one by the manufacturer, its service
agent or similarly qualied persons in order to avoid
a hazard - risk of electric shock.
SAFETY INSTRUCTIONS
IMPORTANT TO BE READ AND OBSERVED
EN

DISPOSAL OF HOUSEHOLD APPLIANCES
The packaging material is 100% recyclable and is
marked with the recycle symbol . This appliance is
manufactured with recyclable or reusable materials.
Dispose of it in accordance with local waste disposal
regulations. For further information on the
treatment, recovery, and recycling of household
electrical appliances, contact your local authority, the
collection service for household waste, or the store
where you purchased the appliance. This appliance is
marked in compliance with European Directive
2012/19/EU, Waste Electrical and Electronic
Equipment (WEEE) and with the Waste Electrical and
Electronic Equipment regulations 2013 (as
amended).
By ensuring this product is disposed of correctly, you
will help prevent negative consequences for the
environment and human health.
The symbol on the product or on the
accompanying documentation indicates that it
should not be treated as domestic waste but must be
taken to an appropriate collection center for the
recycling of electrical and electronic equipment.
ENERGY SAVING TIPS
Make the most of your hot plate’s residual heat by
switching it off a few minutes before you finish
cooking.
The base of your pot or pan should cover the hot
plate completely; a container that is smaller than the
hot plate will cause energy to be wasted. Cover your
pots and pans with tight-fitting lids while cooking
and use as little water as possible. Cooking with the
lid off will greatly increase energy consumption.
Use only flat-bottomed pots and pans.
DECLARATION OF CONFORMITY
This appliance meets Ecodesign requirements of
European Regulation 66/2014 and The Ecodesign for
Energy-Related Products and Energy Information
(Amendment) (EU Exit) Regulations 2019 in
compliance with the European standard EN 60350-2.

INSTALLATION
50 mm
4 mm
850 mm
510 mm
485 mm
900 mm
0
+
2
860 mm
R = Max. 10 mm
Min. 35 mm
Min. 486 mm
Max. 490 mm
L
Min. 35 mm
i
28 mm-
No Max.
min. 20 mm
min. 45 mm
min. 550 mm
Min. 400 mm
Min.100 mm
12 mm-
No Max.
min. 45 mm
min. 550 mm
min. 20 mm
60 mm
min. 10 mm
130 mm
90 mm
105 mm
295 mm
70 mm
130 mm
x4
1 2 3

ELECTRICAL CONNECTION
Electrical connection must be made before connecting the appliance to the electricity supply, check that the voltage and frequency match those
specied on the stovetop nameplate, which is underneath it, and on the Guarantee Sheet, or if applicable on the technical data sheet, which you
must keep together with this manual throughout the product’s service life. Ensure that the inlet cable does not come into contact with the induction
top housing or the oven housing, if it is installed in the same unit.
The electrical connection must be properly grounded, following current legislation, otherwise the induction hob may malfunction.
Installation must be carried out by qualied personnel who know the current safety and installation regulations. Specically, installation must be
carried out in compliance with the regulations of the local electricity supply company. Only the ocial technical service can handle or repair the
appliance, including replacement of the power cable.
Make sure the voltage specied on the data plate located on the bottom of the appliance is the same as that of the home.
Regulations require that the appliance be earthed: use conductors (including the earth conductor) of the appropriate size only.
Warning:
Unusually high power surges can damage the control system (like with any electrical appliance).
It is advised to refrain from using the induction hob during the pyrolytic cleaning function in the case of pyrolytic ovens, due to the high
temperature that this type of device attains.
Before disconnecting the hob from the mains, we recommend switching o the cuto switch and waiting for approximately 25 seconds before
disconnecting from the mains. This time is required to allow for the complete discharge of the electronic circuitry and thus preclude the possibility
of electric shock from the cable terminals.
Keep the Guarantee Certicate or the technical data sheet together with the instructions manual throughout the product’s service life. These contain
important technical information.
yellow-green
blue
blue (gray)
brown
black
DO NOT USE L3
yellow-green
blue
blue (gray)
brown
black
yellow-green
blue
blue (gray)
brown
black
yellow-green
blue
blue (gray)
brown
black
yellow-green
blue
blue (gray)
brown
black
yellow - green
Blue(red)
Blue(white)
Brown
Black
Gray
blue
yellow - green
Blue(red)
Blue(white)
Brown
Black
Gray
blue
yellow - green
Blue(red)
Blue(white)
Brown
Black
Gray
blue
yellow - green
Blue(red)
Blue(white)
Brown
Black
Gray
blue
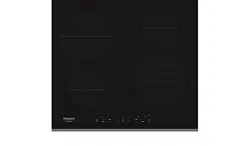
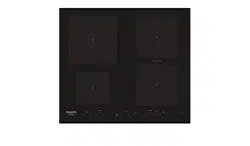
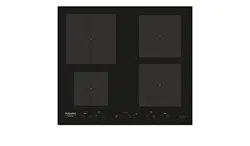
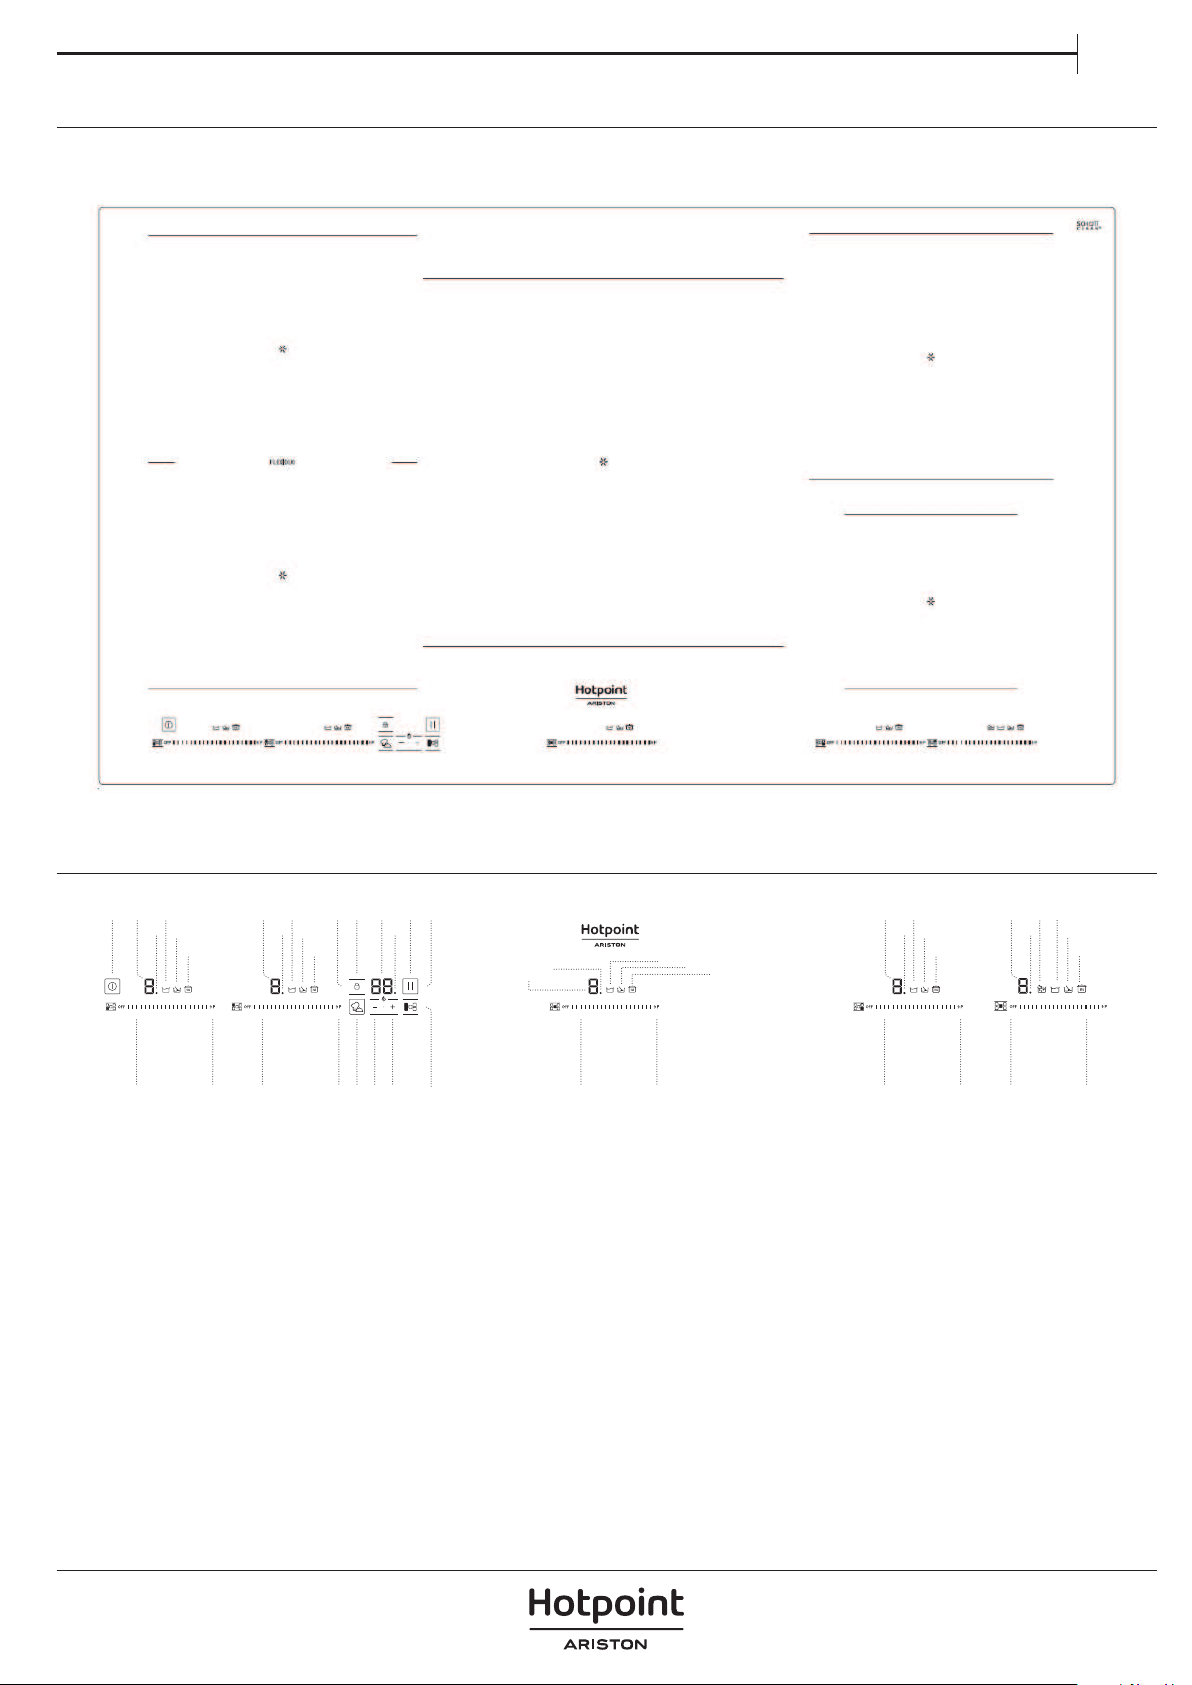
PRODUCT DESCRIPTION
1. Cooktop
2. Control panel
CONTROL PANEL
1. General on/o sensor
2. Cursor slider for controlling power
3. Power and/or residual heat indicator
4. Decimal dot of power and/of residual heat
indicator.
5. Direct access to “Power” function.
6. Activation sensor for “Block” Function.
7. Pilot indicator light “Block” function
activated
8. Activation sensor for “Stop&Go” function
9. Pilot indicator light “Stop&Go” function
activated
10. “Minus” sensor for timer.
11. “Plus” sensor for timer.
12. Timer indicator.
13. Decimal dot of the timer
14. Pilot indicator light “Simmering” function
activated
15. Pilot indicator light” Melting” function
activated
16. Pilot indicator light “Keep Warm”function
activated
17. Activation sensor for “My menu” functions
18. Activation sensor for “FlexiDuo” function
19. Pilot indicator light “Boiling” function
activated
1 14
15
16
14
15
16
14 19
15
16
3
4
6 7 12 9 83
4 13
3
4
3
4
3
4
2 5 5 171011 18 5 5 52 2 2 2
14
15
16
14
15
16

ACCESSORIES
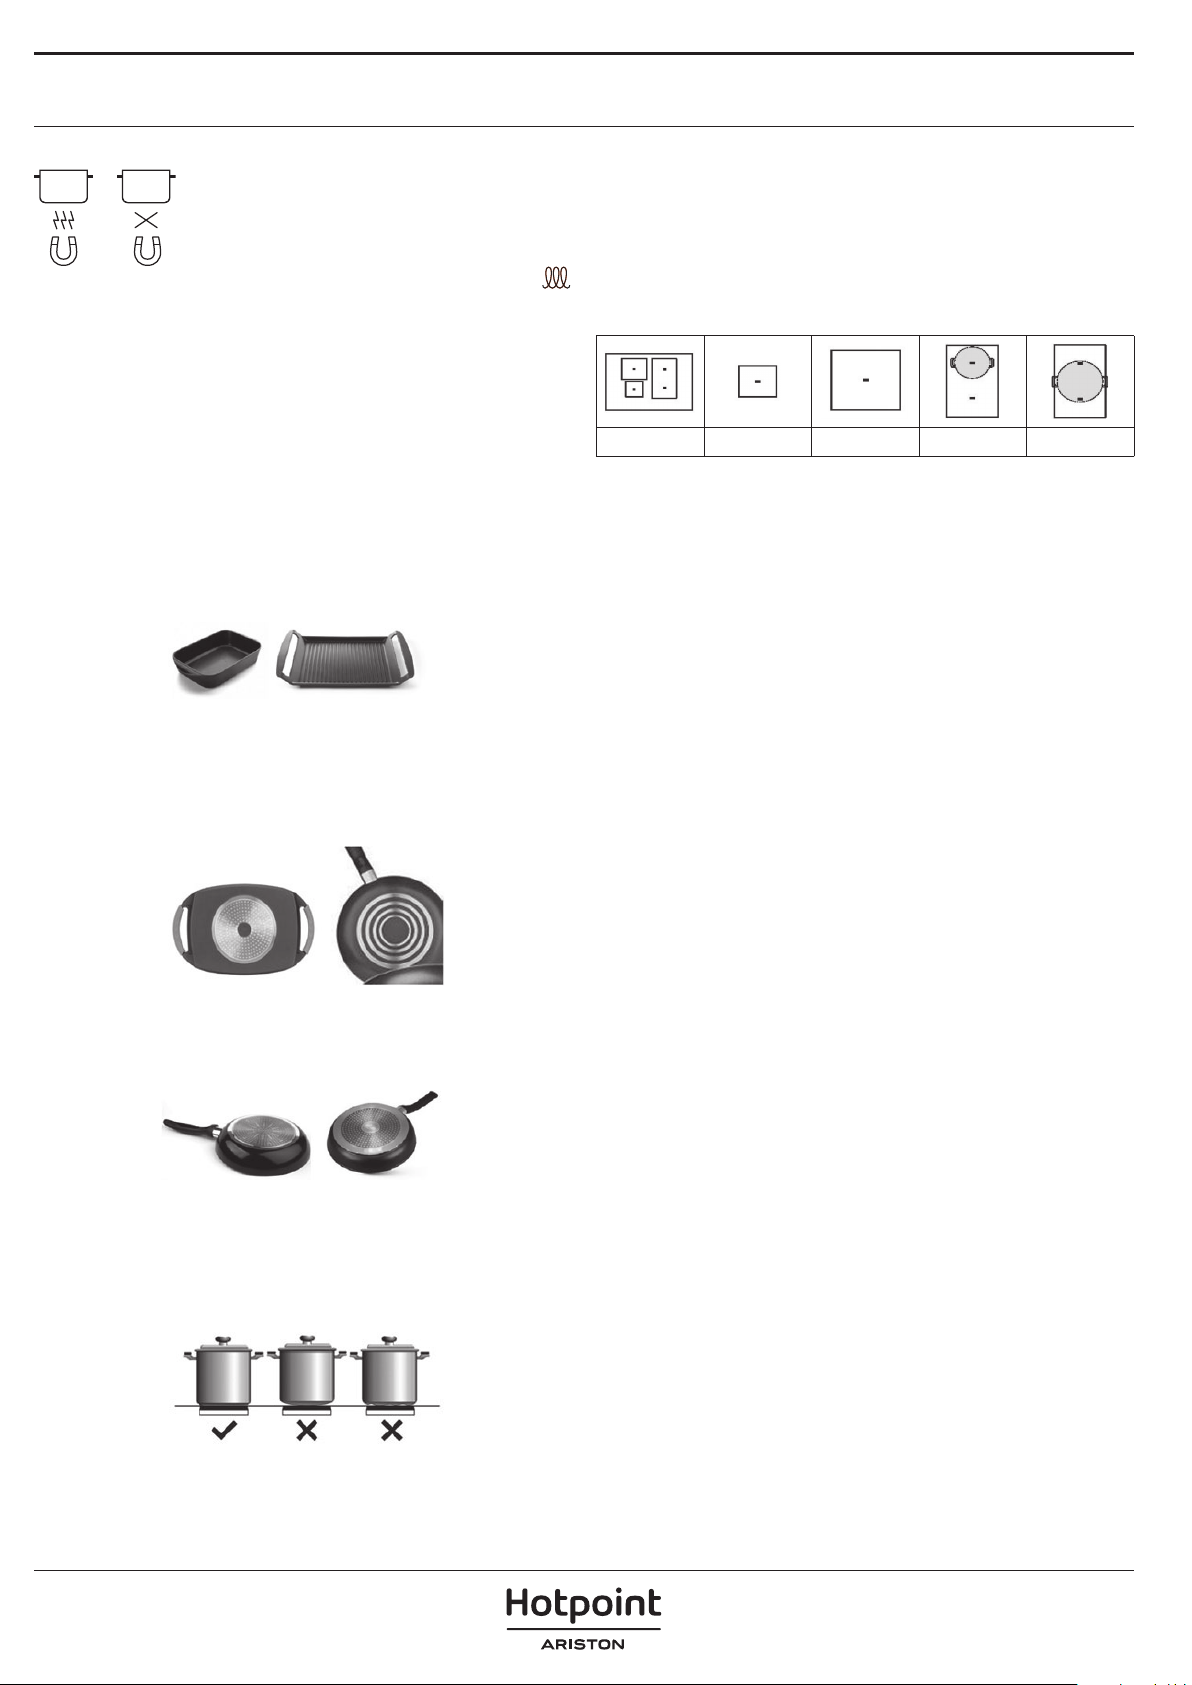
POTS AND PANS
Only use pots and pans made from ferromagnetic
material which are suitable for use with induction hobs:
• enamelled steel
• cast iron
• special pots and pans in stainless steel, suitable
for induction cooking
To determine whether a pot is suitable, check for the
symbol (usually
stamped on the bottom). A magnet may be used to check whether pots are
magnetic.
The quality and the structure of the pot base can alter cooking performance.
Some indications for the base's diameter do not correspond to the actual
diameter of the ferromagnetic surface.
We do not recommend the use of diuser plates or materials such as ne
steel, aluminum, glass, copper, or clay.
Each cooking zone has a minimum pan detection time. This depends
on the material and the ferromagnetic diameter of the base of the pan.
Therefore it is essential to use the cooking zone that best matches the
diameter of the base of the pan to be used.
If the pan is not detected on the selected cooking zone, try using the
next smallest zone. When the FlexiCook is used as a single cooking zone,
larger pans suitable for this type of zone.
Some pans without a complete ferromagnetic base are sold as suitable
for induction. In these pans, only the ferromagnetic base is heated.
Consequently the heat is not evenly distributed across the base of the
pan. This may mean that the non-ferromagnetic part of the base of the
pan does not reach the right cooking temperature.
Other pans, with aluminum inserts in the base have a smaller area of
ferromagnetic material In this case, it may be difficult or even
impossible to detect the pan. In addition, the power supplied may be
lower and, consequently, the pan will not heat up correctly.
The type of base used on the pan may aect the uniformity and results
of the cooking. Pans with a stainless steel "sandwich" base use materials
that assist the uniform distribution and diusion of the heat, resulting in
savings in time and energy.
The base of the pan must be completely at, thus ensuring a uniform
power supply.
Never heat empty pans, or use pans with a thin base, as these may
heat up quickly without allowing time for the automatic disconnection
function of the cooker to come into operation.
NOOK
Minimum diameter of pot/pan base for the dierent cooking areas
To ensure that the hob functions properly, use pots of a suitable minimum
diameter (refer to the table below).
Always use the cooking zone that best corresponds to the minimum
diameter of the bottom of the pot.
Place the pot making sure it is well centered on the cooking zone in use.
It is recommended not to use pots that exceed the perimeter of the cooking
zone in use.
ADAPTER FOR POTS/PANS UNSUITABLE FOR INDUCTION
Using this accessory makes it possible to use pots and pans that are not
suitable for induction hobs. It is important to bear in mind that using it
aects eciency and, consequently, the time needed to heat food. Its
use should be limited because the temperatures reached on its surface
depend signicantly on the pot/pan used, its atness and the type of
food being cooked. Using a pot or pan with a smaller diameter than the
adapter disc may cause heat to build up that is not transmitted to the
pot or pan, which could blacken both the hob and the disc. Adapt the
diameter of your pots/pans and the hob to the diameter of the adapter.
FIRST TIME USE
POWER MANAGEMENT
Some models are equipped with a power limiting function (Power
Management). This function allows the total power generated by the hob to
be set to different values selected by the user. To do this, for the first minute
after having connected the hob to the power supply, it is possible to access
the power limiting menu.
1. Press the (11) touch key for three seconds. The letter PL will appear on
2.
the timer indicator (12)
Press the locking touch key (6). The different power values to which
the hob can be limited will appear and these can be changed using the
(1), any plate can
ACTIVATING PLATES
Once the Touch Control is activated with sensor
be turned on by following these steps:
1.Slide the finger or touch in any position of one of the cursors “slider”
(2). The zone has been selected and simultaneously the power level
will be set between 0 and 9. That power value will be shown on the
corresponding power indicator and its decimal dot (4) will keep light up
during 10 seconds.
2. Use the cursor slider (2) to choose a new cooking level between 0 and
9.
As long as the plate is selected, in other words, with the decimal (4) dot
light up, its power level can be modified.
TURNING OFF A PLATE
Using the touch slider key (2) lower the power to level 0. The hotplate
will switch off.
When a hot plate is switched off an H will appear in its power indicator
(3), if the glass surface of the related to the cooking area is hot and there
is a risk of burns. When the temperature drops, the indicator (3) switches
off (if the hob is disconnected), or otherwise a “-” will light up if the hob
is still connected.
TURNING ALL PLATES OFF
All plates can be simultaneously disconnected by using the general on/
off sensor (1). All plate indicators (3) will turn off. If the heating zone
turned off is hot, its indicator shows an H.
(11) and (10) sensors.
3. Once the value has been selected, once again press the locking touch key
(6).The hob will be limited to the chosen power value.
The power levels available are:
2 kW - 2.5 kW - 3 kW - 3.5 kW - 4 kW - 4.5 kW - 5 kW - 5.5 kW - 6 kW - 6.5 kW - 7 kW
If you want to change the value again, you must unplug the hob and plug it
in again after a few seconds. Thus you will again be able to enter the power
limiting menu.
Every time the power level of a hotplate is changed, the power limiter will
calculate the total power the hob is generating. If you have reached the total
power limit, the touch control will not allow you to increase the power level
of that hotplate. The hob will beep and the power indicator (3) will blink at
the level that cannot be exceeded. If you wish to exceed that value, you must
lower the power of the other hotplates. Sometimes it will not be enough to
lower another by a single level as this depends on the power of each hotplate
and the level it is set at.
It is possible that to raise the level of a large hot plate that of several smaller
ones must be turned down.
If you use the quick switch-on at maximum power function and the said
value is above the value set by the limit, the hotplate will be set to the
maximum possible level. The hob will beep and the said power value will
blink twice on the indicator (3).
To set the power of the hob:
Only visible while running.
The manoeuvres are done by means of the touch keys. You do not need
to exert force on the desired touch key, you only need to touch it with
your fingertip to activate the required function
Each action is verified by a beep.
Use the cursor slider (2) to adjust power levels (0 - 9) by sliding your
finger over it. Sliding towards the right increases the value, whereas
sliding towards the left decreases it.
It’s also possible to directly select a power level by placing your finger
directly on a desired point of the cursor slider (2)
In order to select a plate on these models, directly touch the cursor
slider (2).
SWITCHING ON THE DEVICE
1 Touch the On touch key (1) for at least one second. The touch control
will become active, a beep will be heard and the indicators (3) will light up
displaying a “-”. If any cooking area is hot, the related indicator will flash an H.
If you do not take any action in the next 10 seconds the touch control will
switch off automatically. When the touch control is activated, you can
disconnect it at any time by touching the touch button (1), even if it has
been locked (lock function activated). The touch button (1) always has
priority to disconnect the touch control.
DAILY USE
On activating the Power function in one hotplate, it is possible that the
performance of some of the others may be aected, reducing its power to a
lower level, in which case this will be displayed on its indicator (3).
Deactivation of Power Function, before it's working time passes, can be
done either by means of touching cursor “slider” modifying its power level or
repeating step 3.
TIMER FUNCTION countdown clock
This function facilitates cooking given that you don’t have to be present: You
can set a timer for a plate, and it will turn o once the desired time is up.
For these models, you can simultaneously program each plate for durations
ranging from 1 to 99 minutes.
Setting a timer on a plate.
Once the power level is set on the desired zone, and while the decimal dot of
the zone keeps on, the zone will be able to be timed.
To that end:
1. Touch sensor (10) or (11). Timer Indicator (12) will show “00” and
corresponding zone indicator (3) will show the symbol blinking alternately
with its current power level.
2. Immediately afterwards set a cooking time between 1 and 99 minutes,
using the sensors (10) or (11). With the rst one the value will
start at 60, whereas with the second it will start at 01. To cancel the timer
function, the clock can be adjusted to value '00' using sensor (10). A
quicker way to do this is keeping sensors (10) and (11) pressed
together. When there is less than one minute left, the clock will begin to
countdown in seconds.
3. When the timer indicator (12) stops ashing, it will start to countdown the
time automatically. The indicator (3) relating to the timed hotplate will
alternately display the selected power level and the symbol .
Once the selected cooking time has elapsed, the heating zone being timed
is turned o and the clock emits a series of beeps for several seconds. To turn
o the audible signal, touch any sensor. The timer indicator (12) will display a
ashing 00 beside the decimal dot (4) of the selected zone. If the heating zone
turned o is hot, its power indicator (3) will display alternately the H symbol
and a “-“.
If you wish to time another hotplate at the same time, repeat steps 1 to 3.
If one or more zones are already timed, the timer indicator (12) will show by
default the shortest remaining time to nish, showing a “t” on the related
zone. Rest of timed zones will show on their corresponding indicator zones
the decimal dot blinking. When the cursor ”slider” of another timed zone is
pressed, the timer will show the remaining time of that zone for a few seconds
and its indicator will show its power level and the “t” alternately.
Changing the programmed time
For modifying programmed time, the cursor “slider” (2) of the timed zone has
to be pressed. Then it will be possible to read and modify the time.
Through sensors (10) and (11), you can modify the programmed time.
Disconnecting the clock
If you wish to stop the clock before the programmed time is up, this can be
done at any time by simply adjusting its value to ‘--’.
1. Select the desired plate.
2. Adjust the value of the clock to “00” by using the sensor (10). The clock
is cancelled. This can also be done more quickly by pushing the “sensors
(10) and (11) at the same time.
PAN DETECTOR
Induction cooking zones have a built-in pan detector. This way, the plate will
stop working if there is no pan present or if the pan is not suitable.
The power indicator (3) will show a symbol to designate “there is no pan ”
if, while the zone is on, no pan is detected or the pan is not suitable.
If a pan is taken off the zone while it is running, the plate will automatically
stop supplying energy and it will show the symbol for “there is no pan”. When
a pan is once again placed on the cooking zone, energy supply will resume at
the same power level previously selected.
CONTROL PANEL LOCK
With the Block Function, you can block the other sensors, except for the on/
off sensor
(1), in order to avoid undesired operations. This function
is useful as a childproof safety.
To activate this function, touch sensor
(6) for at least one second.
Once you have done so, the pilot (7) turns on indicating that the control
panel is blocked. To deactivate the function, simply touch sensor
(6)
again.
If the on/off sensor
(1) is used to turn off the appliance while the
block function is activated, it won’t be possible to turn the cooktop on again
until it unblocks.
SILENCER OF THE BEEP
When the hob is on, if one presses the touch key
(11) and the locking touch
key
(6) simultaneously for three seconds, the beep that accompanies
each action will be deactivated. The time indicator (12) will display “OF”. This
deactivation will not be applied to all the functions, as for example the
beep for on/off, the ending of the timer or the locking/unlocking of the touch
keys always remain activated.
To once again activate all the beeps that accompany each action, again
simultaneously press the touch key
(11) and the locking touch key
(6) for three seconds. The time indicator (12) will display “On”.
STOP&GO FUNCTION
This function puts the cooking process on pause. The timer will also be paused
if it is activated.
Activating the Stop function.
Touch the Stop sensor (8) for one second. The pilot (9) lights up and
the power indicators will show the symbol to indicate cooking has been
paused.
Deactivating the Stop function
Touch Stop&Go sensor (8) again. The pilot (9) turns off and
cooking resumes under the same power and timer settings that were
established before the pause.
POWER FUNCTION
This function supplies “extra” power to the plate, above the nominal value.
Said power depends on the size of the plate, with the possibility of reaching
the maximum value permitted by the generator.
1.
2.
Slide the finger above the corresponding cursor slider (2) until the power
indicator (3) shows “9” and keep the finger pressed for one second, or
touch directly on “P” and keep pressed the finger for one second.
The power level indicator (3) will show the symbol , and the plate will
start to supply extra power. The Power function has a maximum duration
specified in Table 1. After this time, the power level will automatically
adjust to 9. A beep sounds.
FUNCTIONS
1 14
15
16
14
15
16
14 19
15
16
3
4
6 7 12 9 83
4 13
3
4
3
4
3
4
2 5 5 171011 18 5 5 52 2 2 2
14
15
16
14
15
16
MY MENU
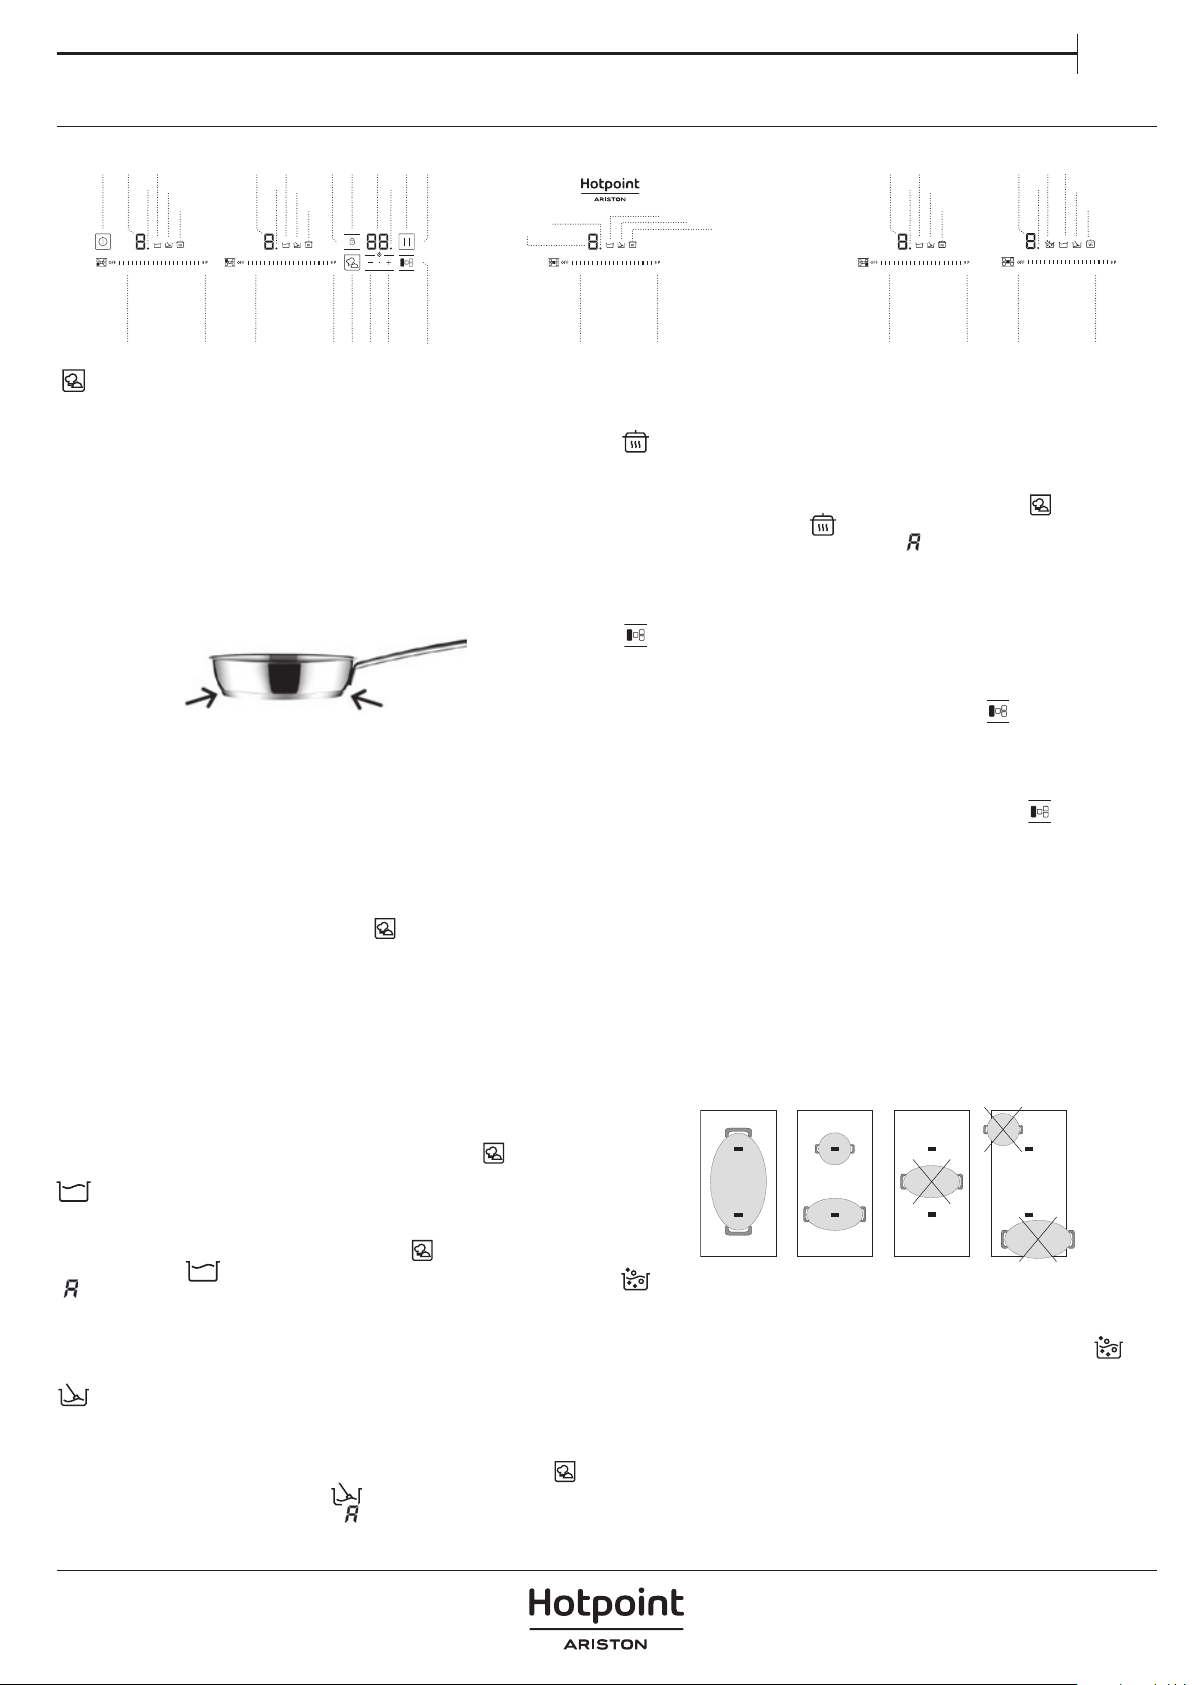
These functions have pre-allocated power levels to make cooking easier,
obtaining excellent results as the temperature of the pan is controlled
continuously by sensors. When the target temperature for the function
has been reached, it is automatically maintained without needing to
change the power level.
The MY MENU functions operate correctly with pans with the same
ferromagnetic area on the base of the pan as the area of the cooking zone.
In addition, for high temperature functions (above 100ºC), pans must have
a at, even base (preferably "sandwich" type) as shown in the gure below
To ensure the correct operation of these functions, it is important that
the pan and the cooking zone are not hot at the start of the process.
The Touch Control has special features that help the user to cook through
the MY MENU sensor (17). These functions are available depending on
the model.
To activate a special feature on a zone:
1.
2.
First it should be selected; and then, the decimal point (4) will be
active on the power indicator (3).
Now click on the MY MENU sensor (17). The sequentially successive
presses will go over all the MY MENU functions available in each
zone one by one. These functions will show the activation with the
corresponding leds (14) simmering, (15) melting, (16) keep warm.
If you want to cancel a special active function at any time, you should
touch the “slider” cursor sensor (2) of the related zone to select it. The
decimal point (4) of the power indicator (3) will light up. Then, touch
again the “slider” (2) cursor to set a new power level or to power o the
zone, or you can choose a dierent special function touching again on
the MY MENU sensor (17).
SIMMERING FUNCTION
This feature allows you to keep it simmering. After the food is boiled,
enable the plate by selecting it, and press the MY MENU sensor (17)
until the led (14) located on the icon lights up. Once the function is
activated, the symbol will appear on the power indicator (3).
You can override the function at any time by turning o the plate, by
changing the power level or by choosing a dierent special function.
MELTING FUNCTION
This function maintains a low temperature in the cooking zone.
Ideal for defrosting food or for slowly melting other food types such as
chocolate, butter, etc.
To activate it, select the plate, and press on the MY MENU sensor
(17)
until the led (15) located on the icon lights up. Once the function is
activated, the symbol will appear on the power indicator (3). You can
override the function at any time by turning o the plate, by changing
the power level or by choosing a dierent special function.
KEEP WARM FUNCTION
This function automatically sets an appropriate power level to keep the
cooked food hot. To activate it, select the plate, and press on the MY
MENU sensor (17) until the led (16) located on the icon lights up.
Once the function is activated, the symbol will appear on the power
indicator (3). You can override the function at any time by turning o
the plate, by changing the power level or by choosing a dierent special
function.
FLEXIDUO
Through this function, it is possible to enable two cooking zones to work
together, and to select a power level and to activate the timer function
for both zones.
To activate this function, press the sensor (18). By doing so, the
decimal points (4) of the linked plates will light up and the value “0” will
be shown on their power indicators (3).
The clock timer indicator (12) will show three segments indicating the
activated zones. In case your model has several zones with “FlexiDuo”,
you can select the desired option by pressing the sensor (18) before
assigning the power to the chosen zone. You will have a few seconds
to perform the next operation; otherwise, the function will be disabled
automatically.
After the “FlexiDuo” is selected, you can assign the power by touching
any of the “sliders” cursors (2) of one of the linked zones. The power level
and its variations are displayed simultaneously on the power indicators
(3) of both zones.
To disable this feature, you should select level '0' to one of the cooking
zones. Also, when the function is disabled, the levels of powers and
functions assigned to the related zones are cleared.
IMPORTANT: Place the pots in the center of the cooking zone so that
they cover at least one of the reference points (as shown below).
BOILING FUNCTION
This function enables the automatic boiling control, which is a great help
for cooking pasta, rice, eggs, boiling some food, etc. It is available only in
zones where the symbol appears.

MAINTENANCE AND CLEANING
Activation of the function
To activate the function, select the plate, and press the 6th SENSE sensor (17) until the led (19) located on the icon / lights up. Once the feature is
activated, the sign will appear on the power indicator (3); a moving segment will appear, indicating that the cooking is under the system's
control. When the system detects that it is about to start boiling, a first beep will be heard.
Take this opportunity to prepare your food for boiling or baking as desired. After 30 seconds, a second beep will be heard; if you have not already
done so, it’s time to pour the food in the pan. After the second beep, the system will activate the timer and stopwatch for you so that you can
control how long the food is to be boiled.
30 seconds after activating the stopwatch, a third beep will sound to warn that from that moment on, the system will decrease the power supplied
in order to maintain a gentle and continuous boil. The timer will remain active until the end of cooking.
If desired, you can disable the timer and set a time for the countdown and automatic shutdown of the plate (see section Timer Function).
Deactivation of the function
You can override the function at any time by turning off the plate, by changing the power level or by choosing a different special function.
SUGGESTIONS
AND RECOMMENDATIONS
•Use pots or pans with thick, completely flat bottoms.
•Do not slide pots and pans over the glass because they could
scratch it.
•Although the glass can take knocks from large pots and pans
without sharp edges, try not to knock it.
•To avoid damaging the ceramic glass surface, do not drag pots and
pans over the glass and keep the undersides of them clean and in
good condition.
•Recommended diameters of the pot bottom (see ‘’Technical Data
Sheet’’ supplied with the product).
!
WARNING
•Do not use steam cleaning equipment.
•Before cleaning, make sure the cooking zones are switched o and that the residual heat indicator (“H“) is not displayed.
Important:
•Do not use abrasive sponges or scouring pads as they may damage the glass.
•After each use, clean the hob (when it is cool) to remove any deposits and stains from food residue.
•A surface that is not kept suitably clean may reduce the sensitivity of control panel buttons.
•Use a scraper only if residues are stuck to the hob. Follow the scraper manufacturer's instructions to avoid scratching the glass.
•Sugar or foods with a high sugar content can damage the hob and must be immediately removed.
•Salt, sugar and sand could scratch the glass surface.
•
Use a soft cloth, absorbent kitchen paper or a special hob cleaner (follow the Manufacturer’s instructions).
•
Spills of liquid in the cooking zones can cause the pots to move or vibrate.
•After cleaning the hob, dry thoroughly.
TROUBLESHOOTING
•Check that the electricity supply has not been shut off.
•If you cannot turn the hob off after using it, disconnect it from the power supply.
•If alphanumeric codes appear on the display when the hob is switched on, consult the following table for instructions.
Please note: The presence of water, liquid spilled from pots or any
objects resting on any of the hob buttons can accidentally activate or
deactivate the control panel lock function.
If something does not work
Before calling the technical service, perform the verifications
described below.
The appliance does not work:
Ensure that the power cable is plugged in.
The induction zones do not produce heat:
The container is not appropriate (it does not have a
ferromagnetic bottom or is too small). Check that the bottom of the
container attracts a magnet, or use a larger container.
A humming is heard when starting to cook in the induction zones:
With containers which are not very thick or not in one piece,
the humming results from the transmission of energy directly to the
bottom of the container. The humming is not a defect, but if you wish
to avoid it anyway, reduce the power level slightly or use a container
with a thicker bottom, and/or of one piece.
The touch control does not light up or, despite lighting, does not
respond:
No heating zone has been selected. Be sure to select a heating zone
before operating it. There is humidity on the sensors,and/or your fingers
are wet. Keep the touch control surface and/or your fingers clean and
dry. The locking function is activated. Unlock the controls.
The sound of a fan is heard while cooking, which continues even
after cooking has ended:
The induction zones have a fan to keep the electronics cool. This only
operates when the electronic circuits get hot. It stops again when the
circuits cool whether the hob is turned on or not.
The symbol will appear on the power indicator of a hotplate: The
induction system does not find a pot or pan on a hotplate or it is of an
unsuited type.
The hotplate will switch off and the message:
DISPLAY CODE DESCRIPTION POSSIBLE CAUSES SOLUTION
C81 or C82 Will appear on the indicators.
Excessive temperature in the electronics
or on the glass.
Wait for a while for the electronics to cool
down or remove the pot or pan so that the
glass can cool.
C85
appears on the indicator of one of the
hotplates.
The pot or pan used is of an unsuited
type.
Switch off the hob, switch it on again and
try with another pot or pan.
C90
The appliance switches off and the
message C90 appears on the power
indicators (3).
The touch control detects on/off (1)
sensor is covered and doesn’t allow
switching on the cooktop.
Remove the possible objects or liquids
keeping the touch control surface, clean
and dry until the message disappears.
C91
The appliance switches off and the
message C91 appears on the power
indicators (3).
The touch control detects Stop&Go
sensor (6) is covered and doesn’t
allow to handle the cooktop.
Remove the possible objects or liquids
keeping the touch control surface clean
and dry, then press twice Stop&Go (6)
sensor for removing the message and
return to normal operation.
EN
These noises may vary according to the type of cookware used and the
amount of food it contains and not the symptom of something wrong.
SOUNDS PRODUCED DURING OPERATION
Induction hobs may whistle or creak during normal operation.
These noises actually come from the cookware and are linked to the pan
bottoms' characteristics (for example, when the bottoms are made from
different layers of material or are irregular).
AFTERSALES SERVICE
To receive complete assistance, please register your product on
www . hotpoint . eu / register.
BEFORE CALLING THE AFTER-SALES SERVICE:
1. See if you can solve the problem by yourself with the help of the
TROUBLESHOOTING suggestions.
2. Switch the appliance off and back on again to see if the fault persists.
IF AFTER THE ABOVE CHECKS THE FAULT STILL OCCURS, GET IN
TOUCH WITH THE NEAREST AFTER-SALES SERVICE.
To receive assistance, call the number shown on the warranty booklet
or follow the website's instructions on www . hotpoint . eu.
When contacting our Client After sales service, always specify:
•a brief description of the fault;
•the type and exact model of the appliance;
XXXXXXXXXXXXXXX
XXXXXXXXXXXXXXXXXXXXXX
Made in X
Type: XXXMod.: XXX
01
XXXX XXX XXXXX X XXXXX XXXXX
XXXXXXXXXXXXXXXXXXXX
XXXXXXXXXXXXXXXXXXXXXXXXXXXXXXXXXXXXXXXXXXXXXXXXXXXXXXXXXXXXXXXXXXXXXXXXX
•the serial number (number after the word SN on the rating plate
located under the appliance). The serial number is also indicated in
the documentation;
SERVICE
SN 000000000000
•your full address;
•your telephone number.
If any repairs are required, please contact an authorized after-sales
service (to guarantee that original spare parts will be used and repairs
carried out correctly).
In the case of flush-mounted installation, call the After-Sales Service to
request assembly of screws kit 4801 211 00112.
ISTRUZIONI PER LA
SICUREZZA
IMPORTANTE: DA LEGGERE E OSSERVARE
Scaricare il manuale d'istruzioni completo su
http:// docs.hotpoint.eu o chiamare il numero di
telefono indicato sul libretto di garanzia.
Prima di utilizzare l'apparecchio, leggere le seguenti
norme di sicurezza. Conservarle per eventuali
consultazioni successive.
Questo manuale e l'apparecchio sono corredati da
importanti avvertenze di sicurezza, da leggere e
rispettare sempre. Il fabbricante declina qualsiasi
responsabilità che derivi dalla mancata osservanza
delle presenti istruzioni di sicurezza, da usi impropri
dell'apparecchio o da errate impostazioni dei
comandi.
AVVERTENZA: Se la supercie del piano di cottura
è incrinata, non utilizzare l'apparecchio per evitare il
rischio di folgorazione.
AVVERTENZA: Pericolo di incendio: non
appoggiare oggetti sulle superci di cottura.
ATTENZIONE: Il processo di cottura deve essere
sorvegliato. I processi di cottura brevi richiedono
una supervisione continua.
AVVERTENZA: La cottura non sorvegliata su un
piano di cottura con grasso e olio può essere
pericolosa e generare incendi. Non tentare MAI di
spegnere le amme con acqua: piuttosto, spegnere
l'apparecchio e soocare le amme, ad esempio con
un coperchio o una coperta antincendio.
Non utilizzare il piano di cottura come supercie
di lavoro o appoggio.
Non avvicinare all'apparecchio stoe o altri materiali
inammabili no a che tutti i componenti non si
siano completamente rareddati, per evitare il
rischio di incendi.
Non poggiare oggetti metallici come coltelli,
forchette, cucchiai e coperchi sulla supercie del
piano di cottura perché potrebbero surriscaldarsi.
Tenere l'apparecchio fuori dalla portata dei
bambini di età inferiore a 3 anni. Tenere i bambini di
età inferiore agli 8 anni a debita distanza
dall'apparecchio, a meno che non siano
costantemente sorvegliati. I bambini di età superiore
agli 8 anni, le persone con ridotte capacità siche,
sensoriali o mentali e le persone che non abbiano
esperienza o conoscenza dell'apparecchio potranno
utilizzarlo solo sotto sorveglianza, o quando siano
state istruite sull'utilizzo sicuro dell'apparecchio e
siano consapevoli dei rischi del suo utilizzo.
Vietare ai bambini di giocare con l'apparecchio. La
pulizia e la manutenzione ordinaria non devono
essere eettuate da bambini senza la supervisione
di un adulto.
Dopo l'uso, spegnere l'elemento del piano di
cottura mediante il rispettivo comando e non fare
adamento sul rilevatore di tegami.
AVVERTENZA: L'apparecchio e i suoi componenti
accessibili possono diventare molto caldi durante
l'uso. Fare attenzione a non toccare gli elementi
riscaldanti. Tenere lontani i bambini di età inferiore
agli 8 anni, a meno che non siano costantemente
sorvegliati.
USO CONSENTITO
ATTENZIONE: l'apparecchio non è destinato ad
essere messo in funzione mediante un dispositivo di
commutazione esterno, ad esempio un
temporizzatore, o attraverso un sistema di comando
a distanza separato.
L'apparecchio è destinato all'uso domestico e ad
applicazioni analoghe, quali: zone cucina di negozi,
uci e altri ambienti lavorativi; agriturismi; camere
di hotel, motel, bed & breakfast e altri ambienti
residenziali.
Non sono consentiti altri usi (ad es., il riscaldamento
di ambienti).
Questo apparecchio non è destinato all'uso
professionale. Non utilizzare l’apparecchio all’aperto.
INSTALLAZIONE
Per evitare il rischio di lesioni personali, le
operazioni di movimentazione e installazione
dell'apparecchio devono essere eseguite da almeno
due persone. Per evitare rischi di taglio, utilizzare
guanti protettivi per le operazioni di disimballaggio
e installazione.
L'installazione, comprendente anche eventuali
raccordi per l'alimentazione idrica e i collegamenti
elettrici, e gli interventi di riparazione devono essere
eseguiti da personale qualicato. Non riparare o
sostituire qualsiasi parte dell'apparecchio se non
espressamente richiesto nel manuale d'uso. Tenere i
bambini a distanza dal luogo di installazione. Dopo
aver disimballato l'apparecchio, assicurarsi che non
sia stato danneggiato durante il trasporto. In caso di
problemi, contattare il rivenditore o il Servizio
Assistenza. A installazione completata, conservare il
materiale di imballaggio (parti in plastica, polistirolo,
ecc.) fuori della portata dei bambini per evitare
potenziali rischi di soocamento. Per evitare rischi di
scosse elettriche, prima di procedere all'installazione
scollegare l'apparecchio dalla rete elettrica. Durante
l'installazione, accertarsi che l'apparecchio non
possa danneggiare il cavo di alimentazione e causare
così rischi di scosse elettriche. Attivare l'apparecchio
solo dopo avere completato la procedura di
installazione.
Eseguire tutte le operazioni di taglio del mobile
prima di inserire l'apparecchio, avendo cura di
rimuovere trucioli o residui di segatura.
IT

Se l'apparecchio non è installato sopra un forno, è
necessario installare un pannello divisorio (non in
dotazione) nel vano sottostante.
AVVERTENZE ELETTRICHE
Deve essere possibile scollegare l'apparecchio
dalla rete elettrica disinserendo la spina, se questa è
accessibile, o tramite un interruttore multipolare
installato a monte della presa nel rispetto dei
regolamenti elettrici vigenti; inoltre, l'apparecchio
deve essere messo a terra in conformità alle norme
di sicurezza elettrica nazionali.
Non utilizzare cavi di prolunga, prese multiple o
adattatori. Una volta terminata l'installazione, i
componenti elettrici non devono più essere
accessibili. Non utilizzare l'apparecchio quando si è
bagnati oppure a piedi nudi. Non accendere
l'apparecchio se il cavo di alimentazione o la spina
sono danneggiati, se si osservano anomalie di
funzionamento o se l'apparecchio è caduto o è stato
danneggiato.
Se il cavo di alimentazione è danneggiato, deve
essere sostituito con uno dello stesso tipo dal
produttore, da un centro di assistenza autorizzato o
da un tecnico qualicato per evitare situazioni di
pericolo o rischi di scosse elettriche.
SMALTIMENTO DEGLI ELETTRODOMESTICI
Il materiale di imballaggio è riciclabile al 100% ed è contrassegnato
dall'icona del riciclo
. Questo apparecchio è stato fabbricato con
materiale riciclabile o riutilizzabile.
Smaltire il prodotto rispettando le normative locali in materia. Per
ulteriori informazioni sul trattamento, il recupero e il riciclaggio degli
elettrodomestici, contattare l'ucio locale competente, il servizio di
raccolta dei riuti domestici o il negozio presso il quale il prodotto è
stato acquistato. Questo apparecchio è contrassegnato in conformità
alla direttiva europea 2012/19/UE, Riuti di apparecchiature elettriche ed
elettroniche (RAEE) e alle norme sui riuti di apparecchiature elettriche
ed elettroniche 2013 (e successive modiche).
Provvedendo al corretto smaltimento del prodotto si contribuirà ad
evitare potenziali conseguenze negative sull'ambiente e sulla salute
umana.
L'icona
sul prodotto o sulla documentazione di accompagnamento
indica che questo apparecchio non deve essere smaltito come riuto
domestico, bensì conferito presso un centro di raccolta preposto al ritiro
delle apparecchiature elettriche ed elettroniche.
CONSIGLI PER IL RISPARMIO ENERGETICO
Per sfruttare al meglio il calore residuo delle piastre, spegnerle alcuni
minuti prima del termine della cottura.
Il fondo della pentola o del tegame dovrebbe coprire completamente la
piastra di cottura; un recipiente con la base più piccola del diametro della
piastra causerà uno spreco di energia. Durante la cottura, coprire pentole
e tegami con un coperchio che chiuda bene il recipiente e usare la
minima quantità d'acqua possibile. La cottura senza coperchio comporta
un consumo di energia notevolmente superiore.
Utilizzare solo pentole e padelle con fondo piatto.
DICHIARAZIONE DI CONFORMITÀ
Questo apparecchio soddisfa i requisiti di Ecodesign del regolamento
europeo 66/2014 e l'Ecodesign per i prodotti connessi all'energia e le
informazioni sull'energia (emendamento) (Uscita UE) Regolamenti 2019
in conformità con la norma europea EN 60350-2.
IT
INSTALLAZIONE
50 mm
4 mm
850 mm
510 mm
485 mm
900 mm
0
+
2
860 mm
R = Max. 10 mm
Min. 35 mm
Min. 486 mm
Max. 490 mm
L
Min. 35 mm
i
28 mm-
No Max.
min. 20 mm
min. 45 mm
min. 550 mm
Min. 400 mm
Min.100 mm
12 mm-
No Max.
min. 45 mm
min. 550 mm
min. 20 mm
60 mm
min. 10 mm
130 mm
90 mm
105 mm
295 mm
70 mm
130 mm
x4
1 2 3
Min. 486 mm
Max. 490 mm
R = Max. 10 mm
Min. 35 mm
Min.35 mm
Min. 400 mm
Min. 100 mm
min. 20 mm
28 mm-
No Max.
45 mm min
min 550 mm
12 mm-
No Max.
10 mm min
60 mm
min. 20 mm
45 mm min
min 550 mm
130 mm
90 mm
150 mm
295 mm
70 mm
130 mm
SISTEMA FAST - CLICK

COLLEGAMENTO ELETTRICO
Il collegamento elettrico deve essere eettuato prima di collegare l'apparecchio alla rete elettrica; vericare che la tensione e la frequenza
corrispondano a quelle specicate sulla targhetta del piano di cottura, che si trova sotto di esso, e sul Foglio di garanzia, o eventualmente
sulla scheda tecnica, che devono essere conservati insieme al presente manuale per tutta la durata di vita del prodotto. Assicurarsi che il cavo
d'ingresso non entri in contatto con l'alloggiamento del piano a induzione o con l'alloggiamento del forno, se è installato nella stessa unità.
Il collegamento elettrico deve essere correttamente messo a terra, seguendo la legislazione vigente, altrimenti il piano di cottura a induzione
potrebbe non funzionare correttamente.
L'installazione deve essere eseguita da personale qualicato a conoscenza delle norme vigenti in materia di sicurezza e installazione. Nella
fattispecie, l’installazione deve essere eseguita in ottemperanza alle direttive della locale società di fornitura elettrica. Solo l'assistenza tecnica
uciale può maneggiare o riparare l'apparecchio, compresa la sostituzione del cavo di alimentazione.
Controllare che la tensione indicata sulla targhetta matricola nella parte inferiore dell'apparecchio sia la stessa della rete elettrica domestica.
La messa a terra dell’apparecchio è obbligatoria per legge;: utilizzare solo conduttori delle dimensioni appropriate (incluso il conduttore di terra).
Avvertenza:
Sbalzi di tensione insolitamente alti possono danneggiare il sistema di controllo (come per qualsiasi apparecchio elettrico).
Si consiglia di non usare il piano di cottura a induzione durante la funzione di pulizia pirolitica nel caso di forni pirolitici, a causa dell'alta
temperatura che raggiunge questo tipo di dispositivo.
Prima di scollegare il piano di cottura dalla rete, si raccomanda di spegnere l'interruttore di spegnimento e attendere circa 25 secondi prima di
scollegarlo dalla rete. Questo tempo è necessario per consentire la scarica completa del circuito elettronico e quindi precludere la possibilità di scosse
elettriche dai terminali del cavo.
Conservare il Certicato di Garanzia o la scheda tecnica insieme al manuale di istruzioni per tutta la durata di vita del prodotto. Questi contengono
importanti informazioni tecniche.
yellow-green
blue
blue (gray)
brown
black
DO NOT USE L3
yellow-green
blue
blue (gray)
brown
black
yellow-green
blue
blue (gray)
brown
black
yellow-green
blue
blue (gray)
brown
black
yellow-green
blue
blue (gray)
brown
black
yellow - green
Blue(red)
Blue(white)
Brown
Black
Gray
blue
yellow - green
Blue(red)
Blue(white)
Brown
Black
Gray
blue
yellow - green
Blue(red)
Blue(white)
Brown
Black
Gray
blue
yellow - green
Blue(red)
Blue(white)
Brown
Black
Gray
blue
giallo-verde
blu
blu (grigio)
marrone
nero
giallo-verde
blu
blu (grigio)
marrone
nero
giallo-verde
blu
blu (grigio)
marrone
nero
giallo-verde
blu
Blu (rosso)
Blu (bianco)
Integrale
Nero
Grigio
giallo-verde
blu
Blu (rosso)
Blu (bianco)
Integrale
Nero
Grigio
giallo-verde
blu
blu (grigio)
marrone
nero
giallo-verde
blu
blu (grigio)
marrone
nero
NON UTILIZZARE L3
giallo-verde
blu
Blu (rosso)
Blu (bianco)
Integrale
Nero
Grigio
giallo-verde
blu
Blu (rosso)
Blu (bianco)
Integrale
Nero
Grigio
IT
DESCRIZIONE PRODOTTO
1. Piano di cottura
2. Pannello di controllo
PANNELLO DEI COMANDI
1. Sensore generale on/o
2. Cursore per il controllo della potenza
3. Indicatore di potenza e/o calore residuo
4. Punto decimale di potenza e/o indicatore
di calore residuo.
5. Accesso diretto alla funzione "Potenza"..
6. Sensore di attivazione per la funzione
"Blocco".
7. Spia luminosa della funzione "Blocco"
attivata
8. Sensore di attivazione della funzione
"Stop&Go"
9. Spia luminosa della funzione "Stop&Go"
attivata
10. Sensore "Meno" per il timer.
11. Sensore "Più" per il timer.
12. Indicatore contaminuti.
13. Punto decimale del timer
14. Spia luminosa della funzione "Brasatura"
attivata
15. Spia luminosa della funzione
"Scioglimento" attivata
16. Spia luminosa della funzione
"Mantenimento in caldo" attivata
17. Sensore di attivazione per le funzioni
"My Menu"
18. Sensore di attivazione per la funzione
"FlexiDuo"
19. Spia luminosa della funzione "Bollitura"
attivata
1 14
15
16
14
15
16
14 19
15
16
3
4
6712 983
4 13
3
4
3
4
3
4
2 5 517101118 5 5 52 2 2 2
14
15
16
14
15
16
ACCESSORI
PENTOLE E PADELLE
Usare solo pentole e padelle ferromagnetiche adatte ai
piani di cottura a induzione:
• stoviglia in acciaio smaltato
• stoviglia in ghisa
• stoviglia speciale in acciaio inox, adatta alla
cottura a induzione.
Per determinare se una pentola è adatta, controllare se riporta l'icona
(generalmente impresso sul fondo). E’ possibile avvalersi di una calamita per
vericare se le pentole sono rilevabili magneticamente.
La qualità e la geometria del fondo della pentola possono far variare le
prestazioni di cottura.
Alcuni diametri del fondo non corrispondono all'eettivo diametro
ferromagnetico.
Non raccomandiamo l'uso di piastre diusori o materiali come acciaio ne,
alluminio, vetro, rame o argilla.
Ogni zona di cottura ha un tempo minimo di rilevamento della pentola. Ciò
dipende dal materiale e dal diametro ferromagnetico del fondo della pentola.
È pertanto essenziale utilizzare la zona di cottura che meglio corrisponde al
diametro del fondo della pentola.
Se la pentola non viene rilevata sulla zona di cottura selezionata, provare ad
utilizzare la zona successiva più piccola. Quando FlexiCook viene utilizzato
come zona di cottura singola, per questo tipo di zona sono adatte pentole più
grandi.
Alcune pentole senza un fondo ferromagnetico completo sono vendute come
adatte all'induzione. In queste pentole, solo il fondo ferromagnetico viene
riscaldato.
Di conseguenza il calore non viene distribuito uniformemente sul fondo della
padella. Il che può signicare che la parte non ferromagnetica del fondo della
pentola non raggiunge la giusta temperatura di cottura.
Altre padelle, con inserti di alluminio sul fondo, presentano un'area più piccola
di materiale ferromagnetico. In questo caso può essere dicile o addirittura
impossibile rilevare la padella. Inoltre, la potenza fornita potrebbe essere
inferiore e, di conseguenza, la pentola non si riscalderà correttamente.
Il tipo di fondo utilizzato sulla pentola può inuenzare l'uniformità e i risultati
della cottura. Le pentole con fondo a "sandwich" in acciaio inossidabile
impiegano materiali che aiutano la distribuzione e la diusione uniforme del
calore, con conseguente risparmio di tempo ed energia.
Il fondo della pentola deve essere completamente piatto, assicurando così
un'alimentazione uniforme.
Mai scaldare pentole vuote o utilizzare pentole con un fondo sottile, perché
potrebbero scaldarsi rapidamente senza dare il tempo alla funzione di
disinserimento automatico della pentola di entrare in funzione.
Diametro minimo del fondo della pentola per le diverse aree di
cottura
Per assicurarsi che il piano di cottura funzioni correttamente, utilizzare pentole
con un diametro minimo adeguato (fare riferimento alla seguente tabella).
Utilizzare sempre la zona di cottura che corrisponde al meglio al diametro
minimo del fondo della pentola.
Posizionare la pentola assicurandosi che sia ben centrata sulla zona di cottura
in uso.
Si raccomanda di non utilizzare pentole che superino il perimetro della zona
di cottura in uso.
ø min. 100 mm 150 mm 120 mm 220 mm
ADATTATORE PER PENTOLE NON ADATTE ALL'INDUZIONE
L’utilizzo dell’accessorio permette di sfruttare pentole e padelle non
adatte ai piani di cottura a induzione. E’ importante ricordare che il suo
impiego ha un impatto sull’ecienza e quindi i tempi di riscaldamento
dei cibi. Il suo utilizzo deve essere limitato in quanto le temperature
che si raggiungono sulla sua supercie sono fortemente dipendenti
dalla pentola utilizzata, dalla sua planarità e dal tipo di alimento
inserito. L’uso di una pentola dal diametro più piccolo rispetto al
disco adattatore può portare a un accumulo di calore che non verrà
trasmesso al recipiente, e che potrebbe annerire sia il piano di cottura
sia il disco. Adattare bene il diametro del vostro utensile e quello del
piano di cottura al diametro dell’adattatore.
NOOK
OK
NO
IT
PRIMO UTILIZZO
GESTIONE DELLA POTENZA
Alcuni modelli sono dotati di una funzione di limitazione della potenza
(Gestione della potenza). Questa funzione consente di impostare la
potenza totale generata dal piano di cottura su diversi valori selezionati
dall'utente. A tal ne, per il primo minuto dopo aver collegato il piano
di cottura all'alimentazione, è possibile accedere al menu di limitazione
della potenza.
1. Tenere premuto il tasto
(11) per tre secondi. La lettera PL
apparirà sull'indicatore del timer (12)
2. Premere il tasto a soramento di blocco
(6). Appariranno i
diversi valori di potenza a cui può essere limitato il piano di cottura
e questi possono essere modicati utilizzando i sensori
(11) e
(10).
3. Una volta selezionato il valore, premere ancora una volta il tasto di
blocco
(6).Il piano idi cottura sarà limitato al valore di potenza
scelto.
I livelli di potenza disponibili sono:
2 kW - 2.5 kW - 3 kW - 3.5 kW - 4 kW - 4.5 kW - 5 kW - 5.5 kW - 6 kW - 6.5
kW - 7 kW
Se si desidera modicare nuovamente il valore, è necessario scollegare
il piano di cottura e ricollegarlo dopo alcuni secondi. Così sarà di nuovo
possibile entrare nel menu di limitazione della potenza.
Ogni volta che il livello di potenza di una piastra viene modicato, il
limitatore di potenza calcolerà la potenza totale che il piano di cottura
sta generando. Se si è raggiunto il limite di potenza totale, il comando a
soramento non consentirà di aumentare il livello di potenza di quella
piastra. Il piano di cottura emette un bip e l'indicatore di potenza (3)
lampeggia al livello che non può essere superato. Se volete superare
tale valore, occorre abbassare la potenza delle altre piastre. A volte non
sarà suciente abbassare un'altra di un solo livello perché ciò dipende
dalla potenza di ogni piastra e dal livello a cui è impostata.
È possibile che per alzare il livello di una piastra grande si debba
abbassare quello di diverse piastre più piccole.
Se si utilizza la funzione di accensione rapida alla massima potenza
e il suddetto valore è superiore al valore impostato dal limite, la
piastra sarà impostata al massimo livello possibile. Il piano di cottura
emetterà un bip e il valore di potenza indicato lampeggerà due volte
sull'indicatore (3).
Per impostare la potenza del piano di cottura:
Visibile solo durante l'esecuzione.
Le manovre vengono eseguite utilizzando i tasti a soramento. Non è
necessario esercitare forza sul tasto a soramento scelto, è suciente
toccarlo con la punta del dito per attivare la funzione richiesta.
Ogni azione è vericata da un bip.
Utilizzare il cursore (2) per regolare i livelli di potenza (0 - 9) facendoci
scorrere sopra il dito. Facendo scorrere verso destra si aumenta il valore,
mentre facendo scorrere verso sinistra lo si diminuisce.
È anche possibile selezionare direttamente un livello di potenza
posizionando il dito direttamente su un punto desiderato del cursore (2)
Per selezionare una piastra su questi modelli, toccare direttamente il
cursore (2).
ACCENSIONE DELL'APPARECCHIO
1 Toccare il tasto a soramento On
(1) per almeno un secondo. Il
comando a soramento si attiverà, si sentirà un bip e gli indicatori (3)
si accenderanno visualizzando "-". Se una zona di cottura è calda, il
relativo indicatore lampeggerà con una H.
Se non si compie alcuna azione nei successivi 10 secondi, il comando
a soramento si spegne automaticamente. Quando il controllo a
soramento è attivato, è possibile scollegarlo in qualsiasi momento
toccando il pulsante a soramento
(1), anche se è stato bloccato
(funzione di blocco attivata). Il pulsante a soramento
(1) ha sempre
la priorità per scollegare il comando a soramento.
ATTIVAZIONE DELLE PIASTRE
Una volta che il Comando a soramento è attivato con il sensore
(1),
è possibile accendere qualsiasi piastra attenendosi ai seguenti passi:
1. Far scorrere il dito o toccare in qualsiasi posizione uno dei
cursori "a scorrimento" (2). La zona è stata selezionata e
contemporaneamente il livello di potenza sarà impostato tra 0 e 9.
Tale valore di potenza sarà visualizzato sull'indicatore di potenza
corrispondente e il relativo punto decimale (4) continuerà ad
accendersi per 10 secondi.
2. Utilizzare il cursore (2) per scegliere un nuovo livello di cottura tra
0 e 9.
Finché la piastra è selezionata, ovvero con il punto decimale (4) acceso,
il relativo livello di potenza può essere modicato.
SPEGNIMENTO DI UNA PIASTRA
Utilizzando il tasto di scorrimento a soramento (2) abbassare la
potenza al livello 0. La piastra si spegnerà.
Quando una piastra è spenta, una H apparirà nel relativo indicatore di
potenza (3) nel caso in cui la supercie di vetro della zona di cottura
sia calda e sussista il rischio di ustioni. Quando la temperatura scende,
l'indicatore (3) si spegne (se il piano di cottura è scollegato), altrimenti si
accende l'icona "-" se il piano di cottura è ancora collegato.
SPEGNIMENTO DI TUTTE LE PIASTRE
Tutte le piastre possono essere scollegate simultaneamente utilizzando
il sensore generale on/o
(1). Tutti gli indicatori della piastra (3) si
spegneranno. Se la zona di riscaldamento spenta è calda, il relativo
indicatore mostra una H.
USO QUOTIDIANO
RILEVATORE DI PENTOLE
Le zone di cottura a induzione dispongono di un rilevatore di pentole
integrato. In questo modo, se non è presente una pentola o se la
pentola non è adatta, la piastra smetterà di funzionare.
L'indicatore di potenza (3) mostrerà un'icona per indicare "nessuna
pentola" nel caso in cui, con la zona accesa, non venga rilevata alcuna
pentola o la pentola non sia adatta.
Se viene tolta una pentola dalla zona mentre è in funzione, la piastra
smetterà automaticamente di fornire energia e mostrerà l'icona per
"nessuna pentola". Quando una pentola viene nuovamente posizionata
sulla zona di cottura, l'alimentazione di energia riprende allo stesso
livello di potenza precedentemente selezionato.
BLOCCO DEL PANNELLO COMANDI
Con la funzione di blocco, è possibile bloccare gli altri sensori,
fatta eccezione per il sensore on/o
(1), per evitare operazioni
indesiderate. Questa funzione è utile come sicurezza per i bambini.
Per attivare questa funzione, toccare il sensore
(6) per almeno un
secondo.
A questo punto, il pilota (7) si accende indicando che il pannello di
comando è bloccato. Per disattivare la funzione, è suciente toccare
nuovamente il sensore
(6).
Se il sensore on/o
(1) viene utilizzato per spegnere l'apparecchio
mentre la funzione di blocco è attivata, non sarà possibile riaccendere il
piano di cottura nché non si sblocca.
SILENZIATORE DEL BIP
Quando il piano di cottura è acceso, se si premono simultaneamente
il tasto a soramento
(11) e il tasto a soramento di blocco (6)
per tre secondi, il bip che accompagna ogni azione verrà disattivato.
L'indicatore del tempo (12) visualizzerà "OFF". Questa disattivazione
non verrà applicata a tutte le funzioni, poiché per esempio i bip per
l'accensione/spegnimento, la ne del timer o il blocco/sblocco dei tasti
a soramento rimangono sempre attivati.
Per attivare di nuovo tutti i bip che accompagnano ogni azione,
premere di nuovo simultaneamente il tasto a soramento
(11) e il
tasto a soramento di blocco
(6) per tre secondi. L'indicatore del
tempo (12) visualizzerà "On".
FUNZIONE STOP&GO
Questa funzione mette in pausa il processo di cottura. Il timer verrà
inoltre messo in pausa se attivato.
Attivare la funzione Stop.
Toccare il sensore Stop
(8) per un secondo. Il pilota (9) si accende
e gli indicatori di potenza mostreranno l'icona
per indicare che la
cottura è stata messa in pausa.
Disattivazione della funzione Stop
Toccare nuovamente il sensore Stop&Go
(8). Il pilota (9) si spegne
e la cottura riprende con le stesse impostazioni di potenza e timer
impostate prima della pausa.
FUNZIONE POTENZA
Questa funzione fornisce una potenza "extra" alla piastra, al di sopra
del valore nominale. Tale potenza dipende dalla dimensione della
piastra, con la possibilità di raggiungere il valore massimo consentito
dal generatore.
1. Far scorrere il dito sopra il cursore corrispondente (2) nché
l'indicatore di potenza (3) mostra "9" e tenere premuto per un
secondo, oppure toccare direttamente su "P" e tenere premuto per
un secondo.
2. L'indicatore del livello di potenza (3) mostrerà l'icona
, e la
piastra inizierà a fornire ulteriore potenza. La funzione Potenza ha
una durata massima specicata nella tabella 1. Dopo questo lasso
di tempo, il livello di potenza si regolerà automaticamente a 9.
Suona un bip.
Attivando la funzione Potenza in una piastra, è possibile che le prestazioni
di alcune delle altre ne risentano, riducendone la potenza a un livello
inferiore; in tal caso ciò sarà visualizzato sul relativo indicatore (3).
La disattivazione della funzione Potenza, prima dello scadere del suo
periodo di funzionamento, può essere eseguita sia toccando il cursore
"a scorrimento" che modica il relativo livello di potenza, sia ripetendo il
passo 3.
FUNZIONE TIMER (conto alla rovescia)
Questa funzione agevola la cottura, dal momento che non è necessario
essere presenti: È possibile impostare un timer per una piastra e questa
si spegnerà una volta trascorso il tempo desiderato.
Per questi modelli, è possibile programmare simultaneamente ogni
piastra per durate che vanno da 1 a 99 minuti.
Impostazione di un timer su una piastra.
Una volta che il livello di potenza è impostato sulla zona desiderata, e
nché il punto decimale della zona resta acceso, la stessa potrà essere
temporizzata.
A tal ne:
1. Toccare il sendore
(10) o (11). L'indicatore del timer (12)
mostrerà "00" e l'indicatore della zona corrispondente (3) indicherà
l'icona lampeggiante alternativamente con il relativo livello di
potenza corrente.
2. Subito dopo, impostare un tempo di cottura tra 1 e 99 minuti,
utilizzando i sensori
(10) o (11). Con il primo il valore
partirà da 60, mentre con il secondo partirà da 01. Per annullare
la funzione del timer, l'orologio può essere regolato sul valore
"00" utilizzando il sensore
(10). Un modo più rapido per farlo
è tenere i sensori
(10) e (11) premuti insieme. Quando
manca meno di un minuto, l'orologio inizia il conto alla rovescia in
secondi.
3. Quando l'indicatore del timer (12) smette di lampeggiare, inizia
automaticamente il conto alla rovescia. L'indicatore (3) relativo
alla piastra temporizzata visualizzerà alternativamente il livello di
potenza selezionato e l'icona
.
Una volta trascorso il tempo di cottura selezionato, la zona di
riscaldamento cronometrata si spegne e l'orologio emette una
serie di bip per alcuni secondi. Per spegnere il segnale acustico,
toccare qualsiasi sensore. L'indicatore del timer (12) mostrerà uno 00
lampeggiante accanto al punto decimale (4) della zona selezionata. Se
la zona di riscaldamento spenta è calda, il relativo indicatore di potenza
(3) visualizzerà alternativamente l'icona H e "-".
Se si desidera cronometrare contemporaneamente un'altra piastra,
ripetere i passi da 1 a 3.
Se una o più zone sono già cronometrate, l'indicatore del timer (12)
mostrerà di default il minor tempo restante alla ne, mostrando una
"t" sulla relativa zona. Il resto delle zone cronometrate mostrerà sulle
rispettive zone di indicazione il punto decimale lampeggiante. Quando
il cursore "a scorrimento" di un'altra zona temporizzata viene premuto,
il timer mostrerà il tempo restante di quella zona per alcuni secondi
e il relativo indicatore mostrerà il proprio livello di potenza e la "t"
alternativamente.
Modicare il tempo programmato
Per modicare il tempo programmato, occorre premere il cursore "a
scorrimento" (2) della zona cronometrata. Sarà quindi possibile leggere
e modicare il tempo.
Attraverso i sensori
(10) e (11), è possibile modicare il tempo
programmato.
Scollegamento dell'orologio
Se si desidera arrestare l'orologio prima che il tempo programmato
sia terminato, è possibile farlo in qualsiasi momento semplicemente
regolando il suo valore su "--".
1. Selezionare la piastra desiderata.
2. Regolare il valore dell'orologio su "00" utilizzando il sensore
(10). L'orologio viene annullato. L'operazione può anche essere
eseguita più rapidamente premendo simultaneamente i sensori
(10) e (11).
IT
FUNZIONI
MY MENU
Queste funzioni dispongono di livelli di potenza preassegnati per
facilitare la cottura, consentendo di ottenere risultati eccellenti in
quanto la temperatura della pentola è controllata da sensori in modo
continuo. Quando la temperatura prevista per la funzione è stata
raggiunta, viene mantenuta automaticamente senza necessità di dover
modicare il livello di potenza.
Le funzioni MY MENU funzionano correttamente con pentole che
presentano sul fondo la stessa area ferromagnetica della zona di
cottura.
Inoltre, per funzioni ad alta temperatura (sopra i 100ºC), le pentole
devono avere un fondo piatto e uniforme (preferibilmente di tipo
"sandwich") come mostrato nella gura seguente
Per garantire il funzionamento corretto di queste funzioni, è
importante che la pentola e la zona di cottura non siano calde all'inizio
del processo.
Il Comando a soramento presenta funzioni speciali che aiutano
l'utente a cucinare grazie al sensore MY MENU (17). Queste funzioni
sono disponibili a seconda del modello.
Per attivare una funzione speciale su una zona:
1. Prima occorre selezionarla; successivamente, il punto decimale (4)
sarà attivo sull'indicatore di potenza (3).
2. Cliccare quindi sul sensore MY MENU
(17). Le pressioni
successive in modo sequenziale consentono di passare ad una ad
una tutte le funzioni MY MENU disponibili in ogni zona. Queste
funzioni mostreranno l'attivazione con i led corrispondenti (14)
brasatura, (15) scioglimento, (16) mantenimento in caldo.
Se si desidera annullare una funzione speciale attiva in qualsiasi
momento, occorre toccare il sensore del cursore "a scorrimento" (2)
della relativa zona per selezionarla. Il punto decimale (4) dell'indicatore
di potenza (3) si accende. Successivamente, toccare nuovamente il
cursore "a scorrimento" (2) per impostare un nuovo livello di potenza
o per spegnere la zona, oppure è possibile scegliere un'altra funzione
speciale toccando nuovamente il sensore MY MENU (17)
.
FUNZIONE BRASATURA
Questa caratteristica permette di mantenere la cottura a fuoco
lento. Dopo che gli alimenti sono stati bolliti, abilitare la piastra
selezionandola e premere il sensore MY MENU
(17) nché il led (14)
situato sull'icona
si accende. Una volta attivata la funzione, l'icona
apparirà sull'indicatore di accensione (3).
È possibile annullare la funzione in qualsiasi momento spegnendo
la piastra, cambiando il livello di potenza o scegliendo una funzione
speciale diversa.
FUNZIONE SCIOGLIMENTO
Questa funzione mantiene una bassa temperatura nella zona di cottura.
Ideale per scongelare i cibi o per sciogliere lentamente altri tipi di
alimenti come cioccolato, burro, ecc.
Per attivarlo, selezionare la piastra e premere sul sensore MY MENU
(17) nché il led (15) situato sull'icona
si accende.
Una volta attivata la funzione, l'icona
apparirà sull'indicatore di
accensione (3). È possibile annullare la funzione in qualsiasi momento
spegnendo la piastra, cambiando il livello di potenza o scegliendo una
funzione speciale diversa.
FUNZIONE MANTENERE IN CALDO
Questa funzione imposta automaticamente un livello di potenza
appropriato per mantenere caldo gli alimenti cucinati. Per attivarlo,
selezionare la piastra e premere sul sensore MY MENU
(17) nché il
led (16) situato sull'icona
si accende.
Una volta attivata la funzione, l'icona
apparirà sull'indicatore di
accensione (3). È possibile annullare la funzione in qualsiasi momento
spegnendo la piastra, cambiando il livello di potenza o scegliendo una
funzione speciale diversa.
FLEXIDUO
Attraverso questa funzione, è possibile abilitare il funzionamento di
due zone di cottura insieme, selezionare un livello di potenza e attivare
la funzione timer per entrambe le zone.
Per attivare questa funzione, premere il sensore
(18). Così facendo,
i punti decimali (4) delle piastre collegate si illumineranno e il valore "0"
sarà mostrato sui rispettivi indicatori di potenza (3).
L'indicatore del timer (12) mostrerà tre segmenti che indicano le zone
attivate. Se il modello dispone di più zone con "FlexiDuo", è possibile
selezionare l'opzione desiderata premendo il sensore
(18) prima
di assegnare la potenza alla zona scelta. Si avranno alcuni secondi per
eseguire l'operazione successiva; altrimenti, la funzione sarà disabilitata
automaticamente.
Dopo aver selezionato "FlexiDuo", è possibile assegnare la potenza
toccando uno qualsiasi dei cursori "a scorrimento" (2) di una delle zone
collegate. Il livello di potenza e le relative variazioni sono visualizzati
simultaneamente sugli indicatori di potenza (3) di entrambe le zone.
Per disattivare questa funzione, occorre selezionare il livello "0" per una
delle zone di cottura. Inoltre, quando la funzione è disattivata, i livelli di
potenza e le funzioni assegnate alle relative zone vengono cancellate.
IMPORTANTE: Posizionare le pentole al centro della zona di cottura in
modo che coprano almeno uno dei punti di riferimento (come
mostrato di seguito).
FUNZIONE BOLLITURA
Questa funzione consente il controllo automatico della bollitura, che è
un ottimo ausilio per la cottura di pasta, riso, uova, per far bollire alcuni
alimenti, ecc. È disponibile solo nelle zone in cui appare l'icona
.
1 14
15
16
14
15
16
14 19
15
16
3
4
6712 983
4 13
3
4
3
4
3
4
2 5 517101118 5 5 52 2 2 2
14
15
16
14
15
16
Attivazione della funzione
Per attivare la funzione, selezionare la piastra, e premere il sensore 6th SENSE (17) no a quando il led (19) situato sull'icona / si accende. Una volta
attivata la funzione, il segno apparirà sull'indicatore di accensione (3); apparirà un segmento in movimento che indica che la cottura avviene sotto
il controllo del sistema. Quando il sistema rileva che sta per iniziare la bollitura, si sente un primo bip.
Approttare di questa opportunità per preparare gli alimenti per la bollitura o la cottura a piacere. Dopo 30 secondi, si sentirà un secondo bip; se
non è già stato fatto, è il momento di versare gli alimenti nella padella. Dopo il secondo bip, il sistema attiverà il timer e il cronometro in modo da
poter monitorare la durata della bollitura degli alimenti.
30 secondi dopo l'attivazione del cronometro, suonerà un terzo bip per avvertire che da quel momento in poi, il sistema diminuirà la potenza
fornita per mantenere una bollitura leggera e continua. Il timer rimarrà attivo no al termine della cottura.
Se si desidera, è possibile disattivare il timer e impostare un tempo per il conto alla rovescia e lo spegnimento automatico della piastra (vedere la
sezione Funzione timer).
Disattivazione della funzione
È possibile annullare la funzione in qualsiasi momento spegnendo la piastra, cambiando il livello di potenza o scegliendo una funzione speciale
diversa.
SUGGERIMENTI E RACCOMANDAZIONI
• Utilizzare pentole o padelle con un fondo spesso e completamente
piatto.
• Non far scorrere pentole e padelle sul vetro perché potrebbero
graarlo.
• Anche se il vetro può resistere a urti di grandi pentole e padelle
senza bordi taglienti, evitare di colpirlo.
• Per evitare di danneggiare la supercie del vetro ceramico,
non trascinare pentole e padelle sul vetro e mantenere la parte
inferiore delle stesse pulita e in buone condizioni.
• Diametri raccomandati del fondo della pentola (vedere ''Scheda
tecnica'' fornita con il prodotto).
MANUTENZIONE E PULIZIA
ATTENZIONE
• Non usare pulitrici a getto di vapore.
• Prima di procedere alla pulizia, assicurarsi che le zone di cottura siano spente e che non compaia l'indicatore di calore
residuo (“H”).
!
Importante:
• Non utilizzare spugne abrasive o pagliette in quanto possono rovinare il vetro.
• Dopo ciascun utilizzo, pulire il piano di cottura (una volta rareddato) per rimuovere eventuali depositi e macchie dovuti a residui di cibo.
• Una supercie non adeguatamente pulita può ridurre la sensibilità dei pulsanti del pannello di controllo.
• Utilizzare un raschietto solo nei casi in cui i residui persistono sul piano cottura. Rispettare le istruzioni del produttore del raschietto per evitare di
graare il vetro.
• Lo zucchero e gli alimenti ad elevato contenuto di zuccheri danneggiano il piano di cottura e devono essere immediatamente rimossi.
• Sale, zucchero e sabbia possono graare la supercie in vetro.
• Utilizzare un panno morbido, carta assorbente da cucina o uno specico detergente per piani di cottura (seguire le istruzioni del produttore).
• Le fuoriuscite di liquidi sulle zone di cottura possono causare spostamenti o vibrazioni delle pentole.
• Dopo aver pulito il piano cottura, asciugarlo accuratamente.
RISOLUZIONE
DEI PROBLEMI
• Controllare che non vi siano interruzioni nella rete elettrica.
• Qualora non si riuscisse a spegnere il piano di cottura dopo l'uso, scollegarlo dall'alimentazione.
• Se, quando il piano di cottura è acceso, sul display appaiono i codici alfanumerici, consultare le seguente tabella per le istruzioni.
Nota: La presenza di acqua, liquido fuoriuscito dalle pentole o oggetti
di qualsiasi genere posati su un qualsiasi tasto del piano possono
provocare l’attivazione o la disattivazione involontaria del blocco del
pannello comandi.
Se qualcosa non funziona
Prima di chiamare il servizio tecnico, eseguire le veriche descritte di
seguito.
L'apparecchio non funziona:
Assicurarsi che il cavo di alimentazione sia collegato.
Le zone a induzione non producono calore:
Il contenitore non è appropriato (non dispone di un fondo
ferromagnetico o è troppo piccolo). Controllare che il fondo del
contenitore attragga un magnete, o utilizzare un contenitore più grande.
Quando si inizia a cucinare nelle zone a induzione si sente un ronzio:
Con contenitori non molto spessi o non in un unico pezzo, il ronzio risulta
dalla trasmissione di energia direttamente sul fondo del contenitore.
Il ronzio non è un difetto, ma se si desidera evitarlo comunque, ridurre
leggermente il livello di potenza o utilizzare un contenitore con un fondo
più spesso, e/o in un unico pezzo.
Il comando a soramento non si accende o, nonostante
l'accensione, non risponde:
Non è stata selezionata alcuna zona di riscaldamento. Assicurarsi di
selezionare una zona di riscaldamento prima di metterla in funzione.
È presente umidità sui sensori e/o le dita sono bagnate. Mantenere la
supercie di comando a soramento e/o le dita pulite e asciutte. La
funzione di blocco è attivata. Sbloccare i comandi.
Durante la cottura si sente il suono di un ventilatore che prosegue
anche dopo il termine della cottura:
Le zone a induzione dispongono di una ventola per mantenere fredda
l'elettronica. Questo funziona solo quando i circuiti elettronici si
scaldano. Si interrompe nuovamente quando i circuiti si rareddano,
sia che il piano di cottura sia acceso o meno.
L'icona
apparirà sull'indicatore di potenza di una piastra: Il sistema
d'induzione non trova una pentola o una padella su una piastra o è di
un tipo non idoneo.
IT
La piastra si spegne e viene visualizzato il messaggio:
CODICE DI VISUALIZZAZIONE DESCRIZIONE POSSIBILI CAUSE SOLUZIONE
C81 o C82 Apparirà sugli indicatori. Temperatura eccessiva
nell'elettronica o sul vetro.
Attendere il rareddamento
dell'elettronica o rimuovere la
padella o la pentola in modo che
il vetro possa rareddarsi.
C85 appare sull'indicatore di una delle
piastre.
La pentola utilizzata è di un tipo
non idoneo.
Spegnere il piano di cottura,
riaccenderlo e provare con
un'altra pentola o padella.
C90 L'apparecchio si spegne e sugli
indicatori di potenza (3) appare il
messaggio C90.
Il comando a soramento rileva
che il sensore on/o (1) è coperto
e non consente l'accensione del
piano di cottura.
Rimuovere i possibili oggetti o
liquidi mantenendo la supercie
di comando a soramento pulita
e asciutta no alla scomparsa del
messaggio.
C91 L'apparecchio si spegne e sugli
indicatori di potenza (3) appare il
messaggio C91.
Il comando a soramento rileva
che il sensore Stop&Go (6) è
coperto e non permette di
maneggiare il piano di cottura.
Rimuovere gli eventuali oggetti o
liquidi mantenendo la supercie
di comando a soramento pulita
e asciutta, quindi premere due
volte il sensore Stop&Go (6) per
rimuovere il messaggio e tornare
al funzionamento normale.
SUONI PRODOTTI DURANTE IL FUNZIONAMENTO
I piani cottura a induzione possono produrre sibili o crepitii durante il
normale funzionamento.
Questi rumori provengono in realtà dalle pentole e sono legati alle
caratteristiche dei fondi delle pentole (ad esempio, quando i fondi sono
costituiti da diversi strati di materiale o sono irregolari).
Questi rumori possono variare secondo il tipo di pentola utilizzata e
la quantità di cibo che contiene e non sono il sintomo di qualcosa di
sbagliato.
SERVIZIO ASSISTENZA
Per ricevere un'assistenza completa, registrare il prodotto su
www.hotpoint.eu/ register.
PRIMA DI CHIAMARE IL SERVIZIO ASSISTENZA:
1. Provare a risolvere da soli il problema seguendo le indicazioni della
sezione
GUIDA ALLA RICERCA GUASTI.
2. Spegnere e riaccendere l'apparecchio per vericare se il problema
persiste.
SE DOPO I CONTROLLI SOPRA DESCRITTI L'INCONVENIENTE
PERMANE, CONTATTARE IL SERVIZIO ASSISTENZA TECNICA.
Per ricevere assistenza, chiamare il numero riportato sul libretto di
garanzia, oppure seguire le istruzioni disponibili sul sito web
www. hotpoint. eu .
Prima di contattare il Servizio Assistenza Tecnica, prepararsi a fornire:
• una breve descrizione del guasto;
• il tipo e il modello esatto dell'apparecchio;
• il numero di serie (numero dopo la parola SN sulla targhetta situata
sotto l'apparecchio). Il numero di serie è anche indicato nella
documentazione;
• il proprio indirizzo completo;
• il proprio numero di telefono.
Qualora si renda necessaria una riparazione, contattare un Servizio
Assistenza Tecnica autorizzato (a garanzia dell'utilizzo di pezzi di
ricambio originali e di una corretta riparazione).
Nel caso di installazione a incasso, contattare il Servizio Assistenza per
richiedere il kit di viti 4801 211 00112.
XXXXXXXXXXXXXXX
XXXXXXXXXXXXXXXXXXXXXX
Made in X
Type: XXX Mod.: XXX
01
XXXX XXX XXXXXX X XXXX XXXXX
XXXXXXXXXXXXXXXXXXXX
XXXXXXXXXXXXXXXXXXXXXXXXXXXXXXXXXXXXXXXXXXXXXXXXXXXXXXXXXXXXXXXXXXXXXXXXX
400011592161