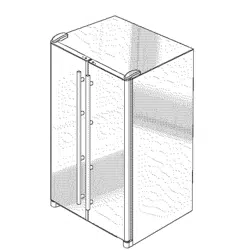
Side by Side
igerator Guide
IM-_IR
-_'_//_ o_ _:,_!_+,_¸
Introduction .................... 1
Safety lnstruction,_ ............... 2
Installation h_structions .......... 3
Features at n Glance .............. 4
Te_nper_zture Contro!,s ............. 5
hlterior Designs ............... 6- Z !
Ice Service ..................... 12
Ice and Water Service .......... 13-14
Water Filter Information ....... !4-16
Refrigerator Cleaning Chart ....... 17
Storage and Maintemmce ........ 18
Food Storage Tips ............... 19
Food Storage Chart .............. 20
Before You Call .............. 2!-22
Warranty ................ Back Page
Introduction Models: 2289, 2388, 2588, 2789, 2989
Congratulations on the pur-
chase of a Jenn-Air refrigera-
tor!
We appreciate your purchase
decision and fee1 confident you
will be happy with this appli-
ance for years to come. For best
results, we suggest reading this
guide carefully. You will find
instructions on the proper oper-
ation and maintenance of your
refrigerator. Additionally food
storage inlbrmation has been
included for you.
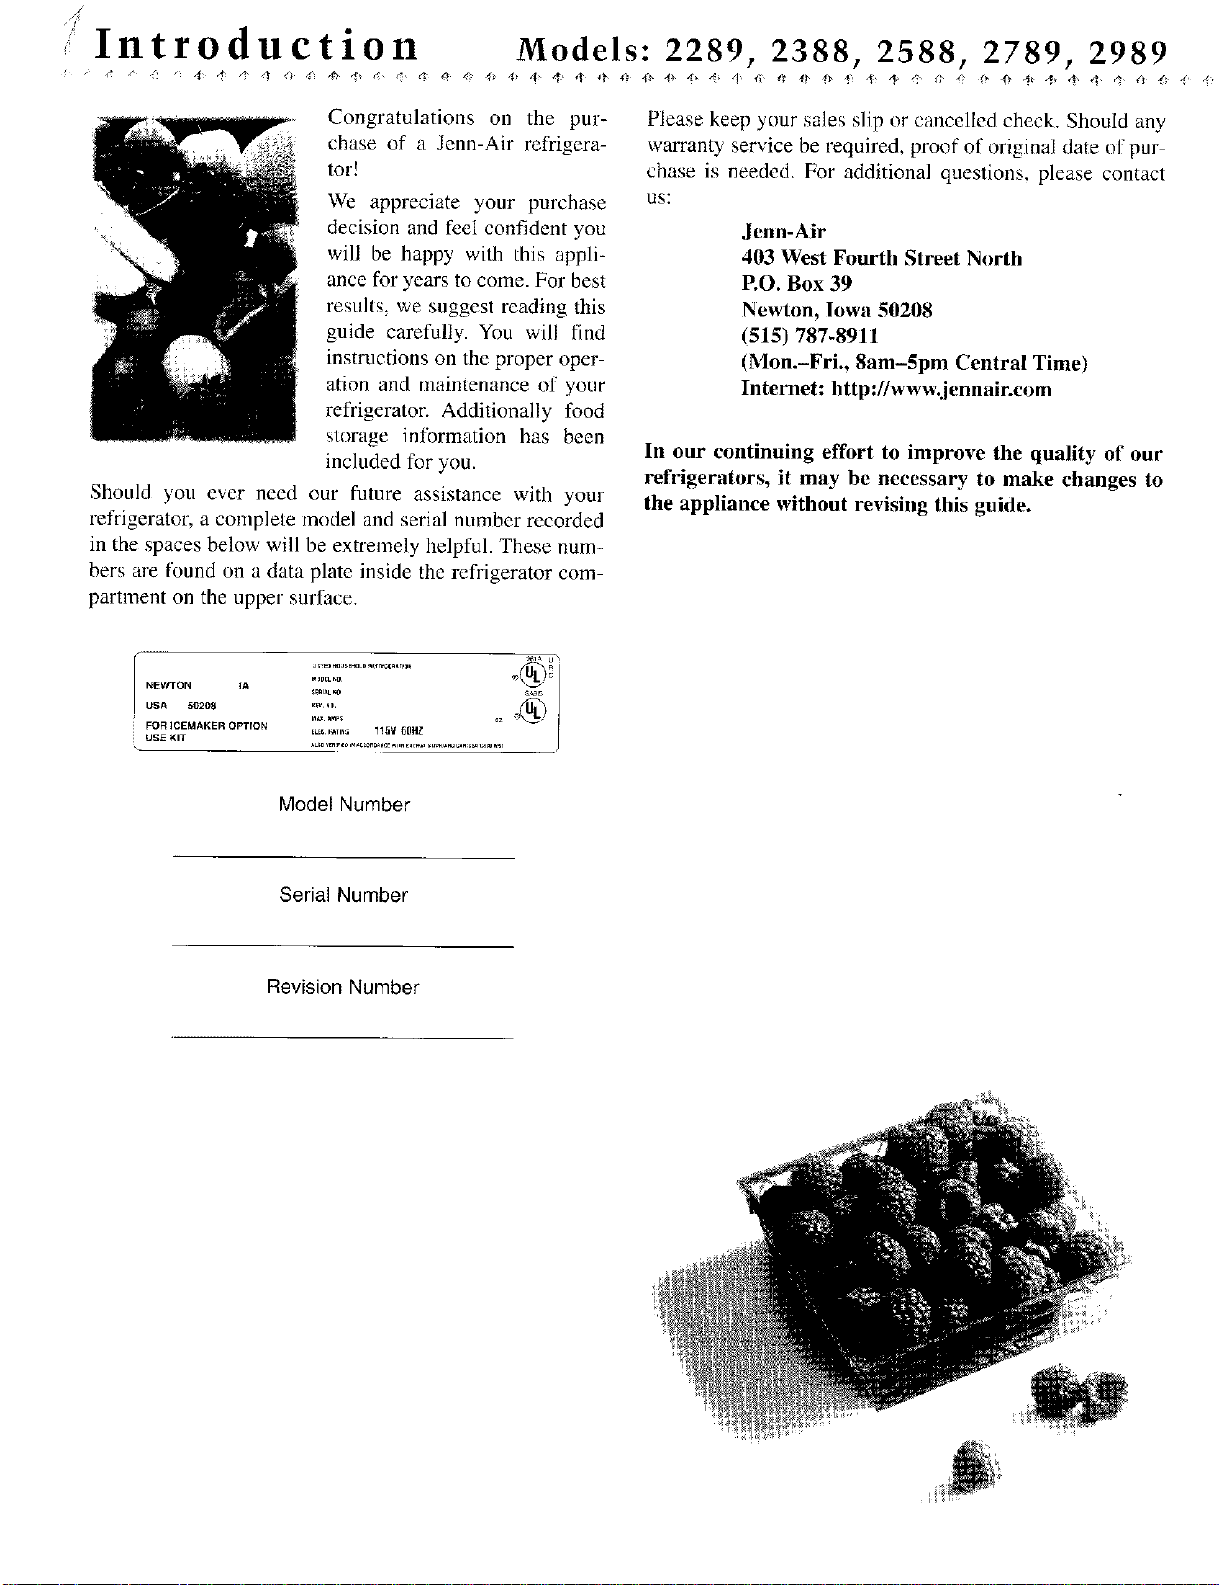
Should you ever need our future assistance with your
refrigerator, a complete model and serial number recorded
in the spaces below' will be exU'emely helpful. These num-
bers are found on a data plate inside the refrigerator com-
partment on the upper surface.
Please keep your sales slip or cancelled check. Should any
warranty service be required, proof of original date ul' par
chase is needed. For additional questions, please contact
us:
Jenn-Air
403 West Fourth Street North
P.O. Box 39
Newton, Iowa 50208
(515) 787-8911
(Mon.-Fri., 8am-5pm Central Time)
Internet: http://www.jennair.eom
In our continuing effort to improve the quality of our
refrigerators, it may be necessary to make changes to
the appliance without revising this guide.
NEWTON IA
USA 517208
FOR IC[:MAKEN OpTfON
USE KIT
Model Number
Serial Number
Revision Number
Important Safety Instructions
,_)k WARNING i When using your appliance, always follow basic precautions, including
the following:
Use the refrigerator only tor its intended purpose.
To prevent possibility of hazard due to electrical shock,
never plug the refrigerator into a receptacle which has
not been grounded adequately and in accord_mce with
the local aud national electrical codes, See the ,_ warn-
ing and grounding insmlctions below.
Unplug the reli'igerator before cleaning or replacing a
light bulb.
In case of power failure, minimize door openings. If the
power failure is of a long duration, protect the food by
placing blocks of d_ ice on top of the packages or check
with a local li'ozeu foods locker about temporary stor-
age. Frozen foods which have thawed completely should
not be refrozen and should be discarded.
Any electrical service cord that hecomes frayed or dam-
aged should be immediately repaired or replaced. Never
unplug your appliance by pulling on the power cord.
Your refrigerator should not be operated in the presence
of explosive li]mes.
Children should not climb, hang or stand on the shelves
o1'this relrigerator.
Important: Child entrapment and suffocation are
not problems of the past. Junked or abandoned
refrigerators are still dangerous.., even if they will
sit for 'just a few days"' If you are getting rid of
your old refrigerator, please follow the instructions
below to help prevent accidents.
• Take off the doo;s.
• Leave the shelves in place so that children may not
easily climb inside.
I
_k WAFINING I This appliance is designed to operate on a normal 115 volt, 15 amp, 60 cycle
line. There should be a separate, grounded circuit serving this appliance only. Do not use an
extension cord. Do not use any device that will alter the electrical performance of this appliance.
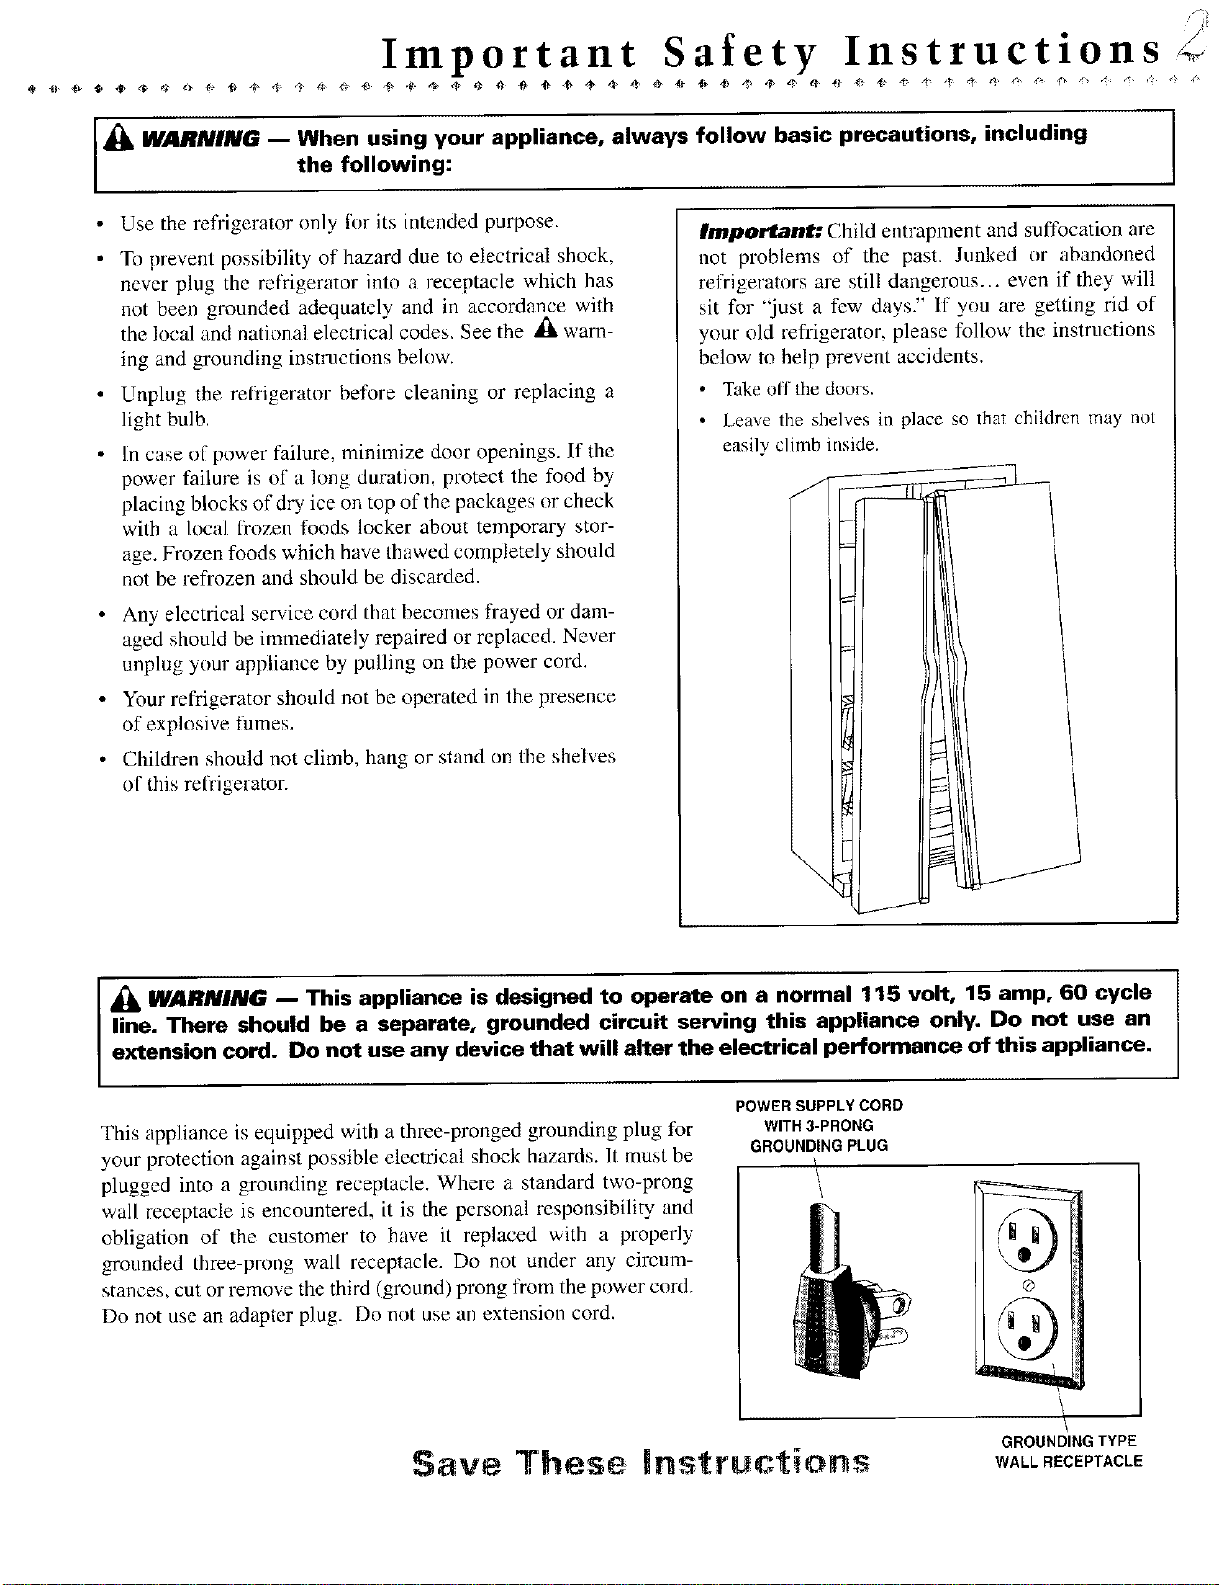
This appliance is equipped with a three-pronged grounding plug for
your protection against possible electrical shock hazards. It must be
plugged into a grounding receptacle. Where a standard two-prong
wail receptacle is encountered, it is the personal responsibility and
obligation of the customer to have it replaced with a properly
grounded three prong wall receptacle. Do not under any circum-
stances, cut or remove the third (ground) prong ti'om the power cord.
Do not use an adapter plug. Do not use an extension cord.
POWER SUPPLY CORD
WITH 3-PRONG
GROUNDING PLUG
/
\
GROUNDI"G TYPE
$ ve These |ns ruci:ions WALLRECEPTACLE
'U
,<'Installation Instructions
/
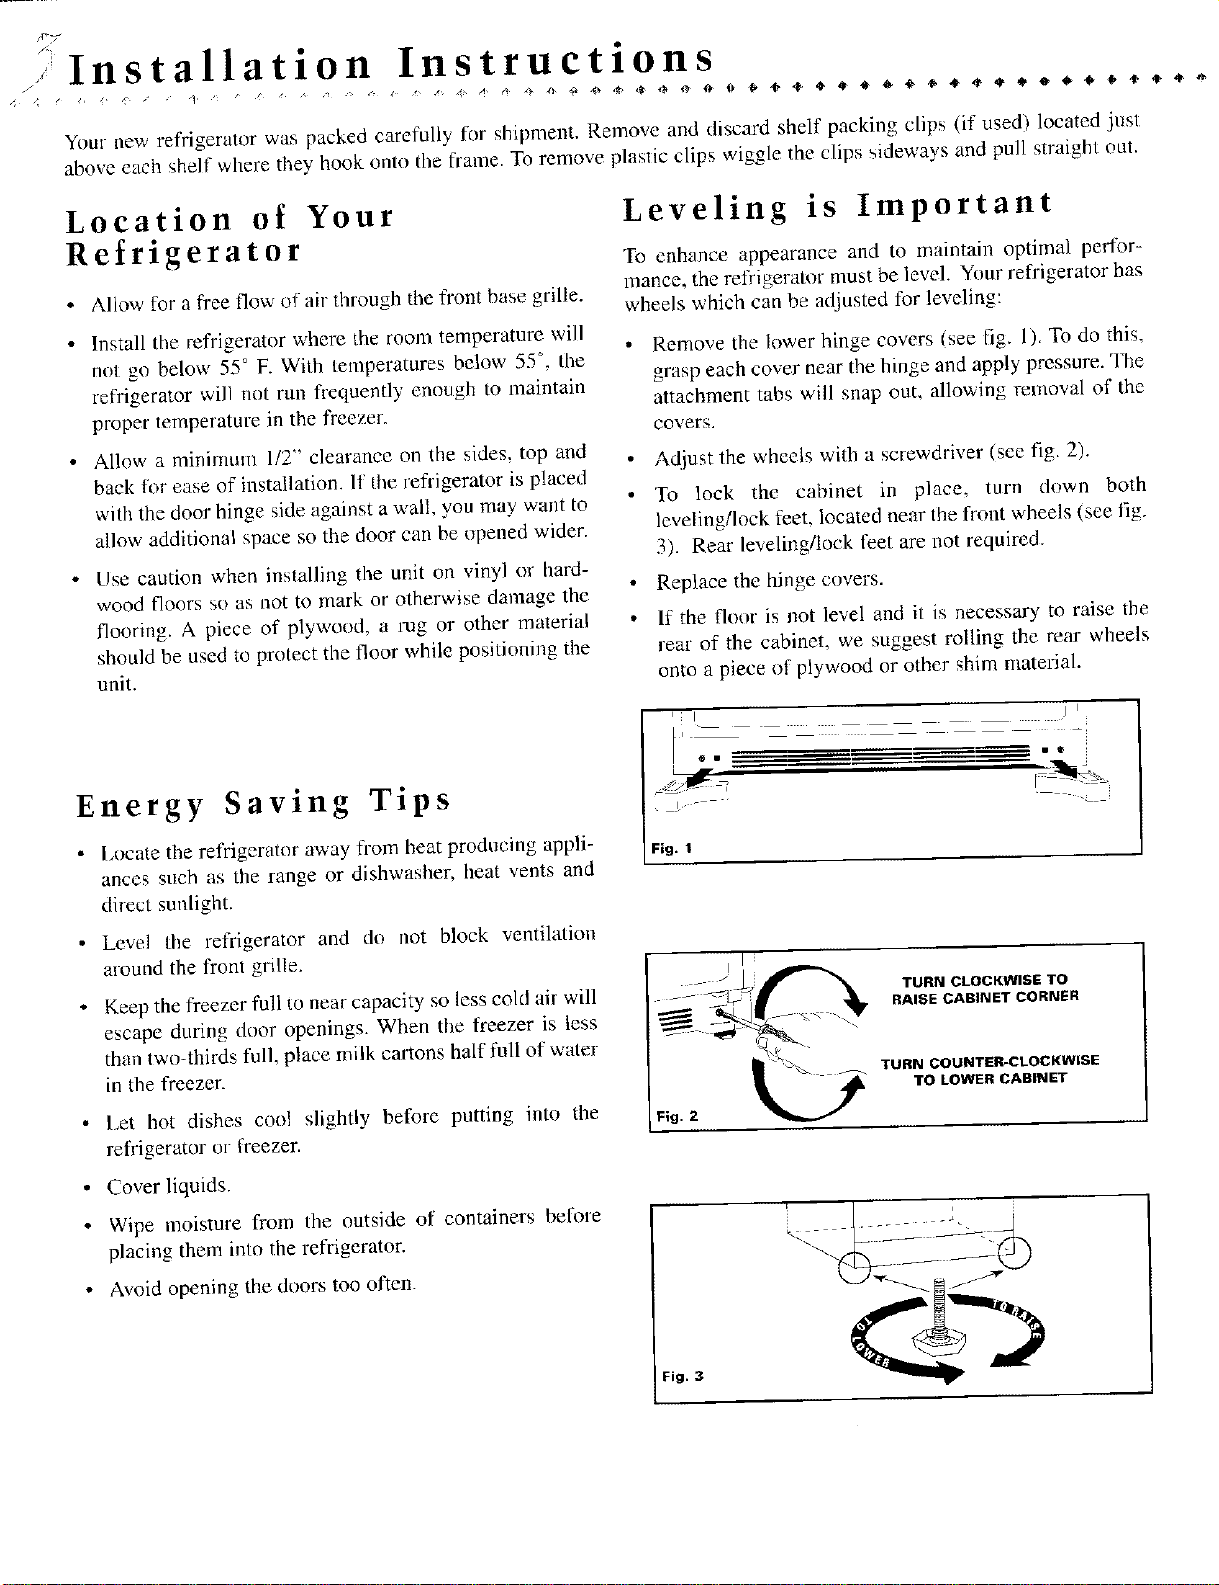
Your new refrigerator was packed carefully for shipment. Remove and discard shelf packing clips (if used) located just
above each shelf where they hook onto the franle. To remove plas[ic clips wiggle the clips sideways and pull straight out.
Location of Your
Refrigerator
Aliowforafre fl ,_ " "
e or' _f an- throu=h the front base grille.
Install the refrigerator where the room temperature will
not go below 55 ° E With temperatures below 55 °, the
refrigerator will not run frequently enough to maintain
proper temperature in the freezer.
Allow a minimunl 1/2" clearance on the sides, top and
back ti)r ease of installation. If the refrigerator is placed
with the door hinge side against a wall, you may want to
allow additional space so the door can be opened wider.
Use caution when installing the unit on vinyl _)r hard-
wood floors so as not to mark or otherwise damage the
flooring. A piece of plywood, a pug or other material
should be used to protect the Boor while positinning the
unit.
Leveling is Important
To enhance appearance and to maintain optimal perfor-
mance, the refrigerator must be level. Your refi'igerator has
wheels which can be adjusted for leveling:
Remove the lower hinge covers Isee fig. 1), To do this,
grasp each cover near the hinge and apply pressure. The
attachment tabs will snap out, allowing removal of the
covers.
At{just the wheels with a screwdriver (see fig. 2).
To lock the cabinet in place, turn down both
leveling/lock feet, located near Ihe front wheels (see fig,
3). Rear levelingi!ock feet are not required.
Replace the hinge covers.
If the floor is not level and it is necessary to raise the
rear of the cabinet, we suggest rolling the rear wheels
onto a piece of plywood or other shim material.
Energy Saving Tips
• l,ocate the refrigeratnr away from heat producing appli-
ances such as the range or dishwasher, heat vents and
direct sunlight.
Ill j i
, t I _ i o
/= .
Fi 9. I
Level the refrigerator and du riot block ventilation
around the front grille.
Keep the freezer foil co near capacity so less cold air will
escape during door openings. When the lreezer is less
than two-thirds full, place milk cartons half full of water
in the freezer.
Let hot dishes cool slightly before putting into the
refrigerator m- freezer.
TURN CLOCKWISE TO
RAISE CABINET CORNER
TURN COUNTER-CLOCKWiSE
TO LOWER CABINET
• Cover liquids.
• Wipe moisture from the outside of containers before
placing them into the refrigerator.
• Avoid opening the doors too often.
Fig. 3
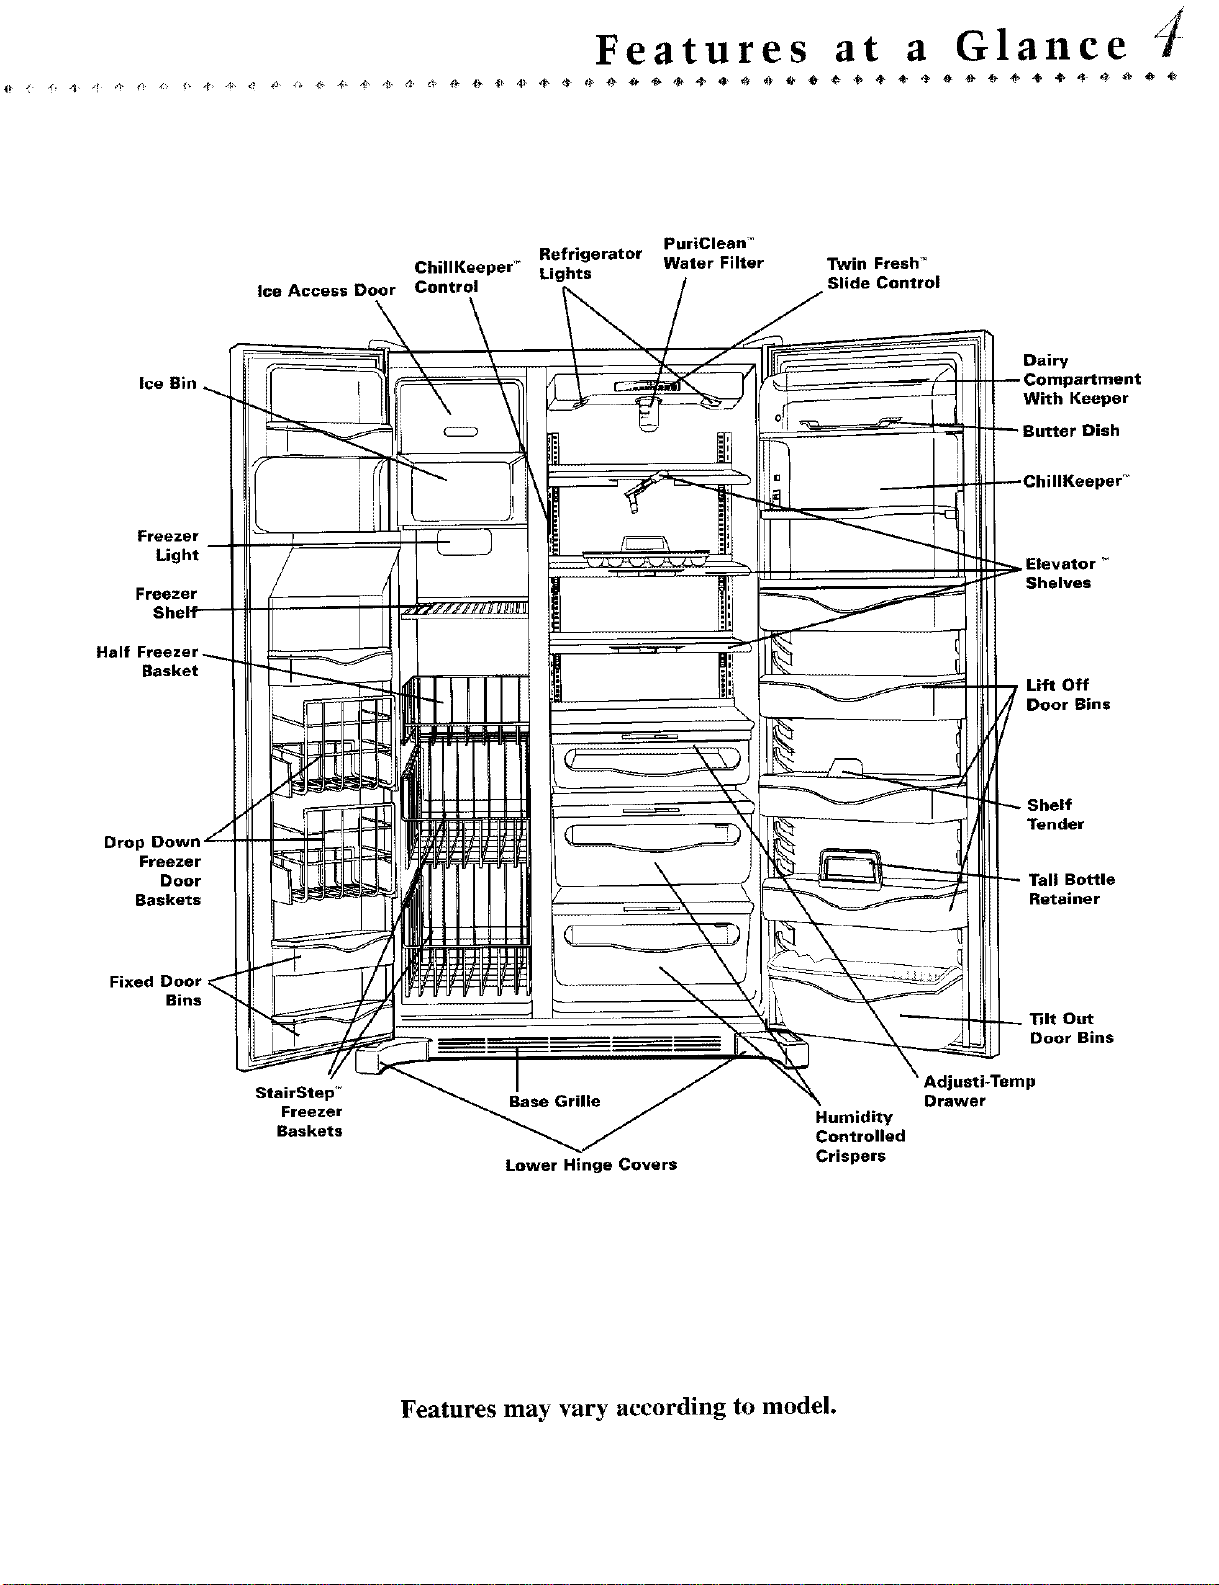
Features at a Glance
lee Access Door
PuriClean "
Refrigerator Water Filter Twin Fresh _
ChillKeeper _ Lights
Control Slide Control
Ice Bin
Freezer
Light
Freezer
H_
Basket
Drop
Freezer
Door
Baskets
Fixed Door
Bins
StairStep'* Base Grille
Freezer Humidity
Baskets Controlled
Lower Hinge Covers Crispers
Dairy
With Keeper
Dish
Elevator _
Shelves
Lift Off
Door Bins
Tender
Bottle
Retainer
Out
Door Bins
Adjusti-Temp
Drawer
Features may vary according to model.
trois
Temperature C °n
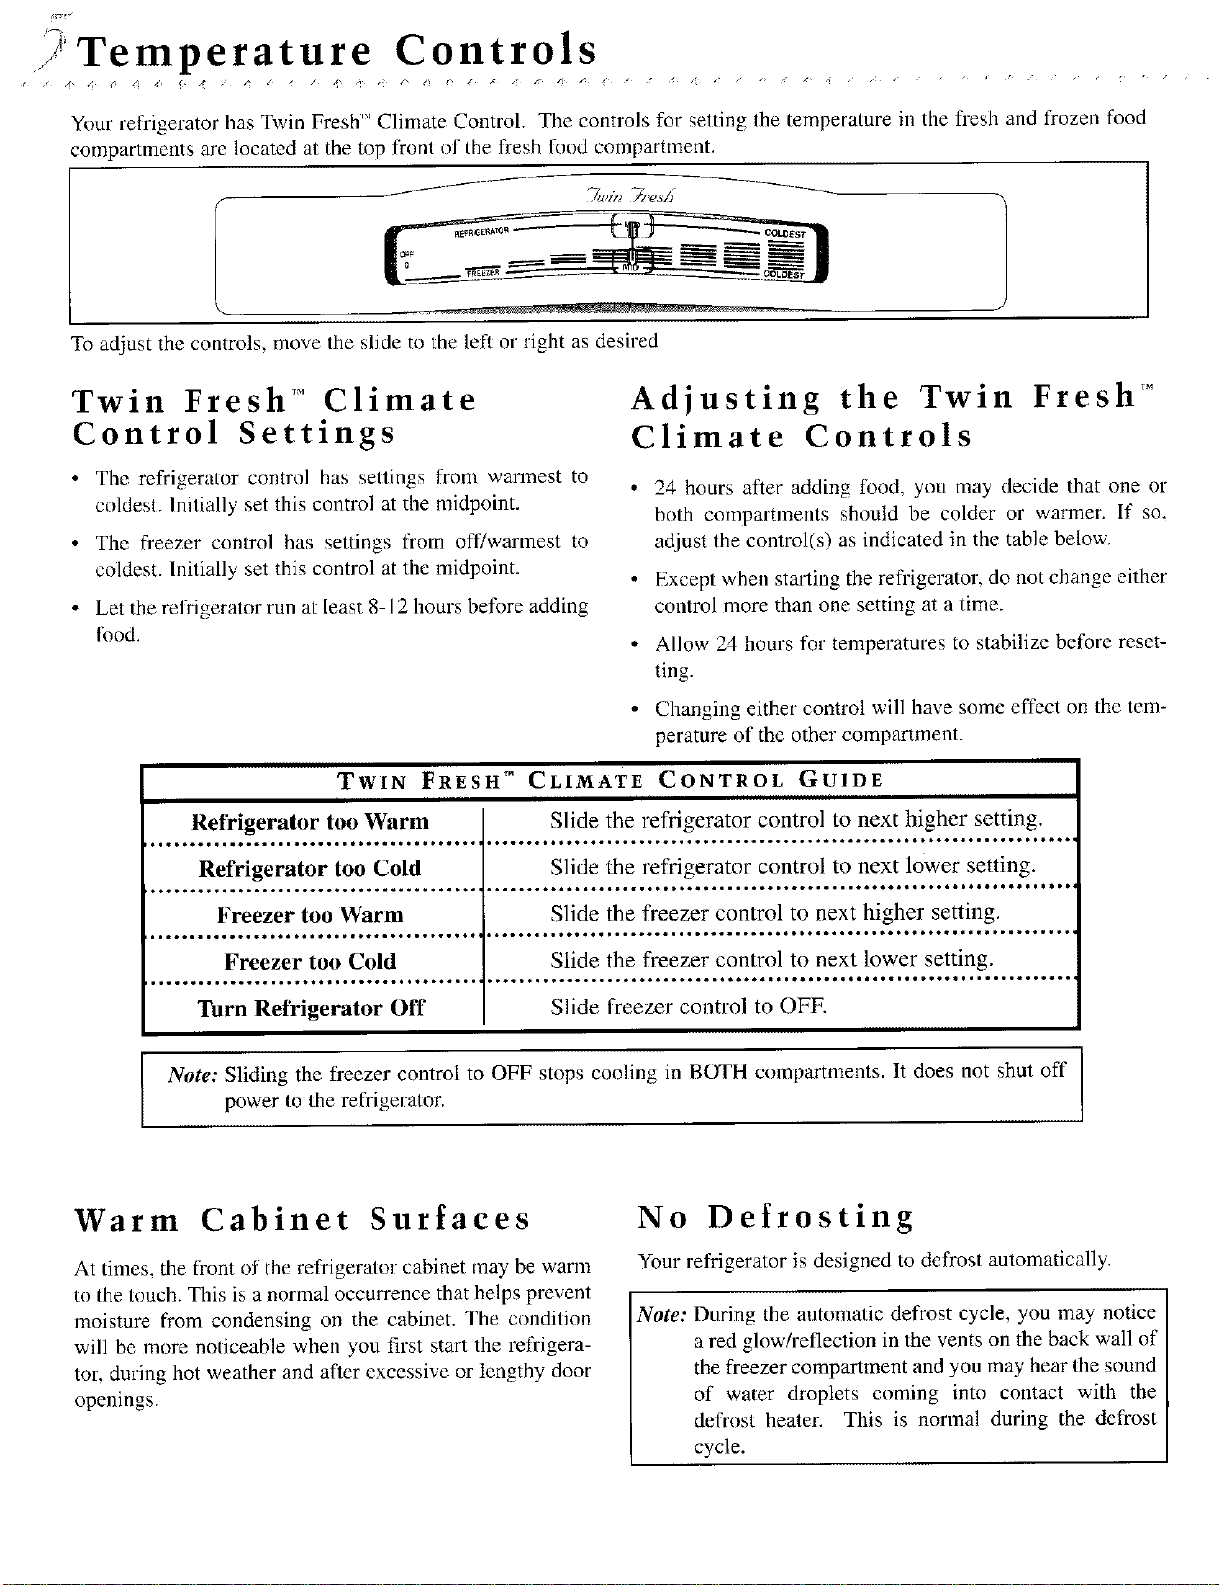
Your refrigerator has Twin Fresh'" Climate Control. The controls for setting the temperature in the fl-esh and frozen food
compartments are located at the top ft'onl ill the fresh food compartment.
To adjust the controls, move the slide to the left or right as desired
Twin Fresh TM Climate
Control Settings
Adjusting the Twin Fresh TM
Climate Controls
• The refrigerator control has sellings from wannest to
coldest. Initially set this control at the midpoint.
• The freezer control has settings from off/warmest to
coldest. Initially set this control at the midpoint.
• Let the refrigerator run at least 8-12 hours before adding
Ik_od.
TWIN FRESH TM CLIMATE
24 hours after adding l)od, you may decide that one or
both compartments should be colder or warmer. If so.
adjust the control(s) as indicated in the table below.
Except when stating the refl'igerator, do not change either
control more than one setting at a time.
Allow 24 hours for temperatures to stabilize before reset-
ting.
Changing either control will have some effect on the tem-
perature of the other compartment.
CONTROL GUIDE
Refrigerator too Warm Slide the refrigerator control to next higher setting.
_**_._•jlllu*o_loje_t_we*l*_*a..._t*o •ooooo. ° o•••o•••°.• •ooo°°o°oo•••*oooooooo oooo•°°••.
Refrigerator too Cold Slide the refrigerator control to next lower setting.
Freezer too Warm
oo•••.o•..
Freezer too Cold
.o°oo••• •¢ooooo • o•••
Turn Refrigerator Off
I
Slide the freezer control to next higher setting.
,oo°°•o • ••°ooo °oooooo ••o°•• •
Slide the freezer control to next lower setting.
Slide freezer control to OFF.
Note: Sliding the freezer control to OFF stops cooling in BUFH compartments. It does not shut off
Ix_wer |o the refrigerator.
Warm Cabinet Surfaces
At times, the fl'ont of the refrigerator cabinet may be warm
to the touch. This is a normal occurrence that helps prevent
moisture from condensing on the cabinet. Fhe condition
will be more noticeable when you first start the refrigera-
tor, during hot weather and after excessive or lengthy door
openings.
No Defrosting
Your refrigerator is designed to defrost automatically•
Note: During the automatic defrost cycle, you may notice
a red glow/reflection in the vents on the back wall of
the freezer compartment and you may hear Ihe sound
of water droplets coming into contact with the
defrost heater. This is normal during the defrost
cycle.
Interior Designs ()
Shelves
Fresh Food Compartment and Door
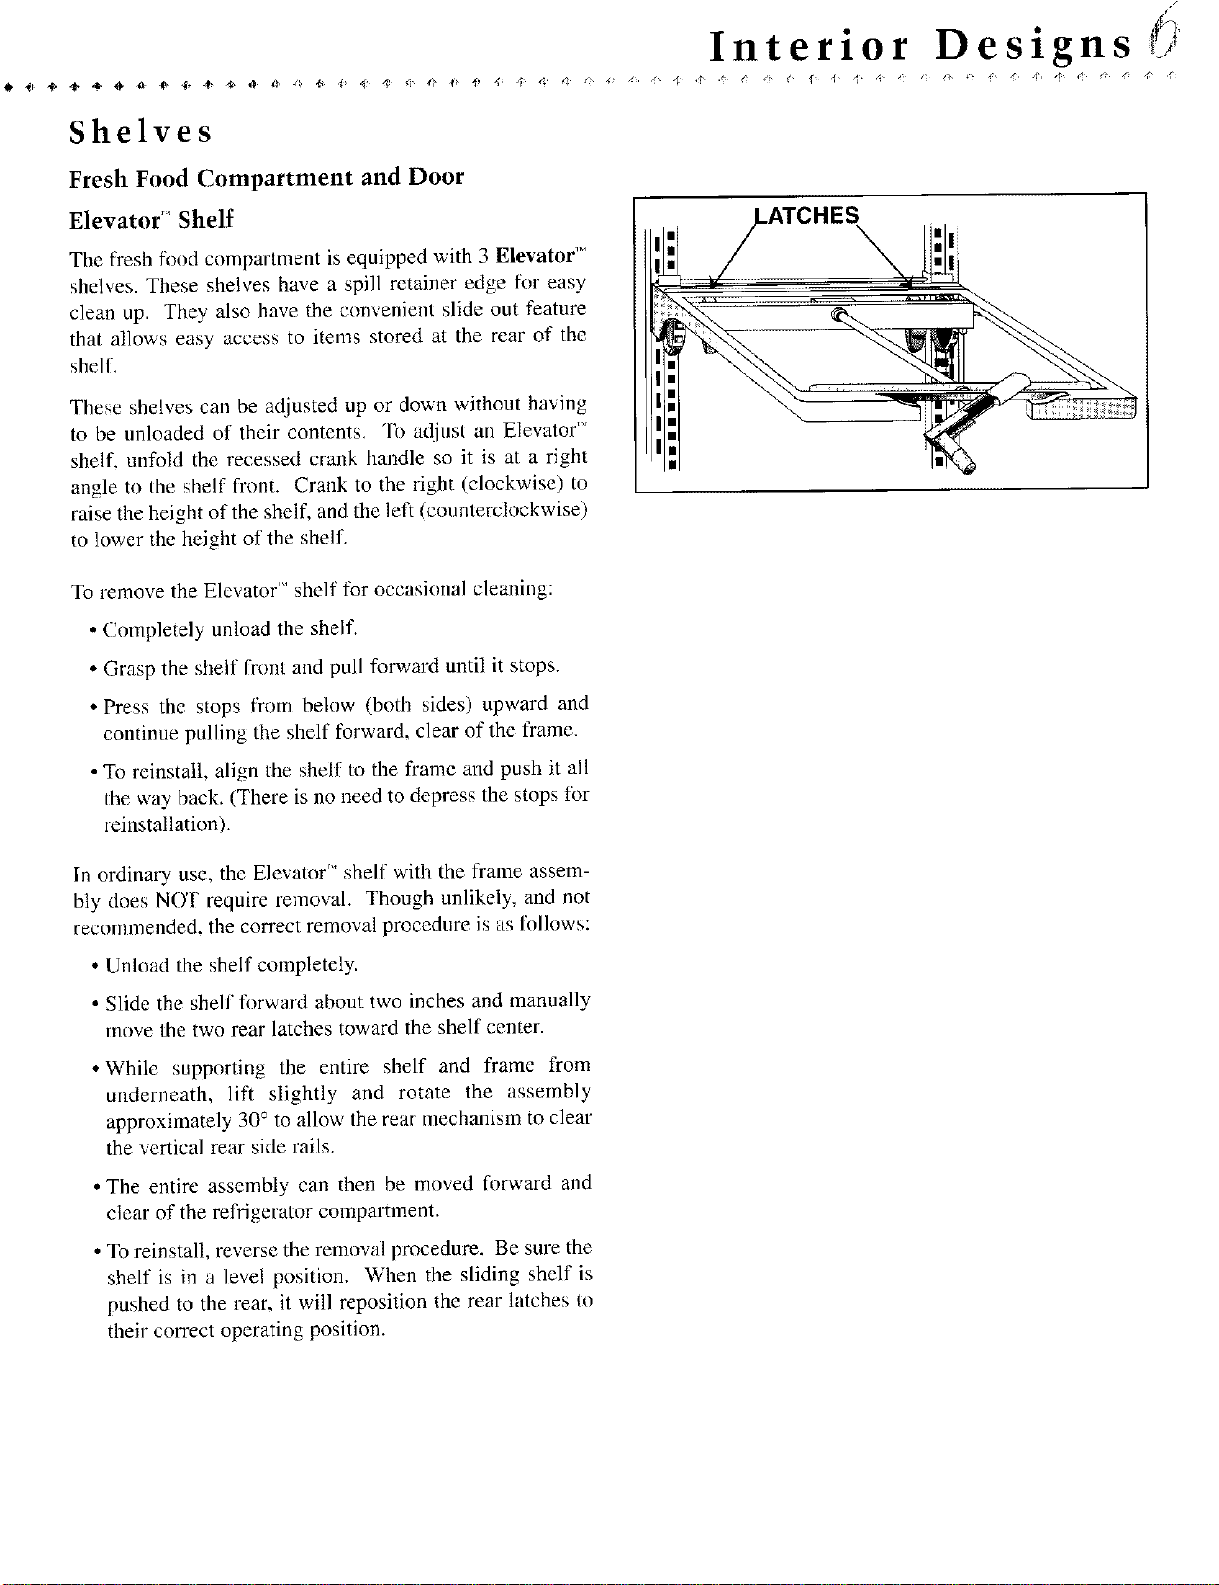
Elevator'" Shelf
The fresh fixed compartment is equipped with 3 Elevator TM
shelves. These shelves have a spill retainer edge f_r easy
clean up. They also have the convenient slide out feature
that allows easy access to items stored at the rear of the
shell.
These shelves can be adjusted up or down without having
to be unloaded of their contents. To adiust an Elevator '_'
shelf, unfold the recessed crank handle so it is at a right
angle to the shelf front. Crank to the right (clockwise) to
raise the height of the shelf, and the left (counterclockwise)
to lower the height of the shelf.
\
To remove the Elevator'" shelf for occasional cleaning:
• Completely unload the shelf.
• Grasp the shelf front and pull forward until it stops.
• Press the stops from below (both sides) upward and
continue pulling the shelf forward, clear of the frame.
• To reinstall, align the shelf to the frame and push it all
the way back. (There is no need to depress the stops tot
_einstallation).
In ordinary use, the Elevator'" shelf with the flame assem-
bly does N(Y!' require removal. Though unlikely, and not
reconlnlended, the correct removal procedure is as li)llows:
• Unload the shelf completely.
• Slide the shelf fl)rward about two inches and manually
move the two rear latches toward the shelf center.
• While supporting the entire shelf and flame from
underneath, lift slightly and rotate the assembly
approximately 30 ° to allow the rear mechanism to clear
the vertical rear side rails.
• The entire assembly can then be moved forward and
clear of the rel_gerator compartment.
• To reinstall, reverse the removal procedure. Be sure the
shelf is in a level position. When the sliding shelf is
pushed to the rear, it will reposition the rear httches to
their correct operating position.
Interior Designs
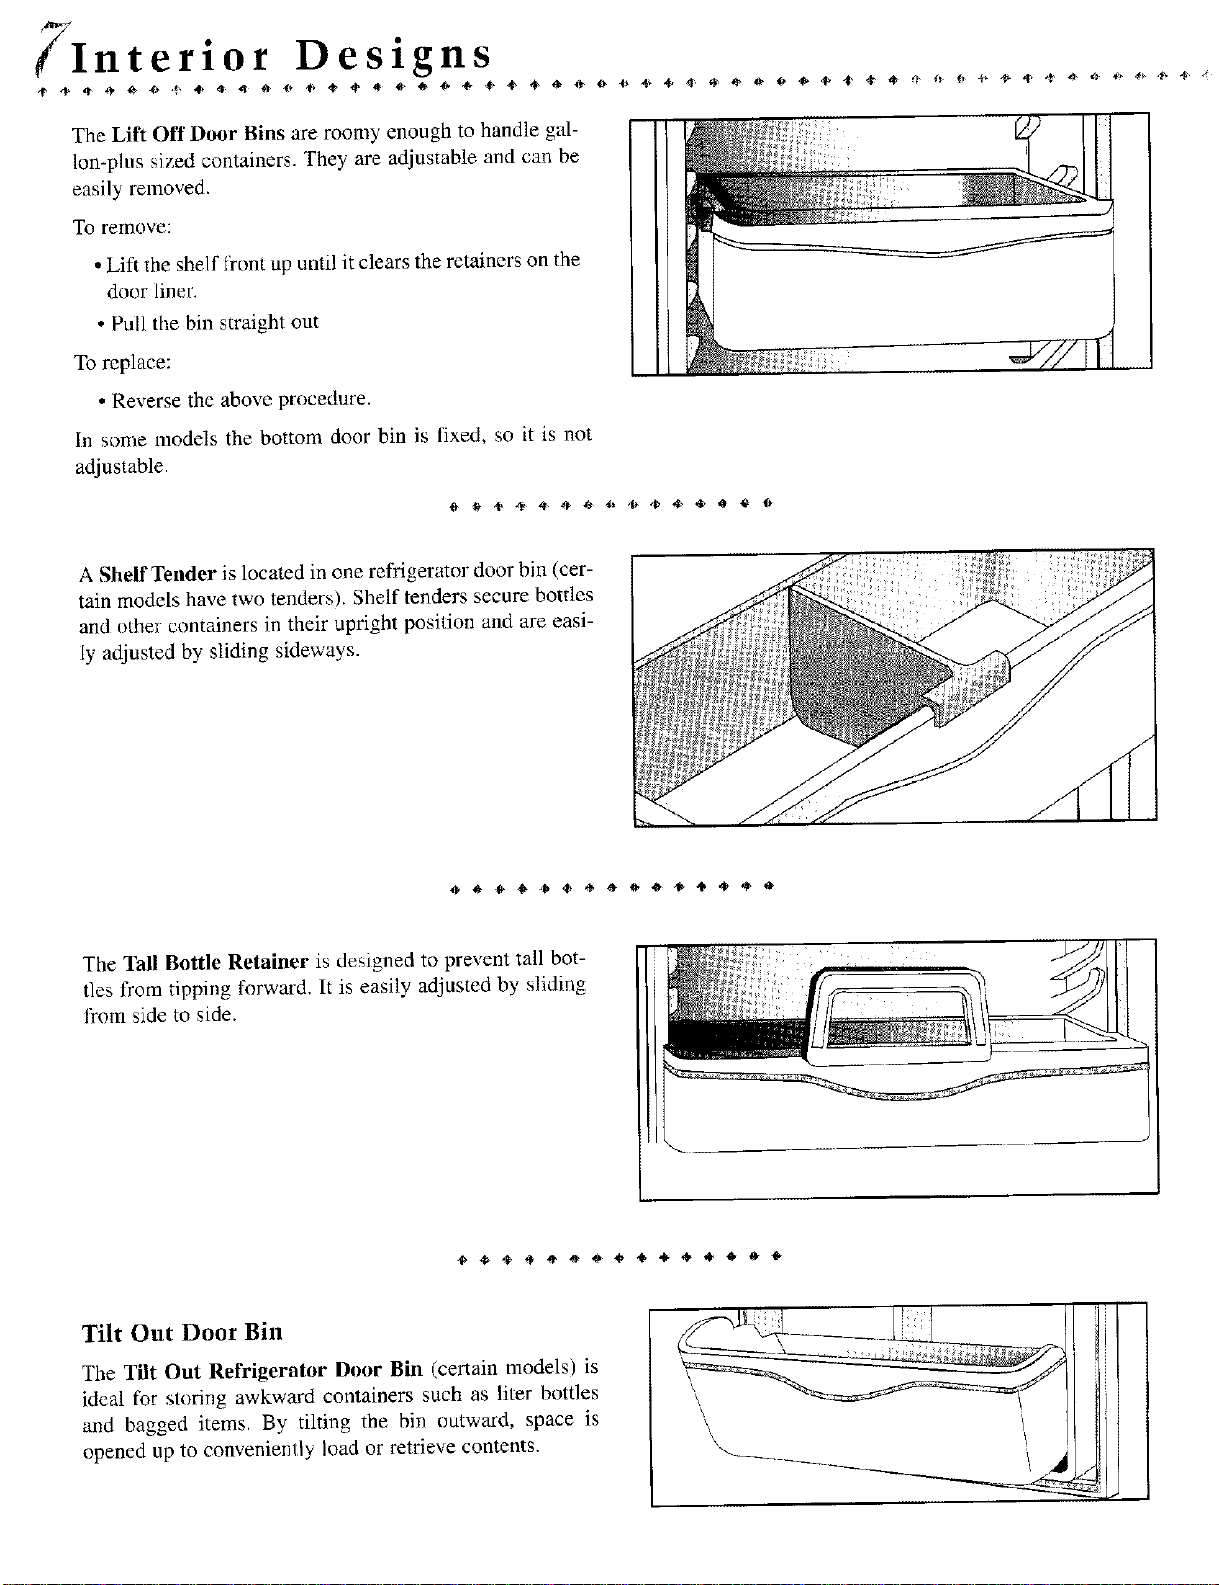
The Lift Off Door Bins are roomy enough to handle gal-
lon-plus sized containers. They are adjustable and can be
easily removed.
To remove:
• Lift the shelf ti'ont up until it clears the retainers on the
door liner.
• Pull the bin straight out
To replace:
• Reverse the above procedure.
In some models the bottom door bin is fixed, so it is not
adjustable.
A Shelf Tender is located in one refrigerator door bin (cer-
tain models have two tenders). Shelf tenders secure bottles
and other containers in their uptight position and are easi-
ly adjusted by sliding sideways.
The Tall Bottle Retainer is designed to prevent tall bot-
tles from tipping forward. It is easily adjusted by sliding
from side to side.
Tilt Out Door Bin
The Tilt Out Refrigerator Door Bin (certain models) is
ideal for storing awkward containers such as liter bottles
and bagged items. By tilting the bin outward, space is
opened up to conveniently load or retrieve contents.
\
\
\
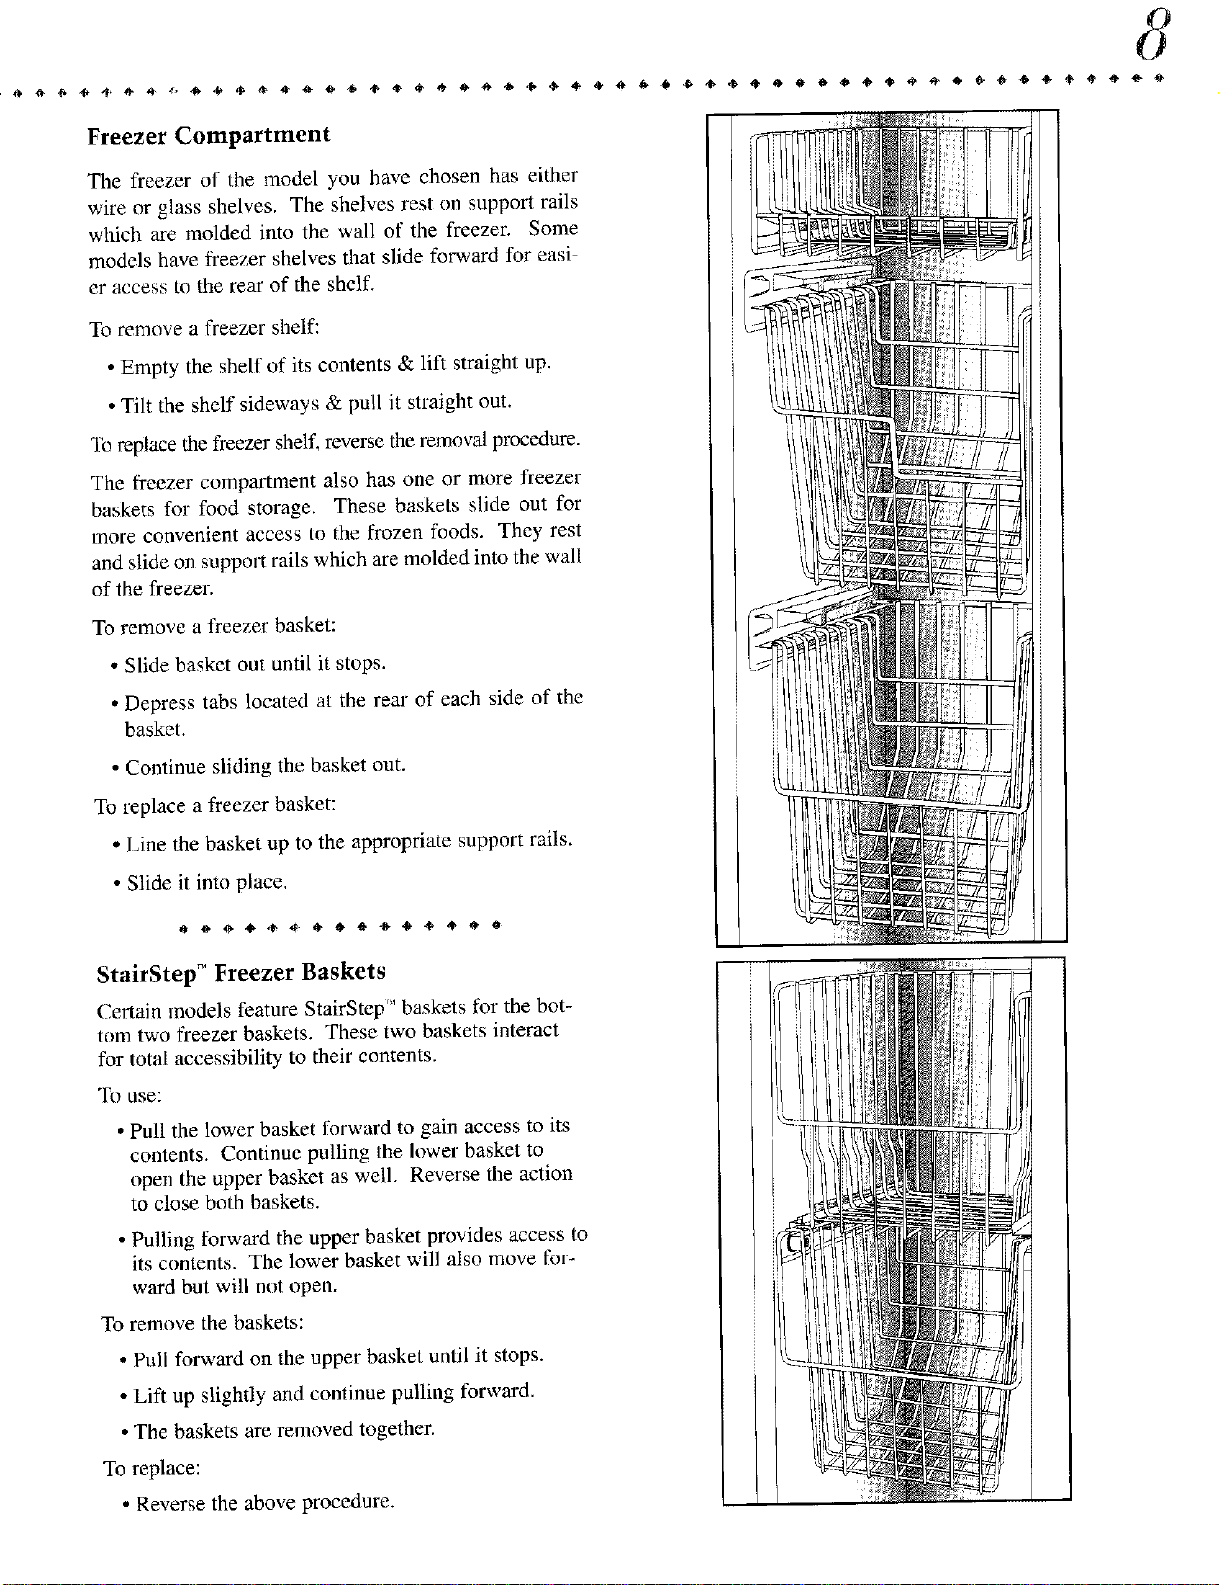
Freezer Compartment
The freezer of the model you have chosen has either
wire or glass shelves. The shelves rest on support rails
which are molded into the wall of the freezer. Some
models have freezer shelves that slide forward for easi
er access to the rear of the shelf.
To remove a freezer shelf:
• Empty the shelf of its contents & lift straight up.
• Tilt the shelf sideways & pull it straight out.
1h replace tile freezer shelf, reverse the removal procedure.
The freezer compartment also has one or more freezer
baskets for food storage. These baskets slide out for
more convenient access to the frozen foods. The), rest
and slide on support rails which are molded into the wall
of the freezer.
To remove a freezer basket:
• Slide basket out until it stops.
• Depress tabs located at the rear of each side of the
basket.
• Continue sliding the basket out.
To replace a freezer basket:
• Line the basket up to the appropriate support rails.
• Slide it into place,
000****06*****0
StairStep _ Freezer Baskets
Certain models feature StairStep" baskets for the bot-
tom two fi-eezer baskets. These two baskets interact
for total accessibility to their contents.
To use:
• Pull the lower basket forward to gain access to its
contents. Continue pulling the lower basket to
open the upper basket as well. Reverse the action
to close bolh baskets.
• Pulling forward the upper basket provides access to
its contents. The lower basket will also move for-
ward but will not open.
To remove the baskets:
• Pull forward on the upper basket until it stops.
• Lift up slighdy and continue pulling forward.
• The baskets are removed together.
To replace:
• Reverse the above procedure.
,J Interior Designs
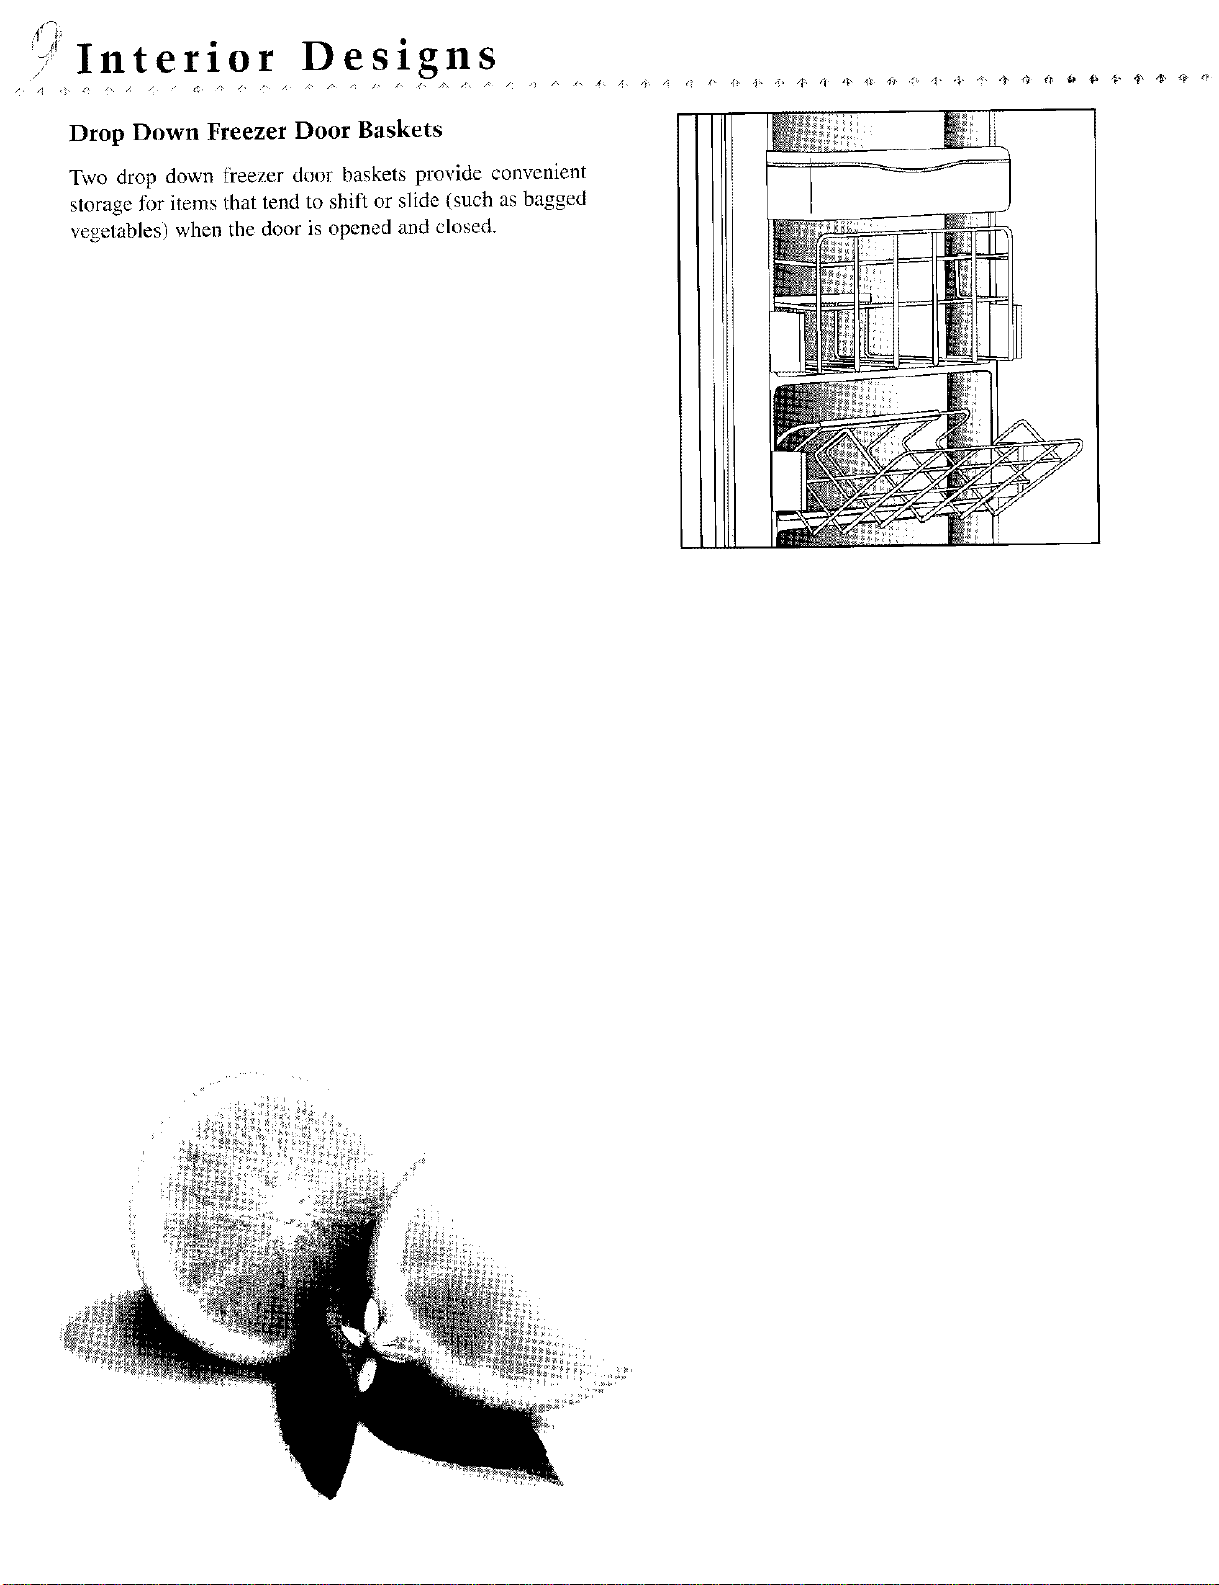
Drop Down Freezer Door Baskets
Two drop down freezer door baskets provide convenient
storage for items that tend to shift or slide (such as bagged
vegetables) when the door is opened and closed.
Specialized Storage Areas
Your refrigerator has an Adjusti-Temp meal storage
drawer. This drawer is designed to provide a shun te:tm
storage area for fresh meats, cheeses and luncheon
meats.
The Adjusti-Temp Drawer is the mp drawer in the
flesh food compartment. The temperature control for
this drawer is located on the shelf front above the draw-
er. Slide the control left or right to achieve the desired
internal temperature of the drawer. The "cool" setting
provides a temperature similar Io that of the surrounding
fresh food compartment. The "cold" setting provides a
lower temperature within the drawer which is recom-
mended when storing fresh meat, poultry or fish.
To ren]ove this drawer fi_r cleaning:
• pull the drawer out until it stops
• lift the drawer up slightly and putl it out
To replace the drawer:
• reverse above procedure
For best results, keep this drawer closed tightly.
I
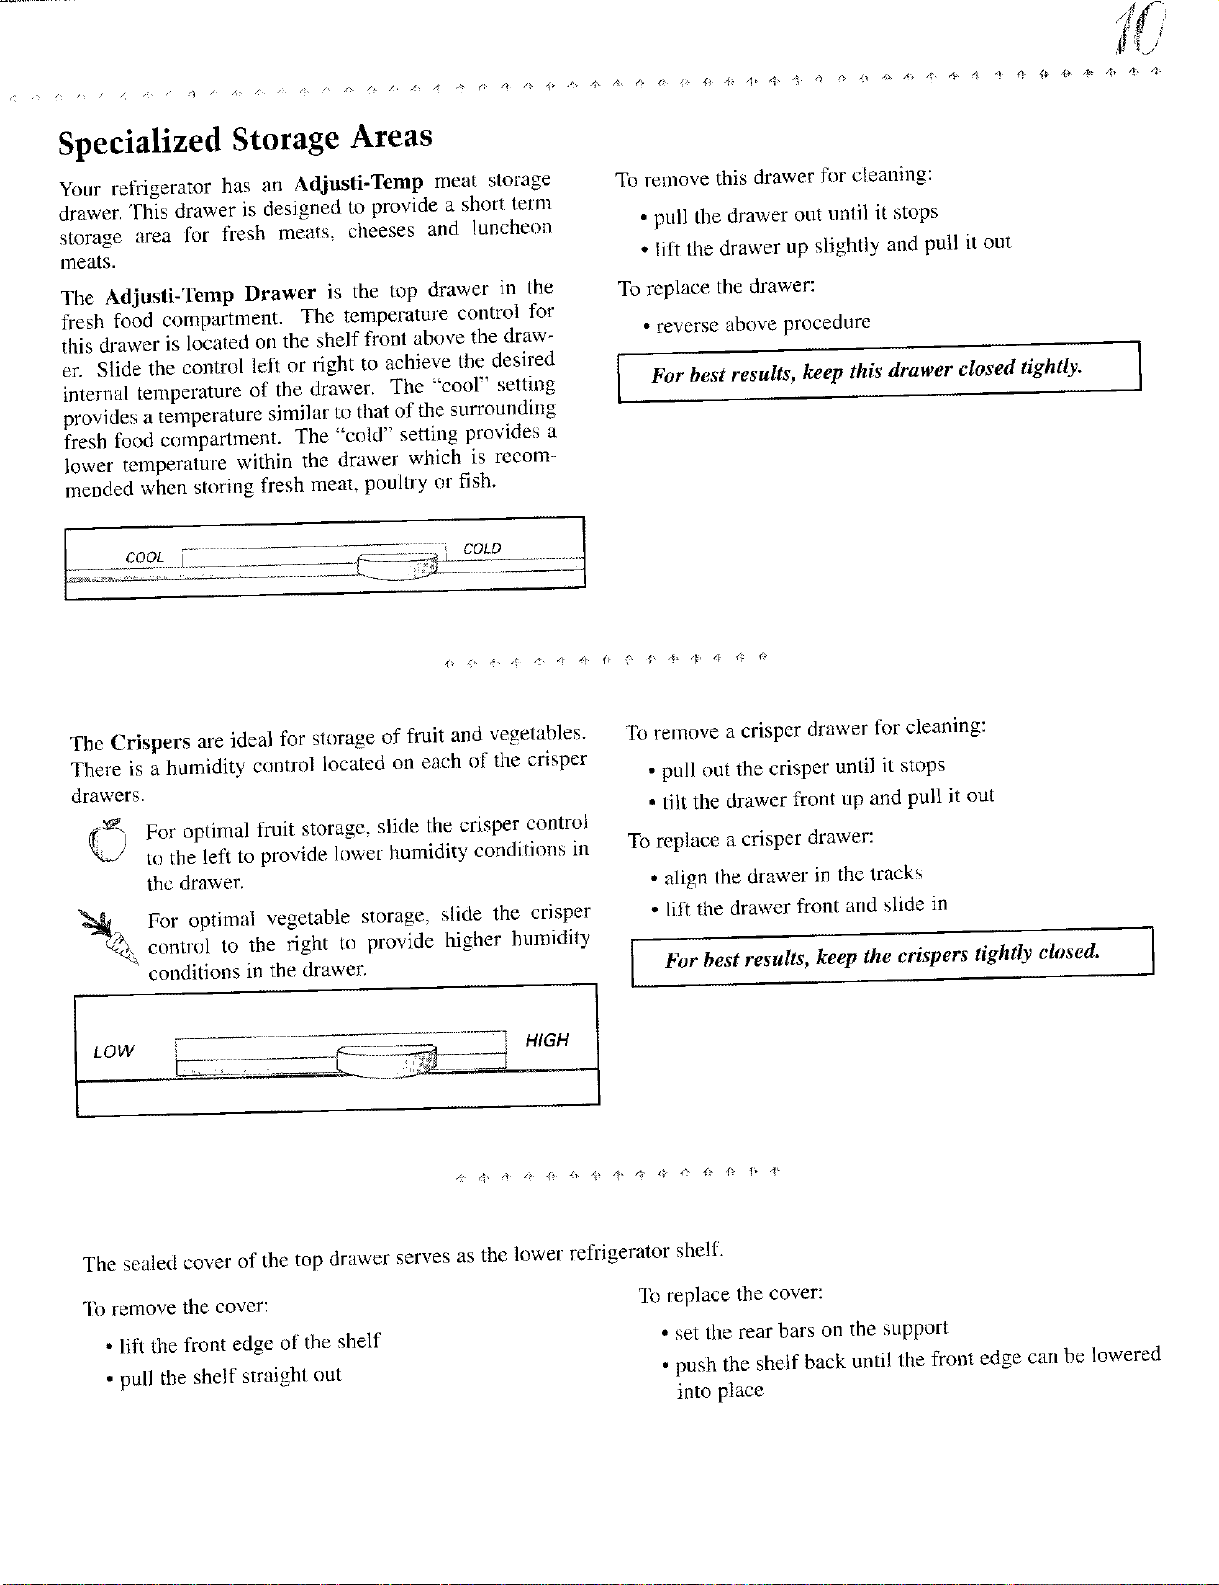
The Crispers are ideal for storage of fruit and vegetables.
There is a humidity control located on each of the crisper
drawers.
_._ For opdma] fl-uit storage, slide the crisper control
)
to the left to provide lower humidity conditions in
the drawer.
_/ For optimal vegetable storage, slide the crisper
control to the right to provide higher humidily
conditions in the drawer.
To remove a crisper drawer for cleaning:
• pull out the crisper until it stops
• tilt the drawer front up and pull it out
To replace a crisper drawer:
• align lhe drawer in the lracks
• lift the drawer front and slide in
bbr best results, keep the crispers tightly closed.
1
LOW _ q HIGH
The sealed cover of the top drawer serves as the lower refrigerator shelf.
To remove the cover:
• lift the front edge of the shelf
• pull the shelf straight out
lb replace the cover:
• set the rear bars on the support
• push the shelf back until the front edge cart be lowered
into place
[/Interior Designs
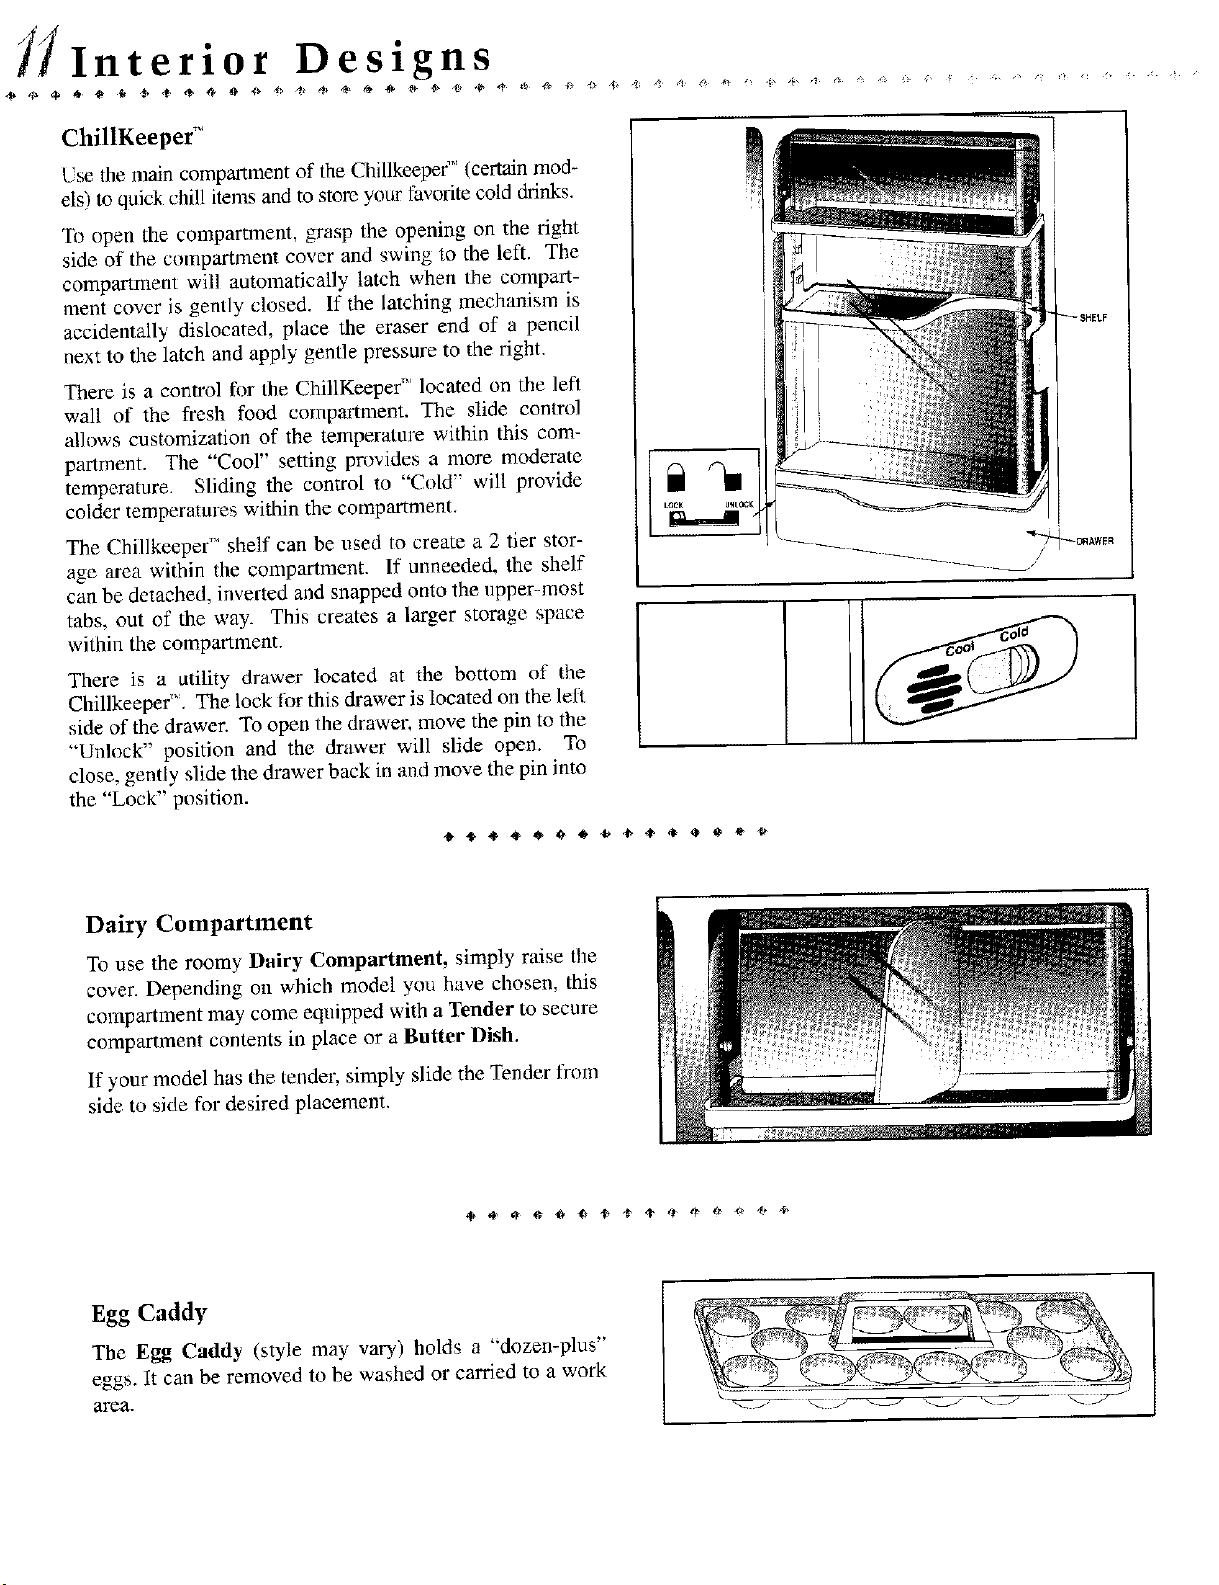
ChillKeeper "_
Use the main compartment of the Chillkeeper'" (certain mod-
els) to quick chill items and to store your favorite cold drinks.
To open the compartment, grasp the opening on the right
side of the compartment cover and swing to the left. The
compartment will automatically latch when the compal-t-
ment cover is gently closed. If the latching mechanism is
accidentally dislocated, place the eraser end of a pencil
next to the latch and apply gentle pressure to the right.
There is a control for the ChillKeepef' located on the left
wall of the fresh food compartment, The slide contrd
allows customization of the temperature within this com-
partment. The "Cool" setting provides a more moderate
temperature. Sliding the control to "Cold" will provide
colder temperatures within the compartment.
The Chillkeeper TM shelf can be used to create a 2 tier stor-
age area within the compartment. If unneeded, the shelf
can be detached, inverted and snapped onto the upper-most
tabs, out of the way. This creates a larger storage space
within the compartment.
There is a utility drawer located at the bottom of the
Chillkeeper". The lock lor this drawer is located on the left
side of the drawer. To open the drawer, move the pin to the
"'Unlock" position and the drawer will slide open. To
close, gently slide the drawer back in and move the pin into
the "Lock" position.
131
_$_ELF
_I3_AWER
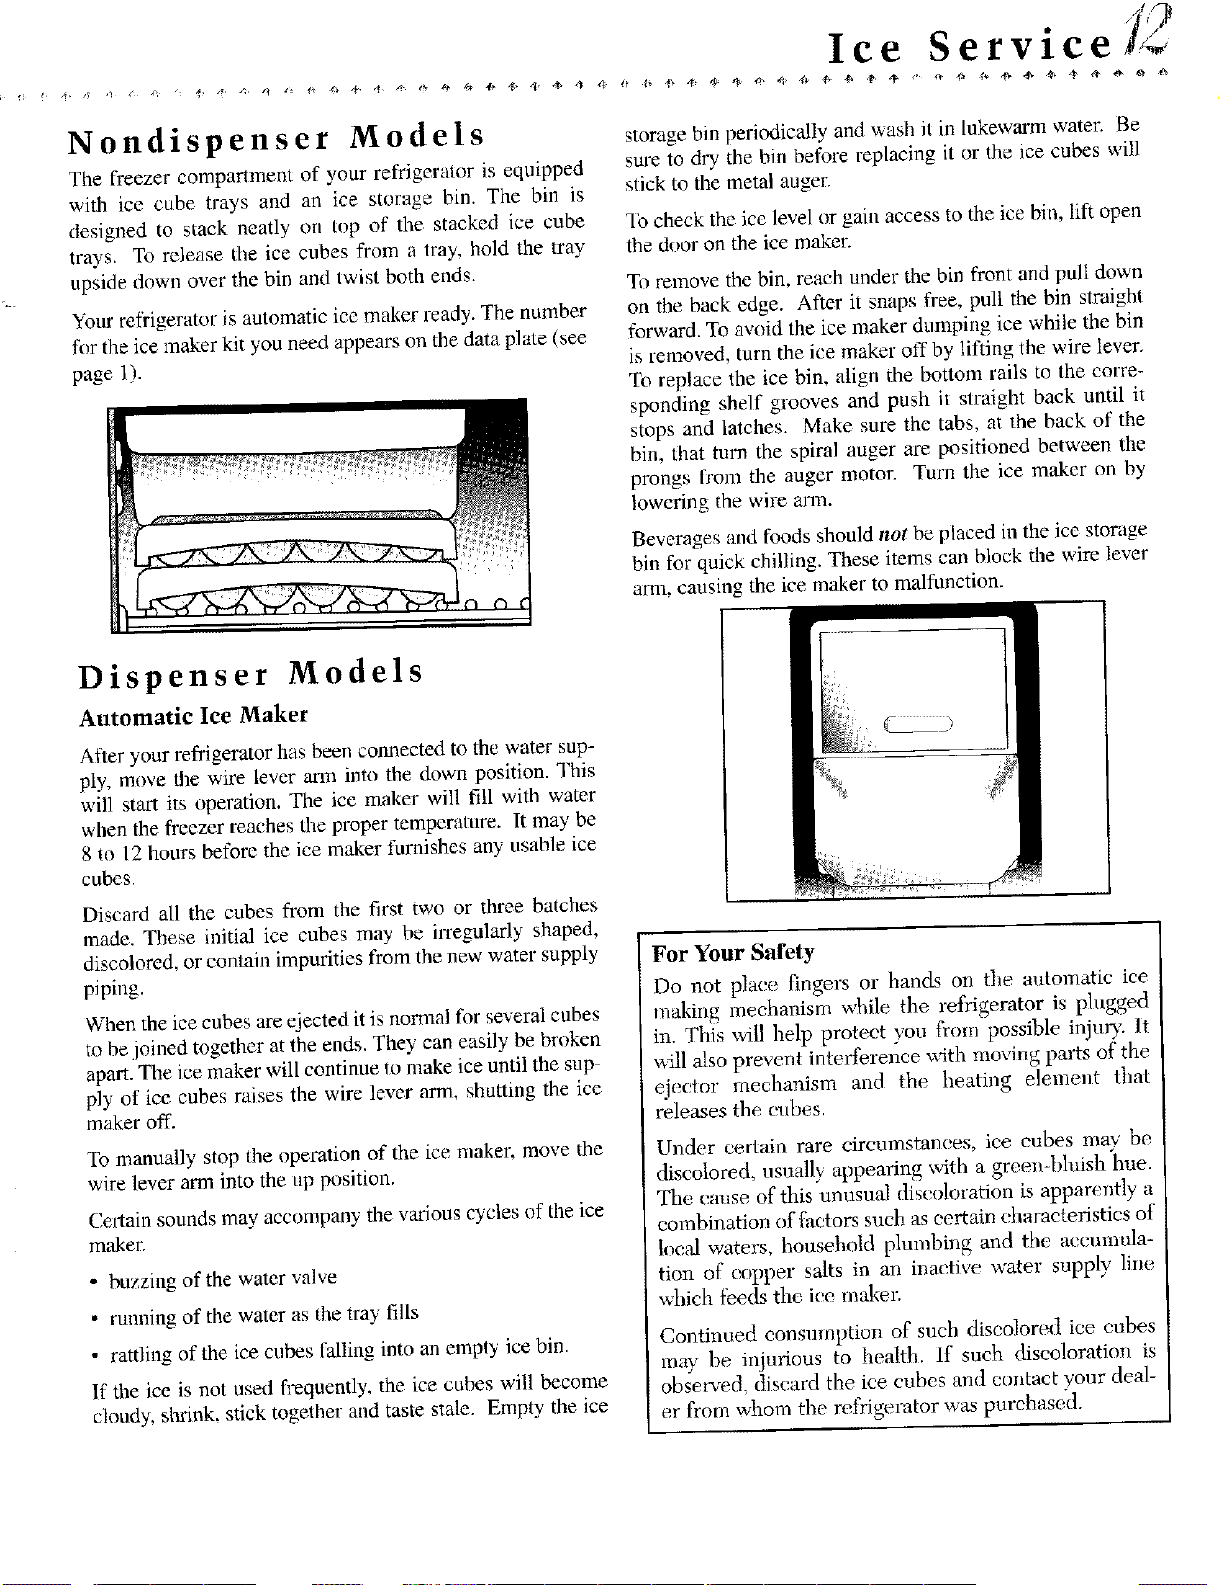
Dairy Compartment
To use the roomy Dairy Compartment, simply raise the
cover. Depending on which model you have chosen, this
compartment may come equipped with a Tender to secure
compartment contents in place or a Butter Dish.
If your model has the tendm; simply slide the Tender from
side to side for desired placement.
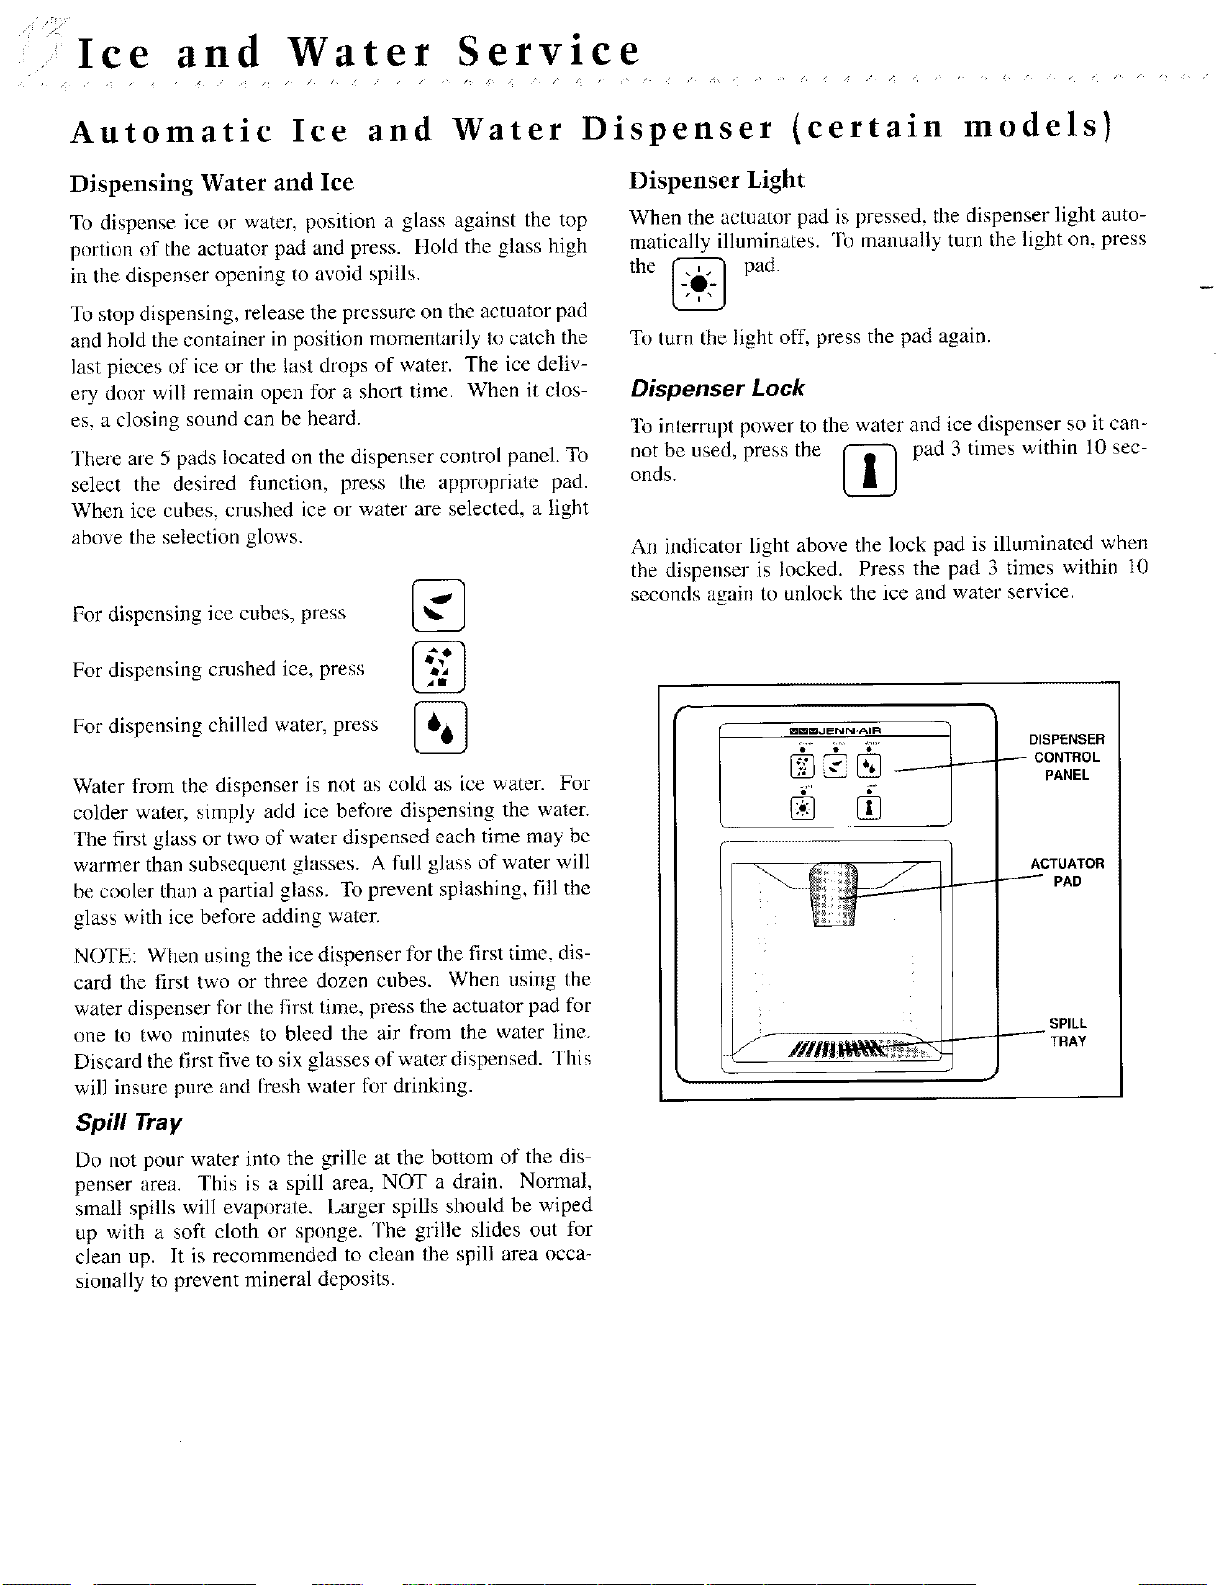
Egg Caddy
The Egg Caddy (style may vary) holds a "dozen-plus"
eggs. It can be removed to be washed or carried to a work
area.
Ice Service
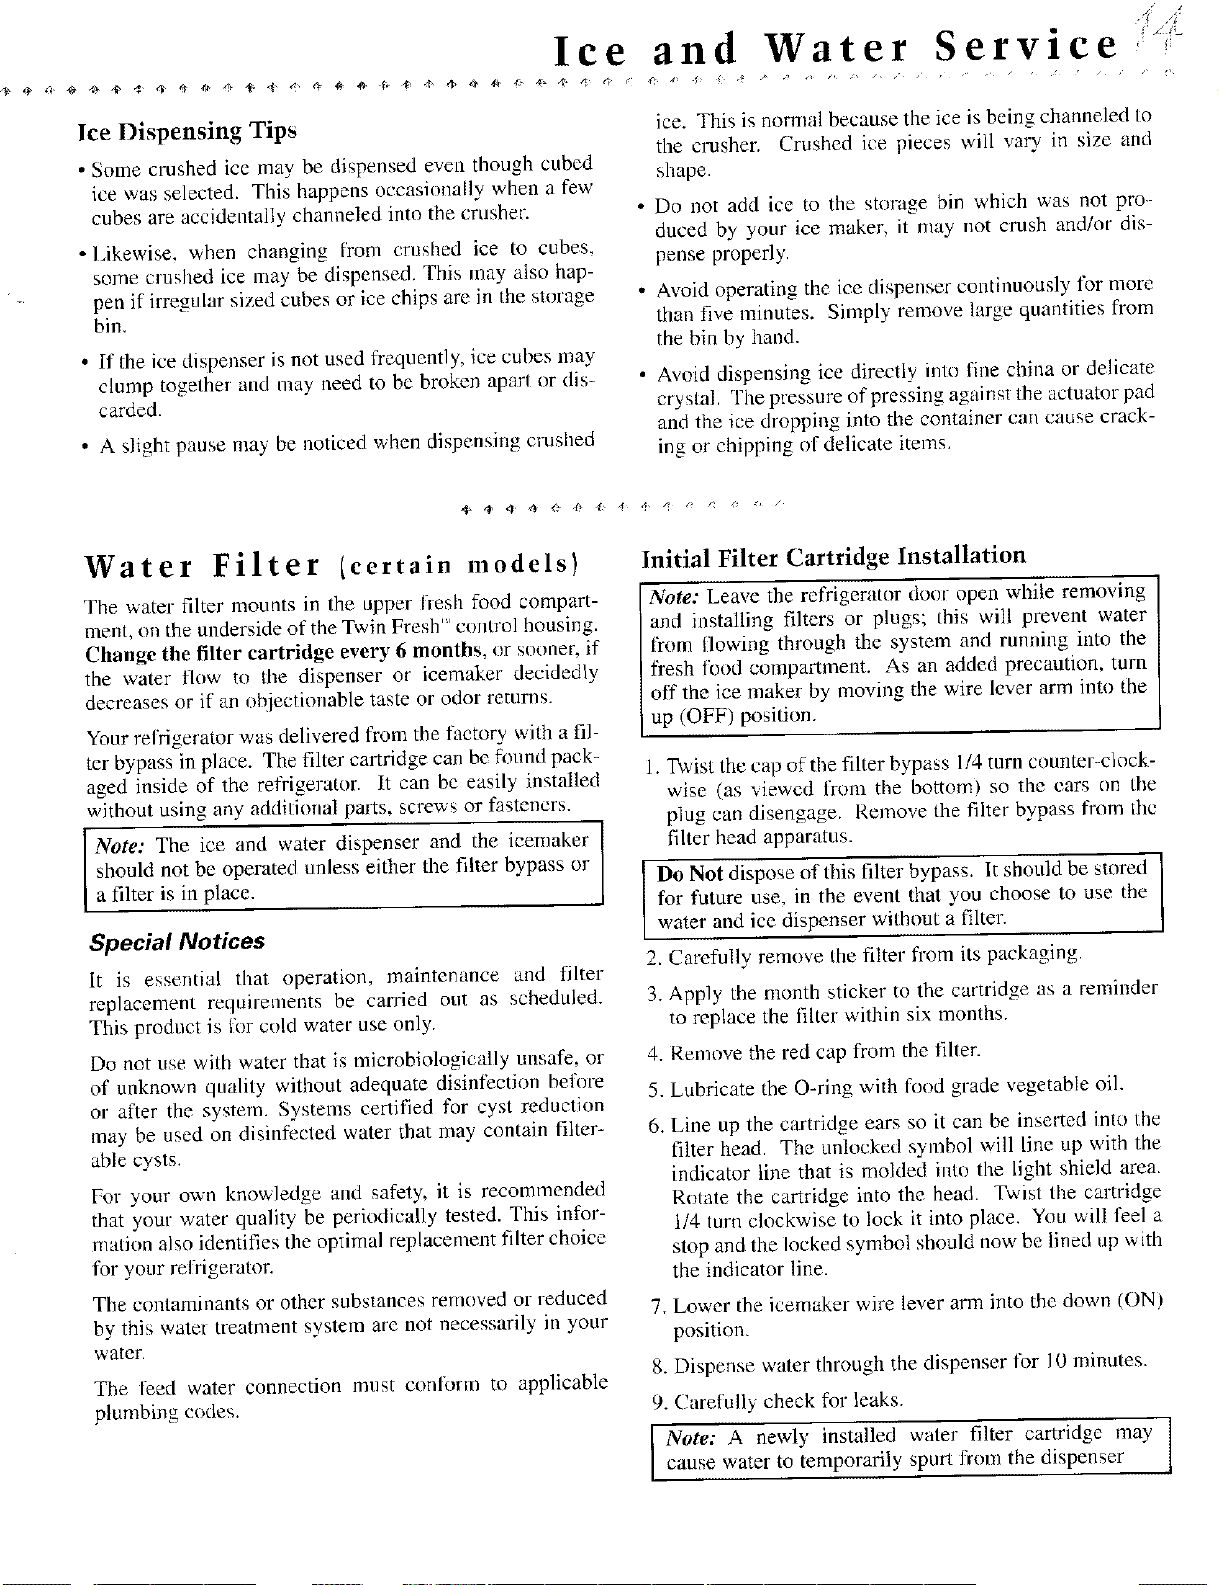
Nondispenser Models
The freezer comparlment of your refrigerator is equipped
with ice cube trays and an ice storage bin. The bin is
designed to stack neatly on top of the stacked ice cube
trays, To release the ice cubes from a tray, hold the tray
upside down over the bin and twist both ends.
Your refi'igeratot; is automatic ice maker ready. The number
fer the ice maker kit you need appears on the data plate (see
page 1).
storage bin periodically and wash it in lukewarm water. Be
sure to dry the bin before rep[acing it or the ice cubes will
slick to the metal auger.
"li)check the ice level or gain access to the ice bin, lift open
the door on the ice maker.
To remove the bin, reach under the bin front and pull down
on the back edge. After it snaps free, pull the bin straight
forward. To aw_id the ice maker dumping ice while the bin
is removed, turn the ice maker off by lifting the wire lever,
To replace the ice bin, align the bottom rails to the corre-
sponding shelf grooves and push it straight back until it
stops and latches. Make sure the tabs, at the back of the
bin, that turn the spiral auger are positioned between the
prongs from the auger motor. Turn the ice maker on by
lowering the wire arm.
Beverages and foods should not be placed in the ice storage
bin for quick chilling. These items can block the wire lever
arm, causing the ice maker to malfunction.
Dispenser Models
Automatic Ice Maker
After your refrigerator has been comaected to the water sup-
ply, move the wire lever arm into the down position. This
will start its operation. The ice maker will till with water
when the freezer reaches the proper temperature. It may' be
8 to 12 hours before the ice maker furnishes any usable ice
cubes,
Discard all the cubes from the first two or three batches
made. These initial ice cubes may be iffegularly shaped,
discolored, or contain impurities from the new water supply
piping.
When the ice cubes are ejected it is normal for several cubes
to be joined together at the ends. They can easily be broken
apart. The ice maker will continue to make ice until the sup-
ply"of ice cubes raises the wire lex_erarm, shutting the ice
maker off.
To manually stop the operation of the ice maker, move the
wire lever arm into the up position.
Certain sounds may accompany the variouscycles of the ice
m_er.
• buzzing of the water valve
• running of the water as the tray fills
• rattling of the ice cubes falling into an empty ice bin.
If the ice is not used frequently, the ice cubes will become
cloudy, shrink, stick together and taste stale. Empty the ice
For Your Safety
Do not plaec fingers m" hands on the automatic ice
making meehanism while the refrigerator is plugged
in. This will help proteet you f'rom possible injur)_ It
will also prevent interference with moving parts of the
ejector mechanism and %e heating element that
releases the cubes.
Under certain rare circumstances, ice cubes may be
discolored, usually appearing with a green-bluish hue.
The crease of this unusual discoloration is apparently a
combination of _etors such as eertain dm raeteristies of
loe,d waters, household plumbing and the accumula-
tion of eopper salts in an inaetive water supply line
which feeds the ice maker.
Continued consumption of such discolored ice cubes
may be injurious to health, if such diseo!oratio_ is
obse_ed discard the ice cubes and eontaet your deal-
er from whom the refrigerator was purchased.
,Ice and Water Service
Automatic Ice and Water Dispenser (certain models)
Dispensing Water and Ice
To dispense ice or water, position a glass against the top
portion of the actuator pad and press, lind the glass high
in the dispenser opening to avoid spills.
To stop dispensing, release the pressure on the actuator pad
and hold the container in position momentarily Io catch the
last pieces of ice or the last drops of water. The ice deliv-
ery door will remain open for a short time. When it clos-
es, a closing sound can be heard.
There are 5 pads located on the dispenser control panel. To
select the desired function, press Ihe appropriate pad.
When ice cubes, crushed ice or water are selected, a light
abn'_e tile selection glows.
For dispensing ice cubes, press
For dispensing crushed ice, press
For dispensing chilled water, press
Water from the dispenser is not as cold as ice water. For
colder water, simply add ice before dispensing the water.
The first glass or two of water dispensed each time may he
warmer than subsequent glasses. A full glass of water will
be conler than a partial glass. To prevent splashing, fill the
glass with ice before adding water.
NOTE: When using the ice dispenser for the first time, dis-
card the first two or three dozen cubes. When usiug lhe
water dispenser for the first time, press the actuator pad for
one to two minutes to bleed the air from the water line.
Discard the first five to six glasses of water dispensed. This
will insure pnre and flesh water tor drinking.
Spill Tray
Do not pour water into the grille at the bottom of the dis
penser area. This is a spill area, NOT a drain. Normal,
small spills will evaporate. Larger spills should be wiped
up with a soft cloth or sponge. The grille slides out for
clean up. It is recommended to clean the spill area occa-
sionally to prevent mineral deposits.
Dispenser Light
When the actuator pad is pressed, the dispenser light auto-
matically illuminates, o na / m y tura the h Jar on. press
the @ pad.
To turn the light off, press the pad again.
Dispenser Lock
To interrupt power to the water and ice dispenser so it can-
not he used, press the _ pad 3 times within 10 sec-
onds.
An indicator light above the lock pad is illuminated when
tile dispenser is locked. Press the pad 3 times within 10
seconds again to unlock the ice and water service.
mmm,JENN-AIR
DISPENSER
CONTROL
PANEL
ACTUATOR
PAD
SPILL
TRAY
Ice and Water Service,,
Ice Dispensing Tips
• Some crushed ice may be dispensed even though cubed
ice was selected. This happens occasionally when a few
cubes are accidentally channeled into the crasher.
• Likewise. when changing from crushed ice to cubes,
some crushed ice may be dispensed. This may also hap-
pen if irregular sized cubes or ice chips are. in the storage
bin.
• If the ice dispenser is not used frequently, ice cubes may
clump together and may need to be broken apart or dis-
carded.
• A slight pause may be noticed when dispensing crusiaed
ice. This is normal because the ice is being channeled to
the crusher. Crushed ice pieces will vary in size and
shape.
• Do not add ice to the storage bin which was not pro-
duced by your ice maker, it may not crush and/or dis-
pense properly.
• Avoid operating the ice dispenser continuously for more
than five minutes. Simply remove large quantities from
the bin by hand.
• Avoid dispensing ice directly int_ fine china or delicate
crystal. The pressure of pressing against the actuator pad
and the ice dropping into the container can cause crack-
ing or chipping of delicate items.
Water Filter [certain models)
The water filter mounts in the upper flesh food compart-
ment, on the underside of the Twin Fresh" control housing.
Change the filter cartridge every 6 months, or sooner, if
the water flow to the dispenser or icemaker decidedly
decreases or if an objectionable taste or odor returns.
Your reIHgerator was delivered from the factocv with a fil
tcr bypass in place. The filter cartridge can be fnnnd pack-
aged inside of the refrigerator. It can be easily installed
without using any additional parts, screws or fasteners.
Note: The ice and water dispenser and the icemaker
should not be operated unless either the filter bypass or
a filter s in place.
Special Notices
It is essential that operation, maintenance and filter
replacement requirements be carried out as scheduled.
This product is l'or cold water use only.
Do not use with water that is microbiologically unsafe, or
of unknown quality without adequate disinfection before
or after the system. Systems certified for cyst reduction
may be used on disinfected water that may contain filter-
able cysts,
For your own knowledge and safety, it is recommended
that your water quality be periodically tested. This infor-
mation also identifies the optimal replacement filter choice
for your reffigelator.
The contaminants or other substances removed or reduced
by this water: treatment system are not necessarily in your
water.
The Ieed water connection must coa:lk_rn_ to applicable
plumbing codes.
Initial Filter Cartridge Installation
Note: Leave the refrigerator door open while removing
and installing filters or plugs; this will prevent water
from flowing through the system anti running into the
fresh food compartment. As an added precaution, turn
off the ice maker by moving the wire lever arm into the
up (OFF) position.
1. Twist the cap of the filter bypass 1/4 turn chanter-clock-
wise (as viewed from the bottom) so the ears on the
plug can disengage. Remove the filter bypass from die
filter head apparatus.
I Do Not dispose of this filter bypass. It should be stored I
for future use, in the event that you choose to use the
I
water and ice dispenser without a filter.
2. Carefully remove the filter from its packaging.
3. Apply the month sticker to the cartridge as a reminder
to replace the filter within six months.
4. Remove the red cap from the filter.
5. Lubricate the O-ring with l'ood grade vegetable oil.
6. Line up the cartridge ears so it can be inserted into the
filter head. The unlocked s) mbol will line up with the
indicator line that is molded into the light shield area.
Rotate the cartridge into the head. Twist the cartridge
1/4 turn clockwise to lock it into place. Yuu will feel a
stop and the locked symbol should now be lined up with
the indicator line.
7. Lower tbe icemaker wire lever arm into tire down (ON)
position.
8. Dispense water through the dispenser tbr 10 minutes.
9. Carelully check for leaks.
I Note: A newly installed water filter cartridge may ]
cause water to temporarily spurt from the dispenser

Replacing the Filter Cartridge
Note: Leave the refrigerator door open while removing
and installing filters or plugs; this will prevent water from
flowing through the system and running into the fresh
food compartment. As an added precaution, turn off the
ice maker by moving the wire lever arm into the up
(OFF) position.
1. Twist the filter cartridge 1/4 tuna counterclockwise (as
viewed from the bottom) so that ears on the cartridge are
able to disengage from the head. The unlocked symbol
will be lined up with the indicator line that is molded
into the light shield area. Twist gently until the cartridge
is free from the head, but DO NOT pull..avoid tipping
the cartridge to prevent spillage. Dispose of the used
cartridge.
2. Carefully remove the replacement filter fnnn its packag-
ing. (Read the label carefully to be sure you have the
correct replacement filter cartridge).
3. Follow steps 3 through 9 under Initial Filler Cartridge
Installation. (See page 14).
Note: A newly-installed water filter cartridge may cause [
water to temporarily spurt from the dispenser, I
Periods of Non-Use
If the refrigerator has been out of use for more than 2
weeks (ie: placed in storage or has been moved) the filler
should be replaced when tbe refrigerator is put back into
service.
For replacement filter cartridges or for service, contact
your local dealer or Maytag Appliances Sales Company,
Jenn-Air Customer Assistance. 1 800-688-1100:
UKF7001AXX T_aste, odor, chlorine, cysts, and lead
UKF6001AXX - Taste, odor, chlorine, and lead
UKF5001AXX - Taste, odor, chlorine.
Note: Filter life may be affected by abnomaal feed water
conditions or unusual incidents such as hydrant flushes,
reservoir turnover, or varying local water conditions.
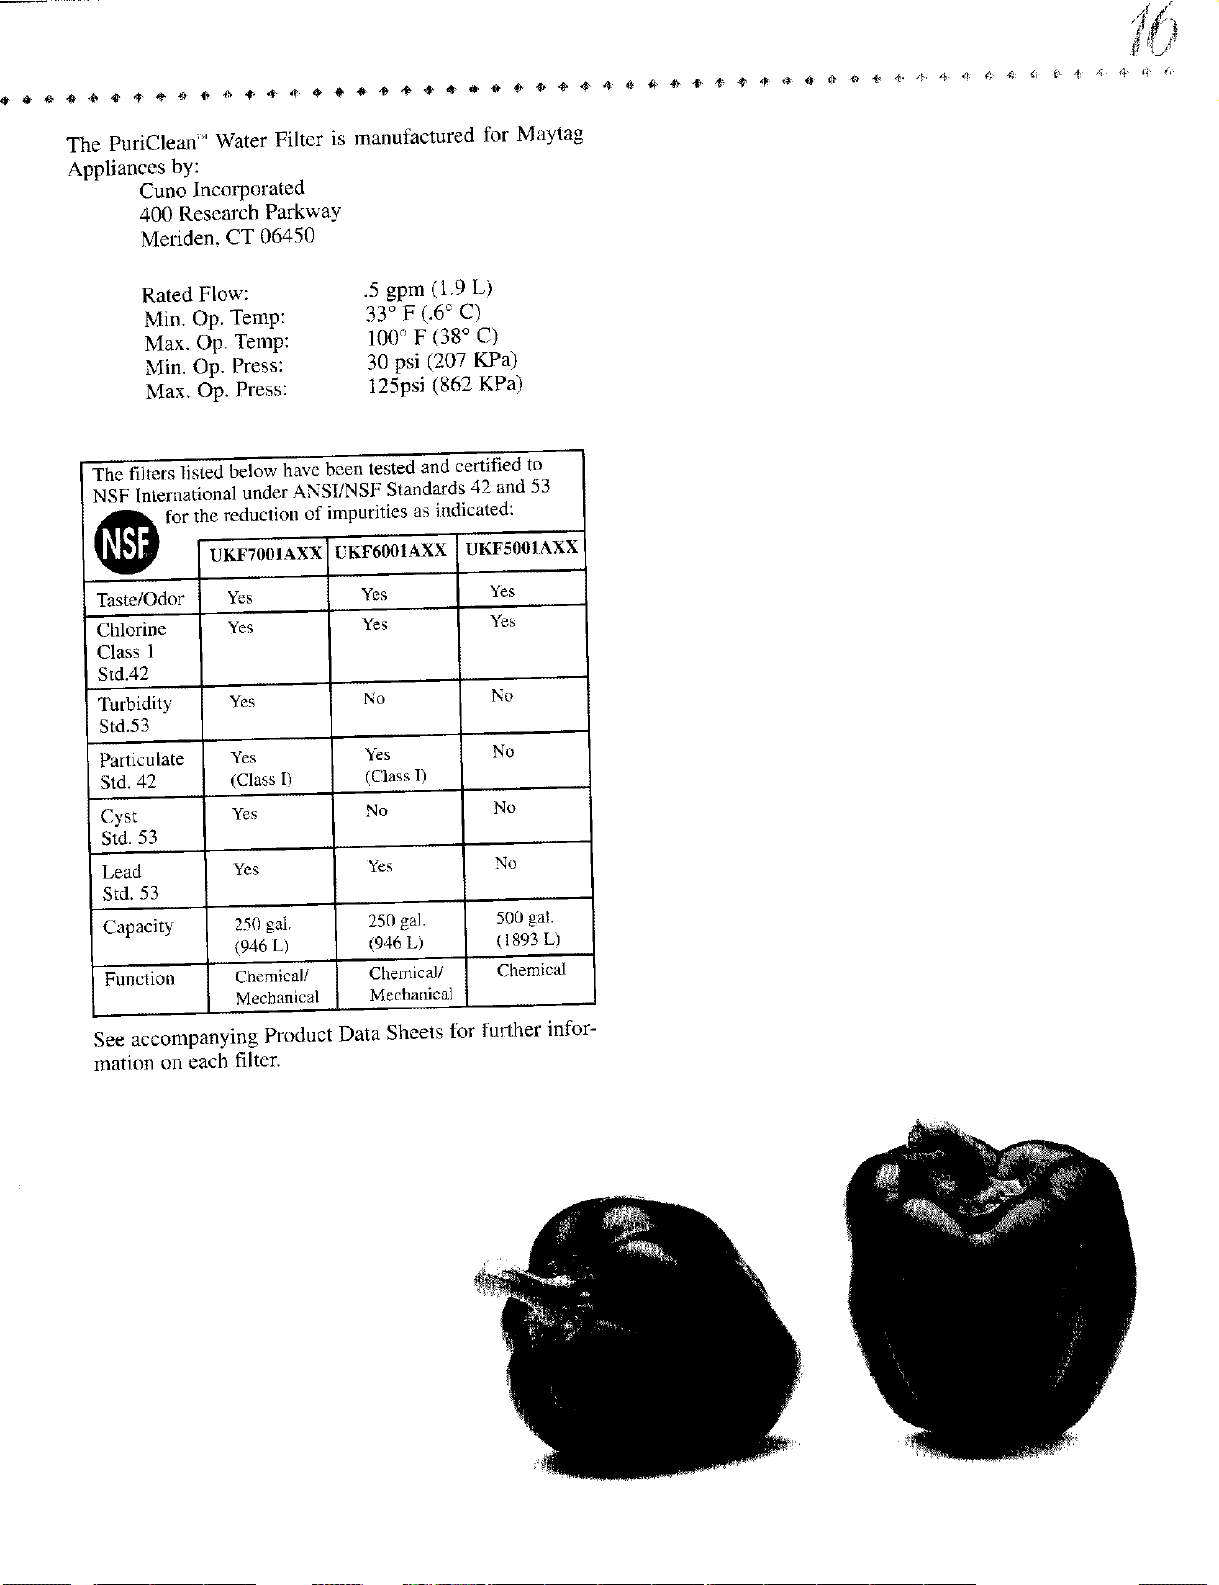
The PuriClean" Water Filter is manufactured for Maytag
Appliances by:
Cuno Incorporated
400 Research Parkway
Meriden, CT 06450
Rated Flow:
Min. Op, Temp:
Max. Op. Temp:
Min. Op. Press:
Max. Op. Press:
.5 gpm (1.9 L)
33 ° F (.6 ° C)
100 ° F (38 ° C)
30 psi (207 KPa)
125psi (862 KPa)
The filters listed below have been tested and certified to
NSF lnternationaI under ANSI/NSF Standards 42 and 53
_for the reduction of impurities as indicated:
Taste/Odor
Chlorine
Class 1
' Std.42
Turbidity
Std.53
Particulate
Std. 42
Cyst
Std. 53
Lead
Std. 53
CapaeiU
Function
Yes
Yes
Yes
Yes
(Class I)
Yes
Yes
250 gal.
(946 L)
Chemical/
Mechanical
Yes
Yes
_O
Yes
(Class 1)
No
Yes
250 gal.
(946 L)
CI2emica//
Meehanical
Yes
Yes
No
No
No
No
500 gal.
( 1893 L)
Chemical
See accompanying Product Data Sheets for further infor-
mation on each filter.
/"
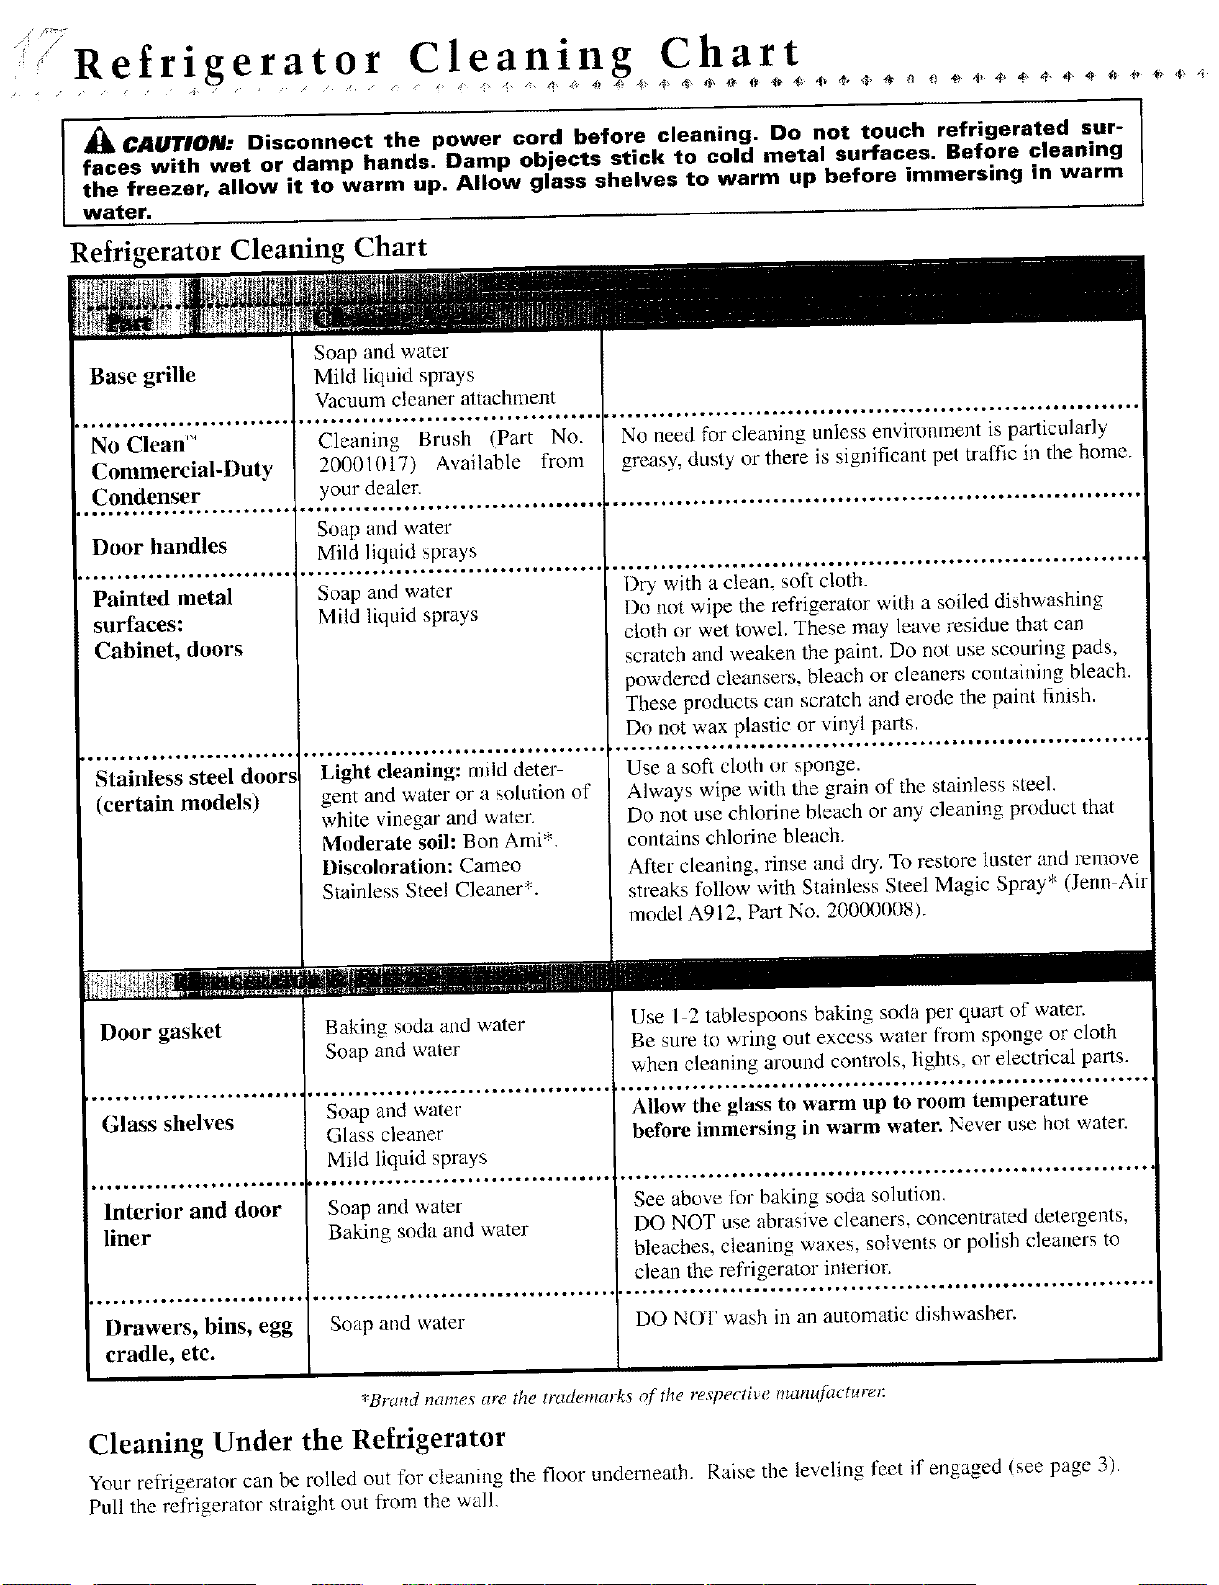
Refrigerator Cleaning Chart
_ CAUTION: Disconnect the power cord before cleaning. Do not touch refrigerated sur-
faces with wet or damp hands. Damp objects stick to cold metal surfaces. Before cleaning
the freezer, allow it to warm up. Allow glass shelves to warm up before immersing in warm
water.
Refrigerator Cleaning Chart
No Clean '_
Commercial-Duty
Condenser
J Q o. i.*. o..I *... t...*,.o*.
Door handles
_.,o.. °,.* °.**°.. I °o*,_**o,
Painted metal
surfaces:
Cabinet, doors
*,.. °.1.**°,e,.o1.***..o..
Stainless steel doors
(certain models)
Door gasket
f...°*..o,..°,*.o*...,_,,*t
Glass shelves
Interior and door
liner
.o_......°°.4°.._ll._WQ*t_
Drawers, bins, egg
cradle, etc.
Cleani_g Brush (Part No.
20001017) Available from
your dealer.
Soap and water
Mild liquid sprays
_ _..o,... °,°oo* • o°*. _.. • _,. • _,°° °. _°.
Soap and water
Mild liquid sprays
.°.°°,.°°,....._..4_*°.IQ_**_..o*.o
Light cleaning: miM deter-
gent and water or a solution of
white vinegar and waler.
Moderate soil: Bon Ami*.
Discoloration: Cameo
Stainless Steel Cleaner*,
Baking soda and water
Soap and water
. o.*.. o. _ o.*._°o°°.. _*l_l** o,, _ _°..
Soap and water
Glass cleaner
Mild liquid sprays
Soap and water
Baking soda and water
Soap and water
No need for cleaning unless environment is particularly
greasy, dusty or there is significant pet traffic in the home.
Dry with a clean, soft cloth.
Do not wipe the refrigerator with a soiled di_hwashing
cloth or wet towel. These may leave residue that can
scratch and weaken the paint. Do not use scouring pads,
powdered cleansers, bleach or cleaners comaining bleach.
These products can scratch and erode the paint finish.
Do not wax plastic or vinyl parts,
Use a soft cloth or sponge.
Always wipe with the grain of the stainless steel.
Do not use chlorine bleach or any cleaning product that
contains chlorine bleach.
After cleaning, rinse and dry. To restore luster and remove
streaks follow with Stainless Steel Magic Spray* (Jerm Air
model A912, Part No. 200(R_008).
Use I 2 tablespoons baking soda per quart of watch
Be sure to wring out excess water from sponge or cloth
when cleaning around controls, lights, or electrical parts.
Allow the glass to warm up to room temperature
before immersing in warm water. Never use hot watec
See above for baking soda solution.
DO NOT use abrasive cleaners, eoncenwated detergents,
bleaches, cleaning waxes, solvents or polish cleaners to
clean the refrigerator interior.
DO NOT wash in an automatic dishwasher.
*Brand names are the trademarks of the respective mam{]acture_:
Cleaning Under the Refrigerator
Your refrigerator can be rolled out for cleaning the floor underneath. Raise the leveling feet if"engaged (see page 3).
Pull the refrigerator straight out from the wall,
/%
Storage an d Maintenance •
Vacations
If you will be gone for a month or less, leave the controls
at the usual settings.
Daring longer absences:
a) remove all food,
b) shut off the ice maker (if installed) and the valve where
you tapped into the water line to supply the refrigerator,
c) disconnect the refiigerator from the electrical outlet,
d) remove the filter catlddge (certain models) and install
tile filter bypass (see page 14 15). Dispose of the used
cartridge. A new cartridge can be installed when the
refrigerator is put back m smwice,
e) clean and dry the ret?igerator thoroughly,
t) leave the doors open to prevent odors.
Moving
When moving, follow steps a-f under Vacations. In addi-
tion, remove and carefully pack any items that are easily
removable. Ship the refrigerator in an upright position with
the doors taped shut.
Replacing a Light Bulb
-_ C411TION: Disconnect the power cord before replacing light bulb(s). Wear gloves as )
protection against possible broken glass.
I
Always use a standard 40 or 60 watt appliance bulb when replacing a fresh food or freez-
er compartment bulb.
Refrigerator
There are two light bulbs located at the top of the refriger-
ator compartment, or_ the underside of the Twin Fresh'"
control housing.
To replace a lightbulb(s), remove the control cover from
the control housing:
• grasp the control cover at the two [ear "finger tabs".
These are located at the upper rear of the [resh food
compartment, behind the light shields.
• pull down slightly to clear the retainer tabs and slide the
cover forward until it is free.
replace the bulb(s) with a 60-watt, standard base appli-
ance bulb(s).
. After replacing the bulb(s), align the control cover on to
ihe ribs on the control ho/Jsing and slide it straight back
until it snaps onto the retainer tabs.
On certain models, there is an additional light located
behind the top drawen To replace:
• remove the top dlawer and cover as explained on page 10.
• carefully reach into the bulb cover and unscrew the
lightbulb.
• replace the bulb with a 60-watt appliance bulb.
Freezer
The freezer light is located on tile back wall of the freezer
compamnent.
To replace:
• unhook the tabs on the top of the light shield by press-
ing in with the thumb on the center top of the light shield
• pivot the shield down
• unscrew the bulb when cool and replace it with a stan-
dard 40-watt appliance bulb
• replace tbe bulb cover by pivoting it back into place a_ld
snapping the tabs into the appropriate slots•
Dispenser Light (dispenser models only)
To replace:
• Locate the lightbulb in the dispenser area to the left of
the actuator•
• Unscrew the used bulb and remove•
• Replace the bulb, using a 120V, 7-watt bulb.
i'f Food Storage Tips
Fresh Food Storage
• The fresh food eompartn_ent of a refrigerator should
be kept between 34°F and 40°F with ml optilmnll tem-
perature of 37°K To check the temperature, place a_
appliance thenuometer in a glass of water and place il_
the center of the refrigerator. Check after 24 hours, if
the temperature is ahme 40°F adjust the controls as
explaiuecl on page 5.
• Avoid overcrowding the refrigerator shelves. This
rednces the eirculation of air around the food and
resnlts in tmeven cooling.
Fruit and Vegetables
• Storage in the crisper drawers traps moisture to help
presen'e the fi'uit and vegetable quality for longer time
periods. (Refer to page 10).
• Snrt fruits and vegetables before storage and use
bruised or soft items first. Discard those showing signs
of decay.
• Ahvays wrap odorous foods such as onim_s and cabbage
so the odor does not transier to other tbods.
• While vegetah]cs m_ed a certain amount of moisture to
remain ffes}L too nmch moisture can shorten storage
tiums (especially lettuce). Drain vegetables well beibre
storing.
Meat and Cheese
• Haw meat amt poultry should be wrapped securely so
leakage and contamination of other tbods or surfilces
does not occur.
• Occasionally mold will develop o_/the snrfiaee of hard
cheeses (Swiss, Cheddar, Parmesan) Cut off at leas! an
inch around and below the moklv area. Keep your
kuitb or instrument out of tile mold'itself, The remain-
ing cheese _dI1 be saib al_d flavorful to eat. Do NOT tU
to save individual cheese slices, soil cheese, cottage
cheese, cream, sour cream or yogurt when mold
appeals.
Frozen Food Storage
• The freezer compartment of a refrigerator should be
kept at 0°F or lower. Te eheek the temperature, place
an appliance thermometer between the frozen pack-
ages and cheek after 24 hours. If the temperature is
above 0°F, adjust the control as described on page 5.
• A freezer operates more efficiently when it is at least
two-thirds thll.
Packaging Foods for Freezing
• To minilnize dehydration and quality deterioration use
ahnuimnn tbi], freezer wrap, freezer bags or airtight
containers Force as mo(h air out ot' the packages as
possible and be sure they are tightly sealed. Trapped _dr
can cause the food to dry out, change color and devel-
op an ot}_-flavor (ti'eezer burn).
• Ovm_vrap fresh meats and poultry with suitable freezer
wrap prior to freezing.
• Do not refreeze meat that has _mpletely thawed.
Loading the Freezer
• AwJid adding too much warm fbod to the freezer at one
time. This o_-erloads the freezer, slows the rate of freez-
ing and can raise the temperature of t)ozen foods.
• Leave space between tl_e packages so cold air can cir-
culate freely; allowing food to freeze as quickly as pos-
sible.
• Avoid storing haM-to-fi'eeze foods such as ice cream
and orange juice on the t)eezer door shelves, These
fbods arc best stored in the freezer interior where the
temperature varies less with door openings.
Refer to the Food Storage Chart on page 9_0 for
approximate storage times.
Dairy Food
• Most dai W fnnds such as milk, yogurt, sore" cream and
cottage cheese have freshness dates on their cartons for
appropriate length of storage. Store these ibods in tim
original carton and refrigerate imuledialely af}er pro-
chasing and each use.
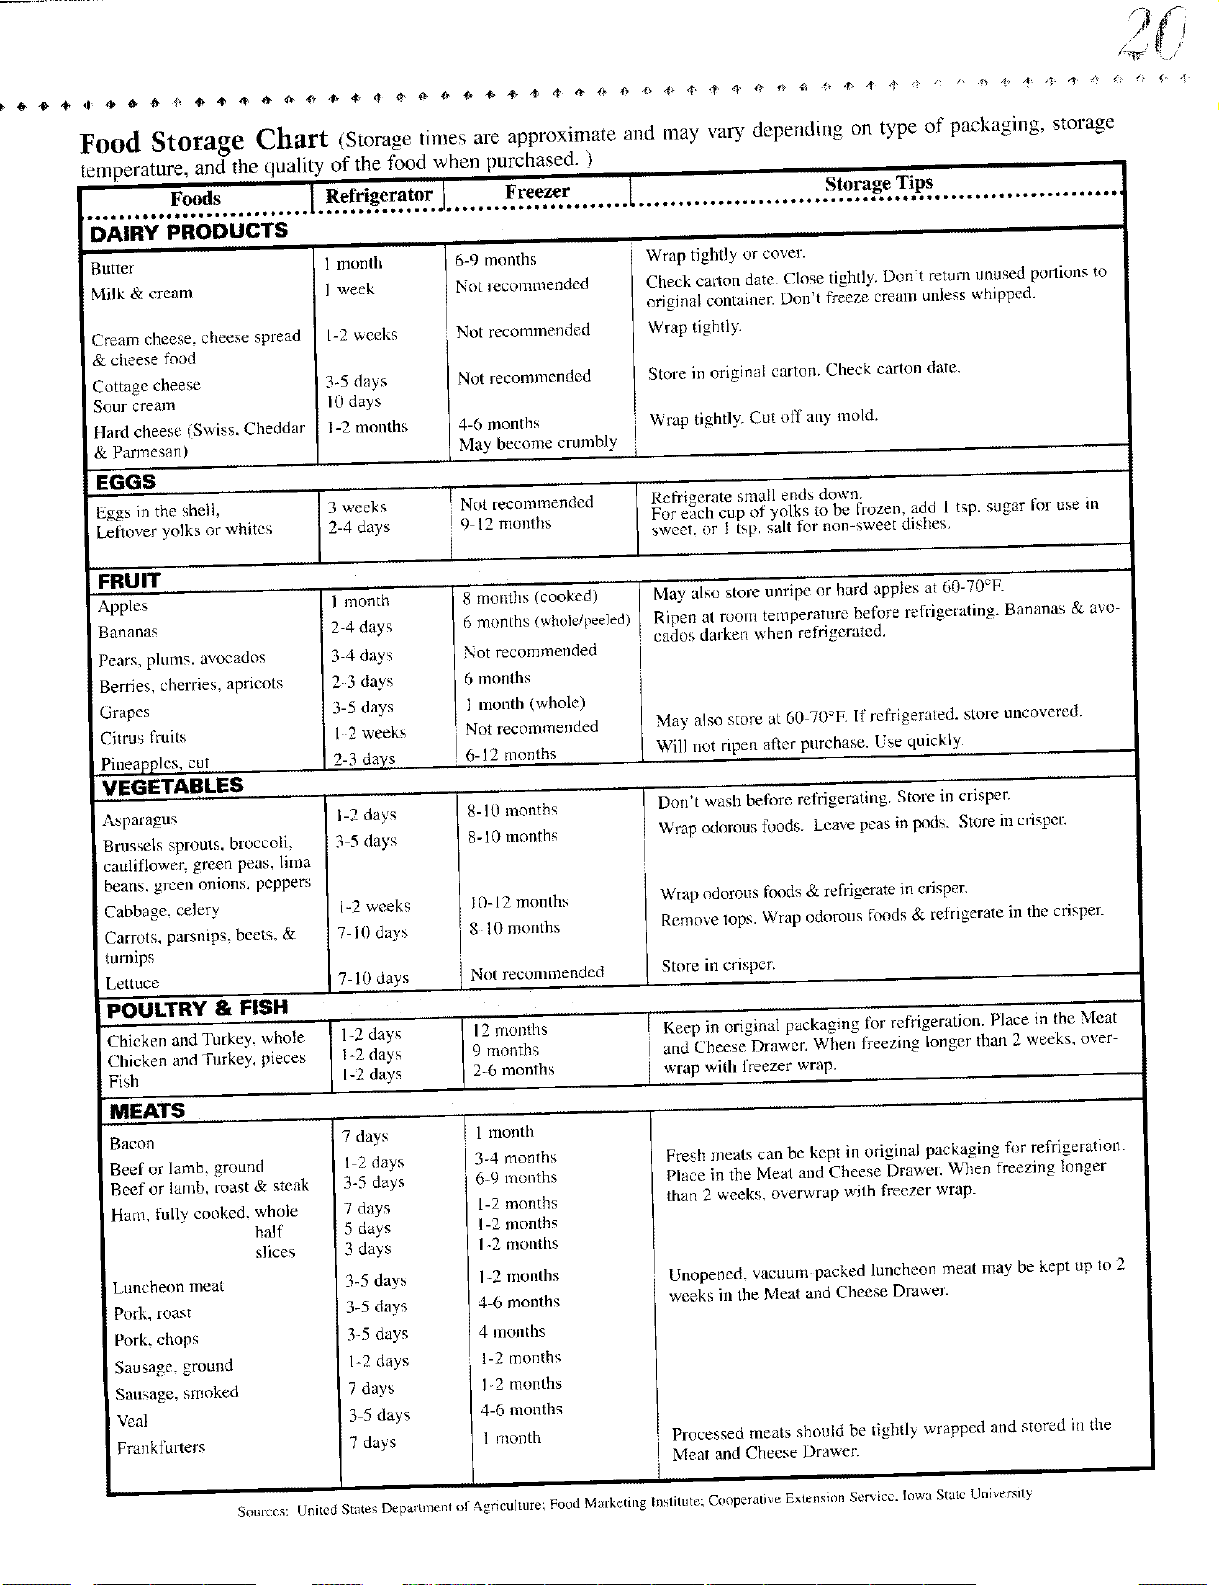
Food Storage Chart (Storage times are approximate attd may vary depending on type of paekaging, storage
temperature, and the quality of the food when purchased. )
Foods Refrigerator Freezer 1 Storage Tips
DAIRY PRODUCTS
Batter
Milk & cream
Cream cheese, cheese spread
& cheese food
Cottage cheese
Sour cream
flard cheese ISwiss. Cheddar
& Parmesan)
i
1 month
I week
1-2 weeks
34 days
10 days
1-2 months
EGGS
Eggs in the sheik I 3 weeks
Leftover yolks or whites 2-4 days
i 6-9 months
No_ _ecommended
Not recommended
Not recommended
4-6 months
May become crumbly
i i
Wrap tightly or Cover.
Check caxton date Close tightly. Don't return tmused pordons to
original container. Don't freeze cream unless whipped.
Wrap tightly
Store in original carten. Check carton date.
_rap tightly. Cut ol'f ally mold.
I
Not recommended
9 12 lnouths
i
Refrigerate small ends down
For each cup of' yolks to be flozen, add 1 t_.p. sugar for
sweet, or 1 tsp. salt fer non-sweet dishes.
.....FRUIT
Apples
Bananas
Pears, plums, avocados
Berries, cherries, apricots
Grapes
Citrus fruits
Pineapples, cet
,VEGETABLES
Abpatagl]s
Brussels sprouts, broccoli
cauliflower, green peas. lima
beans, gl12eaonions, peppers
Cabbage, celery
Carrots, parsnips, beets. &
turnips
Lettuce
POULTRY & FISH
Chicken andTmkey, whole
Chicken and Furkey, pieces
Fish
MEATS
Bacon
Beef or lamb, grolmd
Beef or lamb, roast & steak
Ham, fully cooked, whole
half
slices
Luncheon meat
Pork, roast
Pork, chop_
Sausage, grom_d
Sausage, smoked
Veal
Frankfullers
] I month
2-4 days
3-4 days
2 3 days
3-5 days
I 2 weeks
I 20 days
I-2 days
._-5da'ys
1-2weeks
7 10days
8 months (cooked
6 months (whole/peeled)
Not recommended
6 months
I month (whole)
Not recnmmended
6-12 months
8-10 months
8-10 months
IO-12 month:,
8 10 months
use in
May also store unripe or hard apples at 60-70°F.
Ripen at room temperature before refllgetating. Bananas & avo-
cados dalken when refrigerated.
May also store at 60-70 E If refrigerated, store uncovered.
Will net ripen after purchase. Use quickly
Don't wash before refrigerating. Store in crisper.
Wrap odorous foods. Leave peas in 1-x_ts. Store in cdsper.
W[ap odorous foods & refllgerate in crisper
Remove tops, W_ap odorous foods & relrigerate in the crisper.
' 7 10 days Not recommended Store in crisper.
1-2 day's 12 rnonflls I Keep in origina] packaging lbr refrigeration. Place in the Meat
1-2 days 9 months and Cheese Drawer. When freezing longer than 2 weeks, over-
1-2 days 2-6 months I wrap with freezer ,,,,'rap.
3-4 months
6-9 months
1-2 months
1-2 months
1-2 rnotlths
1-2 mol]lhs
4-6 months
4 months
1-2 months
12 months
4-6 months
1 month
Fresh meats can be kept in original packaging fi_r reffigefatiom
Place in the Meat and Cheese Drawel. When freezing longer
than 2 weeks, overwrap with freezer wrap.
Unoper_ed. vacuum packed ]uncheor_ meat may be kept ap lo 2
weeks ill the Meat and Cheese Drawm.
Processed meats should be tightly wrapped and stered in the
I Meal and Cheese Drawer.
I
7 days
I 2 days
3-5 days
7 clays
5 days
3 days
3-5 days
3-5 days
3-5 days
I-2 days
7 days
3 5 days
7 days
IIIIIIII
Sources: United State_; Depam_ent el Agriculture; laded Malke¢ing Institute; Cooperati_,e Extension Net _, c_,. owa S c UI/vers y
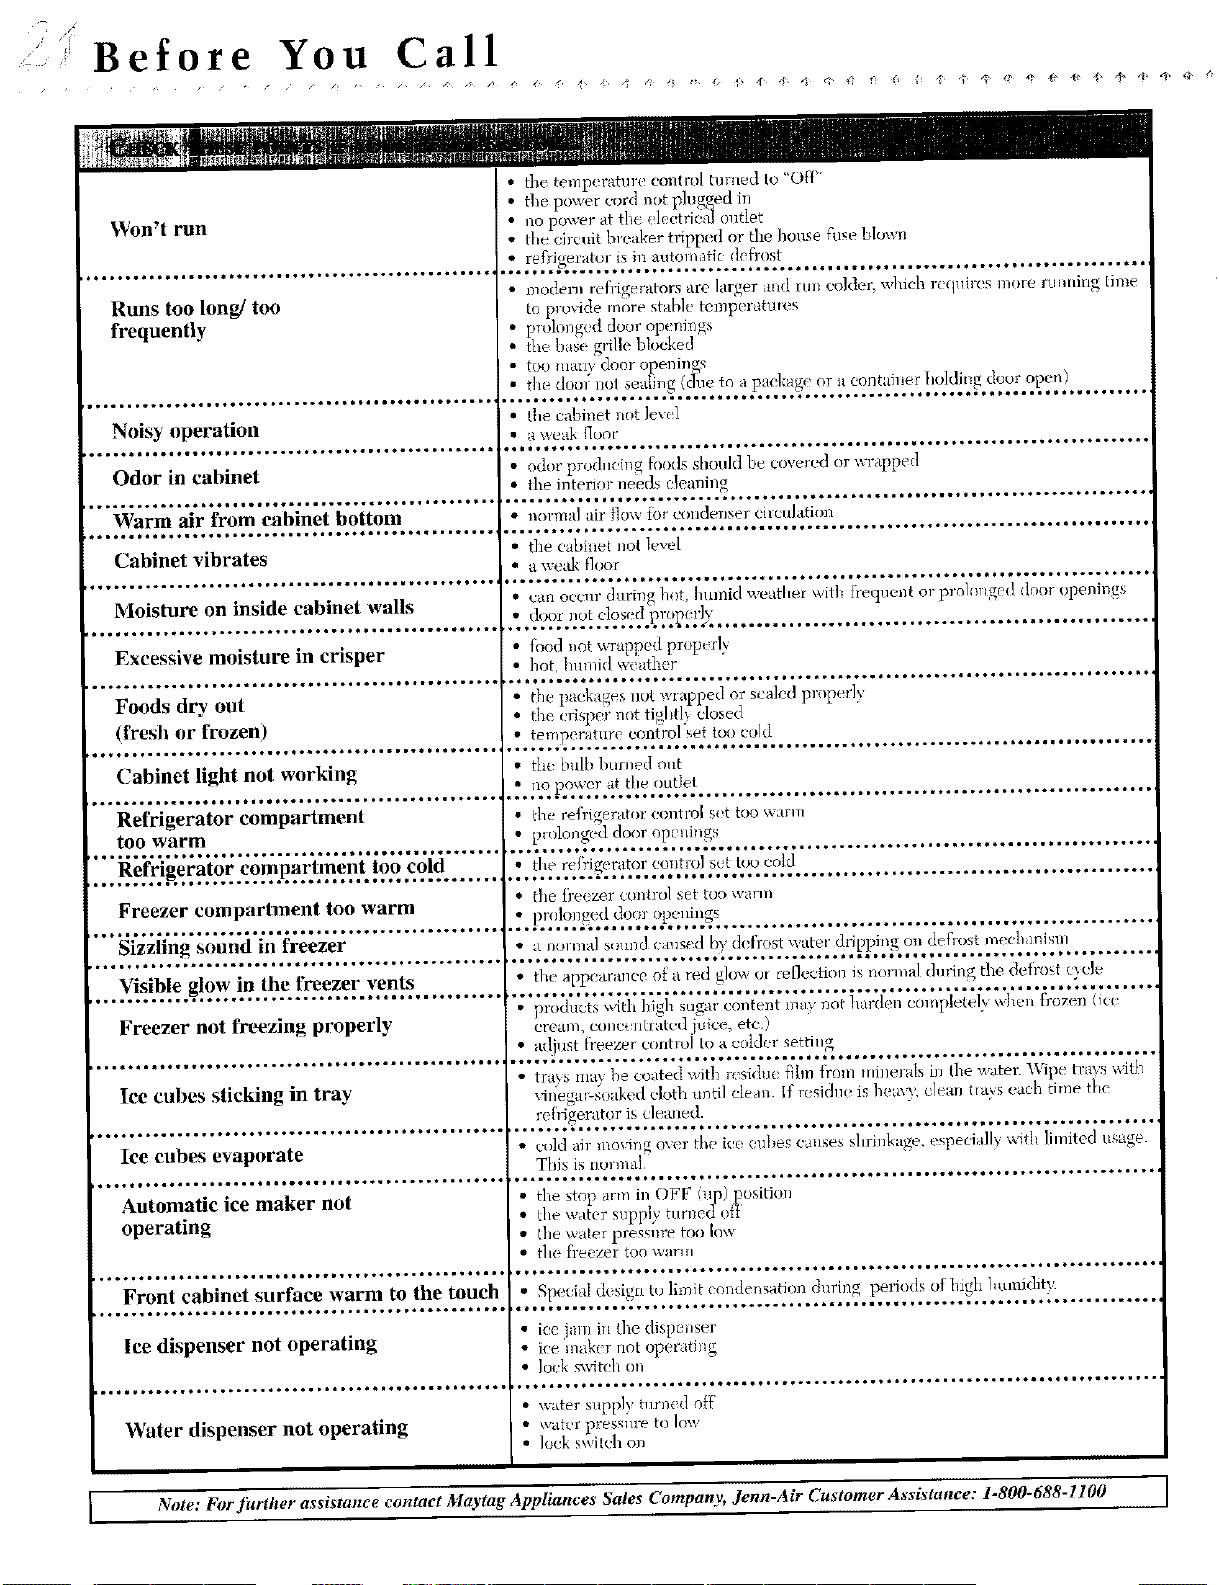
i Before You Call
Won't run
Runs too long/too
frequently
i*°o°°.*°°°**°°o°*o°°°._*°o°o*l***l**e**t_..Q_o°°_*
Noisy operation
Odor in cabinet
Warm air from eabinet bottom
Cabinet vibrates
Moisture on inside cabinet walls
Excessive moisture in crisper
o°°o.oooooo**..°o_.o°*o._oo**o.°.*o°.°*1ooo_*°o°**_
Foods dry out
(fresh or frozen)
I_¢¢ll*=ttlt_4lllt_tltmt¢_tt ¢_*l_tlllltO_Oq_tlll¢
Cabinet light not working
¢*.t'¢ll_ttqlllOO4_Ol_*lllttt_tl_ttlllt_lllt*¢ll¢
Refrigerator compartment
too warm
Refrigerator compartment too cold
t_lllt_tUtlOlllttUllleO4lll_IO_llt_O_I¢III¢¢¢IltI_
Freezer compartment too warm
et_tlttllllll_¢t_II_tl_t_tO=_ll_I¢¢ltllttltOtttlll¢
Sizzling sonnd in freezer
Visible glow in the freezer vents
Freezer not freezing properly
Ice cubes sticking in tray
Iee cubes evaporate
Automatic ice maker not
operating
Front cabinet surface warm to the touch
lee dispenser not operating
Water dispenser not operating
• the temp! rature control ruined to "OF{_'
• the power cord not plugged in
• no power at the e]ectridal outlet
• the circuit breaker tripped or the house fuse bhJwn
:..@2._Y:_*!?L_2Y.L*,._?2,2_f._._.¢.,.,1_._..............................................
i ode]n_ refi_i_e'rators are larger and run colder which rc q_ires more rmming time
to provide more stable te_Tperattlte_
ptolong_ d door ope_li_gs
the base grille blocked
too mall} dool-oDenings
... ) 2 ..........
i , the cabh_et not level
• a We_tk _I/)ot
I * odor prod,eillg ff>odsshould be cove_edor wrapped
• the il_teriorneeds (lealling
. • normal ah' tlo\_ {_lr _)ndenser eimu]ation
• the cabinet not le,.el
I • a weak tloor
• can occur during hot. hltmid weather wil]_ flequent or prohmged door openings
.: ,_.1'."2:.'27!.e!2yJ.l._,.?g!'2b._.......................................................
fbod not wrapped properl)
: hot l>lmid weather
t}le packages llOt wrapped oz"scaled properly
the l risper not tigiltlv
dosed
... !_.'2_._?t_._Y2_Y?n(_°!iS._._.t°':Y;-'._................................................
" the bulb burned out
no po_vc'r at t/*e outlet
• cr , *
_]le refrt.,er0toi (x)nt]?o[ Sit tOO\_ O'ITI
• pmlonged door op_ni,gs
'°_*_*_*_*__*__''_'_*_
• the re{)'igerator control sit too cold
• the fi-e(zer control set too warln
• prolol_geddoor openings
, ° • oo* ° • • o_*,*_,,,*_** _ _,*_,, ooo o.,. • oo ¢ • o.o o* ¢• o,ooo., o**_o, o, _o o. o.0 • °o *, o*oo
• _LI]Oll]]al s(>ll]]d Cius{ (_ b'_,d(@ost water dripping, on defrost ineclhlnisll]
• the appearance o[a red g]o,a (n reflection is normal during the detros[ cycle
• p'odtctsx_d ig suga-co_tent q_;'r_ot rd c( [ ere? we froze_ (ic_
cream, coiled. _lhut; d juice, etc.)
• adiost treezer c'lmt_o] to a col&r settling
• trays may be coated witl_ r_.sidu_ f)hn fi'om minerals i, the water Wipe tra_,s with
viJ{ega_ soak_ d cloth u_ntil clean If r_sidne Js hem_ c]eam I_a_s <ach time the
.... L.%';v2:.........................2.........2.....................
• cold air moving over the ice (:nbes ca_.ses shri_kage, especia]l} _tth limited usage.
T[fis _s _lormal
i the stop arnlm OFF (1_))position
the wtt(r snpplv turne¢l of}
the waler press{ire too low
the freezm too wan,
.. * ,° *o°,. ** oo., *,**° • °.,. ,.. * .o, * o,
• Speci d desig[t to limit condensation during per ods ot higl ]nunidity.
ice am in the dispe_ser
ice maker not oper ttJng
• Io<k sx_4t(!h on
• _ater supply turned off
\vkl_(1"pressure to low
lock swilch on
Note: For further assistonce contact Maytag Appliances Sales Company, Jenn.Air Customer Assistance: 1.800-688-1100 ]
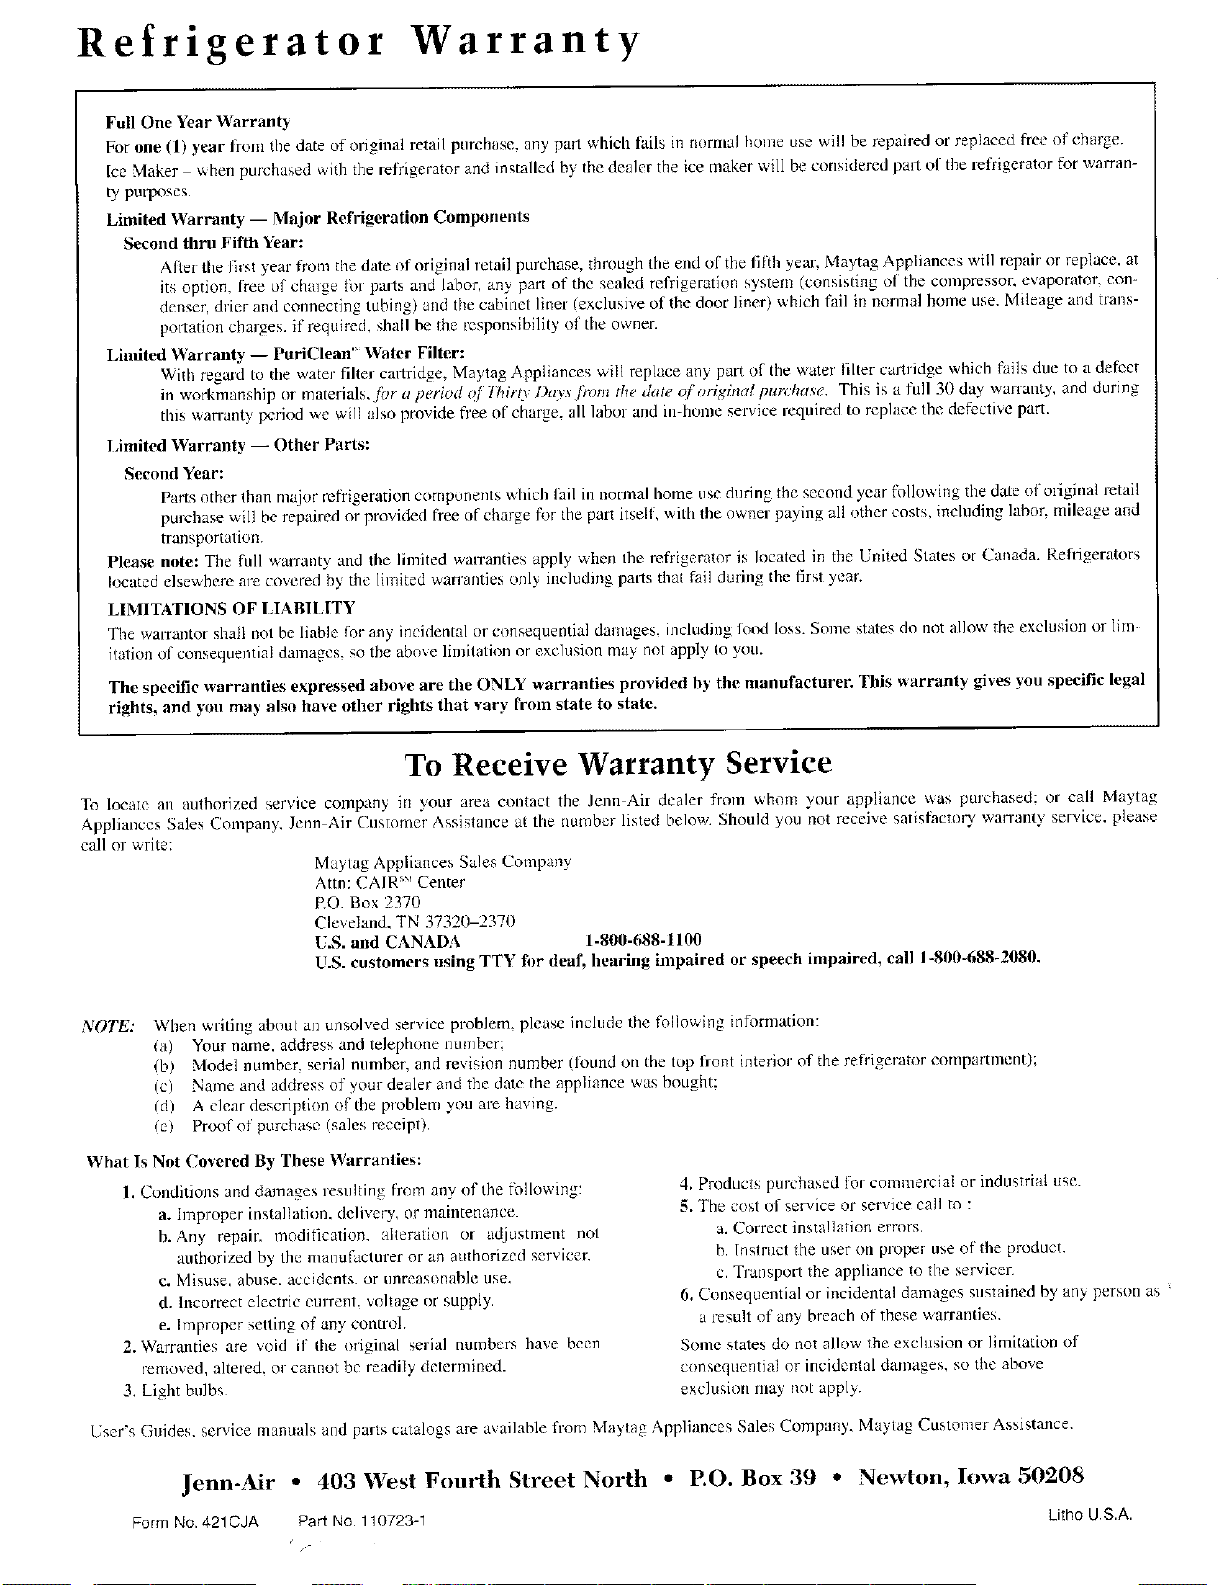
Refrigerator Warranty
Full One Year Warranty
For one (1) year fionl the date of original retail purchase, nny part which fails in nomlal home use will be repaired or replaced flee of charge.
Ice Maker when pulchased with the refrigerator and installed by the dealer the ice maker will be considered pall of the refrigerator for wan'an-
ty purposes
Limited Warranty -- Major Refrigeration Components
Second thru Fifth Year:
Aliet the first year from the date of origimd retail purchase, through the end of the fifth yeal, Maytag Appliances will repair or replace, at
its option, free o1' chmge [bl parts and labor, any part of the sealed refrigeration system (consisting ot the compressor, evaporator, con-
denser, drier and connecting tubing) and the cabinet linel (exclusive of the door liner) which fail in normal home use. Mileage and trans-
pollation chaJges, if required, shall be the responsibility (if tile owner.
Limited Warranty -- PuriClean" Water Filter:
With reared to the water filter cartridge, Maylag Appliances will replace any part of the water filter cartridge which fails due to a defect
in work'rmmship or materials, for a period of llliro l)a_s fioln the d, te oforiffinat pur.'hase. This is a full 30 d W wmlanU, and during
this wan-ant,,, period we will also provide free of charge, all labor and in-honle service required to replace the defective part.
I m ted Warranty -- Other Parts:
Second Year:
parts other than major refrigeration components which lail in normal home use during the second year following tile date of oliginal retail
purchase v_ill be repaired or provided flee nf charge for the pal_ itsdf, with the owner paying all other costs, including labor, mileage and
transportation.
Please note: The full warranty and tile limited wan'anties apply when Ihe refrigerator is located in the United States of Canada. Refligerators
located elsewhere are covered by the limited wanantics only including parts that fail during the first year.
LIMITATIONS OF LIABILITY
The warxantot shall not be liable f_r any incidental or consequential damages, including lotxl loss. Some states do not allow the exclusion or lira
italian of consequential damages, so the above limitation or e×chlsion may not apply Io you.
The specific warranties expressed above are tile ONLY warranties provided by the manufacturer. This _arranty gives you specific legal
rights, and you may also have other rights that vary IYom state to state.
To Receive Warranty Service
To locate an authorized service compan> in your area contact the Jenn Air dealer from whom your appliance _as purchased: o_ call IVla3tag
Appliances Sales Company, Jenn Air Customer Assistance at the number listed below. Should you not receive satisfactory warrant)' service, please
call or write:
Maytag Appliances Sales Company
Atm: CAIR '_' Center
RO. Box 2370
Cle_ eland. TN 37320-23711
U.S. and CANADA 1-800-688-1100
U.S. customers using TTY tim deaf, hearing inlpaired or speech impaired, call 1-8110-688-2080.
NOTE: When writing about an unsolved service problem, please include the following information:
(a) Your name, address and telephone number:
(b/ Model number, serial number, and revision number (h)und on the top liont interior of the refrigerator compartment);
(el Name and address of your dealer and the date the appliance was bought:
(d) A clear description of the ploblem you are having.
(el Proof of purchase/sales receipt).
What Is Not Covered By These Warranties:
1. Conditions and damages resulting from any of the r\fllowing:
a. Improper installation, delivery, or maintenance.
b. Any repair, modification, alteration or adjustment not
authorized by dm manuILtcturer or an authorized servicer
¢. Misuse. abuse, accidents, or unreasonable use.
d. Incorrect electric current, voltage or supply.
e. Improper setting of any controh
2. Warranties are void if tile original serial numbers have been
removed, altered, or cannot be readily determined.
3 Light bulbs
4. Products purchased for commercial or industrial use.
5. The cost ol service or service call to :
a. Correct insta!lation errors.
b. lnstruct the user on p[ope_ use of tile product
c. Trai_sport the appliance to the servicer
6. Consequential or incidental damages sustained by any person as
a ;esult of any breach of these warranties.
Some states do not allow the exclusion or limitadoo of
consequential or incidental damages, so the above
exclusiun may not apply.
User's Guides. ser',,ice mannals and parts catalogs are available from Maytag Appliances Sales Company. Ma) tag Customer Assistance.
Jenn-Air * 403 West Fourth Street North • EO. Box 39 ° Newton, Iowa 50208
Form No. 4210JA Part No 110723-1 Litho US.A.
/-