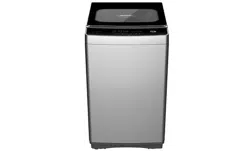
ES-G90G
Operation Manual
WASHING MACHINE
If the appliance is sold or transferred to another owner or if you moved house and leaving the
appliance, always ensure the manual is supplied with the appliance in order for the new owner
can get to know its functions and its relevant warnings. These warnings have been provided for
your safety. You MUST read them carefully before installing or using the appliance.

Before using
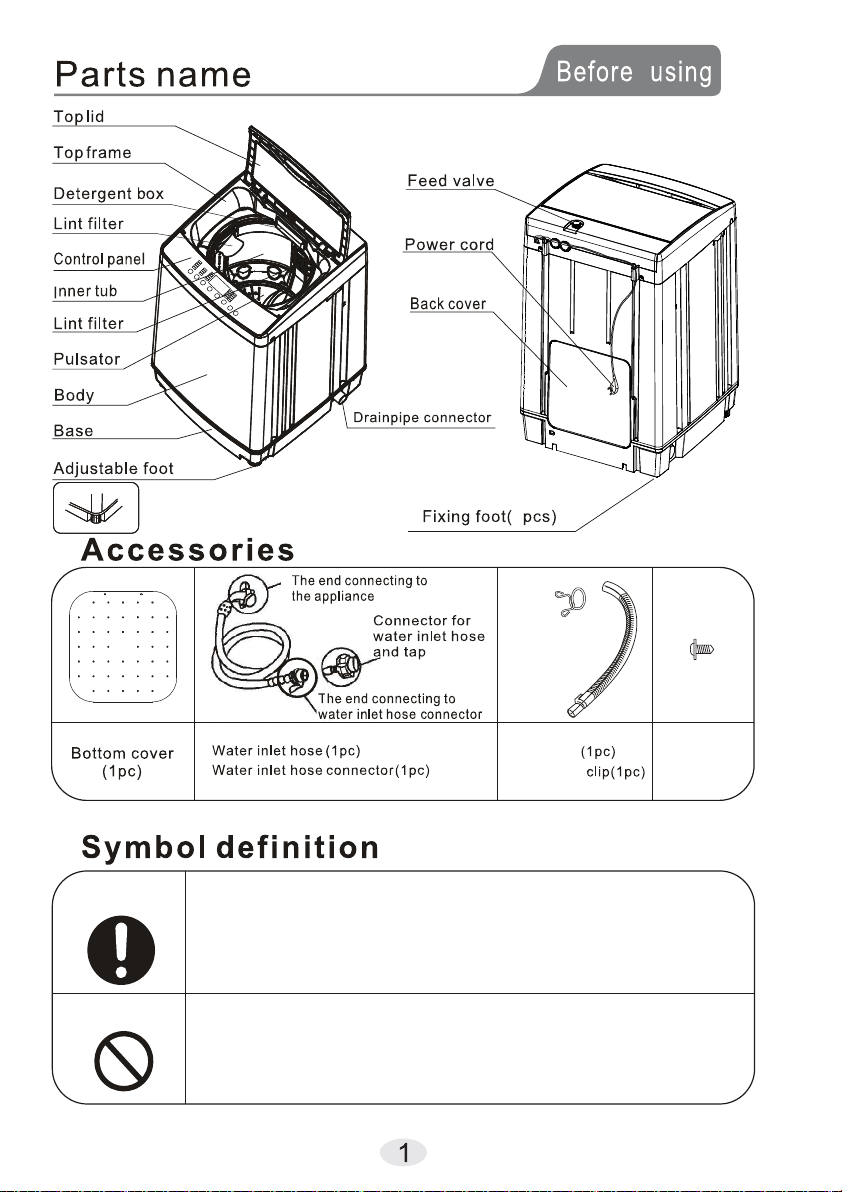
Parts name........................................
1
Cautions........................................... 2
Installation and adjustment.................
4
How to use drain pipe......................... 5
Water
inlet
installation........................
6
Operation
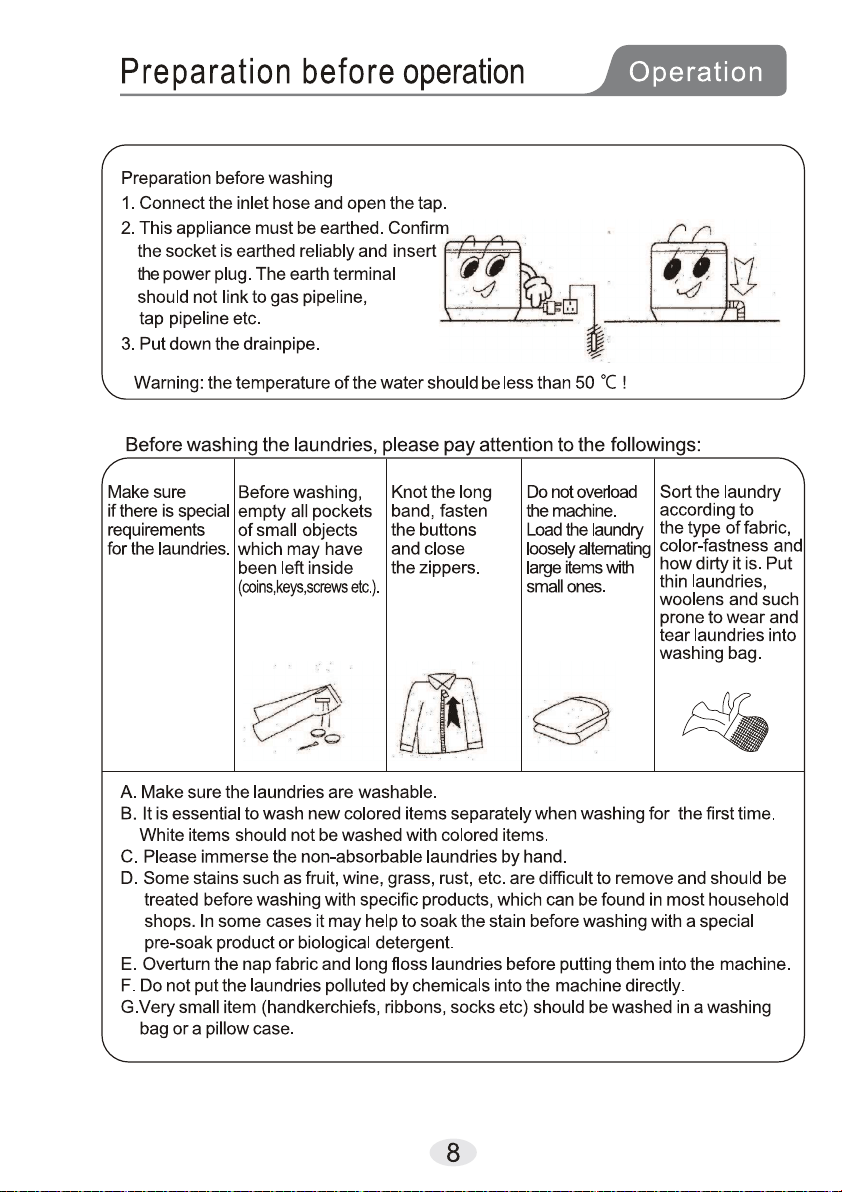
Preparation before operation ..............
8
Load
laundries..............................
..
..
9
Use of detergent................................
9
Control panel instructions..................
10
Operation steps................................ 12
Maintenance..................................... 16
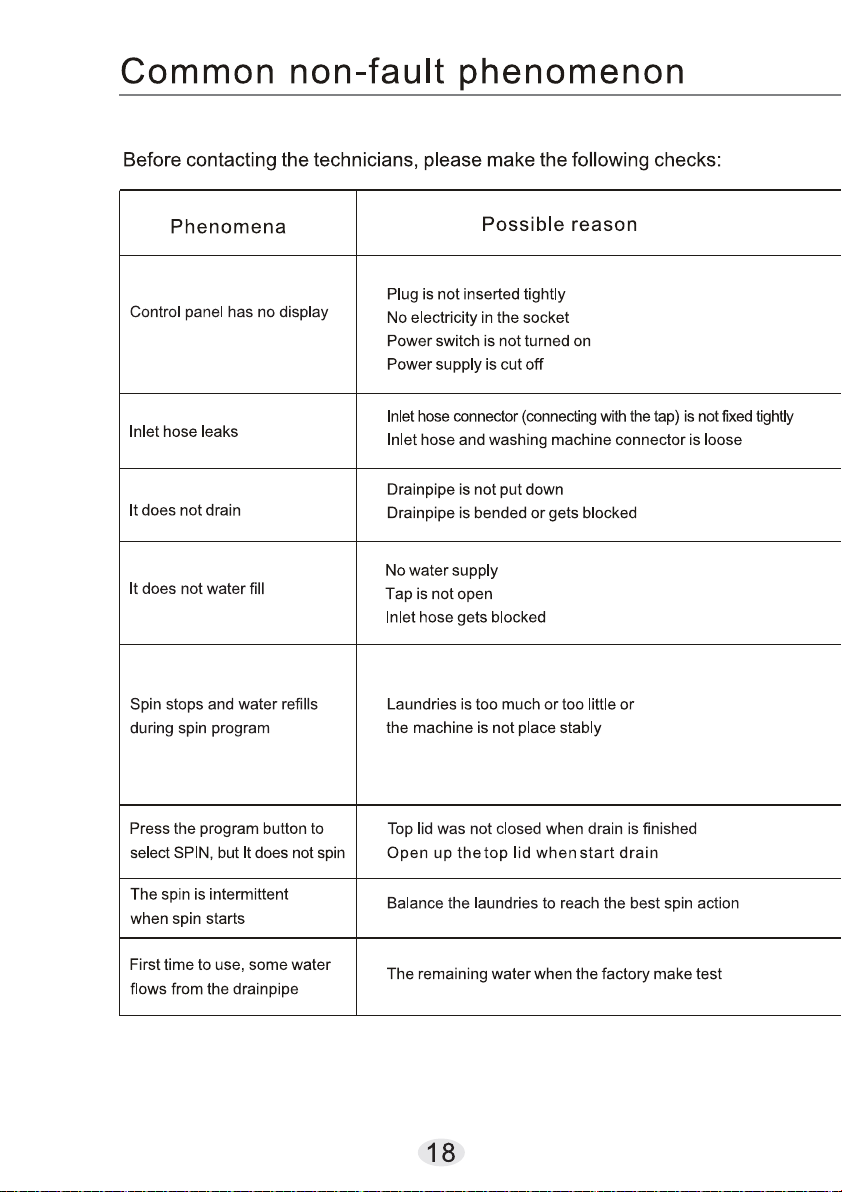
Common non-fault phenomenon.........
17
Specification.....................................
20
Contents
Additional functions..........................
15
Others
.
3
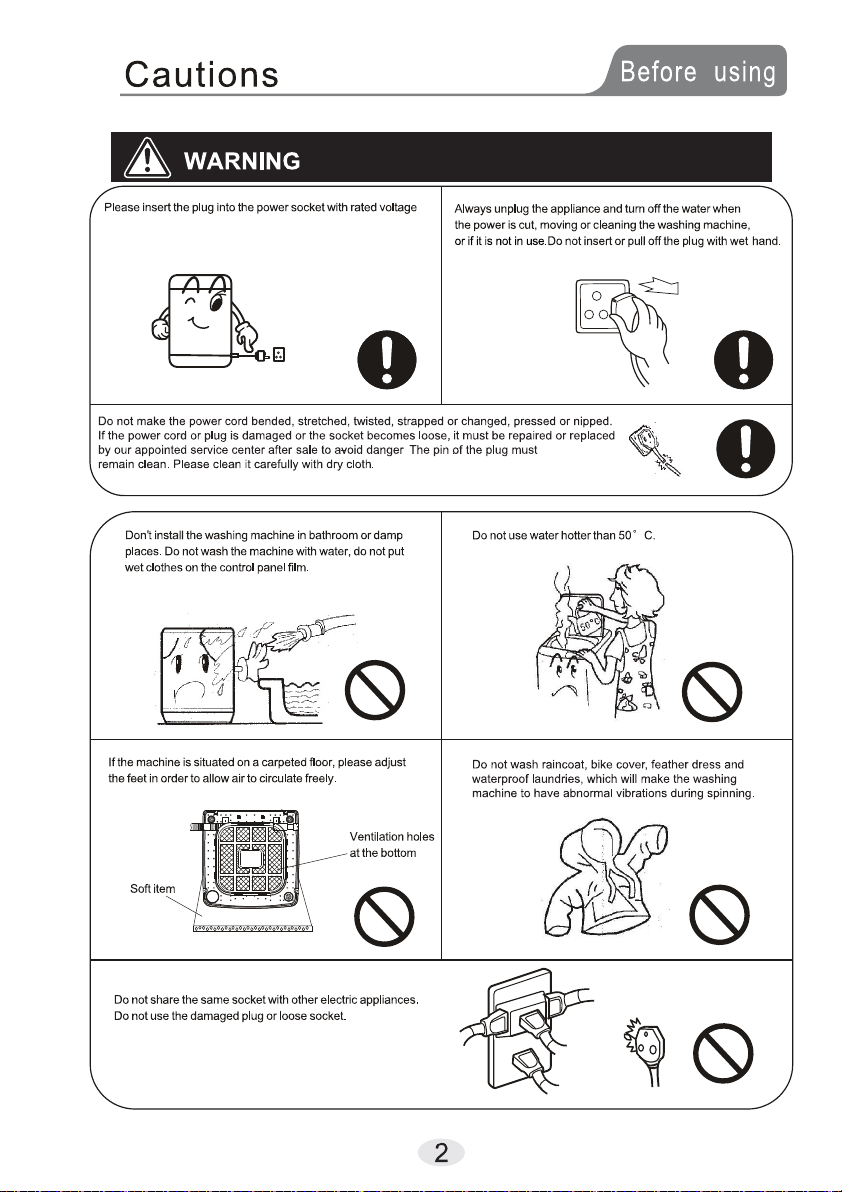
Pay attention to the warning symbols.There may be serious risks on personal
safety or may damage the washing machine if not followed.
The contents of this symbol are prohibited.It may damage the appliance and
can lead to injury.
Prohibited symbol
Warning symbols
9.0kg
ES-G90G
Wash:520W
About 36kg
10/70L 9/65L 8/60L 7/55L
6/50L 5/46L 4/42L 3/38L
2/34L 1/30L
W580mm D587mm H950mm
0.03MPa~0.85MPa
220-240V~ 50Hz
Spin :330W
Drain hose
Drain hose
Screw
(2pcs)
220-240V.
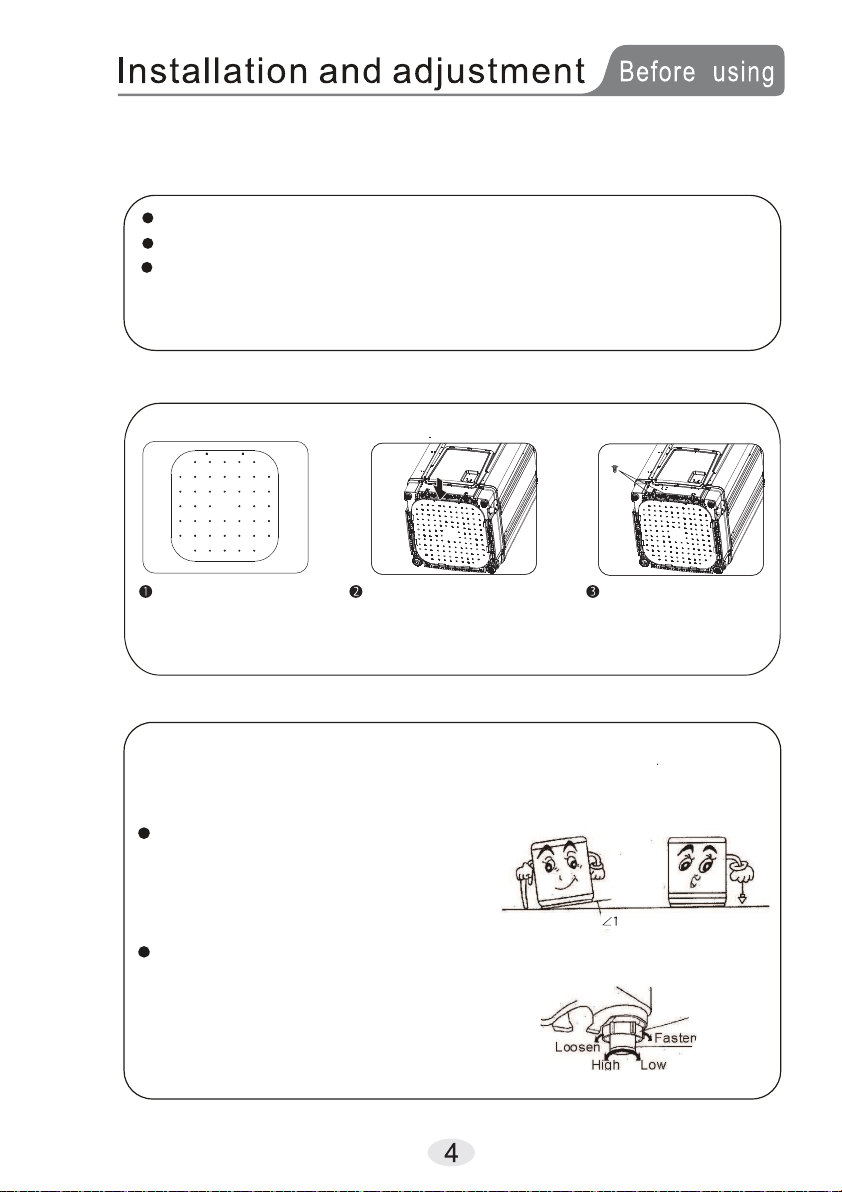
Please install and adjust the machine according to the requirements of the manual.
Correct operation is very important for your safety.
Unpacking
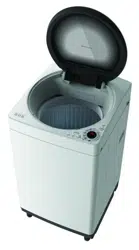
Unpack the carton and take out the bottom cover.
Open the top lid of washing machine and take out all of the accessories.
Remove all wrappers, including the polystyrene base.
You are advised to keep all the packaging for reuse in case the machine is to be
transported again.
Positioning
Make it horizontal.
Use a tied thread with plumb to check
if it is horizontal.
Adjust the adjustable foot
and twist the adjustable foot.
2) Fasten the nut after adjustment.
°
Adjustable nut
Adjustable
foot
1) Lift up the adjustable foot gently, loose the adjustable nut
The distance between the washing machine and the wall should be more than 50mm,
and the maximum allowable angle of the shank base of the machine is 1°
The slanting or rough ground may cause operating stopped or unstable, please adjust it
with the following methods:
1. Abnormal display1. Abnormal display
E1
E3
E2
F1
E4
E0
Display
Explanation
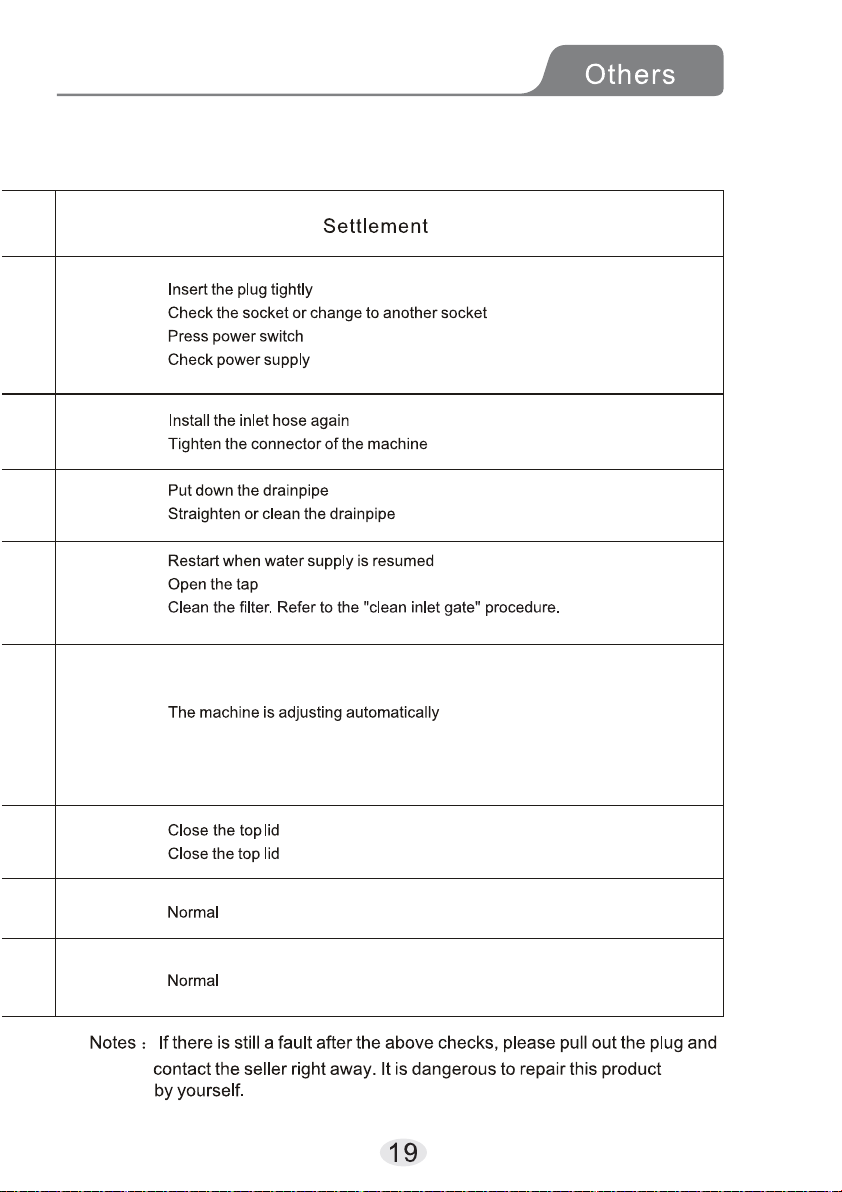
Settlement
The top lid is opened
when preset is started
Close the top lid and clear up the alarm
The top lid is open when
spinning
Close the top lid and clear up the
alarm
Spin does not balance
Water
level
sensor
is
wrong
Turn the power off and leave it for 1minute.
After that,turn the power on again.
If the same error is displayed,cut the
power suppy and call a technicians.
E5
The top lid is opened
after setting child-lock
child-lock
light flashing
synchronously
Open the top lid and refer to the "before using"
procedures and "common non fault phenomenon"
on this manual to settle it, then close the top lid
and clear up the alarm.
Open the top lid and refer to the "before using"
procedures and "common non fault phenomenon"
on this manual to settle it, then close the top lid
and clear up the alarm.
After 15 minutes of draining
time and still not reaching
the water level setting
After 20 minutes of water
filling time and still not
reaching the water level
setting
4. Child lock function
3. Power supply is cut off automatically
During spinning, if the laundries are not placed equally in the tub, it would cause
violent vibration.This machine has imbalance adjustment function, and the vibration
testing system will supervise the running. Once vibration is beyond certain level,
the adjustment system will start automatically to adjust the imbalance.
2. Imbalance adjustment
1) Press the power supply button and did not start the program in 10 minutes, the
power supply will be cut off automatically.
2) After the washing is finished, buzzer will activate. The power supply will be cut
off automatically.
1) If set child lock function, all the buttons will be locked including POWER. If the top lid is
opened during the washing machine working, the washing will be stopped and give an
alarm.But if you can close the top lid in 5 seconds, the washing machine will stop alarm and
continue working. If can not close the top lid in 5 seconds,the washing machine will begin
draining if there is water in the inner tub is 5 cm higher, alarm will be given every 10 minutes
(alarm is always given). When the draining is finished, the washing machine will be in the
stare of washing, if close the top lid, the washing machine is unlocked and start working as
previous setting.
2) Once child lock is set, if open top lid over 5 seconds during washing or rinse ( there is water
in the inner tub),washing machine will drain and give an alarm. If you unlock the function during
draining, the washing machine will add water to setting water level and continue working.
Open the top lid ,make the laundries
place equally, then close it and clear
up the alarm
Close the top lid and clear up the alarm
Installing the bottom cover
To prevent damage from mouse/rats or other insects, please install the bottom cover as shown.
Bottom Cover Slightly lean forward the front
side of washing machine,
following the direction of arrow
and put the bottom cover into
the slot of base.
Use two screws to fix the
bottom cover on the base.
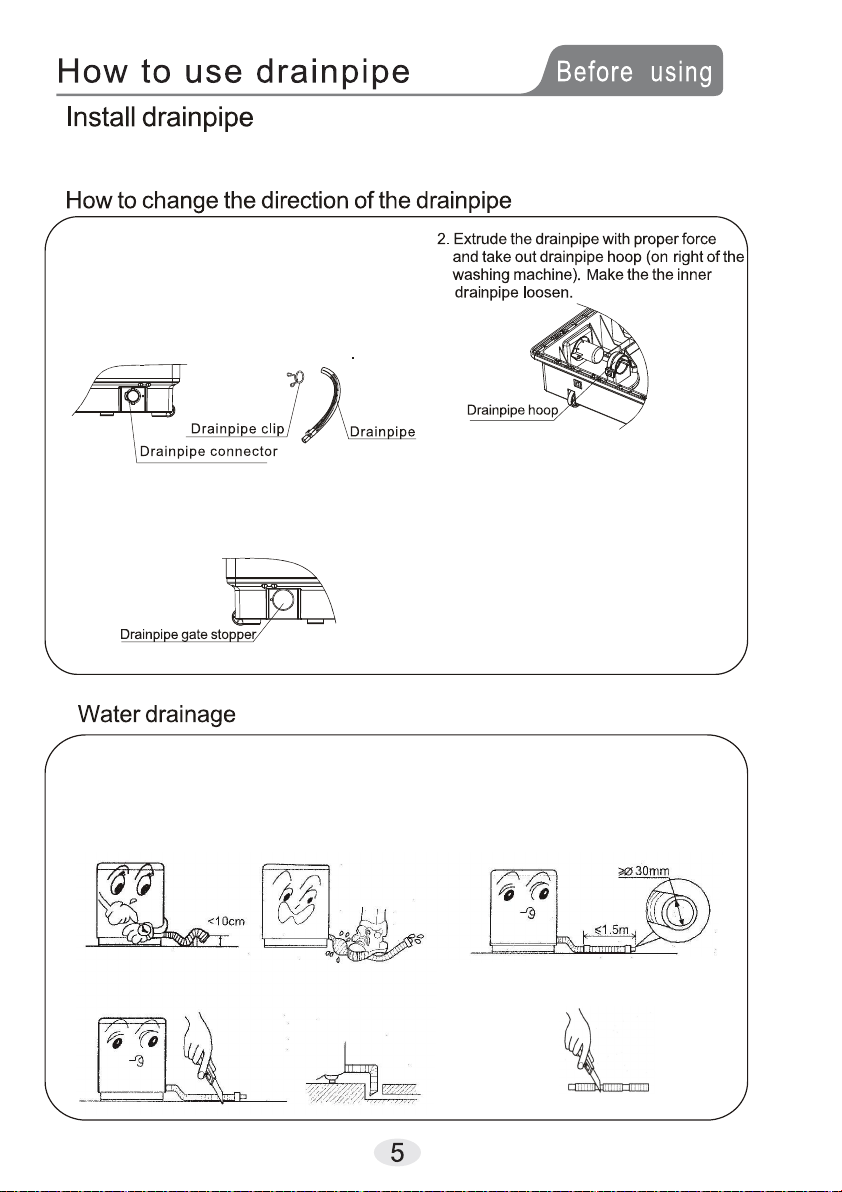
1.Take off the drainpipe and drainpipe clip from the
drainpipe connector. Put soft mat on the floor and
gently put down the washing machine front side
on the mat. Unscrew the back cover by screwdriver
and gently unmount the back cover. Unscrew the
drainpipe connector (on the right of the washing
machine), then loosen the drainpipe connector.
3.With proper force, take off the drainpipe gate stopper
on the left side of the washing machine. The drainpipe
gate stopper is fixed on washing machine base with
two clips, look for the fixing orientation at the back
opening.
4.Pull the inner drainpipe to another side,
avoid distortion of the inner drainpipe.
As per foregoing description, fix the inner
drainpipe with the drainpipe hoop. Fix the
the drainpipe connector with the screw
and install the the drainpipe gate stopper
on the other side of the washing machine.
Gently stand the washing machine, fix the
back cover with screw and install the
drainpipe and drainpipe clip into the
drainpipe connector.
(Washing machine’s right side view)
(Washing machine’s inside view)
(Washing machine’s left side view)
The drainpipe should drain smoothly
1.The height of the drainpipe should be less
than 10cm, otherwise the drainage will not
be smooth and need a long time to drain,
the machine may stop during working.
2.Do not step on or press the drainpipe.
4. Purchase a proper hose if you need
additional drainpipe. Its diameter
should not be less than 30mm and
length should not exceed 1.5m.
If the additional drainpipe is too long,
cut some at A or B point.
A
B
3.Cut the drainpipe if it is too long.
Cut the front end of the drainpipe slantingly
to make drainage smoothly.
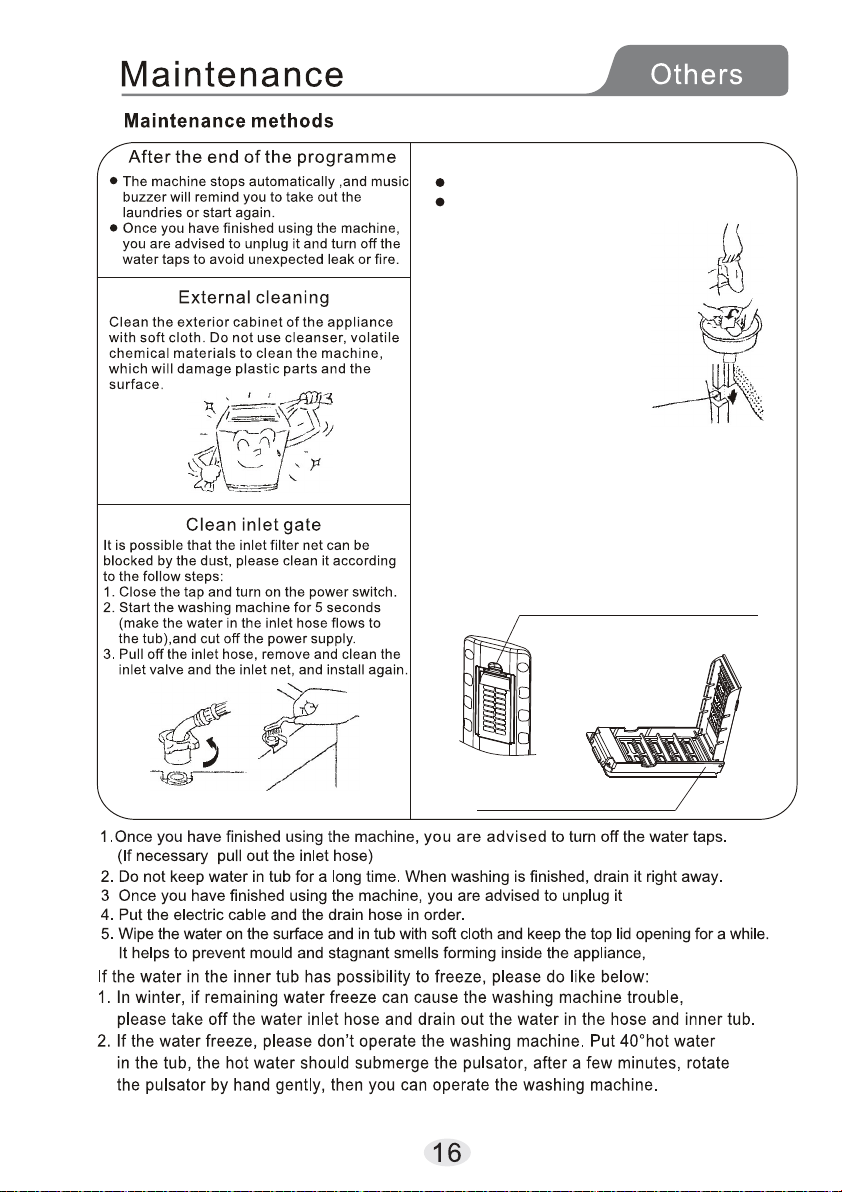
Clean the lint filter
It is necessary to use lint filter during washing.
After washing, please clean the lint filter in
time.
Clean the lint filter according
to the following steps:
1. Pull out the lint filter.
2. Turn the filter net inside out
and wash it.
3. Reverse back the filter net
and remount it.
1. pull out magic filter
2. open the box and clean it
3. close it and reinstall it
4. check if the lint block part is in good
condition
Magic filter cleaning
press this part and pull out to take
out the magic filter
lint block part (black rubber)
Groove
Set the drainpipe clip into the drainpipe to 2-3cm(from the drainpipe end without
hook). Then install the drainpipe into the drainpipe connector and fixed it with the
drainpipe clip. After that put up the drainpipe clip to fasten the grip.
>
1
0m
m
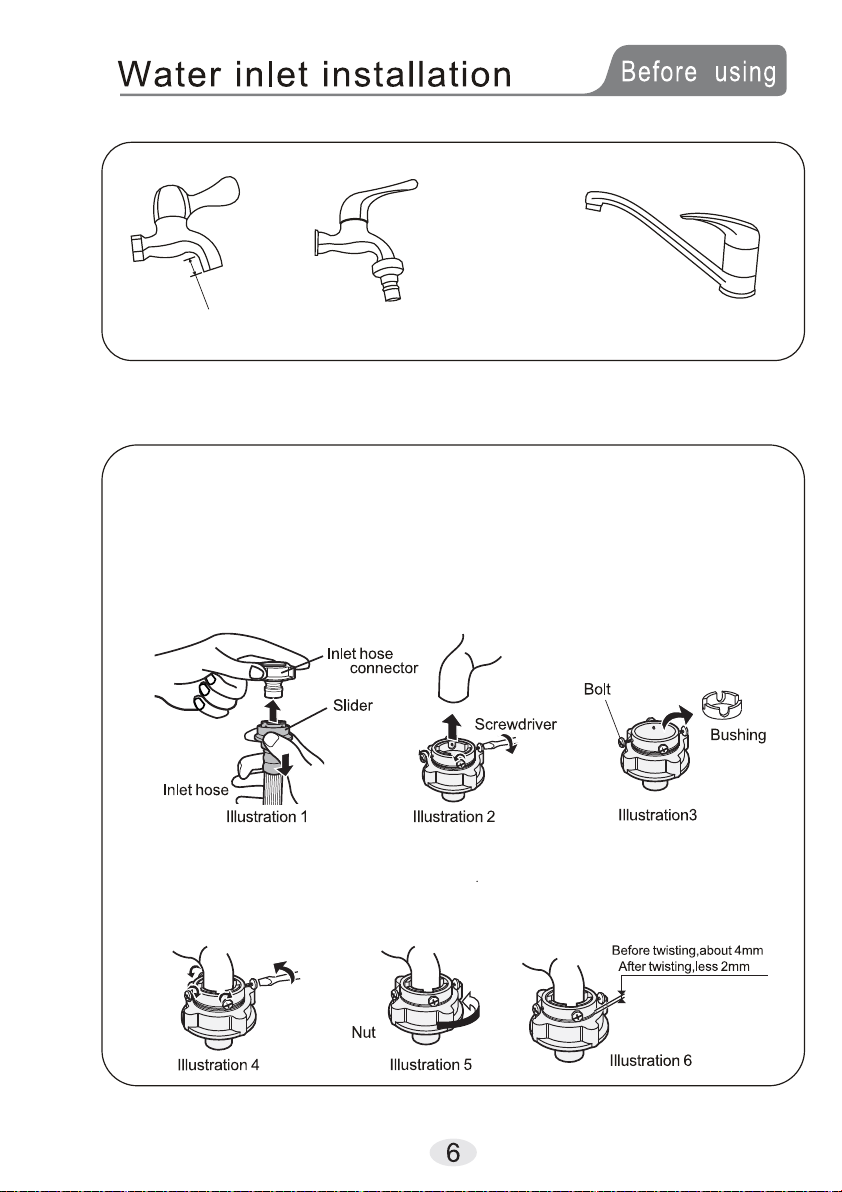
Tap selection
Suitable tap
Not suitable tap
The front end should be longer than 10mm. The tap exit end face
should be flat and smooth, if not file it to avoid leakage.
pat eht ot rotcennoc esoh telni eht tcennoC
1. Press down the slider and remove the inlet hose connector from the inlet hose ,
like below illustration 1.
2. Loosen the four bolts on the inlet hose connector till the tap can be accessed, then
set the inlet hose connector in the tap, see illustration 2.(if the tap caliber is too large and
could not set the inlet hose end, unscrew the four bolts and take out the bushing, tap exit
end must be flat, otherwise it will leak, see illustration 3)
3. Fasten the four bolts in the inlet hose connector evenly, see illustration 4.
Remark: before twisting the nut, the threading is about 4mm above the upper surface of the nut, after twisting,
the threading is less than 2mm above the upper surface of the nut, see illustration 6.
4. Twist the fastening as seen on the illustration
When you reset higher water level than present:
When you reset lower water level than present:
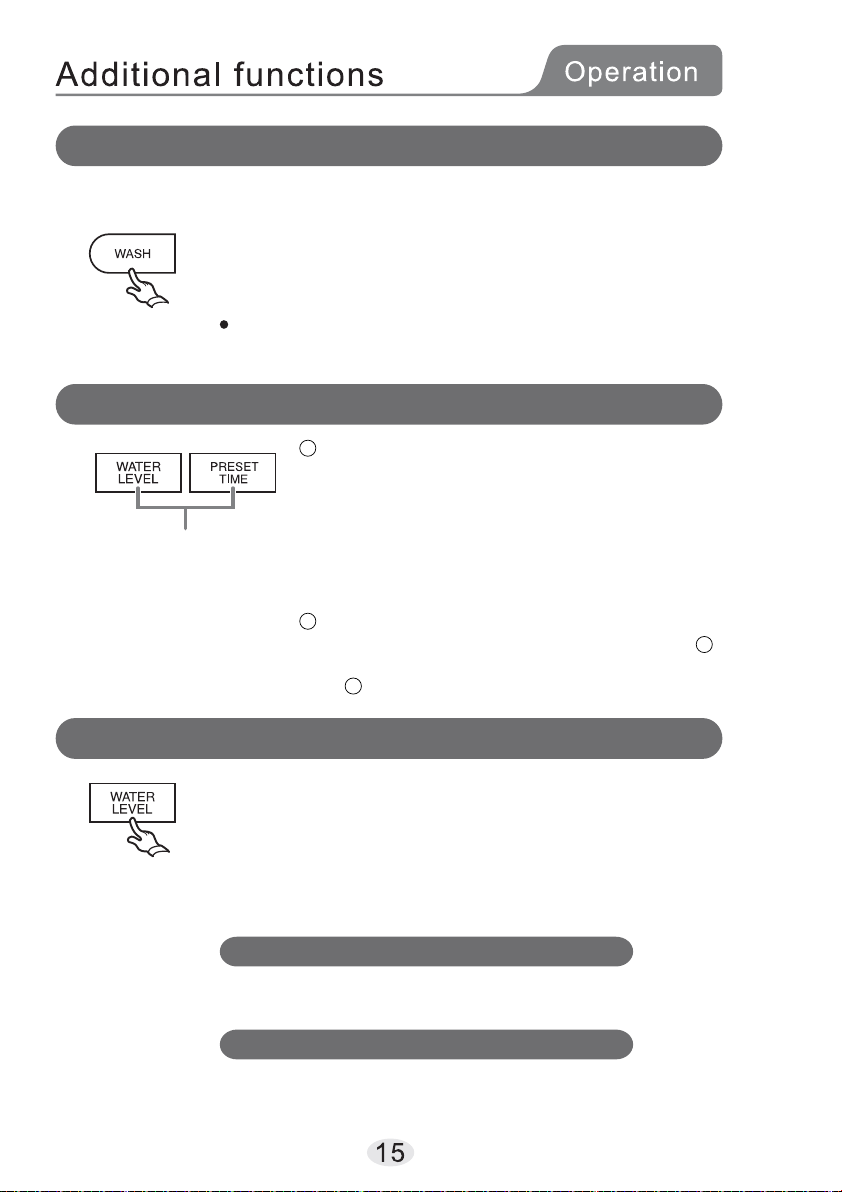
Soak function
Child lock
Add water
When you choose “Normal” , “Speedy” , “Air Dry” , “Blanket” ,
“Soft” , “Baby” or “Delicate” program, you can use soak
function before wash.
After selecting the program, press “WASH” key for 2 seconds
to set soak function.
During wash (including rinse), press “WATER LEVEL” key to
add water as necessary.
Un-press will stop adding.
Or pause the washing machine by pressing “START/PAUSE”
key, and press “WATER LEVEL” key to select water level, then
press “START/PAUSE” key again.
.Before start
You can set child lock by pressing and holding
“WATER LEVEL” key and “PRESET TIME” key
at the same time for 3 seconds.
“CHILD LOCK” is displayed on the operation panel.
Press “START/PAUSE” and the machine is locked.
Press and hold these keys for 3 seconds again to
unlock this function.
.After start
You can set this function with the same way as ,
the machine is locked directly with the same way
as to unlock this function.
When you set this function, the wash procedure can not be
cancelled.
Press and hold
for 2 seconds
Press and hold at the same
time for 3 seconds
The washing machine will add water to the setting level
automatically and continue working.
The new water level will be valid in next water inlet.
1
1
1
2
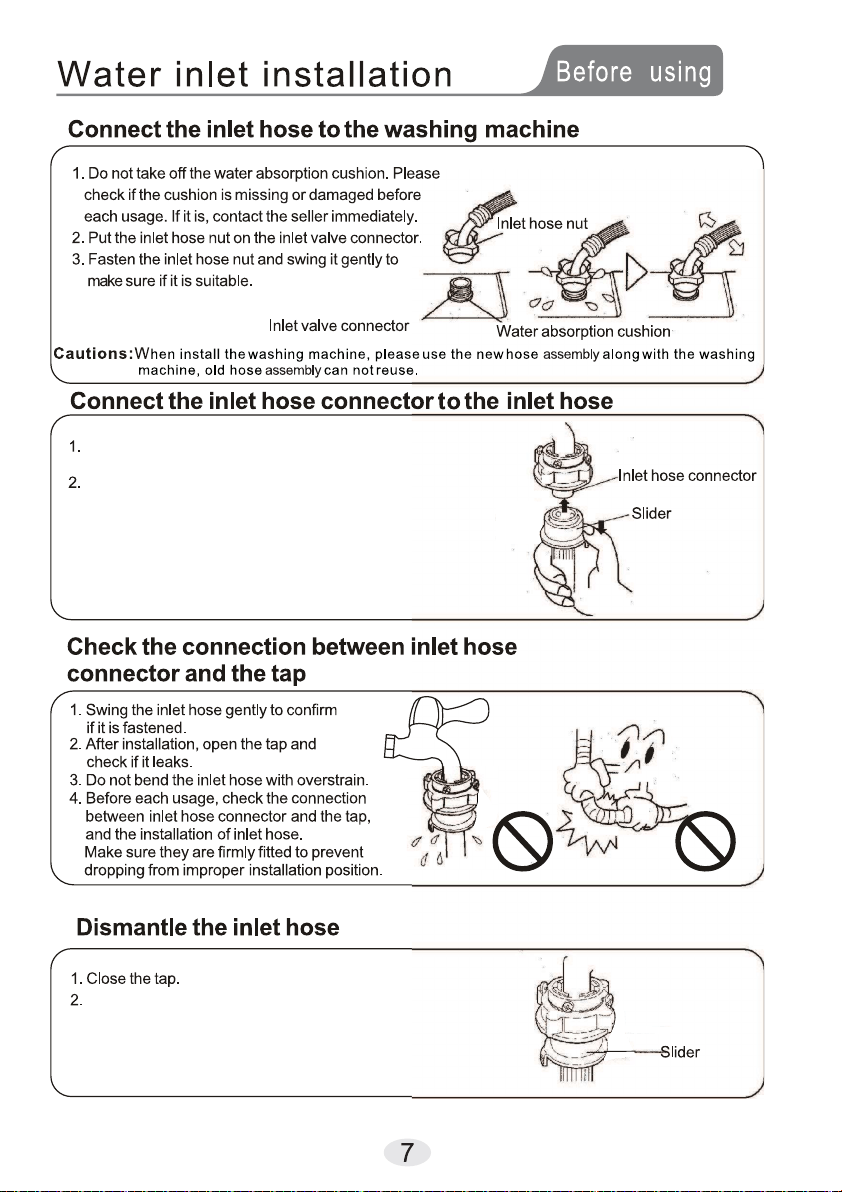
Put the slider down and insert the inlet hose into
the inlet hose connector.
Insert the hose firmly and the click sound is heard.
If you use the washing machine more than once
a week, there is no need to remove the inlet hose
connector to avoid damaging the fixing screw.
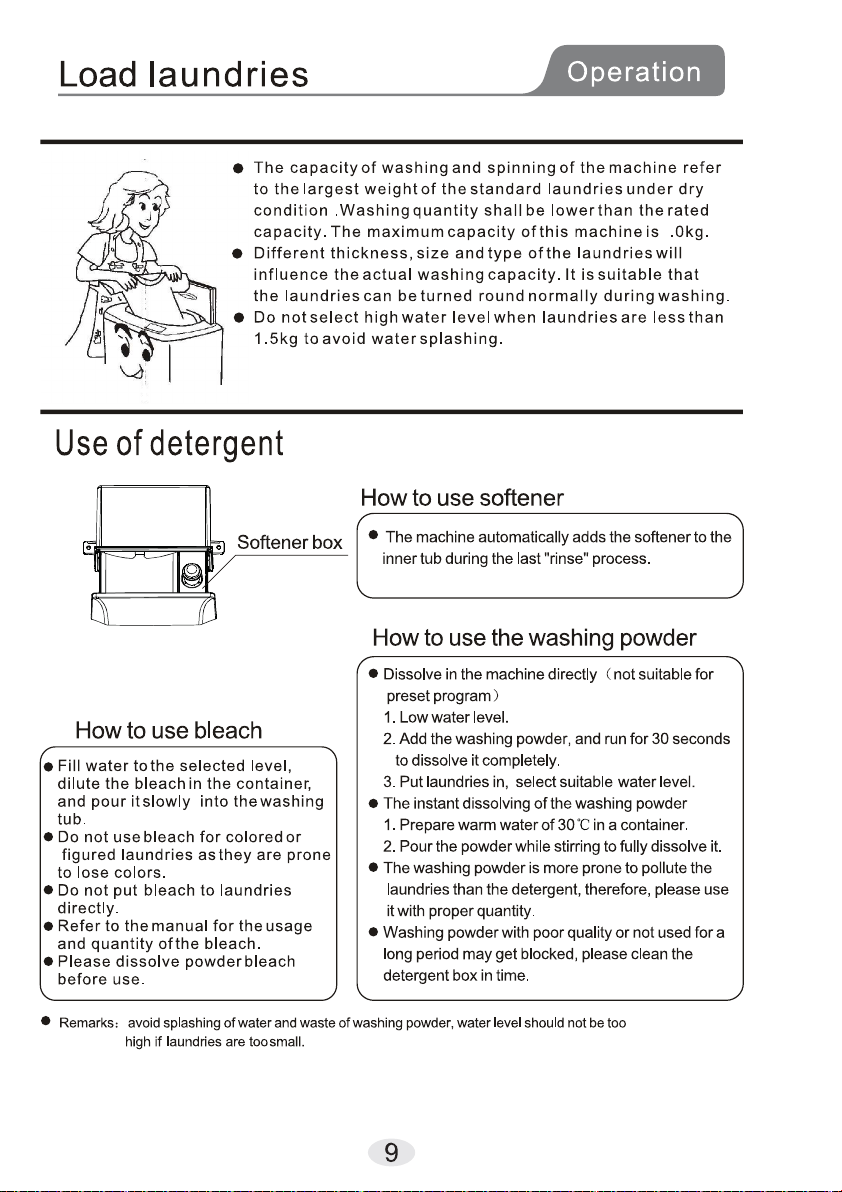
Put the needed washing powder in
the detergent box and softener in the
softener box evenly
9
Control panel / Display
Normal Wash normally soiled everyday clothing.
Blanket Wash strongly for blankets or heavy clothing.
Speedy Wash speedy for not-so-dirty clothing.
Soft
Wash not-so-dirty clothing or a small amount of clothing.
Eco Wash daily clothing with saving electricity and water.
Baby Wash gently and rinse thoroughly for baby clothing.
Jeans Wash sturdy and heavy soiled clothing.
Delicate Wash clothing with the HAND WASH mark.
Air Dry Program for reducing the time to dry.
After spinning, blow air to clothing in the tub to reduce
the time to dry in the shade greatly.
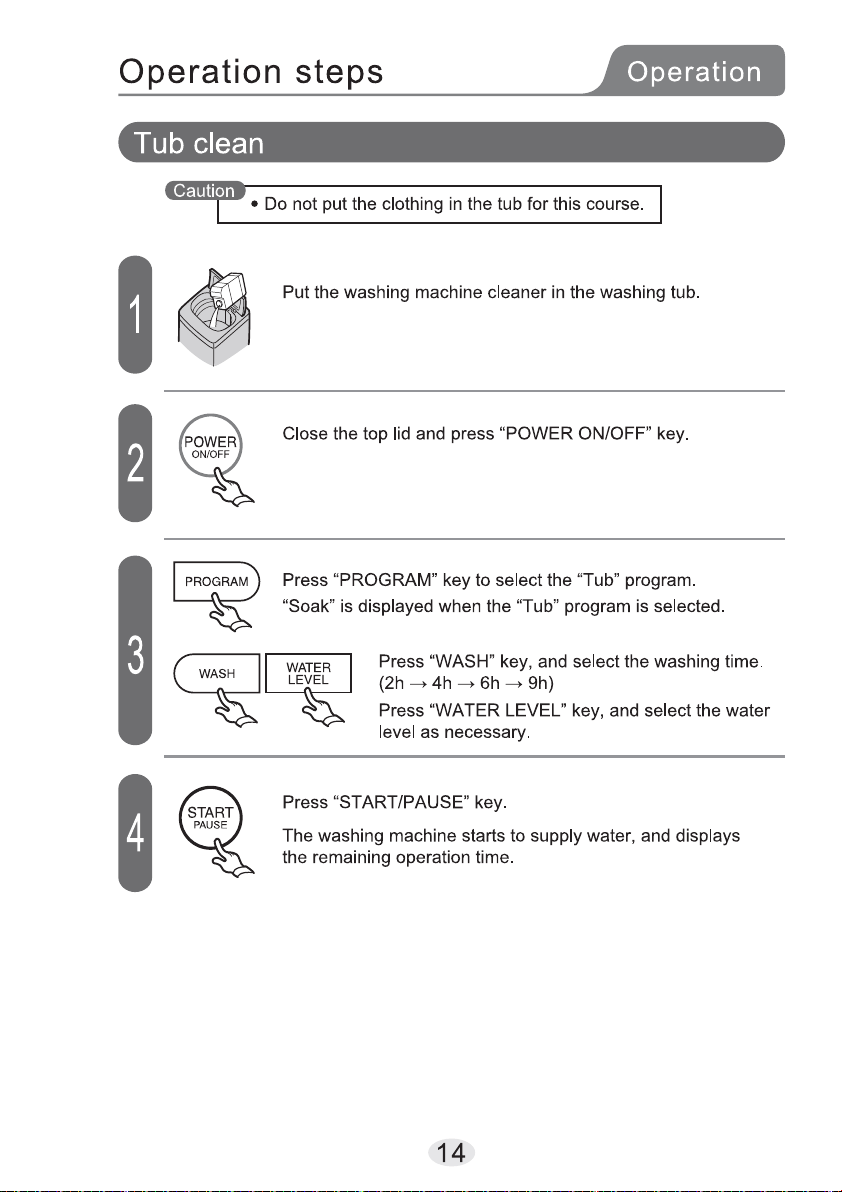
Tub Clean washing / spin drying tub. (See “Tub clean”.)
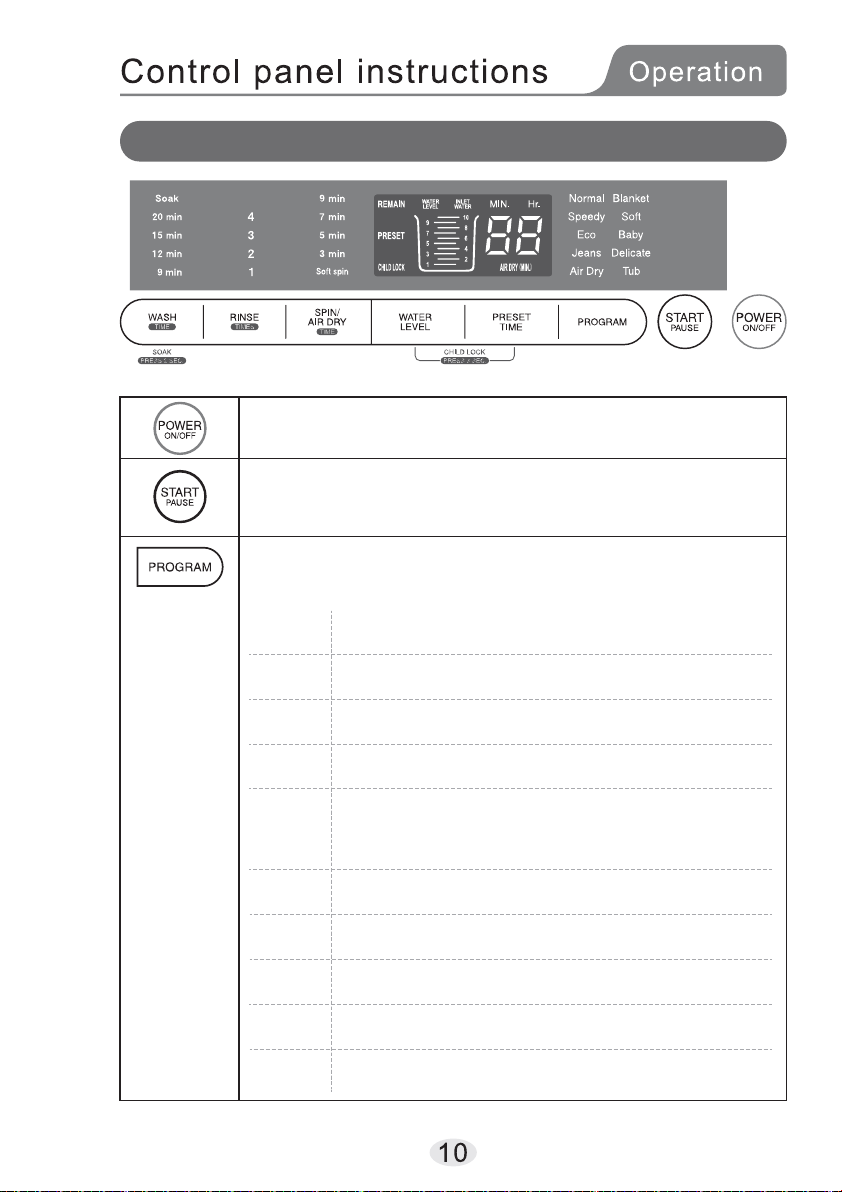
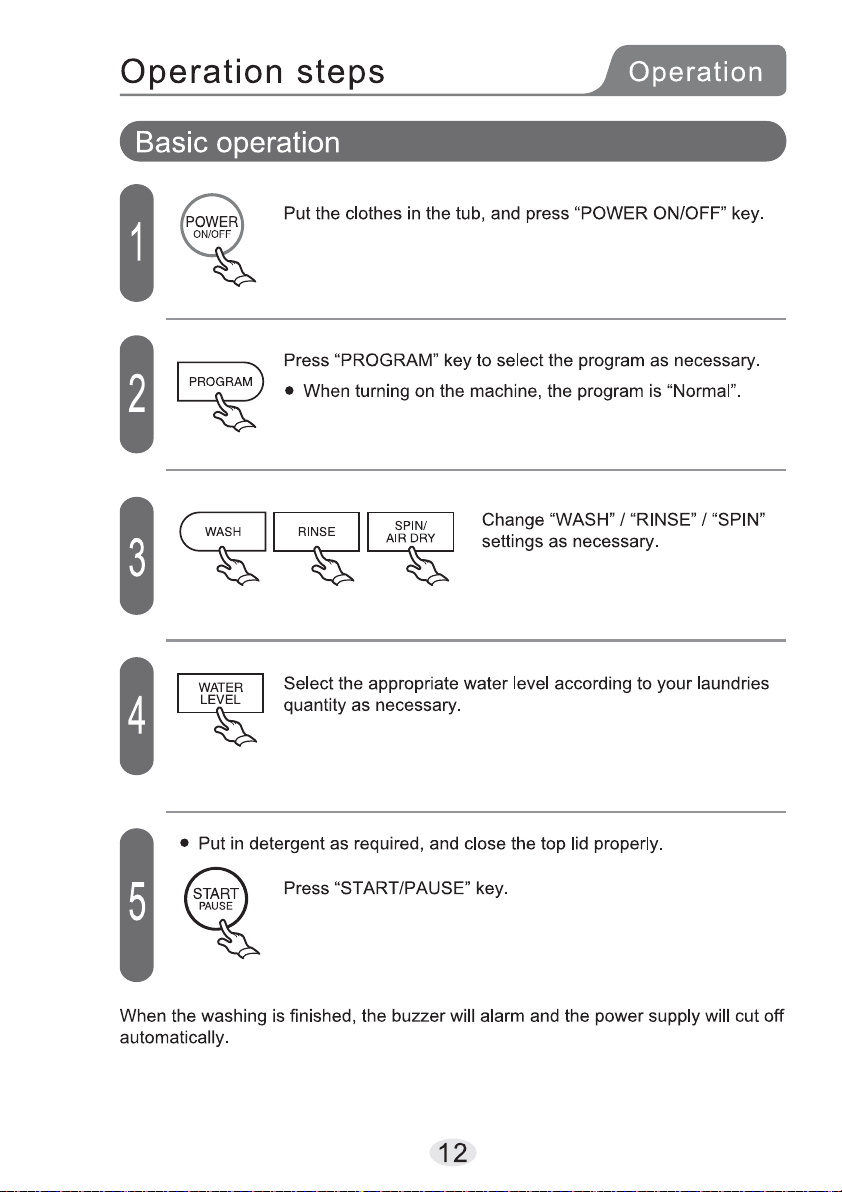
Plug the machine in and then press this key, the machine will turn
on. Press this key again, it will turn off.
Press this key after turning on, the selected program will start.
Press this key again, the operation will pause. Press it once again,
the operation will resume.
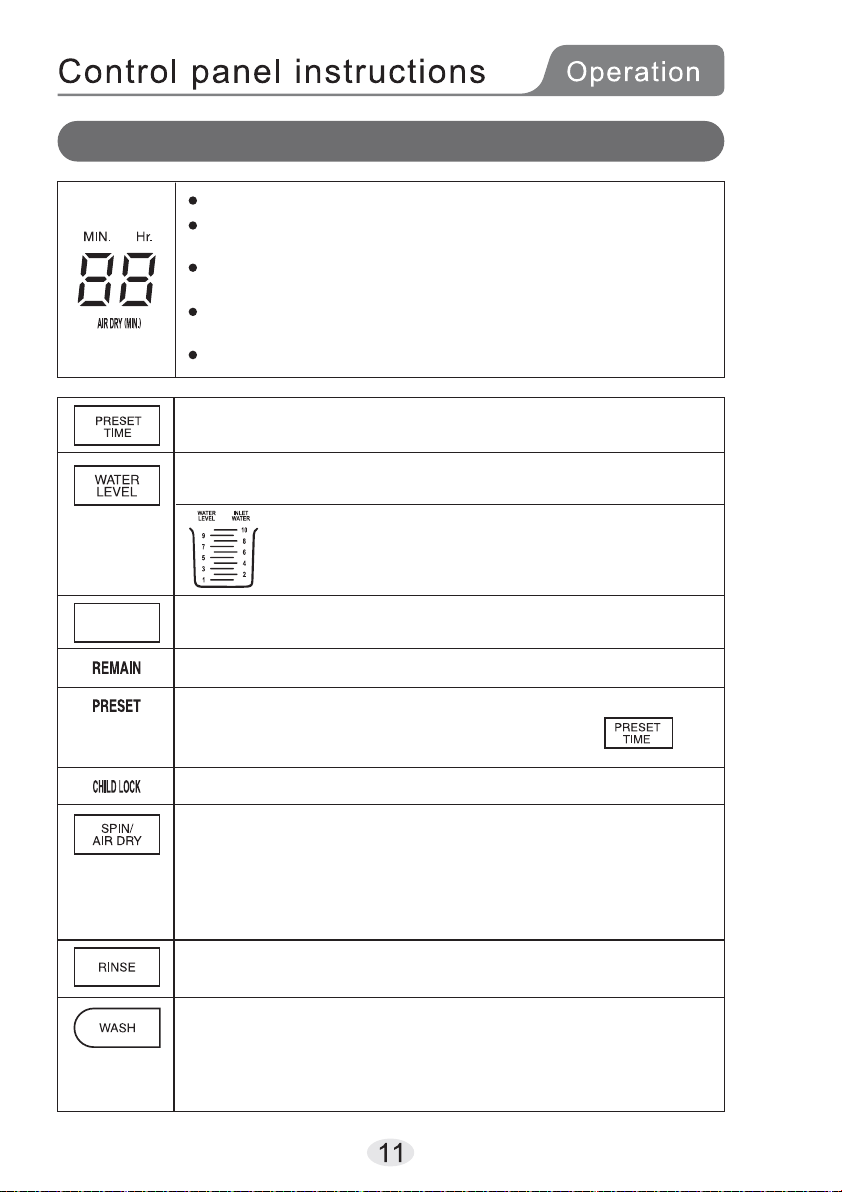
Press to select the program.
You can select the program from below according to the kind of
your laundries.
Control panel / Display
Press to set the preset time.
You can select the time from 2-24 hours.
Press to select the water level or add water in the tub during wash.
(See “Add water”.)
When turning on the machine, the digital timer shows “--” .
If select “Air Dry” program, the digital timer displays the air dry
time, unit is MIN.
When washing, the digital timer shows the remaining operation
time, unit is MIN or Hour.
When the preset time is set
, the digital timer shows the preset time,
unit is HOUR.
When the trouble occurs, the digital time shows the trouble code.
Displays the water level.
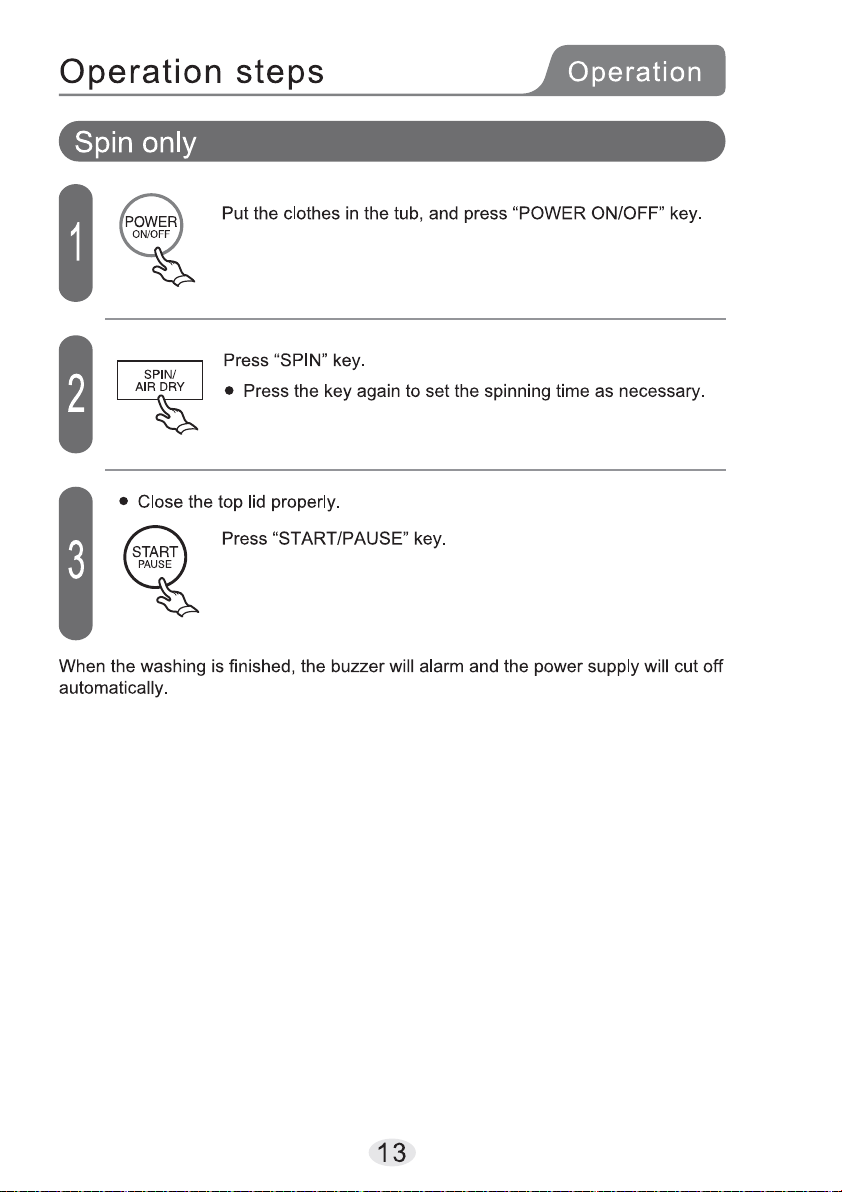
Press to select the spinning time.
(9 min. / 7 min. / blank / 5 min. / 3 min. / Soft spin )
Default setting depends on each program.
When selecting “Air Dry” program, you can also change the time to
dry by pressing this key.
(30 min. / 60 min. / 90 min. Default setting: 30 min.)
Press to select the rinse times. (4 times / 3 times / 2 times / blank / 1 time)
Default setting depends on each program.
Press to select the washing time.
(20 min. / 15 min. / blank / 12 min. / 9 min. )
Default setting depends on each program.
You can turn on/off the soak function by pressing this button for
2 seconds. (See “Soak function”.)
Displayed for the remaining operation time.
Displayed when child lock is set. (See “Child lock”.)
Displayed while setting the preset time or until the preset time comes.
You can see the details of preset program by touching
until the preset time comes.
Blinks during water supply.
INLET
WATER
Control panel / Display
Normal Wash normally soiled everyday clothing.
Blanket Wash strongly for blankets or heavy clothing.
Speedy Wash speedy for not-so-dirty clothing.
Soft
Wash not-so-dirty clothing or a small amount of clothing.
Eco Wash daily clothing with saving electricity and water.
Baby Wash gently and rinse thoroughly for baby clothing.
Jeans Wash sturdy and heavy soiled clothing.
Delicate Wash clothing with the HAND WASH mark.
Air Dry Program for reducing the time to dry.
After spinning, blow air to clothing in the tub to reduce
the time to dry in the shade greatly.
Tub Clean washing / spin drying tub. (See “Tub clean”.)
Plug the machine in and then press this key, the machine will turn
on. Press this key again, it will turn off.
Press this key after turning on, the selected program will start.
Press this key again, the operation will pause. Press it once again,
the operation will resume.
Press to select the program.
You can select the program from below according to the kind of
your laundries.
Control panel / Display
Press to set the preset time.
You can select the time from 2-24 hours.
Press to select the water level or add water in the tub during wash.
(See “Add water”.)
When turning on the machine, the digital timer shows “--” .
If select “Air Dry” program, the digital timer displays the air dry
time, unit is MIN.
When washing, the digital timer shows the remaining operation
time, unit is MIN or Hour.
When the preset time is set
, the digital timer shows the preset time,
unit is HOUR.
When the trouble occurs, the digital time shows the trouble code.
Displays the water level.
Press to select the spinning time.
(9 min. / 7 min. / blank / 5 min. / 3 min. / Soft spin )
Default setting depends on each program.
When selecting “Air Dry” program, you can also change the time to
dry by pressing this key.
(30 min. / 60 min. / 90 min. Default setting: 30 min.)
Press to select the rinse times. (4 times / 3 times / 2 times / blank / 1 time)
Default setting depends on each program.
Press to select the washing time.
(20 min. / 15 min. / blank / 12 min. / 9 min. )
Default setting depends on each program.
You can turn on/off the soak function by pressing this button for
2 seconds. (See “Soak function”.)
Displayed for the remaining operation time.
Displayed when child lock is set. (See “Child lock”.)
Displayed while setting the preset time or until the preset time comes.
You can see the details of preset program by touching
until the preset time comes.
Blinks during water supply.
INLET
WATER
Put the needed washing powder in
the detergent box and softener in the
softener box evenly
9
Put the slider down and insert the inlet hose into
the inlet hose connector.
Insert the hose firmly and the click sound is heard.
If you use the washing machine more than once
a week, there is no need to remove the inlet hose
connector to avoid damaging the fixing screw.
>
1
0m
m
Tap selection
Suitable tap
Not suitable tap
The front end should be longer than 10mm. The tap exit end face
should be flat and smooth, if not file it to avoid leakage.
pat eht ot rotcennoc esoh telni eht tcennoC
1. Press down the slider and remove the inlet hose connector from the inlet hose ,
like below illustration 1.
2. Loosen the four bolts on the inlet hose connector till the tap can be accessed, then
set the inlet hose connector in the tap, see illustration 2.(if the tap caliber is too large and
could not set the inlet hose end, unscrew the four bolts and take out the bushing, tap exit
end must be flat, otherwise it will leak, see illustration 3)
3. Fasten the four bolts in the inlet hose connector evenly, see illustration 4.
Remark: before twisting the nut, the threading is about 4mm above the upper surface of the nut, after twisting,
the threading is less than 2mm above the upper surface of the nut, see illustration 6.
4. Twist the fastening as seen on the illustration
When you reset higher water level than present:
When you reset lower water level than present:
Soak function
Child lock
Add water
When you choose “Normal” , “Speedy” , “Air Dry” , “Blanket” ,
“Soft” , “Baby” or “Delicate” program, you can use soak
function before wash.
After selecting the program, press “WASH” key for 2 seconds
to set soak function.
During wash (including rinse), press “WATER LEVEL” key to
add water as necessary.
Un-press will stop adding.
Or pause the washing machine by pressing “START/PAUSE”
key, and press “WATER LEVEL” key to select water level, then
press “START/PAUSE” key again.
.Before start
You can set child lock by pressing and holding
“WATER LEVEL” key and “PRESET TIME” key
at the same time for 3 seconds.
“CHILD LOCK” is displayed on the operation panel.
Press “START/PAUSE” and the machine is locked.
Press and hold these keys for 3 seconds again to
unlock this function.
.After start
You can set this function with the same way as ,
the machine is locked directly with the same way
as to unlock this function.
When you set this function, the wash procedure can not be
cancelled.
Press and hold
for 2 seconds
Press and hold at the same
time for 3 seconds
The washing machine will add water to the setting level
automatically and continue working.
The new water level will be valid in next water inlet.
1
1
1
2
1.Take off the drainpipe and drainpipe clip from the
drainpipe connector. Put soft mat on the floor and
gently put down the washing machine front side
on the mat. Unscrew the back cover by screwdriver
and gently unmount the back cover. Unscrew the
drainpipe connector (on the right of the washing
machine), then loosen the drainpipe connector.
3.With proper force, take off the drainpipe gate stopper
on the left side of the washing machine. The drainpipe
gate stopper is fixed on washing machine base with
two clips, look for the fixing orientation at the back
opening.
4.Pull the inner drainpipe to another side,
avoid distortion of the inner drainpipe.
As per foregoing description, fix the inner
drainpipe with the drainpipe hoop. Fix the
the drainpipe connector with the screw
and install the the drainpipe gate stopper
on the other side of the washing machine.
Gently stand the washing machine, fix the
back cover with screw and install the
drainpipe and drainpipe clip into the
drainpipe connector.
(Washing machine’s right side view)
(Washing machine’s inside view)
(Washing machine’s left side view)
The drainpipe should drain smoothly
1.The height of the drainpipe should be less
than 10cm, otherwise the drainage will not
be smooth and need a long time to drain,
the machine may stop during working.
2.Do not step on or press the drainpipe.
4. Purchase a proper hose if you need
additional drainpipe. Its diameter
should not be less than 30mm and
length should not exceed 1.5m.
If the additional drainpipe is too long,
cut some at A or B point.
A
B
3.Cut the drainpipe if it is too long.
Cut the front end of the drainpipe slantingly
to make drainage smoothly.
Clean the lint filter
It is necessary to use lint filter during washing.
After washing, please clean the lint filter in
time.
Clean the lint filter according
to the following steps:
1. Pull out the lint filter.
2. Turn the filter net inside out
and wash it.
3. Reverse back the filter net
and remount it.
1. pull out magic filter
2. open the box and clean it
3. close it and reinstall it
4. check if the lint block part is in good
condition
Magic filter cleaning
press this part and pull out to take
out the magic filter
lint block part (black rubber)
Groove
Set the drainpipe clip into the drainpipe to 2-3cm(from the drainpipe end without
hook). Then install the drainpipe into the drainpipe connector and fixed it with the
drainpipe clip. After that put up the drainpipe clip to fasten the grip.
Please install and adjust the machine according to the requirements of the manual.
Correct operation is very important for your safety.
Unpacking
Unpack the carton and take out the bottom cover.
Open the top lid of washing machine and take out all of the accessories.
Remove all wrappers, including the polystyrene base.
You are advised to keep all the packaging for reuse in case the machine is to be
transported again.
Positioning
Make it horizontal.
Use a tied thread with plumb to check
if it is horizontal.
Adjust the adjustable foot
and twist the adjustable foot.
2) Fasten the nut after adjustment.
°
Adjustable nut
Adjustable
foot
1) Lift up the adjustable foot gently, loose the adjustable nut
The distance between the washing machine and the wall should be more than 50mm,
and the maximum allowable angle of the shank base of the machine is 1°
The slanting or rough ground may cause operating stopped or unstable, please adjust it
with the following methods:
1. Abnormal display1. Abnormal display
E1
E3
E2
F1
E4
E0
Display
Explanation
Settlement
The top lid is opened
when preset is started
Close the top lid and clear up the alarm
The top lid is open when
spinning
Close the top lid and clear up the
alarm
Spin does not balance
Water
level
sensor
is
wrong
Turn the power off and leave it for 1minute.
After that,turn the power on again.
If the same error is displayed,cut the
power suppy and call a technicians.
E5
The top lid is opened
after setting child-lock
child-lock
light flashing
synchronously
Open the top lid and refer to the "before using"
procedures and "common non fault phenomenon"
on this manual to settle it, then close the top lid
and clear up the alarm.
Open the top lid and refer to the "before using"
procedures and "common non fault phenomenon"
on this manual to settle it, then close the top lid
and clear up the alarm.
After 15 minutes of draining
time and still not reaching
the water level setting
After 20 minutes of water
filling time and still not
reaching the water level
setting
4. Child lock function
3. Power supply is cut off automatically
During spinning, if the laundries are not placed equally in the tub, it would cause
violent vibration.This machine has imbalance adjustment function, and the vibration
testing system will supervise the running. Once vibration is beyond certain level,
the adjustment system will start automatically to adjust the imbalance.
2. Imbalance adjustment
1) Press the power supply button and did not start the program in 10 minutes, the
power supply will be cut off automatically.
2) After the washing is finished, buzzer will activate. The power supply will be cut
off automatically.
1) If set child lock function, all the buttons will be locked including POWER. If the top lid is
opened during the washing machine working, the washing will be stopped and give an
alarm.But if you can close the top lid in 5 seconds, the washing machine will stop alarm and
continue working. If can not close the top lid in 5 seconds,the washing machine will begin
draining if there is water in the inner tub is 5 cm higher, alarm will be given every 10 minutes
(alarm is always given). When the draining is finished, the washing machine will be in the
stare of washing, if close the top lid, the washing machine is unlocked and start working as
previous setting.
2) Once child lock is set, if open top lid over 5 seconds during washing or rinse ( there is water
in the inner tub),washing machine will drain and give an alarm. If you unlock the function during
draining, the washing machine will add water to setting water level and continue working.
Open the top lid ,make the laundries
place equally, then close it and clear
up the alarm
Close the top lid and clear up the alarm
Installing the bottom cover
To prevent damage from mouse/rats or other insects, please install the bottom cover as shown.
Bottom Cover Slightly lean forward the front
side of washing machine,
following the direction of arrow
and put the bottom cover into
the slot of base.
Use two screws to fix the
bottom cover on the base.
This appliance is not intended for use by persons(including
children) with reduced physical, sensory or mental capabilities,
or lack of experience and knowledge, unless they have been
given supervision or instruction concerning use of the
appliance by a person responsible for their safety.Children
should be supervised to ensure that they do not play with the
appliance.
Notice
220-240V.

3
Pay attention to the warning symbols.There may be serious risks on personal
safety or may damage the washing machine if not followed.
The contents of this symbol are prohibited.It may damage the appliance and
can lead to injury.
Prohibited symbol
Warning symbols
9.0kg
ES-G90G
Wash:520W
About 36kg
10/70L 9/65L 8/60L 7/55L
6/50L 5/46L 4/42L 3/38L
2/34L 1/30L
W580mm D587mm H950mm
0.03MPa~0.85MPa
220-240V~ 50Hz
Spin :330W
Drain hose
Drain hose
Screw
(2pcs)

ES-G90G
Operation Manual
WASHING MACHINE
If the appliance is sold or transferred to another owner or if you moved house and leaving the
appliance, always ensure the manual is supplied with the appliance in order for the new owner
can get to know its functions and its relevant warnings. These warnings have been provided for
your safety. You MUST read them carefully before installing or using the appliance.