AccuSync
TM
LCD5V/LCD7V/LCD9V
ASLCDCover.p65 2/28/03, 9:22 AM1

Inde x
Warning .................................................................................................................... 1
Features .................................................................................................................. 2
Contents ................................................................................................................. 3
Quick Start ............................................................................................................. 4
Controls ...................................................................................................................7
Recommended Use............................................................................................... 12
Specifications ...................................................................................................... 14
Troubleshooting ................................................................................................... 17
References .............................................................................................................18
Limited Warranty ................................................................................................. 19
Avertissement ...................................................................................................... 21
Fonctions ............................................................................................................. 22
Contenu ................................................................................................................. 23
Mise en marche rapide ...................................................................................... 24
Commandes .......................................................................................................... 27
Usage recommandé ............................................................................................ 32
Spécifications ...................................................................................................... 34
Dépannage ............................................................................................................ 37
Références ........................................................................................................... 38
Garantie limitée .................................................................................................. 39
ASLCDCover.p65 2/28/03, 9:22 AM2
1
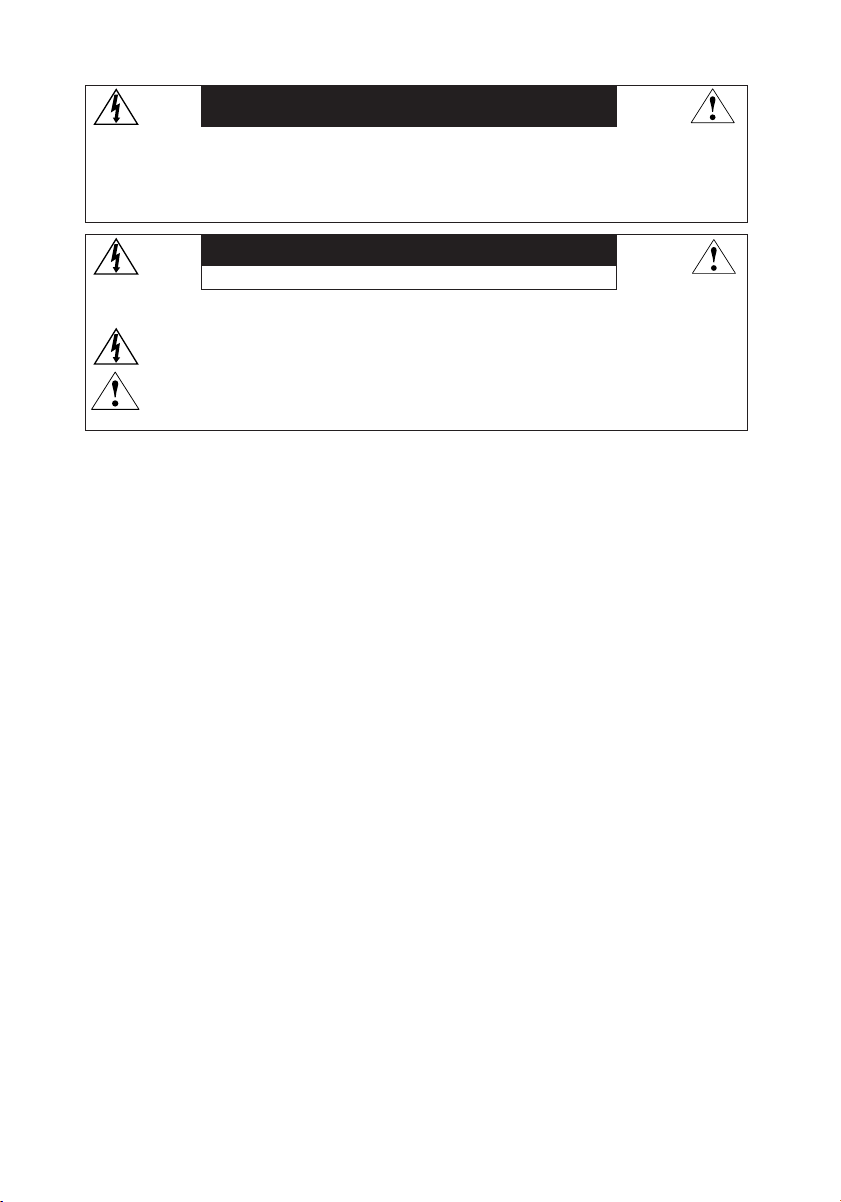
CAUTION: TO REDUCE THE RISK OF ELECTRIC SHOCK, MAKE SURE POWER CORD IS UNPLUGGED FROM
WALL SOCKET. TO FULLY DISENGAGE THE POWER TO THE UNIT, PLEASE DISCONNECT THE POWER
CORD FROM THE AC OUTLET. DO NOT REMOVE COVER (OR BACK). NO USER SERVICEABLE PARTS
INSIDE. REFER SERVICING TO QUALIFIED SERVICE PERSONNEL.
This
symbol warns user that uninsulated voltage within the unit may have sufficient magnitude to cause
electric shock. Therefore, it is dangerous to make any kind of contact with any part inside this unit.
This symbol alerts the user that important literature concerning the operation and maintenance of this
unit has been included. Therefore, it should be read carefully in order to avoid any problems.
WARNING
CAUTION
Canadian Department of Communications Compliance Statement
DOC: This Class B digital apparatus meets all requirements of the Canadian
Interference-Causing Equipment Regulations.
C-UL: Bears the C-UL Mark and is in compliance with Canadian Safety Regulations
according to
CAN/CSA C22.2 No. 950.
FCC Information
1.
Use the attached specified cables with the
LCD5V
(K15AN), LCD7V (K17AN), or LCD9V (K19BN) color
monitor so as not to interfere with radio and television reception.
(1)
Please use the supplied power cord or equivalent to ensure FCC compliance.
(2) Please use the supplied shielded video signal cable (LCD9V).
Use of other cables and adapters may cause interference with radio and television
reception.
2.
This equipment has been tested and found to comply with the limits for a Class B digital device,
pursuant to part 15 of the FCC Rules. These limits are designed to provide reasonable protection
against harmful interference in a residential installation. This equipment generates, uses, and can
radiate radio frequency energy, and, if not installed and used in accordance with the instructions,
may cause harmful interference to radio communications. However, there is no guarantee that
interference will not occur in a particular installation. If this equipment does cause harmful
interference to radio or television reception, which can be determined by turning the equipment
off and on, the user is encouraged to try to correct the interference by one or more of the following
measures:
• Reorient or relocate the receiving antenna.
• Increase the separation between the equipment and receiver.
• Connect the equipment into an outlet on a circuit different from that to which the receiver
is connected.
• Consult your dealer or an experienced radio/TV technician for help.
If necessary, the user should contact the dealer or an experienced radio/television technician for
additional suggestions. The user may find the following booklet, prepared by the Federal
Communications Commission, helpful: ”How to Identify and Resolve Radio-TV Interference Prob-
lems.“ This booklet is available from the U.S. Government Printing Office, Washington, D.C.,
20402, Stock No. 004-000-00345-4.
TO PREVENT FIRE OR SHOCK HAZARDS, DO NOT EXPOSE THIS UNIT TO RAIN OR MOISTURE. ALSO, DO NOT USE
THIS UNIT'S POLARIZED PLUG WITH AN EXTENSION CORD RECEPTACLE OR OTHER OUTLETS UNLESS THE PRONGS
CAN BE FULLY INSERTED.
REFRAIN FROM OPENING THE CABINET AS THERE ARE HIGH VOLTAGE COMPONENTS INSIDE. REFER SERVICING
TO QUALIFIED SERVICE PERSONNEL.
ASLCDmanual022803.p65 2/28/03, 9:43 AM1

2
Congratulations for purchasing an NEC AccuSync LCD5V, LCD7V, or LCD9V, a high performance
color TFT LCD monitor. The AccuSync LCD5V/LCD7V/LCD9V monitor provides flicker-free and
color images at optional resolutions. The AccuSync LCD5V/LCD7V/LCD9V is a TFT LCD monitor
that is intelligent, microprocessor-based and ergonomically designed display, compatible
with most analog RGB (Red, Green, Blue) display standards, including PS/V, PS/2, optional for
Apple Macintosh Centris, Quadra, and Macintosh II family signals. The LCD monitor is capable
of displaying crisp and vibrant color graphics with VGA, SVGA, XGA (non-interlaced), SXGA
(LCD7V/LCD9V only) and most Macintosh compatible color video cards.
·The monitor is able to properly function even in case of upgrade video cards or software
because of the wide auto-scanning compatibility range without requiring to buy a new
monitor.
·LCD5V: The internal microprocessor digitally controls auto-scanning. For horizontal scan
frequencies between 31.5 kHz and 61 kHz, and vertical scan frequencies between
56 Hz and 75 Hz. In each frequency mode, the microprocessor-based circuitry allows the
monitor to function at the precision of a fixed frequency.
•LCD7V: The internal microprocessor digitally controls auto-scanning. For horizontal scan
frequencies between 31.5 kHz and 81 kHz, and vertical scan frequencies between
56 Hz and 75 Hz. In each frequency mode, the microprocessor-based circuitry allows the
monitor to function at the precision of a fixed frequency.
•LCD9V: The internal microprocessor digitally controls auto-scanning. For horizontal scan
frequencies between 31.5 kHz and 81 kHz, and vertical scan frequencies between
56 Hz and 75 Hz. In each frequency mode, the microprocessor-based circuitry allows the
monitor to function at the precision of a fixed frequency.
·The resident memory allows for storing factory default settings and also additional user
adjustment parameters.
·LCD5V: The maximum resolution achievable is XGA 1024 x 768.
•LCD7V/LCD9V: The maximum resolution achievable is SXGA 1280 x 1024.
·The compact and sleek cabinet design saves lot of your desk space and makes your desk
look neat and tidy.
Features
ASLCDmanual022803.p65 2/28/03, 9:43 AM2
3
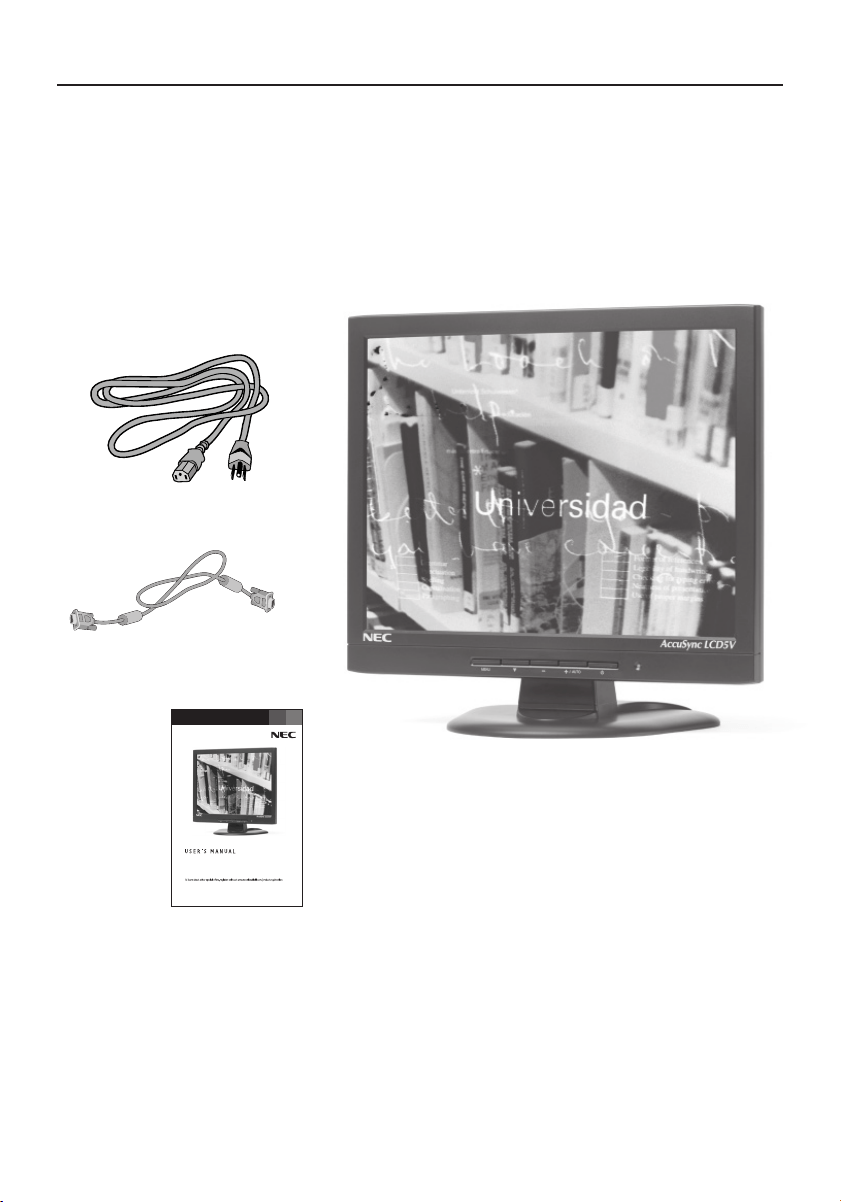
Contents
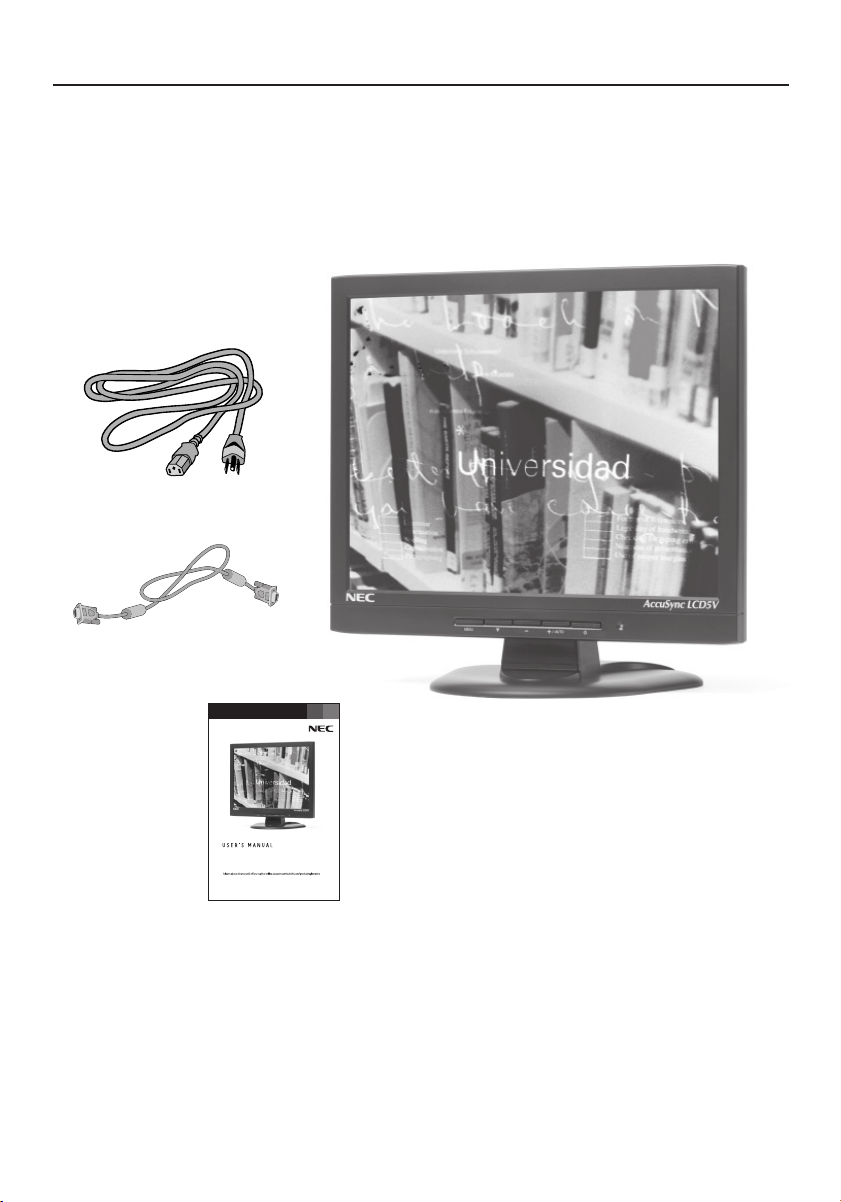
Your new NEC LCD monitor box* should contain the following:
•AccuSync LCD5V, LCD7V, or LCD9V LCD monitor
•Power Cord
•User’s Manual
• Video Signal Cable (LCD9V)
Power Cord
*Remember to save your original box and packing material to transport or ship the monitor.
Video Signal Cable (LCD9V)
AccuSync
TM
LCD5V/LCD7V/LCD9V
User’s Manual
ASLCDmanual022803.p65 2/28/03, 9:43 AM3
4
Quick Start
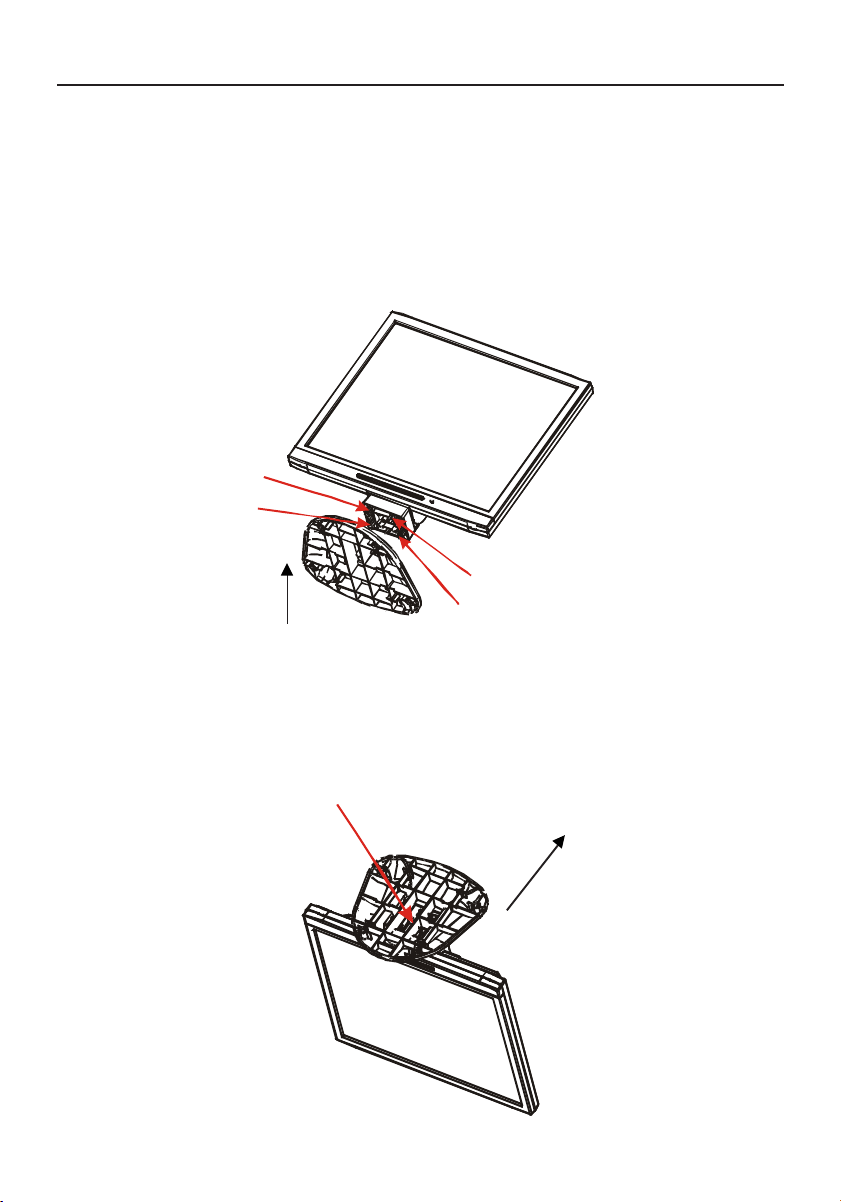
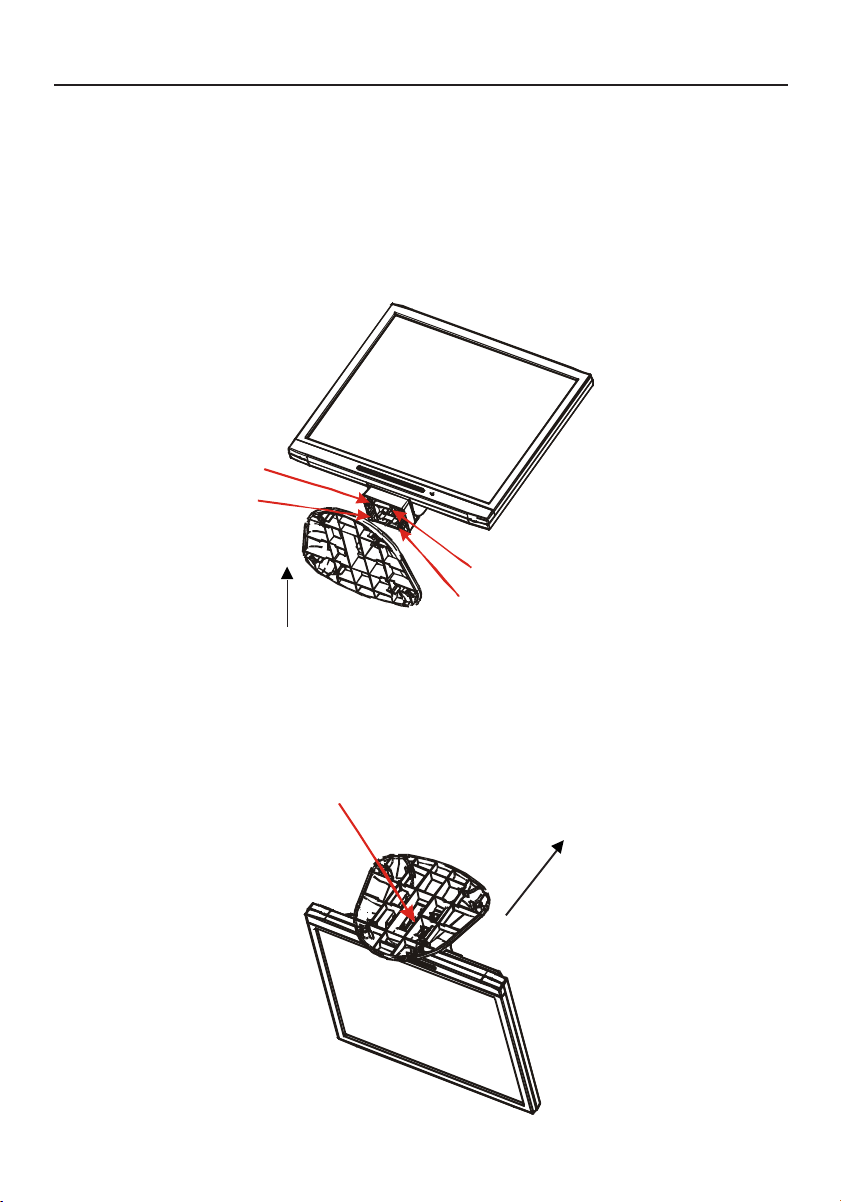
Attaching / Removing the Base (LCD5V/LCD7V)
Install
1. Align the four hooks on the bottom of the monitor with the corresponding slots on the
bottom of the base.
2. Slide the base in the direction of the arrows.
Remove
1. Depress the hook as indicated.
2. Remove the base in the direction of the arrows.
Insure the lock is hooked completely.
Hook
position
Remove direction
ASLCDmanual022803.p65 2/28/03, 9:43 AM4
5
Quick Start –continued
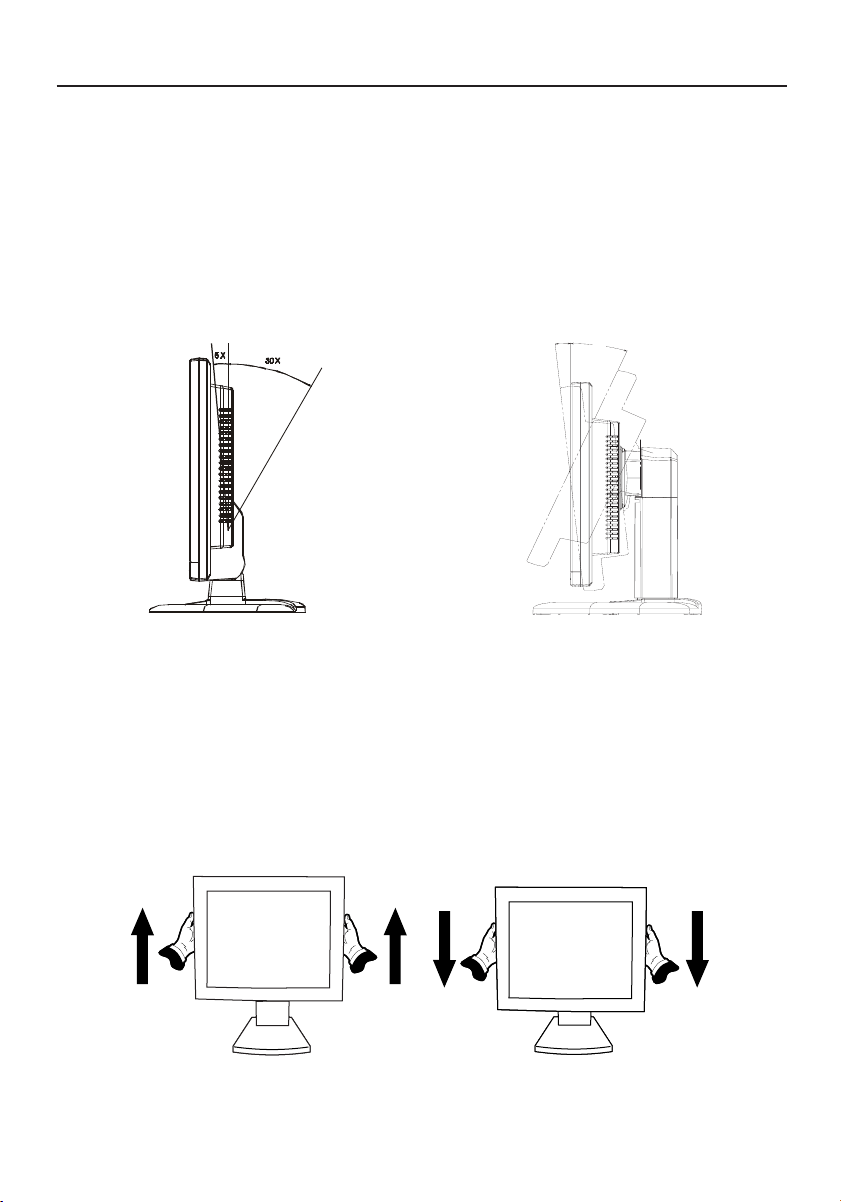
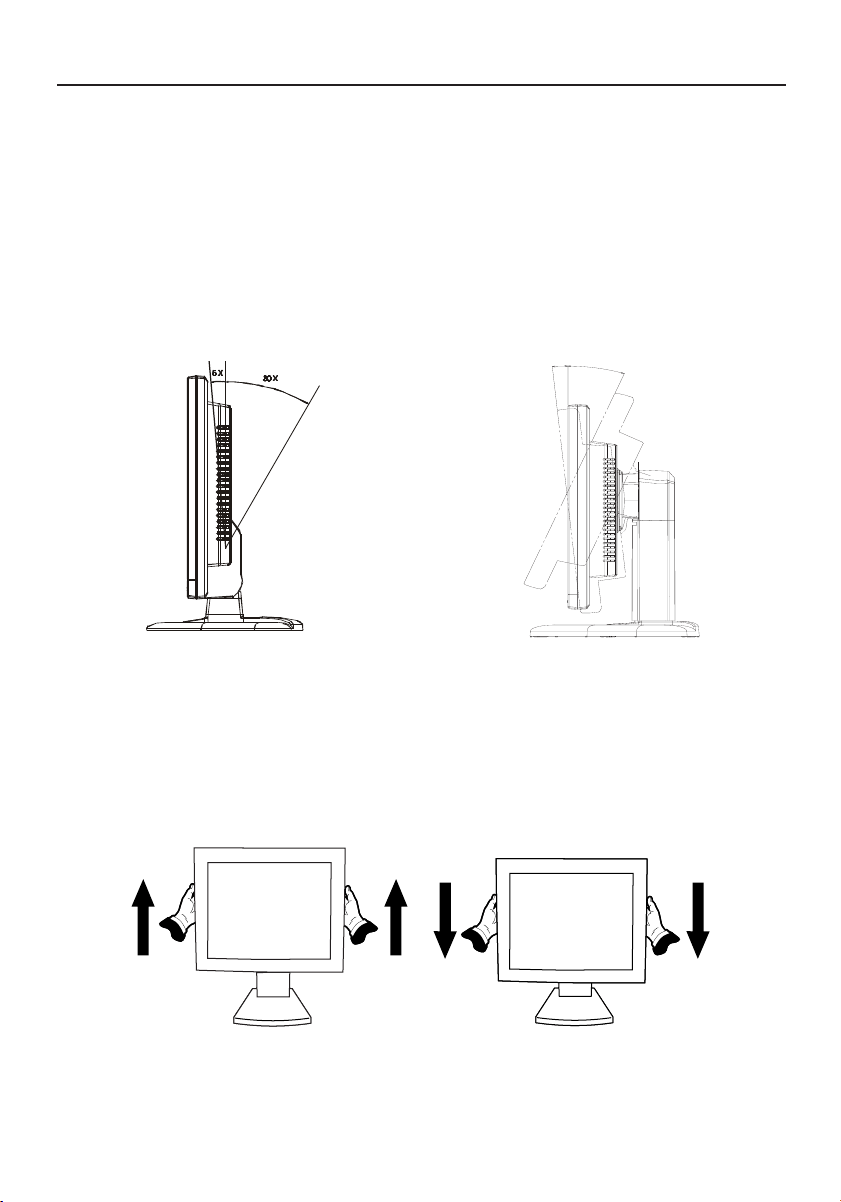
Raise and Lower Monitor Screen (LCD9V)
The monitor may be raised or lowered Landscape mode.
To raise or lower screen, place hands on each side of the monitor and lift or lower to the
desired height.
NOTE:
Handle with care when raising or lowering the monitor screen.
Screen Position Adjustment
In order to optimize the best viewing position, you can adjust the tilt of the monitor by
using both of your hands to hold the edges of the monitor as shown in the figure below.
LCD9V: The monitor can be adjusted
to 20 degrees up or 5 degrees down as
indicated by arrow below.
LCD5V/LCD7V: The monitor can be adjusted
to 30 degrees up or 5 degrees down as
indicated by arrow below.
20X
5X
ASLCDmanual022803.p65 2/28/03, 9:43 AM5
6
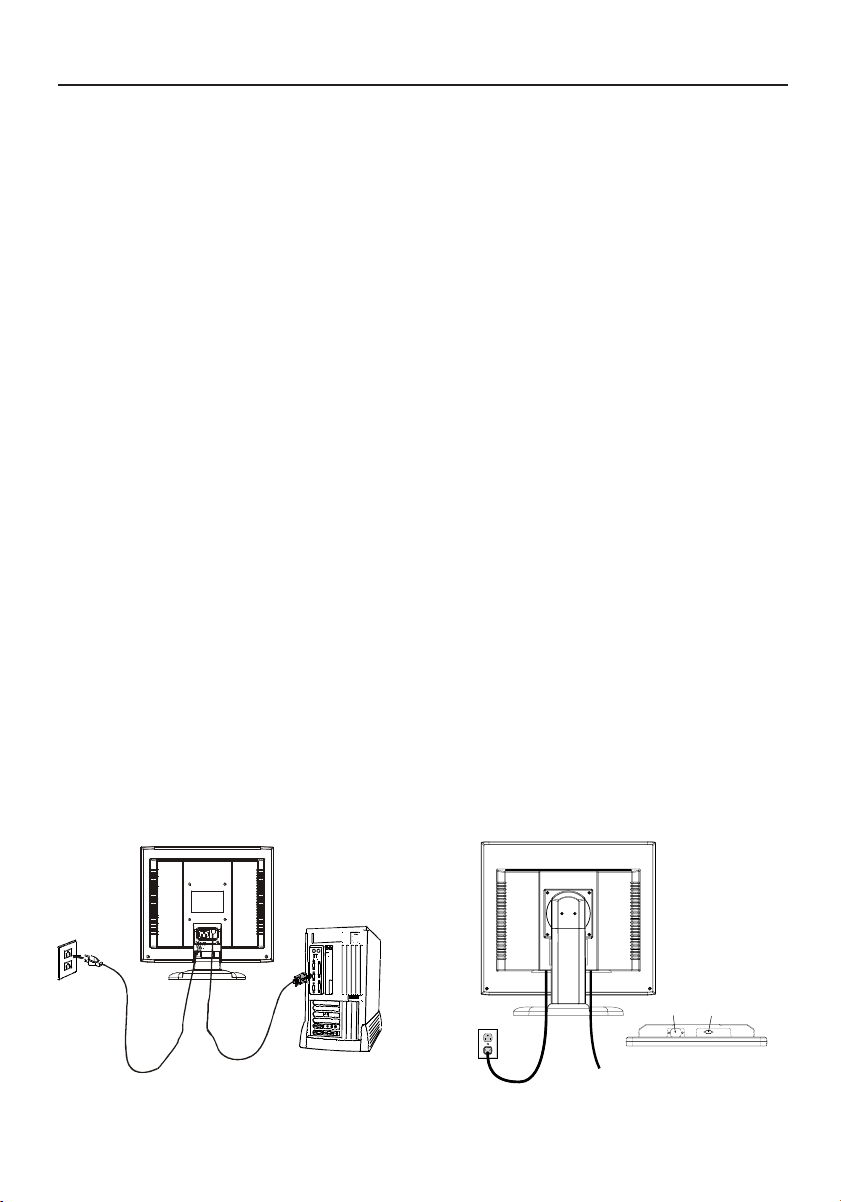
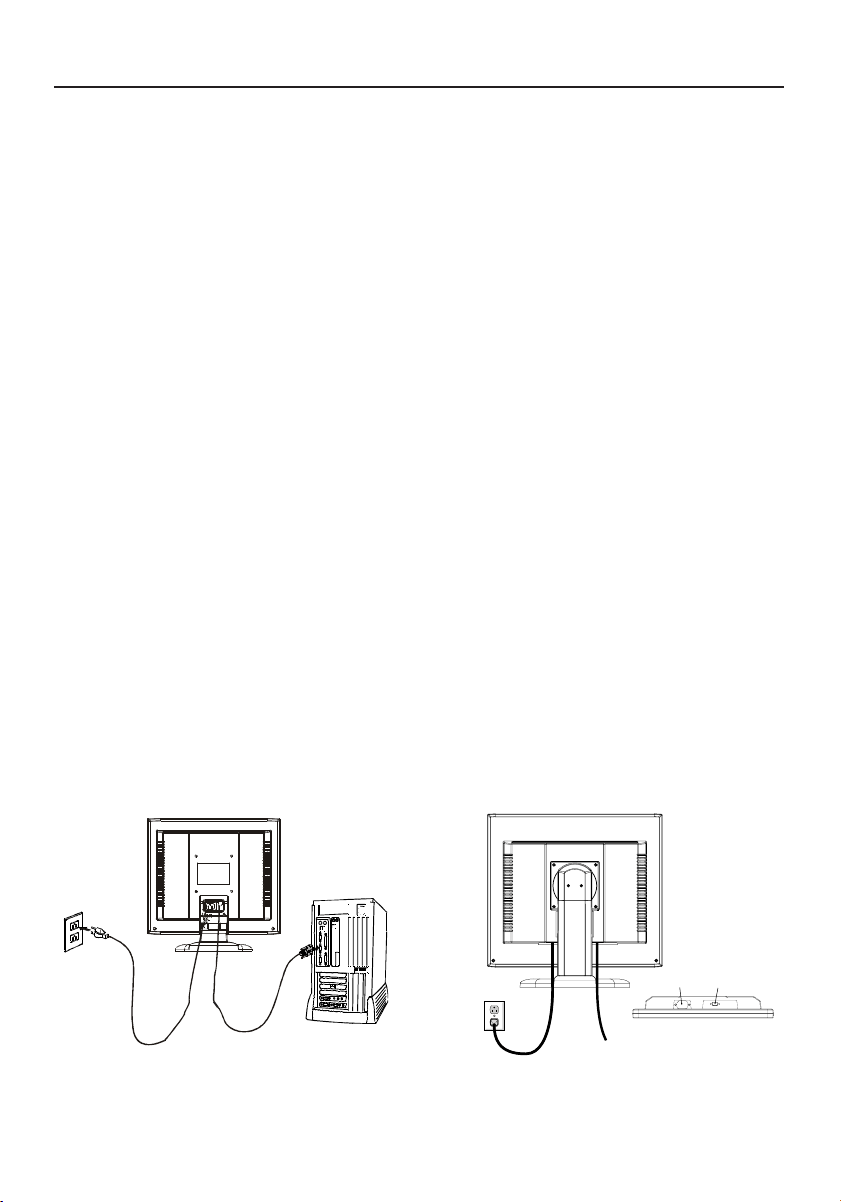
Connecting the Power Cord
· Check first to make sure that the power cord you use is the correct type required
for your area.
·This monitor has a universal power supply that allows operation in either AC 100-
240 V AC voltage area. No user-adjustment is required.
· Plug one end of the power cord to the AC Inlet, plug another end to a proper AC
outlet.
· If you use this monitor at AC125-240V, please refer to Recommended Use section of
this manual for proper selection of an AC power cord.
Installation
To install the monitor to your host system, please follow the steps as given below:
1. Connect Video Cable
a. Make sure both the monitor and computer are powered-OFF.
b. Connect the video cable to the computer.
2. Connect power cord
Connect the power cord to the monitor, then to a properly grounded AC outlet.
3. Power-ON Monitor and Computer
Power-ON the monitor first, then power-ON the computer.
4. If the monitor still does not function properly, please refer to the troubleshooting
section to diagnose the problem.
Quick Start –continued
LCD9V
LCD5V/LCD7V
Power cord
Video signal cable
ASLCDmanual022803.p65 2/28/03, 9:43 AM6
7
edoMedoM
edoM
edoMedoMnoituloseRnoituloseR
noituloseR
noituloseRnoituloseR
.qerF.H.qerF.H
.qerF.H
.qerF.H.qerF.H
)zHk()zHk(
)zHk(
)zHk()zHk(
htdiWdnaBhtdiWdnaB
htdiWdnaB
htdiWdnaBhtdiWdnaB
)zHM()zHM(
)zHM(
)zHM()zHM(
ytiraloPytiraloP
ytiraloP
ytiraloPytiraloP
HH
H
HHVV
V
VV
1AGV053x02707zH74.13223.82+–
2AGV004x02707zH74.13223.82–+
3AGV084x04606zH74.13571.52––
4CAM084x04666zH00.5342.03––
5ASEV084x04627zH68.735.13––
6ASEV084x04657zH05.735.13––
7ASEV006x00865zH61.530.63++
8ASEV006x00806zH88.730.04++
9ASEV006x00857zH88.645.94++
01ASEV006x00827zH80.840.05++
11CAM426x23857zH27.94382.75––
21ASEV867x420106zH63.840.56––
31ASEV867x420107zH84.650.57––
41ASEV867x420157zH20.0657.87++
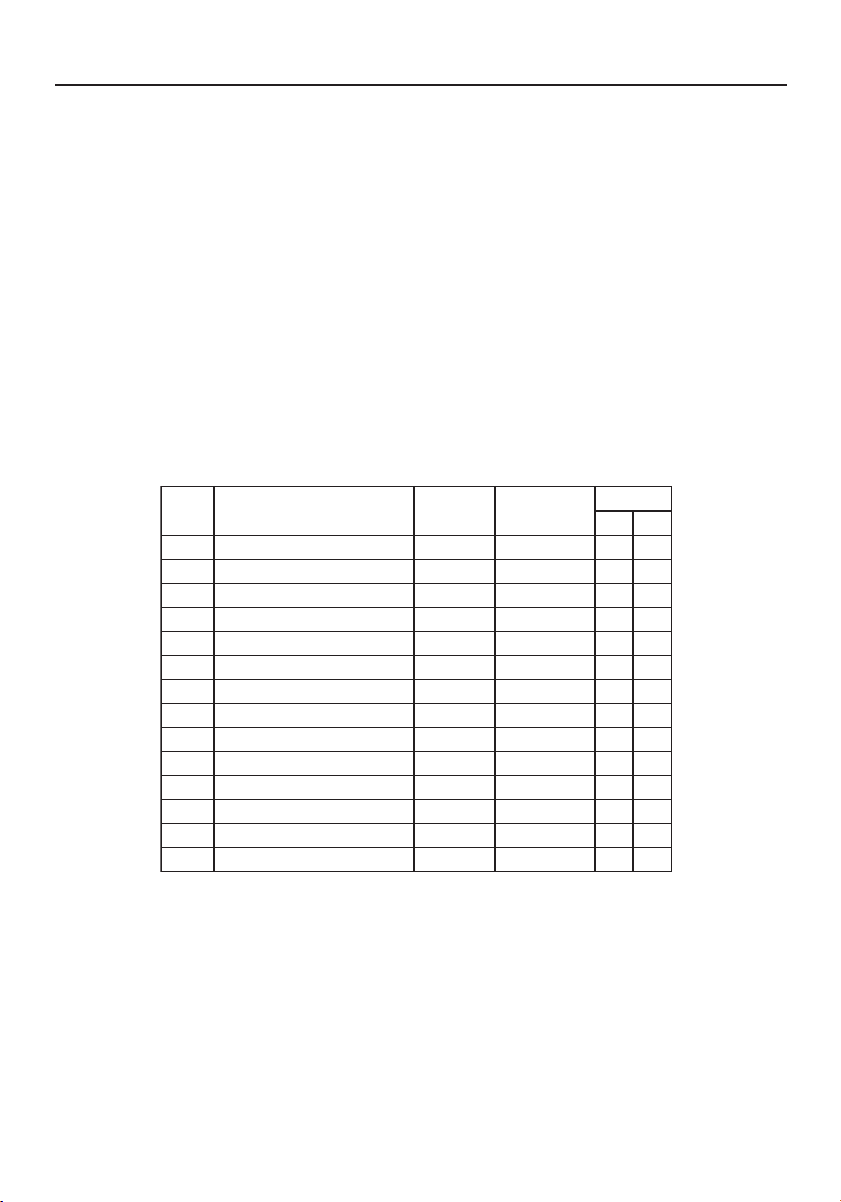
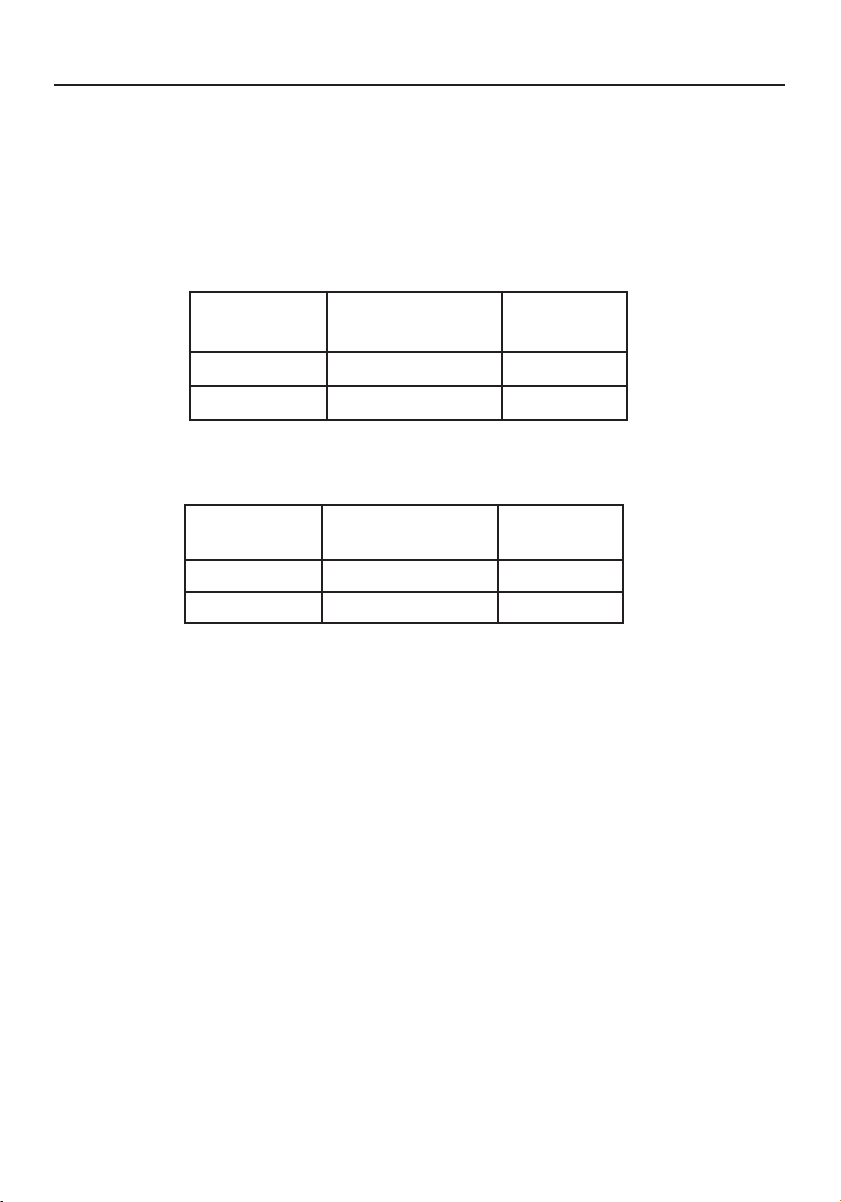
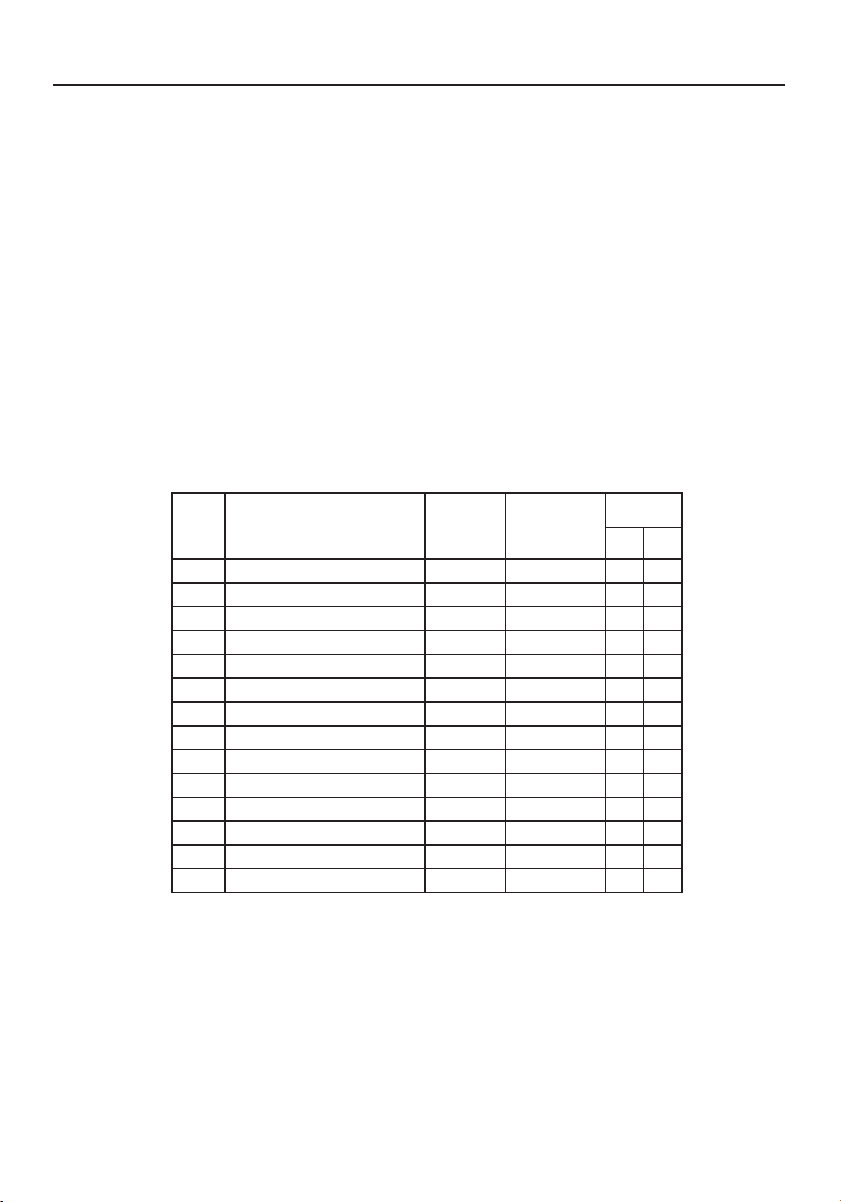
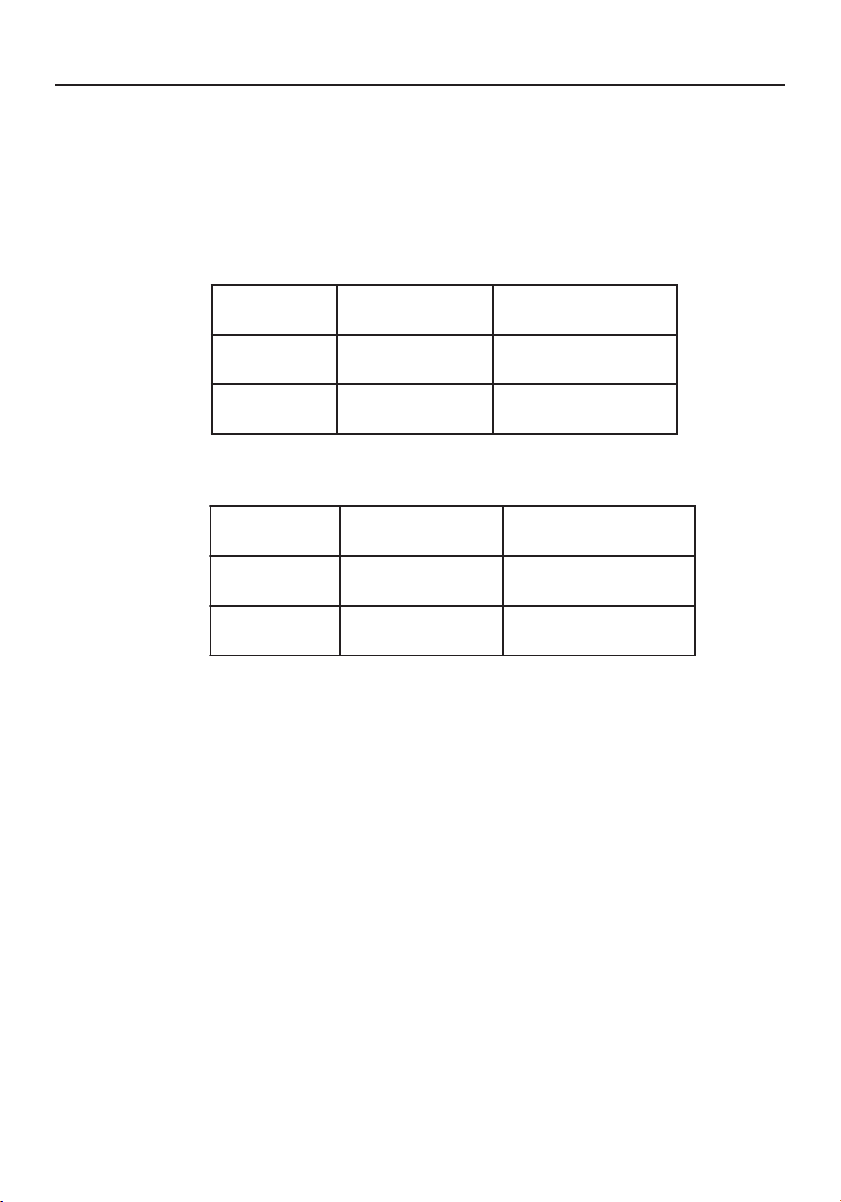
Preset Modes
To reduce the need for adjustment for different modes, the monitor has default setting
modes that are most commonly used as given in the table below. For optimum adjustment,
the user is suggested to perform the Auto Setup under Windows “Full Screen” pattern. When
none of the mode is matched, the user can store their preferred modes in the user modes.
The monitor is capable of storing up to 9 user modes. The only condition to store as a user
mode is the new display information must have 1 kHz difference for horizontal frequency or
1 Hz for vertical frequency or the sync signal polarities are different from the default
modes.
LCD5V
Controls
ASLCDmanual022803.p65 2/28/03, 9:43 AM7
8
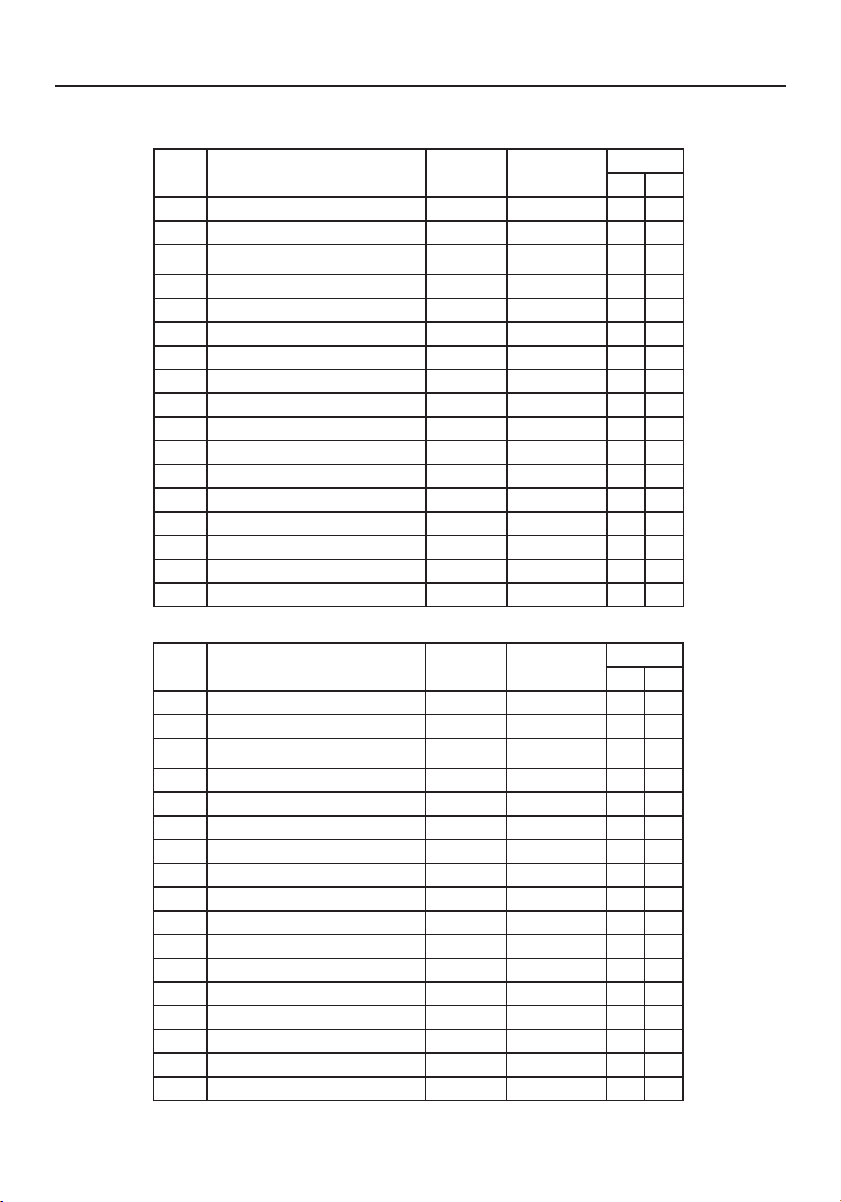
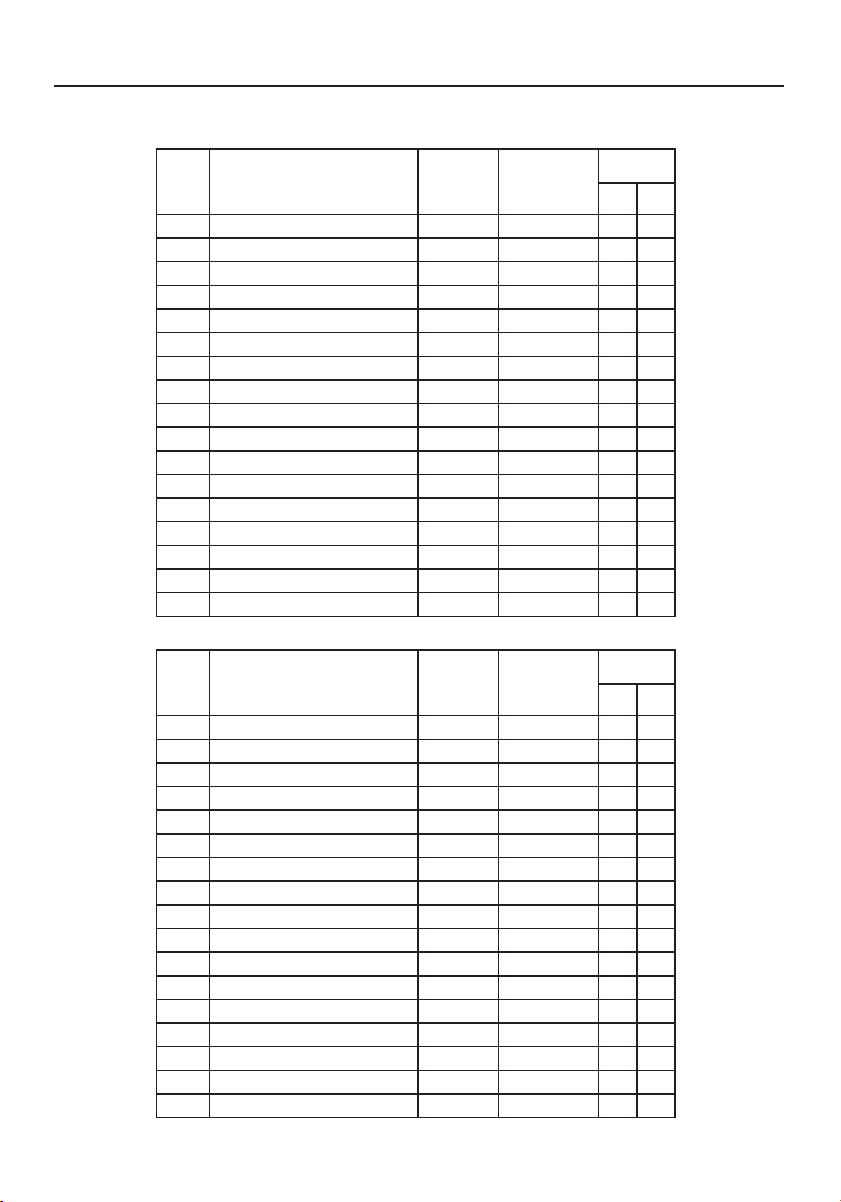
Controls –continued
edoMedoM
edoM
edoMedoMnoituloseRnoituloseR
noituloseR
noituloseRnoituloseR
.qerF.H.qerF.H
.qerF.H
.qerF.H.qerF.H
)zHk()zHk(
)zHk(
)zHk()zHk(
htdiWdnaBhtdiWdnaB
htdiWdnaB
htdiWdnaBhtdiWdnaB
)zHM()zHM(
)zHM(
)zHM()zHM(
ytiraloPytiraloP
ytiraloP
ytiraloPytiraloP
HH
H
HHVV
V
VV
1AGV004x02707zH74.13223.82–+
2AGV084x04606zH74.13571.52––
3CAM084x04666zH00.5342.03––
4ASEV084x04627zH68.735.13––
5ASEV084x04657zH05.735.13––
6ASEV006x00865zH61.530.63++
7ASEV006x00806zH88.730.04++
8ASEV006x00857zH88.645.94++
9ASEV006x00827zH80.840.05++
01CAM426x23857zH27.94382.75––
11ASEV867x420106zH63.840.56––
21ASEV867x420107zH84.650.57––
31ASEV867x420157zH20.0657.87++
41ASEV4201x082106zH0.460.801++
51ASEV4201x082157zH0.080.531++
61ASEV468x251157zH5.760.801++
71ASEV069x082106zH0.060.801++
LCD7V
edoMedoM
edoM
edoMedoMnoituloseRnoituloseR
noituloseR
noituloseRnoituloseR
.qerF.H.qerF.H
.qerF.H
.qerF.H.qerF.H
)zHk()zHk(
)zHk(
)zHk()zHk(
htdiWdnaBhtdiWdnaB
htdiWdnaB
htdiWdnaBhtdiWdnaB
)zHM()zHM(
)zHM(
)zHM()zHM(
ytiraloPytiraloP
ytiraloP
ytiraloPytiraloP
HH
H
HHVV
V
VV
1AGV004x02707zH74.13223.82–+
2AGV084x04606zH74.13571.52––
3CAM084x04666zH00.5342.03––
4ASEV084x04627zH68.735.13––
5ASEV084x04657zH05.735.13––
6ASEV006x00865zH61.530.63++
7ASEV006x00806zH88.730.04++
8ASEV006x00857zH88.645.94++
9ASEV006x00827zH80.840.05++
01CAM426x23857zH27.94382.75––
11ASEV867x420106zH63.840.56––
21ASEV867x420107zH84.650.57––
31ASEV867x420157zH20.0657.87++
41ASEV4201x082106zH0.460.801++
51ASEV4201x082157zH0.080.531++
61ASEV468x251157zH5.760.801++
71ASEV069x082106zH0.060.801++
LCD9V
ASLCDmanual022803.p65 2/28/03, 9:43 AM8
9
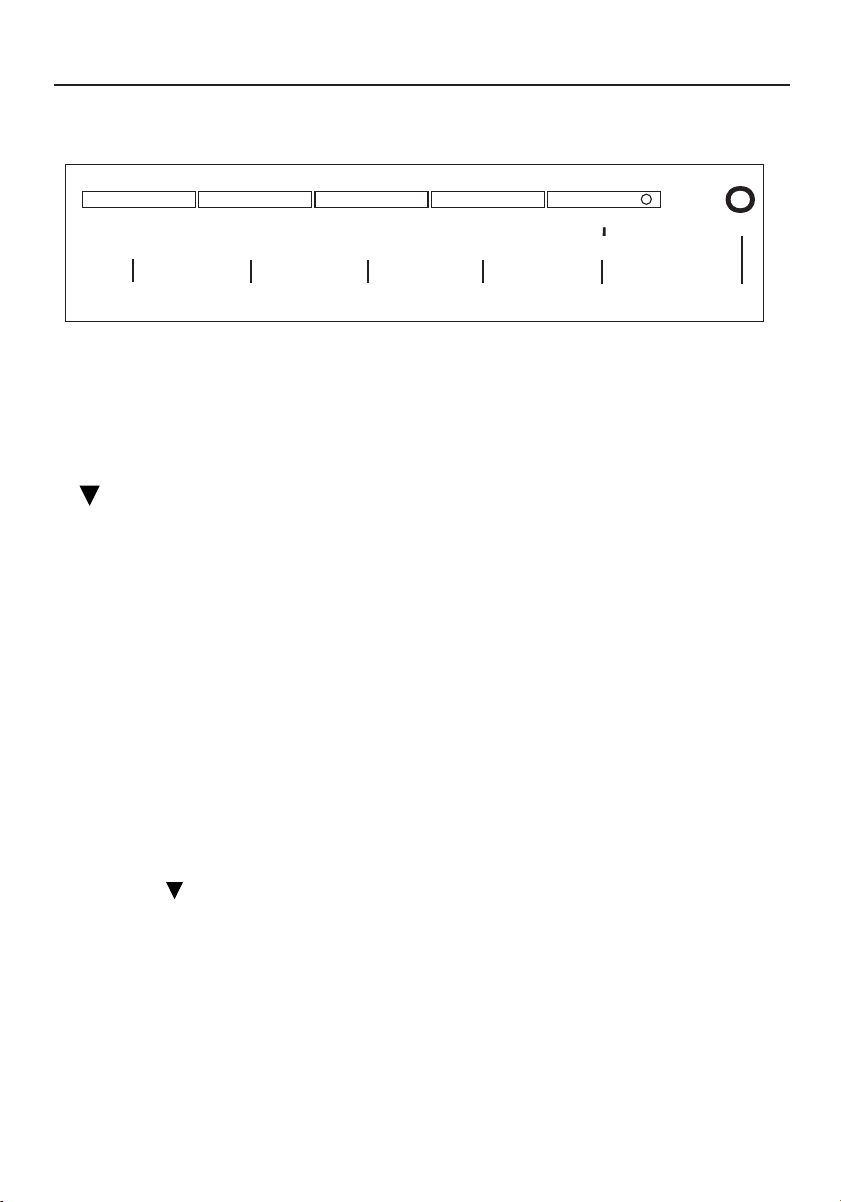
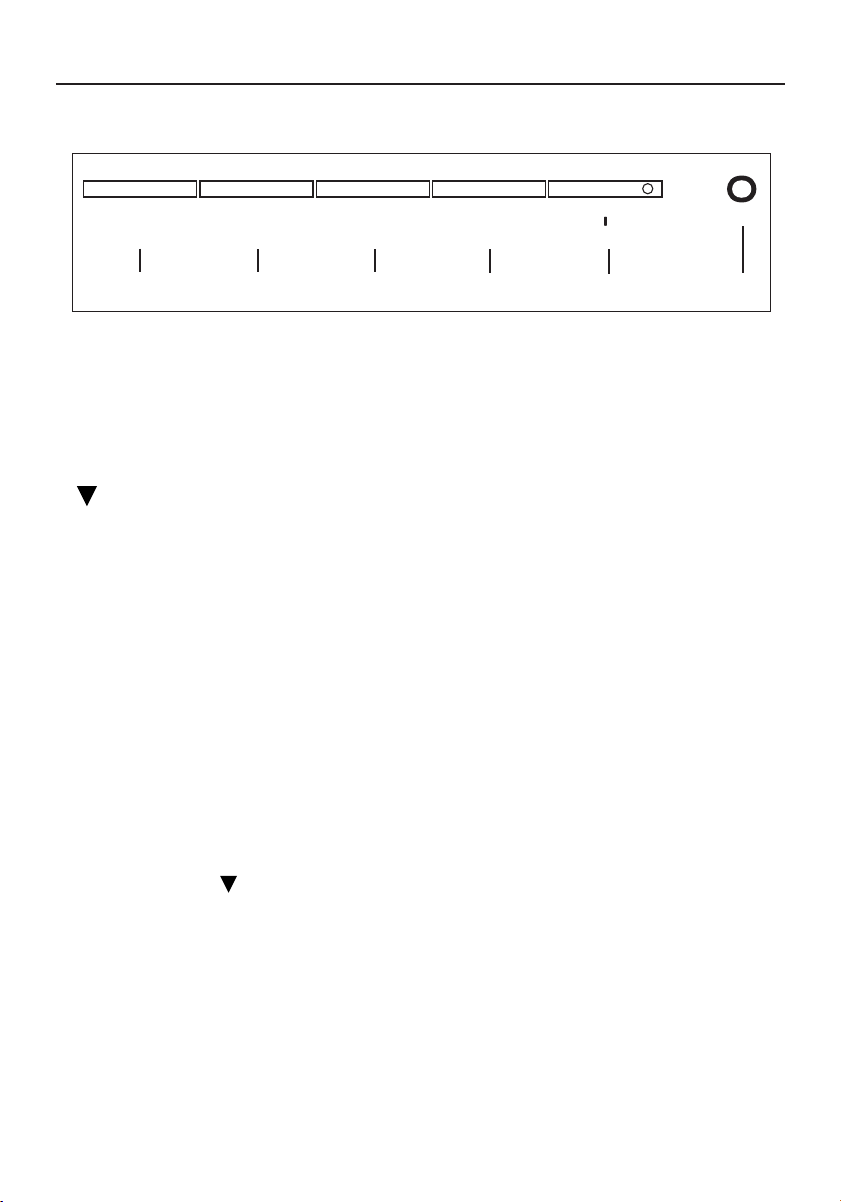
User Controls
1. Power Switch: To turn ON or OFF the power
2. Power LED: Lights up to indicate that the monitor power is turned ON
3. MENU: To exit and enter OSD menu
4. : To move downward in the OSD Item
5. – :To decrease the value of the parameter in the OSD, which has been selected for
adjustment
– : Choose the previous OSD MENU page
6. + :To increase the value of the parameter in the OSD, which has been selected for
adjustment
+ : Choose the next OSD MENU page
AUTO: Act as AUTO adjustment hot key when OSD is not displayed
Standard OSD Operation
1. Press
MENUMENU
MENUMENU
MENU key to activate the OSD menu, when OSD is not displayed.
2. Use Select key to move down through the menu cyclically. The parameter will be
highlighted when selected.
3. Then use ‘‘
++
++
+’’ or ‘‘
--
--
-’’ to increase or decrease the value of the parameter, or make selection
between different options.
4. To quit the OSD screen at any time during the operation, press
MENUMENU
MENUMENU
MENU key. If no keys
are pressed for a time period, the OSD automatically disappears.
5. When OSD is not displayed, press “
++
++
+” key to start Auto-Adjust.
Controls –continued
MENU ▼ – +/AUTO
o
2
3
4
5
6
1
ASLCDmanual022803.p65 2/28/03, 9:43 AM9

10
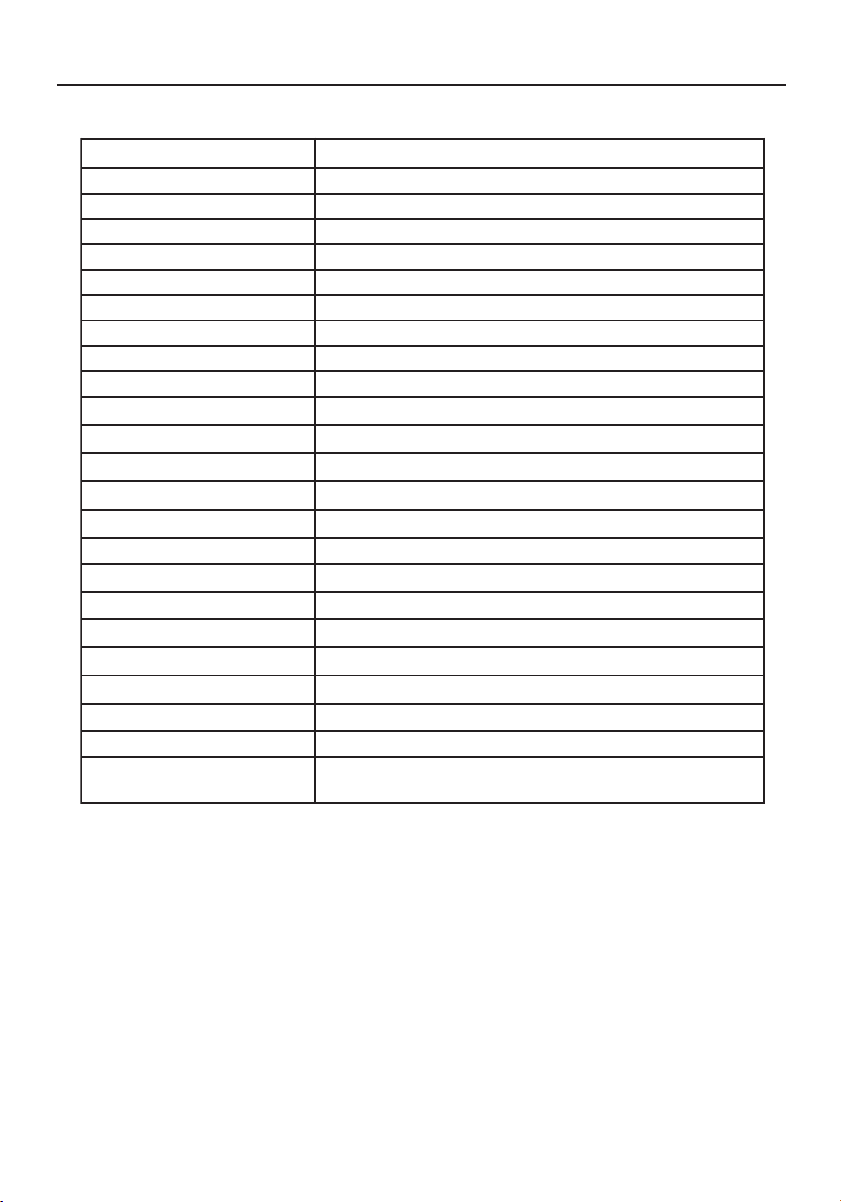
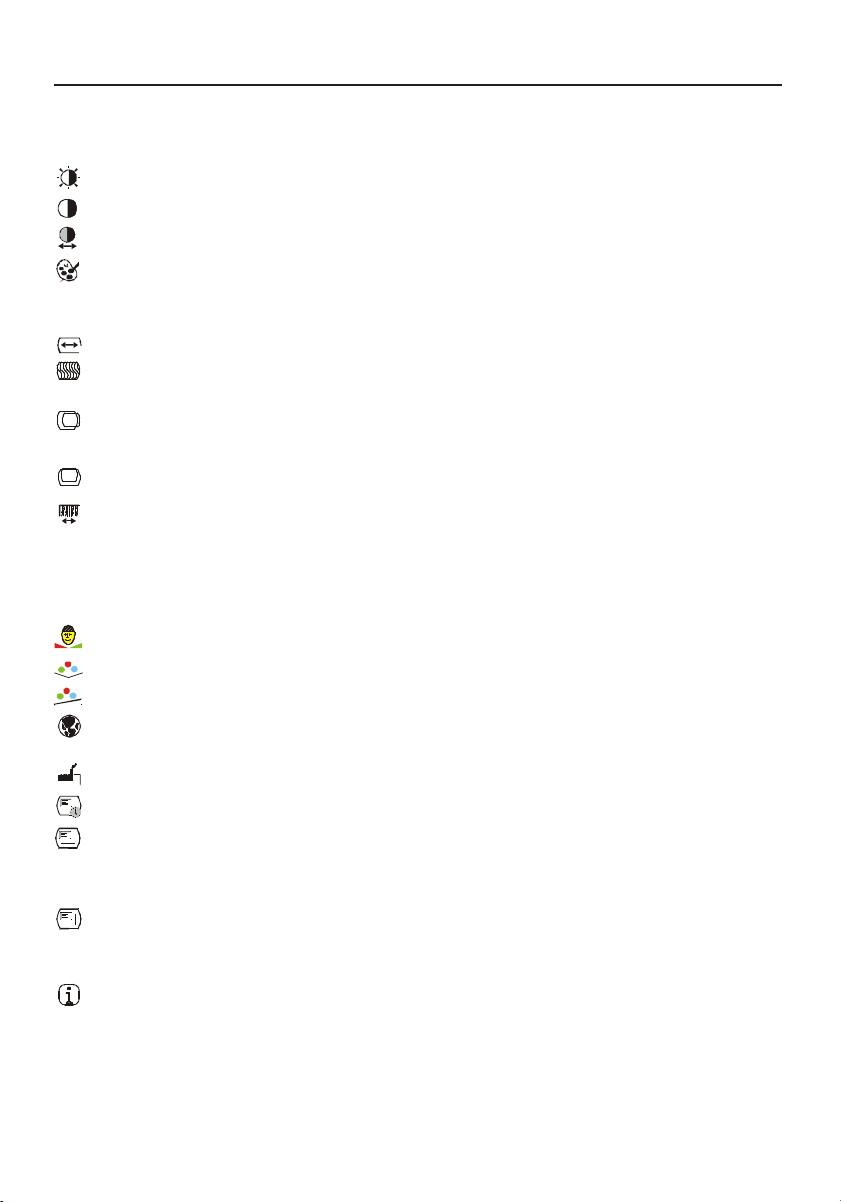
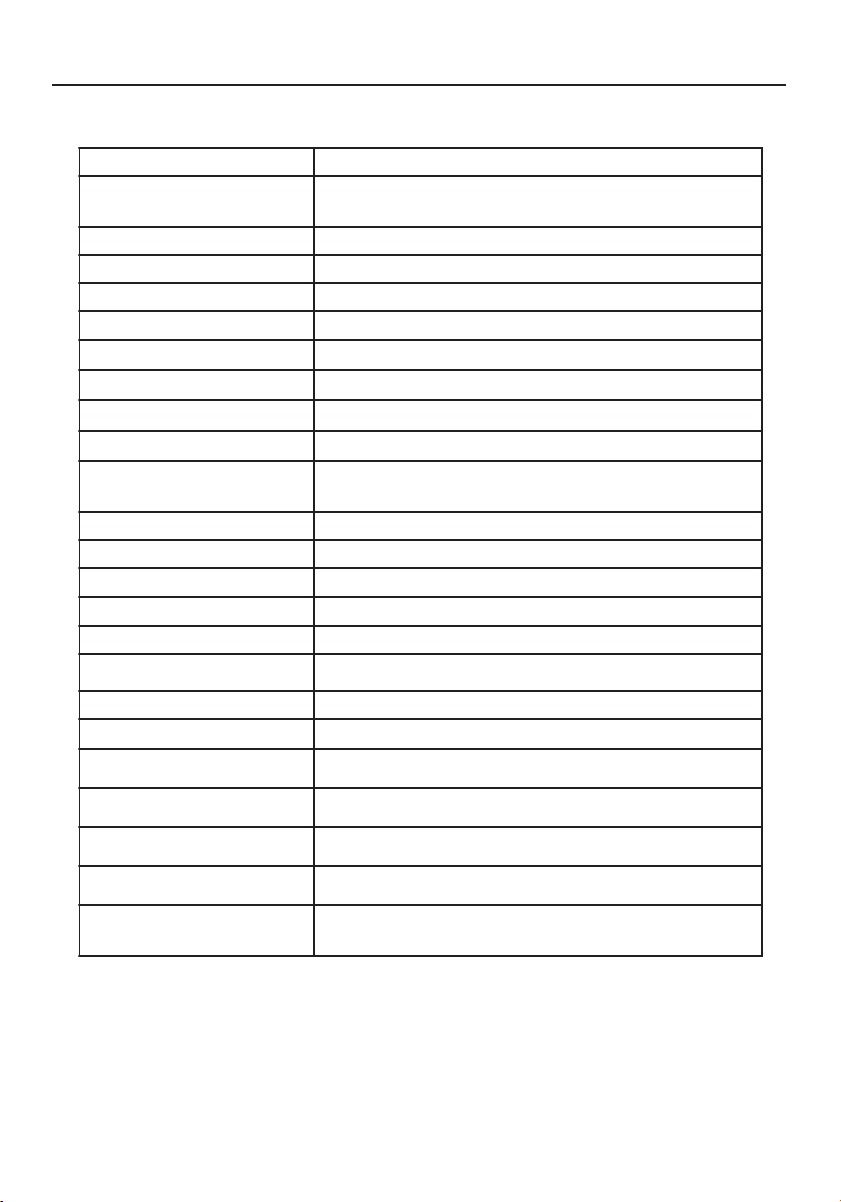
OSD Function Description
Controls –continued
Brightness To increase or decrease the brightness.
Contrast To increase or decrease the contrast.
Auto Contrast Press “+” key to start auto contrast.
Color Temperature Press “-” or “+” to select 5000, 6500, 7500, 9300 and USER.
Only when selecting USER, you can make adjustments to the
R/G/B content.
Horizontal Size To increase or decrease the size of image.
Fine To increase or decrease the noise of the image.
Left/Right To move the screen toward left or right.
Up/Down To move the screen upward or downward.
Auto-Adjust Press “+” to turn on this function. The Auto-Adjust will
automatically adjust V-Position, H-Position, Clock, and
Clock-Phase, the whole process takes about 5 seconds.
Flesh Tone To adjust flesh tone of color.
Hue To adjust hue of color.
Saturation To adjust saturation of color.
Language Select among English, French, Italian, German and Spanish.
Factory Preset To return the monitor to its default settings.
OSD Time Out To adjust the period of OSD auto turn-off time.
OSD Left/Right To move the OSD position horizontally on the screen.
When the “+” key is pressed, the OSD control menu will move
to the right side of the screen. Likewise when the “–” key is
pressed, the OSD control menu will move to the left side.
OSD Up/Down To move the OSD position vertically on the screen.
When the “+” key is pressed, the OSD control menu will move
to the up side of the screen. Likewise when the
“–” key is pressed, the OSD control menu will move to the
lower side.
Information Indicates the current resolution and V-Frequency.
ASLCDmanual022803.p65 2/28/03, 9:44 AM10
11
Controls –continued
Power Saving Mode
The monitor will be driven into “Power Saving” mode by the control signal from the display
controller, as indicated by the amber-color power LED.
The power saving states will be kept until a control signal has been detected or the key-
board or mouse is activated. The recovery time from Active OFF state back to ON state is
around 5 seconds.
DDC (Display Data Channel)
To make your installation easier, the monitor is able to Plug and Play with your system if
your system also supports DDC protocol. The DDC (Display Data Channel) is a communication
protocol through which the monitor automatically informs the host system about its
capabilities, for example, supported resolutions and corresponding timing. The monitor
supports DDC2B standard.
etatSetatS
etatS
etatSetatS
rewoPrewoP
rewoP
rewoPrewoP
noitpmusnoCnoitpmusnoC
noitpmusnoC
noitpmusnoCnoitpmusnoC
thgiLDELthgiLDEL
thgiLDEL
thgiLDELthgiLDEL
NOlamroNneerG
FFOevitcAW2<rebmA
LCD5V
etatSetatS
etatS
etatSetatS
rewoPrewoP
rewoP
rewoPrewoP
noitpmusnoCnoitpmusnoC
noitpmusnoC
noitpmusnoCnoitpmusnoC
thgiLDELthgiLDEL
thgiLDEL
thgiLDELthgiLDEL
NOlamroNneerG
FFOevitcAW3<rebmA
LCD7V/LCD9V
ASLCDmanual022803.p65 2/28/03, 9:44 AM11
12
Safety Precautions and Maintenance
FOR OPTIMUM PERFORMANCE, PLEASE NOTE THE
FOLLOWING WHEN SETTING UP AND USING
THE LCD COLOR MONITOR:
••
••
•
DO NOT OPEN THE MONITOR. DO NOT OPEN THE MONITOR.
DO NOT OPEN THE MONITOR. DO NOT OPEN THE MONITOR.
DO NOT OPEN THE MONITOR. There are no user serviceable parts inside and opening or removing covers may
expose you to dangerous shock hazards or other risks. Refer all servicing to qualified service personnel.
••
••
•
Do not spill any liquids into the cabinet or use your monitor near water.
••
••
• Do not insert objects of any kind into the cabinet slots, as they may touch dangerous voltage points, which
can be harmful or fatal or may cause electric shock, fire or equipment failure.
••
••
• Do not place any heavy objects on the power cord. Damage to the cord may cause shock or fire.
••
••
• Do not place this product on a sloping or unstable cart, stand or table, as the monitor may fall, causing serious
damage to the monitor.
••
••
• When operating the LCD monitor with its AC 125-240V power supply, use a power supply cord that matches
the power supply voltage of the AC power outlet being used. The power supply cord you use must have been
approved by and comply with the safety standards of your country. (Type H05VV-F should be used in Europe)
••
••
• In UK, use a BS-approved power cord with molded plug having a black (5A) fuse installed for use with this monitor.
If a power cord is not supplied with this monitor, please contact your supplier.
••
••
• Do not place any objects onto the monitor and do not use the monitor outdoors.
••
••
• The inside of the fluorescent tube located within the LCD monitor contains mercury.
Please follow the bylaws or rules of your municipality to dispose of the tube properly.
Immediately unplug your monitor from the wall outlet and refer servicing to qualified service personnel
under the following conditions:
••
••
• When the power supply cord or plug is damaged.
••
••
• If liquid has been spilled, or objects have fallen into the monitor.
••
••
• If the monitor has been exposed to rain or water.
••
••
• If the monitor has been dropped or the cabinet damaged.
••
••
• If the monitor does not operate normally by following operating instructions.
••
••
• Do not bend power cord.
••
••
• Do not use monitor in high temperatured, humid, dusty, or oily areas.
• If glass is broken, handle with care.
••
••
• Do not cover vent on monitor.
••
••
• If monitor or glass is broken, do not come in contact with the liquid crystal and handle with care.
••
••
• Allow adequate ventilation around the monitor so that heat can properly dissipate. Do not
block ventilated openings or place the monitor near a radiator or other heat sources. Do not
put anything on top of monitor.
••
••
• The power cable connector is the primary means of detaching the system from the power supply.
The monitor should be installed close to a power outlet which is easily accessible.
••
••
• Handle with care when transporting. Save packaging for transporting.
Image PersistenceImage Persistence
Image PersistenceImage Persistence
Image Persistence
Image persistence is when a residual or “ghost” image of a previous image remains visible on the screen. Unlike
CRT monitors, LCD monitors’ image persistence is not permanent, but constant images being displayed for a
long period of time should be avoided.
To alleviate image persistence, turn off the monitor for as long as the previous image was displayed. For
example, if an image was on the monitor for one hour and a residual image remains, the monitor should be
turned off for one hour to erase the image.
NOTE: NOTE:
NOTE: NOTE:
NOTE: As with all personal display devices, NEC-Mitsubishi Electronics Display recommends using a moving
screen saver at regular intervals whenever the screen is idle or turning off the monitor when not in use.
Recommended Use
CAUTION
ASLCDmanual022803.p65 2/28/03, 9:44 AM12
13
Recommended Use –continued
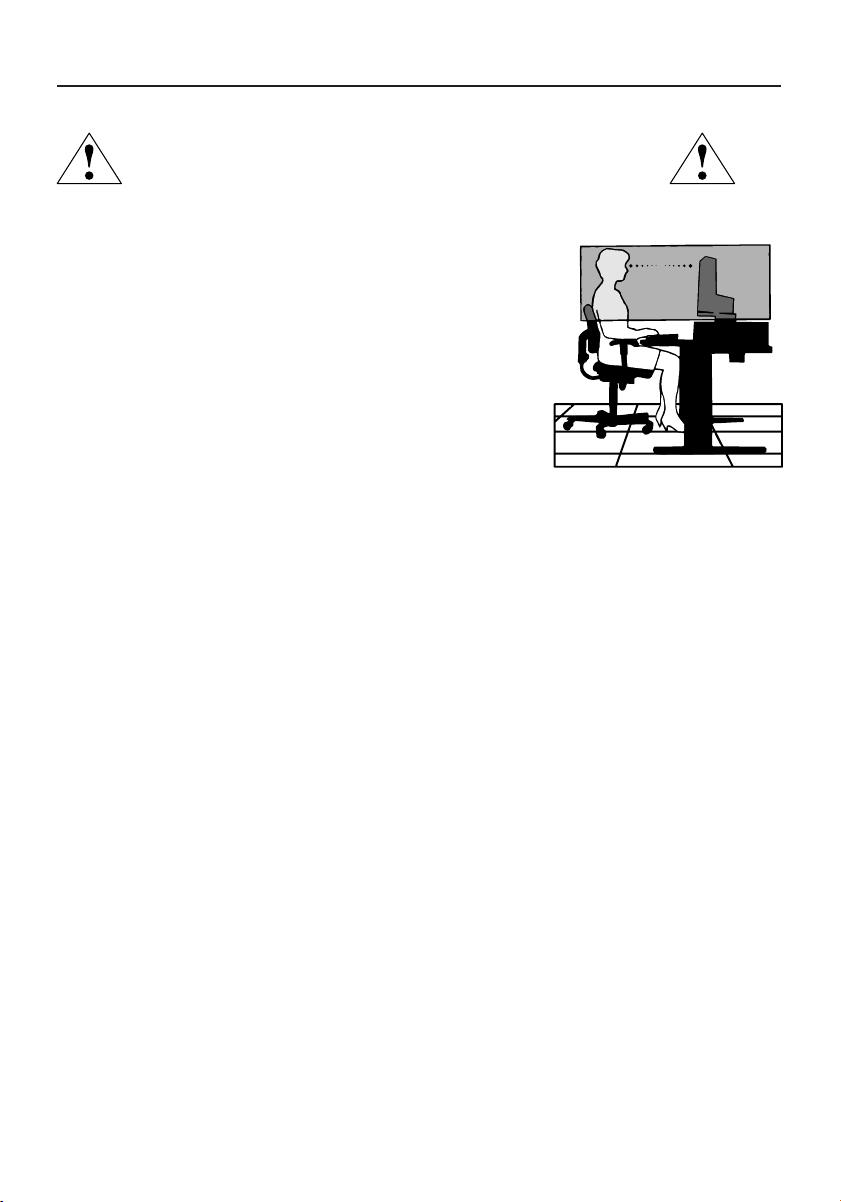
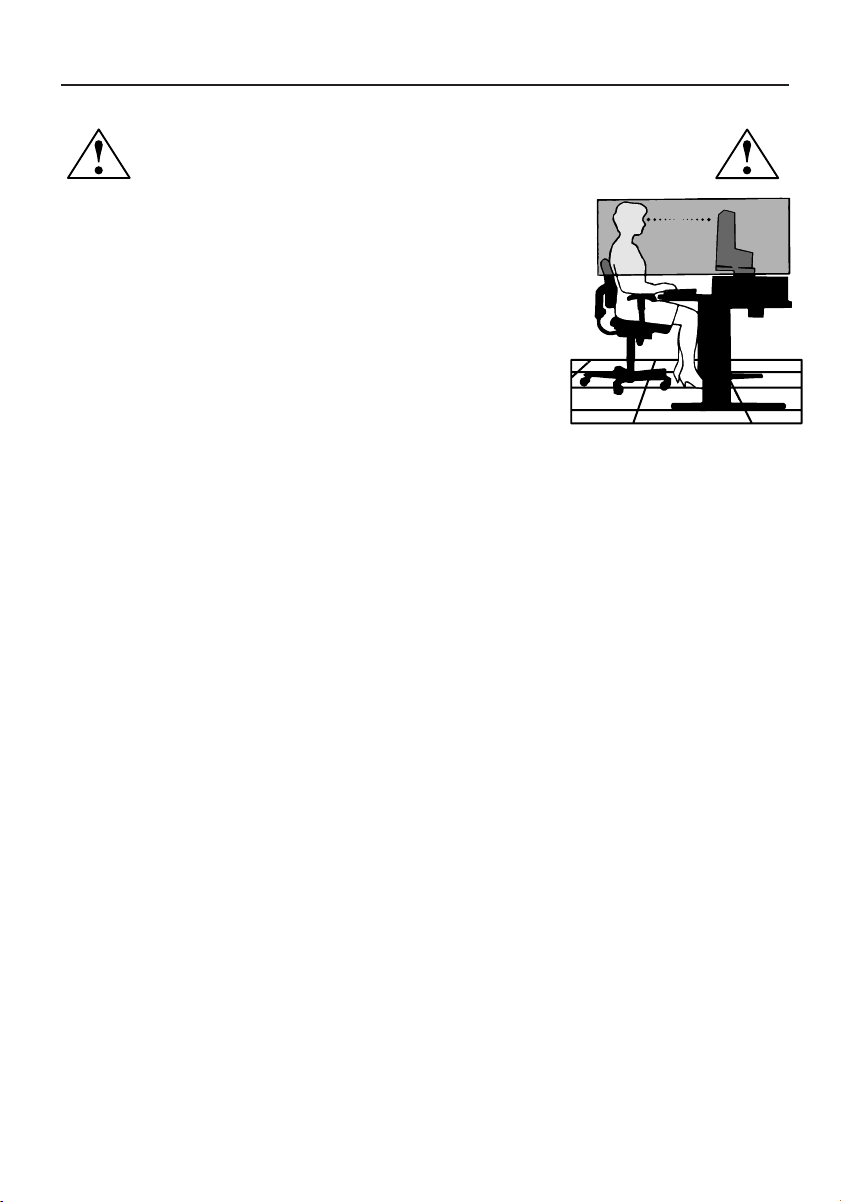
CORRECT PLACEMENT AND ADJUSTMENT OF THE MONITOR
CAN REDUCE EYE, SHOULDER AND NECK FATIGUE. CHECK THE
FOLLOWING WHEN YOU POSITION THE MONITOR:
••
••
• For optimum performance, allow 20 minutes for warm-up.
••
••
• Adjust the monitor height so that the top of the screen is
at or slightly below eye level. Your eyes should look slightly
downward when viewing the middle of the screen.
••
••
•
Position your monitor no closer than 16 inches and no
further away than 28 inches from your eyes. The optimal
distance is 20 inches.
••
••
• Rest your eyes periodically by focusing on an object at
least 20 feet away. Blink often.
••
••
• Position the monitor at a 90° angle to windows and other
light sources to minimize glare and reflections. Adjust the monitor tilt so that ceiling
lights do not reflect on your screen.
••
••
• If reflected light makes it hard for you to see your screen, use an anti-glare filter.
••
••
• Clean the LCD monitor surface with a lint-free, non-abrasive cloth. Avoid using any cleaning
solution or glass cleaner!
••
••
• Adjust the monitor’s brightness and contrast controls to enhance readability.
••
••
• Use a document holder placed close to the screen.
••
••
• Position whatever you are looking at most of the time (the screen or
reference material) directly in front of you to minimize turning your head
while you are typing.
••
••
• Avoid displaying fixed patterns on the monitor for long periods of time to avoid image
persistence (after-image effects).
••
••
• Get regular eye checkups.
Ergonomics
To realize the maximum ergonomics benefits, we recommend the following:
••
••
•
Use the preset Size and Position controls with standard signals
••
••
•
Use the preset Color Setting
••
••
•
Use non-interlaced signals with a vertical refresh rate between 60-75Hz
••
••
•
Do not use primary color blue on a dark background, as it is difficult to see and
may produce eye fatigue to insufficient contrast
For more detailed information on setting up a healthy work environment, write the American
National Standard for Human Factors Engineering of Visual Display Terminal Workstations –
ANSI-HFS Standard No. 100-1988 – The Human Factors Society, Inc. P.O. Box 1369, Santa
Monica, California 90406.
ASLCDmanual022803.p65 2/28/03, 9:44 AM13
14
* All specifications are subject to change without notice.
Specifications
emaNledoMemaNledoM
emaNledoM
emaNledoMemaNledoM V5DCLcnySuccA
yalpsiDDCLyalpsiDDCL
yalpsiDDCL
yalpsiDDCLyalpsiDDCL
epyTyalpsiDDCLTFT"51
)WxH(aerAyalpsiD"9.8x"9.11/mm1.822x1.403
oitaRtsartnoC)lacipyt(1:004
elgnAgniweiV021
o
001roh
o
)01>RC(rev
tupnIrewoPtupnIrewoP
tupnIrewoP
tupnIrewoPtupnIrewoP
egatloVV042-001
ycneuqerFzH06/05
gnitaRtnerruCA52.0-5.0
serutaeFlanoitarepOserutaeFlanoitarepO
serutaeFlanoitarepO
serutaeFlanoitarepOserutaeFlanoitarepO
sroloCyalpsiDsrolocnoillim61revO
noituloseR)mumixam(zH57ta867x4201AGX
ssenthgirBm/dc052
2
)lacipyt(
emiTesnopseR)lacipyt(sm22:fTsm8:rT
ecafretnIBGRgolanA
rotcennoCtupnIrotcennoCtupnI
rotcennoCtupnI
rotcennoCtupnIrotcennoCtupnIbus-Dnip-51
noitacificepSlacisyhPnoitacificepSlacisyhP
noitacificepSlacisyhP
noitacificepSlacisyhPnoitacificepSlacisyhP
)DxHxW(noisnemiD "9.7x"8.21x"6.31/mm002xmm5.523xmm643
thgieWteNsbl3.7/gk3.3
rewoPrewoP
rewoP
rewoPrewoP
noitpmusnocrewoP(W22mumixam)
noitalugeRnoitalugeR
noitalugeR
noitalugeRnoitalugeR
IME&ytefaS,EC,B-CCF,eimonogrE-VUT,SG-VUT,LU-C,LU
,B-CODnaidanaCRATSYGRENE
ASLCDmanual022803.p65 2/28/03, 9:44 AM14

15
Specifications –continued
emaNledoMemaNledoM
emaNledoM
emaNledoMemaNledoM V7DCLcnySuccA
yalpsiDDCLyalpsiDDCL
yalpsiDDCL
yalpsiDDCLyalpsiDDCL
epyTyalpsiDDCLTFT"71
)WxH(aerAyalpsiD"6.01x"3.31/mm4.072xmm9.733
oitaRtsartnoC)lacipyt(1:004
elgnAgniweiV)01>RC(rev°041roh°041
tupnIrewoPtupnIrewoP
tupnIrewoP
tupnIrewoPtupnIrewoP
egatloVV042-001
ycneuqerFzH06/05
gnitaRtnerruCA4.0-8.0
serutaeFlanoitarepOserutaeFlanoitarepO
serutaeFlanoitarepO
serutaeFlanoitarepOserutaeFlanoitarepO
sroloCyalpsiDsrolocnoillim61revO
noituloseR)mumixam(zH57ta4201x0821AGXS
ssenthgirBm/dc062
2
)lacipyt(
emiTesnopseR)lacipyt(sm21:fTsm4:rT
ecafretnIBGRgolanA
rotcennoCtupnIrotcennoCtupnI
rotcennoCtupnI
rotcennoCtupnIrotcennoCtupnIbus-Dnip-51
noitacificepSlacisyhPnoitacificepSlacisyhP
noitacificepSlacisyhP
noitacificepSlacisyhPnoitacificepSlacisyhP
)DxHxW(noisnemiD"9.7x"8.41x"7.41/mm5.002xmm573xmm473
thgieWteNsbl9.9/gk5.4
rewoPrewoP
rewoP
rewoPrewoP
noitpmusnocrewoP(W83)mumixam
noitalugeRnoitalugeR
noitalugeR
noitalugeRnoitalugeR
IME&ytefaS,EC,B-CCF,eimonogrE-VUT,SG-VUT,LU-C,LU
RATSYGRENE,B-CODnaidanaC
* All specifications are subject to change without notice.
ASLCDmanual022803.p65 2/28/03, 9:44 AM15
16
Specifications –continued
emaNledoMemaNledoM
emaNledoM
emaNledoMemaNledoM V9DCLcnySuccA
yalpsiDDCLyalpsiDDCL
yalpsiDDCL
yalpsiDDCLyalpsiDDCL
epyTyalpsiDDCLTFT"91
)WxH(aerAyalpsiD"9.11x"8.41/mm0.103xmm3.673
oitaRtsartnoC)lacipyt(1:005
elgnAgniweiV)01>RC(rev°071roh°071
tupnIrewoPtupnIrewoP
tupnIrewoP
tupnIrewoPtupnIrewoP
egatloVV042-001
ycneuqerFzH06/05
gnitaRtnerruCA5.0-9.0
serutaeFlanoitarepOserutaeFlanoitarepO
serutaeFlanoitarepO
serutaeFlanoitarepOserutaeFlanoitarepO
sroloCyalpsiDsrolocnoillim61revO
noituloseR)mumixam(zH57ta4201x0821AGXS
ssenthgirBm/dc052
2
)lacipyt(
emiTesnopseR)lacipyt(sm01:fTsm51:rT
ecafretnIBGRgolanA
rotcennoCtupnIrotcennoCtupnI
rotcennoCtupnI
rotcennoCtupnIrotcennoCtupnIbus-Dnip-51
noitacificepSlacisyhPnoitacificepSlacisyhP
noitacificepSlacisyhP
noitacificepSlacisyhPnoitacificepSlacisyhP
)DxHxW(noisnemiD"1.9x"4.61x"5.61/mm5.032xmm714xmm814
thgieWteNsbl1.61/gk3.7
rewoPrewoP
rewoP
rewoPrewoP
noitpmusnocrewoP(W64)mumixam
noitalugeRnoitalugeR
noitalugeR
noitalugeRnoitalugeR
IME&ytefaS,EC,B-CCF,eimonogrE-VUT,SG-VUT,LU-C,LU
RATSYGRENE,B-CODnaidanaC
* All specifications are subject to change without notice.
ASLCDmanual022803.p65 2/28/03, 9:44 AM16
17
Troubleshooting
melborPsutatStnerruCydemeR
oN
erutciP
NODEL· ottsartnocdnassenthgirbtsujda,DSOgnisU
.sgnittestluafedriehtotteserromumixam
FFODEL· .hctiwsrewopehtkcehC
·detcennocylreporpsidrocrewopCAfikcehC
.rotinomehtot
syalpsidDEL
rolocrebma
·ylreporpsielbaclangisoedivfikcehC
.rotinomfokcabehttadetcennoc
·.NOsimetsysretupmocforewopehtfikcehC
lamronbA
erutciP
erutciPelbatsnU· retpadascihpargfonoitacificepsehtfikcehC
ebyamhcihwecnailpmocnisirotinomdna
.hctamsimycneuqerflangistupniehtgnisuac
,gnissimsiyalpsiD
ro,tfihsretnec
ootrollamsoot
yalpsidniegral
ezis
·-KCOLC,KCOLC,NOITULOSERtsujda,DSOgnisU
-nonhtiwNOITISOP-VdnaNOITISOP-H,ESAHP
.slangisdradnats
·neercs-llufgnissimfoesacni,DSOgnisU
rehtoronoituloserrehtotcelesesaelp,egami
.gnimithserferlacitrev
·ehtgnitsujdaretfasdnoceswefaroftiaW
rognignahcerofebegamiehtfoezis
gnirewoproelbaclangisehtgnitcennocsid
.rotinomehtFFO
ASLCDmanual022803.p65 2/28/03, 9:44 AM17

18
References
NEC-Mitsubishi Monitor Customer Service & SupportNEC-Mitsubishi Monitor Customer Service & Support
NEC-Mitsubishi Monitor Customer Service & SupportNEC-Mitsubishi Monitor Customer Service & Support
NEC-Mitsubishi Monitor Customer Service & Support
Customer Service and Technical Support:
(800) 632-4662
Fax: (800) 695-3044
Parts and Accessories/Macintosh
Cable Adapter: (888) NEC-MITS [888-632-6487]
Customer Service Policies & Processes: http://www.necmitsubishi.com/
css/ServicePolicies/ServicePolicies.htm
Online Technical Support
Knowledge Base: http://www.necmitsubishi.com/
css/knowledgebase.cfm
Customer Service & Technical
Support Email: http://www.necmitsubishi.com/css/techform.htm
Sales and Product InformationSales and Product Information
Sales and Product InformationSales and Product Information
Sales and Product Information
Sales Information Line (888) NEC-MITS [888-632-6487]
Canadian Customers (866) 771-0266, Ext#: 4037
Government Sales (800) 284-6320
Government Sales email gov@necmitsubishi.com
Rebate Status InformationRebate Status Information
Rebate Status InformationRebate Status Information
Rebate Status Information
NEC Rebate Status www.rebatesHQ.com or 866-765-5696
Mitsubishi Rebate Status www.rebatesHQ.com or 877-405-4692
Electronic ChannelsElectronic Channels
Electronic ChannelsElectronic Channels
Electronic Channels
World Wide Web: http://www.necmitsubishi.com
Product Registration:
http://www.necmitsubishi.com/productregistration
European Operations: http://www.nec-mitsubishi.com
WindowsWindows
WindowsWindows
Windows
®®
®®
®
95/98/Me/2000/XP INF File: 95/98/Me/2000/XP INF File:
95/98/Me/2000/XP INF File: 95/98/Me/2000/XP INF File:
95/98/Me/2000/XP INF File:
http://
www.necmitsubishi.com and select
“Drivers and Downloads”
ASLCDmanual022803.p65 2/28/03, 9:44 AM18

19
Limited Warranty
NEC-Mitsubishi Electronics Display of America, Inc. (hereinafter “NMD-A”) warrants this Product to
be free from defects in material and workmanship and, subject to the conditions set forth below,
agrees to repair or replace (at NMD-A’s sole option) any part of the enclosed unit which proves
defective for a period of three (3) years from the date of first consumer purchase. Spare parts are
warranted for ninety (90) days. Replacement parts or unit may be new or refurbished and will meet
specifications of the original parts or unit.
This warranty gives you specific legal rights and you may also have other rights, which vary from state
to state. This warranty is limited to the original purchaser of the Product and is not transferable. This
warranty covers only NMD-A-supplied components. Service required as a result of third party
components is not covered under this warranty. In order to be covered under this warranty, the
Product must have been purchased in the U.S.A. or Canada by the original purchaser. This warranty
only covers Product distribution in the U.S.A. or Canada by NMD-A. No warranty service is provided
outside of the U.S.A. or Canada. Proof of Purchase will be required by NMD-A to substantiate date
of purchase. Such proof of purchase must be an original bill of sale or receipt containing name and
address of seller, purchaser, and the serial number of the product.
It shall be your obligation and expense to have the Product shipped, freight prepaid, or delivered to
the authorized reseller from whom it was purchased or other facility authorized by NMD-A to render
the services provided hereunder in the original package. All Products returned to NMD-A for service
MUST have prior approval, which may be obtained by calling 1-800-632-4662. The Product shall not
have been previously altered, repaired, or serviced by anyone other than a service facility authorized
by NMD-A to render such service, the serial number of the product shall not have been altered or
removed. In order to be covered by this warranty the Product shall not have been subjected to
displaying of fixed images for long periods of time resulting in image persistence (afterimage
effects), image burn-in, accident, misuse or abuse or operated contrary to the instructions contained
in the User’s Manual. Any such conditions will void this warranty.
NMD-A SHALL NOT BE LIABLE FOR DIRECT, INDIRECT, INCIDENTAL, CONSEQUENTIAL, OR OTHER
TYPES OF DAMAGES RESULTING FROM THE USE OF ANY NMD-A PRODUCT OTHER THAN THE
LIABILITY STATED ABOVE. THESE WARRANTIES ARE IN LIEU OF ALL OTHER WARRANTIES EXPRESS OR
IMPLIED, INCLUDING, BUT NOT LIMITED TO, THE IMPLIED WARRANTIES OF MERCHANTABILITY OR
FITNESS FOR A PARTICULAR PURPOSE. SOME STATES DO NOT ALLOW THE EXCLUSION OF IMPLIED
WARRANTIES OR THE LIMITATION OR EXCLUSION OF LIABILITY FOR INCIDENTAL OR CONSEQUEN-
TIAL DAMAGES SO THE ABOVE EXCLUSIONS OR LIMITATIONS MAY NOT APPLY TO YOU.
This Product is warranted in accordance with the terms of this limited warranty. Consumers are
cautioned that Product performance is affected by system configuration, software, the application,
customer data, and operator control of the system, among other factors. While NMD-A Products are
considered to be compatible with many systems, specific functional implementation by the custom-
ers of the Product may vary. Therefore, suitability of a Product for a specific purpose or application
must be determined by consumer and is not warranted by NMD-A.
For the name of your nearest authorized NEC-Mitsubishi Electronics Display service facility, contact
NEC-Mitsubishi Electronics Display of America at 1-800-632-4662.
ASLCDmanual022803.p65 2/28/03, 9:44 AM19
20
Declaration of the Manufacturer
We hereby certify that the color monitor
LCD5V (K15AN), LCD7V (K17AN),
LCD9V (K19BN)
are in compliance with
Council Directive 73/23/EEC:
– EN 60950
Council Directive 89/336/EEC:
– EN 55022
– EN 61000-3-2
– EN 61000-3-3
– EN 55024
and marked with
NEC-Mitsubishi Electric Visual
Systems Corporation
4-13-23, Shibaura,
Minato-Ku
Tokyo 108-0023, Japan
ASLCDmanual022803.p65 2/28/03, 9:44 AM20
21
AFIN D’ÉVITER TOUT RISQUE D’INCENDIE OU D’ÉLECTROCUTION, NE PAS EXPOSER CET APPAREIL À LA PLUIE OU À
L’HUMIDITÉ. NE PAS UTILISER LA FICHE D’ALIMENTATION POLARISÉE AVEC UNE PRISE DE CORDON DE RALLONGE
OU AUTRE PRISE SAUF SI LES BROCHES PEUVENT ÊTRE ENTIÈREMENT INTRODUITES.
NE PAS OUVRIR LE BOÎTIER, LEQUEL CONTIENT DES COMPOSANTS À HAUTE TENSION. CONFIER TOUS TRAVAUX
À DU PERSONNEL TECHNIQUE QUALIFIÉ.
AVERTISSEMENT
ATTENTION
RISQUE DE DÉCHARGE ÉLECTRIQUE • NE PAS OUVRIR
ATTENTION : POUR ÉVITER TOUT RISQUE D'ÉLECTROCUTION, NE PAS OUVRIR LE COUVERCLE (L'ARRIÈRE). À L'INTÉRIEUR, AUCUNE
PIÈCE NE NÉCESSITE L'INTERVENTION DE L'UTILISATEUR. EN CAS DE PROBLÈME, S'ADRESSER À DU PERSONNEL TECHNIQUE QUALIFIÉ.
Ce symbole est une mise en garde contre les risques d'électrocution que présentent certaines parties dépourvues
d'isolation à l'intérieur de l'appareil. Il est donc dangereux d'établir le moindre contact avec ces parties
.
Ce symbole prévient l'utilisateur que des directives d'utilisation et de maintenance de cet appareil sont fournies avec
ce guide d’utilisateur. Par conséquent, celles-ci doivent être lues attentivement pour éviter tout incident.
Déclaration de conformité – Département des Communications du Canada
DOC : Cet appareil numérique de classe B respecte toutes les exigences du Règlement
sur le matériel à l'origine d'interférences du Canada.
C-UL : Ce produit porte la marque «C-UL» et est conforme aux règlements de sécurité
canadiens selon CAN/CSA C22.2 No. 950.
Informations FCC
1.
Utiliser les câbles spécifiés fournis avec les moniteur couleur
LCD5V
(K15AN), LCD7V (K17AN), ou LCD9V (K19BN)
afin
de ne pas provoquer d'interférences avec la réception radio et télévision
.
(1) Prière d'utiliser le câble d'alimentation fourni ou équivalent pour assurer la conformité FCC.
(2) Veuillez utiliser le câble de signal vidéo blindé fourni (LCD9V).
L'utilisation d'autres câbles et adaptateurs peut provoquer des interférences avec la réception radio et
télévision.
2.
Cet appareil a été testé et s’avère conforme avec les spécifications d'équipements de Classe B, section 15 de la
réglementation FCC. Ces spécifications ont été établies pour garantir une protection raisonnable contre les
interférences nuisibles dans une installation résidentielle. Cet appareil génère, utilise et peut émettre des fréquences
radio et, s'il n'est pas installé et utilisé selon les directives de ce guide, il peut perturber les communications radio.
Cependant, il n'est pas garanti qu'aucune interférence ne se produira dans une installation donnée.
Si cet appareil provoque des interférences nuisibles à la réception radio ou télévision, ce que vous pouvez déterminer
en allumant et en éteignant l'appareil, essayez de remédier au problème en prenant une ou plusieurs des mesures
suivantes :
• Réorienter ou repositionner l'antenne de réception.
• Augmenter la distance entre l'appareil et le récepteur.
• Connecter l'appareil à une prise de courant sur un circuit différent de celui sur lequel le récepteur
est connecté.
• Consulter son revendeur ou un technicien radio/TV pour obtenir de l'aide.
Si nécessaire, l'utilisateur doit contacter le revendeur ou un technicien radio/TV afin d'obtenir des informations
supplémentaires. L'utilisateur peut se procurer le livret utile suivant, préparé par la Federal Communications Commission
: «How to Identify and Resolve Radio-TV Interference Problems» (Comment cerner et résoudre les problèmes
d’interférences radio/TV). Ce livret est disponible auprès du U.S. Government Printing Office, Washington, D.C.,
20402, Stock No. 004-000-00345-4.
ASLCDmanual022803.p65 2/28/03, 9:44 AM21

22
Nous vous félicitons d’avoir choisi le modèle NEC AccuSync LCD5V, LCD7V, ou LCD9V, un
moniteur à cristaux liquides TFT couleur hautes performances. Le moniteur AccuSync
LCD5V/LCD7V/LCD9V offre des images couleur sans scintillement à des résolutions
optionnelles. Le modèle AccuSync LCD5V/LCD7V/LCD9V est un moniteur à cristaux liquides
TFT intelligent, basé sur un microprocesseur et conçu de manière ergonomique, compatible
avec la plupart des normes d’affichage RVB (Rouge, Vert, Bleu) analogiques, y compris PS/V,
PS/2, optionnelles pour les signaux des familles Apple Macintosh Centris, Quadra et
MacintoshII. Le moniteur à cristaux liquides permet d’afficher des graphiques aux couleurs
vives et éclatantes avec des cartes vidéo VGA, SVGA, XGA (non entrelacé), SXGA (LCD7V/
LCD9V) et la plupart des cartes couleur compatibles Macintosh.
· Le moniteur est capable de fonctionner correctement même en cas de mise à niveau de
carte vidéo ou de logiciel grâce à la large gamme de compatibilité de balayage
automatique n’exigeant pas l’achat d’un nouveau moniteur.
·LCD5V: Le microprocesseur interne commande numériquement le balayage automatique
pour les fréquences de balayage horizontal comprises entre 31,5 et 61kHz, et les
fréquences de balayage vertical comprises entre 56 Hz et 75Hz. Dans chaque mode de
fréquence, l’ensemble de circuits basé sur le microprocesseur permet au moniteur de
fonctionner avec la précision d’une fréquence fixe.
•LCD7V: Le microprocesseur interne commande numériquement le balayage automatique
pour les fréquences de balayage horizontal comprises entre 31.5 Hz et 81kHz, et les
fréquences de balayage vertical comprises entre 56 Hz et 75Hz. Dans chaque mode de
fréquence, l’ensemble de circuits basé sur le microprocesseur permet au moniteur de
fonctionner avec la précision d’une fréquence fixe.
•LCD9V: Le microprocesseur interne commande numériquement le balayage automatique
pour les fréquences de balayage horizontal comprises entre 31,5 kHz et 81kHz, et les
fréquences de balayage vertical comprises entre 56 Hz et 75Hz. Dans chaque mode de
fréquence, l’ensemble de circuits basé sur le microprocesseur permet au moniteur de
fonctionner avec la précision d’une fréquence fixe.
·La mémoire résidente permet de stocker les réglages d’usine par défaut ainsi que
d’autres paramètres utilisateur.
·LCD5V: La résolution maximale pouvant être obtenue est XGA 1024x768.
·LCD7V/LCD9V: La résolution maximale pouvant être obtenue est SXGA 1280 x 1024.
·La conception compacte et soignée du coffret préserve l’espace de votre bureau, qui
apparaît net et rangé.
Fonctions
ASLCDmanual022803.p65 2/28/03, 9:44 AM22
23
La boîte* de votre nouveau moniteur NEC LCD contient :
• Moniteur AccuSync LCD5V, LCD7V, ou LCD9V
•Cordon d'alimentation
• Manuel de l’utilisateur
• Câble de signal vidéo (LCD9V)
* Ne pas oublier de conserver la boîte et le matériel d'emballage d'origine pour transporter ou expédier le moniteur.
Contenu
Câble de signal vidéo (LCD9V)
Cordon
d'alimentation
Manuel de l’utilisateur
AccuSync
TM
LCD5V/LCD7V/LCD9V
ASLCDmanual022803.p65 2/28/03, 9:44 AM23
24
Retirer
1. Enfoncez le crochet comme indiqué.
2. Enlevez la base dans la direction des flèches.
Fixer / Retirer la Base (LCD5V/LCD7V)
Installer
1. Alignez les quatre crochets situés sur le fond du moniteur avec les fentes
correspondantes situées sur le fond de la base.
2. Glissez la base dans la direction des flèches.
Mise en marche rapide
Assure complètement le verrou est accroché.
Position de
crochet
enlevez la direction
ASLCDmanual022803.p65 2/28/03, 9:44 AM24
25
Mise en marche rapide (suite)
Réglage de la position de l’écran
Pour obtenir la meilleure position de visualisation, vous pouvez ajuster l’inclinaison du
moniteur en saisissant ses bords à deux mains, comme indiqué dans l’illustration ci-dessous.
L’ inclinaison peut être ajustée de 30degrés vers le haut ou de 5degrés vers le bas, comme
l’indique la flèche.
Levez et baissez l’écran du moniteur (LCD9V)
Le moniteur peut être levé ou baissé en mode Paysage. Pour lever ou baisser l’écran, placez les
mains de chaque côté du moniteur et positionnez-le à la hauteur de votre choix.
NOTA: Manipule sur soin quand augmentant ou l’écran diminuant écran.
LCD9V: L’inclinaison peut être ajustée de
20degrés vers le haut ou de 5degrés vers
le bas, comme l’indique la flèche.
LCD5V/LCD7V: L’inclinaison peut être
ajustée de 30degrés vers le haut ou de
5degrés vers le bas, comme l’indique la
flèche.
20X
5X
ASLCDmanual022803.p65 2/28/03, 9:44 AM25
26
Mise en marche rapide (suite)
Branchement du cordon d’alimentation
·
Assurez-vous tout d’abord que le type de cordon d’alimentation utilisé convient à votre site.
·Ce moniteur est doté d’un boîtier d’alimentation universel lui permettant de fonctionner
dans des régions équipées en 100-240 V CA. Aucun réglage n’est requis par l’utilisateur.
·Branchez une extrémité du cordon d’alimentation au connecteur d’alimentation et
l’autre extrémité à une prise secteur CA appropriée.
• Si vous utilisez ce moniteur à AC125-240V, s'il vous plaît faites référence à section de
l'Usage Recommandée de ce manuel pour sélection adéquate d'AC pouvoir cordon.
Installation
Pour installer le moniteur sur votre système hôte, suivez la procédure ci-dessous:
1. Connectez le Câble Vidéo
a. Assurez-vous que le moniteur et l’ordinateur soient bien éteints.
b. Connectez le câble vidéo à l’ordinateur.
2. Connectez le cordon d’alimentation
Connectez le cordon d’alimentation sur le moniteur, puis sur une prise électrique CA
mise à terre comme il faut.
3. Rallumez le moniteur et l’ordinateur
Rallumez tout d’abord le moniteur, puis l’ordinateur.
4. Si le moniteur ne fonctionne pas correctement, reportez-vous à la section concernant la
localisation des pannes afin de diagnostiquer le problème.
LCD9V
LCD5V/LCD7V
Cordon
d'alimentation
Câble de
signal vidéo
ASLCDmanual022803.p65 2/28/03, 9:44 AM26
27
Modes regles a l’avance
Pour limiter les réglages des différents modes, le moniteur dispose de modes de réglage par
défaut le plus souvent utilisés comme indiqué dans le tableau ci-dessous. Pour un
ajustement optimal, l’utilisateur est encouragé à effectuer l’Auto-Programmation sous le
motif “Ecran Entier” de Windows ou en utilisant le motif. Si aucun mode réglé à l’avance ne
correspond à vos réglages, vous pouvez enregistrer vos modes préférés dans les modes
utilisateur. Le moniteur peut stocker jusqu’à 9modes utilisateur différents. La seule
condition requise pour pouvoir enregistrer un mode utilisateur est que les nouvelles
informations d’affichage doivent avoir une différence de 1kHz de fréquence horizontale et
1Hz de fréquence verticale, ou que les polarités de signal synchrone soient différentes de
celles des modes par défaut.
LCD5V
edoMedoM
edoM
edoMedoMnoituloséRnoituloséR
noituloséR
noituloséRnoituloséR
.qérF.H.qérF.H
.qérF.H
.qérF.H.qérF.H
)zHk()zHk(
)zHk(
)zHk()zHk(
ednaBednaB
ednaB
ednaBednaB
etnasapetnasap
etnasap
etnasapetnasap
)zHM()zHM(
)zHM(
)zHM()zHM(
étiraloPétiraloP
étiraloP
étiraloPétiraloP
HH
H
HHVV
V
VV
1AGV053x02707zH74,13223,82+–
2AGV004x02707zH74,13223,82–+
3AGV084x04606zH74,13571,52––
4CAM084x04666zH00,5342,03––
5ASEV084x04627zH68,735,13––
6ASEV084x04657zH05,735,13––
7ASEV006x00865zH61,530,63++
8ASEV006x00806zH88,730,04++
9ASEV006x00857zH88,645,94++
01ASEV006x00827zH80,840,05++
11CAM426x23857zH27,94382,75––
21ASEV867x420106zH63,840,56––
31ASEV867x420107zH84,650,57––
41ASEV867x420157zH20,0657,87++
Commandes
ASLCDmanual022803.p65 2/28/03, 9:44 AM27
28
Commandes (suite)
LCD7V
edoMedoM
edoM
edoMedoMnoituloséRnoituloséR
noituloséR
noituloséRnoituloséR
.qérF.H.qérF.H
.qérF.H
.qérF.H.qérF.H
)zHk()zHk(
)zHk(
)zHk()zHk(
ednaBednaB
ednaB
ednaBednaB
etnasapetnasap
etnasap
etnasapetnasap
)zHM()zHM(
)zHM(
)zHM()zHM(
étiraloPétiraloP
étiraloP
étiraloPétiraloP
HH
H
HHVV
V
VV
1AGV004x02707zH74,13223,82–+
2AGV084x04606zH74,13571,52––
3CAM084x04666zH00,5342,03––
4ASEV084x04627zH68,735,13––
5ASEV084x04657zH05,735,13––
6ASEV006x00865zH61,530,63++
7ASEV006x00806zH88,730,04++
8ASEV006x00857zH88,645,94++
9ASEV006x00827zH80,840,05++
01CAM426x23857zH27,94382,75––
11ASEV867x420106zH63,840,56––
21ASEV867x420107zH84,650,57––
31ASEV867x420157zH20,0657,87++
41ASEV4201x082106zH0,460,801++
51ASEV4201x082157zH0,080,531++
61ASEV468x251157zH5,760,801++
71ASEV069x082106zH0,060,801++
LCD9V
edoMedoM
edoM
edoMedoMnoituloséRnoituloséR
noituloséR
noituloséRnoituloséR
.qérF.H.qérF.H
.qérF.H
.qérF.H.qérF.H
)zHk()zHk(
)zHk(
)zHk()zHk(
ednaBednaB
ednaB
ednaBednaB
etnasapetnasap
etnasap
etnasapetnasap
)zHM()zHM(
)zHM(
)zHM()zHM(
étiraloPétiraloP
étiraloP
étiraloPétiraloP
HH
H
HHVV
V
VV
1AGV004x02707zH74,13223,82–+
2AGV084x04606zH74,13571,52––
3CAM084x04666zH00,5342,03––
4ASEV084x04627zH68,735,13––
5ASEV084x04657zH05,735,13––
6ASEV006x00865zH61,530,63++
7ASEV006x00806zH88,730,04++
8ASEV006x00857zH88,645,94++
9ASEV006x00827zH80,840,05++
01CAM426x23857zH27,94382,75––
11ASEV867x420106zH63,840,56––
21ASEV867x420107zH84,650,57––
31ASEV867x420157zH20,0657,87++
41ASEV4201x082106zH0,460,801++
51ASEV4201x082157zH0,080,531++
61ASEV468x251157zH5,760,801++
71ASEV069x082106zH0,060,801++
ASLCDmanual022803.p65 2/28/03, 9:44 AM28
29
Boutons de réglage
Boutons du panneau avant
1. Interrupteur d’alimentation: Permet la mise sous tension ou hors tension
2. Voyant d’alimentation: S’allume pour indiquer la mise sous tension
3. Sélectionner MENU : Pour quitter et entrer dans le menu OSD
4. Sélectionner : Permet de descendre dans le menu
5. – :Permet de diminuer la valeur du paramètre de l’affichage à l’écran sélectionné
pour réglage
– : Choisissez la page de MENU OSD précédente
6. + : Permet d’augmenter la valeur du paramètre de l’affichage à l’écran sélectionné
pour réglage
+ : Choisissez la page de MENU OSD suivante
AUTO:Touche de raccourci réglage “AUTO” sans affichage OSD
Fonctionnement standard de l’affichage à l’écran
1. Appuyez sur la touche MENU pour activer le menu OSD, quand OSD n’est pas affiché.
2. Utilisez la touche de Sélection pour vous déplacer vers le bas travers le menu de façon
cyclique. Le paramètre sélectionné est mis en surbrillance.
3. Utilisez alors ‘‘+” ou ‘‘–” pour augmenter ou diminuer la valeur du paramètre, ou
effectuer une sélection parmi différentes options.
4. Pour quitter l’affichage à l’écran à tout moment, appuyez sur MENU bouton. Si vous
n’appuyez sur aucun bouton pendant un certain temps, l’affichage à l’écran disparaît
automatiquement.
5. Quand OSD n’est pas affiché, appuyez sur la touche ‘‘+’’ pour démarrer le Réglage
Automatique.
MENU ▼ – +/AUTO
o
2
3
4
5
6
1
Commandes (suite)
ASLCDmanual022803.p65 2/28/03, 9:45 AM29
30
Luminosité Permet d’augmenter ou de diminuer la luminosité.
Contraste Permet d’augmenter ou de diminuer le contraste.
Contraste Auto
Appuyez sur la touche “+” pour lancer le contraste auto.
Color Temperature Appuyez sur les boutons “+” ou “-” pour choisir les fonctions
5000, 6500, 7500, 9300 et USER. Seul UTILISAT. permet
ensuite d’effectuer des réglages de CONTROLE-R/V/B.
Largeur Pour augmenter ou reduire la taille de l’image.
FinPermet d’augmenter ou de diminuer le parasitage de
l’image.
Gauche / Droite Permet de décaler l’affichage vers la gauche ou vers la
droite.
Haut / Bas
Permet de décaler l’affichage vers le haut ou vers le bas.
Réglage Auto Appuyez sur “+” pour activer cette fonction. L’ajustement
automatique règle automatiquement la position verticale, la
position horizontale, la taille horizontale, la phase et le
contraste, l’ensemble du processus durant environ 5
secondes.
Tons Naturels Pour regler le ton chair de la couleur
Teinte Pour regler la teinte ou la couleur.
Saturation Pour regler la saturation de couleur.
Langue Permet de choisir la langage (anglais, français, italien,
allemand ou espagnol).
Préréglage Usine
Permet de rétablir les réglages par défaut du moniteur.
Extinction OSD
Pour regler la duree de desactivation automatique de l’OSD.
OSD Gauche / Droite Pour bouger l’OSD vers la droite de l’écran il faut appuyer sur
le bouton “+”; pour aller vers la gauche de l’écran il faut
appuyer sur le bouton “-”.
OSD Haut / Bas Pour bouger l’OSD vers le haut de l’écran appuyez sur le
bouton “+”; pour bouger l’OSD vers le bas appuyez sur le
bouton “-”.
Informations Indique les valeurs courantes de résolution ou de fréquence
verticale et de nombre de synchronisations réglé à l’avance.
Description de la fonction d’affichage à l’écran
Commandes (suite)
ASLCDmanual022803.p65 2/28/03, 9:45 AM30
31
Commandes (suite)
Économiseur d’énergie
Le moniteur sera conduit dans le mode “Economie d’Energie’’ par le signal de contrle depuis
le contrleur d’affichage comme indiqu par le voyant indicateur d’allumage de couleur ambre.
Les états de l’économiseur d’énergie seront maintenus jusqu’à la détection d’un signal de
contrôle ou jusqu’à l’activation du clavier ou de la souris. Le temps de recouvrement depuis
l’état ARRET sur l’état MARCHE est d’environs 5 secondes.
DDC
Pour faciliter l’installation, le moniteur peut utiliser la fonction «Plug and Play» si votre
système prend également en charge le protocole DDC. DDC (Display Data Channel) est un
protocole de communication dans lequel le moniteur informe automatiquement le système
hôte de ses capacités, par exemple des résolutions prises en charge et de la synchronisation
correspondante. Ce moniteur prend en charge les normes DDC2B.
LCD7V/LCD9V
tatÉtatÉ
tatÉ
tatÉtatÉ
noitammosnoCnoitammosnoC
noitammosnoC
noitammosnoCnoitammosnoC
eigrené'deigrené'd
eigrené'd
eigrené'deigrené'd
LEDepmaLLEDepmaL
LEDepmaL
LEDepmaLLEDepmaL
NO
)émulla(
lamroNtreV
FFOevitcA
)zevitcaséD(
W3<erbmA
tatÉtatÉ
tatÉ
tatÉtatÉ
noitammosnoCnoitammosnoC
noitammosnoC
noitammosnoCnoitammosnoC
eigrené'deigrené'd
eigrené'd
eigrené'deigrené'd
LEDepmaLLEDepmaL
LEDepmaL
LEDepmaLLEDepmaL
NO
)émulla(
lamroNtreV
FFOevitcA
)zevitcaséD(
W2<erbmA
LCD5V
ASLCDmanual022803.p65 2/28/03, 9:45 AM31
32
Usage recommandé
Consignes de sécurité et d’entretien
POUR UN FONCTIONNEMENT OPTIMAL, PRIÈRE DE NOTER CE QUI SUIT POUR LE
RÉGLAGE ET L'UTILISATION DU MONITEUR COULEUR LCD
:
••
••
•
NE PAS OUVRIR LE MONITEUR. NE PAS OUVRIR LE MONITEUR.
NE PAS OUVRIR LE MONITEUR. NE PAS OUVRIR LE MONITEUR.
NE PAS OUVRIR LE MONITEUR. Aucune pièce intérieure ne nécessite l'intervention de l'utilisateur, et l'ouverture
ou la dépose des couvercles peut entraîner des risques de décharges électriques dangereuses ou d'autres
risques. Confier tous travaux à du personnel technique qualifié.
••
••
• Ne pas renverser de liquides dans le boîtier, ni utiliser le moniteur près de l'eau.
••
••
•
Ne pas introduire d'objets de quelque nature que ce soit dans les fentes du boîtier car ceux-ci pourraient toucher
des endroits sous tension dangereuse, ce qui peut provoquer des blessures, voire être fatal, ou peut occasionner
une décharge électrique, un incendie ou une panne de l'appareil.
••
••
• Ne pas placer d'objets lourds sur le cordon d'alimentation. Un cordon endommagé peut occasionner une
décharge électrique ou un incendie.
••
••
• Ne pas placer cet appareil sur un chariot, un support ou une table inclinée ou instable, afin d'éviter que le
moniteur ne tombe, occasionnant de sérieux dommages au moniteur.
••
••
• Pour l'utilisation du moniteur LCD avec l'alimentation AC mondiale de 125-240 V, utiliser un cordon
d'alimentation qui correspond à la tension de l'alimentation fournie à la prise de courant AC. Le cordon
d'alimentation utilisé doit être agréé et en conformité avec les normes de sécurité de son pays. (Type H05VV-F à
utiliser sauf au Europe.)
••
••
• Au R, –U., utilisez avec ce moniteur un cordon d’alimrntation approuvé BS avec fiche moulée d’un fusible noir
(5A). Si un cordon d’alimentation n’a pas été fourni avec ce moniteur, veuillez contacter votre fournisseur.
••
••
• Ne placer aucun objet sur le moniteur et ne pas l’utiliser en extérieur.
••
••
• L’intérieur du tube fluorescent situé dans le moniteur contient du mercure. Pour l’élimination appropriée,
observez les règlements en vigueur dans votre région.
Débrancher immédiatement le moniteur de la prise murale et confier la réparation à du personnel technique qualifié
dans les cas suivants :
••
••
• Lorsque le cordon d'alimentation ou la fiche est endommagé(e).
••
••
• Si du liquide a été renversé ou des objets sont tombés à l'intérieur du moniteur.
••
••
• Si le moniteur a été exposé à la pluie ou à de l'eau.
••
••
• Si le moniteur est tombé ou le boîtier est endommagé.
••
••
• Si le moniteur ne fonctionne pas normalement en suivant les directives d'utilisation.
••
••
• Ne courbe pas le pouvoir du cordon.
• N’utilise pas votre écran dans de hautes températures humides poussiéreuses près d’huile ou.
• Ne couvre pas l’armoire fente ou usage rayonnai mauvaise chaleur.
• Regal toujours glass sur soin.
•
Si écran ou verre est rodé, ne supporter pas ne venir pas touche le liquide crystal et manche sur soin
.
••
••
•
Prévoir une aération suffisante autour du moniteur pour que la chaleur puisse se dissiper
correctement. Ne pas obstruer les ouvertures de ventilation ni placer le moniteur près d'un
radiateur ou autre source de chaleur. Ne rien poser sur le moniteur.
••
••
• La fiche du cordon d'alimentation est le moyen principal de débrancher le système de
l'alimentation. Le moniteur doit être installé à proximité d'une prise de courant facilement
accessible.
••
••
•
Manipuler avec soin lors du transport. Conserver l'emballage pour le transport.
Persistance de l’image
la persistance de l’image se présente lorsqu’une image résiduelle ou “fantôme” d’une image précédente reste
visible sur l’écran. Contrairement aux moniteurs à tube cathodique, la persistance de le l’image des moniteurs LCD
n’est pas permanente, mais l’affichage d’images constantes pendant une longue période de temps doit être évitée.
Pour remédier à la persistance de l’image, mettez le moniteur hors tension pendant une durée égale à celle de
l’affichage de l’image précédente. Par exemple, si une image est restée affichée sur l’écran pendant une heure et
qu’il reste une image résiduelle, le moniteur doit être mis hors tension pendant une heure pour effacer l’image.
NOTA: NOTA:
NOTA: NOTA:
NOTA: Comme pour tous les équipements d’affichage personnels, NEC-Mitsubishi Electronics Display recommande
l’utilisation d’un économiseur d’écran mobile à des intervalles réguliers, à chaque fois que l’écran est en veille, ou
d’éteindre le moniteur lorsqu’il n’est pas utilisé.
AVERTISSEMENT
ASLCDmanual022803.p65 2/28/03, 9:45 AM32
33
LA MODIFICATION DE LA POSITION ET DU RÉGLAGE DU MONITEUR PEUT RÉDUIRE LA
FATIGUE DES YEUX, DES ÉPAULES ET DE LA NUQUE. OBSERVER LES DIRECTIVES CI-APRÈS
LORS DU POSITIONNEMENT DU MONITEUR :
Usage recommandé (suite)
••
••
• Pour une performance optimale, laissez le moniteur se réchauffer
pendant 20 minutes.
••
••
• Régler la hauteur du moniteur de sorte que le dessus de l'écran soit
au niveau ou légèrement en-dessous du niveau des yeux. Les yeux
doivent regarder légèrement vers le bas lorsque l'on regarde le
milieu de l'écran.
••
••
• Positionner le moniteur à une distance minimale de 40 cm (16 po) et
maximale de 70 cm (28 po) des yeux. La distance optimale est de 50 cm
(20 po).
••
••
• Reposer ses yeux régulièrement en regardant vers un objet situé à
au moins 6 m (20 pieds). Cligner régulièrement.
••
••
• Positionner le moniteur à un angle de 90° par rapport aux fenêtres et autres sources de lumière,
afin de réduire au maximum les reflets et l'éblouissement. Régler l'inclinaison du moniteur de sorte
que l'éclairage du plafond ne soit pas reflété sur l'écran.
••
••
• Si une lumière réfléchie rend la vision de l'écran difficile, utiliser un filtre anti-reflet.
••
••
• Nettoyer régulièrement le moniteur. Utiliser un chiffon sans peluches et non abrasif et une
solution de nettoyage sans alcool, neutre, non abrasive ou un produit nettoyant pour vitres pour
éliminer au maximum la poussière.
••
••
• Régler les commandes de luminosité et de contraste du moniteur pour améliorer la lisibilité.
••
••
• Utiliser un support de document placé près de l'écran.
••
••
• Positionner ce que l'on regarde le plus souvent (l'écran ou les documents de référence)
directement devant soi pour réduire au maximum les mouvements de la tête lorsque l'on
dactylographie.
••
••
• Pour éviter la persistance d’images (images rémanentes), n’affichez pas des motifs fixes sur le
moniteur pendant de longues périodes.
••
••
• Consulter régulièrement un ophtalmologiste.
Ergonomie
Pour optimiser les avantages ergonomiques, observez les directives suivantes :
• Utiliser les commandes de format et position préprogrammées avec signaux standard .
• Utiliser le réglage couleur et les commandes gauche/droite préprogrammés.
•
Utiliser des signaux non entrelacés avec fréquence de rafraîchissement vertical de 60 à 75 Hz.
• Ne pas utiliser la couleur bleu primaire sur fond foncé car cela rend la lecture difficile et peut
occasionner de la fatigue oculaire en raison de contraste insuffisant.
Pour des informations plus détaillées sur l'établissement d'un environnement de travail sain, écrire à
American National Standard for Human Factors Engineering of Visual Display Terminal Workstations -
ANSI-HFS Standard No. 100-1988 - The Human Factors Society, Inc. P.O. Box 1369, Santa Monica,
California 90406.
ASLCDmanual022803.p65 2/28/03, 9:45 AM33
34
Spécifications
* Spécifications pouvant être soumises à des modifications sans préavis.
elèdoMelèdoM
elèdoM
elèdoMelèdoM V5DCLcnySuccA
xuatsircàegahciffAxuatsircàegahciffA
xuatsircàegahciffA
xuatsircàegahciffAxuatsircàegahciffA
sediuqilsediuqil
sediuqil
sediuqilsediuqil
egahciffa'depyTsecuop51TFTsediuqilxuatsirC
)LxH(egahciffa'denoZop9,8xop9,11/mm1,822x1,403
etsartnocedtroppaR)euqipyt(1:004
noisivedelgnA021
o
001roh
o
)01>RC(rev
noitatnemila'deertnEnoitatnemila'deertnE
noitatnemila'deertnE
noitatnemila'deertnEnoitatnemila'deertnE
egatloVV042-001
ecneuqerFzH06/05
lanimontnaruoCA52.0-5.0
edseuqitsirétcaraCedseuqitsirétcaraC
edseuqitsirétcaraC
edseuqitsirétcaraCedseuqitsirétcaraC
tnemennoitcnoftnemennoitcnof
tnemennoitcnof
tnemennoitcnoftnemennoitcnof
egahciffa'dsrueluoCsrueluocedsnoillim61edsulP
noituloséR)mumixam(zH57à867x4201AGX
étisonimuLm/dc052
2
)euqipyt(
esnopéredspmeT)euqipyt(sm22:fTsm8:rT
ecafretnIeuqigolanaBVR
eértne'druetcennoCeértne'druetcennoC
eértne'druetcennoC
eértne'druetcennoCeértne'druetcennoCsehcorb51àbus-D
selleirétamsnoitacificépSselleirétamsnoitacificépS
selleirétamsnoitacificépS
selleirétamsnoitacificépSselleirétamsnoitacificépS
)PxHxL(snoisnemiD op9,7xop8,21xop6,31/mm002xmm5,523xmm643
tensdioPsdiop3,7/gK3,3
noitatnemilAnoitatnemilA
noitatnemilA
noitatnemilAnoitatnemilA
noitammosnoC)mumixam(W22
noitatnemelgéRnoitatnemelgéR
noitatnemelgéR
noitatnemelgéRnoitatnemelgéR
secneréfretniteétirucéS
seuqiténgamortcelé
SG-VUT,LU-C,LU,eimonogrE-VUT,,EC,B-CCF
RATSYGRENE,B-CODnaidanaC
ASLCDmanual022803.p65 2/28/03, 9:45 AM34
35
Spécifications (suite)
* Spécifications pouvant être soumises à des modifications sans préavis.
elèdoMelèdoM
elèdoM
elèdoMelèdoM V7DCLcnySuccA
xuatsircàegahciffAxuatsircàegahciffA
xuatsircàegahciffA
xuatsircàegahciffAxuatsircàegahciffA
sediuqilsediuqil
sediuqil
sediuqilsediuqil
egahciffa'depyTsecuop71TFTsediuqilxuatsirC
)LxH(egahciffa'denoZop6,01xop3,31/mm4,072xmm9,733
etsartnocedtroppaR)euqipyt(1:004
noisivedelgnA)01>RC(rev°041roh°041
noitatnemila'deertnEnoitatnemila'deertnE
noitatnemila'deertnE
noitatnemila'deertnEnoitatnemila'deertnE
egatloVV042-001
ecneuqerFzH06/05
lanimontnaruoCA4.0-8.0
edseuqitsirétcaraCedseuqitsirétcaraC
edseuqitsirétcaraC
edseuqitsirétcaraCedseuqitsirétcaraC
tnemennoitcnoftnemennoitcnof
tnemennoitcnof
tnemennoitcnoftnemennoitcnof
egahciffa'dsrueluoCsrueluocedsnoillim61edsulP
noituloséR)mumixam(zH57à4201x0821AGXS
étisonimuLm/dc062
2
)euqipyt(
esnopéredspmeT)euqipyt(sm21:fTsm4:rT
ecafretnIeuqigolanaBVR
eértne'druetcennoCeértne'druetcennoC
eértne'druetcennoC
eértne'druetcennoCeértne'druetcennoCsehcorb51àbus-D
selleirétamsnoitacificépSselleirétamsnoitacificépS
selleirétamsnoitacificépS
selleirétamsnoitacificépSselleirétamsnoitacificépS
)PxHxL(snoisnemiD op9,7xop8,41xop7,41/mm5,002xmm573xmm473
tensdioPsdiop9,9/gK5,4
noitatnemilAnoitatnemilA
noitatnemilA
noitatnemilAnoitatnemilA
noitammosnoC)mumixam(W83
noitatnemelgéRnoitatnemelgéR
noitatnemelgéR
noitatnemelgéRnoitatnemelgéR
secneréfretniteétirucéS
seuqiténgamortcelé
SG-VUT,LU-C,LU,eimonogrE-VUT,,EC,B-CCF
RATSYGRENE,B-CODnaidanaC
ASLCDmanual022803.p65 2/28/03, 9:45 AM35
36
Spécifications (suite)
* Spécifications pouvant être soumises à des modifications sans préavis.
elèdoMelèdoM
elèdoM
elèdoMelèdoM V9DCLcnySuccA
xuatsircàegahciffAxuatsircàegahciffA
xuatsircàegahciffA
xuatsircàegahciffAxuatsircàegahciffA
sediuqilsediuqil
sediuqil
sediuqilsediuqil
egahciffa'depyTsecuop91TFTsediuqilxuatsirC
)LxH(egahciffa'denoZop9,11xop8,41/mm0,103xmm3,673
etsartnocedtroppaR)euqipyt(1:005
noisivedelgnA)01>RC(rev°071roh°071
noitatnemila'deertnEnoitatnemila'deertnE
noitatnemila'deertnE
noitatnemila'deertnEnoitatnemila'deertnE
egatloVV042-001
ecneuqerFzH06/05
lanimontnaruoCA5.0-9.0
edseuqitsirétcaraCedseuqitsirétcaraC
edseuqitsirétcaraC
edseuqitsirétcaraCedseuqitsirétcaraC
tnemennoitcnoftnemennoitcnof
tnemennoitcnof
tnemennoitcnoftnemennoitcnof
egahciffa'dsrueluoCsrueluocedsnoillim61edsulP
noituloséR)mumixam(zH57à4201x0821AGXS
étisonimuLm/dc052
2
)euqipyt(
esnopéredspmeT)euqipyt(sm01:fTsm51:rT
ecafretnIeuqigolanaBVR
eértne'druetcennoCeértne'druetcennoC
eértne'druetcennoC
eértne'druetcennoCeértne'druetcennoCsehcorb51àbus-D
selleirétamsnoitacificépSselleirétamsnoitacificépS
selleirétamsnoitacificépS
selleirétamsnoitacificépSselleirétamsnoitacificépS
)PxHxL(snoisnemiD op1,9xop4,61xop5,61/mm5,032xmm714xmm814
tensdioPsdiop1,61/gk3,7
noitatnemilAnoitatnemilA
noitatnemilA
noitatnemilAnoitatnemilA
noitammosnoC)mumixam(W64
noitatnemelgéRnoitatnemelgéR
noitatnemelgéR
noitatnemelgéRnoitatnemelgéR
secneréfretniteétirucéS
seuqiténgamortcelé
SG-VUT,LU-C,LU,eimonogrE-VUT,,EC,B-CCF
,B-CODnaidanaCRATSYGRENE
ASLCDmanual022803.p65 2/28/03, 9:45 AM36
37
emèlborPsruocnetatÉnoituloS
saP
egami'd
eémullatnayoV· alzelgér,narcé'làegahciffa'lededia'lÀ
uomumixamuaetsartnocelteétisonimul
.tuafédrapegalgérruelzeruatser
tnietétnayoV· .noitatnemila'druetpurretni'lzeifiréV
·tseACnoitatnemila'dnodroceleuqzeifireV
.ruetinomuaeilertnemetcerroc
tnatongilctnayoV· tseoédivlangisudelbâceleuqzeifiréV
.ruetinomuderèirra'làéhcnarbtnemetcerroc
·.noisnetsuostseruetanidro'leuqzeifiréV
egamI
elamrona
elbatsniegamI· ruetatpada'ledsnoitacificépsseliszeifiréV
el,semrofnoctnosruetinomudteeuqihparg
esiavuamenurennoisaccotnavuoperiartnoc
langisudecneuqérfedecnadnopserroc
.eértne'd
egahciffA
élacéd,tnauqnam
uo,ertnecua
uotitepport
ruopdnargport
elliatal
egahciffa'd
·zelgér,narcé'làegahciffa'lededia'lÀ
.ROHNOITISOP,ESAHP,.ROHELLIAT,NOITULOSER
nonxuangissedceva.TREVNOITISOPte
.dradnats
·ecnesba'dsacne,narcé'làegahciffa'lededia'lÀ
ertuaenuzennoitcelés,narcénielpegami'd
edialédertuanuuonoitulosér
.lacitrevtnemessihcîarfar
·sèrpasednocesseuqleuqerdnettazevedsuoV
edtnavaegami'ledelliatalétsujariova
eduo,langiselretcennocédeduoreifidom
.noisnetsrohruetinomelerttem
Dépannage
ASLCDmanual022803.p65 2/28/03, 9:45 AM37

38
Références
Service à la clientèle et assistance technique du moniteur NEC-MitsubishiService à la clientèle et assistance technique du moniteur NEC-Mitsubishi
Service à la clientèle et assistance technique du moniteur NEC-MitsubishiService à la clientèle et assistance technique du moniteur NEC-Mitsubishi
Service à la clientèle et assistance technique du moniteur NEC-Mitsubishi
Service à la clientèle et assistance technique:
(800) 632-4662
Télécopieur: (800) 695-3044
Pièces et accessoires/adaptateur
de câble Macintosh: (888) NEC-MITS [888-632-6487]
Politiques et processus du service
à la clientèle: http://www.necmitsubishi.com/
css/ServicePolicies/ServicePolicies.htm
Base de connaissance de l’assistance
technique en lign: http://www.necmitsubishi.com/css/
knowledgebase.cfm
Adresse électronique du service à la
clientèle et de l’assistance technique: http://www.necmitsubishi.com/css/techform.htm
Ventes et information produitVentes et information produit
Ventes et information produitVentes et information produit
Ventes et information produit
Ligne d’information sur les ventes: (888) NEC-MITS [888-632-6487]
Clientèle canadienne: (866) 771-0266, Ext#: 4037
Ventes au gouvernement: (800) 284-6320
Adresse électronique du service
des ventes au gouvernement: gov@necmitsubishi.com
Information sur les remisesInformation sur les remises
Information sur les remisesInformation sur les remises
Information sur les remises
Remises actuelles NEC: www.rebatesHQ.com or 866-765-5696
Remises actuelles Mitsubishi:
www.rebatesHQ.com or 877-405-4692
Courrier électroniqueCourrier électronique
Courrier électroniqueCourrier électronique
Courrier électronique
World Wide Web: http://www.necmitsubishi.com
Produit enregistré:
http://www.necmitsubishi.com/productregistration
Opérations Européennes: http://www.nec-mitsubishi.com
Fichier INF WindowsFichier INF Windows
Fichier INF WindowsFichier INF Windows
Fichier INF Windows
®®
®®
®
95/98/Me/2000/XP 95/98/Me/2000/XP
95/98/Me/2000/XP 95/98/Me/2000/XP
95/98/Me/2000/XP
::
::
:
http://
www.necmitsubishi.com et
sélectionne “Downloads and Drivers”
ASLCDmanual022803.p65 2/28/03, 9:45 AM38

39
Garantie limitée
NEC-Mitsubishi Electronics Display of America, Inc. (ci-dessous dénommé « NMD-A ») garantit ce
produit exempt de tout défaut de matériel et de fabrication et, conformément aux conditions
exposées ci-dessous, accepte de réparer ou remplacer (à la seule discrétion de NMD-A) toute pièce
de l’appareil ci-joint, prouvée comme étant défectueuse, et ce pendant une période de trois (3) ans
à partir de la date du premier achat de consommation.
Les pièces de rechange sont garanties pendant
quatre-vingt dix (90) jours. Les pièces de rechange ou unités peuvent être neuves ou reconditionnées
et seront conformes aux spécifications des pièces et des unités d’origine. Cette garantie vous accorde
des droits légaux spécifiques auxquels peuvent s’ajouter d’autres droits pouvant varier d’une
juridiction à l’autre. Cette garantie est limitée à l’acheteur d’origine du produit et n’est pas transférable.
Cette garantie couvre uniquement les composants fournis par NMD-A. Une réparation requise à la
suite de l’utilisation des pièces provenant d’un tiers n’est pas couverte par cette garantie. Pour être
couvert par cette garantie, le produit doit avoir été acheté aux États-Unis ou au Canada par l’acheteur
d’origine. Cette garantie couvre uniquement la distribution du produit aux États-Unis ou au Canada
par NMD-A. Aucune garantie n’est offerte à l’extérieur des États-Unis et du Canada. La preuve d’achat
sera exigée par NMD-A pour prouver la date d’achat. Une telle preuve d’achat doit être une facture
de vente d’origine ou un reçu reprenant le nom et l’adresse du vendeur, de l’acheteur et le numéro
de série du produit.
Pour obtenir un service au titre de la garantie, vous devez expédier le produit en port prépayé ou le
déposer chez le revendeur agréé qui vous l’a vendu ou dans un autre centre autorisé par NMD-A, soit
dans l’emballage d’origine, soit dans un emballage similaire procurant un niveau équivalent de
protection. Avant de retourner tout produit à NMD-A, vous devez d’abord obtenir une autorisation
de retour de marchandise en composant le 1-800-632-4662. Le produit ne pourra avoir été enlevé
ou modifié, réparé ou entretenu au préalable par personne d’autre que du personnel technique
autorisé par NMD-A, et le numéro de série du produit ne pourra pas avoir été enlevé. Pour être
couvert par cette garantie, le produit ne pourra pas avoir été soumis à l’affichage d’une image fixe
pendant de longues périodes de temps résultant en une persistance de l’image, un accident, une
utilisation incorrecte ou abusive ou une utilisation contraire aux directives contenues dans le guide
de l’utilisateur. Une seule de ces conditions annulera la garantie.
NMD-A NE POURRA ÊTRE TENUE RESPONSABLE DE DOMMAGES DIRECTS, INDIRECTS, ACCIDENTELS,
SECONDAIRES OU D’AUTRES TYPES DE DOMMAGES RÉSULTANT DE L’UTILISATION D’UN PRODUIT
QUI N’ENTRENT PAS SOUS LA RESPONSABILITÉ DÉCRITE CI-DESSUS. CES GARANTIES REMPLACENT
TOUTE AUTRE GARANTIE EXPLICITE OU IMPLICITE, Y COMPRIS, MAIS SANS S’Y LIMITER, TOUTE
GARANTIE DE QUALITÉ MARCHANDE OU D’APTITUDE À UNE FIN PARTICULIÈRE. CERTAINES
JURIDICTIONS NE PERMETTANT PAS L’EXCLUSION DE GARANTIES IMPLICITES OU LA LIMITATION OU
L’EXCLUSION DE RESPONSABILITÉ POUR DOMMAGES ACCIDENTELS OU SECONDAIRES, LES EXCLU-
SIONS OU LIMITATIONS CI-DESSUS POURRAIENT NE PAS S’APPLIQUER DANS VOTRE CAS.
Ce produit est garanti selon les termes de cette garantie limitée. Les consommateurs doivent savoir
que les performances du produit peuvent varier selon la configuration du système, le logiciel,
l’application, les données du client et la manière dont le produit est utilisé par l’opérateur, ainsi que
d’autres facteurs. Bien que les produits NMD-A soient considérés compatibles avec de nombreux
systèmes, la mise en oeuvre fonctionnelle du produit peut varier d’un client à l ’autre. Par
conséquent, l’adéquation d’un produit à un besoin ou une application spécifique doit être déterminée
par le consommateur et n’est pas garantie par NMD-A.
Pour connaître le nom du centre de service technique agréé NEC-Mitsubishi Electronics Display le
plus proche, appeler NEC-Mitsubishi Electronics Display of America au
1-800-632-4662.
ASLCDmanual022803.p65 2/28/03, 9:45 AM39
40
Déclaration du fabricant
Nous certifions par la présente que les
moniteurs LCD5V (K15AN),
LCD7V (K17AN), ou LCD9V (K19BN)
conformes à
la directive 73/23/EEC du Counseil:
– EN 60950
la directive
89/336/EEC du Counseil:
– EN 55022
– EN 61000-3-2
– EN 61000-3-3
– EN 55024
et porte le sigle
NEC-Mitsubishi Electric Visual
Systems Corporation
4-13-23, Shibaura,
Minato-Ku
Tokyo 108-0023, Japan
ASLCDmanual022803.p65 2/28/03, 9:45 AM40
41
AVIS DE PROPRIÉTÉ EXCLUSIVE ET DE DÉGAGEMENT DE RESPONSABILITÉ
Les informations contenues dans ce document, y compris tous les designs et matériel s'y rapportant, sont la propriété de NEC-
Mitsubishi Electronics Display of America et/ou ses concédants. NEC-Mitsubishi Electronics Display of America se réserve les
droits de fabrication brevetée, les droits d’auteurs et autres propriétés exclusives à ce document, y compris tous les droits de
design, de fabrication, de reproduction, d'utilisation et de vente y afférent, à condition que ces droits n'ont pas été directement
délivrés à d'autres.
Les produits de NEC-Mitsubishi Electronics Display of America dont il est question dans ce document sont garantis conformément
aux termes de la déclaration de garantie limitée accompagnant chaque produit. Cependant, les performances réelles de chaque
produit dépendent de facteurs tels que la configuration du système, les données du client et la manière dont le produit est utilisé.
Étant donné que la mise en oeuvre fonctionnelle du produit peut varier d’un client à l’autre, l'adéquation et l'application de
configurations spécifiques du produit peuvent être déterminées par le client et ne sont pas garanties par NEC-Mitsubishi
Electronics Display of America .
Afin de permettre l'amélioration du design et des caractéristiques techniques, les informations contenues dans ce document sont
sujettes à modifications sans préavis. La reproduction totale ou partielle de ce document sans l'accord préalable de NEC-
Mitsubishi Electronics Display of America est interdite.
DÉCLARATION DE CONFORMITÉ
Cet appareil est conforme à l'article 15 du règlement de la FCC. L'utilisation est soumise à deux conditions. 1) Cet appareil ne
peut pas occasionner d'interférences nuisibles, et 2) cet appareil doit accepter toutes interférences reçues, y compris les
interférences qui peuvent occasionner un mauvais fonctionnement.
Partie responsable américaine : NEC-Mitsubishi Electronics Display of America, Inc.
Adresse : 1250 N. Arlington Heights Road, Suite 500
Itasca, Illinois 60143-1248
N
o
tél. : (630) 467-3000
Type de produit : Moniteur d’affichage
Classification de l'appareil : Périphérique classe B
Modèle :
LCD5V (K15AN) / LCD7V (K17AN) / LCD9V (K19BN)
Nous déclarons par la présente que les appareils mentionnés ci-dessus sont
conformes aux normes techniques spécifiées dans le règlement de la FCC.
Windows est une marque déposée de Microsoft Corporation. NEC est une marque déposée de NEC Corporation. E NERGY STAR est une marque déposée
aux États-Unis. Tous les autres noms de marques et de produits sont des marques de commerce ou des marques déposées de leurs propriétaires respectifs.
En tant que partenaire ENERGY STAR
®
, NEC-Mitsubishi Electronics Display of America a veillé à ce que ce produit respecte les normes ENERGY STAR
en matière de rendement énergétique. Le logo ENERGY STAR ne représente aucun aval par l’EPA de quelque produit ou service que ce soit.
LCD5V/LCD7V/LCD9V
ASLCDmanual022803.p65 2/28/03, 9:45 AM41
42
PROPRIETARY NOTICE AND LIABILITY DISCLAIMER
The information disclosed in this document, including all designs and related materials, is the valuable property of NEC-Mitsubishi
Electronics Display of America and/or its licensors, as appropriate, reserve all patent, copyright and other proprietary rights to
this document, including all design, manufacturing, reproduction, use and sales rights thereto, except to the extent said rights
are expressly granted to others.
The NEC-Mitsubishi Electronics Display of America product(s) discussed in this document are warranted in accordance with the
terms of the Limited Warranty Statement accompanying each product. However, actual performance of each such product is
dependent upon factors such as system configuration, customer data and operator control. Since implementation by customers
of each product may vary, the suitability of specific product configurations and applications must be determined by the customer
and is not warranted by NEC-Mitsubishi Electronics Display of America.
To allow for design and specification improvements, the information in this document is subject to change at any time without
notice. Reproduction of this document or portions thereof without prior approval of NEC-Mitsubishi Electronics Display of America
is prohibited.
DECLARATION OF CONFORMITY
This device complies with Part 15 of FCC Rules. Operation is subject to the following two conditions. (1) This device may not cause
harmful interference, and (2) this device must accept any interference received, including interference that may cause undesired
operation.
U.S. Responsible Party: NEC-Mitsubishi Electronics Display of America, Inc.
Address: 1250 North Arlington Heights Road, Suite 500
Itasca, Illinois 60143-1248
Tel. No.: (630) 467-3000
Type of Product: Display Monitor
Equipment Classification: Class B Peripheral
Model:
LCD5V (K15AN) / LCD7V (K17AN) / LCD9V (K19BN)
We hereby declare that the equipment specified above
conforms to the technical standards as specified in the FCC Rules.
Windows is a registered trademark of Microsoft Corporation. NEC is a registered trademark of NEC Corporation. ENERGY STAR is a U.S. registered
trademark. All other brands and product names are trademarks or registered trademarks of their respective owners.
As an ENERGY STAR
®
Partner, NEC-Mitsubishi Electronics Display of America has determined that this product meets the ENERGY STAR guidelines for
energy efficiency. The ENERGY STAR emblem does not represent EPA endorsement of any product or service.
LCD5V/LCD7V/LCD9V
ASLCDmanual022803.p65 2/28/03, 9:45 AM42