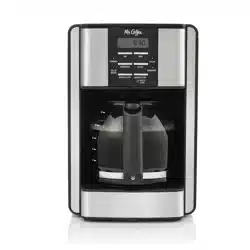
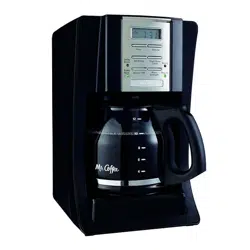
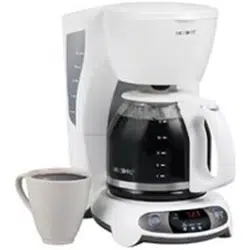
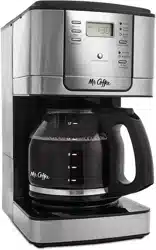
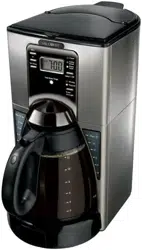
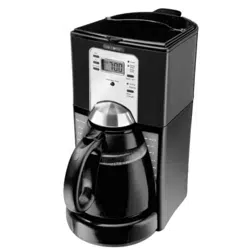
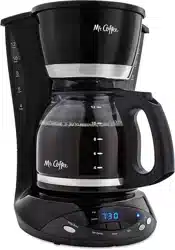
User Manual Mr. Coffee Coffeemaker EHX JPX Series
IMPORTANT SAFEGUARDS
To reduce the risk of fire, electric shock and/or injury to persons, basic safety precautions should always be followed when using electrical appliances, including the following:
- READ ALL INSTRUCTIONS BEFORE USING THE COFFEEMAKER.
- Do not touch the coffeemaker's hot surfaces. Use handles or knobs.
- To protect against electric shock, do not immerse the power cord, power plug or coffeemaker in water or in any other liquid.
- Close adult supervision is necessary when this appliance is used by or near children.
- Turn the coffeemaker OFF and unplug the power cord from the power source when the coffeemaker and clock are not in use and before cleaning. Allow the coffeemaker parts to cool before putting on or taking off parts and before cleaning the appliance.
- Do not operate any appliance with a damaged power cord or power plug, or operate it after the appliance malfunctions, or has been damaged in any manner. Return this appliance only to the nearest Authorized Service Center for examination, repair or adjustment.
- The use of accessory attachments other than MR. COFFEE® brand products may cause hazards or injuries.
- Do not use the coffeemaker outdoors.
- Do not let the power cord hang over edge of table or counter, or allow it to come into contact with hot surfaces.
- Do not place this coffeemaker on or near a hot gas stove or electric burner or in a heated oven.
- To disconnect the coffeemaker, turn it OFF, then remove the power plug from the power supply.
- Place the appliance on a hard, flat level surface to avoid interruption of airflow underneath the coffeemaker.
- This coffeemaker is designed for household use only.
- Do not use appliance for other than intended use.
- Caution, scalding may occur if lid is removed during brewing cycles.
WARNING: To reduce the risk of fire or electric shock, do not remove any service covers. There are no user serviceable parts inside the coffeemaker. Only authorized personnel should repair the coffeemaker.
Please read ALL of the instructions in this manual carefully before you begin to use this appliance. Proper care and maintenance will ensure a long life and a trouble-free operation for this appliance. Please save these instructions and refer to them for cleaning and care tips.
INTRODUCTION
Welcome and congratulations on the purchase of your new MR. COFFEE® Coffeemaker. Your new EH coffeemaker will wake up with you in the morning and provide you breaks and treats during your hectic daily activities. How you enjoy your MR. COFFEE® Coffeemaker is up to you!
DECANTER USE AND CARE
Follow the instructions below to reduce or eliminate the chance of breaking the glass decanter:
- This decanter is designed for use with your MR. COFFEE® coffeemaker and therefore must never be used on a range top or in any oven, including a microwave oven.
- Do not set a hot decanter on a wet or cold surface.
- Do not use a cracked decanter or a decanter having a loose or weakened handle.
- Do not clean the decanter with abrasive cleaners, steel wool pads or other abrasive materials.
- Discard the decanter immediately if it is ever boiled dry.
- Protect the decanter from sharp blows, scratches or rough handling.
SPECIAL CORD SET INSTRUCTIONS
- A short power supply cord is provided to reduce the hazards resulting from a person or pet becoming entangled in, or tripping over, a longer cord.
- An extension cord may be purchased and used if care is exercised in its use.
- If an extension cord is used, the marked electrical rating of the extension cord must be at least 10 amps and 120 volts. The resulting extended cord must be arranged so that it will not drape over a countertop or tabletop where it can be pulled on by children or tripped over accidentally.
- This appliance has a polarized plug (one blade is wider than the other). To reduce the risk of electric shock, this plug will fit in a polarized outlet only one way. If the plug does not fit fully in the outlet, reverse the plug. If it still does not fit, contact a qualified electrician. Do not modify the plug in any way.
- You can customize the length of the power cord so that it is the exact length you desire. To increase the length of the power cord: grasp the power cord (not the power plug) and gently lift it out of the slot, then pull it away from the coffeemaker. To decrease the length of the power cord: Grasp the power cord (not the power plug), lift it out of the slot and gently feed it into the coffeemaker. Lock the cord in the slot when finished.
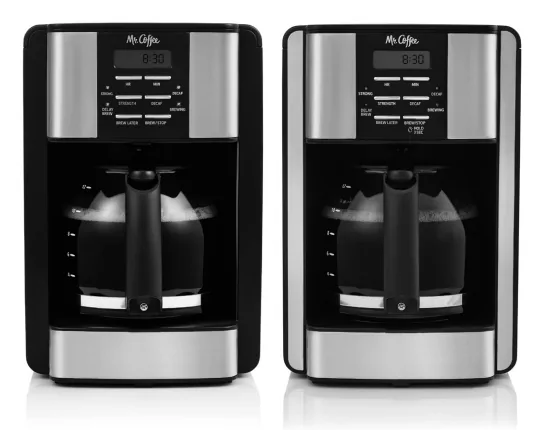
PARTS DIAGRAM
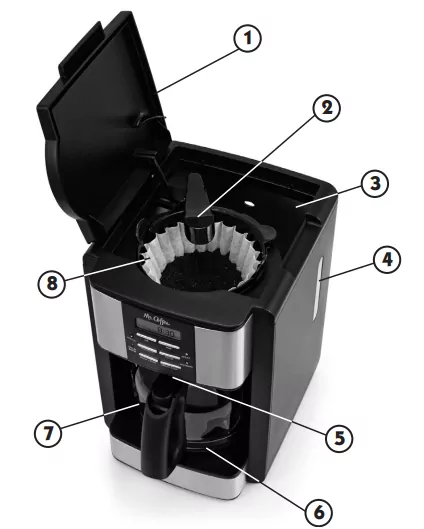
- Brew Basket Lid
- Shower Head
- Water Reservoir
- Water Window
- Pause 'n Serve
- Warming Plate
- Decanter
- Removable Filter Basket
Control Panel
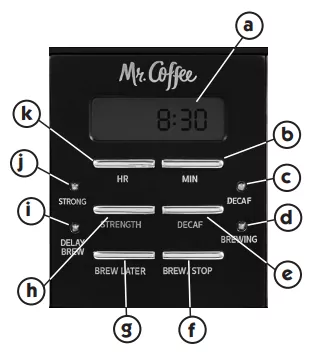
a Clock Display / Fresh Brew Timer Display
b Minute Button
c Decaf Brew Indicator
d Brewing Indicator
e Decaf Button
f Brew/Stop Button
g Brew Later Button
h Strength Button
i Delay Brew Indicator
j Strong Brew Indicator
k Hour Button
Coffeemaker Extras (not included with all models)
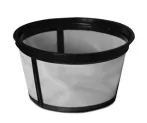
Mr. Coffee® Brand Permanent Filter
COFFEEMAKER FEATURES AND BENEFITS
Your new MR. COFFEE coffeemaker has the following features:
- Brewing Capacity - 12 cups - Glass decanter series
- Removable Filter Basket - The filter basket lifts out for fast and easy cleaning and filling.
- Pause 'n Serve - Can't wait for the coffee to finish brewing? The Pause 'n Serve feature allows you up to 30 seconds to pour a cup of coffee while the coffeemaker is still brewing. Carefully remove the decanter and the Pause 'n Serve feature will be automatically activated, temporarily stopping the flow of coffee into the decanter.
- Water Windows - Show amount of water in the reservoir for accurate filling.
- Non-Stick Warming Plate - This feature allows you to keep your coffee hot after brewing. The non-stick attribute prevents the decanter from sticking to the surface of the warming plate.
- Brew Strength Selector - Adjusts the brewing time to create a more full-flavored coffee.
- Water Filtration System (not included with all models) - Great tasting coffee begins with great water! Improves the taste of your coffee by removing up to 97% of the chlorine from the water you use for brewing.
- Cord Storage - Safely stores excess cord to keep your countertop neat.
- Two-Hour Auto Shut-Off - Keeps your coffee hot for two hours, then automatically shuts off.
- Programmable Controls:
- Clock - The clock serves as a handy kitchen clock and allows you to set the Delay Brew feature and functions as the FRESH BREWTM TIMER feature.
- Fresh Brew Timer feature - Lets you know how long your coffee has been waiting for you.
- Delay Brew - Would you like to wake up to a fresh pot of coffee? The timer allows you to preset when you would like the coffeemaker to automatically begin brewing your coffee, up to 24 hours in advance.
NOTE: If you have selected any of the operating functions, the coffeemaker will act upon the last operation selected if the power is restored within 10 seconds after a power outage.
CLEAN YOUR COFFEEMAKER BEFORE USING THE FIRST TIME
Make sure your first cup of coffee is as good as can be by cleaning your MR. COFFEE® Coffeemaker before its first use. Just follow these simple steps:
- Wash the decanter, decanter lid and the filter basket in a mixture of mild detergent and water. Rinse each thoroughly (please refer to the parts diagram listed above).
- Replace all the parts and close the lid. Then, run a brew cycle with water only, without adding coffee and coffee filter.
- When brewing is complete, turn your coffeemaker off, discard the water in the decanter and rinse the decanter, decanter lid, and filter basket.
Your coffeemaker is now ready to use. Enjoy it!
SETTING THE CLOCK AND DELAY BREW TIME
To Set the Clock:
- Plug the power cord into a standard electrical outlet. The clock will flash on the control panel to indicate that the time has not been set yet.
- Press and hold the HOUR and MINUTE buttons until you reach the current time. The AM or PM indicator will light at the bottom of the display (Figures 1 and 2).
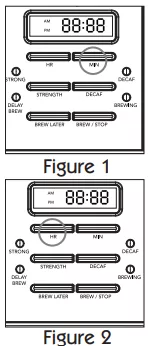
NOTE: Pressing any button before setting the clock will cause the clock to start keeping time from 12:00 a.m. You must set the clock if you want to use the Delay Brew feature.
To Set the Delay Brew Time:
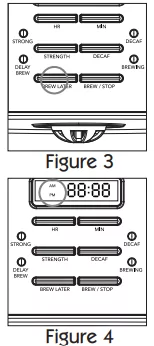
While the display is in the clock mode, simply press the SET DELAY button (Figure 3) and, while the DELAY BREW time is flashing, set the brew time by pressing the HOUR and MINUTE buttons. The AM or PM indicator will light at the bottom of the clock display. (Figure 4)
Within a few seconds the display will change to the current time.
The Delay Brew Time is now set!
NOTE: To activate the DELAY BREW cycle, see the "Brewing Coffee Later" section. To check the programmed time, push the SET DELAY button. The display will show the time you have programmed the coffee to brew. If you press the SET DELAY button again or wait a few seconds, the display will switch back.
PREPARING FOR USE
Selecting and Measuring Ground Coffee:
For best results, use a level tablespoon for ground coffee measurement. Make sure you use medium grind coffee for a perfect brew.
A. Suggested Coffee Measurement Chart:
| To Brew |
Ground Coffee |
1 level tablespoon (tbsp) = 5 gr./0.17 oz.
1 cup = 5 fl. oz. of brewed coffee
Use more or less coffee to suit your taste. |
| 12 Cups |
9 tbsp. |
| 10 Cups |
7.5 tbsp. |
| 8 Cups |
6.5 tbsp. |
| 6 Cups |
4.5 tbsp. |
| 4 Cups |
3 tbsp. |
B. Water Filtration System (Not Included with all models)
Congratulations! You are the owner of a MR. COFFEE® water filtration system. This carbon-based water filter improves the taste of your coffee by removing up to 97% of the chlorine from the water you may use to brew your coffee.
First, look for the MR. COFFEE® Filtration
Friendly symbol  on the bottom of your filter basket. If you do not see this symbol, please call 1-800-672-6333.
To use the water filtration system in your MR. COFFEE® Coffeemaker, please follow these steps:
- Align the red indicator on the frame to the letter that corresponds with the month that you are using the disk for the first time. This serves to remind you to change the disk every month (approx. 30 brewing cycles).
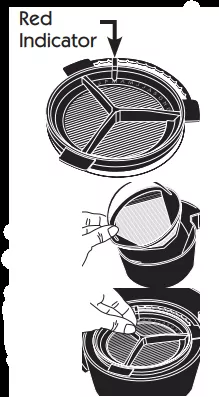
- Rinse the water filter in fresh water before first use. NOTE: For optimum results, use the water filtration system with a permanent filter.
- Follow "Adding Water and Coffee" Instructions
- When you are done brewing your coffee, rinse the water filter with fresh water. Do not put your water filter in the dishwasher.
C. Adding Water and Ground Coffee
- Open the brew basket lid. For your convenience, you can lift out the removable filter basket.
- Place a MR. COFFEE® brand 10-12 cup paper basket-style filter or a MR. COFFEE® permanent filter into the removable filter basket. (Figure 5)
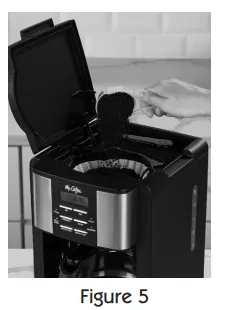
NOTE: If using paper filters, it is important that the sides of the filter fit flush against the side of the filter basket. If filter collapse occurs, dampen the filter before placing in the filter basket and adding ground coffee and water.
- Add the desired amount of coffee and gently shake to level the coffee. See the "Suggested Coffee Measurement Chart".
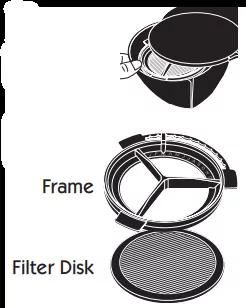
- After following instructions in the Water Filtration System, place the MR. COFFEE® water filter in the basket, making sure that the side marked "this side up" faces you and that the water filter is level.
- Be sure the filter basket is properly centered and all the way down in the brew basket and close the lid.
- Fill the decanter with cold, fresh water to the desired capacity (1 cup equals 5 ounces). For easy and accurate filling, the water markings on the glass decanter and on the dual water windows show the amount of water needed to make the corresponding desired number of cups. Do not fill past the "12 cup MAX line" or water will flow out of the overfill hole in the back of the coffeemaker. The amount of coffee brewed will always be slightly less
- Lift the pour through reservoir lid and pour the water into the water reservoir. Close the lid and place the empty decanter onto the warmer plate.
NOTE: Make sure the decanter is fully placed on the warming plate or the water and the grounds will overflow from the filter basket. An overflow may cause personal injury or damage to property.
CAUTION! To reduce the risk of damaging the decanter and/or the risk of personal injury, do not add cold water to the decanter if the decanter is already hot. Allow the decanter to cool before using.
BREWING COFFEE NOW
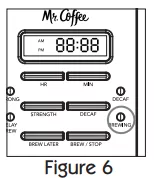
- After completing the steps in the "Adding Water and Ground Coffee" section and with the decanter and the filter basket securely in place, turn the coffeemaker on by pressing the SELECT button once. The BREW NOW green light will turn on to signal that the coffeemaker is on and brewing (Figure 6).
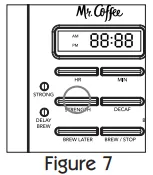
- To enjoy a more full flavored cup of coffee, press the Brew Strength button once. The STRONG Brew Strength amber light will turn on. The coffeemaker will remain in the Brew Strength you have selected until you change it back to REGULAR strength by pressing the Brew Strength button or until you unplug the machine (Figure 7).
- After the used coffee grounds have cooled, carefully remove the filter basket and discard them.
NOTE: The shower head cover is hot after brewing. Always allow the coffeemaker to cool down before cleaning.
- Prior to making a second pot of coffee, turn the coffee maker off. This will reset the FRESH BREW™ TIMER feature. To turn the coffee maker off, press the SELECT/OFF button all lights will turn off.
- Make sure the decanter is empty before starting to brew coffee.
- Be sure to turn your coffee maker off when no longer using it.
DECAF FEATURE
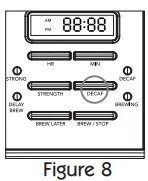
The process used to remove the caffeine from the coffee beans changes the way the roasted and ground coffee reacts to hot water during brewing. This machine was designed to allow you to brew coffee just as you would with regular grounds. To enjoy a DECAF cup of coffee, press the DECAF button once. The DECAF amber light will turn on. Your selected lights will turn on to signal that the coffee maker is on and brewing (Figure 8).
BREWING COFFEE LATER
- You must first set the time when you would like the coffee maker to begin brewing your coffee as described in "Setting the Clock and the Delay Brew Timer" section.
- Prepare your coffee maker as described in "Adding Water and Ground Coffee" section.
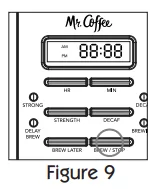
- To activate DELAY BREW and program your coffeemaker to brew coffee at a later time, press the SELECT button twice (Figure 9).
The amber DELAY BREW light will turn on. The coffeemaker is now set to automatically brew coffee at the pre-set later time. At this time the brew strength light will turn on. You can select the strength that you desire by pressing the BREW STRENGTH button. (Amber for STRONG, green for REGULAR)
- At the pre-set time, the green BREW NOW light will turn on and the DELAY BREW amber light will turn off, indicating the brewing has started in the selected brew strength. The FRESH BREW™ TIMER feature will start.
- The coffeemaker warmer plate will keep your coffee hot for 2 hours and then automatically turn off.
As a safety feature, your coffeemaker will NOT start again automatically the next day. If you want your coffee to brew at the same time the following day, simply add a new filter, coffee and water and set DELAY BREW, by repeating Steps 2 and 3 above.
To cancel DELAY BREW: Press the SELECT button until all lights turn off (Figure 9).
CLEANING AND MAINTAINING YOUR COFFEEMAKER
Daily Cleaning:
Always unplug the coffeemaker and allow to cool before cleaning.
Remove the filter basket, permanent filter (not included on all models), decanter and decanter lid and wash them in a solution of hot water and mild liquid soap.
Never use abrasive cleansers, steel wool pads or other abrasive materials. Dishwasher top rack safe parts: glass decanter and lid, filter basket and permanent filter.
The water filter disk is not dishwasher safe.
CAUTION! Never immerse the coffeemaker itself in water, in any other liquid or place in the dishwasher.
Decalcifying your MR. COFFEE Coffeemaker
Minerals (calcium/limestone) found in water will leave deposits in your coffeemaker and will affect it performance. It's recommended that you regularly remove these deposits by using MR. COFFEE Cleaner or vinegar. MR. COFFEE Cleaner is available at many retail stores or by calling the MR. COFFEE brand Consumer Service Department at 1-800-672-6333.
- Follow package instructions to prepare one batch of MR. COFFEE Cleaner. Pour the mixture into the water reservoir. Before decalcifying, remove the water filtration disk from the machine.
NOTE: 4 cups or 20 fl. oz. of undiluted, white household vinegar may be used as a substitute for the cleaner.
- Place an empty MR. COFFEE 10-12 cup basket-style paper filter or MR. COFFEE permanent filter into the filter basket and close the brew basket lid.
- Place the empty decanter back in the unit, centered on the warming plate.
- Brew three cups of cleaning solution through the coffeemaker.
- Turn the coffeemaker off and let stand for 30 minutes.
- Run the remainder of the cleaning solution through the coffeemaker.
- Discard the cleaning solution and rinse the decanter thoroughly with clean water.
- Fill the water reservoir with clean, fresh water.
- Place the empty decanter back on the coffeemaker, centered on the warming plate.
- Remove and discard the paper filter used during the cleaning cycle. If a MR. COFFEE® permanent filter was used during cleaning, remove it and rinse it thoroughly before replacing it in the filter basket.
- Begin brewing and allow the full brew cycle to complete.
- Repeat Steps 8 through 11 one more time. Your coffeemaker is now clean and ready to brew the next pot of delicious, hot coffee!
Suggested Decalcifying Interval:
| Type of Water |
Cleaning Frequency |
| Soft Water |
Every 80 Brew Cycles |
| Hard Water |
Every 40 Brew Cycles or when red light is flashing |
Water Filtration Disk Replacement:
Your water filtration disk will need to be replaced once a month (approx. 30 brew cycles). If the machine will not be in use for an extended period of time, rinse the water filter with running water and clean the coffeemaker before use.
Cleaning the Decanter:
Hard water can leave a whitish stain on the decanter, and coffee may then turn this stain brown. To remove decanter stains:
- Fill the decanter with a solution of equal parts water and vinegar and let the solution stand in the decanter for approximately 20 minutes.
- Discard the solution, then wash and rinse the decanter. Do not use harsh abrasive cleaners that may scratch the decanter, scratches may cause the decanter to break.
USING THE CLEAN FUNCTION TO DECALCIFY YOUR COFFEEMAKER (JPX MODEL ONLY)
The Clean Indicator will illuminate when it is recommended to clean and decalcify your coffeemaker using vinegar. To decalcify your coffeemaker, follow the steps below.
- IMPORTANT: Remove the Advanced Water Filtration System from the coffee maker.
- Prepare 4 cups or 20 fl. oz. of undiluted, white household vinegar. Pour the vinegar into the water reservoir on the carafe side.
- Place an empty 8-12 cup basket-style paper filter or a Mr. Coffee Reusable Coffee Filter into the brew basket.
- Place the empty carafe on the unit, centered on the warming plate.
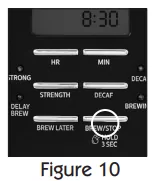
- Press the BREW/STOP button down and hold for 3 seconds so that the BREWING indicator is lit. The prepared cleaning solution will begin being brewed through the coffee maker. (Figure 10)
- The entire cycle will take approximately 45 minutes to complete. The Clean Indicator will turn off when the cycle is complete.
- Discard the cleaning solution and rinse the carafe thoroughly with clean water.
- Fill the water reservoir with 12 cups of clean, fresh water.
- Place the empty carafe back on the coffee maker, centered on the warming plate.
- Remove and discard the paper filter used during the cleaning cycle. If a Mr. Coffee Reusable Coffee Filter was used during cleaning, remove it and rinse it thoroughly before replacing it in the brew basket.
- Press BREW NOW so that the Brew Now Indicator is illuminated and allow the full brew cycle to complete, rinsing the coffeemaker with hot water.
- Discard the water from the carafe and rinse the carafe thoroughly with clean water.
- Repeat steps 8 through 12 one more time, to ensure the coffeemaker is fully rinsed. The Clean Indicator will blink when your coffeemaker has counted 90 brew cycles. Follow steps 1-13 to complete the Clean function. The Clean Indicator will turn off once the clean function is run in its entirety (this will take 45 minutes).
If you wish to stop the Clean function once it has already begun, press the CLEAN button, the Clean function will stop and the Clean Indicator will turn off. Press the BREW NOW button again to ensure the cleaning solution is completely brewed through the machine and follow steps 7-12.
If you wish to turn off the Clean Indicator without running a decalcification cycle, simply press the CLEAN button so that the Clean Indicator is lid solid and then quickly press the CLEAN button again and the Clean Indicator will turn off. Please note that we strongly recommend that you run the Clean function in its entirety when prompted by the Clean Indicator to ensure that your coffeemaker's performance is not affected over time.
If the Clean Indicator is not illuminated, but you wish to use the Clean function, you can still follow steps 1-13.
Cleaning Frequency
| TYPE OF WATER |
CLEANING FREQUENCY |
| Soft Water |
Every 80 Brew Cycles |
| Hard Water |
Every 40 Brew Cycles |
TROUBLESHOOTING YOUR COFFEEMAKER
Your MR. COFFEE® Coffeemaker has been carefully designed to give you many years of trouble-free service. In the unlikely event that your new coffeemaker does not operate satisfactorily, please review the following potential problems and try the steps recommended BEFORE you call an Authorized Sunbeam Service Center.
| PROBLEM |
POSSIBLE CAUSE |
SOLUTION |
| THE "BREW NOW"/ON LIGHT DOES NOT LIGHT UP |
The appliance is unplugged. |
PLUG UNIT IN. |
| There's a power outage. |
WAIT FOR POWER TO BE RESTORED. |
| THE COFFEE IS NOT BREWING |
The appliance is unplugged. |
PLUG UNIT IN. |
| There's a power outage. |
WAIT FOR POWER TO BE RESTORED. |
| The water reservoir is empty. |
CHECK THE WATER WINDOWS. |
| The filter basket is not properly inserted. |
INSERT FILTER BASKET CORRECTLY. |
| The decanter is not placed all the way on the warming plate. |
PLACE DECANTER CORRECTLY ON WARMER PLATE. |
| THE COFFEEMAKER ONLY BREWS WATER |
There are no coffee grounds in the filter basket. |
ADD THE DESIRED AMOUNT OF COFFEE TO THE FILTER. |
| THE COFFEEMAKER BREWS SLOWLY |
The coffeemaker needs cleaning. |
CLEAN COFFEEMAKER AS DESCRIBED IN "CLEANING AND MAINTAINING" SECTION. |
| THE FILTER BASKET OVERFLOWS |
The filter basket is not properly inserted. |
INSERT FILTER BASKET CORRECTLY. |
| The decanter is not placed all the way on the warming plate. |
PLACE DECANTER CORRECTLY ON WARMING PLATE. |
| The decanter lid is not on decanter. |
PLACE LID ON THE DECANTER. |
| Too many coffee grounds were placed in the filter. |
REMOVE FILTER, DISCARD GROUNDS. IF PAPER FILTER, REPLACE. IF PERMANENT FILTER, RINSE. BEGIN BREWING PROCESS AGAIN. |
| The decanter was removed from the warming plate for more than 30 seconds. |
TURN OFF AND UNPLUG THE UNIT. ALLOW TO COOL. WIPE UP THE SPILL. DO NOT SET HOT DECANTER BACK ON THE WET WARMING PLATE OR IT MIGHT CRACK. |
| THE COFFEE IS NOT HOT |
There's a power outage. |
WAIT FOR POWER TO BE RESTORED. |
Do you still have questions? You can call us toll-free at the MR. COFFEE® brand Consumer Service Department, 1-800-672-6333 or you can visit us at www.mrcoffee.com.
SERVICE AND MAINTENANCE
Replacement Parts:
- Coffee Filters - For better tasting coffee, we recommend that you use a MR. COFFEE® brand 10-12 cup basket paper filter or MR. COFFEE® brand permanent filter. These filters are available at most grocery stores.
- Water Filtration - Replacement water filtration disks can be purchased through your local retailer or by calling 1-800-672-6333 in the U.S. or in Canada.
- Decanters - You can usually purchase a replacement decanter from the store where you purchased your coffeemaker. If you are unable to find a replacement, please visit www.mrcoffee.com or call 1-800-672-6333 in the U.S. or in Canada for information on where you can find a store that carries replacement decanters.
Repairs:
If your coffeemaker requires service, do not return it to the store where you purchased it. All repairs and replacements must be made by Sunbeam or by an authorized MR. COFFEE® brand Service Center. If you live in the U.S. or Canada, please call us at the following toll-free telephone numbers to find the location of the nearest authorized service center:
1-800-672-6333 for US and Canada
You may also visit our website at www.mrcoffee.com for a list of service centers.
To assist us in serving you, please have the coffeemaker model number and date of purchase available when you call. The model number is on the bottom of the coffeemaker. We welcome your questions, comments or suggestions. In all your communications, please include your complete name, address and telephone number and a description of the problem.
Visit our website at www.mrcoffee.com and discover the secret to brewing the perfect cup of coffee. You will also find a rich blend of gourmet recipes, entertaining tips and the latest information on MR. COFFEE products.
1-YEAR LIMITED WARRANTY
Sunbeam Products, Inc. or if in Canada Newell Brands Canada ULC (collectively "Sunbeam") warrants that for a period of one year from the date of delivery to the original end user purchaser, this product will be free from defects in material and workmanship. Sunbeam, at its option, will repair or replace, free of charge, this product or any component of the product found to be defective during the warranty period. Replacement will be made with a new product or new component at no cost to the consumer. If the product is no longer available, replacement may be made with a similar product of equal or greater value. This is your exclusive warranty. Do NOT attempt to repair or adjust any electrical or mechanical functions on this product. Sunbeam reserves all rights to decline coverage if the defect or damage was caused by unauthorized components or service. This warranty is valid for the original retail purchaser from the date of delivery and is not transferable. Keep the original proof of purchase. Dealers, service centers, or retail stores selling Sunbeam products do not have the right to alter, modify, or any way change the terms and conditions of this warranty. This warranty does not cover normal wear of parts or damage resulting from any of the following: negligent use or misuse of the product; use on improper voltage or current; use contrary to the operating instructions provided by Sunbeam; disassembly, repair, or alteration by anyone other than Sunbeam or an authorized Sunbeam service center. Sunbeam expressly excludes from this warranty and denies liability for defects or damage caused by repair or alteration by anyone other than Sunbeam or an authorized Sunbeam service center. Further, the warranty does not cover: Acts of God, such as fire, flood, hurricanes and tornadoes. No terms of this warranty may be construed to apply to non-warranty service and maintenance. Accordingly, Sunbeam also denies liability for defects and damage caused by repair or alteration outside the terms of this warranty. There are no warranties which extend beyond those stated herein. ANY IMPLIED WARRANTIES THAT MAY BE APPLICABLE TO PRODUCTS, INCLUDING IMPLIED WARRANTIES OF MERCHANTABILITY OR FITNESS FOR A PARTICULAR PURPOSE, ARE LIMITED IN DURATION TO THE DURATION OF THIS WARRANTY. Some States do not allow limitations on how long an implied warranty lasts, so the above limitation may not apply to you. UNDER NO CIRCUMSTANCES SHALL SUNBEAM BE LIABLE FOR ANY SPECIAL, INCIDENTAL, OR CONSEQUENTIAL DAMAGES BASED UPON BREACH OF THIS LIMITED WARRANTY, BREACH OF CONTRACT, OR STRICT LIABILITY. Some States do not allow the exclusion or limitation of incidental or consequential damages, so the above limitation or exclusion may not apply to you. This warranty gives you specific legal rights, and you may also have other rights which vary from State to State.
How to Obtain Warranty Service
In the U.S.A.
If you have any questions regarding this warranty or would like to obtain warranty support, please call 1-800-672-6333 or visit the MR. COFFEE Website. Proof of purchase and proof of delivery date if different than your date of purchase is required to obtain warranty performance.
In Canada
If you have any question regarding this warranty or would like to obtain warranty service, please call 1-800-672-6333. In the U.S.A. this warranty is offered by Sunbeam Products, Inc, located at 6655 Peachtree Dunwoody Rd, Atlanta, GA 30328. In Canada, this warranty is offered by Newell Brands Canada ULC, located at 20B Hereford Street, Brampton, Ontario L6Y 0M1. If you have any other problem or claim in connection with this product, please write our consumer service department.