Loading ...
Press while the Lasergrip is on.
This will let you turn the laser on or off
when you press the trigger.
The Lasergrip has a fixed 0.95 emissivity setting, which is ideal for
measuring non-reflective surfaces, non-metals, painted surfaces, and
most organic materials.
Emissivity measures how well a surface emits thermal or infrared energy,
ranging from 0.00–1.00. Non-reflective surfaces have a higher emissivity
(closer to 1) and reflective surfaces have a lower emissivity (closer to
0). The Lasergrip is meant for high-emissivity surfaces, and may not
accurately measure polished, shiny, or reflective surfaces.
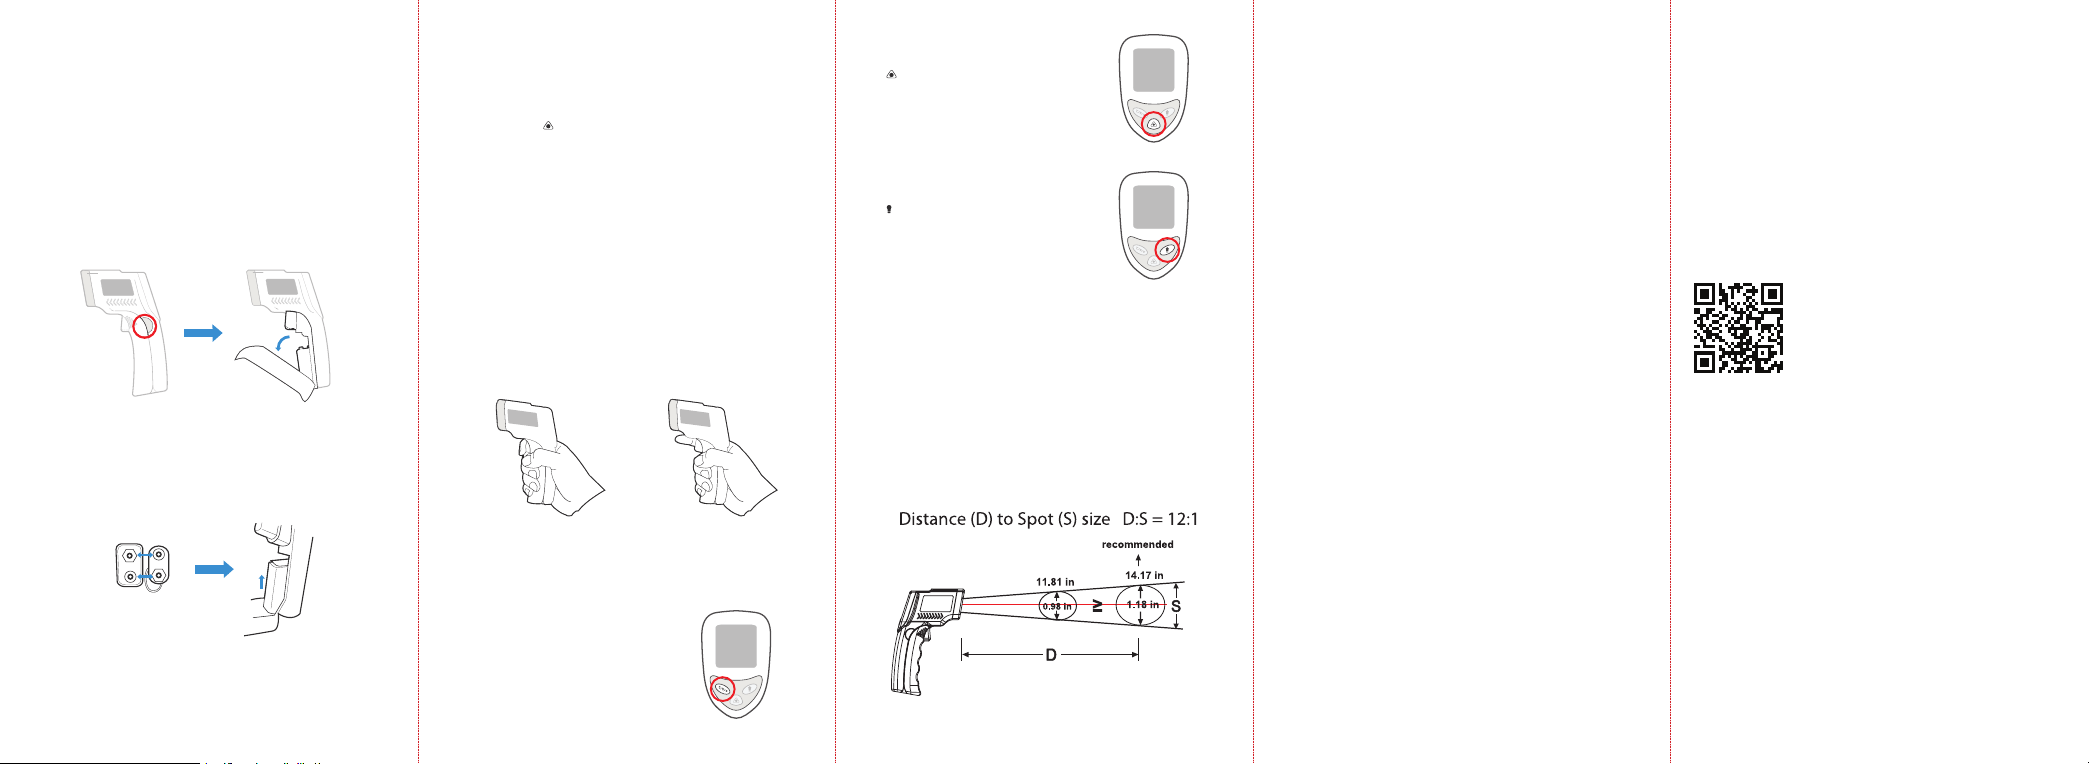
The distance-to-spot D:S ratio determines the accuracy of the reading
taken by the Lasergrip. The smaller the surface that you want to measure,
the closer you should hold the Lasergrip to the surface.
The Lasergrip’s 12:1 D:S ratio means that when 12 inches from a surface,
the Lasergrip measures a “spot” 1 inch in diameter. When 24 inches away,
the “spot” will be 2 inches, and so on. The greater the distance, the larger
the surface area measured.
The Lasergrip's reading will be less accurate over a larger surface area
due to increased temperature variation compared to a smaller surface
area.
To turn the display backlight on or off,
press while the Lasergrip is on.
Federal Communication Commission
Interference Statement
Warranty Information
Laser Activation
Emissivity
Distance-Spot Ratio
Display Backlight Operation
A5-01.00_D_22D06_us
This device complies with Part 15 of the FCC Rules. Operation is subject
to the following two conditions:
1. This device may not cause harmful interference, and
2. This device must accept any interference received, including
interference that may cause undesired operation.
NOTE: This equipment has been tested and found to comply with the
limits for a Class B digital device, pursuant to Part 15 of the FCC Rules.
These limits are designed to provide reasonable protection against
harmful interference in a residential installation. This equipment
generates, uses and can radiate radio frequency energy and, if not
installed and used in accordance with the instructions, may cause
harmful interference to radio communications. However, there is no
guarantee that interference will not occur in a particular installation. If
this equipment does cause harmful interference to radio or television
reception, which can be determined by turning the equipment off and on,
the user is encouraged to try to correct the interference by one or more of
the following measures:
• Reorient or relocate the receiving antenna.
• Increase the separation between the equipment and receiver.
• Connect the equipment into an outlet on a circuit different from that to
which the receiver is connected.
• Consult the dealer or an experienced radio/TV technician for help.
FCC Caution: Any changes or modifications not expressly approved by
the party responsible for compliance could void the user’s authority to
operate this equipment.
FCC SDOC SUPPLIER’S DECLARATION OF
CONFORMITY
Etekcity Corporation hereby declares that this equipment is in
compliance with the FCC Part 15 Subpart B. The declaration
of conformity may be consulted in the support section of our
website, accessible from www.etekcity.com
NOTE:
Operation
• The Lasergrip only measures surface temperature, and cannot accurately
measure internal temperature
• The Lasergrip cannot measure the temperature of objects behind glass or
other transparent materials, and may be inaccurate in areas with steam, dust,
or any other particles in the air.
• The Lasergrip LCD will display
“
HI
”
when the measured temperature is
higher than the measurable range, and will display
“
LO
”
when the measured
temperature is lower than the measurable range.
1. Press the trigger to turn on the Lasergrip.
2. Optionally, press to use the laser for aiming guidance.
3. Point the Lasergrip towards a surface.
4. Press and hold the trigger.
Note: To scan live temperature readings on a surface, keep holding
the trigger as you move the Lasergrip.
5. Release the trigger and the LCD display will show the calculated
temperature.
6. Press the trigger once again to take another measurement.
Surface Temperature Measurement
HOLD for continuous
temperature reading
RELEASE to lock the
temperature result
To change the temperature units, press
the °C/°F button while the Lasergrip is
on.
Unit Conversion
Customer Support
If you have any questions or concerns about your new product, please
contact our helpful Customer Support Team.
Etekcity Corporation
1202 N. Miller St., Suite A
Anaheim, CA 92806
Email: support@etekcity.com
Toll-Free: (855) 686-3835
*Please have your invoice and order ID ready before contacting
Customer Support.
Support Hours
Mon–Fri, 9:00 am–5:00 pm PST/PDT
Scan Here to Receive Exclusive News:
Your product comes with 2 years of warranty,
starting from the date of purchase.
1. Scan the QR code or visit etekcity.com/warranty.
2. Enter your purchase info to receive
exclusive news.
3. Learn about our quality customer support
and gain easy access to warranty
information.
A new pre-installed 9V battery comes in protective plastic wrap inside
your Lasergrip. Follow the steps below to properly install or replace the
battery.
1. Open the battery cover. For first-time use, take the battery out and
remove the plastic wrapper. [Figure 1.1]
2. Securely connect the battery to the battery terminals, making sure the
leads and terminals are connected correctly. [Figure 1.2]
3. Reinsert the battery back into the compartment.
4. Close the battery cover, making sure that the wires are tucked inside the
battery compartment. [Figure 1.3 ]
Battery Installation & Replacement
NOTE:
• The low battery indicator will appear on the display when the power is running
low. Immediately replace the battery when the icon appears.
• Remove the battery before storing if the Lasergrip is not being used for a long
time.
[Figure 1.1]
9V Battery
[Figure 1.2]
[Figure 1.3]
PAIR