Farberware is a registered trademark of Farberware Licensing Company, LLC
Manufactured and sold pursuant to a license from Farberware Licensing Company,
LLC © 2019 Farberware Licensing Company, LLC. All rights reserved.
(rev. 05/29/20 WL)
FCW10BSCWHA
1.0 Cu. Ft. Portable Washing Machine
Lavadora Portátil
Lave-linge portable
Instruction Manual
Manual de Instrucciones
Manuel d'utilisation
ENGLISH
2
CONTENTS
SAFETY . . . . . . . . . . . . . . . . . . . . . . . . . . . . . . . . . . . . . . . . . . 2
IMPORTANT SAFEGUARDS . . . . . . . . . . . . . . . . . . . . . . . . . . . . . 3
ADDITIONAL IMPORTANT SAFEGUARDS . . . . . . . . . . . . . . . . . . . . 3
INTRODUCTION . . . . . . . . . . . . . . . . . . . . . . . . . . . . . . . . . . . . 5
GROUNDING THE UNIT . . . . . . . . . . . . . . . . . . . . . . . . . . . . . . . . 6
PARTS & ASSEMBLY . . . . . . . . . . . . . . . . . . . . . . . . . . . . . . . . . . 7
INSTALLATION INSTRUCTIONS . . . . . . . . . . . . . . . . . . . . . . . . . . . 8
HOW TO OPERATE . . . . . . . . . . . . . . . . . . . . . . . . . . . . . . . . . . . 11
CLEANING & MAINTENANCE . . . . . . . . . . . . . . . . . . . . . . . . . . . . 13
RETURNS & WARRANTY . . . . . . . . . . . . . . . . . . . . . . . . . . . . . . . 14
SAFETY
Appliance Specications:
120 Volts, 60 Hertz
Rated Output: 780 Watts
THIS PRODUCT IS FOR USE IN 120V AC OUTLET ONLY.
Your safety and the safety of others is very important.
We have provided many important safety messages in this manual and
on your appliance. Always read and obey all safety messages.
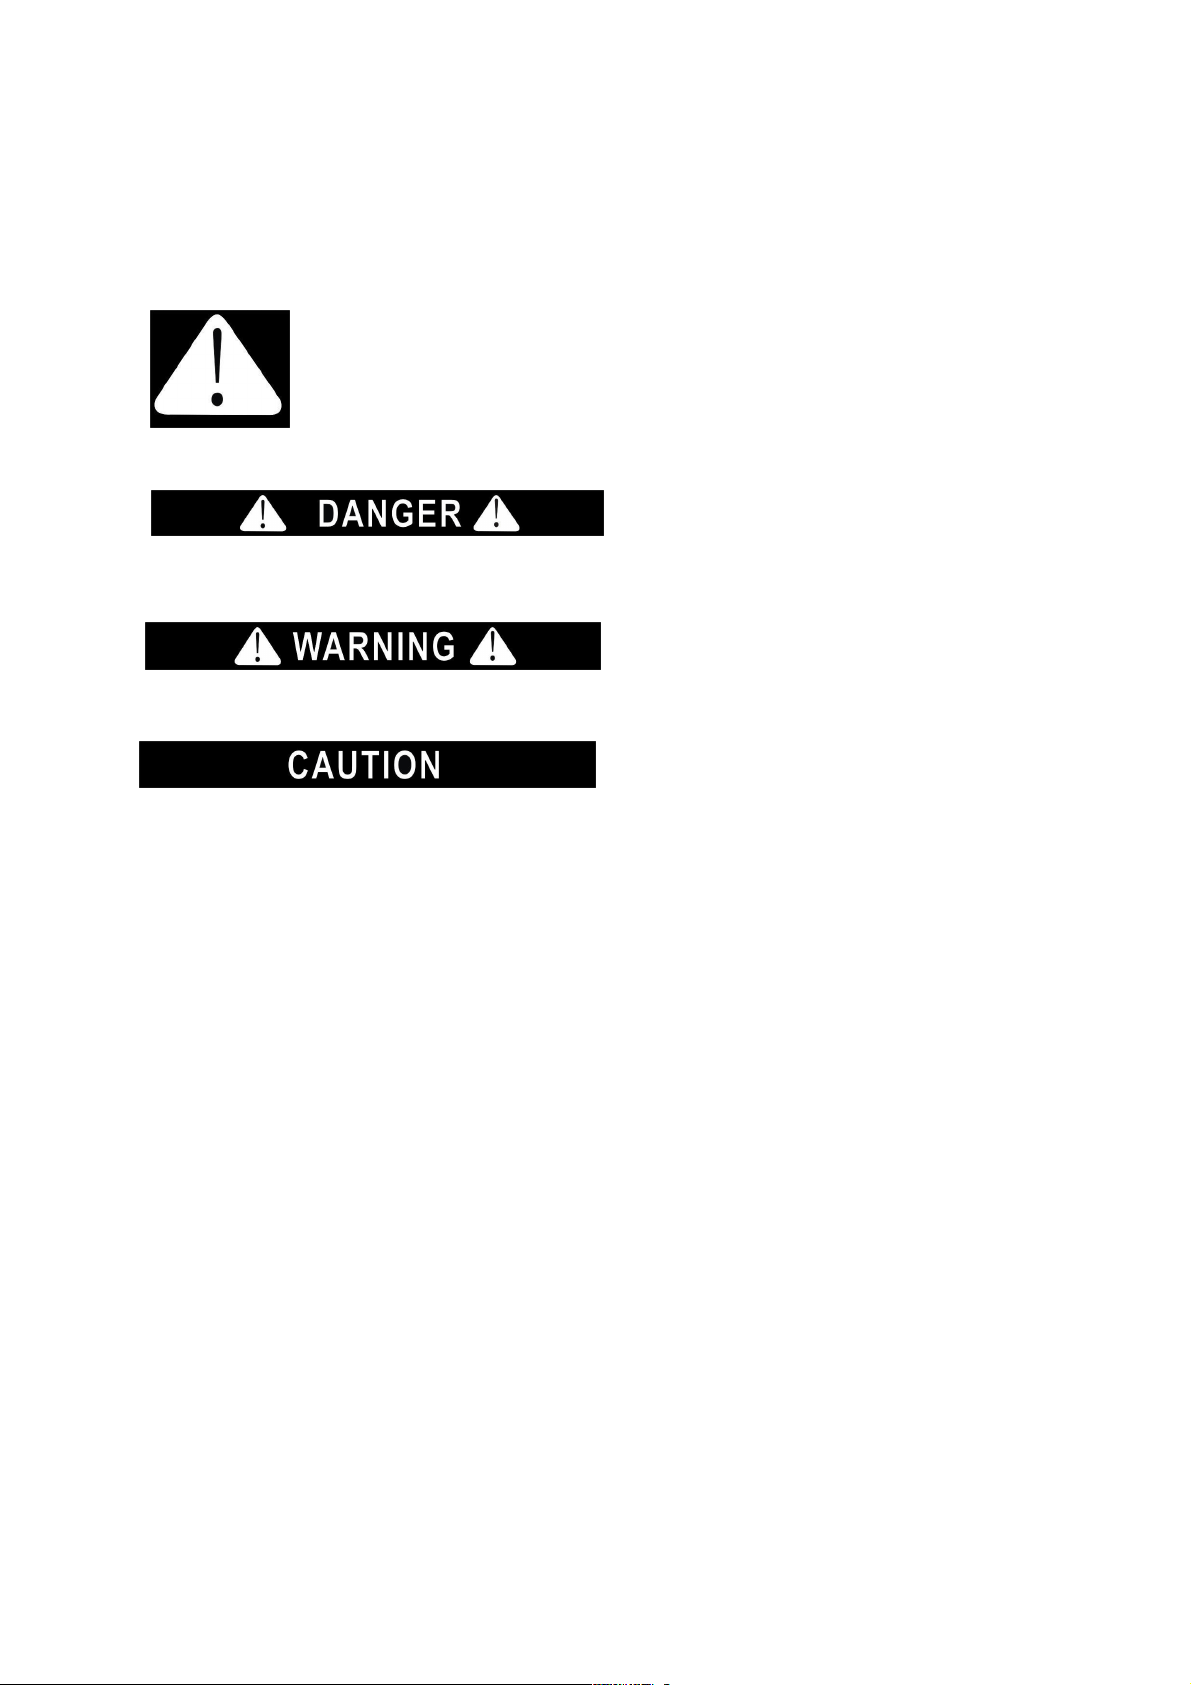
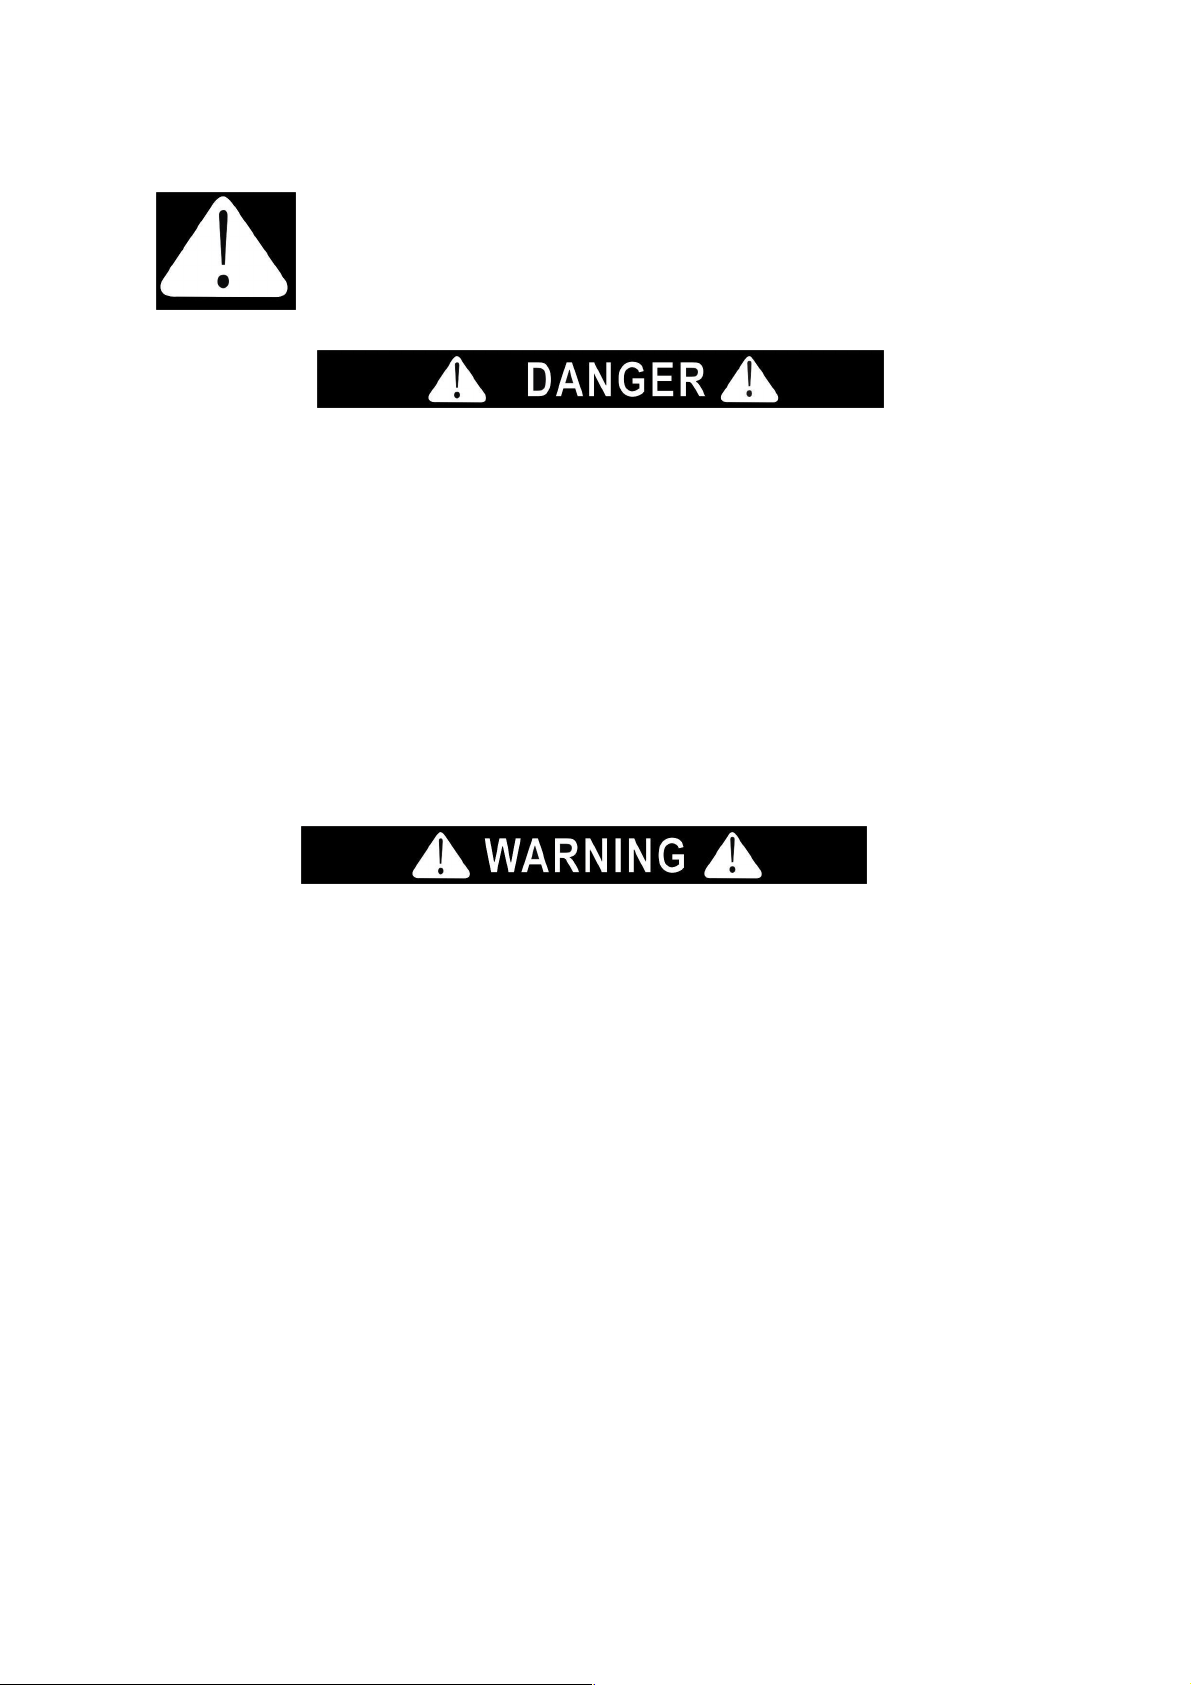
This is the safety alert symbol.
This symbol alerts you to potential hazards that can
cause serious injury to you and others.
All safety messages will follow the safety alert symbol.
All safety messages will tell you what the potential hazard is, tell you how to reduce the
chance of injury, and tell you what can happen if the instructions are not followed.
ENGLISH
3
IMPORTANT SAFEGUARDS
A person who has not read and understood all operating and safety instructions
is not qualied to operate this appliance. All users of this appliance must read and
understand this Instruction Manual before operating or cleaning this appliance.
When using electrical appliances, basic safety precautions
should always be followed, including:
1. Read all instructions before operating this appliance.
2. DO NOT TOUCH the hot surfaces. Use handles or knobs.
3. This appliance is NOT A TOY.
4. Unsupervised young children and cognitively challenged
individuals should never operate this appliance.
5. Close supervision is necessary when any appliance is used by or near children.
6. To protect against electrical shock do not immerse cord, plug or
any part of this appliance in water or other liquids.
7. Unplug from outlet when not in use, before removing parts and before cleaning.
Allow to cool before putting on or taking o any parts, and before cleaning.
8. DO NOT operate any appliance with a damaged cord or plug, or after the appliance
malfunctions, or if the appliance has been damaged in any manner. Return the
appliance to the nearest repair shop for examination, repair or adjustment.
9. The manufacturer does not recommend the use of accessory attachments other than
what is provided by the manufacturer. Use of attachments may cause injuries.
10. DO NOT use the appliance for other than its intended use.
11. DO NOT use outdoors. FOR HOUSEHOLD USE ONLY.
12. DO NOT place on or near a hot gas or electric burner, or in a heated oven.
13. DO NOT let cord hang over edge of table or counter, or touch hot surfaces.
14. NEVER leave unit unattended while in use or when plugged into an outlet.
15. Extreme caution must be used when moving an appliance containing hot food.
16. Always attach plug to appliance rst, then plug cord in the wall outlet. To
disconnect, turn any control to "o," then remove plug from wall outlet.
ADDITIONAL IMPORTANT SAFEGUARDS
Operating Safety Precautions
1. Do not wash articles that have been previously cleaned in, washed in, soaked
in, or spotted with gasoline, dry-cleaning solvents, or other ammable or
explosive substances, as they give o vaports that could ignite or explode.
2. Do not add gasoline, dry-cleaning solvents, or other ammable or or explosive substances
to the wash water. These substances give o vapors that could ignite or explode.
3. Under certain conditions, hydrogen gas may be produced in a hot-water system that has
not been used for two weeks or more. HYDROGEN IS EXPLOSIVE. If the hot water system
has not been used for such a period, before using a washing machine, turn on all hot water
faucets and let water ow from each for several minutes. This will release any accumulated

ENGLISH
4
hydrogen gas. As the gas is ammable, do not smoke or use an open ame during this time.
4. DANGER: Risk of child entrapment. Child entrapment and suocation are not problems of
the past. Junked or abandoned appliances are still dangerous even if sitting in the garage.
5. Before you throw away your old portable washer, take o the lid.
6. Never allow children to operate, play with, or crawl inside the portable washer. Close
supervision of children is necessary when the washer is used near children.
7. Do not reach into the washer if the agitator or inner tub is moving.
8. Do not tamper with controls.
9. Do not repair or replace any part of the washer or attempt any servicing unless specically
recommended in the user maintenance instructions or in published user-repair instructions.
10. Never clean portable washer parts with ammable uids.
The fumes can create a re hazard or explosion.
11. Do not place the washer in steamy rooms or where the washer is directly exposed to
rain. Moisture may destroy the electrical insulation causing an electrical shock hazard.
12. Do not store, use gasoline or any other ammable vapors and liquids in the vicinity of
this or any other portable washer. The fumes can create a re hazard or explosion.
13. If the power cord is damaged, it must be replaced by the manufacturer or its
service agent or a similar qualied person in order to avoid a hazard.
Instructions for the Electrical Cord and Plug
1. ELECTRICAL SHOCK HAZARD: Failure to follow these instructions
can result in death, re, or electrical shock.
• Plug into a grounded 3 prong outlet.
• DO NOT remove ground prong.
• DO NOT use an adapter.
• DO NOT use an extension cord.
2. This unit MUST be grounded. In the event of an electrical short circuit, grounding
reduces the risk of electric shock by providing an escape wire for the electric current.
This unit is equipped with a cord having a grounding wire with a grounding plug.
The plug must be plugged into an outlet that is properly installed and grounded.
3. WARNING: Improper use of the grounding plug can result in a risk of electric
shock. If the plug does not t fully into the outlet, contact a qualied
electrician. Do not attempt to modify the plug in any way.
4. A short power supply cord is provided to reduce the risk resulting
from becoming entangled or tripping over a long cord.
5. The manufacturer does not recommend using this machine in countries that do not
support 120V AC even if a voltage adapter, transformer, or converter is in use.
SAVE THESE INSTRUCTIONS!
ENGLISH
5
INTRODUCTION
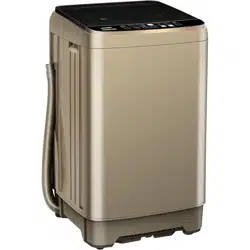
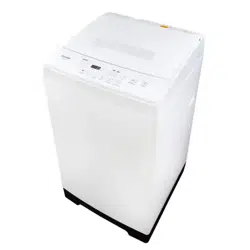
Thank you for purchasing the PORTABLE 1.0 CU. FT. CLOTHES WASHING MACHINE.
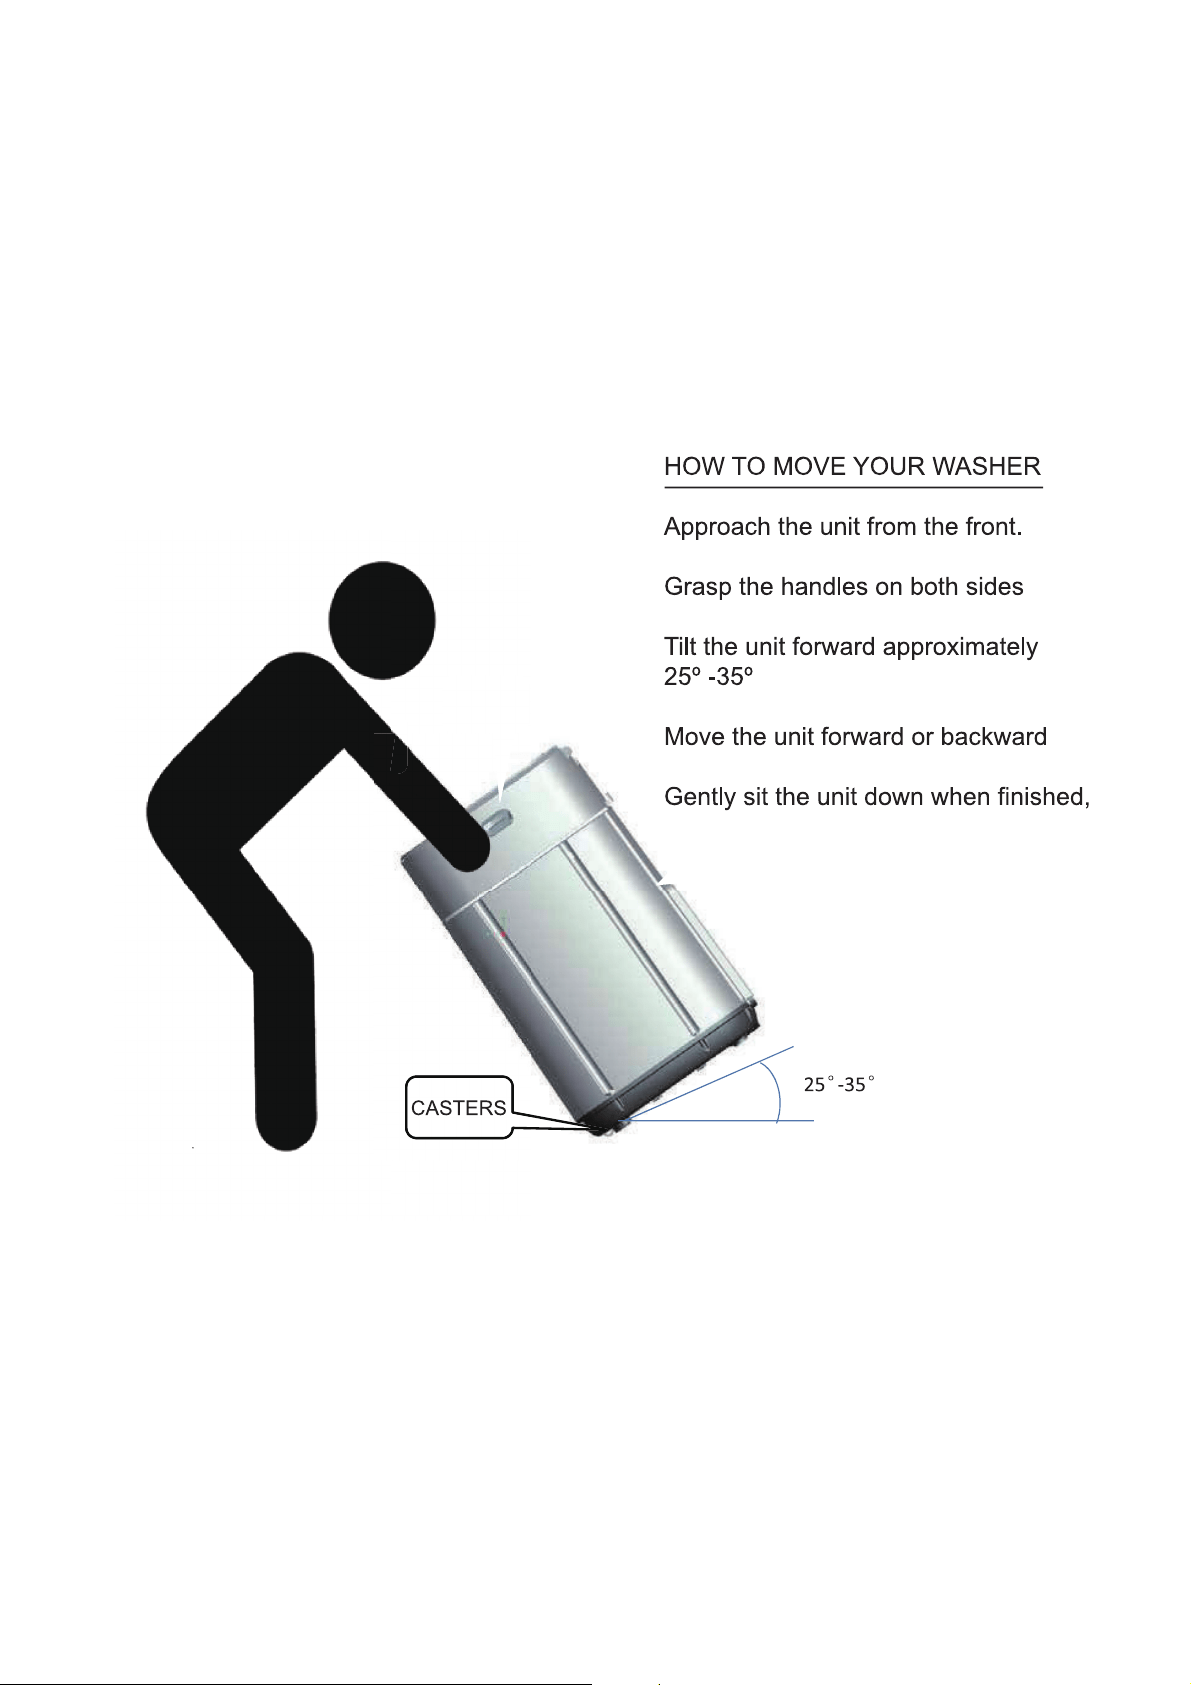
Now you can have the convenience of being able to move your clothes washer where
you need it, with the Farberware Urban Living1.0 Cu Ft Portable Clothes Washer.
With washing capacity up to 7lbs. and 6 wash programs you can have all the wash-
power you need-- exactly where you need it with easy hookup right to your sink!
Features include:
• 1.0 cu. ft. top loading washer
• Washing capacity: 7 lbs.
• Digital controls with LED display
• 6 wash programs: Normal, Heavy, Gentle, Rapid, Soak, Spin
• 6 water levels offer water and energy savings
• 800 RPM maximum spin speed for exceptional water extraction
• Durable stainless steel interior tub
• Transparent tempered glass with soft closing cover
• Premium metallic silver with chrome decoration
• Child safety lock function
• ETL & DOE compliant
ENGLISH
6
GROUNDING THE UNIT
This appliance must be grounded. In the event of a malfunction or breakdown, grounding
will reduce the risk of electric shock by providing a path of least resistance of electric
current. This appliance is equipped with a cord having an equipment-grounding
conductor and a grounding plug. The plug must be plugged into an appropriate outlet
that is installed and grounded in accordance with all local codes and ordinances.
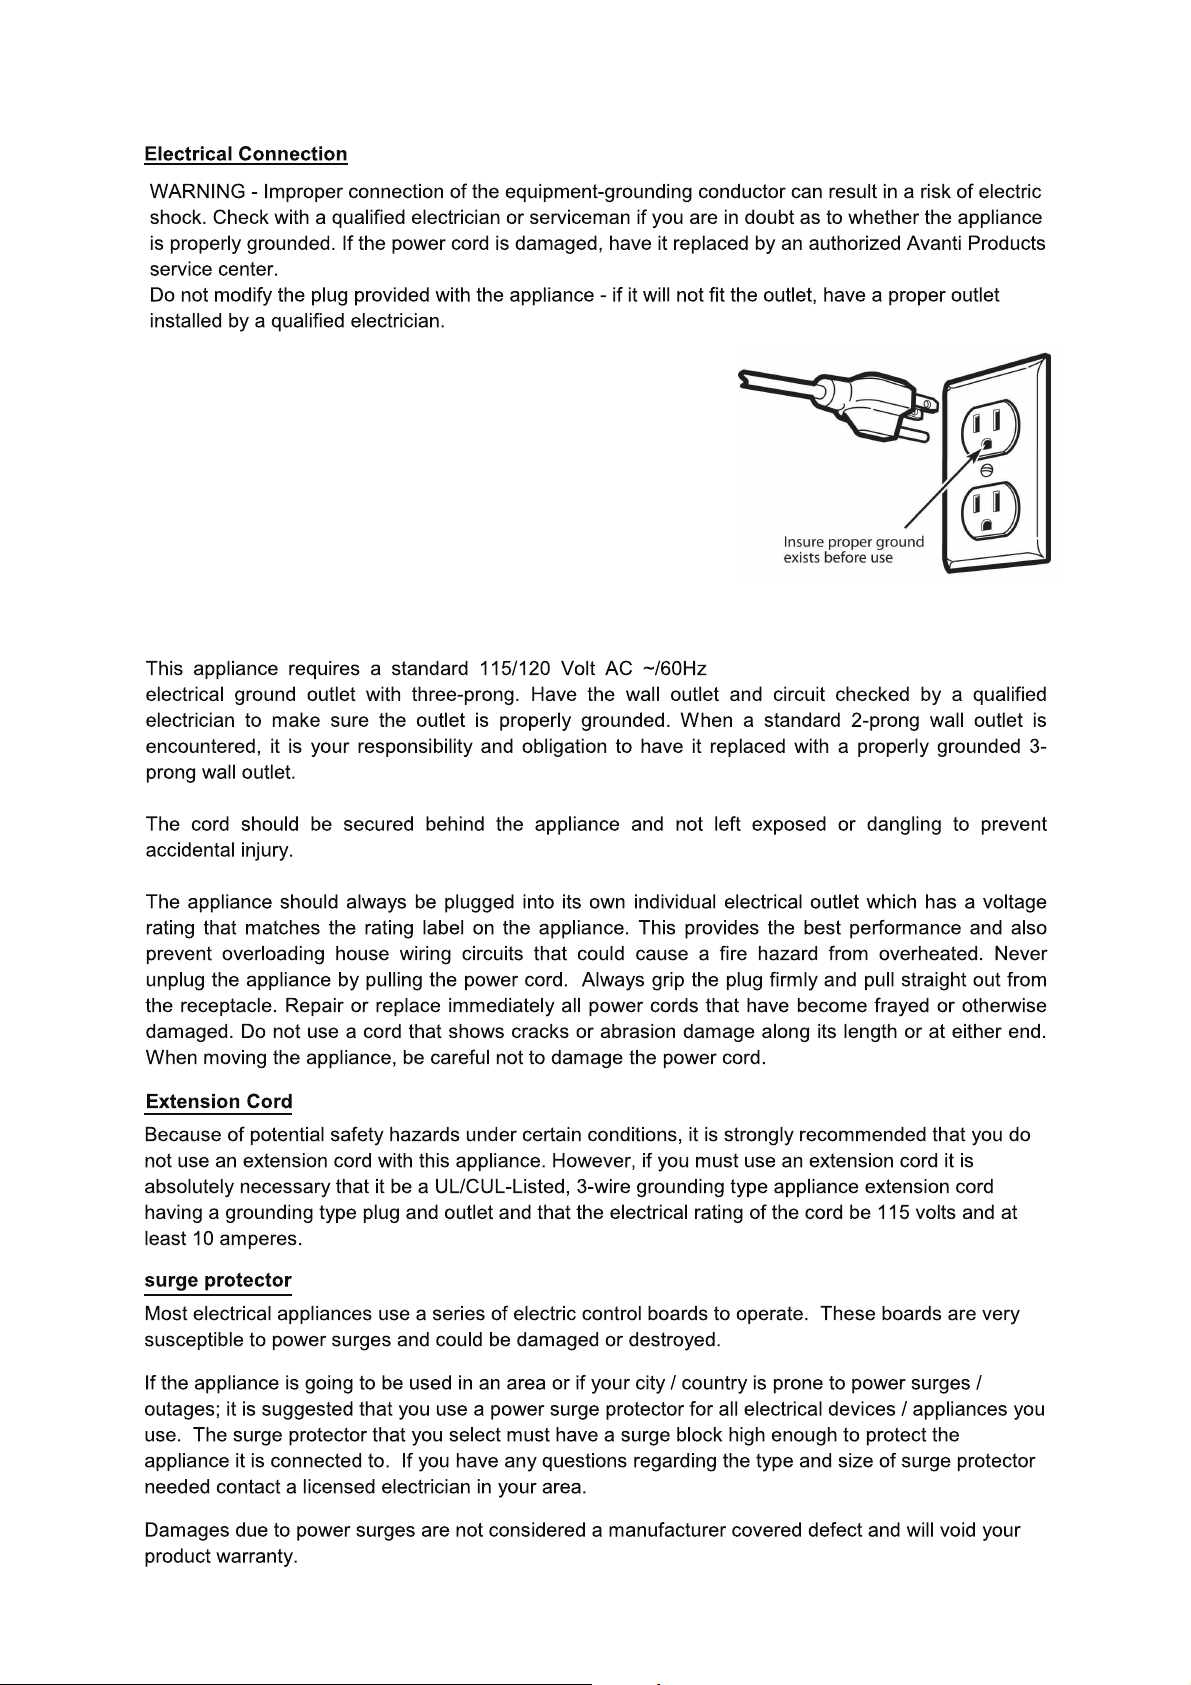
Improper connection of the equipment-grounding conductor can result
in a risk of electric shock. Check with a qualied electrician or service
representative if you are in doubt whether the appliance is properly grounded.
Do not modify the plug provided with the appliance; If it is not t for the
outlet. Have a proper outlet installed by a qualied electrician.
WARNING: Improper use of the grounding plug can result in a risk of electric shock.
FOR PERSONAL SAFETY
DO NOT USE AN EXTENSION CORD OR AN ADAPTER PLUG WITH THIS
APPLIANCE. DO NOT, UNDER ANY CIRCUMSTANCES, CUT OR REMOVE
THE EARTHING CONNECTION FROM THE POWER CORD.
ELECTRICAL REQUIREMENTS
Please look at the rating label to know the rating voltage and connect the dishwasher
to the appropriate power supply. Use the required fuse 10 amp, time delay fuse or
circuit breaker recommended and provide separate circuit serving only this appliance.
ELECTRICAL CONNECTION
Ensure the voltage and frequency of the power being corresponds to
those n the rating plate. Only insert the plug into an electrical socket which
is earthed properly. If the electrical socket to which the appliance must be
connected is not appropriate for the plug , replace the socket, rather than
using a adapters or the like as they could cause overheating and burns.
ENGLISH
7
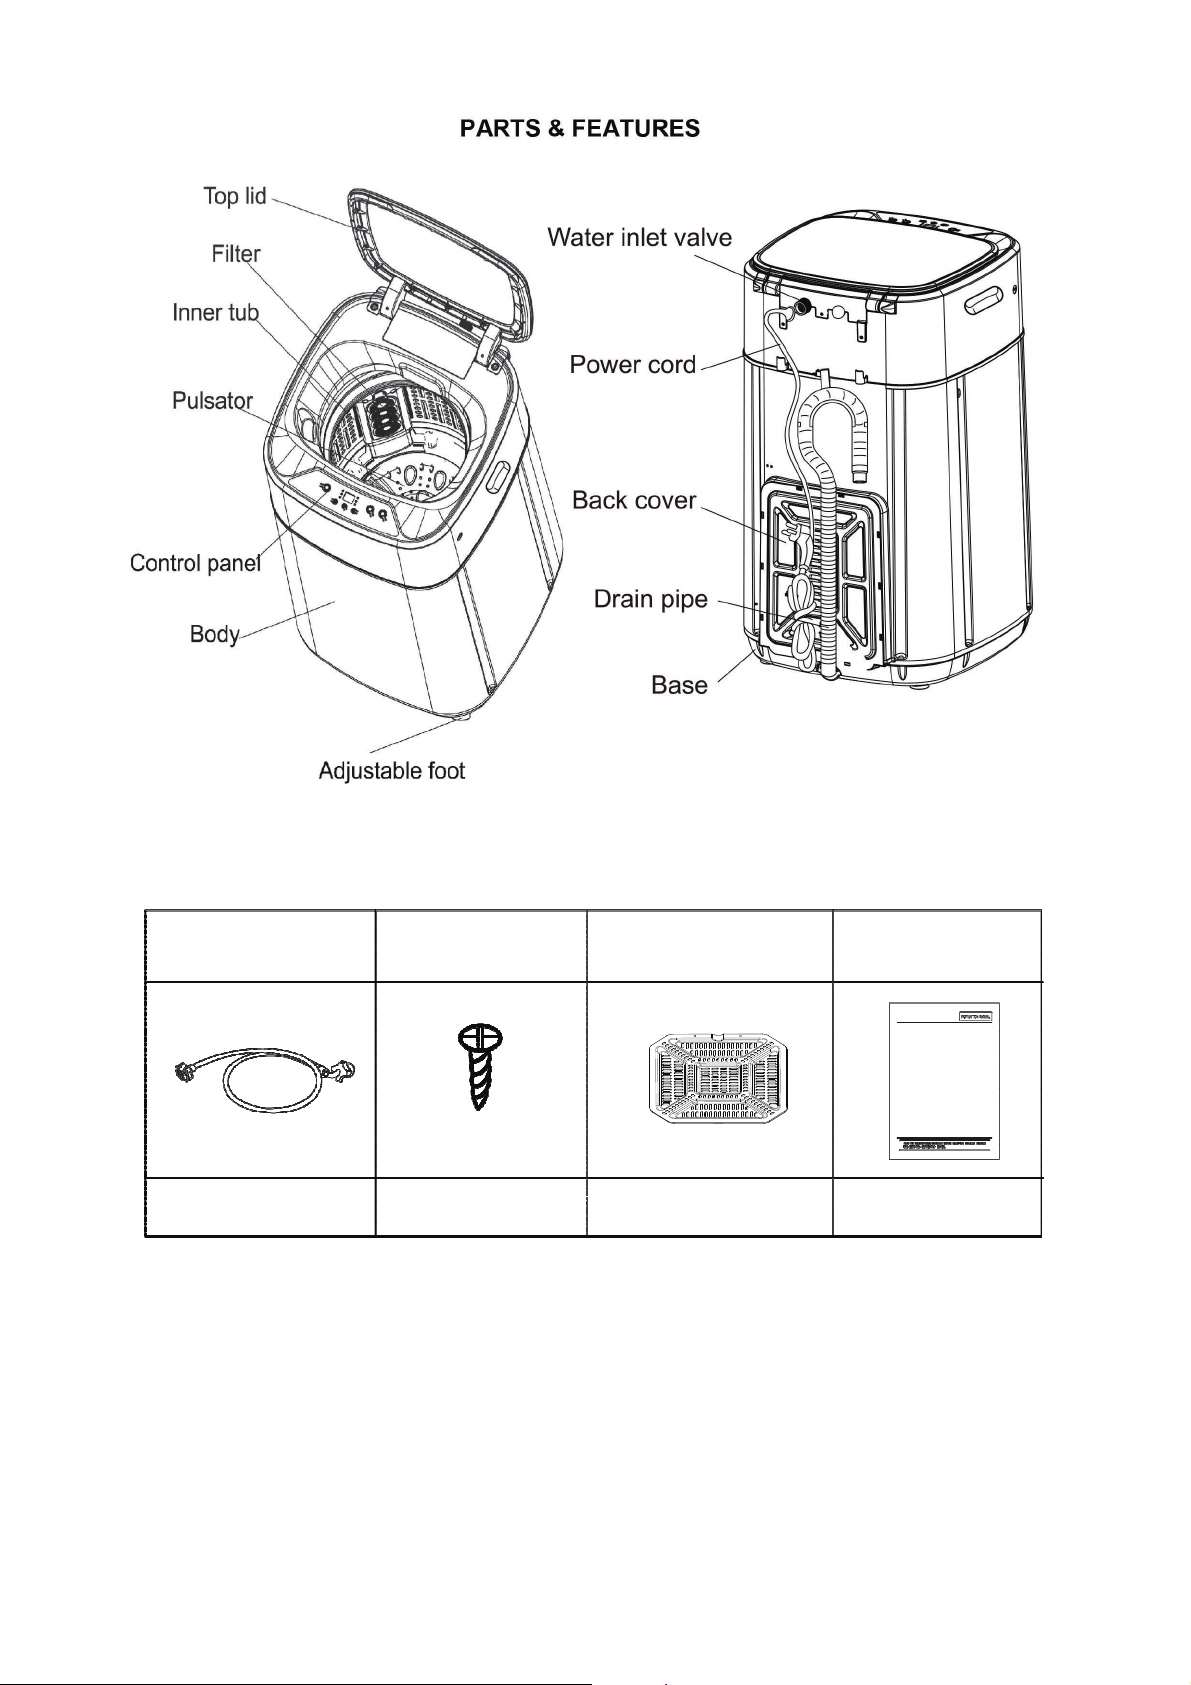
PARTS & ASSEMBLY
Your PORTABLE CLOTHES WASHER is fully assembled. Before using, remove all
packing materials. Check the washer for any damage, such as misaligned or bent
door, damaged door seals and sealing surfaces, broken or loose hinges and latches
and dents inside the washer or on the door. If there is any damage, DO NOT operate
the washer. Return damaged items to the store where it was purchased.
PARTS
Water inlet valve
Body
Power Cord
Control Panel
Adjustable Foot
Filter
Casters
Inner Tub
Top Lid
Back Cover
Drain Hose
Base
Drain hose
with clamp
Inlet hose with
faucet adapter
Two self
screws
Bottom Base
Noise Cover
Drain Hose
Outlet
Fill Detergent
Overow Tube
Overow Plug
ENGLISH
8
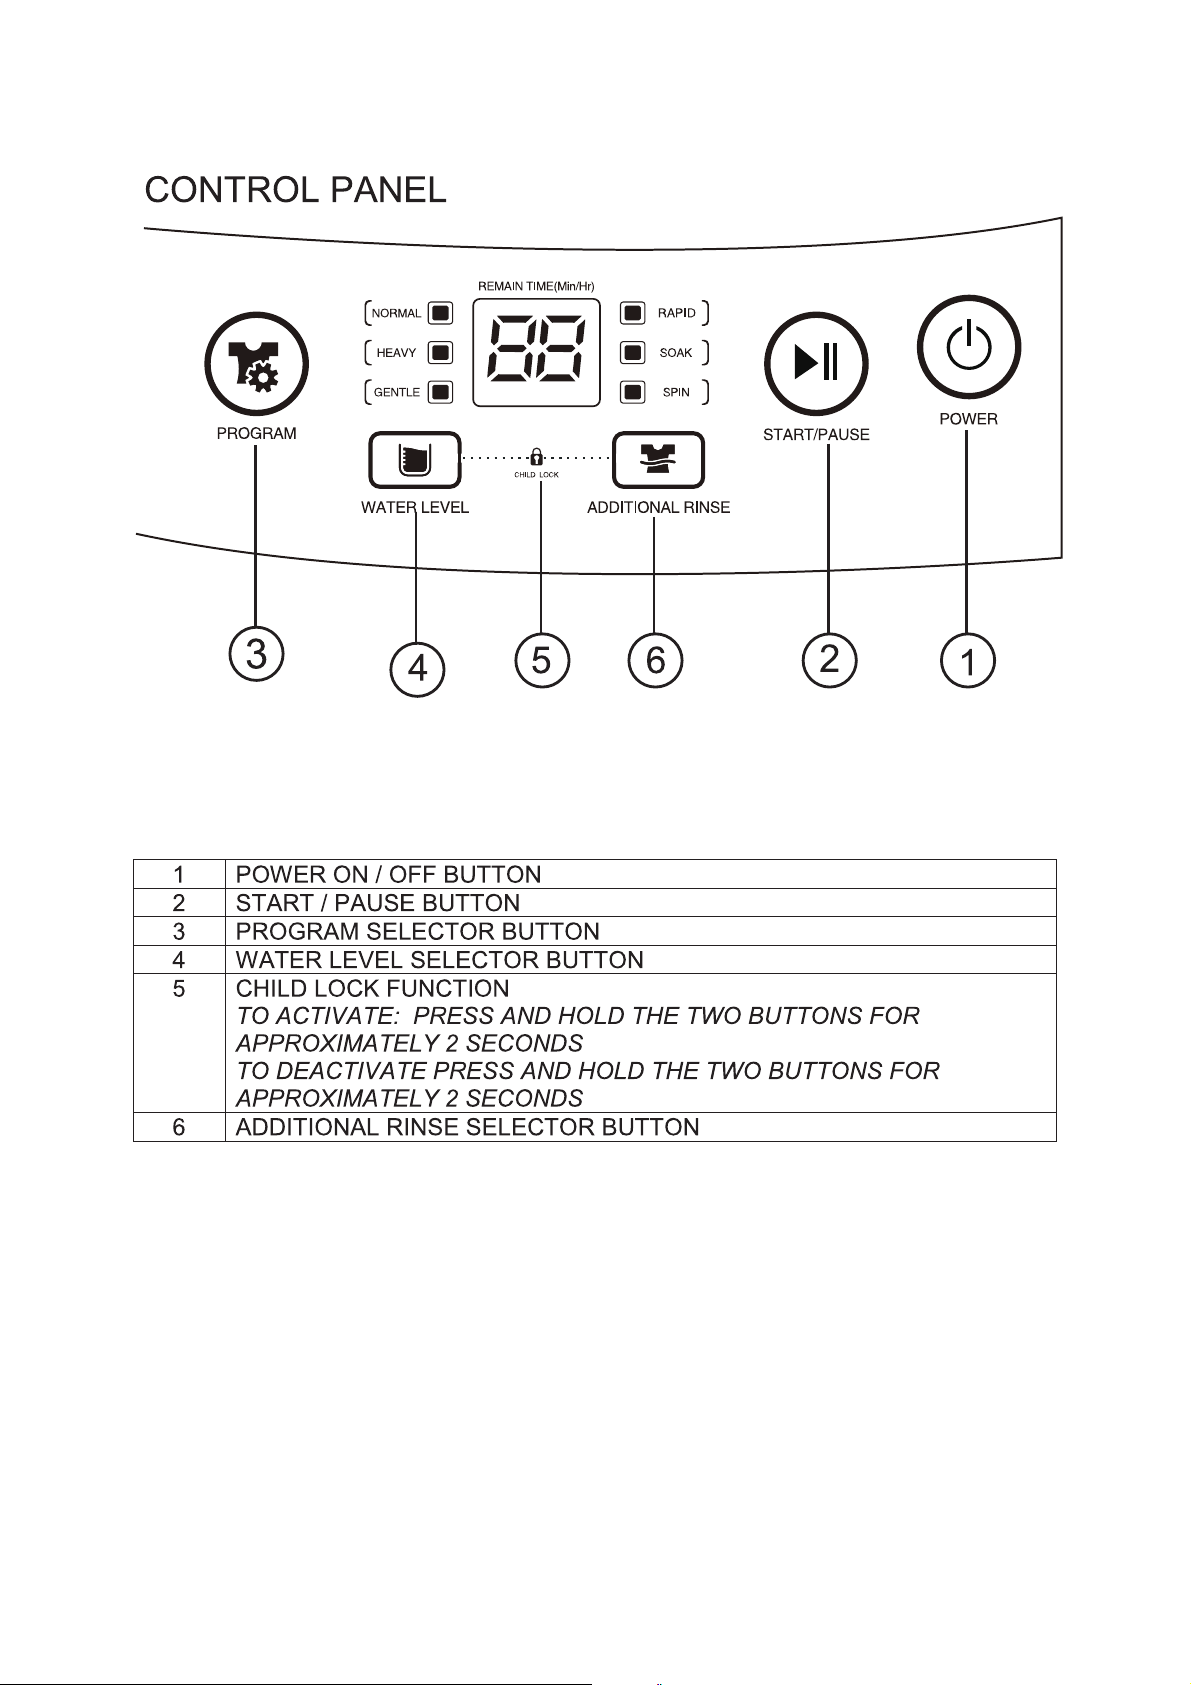
CONTROL PANEL
1 Power On/O Button
2 Start/Pause Button
3 Program Selector Button (Normal, Heavy, Gentle, Rapid, Soak, Spin)
4 Water Level Selector Button (1-6)
5 Child Lock Function
To Activate: Press & Hold The Two Buttons (Water Level/Additional
Rinse) For 2 Seconds. To Deactivate, Do The Same.
6 Additional Rinse Selector Button
INSTALLATION INSTRUCTIONS
BEFORE USING WASHER
• Remove the exterior and interior packing
• You will need the following tools:
1. Wrench
2. Pliers
3. Screwdriver
• Check to be sure you have all of the following parts:
1. One inlet hose
2. One faucet adapter
3. One bottom base noise cover with two screws
4. One drain hose assembly with clamp
• Remove shipping brace. NOTE: It should be saved and used (to prevent damage to
washer components) whenever washer is moved or transported to a new location.
• Clean the interior with lukewarm water using a soft cloth.
• Allow 2 inches of space between the back and sides of the appliance.
• DO NOT use excessively hot water (122 degrees F). Plastic
parts may be deformed or damaged.
ENGLISH
9
• Before washing, check all pockets to make sure any objects
are out to avoid damaging washer or clothes.
• Never splash water on the control panel.
SELECTING A LOCATION
Before you install the portable washer, select a location with the following characteristics:
• A hard level surface
• Away from direct sunlight
• Adequate ventilation
• Away from sources of heat such as gas or coal. Make sure
washing machine does not stand on power cord.
• Ventilation openings must not be obstructed by carpeting when the portable washer is
installed on a carpeted oor. It is recommended that you place your washer on a hard material.
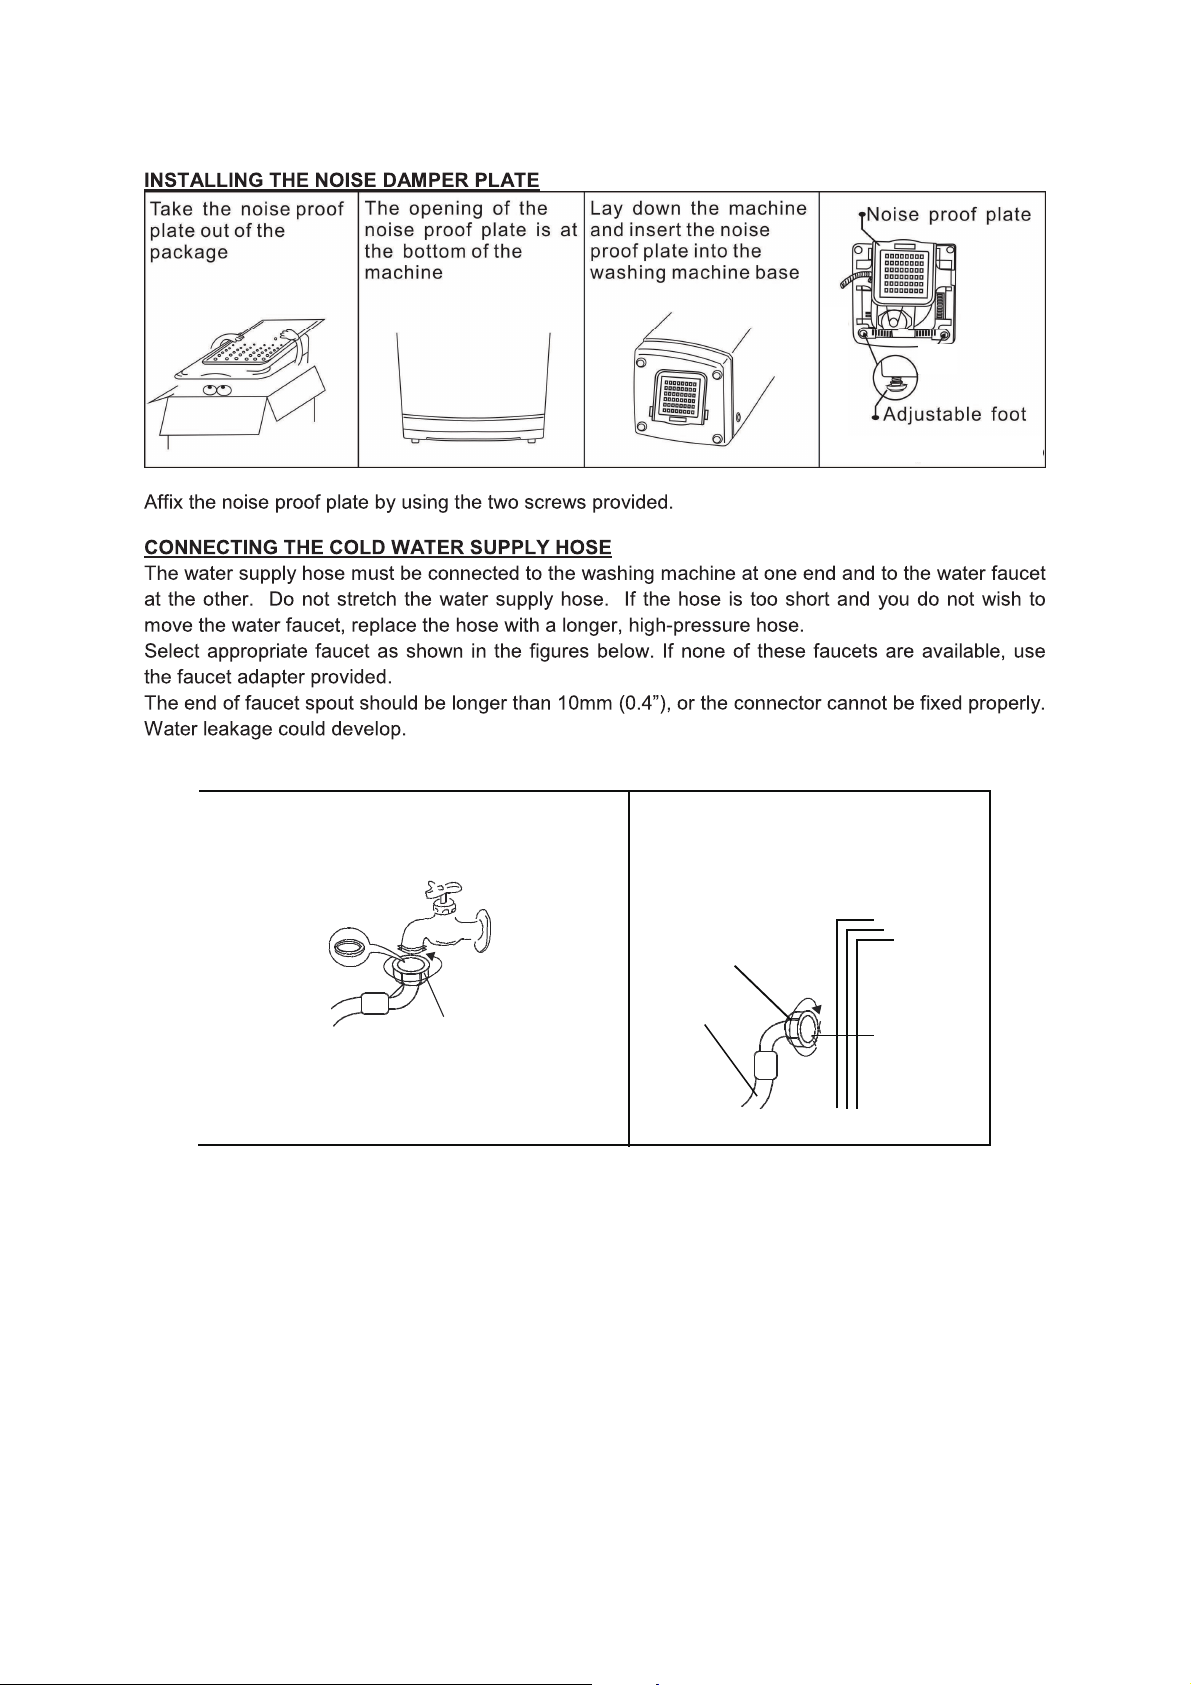
INSTALLING THE NOISE DAMPER PLATE
1. Take the noise proof plate out of the package.
2. The opening of the noise proof plate is at the bottom of the machine.
3. Lay down the machine gently and insert the noise proof
plate into the washing machine base.
4. Connect the noise proof plate by using the two screws provided.
CONNECTING THE WATER INLET HOSE
The water inlet hose must be connected to the washing machine
at one end and to the faucet at the other. Do not stretch the water
supply hose. If the hose is too short and you do not wish to move the
water faucet, replace the hose with a longer, high-pressure hose.
Use the faucet adapter provided to connect to the faucet. If
adapter does not t, you will have to visit your local hardware
store to nd the one that ts. The end of the faucet spout
should be longer than 10 mm (0.4 inches) or the connector
cannot be xed properly. Water leakage could develop.
NOTE: Plumbing tape (not included) is
recommended for a better seal.
ENGLISH
10
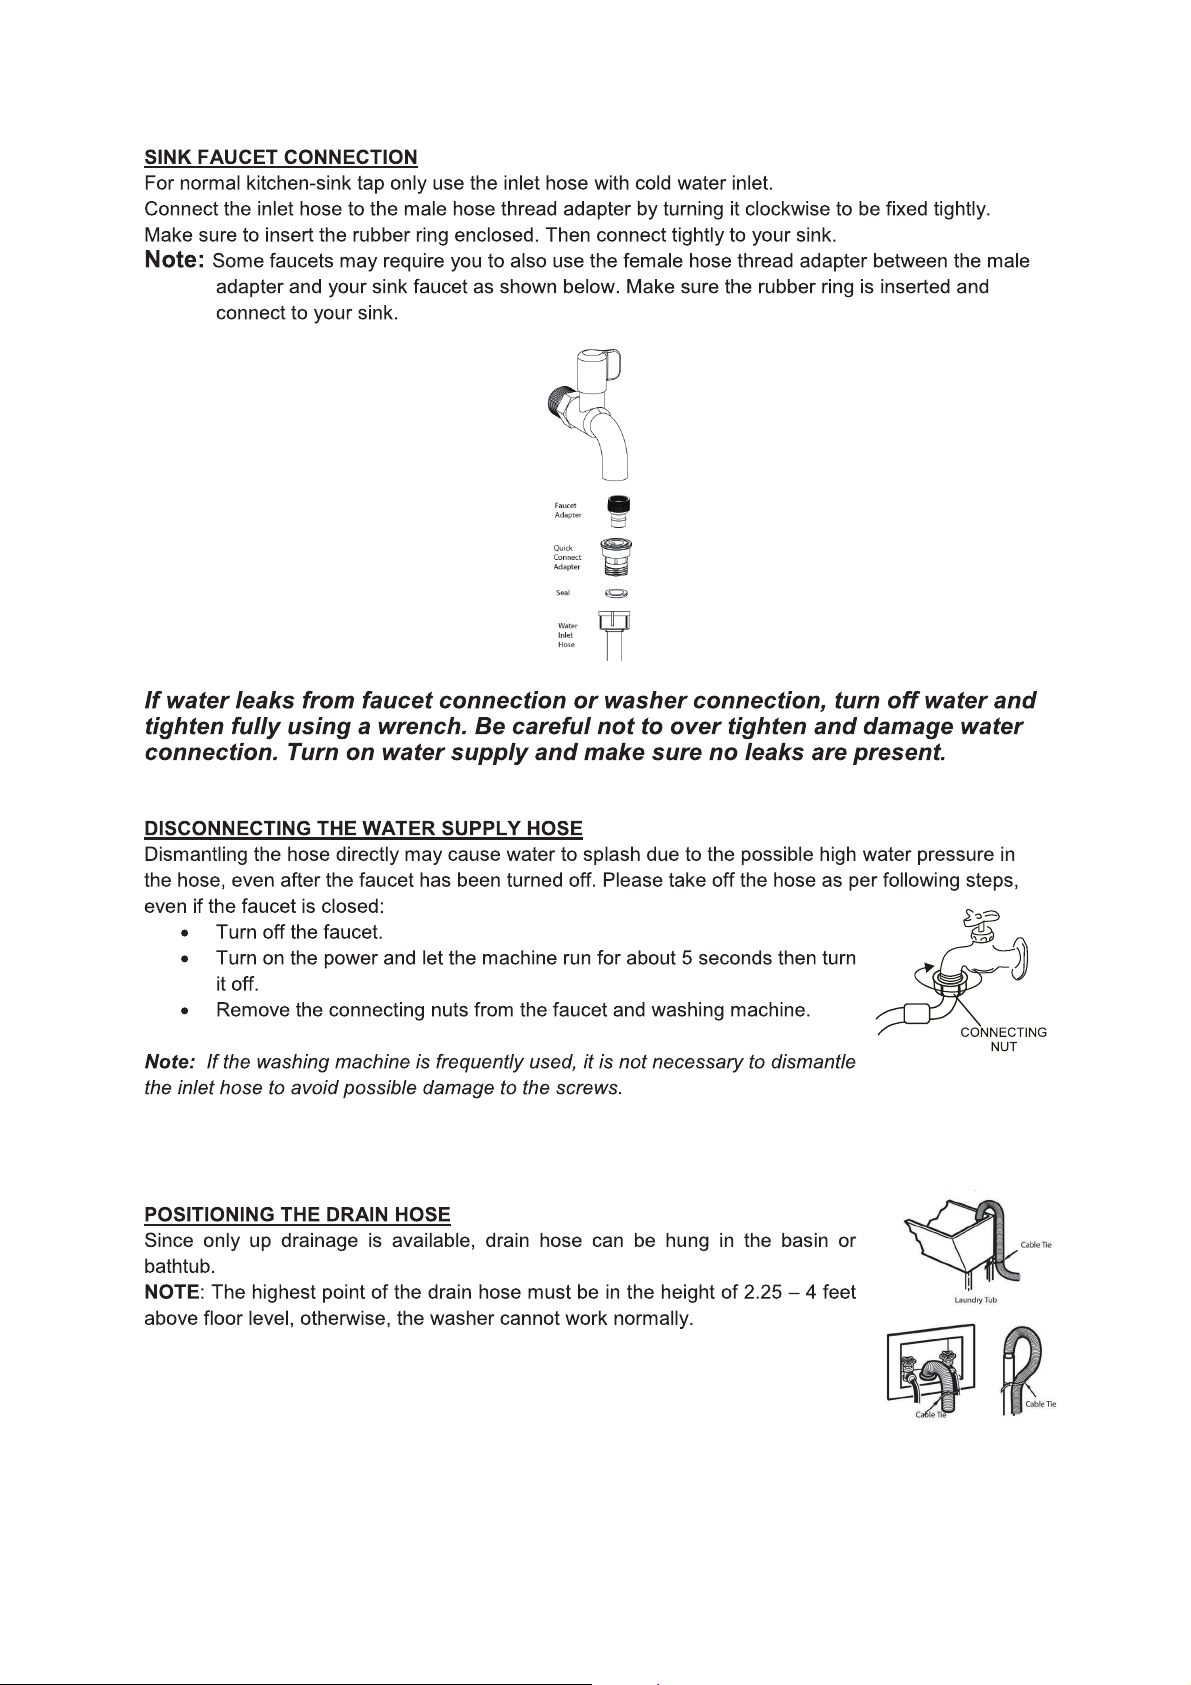
NOTE: Some faucets may require you to also use the female hose thread adapter
between the male adapter and your sink faucet, depending on the sink faucet. The
rubber washer needs to be removed to make it female. Make sure the rubber washer
ring is inserted and connected to your sink or there is a risk for water leakage.
WARNING: If water leaks from faucet connection or washer connection, turn o
water and tighten fully using a wrench. Be careful not to over tighten and damage
water connection. Turn on water supply and make sure no leaks are present.
DISCONNECTING THE WATER INLET HOSE
Dismantling the hose directly may cause water to splash due to the possible
high water pressure in the hose, even after the faucet has been turned o. Please
take o the hose as per following steps, even if the faucet is closed.
• Turn o the faucet and then turn on the power and have let the
machine run for about 5 seconds then turn it o.
• Remove the connecting nuts from the faucet and washing machine.
NOTE: If the washing machine is frequently used, it is not necessary to
dismantle the inlet hose to avoid possible damage to the screws.
CONNECTING THE DRAIN HOSE
Included is one drain hose with a screw clamp. Connect the
bottom end of the drain hose (L Shaped) over the drain hose
outlet, which is located at the back of the unit on the bottom as
seen in picture. Make sure clamp is screwed on tight, ensuring
the hose cannot slip o, which would result in water leakage.
The other end should be placed in a dedicated drain outlet, basin or
tub/sink. DO NOT LET DRAIN HOSE HANG ON THE GROUND. Water
must be drained safely or there will be water damage. Make sure end
of drain hose is in a secured position otherwise water pressure can
force the hose to come loose, which can result in water damage.
WARNING: The highest point of the drain hose must be in the height of
2-4 feet above oor level, otherwise the washer cannot work normally.
Make sure drain hose is in a secured position otherwise the water pressure
can force the hose to come loose, resulting in water leakage. Washer
should not be operated if leaks from washer connections are present.
Faucet Adapter (washer comes out to
make it a female threaded adapter)
Quick Connect Adapter
Water Inlet Hose
Rubber Seal
ENGLISH
11
OVERFLOW TUBE
Your washing machine is equipped with an overow tube for
when water exceeds the maximum level in the washing machine.
The overow plug will prevent water from leaking to the
ground. If overow tube lls up, properly drain the water.
WARNING: Do not ll the washing machine with more than 7 pounds
of clothes, otherwise overow tube may ll up, which could result in water leakage. See
Automatic Wash Cycles chart on the next page to select the appropriate amount of water.
OPERATING INSTRUCTIONS
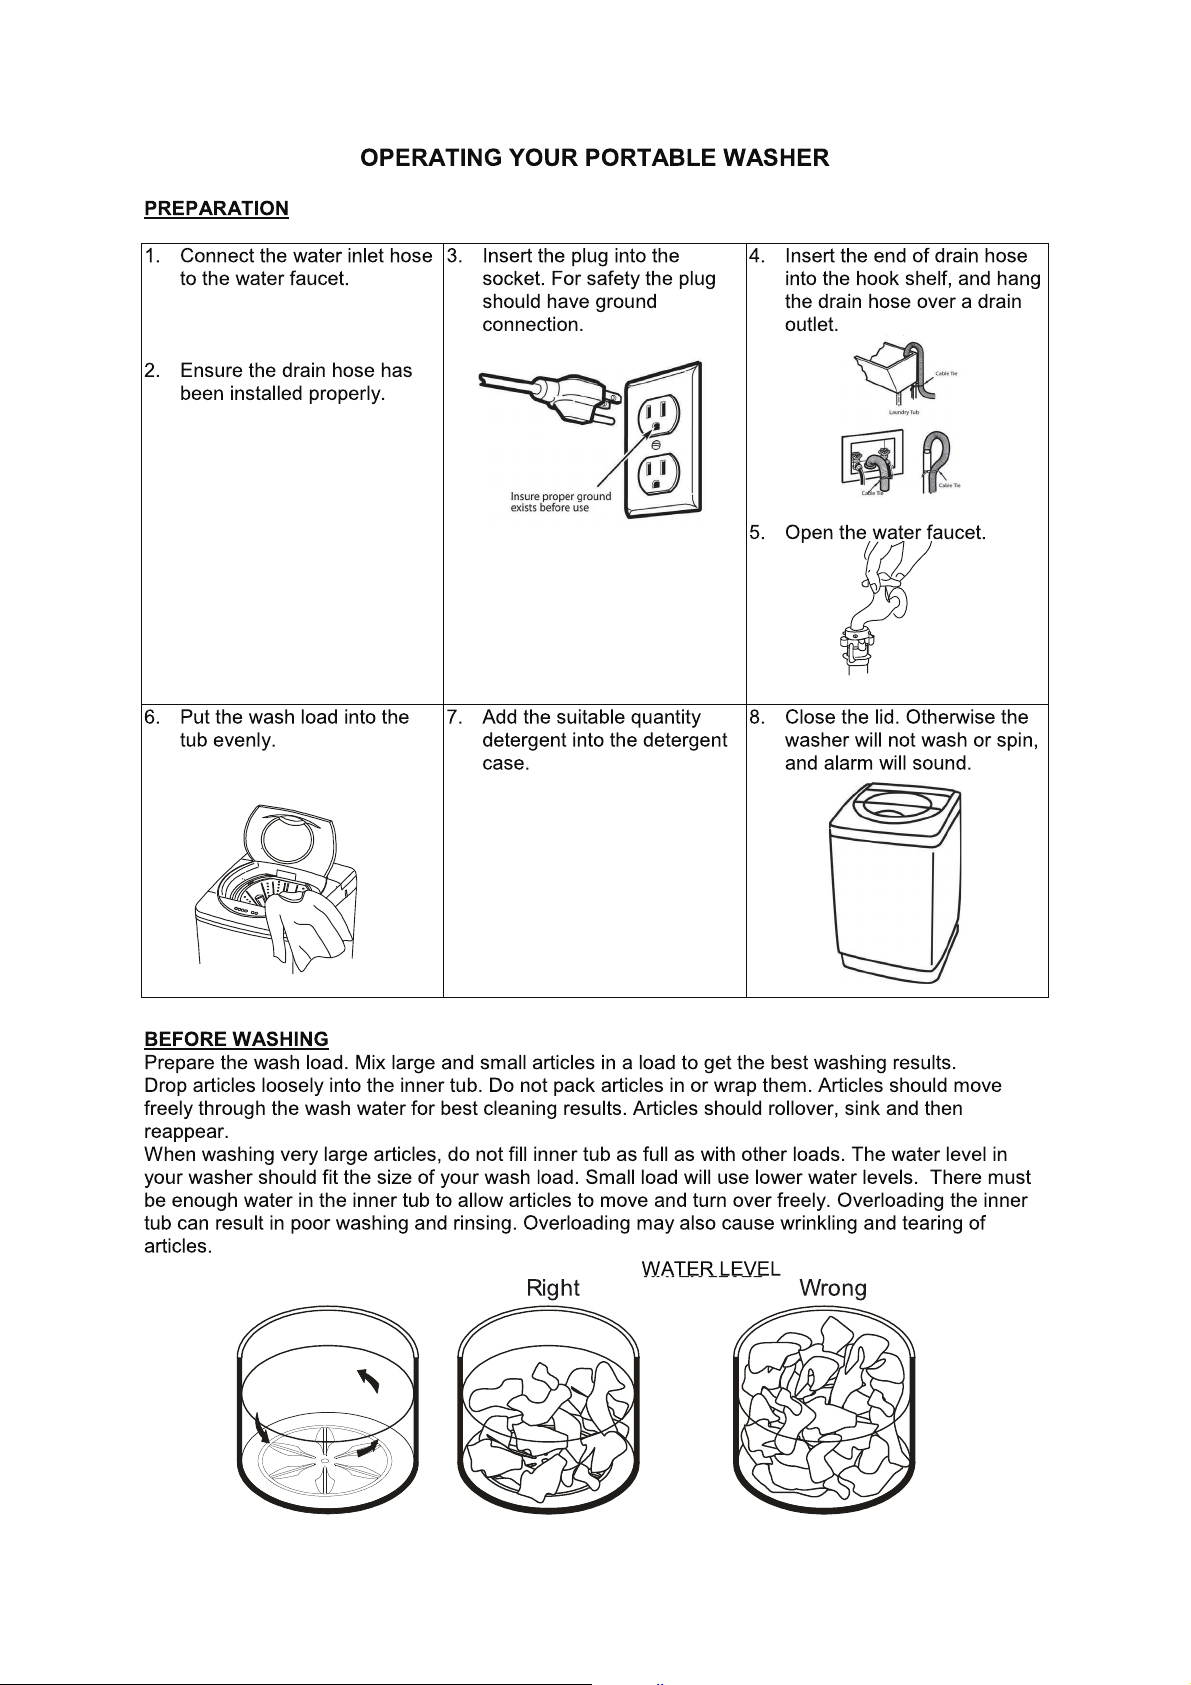
BEFORE WASHING
Make sure both the water inlet and drain hoses are installed properly
and the end of the drain hose is in a secured draining spot (instructions
above). Once unit is plugged in, make sure you place the wash load
into the tub evenly. Mix large and small articles of clothing to get
the best washing results. Drop articles loosely into the inner tub.
Clothing should move freely through the washer for best cleaning results.
When washing very large articles, do not ll inner tub as full as with other loads. The water level in
your washer should t the size of your wash load. Small loads will use lower water levels. There must
be enough water in the inner tub to allow articles to move and turn over freely. Overloading the
inner tub can result in poor washing and rinsing. Overloading may also cause wrinkling and tearing.
HOW TO START A CYCLE
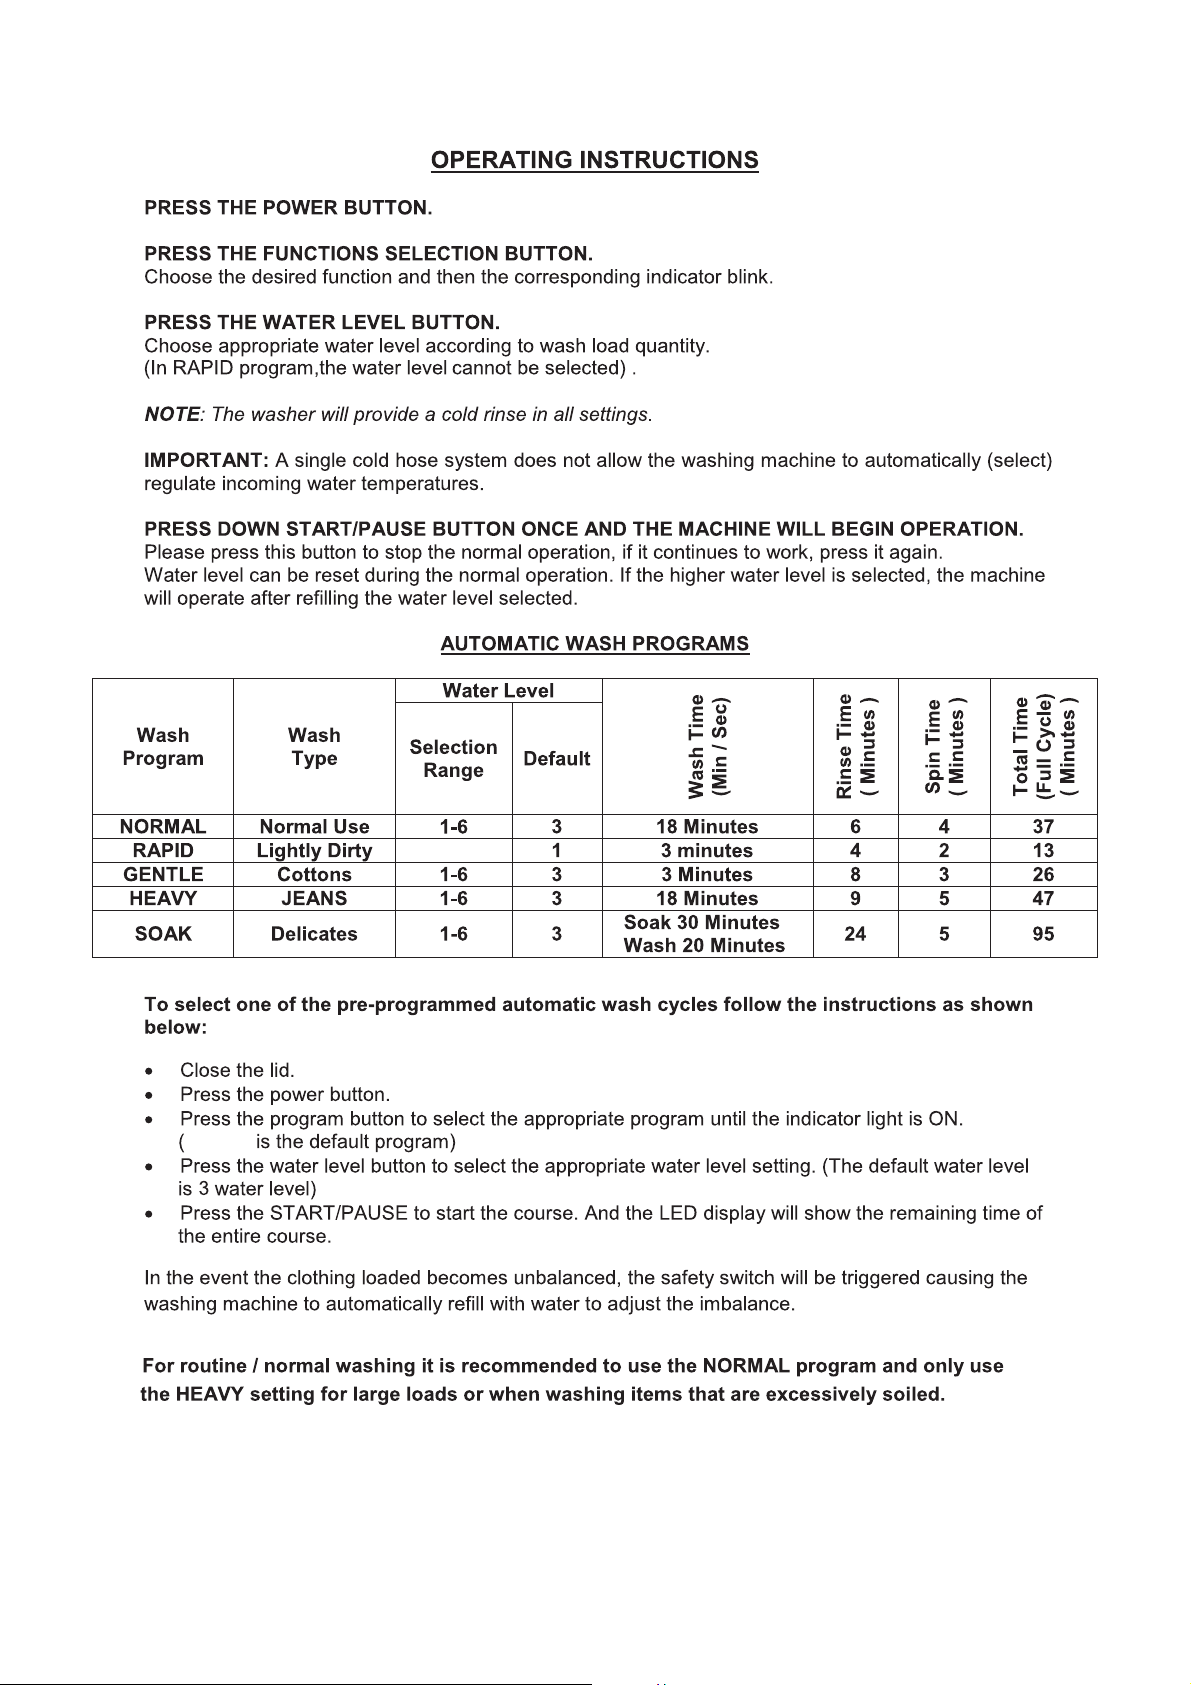
To select one of the pre-programmed automatic wash cycles, follow the instructions as shown below:
1. Turn on the water supply.
2. Pour laundry detergent in the laundry dispensing hole (on top of tub, see picture).
3. Close the lid. NOTE: Lid must be closed in order to start a cycle.
4. Press the power button.
5. Press program button to select program until the indicator light is ON. (Heavy is default).
6. Press the water level button to select the appropriate water level
setting (Can choose between 1-6. Default is 3).
7. Press the Start/Pause to start the cycle. LED display will show the remaining time left of the cycle.
NOTE: In the event the clothing load becomes unbalanced, the safety switch will be triggered,
causing the washing machine to automatically rell with water to adjust the imbalance.
Correct
Wrong
Max Fill Line
ENGLISH
12
AUTOMATIC WASH CYCLES
Wash
Program
Wash Type Water Level
Selection
Range
Water
Level
Default
Wash Time
(Min/Sec)
Rinse
Time
Spin
Time
Total
Time
NORMAL Normal Use 1-6 3 18 Minutes 6 4 37
RAPID Lightly Dirty 1 3 Minutes 4 2 13
GENTLE Cottons 1-6 3 3 Minutes 8 3 26
HEAVY Jeans 1-6 3 18 Minutes 9 5 47
SOAK Delicates 1-6 3 Soak 30 Minutes
Wash 20 Minutes
24 5 95
• Clothes easily discolored should be washed separately to prevent inter-dying.
• If you want to change a selected program, press the POWER button rst
to turn the unit o. Then press the POWER button again to turn unit
on, then press the program button to select the new cycle.
• When the Rinse and Spin functions are on, do not use detergent.
• If you want to drain the water during washing, press the POWER
button rst to turn the unit o, then press the POWER button again
to turn the unit back on, then select the Spin function.
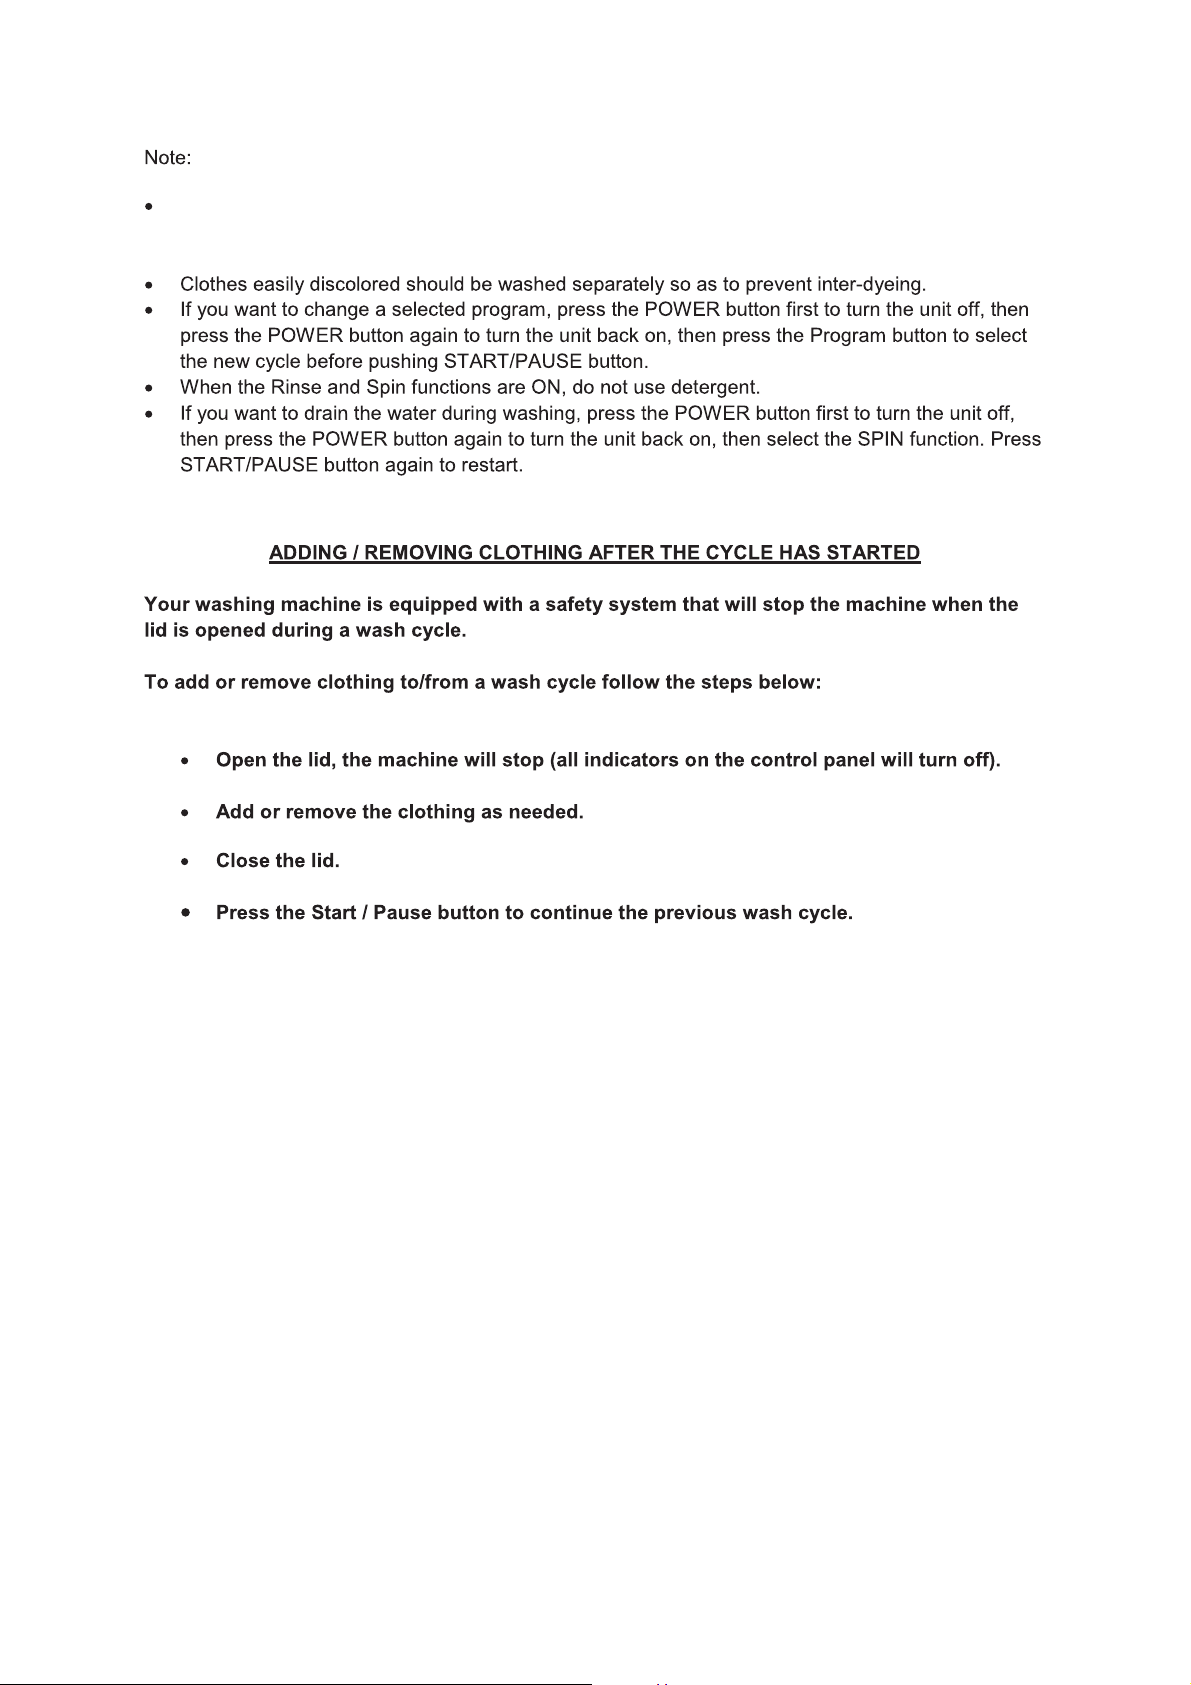
ADDING/REMOVING CLOTHING AFTER CYCLE HAS STARTED
Your washing machine is equipped with a safety system that will
stop the machine when the lid is opened during a wash cycle. To add
or remove clothing from a cycle, follow the steps below:
1. Open the lid. Machine will stop and all indicator lights will turn o.
2. Add or remove clothing as needed.
3. Close the lid. NOTE: Lid must be closed in order to start a cycle. Press
the Start/Pause button to continue the previous wash cycle.
WARNING: Certain internal parts are intentionally not grounded and may present
a risk of electric shock only during servicing. Service personnel - do not contact
the following parts while the appliance is energized. Unplug the unit.
ENGLISH
13
CLEANING & MAINTENANCE
CLEANING YOUR PORTABLE WASHER
• Clean the surface of your portable washer regularly with soft fabric.
• Clean the inner tub regularly, especially immediately after starch or bleach operation.
• Clean the lter in the inlet valve or inlet hose regularly
in order to prevent it from clogging.
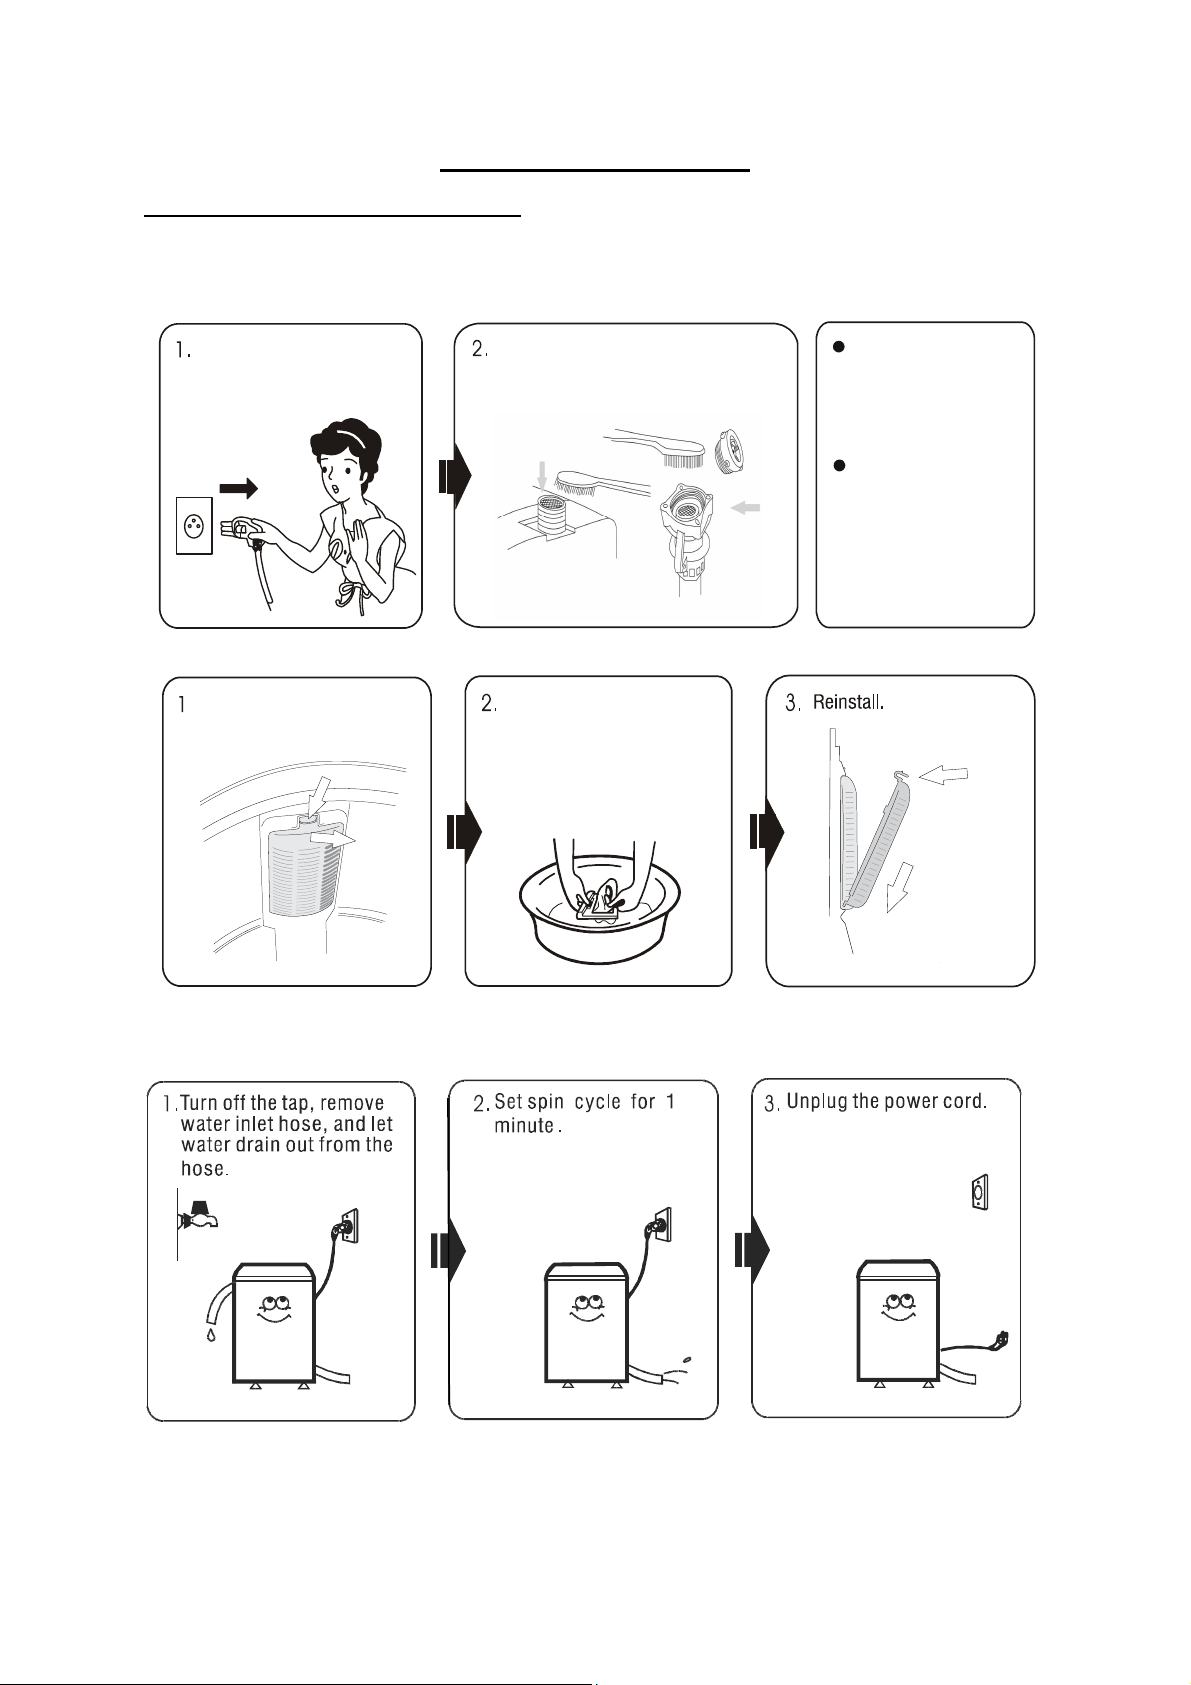
• Clean the lint lter
1. Unplug the
power cord.
2. Remove the inlet
hose and clean the
lter with a brush.
1. Gently push the tab
down and outward
to remove line lter.
2. Clean and rinse
it thoroughly.
3. Reinstall.

ENGLISH
14
RETURNS & WARRANTY
SHOULD YOUR UNIT NOT WORK OR IF DAMAGED WHEN YOU FIRST TAKE IT OUT OF
THE BOX, PLEASE RETURN IT TO THE PLACE OF PURCHASE IMMEDIATELY.
Portable Clothes Washer / FCW10BSCWHA
Should you have any questions, please contact us via email or at the customer service number listed
below between the hours of 8:00 AM and 5:00 PM, Monday through Friday, Central Standard Time.
Distributed by:
Englewood Marketing LLC
1471 Partnership Dr.
Green Bay, WI 54304-5685
Customer Service
Phone: 844-918-0509
Email: [email protected]
One-Year Limited Warranty
This warranty applies to products purchased and used in the U.S. and Canada.
This is the only expressed warranty for this product and is in lieu of any other warranty or condition.
This product is warranted to be free from defects in material and workmanship for a period
of one (1) year from the date of original purchase. This warranty is valid for the original retail
purchaser or gift recipient from the date of initial retail purchase and is not transferable.
Keep your original sales receipt as proof of purchase is required to make a warranty claim.
IMPORTANT: This warranty does not cover damages resulting from use not in conformity with the printed
directions, accident, misuse or abuse, alternation, the axing of any attachments not provided with
the product, loss of parts, or subjecting the appliance to any but the specied voltage. (Read directions
carefully.) This warranty is void if the product is used for other than single-family household use or
subjected to any voltage and waveform other than as specied on the rating label (e.g., 120V ~ 60 Hz).
Englewood Marketing LLC excludes all claims for special, incidental, and consequential damages
caused by breach of express or implied warranty. All liability is limited to the amount of the purchase
price. Every implied warranty, including any statutory warranty or condition of merchantability or
tness for a particular purpose, is disclaimed except to the extent prohibited by law, in which case
such warranty or condition is limited to the duration of this written warranty. This warranty gives you
specic legal rights. You may have other legal rights that vary depending on where you live. Some states
or provinces do not allow limitations on implied warranties or special, incidental, or consequential
damages, so the foregoing limitations may not apply to you.
To make a warranty claim or if service is required,
please call our CUSTOMER SERVICE NUMBER.
For faster service, please have the model, type, and
series numbers ready for the operator to assist you.
Customer Service Number
Englewood Marketing LLC
In the US 844-918-0509
Email: [email protected]
This warranty does not apply to re-manufactured merchandise.
Please read the operating instructions carefully. Failure to comply
with the operating instructions will void this warranty.