
ET-5150/ET-5170/ET-5180 User's Guide


3
Contents
ET-5150/ET-5170/ET-5180 User's Guide .................................................................................................. 15
Product Basics .......................................................................................................................................... 16
Using the Control Panel ..................................................................................................................... 16
Control Panel Buttons and Lights .................................................................................................. 17
The LCD Screen ....................................................................................................................... 18
Status Icon Information ............................................................................................................. 18
Navigating the LCD Screen....................................................................................................... 19
Entering Characters on the LCD Screen................................................................................... 20
Adjusting Control Panel Sounds ............................................................................................... 22
Adjusting the Screen Brightness............................................................................................... 23
Changing LCD Screen Language ............................................................................................. 23
Viewing Animations................................................................................................................... 24
Selecting the Date and Time..................................................................................................... 26
Selecting Your Country or Region............................................................................................. 27
Turning Off the Operation Time Out Setting.............................................................................. 28
Preventing PC Connection via USB.......................................................................................... 29
Product Parts Locations ..................................................................................................................... 30
Product Parts - Front ..................................................................................................................... 31
Product Parts - Inside .................................................................................................................... 33
Product Parts - Back...................................................................................................................... 34
Using Power Saving Settings ............................................................................................................. 34
Changing the Sleep Timer Settings ............................................................................................... 35
Changing the Power Off Timer Settings ........................................................................................ 36
Epson Connect Solutions for Smartphones, Tablets, and More ......................................................... 36
Setting Up Epson Connect Services.............................................................................................. 37
Using Epson Email Print ............................................................................................................... 38
Using Epson Remote Print ........................................................................................................... 39
Using Epson Scan to Cloud........................................................................................................... 40
Using the Epson Smart Panel Mobile App.......................................................................................... 40
Voice-Activated Printing ..................................................................................................................... 41

4
Setting Up Printing on a Chromebook ................................................................................................ 41
Using AirPrint .................................................................................................................................... 42
Android Printing Using the Epson Print Enabler ................................................................................ 42
Using Fire OS Printing ....................................................................................................................... 43
Using Windows 10 Mobile Printing .................................................................................................... 43
Using Epson Print and Scan App with Windows Tablets ................................................................... 44
Using the Mopria Print Service .......................................................................................................... 44
Wi-Fi or Wired Networking........................................................................................................................ 46
Network Security Recommendations ................................................................................................. 46
Wi-Fi Infrastructure Mode Setup......................................................................................................... 47
Selecting Wireless Network Settings from the Control Panel ........................................................ 48
Setting Up Wireless Printing from a Smartphone or Tablet............................................................ 51
Wi-Fi Direct Mode Setup .................................................................................................................... 52
Connecting to a Mobile Device ...................................................................................................... 53
Modifying the Wi-Fi Direct Network Name or Password ................................................................ 53
Wi-Fi Protected Setup (WPS)............................................................................................................. 55
Using WPS to Connect to a Network ............................................................................................. 55
Printing a Network Status Sheet......................................................................................................... 56
Printing a Network Connection Report ............................................................................................... 57
Network Connection Report Codes and Messages ....................................................................... 59
Changing or Updating Network Connections ..................................................................................... 64
Accessing the Web Config Utility................................................................................................... 64
Changing a USB Connection to a Wi-Fi Connection...................................................................... 65
Changing a Wi-Fi Connection to a Wired Network Connection...................................................... 65
Connecting to a New Wi-Fi Router ................................................................................................ 66
Disabling Wi-Fi Features ............................................................................................................... 66
Enabling PCL or PostScript Printing ....................................................................................................... 68
Installing the PCL Driver - Windows .................................................................................................. 68
Installing the PostScript (PS3) Printer Software - Windows ............................................................... 70
Installing the PostScript (PS3) Printer Software - Mac ....................................................................... 70
Selecting PDL (Page Description Language) Settings ....................................................................... 71
PDL Print Configuration Options.................................................................................................... 71
Selecting Printer Language and Interface Settings ............................................................................ 74

5
Printing Language and Interface Options ...................................................................................... 74
Printing a PCL or PS3 (PostScript) Status Sheet ............................................................................... 75
Loading Paper ........................................................................................................................................... 76
Loading Paper in the Cassette ........................................................................................................... 76
Loading Paper in the Rear Paper Feed Slot ....................................................................................... 82
Paper Loading Capacity..................................................................................................................... 85
Double-sided Printing Capacity.......................................................................................................... 86
Compatible Epson Papers.................................................................................................................. 88
Paper or Media Type Settings - Printing Software.............................................................................. 90
Selecting the Paper Settings - Control Panel ..................................................................................... 90
Paper or Media Type Settings - Control Panel............................................................................... 92
Selecting the Default Paper Source Settings...................................................................................... 92
Paper Source Settings Options ..................................................................................................... 93
Selecting the Universal Print Settings ................................................................................................ 93
Universal Print Settings Options .................................................................................................... 94
Placing Originals on the Product ............................................................................................................. 95
Placing Originals on the Scanner Glass ............................................................................................. 95
Placing Originals in the Automatic Document Feeder ........................................................................ 97
ADF Original Document Specifications........................................................................................ 100
Copying .................................................................................................................................................... 101
Copying Documents or Photos......................................................................................................... 101
Copying ID Cards............................................................................................................................. 102
Copying Options............................................................................................................................... 103
Printing from a Computer ....................................................................................................................... 107
Printing with the Standard Epson Printer Software - Windows ......................................................... 107
Selecting Basic Print Settings - Windows .................................................................................... 108
Paper Source Options - Windows ........................................................................................... 110
Print Quality Options - Windows ............................................................................................. 111
Multi-Page Printing Options - Windows................................................................................... 111
Selecting Double-sided Printing Settings - Windows ................................................................... 111
Double-sided Printing Options - Windows............................................................................... 115
Print Density Adjustments - Windows ..................................................................................... 115

6
Selecting Additional Layout and Print Options - Windows ........................................................... 116
Custom Color Correction Options - Windows.......................................................................... 118
Image Options and Additional Settings - Windows.................................................................. 119
Header/Footer Settings - Windows ......................................................................................... 120
Selecting a Printing Preset - Windows......................................................................................... 121
Selecting Extended Settings - Windows ...................................................................................... 123
Extended Settings - Windows ................................................................................................. 124
Printing Your Document - Windows............................................................................................. 125
Locking Printer Settings - Windows ............................................................................................. 126
Locked Setting Options........................................................................................................... 128
Selecting Default Print Settings - Windows.................................................................................. 129
Changing the Language of the Printer Software Screens ....................................................... 130
Changing Automatic Update Options .......................................................................................... 131
Printing with the Built-in Epson Driver - Windows 10 S..................................................................... 132
Selecting Print Settings - Windows 10 S...................................................................................... 133
Printing with the Epson Standard Printer Software - Mac................................................................. 136
Selecting Basic Print Settings - Mac ........................................................................................... 137
Paper Source Options - Mac................................................................................................... 140
Print Quality Options - Mac ..................................................................................................... 140
Selecting Page Setup Settings - Mac .......................................................................................... 141
Selecting Print Layout Options - Mac ........................................................................................... 142
Selecting Double-sided Printing Settings - Mac........................................................................... 142
Double-sided Printing Options and Adjustments - Mac........................................................... 144
Managing Color - Mac ................................................................................................................. 144
Color Matching and Color Options - Mac ................................................................................ 145
Selecting Printing Preferences - Mac .......................................................................................... 146
Printing Preferences - Mac...................................................................................................... 147
Printing Your Document - Mac..................................................................................................... 148
Checking Print Status - Mac.................................................................................................... 149
Printing with the PCL Printer Software - Windows............................................................................ 149
Synchronizing Printer Settings - PCL Driver - Windows .............................................................. 150
Selecting Basic Print Settings - PCL Driver - Windows................................................................ 150
Selecting Default Print Settings - PCL Driver - Windows ............................................................. 152

7
Locking Printer Settings - PCL Driver - Windows......................................................................... 154
PCL Driver Locked Setting Options ........................................................................................ 155
Printing with the PostScript (PS3) Printer Software - Windows ........................................................ 156
Selecting Basic Print Settings - PostScript Printer Software - Windows ...................................... 157
Selecting Default Print Settings - PostScript Printer Software - Windows.................................... 159
PostScript Printer Driver Options - Windows........................................................................... 161
Printing with the PostScript (PS3) Printer Software - Mac ................................................................ 163
Selecting Basic Print Settings - PostScript Printer Software - Mac ............................................. 163
PostScript Printer Driver Options - Mac .................................................................................. 168
Printing from a Smartphone or Tablet............................................................................................... 170
Cancelling Printing Using a Product Button...................................................................................... 171
Scanning .................................................................................................................................................. 172
Starting a Scan................................................................................................................................. 172
Starting a Scan Using the Product Control Panel ........................................................................ 172
Scanning to a Connected Computer............................................................................................ 174
Scanning to the Cloud ................................................................................................................. 176
Setting Up a WSD Port (Windows 7/Windows Vista)................................................................... 177
Scanning Using WSD - Windows ................................................................................................ 178
Control Panel Scanning Options.................................................................................................. 179
Changing Default Scan Job Settings ........................................................................................... 180
Starting a Scan Using Epson ScanSmart .................................................................................... 181
Starting a Scan Using the Epson Scan 2 Icon ............................................................................. 182
Starting a Scan from a Scanning Program................................................................................... 184
Starting a Scan from a Smartphone or Tablet.............................................................................. 186
Scanning a Document in Epson ScanSmart................................................................................ 186
Saving a Scan......................................................................................................................... 189
Attaching a Scan to Email ....................................................................................................... 190
Sending a Scan to a Cloud Service......................................................................................... 191
Printing a Scan........................................................................................................................ 192
Selecting Epson ScanSmart Settings .......................................................................................... 194
Changing the Epson Product .................................................................................................. 194
Changing the Scan Settings.................................................................................................... 195
Changing the File Name Settings ........................................................................................... 196

8
Changing the Save Settings.................................................................................................... 198
Save Settings.......................................................................................................................... 200
Customizing Action Icons........................................................................................................ 201
Scanning in Epson Scan 2........................................................................................................... 203
Additional Scanning Settings - Main Settings Tab................................................................... 206
Additional Scanning Settings - Advanced Settings Tab .......................................................... 207
Saving Scanned Documents as a Searchable PDF Using Epson Scan 2............................... 208
Image Format Options ............................................................................................................ 209
Scan Resolution Guidelines.................................................................................................... 210
Faxing....................................................................................................................................................... 212
Connecting a Telephone or Answering Machine.............................................................................. 212
Setting Up Fax Features .................................................................................................................. 216
Setting Up Basic Fax Features .................................................................................................... 216
Using the Fax Setup Wizard ................................................................................................... 216
Selecting the Line Type........................................................................................................... 218
Setting the Number of Rings to Answer .................................................................................. 219
Selecting Advanced Fax Settings................................................................................................ 220
Receive Settings - Fax............................................................................................................ 221
Report Settings - Fax .............................................................................................................. 223
Basic Settings - Fax ................................................................................................................ 223
Security Settings - Fax............................................................................................................ 225
Setting Up the Fax Utility - Windows............................................................................................ 226
Setting Up Fax Features Using the Fax Utility - Mac ................................................................... 228
Setting Up Contacts and Contact Groups......................................................................................... 229
Setting Up Contacts Using the Product Control Panel................................................................. 230
Creating a Contact .................................................................................................................. 230
Editing or Deleting a Contact .................................................................................................. 232
Creating a Contact Group ....................................................................................................... 233
Editing or Deleting a Contact Group........................................................................................ 235
Sending Faxes ................................................................................................................................. 236
Sending Faxes from the Product Control Panel........................................................................... 236
Sending a Fax Using the Control Panel .................................................................................. 237
Fax Sending Options .............................................................................................................. 239

9
Sending a Fax at a Specified Time ......................................................................................... 241
Dialing Fax Numbers from a Connected Telephone ............................................................... 242
Sending Faxes Using the Fax Utility - Windows .......................................................................... 243
Sending Faxes Using the Fax Utility - Mac .................................................................................. 245
Receiving Faxes............................................................................................................................... 248
Fax Reception ............................................................................................................................. 248
Receiving Faxes Automatically ................................................................................................... 249
Receiving Faxes Manually........................................................................................................... 249
Receiving a Fax by Polling .......................................................................................................... 250
Saving and Viewing Received Faxes .......................................................................................... 251
Checking Fax Status ....................................................................................................................... 253
Printing Fax Reports......................................................................................................................... 253
Fax Report Options ..................................................................................................................... 254
Refilling Ink and Replacing the Maintenance Box ................................................................................ 255
Ink Safety Precautions ..................................................................................................................... 255
Checking the Ink and Maintenance Box Levels................................................................................ 257
Checking the Ink Levels on Your Product.................................................................................... 258
Checking Maintenance Box Status on the LCD Screen............................................................... 258
Checking Ink and Maintenance Box Levels - Windows ............................................................... 259
Checking Ink and Maintenance Box Levels - Mac ....................................................................... 261
Disabling Special Offers with Windows ....................................................................................... 262
Purchase Epson Ink and Maintenance Box...................................................................................... 263
Ink Bottle and Maintenance Box Part Numbers ........................................................................... 263
Refilling the Ink Tanks ...................................................................................................................... 263
Maintenance Box Replacement ....................................................................................................... 269
Adjusting Print Quality............................................................................................................................ 271
Print Head Maintenance................................................................................................................... 271
Print Head Nozzle Check............................................................................................................. 271
Checking the Nozzles Using the Product Control Panel ......................................................... 272
Checking the Nozzles Using a Computer Utility...................................................................... 274
Print Head Cleaning .................................................................................................................... 276
Cleaning the Print Head Using the Product Control Panel ...................................................... 276
Cleaning the Print Head Using a Computer Utility................................................................... 278

10
Power Cleaning ........................................................................................................................... 281
Power Cleaning Using the Product Control Panel................................................................... 281
Power Cleaning Using a Computer Utility ............................................................................... 282
Print Head Alignment ....................................................................................................................... 284
Aligning the Print Head Using the Product Control Panel ............................................................ 284
Cleaning the Paper Guide ................................................................................................................ 286
Cleaning the Print Head Path ........................................................................................................... 287
Checking the Number of Sheets Fed................................................................................................ 290
Checking the Number of Sheets on the LCD Screen................................................................... 291
Checking the Sheet Counter - Windows ...................................................................................... 291
Checking the Sheet Counter - Mac.............................................................................................. 292
Cleaning and Transporting Your Product ............................................................................................. 294
Cleaning Your Product ..................................................................................................................... 294
Cleaning the Paper Rollers .............................................................................................................. 298
Transporting Your Product ............................................................................................................... 300
Solving Problems .................................................................................................................................... 305
Checking for Software Updates........................................................................................................ 305
Product Status Messages ................................................................................................................ 306
Message Appears Prompting You to Reset Ink Levels..................................................................... 307
Running a Product Check ................................................................................................................ 308
Resetting Control Panel Defaults ..................................................................................................... 310
Solving Setup Problems ................................................................................................................... 310
Product Does Not Turn On or Off................................................................................................. 311
Noise After Filling the Ink............................................................................................................. 311
Software Installation Problems .................................................................................................... 311
Solving Network Problems ............................................................................................................... 312
Product Cannot Connect to a Wireless Router or Access Point .................................................. 312
Network Software Cannot Find Product on a Network................................................................. 314
Product Does Not Appear in Mac Printer Window ....................................................................... 315
Wireless Network Connection is Unstable on a Mac ................................................................... 315
Wired Network Connection Becomes Unstable........................................................................... 316
Cannot Print Over a Network....................................................................................................... 316
Cannot Scan Over a Network ...................................................................................................... 318

11
Solving Copying Problems ............................................................................................................... 319
Product Makes Noise, But Nothing Copies.................................................................................. 320
Product Makes Noise When It Sits for a While............................................................................. 320
Copies Have Incorrect or Faint Colors......................................................................................... 320
Position, Size, or Margins of Copies are Incorrect ....................................................................... 321
Originals Do Not Feed From the Automatic Document Feeder.................................................... 321
Solving Paper Problems................................................................................................................... 321
Paper Feeding Problems............................................................................................................. 322
Paper Jam Problems in the Front of the Product ......................................................................... 322
Paper Jam Problems Inside the Product ..................................................................................... 324
Paper Jam Problems in the Rear Cover ...................................................................................... 326
Paper Jams in the Automatic Document Feeder ......................................................................... 329
Paper Ejection Problems ............................................................................................................. 332
Solving Problems Printing from a Computer..................................................................................... 333
Nothing Prints.............................................................................................................................. 333
Product Icon Does Not Appear in Windows Taskbar ................................................................... 334
Printing is Slow ............................................................................................................................ 335
Printing Problems When Using the PostScript Printer Driver....................................................... 336
Solving Page Layout and Content Problems.................................................................................... 337
Inverted Image............................................................................................................................. 337
Too Many Copies Print ................................................................................................................ 338
Blank Pages Print ........................................................................................................................ 338
Incorrect Margins on Printout....................................................................................................... 339
Incorrect Characters Print............................................................................................................ 339
Incorrect Image Size or Position.................................................................................................. 340
Slanted Printout........................................................................................................................... 341
Solving Print Quality Problems......................................................................................................... 341
White or Dark Lines in Printout .................................................................................................... 342
Blurry or Smeared Printout .......................................................................................................... 343
Faint Printout or Printout Has Gaps ............................................................................................. 345
Grainy Printout............................................................................................................................. 346
Incorrect Colors ........................................................................................................................... 347
Solving Scanning Problems ............................................................................................................. 348

12
Scanning Software Does Not Operate Correctly ......................................................................... 349
Cannot Start Epson Scan 2 ......................................................................................................... 349
Scanning is Slow ......................................................................................................................... 350
Solving Scanned Image Quality Problems ....................................................................................... 350
Scanned Image Quality Problems ............................................................................................... 351
Image Consists of a Few Dots Only............................................................................................. 352
Line of Dots Appears in All Scanned Images............................................................................... 353
Straight Lines in an Image Appear Crooked ................................................................................ 353
Image Colors are Patchy at the Edges ........................................................................................ 354
Ripple Patterns Appear in an Image ............................................................................................ 354
Scanned Image Edges are Cropped ........................................................................................... 354
Characters are Not Recognized During Conversion to Editable Text (OCR)............................... 354
Streaks Appear in All Scanned Images ....................................................................................... 355
Solving Faxing Problems.................................................................................................................. 355
Cannot Send or Receive Faxes................................................................................................... 356
Cannot Receive Faxes with a Telephone Connected to Your Product ........................................ 358
Fax Memory Full Error Appears................................................................................................... 358
Fax Quality is Poor ...................................................................................................................... 359
Sent Fax is Received in an Incorrect Size ................................................................................... 360
Received Fax is Not Printed ........................................................................................................ 360
Uninstall Your Product Software....................................................................................................... 360
Uninstalling Product Software - Windows.................................................................................... 360
Uninstalling Product Software - Mac............................................................................................ 362
Where to Get Help............................................................................................................................ 362
Technical Specifications ........................................................................................................................ 364
Windows System Requirements ...................................................................................................... 364
Mac System Requirements .............................................................................................................. 365
Paper Specifications ........................................................................................................................ 365
Printable Area Specifications ........................................................................................................... 366
Scanning Specifications ................................................................................................................... 368
Fax Specifications (ET-5170/ET-5180) ............................................................................................ 369
Automatic Document Feeder (ADF) Specifications .......................................................................... 369
Ink Specifications ............................................................................................................................. 370

13
Dimension Specifications ................................................................................................................. 370
Electrical Specifications ................................................................................................................... 371
Environmental Specifications ........................................................................................................... 371
Interface Specifications .................................................................................................................... 372
Network Interface Specifications ...................................................................................................... 372
Safety and Approvals Specifications ................................................................................................ 373
Notices ..................................................................................................................................................... 375
Important Safety Instructions............................................................................................................ 375
General Product Safety Instructions ............................................................................................ 375
LCD Screen Safety Instructions................................................................................................... 377
Wireless Connection Safety Instructions ..................................................................................... 378
Telephone Equipment Safety Instructions ................................................................................... 378
FCC Compliance Statement............................................................................................................. 379
Binding Arbitration and Class Waiver ............................................................................................... 381
Trademarks...................................................................................................................................... 384
Copyright Notice............................................................................................................................... 385
libTIFF Software Acknowledgment.............................................................................................. 386
A Note Concerning Responsible Use of Copyrighted Materials................................................... 386
Default Delay Times for Power Management for Epson Products ............................................... 386
Copyright Attribution.................................................................................................................... 387


15
ET-5150/ET-5170/ET-5180 User's Guide
Welcome to the ET-5150/ET-5170/ET-5180 User's Guide.
For a printable PDF copy of this guide, click here.

16
Product Basics
See these sections to learn about the basic features of your product.
Using the Control Panel
Product Parts Locations
Using Power Saving Settings
Epson Connect Solutions for Smartphones, Tablets, and More
Using the Epson Smart Panel Mobile App
Voice-Activated Printing
Setting Up Printing on a Chromebook
Using AirPrint
Android Printing Using the Epson Print Enabler
Using Fire OS Printing
Using Windows 10 Mobile Printing
Using Epson Print and Scan App with Windows Tablets
Using the Mopria Print Service
Using the Control Panel
See these sections to learn about the control panel and select control panel settings.
Control Panel Buttons and Lights
Parent topic: Product Basics
17
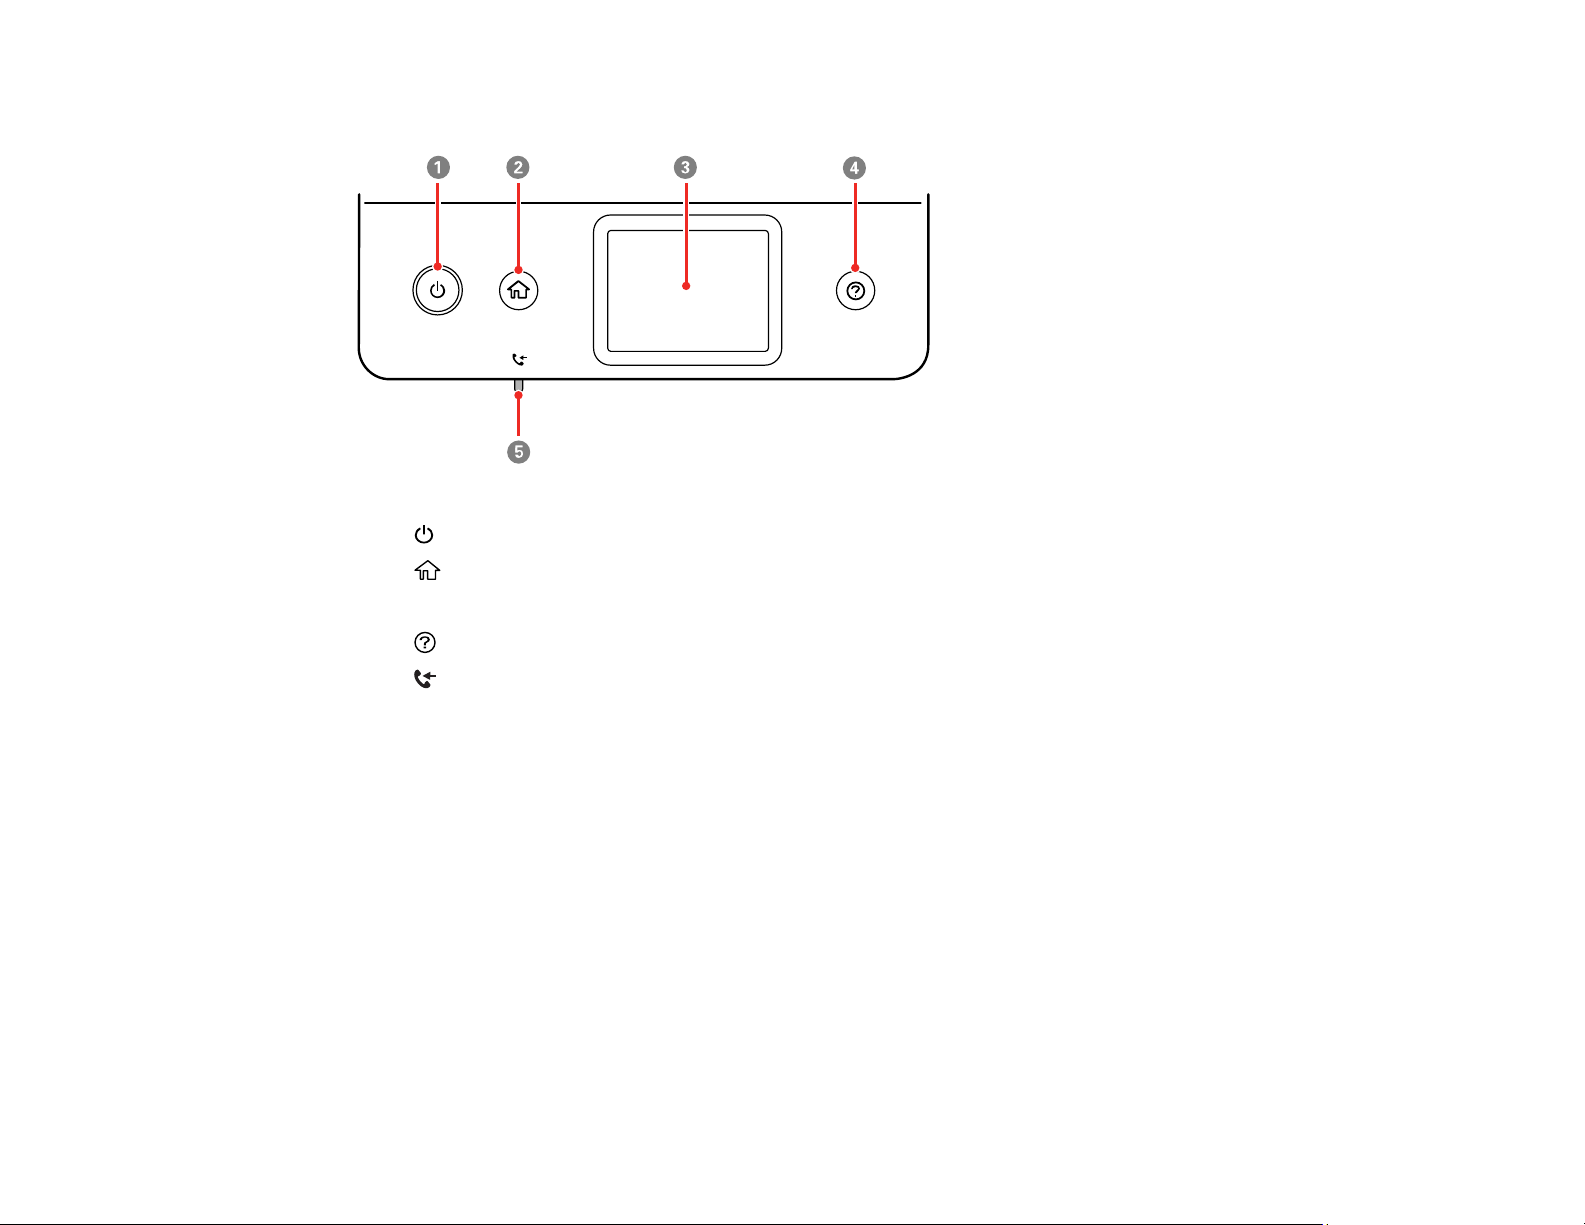
Control Panel Buttons and Lights
1
power button and light
2
home button
3 LCD screen
4
help button
5 received fax light (ET-5170/ET-5180)
The LCD Screen
Status Icon Information
Navigating the LCD Screen
Entering Characters on the LCD Screen
Adjusting Control Panel Sounds
Adjusting the Screen Brightness
Changing LCD Screen Language
Viewing Animations
Selecting the Date and Time
Selecting Your Country or Region
Turning Off the Operation Time Out Setting
Preventing PC Connection via USB
18
Parent topic: Using the Control Panel
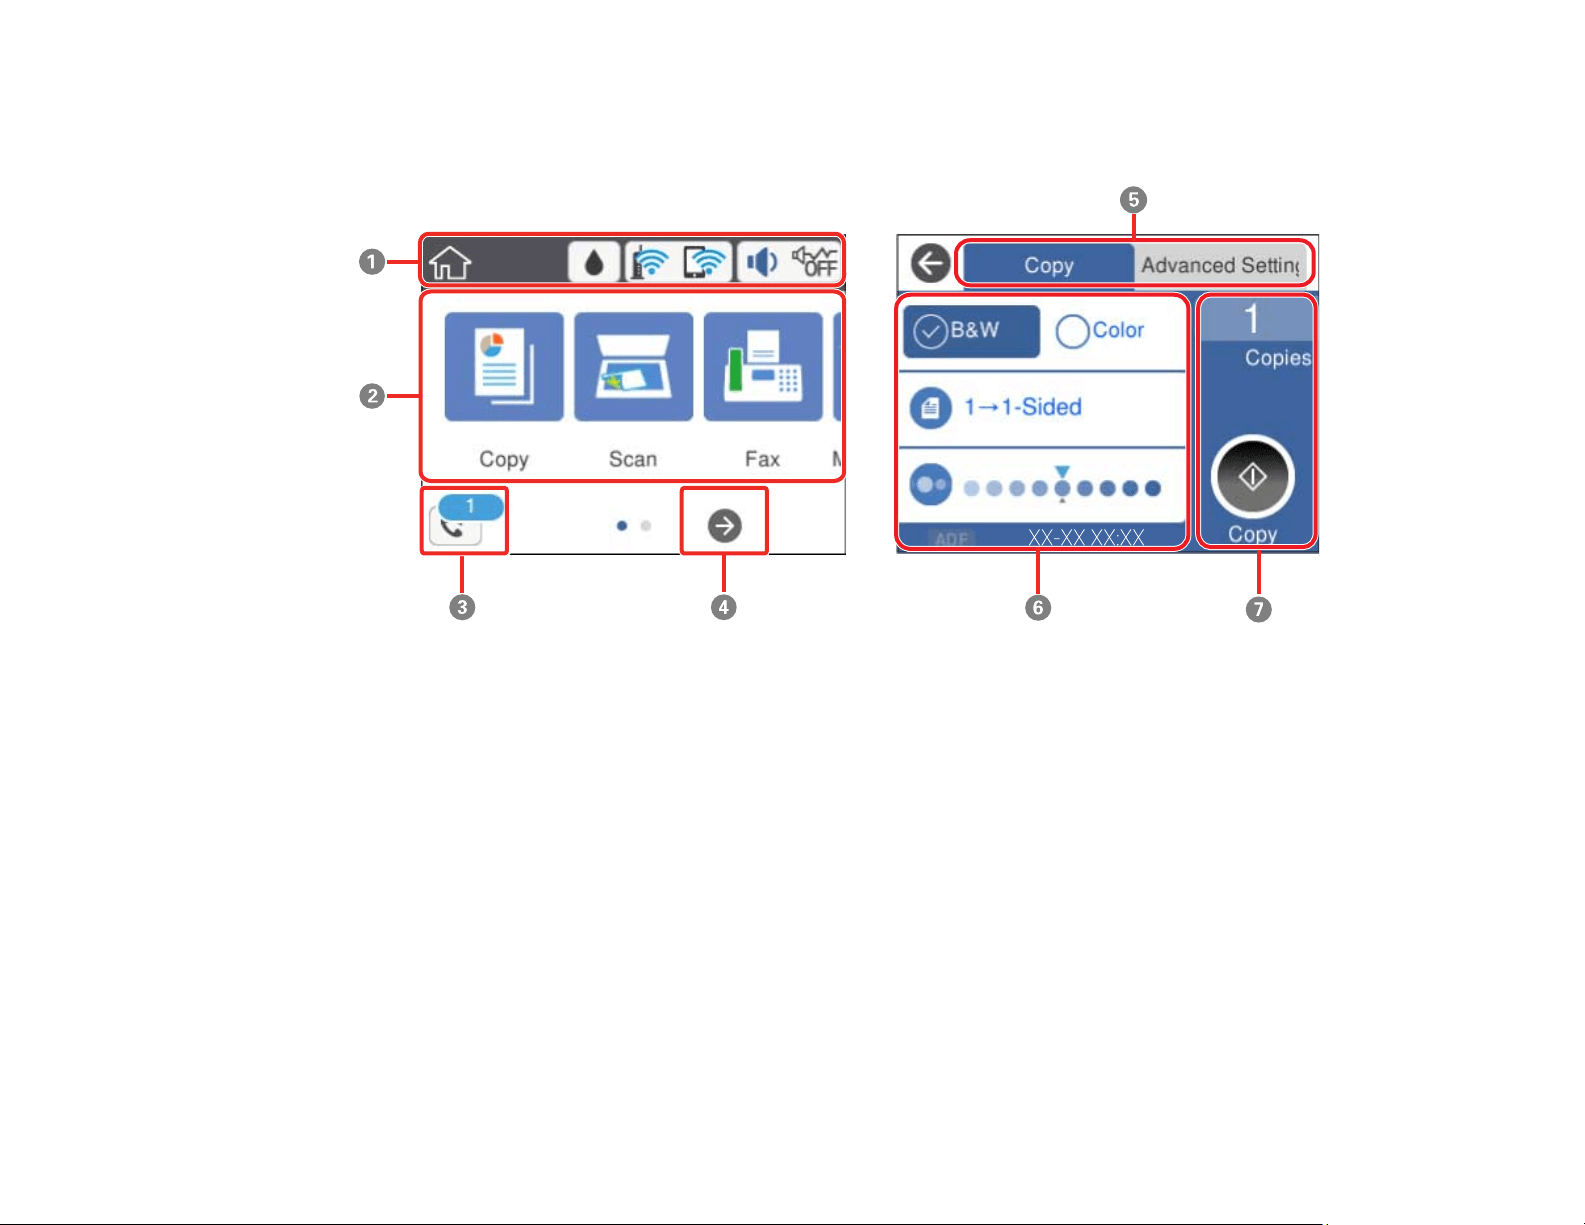
The LCD Screen
1 Displays various status information; select an icon to check its status or adjust its settings
2 Menu options
3 Select to display the Fax Data Information screen (ET-5170/ET-5180); the number displayed
indicates the number of received faxes that are waiting to be read, printed, or saved.
4 Select to scroll the screen to the right
5 Select a tab to view different options and settings
6 Setting options
7 Select to perform an action
Parent topic: Control Panel Buttons and Lights
Status Icon Information
Your product displays status icons on the LCD screen for certain product status conditions.
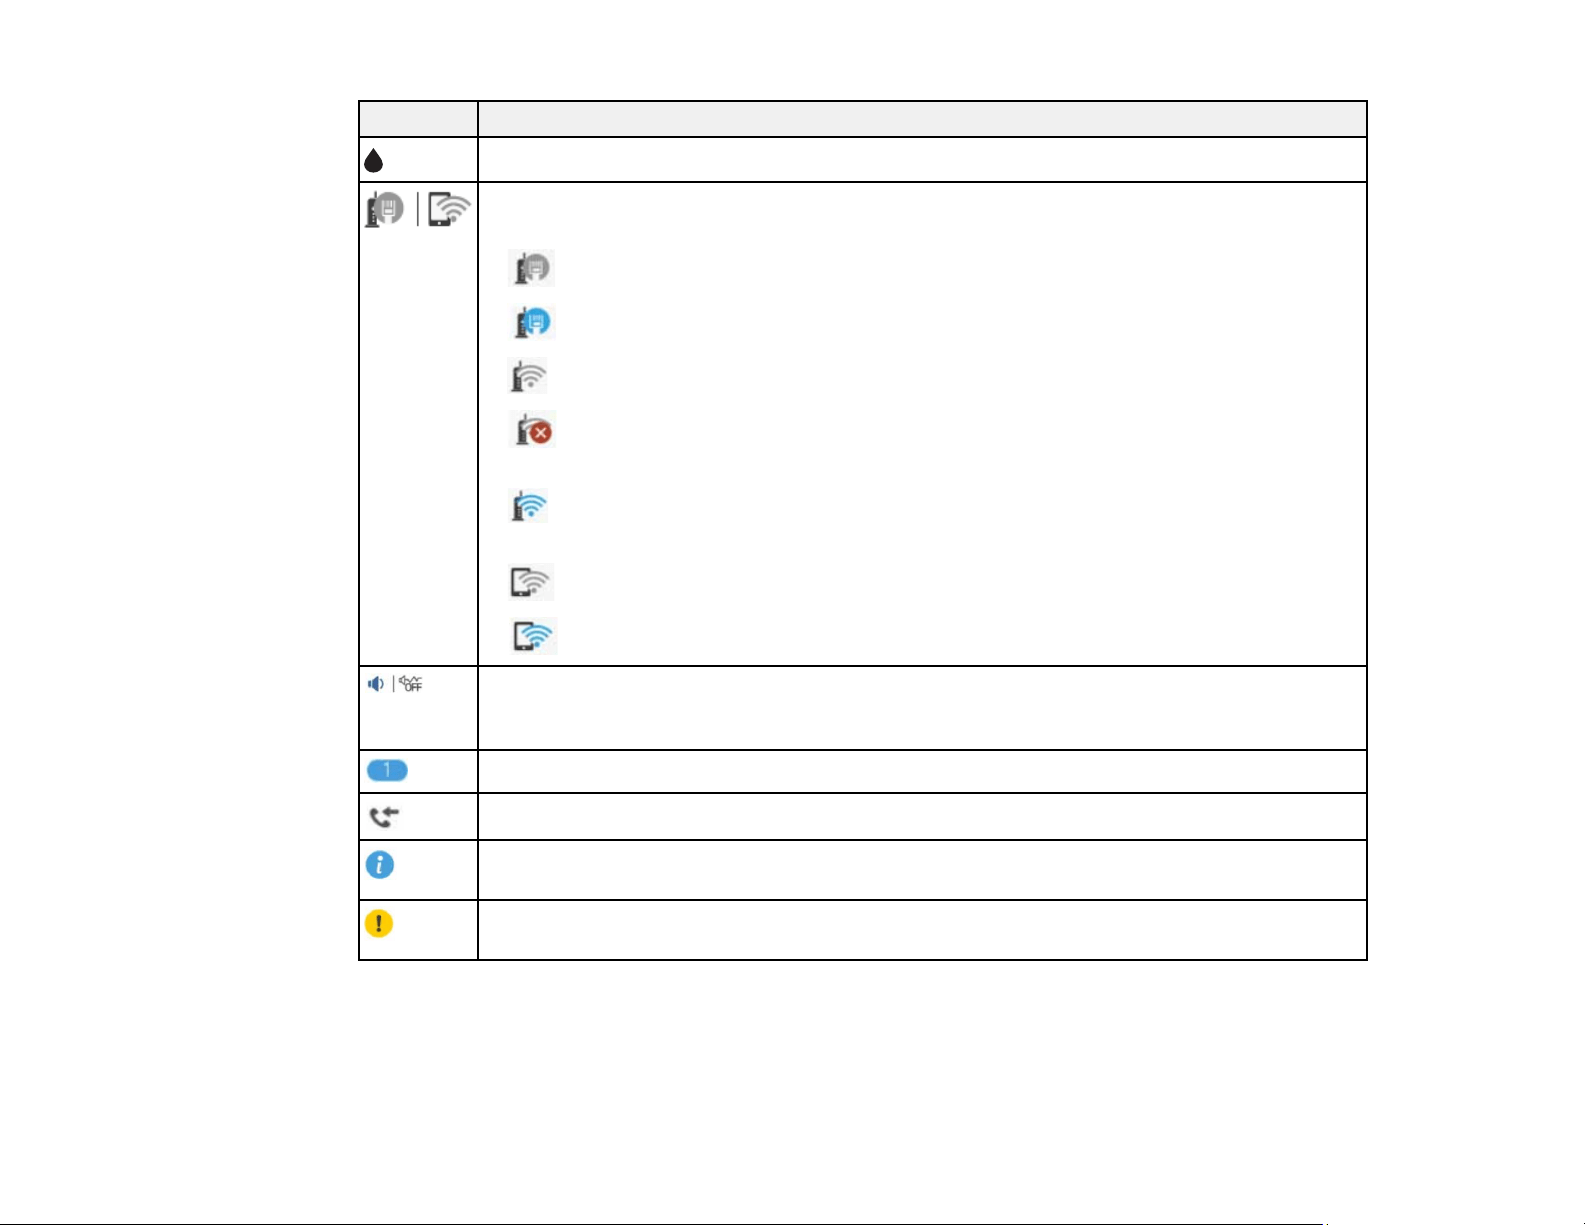
19
Icons Description
Displays the Supply Status screen.
Displays the network connection status; select the icon to set up or change your network
connection.
• The product is not connected to a wired (Ethernet) network.
• The product is connected to a wired (Ethernet) network.
• The product is not connected to a wireless network.
• The product is searching for an SSID or experiencing a wireless network
connection issue.
• The product is connected to a wireless network; the number of bars indicates the
connection's signal strength.
• Wi-Fi Direct is not enabled.
• Wi-Fi Direct is enabled.
The Quiet Mode setting is enabled or disabled. Select the icon to change the setting.
Depending on the selected paper type and print quality, when this feature is enabled noise
is reduced during printing, but print speed may also be reduced.
Displays the number of received faxes that are waiting to be read, printed, or saved.
Displays the Fax Data Information screen.
Displays additional information or instructions, such as loading paper or placing a
document on the scanner; select the icon to display the information.
There is a problem with the indicated setting; select the icon for information on resolving
the problem.
Parent topic: Control Panel Buttons and Lights
Navigating the LCD Screen
Follow these guidelines to navigate and use the menus on the LCD screen.
20
Tap or press the screen to select an item or icon
Flick the screen to scroll swiftly
Slide your finger across the screen to move items
Close or open your fingers across the screen to zoom in or zoom out on a preview image
Parent topic: Control Panel Buttons and Lights
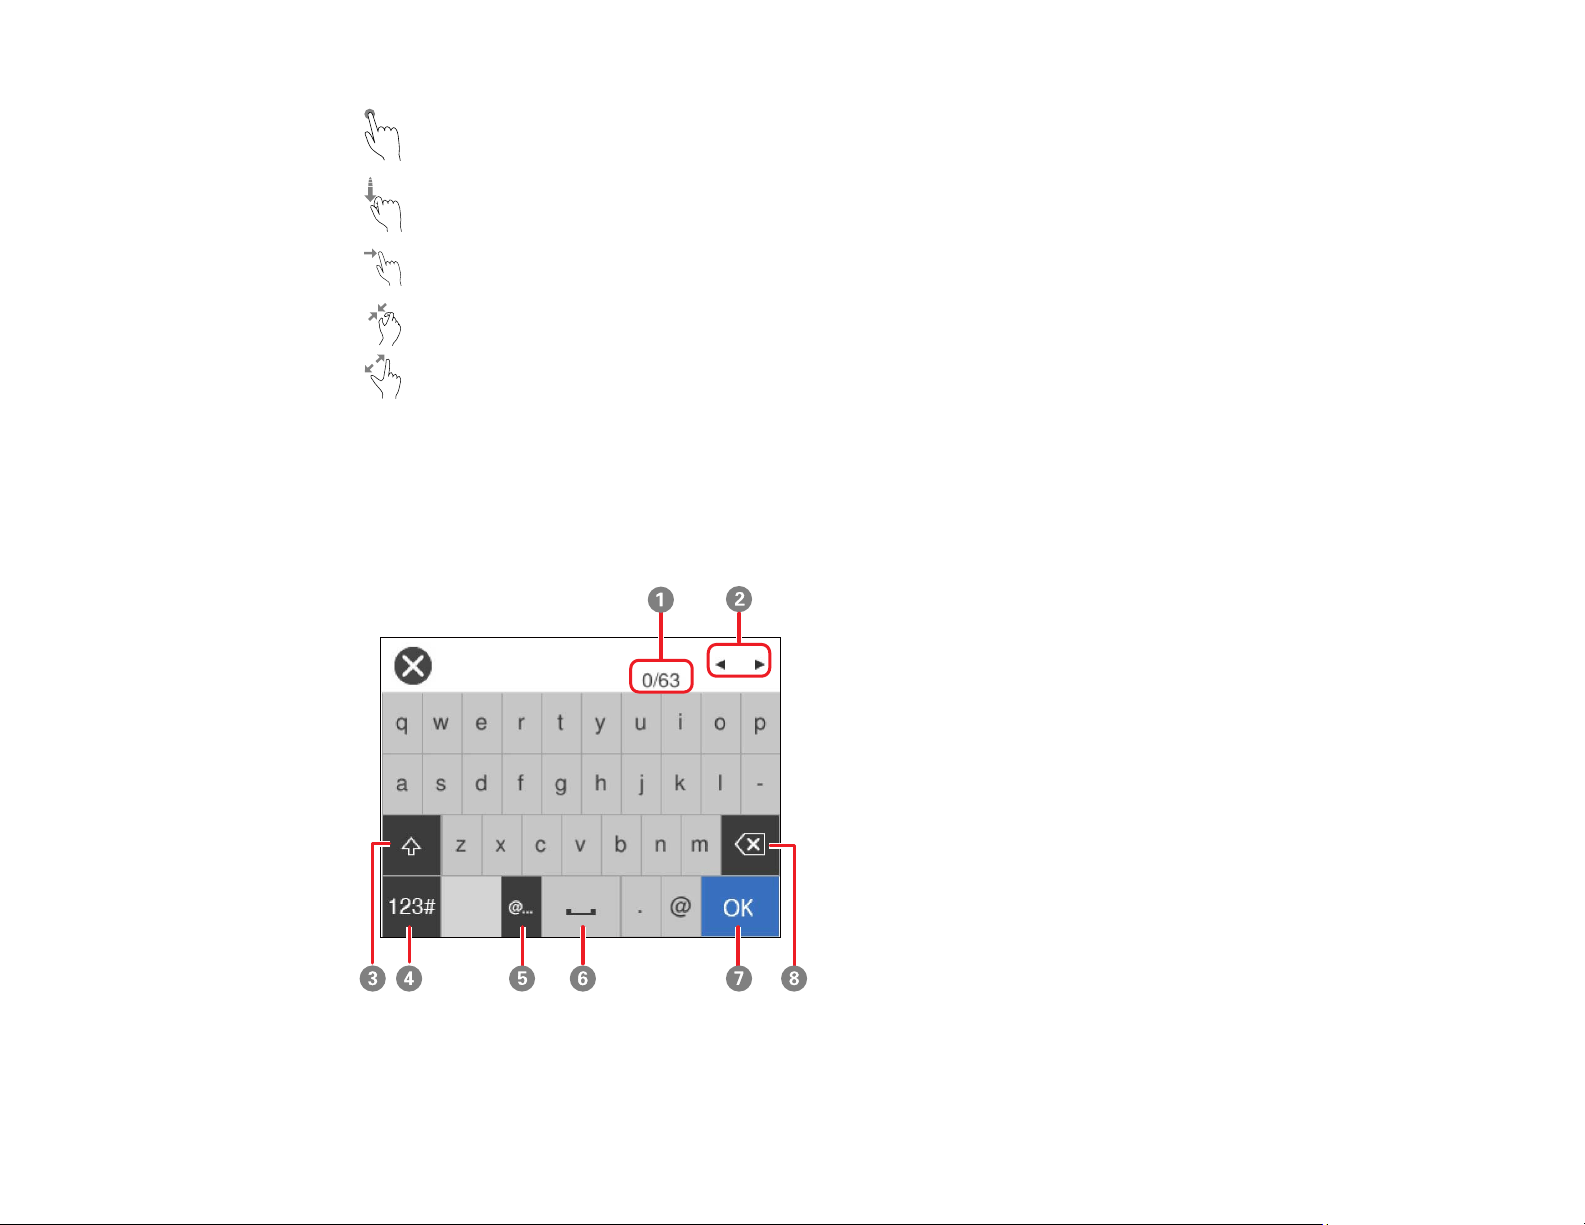
Entering Characters on the LCD Screen
Follow these guidelines to enter characters for passwords and other settings.
On-screen keyboard
1 Displays the character count
21
2 Moves the cursor left or right
3 Switches between uppercase and lowercase characters
4 Switches between characters and numbers or symbols
5 Displays a list of common domain names to choose from
6 Enters a space
7 Select when you are finished
8 Deletes the previous character
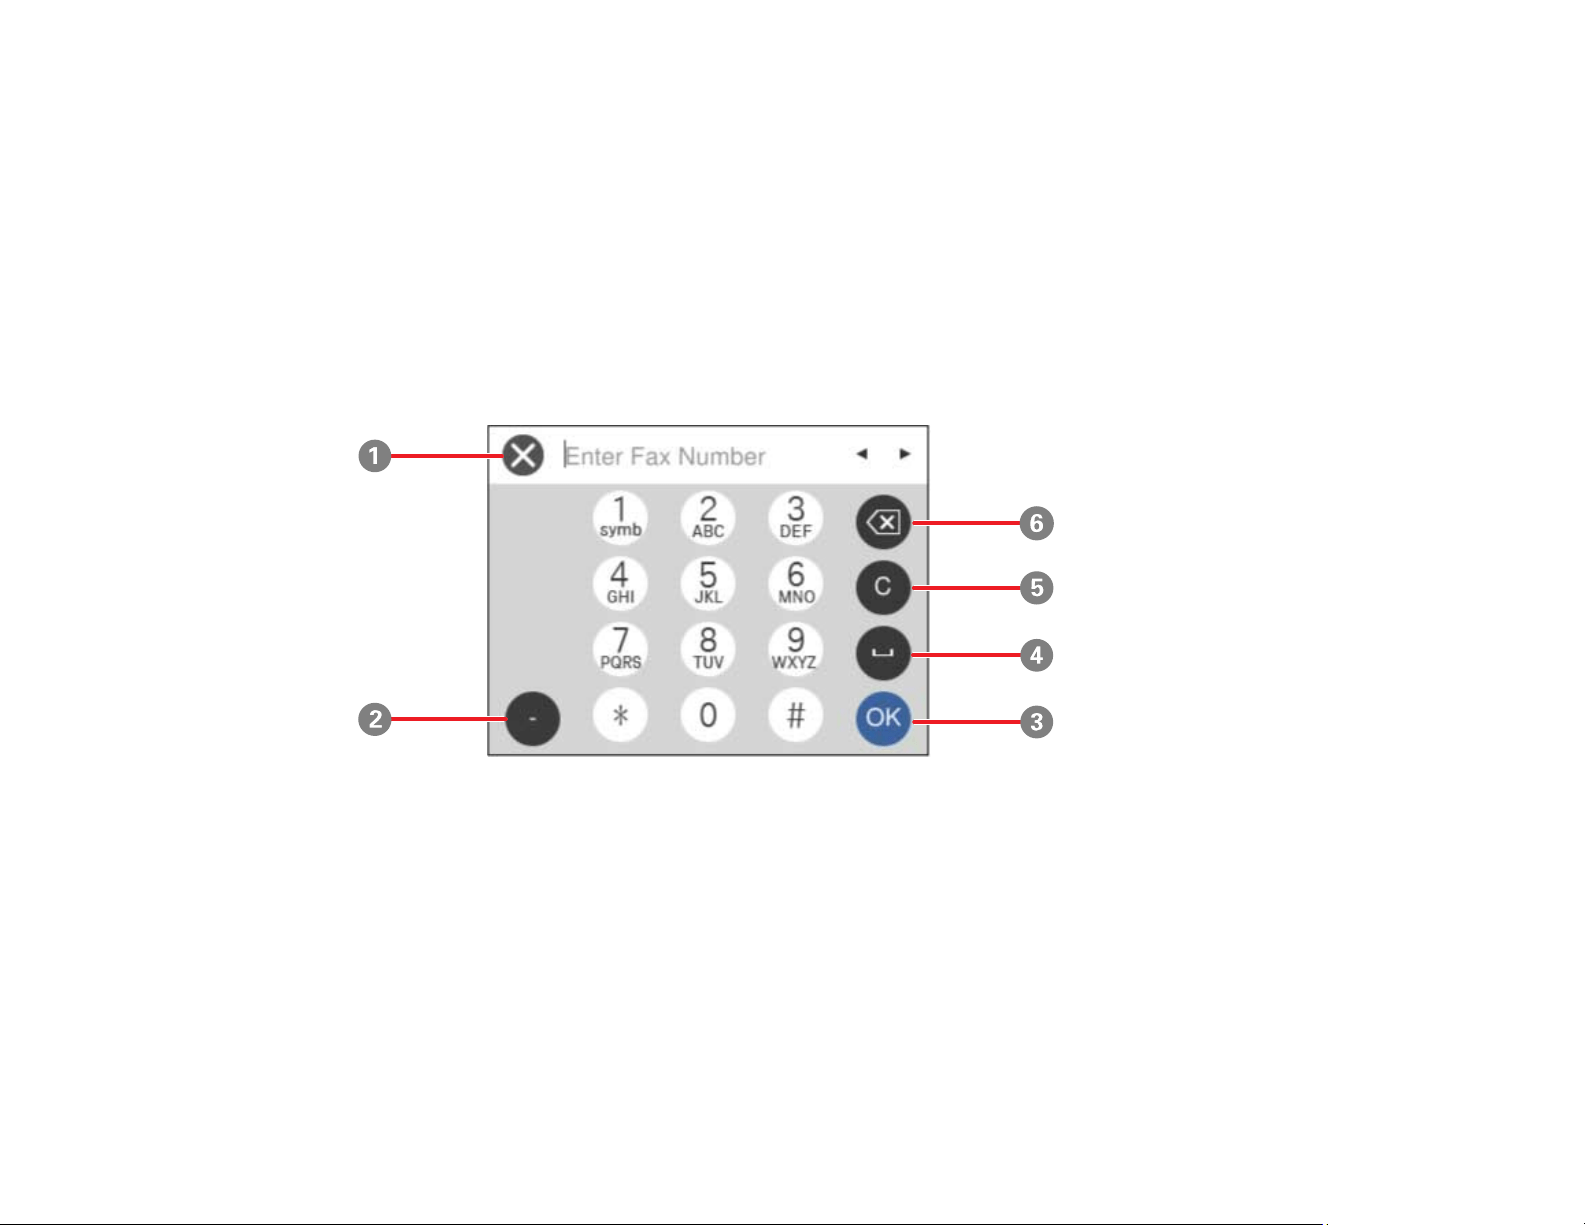
Numeric keypad
1 Cancels entry and closes the keypad
2 Enters a dash
3 Select when you are finished
4 Enters a space
5 Clears the entered number
6 Deletes the previous number
Parent topic: Control Panel Buttons and Lights
22
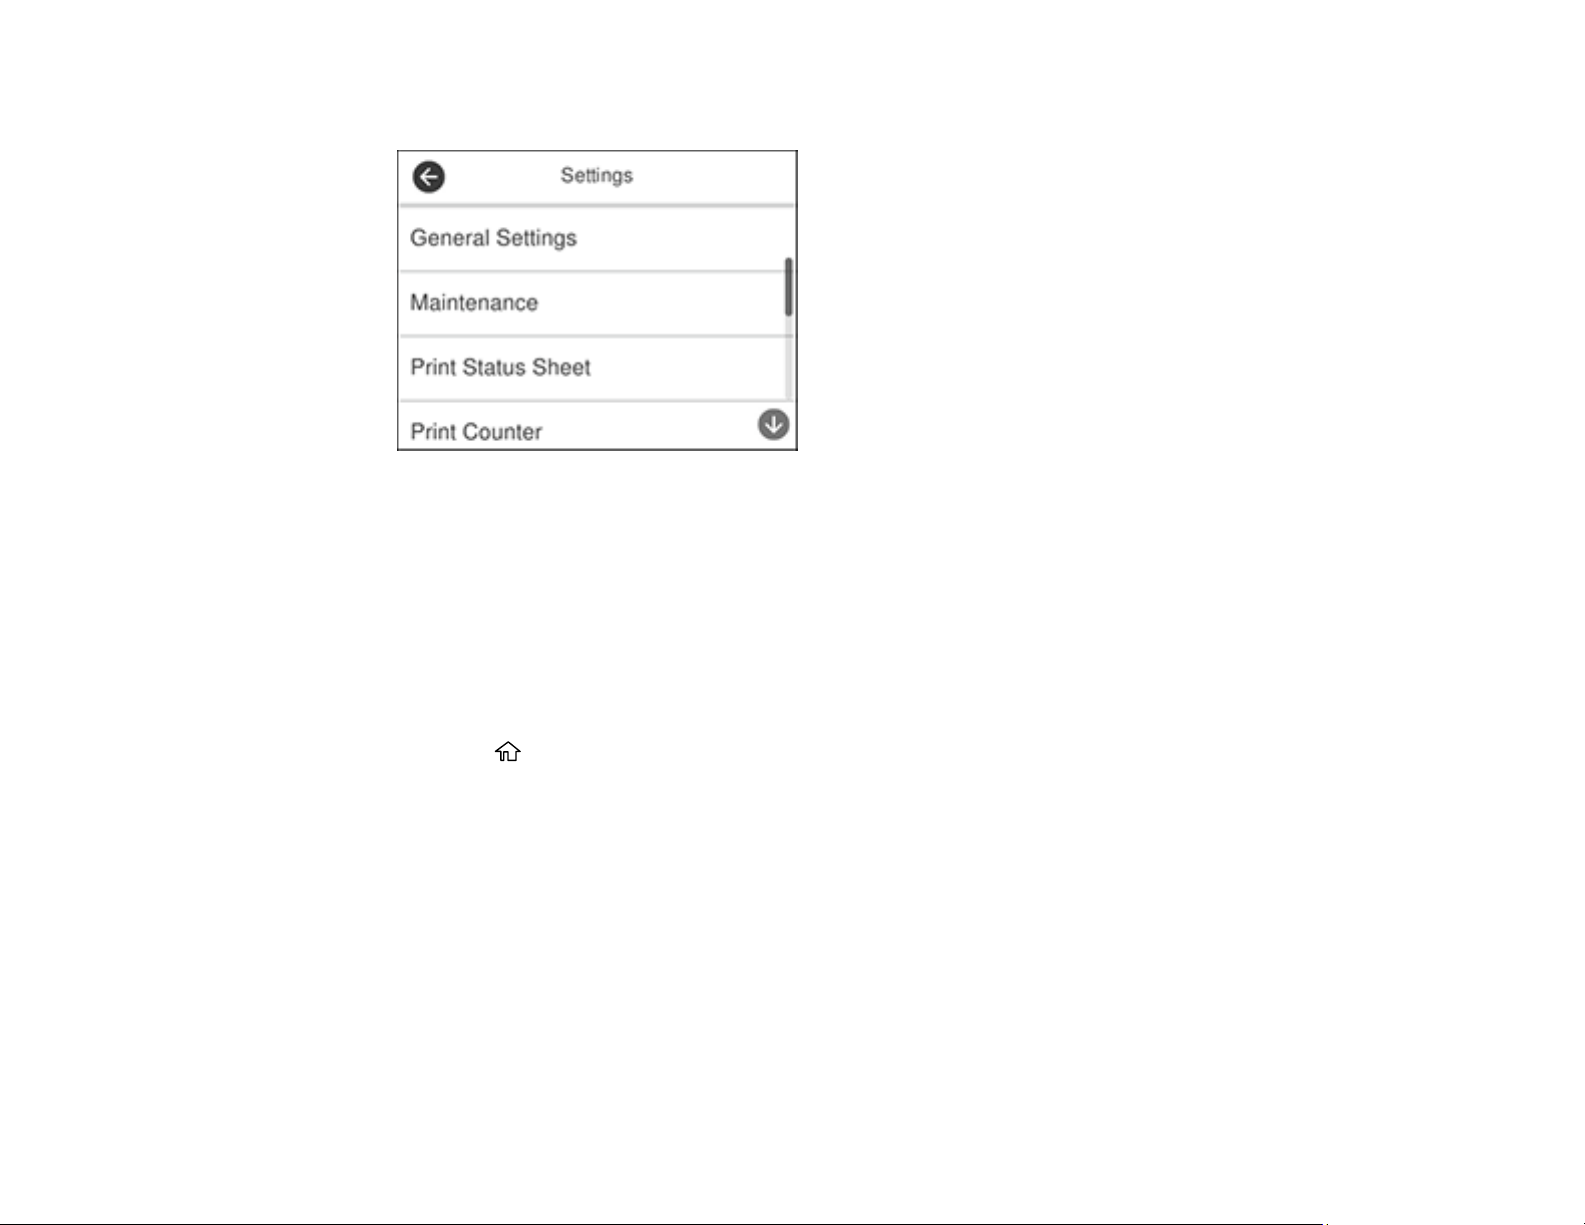
Adjusting Control Panel Sounds
You can adjust the sound level heard when you press buttons on the control panel.
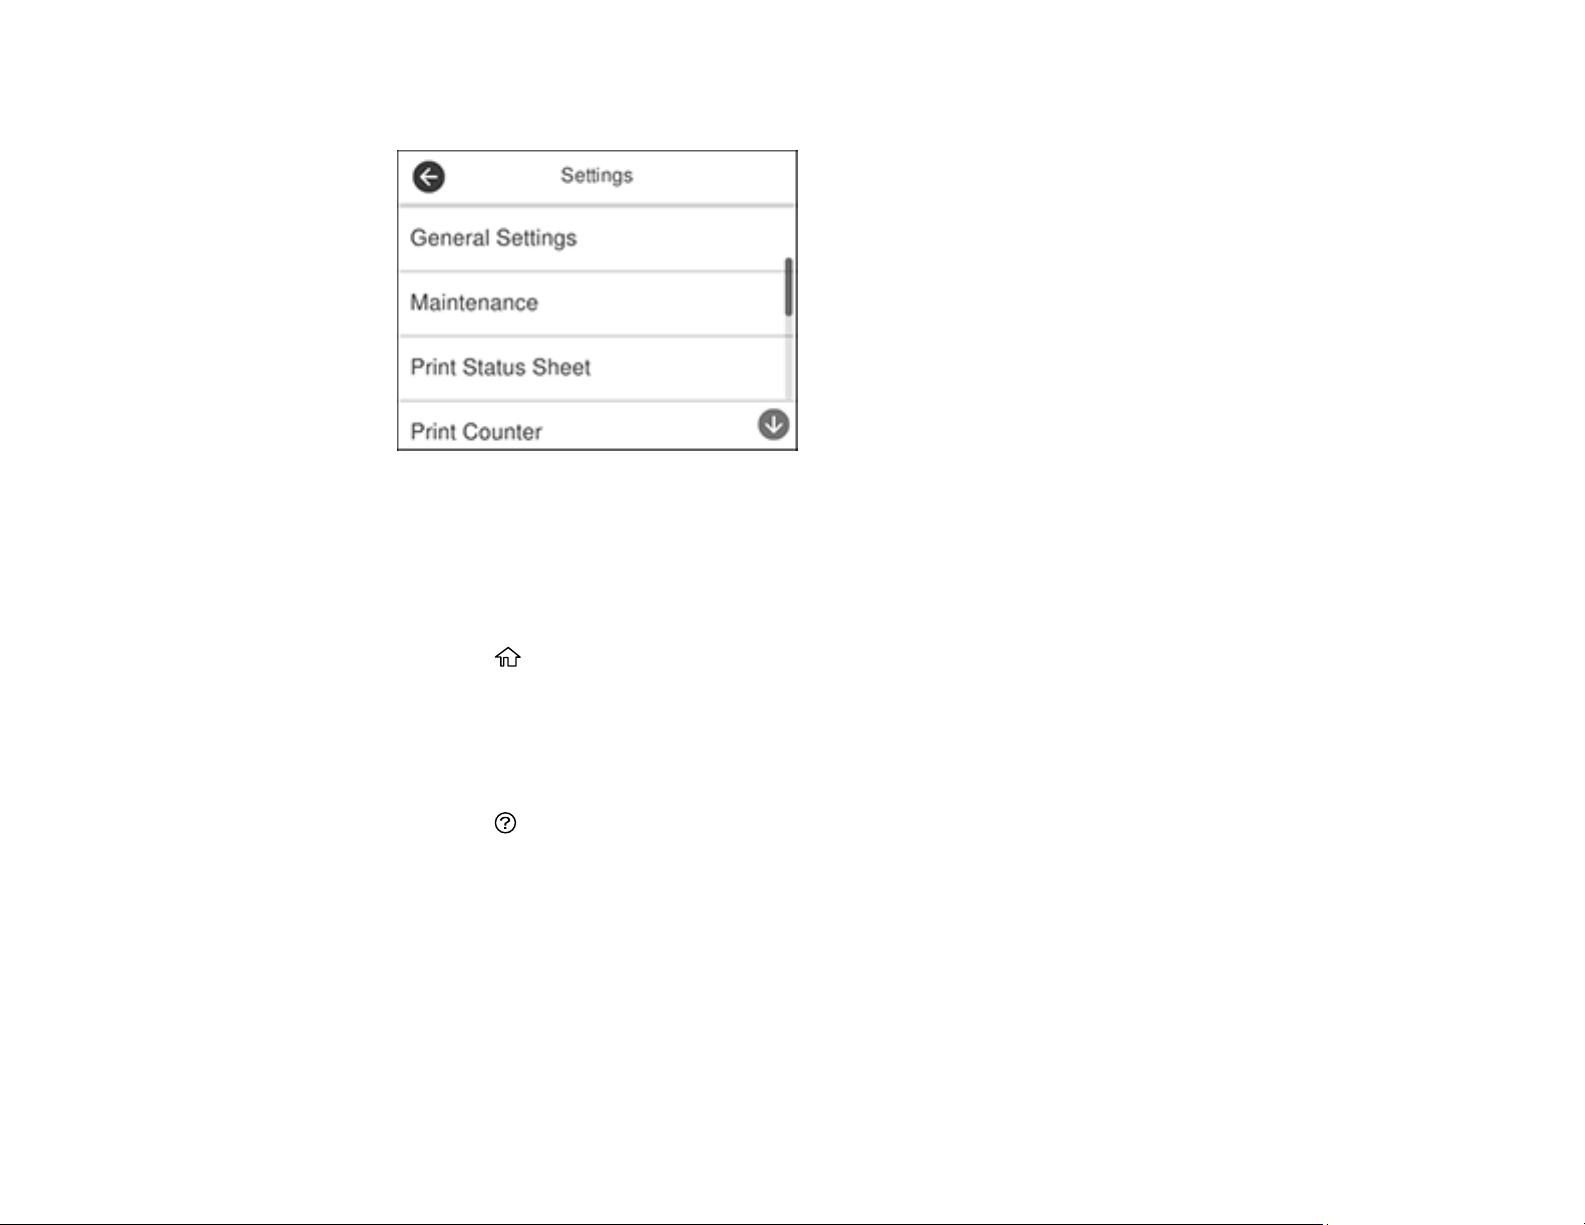
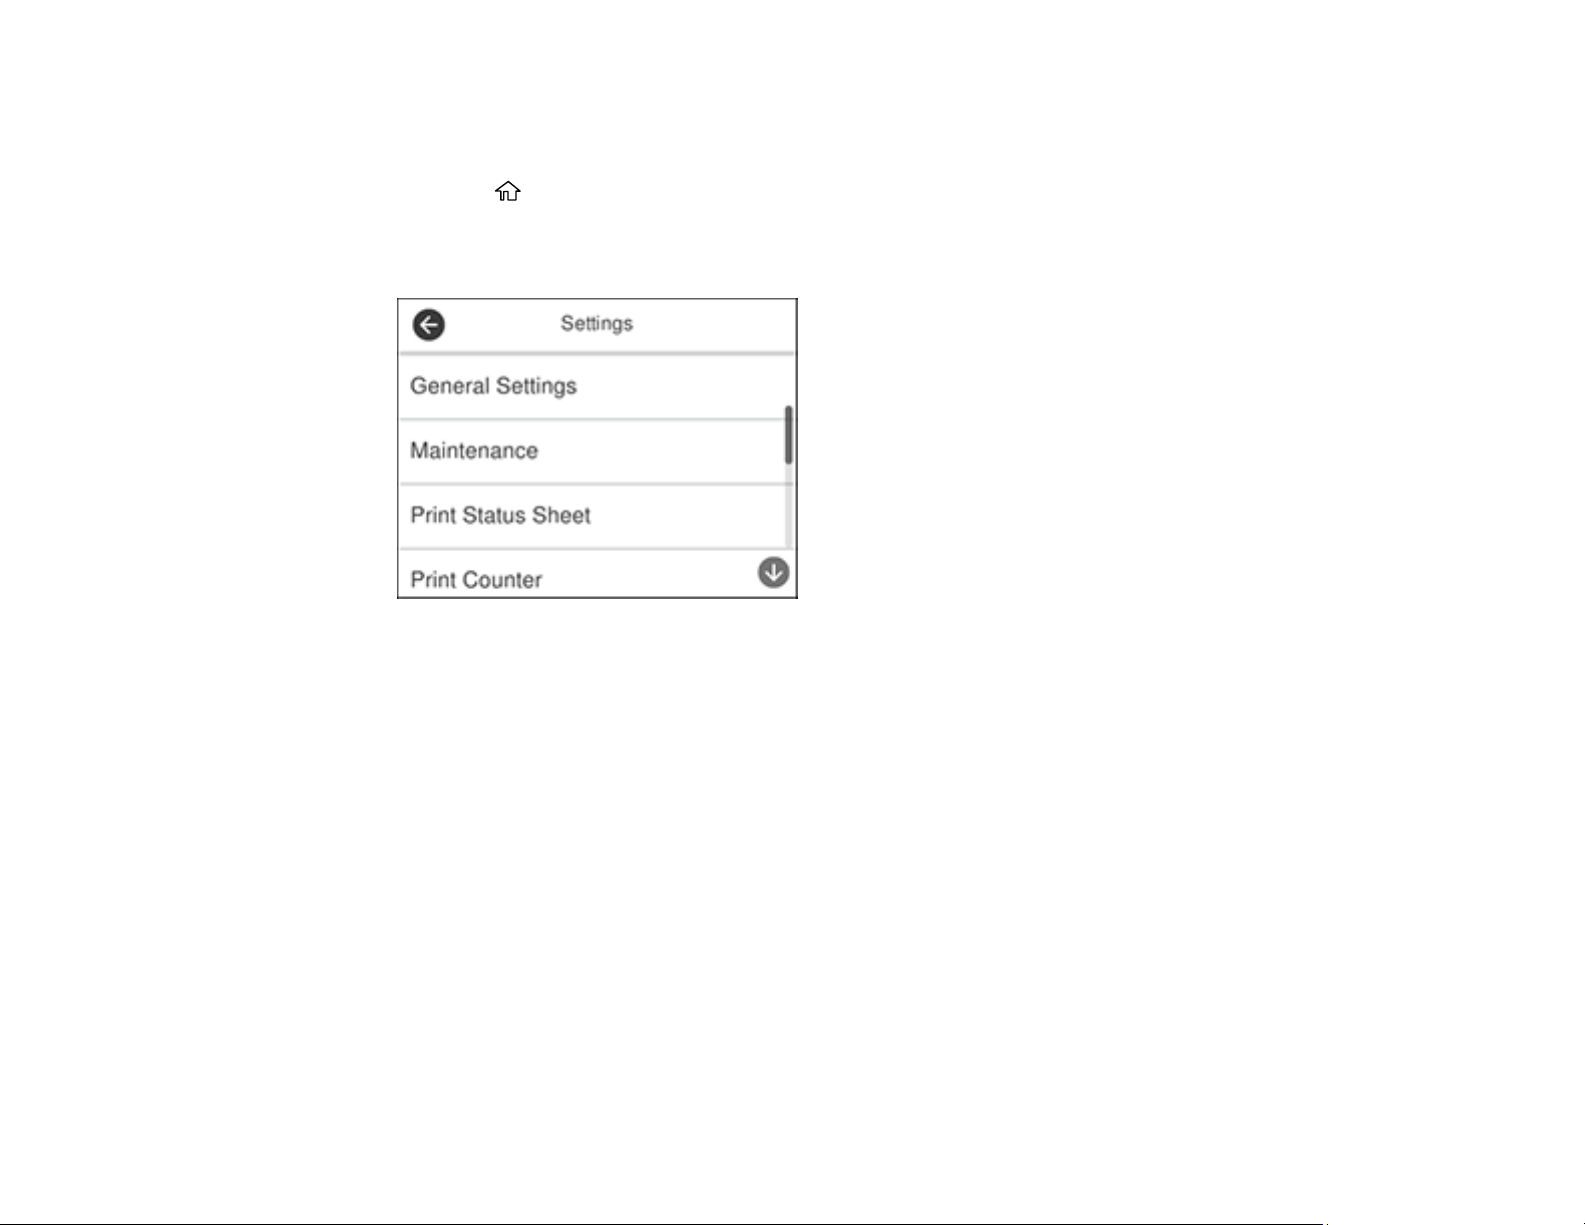
1. Press the home button, if necessary.
2. Select Settings.
You see a screen like this:
3. Select General Settings.
4. Select Basic Settings.
5. Select Sound.
6. Do one of the following:
• To mute all control panel sounds, turn the Mute setting off.
• To select a specific sound level, select Normal Mode or Quiet Mode.
Note: You can also select the icon on the home screen to switch between Normal Mode and
Quiet Mode.
7. Scroll down and select Button Press.
8. Select the – or + icon to decrease or increase the sound.
9. Select OK to exit.

23
Note: You can also adjust the level for various product functions.
Parent topic: Control Panel Buttons and Lights
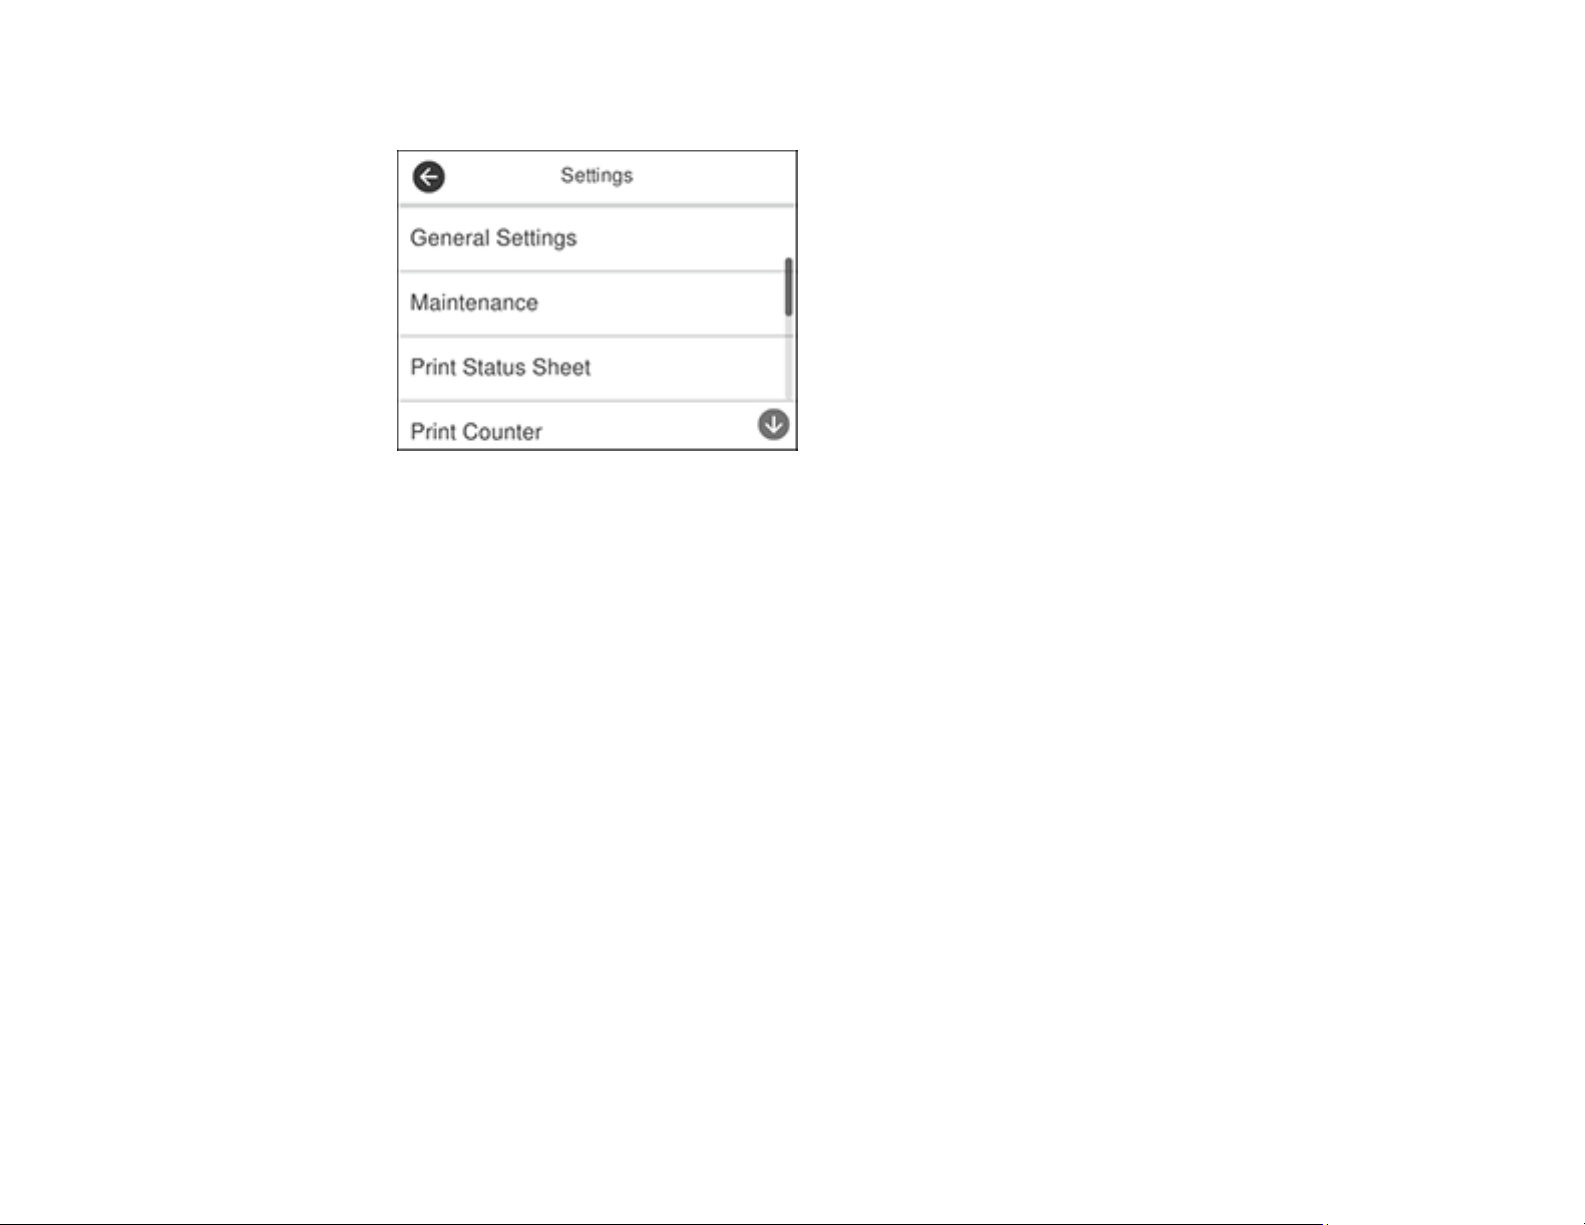
Adjusting the Screen Brightness
You can adjust the brightness of the LCD screen.
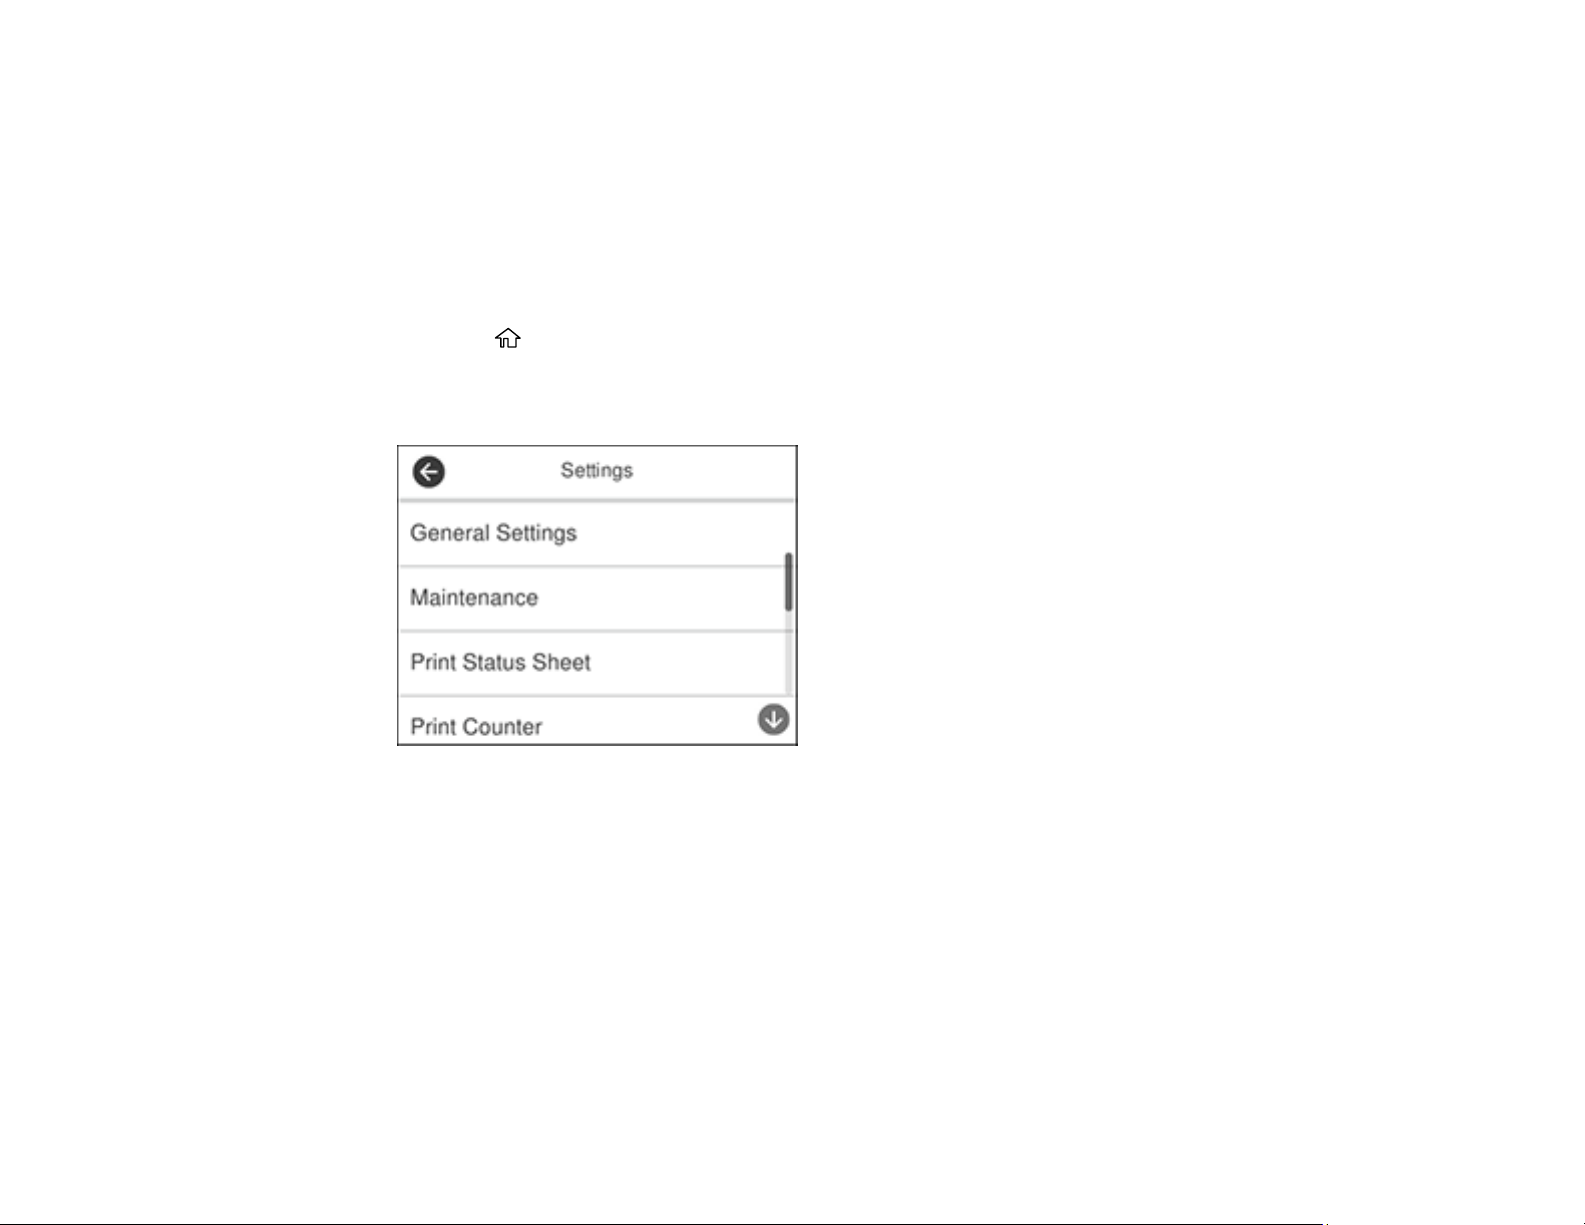
1. Press the home button, if necessary.
2. Select Settings.
You see a screen like this:
3. Select General Settings.
4. Select Basic Settings.
5. Select LCD Brightness.
6. Select the – or + icon to decrease or increase the brightness.
7. Select OK to exit.
Parent topic: Control Panel Buttons and Lights
Changing LCD Screen Language
You can change the language used on the LCD screen.
1. Press the home button, if necessary.
2. Select Settings.
24
You see a screen like this:
3. Select General Settings.
4. Select Basic Settings.
5. Scroll down and select Language.
6. Select a language.
7. Press the home button to exit.
Parent topic: Control Panel Buttons and Lights
Viewing Animations
You can view animations on the LCD screen to help guide you with a procedure or to troubleshoot a
problem.
1. Press the help button.
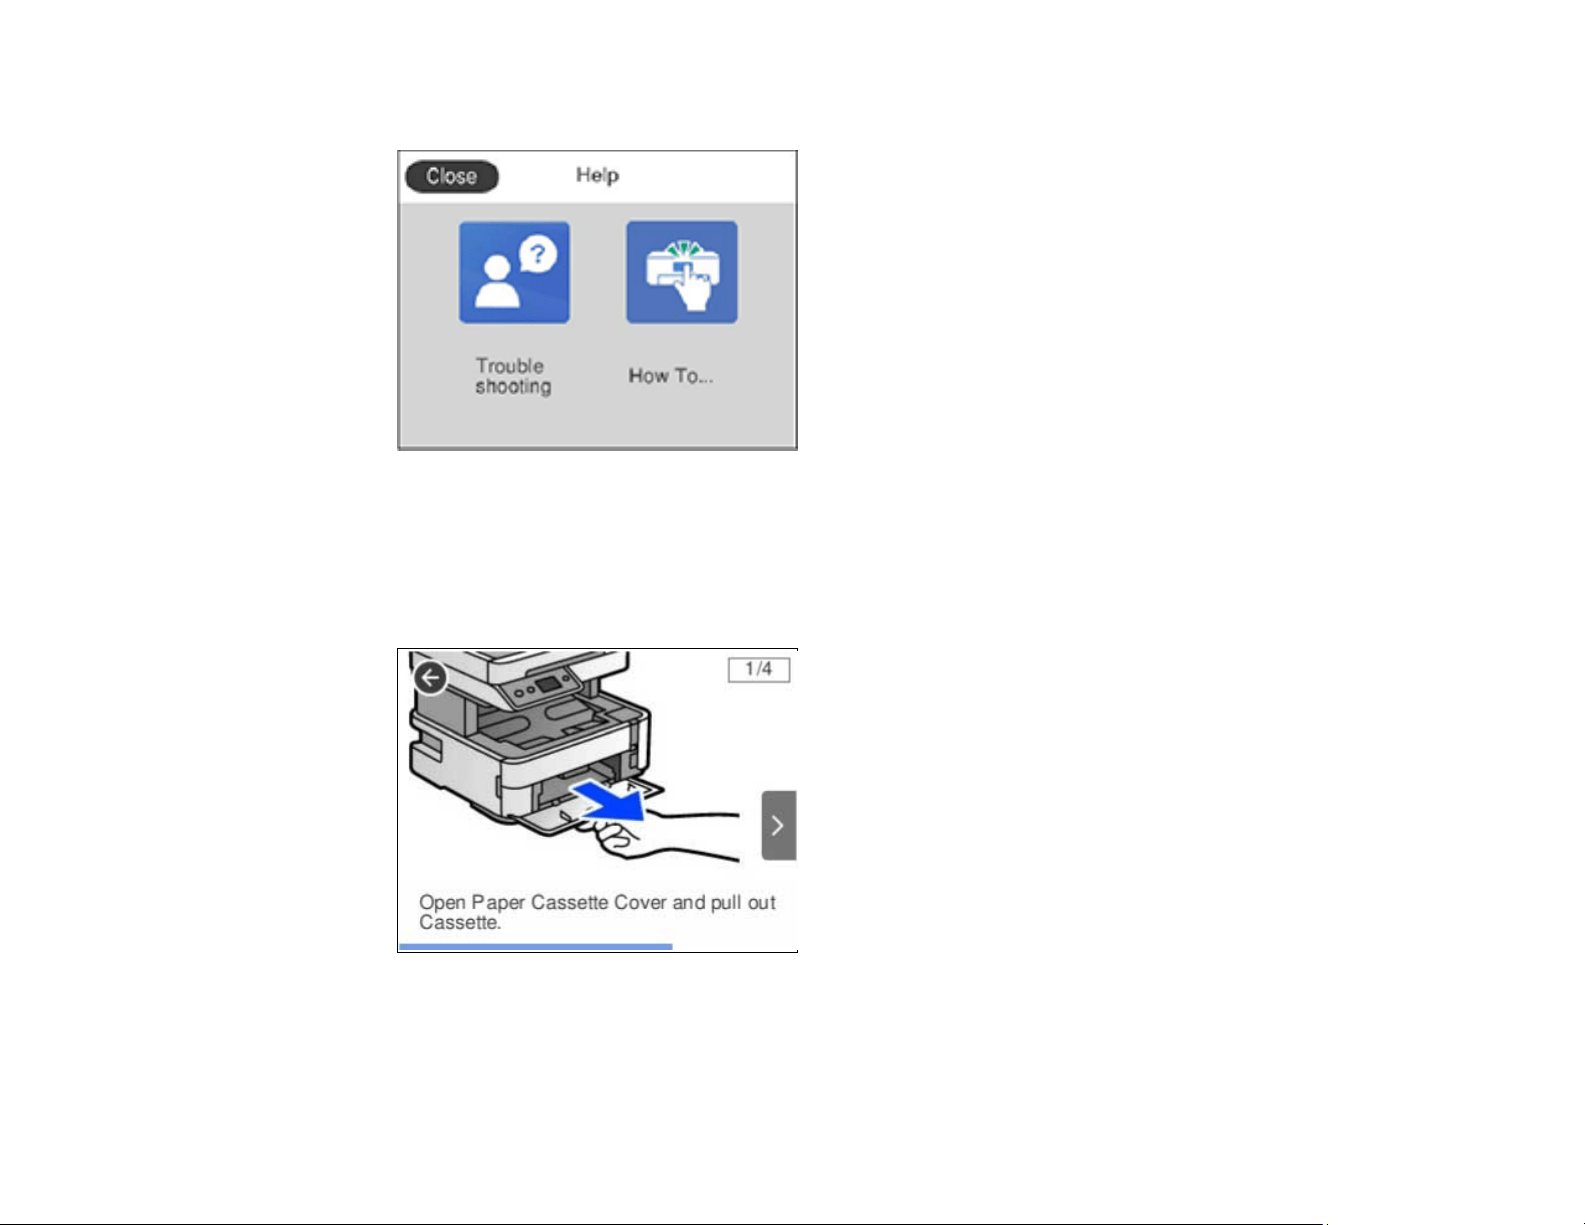
25
You see a screen like this:
2. Select Troubleshooting if you are experiencing a problem or How To to view instructions on
common procedures.
3. Select a topic from the list of available topics and follow the on-screen instructions.
While viewing the topics, you may see screens like this:
1 Displays the current step number and the total number of steps
2 Select the left arrow to view the previous step
26
3 Indicates your overall progress through the animation
4 Select the right arrow to view the next step
Parent topic: Control Panel Buttons and Lights
Selecting the Date and Time
Select the current date, time, and daylight saving phase in your area, and choose your preferred date
and time format.
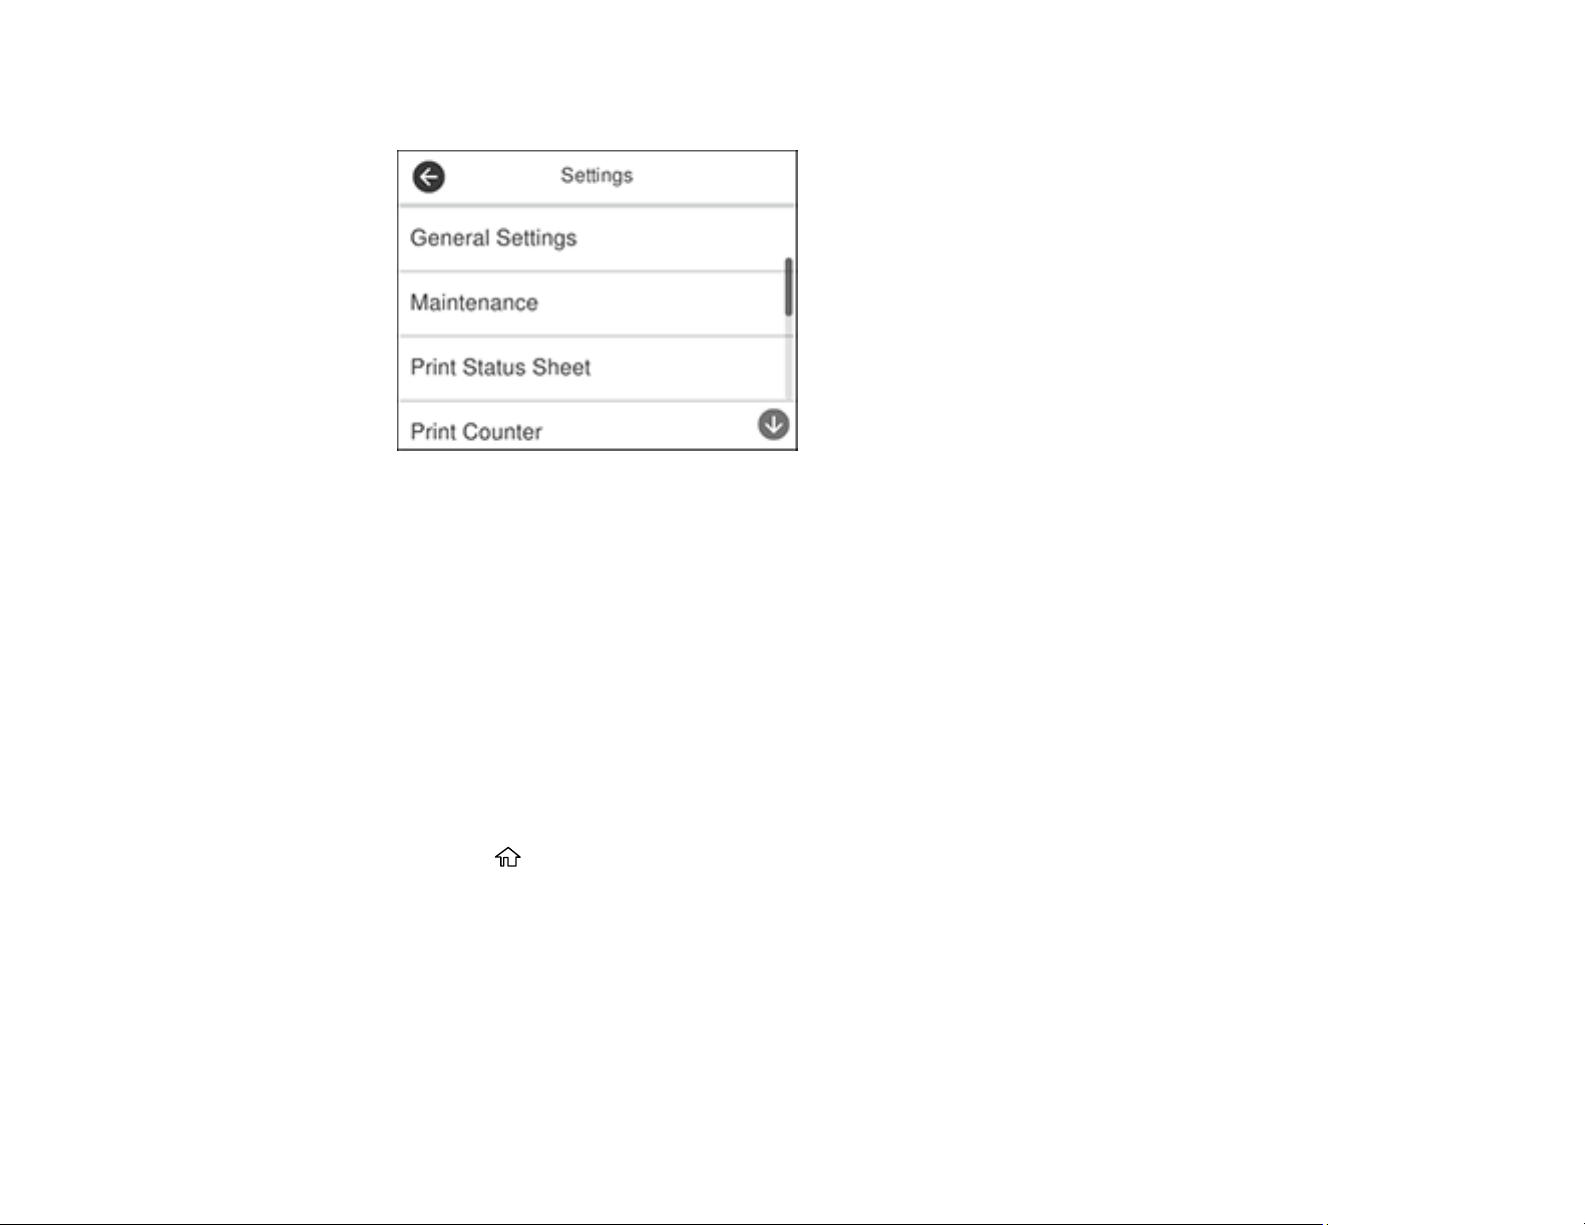
1. Press the home button, if necessary.
2. Select Settings.
You see a screen like this:
3. Select General Settings.
4. Select Basic Settings.
5. Select Date/Time Settings.
6. Select Daylight Saving Time.
7. Select the setting that applies to your area:
• Winter: it is winter or your region does not use Daylight Saving Time (DST)

27
• Summer: it is spring or summer and your region uses Daylight Saving Time (DST)
Note: If your region uses Daylight Saving Time (DST), you must change this setting to match the
season. When you change from Winter to Summer, your product automatically sets its clock ahead
one hour. When you change from Summer to Winter, it sets its clock back one hour.
8. Select Date/Time.
9. Select the date format you want to use.
10. Use the numeric keypad to enter the current date, then select OK.
11. Select the time format you want to use.
12. Use the numeric keypad to enter the current time, then select OK.
13. Select Time Difference.
14. Use the + and - buttons to enter the time difference between your time zone and UTC (Coordinated
Universal Time), then select OK.
Parent topic: Control Panel Buttons and Lights
Selecting Your Country or Region
Before using your product, select the country or region in which you are using your product.
Note: If you change the country or region, your fax settings return to their defaults and you must select
them again. This setting can be locked by an administrator. If you cannot access or change this setting,
contact your administrator for assistance.
1. Press the home button, if necessary.
2. Select Settings.
28
You see a screen like this:
3. Select General Settings.
4. Select Basic Settings.
5. Select Country/Region.
6. Scroll up or down, if necessary, and select your country or region.
You see a confirmation screen.
7. If the setting is correct, select Yes. (If not, select No and retry.)
Parent topic: Control Panel Buttons and Lights
Turning Off the Operation Time Out Setting
The Operation Time Out setting causes the LCD screen to return to the Home screen after a few minutes
of inactivity. This feature is enabled by default, but you can turn it off.
1. Press the home button, if necessary.
2. Select Settings.
29
You see a screen like this:
3. Select General Settings.
4. Select Basic Settings.
5. Scroll down and set Operation Time Out to Off.
Parent topic: Control Panel Buttons and Lights
Preventing PC Connection via USB
You can disable access to your product from a USB-connected computer. This restricts non-network
access to the product.
1. Press the home button, if necessary.
2. Select Settings.
30
You see a screen like this:
3. Select General Settings.
4. Select Printer Settings.
5. Scroll down and select PC Connection via USB.
6. Select Disable.
Parent topic: Control Panel Buttons and Lights
Product Parts Locations
See these sections to identify the parts on your product.
Product Parts - Front
Product Parts - Inside
Product Parts - Back
Parent topic: Product Basics
31
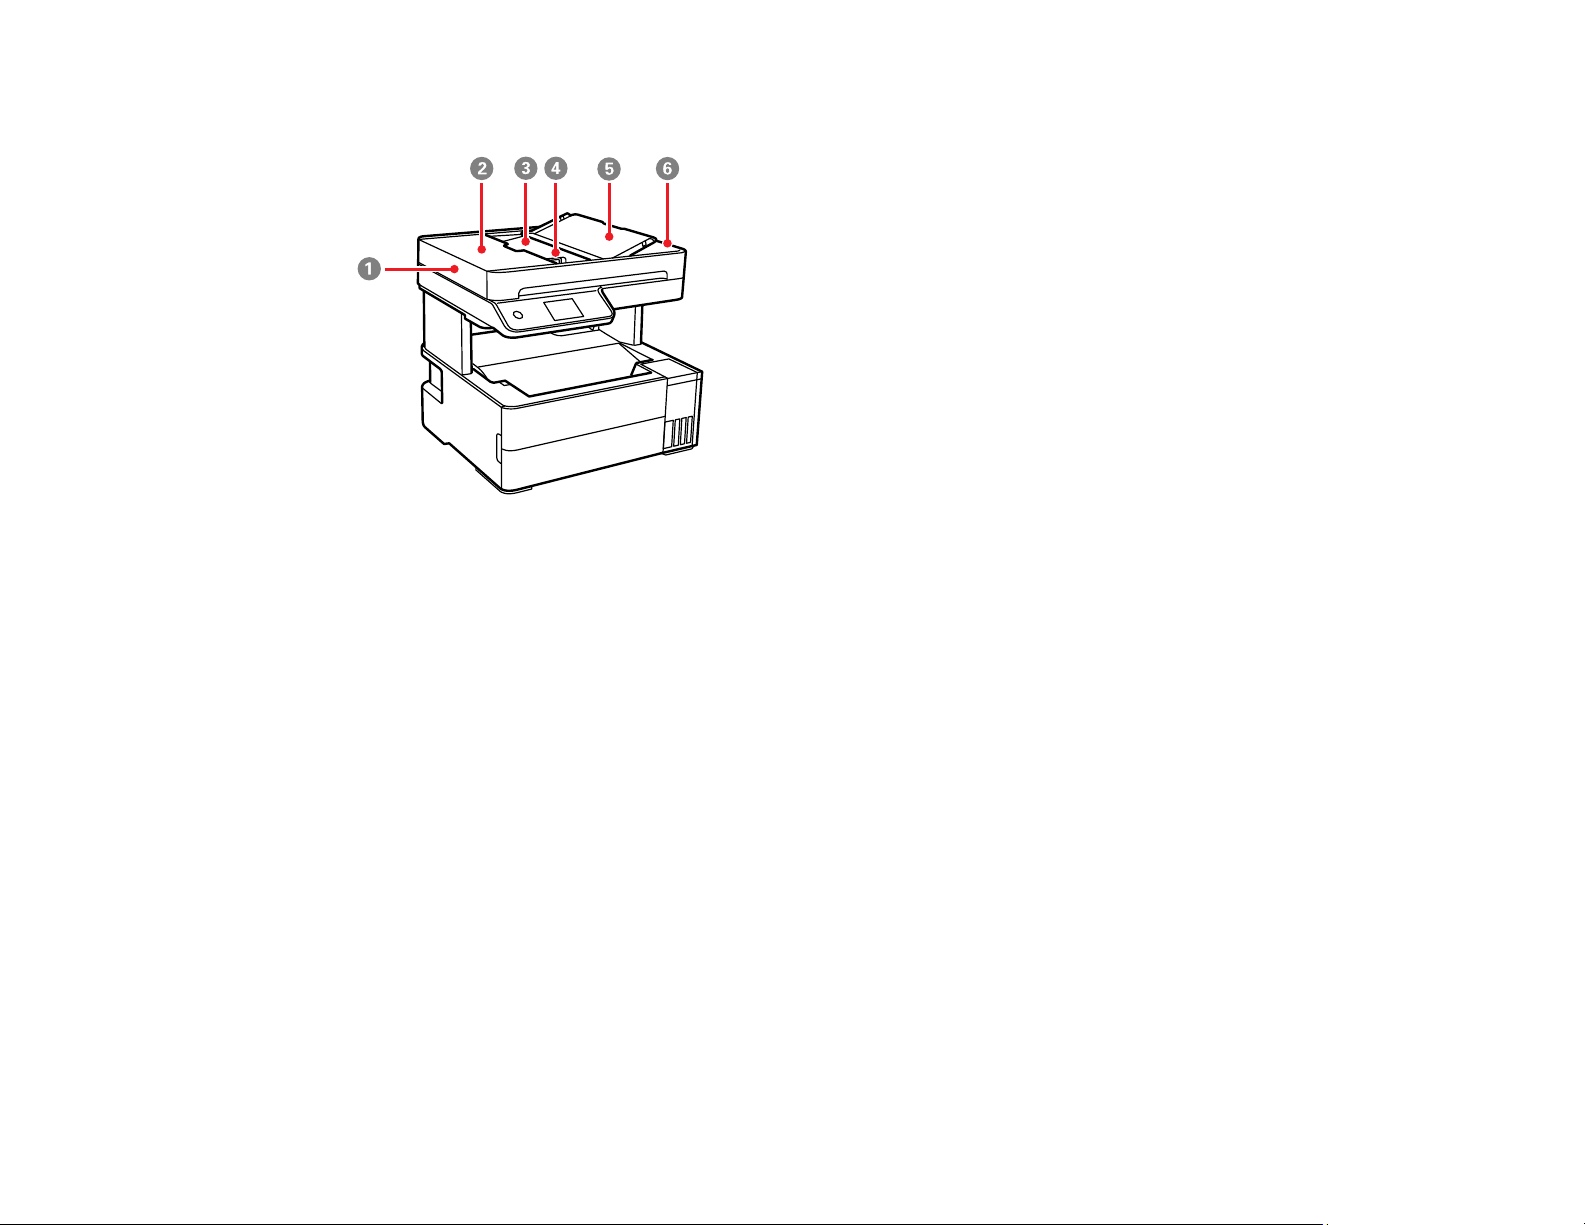
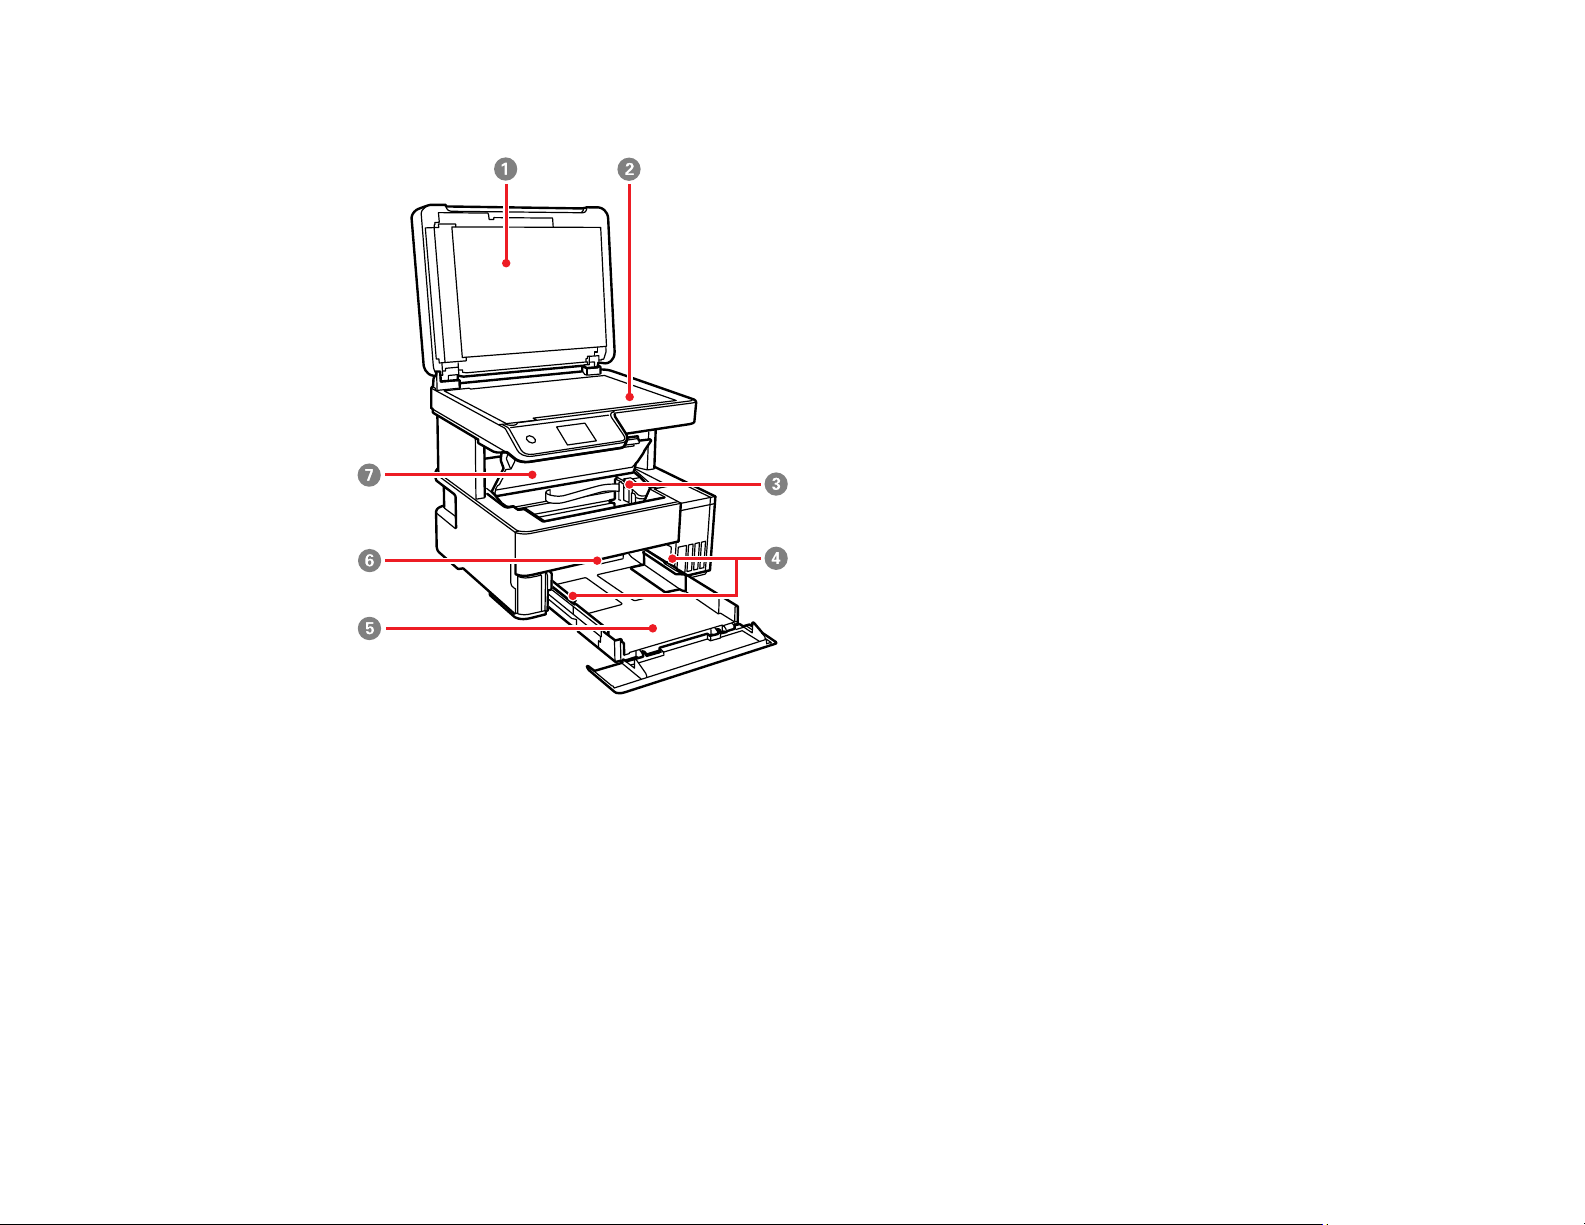
Product Parts - Front
1 Automatic Document Feeder (ADF)
2 ADF cover
3 ADF input tray
4 ADF edge guide
5 ADF document support
34
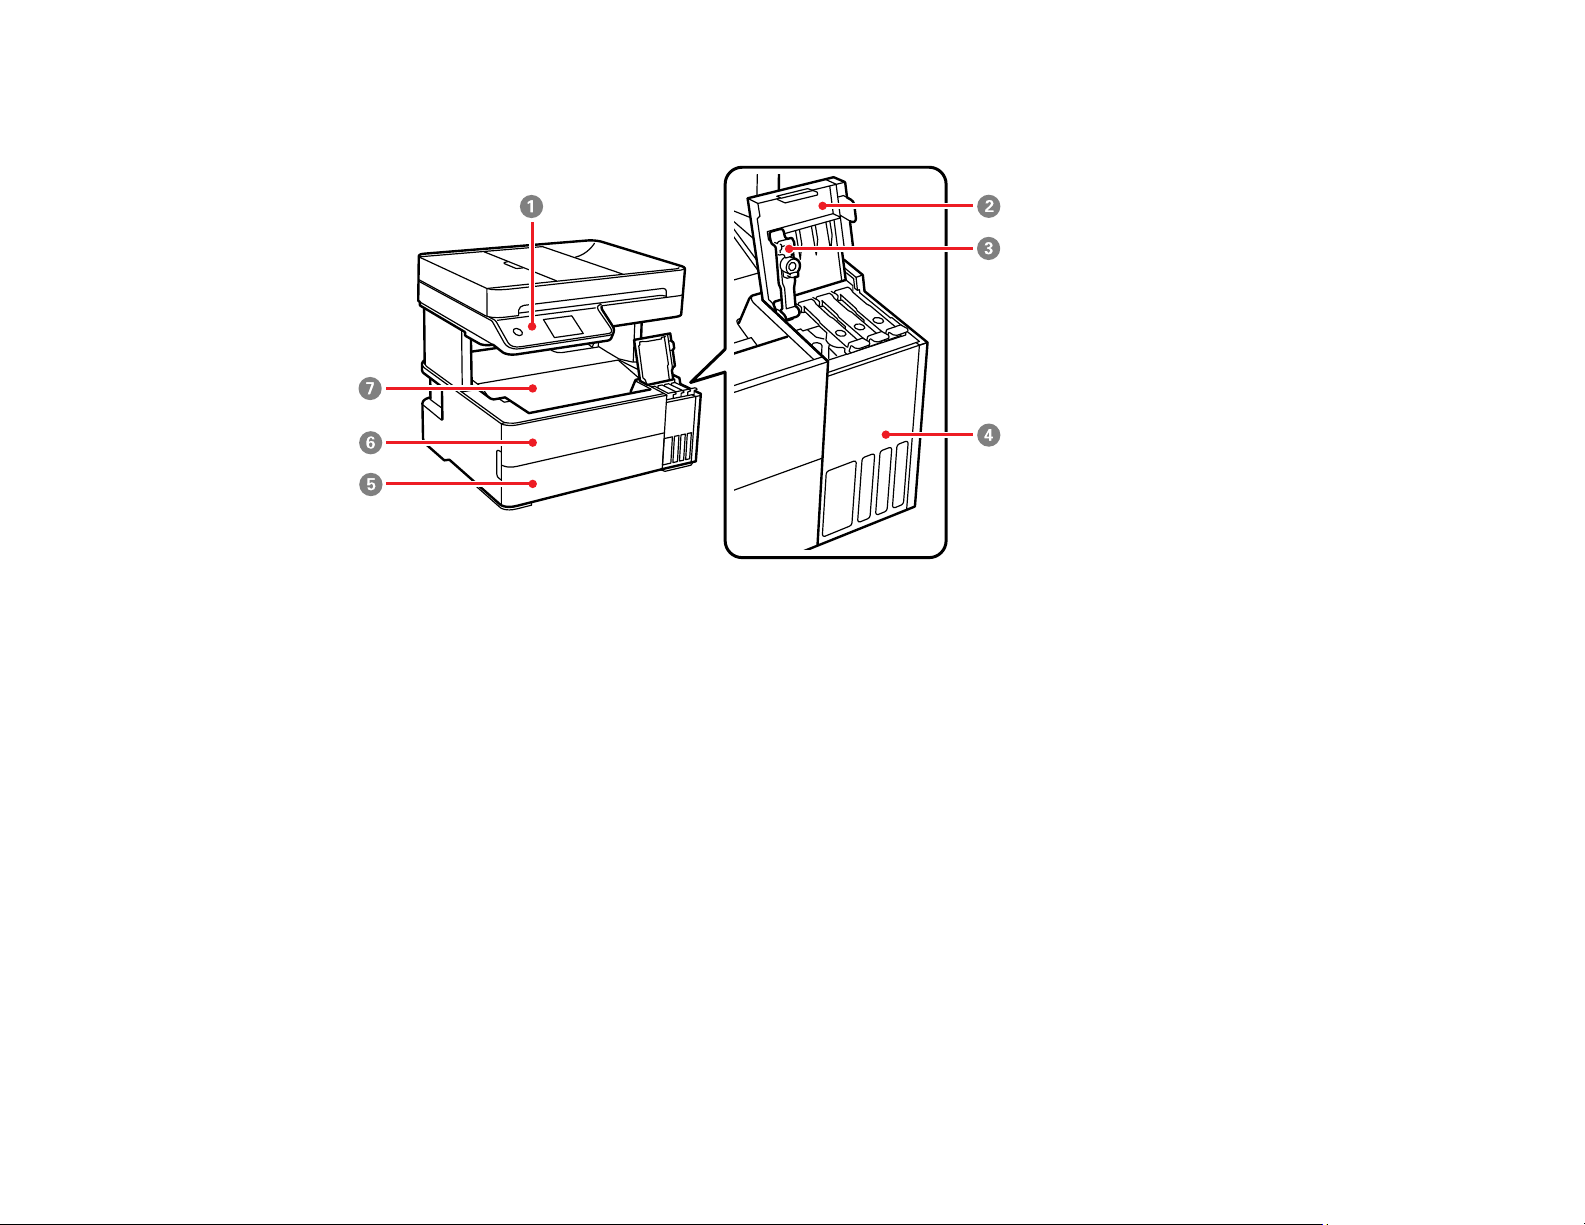
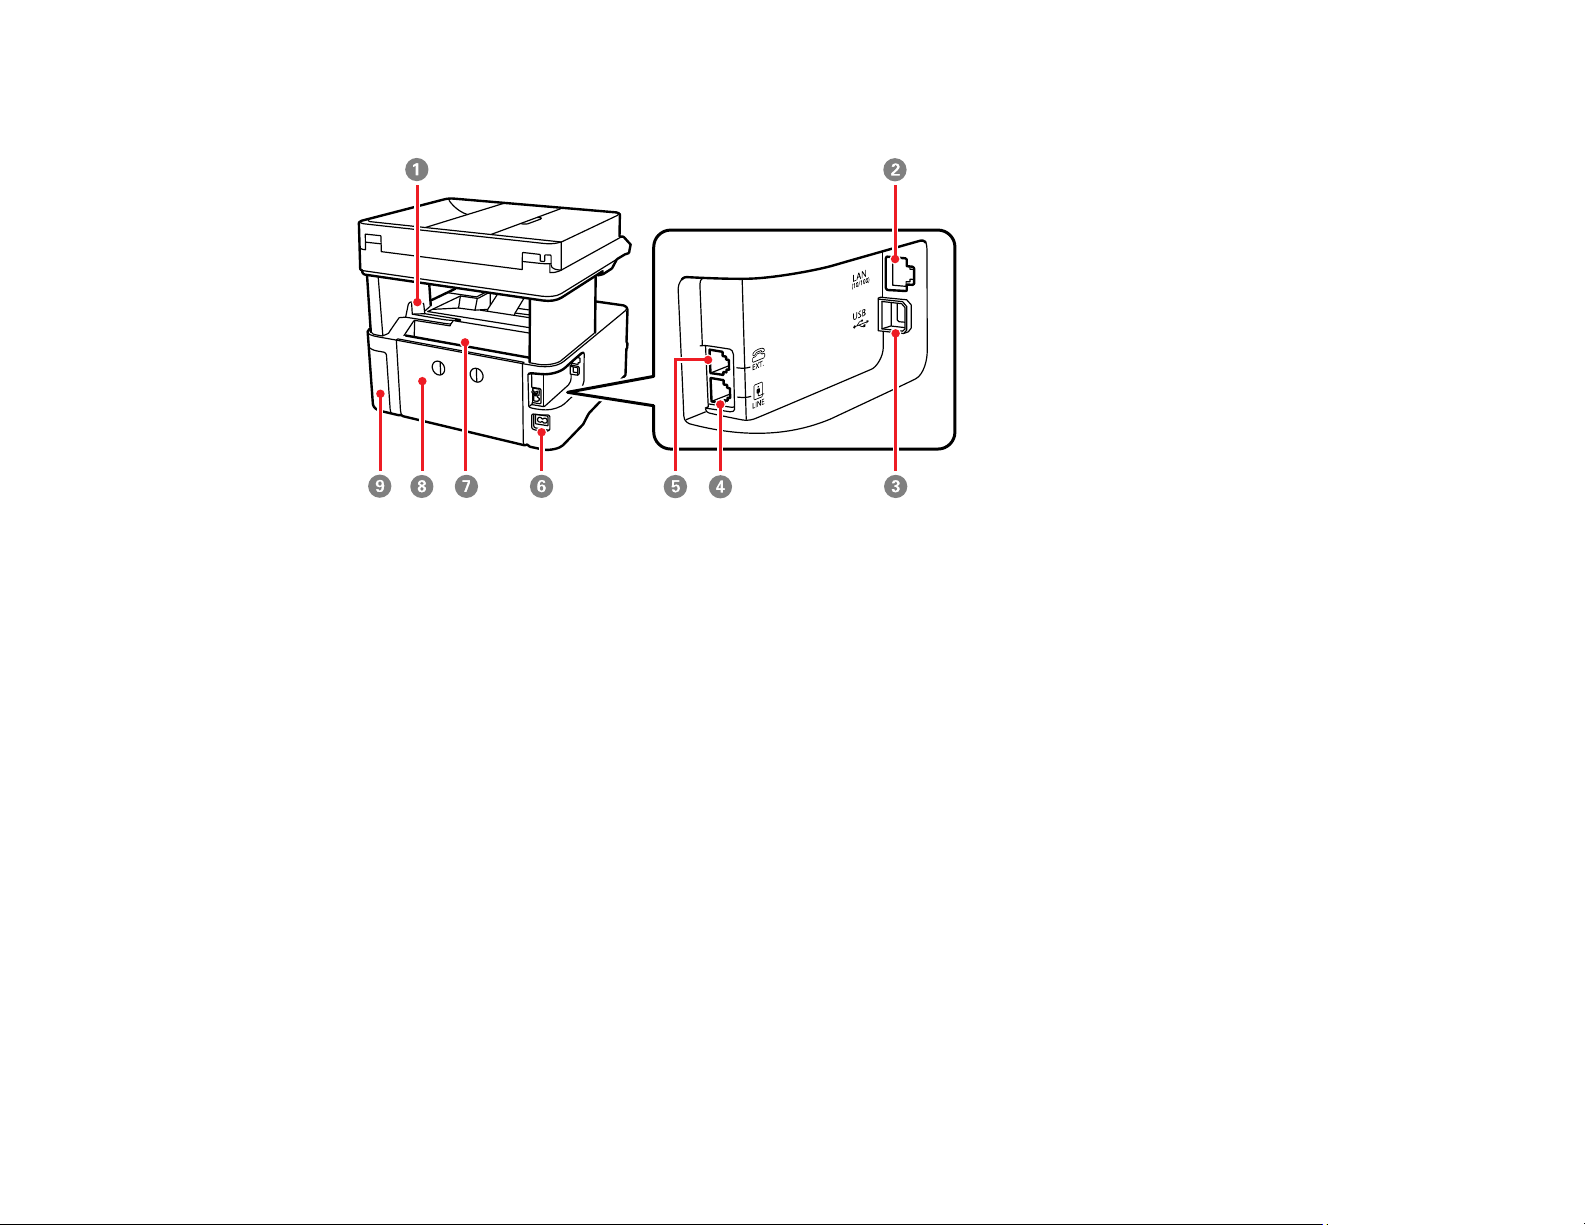
Product Parts - Back
1 Output tray stopper
2 LAN port
3 USB port
4 LINE port (ET-5170/ET-5180)
5 EXT port (ET-5170/ET-5180)
6 AC inlet
7 Rear paper feed slot
8 Rear cover
9 Maintenance box cover
Parent topic: Product Parts Locations
Using Power Saving Settings
Your product enters sleep mode automatically and turns off the LCD screen if it is not used for a period
of time. You can make the time period shorter and select other options to save energy and resources.
Changing the Sleep Timer Settings

35
Changing the Power Off Timer Settings
Parent topic: Product Basics
Changing the Sleep Timer Settings
You can adjust the time period before your product enters sleep mode and turns off the LCD screen.
1. Press the home button, if necessary.
2. Select Settings.
You see a screen like this:
3. Select General Settings.
4. Select Basic Settings.
5. Select Sleep Timer.
6. Select the + and – icons to increase or decrease the number of minutes.
Note: You can also press the minutes field and use the displayed numeric keypad to enter the
number of minutes.
7. Select OK when you are finished.
Parent topic: Using Power Saving Settings
36
Changing the Power Off Timer Settings
You can have the product turn off automatically if it is not used for a specified period of time.
1. Press the home button, if necessary.
2. Select Settings.
You see a screen like this:
3. Select General Settings.
4. Select Basic Settings.
5. Select Power Off Timer.
6. Select a time period between 30minutes and 12h (12 hours).
Parent topic: Using Power Saving Settings
Epson Connect Solutions for Smartphones, Tablets, and More
Use your smartphone, tablet, or computer to print and scan documents, photos, emails, and web pages
from your home, office, or even across the globe.
Note: If you are using your Epson product with the Windows 10 S operating system, you cannot use the
software described in this section. You also cannot download and install any Epson product software
from the Epson website for use with Windows 10 S; you must obtain software only from the Windows
Store.

37
Print from anywhere with these Epson Connect solutions:
• Epson Email Print
• Epson Remote Print
Scan and send a file as an email or upload it to an online service directly from your Epson product with
Epson Scan to Cloud.
Setting Up Epson Connect Services
Using Epson Email Print
Using Epson Remote Print
Using Epson Scan to Cloud
Parent topic: Product Basics
Related tasks
Using AirPrint
Android Printing Using the Epson Print Enabler
Using Fire OS Printing
Using Windows 10 Mobile Printing
Setting Up Epson Connect Services
If you did not activate your product's email address for use with Epson Connect when you set up your
product, you can activate it using the product control panel.
1. Press the home button, if necessary.
2. Select Settings.

38
You see a screen like this:
3. Select General Settings.
4. Select Web Service Settings.
5. Select Epson Connect Services.
6. Select Register.
7. Follow the instructions on the screen to activate your product's email address.
Parent topic: Epson Connect Solutions for Smartphones, Tablets, and More
Related topics
Wi-Fi or Wired Networking
Using Epson Email Print
With Epson Email Print, you can print from any device that can send email, such as your smartphone,
tablet, or laptop. Just activate your product's unique email address. When you want to print, attach a
PDF, Microsoft Office document, or photo to an email and send it to your product. Both the email and the
attachments will print automatically.
1. Connect your product to your network. See the link below.
2. If you did not already set up Email Print when you installed your product software, see the link below
to use your product control panel to activate your unique email address. Or visit epson.com/connect
(U.S) or epson.ca/connect (Canada) to learn more about Email Print, create your Epson Connect
account, and register your product to the Epson Connect service.

39
3. Now you are ready to send and print emails to your product's Email Print address.
Note: Go to epsonconnect.com and log into your Epson Connect account to personalize your product's
email, adjust print settings, and set up other Epson Connect services.
Parent topic: Epson Connect Solutions for Smartphones, Tablets, and More
Related tasks
Setting Up Epson Connect Services
Related topics
Wi-Fi or Wired Networking
Using Epson Remote Print
With Epson Remote Print software, you can print from your laptop or desktop computer to an Epson
Email-enabled product anywhere in the world.
1. Connect your Epson product to your wireless network. See the link below.
2. If you did not already set up an Epson Connect account when you installed your product software,
visit epsonconnect.com to create your account and register your product to the Epson Connect
service.
Note: Make a note of your product's email address.
3. Visit epsonconnect.com to learn more about Remote Print and how to download the Remote Print
Driver software.
4. Download and install the Remote Print software.
5. Enter the email address and optional access key of your Epson product during Remote Print setup.
6. Now you are ready to print remotely. Select the print command in your laptop or desktop computer
application and choose the Remote Print option for your Epson product.
Parent topic: Epson Connect Solutions for Smartphones, Tablets, and More
Related topics
Wi-Fi or Wired Networking

40
Using Epson Scan to Cloud
The Epson Scan to Cloud service allows you to scan and send a file as an email or upload it to an online
service directly from your Epson product. Register an email address or online services such as Box,
DropBox, Evernote, or Google Drive with your Epson Connect account.
1. Connect your Epson product to your network. See the link below.
2. If you did not already set up an Epson Connect account when you installed your product software,
visit epsonconnect.com to create your account and register your product to the Epson Connect
service.
Note: Make a note of your product's email address and password.
3. Visit epsonconnect.com to sign into your account with the email address and password you
selected.
4. Select your product, select Scan to Cloud, and select Destination List.
5. Click Add, then follow the instructions on the screen to create your destination list.
6. Now you are ready to use Scan to Cloud. Select the setting for scanning to Scan to Cloud on your
Epson product control panel.
Parent topic: Epson Connect Solutions for Smartphones, Tablets, and More
Related topics
Wi-Fi or Wired Networking
Using the Epson Smart Panel Mobile App
Use this free Apple and Android app to set up your Epson product and then print, copy, or scan with your
networked Epson product. Epson Smart Panel also lets you check ink levels and product status.
1. Visit epson.com/connect (U.S) or epson.ca/connect (Canada) to learn more about Epson Smart
Panel and check the compatibility of your mobile device.
2. Download Epson Smart Panel from the Apple App Store or Google Play.
3. Connect your mobile device to the wireless network that you want to connect your product to or to
the same wireless network as your product (if your product is already set up).
4. Do one of the following:
• If you haven't set up your product, open Epson Smart Panel and follow the instructions to set up
your product.

41
• If your product is already set up, open Epson Smart Panel and select your Epson product, if
necessary.
Now you are ready to print, copy, or scan with your mobile device and your Epson product.
Parent topic: Product Basics
Related topics
Wi-Fi or Wired Networking
Voice-Activated Printing
Take advantage of voice-activated, hands-free printing from your Epson product with Alexa and Google
Assistant. Depending on which voice assistant you use, you can ask your product to print photos,
calendars, recipes, photo props, and more. Click here for more information.
1. Connect your product to your network. See the link below.
2. Set up your product's email address for use with Epson Connect. See the link below to activate it
from the product control panel.
3. Click here for instructions on how to set up your product and voice assistant to use the voice-
activated printing feature.
Now you are ready to print with your voice and your Epson product.
Parent topic: Product Basics
Related tasks
Setting Up Epson Connect Services
Related topics
Wi-Fi or Wired Networking
Setting Up Printing on a Chromebook
Your Epson printer supports native printing on Chromebook, allowing you to print from a Chromebook
without drivers or cables.
For directions on setting up your printer, visit Setting Up Your Epson Printer on Your Chromebook (U.S.)
or Setting Up Your Epson Printer on Your Chromebook (Canada).
Parent topic: Product Basics
42
Using AirPrint
AirPrint enables instant wireless printing from iPhone, iPad, iPod touch, and Mac without the need to
install drivers or download software.
Note: If you disabled paper configuration messages on your product control panel, you cannot use
AirPrint. See the link below to enable the messages, if necessary.
1. Load paper in your product.
2. Set up your product for wireless printing. See the link below.
3. Connect your Apple device to the same wireless network that your product is using.
4. Print from your device to your product.
Note: For details, see the AirPrint page on the Apple website.
Parent topic: Product Basics
Related references
Paper Source Settings Options
Related topics
Wi-Fi or Wired Networking
Android Printing Using the Epson Print Enabler
You can wirelessly print your documents, emails, photos, and web pages right from your Android phone
or tablet (Android v4.4 or later). With a few taps, your Android device will discover your nearby Epson
product and print.
1. Connect your Epson product to your wireless network. See the link below.
2. On your Android device, download the Epson Print Enabler plug-in from Google Play.
3. Go to Settings on your Android device, select Printing, and enable the Epson plug-in, if necessary.
4. Connect your Android device to the same wireless network as your product.

43
5. Now you are ready to print. From an Android application such as Chrome or Gmail, tap the menu
icon and print whatever is on the screen.
Note: If you do not see your product, tap All Printers and select your product.
Parent topic: Product Basics
Related topics
Wi-Fi or Wired Networking
Using Fire OS Printing
You can wirelessly print from Amazon Fire tablets and phones to your nearby networked Epson product.
There is no software to download, no drivers to install, and no cables to connect. With just a few taps in
Email, Calendar, Contacts, and WPS Office, you can send whatever is on the screen to an Epson
product.
1. Connect your Epson product to your wireless network. See the link below.
2. Connect your Amazon device to the same wireless network as your product.
3. Now you are ready to print. From your Amazon application, tap the print option and select your
product to print whatever is on the screen.
Note: If you see a message telling you that a plug-in is required, tap OK and tap Download. If your
Amazon Fire product uses Fire OS 5 and above, your device automatically uses the built-in Mopria
Print Service app to print.
Parent topic: Product Basics
Related topics
Wi-Fi or Wired Networking
Using Windows 10 Mobile Printing
You can wirelessly print from Windows 10 Mobile tablets and phones to your nearby networked Epson
product. There is no software to download, no drivers to install, and no cables to connect. Look for the
print option in your Windows 10 application to send whatever is on the screen to an Epson product.
1. Connect your Epson product to your wireless network. See the link below.
2. Connect your Windows 10 Mobile device to the same wireless network as your product.

44
3. Now you are ready to print. From your Windows 10 application, tap the print option and select your
product to print whatever is on the screen.
Parent topic: Product Basics
Related topics
Wi-Fi or Wired Networking
Using Epson Print and Scan App with Windows Tablets
You can use this free app to print photos and scan from your Windows (Windows 8 or higher) Surface
RT or Pro tablet with networked Epson products. The Epson Print and Scan app allows you to scan and
capture images right to your tablet or to Microsoft OneDrive.
Note: The Epson Print and Scan app does not support Windows 10 Mobile printing and does not supply
scanning functions for products without scanners.
1. Connect your Epson product to your wireless network. See the link below.
2. Download the Epson Print and Scan app from the Microsoft Windows Store.
3. Connect your Windows tablet to the same wireless network as your product.
4. Open the Epson Print and Scan app and select your Epson product.
Now you are ready to print photos or scan.
Parent topic: Product Basics
Related topics
Wi-Fi or Wired Networking
Using the Mopria Print Service
You can use the Mopria Print Service to print from your Android phone or tablet (Android v4.4 or later) to
your Epson product or any Mopria-certified product from other manufacturers. You can download the
Mopria Print Service from Google Play.
Note: For details on the Mopria Print Service, click here (U.S.) or click here (Canada).
1. Connect your Epson product to your wireless network. See the link below.
2. On your Android device, download the Mopria Print Service app from Google Play.
Note: On some Samsung Galaxy devices, Mopria may come preinstalled.

45
3. Go to Settings on your Android device, select Printing, and enable the Mopria Print Service, if
necessary.
4. Connect your Android device to the same wireless network as your product.
5. Now you are ready to print. From an Android application such as Chrome or Gmail, tap the menu
icon and select Print. Then select All printers, select your Epson product, adjust your print settings,
and print.
Parent topic: Product Basics
Related topics
Wi-Fi or Wired Networking

46
Wi-Fi or Wired Networking
See these sections to use your product on a Wi-Fi or wired network.
Network Security Recommendations
Wi-Fi Infrastructure Mode Setup
Wi-Fi Direct Mode Setup
Wi-Fi Protected Setup (WPS)
Printing a Network Status Sheet
Printing a Network Connection Report
Changing or Updating Network Connections
Network Security Recommendations
To help deter unauthorized access to your product over a network, you should protect your network
environment using appropriate security measures.
Security measures such as these can help deter threats such as loss of user data, use of telephone and
fax lines, and other intrusions:
• Enable security on your wireless LAN
Enable the appropriate security on the wireless LAN you plan to use with your product. Network
security such as a network password can deter interception of traffic over the wireless LAN. Your
router may already have a default password enabled by your Internet service provider (ISP). See your
ISP and router documentation for instructions on how to change the default password and better
secure your network.
• Connect your product only to a network protected by a firewall
Connecting your product directly to the Internet may leave it vulnerable to security threats. Instead,
connect it to a router or other network connection protected by a firewall. Your router may already
have a firewall set up by your Internet service provider; check with your ISP for confirmation. For best
results, set up and use a private IP address for your network connection.
• Change the default administrator password on your product
If your product has an option to set an administrator password, change the default administrator
password to deter access by unauthorized users to personal data stored on your product, such as IDs,
passwords, and contact lists.
Parent topic: Wi-Fi or Wired Networking
47
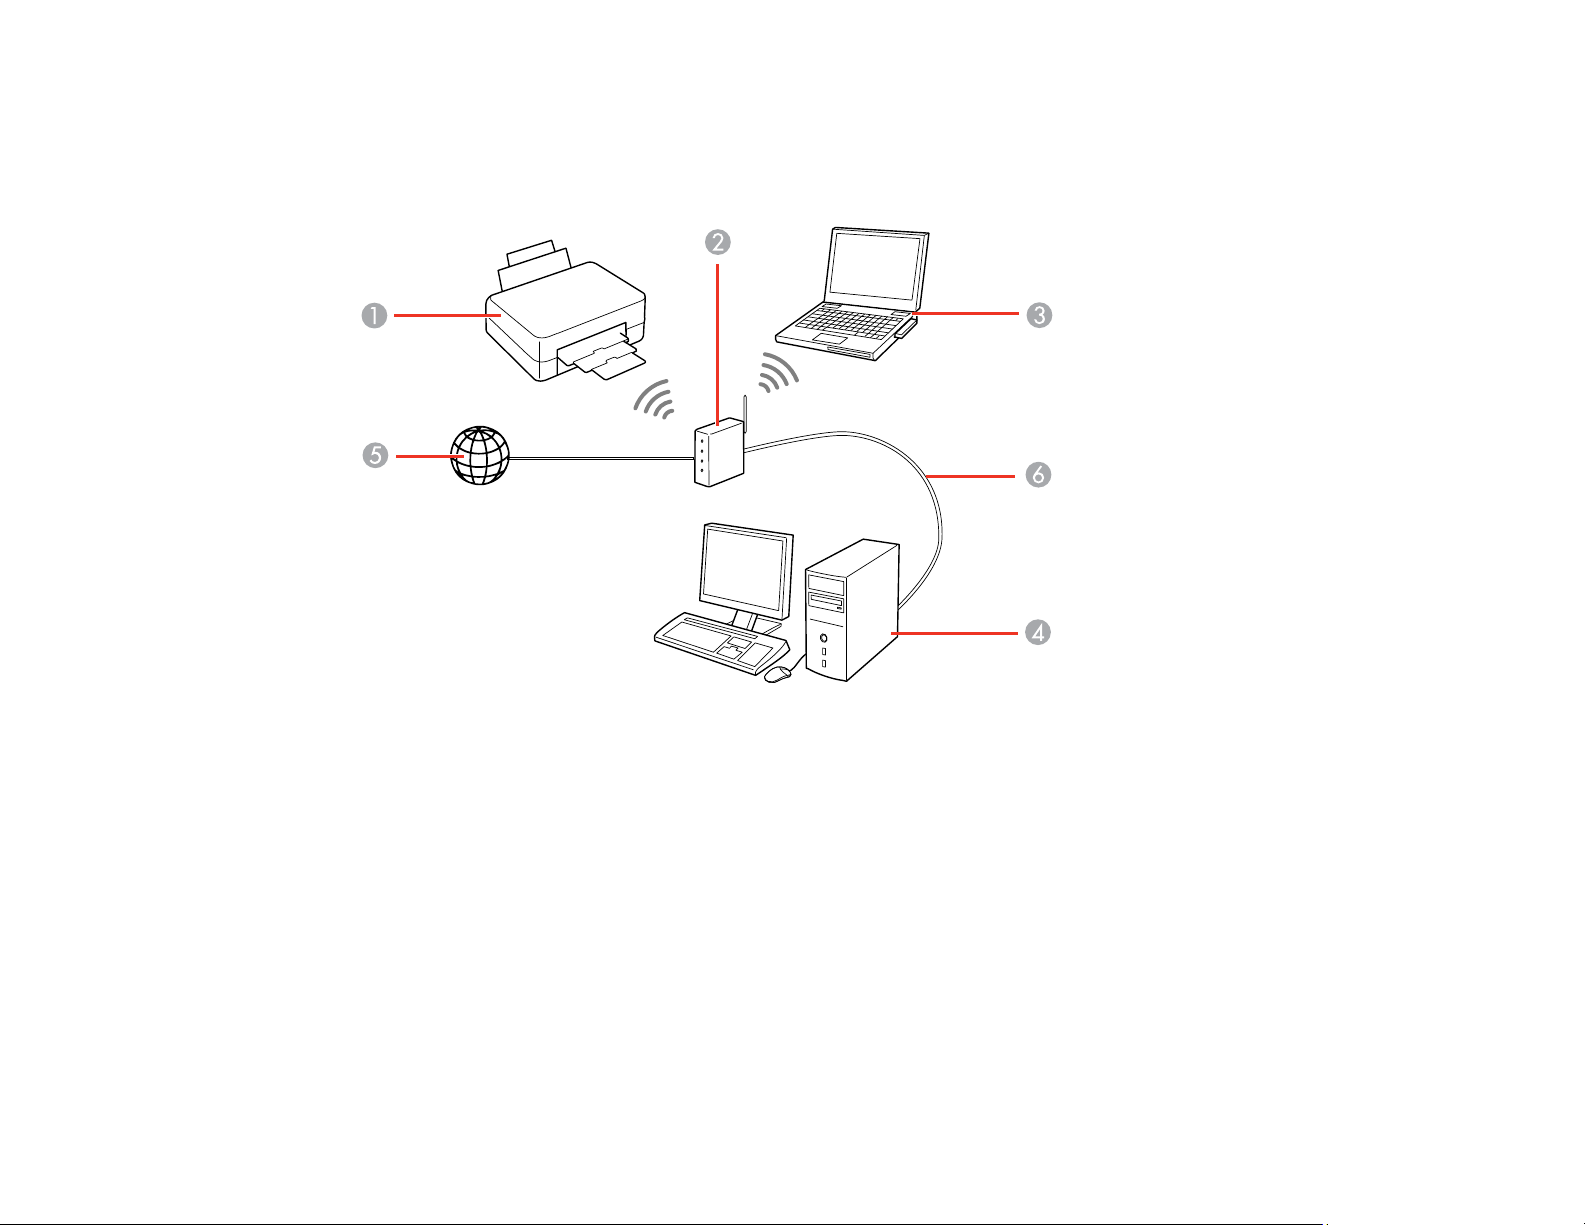
Wi-Fi Infrastructure Mode Setup
You can set up your product to communicate with your computer using a wireless router or access point.
The wireless router or access point can be connected to your computer over a wireless or wired network.
1 Epson product
2 Wireless router or access point
3 Computer with a wireless interface
4 Computer
5 Internet
6 Ethernet cable (used only for wired connection to the wireless router or access point)
Selecting Wireless Network Settings from the Control Panel
Setting Up Wireless Printing from a Smartphone or Tablet
Parent topic: Wi-Fi or Wired Networking
48
Selecting Wireless Network Settings from the Control Panel
You can select or change wireless network settings using your product control panel.
To install your product on a wireless network, follow the instructions on the Start Here sheet and install
the necessary software by downloading it from the Epson website. The installer program guides you
through network setup.
Note: Breakdown or repair of this product may cause loss of network data and settings. Epson is not
responsible for backing up or recovering data and settings during or after the warranty period. We
recommend that you make your own backup or print out your network data and settings.
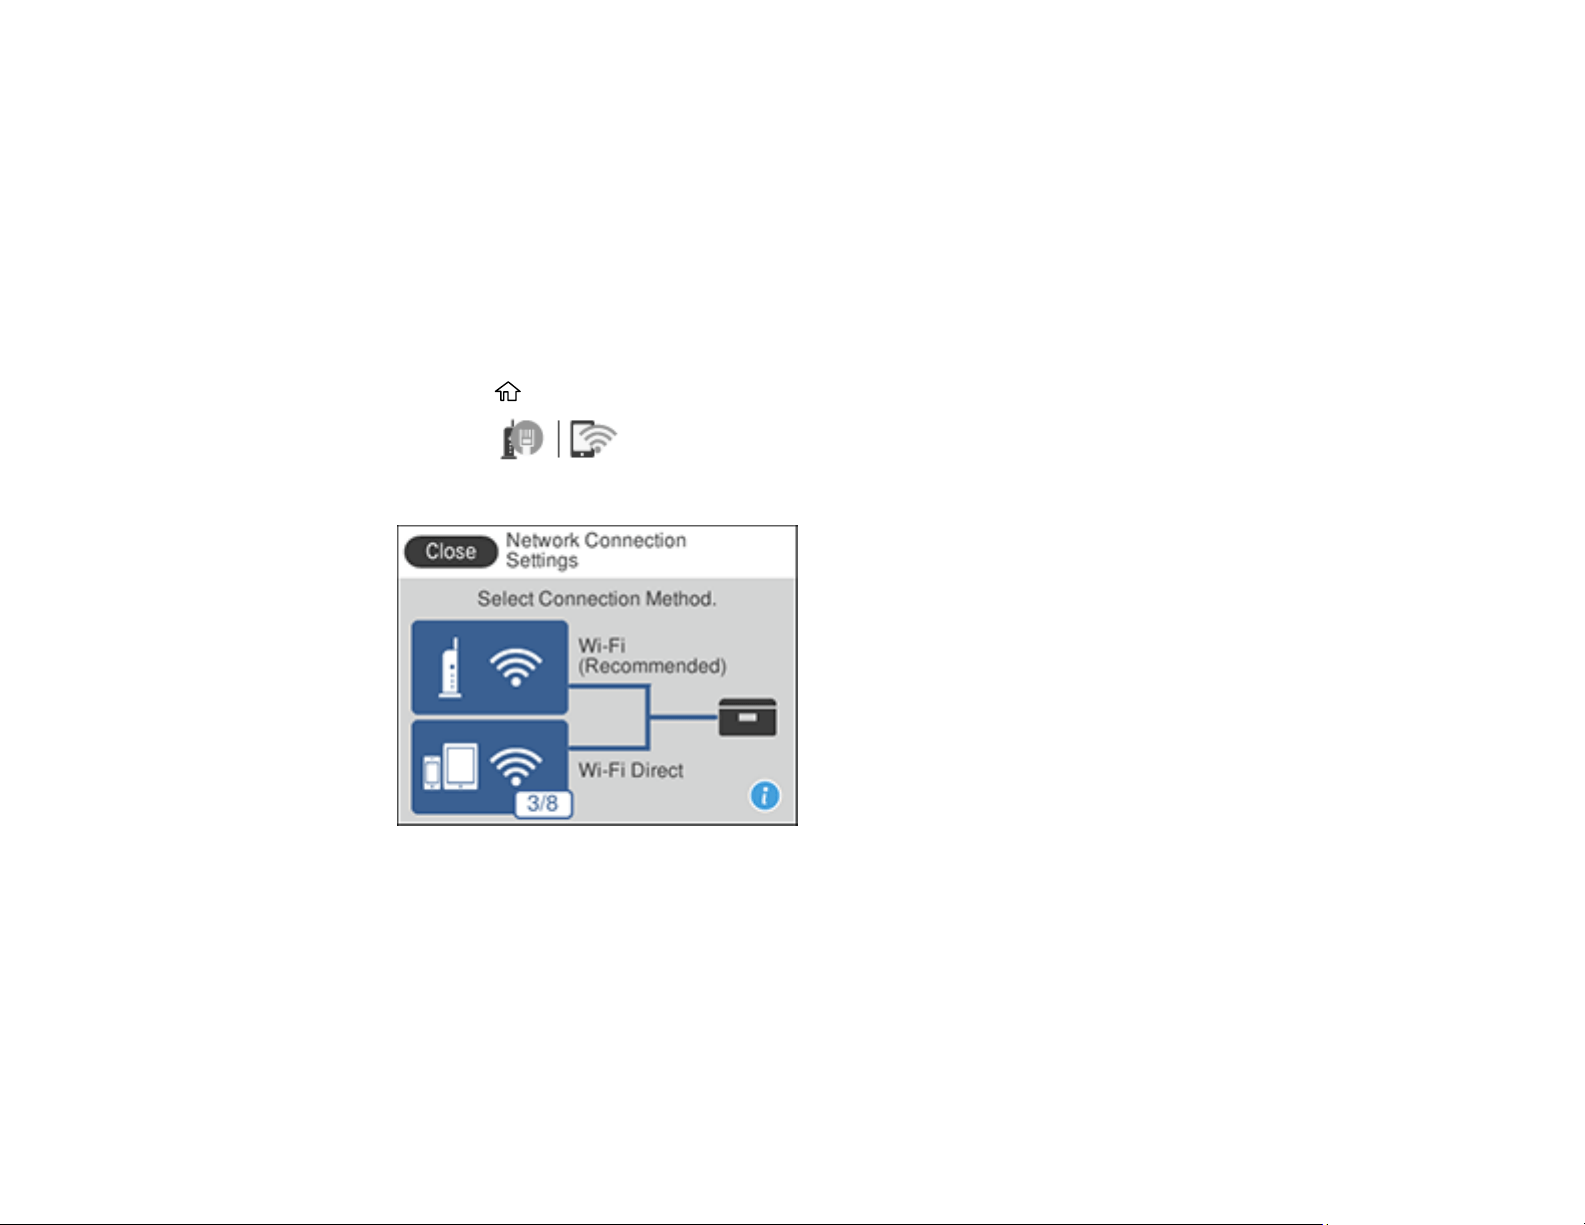
1. Press the home button, if necessary.
2. Select the icon.
You see a screen like this:
3. Select Wi-Fi (Recommended).
4. Select Start Setup or Change Settings.
5. Select Wi-Fi Setup Wizard.
49
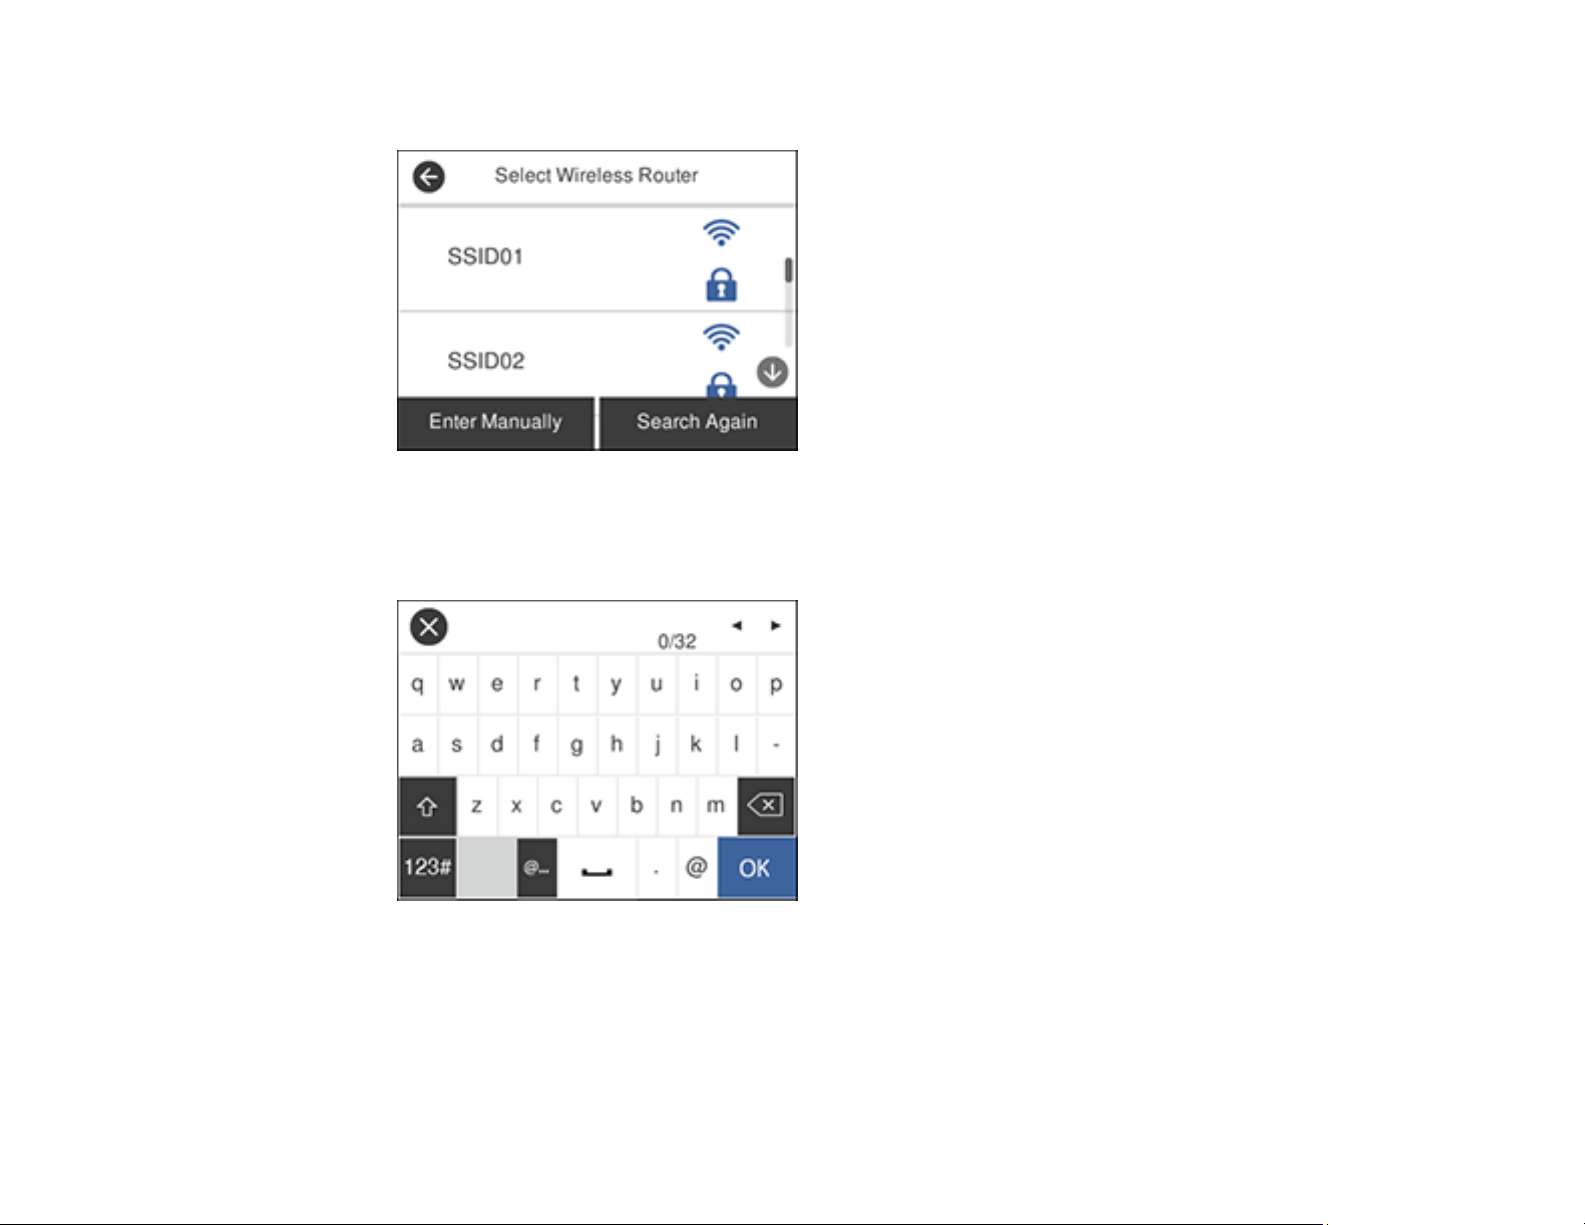
You see a screen like this:
6. Select the name of your wireless network or select Enter Manually to enter the name manually. If
you are entering the name manually, use the displayed keyboard to enter your network name and
enable the password setting to enter the password.
Note: The network name and password are case sensitive. Be sure to correctly enter uppercase and
lowercase letters, and numeric or special characters.
• To move the cursor, press the left or right arrow.
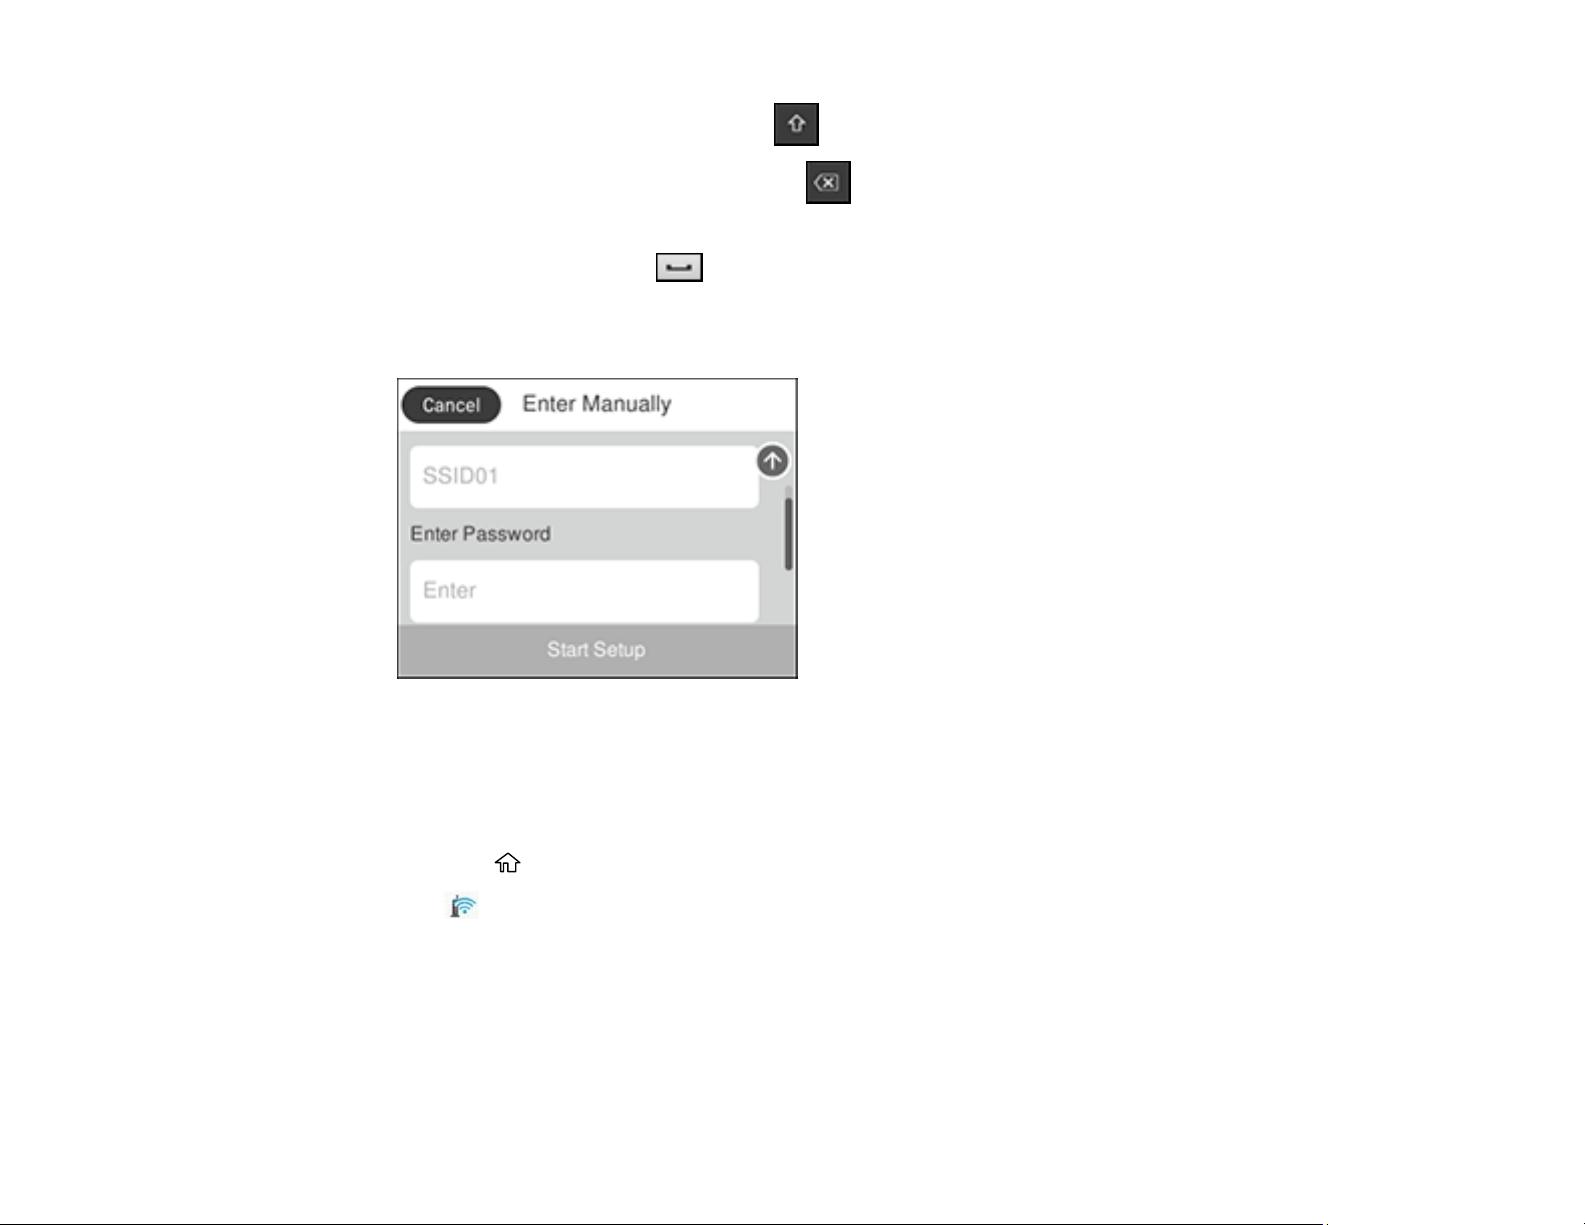
50
• To change the case of letters, select .
• To delete the previous character, select .
• To enter numbers and symbols, select 123#.
• To enter a space, select .
• To finish entering your network name or password, select OK.
7. Select the Enter Password field and use the displayed keyboard to enter your network password.
8. When you are finished, confirm the displayed network settings and select Start Setup to begin
setup.
9. If setup was successful, select Print Check Report to print a network setup report or select OK to
exit.
10. Press the home button to return to the Home screen.
The Wi-Fi icon displayed on the LCD screen indicates your wireless connection status. If the
product is not connected to the network, you may have selected the wrong network name or entered
the password incorrectly. Repeat these steps to try again.
If you are printing from a computer, make sure you installed the network software as described on
the Start Here sheet.
Parent topic: Wi-Fi Infrastructure Mode Setup

51
Related references
Status Icon Information
Related tasks
Printing a Network Status Sheet
Entering Characters on the LCD Screen
Setting Up Wireless Printing from a Smartphone or Tablet
You can use the Epson Smart Panel app to connect your Epson product to a wireless network or
connect your device directly to the product. Epson Smart Panel is available on iOS and Android devices.
Make sure you have the following:
• A Bluetooth-enabled device that is connected to a wireless network
• The Epson Smart Panel app installed on the device
• The wireless network name (SSID) and password
Note: Your device must be close enough to the product to create and maintain a Bluetooth connection.
1. Make sure the product is turned on and is ready to print.
Note: You must perform initial setup and ink installation before setting up wireless printing.
2. Open the Epson Smart Panel app on your device.
3. Do one of the following:
• If the app automatically recognizes the product, follow the on-screen instructions to set up the
wireless connection.
• If the app does not automatically recognize the product, select the + icon and continue with the
next step.
4. On the next screen, select Start setting up and follow the on-screen instructions.
Note: If your product is not listed, move closer to the product and try again. If the product is still not
shown, connect your printer to the wireless network using the control panel and then select Connect
Smartphone to Product Already Connected to Wi-Fi in the Epson Smart Panel app and follow the
on-screen instructions. See the link below for wireless setup instructions.
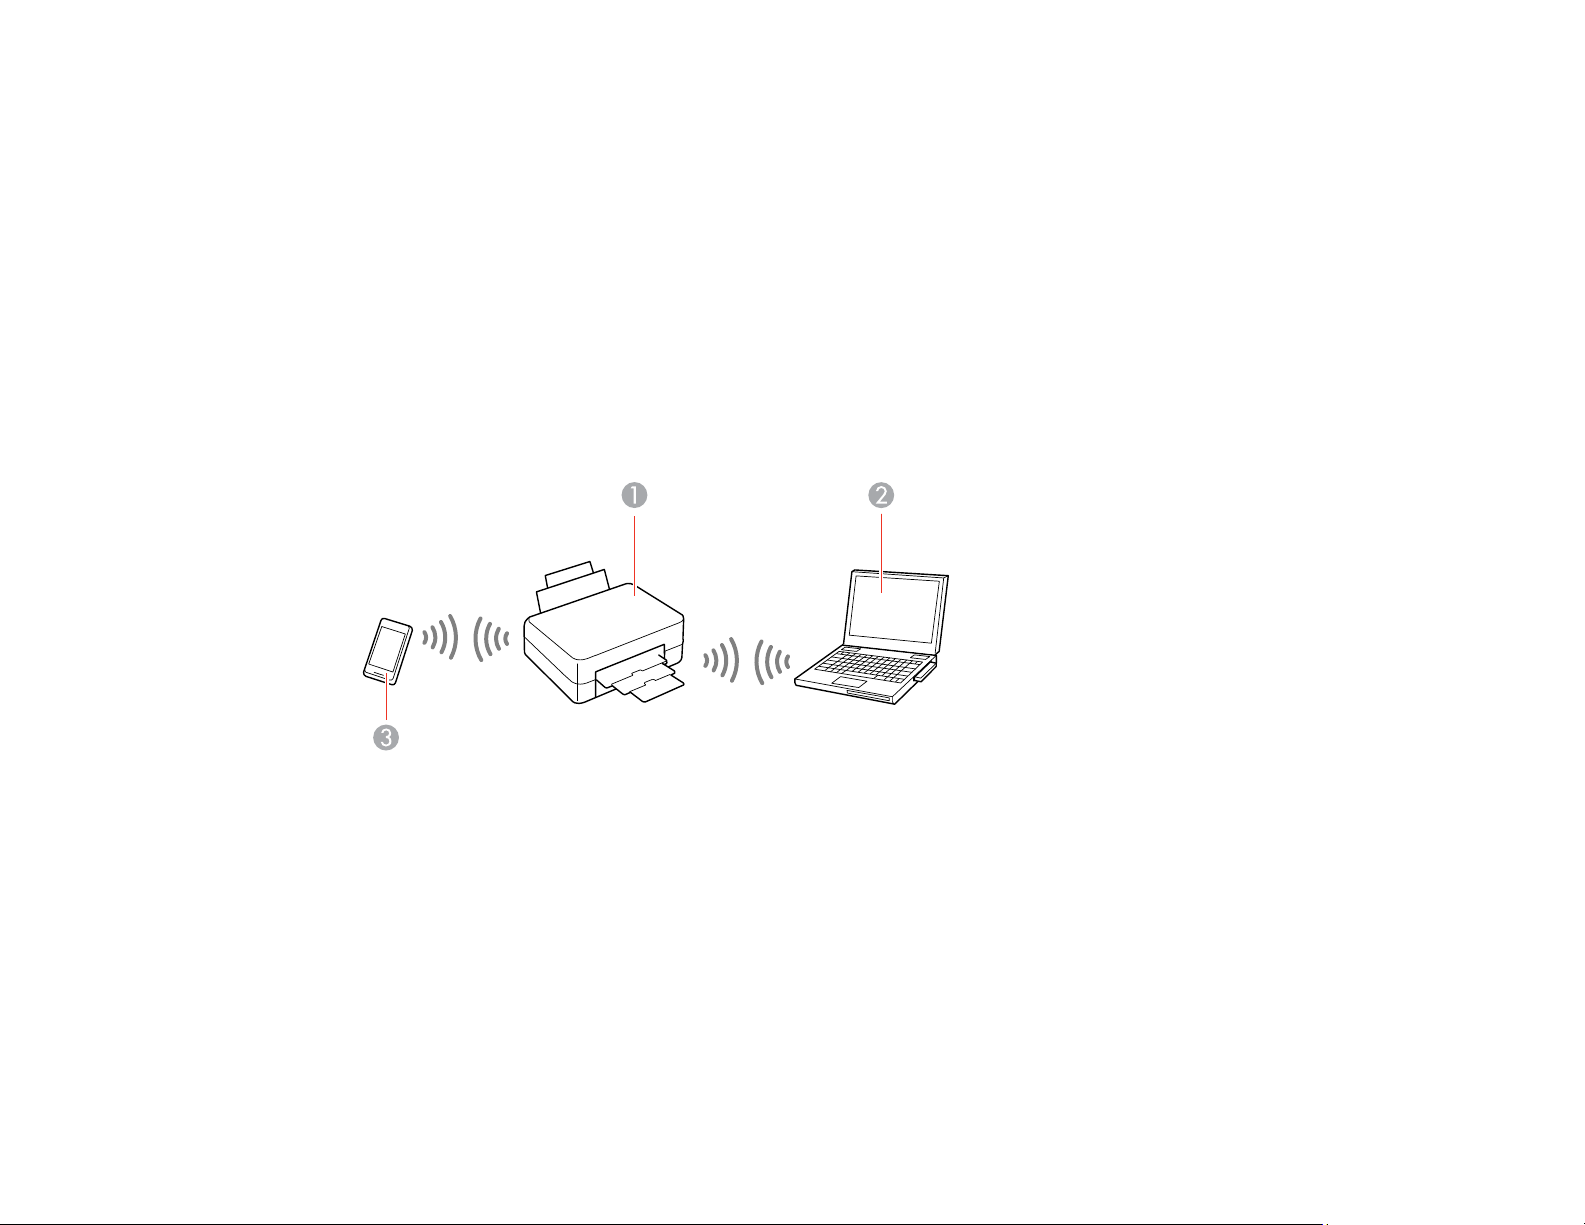
52
Your product is now connected to a wireless network and set up for use with the Epson Smart Panel
app.
Parent topic: Wi-Fi Infrastructure Mode Setup
Related tasks
Using the Epson Smart Panel Mobile App
Related topics
Wi-Fi or Wired Networking
Wi-Fi Direct Mode Setup
You can set up your product to communicate directly with your computer or another device without
requiring a wireless router or access point. In Wi-Fi Direct Mode, the product itself acts as a network
access point for up to 8 devices.
1 Epson product
2 Computer with a wireless interface
3 Other wireless device
Connecting to a Mobile Device
Modifying the Wi-Fi Direct Network Name or Password
Parent topic: Wi-Fi or Wired Networking
Related references
Status Icon Information

53
Connecting to a Mobile Device
You can connect a mobile device directly to the printer without a wireless router or access point.
1. Press the home button, if necessary.
2. Select the icon.
3. Select Wi-Fi Direct.
4. Select Start Setup.
5. Select Other Methods.
6. Select Other OS Devices.
7. Use your device to select the Wi-Fi network name (SSID) displayed on the LCD screen, then enter
the password shown.
8. Open the Epson Smart Panel app on your device and select the printer displayed on the LCD
screen.
9. Select Complete on the LCD screen.
Note: For devices that have been connected to the printer before, select the network name (SSID)
on the device's Wi-Fi screen to connect them again. If you are using an iOS device, you can also
connect by scanning the QR code with the camera app on your device and follow the instructions on
your device.
The Wi-Fi Direct icon displayed on the LCD screen indicates if Wi-Fi Direct is enabled on the
product.
If you are printing from a computer, make sure you installed the network software as described on
the Start Here sheet.
Parent topic: Wi-Fi Direct Mode Setup
Modifying the Wi-Fi Direct Network Name or Password
You can modify the Wi-Fi Direct name and password to create a more descriptive and secure Wi-Fi
Direct network.
Note: If you are printing from a computer, make sure you installed the network software as described on
the Start Here sheet.
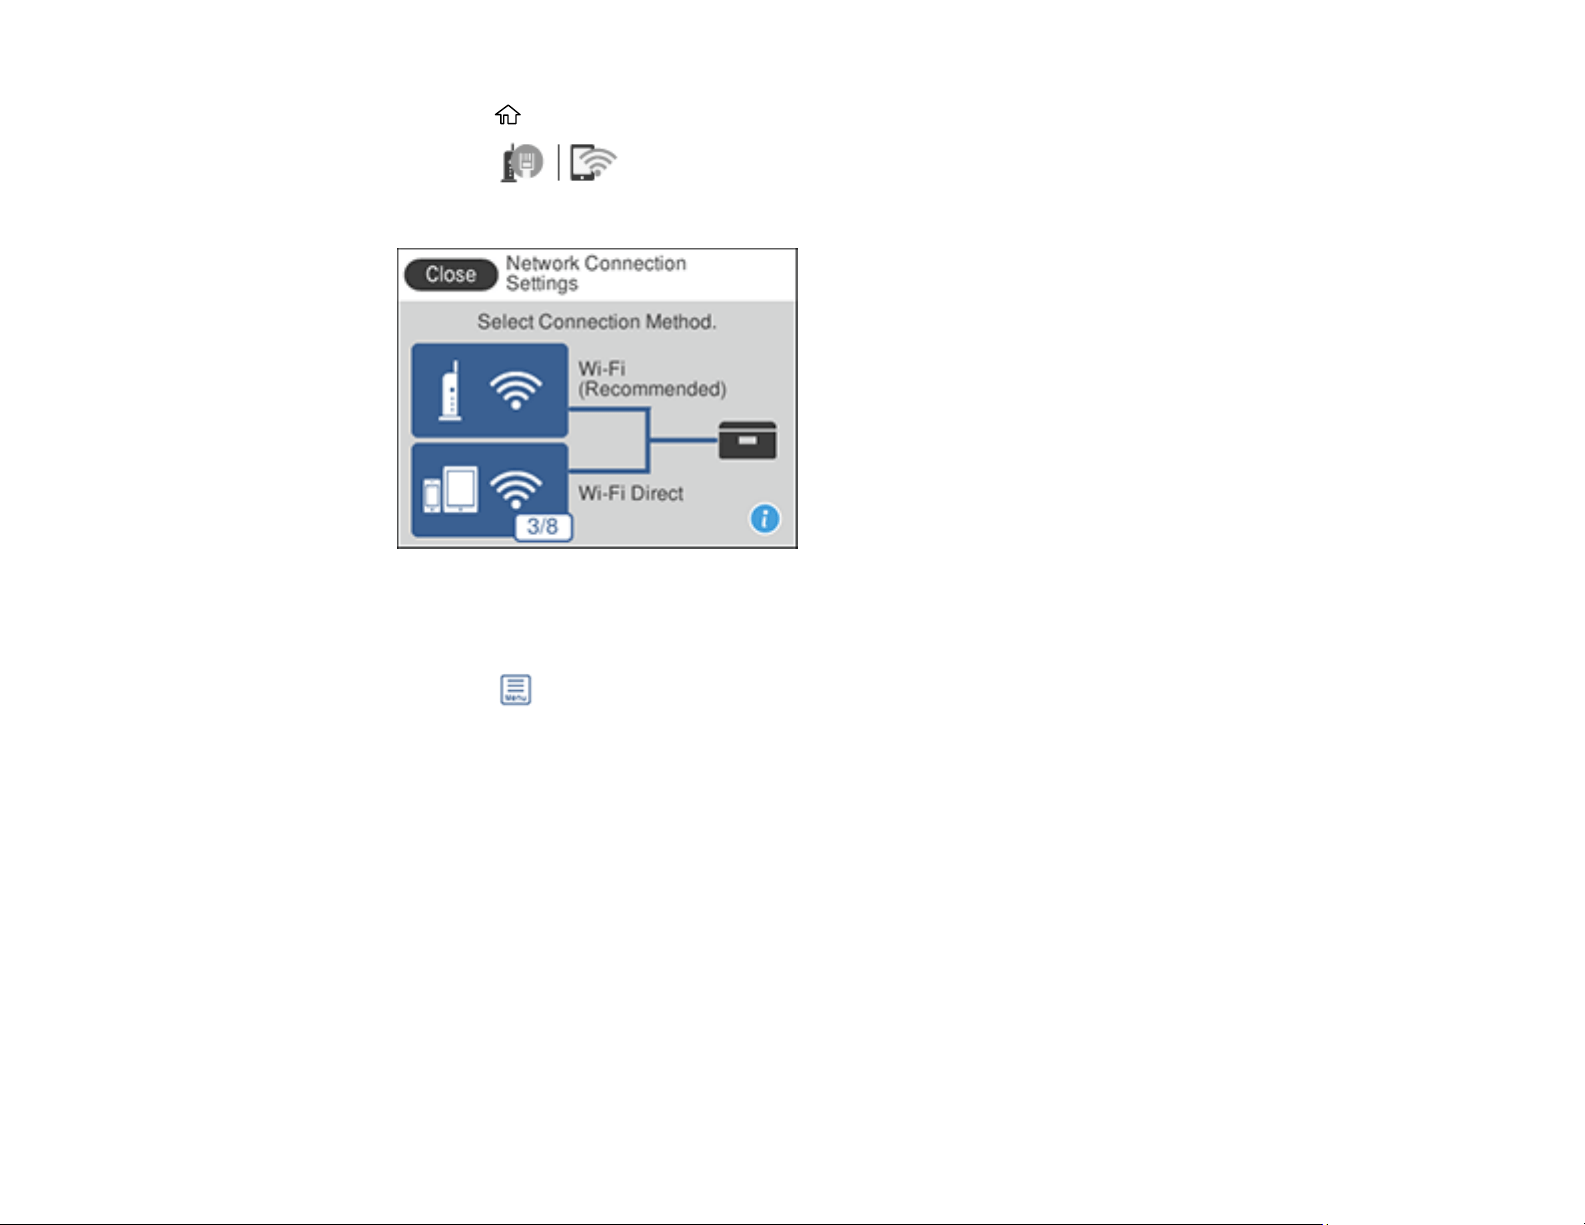
54
1. Press the home button, if necessary.
2. Select the icon.
You see this screen:
3. Select Wi-Fi Direct.
4. Select Start Setup.
5. Select the icon.
6. Press the down arrow and do one of the following:
• To change the Wi-Fi Direct network name, select Change Network Name and select Yes. Select
Change, then use the on-screen keyboard to enter the new network name.
• To change the Wi-Fi Direct password, select Change Password and select Yes. Use the on-
screen keyboard to enter your new Wi-Fi Direct password.
Note: Your password must be at least 8 and no more than 22 characters long.
Note: If you have already connected devices or computers to your product via Wi-Fi Direct, they will
be disconnected when you change the network name or password.
7. When entering your Wi-Fi Direct network name or password, do the following:
• To move the cursor, press the left or right arrow.

55
• To change the case of letters, select .
• To delete the previous character, select .
• To enter numbers and symbols, select 123#.
• To enter a space, select .
• To finish entering your network name or password, select OK.
8. Use your computer or wireless device to select the Wi-Fi network name (SSID) displayed on the
LCD screen, then enter the password shown.
Note: Make a note of the SSID and password that appear.
9. Press the home button to return to the Home screen.
Computers and wireless devices can now access the product using the new network name and
password.
Parent topic: Wi-Fi Direct Mode Setup
Wi-Fi Protected Setup (WPS)
If your network uses a WPS-enabled wireless router or access point, you can quickly connect your
product to the network using Wi-Fi Protected Setup (WPS).
Note: To check if your router is WPS-enabled, look for a button labeled WPS on your router or access
point. If there is no hardware button, there may be a virtual WPS button in the software for the device.
Check your network product documentation for details.
Using WPS to Connect to a Network
Parent topic: Wi-Fi or Wired Networking
Using WPS to Connect to a Network
If you have a WPS-enabled wireless router or access point, you can use Wi-Fi Protected Setup (WPS) to
connect your product to the network.
1. Press the home button, if necessary.
2. Select the icon.
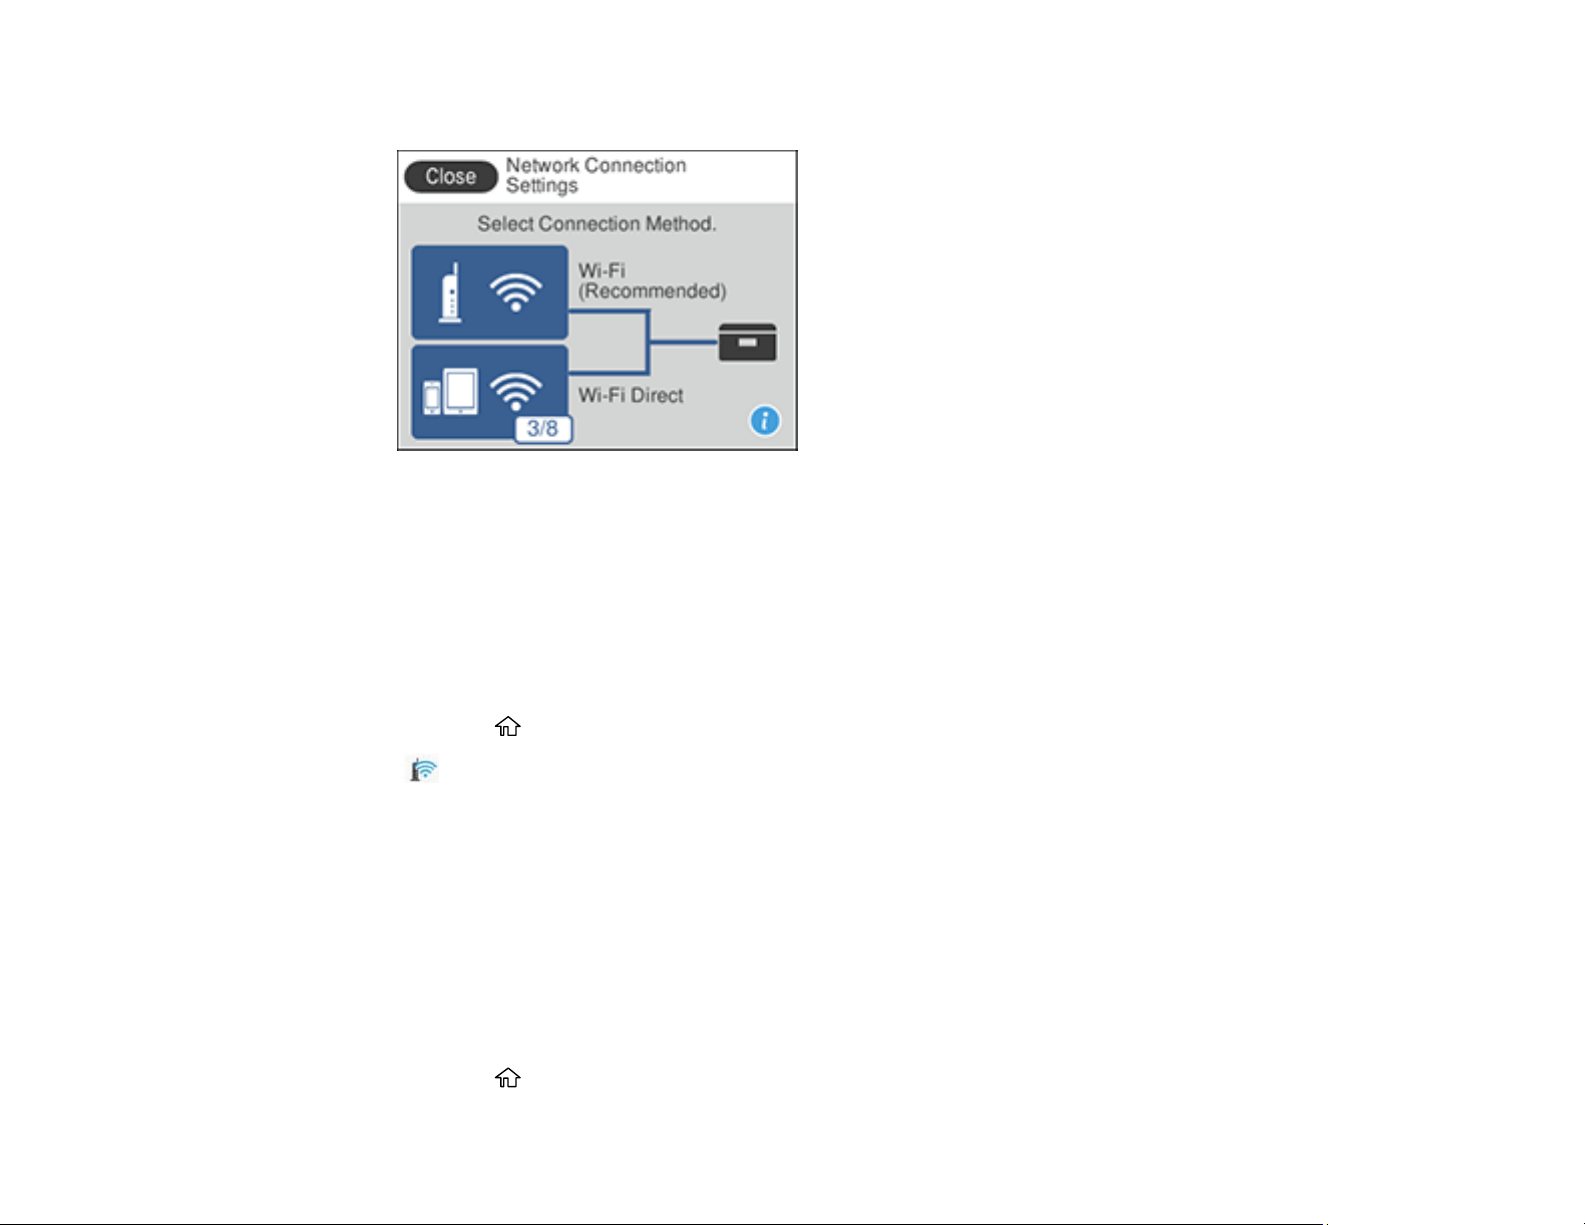
56
You see a screen like this:
3. Select Wi-Fi (Recommended).
4. Select Start Setup or Change Settings.
5. Select Push Button Setup (WPS).
6. Follow the instructions on the LCD screen to complete WPS setup.
Note: Make sure you press Start Setup within two minutes of activating WPS on your router.
7. Press the home button to return to the Home screen.
The Wi-Fi icon displayed on the LCD screen indicates your wireless connection status. If the
product is not connected to the network, repeat these steps to try again.
If you are printing from a computer, make sure you installed the network software as described on the
Start Here sheet.
Parent topic: Wi-Fi Protected Setup (WPS)
Printing a Network Status Sheet
You can print a network status sheet to help you determine the causes of any problems you may have
using your product on a network.
1. Make sure a few sheets of plain paper are loaded in the cassette.
2. Press the home button, if necessary.
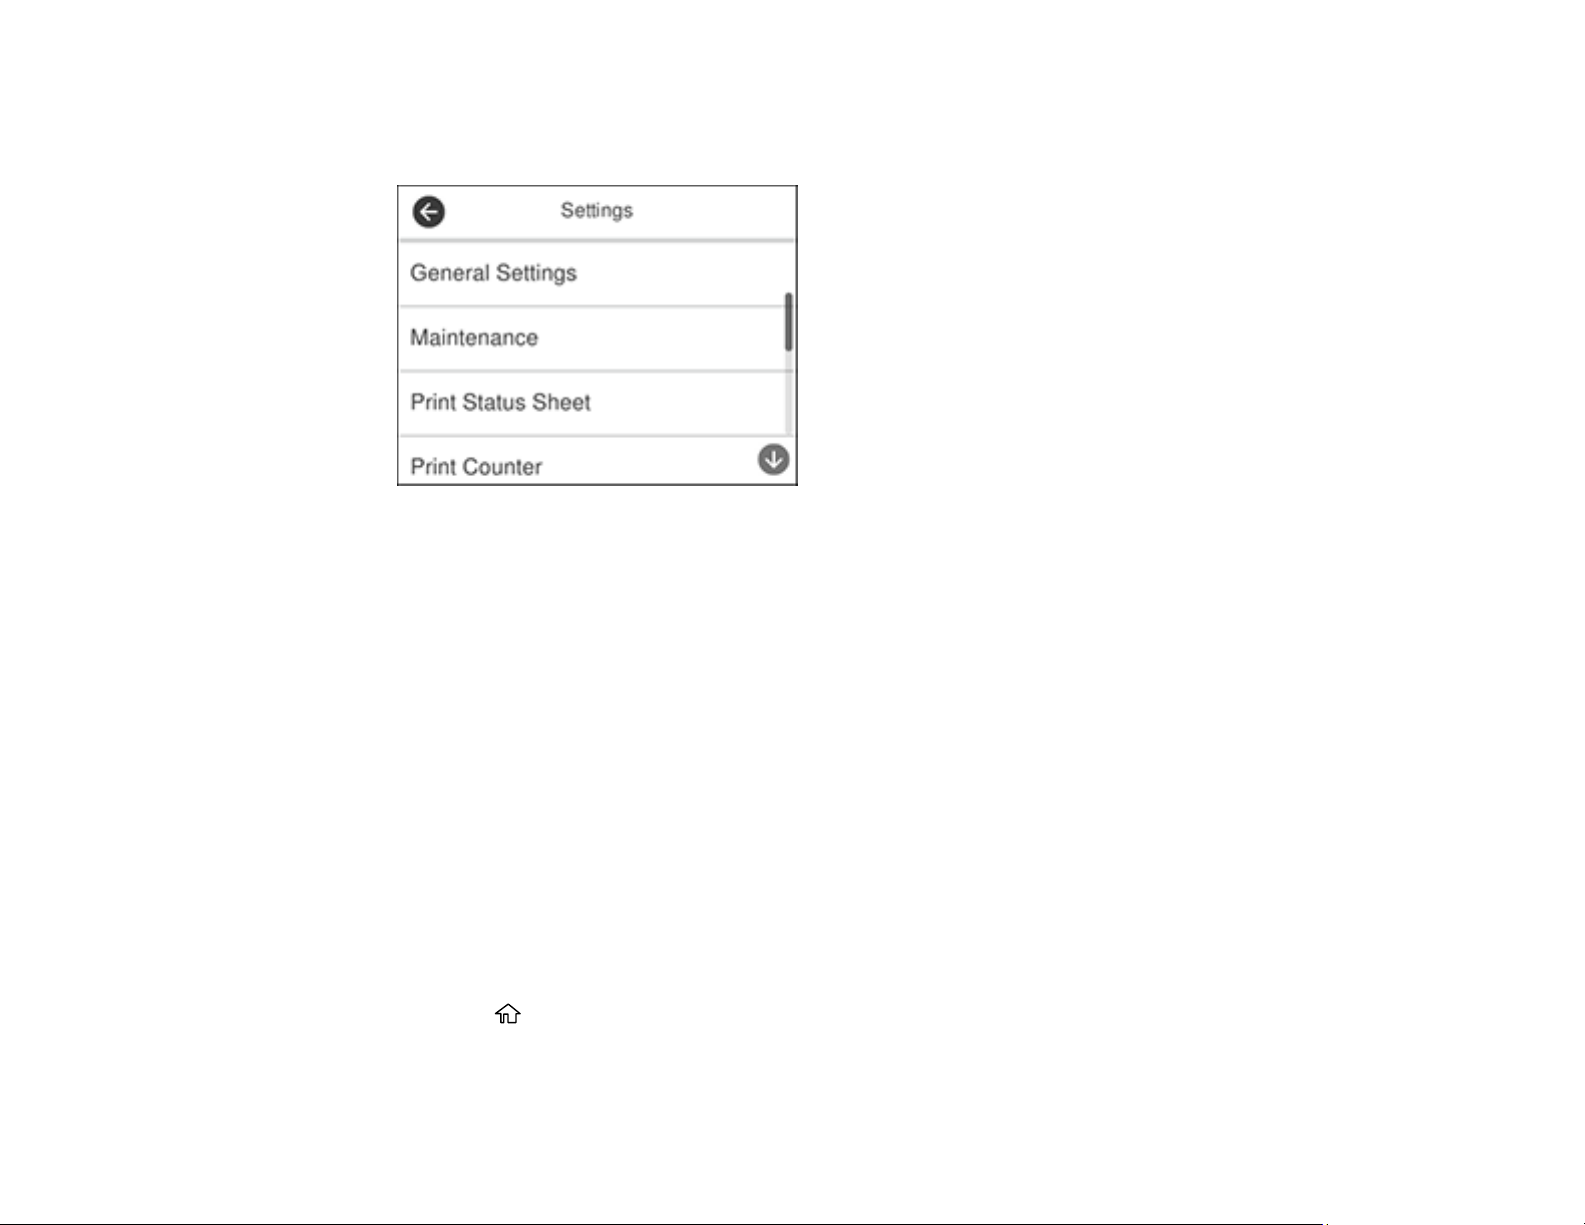
57
3. Select Settings.
You see a screen like this:
4. Select General Settings.
5. Select Network Settings.
6. Select Network Status.
7. Select Print Status Sheet.
8. Select Print to print the status sheet.
Examine the settings shown on the network status sheet to diagnose any problems you have.
Parent topic: Wi-Fi or Wired Networking
Related tasks
Accessing the Web Config Utility
Printing a Network Connection Report
You can print a network connection report to view solutions to any problems you may have using your
product on a network.
1. Make sure a few sheets of plain paper are loaded in the cassette.
2. Press the home button, if necessary.
3. Select Settings.
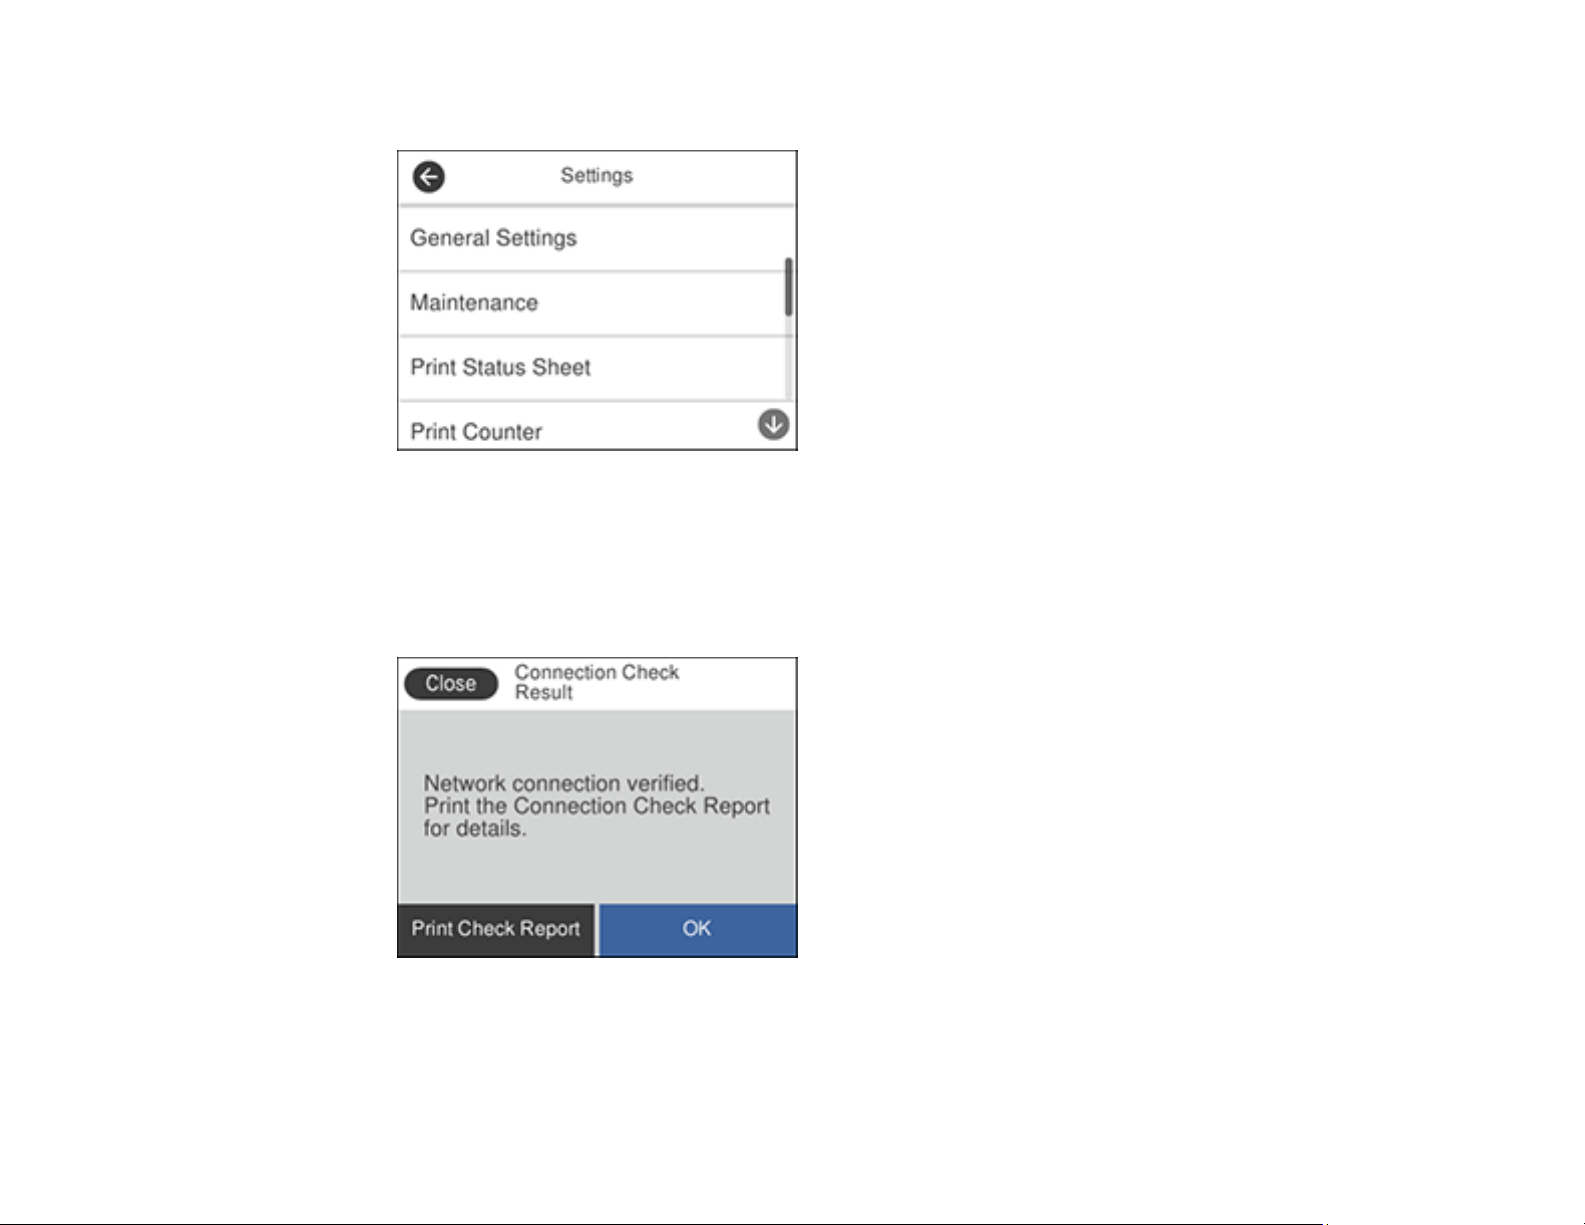
58
You see a screen like this:
4. Select General Settings.
5. Select Network Settings.
6. Select Connection Check.
You see a screen like this:
7. Select Print Check Report to print the network connection report.
Examine any error codes and solutions shown on the network connection report.
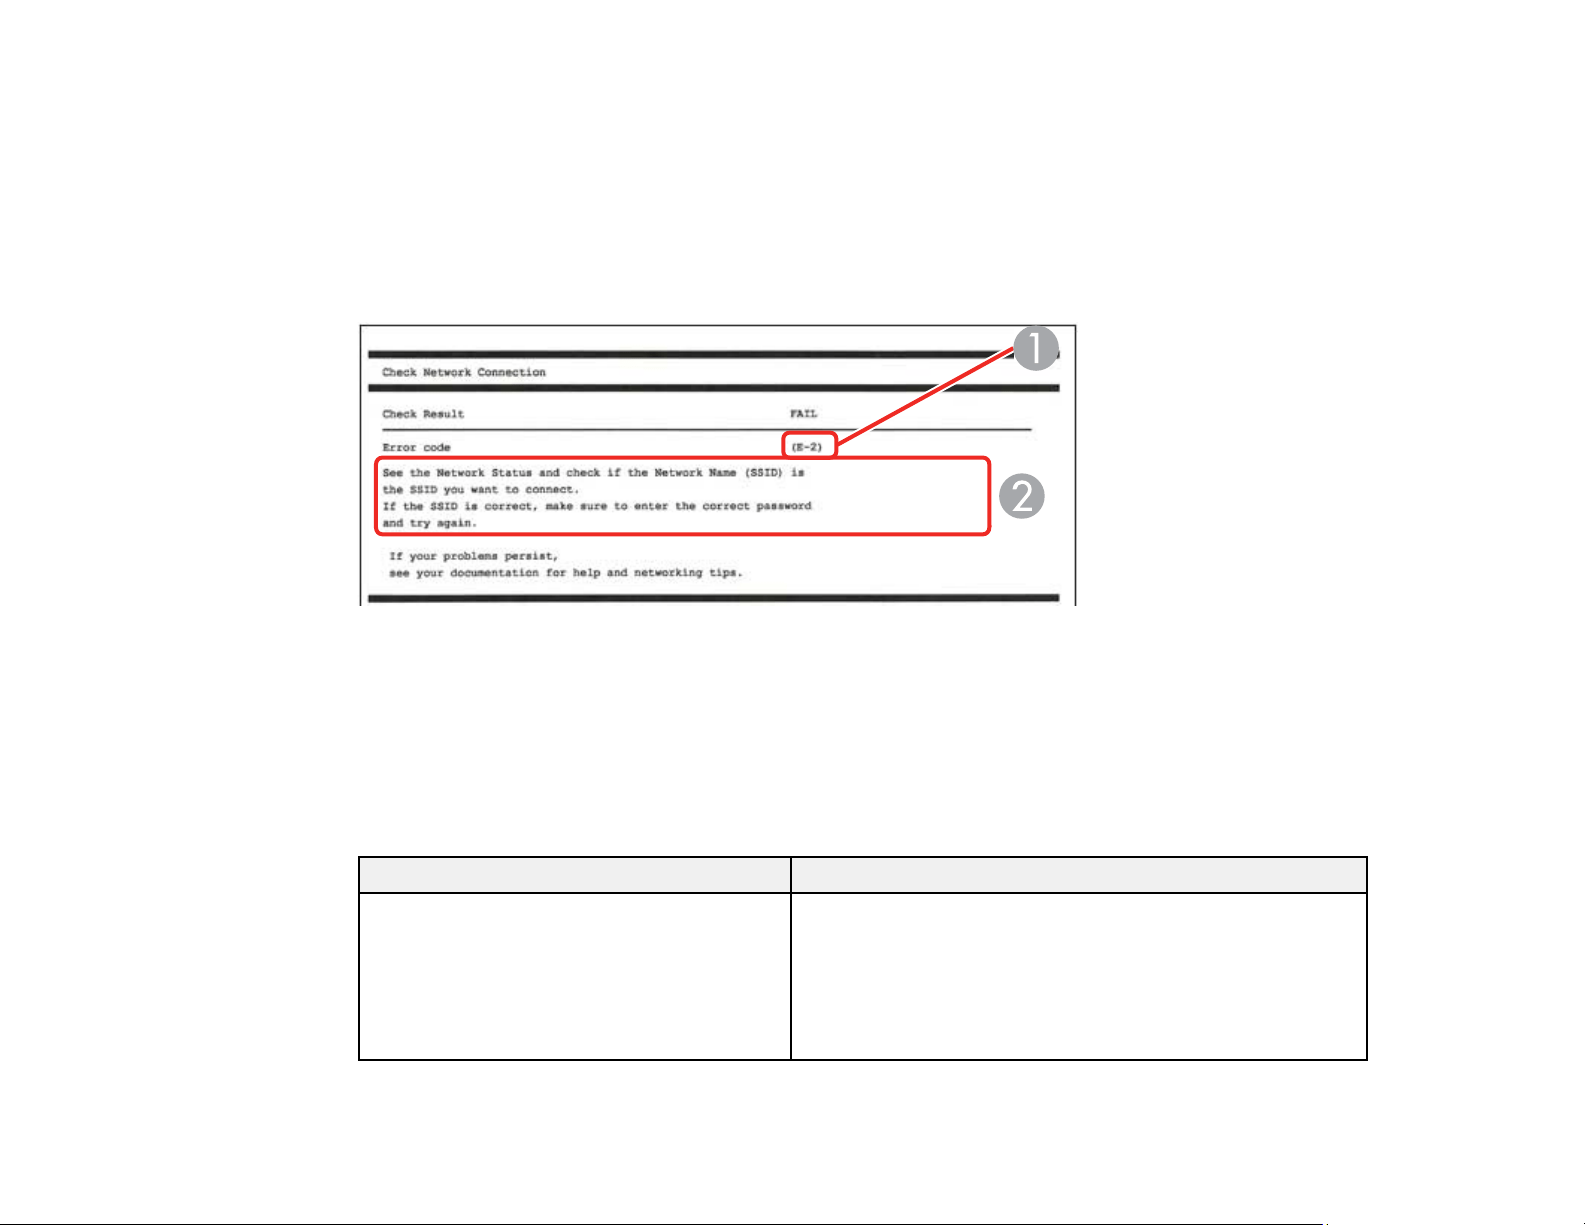
59
Network Connection Report Codes and Messages
Parent topic: Wi-Fi or Wired Networking
Network Connection Report Codes and Messages
Check the error codes and messages on the network connection report to solve problems you may
encounter with network connections. The tables here list solutions to problems based on the error codes
and messages that may appear on the top of the report.
1 Error code
2 Message
Note: Error codes and messages listed here may not all apply to your product.
Error Codes and Messages
Error code and message Solution
E-1
Confirm that the network cable is
connected and network devices such as
hub, router, or access point are turned on.
Make sure your router, access point, and/or hub are
turned on, and the network cable is securely connected to
your device and to your product.
If you are trying to set up Wi-Fi, remove the network cable
and set up Wi-Fi again. Ethernet and Wi-Fi cannot be
connected at the same time.

60
Error code and message Solution
E-2, E-3, or E-7
No wireless network names (SSID) found.
Confirm that the router/access point is
turned on and the wireless network (SSID)
is set up correctly. Contact your network
administrator for assistance.
No wireless network names (SSID) found.
Confirm that the wireless network name
(SSID) of the PC you wish to connect is set
up correctly. Contact your network
administrator for assistance.
Entered security key/password does not
match the one set for your router/access
point. Confirm security key/password.
Contact your network administrator for
assistance.
Check the following:
• Make sure your router or access point is turned on, and
is correctly connected to your computer or network
device.
• Turn off the router or access point, wait about 10
seconds, and turn it on again.
• Move your product closer to your router or access point,
and remove any obstacles between them. Also move
your product away from devices such as wireless
phones or microwaves.
• Confirm that the SSID shown on the network
connection report matches the label on your router or
access point. Also make sure your SSID uses only
ASCII characters and symbols, or your product cannot
display the SSID correctly.
• If you are trying to connect using the WPS push button
method, make sure your router or access point supports
it.
• If you are using a network password, check the label on
your router or access point to confirm that you are using
the correct password, or check with your network
administrator or router/access point documentation.
• If you are connecting to a smart device that generates
an SSID, check the device documentation for the SSID
and password you should use.
• If your wireless connection suddenly disconnects, and
another smart device was added to the network using a
WPS push button method or your network was set up
using a non-WPS push button method, try downloading
and installing your product software again.

61
Error code and message Solution
E-5
Security mode (e.g. WEP, WPA) does not
match the current setting of the printer.
Confirm security mode. Contact your
network administrator for assistance.
If the security on your router or access point is not one of
the following types, change the type of security on your
router or access point and reset your product's network
settings.
• WEP-64 bit (40 bit)
• WEP-128 bit (104 bit)
• WPA PSK (TKIP/AES); also known as WPA Personal
• WPA2 PSK (TKIP/AES); also known as WPA2 Personal
• WPA (TKIP/AES)
• WPA2 (TKIP/AES)
Also make sure you are connecting to the 2.4GHz band
on your network and using the password for that band.
E-6
MAC address of your printer may be
filtered. Check whether your router/access
point has restrictions such as MAC address
filtering. See the documentation of the
router/access point or contact your network
administrator for assistance.
If your router or access point has MAC address filtering
enabled, register your product's MAC address so it is not
filtered. Locate the MAC address on the network
connection report and check your router or access point
documentation for instructions.
If your router or access point is using shared
authentication with WEP security, confirm that you are
using the correct authentication key and index.
If your router or access point limits the number of
connected devices, raise the connection limit. See your
router or access point documentation for instructions.
E-8
Incorrect IP address is assigned to the
printer. Confirm IP address setup of the
network device (hub, router, or access
point). Contact your network administrator
for assistance.
If your product's Obtain IP Address setting is set to Auto,
enable DHCP on your router or access point. If it is set to
Manual, the IP address may be out of range or on a
different network segment; set a valid IP address using
your product control panel or the Web Config utility.
You can also try turning off your product and the router or
access point, waiting about 10 seconds, and turning them
on again.

62
Error code and message Solution
E-9
Confirm the connection and network setup
of the PC or other device. Connection using
the EpsonNet Setup is available. Contact
your network administrator for assistance.
Make sure your computer or network device are turned
on. Also make sure that you can access the Internet and
other devices on the same network from the devices you
are trying to connect to your product.
If you still cannot connect to your product, turn off your
router or access point, wait about 10 seconds, and turn it
on again. Download and install your product software
again to reset your network settings.
E-10
Confirm IP address, subnet mask, and
default gateway setup. Connection using
the EpsonNet Setup is available. Contact
your network administrator for assistance.
Make sure other devices on the network are turned on and
do the following:
• If your product's Obtain IP Address setting is set to
Manual, check the IP address, subnet mask, and
default gateway addresses on the network connection
report to see if they are correct. If not, correct the
settings.
• If DHCP is enabled, set your product's Obtain IP
Address setting to Auto. If you want to use the DHCP-
assigned address as a static address, set the Obtain IP
Address setting to Manual, enter the product's IP
address as listed on the network connection report, and
set the subnet mask to 255.255.255.0.
If you still cannot connect to your product, turn off your
router or access point, wait about 10 seconds, and turn it
on again.
E-11
Setup is incomplete. Confirm default
gateway setup. Connection using the
EpsonNet Setup is available. Contact your
network administrator for assistance.
If you set your product's TCP/IP Setup setting to Manual,
check that the default gateway address listed on the
network connection report is correct. Also turn on the
device that is set as the default gateway.
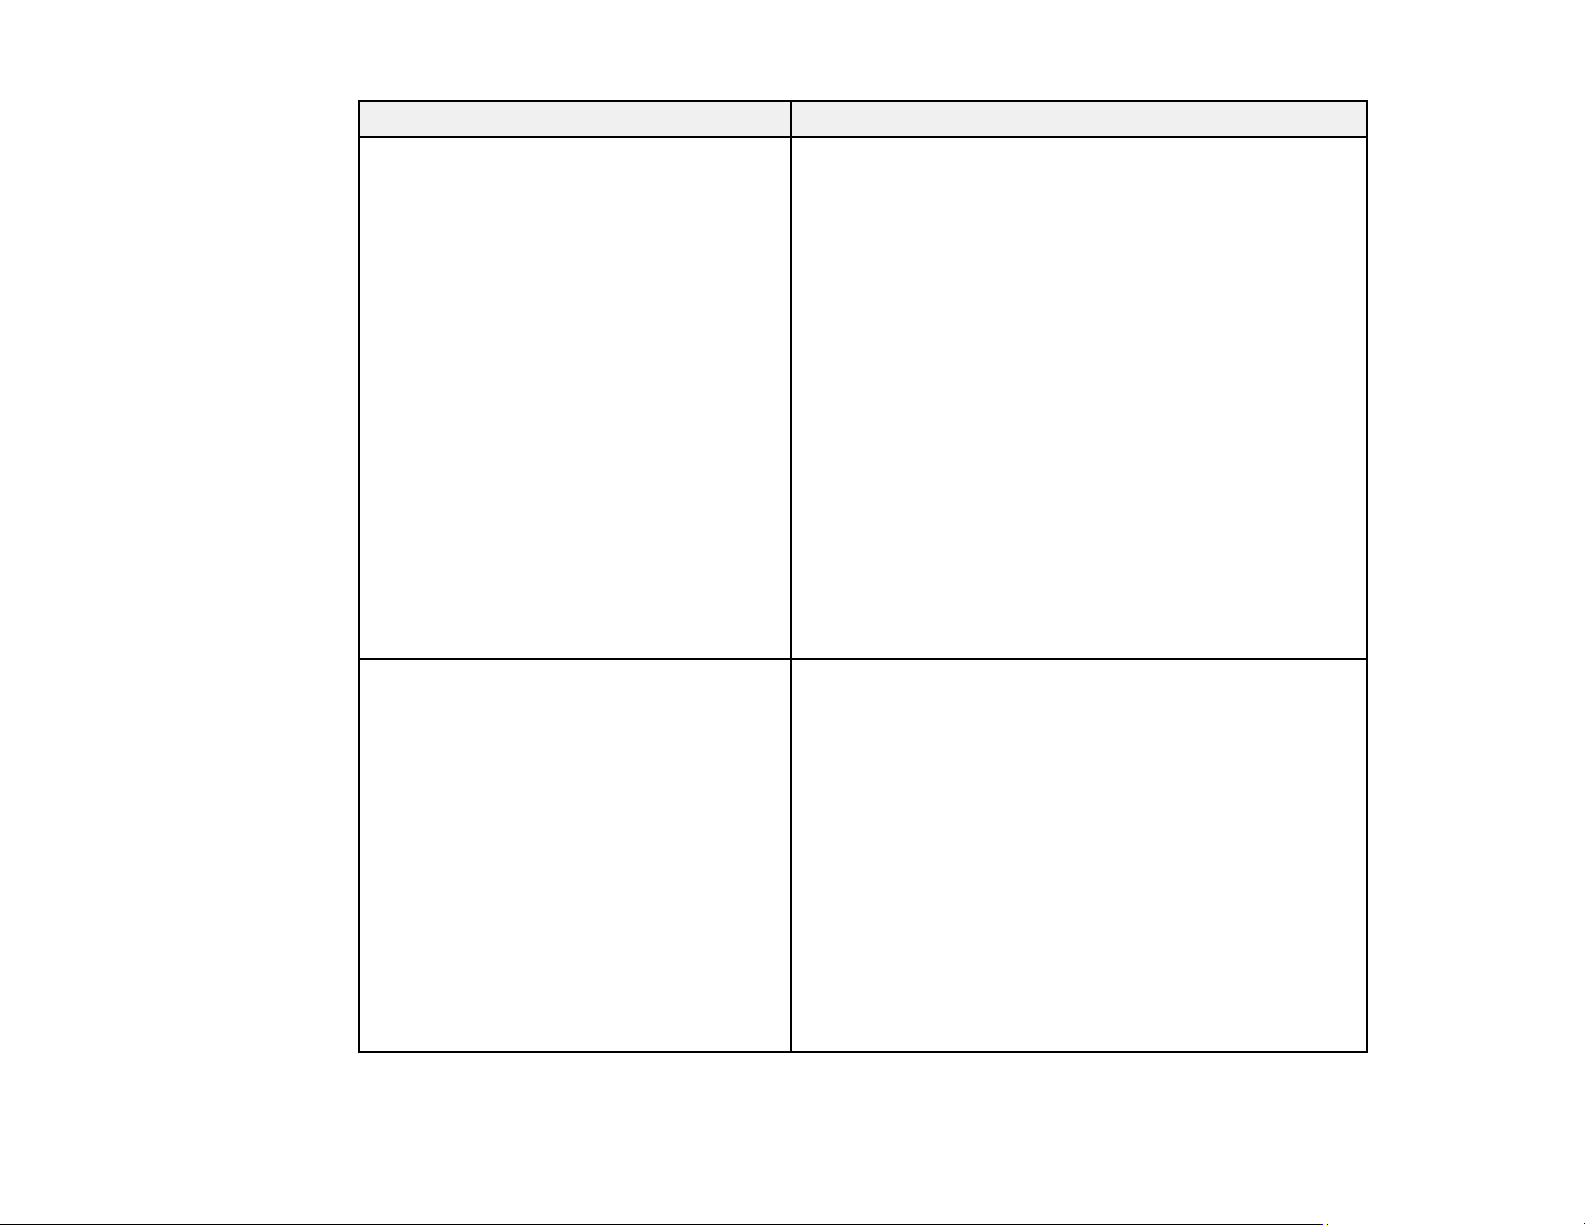
63
Error code and message Solution
E-12
Confirm the following:
-Entered security key/password is correct
-Index of the security key/password is set to
the first number
-IP address, subnet mask, or default
gateway setup is correct
Contact your network administrator for
assistance.
Make sure other devices on the network are turned on and
do the following:
• Make sure the IP address, subnet mask, and default
gateway addresses are correct, if you are entering them
manually.
• Confirm that the subnet mask and default gateway
addresses for other devices are the same.
• Make sure the IP address does not conflict with other
devices.
If you still cannot connect to your product, do the
following:
• Turn off your router or access point, wait about 10
seconds, and turn it on again.
• Download and install your product software again to
reset your network settings.
• If your router or access point uses WEP security with
several registered passwords, make sure that the first
registered password is set on your product.
E-13
Confirm the following:
-Entered security key/password is correct
-Index of the security key/password is set to
the first number
-Connection and network setup of the PC
or other device is correct
Contact your network administrator for
assistance.
Make sure your router, access point, and/or hub are
turned on. Also make sure the TCP/IP setup on your
router, access point, and/or hub is not set manually; this
may cause your product's network settings to differ from
the manually set up devices.
If you still cannot connect to your product, do the
following:
• Turn off your router or access point, wait about 10
seconds, and turn it on again.
• Download and install your product software again to
reset your network settings.
• If your router or access point uses WEP security with
several registered passwords, make sure that the first
registered password is set on your product.

64
Network Environment Messages
Message Solution
The Wi-Fi environment needs to be
improved. Turn the wireless router off and
then turn it on. If the connection does not
improve, see the documentation for the
wireless router.
Move your product closer to your router or access point,
and remove any obstacles between them. Then turn off
your router or access point, wait about 10 seconds, and
turn it back on again. If you still cannot connect to your
product, check the documentation that came with your
router or access point for solutions.
*No more devices can be connected.
Disconnect one of the connected devices if
you want to add another one.
You can connect up to 8 computers or other devices to
your product using a Wi-Fi Direct (Simple AP) connection.
If you want to add another device, disconnect an existing
connected device first.
The same SSID as Wi-Fi Direct exists in
the environment. Change the Wi-Fi Direct
SSID if you cannot connect a smart device
to the printer.
Change the Wi-Fi Direct SSID.
Parent topic: Printing a Network Connection Report
Changing or Updating Network Connections
See these sections to change or update how your product connects to a network.
Accessing the Web Config Utility
Changing a USB Connection to a Wi-Fi Connection
Changing a Wi-Fi Connection to a Wired Network Connection
Connecting to a New Wi-Fi Router
Disabling Wi-Fi Features
Parent topic: Wi-Fi or Wired Networking
Accessing the Web Config Utility
You can select your product's network settings and confirm its operating status using a web browser.
You do this by accessing your product's built-in Web Config utility from a computer or other device that is
connected to the same network as your product.

65
Note: You can also access the Web Config utility from the product information area in the Epson Smart
Panel app.
1. Print a network status sheet.
2. Locate the IP address for your product that is listed on the network status sheet.
3. On a computer or other device connected to the same network as your product, open a web
browser.
4. Enter your product's IP address into the address bar.
5. On the first visit to the Web Config utility, you will be prompted to set an administrator password. The
administrator password is required to access the full capabilities of the Web Config utility.
You see the available Web Config utility options.
Parent topic: Changing or Updating Network Connections
Related tasks
Printing a Network Status Sheet
Changing a USB Connection to a Wi-Fi Connection
If you have already connected your product to your computer using a USB connection, you can change
to a Wi-Fi connection.
1. Disconnect the USB cable from your product.
2. Uninstall your product software.
3. Download and install your product software from the Epson website using the instructions on the
Start Here sheet.
Parent topic: Changing or Updating Network Connections
Related concepts
Uninstall Your Product Software
Changing a Wi-Fi Connection to a Wired Network Connection
If you have already connected your product to your computer wirelessly, you can change to a wired
network connection if necessary.
1. Disable your product's Wi-Fi features.
2. Connect one end of an Ethernet network cable to the product's LAN port.
3. Connect the other end to any available LAN port on your router or access point.

66
4. Uninstall your product software.
5. Download and install your product software from the Epson website.
6. Follow the on-screen instructions to install the software.
7. When you see the Select Your Connection screen, select Wired network connection.
8. If you see a Select Setup Option screen, select Set up printer for the first time.
9. Continue following the rest of the on-screen instructions.
Parent topic: Changing or Updating Network Connections
Related concepts
Uninstall Your Product Software
Related tasks
Disabling Wi-Fi Features
Connecting to a New Wi-Fi Router
If you change the wireless router you have been using on your network, you need to update your
product's Wi-Fi connection to the new router.
1. Do one of the following:
• Windows: Uninstall your product software.
• Mac: Go to the next step.
2. Download and install your product software from the Epson website using the instructions on the
Start Here sheet.
Parent topic: Changing or Updating Network Connections
Related concepts
Uninstall Your Product Software
Disabling Wi-Fi Features
You may need to disable your product's Wi-Fi features if you change your network connection type or
need to solve a problem with your network connection.
Note: Before disabling Wi-Fi features, make a note of your product's SSID (network name) and
password, and any network settings selected for the Epson Connect services you may use.
1. Press the home button, if necessary.
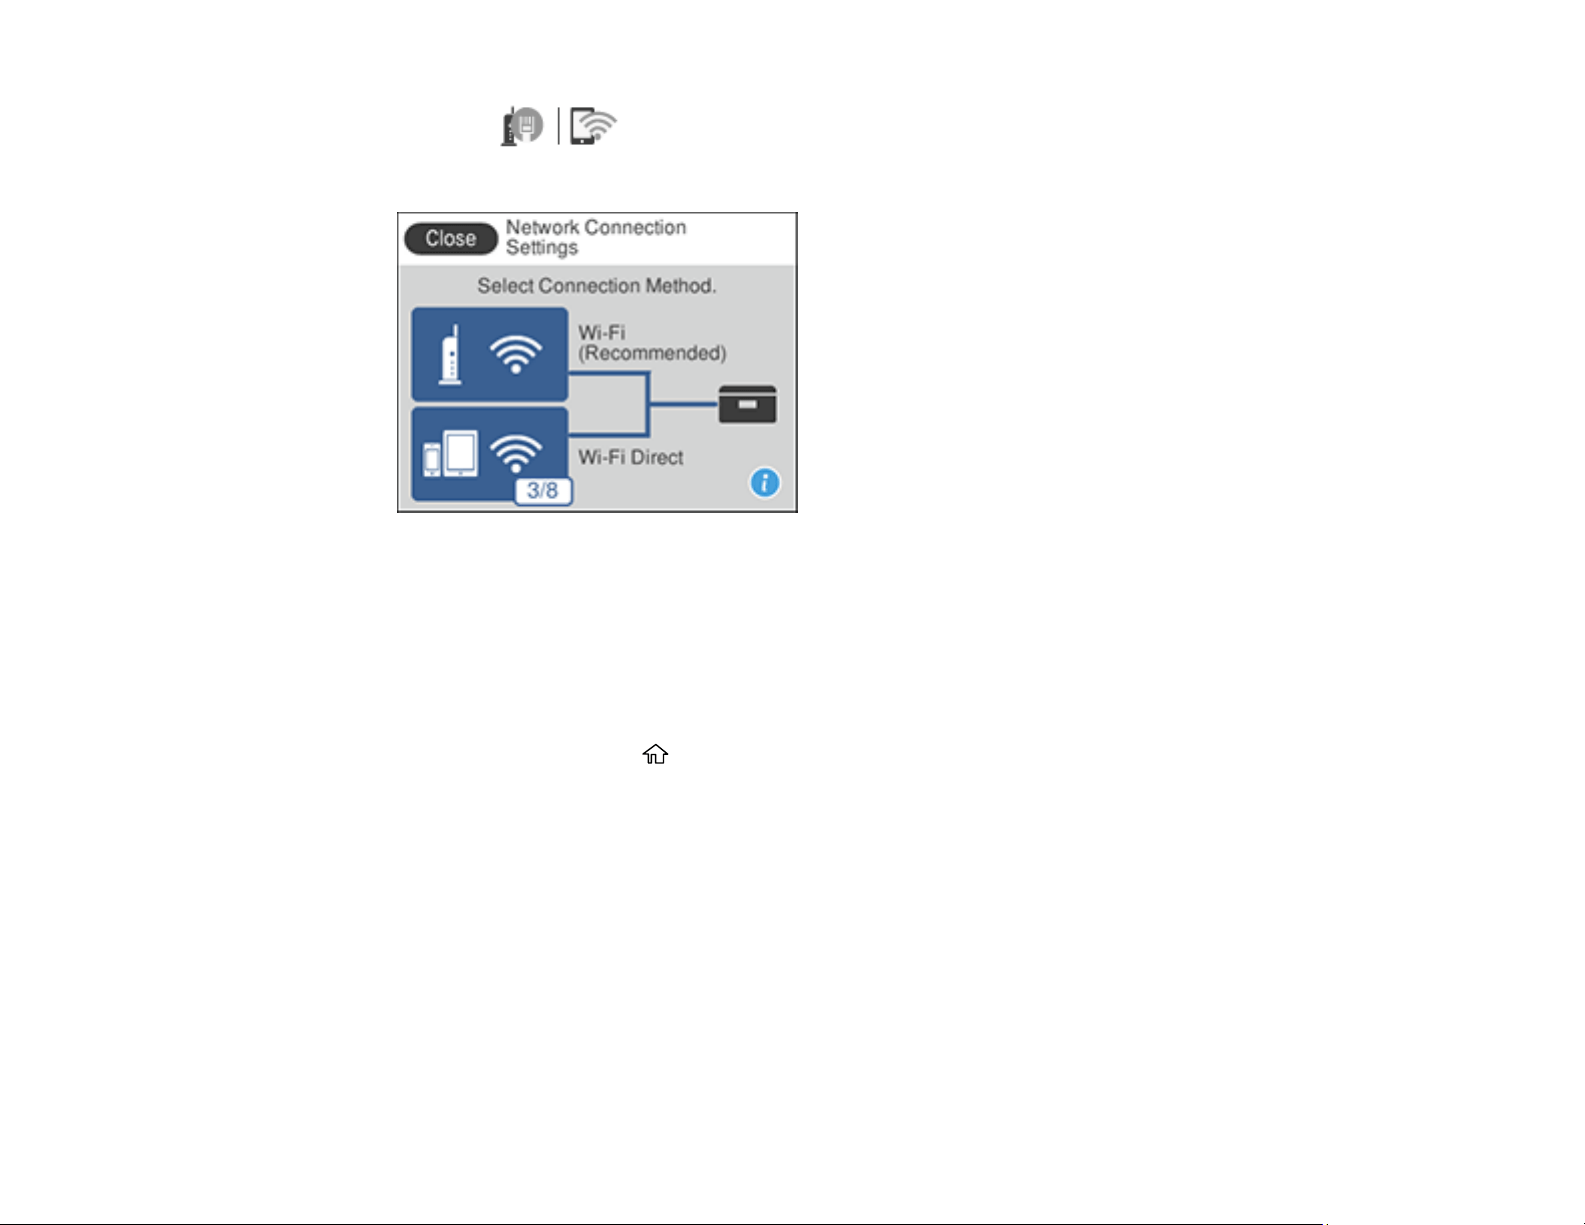
67
2. Select the icon.
You see a screen like this:
3. Select Wi-Fi (Recommended).
4. Select Change Settings.
5. Select Others.
6. Select Disable Wi-Fi.
7. Select Start Setup to disable Wi-Fi.
8. When finished, press the home button to return to the Home screen.
Parent topic: Changing or Updating Network Connections

68
Enabling PCL or PostScript Printing
Before enabling PCL or PostScript printing on your product, make sure you have installed the software
as described on the Start Here sheet (ET-5180).
To download the PCL or PostScript drivers, visit epson.com/support (U.S.) or epson.ca/support
(Canada) and select your product.
Installing the PCL Driver - Windows
Installing the PostScript (PS3) Printer Software - Windows
Installing the PostScript (PS3) Printer Software - Mac
Selecting PDL (Page Description Language) Settings
Selecting Printer Language and Interface Settings
Printing a PCL or PS3 (PostScript) Status Sheet
Installing the PCL Driver - Windows
The PCL driver can be installed on a Windows computer. Before enabling PCL printing on your product,
make sure you have installed the software as described on the Start Here sheet.
Note: Make sure your product is turned on and connected to the same network as your computer before
installing the printer software. Depending on your model, not all printer languages may be supported.
1. To download the PCL file, visit epson.com/support (U.S.) or epson.ca/support (Canada) and select
your product.
2. After downloading the installer file, double-click the downloaded file to install the software.
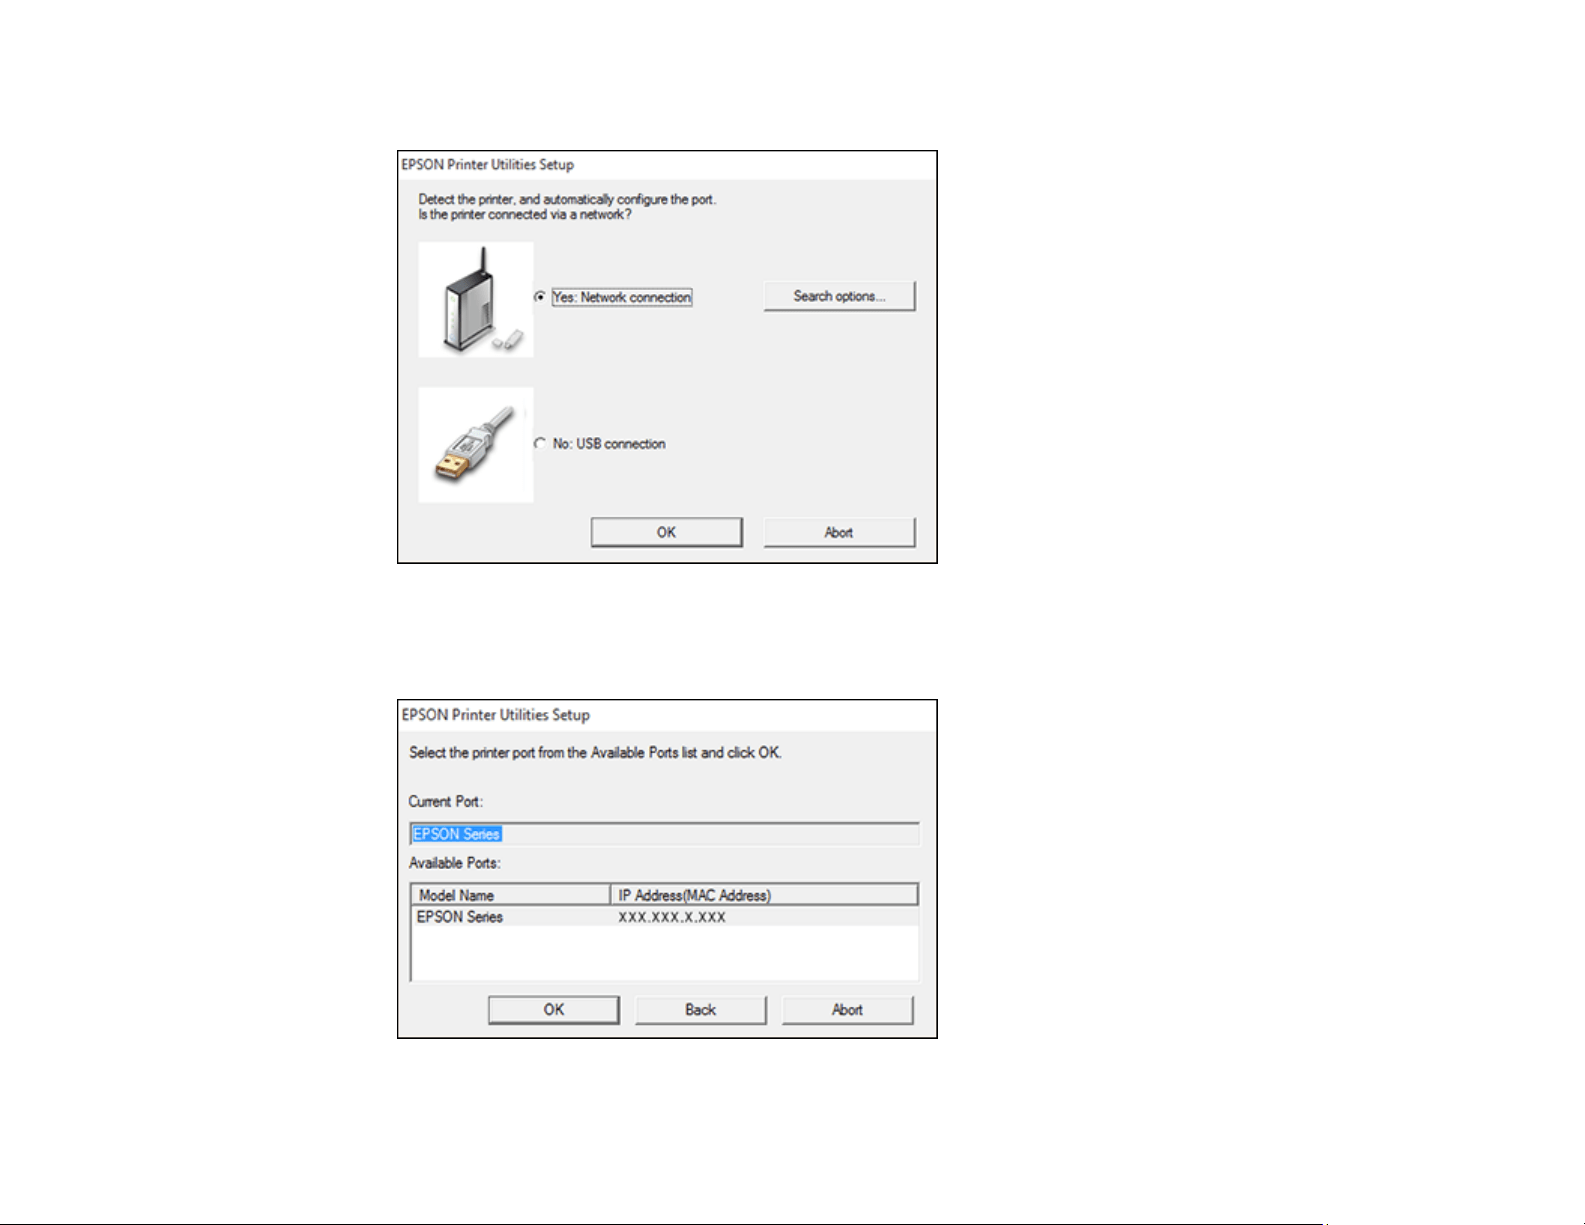
69
3. Follow the on-screen instructions until you see this screen:
4. If your product is already connected to a network, select Yes: Network connection and click OK.
You see a screen like this:

70
5. Make sure your product is selected, and click OK.
A message appears when the installation is complete.
6. If your product is not connected to a network, select No: USB connection and click OK. Connect a
USB cable to your product's USB port, and connect the other end of the cable to your computer.
A message appears when the installation is complete.
Parent topic: Enabling PCL or PostScript Printing
Installing the PostScript (PS3) Printer Software - Windows
If you did not install the standard Epson printer software, you need to install the PostScript (PS3) printer
software before you can adjust the print settings and print to your network printer.
Note: Make sure your product is turned on and connected to the same network as your computer before
installing the printer software.
1. To download the PS3/Postscript software package, visit epson.com/support (U.S.) or
epson.ca/support (Canada) and select your product.
2. After downloading the installer file, double-click the downloaded file to install the software.
3. Click OK.
4. Click Accept.
5. Click Install.
6. Click Next and follow the on-screen instructions.
Parent topic: Enabling PCL or PostScript Printing
Installing the PostScript (PS3) Printer Software - Mac
If you did not install the standard Epson printer software, you need to install the PostScript (PS3) printer
software before you can adjust the print settings and print to your network printer.
Note: Make sure your product is turned on and connected to the same network as your computer before
installing the printer software.
1. To download the PS3 Postscript software package, visit epson.com/support (U.S.) or
epson.ca/support (Canada) and select your product.
2. After downloading the installer file, double-click the downloaded file to install the software.
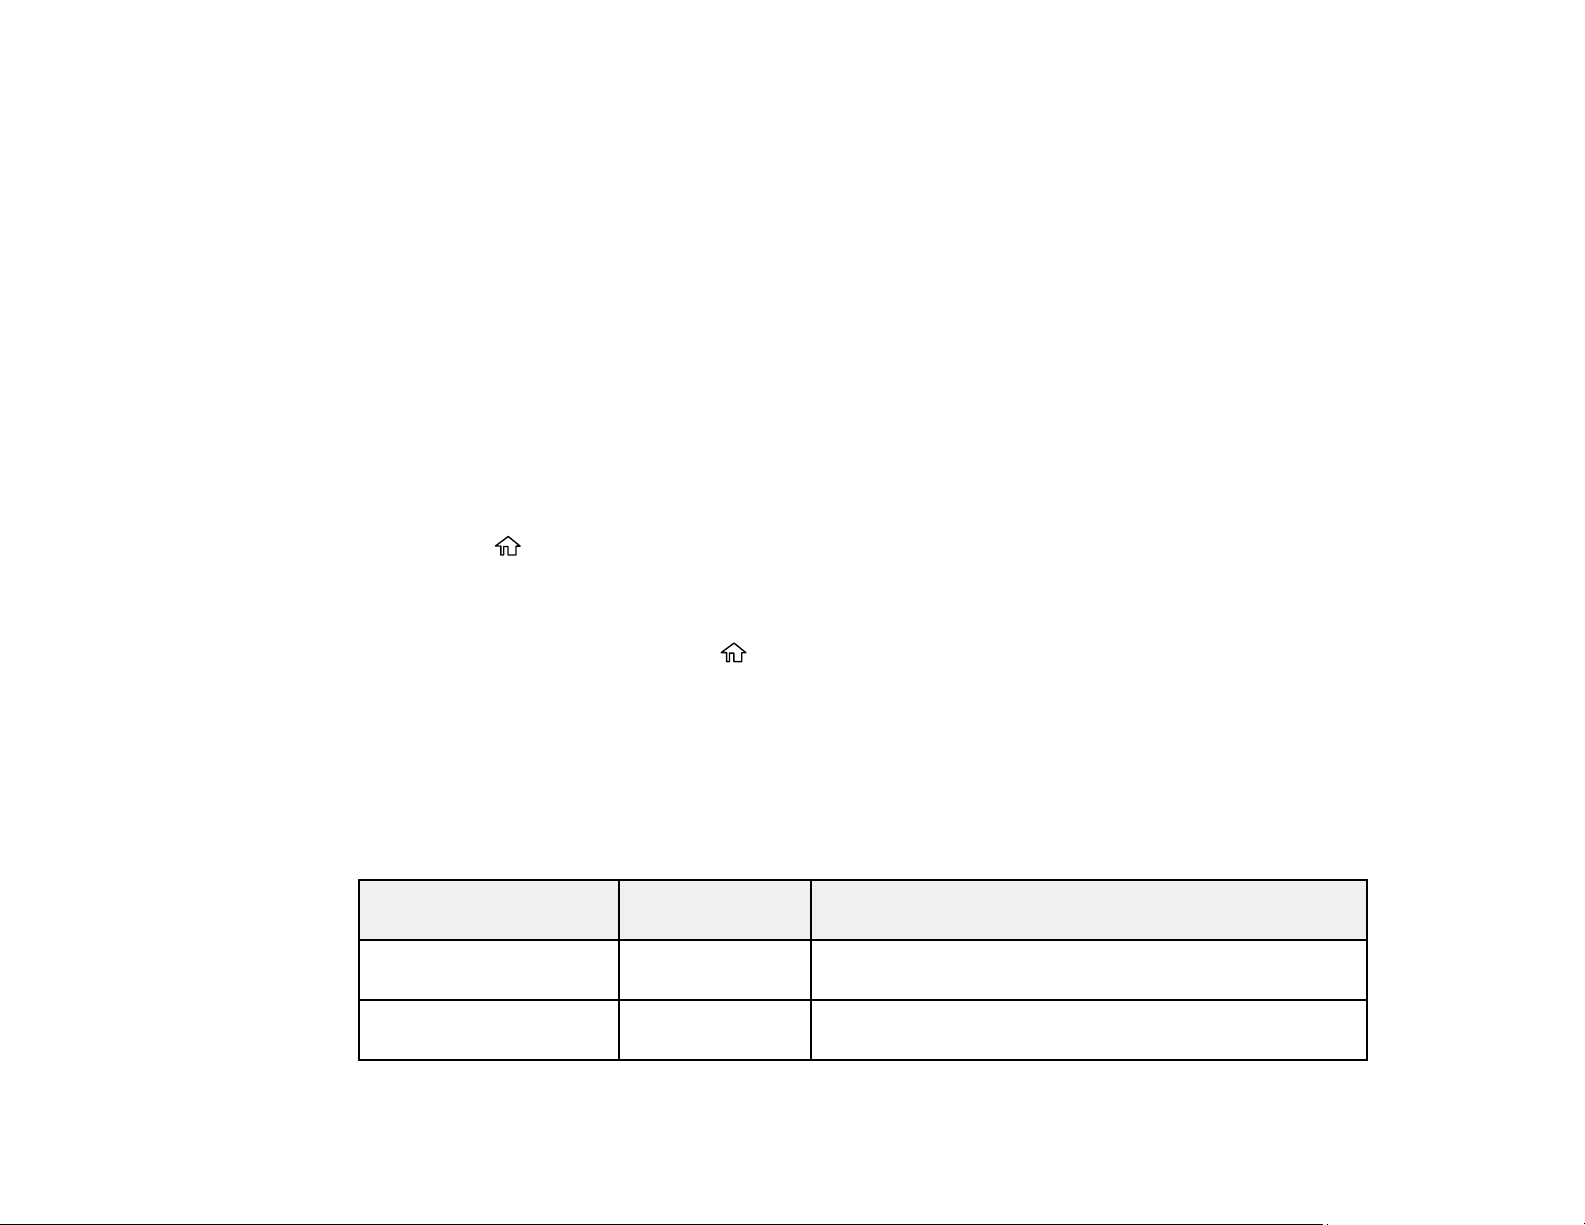
71
3. Double-click EPSON.
4. Click Continue on the next two screens.
5. Click Agree.
6. Click Install.
7. If necessary, enter the administrator password.
8. Click Start and follow the on-screen instructions.
Parent topic: Enabling PCL or PostScript Printing
Selecting PDL (Page Description Language) Settings
You can select settings for PCL and PostScript printing using the control panel on the product.
Note: These settings can be locked by an administrator. If you cannot access these settings, contact
your administrator for assistance.
1. Press the home button, if necessary.
2. Select Settings > General Settings > Printer Settings > PDL Print Configuration.
3. Select one of the options, then select the PDL print configuration options you want to use.
4. When you are finished, press the home to return to the Home screen.
PDL Print Configuration Options
Parent topic: Enabling PCL or PostScript Printing
PDL Print Configuration Options
Select the PDL Print Configuration options you want to use for PCL or PostScript printing.
Common Settings menu
Option Available
settings
Description
Paper Size Various sizes Sets the default paper size for PCL or PostScript
printing
Paper Type Various paper
types
Sets the default paper type for PCL or PostScript
printing
72
Option Available
settings
Description
Orientation Portrait Sets the default orientation for PCL or PostScript
printing
Landscape
Quality Draft Sets the quality for PCL or PostScript printing
Standard
Best
Ink Save Mode On/Off Saves ink by reducing print density
Print Order Last Page on
Top
Starts printing from the first page of a file
First Page on
Top
Starts printing from the last page of a file
Number of Copies 1 to 999 Selects the number of copies to print
Binding Margin Left Edge Specifies the binding edge for double-sided documents
Top Edge
Auto Paper Ejection On/Off Ejects paper automatically when printing is stopped
during a print job
2-Sided Printing On/Off Selects duplex printing
PCL Menu
Option Available
settings
Description
Font Source Resident Uses a font preinstalled on the printer
Download Uses a font you have downloaded
Font Number 0 to 111 Selects the default font number for the default font
source
Pitch 0.44 to 99.99 cpi Selects the default font pitch if the font is scalable and
fixed-pitch (availability depends on font source and
number settings)
73
Option Available
settings
Description
Height 4.00 to 999.75 pt Selects the default font height if the font is scalable and
proportional (availability depends on font source and
number settings)
Symbol Set Various Selects the default symbol set. If the selected font is not
available for the selected symbol set, the font source
and number are replaced with IBM-US (the default
setting).
Form 5 to 128 lines Sets the number of lines for the selected paper size and
orientation. Changes the line spacing (VMI) stored in
the printer. Later changes in page size or orientation
cause changes in the Form value based on the stored
VMI.
CR Function CR Selects the line feed command when printing with a
driver from a specific operating system
CR+LF
LF Function LF
CR+LF
Paper Source Assign 4 Makes the paper source select command compatible
with HP LaserJet 4
4K Makes the paper source select command compatible
with HP LaserJet 4000, 5000, and 8000
5S Makes the paper source select command compatible
with HP LaserJet 5S
PS Menu
Option Available
settings
Description
Error Sheet On/Off Prints a sheet showing the status when errors occur
during PostScript or PDF printing
Coloration Color Selects the color mode for PostScript printing
Mono

74
Option Available
settings
Description
Binary On/Off Enable when printing files that contain binary images
(available when the product is connected to the
network). Allows you to print binary images even if the
driver is set to ASCII.
PDF Page Size Various sizes Selects the paper size when printing a PDF file. If Auto
is selected, the paper size is determined based on the
size of the first page.
Parent topic: Selecting PDL (Page Description Language) Settings
Selecting Printer Language and Interface Settings
You can select printer language and interface settings using the control panel on the product.
Note: These settings can be locked by an administrator. If you cannot access these settings, contact
your administrator for assistance.
1. Press the home button, if necessary.
2. Select Settings > General Settings > Printer Settings.
3. Select the printing language and interface options for your connection type.
4. When you are finished, press the home button to return to the Home screen.
Printing Language and Interface Options
Parent topic: Enabling PCL or PostScript Printing
Printing Language and Interface Options
Select the printing language and interface options you want to use.
Main Printer Settings menu
Option Available
settings
Description
PC Connection via USB Enable Select whether to allow USB communication with the
product
Disable
75
Option Available
settings
Description
USB I/F Timeout Setting 0.5 to 300
seconds
Specify the length of time before ending USB
communication from a computer using the PCL or
PostScript driver. This setting is necessary to avoid
endless USB communication.
Printing Language menu
Option Available
settings
Description
USB Auto
PCL
PS
PDF
Select the language for the USB or network interface
Network
Parent topic: Selecting Printer Language and Interface Settings
Printing a PCL or PS3 (PostScript) Status Sheet
You can print a PCL or PS3 (PostScript) status sheet to confirm the current font information.
1. Press the home button, if necessary.
2. Select Settings > Printer Status/Print > Print Status Sheet.
3. Select PS Font List or PCL Font List.
4. Select Print to print the status sheet.
Parent topic: Enabling PCL or PostScript Printing
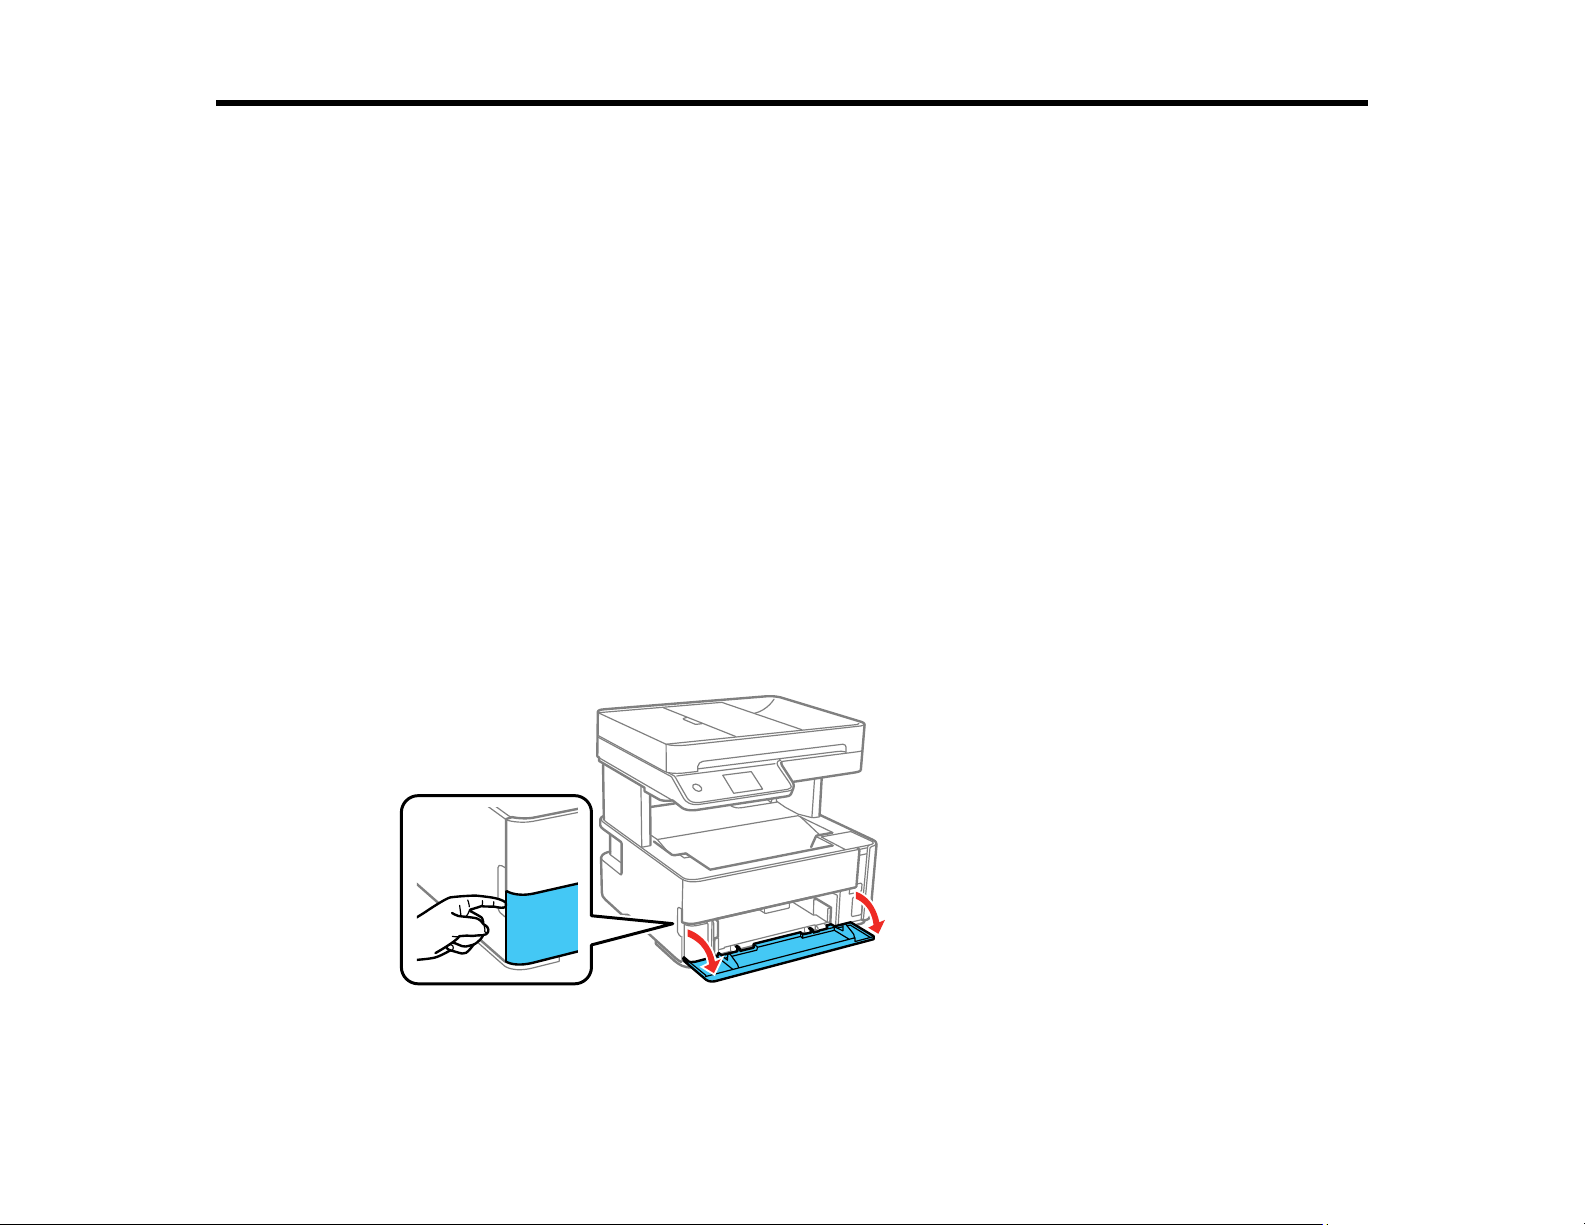
76
Loading Paper
Before you print, load paper for the type of printing you will do.
Loading Paper in the Cassette
Loading Paper in the Rear Paper Feed Slot
Paper Loading Capacity
Double-sided Printing Capacity
Compatible Epson Papers
Paper or Media Type Settings - Printing Software
Selecting the Paper Settings - Control Panel
Selecting the Default Paper Source Settings
Selecting the Universal Print Settings
Loading Paper in the Cassette
You can load paper up to this size in the paper cassette: Legal (8.5 × 14 inches [216 × 356 mm]).
Note: Before loading paper, make sure your product is not currently printing, scanning, or copying.
1. Open the paper cassette cover.
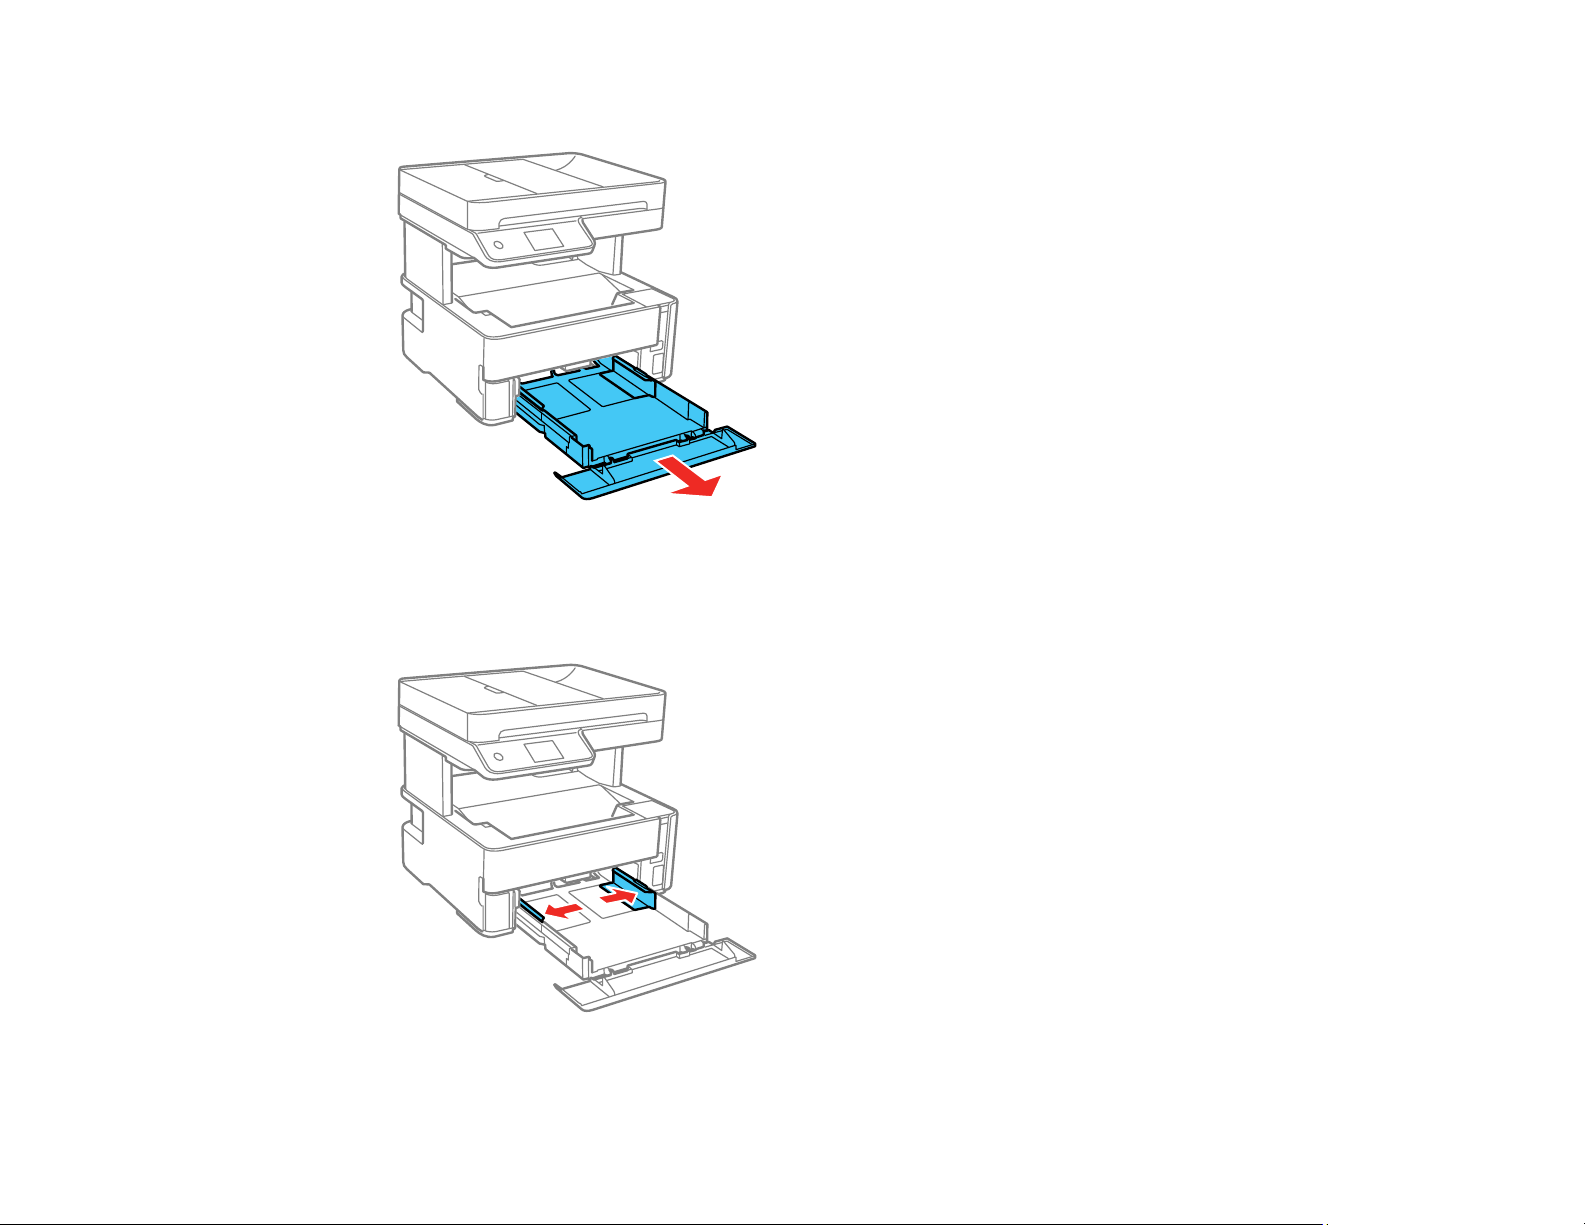
77
2. Pull out the paper cassette until it stops.
Note: You cannot remove the paper cassette.
3. Slide the edge guides outward.

78
4. Do one of the following:
• Insert paper into the cassette with the printable side facedown and slide it in until it stops.
Note: Make sure the paper is loaded against the rear of the cassette.
• For legal-size paper, load paper using the guide line as shown.
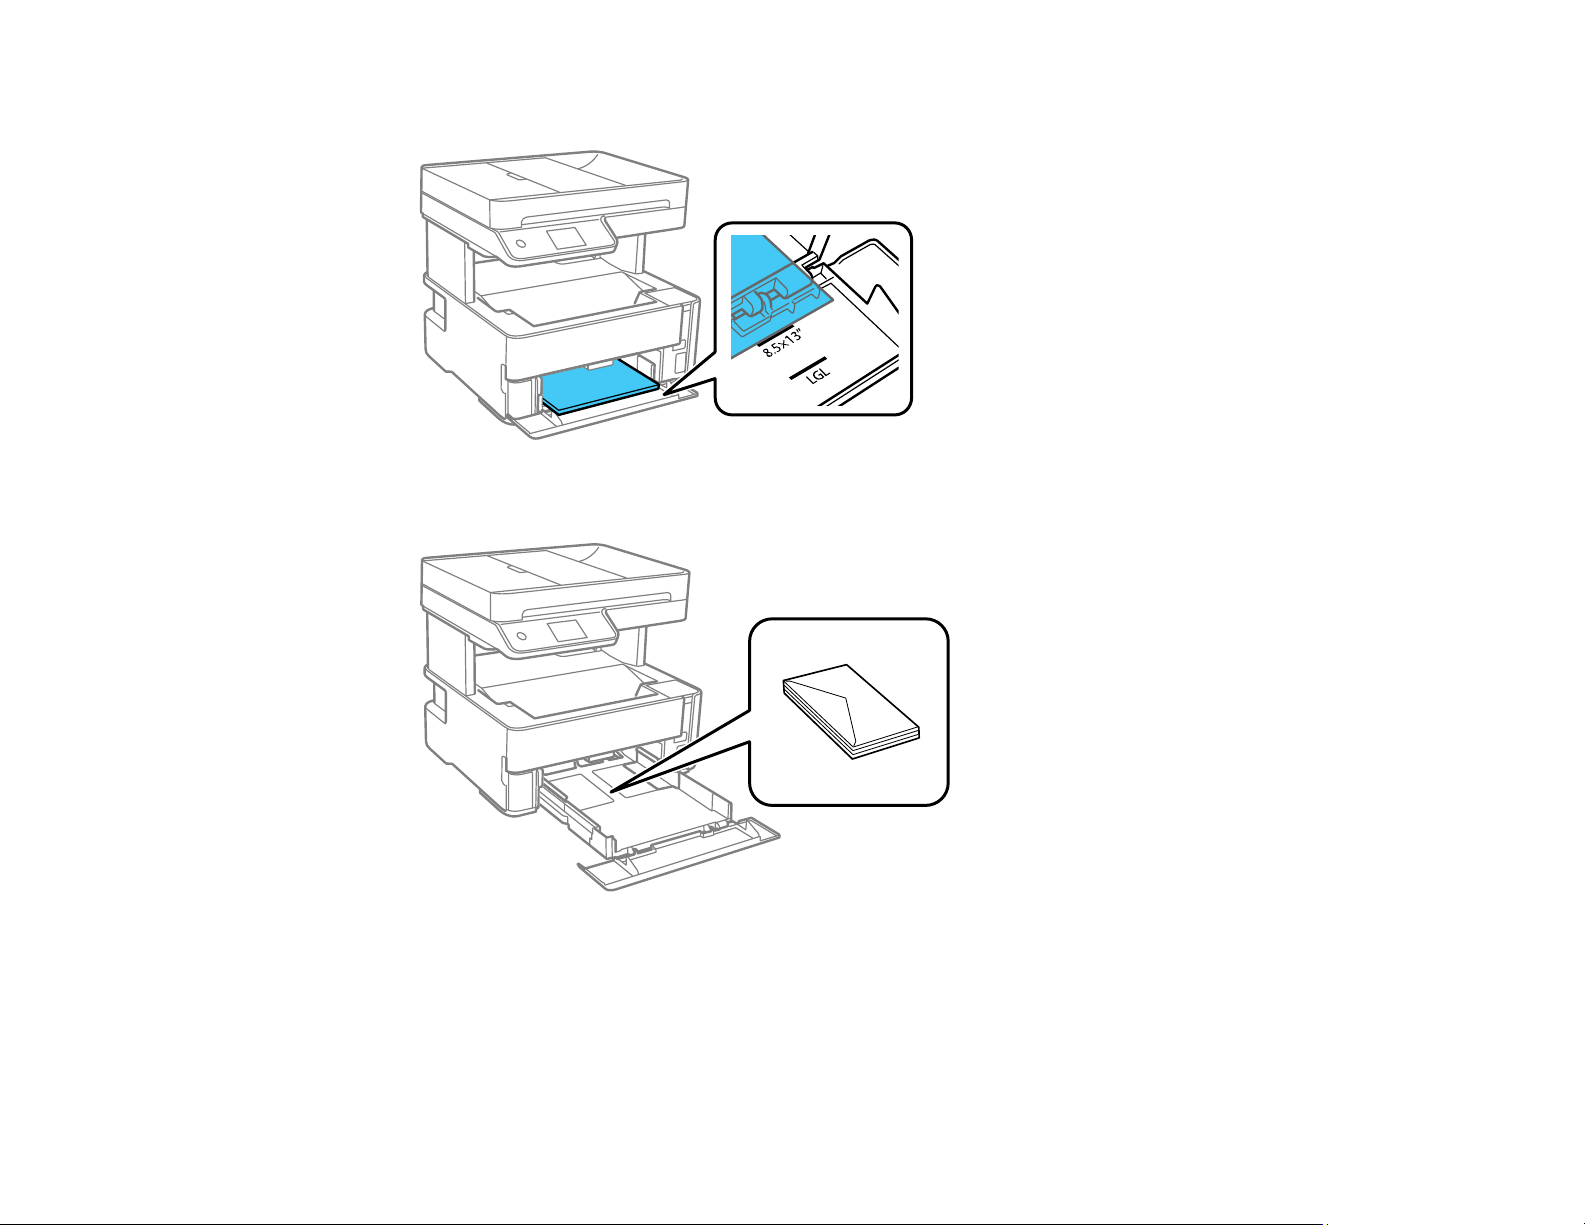
79
• For 8.5 × 13 inches (216 × 330 mm) paper, load paper using the guide line as shown.
• Insert up to 10 envelopes with the printable side facedown and flap edge left, as shown.

80
5. Slide the edge guides against the paper, but not too tightly.
Note: Make sure the paper fits under the tabs on the edge guides.
6. Slide the cassette back into the product until it stops.
7. Select Settings > General Settings > Printer Settings > Paper Source Settings > Paper Setting
to select the size and type of paper you loaded. If your paper size is not displayed, select User
Defined.
Note: If you are printing on letterhead, select Letterhead as the paper type. If you select Letterhead
and you are printing on paper that is smaller than the printer driver setting, make sure you select the
correct paper size setting or the printer may print beyond the edges of the paper. Two-sided printing
is not available on letterhead paper.
8. Do one of the following:
• Close the paper cassette cover.
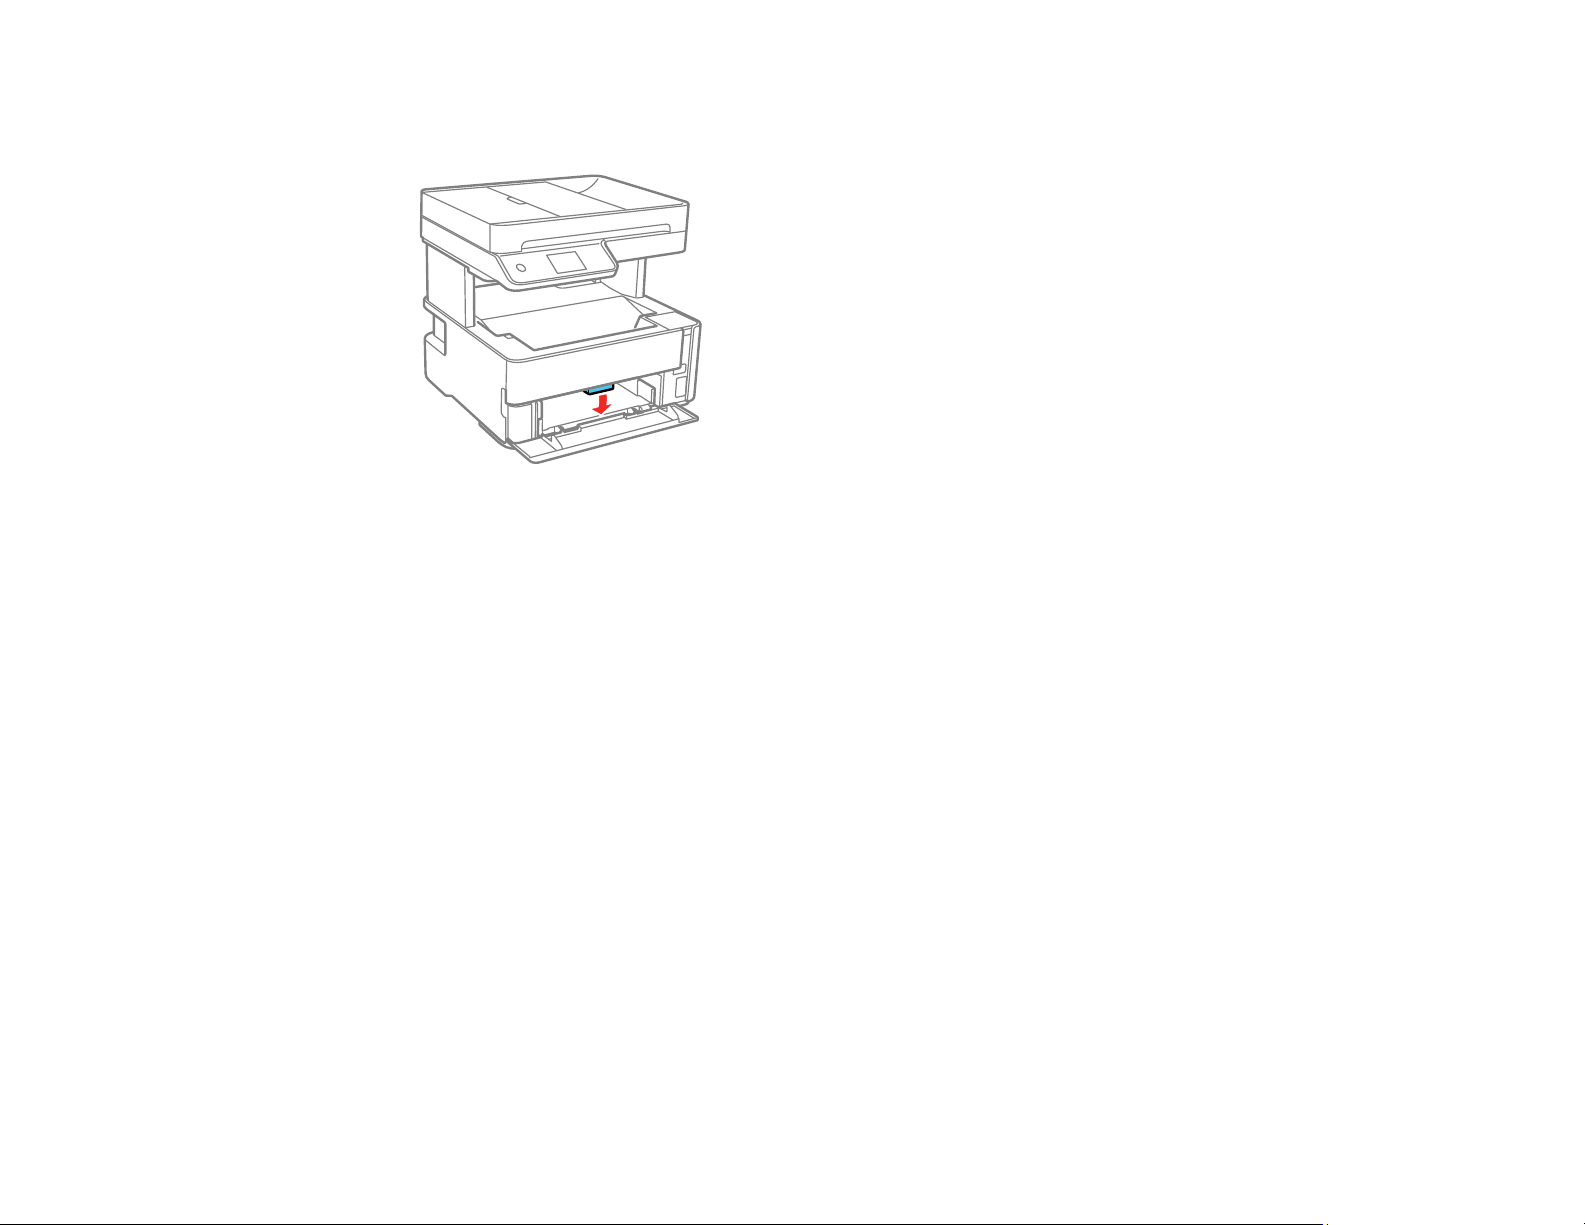
81
• If you loaded envelopes, thick paper, or business cards, lower the output selector to eject paper to
the front of the printer and leave the paper cassette cover open.
Note: Do not remove or insert the paper cassette during printing.
Always follow these paper loading guidelines:
• Load only the recommended number of sheets.
• Load paper short edge first and printable side facedown.
• Make sure the paper fits under the tabs on the edge guides and does not stick out from the rear of
the cassette.
• Do not load an envelope that is curled, folded, or too thin.
• Do not load windowed envelopes or envelopes with adhesive surfaces on the flaps.
• If you have trouble loading a stack of envelopes, press each envelope flat before loading it or load
one envelope at a time.
• If print quality declines when printing multiple envelopes, try loading one envelope at a time.
• Load letterhead or pre-printed paper top edge first.
• Check the paper package for any additional loading instructions.
Parent topic: Loading Paper
Related references
Paper Loading Capacity
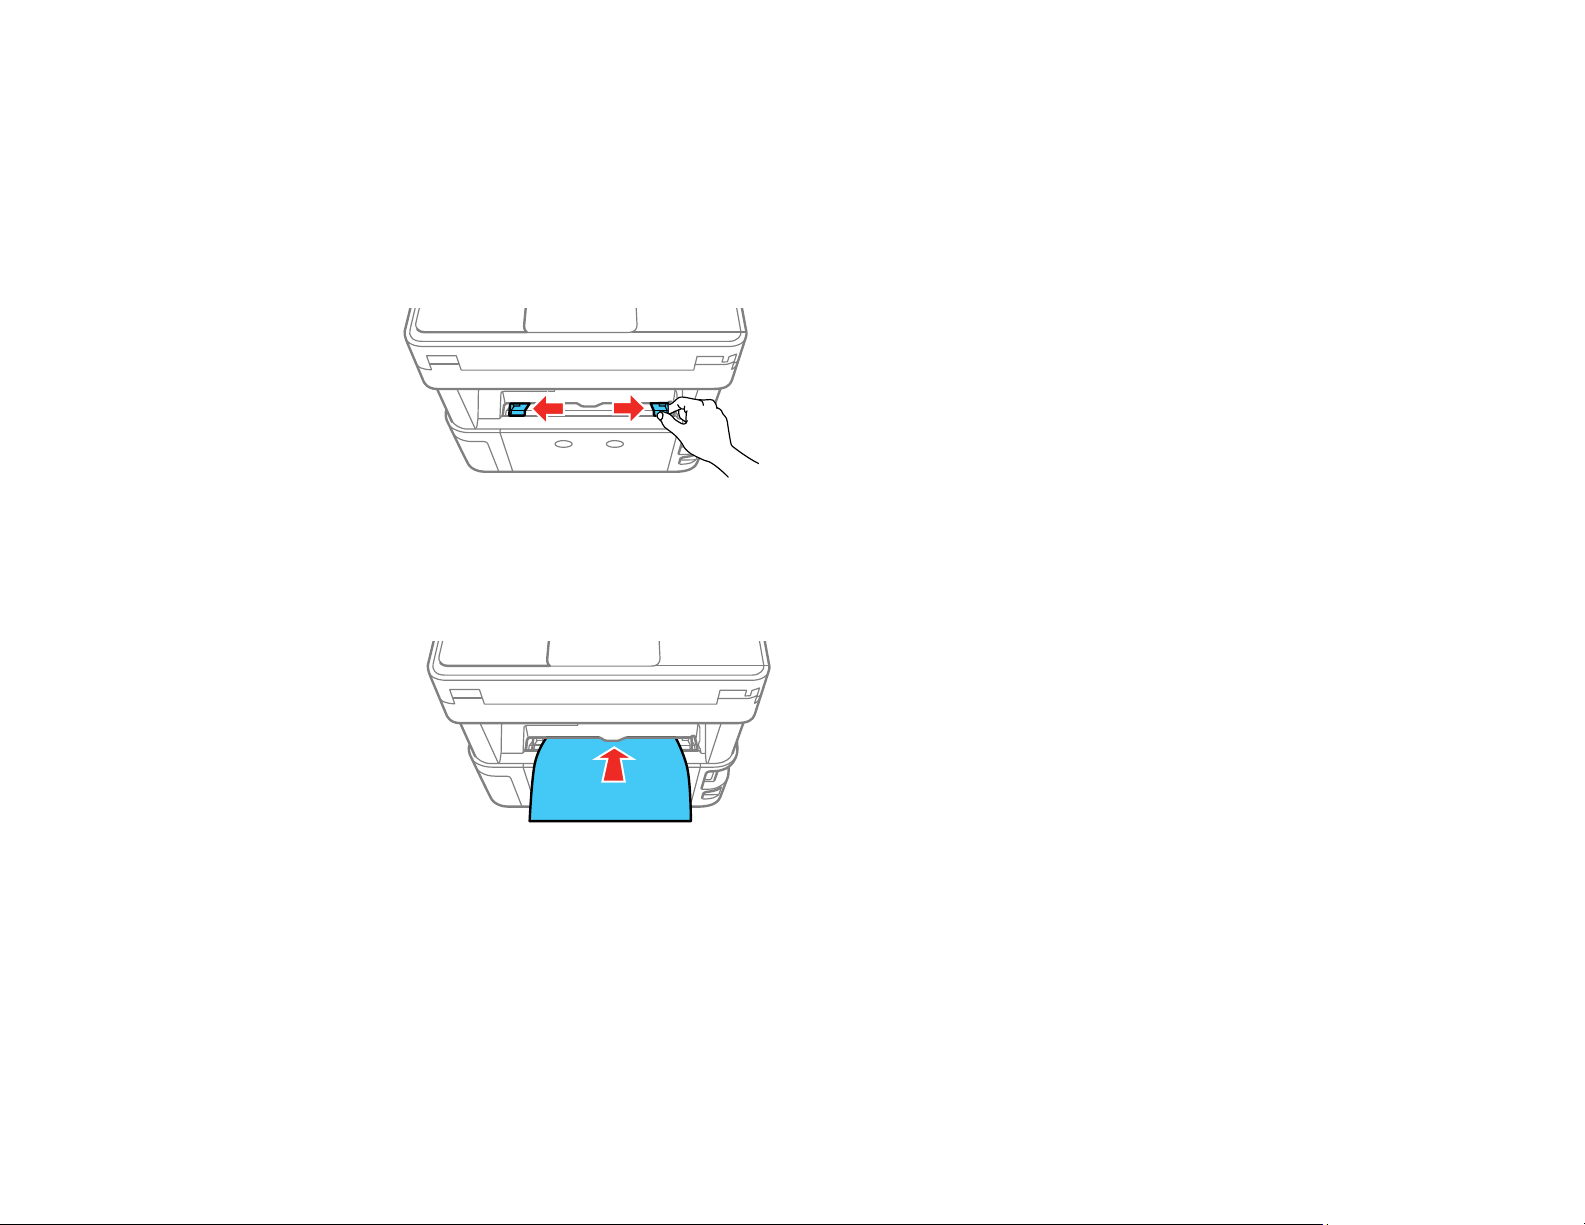
82
Related tasks
Selecting the Default Paper Source Settings
Loading Paper in the Rear Paper Feed Slot
You can print documents on a variety of paper types and sizes from the rear paper feed slot.
1. Slide the edge guides out all the way.
2. Do one of the following:
• Insert one sheet of paper printable side up and short edge first, in the center of the rear paper feed
slot.
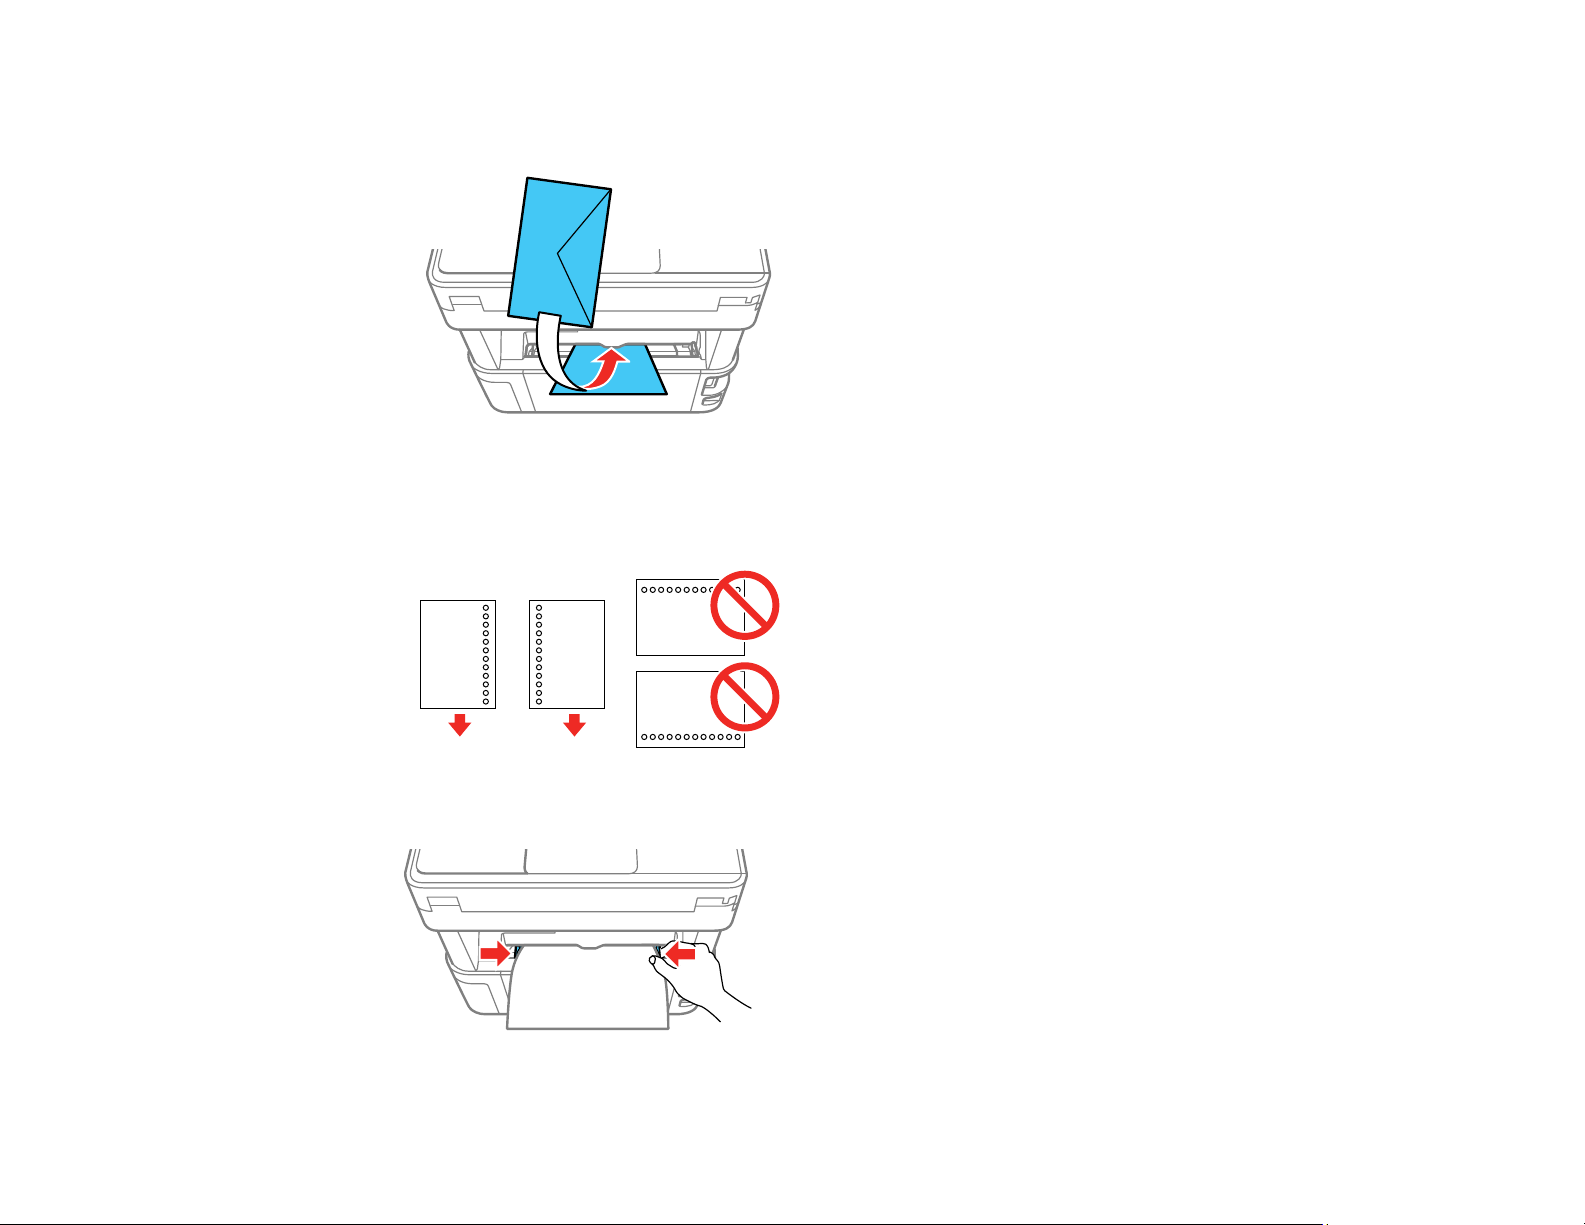
83
• Load one envelope in the center of the rear paper feed slot. Load it printable side up and flap edge
left.
• Load one sheet of loose-leaf or other paper with holes facing as shown. You can load one sheet at
a time in only these sizes: Letter (8.5 × 11 inches [216 × 279 mm]), A4 (8.3 × 11.7 inches
[210 × 297 mm]), 8.5 × 13 inches (216 × 330 mm), or Legal (8.5 × 14 inches [216 × 356 mm]).
3. Slide the edge guides against the paper, but not too tightly.
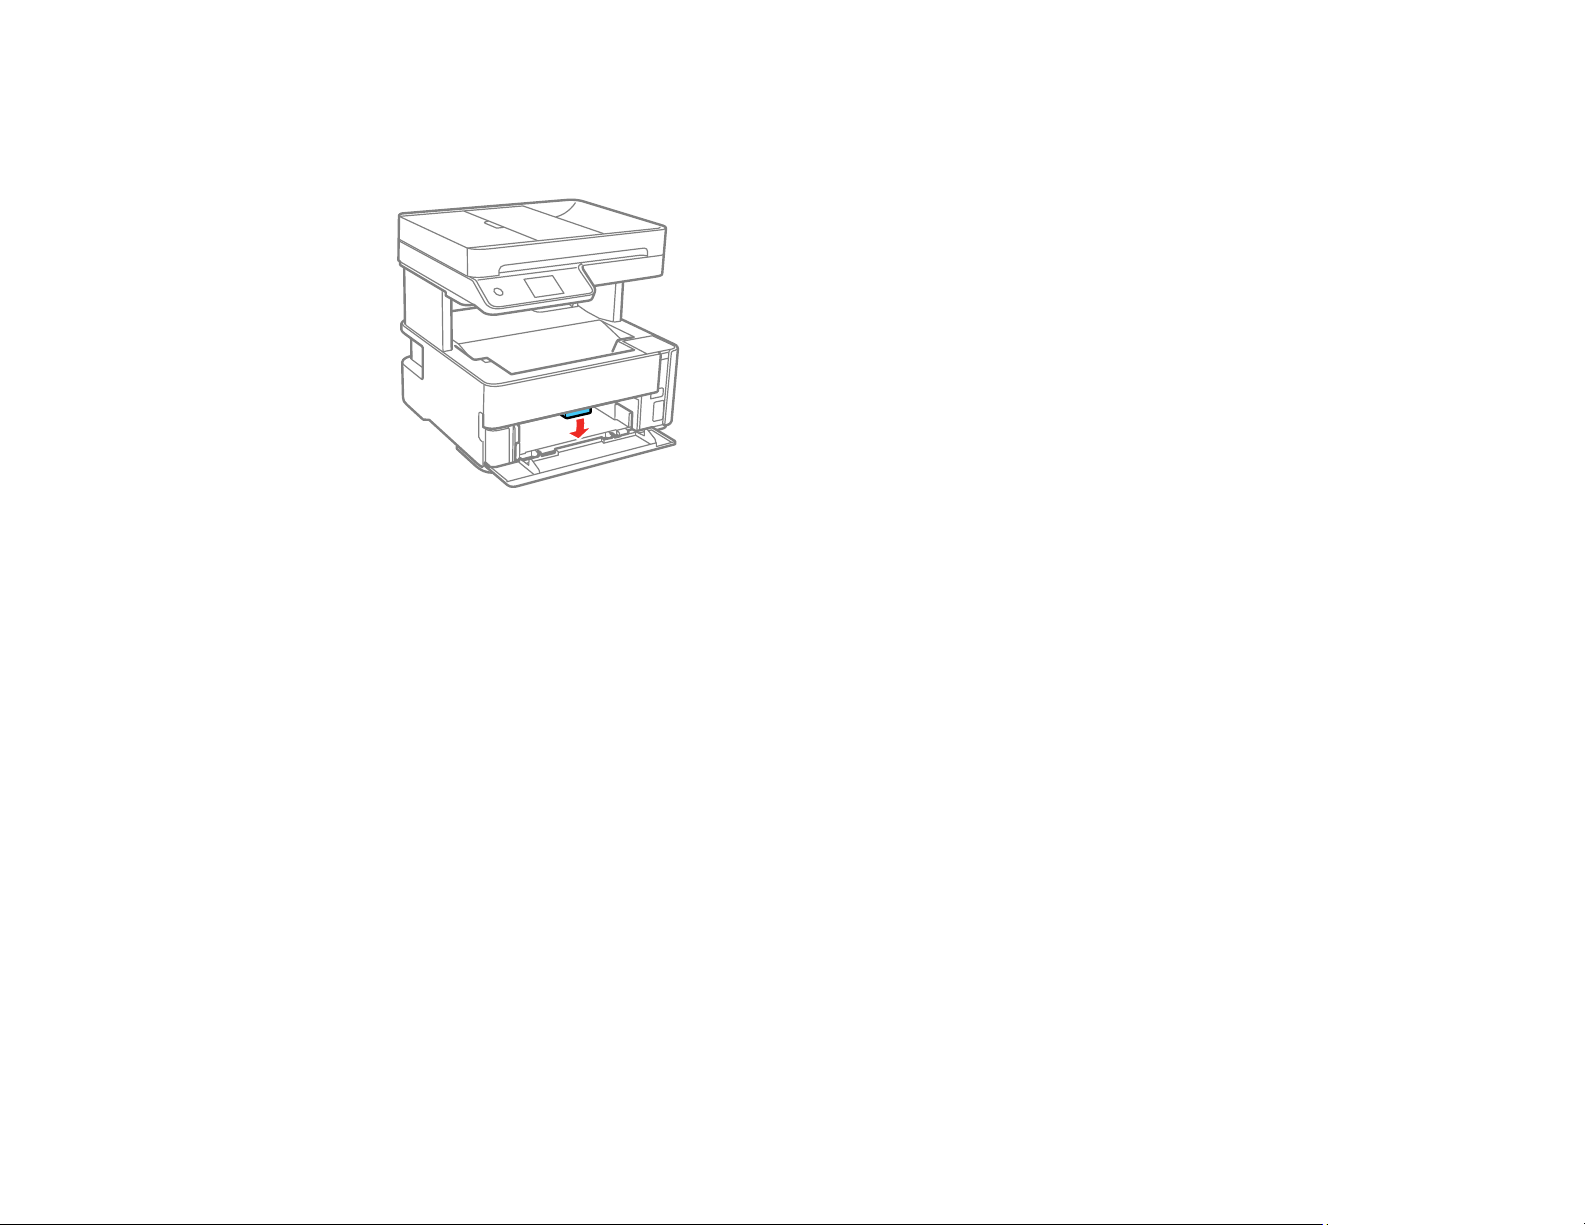
84
4. If you loaded envelopes, thick paper, photo paper, or business cards, open the paper cassette
cover, lower the output selector to eject paper to the front of the printer, and leave the paper cassette
cover open.
5. Select Settings > General Settings > Printer Settings > Paper Source Settings > Paper Setting
to select the size and type of paper you loaded. If your paper size is not displayed, select User
Defined.
Note: If you are printing on letterhead, select Letterhead as the paper type. If you select Letterhead
and you are printing on paper that is smaller than the printer driver setting, make sure you select the
correct paper size setting or the printer may print beyond the edges of the paper. Two-sided printing
is not available on letterhead paper.
Always follow these paper loading guidelines:
• Load only one sheet or envelope at a time.
• Load paper short edge first and printable side up.
• Load letterhead or pre-printed paper top edge first.
• If you have trouble loading an envelope, press it flat before loading it.
• Do not load an envelope that is curled, folded, or too thin.
• Do not load windowed envelopes or envelopes with adhesive surfaces on the flaps.
• Check the paper package for any additional loading instructions.
Parent topic: Loading Paper
85
Related references
Paper Loading Capacity
Related tasks
Selecting the Default Paper Source Settings
Paper Loading Capacity
Note: The output tray holds up to 100 sheets of plain paper facedown. Exceeding this limit can cause
paper to fall or a paper jam to occur. Remove printouts as necessary to keep the amount of paper in the
output tray under 100 sheets.
Paper type Loading capacity
Cassette Rear paper feed slot
Plain paper
Copy paper
Letterhead paper
High-quality plain paper
Letter (8.5 × 11 inches
[216 × 279 mm]) or A4 (8.3 × 11.7
inches [210 × 297 mm]) size or
smaller: 250 sheets
1 sheet
Legal (8.5 × 14 inches
[216 × 356 mm]) size: 50 sheets
8.5 × 13 inches (216 × 330 mm) size:
50 sheets
User-defined (3.5 × 5 inches [89
× 127 mm] to 8.5 × 47.2 inches
[215.9 × 1200 mm]): 1 sheet
—
User-defined (2.1 × 3.4 inches [54
× 86 mm] to 8.5 × 47.2 inches [215.9
× 1200 mm]): —
1 sheet
Epson Bright White Pro Paper
Epson Bright White Premium
Paper
Epson Multipurpose Plus Paper
200 sheets

86
Paper type Loading capacity
Cassette Rear paper feed slot
Epson Presentation Paper Matte 100 sheets 1 sheet
Epson Premium Presentation
Paper Matte
20 sheets
Epson Premium Presentation
Paper Matte Double-sided
1 sheet
Epson Ultra Premium
Presentation Paper Matte
Thick paper (25 to 68 lb [91 to 256
g/m²])
—
Epson Photo Paper Glossy
Epson Premium Photo Paper
Glossy
Epson Premium Photo Paper
Semi-gloss
Epson Ultra Premium Photo
Paper Glossy
20 sheets
Envelopes 10 envelopes 1 envelope
Parent topic: Loading Paper
Related references
Paper Specifications
Double-sided Printing Capacity
You can print double-sided on the paper types and sizes listed here.

87
Paper type Size Double-sided printing capacity
Paper cassette Rear paper feed
slot
Plain paper
Copy paper
High-quality plain paper
Letter (8.5 × 11 inches
[216 × 279 mm]), A4
(8.3 × 11.7 inches
[210 × 297 mm]), or B5
(7.2 × 10.1 inches
[182 × 257 mm])
250 sheets 1 sheet
User-defined (7.2 × 10.1
inches [182 × 257 mm] to
8.5 × 11.7 inches [215.9 x
297 mm])
1 sheet
Epson Bright White Pro
Paper
Epson Bright White
Premium Paper
Epson Multipurpose Plus
Paper
Letter (8.5 × 11 inches
[216 × 279 mm])
200 sheets
Epson Premium
Presentation Paper
Matte Double-sided
Letter (8.5 × 11 inches
[216 × 279 mm]) or A4
(8.3 × 11.7 inches
[210 × 297 mm])
1 sheet
You cannot print double-sided on the following paper types:
• Epson Presentation Paper Matte
• Epson Premium Presentation Paper Matte
• Epson Ultra Premium Presentation Paper Matte
• Epson Photo Paper Glossy
• Epson Premium Photo Paper Glossy
• Epson Premium Photo Paper Semi-gloss
• Epson Ultra Premium Photo Paper Glossy
• Envelopes

88
Parent topic: Loading Paper
Compatible Epson Papers
You can purchase genuine Epson ink, maintenance boxes, and paper at epson.com (U.S. sales) or
epson.ca (Canadian sales). You can also purchase supplies from an Epson authorized reseller. To find
the nearest one, call 800-GO-EPSON (800-463-7766) in the U.S. or 800-807-7766 in Canada.
Note: Paper/media availability varies by country.
Paper Type Size Part number Sheet count
Epson Bright White Pro Paper Letter (8.5 × 11 inches
[216 × 279 mm])
S041586 500
Epson Bright White Premium
Paper
Letter (8.5 × 11 inches
[216 × 279 mm])
S450218-4 500
Epson Multipurpose Plus Paper Letter (8.5 × 11 inches
[216 × 279 mm])
S450217-4 500
Epson Presentation Paper Matte Letter (8.5 × 11 inches
[216 × 279 mm])
S041062 100
Legal (8.5 × 14 inches
[216 × 356 mm])
S041067 100
Epson Premium Presentation
Paper Matte
8 × 10 inches (203 × 254 mm) S041467 50
Letter (8.5 × 11 inches
[216 × 279 mm])
S041257
S042180
50
100
Epson Premium Presentation
Paper Matte Double-sided
Letter (8.5 × 11 inches
[216 × 279 mm])
S041568 50
Epson Ultra Premium Presentation
Paper Matte
Letter (8.5 × 11 inches
[216 × 279 mm])
S041341 50
89
Paper Type Size Part number Sheet count
Epson Photo Paper Glossy 4 × 6 inches (102 × 152 mm) S041809
S042038
50
100
A4 (8.3 × 11.7 inches
[210 × 297 mm])
S041140 20
Letter (8.5 × 11 inches
[216 × 279 mm])
S041141
S041649
S041271
20
50
100
Epson Premium Photo Paper
Glossy
4 × 6 inches (102 × 152 mm) S041727 100
5 × 7 inches (127 × 178 mm) S041464 20
Letter (8.5 × 11 inches
[216 × 279 mm])
S042183
S041667
25
50
Epson Ultra Premium Photo Paper
Glossy
4 × 6 inches (102 × 152 mm) S042181
S042174
60
100
Letter (8.5 × 11 inches
[216 × 279 mm])
S042182
S042175
25
50
5 × 7 inches (127 × 178 mm) S041945 20
Epson Premium Photo Paper
Semi-gloss
4 × 6 inches (102 × 152 mm) S041982 40
Letter (8.5 × 11 inches
[216 × 279 mm])
S041331 20
Parent topic: Loading Paper
90
Paper or Media Type Settings - Printing Software
For this paper Select this paper Type or Media Type setting
Plain paper
Epson Bright White Pro Paper
Epson Bright White Premium Paper
Epson Multipurpose Plus Paper
Plain Paper / Bright White Paper
Letterhead paper Letterhead
Epson Ultra Premium Presentation Paper Matte
Thick paper 25 to 68 lb (91 to 256 g/m²)
Card Stock
Epson Presentation Paper Matte Presentation Paper Matte
Epson Premium Presentation Paper Matte
Epson Premium Presentation Paper Matte Double-
sided
Premium Presentation Paper Matte
Epson Ultra Premium Photo Paper Glossy Ultra Premium Photo Paper Glossy
Epson Premium Photo Paper Glossy Premium Photo Paper Glossy
Epson Photo Paper Glossy Photo Paper Glossy
Epson Premium Photo Paper Semi-gloss Premium Photo Paper Semi-Gloss
Envelopes Envelope
Note: The settings listed here are available only when printing from your computer; they do not apply to
your product's control panel settings.
Parent topic: Loading Paper
Selecting the Paper Settings - Control Panel
You can change the default paper size and paper type using the control panel on the product.
Note: These settings appear automatically when paper is inserted if you set the Paper Setup Auto
Display setting to On.
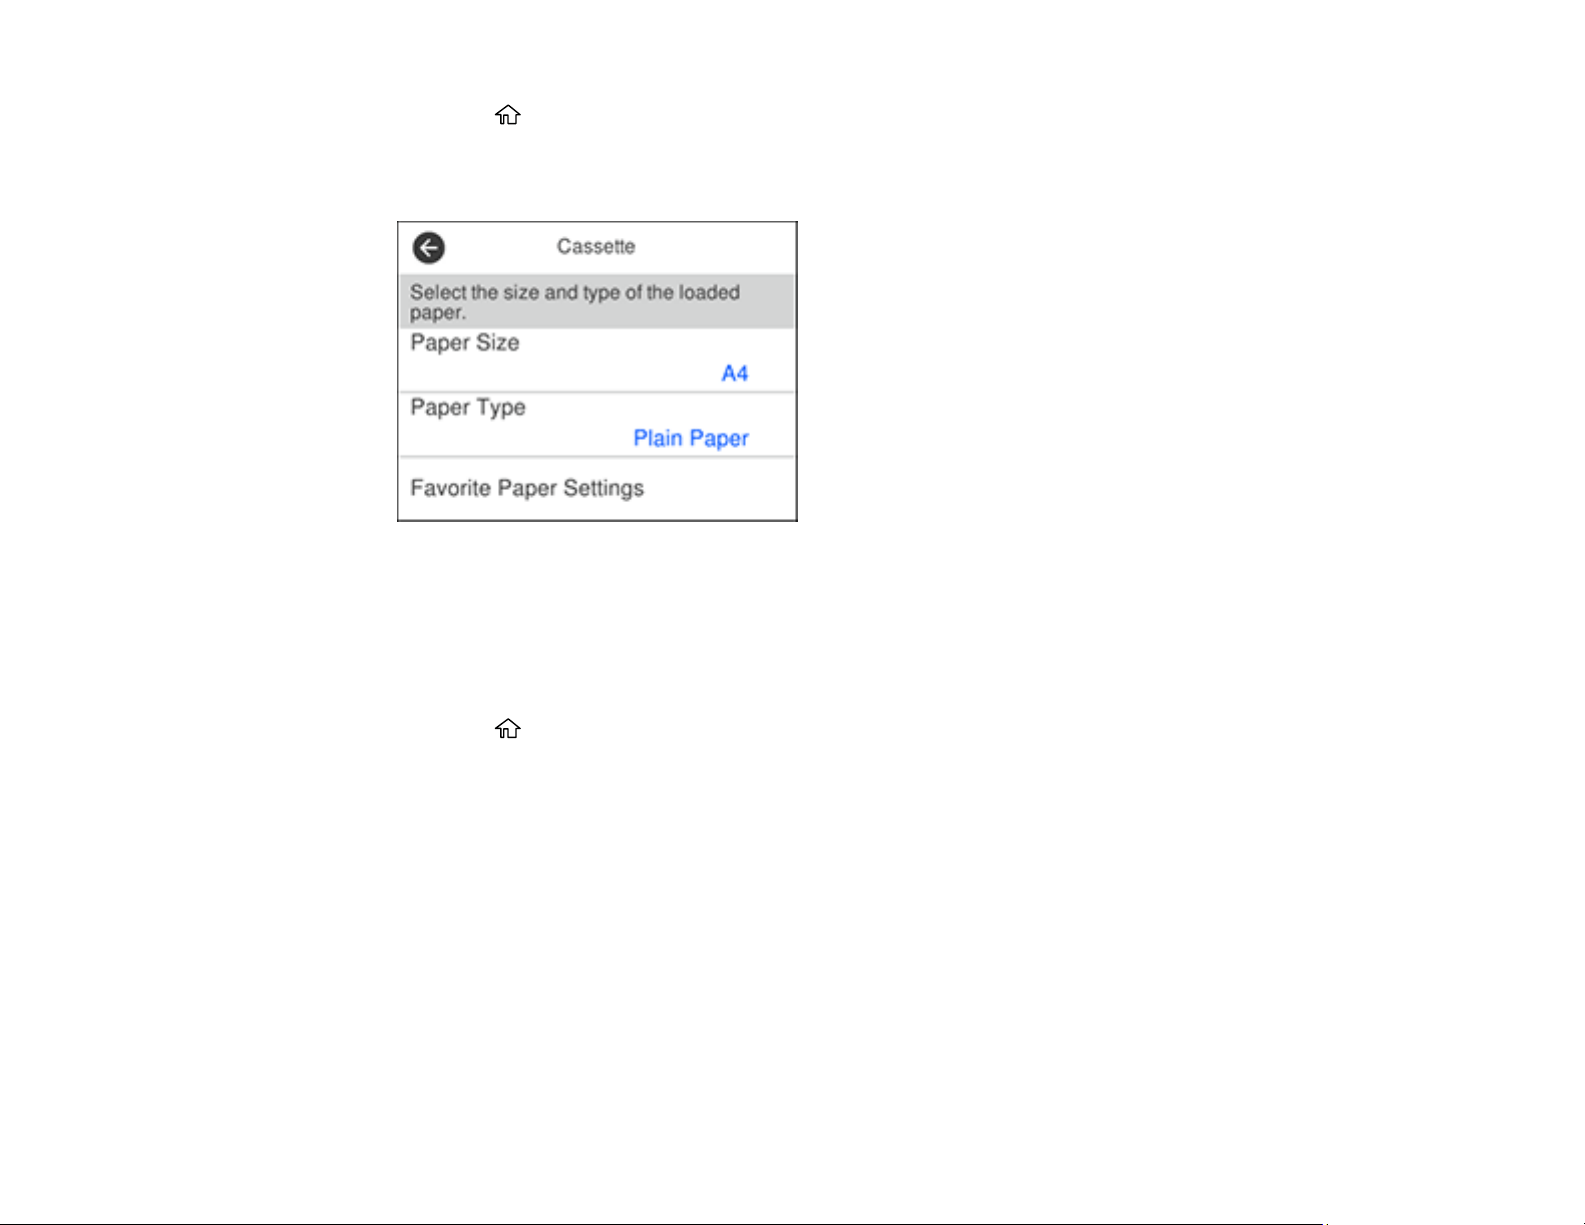
91
1. Press the home button, if necessary.
2. Select Settings > General Settings > Printer Settings > Paper Source Settings > Paper Setting.
You see this screen:
3. Select Paper Size.
4. Select the paper size you loaded.
5. Select Paper Type.
6. Select the paper type you loaded.
7. Press the home button to exit.
Paper or Media Type Settings - Control Panel
Parent topic: Loading Paper
92
Paper or Media Type Settings - Control Panel
For this paper Select this Paper Type setting
Plain paper
High-quality plain paper
Copy paper
Epson Bright White Pro Paper
Epson Bright White Premium Paper
Epson Multipurpose Plus Paper
Plain Paper
Letterhead paper Letterhead
Epson Ultra Premium Photo Paper Glossy Ultra Glossy
Epson Premium Photo Paper Glossy Prem. Glossy
Epson Photo Paper Glossy Glossy
Epson Premium Photo Paper Semi-gloss Prem. Semi-Gloss
Epson Presentation Paper Matte Presentation Matte
Epson Premium Presentation Paper Matte
Epson Ultra Premium Presentation Paper Matte
Epson Premium Presentation Paper Matte Double-
sided
Prem. Matte
Envelope Envelope
Parent topic: Selecting the Paper Settings - Control Panel
Selecting the Default Paper Source Settings
You can change default paper source settings using the control panel on the product.
1. Press the home button, if necessary.
2. Select Settings > General Settings > Printer Settings.
3. Select Auto Error Solver and select one of these options:
• Turn on this setting to display a warning and print single-sided when a 2-sided printing error
occurs, or to print only what the printer could process when a memory full error occurs.
93
• Turn off this setting to display an error message and stop printing if an error occurs.
4. Select the Paper Source Settings options you want to use.
5. When you are finished, press the home button to exit.
Paper Source Settings Options
Parent topic: Loading Paper
Paper Source Settings Options
Select the paper source options you want to use for your print jobs.
Paper Source
Settings option
Available settings Description
Paper Setting Various Select the paper size and type for each paper source
A4/Letter Auto
Switching
On Select On to switch the selected paper size to match the
loaded paper (Letter or A4) if the wrong size is selected
Off
Error Notice Paper Size Notice Select On for either of these settings to display an error
message when the selected paper type or size does not
match the loaded paper
Paper Type Notice
Paper Setup
Auto Display
On Select On to automatically display a menu that lets you
select the paper size and type when you load paper in the
product.
Note: If this setting is disabled, you cannot print using
AirPrint.
Off
Parent topic: Selecting the Default Paper Source Settings
Selecting the Universal Print Settings
You can change the default universal print settings using the control panel on the product.
1. Press the home button, if necessary.
2. Select Settings > General Settings > Printer Settings > Universal Print Settings.
3. Adjust the settings as necessary.
4. When you are finished, press the home button to exit.
94
Universal Print Settings Options
Parent topic: Loading Paper
Universal Print Settings Options
Select the universal print setting options you want to use for your print jobs.
Universal Print
Settings option
Available settings Description
Top Offset — Adjust the top or left margin
Left Offset
Top Offset in
Back
— Adjust the top or left margin of the back page when printing
double-sided.
Left Offset in
Back
Skip Blank Page On Select On to skip printing of blank pages automatically
Off
Parent topic: Selecting the Universal Print Settings

95
Placing Originals on the Product
Follow the instructions here to place your original documents or photos on the product.
Caution: Do not place anything on top of your product or use its cover as a writing surface to avoid
damaging it.
Placing Originals on the Scanner Glass
Placing Originals in the Automatic Document Feeder
Placing Originals on the Scanner Glass
You can place originals up to this size on the scanner glass: Letter (8.5 × 11 inches [216 × 279 mm]) or
A4 (8.3 × 11.7 inches [210 × 297 mm]).
Note: To view animated instructions on how to place originals on the scanner glass, press the button
and select How To > Place Originals.
Note: When originals are placed in the ADF and on the scanner glass, priority is given to the originals in
the ADF.
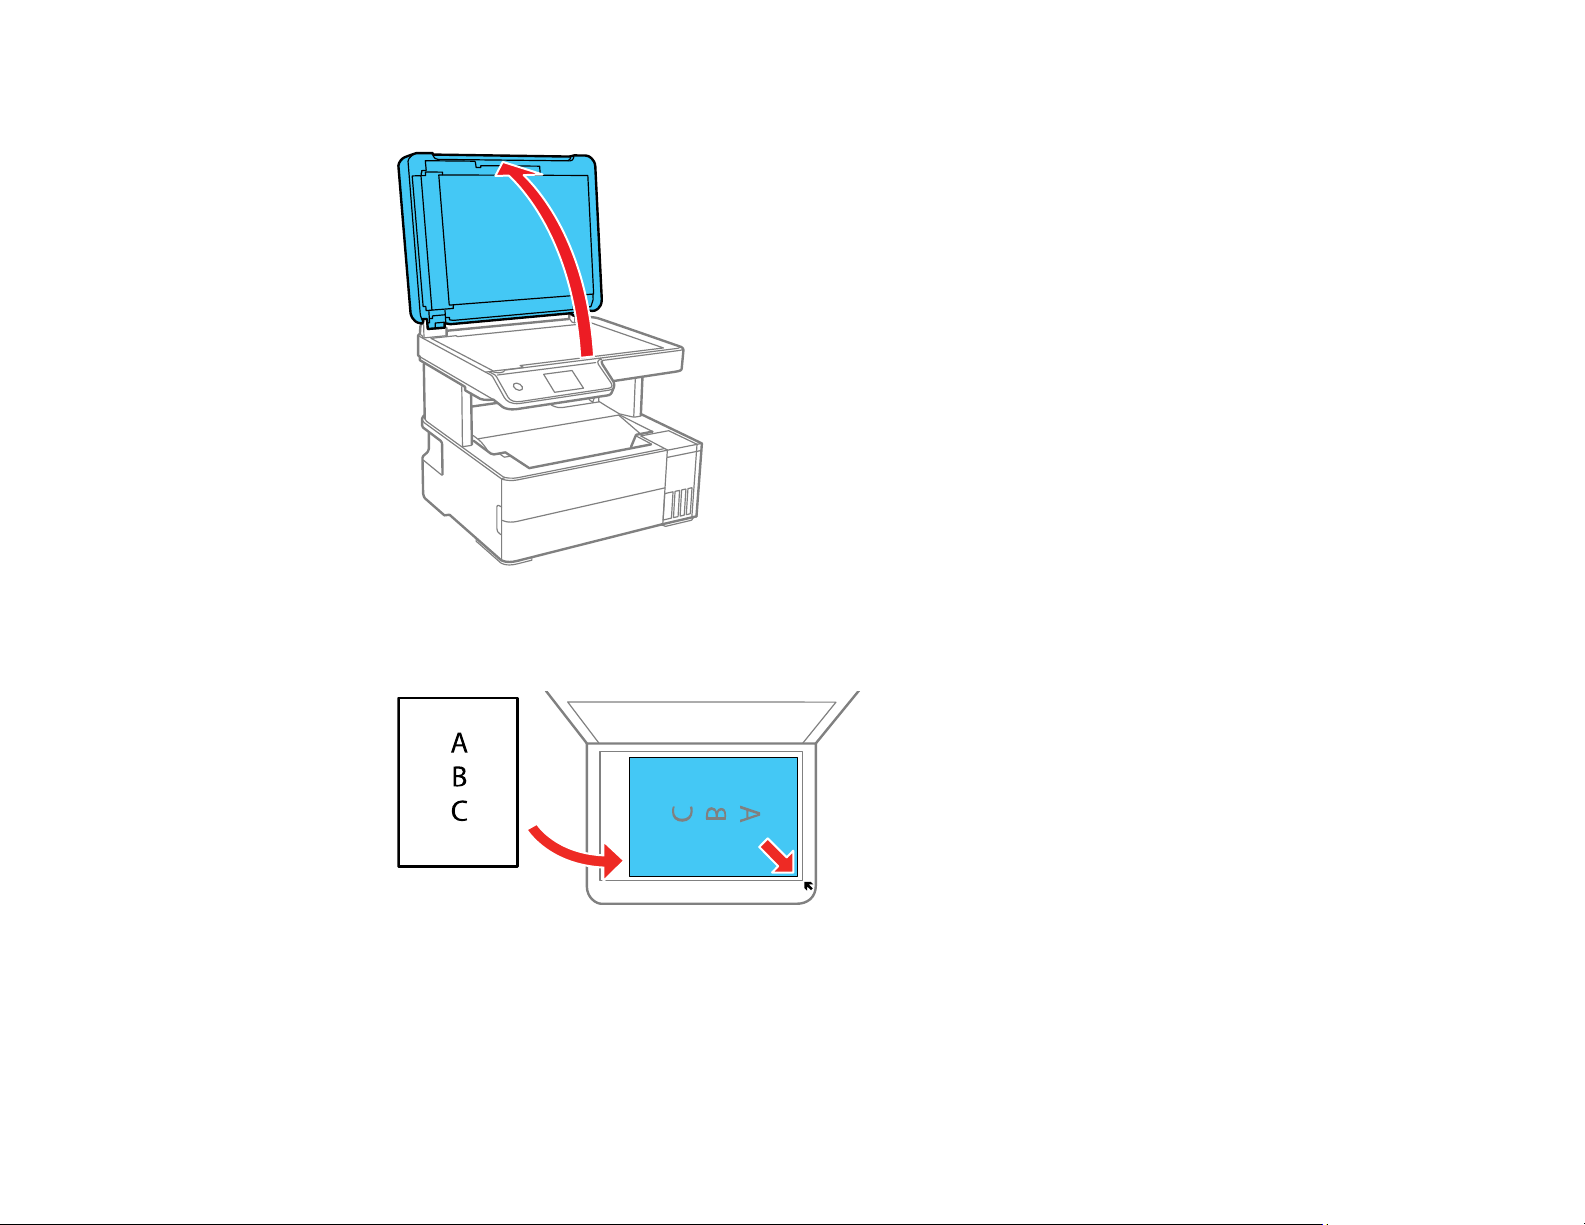
96
1. Open the document cover.
2. Place your original facedown on the scanner glass with the top facing into the corner. Slide the
original to the edges of the indicated corner.
Note: The edges of your original may be cropped by 0.06 inch (1.5 mm) from the edge of the
scanner glass. Manually position your original away from the edges to prevent cropping.
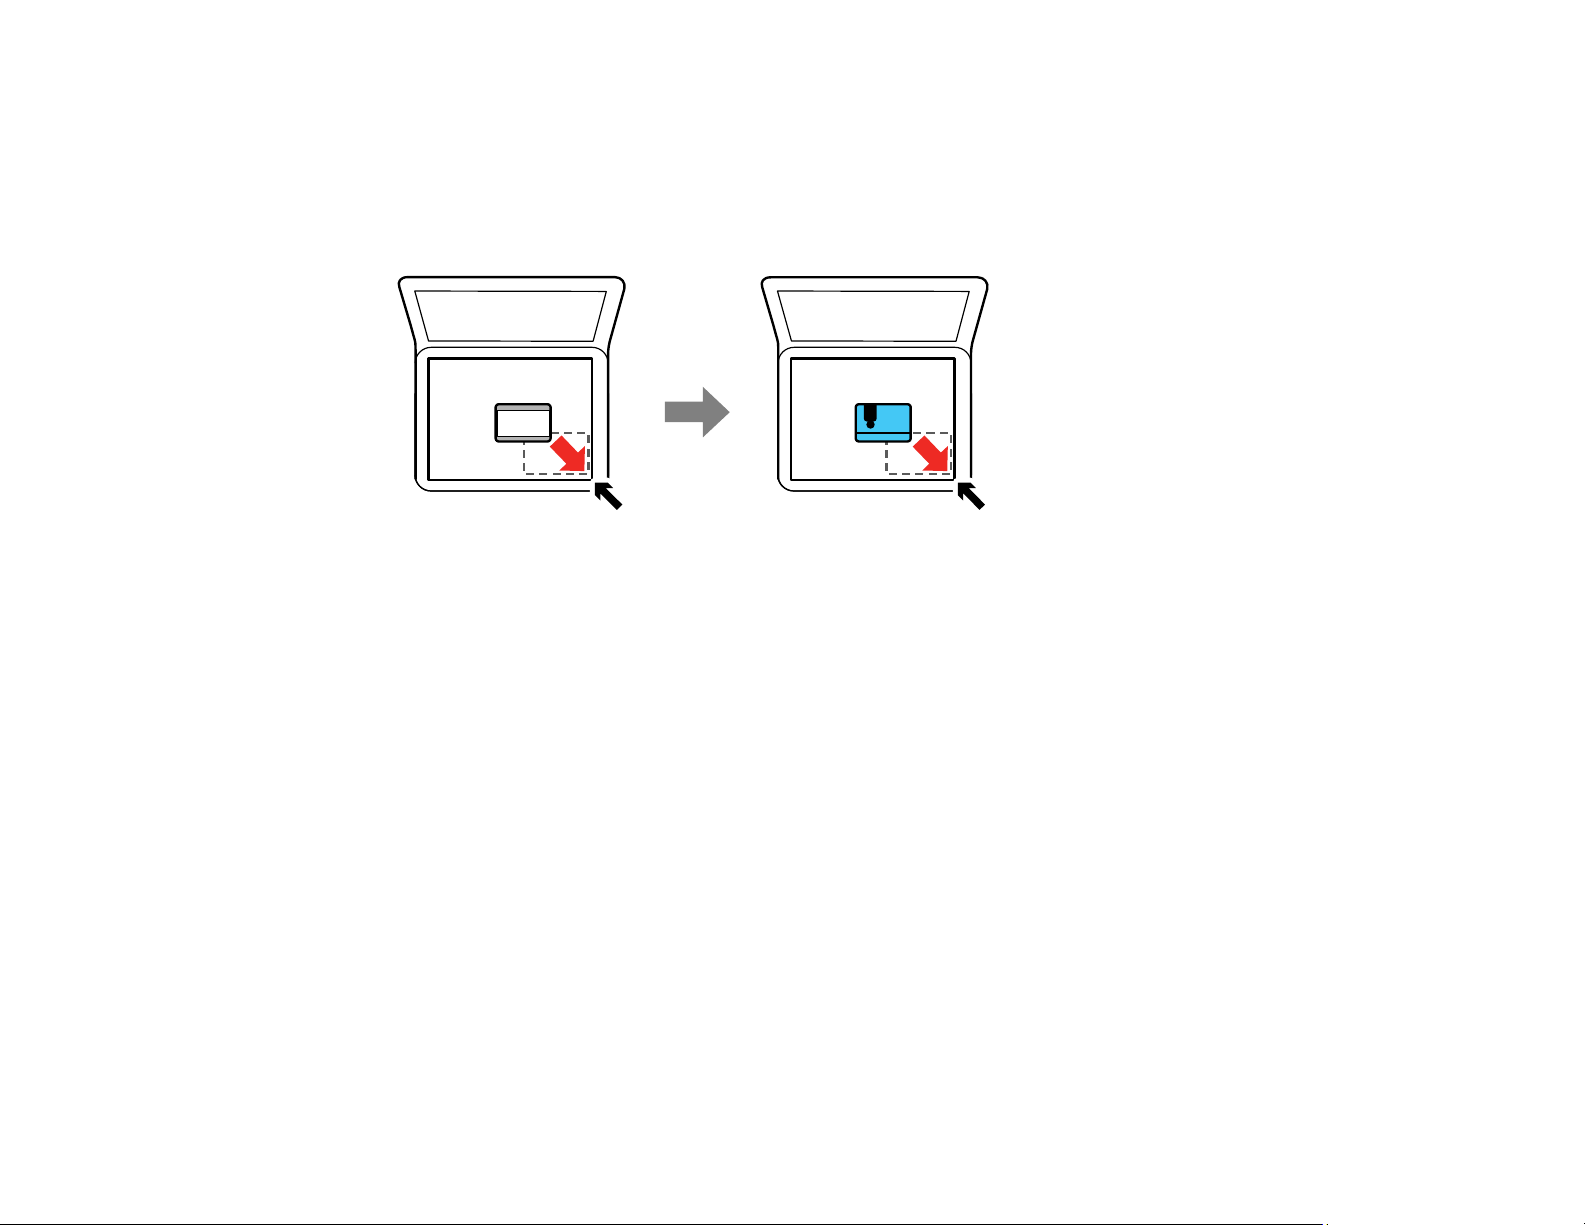
97
Note: If there is any trash or dirt on the scanner glass, the scanning range may expand to include it,
so the image of the original may be displaced or reduced. Remove any trash and dirt on the scanner
glass before scanning.
Note: If you are placing an ID card on the scanner glass, position the card 0.19 inch (5 mm) from the
corner of the scanner glass.
3. Close the document cover gently to keep your original in place.
Caution: Do not push down on the document cover or scanner glass or you may damage the
product.
Remove your originals after scanning. If you leave the originals on the scanner glass for a long time, they
may stick to the glass surface.
Parent topic: Placing Originals on the Product
Related topics
Copying
Scanning
Faxing
Placing Originals in the Automatic Document Feeder
You can place single- or multi-page original documents in the Automatic Document Feeder (ADF). Make
sure the originals meet the Automatic Document Feeder specifications before loading them.
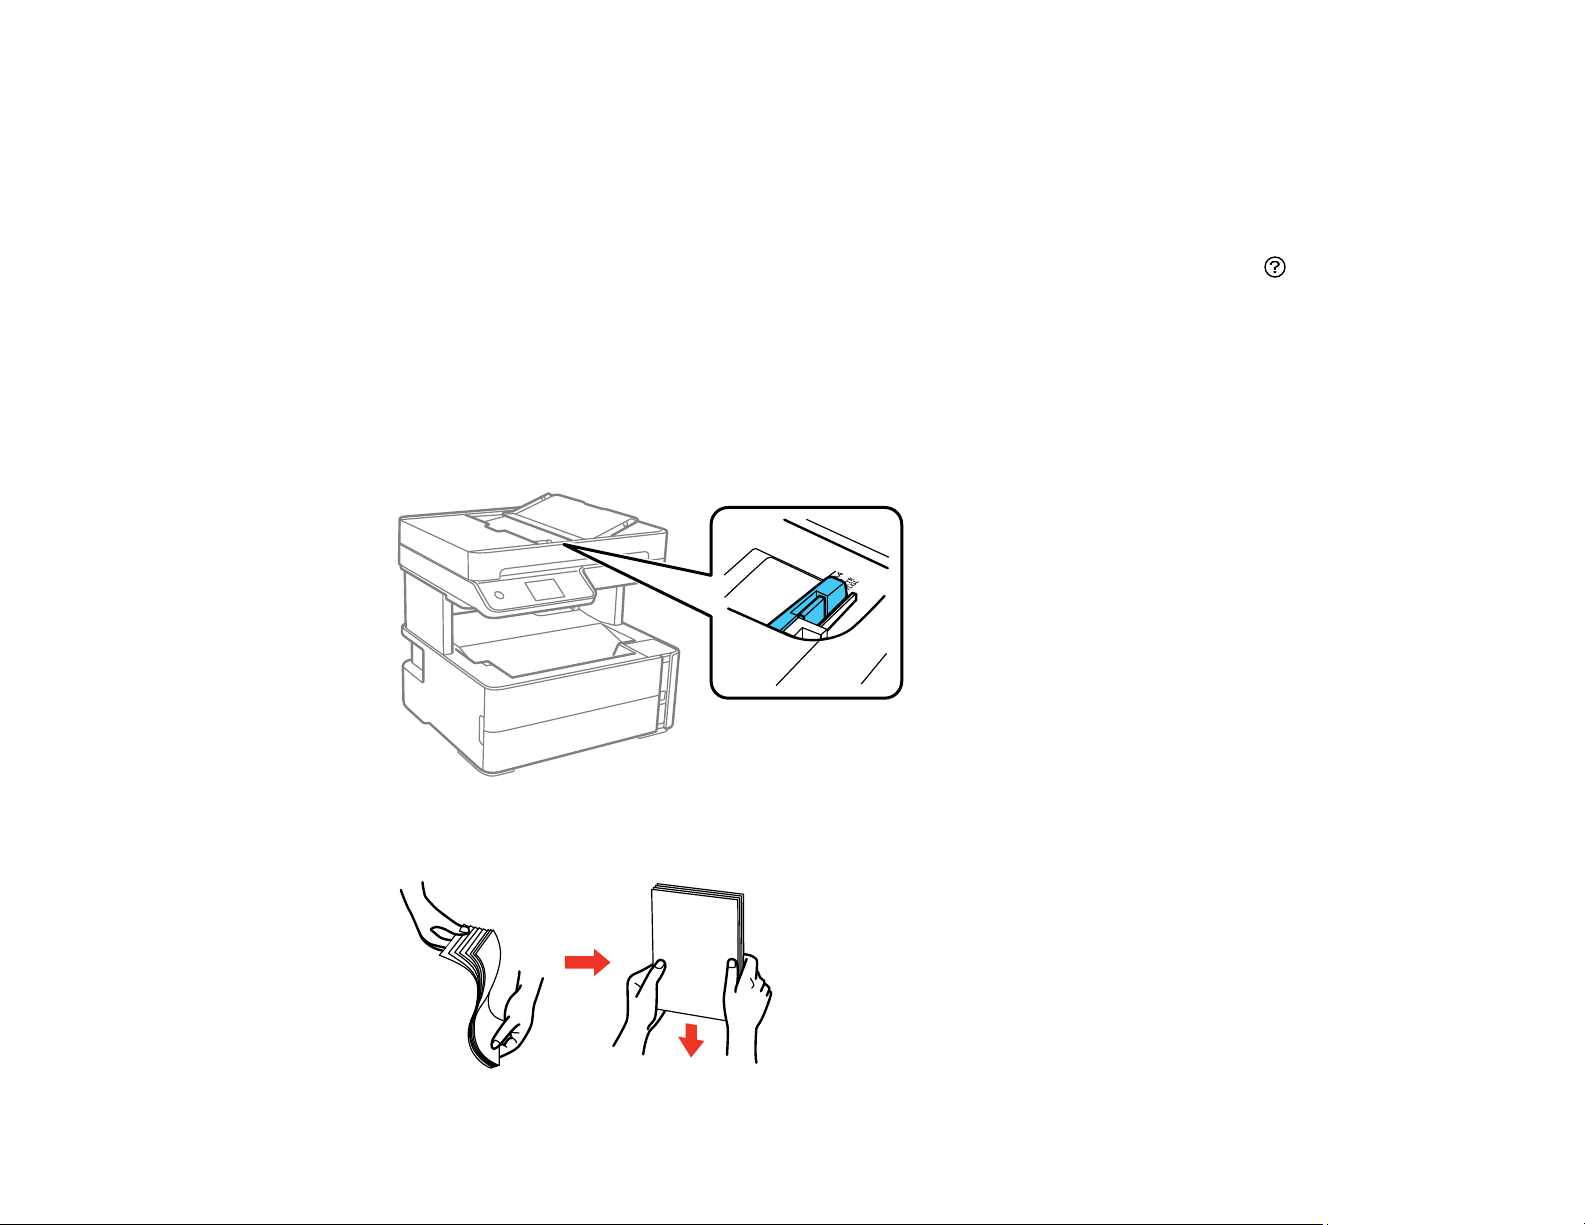
98
Caution: Make sure your originals are not creased or folded, and do not contain holes, staples, tape, or
other materials that could obstruct the feeder.
Caution: Do not place photographs or valuable artwork in the ADF. Place fragile or valuable originals on
the scanner glass to avoid wrinkling or damaging them.
Note: To view animated instructions on how to place originals on the scanner glass, press the button
and select How To > Place Originals
Note: When originals are placed in the ADF and on the scanner glass, priority is given to the originals in
the ADF.
1. Open the ADF input tray.
2. Slide the ADF edge guide outward.
3. Fan your stack of originals and tap them gently on a flat surface to even the edges.
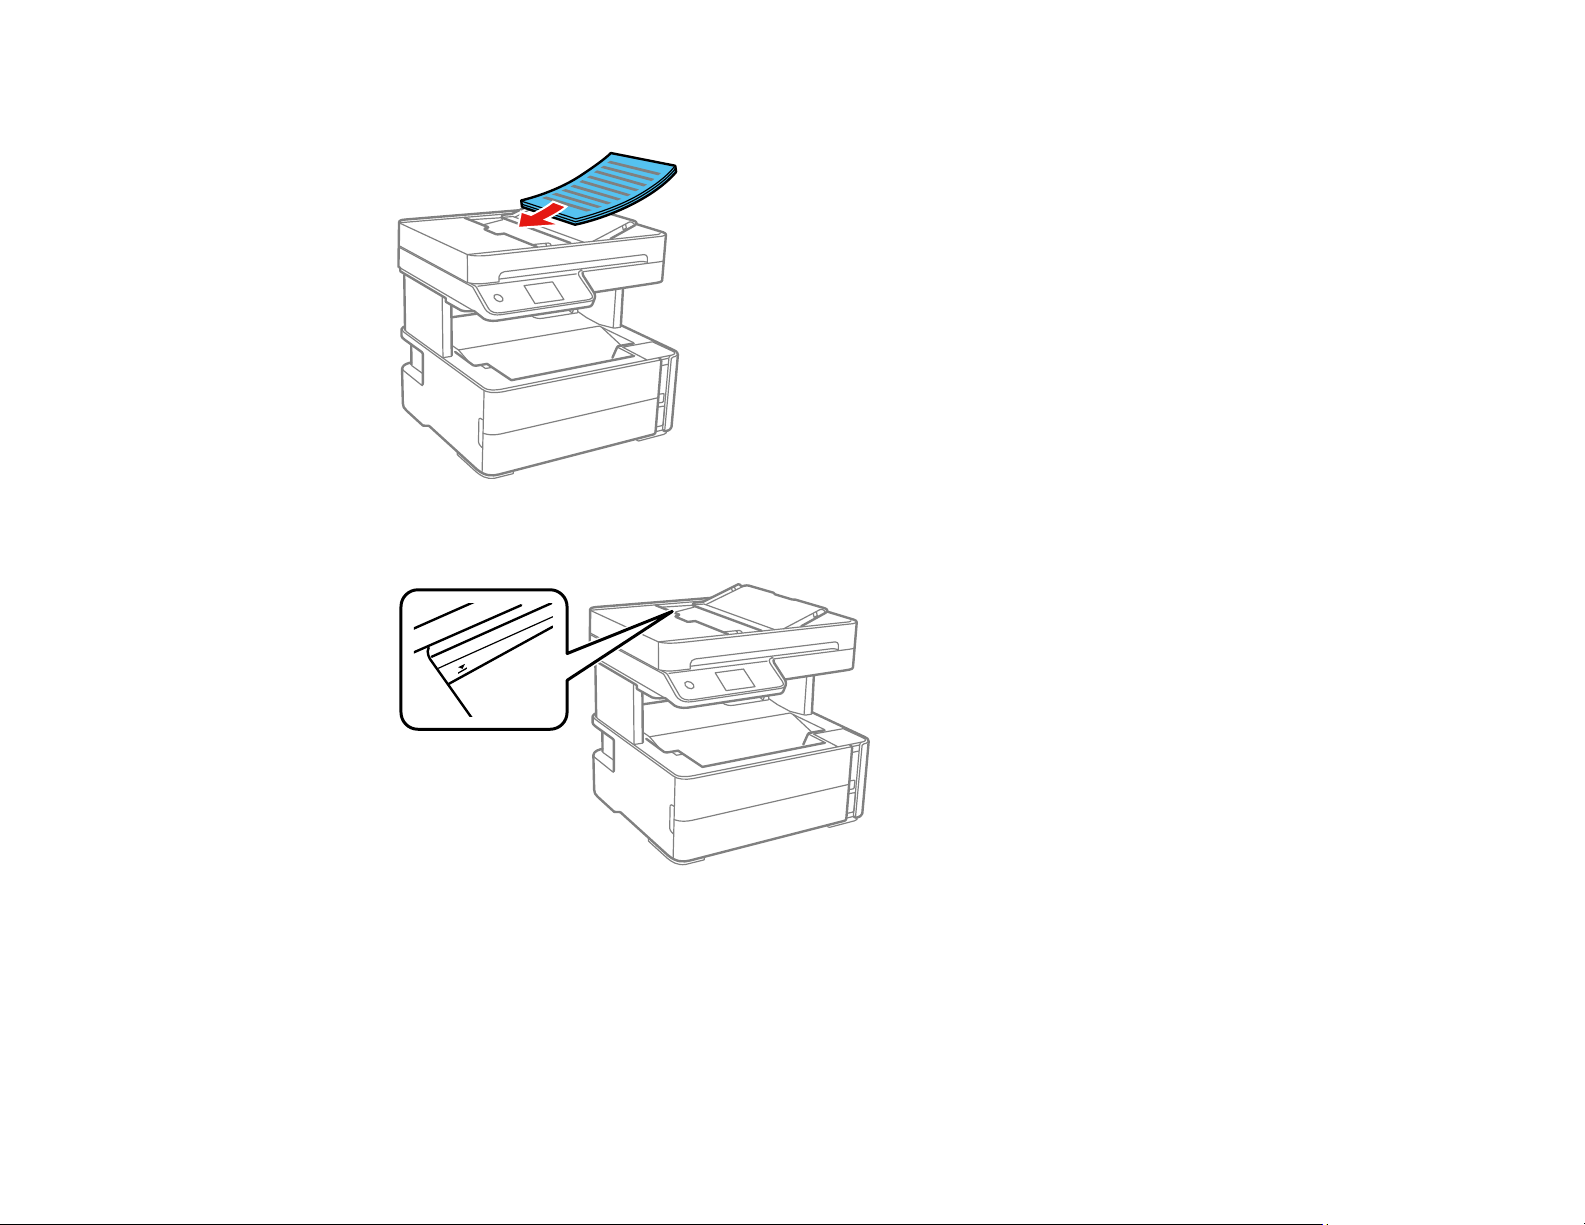
99
4. Insert the originals into the ADF faceup and short edge first.
Note: Do not load originals above the arrow mark on the ADF edge guide.
5. Slide the ADF edge guide against the originals, but not too tightly.
ADF Original Document Specifications
Parent topic: Placing Originals on the Product
Related references
Copying Options
100
Related topics
Copying
Scanning
Faxing
ADF Original Document Specifications
You can load original documents that meet these specifications in the ADF.
Paper type Paper size Paper weight Loading capacity
Plain paper Letter (8.5 × 11 inches
[216 × 279 mm])
17 to 24 lb
(64 to 95 g/m²)
Approximately 35 sheets
A4 (8.3 × 11.7 inches
[210 × 297 mm])
Legal (8.5 × 14 inches
[216 × 356 mm])
10 sheets
8.5 × 13 inches
(216 × 330 mm)
Caution: Do not load the following types of originals in the ADF, or they may be damaged or may
damage the scanner. Use the scanner glass for these types of originals:
• Photos
• Thermal paper
• Originals containing tape, staples, or paper clips
• Originals with carbon paper backing
• Originals that are bound
• Originals with labels, stickers, or sticky notes
• Ripped, curled, folded, deteriorated, or wrinkled originals
• Originals with holes
• Transparencies
• Originals that are cut in an irregular shape or with corners that are not right angles
Parent topic: Placing Originals in the Automatic Document Feeder
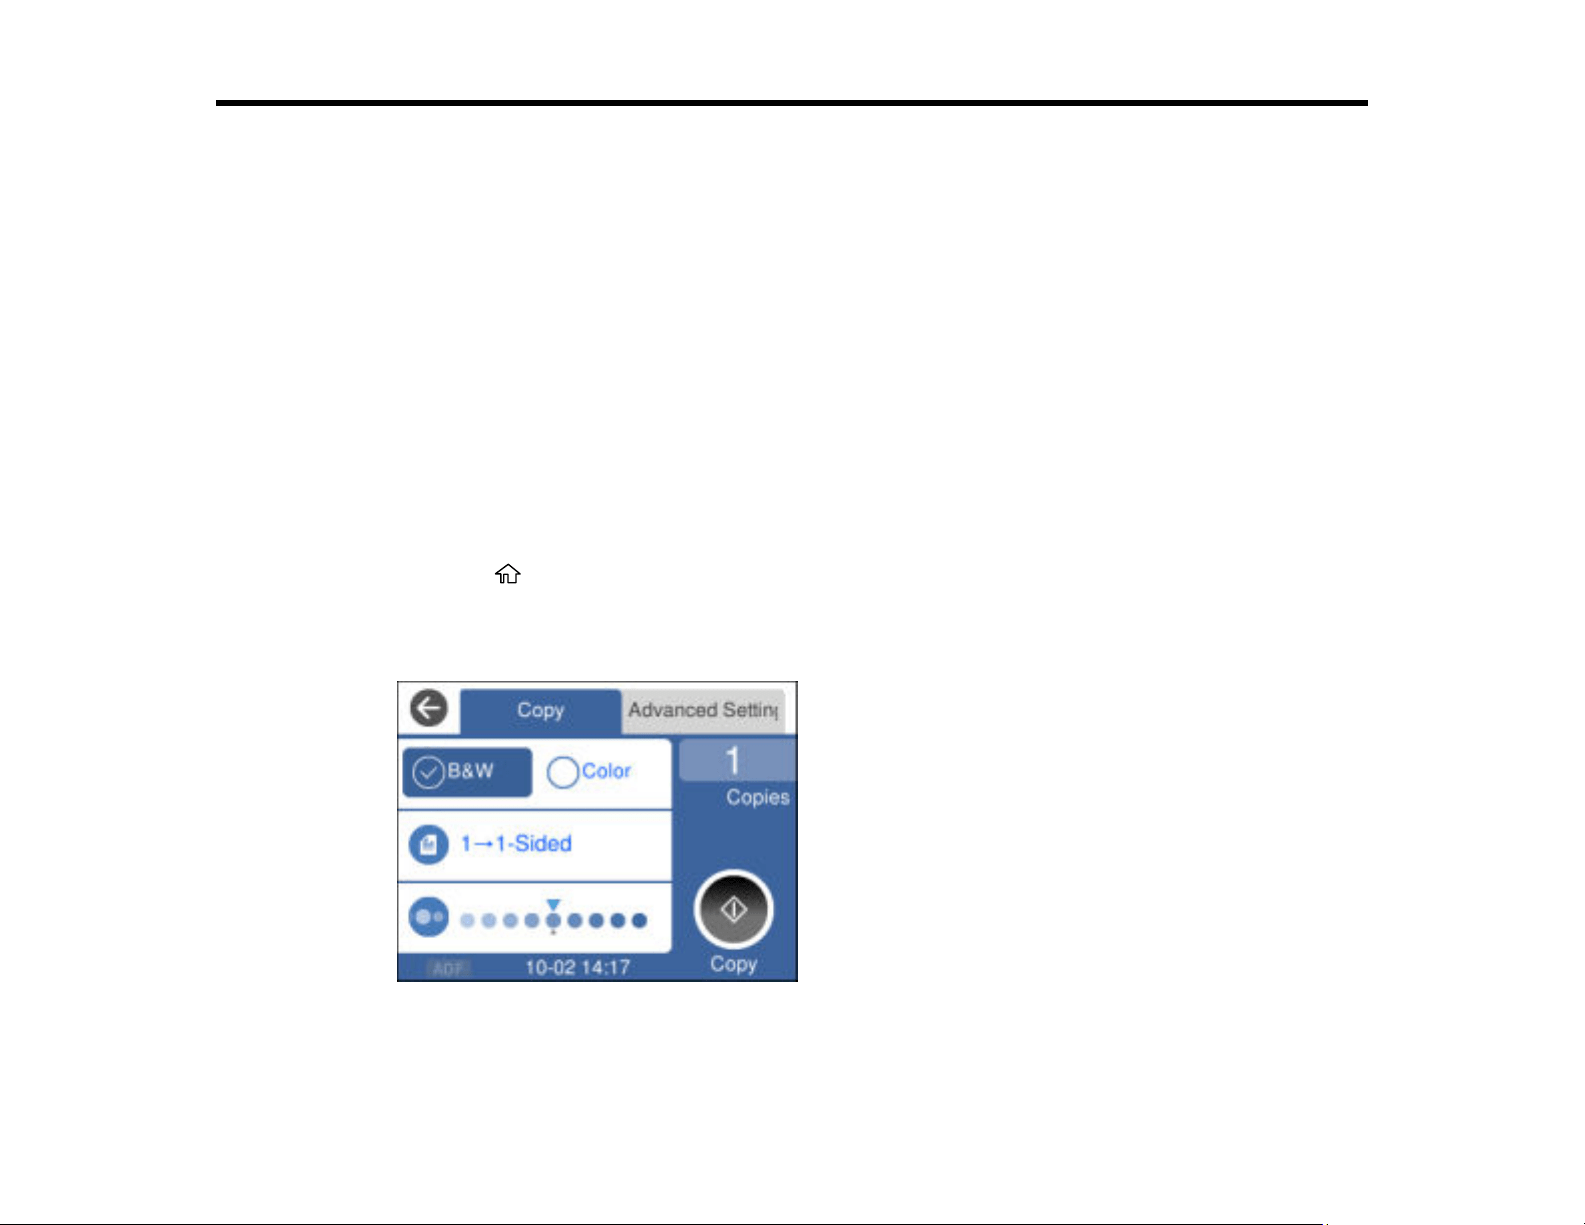
101
Copying
See the information here to copy documents or photos using your product.
Note: Copies may not be exactly the same size as your originals.
Copying Documents or Photos
Copying ID Cards
Copying Options
Copying Documents or Photos
You can copy documents or photos onto various sizes and types of paper, including Epson special
papers.
1. Place your original document or photo on the scanner glass or in the ADF.
2. Load the paper you want to print on in the product.
3. Press the home button, if necessary.
4. Select Copy.
You see a screen like this:
5. Select B&W or Color.

102
6. To print more than one copy, select Copies and use the displayed numeric keypad to select the
number of copies (up to 99).
7. Change any of the displayed settings as necessary.
8. Select Advanced Settings to view and change additional copy settings, if necessary.
9. When you are ready to copy, select Copy.
Note: To cancel printing, select Cancel on the LCD screen.
Parent topic: Copying
Related references
Compatible Epson Papers
Copying Options
Paper Loading Capacity
Related topics
Loading Paper
Placing Originals on the Product
Copying ID Cards
You can copy both sides of an ID card onto a single sheet of paper.
1. Load the paper you want to print on.
2. Place your card or photo on the scanner glass.
3. Press the home button, if necessary.
4. Select Copy.
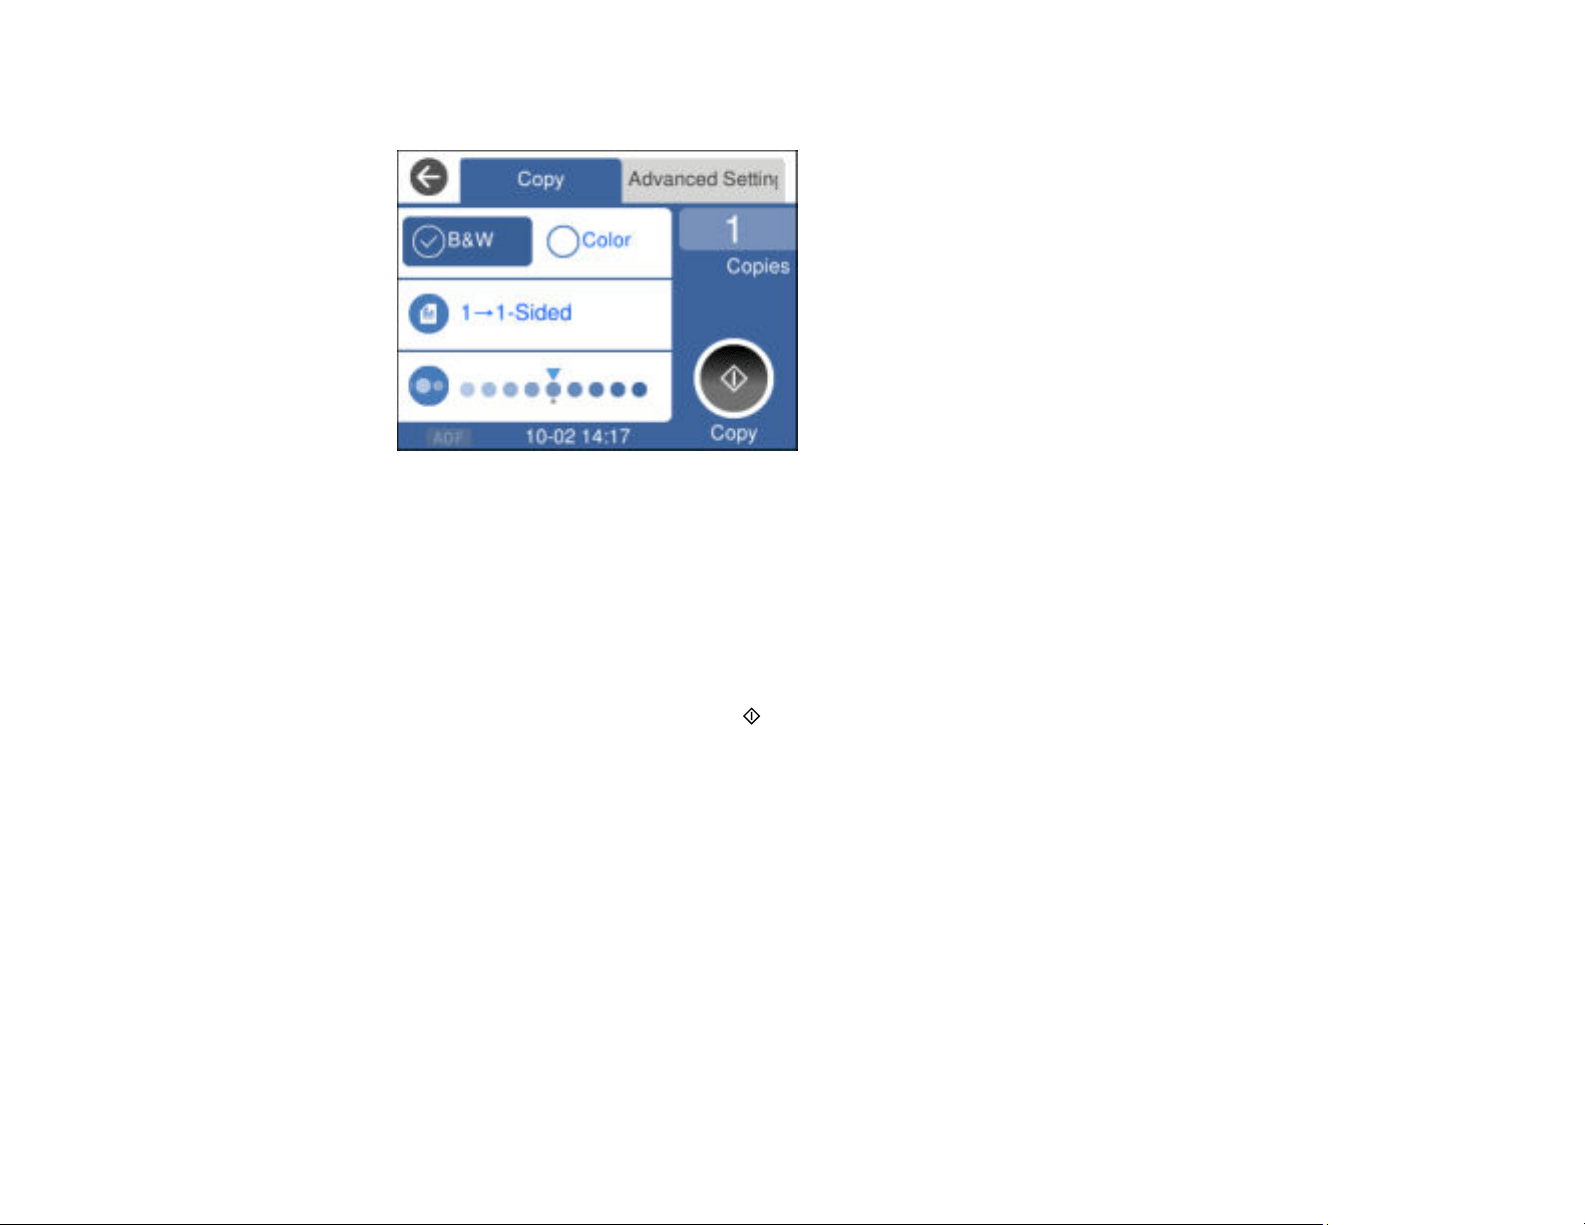
103
You see a screen like this:
5. Select the Advanced Settings tab.
6. Select ID Card Copy.
7. Scan and copy both sides of an ID card onto one side of the paper.
8. To print more than one copy, select Copies and use the displayed numeric keypad to select the
number of copies (up to 99).
9. Change any of the displayed settings as necessary.
10. When you are ready to copy, select Copy.
Note: To cancel printing, select Cancel on the LCD screen.
Parent topic: Copying
Copying Options
Select the copying options you want to use for your copies.
Note: Not all options or settings may be available, depending on other copying settings.
Basic Settings
104
Copying option Available settings Description
Color option B&W Select B&W to copy in black-and-white or Color to copy in
color.
Color
2-Sided 1>1-Sided Select to make 2-sided copies. When you select 1>2-Sided,
also select the orientation and binding edge for your
originals or copies.
1>2-Sided
Density selector Varying levels Adjusts the lightness or darkness of copies
Advanced Settings
Copying option Available settings Description
Paper Setting Various settings Select the paper size and the paper type
Reduce/Enlarge Actual Size Copies the original at its full size
45%->195% and
other conversions
Automatically converts from one size to another
Auto Fit Page Automatically sizes the image to fit the paper size you
selected
Original Size Various sizes Select the document size of your original
Multi-Page Single Page Copies each page of the original onto an individual sheet
2-up Copies multiple page documents onto one sheet. Scroll
down and select the document orientation and layout order
settings as necessary.
Quality Standard Select the quality for copying. Selecting High provides
higher quality printing, but the printing speed may be slower.
High
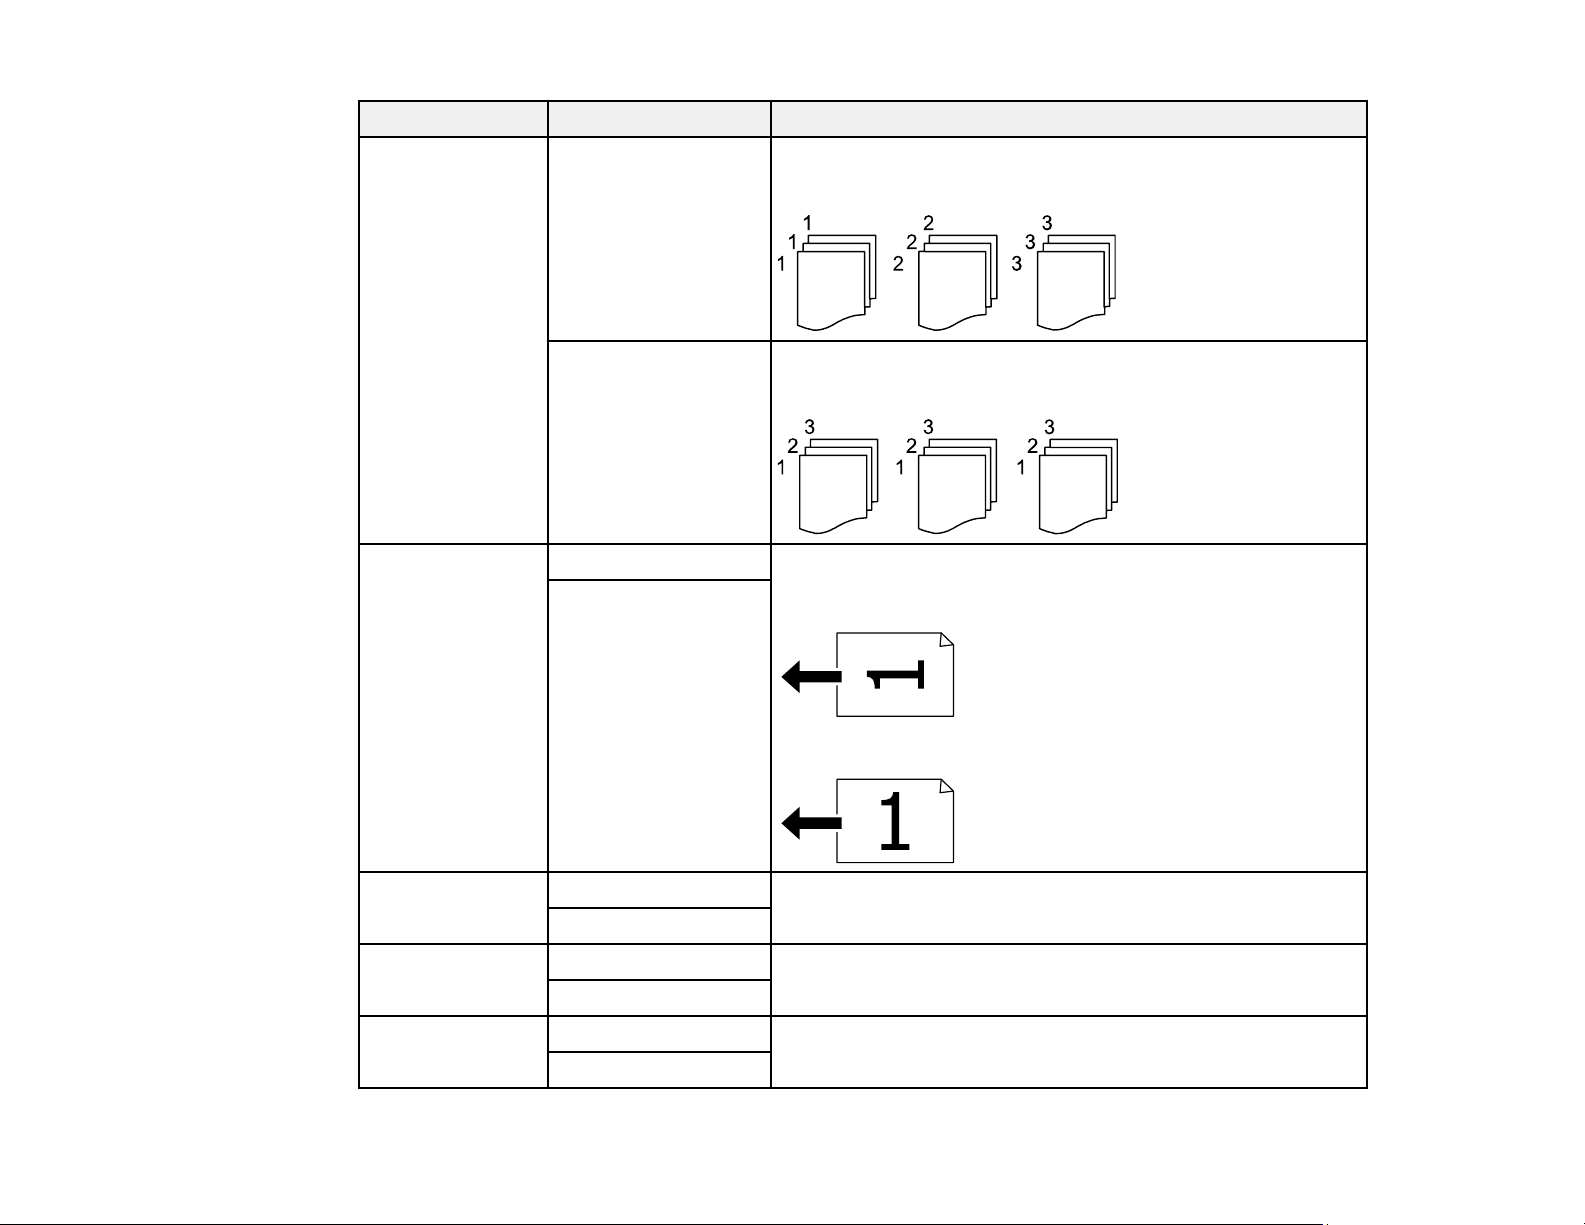
105
Copying option Available settings Description
Finishing Group (Same
Pages)
Select to print multiple copies of a multi-page document in
unordered groups
Collate (Page
Order)
Select to print multiple copies of a multi-page document in
ordered sets
Original
Orientation
Portrait Select the orientation of your original
Portrait:
Landscape:
Landscape
Remove Shadow Off Select On to remove the shadows in the background of the
original or in the center of booklet copies
On
Remove Punch
Holes
Off Select On to remove the binding holes
On
ID Card Copy Off Select On to copy both sides of an ID card onto one side of
a sheet of paper
On


107
Printing from a Computer
Before printing from your computer, make sure you have set up your product and installed its software
as described on the Start Here sheet.
Note: If you have an Internet connection, it is a good idea to check for updates to your product software
on Epson's support website. If you see a Software Update screen, select Enable automatic checking
and click OK. The update scans your system to see if you have the latest product software. Follow the
on-screen instructions.
Printing with the Standard Epson Printer Software - Windows
Printing with the Built-in Epson Driver - Windows 10 S
Printing with the Epson Standard Printer Software - Mac
Printing with the PCL Printer Software - Windows
Printing with the PostScript (PS3) Printer Software - Windows
Printing with the PostScript (PS3) Printer Software - Mac
Printing from a Smartphone or Tablet
Cancelling Printing Using a Product Button
Printing with the Standard Epson Printer Software - Windows
You can print with the standard Epson printer software using any Windows printing program, as
described in these sections.
Note: If you are using your Epson product with the Windows 10 S operating system, you cannot use the
software described in this section. You also cannot download and install any Epson product software
from the Epson website for use with Windows 10 S; you must obtain software only from the Windows
Store.
Selecting Basic Print Settings - Windows
Selecting Double-sided Printing Settings - Windows
Selecting Additional Layout and Print Options - Windows
Selecting a Printing Preset - Windows
Selecting Extended Settings - Windows
Printing Your Document - Windows
Locking Printer Settings - Windows

108
Selecting Default Print Settings - Windows
Changing Automatic Update Options
Parent topic: Printing from a Computer
Selecting Basic Print Settings - Windows
Select the basic settings for the document or photo you want to print.
1. Open a photo or document for printing.
2. Select the print command in your application.
Note: You may need to select a print icon on your screen, the Print option in the File menu, or
another command. See your application's help utility for details.
3. If necessary, select your product name as the printer you want to use.
Note: You may also need to select Properties or Preferences to view your print settings.
109
You see the Main tab of your printer settings window:
4. For the Paper Source setting, select where you loaded the paper you want to print on.
5. Select the size of the paper you loaded as the Document Size setting.
Note: You can also select the User-Defined setting to create a custom paper size.
6. Select the orientation of your document.
Note: If you are printing an envelope, select Landscape.
7. Select the type of paper you loaded as the Paper Type setting.
Note: The setting may not exactly match the name of your paper. Check the paper type settings list
for details.

110
8. Select the Quality setting that matches the print quality you want to use.
9. Select a Color option:
• To print a color document or photo, select the Color setting.
• To print text and graphics in black or shades of gray, select the Black/Grayscale setting.
10. To print on both sides of the paper, select a 2-Sided Printing option.
11. To print multiple pages on one sheet of paper, or print one image on multiple sheets of paper, select
one of the settings in the Multi-Page menu and select the printing options you want.
12. To print multiple copies and arrange their print order, select the Copies options.
13. To reduce noise during printing when you select Plain Paper/Bright White Paper, turn on Quiet
Mode (printing will be slower).
14. To preview your job before printing, select Print Preview.
15. To save your print job as a project that can be modified and combined with other print jobs, select
Job Arranger Lite.
Paper Source Options - Windows
Print Quality Options - Windows
Multi-Page Printing Options - Windows
Parent topic: Printing with the Standard Epson Printer Software - Windows
Related references
Paper or Media Type Settings - Printing Software
Related tasks
Selecting Double-sided Printing Settings - Windows
Printing Your Document - Windows
Paper Source Options - Windows
You can select any of the available options in the Paper Source menu to print on the paper loaded in that
source.
Auto Select
Automatically selects the paper source based on the selected paper size.
Paper Cassette
Selects the paper in the cassette as the paper source.
Rear Paper Feed Slot
Selects the paper in the rear feed slot as the paper source.
111
Parent topic: Selecting Basic Print Settings - Windows
Print Quality Options - Windows
You can select any of the available Quality options to fine-tune the quality of your print. Some settings
may be unavailable, depending on the paper type and border setting you have chosen.
Draft
For draft printing on plain paper.
Standard
For everyday text and image printing.
Standard - Vivid
For text and graphics with good quality and print speed.
High
For photos and graphics with high print quality.
Parent topic: Selecting Basic Print Settings - Windows
Multi-Page Printing Options - Windows
You can select any of the available options in the Multi-Page menu to set up your multi-page print job.
2-Up, 4-Up, 6-Up, 8-Up, 9-Up, and 16-Up
Prints several pages on one sheet of paper. Click the Layout Order button to select page layout and
border options.
2×1 Poster, 2×2 Poster, 3×3 Poster, 4×4 Poster
Prints one image on multiple sheets of paper to create a larger poster. Click the Settings button to
select image layout and guideline options.
Parent topic: Selecting Basic Print Settings - Windows
Selecting Double-sided Printing Settings - Windows
You can print on both sides of the paper by selecting one of the 2-Sided Printing options on the Main tab.
Note: Some options may be pre-selected or unavailable, depending on other settings you have chosen
or if you are accessing the product over a network.

112
1. Select one of the following options for 2-Sided Printing:
• Auto (Long-edge binding) to print your double-sided print job by automatically flipping the paper
on the long edge.
• Auto (Short-edge binding) to print your double-sided print job by automatically flipping the paper
on the short edge.
2. Click the Settings button.
113
You see this window:
114
3. Select the double-sided printing options you want to use.
4. Click OK to return to the Main tab.
5. Click the Print Density button.
You see this window:
6. Select the type of document you are printing as the Document Type setting. The software
automatically sets the Adjustments options for that document type.
7. If necessary, select the Adjustments options you want to use.
8. Click OK to return to the Main tab.
9. Print a test copy of your double-sided document to test the selected settings.
10. Follow any instructions displayed on the screen during printing.
Double-sided Printing Options - Windows
Print Density Adjustments - Windows
Parent topic: Printing with the Standard Epson Printer Software - Windows
Related tasks
Selecting Basic Print Settings - Windows

115
Double-sided Printing Options - Windows
You can select any of the available options on the 2-Sided Printing Settings window to set up your
double-sided print job.
Binding Edge Options
Select a setting that orients double-sided print binding in the desired direction.
Binding Margin Options
Select options that define a wider margin to allow for binding.
Start Page
Selects whether printing starts on the front or back page.
Create Folded Booklet Options
Select the Booklet checkbox and a binding option to print double-sided pages as a booklet.
Parent topic: Selecting Double-sided Printing Settings - Windows
Related tasks
Selecting Basic Print Settings - Windows
Print Density Adjustments - Windows
You can select any of the available options on the Print Density Adjustment window to adjust the print
quality of your double-sided print job.
Print Density
Sets the level of ink coverage for double-sided printing.
Increase Ink Drying Time
Sets the amount of time required for drying ink after printing on one side of the paper before printing
the other side in double-sided printing to prevent ink smearing.
Parent topic: Selecting Double-sided Printing Settings - Windows
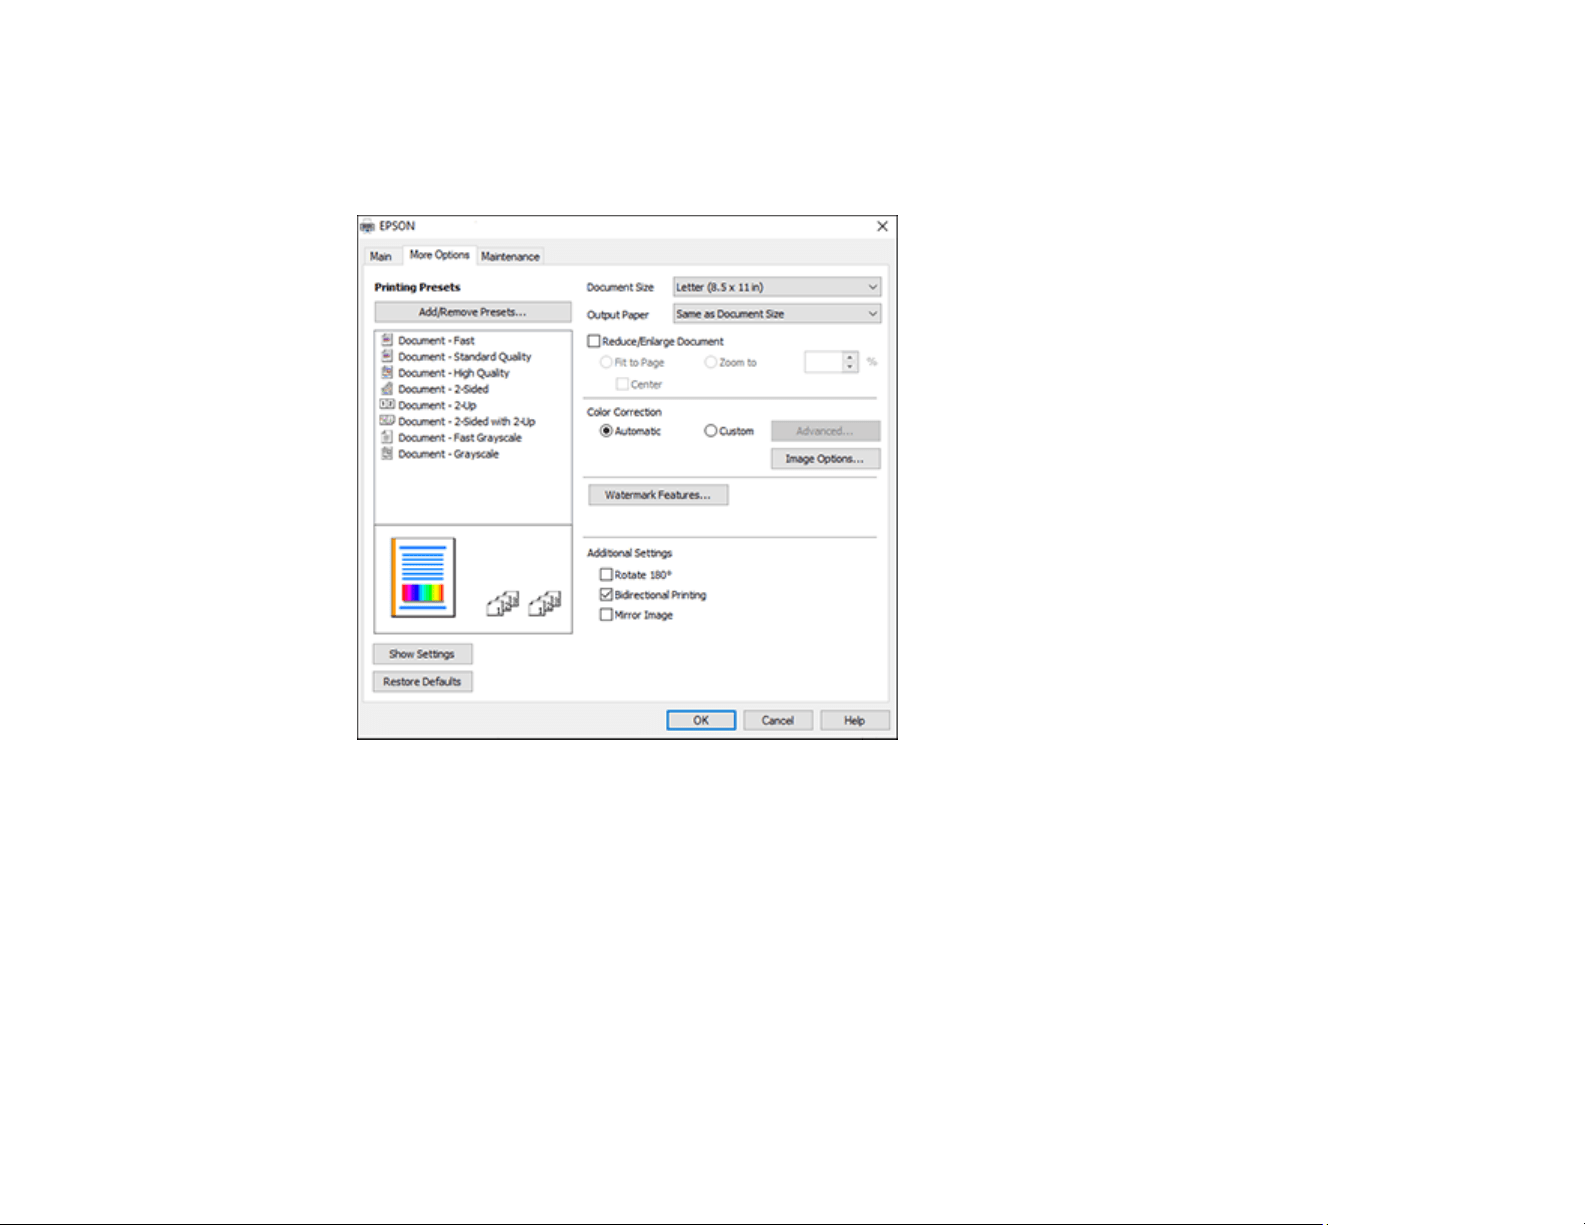
116
Selecting Additional Layout and Print Options - Windows
You can select a variety of additional layout and printing options for your document or photo on the More
Options tab.
1. To change the size of your printed document or photo, select the Reduce/Enlarge Document
checkbox and select one of these sizing options:
• Select the Fit to Page option to size your image to fit the paper you loaded. Select the size of your
document or photo as the Document Size setting, and the size of your paper as the Output Paper
setting. If you want to center your image on the paper, select the Center option.
• Select the Zoom to option to reduce or enlarge your document or photo by a specific percentage.
Select the percentage in the % menu.
2. Select one of the following Color Correction options:
• Select Automatic to automatically adjust the sharpness, brightness, contrast, and color saturation
for your image.

117
• Select Custom and click the Advanced button to manually adjust the color correction settings or
turn off color management in your printer software.
• Select Image Options to access additional settings for improving printed images.
3. To add the following features, click the Watermark Features button:
• Watermark: adds a visible watermark to your printout
• Header/Footer: adds information such as the date and time to the top or bottom of your printout
Note: Click the Settings button to customize the text and location of the header or footer.
4. Select any of the Additional Settings options to customize your print.
Custom Color Correction Options - Windows
Image Options and Additional Settings - Windows
Header/Footer Settings - Windows
Parent topic: Printing with the Standard Epson Printer Software - Windows
Related tasks
Printing Your Document - Windows
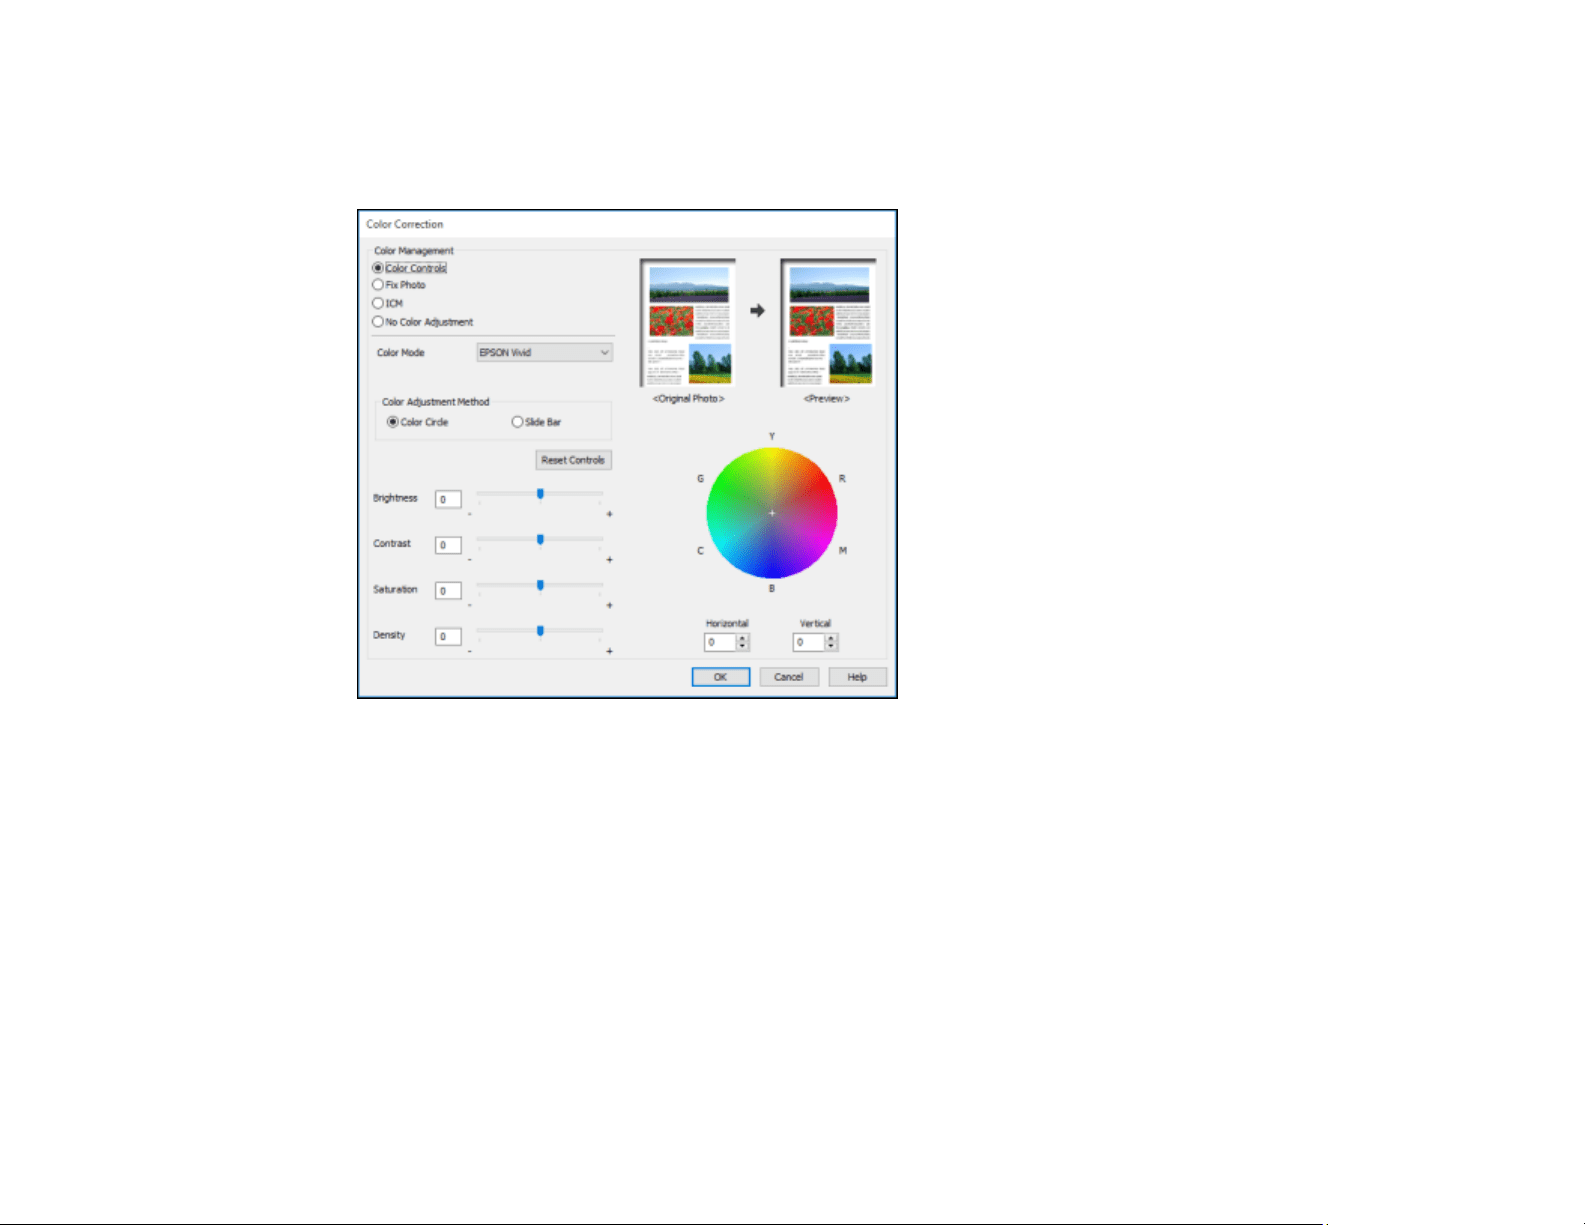
118
Custom Color Correction Options - Windows
You can select any of the available options in the Color Correction window to customize the image colors
for your print job.
Color Controls
Lets you select a Color Mode setting, individual settings for Brightness, Contrast, Saturation, and
Density, and individual color tones. Depending on the selected color mode, you can also adjust the
midtone density using the Gamma setting.
Fix Photo
Improves the color, contrast, and sharpness of flawed photos.
Note: Fix Photo uses a sophisticated face recognition technology to optimize photos that include
faces. For this to work, both eyes and the nose must be visible in the subject's face. If your photo
includes a face with an intentional color cast, such as a statue, you may want to turn off Fix Photo to
retain the special color effects.

119
ICM
Lets you manage color using installed color printing profiles.
No Color Adjustment
Turns off color management in your printer software so you can manage color using only your
application software.
Parent topic: Selecting Additional Layout and Print Options - Windows
Image Options and Additional Settings - Windows
You can select any of the Image Options and Additional Settings to customize your print. Some options
may be pre-selected or unavailable, depending on other settings you have chosen.
Image Options
Emphasize Text
Adjusts the weight of printed text to increase readability.
Emphasize Thin Lines
Adjusts the weight of printed lines to increase visibility.
Edge Smoothing
Smooths jagged edges in low-resolution images such as screen captures or images from the Web.
Fix Red-Eye
Reduces or removes red-eye in photos.
Print Text in Black
Prints colored text in black.
For Color Text
Prints colored text on a background pattern or underlined.
For Color Graphs and Images
Prints colored graphics and images with overlay patterns.
For Color Text, Graphs, and Images
Prints colored text, graphics, and images with overlay patterns.
Enhancement Options
Specifies Color Universal Print enhancement settings for text, graphics, and images.
Additional Settings Options
Rotate 180º
Prints the image rotated 180º from its original orientation.
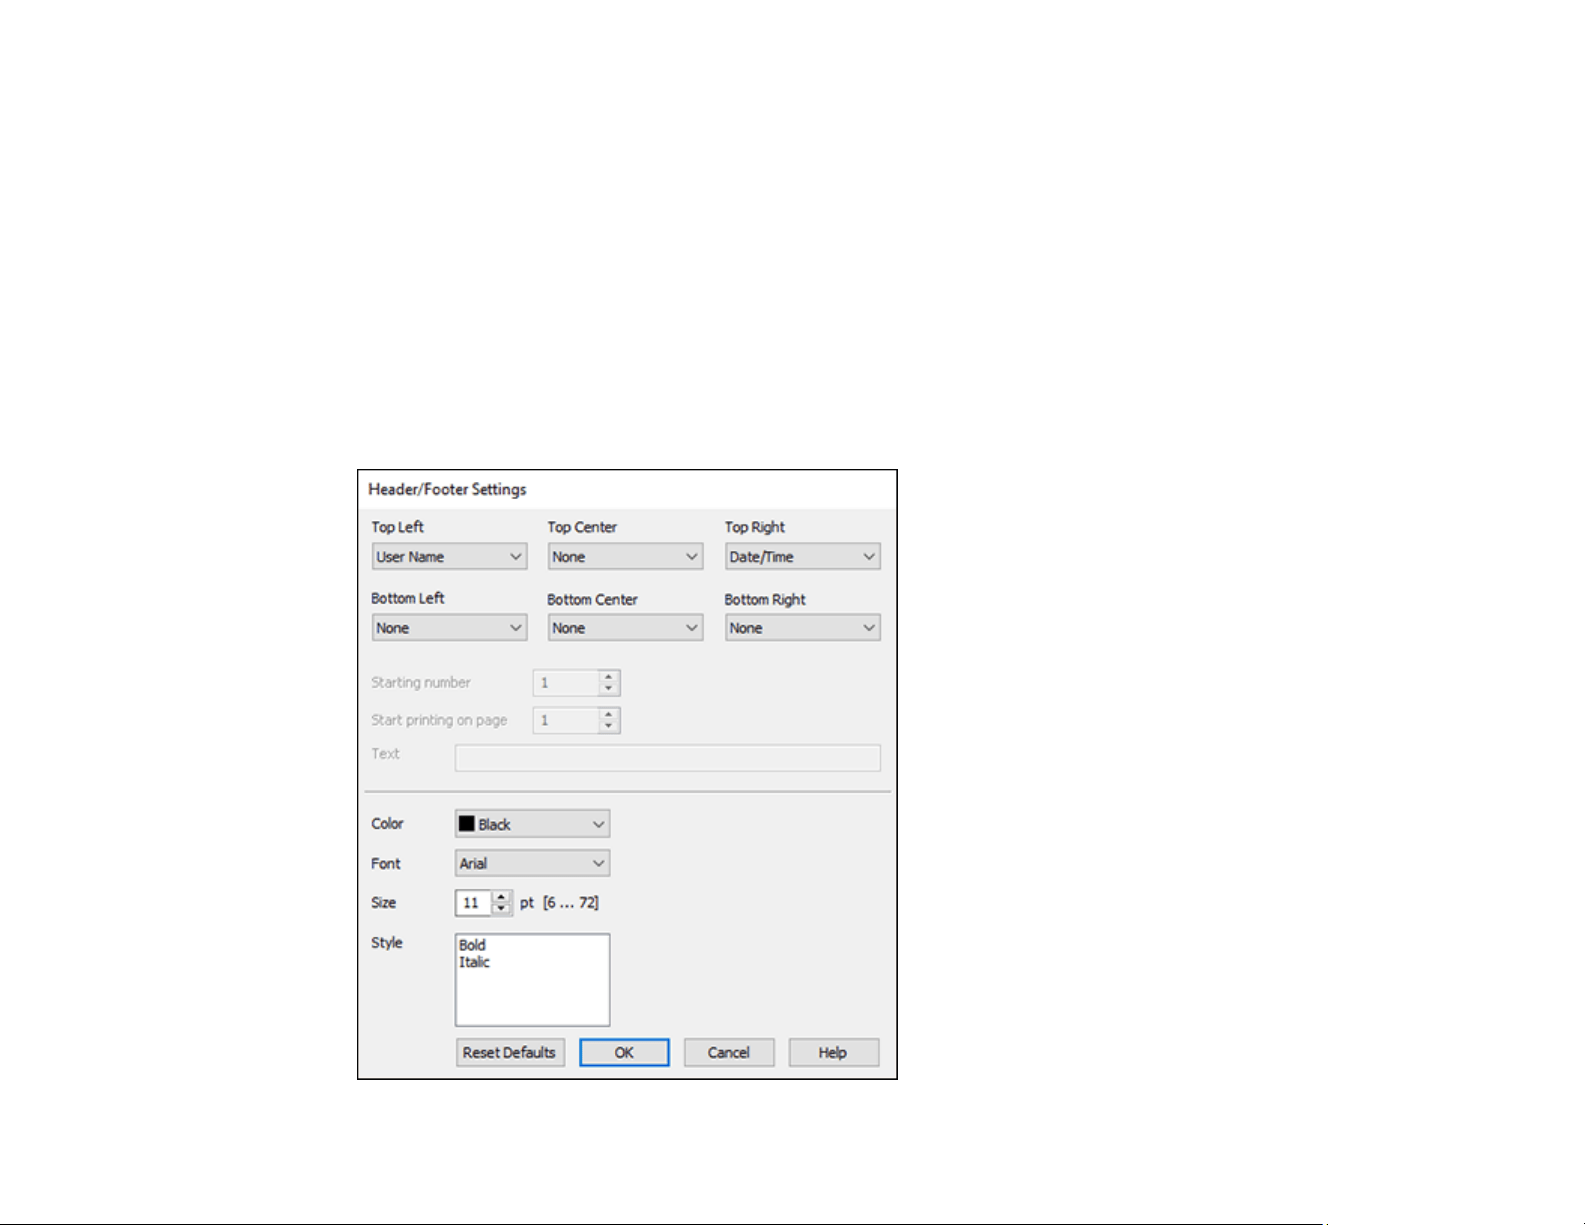
120
Bidirectional Printing
Prints in both directions (right-to-left and left-to-right), speeding up printing, but may reduce print
quality.
Mirror Image
Flips the printed image left to right.
Parent topic: Selecting Additional Layout and Print Options - Windows
Header/Footer Settings - Windows
You can select any of the Header/Footer Settings options to add headers or footers when you print. The
items are available to print at the top or bottom of your pages, in either the left, right, or center of the
page.
Note: These settings are not saved with your document.

121
You can select to print the following information:
• User Name
• Computer Name
• Date
• Date/Time
• Document Name
• Collate Number
• Page Number
• Text
You can also adjust the text settings for the printed information.
Note: The user name, computer name, date, and time come from the Windows Control Panel on your
computer.
Parent topic: Selecting Additional Layout and Print Options - Windows
Selecting a Printing Preset - Windows
For quick access to common groups of print settings, you can select a printing preset on the Main or
More Options tab.
Note: You can create your own preset by clicking the Add/Remove Presets button.
1. Click the Main or More Options tab.
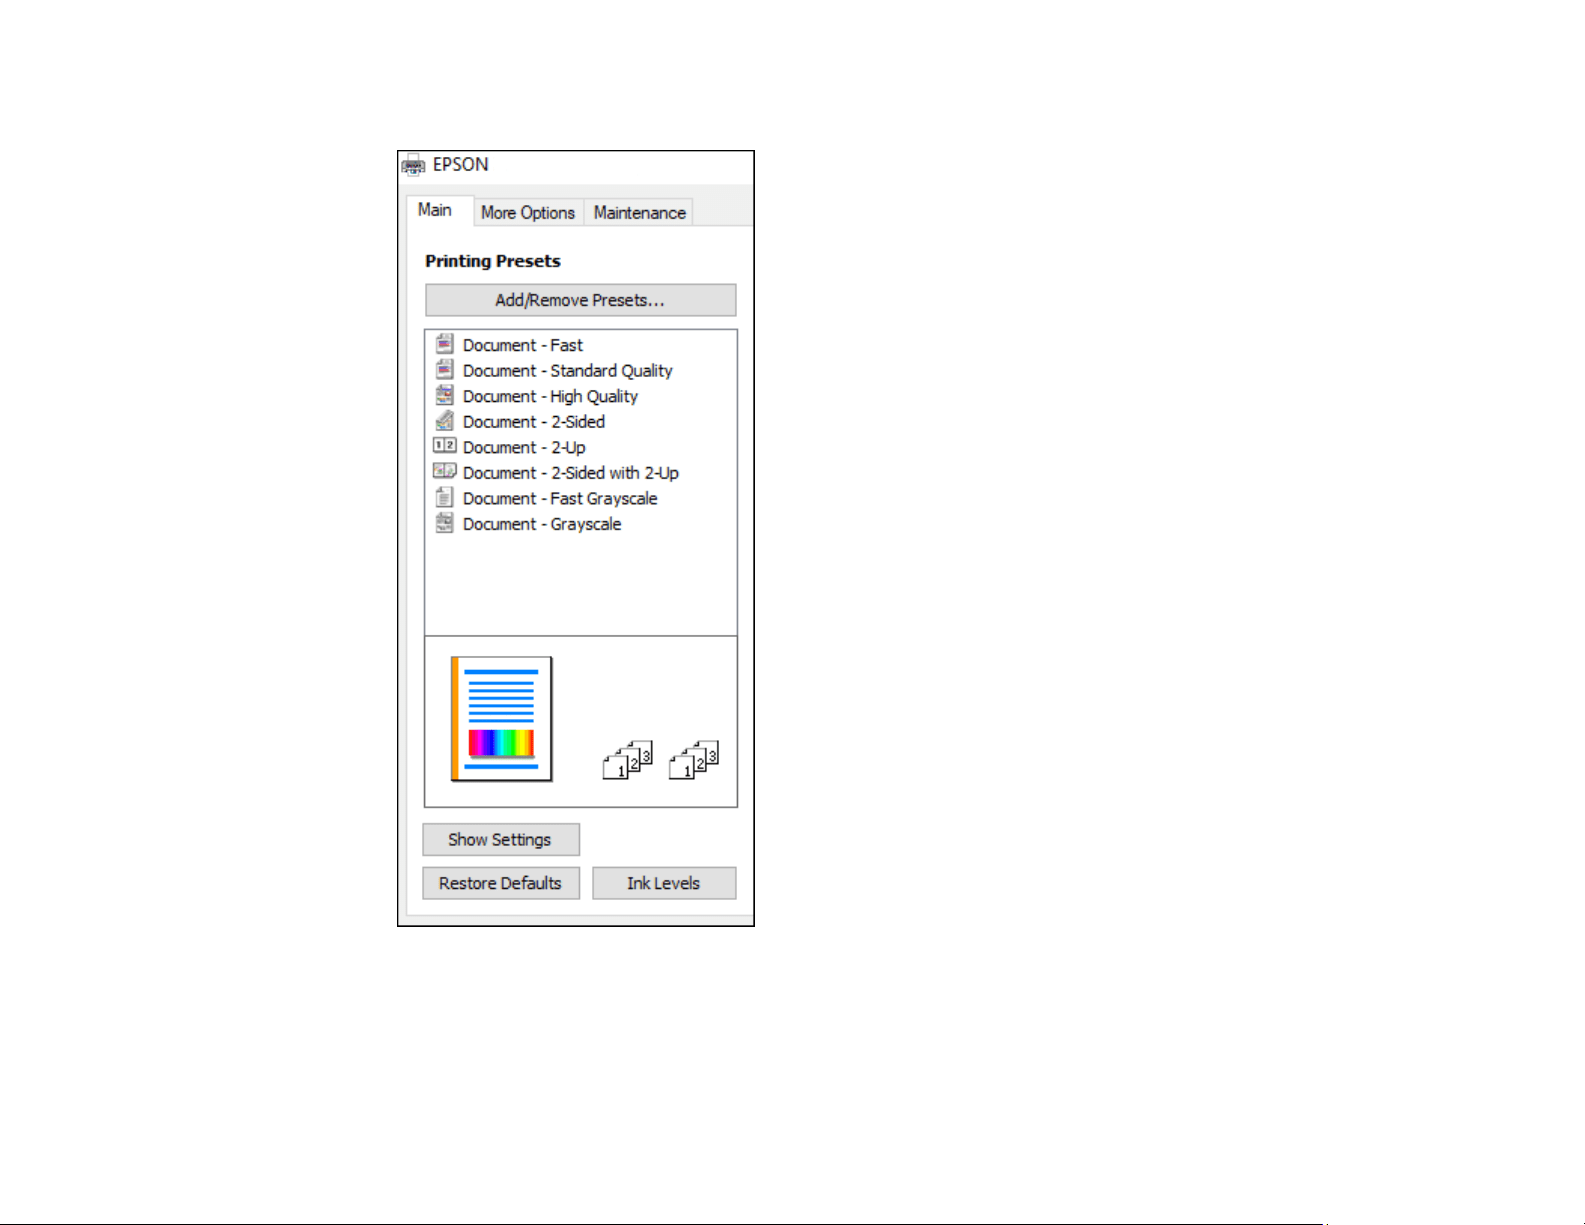
122
You see the available Printing Presets on the left:
2. Place your cursor over one of the Printing Presets to view its list of settings.
3. Click on a preset to change its settings or delete it, or use any of the available options on the screen
to control your printing presets.
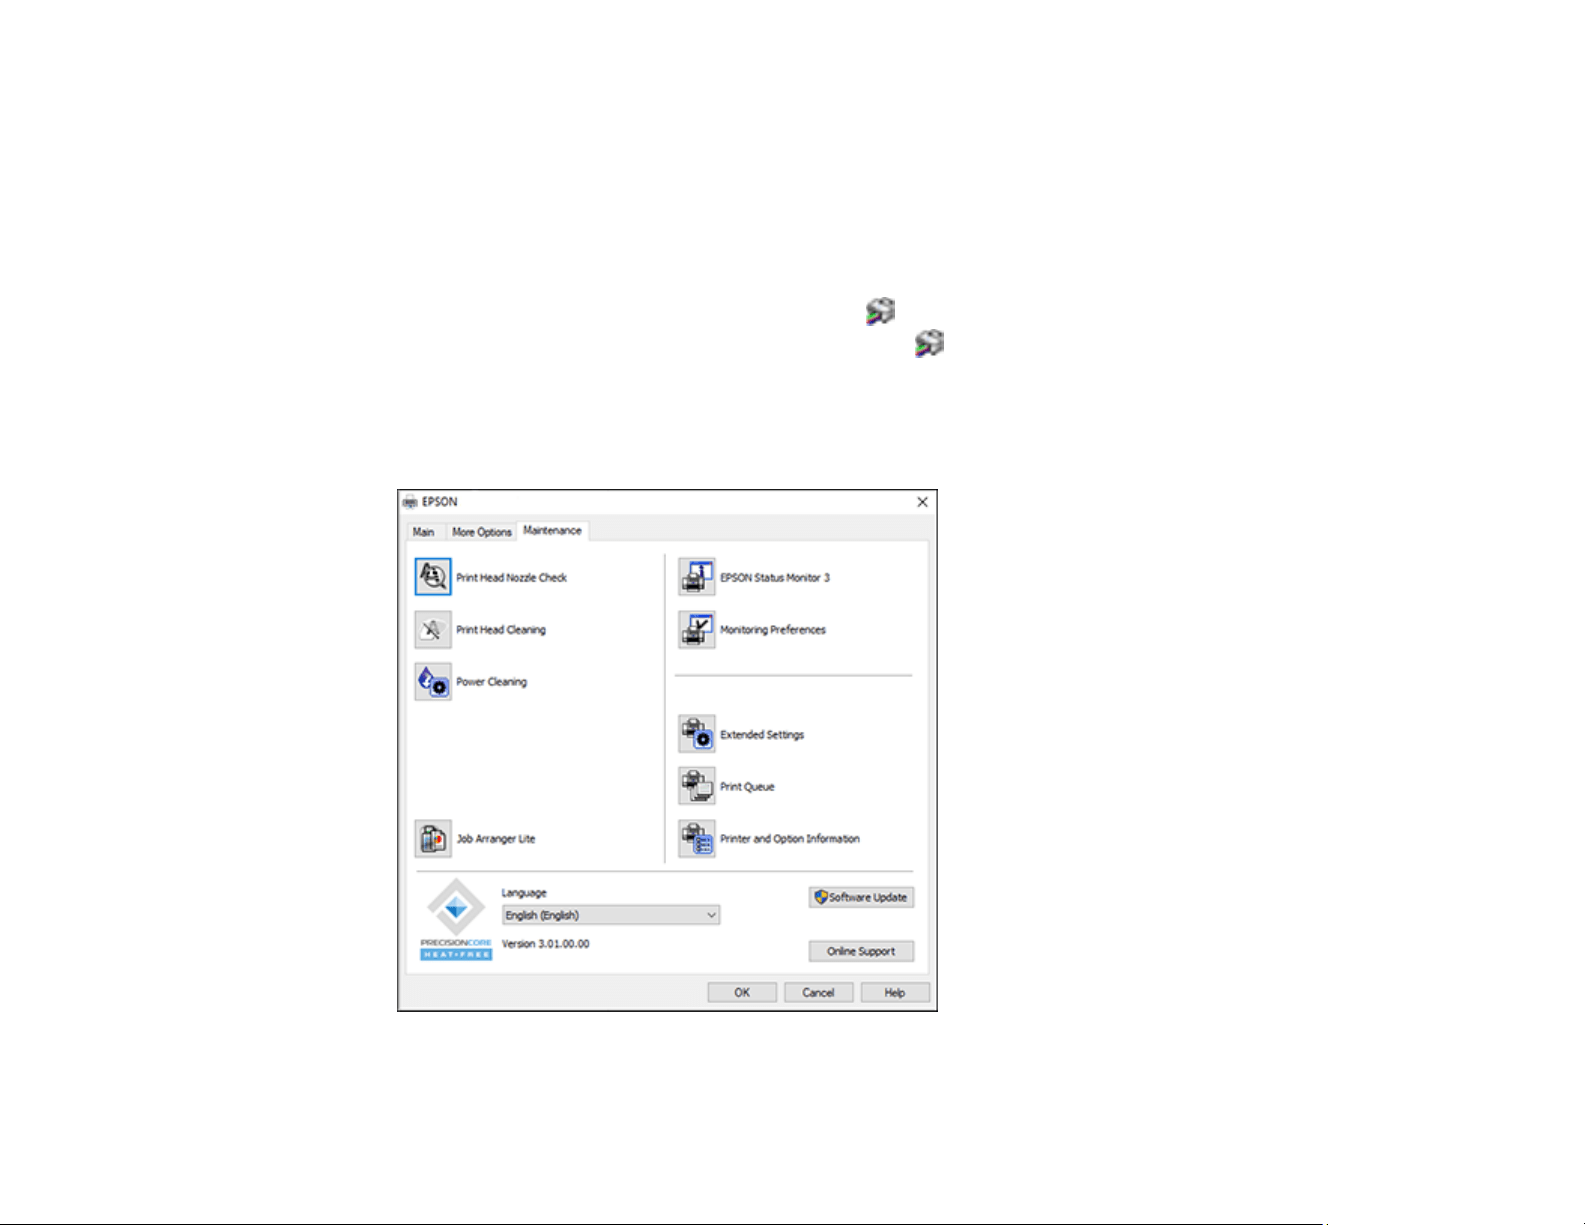
123
4. To choose a preset for printing, select it.
5. Click OK.
Parent topic: Printing with the Standard Epson Printer Software - Windows
Selecting Extended Settings - Windows
You can select additional settings that apply to all the print jobs you send to your product.
1. Access the Windows Desktop and right-click the icon for your product in the right side of the
Windows taskbar, or click the up arrow and right-click .
2. Select Printer Settings.
3. Click the Maintenance tab.
You see the maintenance options:
4. Click the Extended Settings button.
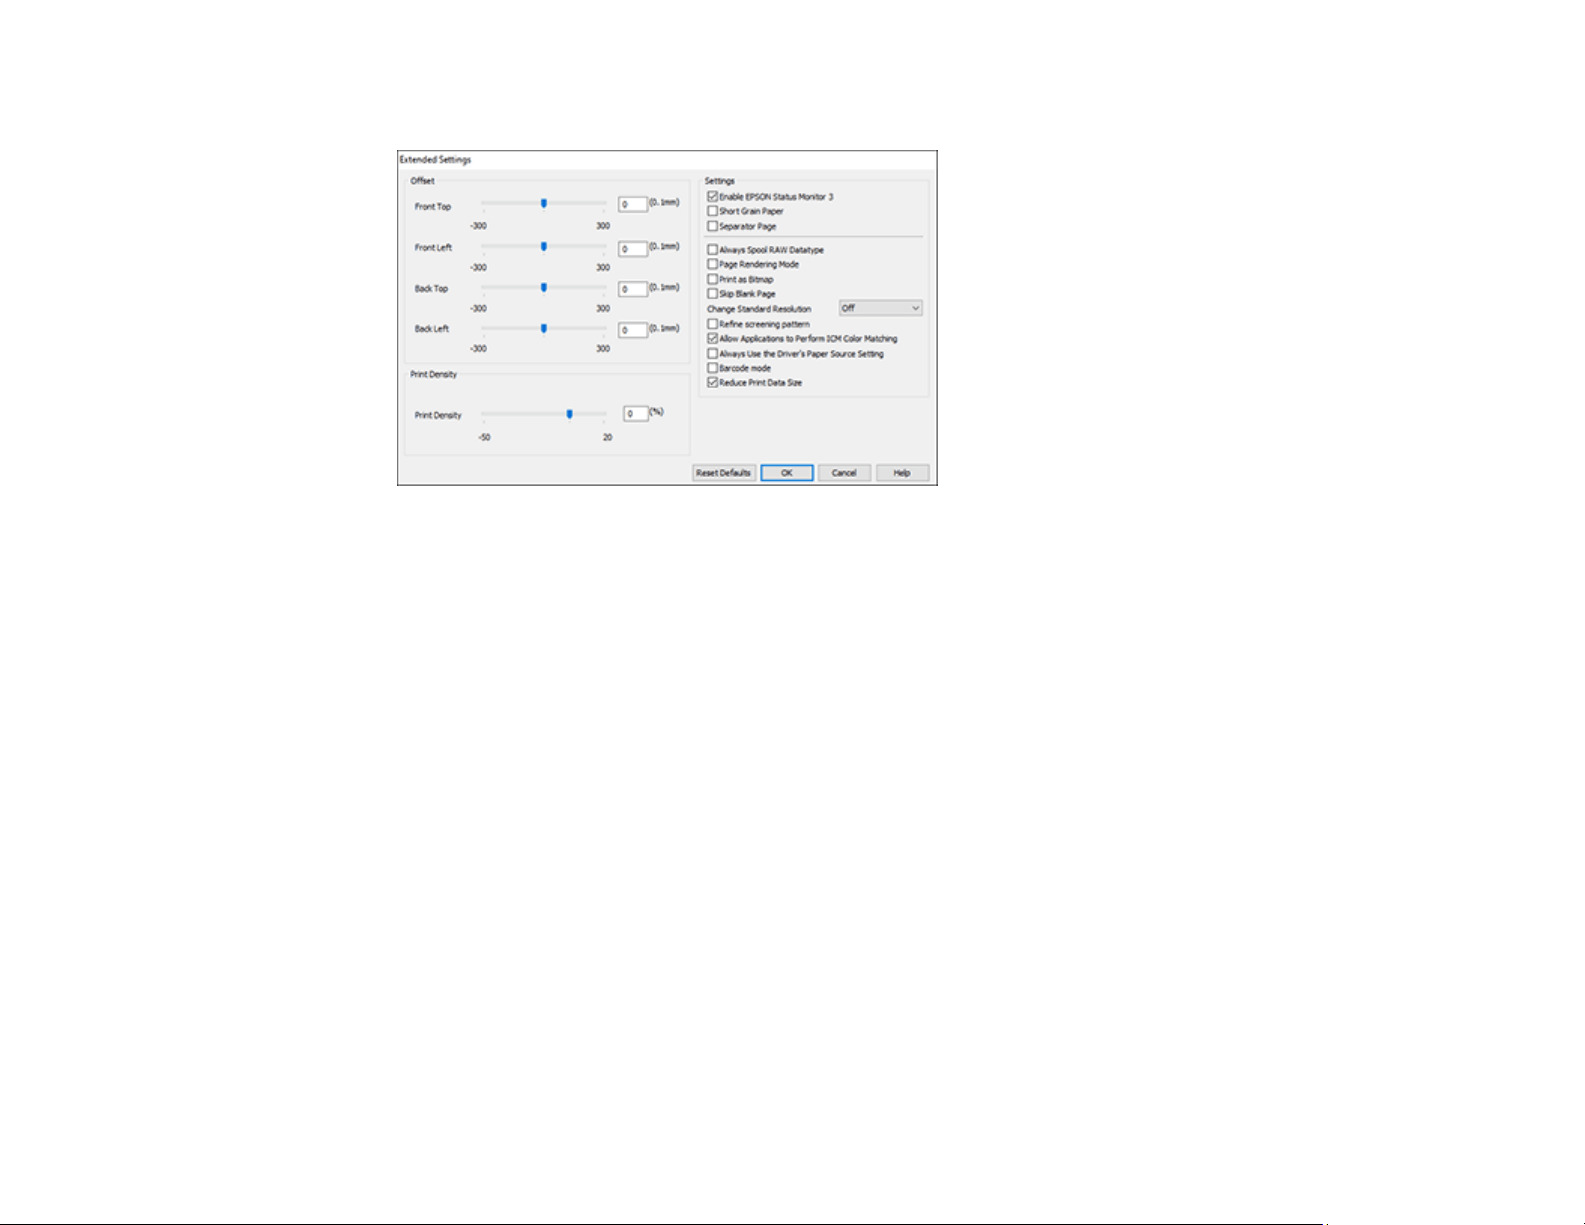
124
You see this window:
5. Select any of the extended settings to customize your print.
6. Click OK to close the Extended Settings window.
7. Click OK to close the printer software window.
Extended Settings - Windows
Parent topic: Printing with the Standard Epson Printer Software - Windows
Extended Settings - Windows
You can select these settings on the Extended Settings window.
Enable EPSON Status Monitor 3
Enables product monitoring for ink and paper supplies and other issues.
Short Grain Paper
Prevents ink from smearing when you print on envelopes or other thick paper.
Separator Page
Before each document, prints a separator page containing the title, user, date, and time.
Always Spool RAW Datatype
Increases print speed and may solve other printing problems.
Page Rendering Mode
Increases print speed when printing is extremely slow or the print head stops during printing.

125
Print as Bitmap
Increases print speed when printing is extremely slow or the print head stops during printing, and
other settings do not help.
Skip Blank Page
Ensures that your product does not print pages that contain no text or images.
Change Standard Resolution
Reduces the resolution of print data to correct printing problems.
Refine screening pattern
Prints graphics with a finer screening pattern.
Allow Applications to Perform ICM Color Matching
Allows applications to perform ICM color matching.
Always Use the Driver's Paper Source Setting
Prints using the paper source setting in the printer driver, rather than the setting in your application.
Barcode mode
Reduces bleeding when printing barcodes on plain paper, letterhead paper, recycled paper,
preprinted paper, envelopes, and thick paper.
Reduce Print Data Size
Increases print data compression to improve print speed. Not recommended when printing fine
patterns.
Parent topic: Selecting Extended Settings - Windows
Printing Your Document - Windows
Once you have selected your print settings, you are ready to save your settings and print.
1. Click OK to save your settings.
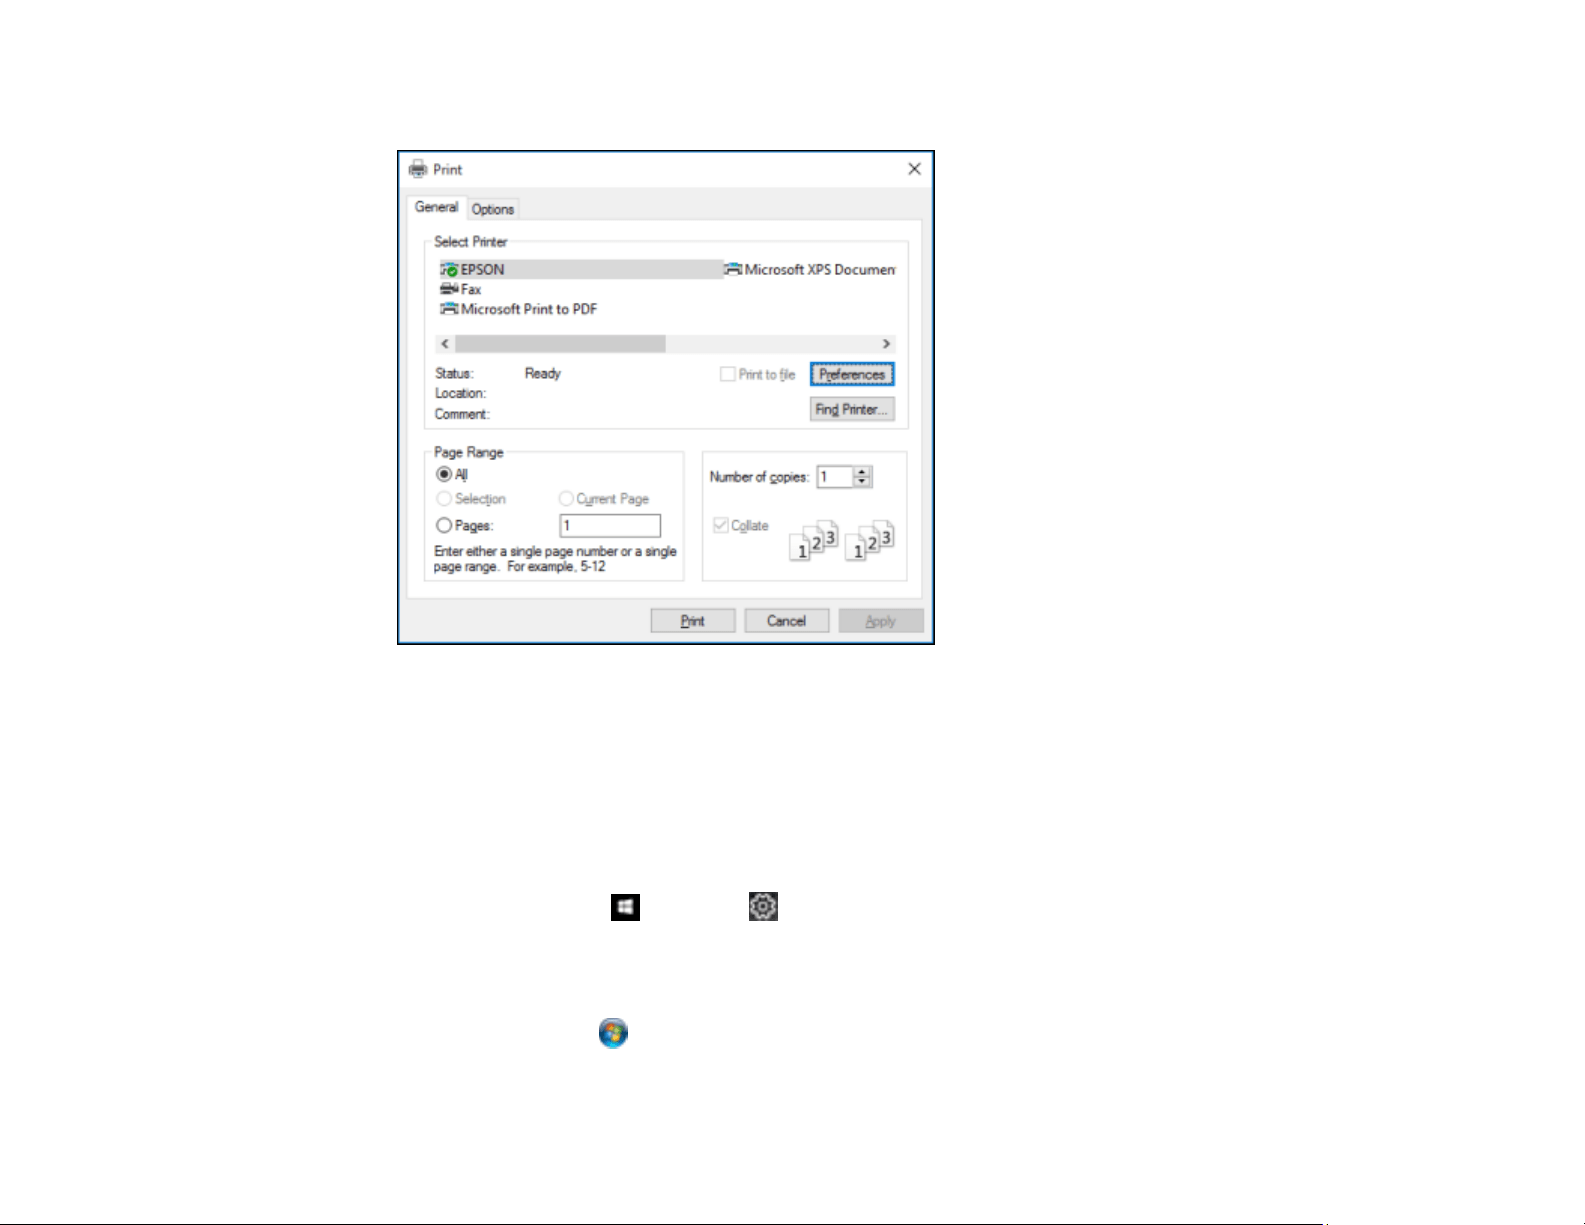
126
You see your application's Print window, such as this one:
2. Click OK or Print to start printing.
Parent topic: Printing with the Standard Epson Printer Software - Windows
Locking Printer Settings - Windows
Windows administrators can lock access to some printer settings to prevent unauthorized changes.
1. Do one of the following:
• Windows 10: Click and select (Settings) > Devices > Printers & scanners. Select your
product name and select Manage > Printer properties.
• Windows 8.x: Navigate to the Apps screen and select Control Panel > Hardware and Sound >
Devices and Printers. Right-click your product and select Printer properties.
• Windows 7: Click and select Devices and Printers. Right-click your product and select
Printer properties.
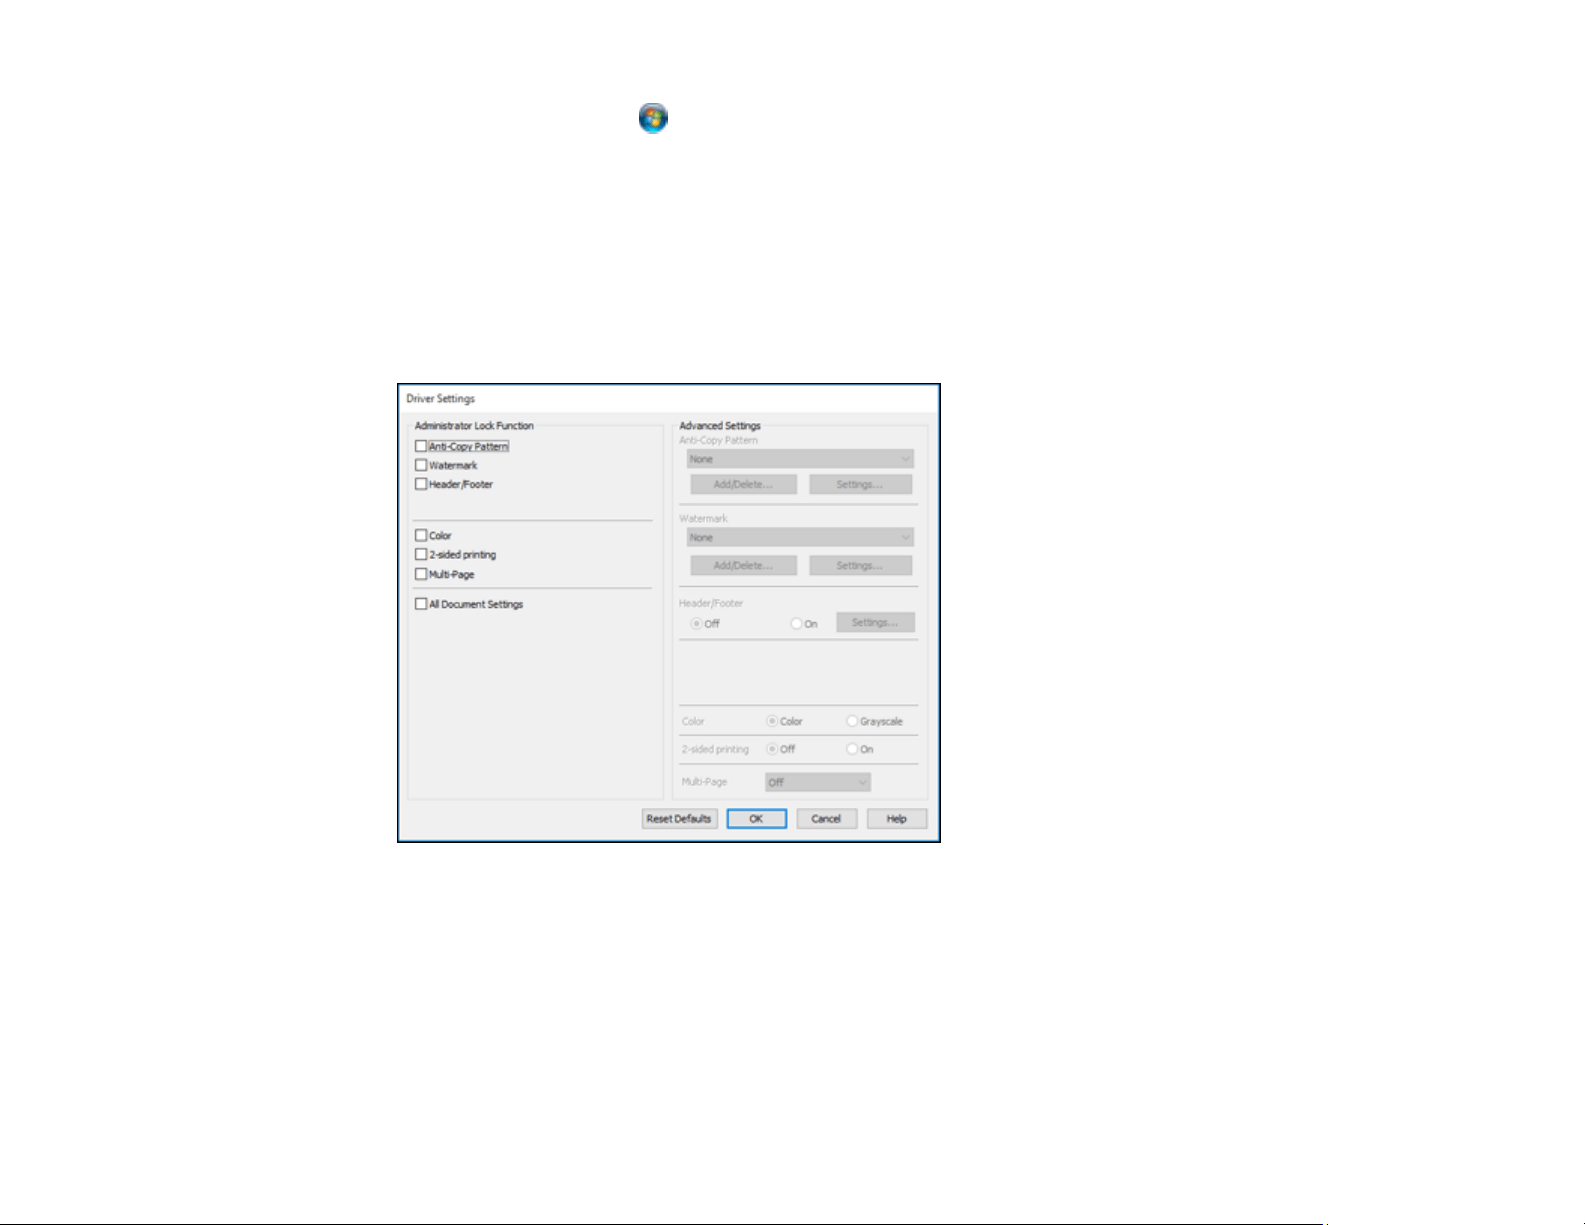
127
• Windows Vista: Click and select Control Panel. Click Printer under Hardware and Sound,
then right-click your product and select Properties.
2. Click the Optional Settings tab.
Note: You can prevent access to the Optional Settings tab by changing the user or group
permissions in the Security tab.
3. Click Driver Settings.
You see this window:
4. Select the checkbox for each setting you want to lock. To lock all print settings, select All Document
Settings.
5. Under Advanced Settings, select the setting option you want to use for each locked setting.
6. Click OK.
Locked Setting Options
Parent topic: Printing with the Standard Epson Printer Software - Windows
128
Locked Setting Options
Select the options you want to use for any locked print settings.
Setting Options Description
Anti-Copy
Pattern
Various data items Lets you select the data to use for the pattern or prohibit anti-
copy patterns
Add/Delete Lets you add or delete a customized anti-copy pattern
Settings Lets you select the arrangement, size, and other settings for
the custom anti-copy pattern
Watermark Various text
watermarks
Lets you select the text for the watermark or prohibit
watermarks
Add/Delete Lets you add or delete a customized text or image-based
watermark
Settings Lets you select the size, position, and other watermark
settings
Header/Footer Off Prohibits headers or footers
On Allows headers and footers
Settings Lets you select the text and position for printing headers and
footers
Color Color Allows color printing
Grayscale Allows printing in black or shades of gray only
2-sided printing Off Allows printing on one side of the paper only
On Allows printing on both sides of the paper
Multi-Page Off Prohibits multi-page settings
2-Up Allows printing of 2 pages on one sheet of paper
4-Up Allows printing of 4 pages on one sheet of paper
6-Up Allows printing of 6 pages on one sheet of paper
8-Up Allows printing of 8 pages on one sheet of paper
9-Up Allows printing of 9 pages on one sheet of paper
16-Up Allows printing of 16 pages on one sheet of paper
129
Setting Options Description
All Document
Settings
— Lets you lock all print settings
Parent topic: Locking Printer Settings - Windows
Selecting Default Print Settings - Windows
When you change your print settings in a program, the changes apply only while you are printing in that
program session. If you want to change the print settings you use in all your Windows programs, you can
select new default print settings.
1. Access the Windows Desktop and right-click the icon for your product in the right side of the
Windows taskbar, or click the up arrow and right-click .
2. Select Printer Settings.
You see the printer settings window:

130
3. Select the print settings you want to use as defaults in all your Windows programs.
4. Click OK.
These settings are now the defaults selected for printing. You can still change them as needed for
printing in any program session.
Changing the Language of the Printer Software Screens
Parent topic: Printing with the Standard Epson Printer Software - Windows
Changing the Language of the Printer Software Screens
You can change the language used on the Windows printer software screens.
1. Access the Windows Desktop and right-click the icon for your product in the right side of the
Windows taskbar, or click the up arrow and right-click .
2. Select Printer Settings.
You see the printer settings window.
3. Click the Maintenance tab.
131
You see the maintenance options:
4. Select the language you want to use as the Language setting.
5. Click OK to close the printer software window.
The printer software screens appear in the language you selected the next time you access them.
Parent topic: Selecting Default Print Settings - Windows
Changing Automatic Update Options
Your printer software for Windows automatically checks for updates to the product software. You can
change how often the software checks for updates or disable this feature.
1. Access the Windows Desktop and right-click the icon for your product in the right side of the
Windows taskbar, or click the up arrow and right-click .
2. Select Software Update Settings.
132
You see this window:
3. Do one of the following:
• To change how often the software checks for updates, select a setting in the Check every menu.
• To disable the automatic update feature, select the Never option.
4. Click OK to exit.
Note: If you choose to disable the automatic update feature, you can check for updates manually.
Parent topic: Printing with the Standard Epson Printer Software - Windows
Related tasks
Checking for Software Updates
Printing with the Built-in Epson Driver - Windows 10 S
You can print with the built-in Epson printer driver using any printing program on Windows 10 S, as
described in these sections.
Note: The built-in Epson driver in Windows 10 S does not include all the available print settings for your
product. To print with additional settings, download and install the Epson Print and Scan utility from the
Windows Store. You cannot download and install any Epson product software from the Epson website
for use with Windows 10 S; you must obtain software only from the Windows Store.
Selecting Print Settings - Windows 10 S
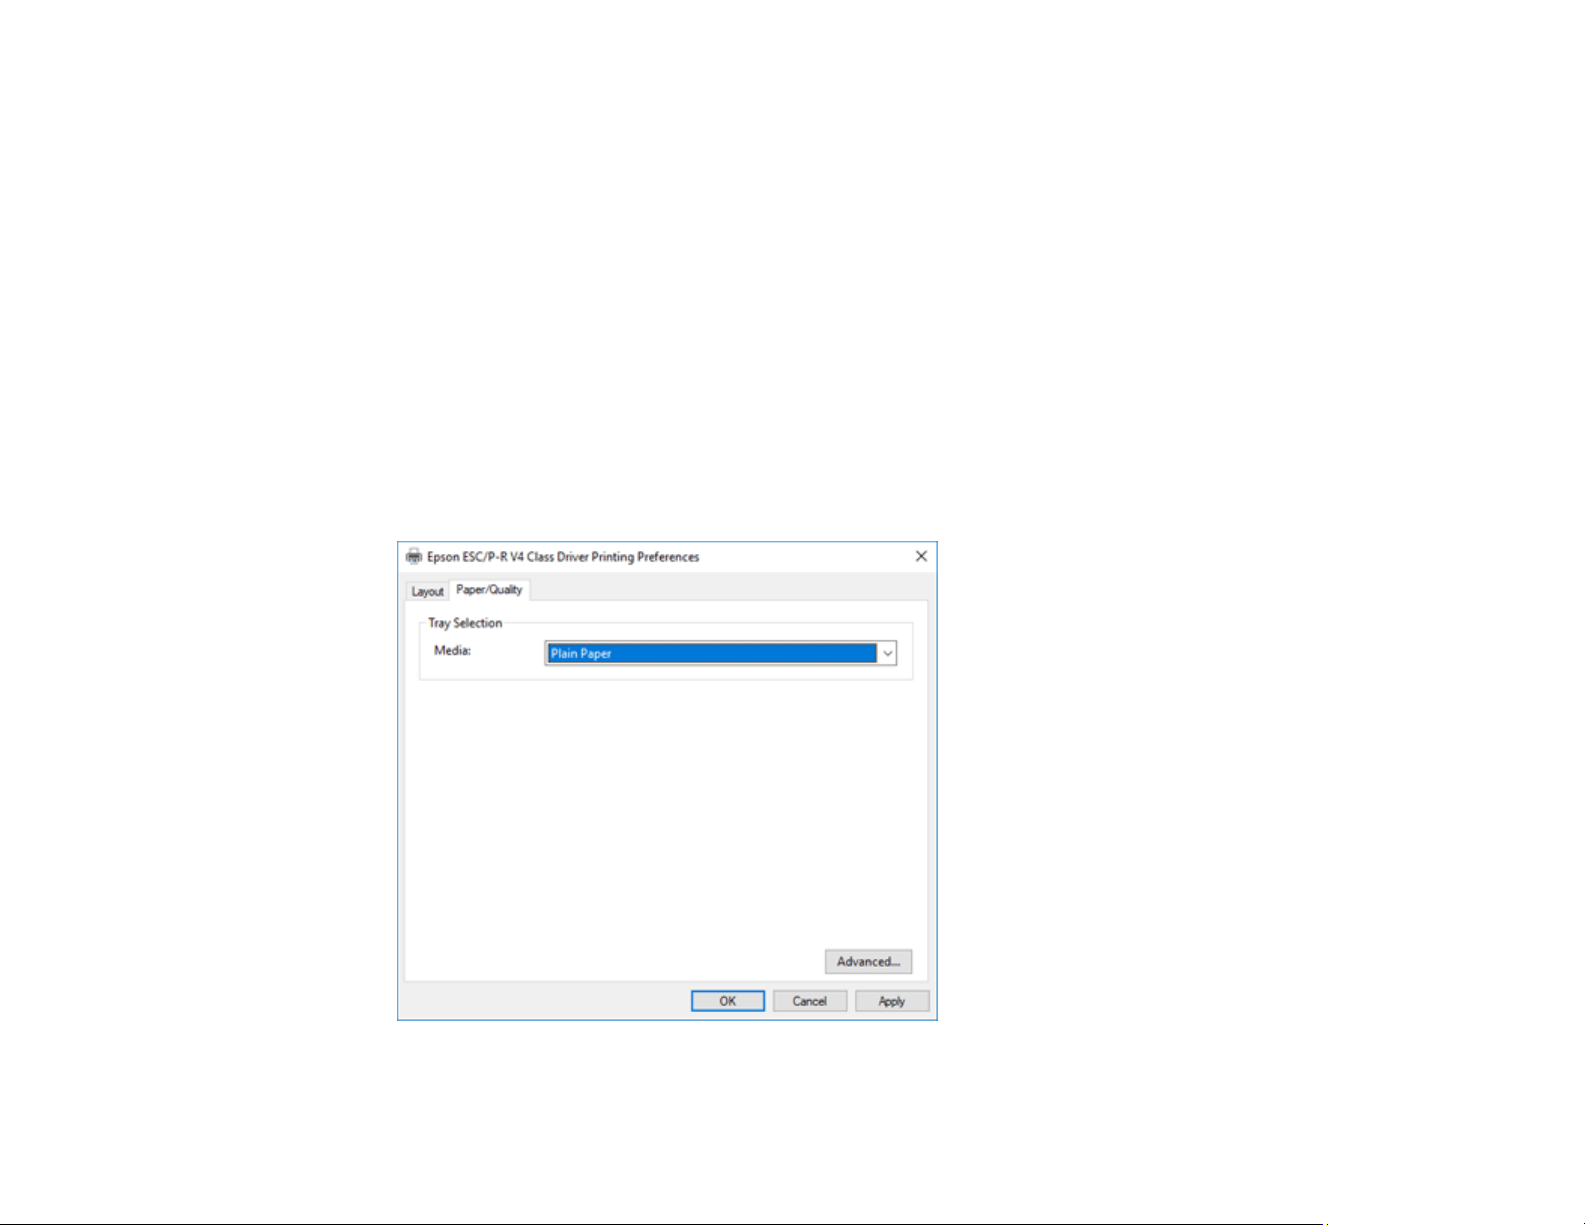
133
Parent topic: Printing from a Computer
Selecting Print Settings - Windows 10 S
Select the settings for your print job in your Windows 10 S application.
1. Open a document for printing.
2. Select the print command in your application.
Note: You may need to select a print icon on your screen, the Print option in the File menu, or
another command. See your application's help utility for details.
3. If necessary, select your product name as the printer you want to use.
Note: You may also need to select Properties or Preferences to view your print settings.
You see a window like this:
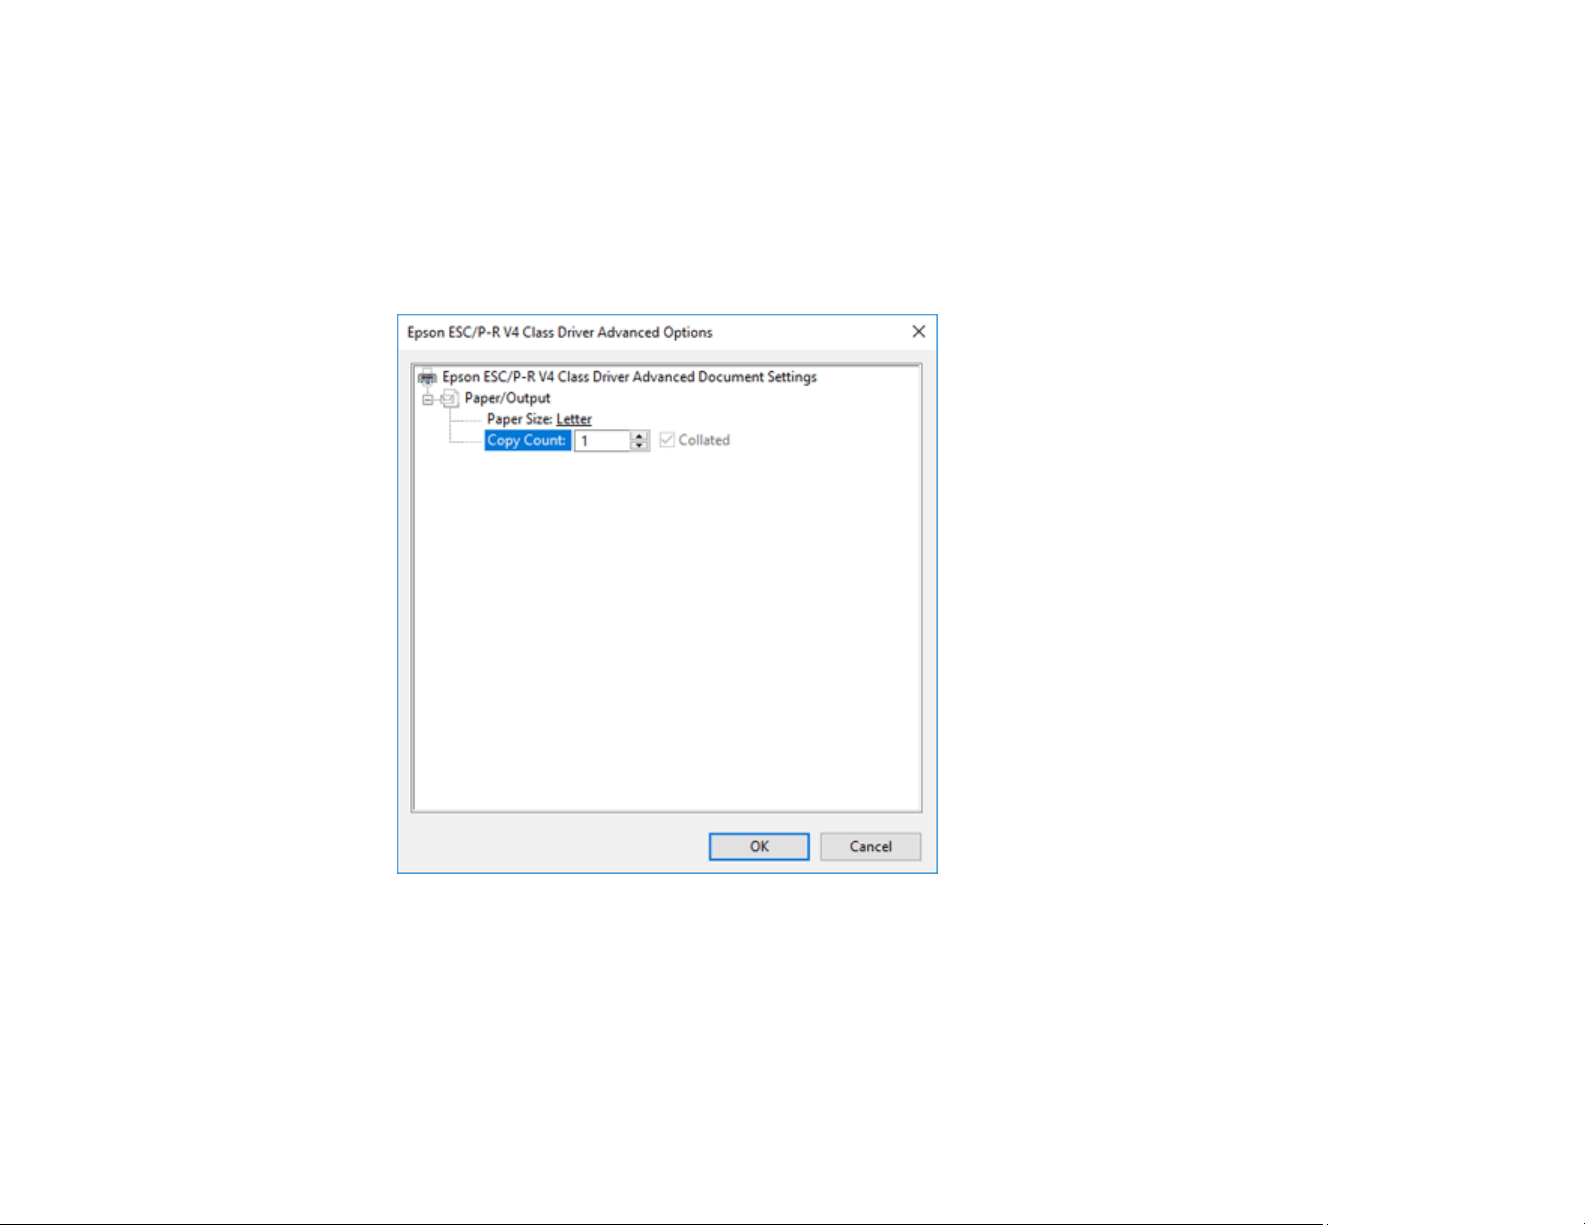
134
4. Select the type of paper you loaded as the Media setting.
Note: The setting may not exactly match the name of your paper. Check the paper type settings list
for details.
5. Click the Advanced button.
You see a window like this:
6. Select the size of the paper you loaded as the Paper Size setting.
7. To print multiple copies, select or enter the number as the Copy Count setting.
8. To print multiple copies of multi-page documents in sets, select the Collated checkbox.
9. Click OK.
You return to the printing preferences window.
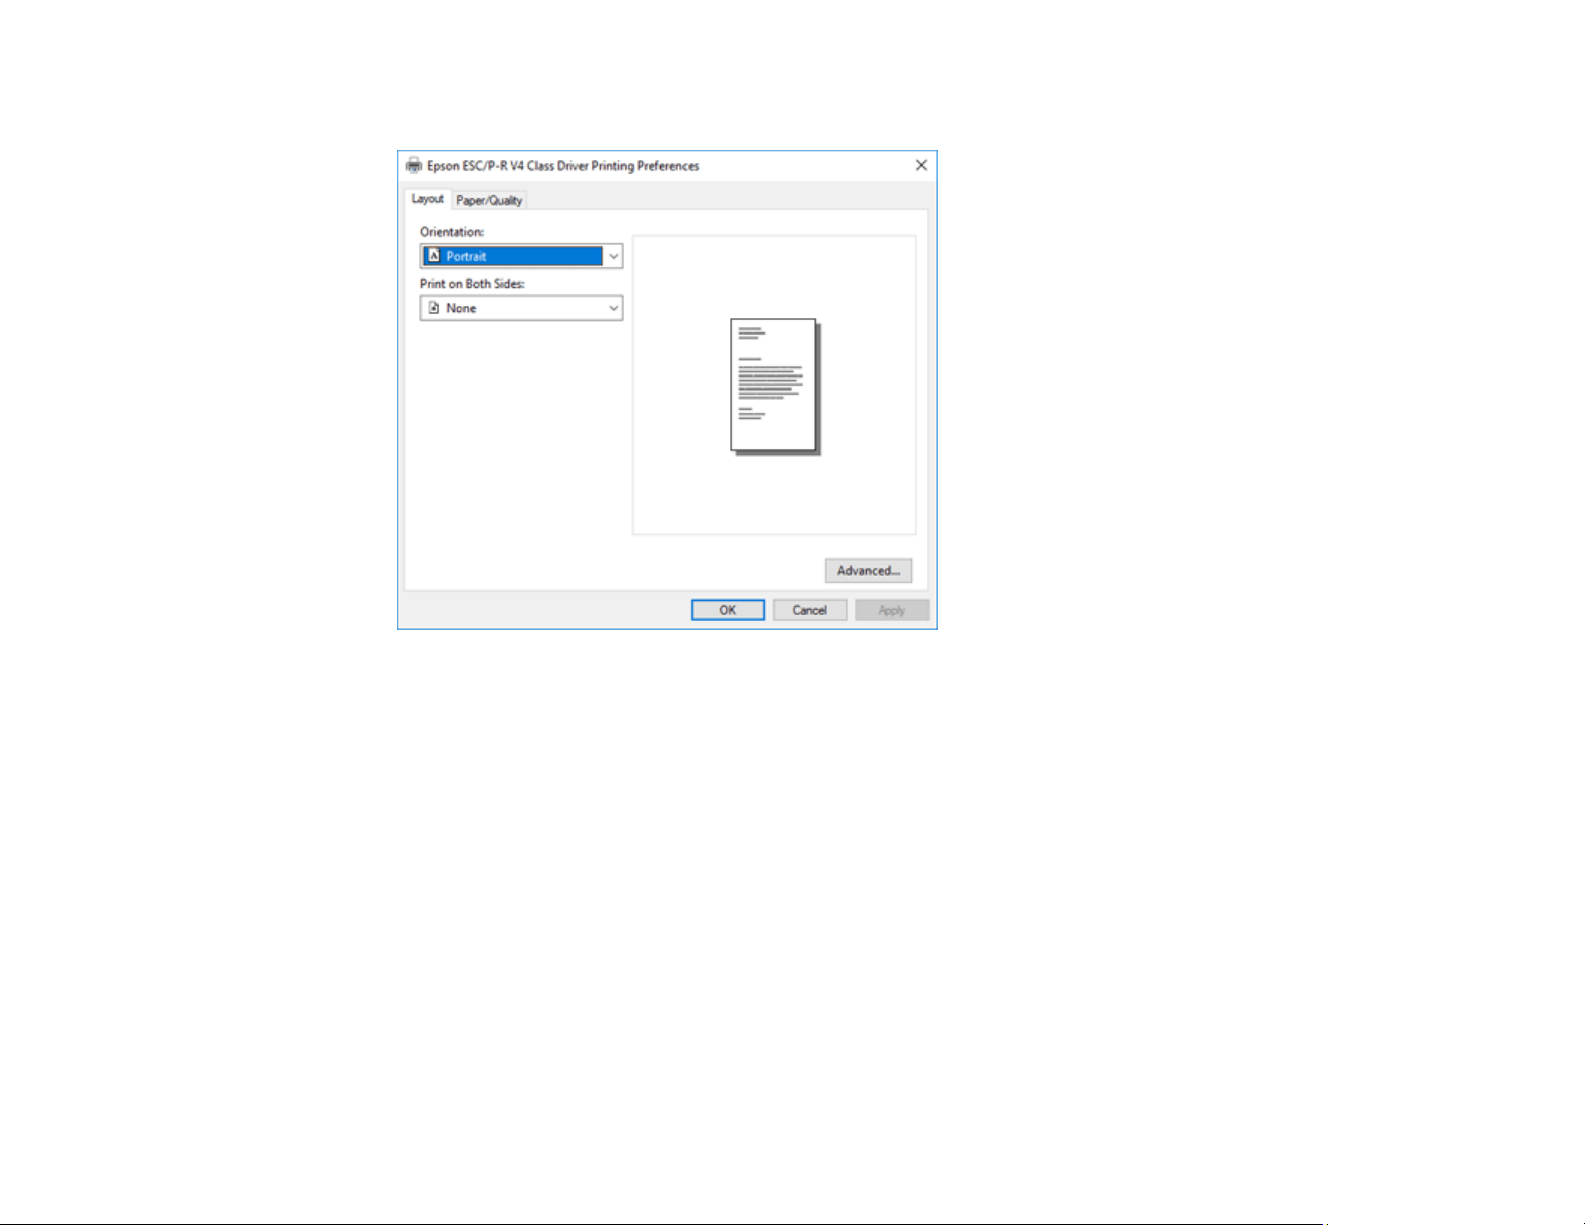
135
10. Select the Layout tab.
11. Select the orientation of your document as the Orientation setting.
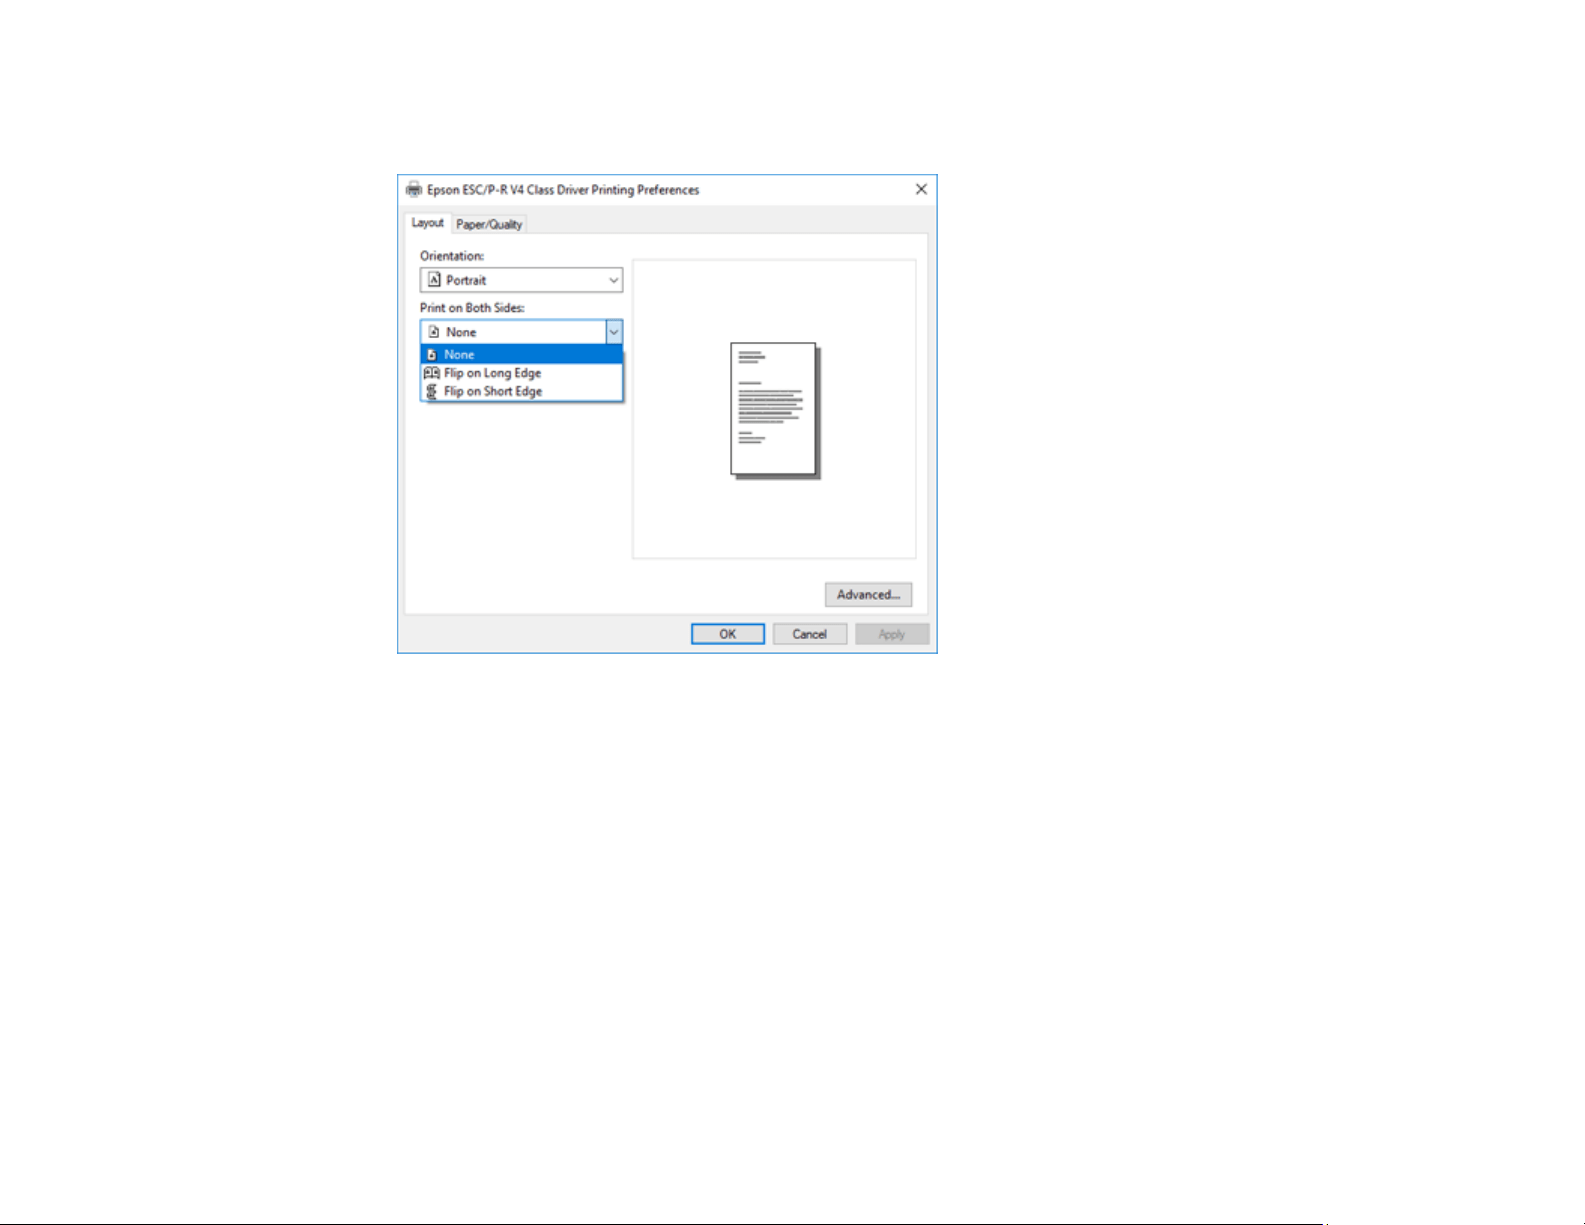
136
12. To print double-sided, select one of the Print on Both Sides options, depending on how you want to
orient the page layout. The icon next to each option shows the layout.
13. Click OK to save your settings.
You see your application's Print window.
14. Click OK or Print to start printing.
Parent topic: Printing with the Built-in Epson Driver - Windows 10 S
Printing with the Epson Standard Printer Software - Mac
You can print with your product using any Mac printing program, as described in these sections.
Note: If you have an Internet connection, it is a good idea to check for updates to your product software
on Epson's support website.
Selecting Basic Print Settings - Mac
Selecting Page Setup Settings - Mac
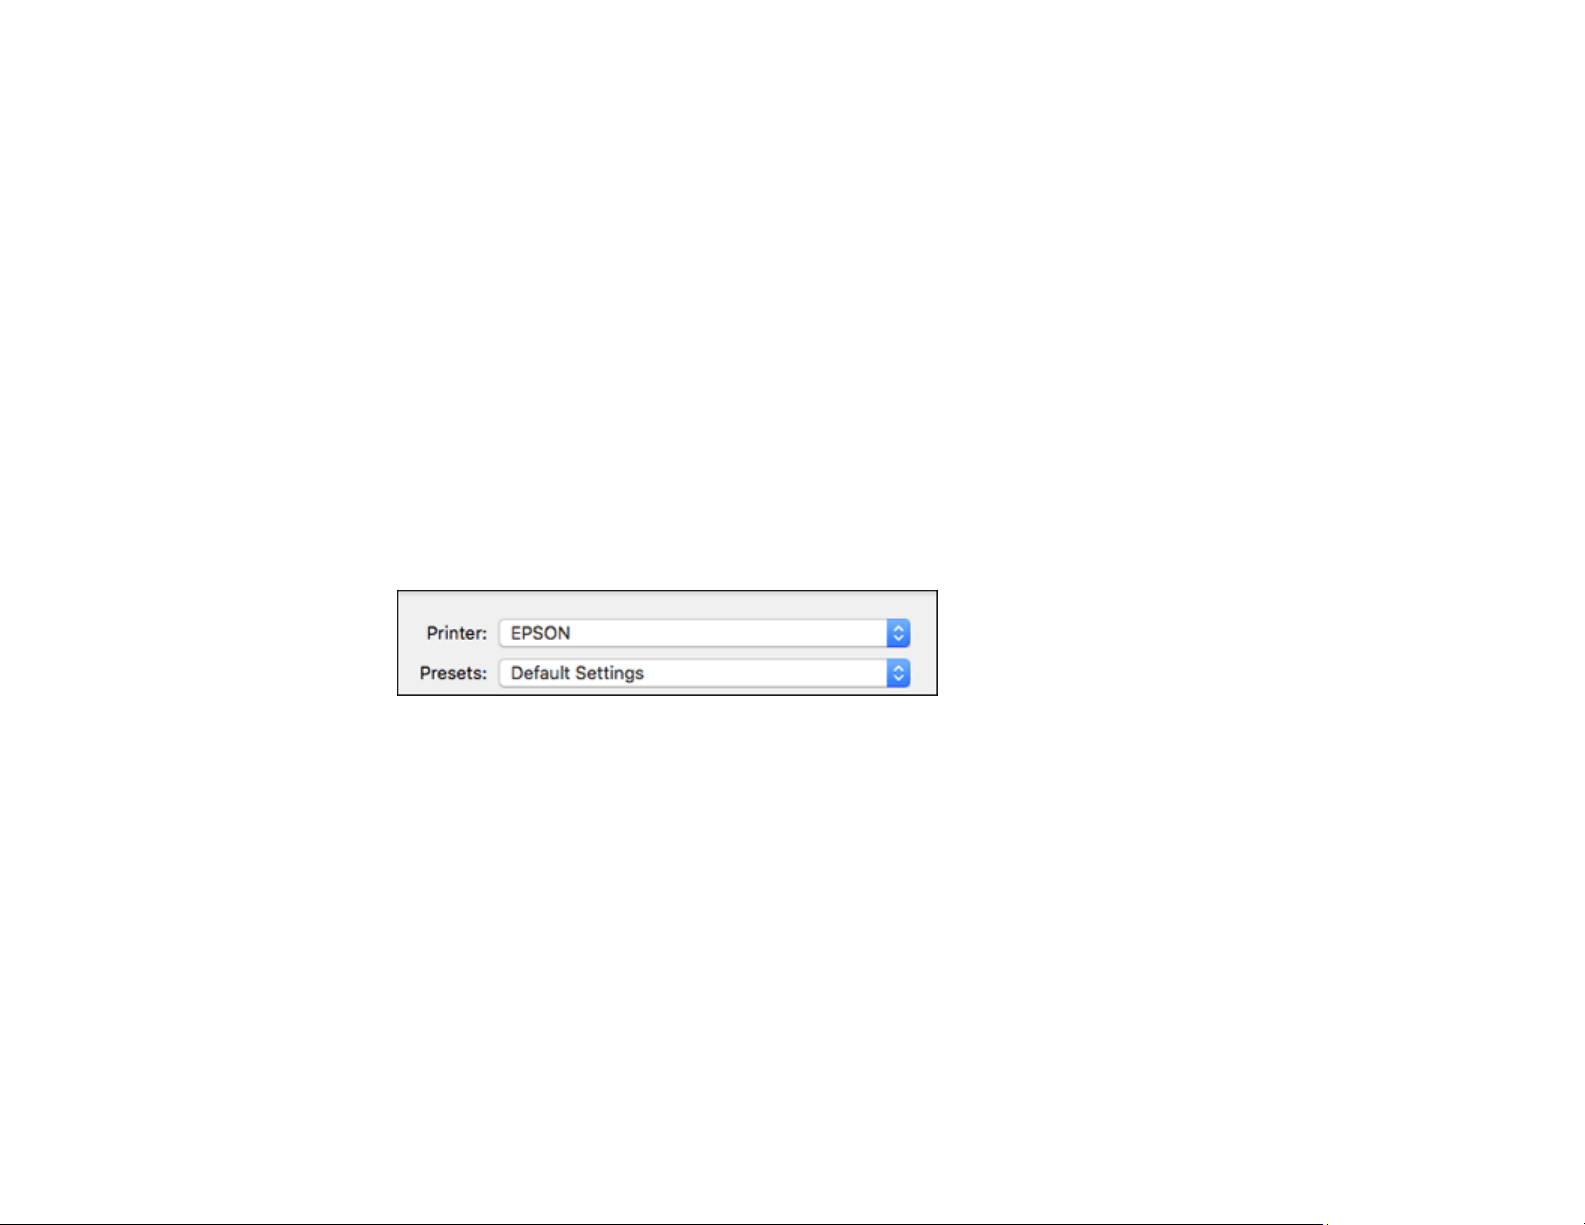
137
Selecting Print Layout Options - Mac
Selecting Double-sided Printing Settings - Mac
Managing Color - Mac
Selecting Printing Preferences - Mac
Printing Your Document - Mac
Parent topic: Printing from a Computer
Selecting Basic Print Settings - Mac
Select the basic settings for the document or photo you want to print.
1. Open a photo or document for printing.
2. Select the print command in your application.
Note: You may need to select a print icon on your screen, the Print option in the File menu, or
another command. See your application's help utility for details.
3. Select your product as the Printer setting.
4. If necessary, click the arrow next to the Printer setting or the Show Details button to expand the
print window.
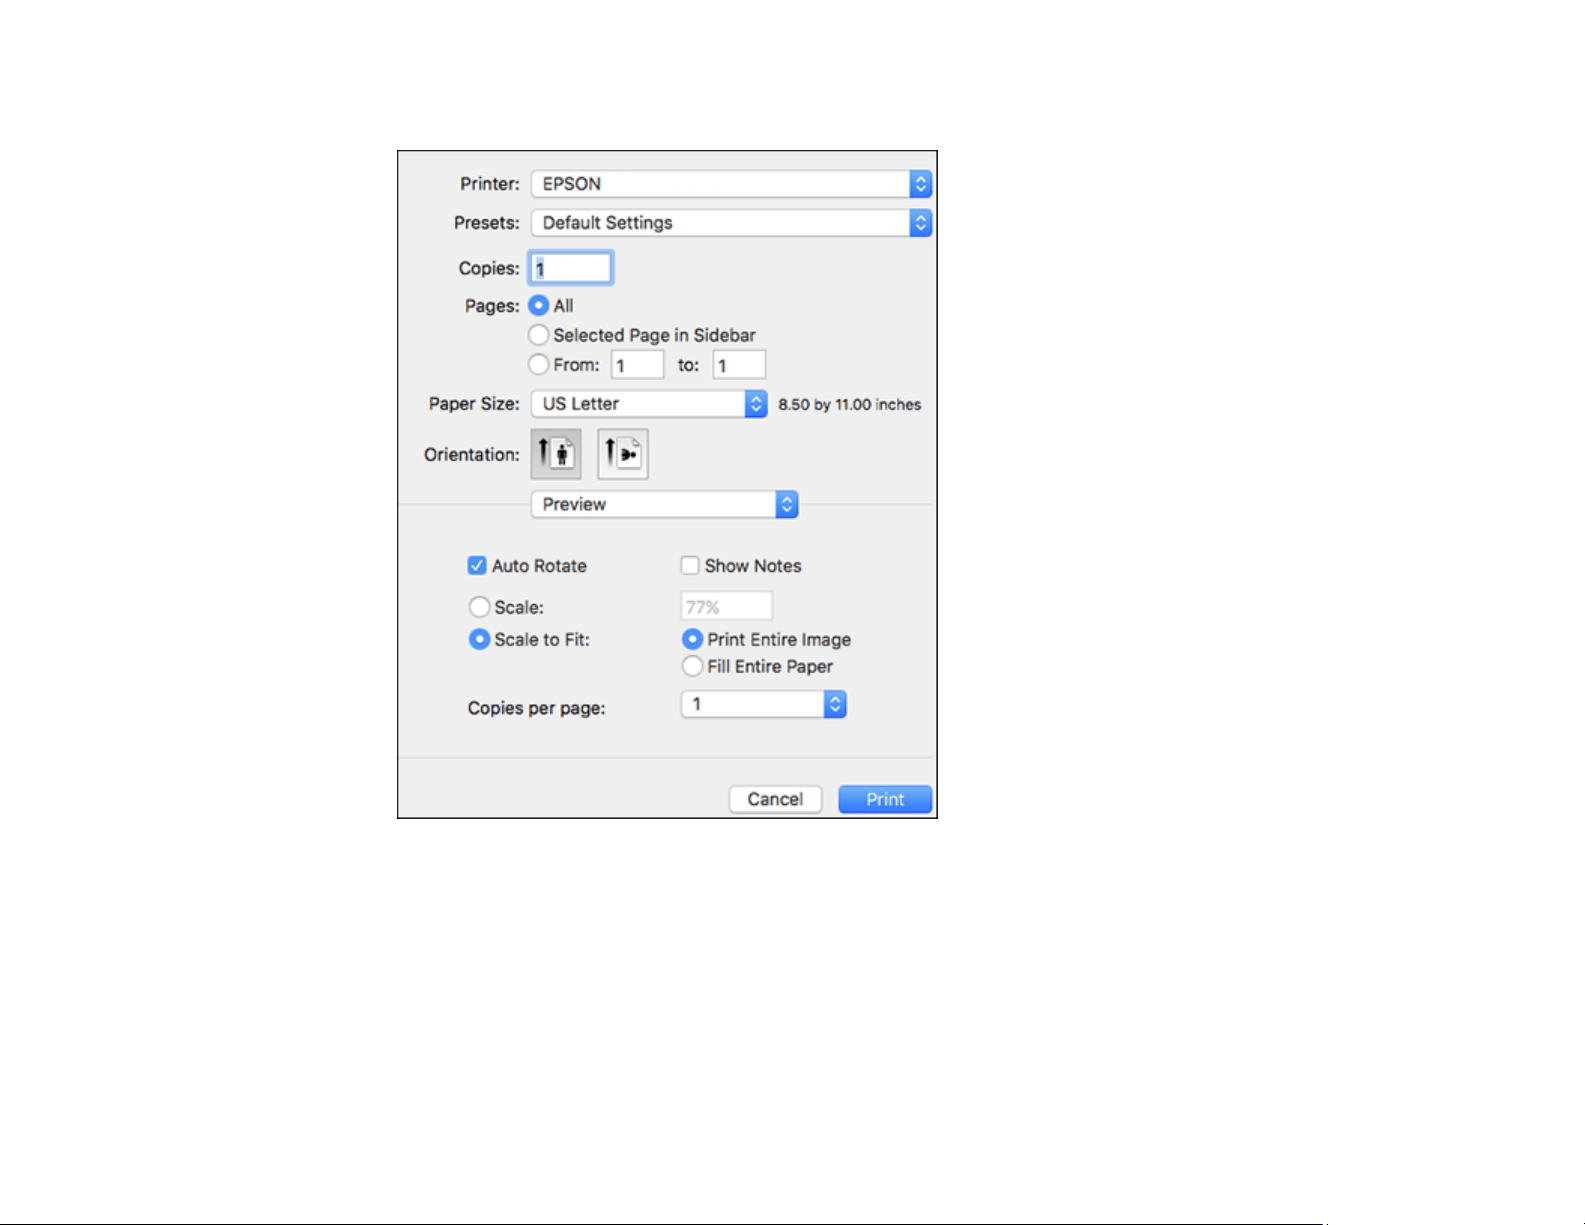
138
You see the expanded printer settings window for your product:
Note: The print window may look different, depending on the Mac OS version and the application
you are using.
5. To use an existing set of print settings, select Presets and choose a preset from the list.
6. Select the Copies and Pages settings as necessary.
Note: If you do not see these settings in the print window, check for them in your application before
printing.
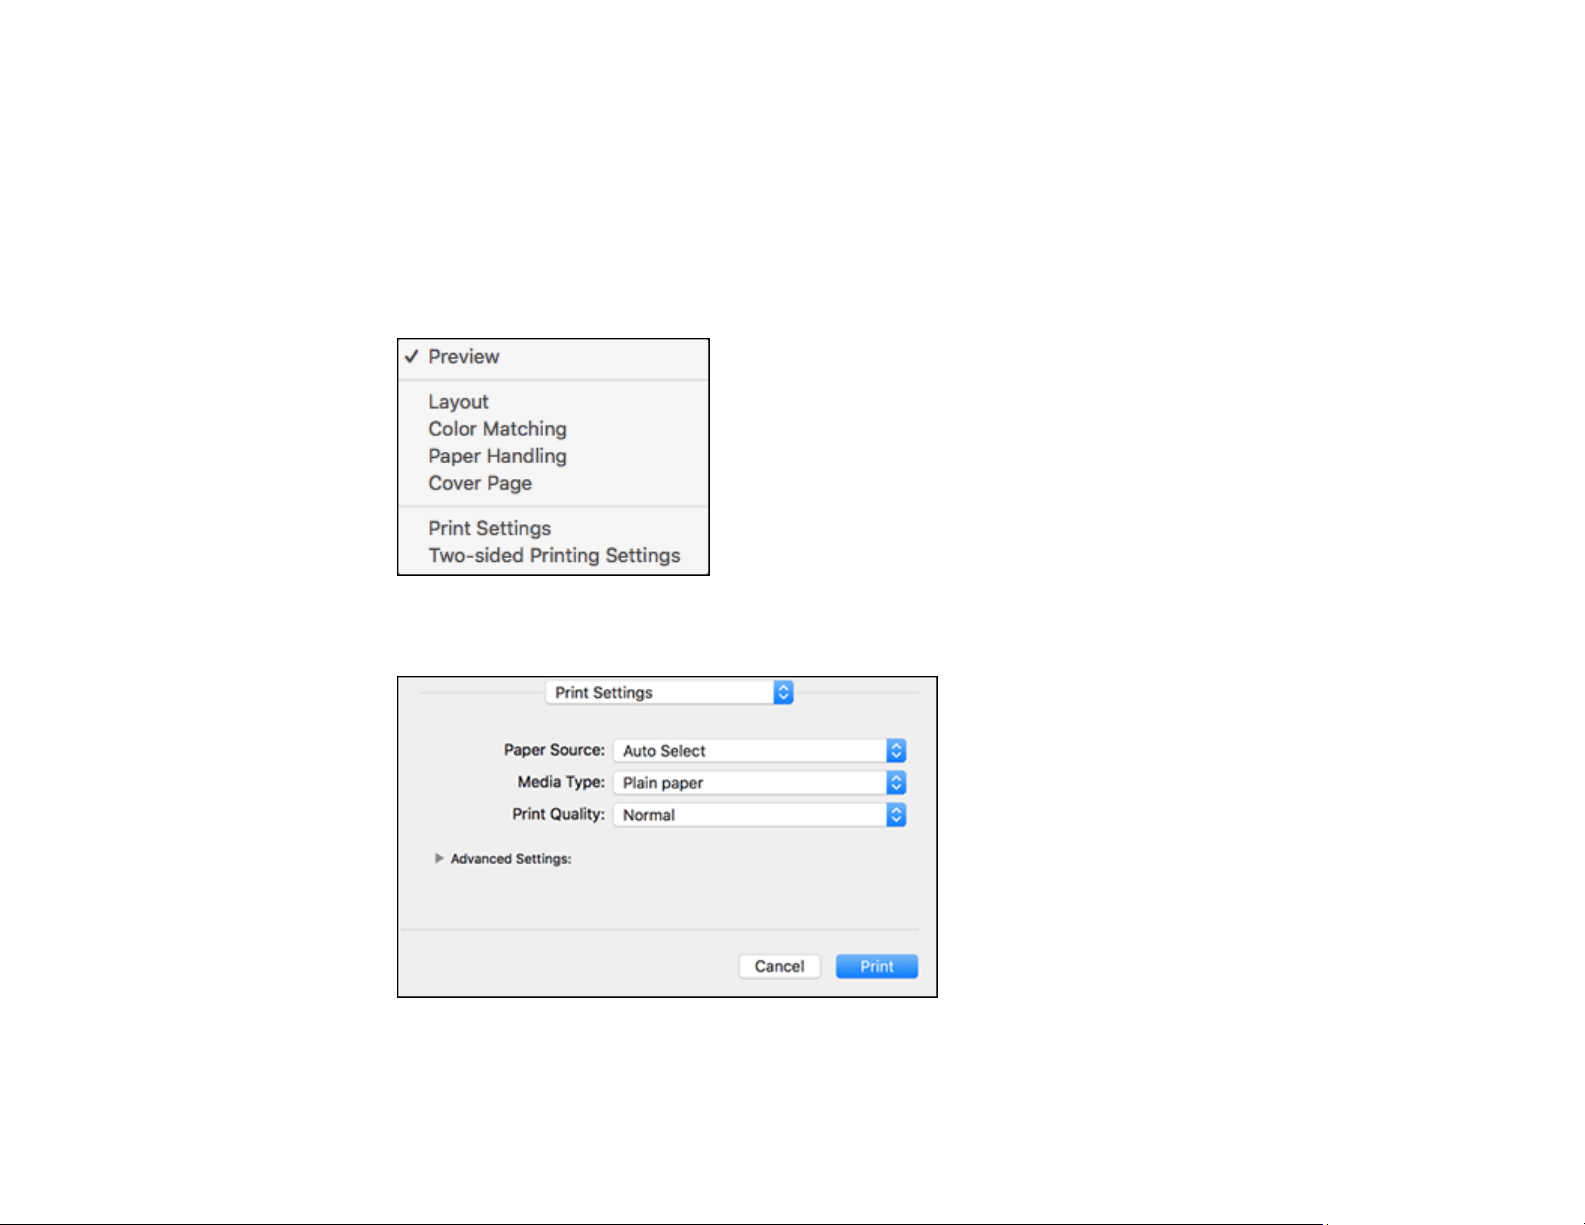
139
7. Select the page setup options: Paper Size and Orientation.
Note: If you do not see these settings in the print window, check for them in your application before
printing. They may be accessible by selecting Page Setup from the File menu.
8. Select any application-specific settings that appear on the screen, such as those shown in the image
above for the Preview application.
9. Select Print Settings or Printer Features from the pop-up menu.
You see these settings:

140
Note: The available print settings and appearance of the print window may be different than those
covered here, depending on the Mac OS version and the application you are using.
10. Select the Paper Source you wish to print from.
11. Select the type of paper you loaded as the Media Type setting.
Note: The setting may not exactly match the name of your paper. Check the paper type settings list
for details.
12. Select the Print Quality setting you want to use.
13. Select any of the available print options.
Paper Source Options - Mac
Print Quality Options - Mac
Parent topic: Printing with the Epson Standard Printer Software - Mac
Related references
Paper or Media Type Settings - Printing Software
Related tasks
Selecting Page Setup Settings - Mac
Printing Your Document - Mac
Paper Source Options - Mac
You can select any of the available options in the Paper Source menu to print on the paper loaded in that
source.
Auto Select
Automatically selects the paper source based on the selected paper size.
Paper Cassette
Selects the paper in the cassette as the paper source.
Rear Paper Feed Slot
Selects the paper in the rear feed slot as the paper source.
Parent topic: Selecting Basic Print Settings - Mac
Print Quality Options - Mac
You can select any of the available Print Quality options to fine-tune the quality of your print. Some
settings may be unavailable, depending on the paper type setting you have chosen.
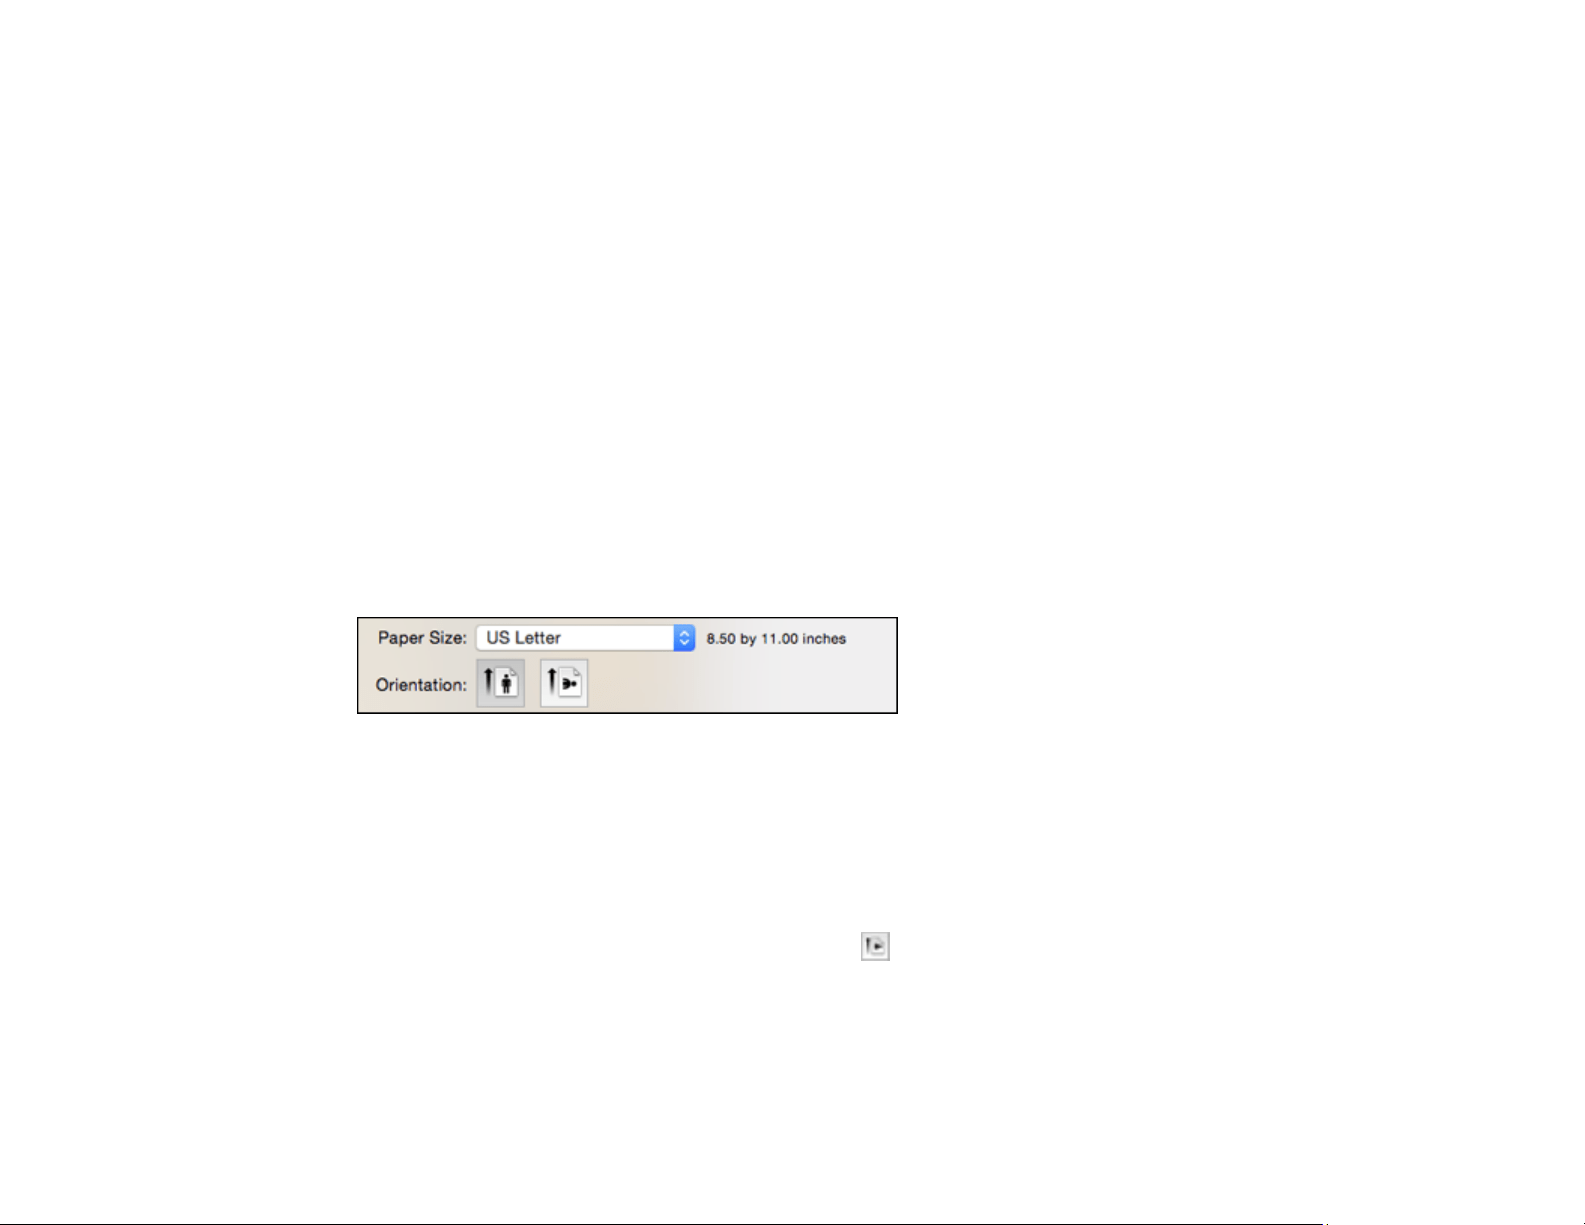
141
Draft
For draft printing on plain paper.
Normal
For everyday text and image printing.
Normal - Vivid
For everyday text and image printing with good quality and print speed.
Fine
For text and graphics with good quality and print speed.
Quality
For text and graphics with increased quality and print speed.
Best Quality
For the best print quality, but the slowest print speed.
Parent topic: Selecting Basic Print Settings - Mac
Selecting Page Setup Settings - Mac
Depending on your application, you may be able to select the paper size and orientation settings from
the print window.
Note: If you do not see these settings in the print window, check for them in your application before
printing. They may be accessible by selecting Page Setup from the File menu.
1. Select the size of the paper you loaded as the Paper Size setting.
2. Select the orientation of your document or photo as shown in the print window.
Note: If you are printing an envelope, select the icon.
Note: You can reduce or enlarge the size of the printed image by selecting Paper Handling from the
pop-up menu and selecting a scaling option.
Parent topic: Printing with the Epson Standard Printer Software - Mac
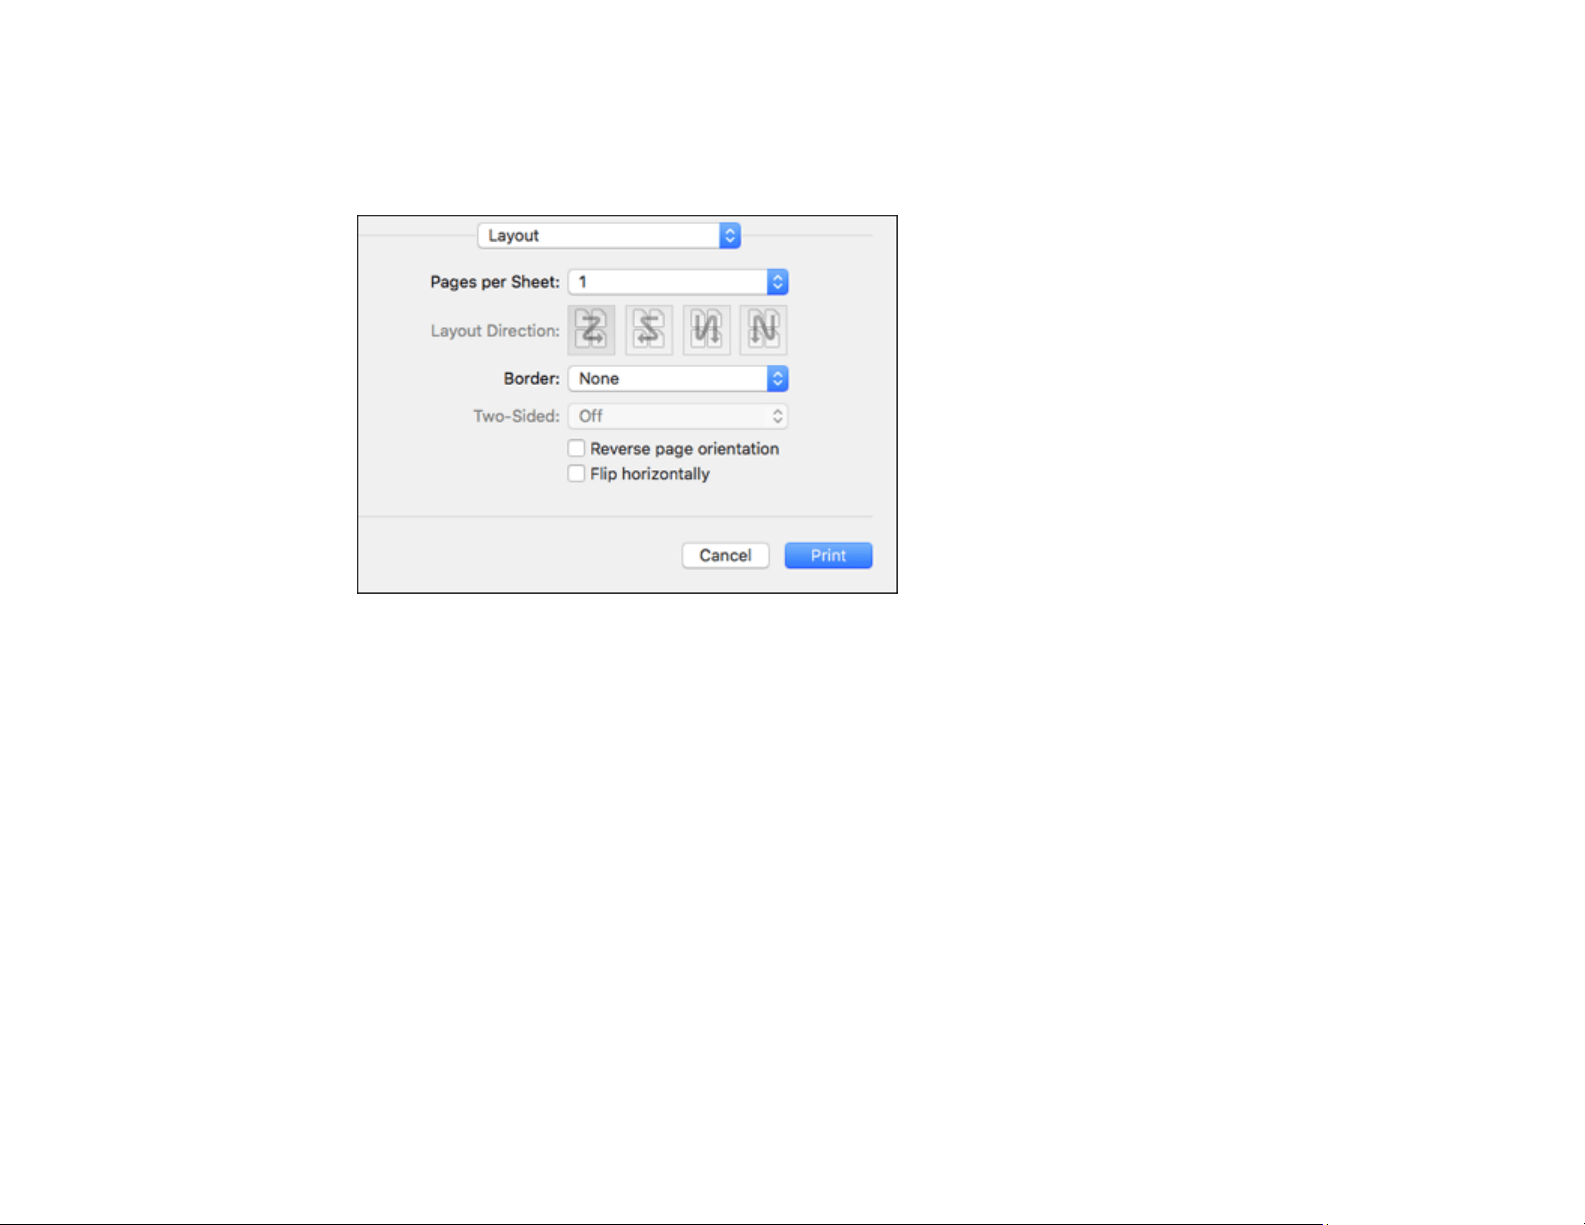
142
Selecting Print Layout Options - Mac
You can select a variety of layout options for your document or photo by selecting Layout from the pop-
up menu on the print window.
• To print multiple pages on one sheet of paper, select the number of pages in the Pages per Sheet
pop-up menu. To arrange the print order of the pages, select a Layout Direction setting.
• To print borders around each page on the sheet, select a line setting from the Border pop-up menu.
• To print on both sides of each page, select a setting from the Two-Sided pop-up menu.
• To invert or flip the printed image, select the Reverse page orientation or Flip horizontally settings.
Parent topic: Printing with the Epson Standard Printer Software - Mac
Selecting Double-sided Printing Settings - Mac
You can print on both sides of the paper by selecting Two-sided Printing Settings from the pop-up
menu on the print window.
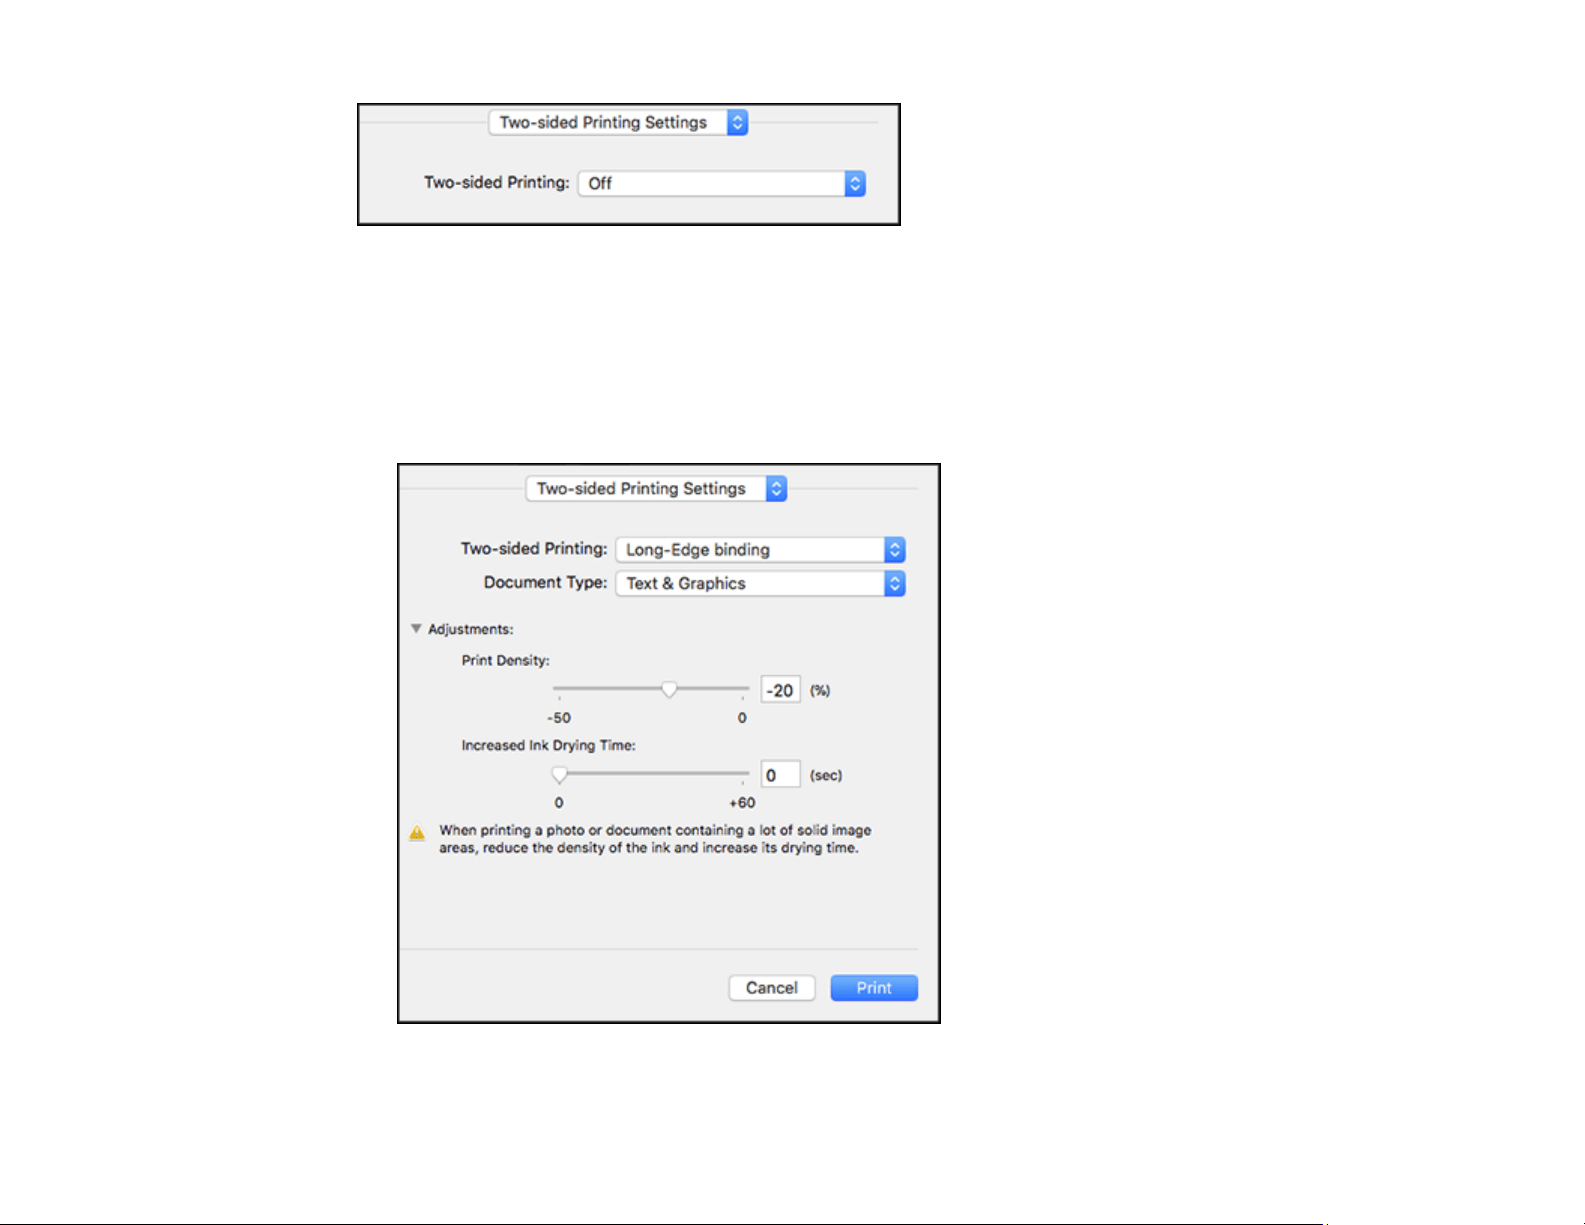
143
Note: Some options may be pre-selected or unavailable, depending on other settings you have chosen
or if you are accessing the product over a network. This screen may be different, depending on the Mac
OS version you are using.
1. Select one of the Two-sided Printing options.
2. Select the type of document you are printing as the Document Type setting. The software
automatically sets the Adjustments options for that document type.
3. If necessary, customize the Adjustments settings as instructed on the screen.
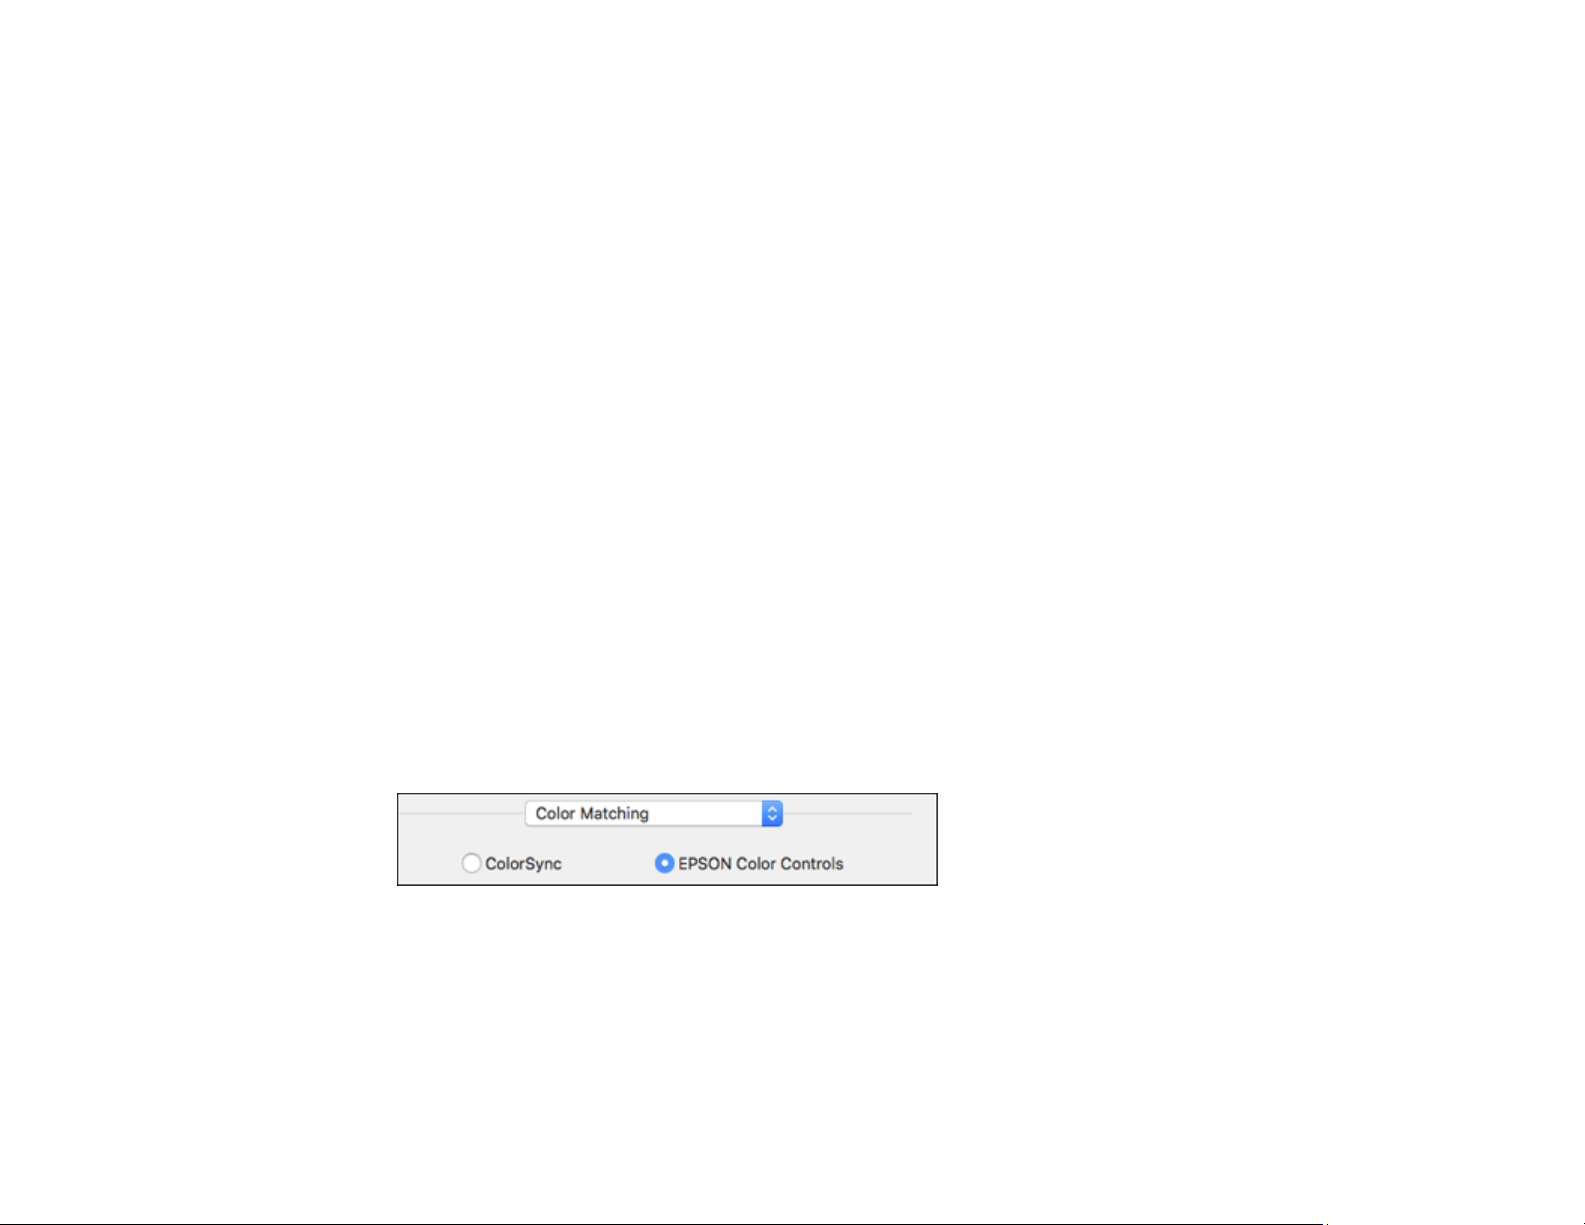
144
4. Print a test copy of your double-sided document to test the selected settings.
5. Follow any instructions displayed on the screen during printing.
Double-sided Printing Options and Adjustments - Mac
Parent topic: Printing with the Epson Standard Printer Software - Mac
Double-sided Printing Options and Adjustments - Mac
You can select any of the available options in the Two-sided Printing Settings pop-up menu to set up
your double-sided print job.
Long-Edge binding
Orients double-sided printed pages to be bound on the long edge of the paper.
Short-Edge binding
Orients double-sided printed pages to be bound on the short edge of the paper.
Print Density
Sets the level of ink coverage for double-sided printing.
Increased Ink Drying Time
Sets the amount of time required for drying ink after printing on one side of the paper before printing
the other side in double-sided printing.
Parent topic: Selecting Double-sided Printing Settings - Mac
Managing Color - Mac
You can adjust the Color Matching and Color Options settings to fine-tune the colors in your printout or
turn off color management in your printer software.
1. Select Color Matching from the pop-up menu in the print window.
2. Select one of the available options.
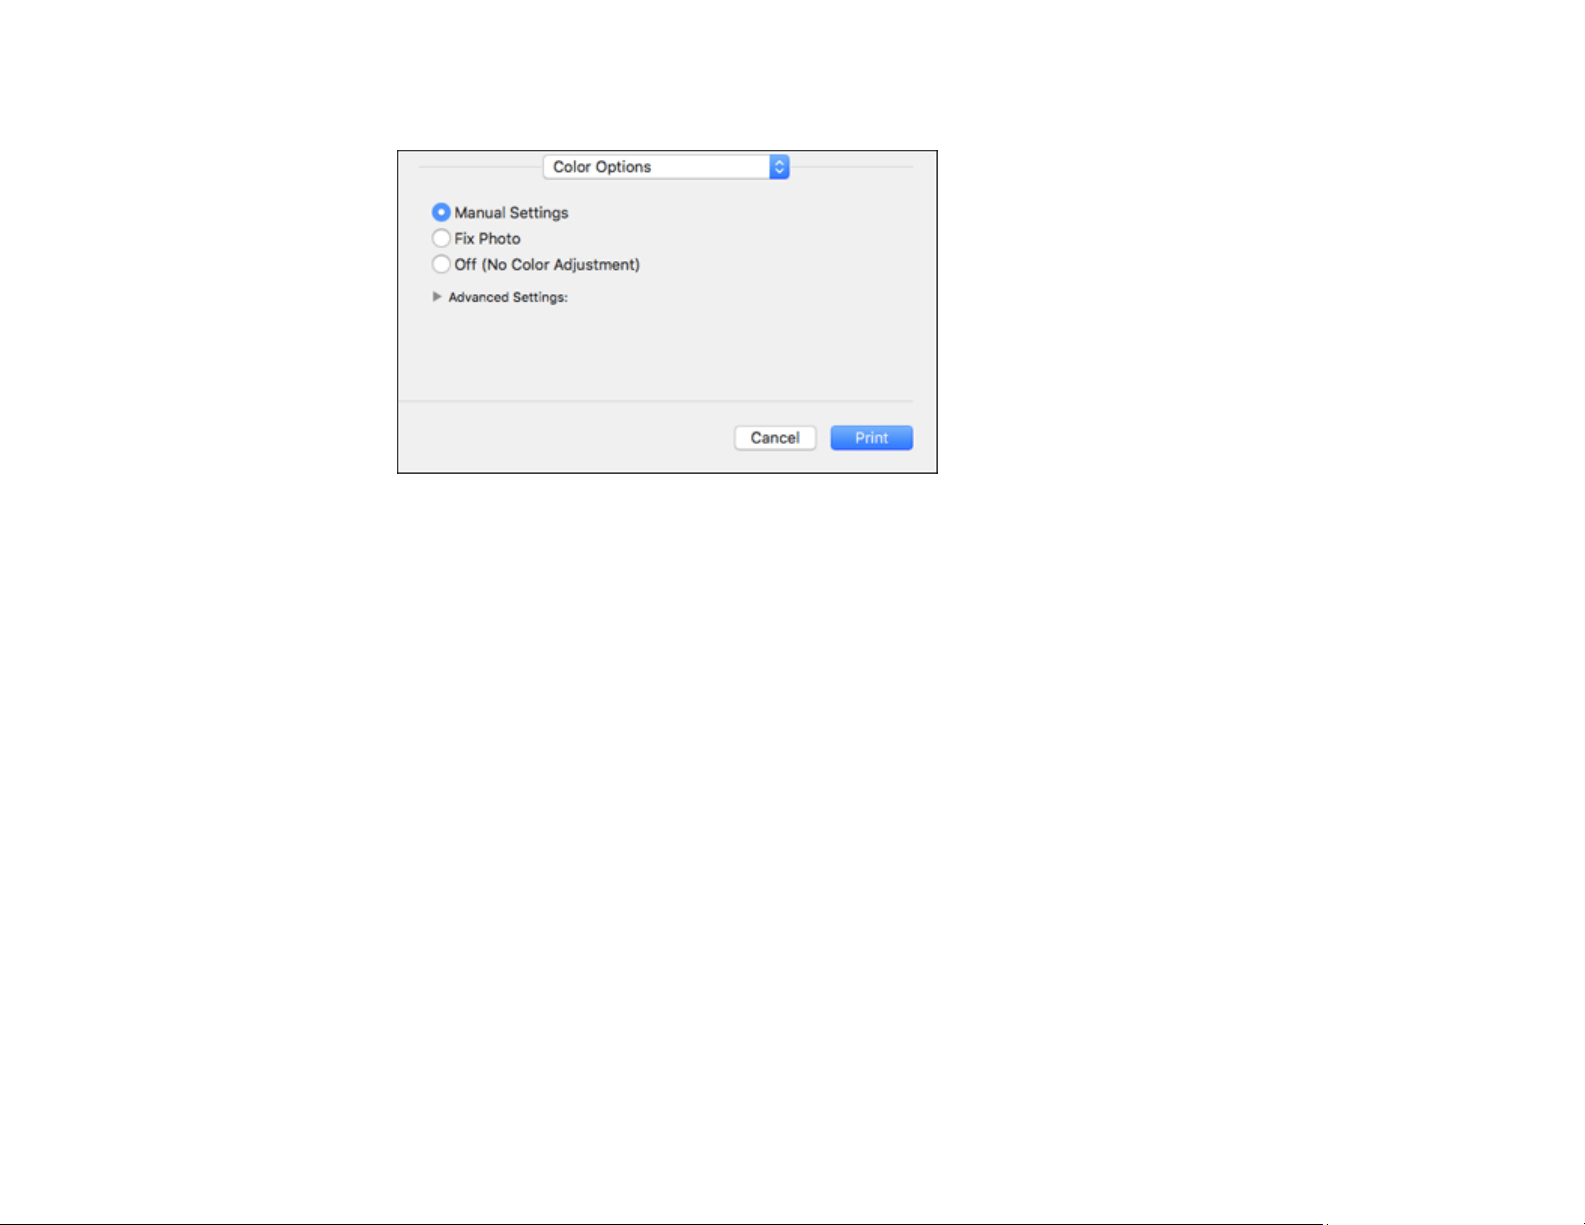
145
3. Select Color Options from the pop-up menu in the print window.
Note: The available settings on the Color Options menu depend on the option you selected on the
Color Matching menu.
4. Select one of the available options.
Color Matching and Color Options - Mac
Parent topic: Printing with the Epson Standard Printer Software - Mac
Color Matching and Color Options - Mac
You can select these settings on the Color Matching and Color Options menus.
Color Matching Settings
EPSON Color Controls
Lets you manage color using controls in your printer driver or turn off color management.
ColorSync
Prints using standard color profiles for your product and paper to help match image colors. You can
customize the conversion method and filter settings on the ColorSync pop-up menu in the print
window.

146
Color Options Settings
Manual Settings
Lets you select manual color adjustments. Click the arrow next to Advanced Settings and select
settings for Brightness, Contrast, Saturation, and individual color tones. You can also select a color
Mode setting for printing photos and graphics and the Fix Red-Eye setting to reduce or remove red-
eye in photos. Depending on the selected color mode, you can also adjust the midtone density using
the Gamma setting.
Fix Photo
Improves the color, contrast, and sharpness of flawed photos. Click the arrow next to Advanced
Settings and select the Fix Red-Eye setting to reduce or remove red-eye in photos.
Note: Fix Photo uses a sophisticated face recognition technology to optimize photos that include
faces. For this to work, both eyes and the nose must be visible in the subject's face. If your photo
includes a face with an intentional color cast, such as a statue, you may want to turn off Fix Photo to
retain the special color effects.
Off (No Color Adjustment)
Turns off color management in your printer software so you can manage color using only your
application software.
Note: An ICC profile is required if color management is turned off.
Parent topic: Managing Color - Mac
Selecting Printing Preferences - Mac
You can select printing preferences that apply to all the print jobs you send to your product.
1. In the Apple menu or the Dock, select System Preferences.
2. Select Print & Fax, Print & Scan, or Printers & Scanners, select your product, and select Options
& Supplies.
3. Select Driver or Options.
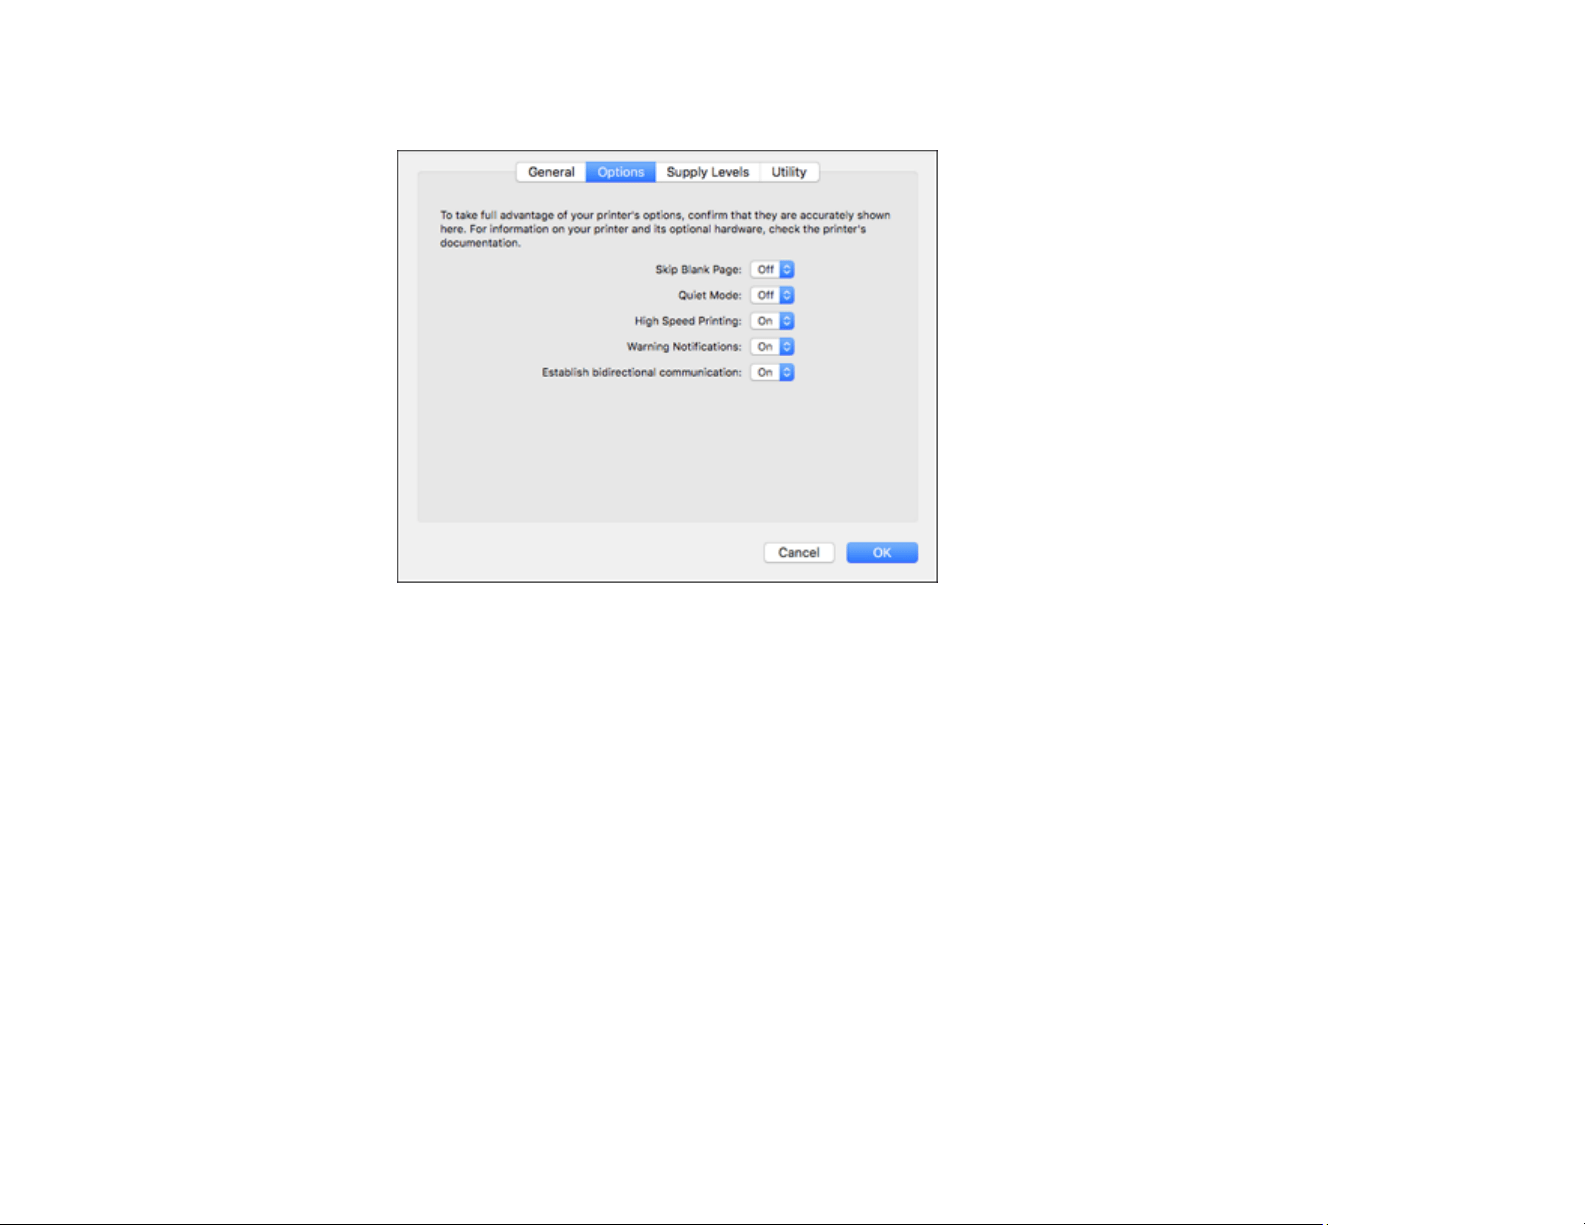
147
You see a screen like this:
Note: The available settings and appearance of the options window may be different than those
covered here, depending on the Mac OS version and the application you are using.
4. Select any of the available printing preferences.
5. Click OK.
Printing Preferences - Mac
Parent topic: Printing with the Epson Standard Printer Software - Mac
Printing Preferences - Mac
You can select these settings on the Options or Driver tab.
Skip Blank Page
Ensures that your product does not print pages that contain no text or images.
Quiet Mode
Lessens noise during printing but may decrease print speed.
High Speed Printing
Speeds up printing but may reduce print quality.
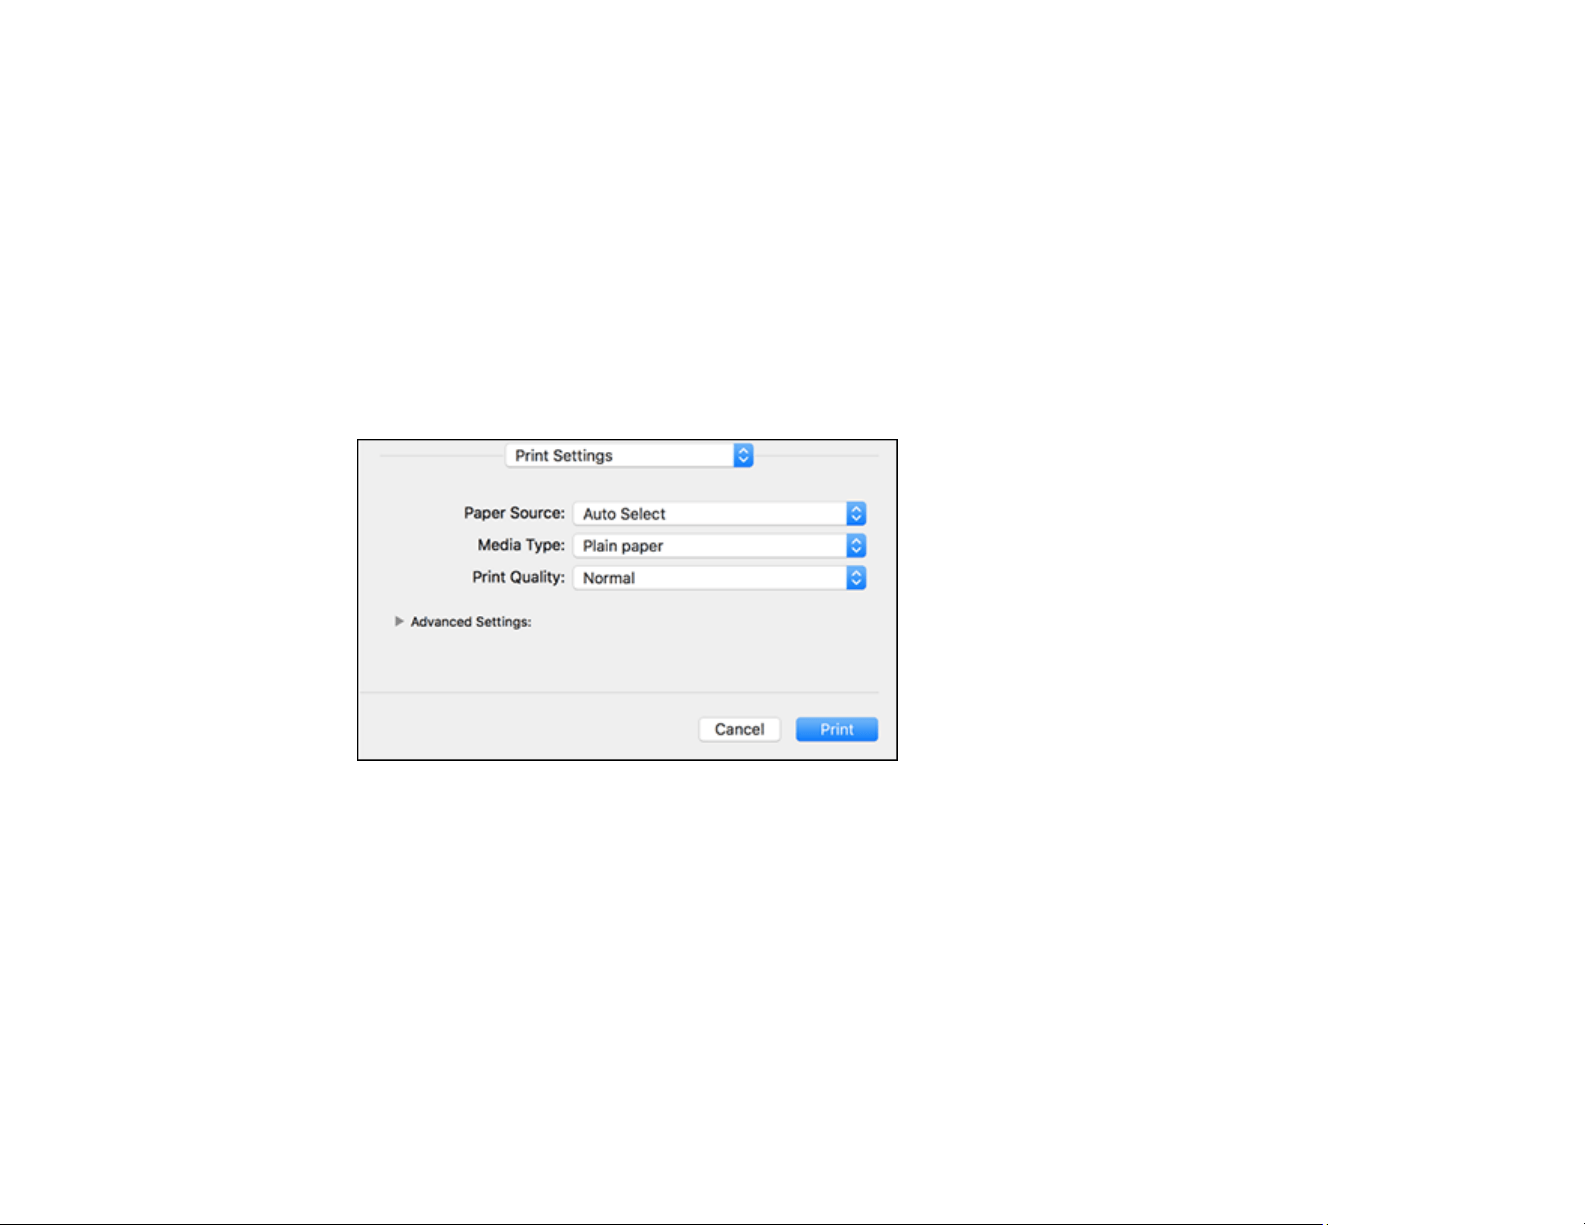
148
Warning Notifications
Lets you choose whether or not to receive warning notifications from the printer software for various
operating conditions.
Establish bidirectional communication
Allows the product to communicate with the computer. Do not change the default setting unless you
experience issues when using a shared printing pool.
Parent topic: Selecting Printing Preferences - Mac
Printing Your Document - Mac
Once you have selected your print settings, you are ready to print.
Click Print at the bottom of the print window.
Checking Print Status - Mac
Parent topic: Printing with the Epson Standard Printer Software - Mac
Related tasks
Selecting Basic Print Settings - Windows
Selecting Page Setup Settings - Mac
Selecting Print Layout Options - Mac
Selecting Printing Preferences - Mac
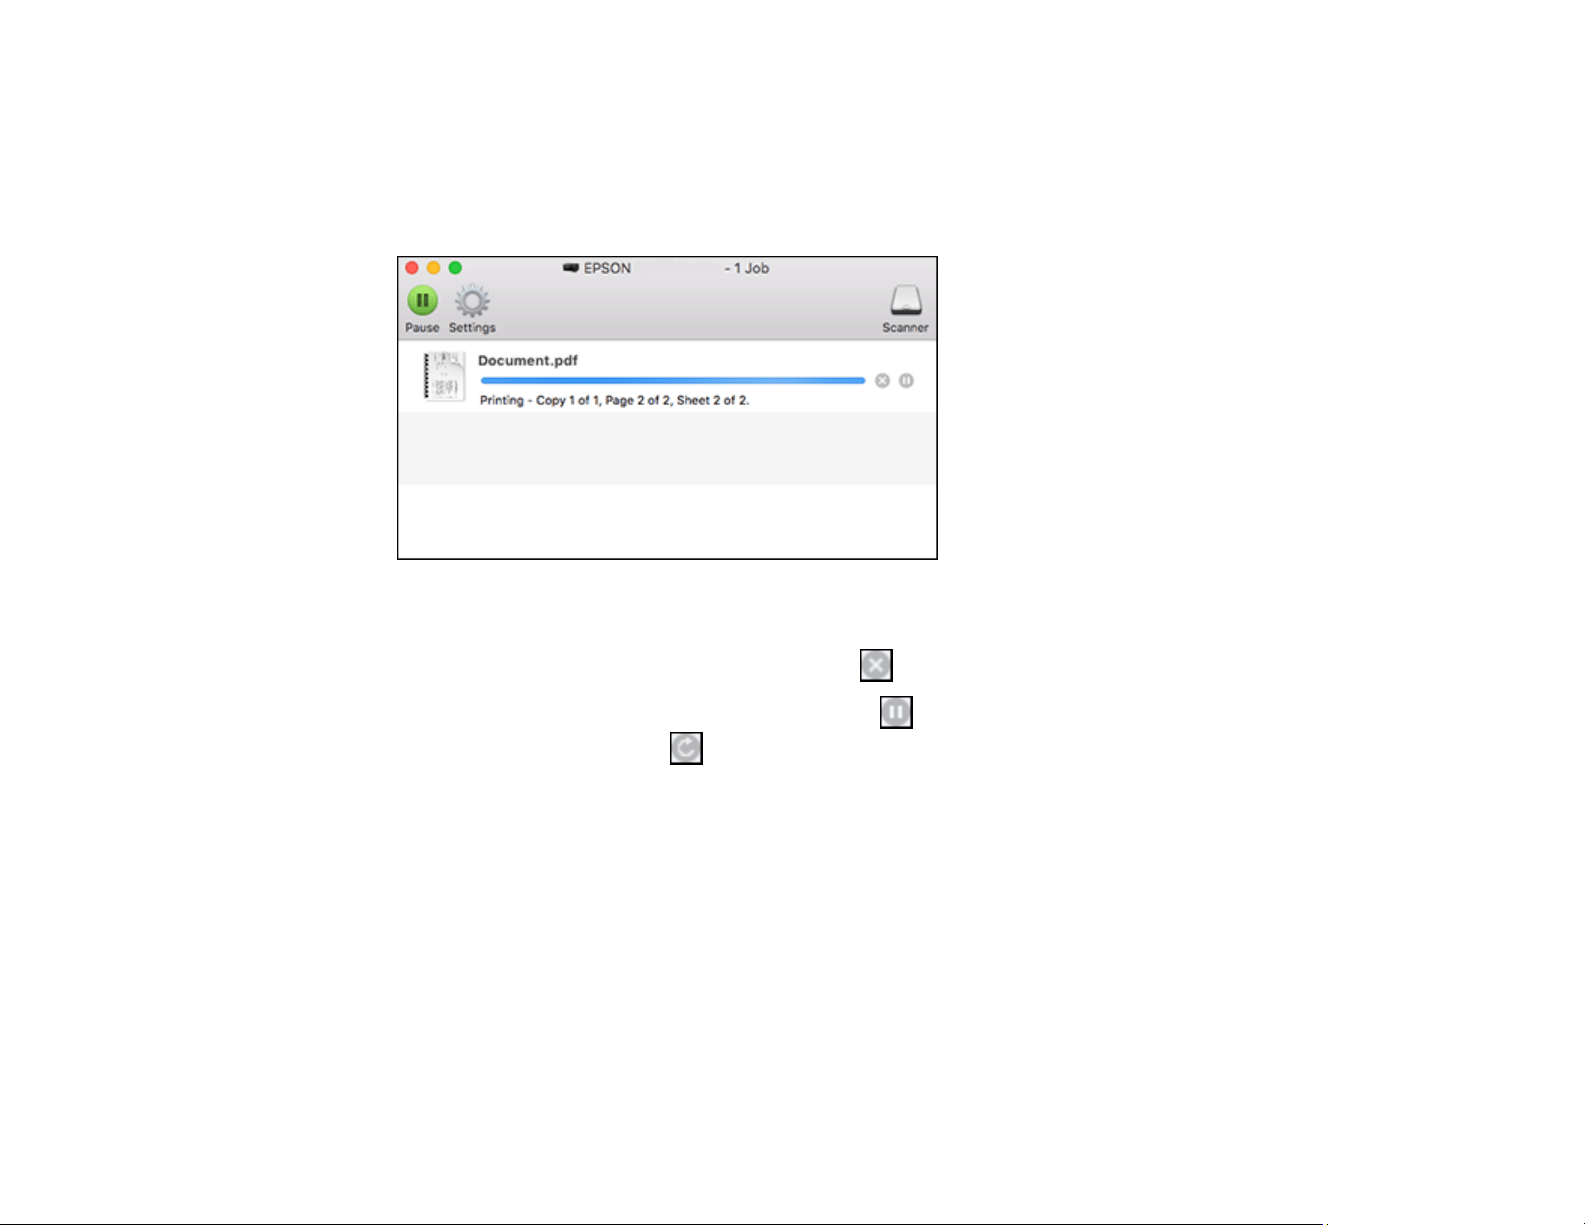
149
Checking Print Status - Mac
During printing, you can view the progress of your print job, control printing, and check ink status.
1. Click the printer icon when it appears in the Dock.
You see the print status window:
2. Select the following options as necessary for your Mac OS version:
• To cancel printing, click the print job and click or Delete.
• To pause a print job, click the print job and click or Hold. To resume a print job, click the
paused print job and click or Resume.
• To pause printing for all queued print jobs, click Pause or Pause Printer.
• To display other printer information, click Settings or Supply Levels.
Parent topic: Printing Your Document - Mac
Printing with the PCL Printer Software - Windows
You can print with the PCL printer software using any Windows printing program, as described in these
sections (ET-5180).
Synchronizing Printer Settings - PCL Driver - Windows
Selecting Basic Print Settings - PCL Driver - Windows
Selecting Default Print Settings - PCL Driver - Windows

150
Locking Printer Settings - PCL Driver - Windows
Parent topic: Printing from a Computer
Synchronizing Printer Settings - PCL Driver - Windows
You may need to synchronize the printer driver with the product if the printer driver does not detect the
correct information or settings from the product.
1. Do one of the following:
• Windows 10: Click and select (Settings) > Devices > Printers & scanners. Right-click on
your product, select the PCL option, and select Manage > Printer properties.
• Windows 8.x: Navigate to the Apps screen and select Control Panel > Hardware and Sound >
Devices and Printers. Right-click on your product, select the PCL option, and select Printer
properties.
• Windows 7: Click and select Devices and Printers. Right-click on your product, select the
PCL option, and select Printer properties.
• Windows Vista: Click and select Control Panel. Click Printer under Hardware and Sound,
then right-click on your product, select the PCL option, and select Properties.
2. Click the Optional Settings tab.
3. Make sure Acquire from Printer is selected and click Get.
The product's settings and other information appears in the Current Printer Information area.
4. Click OK.
Parent topic: Printing with the PCL Printer Software - Windows
Selecting Basic Print Settings - PCL Driver - Windows
Select the basic settings for the document or photo you want to print.
Note: The names of settings on the PCL driver screens may vary slightly, depending on the version of
the driver you have installed.
1. Open a photo or document for printing.
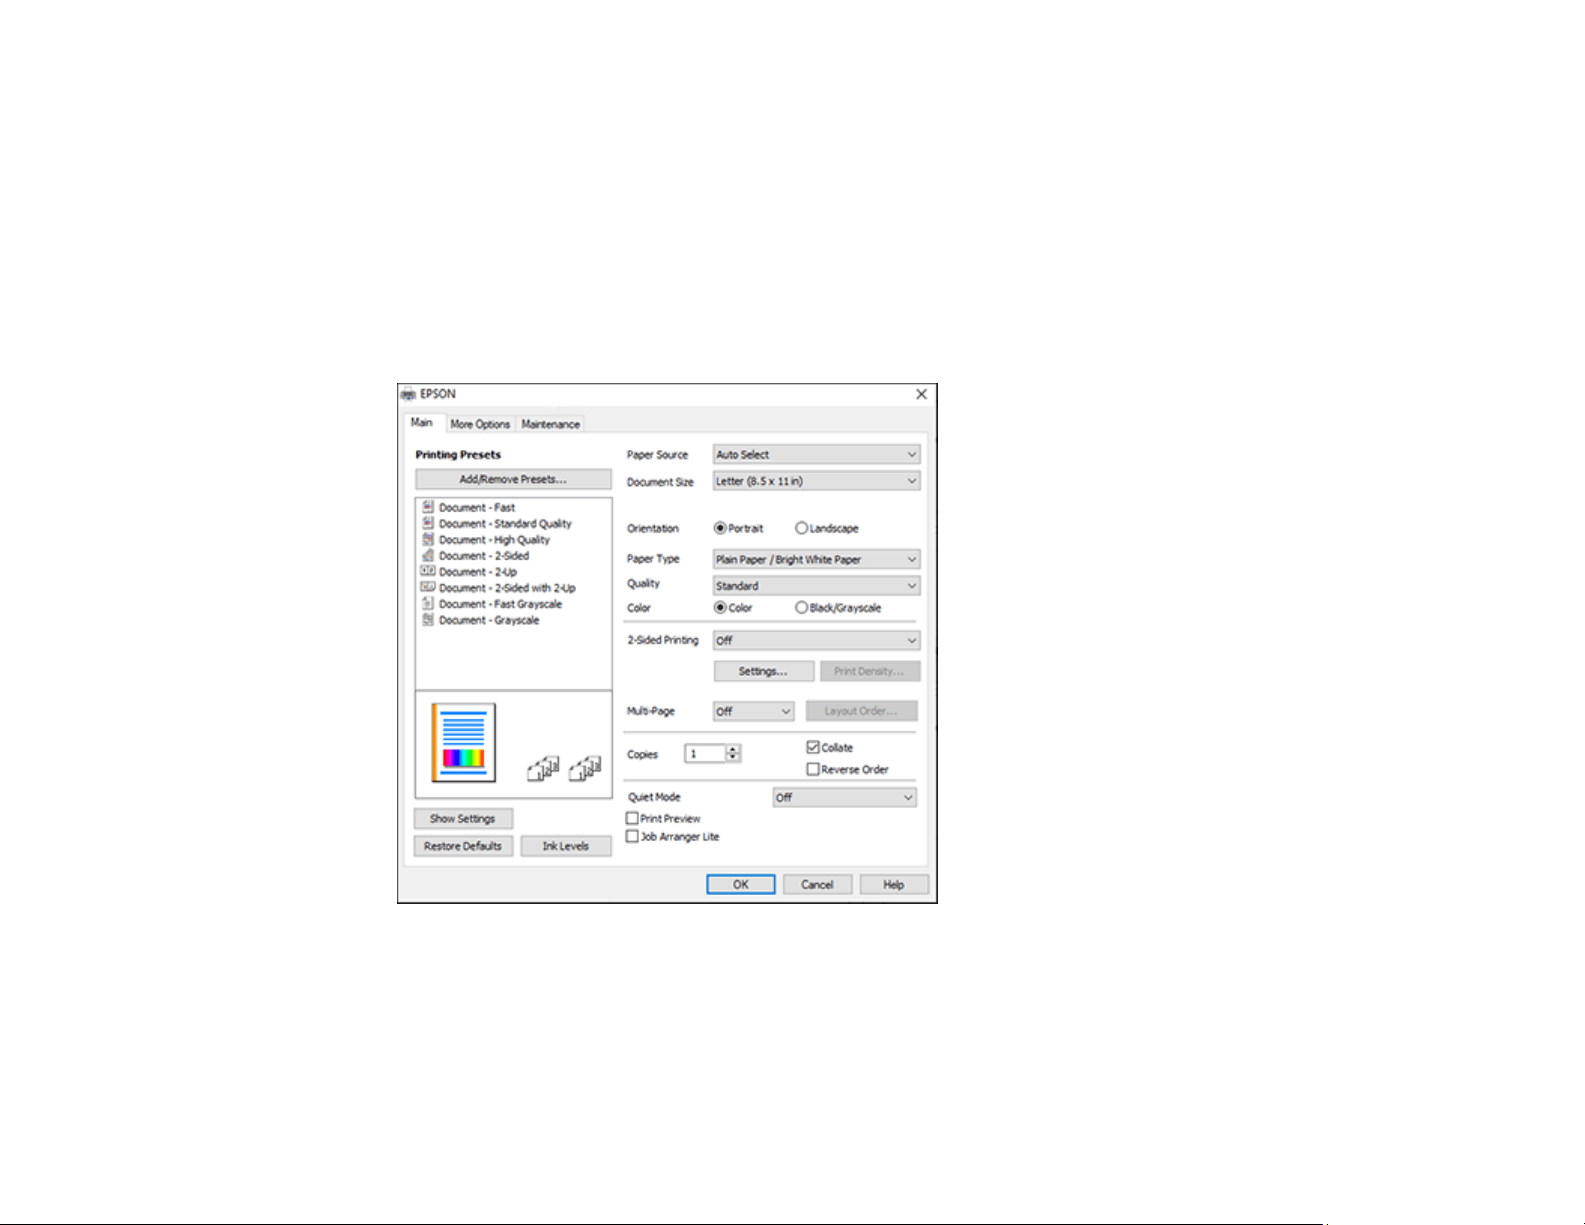
151
2. Select the print command in your application.
Note: You may need to select a print icon on your screen, the Print option in the File menu, or
another command. See your application's help utility for details.
3. If necessary, select the PCL option of your product as the printer you want to use.
Note: You may also need to select Properties or Preferences to view your print settings.
You see the Main tab of your printer settings window:
Note: For more information about a setting, right-click it and select Help.
4. For the Paper Source setting, select where you loaded the paper you want to print on.

152
5. Select the size of the paper you loaded as the Document Size setting.
Note: You can also select the User-Defined setting to create a custom paper size.
6. Select the orientation of your document.
Note: If you are printing an envelope, select Landscape.
7. Select the type of paper you loaded as the Paper Type setting.
Note: The setting may not exactly match the name of your paper. Check the paper type settings list
for details.
8. Select any of the available print options.
9. To select a variety of additional layout and printing options for your document or photo, select the
More Options tab and select the printing options you want.
10. To select maintenance and other optional settings, select the Maintenance tab and select the
options you want.
Parent topic: Printing with the PCL Printer Software - Windows
Related references
Paper Source Options - Windows
Print Quality Options - Windows
Multi-Page Printing Options - Windows
Double-sided Printing Options - Windows
Print Density Adjustments - Windows
Custom Color Correction Options - Windows
Image Options and Additional Settings - Windows
Header/Footer Settings - Windows
Selecting Default Print Settings - PCL Driver - Windows
When you change your print settings in a program, the changes apply only while you are printing in that
program session. If you want to change the print settings you use in all your Windows programs, you can
select new default print settings.
153
1. Do one of the following:
• Windows 10: Click and select (Settings) > Devices > Printers & scanners. Right-click on
your product, select the PCL option, and select Manage > Printing preferences.
• Windows 8.x: Navigate to the Apps screen and select Control Panel > Hardware and Sound >
Devices and Printers. Right-click on your product, select the PCL option, and select Printing
preferences.
• Windows 7: Click and select Devices and Printers. Right-click on your product, select the
PCL option, and select Printing preferences.
• Windows Vista: Click and select Control Panel. Click Printer under Hardware and Sound,
then right-click on your product, select the PCL option, and select Properties.
You see the printer settings window:
Note: For more information about a setting, right-click it and select Help.

154
2. Select the print settings you want to use as defaults in all your Windows programs.
3. Click OK.
These settings are now the defaults selected for printing. You can still change them as needed for
printing in any program session.
Parent topic: Printing with the PCL Printer Software - Windows
Locking Printer Settings - PCL Driver - Windows
Administrators can lock some printer settings to prevent unauthorized changes.
1. Do one of the following:
• Windows 10: Click and select (Settings) > Devices > Printers & scanners. Right-click on
your product, select the PCL option, and select Manage > Printer properties.
• Windows 8.x: Navigate to the Apps screen and select Control Panel > Hardware and Sound >
Devices and Printers. Right-click on your product, select the PCL option, and select Printer
properties.
• Windows 7: Click and select Devices and Printers. Right-click on your product, select the
PCL option, and select Printer properties.
• Windows Vista: Click and select Control Panel. Click Printer under Hardware and Sound,
then right-click on your product, select the PCL option, and select Properties.
2. Click the Optional Settings tab.
3. Click Driver Settings.
155
You see this window:
4. Select the checkbox for the settings you want to lock. To lock all print settings, select All Document
Settings.
5. Under Advanced Settings, select the setting option you want to use for each locked setting.
6. Click OK.
PCL Driver Locked Setting Options
Parent topic: Printing with the PCL Printer Software - Windows
PCL Driver Locked Setting Options
Select the options you want to use for any locked print settings.
156
Setting Options Description
Watermark Various text
watermarks
Lets you select the text for the watermark or prohibit
watermarks
Add/Delete Lets you add or delete a customized text or image-based
watermark
Settings Lets you select the size, position, and other watermark
settings
Header/Footer Off Prohibits headers or footers
On Allows headers and footers
Settings Lets you select the text and position for printing headers and
footers
Color Color Allows color printing
Grayscale Allows printing in black or shades of gray only
2-sided printing Off Allows printing on only one side of the paper
On Allows printing on both sides of the paper
Multi-Page Off Prohibits multi-page settings
2-Up Allows printing of 2 pages on one sheet of paper
4-Up Allows printing of 4 pages on one sheet of paper
6-Up Allows printing of 6 pages on one sheet of paper
8-Up Allows printing of 8 pages on one sheet of paper
9-Up Allows printing of 9 pages on one sheet of paper
16-Up Allows printing of 16 pages on one sheet of paper
Parent topic: Locking Printer Settings - PCL Driver - Windows
Printing with the PostScript (PS3) Printer Software - Windows
You can print with the PostScript (PS3) printer software using any Windows printing program, as
described in these sections (ET-5180).
Selecting Basic Print Settings - PostScript Printer Software - Windows
Selecting Default Print Settings - PostScript Printer Software - Windows

157
Parent topic: Printing from a Computer
Selecting Basic Print Settings - PostScript Printer Software - Windows
Select the basic settings for the document or photo you want to print.
The PostScript printer software supports plain paper printing on these paper and envelope sizes:
• A4 (8.3 × 11.7 inches [210 × 297 mm])
• Letter (8.5 × 11 inches [216 × 279 mm])
• Legal (8.5 × 14 inches [216 × 356 mm])
• A6 (4.1 × 5.8 inches [105 × 148 mm])
• Executive (7.25 × 10.5 inches [184 × 267 mm])
• No. 10 (4.1 × 9.5 inches [105 × 241 mm])
1. Open a photo or document for printing.
2. Select the print command in your application.
Note: You may need to select a print icon on your screen, the Print option in the File menu, or
another command. See your application's help utility for details.
3. If necessary, select your product name as the printer you want to use, and then click the
Preferences button.
158
You see this window:
4. Select the Paper Source that matches where you loaded the paper you want to print on.
5. Select Plain as the Media setting.
6. Select one of the following as the Color setting:
• To print text and graphics in black only, select the Black & White setting.
• To print a color document or photo, select the Color setting.
7. To select additional layout and printing options, select Advanced and select additional settings as
necessary.
8. Click the Layout tab.
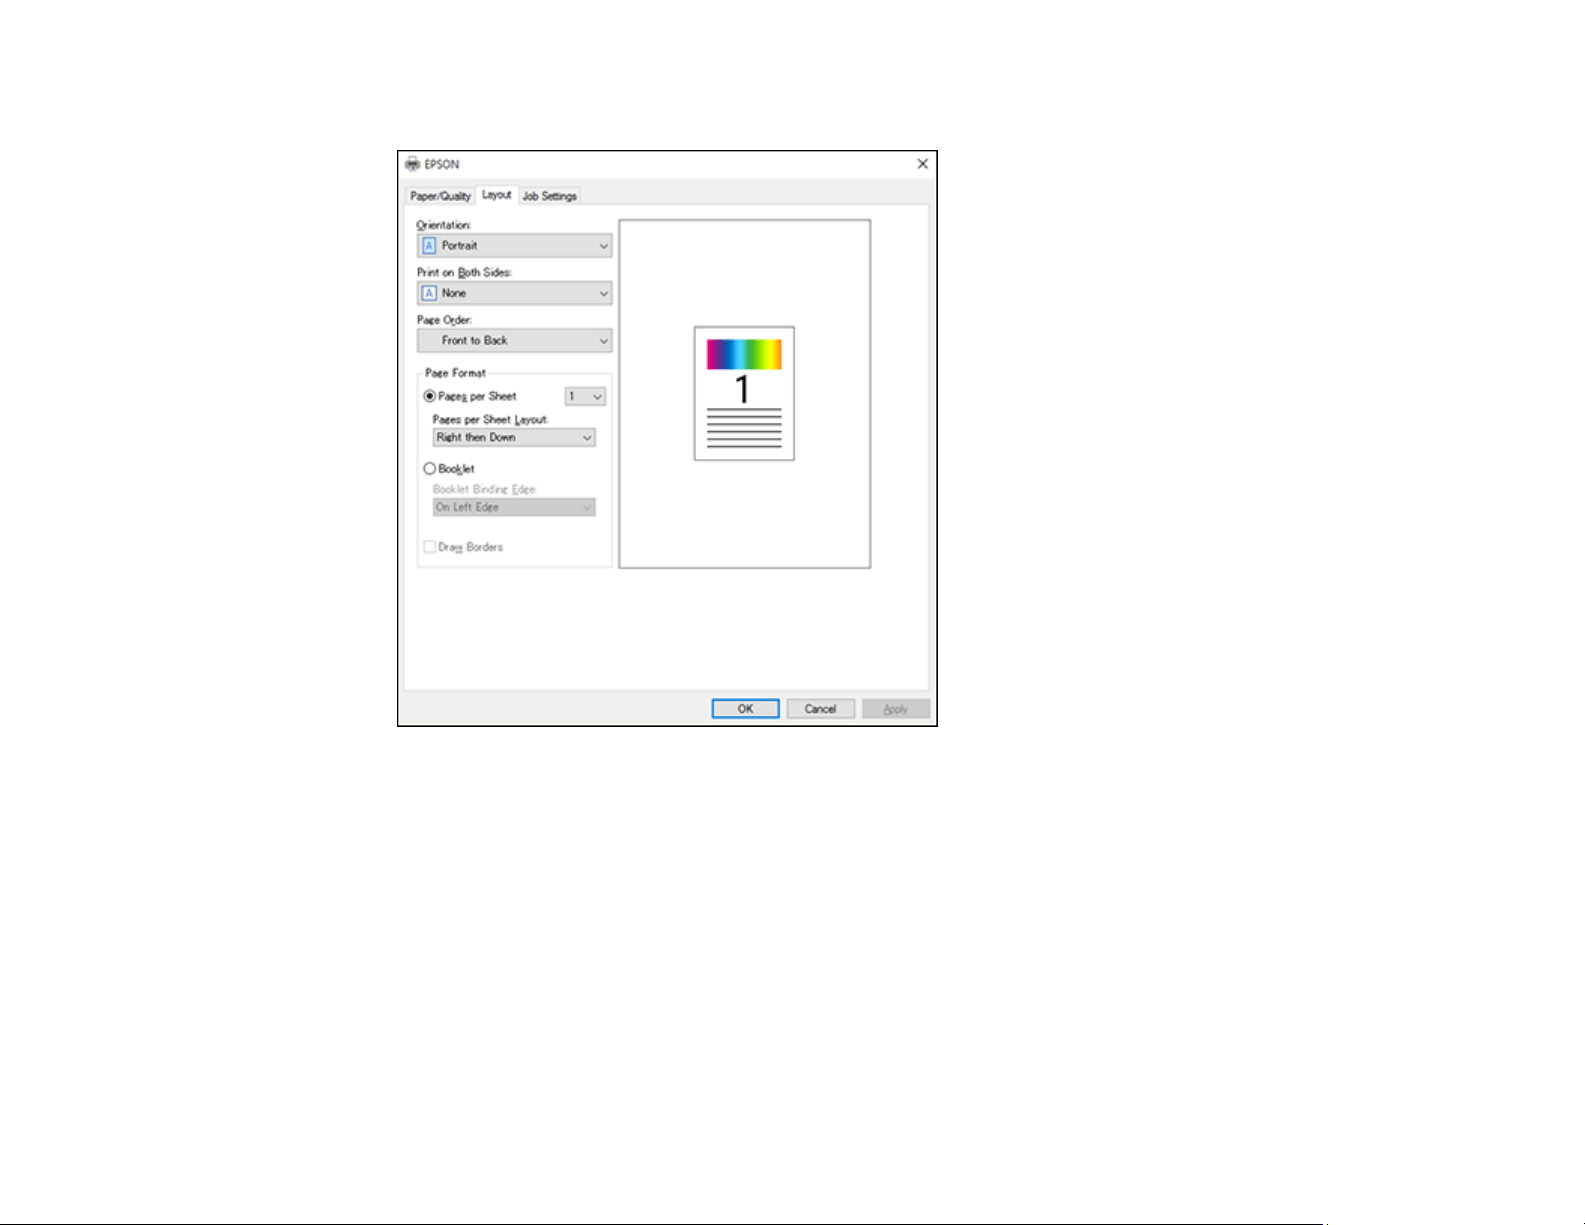
159
You see this window:
9. Select the print options as necessary.
10. Click OK when you are finished.
Parent topic: Printing with the PostScript (PS3) Printer Software - Windows
Related references
Paper Source Options - Windows
Selecting Default Print Settings - PostScript Printer Software - Windows
When you change your print settings in a program, the changes apply only while you are printing in that
program session. If you want to change the print settings you use in all your Windows programs, you can
select new default print settings.
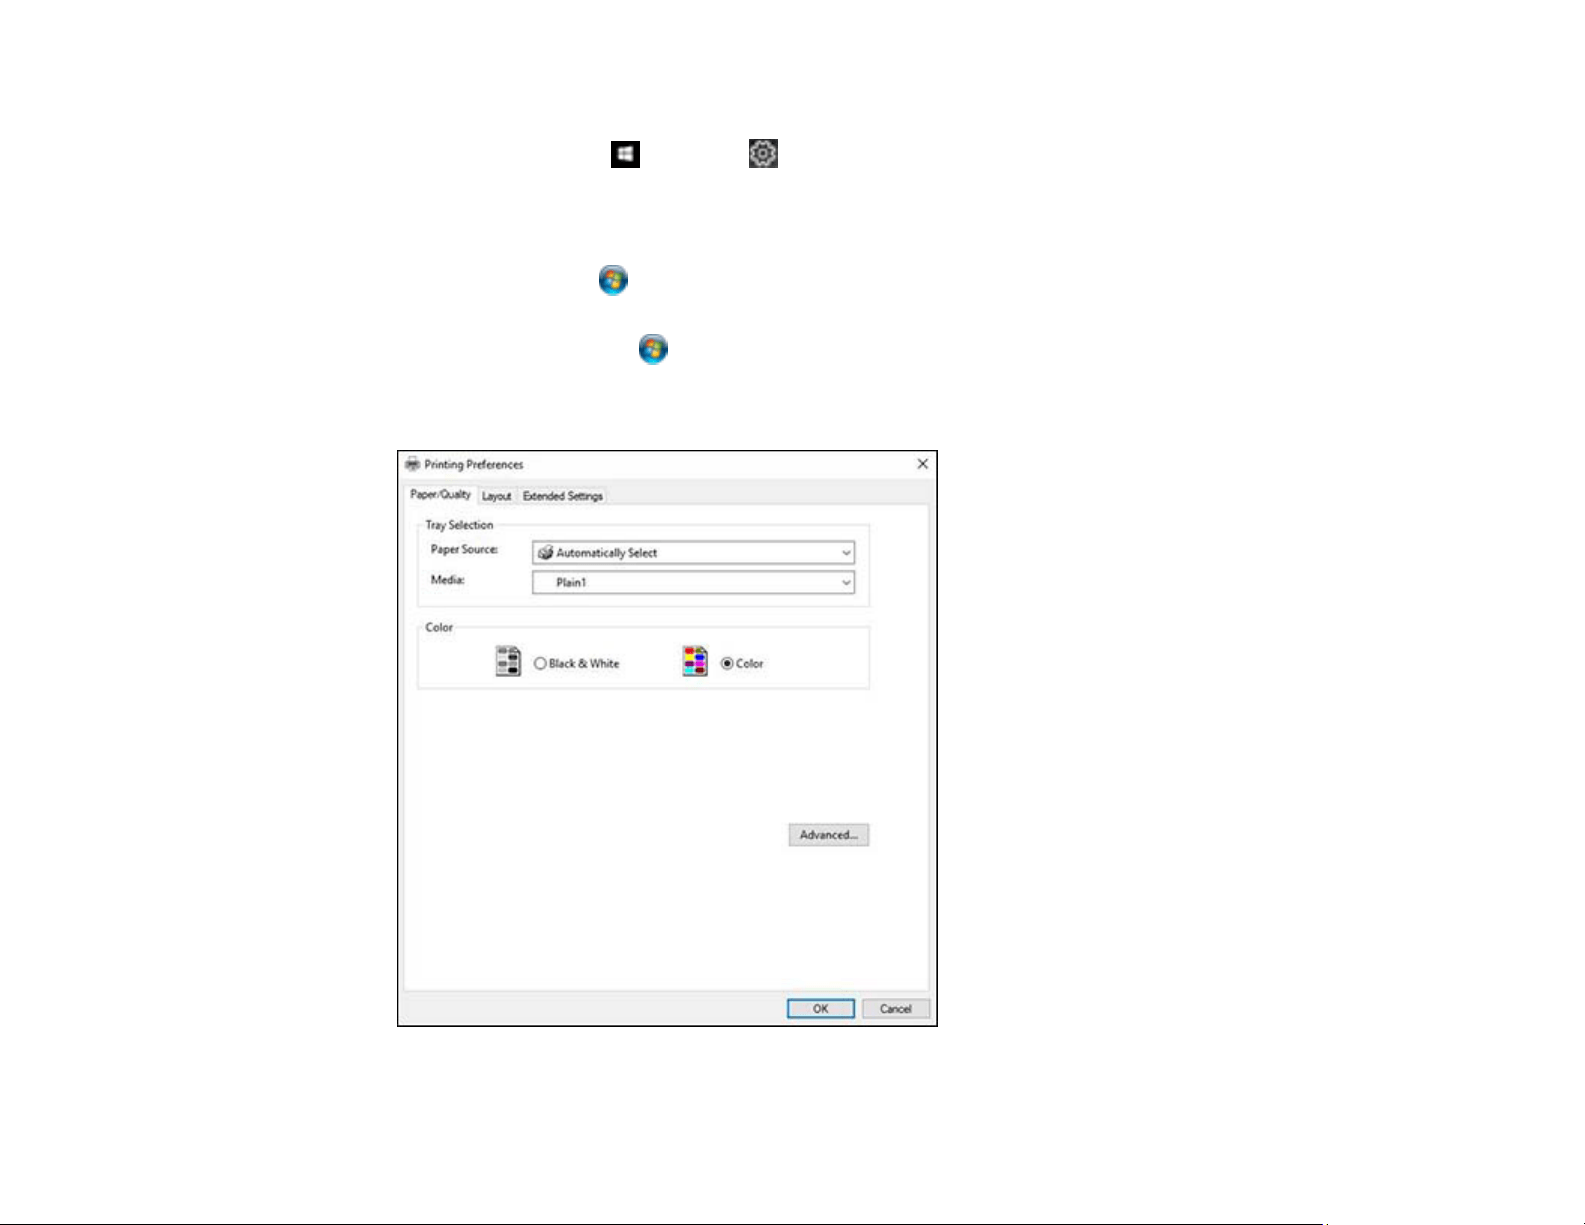
160
1. Do one of the following:
• Windows 10: Click and select (Settings) > Devices > Printers & scanners. Select your
product name and select Manage > Printing preferences.
• Windows 8.x: Navigate to the Apps screen and select Control Panel > Hardware and Sound >
Devices and Printers. Right-click your product name and select Print Preferences.
• Windows 7: Click and select Devices and Printers. Right-click your product name and select
Printing Preferences.
• Windows Vista: Click and select Control Panel. Click Printer under Hardware and Sound,
right-click your product name, and select Printing Preferences.
You see the printer settings window:
161
2. Select the print settings you want to use as defaults in all your Windows programs.
3. Click OK.
These settings are now the defaults selected for printing. You can still change them as needed for
printing in any program session.
PostScript Printer Driver Options - Windows
Parent topic: Printing with the PostScript (PS3) Printer Software - Windows
PostScript Printer Driver Options - Windows
Select the print options you want to use for PostScript printing.
Note: Menus may vary depending on the option selected.
Paper/Quality Options
Setting Options Description
Tray Selection Paper Source Select the paper source from which the paper is fed
Media Select the type of paper on which you want to print
Unspecified: printing is performed from the paper
source for which the paper type is set to the following
in the printer's settings: plain paper, Preprinted,
Letterhead, Color, Recycled, High quality plain paper.
Note: Paper cannot be fed from a paper source that is
set to off in the printer's Auto Select Settings.
Color Black & White Select the color for your print job
Color
Layout Options
Setting Options Description
Orientation various Select the orientation you want to use to print
Print on Both Sides — Select to perform 2-sided printing
162
Setting Options Description
Page Order various Select to print from the top or the last page. If you
select Back to Front, the pages are stacked in the
correct order based on page number after printing.
Page Format Pages per Sheet Allows you to specify the page layout when printing
several pages on one sheet
Booklet Select the binding position for a booklet
Draw Borders Select to place a border line for each page when
printing several pages on one sheet or when creating
a booklet
Job Options
Note: Printer use may be restricted by the administrator. Printing is available after registering your
account to the printer driver. Contact the administrator for details on your user account.
Setting Options Description
Save Access Control
Settings
User Name Allows you to enter a user name and password when
you set Access Control Settings
Password
Advanced Options
Setting Options Description
Paper/Output Paper Size Select the paper size and number of copies
Copies
Graphic Print Quality Select the print quality you want to use for your print
job
Image Color
Management
Select the ICM you want to use for your print job
Scaling Allows you to reduce or enlarge the document
TrueType Font Sets the font substitute to TrueType Font
163
Setting Options Description
Document Options Advanced Printing
Features
Allows you to make detailed settings for printing
features
PostScript Options Allows you to make optional settings
Printer Features Set the following menu items:
• Color Mode: Select whether to print in color or in
monochrome
• Press Simulation: Select a CMYK ink color to
simulate when you print by reproducing the CMYK
ink color of the offset press
• Ink Save Mode: Conserves ink by reducing the
print density
• Rotate by 180°: Rotates the data 180 degrees
before printing
Parent topic: Selecting Default Print Settings - PostScript Printer Software - Windows
Printing with the PostScript (PS3) Printer Software - Mac
You can print with the PostScript (PS3) printer software using any Mac printing program, as described in
these sections (ET-5180).
Selecting Basic Print Settings - PostScript Printer Software - Mac
Parent topic: Printing from a Computer
Selecting Basic Print Settings - PostScript Printer Software - Mac
Select the basic settings for the document or photo you want to print.
The PostScript printer software supports plain paper printing on these paper and envelope sizes:
• A4 (8.3 × 11.7 inches [210 × 297 mm])
• Letter (8.5 × 11 inches [216 × 279 mm])
• No. 10 (4.1 × 9.5 inches [105 × 241 mm])
• A5 (5.8 × 8.2 inches [148 × 210 mm])
• A6 (4.1 × 5.8 inches [105 × 148 mm])
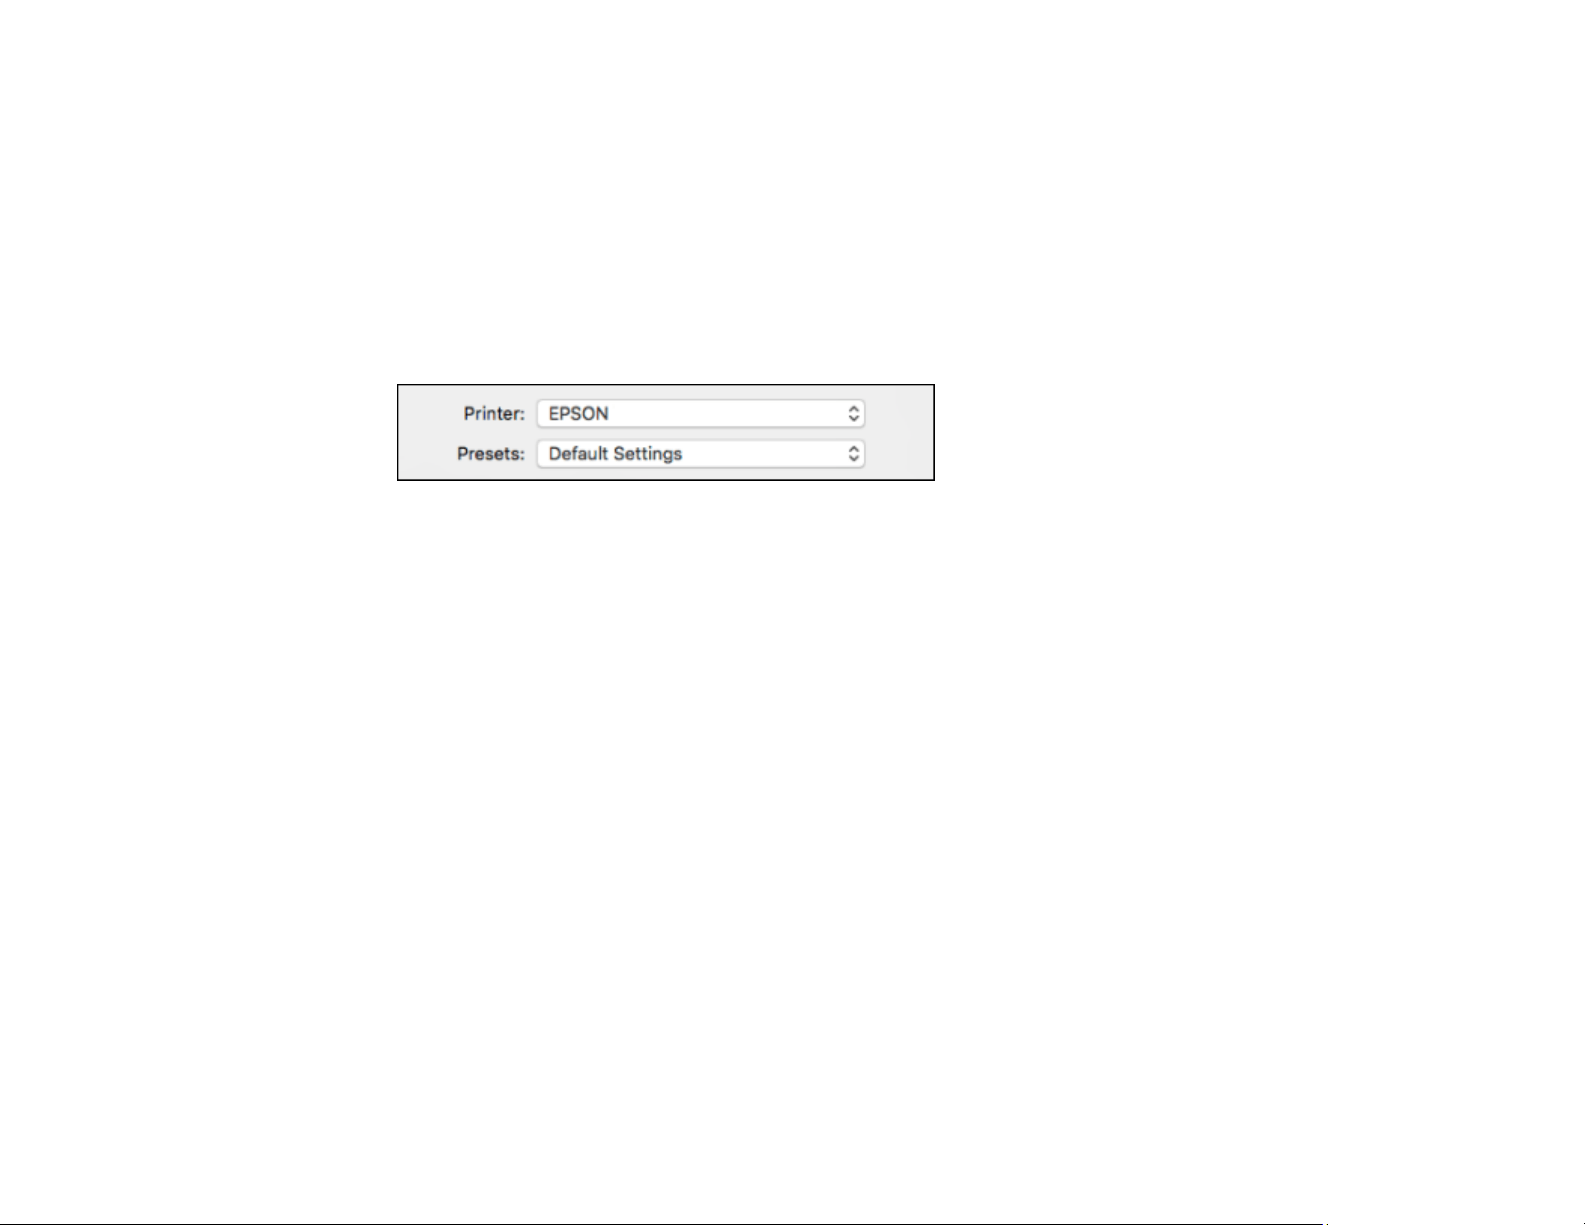
164
• Executive (7.25 × 10.5 inches [184 × 267 mm])
• Legal (8.5 × 14 inches [216 × 356 mm])
1. Open a photo or document for printing.
2. Select the print command in your application.
Note: You may need to select a print icon on your screen, the Print option in the File menu, or
another command. See your application's help utility for details.
3. Select your product as the Printer setting.
4. If necessary, click the arrow next to the Printer setting or the Show Details button to expand the
print window.
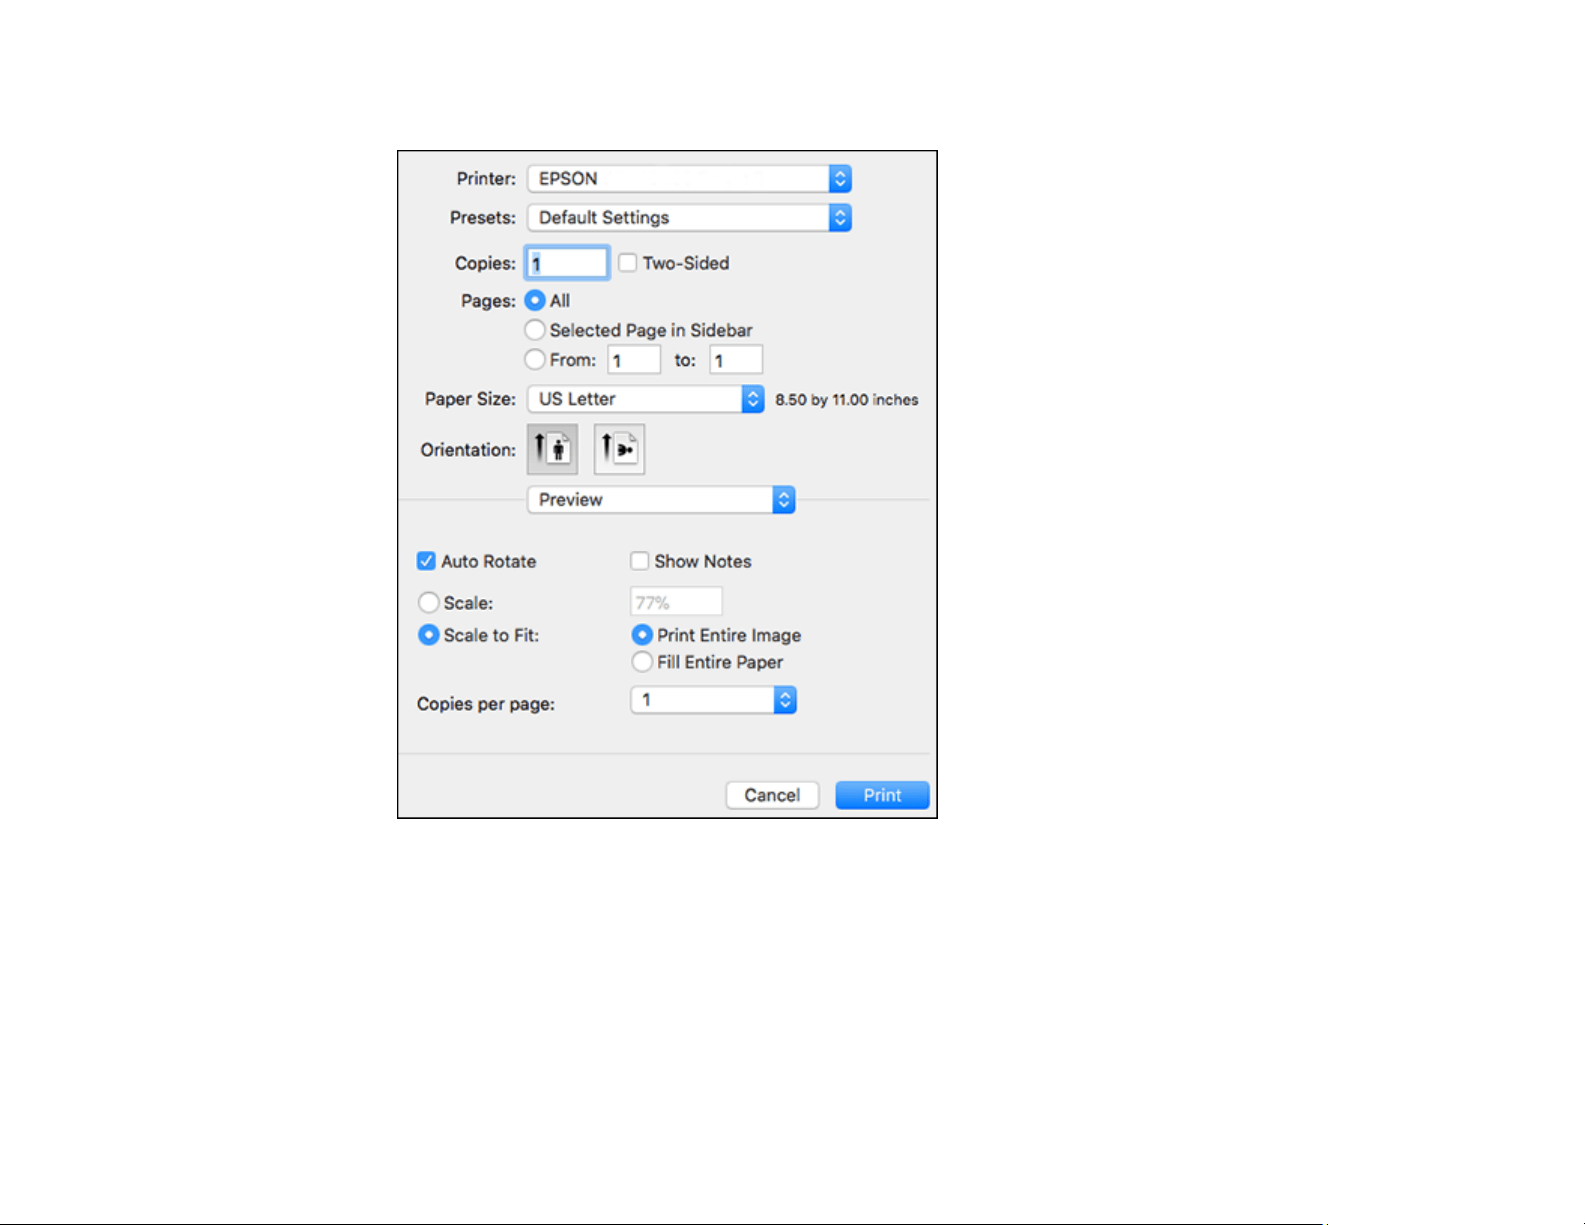
165
You see the expanded printer settings window for your product:
Note: The print window may look different, depending on the Mac OS version and the application
you are using.
5. Select the Two-Sided, Copies, and Pages settings as necessary.
Note: If you do not see these settings in the print window, check for them in your application before
printing.
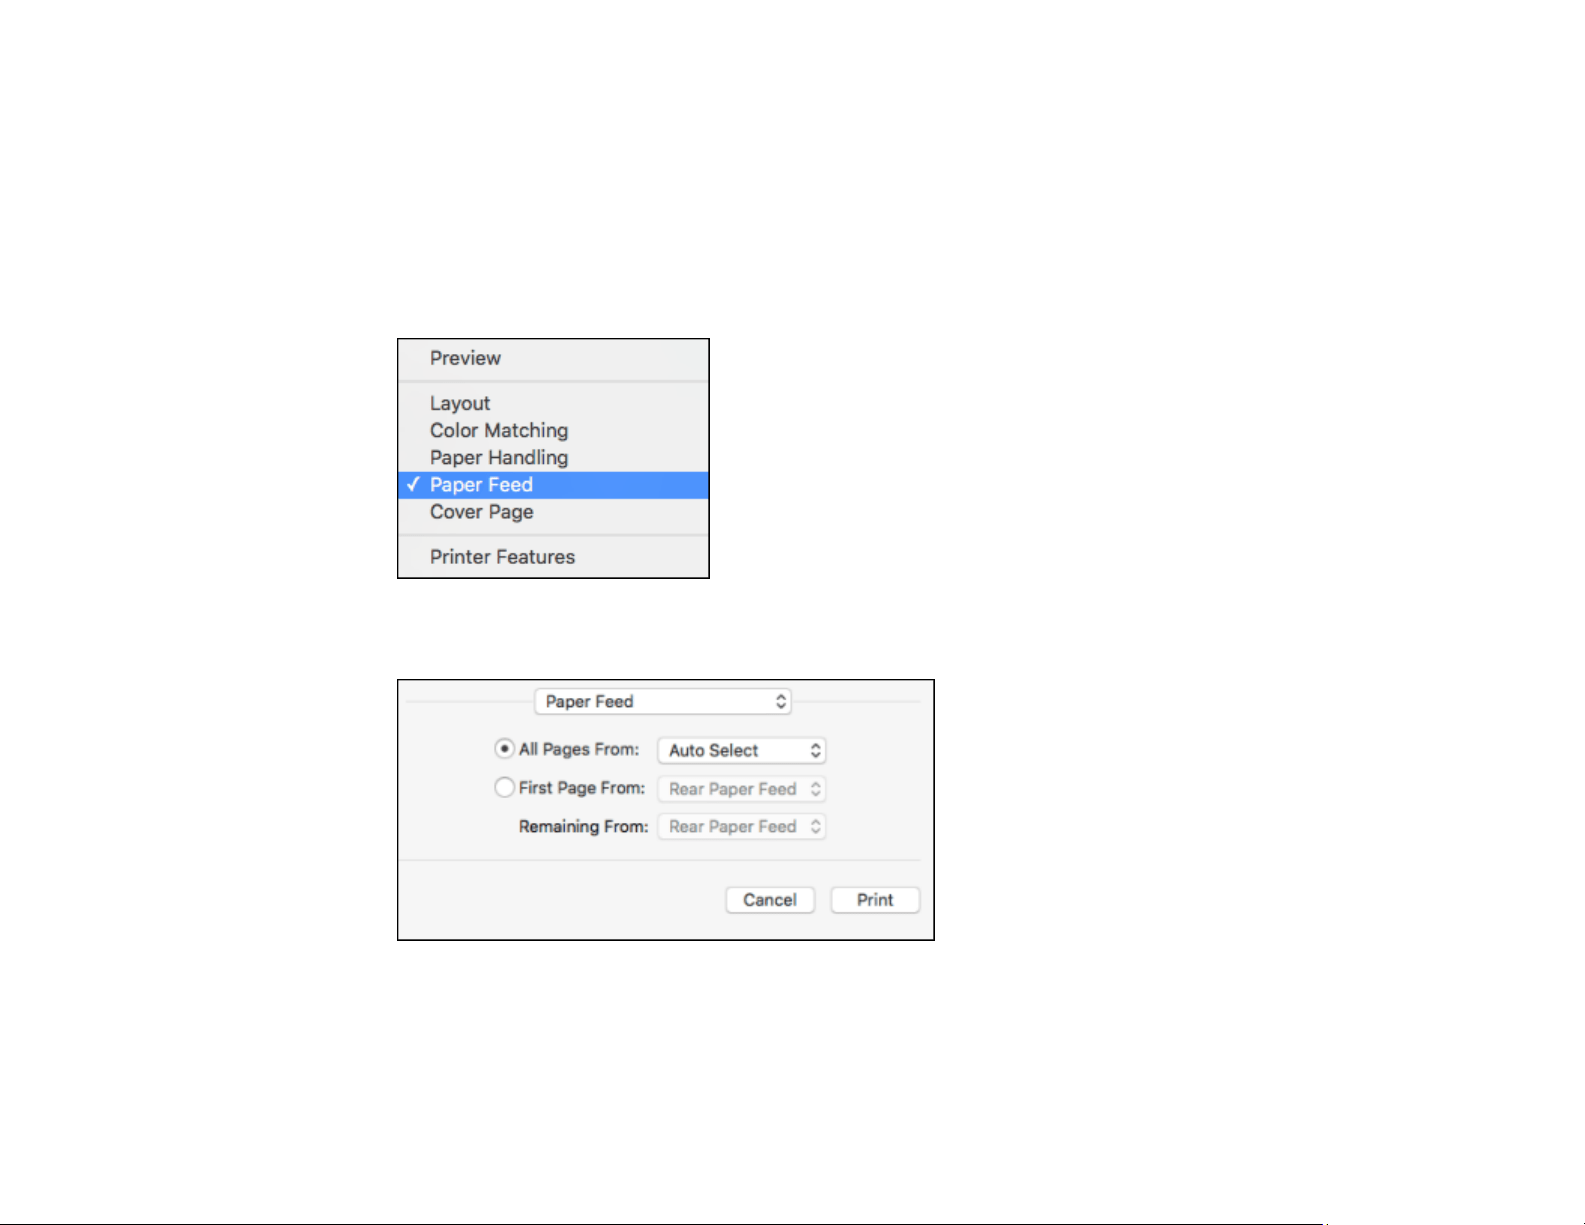
166
6. Select the page setup options: Paper Size and Orientation.
Note: If you do not see these settings in the print window, check for them in your application before
printing. They may be accessible by selecting Page Setup from the File menu.
7. Select any application-specific settings that appear on the screen, such as those shown in the image
above for the Preview application.
8. Select Paper Feed from the pop-up menu.
You see these settings:
9. Select All Pages From or First Page From and select the paper source you want to print from.
167
10. Select Printer Features from the pop-up menu.
You see these settings:
11. Select Plain as the Media Type setting.
12. Select one of the following Print Quality options:
• For fast printing with reduced quality, select Fast.
• For printing text and graphics with good quality and print speed, select Fine.
• For the best printing with reduced speed, select Maximum.
13. Select any of the following from the pop-up menu as necessary:
• Select Layout to adjust a variety of layout options for your document or photo.
• Select Paper Handling to adjust the size of the image as you print it.
168
• Select Color Matching to fine-tune the colors in your printout.
PostScript Printer Driver Options - Mac
Parent topic: Printing with the PostScript (PS3) Printer Software - Mac
Related tasks
Selecting Page Setup Settings - Mac
Selecting Print Layout Options - Mac
Printing Your Document - Mac
PostScript Printer Driver Options - Mac
Select the print options you want to use for PostScript printing.
Note: Menus may vary depending on the option selected.
Layout Options
Setting Options Description
Pages per Sheet — Select the number of pages to be printed on one
sheet
Layout Direction various Allows you to specify the order in which the pages will
print
Border — Select to print a border around the pages
Two-Sided — Select to perform 2-sided printing
Reverse Page
Orientation
— Rotates the page 180 degrees before printing
Flip Horizontally — Select to invert the printed image
Color Matching Options
Setting Options Description
ColorSync/In Printer various Select a color adjustment option to minimize the
difference in color between the printer and the
computer display
Paper Handling Options
169
Setting Options Description
Collate Pages — Select to print multi-page documents collated in order
and sorted into sets
Pages to Print — Select to print only odd or even pages
Page Order various Select to print from the top or the last page
Scale to Fit Paper Size — Select to scale the image to fit on the paper size you
loaded
Destination Paper Size various Select the paper size to print on
Scale Down Only — Select when reducing the size of the document
Paper Feed Options
Setting Options Description
All Pages From — Selecting Auto Select selects the paper source that
matches the Paper Setting on the printer
automatically
First Page
From/Remaining From
various Select the paper source for each page
Cover Page Options
Setting Options Description
Print Cover Page various Select whether or not to print a cover page. When you
want to add a back cover, select After document.
Cover Page Type various Select the contents of the cover page
Printer Features Options
170
Setting Options Description
Quality Media Type Select the type of paper on which you want to print
Unspecified: printing is performed from the paper
source for which the paper type is set to the following
in the printer's settings: plain paper, Preprinted,
Letterhead, Color, Recycled, High quality plain paper.
Note: Paper cannot be fed from a paper source that is
set to off in the printer's Auto Select Settings.
Print Quality Select the print quality you want to use for printing
Color Color Mode Select whether to print in color or in monochrome
Press Simulation Select a CMYK ink color to simulate when you print by
reproducing the CMYK ink color of the offset press
Others Ink Save Mode Select to conserve ink by reducing the print density
Parent topic: Selecting Basic Print Settings - PostScript Printer Software - Mac
Printing from a Smartphone or Tablet
You can print from a smartphone or tablet running iOS or Android using the Epson Smart Panel app.
Note: Your device must be connected to the same wireless network as your Epson product, and Epson
Smart Panel must be configured for use with your product.
1. Download the Epson Smart Panel app from your device's app store or from Epson's website. See
the link below.
2. Open the Epson Smart Panel app and select a print menu on the home screen.
3. Follow the on-screen instructions to begin printing.
Parent topic: Printing from a Computer
Related tasks
Using the Epson Smart Panel Mobile App
Setting Up Wireless Printing from a Smartphone or Tablet


172
Scanning
You can scan your originals and save them as digital files.
Starting a Scan
Starting a Scan
After placing your originals on your product for scanning, start scanning using one of these methods.
Starting a Scan Using the Product Control Panel
Scanning to a Connected Computer
Scanning to the Cloud
Setting Up a WSD Port (Windows 7/Windows Vista)
Scanning Using WSD - Windows
Control Panel Scanning Options
Changing Default Scan Job Settings
Starting a Scan Using Epson ScanSmart
Starting a Scan Using the Epson Scan 2 Icon
Starting a Scan from a Scanning Program
Starting a Scan from a Smartphone or Tablet
Scanning a Document in Epson ScanSmart
Selecting Epson ScanSmart Settings
Scanning in Epson Scan 2
Parent topic: Scanning
Starting a Scan Using the Product Control Panel
You can scan an image to a variety of destinations using your product's control panel.
Your product automatically selects default scan settings, but you can view or change them as necessary.
If you are scanning to a computer, you can change the default scan settings using the Event Manager
utility on the computer.
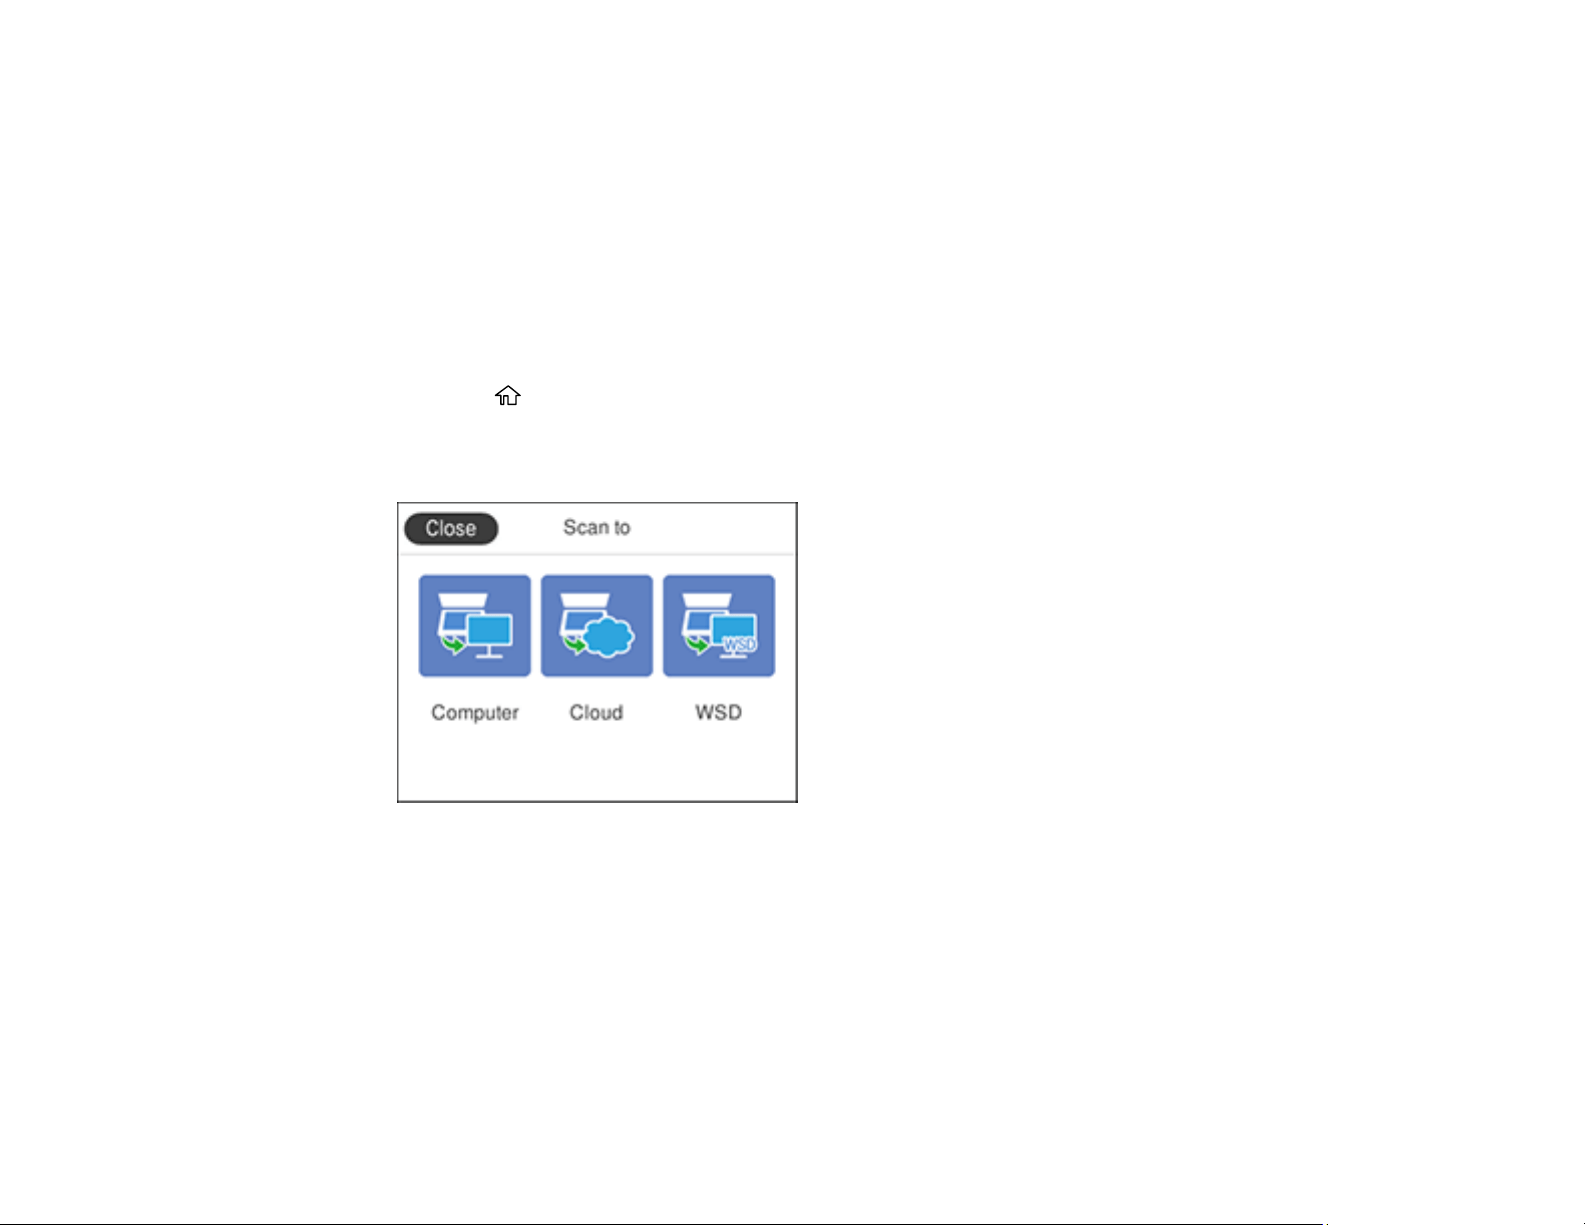
173
1. Make sure you installed the product software and connected the product to your computer or
network.
Note: Restart your computer after installing the product software to enable scanning from the control
panel. Also make sure the Event Manager program is not being blocked by your firewall or security
software.
2. Place your original on the product for scanning.
Note: To scan a double-sided or multi-page document, place your originals in the ADF.
3. Press the home button, if necessary.
4. Select Scan.
You see a screen like this:
5. Select one of the following Scan to options:
• Computer lets you scan to a connected computer using your saved scan settings.
• Cloud sends your scanned files to a destination that you have registered with Epson Connect.
• WSD lets you manage network scanning in Windows 10, Windows 8.x, Windows 7, or Windows
Vista (English only). To use this feature, you must first set up a WSD (Web Services for Devices)
port on your Windows 7 or Windows Vista computer (the port is set up automatically on Windows
10 and Windows 8.x).
6. Follow the instructions in the links below to complete your scan.

174
Parent topic: Starting a Scan
Related tasks
Entering Characters on the LCD Screen
Using Epson Scan to Cloud
Setting Up Wireless Printing from a Smartphone or Tablet
Related topics
Placing Originals on the Product
Scanning to a Connected Computer
You can scan an original and save it to a connected computer using your product's control panel. The
computer must be connected using a USB cable or connected to the same network as your product.
You can save the scanned file as a JPEG or PDF file, or attach it to an email. You can also set up
custom scan settings using Event Manager and automatically scan using those settings on your product
control panel.
Note: Be sure you have installed Epson ScanSmart, Epson Scan 2, and Event Manager on your
computer before scanning to your computer.
1. Place your original on the product for scanning.
Note: To scan a multi-page document, place all of the pages in the ADF.
2. Press the home button, if necessary.
3. Select Scan.
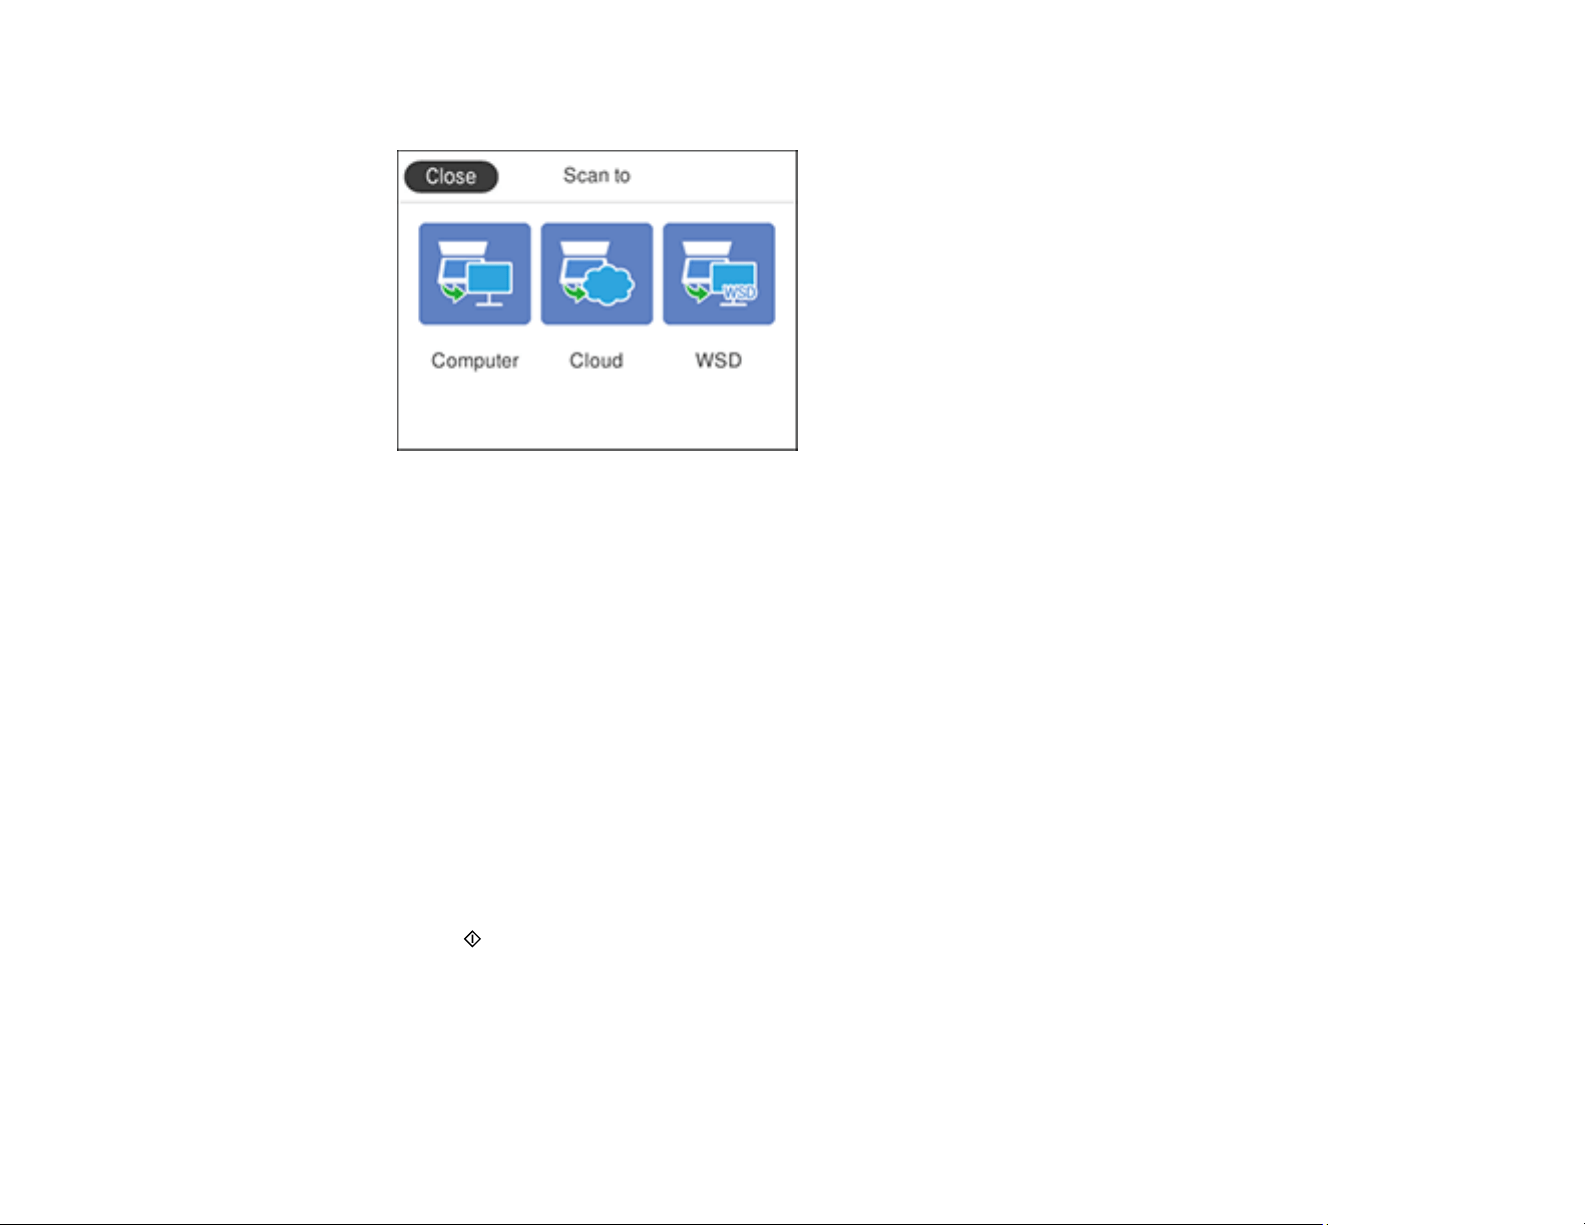
175
You see a screen like this:
4. Select Computer.
Note: Select OK to close the information screen, if necessary.
5. Select Select a computer and choose one of the following options:
• If your computer is connected to your product over a network, select a connected computer from
the displayed list. (If the computer is not listed, select Search Again.)
• If your computer is connected to your product using a USB cable, select USB Connection.
6. Select Preview on Computer and choose one of the following options:
• Preview on Computer to preview the scanned image on your computer before saving it.
• Save as JPEG to save the scanned image as a JPEG file on your computer or as an image
capture on a Mac.
• Save as PDF to save the scanned document or image as a PDF file on your computer or as an
image capture on a Mac.
7. Select Send on the LCD screen to start scanning.
Epson ScanSmart opens and your product scans your original and saves the scanned file to your
computer.
Note: Click Help in Epson ScanSmart for detailed information.
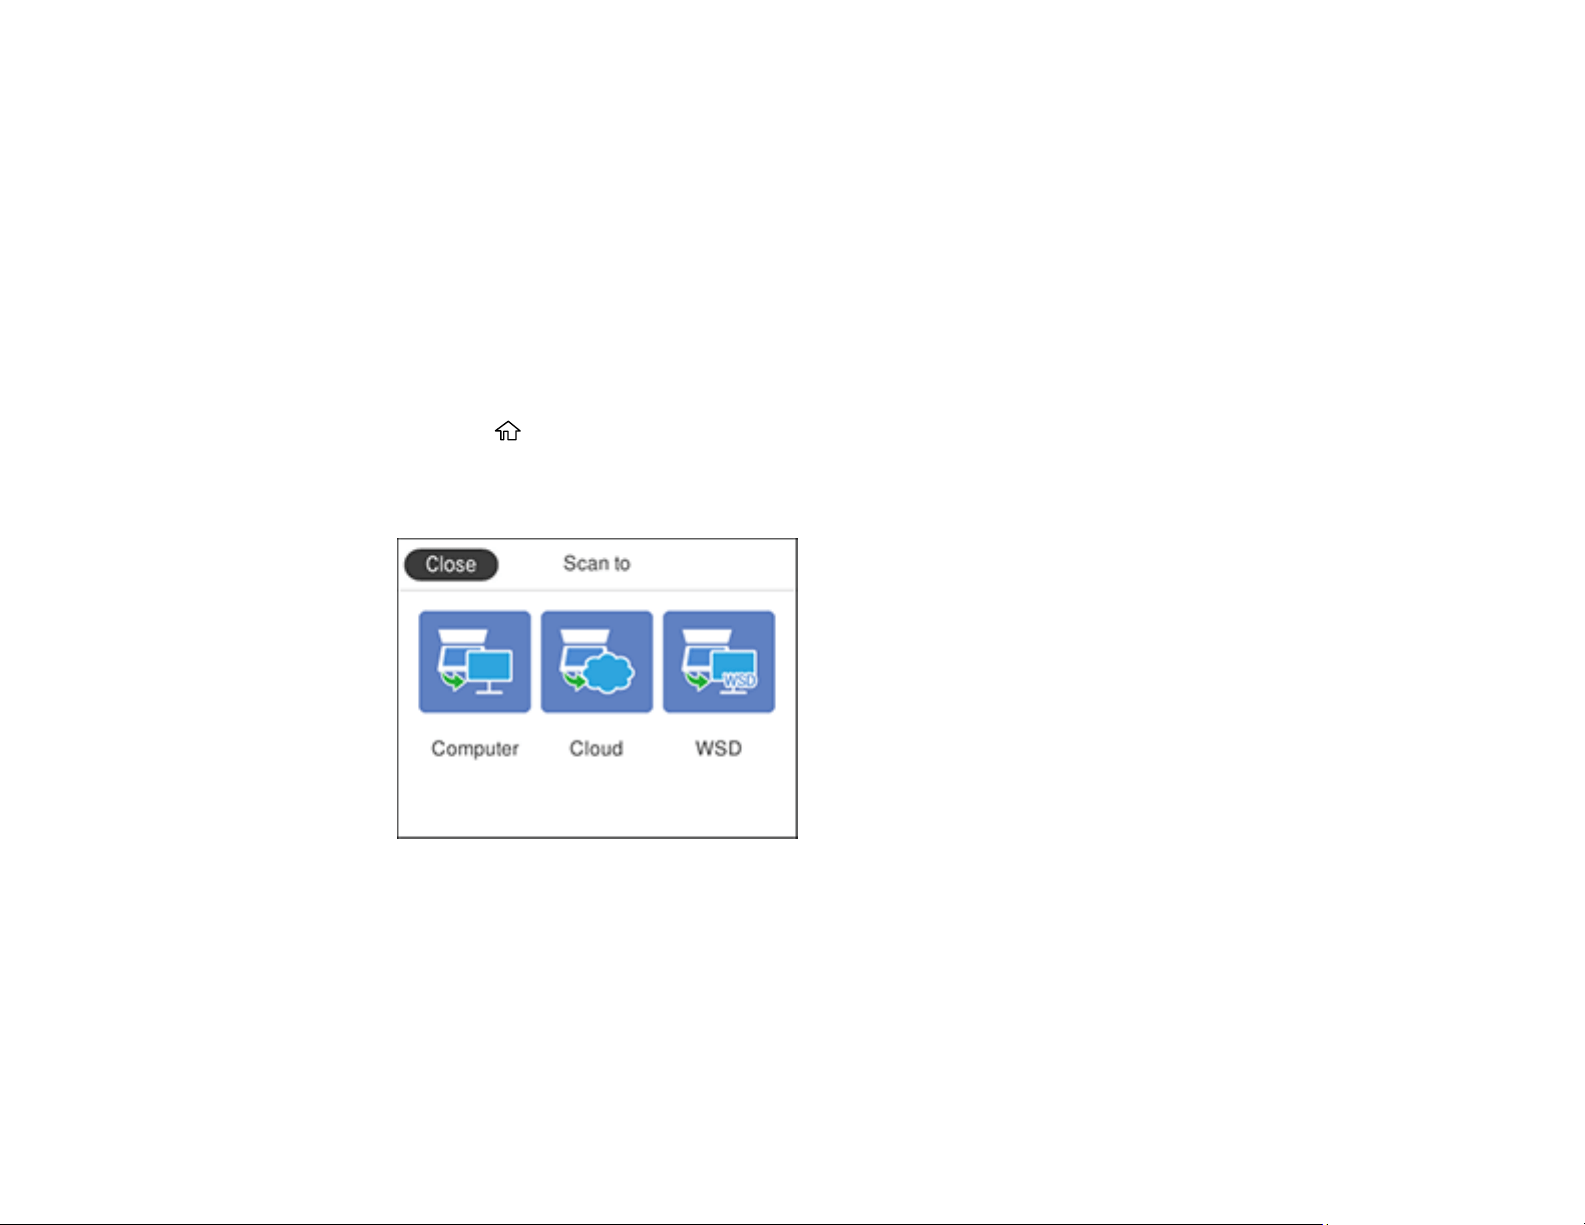
176
Parent topic: Starting a Scan
Related tasks
Changing Default Scan Job Settings
Scanning to the Cloud
You can use the control panel to send your scanned files to a destination that you have registered with
Epson Connect.
Note: Make sure to set up your product using Epson Connect before using this feature.
1. Place your original on the product for scanning.
2. Press the home button, if necessary.
3. Select Scan.
You see a screen like this:
4. Select Cloud.
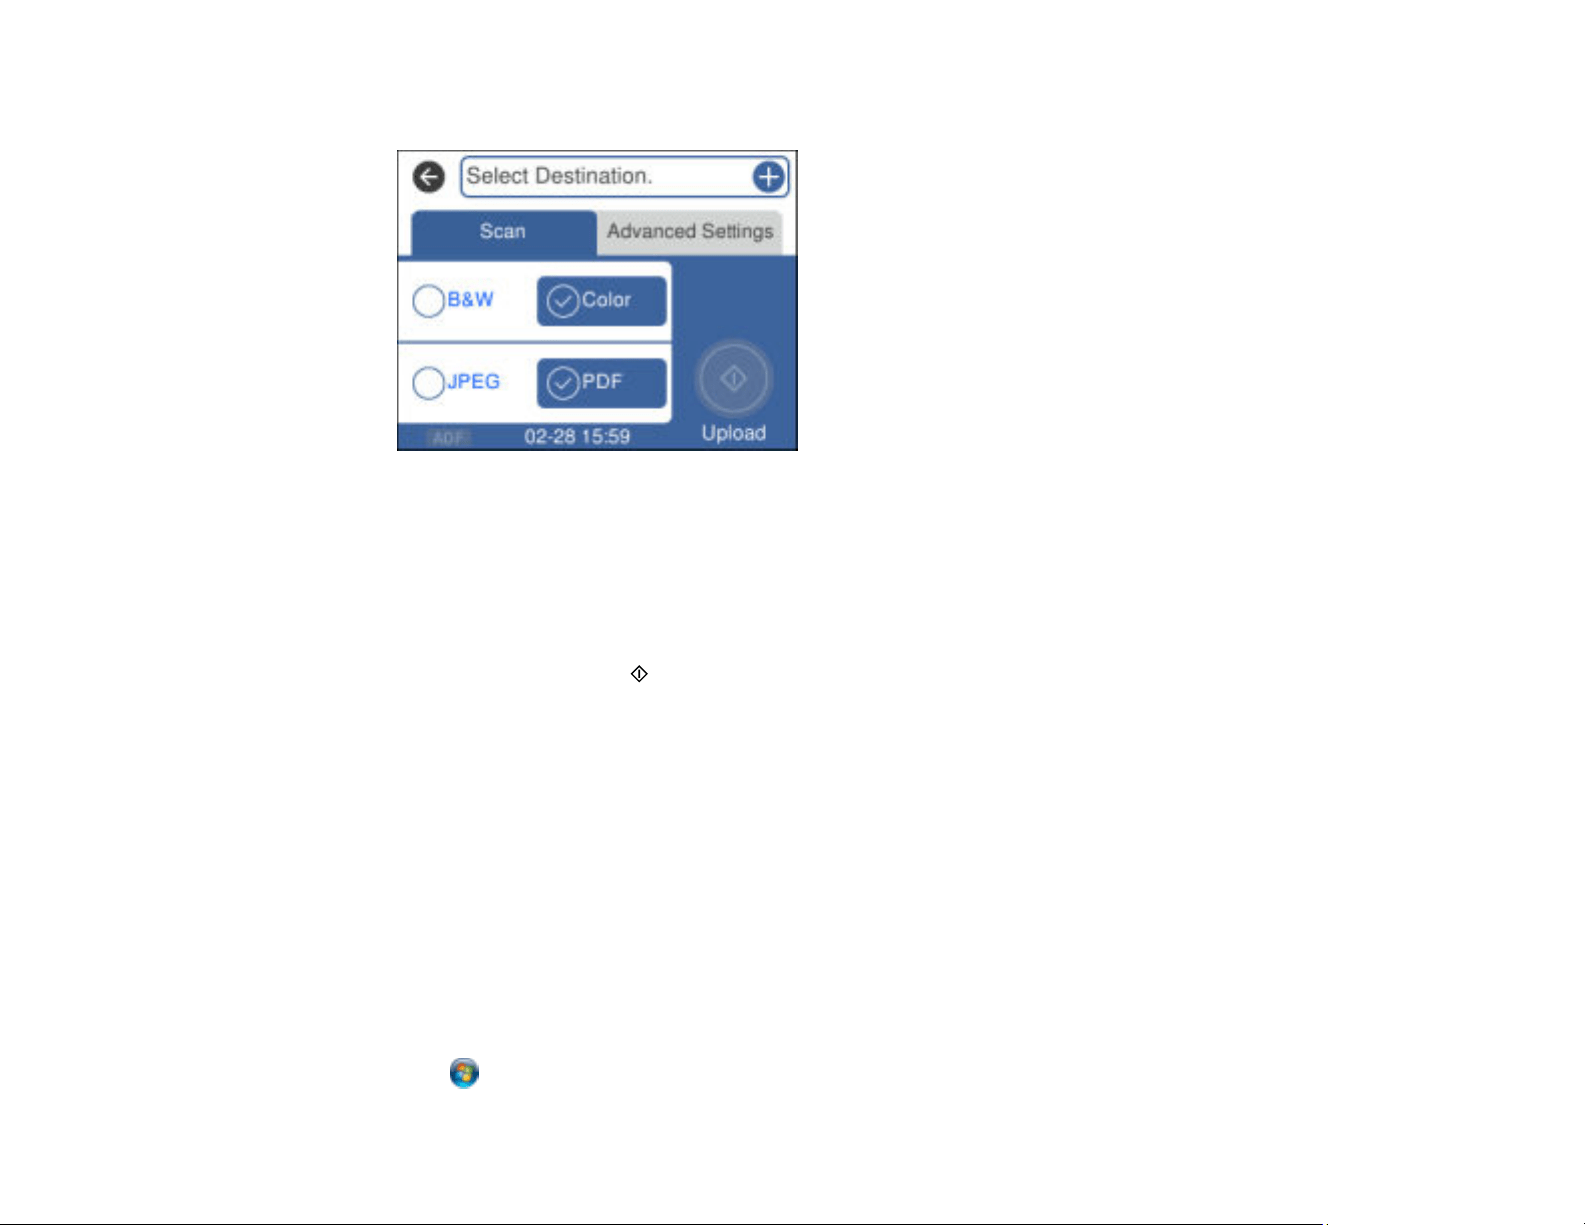
177
You see a screen like this:
Note: You must register your product with Epson Connect to select a destination.
5. Press the OK button to select a destination.
6. Change any of the displayed settings on the Scan tab as necessary.
7. Select the Advanced Settings tab to view and change additional scan settings, if necessary.
8. On the Scan tab, select Upload to start scanning.
Your product scans your original and saves the scanned file to the selected destination.
Parent topic: Starting a Scan
Setting Up a WSD Port (Windows 7/Windows Vista)
You can scan to a networked Windows computer using WSD (Web Services for Devices). You must first
set up a WSD port on your Windows 7 or Windows Vista system (the port is set up automatically on
Windows 10 and Windows 8.x).
Before you set up a WSD port, make sure you installed your product software, and connected your
product and computer to the same network.
1. Turn on your product.
2. Print a network status sheet so you can identify the network name and model name for your product
on the network.
3. Click or Start and select Computer.

178
4. On the left side of the window, select Network.
5. Locate your product on the Network screen, right-click it, and select Install.
6. When you see the User Account Control screen, click Continue.
Note: If you see an Uninstall screen, click Uninstall and repeat these steps as necessary.
7. When you see the message Your device is ready to use in the Windows taskbar, click the
message.
8. On the Driver Software Installation screen, make sure your product is listed as Ready to use. Then
click Close.
9. Do one of the following:
• Windows 7: Click and select Devices and Printers.
• Windows Vista: Click Start and select Control Panel > Hardware and Sound > Printers.
10. Make sure that an icon appears for your product's name on the network.
When you use WSD, select your product name to scan over the network.
Parent topic: Starting a Scan
Scanning Using WSD - Windows
You can scan originals to a computer from the product control panel using WSD (Web Services for
Devices) for network scanning in Windows.
Note: To use this feature on Windows 7 or Windows Vista, you must first set up WSD on the computer.
See Windows help for instructions.
1. Make sure you installed the product software and connected the product to your computer or
network.
2. Place your original on the product for scanning.
3. Press the home button, if necessary.
4. Select Scan.
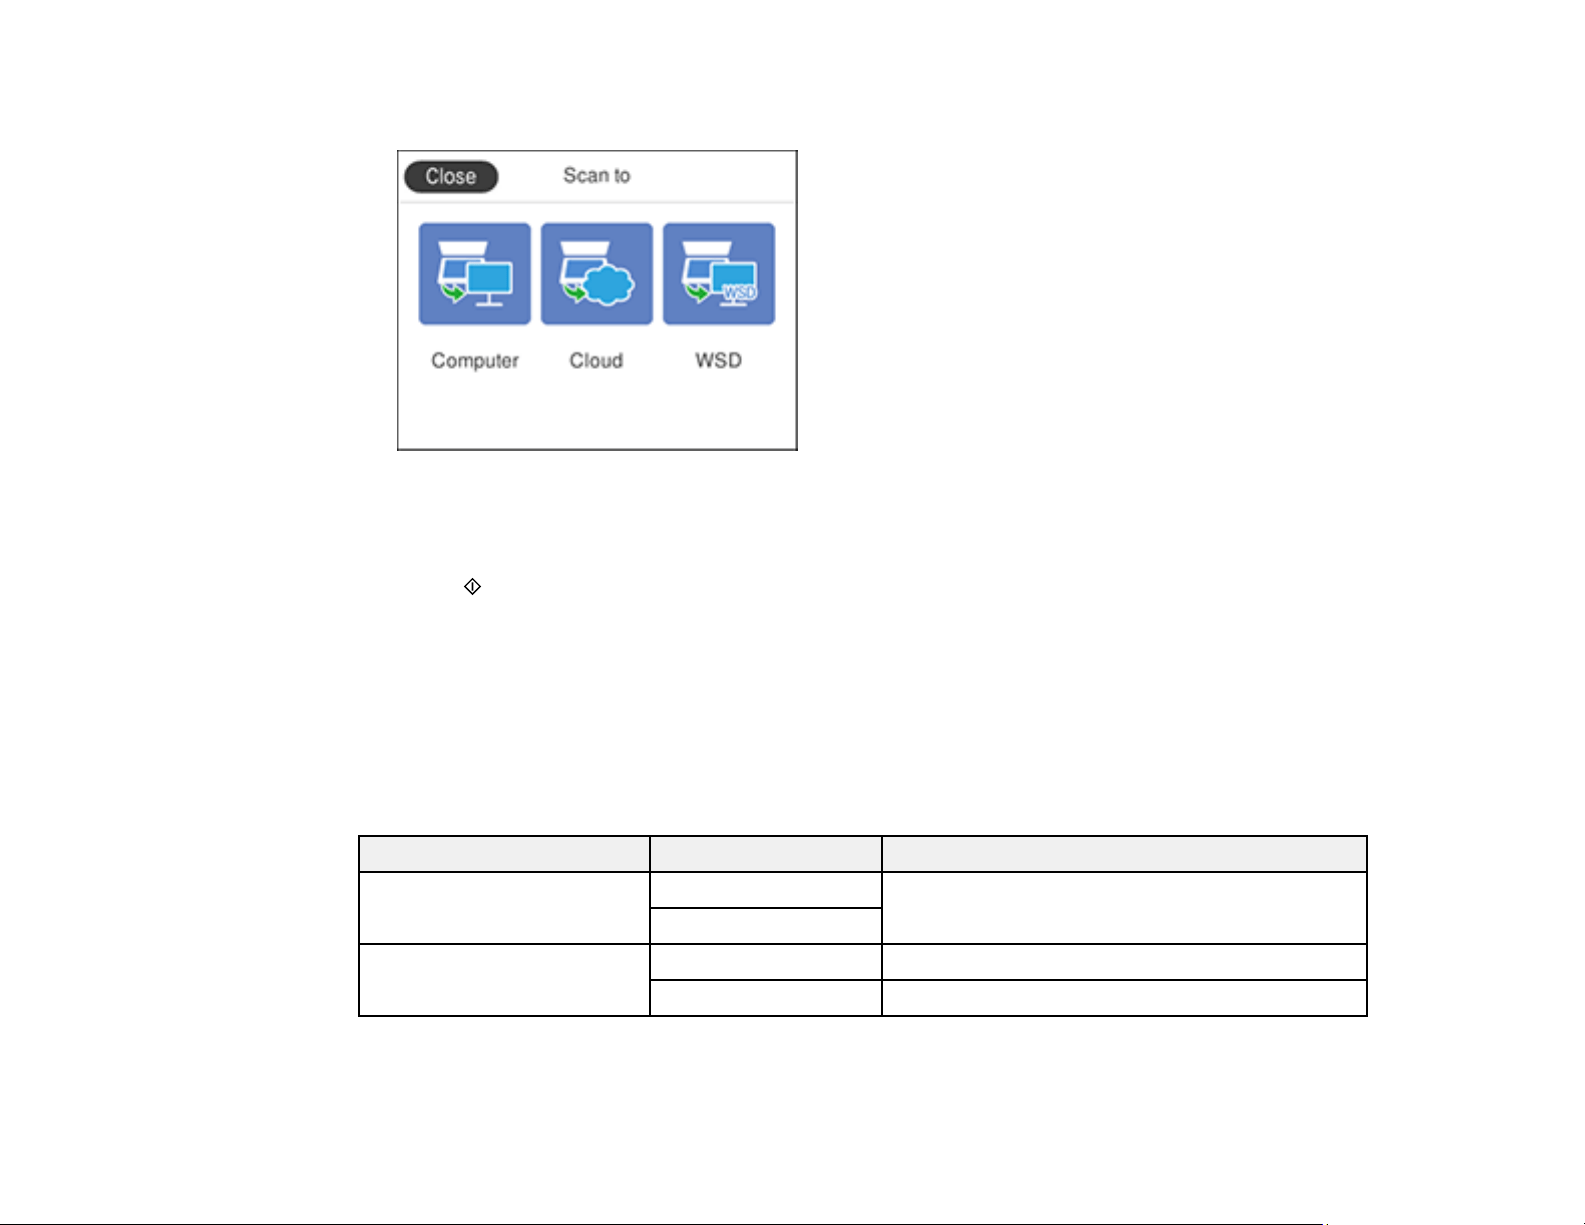
179
You see a screen like this:
5. Select WSD.
6. Select a computer.
7. Select Save on the LCD screen to start scanning.
Your product scans your original and saves the scanned file to your computer.
Parent topic: Starting a Scan
Control Panel Scanning Options
Select the options you want to use for scanning.
Note: Not all options or settings may be available, depending on the Scan to option selected.
Scan to setting Available options Description
Color Mode Color Select whether to scan images in color or black
and white
B&W
File Format JPEG Select for photos
PDF Select for documents
180
Scan to setting Available options Description
Scan Area Various sizes Select the page size for documents, then select
the orientation of the original
Auto Cropping Select for photos with dark edges
Max Area Select for most photos
Original Type Text Specifies the type of original you are scanning
Text & Image
Photo
Density –4 to +4 Adjusts the lightness or darkness of scanned
images.
Remove Shadow On Erases the shadows that appear in the center of
a document when copying a book or the
shadows that appear around a document when
copying thick paper
Off
Remove Punch Holes On Erases the binding holes on a document
Off
Clear All Settings Yes Resets the scan settings to the default settings
No
Parent topic: Starting a Scan
Changing Default Scan Job Settings
You can view or change the default scan job settings your product uses when you scan to your
computer. You do this using the Event Manager program.
1. Do one of the following to open Event Manager:
• Windows 10: Click and select Epson Software > Event Manager.
• Windows 8.x: Navigate to the Apps screen and select Event Manager.
• Windows (other versions): Click or Start > All Programs or Programs > Epson Software >
Event Manager.
• Mac: Open the Applications folder, click Epson Software, and select Event Manager.

181
2. Open the Scanner (Windows) or Select Scanner (Mac) drop-down list and select your product, if
necessary.
3. Click Make Job Settings.
4. Open the Edit Job Settings drop-down list and select the scan job settings you want to view or
change.
5. Change the settings as necessary.
6. Click OK.
7. Click Close to close the Event Manager window.
Parent topic: Starting a Scan
Starting a Scan Using Epson ScanSmart
You can start the Epson ScanSmart program to scan originals and easily review and edit scanned
images. After that, you can save, print, or share them.
• Windows 10: Click > Epson Software > Epson ScanSmart.
• Windows 8.x: Navigate to the Apps screen and select Epson ScanSmart.
• Windows (other versions): Click or Start, and select All Programs or Programs. Select Epson
Software > Epson ScanSmart.
• Mac: Open the Applications folder, open the Epson Software folder, and select Epson ScanSmart.
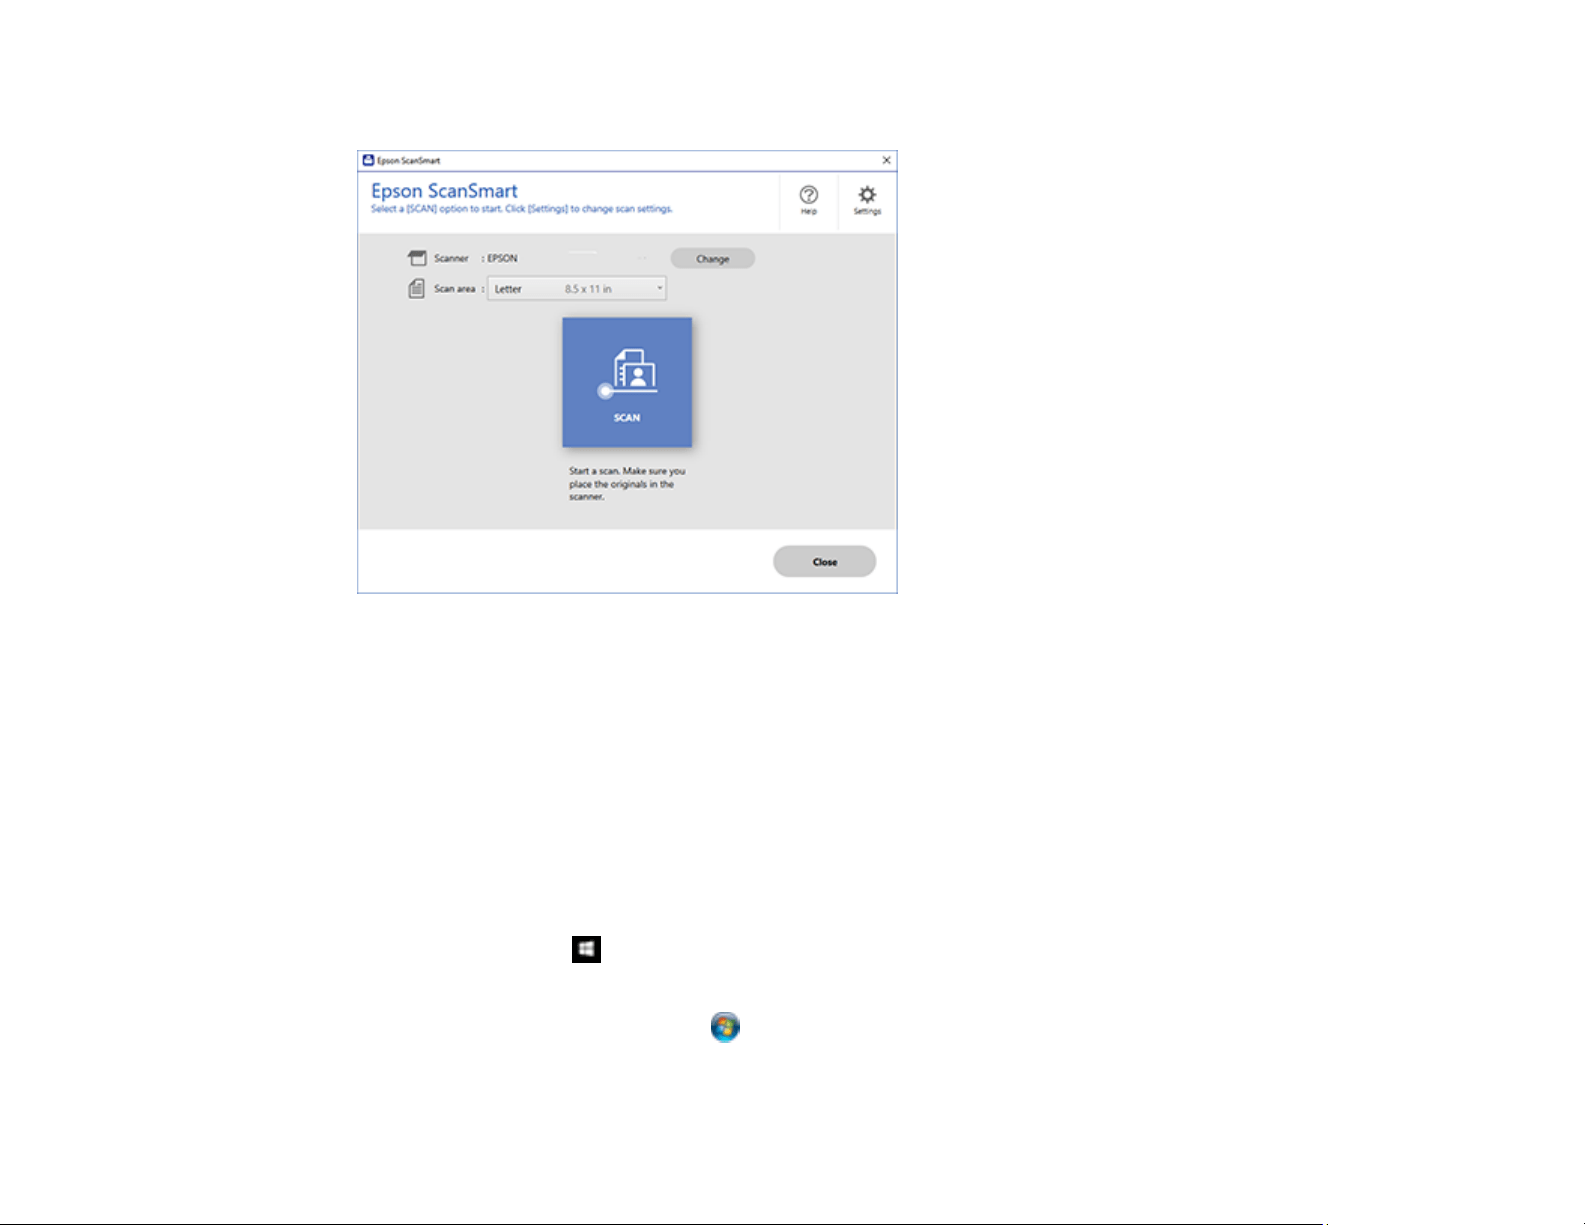
182
You see a screen like this:
Parent topic: Starting a Scan
Starting a Scan Using the Epson Scan 2 Icon
You can start the Epson Scan 2 program to select scan settings, scan, and save the scanned image to a
file.
Note: If you are using your Epson product with the Windows 10 S operating system, you cannot use the
software described in this section. You also cannot download and install any Epson product software
from the Epson website for use with Windows 10 S; you must obtain software only from the Windows
Store.
• Windows 10: Click and select EPSON > Epson Scan 2.
• Windows 8.x: Navigate to the Apps screen and select Epson Scan 2.
• Windows (other versions): Click or Start, and select All Programs or Programs. Select EPSON
> Epson Scan 2 > Epson Scan 2.
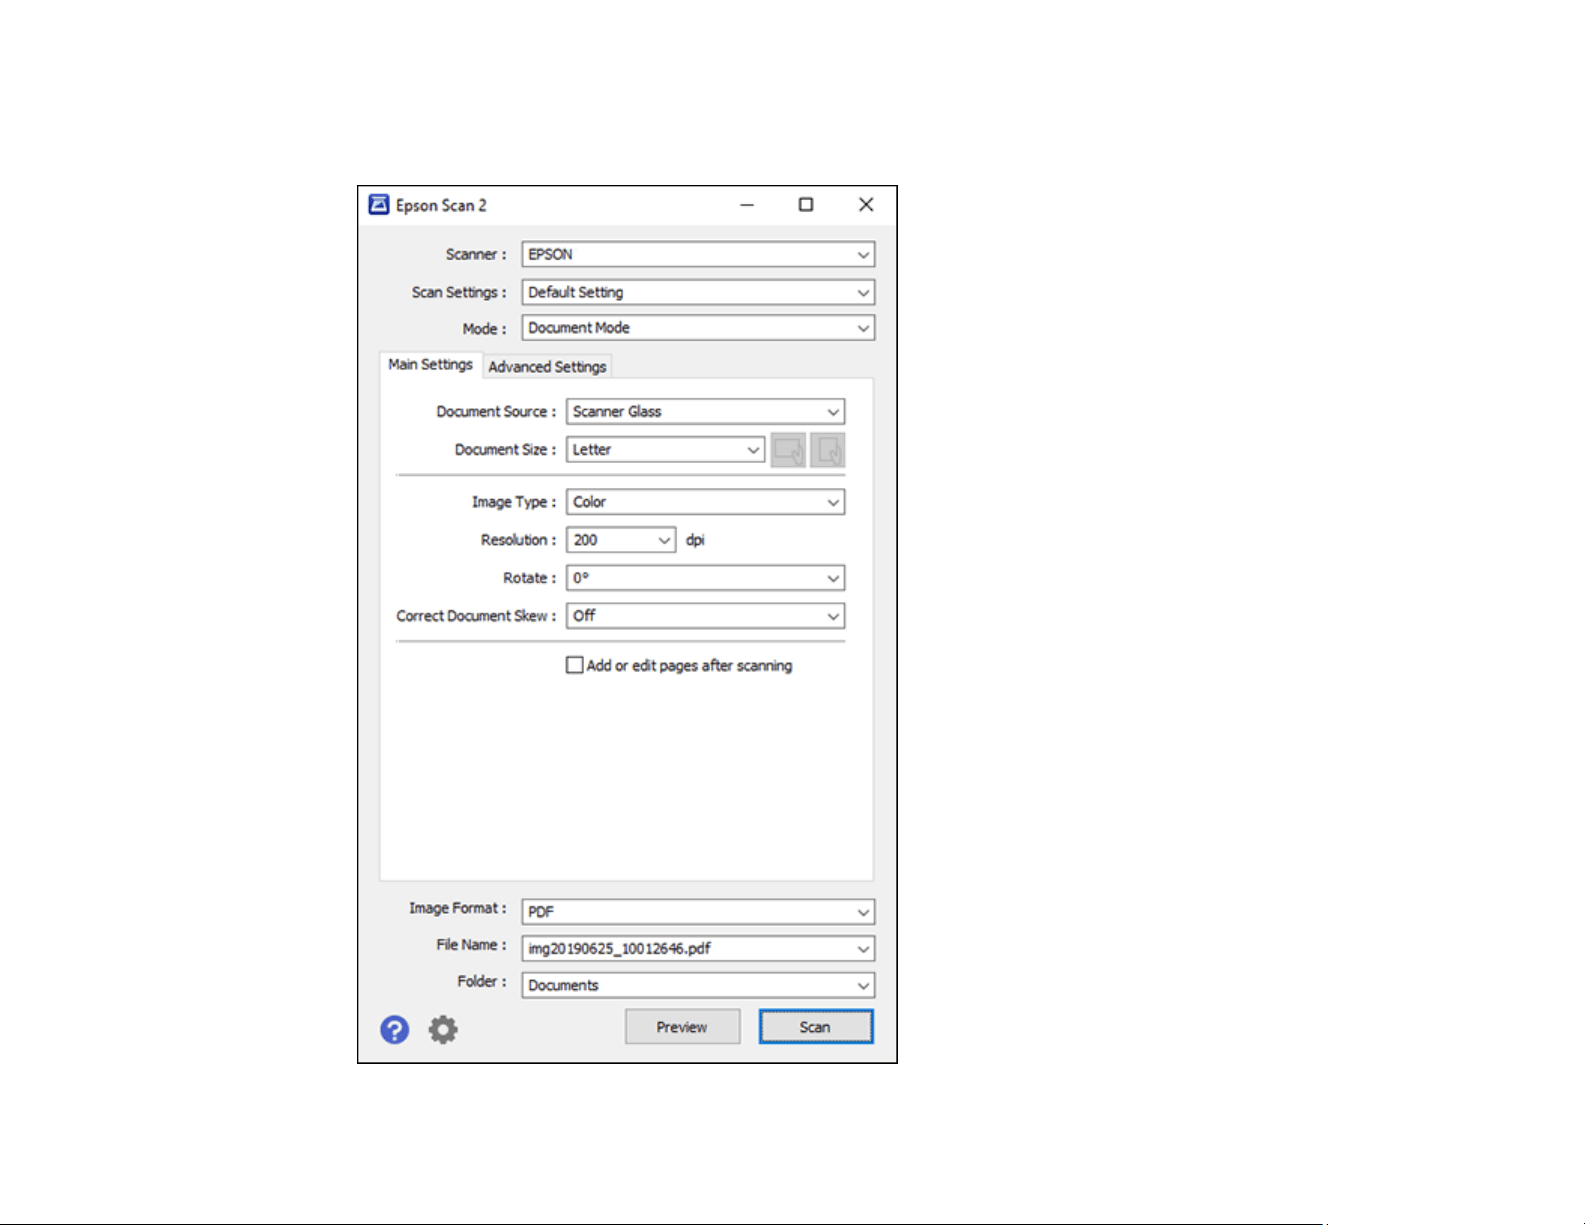
183
• Mac: Open the Applications folder, open the Epson Software folder, and select Epson Scan 2.
You see an Epson Scan 2 window like this:

184
Parent topic: Starting a Scan
Starting a Scan from a Scanning Program
You can start Epson Scan 2 from a TWAIN-compliant scanning program to select scan settings, scan,
and open the scanned image in the program.
Note: If you are using your Epson product with the Windows 10 S operating system, you cannot use the
software described in this section. You also cannot download and install any Epson product software
from the Epson website for use with Windows 10 S; you must obtain software only from the Windows
Store.
1. Open your scanning program and select its scanning option. (See your scanning program help for
instructions.)
2. Select your product.
Note: In certain programs, you may need to select your product as the "source" first. If you see a
Select Source option, choose it and select your product. With Windows, do not select a WIA option
for your product; not all scan functions will be available.

185
You see an Epson Scan 2 window like this:

186
Parent topic: Starting a Scan
Starting a Scan from a Smartphone or Tablet
You can use the Epson Smart Panel app to scan from a network scanner to an iOS or Android device
over a direct Wi-Fi connection.
1. Download the Epson Smart Panel app from your device's app store or from Epson's website. See
the link below.
2. Place your original on the product for scanning.
3. Open the Epson Smart Panel app and select a scan menu on the home screen.
4. Follow the on-screen instructions to scan and save your original.
Parent topic: Starting a Scan
Related tasks
Using the Epson Smart Panel Mobile App
Scanning a Document in Epson ScanSmart
You can scan and review documents and photos in Epson ScanSmart.
Note: The images in this guide show Windows screens. Mac screens may be slightly different.
Depending on your product model and software version, not all options may be available.
1. Load your original into the product.
2. Open Epson ScanSmart on your computer. Do one of the following:
• Windows 10: Click > Epson Software > Epson ScanSmart.
• Windows 8.x: Navigate to the Apps screen and select Epson ScanSmart.
• Windows (other versions): Click or Start, and select All Programs or Programs. Select
Epson Software > Epson ScanSmart.
• Mac: Open the Applications folder, open the Epson Software folder, and select Epson
ScanSmart.
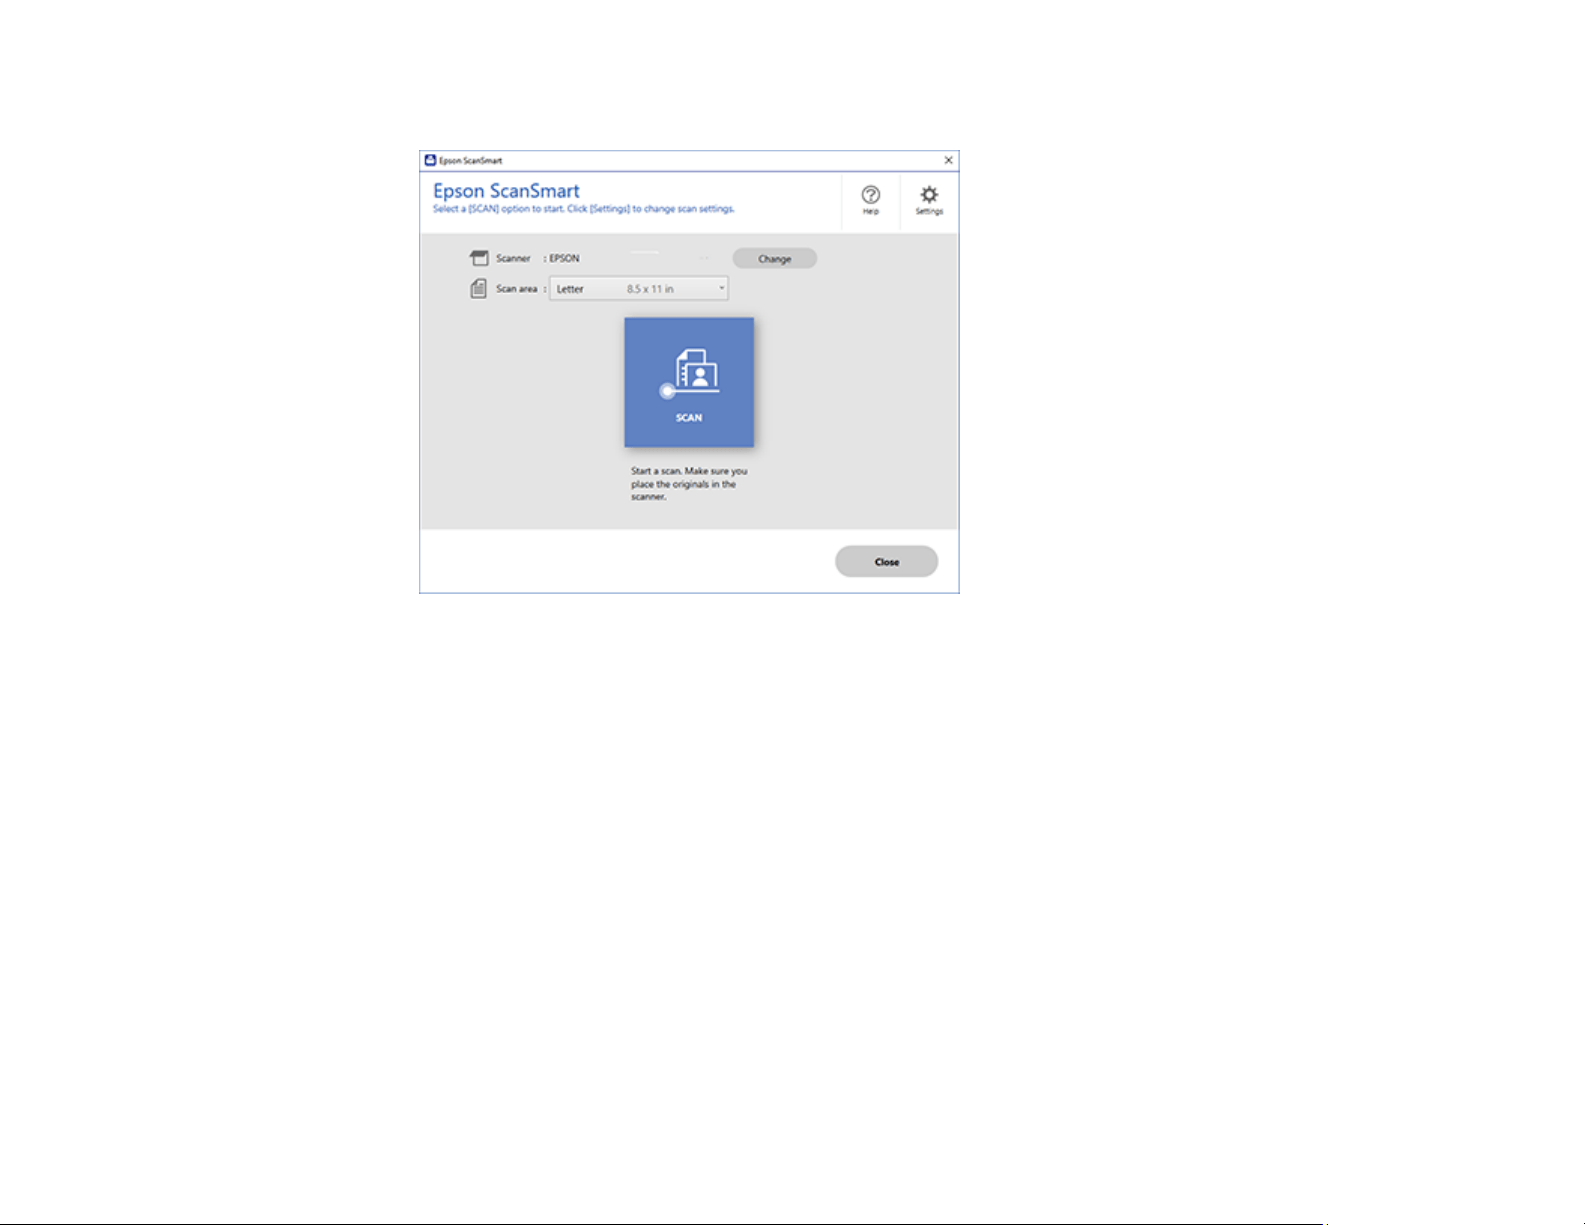
187
You see a screen like this:
3. Select an option for the Scan area setting, if necessary.
Note: The Scan area setting limits the scan area to a selected size starting at the placement arrow
on the scanner bed. It does not scale the image to the selected size.
4. Select SCAN.
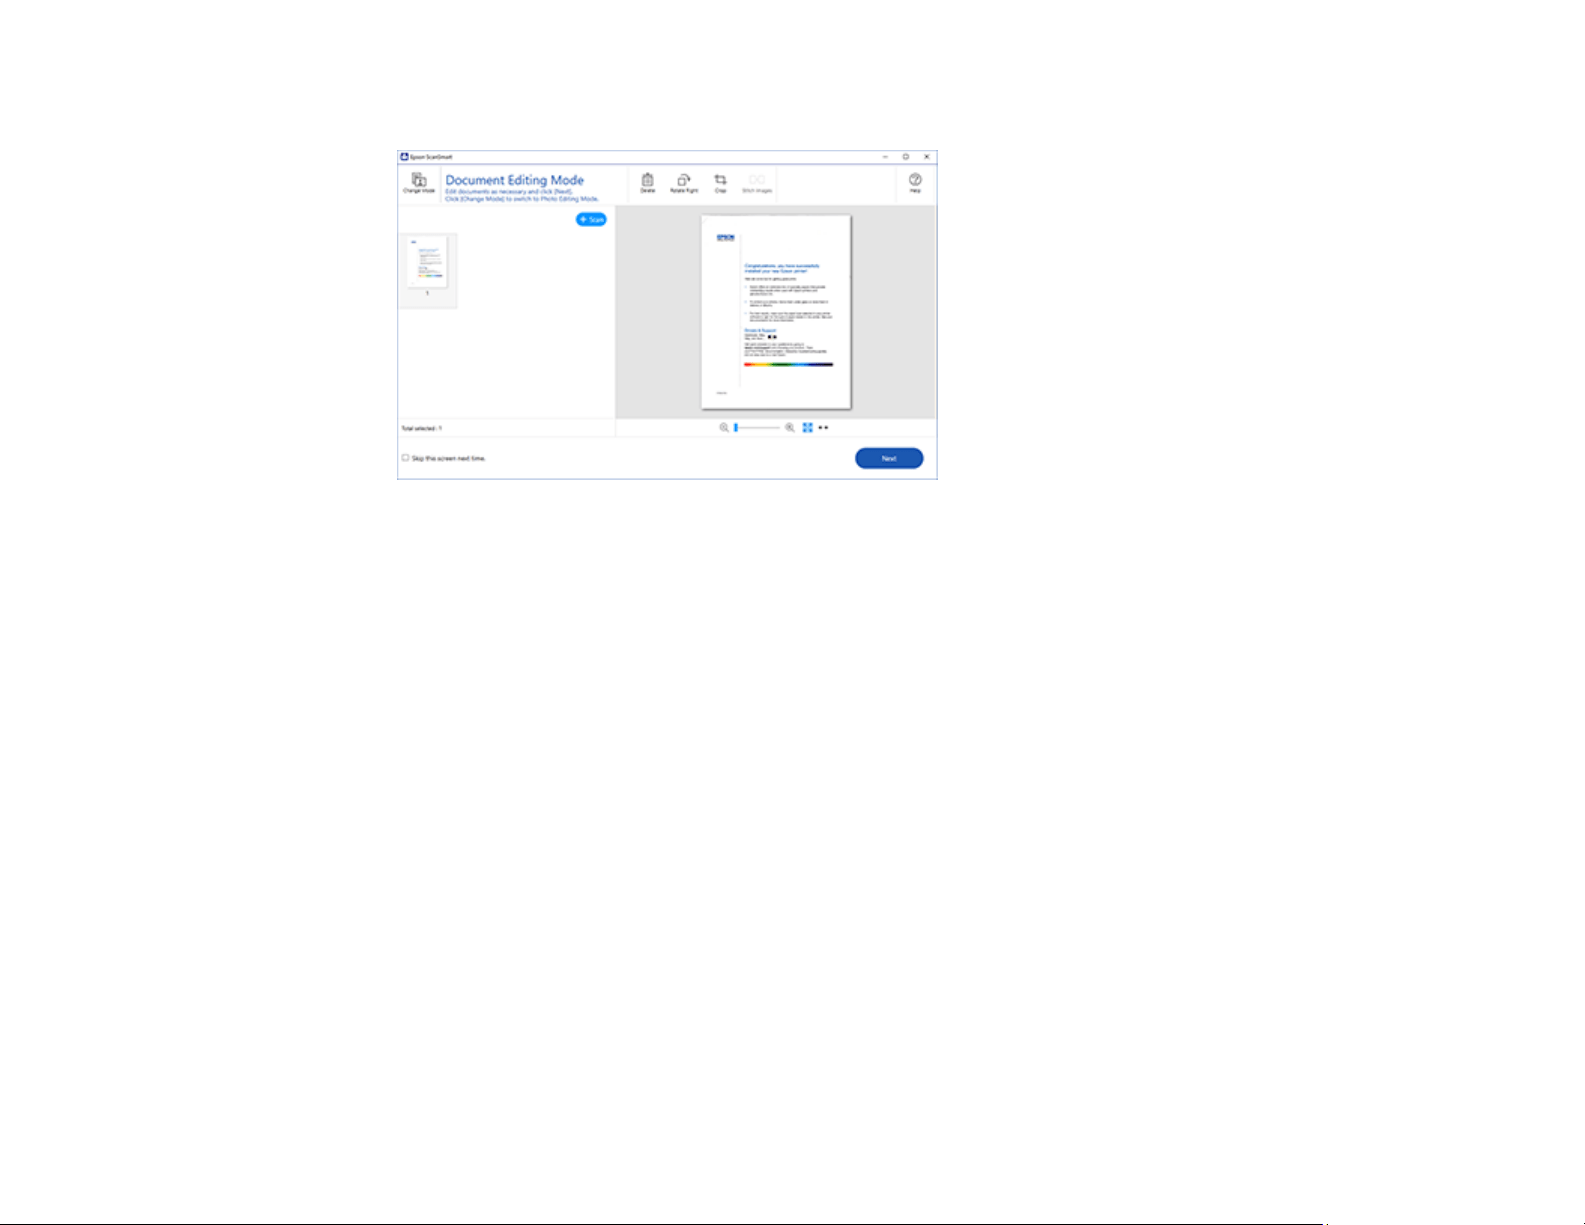
188
The original is scanned. When scanning is complete, you see a screen like this:
5. You can review, edit, or reorder the scanned images as follows:
• Select + Scan to scan more originals.
• Select Delete to delete selected scanned images.
• Select Rotate Right to rotate each scanned image.
• Select Crop to crop the selected image.
• Control-click two images, select Stitch Images, and follow the on-screen instructions to combine
them into a single image.
6. If Photo Mode is automatically detected, the following enhancement options are available:
• Auto Color Enhancement: automatically adjusts the brightness, contrast, and saturation of your
photos
• Restore Faded Colors: restores the colors in faded photos automatically
• Remove Red Eye: automatically removes the red-eye effect from your photos
• Auto Cropping: automatically crops the scanned image edges
7. When you finish reviewing and editing the scanned images, click Next.
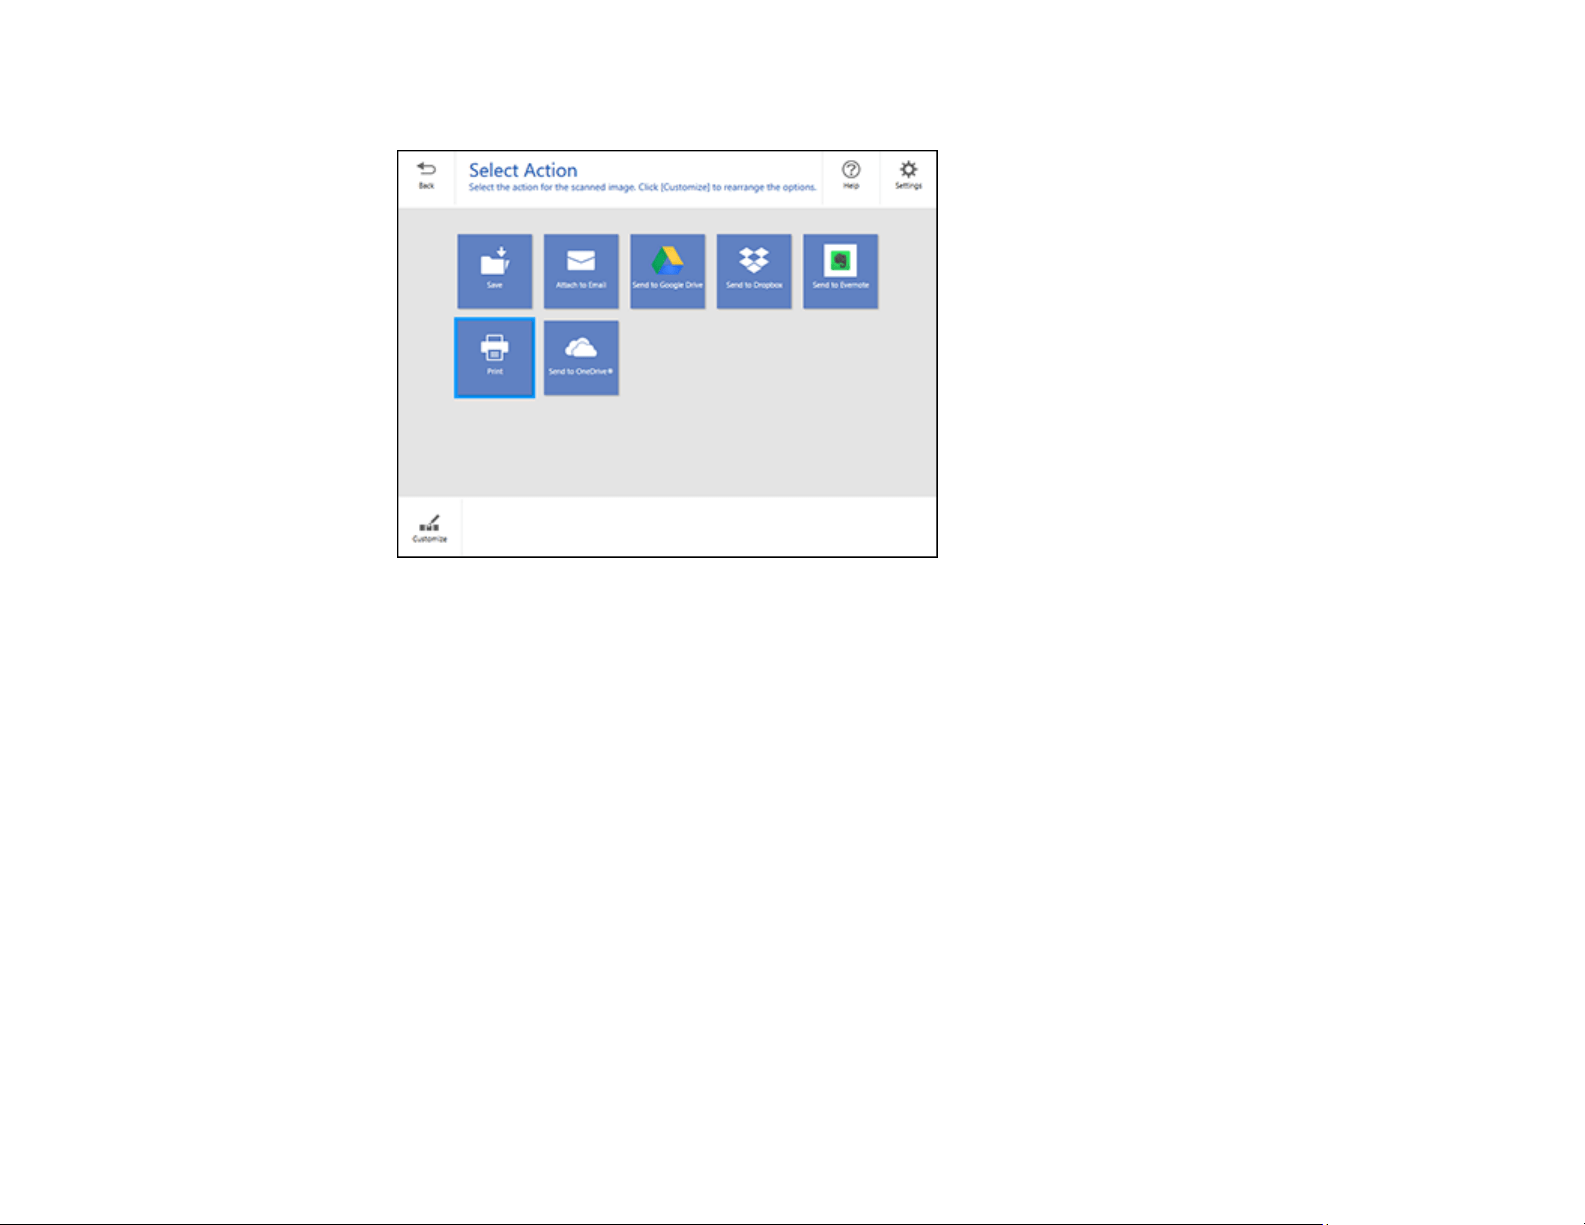
189
You see a screen like this:
8. Select an option to save, send, or print the scanned images. See the links below.
Saving a Scan
Attaching a Scan to Email
Sending a Scan to a Cloud Service
Printing a Scan
Parent topic: Starting a Scan
Saving a Scan
You can save a scanned image to your computer in a variety of formats.
1. Make sure your originals are scanned and reviewed. See the link below.
2. In the Select Action window, click Save.
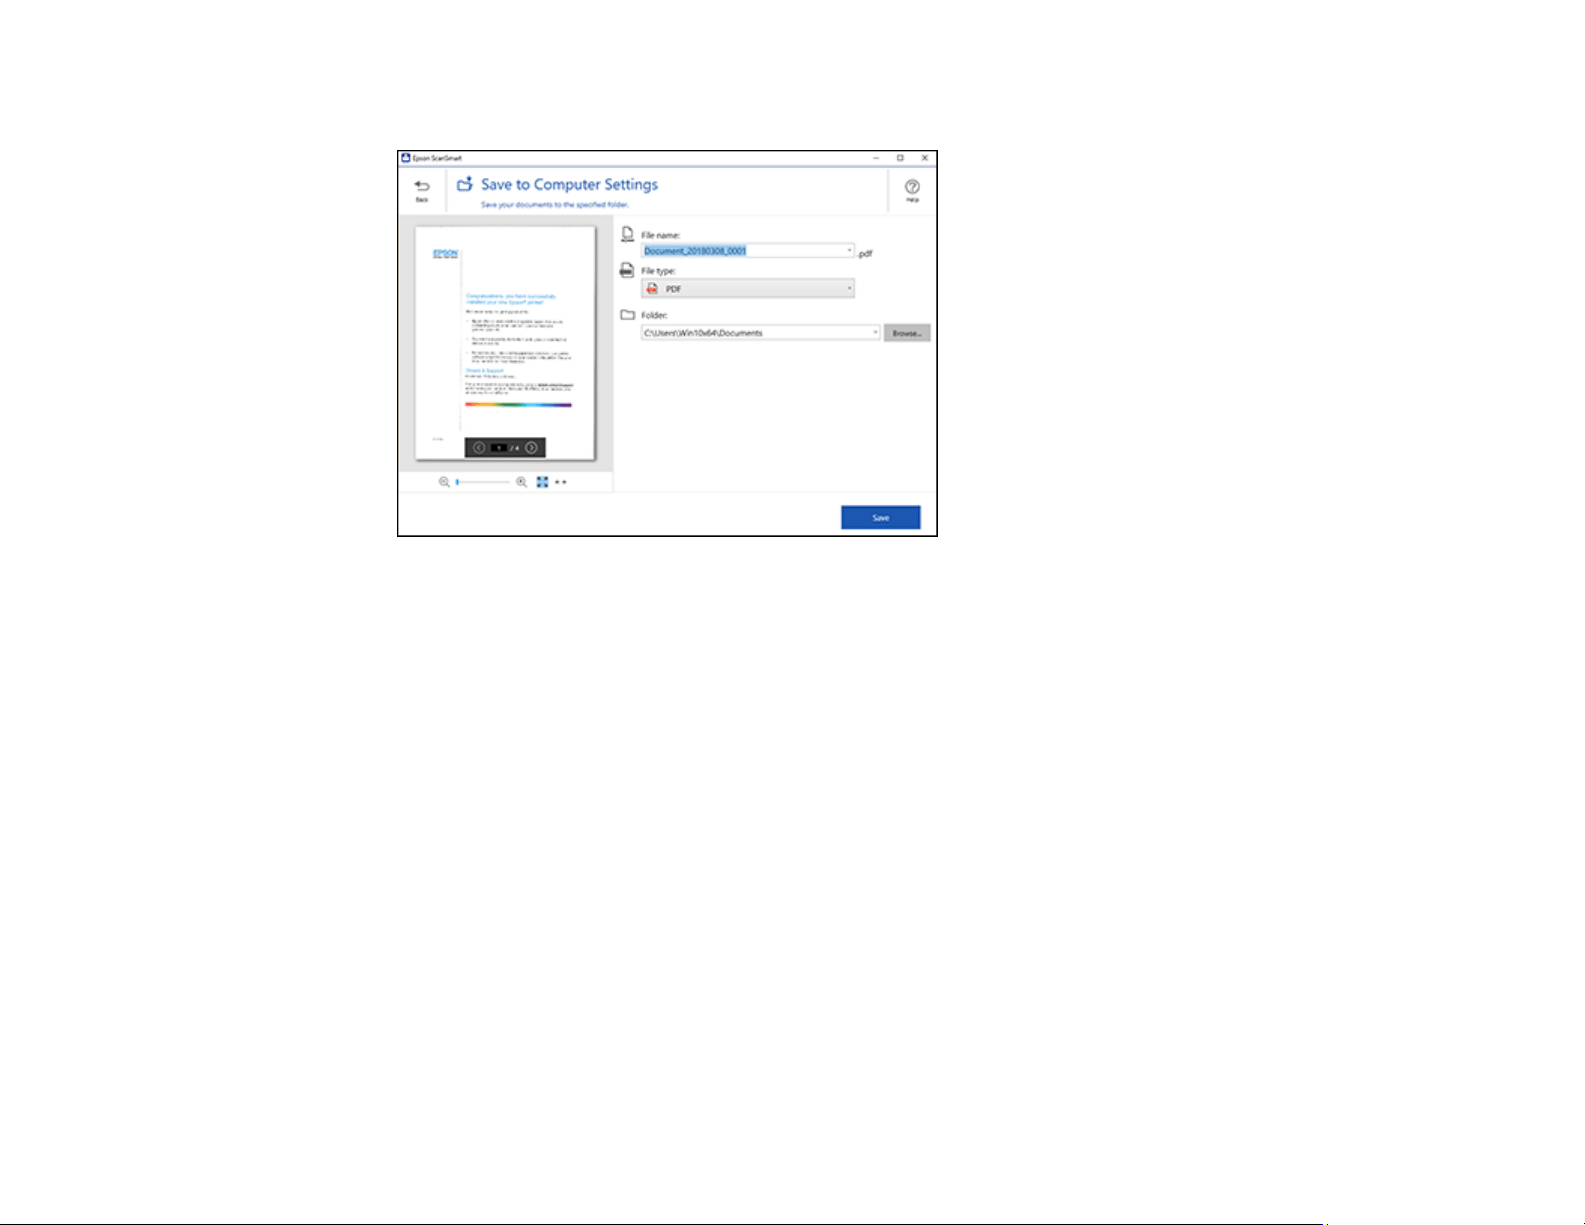
190
You see a screen like this:
3. Change the settings as follows:
• The document type and scan date for the file name are automatically detected. You can change
them as necessary.
• You can save the scanned image in a variety of formats. If you select Searchable PDF as the File
type setting, you can select the OCR (Optical Character Recognition) language.
• Select the folder on your computer where the document is saved.
4. Click Save.
Parent topic: Scanning a Document in Epson ScanSmart
Attaching a Scan to Email
You can attach a scanned image to an email as a file attachment.
Note: Your email app and account settings should be configured before scanning. You must install a
MAPI-type email program such as Outlook Express, Windows Live Mail, Entourage, or Mac Mail. Web-
based email services such as Gmail are not supported. If you do not have a supported email program,
you see an error message.
1. Make sure your originals are scanned and reviewed. See the link below.
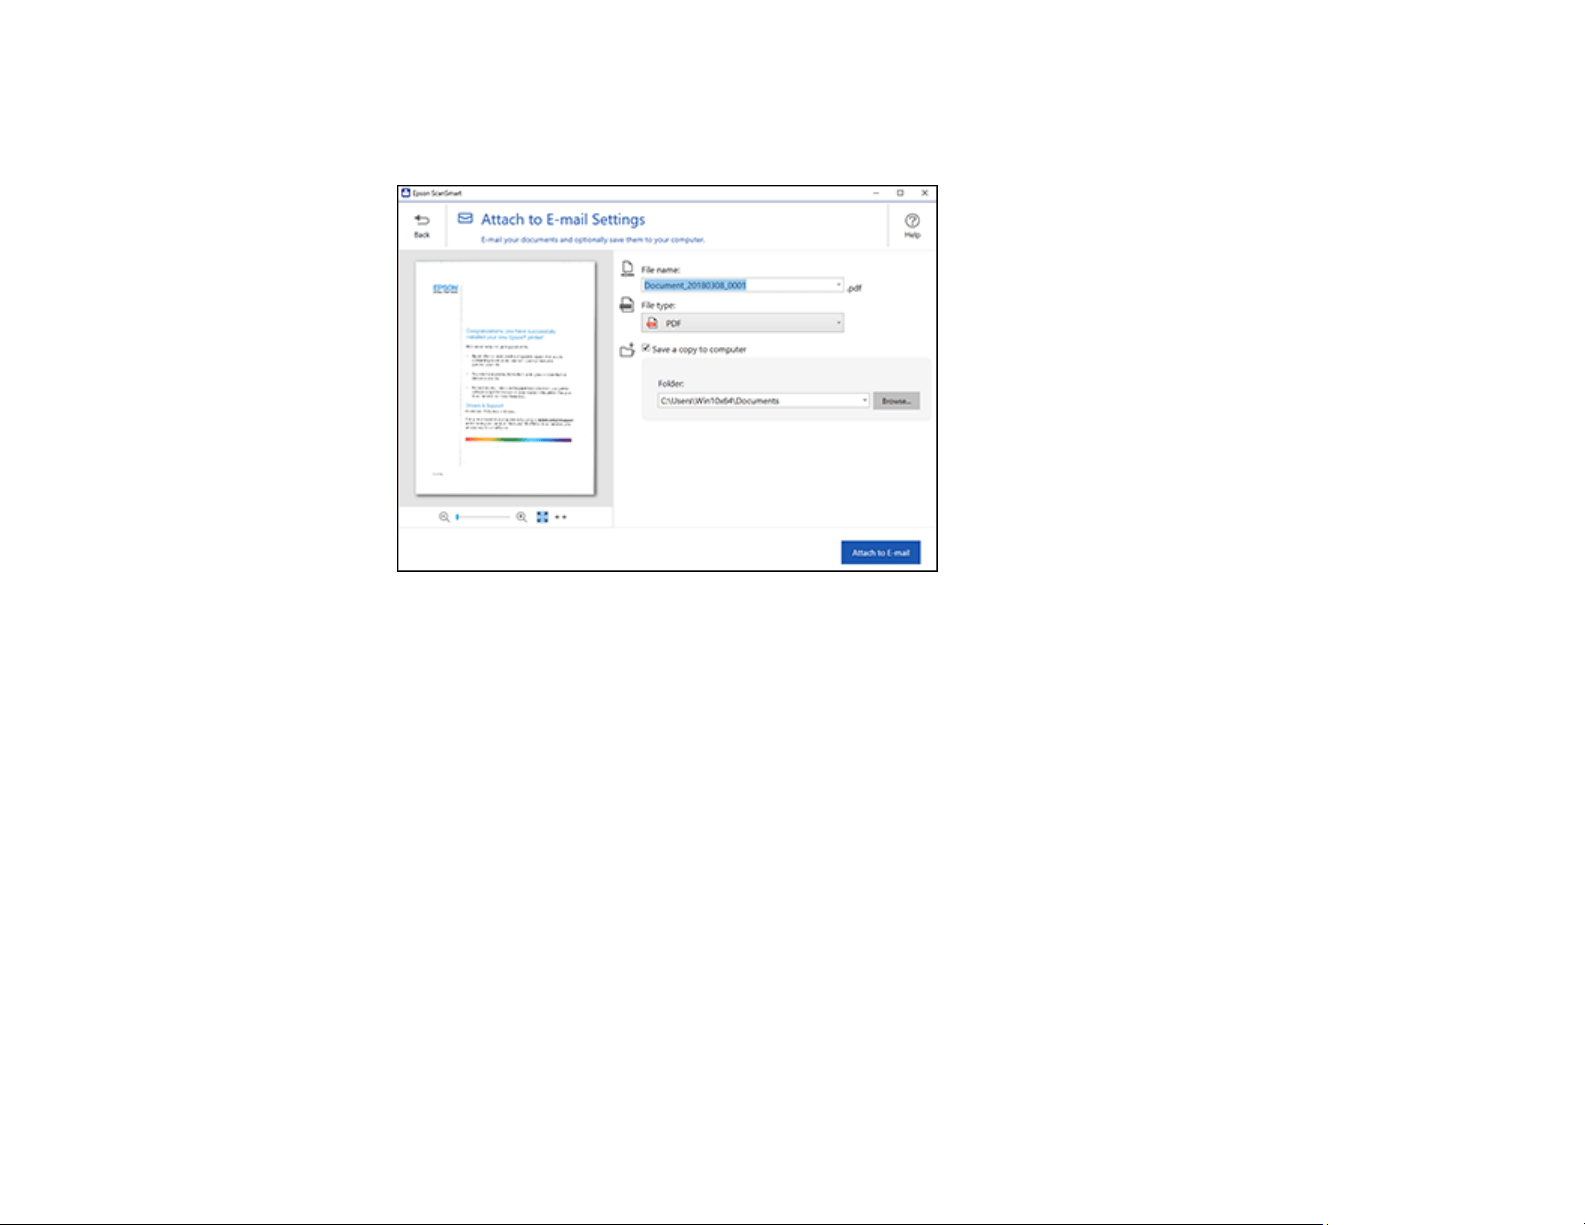
191
2. In the Select Action window, click Attach to Email.
You see a screen like this:
3. Change the settings as follows:
• The document type and scan date for the file name are automatically detected. You can change
them as necessary.
• You can save the scanned image in a variety of formats. If you select Searchable PDF as the File
type setting, you can select the OCR (Optical Character Recognition) language.
• If you also want to save a copy of the scanned image to your computer, make sure the checkbox
is selected and select the folder on your computer in which to save the file.
4. Click Attach to E-mail.
Your email program opens with the file attached to a new email.
Parent topic: Scanning a Document in Epson ScanSmart
Sending a Scan to a Cloud Service
You can upload scanned images to a cloud service.
1. Make sure your originals are scanned and reviewed. See the link below.
2. In the Select Action window, click one of the cloud service send options.
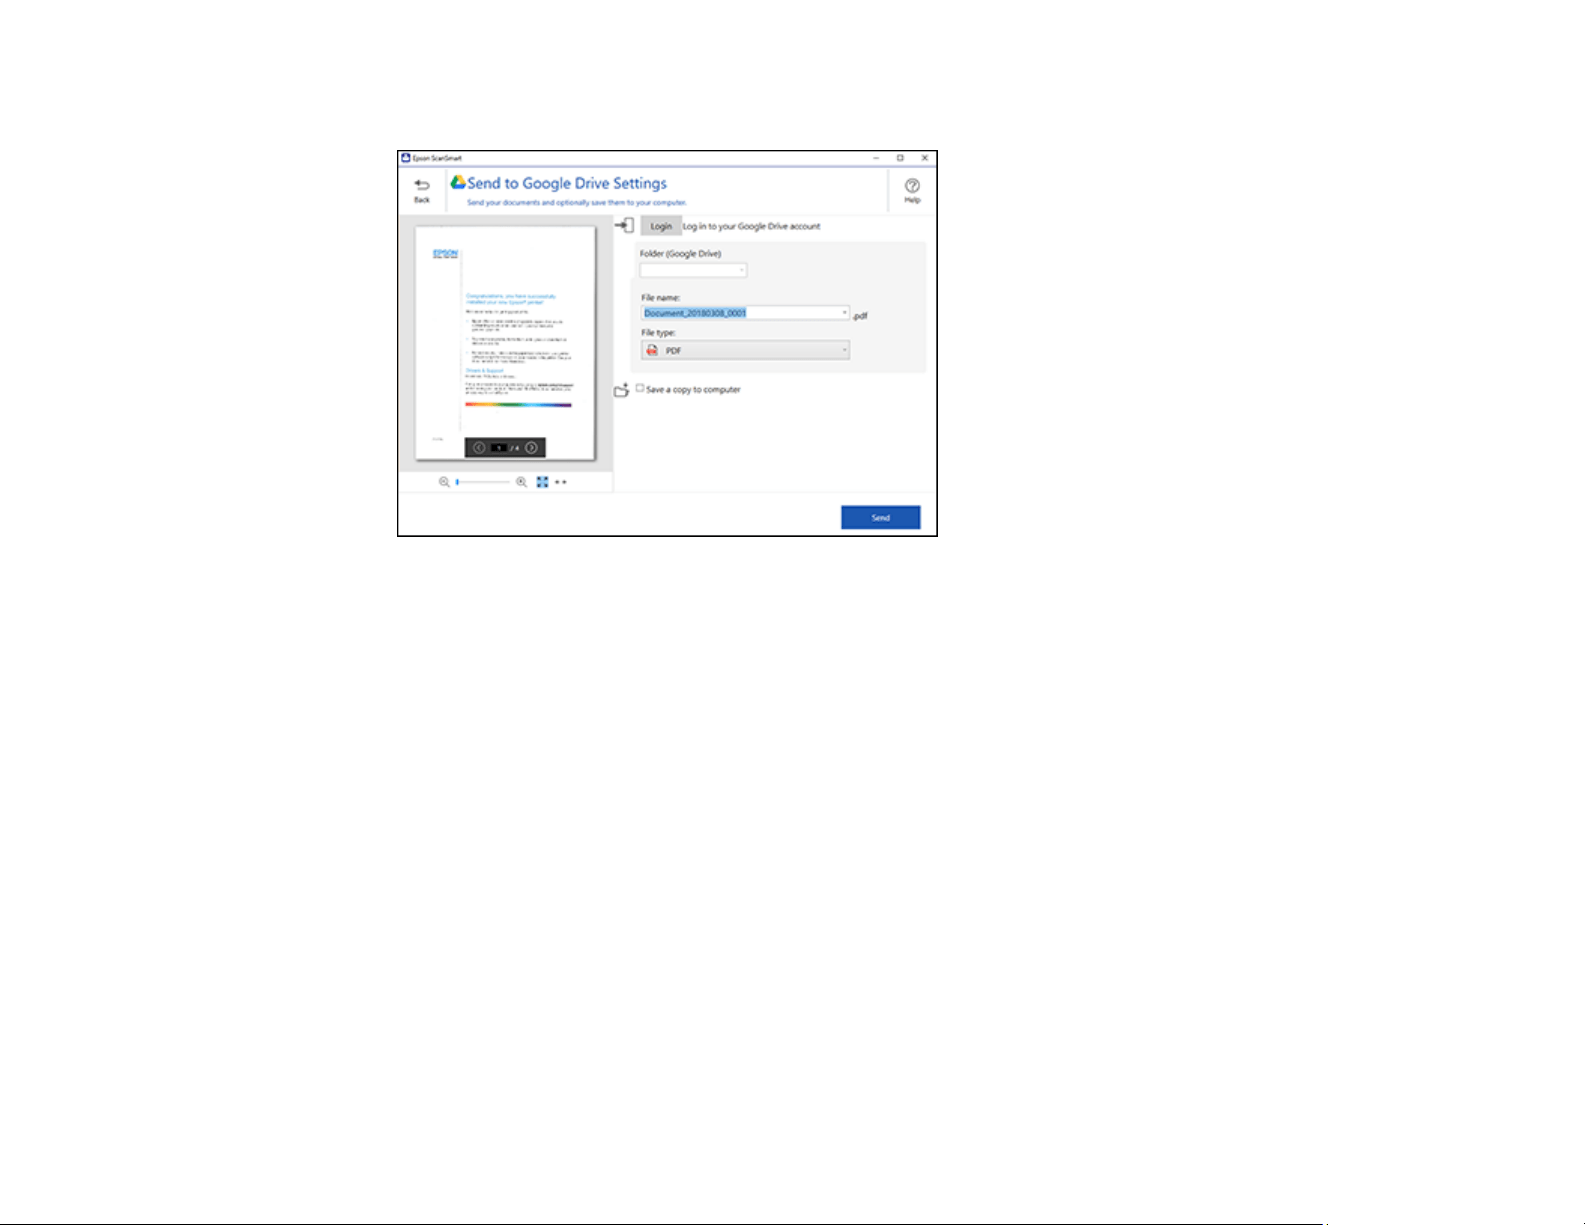
192
You see a screen like this:
3. Log in to your account.
Note: You may need to allow Epson ScanSmart access to your account. The first time you log in,
you may be prompted to enter an authentication code.
4. Change the settings as follows:
• Select the folder in your account where you want to send the document.
• The document type and scan date for the file name are automatically detected. You can change
them as necessary.
• You can save the scanned image in a variety of formats. If you select Searchable PDF as the File
type setting, you can select the OCR (Optical Character Recognition) language.
• If you also want to save a copy of the scanned image to your computer, click the checkbox.
5. Click Send.
Parent topic: Scanning a Document in Epson ScanSmart
Printing a Scan
You can print your scanned image and save the scanned file to your computer.
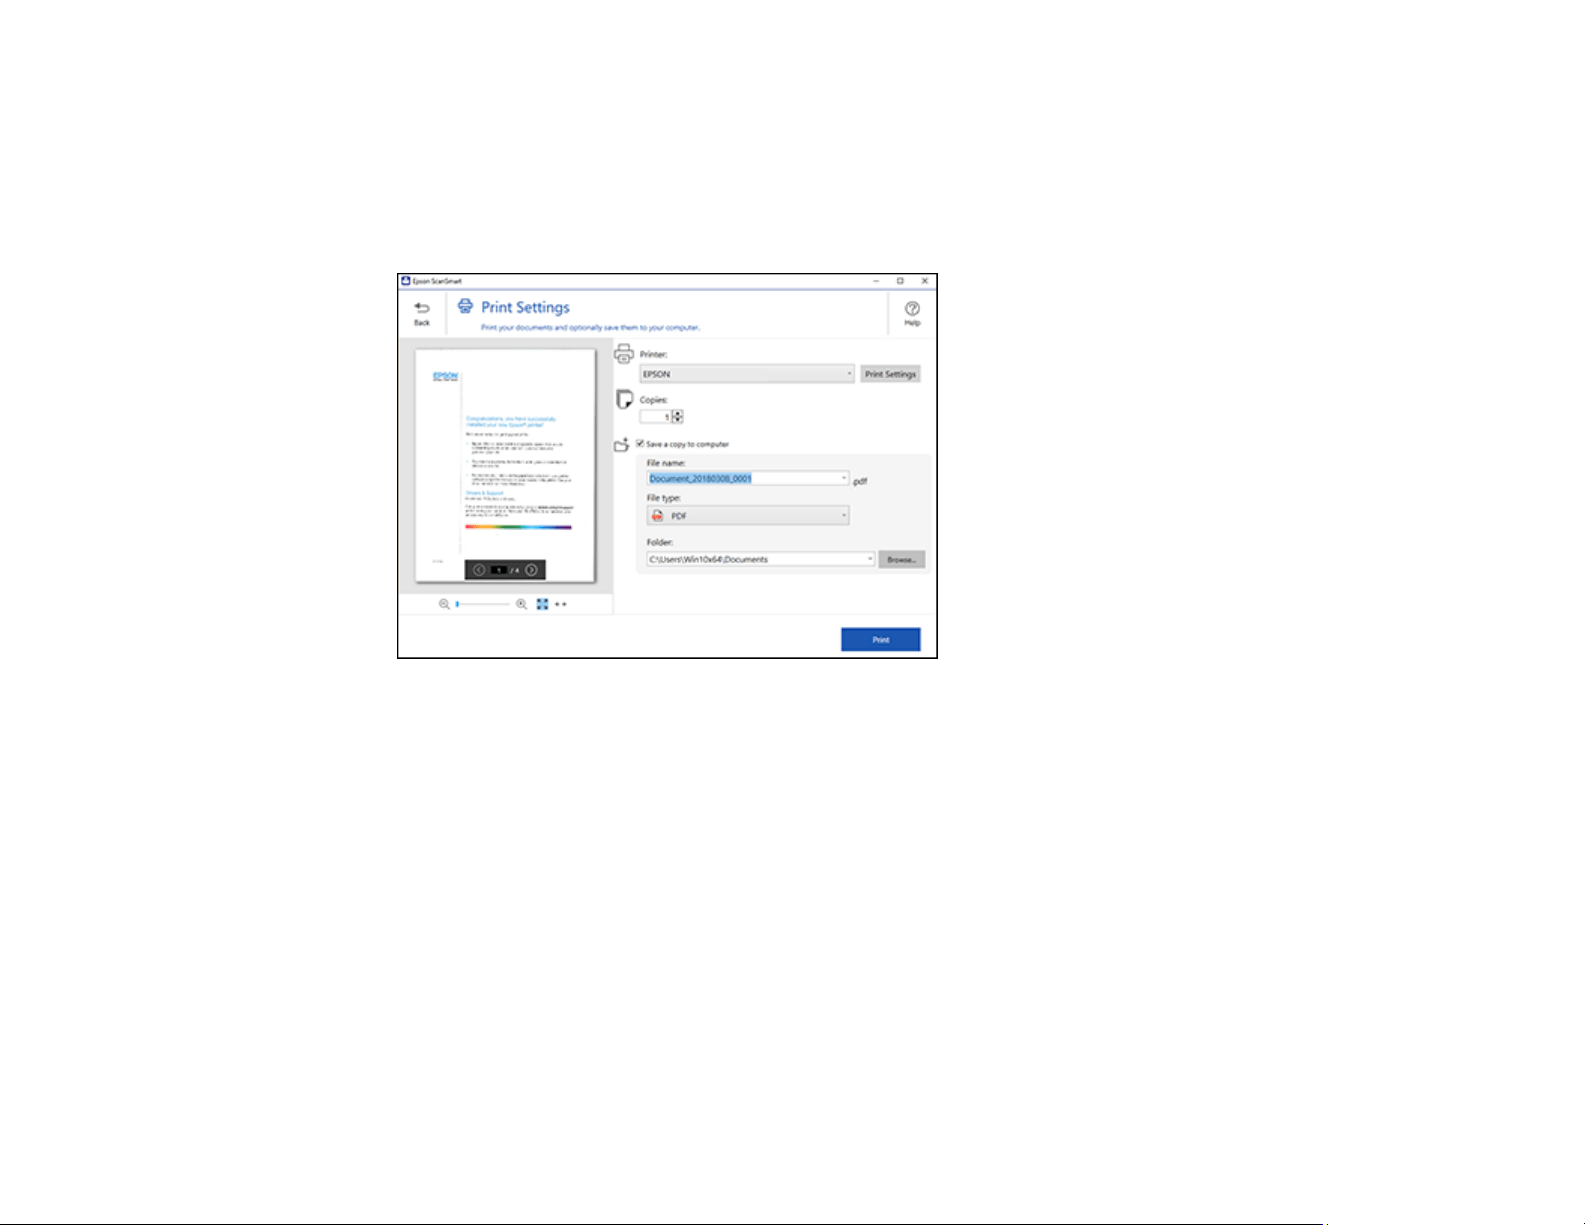
193
Note: Printing scanned images is available only with Epson printers.
1. Make sure your originals are scanned and reviewed. See the link below.
2. In the Select Action window, click Print.
You see a screen like this:
3. Change the settings as follows:
• Select the Epson printer and change the print settings, if necessary.
• Select the number of copies you want to print.
• If you also want to save a copy of the scanned image to your computer, click the checkbox.
• The document type and scan date for the file name are automatically detected. You can change
them as necessary.
• You can save the scanned image in a variety of formats. If you select Searchable PDF as the File
type setting, you can select the OCR (Optical Character Recognition) language.
• Select the folder on your computer in which to save the file.
4. Click Print.
Parent topic: Scanning a Document in Epson ScanSmart
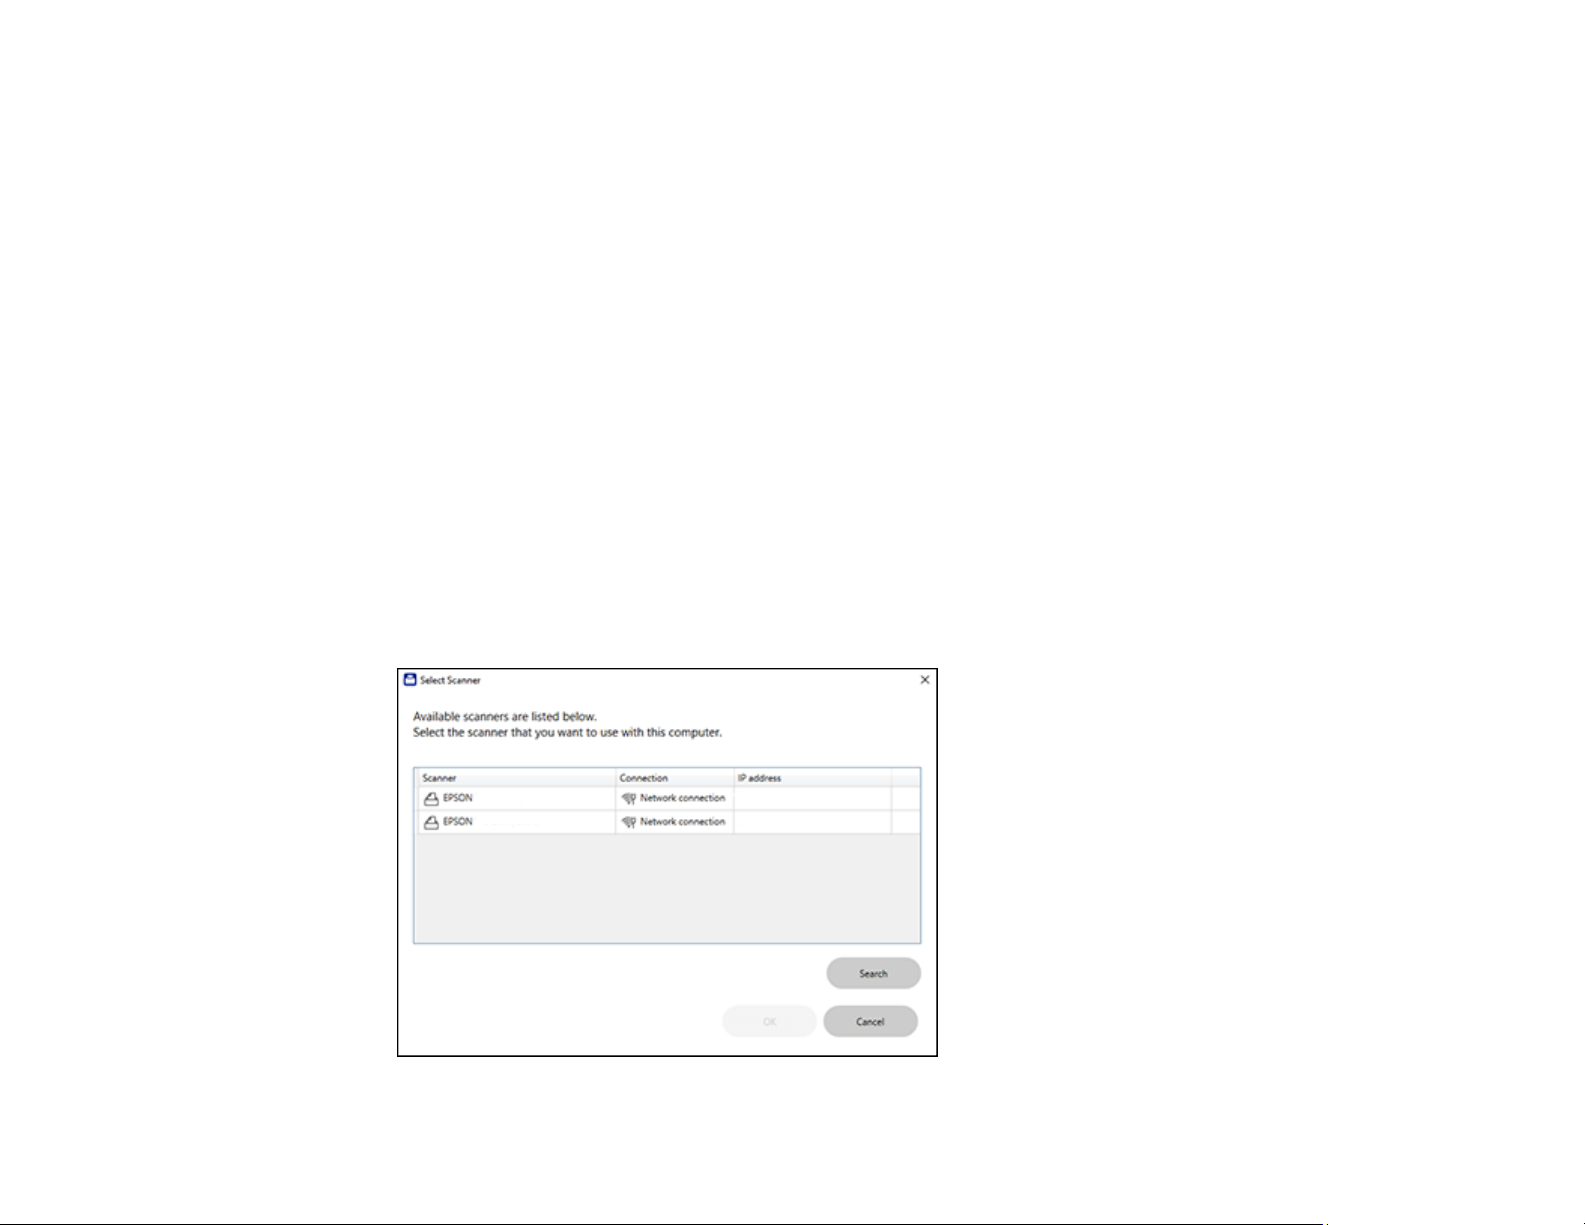
194
Selecting Epson ScanSmart Settings
After starting Epson ScanSmart, you can change various scanning settings.
Changing the Epson Product
Changing the Scan Settings
Changing the File Name Settings
Changing the Save Settings
Save Settings
Customizing Action Icons
Parent topic: Starting a Scan
Changing the Epson Product
If you are using more than one Epson product with Epson ScanSmart, you can change the product that
you are using with your computer.
Note: A product connected to your computer via USB takes priority over a product with a Wi-Fi
connection.
1. On the main screen, click Change.
You see a screen like this:
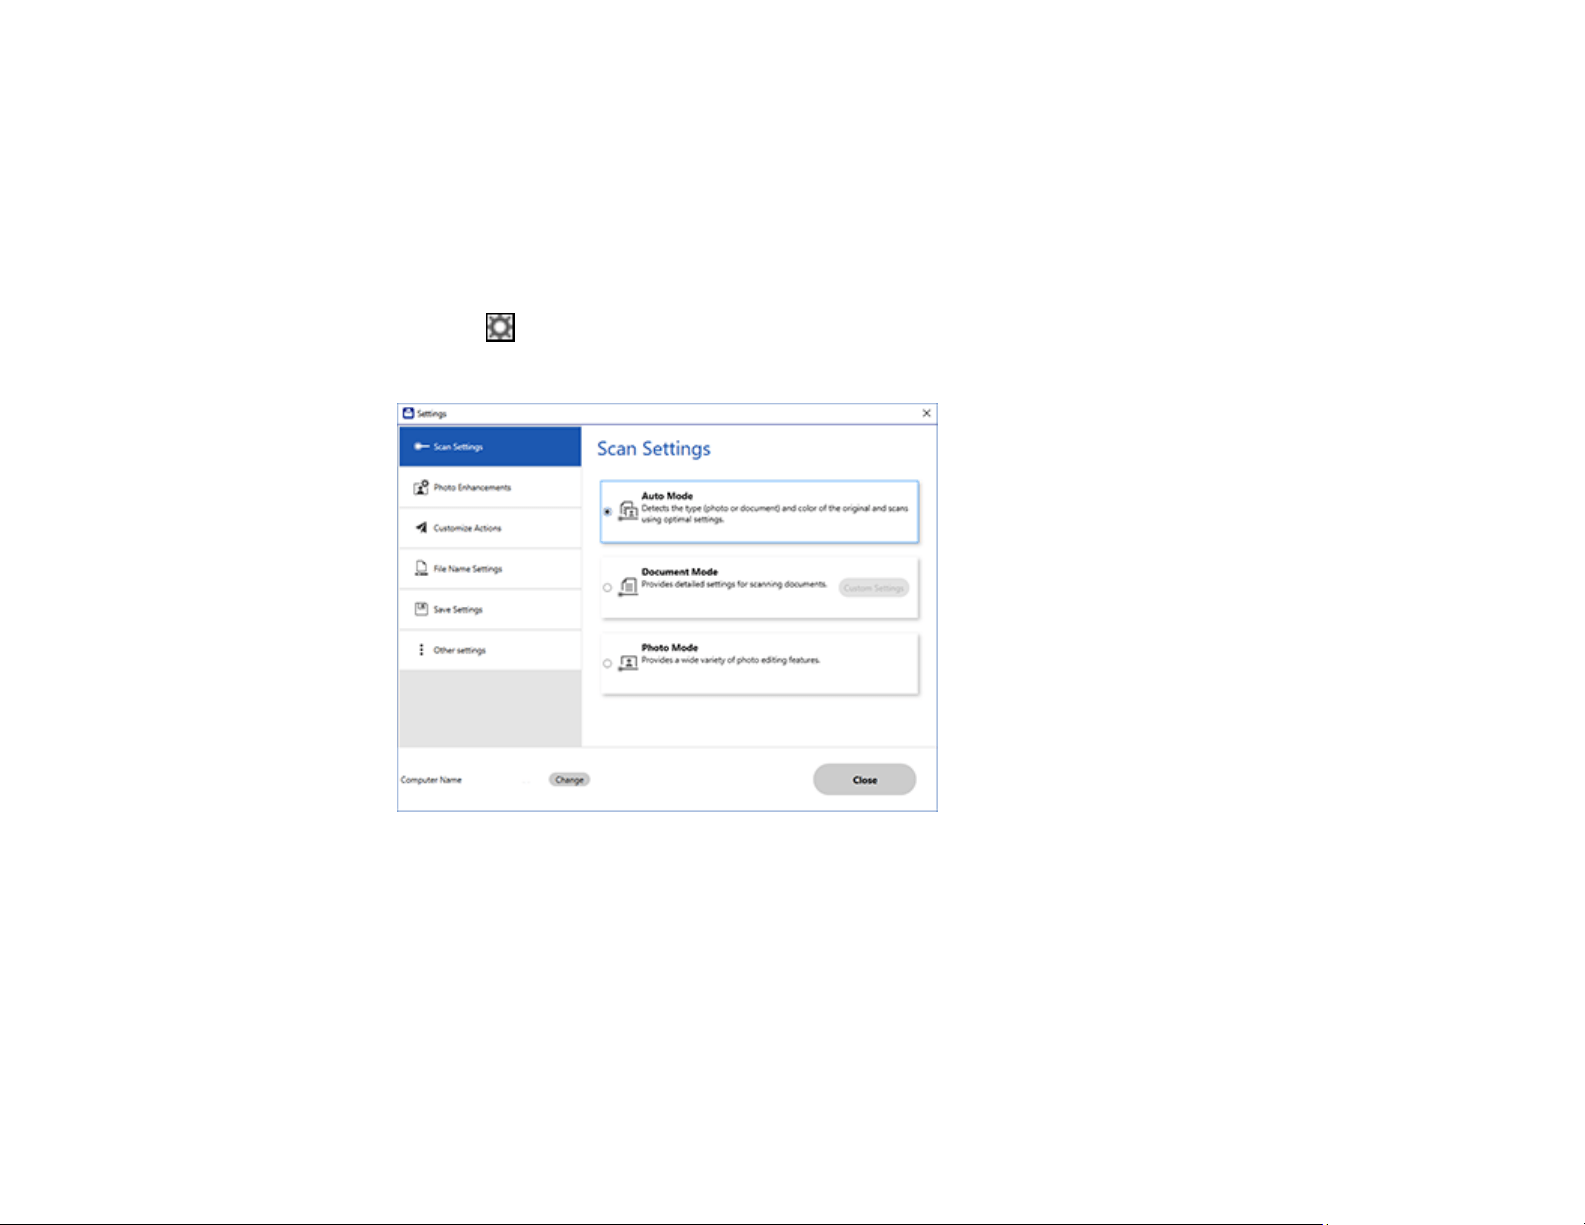
195
2. Select the Epson product you want to use with your computer and click OK.
Parent topic: Selecting Epson ScanSmart Settings
Changing the Scan Settings
You can change detailed scan settings such as the resolution, document size, and more.
Note: If you select Auto Mode, you cannot change the scan settings.
1. Click the Settings button.
You see a screen like this:
2. Do one of the following:
• To change Document Mode settings, select Document Mode > Custom Settings.
• To change Photo Mode settings, select Photo Mode and click Close. When you start a scan, you
will be prompted to select scan settings.
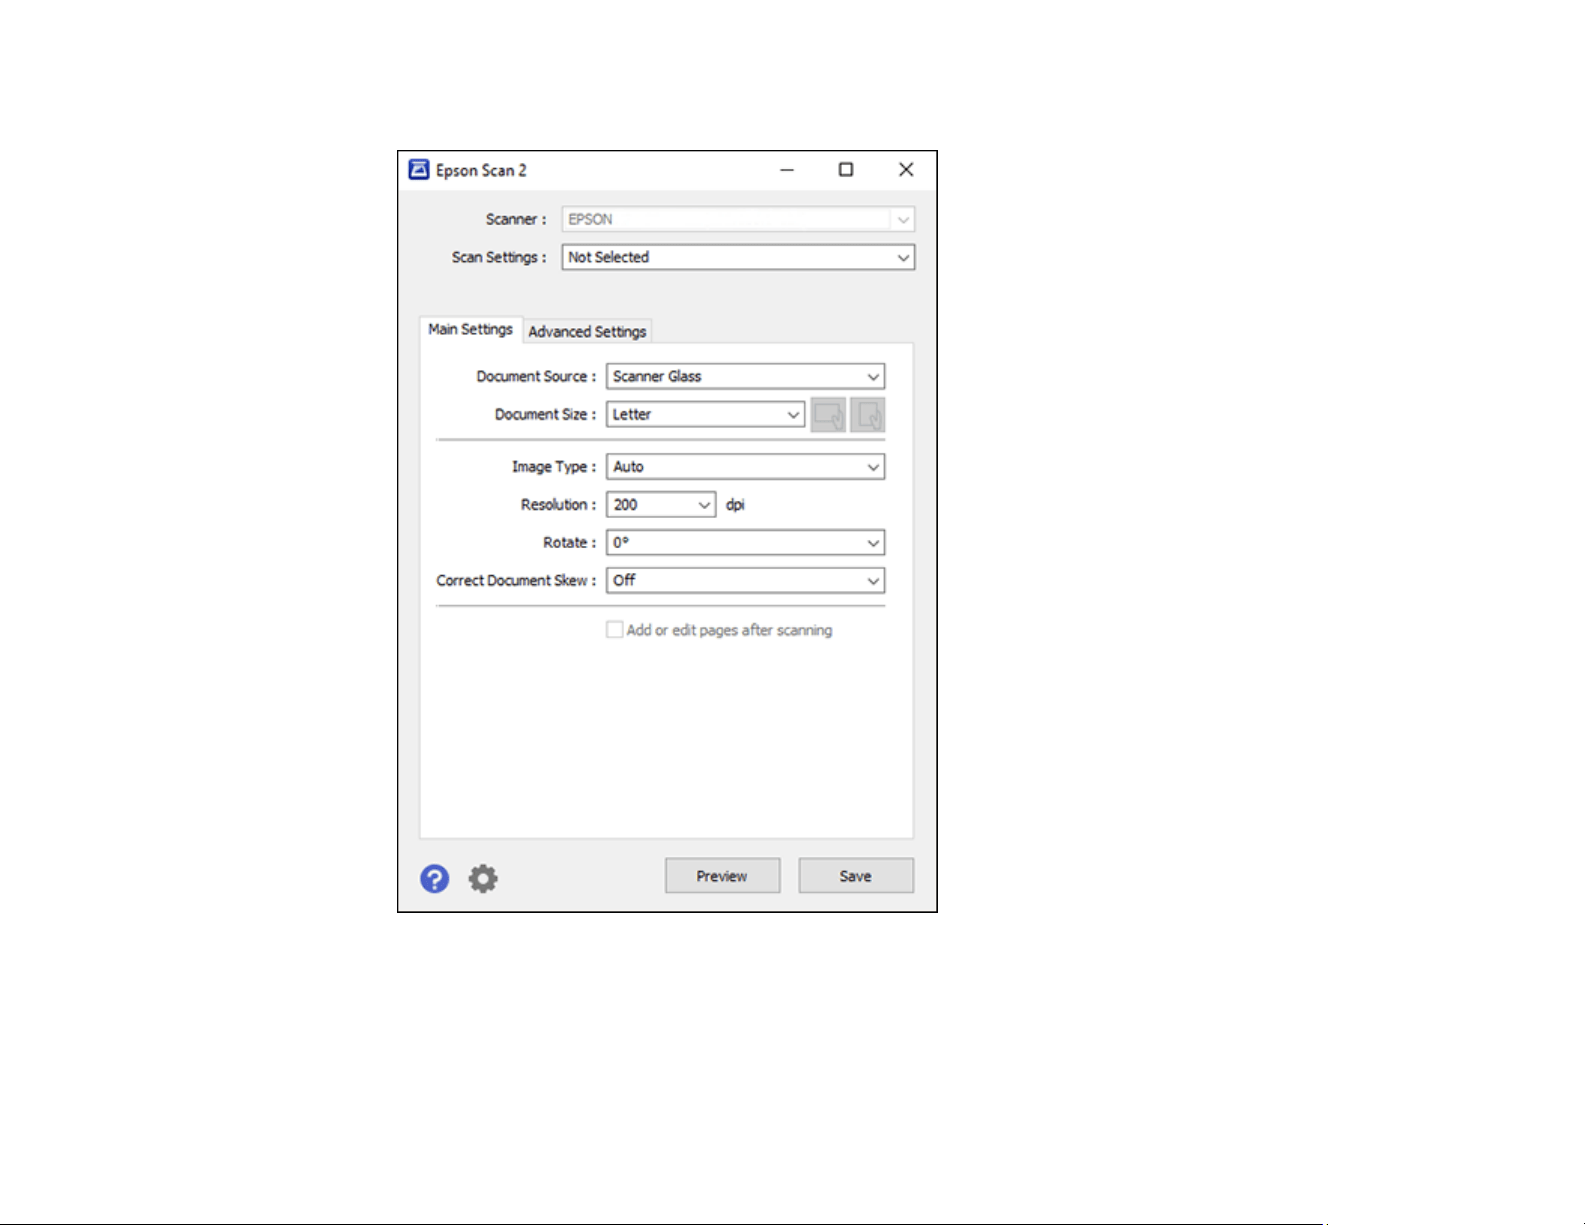
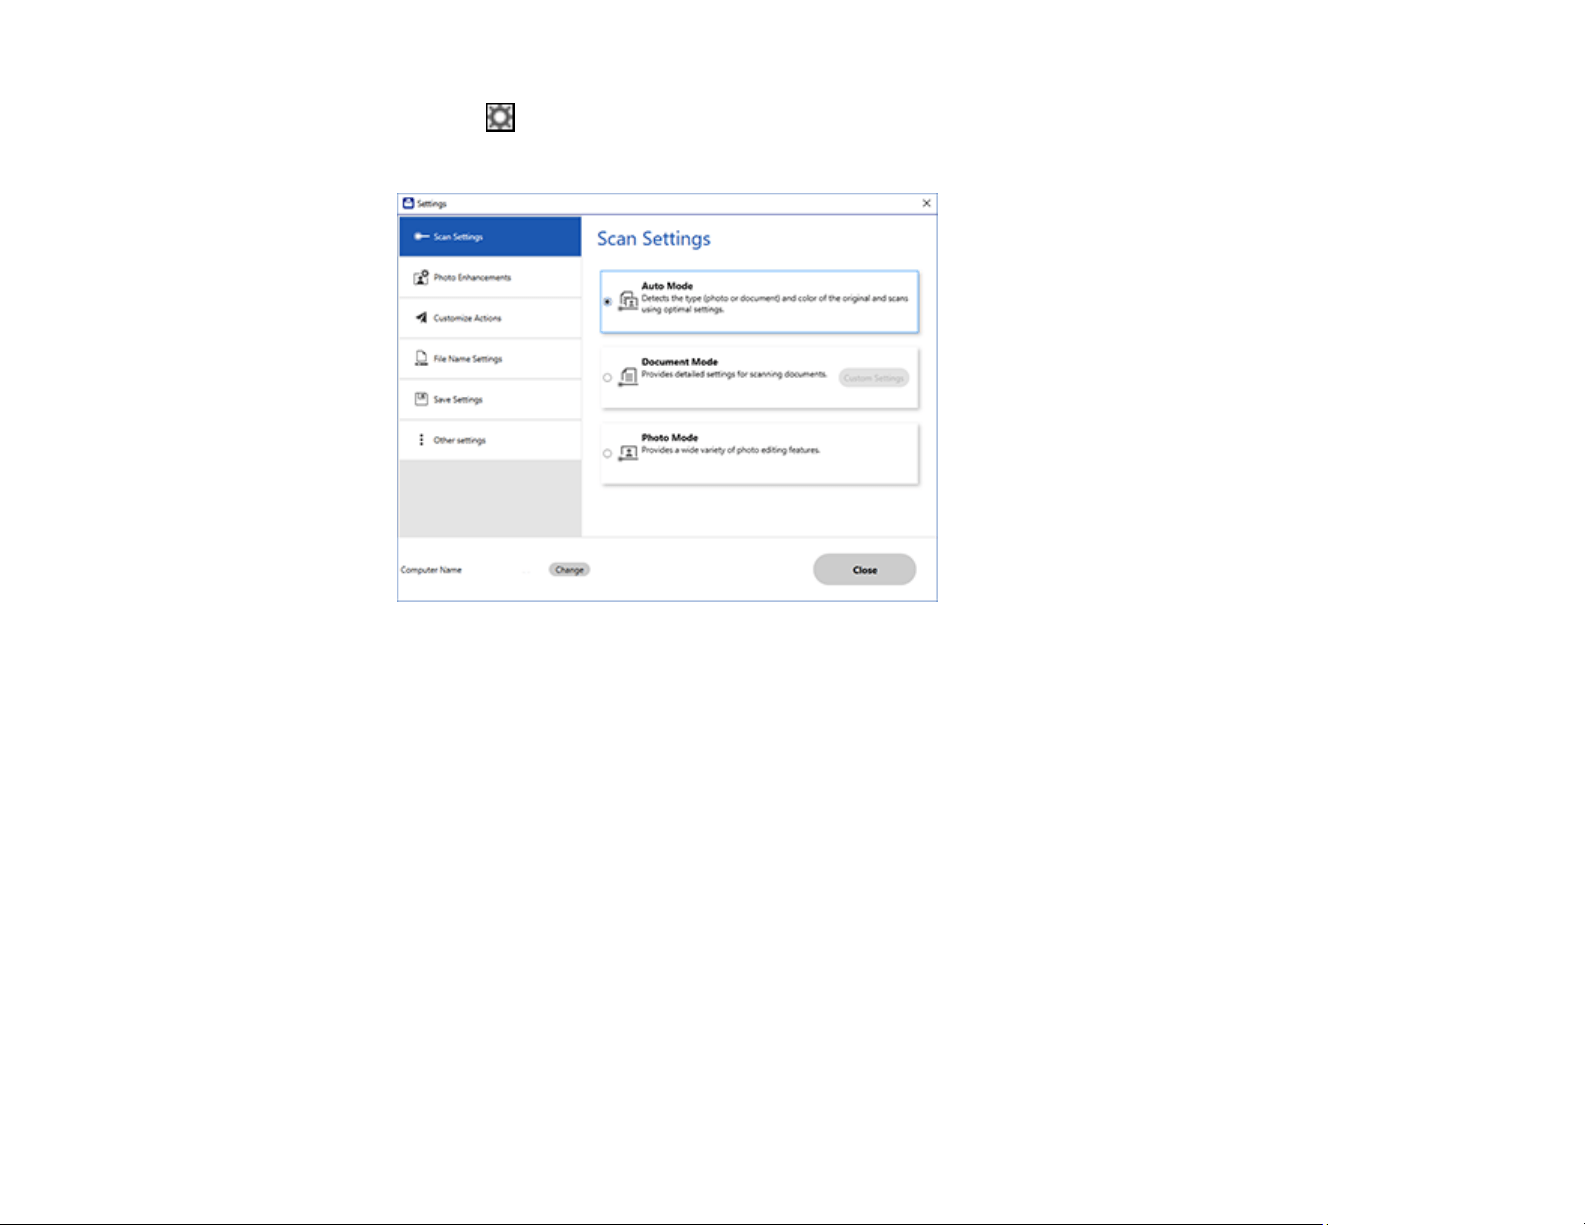
197
1. Click the Settings button.
You see a screen like this:
2. Click the File Name Settings tab.
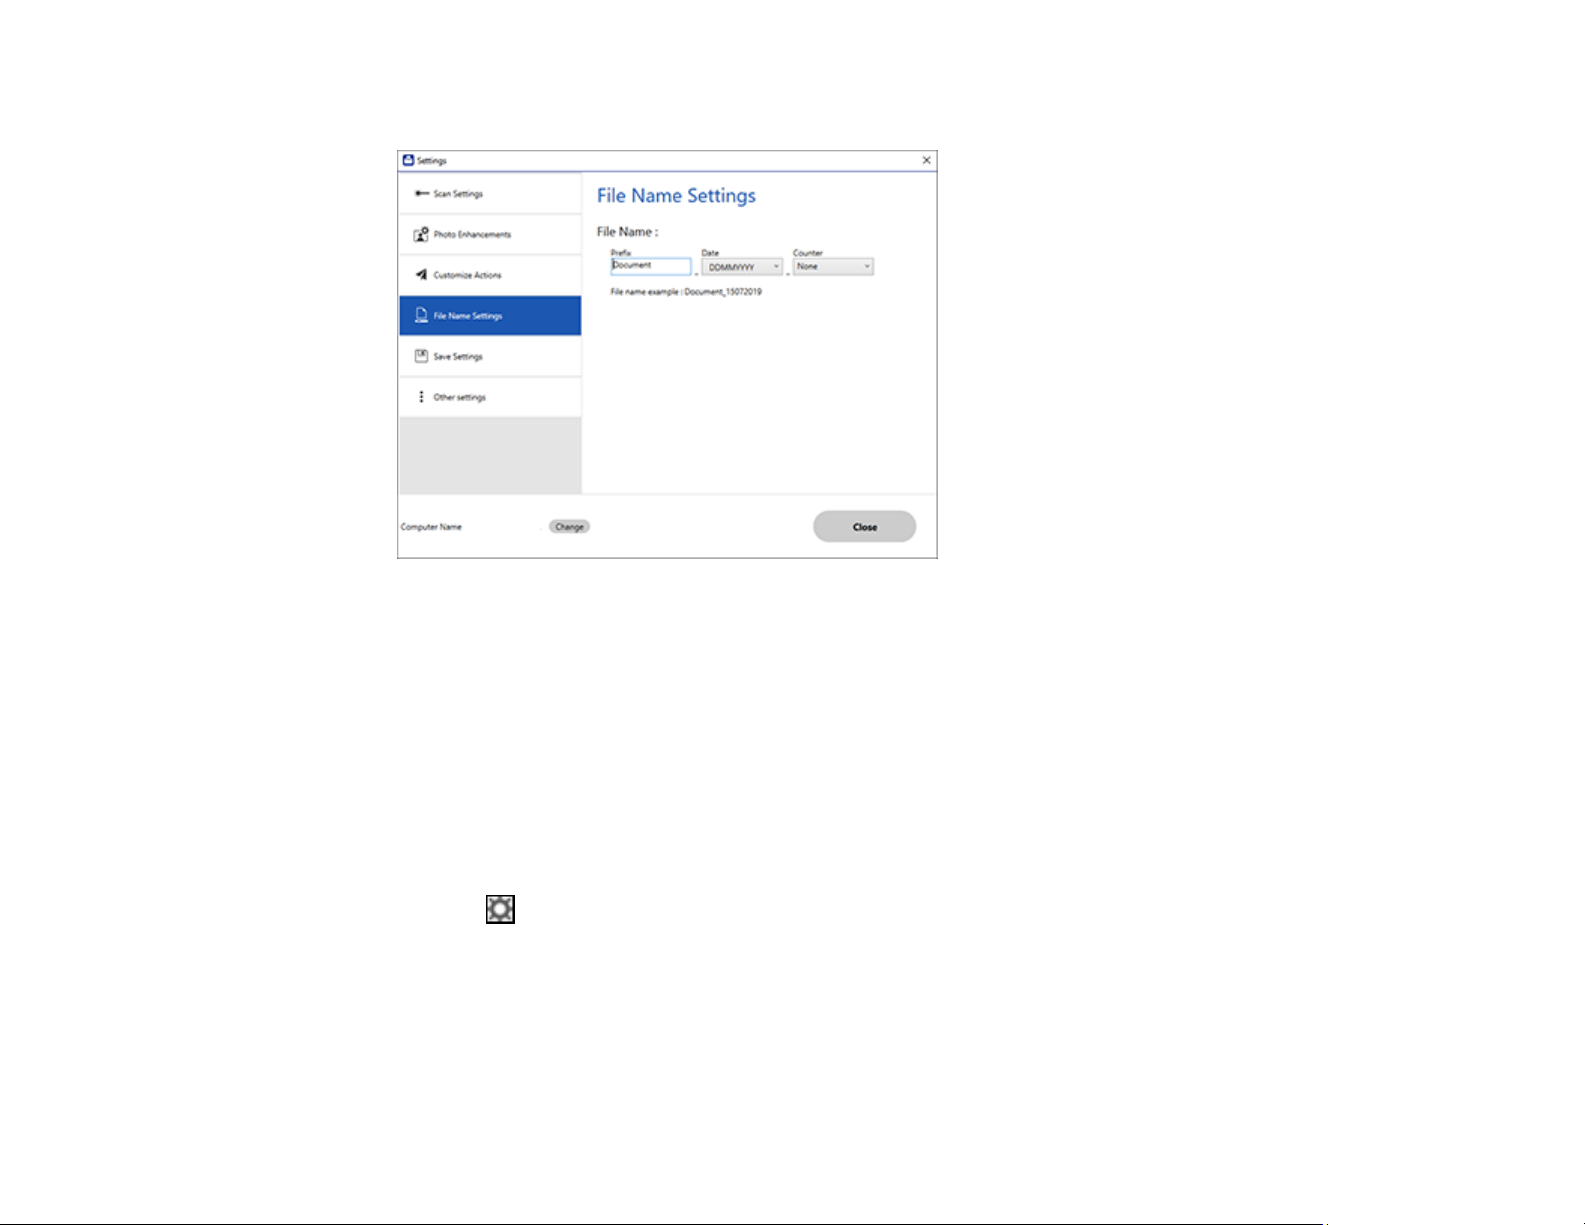
198
You see a screen like this:
3. Change the settings as necessary:
• Enter a prefix for the file name.
• Select the date format.
• Select a numbering format as the counter format.
4. Click Close.
Parent topic: Selecting Epson ScanSmart Settings
Changing the Save Settings
You can change the file type options for saving your scans.
1. Click the Settings button.
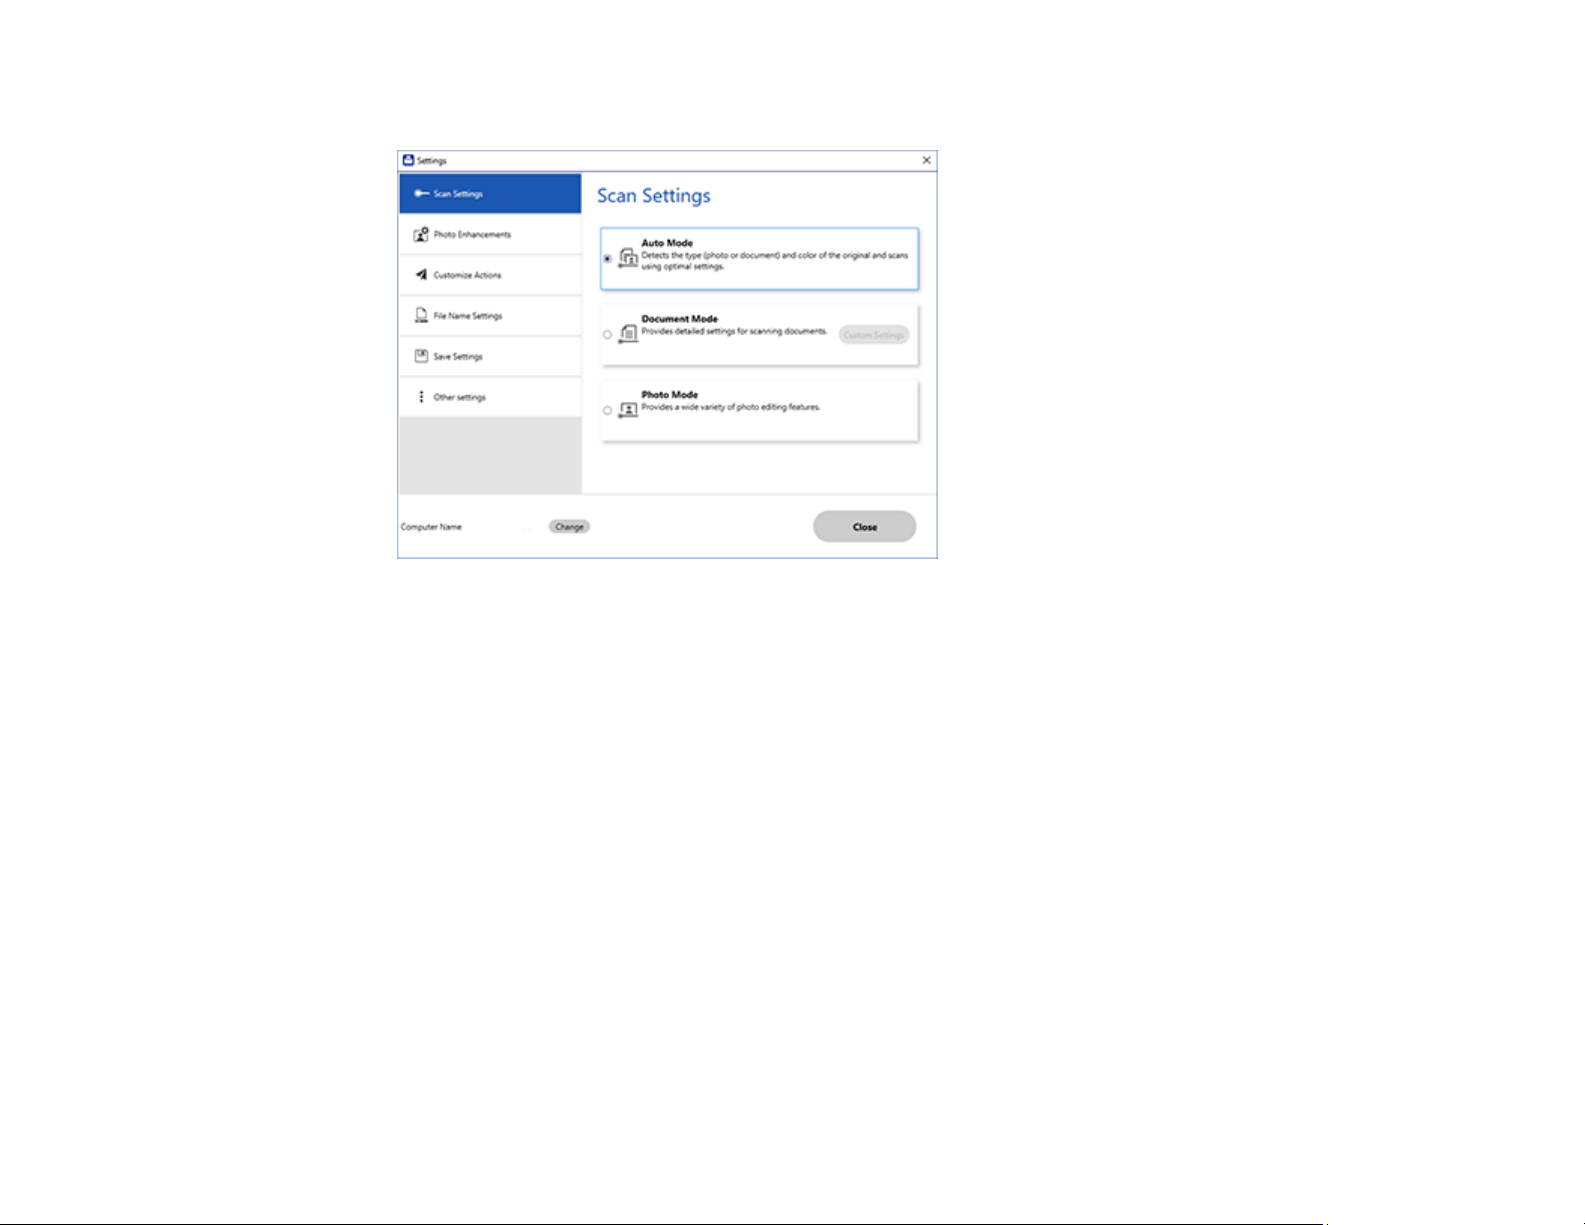
199
You see a screen like this:
2. Click the Save Settings tab.
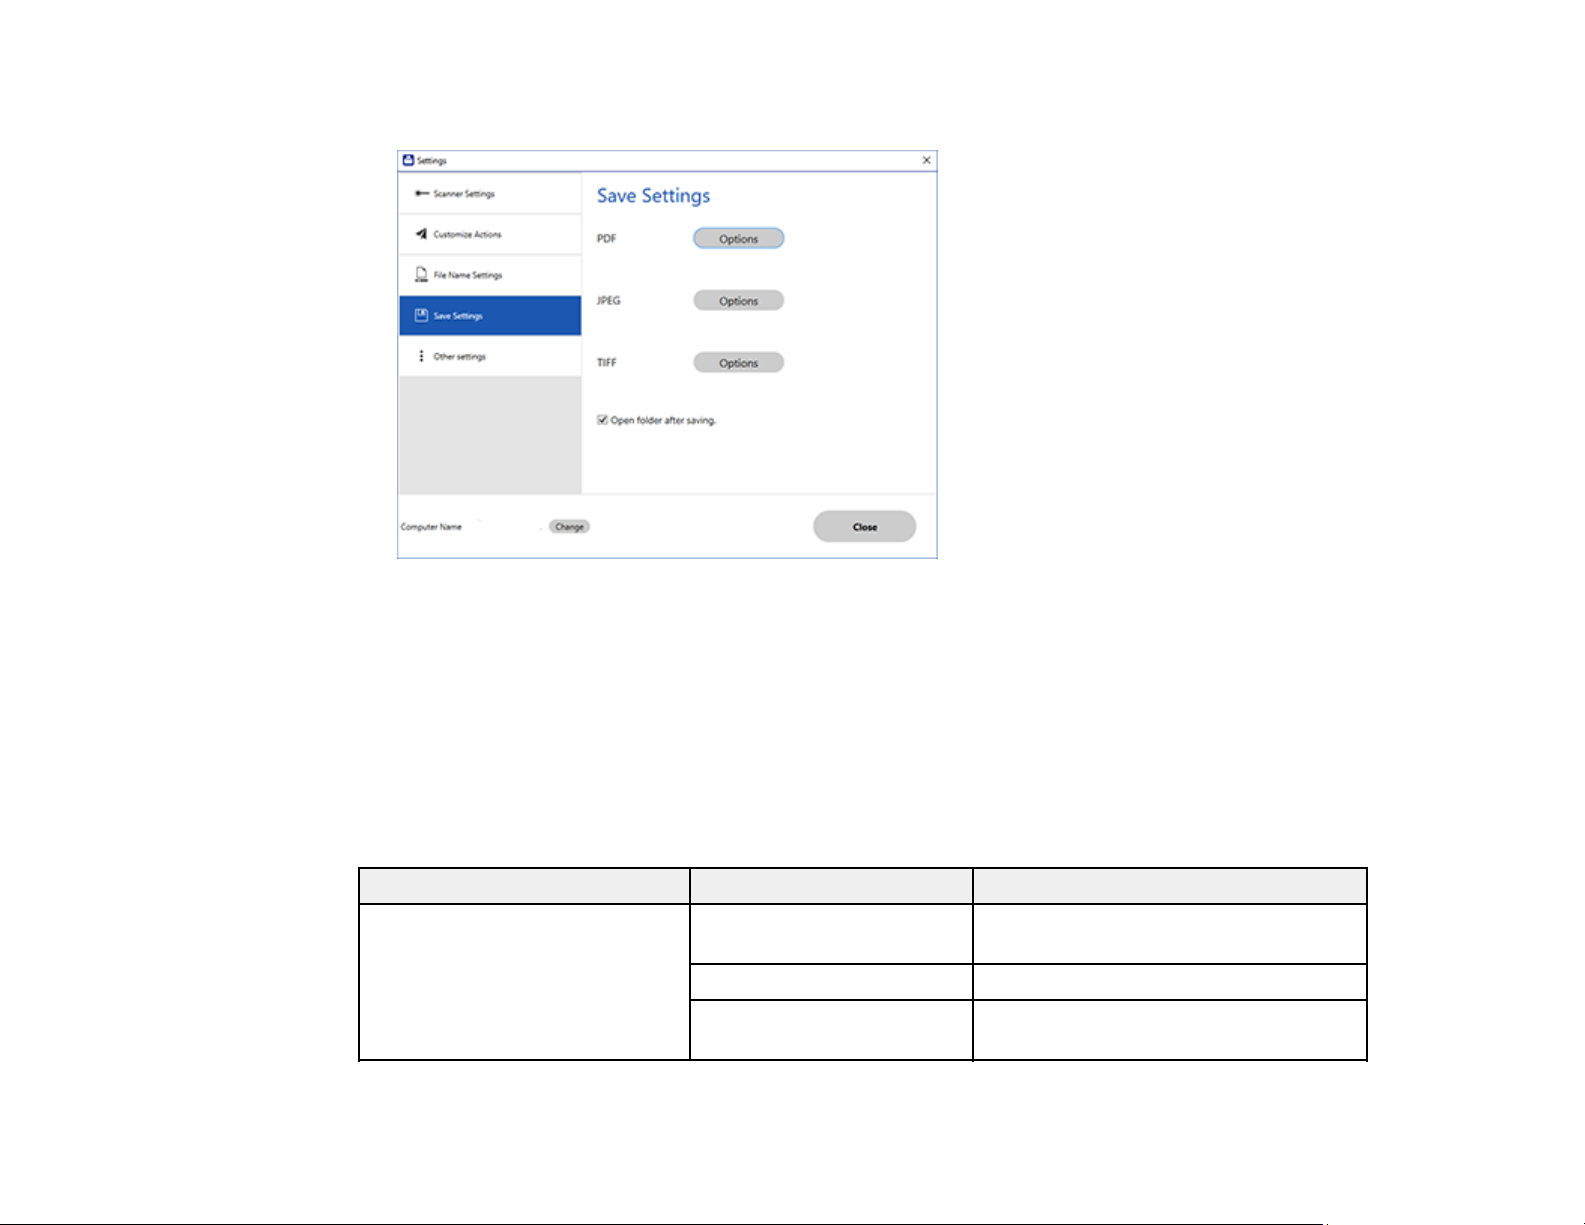
200
You see a screen like this:
3. Click Options for a file format and change the settings as necessary.
4. Click Open folder after saving to open the file folder after a file is saved.
5. Click Close.
Parent topic: Selecting Epson ScanSmart Settings
Save Settings
You can change the settings for how scanned images are saved.
PDF Options
Setting Options Description
General Generate PDF/A File Creates a PDF that conforms to
PDF/A-1 standards
Create file with all pages Saves all pages as one file
Compression Level Selects the compression level for color
or grayscale images
201
JPEG Options
Setting Options Description
Image Quality Options — Sets a compression level by moving a
slider or entering a value. File size
increases the higher the resolution is.
Encoding (Windows only) Standard Images load from top to bottom in a
web browser. It takes longer to load the
entire image.
Progressive Images first load completely at low
resolution and then adjust to high
resolution in a web browser
Embed ICC Profile (Windows
only)
— Allows you to add ICC profiles to the
image
TIFF Options
Setting Options Description
Byte Order Windows
Macintosh
Specifies the operating system where
the scanned image will be used
Compression (Windows only) — Specifies the compression format and
level for Color/Grayscale and B&W
images. File size increases with higher
quality.
Embed ICC Profile (Windows
only)
— Allows you to add ICC profiles to the
image
Parent topic: Selecting Epson ScanSmart Settings
Customizing Action Icons
You can customize which scan action icons appear on the Select Action screen.
Note: You can also customize them by clicking the Customize icon on the Select Action screen.
1. Click the Settings button.

202
You see a screen like this:
2. Click the Customize Actions tab.
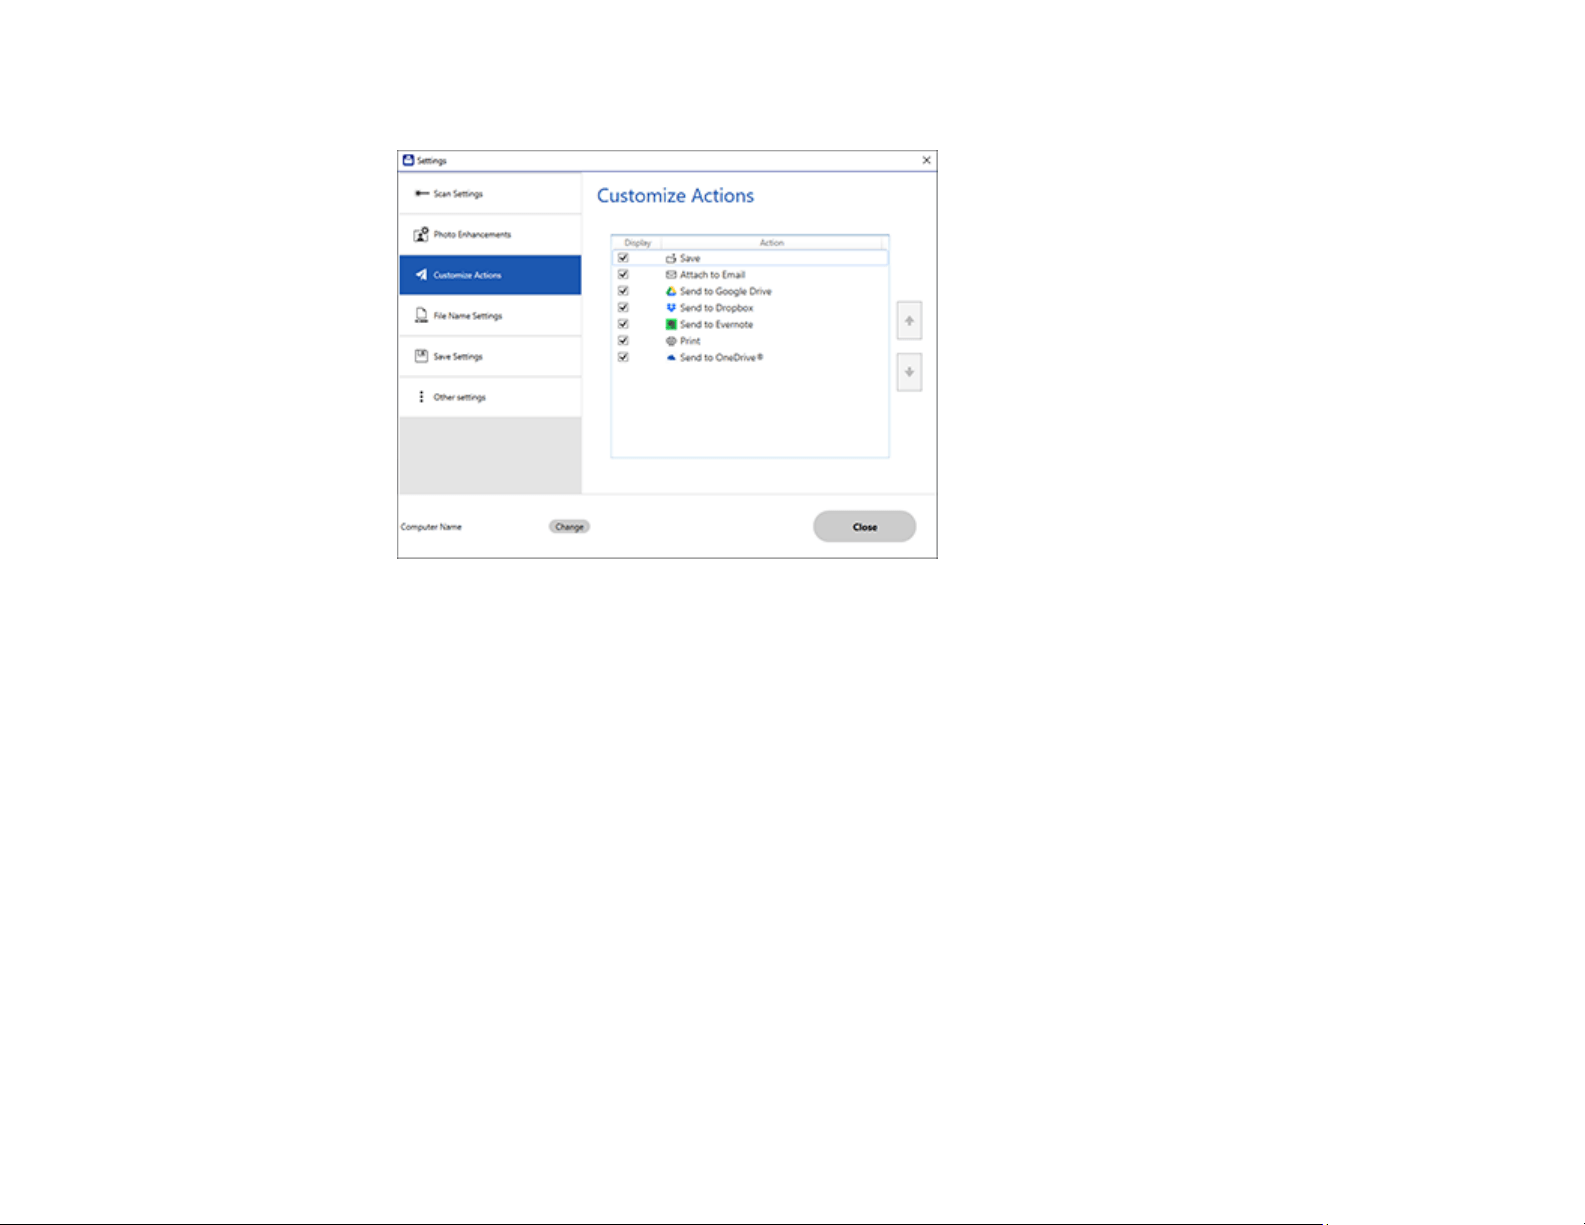
203
You see a screen like this:
3. Choose which action icons to display by selecting or deselecting each checkbox. Click the arrow
icons to move the icons up or down in the display order you want.
4. Click Close.
Parent topic: Selecting Epson ScanSmart Settings
Scanning in Epson Scan 2
Epson Scan 2 gives you access to basic and advanced scanning features. You can scan your document
and save the scanned image in various file formats in your operating system's Documents or My
Documents folder, or open it in your scanning program. You can preview the scanned image and select
or change settings as necessary.
Note: If you are using your Epson product with the Windows 10 S operating system, you cannot use the
software described in this section. You also cannot download and install any Epson product software
from the Epson website for use with Windows 10 S; you must obtain software only from the Windows
Store.
1. Start Epson Scan 2.
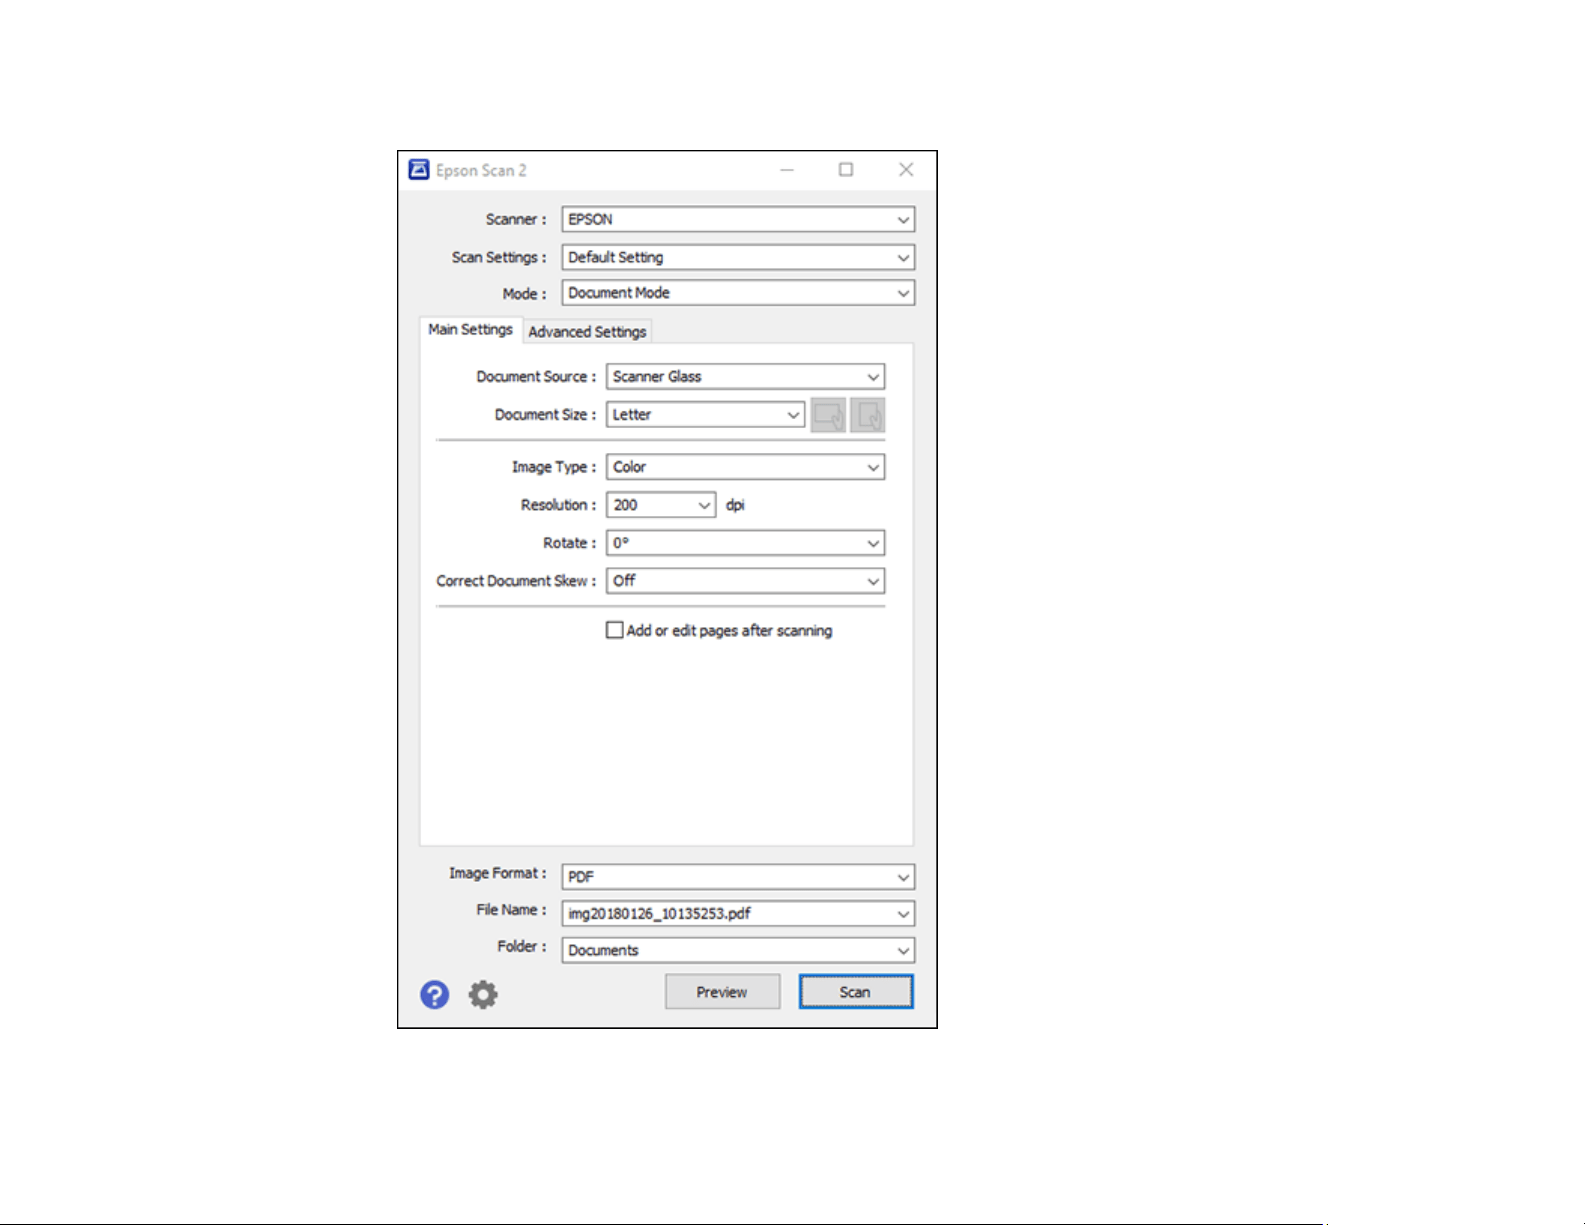
204
You see this window:
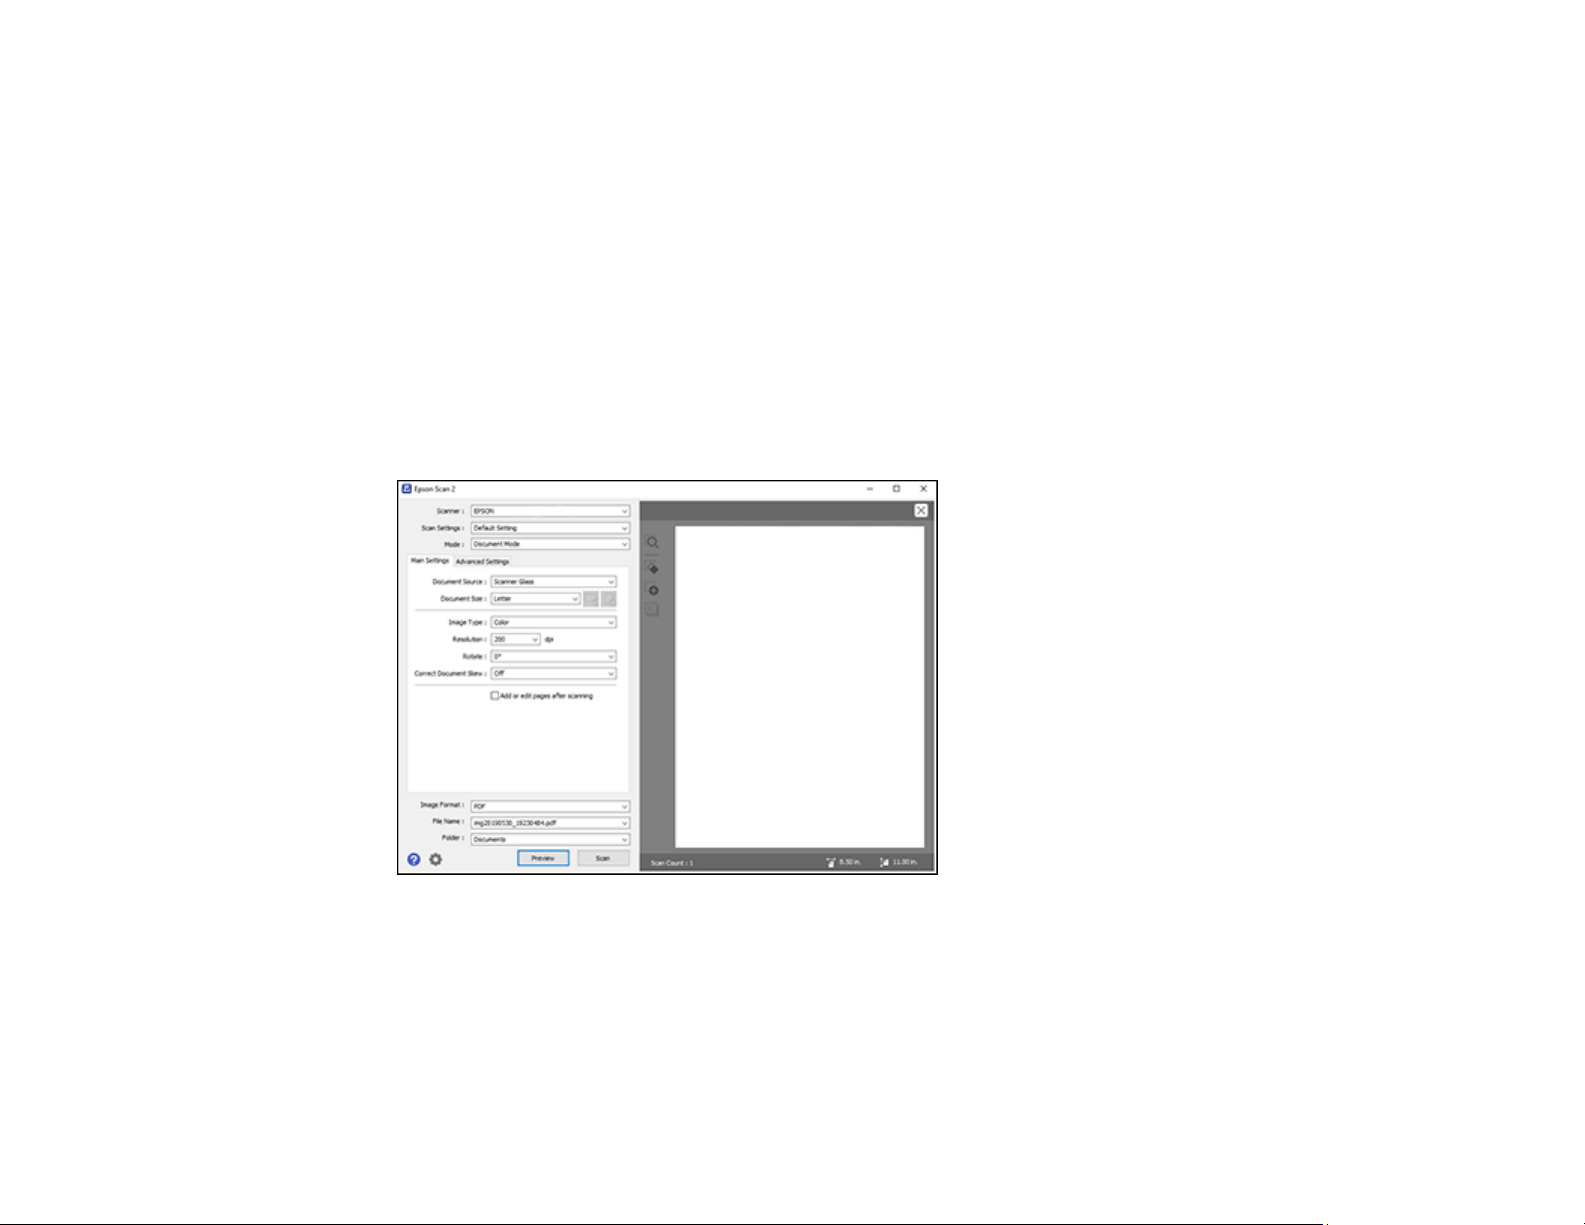
205
2. Select the Mode setting that matches the type of original you are scanning.
3. Select the Document Source setting that matches where you placed your original, or select Auto
Detect to have Epson Scan 2 automatically detect the source.
4. Select the Document Size setting that matches the size of your original. You can select Customize
to enter a custom size, if necessary.
5. Select the image type of your original and how you want it scanned as the Image Type setting.
6. Select the Resolution setting you want to use for your scan.
7. Select the Rotate setting to rotate the scanned image.
8. Select the Correct Document Skew setting to correct skewed originals, image contents, or both.
9. Click the Preview button.
Epson Scan 2 previews your original and displays the results in the Epson Scan 2 window.
10. Reinsert your original into the ADF, if necessary.
11. Select any of the additional settings that you want to use on the Main Settings tab.
12. Do one of the following:
• If you're scanning in Document Mode, select any of the additional settings that you want to use on
the Main Settings tab.

206
• If you're scanning in Photo Mode, select the Color Management and Thumbnail Options
settings as necessary.
13. Click the Advanced Settings tab and select any settings that you want to use.
14. Select the format in which you want to save your scanned file as the Image Format setting. If
necessary, select Options and select any desired format options.
15. Enter the file name for your scanned file in the File Name field. If necessary, select Settings to
modify the file name settings.
16. Select the location in which you want to save your scanned file as the Folder setting. If necessary,
select Select to create a new folder.
17. Click Scan.
The product scans your original and saves the scanned file in the location you specified.
Additional Scanning Settings - Main Settings Tab
Additional Scanning Settings - Advanced Settings Tab
Saving Scanned Documents as a Searchable PDF Using Epson Scan 2
Image Format Options
Scan Resolution Guidelines
Parent topic: Starting a Scan
Additional Scanning Settings - Main Settings Tab
You can select these additional scanning settings on the Epson Scan 2 Main Settings tab. Not all
adjustment settings may be available, depending on other settings you have chosen.
Rotate
Rotates the original image clockwise to the desired angle before scanning it. Select Auto to allow
your product to automatically rotate the image based on the orientation of the text (may take longer to
scan).
Correct Document Skew
Corrects skewed originals, image contents, or both.
Add or edit pages after scanning
Lets you add, remove, or edit the pages in a scan, including rotating pages and changing the page
order.
Note: To save multiple pages in a single file, you must select a file format that supports multiple
pages such as PDF or Multi-TIFF. If you select another file format, each scanned image or page is
saved as a separate file.

207
Parent topic: Scanning in Epson Scan 2
Additional Scanning Settings - Advanced Settings Tab
You can select these additional scanning settings on the Epson Scan 2 Advanced Settings tab. Not all
adjustment settings may be available, depending on other settings you have chosen.
Remove Background
Removes the background of the originals.
Text Enhancement
Sharpens the appearance of letters in text documents.
Auto Area Segmentation
Makes black and white images clearer and text recognition more accurate by separating the text from
the graphics.
Threshold
Adjusts the level at which black areas in text and line art are delineated, improving text recognition in
OCR (Optical Character Recognition) programs.
Color Enhance
Enhances the shades of the color you select in the scanned image. This setting is available only if you
select Grayscale or Black & White as the Image Type setting.
Brightness
Adjusts the overall lightness and darkness of the scanned image.
Contrast
Adjusts the difference between the light and dark areas of the overall scanned image.
Saturation
Adjusts the density of colors in the overall image.
Gamma
Adjusts the midtone density of the scanned image.
Unsharp Mask
Makes the edges of certain image areas clearer. Turn off this option to leave softer edges.
Descreening
Removes the ripple pattern that might appear in subtly shaded image areas, such as skin tones. This
option improves results when scanning magazines or newspapers. (The results of descreening do not
appear in the preview image, only in your scanned image.)
Color Restoration
Corrects color in faded images (when scanning in Photo Mode).

208
Backlight Correction
Lightens darkly backlit images (when scanning in Photo Mode).
Dust Removal
Removes dust on scanned images (when scanning in Photo Mode).
Edge Fill
Corrects shadowing around the edges of the image by filling the shadows with black or white.
Dual Image Output
Scans the original image twice using different output settings (Windows only).
Watermark
Adds a watermark to a scanned image.
Parent topic: Scanning in Epson Scan 2
Saving Scanned Documents as a Searchable PDF Using Epson Scan 2
You can scan a document and save the text in a searchable PDF. In a searchable PDF, text is
recognized using Optical Character Recognition (OCR) and then embedded in the scanned original.
Note: The required Epson Scan 2 OCR Component is installed automatically when you install your
product software as instructed on the Start Here sheet. If you install your scanner software programs
individually, be sure to also install this component if you want to perform OCR.
1. Load your original in the product for scanning.
2. Start Epson Scan 2.
3. Select your scan settings.
4. Click Preview and adjust the area you want to scan, if necessary.
5. If you are using the ADF, reload the ejected original.
6. Select Searchable PDF as the Image Format setting.
7. Select Options from the Image Format list.
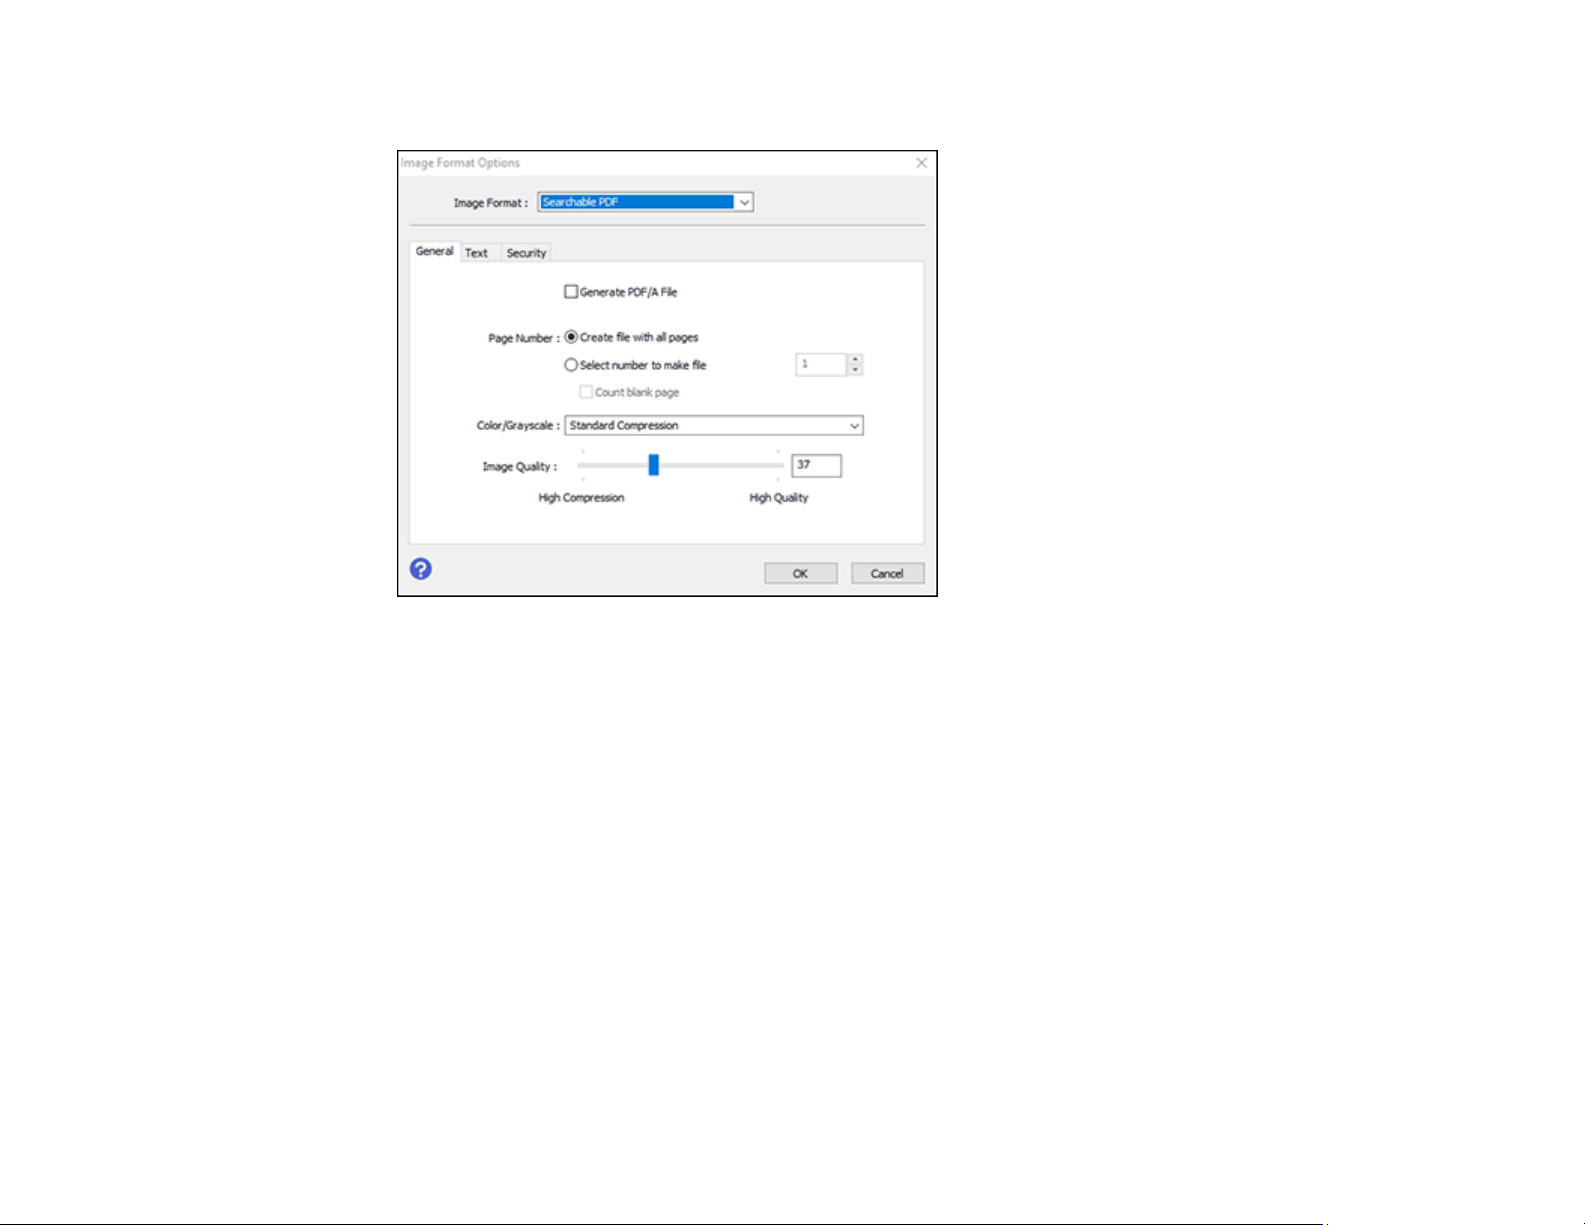
209
You see this window:
8. Select any of the options on the General tab.
9. Select the Text tab.
10. Make sure the language used in the document text is selected as the Text Language setting.
11. Select the Security tab if you want to add a password to the PDF or protect printing or editing
properties.
12. Click OK.
13. Confirm the File Name setting and select a Folder setting for your document.
14. Click Scan.
The scanned image is saved as a searchable PDF.
Parent topic: Scanning in Epson Scan 2
Image Format Options
You can select different image formats and related options. For details on available options, click the ?
icon on the Epson Scan 2 Image Format Options window. Not all image formats have options.

210
BITMAP (*.bmp)
A standard image file format for most Windows programs.
JPEG (*.jpg)
An image format that lets you highly compress image data. However, the higher the compression, the
lower the image quality. (The TIFF format is recommended when you need to modify or retouch your
scanned image.)
PNG (*.png)
An image format that does not lose quality during editing.
TIFF (*.tif)
A file format created for exchanging data between many programs, such as graphic and DTP
software.
Multi-TIFF (*.tif)
A TIFF file format when multiple pages are saved to the same file, allowing you to edit the images
using a compatible program.
PDF (*.pdf)
A document format that is readable by Windows and Mac systems using Adobe Reader, Acrobat, or
other programs. You can save multi-page documents in one PDF file.
Searchable PDF (*.pdf)
A document format that is readable by Windows and Mac systems using Adobe Reader, Acrobat, or
other programs. You can save multi-page documents in one PDF file. Recognized text in the scanned
document can be searched.
Parent topic: Scanning in Epson Scan 2
Scan Resolution Guidelines
The Resolution setting, measured in dpi (dots per inch), controls the amount of detail captured in your
scans. Increasing the resolution raises the amount of detail captured but comes with the following
disadvantages:
• Larger file sizes
• It takes longer to scan your originals, send/receive your scans by email or fax, and to print your scans
• The image may become too large to fit on your display or print on paper
If you plan to enlarge a scanned image so you can print it at a larger size, you may need to increase the
resolution from the default resolution set by Epson Scan 2. Follow these guidelines to determine the
resolution setting you need:
• You will scan the image at its original size but enlarge it later in an image-editing program.

211
Increase the Epson Scan 2 Resolution setting in your scan. Increase the resolution by the same
amount you will increase the image size to retain a high image quality. For example, if the resolution is
300 dpi (dots per inch) and you will double the image size later, change the Resolution setting to 600
dpi.
• You will scan the image at 100% or a smaller size.
Select the Epson Scan 2 Resolution setting based on how you will use the scanned image:
• Email/view on a computer screen/post on the web: 96 to 200 dpi
• Print/fax/convert to editable text (OCR)/create searchable PDF: 200 to 300 dpi
Parent topic: Scanning in Epson Scan 2

212
Faxing
See these sections to fax using your product (ET-5170/ET-5180).
Note: This product allows you to store names, telephone numbers, and fax data in its memory even
when the power is turned off. Make sure you restore all of the default settings if you give away or dispose
of the product. This will erase all of your network settings and fax data.
Connecting a Telephone or Answering Machine
Setting Up Fax Features
Setting Up Contacts and Contact Groups
Sending Faxes
Receiving Faxes
Checking Fax Status
Printing Fax Reports
Connecting a Telephone or Answering Machine
You must connect your product to a telephone wall jack to send or receive faxes. If you want to use the
same telephone line to receive calls, you can connect a telephone or answering machine to your product
using an additional phone cable.
Note: If you do not connect a telephone to your product, make sure Receive Mode is set to Auto.
Otherwise, you cannot receive faxes.

213
1. Connect a phone cable to your telephone wall jack and to the LINE port on your product.
Note: If you have a DSL or ISDN connection, you must connect the appropriate DSL filter, or ISDN
terminal adapter or router to the wall jack to be able to use the line for faxing or voice calls using your
product. Contact your DSL or ISDN provider for the necessary equipment.
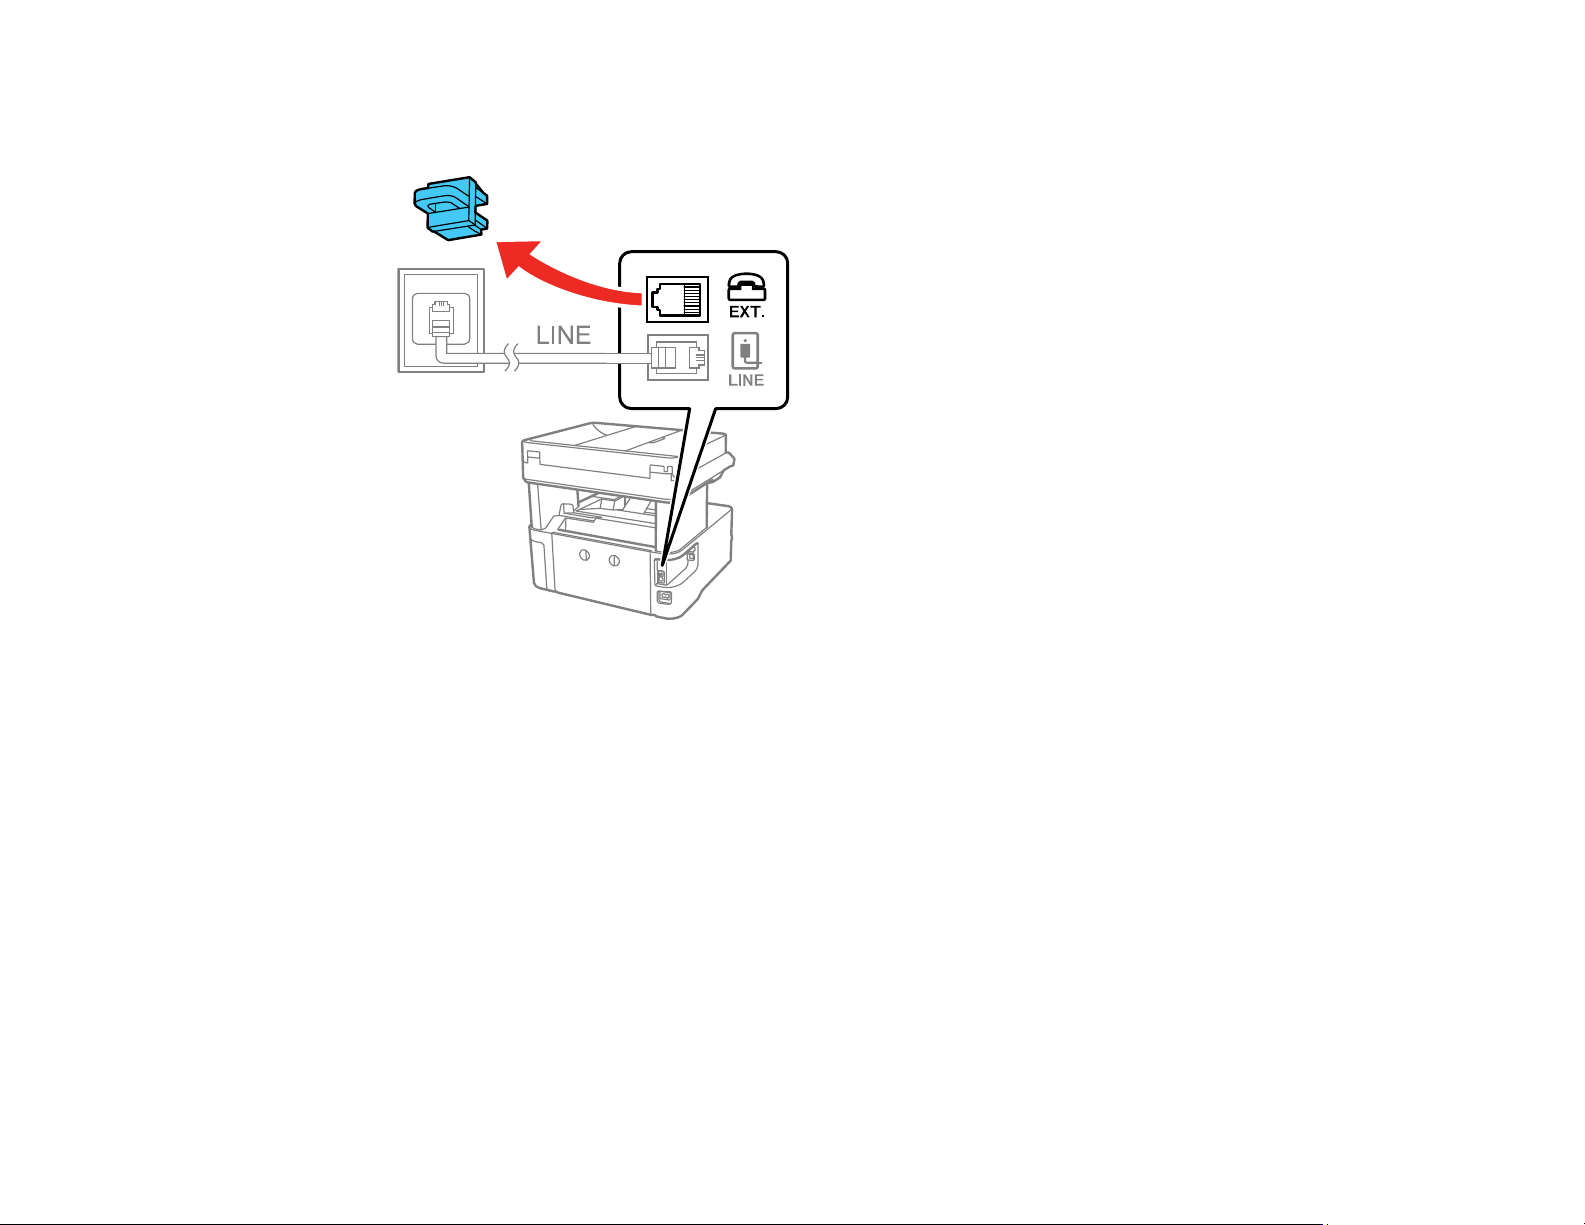
214
2. If you are connecting a telephone or answering machine to your product using a second phone
cable, remove the cap from the EXT port on your product.
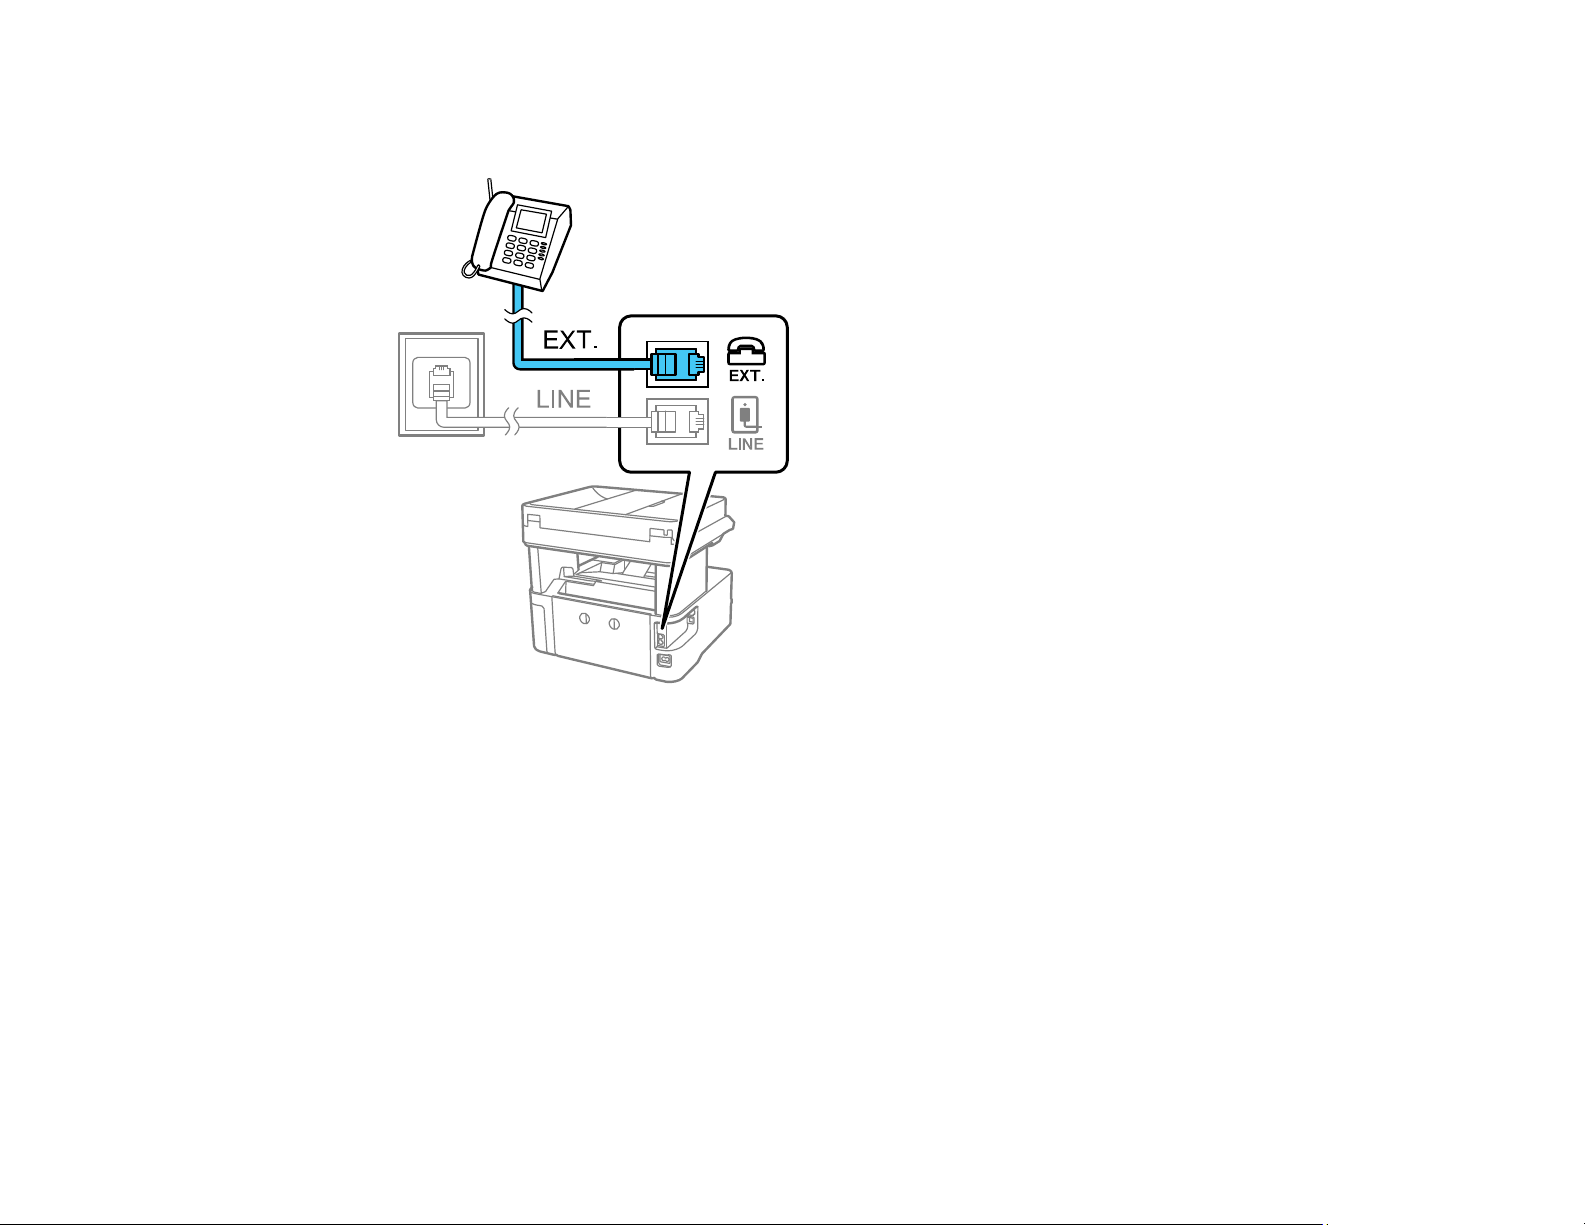
215
3. Connect a second phone cable to your telephone or answering machine and to the EXT port on your
product.
Note: If you connect an answering machine and Receive Mode is set to Auto, set the number of
rings before your product answers a call to a number that is higher than your answering machine's
setting for the number of rings.
Any phone or answering machine must be connected to the EXT port for your product to detect an
incoming fax call when the phone is picked up. Epson cannot guarantee compatibility with VoIP,
cable phone systems, or fiberoptic digital services such as FIOS.
Parent topic: Faxing
Related references
Basic Settings - Fax

216
Setting Up Fax Features
Before faxing with your product, set up your fax header and select the fax features you want to use.
Note: If you leave your product unplugged for a long period of time, you may need to reset the date and
time settings for faxes.
Setting Up Basic Fax Features
Selecting Advanced Fax Settings
Setting Up the Fax Utility - Windows
Setting Up Fax Features Using the Fax Utility - Mac
Parent topic: Faxing
Related tasks
Receiving Faxes Automatically
Setting Up Basic Fax Features
See these sections to select the basic settings you need to use the product's fax features.
Using the Fax Setup Wizard
Selecting the Line Type
Setting the Number of Rings to Answer
Parent topic: Setting Up Fax Features
Using the Fax Setup Wizard
You can setup the product's basic fax settings using the Fax Setting Wizard. This wizard is automatically
displayed when the product is turned on for the first time. You can also change these settings individually
from the Fax Settings menu.
1. Press the home button, if necessary.
2. Select Settings > General Settings > Fax Settings > Fax Setting Wizard.

217
You see a screen like this:
3. Make sure a phone line is connected and select Proceed.
4. Use the displayed keyboard to enter the sender name for your fax source, such as your name or a
business name. You can enter up to 40 characters. Select OK when finished.
5. Use the numeric keypad to enter your fax number, up to 20 characters. Select OK when finished.
Note: The name and phone number in the fax header identifies the source of the faxes you send.
6. On the Distinctive Ring Setting screen, do one of the following:
• If you have subscribed to a distinctive ring service from your telephone company, select Settings.
Select the ring pattern to be used for incoming faxes or select All. If you selected All, go to the
next step. If you selected another ring pattern, go to step 9.
• If you do not have a distinctive ring service, select Skip and go to step 9.
Note: Distinctive ring services allows you to have several phone numbers on one phone line. Each
number is assigned a different ring pattern. You can use one number for voice calls and another for
fax calls. Select the ring pattern assigned to fax calls in the Distinctive Ring Setting. If you select a
ring pattern other than All, Receive Mode is automatically set to Auto.
7. On the Receive Mode Setting screen, do one of the following:
• If you have connected an external telephone or answering machine to the product, select Yes and
go to the next step.

218
• If you did not connect an external telephone or answering machine, select No and go to step 9.
(Receive Mode is automatically set to Auto; otherwise you cannot receive faxes.)
8. On the next Receive Mode Setting screen, select Yes to receive faxes automatically or select No to
receive faxes manually.
Note: If you connect an external answering machine and select to receive faxes automatically, make
sure the Rings to Answer setting is correct. If you select to receive faxes manually, you need to
answer every call and use the product’s control panel or your phone to receive faxes.
9. On the Proceed screen, confirm the displayed settings and select Proceed, or press the back arrow
to change the settings.
10. On the Run Check Fax Connection screen, select Start Checking and follow the on-screen
instructions to check the fax connection and print a report of the check result. If there are any errors
reported, try the solutions on the report and run the check again.
11. If the Select Line Type screen appears, select the correct line type.
Note: If you are connecting the product to a standard phone line, select PSTN and then select Do
Not Detect on the Confirmation screen that appears. However, selecting this setting may cause the
product to drop the first digit of a fax number and send the fax to the wrong number.
Parent topic: Setting Up Basic Fax Features
Related tasks
Entering Characters on the LCD Screen
Selecting the Line Type
If you connect the product to a PBX phone system or terminal adapter, you must change the product's
line type. PBX (Private Branch Exchange) is used in office environments where an external access code
such as “9” must be dialed to call an outside line. The default Line Type setting is PSTN (Public Switched
Telephone Network), which is a standard home phone line.
1. Press the home button, if necessary.
2. Select Settings > General Settings > Fax Settings > Basic Settings > Line Type > PBX.
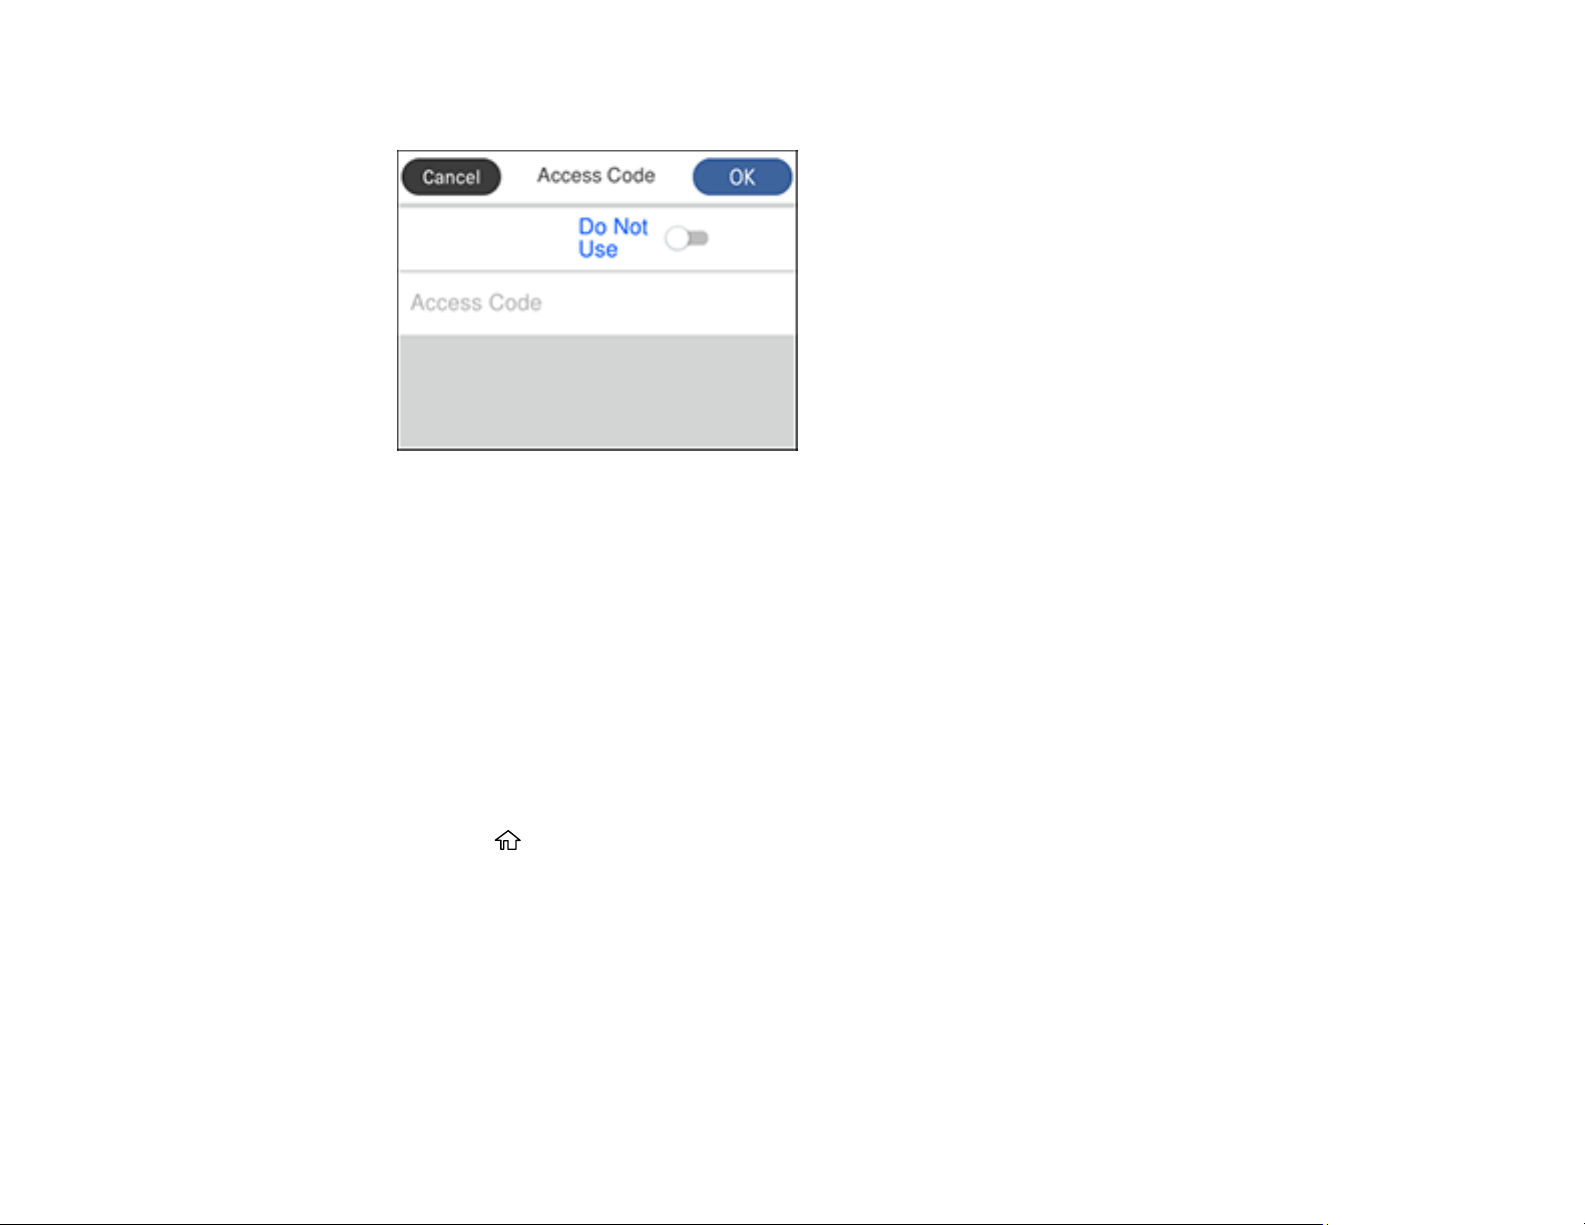
219
You see a screen like this:
3. Set the switch to Use to activate the setting.
4. Select Access Code.
5. Use the numeric keypad to enter the access code, such as 9, and select OK.
Parent topic: Setting Up Basic Fax Features
Related tasks
Entering Characters on the LCD Screen
Setting the Number of Rings to Answer
If you connect an external answering machine and select to receive faxes automatically, make sure the
Rings to Answer setting is correct. The number of rings should be higher than the number of rings your
answering machine is set to for answering a call.
1. Press the home button, if necessary.
2. Select Settings > General Settings > Fax Settings > Basic Settings > Rings to Answer.
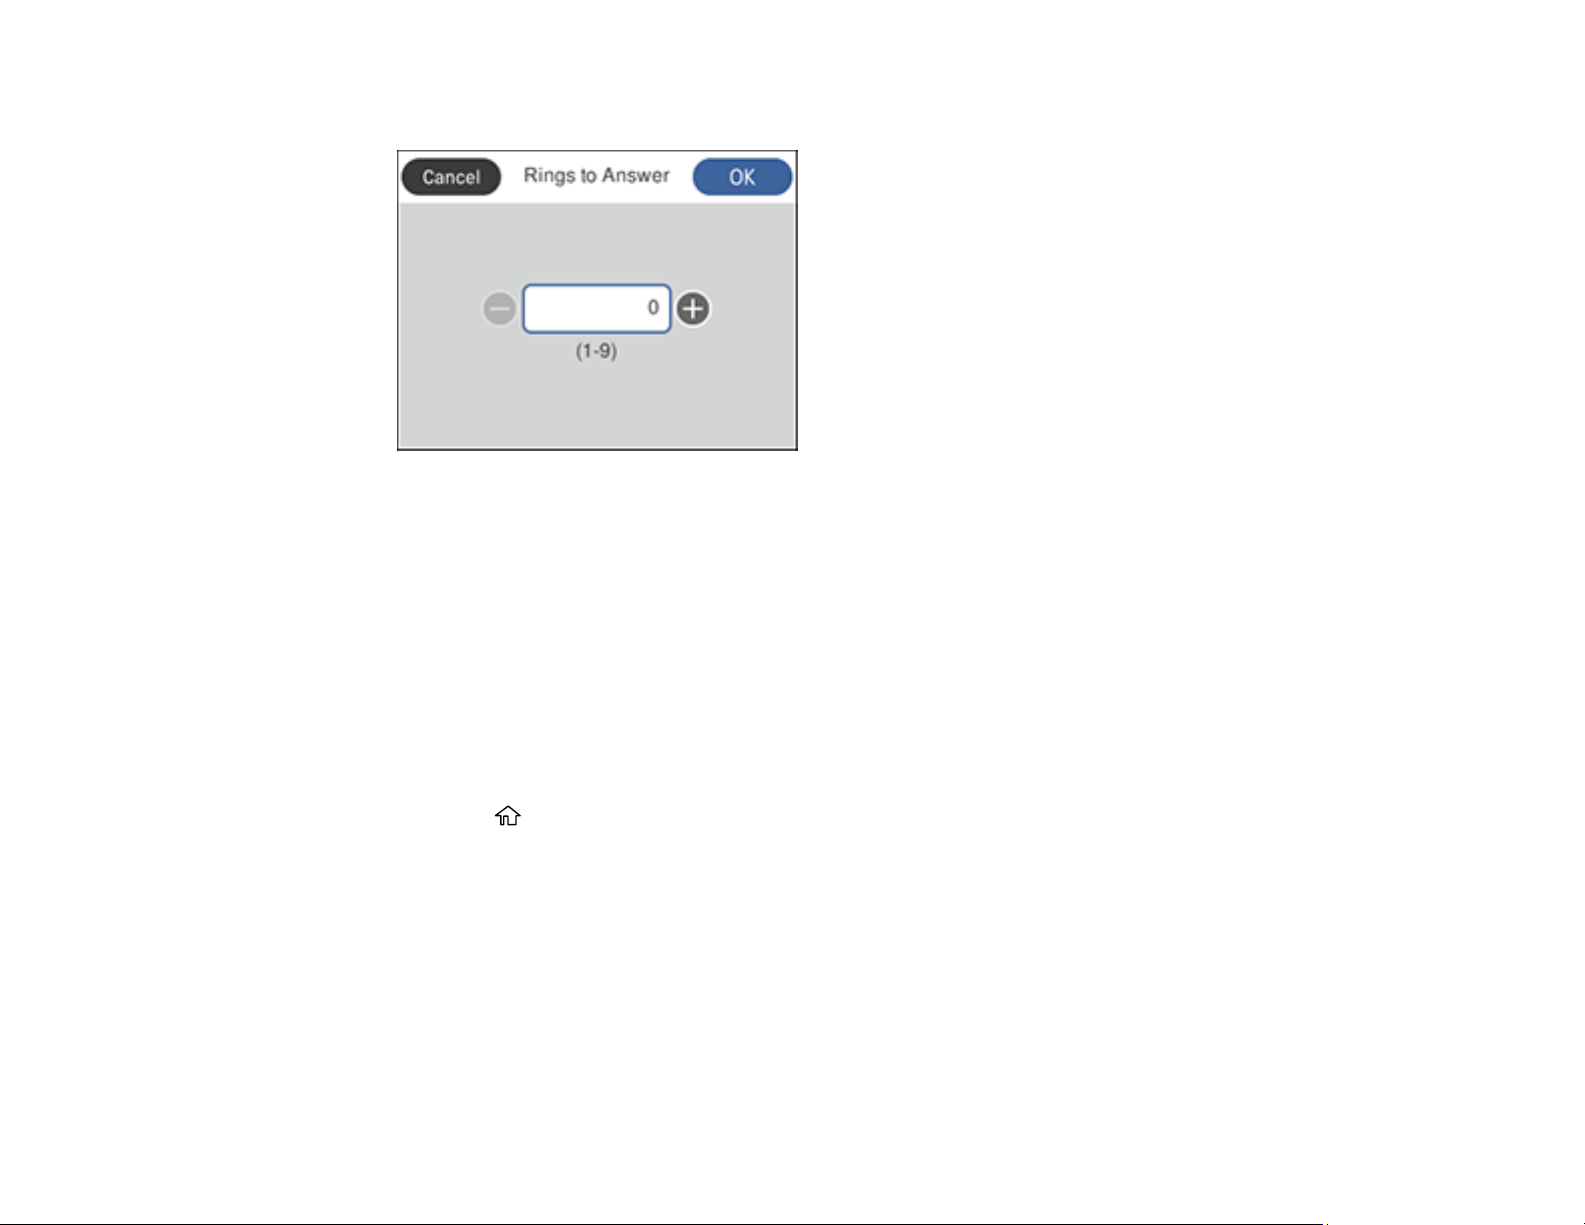
220
You see a screen like this:
3. Select the number of rings and select OK. Make sure to select a number higher than the number of
rings your answering machine is set to for answering a call.
Note: An answering machine picks up every call faster than the product, but the product can detect fax
tones and start receiving faxes. If you answer the phone and hear a fax tone, check that the product has
started receiving the fax, then hang up the phone.
Parent topic: Setting Up Basic Fax Features
Selecting Advanced Fax Settings
You can select a variety of advanced fax settings.
1. Press the home button, if necessary.
2. Select Settings.
3. Select General Settings.
4. Scroll down and select Fax Settings.
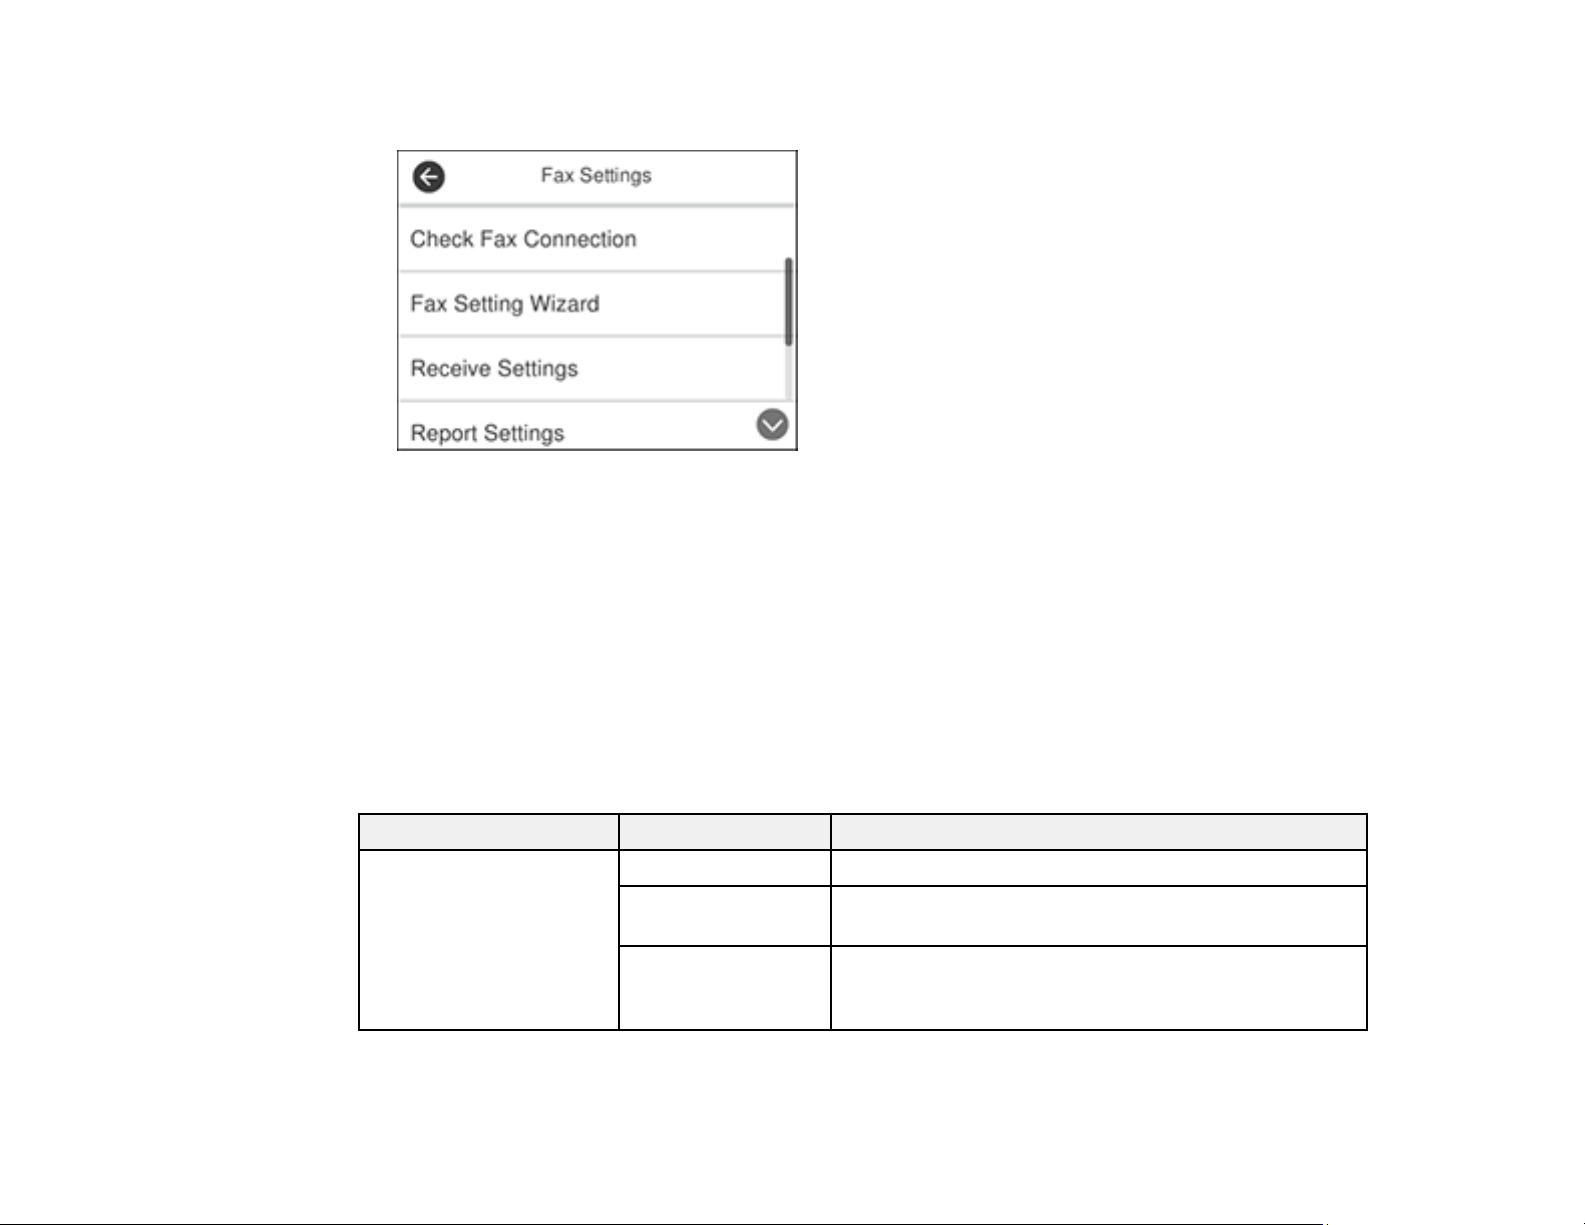
221
You see a screen like this:
5. Select the group of settings you want to change.
Receive Settings - Fax
Report Settings - Fax
Basic Settings - Fax
Security Settings - Fax
Parent topic: Setting Up Fax Features
Receive Settings - Fax
Select the fax output or print options you want to use for incoming faxes.
Fax Output Settings
Setting Options Description
Save to Inbox Save to Inbox Saves received faxes in the product's inbox
Options when
memory is full
Selects an action to perform when you receive an
incoming fax and the inbox is full
Inbox Password
Settings
Sets a password for the inbox. You cannot set a
password if you selected Receive and print faxes for
the Options when memory is full setting.
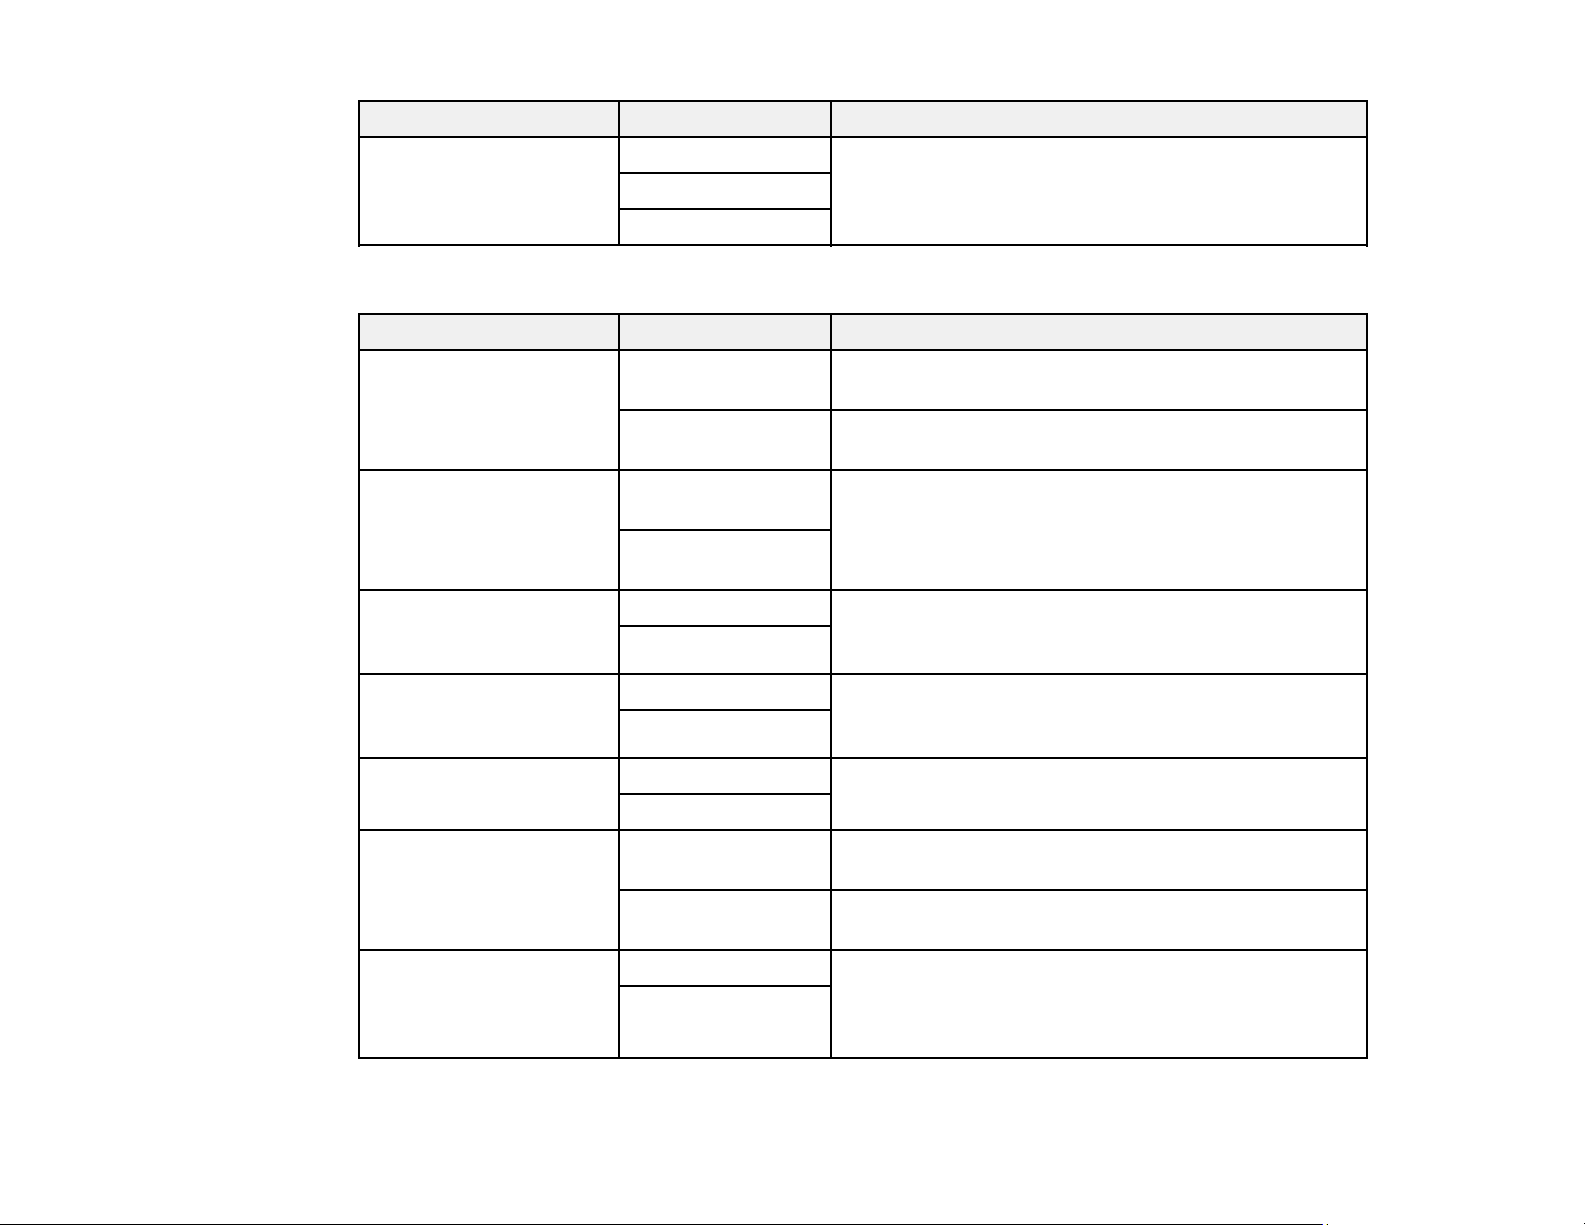
222
Setting Options Description
Save to Computer No Converts received faxes to PDFs and saves them on
a computer connected to the product
Yes
Yes and Print
Print Settings
Setting Options Description
Auto Reduction On Select to reduce the size of large received faxes to fit
on the paper size
Off Select to print large incoming faxes at their original
size on multiple sheets, if necessary
Split Page Settings Delete Print Data
After Split
Select how to split large incoming faxes across
multiple sheets
Overlap When
Split
Auto Rotation On If you have loaded A5-size paper, select On to rotate
landscape-oriented incoming faxes so that they print
correctly on the paper
Off
Add Reception
Information
On Select On to include the date, time, the sender's
information, and a page number in the header of your
incoming faxes
Off
2-Sided On Select On to print incoming faxes double sided. You
can also select the Binding Margin.
Off
Print Start Timing All Pages
Received
Select to print incoming faxes after the product
receives all of the pages of the document
First Page
Received
Select to print incoming faxes as soon as the product
receives the first page of the document
Collation Stack On Select On to print incoming faxes so that the pages
are stacked in the correct page order. (When the
product is low on memory, this option may not be
available.)
Off
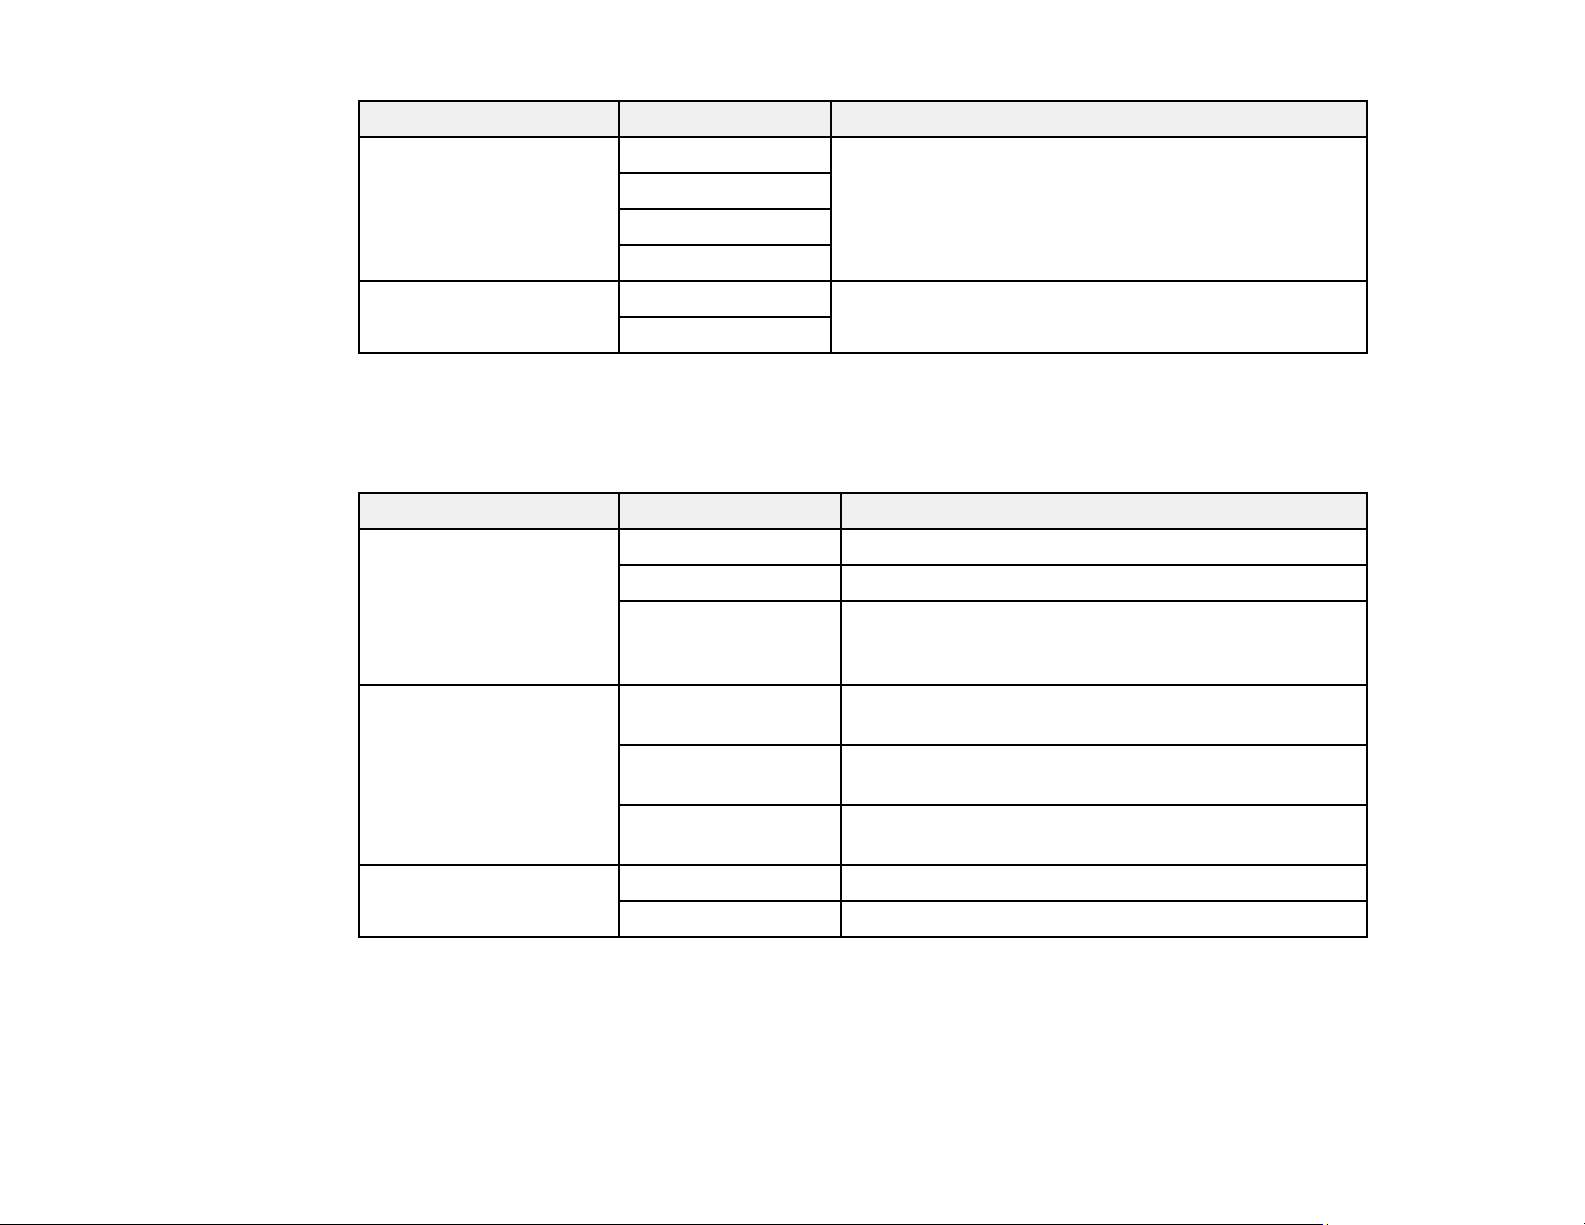
223
Setting Options Description
Print Suspend Time Off Select On to set a time period to stop automatic
printing of faxes or reports and save received faxes in
the product’s memory. (Make sure there is enough
free memory before using this function.)
On
Time to Stop
Time to Restart
Quiet Mode On Select On to reduce noise during printing. (Printing
speed may be reduced.)
Off
Parent topic: Selecting Advanced Fax Settings
Report Settings - Fax
Select the options you want to use for fax reports.
Setting Options Description
Fax Log Auto Print Off Does not print a fax log
On(Every 30) Prints a fax log after every 30 fax jobs are completed
On(Time) Prints a fax log at a specified time. If the number of
completed fax jobs exceeds 30, the fax log prints
before the specified time.
Attach Fax Image to
Report
Off Does not include an image on the Transmission
Report
On(Large Image) Prints a Transmission Report that includes the upper
part of the first page of the sent document
On(Small Image) Prints a Transmission Report that includes a reduced
size of the entire first page of the sent document
Report Format Simple Prints a simple fax report
Detail Prints a fax report that includes error codes
Parent topic: Selecting Advanced Fax Settings
Basic Settings - Fax
Set the basic options you want to use for incoming and outgoing faxes.
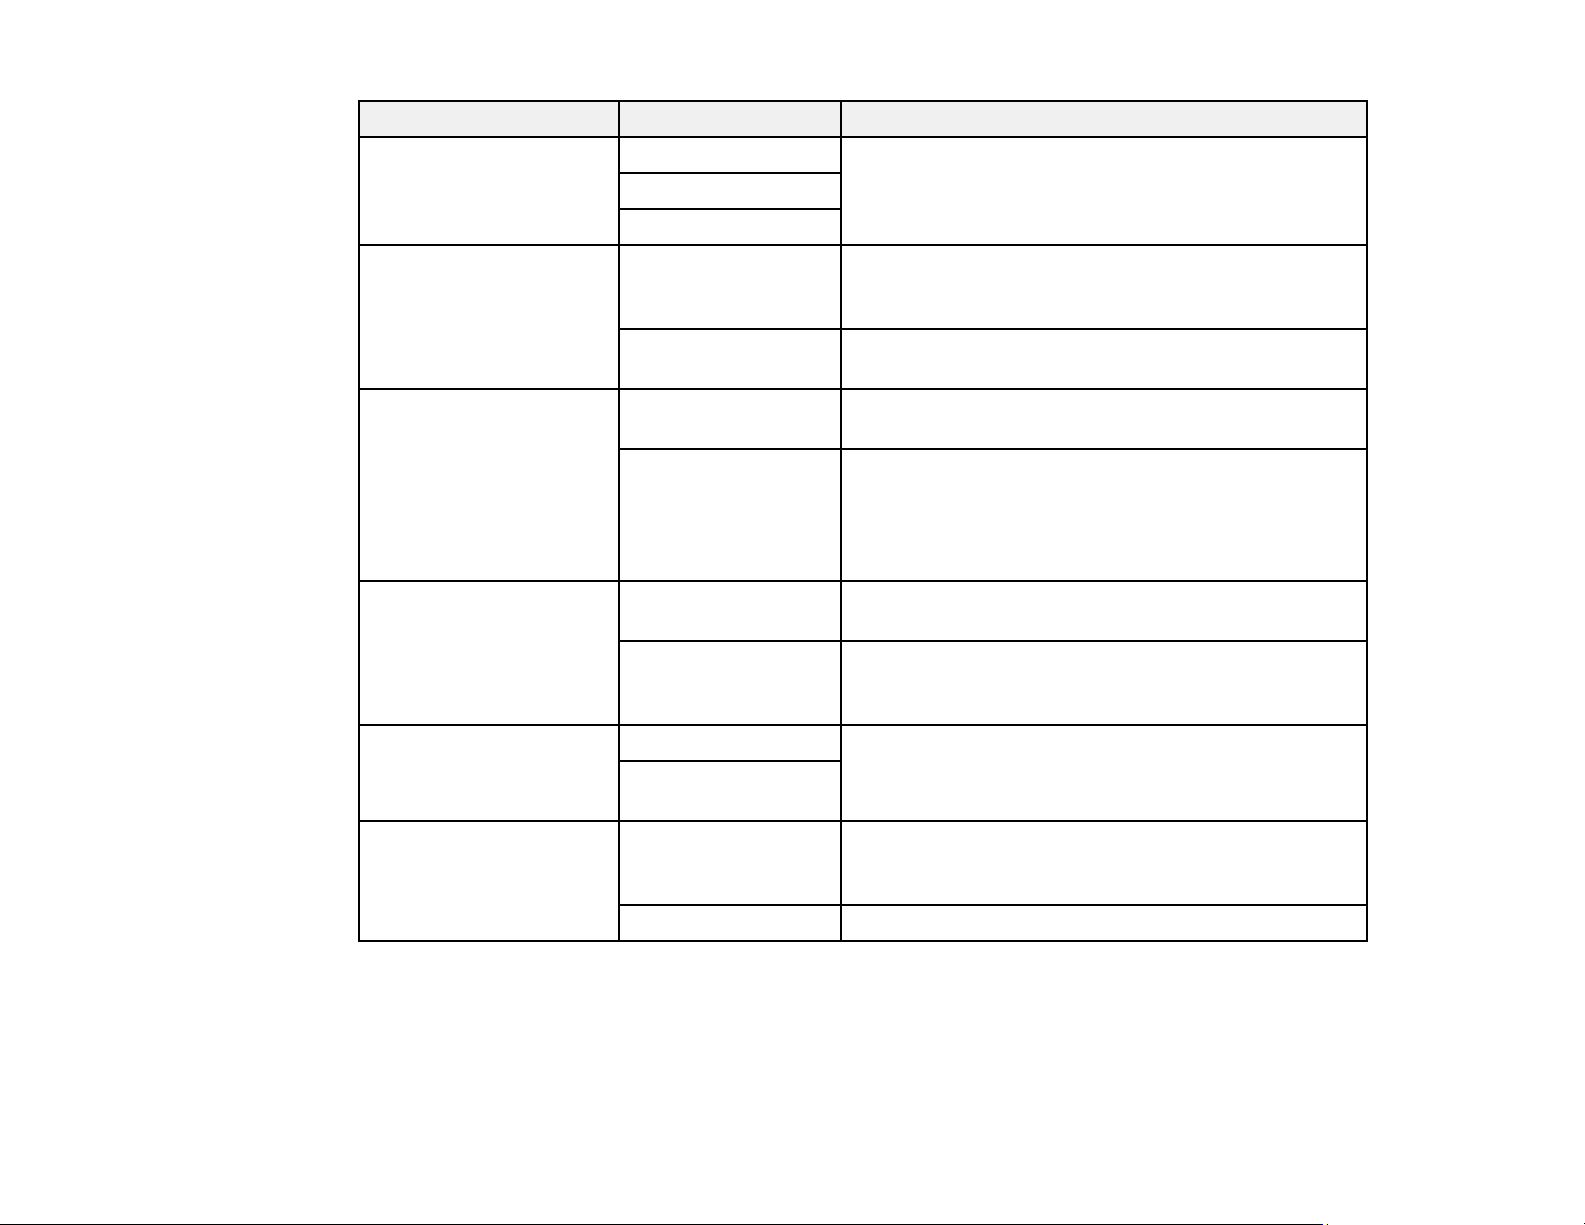
224
Setting Options Description
Fax Speed Fast(33,600bps) Sets the speed at which you send and receive faxes
Medium(14,400bps)
Slow(9,600bps)
ECM On Turns on Error Correction Mode (ECM) to
automatically correct errors in sent or received fax
data
Off Turns off Error Correction Mode (ECM); color faxes
cannot be sent or received
Dial Tone Detection On Automatically dials the number you enter for faxing
when the product detects a dial tone
Off Turns off automatic dial tone detection, which may
be necessary if the product is connected to a PBX
(Private Branch Exchange) or a TA (Terminal
Adapter). However, turning this setting off may cause
the product to drop the first digit of a fax number.
Line Type PSTN Selects a standard phone line (Public Switched
Telephone Network)
PBX Selects Private Branch Exchange, the type of phone
line used in office environments where an access
code such as 9 must be used to call an outside line
Header Fax Header Select to enter the header information and your
phone number for inclusion on outgoing faxes
Your Phone
Number
Receive Mode Manual Lets you confirm whether an incoming fax should be
printed; a telephone must be connected to the
product
Auto Automatically receives and prints faxes
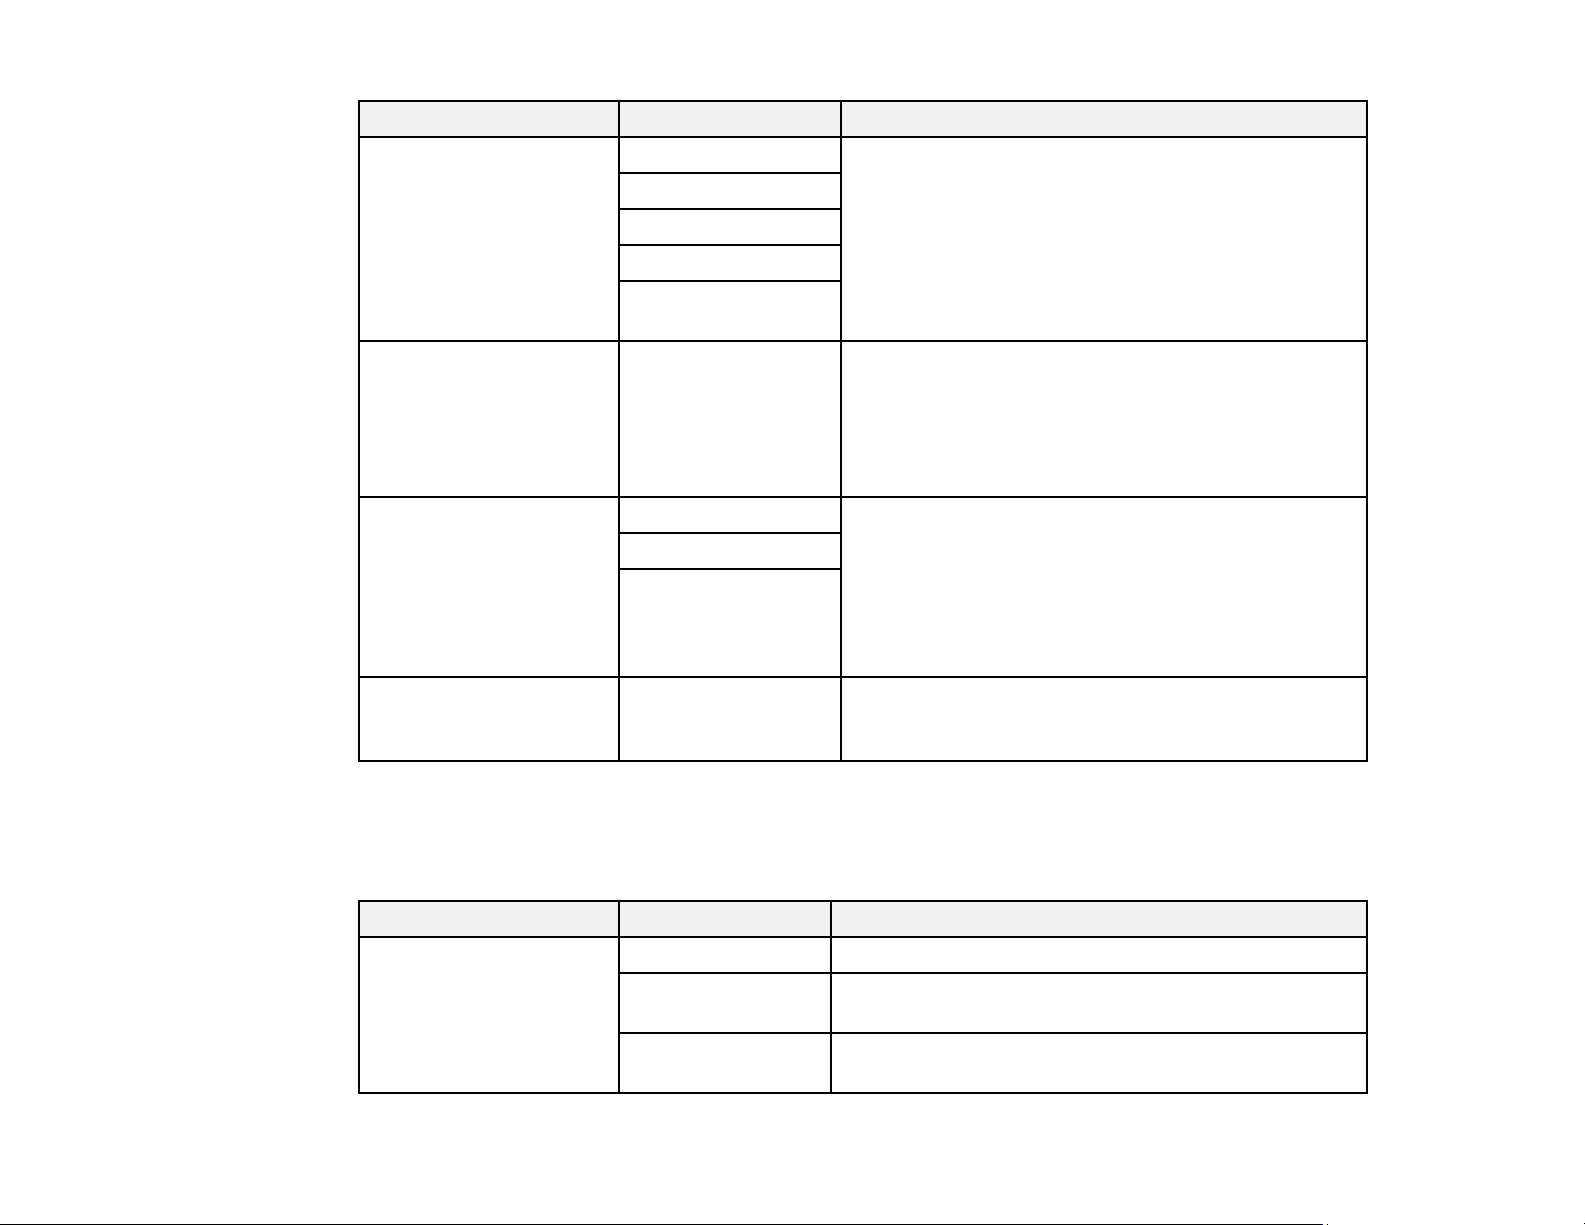
225
Setting Options Description
Distinctive Ring All If you are using a Distinctive Ring Service on your
phone line, your telephone company can assign two
or more phone numbers to the same line and assign
different ring patterns to each. If you use this service,
select the number of rings for your fax number so
your product can receive faxes on the correct
number of rings. Select All for phones lines that do
not use this service.
Single
Double
Triple
Double&Triple
Rings to Answer 1 to 9 Sets the number of rings before your product
receives a fax. If Receive Mode is set to Auto and an
answering machine is connected to the product,
make sure this setting is set higher than the number
of rings your answering machine is set to answer a
call.
Remote Receive Off Lets you start receiving faxes using your phone
instead of operating the product (if Receive Mode is
set to Auto). When you select On, you must also set
a Start Code. If you are using a cordless handset
with its base connected to the product, you can start
receiving the fax by entering the code using the
handset.
On
Start Code
Rejection Fax Various Lets you automatically reject faxes from blocked
numbers, with blank headers, or from unrecognized
contacts
Parent topic: Selecting Advanced Fax Settings
Security Settings - Fax
Set the security options you want to use for fax data.
Setting Options Description
Direct Dialing
Restrictions
Off Does not restrict dialed fax numbers
On Allows faxing only to numbers stored in the contacts
list or history
Enter Twice Requires you to enter fax numbers twice to prevent
errors

226
Setting Options Description
Confirm Address List Off Selects whether or not to display a recipient
confirmation screen before a fax is sent
On
Backup Data Auto Clear Off Automatically erases sent or received fax data from
your product's memory
On
Clear Backup Data — Deletes all sent or received fax data remaining in your
product's memory; run this function if you are giving
away or disposing of your product
Parent topic: Selecting Advanced Fax Settings
Setting Up the Fax Utility - Windows
You can set up the FAX Utility for Windows for use with your product.
Note: Before using the FAX Utility for Windows, make sure you have set up the fax features on your
product using the product control panel. Also first confirm that you can send and receive faxes using the
control panel.
1. Do one of the following:
• Windows 10: Click and select EPSON Software.
• Windows 8.x: Navigate to the Apps screen.
• Windows (other versions): Click or Start > Programs or All Programs > EPSON Software.
2. Select FAX Utility.
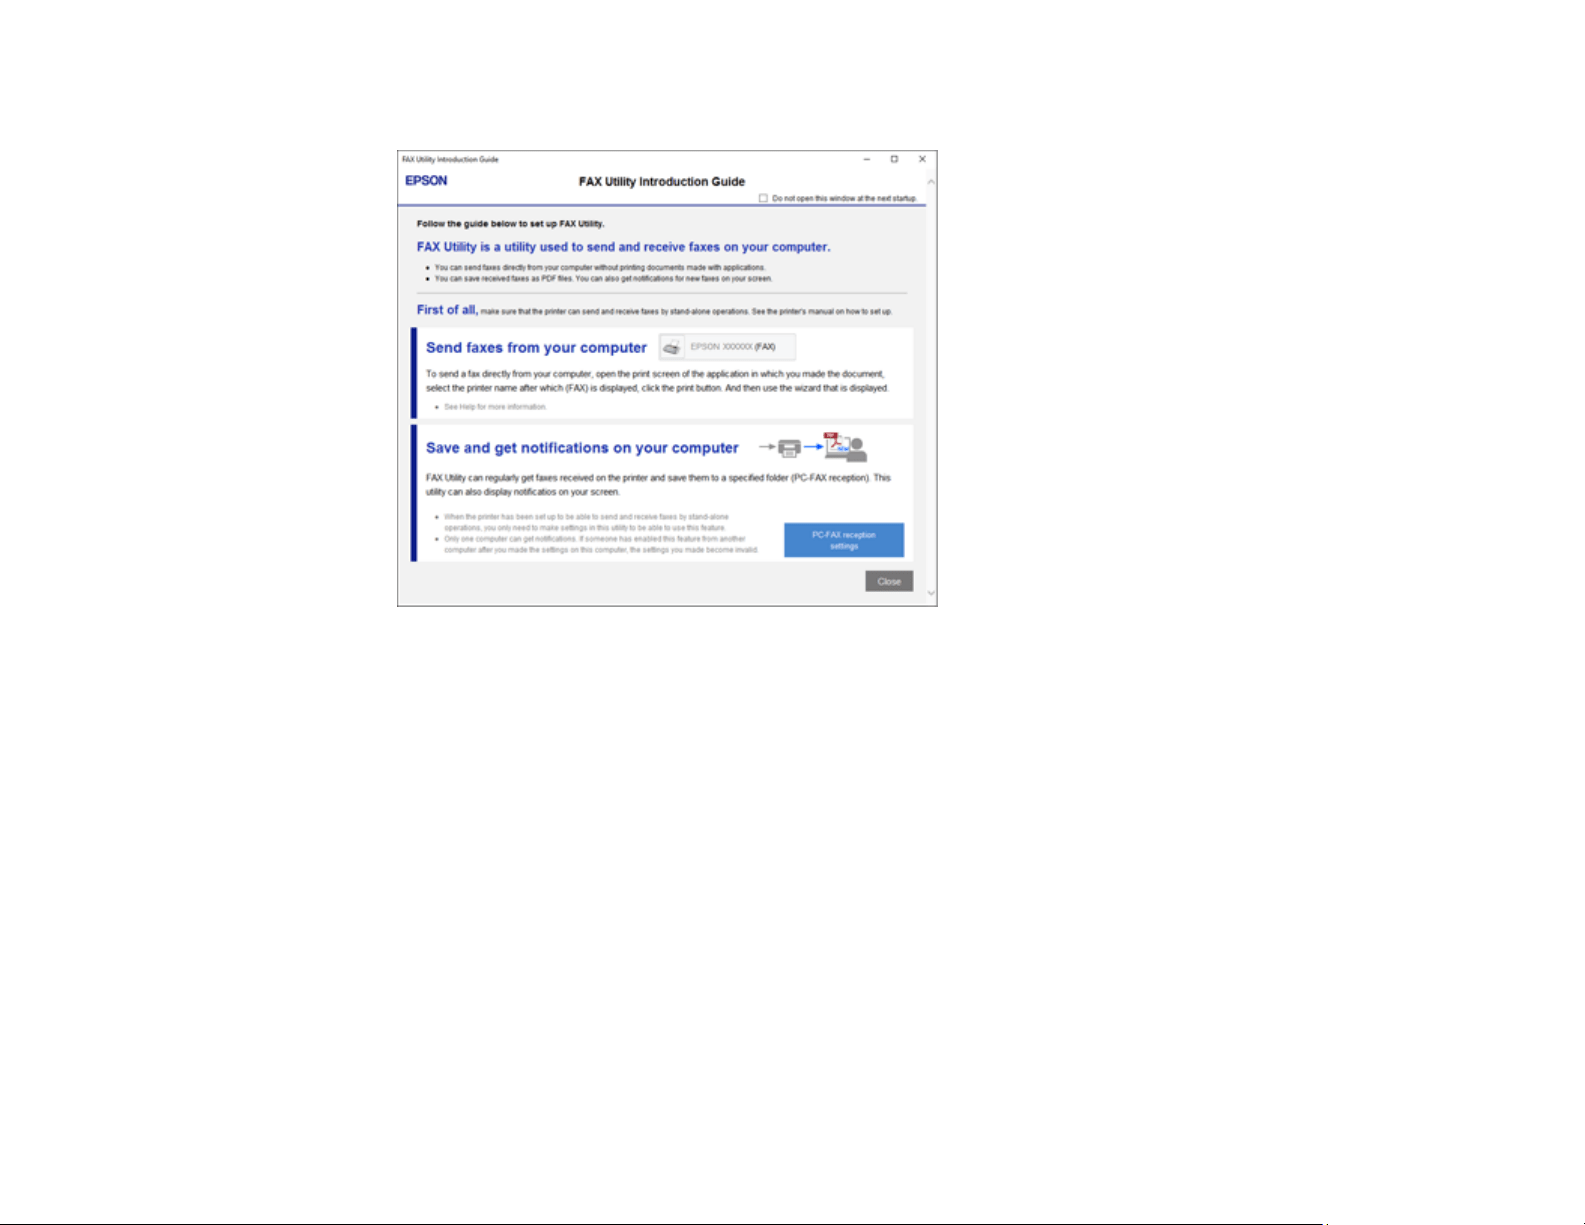
227
The first time you use the FAX Utility, you see this introduction window:
3. Read about the FAX Utility and click Close at the bottom of the window.
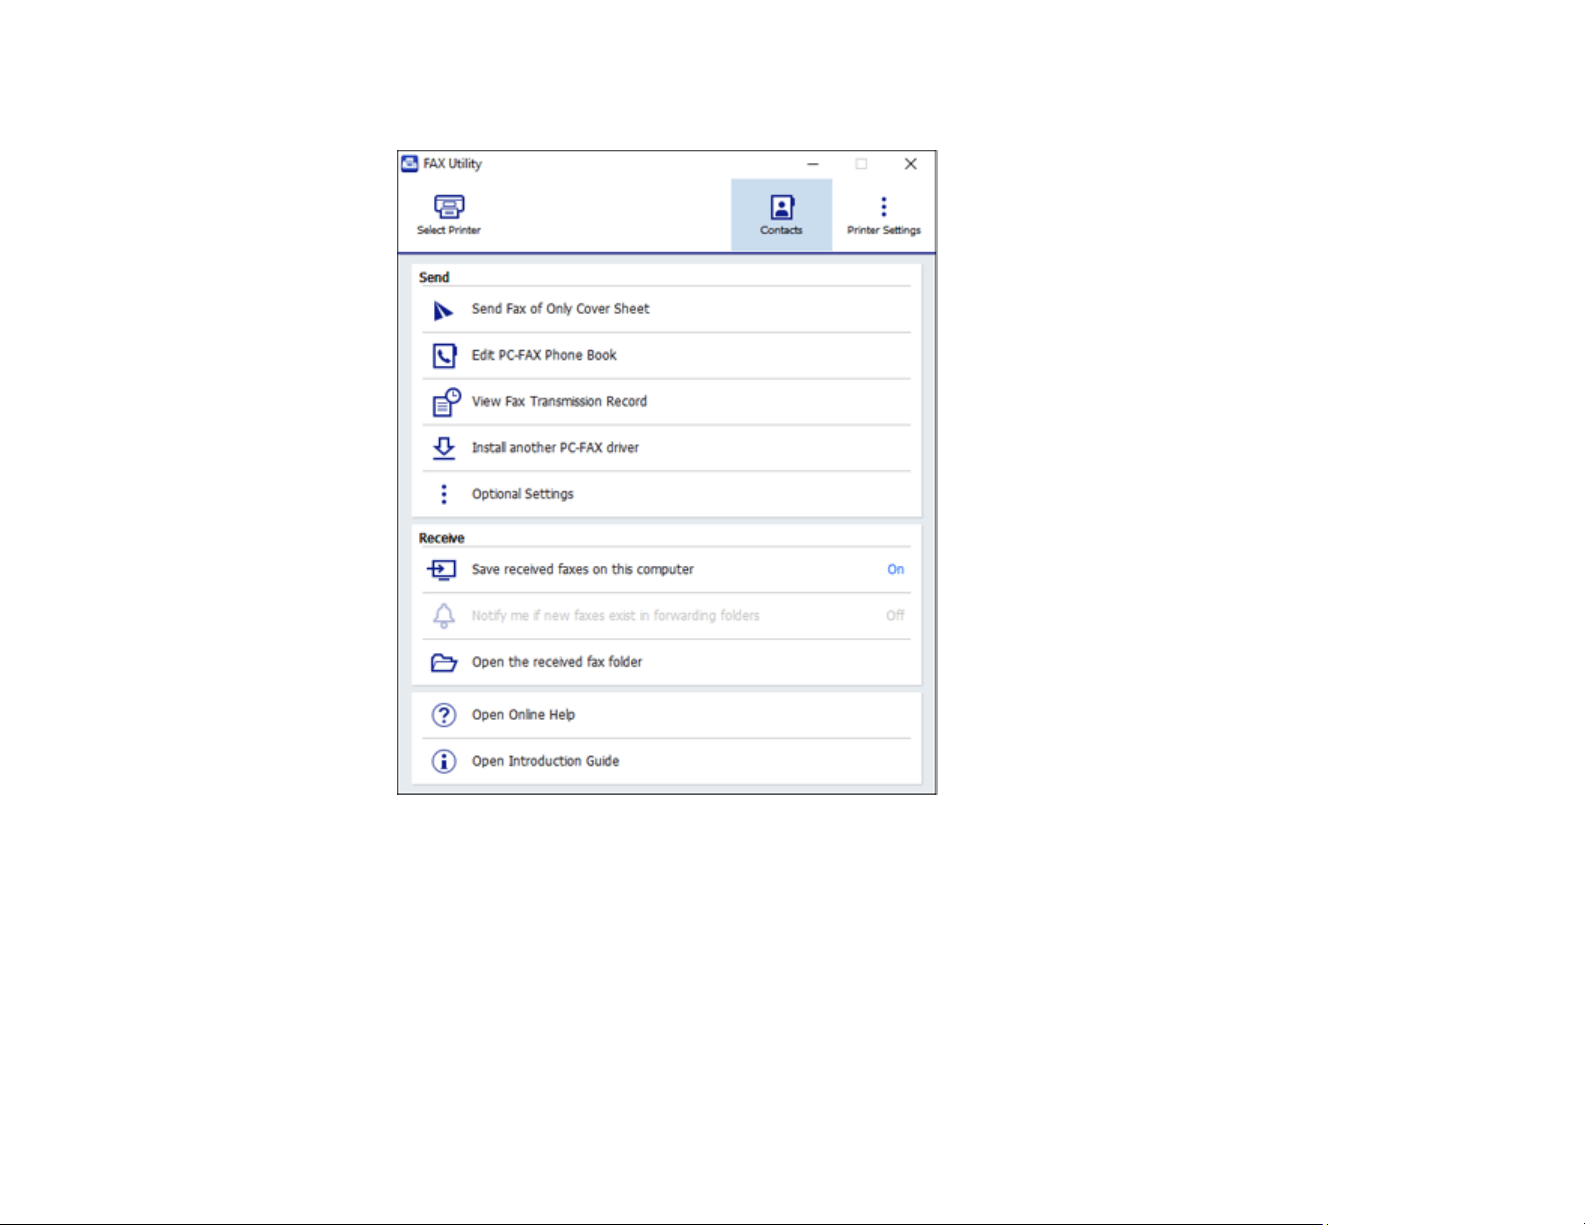
228
You see this window:
4. Click Select Printer and follow the on-screen instructions to transfer your product's fax settings to
the FAX Utility.
Note: For detailed information, click Help or Open Online Help.
Parent topic: Setting Up Fax Features
Setting Up Fax Features Using the Fax Utility - Mac
You can set up your fax header and select your fax settings using the FAX Utility for Mac.
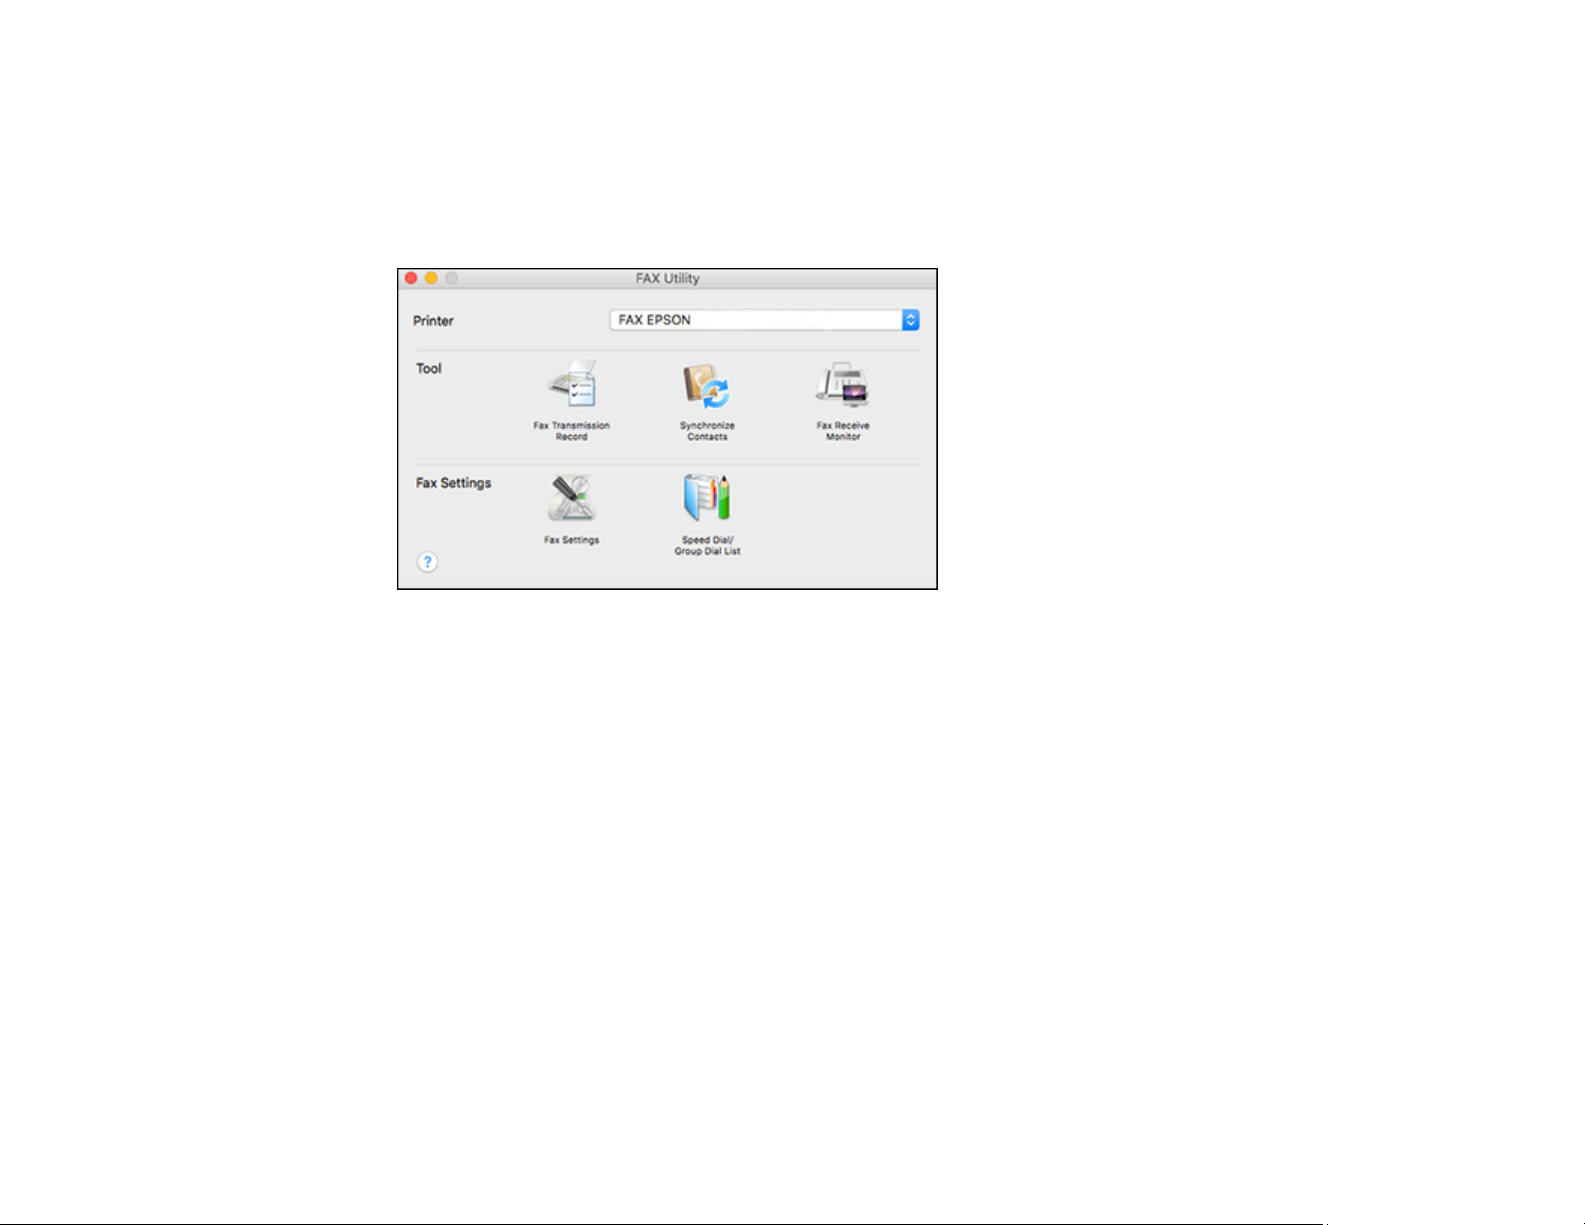
229
1. In the Apple menu or the Dock, select System Preferences. Select Print & Fax, Print & Scan, or
Printers & Scanners, select the FAX option for your product, and select Options & Supplies.
Select Utility and select Open Printer Utility.
2. Double-click FAX Utility, if necessary.
You see a window like this:
3. Select your FAX product in the Printer list.
4. Select Fax Settings.
5. Follow the prompts that appear on the screen to enter your fax header information and select your
fax settings.
Note: For detailed information, select the FAX Utility ? icon.
Parent topic: Setting Up Fax Features
Setting Up Contacts and Contact Groups
You can set up a list of contacts and their fax numbers so you can quickly select them for faxing. You
can also set up contact groups to send a fax message to multiple contacts.
Setting Up Contacts Using the Product Control Panel
Parent topic: Faxing
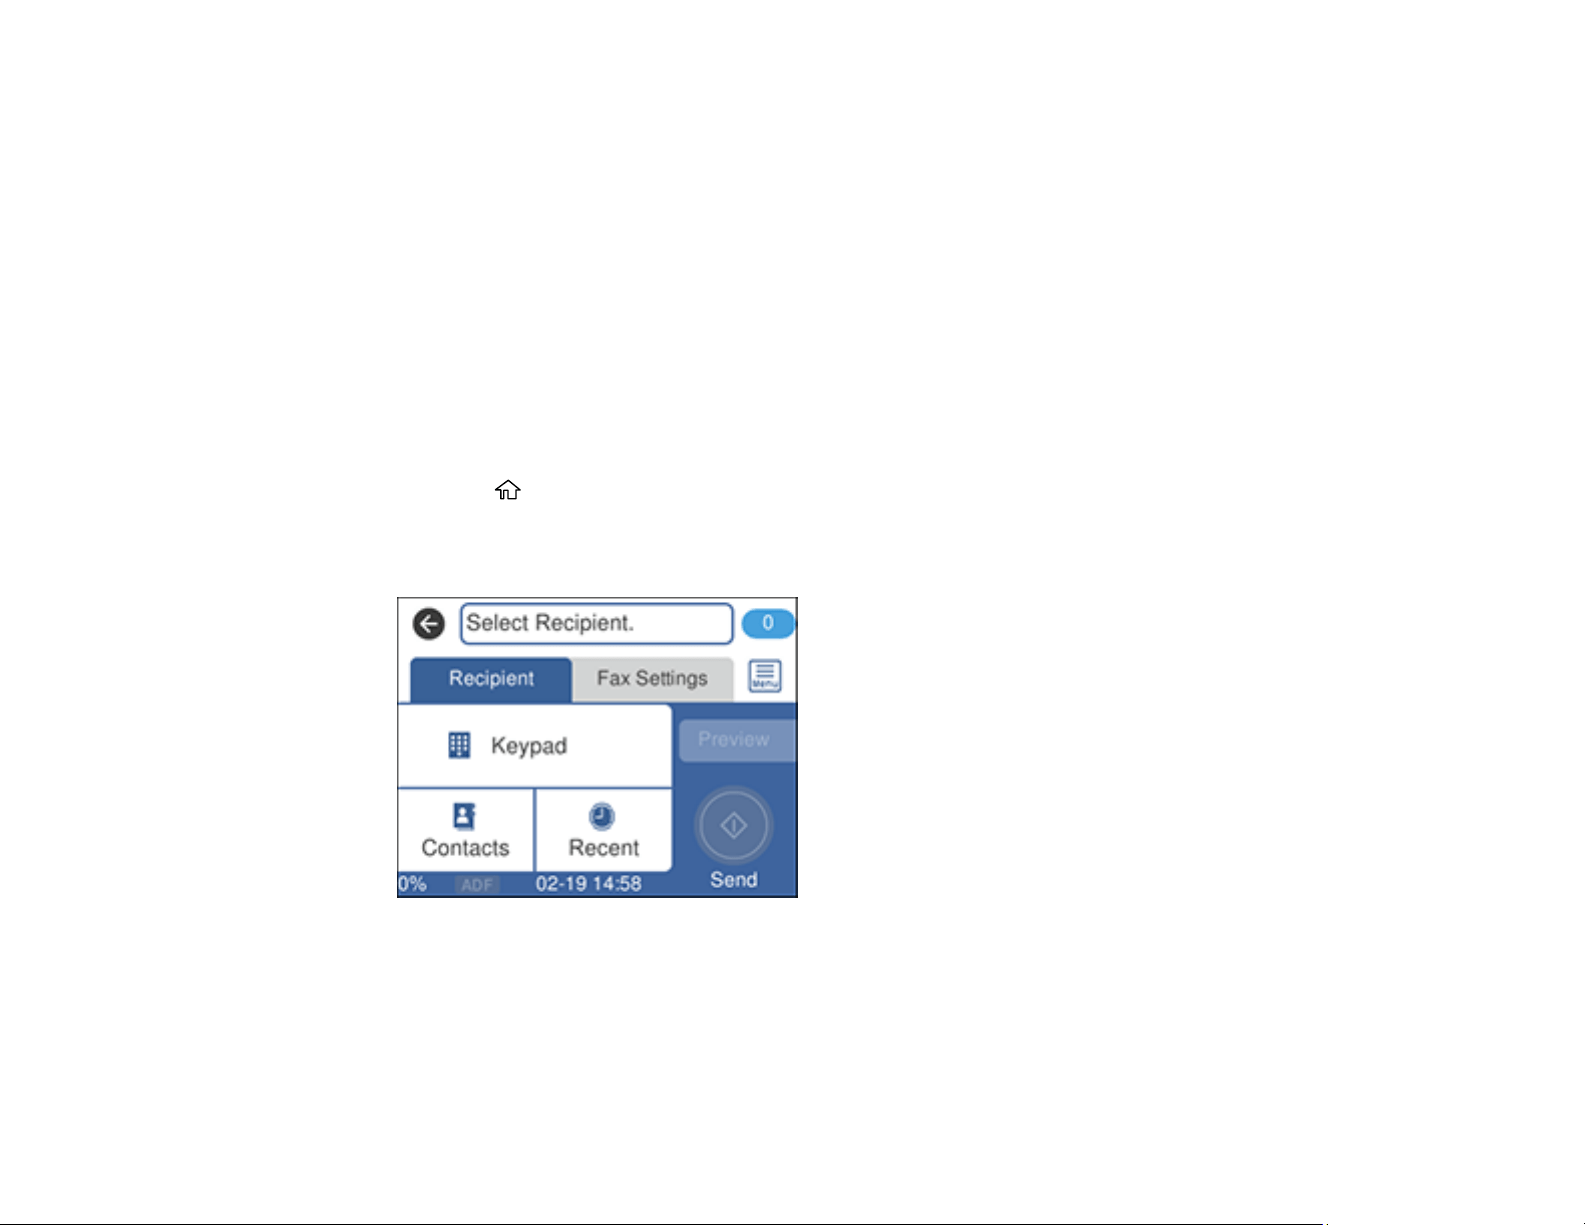
230
Setting Up Contacts Using the Product Control Panel
You can set up your contacts and contact groups using the control panel on your product.
Creating a Contact
Editing or Deleting a Contact
Creating a Contact Group
Editing or Deleting a Contact Group
Parent topic: Setting Up Contacts and Contact Groups
Creating a Contact
You can create a list of contacts to save frequently used fax numbers.
Note: You can create up to 100 contacts and contact groups combined.
1. Press the home button, if necessary.
2. Select Fax.
You see a screen like this:
3. Select Contacts.
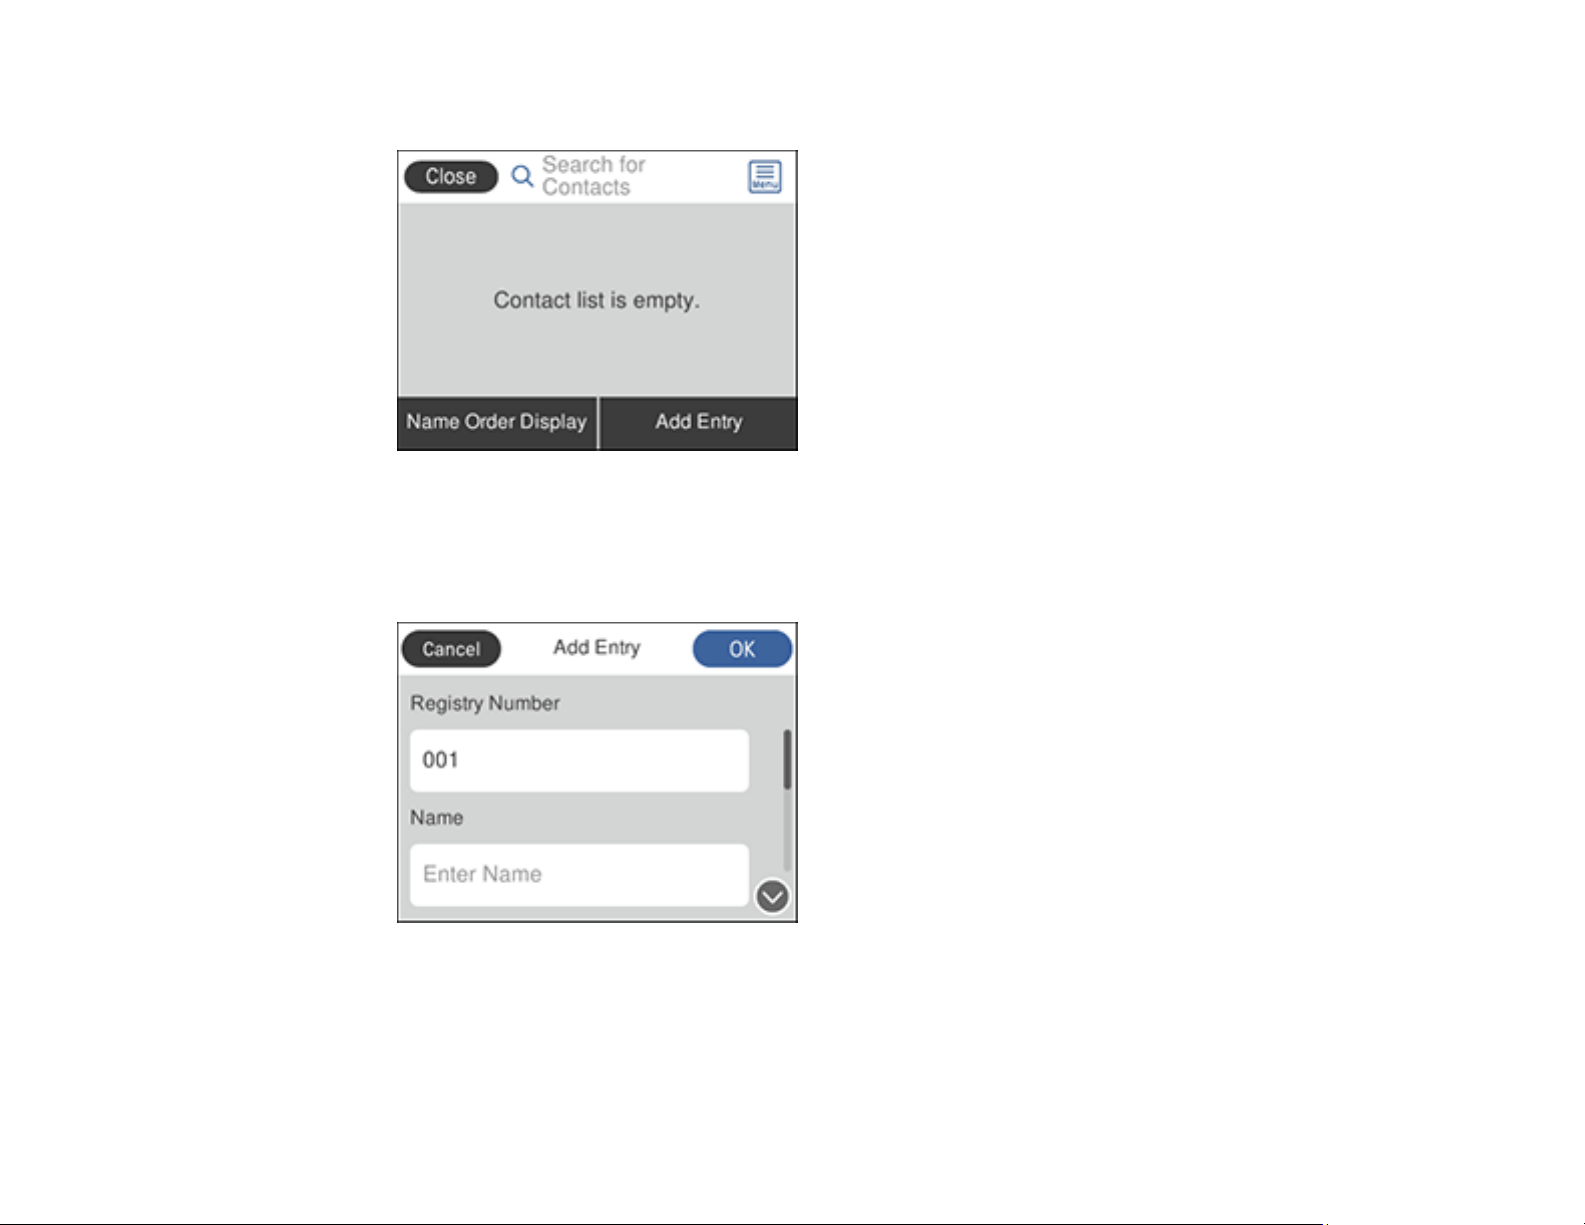
231
You see a screen like this:
4. Select Add Entry.
5. Select Add Contact.
You see a screen like this:
6. Select the registry number you want to use for the contact you are adding.
7. Select the Name field, use the displayed keyboard to enter the contact name (up to 30 characters),
and select OK.
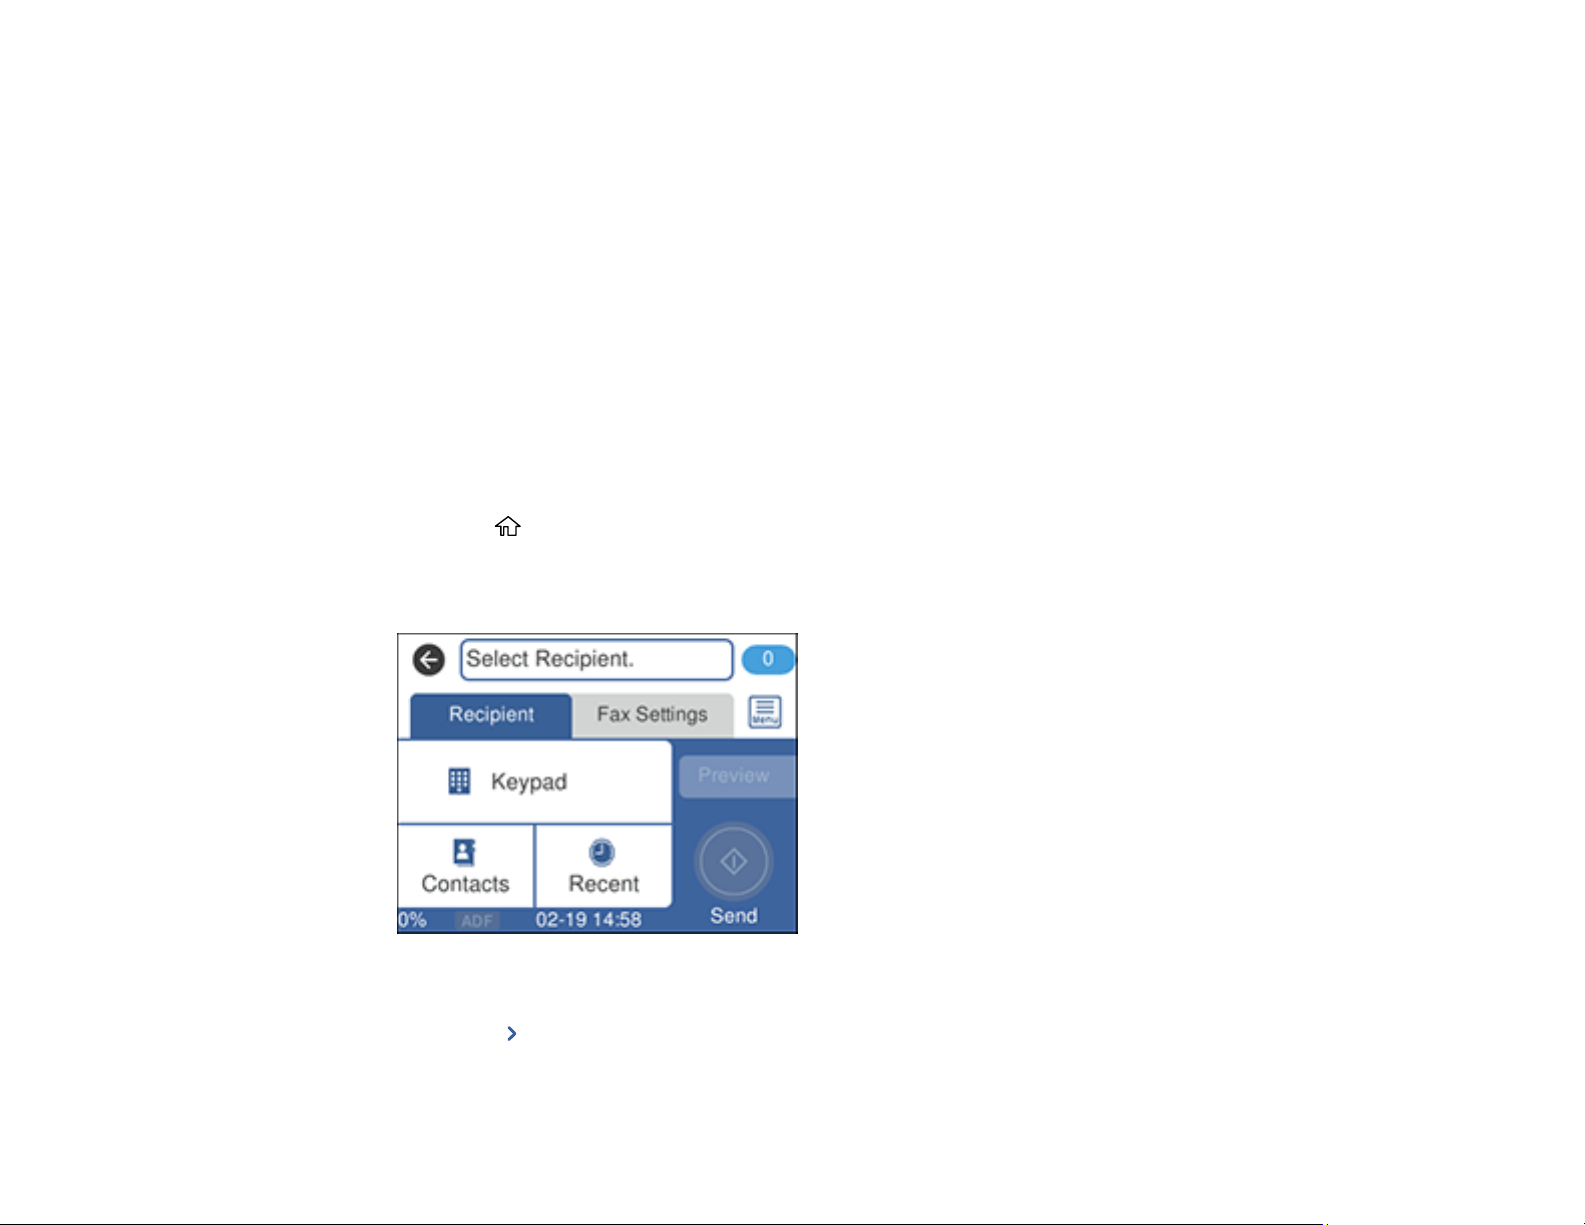
232
8. Select the Index Word field, use the displayed keyboard to enter a word to use when searching for
an entry (up to 30 characters), and select OK. (This field is optional.)
9. Select the Fax Number field, and use the numeric keypad to enter the fax number, and select OK.
You can enter up to 64 characters.
Note: If necessary, enter an outside line access code (such as 9) at the beginning of the fax number.
If the access code has been set up in the Line Type setting, enter the # pound sign instead of the
code.
10. Set any additional settings, if necessary.
11. Select OK.
Parent topic: Setting Up Contacts Using the Product Control Panel
Editing or Deleting a Contact
You can edit or delete any of the contacts on your list.
1. Press the home button, if necessary.
2. Select Fax.
You see a screen like this:
3. Select Contacts.
4. Select the icon next to the contact you want to edit or delete.
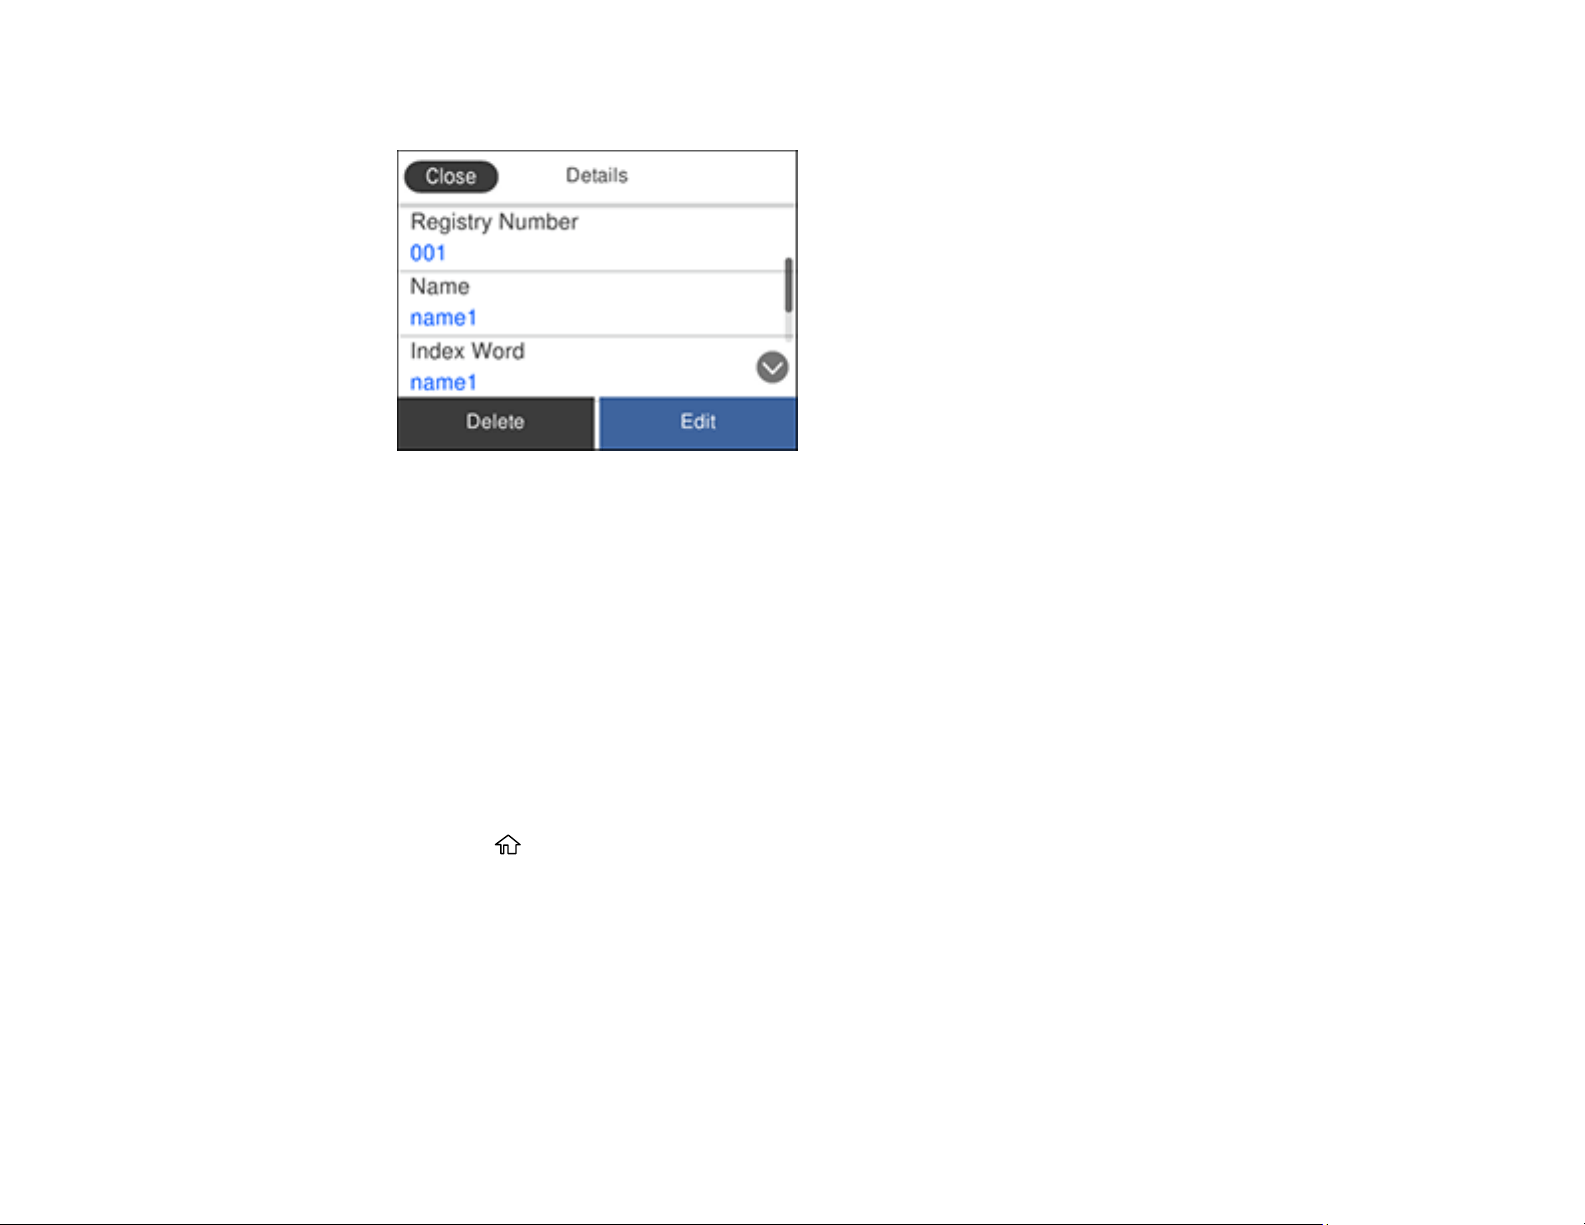
233
You see a screen like this:
5. Do one of the following:
• To delete the contact, select Delete and select Yes on the confirmation screen.
• To edit the contact, select Edit, and change the contact information as necessary. Select OK
when finished.
Parent topic: Setting Up Contacts Using the Product Control Panel
Creating a Contact Group
You can create a group of contacts so that you can easily send faxes to multiple recipients.
Note: You can create up to 100 contacts and contact groups combined. You must create a contact
before creating a contact group.
1. Press the home button, if necessary.
2. Select Fax.
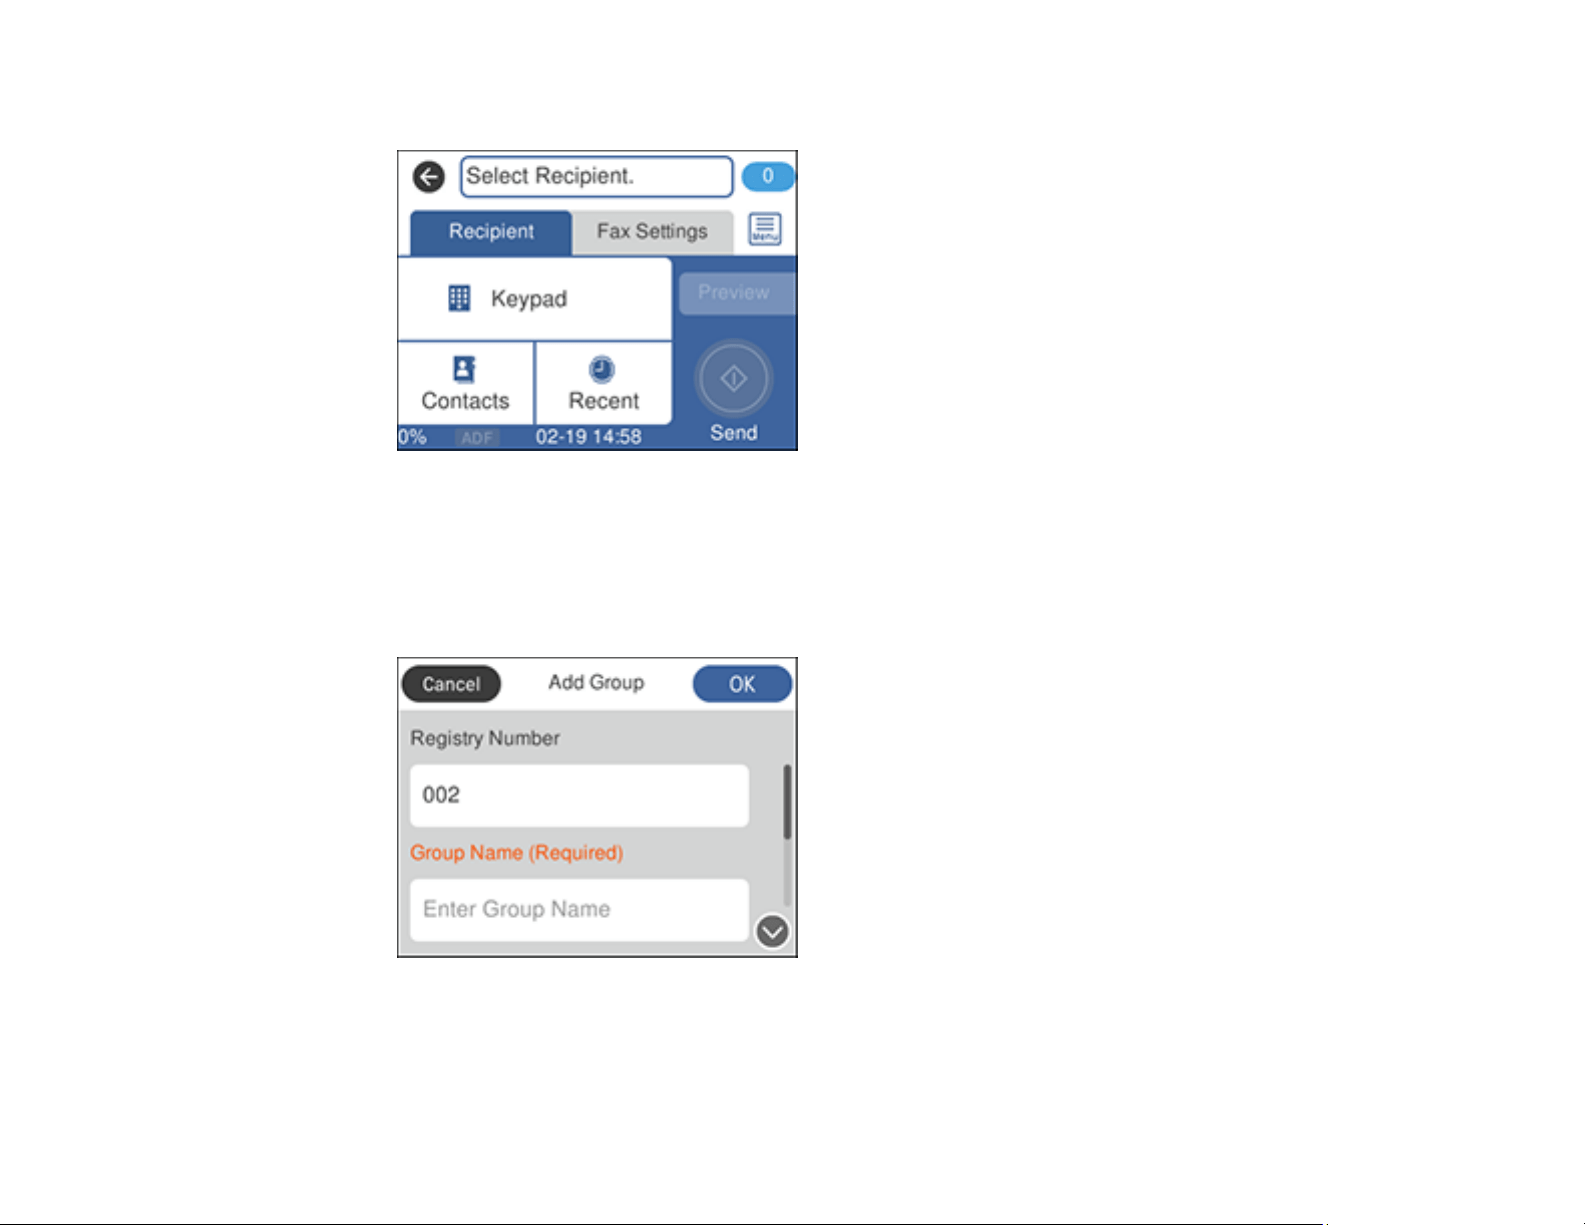
234
You see a screen like this:
3. Select Contacts.
4. Select Add Entry.
5. Select Add Group.
You see a screen like this:
6. Select the registry number you want to use for the group you are adding.
7. Select the Group Name field, use the displayed keyboard to enter the group name (up to 30
characters), and select OK.
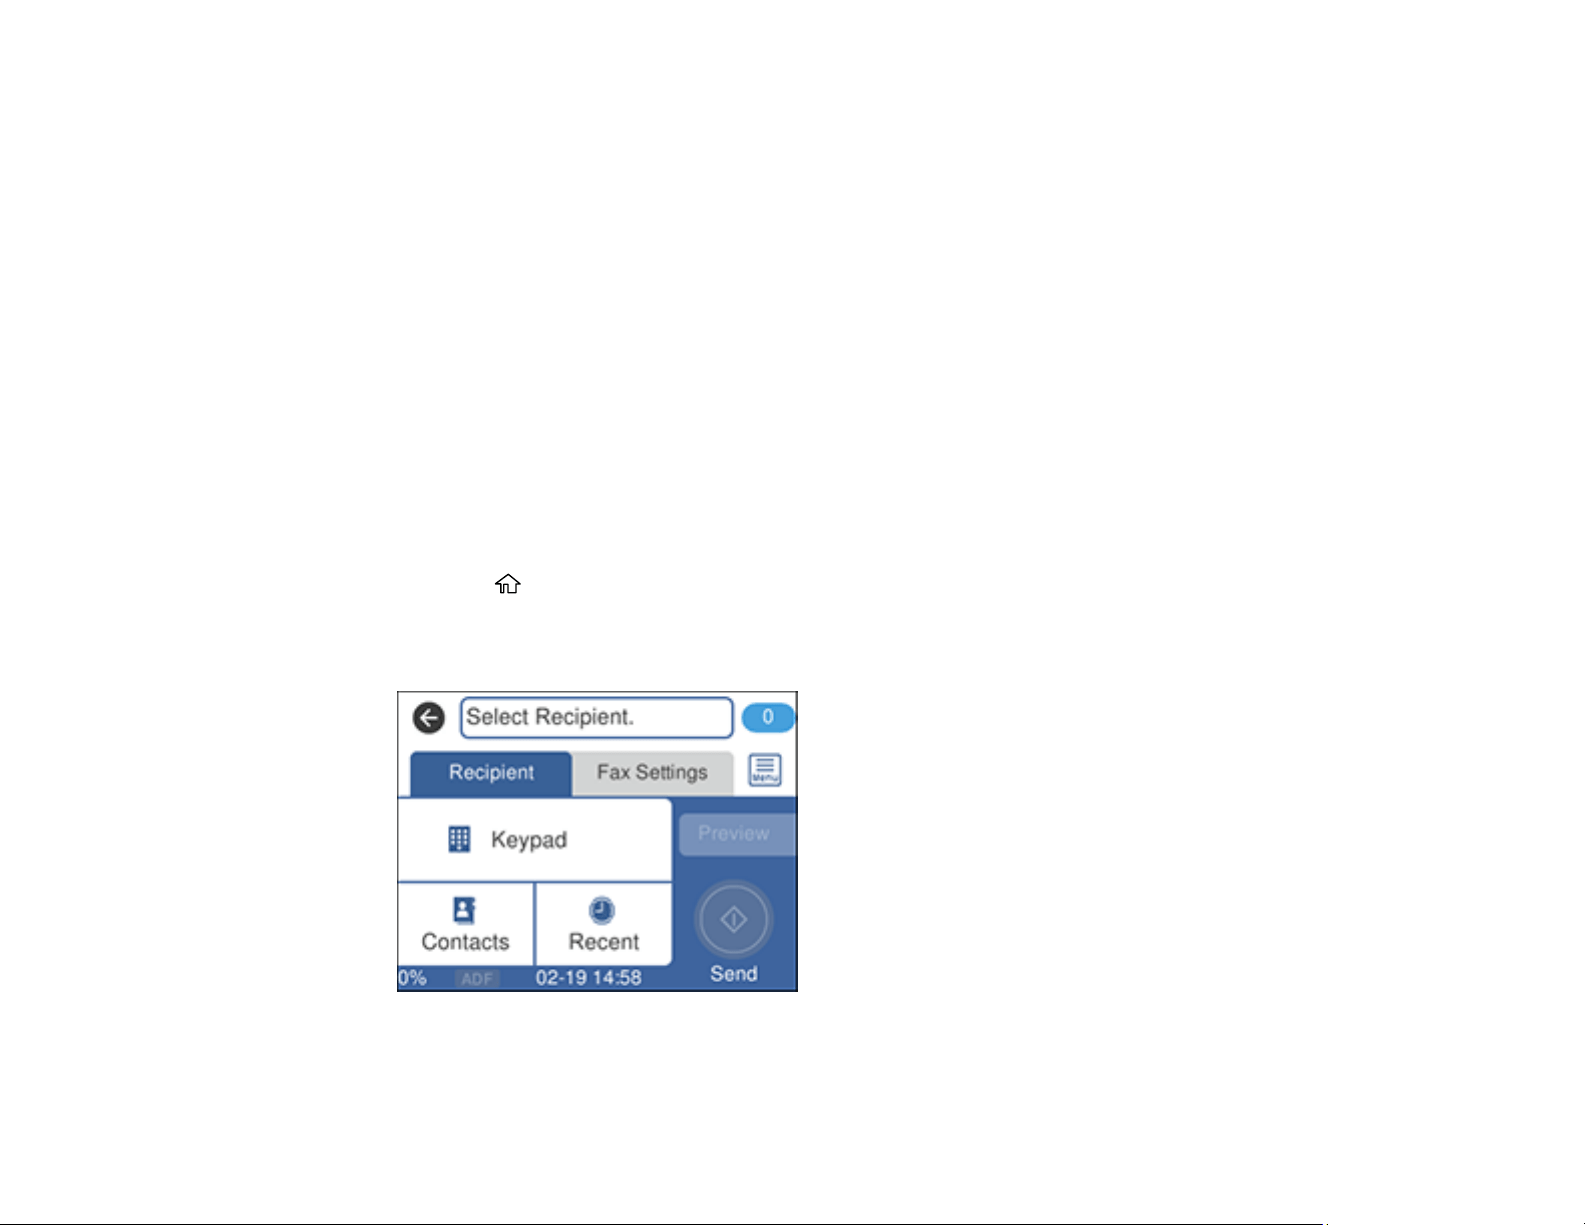
235
8. Select the Index Word field, use the displayed keyboard to enter a word to use when searching for a
group (up to 30 characters), and select OK. (This field is optional.)
9. Select Contact(s) Added to the Group.
You see your contacts list.
10. Select each contact you want to include in your group.
Note: To display the contacts in alphabetical order, select Name Order Display.
A check mark appears next to each selected contact.
11. Select Close when finished.
12. Select OK to save the entry.
Parent topic: Setting Up Contacts Using the Product Control Panel
Editing or Deleting a Contact Group
You can edit an existing contact group to add or delete entries. You can also delete the entire contact
group.
1. Press the home button, if necessary.
2. Select Fax.
You see a screen like this:
3. Select Contacts.
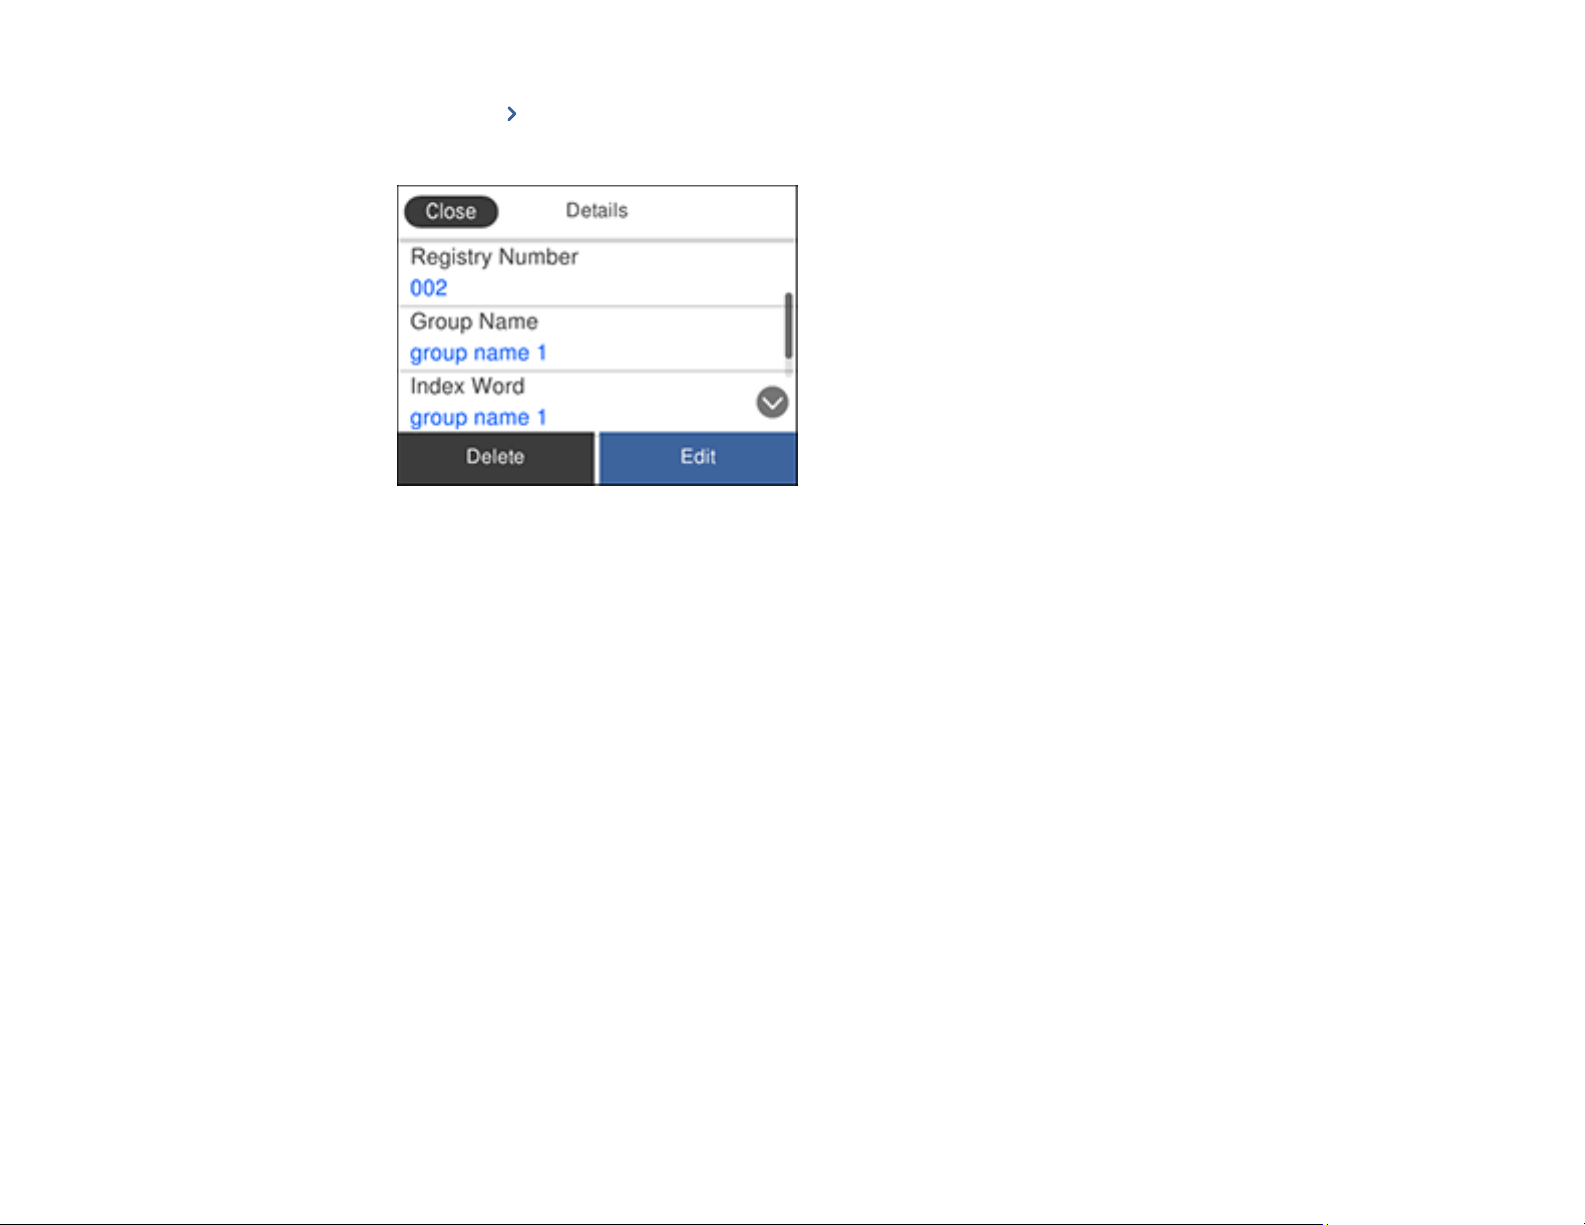
236
4. Select the icon next to the group you want to edit or delete.
You see a screen like this:
5. Do one of the following:
• To delete the group, select Delete and select Yes on the confirmation screen.
• To edit the group, select Edit and change the group name or contacts included as necessary.
Select OK when finished.
Parent topic: Setting Up Contacts Using the Product Control Panel
Sending Faxes
See these sections to send faxes using your product.
Sending Faxes from the Product Control Panel
Sending Faxes Using the Fax Utility - Windows
Sending Faxes Using the Fax Utility - Mac
Parent topic: Faxing
Sending Faxes from the Product Control Panel
See these sections to send faxes using the product's control panel.
Sending a Fax Using the Control Panel
Fax Sending Options

237
Sending a Fax at a Specified Time
Dialing Fax Numbers from a Connected Telephone
Parent topic: Sending Faxes
Related references
Fax Sending Options
Related tasks
Selecting the Line Type
Related topics
Setting Up Contacts Using the Product Control Panel
Placing Originals on the Product
Sending a Fax Using the Control Panel
You can send a fax from your product control panel by entering the fax number, or selecting the number
from either the contact list or fax history.
Note: Depending on the product's available memory, you can fax up to 100 pages at a time, including a
cover sheet. You can send a black-and-white fax to up to 100 contacts or 99 groups at a time, or send a
color fax to one recipient at a time. If your recipient's fax machine does not print in color, your fax is
automatically sent in black-and-white.
1. Place your original on the product for faxing.
2. Press the home button, if necessary.
3. Select Fax.

238
You see a screen like this:
4. Do one of the following to select fax recipients:
• Manually enter a fax number: Select Keypad, enter a fax number using the numeric keypad,
and select OK when done. To add another fax number, repeat this step; the number of multiple
recipients appears in the upper right corner of the LCD screen.
Note: If direct dialing has been restricted, you can only select the number from the contact list or
fax history. If necessary, enter an outside line access code (such as 9) at the beginning of the fax
number. If the access code has been set up in the Line Type setting, enter the # pound sign
instead of the code. If your fax number requires a brief pause, select – to insert a pause symbol
(–).
• Select from the contact list: Select Contacts to display the contact list. Select one or more
contacts (select the contact again to deselect it), and select Close.
• Select from the sent fax history: Select Recent to display the sent fax history. Select a recipient
from the list.
Note: To delete selected recipients, press the number of multiple recipients displayed in the upper
right corner of the LCD screen. Select each recipient you want to delete and select Remove.
5. If you need to change any fax settings, select Fax Settings and select your settings.
239
6. If you want to preview your fax in black-and-white on the LCD screen, select Preview. (If the preview
looks incorrect, select Cancel, reposition the document or change the fax settings, and repeat this
step.) You cannot send the fax in color after previewing it.
Note: If you do not touch the preview screen for 20 seconds, your product sends the fax
automatically. You cannot preview images when the Direct Send setting is turned on.
7. Select Send.
Note: To cancel faxing, select Cancel.
Your product scans your original and prompts you to place additional pages, if necessary.
After scanning your originals, your product dials the number and sends the fax.
Note: If the fax number is busy or there is a problem, the product automatically redials after one minute.
While the product is sending a color fax, other features are unavailable.
Parent topic: Sending Faxes from the Product Control Panel
Fax Sending Options
While sending a fax, you can select Fax Settings and select these options.
Setting Options Description
Original Size (Glass) Half Letter Sets the size for a document placed on the scanner
glass
A5
Letter
A4
Color Mode B&W Select whether to scan images in color or black and
white
Color
240
Setting Options Description
Resolution Standard Adjusts the scan resolution and print quality of
outgoing faxes
Fine
Super Fine
Ultra Fine
Photo
Density Varying levels
available
Select from various density levels
Remove Background Auto Automatically removes any background color on
scanned images
Varying levels
available
Lets you select from various levels of background
color adjustment
Sharpness Varying levels
available
Lets you enhance the outline of the scanned image
ADF Continuous Scan Off Select On to have the product to ask if you want to
scan another page after a document in the ADF has
finished scanning
On
Direct Send Off Select On to send black-and-white faxes to a single
recipient as soon as the connection is made, without
saving the scanned image to memory. You cannot
use this setting when sending a color fax or sending a
fax to multiple recipients.
On
Send Fax Later Off Select On to send the current fax at a selected time
On
Add Sender Information Off Includes a header, your phone number, or a
destination list in the selected location on your
outgoing faxes
Outside of Image
Inside of Image
Transmission Report Print on Error Selects when or if to print transmission reports
Print
Do Not Print
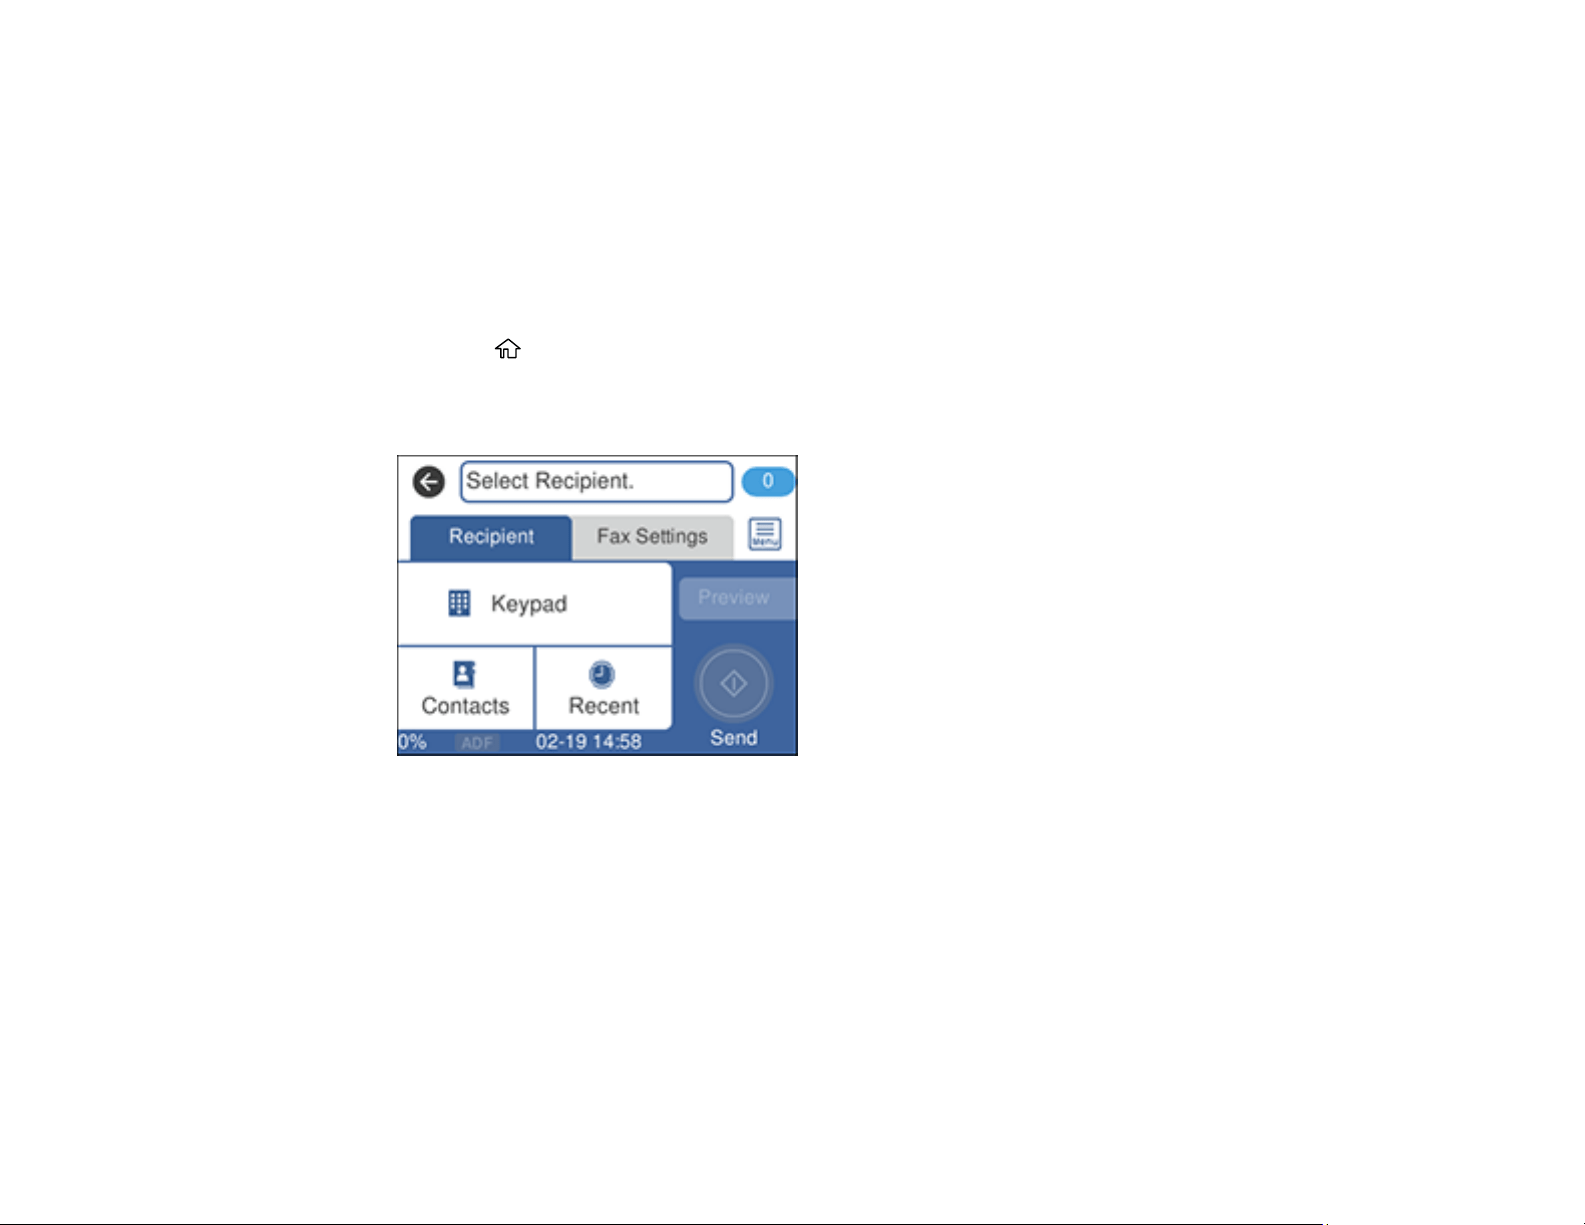
241
Parent topic: Sending Faxes from the Product Control Panel
Sending a Fax at a Specified Time
You can send a fax at a time of your choice. You can only schedule one fax at a time.
Note: Make sure the product's date and time settings are correct. You can only send faxes in black-and-
white when you use this option.
1. Place your original on the product for faxing.
2. Press the home button, if necessary.
3. Select Fax.
You see a screen like this:
4. Enter a fax number or select a number from the Contacts or Recent list.
5. Select the Fax Settings tab.
6. Select Send Fax Later.
7. Select On.
8. Select Time, use the numeric keypad on the LCD screen to enter your desired time, and select OK,
then select OK again.
9. Select the Recipient tab and select Send.
Note: To cancel faxing, select Cancel.

242
After scanning your originals, your product dials the number and sends the fax at the specified time.
Note: If the product is turned off at the specified time, the fax is sent when it is powered on.
Parent topic: Sending Faxes from the Product Control Panel
Related topics
Setting Up Contacts and Contact Groups
Placing Originals on the Product
Dialing Fax Numbers from a Connected Telephone
If you connected a telephone to the EXT port on your product, you can send a fax by dialing the fax
number from the connected telephone. If the recipient's phone number and fax number are the same,
you can speak to the recipient before sending the fax.
1. Place your original on the product for faxing.
2. Press the home button, if necessary.
3. Dial the fax number from the connected telephone. Speak to the recipient if necessary.
Note: If you are using a pre-paid calling card, enter the number and password required to use the
card before entering the destination fax number.
4. Select Fax on the LCD screen.
5. Select the Fax Settings tab and select any settings as necessary.
Note: Your product now communicates with the recipient's fax machine. Do not hang up the
telephone.
6. When you hear a fax tone, select Send on the Recipient tab to start sending the fax.
Note: If your recipient's fax machine does not print in color, your fax is automatically sent in black-
and-white.
7. Hang up the telephone.
Parent topic: Sending Faxes from the Product Control Panel
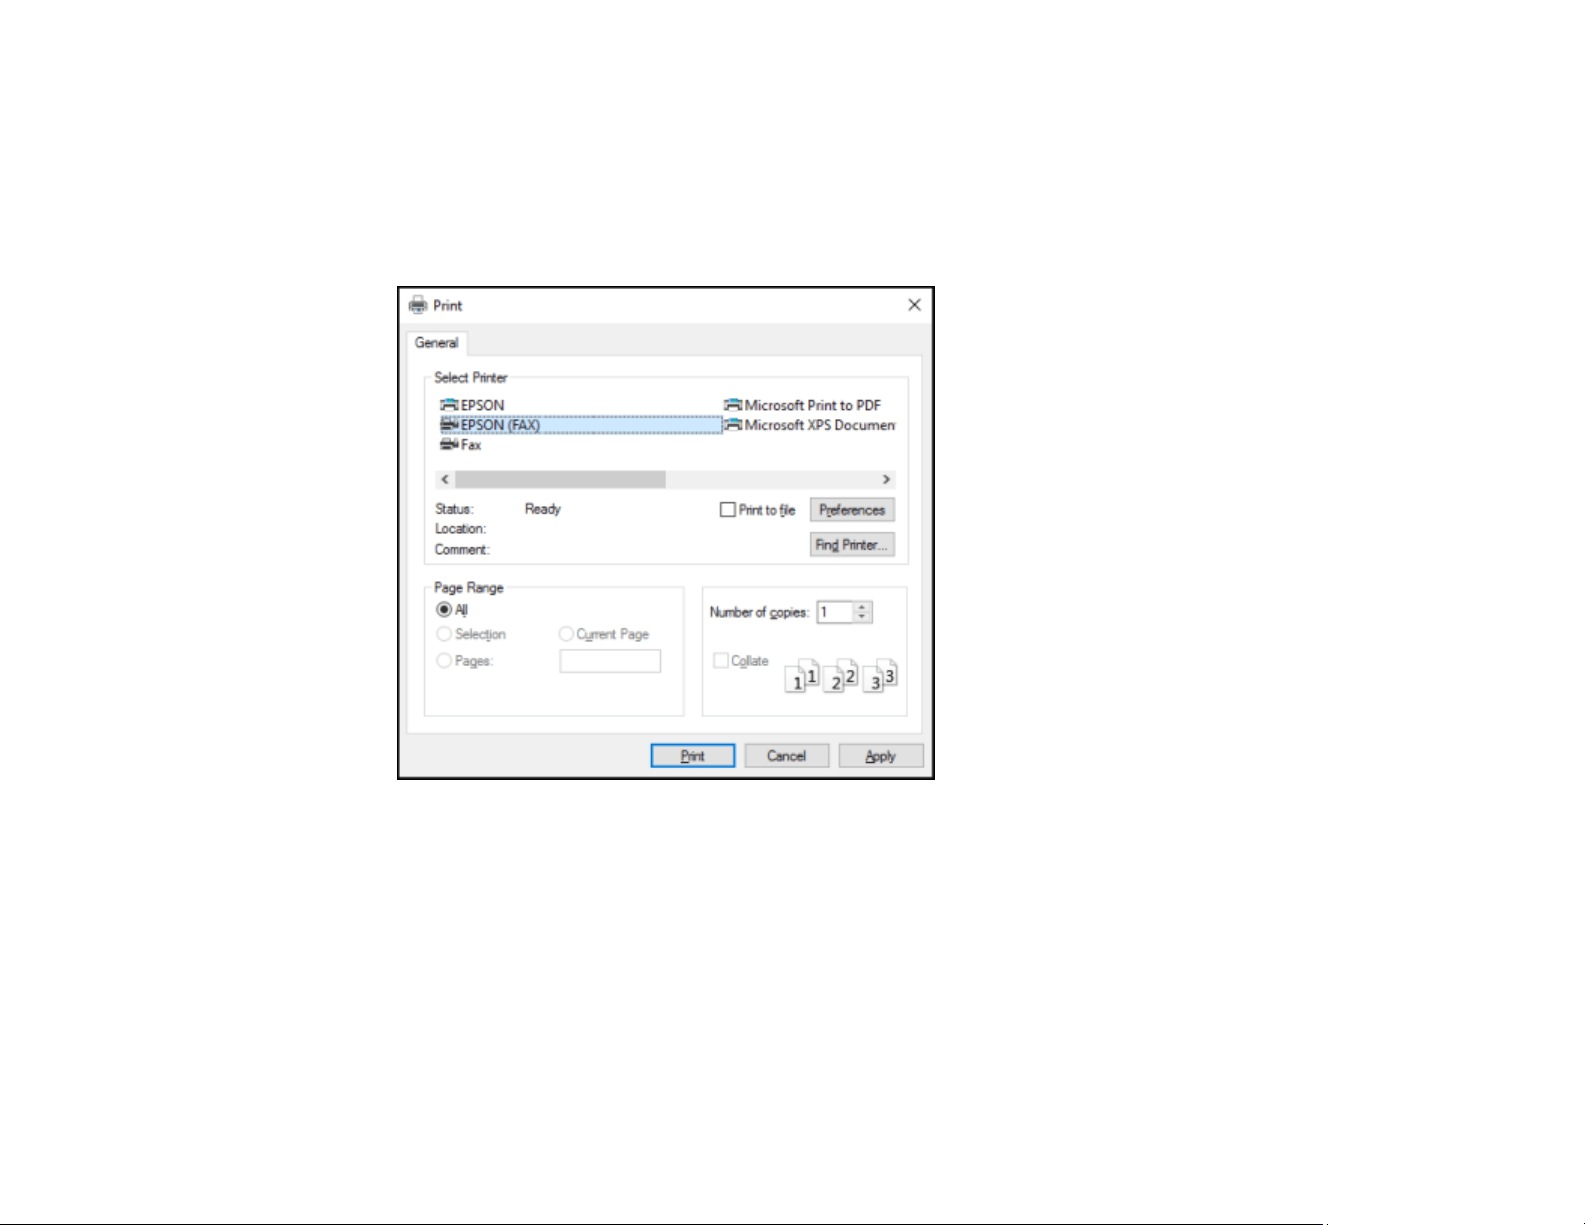
243
Sending Faxes Using the Fax Utility - Windows
You can send a fax from a printing program in Windows. You can fax up to 100 pages at a time,
including a cover sheet.
1. Open the file you want to fax and select the print command.
You see a window like this:
2. Select your product with the FAX option as the printer.
3. To change the Paper Size, Orientation, Color, Image Quality, or Character Density settings, click the
Preferences or Properties button, change the necessary settings, and click OK.
Note: If you see a Setup, Printer, or Options button, click it. Then click Preferences or Properties
on the next screen. For more information about selecting fax print settings, click Help.
4. Select the Page Range as necessary. (Leave the Number of copies set to 1.)
5. Click Print or OK.
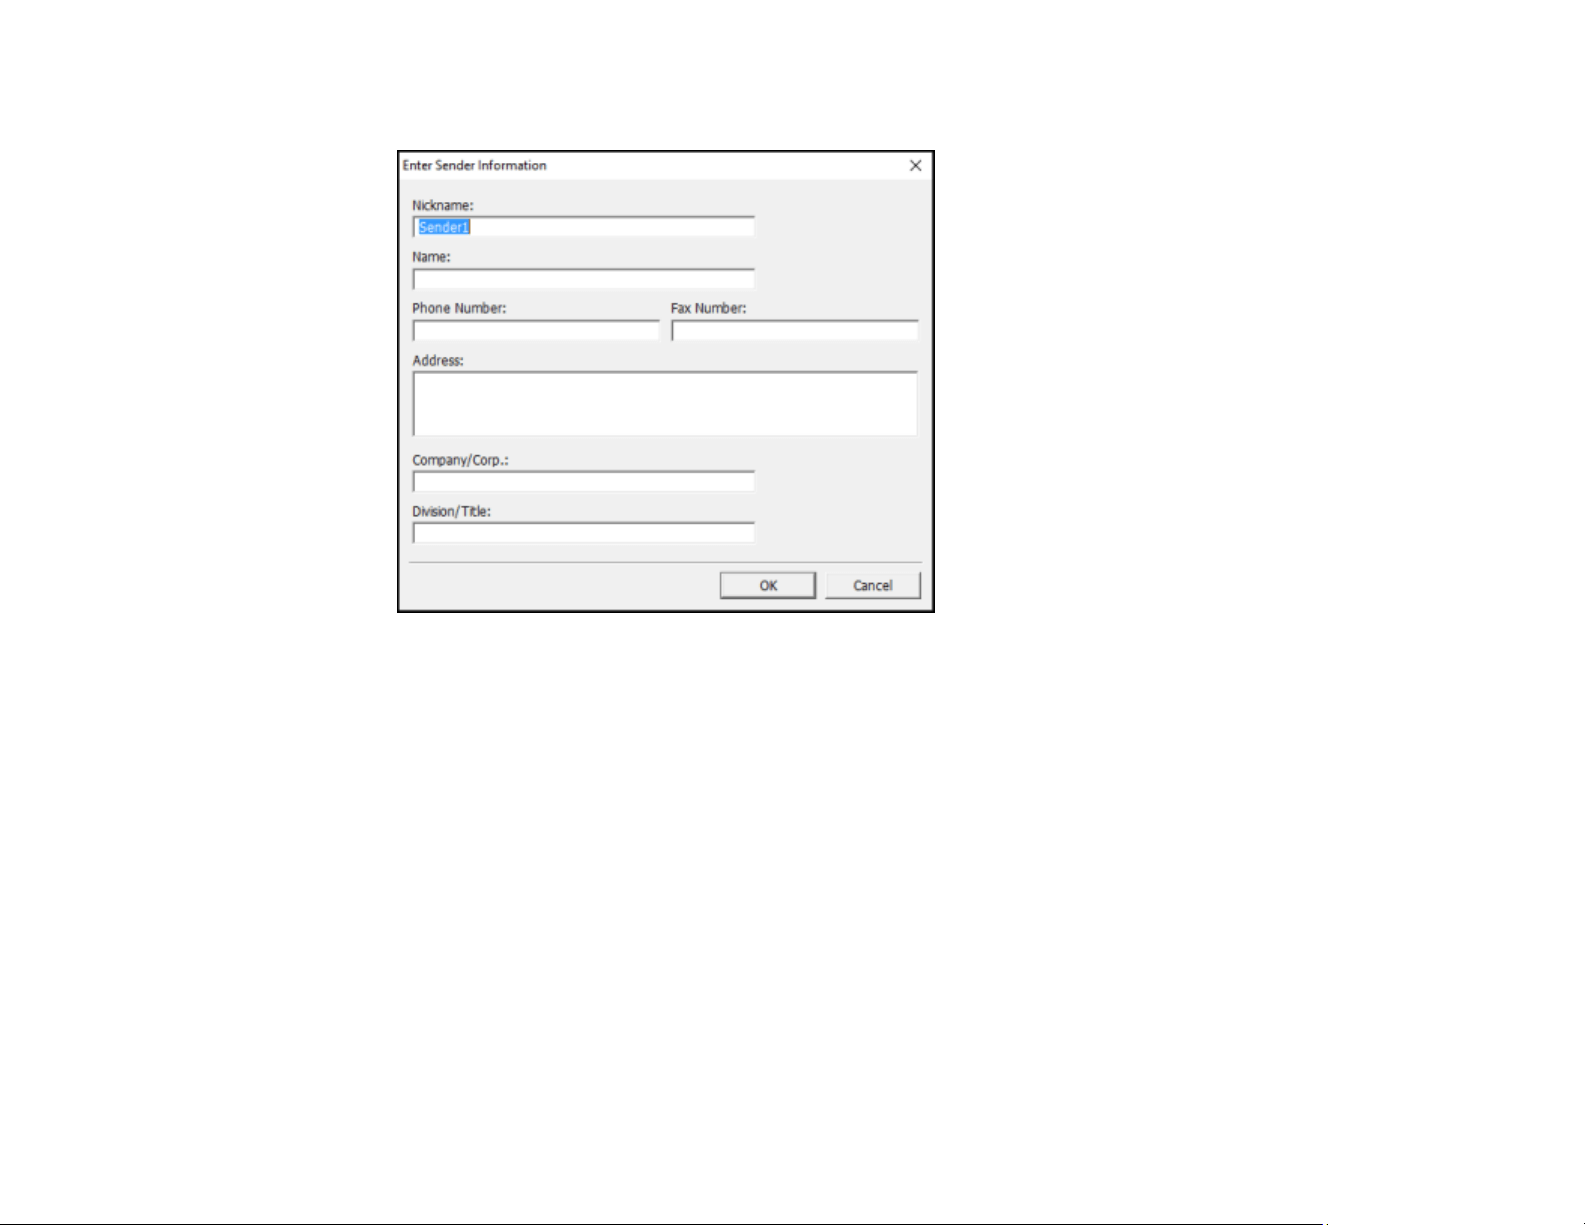
244
If you’re faxing for the first time, you see a window like this one:
6. Enter your sender information so that recipients can identify the origin of the fax. Then click OK to
save the sender information.
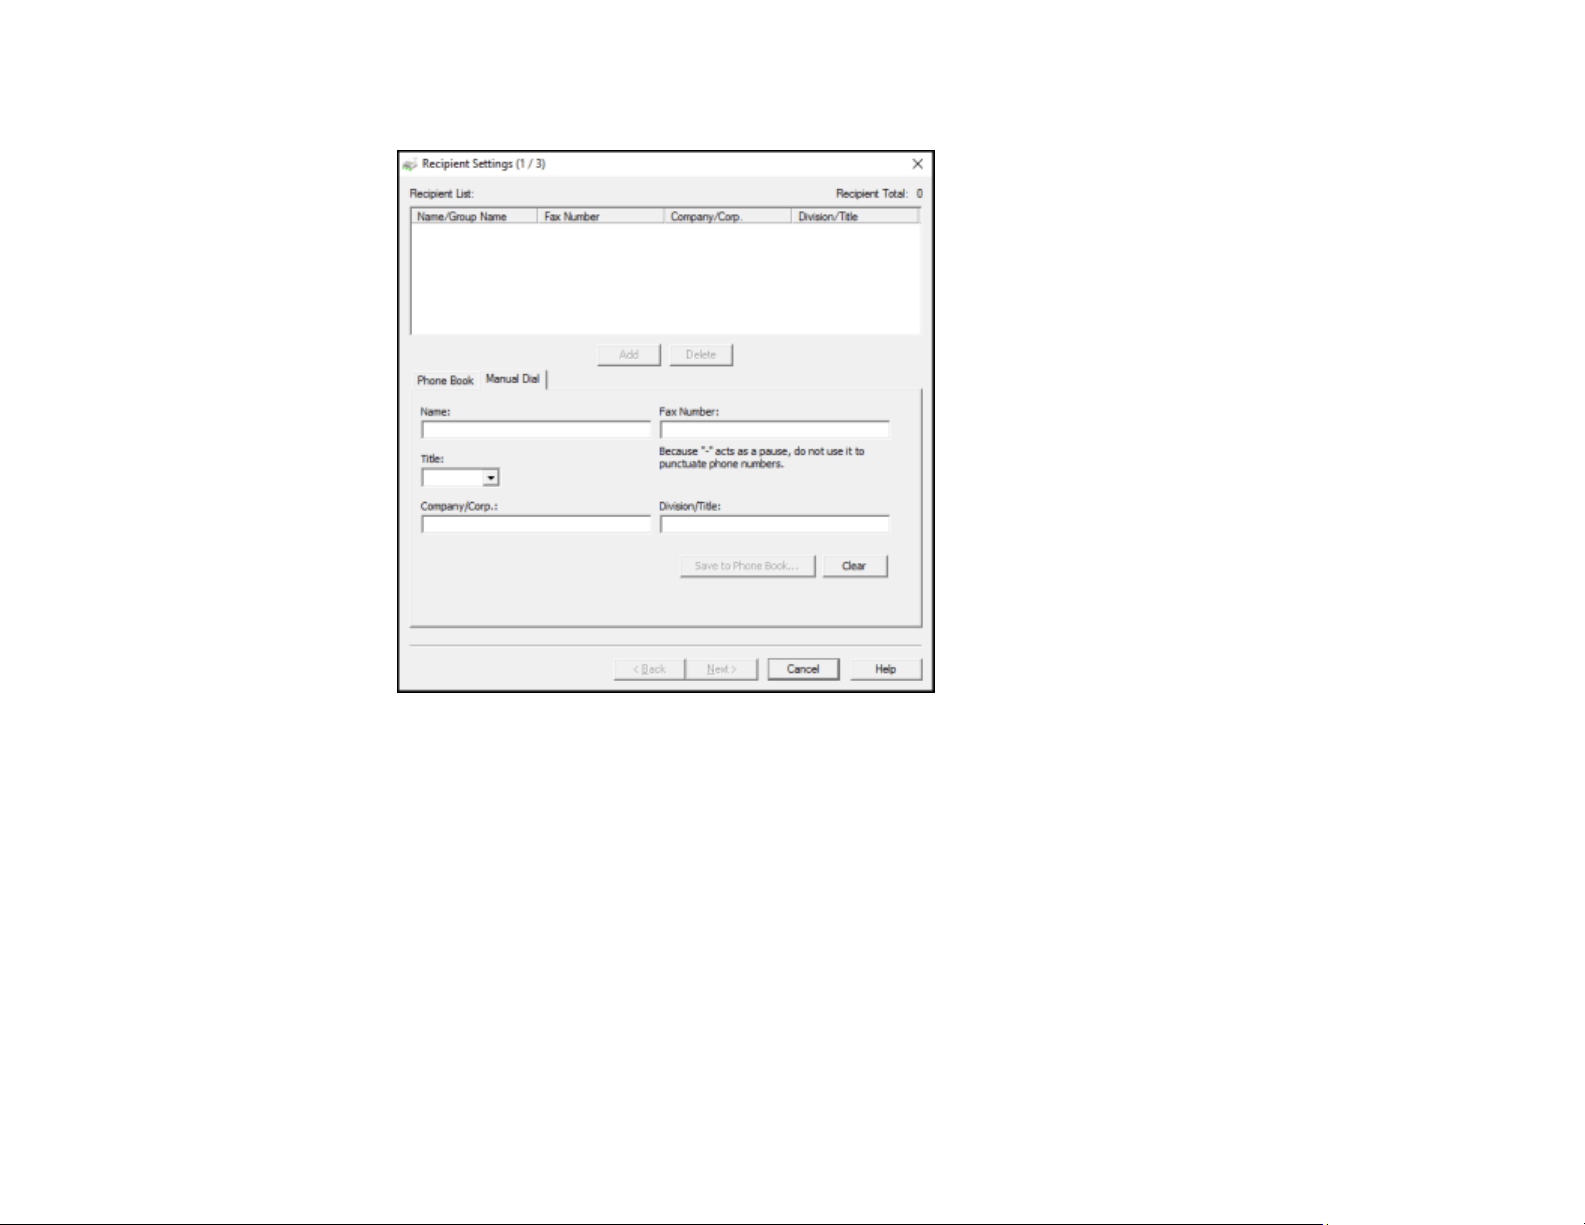
245
You see a window like this:
7. Enter the recipient's name and fax number or select a recipient from the phonebook, then click Next.
Note: For detailed instructions on using the Epson FAX Utility, click Help.
8. Select a cover sheet and enter a subject and message, then click Next.
9. Click Send to transmit your fax.
Parent topic: Sending Faxes
Sending Faxes Using the Fax Utility - Mac
You can send a fax from a Mac printing program using the FAX Utility. You can fax up to 100 pages at a
time, including a cover sheet.
1. Open the file you want to fax.
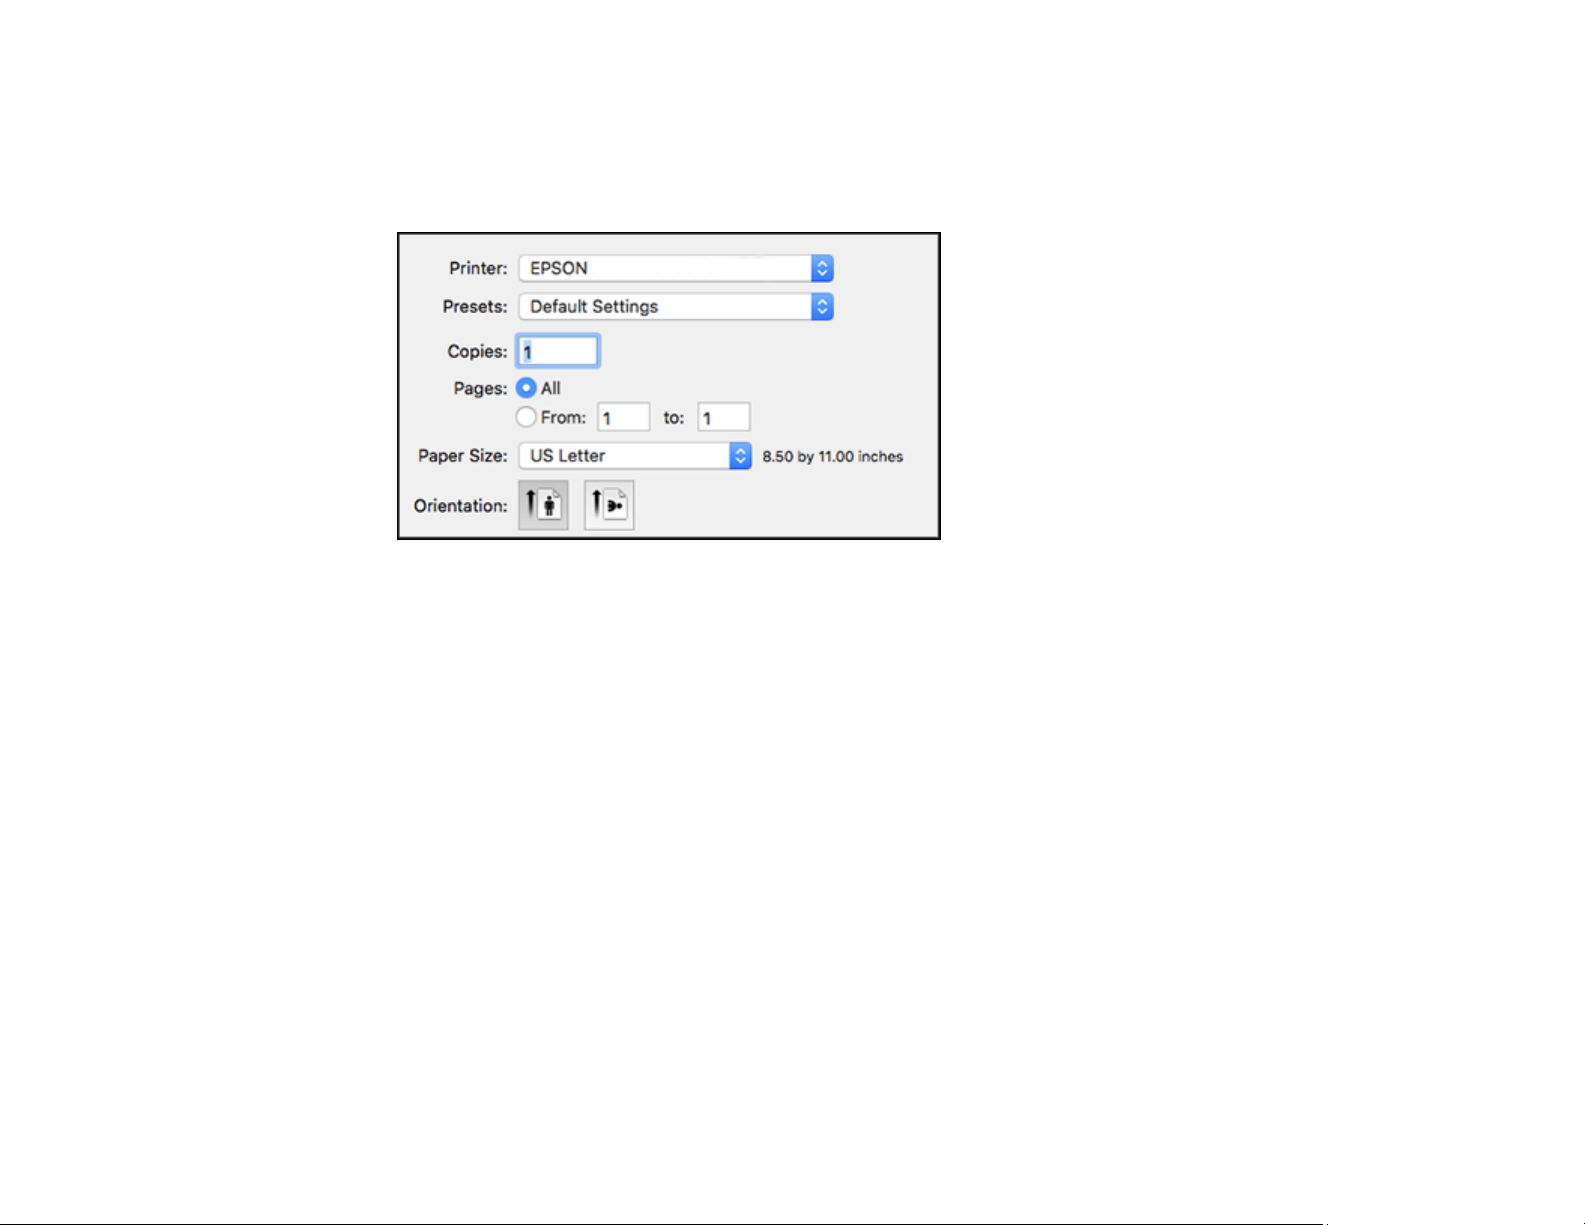
246
2. Select the print command in your application.
Note: You may need to select a print icon on your screen, the Print option in the File menu, or
another command. See your application's help utility for details.
3. Select your product FAX option as the Printer setting.
4. If necessary, click the arrow next to the Printer setting or the Show Details button to expand the
print window.
5. Select the number of pages you are faxing as the Pages setting.
Note: Leave the Copies setting set to 1.
6. Select Recipient Settings from the pop-up menu.
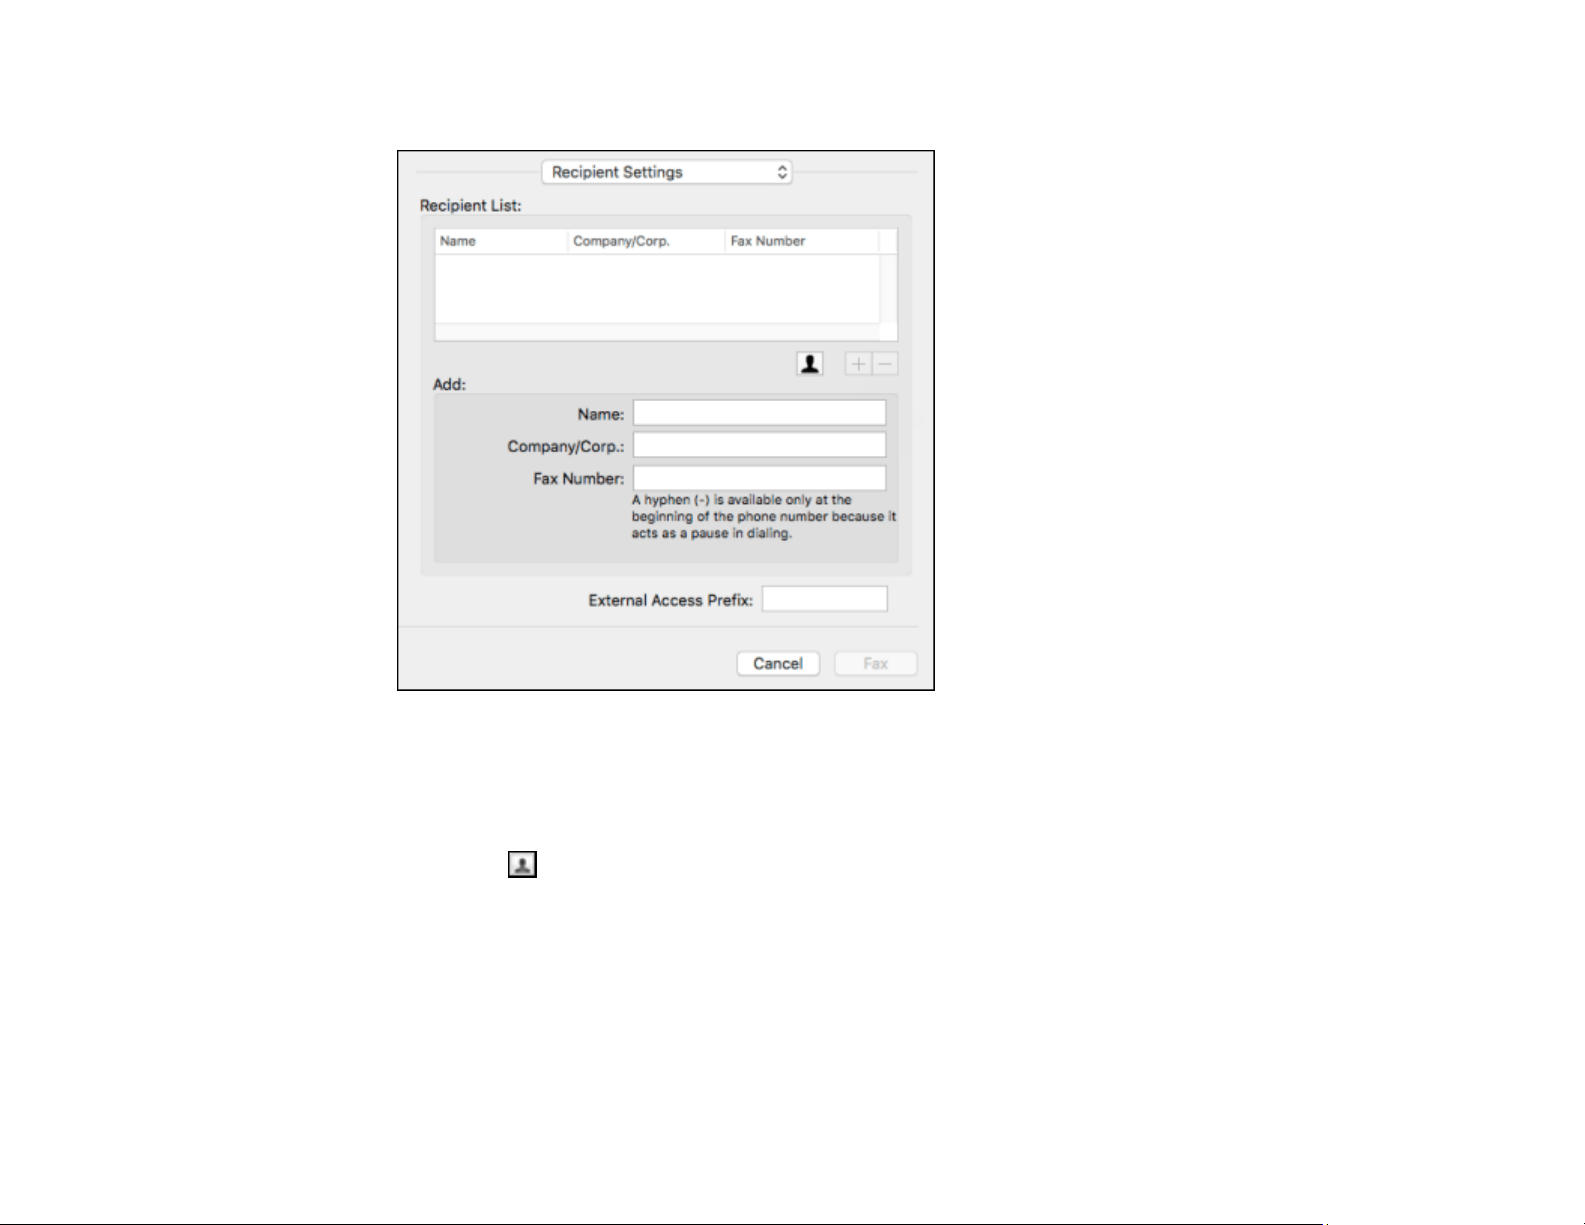
247
You see this window:
7. Do one of the following to choose your recipient:
• Select a name or group from the Recipient List.
• Enter a name, company, and fax number and click the + button.
• Click the icon and select a recipient from your address book.
8. Select Fax Settings from the pop-up menu.
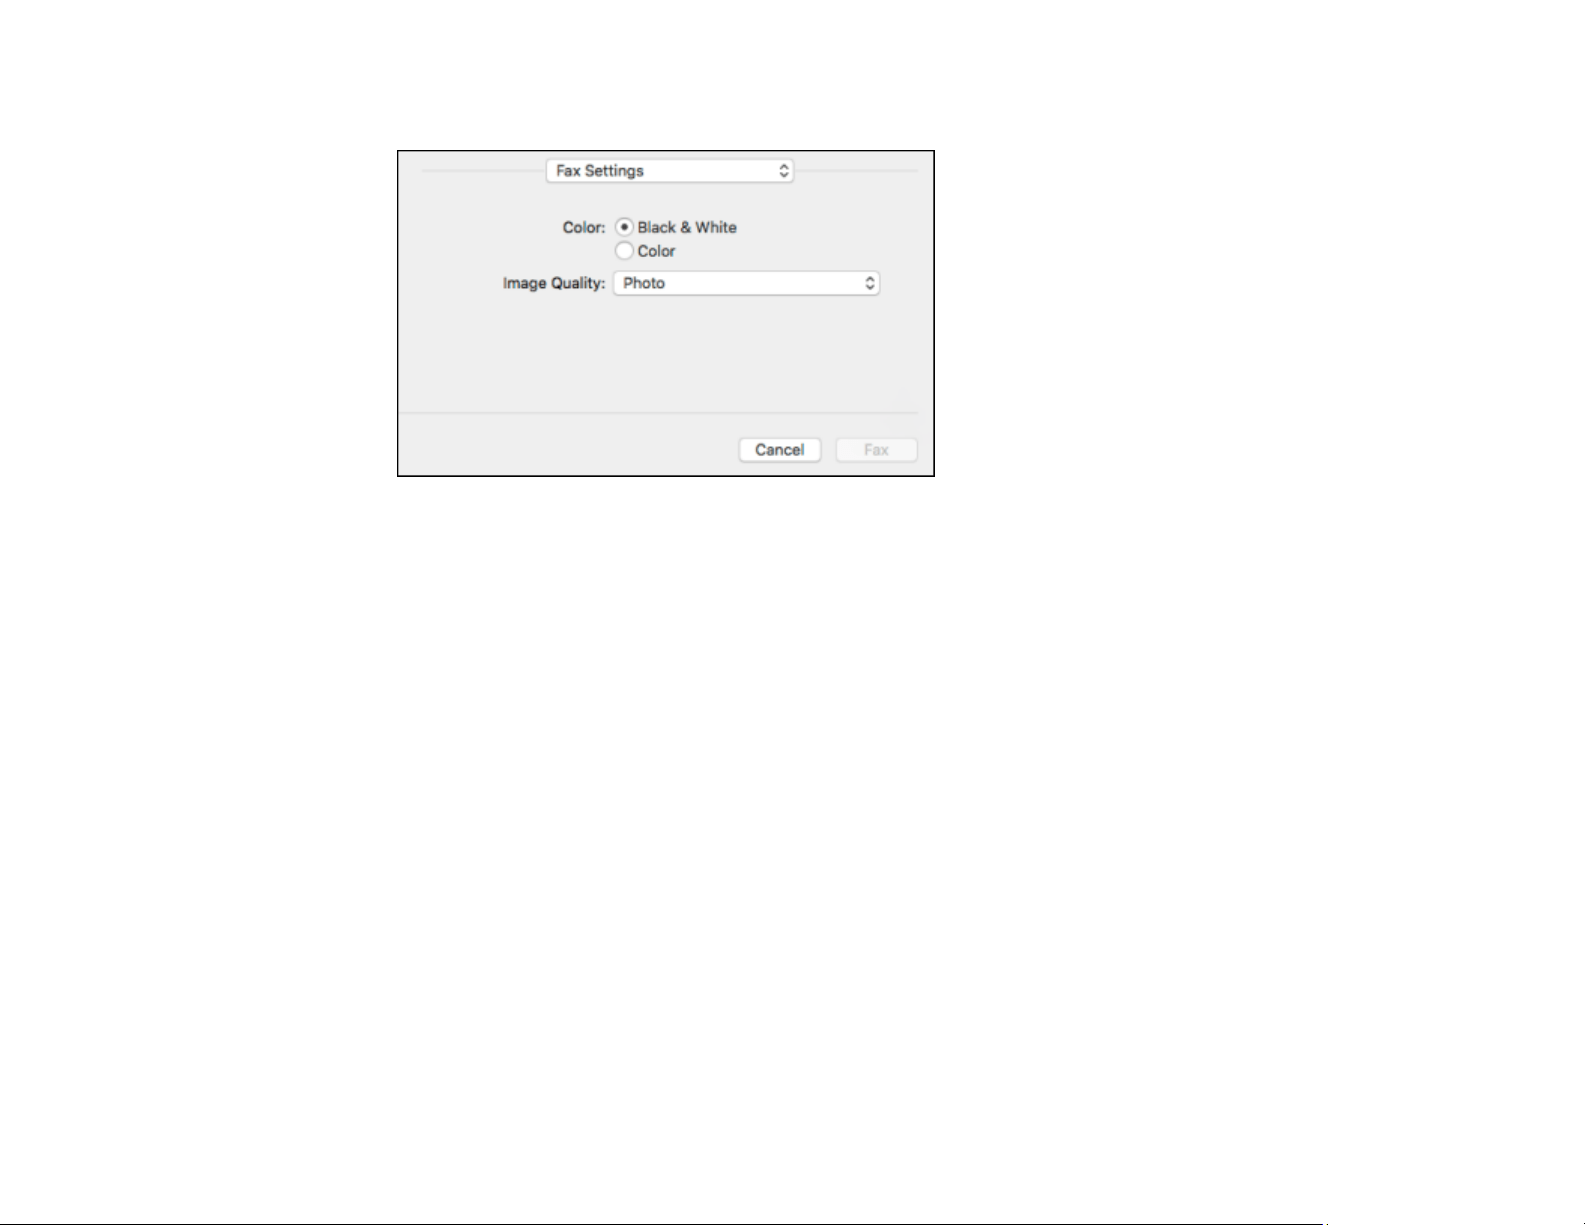
248
You see this window:
9. Select the Color and Image Quality settings you want to use for your fax.
10. Click Fax.
Parent topic: Sending Faxes
Receiving Faxes
See these sections to receive faxes with your product.
Note: Do not turn the product off while it is receiving a fax. Otherwise, the fax transmission will be lost.
Fax Reception
Receiving Faxes Automatically
Receiving Faxes Manually
Receiving a Fax by Polling
Saving and Viewing Received Faxes
Parent topic: Faxing
Fax Reception
Your product will automatically receive and print faxes when you set the Receive Mode to Auto.

249
If you connected a telephone to your product so you can use the same phone line for faxes and voice
calls, you can also set your product to receive faxes manually. This allows you to check for a fax tone
using the telephone and press a button on your product to receive the fax.
Make sure to load paper in your product and select your fax settings before receiving a fax.
Note: If you run out of paper during fax printing, load more paper and press the button indicated on your
product's LCD screen to continue.
Note: Do not turn the product off while it is receiving a fax. Otherwise, the fax transmission will be lost.
Parent topic: Receiving Faxes
Receiving Faxes Automatically
To receive faxes automatically, make sure Receive Mode is set to Auto (the default setting for the
product).
To change the Receive Mode if necessary, select Settings > General Settings > Fax Settings > Basic
Settings > Receive Mode.
If an answering machine is connected, make sure the product's Rings to Answer setting is set higher
than the number of rings your answering machine is set to answer a call. For example, if the answering
machine is set to pick up on the fourth ring, set the product to pick up on the fifth ring or later.
Parent topic: Receiving Faxes
Related references
Basic Settings - Fax
Related tasks
Receiving Faxes Manually
Receiving Faxes Manually
You can set up your product to receive faxes manually by setting the Receive Mode to Manual. This lets
you check for a fax tone on the connected telephone before receiving a fax.
1. To change the Receive Mode, select Settings > General Settings > Fax Settings > Basic
Settings > Receive Mode and select Manual.
2. When the connected telephone rings, answer the call.

250
3. If you hear a fax tone, select Fax on the LCD display.
Note: To receive a fax using the attached telephone instead of the product control panel, enable the
Fax Settings > Basic Settings > Remote Receive setting.
4. Select Send/Receive.
5. Select Receive.
6. Select the icon to start receiving the fax.
7. Hang up the telephone.
Parent topic: Receiving Faxes
Related references
Basic Settings - Fax
Related tasks
Receiving Faxes Automatically
Receiving a Fax by Polling
You can use polling to receive a fax from another fax machine (such as a fax information service).
Note: You cannot use polling to receive a fax from a fax information service that uses audio guidance.
1. Press the home button, if necessary.
2. Select Fax.
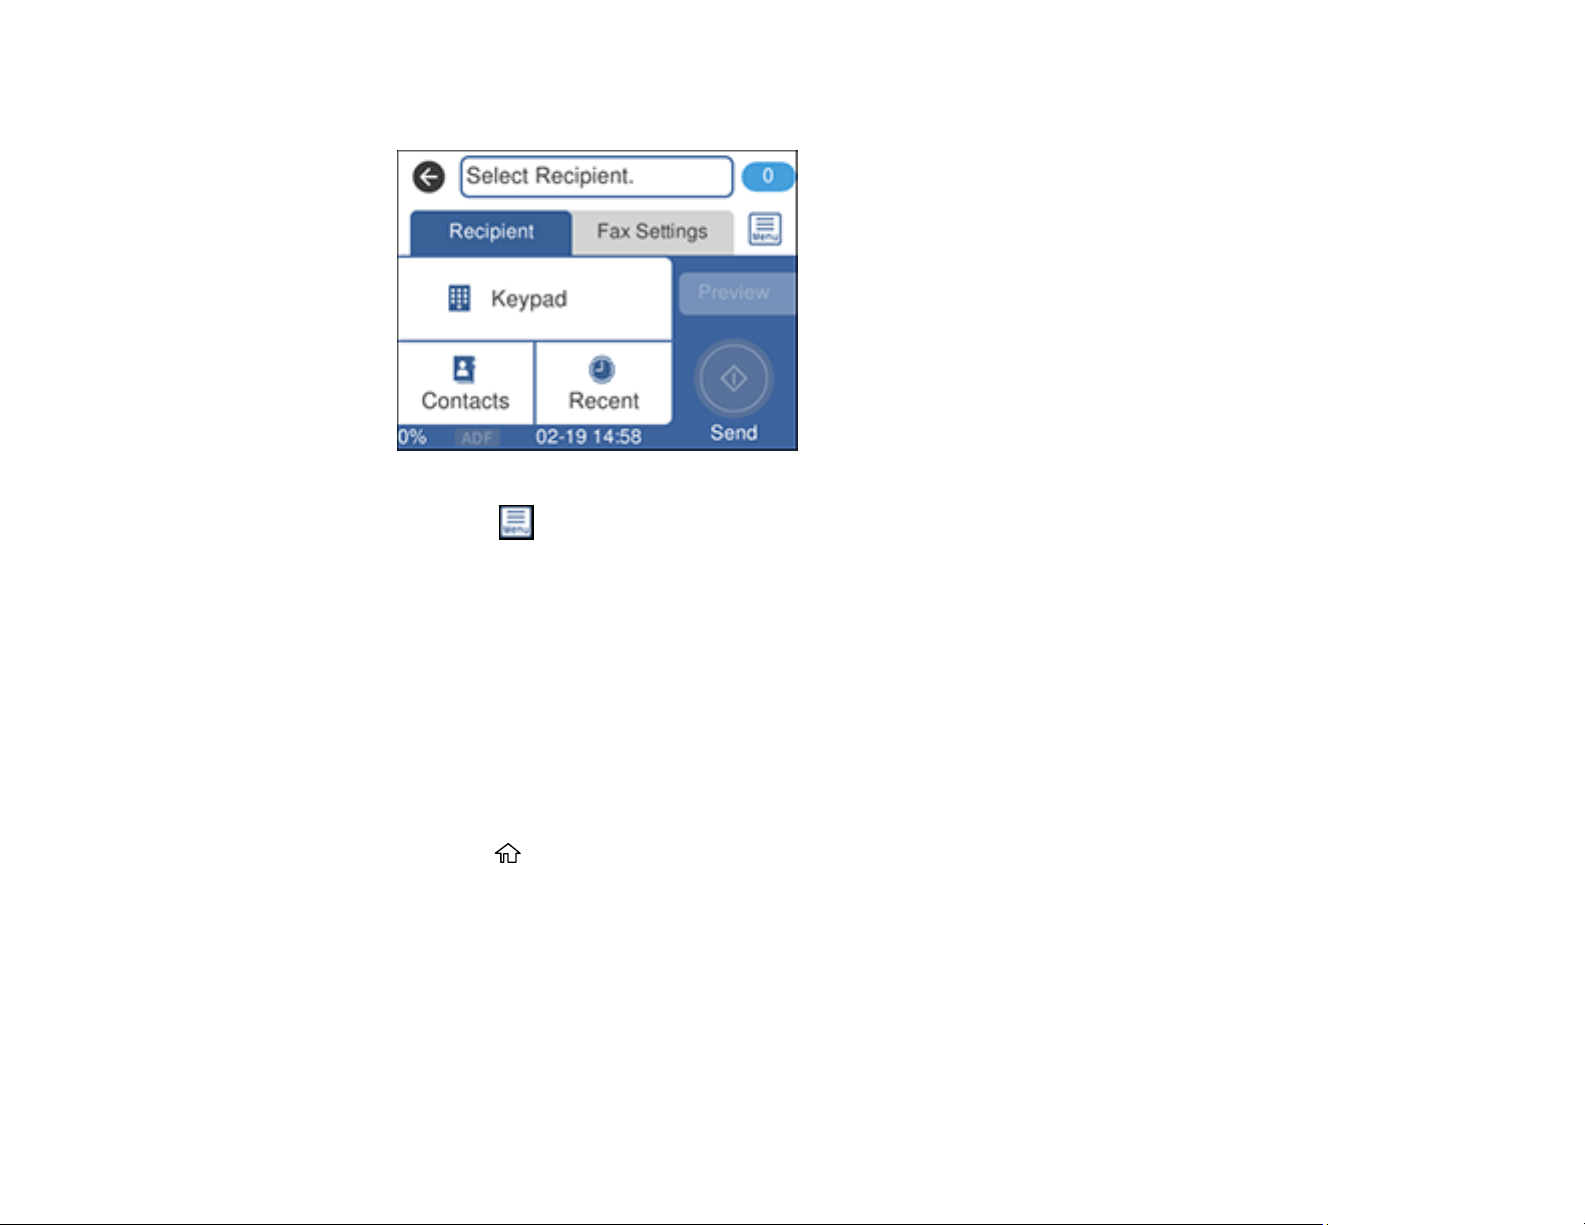
251
You see a screen like this:
3. Select the icon.
4. Set Polling Receive to On.
5. Select Close.
6. Enter the fax number you expect to receive the fax from.
7. Select Polling to start receiving the fax.
Parent topic: Receiving Faxes
Saving and Viewing Received Faxes
You can save received faxes in your product's memory and view them on the LCD screen. The inbox
can hold up to 100 documents but can vary depending on the file size of the documents.
1. Press the home button, if necessary.
2. Select Settings > General Settings > Fax Settings > Receive Settings > Fax Output Settings.
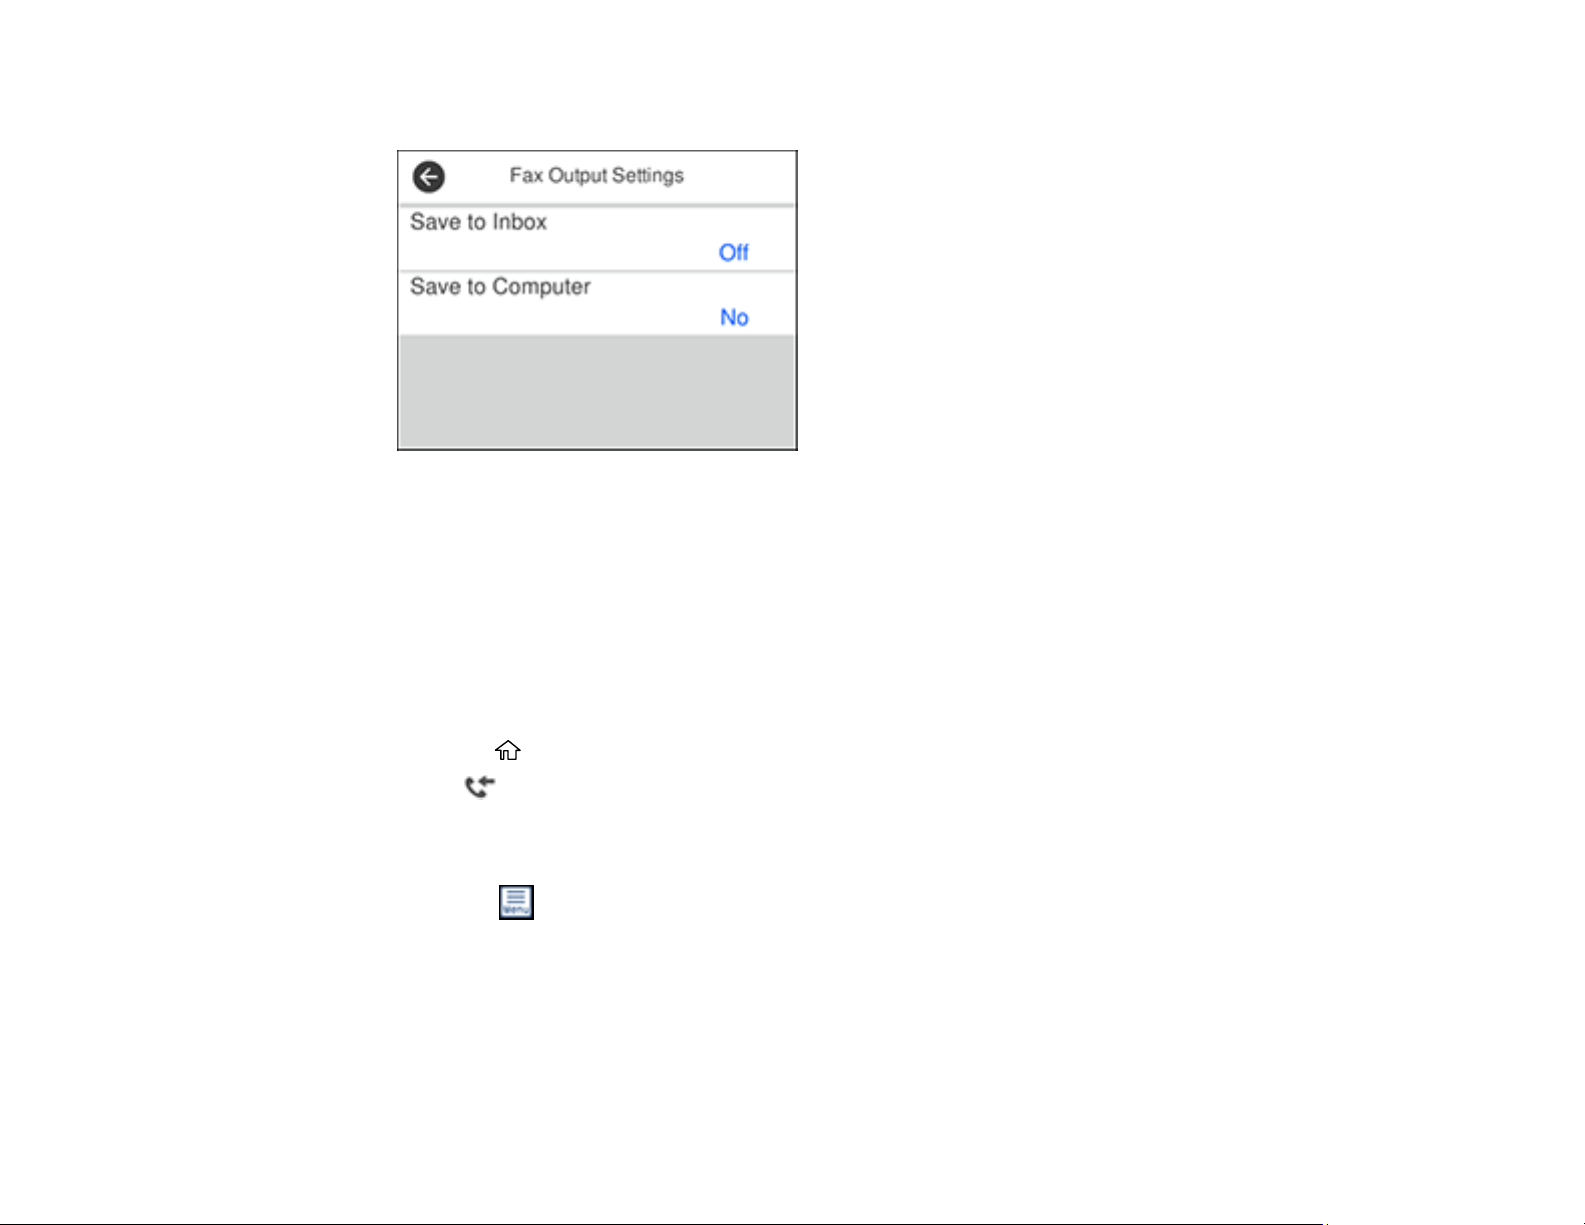
252
You see a screen like this:
3. Select Save to Inbox.
4. Set Save to Inbox to On.
5. Select Options When Memory is Full and choose an option.
6. Select Inbox Password Settings to set, change, or reset the password for the inbox.
Note: You cannot set an Inbox password if you set Options When Memory is Full to Receive and
print faxes.
7. Press the home button.
8. Select . Enter the inbox password, if necessary.
9. Select the fax you want to view.
You see the fax displayed on the screen.
10. Select the icon.
11. Select one of the printing or deleting options, and follow the on-screen instructions.
Note: Delete faxes after you print or view them to prevent the product's memory from filling up. When the
memory is full, you can only print or reject incoming faxes.
Parent topic: Receiving Faxes
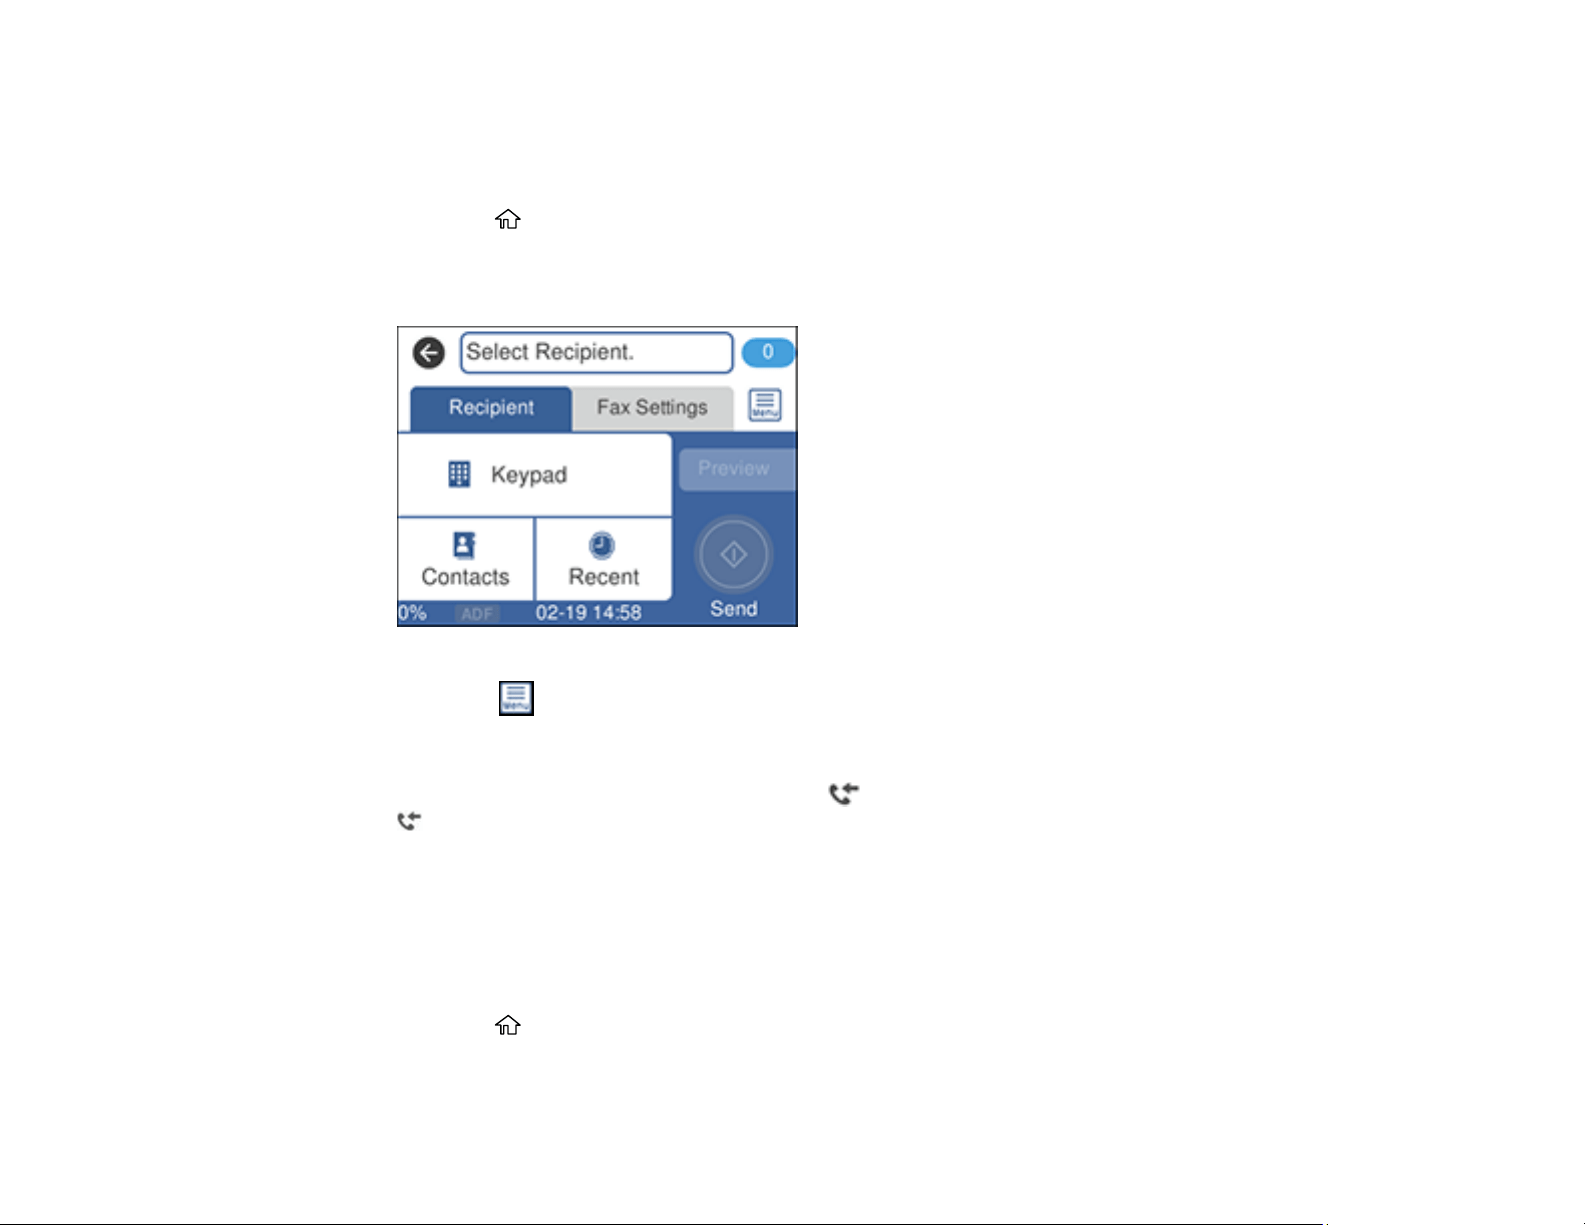
253
Checking Fax Status
You can check the status of current fax jobs, or faxes that have been received or sent on the product
control panel.
1. Press the home button, if necessary.
2. Select Fax.
You see a screen like this:
3. Select the icon.
4. Select Transmission Log and select the fax job you want to check.
Note: If you see a numbered icon above the icon on your product's LCD screen or the
received fax light is flashing, received faxes have been temporarily saved to the product's
memory.
Parent topic: Faxing
Printing Fax Reports
You can print several types of fax reports whenever necessary.
1. Press the home button, if necessary.
2. Select Fax.
254
You see a screen like this:
3. Select the icon.
4. Select Fax Report.
5. Select the fax report you want to print.
Fax Report Options
Parent topic: Faxing
Fax Report Options
Select the fax report or list you want to print.
Last Transmission
Print a report on the previous fax that was sent or received through polling. You can use the Fax
Settings > Transmission Report setting to print the report automatically.
Fax Log
View or print a report on recent fax transmissions. You can use the Settings > General Settings >
Fax Settings > Report Settings > Fax Log Auto Print setting to print the report automatically.
Fax Settings List
Print a list of the current fax communication settings.
Protocol Trace
Print a detailed report for the previous sent or received fax.
Parent topic: Printing Fax Reports

255
Refilling Ink and Replacing the Maintenance Box
Periodically check the ink tanks to see if they need to be refilled.
Before checking the ink level or refilling an ink tank as described here, be sure to read the ink safety
precautions.
Caution: Visually check the ink levels in the product’s ink tanks to confirm the actual ink levels.
Continued use of the product when the ink is expended could damage the product.
Ink Safety Precautions
Checking the Ink and Maintenance Box Levels
Purchase Epson Ink and Maintenance Box
Refilling the Ink Tanks
Maintenance Box Replacement
Ink Safety Precautions
Note: The product has a low ink alert system. The accuracy of this system depends on the user refilling
the ink tanks correctly. The product cannot directly measure the ink levels in the tanks; instead it
estimates the amount of ink remaining by internally monitoring ink usage. The low ink alert system may
generate inaccurate messages if the ink tanks are not refilled according to these instructions.
Visually check the ink levels in the product’s ink tanks to confirm the actual ink levels. Continued use of
the product when the ink is expended could damage the product.
Ink Handling Precautions
• Keep ink bottles and the ink tanks out of the reach of children. Do not allow children to drink from or
handle the ink bottles and bottle caps.
• Do not tilt or shake an ink bottle after opening it; otherwise, ink may leak.
• Be careful not to touch any ink when you handle the ink tanks, ink tank caps, and opened ink bottles or
ink bottle caps.
• If ink gets on your skin, wash it thoroughly with soap and water. If ink gets into your eyes, flush them
immediately with water. If discomfort or problems persist, see a doctor immediately. If ink gets into
your mouth, spit it out and see a doctor right away.
• Do not disassemble the maintenance box; otherwise ink may get into your eyes or on your skin.

256
• Do not shake or squeeze the ink bottles.
• If ink spills, wipe it up immediately. To prevent the ink from spreading, blot the spill with a dry cloth,
then wipe it with a damp cloth. The ink will be hard to remove once it has dried.
Ink Refilling Precautions
• Use ink bottles with the correct part number for this product.
• Epson's warranties do not extend to any damage caused by the use of third-party ink or ink not
designed for your printer.
• This product requires careful handling of ink. Ink may splatter when the ink tanks are filled or refilled
with ink. If ink gets on your clothes or belongings, it may not come off.
• Do not open the ink bottle package until you are ready to fill an ink tank. Ink bottles are vacuum
packed to maintain reliability. If you leave an ink bottle unpacked for a long time before using it, print
quality may be affected.
• If the ink level is below the lower line on an ink tank, refill the ink. Continued use of the product when
the ink level is below the lower line on an ink tank could damage the product.
• Visually check the ink levels in the product’s ink tanks to confirm the actual ink levels. Continued use
of the product when the ink is expended could damage the product.
• Do not maintain low ink levels for extended periods of time.
• For optimum printing results, refill the ink tanks to the upper line at least once a year.
• After bringing an ink bottle inside from a cold storage site, allow it to warm up at room temperature for
at least three hours before using it.
• Use the ink bottle before the date printed on the package.
• After opening an ink bottle, Epson recommends using it as soon as possible.
• Wipe off any ink around the tanks and ports with a clean, lint-free cloth or cotton swab.
• Store ink bottles in a cool, dark place. Keep them out of direct sunlight.
• Do not store the ink bottles in high or freezing temperatures.
• Store the ink bottles in the same environment as the product. When storing or transporting an opened
ink bottle, do not tilt the bottle and do not subject it to impacts or temperature changes. Otherwise, ink
may leak even if the cap on the ink bottle is tightened securely. Be sure to keep the ink bottle upright
when tightening the cap, and take measures to prevent ink from leaking when you transport the bottle.

257
Ink Bottle and Ink Tank Information
• To maintain optimum print head performance, some ink is consumed from all ink tanks during printing
and when performing maintenance operations, such as cleaning the print head. Ink may also be
consumed when the product is turned on.
• Some ink in the ink bottles supplied with your product is used during initial setup; these ink bottles may
print fewer pages compared to subsequent ink bottles.
• Quoted ink yields may vary depending on the images you are printing, the paper type you are using,
how often you print, and environmental conditions such as temperature.
• The ink bottles may contain recycled materials, but this does not affect product function or
performance.
• When printing in monochrome or grayscale, color ink may be used instead of black ink, depending on
the paper type or print quality settings. This is because a mixture of color inks is used to create black.
• A reserve amount of ink remains in the tank when your product indicates that a refill is necessary.
Parent topic: Refilling Ink and Replacing the Maintenance Box
Checking the Ink and Maintenance Box Levels
Your product and software will let you know when to refill an ink tank or replace the maintenance box.
Checking the Ink Levels on Your Product
Checking Maintenance Box Status on the LCD Screen
Checking Ink and Maintenance Box Levels - Windows
Checking Ink and Maintenance Box Levels - Mac
Disabling Special Offers with Windows
Parent topic: Refilling Ink and Replacing the Maintenance Box
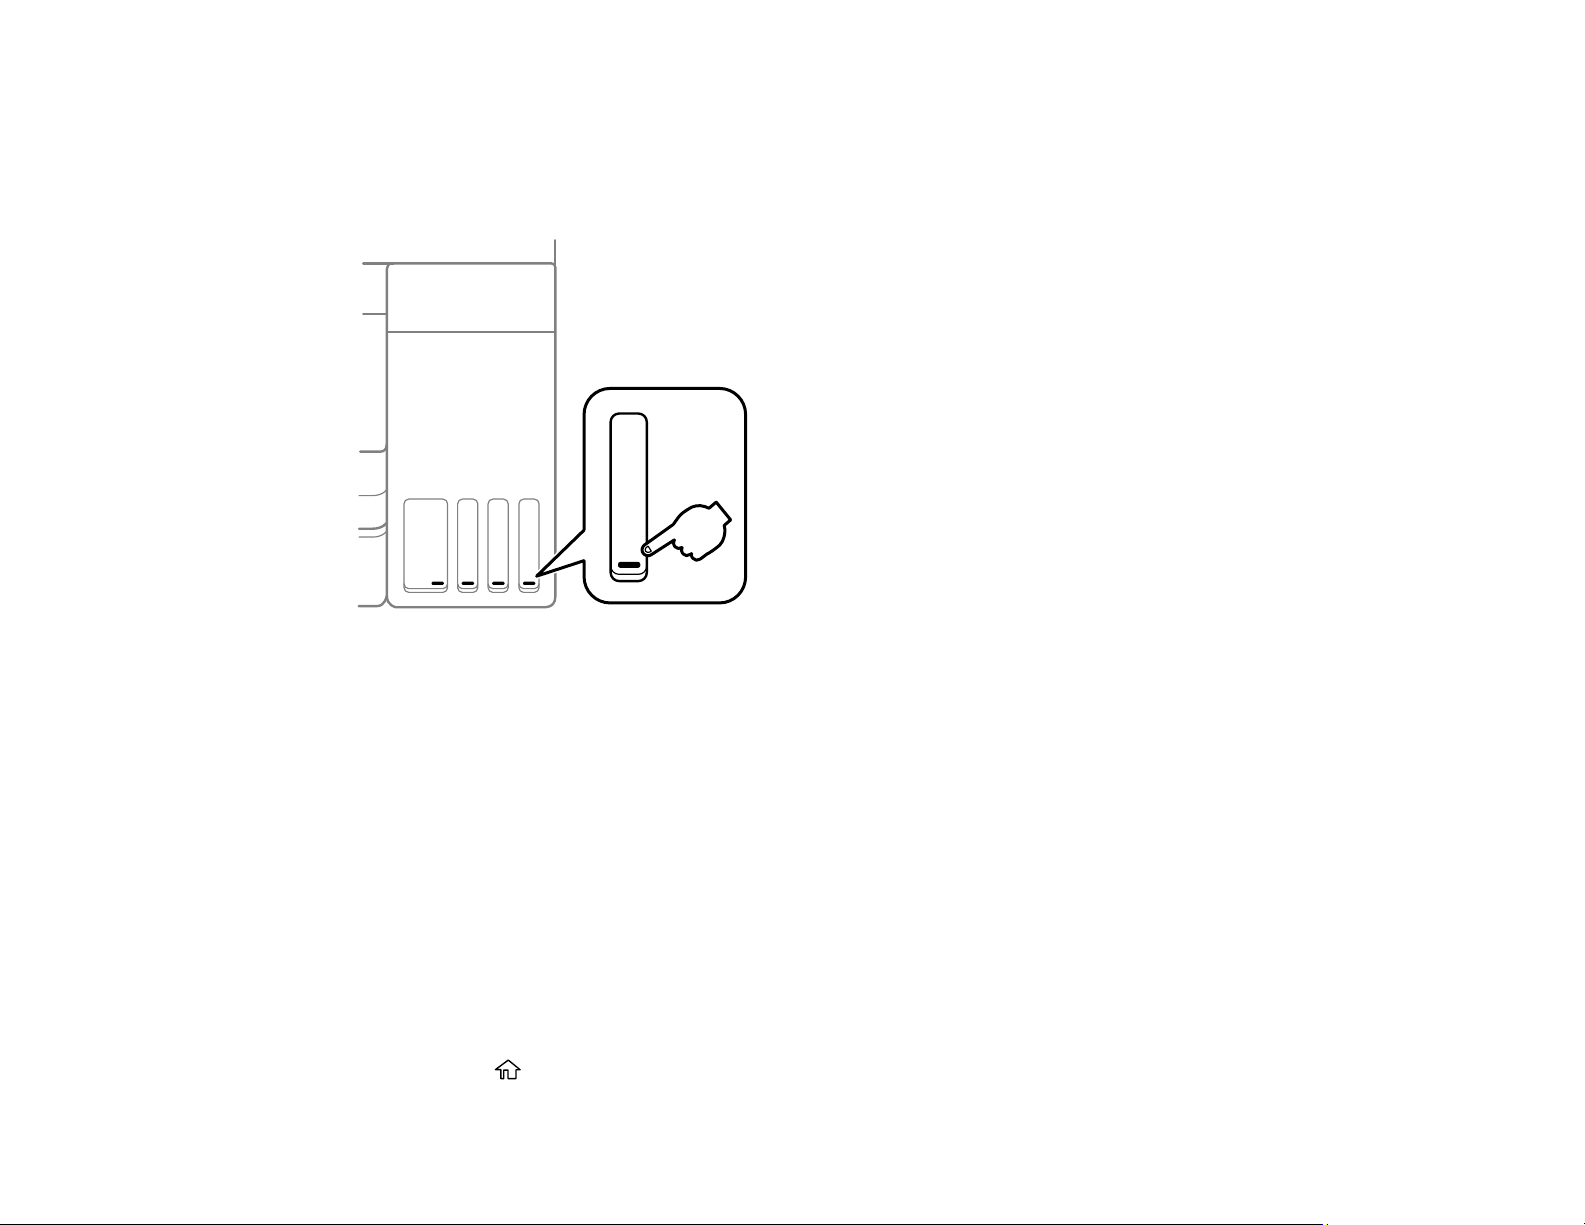
258
Checking the Ink Levels on Your Product
To confirm the actual ink remaining, visually check the ink levels in the product’s ink tanks. Make sure
the ink levels are above the lower line on the ink tanks. If any of the ink tanks are below the lower line, fill
them to the upper line on the ink tank.
Note: The product has a low ink alert system. The accuracy of this system depends on the user refilling
the ink tanks correctly. The product cannot directly measure the ink levels in the tanks; instead it
estimates the amount of ink remaining by internally monitoring ink usage. The low ink alert system may
generate inaccurate messages if the ink tanks are not refilled according to these instructions.
As a precaution, perform regular visual inspections of the ink tanks to ensure ink levels do not fall below
the lower line. Continued use of the product when the ink level is below the lower line on the tank could
damage the product.
Parent topic: Checking the Ink and Maintenance Box Levels
Related tasks
Refilling the Ink Tanks
Checking Maintenance Box Status on the LCD Screen
You can check the status of your maintenance box using your product's LCD screen.
1. Press the home button, if necessary.

259
2. Select Maintenance
3. Select Remaining capacity of Maintenance box.
You see the remaining ink capacity of the maintenance box.
4. Press the home button again to exit the screen.
Parent topic: Checking the Ink and Maintenance Box Levels
Checking Ink and Maintenance Box Levels - Windows
A low ink reminder appears if you try to print when ink is low, and you can check your ink levels at any
time using a utility on your Windows computer.
1. To check your ink and maintenance box levels, access the Windows Desktop and double-click the
icon for your product in the right side of the Windows taskbar, or click the up arrow and double-
click .

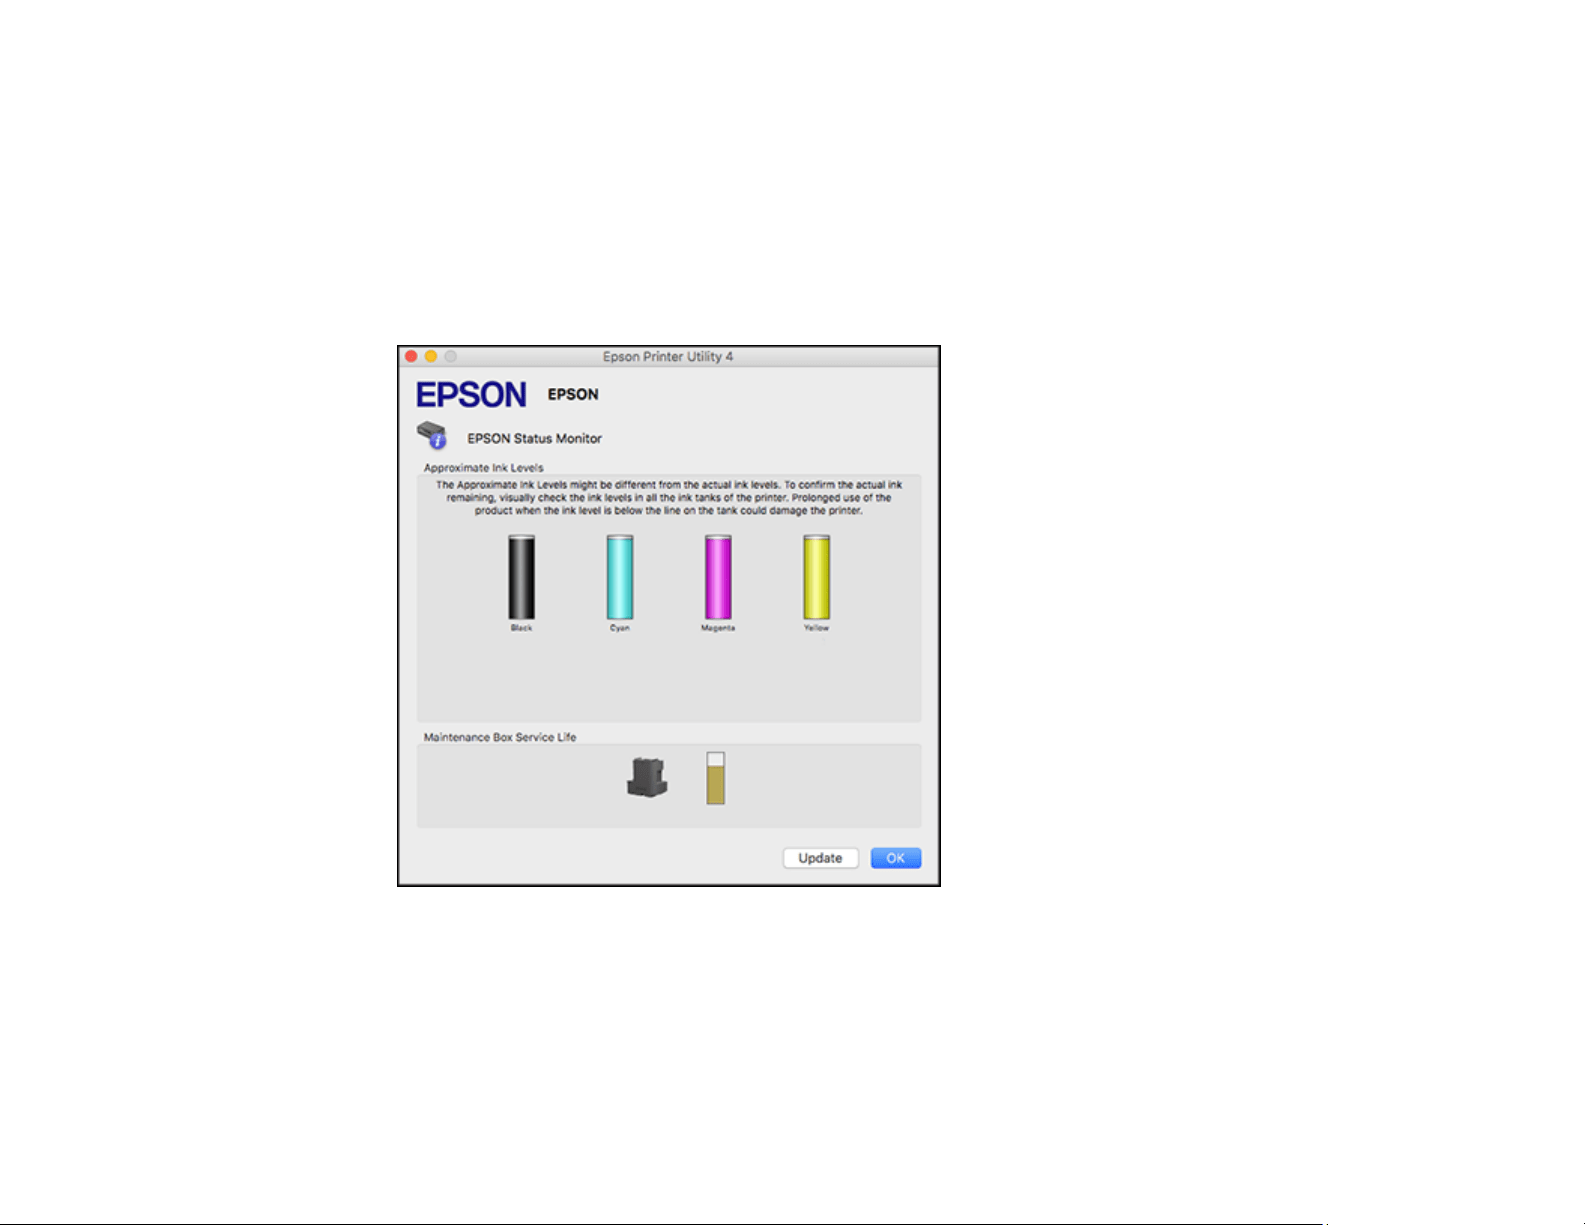
261
Checking Ink and Maintenance Box Levels - Mac
You can check your ink levels using a utility on your Mac.
1. In the Apple menu or the Dock, select System Preferences. Select Print & Fax, Print & Scan, or
Printers & Scanners, select your product, and select Options & Supplies. Select Utility and select
Open Printer Utility.
2. Select EPSON Status Monitor.
You see a window like this:
3. Refill any ink tank or replace the maintenance box as needed.
Note: To update or refresh the displayed ink levels, click Update.
Parent topic: Checking the Ink and Maintenance Box Levels
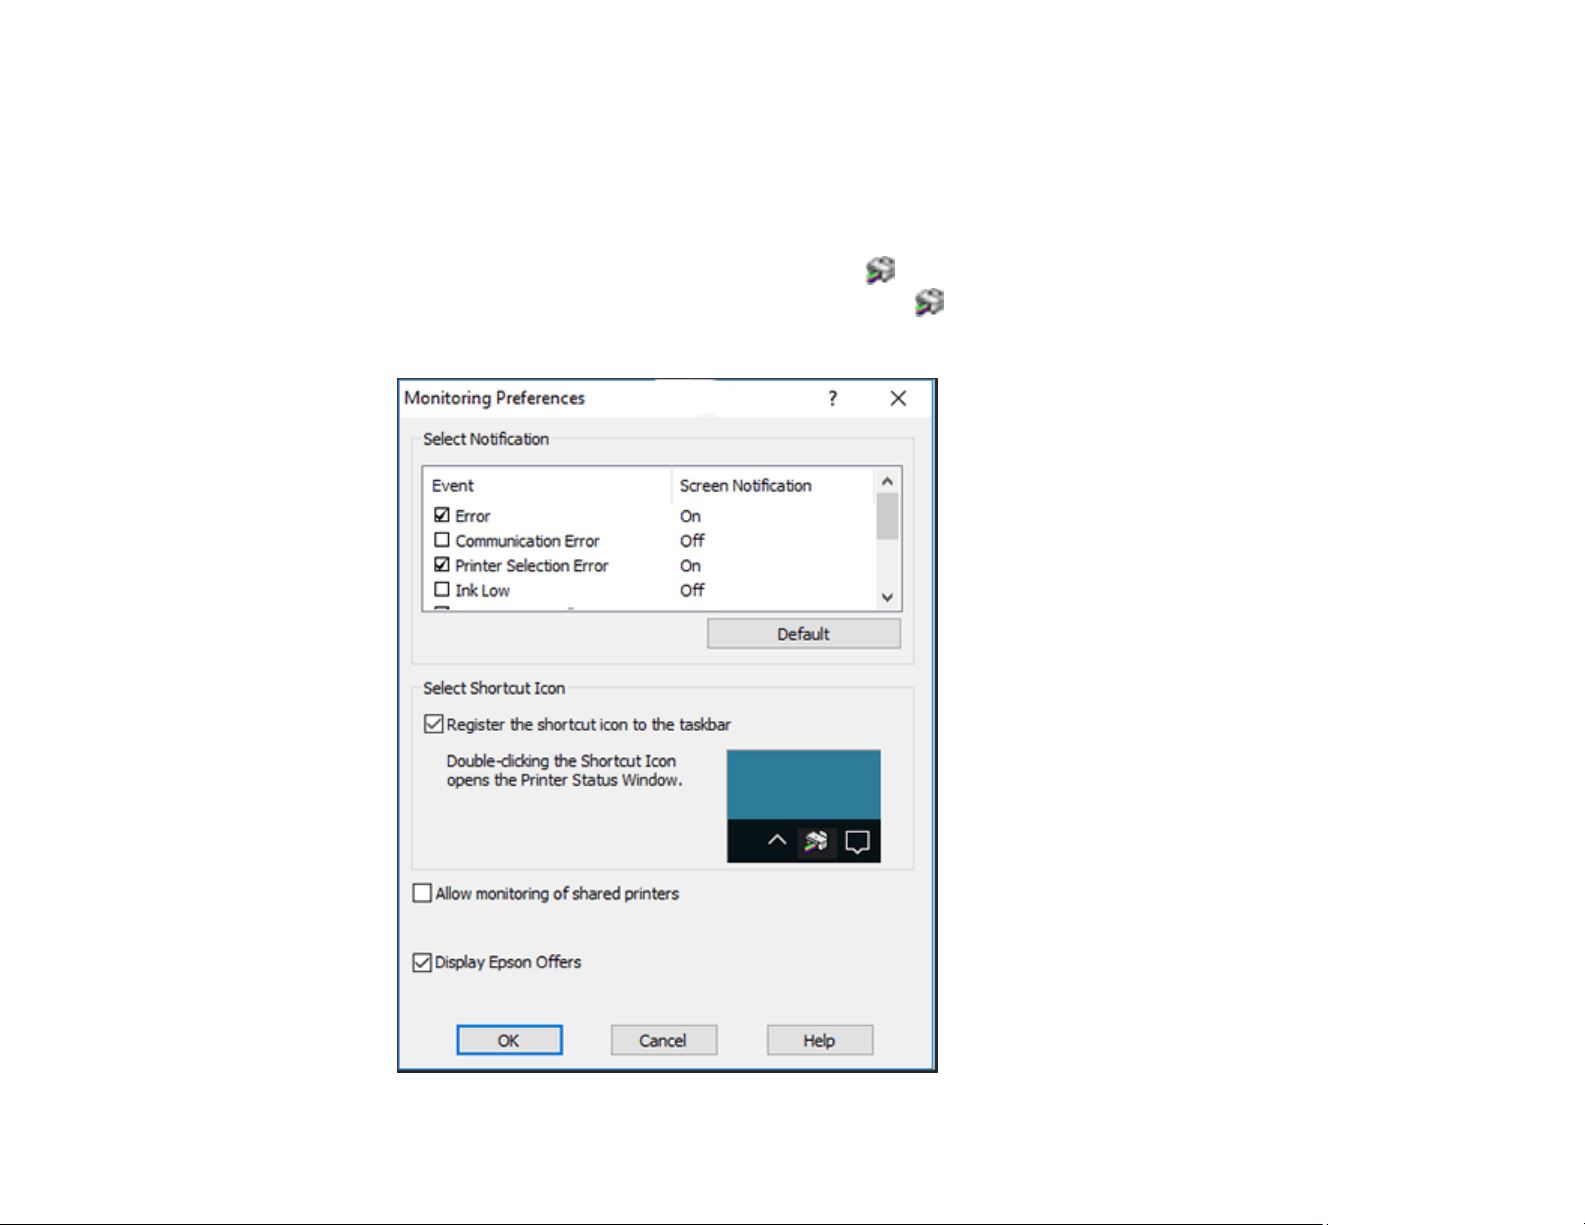
262
Related tasks
Refilling the Ink Tanks
Disabling Special Offers with Windows
You can disable special offers messages from Epson using a utility on your Windows computer.
1. Access the Windows Desktop and right-click the icon for your product in the right side of the
Windows taskbar, or click the up arrow and right-click . Select Monitoring Preferences.
You see this window:

263
2. To disable promotional offers, deselect the Display Epson Offers checkbox.
Parent topic: Checking the Ink and Maintenance Box Levels
Purchase Epson Ink and Maintenance Box
You can purchase genuine Epson ink, maintenance boxes, and paper at epson.com (U.S. sales) or
epson.ca (Canadian sales). You can also purchase supplies from an Epson authorized reseller. To find
the nearest one, call 800-GO-EPSON (800-463-7766) in the U.S. or 800-807-7766 in Canada.
Note: Epson's warranties do not extend to any damage caused by the use of third-party ink or ink not
designed for your printer.
The included initial ink bottles must be used for printer setup and are not for resale. The printer ships
with full ink bottles and part of the ink from the first bottles is used to charge the print head. Yields vary
considerably based on images printed, print settings, paper type, frequency of use and temperature.
Ink Bottle and Maintenance Box Part Numbers
Parent topic: Refilling Ink and Replacing the Maintenance Box
Ink Bottle and Maintenance Box Part Numbers
Use these part numbers when you order or purchase new ink bottles or a new maintenance box. Use the
ink by the date printed on the package.
Ink color Part number
Black T542120-S
Cyan T542220-S
Magenta T542320-S
Yellow T542420-S
Maintenance box part number: T04D100
Parent topic: Purchase Epson Ink and Maintenance Box
Refilling the Ink Tanks
Make sure you have a new ink bottle handy and have read the ink safety precautions before you begin.
You can continue to use the product even if one or more ink tanks are not filled all the way. However, for
the most accurate ink level monitoring, fill all the ink tanks up to the upper line.
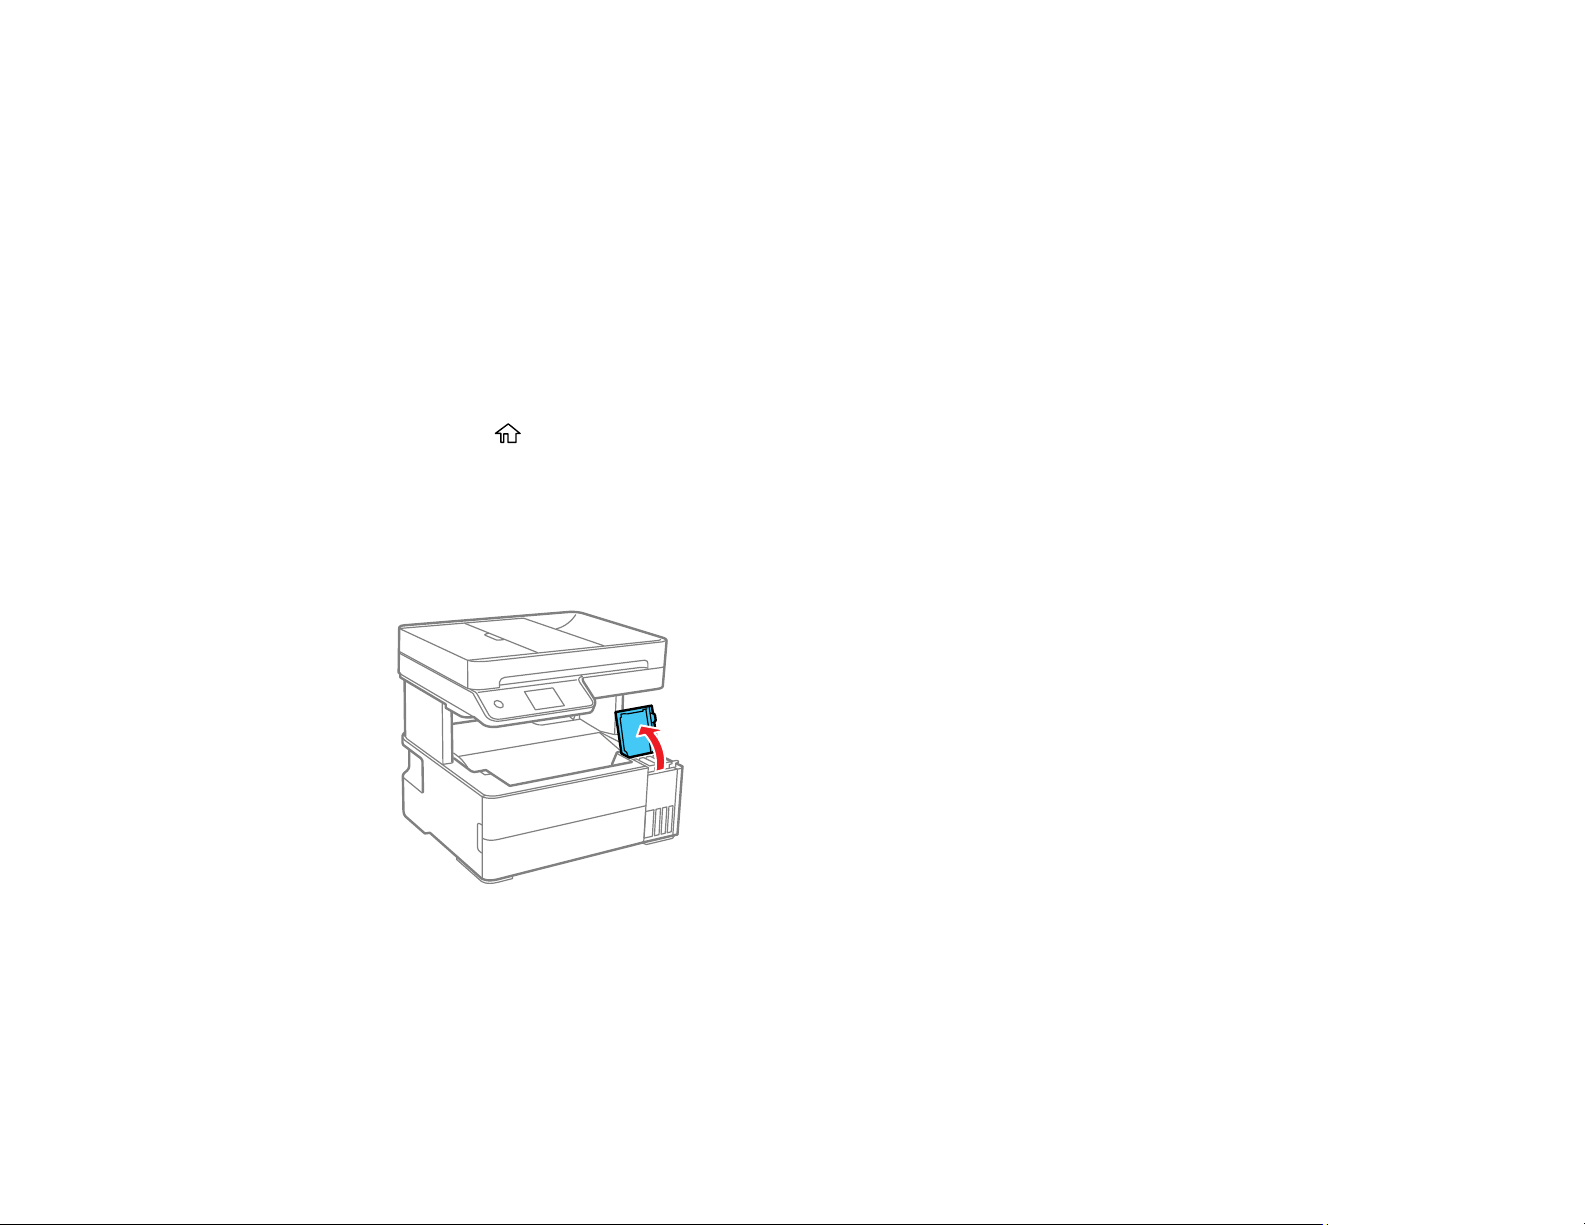
264
Note: The product has a low ink alert system. The accuracy of this system depends on the user refilling
the ink tanks correctly. The product cannot directly measure the ink levels in the tanks; instead it
estimates the amount of ink remaining by internally monitoring ink usage. The low ink alert system may
generate inaccurate messages if the ink tanks are not refilled according to these instructions.
As a precaution, perform regular visual inspections of the ink tanks to ensure ink levels do not fall below
the lower line. Continued use of the product when the ink level is below the lower line on the tank could
damage the product.
Caution: If ink spills, wipe it off immediately with a damp towel to avoid permanent stains. If ink gets on
your clothes or belongings, it may not come off.
1. Turn on your product.
2. Press the home button, if necessary.
3. Select Maintenance.
4. Select Fill Ink.
5. Read the filling ink precautions on the LCD screen and press Proceed.
6. Open the ink tank cover.
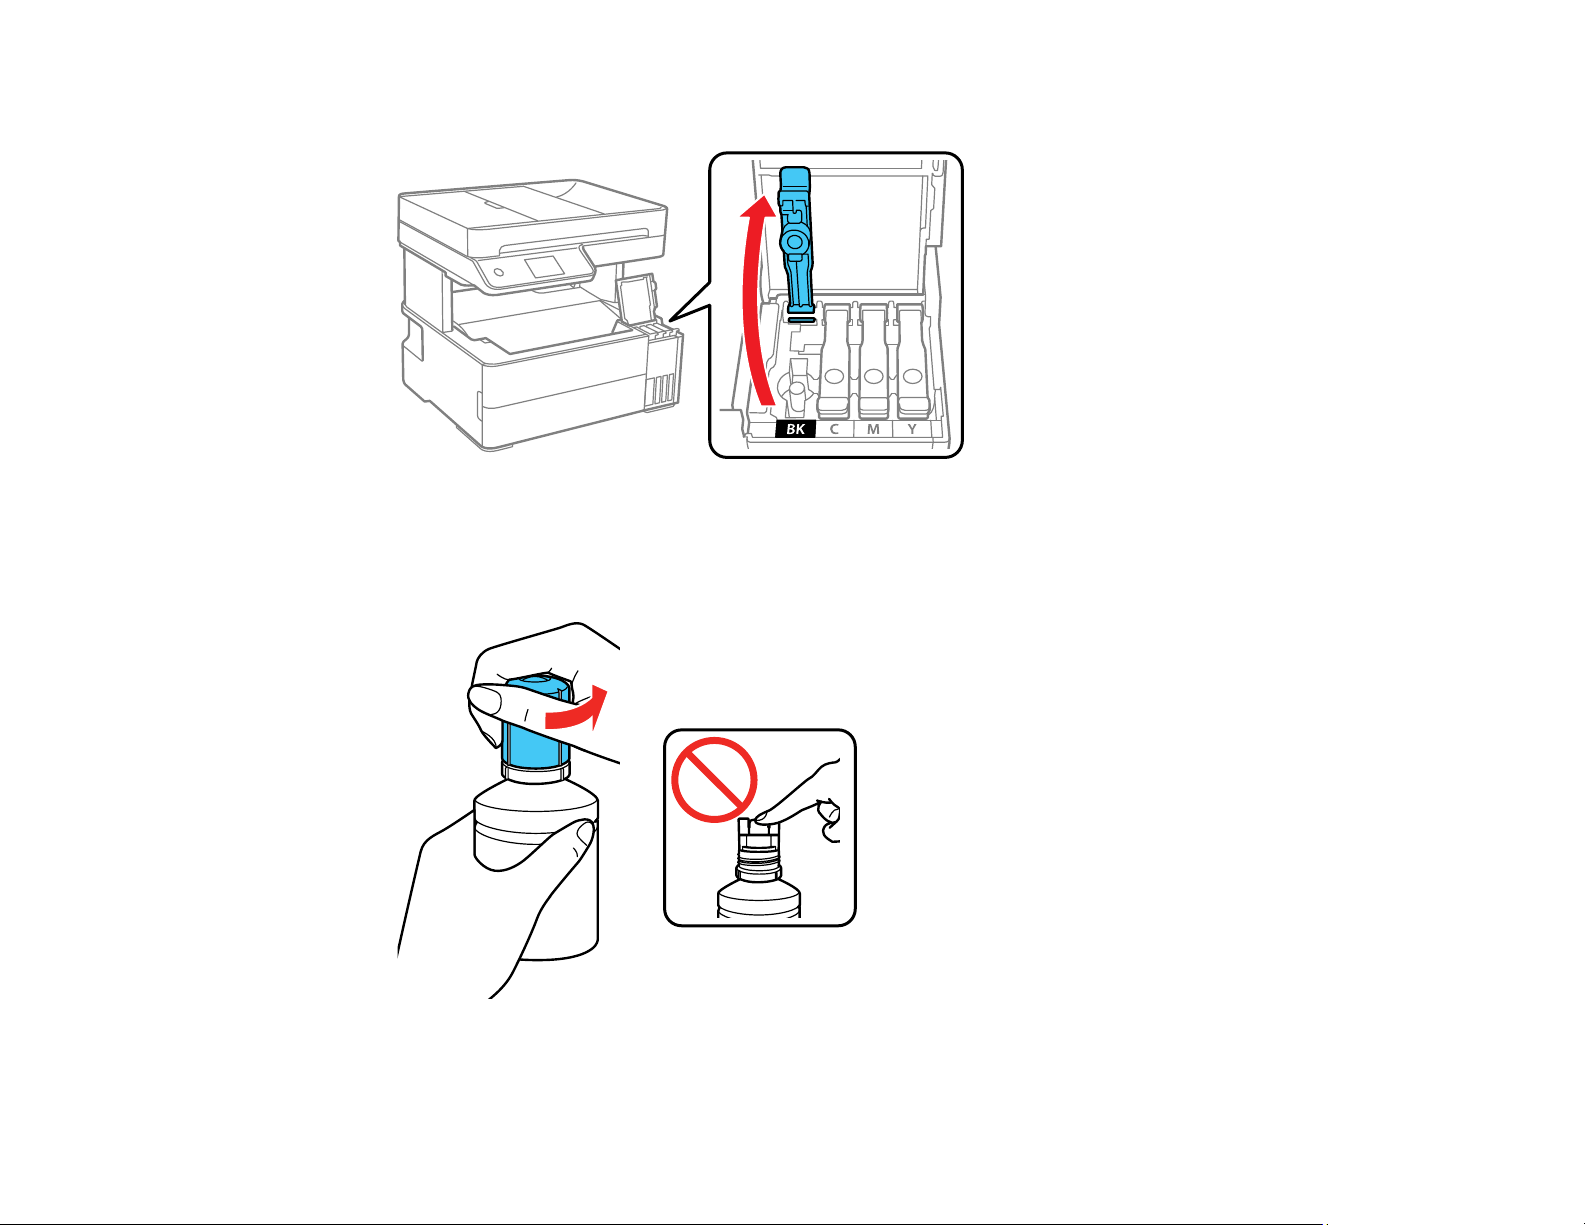
265
7. Open the ink tank cap.
Note: Refer to the color-coded sticker on the ink tank unit to identify the color of each tank.
8. Hold the ink bottle upright and slowly turn the bottle cap to remove it.

266
Caution: Do not shake or squeeze the bottle. Do not touch the top of the bottle after its cap is
removed.
Warning: If ink gets on your skin, wash it thoroughly with soap and water. If ink gets into your eyes,
flush them immediately with water. If ink gets into your mouth, spit it out immediately. Seek medical
advice if problems persist. Keep the ink bottles out of the reach of children and do not drink the ink.
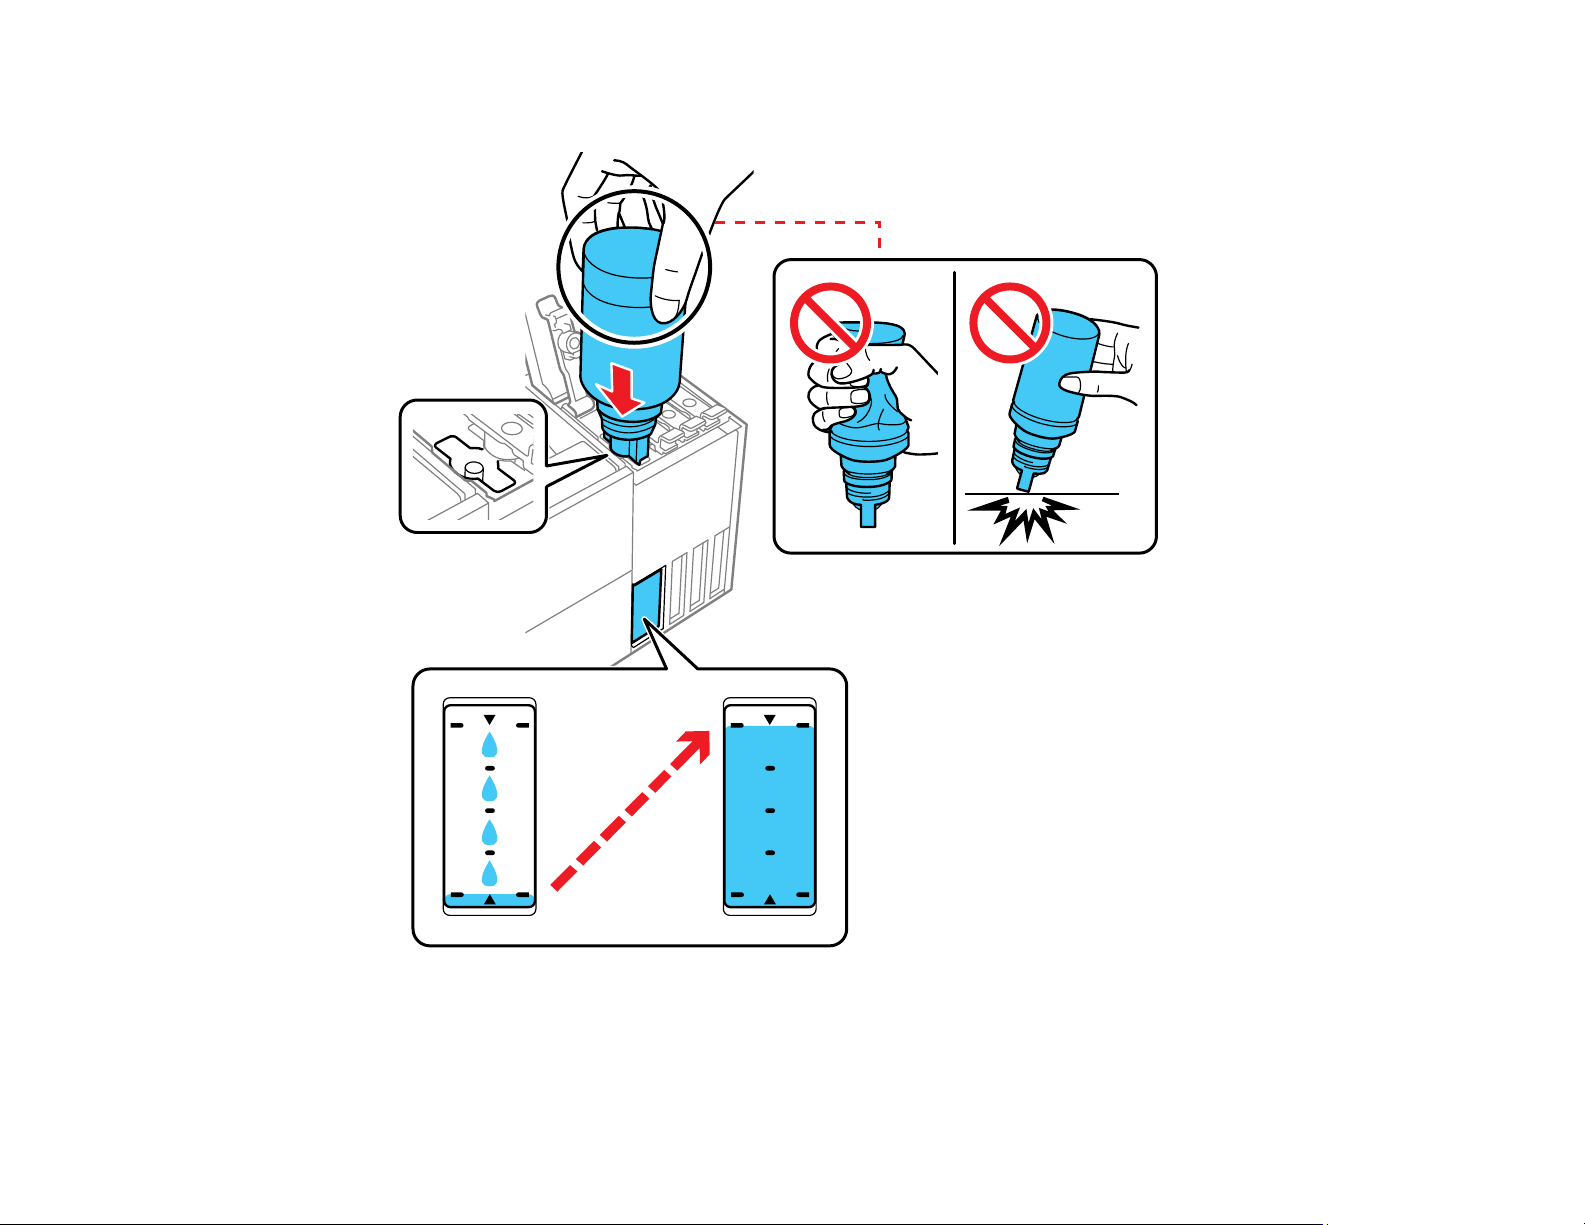
267
9. Align the top of the ink bottle with the filling port, and then insert it straight into the port.
Note: Do not force the bottle into position; each bottle is keyed for each color.
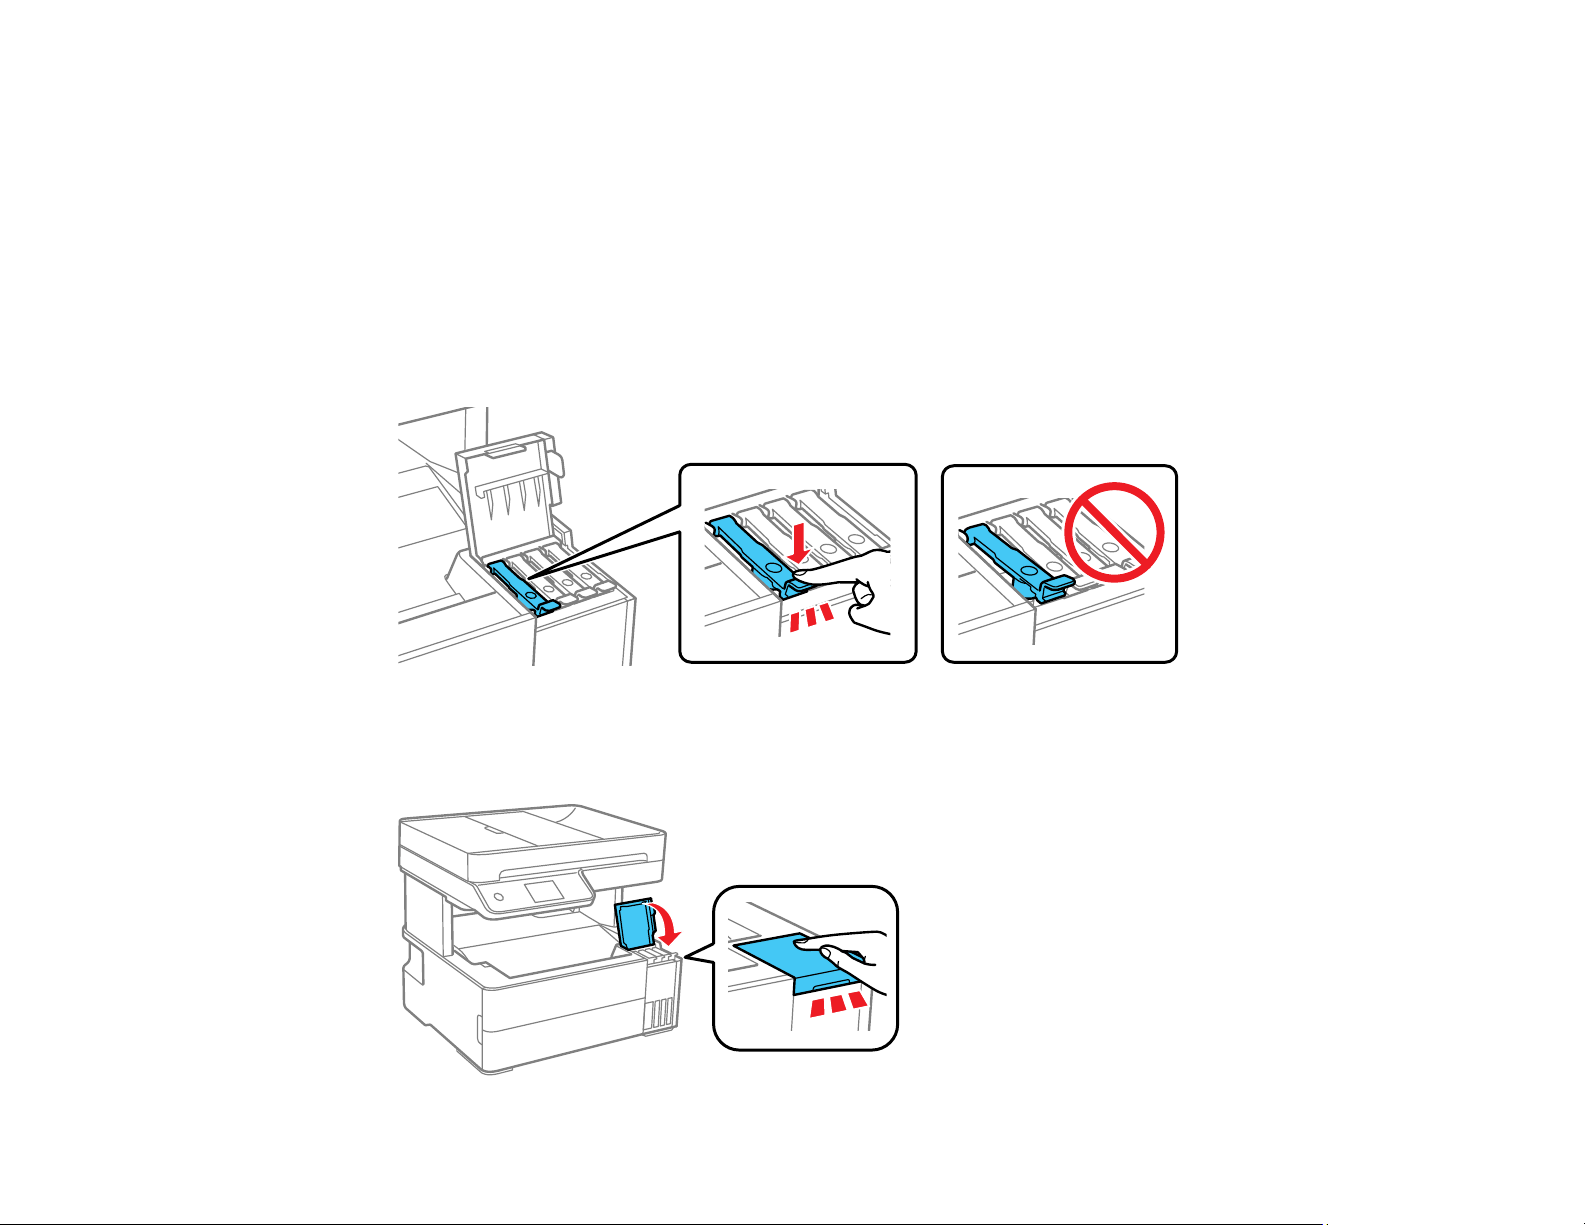
268
10. Wait for the ink to fill the tank. Do not squeeze the bottle or allow it to contact any surface. Ink flows
into the tank and stops automatically when the ink is filled to the upper line.
Note: If ink does not flow from the bottle, lift and reinsert the bottle.
11. When the ink tank is full, remove the ink bottle and securely close it with the cap.
Note: If any ink remains in the bottle, store the bottle upright for later use. Do not leave the ink bottle
inserted; otherwise the bottle may be damaged or ink may leak.
12. Close the ink tank cap.
13. Repeat the steps above to refill other ink tanks, as necessary.
14. Close the ink tank cover until it clicks.

269
15. Follow the on-screen instructions to reset the ink level for any color of ink you refilled.
Note: Even if you do not refill ink up to the upper line on the ink tank, you can continue using the
printer. To keep your printer operating at its best, however, fill the ink tank up to the upper line and
reset the ink level immediately.
Parent topic: Refilling Ink and Replacing the Maintenance Box
Maintenance Box Replacement
The maintenance box stores surplus ink that gets collected during printing or print head cleaning. When
you see a message on the LCD screen, follow the on-screen instructions to replace the maintenance
box.
Note: When the maintenance box is full, you cannot print or clean the print head until it is replaced.
However, you can perform operations that do not require ink, such as scanning.
Note the following precautions when replacing the maintenance box:
• Do not remove the maintenance box or its cover except when replacing the maintenance box;
otherwise, ink may leak.
• Do not touch the green chip on the side of the maintenance box.
• Do not tilt the maintenance box after removing it or ink may leak.
• Do not touch the openings in the maintenance box or you may get ink on you.
• Do not drop the maintenance box or subject it to strong shocks.
• If you cannot replace the cover, the maintenance box may not be installed correctly. Remove and
reinstall the maintenance box.
• Do not store the maintenance box in high or freezing temperatures.
• Do not replace the maintenance box during printing; otherwise, ink may leak.
• If you cannot close the maintenance box cover, make sure the maintenance box is installed properly.
• Keep the maintenance box out of direct sunlight.
Caution: Do not reuse a maintenance box that has been removed and left uninstalled for a long period.
Keep the maintenance box away from direct sunlight.
Note: The maintenance box is a user-replaceable part and is not covered by the product warranty.


271
Adjusting Print Quality
If your print quality declines, you may need to run a utility to clean or align the print head.
If running these utilities does not solve the problem, you may need to run a Power Cleaning or clean the
paper or print head path.
Print Head Maintenance
Print Head Alignment
Cleaning the Paper Guide
Cleaning the Print Head Path
Checking the Number of Sheets Fed
Print Head Maintenance
If your printouts become too light, or you see dark or light bands across them, you may need to clean the
print head nozzles. Cleaning uses ink, so clean the nozzles only if print quality declines.
You can check for clogged nozzles before you clean them so you don’t clean them unnecessarily.
Note: You may not be able to clean the print head when the ink level in any of the tanks is low. You may
have to refill the ink tank first.
If you still see white or dark lines or gaps in your printouts, even after cleaning the print head several
times, you can run a Power Cleaning.
Print Head Nozzle Check
Print Head Cleaning
Power Cleaning
Parent topic: Adjusting Print Quality
Related tasks
Refilling the Ink Tanks
Print Head Nozzle Check
You can print a nozzle check pattern to check for clogged nozzles.
Checking the Nozzles Using the Product Control Panel
Checking the Nozzles Using a Computer Utility
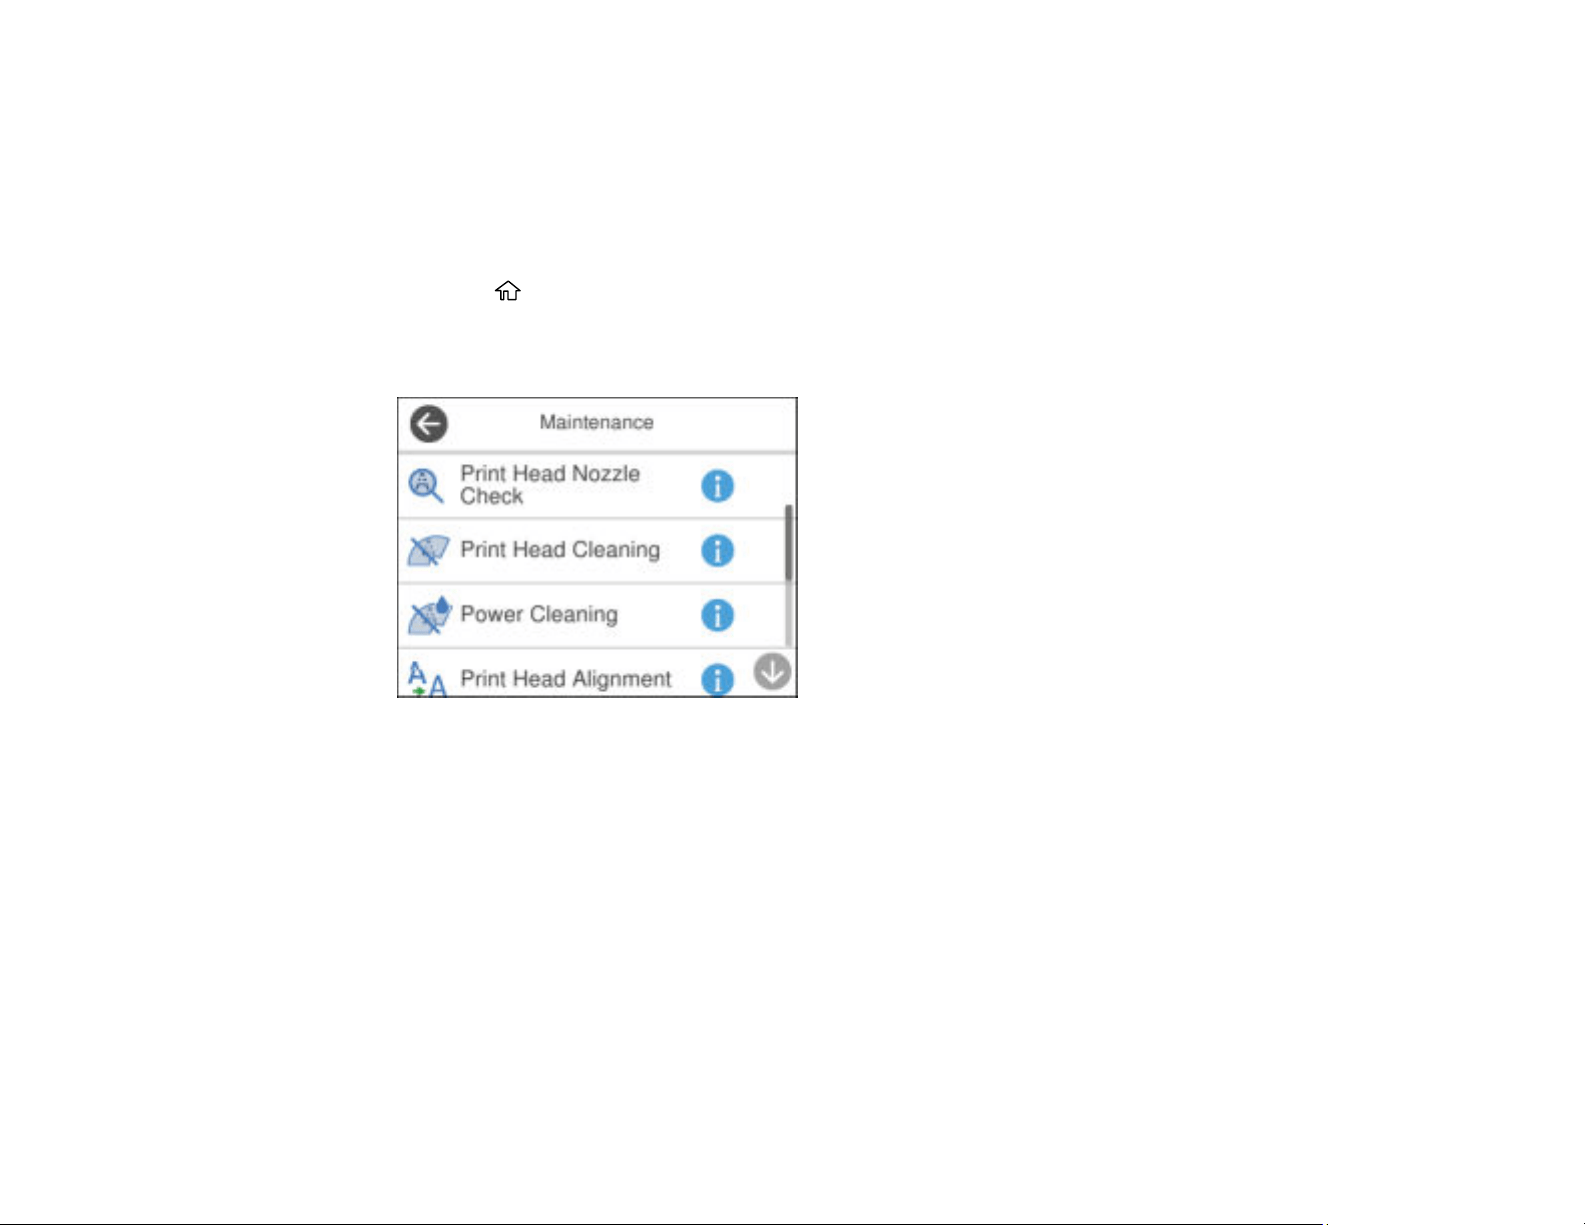
272
Parent topic: Print Head Maintenance
Checking the Nozzles Using the Product Control Panel
You can check the print head nozzles using the control panel on your product.
1. Make sure there are no errors on the LCD screen and the output tray is extended.
2. Load a few sheets of plain paper in the product.
3. Press the home button, if necessary.
4. Select Maintenance.
You see a screen like this:
5. Select Print Head Nozzle Check.
6. Select Print.
The nozzle check pattern is printed.

273
7. Check the printed pattern to see if there are gaps in the lines.
Print head is clean
Print head needs cleaning
8. Do one of the following:
• If there are no gaps, the print head is clean. Select O.
• If there are gaps or the pattern is faint, select X. Follow the instructions on the screen to clean the
print head.
If you don’t see any improvement after cleaning the print head up to 3 times, turn the product off and wait
at least 12 hours. Then try cleaning the print head again. If quality still does not improve, run a Power
Cleaning. If there is still no improvement, contact Epson support.
Parent topic: Print Head Nozzle Check
Related tasks
Cleaning the Print Head Using the Product Control Panel
Power Cleaning Using the Product Control Panel
Refilling the Ink Tanks
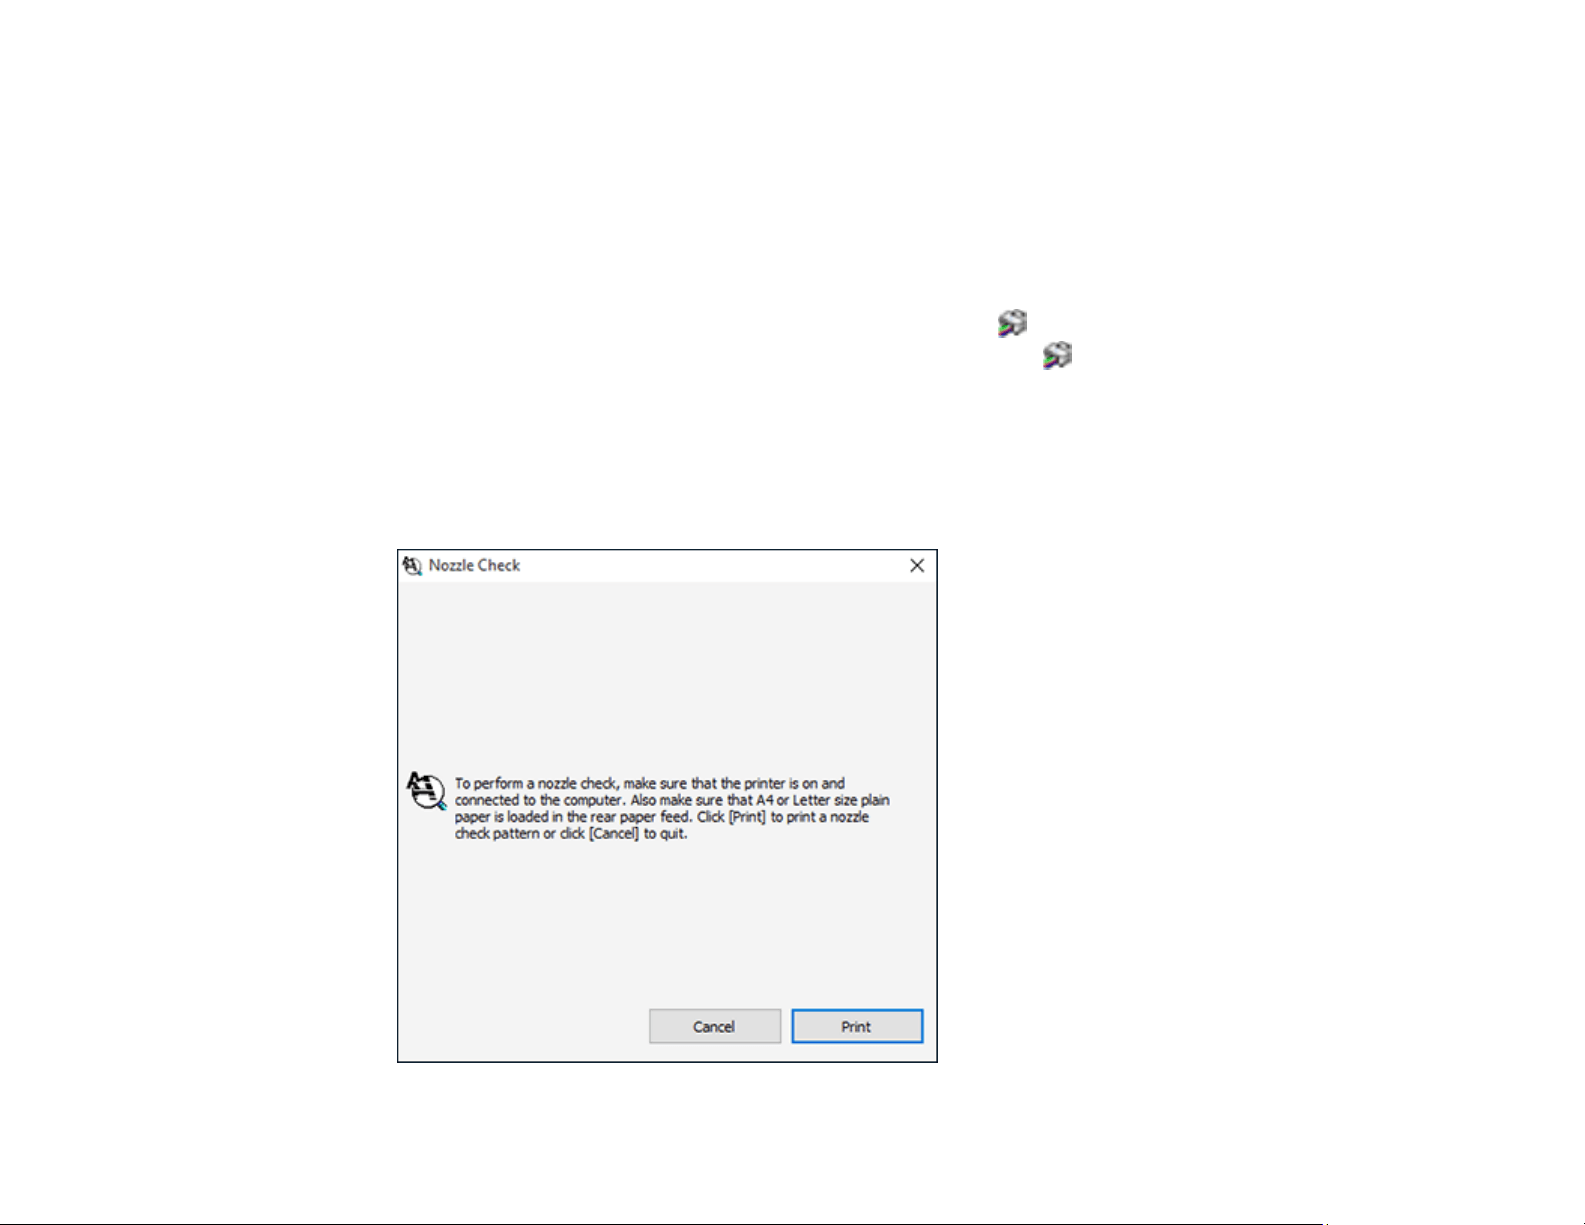
274
Related topics
Loading Paper
Checking the Nozzles Using a Computer Utility
You can check the print head nozzles using a utility on your Windows or Mac computer.
1. Load a few sheets of plain paper in the paper cassette.
2. Do one of the following:
• Windows: Access the Windows Desktop and right-click the icon for your product in the right
side of the Windows taskbar, or click the up arrow and right-click .
• Mac: In the Apple menu or the Dock, select System Preferences. Select Print & Fax, Print &
Scan, or Printers & Scanners, select your product, and select Options & Supplies. Select
Utility and select Open Printer Utility.
3. Select Print Head Nozzle Check.
You see a window like this:
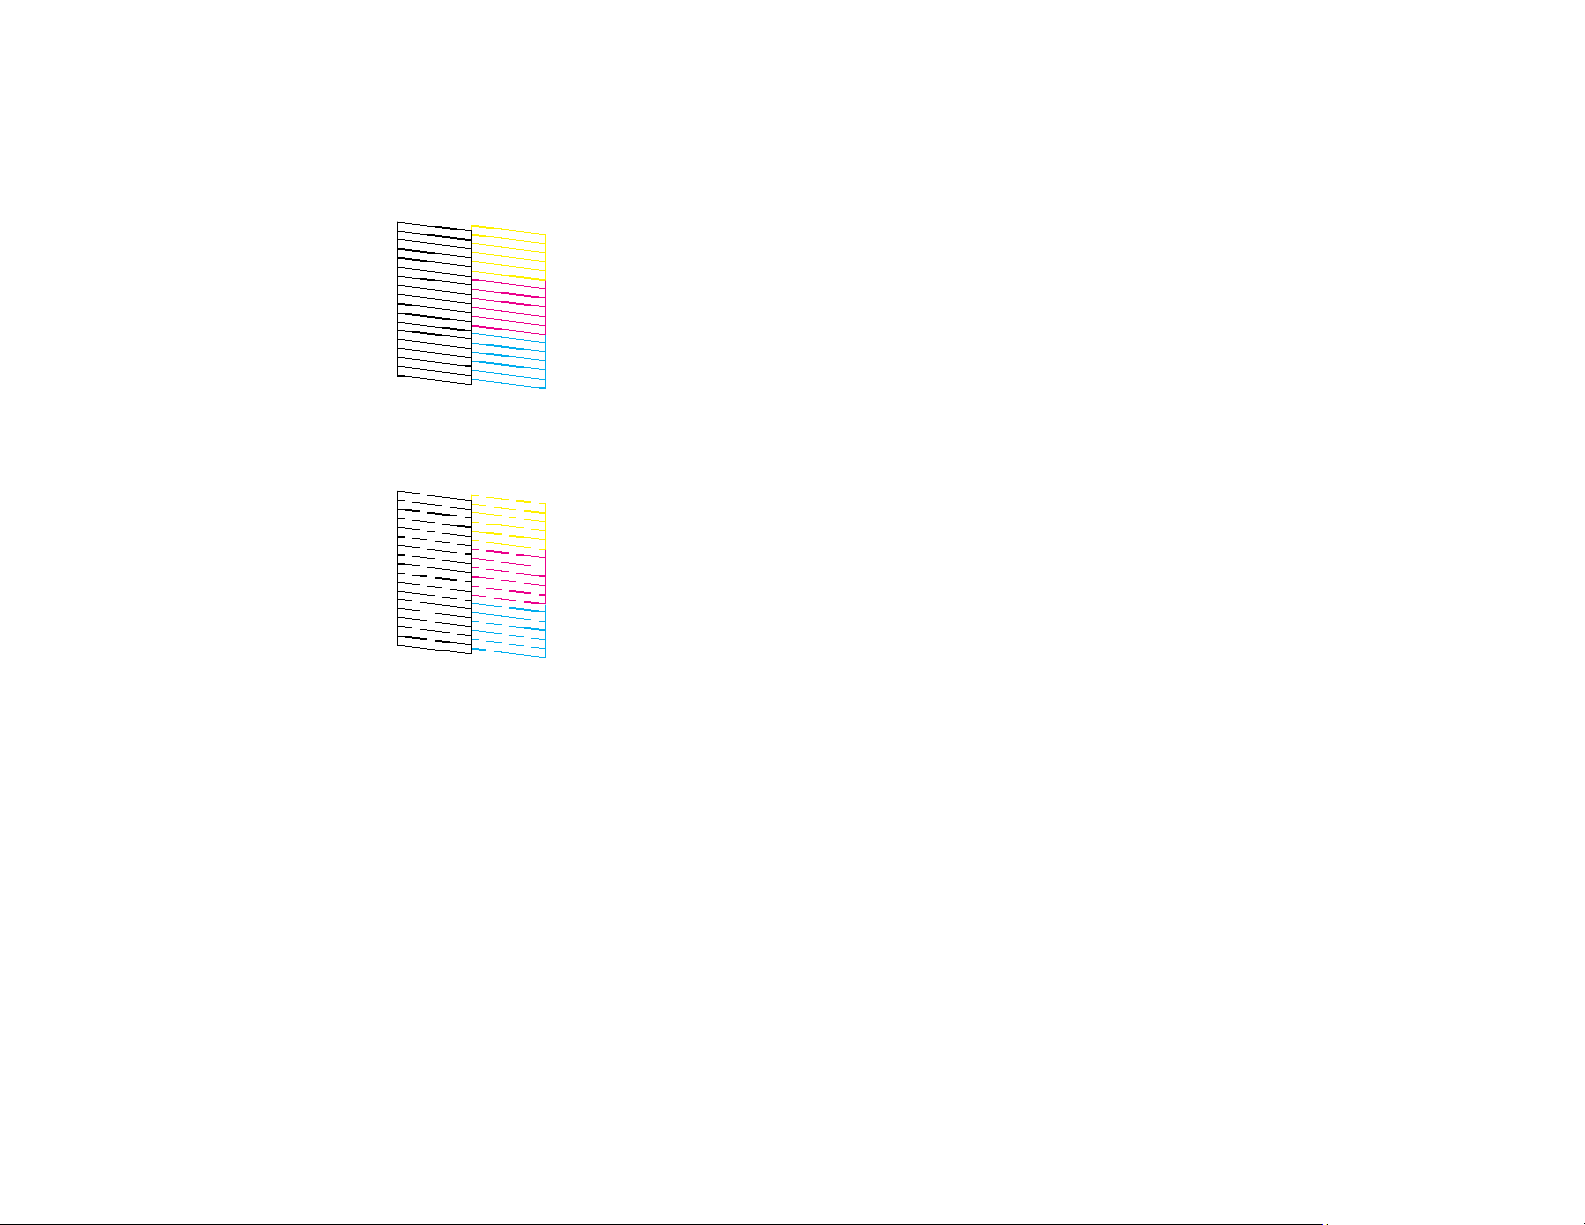
275
4. Click Print.
5. Check the printed pattern to see if there are gaps in the lines.
Print head is clean
Print head needs cleaning
6. Do one of the following:
• If there are no gaps, click Finish.
• If there are gaps or the pattern is faint, clean the print head.
• If almost the entire pattern is missing, click Finish and perform a Power Cleaning.
Parent topic: Print Head Nozzle Check
Related tasks
Cleaning the Print Head Using a Computer Utility
Power Cleaning Using a Computer Utility
Refilling the Ink Tanks
Related topics
Loading Paper
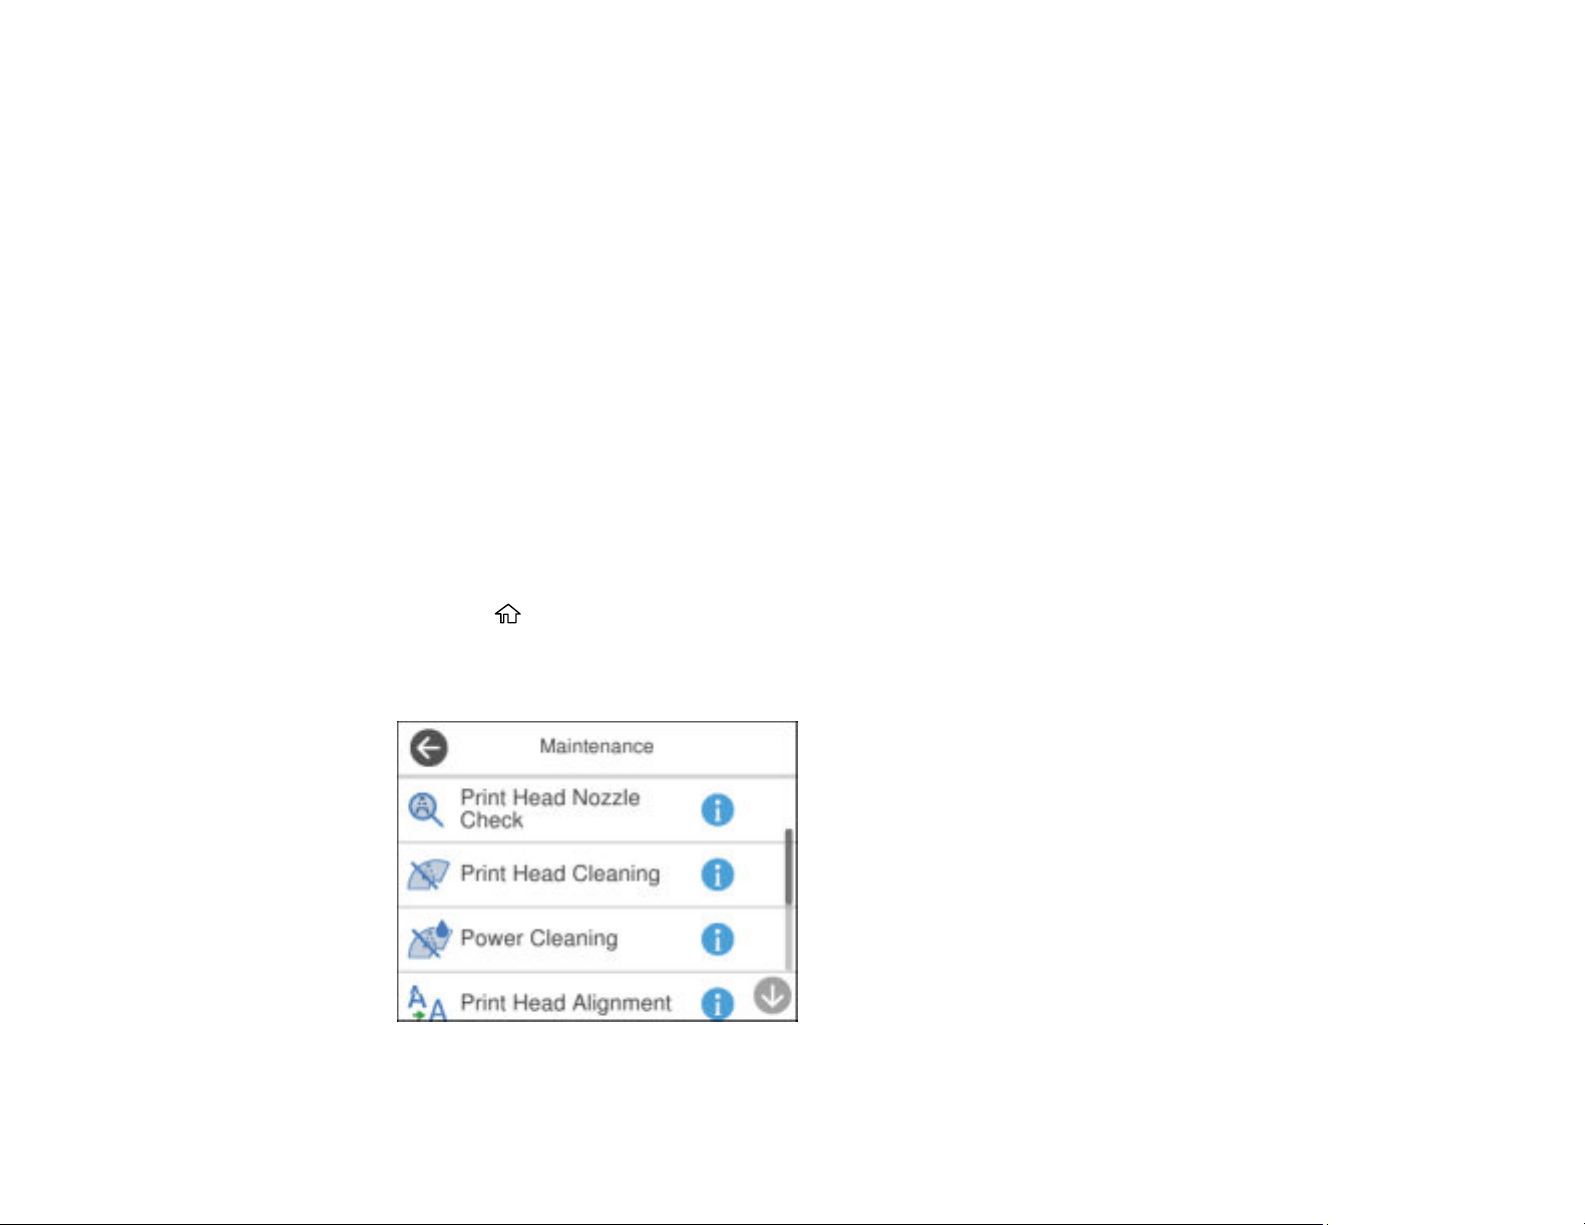
276
Print Head Cleaning
If print quality has declined and the nozzle check pattern indicates clogged nozzles, you can clean the
print head.
Note: You may not be able to clean the print head when the ink level in any of the tanks is low. You may
have to refill the ink tank first.
Cleaning the Print Head Using the Product Control Panel
Cleaning the Print Head Using a Computer Utility
Parent topic: Print Head Maintenance
Related tasks
Refilling the Ink Tanks
Cleaning the Print Head Using the Product Control Panel
You can clean the print head nozzles using the control panel on your product.
1. Make sure there are no errors on the LCD screen and the output tray is extended.
2. Load a few sheets of plain paper in the product.
3. Press the home button, if necessary.
4. Select Maintenance.
You see a screen like this:
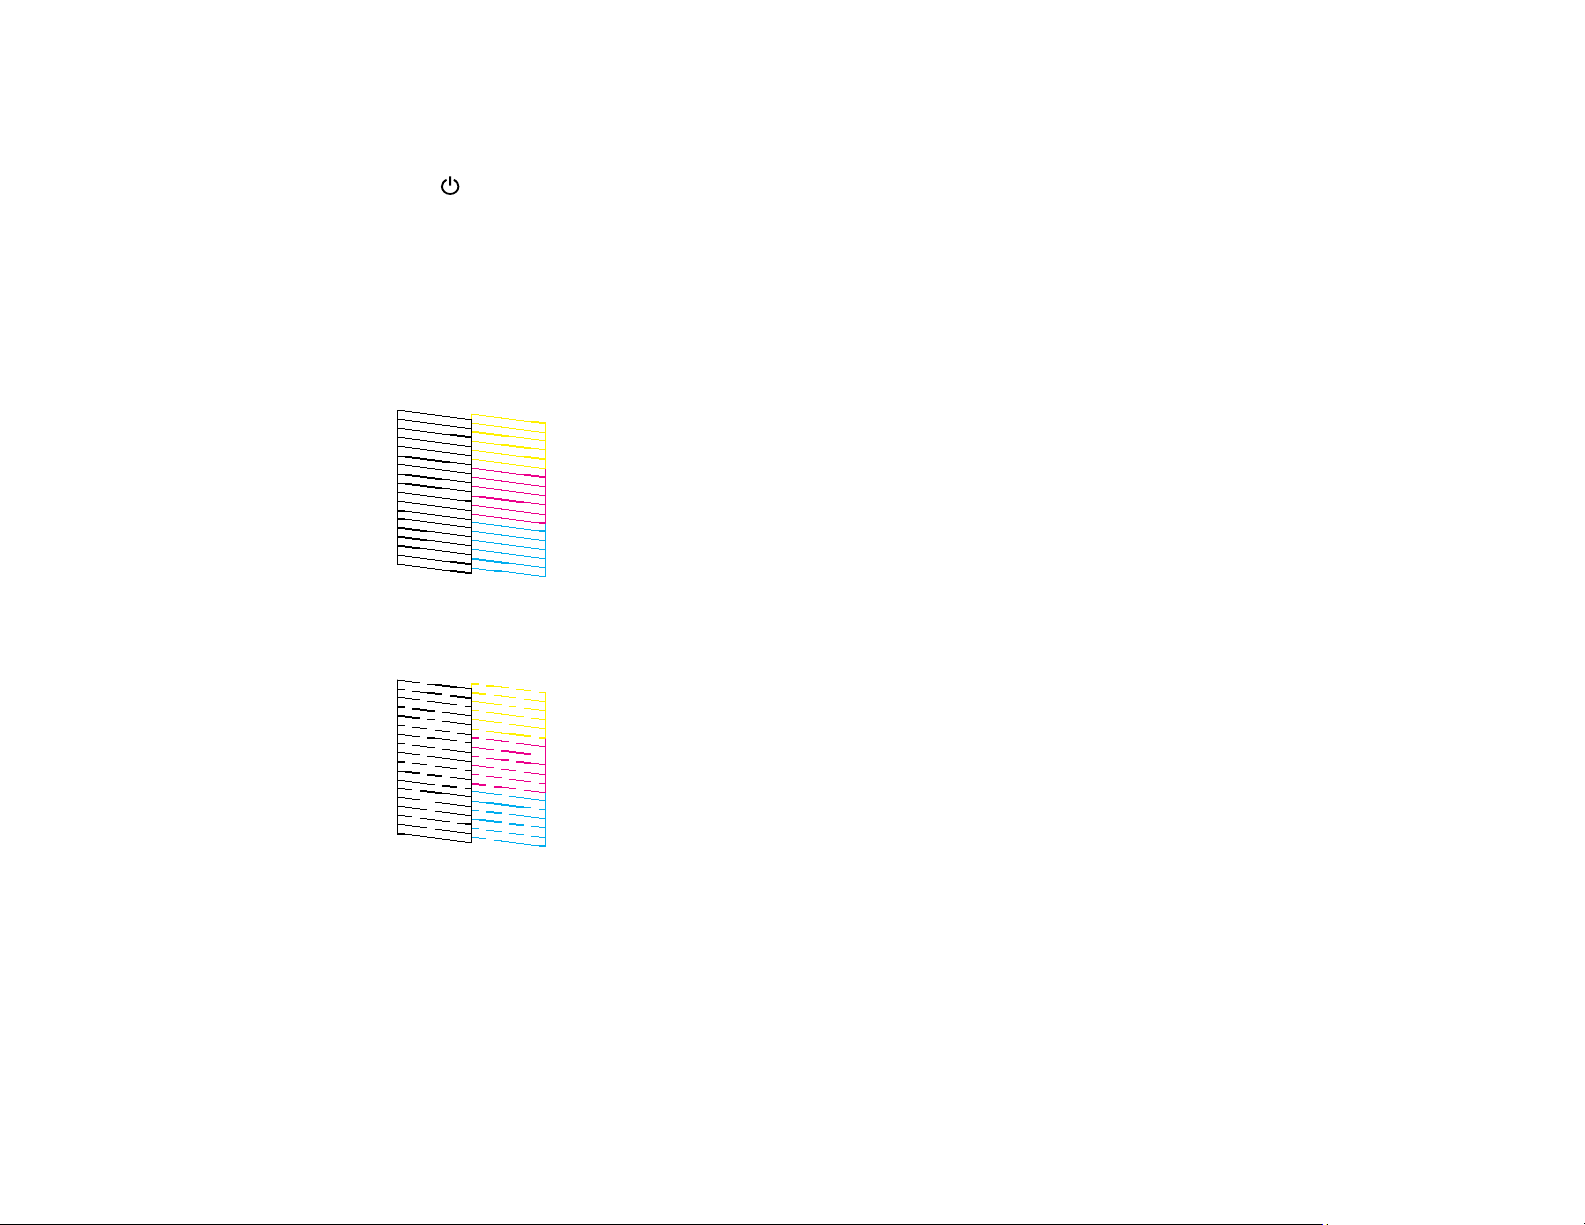
277
5. Select Print Head Cleaning.
6. Select Start to clean the print head.
The power light flashes throughout the cleaning cycle and stays on when the cleaning cycle is
finished. When the cleaning cycle is finished, a nozzle check pattern prints automatically.
Caution: Never turn off the product or open the printer cover during a cleaning cycle or you may not
be able to print.
7. Check the printed pattern to see if there are gaps in the lines.
Print head is clean
Print head needs cleaning
8. Do one of the following:
• If there are no gaps, the print head is clean. Select O.
• If there are gaps or the pattern is faint, select X. Follow the instructions on the screen to clean the
print head.

278
If you don’t see any improvement after cleaning the print head up to 3 times, turn off the product and wait
at least 12 hours without printing. Then try cleaning the print head again. If quality still does not improve,
run a Power Cleaning. If there is still no improvement, contact Epson support.
Parent topic: Print Head Cleaning
Related tasks
Checking the Nozzles Using the Product Control Panel
Power Cleaning Using the Product Control Panel
Refilling the Ink Tanks
Related topics
Loading Paper
Cleaning the Print Head Using a Computer Utility
You can clean the print head using a utility on your Windows or Mac computer.
1. Make sure there are no errors on the LCD screen and the output tray is extended.
2. Load a few sheets of plain paper in the product.
3. Do one of the following:
• Windows: Access the Windows Desktop and right-click the icon for your product in the right
side of the Windows taskbar, or click the up arrow and right-click .
• Mac: In the Apple menu or the Dock, select System Preferences. Select Print & Fax, Print &
Scan, or Printers & Scanners, select your product, and select Options & Supplies. Select
Utility and select Open Printer Utility.
4. Select Print Head Cleaning.
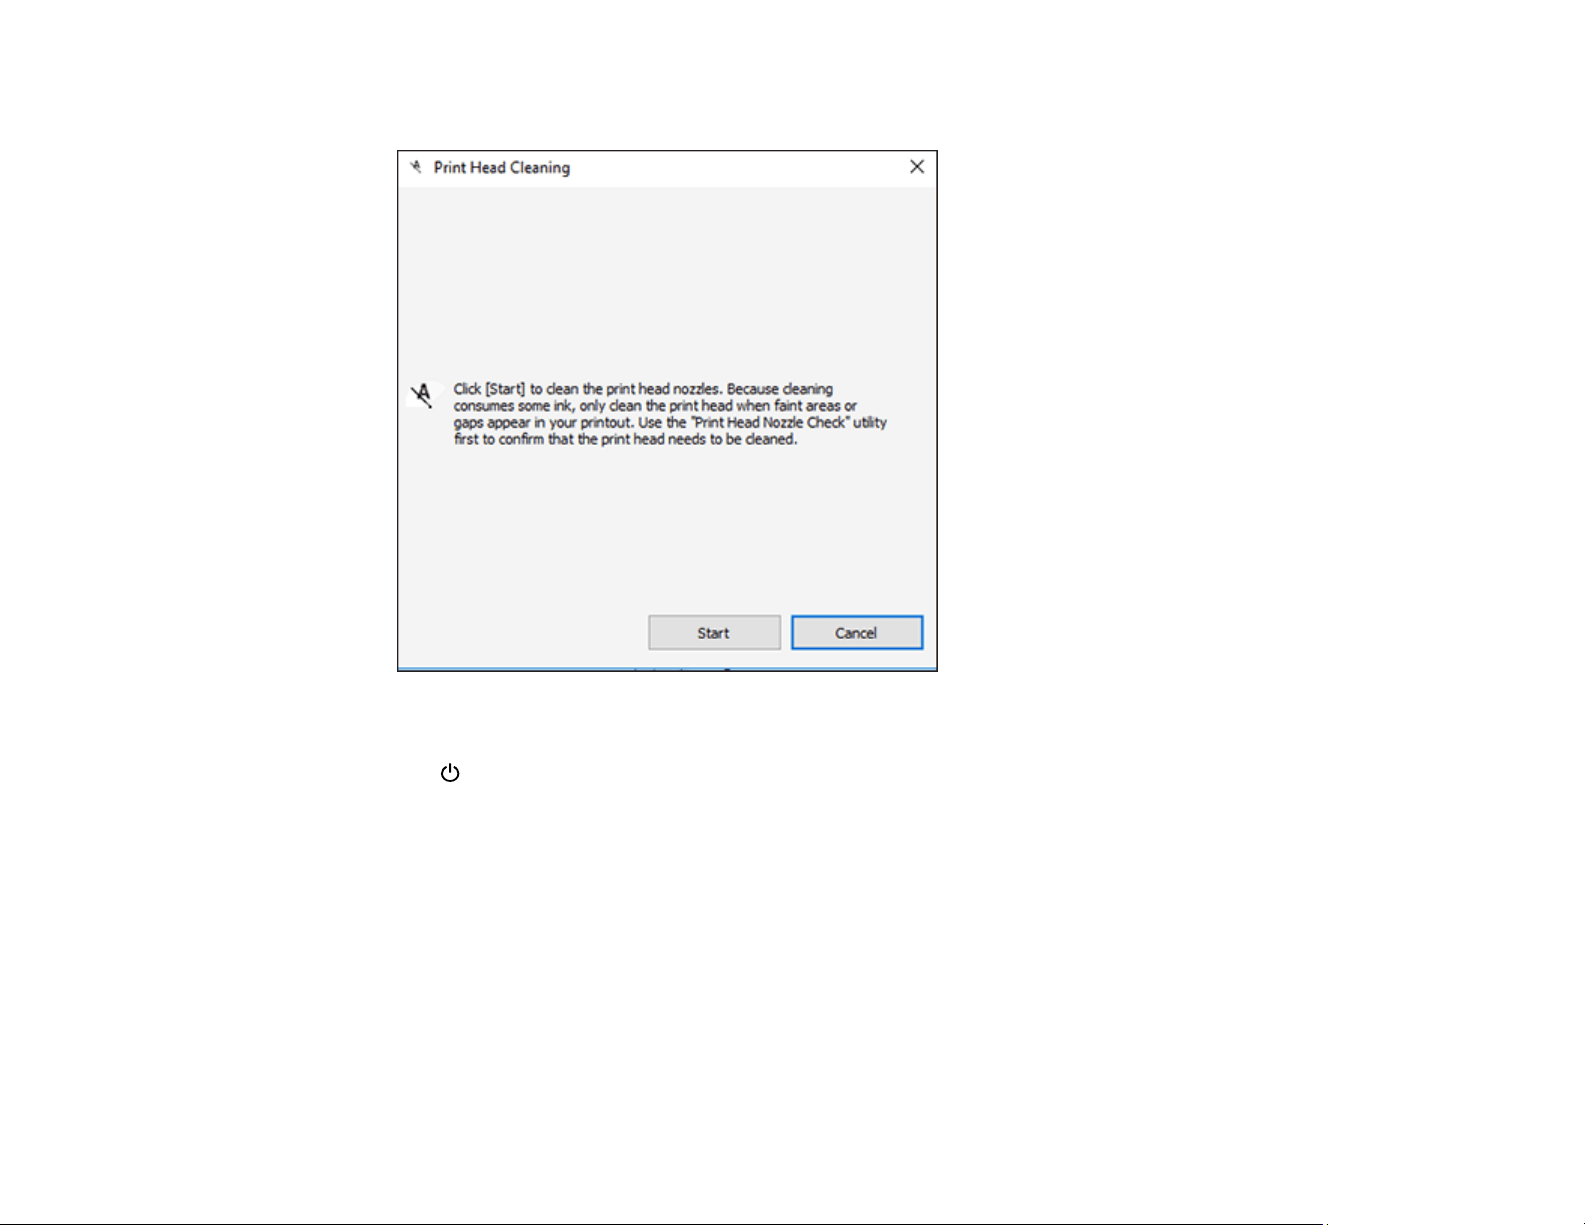
279
You see a window like this:
5. Click Start to begin the cleaning cycle.
The power light flashes throughout the cleaning cycle and stays on when the cleaning cycle is
finished.
Caution: Never turn off the product or open the scanner unit during a cleaning cycle or you may not
be able to print.
6. When the cleaning cycle is finished, you can check to see if the nozzles are clean; click Print Nozzle
Check Pattern and click Print.
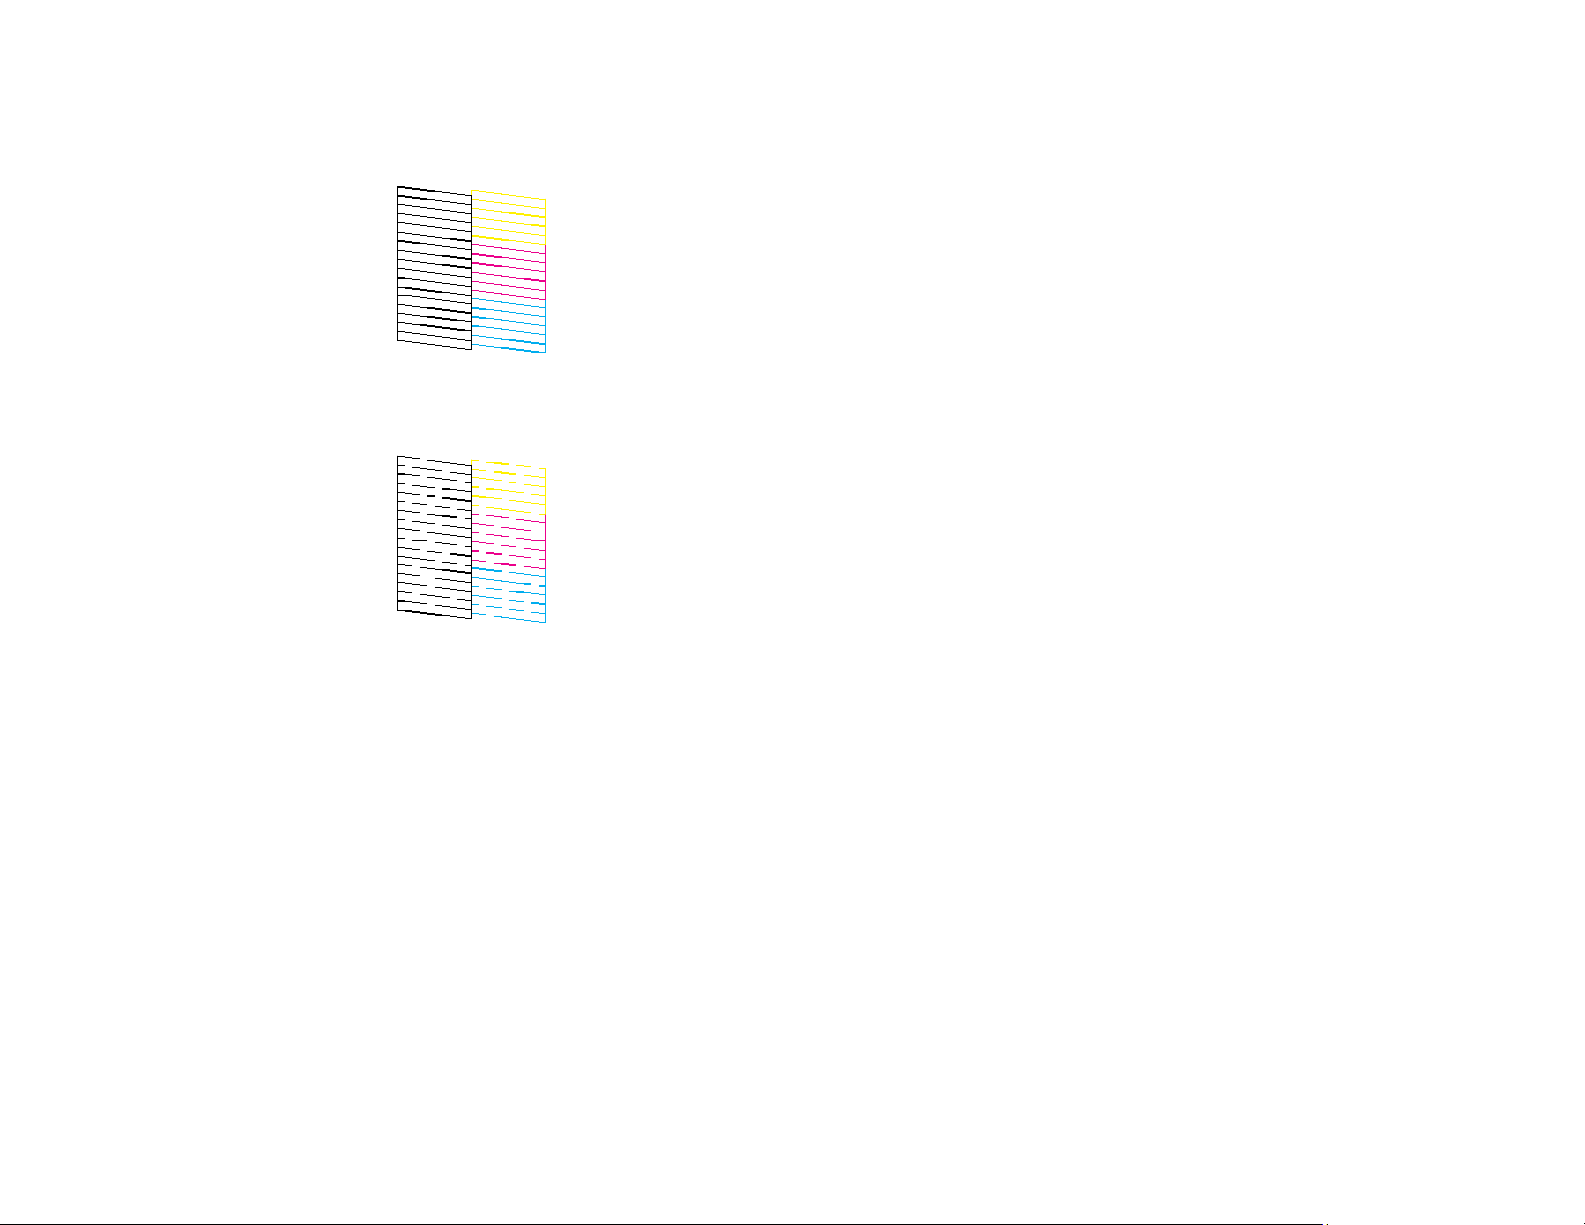
280
7. Check the printed pattern to see if there are gaps in the lines.
Print head is clean
Print head needs cleaning
• If there are no gaps, click Finish.
• If there are gaps or the pattern is faint, click Clean to clean the print head again.
• If almost the entire pattern is missing, click Finish and perform a Power Cleaning.
If you don’t see any improvement after cleaning the print head up to 3 times, turn off the product and wait
at least 12 hours. Then try cleaning the print head again. If quality still does not improve, run a Power
Cleaning. If there is still no improvement, contact Epson support.
Parent topic: Print Head Cleaning
Related references
Where to Get Help
Related tasks
Refilling the Ink Tanks
Power Cleaning Using a Computer Utility

281
Related topics
Loading Paper
Power Cleaning
If you still see white or dark lines or missing nozzles in your printouts, even after cleaning the print head
several times, you can run a Power Cleaning.
If you do not see improvement after running a Power Cleaning, turn off the product and wait at least 12
hours before running another Power Cleaning.
Caution: Running a Power Cleaning consumes a lot of ink, so you should run it only if necessary. Make
sure each ink tank is at least one-third full before running a Power Cleaning, or it may damage the
product.
Caution: Power Cleaning may cause the maintenance box to reach its capacity sooner. When the
maintenance box is full, you need to replace it to continue printing.
Power Cleaning Using the Product Control Panel
Power Cleaning Using a Computer Utility
Parent topic: Print Head Maintenance
Power Cleaning Using the Product Control Panel
You can run a Power Cleaning using the control panel on your product.
After a Power Cleaning, you must turn off the product and wait at least 12 hours before running another
Power Cleaning.
1. Visually check the ink levels and make sure each ink tank is at least one-third full.
Caution: If you run a Power Cleaning when the ink levels are low, you may damage the product.
2. Press the home button, if necessary.
3. Select Maintenance.

282
You see a screen like this:
4. Select Power Cleaning.
5. Follow the on-screen instructions to run the Power Cleaning.
Note: If you cannot run this feature, solve the problems that are displayed on the screen and run
Power Cleaning again.
6. When the Power Cleaning is finished, run a nozzle check.
If print quality has not improved after running Power Cleaning, wait at least 12 hours without printing,
and then print the nozzle check pattern again. Run Print Head Cleaning or Power Cleaning again
depending on the printed pattern. If quality still does not improve, contact Epson support.
Parent topic: Power Cleaning
Related tasks
Refilling the Ink Tanks
Power Cleaning Using a Computer Utility
You can run a Power Cleaning using a utility on your Windows or Mac computer.
Note: After running a Power Cleaning, you must turn off the product and wait at least 12 hours before
running another Power Cleaning.
1. Make sure there are no errors on the LCD screen.

283
2. Load a few sheets of plain paper in the product.
3. Do one of the following:
• Windows: Access the Windows Desktop and right-click the icon for your product in the right
side of the Windows taskbar, or click the up arrow and right-click . Select Printer Settings and
click the Maintenance tab.
• Mac: In the Apple menu or the Dock, select System Preferences. Select Print & Fax, Print &
Scan, or Printers & Scanners, select your product, and select Options & Supplies. Select
Utility and select Open Printer Utility.
4. Select Power Cleaning.
You see a window like this:
5. Follow the on-screen instructions to run a Power Cleaning.
6. When Power Cleaning is finished, run a nozzle check.

284
If print quality has not improved after running Power Cleaning, wait for at least 12 hours without printing,
and then print the nozzle check pattern again. Run Print Head Cleaning or Power Cleaning again
depending on the printed pattern. If quality still does not improve, contact Epson support.
Parent topic: Power Cleaning
Related tasks
Refilling the Ink Tanks
Print Head Alignment
If your printouts become grainy or blurry, you notice misalignment of vertical lines, or you see dark or
light horizontal bands, you may need to align the print head.
Note: Banding may also occur if your print head nozzles need cleaning.
Aligning the Print Head Using the Product Control Panel
Parent topic: Adjusting Print Quality
Aligning the Print Head Using the Product Control Panel
You can align the print head using the control panel on your product.
1. Make sure there are no errors on the LCD screen and the output tray is extended.
2. Load a few sheets of plain paper in the product.
3. Press the home button, if necessary.
4. Select Maintenance.
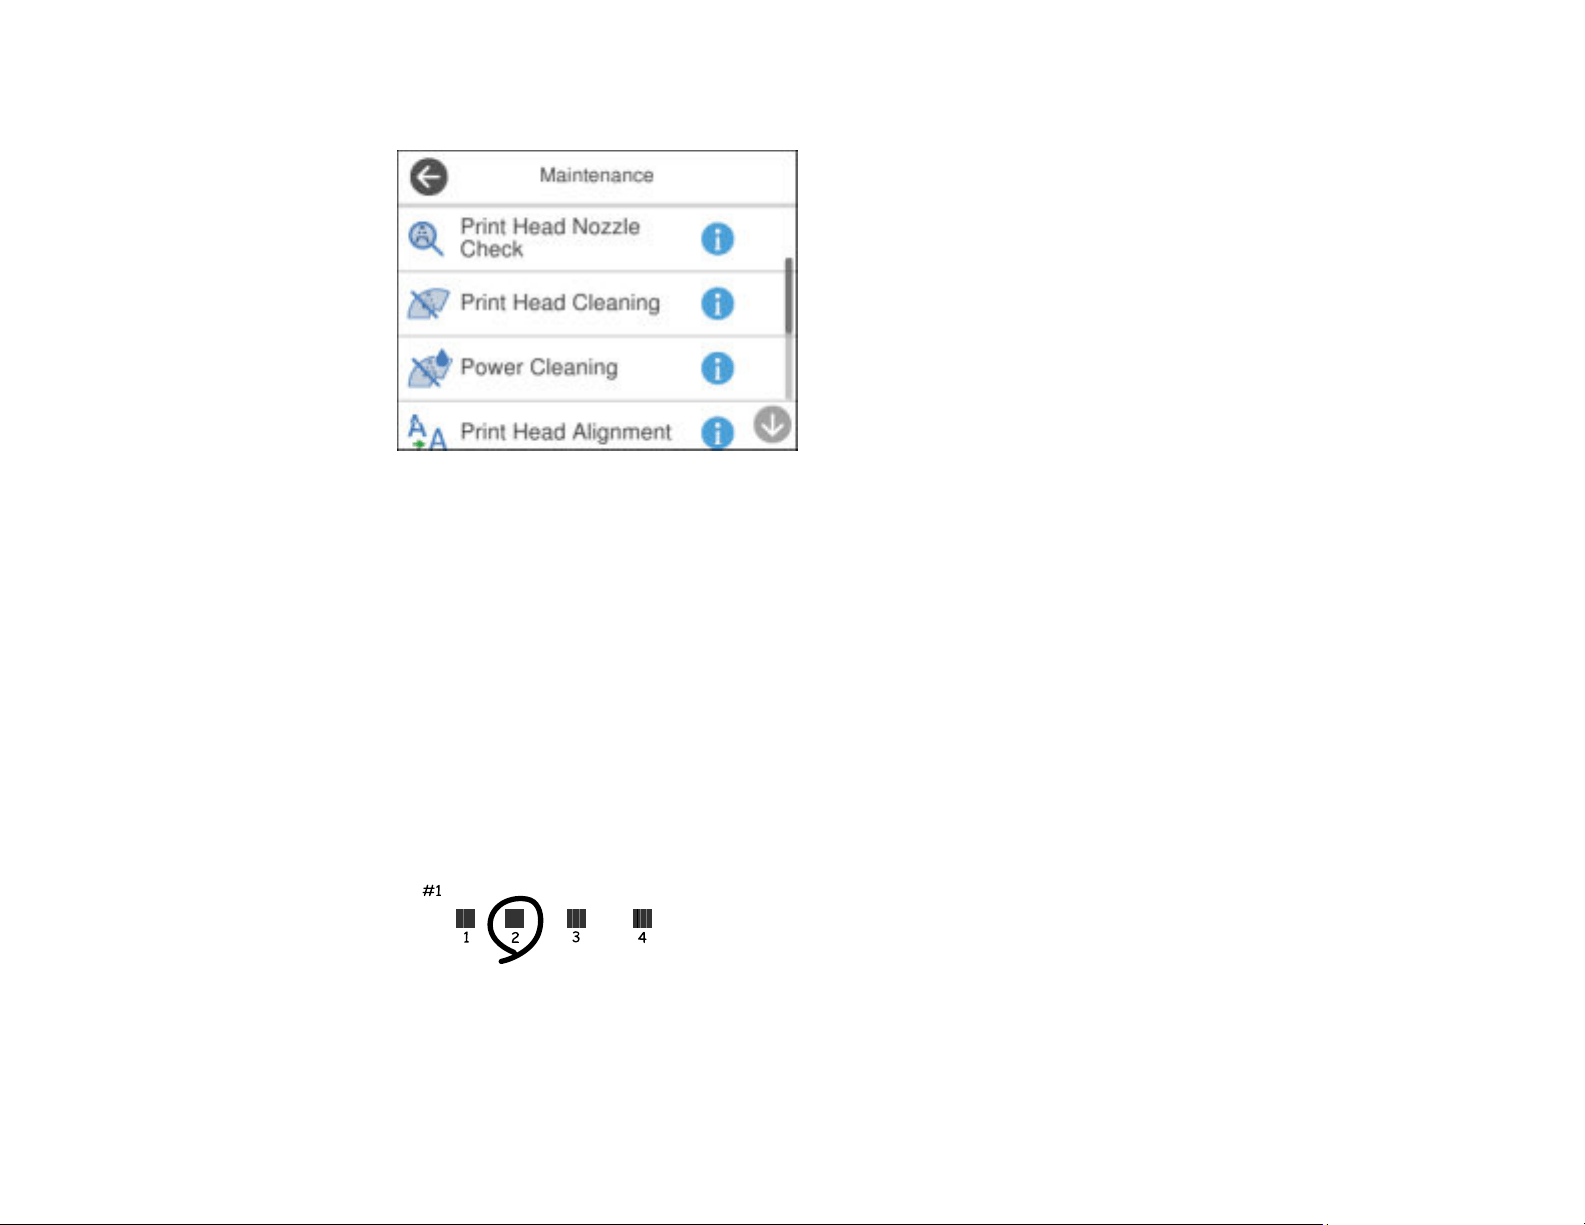
285
You see a screen like this:
5. Select Print Head Alignment.
6. Select one of the following options:
• Vertical Alignment if your printout is blurry or contains vertical ruled lines that are misaligned.
• Horizontal Alignment if your printout contains horizontal banding.
7. Follow the on-screen instructions to print an alignment sheet.
Note: Do not cancel printing while you are printing head alignment patterns.
8. Check the printed patterns on the alignment sheet and select the following on the LCD screen,
depending on the alignment pattern you printed:
• Vertical Alignment: For each set of patterns, select the number representing the pattern with the
least amount of separation or overlap.
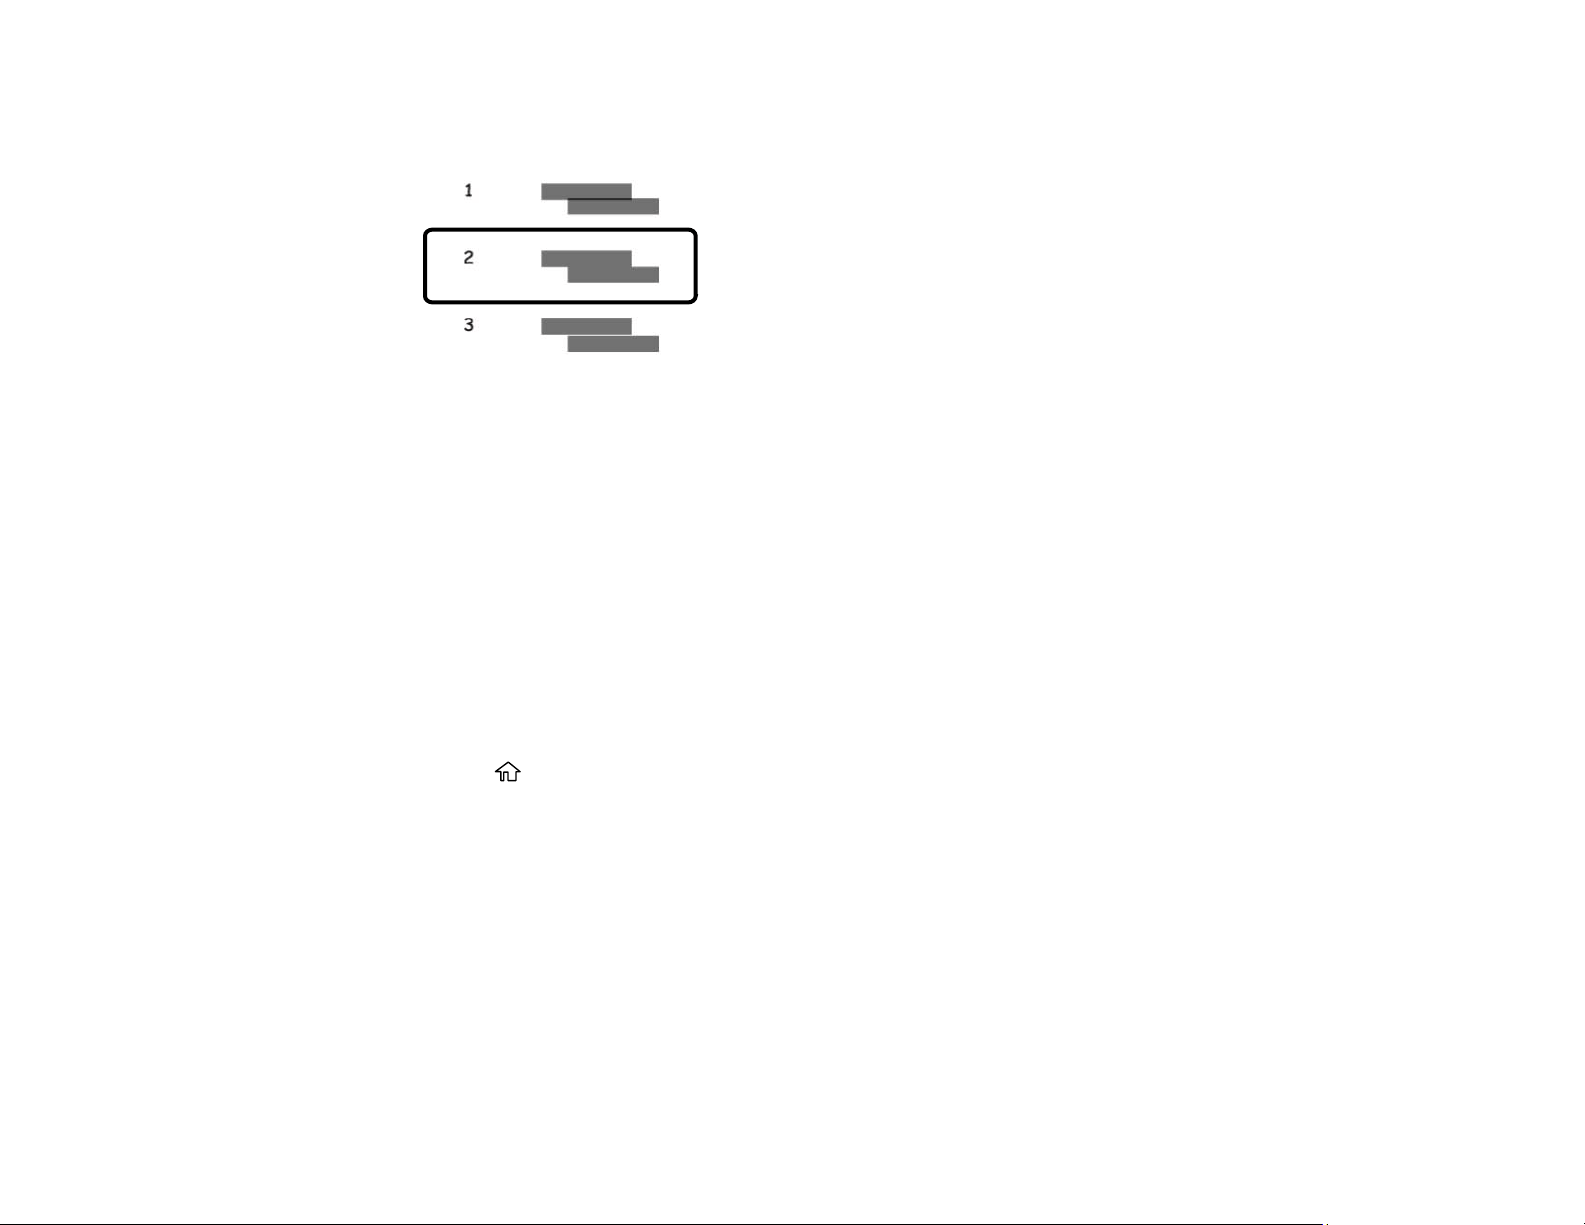
286
• Horizontal Alignment: Select the number representing the pattern with the least amount of
separation or overlap.
9. Continue following the rest of the on-screen instructions to finish the alignment.
Parent topic: Print Head Alignment
Related topics
Loading Paper
Cleaning the Paper Guide
If you see ink on the back of a printout or if printouts are smeared or scuffed, you can clean the paper
guide roller to remove any excess ink.
1. Make sure there are no errors on the LCD screen.
2. Load plain paper in the product in this size: Letter (8.5 × 11 inches [216 × 279 mm]) or A4 (8.3 × 11.7
inches [210 × 297 mm]).
3. Press the home button, if necessary.
4. Select Maintenance.
287
You see a screen like this:
5. Scroll down and select Paper Guide Cleaning.
6. Follow the on-screen instructions to clean the paper guide.
7. Repeat these steps as necessary until the paper comes out clean.
Parent topic: Adjusting Print Quality
Related concepts
Print Head Alignment
Print Head Cleaning
Related tasks
Cleaning the Print Head Using a Computer Utility
Cleaning the Print Head Path
If the print quality has not improved after cleaning and aligning the print head and cleaning the paper
path, the print head path inside the printer may be smeared with ink.
To clean the print head path, use the following:
• Several cotton swabs
• ¼ cup (60 ml) water containing 2 to 3 drops of mild dish detergent
• A small flashlight
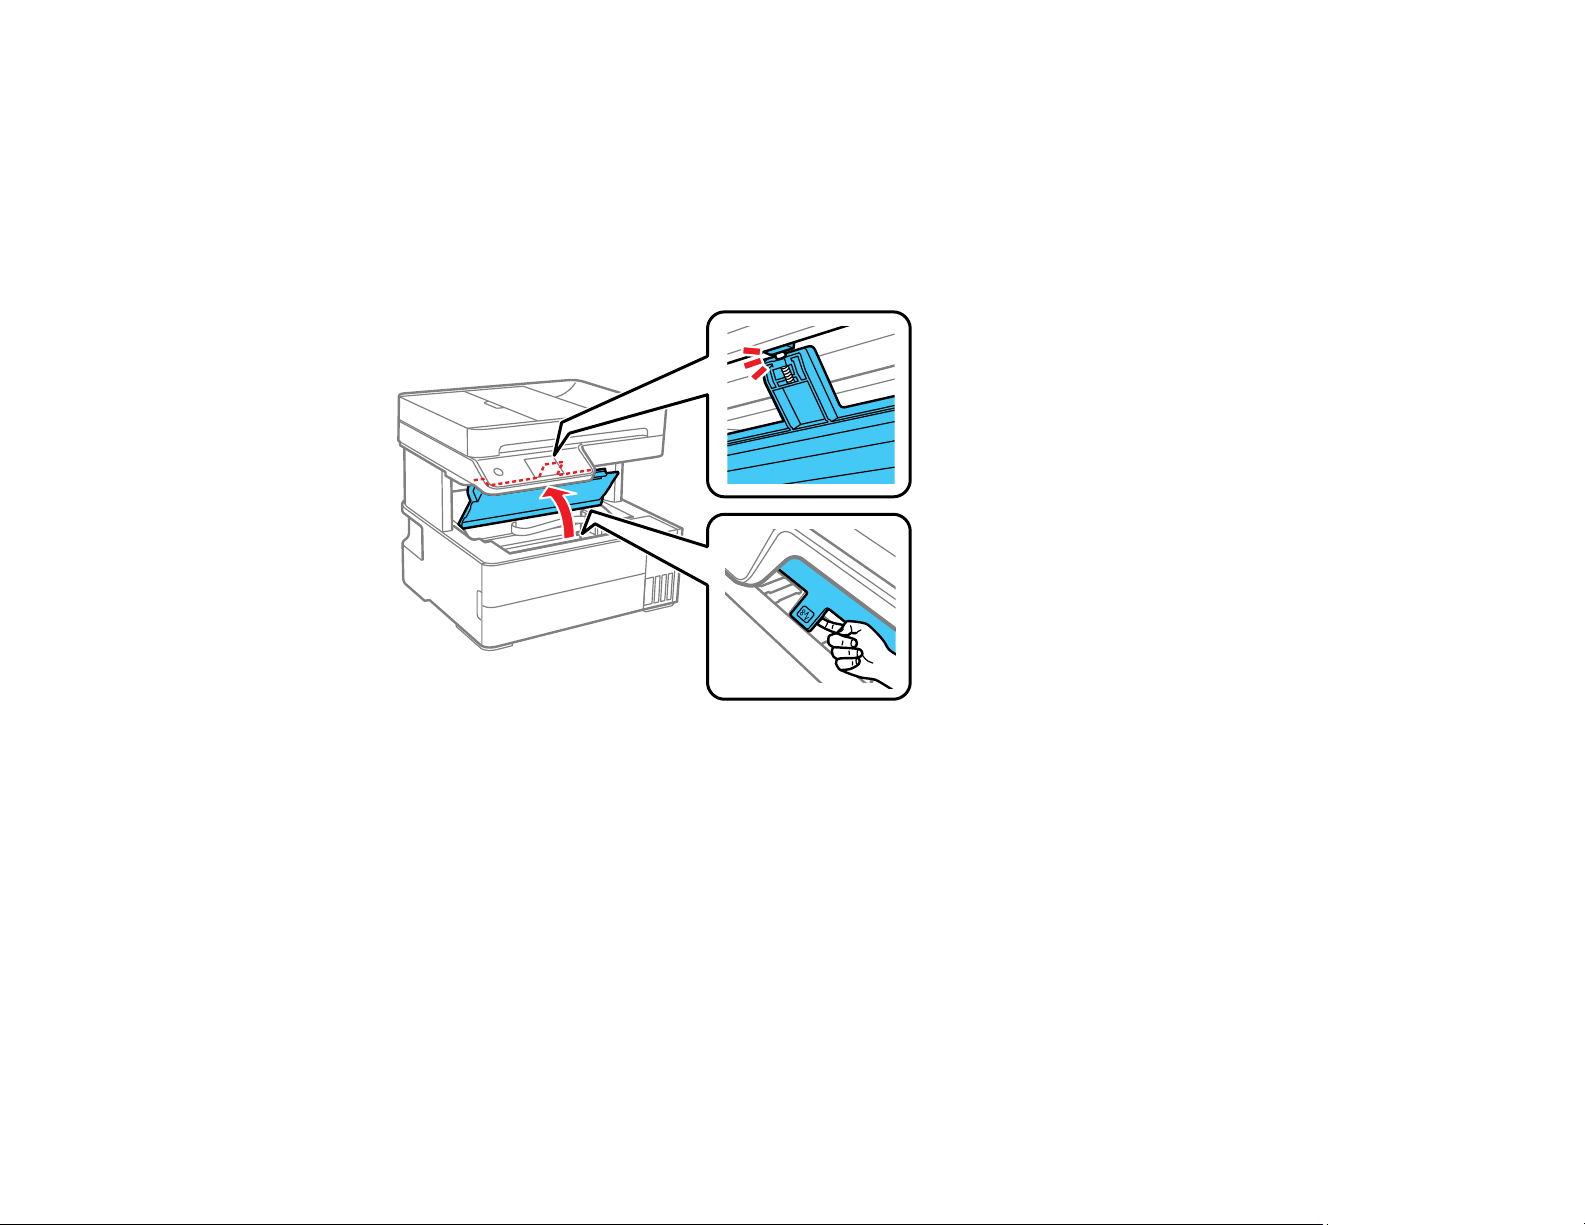
288
Caution: Do not use any other liquid to clean the print head path or you may damage your product.
1. Turn off the product.
2. Unplug the power cable.
3. Disconnect any connected cables.
4. Lift up the printer cover until it clicks into place.
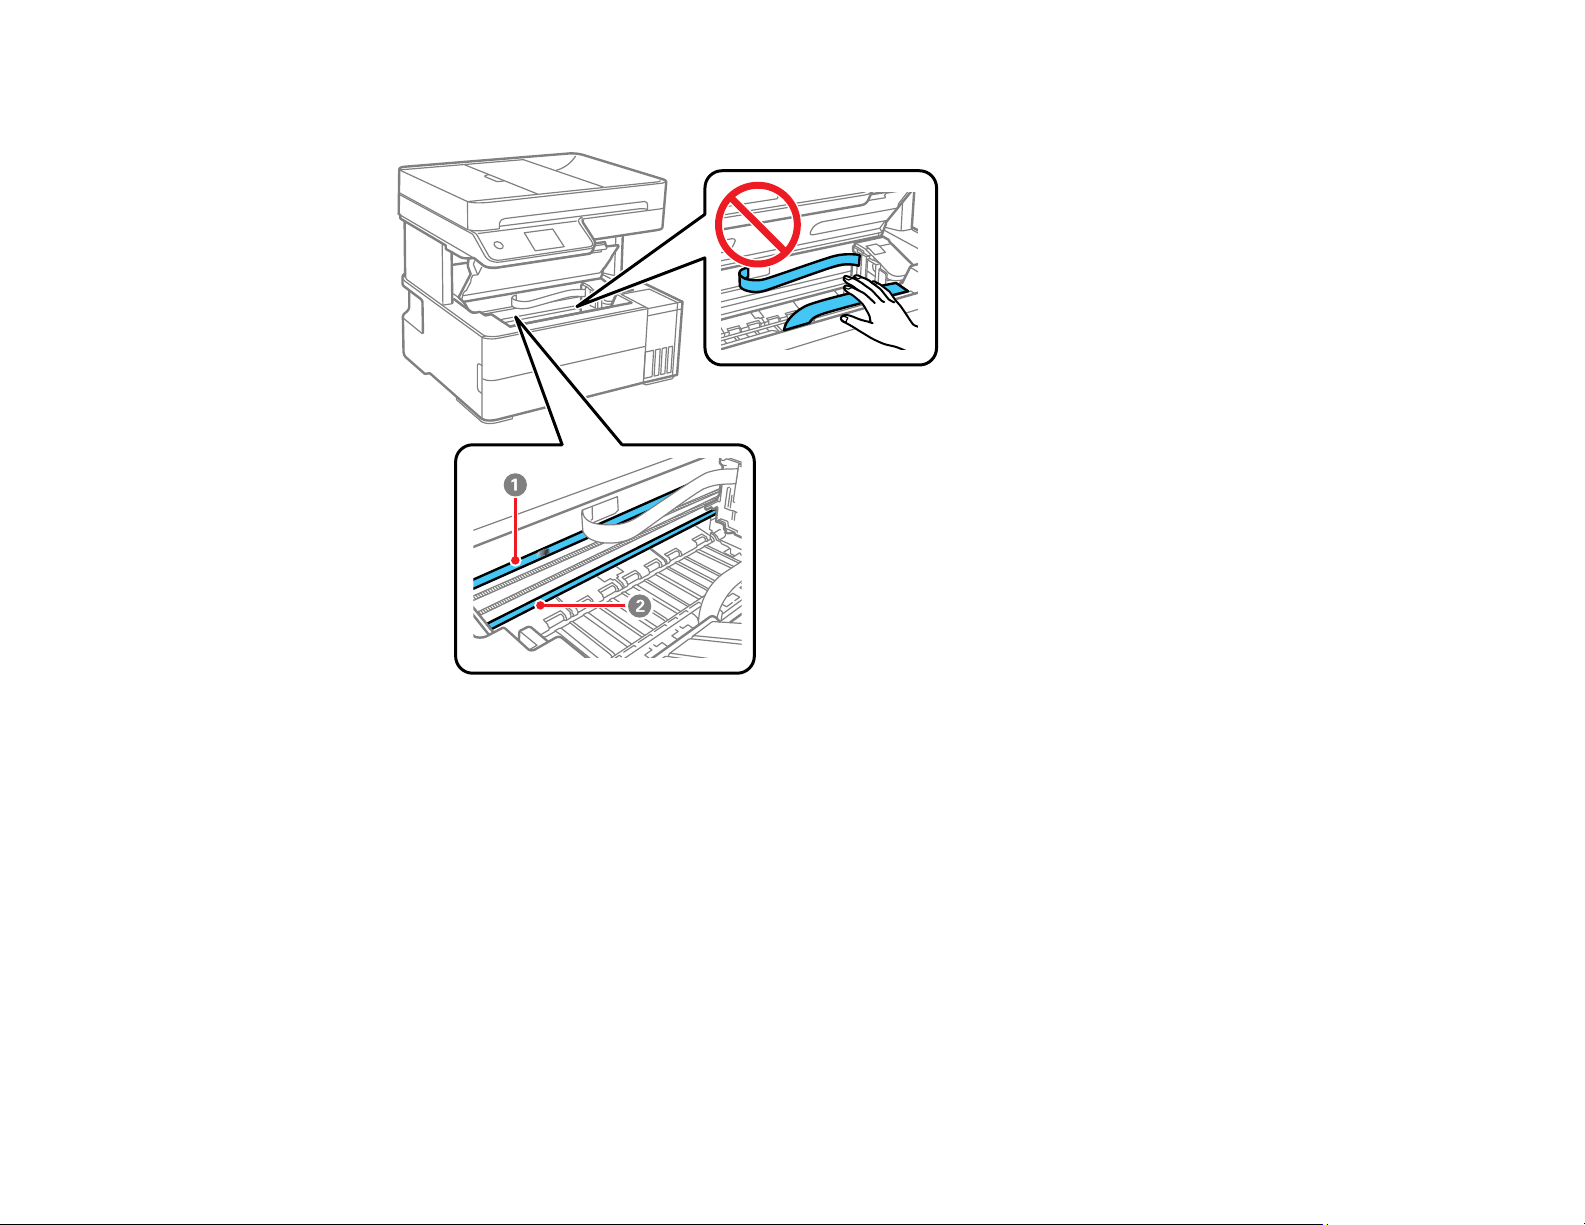
289
5. Using the flashlight, check the translucent film shown here for ink smears.
1 Translucent film
2 Print head rail
Caution: Do not touch the print head rail or wipe the grease off of it. You may not be able to print. Do
not touch the white flat cable or ink tubes.
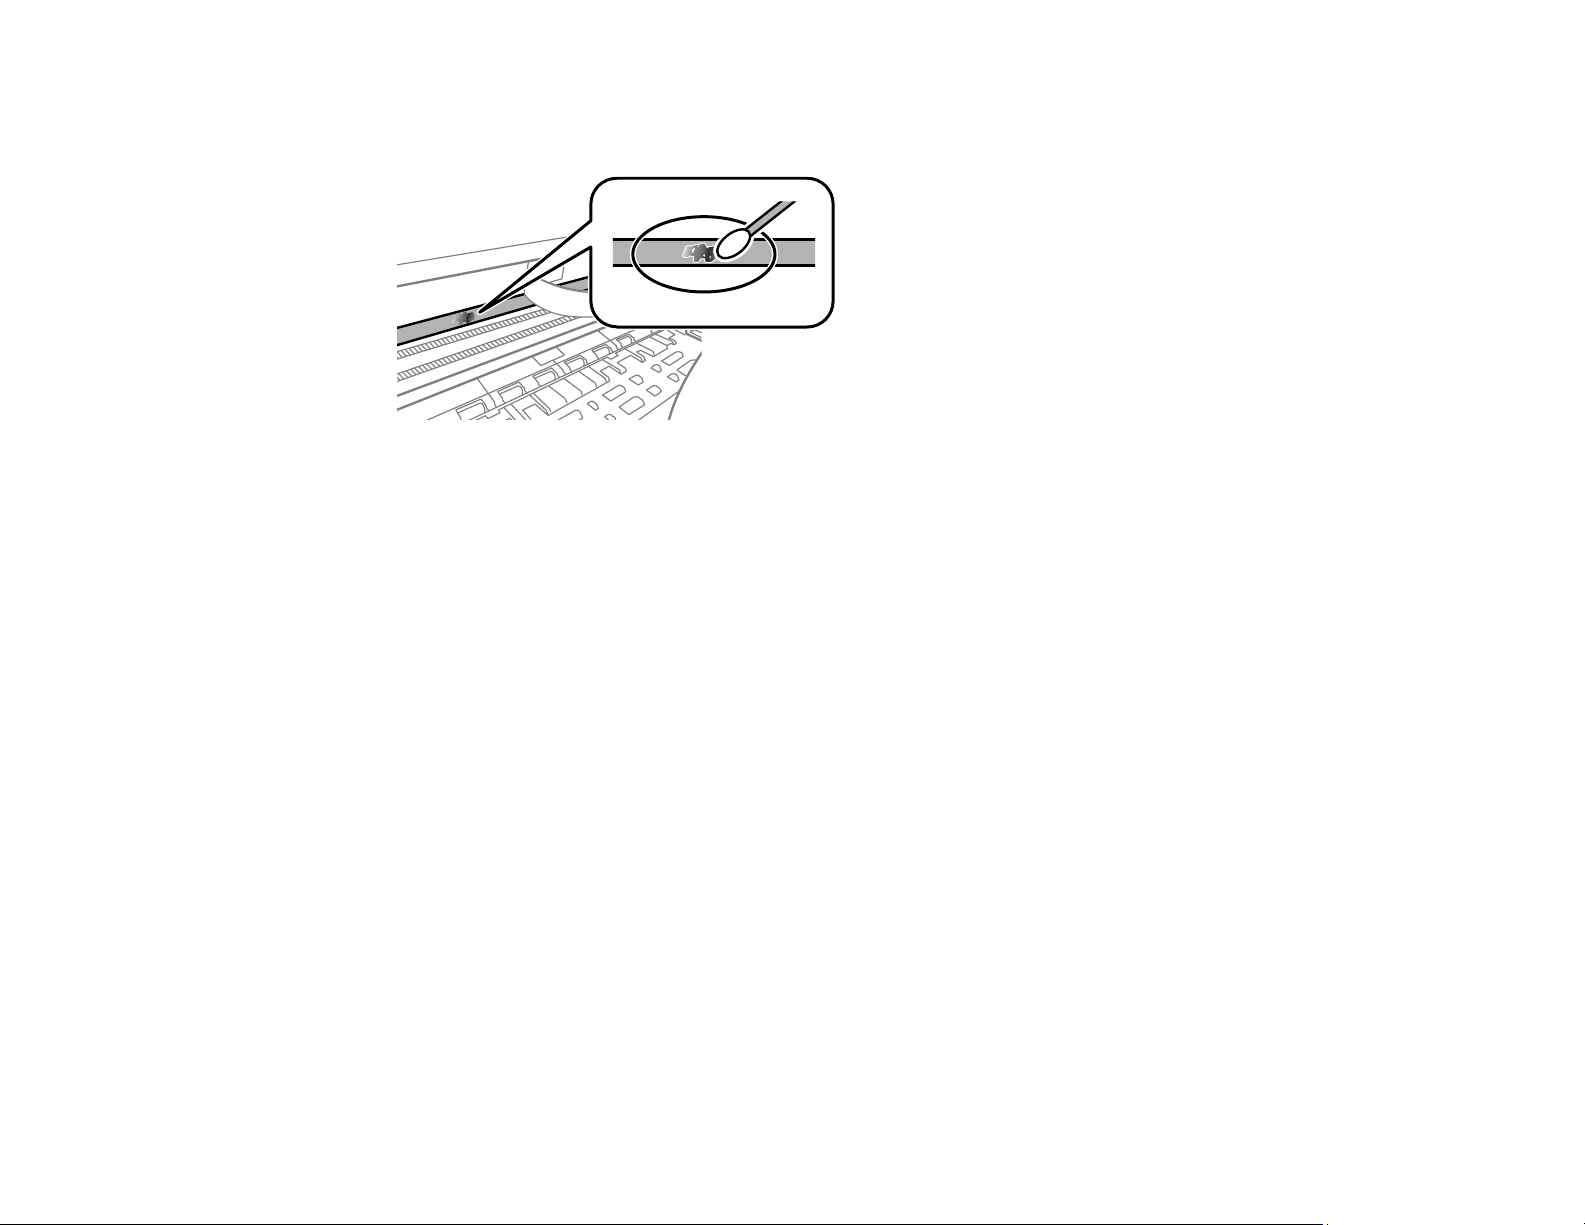
290
6. Moisten a cotton swab with the water and detergent mixture, and squeeze out any excess moisture.
Lightly wipe the ink off the translucent film.
Caution: Do not press too hard on the film or you may dislocate the anchor springs and damage
your product.
7. Use a new, dry cotton swab to dry the translucent film. Do not leave any cotton fibers on the film.
8. Repeat steps 6 and 7 as necessary to clean all ink smears.
9. When the translucent film is dry, close the printer cover.
10. Reconnect any disconnected cables, plug in the power cord, and turn on the product.
Parent topic: Adjusting Print Quality
Checking the Number of Sheets Fed
You can view an option that displays the number of sheets of paper that have fed through the product.
Note: You can also view the number of sheets of paper fed through the product by printing a nozzle
check.
Checking the Number of Sheets on the LCD Screen
Checking the Sheet Counter - Windows
Checking the Sheet Counter - Mac
Parent topic: Adjusting Print Quality

291
Checking the Number of Sheets on the LCD Screen
You can view the number of sheets of paper that have fed through the product on the LCD screen.
1. Press the home button, if necessary.
2. Select Settings > Print Counter to view the number of prints (In Total, B&W and Color).
Parent topic: Checking the Number of Sheets Fed
Checking the Sheet Counter - Windows
You can check the number of sheets of paper that have fed through the product by checking the sheet
counter.
1. Access the Windows Desktop and right-click the icon for your product in the right side of the
Windows taskbar, or click the up arrow and right-click .
2. Select Printer Settings.
3. Click the Maintenance tab.
4. Select Printer and Option Information.
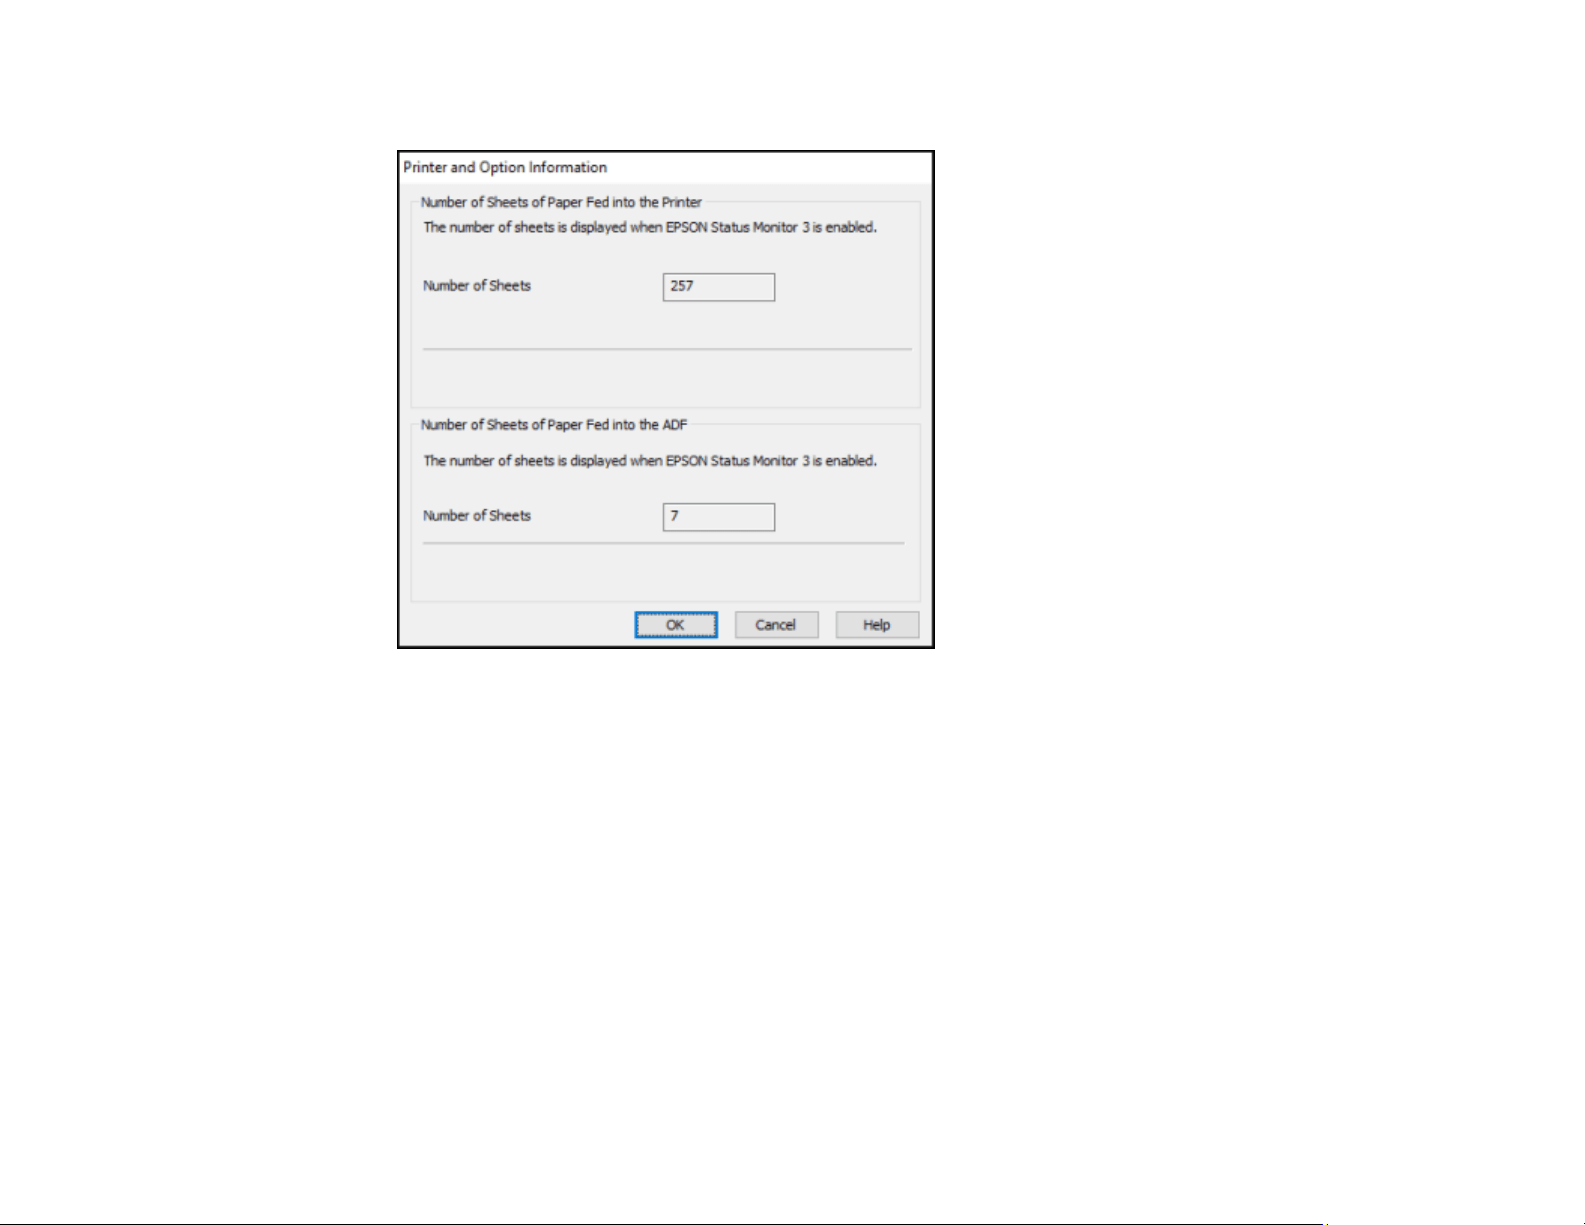
292
You see this window:
5. After checking the number of sheets fed into the printer, click OK to close the window.
Note: The number of sheets is displayed only when Epson Status Monitor 3 is enabled.
Parent topic: Checking the Number of Sheets Fed
Checking the Sheet Counter - Mac
You can check the number of sheets of paper that have fed through the product by checking the sheet
counter.
1. In the Apple menu or the Dock, select System Preferences. Select Print & Fax, Print & Scan, or
Printers & Scanners, select your product, and select Options & Supplies. Select Utility and select
Open Printer Utility.
2. Select Printer and Option Information.
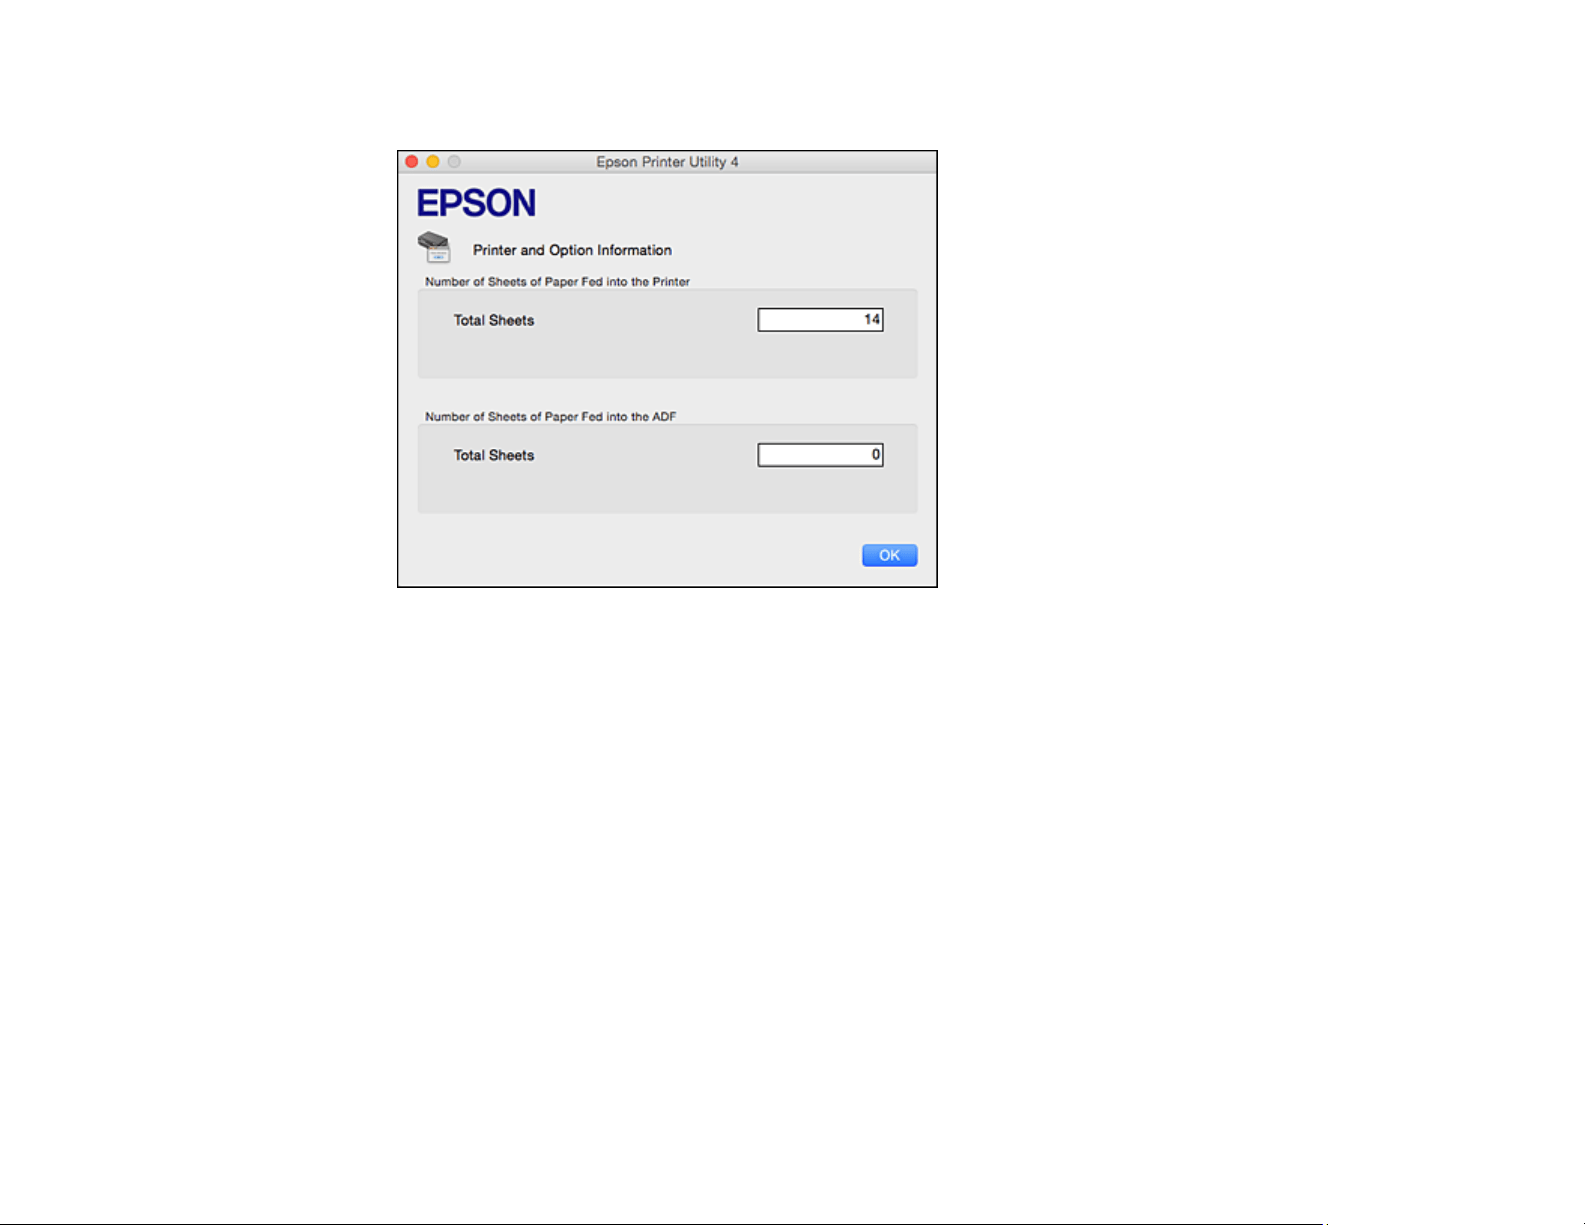
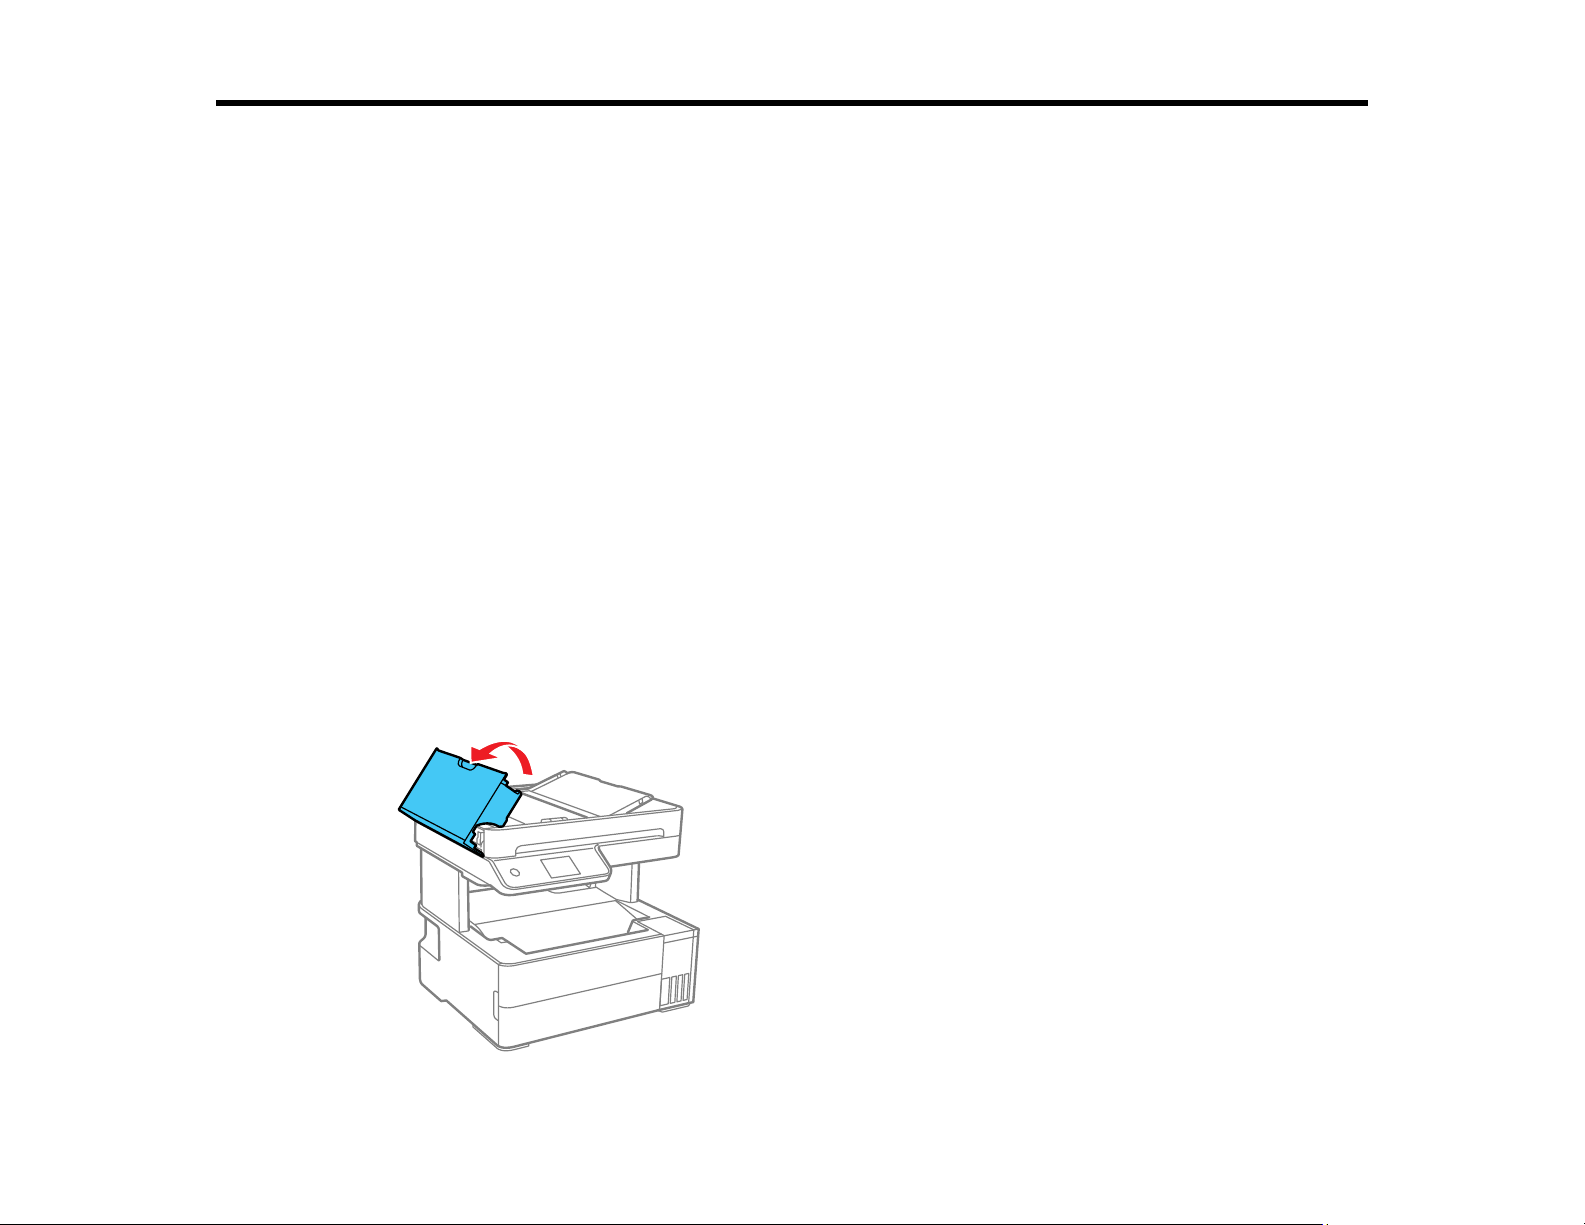
294
Cleaning and Transporting Your Product
See these sections if you need to clean or transport your product.
Cleaning Your Product
Cleaning the Paper Rollers
Transporting Your Product
Cleaning Your Product
To keep your product working at its best, you should clean it several times a year.
Close the output tray and front cover when you are not using the product to protect it from dust.
Caution: Do not use a hard brush, alcohol, or paint thinner to clean the product or you may damage it.
Do not use oil or other lubricants inside the product or let water get inside it.
1. Turn off the product.
2. Unplug the power cable.
3. Disconnect any connected cables.
4. Remove all the paper.
5. Open the ADF cover.
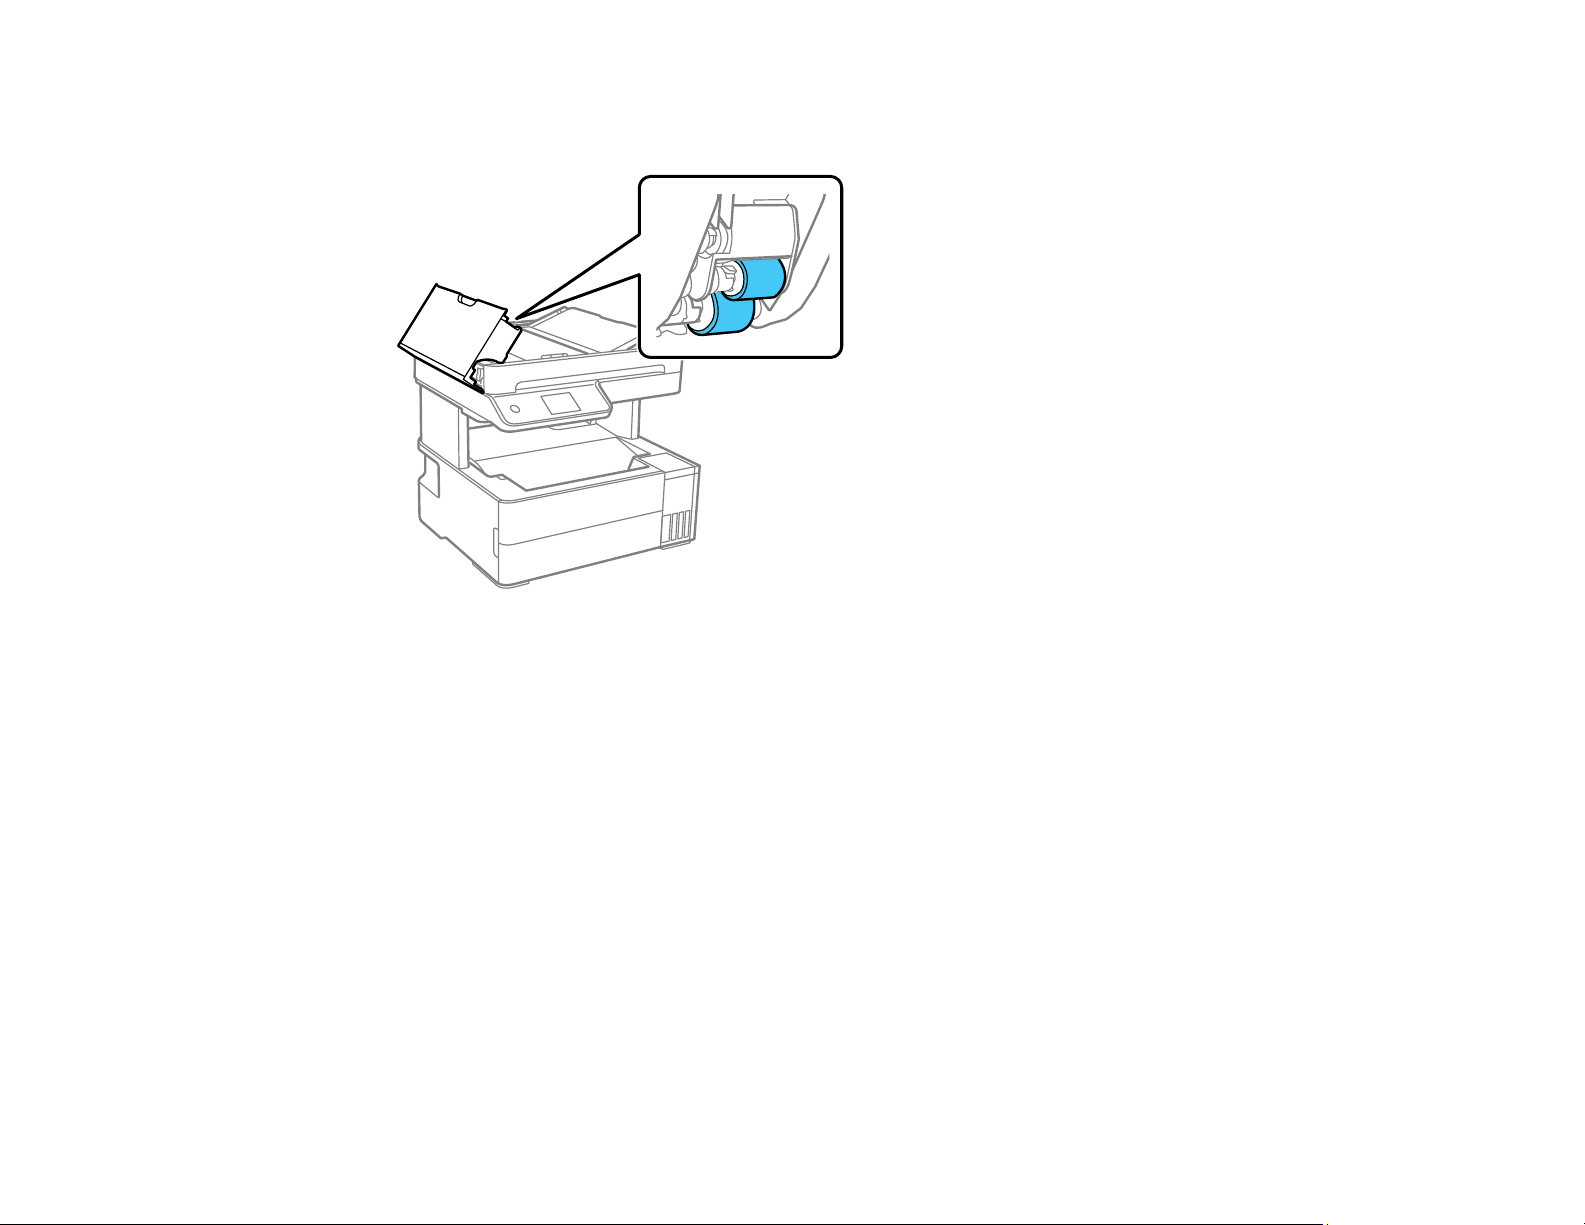
295
6. Use a soft, moist, lint-free cloth (microfiber is recommended) to clean the rollers and the interior of
the ADF.
Caution: Do not use a dry cloth to clean the rollers.
7. Close the ADF cover.
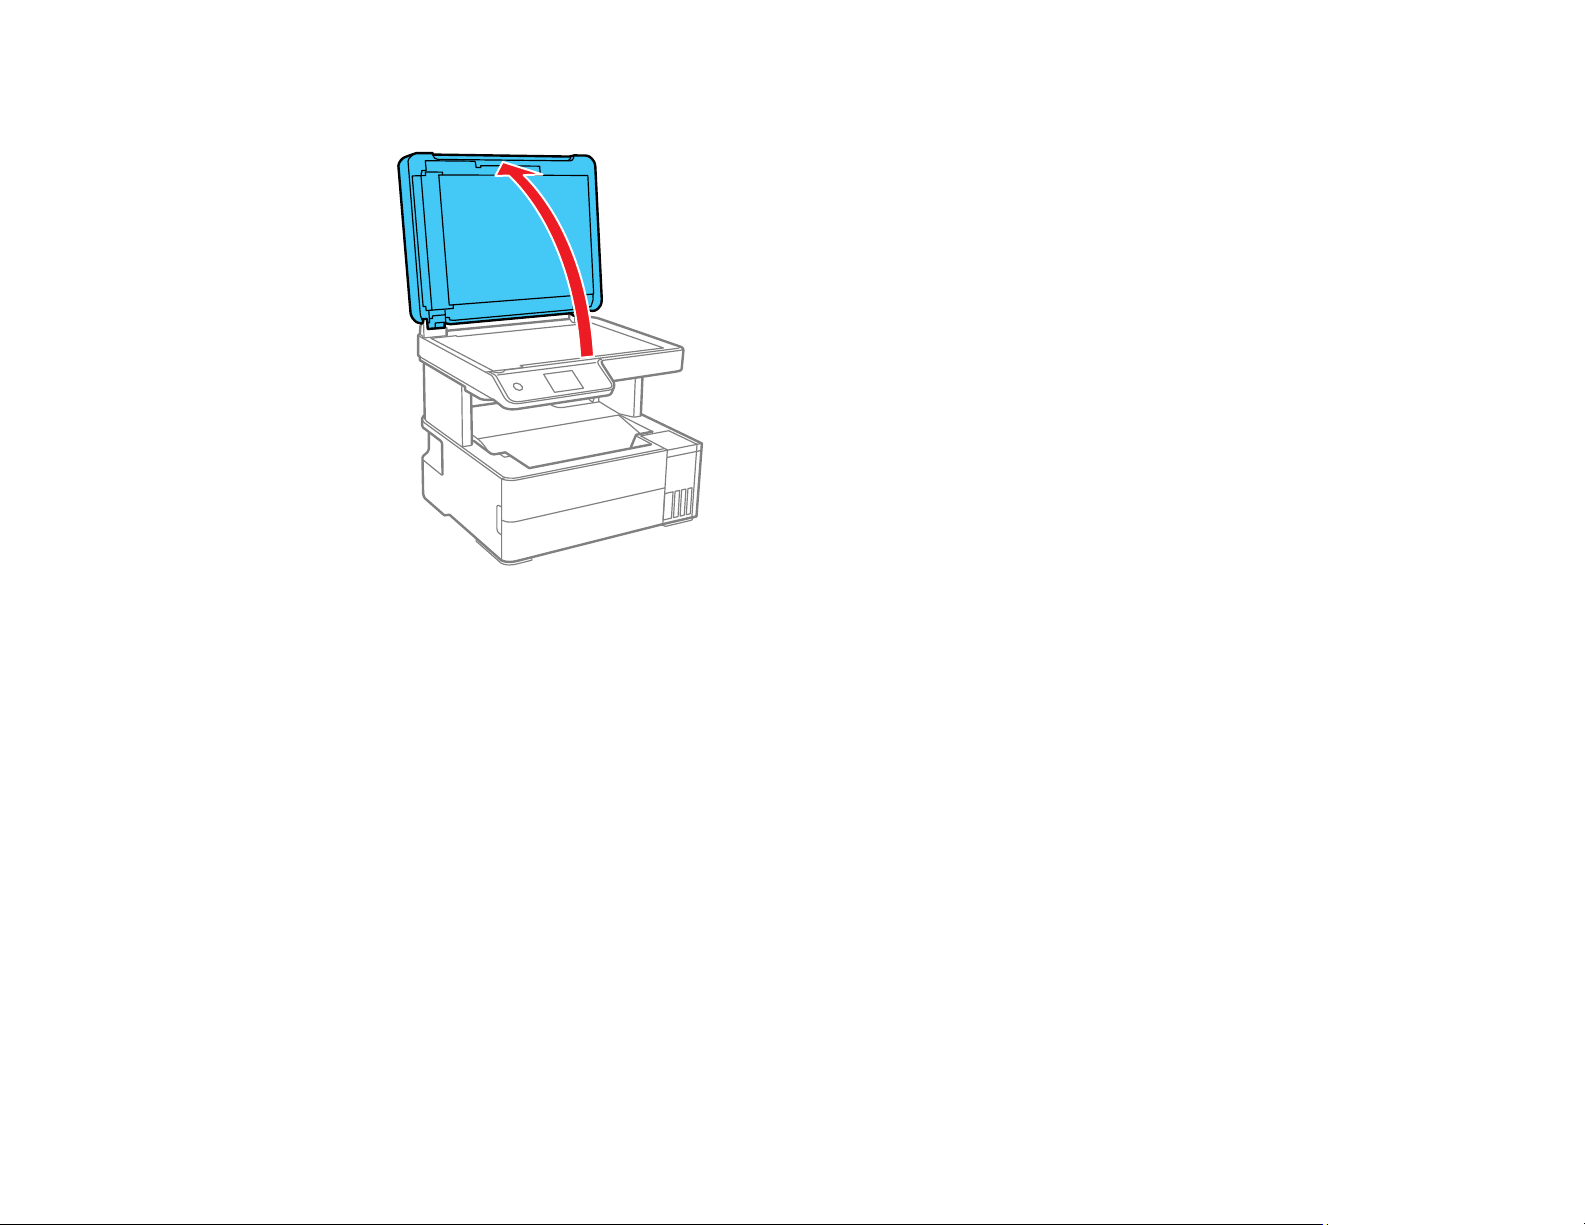
296
8. Open the document cover.
9. Clean the scanner glass with a soft, lint-free cloth (microfiber is recommended), moistened with a
little glass cleaner.
Caution: Do not spray glass cleaner directly on the glass and do not press the glass surface with
any force.
10. Close the document cover.
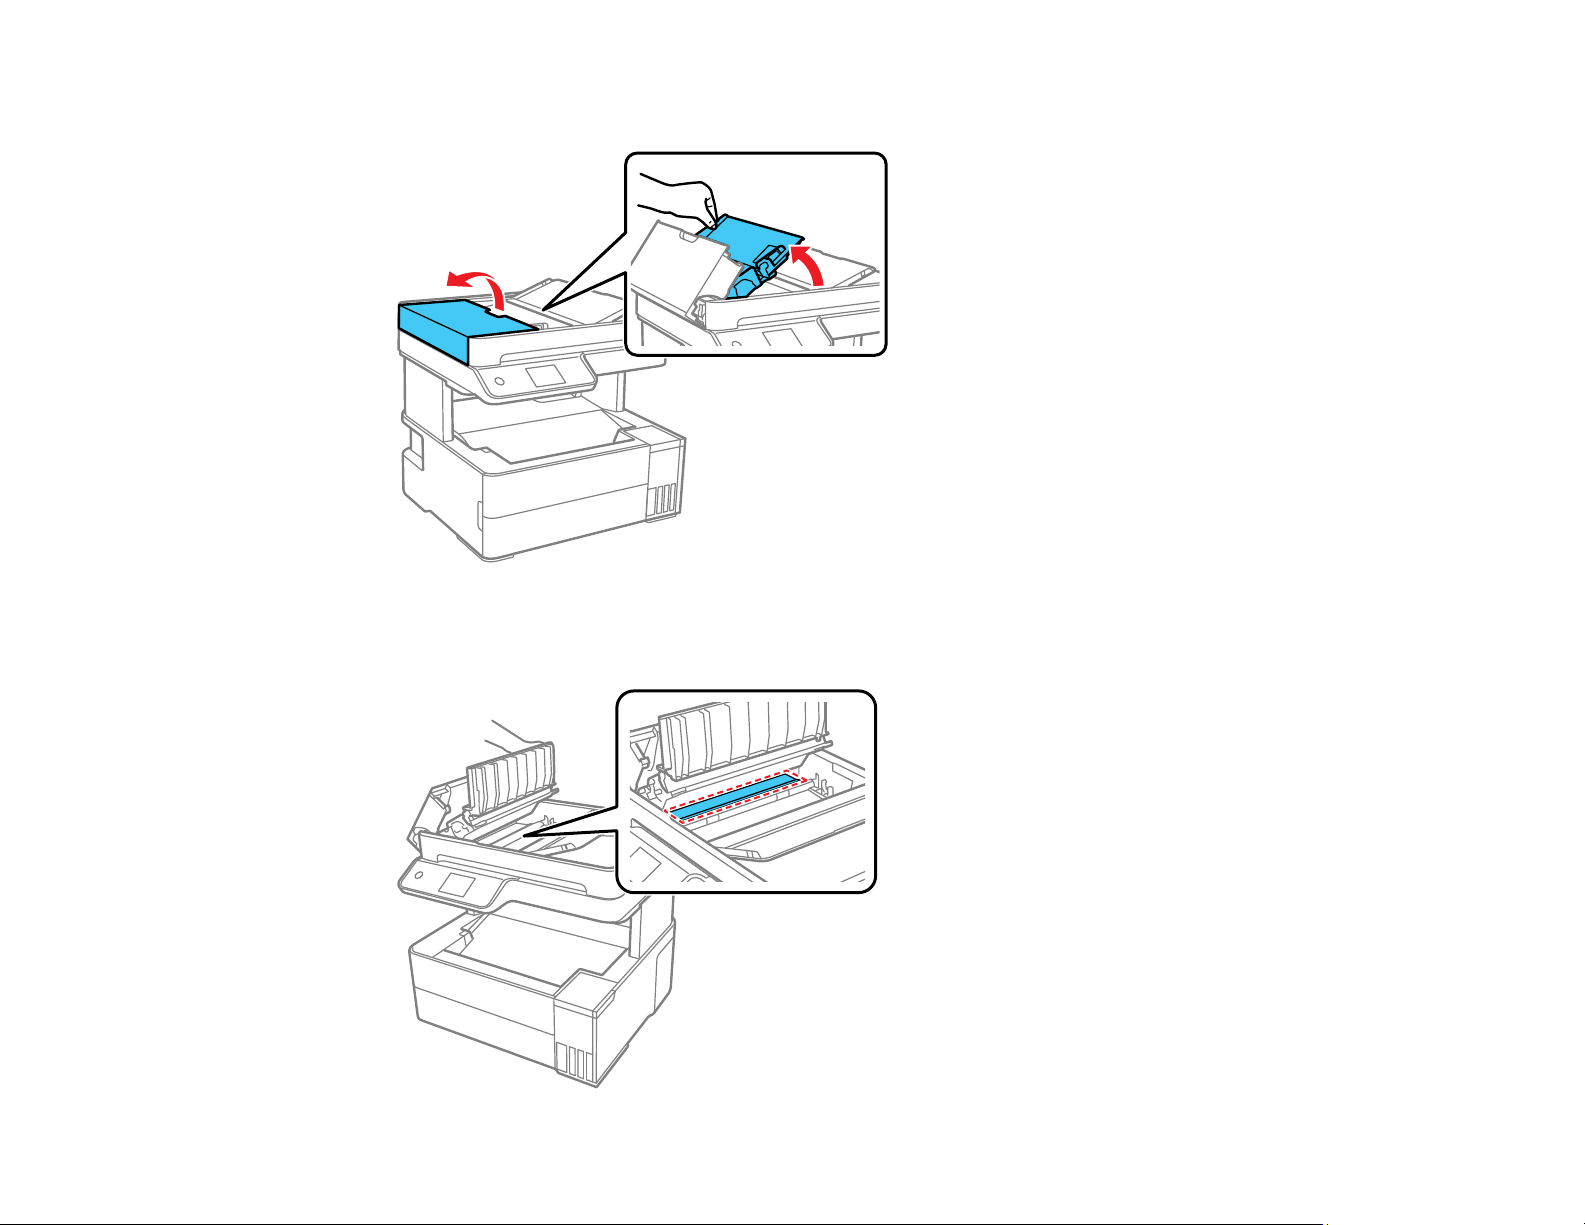
297
11. Open the ADF cover and raise the ADF input tray.
12. Use a soft, dry, lint-free cloth (microfiber is recommended) to clean the transparent part on the
underside of the ADF input tray.
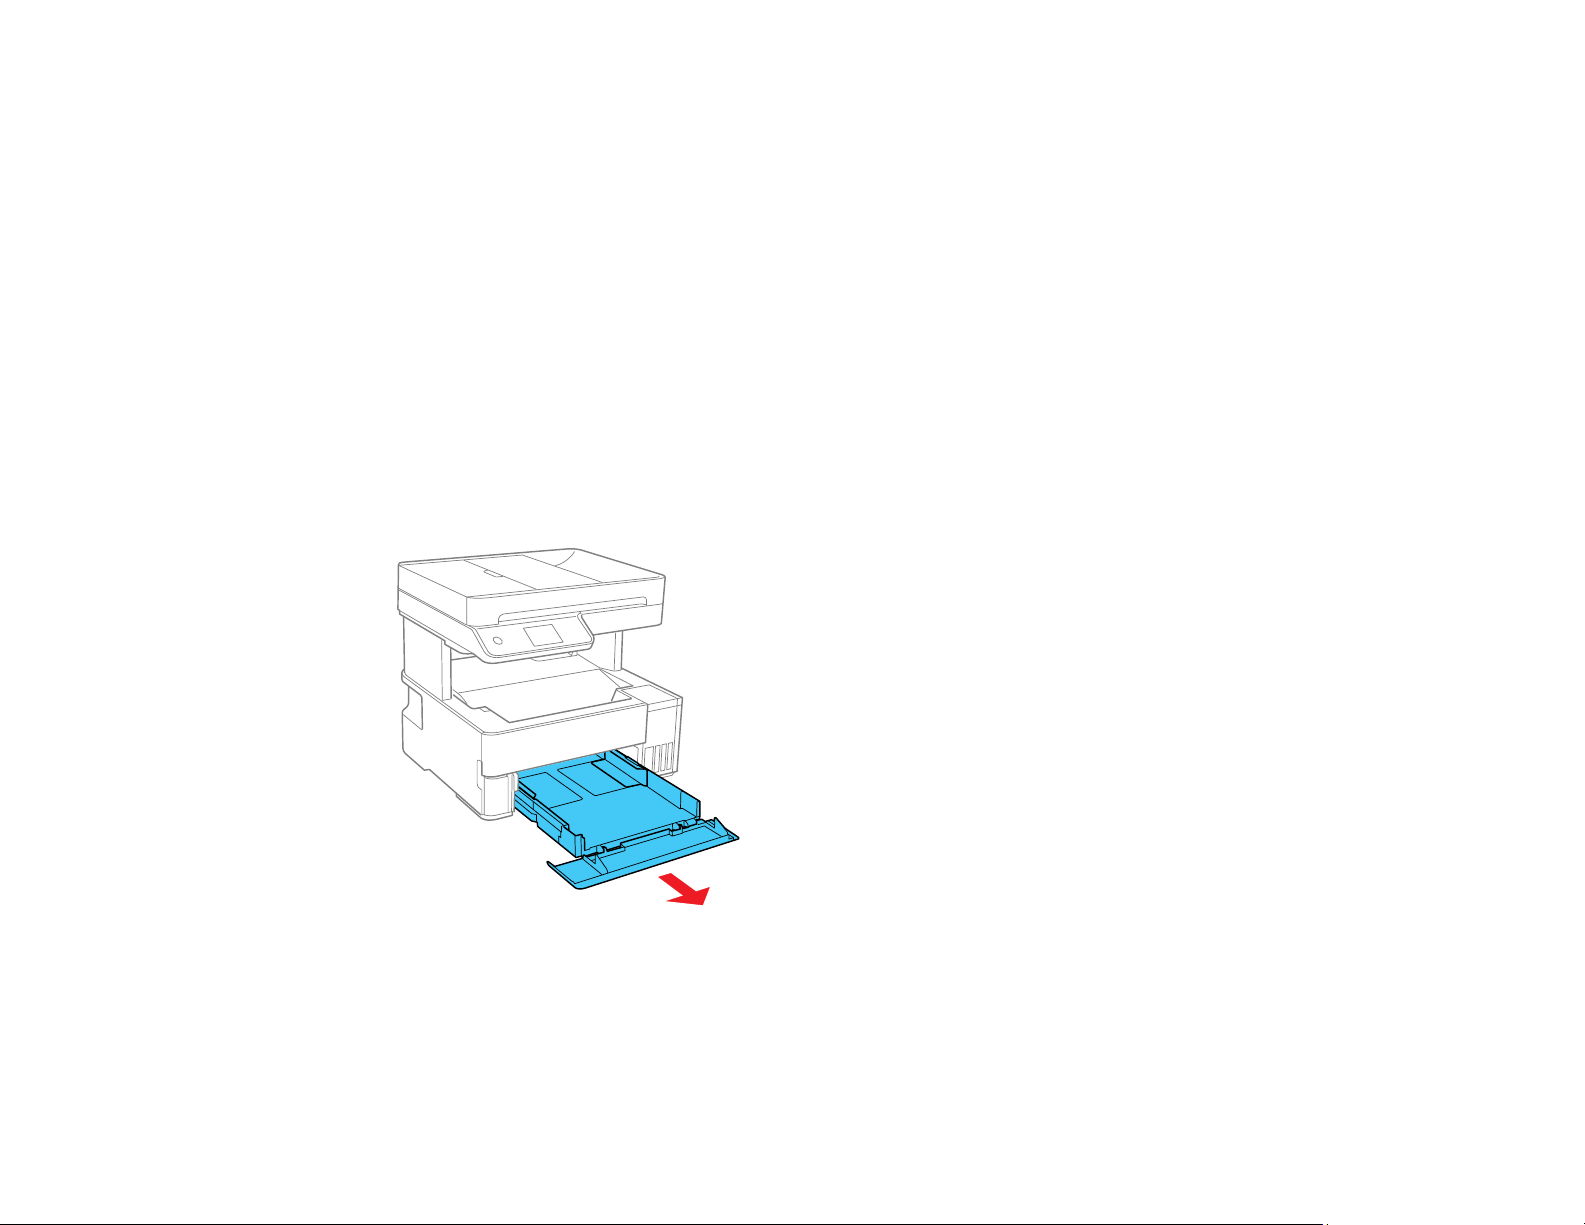
298
13. Close the ADF input tray.
14. Clean the outer case and control panel with a soft, dry cloth. Do not use liquid or chemical cleansers.
Parent topic: Cleaning and Transporting Your Product
Cleaning the Paper Rollers
If you encounter repeated paper feed issues from the cassette, clean the paper rollers inside the
product.
1. Turn off the product.
2. Unplug the power cable.
3. Disconnect any connected cables.
4. Make sure the ink tank caps are securely closed.
5. Close the document cover, the ADF cover, and the printer cover.
6. Slide out the paper cassette and remove the paper.
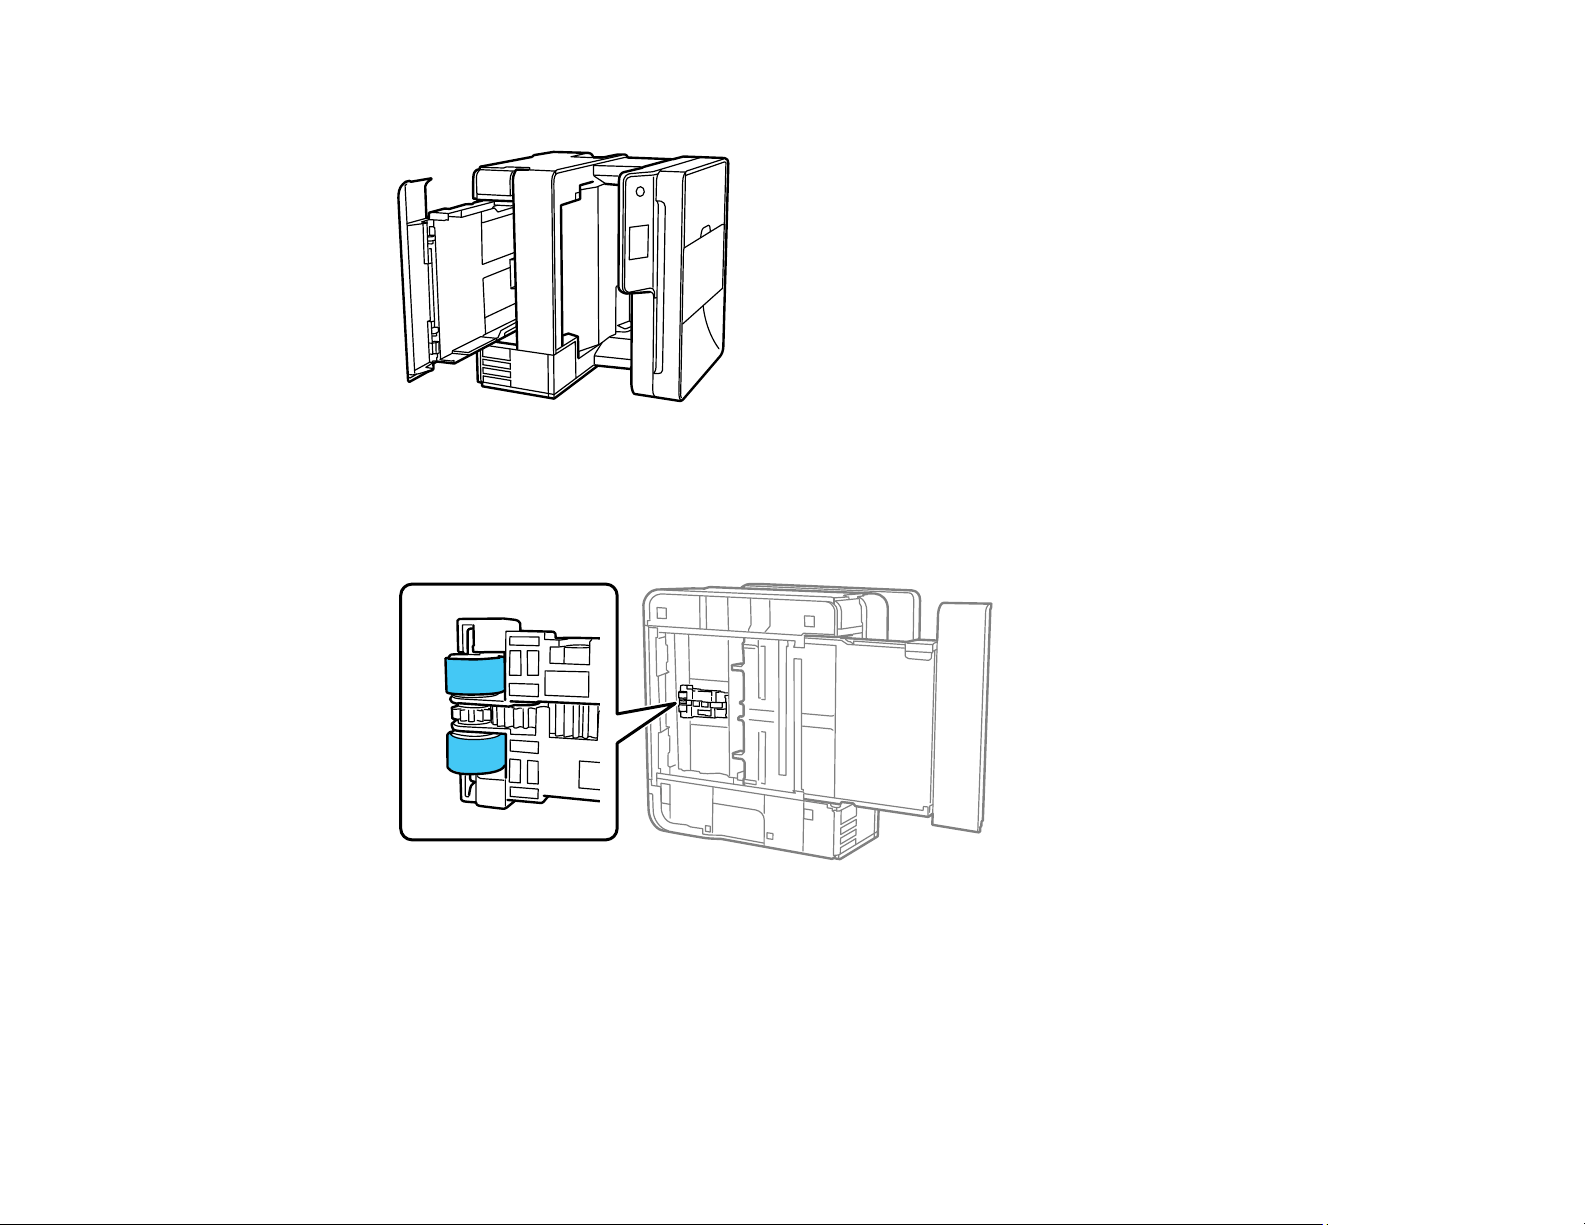
299
7. Place the product on its side with the ink tank on the bottom.
Warning: Be careful not to trap your fingers under the product.
8. Use a soft, moist cloth to clean the paper rollers, as shown. Rotate the rollers to clean them
thoroughly.
9. Return the product to its normal position.
Caution: Do not leave the product on its side for an extended period of time.
10. Replace the paper, slide in the paper cassette, and connect the power cord and any interface
cables.
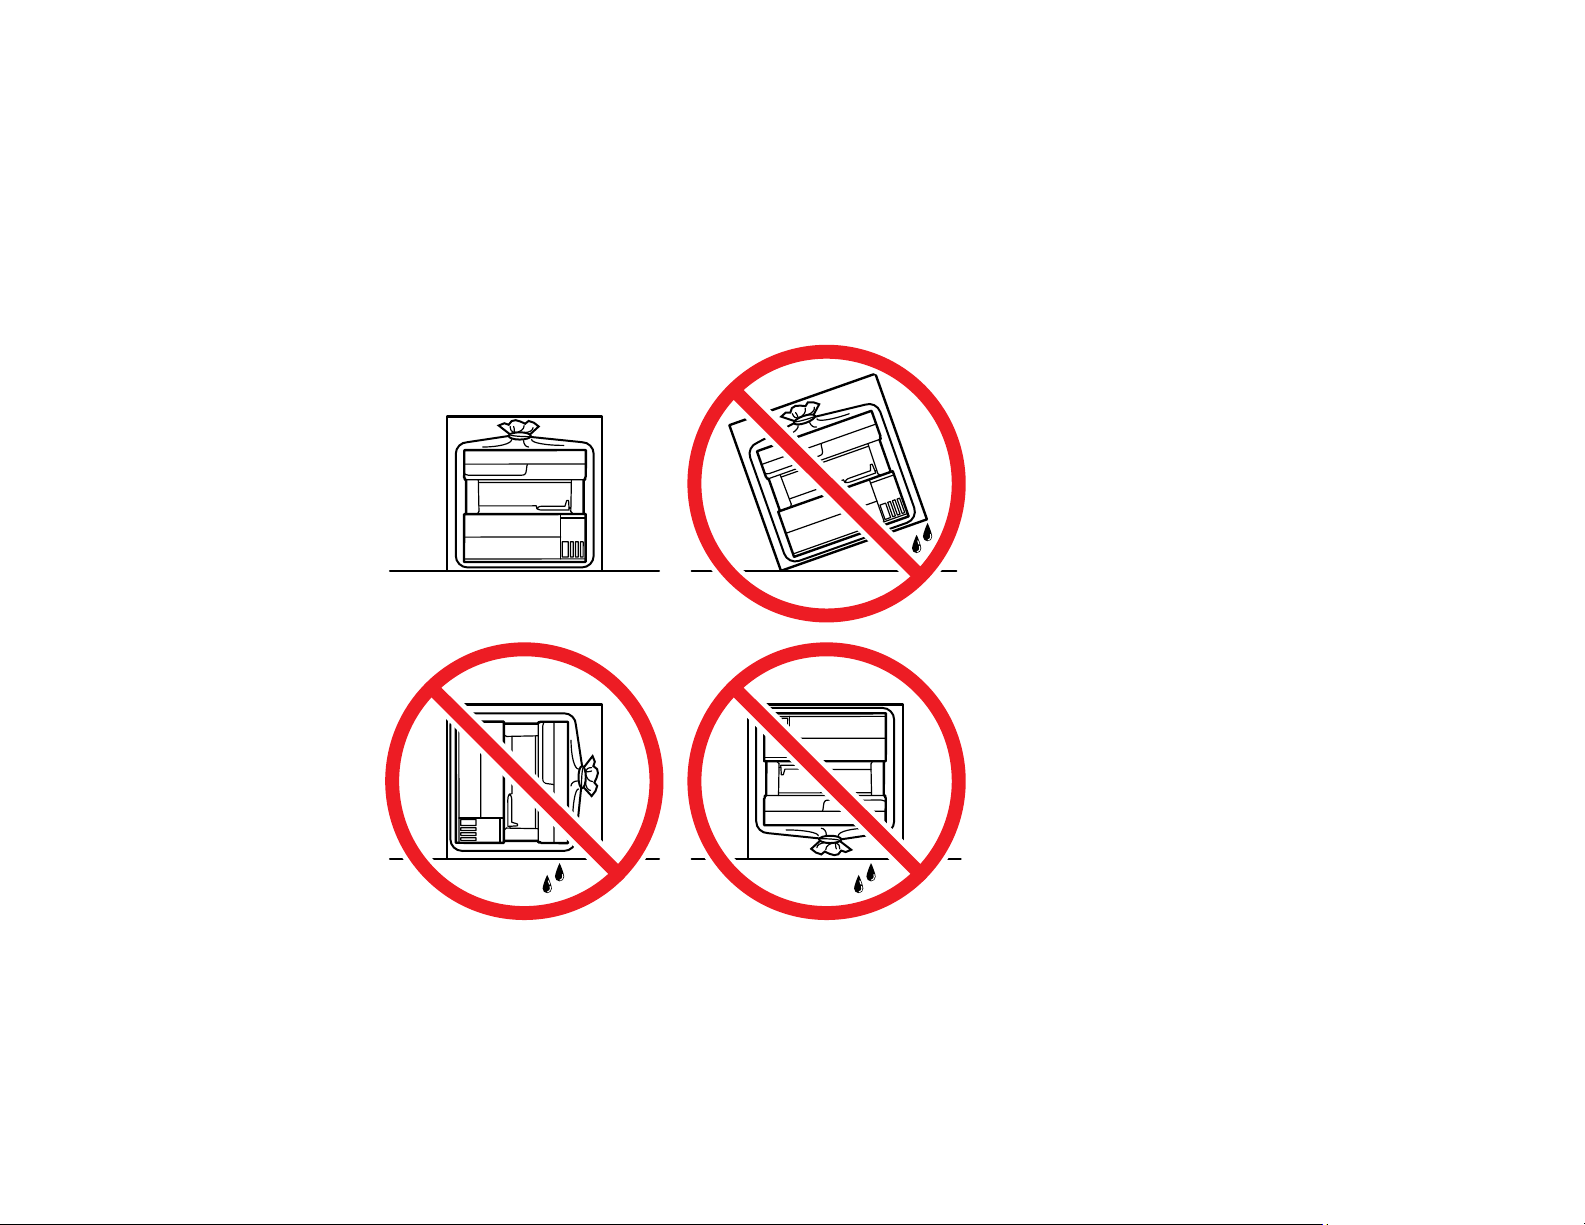
300
Parent topic: Cleaning and Transporting Your Product
Transporting Your Product
If you need to store your product or transport it some distance, prepare it for transportation as described
here.
Caution: During transportation and storage, follow these guidelines:
• Avoid tilting the product, placing it vertically, or turning it upside down; otherwise ink may leak.

301
• Do not lift the product by gripping the scanner unit. Make sure you lift using the handholds on the
bottom of the product.
• When storing or transporting an ink bottle after removing its seal, do not tilt the bottle and do not
subject it to impacts or temperature changes. Otherwise, ink may leak even if the cap on the ink bottle
is tightened securely. Be sure to keep the ink bottle upright when tightening the cap, and take
measures to prevent ink from leaking when transporting the ink bottles.
• Do not put opened ink bottles in the box with the product.
• Do not carry the product by its control panel; this may damage the product.
Note: Before storing your product for a long period, replace low, expended, or expired ink to help
prevent the print head from drying out. Store your product in a cool, dry place.
1. Turn off the product.
2. Open the printer cover and check to see if the print head is in the far right position (the home
position). If not, turn on the product, wait for the print head to move to the far right, then turn the
product off again.
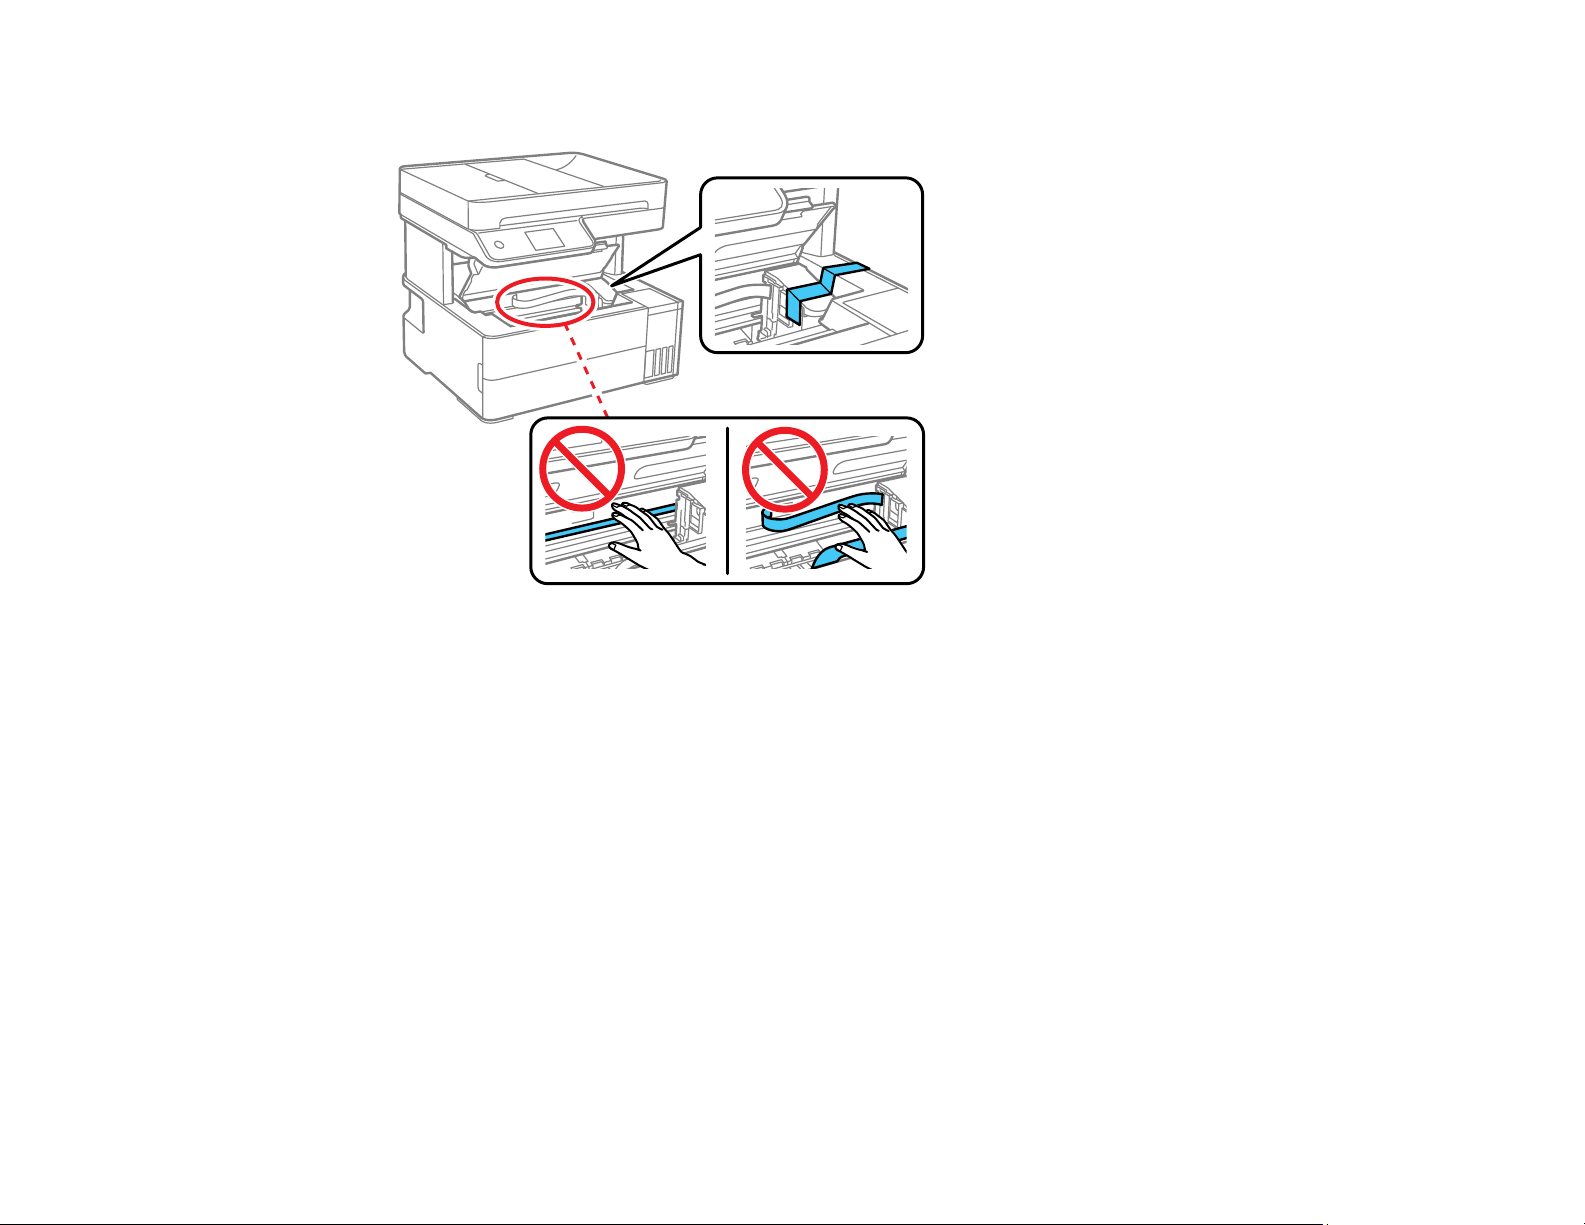
302
3. Secure the print head to the case with tape.
Caution: Do not place tape on the white flat cable or ink tubes inside the product; otherwise, you
may damage your product.
4. Close the printer cover.
5. Remove all the paper from the product.
6. Unplug the power cable.
7. Disconnect any connected cables.

303
8. Open the ink tank cover and make sure that the ink tank caps are installed securely.
9. Close the ink tank cover until it clicks into place.

304
10. Insert the accessory box that came with the printer with the flap facing the front as shown below.
11. Place the product in a plastic bag.
12. Place the product in its original packaging materials, if possible, or use equivalent cushioning around
the product.
Be sure to remove the tape from the print head before turning on your product. If print quality has
declined when you print again, clean and align the print head.
Parent topic: Cleaning and Transporting Your Product
Related concepts
Print Head Alignment
Print Head Cleaning

305
Solving Problems
Check these sections for solutions to problems you may have using your product.
Checking for Software Updates
Product Status Messages
Message Appears Prompting You to Reset Ink Levels
Running a Product Check
Resetting Control Panel Defaults
Solving Setup Problems
Solving Network Problems
Solving Copying Problems
Solving Paper Problems
Solving Problems Printing from a Computer
Solving Page Layout and Content Problems
Solving Print Quality Problems
Solving Scanning Problems
Solving Scanned Image Quality Problems
Solving Faxing Problems
Uninstall Your Product Software
Where to Get Help
Checking for Software Updates
It's a good idea to check Epson's support website occasionally for free updates to your product software.
Visit epson.com/support (U.S.) or epson.ca/support (Canada) and select your product.
• Windows: Your printer software automatically checks for updates. You can also manually update the
software by selecting Software Update here:
• Accessing the Windows Desktop and right-clicking the icon for your product in the right side of
the Windows taskbar, or clicking the up arrow and right-clicking .
• On the Maintenance tab in the printer settings window
You can also update the software by selecting EPSON Software Updater in the EPSON or Epson
Software program group, accessible by the Start button, or on the Start or Apps screens, depending
on your version of Windows.

306
• OS X: You can manually update the software by opening the Applications > Epson Software folder
and selecting EPSON Software Updater.
• macOS 10.12.x, 10.13.x, 10.14.x, 10.15.x, or 11.x: You can manually update the software by opening
the App Store, selecting Updates, searching for a software update option for Epson Software, and
selecting Update.
Parent topic: Solving Problems
Product Status Messages
You can often diagnose problems with your product by checking the messages on its LCD screen.
LCD screen message Condition/solution
Printer error. Turn on the
printer again. See your
documentation for details.
A printer error has occurred. Turn the product off and then back on again. If
the error continues, check for a paper jam. If there is no paper jam, contact
Epson for support.
Paper out in XX. Load paper in the cassette or rear paper feed slot.
Paper Setup Auto Display
is set to Off. Some
features may not be
available. For details, see
your documentation.
The Paper Setup Auto Display option is disabled. You must enable
Paper Setup Auto Display to use AirPrint.
No dial tone is detected. Make sure the phone cable is connected correctly and the phone line
works. If you connected the product to a PBX (Private Branch Exchange)
phone line or Terminal Adapter, change the Line Type setting to PBX. If
you still cannot send a fax, turn off the Dial Tone Detection setting.
(Turning off the Dial Tone Detection setting may cause the product to drop
the first digit of a fax number.)
The combination of IP
address and the subnet
mask is invalid. See your
documentation for more
details.
There is a problem with the network connection to your product. Check the
solutions in this guide.
To use cloud services,
update the root certificate
from the Epson Web
Config utility.
Access your product's built-in Web Config utility and update the root
certificate for your product.

307
LCD screen message Condition/solution
Check that the printer
driver is installed on the
computer and that the port
settings for the printer are
correct.
Make sure the printer port is selected correctly on the Port tab of the
Printer Properties screen (Windows) or the System Properties > USB list
(Mac).
Select USBXXX for a USB connection or EpsonNet Print Port for a
network connection.
Check that the printer
driver is installed on the
computer and that the
USB port settings for the
printer are correct.
Recovery Mode A firmware update has failed. Connect your product using a USB cable and
try updating the firmware again. If you still receive this error message,
contact Epson for support.
Parent topic: Solving Problems
Related references
Where to Get Help
Paper Source Settings Options
Related tasks
Connecting a Telephone or Answering Machine
Checking for Software Updates
Accessing the Web Config Utility
Related topics
Solving Paper Problems
Loading Paper
Wi-Fi or Wired Networking
Message Appears Prompting You to Reset Ink Levels
If you see a message on the LCD screen prompting you to reset the ink levels, do the following:
1. Refill all of the ink tanks or the ink tanks indicated on the LCD screen all the way to the top.
Note: Depending on the operating conditions, you may see the ink reset message even when there is
still ink in the tanks.
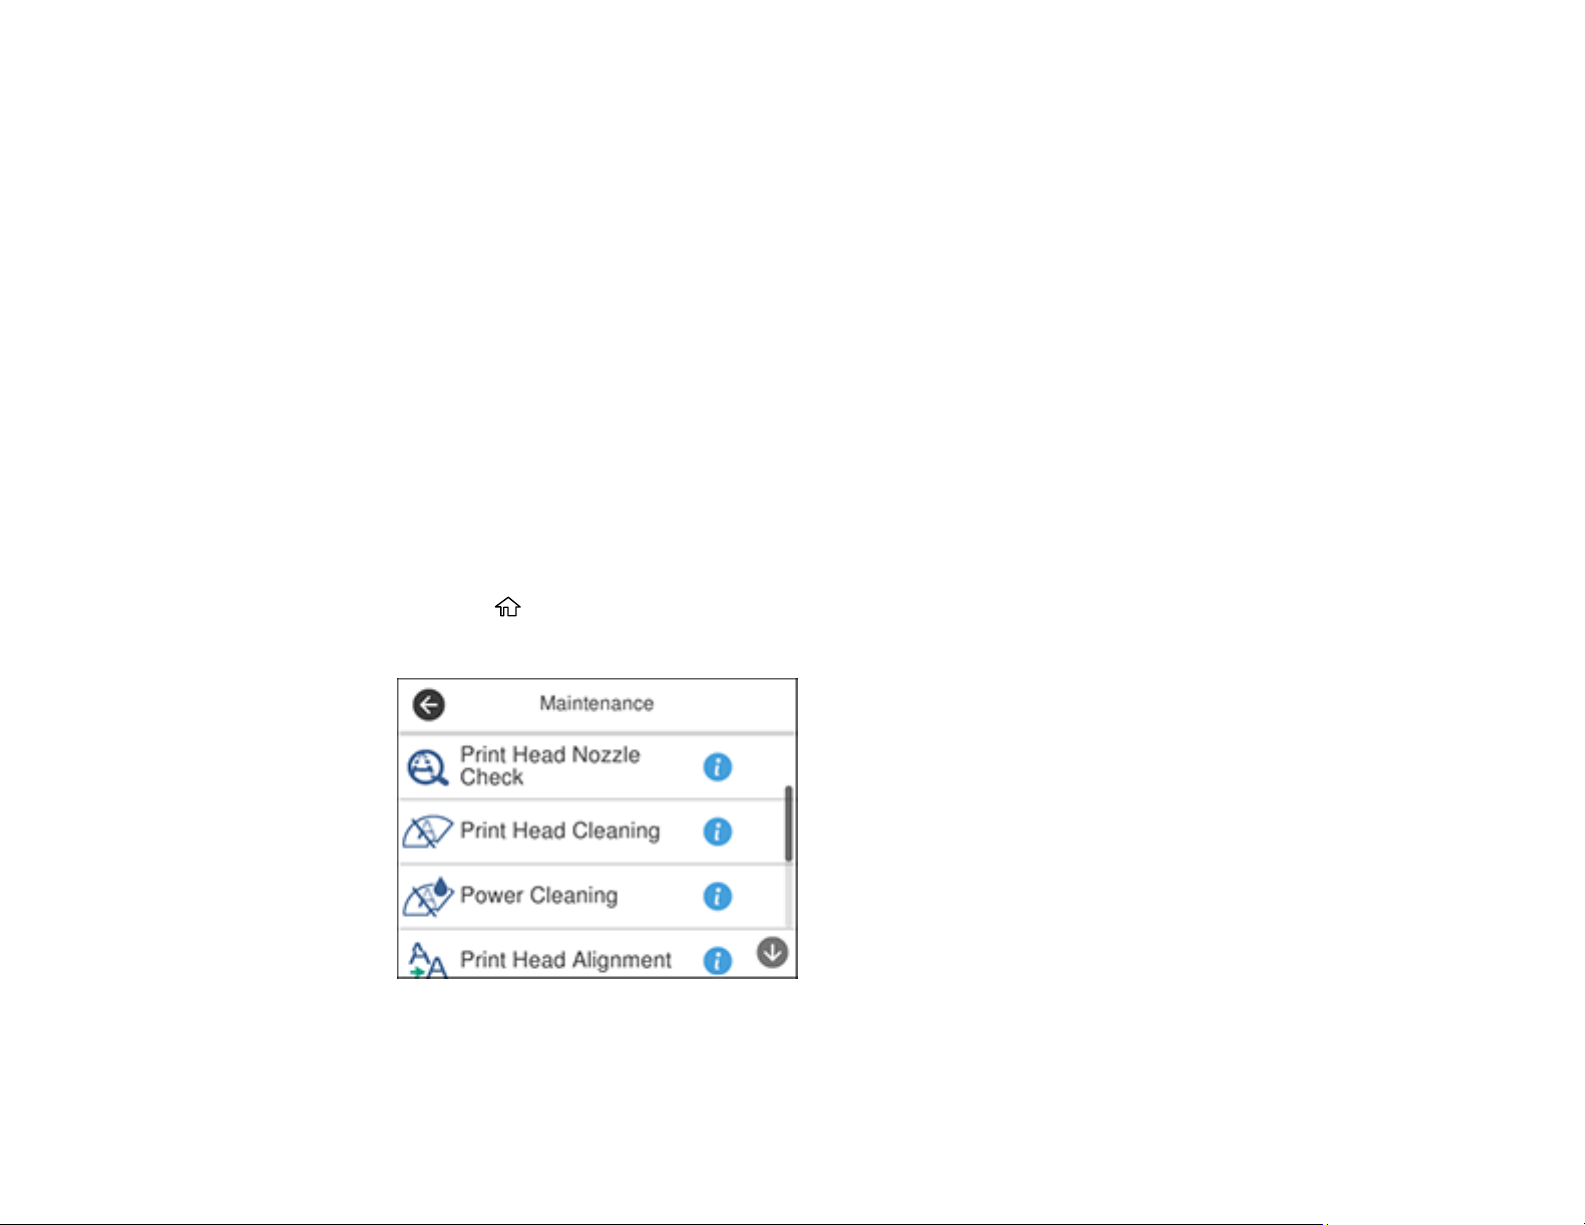
308
2. Select the colors that you refilled on the LCD screen.
3. Follow the instructions on the LCD screen to reset the ink levels.
Note: The product has a low ink alert system. The accuracy of this system depends on the user refilling
the ink tanks correctly. The product cannot directly measure the ink levels in the tanks; instead it
estimates the amount of ink remaining by internally monitoring ink usage. The low ink alert system may
generate inaccurate messages if the ink tanks are not refilled according to these instructions.
As a precaution, perform regular visual inspections of the ink tanks to ensure ink levels do not fall below
the lower line. Continued use of the product when the ink level is below the lower line on the tank could
damage the product.
Parent topic: Solving Problems
Running a Product Check
Running a product check helps you determine if your product is operating properly.
1. Disconnect any interface cables connected to your product.
2. Load plain paper in the product.
3. Press the home button, if necessary.
4. Select Maintenance.

309
5. Select Print Head Nozzle Check.
6. Select Print.
The nozzle check pattern is printed.
7. Do one of the following, depending on the results of the product check:
• If the page prints and the nozzle check pattern is complete, the product is operating properly. Any
operation problem you may have could be caused by your computer, cable, software, or selected
settings. Check the other solutions in this book or try uninstalling and reinstalling your printer
software.
• If the page prints but the nozzle check pattern has gaps, clean or align the print head.
• If the page does not print, the product may have a problem. Check the other solutions in this
manual. If they do not work, contact Epson.
Parent topic: Solving Problems
Related concepts
Print Head Alignment
Print Head Cleaning
Uninstall Your Product Software
Related references
Where to Get Help
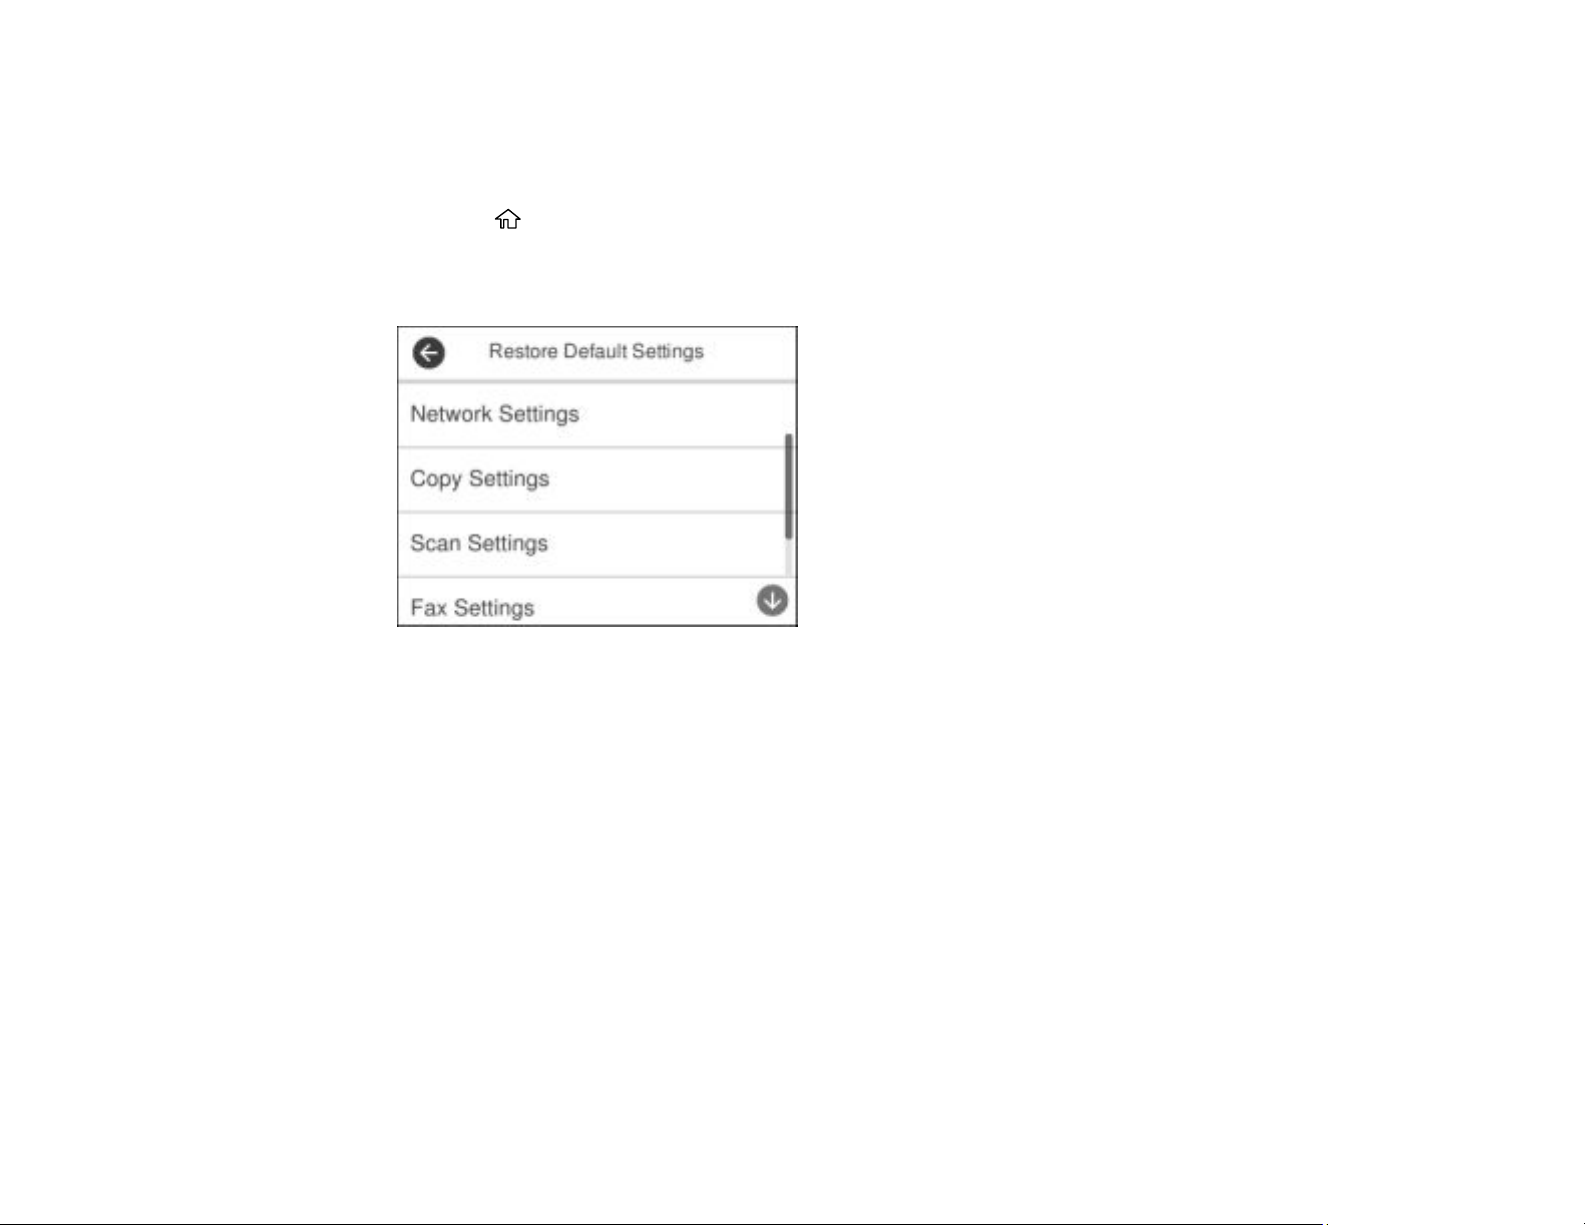
310
Resetting Control Panel Defaults
If you have a problem with settings on the product control panel, you can reset them to their factory
defaults. You can choose which settings to reset or reset them all.
1. Press the home button, if necessary.
2. Select Settings.
3. Select Restore Default Settings.
4. Select one of these options:
• Network Settings: Resets all network settings.
• Copy Settings: Resets all copy settings.
• Scan Settings: Resets all scan settings.
• Fax Settings: Resets all fax settings (ET-5170/ET-5180).
• Clear All Data and Settings: Resets all control panel settings and deletes any stored information.
You see a confirmation screen.
5. Select Yes to reset the selected settings. (Select No if you want to cancel the operation.)
Parent topic: Solving Problems
Solving Setup Problems
Check these sections if you have problems while setting up your product.

311
Product Does Not Turn On or Off
Noise After Filling the Ink
Software Installation Problems
Parent topic: Solving Problems
Product Does Not Turn On or Off
If you cannot turn the product on or off, try these solutions:
• If you cannot turn on your product, make sure the power cord is securely connected and hold down
the power button a little longer.
• If you cannot turn off your product, hold down the power button a little longer. If you still cannot turn off
your product, unplug the power cord, plug the power cord back in, then turn your product on and off
again using the power button.
Parent topic: Solving Setup Problems
Noise After Filling the Ink
If you hear noises from your product after filling the ink tanks with ink, check these explanations:
• The first time you fill the tanks with ink, the product must charge its print head. Wait until charging
finishes before you turn off the product, or it may charge improperly and use excess ink the next time
you turn it on. Your product is finished charging the print head when the power light stops flashing.
• If the product's print head stops moving or making noise, and the charging process has not finished
after approximately 20 minutes, turn off your product. Turn it back on and check to see if charging is
still in progress. If it is still in progress, contact Epson for help.
Parent topic: Solving Setup Problems
Software Installation Problems
If you have problems while installing your product software, try these solutions:
• Make sure your product is turned on and any necessary cables are securely connected at both ends. If
you still have problems installing software, disconnect the cable and carefully follow the instructions on
the Start Here sheet. Also make sure your system meets the requirements for your operating system.
• Close any other programs, including screen savers and virus protection software, and install your
product software again.
• In Windows, make sure your product is selected as the default printer and the correct port is shown in
the printer properties.

312
• If you see any error message or your software does not install correctly in Windows, you may not have
software installation privileges. Contact your system administrator.
• If you are printing over a network, make sure your product is set up properly on the network.
Parent topic: Solving Setup Problems
Related concepts
Uninstall Your Product Software
Related references
Windows System Requirements
Mac System Requirements
Solving Network Problems
Check these solutions if you have problems setting up or using your product on a network.
Note: Breakdown or repair of this product may cause loss of fax and network data and settings. Epson is
not responsible for backing up or recovering data and settings during or after the warranty period. We
recommend that you make your own backup or print out your fax and network data and settings.
Product Cannot Connect to a Wireless Router or Access Point
Network Software Cannot Find Product on a Network
Product Does Not Appear in Mac Printer Window
Wireless Network Connection is Unstable on a Mac
Wired Network Connection Becomes Unstable
Cannot Print Over a Network
Cannot Scan Over a Network
Parent topic: Solving Problems
Product Cannot Connect to a Wireless Router or Access Point
If your product has trouble finding or connecting to a wireless router or access point, try these solutions:
• If you are connecting the product via Wi-Fi Protected Setup (WPS) and the Wi-Fi icon on your
product's LCD screen is not lit or does not appear, make sure you select one of the WPS options from
the product control panel within 2 minutes of pressing the WPS button on your router.
• Make sure to place your product within contact range of your router or access point. Avoid placing
your product near a microwave oven, cordless phone, or large metal object, such as a filing cabinet.

313
• Verify that your router or access point is operating correctly by connecting to it from your computer or
another device.
• Print a network connection report and check the codes and messages on the report to help determine
the cause of the problem.
• You may need to disable the firewall and any anti-virus software on your wireless router or access
point.
• Try restarting your router following the instructions in your router documentation.
Note: If you are reading these instructions online, you will lose your Internet connection when you
restart your router.
• Check to see if access restrictions, such as MAC address filtering, are set on the router or access
point. If access restrictions are set, add your product's MAC address to your router's address list. To
obtain your product's MAC address, print a network status sheet. Then follow the instructions in your
router or access point documentation to add the address to the list.
• If your router or access point does not broadcast its network name (SSID), follow the instructions that
came with your product to enter your wireless network name manually.
• If your router or access point has security enabled, determine the kind of security it is using and any
required password or passphrase for connection. Then make sure to enter the exact WEP key or WPA
passphrase correctly.
• Check if your computer is restricting the available wireless channels. If so, verify that your wireless
access point is using one of the usable channels and change to a usable channel, if necessary.
• If you cannot connect your product to a device using Wi-Fi Direct, you may have exceeded the
maximum number of devices connected to your product (8). Print a network status sheet or access
Web Config on the browser for your device and check the number of connected devices. If 8 devices
are already connected, disconnect a device by deleting the product's SSID from the Wi-Fi screen of
that device. If fewer than 8 devices are connected, check the accuracy of your other network settings,
move your device closer to your product, and try connecting again.
• If you are using a Wi-Fi Direct connection that suddenly disconnects, the Wi-Fi direct password on
your device may have been changed. If necessary, delete the existing DIRECT-xxxxxxxx connection
settings from your device and enter a new password. See your device documentation for instructions.
Parent topic: Solving Network Problems
Related concepts
Wi-Fi Direct Mode Setup

314
Related tasks
Selecting Wireless Network Settings from the Control Panel
Printing a Network Status Sheet
Printing a Network Connection Report
Disabling Wi-Fi Features
Related topics
Wi-Fi or Wired Networking
Network Software Cannot Find Product on a Network
If EpsonNet Setup cannot find your product on a network, try these solutions:
• Make sure your product is turned on and connected to your network. Verify the connection using your
product control panel.
• Check if your network name (SSID) contains non-ASCII characters. Your product cannot display non-
ASCII characters.
• Print a network connection report and check the codes and messages on the report to help determine
the cause of the problem.
• Make sure your product is not connected to a guest network.
• If necessary, reinstall your product software and try running EpsonNet Setup again:
1. Reset your product's network settings to their factory defaults.
2. Windows only: Uninstall your product software.
3. Restart your router following the instructions in your router documentation.
Note: If you are reading these instructions online, you will lose your Internet connection when you
restart your router, so note the next step before restarting it.
4. Download your product software from the Epson website using the instructions on the Start Here
sheet.
• If you have replaced your router, reinstall your product software to connect to the new router.
Note: If you are using a 5 GHz wireless router, set the router to operate in dual band (2.4 GHz and
5 GHz) mode. If your router uses a single network name (SSID) for both the 2.4 GHz and 5 GHz band,
give each band its own network name (SSID) instead, such as Home Network 2.4 GHz and Home
Network 5 GHz. See your router documentation or contact your internet service provider for
instructions.

315
• Check to see if your wireless router or access point has an enabled Privacy Separator function that is
preventing detection of your device over the network. See your router or access point documentation
for instructions on disabling the Privacy Separator function.
Parent topic: Solving Network Problems
Related concepts
Uninstall Your Product Software
Wi-Fi Direct Mode Setup
Related topics
Wi-Fi or Wired Networking
Product Does Not Appear in Mac Printer Window
If your product does not appear in the Mac printer window, try these solutions:
• Turn your product off, wait 30 seconds, then turn it back on again.
• If you are connecting the product via Wi-Fi Protected Setup (WPS) and the Wi-Fi icon does not appear
on your product's LCD screen, make sure you select one of the WPS options from the product control
panel within 2 minutes of pressing the WPS button on your router.
• If you are connecting the product wirelessly via EpsonNet Setup and the Wi-Fi icon does not appear
on your LCD screen, make sure your product software was installed correctly. If necessary, reinstall
your software.
Note: If you are using a 5 GHz wireless router, set the router to operate in dual band (2.4 GHz and
5 GHz) mode. If your router uses a single network name (SSID) for both the 2.4 GHz and 5 GHz band,
give each band its own network name (SSID) instead, such as Home Network 2.4 GHz and Home
Network 5 GHz. See your router documentation or contact your internet service provider for instructions.
Parent topic: Solving Network Problems
Related concepts
Uninstall Your Product Software
Wireless Network Connection is Unstable on a Mac
If you connected a device to a USB 3.0 port on your Mac, you may experience wireless network
interference between your product and your Mac.
If you cannot connect to your product over the wireless network or the connection becomes unstable,
move the device connected to your Mac USB 3.0 port further away from your Mac.

316
Parent topic: Solving Network Problems
Wired Network Connection Becomes Unstable
When you connect the product to a wired network using a router or access point that supports IEEE
802.3az (Energy Efficient Ethernet), the connection may become unstable, you may be unable to
connect to the product, and the communication speed may become slow. If you experience any of these
issues, follow the steps below to disable IEEE 802.3az and then connect your product again.
1. Disconnect the Ethernet cables connected to the computer and your product.
2. Disable IEEE 802.3az for the computer's network adapter if it is enabled (check your operating
system's Ethernet connection settings).
3. Connect the computer and your product directly with an Ethernet cable.
4. Print a network connection report from your product.
5. On the computer, open a web browser and enter your product's IP address from the network
connection report.
6. Select Advanced Settings > Network Settings > Wired LAN.
7. Select OFF for IEEE 802.3az. and click Next.
8. Click OK and remove the Ethernet cable connecting the computer and your product.
9. If you disabled IEEE 802.3az for your computer's network adapter, enable it.
10. Reconnect the Ethernet cables from the router or access point to your computer and product.
If problems still occur, other devices on the network may be causing them.
Parent topic: Solving Network Problems
Related tasks
Printing a Network Connection Report
Cannot Print Over a Network
If you cannot print over a network, try these solutions:
• Make sure that your product is turned on.
• Make sure you install your product's network software as described in your product documentation.
• Print a network status sheet and verify that the network settings are correct. If the network status is
Disconnected, check any cable connections and turn your product off and then on again.

317
• Print a network connection report and check the codes and messages on the report to help determine
the cause of the problem.
• If you are using TCP/IP, make sure the product's IP address is set correctly for your network. If your
network does not assign IP addresses using DHCP, set the IP address manually.
• Make sure your computer and product are both using the same wireless network.
• If network printing is slow, print a network status sheet and check the signal strength. If it is poor, place
your product closer to your router or access point. Avoid placing your product near a microwave oven,
cordless phone, or large metal object, such as a filing cabinet.
Note: If you are using a 5 GHz wireless router, set the router to operate in dual band (2.4 GHz and
5 GHz) mode. If your router uses a single network name (SSID) for both the 2.4 GHz and 5 GHz band,
give each band its own network name (SSID) instead, such as Home Network 2.4 GHz and Home
Network 5 GHz. See your router documentation or contact your internet service provider for
instructions.
• Try restarting your router following the instructions in your router documentation.
Note: If you are reading these instructions online, you will lose your Internet connection when you
restart your router.
• Check if there are any paused print jobs.
• Make sure your printer is selected as the default printer.
• Check if the selected printer port is correct.
• Check to see if your wireless router or access point has an enabled Privacy Separator function that is
preventing printing from a device over the network. See your router or access point documentation for
instructions on disabling the Privacy Separator function.
• If you are connecting the product via Wi-Fi Protected Setup (WPS) and the Wi-Fi icon does not appear
on your product's LCD screen, make sure you select one of the WPS options from the product control
panel within 2 minutes of pressing the WPS button on your router.
• Check your wired LAN router or access point to see if the LED for the port to which your product is
connected is on or flashing. If the link LED is off, try the following:
• Make sure the Ethernet cable is securely connected to your product and to your router, access
point, switch, or hub.
• Try connecting your product to a different port or a different router, access point, switch, or hub.
• Try connecting with a different Ethernet cable.

318
• Try printing to your product from another computer on the network.
Note: If you are using a 5 GHz wireless router, set the router to operate in dual band (2.4 GHz and
5 GHz) mode. If your router uses a single network name (SSID) for both the 2.4 GHz and 5 GHz band,
give each band its own network name (SSID) instead, such as Home Network 2.4 GHz and Home
Network 5 GHz. See your router documentation or contact your internet service provider for
instructions.
• If you are connecting the product via EpsonNet Setup and the Wi-Fi icon does not appear on the LCD
screen, make sure your product software was installed correctly. If necessary, reinstall your software.
Parent topic: Solving Network Problems
Related concepts
Uninstall Your Product Software
Related references
Cannot Scan Over a Network
Related tasks
Printing a Network Status Sheet
Related topics
Wi-Fi or Wired Networking
Cannot Scan Over a Network
If you cannot scan over a network, try these solutions:
• Make sure the computer and product are connected to the same network (or network segment/VLAN).
• Move the product and computer or smart device closer to the router or access point.
• If network communication was interrupted while starting Epson Scan 2, exit Epson Scan 2, wait a few
seconds, and restart it. If Epson Scan 2 cannot restart, turn off your product, turn it back on, and try
restarting Epson Scan 2 again.
• If you are scanning a large original at a high resolution, a network communication error may occur. Try
scanning again at a lower resolution.
• Check the network connection setting in the Epson Scan 2 Utility.
• Check the scanner setting and reset the connection if necessary using Epson Scan 2 Utility:
Windows 10: Click and select EPSON > Epson Scan 2 Utility. Make sure your product is
selected. If necessary, select the Other tab and click Reset.

319
Windows 8.x: Navigate to the Apps screen, select EPSON, and select Epson Scan 2 Utility. Make
sure your product is selected. If necessary, select the Other tab and click Reset.
Windows (other versions): Click or Start > All Programs or Programs > EPSON > Epson
Scan 2 > Epson Scan 2 Utility. Make sure your product is selected. If necessary, select the Other
tab and click Reset.
Mac: Open the Applications folder, click Epson Software, and click Epson Scan 2 Utility. Make
sure your product is selected. If necessary, select the Other tab and click Reset.
• You may need to disable the firewall and any anti-virus software on your wireless router or access
point.
• If you see the message "Network product is not available: currently being used by user", there may be
a communication error between the product and computer. Restart the product.
• If the Firewall function is active, the product may not be discovered by the Epson Scan 2 Utility. Open
the Epson Scan 2 Utility, enter the IP address for your product, and click Add.
• If the product and computer cannot communicate and are connected to the same network (or network
segment/VLAN), the privacy separator on your router must be disabled. Follow the instructions in your
router documentation to disable the privacy separator.
Parent topic: Solving Network Problems
Related tasks
Starting a Scan Using the Product Control Panel
Starting a Scan from a Smartphone or Tablet
Scanning a Document in Epson ScanSmart
Starting a Scan Using the Epson Scan 2 Icon
Starting a Scan from a Scanning Program
Solving Copying Problems
Check these solutions if you have problems copying with your product.
Product Makes Noise, But Nothing Copies
Product Makes Noise When It Sits for a While
Copies Have Incorrect or Faint Colors
Position, Size, or Margins of Copies are Incorrect
Originals Do Not Feed From the Automatic Document Feeder
Parent topic: Solving Problems

320
Product Makes Noise, But Nothing Copies
If your product makes a noise, but nothing copies, try these solutions:
• Run a nozzle check to see if any of the print head nozzles are clogged. Then clean the print head, if
necessary.
• If the nozzle check page does not print, but the product's power is on, make sure your product
software is installed correctly.
• Make sure your product is level (not tilted).
Parent topic: Solving Copying Problems
Related concepts
Print Head Nozzle Check
Print Head Cleaning
Product Makes Noise When It Sits for a While
Your product is performing routine maintenance. This is normal.
Parent topic: Solving Copying Problems
Copies Have Incorrect or Faint Colors
If your copies have incorrect, uneven, smeared, or faint colors, try these solutions:
• Run a print head nozzle check to see if any of the nozzles are clogged. Then clean the print head, if
necessary.
• Do not press too hard on the original when you copy from the scanner glass.
• Clean the scanner glass with a soft, dry, lint-free cloth or use a small amount of glass cleaner on the
cloth, if necessary. Paper towels are not recommended.
Caution: Do not spray glass cleaner directly on the scanner glass.
• Clean the ADF.
• Wipe any dirt or dust off of your originals.
• If the colors are smeared, try lowering the copy density setting on the LCD screen.
Parent topic: Solving Copying Problems

321
Position, Size, or Margins of Copies are Incorrect
If the position, size, or margins of your copies are incorrect, try these solutions:
• When placing originals in the ADF, make sure the edge guides are against the edges of the paper.
• When placing originals on the scanner glass, make sure the original is placed correctly for scanning.
Align the corner of the original with the corner indicated by the symbol on the scanner glass. If
necessary, move the original away from the edges of the scanner glass slightly.
• Clean the scanner glass and ADF.
• Make sure the paper is loaded in the correct direction.
• Select the appropriate Original Size in the copy settings on the LCD screen.
Parent topic: Solving Copying Problems
Originals Do Not Feed From the Automatic Document Feeder
If your originals do not feed when placed in the ADF, try these solutions:
• Make sure the size, weight, and number of your originals are supported by the ADF.
• Make sure the originals are loaded correctly.
• Make sure the document is not curled or creased.
• Try cleaning the inside of the ADF.
Parent topic: Solving Copying Problems
Solving Paper Problems
Check these sections if you have problems using paper with your product.
Paper Feeding Problems
Paper Jam Problems in the Front of the Product
Paper Jam Problems Inside the Product
Paper Jam Problems in the Rear Cover
Paper Jams in the Automatic Document Feeder
Paper Ejection Problems
Parent topic: Solving Problems

322
Paper Feeding Problems
If you have problems feeding paper, try these solutions:
• If paper does not feed for printing, remove it from the rear feed slot or cassette. Reload it, then adjust
the edge guides. Make sure the paper stack is not above the tab on the edge guides inside the
cassette. Make sure to load only one sheet at a time in the rear feed slot.
• Place the product on a flat surface and operate it in the recommended environmental conditions.
• Be sure to insert the paper cassette all the way into your product.
• If multiple pages feed at once, remove the paper, fan the edges to separate the sheets, and reload it.
• Do not load more than the recommended number of sheets.
• Make sure your paper meets the specifications for your product.
• If paper jams when you print on both sides of the paper, try loading fewer sheets.
• Make sure the paper size and paper type settings are correct for the paper source.
• Run the paper guide cleaning utility to clean the paper roller.
• Clean the roller inside the printer to remove any dust on the paper path.
• For best results, follow these guidelines:
• Use new, smooth, high-quality paper that is not curled, creased, old, too thin, or too thick.
• Load paper in the cassette printable side down.
• Follow any special loading instructions that came with the paper.
Parent topic: Solving Paper Problems
Related references
Paper Jam Problems Inside the Product
Paper Specifications
Automatic Document Feeder (ADF) Specifications
Paper Jam Problems in the Front of the Product
If you see a message that paper has jammed in the front of the product, follow the steps here.
1. Cancel the print job, if necessary.
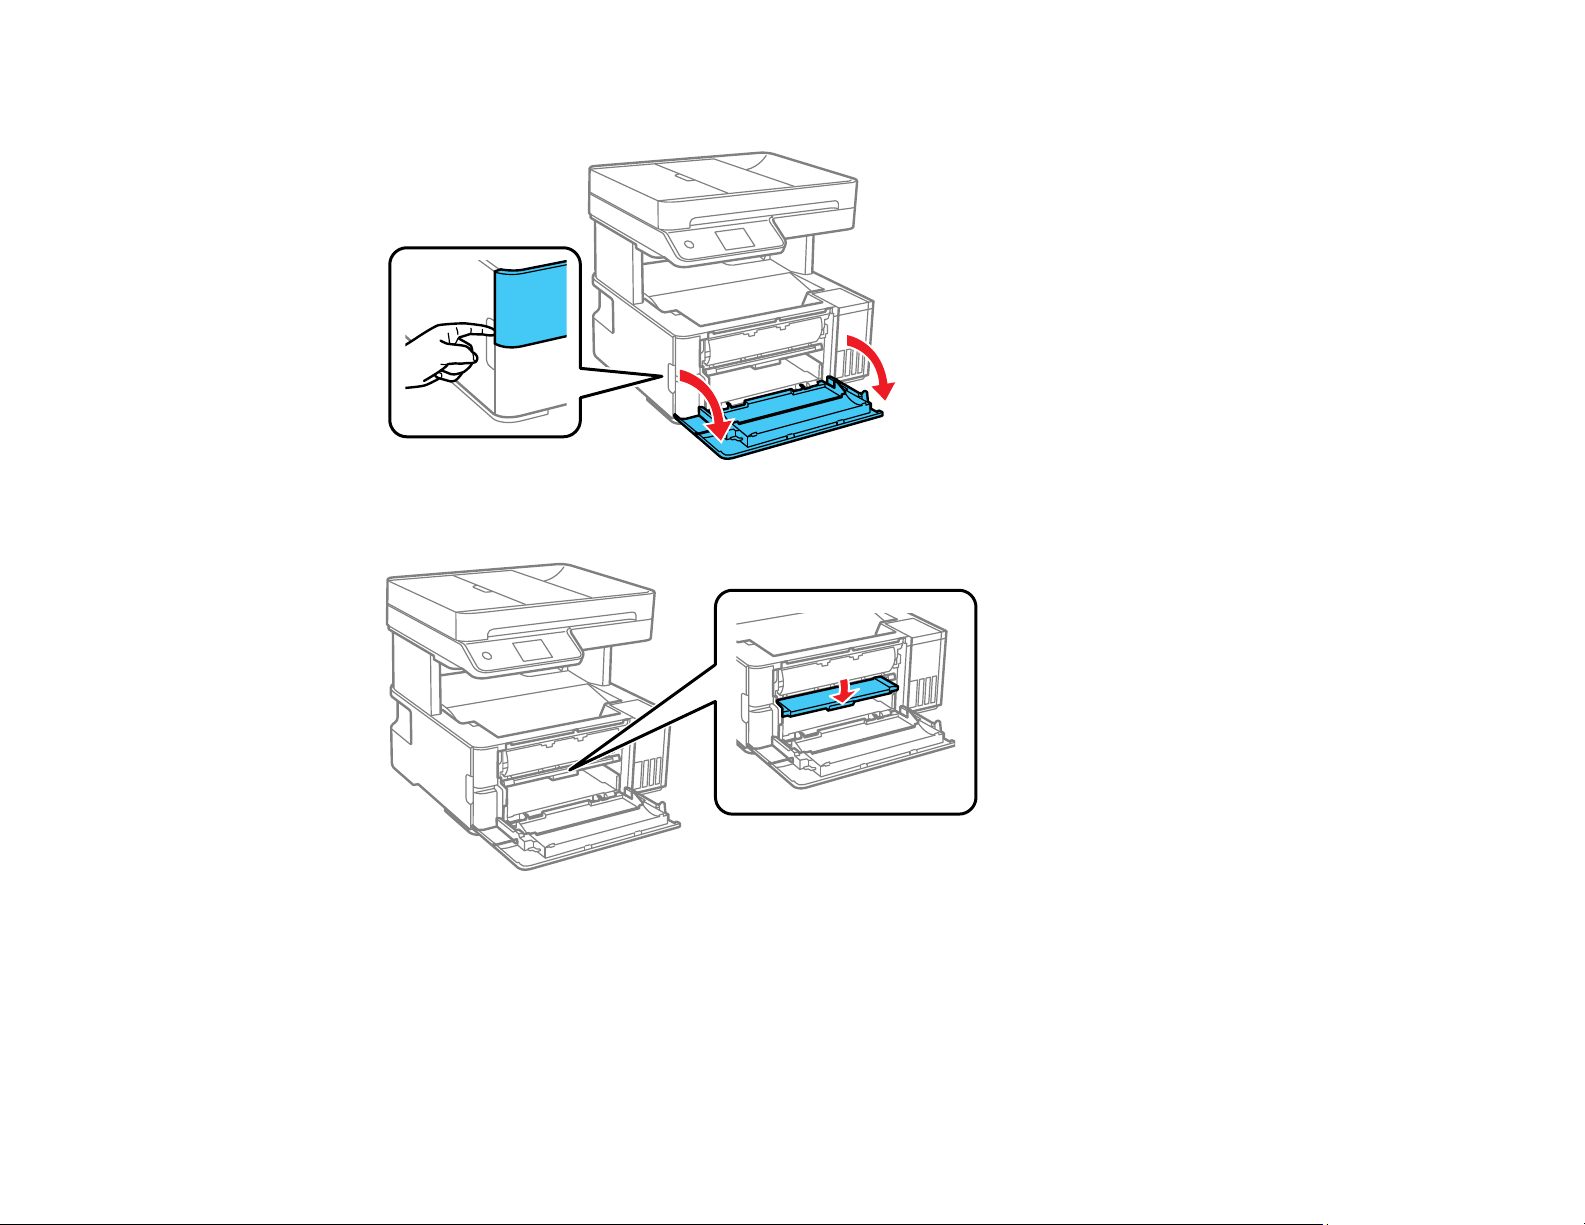
323
2. Open the front cover.
3. Lower the output selector.
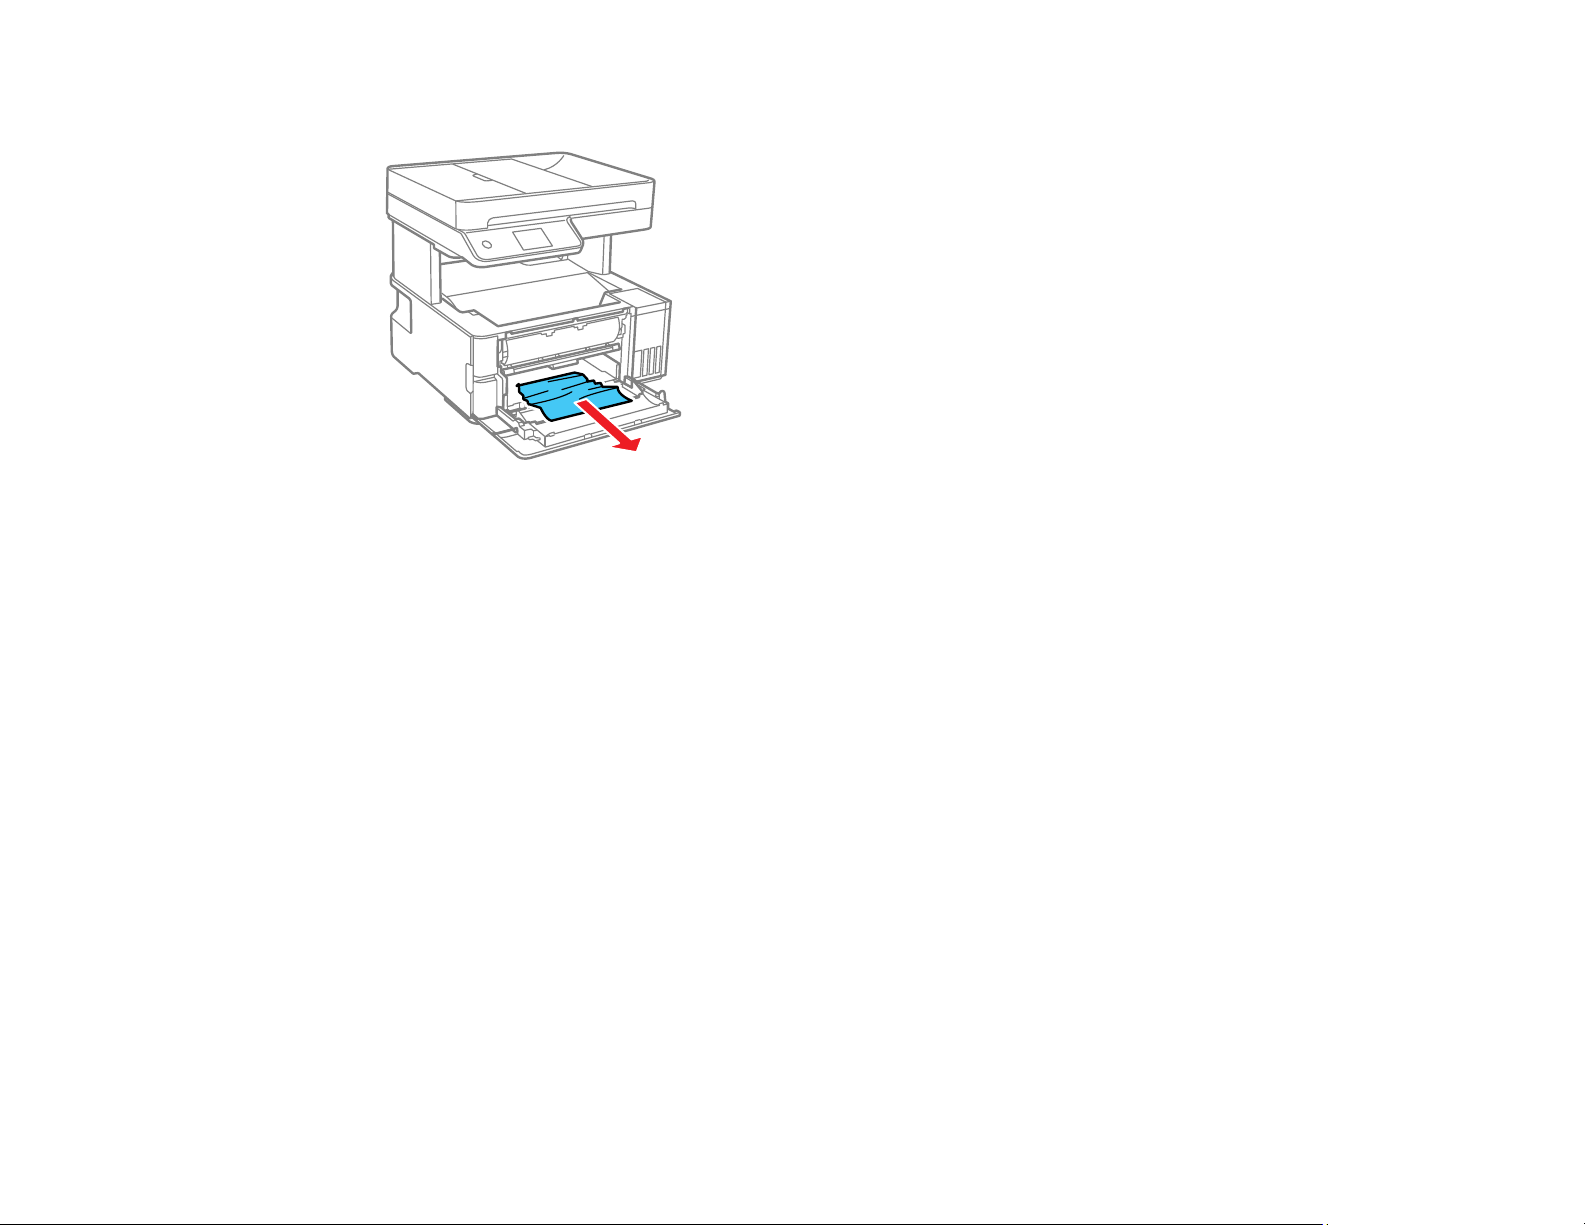
324
4. Remove any jammed paper from the front of the product.
5. Raise the output selector.
6. Close the front cover until it clicks into place.
7. Follow the prompts on the LCD screen to clear any error messages. If you still see a paper jam
message, check the other paper jam solutions.
Parent topic: Solving Paper Problems
Paper Jam Problems Inside the Product
If you see a message that paper has jammed inside the product, follow the steps here.
Warning: Never touch the buttons on the control panel while your hand is inside the product. If the
product starts operating, it may cause an injury. Do not touch any protruding parts inside the product.
1. Cancel the print job, if necessary.
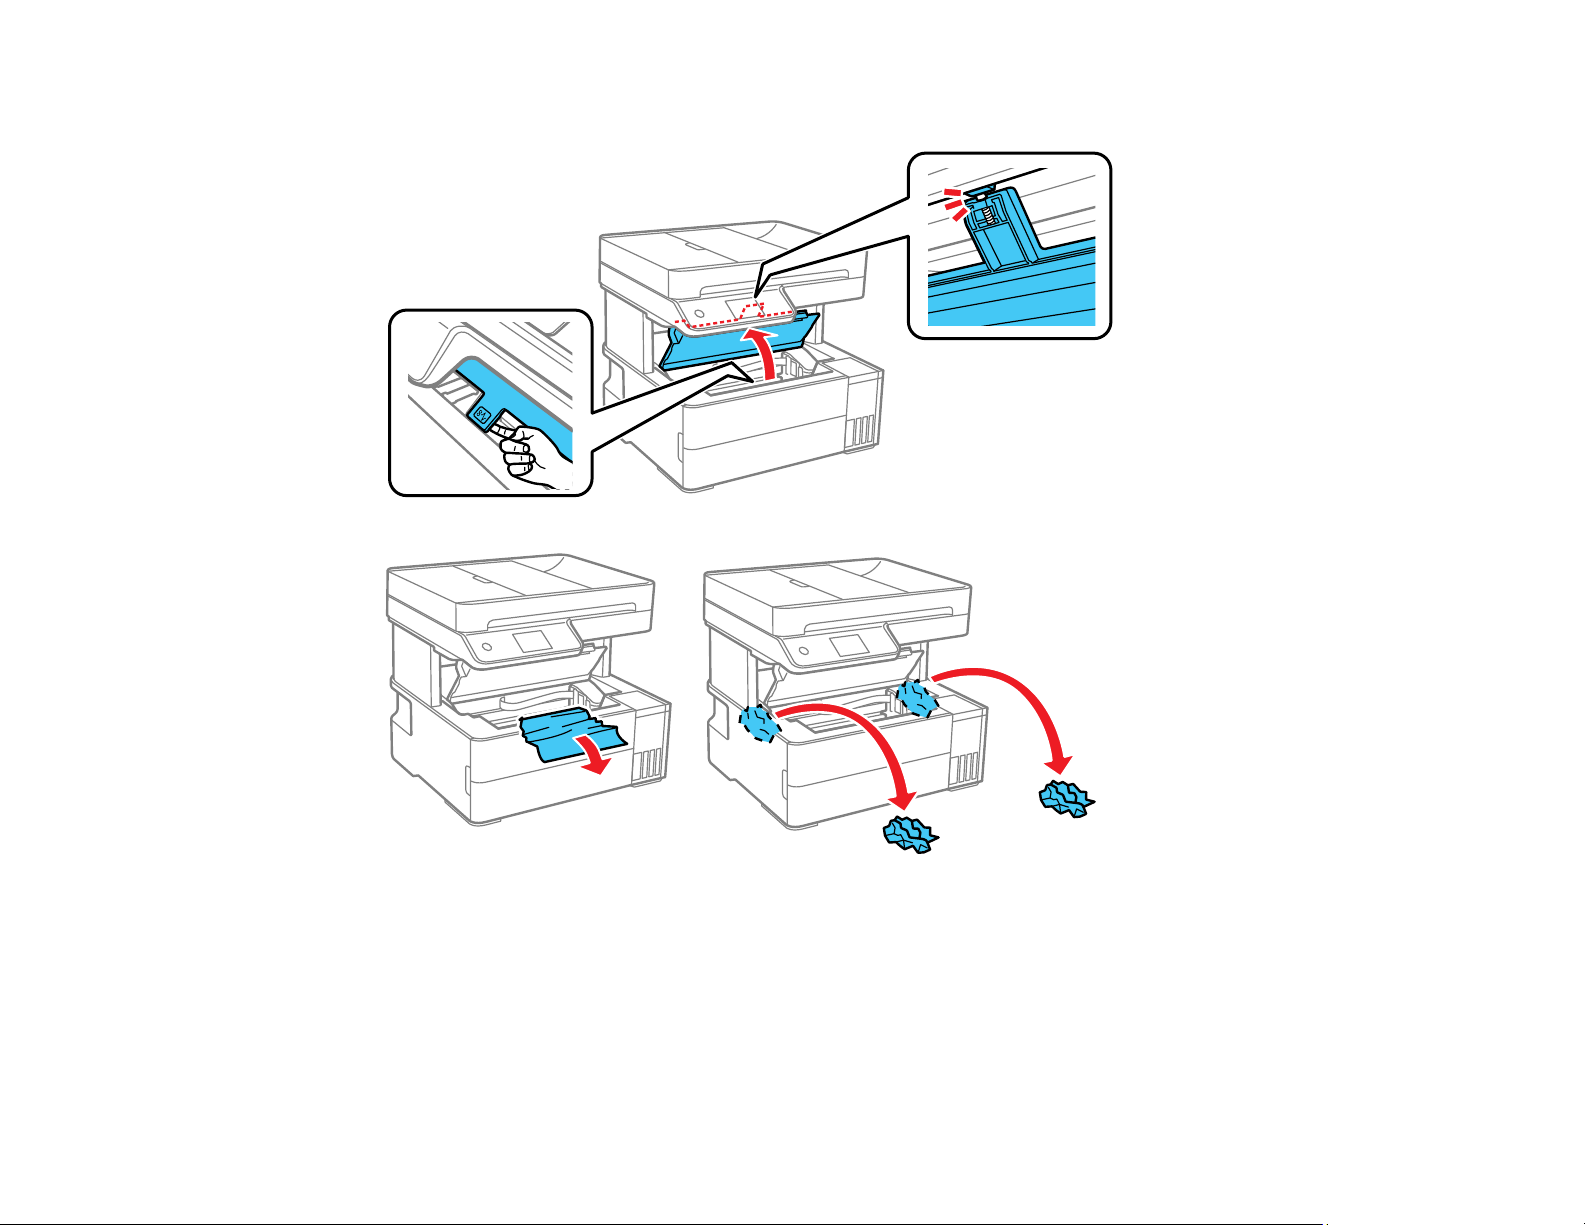
325
2. Lift the printer cover until it clicks into place and remove any jammed paper inside.
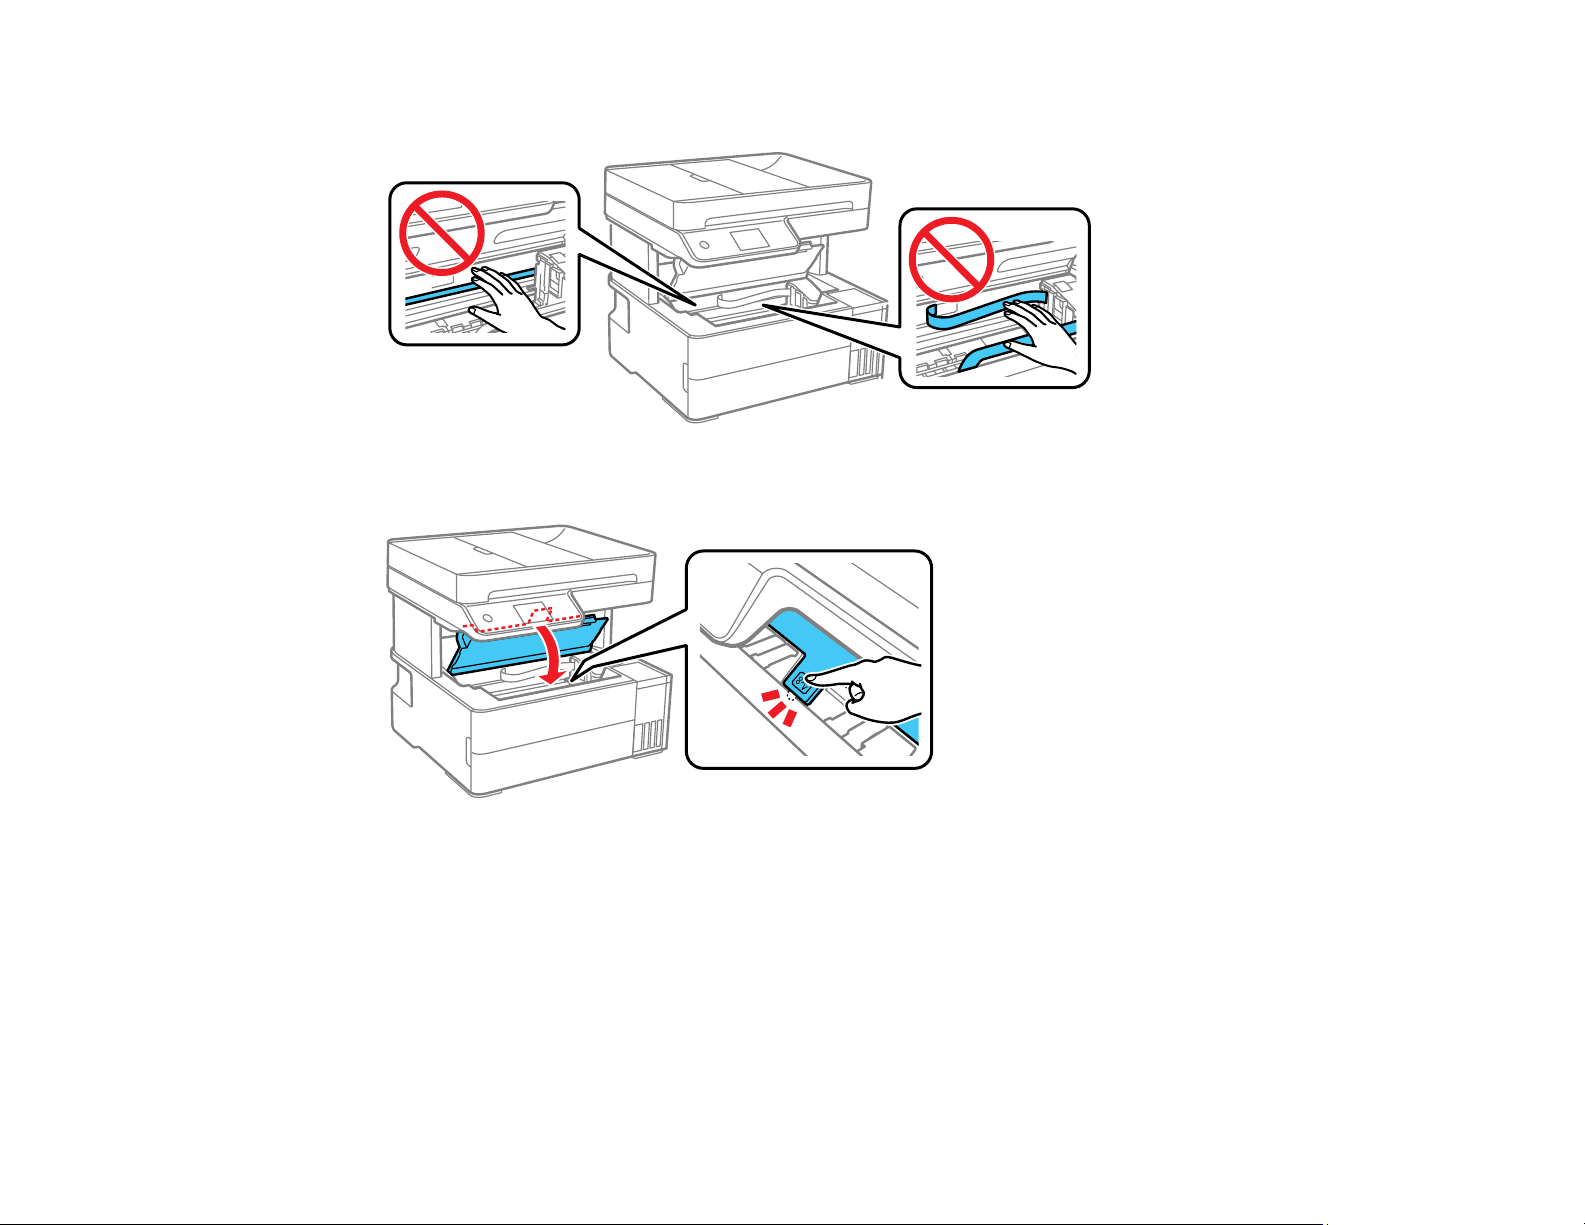
326
Caution: Do not touch the flat white cable or translucent film inside the printer.
3. Close the printer cover until it clicks into place.
4. Follow the prompts on the LCD screen to clear any error messages. If you still see a paper jam
message, check the other paper jam solutions.
Parent topic: Solving Paper Problems
Paper Jam Problems in the Rear Cover
If you see a message that paper has jammed in the rear cover, follow the steps here.
1. Cancel the print job, if necessary.
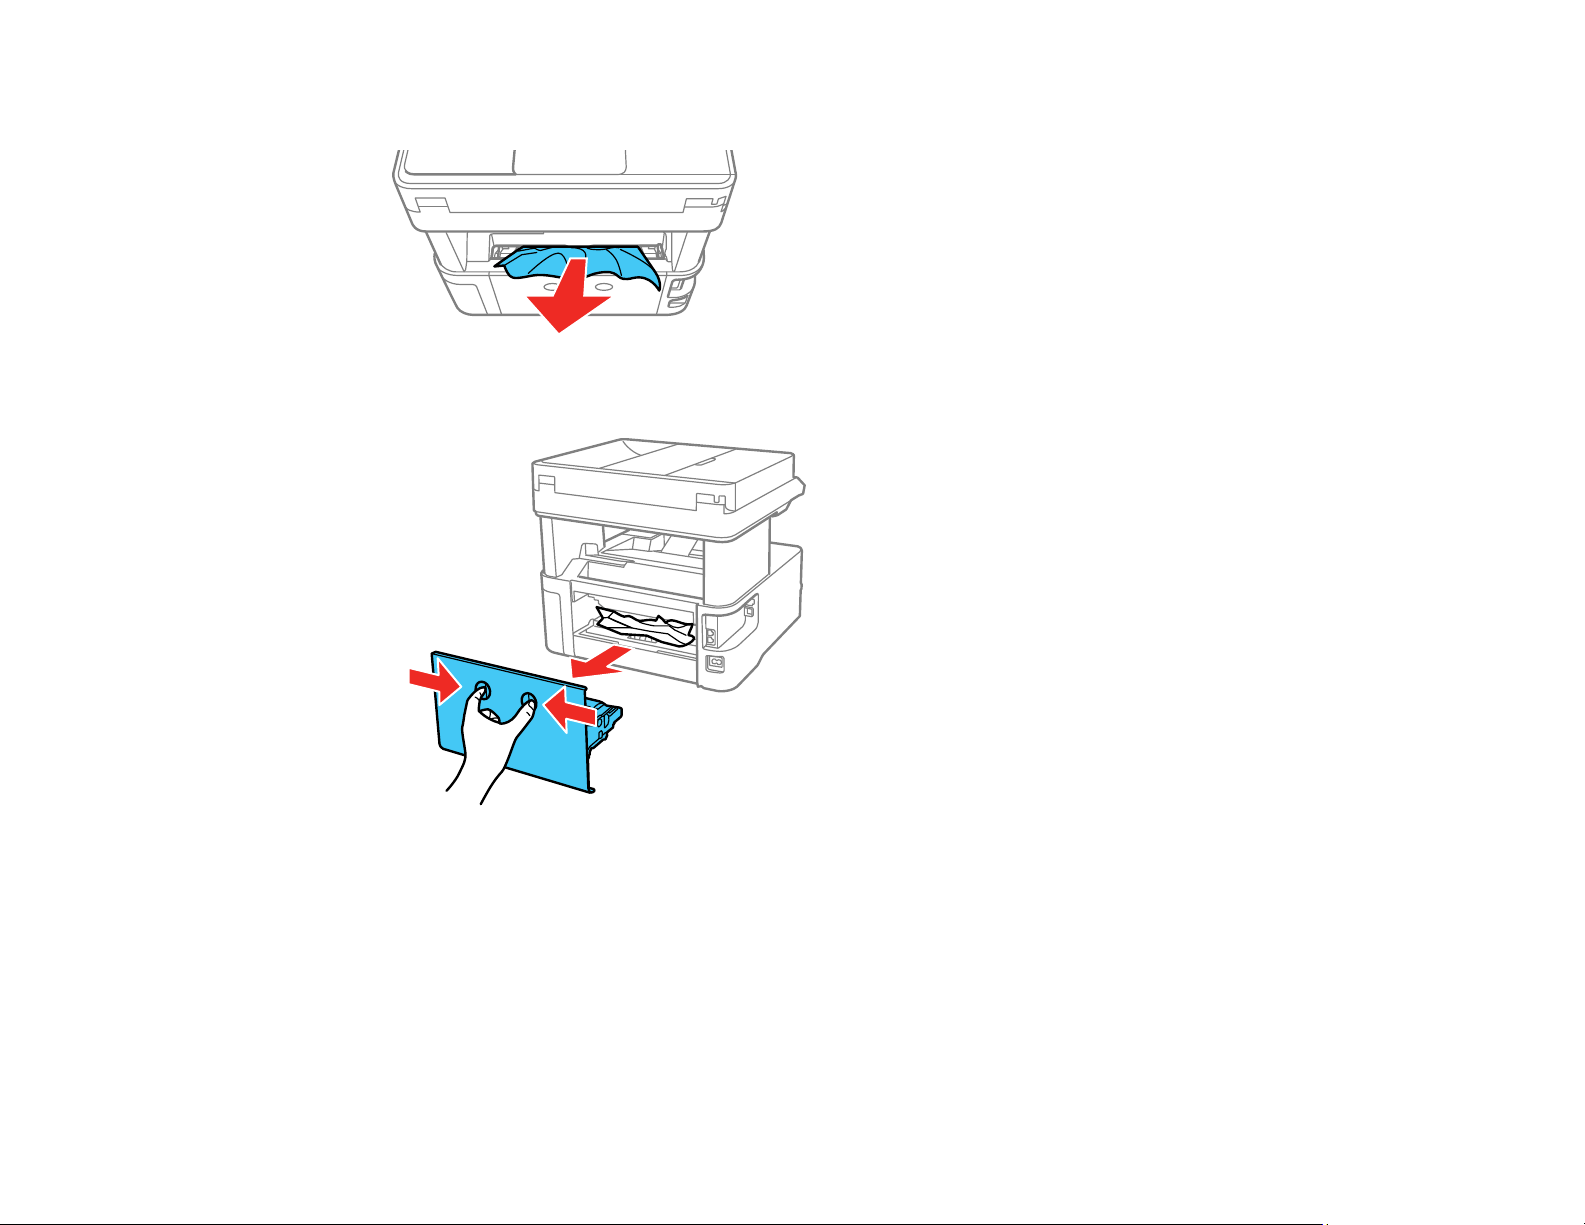
327
2. Remove any jammed paper from the rear feed slot, if necessary.
3. Press the buttons to release the rear cover and remove the cover from your product.
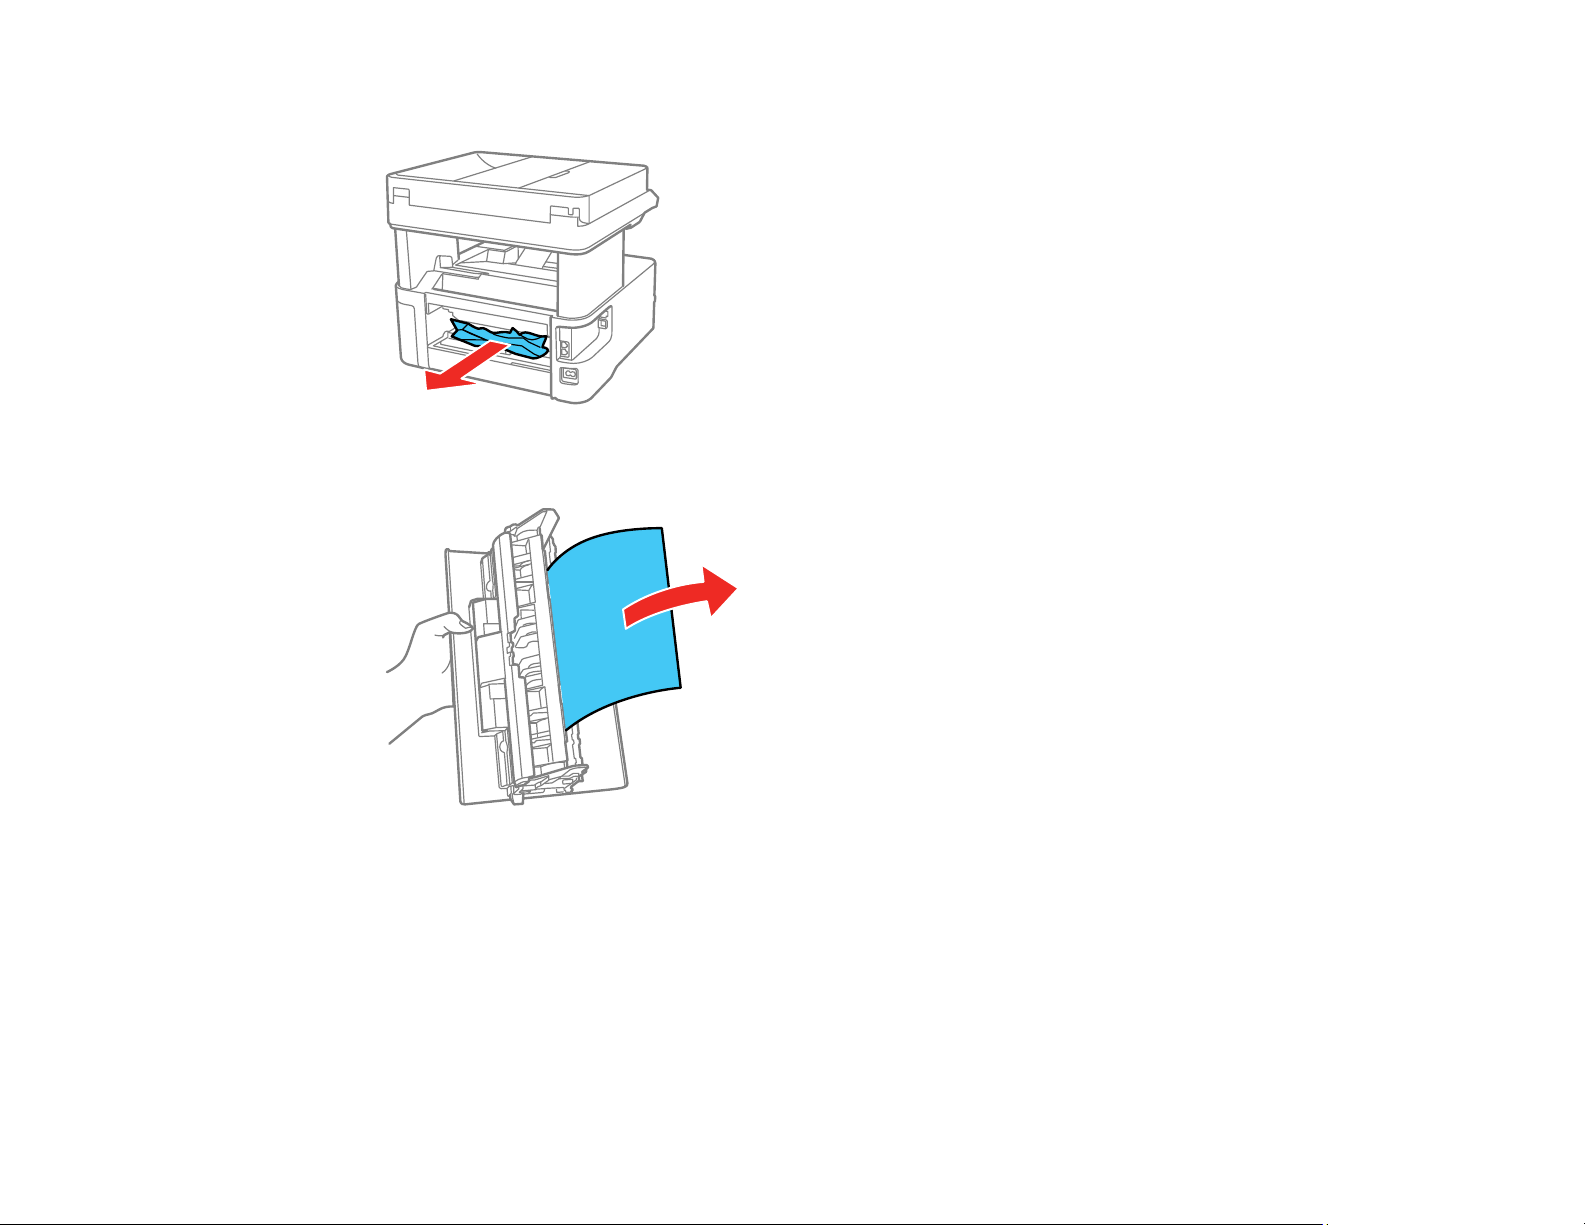
328
4. Carefully remove any jammed paper from inside the product.
5. Remove any jammed paper from the rear cover.
6. Press the buttons and reattach the rear cover.
7. Follow the prompts on the LCD screen to clear any error messages. If you still see a paper jam
message, check the other paper jam solution.
Parent topic: Solving Paper Problems

329
Paper Jams in the Automatic Document Feeder
If you have problems with paper jams in the automatic document feeder (ADF), follow the steps below or
on the LCD screen to clear the jam.
1. Cancel the print job, if necessary.
2. Remove your originals from the ADF.
3. Open the ADF cover.
Caution: Make sure you open the ADF cover before removing any jammed paper. Otherwise the
product may be damaged.
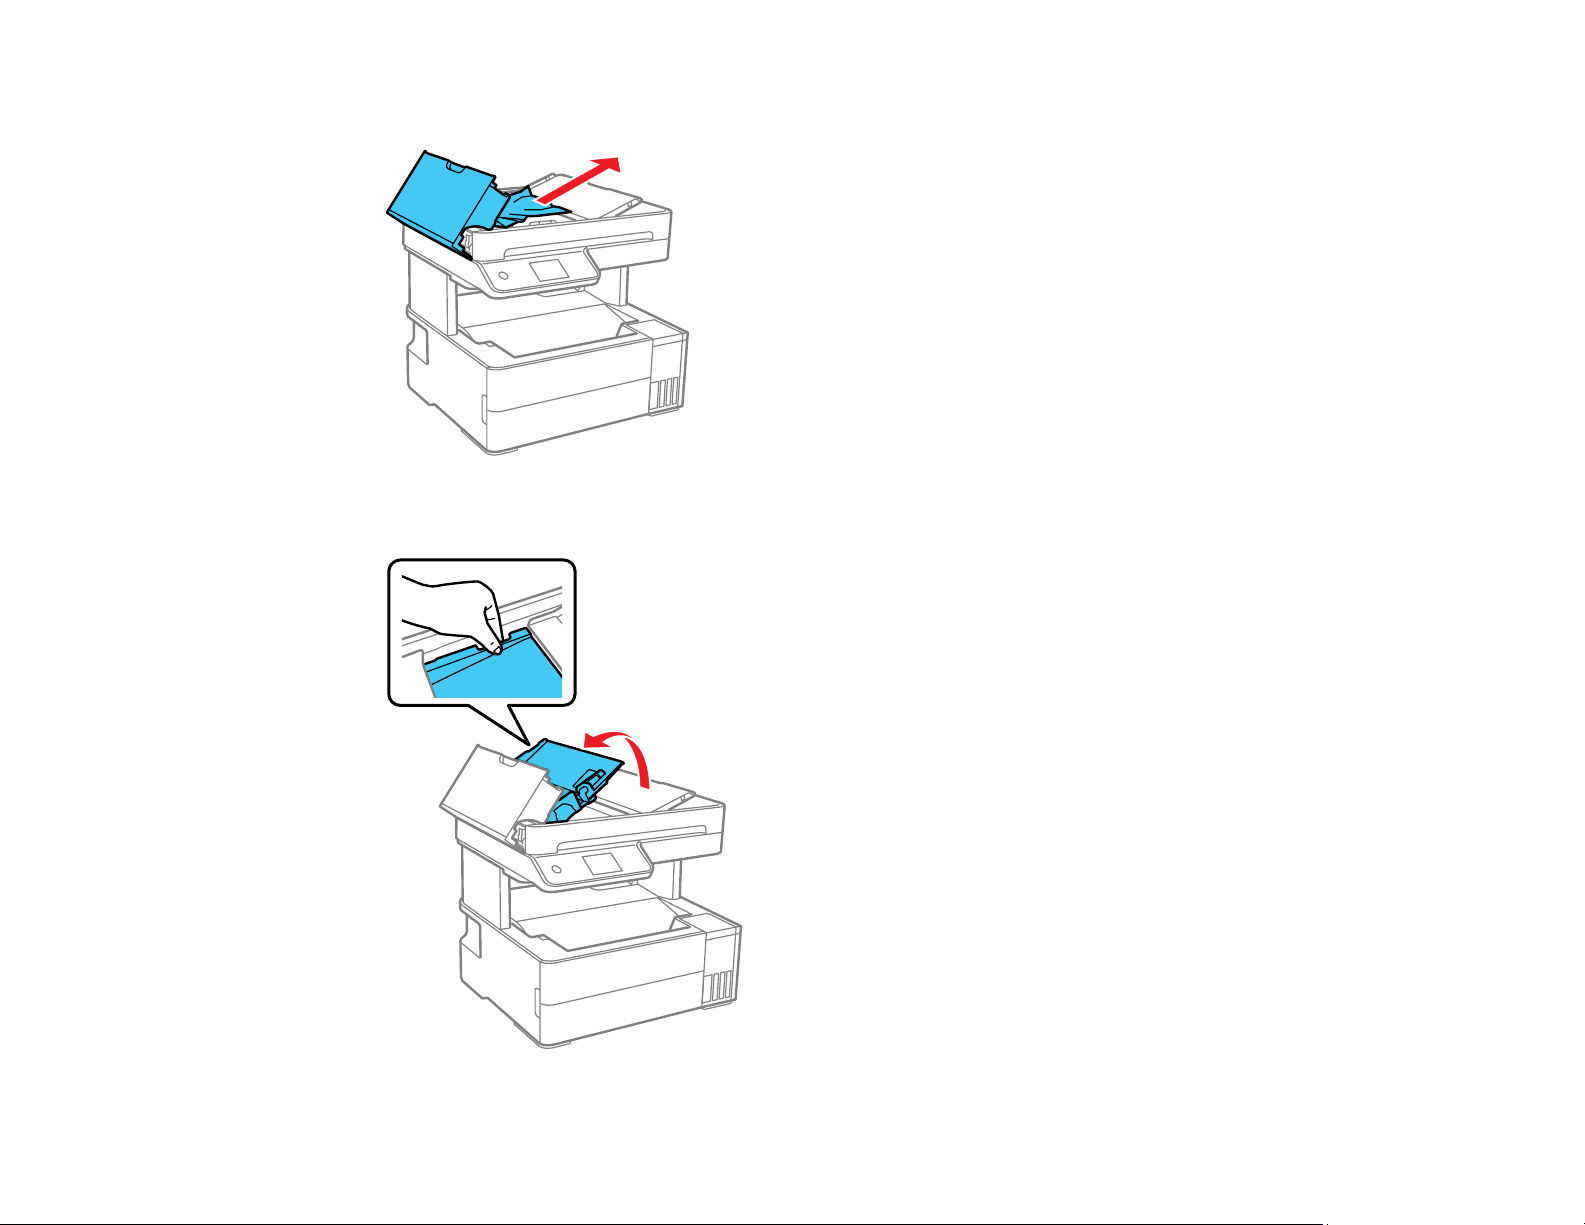
330
4. Carefully remove any jammed paper.
5. Open the ADF input tray.
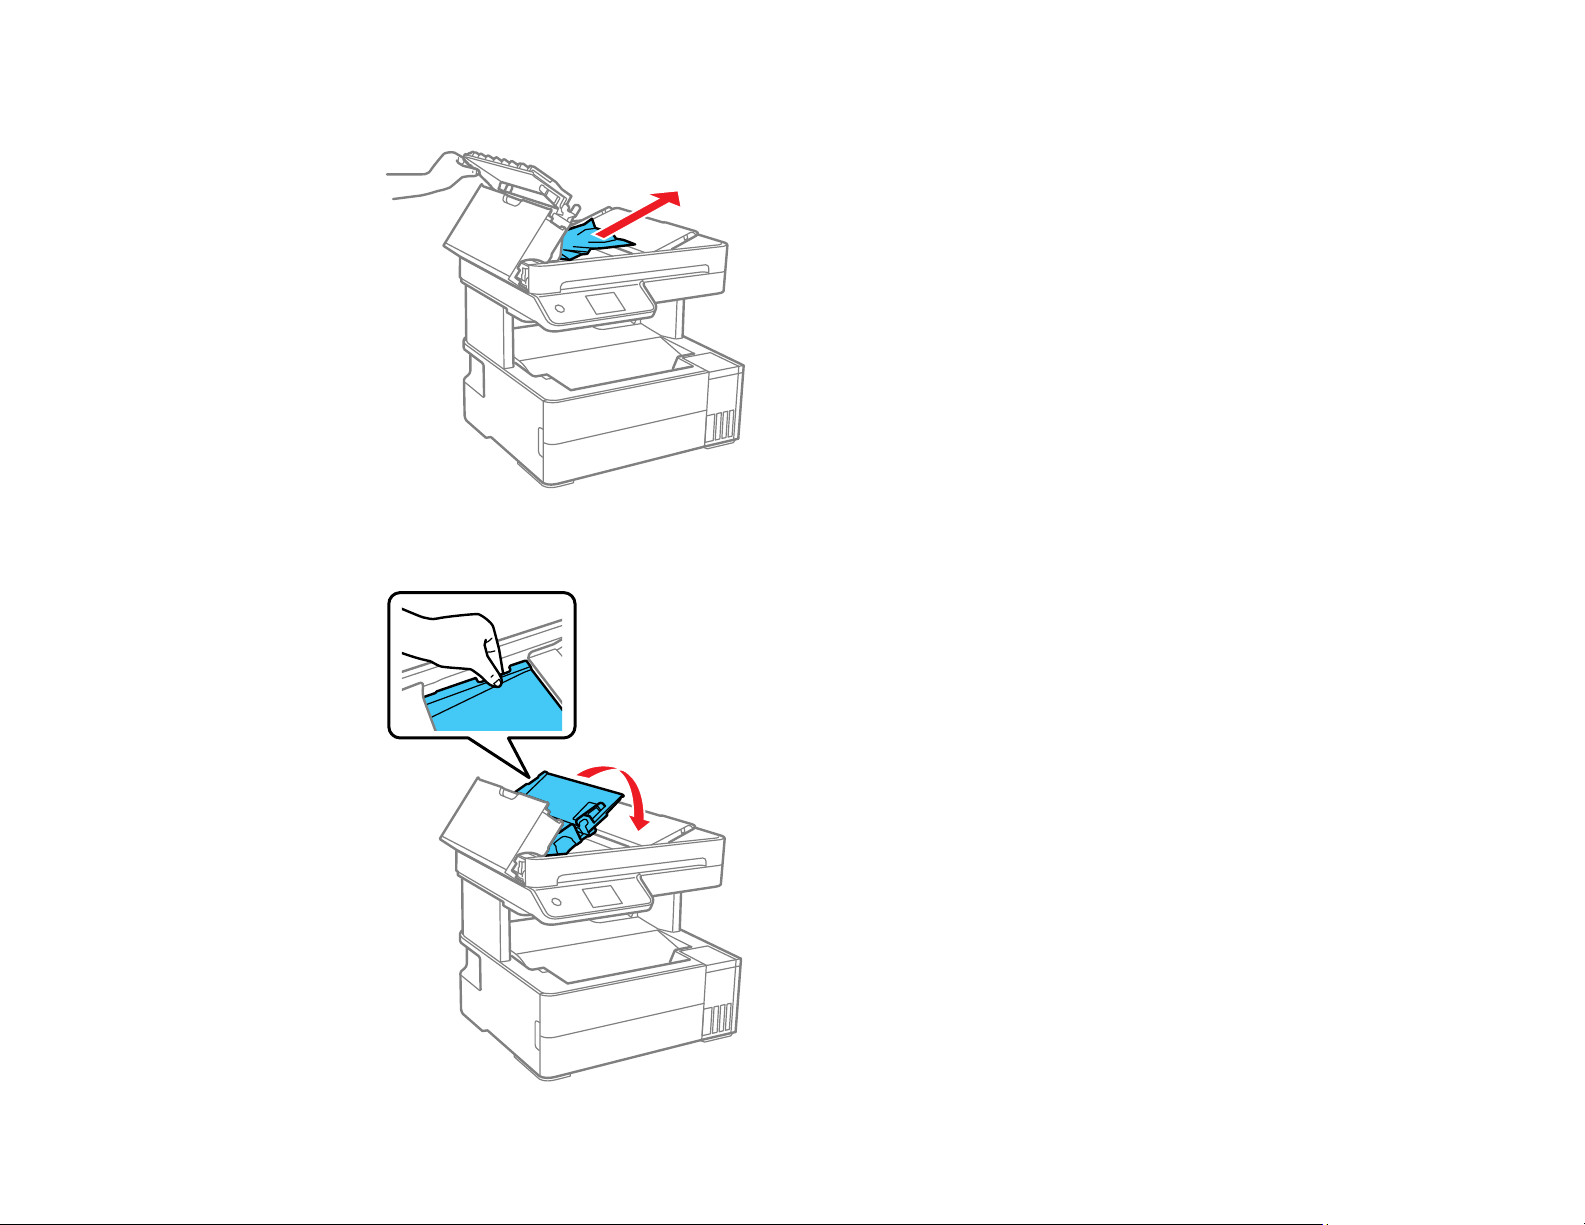
331
6. Carefully remove any jammed paper from beneath the ADF input tray.
7. Close the ADF input tray.

332
8. Close the ADF cover until it clicks into place.
9. Reload your originals.
Caution: Do not load the ADF beyond its capacity for your paper size. Also make sure your originals
are not bent, folded, or curled and do not have tape, staples, or other materials that could obstruct the
feeder.
10. Follow the prompts on the LCD screen to clear any error messages. If you still see a paper jam
message, check the other paper jam solutions.
Parent topic: Solving Paper Problems
Paper Ejection Problems
If you have problems with paper ejecting properly, try these solutions:
• If paper does not eject fully, you may have set the wrong paper size. Cancel printing to eject the paper.
Select the correct paper size when you reprint.
• If paper is wrinkled when it ejects, it may be damp or too thin. Load new paper and be sure to select
the correct paper type setting when you reprint.
Parent topic: Solving Paper Problems
Related references
Paper Jam Problems Inside the Product
Paper or Media Type Settings - Printing Software

333
Paper or Media Type Settings - Control Panel
Related topics
Loading Paper
Solving Problems Printing from a Computer
Check these sections if you have problems while printing from your computer.
Note: When printing using AirPrint, the available print settings are different from those covered in this
manual. See the Apple website for details.
Nothing Prints
Product Icon Does Not Appear in Windows Taskbar
Printing is Slow
Printing Problems When Using the PostScript Printer Driver
Parent topic: Solving Problems
Nothing Prints
If you have sent a print job and nothing prints, try these solutions:
• Make sure your product is turned on and connected to your computer.
• Make sure any interface cables are connected securely at both ends.
• If you connected your product to a USB hub, make sure it is a first-tier hub. If it still does not print,
connect your product directly to your computer instead of the hub.
• If the printer cannot print using a USB connection, disconnect the USB cable from the computer, right-
click on the printer icon displayed on the computer, and select Remove Device. Then connect the
USB cable to the computer and try a test print.
• Make sure the printer status is not offline or pending.
• Make sure you are using the Epson printer driver for your product or the available functions are
limited.
• Run a product check to see if a test page prints. If the test page prints, check to see if your product
software is installed correctly.
• Make sure your system meets the requirements for your operating system. If you are printing a high-
resolution image, you may need more than the minimum requirements. Print the image at a lower
resolution or if necessary, increase your system's memory.

334
• In Windows, make sure your product is selected as the default printer and the printer port setting
matches the printer connection port.
• In Windows, delete all jobs from the Windows Spooler. Click Print Queue on the Maintenance tab in
the printer settings window, and cancel any stalled print jobs.
• On a Mac, make sure the printer is added to the printer list and the printer is not paused.
• Make sure your product is selected as the printer in your printing program.
Parent topic: Solving Problems Printing from a Computer
Related tasks
Running a Product Check
Product Icon Does Not Appear in Windows Taskbar
If you do not see your product icon in the Windows taskbar, first try restarting your computer. If that does
not work, try this solution:
1. Do one of the following:
• Windows 10: Click and select (Settings) > Devices > Printers & scanners. Select your
product name and select Manage > Printing preferences.
• Windows 8.x: Navigate to the Apps screen and select Control Panel > Hardware and Sound >
Devices and Printers. Right-click your product name, select Printing Preferences, and select
your product name again if necessary.
• Windows 7: Click and select Devices and Printers. Right-click your product name, select
Printing Preferences, and select your product name again if necessary.
• Windows Vista: Click , select Control Panel, and click Printer under Hardware and Sound.
Right-click your product name, select Printing Preferences, and select your product name again if
necessary.
2. Click the Maintenance tab.
3. Click the Extended Settings button.
4. Select Enable EPSON Status Monitor 3 and click OK.
5. Click the Monitoring Preferences button.
6. Click the checkbox for the option that adds the shortcut icon to the taskbar.
7. Click OK to close the open program windows.
Parent topic: Solving Problems Printing from a Computer

335
Printing is Slow
If printing becomes slow, try these solutions:
• Make sure your system meets the requirements for your operating system. If you are printing a high-
resolution image, you may need more than the minimum requirements. If necessary, increase your
system's memory.
• If you are using Windows 7, close the Devices and Printers window before you print.
• On a Mac, make sure you download and install the Epson printer driver.
• Make sure Quiet Mode is turned off.
• Clear space on your hard drive or run a defragmentation utility to free up existing space.
• Close any programs you are not using when you print.
• If your product is connected to a USB hub, connect it directly to your computer instead.
• If printing becomes slower after printing continuously for a long time, the product may have
automatically slowed down to protect the print mechanism from overheating or becoming damaged.
Let the product rest with the power on for 30 minutes, then try printing again.
• If you are printing over a wireless network, factors such as interference, network traffic, or weak signal
strength may affect your printing speed.
Note: If you are using a 5 GHz wireless router, set the router to operate in dual band (2.4 GHz and
5 GHz) mode. If your router uses a single network name (SSID) for both the 2.4 GHz and 5 GHz band,
give each band its own network name (SSID) instead, such as Home Network 2.4 GHz and Home
Network 5 GHz. See your router documentation or contact your internet service provider for
instructions.
For the fastest printing, select the following settings in your product software:
• Make sure the paper type setting matches the type of paper you loaded.
• Turn on any high speed settings in your product software.
• Select a lower print quality setting.
• Make sure the ink drying time has not been increased for double-sided printing.
• Windows: Click the Maintenance or Utility tab, select Extended Settings or Speed and Progress,
and select the following settings:
• Always Spool RAW Datatype
• Page Rendering Mode

336
• Print as Bitmap
• Windows: Select Printing preferences, click the More Options tab, and make sure the
Bidirectional printing setting is enabled.
• Mac: Select System Preferences, select Printers & Scanners, and select your product. Select
Options & Supplies, select Options (or Driver), and enable the Bidirectional printing setting.
If printing is still slow and you are using Windows 7 or Windows Vista, try the following:
1. Click and select Computer or My Computer. Double-click the C: drive and open these folders:
ProgramData > EPSON > PRINTER.
Note: If you do not see the ProgramData folder, open the Organize menu and select Folder and
search options. In the window that appears, click the View tab, select Show hidden files, folders,
and drives in the Advanced settings list, and click OK.
2. Right-click the EPAUDF01.AUD file and select Delete.
3. Restart your computer and try printing again.
Parent topic: Solving Problems Printing from a Computer
Related references
Paper or Media Type Settings - Printing Software
Windows System Requirements
Mac System Requirements
Related tasks
Selecting Basic Print Settings - Windows
Selecting Basic Print Settings - Mac
Selecting Printing Preferences - Mac
Selecting Extended Settings - Windows
Printing Problems When Using the PostScript Printer Driver
If you have sent a print job using the PostScript printer driver (ET-5180) and nothing prints, try these
solutions:
• Make sure your product is turned on and connected to your computer.
• Make sure any interface cables are connected securely at both ends.
• If you connected your product to a USB hub, make sure it is a first-tier hub. If it still does not print,
connect your product directly to your computer instead of the hub.

337
• Make sure the printer status is not offline or pending.
• Try changing the printing language to Auto or PS on the control panel.
• In Windows, delete all jobs from the Windows Spooler. Click Print Queue on the Maintenance tab in
the printer settings window, and cancel any stalled print jobs.
• In Windows, select Print directly to the printer on the Advanced tab in the printer settings window.
• Make sure that the settings in the printing software match the settings in the printer driver.
• In Windows, set the Output Protocol setting on the Device Settings tab in the printer properties to
ASCII or TBCP.
• In Windows, select the appropriate substitution fonts on the Device Settings tab in the printer
properties.
Parent topic: Solving Problems Printing from a Computer
Solving Page Layout and Content Problems
Check these sections if you have problems with the layout or content of your printed pages.
Inverted Image
Too Many Copies Print
Blank Pages Print
Incorrect Margins on Printout
Incorrect Characters Print
Incorrect Image Size or Position
Slanted Printout
Parent topic: Solving Problems
Inverted Image
If your printed image is inverted unexpectedly, try these solutions:
• Turn off any mirror or inversion settings in your printing application.
• Turn off the Mirror Image, Flip horizontally, or Reverse page orientation settings in your printer
software. (This option has different names, depending on your operating system version.)
Parent topic: Solving Page Layout and Content Problems
Related tasks
Selecting Basic Print Settings - Windows

338
Selecting Additional Layout and Print Options - Windows
Selecting Basic Print Settings - Mac
Too Many Copies Print
Make sure that the Copies setting in your printing program or printer software is not set for multiple
copies.
Parent topic: Solving Page Layout and Content Problems
Related tasks
Selecting Basic Print Settings - Windows
Selecting Basic Print Settings - Mac
Blank Pages Print
If blank pages print unexpectedly, try these solutions:
• Make sure you selected the correct paper size settings in your printing program and printer software.
• If a blank page exists in a document you are printing and you want to skip printing it, select the Skip
Blank Page setting in your printer software, if available.
• Run a print head nozzle check to see if any of the nozzles are clogged. Then clean the print head, if
necessary.
• Make sure your product is selected as the printer in your printing program.
• You may need to refill the ink. Visually check the ink levels.
Parent topic: Solving Page Layout and Content Problems
Related concepts
Print Head Nozzle Check
Print Head Cleaning
Related references
Paper or Media Type Settings - Printing Software
Paper or Media Type Settings - Control Panel
Related tasks
Selecting Basic Print Settings - Windows
Selecting Extended Settings - Windows
Selecting Basic Print Settings - Mac

339
Related topics
Loading Paper
Incorrect Margins on Printout
If your printed page has incorrect margins, try these solutions:
• Make sure you selected the correct paper size settings in your printing program and printer software.
• Make sure you selected the correct margins for your paper size in your printing program.
• Make sure your paper is positioned correctly for feeding into the product.
• When placing originals on the scanner glass, align the corner of the original with the corner indicated
by the arrow. If the edges of the copy are cropped, move the original slightly away from the corner.
• Clean the scanner glass and the document cover. If there is dust or stains on the glass, the copy area
may extend to include the dust or stains.
• Load paper in the correct direction and slide the edge guides against the edges of the paper.
• Select the appropriate original size in the copy settings.
You can use the preview option in your printer software to check your margins before you print.
Parent topic: Solving Page Layout and Content Problems
Related references
Copying Options
Related tasks
Selecting Basic Print Settings - Windows
Selecting Additional Layout and Print Options - Windows
Selecting Basic Print Settings - Mac
Selecting Page Setup Settings - Mac
Related topics
Loading Paper
Placing Originals on the Product
Incorrect Characters Print
If incorrect characters appear in your prints, try these solutions before reprinting:
• Make sure any cables are securely connected at both ends.

340
• In Windows, delete all jobs from the Windows Spooler. Click Print Queue on the Maintenance tab in
the printer settings window, and cancel any stalled print jobs.
• If your product is connected to a USB hub, connect it directly to your computer instead.
• If incorrect characters still appear in your prints, try connecting your product using a different cable.
• If your computer entered sleep mode the last time you printed, the next print job after your computer
exits sleep mode may contain garbled characters. Print your document again.
• Make sure you are using the printer software for this product. Check the product name at the top of the
driver window.
Parent topic: Solving Page Layout and Content Problems
Related tasks
Selecting Basic Print Settings - Windows
Selecting Basic Print Settings - Mac
Selecting Page Setup Settings - Mac
Incorrect Image Size or Position
If your printed image is the wrong size or in the wrong position, try these solutions:
• Make sure you selected the correct paper size and layout settings in your printing program and printer
software.
• Make sure you selected the correct paper size on the control panel.
• Make sure your paper is positioned correctly for feeding into the printer.
• Slide the edge guides against the edges of the paper.
• Clean the scanner glass and document cover.
• If the edges of a copy are cropped, slightly move the original away from the edges of the scanner
glass.
• Make sure you selected the correct margins for your paper size in your printing program.
• Be sure to select the appropriate original size setting for your original in the copy settings.
You can use the preview option in your printer software to check your margins before you print.
Parent topic: Solving Page Layout and Content Problems
Related references
Copying Options

341
Related tasks
Selecting Basic Print Settings - Windows
Selecting Basic Print Settings - Mac
Selecting Page Setup Settings - Mac
Cleaning Your Product
Related topics
Loading Paper
Slanted Printout
If your printouts are slanted, try these solutions:
• Make sure the paper is loaded in the correct direction.
• Make sure your paper meets the specifications for your product.
• Do not load more than the recommended number of sheets.
• Slide the edge guide against the edge of the paper.
• Select a higher print quality setting in your printer software.
• Turn off any high speed settings in your product software.
• Align the print head.
• Adjust the print quality.
• Make sure the product is not printing while tilted or at an angle.
Parent topic: Solving Page Layout and Content Problems
Related tasks
Selecting Basic Print Settings - Windows
Selecting Basic Print Settings - Mac
Related topics
Loading Paper
Solving Print Quality Problems
Check these sections if your printouts have problems with print quality, but your image looks fine on your
computer screen.

342
Note: When printing using AirPrint, the available print settings are different from those covered in this
manual. See the Apple website for details.
White or Dark Lines in Printout
Blurry or Smeared Printout
Faint Printout or Printout Has Gaps
Grainy Printout
Incorrect Colors
Parent topic: Solving Problems
Related topics
Solving Scanned Image Quality Problems
White or Dark Lines in Printout
If you notice white or dark lines in your prints (also called banding), try these solutions before you reprint:
• Run a nozzle check to see if any of the print head nozzles are clogged. Then clean the print head, if
necessary.
• Make sure the paper type setting matches the type of paper you loaded.
• Make sure you loaded the printable side of the paper correctly for your product.
• Turn off any high speed settings in your product software.
• Align the print head. If print quality does not improve after aligning the print head, disable the
bidirectional (high speed) setting.
• Adjust the print quality in the product software.
• When horizontal banding appears or the top or bottom of the paper is smeared, load paper in the
correct direction and slide the edge guides to the edges of the paper.
• If you continue to see horizontal or vertical bands or streaks in your printouts after cleaning and
aligning the print head, you can finely tune the horizontal or vertical alignment in the Maintenance
menu.
• If you continue to see horizontal bands or streaks in your printouts after cleaning the print head and
adjusting the print quality, make print quality adjustments for each paper type.
• If you are copying from the ADF, copy from the scanner glass instead or use a higher quality setting.
• When vertical banding appears or the paper is smeared, clean the paper path.
• You may need to refill the ink. Visually check the ink levels.

343
• If you have not used the product for a long time, run the Power Cleaning utility.
Note: Power Cleaning consumes a lot of ink, so run this utility only if you cannot improve print quality
by cleaning the print head.
Parent topic: Solving Print Quality Problems
Related concepts
Print Head Cleaning
Print Head Nozzle Check
Print Head Alignment
Power Cleaning
Related references
Paper or Media Type Settings - Printing Software
Related tasks
Aligning the Print Head Using the Product Control Panel
Selecting Printing Preferences - Mac
Selecting Additional Layout and Print Options - Windows
Refilling the Ink Tanks
Related topics
Loading Paper
Blurry or Smeared Printout
If your printouts are blurry or smeared, try these solutions:
• Make sure your paper is not damp, curled, old, or loaded incorrectly in your product.
• Use a support sheet with special paper, or load special paper one sheet at a time.
• Place a piece of black paper on the back of the original and copy it again.
• Make sure your paper meets the specifications for your product.
• Use Epson papers to ensure proper saturation and absorption of genuine Epson inks.
• Make sure the paper type setting in your product software matches the type of paper you loaded.
• If you are printing on letterhead paper, make sure the paper size setting matches the size of paper you
loaded. If you select a paper size that is too large for the paper you loaded, the product may print
beyond the edges of the paper and cause ink to smear.

344
• Make sure you loaded the printable side of the paper correctly for your product.
• If you are printing on thick paper or envelopes, make sure you select the appropriate settings.
• When manually printing 2-sided, make sure the ink is completely dry before loading the paper.
• Avoid handling printouts on glossy paper right after printing to allow the ink to set.
• Dry printouts completely before filing or displaying them. When drying printouts, avoid direct sunlight,
do not use a dryer, and do not touch the printed side of the paper.
• Do not stack printouts immediately after printing.
• Turn off any high speed settings in your product software.
• If you print on both sides of a sheet of paper, smudges may appear on the reverse side of heavily
saturated or dark images. If one side of a sheet will contain a lighter image or text, print that side first.
Adjust the density and/or ink drying time settings.
• The ink levels may be low and you may need to refill the ink. Visually check the ink levels.
• Run a nozzle check to see if any of the print head nozzles are clogged. Then clean the print head, if
necessary.
• Align the print head.
• Adjust the print quality in the product software.
• Clean the paper path.
• Clean the paper rollers.
• Do not press too hard on the original or the document cover when you are scanning originals on the
scanner glass.
• Clean the scanner glass.
• Clean the ADF.
• Use the ink before the date printed on the package.
• If you printed when the ink levels were too low to be seen in the ink tank windows, refill the ink tanks to
the upper lines and run the Power Cleaning utility. Then run a nozzle check to see if print quality has
improved.
• If you have not used the product for a long time, run the Power Cleaning utility.
Note: Power Cleaning consumes a lot of ink, so run this utility only if you cannot improve print quality
by cleaning the print head.

345
Note: Your product will not operate properly while tilted at an angle. Place it on a flat, stable surface that
extends beyond the base of the product in all directions.
Parent topic: Solving Print Quality Problems
Related concepts
Print Head Nozzle Check
Print Head Cleaning
Print Head Alignment
Related references
Compatible Epson Papers
Paper Specifications
Related tasks
Aligning the Print Head Using the Product Control Panel
Selecting Printing Preferences - Mac
Selecting Additional Layout and Print Options - Windows
Selecting Basic Print Settings - Windows
Selecting Basic Print Settings - Mac
Selecting Extended Settings - Windows
Cleaning the Paper Guide
Faint Printout or Printout Has Gaps
If your printouts are faint or have gaps, try these solutions:
• Run a nozzle check to see if any of the print head nozzles are clogged. Then clean the print head, if
necessary.
• The ink levels may be low. Visually check the ink levels.
• Make sure the paper type setting matches the type of paper you loaded.
• Make sure your paper is not damp, curled, old, or loaded incorrectly in your product.
• Align the print head.
• Adjust the print quality in the product software.
• Clean the paper path.
• Clean the paper rollers.
• If you have not used the product for a long time, run the Power Cleaning utility.

346
Note: Power Cleaning consumes a lot of ink, so run this utility only if you cannot improve print quality
by cleaning the print head.
Parent topic: Solving Print Quality Problems
Related concepts
Print Head Nozzle Check
Print Head Cleaning
Print Head Alignment
Related references
Paper or Media Type Settings - Control Panel
Related tasks
Selecting Basic Print Settings - Windows
Selecting Basic Print Settings - Mac
Cleaning the Paper Guide
Refilling the Ink Tanks
Related topics
Loading Paper
Grainy Printout
If your printouts are grainy, try these solutions:
• Make sure you loaded the printable side of the paper correctly for your product.
• Select a higher print quality setting and turn off any high speed settings in your product software.
• Run a nozzle check to see if any of the print head nozzles are clogged. Then clean the print head, if
necessary.
• Align the print head.
• Adjust the print quality in the product software.
• You may need to increase the image resolution or print a smaller size; see your software
documentation.
Note: Images from the Internet may be low resolution and not result in a high quality printout.
• If you enlarged the image size in an image-editing program, you need to increase the image resolution
setting to retain a high image quality. Increase the image resolution by the same amount you increase

347
the image size. For example, if the image resolution is 300 dpi (dots per inch) and you will double the
image size for printing, change the resolution setting to 600 dpi.
Note: Higher resolution settings result in larger file sizes, which take longer to process and print.
Consider the limitations of your computer system when selecting a resolution, and select the lowest
possible resolution that produces acceptable quality to keep file sizes manageable.
Parent topic: Solving Print Quality Problems
Related concepts
Print Head Nozzle Check
Print Head Cleaning
Print Head Alignment
Related tasks
Aligning the Print Head Using the Product Control Panel
Selecting Printing Preferences - Mac
Selecting Additional Layout and Print Options - Windows
Selecting Basic Print Settings - Windows
Selecting Basic Print Settings - Mac
Related topics
Loading Paper
Incorrect Colors
If your printouts have incorrect colors, try these solutions:
• Make sure the paper type setting matches the paper you loaded.
• Make sure the Black/Grayscale or Grayscale setting is not selected in your printer software.
• If you selected Standard-Vivid (Windows) or Normal-Vivid (Mac) as the quality setting in the printer
software, try selecting Standard (Windows) or Normal (Mac) instead.
• Run a nozzle check to see if any of the print head nozzles are clogged. Then clean the print head, if
necessary.
• The ink levels may be low and you may need to refill the ink. Visually check the ink levels.
• If you printed when the ink levels were too low to be seen in the ink tank windows, refill the ink tanks to
the upper lines and run the Power Cleaning utility. Then run a nozzle check to see if print quality has
improved.

348
• After you print, the colors in your printout need time to set as the ink dries. During this time, the colors
may look different than you expect. To speed up drying time, do not stack your printouts on top of each
other.
• Your printed colors can never exactly match your on-screen colors. However, you can use a color
management system to get as close as possible. Try using the color management options in your
printer software.
• Try turning off the PhotoEnhance setting in Windows.
• For best results, use genuine Epson paper.
• If you have not used the product for a long time, run the Power Cleaning utility.
Note: Power Cleaning consumes a lot of ink, so run this utility only if you cannot improve print quality
by cleaning the print head.
Parent topic: Solving Print Quality Problems
Related concepts
Print Head Nozzle Check
Print Head Cleaning
Related references
Compatible Epson Papers
Related tasks
Selecting Basic Print Settings - Windows
Selecting Basic Print Settings - Mac
Selecting Additional Layout and Print Options - Windows
Refilling the Ink Tanks
Managing Color - Mac
Solving Scanning Problems
Check these solutions if you have problems scanning with your product.
Note: For solutions when using the Epson ScanSmart software, see the Epson ScanSmart help utility.
Scanning Software Does Not Operate Correctly
Cannot Start Epson Scan 2
Scanning is Slow

349
Parent topic: Solving Problems
Scanning Software Does Not Operate Correctly
If your scanning software does not operate correctly, try these solutions:
• Make sure your computer has adequate memory and meets the system requirements for your
operating system.
• Make sure your computer is not running in a power-saving mode, such as sleep or standby. If so,
wake your system and restart your scanning software.
• If you upgraded your operating system but did not reinstall your scanning software, try reinstalling it.
• In Windows, make sure your product is listed as a valid device in the Scanners and Cameras control
panel.
• If you are scanning with the ADF, make sure the ADF and document covers are closed.
• Try scanning at a lower resolution or increase the free space on the computer's hard disk. Scanning
stops if the total data size reaches the limit.
Parent topic: Solving Scanning Problems
Related concepts
Uninstall Your Product Software
Related references
Windows System Requirements
Mac System Requirements
Cannot Start Epson Scan 2
If you cannot start Epson Scan 2, try these solutions:
• Make sure your product is turned on and any interface cables are securely connected at both ends.
• If your product is connected to a USB hub, connect it directly to your computer instead.
• If you scan at a high resolution over a network, a communication error may occur. Lower the
resolution.
• If you are scanning with the ADF, check that the document cover and ADF cover are closed.
• Make sure Epson Scan 2 is selected as your scanning program.
• Make sure your computer is not running in a power-saving mode, such as sleep or standby. If so,
wake your system and restart Epson Scan 2.

350
• Check the connection setting and test the connection using Epson Scan 2 Utility:
Windows 10: Click and select EPSON > Epson Scan 2 Utility. Make sure the correct product is
selected. If necessary, select the Other tab and click Reset.
Windows 8.x: Navigate to the Apps screen and select Epson Scan 2 Utility. Make sure the correct
product is selected. If necessary, select the Other tab and click Reset.
Windows (other versions): Click or Start > All Programs or Programs > EPSON > Epson Scan
2 > Epson Scan 2 Utility. Make sure the correct product is selected. If necessary, select the Other
tab and click Reset.
Mac: Open the Applications folder, click Epson Software, and click Epson Scan 2 Utility. Make
sure the correct product is selected. If necessary, select the Other tab and click Reset.
• Make sure you do not have multiple versions of Epson Scan 2 installed. If you do, uninstall both
versions and install one version.
• If you upgraded your operating system but did not reinstall Epson Scan 2, try reinstalling it.
Parent topic: Solving Scanning Problems
Related concepts
Uninstall Your Product Software
Related topics
Starting a Scan
Scanning is Slow
If scanning becomes slow, try these solutions:
• Scan your original at a lower resolution, if possible.
• Make sure your system meets the requirements for your operating system. If you are scanning a high-
resolution image, you may need more than the minimum requirements. If necessary, increase your
system's memory or reduce the resolution.
• If scanning becomes slower after scanning continuously with the ADF for a long time, the scanner may
have automatically slowed down to protect the scanner mechanism from overheating or becoming
damaged. Let the scanner rest with the power on for 30 minutes, then try scanning again.
Parent topic: Solving Scanning Problems
Solving Scanned Image Quality Problems
Check these sections if a scanned image on your computer screen has a quality problem.

351
Note: For solutions when using the Epson ScanSmart software, see the Epson ScanSmart help utility.
Scanned Image Quality Problems
Image Consists of a Few Dots Only
Line of Dots Appears in All Scanned Images
Straight Lines in an Image Appear Crooked
Image Colors are Patchy at the Edges
Ripple Patterns Appear in an Image
Scanned Image Edges are Cropped
Characters are Not Recognized During Conversion to Editable Text (OCR)
Streaks Appear in All Scanned Images
Parent topic: Solving Problems
Scanned Image Quality Problems
If you encounter quality problems with your scanned image, try these solutions:
Image is Distorted or Blurry
• Make sure your original is not wrinkled or warped. This may prevent the original from laying flat on the
scanner glass.
• Do not move your original or your product during scanning.
• Clean the scanner glass and the ADF and remove and dirt or dust on your originals.
• Your product will not operate properly while tilted at an angle. Place your product on a flat, stable
surface that extends beyond its base in all directions.
• Adjust these Epson Scan 2 or Epson ScanSmart settings (if available) and try scanning again:
• Make sure you select the correct Image Type for your original.
• Increase the Resolution setting.
• If the Image Type setting is Black & White, adjust the Threshold setting. (The Image Option must
be set to None or Color Enhance.)
• If the Image Type setting is Color or Grayscale, select the Unsharp Mask setting.
• If the Image Type setting is Black & White, select Text Enhancement. If the Image Type setting is
Color or Grayscale, change the Text Enhancement setting to High.

352
Image is Too Dark
• Make sure you select the correct Image Type for your original.
• If the Image Type is set to Color or Grayscale, adjust the Brightness setting.
• Check the brightness and contrast settings of your computer monitor.
Back of Original Image Appears in Scanned Image
• Place a piece of black paper on the back of the original and scan it again.
• Adjust these Epson Scan 2 or Epson ScanSmart settings (if available) and try scanning again:
• Make sure you select the correct Image Type for your original.
• Select the Advanced Settings tab and adjust the Brightness setting.
• If the Image Type is set to Black & White, select Text Enhancement. If the Image Type is set to
Color or Grayscale, change the Text Enhancement setting to High.
Scanned Image Colors Do Not Match Original Colors
Printed colors can never exactly match the colors on your computer monitor because printers and
monitors use different color systems: monitors use RGB (red, green, and blue) and printers typically use
CMYK (cyan, magenta, yellow, and black).
Check the color matching and color management capabilities of your computer, display adapter, and the
software you are using to see if they are affecting the palette of colors you see on your screen.
To adjust the colors in your scanned image, adjust these Epson Scan 2 or Epson ScanSmart settings (if
available) and try scanning again:
• Make sure you select the correct Image Type for your original.
• If the Image Type setting is Auto, Color or Grayscale, adjust the Contrast setting.
• If the Image Type setting is Black & White or Grayscale, adjust the Color Enhance setting.
Parent topic: Solving Scanned Image Quality Problems
Related references
Additional Scanning Settings - Main Settings Tab
Additional Scanning Settings - Advanced Settings Tab
Image Consists of a Few Dots Only
If your scanned image consists only of a few dots, try these solutions:
• Make sure you placed your original for scanning facing the correct way.

353
• If the Image Type setting is Black & White, adjust the Threshold and scan again. (The Image
Option must be set to None or Color Enhance.)
• Remove any lint or dirt from your original.
• Clean the scanner glass.
• Do not press on the original or the document cover with too much force.
Parent topic: Solving Scanned Image Quality Problems
Line of Dots Appears in All Scanned Images
If a line of dots appears in all your scanned images, try these solutions:
• Clean the scanner glass with a soft, dry, lint-free cloth or use a small amount of glass cleaner on the
cloth, if necessary. Paper towels are not recommended.
Caution: Do not spray glass cleaner directly on the scanner glass.
• Make sure any interface cables are securely connected at both ends.
• Remove any dust or dirt that may have adhered to your original.
• Keep the document cover closed to prevent dirt or dust from getting inside.
If you are scanning from the ADF, make sure the ADF edge guides fit against the loaded originals. You
can also try cleaning the ADF and scanning again.
Parent topic: Solving Scanned Image Quality Problems
Straight Lines in an Image Appear Crooked
If straight lines in an original appear crooked in a scanned image, make sure to place your original
straight when you scan it.
Clean the scanner glass with a soft, dry, lint-free cloth or use a small amount of glass cleaner on the
cloth, if necessary. Paper towels are not recommended.
Keep the document cover closed to prevent dirt or dust from getting inside.
If you are scanning from the ADF, make sure the ADF edge guides fit against the loaded originals. You
can also try cleaning the ADF and scanning again.
Parent topic: Solving Scanned Image Quality Problems
Related topics
Placing Originals on the Product

354
Image Colors are Patchy at the Edges
If you are scanning a thick or warped original, cover its edges with paper to block external light as you
scan it.
Parent topic: Solving Scanned Image Quality Problems
Ripple Patterns Appear in an Image
You may see a ripple pattern (called a moiré) in scanned images of printed documents. This is caused
by interference from differing pitches in the scanner's screen and your original's halftone screen. To
reduce this effect, adjust these Epson Scan 2 settings (if available) and try scanning again:
• Select the Descreening setting on the Advanced Settings tab.
• Select a lower Resolution setting.
Parent topic: Solving Scanned Image Quality Problems
Related references
Additional Scanning Settings - Main Settings Tab
Additional Scanning Settings - Advanced Settings Tab
Scanned Image Edges are Cropped
If the edges of a scanned image are cropped, make sure your original is placed correctly for scanning. If
necessary, move your original away from the edges of the scanner glass slightly.
In the Epson Scan 2 or Epson ScanSmart settings, set the Edge Fill setting to None.
Parent topic: Solving Scanned Image Quality Problems
Related topics
Placing Originals on the Product
Characters are Not Recognized During Conversion to Editable Text (OCR)
If characters in your scanned images are not recognized during OCR conversion, try these solutions:
• Make sure your original is loaded straight on your product.
• Use an original with clear text.
• When saving scanned images as Searchable PDFs, make sure the correct OCR language is selected.
• Adjust the following Epson Scan 2 or Epson ScanSmart settings if available, and try scanning again:
• On the Main Settings tab, make sure you select the correct Image Type for your original.

355
• On the Main Settings tab, set the Resolution between 200 and 600 dpi.
• On the Advanced Settings tab, select Text Enhancement and choose a setting.
Note: The Text Enhancement setting depends on the selected Image Type.
• If the Image Type is set to Black & White, adjust the Threshold setting on the Advanced Settings
tab. (The Image Option must be set to None.)
Parent topic: Solving Scanned Image Quality Problems
Streaks Appear in All Scanned Images
If streaks appear in all your scanned images, try these solutions:
• Clean the scanner glass with a soft, dry, lint-free cloth or use a small amount of glass cleaner on the
cloth, if necessary. Paper towels are not recommended.
• Keep the document cover closed to prevent dirt or dust from getting inside.
Parent topic: Solving Scanned Image Quality Problems
Solving Faxing Problems
Check these solutions if you have problems faxing with your product (ET-5170/ET-5180).
Cannot Send or Receive Faxes
Cannot Receive Faxes with a Telephone Connected to Your Product
Fax Memory Full Error Appears
Fax Quality is Poor
Sent Fax is Received in an Incorrect Size
Received Fax is Not Printed
Parent topic: Solving Problems
Related tasks
Setting Up the Fax Utility - Windows
Setting Up Fax Features Using the Fax Utility - Mac
Checking Fax Status
Printing Fax Reports
Selecting the Date and Time

356
Related topics
Setting Up Fax Features
Cannot Send or Receive Faxes
If you cannot send or receive faxes, try these solutions:
• If an error code is displayed on the control panel, try the solutions suggested in the error code list.
• Use Check Fax Connection on the control panel (Settings > General Settings > Fax Settings >
Check Fax Connection) to run the automatic fax connection check. Try the solutions suggested in
the report.
• If you are faxing from a computer, use the Epson FAX Utility to send your fax.
• Make sure the recipient's fax machine is turned on and working.
• Make sure paper is loaded correctly in your product.
• Make sure you have set up your header information and have not blocked your caller ID. Otherwise,
your faxes might be rejected by the recipient's fax machine.
• If you did not connect a telephone to your product, set the Receive Mode setting to Auto so you can
receive faxes automatically.
• Check that the cable connecting your telephone wall jack to your product's LINE port is secure.
• Print a fax connection report using your product control panel or fax software to help diagnose the
problem.
• Verify that the telephone wall jack works by connecting a phone to it and testing it.
• If there is no dial tone and you connected the product to a PBX (Private Branch Exchange) phone line
or Terminal Adapter, change the Line Type setting to PBX. If you still cannot send a fax, turn off the
product's dial tone detection setting. (Turning off the dial tone setting may cause the product to drop
the first digit of a fax number.)
• Check the Line Type setting and set it to PBX. If your phone system requires an external access code
to reach an outside line, register the code to the product and add a # (hash) to the beginning of the
phone number when dialing.
• If you connected your product to a DSL phone line, you must connect a DSL filter to the phone jack to
enable faxing over the line. Contact your DSL provider for the necessary filter.
• If you are connected to a DSL phone line, connect the product directly to a telephone wall jack and
send a fax. If it works, the problem may be caused by the DSL filter. Contact your DSL provider.
• If your telephone line has static, turn off your product's error correction mode fax communication
setting and try faxing again.

357
• Make sure you installed the FAX driver for your product and that it is not paused.
• Try lowering your product's fax speed setting.
• If a communication error occurs, change the Fax Speed setting to Slow(9,600bps) on the control
panel.
• Make sure the error correction mode (ECM) setting is turned on if you are trying to send or receive a
color fax.
• If your telephone line uses call waiting and you have trouble receiving faxes, turn off call waiting to
prevent disruption of incoming faxes.
• If you have subscribed to a call forwarding service, the product may not be able to receive faxes.
Contact your service provider for assistance.
• If the recipient fax machine does not answer your call within 50 seconds after the product has finished
dialing, add pauses after the fax number to send the fax.
• Check your inbox and delete faxes after reading or printing them. If the inbox is full, the product cannot
receive faxes.
• When sending faxes using the subaddress feature, ask the recipient if their fax machine can receive
faxes using this feature. Check that the subaddress and password are correct, and that they match
with the recipient subaddress and password. Check this when receiving faxes as well.
• Check if the sender's fax number is registered to the Rejection Number List.
• If you enabled Rejection Fax options, check if the sender is blocked, did not set up header
information, or is not registered in your contacts list, as necessary.
• If you cannot send faxes at a specified time, make sure the date and time are set correctly on the
product.
• If you have not connected a telephone to the printer, set the Receive Mode setting to Auto on the
control panel.
• If you are receiving faxes using the Epson FAX Utility, check that your product is registered as a fax
product in your operating system:
Windows: Make sure the product appears in Devices and Printers, Printer, or Printers and Other
Hardware. If the product does not appear, uninstall and re-install the Epson FAX Utility.
Mac: Select System Preferences > Printers & Scanners (or Print & Scan or Print & Fax) and make
sure your product appears. If your product does not appear, click + and add your product. If the
product does appear, double-click it and make sure it is not paused.
Note: Do not turn the product off while it is receiving a fax. Otherwise, the fax transmission will be lost.

358
Note: If your product is connected to a VoIP (Voice over Internet Protocol) phone line, keep in mind that
fax machines are designed to work over analog phone lines. Epson cannot guarantee that fax
transmission will work when using VoIP.
If your phone line includes voice mail answering services, calls or faxes may be inadvertently received
by your voice mail service.
Parent topic: Solving Faxing Problems
Cannot Receive Faxes with a Telephone Connected to Your Product
If you cannot receive faxes when a telephone is connected to your product, try these solutions:
• Make sure your telephone is connected to your product's EXT port.
• Make sure the Receive Mode is set to Manual.
Note: When answering a call that is a fax, wait until the product's LCD screen displays a message that a
connection has been made before you hang up.
Parent topic: Solving Faxing Problems
Related tasks
Connecting a Telephone or Answering Machine
Receiving Faxes Manually
Using the Fax Setup Wizard
Fax Memory Full Error Appears
If you see an error message telling you that the product's fax memory is full, try these solutions:
• If you set the product to save received faxes in the product's memory or inbox, delete any faxes you
have already read.
Note: Your product can store up to 100 faxes before its inbox is full.
• If you set the product to save received faxes on a computer, turn on the selected computer. Once the
faxes are saved on the computer, they are deleted from the product's memory.
• If the memory is full, try the following:
• Send a monochrome fax using the direct sending feature
• Send your faxes by dialing from a connected external phone

359
• Send your faxes in smaller batches
• If the product cannot print a received fax due to a product error, such as a paper jam, the memory full
error may appear. Clear any product errors, then ask the sender to resend the fax.
Parent topic: Solving Faxing Problems
Related tasks
Setting Up the Fax Utility - Windows
Setting Up Fax Features Using the Fax Utility - Mac
Fax Quality is Poor
If you receive a poor quality fax, try these solutions:
• Try enabling the error correction mode (ECM) setting.
• Contact the fax sender and ask them to send the fax in a higher resolution.
• Try reprinting the received fax.
If the sent fax quality is poor, try these solutions:
• Clean the scanner glass.
• Clean the ADF.
• Try changing the resolution or density setting on the control panel.
• Try changing the original type setting on the control panel.
• If you are sending a monochrome fax to a single recipient, try sending the fax using the Direct Send
feature.
Note: If you send a high-resolution monochrome fax without using the Direct Send feature, the
product may automatically lower the resolution.
• Try enabling the error correction mode (ECM) setting.
Parent topic: Solving Faxing Problems
Related references
Basic Settings - Fax
Fax Sending Options
Related tasks
Cleaning Your Product

360
Sent Fax is Received in an Incorrect Size
If your recipient receives a fax in an incorrect size, try these solutions:
• If you are sending a fax using the scanner glass, make sure your original is placed correctly and that
the correct paper size is selected on the control panel.
• Clean the scanner glass and document cover.
Parent topic: Solving Faxing Problems
Related tasks
Cleaning Your Product
Related topics
Placing Originals on the Product
Received Fax is Not Printed
If a received fax is not printed, try these solutions:
• Make sure the product is free of errors. The product cannot print received faxes if an error has
occurred with the product, such as a paper jam.
• If the product has been set to save received faxes in the product's memory or inbox, received faxes
are not automatically printed. Check the Receive Settings options on the product control panel and
change them, if necessary.
Parent topic: Solving Faxing Problems
Uninstall Your Product Software
If you have a problem that requires you to uninstall and re-install your software, follow the instructions for
your operating system.
Uninstalling Product Software - Windows
Uninstalling Product Software - Mac
Parent topic: Solving Problems
Uninstalling Product Software - Windows
You can uninstall and then re-install your product software to solve certain problems.
1. Turn off the product.
2. Close any open programs or applications.

361
3. Disconnect any interface cables.
4. Do one of the following:
• Windows 10: Click and select (Settings) > Apps or System > Apps & features. Then
select the program you want to uninstall and select Uninstall.
• Windows 8.x: Navigate to the Apps screen and select Control Panel > Programs > Programs
and Features. Select the uninstall option for your Epson product, then select Uninstall/Change.
Note: If you see a User Account Control window, click Yes or Continue.
Select your product again, if necessary, then select OK, and click Yes to confirm the
uninstallation.
• Windows (other versions): Click or Start, and select All Programs or Programs. Select
EPSON, select your product, then click EPSON Printer Software Uninstall.
Note: If you see a User Account Control window, click Yes or Continue.
In the next window, select your product and click OK. Then follow any on-screen instructions.
5. Do one of the following to uninstall Epson Event Manager, then follow any on-screen instructions:
• Windows 10/8.x: Select Epson Event Manager and click Uninstall.
• Windows 7/Windows Vista: Open the Windows Control Panel utility. Select Programs and
Features. (In Classic view, select Programs and click Uninstall a program.) Select Epson
Event Manager and click Uninstall/Change.
6. Do one of the following to uninstall Epson Scan 2, then follow any on-screen instructions:
• Windows 10: Select Epson Scan 2 and click Uninstall.
• Windows 8.x/Windows 7/Windows Vista: Select Epson Scan 2 and click Uninstall/Change.
7. Do one of the following to uninstall Epson ScanSmart, then follow any on-screen instructions:
• Windows 10: Select Epson ScanSmart and click Uninstall.
• Windows 8.x/Windows 7/Windows Vista: Select Epson ScanSmart and click
Uninstall/Change.
8. Restart your computer, then see the Start Here sheet to re-install your software.
Note: If you find that re-installing your product software does not solve a problem, contact Epson.

362
Parent topic: Uninstall Your Product Software
Uninstalling Product Software - Mac
In most cases, you do not need to uninstall your product software before re-installing it. However, you
can download the Uninstaller utility from the Epson support website to uninstall your product software as
described here.
Note: If you find that re-installing your product software does not solve a problem, contact Epson.
1. To download the Uninstaller utility, visit epson.com/support (U.S.) or epson.ca/support (Canada) and
select your product.
2. Click Downloads.
3. Select your operating system, click Utilities, locate the Uninstaller utility, and click Download.
4. Run the file you downloaded.
5. Double-click the Uninstaller icon.
6. In the Epson Uninstaller screen, select the checkbox for each software program you want to
uninstall.
7. Click Uninstall.
8. Follow the on-screen instructions to uninstall the software.
9. Reinstall your product software.
Note: If you uninstall the printer driver and your product name remains in the Print & Fax, Print & Scan,
or Printers & Scanners window, select your product name and click the – (remove) icon to remove it.
Parent topic: Uninstall Your Product Software
Where to Get Help
If you need to contact Epson for technical support services, use the following support options.
Internet Support
Visit Epson's support website at epson.com/support (U.S.) or epson.ca/support (Canada) and select
your product for solutions to common problems. You can download drivers and documentation, get
FAQs and troubleshooting advice, or e-mail Epson with your questions.

363
Speak to a Support Representative
Before you call Epson for support, please have the following information ready:
• Product name
• Product serial number (located on a label on the product)
• Proof of purchase (such as a store receipt) and date of purchase
• Computer configuration
• Description of the problem
Then call:
• U.S.: (562) 276-4382, 6 AM to 8 PM, Pacific Time, Monday through Friday, and 7 AM to 4 PM, Pacific
Time, Saturday
• Canada: (905) 709-3839, 6 AM to 8 PM, Pacific Time, Monday through Friday, and 7 AM to 4 PM,
Pacific Time, Saturday
Days and hours of support are subject to change without notice. Toll or long distance charges may
apply.
Purchase Supplies and Accessories
You can purchase genuine Epson ink and paper at epson.com (U.S. sales) or epson.ca (Canadian
sales). You can also purchase supplies from an Epson authorized reseller. To find the nearest one, call
800-GO-EPSON (800-463-7766) in the U.S. or 800-807-7766 in Canada.
Parent topic: Solving Problems

364
Technical Specifications
These sections list the technical specifications for your product.
Note: Epson offers a recycling program for end of life Epson products. Please go to this site (U.S) or this
site (Canada) for information on how to return your Epson products for proper disposal.
Windows System Requirements
Mac System Requirements
Paper Specifications
Printable Area Specifications
Scanning Specifications
Fax Specifications (ET-5170/ET-5180)
Automatic Document Feeder (ADF) Specifications
Ink Specifications
Dimension Specifications
Electrical Specifications
Environmental Specifications
Interface Specifications
Network Interface Specifications
Safety and Approvals Specifications
Windows System Requirements
To use your product and its software, your computer should use one of these Microsoft operating
systems:
• Windows 10
• Windows 8.x
• Windows 7
• Windows Vista
• Windows XP Professional x64 Edition SP2 or later
• Windows XP SP3 or later
• Windows Server 2003 SP2 or later

365
Note: For the latest product software available for your operating system, visit the Epson support site at
epson.com/support (U.S.) or epson.ca/support (Canada), select your product, and select Downloads.
Parent topic: Technical Specifications
Mac System Requirements
To use your product and its software, your Mac should use one of these operating systems:
• macOS 11.x
• macOS 10.15.x
• macOS 10.14.x
• macOS 10.13.x
• macOS 10.12.x
• OS X 10.11.x
• OS X 10.10.x
• OS X 10.9.x
• OS X 10.8.x
• OS X 10.7.x
Note: For the latest product software available for your operating system, visit the Epson support site at
epson.com/support (U.S.) or epson.ca/support (Canada), select your product, and select Downloads.
Parent topic: Technical Specifications
Paper Specifications
Note: Since the quality of any particular brand or type of paper may be changed by the manufacturer at
any time, Epson cannot guarantee the quality of any non-Epson brand or type of paper. Always test a
sample of paper stock before purchasing large quantities or printing large jobs.

366
Single-sheets
Size A4 (8.3 × 11.7 inches [210 × 297 mm])
A6 (4.1 × 5.8 inches [105 × 148 mm])
Letter (8.5 × 11 inches [216 × 279 mm])
Legal (8.5 × 14 inches [216 × 356 mm])
8 × 10 inches (203 × 254 mm)
8.5 × 13 inches (216 × 330 mm)
Half Letter (5.5 × 8.5 inches [140 × 216 mm])
Executive (7.25 × 10.5 inches [184 × 267 mm])
Mexico-Oficio (8.5 × 13.4 inches [216 × 340 mm])
Oficio 9 (8.46 × 12.4 inches [215 × 315 mm])
Paper types Plain paper
Note: Your product also supports compatible papers distributed by
Epson. See the link at the end of this topic for a list of compatible
Epson papers.
Weight Plain paper: 17 lb (64 g/m
2
) to 24 lb (90 g/m
2
)
Envelopes
Size No. 10 (4.1 × 9.5 inches [105 × 241 mm])
Paper types Plain bond paper
Weight 20 lb (75 g/m
2
) to 24 lb (90 g/m
2
)
Parent topic: Technical Specifications
Related references
Compatible Epson Papers
Printable Area Specifications
Note: Print quality may decline in the shaded areas due to the printer's mechanism.
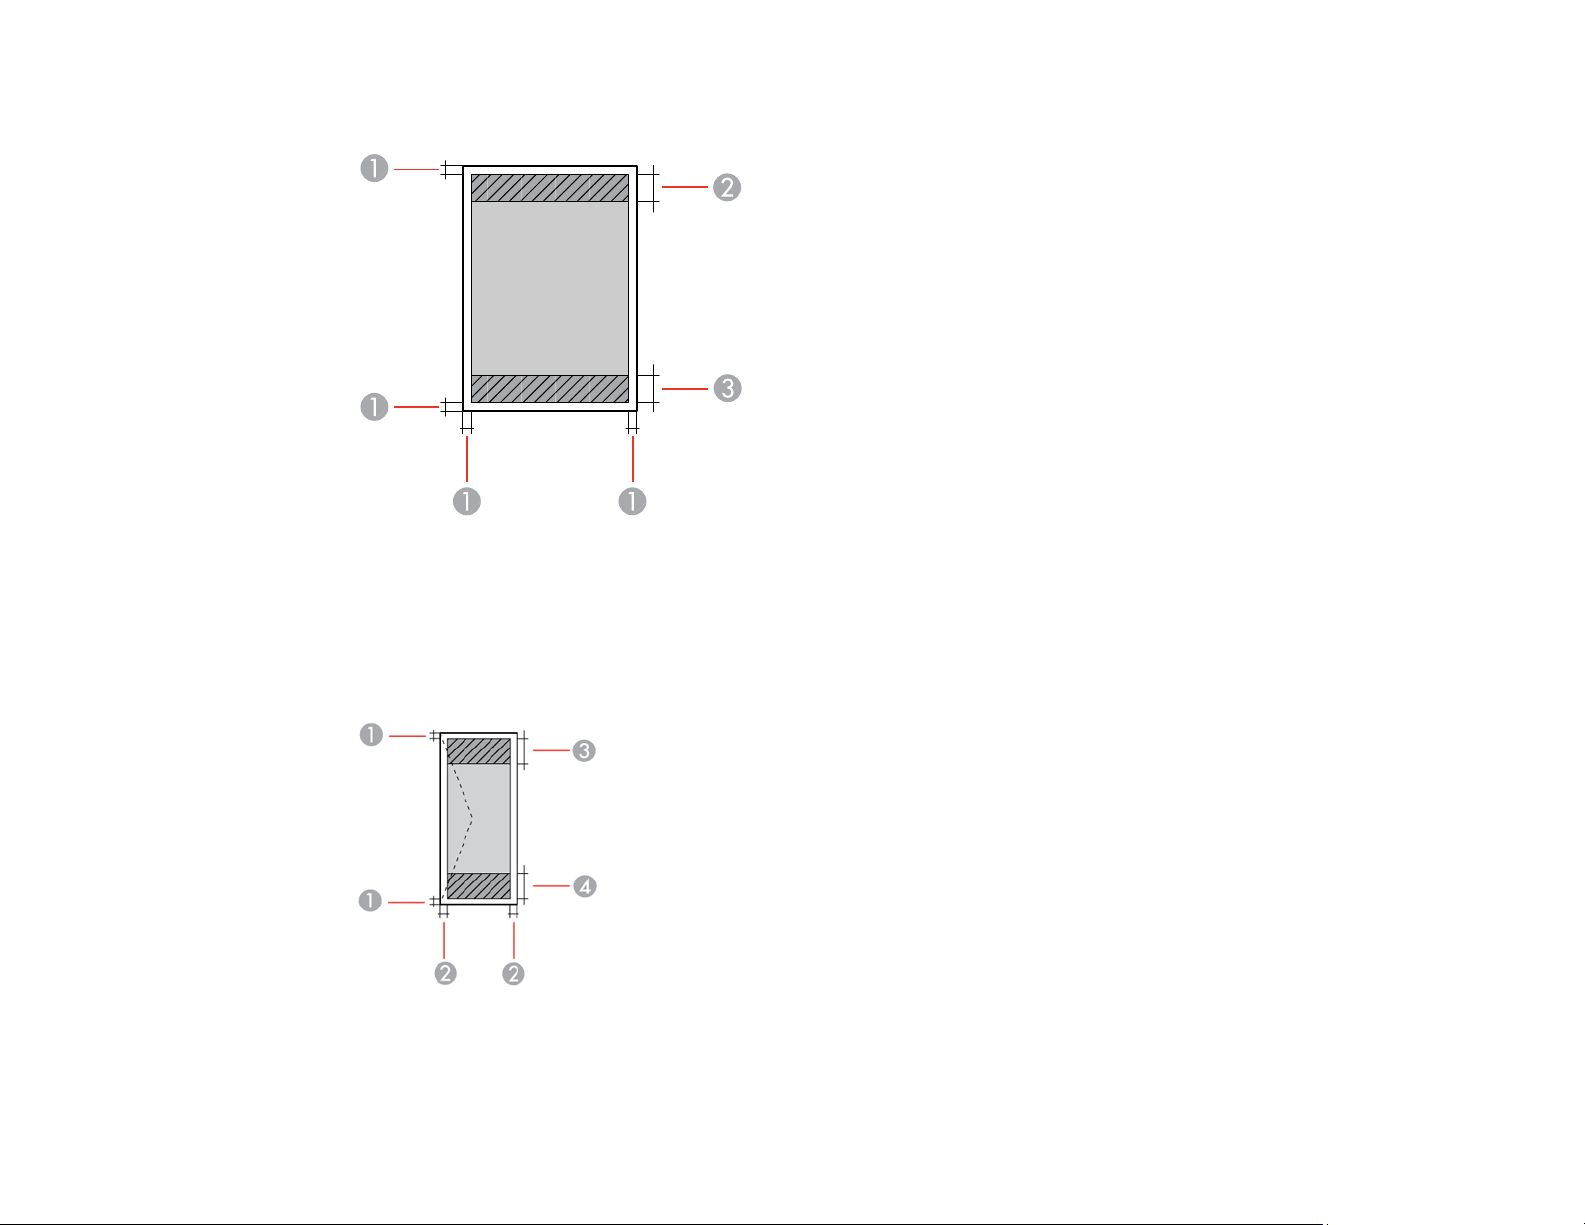
367
Single sheets
1 Top/bottom/left/right margins: 0.12 inch (3 mm) minimum
2 Reduced print quality area/top: 1.81 inches (46 mm) minimum
3 Reduced print quality area/bottom: 1.73 inches (44 mm) minimum
Envelopes
1 Right/left margins: 0.12 inch (3 mm) minimum
2 Top/bottom margins: 0.12 inch (3 mm) minimum

368
3 Reduced print quality area/right: 0.95 inch (24 mm) minimum
4 Reduced print quality area/left: 1.81 inches (46 mm) minimum
Parent topic: Technical Specifications
Scanning Specifications
Scanner type Flatbed
Photoelectric device CIS
Effective pixels 10200 × 14040 pixels at 1200 dpi
Document size Maximum: 8.5 × 11.7 inches (216 × 297 mm)
Scanner glass: US letter or A4
Scanning resolution 1200 dpi (main scan)
2400 dpi (sub scan)
Output resolution 50 to 9600 in 1 dpi increments
Image data Color:
48 bits per pixel internal (16 bits per pixel per color internal)
24 bits per pixel external (8 bits per pixel per color external)
Grayscale:
16 bits per pixel internal
8 bits per pixel external
Black and white:
16 bits per pixel internal
1 bit per pixel external
Light source LED
Parent topic: Technical Specifications

369
Fax Specifications (ET-5170/ET-5180)
Fax type Walk-up black-and-white and color fax capability (ITU-T Super
Group 3)
Supported lines Standard analog telephone lines and PBX (Private Branch
Exchange) telephone systems
Speed Up to 33.6 kbps
Resolution Monochrome:
Standard: 203 pixels per inch × 98 lines per inch (8 pixels per mm ×
3.85 lines per mm)
Fine: 203 pixels per inch × 196 lines per inch (8 pixels per mm × 7.7
lines per mm)
Super Fine: 203 pixels per inch × 392 lines per inch (8 pixels per mm
× 15.4 lines per mm)
Ultra Fine: 406 pixels per inch × 392 lines per inch (16 pixels per mm
× 15.4 lines per mm)
Photo: 203 pixels per inch × 196 lines per inch (8 pixels per mm ×
7.7 lines per mm)
Color:
200 × 200 dpi
Page memory Up to 180 (ITU-T No. 1 chart in monochrome draft mode)
Redial 2 times (with 1 minute interval); specifications may differ by country
or region
Interface RJ-11 Phone Line
RJ-11 Telephone set connection
Parent topic: Technical Specifications
Automatic Document Feeder (ADF) Specifications
Paper size US letter, legal, A4, or 8.5 × 13 inch (216 × 330 mm) size
Paper type Plain paper

370
Paper weight 17 lb (64 g/m
2
) to 24 lb (95 g/m
2
)
Sheet feeding capacity Total thickness: 0.15 inch (3.85 mm)
Approximately 35 sheets (US letter or A4) or 10 sheets (legal or 8.5
× 13 inch [216 × 330 mm])
Parent topic: Technical Specifications
Ink Specifications
Note: Epson's warranties do not extend to any damage caused by the use of third-party ink or ink not
designed for your printer.
The included initial ink bottles must be used for printer setup and are not for resale. The printer ships
with full ink bottles and part of the ink from the first bottles is used to charge the print head. Yields vary
considerably based on images printed, print settings, paper type, frequency of use and temperature.
Color Black, Cyan, Magenta, Yellow
Ink bottle life Epson recommends using an ink bottle before the date printed on
the package
Temperature Storage: –4 to 104 °F (–20 to 40 °C)
1 month at 104 °F (40 °C)
Ink freezes at 5 °F (–15 °C)
Ink thaws and is usable after approximately 2 hours at 77 °F (25 °C)
Parent topic: Technical Specifications
Dimension Specifications
Height Stored: 13.6 inches (346 mm)
Printing: 13.6 inches (346 mm)
Width Stored: 14.8 inches (375 mm)
Printing: 14.8 inches (375 mm)

371
Depth Stored: 13.7 inches (347 mm)
Printing: 13.7 inches (347 mm)
Weight
(without ink and power cord)
Approximately 16.1 lb (7.3 kg)
Parent topic: Technical Specifications
Electrical Specifications
Power supply rating 100 to 240 V
Input voltage range 90 to 264 V
Rated frequency range 50/60 Hz
Input frequency range 49.5 to 60.5 Hz
Rated current 0.5 to 0.2 A
Power consumption
(with USB connection)
Standalone copying: Approximately 12.0 W (ISO/IEC24712)
Ready mode (ET-5150): Approximately 5.3 W
Ready mode (ET-5170): Approximately 5.4 W
Ready mode (ET-5180): Approximately 5.5 W
Sleep mode (ET-5150/ET-5170): Approximately 0.9 W
Sleep mode (ET-5180): Approximately 1.0 W
Power off mode: Approximately 0.2 W
Parent topic: Technical Specifications
Environmental Specifications
Temperature Operating: 50 to 95 °F (10 to 35 °C)
Storage: –4 to 104 °F (–20 to 40 °C) (before initial ink charging)
5 to 104 °F (–15 to 40 °C) (after initial ink charging)
1 month at 104 °F (40 °C)

372
Humidity
(without condensation)
Operating: 20 to 80% RH
Storage: 5 to 85% RH
Parent topic: Technical Specifications
Interface Specifications
Interface type Hi-Speed USB
Note: USB 3.0 cables are not supported.
Parent topic: Technical Specifications
Network Interface Specifications
Wi-Fi
Standard IEEE 802.11 b/g/n; IEEE 802.11n is available only for the HT20
Frequency range 2.4 GHz
Maximum radio-frequency
power transmitted
20 dBm (EIRP)
Coordination modes Infrastructure mode
Wi-Fi Direct (Simple AP); not supported for IEEE 802.11b
Note: Wi-Fi Direct Simple AP mode is available even if you connect
the product to an Ethernet network.
Security WPA2-PSK (AES); complies with WPA2 with support for
WPA/WPA2 Personal; Wi-Fi Direct supports only WPA2-PSK (AES)
security
WEP (64/128 bit)

373
Ethernet
Standard IEEE802.3i (10BASE-T); use a category 5e or higher shielded
twisted pair cable to prevent radio interference
IEEE802.3u (100BASE-TX)
IEEE802.3az (Energy Efficient Ethernet); the connected device
should be IEEE802.3az compliant
Communication mode Auto, 10Mbps Full duplex, 10Mbps Half duplex, 100Mbps Full
duplex, 100Mbps Half duplex
Connector RJ-45
Security Protocol
SSL/TLS: HTTPS Server/Client, IPPS
Parent topic: Technical Specifications
Safety and Approvals Specifications
United States Safety: UL60950-1
EMC: FCC part 15 Subpart B Class B
Canada Safety: CAN/CSA C22.2 No. 60950-1
EMC: CAN ICES-3 (B)/NMB-3 (B)
This equipment contains the following wireless module:
• Manufacturer: Seiko Epson Corporation.
• Type: J26H006
This product conforms to Part 15 of FCC Rules and RSS-210 of the IC Rules. Epson cannot accept
responsibility for any failure to satisfy the protection requirements resulting from a non-recommended
modification of the product. Operation is subject to the following two conditions: (1) this device may not
cause harmful interference, and (2) this device must accept any interference received, including
interference that may cause undesired operation of the device.
To prevent radio interference to the licensed service, this device is intended to be operated indoors and
away from windows to provide maximum shielding. Equipment (or its transmit antenna) that is installed
outdoors is subject to licensing.

374
This equipment complies with FCC/IC radiation exposure limits set forth for an uncontrolled environment
and meets the FCC radio frequency (RF) Exposure Guidelines in Supplement C to OET65 and RSS-102
of the IC radio frequency (RF) Exposure rules. This equipment should be installed and operated so that
the radiator is kept at least 7.9 inches (20 cm) or more away from a person's body (excluding extremities:
hands, wrists, feet and ankles).
Parent topic: Technical Specifications

375
Notices
Check these sections for important notices about your product.
Note: Epson offers a recycling program for end of life Epson products. Please go to this site (U.S) or this
site (Canada) for information on how to return your Epson products for proper disposal.
Important Safety Instructions
FCC Compliance Statement
Binding Arbitration and Class Waiver
Trademarks
Copyright Notice
Important Safety Instructions
Before using your Epson product, read and follow these safety instructions.
General Product Safety Instructions
LCD Screen Safety Instructions
Wireless Connection Safety Instructions
Telephone Equipment Safety Instructions
Parent topic: Notices
General Product Safety Instructions
• Be sure to follow all warnings and instructions marked on the product.
• Use only the type of power source indicated on the product's label.
• Use only the power cord that comes with the product. Use of another cord may cause fires or shock.
Do not use the cord with any other equipment.
• Make sure the AC power cord meets the relevant local safety standard.
• Place the product near a wall outlet where the plug can be easily unplugged.
• Avoid plugging the product into an outlet on the same circuit as a photo copier or air control system
that regularly switches on and off, or on an outlet controlled by a wall switch or timer.
• Do not let the power cord become damaged or frayed. Place it to avoid abrasions, cuts, fraying,
crimping, and kinking. Do not place objects on top of it and do not allow it to be stepped on or run over.
Be careful to keep the cord straight at each end.

376
• If you use an extension cord with the product, make sure the total ampere rating of the devices
plugged into the extension cord does not exceed the cord's ampere rating. Also, make sure the total
ampere rating of all devices plugged into the wall outlet does not exceed the wall outlet's ampere
rating.
• Always turn off the product using the power button, and wait until the power light stops flashing before
unplugging the product or cutting off power to the electrical outlet.
• If you will not be using the product for a long period, unplug the power cord from the electrical outlet.
• Place the product on a flat, stable surface that extends beyond its base in all directions. It will not
operate properly if it is tilted or at an angle.
• Allow space behind the product for the cables, and space above the product so that you can fully raise
the document cover.
• Leave enough space in front of the product for the paper to be fully ejected.
• Avoid locations that are subject to rapid changes in heat or humidity, shocks or vibrations, or dust.
• Do not place or store the product outdoors.
• Do not place the product near excessive heat sources or in direct sunlight.
• Leave enough room around the product for sufficient ventilation. Do not block or cover openings in the
case or insert objects through the slots.
• Keep the product away from potential sources of electromagnetic interference, such as loudspeakers
or the base units of cordless telephones.
• Keep your product at least 8.7 inches (22 cm) away from cardiac pacemakers to prevent your
product's radio waves from affecting the operation of the pacemaker.
• When connecting the product to a computer or other device with a cable, ensure the correct
orientation of the connectors. Each connector has only one correct orientation. Inserting a connector
in the wrong orientation may damage both devices connected by the cable.
• Do not sit or lean on the product. Do not place heavy objects on the product.
• Do not touch the flat white cable or ink tubes inside the product.
• Do not move the print head by hand; this may damage the product.
• Do not put your hand inside the product while it is printing.
• Do not spill liquid on the product or use the product with wet hands.
• Do not use aerosol products that contain flammable gases inside or around the product. Doing so may
cause fire.
• Do not press too hard on the scanner glass when placing originals.
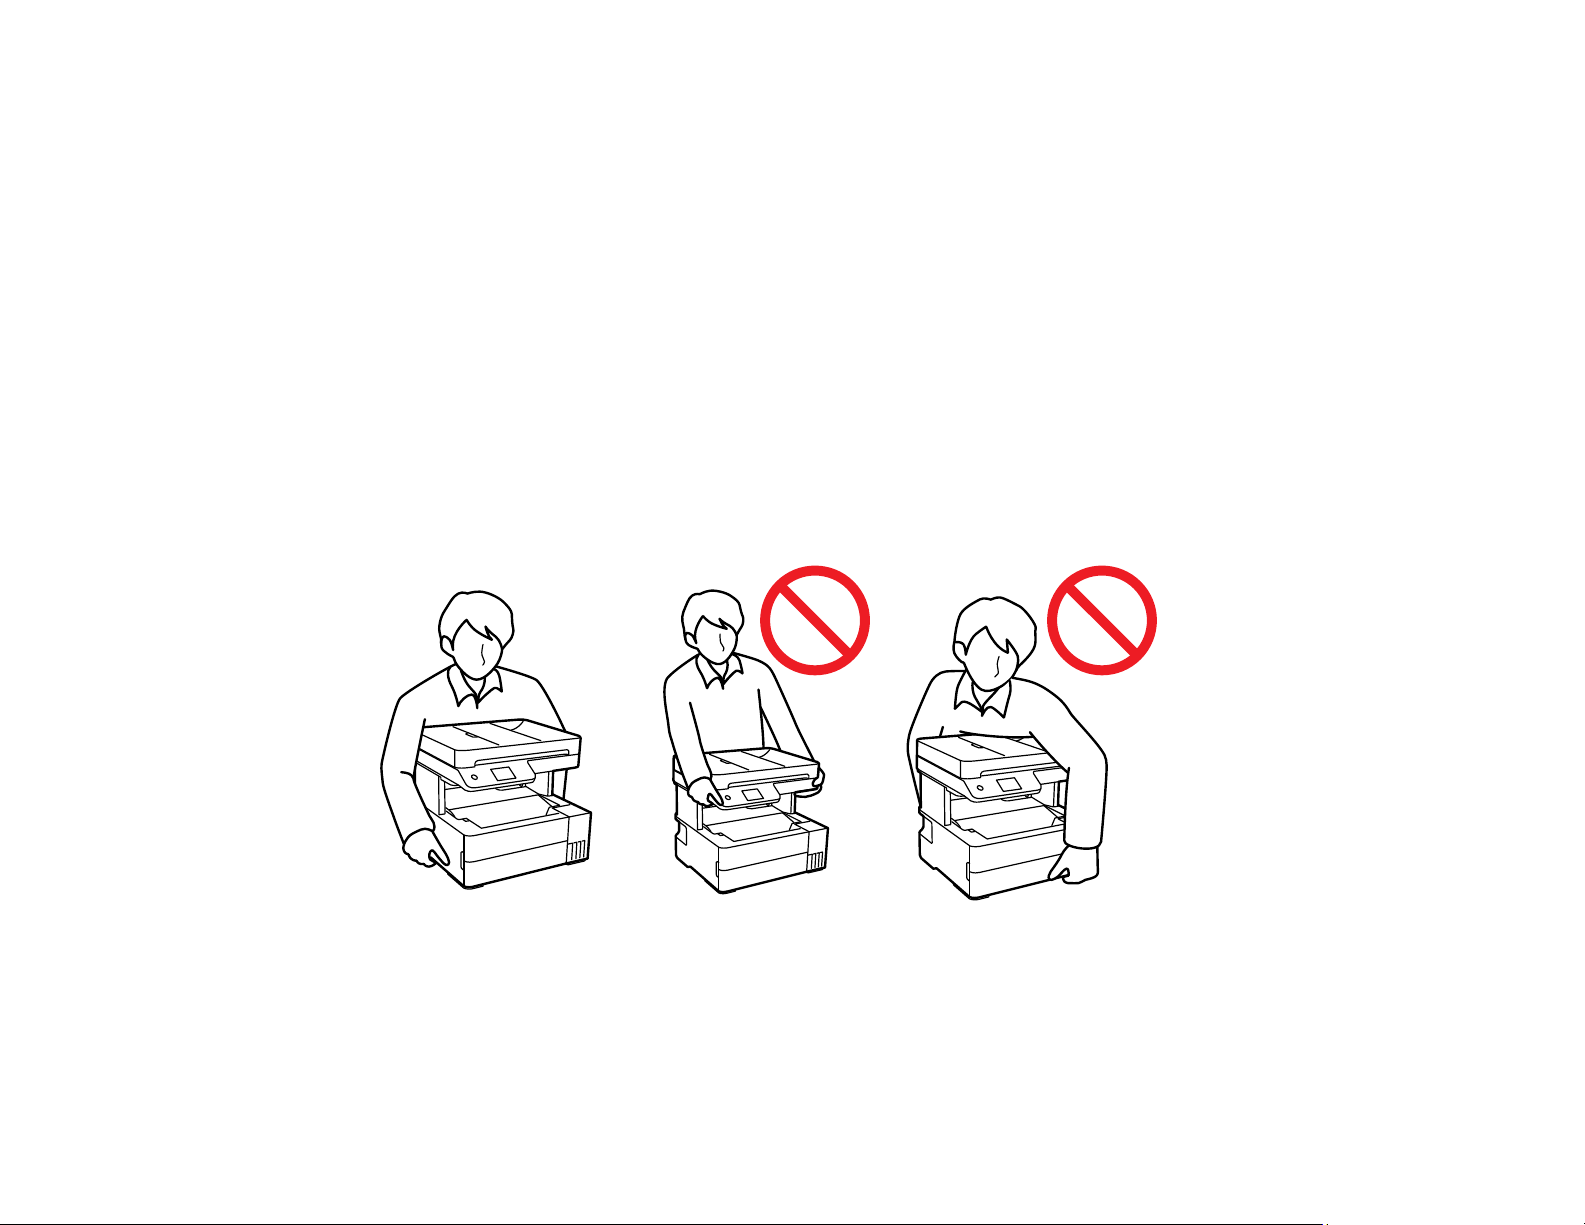
377
• Do not open the scanner section while the product is copying, printing, scanning, or performing any
other functions.
• Be careful not to trap your fingers when closing the ADF.
• Except as specifically explained in your documentation, do not attempt to service or disassemble the
product yourself.
• Unplug the product and refer servicing to qualified service personnel under the following conditions: if
the power cord or plug is damaged; if liquid has entered the product; if the product has been dropped
or the case damaged; if the product does not operate normally or exhibits a distinct change in
performance. Adjust only those controls that are covered by the operating instructions.
• If any of the ink tanks are not filled up to the lower line, refill the ink soon. Prolonged use of the product
when the ink level is below the lower line could damage the product.
• Before transporting the product, make sure that the print head is in the home (far right) position.
• When storing or transporting the product, do not tilt it, stand it on its side, or turn it upside down;
otherwise, ink may leak.
• When lifting the printer, place your hands in the positions shown below.
Parent topic: Important Safety Instructions
LCD Screen Safety Instructions
• Use only a dry, soft cloth to clean the LCD screen. Do not use liquid or chemical cleansers.

378
• If the LCD screen is damaged, contact Epson. If the liquid crystal solution gets on your hands, wash
them thoroughly with soap and water. If the liquid crystal solution gets into your eyes, flush them
immediately with water. If discomfort or vision problems remain after a thorough flushing, see a doctor
immediately. If liquid enters your mouth, see a doctor immediately.
• Do not press too hard on the LCD screen or subject it to heavy impacts.
• Do not use a pointy or sharp object, such as a pen or your fingernail, to operate the LCD screen.
• If the LCD screen chips or cracks, do not touch or attempt to remove the broken pieces; contact Epson
for support.
• Do not subject your product to sudden changes in temperature or humidity; this may cause
condensation to develop inside the LCD screen and degrade its performance.
• The LCD screen may contain a few small bright or dark spots, and may display uneven brightness.
These are normal and do not indicate that the screen is damaged in any way.
Parent topic: Important Safety Instructions
Wireless Connection Safety Instructions
Radio waves from this product may adversely affect the operation of medical equipment or automatically
controlled devices, such as pacemakers, automatic doors or fire alarms. When using this product near
such devices or inside a medical facility, follow the directions from authorized staff members at the
facility, and follow all posted warnings and directions on the device to avoid causing an accident.
Parent topic: Important Safety Instructions
Telephone Equipment Safety Instructions
When using telephone equipment, you should always follow basic safety precautions to reduce the risk
of fire, electric shock, and personal injury, including the following:
• Do not use the Epson product near water.
• Avoid using a telephone during an electrical storm. There may be a remote risk of electric shock from
lightning.
• Do not use a telephone to report a gas leak in the vicinity of the leak.
Caution: To reduce the risk of fire, use only a No. 26 AWG or larger telecommunication line cord.
Parent topic: Important Safety Instructions

379
FCC Compliance Statement
For United States Users
This equipment complies with Part 68 of the FCC rules and the requirements adopted by the
Administrative Council for Terminal Attachments ("ACTA"). On the surface of this equipment is a label
that contains, among other information, a product identifier in the format US:AAAEQ##TXXXX. If
requested, this number must be provided to the telephone company.
Applicable certification jack Universal Service Order Codes ("USOC") for the equipment: RJ11C.
A plug and jack used to connect this equipment to the premises wiring and telephone network must
comply with the applicable FCC Part 68 rules and requirements adopted by the ACTA. A compliant
telephone cord and modular plug is provided with this product. It is designed to be connected to a
compatible modular jack that is also compliant. See installation instructions for details.
The REN is used to determine the number of devices that may be connected to a telephone line.
Excessive RENs on a telephone line may result in the devices not ringing in response to an incoming
call. In most but not all areas, the sum of RENs should not exceed five (5.0). To be certain of the number
of devices that may be connected to a line, as determined by the total RENs, contact the local telephone
company. For products approved after July 23, 2001, the REN for this product is part of the product
identifier that has the format US:AAAEQ##TXXXX. The digits represented by ## are the REN without a
decimal point (e.g., 03 is a REN of 0.3). For earlier products, the REN is separately shown on the label.
If this equipment causes harm to the telephone network, the telephone company will notify you in
advance that temporary discontinuance of service may be required. But if advance notice isn't practical,
the telephone company will notify the customer as soon as possible. Also, you will be advised of your
right to file a complaint with the FCC if you believe it is necessary.
The telephone company may make changes in its facilities, equipment, operations, or procedures that
could affect the operation of the equipment. If this happens the telephone company will provide advance
notice in order for you to make necessary modifications to maintain uninterrupted service.
If you have problems with this product and require technical or customer support, please visit
www.epson.com for more information.
This product is not intended to be repaired by the customer. If you experience trouble connecting this
equipment to a telephone line, please contact:
Name: Epson America, Inc.
Address: 3131 Katella Ave., Los Alamitos, CA 90720 U.S.A.
Telephone: (562) 981-3840
If the equipment is causing harm to the telephone network, the telephone company may request that you
disconnect the equipment until the problem is resolved.

380
This equipment may not be used on coin service provided by the telephone company. Connection to
party line service is subject to state tariffs. Contact the state public utility commission, public service
commission or corporation commission for information.
If your home has specially wired alarm equipment connected to the telephone line, ensure the
installation of this equipment does not disable your alarm equipment. If you have questions about what
will disable alarm equipment, consult your telephone company or a qualified installer.
The Telephone Consumer Protection Act of 1991 makes it unlawful for any person to use a computer or
other electronic device, including fax machines, to send any message unless such message clearly
contains in a margin at the top or bottom of each transmitted page or on the first page of the
transmission, the date and time it is sent and an identification of the business or other entity, or other
individual sending the message and the telephone number of the sending machine or such business,
other entity, or individual. (The telephone number provided may not be a 900 number or any other
number for which charges exceed local or long-distance transmission charges.)
In order to program this information into your fax machine, click the link below for instructions on entering
fax header information.
According to the FCC's electrical safety advisory, we recommend that you may install an AC surge
arrester in the AC outlet to which this equipment is connected. Telephone companies report that
electrical surges, typically lightning transients, are very destructive to customer terminal equipment
connected to AC power sources and that this is a major nationwide problem.
This equipment has been tested and found to comply with the limits for a Class B digital device, pursuant
to Part 15 of the FCC Rules. These limits are designed to provide reasonable protection against harmful
interference in a residential installation. This equipment generates, uses, and can radiate radio
frequency energy and, if not installed and used in accordance with the instructions, may cause harmful
interference to radio or television reception. However, there is no guarantee that interference will not
occur in a particular installation. If this equipment does cause interference to radio and television
reception, which can be determined by turning the equipment off and on, the user is encouraged to try to
correct the interference by one or more of the following measures:
• Reorient or relocate the receiving antenna.
• Increase the separation between the equipment and receiver.
• Connect the equipment into an outlet on a circuit different from that to which the receiver is connected.
• Consult the dealer or an experienced radio/TV technician for help.
WARNING
The connection of a non-shielded equipment interface cable to this equipment will invalidate the FCC
Certification or Declaration of this device and may cause interference levels which exceed the limits
established by the FCC for this equipment. It is the responsibility of the user to obtain and use a shielded

381
equipment interface cable with this device. If this equipment has more than one interface connector, do
not leave cables connected to unused interfaces. Changes or modifications not expressly approved by
the manufacturer could void the user’s authority to operate the equipment.
For Canadian Users
1. This product meets the applicable Innovation, Science and Economic Development Canada technical
specifications.
2. The Ringer Equivalence Number indicates the maximum number of devices allowed to be connected
to a telephone interface. The termination of an interface may consist of any combination of devices
subject only to the requirement that the sum of the RENs of all the devices does not exceed five.
CAN ICES-3(B)/NMB-3(B)
Le présent produit est conforme aux spécifications techniques applicables d’Innovation, Sciences et
Développement économique Canada.
L’indice d’équivalence de la sonnerie (IES) sert à indiquer le nombre maximal de dispositifs qui peuvent
être raccordés à une interface téléphonique. La terminaison d’une interface peut consister en une
combinaison quelconque de dispositifs, à la seule condition que la somme des IES de tous les dispositifs
n’excède pas cinq.
CAN ICES-3(B)/NMB-3(B)
Parent topic: Notices
Binding Arbitration and Class Waiver
1. DISPUTES, BINDING INDIVIDUAL ARBITRATION, AND WAIVER OF CLASS ACTIONS AND
CLASS ARBITRATIONS
1.1 Disputes. The terms of this Section 1 shall apply to all Disputes between you and Epson. The term
"Dispute" is meant to have the broadest meaning permissible under law and includes any dispute, claim,
controversy or action between you and Epson arising out of or relating to this Agreement, Epson
branded products (hardware and including any related software), or other transaction involving you and
Epson, whether in contract, warranty, misrepresentation, fraud, tort, intentional tort, statute, regulation,
ordinance, or any other legal or equitable basis. "DISPUTE" DOES NOT INCLUDE IP CLAIMS, or more
specifically, a claim or cause of action for (a) trademark infringement or dilution, (b) patent infringement,
(c) copyright infringement or misuse, or (d) trade secret misappropriation (an "IP Claim"). You and Epson
also agree, notwithstanding Section 1.6,that a court, not an arbitrator, may decide if a claim or cause of
action is for an IP Claim.
1.2 Binding Arbitration. You and Epson agree that all Disputes shall be resolved by binding arbitration
according to this Agreement. ARBITRATION MEANS THAT YOU WAIVE YOUR RIGHT TO A JUDGE

382
OR JURY IN A COURT PROCEEDING AND YOUR GROUNDS FOR APPEAL ARE LIMITED.
Pursuant to this Agreement, binding arbitration shall be administered by JAMS, a nationally recognized
arbitration authority, pursuant to its code of procedures then in effect for consumer related disputes, but
excluding any rules that permit joinder or class actions in arbitration (for more detail on procedure, see
Section 1.6 below). You and Epson understand and agree that (a) the Federal Arbitration Act (9 U.S.C.
§1, et seq.) governs the interpretation and enforcement of this Section 1, (b) this Agreement
memorializes a transaction in interstate commerce, and (c) this Section 1 shall survive termination of this
Agreement.
1.3 Pre-Arbitration Steps and Notice. Before submitting a claim for arbitration, you and Epson agree to
try, for sixty (60) days, to resolve any Dispute informally. If Epson and you do not reach an agreement to
resolve the Dispute within the sixty (60) days), you or Epson may commence an arbitration. Notice to
Epson must be addressed to: Epson America, Inc., ATTN: Legal Department, 3131 Katella Ave., Los
Alamitos, CA 90720 (the "Epson Address"). The Dispute Notice to you will be sent to the most recent
address Epson has in its records for you. For this reason, it is important to notify us if your address
the Dispute shall include the sender's name, address and contact information, the facts giving rise to the
Dispute, and the relief requested (the "Dispute Notice"). Following receipt of the Dispute Notice, Epson
and you agree to act in good faith to resolve the Dispute before commencing arbitration.
1.4 Small Claims Court. Notwithstanding the foregoing, you may bring an individual action in the small
claims court of your state or municipality if the action is within that court's jurisdiction and is pending only
in that court.
1.5 WAIVER OF CLASS ACTIONS AND CLASS ARBITRATIONS. YOU AND EPSON AGREE THAT
EACH PARTY MAY BRING DISPUTES AGAINST THE OTHER PARTY ONLY IN AN INDIVIDUAL
CAPACITY, AND NOT AS A PLAINTIFF OR CLASS MEMBER IN ANY CLASS OR
REPRESENTATIVE PROCEEDING, INCLUDING WITHOUT LIMITATION FEDERAL OR STATE
CLASS ACTIONS, OR CLASS ARBITRATIONS. CLASS ACTION LAWSUITS, CLASS-WIDE
ARBITRATIONS, PRIVATE ATTORNEY-GENERAL ACTIONS, AND ANY OTHER PROCEEDING
WHERE SOMEONE ACTS IN A REPRESENTATIVE CAPACITY ARE NOT ALLOWED.
ACCORDINGLY, UNDER THE ARBITRATION PROCEDURES OUTLINED IN THIS SECTION, AN
ARBITRATOR SHALL NOT COMBINE OR CONSOLIDATE MORE THAN ONE PARTY'S CLAIMS
WITHOUT THE WRITTEN CONSENT OF ALL AFFECTED PARTIES TO AN ARBITRATION
PROCEEDING.
1.6 Arbitration Procedure. If you or Epson commences arbitration, the arbitration shall be governed by
the rules of JAMS that are in effect when the arbitration is filed, excluding any rules that permit arbitration
on a class or representative basis (the "JAMS Rules"), available at http://www.jamsadr.com or by calling
1-800-352-5267, and under the rules set forth in this Agreement. All Disputes shall be resolved by a
single neutral arbitrator, and both parties shall have a reasonable opportunity to participate in the
selection of the arbitrator. The arbitrator is bound by the terms of this Agreement. The arbitrator, and not
any federal, state or local court or agency, shall have exclusive authority to resolve all disputes arising

383
out of or relating to the interpretation, applicability, enforceability or formation of this Agreement,
including any claim that all or any part of this Agreement is void or voidable. Notwithstanding this broad
delegation of authority to the arbitrator, a court may determine the limited question of whether a claim or
cause of action is for an IP Claim, which is excluded from the definition of "Disputes" in Section 1.1
above. The arbitrator shall be empowered to grant whatever relief would be available in a court under
law or in equity. The arbitrator may award you the same damages as a court could, and may award
declaratory or injunctive relief only in favor of the individual party seeking relief and only to the extent
necessary to provide relief warranted by that party's individual claim. In some instances, the costs of
arbitration can exceed the costs of litigation and the right to discovery may be more limited in arbitration
than in court. The arbitrator's award is binding and may be entered as a judgment in any court of
competent jurisdiction.
You may choose to engage in arbitration hearings by telephone. Arbitration hearings not conducted by
telephone shall take place in a location reasonably accessible from your primary residence, or in Orange
County, California, at your option.
a) Initiation of Arbitration Proceeding. If either you or Epson decides to arbitrate a Dispute, both parties
agree to the following procedure:
(i) Write a Demand for Arbitration. The demand must include a description of the Dispute and the amount
of damages sought to be recovered. You can find a copy of a Demand for Arbitration at
http://www.jamsadr.com ("Demand for Arbitration").
(ii) Send three copies of the Demand for Arbitration, plus the appropriate filing fee, to: JAMS, 500 North
State College Blvd., Suite 600 Orange, CA 92868, U.S.A.
(iii) Send one copy of the Demand for Arbitration to the other party (same address as the Dispute
Notice), or as otherwise agreed by the parties.
b) Hearing Format. During the arbitration, the amount of any settlement offer made shall not be disclosed
to the arbitrator until after the arbitrator determines the amount, if any, to which you or Epson is entitled.
The discovery or exchange of non-privileged information relevant to the Dispute may be allowed during
the arbitration.
c) Arbitration Fees. Epson shall pay, or (if applicable) reimburse you for, all JAMS filings and arbitrator
fees for any arbitration commenced (by you or Epson) pursuant to provisions of this Agreement.
d) Award in Your Favor. For Disputes in which you or Epson seeks $75,000 or less in damages exclusive
of attorney's fees and costs, if the arbitrator's decision results in an award to you in an amount greater
than Epson's last written offer, if any, to settle the Dispute, Epson will: (i) pay you $1,000 or the amount
of the award, whichever is greater; (ii) pay you twice the amount of your reasonable attorney's fees, if
any; and (iii) reimburse you for any expenses (including expert witness fees and costs) that your attorney
reasonably accrues for investigating, preparing, and pursuing the Dispute in arbitration. Except as
agreed upon by you and Epson in writing, the arbitrator shall determine the amount of fees, costs, and
expenses to be paid by Epson pursuant to this Section 1.6d).

384
e) Attorney's Fees. Epson will not seek its attorney's fees and expenses for any arbitration commenced
involving a Dispute under this Agreement. Your right to attorney's fees and expenses under Section
1.6d) above does not limit your rights to attorney's fees and expenses under applicable law;
notwithstanding the foregoing, the arbitrator may not award duplicative awards of attorney's fees and
expenses.
1.7 Opt-out. You may elect to opt-out (exclude yourself) from the final, binding, individual
arbitration procedure and waiver of class and representative proceedings specified in this
Agreement by sending a written letter to the Epson Address within thirty (30) days of your assent
to this Agreement (including without limitation the purchase, download, installation of the
Software or other applicable use of Epson Hardware, products and services) that specifies (i)
your name, (ii) your mailing address, and (iii) your request to be excluded from the final, binding
individual arbitration procedure and waiver of class and representative proceedings specified in
this Section 1. In the event that you opt-out consistent with the procedure set forth above, all
other terms shall continue to apply, including the requirement to provide notice prior to litigation.
1.8 Amendments to Section 1. Notwithstanding any provision in this Agreement to the contrary, you
and Epson agree that if Epson makes any future amendments to the dispute resolution procedure and
class action waiver provisions (other than a change to Epson's address) in this Agreement, Epson will
obtain your affirmative assent to the applicable amendment. If you do not affirmatively assent to the
applicable amendment, you are agreeing that you will arbitrate any Dispute between the parties in
accordance with the language of this Section 1 (or resolve disputes as provided for in Section 1.7, if you
timely elected to opt-out when you first assented to this Agreement).
1.9 Severability. If any provision in this Section 1 is found to be unenforceable, that provision shall be
severed with the remainder of this Agreement remaining in full force and effect. The foregoing shall not
apply to the prohibition against class or representative actions as provided in Section 1.5. This
means that if Section 1.5 is found to be unenforceable, the entire Section 1 (but only Section 1)
shall be null and void.
Parent topic: Notices
Trademarks
EPSON
®
and Epson Smart Panel
®
are registered trademarks, EPSON Exceed Your Vision is a
registered logomark, and Epson Connect
TM
and Remote Print
TM
are trademarks of Seiko Epson
Corporation.
Windows is a registered trademark of Microsoft Corporation in the United States and/or other countries.
Apple, App Store, AirPrint, AirPrint logo, ColorSync, iPad, iPhone, iPod touch, Mac, macOS, and OS X
are trademarks of Apple Inc., registered in the U.S. and other countries.

385
Use of the Works with Apple badge means that an accessory has been designed to work specifically
with the technology identified in the badge and has been certified by the developer to meet Apple
performance standards.
Google
®
is a registered trademark and Android
TM
, Gmail
TM
, Chrome
TM
, Google Drive
TM
, Google Play
TM
,
and Google Cloud Print
TM
are trademarks of Google LLC.
Wi-Fi Direct
®
is a registered trademark of Wi-Fi Alliance
®
.
General Notice: Other product names used herein are for identification purposes only and may be
trademarks of their respective owners. Epson disclaims any and all rights in those marks.
Parent topic: Notices
Copyright Notice
All rights reserved. No part of this publication may be reproduced, stored in a retrieval system, or
transmitted in any form or by any means, electronic, mechanical, photocopying, recording, or otherwise,
without the prior written permission of Seiko Epson Corporation. The information contained herein is
designed only for use with this Epson product. Epson is not responsible for any use of this information as
applied to other products.
Neither Seiko Epson Corporation nor its affiliates shall be liable to the purchaser of this product or third
parties for damages, losses, costs, or expenses incurred by purchaser or third parties as a result of:
accident, misuse, or abuse of this product or unauthorized modifications, repairs, or alterations to this
product, or (excluding the U.S.) failure to strictly comply with Seiko Epson Corporation's operating and
maintenance instructions.
Seiko Epson Corporation shall not be liable for any damages or problems arising from the use of any
options or any consumable products other than those designated as Original Epson Products or Epson
Approved Products by Seiko Epson Corporation.
Seiko Epson Corporation shall not be held liable for any damage resulting from electromagnetic
interference that occurs from the use of any interface cables other than those designated as Epson
approved Products by Seiko Epson Corporation.
This information is subject to change without notice.
libTIFF Software Acknowledgment
A Note Concerning Responsible Use of Copyrighted Materials

386
Default Delay Times for Power Management for Epson Products
Copyright Attribution
Parent topic: Notices
libTIFF Software Acknowledgment
Copyright © 1988-1997 Sam Leffler
Copyright © 1991-1997 Silicon Graphics, Inc.
Permission to use, copy, modify, distribute, and sell this software and its documentation for any purpose
is hereby granted without fee, provided that (I) the above copyright notices and this permission notice
appear in all copies of the software and related documentation, and (ii) the names of Sam Leffler and
Silicon Graphics may not be used in any advertising or publicity relating to the software without the
specific, prior written permission of Sam Leffler and Silicon Graphics.
THE SOFTWARE IS PROVIDED "AS-IS" AND WITHOUT WARRANTY OF ANY KIND, EXPRESS,
IMPLIED OR OTHERWISE, INCLUDING WITHOUT LIMITATION, ANY WARRANTY OF
MERCHANTABILITY OR FITNESS FOR A PARTICULAR PURPOSE.
IN NO EVENT SHALL SAM LEFFLER OR SILICON GRAPHICS BE LIABLE FOR ANY SPECIAL,
INCIDENTAL, INDIRECT OR CONSEQUENTIAL DAMAGES OF ANY KIND, OR ANY DAMAGES
WHATSOEVER RESULTING FROM LOSS OF USE, DATA OR PROFITS, WHETHER OR NOT
ADVISED OF THE POSSIBILITY OF DAMAGE, AND ON ANY THEORY OF LIABILITY, ARISING OUT
OF OR IN CONNECTION WITH THE USE OR PERFORMANCE OF THIS SOFTWARE.
Parent topic: Copyright Notice
A Note Concerning Responsible Use of Copyrighted Materials
Epson encourages each user to be responsible and respectful of the copyright laws when using any
Epson product. While some countries' laws permit limited copying or reuse of copyrighted material in
certain circumstances, those circumstances may not be as broad as some people assume. Contact your
legal advisor for any questions regarding copyright law.
Parent topic: Copyright Notice
Default Delay Times for Power Management for Epson Products
This product will enter sleep mode after a period of nonuse. This is to ensure that the product meets
Energy Star standards of energy efficiency. More energy savings can be achieved by setting the time to
sleep to a shorter interval.
Parent topic: Copyright Notice