
High Performance Blender with Touch-Activated Display
Instruction Manual
Licuadora de alto rendimiento con pantalla toque
Manual de instrucciones
19030, 19035, 19040, 19020 Beautifu Blender IM R7.indd 1 2021-04-07 9:19 AM

The kitchen is my family’s happy
place. It’s where we cook and eat
and bake and laugh and share our
most beautiful moments together.
That’s what inspired the creation
of Beautiful, my new collection
of easy-to-use kitchenware that
you’ll want to keep out on your
kitchen counter. So whether
your kitchen has flour all over
the place from a kid's baking
session or you’re throwing an adult
dinner party, I hope every step will
be simple, delicious and beautiful!
www.cookwithbeautiful.com
19030, 19035, 19040, 19020 Beautifu Blender IM R7.indd 2 2021-04-07 9:19 AM

Section 1: Safety
Important Safeguards ............................................ 2-6
Additional Important Safeguards ................................. 7-8
Notes on the Plug ................................................ 8
Notes on the Cord .............................................. 8-9
Plasticizer Warning ............................................... 9
Electric Power .................................................... 9
Section 2: Instructions
Getting to Know Your High Performance Blender ................... 11
Touch-Activated Display Control Panel ......................... 12-14
Before Using for the First Time .................................. 15
Jar Assembly ..................................................... 16
Operation ..................................................... 16-18
Function Selection Guide ......................................... 19
Beautiful Blender Notes .......................................... 20
Beautiful Food Prep Tips ......................................... 20
User Maintenance Instructions .................................... 20
Care & Cleaning Instructions ..................................... 21
Storing Instructions ............................................. 21
Troubleshooting .................................................. 20
Warranty ...................................................... 22-23
Table of Contents
19030, 19035, 19040, 19020 Beautifu Blender IM R7.indd 1 2021-04-07 9:19 AM

The kitchen is my family’s happy
place. It’s where we cook and eat
and bake and laugh and share our
most beautiful moments together.
That’s what inspired the creation
of Beautiful, my new collection
of easy-to-use kitchenware that
you’ll want to keep out on your
kitchen counter. So whether
your kitchen has flour all over
the place from a kid's baking
session or you’re throwing an adult
dinner party, I hope every step will
be simple, delicious and beautiful!
www.cookwithbeautiful.com
Table of Contents
Section 1: Safety
Medidas de seguridad importantes ............................. 26-28
Otras medidas de seguridad importantes ....................... 29-30
Enchufe de 3 conductores con conexión a tierra .................. 30
Notas sobre el cable ............................................ 31
Advertencia sobre plasticados ................................... 32
Potencia eléctrica ............................................... 32
Section 2: Instructions
Descripción de la licuadora de alto rendimiento .................. 34
Panel de control de pantalla activado por toqu ............... 35-38
Antes de usar por primera vez ................................... 39
Montaje de la jarra .............................................. 40
Funcionamiento ................................................ 41-43
Guía de selección de funciones .............................. 44- 45
Notas sobre la licuadora beautiful ............................... 45
Consejos beautiful de preparación de alimentos ................... 45
Troubleshooting .................................................. 20
Instrucciones de mantenimiento para el usuario ................... 46
Instrucciones de cuidado y limpieza .............................. 46
Instrucciones de almacenamiento .................................. 47
Resolución de problemas ......................................... 48
Garantía ...................................................... 49-50
19030, 19035, 19040, 19020 Beautifu Blender IM R7.indd 2 2021-04-07 9:19 AM

Section 1
Safety
19030, 19035, 19040, 19020 Beautifu Blender IM R7.indd 3 2021-04-07 9:19 AM

4
IMPORTANT SAFEGUARDS
When using electrical appliances, basic safety precautions
should always be followed including the following:
1. READ ALL INSTRUCTIONS.
2. To protect against risk of electrical shock do not put
cord, plugs, or appliance in water or other liquid.
3. This appliance is not intended for use by persons
(including children) with reduced physical, sensory
or mental capabilities, or lack of experience and
knowledge, unless they have been given supervision
or instruction concerning use of the appliances
by a person responsible for their safety.
4. Close supervision is necessary when any appliance
is used by or near children.
5. This Blender is not a toy. Children should be
supervised to ensure they do not play with the
appliance.
6. Unplug from outlet when not in use, before putting
on or taking off parts and before cleaning.
Flashing light (or identify other means used)
indicates ready to operate. Avoid inadvertent contact
with the touch screen.
19030, 19035, 19040, 19020 Beautifu Blender IM R7.indd 4 2021-04-07 9:19 AM

5
7. Flashing light indicates ready to operate. Avoid any
contact with blades or moveable parts.
8. Do not operate any appliance with a damaged cord or plug
or after the appliance malfunctions, or it is dropped,
or has been damaged in any manner. If the manufacturer
has authorized service facilities, instruction to
return the appliance to the nearest authorized service
facility may be used instead of instructing the user
to contact the manufacturer at the customer service
phone number: 1-866-832-4843.
NOTE: DO NOT ATTEMPT TO REPAIR THE UNIT YOURSELF.
THIS WILL VOID THE WARRANTY.
9. The use of attachments, including canning jars,
not recommended by the manufacturer may cause a risk
of injury to persons.
10. Do not use outdoors.
11. Do not let cord hang over edge of table or counter.
12. Do not let cord contact hot surfaces, including
the stove.
13. Blades are sharp. Handle carefully.
14. Do not blend hot liquids.
15. Never use the blender jar to process ingredients
without the lid and measuring cap properly locked
in place.
16. Never place any Blender attachments into a microwave
oven.
17. Keep hands and utensils out of the jar while blending
19030, 19035, 19040, 19020 Beautifu Blender IM R7.indd 5 2021-04-07 9:19 AM

6
to reduce the risk of severe injury to persons or damage
to the unit.
18. Always operate the Blender with its lid in place.
A scraper may be used ONLY when the Blender is
not running.
19. Never add ingredients to the jar while the Blender
is operating.
FOR HOUSEHOLD
USE ONLY
SAVE THESE
INSTRUCTIONS
19030, 19035, 19040, 19020 Beautifu Blender IM R7.indd 6 2021-04-07 9:19 AM

7
ADDITIONAL IMPORTANT
SAFEGUARDS
1. All users of this appliance must read and understand
this instruction manual before operating or cleaning
this appliance.
2. The cord to this appliance should be plugged into a
3-prong 120V AC electrical outlet only.
3. If this appliance begins to malfunction during use,
immediately press or any illuminated SPEED or PRESET
button to turn the Blender OFF, then unplug the cord.
Do not use or attempt to repair the malfunctioning
appliance. Contact Consumer Service: 1-866-832-4843.
4. If this appliance falls or accidentally becomes
immersed in water, unplug it immediately. Do not reach
into the water!
5. Do not use this appliance after it has fallen into
or becomes immersed in water.
6. To reduce the risk of injury to persons or property,
never use this appliance in an unstable position
7. Do not use this appliance for other than its intended
use.
19030, 19035, 19040, 19020 Beautifu Blender IM R7.indd 7 2021-04-07 9:19 AM

8
8. Do not use if the jar is cracked or chipped.
IMPORTANT: Do not overll beyond the jar’s MAX line.
WARNING: To avoid spills, make sure the lid is properly
locked in place on the jar with the measuring cap
in position before pressing any button.
GROUNDED 3-CONDUCTOR PLUG
This appliance is equipped with a grounded-type 3-wire
cord (3-prong plug). This plug will only t into an
electrical outlet made for a 3-prong plug. This is a
safety feature. If the plug should fail to t the outlet,
contact an electrician to replace the obsolete outlet.
Do not attempt to defeat this safety feature.
NOTES ON THE CORD
a) A short power-supply cord (or detachable power-supply
cord) is to be provided to reduce risks resulting from
becoming entangled in or tripping over a longer cord.
b) Longer detachable power-supply cords or extension cords
are available and may be used if care is exercised in
their use.
c) If a long detachable power-supply cord or extension
cord is used:
1) The marked electrical rating of the detachable power-
supply cord or extension cord should be at least as
great as the electrical rating of the appliance;
19030, 19035, 19040, 19020 Beautifu Blender IM R7.indd 8 2021-04-07 9:19 AM

9
2) If the appliance is of the grounded type, the extension
cord should be a grounding- type 3-wire cord; and
3) The longer cord should be arranged so that it will not
drape over the counter top or table top where it can be
pulled on by children or tripped over.
PLASTICIZER WARNING
CAUTION: To prevent Plasticizers from migrating to the
nish of the counter top or table top or other furniture,
place NON-PLASTIC coasters or place mats between the
appliance and the nish of the counter top or table top.
Failure to do so may cause the nish to darken; permanent
blemishes may occur, or stains can appear.
ELECTRIC POWER
If the electrical circuit is overloaded with other
appliances, your appliance may not operate properly.
It should be operated on a separate electrical circuit
from other appliances.
19030, 19035, 19040, 19020 Beautifu Blender IM R7.indd 9 2021-04-07 9:19 AM

Section 2
Instructions
19030, 19035, 19040, 19020 Beautifu Blender IM R7.indd 10 2021-04-07 9:19 AM
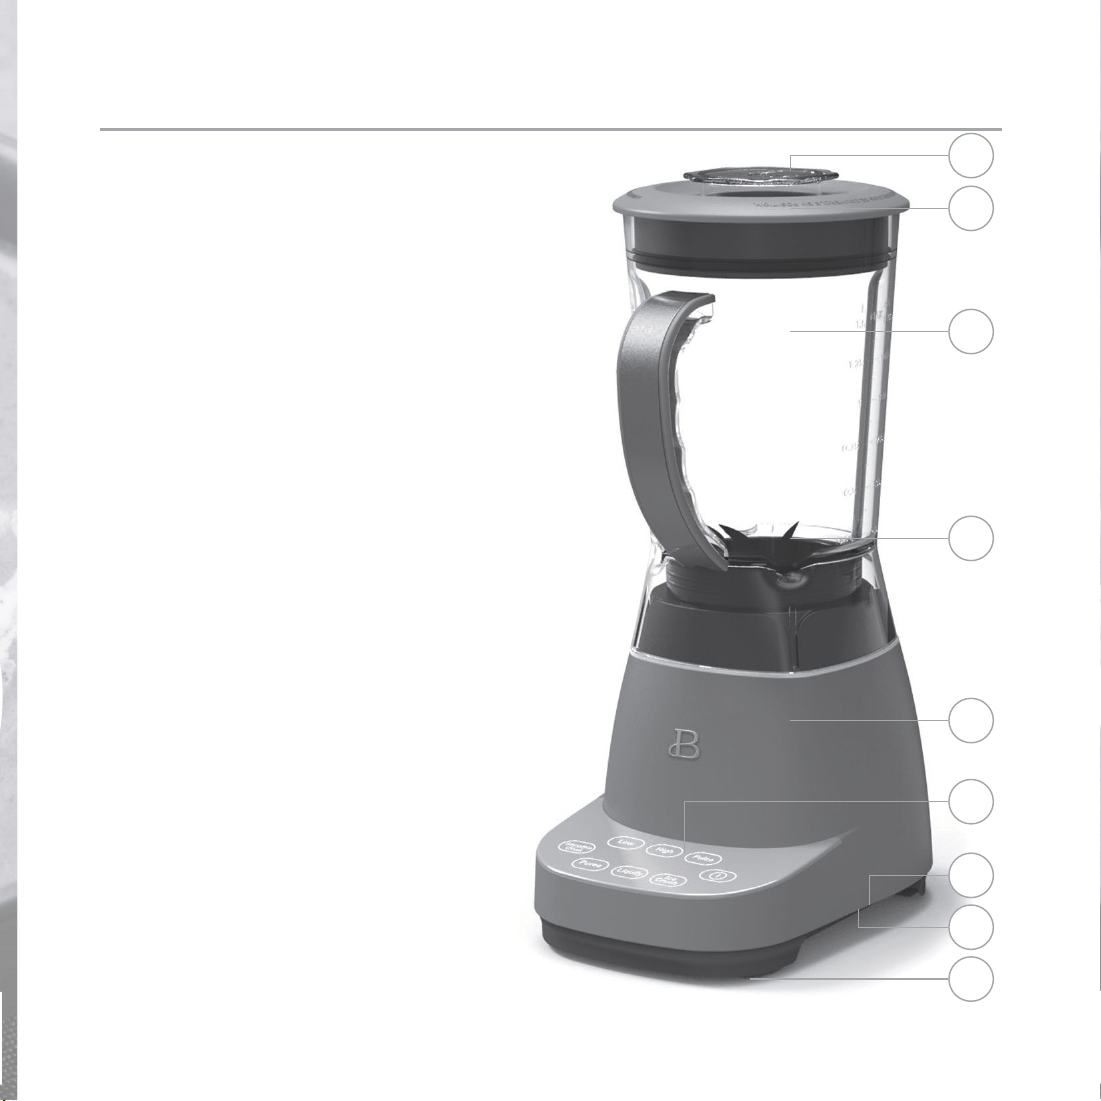
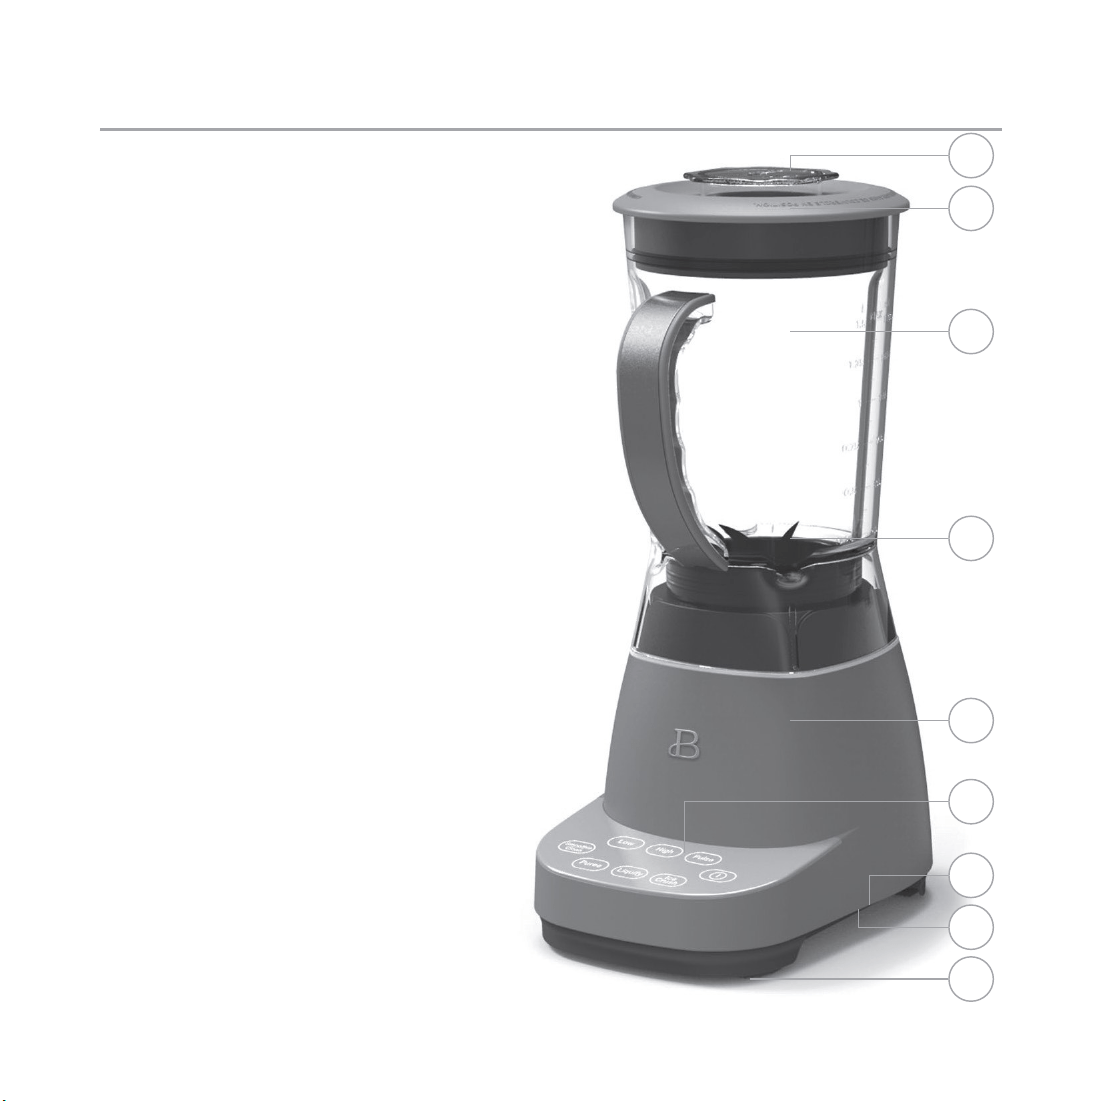
Getting To Know Your High Performance Blender
Product may vary slightly from illustration
1. 2 oz. Measuring Cap
2. Jar Lid
3. 50 oz. Tritan™ Jar
4. 4 Tip Stainless Steel Blade
5. Motor Base with
Soft Matte Premium Finish
6. Touch-Activated Display Control Panel
7. 3-Prong Plug (not shown)
8. Cord Storage (not shown)
9. Non-Skid Feet
1
2
3
4
5
6
7
8
9
11
19030, 19035, 19040, 19020 Beautifu Blender IM R7.indd 11 2021-04-07 9:19 AM
12
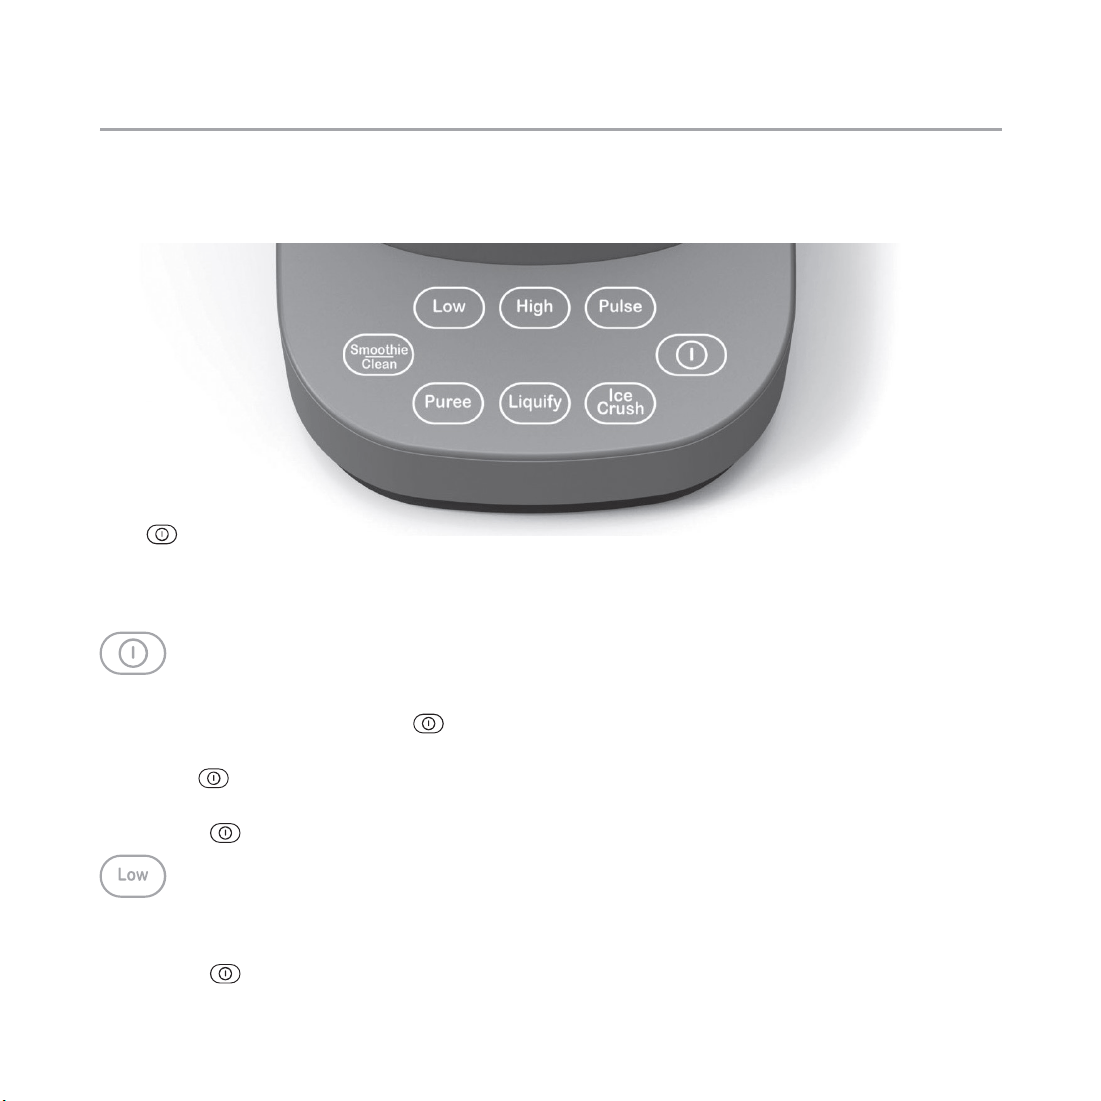
Touch-Activated Display Control Panel
A screen that only shows up when you need it.
3 SPEED buttons: LOW, HIGH, PULSE as well as 4 PRESET blending functions:
PUREE, LIQUIFY, ICE CRUSH, SMOOTHIE/CLEAN illuminate when active and disappear
when not in use.
• When the Blender is plugged in, all buttons will illuminate and
a tone will sound, the button will illuminate and then pulse slowly
on and off.
• When is pressed, a tone will sound, and the control panel will
illuminate and the power button will begin to ash.
• Press to STOP any operation.
• Select LOW when a slower speed is required; to begin mixing, to prevent
over-mixing, and when working with heavier batters.
• Press to turn the function OFF.
1.
2. LOW
3. HIGH
4. PULSE
5. PUREE
6. LIQUIFY
7. ICE CRUSH
8. SMOOTHIE/CLEAN
19030, 19035, 19040, 19020 Beautifu Blender IM R7.indd 12 2021-04-07 9:19 AM

13
• LOW speed blending will automatically turn OFF after 60 seconds.
• Select HIGH to blend ingredients to the desired consistency when a
faster speed is required.
• Press to turn the function OFF.
• HIGH speed blending will automatically turn OFF after 60 seconds.
• Select PULSE to blend ingredients through controlled bursts of power.
• Use PULSE to dislodge ingredients clumped around the blade and at the
bottom of the jar.
• PULSE is activated as the button is pressed. Release the PULSE button
to turn the Blender OFF.
• For best results, time the pulses to ensure that blades come
to a complete stop before pulsing again.
• Use PUREE to prepare smooth soups and spreads, and to puree fruits
and vegetables. All ingredients should be blended cold or at room
temperature.
• Make sure sufcient liquid is added to create a smooth and even
consistency. Add small amounts of stock, yogurt, milk, or water through
the measuring cap, until the desired consistency is achieved.
• Press to turn the function OFF.
• PUREE has a preset cycle time and will automatically turn OFF after 60
seconds.
19030, 19035, 19040, 19020 Beautifu Blender IM R7.indd 13 2021-04-07 9:19 AM

14
• Ideal for preparing soups and to blend thick or dense foods.
• When LIQUIFY is pressed, a tone will sound, the button will illuminate
and the Blender will begin blending at lower speeds, then progressively
increase to high speed.
• Press to turn the function OFF.
• LIQUIFY has a preset cycle time and will automatically turn OFF after
60 seconds.
• ICE CRUSH quickly crushes up to 10 ice cubes and is perfect
for preparing frozen drink recipes such as margaritas and daiquiris.
• Press to turn the function OFF.
• ICE CRUSH has a preset cycle time and will automatically turn OFF after
26 seconds.
• Blends fresh or frozen fruits and vegetables into the perfect smoothie.
• Press to turn the function OFF.
• SMOOTHIE/CLEAN has a preset cycle time and will automatically turn OFF
after 60 seconds.
• To best automatically clean the Blender jar, rst ll jar with water
to the 24 oz line and add a small amount of liquid dish soap.
Press SMOOTHIE/CLEAN. The initial cleaning will continue for 60 seconds.
• Rinse the jar thoroughly with warm water. Repeat procedure without soap.
Add room temperature water to the blender jar MAX line. Press SMOOTHIE/
CLEAN and run once again. Rinse well. Then place the clean jar upside
down on a rack to dry.
• Always clean jar and blade immediately after use to prevent food
from hardening.
• The Tritan™ Jar is top rack dishwasher safe.
19030, 19035, 19040, 19020 Beautifu Blender IM R7.indd 14 2021-04-07 9:19 AM
15
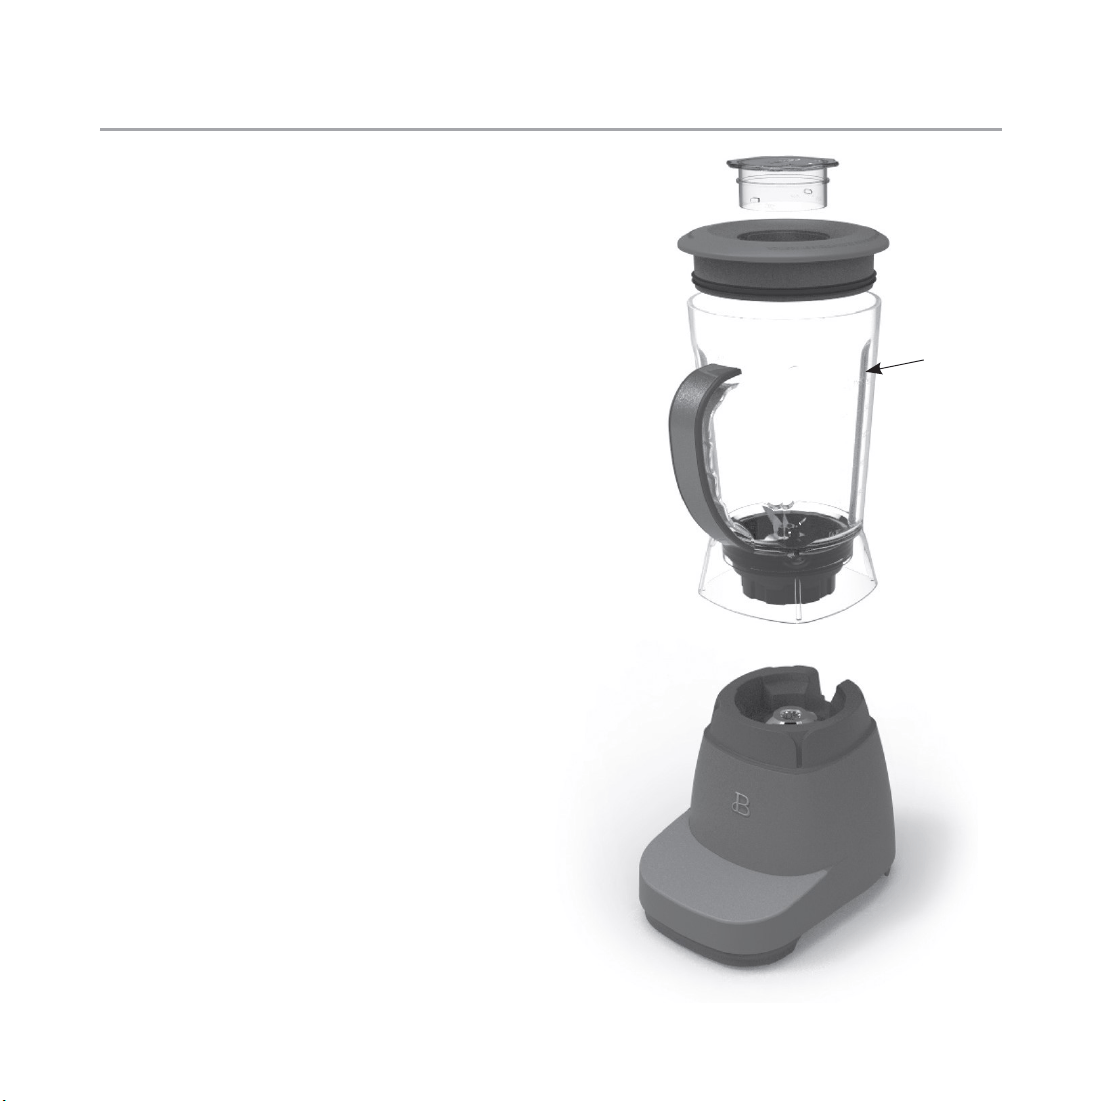
Before Using for the First Time
Carefully unpack the Blender and
remove all packaging materials.
Check the contents to ensure that
all attachments (50 oz. jar, lid and
measuring cap) are present (see Figure
1), and have been received in good
condition.
1. Wash the jar, lid, and measuring
cap in warm, soapy water before
rst use. Rinse thoroughly.
WARNING: Do not touch blade.
Blending blades are very sharp.
Use extreme care when handling.
Failure to do so can result in
personal injury.
2. Wipe the motor base with a
damp cloth.
WARNING: DO NOT IMMERSE THE MOTOR
BASE IN WATER.
Never ll
jar beyond
the MAX line
19030, 19035, 19040, 19020 Beautifu Blender IM R7.indd 15 2021-04-07 9:19 AM

16
Jar Assembly
1. Always check to be sure the blade collar is properly tted into the jar
before use.
2. To avoid spills, ensure that the lid is rmly secured to the jar.
Press the lid down on the top portion of the jar until it rests rmly
in place. Place the measuring cap into the center of the lid and twist
clockwise to secure it safely in place.
3. Use the measuring cap to measure and add ingredients before and
while blending.
4. Add ingredients to the jar.
NOTE: When blending, foods or liquids tend to expand as they rise up
the side of the jar. Do not ll jar past its MAX line.
WARNING: Pay close attention while processing. Never operate the Blender
when the jar is empty.
Operation
1. Place the motor base on a at, clean, dry counter top or table.
2. Plug the power cord into a 3-prong 120V AC electrical outlet. A tone
will sound. The will illuminate and then pulse slowly on and off.
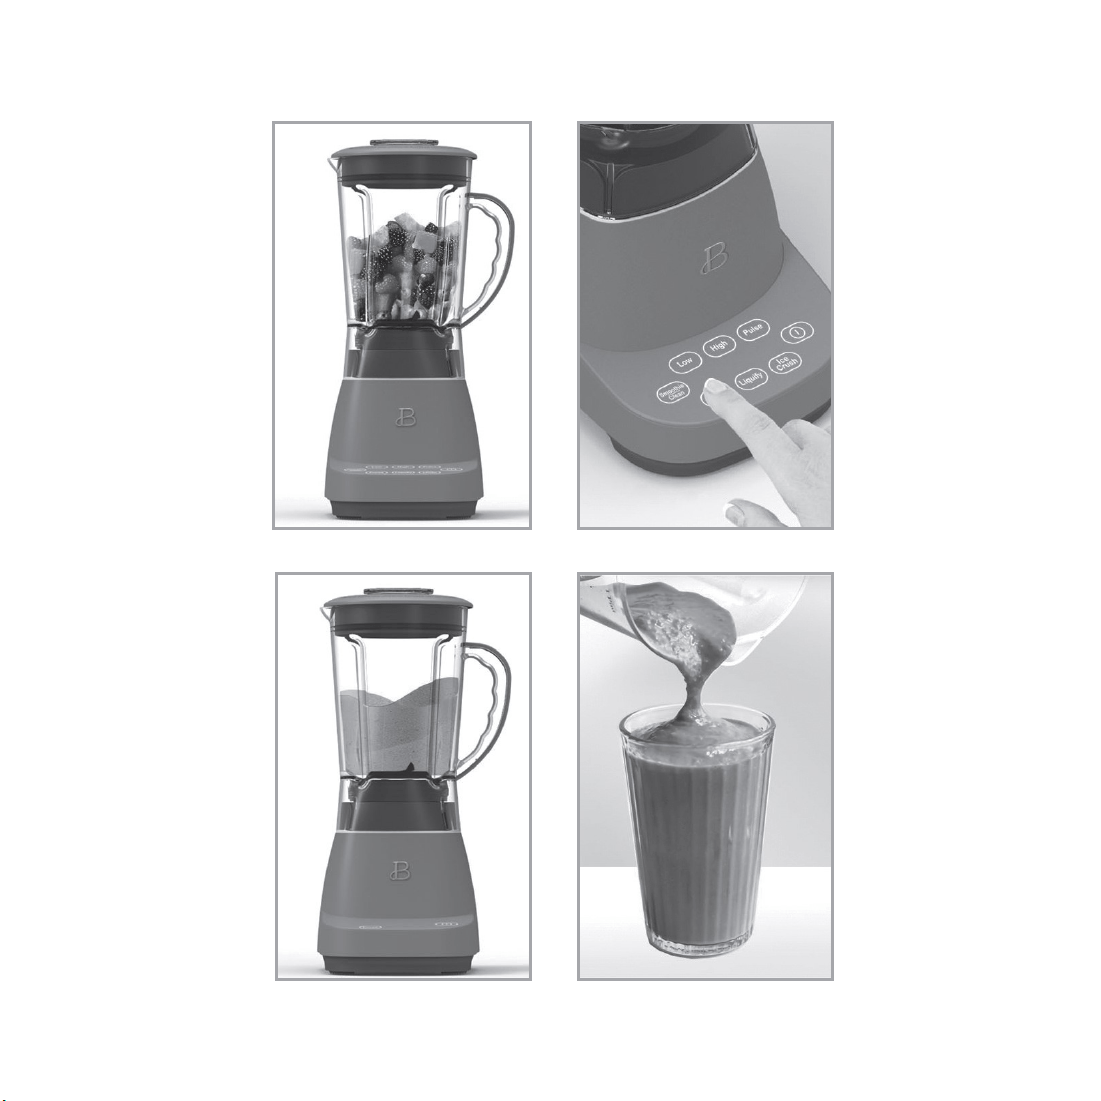
3. Add ingredients to the jar (Figure 1).
WARNING: Never overll the jar. To avoid personal injury, leakage,
or damage to the Blender, make sure that ingredients do not surpass
the MAX line. Place the jar securely onto the motor base.
IMPORTANT: When adding Smoothie ingredients to the jar, add liquids
and/or yogurt to the blender jar rst. Then layer smaller chopped
ingredients, both fresh and frozen. Larger chunks and ice should be
added last. To avoid spinning blades and ensure a successful, creamy
Smoothie, do not try to process too many frozen chunks.
4. Make sure the measuring cap is in position in the lid.
19030, 19035, 19040, 19020 Beautifu Blender IM R7.indd 16 2021-04-07 9:19 AM

17
5. Add the lid onto the jar. Press to seal. Check before blending.
WARNING: To avoid spills, make sure the lid is locked securely before
pressing any SPEED or PRESET buttons.
WARNING: Do not blend hot liquids.
6. When the pulsing is pressed, a tone will sound as the control panel
illuminates, the button will ash and remains active for 20 seconds.
7. Press the desired SPEED or PRESET button to begin blending (Figure 2).
A tone will sound. The button will illuminate and selected SPEED or
PRESET will begin to ash. All other buttons will disappear when not in
use. Press the desired SPEED or PRESET once more to activate the setting
and begin blending. (Figure 3)
NOTE: If no buttons are pressed in 20 seconds, the control panel
will darken and the button will illuminate and begin to pulse.
8. When using the PULSE function, the PULSE button will illuminate when
pressed. When the button is released, the control panel will remain
active for 20 seconds.
9. When blending HIGH or LOW SPEED, press to STOP blending when desired
consistency is reached.
10. HIGH or LOW speed blending will automatically turn OFF after 60 seconds.
11. PUREE, LIQUIFY, ICE CRUSH, SMOOTHIE/CLEAN times and speeds are PRESET
and will STOP automatically when cycles are complete.
12. Press to STOP blending. Check results and if necessary,
stir in liquid, water, juice, or stock to thin food until
the desired consistency is reached.
WARNING: Do not operate the motor continuously for more than 1 minute
at a time.
13. After processing food in the jar, pull the lid up and off jar to remove.
The spouted jar makes pouring easy. (Figure 4)
HINT! A small spatula is helpful for removing thicker processed foods.
14. Unplug the Blender when not in use and before cleaning.
19030, 19035, 19040, 19020 Beautifu Blender IM R7.indd 17 2021-04-07 9:19 AM

18
Fig. 1
Fig. 3
Fig. 2
Fig. 4
19030, 19035, 19040, 19020 Beautifu Blender IM R7.indd 18 2021-04-07 9:19 AM

19
Function Selection Guide
INGREDIENT/RECIPE FUNCTION DESCRIPTION
Pudding, Pie Filling, Custard PULSE or LOW Thick and creamy
Bread, Stale Bread, Crackers,
Cookies (1/2 inch pcs, 1 cup
batches)
PULSE or LOW Coarse to ne crumbs
Nuts (shelled, 1/2 cup or less
at a time)
PULSE or LOW Coarse to ne chopped nuts,
chopped nuts for baking
Nuts (shelled, 1/2 cup or less
at a time Homemade Nut Flours,
Meals, Nut Butter)
ICE CRUSH Fine ground nut ours,
nut meals Fresh preservative
free nut butters
Mayonnaise, Salad Dressings,
Salsas
LOW Thick and creamy, blended,
and emulsied
Pancake/Wafe Batter, Omelets LOW Light and uffy
Cream, Egg Whites HIGH Thick and frothy
Milk Shakes HIGH Smooth and creamy
Smoothies, Drinks SMOOTHIE Smooth, thick & creamy and
health drinks
Vegetable Puree PUREE Smooth and creamy
Crush Ice (up to 10 cubes) ICE CRUSH Coarse crush to snowy
Frozen Cocktails ICE CRUSH Thick and slushy
Dips, Appetizers ICE CRUSH Perfect for leafy recipes
Almond Milk, Coconut Milk,
Soy Milk Oat Milk
LIQUIFY Unltered for cooking.
Filter for drinking.
Fresh Fruit Drinks LIQUIFY Thick and pulpy
19030, 19035, 19040, 19020 Beautifu Blender IM R7.indd 19 2021-04-07 9:19 AM

20
Beautiful Blender Notes:
• When using the PULSE function, Blender operation will STOP when
the button is released.
• PUREE, LIQUIFY, ICE CRUSH, SMOOTHIE/CLEAN are preset and will STOP
automatically when their cycle is complete. To interrupt blending,
press POWER or any illuminated SPEED or PRESET button to turn
the Blender OFF.
• Use LOW speed to begin the blending process or whenever the recipe calls
for slower speeds.
Beautiful Food Prep Tips
1. Use organic fruits and vegetables whenever possible.
2. Wash all produce (even organic) thoroughly before removing peels
and skins.
3. Reduce risk of bacteria contamination by using a wooden cutting board
(not plastic). It is best practice to identify and use separate cutting
boards for meats/sh/poultry and fruits/vegetables.
4. Choose USDA Certied Organic
• No additives, no sweeteners, no hydrogenated fats.
• No harmful pesticides.
• Organic farming produces fewer waste products and less pollution.
• Organic foods are arsenic-free.
• Higher quality ingredients for you and the entire family.
User Maintenance Instructions
This appliance requires little maintenance. It contains no user-serviceable
parts. Any servicing requiring disassembly other than cleaning must be
performed by a qualied appliance repair technician.
19030, 19035, 19040, 19020 Beautifu Blender IM R7.indd 20 2021-04-07 9:19 AM

21
Care & Cleaning Instructions
CAUTION: DO NOT IMMERSE THE MOTOR BASE, PLUG, OR CORD IN WATER OR ANY
OTHER LIQUID.
1. Always unplug the Blender before cleaning.
2. Rinse jar, lid and measuring cap immediately after processing to prevent
food from hardening and to make cleanup easier. It is not recommended
to remove the blade from the jar.
3. To clean the jar, ll with clean, warm water to the MAX line and add
a small amount of liquid dish soap.
4. Press SMOOTHIE/CLEAN. A tone will sound. Both the button,
and SMOOTHIE/CLEAN will illuminate. All other buttons will disappear.
NOTE: CLEAN has a preset cycle time and will automatically turn OFF
after 60 seconds.
5. Rinse out the jar’s contents with warm water. Repeat procedure without
soap. Add room temperature water to the blender jar and ll to the
24oz / 3 cup line. Press SMOOTHIE/CLEAN and run once again. Place the
clean jar upside down on a rack to dry.
6. The Tritan™ Jar is top rack dishwasher safe.
7. Wipe the motor base with a damp cloth or sponge. Dry thoroughly.
Storing Instructions
1. Unplug and clean unit.
2. Store in original box or in a clean, dry place.
3. Never store the Blender while it is hot or plugged in.
4. Never wrap cord tightly around the appliance. Never place any stress
on cord, especially where the cord enters the motor base, as this could
cause the cord to fray and break.
19030, 19035, 19040, 19020 Beautifu Blender IM R7.indd 21 2021-04-07 9:19 AM

22
Troubleshooting
PROBLEM CAUSE SOLUTION
The blender motor
rotates very
slowly.
Jar is
overloaded.
• Remove some food from the jar
and continue blending. Ensure
that ingredients do not surpass
the max line.
• Add liquid to the jar
and continue blending.
Ingredients
are notmixing
togetherwell.
Heavier
ingredients
have fallen
to the bottom.
• If necessary, remove jar and shake
ingredients to re-distribute.
Continue blending.
• If the puree is still not blended
smooth, itmay be necessary to add
liquid tothejar and continue
blending.
The blender
has stopped
operating.
The motor is
overloaded
and stopped
functioning to
prevent damage.
• The blender has a resettable
thermal protection. Unplug the
unit and let it cool for
25minutes. Reduce the load
of the jar and clear any jams.
Commence operationagain as
indicated intheoperation section.
The jar is leaking
from the blade
area.
The blade base
isloose.
• Turn the blade base located below
the jar clockwise to tighten.
19030, 19035, 19040, 19020 Beautifu Blender IM R7.indd 22 2021-04-07 9:19 AM

Limited Two-Year Warranty
Sensio Inc. dba Made by Gather™
hereby warrants that for a period
of TWO YEARS from the date of
purchase, this product will be free
from mechanical defects in material
and workmanship, and for 90 days in
respect to non-mechanical parts. At
its sole discretion, Sensio Inc. dba
Made by Gather™ will either repair
or replace the product found to be
defective, or issue a refund on the
product during the warranty period.
The warranty is only valid for
the original retail purchaser from
the date of initial retail purchase
and is not transferable.
Keep the original sales receipt,
as proof of purchase isrequired
to obtain warranty validation.
Retail stores selling this product
do not have the right to alter,
modify, or in any way revise the
terms and conditions of the warranty.
Exclusions:
The warranty does not cover normal
wear of parts or damage resulting
from any of thefollowing: negligent
use of the product, use of improper
voltage or current, improper routine
maintenance, use contrary to the
operating instructions, disassembly,
repair, or alteration by anyone
other than qualied Sensio Inc.
dba Made by Gather™ personnel.
Also, the warranty does not cover
Acts of God such as re, oods,
hurricanes, or tornadoes.
Sensio Inc. dba Made by Gather™ shall
not be liable for any incidental or
consequential damages caused by the
breach of any express or implied
warranty. Apart from the extent
prohibited by applicable law, any
implied warranty of merchantability
or tness for a particular purpose
is limited in time to the duration
of the warranty. Some states,
provinces or jurisdictions do not
allow the exclusion or limitation
of incidental or consequential
damages, or limitations on how
long an implied warranty lasts,
and therefore, the above exclusions
or limitations may not apply to you.
The warranty covers specic legal
rights which may vary by state,
province and/or jurisdiction.
23
19030, 19035, 19040, 19020 Beautifu Blender IM R7.indd 23 2021-04-07 9:19 AM

24
How To Obtain Warranty Service:
You must contact Customer Service at
our toll-free number: 1-877-775-3564.
A Customer Service Representative
will attempt to resolve warranty
issues over thephone. If the
Customer Service Representative
is unable to resolve the problem,
you will be provided with a case
number and asked to return the
product to Sensio Inc. dba Made
by Gather™ Attach a tag to the
product that includes: your name,
address, daytime contact telephone
number, case number, and description
of the problem.
Also, include a copy of the original
sales receipt. Carefully package
the tagged product with the sales
receipt, and send it (with shipping
and insurance prepaid) to SENSIO
Inc.’s address. Sensio Inc. dba
Made by Gather™ shall bear no
responsibility or liability for
the returned product while in
transit to Sensio Inc. DBA Made by
Gather™ Customer Service Center.
19030, 19035, 19040, 19020 Beautifu Blender IM R7.indd 24 2021-04-07 9:19 AM

Sección 1
Seguridad
19030, 19035, 19040, 19020 Beautifu Blender IM R7.indd 25 2021-04-07 9:19 AM

26
MEDIDAS DE SEGURIDAD
IMPORTANTES
Al usar electrodomésticos, se deben seguir siempre las
precauciones básicas, entre ellas:
1. LEER TODAS LAS INSTRUCCIONES.
2. Para protegerse del riesgo de descargas eléctricas,
no sumergir el cable, los enchufes ni el
electrodoméstico en agua ni en ningún otro líquido.
3. Este electrodoméstico no debe ser utilizado por
personas (incluidos niños) con capacidades físicas,
sensoriales o mentales reducidas o con falta de
experiencia y conocimientos, salvo que una persona
responsable por su seguridad los supervise o los
instruya sobre el uso del electrodoméstico.
4. Se requiere supervisión estricta si un niño hará uso
del electrodoméstico, o si habrá niños cerca durante
su uso.
5. Esta licuadora no es un juguete. Se debe supervisar
a los niños para asegurarse de que no jueguen con
el electrodoméstico.
6. Para desconectar, presionar
o cualquier botón
de velocidad o función precongurada iluminados para
apagar la licuadora.
19030, 19035, 19040, 19020 Beautifu Blender IM R7.indd 26 2021-04-07 9:19 AM

27
7. Antes de colocar o retirar accesorios y antes de
limpiarlo, se debe apagar el electrodoméstico (OFF)
y luego desenchufarlo del tomacorriente cuando
no se esté utilizando. Para desenchufarlo, agarrar
el enchufe y retirarlo del tomacorriente. Nunca se debe
tirar del cable de alimentación.
ATENCIÓN: EVITAR EL CONTACTO CON LAS PARTES MÓVILES.
8. No utilizar ningún electrodoméstico si el cable
o el enchufe están dañados, el funcionamiento es
defectuoso o se detuvo, o el aparato se ha dañado
de alguna manera. Contact Consumer Service.
NOTA: NO INTENTAR REPARAR LA UNIDAD POR CUENTA PROPIA.
ESTO ANULARÁ LA GARANTÍA.
9. El uso de accesorios, incluidas las jarras
contenedoras, no recomendados por el fabricante puede
causar un riesgo de lesiones a personas.
10. No utilizar el electrodoméstico en exteriores.
11. No permitir que el cable cuelgue del borde de una mesa
o encimera.
12. No permitir que el cable entre en contacto con
supercies calientes, incluida la hornalla.
13. Las cuchillas son losas. Manipular con cuidado.
14. No licuar líquidos calientes.
15. Nunca utilizar la jarra de la licuadora para procesar
ingredientes sin la tapa ni la taza medidora aseguradas
adecuadamente en su lugar.
19030, 19035, 19040, 19020 Beautifu Blender IM R7.indd 27 2021-04-07 9:19 AM

28
16. Nunca introducir ningún accesorio de la licuadora
en un horno microondas.
17. Mantener las manos y los utensilios fuera de la jarra
al procesar los alimentos para reducir los riesgos
de lesiones graves a las personas o daños a la unidad.
18. Siempre utilizar la licuadora con la tapa en su lugar.
Se puede utilizar una espátula SOLO si la licuadora
no está en funcionamiento.
19. Nunca agregar ingredientes a la jarra mientras
la licuadora esté en funcionamiento.
SOLO PARA USO
DOMÉSTICO
GUARDAR ESTAS
INSTRUCCIONES
19030, 19035, 19040, 19020 Beautifu Blender IM R7.indd 28 2021-04-07 9:19 AM

29
OTRAS MEDIDAS
DE SEGURIDAD
IMPORTANTES
1. Todos los usuarios de este electrodoméstico deben
leer y comprender este Manual de instrucciones antes
de poner en funcionamiento o limpiar la unidad.
2. El cable de este electrodoméstico debe enchufarse
únicamente en un tomacorriente eléctrico para 3 tomas
de 120 V CA.
3. Si, durante el uso, este electrodoméstico empieza
a funcionar mal, presionar de inmediato o cualquier
botón de velocidad o función precongurada iluminados
para apagar la licuadora, y luego desenchufar el cable.
No utilizar el electrodoméstico ni intentar repararlo
si funciona mal. Contact Consumer Service.
4. Si el electrodoméstico se cae o accidentalmente
se sumerge en agua, desenchufarlo de inmediato.
¡No introducir la mano en el agua!
5. No utilizar este electrodoméstico después de que
se haya caído o se haya sumergido en agua.
6. Para reducir el riesgo de lesiones a personas o daños
materiales, nunca usar este electrodoméstico en una
posición inestable.
19030, 19035, 19040, 19020 Beautifu Blender IM R7.indd 29 2021-04-07 9:19 AM

30
7. No utilizar el electrodoméstico para otros nes que
no sean para los que fue diseñado.
8. No utilizar si la jarra está rajada o agrietada.
IMPORTANTE: No llenar en exceso ni superar la línea
máxima (MAX) de la jarra.
ADVERTENCIA: Para evitar los derrames, vericar que
la tapa esté asegurada en su lugar con la cubierta
de la taza medidora en posición antes de presionar
cualquier botón.
ENCHUFE DE 3 CONDUCTORES CON CONEXIÓN A TIERRA
Este electrodoméstico está equipado con un cable de
3 alambres con conexión a tierra (enchufe de 3 tomas).
Este enchufe solo podrá conectarse en un tomacorriente para
3 tomas. Este es un elemento de seguridad. Si el enchufe
no pudiera conectarse en el tomacorriente, contactar a
un electricista para reemplazar el tomacorriente obsoleto.
No intentar manipular este elemento de seguridad.
19030, 19035, 19040, 19020 Beautifu Blender IM R7.indd 30 2021-04-07 9:19 AM

31
NOTAS SOBRE EL CABLE
a) Se debe utilizar un cable de alimentación corto
(o un cable de alimentación desconectable) para reducir
el riesgo de enredarse o tropezar con uno más largo.
b) Existen cables de alimentación desconectables
más largos o prolongadores y pueden usarse si se hace
con precaución.
c) Si se utiliza un cable de alimentación desconectable
más largo o un prolongador, tenga en cuenta lo
siguiente:
1) La capacidad eléctrica nominal del cable de
alimentación desconectable o prolongador debe
ser al menos igual a la capacidad eléctrica del
electrodoméstico.
2) Si el electrodoméstico cuenta con conexión a tierra,
el prolongador debe ser del tipo con conexión a tierra
de 3 alambres.
3) El cable más largo debe estar dispuesto de manera
que no cuelgue de la encimera o de la mesa,
ya que puede ser jalado por niños, o cualquier
persona podría tropezarse.
19030, 19035, 19040, 19020 Beautifu Blender IM R7.indd 31 2021-04-07 9:19 AM

32
ADVERTENCIA SOBRE PLASTIFICADOS
ATENCIÓN: A n de evitar que los plasticados se adhieran
al acabado de la encimera, la mesa u otro mueble, colocar
un posafuentes o salvamanteles que NO SEAN DE PLÁSTICO
entre el electrodoméstico y el acabado de la supercie
de la encimera o mesa. Si no se hace esto, es posible
que el acabado se oscurezca, se formen marcas permanentes
o aparezcan manchas.
POTENCIA ELÉCTRICA
Si el circuito eléctrico está sobrecargado por el uso
de otros electrodomésticos, es posible que no funcione
correctamente. Esta unidad debe funcionar en un circuito
eléctrico separado de otros electrodomésticos.
19030, 19035, 19040, 19020 Beautifu Blender IM R7.indd 32 2021-04-07 9:19 AM

Sección 1
Instrucciones
19030, 19035, 19040, 19020 Beautifu Blender IM R7.indd 33 2021-04-07 9:19 AM
Descripción de la licuadora de alto rendimiento
El producto puede variar ligeramente con respecto a la ilustración.
1. Taza medidora de 2 oz (60 ml)
2. Cubierta de la jarra
3. Jarra Tritan<TM> de 50 oz (1.5 l)
4. Cuchilla de acero inoxidable
de 4 puntas
5. Base con el motor con acabado
suave mate
6. Panel de control de pantalla activado
por toque
7. Enchufe de 3 tomas (no se muestra)
8. Área de almacenamiento para el cable
(no se muestra)
9. Base antideslizante
1
2
3
4
5
6
7
8
9
34
19030, 19035, 19040, 19020 Beautifu Blender IM R7.indd 34 2021-04-07 9:19 AM

35
Panel de control de pantalla activado por toque
Una pantalla que solo aparece cuando la necesita.
Botones de 3 VELOCIDADES: LOW (Baja), HIGH (Alta), PULSE (Pulso) y 4 funciones
de procesado PRECONFIGURADAS: PUREE (Hacer puré), LIQUIFY (Licuar), ICE CRUSH
(Picar hielo), SMOOTHIE/CLEAN (Batido/limpiar) que se iluminan cuando están
activas y desparecen cuando no se usan.
• Al enchufar la licuadora, todos los botones se iluminarán y sonará
un tono, el botón se iluminará y luego la luz se encenderá
y se apagará a ritmo lento.
• Cuando se presiona, sonará un tono, el panel de control se iluminará
y el botón de encendido comenzará a parpadear.
• Presionar para DETENER cualquier operación.
1.
2. LOW (Baja)
3. HIGH (Alta)
4. PULSE (Pulso)
5. PUREE (Hacer puré)
6. LIQUIFY (Licuar)
7. ICE CRUSH (Picar
hielo)
8. SMOOTHIE/CLEAN
(Batido/limpiar)
19030, 19035, 19040, 19020 Beautifu Blender IM R7.indd 35 2021-04-07 9:19 AM

36
• Seleccionar LOW cuando se requiera una velocidad más baja;
para comenzar a mezclar, evitar mezclar en exceso, y cuando se trabaja
con preparaciones más pesadas.
• Presionar para apagar la función.
• La función de velocidad LOW se apagará automáticamente
a los 60 segundos.
• Seleccionar la función HIGH para mezclar ingredientes y obtener
la consistencia deseada cuando se requiere una velocidad más alta.
• Presionar para apagar la función.
• La función de velocidad HIGH se apagará automáticamente
a los 60 segundos.
• Seleccionar PULSE (Pulso) para mezclar los ingredientes mediante impulsos
de potencia controlados.
• La función PULSE ayuda a expulsar ingredientes atascados alrededor
de la cuchilla y en el fondo de la jarra.
• PULSE se activa mientras se presione el botón. Soltar el botón PULSE
para apagar la licuadora.
• Para obtener mejores resultados, calcular la duración de los pulsos para
asegurarse de que la cuchilla se detenga por completo antes de comenzar
el siguiente pulso.
19030, 19035, 19040, 19020 Beautifu Blender IM R7.indd 36 2021-04-07 9:19 AM

37
• Usar la función PUREE (Hacer puré) para preparar sopas y untables
suaves, y para hacer purés de frutas y verduras. Todos los ingredientes
deben licuarse fríos o a temperatura ambiente.
• Agregar líquido suciente para obtener una consistencia suave
y homogénea. Agregar pequeñas cantidades de caldo, yogur, leche o agua
a través de la taza medidora hasta obtener la consistencia deseada.
• Presionar para apagar la función.
• La función PUREE tiene una duración precongurada y se apagará
automáticamente luego de 60 segundos.
• Función ideal para preparar sopas y licuar alimentos gruesos o espesos.
• Al presionar LIQUIFY (Licuar), sonará un tono, el botón se iluminará
y la licuadora comenzará a funcionar a velocidad baja, para luego
aumentarla progresivamente hasta la velocidad alta.
• Presionar para apagar la función.
• La función LIQUIFY tiene una duración precongurada y se apagará
automáticamente luego de 60 segundos.
• La función ICE CRUSH (Picar hielo) pica rápidamente hasta 10 cubitos
de hielo y es perfecta para preparar recetas de bebidas heladas,
como margaritas y daiquiris.
• Presionar para apagar la función.
• La función ICE CRUSH tiene una duración precongurada y se apagará
automáticamente luego de 26 segundos.
19030, 19035, 19040, 19020 Beautifu Blender IM R7.indd 37 2021-04-07 9:19 AM

38
• Transforma frutas y verduras frescas o congeladas en el batido perfecto.
• Presionar para apagar la función.
• La función SMOOTHIE/CLEAN (Batido/limpiar) tiene una duración
precongurada y se apagará automáticamente luego de 60 segundos.
• Para limpiar la jarra automáticamente, llenarla con agua hasta
la línea máxima (MAX) y agregar un poco de jabón líquido.
Presionar SMOOTHIE/CLEAN. La limpieza inicial durará 60 segundos.
• Enjuagar bien la jarra con agua tibia. Repetir el procedimiento
sin jabón. Agregar agua a temperatura ambiente a la jarra
de la licuadora hasta la línea MAX. Presionar SMOOTHIE/CLEAN y hacer
funcionar el ciclo nuevamente. Enjuagar bien. Luego colocar la jarra
limpia boca abajo sobre un escurreplatos para que se seque.
• Siempre limpiar la jarra y la cuchilla inmediatamente después
del uso para evitar que los restos de comida se endurezcan.
• La jarra Tritan™ es apta para lavarla en el estante superior
del lavavajillas.
19030, 19035, 19040, 19020 Beautifu Blender IM R7.indd 38 2021-04-07 9:19 AM

39
Antes de usar por primera vez
Desempacar cuidadosamente la licuadora
y retirar todos los materiales de
empaque. Revisar el contenido para
vericar que todos los accesorios
(jarra de 50 oz [1.5l], tapa y taza
medidora) estén incluidos
(Figura 1), y que estén en buenas
condiciones.
1. Lavar la jarra, la tapa y la taza
medidora en agua tibia jabonosa
antes de usar por primera vez.
Enjuagar bien.
ADVERTENCIA: No tocar la cuchilla.
Las cuchillas de la licuadora son
muy losas. Tener extremo cuidado
al manipularlas. De lo contrario,
puede provocar lesiones físicas.
2. Limpiar la base del motor con un
trapo húmedo.
ADVERTENCIA: NO SUMERGIR LA BASE
DEL MOTOR EN AGUA.
Never ll
jar beyond
the MAX line
19030, 19035, 19040, 19020 Beautifu Blender IM R7.indd 39 2021-04-07 9:19 AM

40
Montaje de la jarra
1. Siempre asegurarse de que el collarín de la cuchilla esté sujeto
adecuadamente en la jarra antes de utilizarla.
2. Para evitar derrames, vericar que la tapa esté asegurada rmemente
en la jarra. Presionar la tapa hacia abajo en la porción superior
de la jarra hasta que quede asegurada rmemente en su lugar. Ubicar
la taza medidora en el centro de la tapa y girarla en sentido horario
para asegurarla en su lugar.
3. Usar la taza medidora para medir y agregar ingredientes antes y durante
el funcionamiento.
4. Agregar ingredientes a la jarra.
NOTA: Durante el licuado, los alimentos o los líquidos tienden
a expandirse a medida que se elevan por las paredes de la jarra.
No llenar la jarra por sobre su línea MAX.
ADVERTENCIA: Prestar especial atención mientras se procesa. Nunca poner
la licuadora en funcionamiento cuando la jarra esté vacía.
Funcionamiento
1. Ubicar la base del motor en una encimera o una mesa plana,
limpia y seca.
2. Enchufar el cable de alimentación a un tomacorriente eléctrico para
3 tomas de 120 V CA. Sonará un tono. El botón se iluminará y luego
la luz se encenderá y se apagará a ritmo lento.
3. Agregar ingredientes a la jarra.
ADVERTENCIA: Nunca sobrellenar la jarra. Para evitar lesiones personales,
pérdidas o daños en la licuadora, asegurarse de que los ingredientes
no superen la línea MAX. Colocar la jarra bien asegurada sobre la base
del motor.
IMPORTANTE: Al agregar los ingredientes de un batido a la jarra,
primero agregar los líquidos o el yogur. Luego la capa de ingredientes
picados más pequeños, tanto frescos como congelados. Por último, deben
agregarse los trozos más grandes y el hielo. Para que las cuchillas
giren adecuadamente y asegurar la cremosidad y el éxito del batido,
no procesar demasiados trozos congelados.
19030, 19035, 19040, 19020 Beautifu Blender IM R7.indd 40 2021-04-07 9:19 AM

41 41
4. Asegurarse de que la taza medidora esté en su lugar en la tapa.
5. Colocar la tapa sobre la jarra. Presionar para que quede sellado.
Revisar antes de licuar. (Figure 2)
ADVERTENCIA: Para evitar derrames, vericar que la tapa esté bien
asegurada antes de presionar cualquier botón de velocidades o funciones
preconguradas.
ADVERTENCIA: No licuar líquidos calientes.
6. Cuando se presiona el pulso, sonará un tono mientras el panel de control
se ilumina, el botón parpadeará y permanecerá activo durante
20 segundos.
7. Presionar el botón de velocidad o función precongurada que desee para
comenzar a procesar. Sonará un tono. El botón se iluminará y la
VELOCIDAD seleccionada o PREAJUSTE comenzará a parpadear. Todos los demás
botones desaparecerán cuando no estén en uso. Presione la VELOCIDAD
o PREAJUSTE deseado una vez más para activar el ajuste y comenzar
a mezclar.
NOTA: Si no se presiona ningún botón antes de los 20 segundos,
el panel de control se oscurecerá y el botón se iluminará
y comenzará a destellar.
8. Al usar la función PULSE (Pulso), el botón se iluminará cuando
se lo presione. Al soltarse el botón, el panel de control permanecerá
activo durante 20 segundos.
9. Al licuar a VELOCIDAD HIGH (Alta) o LOW (Baja), presionar el botón
para detener el licuado al obtener la consistencia deseada.
10. La función de velocidad HIGH o LOW se apagará automáticamente
a los 60 segundos.
11. Las funciones PUREE, LIQUIFY, ICE CRUSH, SMOOTHIE/CLEAN tienen duraciones
y velocidades preconguradas y se detendrán automáticamente cuando cada
ciclo esté completo.
19030, 19035, 19040, 19020 Beautifu Blender IM R7.indd 41 2021-04-07 9:19 AM

42 42
12. Presionar para detener el funcionamiento. (Figure 3) Revisar
el resultado y, de ser necesario, agregar líquido, agua, jugo o caldo
para aligerar los alimentos procesados hasta obtener la consistencia
deseada.
ADVERTENCIA: No dejar el motor en funcionamiento durante más de 1 minuto
en cada ocasión.
13. Después de procesar alimentos en la jarra, levantar la tapa y sacar el
vaso para retirarlos. La jarra con pico facilita el servido. (Figura 4)
SUGERENCIA Para retirar alimentos procesados más espesos, puede resultar
útil ayudarse con una espátula.
14. Desenchufar la licuadora antes de limpiarla y cuando no se la utilice.
19030, 19035, 19040, 19020 Beautifu Blender IM R7.indd 42 2021-04-07 9:19 AM
43
Figura 1
Figura 3
Figura 2
Figura 4
19030, 19035, 19040, 19020 Beautifu Blender IM R7.indd 43 2021-04-07 9:19 AM

44
Guía De Selección De Funciones
INGREDIENTE/RECETA FUNCIÓN DESCRIPCIÓN
Pudín, relleno de pastel, crema PULSE
o LOW
Espeso y cremoso
Pan, pan duro, galletas,
galletitas (piezas de 1/2 in
[1.3 cm], tandas de 1 taza)
PULSE
o LOW
Migas gruesas a nas
Nueces (peladas, 1/2 taza o menos
por vez)
PULSE
o LOW
Nueces en trozos gruesos o nos,
nueces picadas para hornear
Nueces (peladas, 1/2 taza o menos
por vez) Harina de nueces casera,
comidas o mantequilla de nuez
ICE
CRUSH
Harina de nuez namente molida o
comidas con nueces Mantequilla de
nuez sin conservantes
Mayonesa, aderezos para ensaladas
o salsas
LOW Espeso y cremoso, licuado
y emulsionado
Pasta para panqueques o wafes,
omelettes
LOW Liviano y esponjoso
Crema, claras de huevo HIGH Espeso y espumoso
Batidos de leche HIGH Suaves y cremosos
Batidos, bebidas SMOOTHIE Bebidas suaves, espesas y
cremosas, y saludables
Puré de vegetales PUREE Suaves y cremosos
Picar hielo (hasta 10 cubitosICE CRUSH
Grandes
trozos
a nevado
Coarse crush to snowy
Cócteles helados ICE
CRUSH
Espesos y granizados
Salsas, aperitivos CRUSH perfecto para recetas con hojas
19030, 19035, 19040, 19020 Beautifu Blender IM R7.indd 44 2021-04-07 9:19 AM

45
INGREDIENTE/RECETA FUNCIÓN DESCRIPCIÓN
Leche de almendras, leche de coco
o leche de soja Leche de avena
LIQUIFY Sin ltrar para cocinar.
Filtrar para bebidas.
Bebidas de frutas frescas LIQUIFY Espesas y con pulpa
Notas sobre la licuadora beautiful
• Al usar la función PULSE (Pulso), el funcionamiento se DETENDRÁ cuando
se suelte el botón.
• Las funciones PUREE, LIQUIFY, ICE CRUSH, SMOOTHIE/CLEAN están
preconguradas y se DETENDRÁN automáticamente cuando cada ciclo esté
completo. Para interrumpir el funcionamiento, presionar el botón
o cualquier botón de velocidades o funciones preconguradas iluminados
para apagar la licuadora.
• Usar la velocidad LOW para comenzar a procesar o cuando la receta
indique velocidades más bajas.
Consejos beautiful de preparación de alimentos
1. Cuando sea posible, usar frutas y verduras orgánicos.
2. Lavar todos los productos (incluso los orgánicos) muy bien antes
de quitarles las cáscaras y pieles.
3. Reducir el riesgo de contaminación por bacterias al usar una tabla
de cortar de madera (no de plástico). Es una práctica recomendada
identicar y usar tablas de cortar separadas para carnes/pescados/aves
y frutas/verduras.
4. Elegir productos orgánicos certicados por la USDA
• Sin aditivos, sin endulzantes, sin grasas hidrogenadas.
• Sin pesticidas dañinos.
• La agricultura orgánica produce menos desperdicios y menos contaminación.
• Los alimentos orgánicos no contienen arsénico.
• Ingredientes de mayor calidad para usted y para toda su familia.
19030, 19035, 19040, 19020 Beautifu Blender IM R7.indd 45 2021-04-07 9:19 AM

46
Instrucciones de mantenimiento para el usuario
Este electrodoméstico necesita poco mantenimiento. No contiene piezas que el
usuario pueda reparar. Cualquier tipo de mantenimiento, aparte de la limpieza,
que requiera desarmar el aparato, debe ser realizado por un técnico calicado
que repare electrodomésticos.
Instrucciones de cuidado y limpieza
ATENCIÓN: NO SUMERGIR LA BASE DEL MOTOR, EL ENCHUFE, NI EL CABLE EN AGUA NI EN
NINGÚN OTRO LÍQUIDO.
1. Siempre desenchufar la licuadora antes de limpiarla.
2. Enjuagar la jarra, la tapa y la taza medidora inmediatamente después
de procesar para evitar que los restos de comida se endurezcan y
facilitar la limpieza. No se recomienda retirar la cuchilla de la jarra.
3. Para limpiar la jarra, llenarla con agua limpia y tibia hasta la línea
MAX y agregar un poco de jabón líquido.
4. Presionar SMOOTHIE/CLEAN. Sonará un tono. Tanto el botón
como el botón SMOOTHIE/CLEAN se iluminarán. Todos los demás
botones desaparecerán.
NOTA: La función CLEAN tiene una duración precongurada y se apagará
automáticamente luego de 60 segundos.
5. Enjuagar bien el contenido de la jarra con agua tibia.
Repetir el procedimiento sin jabón. Agregar agua a temperatura ambiente
a la jarra de la licuadora hasta la línea MAX. Presionar SMOOTHIE/
CLEAN y hacer funcionar el ciclo nuevamente. Colocar boca abajo la jarra
limpia sobre un escurreplatos para que se seque.
6. La jarra Tritan™ es apta para lavarla en el estante superior
del lavavajillas.
7. Limpiar la base del motor con un trapo o esponja húmedos. Secar bien.
19030, 19035, 19040, 19020 Beautifu Blender IM R7.indd 46 2021-04-07 9:19 AM

47
Instrucciones de almacenamiento
1. Desenchufar y limpiar la unidad.
2. Guardar en la caja original o en un lugar limpio y seco.
3. Nunca guardar la licuadora si está caliente o enchufada.
4. Nunca enrollar el cable con rmeza alrededor del electrodoméstico.
Nunca aplicar tensión en el cable, especialmente en la parte que ingresa
en la unidad, ya que podría pelarse y romperse.
19030, 19035, 19040, 19020 Beautifu Blender IM R7.indd 47 2021-04-07 9:19 AM

48
Resolución de problemas
PROBLEM CAUSE SOLUTION
El motor de la
licuador gira muy
lentamente.
La jarra está
so
• Sacar un poco de alimentos de
la jarra y seguir procesando.
Asegurarse de que los ingredientes
no superen la línea máxima.
• Agregar líquido a la jarra y seguir
procesando.v
Los ingredientes
no se mezclan
bien.
Los
ingredientes
más pesados
cayeron al
fondo de la
jarra.
• De ser necesario, retirar la jarra
y agitar los ingredientes para
redistribuirlos. Seguir procesando.
• Si la mezcla todavía no está
uniformemente procesada, puede ser
necesario agregar líquido a la
jarra y seguir procesando.
La licuadora
ha detenido su
funcionamiento.
El motor está
sobrecargado
y dejó de
funcionar para
evitar daños.
• La licuadora cuenta con una
protección térmica reiniciable.
Desenchufar la unidad y dejar que
se enfríe por 25 minutos. Reducir
la carga de la jarra y remover
cualquier atasco.
• Comenzar nuevamente a procesar
La jarra está
goteando en
la zona de la
cuchilla.
La base de la
cuchilla está
oja.
• Girar la base de la cuchilla
(bajo la jarra) en sentido horario
para ajustarla.
19030, 19035, 19040, 19020 Beautifu Blender IM R7.indd 48 2021-04-07 9:19 AM

Garantía limitada de dos años
Mediante la presente, Sensio Inc.
dba Made by Gather™. garantiza que,
durante el plazo de DOS AÑOS a partir
de la fecha de compra, este producto
no presentará defectos mecánicos en
el material ni en la mano de obra, y
durante 90 días, no los presentará en
las piezas no mecánicas. A su entera
discreción, Sensio Inc. dba Made by
Gather™ que resulte defectuoso, o
emitirá un reembolso por el producto
durante el plazo de garantía.
Esta garantía es válida únicamente
para el comprador minorista
original a partir de la fecha de
compra minorista inicial y no es
transferible. Conserve el recibo
de compra original, ya que se exige
una prueba de compra para obtener
la validación de la garantía. Las
tiendas minoristas no tienen derecho
a alterar, modicar ni corregir
de ninguna manera los términos y
condiciones de la garantía.
Exclusiones:
La garantía no cubre el desgaste
normal de las piezas ni el daño
ocasionado por cualquiera de las
siguientes causas: uso negligente
del producto, uso de un voltaje o
corriente incorrectos, mantenimiento
de rutina inadecuado, uso
contrario al de las instrucciones
de funcionamiento, desarmado,
reparación o alteración a cargo
de personas que no sean miembros
del personal calicado de Sensio
Inc. dba Made by Gather™ Asimismo,
la garantía no cubre actos de
la naturaleza, como incendios,
inundaciones, huracanes o tornados.
Sensio Inc. dba Made by Gather™
no asumirá responsabilidad por
daños incidentales o resultantes
ocasionados por la violación
de cualquier garantía expresa
o implícita. Salvo en la medida
en que lo prohíban las leyes
aplicables, cualquier garantía
implícita de comerciabilidad o
aptitud para un propósito particular
se limita temporalmente a la
duración de la garantía. Algunos
estados, provincias o jurisdicciones
no permiten la exclusión ni la
limitación de daños incidentales
o resultantes, o limitaciones
sobre la duración de una garantía
implícita y, por lo tanto, es posible
que las exclusiones o limitaciones
mencionadas no le correspondan.
La garantía cubre derechos legales
especícos que pueden variar de
un estado, una provincia o una
jurisdicción a otros.
49
19030, 19035, 19040, 19020 Beautifu Blender IM R7.indd 49 2021-04-07 9:19 AM

50
Cómo obtener el servicio de garantía
Debe comunicarse con el Servicio
de atención al cliente a nuestro
número telefónico gratuito:
1-877-775-3564. Un representante
del Servicio de atención al cliente
intentará resolver los problemas
referidos a la garantía por
teléfono. Si este no puede resolver
el problema, le proporcionarán un
número de caso y le solicitarán que
devuelva el producto a Sensio Inc.
dba Made by Gather™ Adhiera una
etiqueta al producto que incluya:
su nombre, dirección, número
telefónico de contacto durante el
día, número de caso y descripción
del problema. Además, incluya una
copia del recibo de compra original.
Envuelva cuidadosamente el producto
etiquetado con el recibo de compra,
y envíelo (con el envío y el seguro
prepagados) a la dirección de Sensio
Inc. dba Made by Gather™. Sensio
Inc. dba Made by Gather™ no asumirá
obligación ni responsabilidad alguna
por el producto devuelto que esté
en el trayecto hacia el Centro de
servicio al cliente de Sensio Inc.
dba Made by Gather™
19030, 19035, 19040, 19020 Beautifu Blender IM R7.indd 50 2021-04-07 9:19 AM

19030, 19035, 19040, 19020 Beautifu Blender IM R7.indd 51 2021-04-07 9:19 AM

19030, 19035, 19040, 19020 Beautifu Blender IM R7.indd 52 2021-04-07 9:19 AM

19030, 19035, 19040, 19020 Beautifu Blender IM R7.indd 53 2021-04-07 9:19 AM

19030, 19035, 19040, 19020 Beautifu Blender IM R7.indd 54 2021-04-07 9:19 AM