

Contents
Safety information........................................................................................ 6
Conventions.......................................................................................................................................................... 6
Product statements............................................................................................................................................. 6
Learning about the printer...........................................................................9
Finding information about the printer.............................................................................................................9
Selecting a location for the printer................................................................................................................ 10
Printer configurations........................................................................................................................................12
Attaching cables.................................................................................................................................................12
Using the control panel.....................................................................................................................................13
Understanding the status of the power button and indicator light....................................................... 14
Printing the Network Setup Page...................................................................................................................14
Setting up and using the home screen applications..............................15
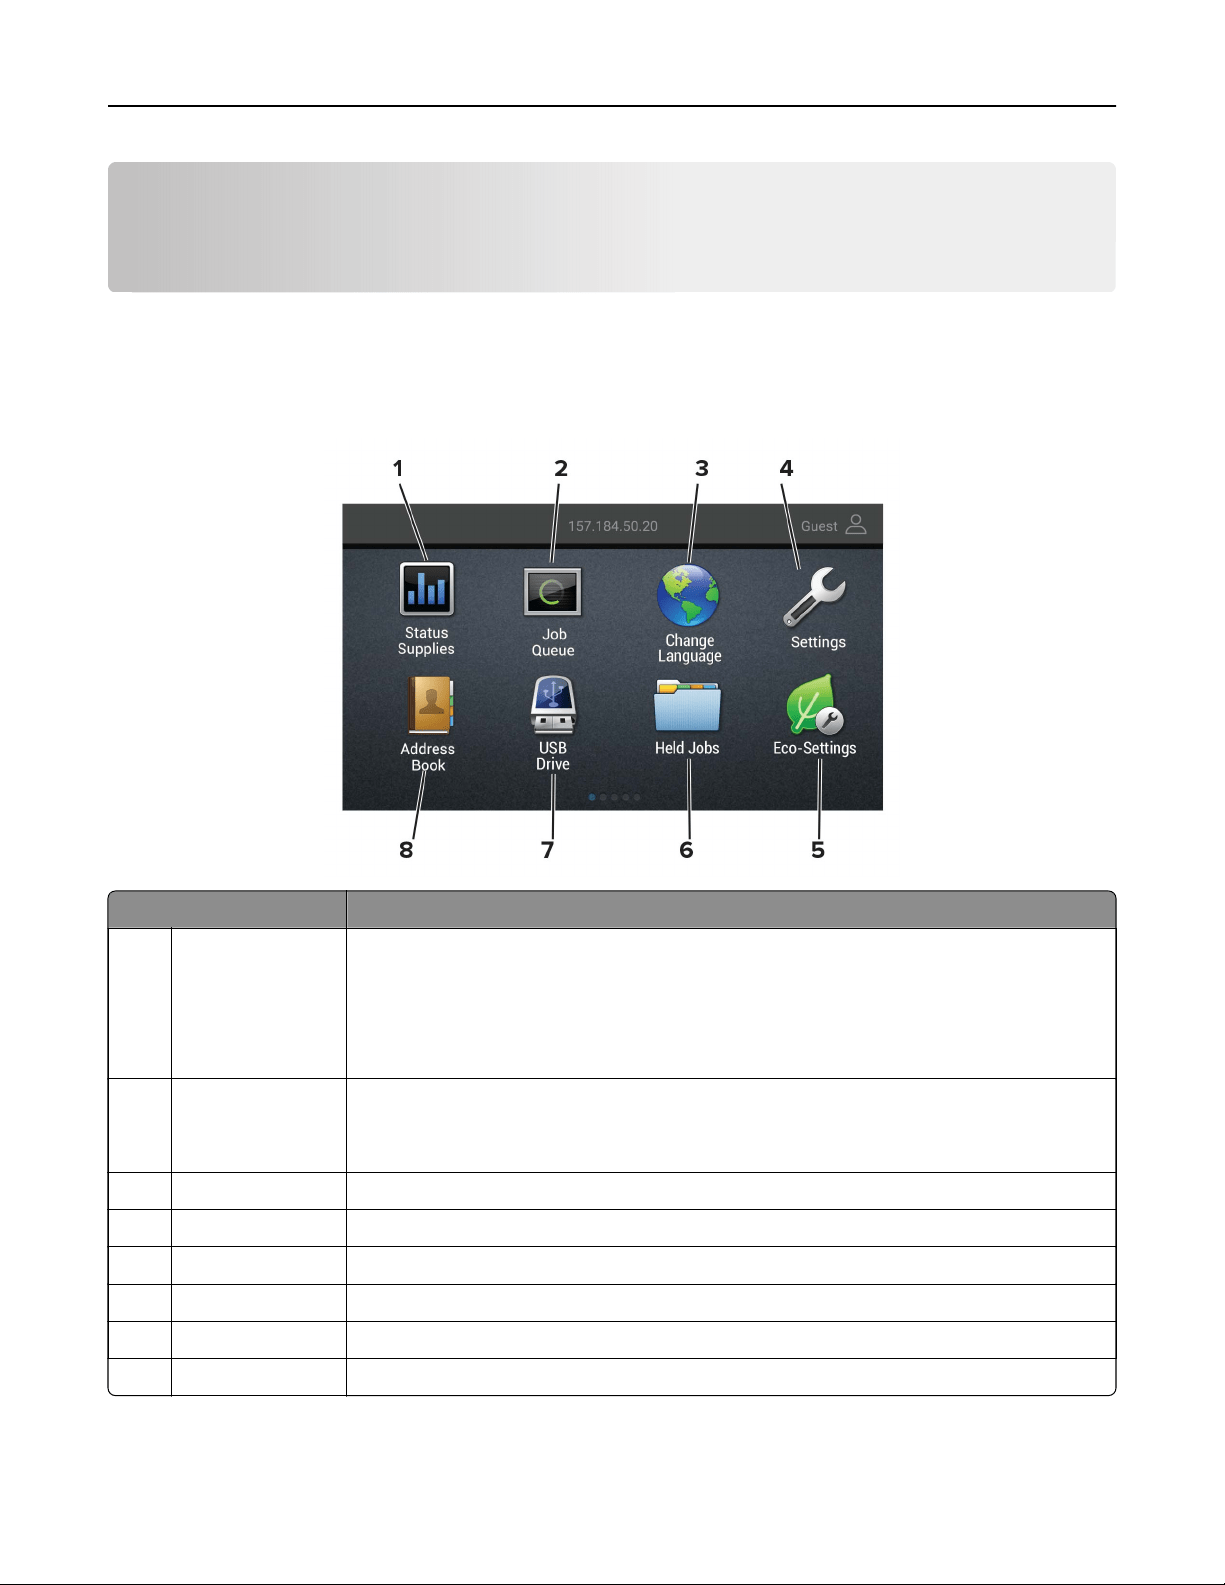
Using the home screen.....................................................................................................................................15
Customizing the home screen........................................................................................................................16
Using Display Customization.......................................................................................................................... 16
Configuring Eco‑Settings................................................................................................................................. 16
Using Customer Support.................................................................................................................................. 17
Using QR Code Generator...............................................................................................................................17
Setting up Device Quotas................................................................................................................................ 17
Creating a Cloud Connector profile.............................................................................................................. 18
Managing bookmarks........................................................................................................................................18
Managing contacts.............................................................................................................................................19
Setting up and using the accessibility features...................................... 21
Activating Voice Guidance...............................................................................................................................21
Navigating the screen using gestures..........................................................................................................21
Enabling Magnification mode........................................................................................................................ 22
Adjusting the Voice Guidance speech rate................................................................................................22
Using the keyboard on the display...............................................................................................................22
Enabling spoken passwords or personal identification numbers........................................................ 22
Loading paper and specialty media......................................................... 23
Setting the paper size and type.................................................................................................................... 23
Contents 2

Configuring Universal paper settings.......................................................................................................... 23
Loading trays...................................................................................................................................................... 23
Loading the multipurpose feeder................................................................................................................. 25
Linking trays........................................................................................................................................................26
Paper support..............................................................................................27
Supported paper sizes.....................................................................................................................................27
Supported paper types....................................................................................................................................29
Supported paper weights............................................................................................................................... 29
Printing......................................................................................................... 31
Printing from a computer..................................................................................................................................31
Printing from a mobile device......................................................................................................................... 31
Printing from a flash drive............................................................................................................................... 32
Supported flash drives and file types...........................................................................................................33
Configuring confidential jobs......................................................................................................................... 34
Printing confidential and other held jobs....................................................................................................34
Printing from a Cloud Connector profile..................................................................................................... 35
Printing a font sample list................................................................................................................................35
Printing a directory list..................................................................................................................................... 35
Canceling a print job........................................................................................................................................ 36
Understanding the printer menus............................................................ 37
Menu map............................................................................................................................................................37
Device...................................................................................................................................................................38
Print....................................................................................................................................................................... 49
Paper.....................................................................................................................................................................57
USB Drive............................................................................................................................................................ 58
Network/Ports.................................................................................................................................................... 60
Security..................................................................................................................................................................71
Reports................................................................................................................................................................. 78
Help.......................................................................................................................................................................79
Troubleshooting.................................................................................................................................................79
Printing the Menu Settings Page...................................................................................................................79
Securing the printer................................................................................... 80
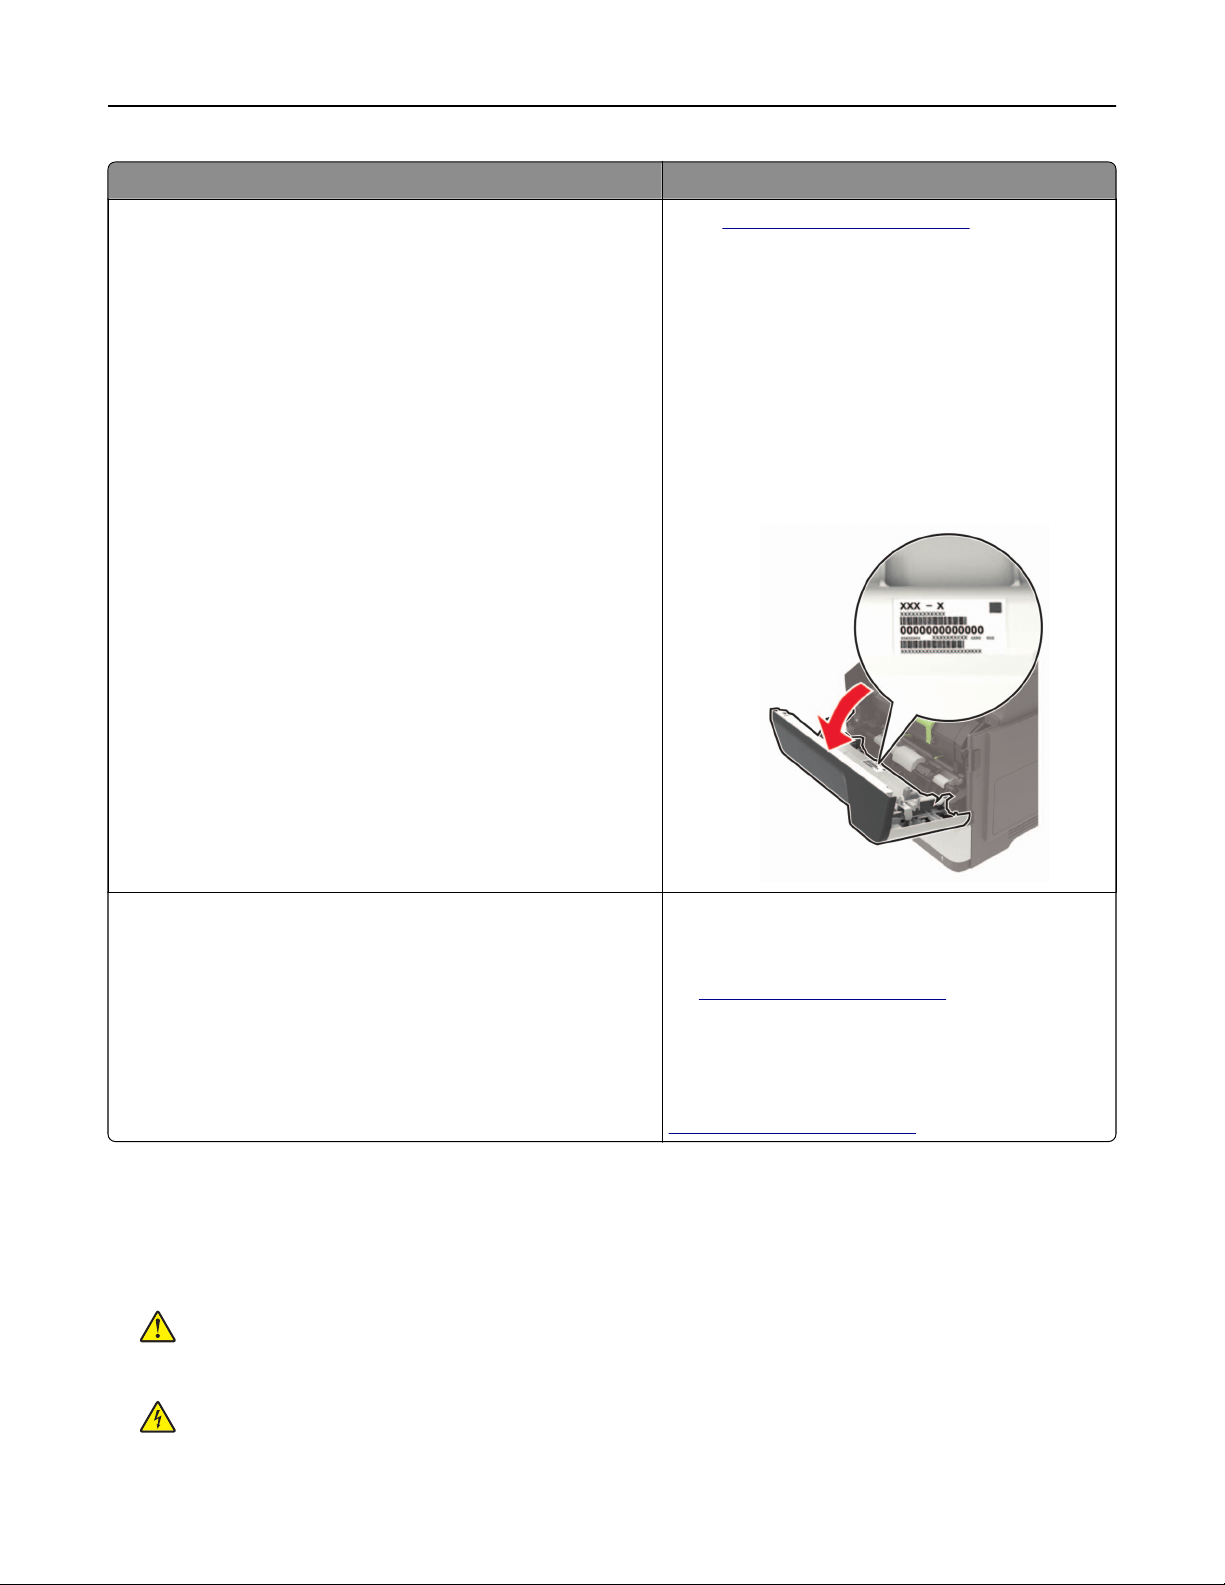
Locating the security slot................................................................................................................................ 80
Contents 3

Erasing printer memory................................................................................................................................... 80
Erasing printer hard disk memory.................................................................................................................80
Encrypting the printer hard disk.....................................................................................................................81
Restoring factory default settings.................................................................................................................. 81
Statement of Volatility....................................................................................................................................... 81
Maintaining the printer.............................................................................. 83
Setting up e‑mail alerts....................................................................................................................................83
Adjusting the default headphone volume.................................................................................................. 83
Networking..........................................................................................................................................................83
Setting up serial printing (Windows only)....................................................................................................86
Cleaning the printer.......................................................................................................................................... 87
Ordering parts and supplies...........................................................................................................................87
Replacing parts and supplies.........................................................................................................................90
Moving the printer...........................................................................................................................................100
Saving energy and paper............................................................................................................................... 101
Recycling............................................................................................................................................................102
Clearing jams.............................................................................................103
Avoiding jams................................................................................................................................................... 103
Identifying jam locations................................................................................................................................ 104
Paper jam in door A........................................................................................................................................ 106
Paper jam in the rear door............................................................................................................................ 109
Paper jam in the standard bin........................................................................................................................110
Paper jam in the duplex unit........................................................................................................................... 111
Paper jam in trays............................................................................................................................................. 112
Paper jam in the multipurpose feeder.........................................................................................................112
Troubleshooting.........................................................................................114
Network connection problems......................................................................................................................114
Hardware options problems...........................................................................................................................117
Issues with supplies......................................................................................................................................... 119
Paper feed problems....................................................................................................................................... 121
Printing problems.............................................................................................................................................123
Contacting customer support.......................................................................................................................152
Contents 4

Upgrading and migrating.........................................................................153
Hardware............................................................................................................................................................153
Software..............................................................................................................................................................167
Firmware............................................................................................................................................................ 168
Notices.........................................................................................................171
Index........................................................................................................... 182
Contents 5

Safety information
Conventions
Note: A note identifies information that could help you.
Warning: A warning identifies something that could damage the product hardware or software.
CAUTION: A caution indicates a potentially hazardous situation that could injure you.
Dierent types of caution statements include:
CAUTION—POTENTIAL INJURY: Indicates a risk of injury.
CAUTION—SHOCK HAZARD: Indicates a risk of electrical shock.
CAUTION—HOT SURFACE: Indicates a risk of burn if touched.
CAUTION—TIPPING HAZARD: Indicates a crush hazard.
CAUTION—PINCH HAZARD: Indicates a risk of being caught between moving parts.
Product statements
CAUTION—POTENTIAL INJURY: To avoid the risk of fire or electrical shock, connect the power cord to
an appropriately rated and properly grounded electrical outlet that is near the product and easily
accessible.
CAUTION—POTENTIAL INJURY: To avoid the risk of fire or electrical shock, use only the power cord
provided with this product or the manufacturer's authorized replacement.
CAUTION—POTENTIAL INJURY: Do not use this product with extension cords, multioutlet power strips,
multioutlet extenders, or UPS devices. The power capacity of these types of accessories can be easily
overloaded by a laser printer and may result in a risk of fire, property damage, or poor printer
performance.
CAUTION—POTENTIAL INJURY: Only a Lexmark Inline Surge Protector that is properly connected
between the printer and the power cord provided with the printer may be used with this product. The
use of non-Lexmark surge protection devices may result in a risk of fire, property damage, or poor
printer performance.
CAUTION—SHOCK HAZARD: To avoid the risk of electrical shock, do not place or use this product near
water or wet locations.
CAUTION—SHOCK HAZARD: To avoid the risk of electrical shock, do not set up this product or make
any electrical or cabling connections, such as the power cord, fax feature, or telephone, during a
lightning storm.
CAUTION—POTENTIAL INJURY: Do not cut, twist, bind, crush, or place heavy objects on the power
cord. Do not subject the power cord to abrasion or stress. Do not pinch the power cord between objects
such as furniture and walls. If any of these things happen, a risk of fire or electrical shock results. Inspect
the power cord regularly for signs of such problems. Remove the power cord from the electrical outlet
before inspecting it.
Safety information 6

CAUTION—SHOCK HAZARD: To avoid the risk of electrical shock, make sure that all external
connections (such as Ethernet and telephone system connections) are properly installed in their marked
plug-in ports.
CAUTION—SHOCK HAZARD: To avoid the risk of electrical shock, if you are accessing the controller
board or installing optional hardware or memory devices sometime after setting up the printer, then turn
the printer o, and unplug the power cord from the electrical outlet before continuing. If you have any
other devices attached to the printer, then turn them o as well, and unplug any cables going into the
printer.
CAUTION—SHOCK HAZARD: To avoid the risk of electrical shock when cleaning the exterior of the
printer, unplug the power cord from the electrical outlet and disconnect all cables from the printer before
proceeding.
CAUTION—POTENTIAL INJURY: If the printer weight is greater than 20 kg (44 lb), then it may require
two or more people to lift it safely.
CAUTION—POTENTIAL INJURY: When moving the printer, follow these guidelines to avoid personal
injury or printer damage:
• Make sure that all doors and trays are closed.
• Turn o the printer, and then unplug the power cord from the electrical outlet.
• Disconnect all cords and cables from the printer.
• If the printer has separate floor-standing optional trays or output options attached to it, then disconnect
them before moving the printer.
• If the printer has a caster base, then carefully roll it to the new location. Use caution when passing over
thresholds and breaks in
flooring.
• If the printer does not have a caster base but is configured with optional trays or output options, then remove
the output options and lift the printer
o
the trays. Do not try to lift the printer and any options at the same
time.
• Always use the handholds on the printer to lift it.
• Any cart used to move the printer must have a surface able to support the full footprint of the printer.
• Any cart used to move the hardware options must have a surface able to support the dimensions of the
options.
• Keep the printer in an upright position.
• Avoid severe jarring movements.
• Make sure that your fingers are not under the printer when you set it down.
• Make sure that there is adequate clearance around the printer.
CAUTION—TIPPING HAZARD: Installing one or more options on your printer or MFP may require a
caster base, furniture, or other feature to prevent instability causing possible injury. For more information
on supported configurations, see
www.lexmark.com/multifunctionprinters.
CAUTION—TIPPING HAZARD: To reduce the risk of equipment instability, load each tray separately.
Keep all other trays closed until needed.
CAUTION—HOT SURFACE: The inside of the printer might be hot. To reduce the risk of injury from a hot
component, allow the surface to cool before touching it.
CAUTION—PINCH HAZARD: To avoid the risk of a pinch injury, use caution in areas marked with this
label. Pinch injuries may occur around moving parts, such as gears, doors, trays, and covers.
Safety information 7

CAUTION—POTENTIAL INJURY: This product uses a laser. Use of controls or adjustments or
performance of procedures other than those specified in the User’s Guide may result in hazardous
radiation exposure.
CAUTION—POTENTIAL INJURY: The lithium battery in this product is not intended to be replaced.
There is a danger of explosion if a lithium battery is incorrectly replaced. Do not recharge, disassemble,
or incinerate a lithium battery. Discard used lithium batteries according to the manufacturer's instructions
and local regulations.
This product is designed, tested, and approved to meet strict global safety standards with the use of specific
manufacturer's components. The safety features of some parts may not always be obvious. The manufacturer
is not responsible for the use of other replacement parts.
Refer service or repairs, other than those described in the user documentation, to a service representative.
This product uses a printing process that heats the print media, and the heat may cause the media to release
emissions. You must understand the section in your operating instructions that discusses the guidelines for
selecting print media to avoid the possibility of harmful emissions.
This product may produce small amounts of ozone during normal operation, and may be equipped with a filter
designed to limit ozone concentrations to levels well below the recommended exposure limits. To avoid high
ozone concentration levels during extensive usage, install this product in a well-ventilated area and replace
the ozone and exhaust filters if instructed to do so in the product maintenance instructions. If there are no
references to filters in the product maintenance instructions, then there are no filters requiring replacement for
this product.
SAVE THESE INSTRUCTIONS.
Safety information 8
Learning about the printer
Finding information about the printer
What are you looking for? Find it here
Initial setup instructions:
• Connecting the printer
• Installing the printer software
See the setup documentation that came with the
printer or go to
http://support.lexmark.com.
More setup and instructions for using the printer:
• Selecting and storing paper and specialty media
• Loading paper
• Configuring printer settings
• Viewing and printing documents and photos
• Setting up and using the printer software
• Configuring the printer on a network
• Caring for and maintaining the printer
• Troubleshooting and solving problems
Information Center—Go to
http://infoserve.lexmark.com.
Help Menu Pages—Access the guides on the
printer
firmware
or go to
http://support.lexmark.com.
Touch Screen Guide—Go to
http://support.lexmark.com.
Product videos—Go to
http://infoserve.lexmark.com/idv/.
Information on setting up and configuring the accessibility
features of your printer
Lexmark Accessibility Guide—Go to
http://support.lexmark.com.
Help using the printer software Help for Microsoft Windows or Macintosh operating
systems—Open a printer software program or
application, and then click Help.
Click
?
to view context‑sensitive information.
Notes:
• Help is automatically installed with the printer
software.
• Depending on the operating system, the
printer software is located in the printer
program folder or on the desktop.
Learning about the printer 9
What are you looking for? Find it here
The latest supplemental information, updates, and customer
support:
• Documentation
• Driver downloads
• Live chat support
• E‑mail support
• Voice support
Go to
http://support.lexmark.com.
Note: Select your country or region, and then
select your product to view the appropriate
support site.
Support contact information for your country or
region can be found on the website or on the
printed warranty that came with the printer.
Have the following information ready when you
contact customer support:
• Place and date of purchase
• Machine type and serial number
• Safety information
• Regulatory information
• Warranty information
• Environmental information
Warranty information varies by country or region:
• In the U.S.—See the Statement of Limited
Warranty included with the printer, or go to
http://support.lexmark.com.
• In other countries and regions—See the
printed warranty that came with the printer.
Product Information Guide—See the
documentation that came with the printer or go to
http://support.lexmark.com.
Selecting a location for the printer
• Leave enough room to open trays, covers, and doors and to install hardware options.
• Set up the printer near an electrical outlet.
CAUTION—POTENTIAL INJURY: To avoid the risk of fire or electrical shock, connect the power cord
to an appropriately rated and properly grounded electrical outlet that is near the product and easily
accessible.
CAUTION—SHOCK HAZARD: To avoid the risk of electrical shock, do not place or use this product
near water or wet locations.
Learning about the printer 10
• Make sure that airflow in the room meets the latest revision of the ASHRAE 62 standard or the CEN Technical
Committee 156 standard.
• Provide a
flat,
sturdy, and stable surface.
• Keep the printer:
– Clean, dry, and free of dust
– Away from stray staples and paper clips
– Away from the direct
airflow
of air conditioners, heaters, or ventilators
– Free from direct sunlight and humidity extremes
• Observe the recommended temperatures and avoid fluctuations.
Ambient temperature 10 to 32°C (50 to 90°F)
Storage temperature 0 to 40°C (32 to 104°F)
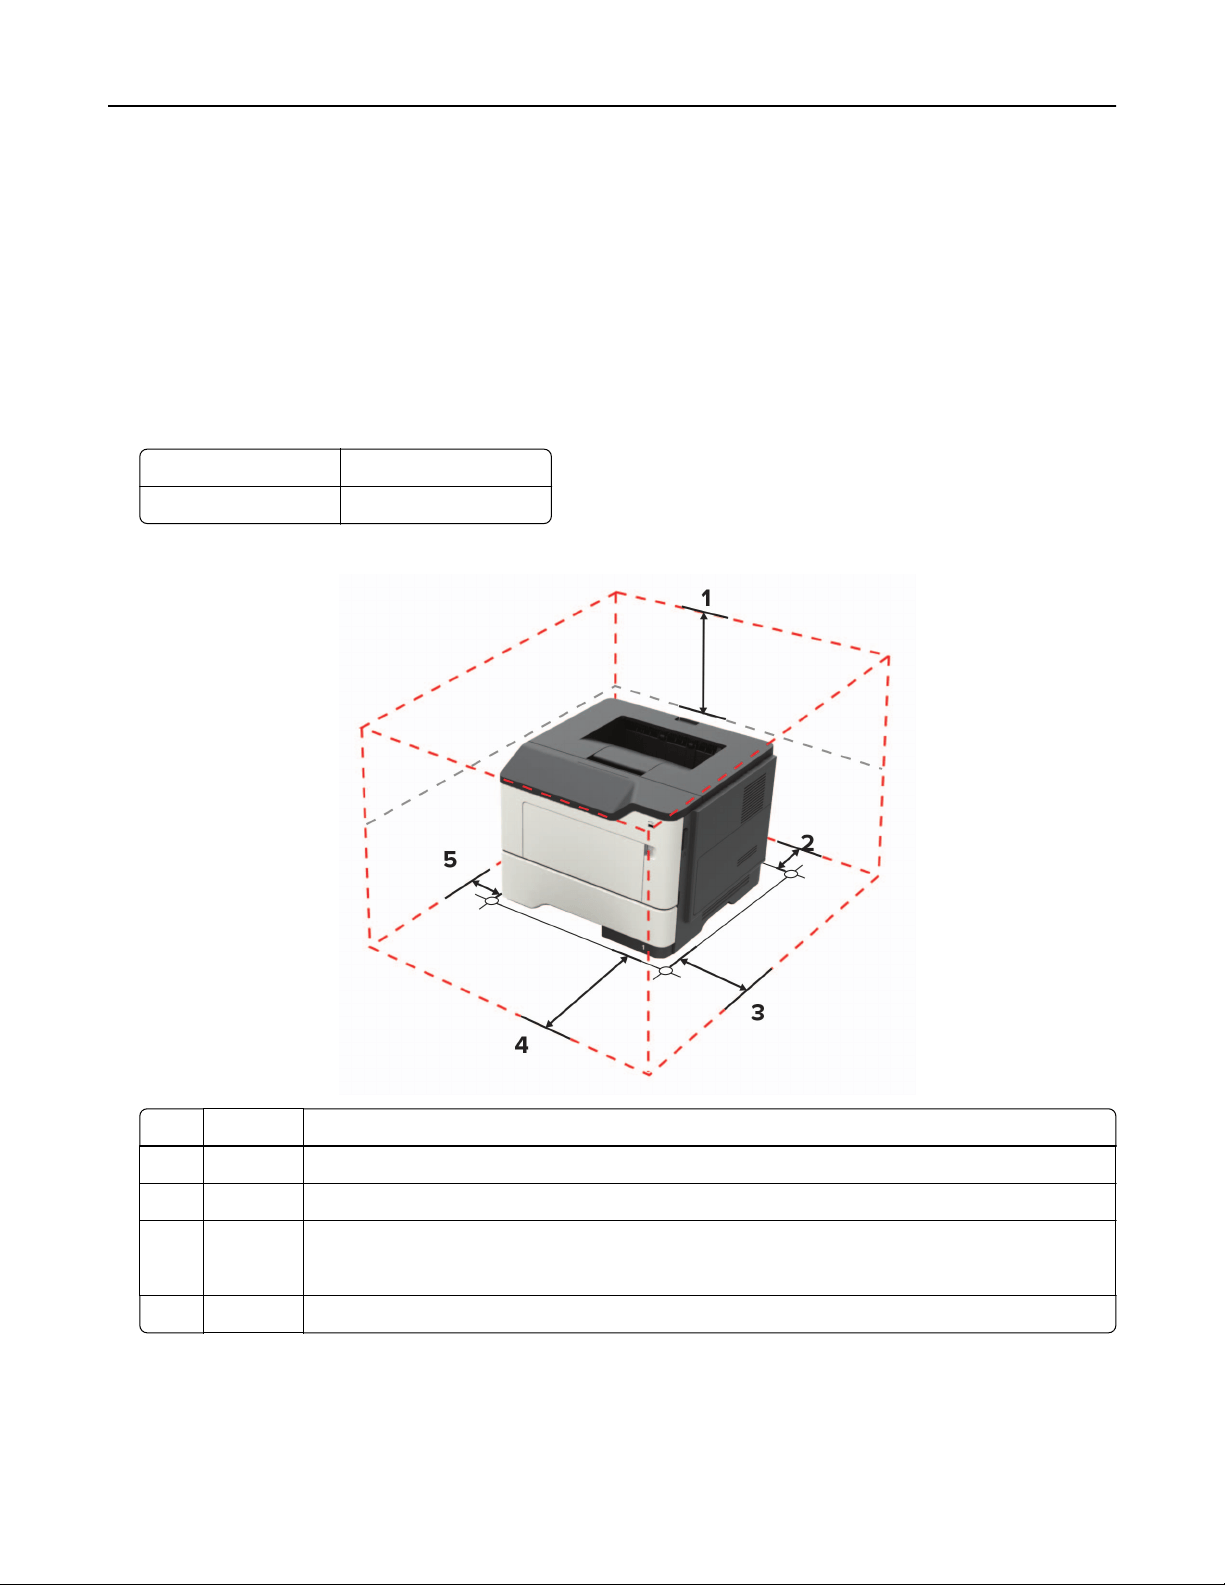
• Allow the following recommended amount of space around the printer for proper ventilation:
1 Top 30 5 mm ( 12 in.)
2 Rear 100 mm (3.94 in.)
3 Right side 110 mm (4.33 in.)
4 Front 305 mm (12 in.)
Note: The minimum space needed in front of the printer is 76 mm (3 in.).
5 Left side 65 mm (2.56 in.)
Learning about the printer 11
Printer configurations
CAUTION—TIPPING HAZARD: Installing one or more options on your printer or MFP may require a
caster base, furniture, or other feature to prevent instability causing possible injury. For more information
on supported configurations, see
www.lexmark.com/multifunctionprinters.
CAUTION—TIPPING HAZARD: To reduce the risk of equipment instability, load each tray separately.
Keep all other trays closed until needed.
You can configure your printer by adding optional 250‑ or 550‑sheet trays. For more information, see
“Installing
optional trays” on page 166.
1 Control panel
2 Standard bin
3 Controller board access cover
4 Standard 550‑sheet tray
5 Optional 250‑ or 550‑sheet tray
6 Multipurpose feeder
7 Door A
Attaching cables
CAUTION—SHOCK HAZARD: To avoid the risk of electrical shock, do not set up this product or make
any electrical or cabling connections, such as the power cord, fax feature, or telephone, during a
lightning storm.
Learning about the printer 12
CAUTION—POTENTIAL INJURY: To avoid the risk of fire or electrical shock, connect the power cord to
an appropriately rated and properly grounded electrical outlet that is near the product and easily
accessible.
CAUTION—POTENTIAL INJURY: To avoid the risk of fire or electrical shock, use only the power cord
provided with this product or the manufacturer's authorized replacement.
Warning—Potential Damage: To avoid loss of data or printer malfunction, do not touch the USB cable, any
wireless network adapter, or the printer in the areas shown while actively printing.
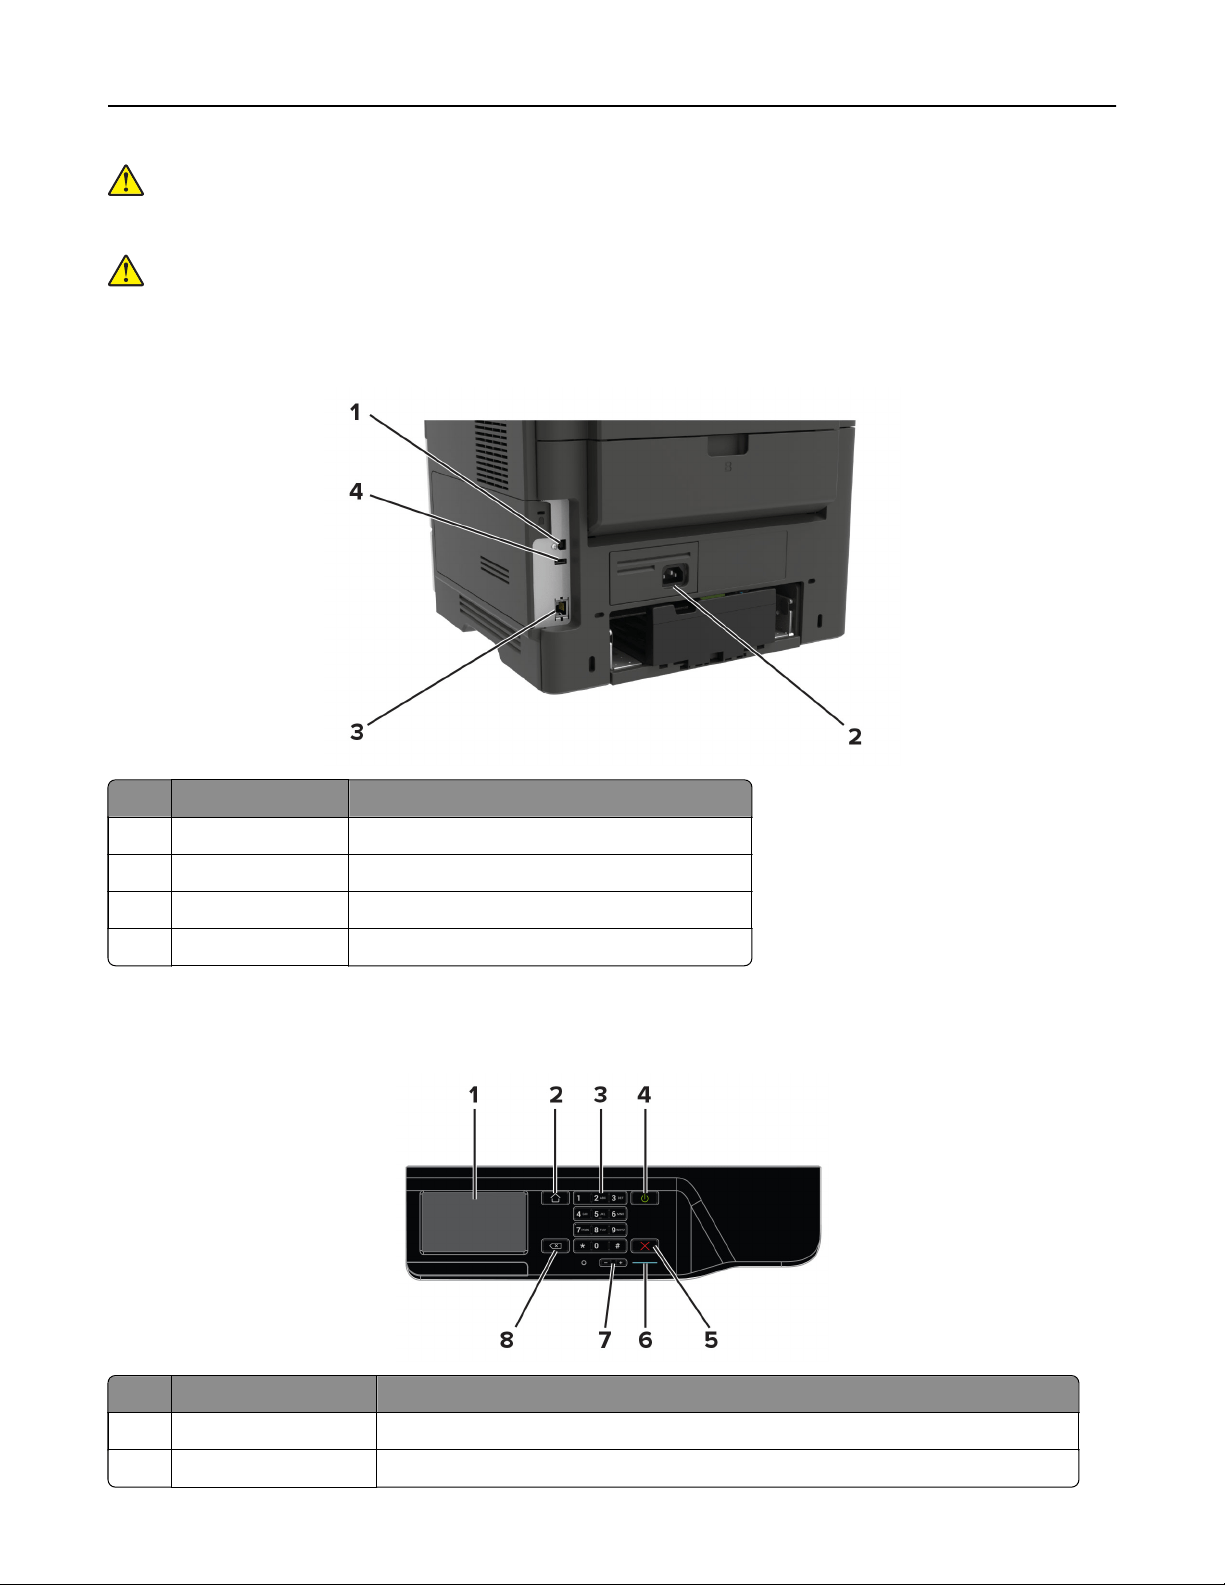
Printer port Function
1 USB printer port Connect the printer to a computer.
2 Power cord socket Connect the printer to an electrical outlet.
3 Ethernet port Connect the printer to a network.
4 USB port Attach a keyboard or any compatible option.
Using the control panel
Use the To
1 Display View printing options, printer status, and error messages.
2 Home button Go to the home screen.
Learning about the printer 13
Use the To
3 Keypad Enter numbers or symbols in an input field.
4 Power button Turn on or turn o the printer.
Note: To turn o the printer, press and hold the power button for five seconds.
5 Stop or Cancel button Stop the current printer task.
6 Indicator light Check the printer status.
7 Volume buttons Adjust the volume of the headset or speaker.
8 Backspace button Move the cursor backward and delete a character in an input field.
Understanding the status of the power button and
indicator light
Indicator light Printer status
O The printer is o or in Hibernate mode.
Blue The printer is ready or processing data.
Red The printer requires user intervention.
Power button light Printer status
O The printer is o, ready, or processing data.
Solid amber The printer is in Sleep mode.
Blinking amber The printer is in Hibernate mode.
Printing the Network Setup Page
From the home screen, touch Settings > Reports > Network > Network Setup Page.
Learning about the printer 14
Setting up and using the home screen
applications
Using the home screen
Note: Your home screen may vary depending on your home screen customization settings, administrative
setup, and active embedded solutions.
Touc h To
1 Status/Supplies
• Show a warning or error message whenever the printer requires intervention to
continue processing.
• View more information on the printer warning or message, and on how to clear it.
Note: You can also access this setting by touching the top section of the home
screen.
2 Job Queue Show all the current print jobs.
Note: You can also access this setting by touching the top section of the home
screen.
3 Change Language Change the language on the display.
4 Settings Access the printer menus.
5 Eco‑Settings Manage energy consumption, noise, toner, and paper usage settings.
6 Held Jobs Show the print jobs that are held in the printer memory.
7 USB Drive Print photos and documents from a flash drive.
8 Address Book Manage a contact list that other applications on the printer can access.
Setting up and using the home screen applications 15

Customizing the home screen
1 From the control panel, touch Settings > Device > Visible Home Screen Icons.
2 Select the icons that you want to appear on the home screen.
3 Apply the changes.
Using Display Customization
Before using the application, make sure to do the following:
• From the Embedded Web Server, click Apps > Display Customization >
Configure
.
• Enable and
configure
the screen saver, slideshow, and wallpaper settings.
Managing screen saver and slide show images
1 From the Screen Saver and Slideshow Images section, add, edit, or delete an image.
Notes:
• You can add up to 10 images.
• When enabled, the status icons appear on the screen saver only when there are errors, warnings, or
cloud‑based notifications.
2 Apply the changes.
Changing the wallpaper image
1 From the home screen, touch Change Wallpaper.
2 Select an image to use.
3 Apply the changes.
Running a slide show from a flash drive
1 Insert a flash drive into the USB port.
2 From the home screen, touch Slideshow.
Images appear in alphabetical order.
Note: You can remove the flash drive after the slide show starts, but the images are not stored in the
printer. If the slide show stops, then insert the flash drive again to view the images.
Configuring Eco
‑Settings
1 From the home screen, touch Eco
‑Settings.
2 Configure Eco‑Mode or Schedule Power Modes.
3 Apply the changes.
Setting up and using the home screen applications 16

Using Customer Support
1 From the home screen, touch Customer Support.
2 Print or e‑mail the information.
Note: For information on configuring the application settings, see the Customer Support Administrator’s
Guide.
Using QR Code Generator
You may need administrative rights to access the application.
1 Open a Web browser, and then type the printer IP address in the address field.
Notes:
• View the printer IP address on the printer home screen. The IP address appears as four sets of
numbers separated by periods, such as 123.123.123.123.
• If you are using a proxy server, then temporarily disable it to load the Web page correctly.
2 Click Apps > QR Code Generator > Configure.
3 Do either of the following:
• Select a default QR code value.
• Type a QR code value.
4 Apply the changes.
Setting up Device Quotas
You may need administrative rights to access the application.
1 Open a Web browser, and then type the printer IP address in the address
field.
Notes:
• View the printer IP address on the printer home screen. The IP address appears as four sets of
numbers separated by periods, such as 123.123.123.123.
• If you are using a proxy server, then temporarily disable it to load the Web page correctly.
2 Click Apps > Device Quotas >
Configure
.
3 From the User Accounts section, add or edit a user, and then set the user quota.
4 Apply the changes.
Note: For information on how to configure the application and its security settings, see the Device
Quotas Administrator’s Guide.
Setting up and using the home screen applications 17

Creating a Cloud Connector profile
Note: This application is available only in certain country or region. For more information, contact your
Lexmark representative.
1 From the home screen, touch Cloud Connector.
2 Select a cloud service provider.
3 Touc h Create or
.
4 Type a unique
profile
name.
Note: We recommend creating a PIN to protect the profile.
5 Touc h OK, and then take note of the authorization code.
Note: The authorization code is valid only for 24 hours.
6 Open a web browser, and then go to https://lexmark.cloud-connect.co.
7 Click Next, and then accept the Terms of Use.
8 Enter the authorization code, and then click Connect.
9 Log in to your cloud service provider account.
10 Grant permissions.
Note: To complete the authorization process, open the profile within 72 hours.
Managing bookmarks
Creating bookmarks
Use bookmarks to print frequently accessed documents that are stored in servers or on the web.
1 Open a web browser, and then type the printer IP address in the address field.
Notes:
• View the printer IP address on the printer home screen. The IP address appears as four sets of
numbers separated by periods, such as 123.123.123.123.
• If you are using a proxy server, then temporarily disable it to load the web page correctly.
2 Click Bookmarks > Add Bookmark, and then type a bookmark name.
3 Select an Address protocol type, and then do one of the following:
• For HTTP and HTTPS, type the URL that you want to bookmark.
• For HTTPS, make sure to use the host name instead of the IP address. For example, type
myWebsite.com/sample.pdf instead of typing 123.123.123.123/sample.pdf. Make sure that
the host name also matches the Common Name (CN) value in the server certificate. For more information
on obtaining the CN value in the server certificate, see the help information for your web browser.
• For FTP, type the FTP address. For example, myServer/myDirectory. Enter the FTP port. Port 21 is
the default port for sending commands.
Setting up and using the home screen applications 18

• For SMB, type the network folder address. For example, myServer/myShare/myFile.pdf. Type the
network domain name.
• If necessary, select the Authentication type for FTP and SMB.
To limit access to the bookmark, enter a PIN.
Note: The application supports the following
file
types: PDF, JPEG, TIFF, and HTML-based web pages.
Other file types such as DOCX and XLXS are supported in some printer models.
4 Click Save.
Creating folders
1 Open a web browser, and then type the printer IP address in the address field.
Notes:
• View the printer IP address on the printer home screen. The IP address appears as four sets of
numbers separated by periods, such as 123.123.123.123.
• If you are using a proxy server, then temporarily disable it to load the web page correctly.
2 Click Bookmarks > Add Folder, and then type a folder name.
Note: To limit access to the folder, enter a PIN.
3 Click Save.
Note: You can create folders or bookmarks inside a folder. To create a bookmark, see
“Creating bookmarks”
on page 18.
Managing contacts
Adding contacts
1 Open a web browser, and then type the printer IP address in the address field.
Notes:
• View the printer IP address on the printer home screen. The IP address appears as four sets of
numbers separated by periods, such as 123.123.123.123.
• If you are using a proxy server, then temporarily disable it to load the web page correctly.
2 Click Address Book.
3 From the Contacts section, add a contact.
Note: You can assign the contact to one or more groups.
4 If necessary, specify a login method to allow application access.
5 Apply the changes.
Adding groups
1 Open a web browser, and then type the printer IP address in the address field.
Setting up and using the home screen applications 19

Notes:
• View the printer IP address on the printer home screen. The IP address appears as four sets of
numbers separated by periods, such as 123.123.123.123.
• If you are using a proxy server, then temporarily disable it to load the web page correctly.
2 Click Address Book.
3 From the Contact Groups section, add a group name.
Note: You can assign one or more contacts to the group.
4 Apply the changes.
Editing contacts or groups
1 Open a web browser, and then type the printer IP address in the address
field.
Notes:
• View the printer IP address on the printer home screen. The IP address appears as four sets of
numbers separated by periods, such as 123.123.123.123.
• If you are using a proxy server, then temporarily disable it to load the web page correctly.
2 Click Address Book.
3 Do either of the following:
• From the Contacts section, click a contact name, and then edit the information.
• From the Contact Groups section, click a group name, and then edit the information.
4 Apply the changes.
Deleting contacts or groups
1 Open a web browser, and then type the printer IP address in the address field.
Notes:
• View the printer IP address on the printer home screen. The IP address appears as four sets of
numbers separated by periods, such as 123.123.123.123.
• If you are using a proxy server, then temporarily disable it to load the web page correctly.
2 Click Address Book.
3 Do either of the following:
• From the Contacts section, select a contact that you want to delete.
• From the Contact Groups section, select a group name that you want to delete.
Setting up and using the home screen applications 20

Setting up and using the accessibility features
Activating Voice Guidance
From the control panel
1 Press and hold the 5 key until you hear a voice message.
2 Select OK.
From the keyboard
1 Press and hold the 5 key until you hear a voice message.
2 Press Tab to navigate the focus cursor to the OK button, and then press Enter.
Notes:
• Voice Guidance is also activated when you insert headphones into the headphone jack.
• To adjust the volume, use the volume buttons at the bottom part of the control panel.
Navigating the screen using gestures
Notes:
• The gestures are applicable only when Voice Guidance is activated.
• Enable Magnification to use the zoom and pan gestures.
• Use a physical keyboard to type characters and adjust certain settings.
Gesture Function
Double‑tap Select an option or item on the screen.
Triple‑tap Zoom in or zoom out text and images.
Swipe right or swipe down Move to the next item on the screen.
Swipe left or swipe up Move to the previous item on the screen.
Pan Access parts of the zoomed image that are beyond the limits of the screen.
Note: This gesture requires the use of two fingers to drag across a zoomed
image.
Swipe up then left Exit an application and return to the home screen.
Swipe down then left
• Cancel a job.
• Go back to the previous setting.
• Exit the screen that appears without changing any setting or value.
Swipe up then down Repeat a spoken prompt.
Setting up and using the accessibility features 21

Enabling Magnification mode
1 From the control panel, press and hold the 5 key until you hear a voice message.
2 Select Magnification mode.
3 Select OK.
For more information on navigating a magnified screen, see
“Navigating the screen using gestures” on page
21.
Adjusting the Voice Guidance speech rate
1 From the home screen, select Settings > Device > Accessibility > Speech Rate.
2 Select the speech rate.
Using the keyboard on the display
Do one or more of the following:
• Drag a finger over the key to announce the character.
• Lift the finger to enter or type the character in the field.
• Select Backspace to delete characters.
• To hear the content in the input
field,
select Tab, and then select Shift + Tab.
Enabling spoken passwords or personal identification
numbers
1 From the home screen, select Settings > Device > Accessibility > Speak Passwords/PINs.
2 Enable the setting.
Setting up and using the accessibility features 22
Loading paper and specialty media
Setting the paper size and type
1 From the home screen, navigate to:
Settings > Paper > Tray
Configuration
> Paper Size/Type > select a paper source
2 Set the paper size and type.
Configuring Universal paper settings
1 From the home screen, touch Settings > Paper > Media Configuration > Universal Setup.
2 Configure the settings.
Loading trays
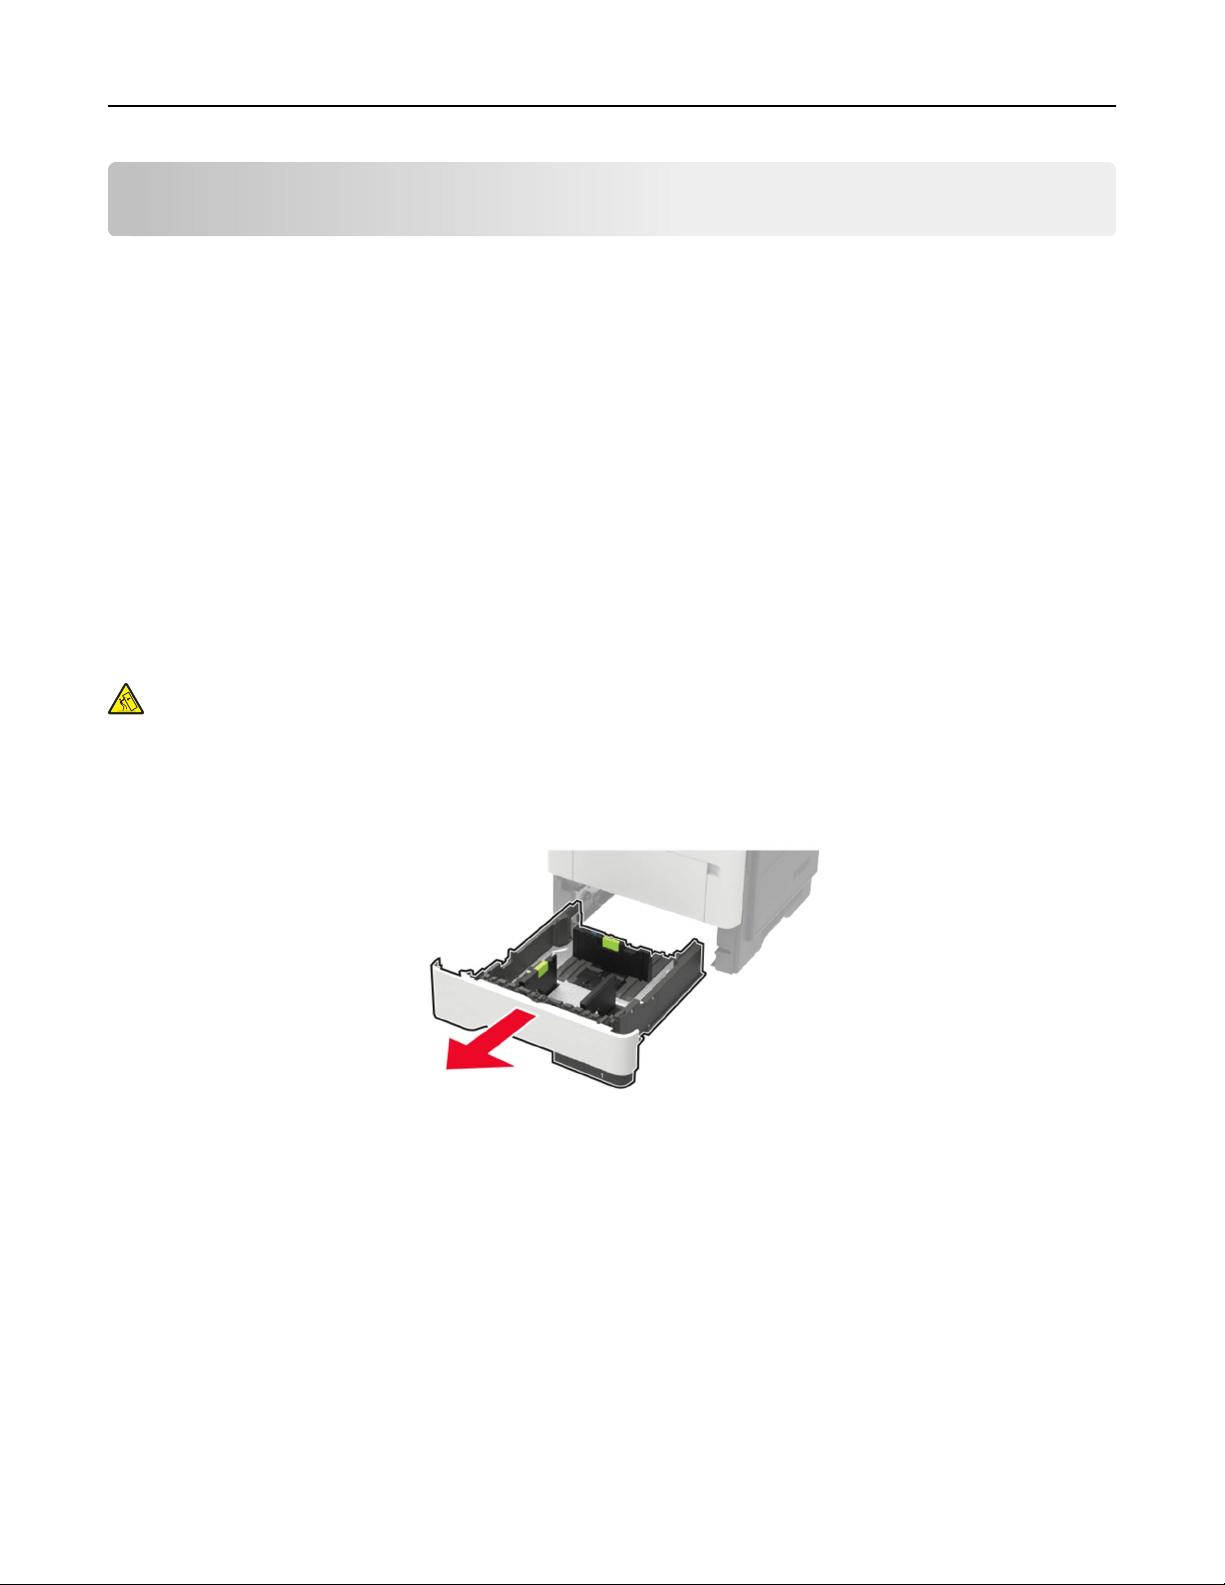
CAUTION—TIPPING HAZARD: To reduce the risk of equipment instability, load each tray separately.
Keep all other trays closed until needed.
1 Remove the tray.
Note: To avoid paper jams, do not remove trays while the printer is busy.
Loading paper and specialty media 23
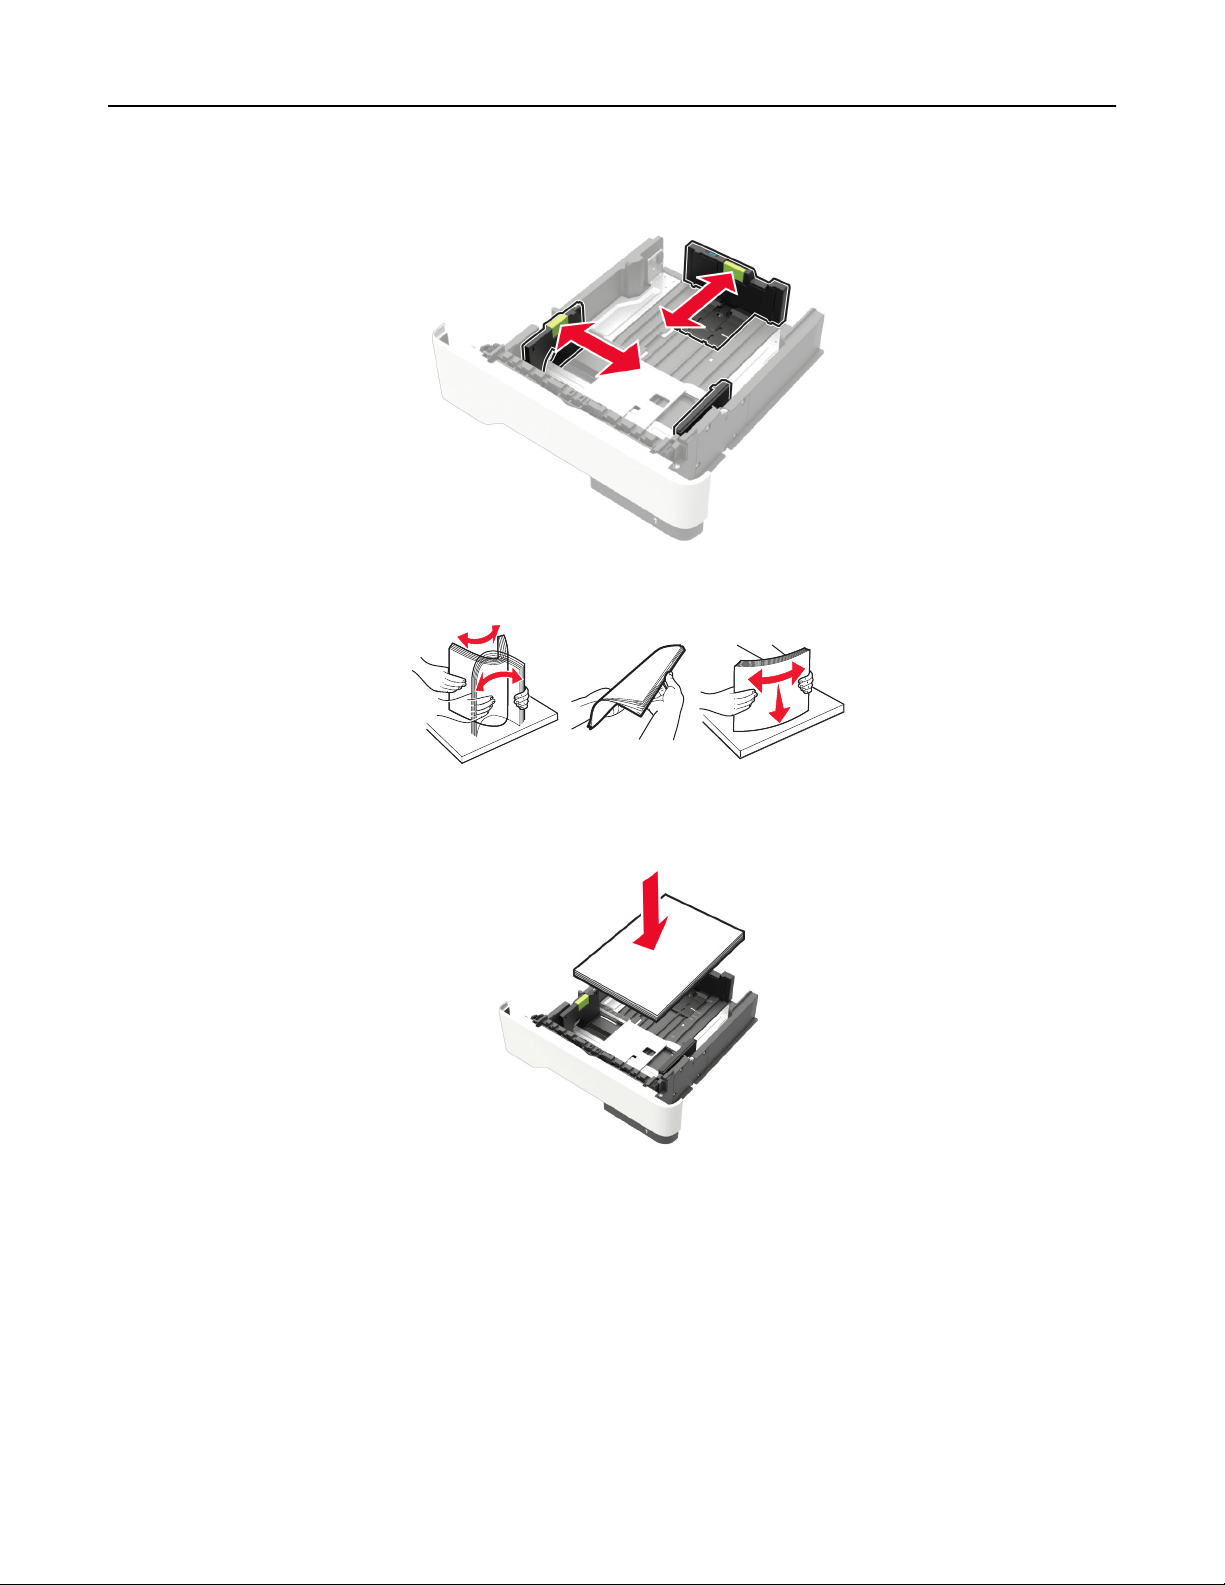
2 Adjust the paper guides to match the size of the paper that you are loading.
3 Flex, fan, and align the paper edges before loading.
4 Load the paper stack with the printable side facedown, and then make sure that the side guides fit snugly
against the paper.
Notes:
• Load letterhead facedown with the top edge of the sheet toward the front of the tray for one‑sided
printing.
• Load letterhead faceup with the bottom edge of the sheet toward the front of the tray for two‑sided
printing.
• Do not slide paper into the tray.
• To avoid paper jams, make sure that the stack height is below the maximum paper
fill
indicator.
5 Insert the tray.
If necessary, set the paper size and paper type from the control panel to match the paper loaded.
Loading paper and specialty media 24
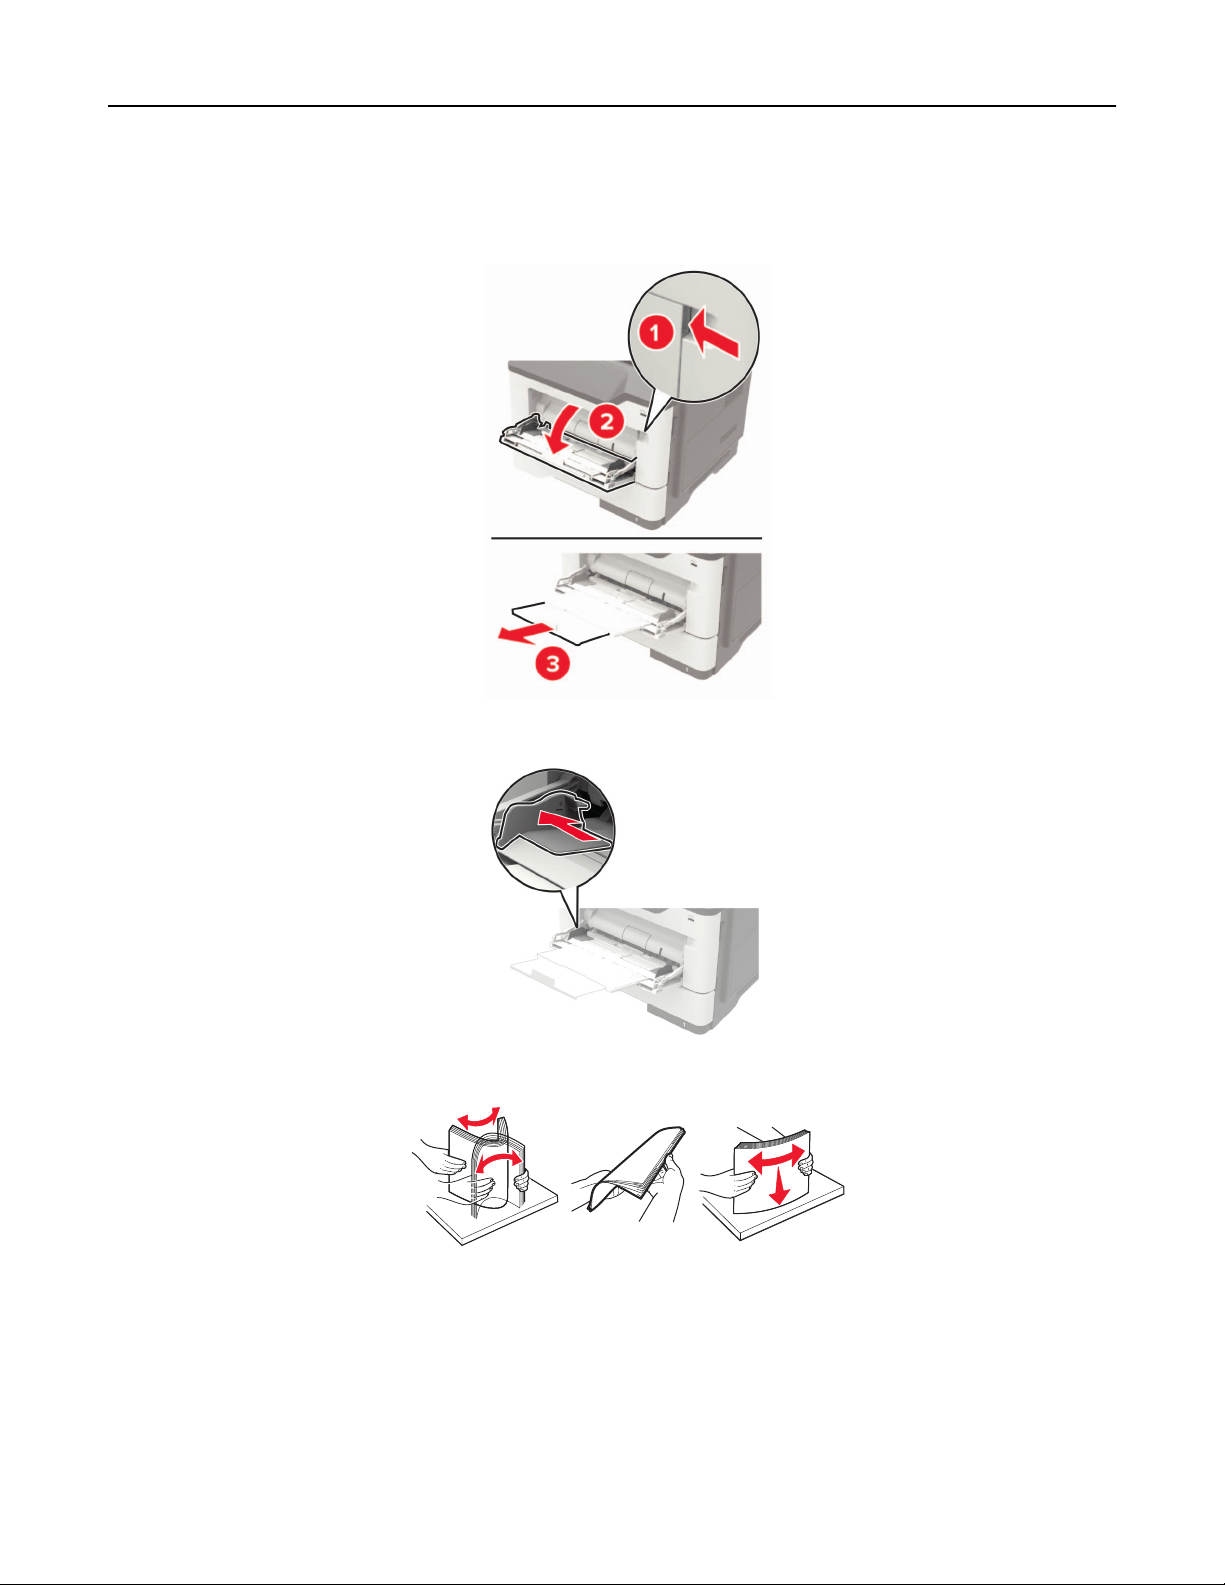
Loading the multipurpose feeder
1 Open the multipurpose feeder.
2 Adjust the guide to match the size of the paper that you are loading.
3 Flex, fan, and align the paper edges before loading.
4 Load paper with the printable side faceup.
Notes:
• Load letterhead faceup with the top edge of the sheet toward the front of the tray for one‑sided
printing.
• Load letterhead facedown with the bottom edge of the sheet toward the front of the tray for
two‑sided printing.
• Load envelopes with the flap facedown on the left side.
Loading paper and specialty media 25

• Load European envelopes with the flap facedown and entering the printer first.
Warning—Potential Damage: Do not use envelopes with stamps, clasps, snaps, windows, coated linings,
or self‑stick adhesives.
5 From the control panel, set the paper size and paper type to match the paper loaded.
Linking trays
1 From the home screen, touch Settings > Paper > Tray Configuration > select a paper source.
2 Set the same paper size and paper type for the trays that you are linking.
3 From the home screen, touch Settings > Device > Maintenance > Configuration Menu > Tray Configuration
> Tray Linking.
4 Touc h Automatic.
To unlink trays, make sure that no trays have the same paper size and paper type settings.
Warning—Potential Damage: The temperature of the fuser varies according to the specified paper type. To
avoid printing issues, match the paper type setting in the printer with the paper loaded in the tray.
Loading paper and specialty media 26
Paper support
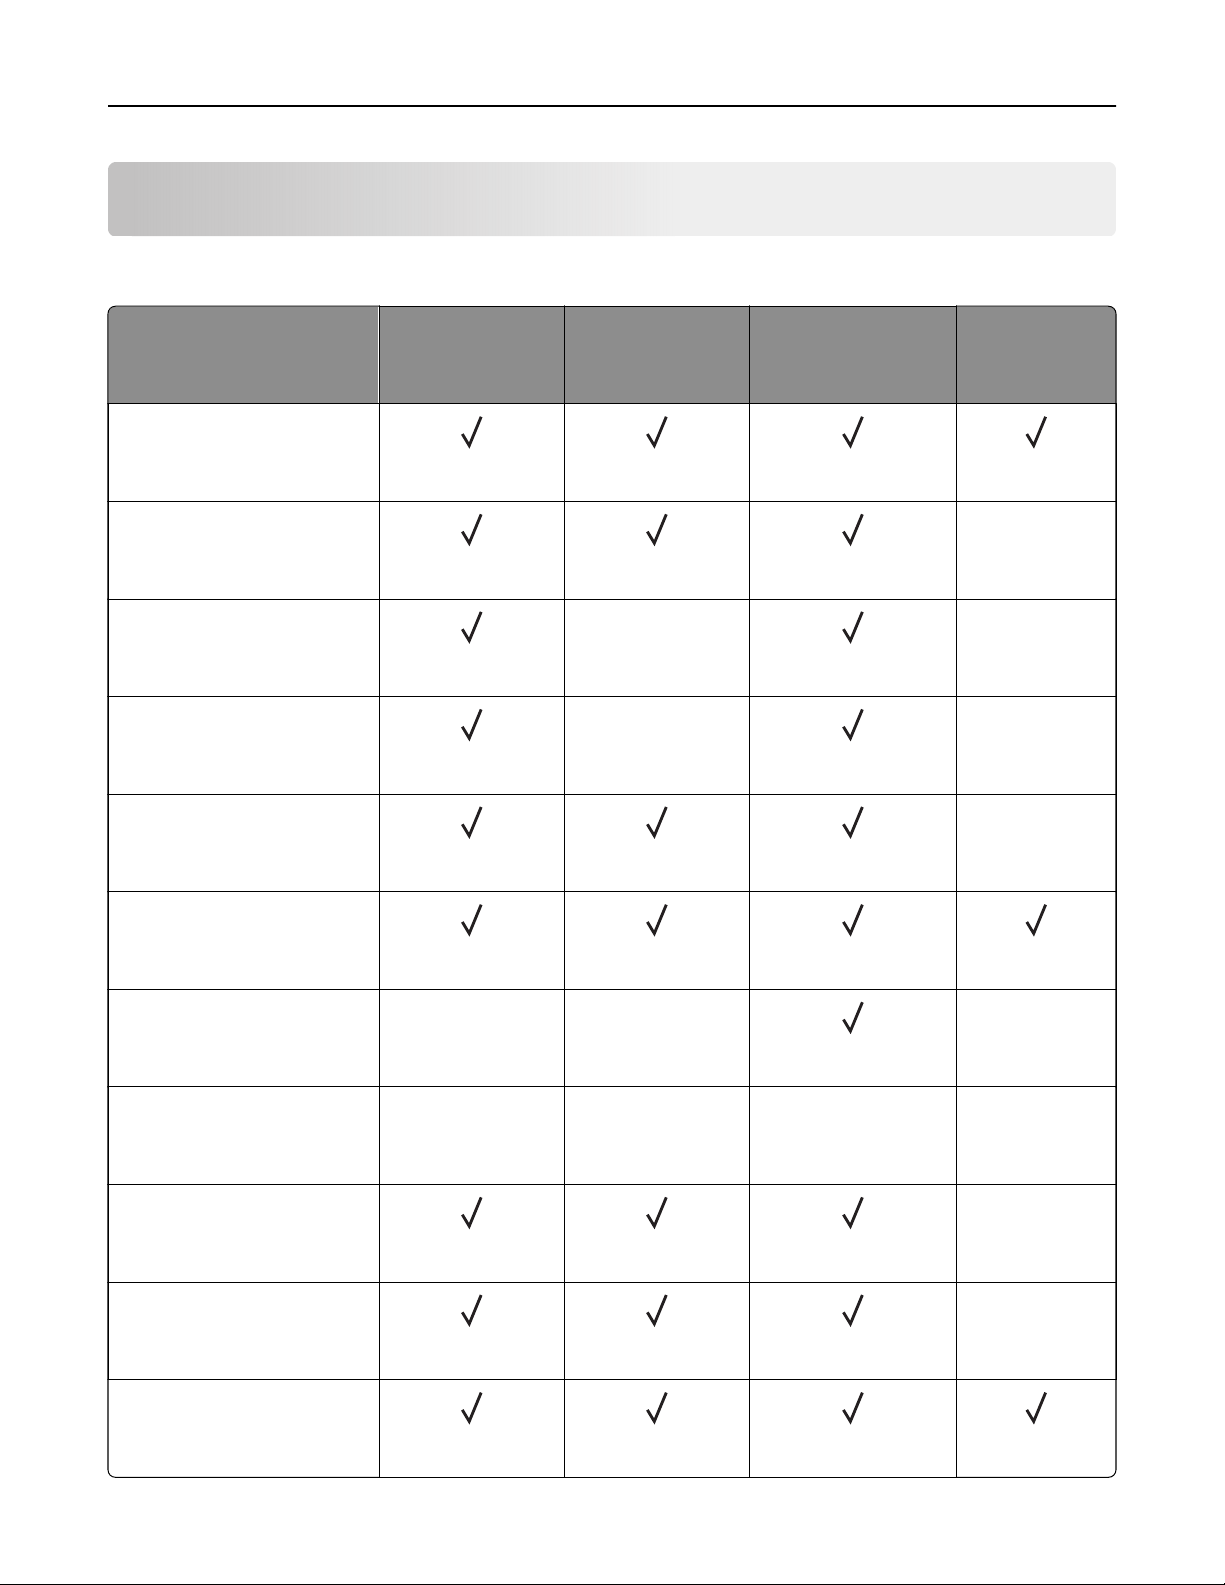
Supported paper sizes
Paper size Standard
550
‑sheet
tray
Optional
250‑ or 550‑sheet
tray
Multipurpose feeder Two
‑sided
printing
A4
210 x 297 mm
(8.3 x 11.7 in.)
A5
210 x 148 mm
(8.3 x 5.8 in.)
X
A5 LEF
148 x 210 mm
(5.8 x 8.3 in.)
X X
A6
105 x 148 mm
(4.1 x 5.8 in.)
X X
JIS B5
182 x 257 mm
(7.2 x 10.1 in.)
X
Oficio (Mexico)
216 x 340 mm
(8.5 x 13.4 in.)
Hagaki
100 x 148 mm
(3.9 x 5.8 in.)
XX
X
Business card
50.8 x 88.9 mm
(2 x 3.5 in.)
XX XX
Statement
140 x 216 mm
(5.5 x 8.5 in.)
X
Executive
184 x 267 mm
(7.3 x 10.5 in.)
X
Letter
216 x 279 mm
(8.5 x 11 in.)
Paper support 27
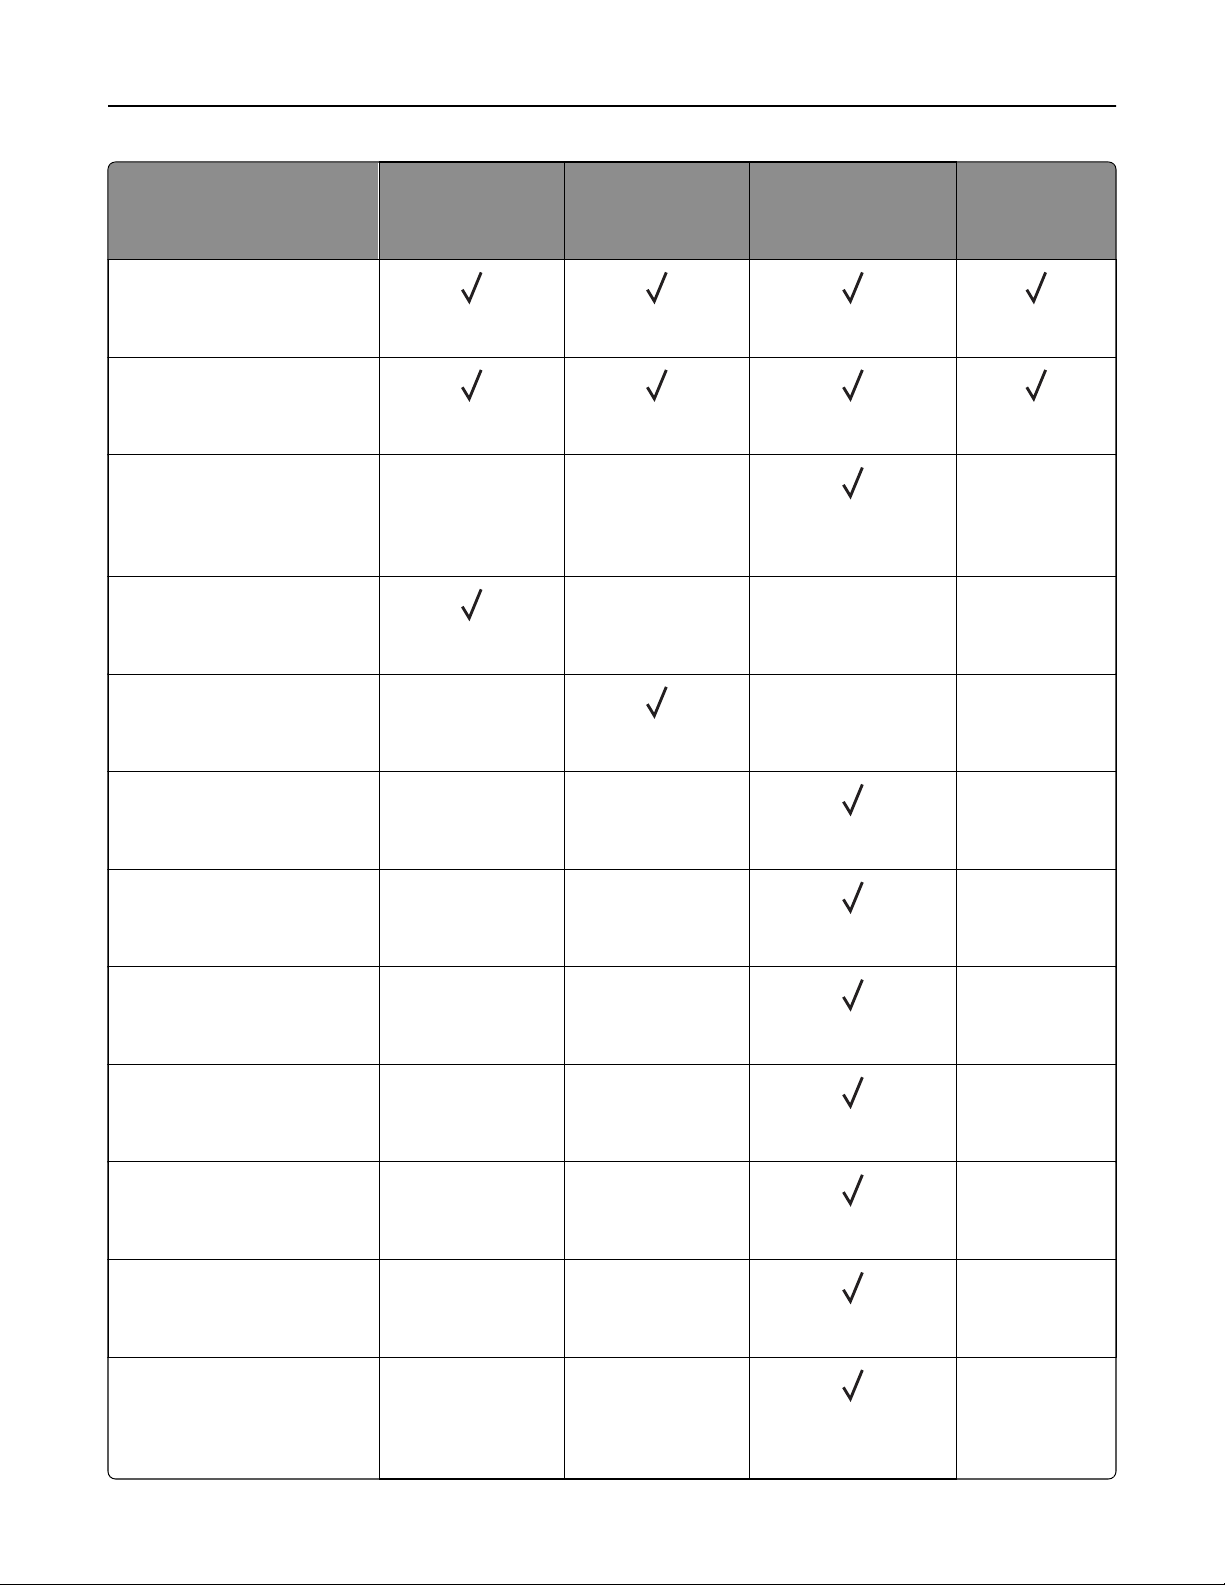
Paper size Standard
550
‑sheet
tray
Optional
250‑ or 550‑sheet
tray
Multipurpose feeder Two
‑sided
printing
Legal
216 x 356 mm
(8.5 x 14 in.)
Folio
216 x 330 mm
(8.5 x 13 in.)
Universal
76.2 x 127 mm to
216 x 356 mm
(3 x 5 in. to 8.5 x 14 in.)
XX
X
Universal
105 x 148 mm to 216 x 356 mm
(4.13 x 5.83 in. to 8.5 x 14 in.)
XXX
Universal
148 x 210 mm to 216 x 356 mm
(5.83 x 8.27 in. to 8.5 x 14 in.)
X
XX
7 3/4 Envelope (Monarch)
98 x 191 mm
(3.9 x 7.5 in.)
XX
X
9 Envelope
98 x 225 mm
(3.9 x 8.9 in.)
XX
X
10 Envelope
105 x 241 mm
(4.1 x 9.5 in.)
XX
X
DL Envelope
110 x 220 mm
(4.3 x 8.7 in.)
XX
X
C5 Envelope
162 x 229 mm
(6.4 x 9 in.)
XX
X
B5 Envelope
176 x 250 mm
(6.9 x 9.8 in.)
XX
X
Other Envelope
76.2 x 127 mm to
216 x 356 mm
( 3 x 5 in. to 8.5 x 14 in.)
XX
X
Paper support 28
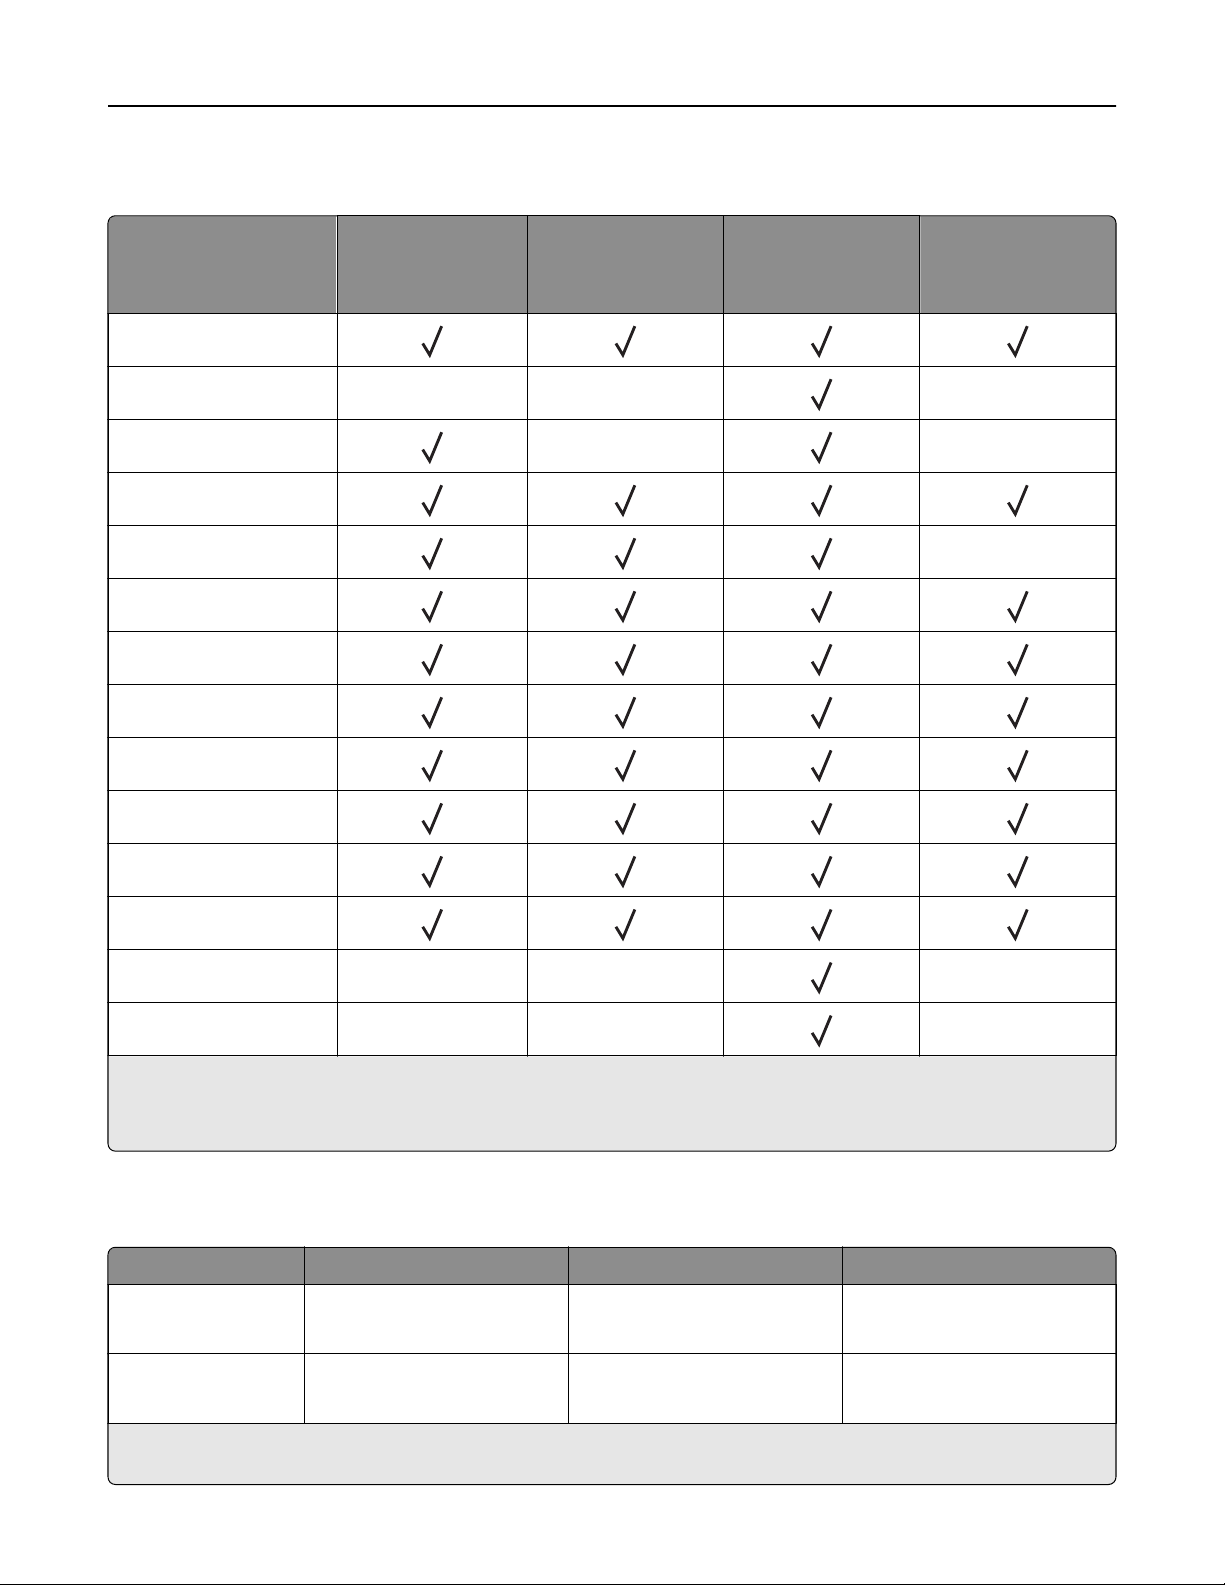
Supported paper types
Paper type Standard
550
‑sheet
tray
Optional
250
‑ or 550‑sheet
tray
Multipurpose feeder Two
‑sided printing
Plain paper
Card stock X X X
Transparency
X X
Recycled
Paper labels
1
X
Bond
2
Letterhead
Preprinted
Colored paper
Light paper
Heavy paper
2
Rough/Cotton
Envelope X X X
Rough envelope X X
X
1
One‑sided paper labels designed for laser printers are supported for occasional use. It is recommended to print
20 or fewer pages of paper labels per month. Vinyl, pharmacy, and two‑sided labels are not supported.
2
Bond and Heavy paper are supported in two‑sided printing up to 90‑g/m
2
(24‑lb) paper weight.
Supported paper weights
Paper type Tray Multipurpose feeder Two‑sided printing
Plain paper
60–120 g/m
2
(16–32 lb)
60–216 g/m
2
(16–58 lb)
60–90 g/m
2
(16–24 lb)
Card stock N/A
60–216 g/m
2
(16–58 lb)
N/A
* One‑sided paper labels designed for laser printers are supported for occasional use. It is recommended to print
20 or fewer pages of paper labels per month. Vinyl, pharmacy, and two‑sided labels are not supported.
Paper support 29

Paper type Tray Multipurpose feeder Two‑sided printing
Transparency
60–120 g/m
2
(16–32 lb)
60–216 g/m
2
(16–58 lb)
N/A
Labels*
60–120 g/m
2
(16–32 lb)
60–216 g/m
2
(16–58 lb)
N/A
Envelopes N/A
60–216 g/m
2
(16–58 lb)
N/A
* One‑sided paper labels designed for laser printers are supported for occasional use. It is recommended to print
20 or fewer pages of paper labels per month. Vinyl, pharmacy, and two‑sided labels are not supported.
Paper support 30

Printing
Printing from a computer
Note: For labels, card stock, and envelopes, set the paper size and type in the printer before printing the
document.
1 From the document that you are trying to print, open the Print dialog.
2 If necessary, adjust the settings.
3 Print the document.
Printing from a mobile device
Printing from a mobile device using Lexmark Mobile Print
Lexmark
TM
Mobile Print allows you to send documents and images directly to a supported Lexmark printer.
1 Open the document, and then send or share the document to Lexmark Mobile Print.
Note: Some third‑party applications may not support the send or share feature. For more information, see
the documentation that came with the application.
2 Select a printer.
3 Print the document.
Printing from a mobile device using Mopria Print Service
Mopria
®
Print Service is a mobile printing solution for mobile devices running on Android
TM
version 5.0 or later.
It allows you to print directly to any Mopria‑certified printer.
Note: Make sure that you download the Mopria Print Service application from the Google Play
TM
store and
enable it in the mobile device.
1 From your Android mobile device, launch a compatible application or select a document from your
file
manager.
2 Tap
> Print.
3 Select a printer, and then adjust the settings, if necessary.
4 Tap
.
Printing from a mobile device using AirPrint
The AirPrint software feature is a mobile printing solution that allows you to print directly from Apple devices
to an AirPrint‑certified printer.
Printing 31
Notes:
• Make sure that the Apple device and the printer are connected to the same network. If the network has
multiple wireless hubs, then make sure that both devices are connected to the same subnet.
• This application is supported only in some Apple devices.
1 From your mobile device, select a document from your
file
manager or launch a compatible application.
2 Tap
> Print.
3 Select a printer, and then adjust the settings, if necessary.
4 Print the document.
Printing from a mobile device using Wi
‑Fi Direct®
Wi‑Fi Direct
®
is a printing service that lets you print to any Wi‑Fi Direct‑ready printer.
Note: Make sure that the mobile device is connected to the printer wireless network. For more information,
see
“Connecting a mobile device to the printer” on page 85.
1 From your mobile device, launch a compatible application or select a document from your
file
manager.
2 Depending on your mobile device, do one of the following:
• Tap > Print.
• Tap
> Print.
• Tap
> Print.
3 Select a printer, and then adjust the settings, if necessary.
4 Print the document.
Printing from a flash drive
1 Insert the flash drive.
Printing 32
Notes:
• If you insert the flash drive when an error message appears, then the printer ignores the flash drive.
• If you insert the flash drive while the printer is processing other print jobs, then Busy appears on the
display.
2 From the display, touch the document that you want to print.
If necessary, configure other print settings.
3 Send the print job.
To print another document, touch USB Drive.
Warning—Potential Damage: To avoid loss of data or printer malfunction, do not touch the flash drive or
the printer in the area shown while actively printing, reading, or writing from the memory device.
Supported flash drives and file types
Flash drives
• Lexar JumpDrive S70 (16GB and 32GB)
• SanDisk Cruzer (16GB and 32GB)
• PNY Attache (16GB and 32GB)
Notes:
– The printer supports high‑speed USB flash drives with full‑speed standard.
– USB
flash
drives must support the File Allocation Table (FAT) system.
File types
Documents
• PDF (version 1.7 or earlier)
• HTML
• XPS
• Microsoft file formats (.doc, .docx, .xls, .xlsx, .ppt, .pptx)
Printing 33

Images
• .dcx
• .gif
• .JPEG or .jpg
• .bmp
• .pcx
• .TIFF or .tif
• .png
Configuring confidential jobs
1 From the control panel, navigate to:
Settings > Security > Confidential Print Setup
2 Configure the settings.
Use To
Max Invalid PIN Set the number of times an invalid PIN can be entered.
Note: When the limit is reached, the print jobs for that user name are deleted.
Confidential Job
Expiration
Set the expiration time for confidential print jobs.
Note:
Confidential
held jobs are stored in the printer until they are released or
deleted manually.
Repeat Job Expiration Set the expiration time for a repeat print job.
Note: Repeat held jobs are stored in the printer memory for reprinting.
Verify Job Expiration Set the expiration time that the printer prints a copy before printing the remaining
copies.
Note: Verify jobs print one copy to check if it is satisfactory before printing the
remaining copies.
Reserve Job Expiration Set the expiration time that the printer stores print jobs.
Note: Reserve held jobs are automatically deleted after printing.
Require All Jobs to be
Held
Set the printer to hold all print jobs.
Keep duplicate
documents
Set the printer to print all documents with the same file name.
Printing confidential and other held jobs
For Windows users
1 With a document open, click File > Print.
2 Click Properties, Preferences, Options, or Setup.
3 Click Print and Hold.
Printing 34

4 Select Use Print and Hold, and then assign a user name.
5 Select the print job type (Confidential, Repeat, Reserve, or Verify).
If the print job is confidential, then enter a four‑digit PIN.
6 Click OK or Print.
7 From the printer home screen, release the print job.
• For confidential print jobs, touch Held jobs > select your user name > Confidential > enter the PIN >
select the print job > configure the settings > Print.
• For other print jobs, touch Held jobs > select your user name > select the print job > configure the settings
> Print.
For Macintosh users
1 With a document open, choose File > Print.
2 From the Preview or Media & Quality menu, choose PIN Printing.
3 Enable Print with PIN, and then enter a four‑digit PIN.
4 Click Print.
5 From the printer home screen, release the print job. Touch Held jobs > select your computer name >
Confidential
> enter the PIN > select the print job > Print.
Printing from a Cloud Connector profile
1 From the home screen, touch Cloud Connector.
2 Select a cloud service provider, and then select a
profile.
Note: For more information on creating a Cloud Connector
profile,
see
“Creating a Cloud Connector
profile”
on page 18.
3 Touc h Print, and then select a file.
If necessary, change the settings.
Note: Make sure to select a supported
file.
4 Print the document.
Printing a font sample list
1 From the home screen, touch Settings > Reports > Print > Print Fonts.
2 To uc h PCL Fonts or PS Fonts.
Printing a directory list
From the home screen, touch Settings > Reports > Print > Print Directory.
Printing 35

Canceling a print job
From the printer control panel
1 From the home screen, touch Job Queue.
Note: You can also access this setting by touching the top section of the home screen.
2 Select the job to cancel.
From the computer
1 Depending on the operating system, do either of the following:
• Open the printers folder, and then select your printer.
• From the System Preferences in the Apple menu, navigate to your printer.
2 Select the job to cancel.
Printing 36
Understanding the printer menus
Menu map
Device
• Preferences
• Eco‑Mode
• Remote Operator Panel
• Notifications
• Power Management
• Information Sent to Lexmark
• Accessibility
• Restore Factory Defaults
• Maintenance
• Visible Home Screen Icons
• About this Printer
Print
• Layout
• Setup
• Quality
• Job Accounting
• XPS
• PDF
• PostScript
• PCL
• HTML
• Image
Paper
•
Tray Configuration • Media Configuration
USB Drive Flash Drive Print
Network/Ports
•
Network Overview
• Wireless
• Ethernet
• TCP/IP
• SNMP
• IPSec
• 802.1x
• LPD Configuration
• HTTP/FTP Settings
• USB
• Restrict external network access
• Wi‑Fi Direct
Security
•
Login Methods
• Schedule USB Devices
• Security Audit Log
• Login Restrictions
• Confidential Print Setup
• Disk Encryption
• Erase Temporary Data Files
• Solutions LDAP Settings
• Mobile Services Management
• Miscellaneous
Reports
• Menu Settings Page
• Device
• Print
• Network
Help
• Print All Guides
• Mono Quality Guide
• Connection Guide
• Information Guide
• Media Guide
• Moving Guide
• Print Quality Guide
• Supplies Guide
Troubleshooting Print Quality Test Pages
Understanding the printer menus 37

Device
Preferences
Menu item Description
Display Language
[List of languages]
Set the language of the text that appears on the display.
Country/Region
[List of countries or regions]
Identify the country or region where the printer is configured
to operate.
Run initial setup
On
O*
Run the setup wizard.
Keyboard
Keyboard Type
[List of languages]
Select a language as a keyboard type.
Note: All the Keyboard Type values may not appear or may
require special hardware to appear.
Displayed information
Display Text 1 [IP Address*]
Display Text 2 [Date/Time*]
Custom Text 1
Custom Text 2
Specify the information to appear on the home screen.
Date and Time
Configure
Current Date and Time
Manually Set Date and Time
Date Format [MM‑DD‑YYYY*]
Time Format [12 hour A.M./P.M.*]
Time Zone [Eastern Time*]
Configure the printer date and time.
Date and Time
Network Time Protocol
Enable NTP [On*]
NTP Server
Enable Authentication
Configure the settings for Network Time Protocol (NTP).
Note: When Enable Authentication is set to MD5 key, Key ID
and Password appear.
Paper Sizes
U.S.*
Metric
Specify the unit of measurement for paper sizes.
Note: The country or region selected in the initial setup
wizard determines the initial paper size setting.
Screen Brightness
20–100% (100*)
Adjust the brightness of the display.
Flash Drive Access
Enabled*
Disabled
Enable access to the flash drive.
Note: An asterisk (*) next to a value indicates the factory default setting.
Understanding the printer menus 38

Menu item Description
Screen Timeout
5–300 seconds (60*)
Set the idle time in seconds before the display shows the home
screen or before the printer logs o a user account
automatically.
Note: An asterisk (*) next to a value indicates the factory default setting.
Eco-Mode
Menu item Description
Print
Sides
1‑Sided*
2‑Sided
Specify whether to print on one side or two sides of the paper.
Print
Pages per Side
O*
2 pages per side
3 pages per side
4 pages per side
6 pages per side
9 pages per side
12 pages per side
16 pages per side
Print multiple page images on one side of a sheet of paper.
Print
Toner Darkness
1–10 (8*)
Determine the lightness or darkness of text images.
Note: An asterisk (*) next to a value indicates the factory default setting.
Remote Operator Panel
Menu item Description
External VNC Connection
Don’t Allow*
Allow
Connect an external Virtual Network Computing (VNC) client
to the remote control panel.
Authentication Type
None*
Standard Authentication
Set the authentication type when accessing the VNC client
server.
VNC Password Specify the password to connect to the VNC client server.
Note: This menu item appears only if Authentication Type is
set to Standard Authentication.
Note: An asterisk (*) next to a value indicates the factory default setting.
Understanding the printer menus 39

Notifications
Menu item Description
Supplies
Show Supply Estimates
Show estimates*
Do not show estimates
Show the estimated status of the supplies.
E‑mail Alerts Setup
E‑mail Setup
Primary SMTP Gateway
Type the IP address or host name of the primary SMTP server
for sending e-mail.
E
‑mail Alerts Setup
E‑mail Setup
Primary SMTP Gateway Port
1–65535 (25*)
Enter the port number of the primary SMTP server.
E
‑mail Alerts Setup
E‑mail Setup
Secondary SMTP Gateway
Type the server IP address or host name of your secondary or
backup SMTP server.
E
‑mail Alerts Setup
E‑mail Setup
Secondary SMTP Gateway Port
1–65535 (25*)
Enter the server port number of your secondary or backup
SMTP server.
E
‑mail Alerts Setup
E‑mail Setup
SMTP Timeout
5–30 seconds (30*)
Specify how long before the printer times out if the SMTP
server does not respond.
E
‑mail Alerts Setup
E‑mail Setup
Reply Address
Specify a reply address in the e‑mail.
E
‑mail Alerts Setup
E‑mail Setup
Always use SMTP default Reply Address
O*
On
Use the SMTP default reply address.
E‑mail Alerts Setup
E‑mail Setup
Use SSL/TLS
Disabled*
Negotiate
Required
Send an e‑mail using an encrypted link.
Note: An asterisk (*) next to a value indicates the factory default setting.
Understanding the printer menus 40

Menu item Description
E‑mail Alerts Setup
E‑mail Setup
Require Trusted
Certificate
On*
O
Require a trusted certificate when accessing the SMTP server.
E
‑mail Alerts Setup
E‑mail Setup
SMTP Server Authentication
No authentication required*
Login / Plain
NTLM
CRAM‑MD5
Digest‑MD5
Kerberos 5
Set the authentication type for the SMTP server.
E
‑mail Alerts Setup
E‑mail Setup
Device‑Initiated E‑mail
None*
Use Device SMTP Credentials
Set whether credentials are required for device‑initiated
e‑mails.
E
‑mail Alerts Setup
E‑mail Setup
Use Active Directory Device Credentials
O
On*
Enable user credentials and group designations to connect to
the SMTP server.
E
‑mail Alerts Setup
E‑mail Setup
Device Userid
Specify the user ID to connect to the SMTP server.
E
‑mail Alerts Setup
E‑mail Setup
Device Password
Specify the password to connect to the SMTP server.
E
‑mail Alerts Setup
E‑mail Setup
Kerberos 5 REALM
Specify the realm for the Kerberos 5 authentication protocol.
E
‑mail Alerts Setup
E‑mail Setup
NTLM Domain
Specify the domain name for the NTLM security protocol.
Error Prevention
Jam Assist
O
On*
Set the printer to flush blank pages or pages with partial prints
automatically after a jammed page has been cleared.
Note: An asterisk (*) next to a value indicates the factory default setting.
Understanding the printer menus 41

Menu item Description
Error Prevention
Auto Continue
O
On* (5 seconds)
Let the printer continue processing or printing a job
automatically after clearing certain printer conditions that
require user intervention.
Error Prevention
Auto Reboot
Auto Reboot
Reboot when idle
Reboot always*
Reboot never
Set the printer to restart when an error occurs.
Error Prevention
Auto Reboot
Max Auto Reboots
1–20 (2*)
Set the number of automatic reboots that the printer can
perform.
Error Prevention
Auto Reboot
Auto Reboot Window
1–525600 (720*)
Set the number of seconds before the printer performs an
automatic reboot.
Error Prevention
Auto Reboot
Auto Reboot Counter
Show a read‑only information of the reboot counter.
Error Prevention
Display Short Paper Error
On
Auto‑clear*
Set the printer to show a message when a short paper error
occurs.
Note: Short paper refers to the size of the paper loaded.
Error Prevention
Page Protect
O*
On
Set the printer to process the entire page into the memory
before printing it.
Jam Content Recovery
Jam Recovery
O
On
Auto*
Set the printer to reprint jammed pages.
Note: An asterisk (*) next to a value indicates the factory default setting.
Understanding the printer menus 42
Power Management
Menu item Description
Sleep Mode Profile
Print from Sleep Mode
Stay awake after printing
Enter Sleep Mode after printing*
Set the printer to stay in Ready mode or return to Sleep mode
after printing.
Timeouts
Sleep Mode
1–120 minutes (15*)
Set the idle time before the printer begins operating in Sleep
mode.
Timeouts
Hibernate Timeout
Disabled
1 hour
2 hours
3 hours
6 hours
1 day
2 days
3 days*
1 week
2 weeks
1 month
Set the time before the printer turns o.
Timeouts
Hibernate Timeout on Connection
Hibernate
Do Not Hibernate*
Set Hibernate Timeout to turn o the printer while an active
Ethernet connection exists.
Schedule Power Modes
Schedules
Add New Schedule
Schedule the printer when to enter Sleep or Hibernate mode.
Note: An asterisk (*) next to a value indicates the factory default setting.
Information Sent to Lexmark
Menu item Description
Information Sent to Lexmark
Supplies and Page Usage
Device Performance
None of the Above*
Send printer usage and performance information to Lexmark.
Note: Information Send Time appears only when you select any of the settings in
Information Sent to Lexmark, except None of the Above.
Information Send Time
Start Time
Stop Time
Note: An asterisk (*) next to a value indicates the factory default setting.
Understanding the printer menus 43
Accessibility
Menu item Description
Duplicate Key Strike Interval
0–5 (0*)
Set the interval in seconds during which the printer ignores duplicate key
presses on an attached keyboard.
Key Repeat Initial Delay
0.25–5 (1*)
Set the initial length of delay in seconds before a repeating key starts
repeating.
Note: This menu item appears only when a keyboard is attached to the
printer.
Key Repeat Rate
0.5–30 (30*)
Set the number of presses per second for a repeating key.
Note: This menu item appears only when a keyboard is attached to the
printer.
Prolong Screen Timeout
O*
On
Let the user remain in the same location and reset the Screen Timeout
timer when it expires instead of returning to the home screen.
Headphone Volume
1–10 (5*)
Adjust the headphone volume.
Note: This menu item appears only when a headphone is attached to
the printer.
Enable Voice Guidance When
Headphone Is Attached
O*
On
Enable Voice Guidance when a headphone is attached to the printer.
Speak Passwords/PINs
O*
On
Set the printer to read out loud passwords or personal identification
numbers.
Note: This menu item appears only when a headphone or a speaker is
attached to the printer.
Speech Rate
Very Slow
Slow
Normal*
Fast
Faster
Very Fast
Rapid
Very Rapid
Fastest
Set the Voice Guidance speech rate.
Note: This menu item appears only when a headphone or a speaker is
attached to the printer.
Note: An asterisk (*) next to a value indicates the factory default setting.
Understanding the printer menus 44
Restore Factory Defaults
Menu item Description
Restore Settings
Restore all settings
Restore printer settings
Restore network settings
Restore app settings
Restore the printer factory default settings.
Maintenance
Configuration Menu
Menu item Description
USB Configuration
USB PnP
1*
2
Change the USB driver mode of the printer to improve its
compatibility with a personal computer.
USB Configuration
USB Speed
Full
Auto*
Set the USB port to run at full speed and disable its high‑speed
capabilities.
Tray Configuration
Tray Linking
Automatic*
O
Set the printer to link the trays that have the same paper type
and paper size settings.
Tray Configuration
Show Tray Insert Message
O
Only for unknown sizes*
Always
Display a message to select paper size and type after inserting
the tray.
Tray Configuration
A5 Loading
Short Edge*
Long Edge
Specify the page orientation when loading A5 paper size.
Tray Configuration
Paper Prompts
Auto*
Multipurpose Feeder
Manual Paper
Set the paper source that the user fills when a prompt to load
paper appears.
Note: An asterisk (*) next to a value indicates the factory default setting.
Understanding the printer menus 45

Menu item Description
Tray Configuration
Envelope Prompts
Auto*
Multipurpose Feeder
Manual Envelope
Set the paper source that the user fills when a prompt to load
envelope appears.
Tray Configuration
Action for Prompts
Prompt user*
Continue
Use current
Set the printer to resolve paper- or envelope-related change
prompts.
Reports
Menu Settings Page
Event Log
Event Log Summary
HealthCheck Statistics
Print reports about printer menu settings, status, and event
logs.
Supply Usage And Counters
Clear Supply Usage History
Reset Black Cartridge Counter
Reset Black Imaging Unit Counter
Reset Maintenance Counter
Reset the supply page counter or view the total printed pages.
Printer Emulations
PPDS Emulation
O*
On
Set the printer to recognize and use the PPDS data stream.
Printer Emulations
PS Emulation
O
On*
Set the printer to recognize and use the PS data stream.
Printer Emulations
Emulator Security
Page Timeout
0–60 (60*)
Set the page timeout during emulation.
Printer Emulations
Emulator Security
Reset Emulator After Job
O*
On
Reset the emulator after a print job.
Note: An asterisk (*) next to a value indicates the factory default setting.
Understanding the printer menus 46
Menu item Description
Printer Emulations
Emulator Security
Disable Printer Message Access
O
On*
Disable access to the printer message during emulation.
Print Configuration
Font Sharpening
0–150 (24*)
Set a text point-size value below which the high‑frequency
screens are used when printing font data.
Print Configuration
Print Density
Disabled*
1–5
Adjust the toner density when printing or copying documents.
Device Operations
Quiet Mode
O*
On
Set the printer to reduce the amount of noise that it makes
when printing.
Note: Enabling this setting slows down the overall
performance of the printer.
Device Operations
Panel Menus
O
On*
Enable access to the control panel menus.
Device Operations
Safe Mode
O*
On
Set the printer to operate in a special mode, in which it attempts
to continue oering as much functionality as possible, despite
known issues.
For example, when set to On, and the duplex motor is
nonfunctional, the printer performs one‑sided printing of the
documents even if the job is two‑sided printing.
Device Operations
Clear Custom Status
Erase all custom messages.
Device Operations
Clear all remotely-installed messages
Erase all remotely‑installed messages.
Device Operations
Automatically Display Error Screens
O
On*
Show existing error messages on the display after the printer
remains inactive on the home screen for a length of time equal
to the Screen Timeout setting.
App Configuration
LES Applications
O
On*
Enable the Lexmark Embedded Solutions (LES) applications.
Note: An asterisk (*) next to a value indicates the factory default setting.
Understanding the printer menus 47
Out of Service Erase
Menu item Description
Out of Service Erase
Memory Last Sanitized
Hard Disk Last Sanitized
Show information on when the printer memory or hard disk was
last sanitized.
Note: Hard Disk Last Sanitized appears only when an optional
hard disk is installed.
Out of Service Erase
Sanitize all information on nonvolatile memory
Erase all printer and network settings
Erase all apps and app settings
Sanitize all information on hard disk
Clear all settings and applications that are stored in the printer
memory or hard disk.
Note: Sanitize all information on hard disk appears only when
an optional hard disk is installed.
Visible Home Screen Icons
Menu Description
Status/Supplies
Job Queue
Change Language
Address Book
Bookmarks
Held Jobs
USB
App Profiles
Display Customization
Eco-Settings
Specify which icons to show on the home screen.
About this Printer
Menu item Description
Asset Tag Show the serial number of the printer.
Printer’s Location Identify the printer location. The maximum length is 63 characters.
Contact Personalize the printer name. The maximum length is 63 characters.
Export Configuration File to USB Export the configuration file to a flash drive.
Export Compressed Logs to USB Export the compressed log files to a flash drive.
Send Logs
Cancel
Send
Send diagnostic information to Lexmark.
Understanding the printer menus 48

Print
Layout
Menu item Description
Sides
1‑Sided*
2‑Sided
Specify whether to print on one side or two sides of the paper.
Flip Style
Long Edge*
Short Edge
Determine which side of the paper is bound when performing two‑sided
printing.
Note: Depending on the option selected, the printer automatically osets
each printed information of the page to bind the job correctly.
Blank Pages
Print
Do Not Print*
Print blank pages that are included in a print job.
Collate
O [1,1,1,2,2,2]*
On [1,2,1,2,1,2]
Keep the pages of a print job stacked in sequence, particularly when printing
multiple copies of the job.
Separator Sheets
None*
Between Copies
Between Jobs
Between Pages
Insert blank separator sheets when printing.
Separator Sheet Source
Tray [x] (1*)
Multipurpose Feeder
Specify the paper source for the separator sheet.
Pages per Side
O*
2 pages per side
3 pages per side
4 pages per side
6 pages per side
9 pages per side
12 pages per side
16 pages per side
Print multiple page images on one side of a sheet of paper.
Pages per Side Ordering
Horizontal*
Reverse Horizontal
Vertical
Reverse Vertical
Specify the positioning of multiple page images when using Pages per Side.
Note: The positioning depends on the number of page images and their
page orientation.
Note: An asterisk (*) next to a value indicates the factory default setting.
Understanding the printer menus 49
Menu item Description
Pages per Side Orientation
Auto*
Landscape
Portrait
Specify the orientation of a multiple‑page document when using Pages per
Side.
Pages per Side Border
None*
Solid
Print a border around each page image when using Pages per Side.
Copies
1–9999 (1*)
Specify the number of copies for each print job.
Print Area
Normal*
Whole Page
Set the printable area on a sheet of paper.
Note: An asterisk (*) next to a value indicates the factory default setting.
Setup
Menu item Description
Printer Language
PCL Emulation*
PS Emulation
Set the printer language.
Note: Setting a printer language default does not prevent a software
program from sending print jobs that use another printer language.
Job Waiting
O*
On
Preserve print jobs requiring supplies so that jobs not requiring the missing
supplies can print.
Note: This menu item appears only when a hard disk is installed.
Job Hold Timeout
0–255 (30*)
Set the time in seconds that the printer waits for user intervention before
it holds jobs that require unavailable resources and continues to print other
jobs in the print queue.
Note: This menu item appears only when a hard disk is installed.
Download Target
RAM*
Disk
Specify where to save all permanent resources, such as fonts and macros,
that have been downloaded to the printer.
Note: This menu item appears only when a hard disk is installed.
Resource Save
O*
On
Determine what the printer does with downloaded resources, such as
fonts and macros, when it receives a job that requires more than the
available memory.
Notes:
• When set to O, the printer retains downloaded resources only until
memory is needed. Resources associated with the inactive printer
language are deleted.
• When set to On, the printer preserves all the permanent
downloaded resources across all language switches. When
necessary, the printer shows memory full messages instead of
deleting permanent resources.
Note: An asterisk (*) next to a value indicates the factory default setting.
Understanding the printer menus 50
Menu item Description
Print All Order
Alphabetical*
Newest First
Oldest First
Specify the order in which held and confidential jobs are printed when Print
All is selected.
Note: This menu item appears only when a hard disk is installed.
Note: An asterisk (*) next to a value indicates the factory default setting.
Quality
Menu item Description
Print Resolution
300 dpi
600 dpi*
1200 Image Q
2400 Image Q
1200 dpi
Set the resolution for the text and images on the printed output.
Note: Resolution is determined in dots per inch or image quality.
Pixel Boost
O*
Fonts
Horizontally
Vertically
Both directions
Enable more pixels to print in clusters for clarity, in order to enhance text and
images.
Toner Darkness
1–10 (8*)
Determine the lightness or darkness of text images.
Halftone
Normal*
Detail
Enhance the printed output to have smoother lines with sharper edges.
Brightness
‑6 to 6 (0*)
Adjust the brightness of the printed output.
Contrast
0–5 (0*)
Adjust the contrast of the printed output.
Gray Correction
Auto*
O
Adjust the contrast enhancement applied to images.
Note: An asterisk (*) next to a value indicates the factory default setting.
Understanding the printer menus 51

Job Accounting
Menu item Description
Job Accounting
O*
On
Set the printer to create a log of the print jobs that it receives.
Note: This menu item appears only when a flash memory or hard disk is
installed.
Accounting Log Frequency
Daily
Weekly
Monthly*
Specify how often the printer creates a log file.
Log Action at End of Frequency
None*
E‑mail Current Log
E‑mail & Delete Current Log
Post Current Log
Post & Delete Current Log
Specify how the printer responds when the frequency threshold expires.
Note: The value defined in Accounting Log Frequency determines when this
action is triggered.
Log Action at Near Full
None*
E‑mail Current Log
E‑mail & Delete Current Log
E‑mail & Delete Oldest Log
Post Current Log
Post & Delete Current Log
Post & Delete Oldest Log
Delete Current Log
Delete Oldest Log
Delete All But Current
Delete All Logs
Specify how the printer responds when the hard disk is nearly full.
Log Action at Full
None*
E‑mail & Delete Current Log
E‑mail & Delete Oldest Log
Post & Delete Current Log
Post & Delete Oldest Log
Delete Current Log
Delete Oldest Log
Delete All But Current
Delete All Logs
Specify how the printer responds when hard disk usage reaches the maximum
limit (100MB).
URL to Post Log Specify where the printer posts job accounting logs.
E
‑mail Address to Send Logs Specify the e‑mail address to which the printer sends job accounting logs.
Log File Prefix Specify the prefix for the log files.
Note: The current host name defined in the TCP/IP menu is used as the
default log
file
prefix.
Note: An asterisk (*) next to a value indicates the factory default setting.
Understanding the printer menus 52
XPS
Menu item Description
Print Error Pages
O*
On
Print a test page that contains information on errors.
Minimum Line Width
1–30 (2*)
Set the minimum stroke width of any job printed in 1200 dpi.
Note: An asterisk (*) next to a value indicates the factory default setting.
PDF
Menu item Description
Scale To Fit
O*
On
Scale the page content to fit the selected paper size.
Annotations
Print
Do Not Print*
Specify whether to print annotations in the PDF.
Print PDF Error
O
On*
Enable the printing of PDF error.
Note: An asterisk (*) next to a value indicates the factory default setting.
PostScript
Menu item Description
Print PS Error
O*
On
Print a page that describes the PostScript® error.
Note: When an error occurs, processing of the job stops, the printer
prints an error message, and the rest of the print job is flushed.
Minimum Line Width
1–30 (2*)
Set the minimum stroke width.
Note: Jobs printed in 1200 dpi use the value directly.
Lock PS Startup Mode
O
On*
Disable the SysStart file.
Note: An asterisk (*) next to a value indicates the factory default setting.
Understanding the printer menus 53
Menu item Description
Font Priority
Resident*
Flash/Disk
Establish the font search order.
Notes:
• Resident sets the printer to search its memory for the requested font
before searching the flash memory or printer hard disk.
• Flash/Disk sets the printer to search the flash memory or printer hard
disk for the requested font before searching the printer memory.
• This menu item appears only when a flash memory or hard disk is
installed.
Wait Timeout
O
On* (40 seconds)
Enable the printer to wait for more data before canceling a print job.
Note: An asterisk (*) next to a value indicates the factory default setting.
PCL
Menu item Description
Font Source
Resident*
Disk
Download
Flash
All
Select the source which contains the default font selection.
Notes:
• Disk and Flash appear only when a non‑defective, non‑protected
hard disk or flash memory is installed.
• Download appears only if downloaded fonts exist in the printer
memory.
Font Name
[List of available fonts] (Courier*)
Select a font from the specified font source.
Symbol Set
[List of available symbol set] (10U
PC‑8*)
Specify the symbol set for each font name.
Note: A symbol set is a set of alphabetic and numeric characters,
punctuation, and special symbols. Symbol sets support the dierent
languages or specific programs such as math symbols for scientific text.
Pitch
0.08–100.00 (10.00*)
Specify the pitch for fixed or monospaced fonts.
Note: Pitch refers to the number of fixed‑space characters in a horizontal
inch of type.
Orientation
Portrait*
Landscape
Reverse Portrait
Reverse Landscape
Specify the orientation of text and graphics on the page.
Note: An asterisk (*) next to a value indicates the factory default setting.
Understanding the printer menus 54
Menu item Description
Lines per Page
1–255 (60*)
Specify the number of lines of text for each page printed through the PCL®
data stream.
Notes:
• This menu item activates vertical escapement that causes the
selected number of requested lines to print between the default
margins of the page.
• 60 is the U.S. factory default setting. 64 is the international factory
default setting.
PCL5 Minimum Line Width
1–30 (2*)
Set the initial minimum stroke width.
PCLXL Minimum Line Width
1–30 (2*)
A4 Width
198 mm*
203 mm
Set the width of the logical page on A4‑size paper.
Note: Logical page is the space on the physical page where data is
printed.
Auto CR after LF
On
O*
Set the printer to perform a carriage return after a line feed control
command.
Note: Carriage return is a mechanism that commands the printer to move
the position of the cursor to the first position on the same line.
Auto LF after CR
On
O*
Set the printer to perform a line feed after a carriage return control
command.
Tray Renumber
Assign Tray [x]
Configure the printer to work with a dierent print driver or custom
application that uses a dierent set of source assignments to request a
given paper source.
Tray Renumber
View Factory Defaults
Show the factory default value assigned for each paper source.
Tray Renumber
Restore Defaults
Return all tray assignments to factory default values.
Print Timeout
O
On* (90 seconds)
Set the printer to end a print job after it has been idle for the specified
amount of time.
Note: An asterisk (*) next to a value indicates the factory default setting.
HTML
Menu item Description
Font Name
Times*
Set the font to use when printing HTML documents.
Note: An asterisk (*) next to a value indicates the factory default setting.
Understanding the printer menus 55

Menu item Description
Font Size
1–255 (12*)
Set the font size to use when printing HTML documents.
Scale
1–400% (100*)
Scale HTML documents for printing.
Orientation
Portrait*
Landscape
Set the page orientation for HTML documents.
Margin Size
8–255 mm (19*)
Set the page margin for HTML documents.
Backgrounds
Do Not Print
Print*
Print background information or graphics in HTML documents.
Note: An asterisk (*) next to a value indicates the factory default setting.
Image
Menu item Description
Auto Fit
On
O*
Select the best available paper size and orientation setting for an image.
Note: When set to On, this menu item overrides the scaling and orientation
settings for the image.
Invert
O*
On
Invert bitonal monochrome images.
Note: This menu item does not apply to GIF or JPEG image formats.
Scaling
Anchor Top Left
Best Fit*
Anchor Center
Fit Height/Width
Fit Height
Fit Width
Adjust the image to fit the printable area.
Note: When Auto Fit is set to On, Scaling is automatically set to Best Fit.
Orientation
Portrait*
Landscape
Reverse Portrait
Reverse Landscape
Specify the orientation of text and graphics on the page.
Note: An asterisk (*) next to a value indicates the factory default setting.
Understanding the printer menus 56

Paper
Tray Configuration
Menu item Description
Default Source
Tray [x] (1*)
Multipurpose Feeder
Manual Paper
Manual Envelope
Set the paper source for all print jobs.
Paper Size/Type
Tray [x]
Multipurpose Feeder
Manual Paper
Manual Envelope
Specify the paper size or paper type loaded in each paper source.
Substitute Size
O
Statement/A5
Letter/A4
All Listed*
Set the printer to substitute a specified paper size if the requested size is not
loaded in any paper source.
Notes:
•
O
prompts the user to load the required paper size.
• Statement/A5 prints A5‑size document on statement when loading
statement and statement‑size jobs on A5 paper size when loading A5.
• Letter/A4 prints A4‑size document on letter when loading letter and
letter‑size jobs on A4 paper size when loading letter.
• All Listed substitutes Letter/A4.
Configure MP
Cassette*
Manual
First
Determine the behavior of the multipurpose feeder.
Notes:
• Cassette configures the multipurpose feeder as the automatic paper
source.
• Manual sets the multipurpose feeder only for manual-feed print jobs.
• First configures the multipurpose feeder as the primary paper source.
Note: An asterisk (*) next to a value indicates the factory default setting.
Media Configuration menu
Universal Setup
Menu item Description
Units of Measure
Inches
Millimeters
Specify the unit of measurement for the universal paper.
Note: Inches is the U.S. factory default setting. Millimeters is the
international factory default setting.
Note: An asterisk (*) next to a value indicates the factory default setting.
Understanding the printer menus 57
Menu item Description
Portrait Width
3.00–14.17 inches (8.50*)
76–360 mm (216*)
Set the portrait width of the universal paper.
Portrait Height
3.00–14.17 inches (14*)
76–360 mm (356*)
Set the portrait height of the universal paper.
Feed Direction
Short Edge*
Long Edge
Set the printer to pick paper from the short edge or long edge
direction.
Note: Long Edge appears only when the longest edge is shorter
than the maximum width supported.
Note: An asterisk (*) next to a value indicates the factory default setting.
Media Types
Menu item Description
Plain
Transparency
Recycled
Labels
Bond
Envelope
Letterhead
Preprinted
Colored Paper
Light
Heavy
Custom Type [X]
Specify the texture, weight, and orientation of the paper loaded.
USB Drive
Flash Drive Print
Menu item Description
Number of Copies
1–9999 (1*)
Set the number of copies.
Paper Source
Tray [x] (1*)
Multipurpose Feeder
Manual Paper
Manual Envelope
Set the paper source for the print job.
Note: An asterisk (*) next to a value indicates the factory default setting.
Understanding the printer menus 58

Menu item Description
Collate
(1,1,1) (2,2,2)
(1,2,3) (1,2,3)*
Keep the pages of a print job stacked in sequence, particularly when printing multiple
copies of the job.
Sides
1‑Sided*
2‑Sided
Specify whether to print on one side or both sides of the paper.
Flip Style
Long Edge*
Short Edge
Determine which side of the paper is bound when performing two‑sided printing.
Pages per Side
O*
2 pages per side
3 pages per side
4 pages per side
6 pages per side
9 pages per side
12 pages per side
16 pages per side
Print multiple page images on one side of a sheet of paper.
Pages per Side Ordering
Horizontal*
Reverse Horizontal
Reverse Vertical
Vertical
Specify the positioning of multiple page images when using Pages per Side menu.
Pages per Side Orientation
Auto*
Landscape
Portrait
Specify the orientation of multiple page images when using Pages per Side menu.
Pages per Side Border
None*
Solid
Print a border around each page image when using Pages per Side menu.
Separator Sheets
O*
Between Copies
Between Jobs
Between Pages
Insert blank separator sheets when printing.
Separator Sheet Source
Tray [x] (1*)
Multipurpose Feeder
Specify the paper source for the separator sheet.
Blank Pages
Do Not Print*
Print
Print blank pages in a print job.
Note: An asterisk (*) next to a value indicates the factory default setting.
Understanding the printer menus 59
Network/Ports
Network Overview
Menu item Description
Active Adapter
Auto*
Standard Network
Wireless
Specify the type of the network connection.
Note: Wireless is available only in printers connected to a wireless network.
Network Status Show the connectivity status of the printer network.
Display Network Status on
Printer
O
On*
Show the network status on the display.
Speed, Duplex Show the speed of the currently active network card.
IPv4 Show the IPv4 address.
All IPv6 Addresses Show all IPv6 addresses.
Reset Print Server Reset all active network connections to the printer.
Note: This setting removes all network
configuration
settings.
Network Job Timeout
O
On* (90 seconds)
Set the time before the printer cancels a network print job.
Banner Page
O*
On
Print a banner page.
Enable Network Connections
O
On*
Enable the printer to connect to a network.
Enable LLDP
O*
On
Enable Link Layer Discovery Protocol (LLDP) in the printer.
Note: An asterisk (*) next to a value indicates the factory default setting.
Wireless
Note: This menu is available only in printers connected to a Wi‑Fi network or printers that have a wireless
network adapter.
Menu item Description
Setup Using Mobile App Configure the wireless connection using Lexmark
Mobile Assistant.
Understanding the printer menus 60

Menu item Description
Setup On Printer Panel
Choose Network
Add Wi‑Fi Network
Network Name
Network Mode (Infrastructure*)
Wireless Security Mode (Disabled*)
Configure the wireless connection using the control
panel.
Wi
‑Fi Protected Setup
Start Push Button Method
Start PIN Method
Establish a Wi‑Fi network and enable network security.
Enable Wi
‑Fi Direct
On
O*
Enable Wi-Fi Direct‑capable devices to connect to the
printer.
Compatibility
802.11b/g/n (2.4GHz)
802.11a/b/g/n/ac (2.4GHz/5GHz)*
802.11a/n/ac (5GHz)
Specify the standard for the Wi‑Fi network.
Wireless Security Mode
Disabled*
WEP
WPA2/WPA-Personal
WPA2-Personal
802.1x - RADIUS
Set the security mode for connecting the printer to Wi‑Fi
devices.
IPv4
Enable DHCP (On*)
Set Static IP Address
Configure the IPv4 settings.
IPv6
Enable IPv6 (On*)
Enable DHCPv6
(O*)
Stateless Address Autoconfiguration (On*)
DNS Server Address
Manually Assigned IPv6 Address
Manually Assigned IPv6 Router
Address
Prefix
(64*)
All IPv6 Addresses
All IPv6 Router Addresses
Configure the IPv6 settings.
Network Address Specify the network address.
PCL SmartSwitch
O
On*
Set the printer to switch automatically to PCL emulation
when a print job requires it, regardless of the default
printer language.
Note: When this setting is disabled, the printer does
not examine incoming data and uses the default printer
language specified in the Setup menu.
Understanding the printer menus 61
Menu item Description
PS SmartSwitch
O
On*
Set the printer to switch automatically to PostScript
emulation when a print job requires it, regardless of the
default printer language.
Note: When this setting is disabled, the printer does
not examine incoming data and uses the default printer
language specified in the Setup menu.
Job Buering
O*
On
Temporarily store print jobs on the hard disk before
printing.
Note: This menu item appears only when a hard disk is
installed.
Mac Binary PS
Auto*
On
O
Set the printer to process Macintosh binary PostScript
print jobs.
Notes:
• On processes raw binary PostScript print jobs.
• O filters print jobs using the standard protocol.
Ethernet
Menu item Description
Network Speed Show the speed of an active network adapter.
IPv4
Enable DHCP
O
On*
Enable Dynamic Host Configuration Protocol (DHCP).
Note: DHCP is a standard protocol that allows a server to distribute IP
addressing and configuration information dynamically to clients.
IPv4
Set Static IP Address
IP Address
Netmask
Gateway
Set the static IP address of your printer.
IPv6
Enable IPv6
O
On*
Enable IPv6 in the printer.
IPv6
Enable DHCPv6
O*
On
Enable DHCPv6 in the printer.
Note: An asterisk (*) next to a value indicates the factory default setting.
Understanding the printer menus 62

Menu item Description
IPv6
Stateless Address
Autoconfiguration
O
On*
Set the network adapter to accept the automatic IPv6 address configuration
entries provided by a router.
IPv6
DNS Server Address
Specify the DNS server address.
IPv6
Manually Assigned IPv6
Address
Assign the IPv6 address.
IPv6
Manually Assigned IPv6 Router
Assign the IPv6 address.
IPv6
Address
Prefix
0–128 (64*)
Specify the address prefix.
IPv6
All IPv6 Addresses
Show all IPv6 addresses.
IPv6
All IPv6 Router Addresses
Show all IPv6 router addresses.
Network Address
UAA
LAA
Show the printer Media Access Control (MAC) addresses: Locally Administered
Address (LAA) and Universally Administered Address (UAA).
Note: You can change the printer LAA manually.
PCL SmartSwitch
O
On*
Set the printer to switch automatically to PCL emulation when a print job
requires it, regardless of the default printer language.
Note: If PCL SmartSwitch is o, then the printer does not examine incoming
data and uses the default printer language specified in the Setup menu.
PS SmartSwitch
O
On*
Set the printer to switch automatically to PS emulation when a print job requires
it, regardless of the default printer language.
Note: If PS SmartSwitch is o, then the printer does not examine incoming
data and uses the default printer language specified in the Setup menu.
Job Buering
O
On*
Temporarily store jobs on the printer hard disk before printing.
Note: This menu item appears only when a hard disk is installed.
Mac Binary PS
Auto*
On
O
Set the printer to process Macintosh binary PostScript print jobs.
Notes:
• On processes raw binary PostScript print jobs.
• O filters print jobs using the standard protocol.
Energy Ecient Ethernet
O
On*
Reduce power consumption when the printer does not receive data from the
Ethernet network.
Note: An asterisk (*) next to a value indicates the factory default setting.
Understanding the printer menus 63
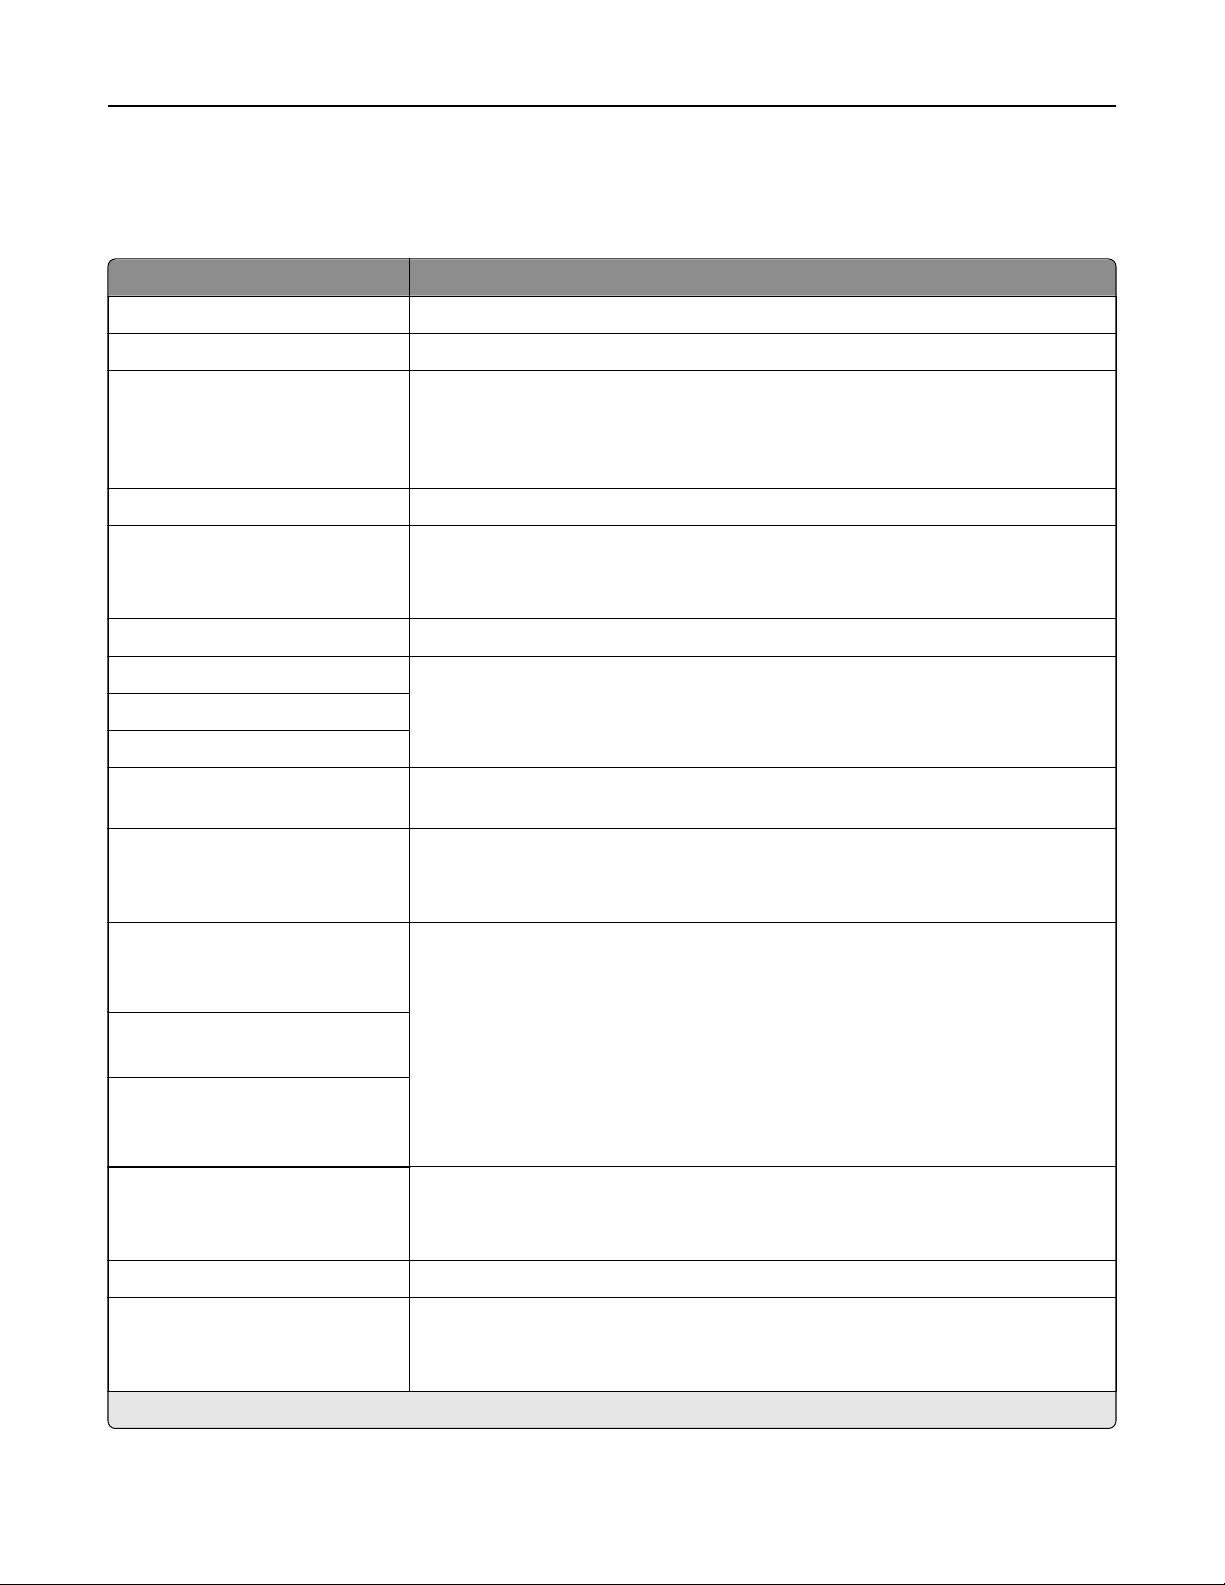
TCP/IP
Note: This menu appears only in network printers or printers attached to print servers.
Menu item Description
Set Hostname Set the current TCP/IP host name.
Domain Name Set the domain name.
Allow DHCP/BOOTP to update
NTP server
On*
O
Allow the DHCP and BOOTP clients to update the NTP settings of the printer.
Zero Configuration Name Specify a service name for the zero configuration network.
Enable Auto IP
On*
O
Assign an IP address automatically.
DNS Server Address Specify the current Domain Name System (DNS) server address.
Backup DNS Server Address Specify the backup DNS server addresses.
Backup DNS Server Address 2
Backup DNS Server Address 3
Domain Search Order Specify a list of domain names to locate the printer and its resources that reside
in dierent domains on the network.
Enable DDNS
O*
On
Update the Dynamic DNS settings.
DDNS TTL
300–31536000 seconds
(3600*)
Specify the current DDNS settings.
Default TTL
5–254 seconds (254*)
DDNS Refresh Time
300–31536000 seconds
(604800*)
Enable mDNS
On*
O
Update multicast DNS settings.
WINS Server Address Specify a server address for Windows Internet Name Service (WINS).
Enable BOOTP
O*
On
Allow the BOOTP to assign a printer IP address.
Note: An asterisk (*) next to a value indicates the factory default setting.
Understanding the printer menus 64

Menu item Description
Restricted Server List Specify an IP address for the TCP connections.
Notes:
• Use a comma to separate each IP address.
• You can add up to 50 IP addresses.
Restricted Server List Options
Block All Ports*
Block Printing Only
Block Printing and HTTP Only
Specify how the IP addresses in the list can access the printer functionality.
MTU
256–1500 (1500*)
Specify a maximum transmission unit (MTU) parameter for the TCP connections.
Raw Print Port
1–65535 (9100*)
Specify a raw port number for printers connected on a network.
Outbound Trac Maximum
Speed
Disabled*
Enabled
100–1000000 (100000*)
Enable the printer maximum transfer rate.
Enable TLSv1.0
On*
O
Enable the TLSv1.0 protocol.
Enable TLSv1.1
On*
O
Enable the TLSv1.1 protocol.
SSL Cipher List Specify the cipher algorithms to use for the SSL or the TLS connections.
Note: An asterisk (*) next to a value indicates the factory default setting.
SNMP
Note: This menu appears only in network printers or printers that are attached to print servers.
Understanding the printer menus 65

Menu item Description
SNMP Versions 1 and 2c
Enabled
O
On*
Allow SNMP Set
O
On*
Enable PPM MIB
O
On*
SNMP Community
Configure Simple Network Management Protocol (SNMP) versions 1
and 2c to install print drivers and applications.
SNMP Version 3
Enabled
O
On*
Context Name
Set Read/Write Credentials
User Name
Authentication Password
Privacy Password
Set Read‑only Credentials
User Name
Authentication Password
Privacy Password
Authentication Hash
MD5
SHA1*
Minimum Authentication Level
No Authentication, No Privacy
Authentication, No Privacy
Authentication, Privacy*
Privacy Algorithm
DES
AES‑128*
Configure SNMP version 3 to install and update the printer security.
Note: An asterisk (*) next to a value indicates the factory default setting.
IPSec
Note: This menu appears only in network printers or printers that are attached to print servers.
Understanding the printer menus 66

Menu item Description
Enable IPSec
O*
On
Enable Internet Protocol Security (IPSec).
Base Configuration
Default*
Compatibility
Secure
Set the IPSec base configuration.
Note: This menu item appears only when Enable IPSec is set to
On.
DH (Die
‑Hellman) Group Proposal
modp2048 (14)*
modp3072 (15)
modp4096 (16)
modp6144 (17)
Set the IPSec base configuration.
Note: This menu item appears only when Base
Configuration
is set
to Compatibility.
Proposed Encryption Method
3DES
AES*
Set the encryption method.
Note: This menu item appears only when Base Configuration is set
to Compatibility.
Proposed Authentication Method
SHA1
SHA256*
SHA512
Set the authentication method.
Note: This menu item appears only when Base
Configuration
is set
to Compatibility.
IKE SA Lifetime (Hours)
1
2
4
8
24*
Specify the IKE SA expiry period.
Note: This menu item appears only when Base
Configuration
is set
to Secure.
IPSec SA Lifetime (Hours)
1
2
4
8*
24
Specify the IPSec SA expiry period.
Note: This menu item appears only when Base Configuration is set
to Secure.
IPSec Device Certificate Specify an IPSec certificate.
Note: This menu item appears only when Enable IPSec is set to
On.
Pre
‑Shared Key Authenticated
Connections
Host [x]
Configure the authenticated connections of the printer.
Note: These menu items appear only when Enable IPSec is set to
On.
Certificate Authenticated Connections
Host [x] Address[/subnet]
Note: An asterisk (*) next to a value indicates the factory default setting.
Understanding the printer menus 67
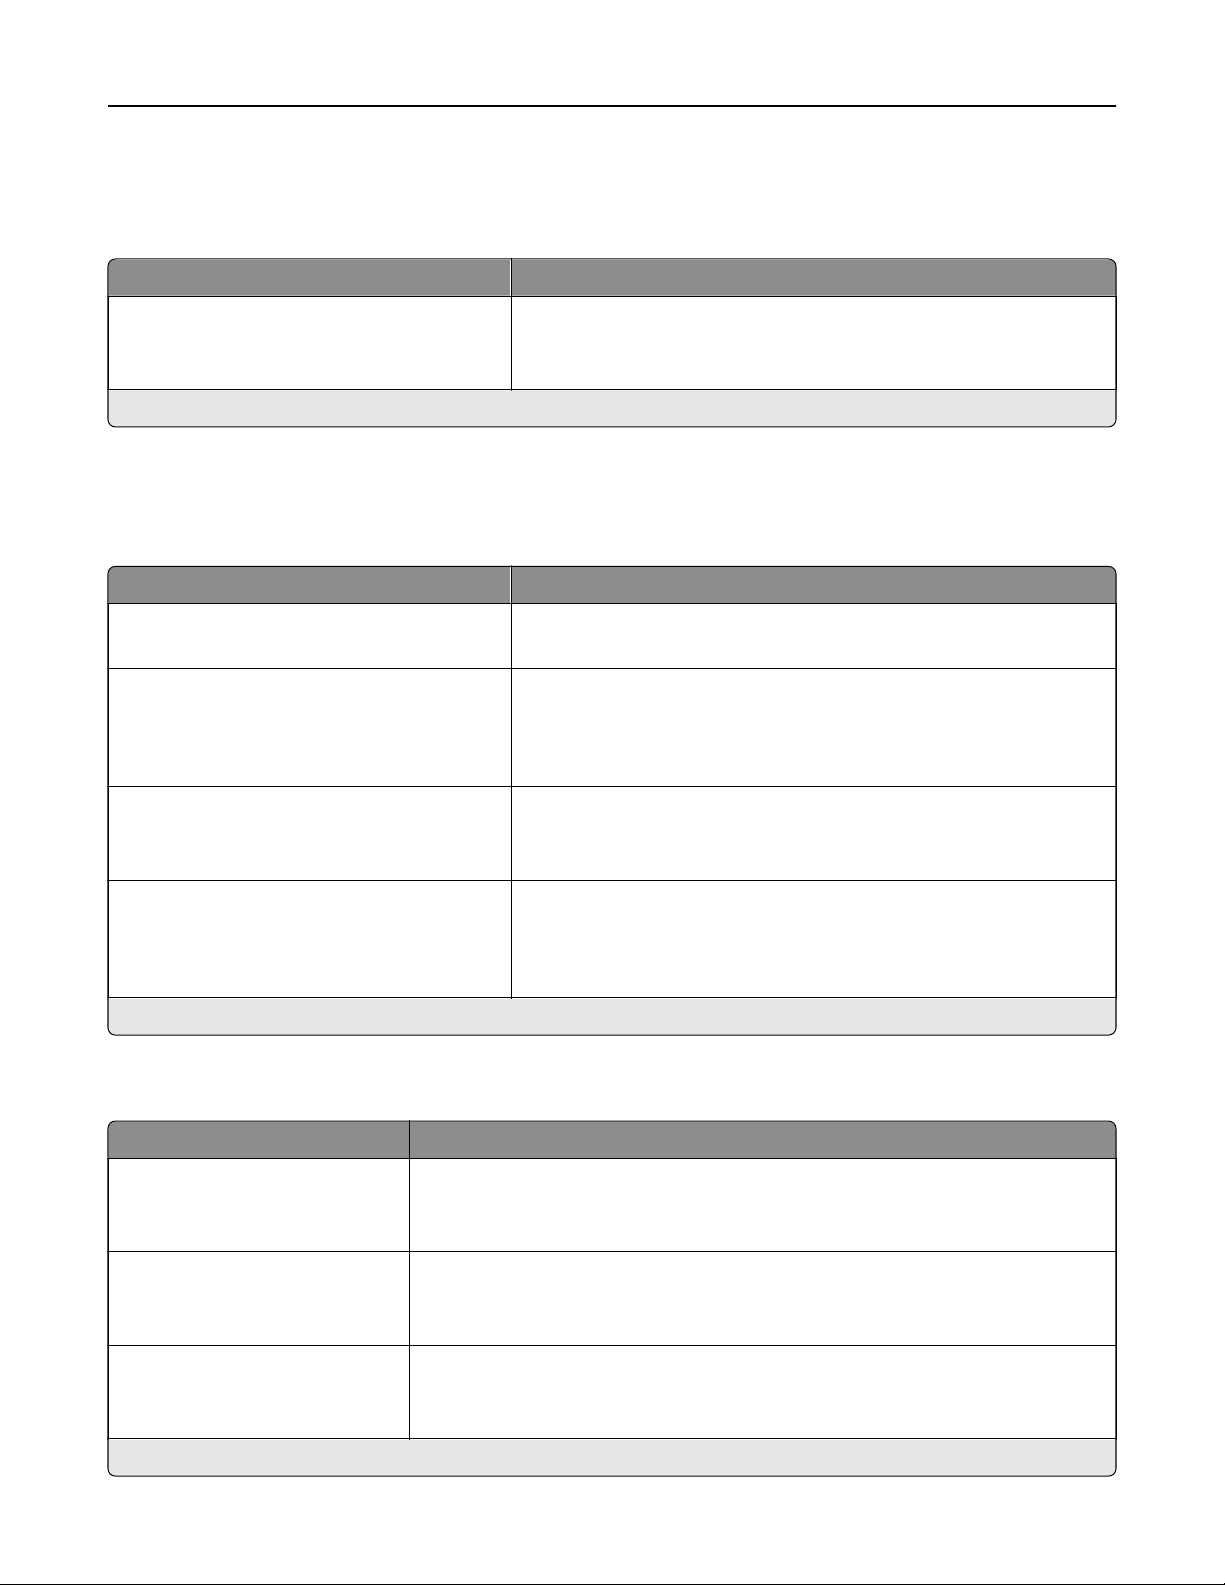
802.1x
Note: This menu appears only in network printers or printers that are attached to print servers.
Menu item Description
Active
O*
On
Let the printer join networks that require authentication before
allowing access.
Note: An asterisk (*) next to a value indicates the factory default setting.
LPD Configuration
Note: This menu appears only in network printers or printers that are attached to print servers.
Menu item Description
LPD Timeout
0–65535 seconds (90*)
Set the time‑out value to stop the Line Printer Daemon (LPD) server
from waiting indefinitely for hung or invalid print jobs.
LPD Banner Page
O*
On
Print a banner page for all LPD print jobs.
Note: A banner page is the first page of a print job used as a
separator of print jobs and to identify the originator of the print job
request.
LPD Trailer Page
O*
On
Print a trailer page for all LPD print jobs.
Note: A trailer page is the last page of a print job.
LPD Carriage Return Conversion
O*
On
Enable carriage return conversion.
Note: Carriage return is a mechanism that commands the printer to
move the position of the cursor to the first position on the same
line.
Note: An asterisk (*) next to a value indicates the factory default setting.
HTTP/FTP Settings
Menu item Description
Enable HTTP Server
O
On*
Access the Embedded Web Server to monitor and manage the printer.
Enable HTTPS
O
On*
Enable Hypertext Transfer Protocol Secure (HTTPS) to encrypt data transferring
to and from the print server.
Force HTTPS Connections
On
O*
Force the printer to use HTTPS connections.
Note: An asterisk (*) next to a value indicates the factory default setting.
Understanding the printer menus 68
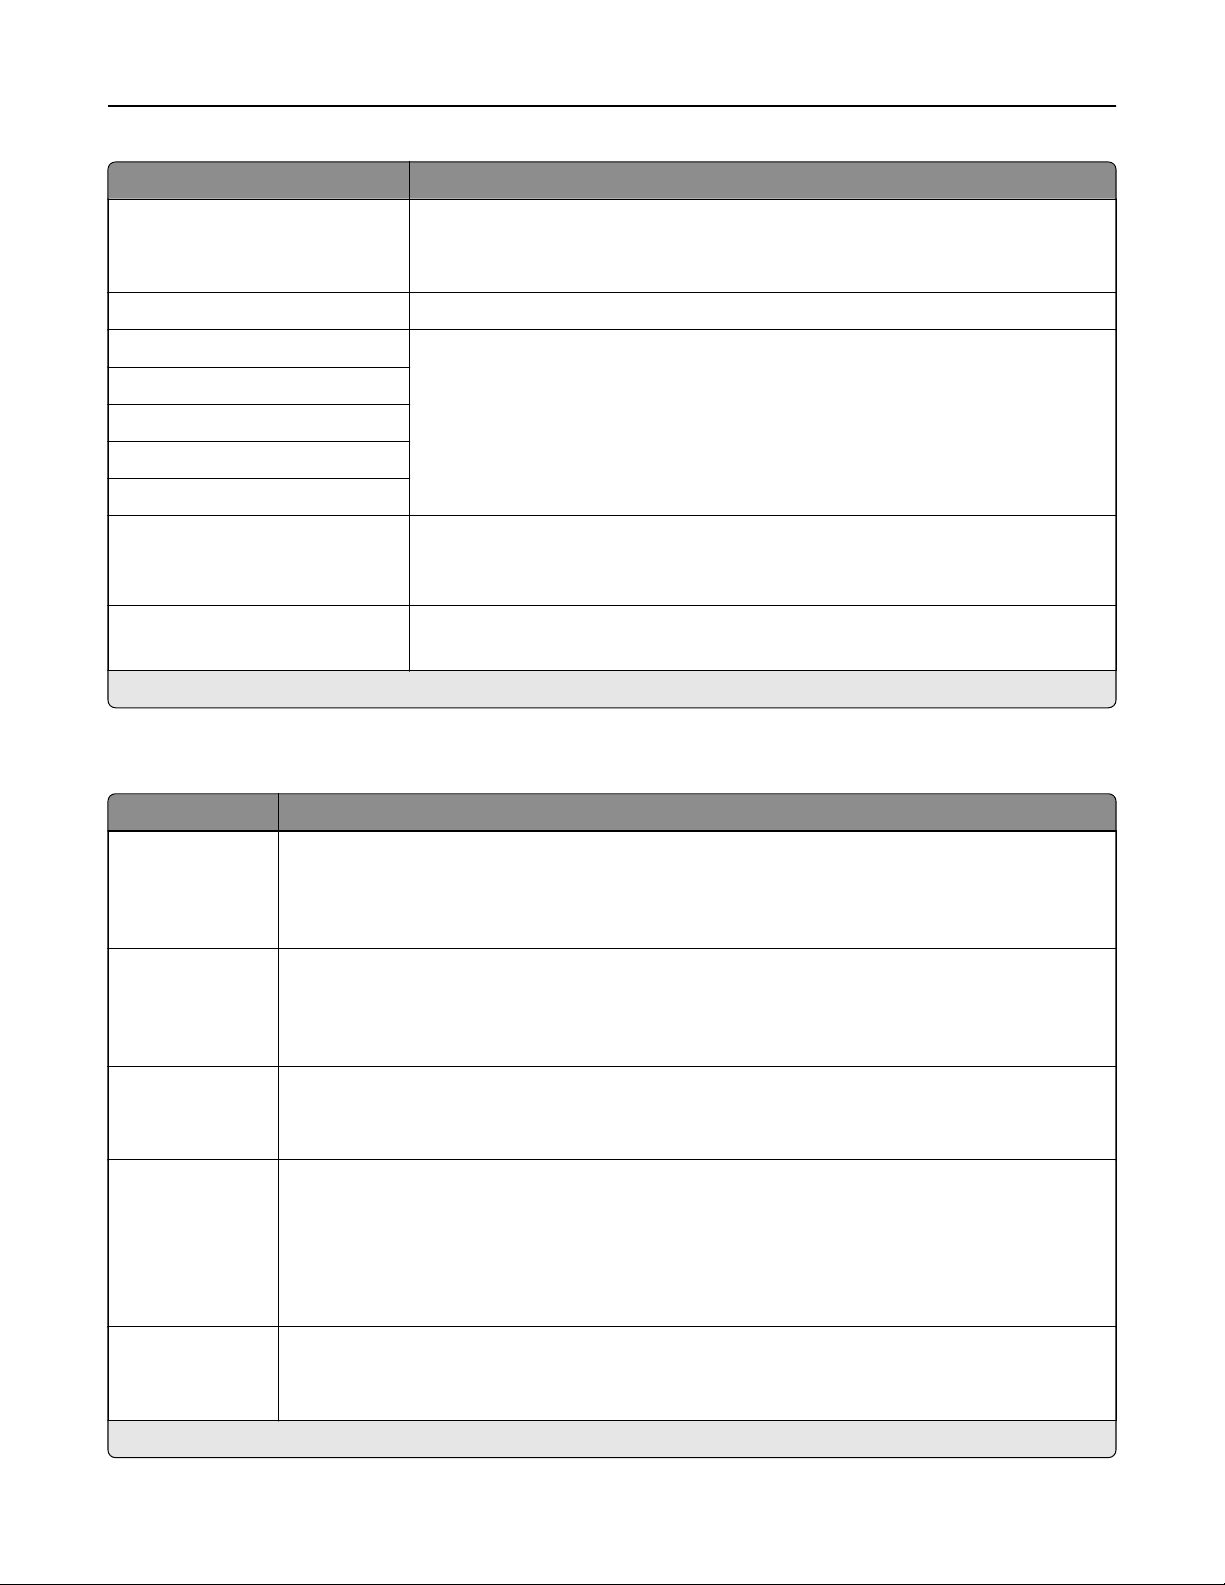
Menu item Description
Enable FTP/TFTP
O
On*
Send files using FTP/TFTP.
Local Domains Specify domain names for HTTP and FTP servers.
HTTP Proxy IP Address Configure the HTTP and FTP server settings.
FTP Proxy IP Address
HTTP Default IP Port
HTTPS Device Certificate
FTP Default IP Port
Timeout for HTTP/FTP
Requests
1–299 (30*)
Specify the amount of time before the server connection stops.
Retries for HTTP/FTP Requests
1–299 (3*)
Set the number of retries to connect to the HTTP/FTP server.
Note: An asterisk (*) next to a value indicates the factory default setting.
USB
Menu item Description
PCL SmartSwitch
O
On*
Set the printer to switch to PCL emulation when a print job received through a USB port requires
it, regardless of the default printer language.
Note: When this setting is disabled, the printer does not examine incoming data and uses the
default printer language specified in the Setup menu.
PS SmartSwitch
O
On*
Set the printer to switch to PostScript emulation when a print job received through a USB port
requires it, regardless of the default printer language.
Note: When this setting is disabled, the printer does not examine incoming data and uses the
default printer language specified in the Setup menu.
Job Buering
O*
On
Temporarily store jobs on the hard disk before printing.
Note: This menu item appears only when a hard disk is installed.
Mac Binary PS
Auto*
On
O
Set the printer to process Macintosh binary PostScript print jobs.
Notes:
• Auto processes print jobs from computers using either Windows or Macintosh operating
systems.
• O filters PostScript print jobs using the standard protocol.
Enable USB Port
O
On*
Enable the front USB drive port.
Note: An asterisk (*) next to a value indicates the factory default setting.
Understanding the printer menus 69
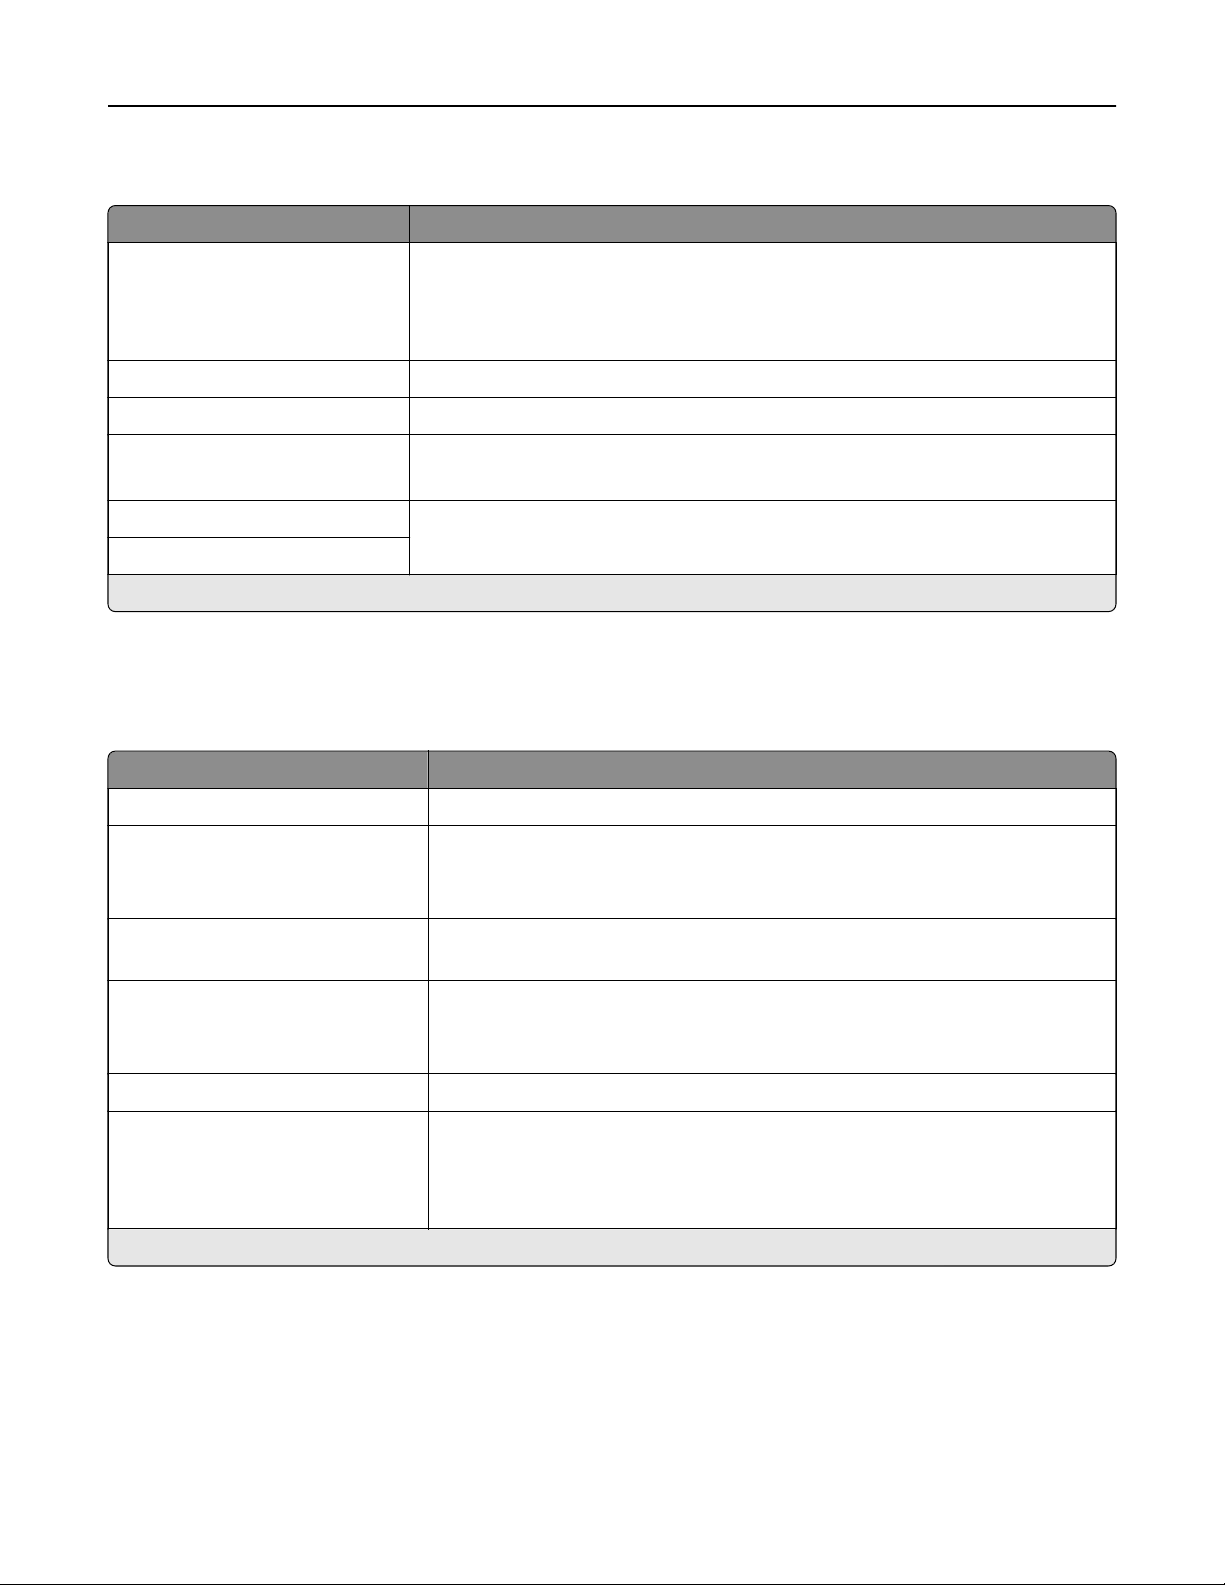
Restrict external network access
Menu item Description
Restrict external network
access
O*
On
Restrict access to network sites.
External network address Specify the network addresses with restricted access.
E
‑mail address for notification Specify an e‑mail address to send a notification of logged events.
Ping frequency
1–300 (10*)
Specify the network query interval in seconds.
Subject Specify the subject and message of the notification e‑mail.
Message
Note: An asterisk (*) next to a value indicates the factory default setting.
Wi‑Fi Direct
Note: This menu appears only when a direct Wi‑Fi network is the active network.
Menu item Description
SSID Specify the service set identifier (SSID) of the Wi‑Fi network.
Preferred Channel Number
Auto
1–11 (6*)
Show the PSK on the Network Setup Page.
Set PSK Set the preshared key (PSK) to authenticate and validate users on a Wi‑Fi
connection.
Show PSK on Setup Page
O
On*
Show the PSK on the Network Setup Page.
Group Owner IP Address Specify the IP address of the group owner.
Auto
‑Accept Push Button
Requests
O*
On
Accept requests to connect to the network automatically.
Note: Accepting clients automatically is not secure.
Note: An asterisk (*) next to a value indicates the factory default setting.
Understanding the printer menus 70

Security
Login Methods
Manage Permissions
Menu item Description
Function Access
Modify Address Book
Manage Shortcuts
Create Profiles
Manage Bookmarks
Flash Drive Print
Held Jobs Access
Use Profiles
Cancel Jobs at the Device
Change Language
Internet Printing Protocol (IPP)
B/W Print
Network Folder – Scan
Control access to the printer functions.
Administrative Menus
Security Menu
Network/Ports Menu
Paper Menu
Reports Menu
Function Configuration Menus
Supplies Menu
Option Card Menu
SE Menu
Device Menu
Control access to the printer menu settings.
Device Management
Remote Management
Firmware Updates
Apps Configuration
Embedded Web Server Access
Import / Export All Settings
Out of Service Erase
Control access to the printer management options.
Apps
New Apps
Slideshow
Change Wallpaper
Screen Saver
Eco–Settings
Control access to printer applications.
Understanding the printer menus 71
Local Accounts
Menu item Description
Manage Groups/Permissions Show a list of all saved groups in the printer.
Add User
User Name/Password
User Name
Password
PIN
Create local accounts and specify their access to the printer functions,
administrative menus, printer management options, and applications.
Default Login Methods
Note: This menu appears only when you
configure
the settings in the Local Accounts menu.
Menu item Description
Control Panel
User Name/Password
User Name
Password
PIN
HELIOS LDAP
Kerberos
Specify the default login method to access the control panel.
Browser
User Name/Password
User Name
Password
PIN
HELIOS LDAP
Kerberos
Specify the default login method to access the browser.
Schedule USB Devices
Menu item Description
Schedules
Add New Schedule
Schedule access to the front USB port.
Security Audit Log
Menu item Description
Enable Audit
O*
On
Record the events in the secure audit log and remote syslog.
Note: An asterisk (*) next to a value indicates the factory default setting.
Understanding the printer menus 72

Menu item Description
Enable Remote Syslog
O*
On
Send audit logs to a remote server.
Remote Syslog Server Specify the remote syslog server.
Remote Syslog Port
1–65535 (514*)
Specify the remote syslog port.
Remote Syslog Method
Normal UDP*
Stunnel
Specify a syslog method to transmit logged events to a remote server.
Remote Syslog Facility
0 ‑ Kernel Messages
1 ‑ User‑Level Messages
2 ‑ Mail System
3 ‑ System Daemons
4 ‑ Security/Authorization
Messages*
5 ‑ Messages Generated
Internally by Syslogs
6 ‑ Line Printer Subsystem
7 ‑ Network News Subsystem
8 ‑ UUCP Subsystem
9 ‑ Clock Daemon
10 ‑ Security/Authorization
Messages
11 ‑ FTP Daemon
12 ‑ NTP Subsystem
13 ‑ Log Audit
14 ‑ Log Alert
15 ‑ Clock Daemon
16 ‑ Local Use 0 (local0)
17‑ Local Use 1 (local1)
18 ‑ Local Use 2 (local2)
19 ‑ Local Use 3 (local3)
20 ‑ Local Use 4 (local4)
21 ‑ Local Use 5 (local5)
22 ‑ Local Use 6 (local6)
23 ‑ Local Use 7 (local7)
Specify a facility code that the printer uses when sending log events to a remote
server.
Note: An asterisk (*) next to a value indicates the factory default setting.
Understanding the printer menus 73

Menu item Description
Severity of Events to Log
0 ‑ Emergency
1 ‑ Alert
2 ‑ Critical
3 ‑ Error
4 ‑ Warning*
5 ‑ Notice
6 ‑ Informational
7 ‑ Debug
Specify the priority level cuto for logging messages and events.
Remote Syslog Non
‑Logged
Events
O*
On
Send all events, regardless of severity level, to the remote server.
Admin’s E
‑mail Address Send e‑mail notification of logged events to the administrator.
E
‑mail Log Cleared Alert
O*
On
Send e‑mail notification to the administrator when a log entry is deleted.
E
‑mail Log Wrapped Alert
O*
On
Send e‑mail notification to the administrator when the log becomes full and
begins to overwrite the oldest entries.
Log Full Behavior
Wrap Over Older Entries*
E‑mail Log Then Delete All
Entries
Resolve log storage issues when the log fills its allotted memory.
E
‑mail % Full Alert
O*
On
Send e‑mail notification to the administrator when the log fills its allotted
memory.
% Full Alert Level
1–99 (90*)
E
‑mail Log Exported Alert
O*
On
Send e‑mail notification to the administrator when a log is exported.
E
‑mail Log Settings Changed
Alert
O*
On
Send e‑mail notification to the administrator when Enable Audit is set.
Log Line Endings
LF (\n)*
CR (\r)
CRLF (\r\n)
Specify how the log file terminates the end of each line.
Note: An asterisk (*) next to a value indicates the factory default setting.
Understanding the printer menus 74
Menu item Description
Digitally Sign Exports
O*
On
Add a digital signature to each exported log file.
Clear Log Delete all audit logs.
Export Log
Syslog (RFC 5424)
Syslog (RFC 3164)
CSV
Export a security log to a flash drive.
Note: An asterisk (*) next to a value indicates the factory default setting.
Login Restrictions
Menu item Description
Login failures
1–10 (3*)
Specify the number of failed login attempts before the user gets locked out.
Failure time frame
1–60 minutes (5*)
Specify the time frame between failed login attempts before the user gets locked out.
Lockout time
1–60 minutes (5*)
Specify the lockout duration.
Web Login Timeout
1–120 minutes (10*)
Specify the delay for a remote login before the user is logged o automatically.
Note: An asterisk (*) next to a value indicates the factory default setting.
Confidential Print Setup
Menu item Description
Max Invalid PIN
2–10
Set the number of times an invalid PIN can be entered.
Notes:
• A value of zero turns o this setting.
• When the limit is reached, the print jobs for that user name and PIN are
deleted.
Confidential Job Expiration
O*
1 Hour
4 Hours
24 Hours
1 Week
Set the expiration time for confidential print jobs.
Notes:
• If this menu item is changed while confidential print jobs reside in the printer
memory or hard disk, then the expiration time for those print jobs does not
change to the new default value.
• If the printer is turned o, then all confidential jobs held in the printer memory
are deleted.
Note: An asterisk (*) next to a value indicates the factory default setting.
Understanding the printer menus 75
Menu item Description
Repeat Job Expiration
O*
1 Hour
4 Hours
24 Hours
1 Week
Set the expiration time for a print job that you want to repeat.
Verify Job Expiration
O*
1 Hour
4 Hours
24 Hours
1 Week
Set the expiration time that the printer prints a copy for the user to examine its quality,
before printing the remaining copies.
Reserve Job Expiration
O*
1 Hour
4 Hours
24 Hours
1 Week
Set the expiration time that the printer stores print jobs for printing later.
Require All Jobs to be Held
O*
On
Set the printer to hold all print jobs.
Keep duplicate documents
O*
On
Set the printer to print other documents with the same file name without overwriting
any of the print jobs.
Note: An asterisk (*) next to a value indicates the factory default setting.
Disk Encryption
Note: This menu appears only when a hard disk is installed.
Menu item Description
Status
Enabled
Disabled
Enable disk encryption.
Start encryption
Understanding the printer menus 76

Erase Temporary Data Files
Menu item Description
Stored in onboard memory
O*
On
Delete all files stored on the printer memory.
Note: An asterisk (*) next to a value indicates the factory default setting.
Solutions LDAP Settings
Menu item Description
Follow LDAP Referrals
O*
On
Search the dierent servers in the domain for the logged-in user account.
LDAP Certificate Verification
Ye s
No*
Enable verification of LDAP certificates.
Mobile Services Management
Use To
AirPrint
Print
Scan
Fax
Enable functions in the AirPrint software feature.
Miscellaneous
Menu item Description
Protected Features
Show*
Hide
Show all the features that Function Access Control (FAC) protects regardless
of the security permission that the user has.
Note: Hide displays only FAC‑protected features that the user has access.
Print Permission
O*
On
Let the user log in before printing.
Default Print Permission Login
User Name/Password*
User Name
Set the default login for Print Permission.
Note: An asterisk (*) next to a value indicates the factory default setting.
Understanding the printer menus 77
Menu item Description
Security Reset Jumper
Enable “Guest” access*
No
Eect
Specify user access to the printer.
Notes:
• The jumper is located beside a lock icon on the controller board.
• Enable “Guest” access provides anyone access to all aspects of the
printer.
• No Eect may make access to the printer impossible when the required
security information is unavailable.
Minimum Password Length
0–32
Specify the password length.
Note: An asterisk (*) next to a value indicates the factory default setting.
Reports
Menu Settings Page
Menu item Description
Menu Settings Page Print a report that contains the printer menus.
Device
Menu item Description
Device Information Print a report that contains information about the printer.
Device Statistics Print a report about printer usage and supply status.
Profiles List Print a list of profiles that are stored in the printer.
Asset Report Print a report that contains the printer serial number and model name.
Print
Menu item Description
Print Fonts
PCL Fonts
PS Fonts
Print samples and information about the fonts that are available in each printer
language.
Print Demo
Demo Page
Print a page that shows the printer capabilities and supported solutions.
Print Directory Print the resources that are stored in the flash drive or printer hard disk.
Note: This menu item appears only when a
flash
drive or printer hard disk is
installed.
Understanding the printer menus 78

Network
Menu item Description
Network Setup Page Print a page that shows the configured network and wireless settings on the
printer.
Note: This menu item appears only in network printers or printers connected
to print servers.
Wi
‑Fi Direct Connected Clients Print a page that shows the list of devices that are connected to the printer using
Wi‑Fi Direct.
Note: This menu item appears only when Enable Wi‑Fi Direct is set to On.
Help
Menu item Description
Print All Guides Prints all the guides
Connection Guide Provides information about connecting the printer locally (USB) or to a network
Information Guide Provides information about the printer
Media Guide Provides information about loading paper and specialty media
Mono Quality Guide Provides information about solving mono print quality settings
Moving Guide Provides information about moving, locating, or shipping the printer
Print Quality Guide Provides information about solving print quality issues
Supplies Guide Provides information about ordering supplies
Troubleshooting
Troubleshooting
Menu item Description
Print Quality Test Pages Print sample pages to identify and correct print quality defects.
Printing the Menu Settings Page
From the home screen, touch Settings > Reports > Menu Settings Page.
Understanding the printer menus 79
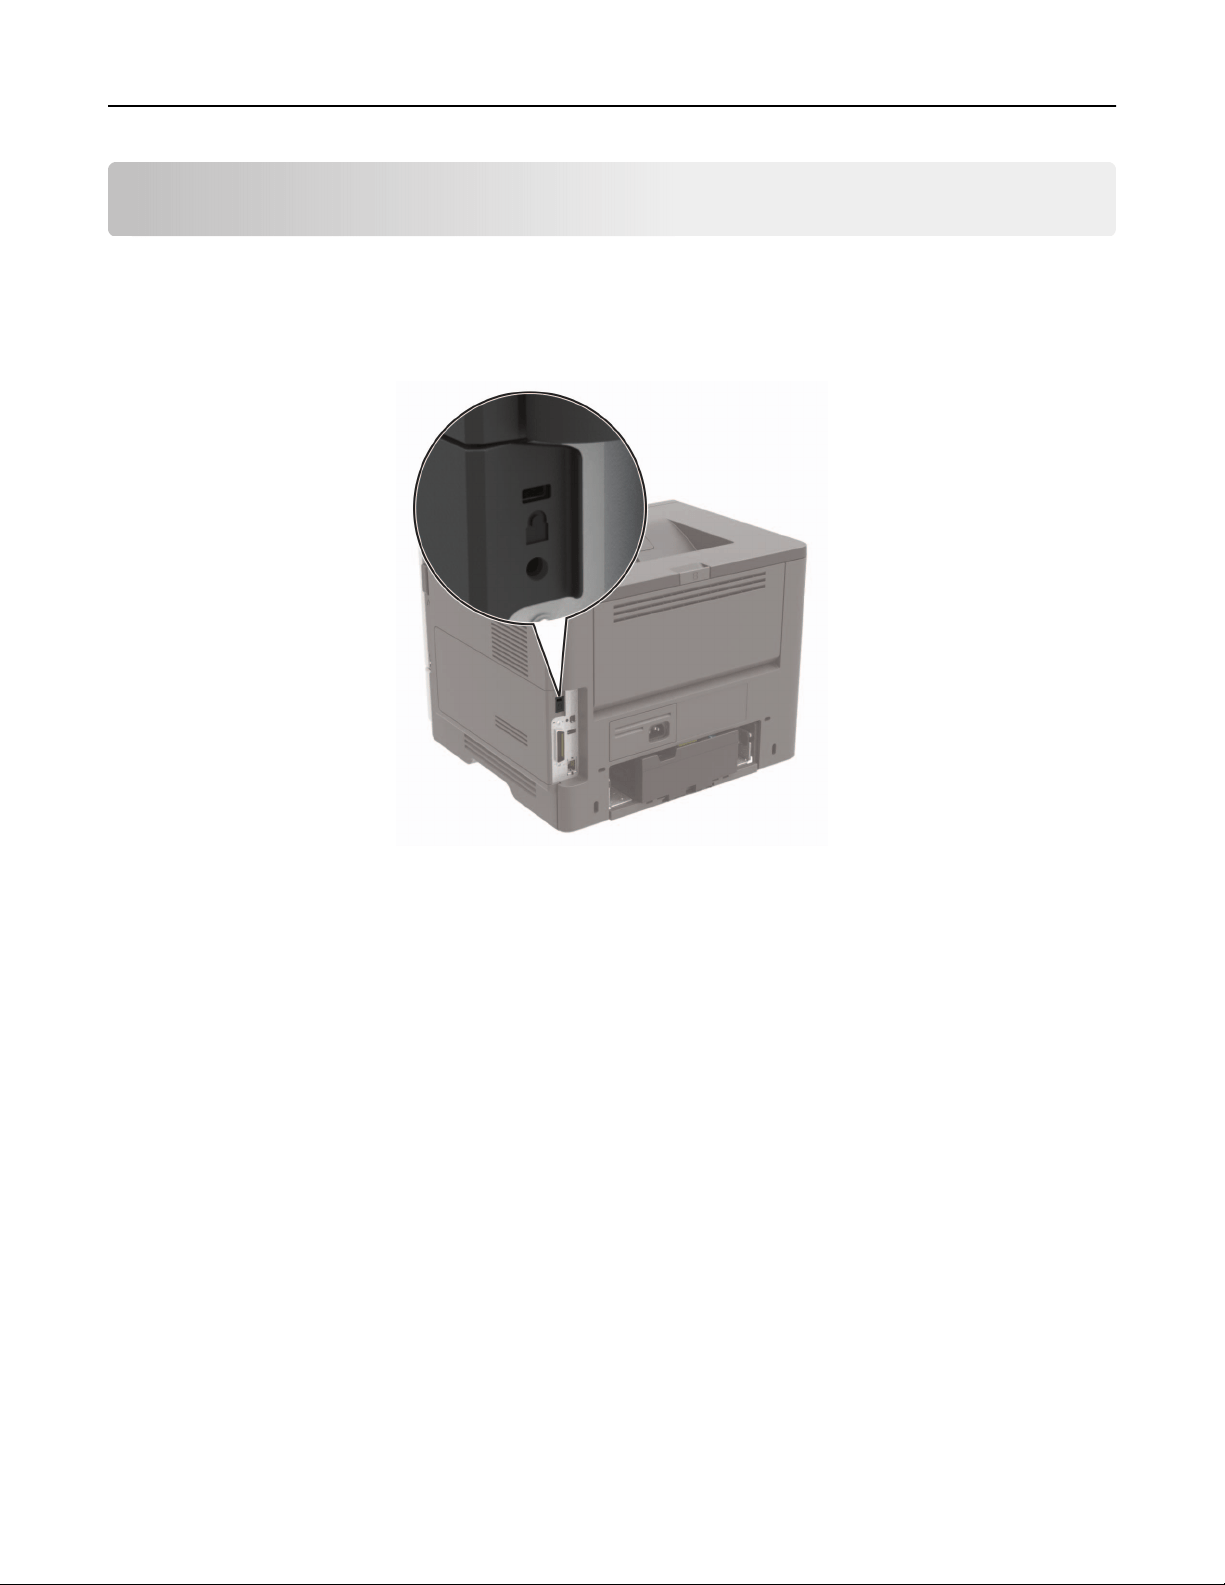
Securing the printer
Locating the security slot
The printer is equipped with a security lock feature. Attach a security lock compatible with most laptop
computers in the location shown to secure the printer in place.
Erasing printer memory
To erase volatile memory or buered data in your printer, turn o the printer.
To erase nonvolatile memory or individual settings, device and network settings, security settings, and
embedded solutions, do the following:
1 From the home screen, touch Settings > Device > Maintenance > Out of Service Erase.
2 Select the Sanitize all information on nonvolatile memory check box, and then touch ERASE.
3 Select Start initial setup wizard or Leave printer
oine
, and then touch Next.
4 Start the operation.
Erasing printer hard disk memory
1 From the home screen, touch Settings > Device > Maintenance > Out of Service Erase.
2 Select the Sanitize all information on hard disk check box, and then touch ERASE.
3 Select a method to erase data.
4 Start the operation.
Securing the printer 80

Note: This process can take from several minutes to more than an hour, making the printer unavailable for
other tasks.
Encrypting the printer hard disk
This process erases all contents in the hard disk. If necessary, back up important data from the printer before
starting the encryption.
1 From the home screen, touch Settings > Security > Disk Encryption > Start encryption.
2 Follow the instructions on the display.
Notes:
• To avoid loss of data, do not turn o the printer during the encryption process.
• This process can take from several minutes to more than an hour, making the printer unavailable for
other tasks.
• After encryption, the printer automatically restarts.
Restoring factory default settings
1 From the home screen, touch Settings > Device > Restore Factory Defaults.
2 To uc h Restore Settings > select the settings that you want to restore > RESTORE.
3 Start the operation.
Statement of Volatility
Type of memory Description
Volatile memory The printer uses standard random access memory (RAM)
to buer temporarily user data during simple print and
copy jobs.
Non-volatile memory The printer may use two forms of non-volatile memory:
EEPROM and NAND (flash memory). Both types are used
to store the operating system, printer settings, network
information, scanner and bookmark settings, and
embedded solutions.
Hard disk memory Some printers may have a hard disk drive installed. The
printer hard disk is designed for printer-specific
functionality. The hard disk lets the printer retain
buered
user data from complex print jobs, form data, and font
data.
Erase the content of any installed printer memory in the following circumstances:
• The printer is decommissioned.
• The printer hard disk is replaced.
• The printer is moved to a dierent department or location.
• The printer is serviced by someone from outside your organization.
Securing the printer 81

• The printer is removed from your premises for service.
• The printer is sold to another organization.
Disposing of a printer hard disk
• Degaussing—Flushes the hard disk with a magnetic field that erases stored data
• Crushing—Physically compresses the hard disk to break component parts and render them unreadable
• Milling—Physically shreds the hard disk into small metal bits
Note: To guarantee that all data are completely erased, destroy physically each hard disk where data is
stored.
Securing the printer 82

Maintaining the printer
Warning—Potential Damage: Failure to maintain optimum printer performance, or to replace parts and
supplies, may cause damage to your printer.
Setting up e
‑mail alerts
Configure
the printer to send e‑mail alerts when supplies are low, when paper must be changed or added, or
when there is a paper jam.
1 Open a web browser, and then type the printer IP address in the address field.
Notes:
• View the printer IP address on the printer home screen. The IP address appears as four sets of
numbers separated by periods, such as 123.123.123.123.
• If you are using a proxy server, then temporarily disable it to load the web page correctly.
2 Click Settings > Device > Notifications > E
‑mail Alert Setup, and then configure the settings.
Note: For more information on SMTP settings, contact your e‑mail provider.
3 Click Setup E-mail Lists and Alerts, and then configure the settings.
4 Apply the changes.
Adjusting the default headphone volume
1 From the control panel, navigate to:
Settings > Device > Accessibility
2 Adjust the headphone volume.
Note: The volume resets to the default value after the session is logged out or when the printer wakes
from Sleep or Hibernate mode.
Networking
Connecting the printer to a Wi
‑Fi network
Make sure that Active Adapter is set to Auto. From the home screen, touch Settings > Network/Ports > Network
Overview > Active Adapter.
Using the control panel
1 From the home screen, touch Settings > Network/Ports > Wireless > Setup On Printer Panel > Choose
Network.
2 Select a Wi‑Fi network, and then type the network password.
Maintaining the printer 83

Note: For Wi‑Fi‑network‑ready printer models, a prompt for Wi‑Fi network setup appears during initial
setup.
Using Lexmark Mobile Assistant
1 Depending on your mobile device, download the Lexmark Mobile Assistant application from either the
Google Play store or App Store online store.
2 From the printer home screen, touch Settings > Network/Ports > Wireless > Setup Using Mobile App >
Printer ID.
3 From your mobile device, launch the application, and then accept the Terms of Use.
Note: If necessary, grant permissions.
4 Tap Connect to Printer > Go to Wi
‑Fi Settings.
5 Connect your mobile device to the printer wireless network.
6 Return to the application, and then tap Setup Wi-Fi Connection
7 Select a Wi-Fi network, and then type the network password.
8 Tap Done.
Connecting the printer to a wireless network using Wi‑Fi Protected Setup
(WPS)
Before you begin, make sure that:
• The access point (wireless router) is WPS‑
certified
or WPS‑compatible. For more information, see the
documentation that came with your access point.
• A wireless network adapter is installed in your printer. For more information, see the instructions that came
with the adapter.
• Active Adapter is set to Auto. From the home screen, touch Settings > Network/Ports > Network Overview
> Active Adapter.
Using the Push Button method
1 From the home screen, touch Settings > Network/Ports > Wireless > Wi
‑Fi Protected Setup > Start Push
Button Method.
2 Follow the instructions on the display.
Using the personal identification number (PIN) method
1 From the home screen, touch Settings > Network/Ports > Wireless > Wi
‑Fi Protected Setup > Start PIN
Method.
2 Copy the eight‑digit WPS PIN.
3 Open a web browser, and then type the IP address of your access point in the address
field.
Notes:
• To know the IP address, see the documentation that came with your access point.
• If you are using a proxy server, then temporarily disable it to load the web page correctly.
Maintaining the printer 84

4 Access the WPS settings. For more information, see the documentation that came with your access point.
5 Enter the eight‑digit PIN, and then save the changes.
Connecting a mobile device to the printer
Before connecting your mobile device, make sure to do the following:
• Enable Wi‑Fi Direct in the printer. From the control panel, navigate to: Settings > Network/Ports > Wireless
> Enable Wi
‑Fi Direct.
• Show the preshared key (PSK) on the Network Setup Page. From the control panel, navigate to: Settings >
Network/Ports > Wi
‑Fi Direct > Show PSK on Setup Page.
• Print the Network Setup Page. From the control panel, navigate to: Settings > Reports > Network > Network
Setup Page.
Connecting using Wi
‑Fi Direct
1 From the mobile device, go to the settings menu.
2 Enable Wi‑Fi, and then tap Wi
‑Fi Direct.
3 Select the printer SSID.
4
Confirm
the connection on the printer control panel.
Connecting using Wi
‑Fi
1 From the mobile device, go to the settings menu.
2 Tap Wi
‑Fi, and then select the printer SSID.
Note: The string DIRECT-xy (where x and y are two random characters) is added before the SSID.
3 Enter the PSK.
Note: The PSK is the password.
Notes:
• You can change the SSID on the control panel. Navigate to: Settings > Network/Ports > Wi
‑Fi Direct >
SSID.
• You can also change the PSK on the control panel. Navigate to: Settings > Network/Ports > Wi
‑Fi Direct
> Set PSK.
Deactivating the Wi‑Fi network
1 From the home screen, touch Settings > Network/Ports > Network Overview > Active Adapter > Standard
Network.
2 Follow the instructions on the display.
Maintaining the printer 85

Changing the printer port settings after installing an internal solutions port
Notes:
• If the printer has a static IP address, then do not change the configuration.
• If the computers are configured to use the network name instead of an IP address, then do not change
the configuration.
• If you are adding a wireless internal solutions port (ISP) to a printer previously configured for an Ethernet
connection, then disconnect the printer from the Ethernet network.
For Windows users
1 Open the printers folder.
2 From the shortcut menu of the printer with the new ISP, open the printer properties.
3 Configure the port from the list.
4 Update the IP address.
5 Apply the changes.
For Macintosh users
1 From System Preferences in the Apple menu, navigate to the list of printers, and then select + > IP.
2 Type the IP address in the address field.
3 Apply the changes.
Setting up serial printing (Windows only)
1 Set the parameters in the printer.
a From the control panel, navigate to the menu for the port settings.
b Locate the menu for the serial port settings, and then adjust the settings, if necessary.
c Apply the changes.
2 From your computer, open the printers folder, and then select your printer.
3 Open the printer properties, and then select the COM port from the list.
4 Set the COM port parameters in Device Manager.
Notes:
• Serial printing reduces printing speed.
• Make sure that the serial cable is connected to the serial port on your printer.
Maintaining the printer 86

Cleaning the printer
CAUTION—SHOCK HAZARD: To avoid the risk of electrical shock when cleaning the exterior of the
printer, unplug the power cord from the electrical outlet and disconnect all cables from the printer before
proceeding.
Notes:
• Perform this task after every few months.
• Damage to the printer caused by improper handling is not covered by the printer warranty.
1 Turn o the printer, and then unplug the power cord from the electrical outlet.
2 Remove paper from the standard bin and multipurpose feeder.
3 Remove any dust, lint, and pieces of paper around the printer using a soft brush or vacuum.
4 Wipe the outside of the printer with a damp, soft, lint‑free cloth.
Notes:
• Do not use household cleaners or detergents, as they may damage the finish of the printer.
• Make sure that all areas of the printer are dry after cleaning.
5 Connect the power cord to the electrical outlet, and then turn on the printer.
CAUTION—POTENTIAL INJURY: To avoid the risk of fire or electrical shock, connect the power cord
to an appropriately rated and properly grounded electrical outlet that is near the product and easily
accessible.
Ordering parts and supplies
To order parts and supplies in the U.S., contact 1-800-539-6275 for information about Lexmark authorized
dealers in your area. In other countries or regions, go to
www.lexmark.com or contact the place where you
purchased the printer.
Note: All life estimates for printer supplies assume printing on letter‑ or A4‑size plain paper.
Checking the status of parts and supplies
1 From the home screen, touch Status/Supplies.
2 Select the parts or supplies that you want to check.
Note: You can also access this setting by touching the top section of the home screen.
Using genuine Lexmark parts and supplies
Your Lexmark printer is designed to function best with genuine Lexmark parts and supplies. Use of third-party
supplies or parts may aect the performance, reliability, or life of the printer and its imaging components. It can
also
aect
warranty coverage. Damage caused by the use of third-party parts and supplies is not covered by
the warranty. All life indicators are designed to function with Lexmark parts and supplies, and may deliver
unpredictable results if third-party parts and supplies are used. Imaging component usage beyond the intended
life may damage your Lexmark printer or its associated components.
Maintaining the printer 87

Warning—Potential Damage: Supplies and parts without Return Program agreement terms may be reset and
remanufactured. However, the manufacturer’s warranty does not cover any damage caused by non-genuine
supplies or parts. Resetting counters on the supply or part without proper remanufacturing can cause
damage to your printer. After resetting the supply or part counter, your printer may display an error indicating
the presence of the reset item.
Ordering a toner cartridge
Notes:
• The estimated cartridge yield is based on the ISO/IEC 19752 standard.
• Extremely low print coverage for extended periods of time may negatively aect actual yield.
Lexmark MS622 Return Program toner cartridges
Item United States
and Canada
European
Economic
Area
Rest of Asia
Pacific
Latin America Rest of
Europe,
Middle East,
and Africa
Australia and
New Zealand
Return
Program toner
cartridge
56F1000 56F2000 56F3000 56F4000 56F5000 56F6000
High yield
Return
Program toner
cartridge
56F1H00 56F2H00 56F3H00 56F4H00 56F5H00 56F6H00
Extra high
yield Return
Program toner
cartridge*
56F1X00 56F2X00 56F3X00 56F4X00 56F5X00 56F6X00
Ultra high yield
Return
Program toner
cartridge
56F1U00 56F2U00 56F3U00 56F4U00 56F5U00 56F6U00
High yield
Corporate
Return
Program toner
cartridge*
56F1H0E 56F2H0E 56F3H0E 56F4H0E 56F5H0E 56F6H0E
Extra high
yield
Corporate
Return
Program toner
cartridge*
56F1X0E 56F2X0E 56F3X0E 56F4X0E 56F5X0E 56F6X0E
* Available only for contract‑managed printers. For more information, contact your Lexmark representative or system
administrator.
Maintaining the printer 88
Item United States
and Canada
European
Economic
Area
Rest of Asia
Pacific
Latin America Rest of
Europe,
Middle East,
and Africa
Australia and
New Zealand
Ultra high yield
Corporate
Return
Program toner
cartridge*
56F1U0E 56F2U0E 56F3U0E 56F4U0E 56F5U0E 56F6U0E
* Available only for contract‑managed printers. For more information, contact your Lexmark representative or system
administrator.
Lexmark MS622 regular toner cartridge
Item Worldwide
Ultra high yield regular toner cartridge 56F0UA0
Lexmark M3250 Return Program toner cartridge
Item United States, Canada,
Australia, and New Zealand
European Economic
Area
Rest of Asia Pacific Latin America
Regular toner
cartridge
24B6887 24B6890 24B6893 24B6896
Ordering an imaging unit
Extremely low print coverage for extended periods of time may cause imaging unit parts to fail before the toner
is exhausted.
Item Part Number
Return Program imaging unit 56F0Z00
Regular imaging unit 56F0ZA0
Corporate Return Program imaging unit* 56F0Z0E
* This imaging unit is available only for contract‑managed printers. For more information, contact your Lexmark
representative or system administrator.
Ordering a maintenance kit
Match the maintenance kit to the printer voltage.
Notes:
• Using certain types of paper may require more frequent replacement of the maintenance kit.
• The maintenance kit includes a fuser, MPF pick roller and separator pad, pick tires, separator roller
assembly, and transfer roller. These parts may be individually ordered and replaced if necessary.
Maintaining the printer 89
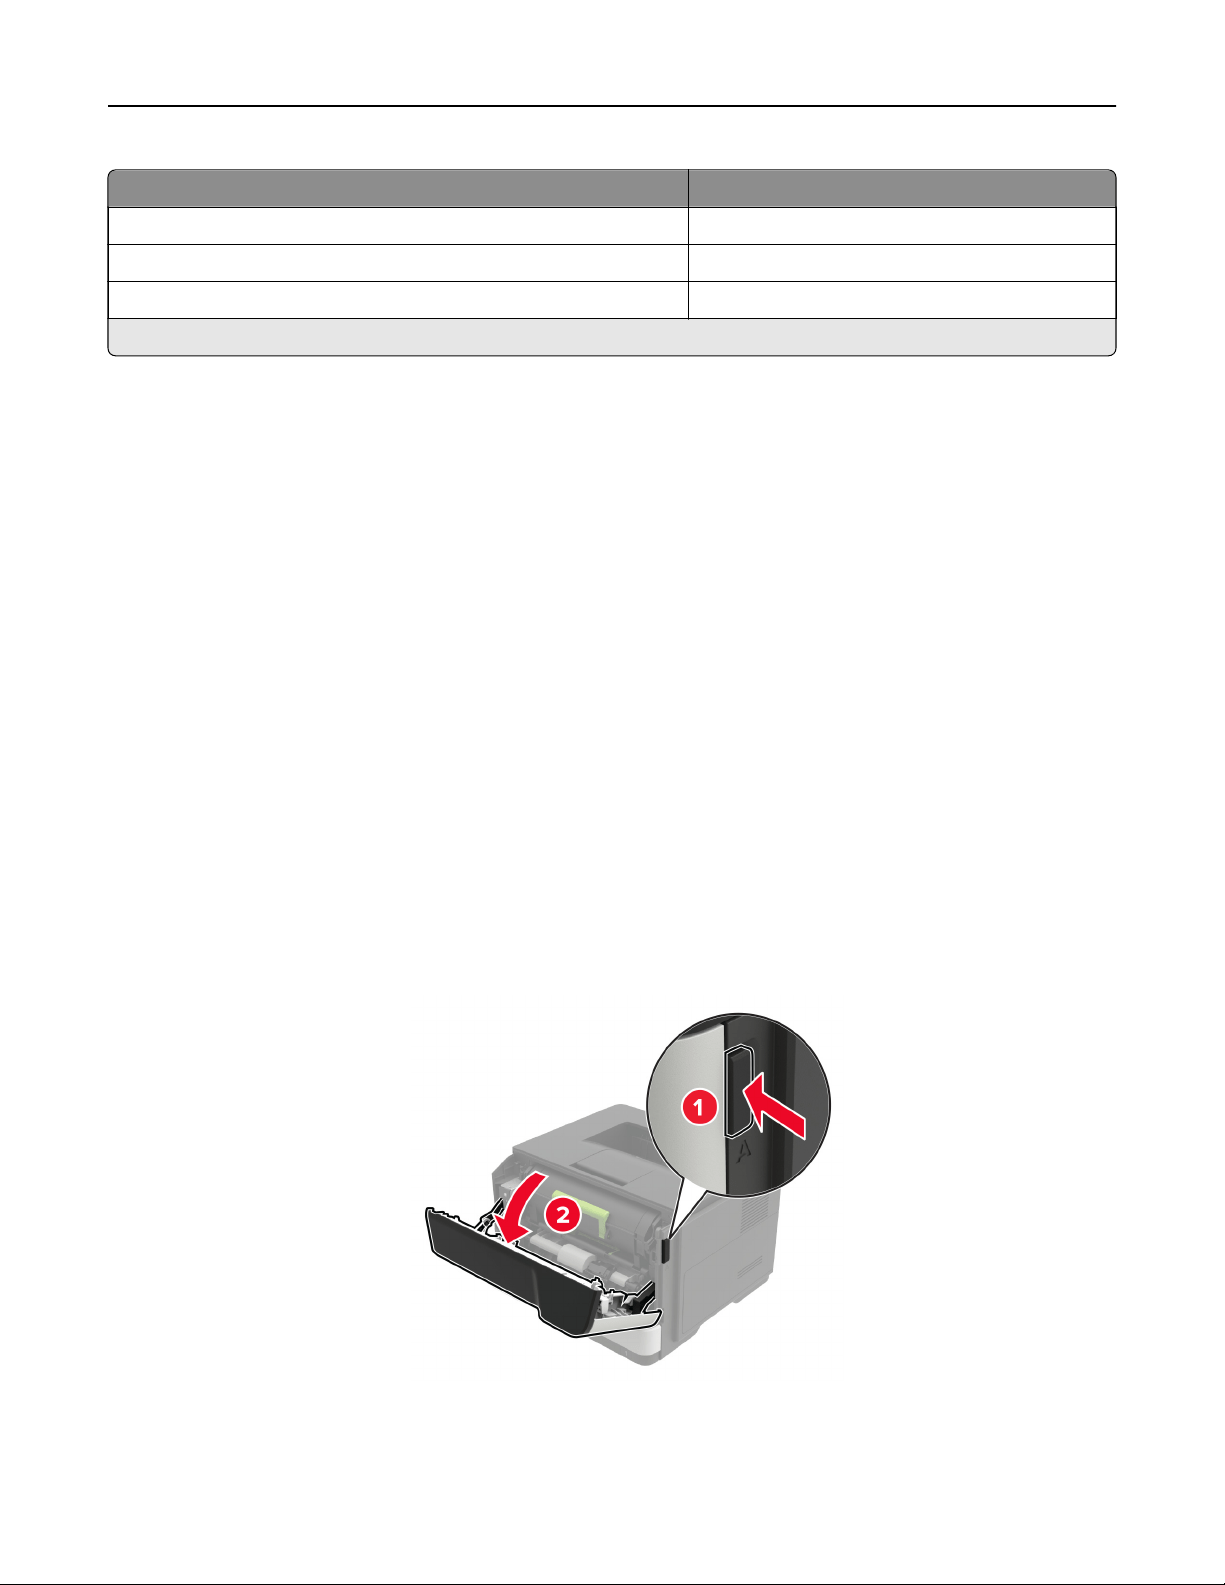
Item Part number
200K maintenance kit, 100 V 41X1227
200K maintenance kit, 110 V 41X1225
200K maintenance kit, 220 V 41X1226
Note: Only an authorized service technician can replace the maintenance kit. Contact your service provider.
Configuring
supply
notifications
1 Open a web browser, and then type the printer IP address in the address
field.
Notes:
• View the printer IP address on the printer home screen. The IP address appears as four sets of
numbers separated by periods, such as 123.123.123.123.
• If you are using a proxy server, then temporarily disable it to load the web page correctly.
2 Click Settings > Device >
Notifications
.
3 From the Supplies menu, click Custom Supply Notifications.
4 Select a
notification
for each supply item.
5 Apply the changes.
Replacing parts and supplies
Replacing the toner cartridge
1 Open door A.
Maintaining the printer 90
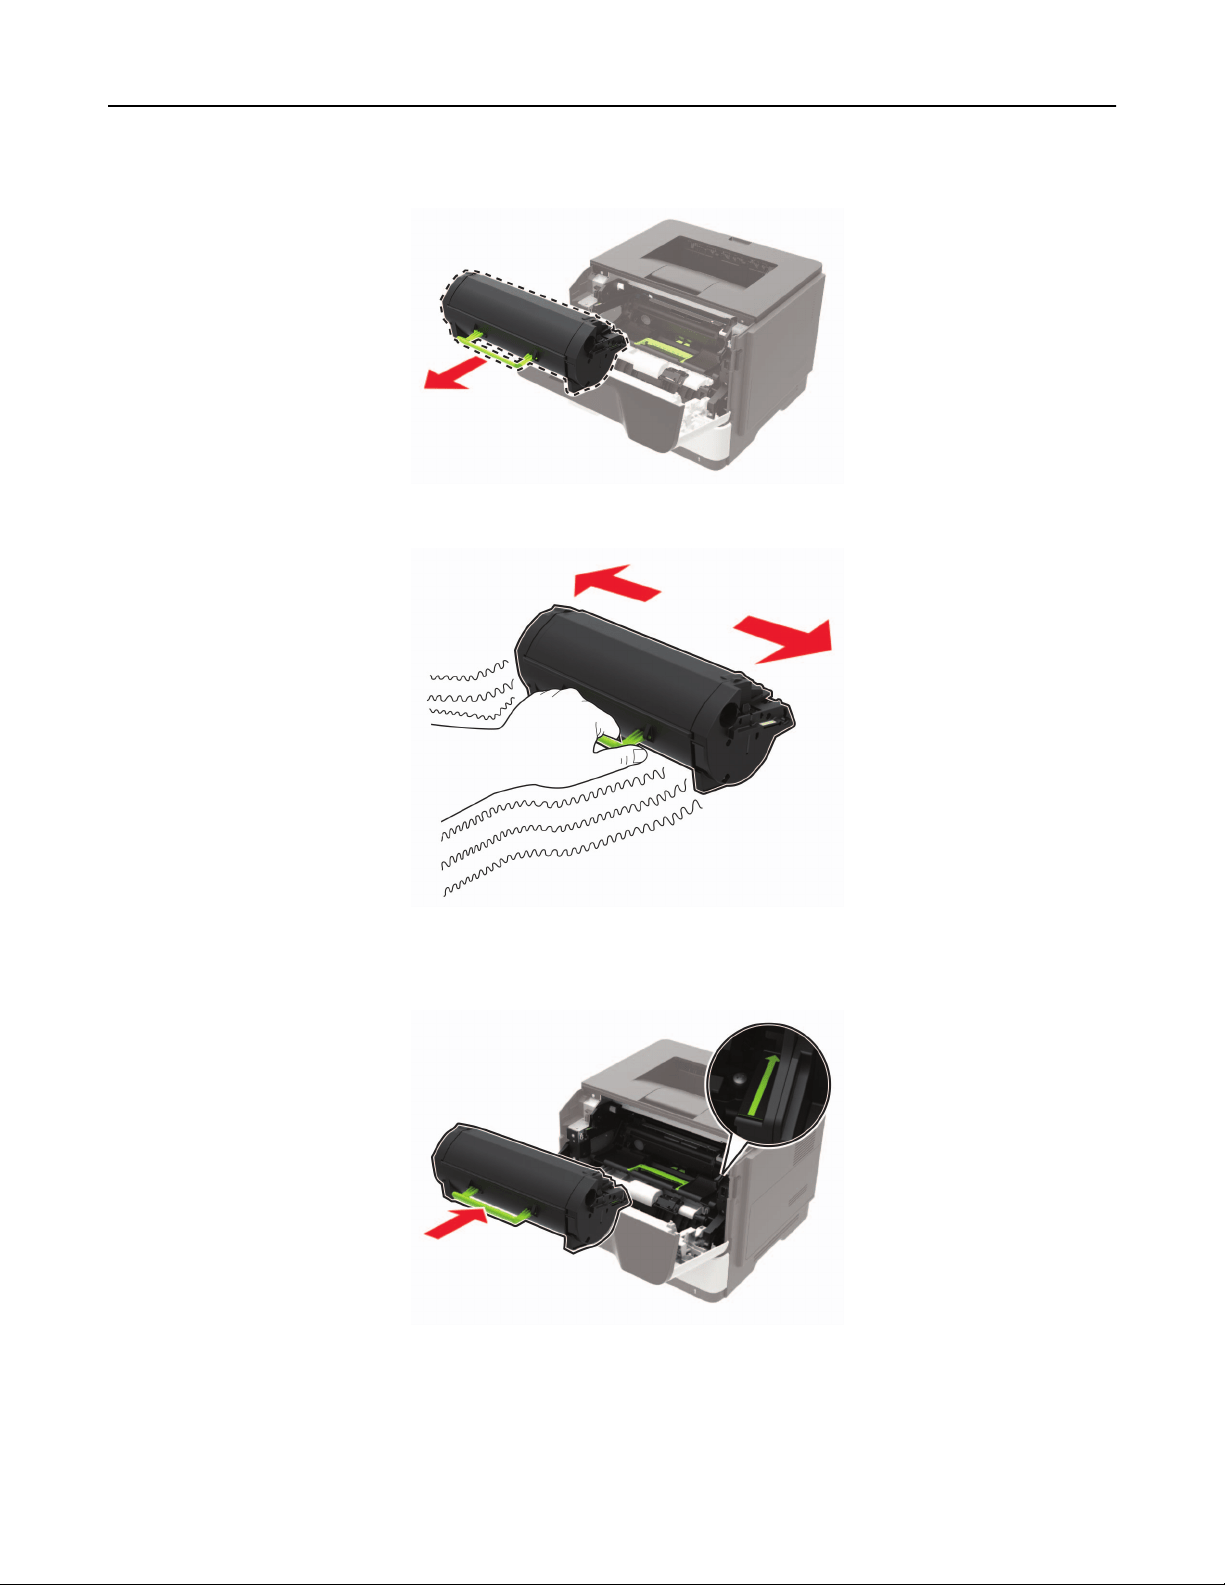
2 Remove the used toner cartridge.
3 Unpack the new toner cartridge, and then shake it three times to redistribute the toner.
4 Insert the new toner cartridge.
Note: Use the arrows inside the printer as guides.
5 Close door A.
Maintaining the printer 91
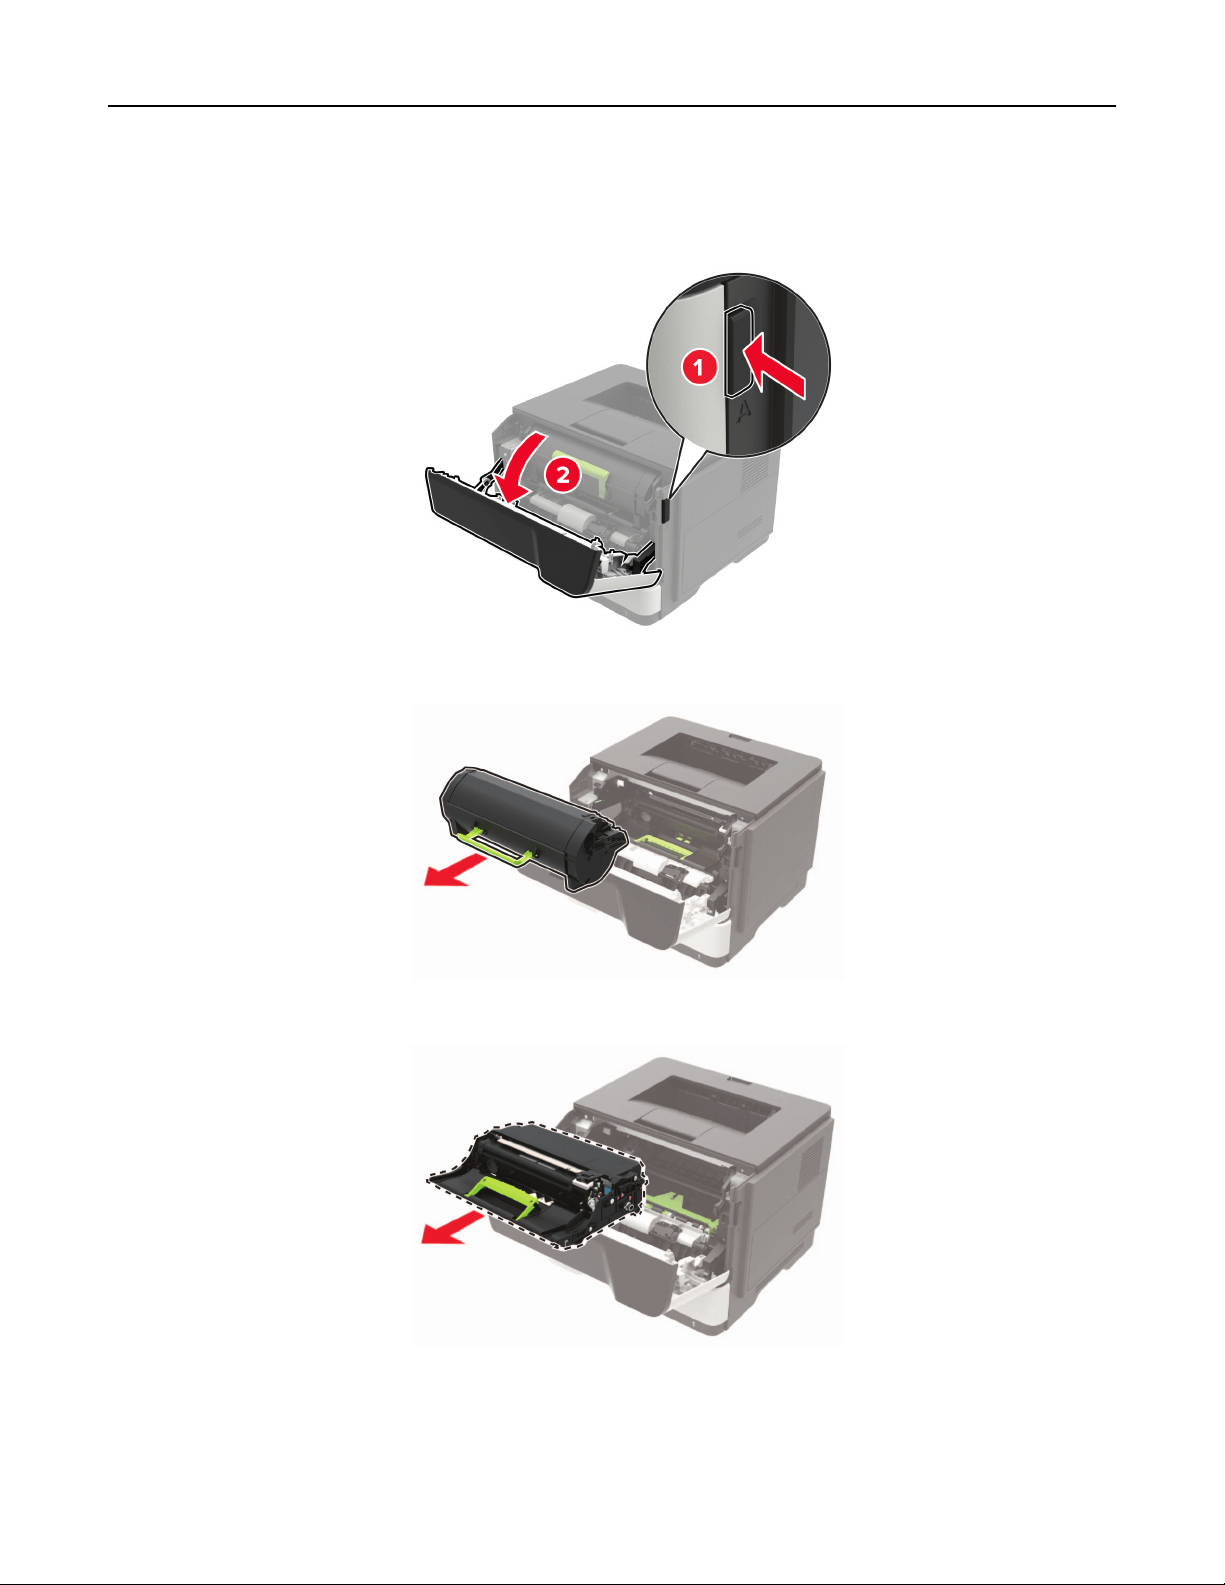
Replacing the imaging unit
1 Open door A.
2 Remove the toner cartridge.
3 Remove the used imaging unit.
Maintaining the printer 92
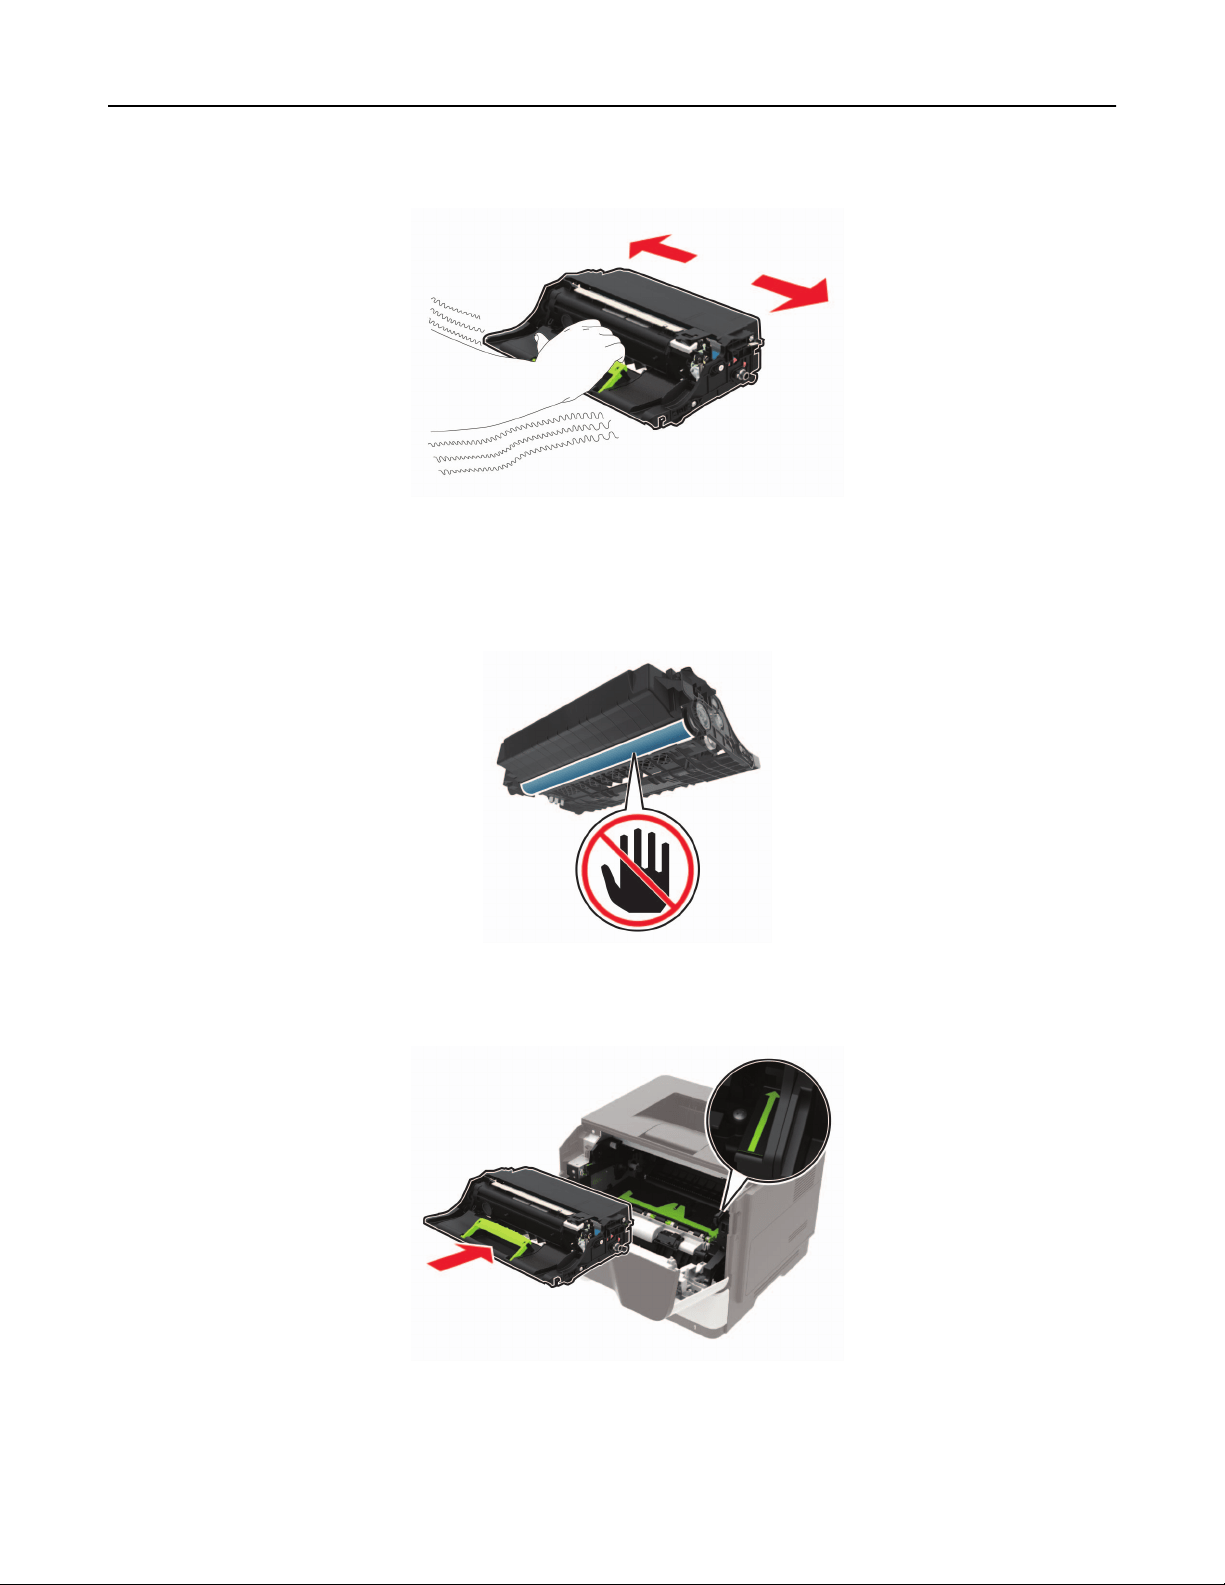
4 Unpack the new imaging unit, and then shake it three times to redistribute the toner.
Warning—Potential Damage: Do not expose the imaging unit to direct light for more than 10 minutes.
Extended exposure to light may cause print quality problems.
Warning—Potential Damage: Do not touch the photoconductor drum. Doing so may aect the quality of
future print jobs.
5 Insert the new imaging unit.
Note: Use the arrows inside the printer as guides.
6 Insert the toner cartridge.
Note: Use the arrows inside the printer as guides.
Maintaining the printer 93
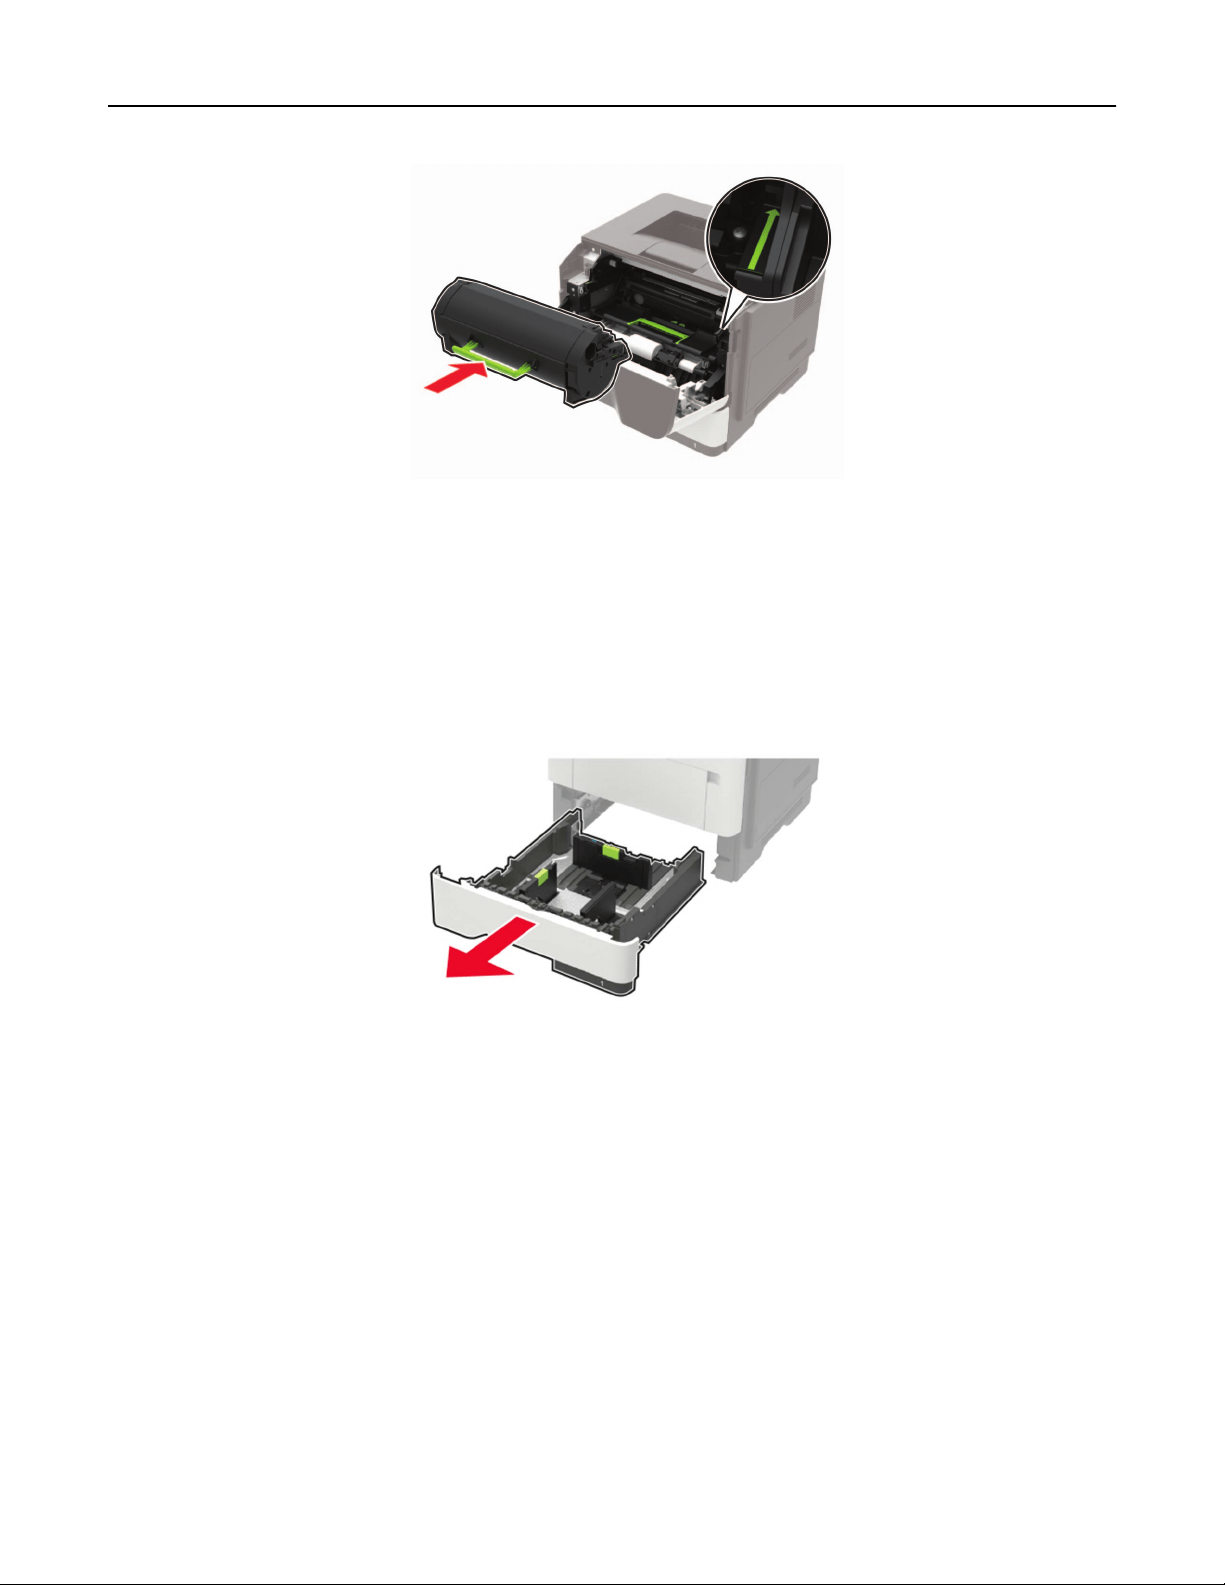
7 Close door A.
Replacing the pick tires
1 Turn o the printer.
2 Unplug the power cord from the electrical outlet, and then from the printer.
3 Remove the tray.
Maintaining the printer 94
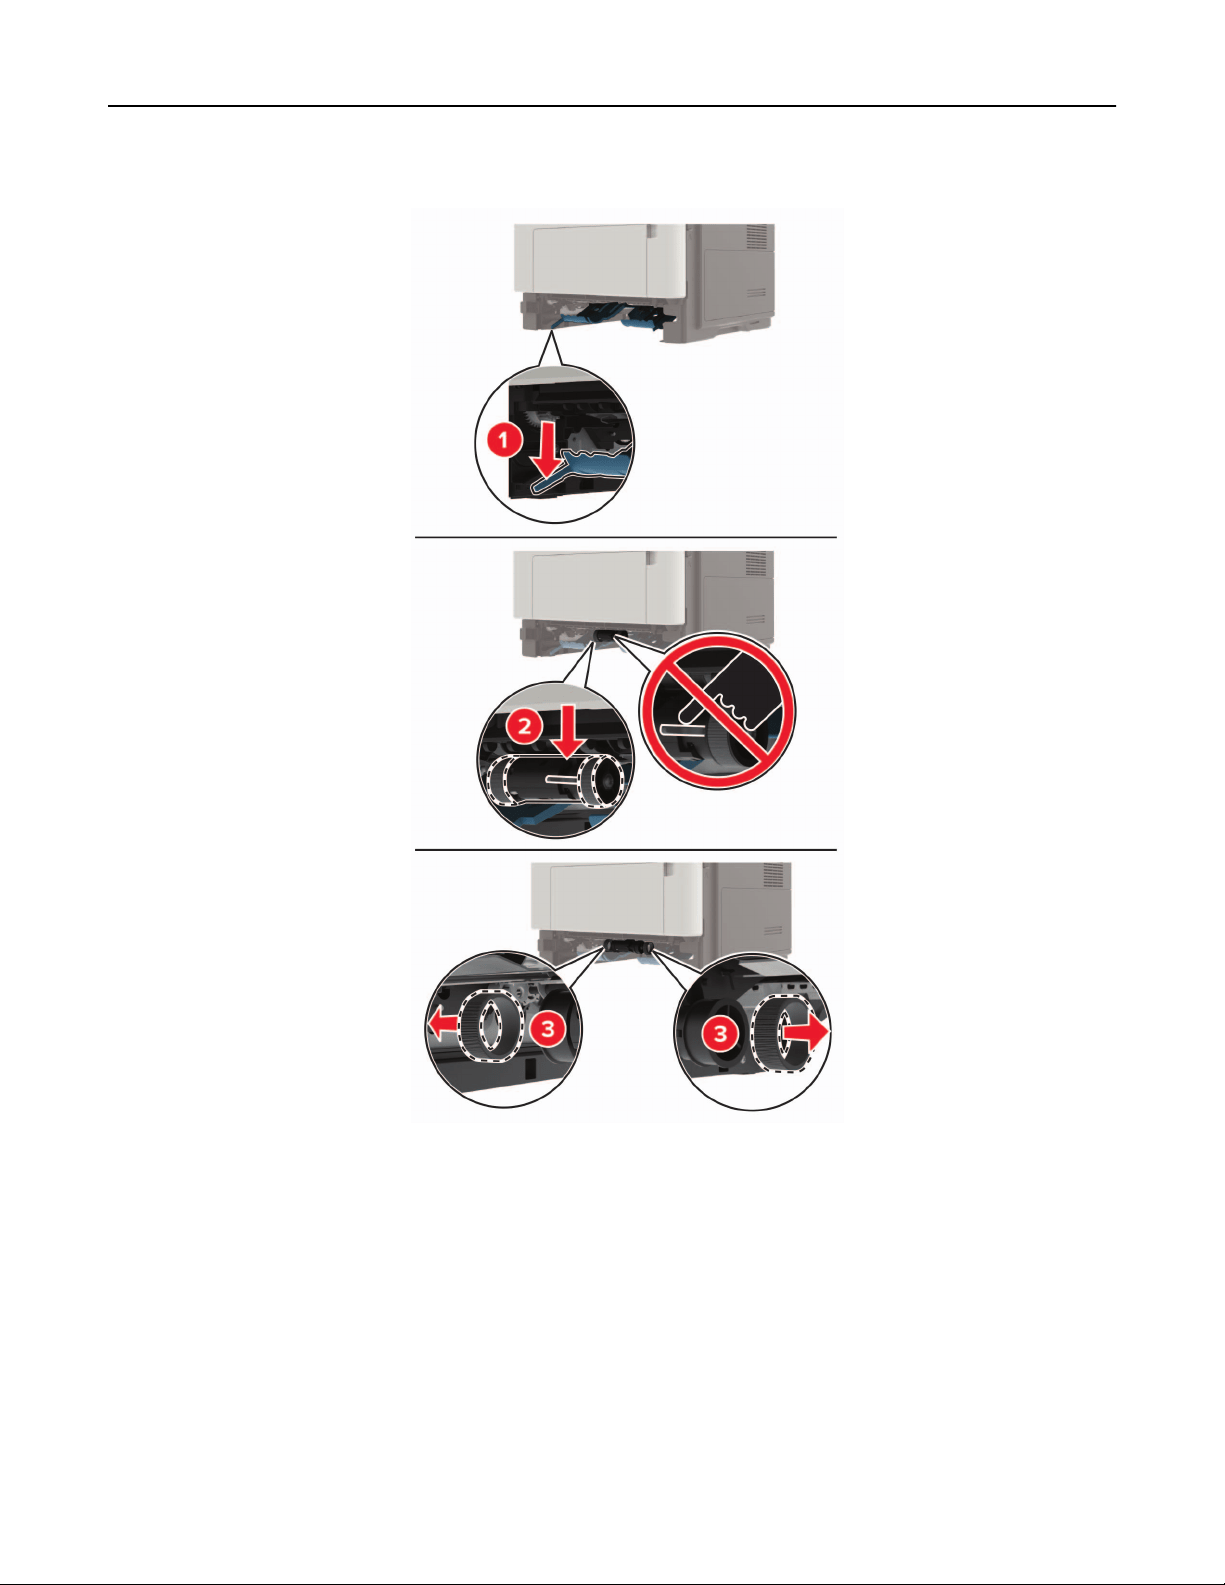
4 Remove the used pick tires one after the other.
5 Unpack the new pick tires.
Maintaining the printer 95
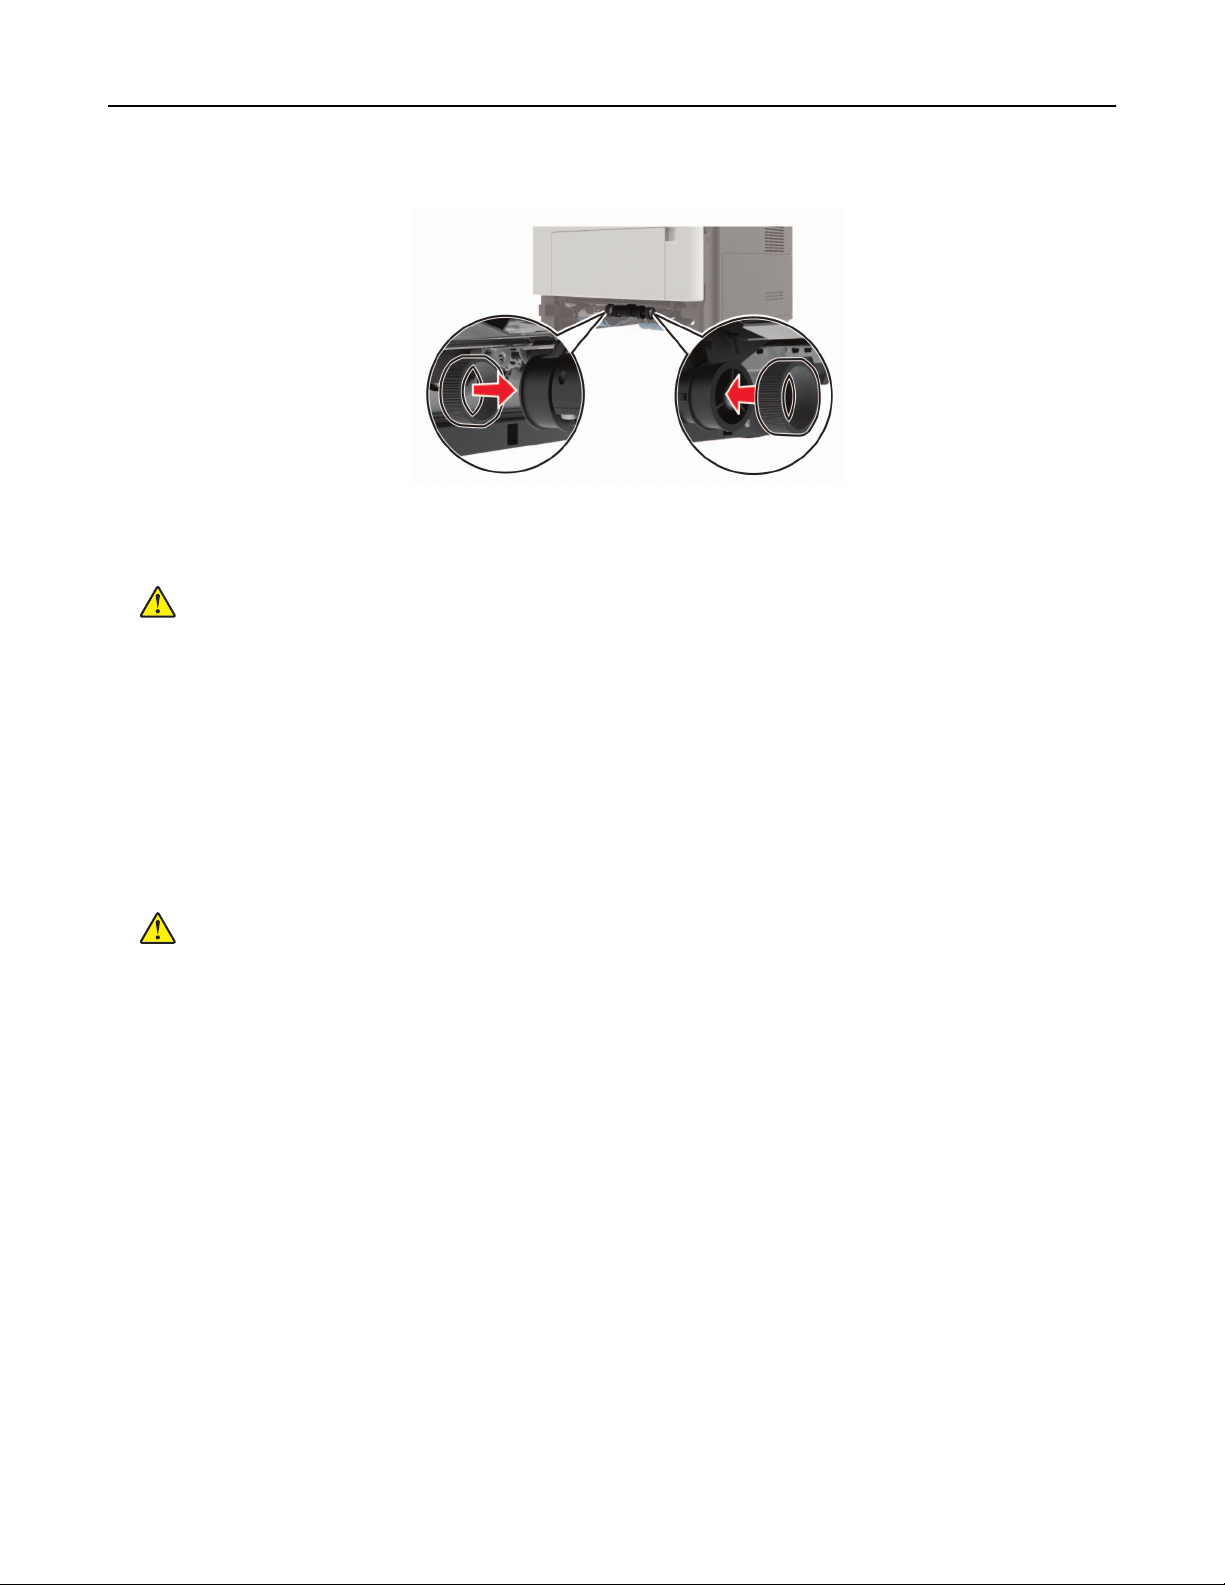
6 Insert the new pick tires.
7 Insert the tray.
8 Connect the power cord to the printer, and then to the electrical outlet.
CAUTION—POTENTIAL INJURY: To avoid the risk of
fire
or electrical shock, connect the power cord
to an appropriately rated and properly grounded electrical outlet that is near the product and easily
accessible.
9 Turn on the printer.
Replacing the pick roller assembly
1 Turn o the printer.
2 Unplug the power cord from the electrical outlet, and then from the printer.
3 Remove the optional tray.
CAUTION—POTENTIAL INJURY: If the printer weight is greater than 20 kg (44 lb), then it may
require two or more people to lift it safely.
Maintaining the printer 96
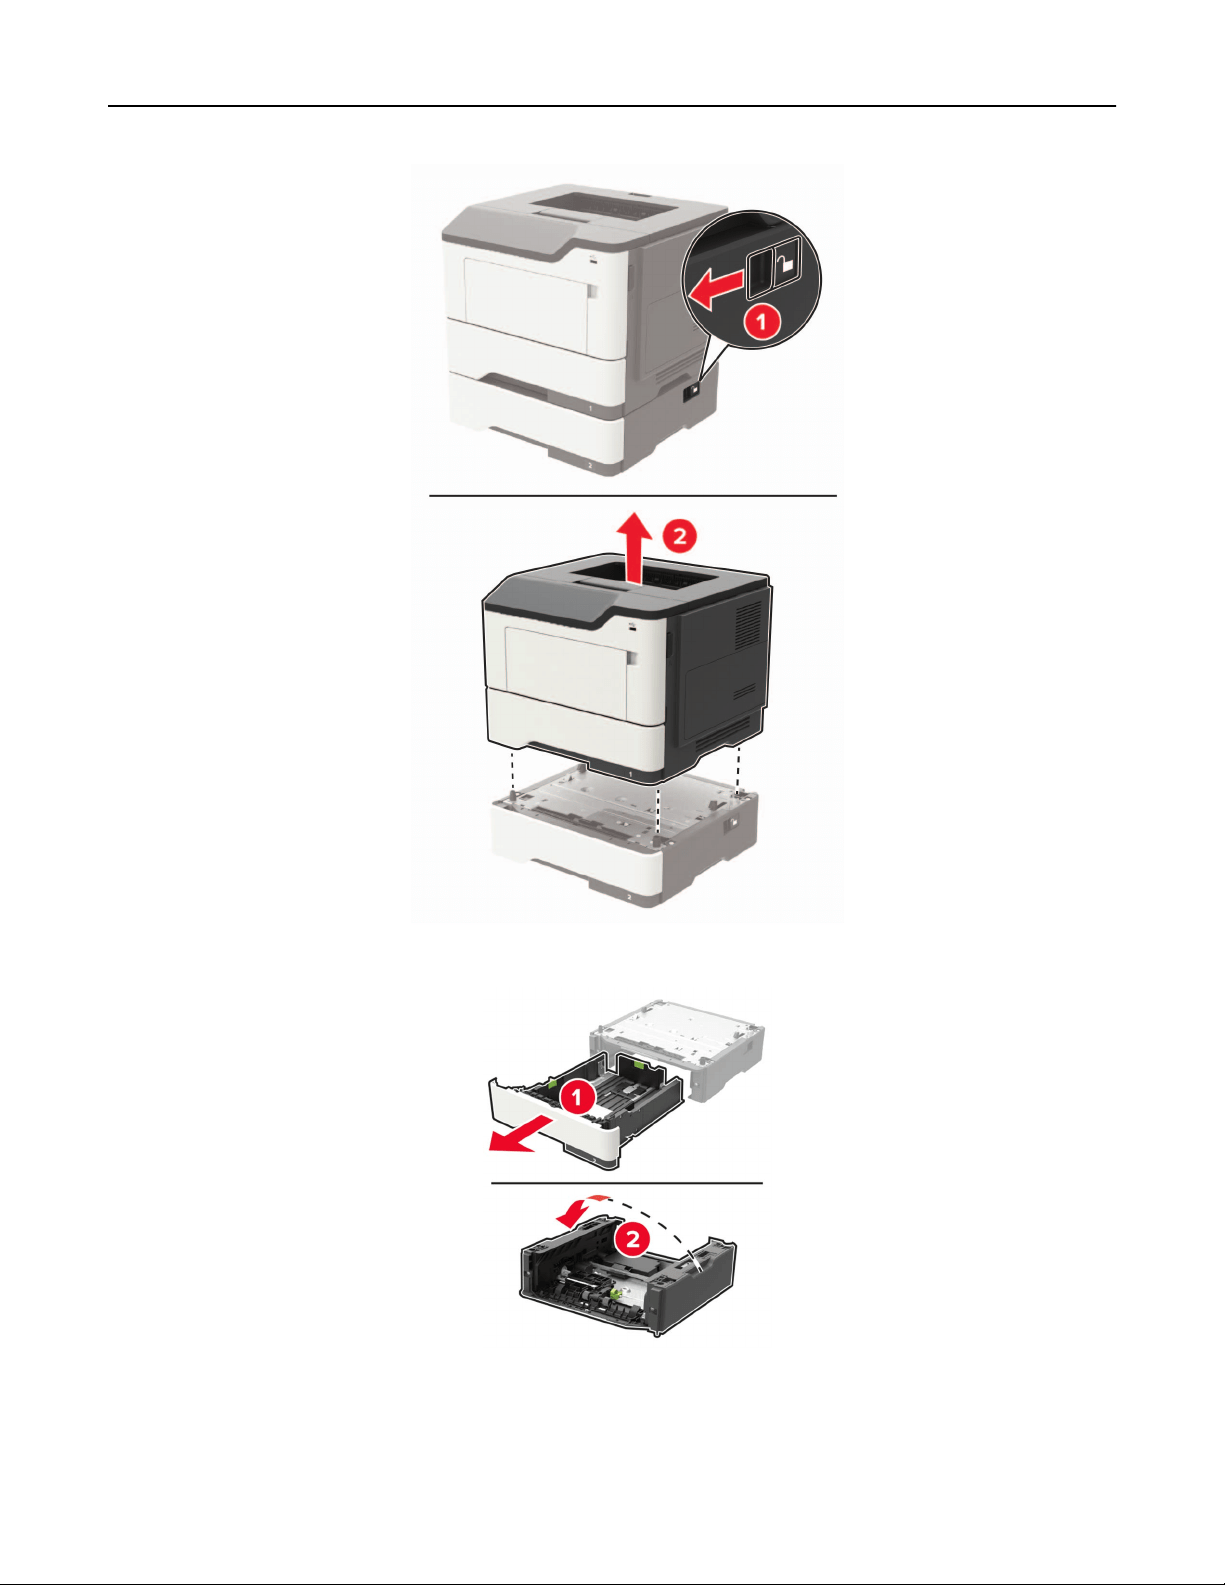
4 Remove the tray insert, and then flip the tray base.
Maintaining the printer 97
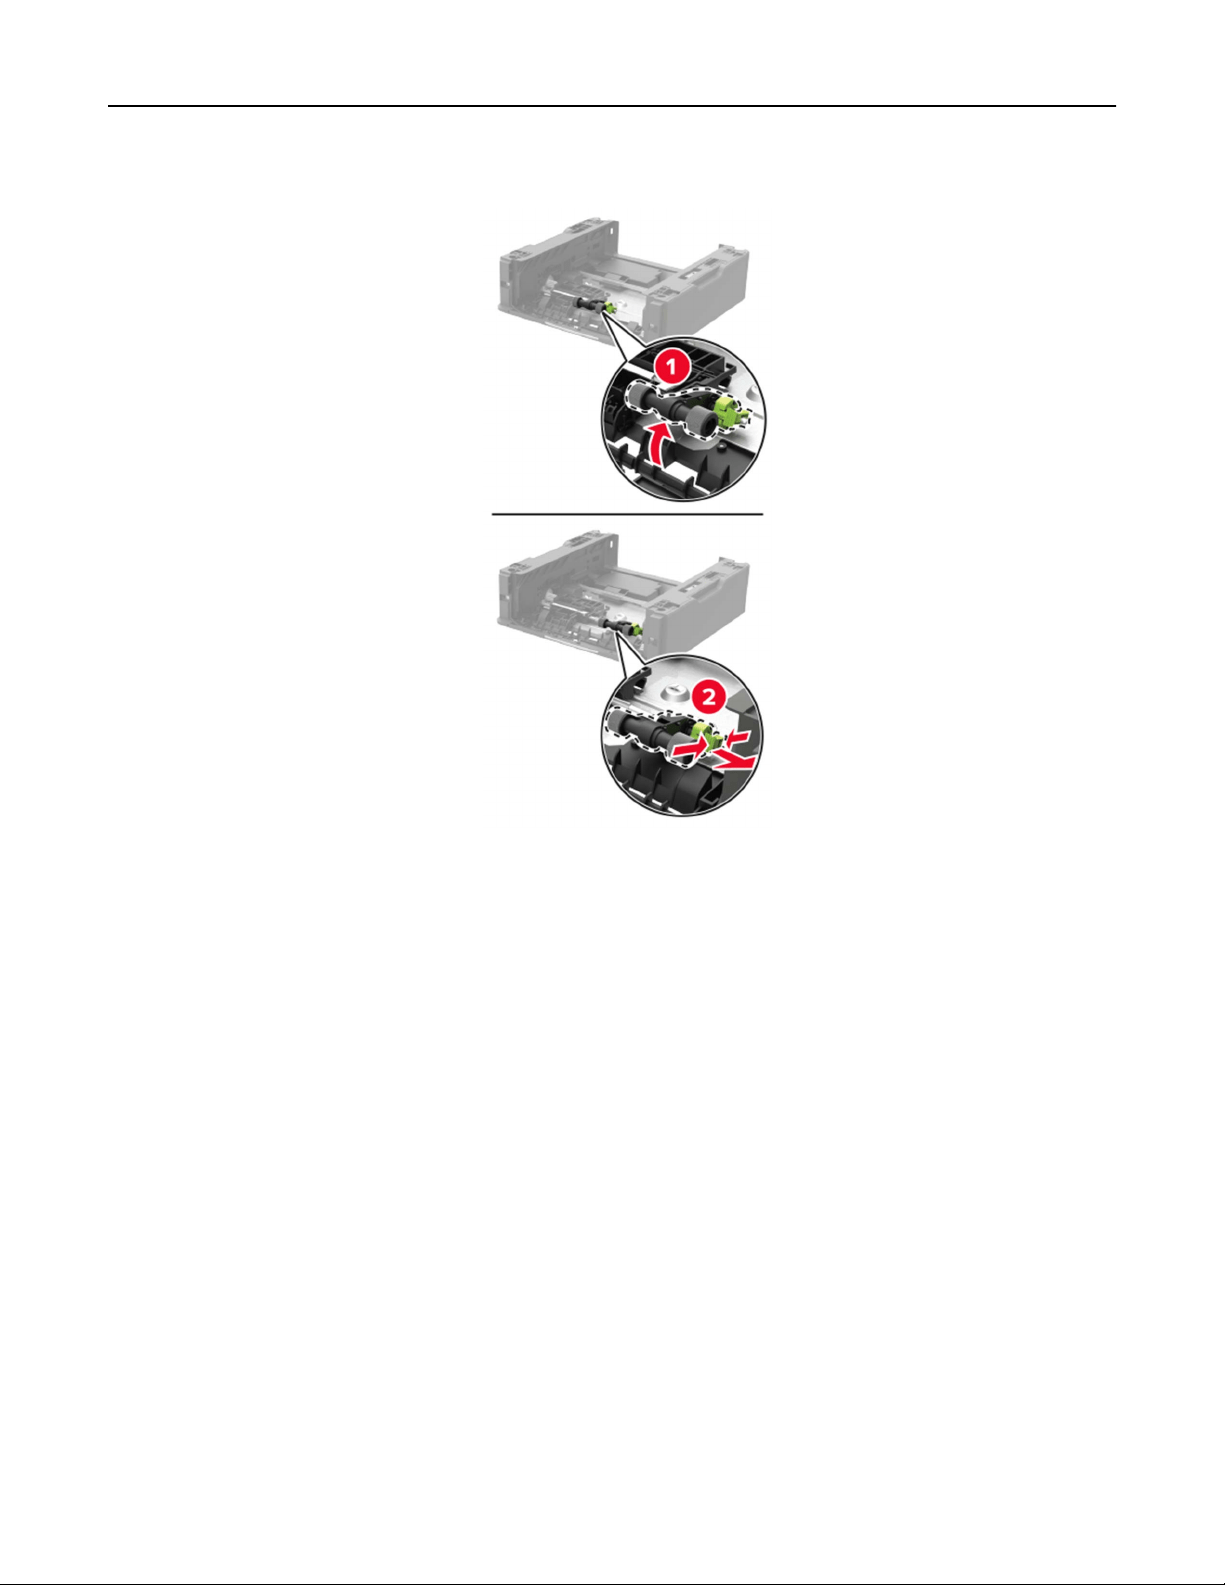
5 Remove the used pick roller assembly.
6 Unpack the new pick roller assembly.
Maintaining the printer 98
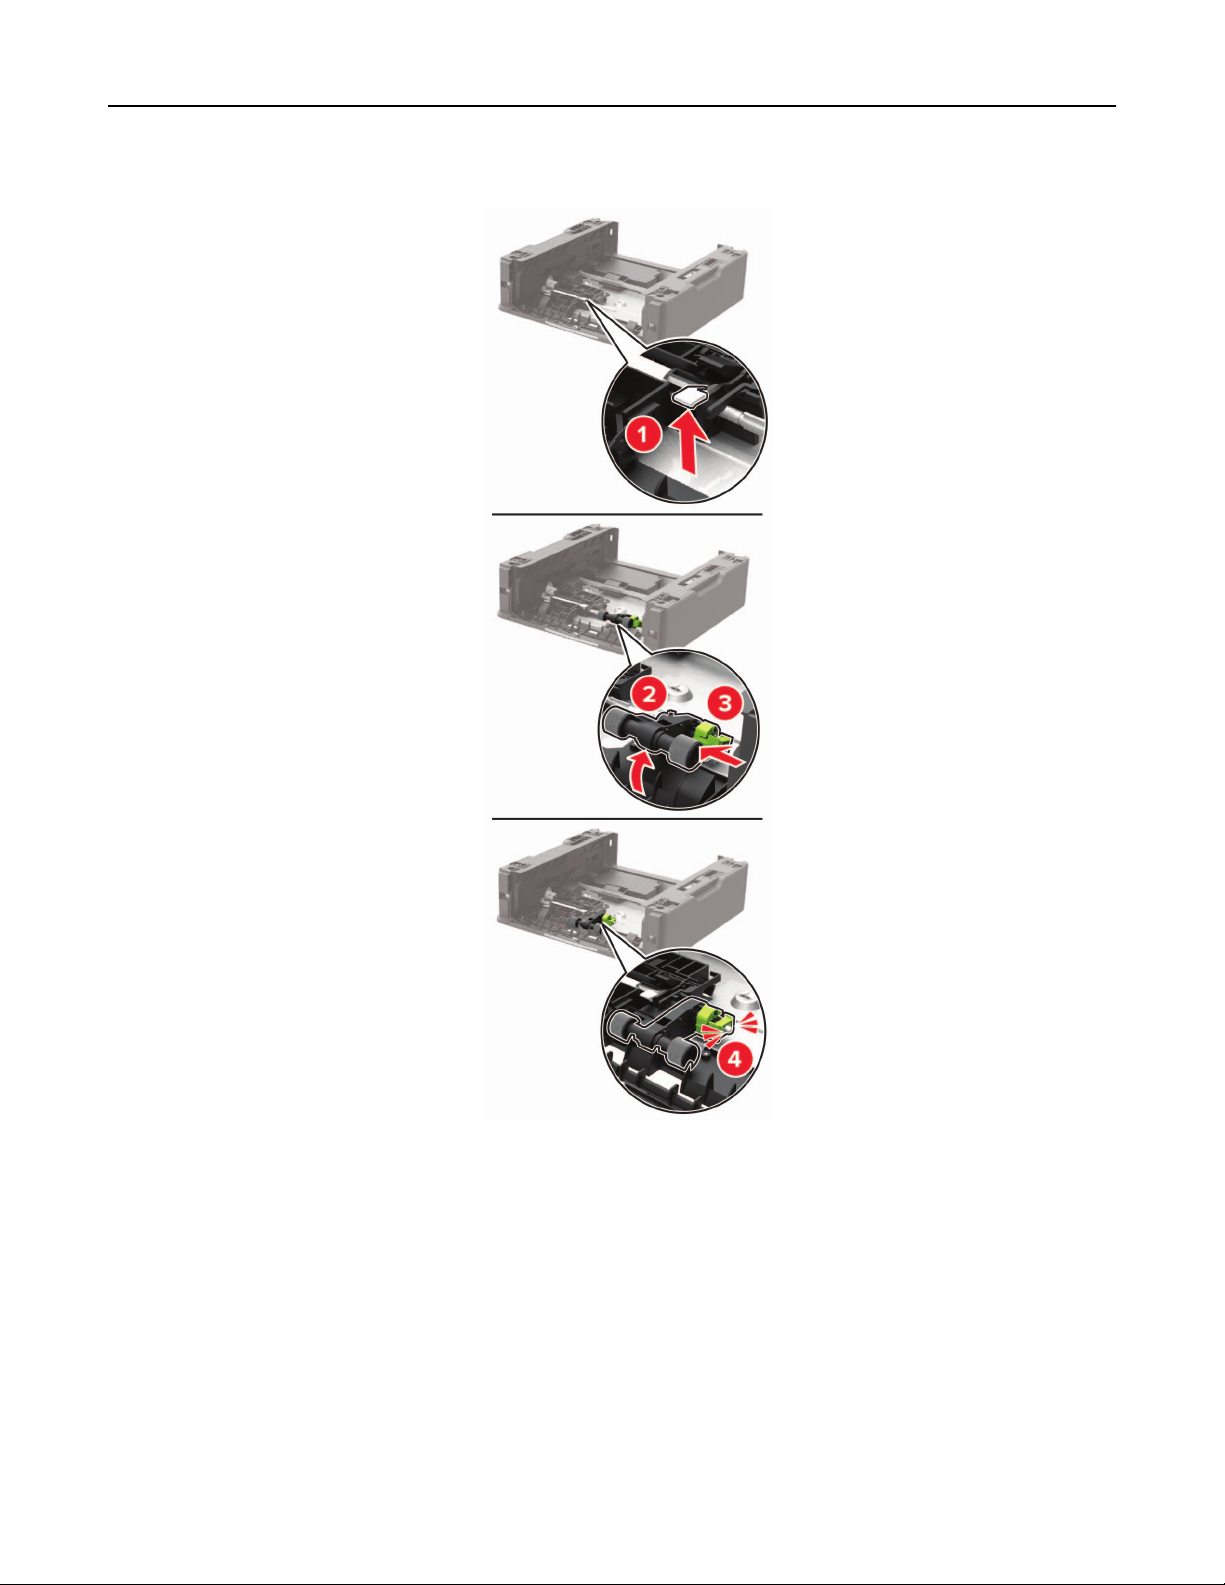
7 Insert the new pick roller assembly.
8 Flip the tray base, and then insert the tray insert.
Maintaining the printer 99

9 Align the printer with the optional tray, and then lower the printer until it clicks into place.
10 Connect the power cord to the printer, and then to the electrical outlet.
CAUTION—POTENTIAL INJURY: To avoid the risk of fire or electrical shock, connect the power cord
to an appropriately rated and properly grounded electrical outlet that is near the product and easily
accessible.
11 Turn on the printer.
Moving the printer
Moving the printer to another location
CAUTION—POTENTIAL INJURY: If the printer weight is greater than 20 kg (44 lb), then it may require
two or more people to lift it safely.
CAUTION—POTENTIAL INJURY: To avoid the risk of fire or electrical shock, use only the power cord
provided with this product or the manufacturer's authorized replacement.
CAUTION—POTENTIAL INJURY: When moving the printer, follow these guidelines to avoid personal
injury or printer damage:
• Make sure that all doors and trays are closed.
• Turn o the printer, and then unplug the power cord from the electrical outlet.
• Disconnect all cords and cables from the printer.
• If the printer has separate floor-standing optional trays or output options attached to it, then disconnect
them before moving the printer.
• If the printer has a caster base, then carefully roll it to the new location. Use caution when passing over
thresholds and breaks in flooring.
Maintaining the printer 100

• If the printer does not have a caster base but is configured with optional trays or output options, then remove
the output options and lift the printer
o
the trays. Do not try to lift the printer and any options at the same
time.
• Always use the handholds on the printer to lift it.
• Any cart used to move the printer must have a surface able to support the full footprint of the printer.
• Any cart used to move the hardware options must have a surface able to support the dimensions of the
options.
• Keep the printer in an upright position.
• Avoid severe jarring movements.
• Make sure that your fingers are not under the printer when you set it down.
• Make sure that there is adequate clearance around the printer.
Note: Damage to the printer caused by improper moving is not covered by the printer warranty.
Shipping the printer
For shipping instructions, go to
http://support.lexmark.com or contact customer support.
Saving energy and paper
Configuring
the power save mode settings
Sleep mode
1 From the home screen, touch Settings > Device > Power Management > Timeouts > Sleep Mode.
2 Specify the amount of time that the printer stays idle before it enters Sleep Mode.
Hibernate mode
1 From the home screen, touch Settings > Device > Power Management > Timeouts > Hibernate Timeout.
2 Select the amount of time that the printer stays idle before it enters Hibernate mode.
Notes:
• For Hibernate Timeout to work, set Hibernate Timeout on Connection to Hibernate.
• The Embedded Web Server is disabled when the printer is in Hibernate mode.
Adjusting the brightness of the printer display
1 From the home screen, touch Settings > Device > Preferences > Screen Brightness.
2 Adjust the setting.
Maintaining the printer 101

Conserving supplies
• Print on both sides of the paper.
Note: Two-sided printing is the default setting in the print driver.
• Print multiple pages on a single sheet of paper.
• Use the preview feature to see how the document looks like before printing it.
• Print one copy of the document to check its content and format for accuracy.
Recycling
Recycling Lexmark products
To return Lexmark products for recycling:
1 Go to
www.lexmark.com/recycle.
2 Select the product you want to recycle.
Note: Printer supplies and hardware not listed in the Lexmark Collection and Recycling Program may be
recycled through your local recycling center.
Recycling Lexmark packaging
Lexmark continually strives to minimize packaging. Less packaging helps to ensure that Lexmark printers are
transported in the most ecient and environmentally sensitive manner and that there is less packaging to
dispose of. These
eciencies
result in fewer greenhouse emissions, energy savings, and natural resource
savings. Lexmark also
oers
recycling of packaging components in some countries or regions. For more
information, go to
www.lexmark.com/recycle, and then choose your country or region. Information on available
packaging recycling programs is included with the information on product recycling.
Lexmark cartons are 100% recyclable where corrugated recycling facilities exist. Facilities may not exist in your
area.
The foam used in Lexmark packaging is recyclable where foam recycling facilities exist. Facilities may not exist
in your area.
When you return a cartridge to Lexmark, you can reuse the box that the cartridge came in. Lexmark recycles
the box.
Maintaining the printer 102
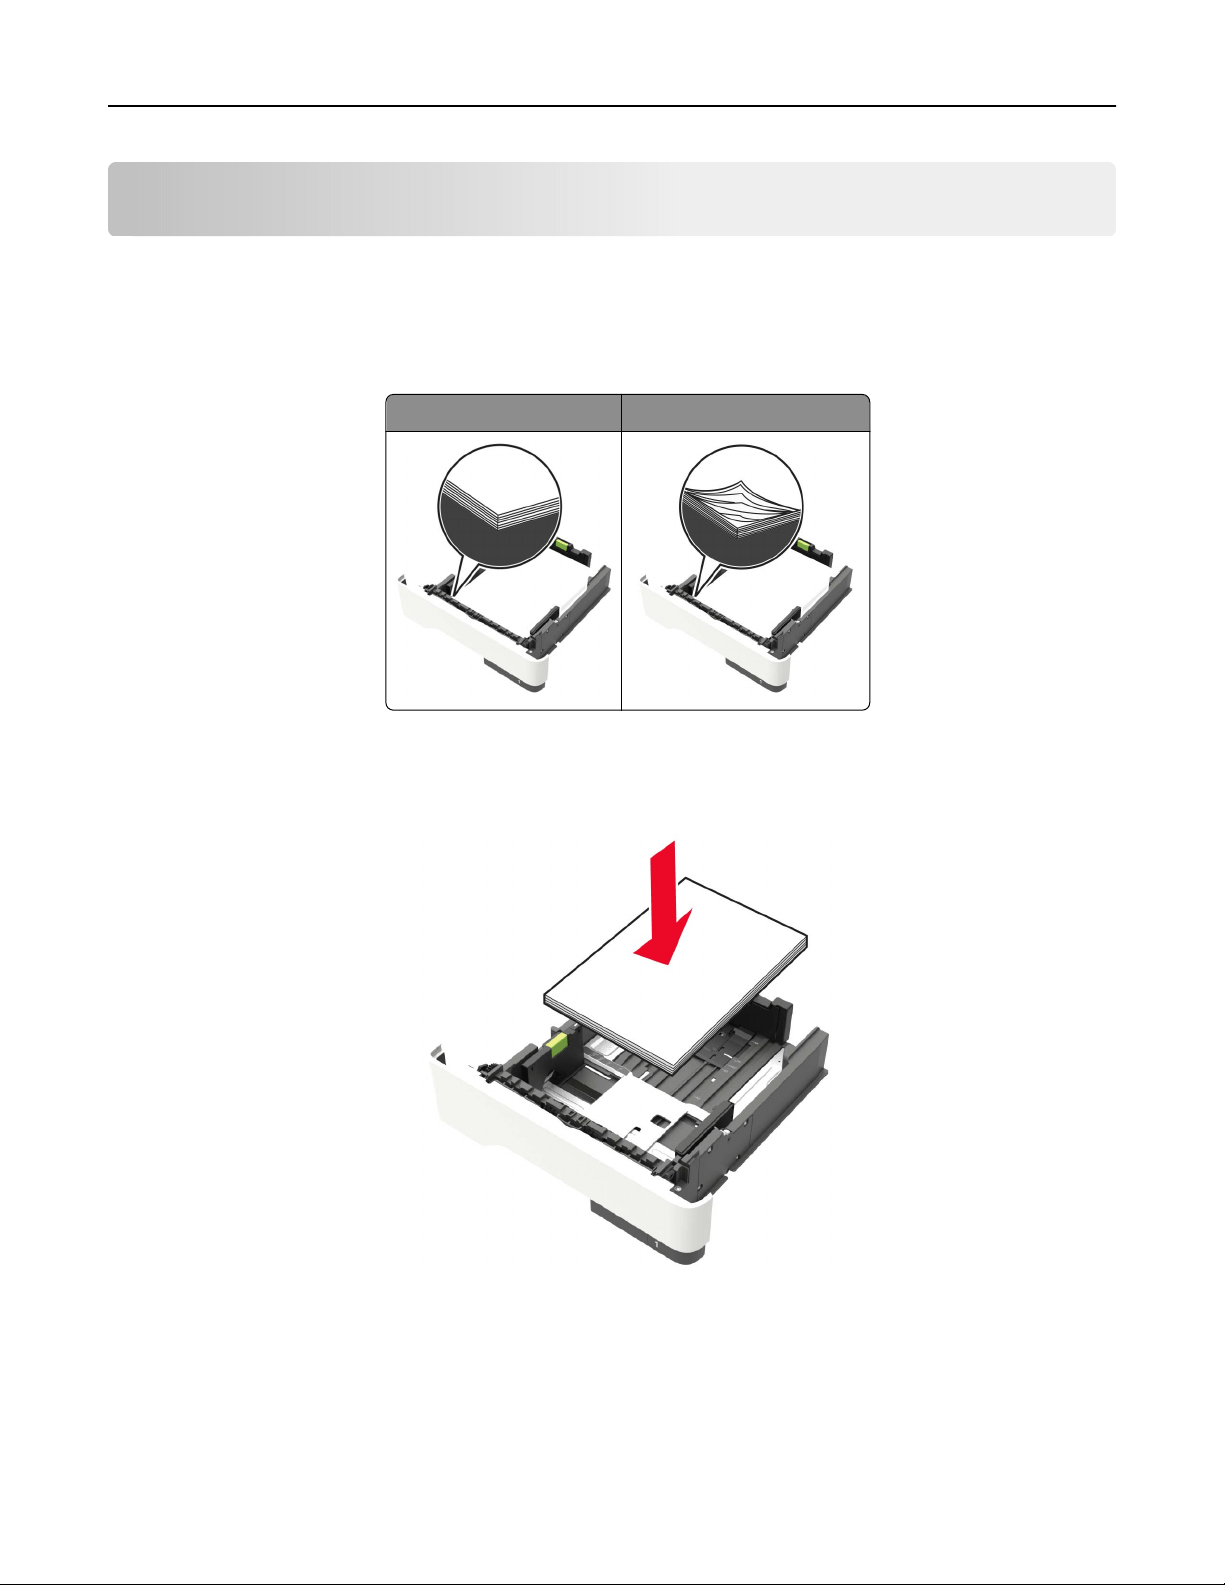
Clearing jams
Avoiding jams
Load paper properly
• Make sure that the paper lies flat in the tray.
Correct loading of paper Incorrect loading of paper
• Do not load or remove a tray while the printer is printing.
• Do not load too much paper. Make sure that the stack height is below the maximum paper
fill
indicator.
• Do not slide paper into the tray. Load paper as shown in the illustration.
• Make sure that the paper guides are positioned correctly and are not pressing tightly against the paper or
envelopes.
• Push the tray firmly into the printer after loading paper.
Clearing jams 103

Use recommended paper
• Use only recommended paper or specialty media.
• Do not load paper that is wrinkled, creased, damp, bent, or curled.
• Flex, fan, and align the paper edges before loading.
• Do not use paper that has been cut or trimmed by hand.
• Do not mix paper sizes, weights, or types in the same tray.
• Make sure that the paper size and type are set correctly on the computer or printer control panel.
• Store paper according to manufacturer recommendations.
Identifying jam locations
Notes:
• When Jam Assist is set to On, the printer automatically
flushes
blank pages or partially printed pages
after a jammed page has been cleared. Check your printed output for blank pages.
• When Jam Recovery is set to On or Auto, the printer reprints jammed pages.
Clearing jams 104
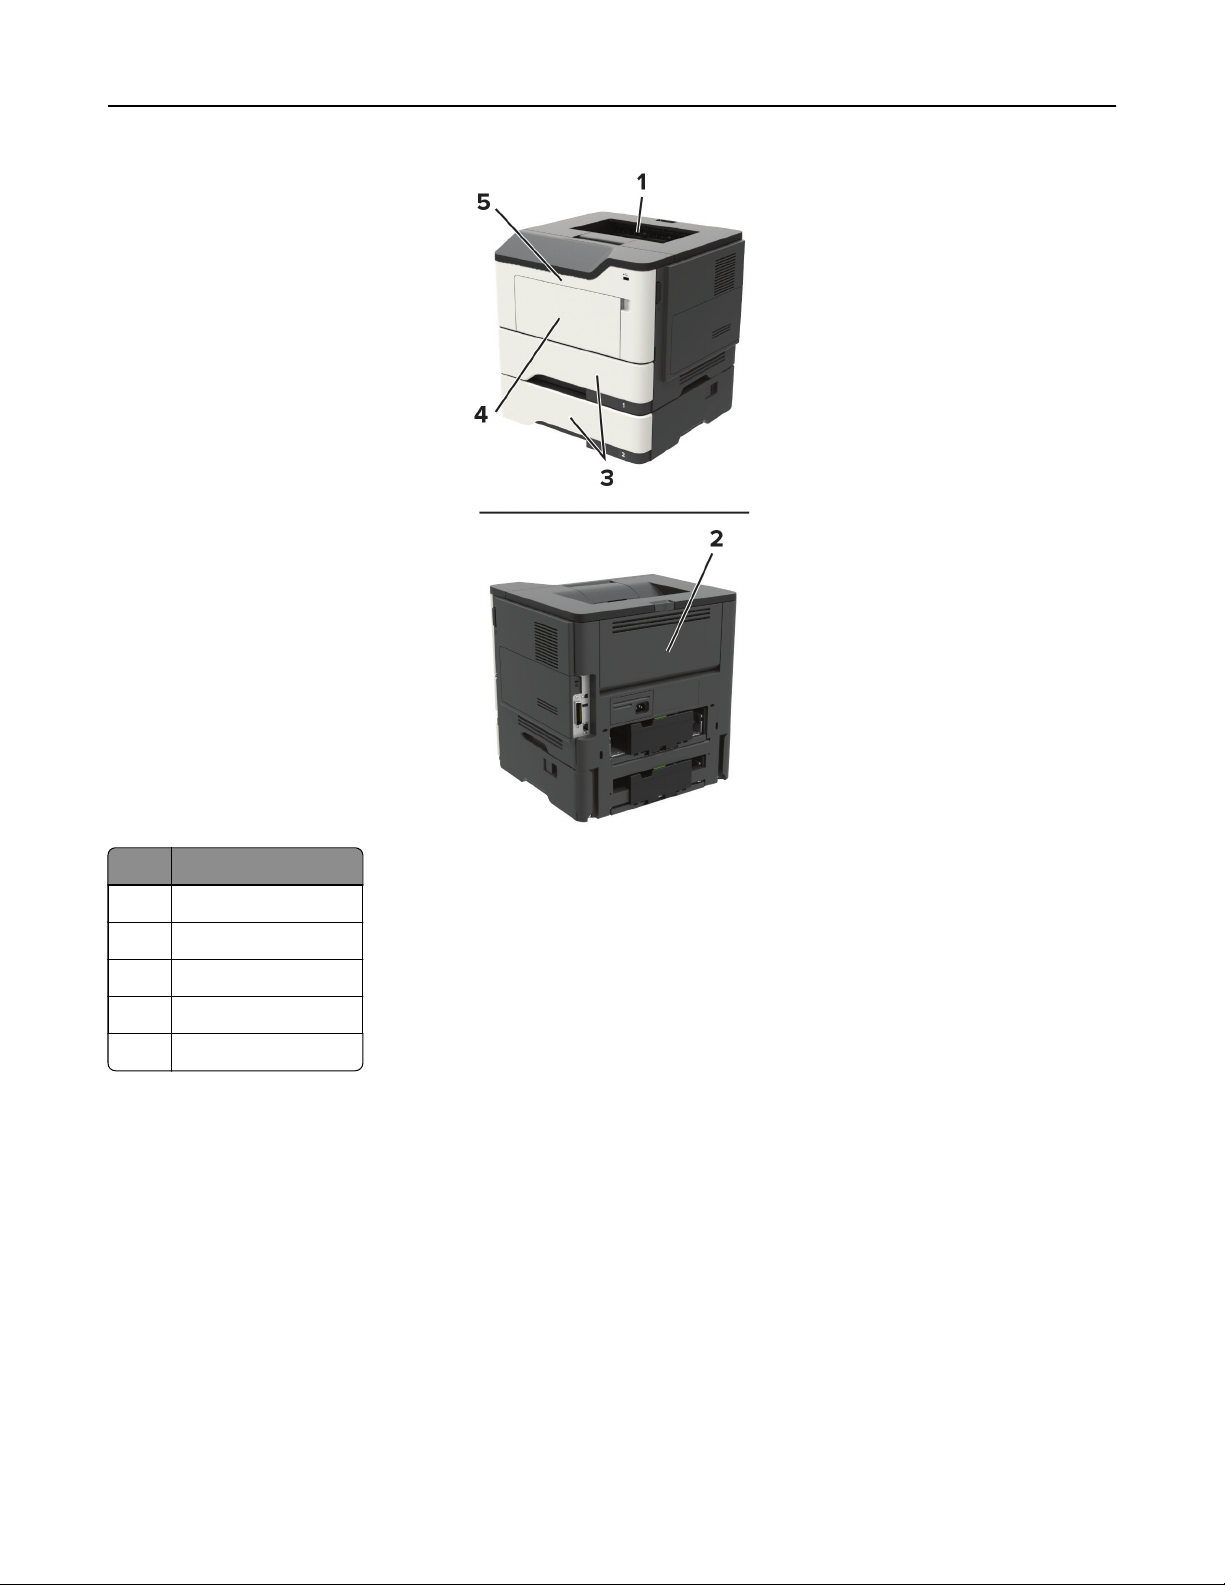
Jam location
1 Standard bin
2 Rear door
3 Tray [x]
4 Multipurpose feeder
5 Door A
Clearing jams 105
Paper jam in door A
1 Remove the tray.
2 Open door A.
3 Remove the toner cartridge.
Clearing jams 106
4 Remove the imaging unit.
Warning—Potential Damage: Do not expose the imaging unit to direct light for more than 10 minutes.
Extended exposure to light may cause print quality problems.
Warning—Potential Damage: Do not touch the photoconductor drum. Doing so may aect the quality of
future print jobs.
5 Remove the jammed paper.
CAUTION—HOT SURFACE: The inside of the printer might be hot. To reduce the risk of injury from a
hot component, allow the surface to cool before touching it.
Note: Make sure that all paper fragments are removed.
Clearing jams 107
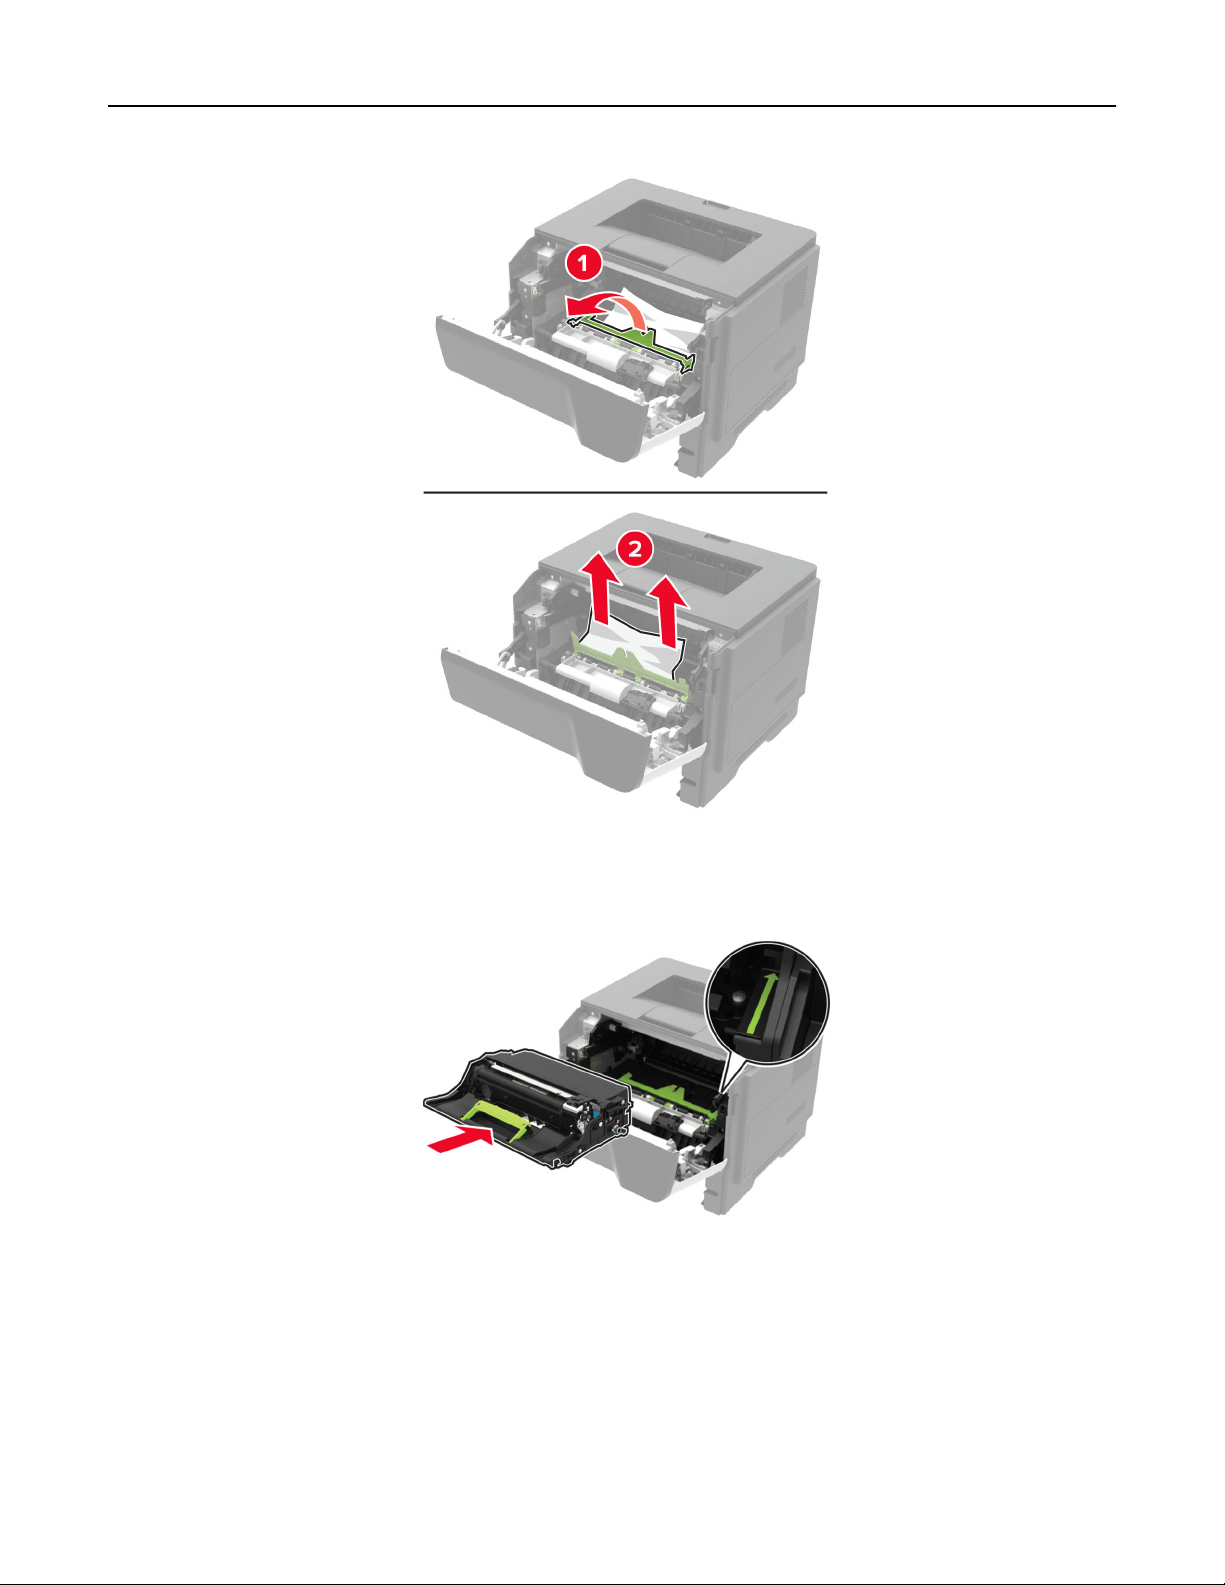
6 Insert the imaging unit.
Note: Use the arrows inside the printer as guides.
7 Insert the toner cartridge.
Note: Use the arrows inside the printer as guides.
Clearing jams 108
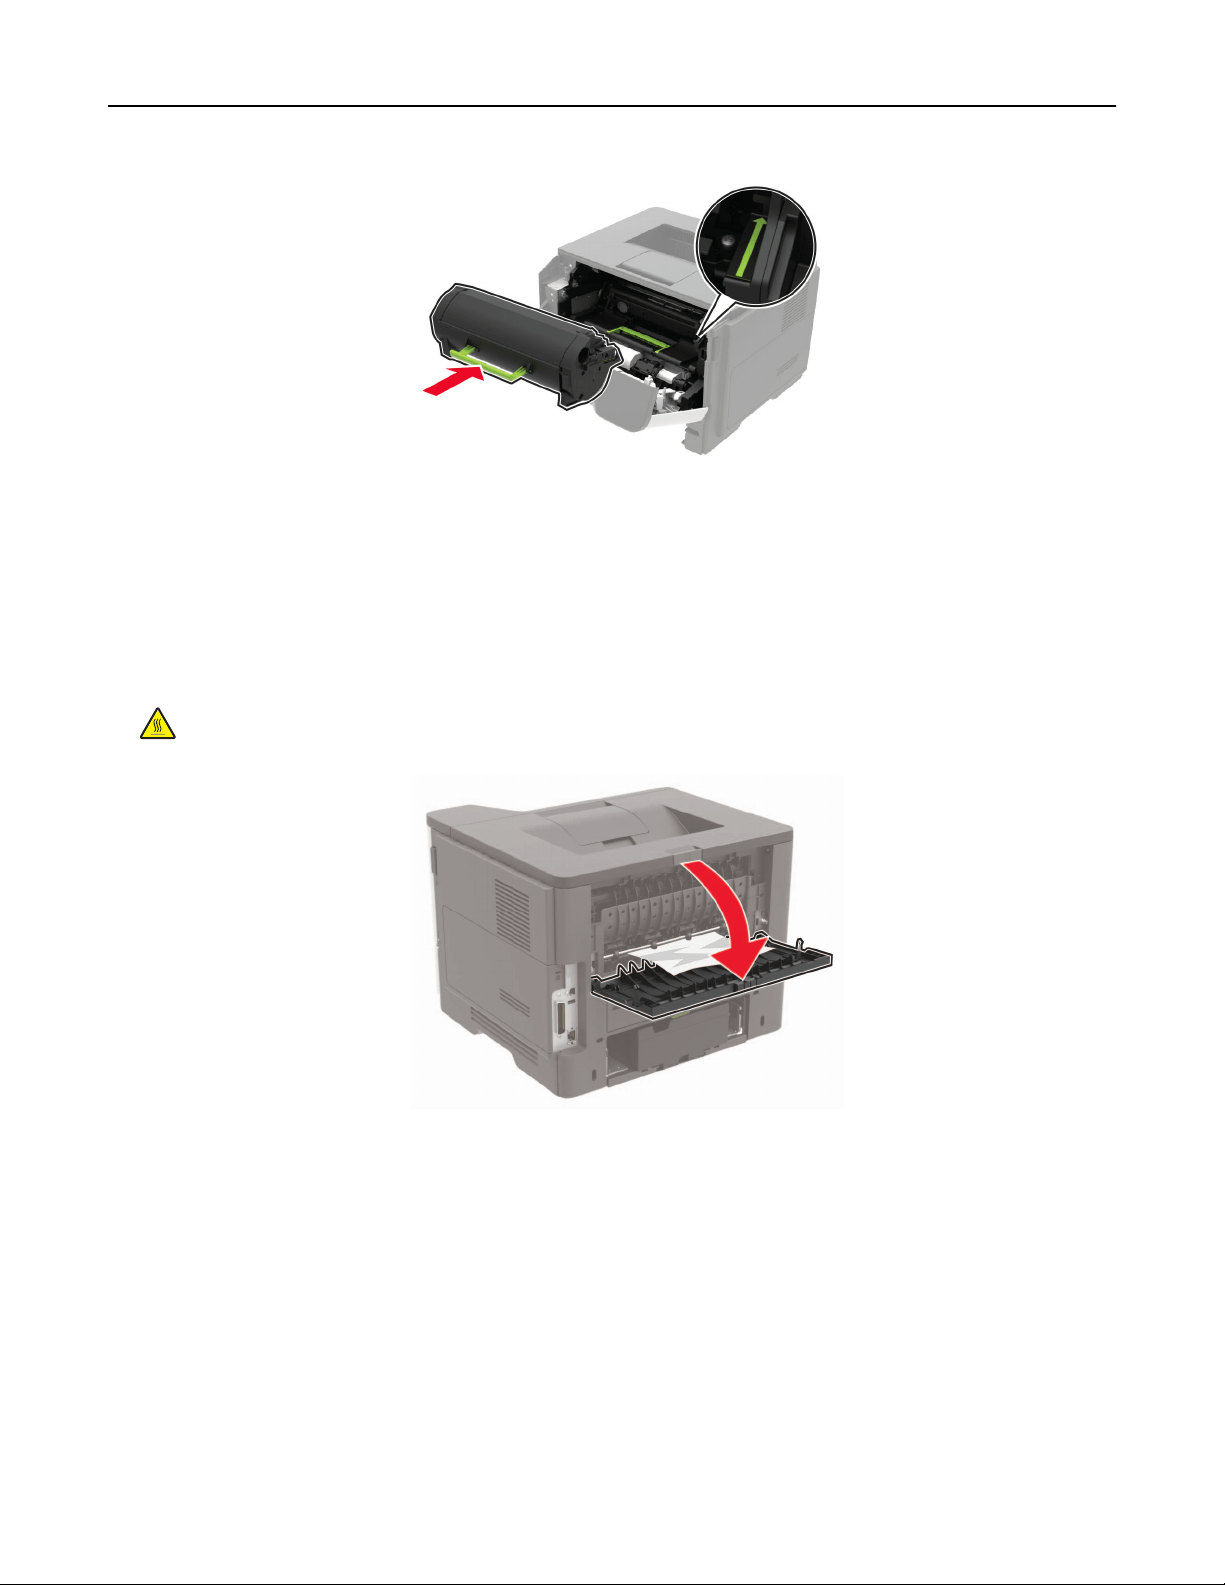
8 Close door A.
9 Insert the tray.
Paper jam in the rear door
1 Open the rear door.
CAUTION—HOT SURFACE: The inside of the printer might be hot. To reduce the risk of injury from a
hot component, allow the surface to cool before touching it.
2 Remove the jammed paper.
Note: Make sure that all paper fragments are removed.
Clearing jams 109
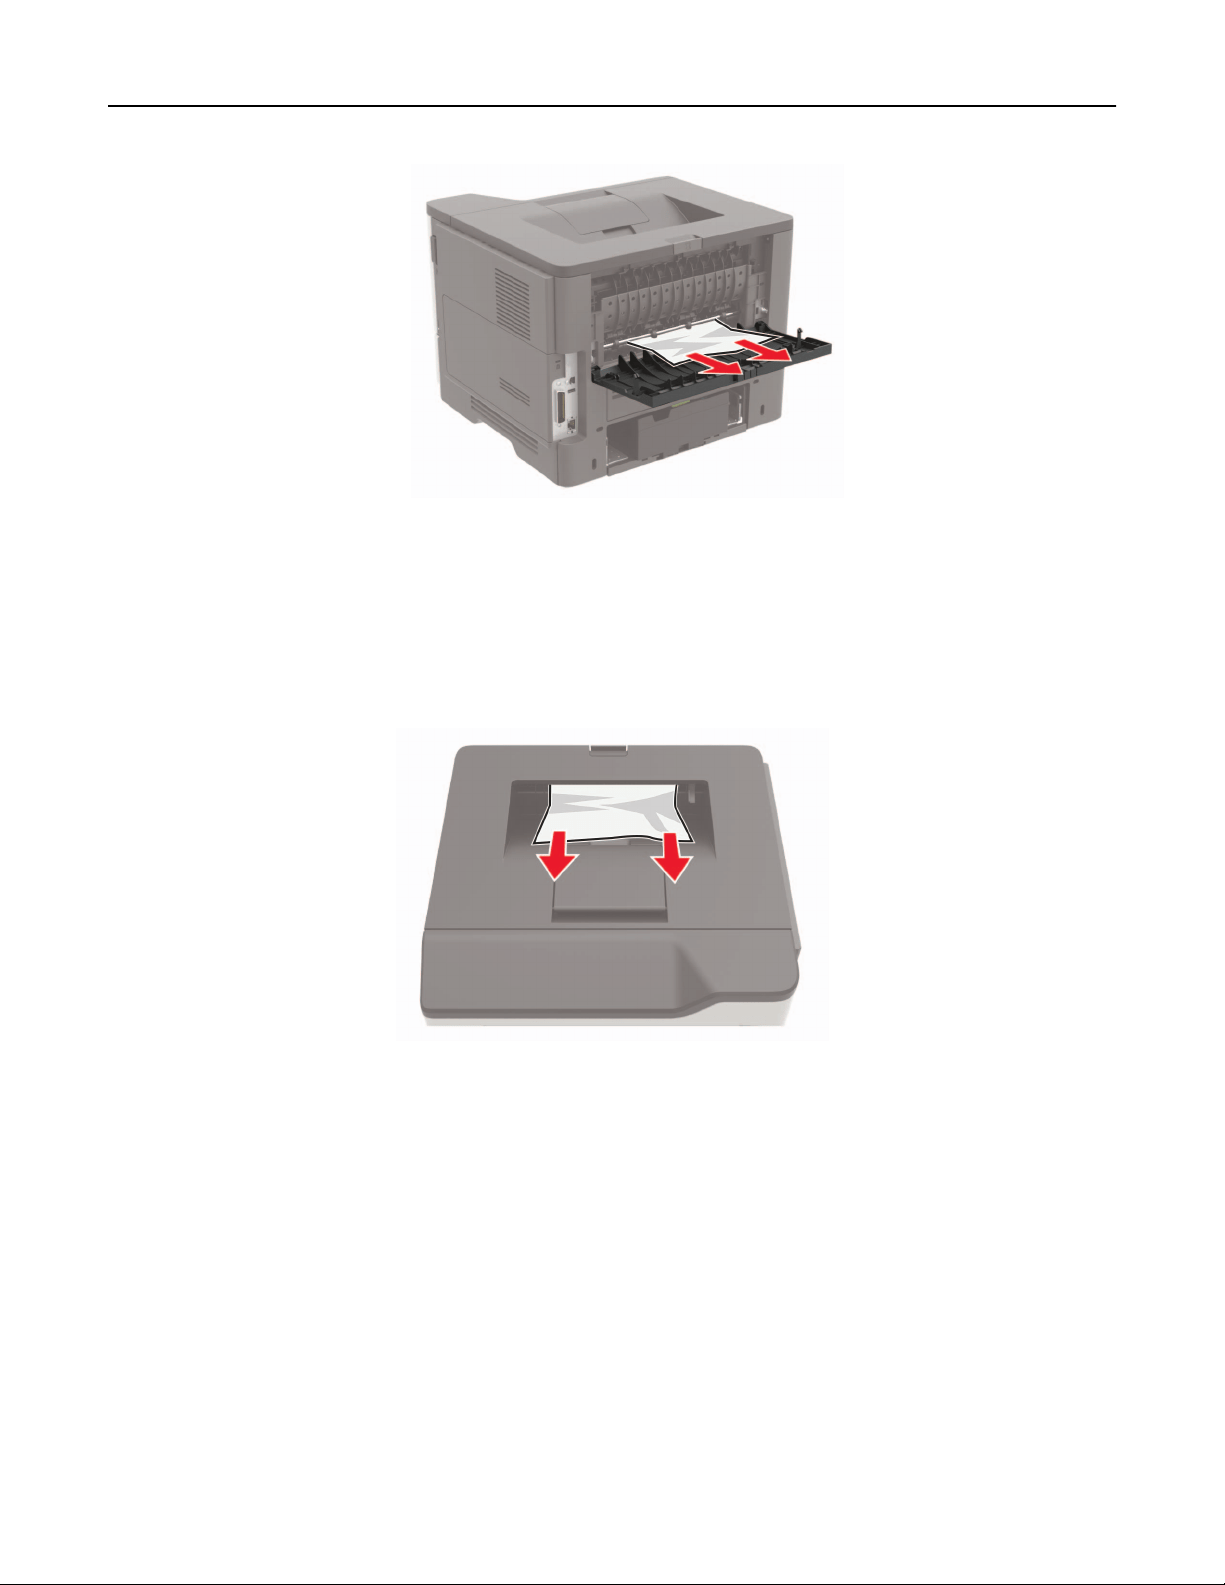
3 Close the rear door.
Paper jam in the standard bin
Remove the jammed paper.
Note: Make sure that all paper fragments are removed.
Clearing jams 110
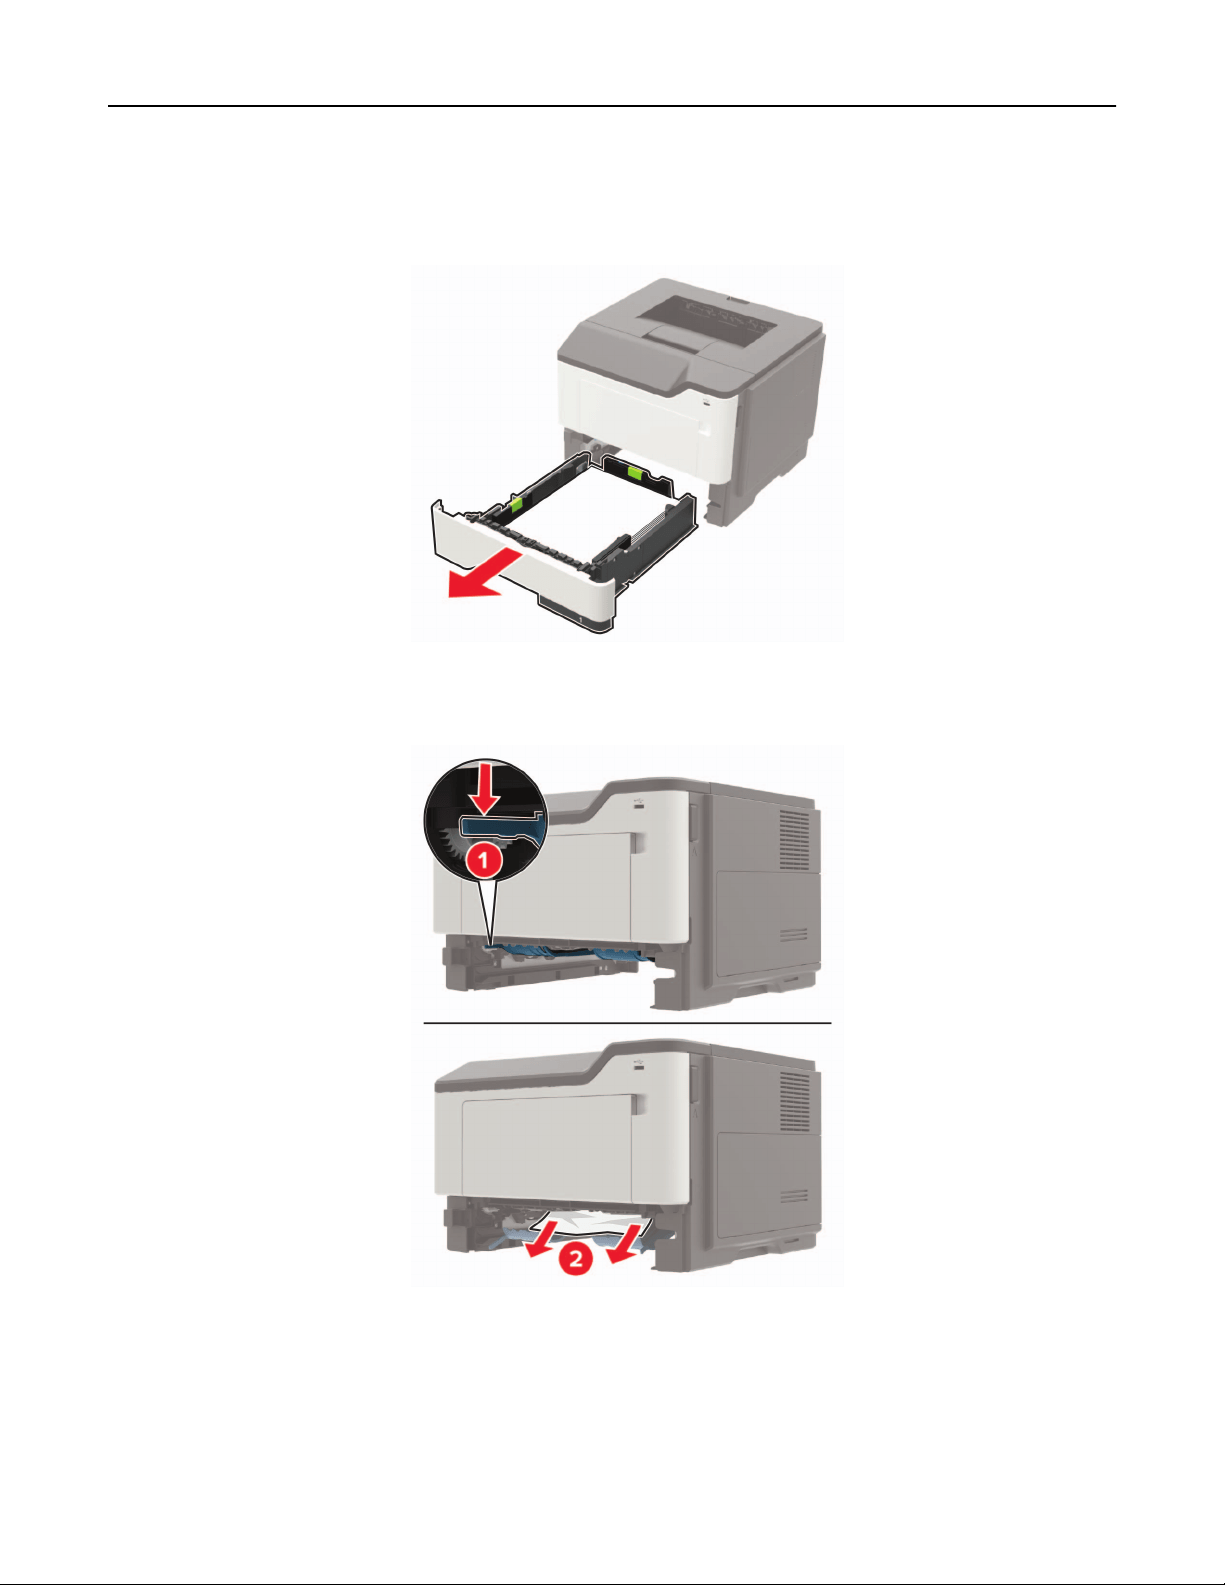
Paper jam in the duplex unit
1 Remove the tray.
2 Remove the jammed paper.
Note: Make sure that all paper fragments are removed.
3 Insert the tray.
Clearing jams 111
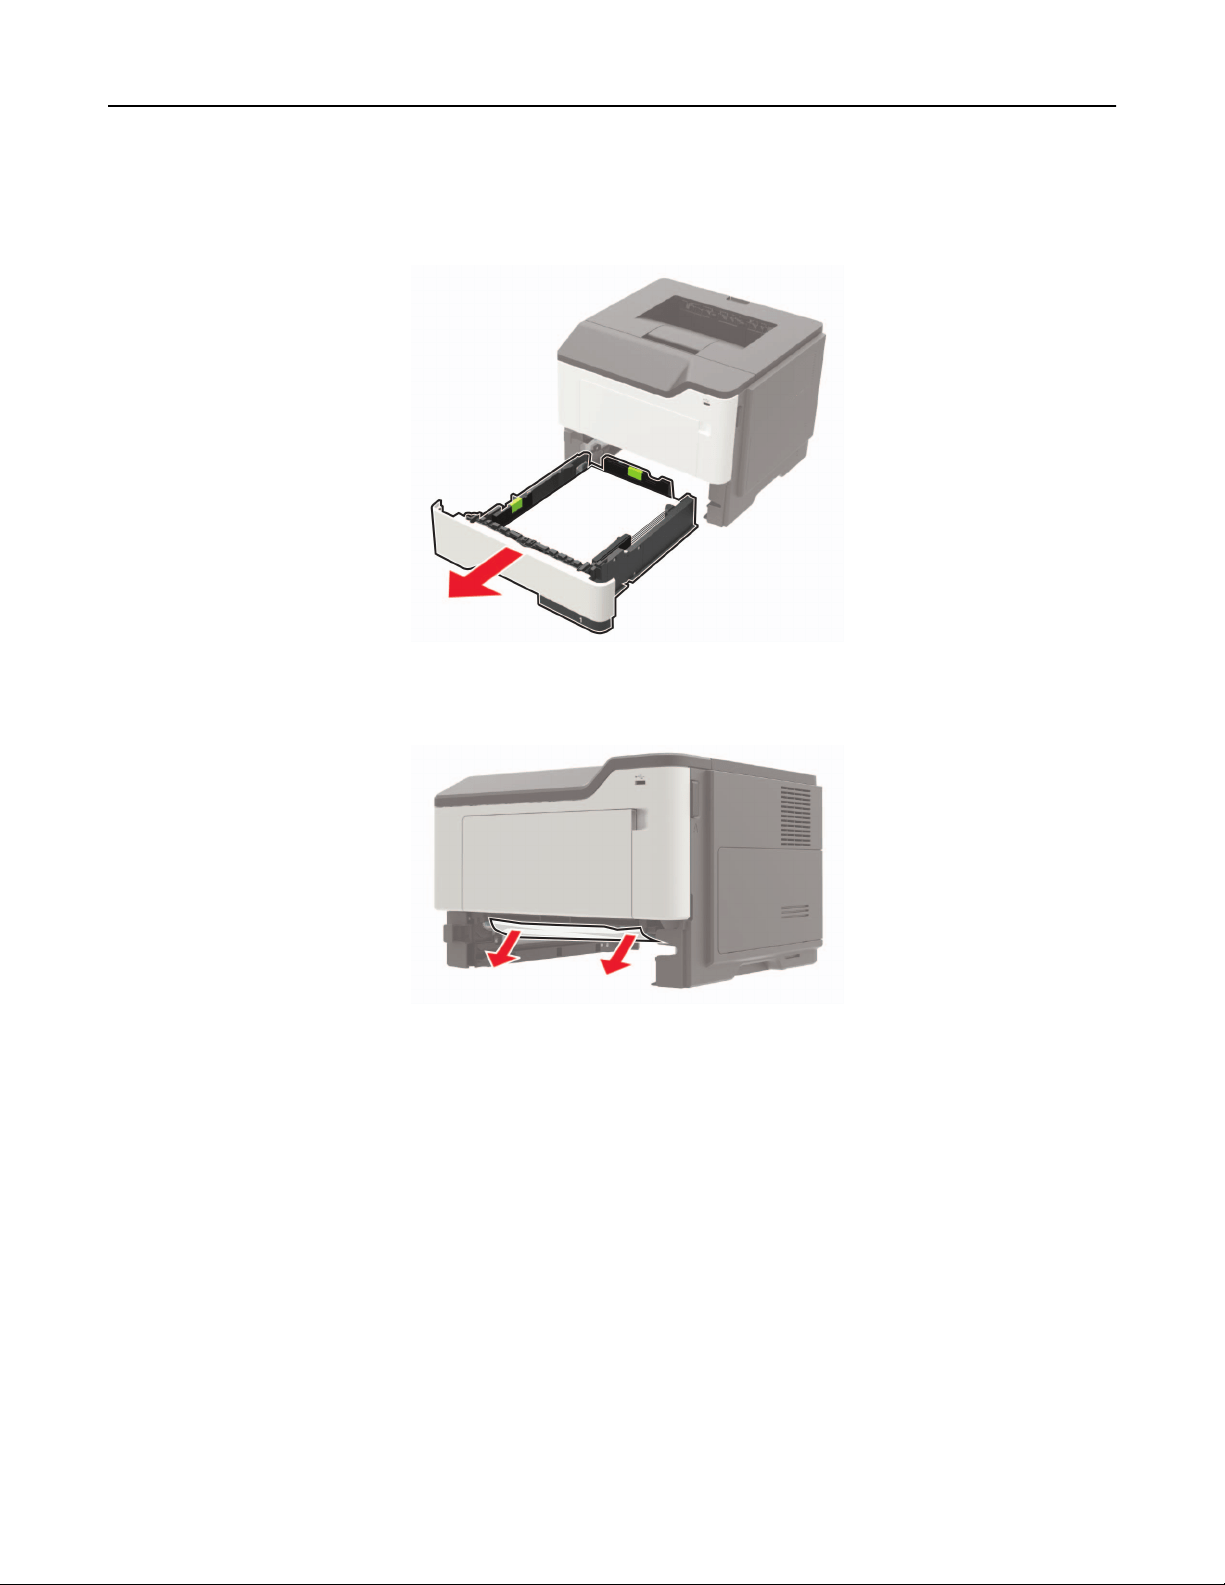
Paper jam in trays
1 Remove the tray.
2 Remove the jammed paper.
Note: Make sure that all paper fragments are removed.
3 Insert the tray.
Paper jam in the multipurpose feeder
1 Remove paper from the multipurpose feeder.
2 Remove the jammed paper.
Note: Make sure that all paper fragments are removed.
Clearing jams 112
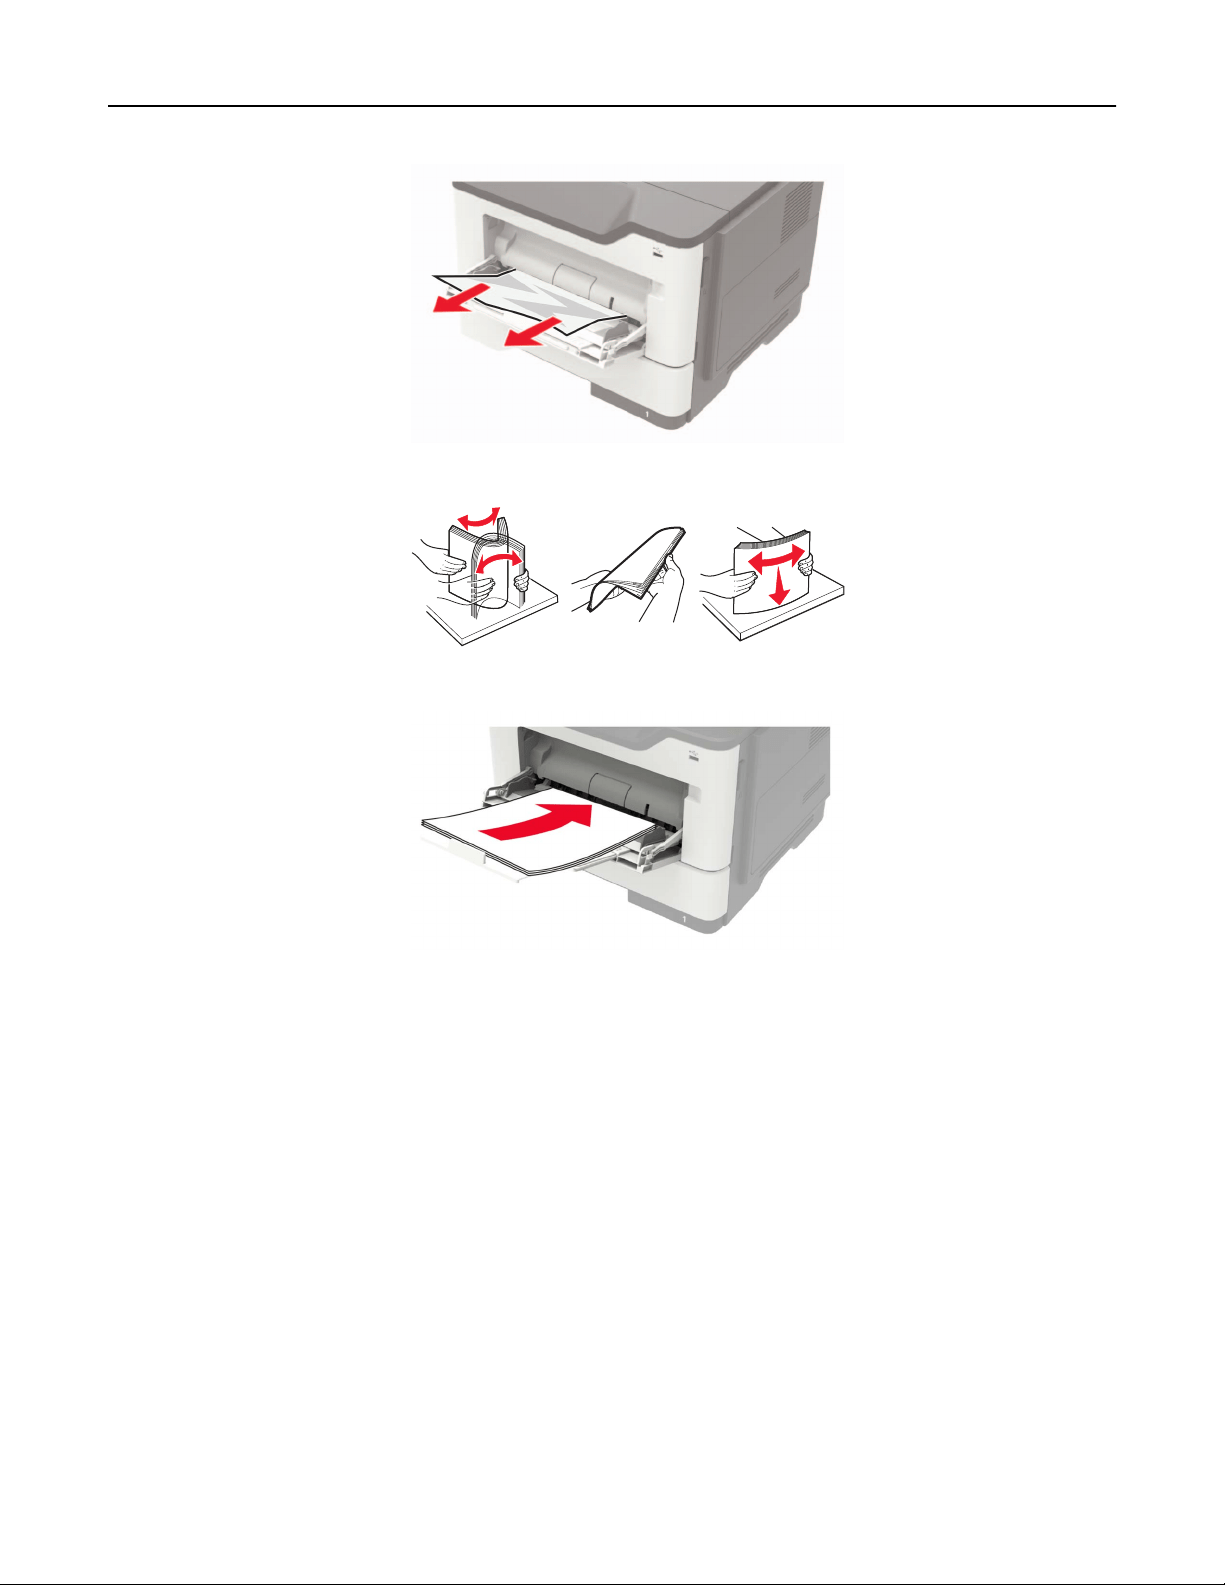
3 Flex, fan, and align the paper edges before loading.
4 Reload paper, and then adjust the paper guide.
Clearing jams 113

Troubleshooting
Network connection problems
Cannot open Embedded Web Server
Action Yes No
Step 1
Check if the printer is on.
Is the printer on?
Go to step 2. Turn on the printer.
Step 2
Make sure that the printer IP address is correct.
Notes:
• View the IP address on the home screen.
• An IP address appears as four sets of numbers separated by
periods, such as 123.123.123.123.
Is the printer IP address correct?
Go to step 3. Type the correct
printer IP address in
the address field.
Step 3
Check if you are using a supported browser:
• Internet Explorer version 11 or later
• Microsoft Edge
• Safari version 6 or later
• Google Chrome
TM
version 32 or later
• Mozilla Firefox version 24 or later
Is your browser supported?
Go to step 4. Install a supported
browser.
Step 4
Check if the network connection is working.
Is the network connection working?
Go to step 5. Contact your
administrator.
Step 5
Make sure that the cable connections to the printer and print server
are secure. For more information, see the documentation that
came with the printer.
Are the cable connections secure?
Go to step 6. Secure the cable
connections.
Step 6
Check if the web proxy servers are disabled.
Are the web proxy servers disabled?
Go to step 7. Contact your
administrator.
Troubleshooting 114

Action Yes No
Step 7
Access the Embedded Web Server.
Did the Embedded Web Server open?
The problem is
solved.
Contact
customer
support.
Unable to read
flash
drive
Action Yes No
Step 1
Check if the printer is not busy processing another print, copy,
scan, or fax job.
Is the printer ready?
Go to step 2. Wait for the printer to
finish processing the
other job.
Step 2
Check if the flash drive is supported. For more information, see
“Supported flash drives and file types” on page 33.
Is the
flash
drive supported?
Go to step 3. Insert a supported
flash drive.
Step 3
Remove, and then insert the flash drive.
Does the printer recognize the flash drive?
The problem is
solved.
Contact
customer
support.
Enabling the USB port
From the home screen, touch Settings > Network/Ports > USB > Enable USB Port.
Cannot connect the printer to the Wi
‑Fi network
Action Yes No
Step 1
Make sure that Active Adapter is set to Auto.
From the home screen, touch Settings > Network/Ports > Network
Overview > Active Adapter > Auto.
Can the printer connect to the Wi‑Fi network?
The problem is
solved.
Go to step 2.
Step 2
Check if the correct Wi‑Fi network is selected.
Note: Some routers may share the default SSID.
Are you connecting to the correct Wi‑Fi network?
Go to step 4. Go to step 3.
Troubleshooting 115

Action Yes No
Step 3
Connect to the correct Wi‑Fi network. For more information, see
“Connecting the printer to a Wi‑Fi network” on page 83.
Can the printer connect to the Wi‑Fi network?
The problem is
solved.
Go to step 4.
Step 4
Check the wireless security mode.
From the home screen, touch Settings > Network/Ports > Wireless
> Wireless Security Mode.
Is the correct wireless security mode selected?
Go to step 6. Go to step 5.
Step 5
Select the correct wireless security mode.
Can the printer connect to the Wi‑Fi network?
The problem is
solved.
Go to step 6.
Step 6
Make sure that you entered the correct network password.
Note: Take note of the spaces, numbers, and capitalization in the
password.
Can the printer connect to the Wi‑Fi network?
The problem is
solved.
Contact
customer
support.
Checking the printer connectivity
1 From the home screen, touch Settings > Reports > Network > Network Setup Page.
2 Check the first section of the network setup page, and confirm that the status is connected.
If the status is not connected, then the LAN drop may be inactive, or the network cable may be
malfunctioning. Contact your administrator for assistance.
Troubleshooting 116
Hardware options problems
Cannot detect internal option
Action Yes No
Step 1
Turn o the printer, wait for about 10 seconds, and then turn on the
printer.
Does the internal option operate correctly?
The problem is
solved.
Go to step 2.
Step 2
Print the Menu Settings Page, and then check if the internal option
appears in the Installed Features list.
Is the internal option listed in the menu settings page?
Go to step 4. Go to step 3.
Step 3
Check if the internal option is installed properly into the controller
board.
a Turn o the printer, and then unplug the power cord from the
electrical outlet.
b Make sure that the internal option is installed in the appropriate
connector in the controller board.
c Connect the power cord to the electrical outlet, and then turn
on the printer.
CAUTION—POTENTIAL INJURY: To avoid the risk of fire
or electrical shock, connect the power cord to an
appropriately rated and properly grounded electrical outlet
that is near the product and easily accessible.
Does the internal option operate correctly?
The problem is
solved.
Go to step 4.
Step 4
a Check if the internal option is available in the print driver.
Note: If necessary, manually add the internal option in the
print driver to make it available for print jobs. For more
information, see
“Adding available options in the print driver”
on page 167.
b Resend the print job.
Does the internal option operate correctly?
The problem is
solved.
Contact
customer
support.
Troubleshooting 117

Parallel or serial interface card does not operate correctly
Action Yes No
Step 1
Print a menu settings page, and then check if the parallel or serial
interface card appears in the Installed Features list.
Is the parallel or serial interface card listed in the Installed Features
list?
Go to step 3. Go to step 2.
Step 2
Remove, and then install the parallel or serial interface card.
For more information, see
“Installing an internal solutions port” on
page 160.
Does the parallel or serial interface card operate correctly?
The problem is
solved.
Go to step 3.
Step 3
Check the connection between the cable and the parallel or serial
interface card.
Does the parallel or serial interface card operate correctly?
The problem is
solved.
Contact
customer
support.
Internal solutions port does not operate correctly
Action Yes No
Step 1
Print a menu settings page, and then check if the internal solutions
port (ISP) appears in the Installed Features list.
Is the ISP listed in the Installed Features list?
Go to step 3. Go to step 2.
Step 2
Remove, and then install the ISP. For more information, see
“Installing an internal solutions port” on page 160.
Note: Use a supported ISP.
Does the ISP operate correctly?
The problem is
solved.
Go to step 3.
Step 3
Check the cable and the ISP connection.
a Use the correct cable, and then make sure that it is securely
connected to the ISP.
b Check if the ISP solution interface cable is securely connected
into the receptacle of the controller board.
Does the ISP operate correctly?
The problem is
solved.
Contact customer
support.
Troubleshooting 118

Defective flash detected
Try one or more of the following:
• Replace the defective flash memory.
• From the printer control panel, select Continue to ignore the message and continue printing.
• Cancel the current print job.
Not enough free space in
flash
memory for resources
Try one or more of the following:
• From the printer control panel, select Continue to clear the message and continue printing.
• Delete fonts, macros, and other data stored in the flash memory.
• Install flash memory with larger capacity.
Note: Downloaded fonts and macros that are not previously stored in the
flash
memory are deleted.
Unformatted
flash
detected
Try one or more of the following:
• From the control panel, select Continue to stop the defragmentation and continue printing.
• Format the flash memory.
Note: If the error message remains, then the flash memory may be defective and needs to be
replaced.
Issues with supplies
Replace cartridge, printer region mismatch
To correct this problem, purchase a cartridge with the correct region that matches the printer region, or
purchase a worldwide cartridge.
• The first number in the message after 42 indicates the region of the printer.
• The second number in the message after 42 indicates the region of the cartridge.
Printer and toner cartridge regions
Region Numeric code
Worldwide or Undefined region 0
North America (United States, Canada) 1
European Economic Area, Western Europe, Nordic countries, Switzerland 2
Asia Pacific 3
Latin America 4
Rest of Europe, Middle East, Africa 5
Australia, New Zealand 6
Troubleshooting 119

Region Numeric code
Invalid region 9
Note: To find the region settings of the printer and toner cartridge, print the print quality test pages.
From the control panel, navigate to: Settings > Troubleshooting > Print Quality Test Pages.
Non‑Lexmark supply
The printer has detected a non‑Lexmark supply or part installed in the printer.
Your Lexmark printer is designed to function best with genuine Lexmark supplies and parts. Use of third-
party supplies or parts may aect the performance, reliability, or life of the printer and its imaging
components.
All life indicators are designed to function with Lexmark supplies and parts and may deliver unpredictable
results if third-party supplies or parts are used. Imaging component usage beyond the intended life may
damage your Lexmark printer or associated components.
Warning—Potential Damage: Use of third-party supplies or parts can aect warranty coverage.
Damage caused by the use of third-party supplies or parts may not be covered by the warranty.
To accept any and all of these risks and to proceed with the use of non-genuine supplies or parts in your
printer, from the control panel, press and hold X and # simultaneously for 15 seconds.
If you do not want to accept these risks, then remove the third-party supply or part from your printer and
install a genuine Lexmark supply or part. For more information, see
“Using genuine Lexmark parts and
supplies” on page 87.
If the printer does not print after pressing and holding X and # simultaneously for 15 seconds, then reset
the supply usage counter.
1 From the control panel, navigate to:
Settings > Device > Maintenance >
Configuration
Menu > Supply Usage And Counters
2 Select the part or supply that you want to reset, and then select Start.
3 Read the warning message, and then select Continue.
4 Press and hold X and # simultaneously for 15 seconds to clear the message.
Note: If you are unable to reset the supply usage counters, then return the item to the place of
purchase.
Troubleshooting 120

Paper feed problems
Envelope seals when printing
Action Yes No
Step 1
a Use an envelope that has been stored in a dry environment.
Note: Printing on envelopes with high moisture content can
seal the flaps.
b Send the print job.
Does the envelope seal when printing?
Go to step 2. The problem is
solved.
Step 2
a Make sure that paper type is set to Envelope.
From the control panel, navigate to:
Settings > Paper > Tray
Configuration
> Paper Size/Type
b Send the print job.
Does the envelope seal when printing?
Contact
customer
support.
The problem is
solved.
Collated printing does not work
Action Yes No
Step 1
a From the control panel, navigate to:
Settings > Print > Layout > Collate
b Tou c h On [1,2,1,2,1,2].
c Print the document.
Is the document collated correctly?
The problem is
solved.
Go to step 2.
Step 2
a From the document that you are trying to print, open the Print
dialog, and then select Collate.
b Print the document.
Is the document collated correctly?
The problem is
solved.
Go to step 3.
Step 3
a Reduce the number of pages to print.
b Print the document.
Are the pages collated correctly?
The problem is
solved.
Contact
customer
support.
Troubleshooting 121

Tray linking does not work
Action Yes No
Step 1
a Check if the trays contain the same paper size and paper type.
b Check if the paper guides are positioned correctly.
c Print the document.
Do the trays link correctly?
The problem is
solved.
Go to step 2.
Step 2
a From the control panel, touch Settings > Paper > Tray
Configuration > Paper Size/Type
b Set the paper size and paper type to match the paper loaded
in the linked trays.
c Print the document.
Do the trays link correctly?
The problem is
solved.
Go to step 3.
Step 3
a Make sure that Tray Linking is set to Automatic. For more
information, see
“Linking trays” on page 26.
b Print the document.
Do the trays link correctly?
The problem is
solved.
Contact
customer
support.
Paper frequently jams
Action Yes No
Step 1
a Remove the tray.
b Check if paper is loaded correctly.
Notes:
• Make sure that the paper guides are positioned correctly.
• Make sure that the stack height is below the maximum
paper fill indicator.
• Make sure to print on recommended paper size and type.
c Insert the tray.
d Print the document.
Do paper jams occur frequently?
Go to step 2. The problem is
solved.
Troubleshooting 122
Action Yes No
Step 2
a From the control panel, navigate to:
Settings > Paper > Tray Configuration > Paper Size/Type
b Set the correct paper size and type.
c Print the document.
Do paper jams occur frequently?
Go to step 3. The problem is
solved.
Step 3
a Load paper from a fresh package.
Note: Paper absorbs moisture due to high humidity. Store
paper in its original wrapper until you are ready to use it.
b Print the document.
Do paper jams occur frequently?
Contact
customer
support.
The problem is
solved.
Jammed pages are not reprinted
Action Yes No
a From the control panel, navigate to:
Settings > Device >
Notifications
> Jam Content Recovery
b In the Jam Recovery menu, select On or Auto.
c Print the document.
Are the jammed pages reprinted?
The problem is
solved.
Contact
customer
support.
Printing problems
Print quality is poor
Blank or white pages
Note: Before solving the problem, print the Print Quality Test Pages. From the control panel, navigate to
Settings > Troubleshooting > Print Quality Test Pages. For non‑touch‑screen printer models, press
to
navigate through the settings.
Troubleshooting 123

Action Yes No
Step 1
a Check if the printer is using a genuine and supported Lexmark
toner cartridge.
Note: If the cartridge is not supported, then install a
supported one.
b Print the document.
Is the printer printing blank or white pages?
Go to step 2. The problem is
solved.
Step 2
a Remove any packing material that is left on the imaging unit.
1 Remove the toner cartridge, and then remove the imaging
unit.
Warning—Potential Damage: Do not expose the imaging
unit to direct light for more than 10 minutes. Extended
exposure to light may cause print quality problems.
Warning—Potential Damage: Do not touch the
photoconductor drum under the imaging unit. Doing so
may aect the quality of future print jobs.
2 Check the imaging unit for signs of damage, and replace if
necessary.
Note: Make sure that the photoconductor drum contact is
not bent or out of place.
3 Firmly shake the imaging unit to redistribute the toner.
4 Insert the imaging unit, and then insert the toner cartridge.
b Print the document.
Is the printer printing blank or white pages?
Go to step 3. The problem is
solved.
Step 3
Check the status of the toner cartridge, and replace if necessary.
a From the control panel, navigate to:
Status/Supplies > Supplies
b Print the document.
Is the printer printing blank or white pages?
Contact
customer
support.
The problem is
solved.
Dark print
Troubleshooting 124

Note: Before solving the problem, print the Print Quality Test Pages. From the control panel, navigate to
Settings > Troubleshooting > Print Quality Test Pages. For non‑touch‑screen printer models, press
to
navigate through the settings.
Action Yes No
Step 1
a Check if the printer is using a genuine and supported Lexmark
toner cartridge.
Note: If the cartridge is not supported, then install a
supported one.
b Print the document.
Is the print dark?
Go to step 2. The problem is
solved.
Step 2
a Turn o the printer, wait for about 10 seconds, and then turn on
the printer.
b Reduce toner darkness. From the control panel, navigate to:
Settings > Print > Quality
c Print the document.
Is the print dark?
Go to step 3. The problem is
solved.
Step 3
a Depending on your operating system, specify the paper type
from the Printing Preferences or Print dialog.
Notes:
• Make sure that the setting matches the paper loaded.
• You can also change the setting on the printer control
panel.
b Print the document.
Is the print dark?
Go to step 4. The problem is
solved.
Step 4
Check if the paper has texture or rough finishes.
Are you printing on textured or rough paper?
Go to step 5. Go to step 6.
Step 5
a Replace textured paper with plain paper.
b Print the document.
Is the print dark?
Go to step 6. The problem is
solved.
Troubleshooting 125
Action Yes No
Step 6
a Load paper from a fresh package.
Note: Paper absorbs moisture due to high humidity. Store
paper in its original wrapper until you are ready to use it.
b Print the document.
Is the print dark?
Go to step 7. The problem is
solved.
Step 7
a Remove, and then insert the imaging unit.
Warning—Potential Damage: Do not expose the imaging unit
to direct light for more than 10 minutes. Extended exposure
to light may cause print quality problems.
Warning—Potential Damage: Do not touch the
photoconductor drum under the imaging unit. Doing so may
aect the quality of future print jobs.
b Print the document.
Is the print dark?
Go to step 8. The problem is
solved.
Step 8
a Replace the imaging unit.
b Print the document.
Is the print dark?
Contact
customer
support.
The problem is
solved.
Fine lines are not printed correctly
Note: Before solving the problem, print the Print Quality Test Pages. From the control panel, navigate to
Settings > Troubleshooting > Print Quality Test Pages. For non‑touch‑screen printer models, press
to
navigate through the settings.
Troubleshooting 126
Action Yes No
Step 1
a Check if the printer is using a genuine and supported Lexmark
toner cartridge.
Note: If the cartridge is not supported, then install a
supported one.
b Print the document.
Are fine lines not printed correctly?
Go to step 2. The problem is
solved.
Step 2
a Adjust the print quality settings.
1 From the control panel, navigate to:
Settings > Print > Quality > Pixel Boost > Fonts
2 Adjust Toner Darkness to 7. From the control panel, navigate
to:
Settings > Print > Quality
b Print the document.
Are fine lines not printed correctly?
Contact
customer
support.
The problem is
solved.
Folded or wrinkled paper
Note: Before solving the problem, print the Print Quality Test Pages. From the control panel, navigate to
Settings > Troubleshooting > Print Quality Test Pages. For non‑touch‑screen printer models, press
to
navigate through the settings.
Action Yes No
Step 1
a Check if the printer is using a genuine and supported Lexmark
toner cartridge.
Note: If the cartridge is not supported, then install a
supported one.
b Print the document.
Is the paper folded or wrinkled?
Go to step 2. The problem is
solved.
Troubleshooting 127
Action Yes No
Step 2
a Load paper from a fresh package.
Note: Paper absorbs moisture due to high humidity. Store
paper in its original wrapper until you are ready to use it.
b Print the document.
Is the paper folded or wrinkled?
Go to step 3. The problem is
solved.
Step 3
a Depending on your operating system, specify the paper type
from the Printing Preferences or Print dialog.
Notes:
• Make sure that the setting matches the paper loaded.
• You can also change the setting from the printer control
panel.
b Print the document.
Is the paper folded or wrinkled?
Contact customer
support.
The problem is
solved.
Gray background
Note: Before solving the problem, print the Print Quality Test Pages. From the control panel, navigate to
Settings > Troubleshooting > Print Quality Test Pages. For non‑touch‑screen printer models, press
to
navigate through the settings.
Action Yes No
Step 1
a Turn o the printer, wait for 10 seconds, and then turn on the
printer.
b Increase toner darkness.
From the control panel, navigate to:
Settings > Print > Quality
c Print the document.
Does gray background appear on prints?
Go to step 2. The problem is
solved.
Troubleshooting 128

Action Yes No
Step 2
a Check if the printer is using a genuine and supported Lexmark
toner cartridge.
Note: If the toner cartridge is not supported, then install a
supported one.
b Print the document.
Does gray background appear on prints?
Go to step 3. The problem is
solved.
Step 3
a Depending on your operating system, specify the paper type
from the Printing Preferences or Print dialog.
Notes:
• Make sure that the setting matches the paper loaded.
• You can also change the setting from the printer control
panel.
b Print the document.
Does gray background appear on prints?
Go to step 4. The problem is
solved.
Step 4
Check the status of the toner cartridge, and replace if necessary.
a From the control panel, navigate to:
Status/Supplies > Supplies
b Print the document.
Does gray background appear on prints?
Go to step 5. The problem is
solved.
Troubleshooting 129
Action Yes No
Step 5
a Remove the imaging unit.
Warning—Potential Damage: Do not expose the imaging unit
to direct light for more than 10 minutes. Extended exposure
to light may cause print quality problems.
Warning—Potential Damage: Do not touch the
photoconductor drum under the imaging unit. Doing so may
aect the quality of future print jobs.
b Remove any packing material that is stuck on the imaging unit.
Note: Make sure to remove any obstruction between the
charge roller and photoconductor drum.
c Insert the imaging unit.
d Print the document.
Does gray background appear on prints?
Go to step 6. The problem is
solved.
Step 6
a Replace the imaging unit.
b Print the document.
Does gray background appear on prints?
Contact
customer
support.
The problem is
solved.
Horizontal light bands
Note: Before solving the problem, print the Print Quality Test Pages. From the control panel, navigate to
Settings > Troubleshooting > Print Quality Test Pages. For non‑touch‑screen printer models, press
to
navigate through the settings.
Troubleshooting 130
Action Yes No
a Check if the printer is using a genuine and supported Lexmark
toner cartridge.
Note: If the cartridge is not supported, then install a
supported one.
b Print the document.
Do horizontal light bands appear on prints?
Contact
customer
support.
The problem is
solved.
Incorrect margins
Action Yes No
Step 1
a Adjust the paper guides to the correct position for the paper
loaded.
b Print the document.
Are the margins correct?
The problem is
solved.
Go to step 2.
Step 2
a Depending on your operating system, specify the paper size
from the Printing Preferences or Print dialog.
Notes:
• Make sure that the setting matches the paper loaded.
• You can also change the setting from the printer control
panel.
b Print the document.
Are the margins correct?
The problem is
solved.
Contact
customer
support.
Troubleshooting 131
Light print
Note: Before solving the problem, print the Print Quality Test Pages. From the control panel, navigate to
Settings > Troubleshooting > Print Quality Test Pages. For non‑touch‑screen printer models, press
to
navigate through the settings.
Action Yes No
Step 1
a Check if the printer is using a genuine and supported Lexmark
toner cartridge.
Note: If the cartridge is not supported, then install a
supported one.
b Print the document.
Is the print light?
Go to step 2. The problem is
solved.
Step 2
a Turn o the printer, wait for about 10 seconds, and then turn on
the printer.
b Increase toner darkness. From the control panel, navigate to:
Settings > Print > Quality
c Print the document.
Is the print light?
Go to step 3. The problem is
solved.
Step 3
a Depending on your operating system, specify the paper type
from the Printing Preferences or Print dialog.
Notes:
• Make sure that the setting matches the paper loaded.
• You can also change the setting on the printer control
panel.
b Print the document.
Is the print light?
Go to step 4. The problem is
solved.
Troubleshooting 132
Action Yes No
Step 4
Check the status of the toner cartridge, and replace if necessary.
a From the control panel, navigate to:
Status/Supplies > Supplies
b Print the document.
Is the print light?
Go to step 5. The problem is
solved.
Step 5
a Remove the toner cartridge, and then remove the imaging unit.
Warning—Potential Damage: Do not expose the imaging unit
to direct light for more than 10 minutes. Extended exposure
to light can cause print quality problems.
Warning—Potential Damage: Do not touch the
photoconductor drum under the imaging unit. Doing so may
aect the quality of future print jobs.
b Push either side of the transfer roller, located below the imaging
unit, to check if it depresses and bounces back into place.
CAUTION—HOT SURFACE: The inside of the printer
might be hot. To reduce the risk of injury from a hot
component, allow the surface to cool before touching it.
c If the transfer roller does not depress and bounce back into
place, then remove and insert it.
1 Pull up one end of the transfer roller and push it down until
it clicks into place.
2 If necessary, repeat the step on the other end.
d Firmly shake the imaging unit to redistribute the toner, and then
insert it.
e Insert the toner cartridge.
f Turn
o
the printer, wait for 10 seconds, and then turn on the
printer.
g Print the document.
Is the print light?
Go to step 6. The problem is
solved.
Step 6
a If the issue happens after installing a new maintenance kit, then
check whether the transfer roller included with the kit is
installed.
Note: If necessary, replace the transfer roller.
b Print the document.
Is the print light?
Go to step 7. The problem is
solved.
Troubleshooting 133
Action Yes No
Step 7
Check the status of the imaging unit. From the control panel,
navigate to:
Status/Supplies > Supplies
Is the imaging unit near End of Life?
Go to step 8. Contact
customer
support.
Step 8
a Replace the imaging unit.
b Print the document.
Is the print light?
Contact
customer
support.
The problem is
solved.
Mottled print and dots
Note: Before solving the problem, print the Print Quality Test Pages. From the control panel, navigate to
Settings > Troubleshooting > Print Quality Test Pages. For non‑touch‑screen printer models, press
to
navigate through the settings.
Action Yes No
Step 1
a Check if the printer is using a genuine and supported Lexmark
toner cartridge.
Note: If the toner cartridge is not supported, then install a
supported one.
b Print the document.
Is the print mottled?
Go to step 2. The problem is
solved.
Step 2
Check the printer for leaked toner contamination.
Is the printer free of leaked toner?
Go to step 4. Go to step 3.
Step 3
a Replace the toner cartridge.
b Print the document.
Is the print mottled?
Go to step 4. The problem is
solved.
Troubleshooting 134
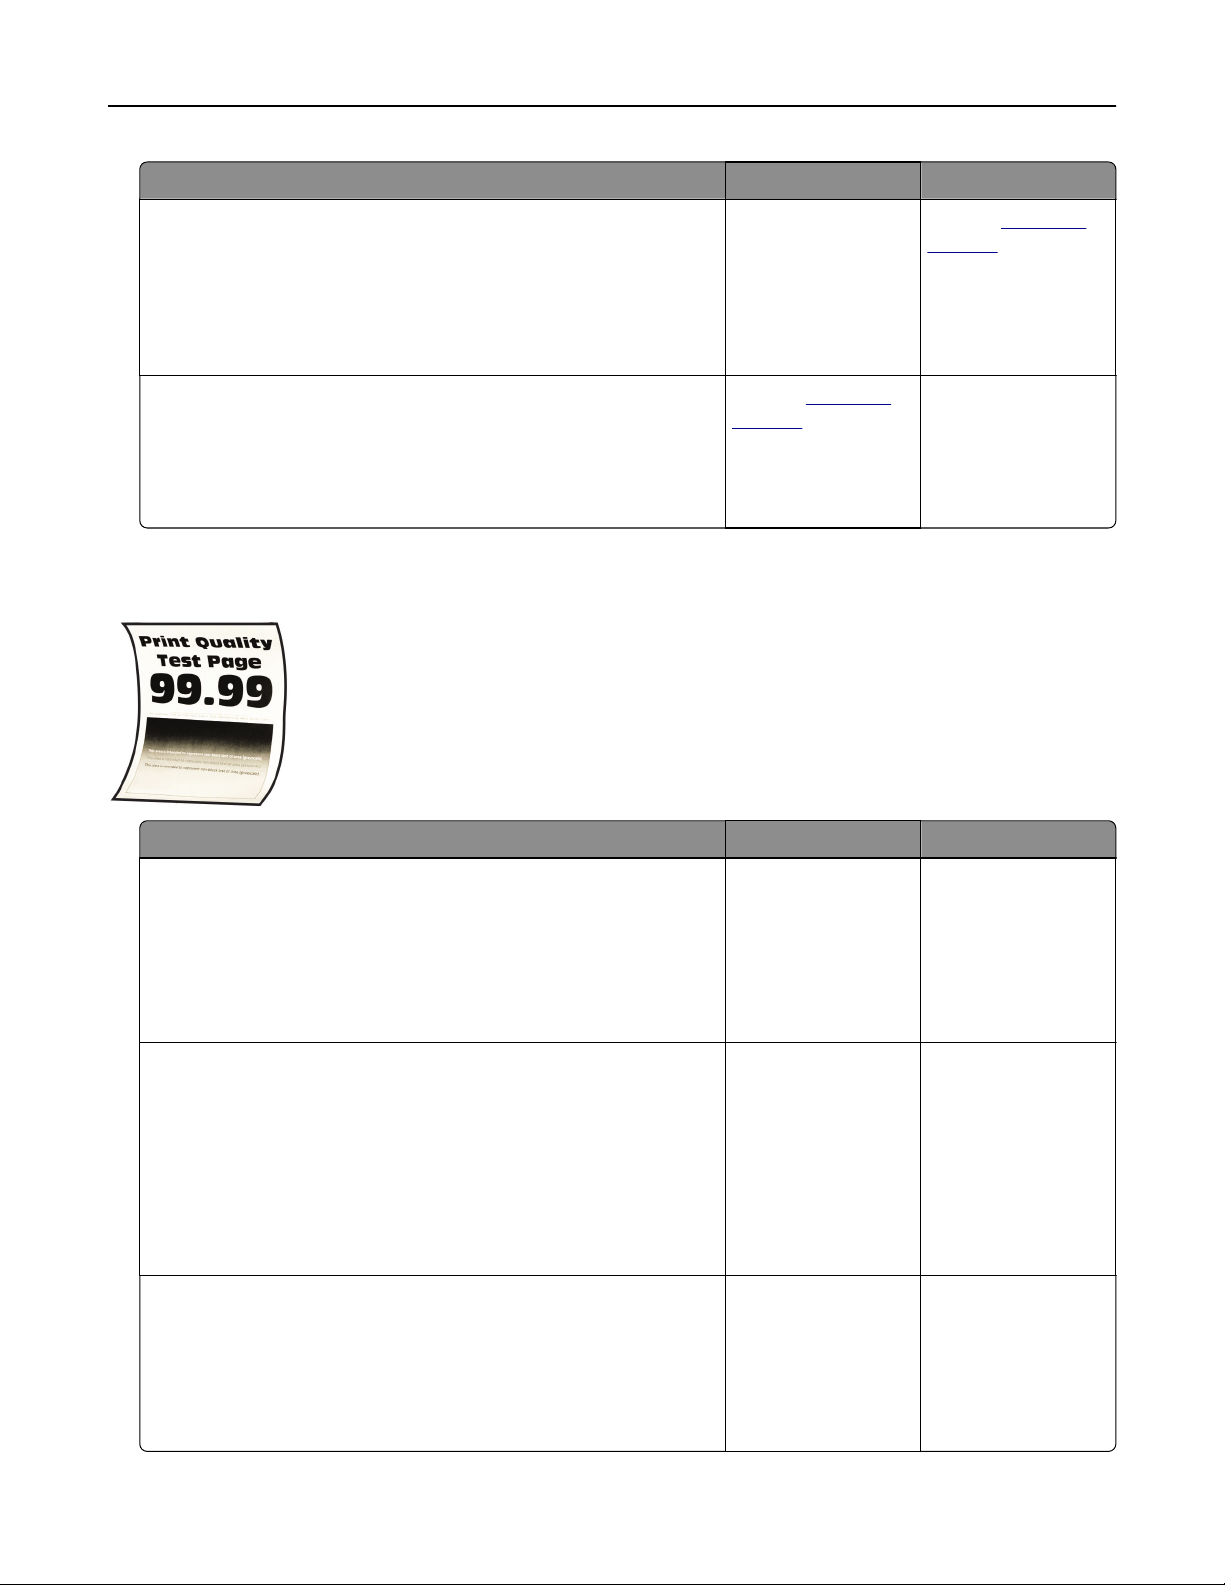
Action Yes No
Step 4
Check the status of the imaging unit. From the control panel,
navigate to:
Status/Supplies > Supplies
Is the imaging unit near end of life?
Go to step 5. Contact
customer
support.
Step 5
a Replace the imaging unit.
b Print the document.
Is the print mottled?
Contact
customer
support.
The problem is
solved.
Paper curl
Action Yes No
Step 1
a Check if the paper loaded is supported.
Note: If paper is not supported, then load a supported paper.
b Print the document.
Is the paper curled?
Go to step 2. The problem is
solved.
Step 2
a Check if the printer is using a genuine and supported Lexmark
toner cartridge.
Note: If the cartridge is not supported, then install a
supported one.
b Print the document.
Is the paper curled?
Go to step 3. The problem is
solved.
Step 3
a Adjust the guides in the tray to the correct position for the paper
loaded.
b Print the document.
Is the paper curled?
Go to step 4. The problem is
solved.
Troubleshooting 135
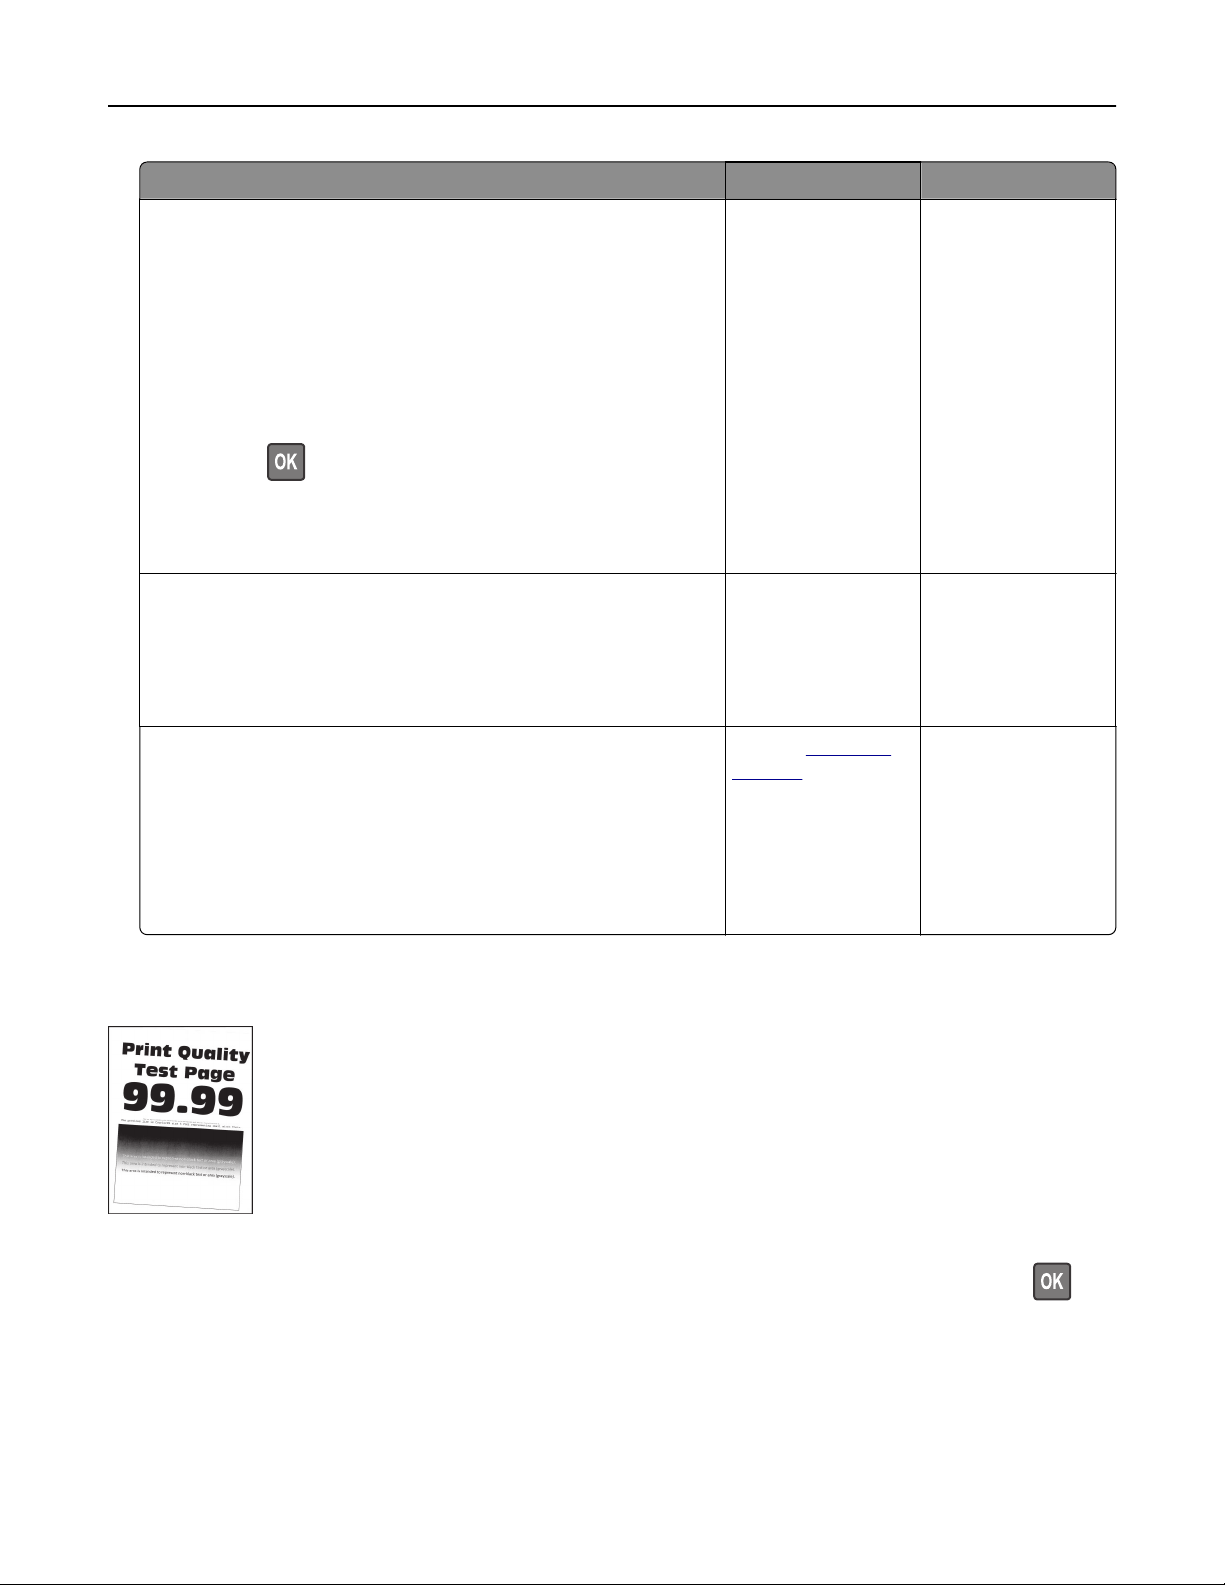
Action Yes No
Step 4
a Depending on your operating system, specify the paper size
and paper type from the Printing Preferences or Print dialog.
Notes:
• Make sure that the settings match the paper loaded.
• You can also change the setting on the printer control
panel. Navigate to Settings > Paper > Tray Configuration
> Paper Size/Type. For non‑touch‑screen printer models,
press
to navigate through the settings.
b Print the document.
Is the paper curled?
Go to step 5. The problem is
solved.
Step 5
a Remove paper, flip it over, and then reload paper.
b Print the document.
Is the paper curled?
Go to step 6. The problem is
solved.
Step 6
a Load paper from a fresh package.
Note: Paper absorbs moisture due to high humidity. Store
paper in its original wrapper until you are ready to use it.
b Print the document.
Is the paper curled?
Contact
customer
support.
The problem is
solved.
Print crooked or skewed
Note: Before solving the problem, print the Print Quality Test Pages. From the control panel, navigate to
Settings > Troubleshooting > Print Quality Test Pages. For non‑touch‑screen printer models, press
to
navigate through the settings.
Troubleshooting 136
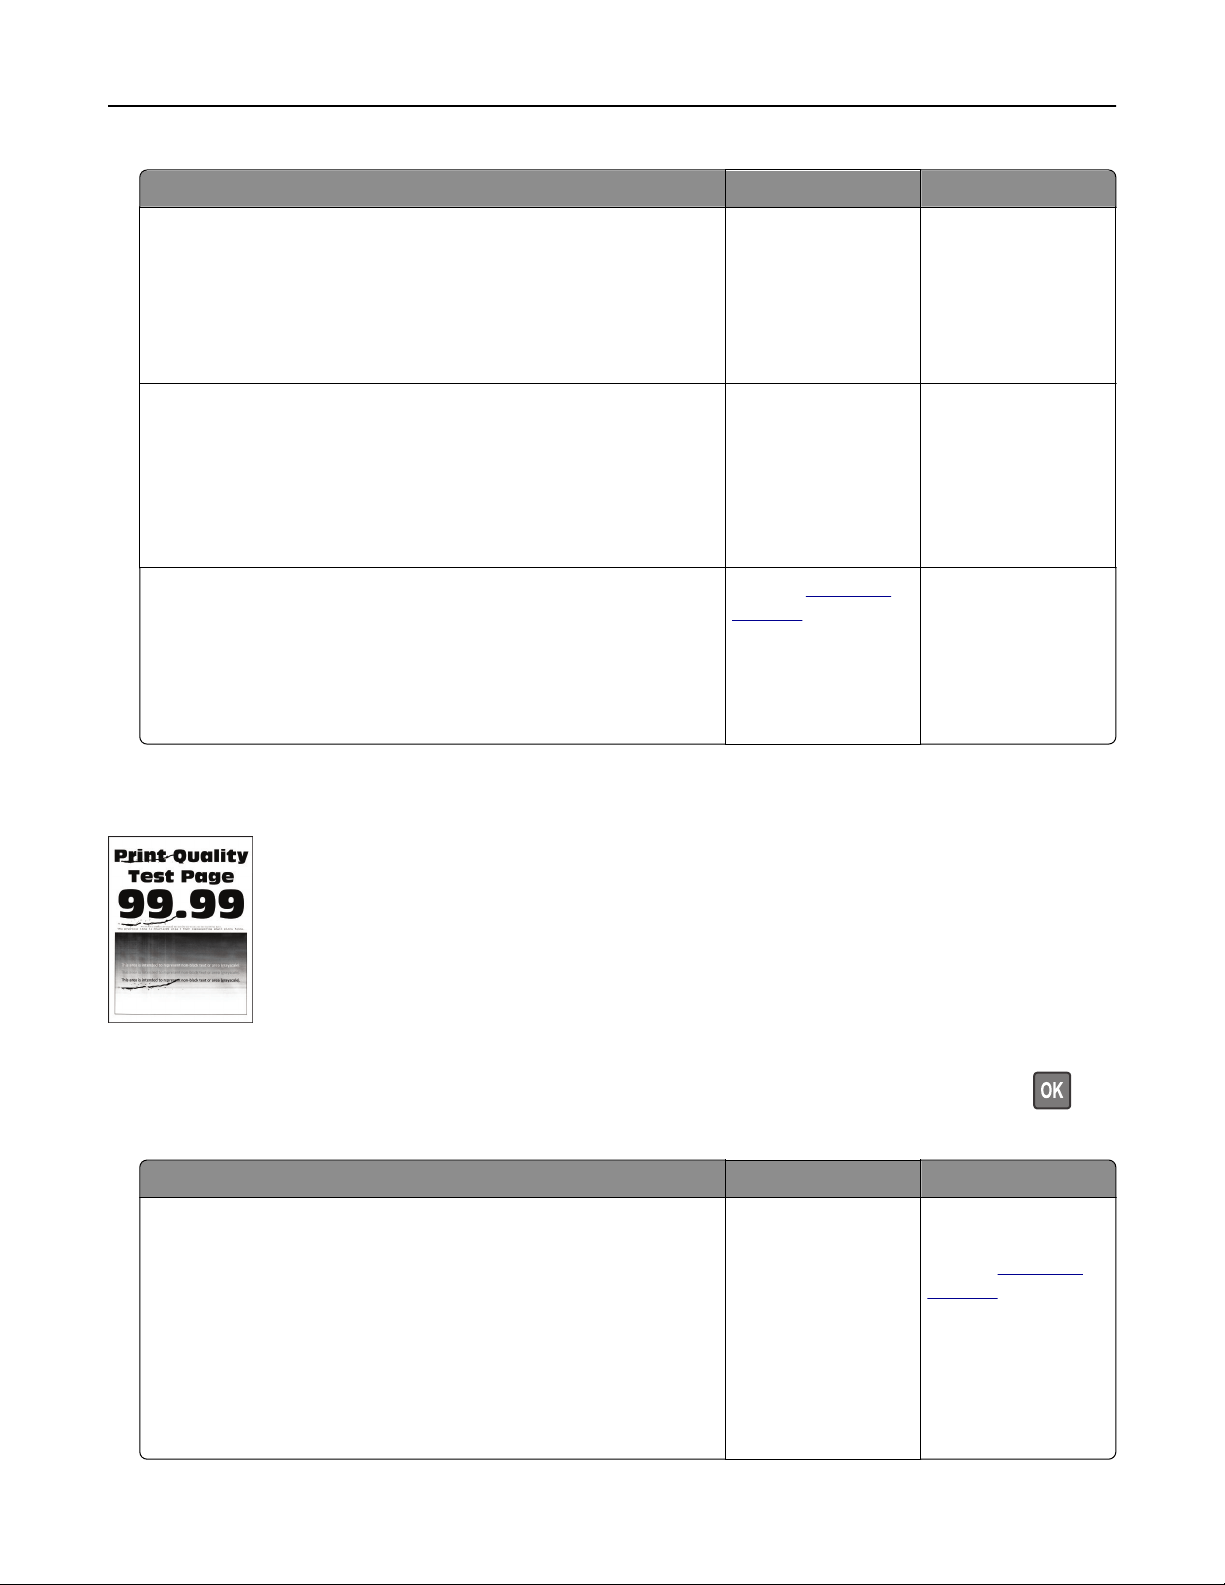
Action Yes No
Step 1
a Adjust the guides in the tray to the correct position for the paper
loaded.
b Print the document.
Is the print crooked or skewed?
Go to step 2. The problem is
solved.
Step 2
a Check if the paper loaded is supported.
Note: If paper is not supported, then load a supported paper.
b Print the document.
Is the print crooked or skewed?
Go to step 3. The problem is
solved.
Step 3
a Check the pick tire in the tray for signs of damage and
contamination, and replace if necessary.
b Print the document.
Is the print crooked or skewed?
Contact
customer
support.
The problem is
solved.
Repeating defects
Note: Before solving the problem, print the Print Quality Test Pages. From the control panel, navigate to
Settings > Troubleshooting > Print Quality Test Pages. For non‑touch‑screen printer models, press
to
navigate through the settings.
Action Yes No
Step 1
Using the Print Quality Test Pages, check if the distance between
the repeating defects is equal to any of the following:
• 97 mm (3.82 in.)
• 47 mm (1.85 in.)
• 38 mm (1.5 in.)
Does the distance between the repeating defects match any of the
measurements?
Go to step 2. Take note of the
distance, and then
contact
customer
support.
Troubleshooting 137
Action Yes No
Step 2
a Replace the imaging unit.
b Print the document.
Do the repeating defects appear?
Contact
customer
support.
The problem is
solved.
Solid black pages
Note: Before solving the problem, print the Print Quality Test Pages. From the control panel, navigate to
Settings > Troubleshooting > Print Quality Test Pages. For non‑touch‑screen printer models, press
to
navigate through the settings.
Action Yes No
Step 1
a Check if the printer is using a genuine and supported Lexmark
toner cartridge.
Note: If the toner cartridge is not supported, then install a
supported one.
b Print the document.
Is the printer printing solid black pages?
Go to step 2. The problem is
solved.
Step 2
a Remove, and then insert the imaging unit.
Warning—Potential Damage: Do not expose the imaging unit
to direct light for more than 10 minutes. Extended exposure
to light may cause print quality problems.
Warning—Potential Damage: Do not touch the
photoconductor drum under the imaging unit. Doing so may
aect the quality of future print jobs.
b Print the document.
Is the printer printing solid black pages?
Go to step 3. The problem is
solved.
Troubleshooting 138
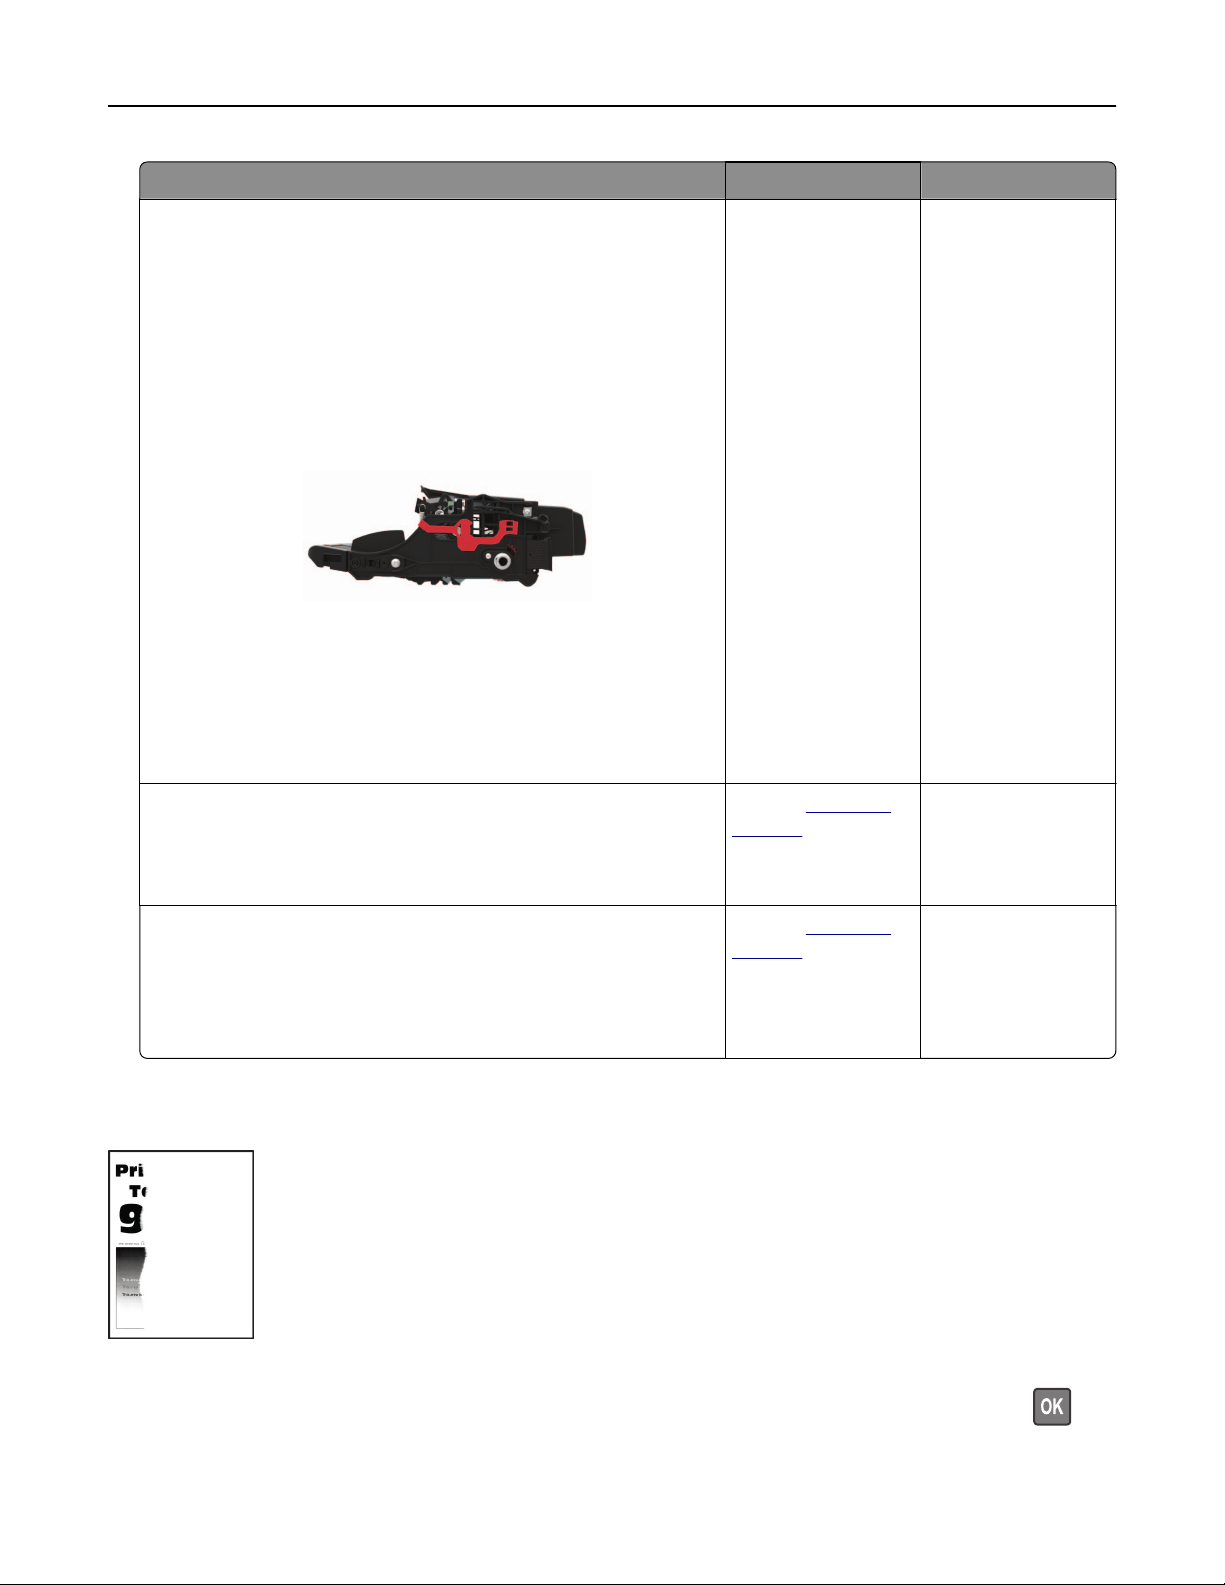
Action Yes No
Step 3
a Remove the imaging unit.
Warning—Potential Damage: Do not expose the imaging unit
to direct light for more than 10 minutes. Extended exposure
to light may cause print quality problems.
Warning—Potential Damage: Do not touch the
photoconductor drum under the imaging unit. Doing so may
aect the quality of future print jobs.
b Remove any packing material that is stuck on the imaging unit.
Note: Make sure to remove any obstruction between the
charge roller and photoconductor drum.
c Insert the imaging unit.
d Print the document.
Is the printer printing solid black pages?
Go to step 4. The problem is
solved.
Step 4
Check the imaging unit for signs of damage.
Is the imaging unit free from damage?
Contact
customer
support.
Go to step 5.
Step 5
a Replace the imaging unit.
b Print the document.
Is the printer printing solid black pages?
Contact
customer
support.
The problem is
solved.
Text or images cut o
Note: Before solving the problem, print the Print Quality Test Pages. From the control panel, navigate to
Settings > Troubleshooting > Print Quality Test Pages. For non‑touch‑screen printer models, press
to
navigate through the settings.
Troubleshooting 139
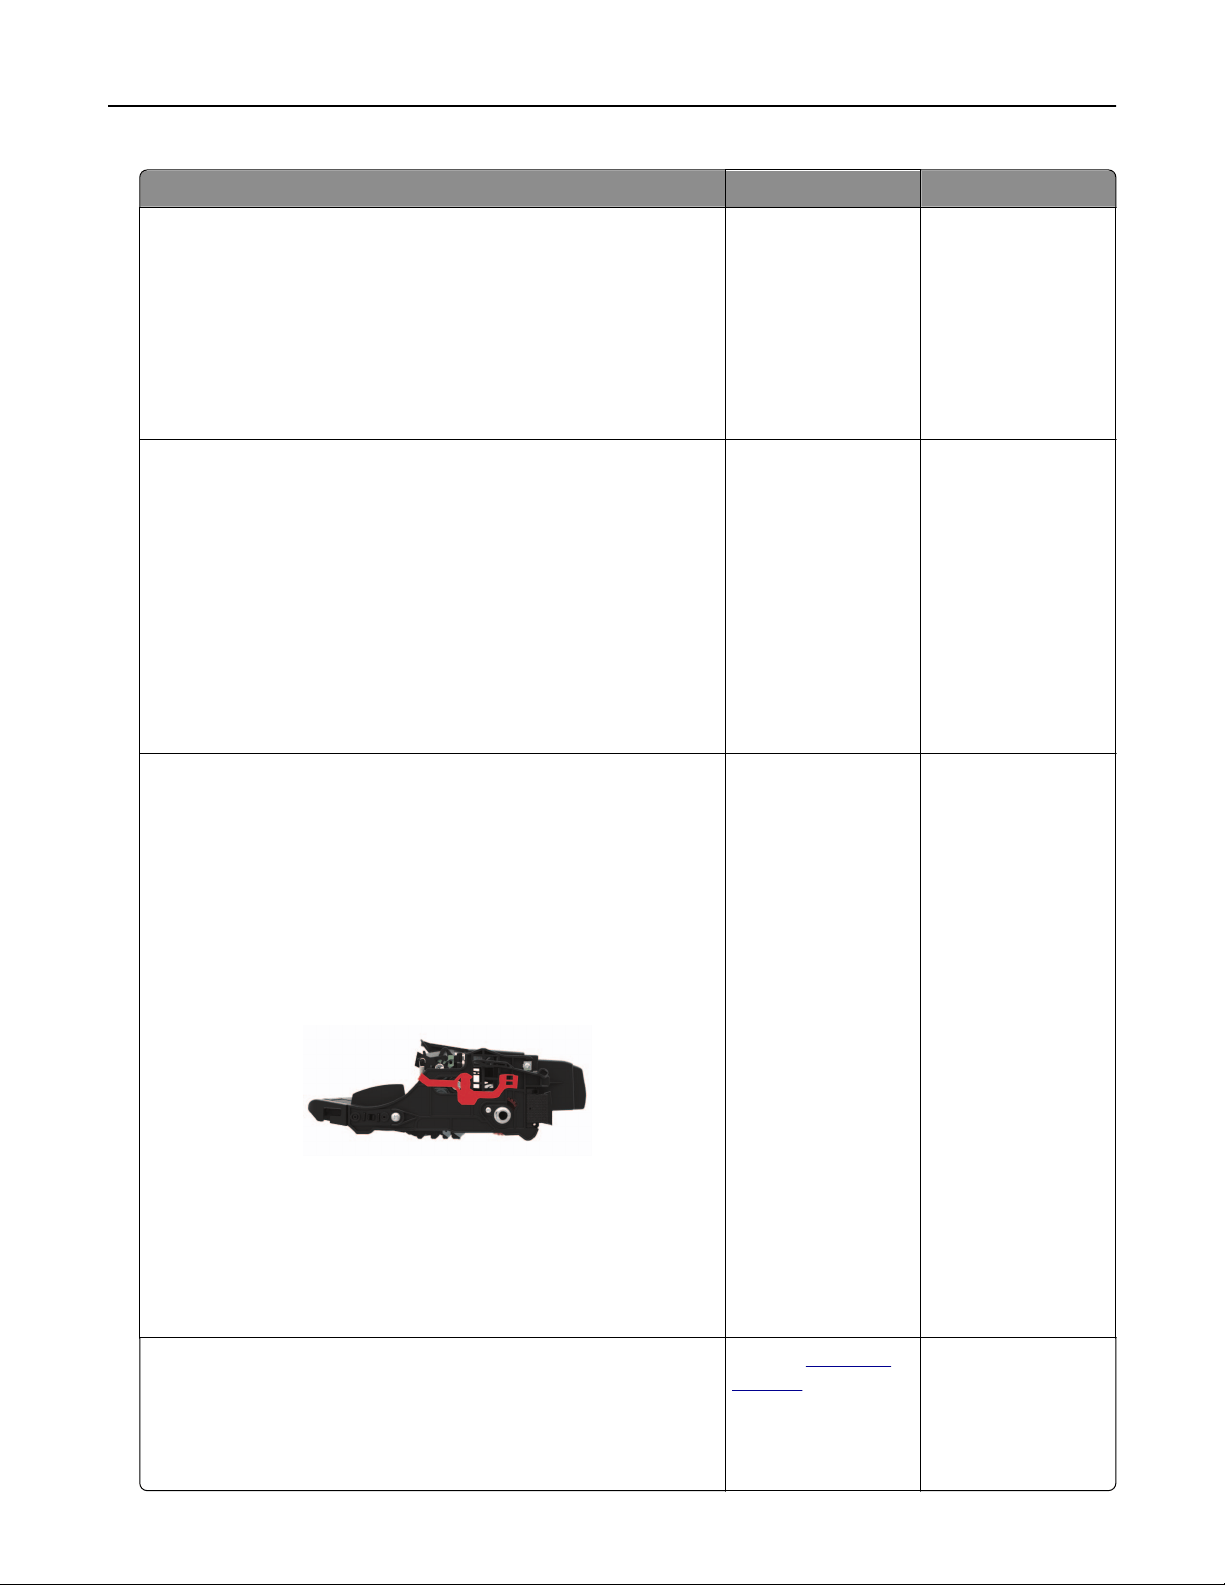
Action Yes No
Step 1
a Check if the printer is using a genuine and supported Lexmark
toner cartridge.
Note: If the toner cartridge is not supported, then install a
supported one.
b Print the document.
Are text or images cut o?
Go to step 2. The problem is
solved.
Step 2
a Remove, and then insert the imaging unit.
Warning—Potential Damage: Do not expose the imaging unit
to direct light for more than 10 minutes. Extended exposure
to light may cause print quality problems.
Warning—Potential Damage: Do not touch the
photoconductor drum under the imaging unit. Doing so may
aect the quality of future print jobs.
b Print the document.
Are text or images cut o?
Go to step 3. The problem is
solved.
Step 3
a Remove the imaging unit.
Warning—Potential Damage: Do not expose the imaging unit
to direct light for more than 10 minutes. Extended exposure
to light may cause print quality problems.
Warning—Potential Damage: Do not touch the
photoconductor drum under the imaging unit. Doing so may
aect the quality of future print jobs.
b Remove any packing material that is stuck on the imaging unit.
Note: Make sure to remove any obstruction between the
charge roller and photoconductor drum.
c Insert the imaging unit.
d Print the document.
Are text or images cut o?
Go to step 4. The problem is
solved.
Step 4
a Replace the imaging unit.
b Print the document.
Are text or images cut o?
Contact
customer
support.
The problem is
solved.
Troubleshooting 140
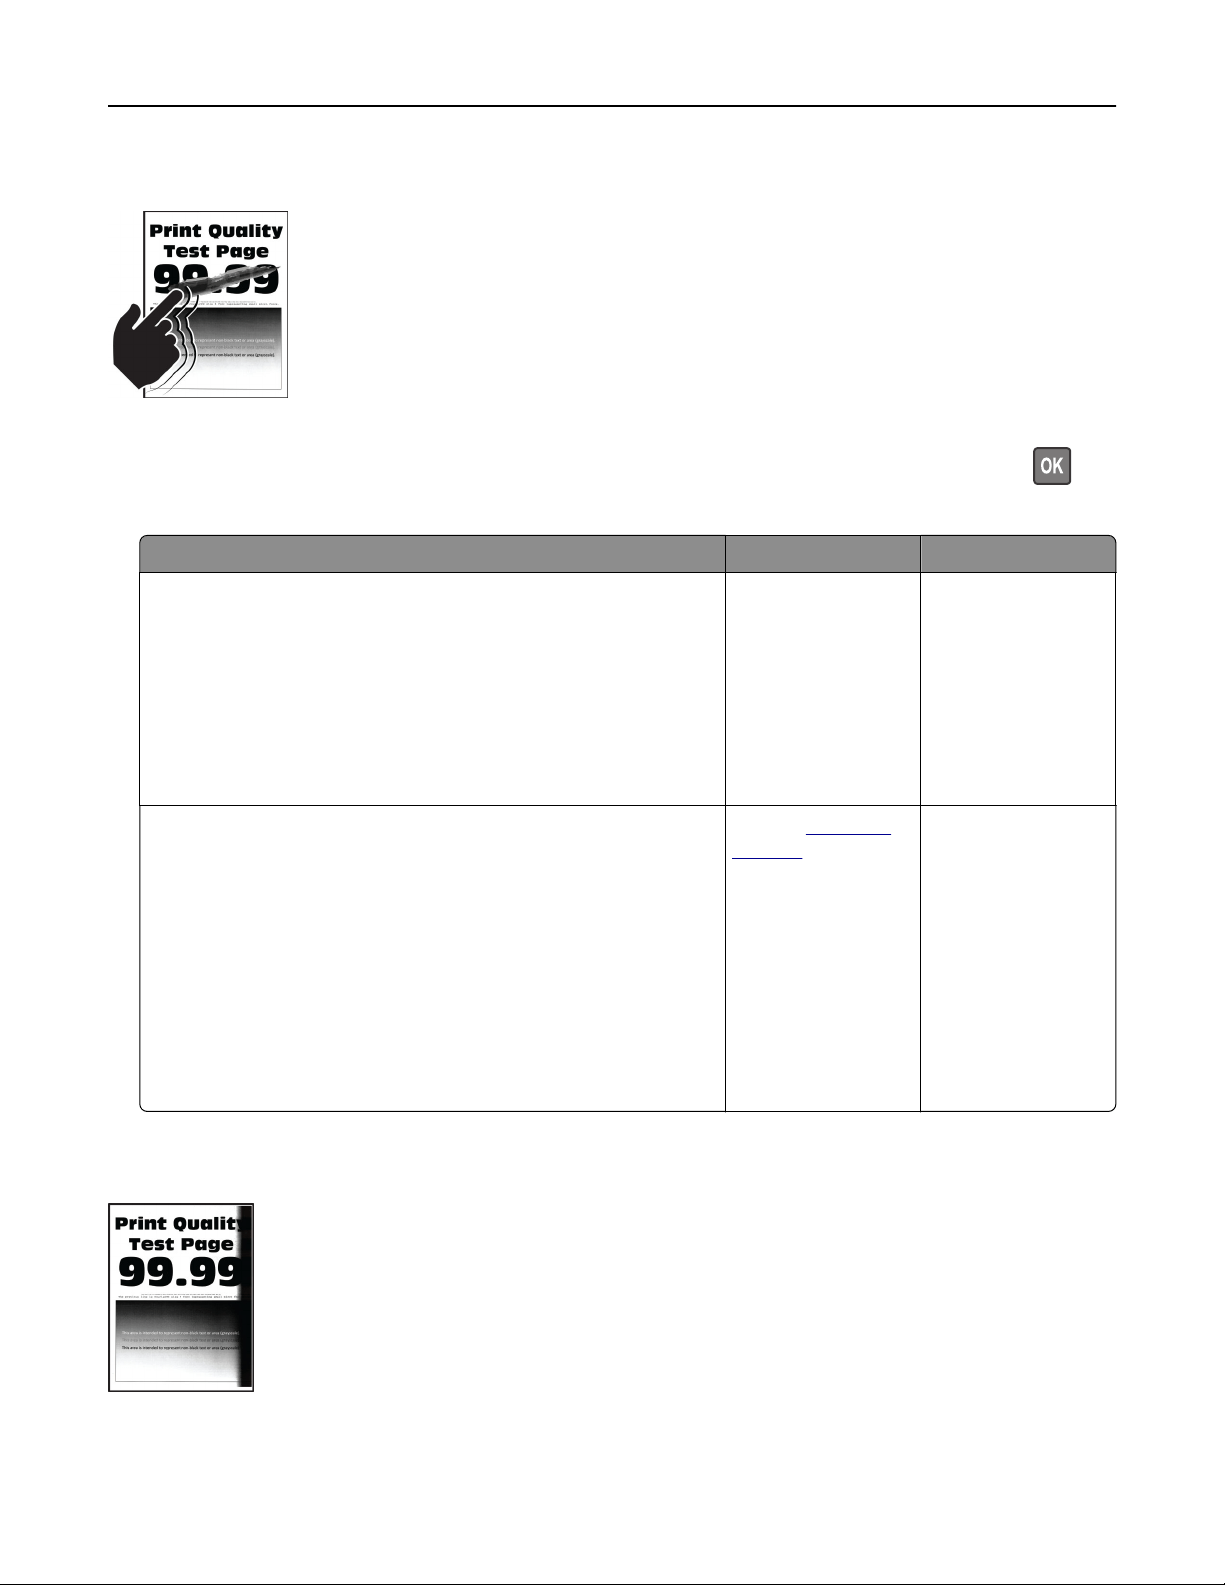
Toner easily rubs o
Note: Before solving the problem, print the Print Quality Test Pages. From the control panel, navigate to
Settings > Troubleshooting > Print Quality Test Pages. For non‑touch‑screen printer models, press
to
navigate through the settings.
Action Yes No
Step 1
a Check if the printer is using a genuine and supported Lexmark
toner cartridge.
Note: If the toner cartridge is not supported, then install a
supported one.
b Print the document.
Does the toner easily rub o?
Go to step 2. The problem is
solved.
Step 2
a Depending on your operating system, specify the paper type
from the Printing Preferences or Print dialog.
Notes:
• Make sure that the setting matches the paper loaded.
• You can also change the setting on the printer control
panel.
b Print the document.
Does the toner easily rub o?
Contact
customer
support.
The problem is
solved.
Vertical dark bands
Troubleshooting 141
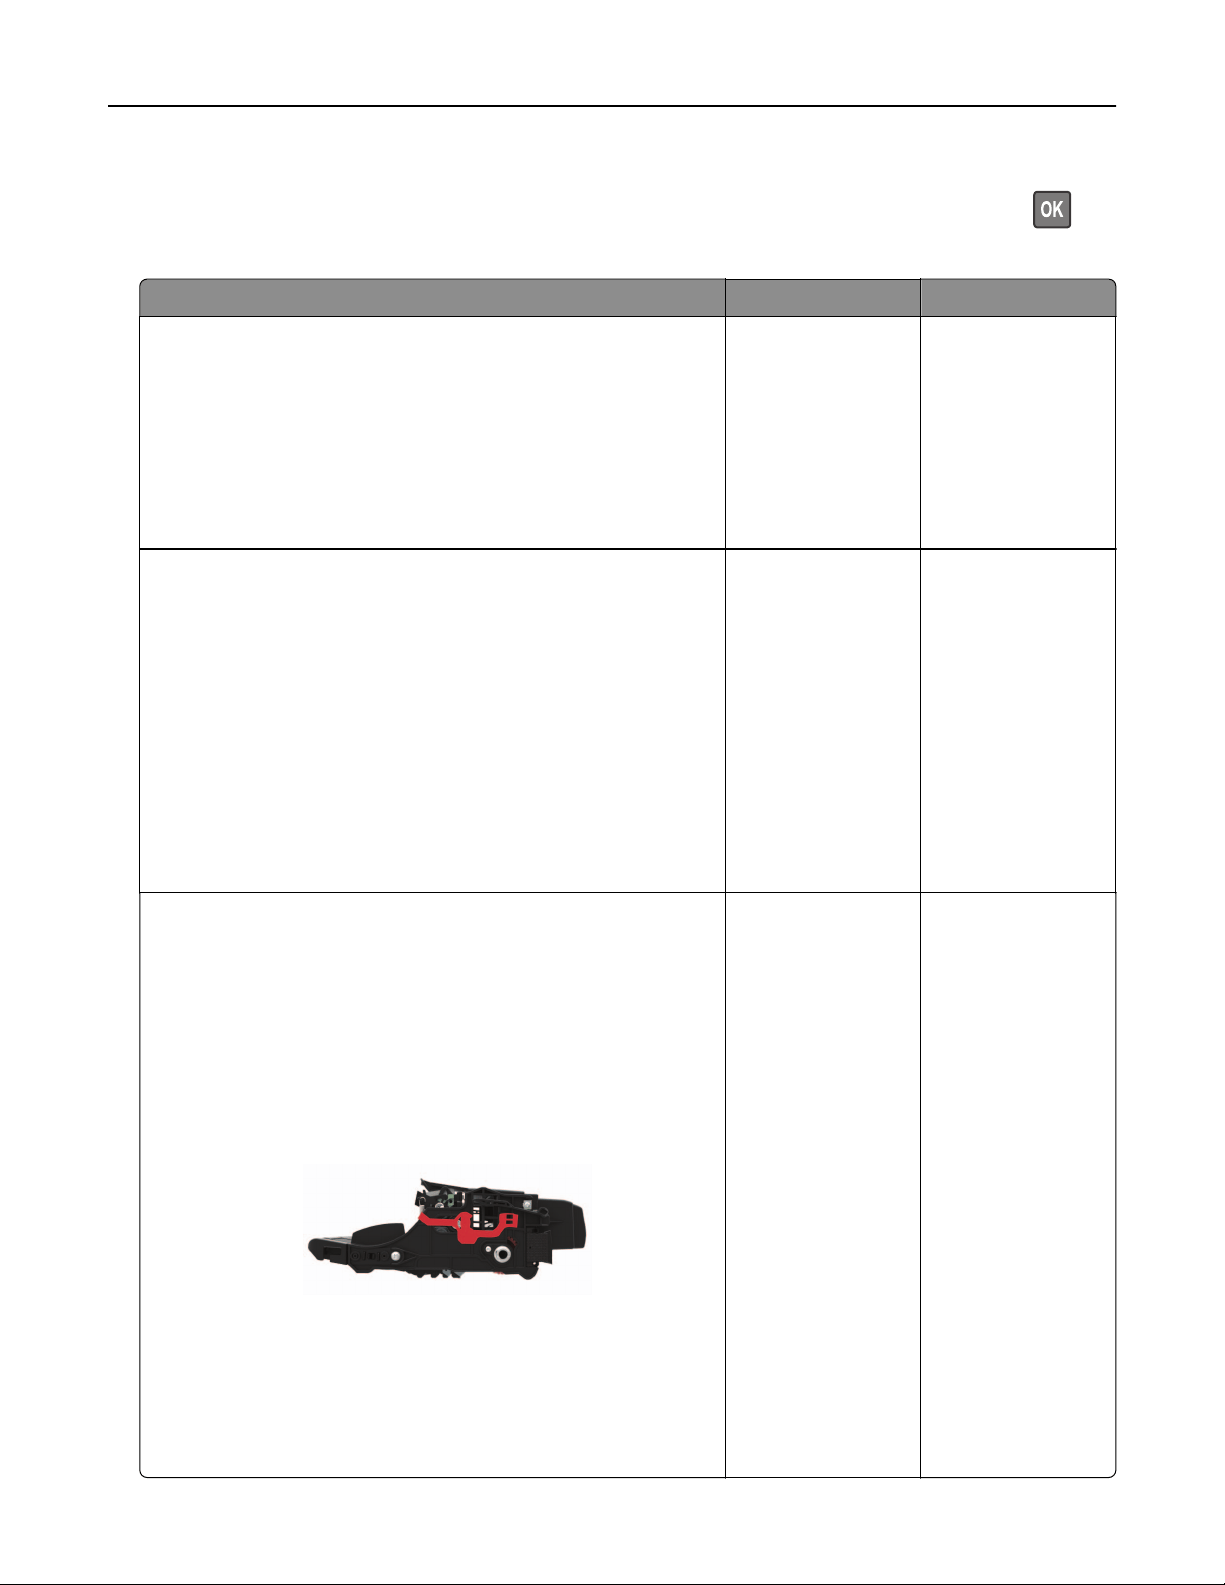
Note: Before solving the problem, print the Print Quality Test Pages. From the control panel, navigate to
Settings > Troubleshooting > Print Quality Test Pages. For non‑touch‑screen printer models, press
to
navigate through the settings.
Action Yes No
Step 1
a Check if the printer is using a genuine and supported Lexmark
toner cartridge.
Note: If the toner cartridge is not supported, then install a
supported one.
b Print the document.
Do vertical dark bands appear on prints?
Go to step 2. The problem is
solved.
Step 2
a Remove the toner cartridge, and then remove the imaging unit.
Warning—Potential Damage: Do not expose the imaging unit
to direct light for more than 10 minutes. Extended exposure
to light may cause print quality problems.
Warning—Potential Damage: Do not touch the
photoconductor drum under the imaging unit. Doing so may
aect the quality of future print jobs.
b Insert the imaging unit, and then insert the cartridge.
c Print the document.
Do vertical dark bands appear on prints?
Go to step 3. The problem is
solved.
Step 3
a Remove the imaging unit.
Warning—Potential Damage: Do not expose the imaging unit
to direct light for more than 10 minutes. Extended exposure
to light may cause print quality problems.
Warning—Potential Damage: Do not touch the
photoconductor drum under the imaging unit. Doing so may
aect the quality of future print jobs.
b Remove any packing material that is stuck on the imaging unit.
Note: Make sure to remove any obstruction between the
charge roller and photoconductor drum.
c Insert the imaging unit.
d Print the document.
Do vertical dark bands appear on prints?
Go to step 4. The problem is
solved.
Troubleshooting 142

Action Yes No
Step 4
a Check if a bright light enters the right side of the printer, and
move the printer if necessary.
b Print the document.
Do vertical dark bands appear on prints?
Contact
customer
support.
The problem is
solved.
Vertical dark lines or streaks
Note: Before solving the problem, print the Print Quality Test Pages. From the control panel, navigate to
Settings > Troubleshooting > Print Quality Test Pages. For non‑touch‑screen printer models, press
to
navigate through the settings.
Action Yes No
Step 1
a Check if the printer is using a genuine and supported Lexmark
toner cartridge.
Note: If the toner cartridge is not supported, then install a
supported one.
b Print the document.
Do vertical dark lines or streaks appear on prints?
Go to step 2. The problem is
solved.
Step 2
a Remove, and then reinstall the imaging unit.
Warning—Potential Damage: Do not expose the imaging unit
to direct light for more than 10 minutes. Extended exposure
to light can cause print quality problems.
Warning—Potential Damage: Do not touch the
photoconductor drum under the imaging unit. Doing so may
aect the quality of future print jobs.
b Print the document.
Do vertical dark lines or streaks appear on prints?
Go to step 3. The problem is
solved.
Troubleshooting 143
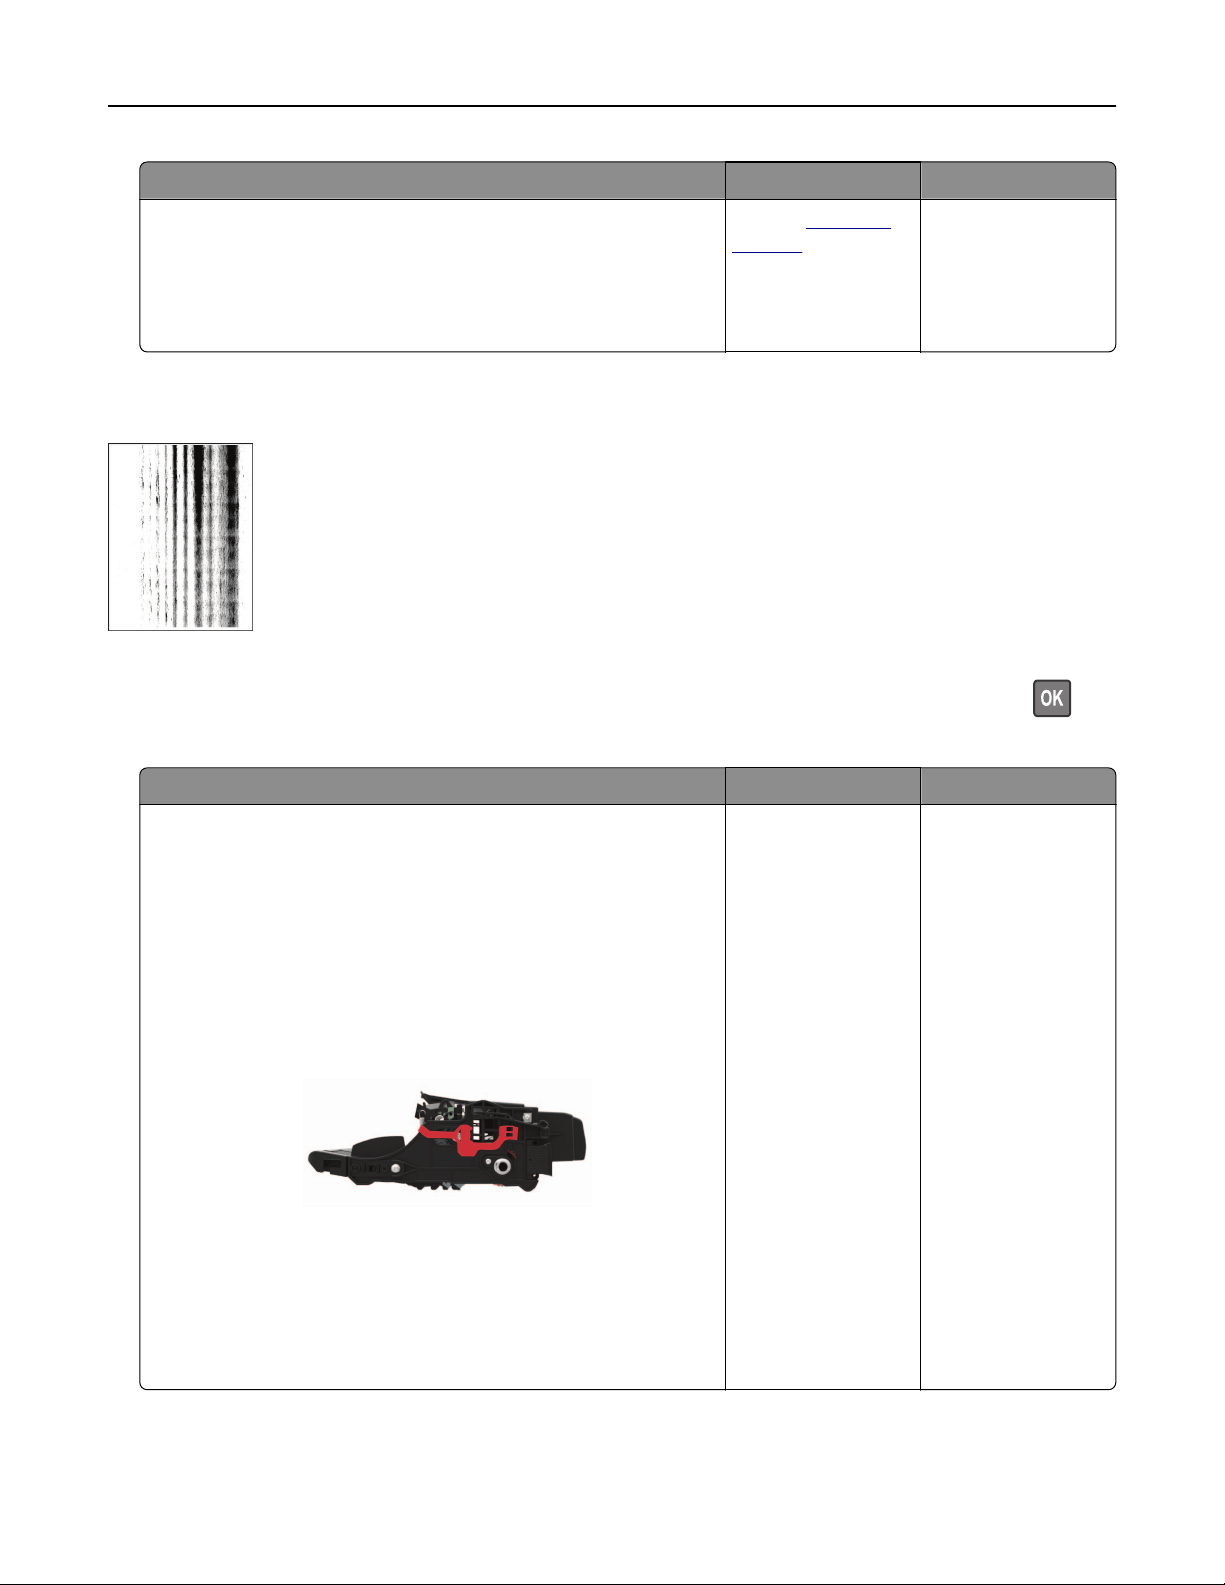
Action Yes No
Step 3
a Replace the imaging unit.
b Print the document.
Do vertical dark lines or streaks appear on prints?
Contact
customer
support.
The problem is
solved.
Vertical dark streaks with print missing
Note: Before solving the problem, print the Print Quality Test Pages. From the control panel, navigate to
Settings > Troubleshooting > Print Quality Test Pages. For non‑touch‑screen printer models, press
to
navigate through the settings.
Action Yes No
Step 1
a Remove the imaging unit.
Warning—Potential Damage: Do not expose the imaging unit
to direct light for more than 10 minutes. Extended exposure
to light may cause print quality problems.
Warning—Potential Damage: Do not touch the
photoconductor drum under the imaging unit. Doing so may
aect the quality of future print jobs.
b Remove any packing material that is stuck on the imaging unit.
Note: Make sure to remove any obstruction between the
charge roller and photoconductor drum.
c Insert the imaging unit.
d Print the document.
Do vertical dark streaks with missing images appear on prints?
Go to step 2. The problem is
solved.
Troubleshooting 144
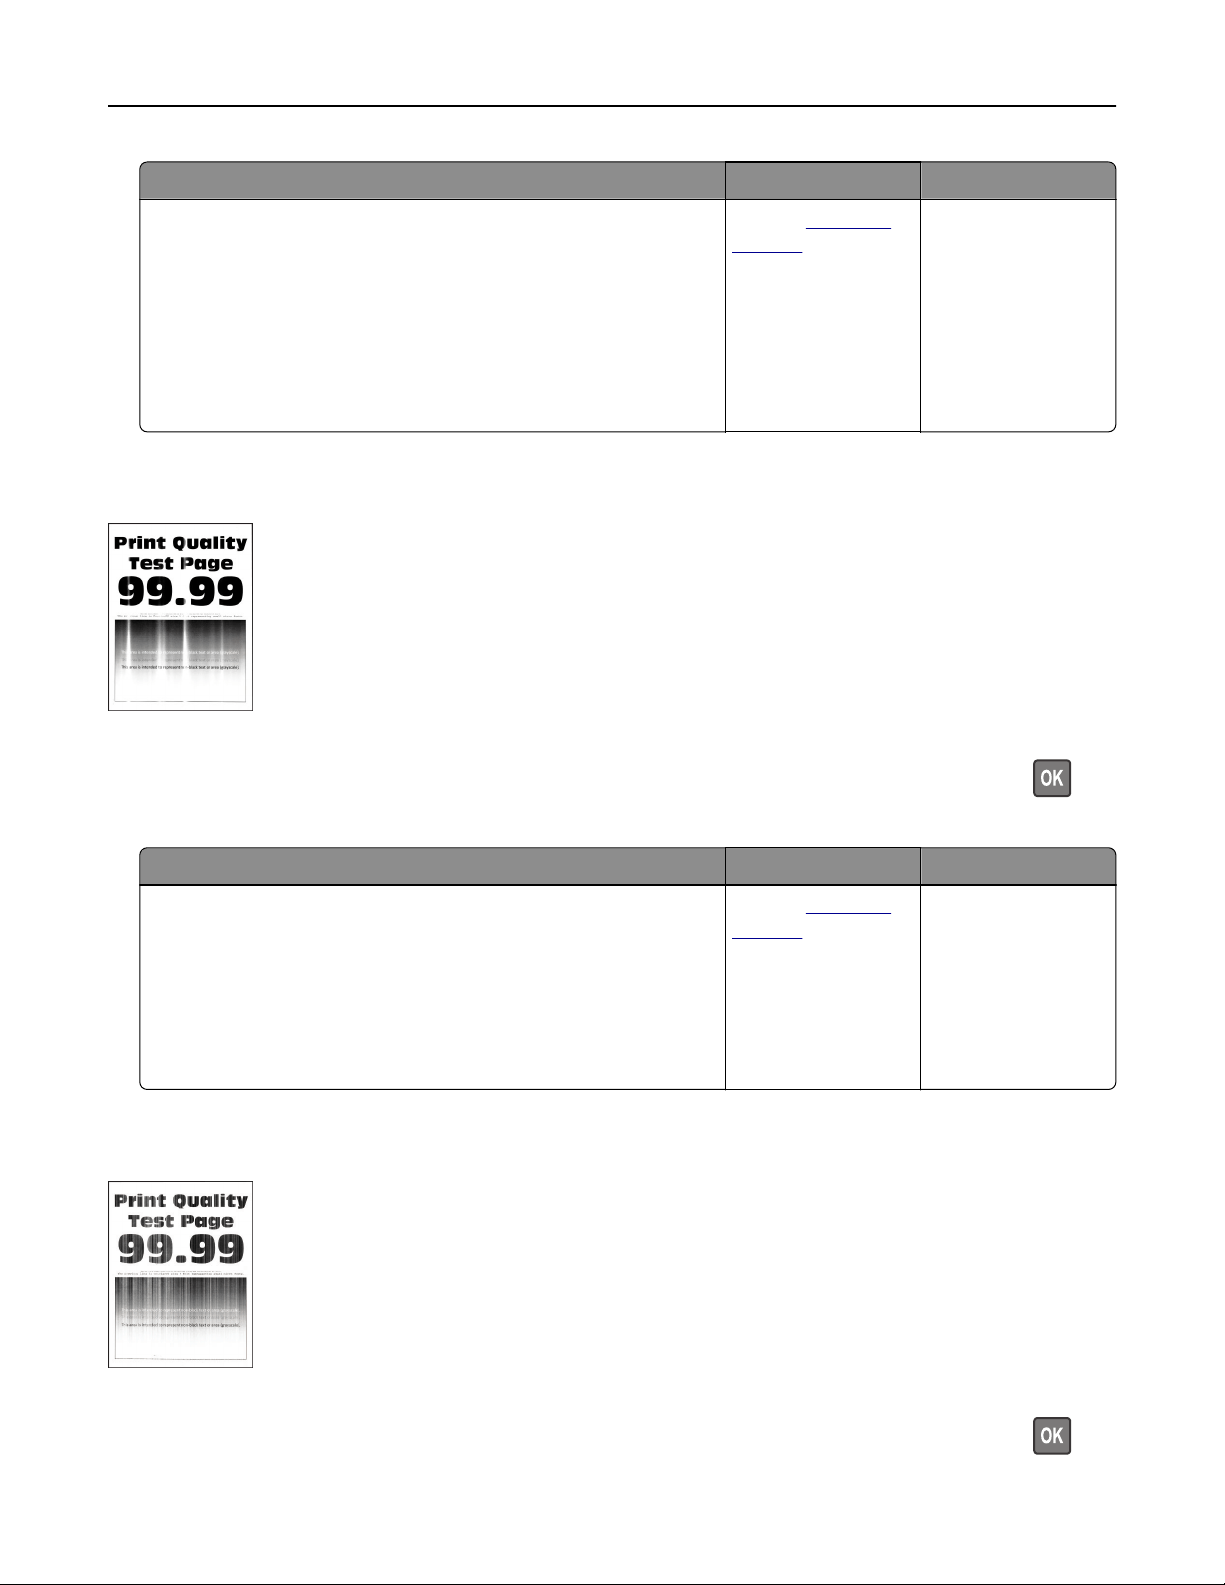
Action Yes No
Step 2
a Check if the printer is using a genuine and supported Lexmark
toner cartridge.
Note: If the toner cartridge is not supported, then install a
supported one.
b Print the document.
Do vertical dark streaks with missing images appear on prints?
Contact
customer
support.
The problem is
solved.
Vertical light bands
Note: Before solving the problem, print the Print Quality Test Pages. From the control panel, navigate to
Settings > Troubleshooting > Print Quality Test Pages. For non‑touch‑screen printer models, press
to
navigate through the settings.
Action Yes No
a Check if the printer is using a genuine and supported Lexmark
toner cartridge.
Note: If the cartridge is not supported, then install a
supported one.
b Print the document.
Do vertical light bands appear on prints?
Contact
customer
support.
The problem is
solved.
Vertical white lines
Note: Before solving the problem, print the Print Quality Test Pages. From the control panel, navigate to
Settings > Troubleshooting > Print Quality Test Pages. For non‑touch‑screen printer models, press to
navigate through the settings.
Troubleshooting 145

Action Yes No
Step 1
a Check if the printer is using a genuine and supported Lexmark
toner cartridge.
Note: If the cartridge is not supported, then install a
supported one.
b Print the document.
Do vertical white lines appear on prints?
Go to step 2. The problem is
solved.
Step 2
a Depending on your operating system, specify the paper type
from the Printing Preferences or Print dialog.
Notes:
• Make sure that the setting matches the paper loaded.
• You can also change the setting on the printer control
panel.
b Print the document.
Do vertical white lines appear on prints?
Contact
customer
support.
The problem is
solved.
Confidential
and other held documents do not print
Action Yes No
Step 1
a From the control panel, check if the documents appear in the
Held Jobs list.
Note: If the documents are not listed, then print the
documents using the Print and Hold options.
b Print the documents.
Are the documents printed?
The problem is
solved.
Go to step 2.
Step 2
The print job may contain a formatting error or invalid data. Delete
the print job, and then send it again.
Are the documents printed?
The problem is
solved.
Go to step 3.
Troubleshooting 146

Action Yes No
Step 3
If you are printing from the Internet, then the printer may be reading
the multiple job titles as duplicates.
For Windows users
a Open the Printing Preferences dialog.
b From the Print and Hold tab, click Use Print and Hold, and then
click Keep duplicate documents.
c Enter a PIN, and then save the changes.
d Send the print job.
For Macintosh users
a Save and name each job dierently.
b Send the job individually.
Are the documents printed?
The problem is
solved.
Go to step 4.
Step 4
a Delete some held jobs to free up printer memory.
b Print the documents.
Are the documents printed?
The problem is
solved.
Go to step 5.
Step 5
a Add printer memory.
b Print the documents.
Are the documents printed?
The problem is
solved.
Contact
customer
support.
Slow printing
Action Yes No
Step 1
Make sure that the printer cable is securely connected to the
printer and to the computer, print server, option, or other network
device.
Is the printer printing slow?
Go to step 2. The problem is
solved.
Step 2
a Make sure that the printer is not in Quiet Mode.
From the home screen, touch Settings > Device > Maintenance
> Configuration Menu > Device Operations > Quiet Mode.
b Print the document.
Is the printer printing slow?
Go to step 3. The problem is
solved.
Troubleshooting 147

Action Yes No
Step 3
a Depending on your operating system, specify the print
resolution from the Printing Preferences or Print dialog.
b Set the resolution to 600 dpi.
c Print the document.
Is the printer printing slow?
Go to step 4. The problem is
solved.
Step 4
a From the home screen, touch Settings > Print > Quality > Print
Resolution.
b Set the resolution to 600 dpi.
c Print the document.
Is the printer printing slow?
Go to step 5. The problem is
solved.
Step 5
a Depending on your operating system, specify the paper type
from the Printing Preferences or Print dialog.
Notes:
• Make sure that the setting matches the paper loaded.
• You can also change the setting on the printer control
panel.
• Heavier paper prints more slowly.
• Paper narrower than letter, A4, and legal may print more
slowly.
b Print the document.
Is the printer printing slow?
Go to step 6. The problem is
solved.
Step 6
a Make sure that the printer settings for texture and weight match
the paper being loaded.
From the home screen, touch Settings > Paper > Media
Configuration > Media Types.
Note: Rough paper textures and heavy paper weights may
print more slowly.
b Print the document.
Is the printer printing slow?
Go to step 7. The problem is
solved.
Step 7
Remove held jobs.
Is the printer printing slow?
Go to step 8. The problem is
solved.
Troubleshooting 148
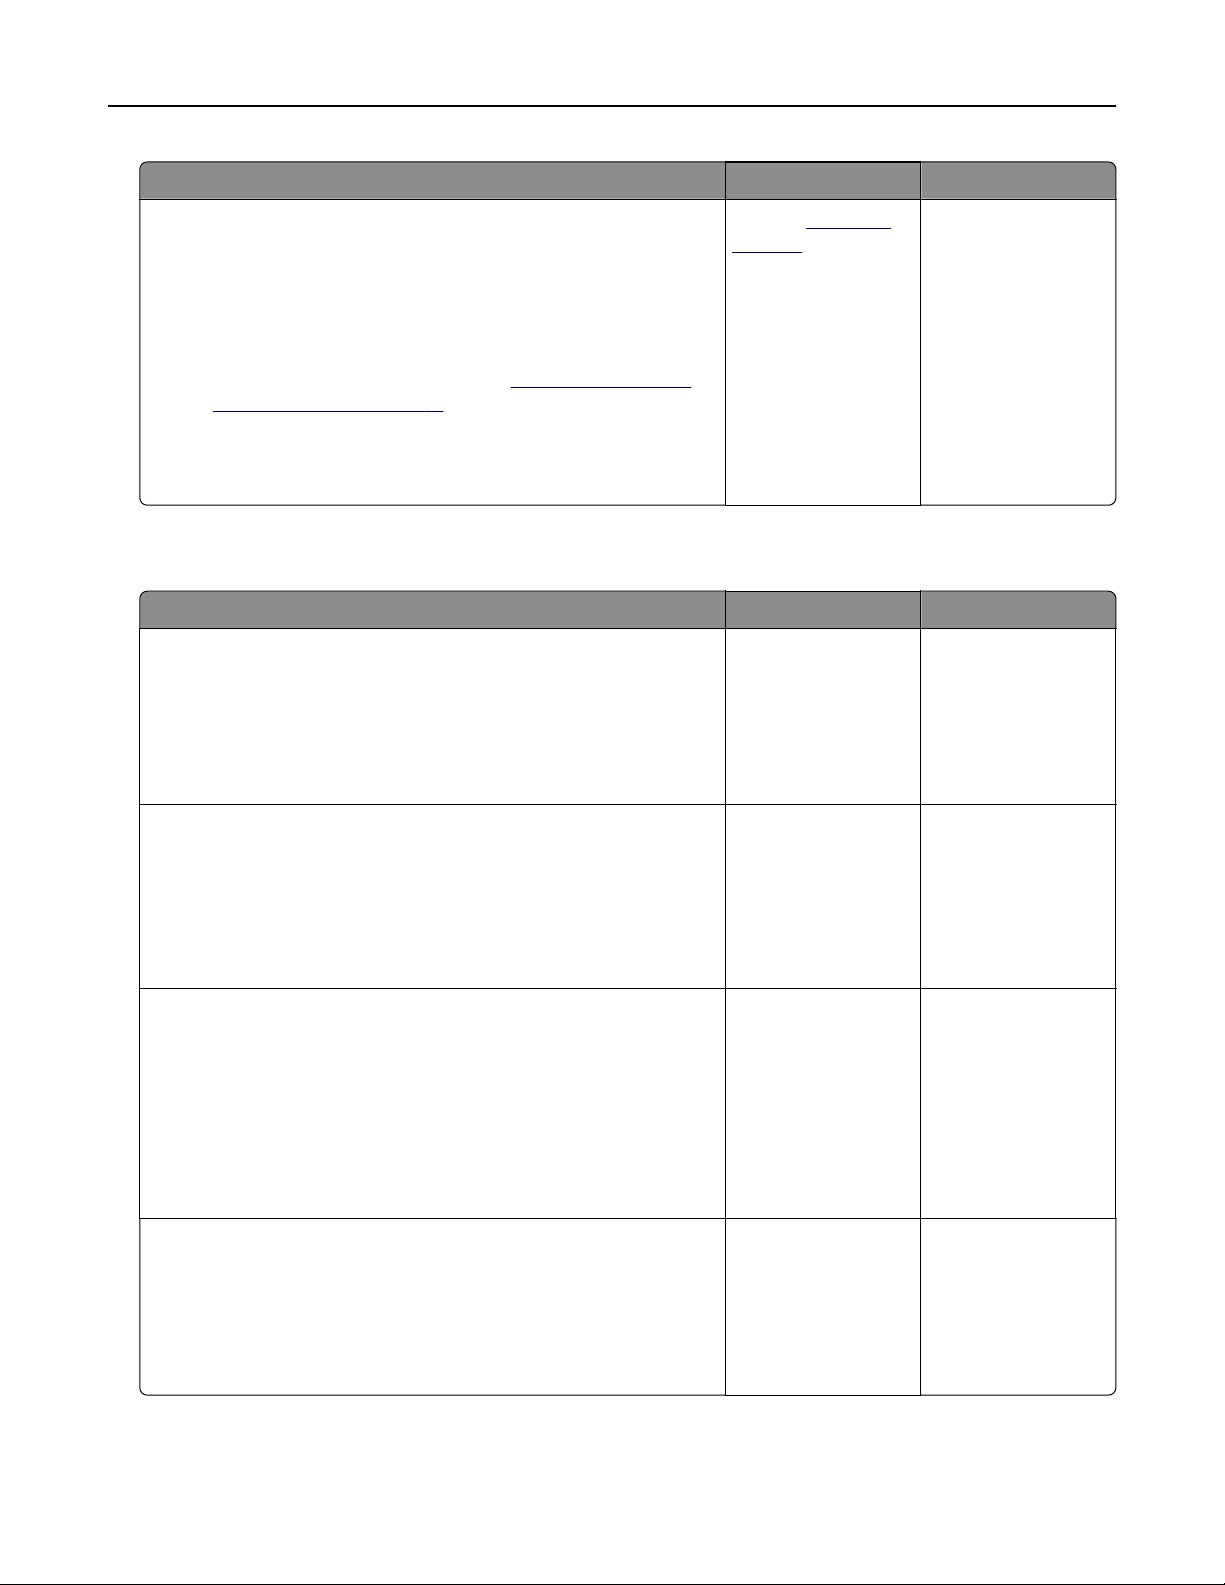
Action Yes No
Step 8
a Make sure that the printer is not overheating.
Notes:
• Allow the printer to cool down after a long print job.
• Observe the recommended ambient temperature for the
printer. For more information, see
“Selecting a location
for the printer” on page 10.
b Print the document.
Is the printer printing slow?
Contact
customer
support.
The problem is
solved.
Print jobs do not print
Action Yes No
Step 1
a From the document you are trying to print, open the Print
dialog, and then check if you have selected the correct printer.
b Print the document.
Is the document printed?
The problem is
solved.
Go to step 2.
Step 2
a Check if the printer is on.
b Resolve any error messages that appear on the display.
c Print the document.
Is the document printed?
The problem is
solved.
Go to step 3.
Step 3
a Check if the ports are working and if the cables are securely
connected to the computer and the printer.
For more information, see the setup documentation that came
with the printer.
b Print the document.
Is the document printed?
The problem is
solved.
Go to step 4.
Step 4
a Turn o the printer, wait for about 10 seconds, and then turn on
the printer.
b Print the document.
Is the document printed?
The problem is
solved.
Go to step 5.
Troubleshooting 149

Action Yes No
Step 5
a Remove, and then reinstall the print driver.
b Print the document.
Is the document printed?
The problem is
solved.
Contact
customer
support.
The printer is not responding
Action Yes No
Step 1
Check if the power cord is connected to the electrical outlet.
CAUTION—POTENTIAL INJURY: To avoid the risk of fire or
electrical shock, connect the power cord to an appropriately
rated and properly grounded electrical outlet that is near the
product and easily accessible.
Is the printer responding?
The problem is
solved.
Go to step 2.
Step 2
Check if the electrical outlet is turned o by a switch or breaker.
Is the electrical outlet turned o by a switch or breaker?
Turn on the switch or
reset the breaker.
Go to step 3.
Step 3
Check if the printer is on.
Is the printer on?
Go to step 4. Turn on the printer.
Step 4
Check if the printer is in Sleep or Hibernate mode.
Is the printer in Sleep or Hibernate mode?
Press the power
button to wake the
printer.
Go to step 5.
Step 5
Check if the cables connecting the printer and the computer are
inserted to the correct ports.
Are the cables inserted to the correct ports?
Go to step 6. Insert the cables to
the correct ports.
Step 6
Turn o the printer, install the hardware options, and then turn on
the printer.
For more information, see the documentation that came with the
option.
Is the printer responding?
The problem is
solved.
Go to step 7.
Troubleshooting 150

Action Yes No
Step 7
Install the correct print driver.
Is the printer responding?
The problem is
solved.
Go to step 8.
Step 8
Turn o the printer, wait for about 10 seconds, and then turn on the
printer.
Is the printer responding?
The problem is
solved.
Contact
customer
support.
Adjusting toner darkness
1 From the home screen, touch Settings > Print > Quality.
2 In the Toner Darkness menu, adjust the settings.
Job prints from the wrong tray or on the wrong paper
Action Yes No
Step 1
a Check if you are printing on the correct paper.
b Print the document.
Is the document printed on the correct paper?
Go to step 2. Load the correct
paper size and paper
type.
Step 2
a Depending on your operating system, specify the paper size
and paper type from the Printing Preferences or Print dialog.
Note: You can also change the settings on the printer control
panel. Navigate to:
Settings > Paper > Tray Configuration > Paper Size/Type
b Make sure that the settings match the paper loaded.
c Print the document.
Is the document printed on the correct paper?
The problem is
solved.
Go to step 3.
Step 3
a Check if the trays are linked.
For more information, see
“Linking trays” on page 26.
b Print the document.
Is the document printed from the correct tray?
The problem is
solved.
Contact
customer
support.
Troubleshooting 151

Contacting customer support
Before contacting customer support, make sure to have the following information:
• Printer problem
• Error message
• Printer model type and serial number
Go to
http://support.lexmark.com to receive e‑mail or chat support, or browse through the library of manuals,
support documentation, drivers, and other downloads.
Technical support via telephone is also available. In the U.S. or Canada, call 1-800-539-6275. For other countries
or regions, go to
http://support.lexmark.com.
Troubleshooting 152

Upgrading and migrating
Hardware
Available internal options
• Flash memory
• Font cards
• Firmware cards
– Forms and Bar Code
– IPDS
– PRESCRIBE
• Internal solutions port
– RS-232C Serial Interface Card
– Thin Parallel
Accessing the controller board
CAUTION—SHOCK HAZARD: To avoid the risk of electrical shock, if you are accessing the controller
board or installing optional hardware or memory devices sometime after setting up the printer, then turn
the printer o, and unplug the power cord from the electrical outlet before continuing. If you have any
other devices attached to the printer, then turn them o as well, and unplug any cables going into the
printer.
1 Turn
o
the printer.
2 Unplug the power cord from the electrical outlet, and then from the printer.
3 Using a flat-head screwdriver, open the controller board access cover.
Warning—Potential Damage: Controller board electronic components are easily damaged by static
electricity. Touch a metal surface on the printer before touching any controller board components or
connectors.
Upgrading and migrating 153

4 Close the access cover.
5 Connect the power cord to the printer, and then to the electrical outlet.
CAUTION—POTENTIAL INJURY: To avoid the risk of
fire
or electrical shock, connect the power cord
to an appropriately rated and properly grounded electrical outlet that is near the product and easily
accessible.
6 Turn on the printer.
Installing a memory card
CAUTION—SHOCK HAZARD: To avoid the risk of electrical shock, if you are accessing the controller
board or installing optional hardware or memory devices sometime after setting up the printer, then turn
the printer o, and unplug the power cord from the electrical outlet before continuing. If you have any
other devices attached to the printer, then turn them o as well, and unplug any cables going into the
printer.
1 Turn o the printer.
2 Unplug the power cord from the electrical outlet, and then from the printer.
3 Open the controller board access cover.
Warning—Potential Damage: Controller board electronic components are easily damaged by static
electricity. Touch a metal surface on the printer before touching any controller board components or
connectors.
Upgrading and migrating 154
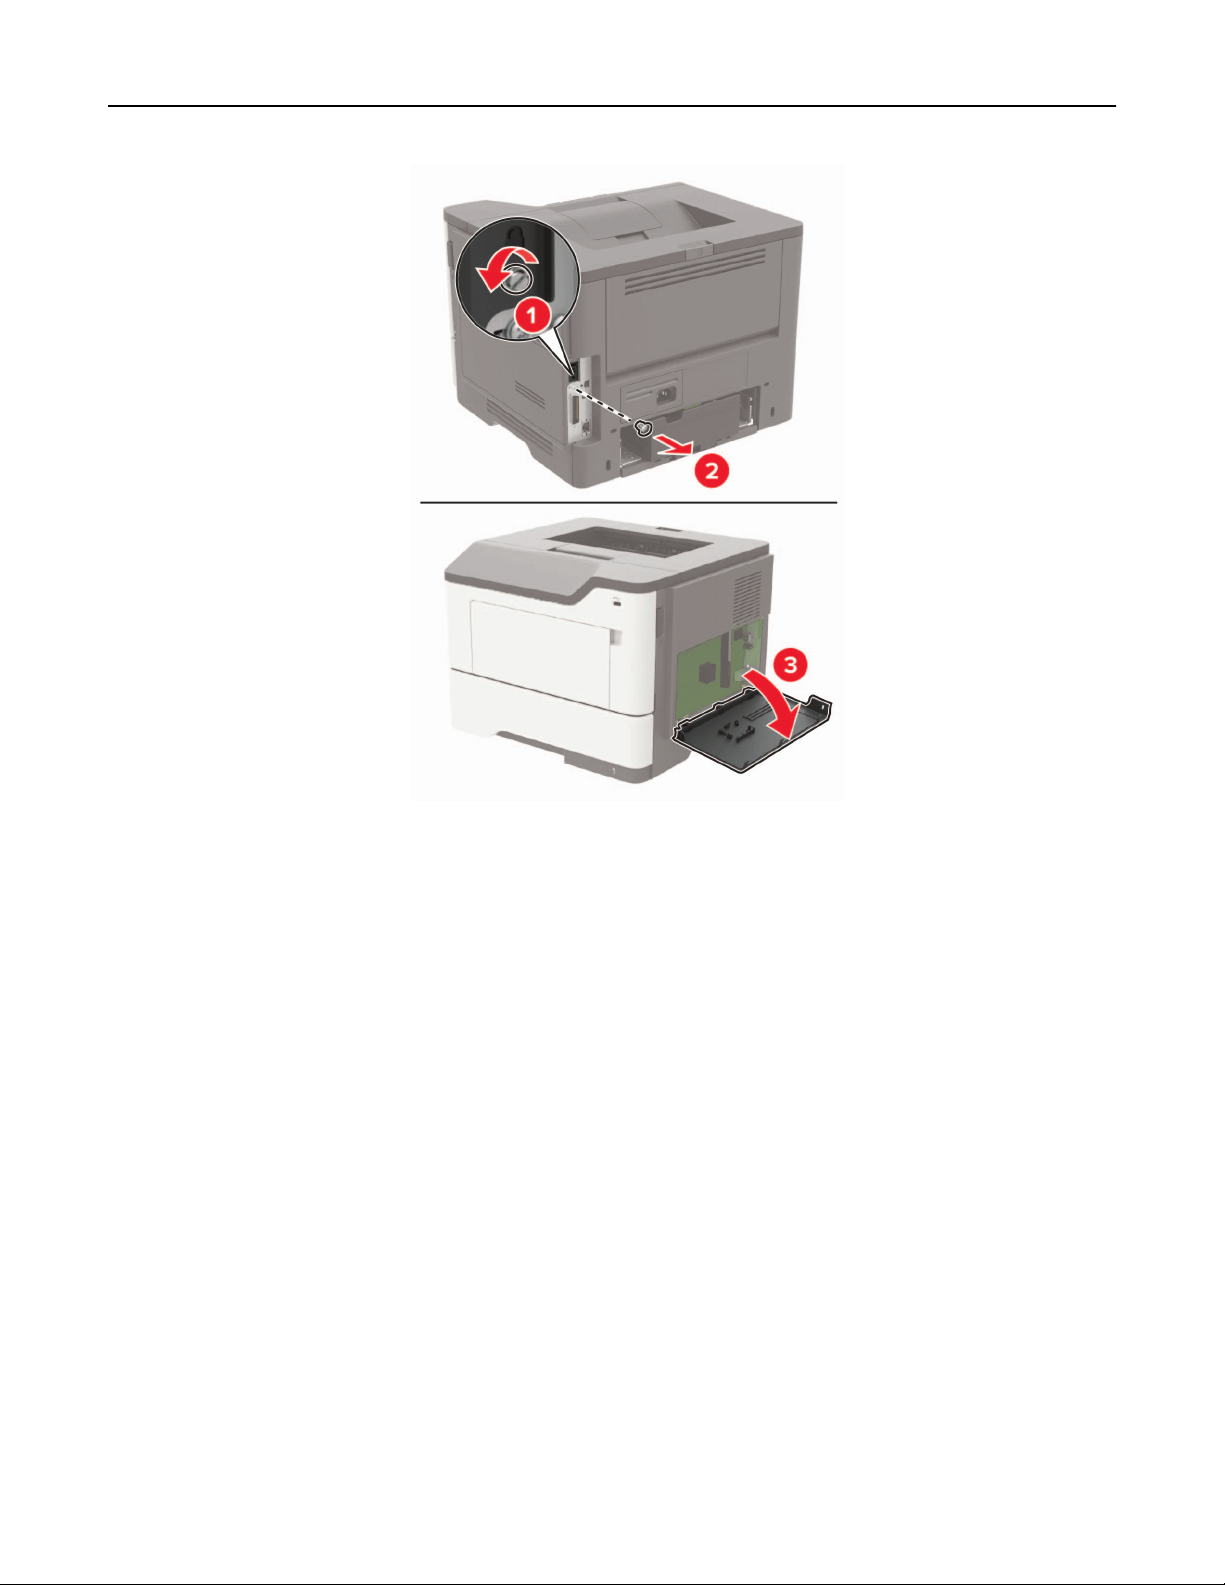
4 Unpack the memory card.
Warning—Potential Damage: Do not touch the connection points along the edge of the card.
Upgrading and migrating 155

5 Insert the memory card until it clicks into place.
6 Close the controller board access cover.
7 Connect the power cord to the printer, and then to the electrical outlet.
CAUTION—POTENTIAL INJURY: To avoid the risk of
fire
or electrical shock, connect the power cord
to an appropriately rated and properly grounded electrical outlet that is near the product and easily
accessible.
8 Turn on the printer.
Installing an optional card
CAUTION—SHOCK HAZARD: To avoid the risk of electrical shock, if you are accessing the controller
board or installing optional hardware or memory devices sometime after setting up the printer, then turn
the printer o, and unplug the power cord from the electrical outlet before continuing. If you have any
other devices attached to the printer, then turn them o as well, and unplug any cables going into the
printer.
1 Turn o the printer.
2 Unplug the power cord from the electrical outlet, and then from the printer.
3 Open the controller board access cover.
Warning—Potential Damage: Controller board electronic components are easily damaged by static
electricity. Touch a metal surface on the printer before touching any components or connectors.
Upgrading and migrating 156

4 Unpack the optional card.
Warning—Potential Damage: Do not touch the connection points along the edge of the card.
5 Push the card firmly into place.
Note: The entire length of the connector on the card must touch and be
flush
against the controller
board.
Warning—Potential Damage: Improper installation of the card may cause damage to the card and the
controller board.
6 Close the access cover.
Upgrading and migrating 157
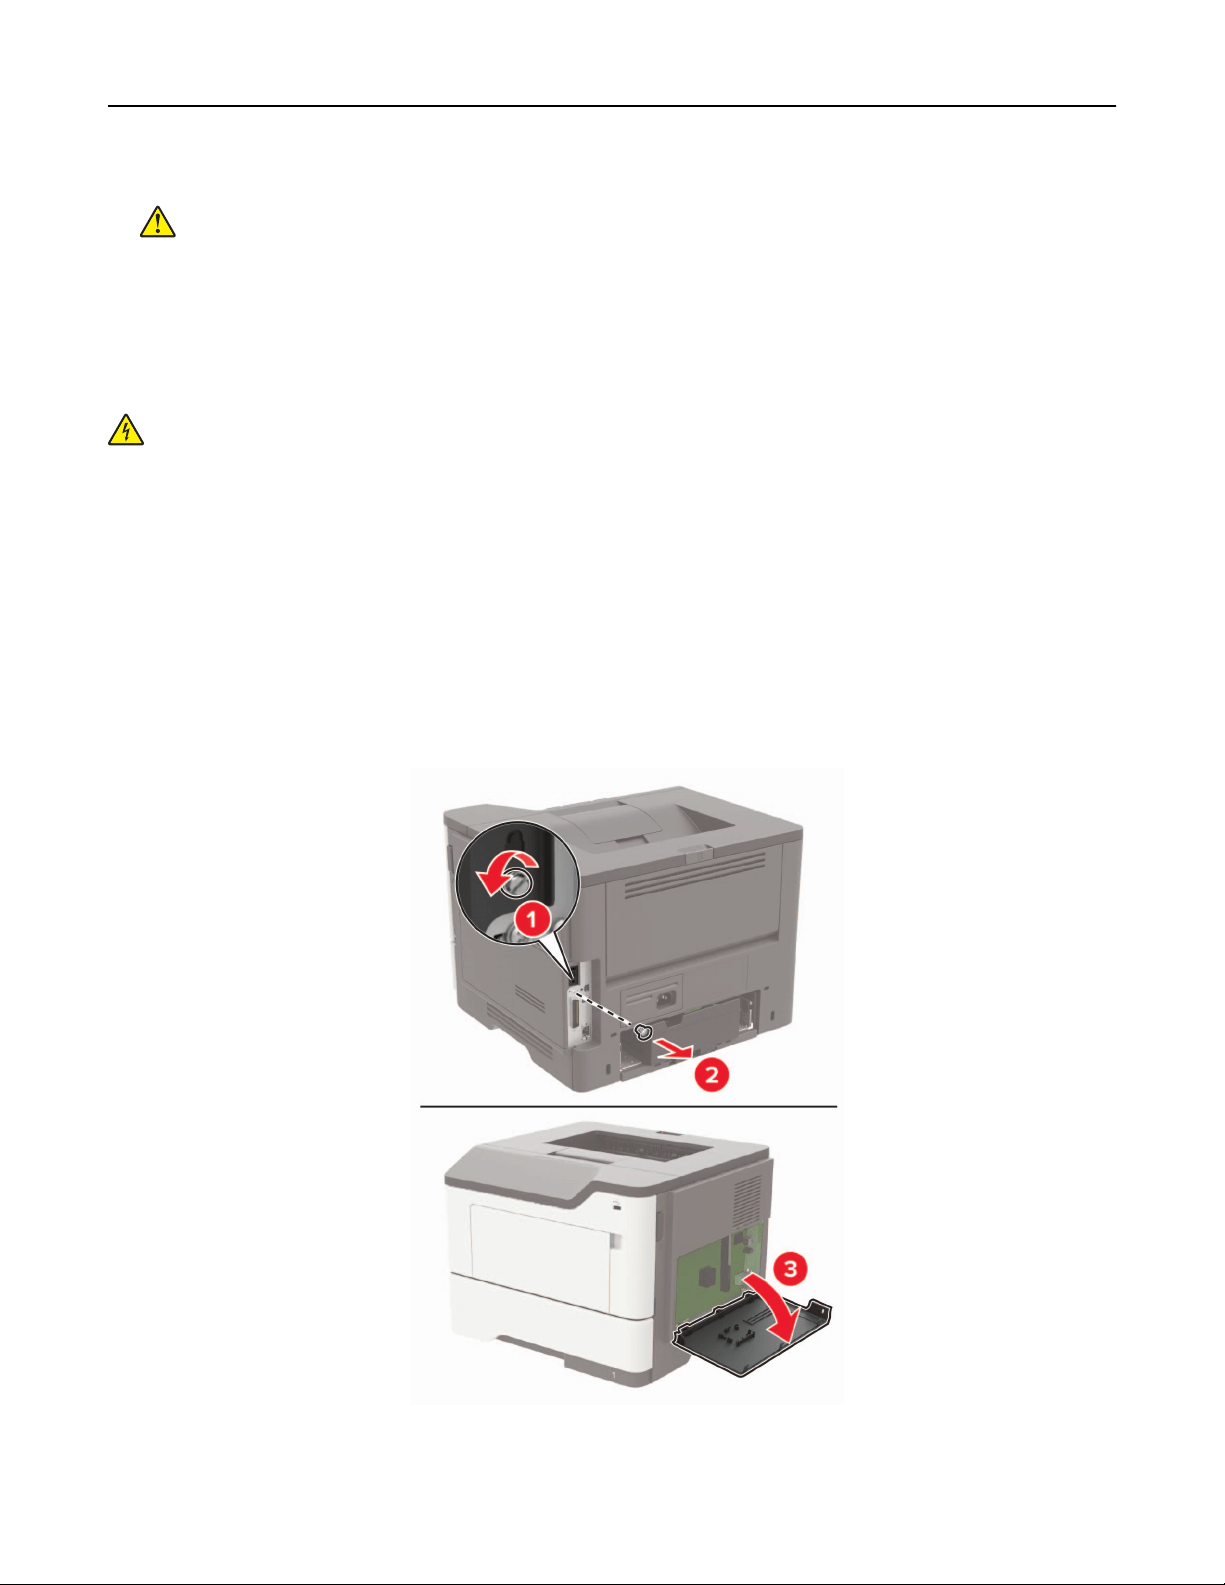
7 Connect the power cord to the printer, and then to the electrical outlet.
CAUTION—POTENTIAL INJURY: To avoid the risk of
fire
or electrical shock, connect the power cord
to an appropriately rated and properly grounded electrical outlet that is near the product and easily
accessible.
8 Turn on the printer.
Installing a printer hard disk
CAUTION—SHOCK HAZARD: To avoid the risk of electrical shock, if you are accessing the controller
board or installing optional hardware or memory devices sometime after setting up the printer, then turn
the printer o, and unplug the power cord from the electrical outlet before continuing. If you have any
other devices attached to the printer, then turn them o as well, and unplug any cables going into the
printer.
1 Turn o the printer.
2 Unplug the power cord from the electrical outlet, and then from the printer.
3 Open the controller board access cover.
Warning—Potential Damage: Controller board electronic components are easily damaged by static
electricity. Touch a metal surface on the printer before touching any controller board components or
connectors.
4 Unpack the hard disk.
Upgrading and migrating 158
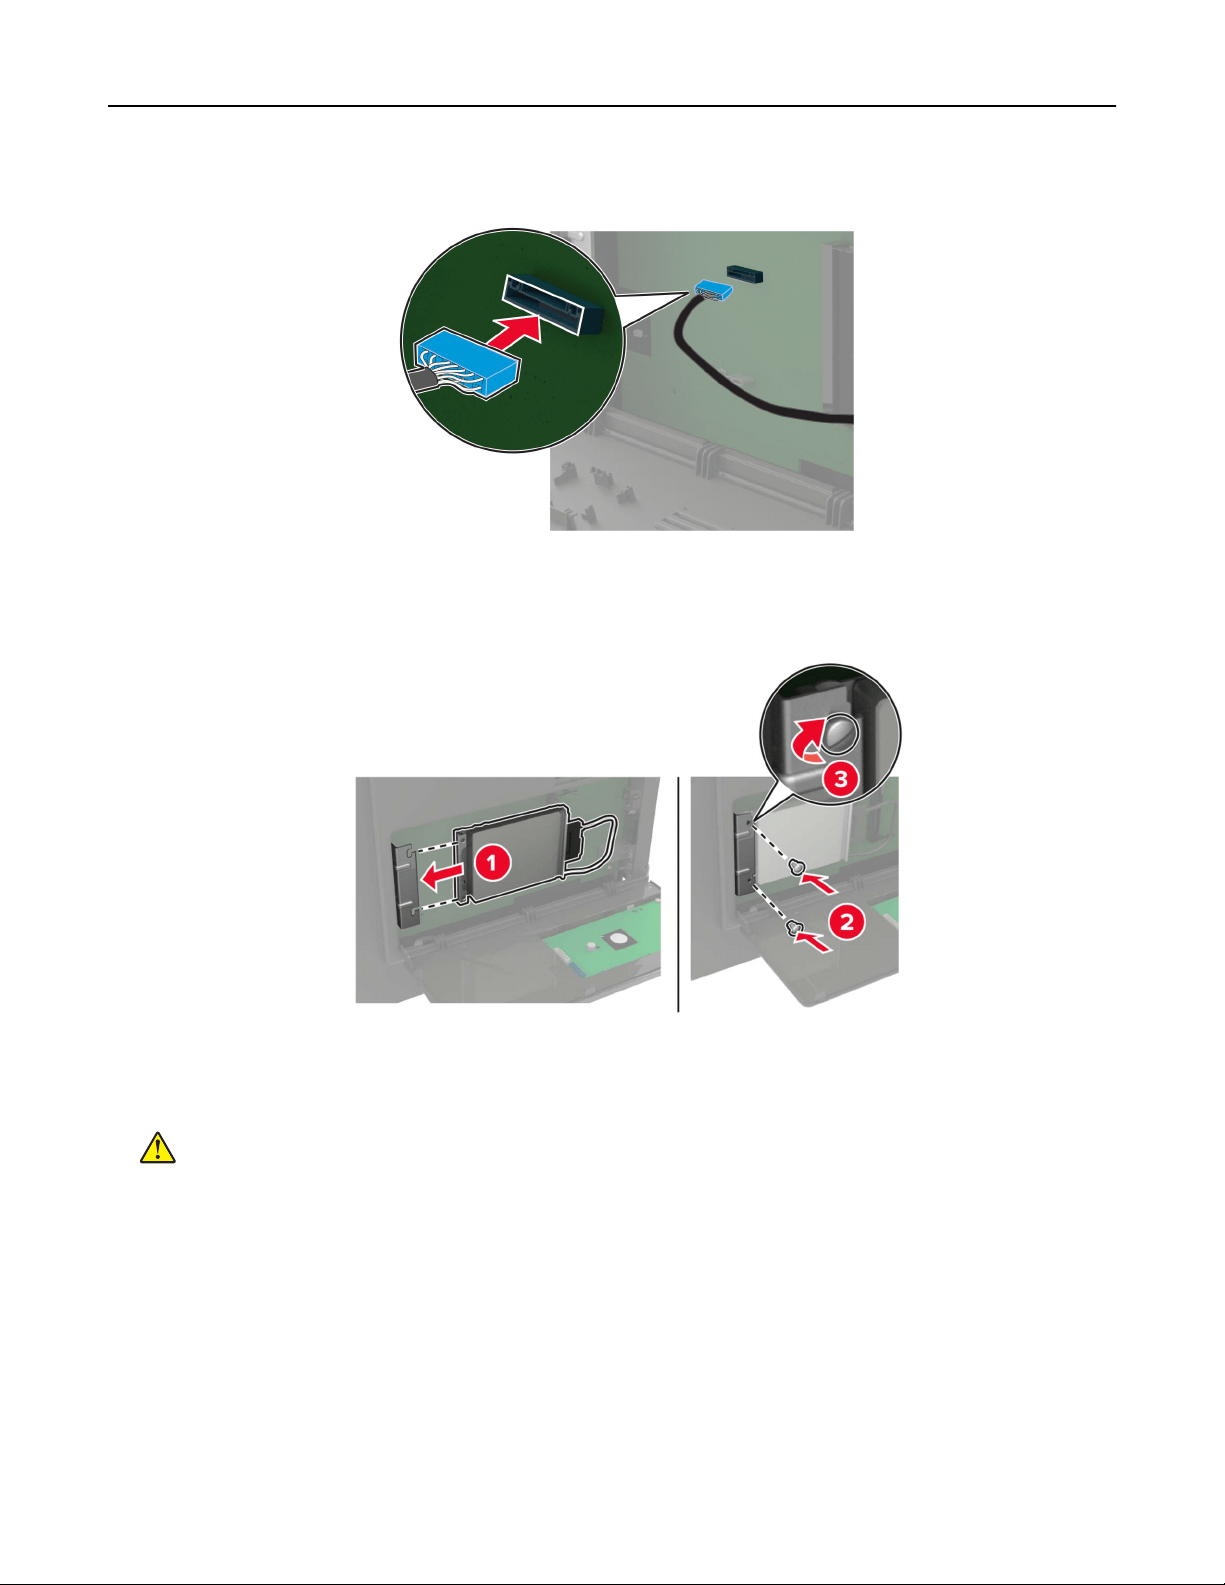
5 Attach the hard disk interface cable to the controller board.
6 Attach the hard disk to the controller board.
Warning—Potential Damage: Do not touch or press the center of the hard disk.
7 Close the access cover.
8 Connect the power cord to the printer, and then to the electrical outlet.
CAUTION—POTENTIAL INJURY: To avoid the risk of fire or electrical shock, connect the power cord
to an appropriately rated and properly grounded electrical outlet that is near the product and easily
accessible.
9 Turn on the printer.
Upgrading and migrating 159
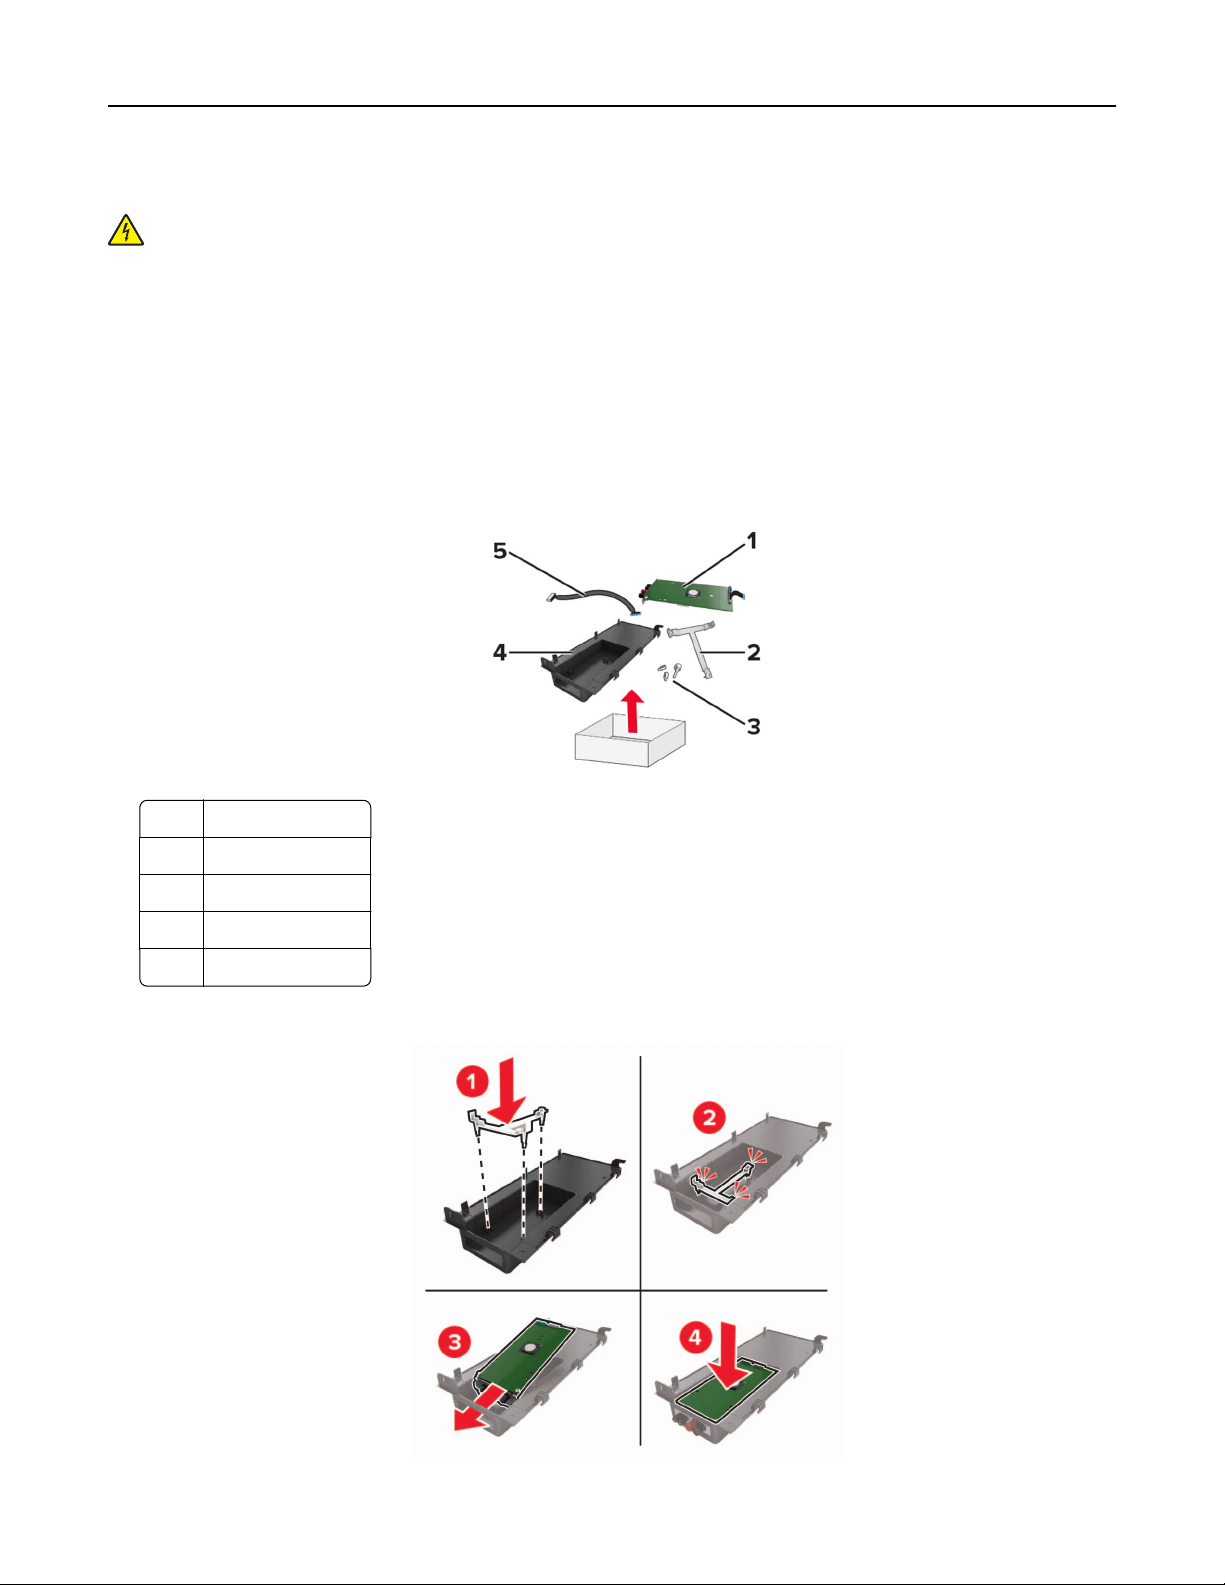
Installing an internal solutions port
CAUTION—SHOCK HAZARD: To avoid the risk of electrical shock, if you are accessing the controller
board or installing optional hardware or memory devices sometime after setting up the printer, then turn
the printer o, and unplug the power cord from the electrical outlet before continuing. If you have any
other devices attached to the printer, then turn them o as well, and unplug any cables going into the
printer.
1 Turn o the printer.
2 Unplug the power cord from the electrical outlet, and then from the printer.
3 Unpack the internal solutions port (ISP) kit.
Note: Remove the preinstalled interface cable from the ISP.
1 ISP
2 Mounting bracket
3 Thumbscrews
4 Housing
5 Interface cable
4 Install the ISP into its housing.
Upgrading and migrating 160
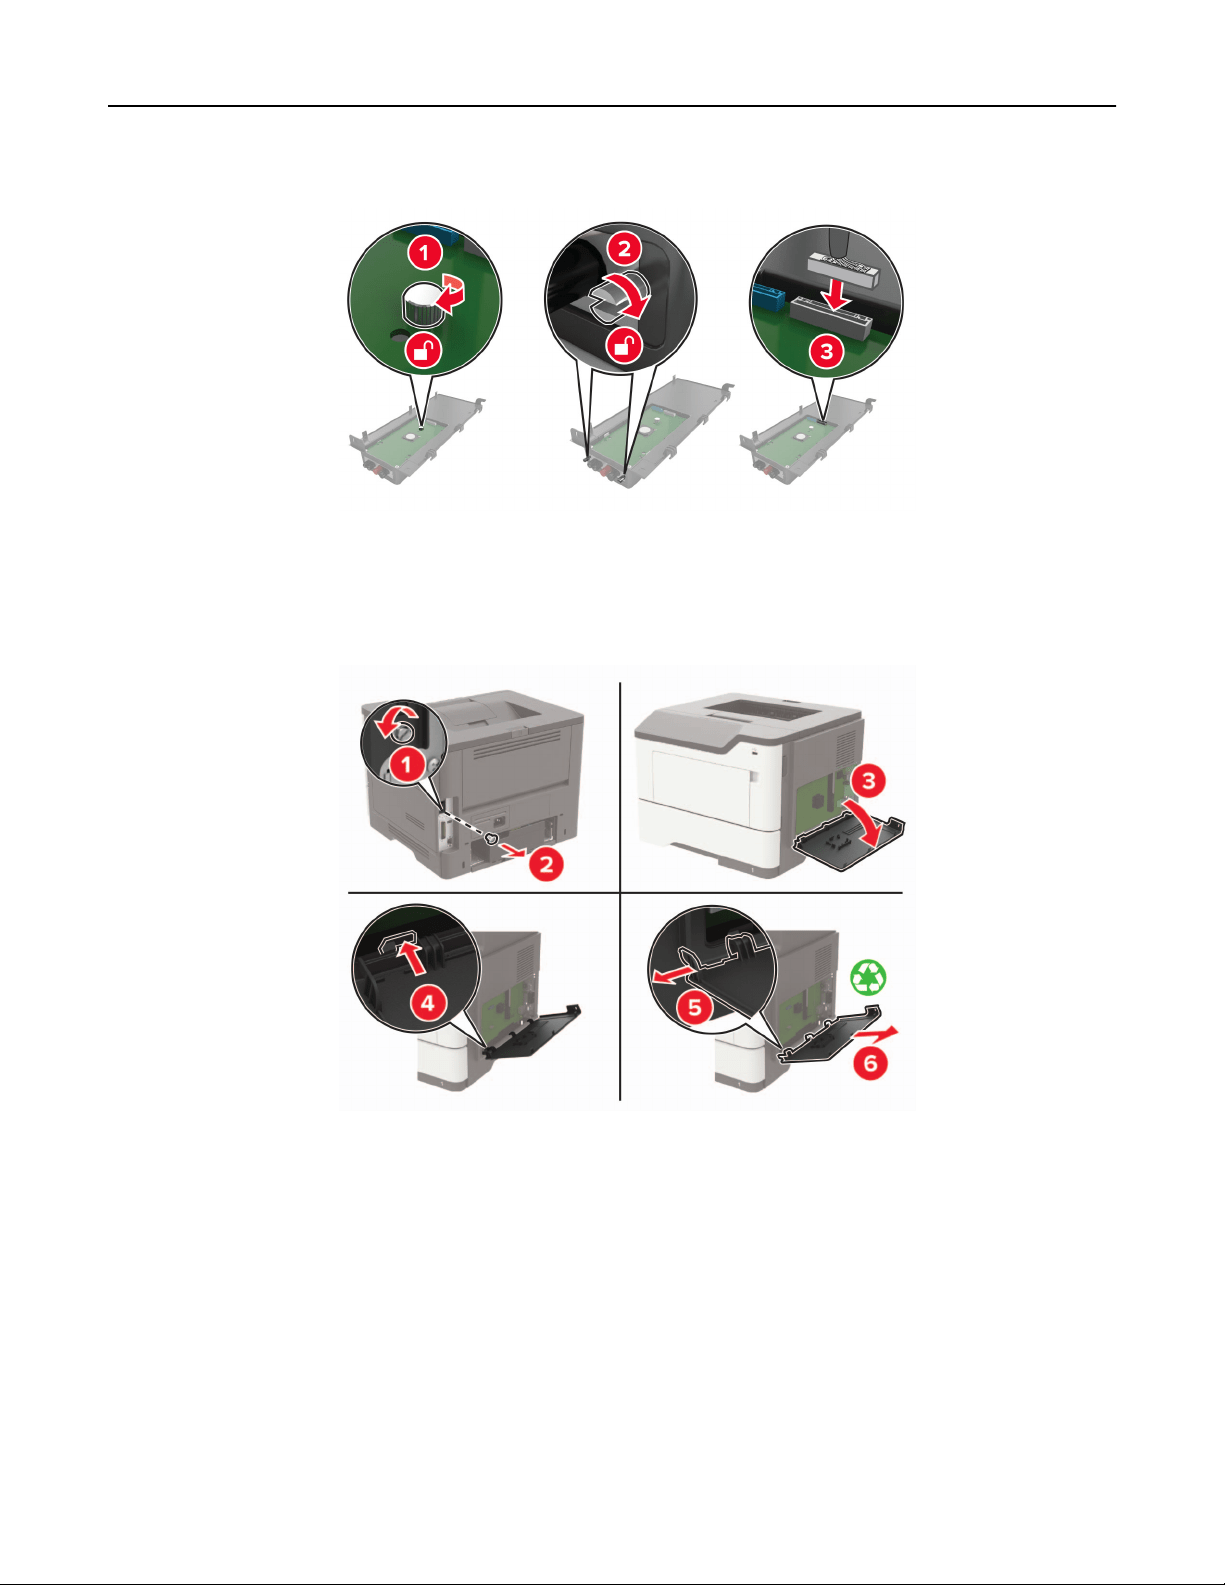
5 Secure the ISP in place and attach the ISP extended cable.
6 Open, and then remove the controller board access cover.
Warning—Potential Damage: Controller board electronic components are easily damaged by static
electricity. Touch a metal surface on the printer before touching any controller board electronic
components or connectors.
Upgrading and migrating 161
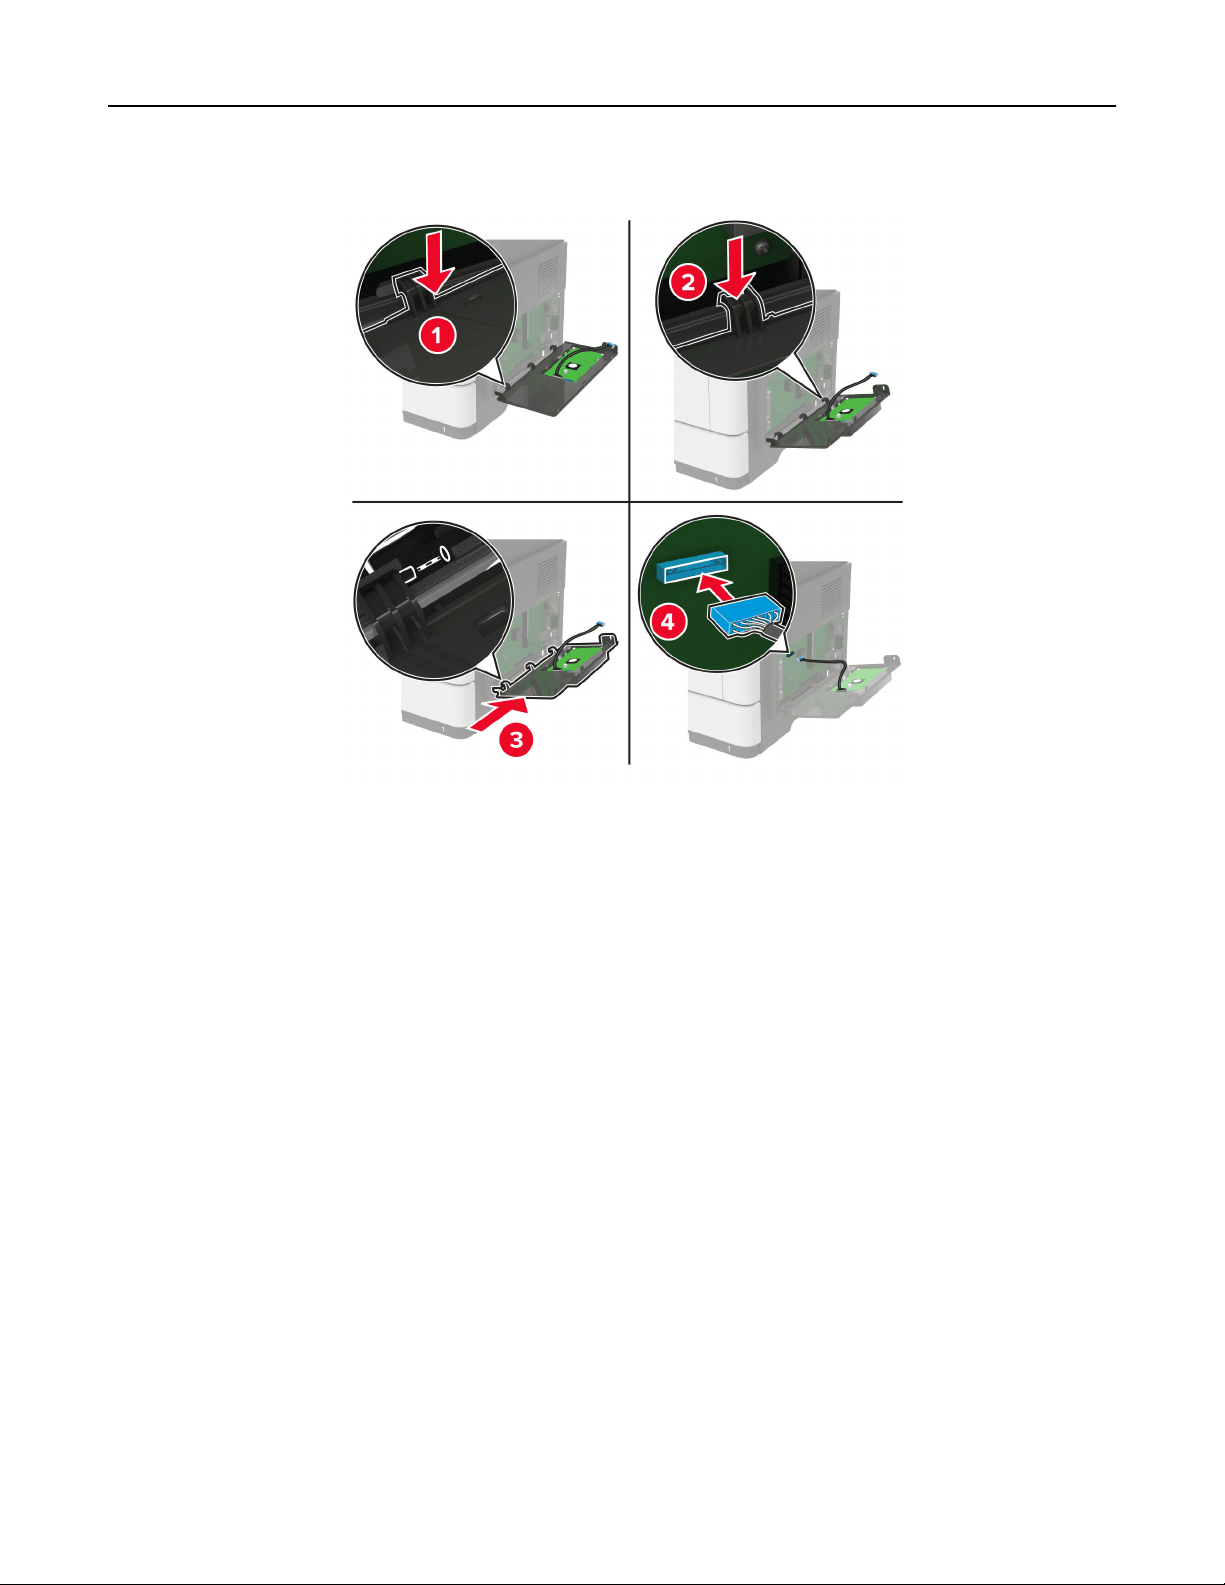
7 Attach the ISP kit to the printer.
Upgrading and migrating 162

If a printer hard disk is installed, then remove the hard disk before installing the ISP.
a Unplug the hard disk interface cable from the controller board.
Upgrading and migrating 163
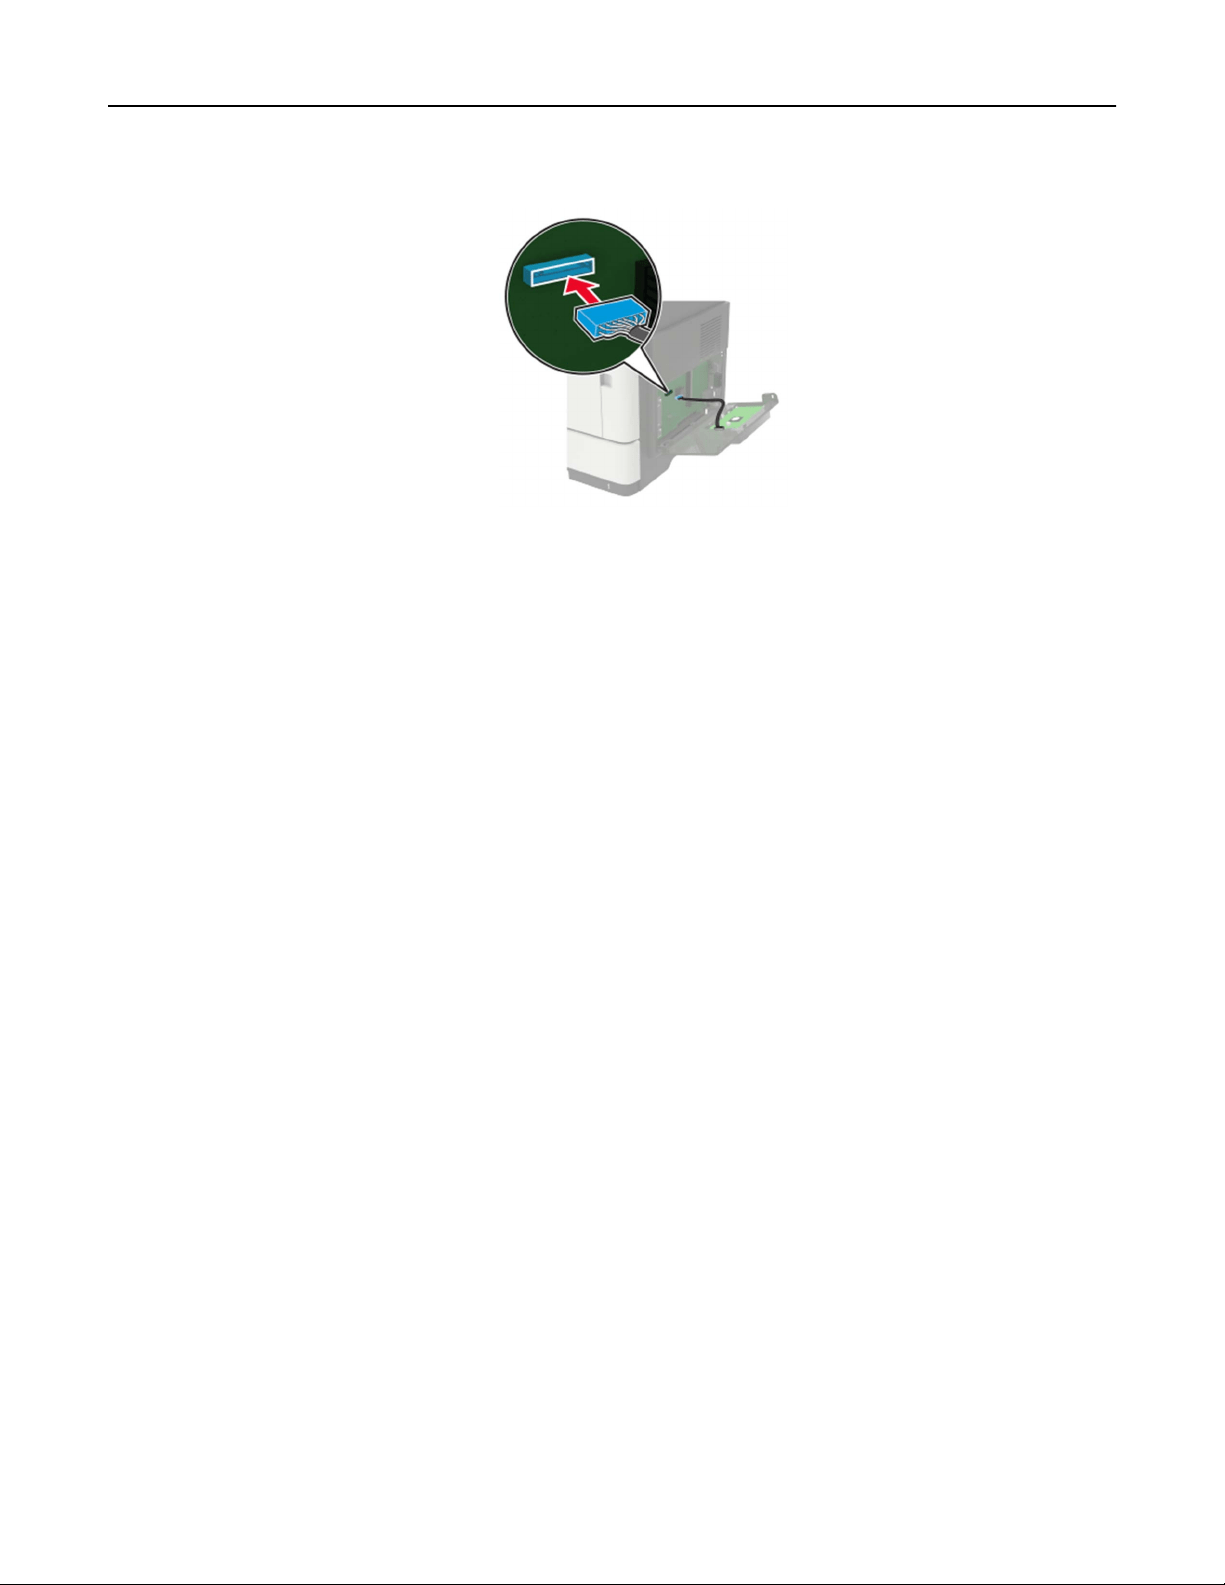
b Connect the ISP extended cable to the ISP connector.
Upgrading and migrating 164
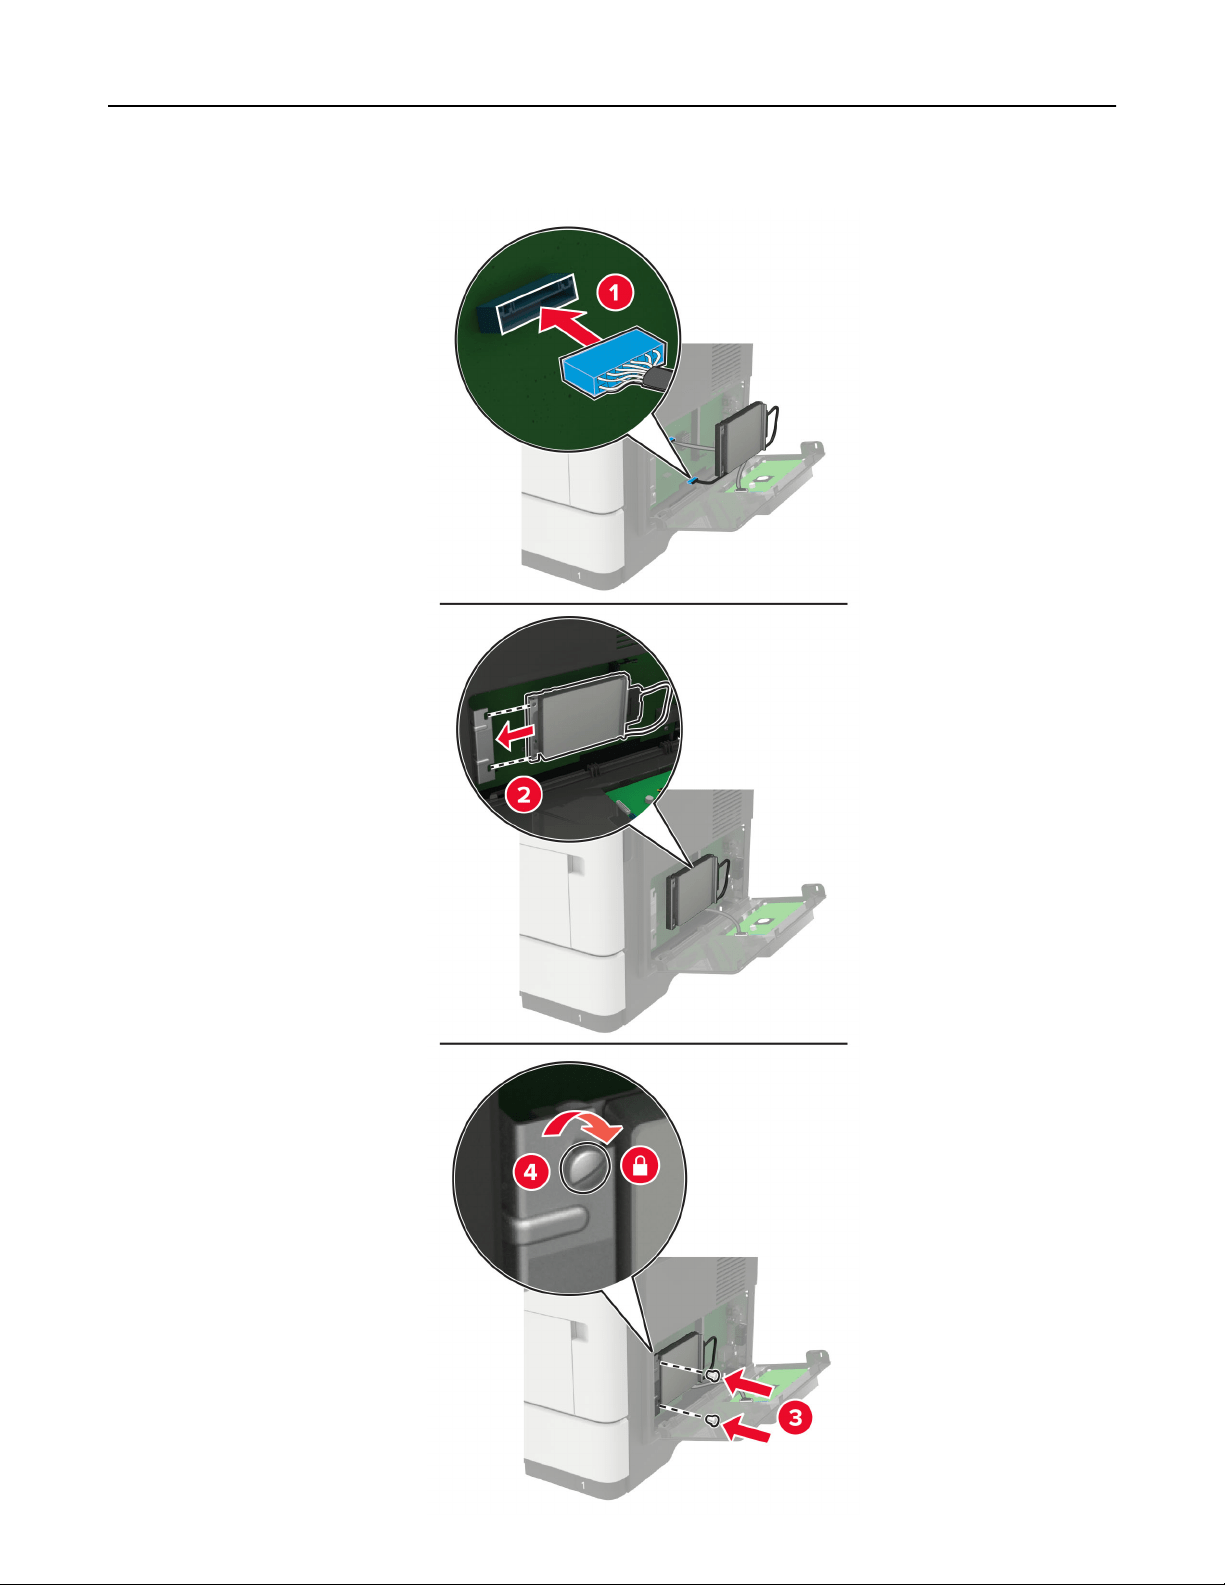
c Install the hard disk.
Upgrading and migrating 165
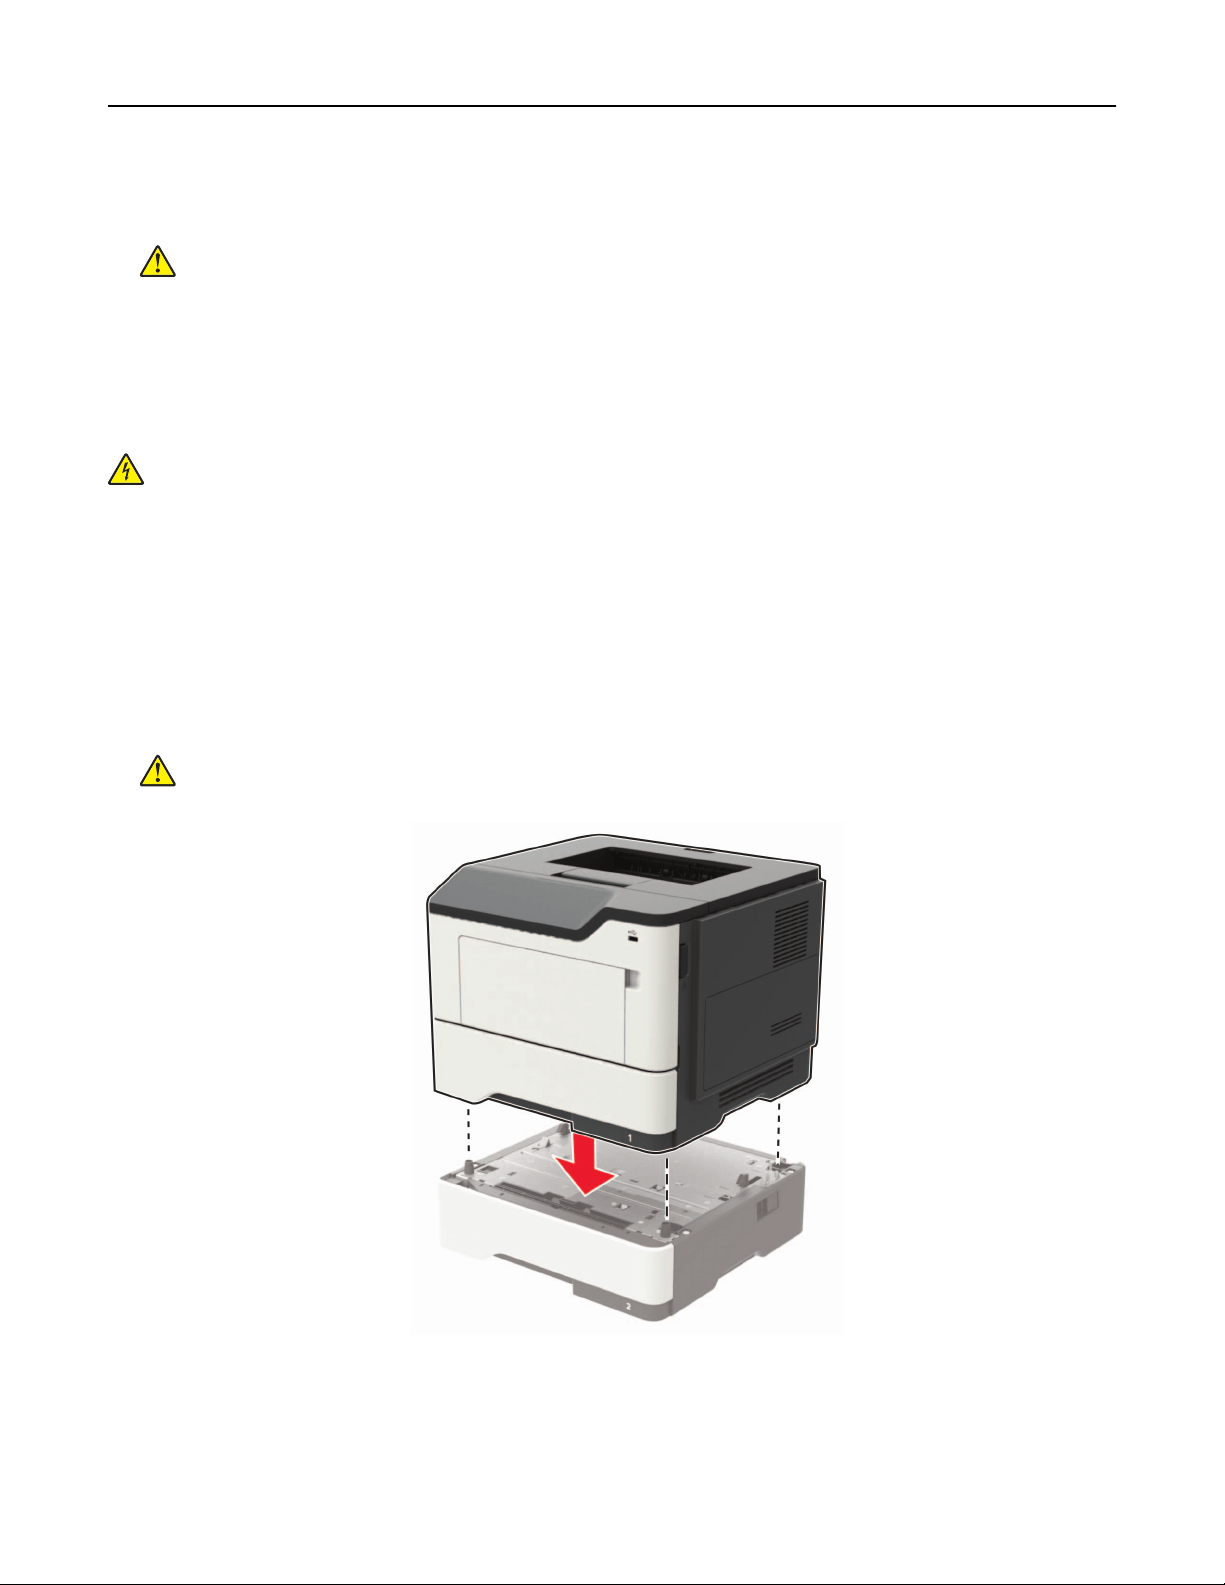
8 Close the access cover.
9 Connect the power cord to the printer, and then to the electrical outlet.
CAUTION—POTENTIAL INJURY: To avoid the risk of fire or electrical shock, connect the power cord
to an appropriately rated and properly grounded electrical outlet that is near the product and easily
accessible.
10 Turn on the printer.
Installing optional trays
CAUTION—SHOCK HAZARD: To avoid the risk of electrical shock, if you are accessing the controller
board or installing optional hardware or memory devices sometime after setting up the printer, then turn
the printer o, and unplug the power cord from the electrical outlet before continuing. If you have any
other devices attached to the printer, then turn them o as well, and unplug any cables going into the
printer.
1 Turn
o
the printer.
2 Unplug the power cord from the electrical outlet, and then from the printer.
3 Unpack the optional tray, and then remove all packing material.
4 Align the printer with the optional tray, and then lower the printer into place.
CAUTION—POTENTIAL INJURY: If the printer weight is greater than 20 kg (44 lb), then it may
require two or more people to lift it safely.
Upgrading and migrating 166

5 Connect the power cord to the printer, and then to the electrical outlet.
CAUTION—POTENTIAL INJURY: To avoid the risk of
fire
or electrical shock, connect the power cord
to an appropriately rated and properly grounded electrical outlet that is near the product and easily
accessible.
6 Turn on the printer.
Add the tray in the print driver to make it available for print jobs. For more information, see
“Adding available
options in the print driver” on page 167.
Software
Installing the printer software
Notes:
• The print driver is included in the software installer package.
• For Macintosh computers with macOS version 10.7 or later, you do not need to install the driver to print
on an AirPrint-certified printer.
1 Obtain a copy of the software installer package.
• From the software CD that came with your printer.
• Go to
http://support.lexmark.com, and then select your printer and operating system.
2 Run the installer, and then follow the instructions on the computer screen.
Adding available options in the print driver
For Windows users
1 Open the printers folder.
2 Select the printer you want to update, and then do either of the following:
• For Windows 7 or later, select Printer properties.
• For earlier versions, select Properties.
3 Navigate to the Configuration tab, and then select Update Now ‑ Ask Printer.
4 Apply the changes.
For Macintosh users
1 From System Preferences in the Apple menu, navigate to your printer, and then select Options & Supplies.
2 Navigate to the list of hardware options, and then add any installed options.
3 Apply the changes.
Upgrading and migrating 167
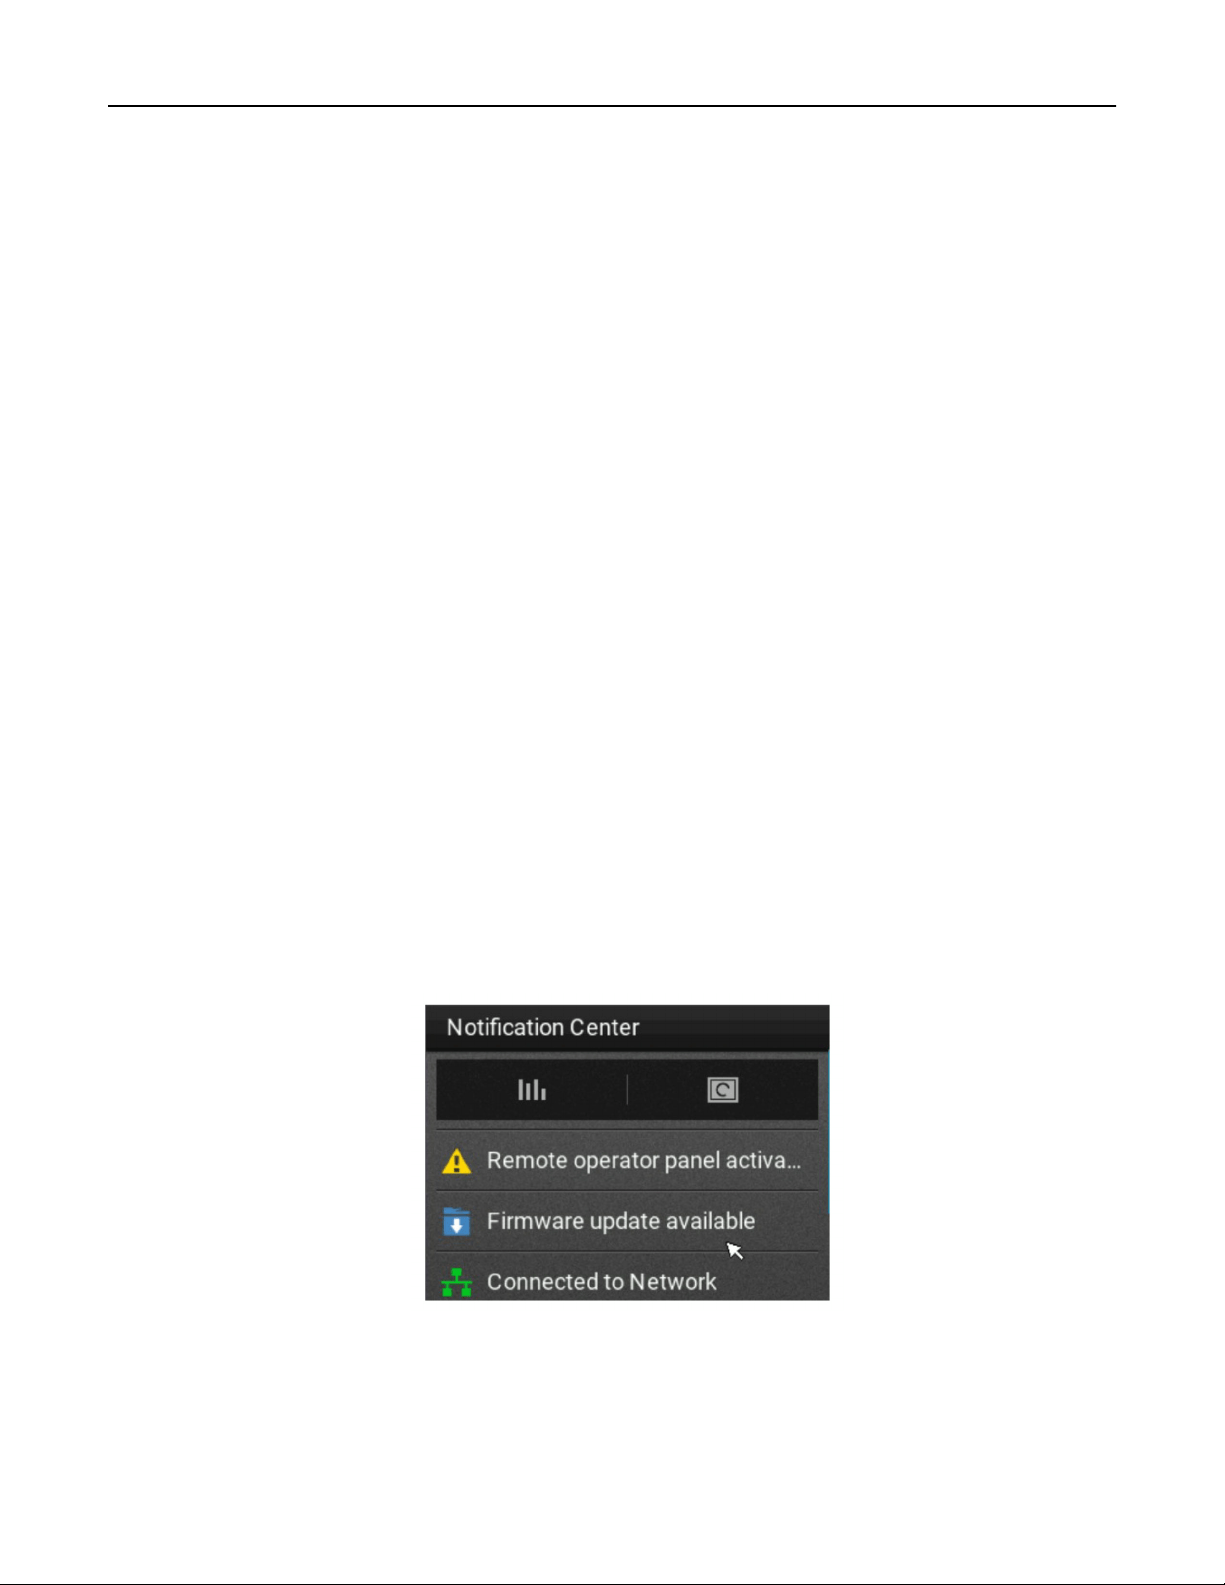
Firmware
Exporting or importing a configuration file
You can export the configuration settings of your printer into a text file, and then import the file to apply the
settings to other printers.
1 Open a web browser, and then type the printer IP address in the address field.
Notes:
• View the printer IP address on the printer home screen. The IP address appears as four sets of
numbers separated by periods, such as 123.123.123.123.
• If you are using a proxy server, then temporarily disable it to load the web page correctly.
2 From the Embedded Web Server, click Export Configuration or Import Configuration.
3 Follow the instructions on the screen.
4 If the printer supports applications, then do the following:
a Click Apps > select the application >
Configure
.
b Click Export or Import.
Updating firmware
Updating the firmware using the control panel
Using the notification center
This method is applicable only in some printer models.
1 From the control panel, navigate to the notification center, and then select Firmware update available.
Upgrading and migrating 168

2 Select Install now.
The printer reboots automatically after the update.
Using the Settings menu
1 From the control panel, navigate to Settings > Device > Update Firmware.
2 Depending on your printer model, select Check for updates or Check for updates now.
3 If a new update is available, then select Install now.
The printer reboots automatically after the update.
Updating the firmware using the Embedded Web Server
Before you begin, make sure that:
• You have downloaded the latest printer firmware from https://support.lexmark.com and saved it to your
flash drive or computer.
Note: To deploy the printer
firmware,
extract the
.fls
firmware
file
from the ZIP package.
• You are not using a special code on your printer to avoid losing this functionality.
Warning—Potential Damage: Make sure that all printers receiving firmware updates are turned on during
the entire firmware update process. Turning o a printer during a firmware update can severely damage it.
If the printer is connected to the network when checking for updates, then downloading the firmware is not
required.
1 Open a web browser, and then type the printer IP address in the address field.
Notes:
• View the printer IP address on the printer home screen. The IP address appears as four sets of
numbers separated by periods, such as 123.123.123.123.
• If you are using a proxy server, then temporarily disable it to load the web page correctly.
2 Click Device.
3 Scroll down, and then click Update Firmware.
4 Depending on your printer model, click Check for updates or Check for updates now.
If a new update is available, then click I agree, start update.
Upgrading and migrating 169

The printer reboots automatically after the update.
Upgrading and migrating 170

Notices
Product information
Product name:
Lexmark M3250, Lexmark MS622de printers
Machine type:
4600
Model(s):
835, 895
Edition notice
September 2023
The following paragraph does not apply to any country where such provisions are inconsistent with local
law: LEXMARK INTERNATIONAL, INC., PROVIDES THIS PUBLICATION “AS IS” WITHOUT WARRANTY OF ANY
KIND, EITHER EXPRESS OR IMPLIED, INCLUDING, BUT NOT LIMITED TO, THE IMPLIED WARRANTIES OF
MERCHANTABILITY OR FITNESS FOR A PARTICULAR PURPOSE. Some states do not allow disclaimer of
express or implied warranties in certain transactions; therefore, this statement may not apply to you.
This publication could include technical inaccuracies or typographical errors. Changes are periodically made
to the information herein; these changes will be incorporated in later editions. Improvements or changes in the
products or the programs described may be made at any time.
References in this publication to products, programs, or services do not imply that the manufacturer intends to
make these available in all countries in which it operates. Any reference to a product, program, or service is
not intended to state or imply that only that product, program, or service may be used. Any functionally
equivalent product, program, or service that does not infringe any existing intellectual property right may be
used instead. Evaluation and
verification
of operation in conjunction with other products, programs, or services,
except those expressly designated by the manufacturer, are the user’s responsibility.
For Lexmark technical support, go to
http://support.lexmark.com.
For information on Lexmark's privacy policy governing the use of this product, go to
www.lexmark.com/privacy.
For information on supplies and downloads, go to
www.lexmark.com.
© 2018 Lexmark International, Inc.
All rights reserved.
GOVERNMENT END USERS
The Software Program and any related documentation are "Commercial Items," as that term is
defined
in 48
C.F.R. 2.101, "Computer Software" and "Commercial Computer Software Documentation," as such terms are
used in 48 C.F.R. 12.212 or 48 C.F.R. 227.7202, as applicable. Consistent with 48 C.F.R. 12.212 or 48 C.F.R.
227.7202-1 through 227.7207-4, as applicable, the Commercial Computer Software and Commercial Software
Notices 171

Documentation are licensed to the U.S. Government end users (a) only as Commercial Items and (b) with only
those rights as are granted to all other end users pursuant to the terms and conditions herein.
Trademarks
Lexmark, the Lexmark logo, and MarkNet are trademarks or registered trademarks of Lexmark International,
Inc. in the United States and/or other countries.
Google Chrome, Android, and Google Play are trademarks of Google LLC.
Macintosh, Mac, OS X, App Store, Safari, and AirPrint are trademarks of Apple Inc., registered in the U.S. and
other countries. Use of the Works with Apple badge means that an accessory has been designed to work
specifically with the technology identified in the badge and has been certified by the developer to meet Apple
performance standards.
The Mopria® word mark is a registered and/or unregistered trademark of Mopria Alliance, Inc. in the United
States and other countries. Unauthorized use is strictly prohibited.
PCL® is a registered trademark of the Hewlett-Packard Company. PCL is Hewlett-Packard Company’s
designation of a set of printer commands (language) and functions included in its printer products. This printer
is intended to be compatible with the PCL language. This means the printer recognizes PCL commands used
in various application programs, and that the printer emulates the functions corresponding to the commands.
PostScript is a registered trademark of Adobe Systems Incorporated in the United States and/or other countries.
Wi-Fi® and Wi-Fi Direct® are registered trademarks of Wi-Fi Alliance®.
All other trademarks are the property of their respective owners.
Licensing notices
All licensing notices associated with this product can be viewed from the CD:\NOTICES directory of the
installation software CD.
Noise emission levels
The following measurements were made in accordance with ISO 7779 and reported in conformance with ISO
9296.
Note: Some modes may not apply to your product.
1-meter average sound pressure, dBA
Printing 56
Scanning N/A
Copying N/A
Ready 14
Values are subject to change. See www.lexmark.com for current values.
Notices 172

Waste from Electrical and Electronic Equipment (WEEE) directive
The WEEE logo
signifies
specific
recycling programs and procedures for electronic products in countries of the
European Union. We encourage the recycling of our products.
If you have further questions about recycling options, visit the Lexmark Web site at
www.lexmark.com for your
local sales oce phone number.
India E-Waste notice
This product including components, consumables, parts and spares complies with the “India E-Waste Rules”
and prohibits use of lead, mercury, hexavalent chromium, polybrominated biphenyls or polybrominated
diphenyl ethers in concentrations exceeding 0.1% by weight and 0.01% by weight for cadmium, except for the
exemption set in the Rule.
Product disposal
Do not dispose of the printer or supplies in the same manner as normal household waste. Consult your local
authorities for disposal and recycling options.
Returning Lexmark cartridges for reuse or recycling
The Lexmark Cartridge Collection Program allows you to return used cartridges for free to Lexmark for reuse
or recycling. One hundred percent of the empty cartridges returned to Lexmark are either reused or
demanufactured for recycling. The boxes used to return the cartridges are also recycled.
To return Lexmark cartridges for reuse or recycling, do the following:
1 Go to
www.lexmark.com/recycle.
2 Select the product that you want to recycle.
Notices 173
Static sensitivity notice
This symbol identifies static-sensitive parts. Do not touch the areas near these symbols without first touching
a metal surface in an area away from the symbol.
To prevent damage from electrostatic discharge when performing maintenance tasks such as clearing paper
jams or replacing supplies, touch any exposed metal frame of the printer before accessing or touching interior
areas of the printer even if the symbol is not present.
ENERGY STAR
Any Lexmark product bearing the ENERGY STAR
®
emblem on the product or on a start-up screen is
certified
to
comply with Environmental Protection Agency (EPA) ENERGY STAR requirements as of the date of manufacture.
Temperature information
Ambient operating temperature 10 to 32°C (50 to 90°F)
Shipping temperature -40 to 43.3°C (-40 to 110°F)
Storage temperature and relative humidity 0 to 40°C (32 to 104°F)
8 to 80% RH
Laser notice
The printer is certified in the U.S. to conform to the requirements of DHHS 21 CFR, Chapter I, Subchapter J for
Class I (1) laser products, and elsewhere is certified as a Class I laser product conforming to the requirements
of IEC 60825-1: 2014.
Class I laser products are not considered to be hazardous. The laser system and printer are designed so there
is never any human access to laser radiation above a Class I level during normal operation, user maintenance,
or prescribed service conditions. The printer has a non-serviceable printhead assembly that contains a laser
with the following specifications:
Class: IIIb (3b) AlGaInP
Nominal output power (milliwatts): 15
Notices 174

Wavelength (nanometers): 650–670
Power consumption
Product power consumption
The following table documents the power consumption characteristics of the product.
Note: Some modes may not apply to your product.
Mode Description Power consumption (Watts)
Printing The product is generating hard‑copy output from electronic inputs. One-sided: 670
Two-sided: 395
Copy The product is generating hard‑copy output from hard‑copy original
documents.
N/A
Scan The product is scanning hard‑copy documents. N/A
Ready The product is waiting for a print job. 9.5
Sleep Mode The product is in a high‑level energy‑saving mode. 1.06
Hibernate The product is in a low‑level energy‑saving mode. 0.1
O The product is plugged into an electrical outlet, but the power switch is
turned o.
0.1
The power consumption levels listed in the previous table represent time-averaged measurements.
Instantaneous power draws may be substantially higher than the average.
Values are subject to change. See www.lexmark.com for current values.
Sleep Mode
This product is designed with an energy-saving mode called Sleep Mode. The Sleep Mode saves energy by
lowering power consumption during extended periods of inactivity. The Sleep Mode is automatically engaged
after this product is not used for a
specified
period of time, called the Sleep Mode Timeout.
Factory default Sleep Mode Timeout for this product (in minutes): 15
By using the configuration menus, the Sleep Mode Timeout can be modified between 1 minute and 120 minutes.
If the print speed is less than or equal to 30 pages per minute, then you can set the timeout only up to 60
minutes. Setting the Sleep Mode Timeout to a low value reduces energy consumption, but may increase the
response time of the product. Setting the Sleep Mode Timeout to a high value maintains a fast response, but
uses more energy.
Hibernate Mode
This product is designed with an ultra‑low power operating mode called Hibernate mode. When operating in
Hibernate Mode, all other systems and devices are powered down safely.
Notices 175

The Hibernate mode can be entered in any of the following methods:
• Using the Hibernate Timeout
• Using the Schedule Power modes
Factory default Hibernate Timeout for this product in all countries or regions 3 days
The amount of time the printer waits after a job is printed before it enters Hibernate mode can be modified
between one hour and one month.
O
mode
If this product has an o mode which still consumes a small amount of power, then to completely stop product
power consumption, disconnect the power supply cord from the electrical outlet.
Total energy usage
It is sometimes helpful to estimate the total product energy usage. Since power consumption claims are
provided in power units of Watts, the power consumption should be multiplied by the time the product spends
in each mode in order to calculate energy usage. The total product energy usage is the sum of each mode's
energy usage.
Applicability of Regulation (EU) 2019/2015 and (EU) 2019/2020
Per Commission Regulation (EU) 2019/2015 and (EU) 2019/2020, the light source contained within this product
or its component is intended to be used for Image Capture or Image Projection only, and is not intended for
use in other applications.
Regulatory notices for wireless products
This section contains regulatory information that applies only to wireless models.
If in doubt as to whether your model is a wireless model, go to
http://support.lexmark.com.
Modular component notice
Wireless models contain one of the following modular components:
Lexmark Regulatory Type/Model Number LEX-M07-001; FCC ID:IYLLEXM07001; Industry Canada IC:2376A-
LEXM07001
Lexmark Regulatory Type/Model Number LEX-M08-001; FCC ID:IYLLEXM08001; IC:2376A-LEXM08001
To determine which modular components are installed in your particular product, refer to the labeling on your
actual product.
Exposure to radio frequency radiation
The radiated output power of this device is far below the radio frequency exposure limits of the FCC and other
regulatory agencies. A minimum separation of 20 cm (8 inches) must be maintained between the antenna and
any persons for this device to satisfy the RF exposure requirements of the FCC and other regulatory agencies.
Notices 176

Innovation, Science and Economic Development Canada
This device complies with Innovation, Science and Economic Development Canada license-exempt RSS
standards. Operation is subject to the following two conditions: (1) this device may not cause interference, and
(2) this device must accept any interference, including interference that may cause undesired operation of the
device.
Innovation, Sciences et Développement économique Canada
Cet appareil est conforme aux normes RSS exemptes de licence d'Innovation, Sciences et Développement
économique Canada. Son fonctionnement est soumis aux deux conditions suivantes : (1) cet appareil ne doit
pas causer d'interférences et (2) il doit accepter toutes les interférences, y compris les celles qui peuvent
entraîner un fonctionnement indésirable.
European Community (EC) directives conformity
This product is in conformity with the protection requirements of EC Council directive 2014/53/EU on the
approximation and harmonization of the laws of the Member States relating to radio equipment.
The manufacturer of this product is: Lexmark International, Inc., 740 West New Circle Road, Lexington, KY,
40550 USA. The authorized representative is: Lexmark International Technology Hungária Kft., 8 Lechner Ödön
fasor, Millennium Tower III, 1095 Budapest HUNGARY. A declaration of conformity to the requirements of the
Directives is available upon request from the Authorized Representative or may be obtained at
www.lexmark.com/en_us/about/regulatory-compliance/european-union-declaration-of-conformity.html.
Compliance is indicated by the CE marking:
EU and other countries statement of radio transmitter operational frequency bands and
maximum RF power
This radio product transmits in the 2.4GHz (2.412–2.472GHz) band in the EU. The maximum transmitter EIRP
power output, including antenna gain, is ≤ 20dBm.
Federal Communications Commission (FCC) compliance information
statement
This product has been tested and found to comply with the limits for a Class A digital device, pursuant to Part
15 of the FCC Rules. Operation is subject to the following two conditions: (1) this device may not cause harmful
interference, and (2) this device must accept any interference received, including interference that may cause
undesired operation.
The FCC Class A limits are designed to provide reasonable protection against harmful interference when the
equipment is operated in a commercial environment. This equipment generates, uses, and can radiate radio
frequency energy and, if not installed and used in accordance with the instruction manual, may cause harmful
Notices 177

interference to radio communications. Operation of this equipment in a residential area is likely to cause harmful
interference, in which case the user will be required to correct the interference at his own expense.
The manufacturer is not responsible for any radio or television interference caused by using other than
recommended cables or by unauthorized changes or modifications to this equipment. Unauthorized changes
or modifications could void the user's authority to operate this equipment.
Note: To assure compliance with FCC regulations on electromagnetic interference for a Class A computing
device, use a properly shielded and grounded cable such as Lexmark part number 1021231 for parallel attach
or 1021294 for USB attach. Use of a substitute cable not properly shielded and grounded may result in a
violation of FCC regulations.
Any questions regarding this compliance information statement should be directed to:
Director of Lexmark Technology & Services
Lexmark International, Inc.
740 West New Circle Road
Lexington, KY 40550
Telephone: (859) 232–2000
E-mail: [email protected]
Innovation, Science and Economic Development Canada compliance
statement
This Class A digital apparatus meets all requirements of the Canadian Interference-Causing Equipment
Standard ICES-003.
Avis de conformité aux normes de l’Innovation, Sciences et
Développement économique Canada
Cet appareil numérique de classe A est conforme aux exigences de la norme canadienne relative aux
équipements pouvant causer des interférences NMB-003.
Notice to users of Class A products in Brazil
Este produto não é apropriado para uso em ambientes domésticos, pois poderá causar interferências
eletromagnéticas que obrigam o usuário a tomar medidas necessárias para minimizar estas interferências.
European Community (EC) directives conformity
This product is in conformity with the protection requirements of EC Council directives 2014/30/EU, 2014/35/EU,
and 2011/65/EU as amended by (EU) 2015/863 on the approximation and harmonization of the laws of the
Member States relating to electromagnetic compatibility, safety of electrical equipment designed for use within
certain voltage limits, and on the restrictions of use of certain hazardous substances in electrical and electronic
equipment.
The manufacturer of this product is: Lexmark International, Inc., 740 West New Circle Road, Lexington, KY,
40550 USA. The authorized representative is: Lexmark International Technology Hungária Kft., 8 Lechner Ödön
fasor, Millennium Tower III, 1095 Budapest HUNGARY. A declaration of conformity to the requirements of the
Notices 178

Directives is available upon request from the Authorized Representative or may be obtained at
www.lexmark.com/en_us/about/regulatory-compliance/european-union-declaration-of-conformity.html.
This product satisfies the Class A limits of EN 55022 and EN55032 and safety requirements of EN 62368-1.
Radio interference notice
Warning
This is a product that complies with the emission requirements of EN55022 and EN55032 Class A limits and
immunity requirements of EN55024. This product is not intended to be used in residential/domestic
environments.
This is a Class A product. In a domestic environment, this product may cause radio interference, in which case
the user may be required to take adequate measures.
STATEMENT OF LIMITED WARRANTY FOR LEXMARK LASER PRINTERS,
LEXMARK LED PRINTERS, AND LEXMARK MULTIFUNCTION LASER
PRINTERS
Lexmark International, Inc., Lexington, KY
This limited warranty applies to the United States and Canada. For customers outside the U.S., refer to the
country-specific warranty information that came with your product.
This limited warranty applies to this product only if it was originally purchased for your use, and not for resale,
from Lexmark or a Lexmark Remarketer, referred to in this statement as “Remarketer.”
Limited warranty
Lexmark warrants that this product:
—Is manufactured from new parts, or new and serviceable used parts, which perform like new parts
—Is, during normal use, free from defects in material and workmanship
If this product does not function as warranted during the warranty period, contact a Remarketer or Lexmark for
repair or replacement (at Lexmark's option).
If this product is a feature or option, this statement applies only when that feature or option is used with the
product for which it was intended. To obtain warranty service, you may be required to present the feature or
option with the product.
If you transfer this product to another user, warranty service under the terms of this statement is available to
that user for the remainder of the warranty period. You should transfer proof of original purchase and this
statement to that user.
Limited warranty service
The warranty period starts on the date of original purchase as shown on the purchase receipt and ends 12
months later provided that the warranty period for any supplies and for any maintenance items included with
the printer shall end earlier if it, or its original contents, are substantially used up, depleted, or consumed. Fuser
Notices 179

Units, Transfer/Transport Units, Paper Feed items, if any, and any other items for which a Maintenance Kit is
available are substantially consumed when the printer displays a “Life Warning” or “Scheduled Maintenance”
message for such item.
To obtain warranty service you may be required to present proof of original purchase. You may be required to
deliver your product to the Remarketer or Lexmark, or ship it prepaid and suitably packaged to a Lexmark
designated location. You are responsible for loss of, or damage to, a product in transit to the Remarketer or the
Lexmark designated location.
When warranty service involves the exchange of a product or part, the item replaced becomes the property of
the Remarketer or Lexmark. The replacement may be a new or repaired item.
The replacement item assumes the remaining warranty period of the original product.
Replacement is not available to you if the product you present for exchange is defaced, altered, in need of a
repair not included in warranty service, damaged beyond repair, or if the product is not free of all legal
obligations, restrictions, liens, and encumbrances.
As part of your warranty service and/or replacement, Lexmark may update the firmware in your printer to the
latest version. Firmware updates may modify printer settings and cause counterfeit and/or unauthorized
products, supplies, parts, materials (such as toners and inks), software, or interfaces to stop working. Authorized
use of genuine Lexmark products will not be impacted.
Before you present this product for warranty service, remove all print cartridges, programs, data, and removable
storage media (unless directed otherwise by Lexmark).
For further explanation of your warranty alternatives and the nearest Lexmark authorized servicer in your area
contact Lexmark on the World Wide Web.
Remote technical support is provided for this product throughout its warranty period. For products no longer
covered by a Lexmark warranty, technical support may not be available or only be available for a fee.
Extent of limited warranty
Lexmark does not warrant uninterrupted or error-free operation of any product or the durability or longevity of
prints produced by any product.
Warranty service does not include repair of failures caused by:
—Modification
or unauthorized attachments
—Accidents, misuse, abuse or use inconsistent with Lexmark user’s guides, manuals, instructions or guidance
—Unsuitable physical or operating environment
—Maintenance by anyone other than Lexmark or a Lexmark authorized servicer
—Operation of a product beyond the limit of its duty cycle
—Use of printing media outside of Lexmark specifications
—Refurbishment, repair, refilling or remanufacture by a third party of products, supplies or parts
—Products, supplies, parts, materials (such as toners and inks), software, or interfaces not furnished by Lexmark
TO THE EXTENT PERMITTED BY APPLICABLE LAW, NEITHER LEXMARK NOR ITS THIRD PARTY SUPPLIERS
OR REMARKETERS MAKE ANY OTHER WARRANTY OR CONDITION OF ANY KIND, WHETHER EXPRESS
OR IMPLIED, WITH RESPECT TO THIS PRODUCT, AND SPECIFICALLY DISCLAIM THE IMPLIED
WARRANTIES OR CONDITIONS OF MERCHANTABILITY, FITNESS FOR A PARTICULAR PURPOSE, AND
SATISFACTORY QUALITY. ANY WARRANTIES THAT MAY NOT BE DISCLAIMED UNDER APPLICABLE LAW
ARE LIMITED IN DURATION TO THE WARRANTY PERIOD. NO WARRANTIES, EXPRESS OR IMPLIED, WILL
Notices 180

APPLY AFTER THIS PERIOD. ALL INFORMATION, SPECIFICATIONS, PRICES, AND SERVICES ARE SUBJECT
TO CHANGE AT ANY TIME WITHOUT NOTICE.
Limitation of liability
Your sole remedy under this limited warranty is set forth in this document. For any claim concerning performance
or nonperformance of Lexmark or a Remarketer for this product under this limited warranty, you may recover
actual damages up to the limit set forth in the following paragraph.
Lexmark's liability for actual damages from any cause whatsoever will be limited to the amount you paid for the
product that caused the damages. This limitation of liability will not apply to claims by you for bodily injury or
damage to real property or tangible personal property for which Lexmark is legally liable. IN NO EVENT WILL
LEXMARK BE LIABLE FOR ANY LOST PROFITS, LOST SAVINGS, INCIDENTAL DAMAGE, OR OTHER
ECONOMIC OR CONSEQUENTIAL DAMAGES. This is true even if you advise Lexmark or a Remarketer of the
possibility of such damages. Lexmark is not liable for any claim by you based on a third party claim.
This limitation of remedies also applies to claims against any Suppliers and Remarketers of Lexmark. Lexmark's
and its Suppliers' and Remarketers' limitations of remedies are not cumulative. Such Suppliers and Remarketers
are intended beneficiaries of this limitation.
Additional rights
Some states do not allow limitations on how long an implied warranty lasts, or do not allow the exclusion or
limitation of incidental or consequential damages, so the limitations or exclusions contained above may not
apply to you.
This limited warranty gives you
specific
legal rights. You may also have other rights that vary from state to state.
Notices 181

Index
A
accessing the controller
board 153
activating Voice Guidance 21
adding contacts 19
adding groups 19
adding hardware options
print driver 167
adding internal options
print driver 167
adjusting default volume
headphone 83
adjusting speech rate
Voice Guidance 22
adjusting the brightness
printer display 101
adjusting the brightness of the
printer display 101
adjusting toner darkness 151
AirPrint
using 31
attaching cables 12
avoiding paper jams 103
B
blank pages 123
bookmarks
creating 18
creating folders for 19
C
cables
Ethernet 12
parallel 12
USB 12
canceling a print job
from the computer 36
from the printer control
panel 36
cannot connect printer to
Wi‑Fi 115
cannot open Embedded Web
Server 114
changing the printer port settings
after installing ISP 86
changing the wallpaper 16
checking the status of parts and
supplies 87
cleaning
exterior of the printer 87
interior of the printer 87
cleaning the printer 87
clearing jam
in door A 106
Cloud Connector
profile
creating 18
printing from 35
collated printing does not
work 121
confidential documents do not
print 146
confidential
print jobs 34
printing 34
configuring Eco‑Mode setting 16
configuring Eco‑Settings 16
configuring
supply
notifications 90
connecting a mobile device
to the printer wireless
network 85
connecting the printer
to a wireless network 83
connecting to a wireless network
using PIN method 84
using Push Button method 84
conserving supplies 102
contacting customer support 152
contacts
adding 19
deleting 20
editing 20
control panel
buttons 13
indicator light 13
using 13
controller board
accessing 153
creating a Cloud Connector
profile
18
creating bookmarks 18
creating folders
for bookmarks 19
crooked print 136
Customer Support
using 17
customer support
contacting 152
customizing the display 16
D
deactivating the Wi‑Fi
network 85
default headphone volume
adjusting 83
Defective flash detected 119
deleting contacts 20
deleting groups 20
Device Quotas
setting up 17
directory list
printing 35
Display Customization
using 16
documents, printing
from a computer 31
from a mobile device 31
dots on print 134
E
Eco‑Settings
configuring 16
editing contacts 20
editing groups 20
emission notices 172, 176
enabling Magnification mode 22
enabling personal identification
numbers 22
enabling spoken passwords 22
enabling the USB port 115
enabling Wi‑Fi Direct 85
encrypting
printer hard disk 81
environmental settings 101
erasing
printer memory 80
erasing hard disk memory 80
erasing printer memory 81
Ethernet port 12
exporting a configuration file
using the Embedded Web
Server 168
Index 182

e‑mail alerts
setting up 83
F
factory default settings
restoring 81
FCC notices 176
finding more information about
the printer 9
firmware,
updating
using the control panel 168
using the Embedded Web
Server 169
flash
drive
printing from 32
folder paper 127
font sample list
printing 35
G
genuine Lexmark parts and
supplies 87
groups
adding 19
deleting 20
editing 20
H
hard disk memory
erasing 80
hardware options
trays 166
hardware options, adding
print driver 167
held documents do not print 146
held jobs 34
printing 34
Hibernate mode
configuring 101
home screen
customizing 16
using 15
home screen icons 15
displaying 16
I
icons on the home screen
showing 16
identifying jam locations 104
imaging unit
ordering 89
replacing 92
importing a configuration file
using the Embedded Web
Server 168
indicator light
understanding the status 14
installing a memory card 154
installing an internal solutions
port 160
installing an optional card 156
installing options
printer hard disk 158
installing the print driver 167
installing the printer software 167
installing trays 166
internal option is not
detected 117
internal options
firmware cards 153
flash memory 153
font cards 153
installing 156
internal solutions port 153
memory card 154
internal options, adding
print driver 167
internal solutions port
installing 160
troubleshooting 118
J
jams
avoiding 103
jams, clearing
in the duplex unit 111
in the multipurpose feeder 112
in the standard bin 110
trays 112
K
keyboard on the display
using 22
L
Lexmark Mobile Print
using 31
linking trays 26
loading
multipurpose feeder 25
loading envelopes
in the multipurpose feeder 25
loading trays 23
locating paper jams 104
locating the security slot 80
M
Magnification mode
enabling 22
maintenance kit
ordering 89
managing screen saver 16
memory card
installing 154
menu
802.1x 68
About this Printer 48
Accessibility 44
Confidential Print Setup 75
Configuration Menu 45
Default Login Methods 72
Device 78
Disk Encryption 76
Eco‑Mode 39
Erase Temporary Data Files 77
Ethernet 62
Flash Drive Print 58
Help 79
HTML 55
HTTP/FTP Settings 68
Image 56
Information Sent to Lexmark 43
IPSec 66
Job Accounting 52
Layout 49
Local Accounts 72
Login Restrictions 75
LPD Configuration 68
Manage Permissions 71
Media Types 58
Menu Settings Page 78
Miscellaneous 77
Mobile Services
Management 77
Network 79
Network Overview 60
Notifications 40
Out of Service Erase 48
PCL 54
PDF 53
PostScript 53
Power Management 43
Preferences 38
Print 78
Index 183

Quality 51
Remote Operator Panel 39
Restore Factory Defaults 45
Restrict external network
access 70
Schedule USB Devices 72
Security Audit Log 72
Setup 50
SNMP 65
Solutions LDAP Settings 77
TCP/IP 64
Tray Configuration 57
Troubleshooting 79
Universal Setup 57
USB 69
Visible Home Screen Icons 48
Wireless 60
Wi‑Fi Direct 70
XPS 53
Menu Settings Page
printing 79
mobile device
printing from 31, 32
Mopria Print Service 31
mottled print 134
moving the printer 10, 100
multipurpose feeder
loading 25
N
navigating the screen
using gestures 21
navigating the screen using
gestures 21
Network Setup Page
printing 14
network setup page
printing 116
noise emission levels 172
nonvolatile memory
erasing 80
Non‑Lexmark supply 120
non‑volatile memory 81
Not enough free space in
flash
memory for resources 119
notices 172, 173, 174, 175, 176
O
optional card
installing 156
options
internal solutions port 160
ordering
imaging unit 89
maintenance kit 89
ordering supplies
toner cartridge 88
P
paper
Universal size setting 23
paper curl 135
paper jam in door A 106
paper jam in the duplex unit 111
paper jam in the multipurpose
feeder 112
paper jam in the rear door 109
paper jam in trays 112
paper jam, clearing
in the duplex unit 111
in the multipurpose feeder 112
in the rear door 109
trays 112
paper jams
avoiding 103
paper jams, clearing
in the standard bin 110
paper sizes
supported 27
paper types
supported 29
paper weights
supported 29
parallel interface card
troubleshooting 118
parallel port 12
parts status
checking 87
personal identification number
method 84
personal identification numbers
enabling 22
pick roller assembly
replacing 96
pick tires
replacing 94
power button light
understanding the status 14
power save modes
configuring 101
print driver
hardware options, adding 167
installing 167
print job
canceling from the
computer 36
canceling from the printer
control panel 36
print jobs not printed 149
Print Quality Test Pages 79
print quality troubleshooting
blank or white pages 123
crooked or skewed print 136
dark print 124
fine lines are not printed
correctly 126
folded or wrinkled paper 127
gray background on prints 128
horizontal light bands 130
light print 132
mottled print and dots 134
paper curl 135
repeating defects 137
solid black pages 138
text or images cut o 139
toner easily rubs o 141
vertical dark bands 141
vertical dark lines or
streaks 143
vertical dark streaks with print
missing 144
vertical light bands 145
vertical white lines 145
print troubleshooting
collated printing does not
work 121
confidential and other held
documents do not print 146
envelope seals when
printing 121
incorrect margins 131
jammed pages are not
reprinted 123
job prints from the wrong
tray 151
job prints on the wrong
paper 151
paper frequently jams 122
print jobs do not print 149
slow printing 147
tray linking does not work 122
unable to read flash drive 115
printer
minimum clearances 10
Index 184

selecting a location 10
shipping 101
printer configurations 12
printer display
adjusting the brightness 101
printer hard disk
encrypting 81
installing 158
printer hard disk memory 81
printer information
finding 9
printer is not responding 150
printer memory
erasing 80
printer menus 37
printer messages
Defective flash detected 119
Non‑Lexmark supply 120
Not enough free space in flash
memory for resources 119
Replace cartridge, printer region
mismatch 119
Unformatted flash detected 119
printer options troubleshooting
cannot detect internal
option 117
internal solutions port 118
parallel interface card 118
serial interface card 118
printer port settings
changing 86
printer settings
restoring factory default 81
printer software
installing 167
printer status 14
printer wireless network
connecting a mobile device
to 85
printing
confidential print jobs 34
directory list 35
font sample list 35
from a Cloud Connector
profile 35
from a computer 31
from a flash drive 32
from a mobile device 31, 32
held jobs 34
Menu Settings Page 79
Network Setup Page 14
network setup page 116
using Mopria Print Service 31
using Wi‑Fi Direct 32
printing a directory list 35
printing a font sample list 35
printing a network setup
page 116
printing from a computer 31
printing from a flash drive 32
Push Button method 84
Q
QR codes
adding 17
R
recycling
Lexmark packaging 102
Lexmark products 102
removing paper jam
in door A 106
repeat print jobs 34
Replace cartridge, printer region
mismatch 119
replacing supplies
imaging unit 92
toner cartridge 90
replacing the pick roller
assembly 96
replacing the pick tires 94
resetting
supply usage counters 120
resetting the supply usage
counters 120
running a slideshow 16
S
safety information 6, 7, 8
scheduling power modes 16
securing printer memory 81
security slot
locating 80
selecting a location for the
printer 10
serial interface card
troubleshooting 118
serial printing
setting up 86
setting the paper size 23
setting the paper type 23
setting the Universal paper
size 23
setting up Device Quotas 17
setting up e‑mail alerts 83
setting up serial printing 86
shipping the printer 101
skewed print 136
Sleep mode
configuring 101
slow printing 147
spoken passwords
enabling 22
statement of volatility 81
storing print jobs 34
supplies
conserving 102
supplies status
checking 87
supplies, ordering
maintenance kit 89
supply notifications
configuring 90
supply usage counters
resetting 120
supported file types 33
supported flash drives 33
supported paper sizes 27
supported paper types 29
supported paper weights 29
T
toner cartridge
ordering 88
replacing 90
toner darkness
adjusting 151
trays
installing 166
linking 26
loading 23
unlinking 26
troubleshooting
cannot connect printer to
Wi‑Fi 115
cannot open Embedded Web
Server 114
printer is not responding 150
troubleshooting, print
collated printing does not
work 121
confidential and other held
documents do not print 146
envelope seals when
printing 121
Index 185

incorrect margins 131
jammed pages are not
reprinted 123
job prints from the wrong
tray 151
job prints on the wrong
paper 151
paper frequently jams 122
print jobs do not print 149
slow printing 147
tray linking does not work 122
troubleshooting, print quality
blank or white pages 123
crooked or skewed print 136
dark print 124
fine lines are not printed
correctly 126
folded or wrinkled paper 127
gray background on prints 128
horizontal light bands 130
light print 132
mottled print and dots 134
paper curl 135
repeating defects 137
solid black pages 138
text or images cut o 139
toner easily rubs o 141
vertical dark bands 141
vertical dark lines or
streaks 143
vertical dark streaks with print
missing 144
vertical light bands 145
vertical white lines 145
troubleshooting, printer options
cannot detect internal
option 117
internal solutions port 118
U
unable to read flash drive
troubleshooting, print 115
Unformatted flash detected 119
Universal paper size
setting 23
unlinking trays 26
updating firmware
using the control panel 168
using the Embedded Web
Server 169
USB port 12
enabling 115
using Customer Support 17
using Display Customization 16
using genuine Lexmark parts and
supplies 87
using QR Code Generator 17
using the home screen 15
V
verify print jobs 34
vertical dark lines on prints 143
vertical streaks on prints 143
virtual keyboard
using 22
Voice Guidance
activating 21
speech rate 22
Voice Guidance speech rate
adjusting 22
volatile memory 81
erasing 80
W
white lines 145
white pages 123
wireless network
connecting the printer to 83
Wi‑Fi Protected Setup 84
wireless networking 83
Wi‑Fi Direct 85
printing from a mobile
device 32
Wi‑Fi network
deactivating 85
Wi‑Fi Protected Setup
wireless network 84
wrinkled paper 127
Index 186