
Pyle PBC5200
3G Wi-Fi Mobile Power Bank and Router Integrator
Quick Installation Guide

-1-
3G Wi-Fi mobile power bank and router integrator is a 3G network product for consumers, which
integrates 3G routing, wireless routing, ADSL dial-up Internet access, wireless network storage, mobile
power and other functions. This allows you to create a wireless network anytime and anywhere there is a
LAN connection. You can easily share contents in digital devices with others. Various functions of this
product are listed below:
3G Routing: support 3G wireless network card dialing and bandwidth sharing for WCDMA / CDMA
2000 / TD-SCDMA standard;
Wireless routing: support traditional wired broadband ADSL dial-up, dynamic and static network
access;
Wireless network storage: supports file reading and sharing on U disk, USB mobile hard disk, as
well as online video on-demand;
Mobile power bank: can charge iPhone, iPad, Android smart phones, tablet PCs and other mobile
digital devices;
Wireless relay: relay and amplify the signals and thus extend the c overage of wireless network.
1.
1.
List
List
of
of
accessories
accessories
Thank you for buying the 3G Wi-Fi mobile power and router integrator. Please make sure your package
includes the following accessories.
1. Host
2. USB charging cable
3. Quick Installation Guide / Warranty Card
4. Certificate

-2-
2.
2.
Introduction
Introduction
of
of
panel
panel
2.1
2.1
Description
Description
of
of
hardware
hardware
interfaces
interfaces
Hardware
Interface
Identity Detailed Description of Functions
Power switch
R Turn on the power switch to R to start the router function
C
Charging, switch to C to activate the mobile power bank function to
charge devices through the USB port
Off switch
Battery indicator
button
Press this button, the battery indicator will show the current battery,
battery indicator is divided into four levels.
USB interface
This interface can connect 3G USB modems, U disk, USB mobile
hard disk, flash drive, or connect smart phones, tablet PCs, PSP
and other digital terminals for charging.
DC charging
interface
DC 5V input, you can charge the unit through the Micro USB
charging cable.
Charging
indicator
When the unit is being charged, the indicator is always on
RJ45 network
port
WAN port: In the mode of Dynamic IP/Static IP/PPPoE, the port is
used as a WAN port to c onnect a wired network, LAN broadband,
xDSL Modem/Cable Modem of hotels.
Restore factory
settings
In Routing state, long press for 5 seconds, then release the key,
the router will restore to factory settings.
USB
USB
port:
port:
Connect
Connect
the
the
network
network
card
card
,
,
mass
mass
storage
storage
device,
device,
or
or
charge
charge
the
the
phone
phone
Charg
Charg
ing
ing
Indicator
Indicator
DC
DC
char
g
in
g
charging
interface
interface
RJ45
RJ45
network
network
cable
cable
port
port
Power
Power
Switch
Switch
R:
R:
Power
Power
C
C
:
:
Charging
Charging
0:
0:
O
O
ff
ff
Batter
y
Battery
indicato
r
indicator
button
button
Batter
y
Battery
indicato
r
indicator
Restore
Restore
factor
y
factory
settin
g
s
settings

-3-
2.2
2.2
Descriptions
Descriptions
of
of
Status
Status
Indicators
Indicators
Action
Performed
Indicator
status
Details
Turn On the
power
Blue light
always on
Slide the power switch to C to power on unit
Removable
storage
inserted
Equipment
Blue light
flashes slowly
(1.5 seconds
each time)
When U disk, mobile hard drives and other removable storage
devices are plugged in to the USB port, you can see the blue
light flash slowly after 8-10 seconds, indicating that the
removable storage devices are loaded normally and can be
accessed.
Blue light
always on
Removable storage devices are not loaded successfully
3G card
inserted
Blue light
flashes quickly
(0.5 seconds
each time)
When 3G USB m odems are inserted, you can see the blue light
flash quickly after about 30 seconds (0.5 seconds each time),
indicating the router is in the 3G dialing state;
Blue light
flashes slowly
(1.5 seconds
each time)
Blue light flashes slowly (1.5 seconds each time), indicating that
the router has dialed-up via 3G successfully, and you can
access the Internet.
Blue light
always on
Dial not successful
Insert ADSL
network cable
(PPPOE Mode)
Green light
always on
With the Ethernet cable plugged in, if you can see the green
light is always on after 5 seconds, this indicates that the network
connection is normal;
Blue light
flashes slowly
(1.5 seconds
each time)
After green light is on for a while, if you see the blue light flash
slowly, this indicates that the router ADSL has dialed-up
successfully, and you can access the Internet
Network cable
plugged into
the router
(Dynamic IP
mode)
Green light
always on
Indicates that the network cable is connected properly
Green light
flashes slowly
(1.5 seconds
each time)
Indicates that network cable is c onnected properly, also
meaning that the router has successfully retrieved IP addresses
dynamically assigned on the upper router.
Network cable
plugged into
the router
(Static IP mode)
Green light
always on
Indicating that the network cable is connected properly

-4-
3. Application scenarios
The product supports the following application modes:
1) 3G to W iFi Internet Sharing mode
2) Wired to WiFi Internet Sharing mode
3G to wifi mode
Plug 3G USB data card
Gas ADSL modem / router
Wired broadband to wifi mode
-5-
4.
4.
Mobile
Mobile
power
power
function:
function:
Instructions
Instructions
for
for
charging
charging
mobile
mobile
phones,
phones,
tablet
tablet
computers
computers
and
and
other
other
digital
digital
products
products
Step 1: Battery display.
Before charging mobile phones, tablet computers and other digital products, check the battery level of the
device itself, and follow these instructions:
a) Press the battery indicator button. The battery indicator light should turn on and you can see the
current battery percentage. The light will turn off automatically when idle for more than four seconds in
order to save power.
b) The corresponding relationship between battery and power indicator:
(Battery schematic diagram)
Step 2: Charge mobile phones, tablet computers and other digital products.
Set the switch to the charging function (C) position to activate mobile power function, and then connect
the charging cable of digital products to the USB port of this product. This unit can charge iPad, iPhone,
LED s tatus Details
Battery
level
indicator
No lights
No electricity, please charge this unit
first
One light is on Capacity is less than 25%
Two lights are on Capacity is between 25% - 50%
Three lights are on Capacity is between 50% - 75%
Four lights are on Capacity is between 75% - 100%
Press the "z"
button, you can
display the
current battery
charge
Battery level
indicator
(divided into
four)

-6-
Android smart phones, and other mobile digital devices.
Tip: Use original charging cable for cell phones to achieve the best results.
(Schematic
(Schematic
diagram
diagram
of
of
charging
charging
devices)
devices)
5.
5.
Charge
Charge
this
this
product
product
When the battery has been exhausted, you can charge it in the following two ways:
Power Charging: Connect one end of the Micro USB charging cable to the DC c harging port of this
product (Micro USB Interface) and connect the other end to the USB port of charging adapter.
Computer USB Charging: Connect one end of the Micro USB charging cable to the DC charging
port of this product (Micro USB Interface) and connect the other end to the computer's USB port.
(Schematic diagram of charging this 3G Wi-Fi unit)
Please connect
the smaller end
of Micro USB
charging cable
to this interface
Charge various
devices via this
USB port

-7-
Charging Precautions:
1. Please choose the charging adapter where the output is 5V (output current is between 600 to 1000mA)
Common charging adapters, such as adapters for iPhone or iPad, can be used.
2. Charging time: it will take about 5-8 hours with a charge of 5V 1000mA; 11 hours with a charge of 5V
600mA;
It will take more than 12 hours if it is directly charged using a computer USB.
3. In the process of charging this unit, do not reuse the unit to charge other equipment, in order to protect
the battery and prolong battery life.
6.
6.
Features
Features
and
and
configurations
configurations
of
of
3G
3G
Wi-Fi
Wi-Fi
wireless
wireless
router
router
3G Wi-Fi router supports access and configuration through a web browser. You can use common
browsers, such as Microsoft's IE browser, Apple's Safari browser and the built-in browser of any Android
operating system. Login to the router, browse contents of mobile storage, and configure the router
parameters.
The
The
following
following
is
is
an
an
introduction
introduction
to
to
the
the
operation
operation
of
of
this
this
unit.
unit.
6.1
6.1
The
The
use
use
your
your
wireless
wireless
device,
device,
you
you
need
need
to
to
connect
connect
to
to
the
the
wireless
wireless
router
router
first
first
(for
(for
example,
example,
iPad)
iPad)
Step 1: Open the main interface of the iPad, select "Settings" "Wireless LAN", enter the Wi-Fi settings
page. Turn on the wireless network switch, iPad will automatically scan surrounding wireless networks,
and you will see the id 3G Wi-Fi xxxx, double-click to connect.
Step 2: When connecting, enter the Wi-Fi password behind the router enclosure, and make the
connection (the password can be modified yourself)
If connected successfully, a tick “ ” will appear to the left, while at the same time there will be a sign
at the upper left corner of the screen indicating a successful connection. If prompted you can not
join the network, please make sure your wireless password is entered correctly.

-8-
Step 3: View and set network parameters. Click the ">" button at the right of where it says c onnected, and
the setting page for wireless c onnection network parameters pops up (By default, DHCP server is enabled
by the router, it is recommended to use DHCP).
Set up
Flight mode
Wireless LAN
Notification Open
Location Service Open
Brightness and Wallpaper
Digital Photo Frame
General
Mail, Contacts, Calendars
Video
Photo
Memo
Applications
Wireless LAN
Select a Network…
Wireless LAN
Other…
Ask to Join Networks
The computer will be automatically added to a known network,
if the network is not known, it prompts to ask if you want to
join a new network

-9-
6.2
6.2
Enter
Enter
the
the
configuration
configuration
interface
interface
for
for
3G
3G
Wi-Fi
Wi-Fi
router
router
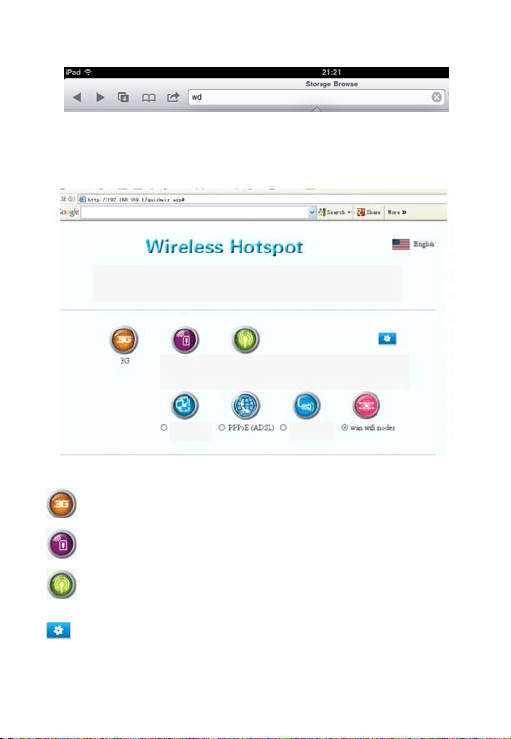
Click the Safari browser, enter: http://192.168.169.1, in the address bar. Click the "Go" button to enter the
homepage of the router configuration page. See below:
In addition, for users of iPhone and iPad ios devices, there is a more efficient way to enter the router
configuration page. You can directly enter "wd" in the Safari browser's address bar. Then, you can go in
by clicking the "Go" button.
Set up
Flight mode
Wireless LAN
Notification Open
Location Service Open
Brightness and Wallpaper
Digital Photo Frame
General
Mail, Contacts, Calendars
Video
Photo
Memo
Applications
Ignore this Network
IP address
Static IP
Subnet Mask
Router
Search Domains
Client ID
Renewal
Close Manually
HTTP Proxy
Automatically
-10-
6.3
6.3
Homepage
Homepage
of
of
3G
3G
router
router
configuration
configuration
interface
interface
–
–
Description
Description
of
of
functions
functions
in
in
common
common
functions
functions
operation
operation
interface
interface
Icons of the first row:
: Click on this icon, you can enter the 3G configuration page;
: Click on this icon, you can browse and play multimedia files on mobile storage devices.
: Click on this icon, you can enter the WiFi security settings interface. Here, you can change the
WiFi password.
: Click on this icon, you c an enter the router's advanced setup interface. Here, you can set up
more features of the router, such as upgrading firmware, checking status, and so on.
User interface for common functions
You can choose a suitable network connection type according to your network
environment, and set parameters for different types of network connections
Advanced Settings
Multimedia
browser
Wifi Security
Settings
Dynamic
(obtain IP
automatically)
Please choose the right type of network connection according to your current Internet environment
Static (fixed IP)

-11-
Second row icons:
: Click on this icon to enter the setting interface for dynamic IP Internet. This will pop up at the
bottom of the page. If your current Internet environment is through a wired network cable (Hotel
Internet typically uses this method), then the IP address is assigned by the upper router. Please
click on the "OK" button to complete the setting; otherwise click "Cancel."
: Click on this icon to enter the setting interface for PPPOE dial-up. This will pop up at the bottom
of the page. If your current Internet environment is through a wired network cable or a telephone
line dial-up, then, please first enter the user name and password of the PPPOE dial-up, and
then click the "OK" button to complete the setting; otherwise click" Cancel."
: Click on this icon to enter the setting interface for static IP Internet. This will pop up at the bottom
of the page. If your current Internet environment is through a wired network cable and the IP
address is manually specified, then enter the addresses of IP address, subnet mask, gateway,
and DNS domain name in each column. Then click the "OK" button to complete the setting;
otherwise click "Cancel."
: Click on this icon to enter the setting interface for WiFi repeater mode. This will pop up at the
bottom of the page. Click "Search all AP", and then check the SSID you want to relay. Enter the
password and click OK.
6.4
6.4
To
To
modify
modify
Wi-Fi
Wi-Fi
passwords
passwords
WiFi router's factory-set password is relatively simple. When you first use this product, remember to
modify the WiFi password to ensure data security.
Modification method:
Click on "WiFi Security" icon, enter the setting page for WiFi security.

-12-
Tip:
a) In order to prevent your wireless network from unauthorized access by others, we recommend setting
up wireless encryption. The recommended encryption method is WPA-PSK/WPA2-PSK.
b) After setting the wireless network SSID and encryption, please connect the wireless network again.
The W iFi password has now been s et.
6.5.
6.5.
To
To
set
set
parameters
parameters
for
for
3G
3G
Internet
Internet
When users insert the 3G modem into the router's USB port, the router will automatically begin 3G dial up.
When 3G dials-up, the system needs to call some configuration information. So please configure them in
the 3G configuration page before inserting the 3G modem.
Click the "3G" icon to enter the 3G setting interface, select "3G network card model", and in the dial
setting, select "dialing on start mode", type "dial-up parameters" provided by 3G ISP, and click "OK".
Language
Network Settings
Wireless network settings
Basic Settings
Security Settings
Client List
DHCP server
Network sharing
System Management
Status
Home
Wireless network security/encryption settings
Set up a wireless network security/encryption to prevent unauthorized
device access
Safe Mode
WI-FI Protected Access
WPA encryption algorithm
Password
Private key update cycle
OK Cancel

-13-
By default the system is in automatic recognition mode, plug and play, users do not need to do any
modification.
Normally, you only need to select "Auto Detect" (automatic identification) for "USB 3G Modem" Model on
the interface shown in the above figure, which can automatically set the dial number, APN user name and
password and other information.This way, you only need to connect 3G modem to the router's USB port,
and there’s no need to do any setting before completing 3G dialing.
3G netw ork connection settings
You can set the appropriate connection parameters
according to your local 3G network environment
3G model
USB 3G modem
Current status
Disconnected
Connected
Dial settings
Start
dialing
Permanent connection
If there’s no traffic in specified minutes, then disconnect dialing
Dial-up parameters
(Default, Custom)
OK Cancel

-14-
6.6
6.6
To
To
set
set
the
the
parameters
parameters
of
of
wired
wired
broadband
broadband
Internet
Internet
access
access
In wired Wi-Fi mode, 3G Wi-Fi is equivalent to a wireless router, the Ethernet port works as W AN port, all
of the wireless terminals only connect to the Internet via Wi-Fi router.
Click the "Network Settings" → "WAN", choose the way to access the Internet according to the front-end
broadband lines, and the router supports three kinds of common wired Internet: static IP, dynamic IP,
PPPoE.
a) Static IP
If the network provider provides the way of static IP for your access to Internet, you need to enter the
IP address, subnet mask, gateway, DNS server, alternate DNS server provided by your ISP or
network administrator.
b) Dynamic IP
If the network provider provides the way of dynamic IP for your access to Internet, you do not need to
make any settings here. Just click "OK". Dynamic IP is the method of accessing Internet commonly
used in hotels and restaurants and other public places.
c) PPPoE
If you access internet by "ADSL virtual dial-up" approach, you only need to type account information
provided by your ISP in the "User Name" and "Password" input boxes, and after that the setup is
Static mode
IP address
Subnet Mask
Gateway
Primary DNS server
Alternate DNS server
OK Cancel
DHCP mode
Network Name
OK Cancel

-15-
complete, click "OK".
d) Wireless Repeater
If you want to use the "Wireless Repeater" mode, simply check the "wan WiFi modes" item, click
"Scan all AP", then select the name of the wireless network interface you want to relay, enter the
password and click "OK" button.
PPPOE mode
User Name
Password
Confirm Password
Run Mode
Manually
OK Cancel

-16-
6.7
6.7
Basic
Basic
settings
settings
of
of
WiFi
WiFi
wireless
wireless
network
network
Click on the left menu bar, "Wireless Network Settings" -> "Basic Settings", you can make basic wireless
network settings of network mode, SSID, wireless channel, and others.
6.8
6.8
To
To
upgrade
upgrade
firmware
firmware
of
of
wireless
wireless
router
router
Router supports upgrading firmware through the browser.
There are two methods of upgrading firmware as follows:
1) Upgrade firmware via LAN
This method can only be used to upgrade the firmware on Windows PC and notebook computers.
Steps are as follows:
Click the "Select Files button," locate the name of the firmware to be upgraded in the pop-up file
selection box, after that, click "OK" button to begin the upgrade.
2) Upgrade firmware via a USB storage device (U disk or SD card)
Please use the browser to log into the router (You can use browsers of PCs, smart phones, tablet
computers to operate), in the left menu, select [System Management] - [Firmware Upgrade], and
Language
Network Settings
Wireless network settings
Basic Settings
Security Settings
Client List
DHCP server
Network sharing
System Management
Status
Home
Basic Wireless Settings
You can make basic wireless communication settings, such as: network name
(
Service Set Identifier
)
and channels
Wireless Network
Network mode
Network name (Service Set Identifier)
Broadcast network name (Service Set Identifier) Enable Disable
Basic Service Set Identifier
Frequencies (channels)
Select automatically
OK Cancel

-17-
then plug a U disk / TF containing the upgrade file into the socket of the router, then click the [scan]
button on the user interface, select the file you want to upgrade in the drop-down box, and click [OK]
button.
During the process of upgrading firmware, the indicator light of the router will flash quickly and constantly.
While it is flashing, please do not turn off power of the router until the router's indicator goes off. After
router upgrade is complete, it will cause the router to restart. Then, your wireless device may need to
re-search the device and reconnect manually.
Specific process is shown below:
Language
Network Settings
Wireless network
settings
DHCP server
Network sharing
System Management
Status
Home
OK Search:
Management
Firmware Upgrade:
Settings Manager
Status
Statistics
Step 1
Step 2
Firmware Update
Updating router firmware can add new features. Please copy the firmware for update to
the flash drive, U disk or SD card. Then insert U disk/SD/flash drive card into the device,
and then click the [Search] button. After you see the name of the selected firmware file,
click the [OK] button to start the upgrade.
The process of firmware update will take about 1 minute, please wait patiently.
Warning, abnormal firmware will interrupt the normal operation of system.
Updating the firmware from the USB Disk
Location

-18-
7.
7.
To
To
restore
restore
the
the
factory
factory
configuration
configuration
of
of
the
the
wireless
wireless
router
router
If we modify some of the parameters of the router, it may cause some problems when we use the router.
For example, we modify the router's WiFi password, but after a period of time, we forget this password. If
that happens, please manually restore the wireless router's parameters to the factory defaults, concrete
steps are as follows:
Language
Network Settings
Wireless network
DHCP server
Network sharing
System Management
Status
Home
OK Search:
Management
Firmware Upgrade:
Settings Manager
Status
Statistics
Step 4
Step 3
Firmware Update
Updating router firmware can add new features. Please copy the firmware for update to
the flash drive, U disk or SD card. Then insert U disk/SD/flash drive card into the device,
and then click the [Search] button. After you see the name of the selected firmware file,
click the [OK] button to start the upgrade.
The process of firmware update will take about 1 minute, please wait patiently.
Warning, abnormal firmware will interrupt the normal operation of system.
Updating the firmware from the USB Disk
Location

-19-
8.
8.
The
The
function
function
of
of
wireless
wireless
network
network
storage:
storage:
the
the
way
way
iPad
iPad
and
and
other
other
devices
devices
access
access
the
the
U
U
disk
disk
or
or
mobile
mobile
hard
hard
disk
disk
3G Wi-Fi provides a USB interface to connect to Flash drives, U disk, or mobile hard disk reader, etc., and
supports the shared access of contents of these storage devices wirelessly. For example, you can use a
third-party media software to play, upload, download shared files on USB storage device on iOS platform,
such as: iTunes, Goodplayer, OPlayerHD, TIOD, Aceplayer.
Router provides three ways to access Flash drive disk or mobile hard drives and other storage devices,
steps of wireless storage access are as follows:
8.1
8.1
Online
Online
play
play
of
of
streaming
streaming
media
media
Step 1: Plug U disk, mobile hard drives and other USB storage devices into the router's USB port.
Step 3: Open the router's power switch, and after the router starts, check the blue LED status indicator of
the router.
Step 4: Open iPad Wi-Fi settings, select SSID of 3G WI-FI equipment, and connect to wireless network
(refer to the previous section)
Step 5: Click the Safari browser, type: http://192.168.169.1 or "wd" in the address bar, c lick the "Go"
button, then click on "Multimedia Browse" icon to enter the mobile storage device file browser page of the
router, where you can quickly access pictures, videos, music and other files inside the U disk or mobile
hard disk.
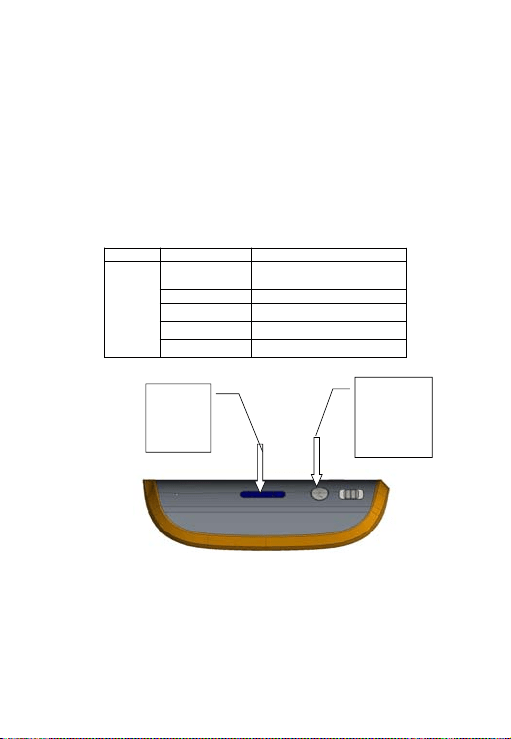
Use a small needle, for example a paperclip, insert the
paperclip into the hole indicated by the arrow, when
you feel that it may contact the switch inside the unit,
give the paperclip a push with force and hold it for 5
seconds, then release the paperclip, after that you can
see the blue light flash which indicates the restoration
to factor
y
set is successful.

-20-
The storage1, storage2 ... are names of the shared folders of U disk, mobile hard disks.
8.2
8.2
FTP
FTP
Server:
Server:
The following describes how to use the iPad to share files on the FTP server of the router, here we cite
Goodplayer as an example. GoodPlayer is not only a local media player, but it is an integrator of
"Movie Player & Downloader & Streaming Media Player." In fact, as long as shared media files are
transferred to your iOS device via Wi-Fi, you can immediately play them.
Step 1: Enter the App Store, search for "Goodplayer" program, then download and install the program.
Step 2: Open Goodplayer, switch to the Wi-Fi interface, and click icon at the right corner of the
bottom.
Removable storage device file and directory browsing
Current Location: /media
List of files and directories
Return
Return
Name Modified Time Size
Cancel Search
Category Price Device Reset the filter
Entire Entire Entire Clear all
Did you want to search moreplayer?
Ipad App
1-2, total of 2, Show All Sorted by: Relevance
GoodPlayer
Entertainment
Updated on September 11, 2012
528 ratings

-21-
Step 3: Select the FTP client
Step 4: Click the button at the upper right corner, enter parameters of the FTP server, click the
"Save" button at the upper right corner.
Download Manager, browser
Complete Media URL
SMB/CIFS Client
UPnP/DLNA Client
WebDAV Client
FTP Client
SFTP Client

-22-
IPAddress: 192.168.169.1
Username: admin
Password: admin
Port Number: You can customize the value, and the default value is 21.
Step 5: Back to main program interface of Goodplayer, click on the FTP server just added [FTP]
192.168.169.1
The storage, storage1, storage2 .... shows up after clicking
storage1, storage2 ... are names of the shared folders on U disk, mobile hard disk.
Step 6: If you click on a file separately and choose to play this URL, the file will immediately be played; if
you choose to download the file, the file will be downloaded onto the iPad.
FTP Server
FTP Server
IP address
User name
Password
Port number
Encoding format
Passive mode
Shared
file

-23-
Note: The above is only a simple introduction for Goodplayer to play files via Wi-Fi, if you need more
details, please visit Goodplayer’s online help documentation.
Goodplayer Settings upper right corner button Online Help
8.3Server
8.3Server
The following describes how to use the iPad to share files on the server. Here we cite OplayerHD Lite as
an example. OPlayerHD can be used to enhance the media playback capability of your iPad, you can also
use it to play streaming media on the network, and now it supports http protocol. Currently supported file
formats are mp3, wma, wmv, avi, flv, rm, rmvb, mp3, 3gp, mkv, etc.
Step 1: Enter the App Store, search for "OplayerHD Lite" program, then download and install that
program.
Step 2: Open OplayerHD Lite, switch to the file server interface and click the button next to the "+".
Shared Folders
9200 data
Double LAN ports
Download
Play this URL
Copy Link
Cancel

-24-
Step 3: Select the Windows Server and enter the address, authentication and other parameters of the
server. Click the "Save" button at the upper right corner.
IPAddress: 192.168.169.1
Port: 139 (default value)
Username: admin
File server
My Documents
Open URL
Close
Add Server
Add Server
Windows Servers
FTP Server
Dropbox
Document Management
WIFI transmission
Add Server Add Windows Servers Save
Server Address
Server Address
Port
Authenticate
User name
Password
Server Name
Name

-25-
Password: admin
Step 5: Back to main interface of OplayerHD Lite program, click the- server just added 192.168.169.1
Step 6: Open Share Storage, Storage1, Storage2 ... shared folders, and click a specific file.
Tip: For more information about the software, you can view OplayerHD help documentation, read
frequently asked questions. The lower right corner "···" button Help FAQ
Download of the file list is finished
My Documents
Open URL
File server Edit
My Documents
Open URL
File server Edit
Retreat

-26-
9. Solutions for Frequently Asked Questions
1. What can I do if I forget the WiFi encryption key?
Press RESET to restore the router to factory settings, for details please refer to Section 7.
2. What do I do if I cannot log on to the router management interface?
1) Check if the IP address and DNS address are set to be obtained automatically. Normally the IP
address obtained should be 192.168.169.X.
2) Try using another computer to log on;
If the problem is still not resolved after the above operations, try to restore the router to factory
settings.
3. What can I do if the notebook can not find the wireless s ignal?
1) Check if the built-in wireless LAN switch of the laptop is turned on (For details, please view laptop
manual);
2) Open the Device Manager of the computer, and view if the wireless network adapter driver is
successfully installed and enabled;
3) Check if the computer's wireless service is turned on (Check if the status of Wireless Zero
Configuration in the service option is set to Start, and if Startup Type is set to "Start automaticly”);
4) Try to find the wireless signal within a 1-2m distance.
5) Please use another computer's wireless adapter to find the wireless signal;
If the problem is still not resolved after the above operations, try to restore the router to factory
settings.
4. How do I clear the previous network configuration with Windows 7 and Apple iPad?
Windows7: Network and Sharing Center—Manage wireless networks, select the corresponding
wireless network name, and do delete operation;
iPad: Navigate to Setting --- Wireless LAN --- corresponding wireless network name, ignore (or foret)
this network option above the right blue arrow, and click Ignore.
5. How to view the router software and hardware version?
In the management interface, click on
"Advanced Settings" button to view.