User Manual
Questions or Concerns?
[email protected] | 1-888-402-1684
Mon–Fri, 9:00 am–5:00 pm PST/PDT
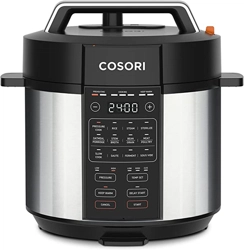
6.0-Quart Pressure Cooker
(We hope you love your new pressure cooker as much as we do)
Our helpful, in-house chefs are ready to assist
you with any questions you might have!
On behalf of all of us at COSORI,
CONTACT OUR CHEFS
Email: [email protected]
Toll-Free: 1-888-402-1684
Mon–Fri, 9:00 am—5:00 pm PST/PDT
explore
our recipe gallery
www.cosori.com/recipes
join
the COSORI Cooks Community on Facebook
facebook.com/groups/cosoricooks
enjoy
weekly, featured recipes
made exclusively by our in-house chefs

3
Table of Contents Package Contents
Specifications
Model CMC-CO601-SUS
Power Supply AC 120V, 60Hz
Rated Power 1100W
Capacity
6.0 qt / 5.7 L
(serves 4–6 people)
Dimensions
13.4 x 12.6 x 12.5 in /
34.0x32.0x 31.7 cm
Weight 11.9 lb / 5.4 kg
Smart Control No
Package Contents
Specifications
Important Safeguards
Getting To Know Your
Pressure Cooker Diagram
Control Panel
Control Panel Buttons
Display
Pressure Cooker Lid
Sealing Ring
Anti-Block Shield
Float Valve
Inner Pot
Steam Rack
Pressure Cooking Stages
Releasing Pressure
Before First Use
Setting Up
Test Run
Cooking Functions
Cooking Functions Reference Chart
(Pressure Cooking)
Cooking Functions Reference Chart
(Non-Pressure Cooking)
Customize Cooking Function Settings
Pressure Cook
Slow Cook
Sauté
Ferment
Sous Vide
Delay Start
Keep Warm
Sterilize
Reset Customized Cooking Functions
Care & Maintenance
Cleaning the Pressure Cooker Base
Cleaning the Inner Pot, Lid, Lid Parts
and Steam Rack
Cleaning the Condensation Collector
Cleaning the Sealing Ring
Eliminating Lingering Odor
Storage
Troubleshooting
Warranty Information
Customer Support
Download the free VeSync app to access
original recipes and video tutorials from
the COSORI chefs, interact with our online
community, and more!
3
3
4
8
8
9
10
11
12
13
13
13
13
13
14
14
16
16
17
18
18
19
19
20
21
21
22
23
24
24
25
26
27
27
27
28
29
29
29
30
33
34
1 x 6.0-Quart Pressure Cooker
1 x Inner Pot
1 x Steam Rack
1 x Recipe Book
1 x User Manual
1 x Quick Reference Guide

4
IMPORTANT SAFEGUARDS
Follow basic safety precautions when using your pressure cooker. Read all instructions.
Key Safety Points
General Safety
• This appliance cooks under pressure.
Improper use may result in burn
injuries. Make sure unit is properly
closed before operating. See Pressure
Cooker Lid (page 12).
• CAUTION: Always properly lock and
seal the lid before pressure cooking.
• Do not touch hot surfaces. Use
handles. Never move the cooker
while it is in use.
• Use caution when opening the
pressure cooker, as hot steam may
come out, creating a safety hazard.
• Do not block any ventilation
openings. Hot steam is released
through openings. Keep your hands
and face clear of openings.
• Do not touch the steam release
valve or the area near the valve while
cooking. Do not cover the area with a
cloth.
• Always use heat-resistant gloves,
pads, or oven mitts when handling
hot materials.
• To reduce the risk of electrical shock
never use the pressure cooker
without the inner pot in place.
• Do not force the lid open. Only
open the lid after all pressure has
been released and the float valve has
dropped back down into the lid.
• To protect against electric shock, do
not immerse the pressure cooker,
cord, or plug in water or liquid.
• Unplug when not in use and before
cleaning. Allow to cool before putting
on or taking o parts, and before
cleaning or storage.
• Close supervision is necessary when
the pressure cooker is used by or
near children.
• Children should be supervised to
ensure that they do not play with the
pressure cooker.
• Do not allow children to clean or perform
maintenance on the pressure cooker.
• Do not use your pressure cooker if
it is damaged, not working, or if the
cord or plug is damaged. Contact
Customer Support (see page 34).
• Using accessories or replacement
parts not recommended by COSORI
may cause injuries. Using any other
pressure cooker lids or inner pots
may cause injury and damage to the
pressure cooker.
• Do not use outdoors.
• Do not place the pressure cooker or
any of its parts on a stove, near gas or
electric burners, or in a heated oven.
• Do not put food, liquid, or foreign
objects on the heating plate.
• Always make sure the heating
element is clean before inserting the
inner pot.
• To disconnect, press CANCEL, then
remove plug from wall outlet.
• Ensure the heating plate is clean and
the underside of the inner pot is dry
before inserting the inner pot.
• Be extremely cautious when moving
your pressure cooker (or removing
READ AND SAVE THESE
INSTRUCTIONS
Read this manual carefully and completely and retain for future reference.
Failure to adhere to safety instructions may result in serious injury or damage.
WARNING

Note: See Care & Maintenance for instructions on
how to clean the pressure cooker, all parts, and any
accessories (page 27).
5
General Safety Cont.
While Cooking
• CAUTION: Risk of electric shock.
Cook only in the removable inner
pot. Do not put any liquid directly
into the pressure cooker.
• Use on a flat, stable, heat-resistant
surface away from heat sources or
liquids.
• The removable inner pot is extremely
hot during use and can be heavy
when full of ingredients.
• Extreme caution should be exercised
when using containers constructed
of materials other than metal or glass.
• Before use, make sure all vent
openings are clear of food debris.
• Always move the pressure release
switch to ‘Seal’ when using
pressurized cooking programs.
• Hot steam from the steam release
valve can cause burns.
• Always make sure the sealing ring is
properly secured in the sealing ring
rack.
• Always make sure the pressure
cooker is properly closed before
pressure cooking.
• Never use your pressure cooker
without adding liquid, as this will
seriously damage the cooker.
• Do not exceed the maximum fill line
(see Inner Pot, page 13).
• CAUTION: Avoid recipes that call
for more than ¼ cup / 60 mL of oil
or fat content. Using hot oil during
pressure cooking may cause burns.
• Do not fill the inner pot higher than
the “PC MAX—2/3” line (Pressure
Cooking Maximum), as marked
on the inner pot. When cooking
foods that expand, such as rice or
dehydrated vegetables, do not fill the
cooker to more than ½ of the inner
pot’s capacity.
the inner pot) if it contains hot oil or
other hot liquids.
• Always place the inner pot on a
heat-resistant surface after removing
it from the pressure cooker.
• Do not use the included steam rack
and inner pot in a microwave, on a
stove or grill, or in an oven.
• Do not clean with metal scouring
pads. Metal fragments can break o
the pad and touch electrical parts,
creating a risk of electric shock.
• Do not place anything on top of your
pressure cooker.
• Do not store anything inside your
pressure cooker or removable inner
pot other than recommended
COSORI accessories.
• The pressure cooker is not intended
to be operated by means of an
external timer or separate remote-
control system.
• This pressure cooker is not intended
for use by persons (including
children) with reduced physical,
sensory, or mental capabilities,
or lack of experience and
knowledge, unless they have been
given supervision or instruction
concerning use of the pressure
cooker by a person responsible for
their safety.
• Do not tamper with any of the safety
mechanisms beyond instructed in
Care & Maintenance (page 27).
• Only use as directed in this manual.
Do not use for any purpose other
than its intended use.
• Not for commercial use. Household
use only.
• Always check the pressure release
devices for clogging before use.
Read this manual carefully and completely and retain for future reference.
Failure to adhere to safety instructions may result in serious injury or damage.
WARNING

6
• Do not place paper, cardboard, or
plastic into your pressure cooker, or
any materials which may catch fire
or melt.
• Do not use this pressure cooker for
deep frying or pressure frying.
• Do not block any ventilation
openings. Hot steam is released
through openings. Keep your
hand,face or exposed skin clear
of the steam release valve or other
openings while using the pressure
cooker
.• WARNING: Spilled food can cause
serious burns. Keep the pressure
cooker and cord away from children.
Never drape cord over edge of
counter, never use outlet below
counter, and never use with an
extension cord.
• The steam release valve and steam
release pipe allow steam to escape.
Check these parts regularly to make
sure they are not blocked or clogged
with food.
• Do not leave the pressure cooker
unattended while in use.
• Do not touch the heating element
after cooking, as it will be hot and
may cause burns.
• To turn the pressure cooker o,
press CANCEL to stop cooking, then
unplug. To unplug, grab the plug and
pull from the outlet. Never pull from
the power cord.
• The ducts in the pressure regulator
allowing the escape of steam should
be checked regularly to ensure that
they are not blocked.
• Always check the pressure release
devices for clogging before use.
• The container must not be opened
until the pressure has decreased
suciently. see “page 11 Pressure
Cooker Lid ,page 12 Float Valve, and
page 13 Releasing Pressure.”
• Do not open the pressure cooker
until the unit the unit has cooled
and all internal pressure has been
released.If the handles are dicult
While Cooking Cont.
• Use extreme caution when cooking
and venting food such as applesauce,
cranberries, pearl barley, oatmeal,
split peas, noodles, etc., as these
foods may foam, froth, or splatter,
and may clog the steam release pipe
and/or steam release valve.Do not fill
the inner pot higher than the “—½”
line when cooking these foods.
• Use caution when cooking doughy
food to avoid food being ejected.
• Cooking meat with skin may swell
under pressure. Do not prick the
meat while the skin is swollen, as you
may be burned.
• Always place hot accessories and
the removable inner pot on a heat-
resistant surface.
• The container must not be opened until
the pressure has decreased suciently.
Do not open the pressure cooker until
the unit the unit has cooled and all
internal pressure has been released.
If the handles are dicult to push
apart,this indicates that the cooker is still
pressurized-do not force it open.Any
pressure in the cooker can be hazardous.
Never force the lid open while there
is pressure inside. Always wait for the
float valve to drop before opening the
lid. See Pressure Cooker Lid (page
12), Float Valve (page 13), and
Releasing Pressure (page 14).
• Only use the original pressure
cooking lid. Using any other lid to
pressure cook may cause injury.
• Float valve up: Do not open lid. Float
valve down: Safe to open lid. Do not
force the lid open when the float
valve is still in the up position.
• If the inner pot sticks to the lid,
move the steam release switch to the
‘Vent’ position to release suction. See
Pressure Cooker Lid (page 12).
• Do not put hands, face, or exposed
skin over the steam release valve.
• Do not touch accessories or the
inner pot during or immediately after
cooking.
Read this manual carefully and completely and retain for future reference.
Failure to adhere to safety instructions may result in serious injury or damage.
WARNING

7
Electromagnetic Fields (EMF)
The COSORI pressure cooker
complies with all standards regarding
electromagnetic fields (EMF). If
handled properly and according to
the instructions in this user manual,
the appliance is safe to use based on
scientific evidence available today.
SAVE THESE
INSTRUCTIONS
Power & Cord
• This pressure cooker uses a short
power-supply cord to reduce the
risk of being pulled on or grabbed by
children, or entangling or tripping.
• A short power-supply cord is
provided to reduce the risk resulting
from becoming entangled in or
tripping over a longer cord.
• Never use with an extension cord.
This pressure cooker is intended for
countertop use only.
• Do not use a power adapter.
• Your pressure cooker has a 3-prong
grounding plug, and should only
be used with 120V, 60Hz electrical
systems in North America. Always
plug in to a grounded electrical
outlet. Do not modify the plug in any
way.
• Do not let the power cord hang over
the edge of a table or counter, or
touch hot surfaces.
• Keep the pressure cooker and its cord
out of reach of children.
• Never use an outlet below the
counter when plugging in your
pressure cooker.
• If the power supply cord is damaged,
it must be replaced by Arovast
Corporation or similarly qualified
persons in order to avoid an electric
or fire hazard. Please contact
Customer Support (page 34).
to push apart,this indicates that the
cooker is still pressurized-do not
force it open.Any pressure in the
cooker can be hazardous.See “page
11 Pressure Cooker Lid ,page 12
Float Valve, and page 13 Releasing
Pressure.”
• Never put hands or face near the
steam release valve.
• Float valve up:Do not open lid.
• Float valve down:Safe to open lid.
• For pressure cooking, the steam
release switch must be in the ‘Seal’
position.
• If the inner pot sticks to the lid, move
the steam release switch to the ‘Vent
position to release suction.
• Only use the original pressure
cooking lid. Using any other lid to
pressure cook may cause injury.
Read this manual carefully and completely and retain for future reference.
Failure to adhere to safety instructions may result in serious injury or damage.
WARNING
8
GETTING TO KNOW YOUR
PRESSURE COOKER
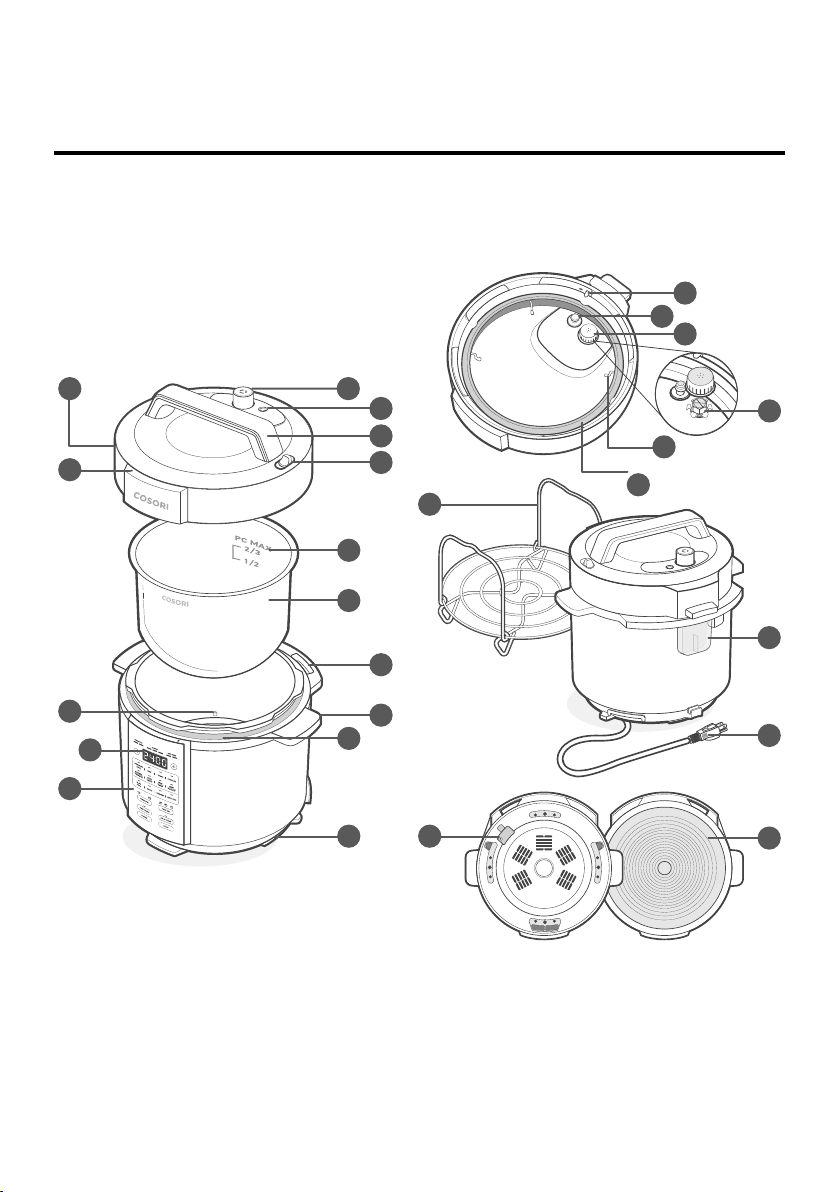
Pressure Cooker Diagram
Your COSORI Pressure Cooker combines 9-in-1 cooking functions to cook foods 70% faster than
traditional cooking methods. With user-friendly controls, cool-to-touch lid, nonstick inner pot,
and safe steam release switch, the COSORI Pressure Cooker is the star of your kitchen.
A. Pressure Cooker Lid
B. Steam Release Valve
C. Float Valve
D. Lid Handle
E. Steam Release Switch
F. Lid Marker
G. Lid Holder
H. Pressure Cooker Handles
I. Water Collection Channel
J. Locking Pin
K. Silicone Cap
L. Anti-Block Shield
M. Steam Release Pipe
N. Sealing Ring Rack
O. Sealing Ring
P. Condensation Collector
Q. Fill Lines
R. Inner Pot
S. Heating Element
T. Non-Slip Silicone Pads
U. Power Cord
V. Control Panel
W. Display
X. Steam Rack
Y. Cord Housing
Z. Pressure Cooker Base
BACK
B
FRONT
A
N
O
F
T
V
W
C
D
E
P
U
Q
R
J
K
L
M
LID BOTTOM
S
Y
Z
G
H
I
X
9
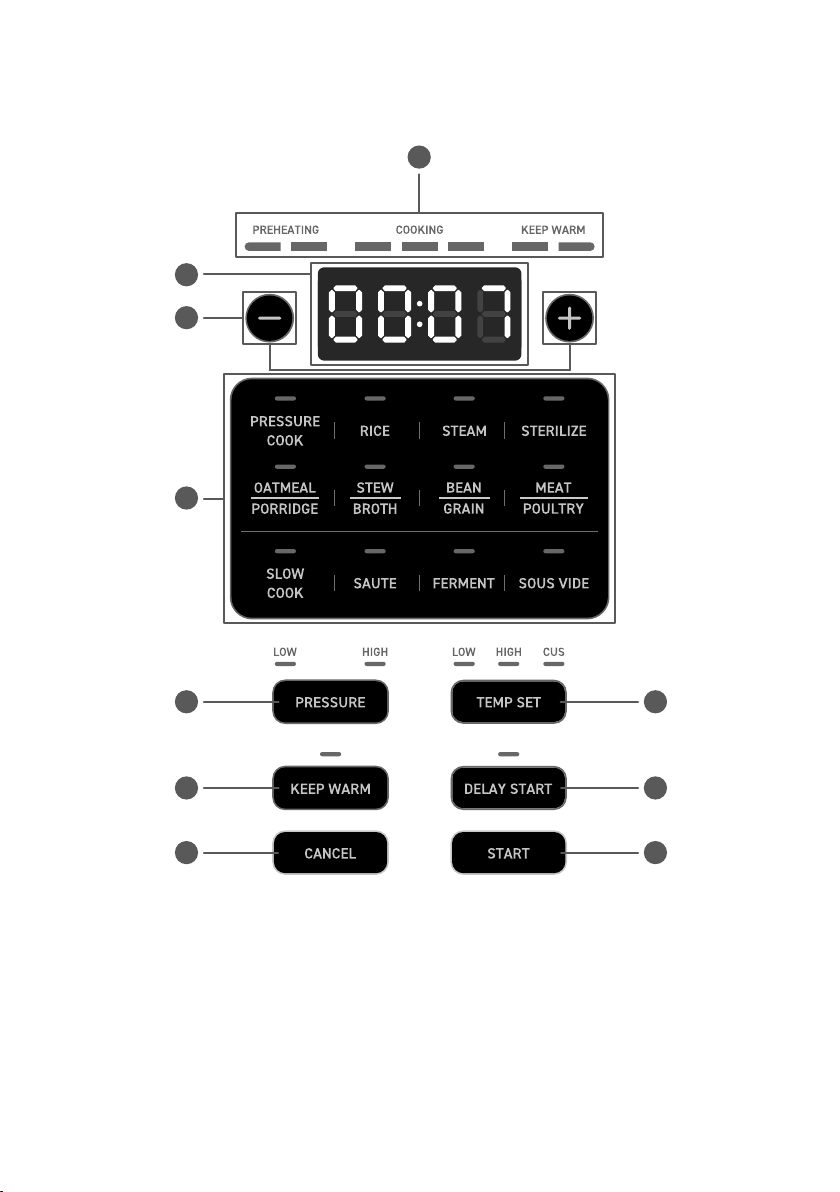
A. Progress Bar
B. Display
C. Time & Temp Adjustment/
Buzzer On/O
D. Cooking Functions
E. Pressure Set
F. Keep Warm
G. Cancel
H. Temperature Set
I. Delay Start
J. Start
A
B
C
Display Diagram
Control Panel
D
E H
F I
G J

10
Control Panel Buttons
Progress Bar
Lights up depending on what cooking stage is active.
Flashing lights indicate the work process at dierent stages.
Display
• Displays cook time and temperature when a cooking function is
selected/customized.
• Time is shown in HH:MM format and counts up or down
depending on the cooking function and cooking stage.
• Displays temperature in °F (Fahrenheit) during non-pressure
cooking except Keep Warm.
• Displays messages about the lid and cooking status. See Display
Messages (page 11).
Time & Temp Adjustment
Adjusts cook time, temperature, Delay Start timer, and Keep Warm timer.
Buzzer On/O
• Turns the pressure cooker sounds on/o.
• When in standby:
• Press and hold the + button until the display shows ‘S ON’, and the
sound will turn on.
• Press and hold the - button until the display shows ‘S OFF’, and the
sound will turn o.
Note: Safety and error alerts cannot be turned o.
Cooking Functions
Pressure Cooking Functions:
Pressure Cook
Rice
Steam
Sterilize
Oatmeal/Porridge
Stew/Broth
Bean/Grain
Meat/Poultry
Non-Pressure Cooking
Functions:
Slow Cook
Sauté
Ferment
Sous Vide
Keep Warm
Pressure Set
Sets ‘Low’ or ‘High’ pressure for pressure cooking.
Temperature Set
• Sets ‘Low’, ‘High’, or ‘Cus’ (Custom) temperature.
Note: ‘Cus’ temperature setting allows you to increase or
decrease the temperature for ‘Sauté’, ‘Ferment’, and ‘Sous Vide’
using the - or + buttons.
Keep Warm
• Turns Keep Warm on/o.
• Can be used as a cooking function to reheat food.
• For more information, see Keep Warm (page 24).
Note: Automatically on for all cooking functions except ‘Sauté’,
‘Ferment’, and ‘Sous Vide’.
Delay Start
• Delays when a cooking function starts.
Note: Delay Start is not available for ‘Sauté’, ‘Ferment’, and
‘Sous Vide’.
Start Starts the cooking function selected.
Cancel Stops the cooking function at any time.

11
The pressure cooker is on standby.
The lid is o or not closed properly.
The pressure cooker is pre-heating/pressurizing.
The pressure cooker is ready for food to be added to the inner pot when
using ‘Sauté’ cooking function.
The display shows one of the following:
1. When a cooking function is active, the timer counts down and
shows the remaining cook time until cooking is finished.
2. When Delay Start is active, the timer counts down until the cooking
function begins.
3. When Keep Warm is active, the timer counts up from 00:00,
showing the length of time that food has been warming.
The cooking function has finished and ‘Keep Warm’ is o.
The pressure cooker may be overheating due to not enough liquid.
For more information, see Troubleshooting (page 30).
Display
Display Messages
12
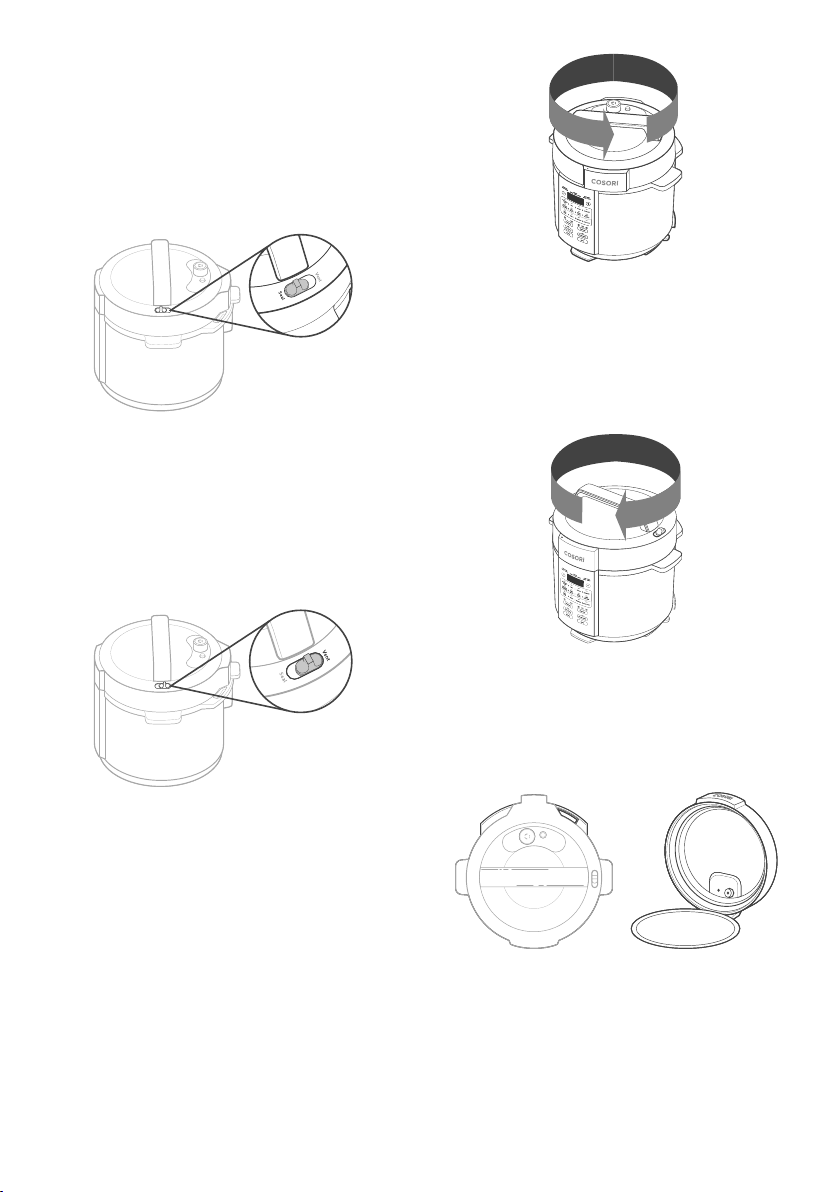
• When cooking with a pressurized cooking
function, the steam release switch will
automatically move to ‘Seal’ when closed.
[Figure 1.1]
Pressure Cooker Lid
Note:
• Always wait for the float valve to drop before
removing the lid.
• The pressure cooker will make a sound when
the lid is closed and opened so you know when
the lid is secured and not secured.
• When cooking with a non-pressurized
cooking function, always move the steam
release switch to ‘Vent’. [Figure 1.2]
Figure 1.1
Figure 1.3
Figure 1.4
Figure 1.5
Figure 1.2
• The lid will lock when pressure is created
and unlock when pressure is completely
released.
• When using a non-pressurized cooking
function, the lid does not lock so you
can taste test food during cooking.
• To remove the lid, twist the lid
counterclockwise to align the orange
dot on the lid with the orange dot on the
pressure cooker base and lift. [Figure 1.3]
• To close and secure the lid, align the orange
dot on the lid with the orange dot on the
pressure cooker base and twist clockwise.
[Figure 1.4]
• The lid can be placed in the lid holder located
in the back of the pressure cooker base for
convenience. [Figure 1.5]
13
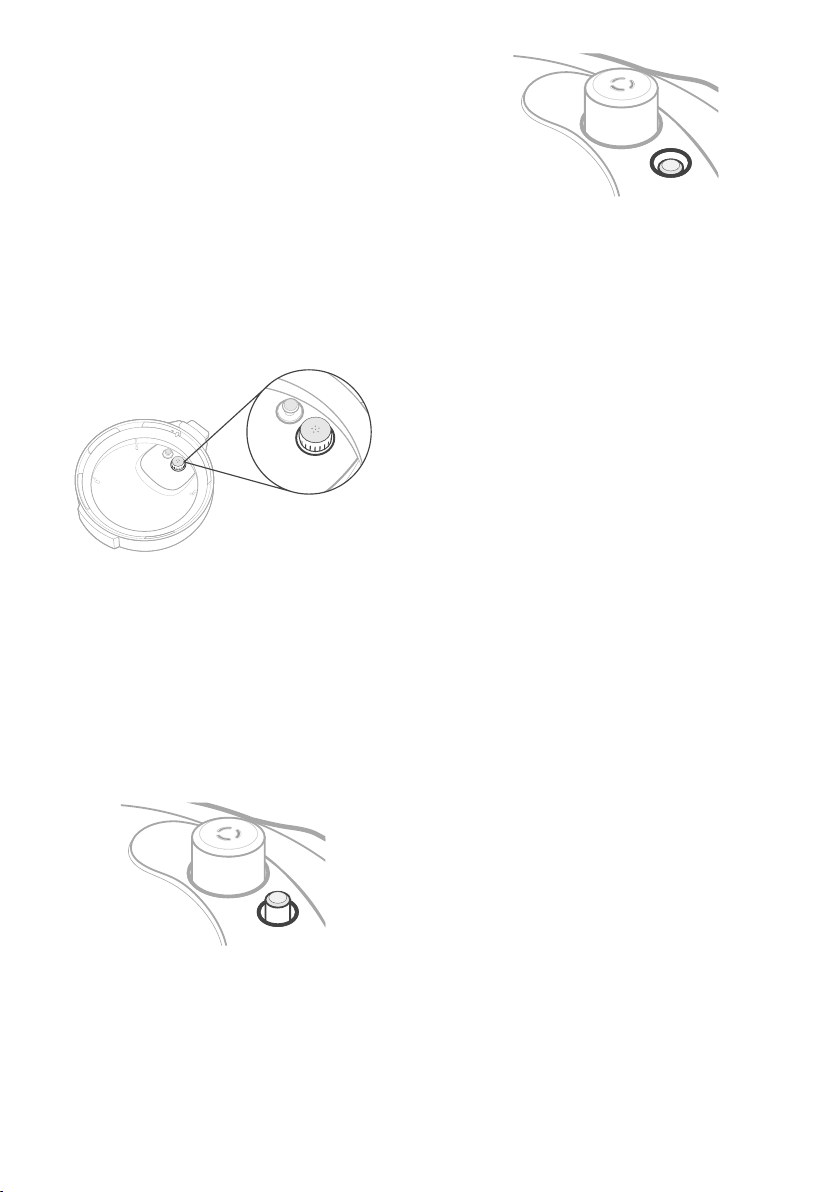
The anti-block shield prevents food from
clogging the steam release pipe and helps
regulate pressure during the cooking
process. [Figure 1.6]
The sealing ring (pre-installed) allows for an
airtight seal between the inner pot and the lid.
The inner pot is made of aluminum metal
with nonstick ceramic coating.
The steam rack helps food from touching
liquid at the bottom of the inner pot. Only use
heat-proof and water-proof containers on the
steam rack and inside the pressure cooker.
• The float valve indicates if there is
pressure inside the cooker.
• Float valve up means there is pressure
inside. [Figure 1.7]
CAUTION:
• Do not fill the inner pot higher than the
“PC MAX—⁄” line (Pressure Cooking
Maximum), as marked on the inner pot.
• Do not fill the inner pot higher than the
“—½” line when cooking food such as
applesauce, cranberries, pearl barley,
oatmeal, split peas, noodles, etc. These
foods may foam, froth, or splatter, and
may clog the steam release pipe and/or
steam release valve.
Sealing Ring
Inner Pot
Steam Rack
Anti-Block Shield
Float Valve
Note: Never try to remove the lid while the float
valve is up.
Figure 1.6
Figure 1.8
Figure 1.7
• The float valve indicates if there is
pressure inside the cooker. Float valve
down means there is no pressure inside.
[Figure 1.8]

14
Pressure Cooking Stages Releasing Pressure
There are 3 stages during pressure cooking:
1. PREHEATING:
• The display will show and
the progress bar will be lit up under
‘PREHEATING’.
• The float valve will pop up once
enough pressure has been created.
NATURAL RELEASE
The pressure cooker will release pressure
normally over time.
• Cooking stops gradually and pressure
is naturally released over time. When
natural release completes, the float valve
will drop.
• The steam release switch stays in
the ‘Seal’ position. After the float
valve has dropped, the lid will unlock
automatically.
• We recommend naturally releasing
pressure when cooking soups, stews,
chilis, pastas, oatmeal, congee, beans,
grains, and food that expand during
cooking to avoid splatter.
QUICK RELEASE
You can manually release steam by using the
steam release switch (see page 8).
• Cooking stops quickly as pressure is
released rapidly, along with hot steam.
• Once the cooking phase has finished,
move the steam release switch to the
‘Vent’ position.
Note: The time it takes for the pressure cooker
to create pressure depends on what you are
cooking, the amount of liquid, amount of food,
and temperature setting. Frozen foods will take the
longest time, while thawed food will be quicker.
The preset cooking time does not include the
preheating time,and the preheating time is not
shown on the display.
Note: Cook time, pressure level, and temperature
can be adjusted at any time during cooking.
Note: Natural release can take up to 40 minutes
depending on the dish.
Note: If the pressure cooker releases too much
steam, move the steam release switch to ‘Seal’ and
allow the rest of the pressure to naturally release.
Note: Optionally, you can use Quick Release or
Timed Pressure Release to release the pressure
(see Releasing Pressure, page 14).
2. COOKING:
• Once pre-heating has finished, the
display will begin the countdown
timer. The progress bar will be lit up
under ‘COOKING’.
• The amount of pressure selected
(LOW or HIGH) is maintained during
the ‘COOKING’ phase.
3. KEEP WARM:
• Once cooking has finished, the display
will show a timer starting from ‘00:00’
and the progress bar will be lit up
under ‘KEEP WARM’.
• If you cancel the automatic Keep
Warm before starting a pressurized
cooking function, after cooking is
finished, the display will show ‘END’ and
begin to release pressure naturally until
the float valve drops (see Keep Warm,
page 24).
• If automatic Keep Warm is not
canceled before cooking, after cooking
is finished, the display will show the
count up timer starting from ‘00:00’
until you press CANCEL.
When cooking with a pressurized cooking
function (Pressure, Rice, Steam, Sterilize,
Oatmeal/Porridge, Stew/Broth, Bean/Grain,
and Meat/Poultry), you must depressurize the
pressure cooker before opening the lid.
CAUTION: Always wait until the float valve
drops before opening the lid.
There are 3 types of ways the pressure cooker
can depressurize:

15
TIMED NATURAL RELEASE
• Cooking gradually stops until the
remaining pressure is quick released.
• Keep the steam release switch in the
‘Seal’ position for a few minutes after
cooking has finished, then move the
switch to the ‘Vent’ position to quick
release the rest of the pressure.
• We recommend using timed natural
release for food such as rice and grains.
CAUTION:
• Do not place hands, face, or exposed
skin over the steam release valve.
• Do not open the lid until pressure is
finished releasing. The lid will stay locked
until the float valve drops down.
• Never force the float valve down while it
is still up.
• To avoid dangerous food splatter, always
use natural release for foods that have
a large liquid volume or high starch
content (such as soup, porridge, or fruit
jam).
Note: Once the switch is moved to ‘Vent’, the
pressure won’t be as strong as immediately quick
releasing pressure.
• We recommend quickly releasing
pressure when cooking vegetables
and seafood to make sure food is not
overcooked.

16
BEFORE FIRST USE
1. Remove all plastic packaging from the
pressure cooker. Read and remove all
temporary stickers and warning cards.
Setting Up
Note: Do not remove the permanent warning
sticker from the lid or the foil certification label from
the pressure cooker base.
Note: Leave 5 inches / 13 cm of space above the
pressure cooker. [Figure 2.1]
2. Place the pressure cooker on a stable,
level, heat-resistant surface. Keep away
from areas that can be damaged by
steam (such as walls or cupboards).
3. Twist the pressure cooker lid counterclockwise
and lift to open. Remove the inner pot from
the pressure cooker.
4. Make sure that the sealing ring is fit snugly
inside the lid.
Figure 2.1
Figure 2.3
5 in /
13 cm
5 in /
13 cm
5. Remove the inner pot. Wipe the heating
element with a soft, dry cloth to make
sure it’s clear of debris. [Figure 2.2]
6. Wash the inner pot, accessories, and
inside the lid using a non-abrasive sponge
with water and a mild detergent, then dry
thoroughly. See Care & Maintenance,
page 27.
7. Insert the inner pot back into the pressure
cooker base.
8. Plug into a kitchen outlet. [Figure 2.3]
Figure 2.2
9. Before cooking, complete a Test Run
(see page 17).
17
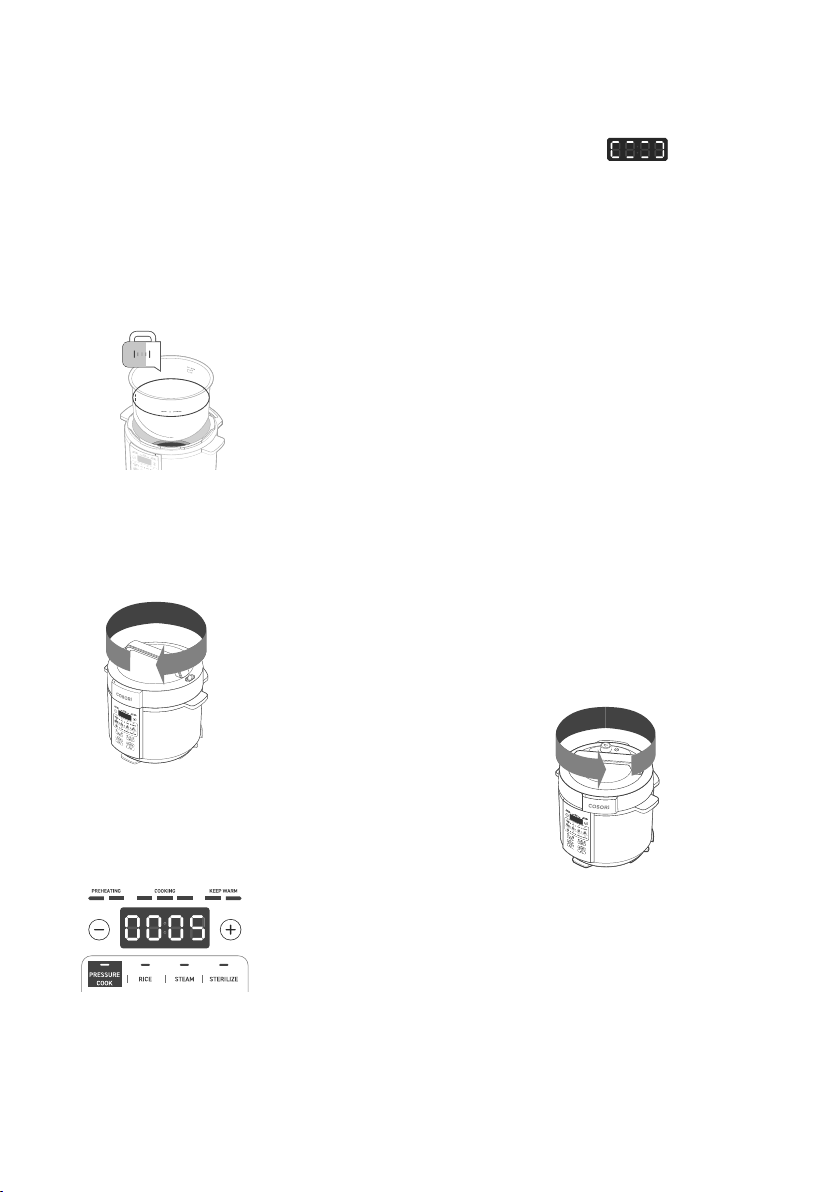
1. Make sure the inner pot is clean and
empty.
2. Add 3 cups / 750 mL of water to the
inner pot. [Figure 3.1]
Test Run
Make sure you perform a Test Run before
using your pressure cooker. This will help
you learn how to use the cooker, and make
sure it’s working properly.
Note: KEEP WARM is on by default.
Figure 3.4
3. Place the lid on the pressure cooker and
turn clockwise to secure. The pressure
cooker will make a sound to indicate the
lid is locked. [Figure 3.2]
4. Select PRESSURE COOK and press the
– or + buttons to set the cook time for 5
minutes. [Figure 3.3]
5. Press PRESSURE to select HIGH pressure.
6. Press KEEP WARM to turn o automatic
KEEP WARM.
Note: All pressure cookers may have a plastic smell
from the manufacturing process. This is normal. If
the plastic smell does not decrease after a test run,
contact Customer Support (see page 34).
Figure 3.1
Figure 3.2
Figure 3.3
7. Press START to begin cooking. The
pressure cooker will beep once, then
start pre-heating. The progress bar will
light up under ‘PREHEATING’ and the
display will show .
8. Once done preheating, the progress bar
will light up under ‘COOKING’ and the
timer countdown will begin.
9. When the test run ends, the display will
show ‘End’ and the pressure cooker
will beep 5 times to indicate cooking is
finished.
10. The pressure cooker will begin to
naturally release the pressure. Once the
pressure has been completely released,
the float valve will drop.
• Optionally, you can quick release or
timed natural release the pressure
before opening the lid. See Releasing
Pressure (page 14).
• The lid will unlock when the float valve
drops down.
11. Twist the lid counterclockwise. The
pressure cooker will make a sound
to indicate the lid is unlocked. Lift to
remove. [Figure 3.4]
12. Use oven mitts to carefully remove the
inner pot. Discard the water.
13. Allow the inner pot to cool, then dry
using a soft towel.

18
Cooking Functions Reference Chart
(Pressure Cooking)
Cooking
Function
Pressure Setting Time Range Default Time
Pressure Cook
Low
00:01–04:00
00:35
High
Rice
Low
00:01–01:00
00:12
High
Steam
Low
00:01–04:00
00:10
High
Sterilize
Low
00:01–01:00
00:30
High
Oatmeal/Porridge
Low
00:01–01:00
00:20
High
Stew/Broth
Low
00:01–04:00
00:30
High
Bean/Grain
Low
00:01–01:00
00:30
High
Meat/Poultry
Low
00:01–04:00
00:35
High
Cooking functions are programmed with an ideal time and temperature for cooking certain foods.
COOKING FUNCTIONS
(The preset cooking time does not include the preheating time, and the preheating time is not shown on the display. )

19
Cooking Functions Reference Chart
(Non-Pressure Cooking)
Customize Cooking Function Settings
Cooking
Function
Temperature Setting Time Range Default Time
Slow Cook
Low-212 °F
00:05–24:00
06:00
High-212 °F
Sauté
Low-284 °F
00:01–01:00
00:30 High-356 °F
Cus-248~356 °F
Ferment
Low-91 °F
00:05–99:30
08:00 High-108 °F
Cus-77~185 °F
Sous Vide Cus-77~194 °F
00:05–99:30
03:00
Manual Keep Warm
Low-149 °F
00:30–12:00
12:00
High-174 °F
00:30–12:00
12:00
Cooking Functions (Cont.)
To customize a cooking function’s time, follow
the steps below.
1. Select a cooking function.
2. Press the - and + buttons to adjust the
time.
3. Press START.
Auto Keep Warm temperature is 163°F
Note: Keep Warm is not available for Sauté, Sous Vide, or Ferment cooking functions.
To customize a cooking function’s temperature,
follow the steps below.
1. Select a cooking function.
2. Select TEMP SET.
3. Press the cooking function’s button
again, and use the - and + buttons to
adjust the temperature.
4. Press START.
Note: When you change a cooking function’s settings, the pressure cooker will remember the new settings even
if the pressure cooker has been unplugged. See Reset Customized Cooking Functions (page 24) to reset
customized cooking functions.
20
Pressure Cook
Pressure cooking creates steam from liquid
to cook food. To create steam, use broth,
stock, soup, or juice.
CAUTION: Avoid recipes that call for more
than ¼ cup / 60 mL of oil or fat content as
using hot oil during pressure cooking may
cause burns.
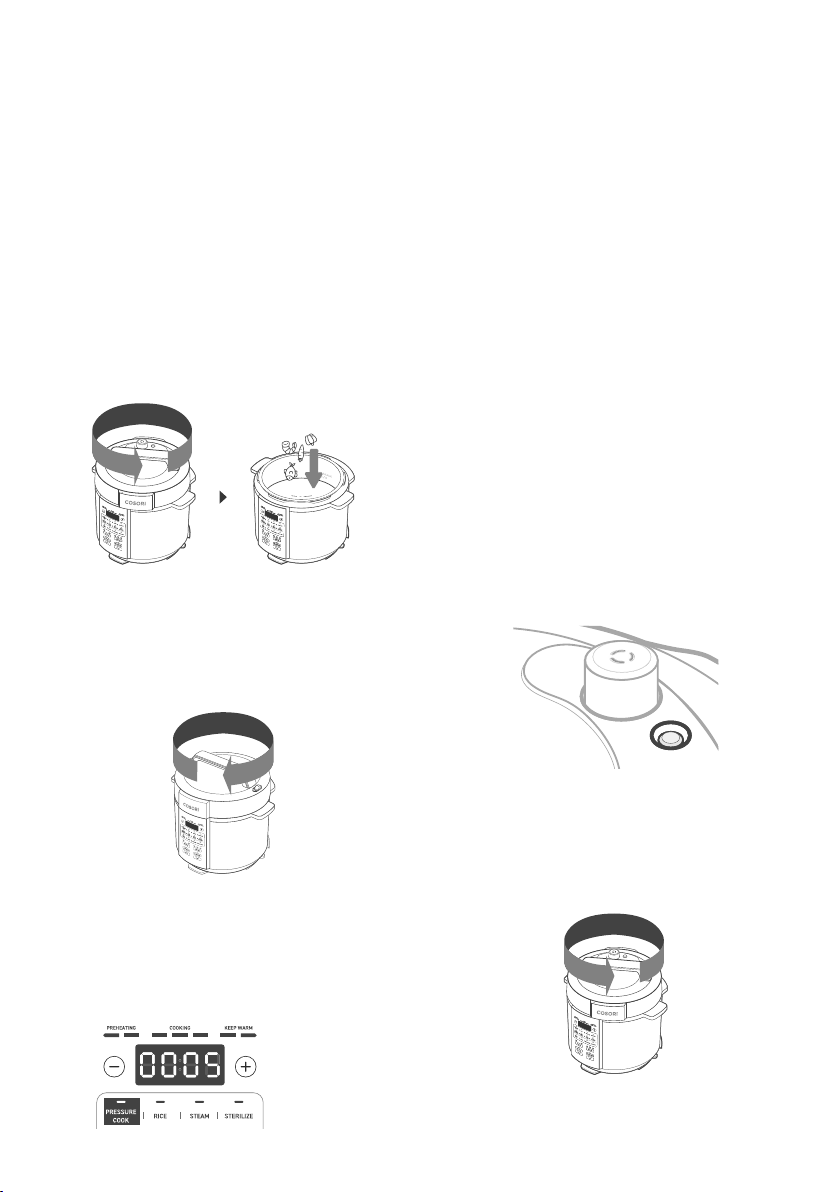
1. Twist the lid counterclockwise and lift to
remove. Add the ingredients to the inner
pot. [Figure 4.1]
2. Close the lid on the pressure cooker and
turn clockwise to secure. [Figure 4.2]
Figure 4.1
Figure 4.2
Figure 4.3
Figure 4.4
3. Select PRESSURE COOK and press the
– or + buttons to adjust the time.
[Figure 4.3]
4. Press PRESSURE to select LOW or HIGH
pressure.
5. You can press KEEP WARM to turn o
automatic Keep Warm.
Figure 4.3
6. To delay cooking, press DELAY START.
Then press the – or + buttons to adjust
the delay start timer.
7. Press START to begin cooking. The
pressure cooker will beep once, then
start cooking.
8. When the cooking function ends, the
pressure cooker will beep 5 times.
9. Push the steam release switch to ‘Vent’
to quick release the pressure. Optionally,
you can use one of the other forms
of pressure releasing. See Releasing
Pressure, page 14.
10. The float valve will drop to indicate when
the pressure has been fully released.
[Figure 4.3]
Note: Keep Warm is on by default.
11. Twist the lid counterclockwise and lift to
open. [Figure 4.4]
21
Slow Cook
RICE/GRAINS QUICK REFERENCE CHART
Slow Cook lets you use your pressure cooker
like any slow cooker. You can program Slow
Cook for up to 24 hours of cook time.
See the Rice/Grains Quick Reference
Chart below for grain to water ratios when
pressure cooking.
1. Twist the lid counterclockwise and lift to
open. Add the ingredients to the inner
pot. [Figure 5.1]
Figure 5.1
Figure 5.2
Figure 5.3
2. Close the lid on the pressure cooker and
turn clockwise to secure. Move the steam
release switch to ‘Vent’.
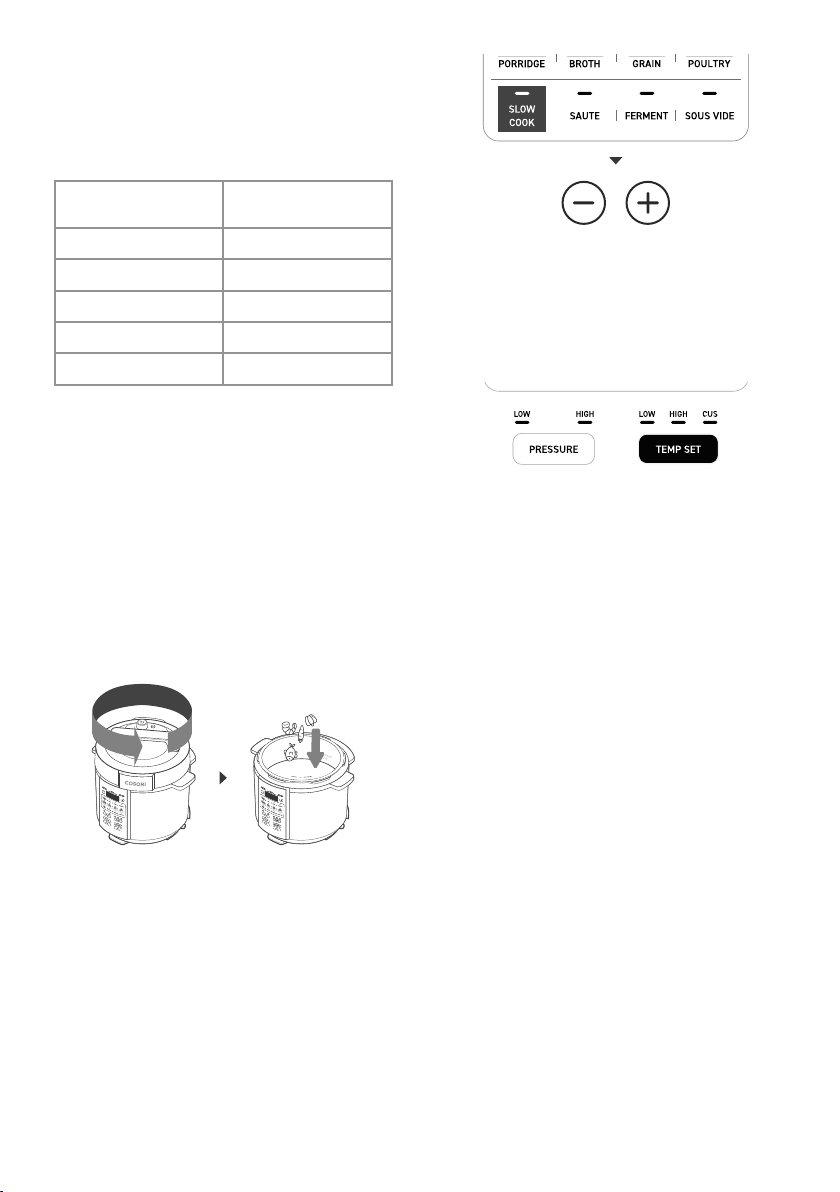
3. Select SLOW COOK and press the
– or + buttons to adjust the time if
necessary. [Figure 5.2]
4. Press TEMP SET to select a LOW or
HIGH temperature. [Figure 5.3]
5. You can press KEEP WARM to turn o
automatic Keep Warm.
Note: Keep Warm will be on by default.
6. To delay cooking, press DELAY START.
Then press the – or + buttons to adjust
the delay start timer.
7. Press START to begin cooking. The
pressure cooker will beep once, then start.
8. When the cooking function ends, the
pressure cooker will beep 5 times.
9. Twist the lid counterclockwise and lift to
open.
Rice and
Grain
Grain to
Water Ratio
White Rice 1 : 1¼
Brown Rice 1 : 1¼
Quick Oats 1 : 3
Porridge 1 : 5
Quinoa 1 : 1¼
8
22
Sauté
Ferment
Sauté can replace a frying pan or grill and
sear foods. Sauté can also prepare food for
recipes that call for a pressurized cooking
function.
Ferment can make yogurt using a 2-step
process: heating milk to pasteurize it, and
culturing the yogurt.
1. Twist the lid counterclockwise and lift to
remove. Do not use the pressure cooker
lid when using the SAUTE cooking
function. [Figure 6.1]
1. Twist the lid counterclockwise and lift
to open. Add the milk to the inner pot.
[Figure 7.1]
Figure 6.1
Figure 7.1
Figure 6.2
Figure 7.2
Figure 6.3
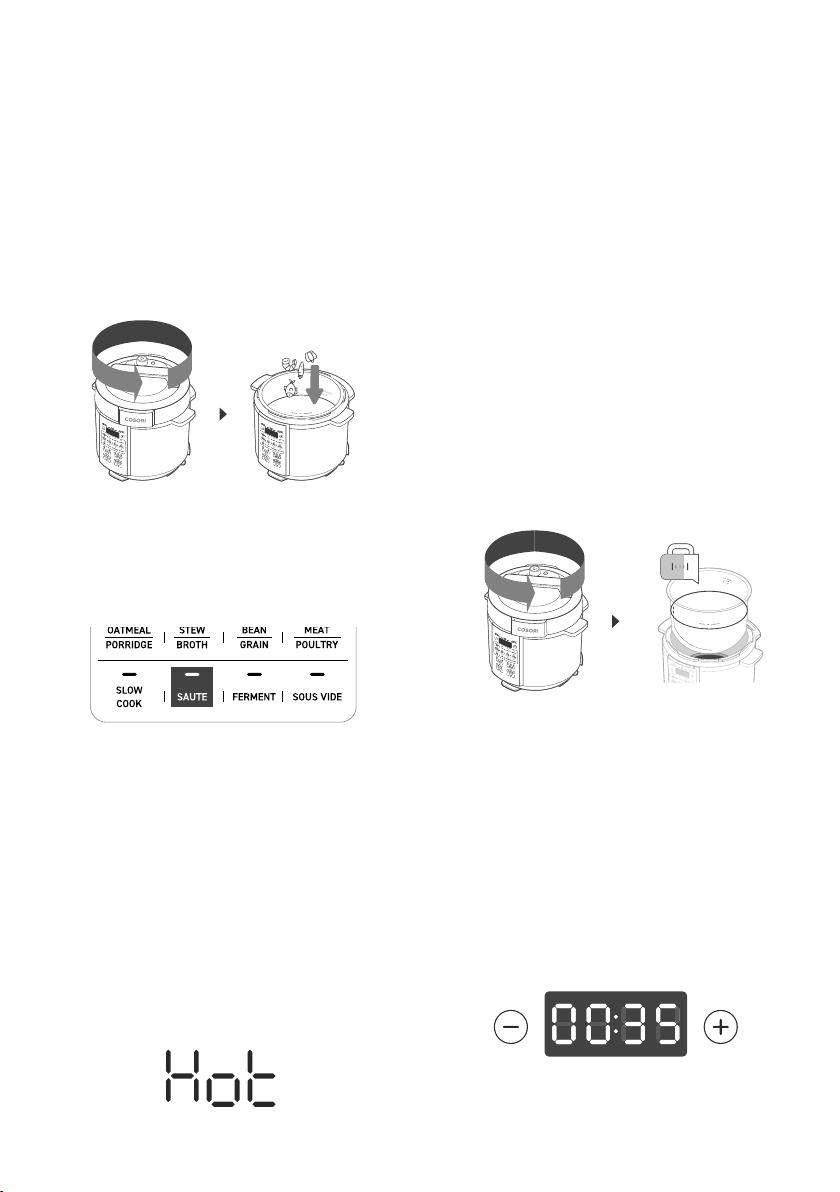
2. Select SAUTE and press the – or +
buttons to adjust the time. [Figure 6.2]
3. Press TEMP SET to select a LOW, HIGH,
or CUS (custom) cook temperature.
a. If you select CUS, select SAUTE again,
then press the – or + buttons to adjust
the temperature.
4. Press START to begin cooking. The
pressure cooker will beep once, then start.
5. When the display says ‘HOT’ with 3
beeps, add the ingredients to the inner
pot. [Figure 6.3]
6. When the selected cook time is done, the
cooker will beep 5 times. Optionally, press
CANCEL to stop the SAUTE cooking
function before the cook time finishes.
STEP 1: HEATING THE MILK
2. Close the lid on the pressure cooker and
turn clockwise to secure. The pressure
cooker will make a sound to indicate the
lid is locked.
3. Move the steam release switch to ‘Vent’.
4. Select FERMENT and press the – or +
buttons to adjust the time to 35 minutes
(00:35). [Figure 7.2]
Note: Delay Start and Keep Warm are not available
for the ‘Sauté’ cooking function.

23
Sous Vide
Sous Vide is a method of cooking meat
or fish in a vacuum-sealed, food-safe bag
submerged in water. You’ll need tongs, a
thermometer, and a resealable or vacuum-
sealed, food-safe plastic bag.
1. Twist the lid counterclockwise and lift
to open.
2. Fill the inner pot with water to the “—½”
line. [Figure 8.1]
Figure 7.3
Figure 8.1
STEP 2: CULTURING THE YOGURT
5. Press TEMP SET to select CUS (custom)
cook temperature.
6. Select FERMENT again, then press the
– or + buttons to adjust the temperature
to 161°F.
7. Press START to begin cooking. The
cooker will beep once, then start.
8. Open the lid and check the temperature
of the milk after 15 minutes. If the milk
has reached 161°F, press CANCEL. If not,
let the milk continue to ferment until it
reaches 161°F.
9. Carefully remove the inner pot and allow
the milk to cool to 110°F, then place the
pot back into the pressure cooker.
Note: To cool down the milk faster, place the inner
pot in an ice bath.
Note: Delay Start and Keep Warm are not available
for the ‘Ferment’ cooking function.
10. Reserve 1 cup of the 110°F milk and place
into a large bowl, then add 4 tablespoons
of plain yogurt and stir to combine.
11. Add the yogurt milk mixture back into
the inner pot with the rest of the milk.
12. Close the lid on the pressure cooker and
turn clockwise to secure. Move the steam
release switch to ‘Vent’.
13. Select FERMENT and press the – or +
buttons to adjust the time to 10 hours
(10:00). [Figure 7.3]
14. Press TEMP SET to select CUS (custom)
cook temperature.
15. Select FERMENT again, then press the
– or + buttons to adjust the temperature
to 110°F.
16. Press START to begin cooking. The
pressure cooker will beep once, then start.
17. When the cook time has finished and the
cooker has beeped, open the lid carefully
and check if the yogurt has set. To do
this, gently nudge the inner pot to see
if the yogurt jiggles all together with no
separation. If the yogurt is loose, continue
to ferment for another 1 to 2 hours.
18. Remove the inner pot and cool to room
temperature without stirring, about
2 hours. After the yogurt has cooled,
cover the pot with plastic wrap and let
it chill for 6 hours in the refrigerator.
19. Stir the chilled yogurt until completely
smooth.
20. Store the yogurt in airtight containers
of your choice—glass jars are
recommended—for up to 2 weeks if
unopened. Once a container is opened,
use within 7 days.
24
3. Close the lid on the pressure cooker and
turn clockwise to secure. Move the steam
release switch to ‘Vent’.
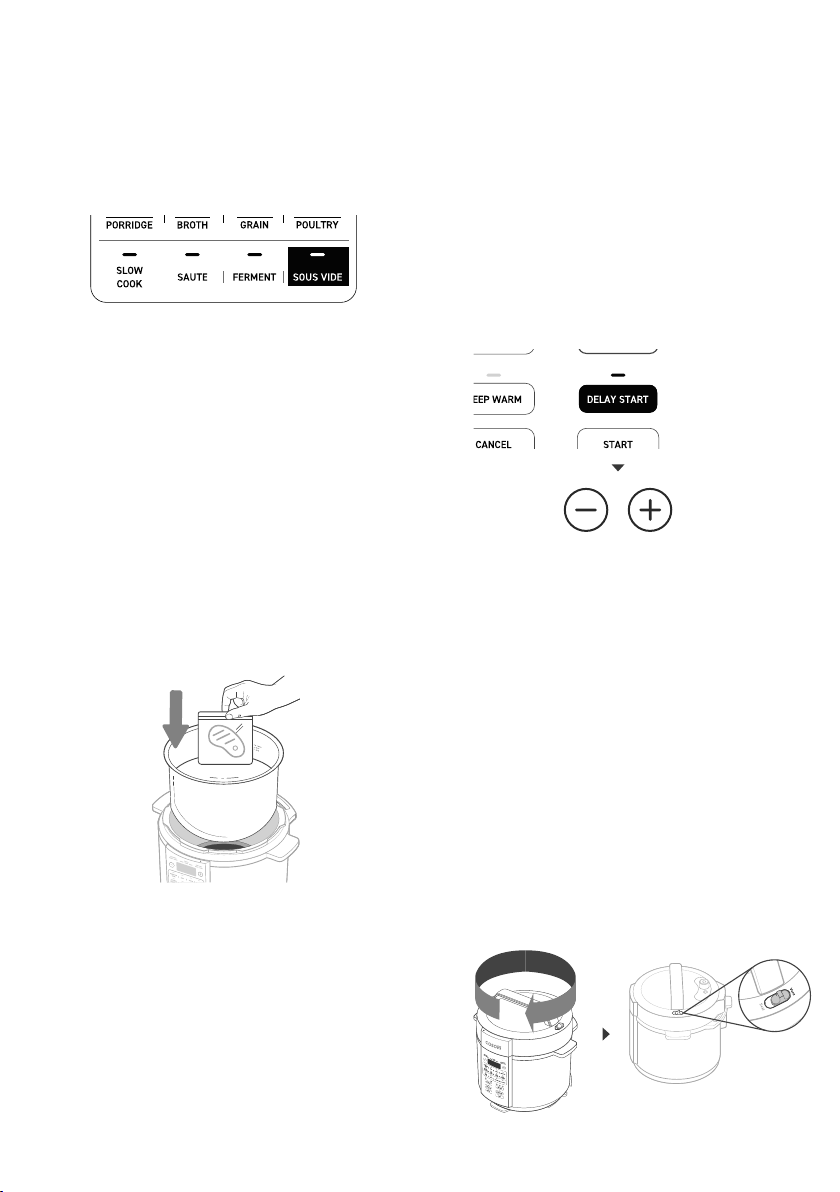
4. Select SOUS VIDE and press the – or +
buttons to adjust the time. [Figure 8.2]
5. Press TEMP SET to select CUS (custom)
cook temperature.
6. Select SOUS VIDE again, then press the
– or + buttons to adjust the temperature.
7. Press START to begin cooking. The
pressure cooker will beep once, then start.
8. While the cooker is preheating, prepare
your meat or fish in a vacuum-sealed,
food-safe bag.
9. When the progress bar shows COOKING
stage, remove the lid and carefully
submerge the food in the inner pot.
[Figure 8.3]
10. Close and secure the lid.
11. When the cooking function ends, the
display will show ‘End’ and the pressure
cooker will beep 5 times.
Note: Add more water if the meat or fish is not fully
submerged. Make sure the seal of the bag is above
the water line.
Note: Delay Start is not available when using the
‘Sauté’, ‘Ferment’, and ‘Sous Vide’ cooking functions.
Note: Delay Start and Keep Warm are not available
for the ‘Sous Vide’ cooking function.
Figure 8.2
Figure 8.3
Figure 9.2
Delay Start
Keep Warm
Delay Start lets you add ingredients now, but
cook later.
Keep Warm can be used to keep cooked food
warm or reheat food.
1. Select a cooking function and adjust the
cook time, temperature, and pressure
level as needed.
2. Select DELAY START.
3. Press the – or + buttons to adjust the
delay start timer from 10 minutes (00:10)
to 24 hours (24:00). [Figure 9.1]
4. Press START. The cooking function
will start when the delay start timer is
finished.
Figure 9.1
1. Place food into the inner pot.
2. Close the lid on the pressure cooker and
turn clockwise to secure. Move the steam
release switch to ‘Vent’. [Figure 9.2]
25
Figure 9.3
Sterilize
Sterilize can be used to disinfect glass, silicone,
and metal household items. Do not sterilize
industrial equipment in the pressure cooker.
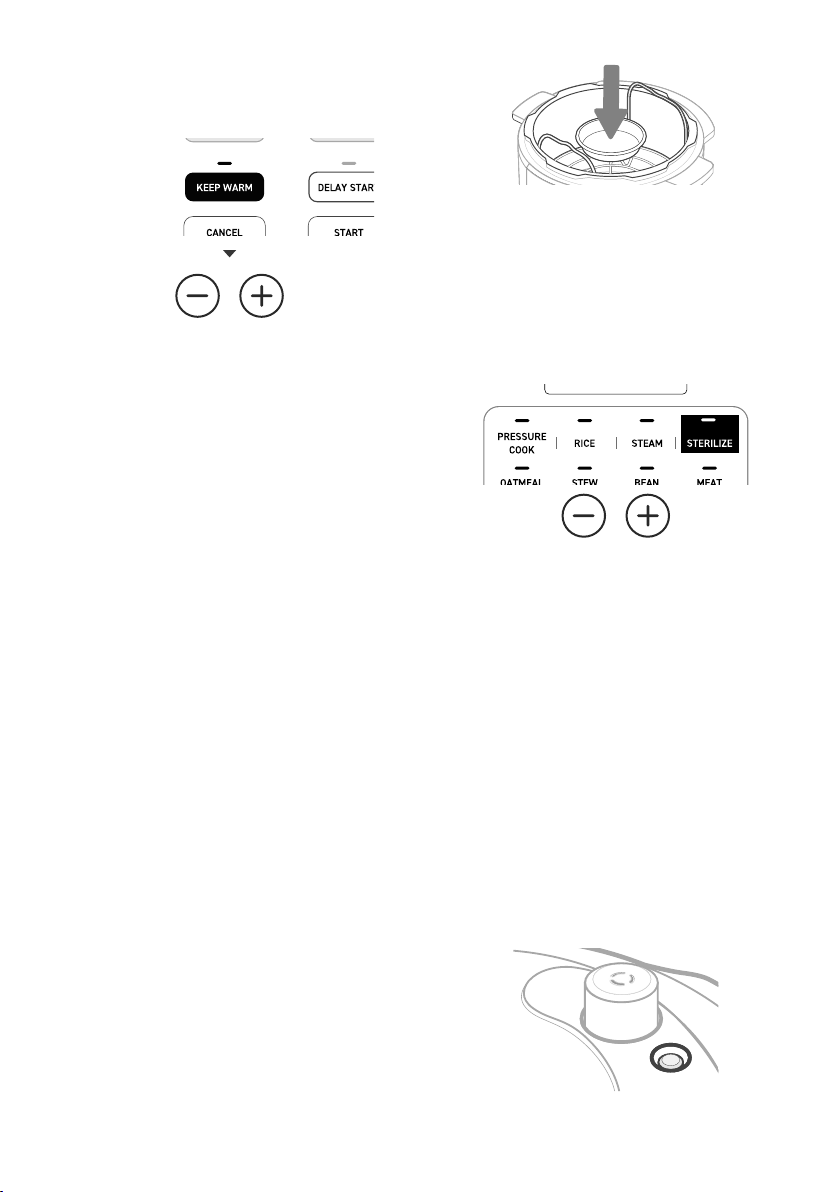
1. Add 2 cups / 500 mL of water into the
inner pot.
2. Insert the steam rack and place items on
the steam rack. [Figure 9.4]
Note: Keep Warm is not available when using the
‘Sauté’, ‘Ferment’, and ‘Sous Vide’ cooking functions.
Note: When warming thick or starchy foods, stir the
food every 40 to 60 minutes to ensure even heating.
Note: The default sterilize time is 30 minutes (00:30).
Figure 9.5
Figure 9.4
1. Close the lid and turn clockwise to secure.
2. Select STERILIZE and press the – or +
buttons to adjust the time if desired.
[Figure 9.5]
3. Press PRESSURE to select LOW or HIGH
pressure.
4. Press START to begin sterilizing. The
pressure cooker will beep once, then start.
5. When the cooking function ends, the
pressure cooker will beep 10 times.
6. Push the steam release switch to ‘Vent’
to quick release the pressure.
7. The float valve will drop to indicate when
the pressure has been fully released.
[Figure 9.6]
Figure 9.6
3. Select KEEP WARM and press the
– or + buttons to adjust the time for up to
12 hours. [Figure 9.3]
4. Press TEMP SET to select a LOW, HIGH,
or CUS (custom) cook temperature.
a. If you select CUS, select KEEP WARM
again, then press the – or + buttons
to adjust the temperature.
5. When warming thick or starchy foods, stir
the food every 40 to 60 minutes to ensure
even heating.
6. Press START to begin warming. The
pressure cooker will beep once, then start.
7. When the timer is finished, warming will
stop, and the display will show ‘END’.

26
1. Twist the lid counterclockwise and lift to
open.
2. Use oven mitts or tongs to safely remove
the hot, sterilized items and allow to cool
on a heat-resistant surface.
3. Allow the inner pot to cool before
removing the steam rack and any
remaining water from the inner pot.
Reset Customized Cooking
Functions
The pressure cooker will remember cook
time, temperature, and pressure level of
adjusted cooking function settings until you
reset the settings.
To reset a single cooking function:
1. When in standby, press and hold the
desired cooking function you want to
reset.
2. The display will show and the
cooking function’s settings will return to
the default setting.
To reset all cooking functions:
1. When in standby, press and hold
CANCEL until the pressure cooker
beeps.
2. All cooking function settings will reset
and return to their default settings.

27
CARE & MAINTENANCE
1. Before cleaning, unplug the pressure
cooker and allow to cool completely.
Remove the lid for faster cooling.
• Do not wash or dry the pressure
cooker base in a dishwasher.
2. Wipe the inside and outside of the
cooker with a clean, damp cloth.
• Do not immerse the pressure cooker
base in water.
• Do not spray water inside the cooker.
[Figure 10.1]
1. Allow the inner pot, lid, lid parts, and
steam rack to cool completely. Wipe
away any leftover food residue.
2. Apply soap and water to a soft, damp
sponge. Wash the inner pot and steam
rack and soak in warm, soapy water if
necessary.
3. Clean the inside of the lid. Make sure to
remove any food debris from the anti-
block shield and sealing ring. Do not
submerge lid in water.
4. If necessary, the parts inside the lid can
be removed for cleaning. These parts are
small and easy to lose, so be careful.
a. Remove the sealing ring by pulling
the edge of the silicone out of
the sealing ring rack and wipe
clean. Replace the sealing ring by
pressing it firmly in to the sealing
ring rack to prevent warping. The
sealing ring should fit snugly inside
the sealing ring rack and shouldn’t
fall out when lifting the lid.
Clean your pressure cooker, inner pot, steam
rack, and lid after every use.
Your pressure cooker has a stainless steel,
fingerprint-resistant housing for easy cleaning.
Note:
• Do not use abrasive cleaners, metal scouring
pads, or metal utensils on any part of the
pressure cooker and accessories, including the
inner pot. These will scratch or damage their
surfaces.
• This pressure cooker contains no user-
serviceable parts. Any repairs should
be performed by an authorized service
representative. Contact Customer Support
(see page 34).
Note:
• We recommend hand washing the inner pot,
lid, lid parts, sealing ring, and steam rack.
• The inner pot, lid, lid parts, and steam rack can
be washed in the top rack of the dishwasher,
but may wear more quickly over time.
Cleaning the Pressure
Cooker Base
Cleaning the Inner Pot, Lid,
Lid Parts, and Steam Rack
3. Remove the inner pot. Wipe the heating
element with a soft, dry cloth to make
sure it’s clear of debris.
4. Let all surfaces dry completely before
using the pressure cooker. Always make
sure the heating element inside the
pressure cooker is dry before using.
Figure 10.1
28
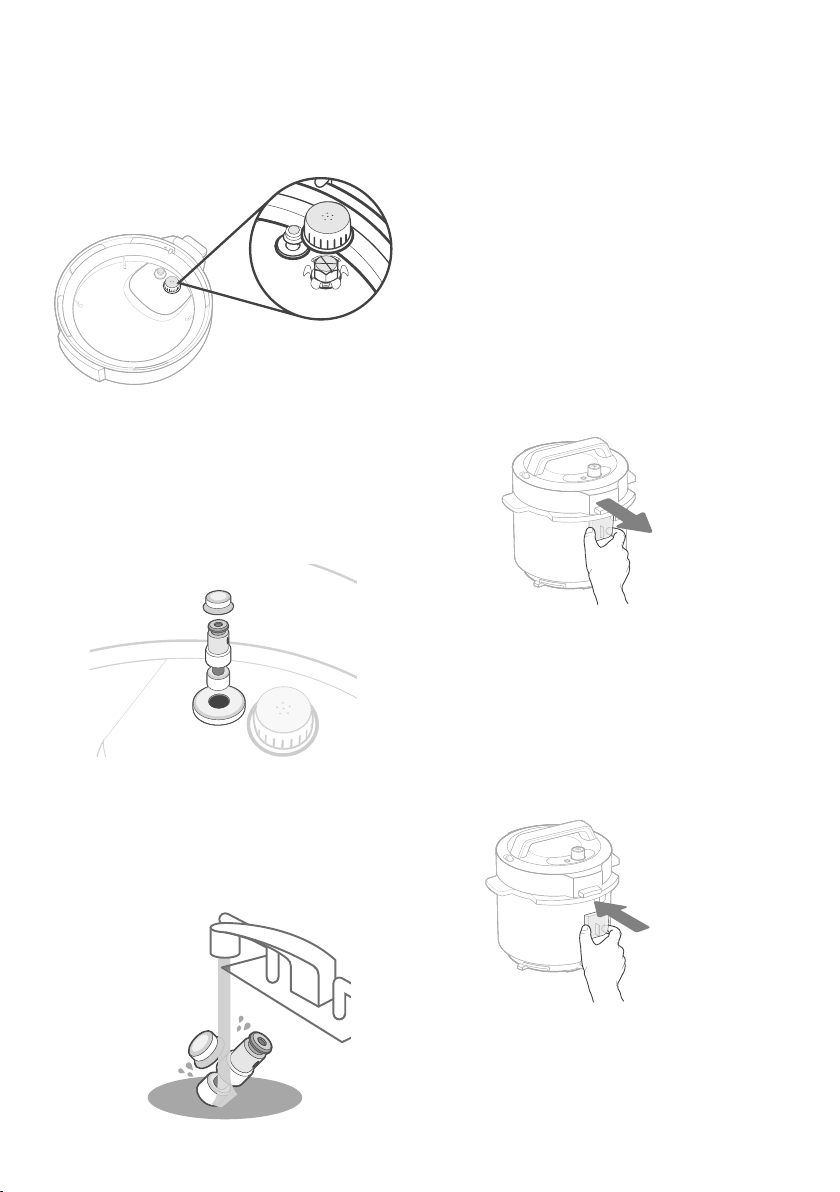
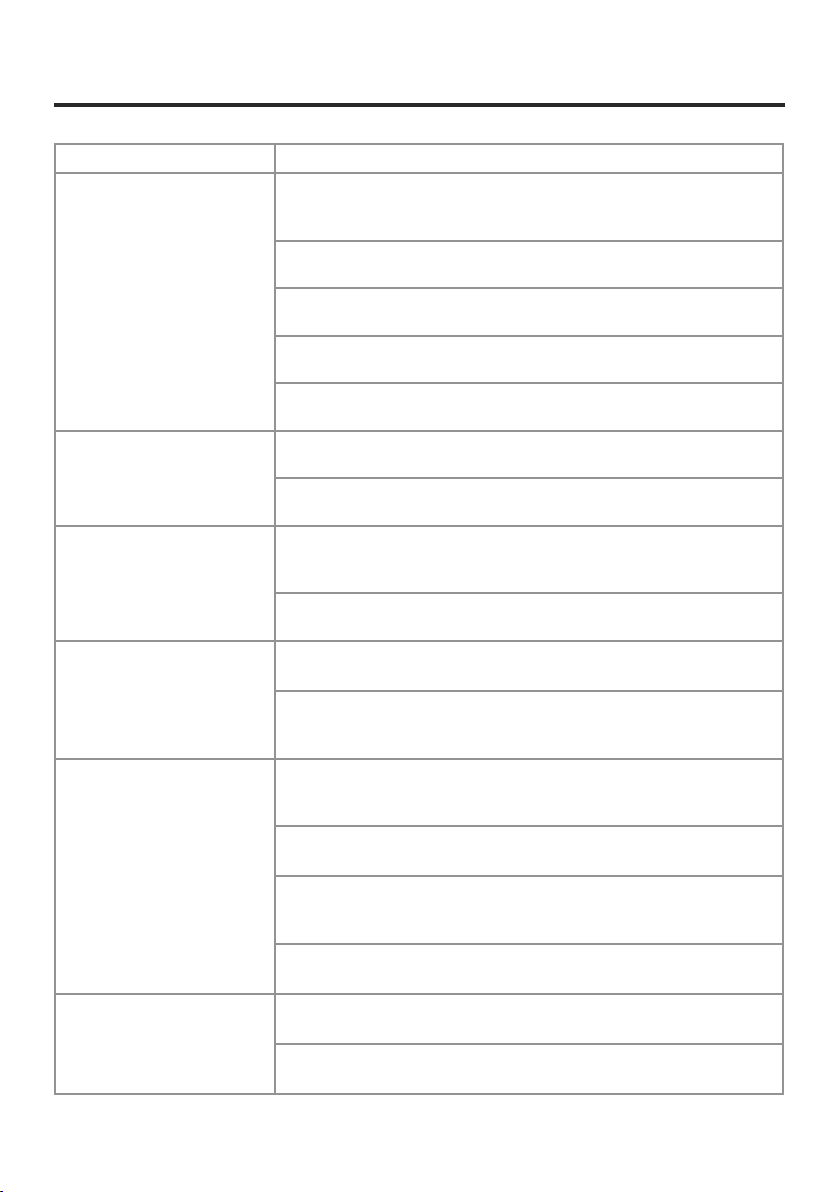
Cleaning the Condensation
Collector
b. Remove the anti-block shield by
gripping it from either side, then
pulling it up. [Figure 10.2] Rinse
and dry the anti-block shield and
replace it inside the lid.
c. Remove the silicone cap from the
float valve. The float valve may
drop out unexpectedly without the
silicone cap, so remove carefully.
[Figure 10.3]
d. Rinse both parts with clean water,
and secure the float valve back
onto the lid using the float valve
silicone cap. [Figure 10.4]
1. Remove the condensation collector by
gripping each side with your thumb and
pointer finger and pulling away from the
pressure cooker. [Figure 10.5]
Figure 10.2
Figure 10.3
5. Dry thoroughly.
6. Always replace the inner pot into the
pressure cooker before plugging in or
turning on.
a. Make sure the bottom outside of
the inner pot is dry before placing
into the pressure cooker.
Figure 10.4
Note: Do not pull down on the condensation collector.
Note: Always replace the condensation collector
before cooking in the pressure cooker. Do not use the
pressure cooker without the condensation collector in
place.
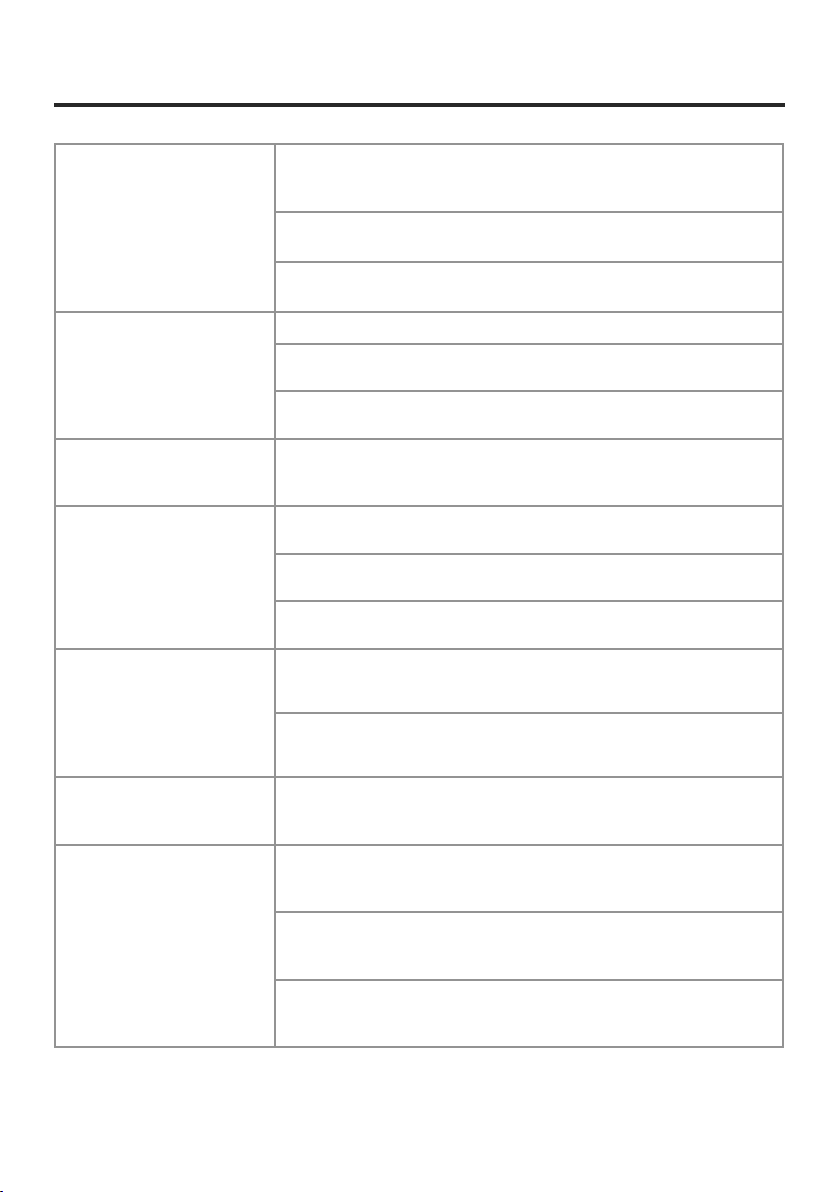
2. Hand wash the condensation collector
with soap and water or in the top rack of
a dishwasher. Dry thoroughly.
3. Replace the condensation collector.
[Figure 10.6]
Figure 10.5
Figure 10.6

29
Storage
1. Clean and dry the pressure cooker and
all parts.
2. Place the inner pot and steam rack into
the pressure cooker. Close the pressure
cooker lid and twist to secure into place.
3. Wrap the power cord clockwise around
the base of the pressure cooker so that it
sits securely in the cord housing.
[Figure 10.10]
2. Add 1 cup / 250 mL of water and 1 cup /
250 mL of vinegar to the inner pot.
3. Select PRESSURE COOK and press the
– or + buttons to adjust the time to 5–10
minutes.
4. Press START to begin cooking. The
pressure cooker will beep once, then
start cooking.
5. When the cooking function ends, the
pressure cooker will beep 10 times.
6. Push the steam release switch to ‘Vent’
to quick release the pressure.
Note: The float valve will drop to indicate when the
pressure has been fully released.
Eliminating Lingering Odor
1. Make sure all lid parts are installed in the
lid. See Cleaning the Inner Pot, Lid, Lid
Parts, and Steam Rack (page 27).
Cleaning the Sealing Ring
1. Remove the sealing ring by pulling the
edge of the silicone out of the sealing
ring rack. [Figure 10.7]
2. Hand wash the sealing ring with soap and
water or in the top rack of a dishwasher.
Dry thoroughly. [Figure 10.8]
Note: Make sure the sealing ring does not have any
warping or tears. If the sealing ring is damaged,
contact Customer Support (page 34).
Figure 10.7
Figure 10.8
3. Replace the sealing ring by pressing
it firmly into the sealing ring rack to
prevent warping. The sealing ring should
fit snugly inside the sealing ring rack
and shouldn’t fall out when lifting the lid.
[Figure 10.9]
7. Twist the lid counterclockwise and lift to
open.
8. Use oven mitts to carefully remove the
inner pot. Discard the water and vinegar
mixture.
9. Allow the inner pot to cool, then dry
using a soft towel.
4. Store the pressure cooker in an upright
position. Do not store anything on top.
Figure 10.10
30
Problem Possible Solution
Steam leaks from the side of
the lid.
The sealing ring may be missing or not secure. Open the lid and firmly
press on the sealing ring to secure in the sealing ring rack. See Care &
Maintenance (page 27).
Food debris may be stuck to the sealing ring. Clean the sealing ring. See
Care & Maintenance (page 27).
The lid is not properly closed. Open and close the lid, and make sure the
lid is locked in place. See Pressure Cooker Lid (page 12).
The sealing ring may be warped or broken. Contact Customer Support
(see page 34).
The inner pot’s rim may be warped. Contact Customer Support
(see page 34).
There is an occasional
clicking sound.
The bottom outside of the inner pot may be wet. Dry the exterior of the
inner pot.
The pressure board may be switching when temperature is increasing
inside the pressure cooker. This is normal.
The lid is dicult to close
and secure.
The sealing ring may not be properly installed. Open the lid and firmly
press on the sealing ring to secure in the sealing ring rack. See Care &
Maintenance (page 27).
The float valve may be stuck in the up position. Push the float valve down
with a long utensil.
The inner pot is stuck to the
lid or the lid is dicult to
remove.
Move the steam release switch to ‘Vent’ position to allow any pressure to
be released and open the lid.
Release any pressure (see page 14) and gently tap the steam release
valve with a long utensil. Open the lid and clean the float valve and
surrounding area before using the pressure cooker again.
The float valve does not rise.
There may be food debris on the float valve or float valve silicone cap.
Clean the float valve and cap thoroughly and perform a test run. See Care
& Maintenance (page 27).
There may not be enough liquid in the inner pot. Add liquid to the inner
pot if necessary, and check for scorching on the bottom of the inner pot.
The float valve may be obstructed by the lid-locking mechanism. Tap the
float valve with a long utensil. If the float valve does not drop, turn the
pressure cooker o and contact Customer Support (see page 34).
The inner pot, float valve, silicone cap, or heating element may be
damaged or missing. Contact Customer Support (see page 34).
Small amounts of steam
leak or hiss from the steam
release valve during the
cooking cycle.
The steam release switch may be in the ‘Vent’ position. Move the switch
to ‘Seal’.
The pressure cooker may be regulating excess pressure. This is normal.
TROUBLESHOOTING
31
If your problem is not listed, please contact Customer Support (see page 34).
The display is blank after
connecting the pressure
cooker to a power outlet.
The plug may not be fully connected to the pressure cooker, or to the
power outlet. Make sure the plug is secure. If the plug is damaged, contact
Customer Support (see page 34).
The outlet may not have power. Try a dierent outlet.
The pressure cooker’s fuse may have blown. Contact Customer Support
(see page 34).
Steam gushes from the
steam release valve when the
steam release switch is in
the ‘Seal’ position.
There may not be enough liquid in the inner pot. Add liquid if necessary.
The pressure sensor may not be properly working. Contact Customer
Support (see page 34).
The steam release valve may not be properly sealed. Safely move the steam
release switch to ‘Vent’ and back to ‘Seal’.
Error code “E1”, “E2”, “C6H”,
or “C6L” shows on the
display.
The pressure sensor may be faulty. Contact Customer Support
(see page 34).
Error code “C7” or “NoPr”
shows on the display.
The heating element may not be working. Contact Customer Support
(see page 34).
There may not be enough liquid in the inner pot. Add liquid if necessary.
The steam release switch may not be in the ‘Seal’ position.
Error code “Lid” shows on
the display.
The lid may not be completely sealed. Remove the lid and replace the lid,
and make sure it is secure. See Pressure Cooker Lid (page 12).
If ‘Saute’ cooking function is selected, remove the lid. Do not use the
pressure cooker lid with the ‘Saute’ cooking function.
Error code “PrSE” shows on
the display.
Pressure has accumulated during a non-pressurized cooking function.
Move the steam release switch to the ‘Vent’ position, or remove the lid if
the lid is not needed.
Error code “Food burn”
shows on the display.
There may not be enough liquid in the inner pot. Make sure the float
valve is in the down position and the pressure is released. Open the lid to
inspect the bottom of the inner pot.
High temperature may be detected at the bottom of the inner pot. The
pressure cooker will automatically lower the temperature to prevent
overheating.
Starch deposits at the bottom of the inner pot may have caused uneven
heating. Turn the pressure cooker o, release the pressure accordingly,
and inspect the bottom of the inner pot.
TROUBLESHOOTING (CONT.)

32
This device complies with Part 15 of the FCC Rules. Operation is subject to the following two conditions:
1. This device may not cause harmful interference, and
2. This device must accept any interference received, including interference that may cause undesired
operation.
NOTE: This equipment has been tested and found to comply with the limits for a Class B digital device,
pursuant to Part 15 of the FCC Rules. These limits are designed to provide reasonable protection against
harmful interference in a residential installation. This equipment generates, uses and can radiate radio
frequency energy and, if not installed and used in accordance with the instructions, may cause harmful
interference to radio communications. However, there is no guarantee that interference will not occur in
a particular installation. If this equipment does cause harmful interference to radio or television reception,
which can be determined by turning the equipment o and on, the user is encouraged to try to correct the
interference by one or more of the following measures:
• Reorient or relocate the receiving antenna.
• Increase the separation between the equipment and receiver.
• Connect the equipment into an outlet on a circuit dierent from that to which the receiver is
connected.
• Consult the dealer or an experienced radio/TV technician for help.
FCC Caution: Any changes or modifications not expressly approved by the party responsible for compliance
could void the user’s authority to operate this equipment.
FEDERAL COMMUNICATION COMMISSION
INTERFERENCE STATEMENT PART 15
Arovast Corporation hereby declares that this equipment is in compliance with FCC requirements.
The declaration of conformity may be consulted in the support section of our website, accessible from
www.cosori.com
FCC SDOC SUPPLIER’S DECLARATION OF
CONFORMITY

33
WARRANTY INFORMATION
Product
6.0-Quart Pressure
Cooker
Model CMC-CO601-SUS
For your own reference, we strongly recommend
that you record your order ID and date of purchase.
Date of Purchase
Order ID
TERMS & POLICY
Arovast Corporation (“Arovast”) warrants this
product to the original purchaser to be free from
defects in material and workmanship, under
normal use and conditions, for a period of 2 years
from the date of original purchase.
Arovast agrees, at our option during the warranty
period, to repair any defect in material or
workmanship or furnish an equal product in
exchange without charge, subject to verification of
the defect or malfunction and proof of the date of
purchase.
There is no other express warranty. This warranty
does not apply:
• If the product has been modified from its
original condition;
• If the product has not been used in
accordance with directions and instructions
in the user manual;
• To damages or defects caused by accident,
abuse, misuse or improper or inadequate
maintenance;
• To damages or defects caused by service
or repair of the product performed by an
unauthorized service provider or by anyone
other than Arovast;
• To damages or defects occurring during
commercial use, rental use, or any use for
which the product is not intended;
• To damages or defects exceeding the cost of
the product.
Arovast will not be liable for indirect, incidental, or
consequential damages in connection with the use
of the product covered by this warranty.
This warranty extends only to the original
consumer purchaser of the product and is not
transferable to any subsequent owner of the
product regardless of whether the product is
transferred during the specified term of the
warranty.
This warranty does not extend to products
purchased from unauthorized sellers. Arovast’s
warranty extends only to products purchased
from authorized sellers that are subject to Arovast’s
quality controls and have agreed to follow its
quality controls.
All implied warranties are limited to the period of
this limited warranty.
This warranty gives you specific legal rights
and you may also have other rights which vary
from state to state. Some states do not allow
the exclusion or limitation of incidental or
consequential damages, so the above limitation or
exclusion may not apply to you.
If you discover that your product is defective within
the specified warranty period, please contact
Customer Support via [email protected].
DO NOT dispose of your product before contacting
us. Once our Customer Support Team has
approved your request, please return the product
with a copy of the invoice and order ID.
Every COSORI product automatically includes a
2-year warranty. To make the customer support
process quick and easy, register your product
online at www.cosori.com/warranty
This warranty is made by:
Arovast Corporation
1202 N. Miller St., Suite A
Anaheim, CA 92806

34
CUSTOMER SUPPORT
If you have any questions or concerns about your new product, please contact our helpful
Customer Support Team.
*Please have your invoice and order ID ready before contacting Customer Support.
Arovast Corporation
1202 N. Miller St., Suite A
Anaheim, CA 92806
Email: [email protected]
Toll-Free: 1-888-402-1684
Support Hours
Mon–Fri, 9:00 am–5:00 pm PST/PDT

We hope this has been helpful to you. We can’t wait to see your beautiful
results, and we think you’ll want to share glam shots! Our community
awaits your uploads—just pick your platform of choice below.
Snap, tag, and hashtag away, COSORI chef!
@Cosori
Scan the QR code
to get the app.
@CosoriCooks
#LiveLifeTastefully #iCookCosori
Considering what to cook? Many recipe ideas are available,
both from us and the COSORI community.
SHOW US WHAT YOU’RE MAKING
MORE COSORI RECIPES

NOTES

Questions or Concerns?
Mon–Fri, 9:00 am–5:00 pm PST/PDT
[email protected] | 1-888-402-1684
A2_D_23C02_us