CUTTING THE BENCHTOP GENERAL INFORMATION
GRANITE SINK INSTALLATION INSTRUCTIONS
Please retain for consumer as care instructions are included
SEALANT
Oliveri recommends using the sealant strip (supplied with the sink), to seal between the sink and the bench
top. However, if silicone is used, it MUST be a “Neutral Cure” product – the use of “Acetic Cure” silicone
can damage or discolour the sink and will void warranty.
WASTE DISPOSAL UNITS
Waste disposal units can be fitted to Oliveri’s Granite Sinks. However, faulty or damaged waste disposal
units can cause vibration, which may lead to sink damage and will void warranty.
BASKET WASTE INSTALLATION
1 Fit the basket waste into the hole in the sink and then place the drain under the hole.
DO NOT USE SILICONE ADHESIVE.
2. Fasten the basket waste to the drain using a screw. Do not overtighten.
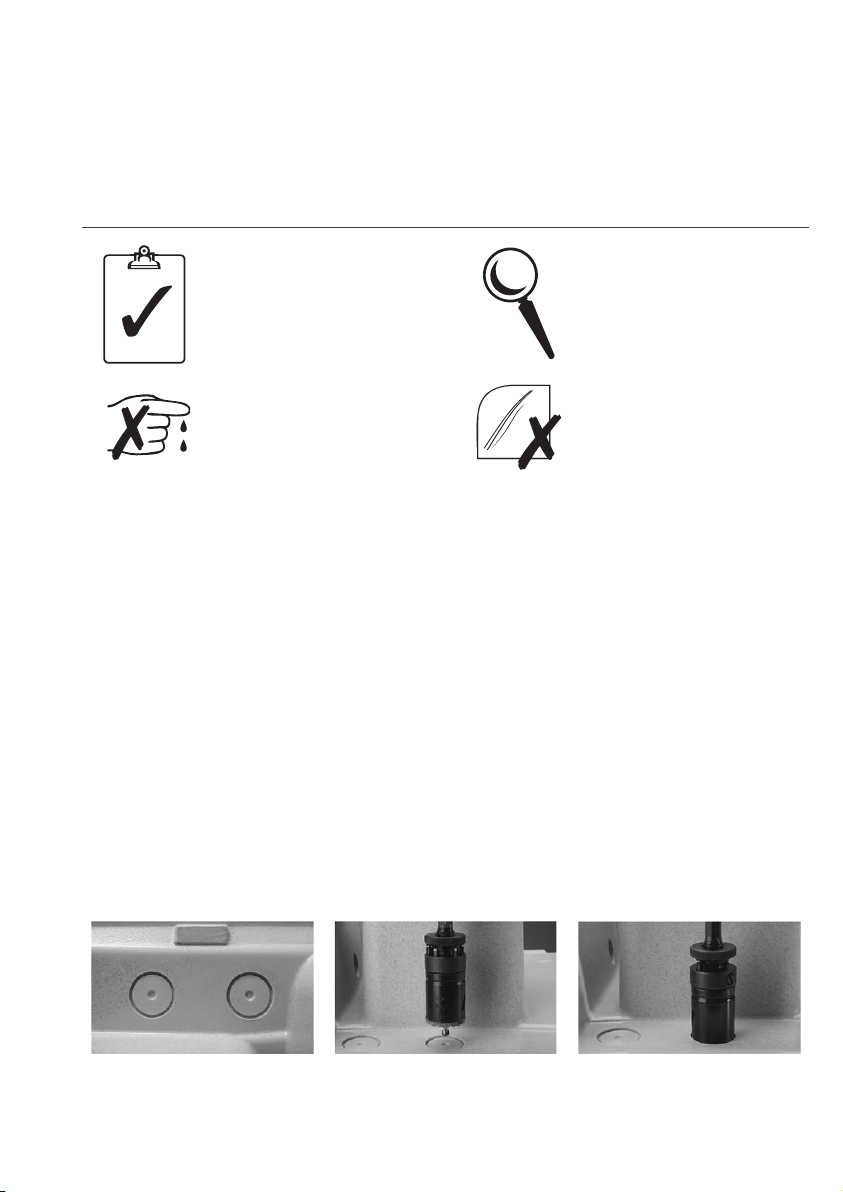
DRILLING THE TAP HOLE
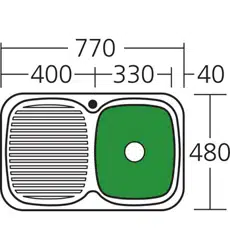
Oliveri granite sinks with drainboards are provided with a pre-punched hole (picture A) placed on the front
and back of the sink in order to choose which side the bowls / drainer will sit. NOTE!
In order to avoid any possible damage to the sink, we strictly recommend to drill these pre-punched holes
using 35-37mm drill following the procedure shown in pictures B and C. We recommend using a diamond
coated drill to drill this hole.
Fig. A - Pre-punched tap holes Fig. B - Place the tool on the
pre-punched hole.
Fig. C - Drill the hole.
CHECK SPACE
Ensure there is adequate space for tapware (including a splashback if
specified). Check space for installation (underneath) and operation (above).
Particular care must be taken when a thick splash back is used (it may
interfere with tapware location and operation). Ensure the cabinet will not
foul the sink mounting flange or basins.
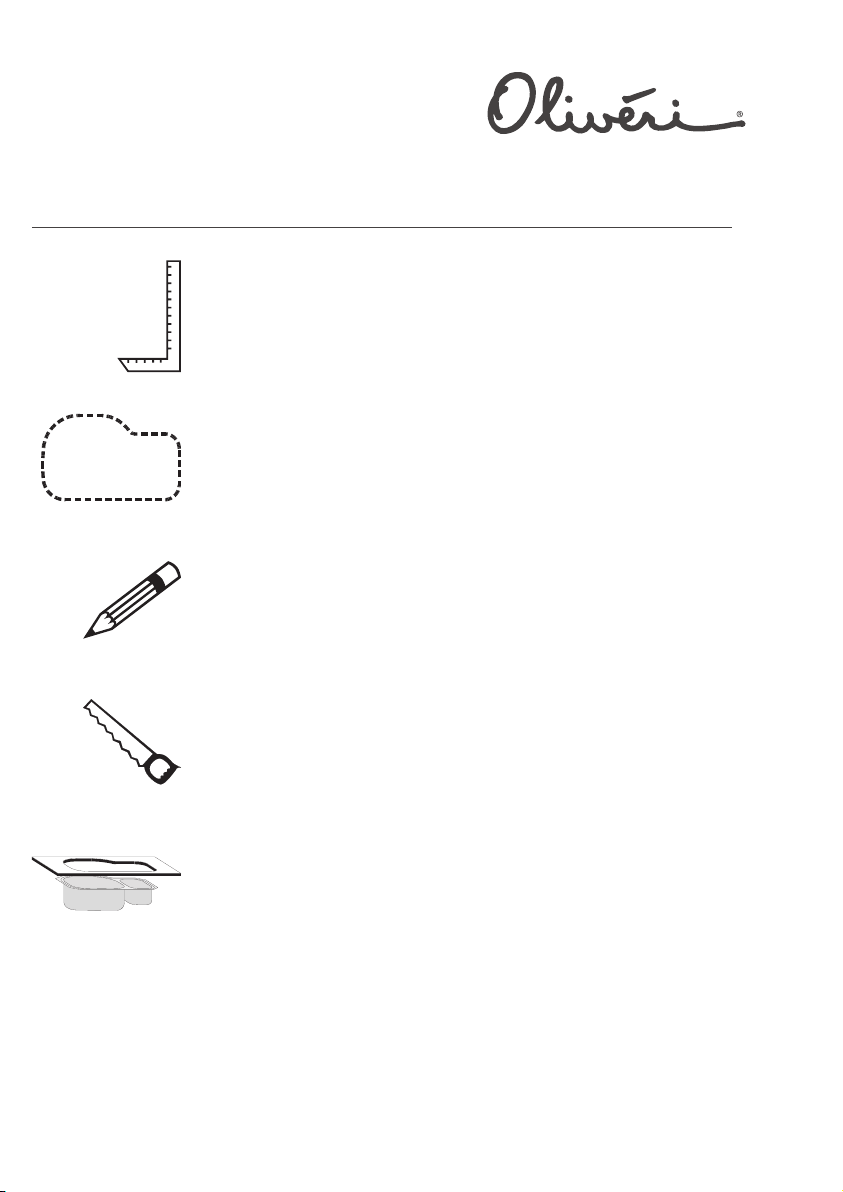
TEMPLATE
Cut out templates for your Oliveri sink are available online at oliveri.com.au.
Use the product model number to find the template. Some sink templates
apply to both left-hand and right-hand model sinks. Ensure template is
correct way around for your model.
MARK CUT OUT
Carefully mark out the template (or follow drawing instructions) making
allowance for any additional polishing back that is required after cutting.
Note: The template is the exact finished cut-out size required.
CUT & FINISH HOLE
Drill pilot holes to accept an appropriate cutting tool for the benchtop
material (wear suitable personal protection equipment). Cut inside the mark,
allowing sufficient room for any polishing back.
Note: Accuracy is essential to ensure the bowl / basin and accessories
fit correctly.
TRIAL FIT THE SINK
Carefully position the sink against benchtop to make sure it fits the cut out
correctly. If the fit is not correct, remove the sink and proceed with remedial
work. Perform another trial fit after corrections have been made.
IT IS HIGHLY RECOMMENDED THE ACTUAL SINK BE PRESENT AT TIME OF CUTTING
Any advice, recommendation, information, assistance or service provided by Tasman Sinkware in relation to goods
manufactured by it or their use and installation, is given in good faith and is believed by Tasman Sinkware to be
appropriate and reliable. However, any advice, recommendation, information, assistance or service is provided by
Tasman Sinkware without responsibility or liability.
Download cut out files (PDF, DWG or DXF) from oliveri.com.au
CHECK MODEL
The model number on the sink
packaging must match the model
of sink the customer ordered.
Do not install if incorrect.
AVOID CUTS
The perimeter and punch-outs on
the sink may contain sharp edges.
Handle the sink carefully to avoid
personal injury.
CHECK THE CONDITION
Inspect the sink for any visible
defects. Do not install the sink if
defects are found. Contact your
sink retailer / point of purchase.
AVOID BREAKAGES
Granite sinks can be broken if
proper care is not taken during
installation.
© Tasman Sinkware - TF158c Granite Sink Installation Instructions
CUTTING THE BENCHTOP GENERAL INFORMATION
GRANITE SINK INSTALLATION INSTRUCTIONS
Please retain for consumer as care instructions are included
SEALANT
Oliveri recommends using the sealant strip (supplied with the sink), to seal between the sink and the bench
top. However, if silicone is used, it MUST be a “Neutral Cure” product – the use of “Acetic Cure” silicone
can damage or discolour the sink and will void warranty.
WASTE DISPOSAL UNITS
Waste disposal units can be fitted to Oliveri’s Granite Sinks. However, faulty or damaged waste disposal
units can cause vibration, which may lead to sink damage and will void warranty.
BASKET WASTE INSTALLATION
1 Fit the basket waste into the hole in the sink and then place the drain under the hole.
DO NOT USE SILICONE ADHESIVE.
2. Fasten the basket waste to the drain using a screw. Do not overtighten.
DRILLING THE TAP HOLE
Oliveri granite sinks with drainboards are provided with a pre-punched hole (picture A) placed on the front
and back of the sink in order to choose which side the bowls / drainer will sit. NOTE!
In order to avoid any possible damage to the sink, we strictly recommend to drill these pre-punched holes
using 35-37mm drill following the procedure shown in pictures B and C. We recommend using a diamond
coated drill to drill this hole.
Fig. A - Pre-punched tap holes Fig. B - Place the tool on the
pre-punched hole.
Fig. C - Drill the hole.
CHECK SPACE
Ensure there is adequate space for tapware (including a splashback if
specified). Check space for installation (underneath) and operation (above).
Particular care must be taken when a thick splash back is used (it may
interfere with tapware location and operation). Ensure the cabinet will not
foul the sink mounting flange or basins.
TEMPLATE
Cut out templates for your Oliveri sink are available online at oliveri.com.au.
Use the product model number to find the template. Some sink templates
apply to both left-hand and right-hand model sinks. Ensure template is
correct way around for your model.
MARK CUT OUT
Carefully mark out the template (or follow drawing instructions) making
allowance for any additional polishing back that is required after cutting.
Note: The template is the exact finished cut-out size required.
CUT & FINISH HOLE
Drill pilot holes to accept an appropriate cutting tool for the benchtop
material (wear suitable personal protection equipment). Cut inside the mark,
allowing sufficient room for any polishing back.
Note: Accuracy is essential to ensure the bowl / basin and accessories
fit correctly.
TRIAL FIT THE SINK
Carefully position the sink against benchtop to make sure it fits the cut out
correctly. If the fit is not correct, remove the sink and proceed with remedial
work. Perform another trial fit after corrections have been made.
IT IS HIGHLY RECOMMENDED THE ACTUAL SINK BE PRESENT AT TIME OF CUTTING
Any advice, recommendation, information, assistance or service provided by Tasman Sinkware in relation to goods
manufactured by it or their use and installation, is given in good faith and is believed by Tasman Sinkware to be
appropriate and reliable. However, any advice, recommendation, information, assistance or service is provided by
Tasman Sinkware without responsibility or liability.
Download cut out files (PDF, DWG or DXF) from oliveri.com.au
CHECK MODEL
The model number on the sink
packaging must match the model
of sink the customer ordered.
Do not install if incorrect.
AVOID CUTS
The perimeter and punch-outs on
the sink may contain sharp edges.
Handle the sink carefully to avoid
personal injury.
CHECK THE CONDITION
Inspect the sink for any visible
defects. Do not install the sink if
defects are found. Contact your
sink retailer / point of purchase.
AVOID BREAKAGES
Granite sinks can be broken if
proper care is not taken during
installation.
© Tasman Sinkware - TF158c Granite Sink Installation Instructions
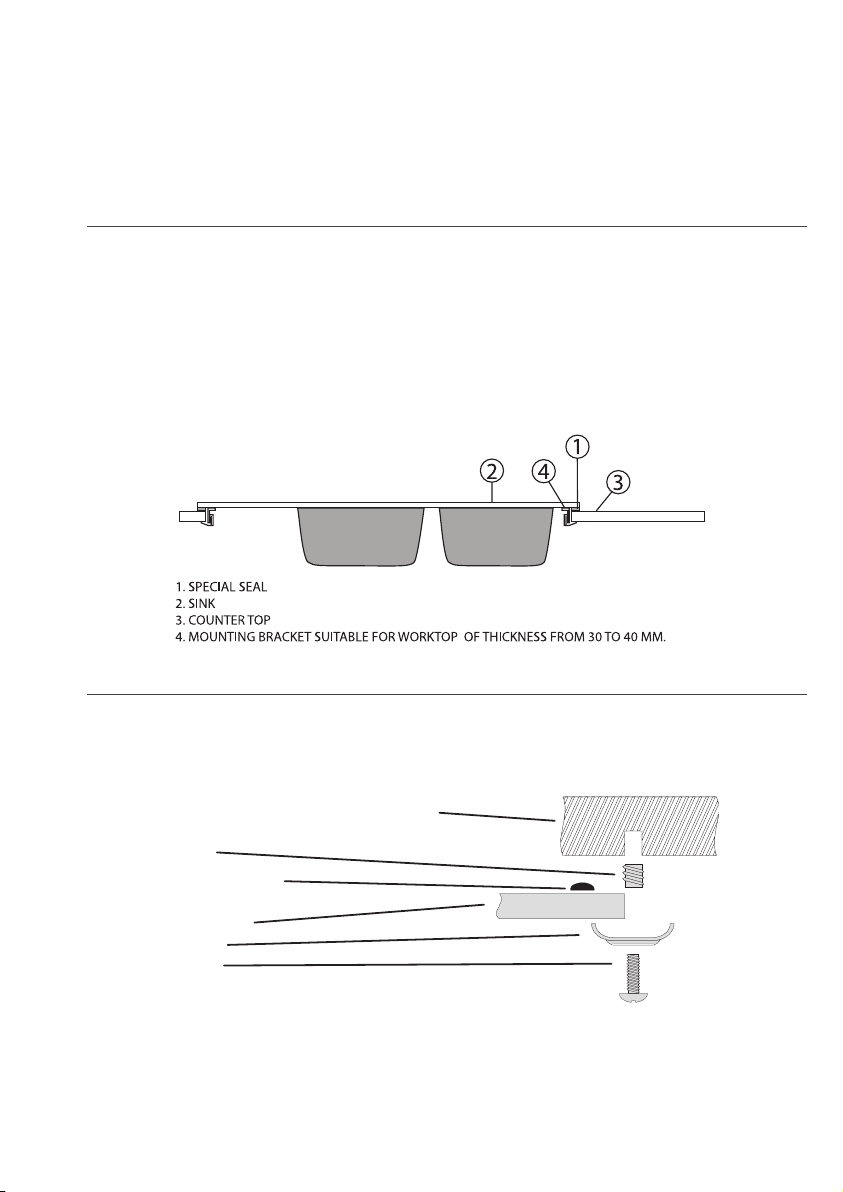
The special seal (1) should be placed carefully onto the upper surface of the benchtop, on the edge of the
cut out. Press down on it lightly so that it sticks to the surface Carefully lower the sink into the cut out
and onto the seal. Fasten the mounting brackets (4) to the sink as shown, using the screws provided. Then
tighten the mounting bracket with a screwdriver, making sure that the sink is pulled down towards the
benchtop and compresses the seal (1).
NOTE: Do not overtighten the mounting bracket screws.
Once the sink is installed carefully trim any excess seal from around the sink.
Bolt it to the benchtop using “molly” assemblies. Care must be taken during drilling and tightening to
avoid cracking.
If you have any doubts, confirm the correct mounting method for your material by consulting
the benchtop supplier.
• Avoid placing pots, pans or other hot objects in excess of 280° C on the surface of the sink (CAUTION! The
bottom of a pot or pan just removed from the burner can reach temperatures of over 600°C).
• Pots, pans and other hot objects must be placed on appropriate potholders (made of wood, rubber, etc.).
Avoid causing excessive thermal shock due to the presence of very hot and very cold objects on the sink at
the same time.
• Do not use the sink as a cutting surface: rather, use a cutting board made of hardwood or polyethylene,
which can be purchased together with the sink.
• The use of stainless steel dish baskets or surface protectors (which can be purchased together with the sink)
can reduce the risk of accidental damage.
• Do not use abrasive substances or metal cleaning pads (steel wool) to clean the sink because they scratch
the surface, making it susceptible to stains.
• Heavy or pointed objects that fall on the surface of the sink can damage it.
• Scratches and chips on the surface of the sink can be removed using sandpaper and then a coat of polish.
• CAUTION! Do not pour alcohol, gasoline, trichloroacetic acid or any solvents in general into or onto the sink
because they could react with the chemical structure of the sink and damage it beyond repair.
• Clean the sink regularly after each time it is used with warm water and a liquid detergent and a soft cloth.
Generic stains should be removed immediately.
• Cleaning powders and creams which are even slightly abrasive should not be used, nor chemically aggressive
detergents.
• Marks caused by foods or liquid which stain easily, i.e. tea, coffee, fruit juice and the like, must be removed
immediately with very hot water and a cleaning product.
• Special stains, such as those caused by Indian ink, ink, oil-based stains or paints, etc., must be removed
immediately.
If these stains are difficult to remove, use a cloth dampened with denatured alcohol.
• For organic stains which are especially difficult to remove, it is recommended that you fill the sink with a
highly diluted organic cleaner such as bleach and let stand overnight. The next morning, rinse with warm
water and a soft cloth.
• Lines caused by contact between a pot or fork and the surface of the sink should be removed with a cloth
or sponge and liquid detergent.
1” Counter / benchtop with hole drilled
Molly
Special sealant
Sink flange
Saddle
Screw
© Tasman Sinkware - TF158c Granite Sink Installation Instructions
GRANITE SINK INSTALLATION INSTRUCTIONS
Please retain for consumer as care instructions are included
FOR TOPMOUNT INSTALLATION PRACTICAL ADVICE ON THE CARE AND MAINTENANCE OF THE SINK
OTHER INSTRUCTIONS ON HOW TO CLEAN THE SINK
FOR UNDERMOUNT INSTALLATION