Loading ...
Loading ...
2422-3
6. After you input the site name, press C
until the current DST/Standard Time setting
starts to flash on the display.
• The site name area has spaces for 14
characters, so you must continue to press
C until you get past the 14th character.
• O indicates DST and OFF indicates
Standard Time.
7. Press D to toggle the setting between DST (O ) and Standard Time
(OFF).
8. Press C and the current GMT differential starts to flash.
9. Use D (+) and B (–) to change it.
• See “TIME ZONE TABLE” at the back of this manual for GMT
differential information for a number of time zones and cities.
10. Press A to exit the setting screen.
To toggle a site time between DST and Standard Time
1. In the Site Mode, use D to display the name of the site whose DST/
Standard Time setting you want to change.
2. Hold down A until the cursor appears on the display, which indicates
the setting screen.
3. Press C 14 times until the DST/Standard Time setting screen
appears, with either O or OFF flashing.
4. Press D to toggle the setting between DST (O ) and Standard Time
(OFF).
5. Press A to exit the setting screen.
GMT differential
IDENTIFICATION MODE
With the Identification (ID) Mode, you can
store your SCUBA diver certificate number,
passport number, and blood type.
• All of the operations in this section are
performed in the Identification Mode, which
you enter by pressing C.
About Identification Mode Data
• The Identification Mode has three pre-
programmed data titles: C CARD
(SCUBA diver certificate number),
PASSPORT (passport number), and
BLOOD TYPE (blood type).
• Except for BLOOD TYPE, you can input 16 characters (letters,
numbers, symbols) in the text area and 10 digits in the number area.
• In the case of BLOOD TYPE, you can input a blood type (ABO)
and Rh factor.
To view Identification Mode data
In the Identification Mode, each press of D scrolls through the data in
the sequence shown below.
PASSPORT
C CARD
BLOOD TYPE
• In the Text Area, the title alternates with the input text.
Number area
Mode indicator
Text area
C CARD
Inputting Text and Numbers
The following procedure is the same for C CARD and
PASSPORT data.
To input text and numbers
1. In the Identification Mode, use D to
display either C CARD or
PASSPORT.
2. Hold down A until the cursor appears in
the text area, which indicates the setting
screen.
• If you do not want to input text into the text
area, press C 16 times to move the cursor
to the number area and jump to step 7.
3. Use B and D to change the character at the cursor position in the
text area. The character changes in the following sequence.
-
)
Press D.
Press B.
(space)
1
to
0
A
to
Z
( / .
4. When the character you want is at the cursor position, press C to
move the cursor to the right.
5. Repeat steps 3 and 4 to input the rest of your text.
6. After you input the text, use C to move the cursor to the number
area.
Cursor
• The text area in the Identification Mode can hold up to 16
characters. When the cursor is located at the 16th space of the text
area, moving the cursor to the right causes it to jump down to the
first digit in the number area. When the cursor is at the 10th digit of
the number area, moving it to the right causes it jump back up to the
first character of the text area.
7. Use B and D to change the character (hyphen, number, or space)
at the cursor position in the number area. The character changes in
the following sequence.
x
(space)
0
to
9
Press D.
Press B.
8. When the character you want is at the cursor position, press C to
move the cursor to the right.
9. Repeat steps 7 and 8 to input the rest of the number.
10. Press A to store your data and exit the setting screen.
To input your blood type
1. In the Identification Mode, use D to
display the BLOOD TYPE.
2. Hold down A until the blood type starts to
flash, which indicates the setting screen.
3. Use B and D to scroll through the
available blood types in the following
sequence.
A B O AB
Press D.
Press B.
4. Press C so the Rh factor indicator (x or *) is flashing.
5. Press D to select either x (negative) or * (positive).
6. Press A to store your settings and exit the setting screen.
To edit C CARD and PASSPORT data
1. In the Identification Mode, use D to display either C CARD or
PASSPORT.
2. Hold down A until the cursor appears in the text area, which
indicates the setting screen.
3. Use C to move the cursor to the character you want to change.
4. Use B and D to change the character.
• For details on inputting characters, see “To input text and numbers.”
5. After making the changes that you want, press A to store them and
exit the setting screen.
To delete C CARD and PASSPORT data
1. In the Identification Mode, use D to display either C CARD or
PASSPORT.
2. Hold down A until the cursor appears in the text area, which
indicates the setting screen.
3. Press B and D at the same time to delete the currently displayed
data.
• After the data is deleted, the cursor appears in the text area, ready
for input.
4. Input data or press A to exit the setting screen.
Blood type
Rh factor indicator
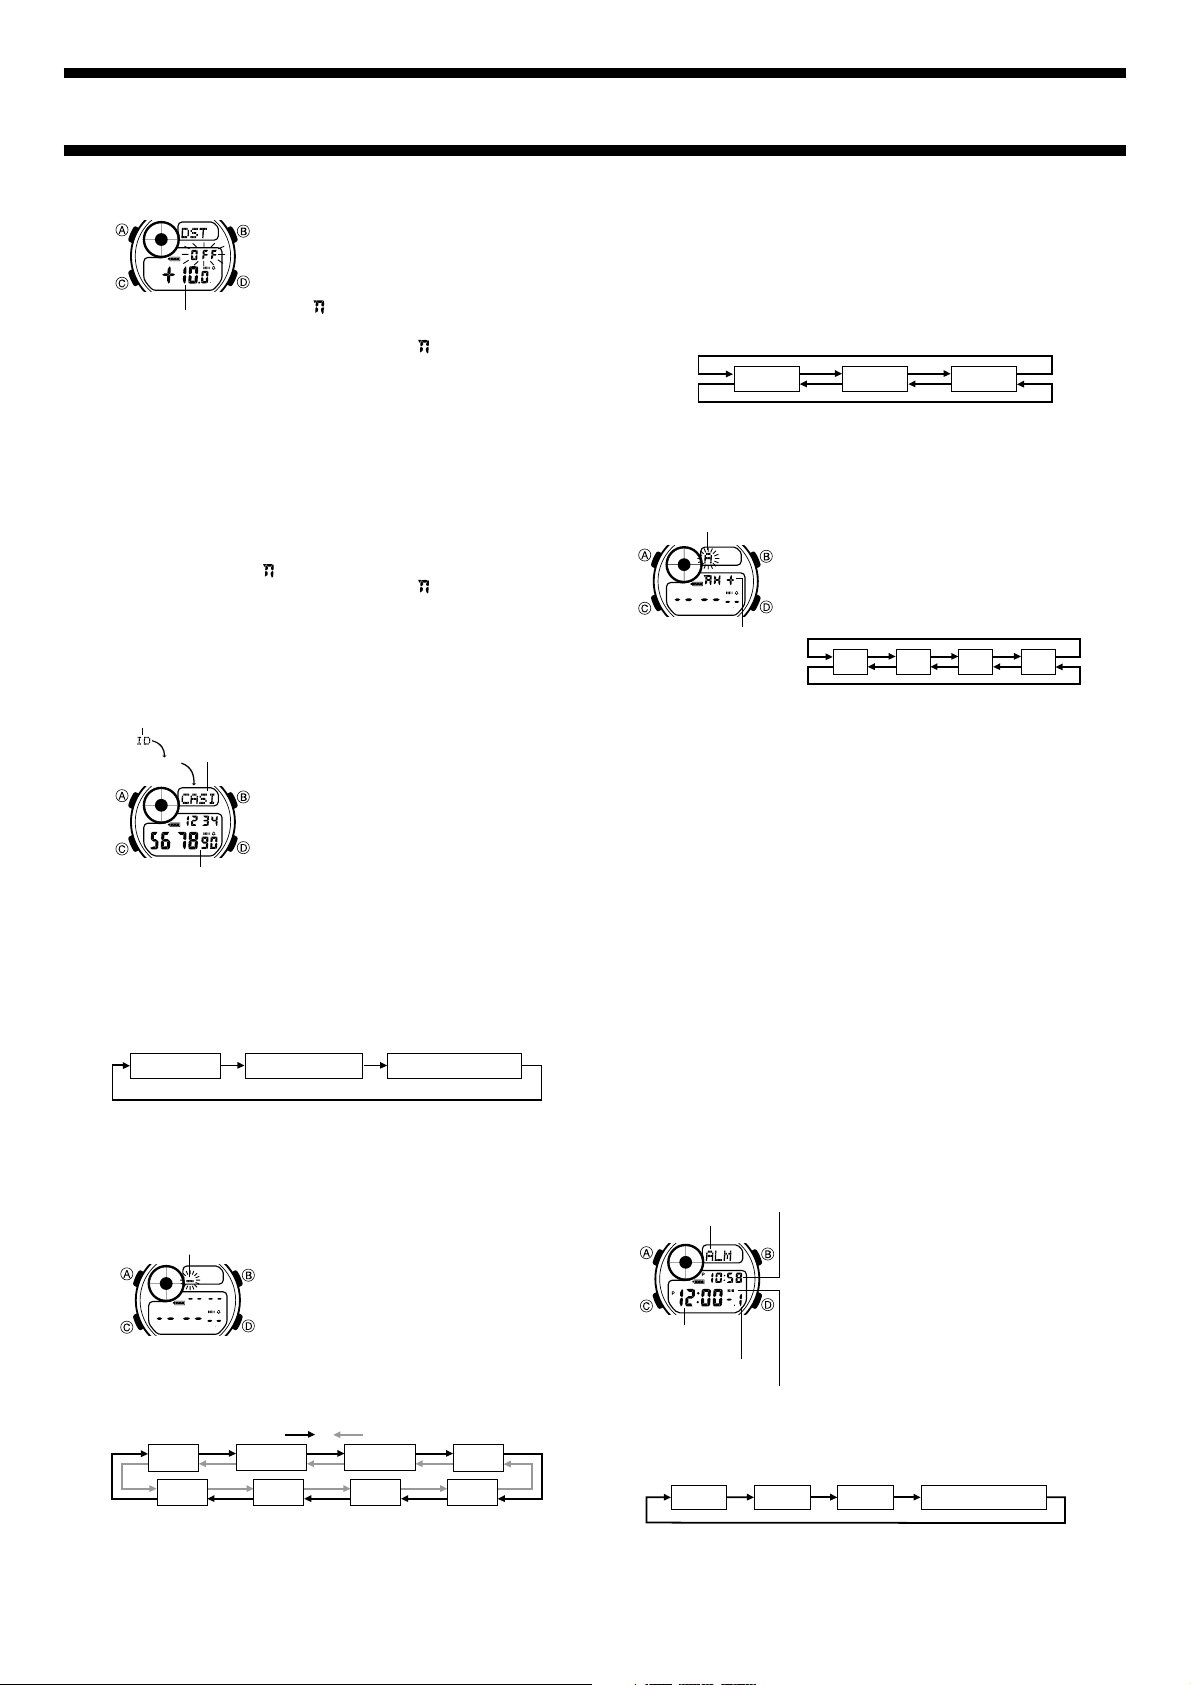
ALARM
You can set up to three independent Daily
Alarms. When an alarm is turned on, the
alarm tone sounds for 20 seconds at the
preset time each day. Press any button to stop
the alarm after it starts to sound.
When the Hourly Time Signal is turned on, the
watch beeps every hour on the hour.
• The alarm number (1 through 3) indicates
the currently displayed alarm screen. On the
Hourly Time Signal screen, SIG appears
in place of ALM.
• Alarm settings (and Hourly Time Signal
settings) are available in the Alarm Mode,
which you enter by using C.
To set an alarm time
1. In the Alarm Mode, use D to select the alarm (1, 2, or 3) whose
time you want to set.
Alarm 1
Hourly Time Signal
Alarm 2 Alarm 3
2. Hold down A until the hour digits of the alarm time start to flash,
which indicates the setting screen.
• This automatically turns on the alarm.
Alarm on indicator
Mode indicator
Alarm time
(Hour : Minutes)
Current time
Alarm number
Loading ...
Loading ...
Loading ...