IMPORTANT: Before installation, please read all warning statements included at the bottom of
these instructions.
To ensure proper installation, please follow each step below:
Step 1 - INITIAL SETUP
1. Carefully unpack your lights from the box. Remove and dispose of the wire ties and
plastic bag (see warning on bottom).
2. When installing landscape lights outside, a ground fault circuit interrupter (GFCI)
receptacle must be used. Before installing, plug the landscape lights into the GFCI
receptacle to ensure all lights work properly.
IMPORTANT: Unplug the landscape lights prior to installation.
Step 2 - INSTALLING LANDSCAPE LIGHTS
Each landscape light is designed with two universal keyholes for mounting the included
stakes (one per light) or for mounting on a flat surface (see below instructions).
Ground Mounting
1. Carefully plan your installation by laying out your
landscape lights in the desired sequence—starting
with the GFCI receptacle and power supply. The first
light can be within 10ft. of the power supply. Each
subsequent light can be placed within 8ft. of each
other.
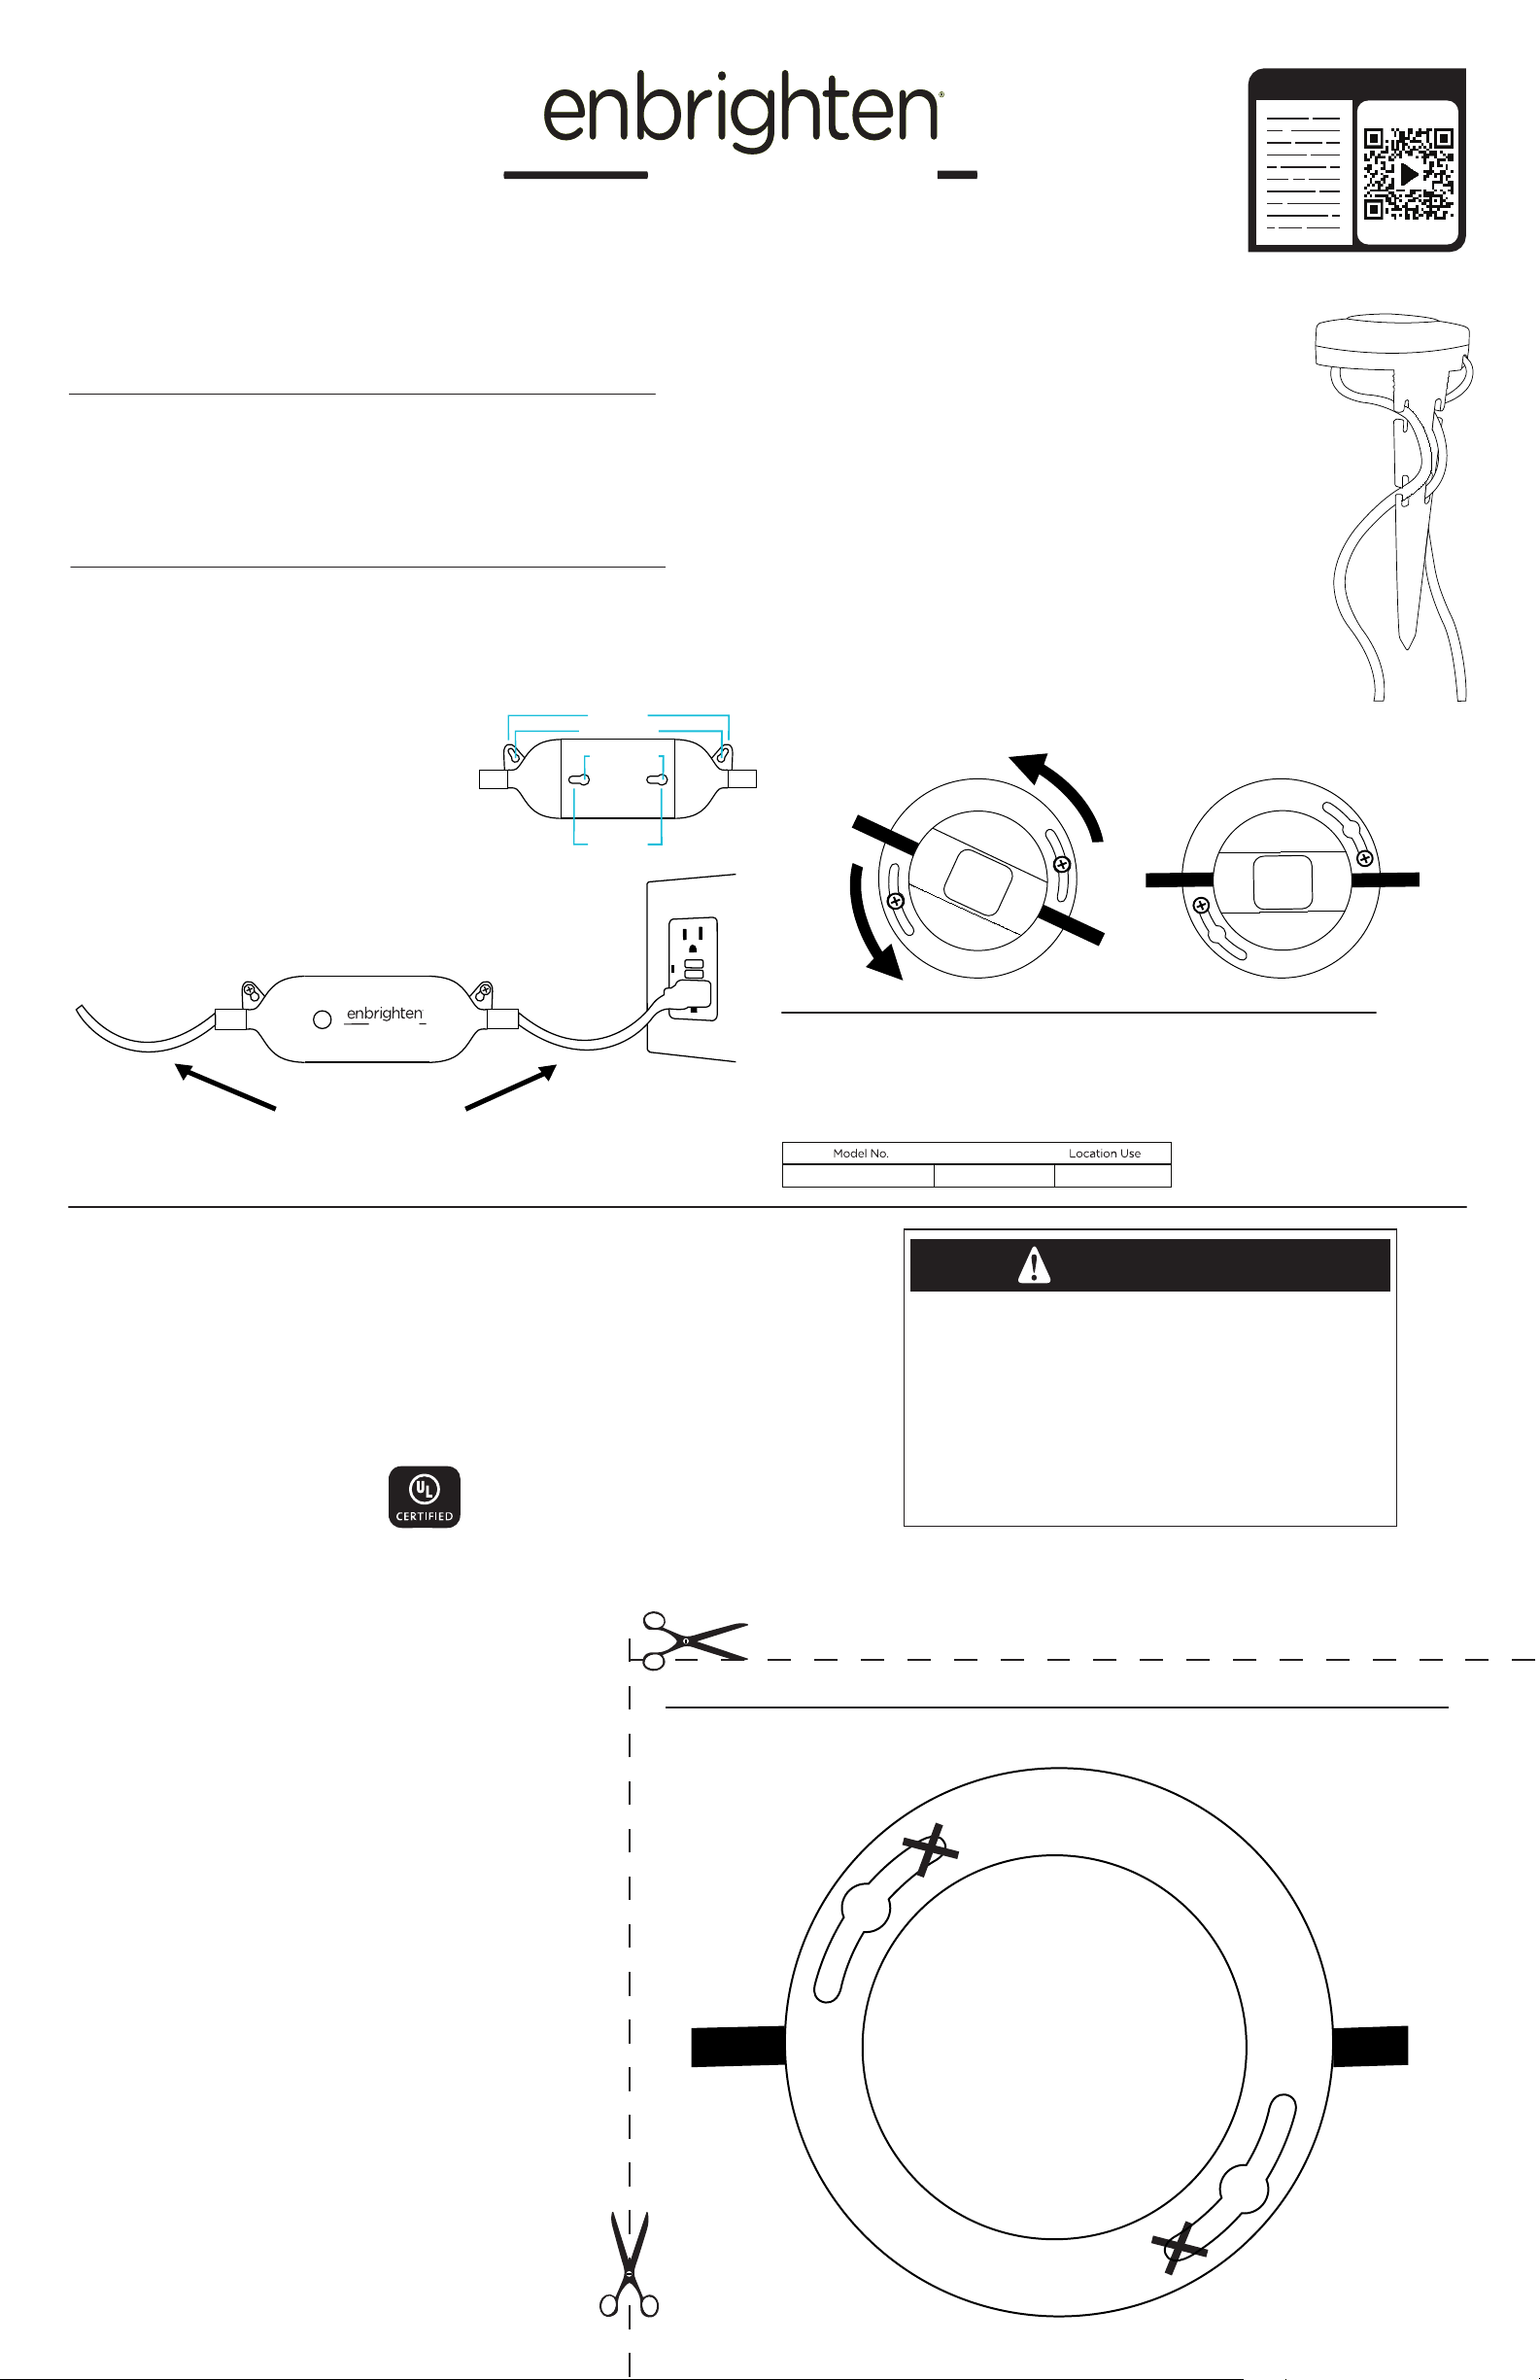
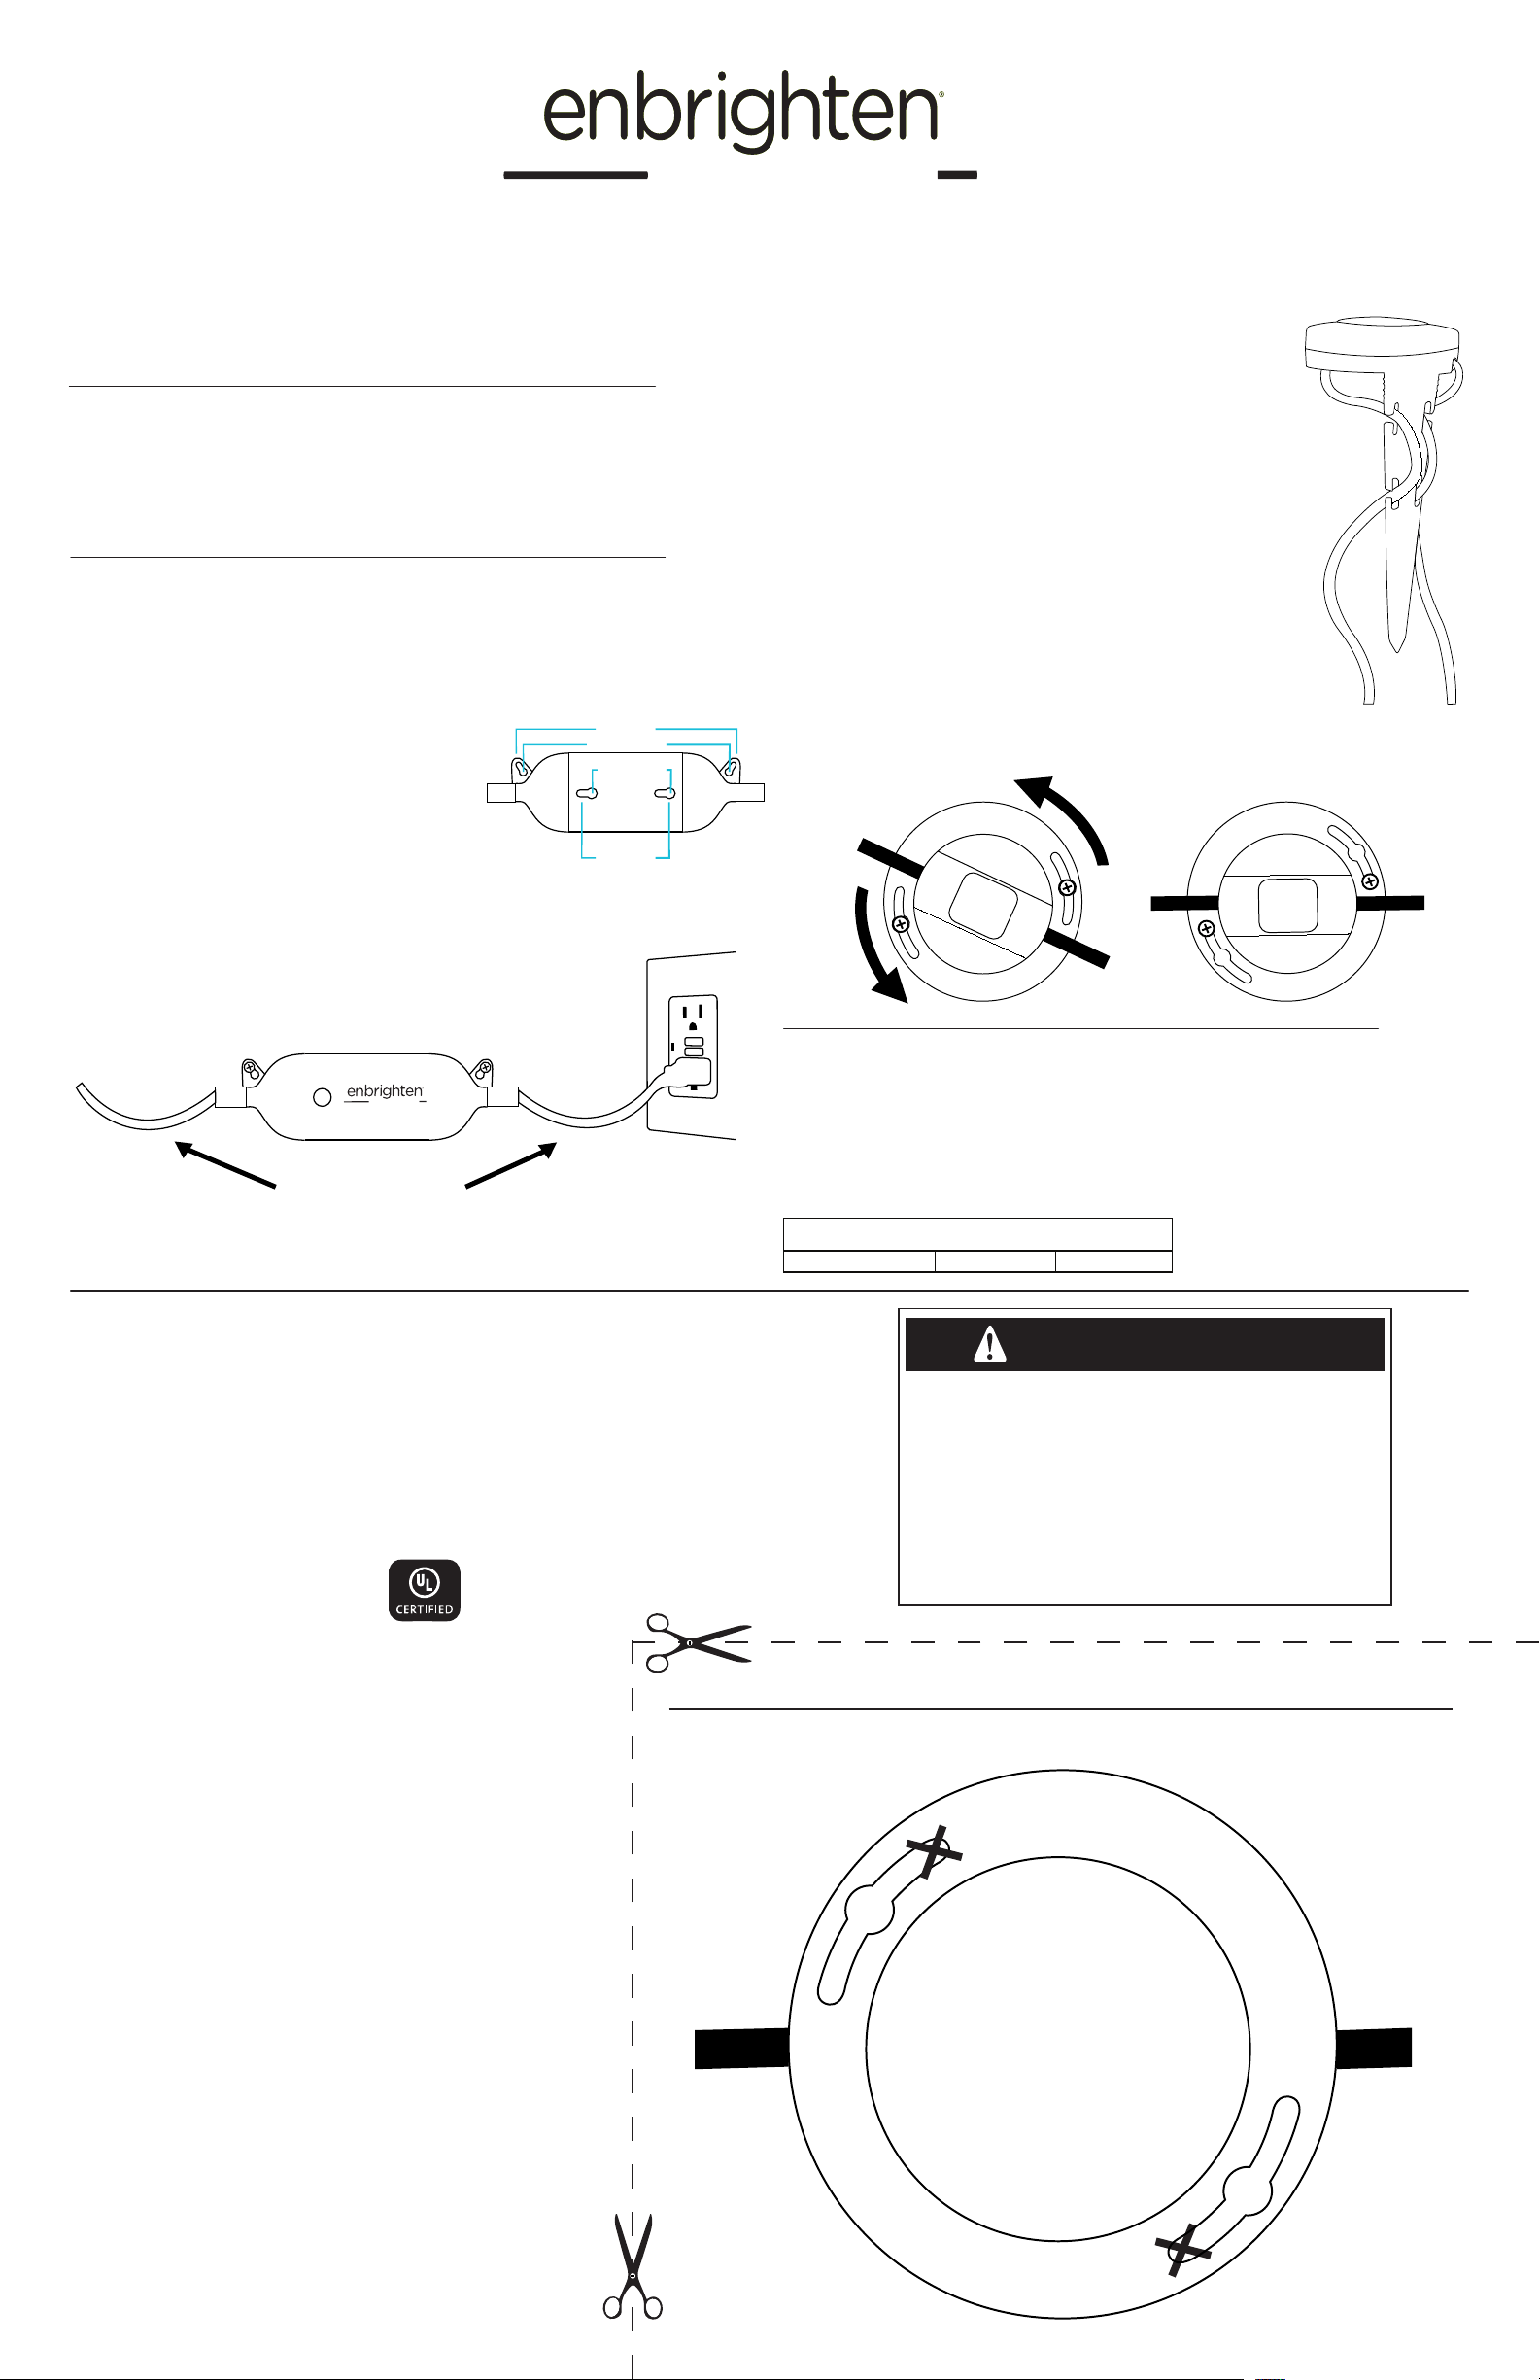
2. Mount the power supply using either the keyholes on
the back or ear-tabs on the side (see Figure A). Do not
lay the power supply directly on the ground or where
standing water may accumulate (see Figure B).
Landscapes
L
a
n
d
s
c
a
p
e
s
L
a
n
d
s
c
a
p
e
s
3. Ground mounting has two options for installation: placing the light directly
on the ground or using the included mounting stake.
a) Placing on the ground: lay each light directly on flattened ground such
as garden bedding, walkways, etc.
b) Using the mounting stake: insert the stake into either keyhole slot on
the bottom of the puck and firmly plant it into soil or mulch (see
Figure C). NOTE: If the stake requires more than a firm push, loosen
the soil or remove debris.
c) Cord-management: your Enbrighten landscape lights feature burial-
grade cable. This allows you to conceal excess cable by directly
burying it in the soil or covering it with garden bedding.
Flat-surface mounting
Lay out the landscape system in the manner in which you plan to install. Only
mount lights to a solid support structure, such as joist, beams, studs or other
solid mounting surfaces. Use two #6 pan head screws (not included) of an
appropriate length for the surface (See Figure D) to properly mount the lights.
Use the provided mounting template for guidance.
Step 3 - ACTIVATING LANDSCAPE LIGHTS
To turn on or o, press button on power supply.
Figure D
Figure B
Do not pull cord tight, leave
slack in loop to prevent
strain on power supply.
READ IT OR WATCH IT
Read instructions or watch easy-to-follow video.
Scan QR code or visit https://byjasco.com/56064i
Electrical ratings
Input: 120V, 50/60Hz
WLL/52/6/18/2 26W WET
Input Watt, Max.
Figure C
Congratulations on your recent purchase of Enbrighten Landscape Lights. Enbrighten
Landscape Lights are designed to provide lighting for life with no bulbs to replace ever again!
Keyholes
Ear-tabs
2in./50.8mm
6.38in./162mm
Figure A
Align parallel with edge of mounting surface
Line A
Mounting Template
Cut out mounting template and place template at
your desired mounting location. Align line A parallel
with edge of the mounting surface. Drill pilot holes
on X locations and screw into the pilot holes. Place
puck onto the keyholes, and twist to lock into place.
* Pilot hole drill size for #6 pan head wood screw,
soft wood 3/32in., hard wood 9/64in.
Drill
Hole
Drill
Hole
Refer to the manual or visit www.byjasco.com for limitations and restrictions on warranties and the product registration information.
WARNING: When using outdoor-use portable luminaires, basic safety precautions should always be followed to reduce the risk of fire, electrical shock, and
personal injury, including the following:
Ground Fault Circuit Interrupter (GFCI) protection is to be provided on the circuit(s) or outlet(s) to be used for the wet location portable luminaire. Receptacles are
available having built-in GFCI protection and are able to be used for this measure of safety.
WARNING: Keep these bags away from babies and children. Do not use in cribs, beds, carriages, or playpens. The thin film may cling to nose and mouth and
prevent breathing.
Warranty Information: This Jasco product is warrantied for three (3) years with a limited-lifetime replacement warranty on Enbrighten LED light source only.
RISK OF ELECTRIC SHOCK
• RECEPTACLE OUTLETS USED FOR POWERING
LANDSCAPE LIGHTS SHALL COMPLY WITH ALL
NATIONAL AND LOCAL ELECTRICAL CODES.
CONSULT LOCAL ELECTRICIAN IF UNSURE OF
COMPLIANCE REQUIREMENTS.
• FOR USE ONLY ON GFCI PROTECTED CIRCUITS.
• DO NOT SUBMERSE.
• DO NOT USE AROUND AQUARIUMS.
• LANDSCAPE LIGHTS ARE A WET-LOCATION
PRODUCT AND HAVE NO SERVICEABLE PARTS.
• DO NOT USE WITH EXTENSION CORD, NEAR WATER
OR WHERE WATER MAY ACCUMULATE.
• KEEP LAMPS AT LEAST 16 FEET FROM POOLS
AND SPAS.
• KEEP PLUGS AND RECEPTACLES DRY.
• AVOID DAMAGE TO THE CORDS AND LAMP
ASSEMBLIES DURING INSTALLATION. PERIODICALLY
INSPECT THE LANDSCAPE LIGHTS FOR PHYSICAL
DAMAGE OR OTHER DAMAGE CAUSED BY OUTDOOR
EXPOSURE TO THE ELEMENTS.
• REPLACE ANY DAMAGED LANDSCAPE
LIGHTS.
• DO NOT INSTALL IN LOCATIONS WHERE
LANDSCAPE LIGHTS CAN BE STEPPED ON.
• ENSURE LANDSCAPE LIGHTS ARE
UNPLUGGED FROM POWER DURING
INSTALLATION.
• CHILDREN SHOULD NOT PLAY WITH
LANDSCAPE LIGHTS.
• UL RECOMMENDS TESTING GFCI CIRCUITS
AND RECEPTACLES EVERY MONTH TO
ENSURE PROPER OPERATION.
RISK OF FIRE
• LANDSCAPE LIGHTS ARE DESIGNED TO
BE MOUNTED WITH THEIR INDIVIDUAL
KEYHOLE MOUNTING FEATURE. DO
NOT MOUNT LANDSCAPE LIGHTS USING
THE MAIN ELECTRICAL CORD OR THE
INDIVIDUAL DROP CORDS.
• NOT INTENDED FOR INSTALLATION IN
CEILINGS, SOFFITS, CABINETS, ATTICS, OR
OTHER ENCLOSED SPACES.
MADE IN THAILAND
Distributed by Jasco Products Company LLC,
10 E. Memorial Rd., Oklahoma City, OK 73114.
This Jasco product comes with a 3-year limited warranty.
Visit www.byjasco.com for warranty details.
Questions? Contact our U.S.-based Consumer Care at 1-800-654-8483
between 7AM-8PM, M-F, Central Time.
Patents pending | www.enbrightenme.com
Important — please read:
WARNING
56064
Version 2
02/22
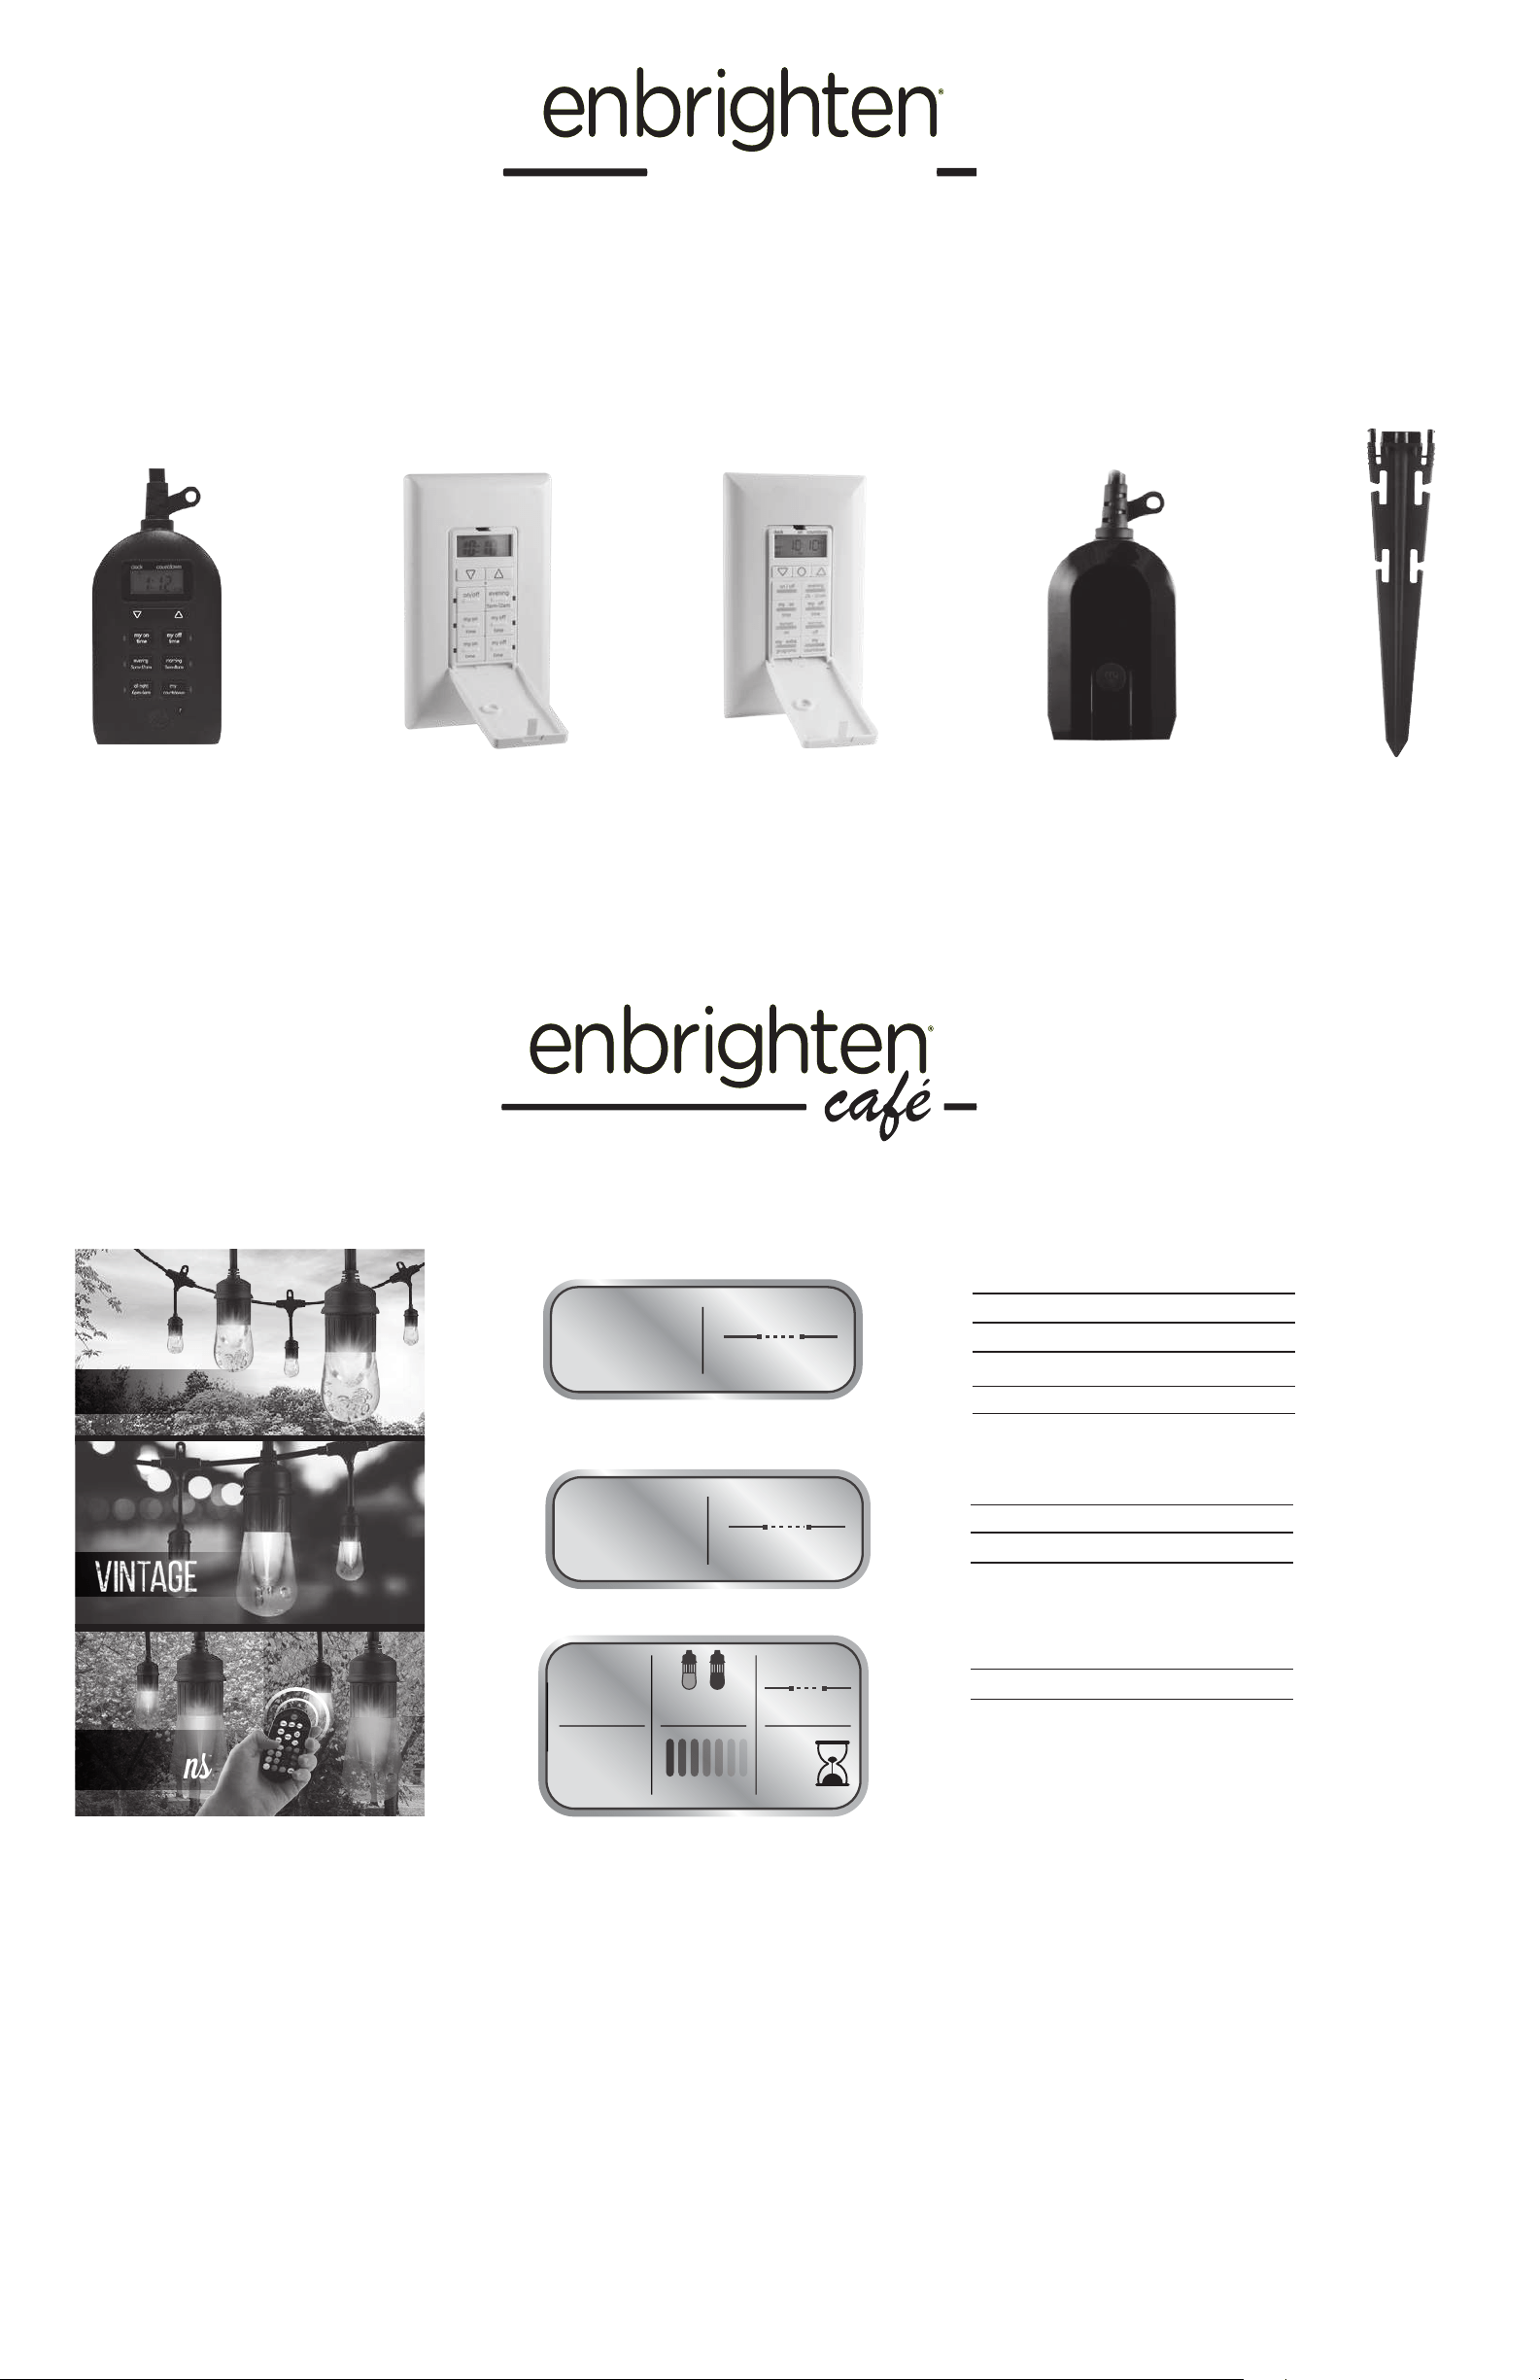
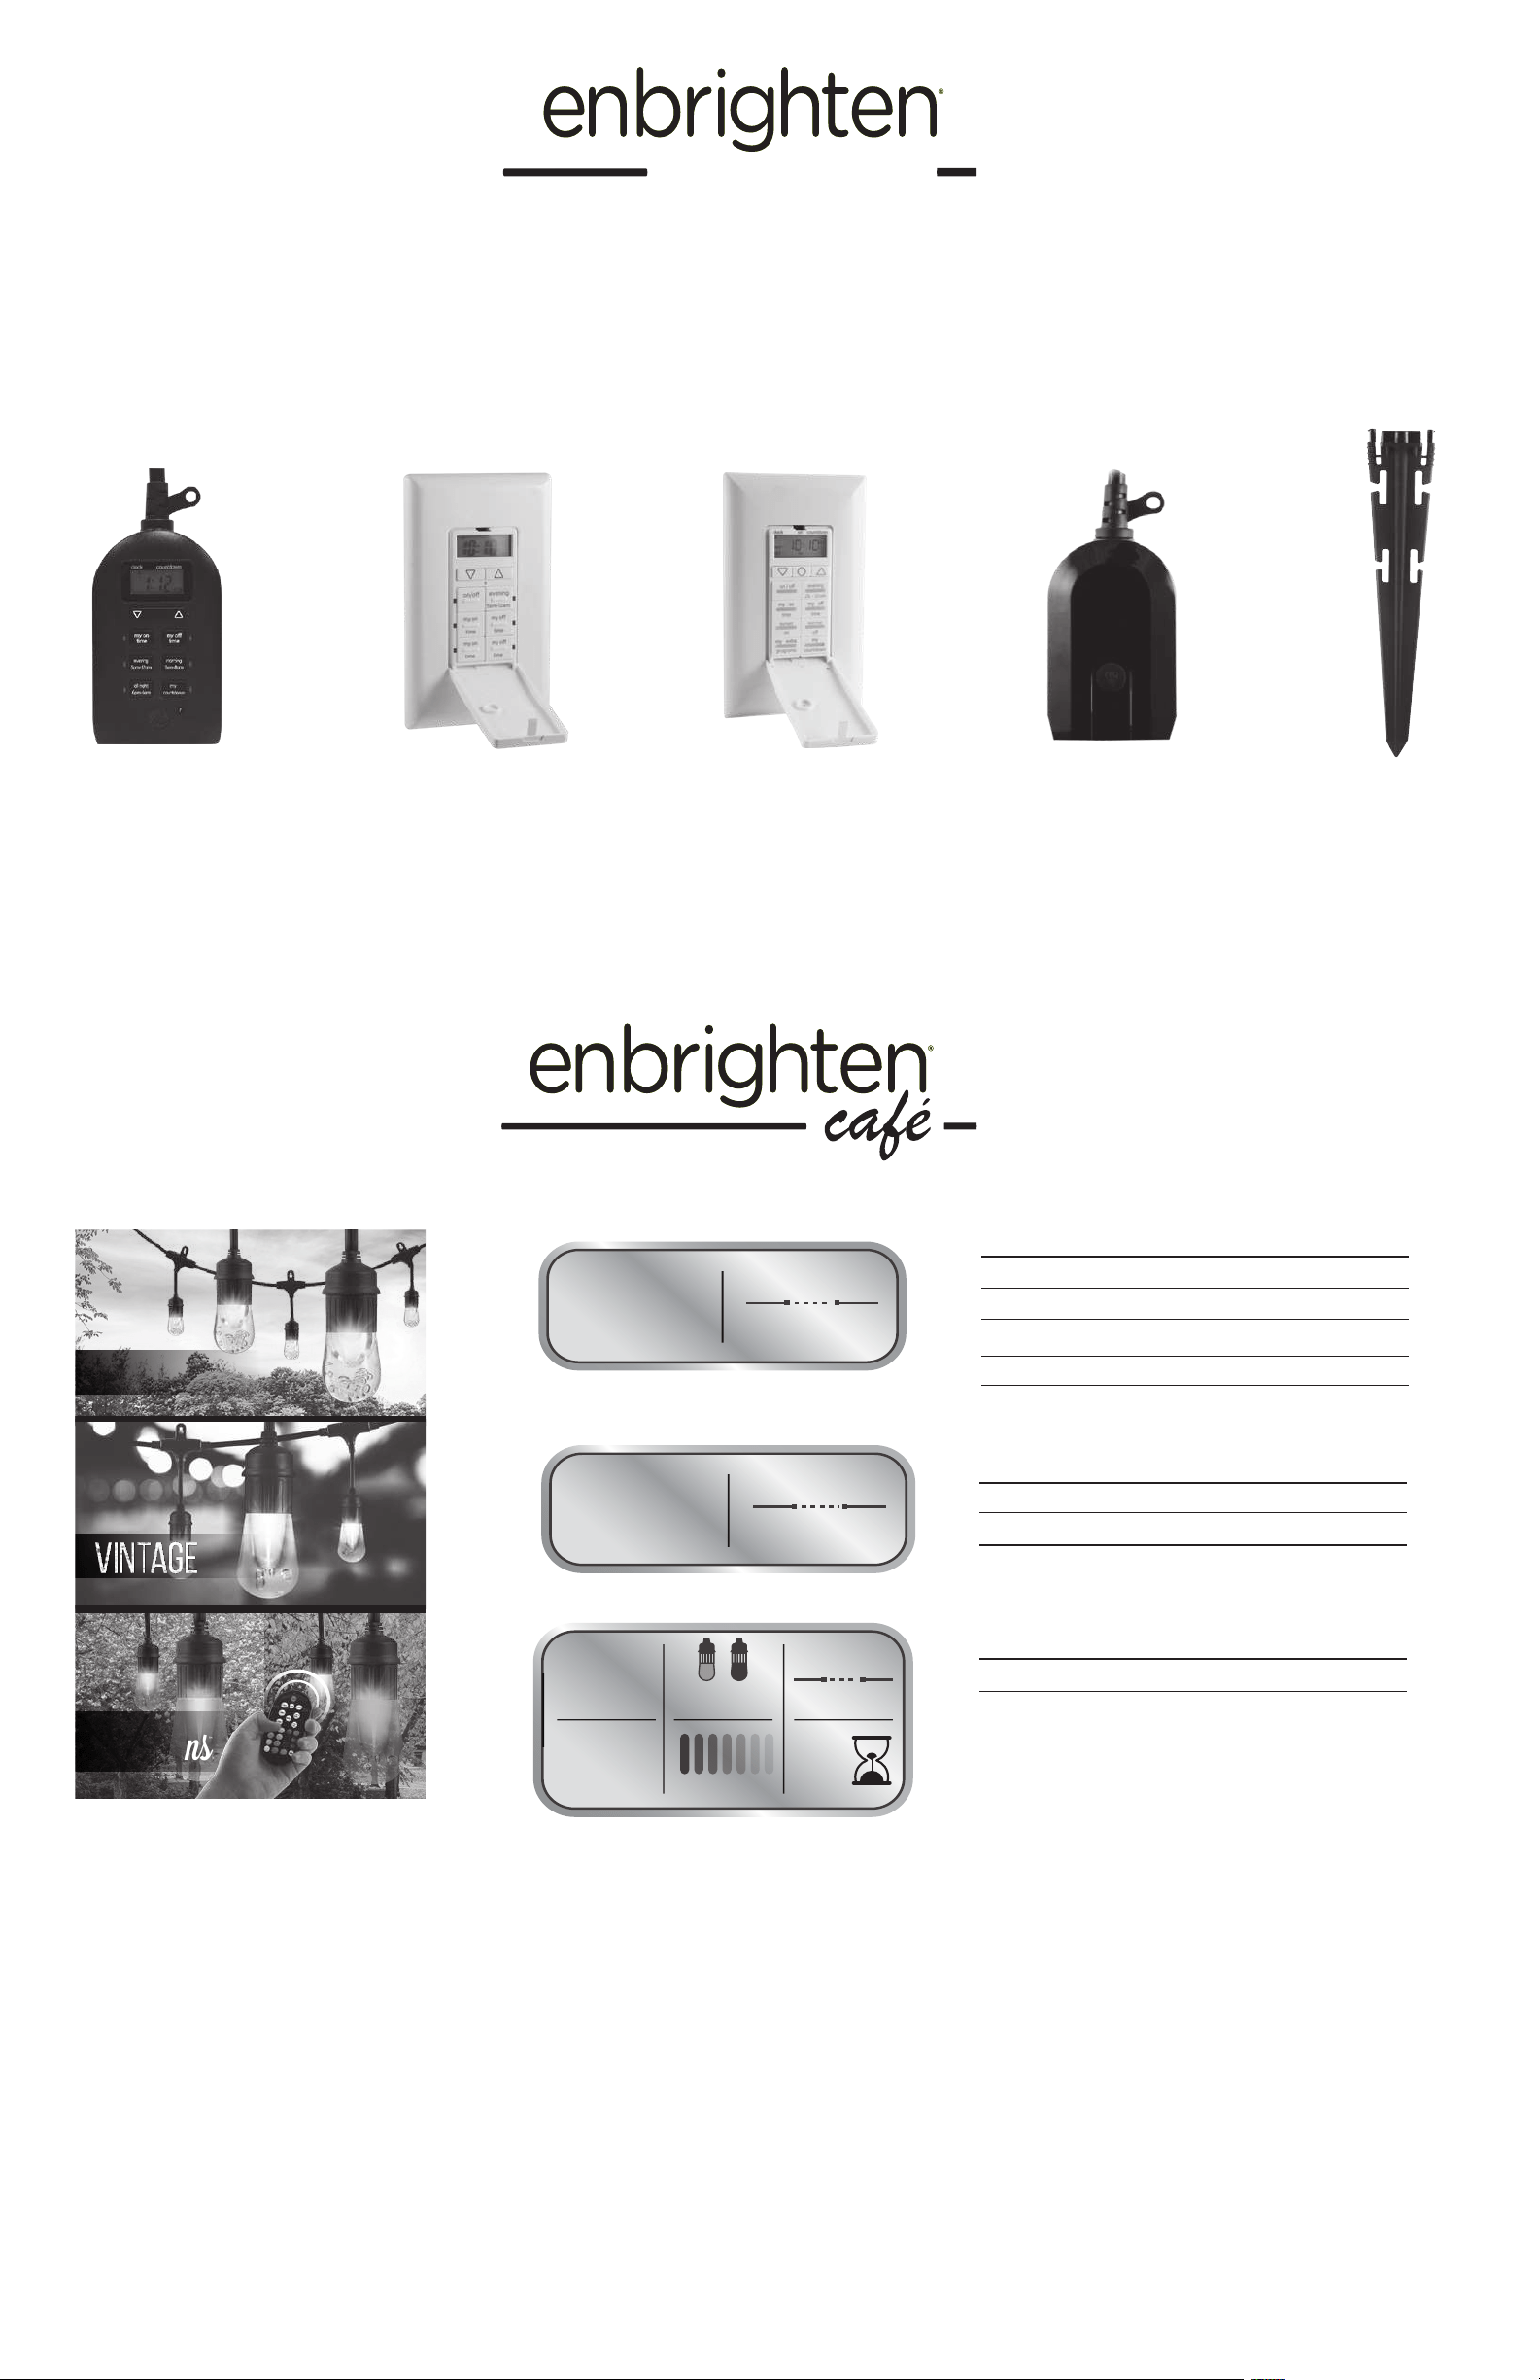
myTouchSmart
Outdoor/Indoor Plug-in Timer
Model #26898
Heavy-duty and
weather-resistant with two
grounded outlets. Fully
customizable time settings.
Easy-to-program custom
settings, presets and countdown
options. ON/OFF switch opens
to reveal program buttons.
Schedule and control outdoor
lighting from any mobile or
voice-controlled device.
Easy-to-program custom settings,
presets and countdown options.
Self-adjusts to sunset/sunrise times
throughout the year. ON/OFF switch
opens to reveal program buttons.
For addtional stakes and
accessories, visit
www.enbrightenme.com
or call 1-800-654-8483
myTouchSmart
In-Wall Digital Timer
Model #414311
myTouchSmart Sunsmart™
In-Wall Digital Timer
Model #33861
myTouchSmart
Outdoor/Indoor Wifi Smart Plug
Model #39845
Multiple lengths and styles available now at www.enbrightenme.com
Landscapes
Simplify your enbrighten® experience by
automating on and o light times
We recommend the following models, available at select retailers or at www.enbrightenme.com
WARM
VINTAGE LIGHT
2200K
LINKABLE
750ft.
UP
TO
Black cord:
35626 12ft. / 6 Bulbs
35629 24ft. / 12 Bulbs
35631 48ft. / 24 Bulbs
White cord:
35643 12ft. / 6 Bulbs
35646 24ft. / 12 Bulbs
35648 48ft. / 24 Bulbs
WARM
WHITE LIGHT
2700K
LINKABLE
750ft.
UP
TO
Black cord:
31660 12ft. / 6 Bulbs
33307 18ft. / 9 Bulbs
31662 24ft. / 12 Bulbs
31663 36ft. / 18 Bulbs
31664 48ft. / 24 Bulbs
White cord:
35604 12ft. / 6 Bulbs
36803 24ft. / 12 Bulbs
35608 48ft. / 24 Bulbs
WARM
VINTAGE LIGHT
2200K
LINKABLE
750ft.
UP
TO
ANY 2 COLOR
COMBINATIONS
DIMMABLE
PRESET
COLOR &
EFFECT
MODES
2 OR 4
HOUR
TIMERS
Black cord:
37791 24ft. / 12 Bulbs
37790 48ft. / 24 Bulbs
White cord:
39511 24ft. / 12 Bulbs
39092 48ft. / 24 Bulbs
Seasons
™
Classic
IMPORTANTE: Antes de la instalación, lea todas las advertencias que se incluyen al final de estas
instrucciones.
Para garantizar una correcta instalación, siga todos los pasos que se detallan a continuación:
Paso 1: INSTALACIÓN INICIAL
1. Saque de la caja las bombillas tus con cuidado. Quite ydeseche los alambres de sujeción y la
bolsa de plástico (véase la advertencia en la parte inferior).
2. Si las bombillas para exterior se instalan afuera, se debe utilizar un interruptor de circuito de
falla de puesta a tierra (GFCI). Antes de instalarlas, enchúfelas a un interruptor de circuito de
falla de puesta a tierra para asegurarse de que todas las bombillas funcionan correctamente.
IMPORTANTE: Desenchufe las bombillas para exterior antes de realizar la instalación.
Paso 2: INSTALACIÓN DE LAS BOMBILLAS PARA EXTERIOR
Cada bombilla contiene dos orificios universales para montar las estacas que vienen incluidas
(unapor bombilla) o para permitir el montaje sobre una superficie plana (véanse las siguientes
instrucciones).
Montaje sobre el suelo:
1. Acomode el sistema de iluminación para exterior,
a fin deplanificar detenidamente la instalación.
Comience por el GFCI y el montaje del controlador.
Laprimera bombilla puede colocarse a una distancia
dehasta 10ft. (3m) del controlador. Cada una
delas siguientes bombillas puede colocarse a una
distanciade hasta 8ft. (2.44m) de la anterior.
2. Monte la fuente de alimentación utilizando los ojos
de cerradura en la parte posterior o las orejeras en
el lateral (véase la figura A). No coloque la fuente de
alimentación directamente en el suelo o donde se
pueda acumular agua estancada (véase la figura B).
Consulte el manual o visite www.byjasco.com para obtener información sobre las limitaciones y restricciones de la garantía y la información para
registrarelproducto.
ADVERTENCIA: Cuando utilice luminarias portátiles para exterior, siempre respete las precauciones básicas para reducir el riesgo de incendio,
descargaseléctricas y lesiones a personas, incluidas las siguientes:
Proteja los circuitos o las tomas que utilizará para alimentar las luminarias portátiles en lugares húmedos mediante un interruptor de circuito de falla
depuestaatierra (GFCI). Es posible conseguir tomas con protección GFCI incorporada para cumplir con esta medida de seguridad.
ADVERTENCIA: Mantenga las bolsas lejos del alcance de bebés y niños. No use en cunas, camas, cochecitos ni corralitos para bebés. Su capa fina
puedepegarse a la nariz y la boca, impidiendo así la respiración.
Información sobre la garantía: Este producto de Jasco tiene una garantía de tres (3) años y una garantía limitada de por vida únicamente para los
repuestosdela fuente de luz LED Enbrighten.
RIESGO DE DESCARGA ELÉCTRICA
• LAS TOMAS ELÉCTRICAS QUE SE UTILICEN PARA ALIMENTAR
EL SISTEMA DE ILUMINACIÓN PARA EXTERIOR DEBEN CUMPLIR
CON LOS CÓDIGOS ELÉCTRICOS LOCALES Y NACIONALES.
CONSULTE CON UN ELECTRICISTA LOCAL SI NO ESTÁ SEGURO
SOBRE LOS REQUISITOS NORMATIVOS.
• SOLO SE DEBE UTILIZAR CON CIRCUITOS PROTEGIDOS
MEDIANTE GFCI.
• NO SUMERGIR.
• NO USAR CERCA DE ACUARIOS.
• LAS BOMBILLAS PARA EXTERIOR SON PRODUCTOS APTOS
PARA LUGARES HÚMEDOS Y NO CONTIENEN PIEZAS QUE
PUEDAN SER REPARADAS POR EL USUARIO.
• NO USAR CON CABLES DE EXTENSIÓN, CERCA DEL AGUA O
EN ÁREAS EN LAS QUE PUEDA ACUMULARSE AGUA.
• MANTENER LAS BOMBILLAS A UNA DISTANCIA MÍNIMA DE 4,8
METROS (16 PIES) DE PISCINAS Y SPAS.
• MANTENGA SECOS LOS ENCHUFES Y LAS TOMAS.
• EVITE DAÑAR LOS CABLES Y LAS BOMBILLAS DURANTE LA
INSTALACIÓN. REVISE PERIÓDICAMENTE LAS BOMBILLAS
PARA EXTERIOR A FIN DE DETECTAR DAÑOS FÍSICOS U OTROS
DAÑOS PROVOCADOS POR LA EXPOSICIÓN A LA INTEMPERIE.
• REEMPLACE LAS BOMBILLAS PARA EXTERIOR
QUE ESTÉN DAÑADAS.
• NO INSTALE LAS BOMBILLAS EN ÁREAS EN LAS
QUE SEA PROBABLE PISARLAS.
• ASEGÚRESE DE QUE LAS BOMBILLAS PARA
EXTERIOR ESTÉN DESENCHUFADAS DURANTE
LA INSTALACIÓN.
• LOS NIÑOS NO DEBEN JUGAR CON LAS
BOMBILLAS PARA EXTERIOR.
• DE ACUERDO CON LA NORMA UL, SE
RECOMIENDA PROBAR LAS TOMAS Y LOS
CIRCUITOS GFCI TODOS LOS MESES PARA
GARANTIZAR SU CORRECTO FUNCIONAMIENTO.
RIESGO DE INCENDIO
• CADA BOMBILLA PARA EXTERIOR ESTÁ
DISEÑADA PARA SER INSTALADA UTILIZANDO SU
PROPIO ORIFICIO DE MONTAJE. NO LAS INSTALE
UTILIZANDO EL CABLE ELÉCTRICO PRINCIPAL NI
LOS CABLES DE EXTENSIÓN INDIVIDUALES.
• NO INSTALAR EN TECHOS, SOFITOS, ARMARIOS,
ÁTICOS U OTROS LUGARES CERRADOS.
HECHO EN TAILANDIA
Distribuido por Jasco Products Company LLC,
10 E. Memorial Rd., Oklahoma City, OK 73114.
Este producto de Jasco tiene una garantía limitada de 3años.
Visite www.byjasco.com para conocer los detalles de la garantía.
¿Tiene preguntas? Póngase en contacto con nuestro servicio de atención
al consumidor de EE. UU. al 1-800-654-8483, de 7a.m. a 8p.m. (hora
estándar del centro).
Patente en trámite | www.enbrightenme.com
Especificación eléctrica
Entrada: 120V, 50/60Hz
Importante, leer:
ADVERTENCIA
Landscapes
L
a
n
d
s
c
a
p
e
s
L
a
n
d
s
c
a
p
e
s
Figura D
Figura C
Figura B
WLL/52/6/18/2 26W
No tense el cordón. Deje
cordón flojo en espiral
para evitar que el fuente
de alimentación se
esfuerce.
Felicitaciones por su compra reciente de las bombillas para exterior Enbrighten
Landscape Lights. Las bombillas Enbrighten para exterior están diseñadas conel fin de
brindar iluminación de por vida. ¡No tendrá que reemplazarlas nunca!
3. El montaje en el suelo tiene dos opciones de instalación: colocar la luz
directamente en el suelo o usar la estaca de montaje incluida.
a) Colocación en el suelo: coloque cada luz directamente sobre un
suelo plano, como camas de jardín, pasillos, etc..
b) Usando la estaca de montaje: inserte la estaca en cualquiera de las
ranuras de ojo de cerradura en la parte inferior del disco y plantéelo
firmemente en el suelo o mantillo (véase la figura C). NOTA: Si la
estaca requiere más que un empujón firme, afloje la tierra o elimine
los escombros.
c) Control del cable: Las bombillas para exterior Enbrighten
tienen cables aptosparaser enterrados, lo que le permite enterrar
directamente lo quesobredecable o cubrirlo con una capa de
césped.
Montaje sobre una superficie plana
Acomode el sistema de iluminación para exterior de la manera en que
desee instalarlo. Instale las bombillas únicamente en estructuras de
soporte sólidas, como vigas, viguetas, travesaños u otra superficie de
montaje sólida. Utilice dos tornillos de cabeza plana n.º 6 (no incluidos)
que tengan la longitud adecuada según la superficie sobre la que
se realizará el montaje de las bombillas (véase la figura D). Utilice la
plantilla de montaje proporcionada como guía.
Paso 3: ACTIVAR DE LAS BOMBILLAS PARA EXTERIOR
Para encender o apagar, presione el botón en la fuente de alimentación.
Ojos de
cerradura
Orejeras
2in./50.8mm
6.38in./162mm
Figura A
Alinee de forma paralela al borde de la superficie de montaje
Línea A
Plantilla de montaje
Recorte la plantilla de montaje y colóquela
en la zona en donde desea hacer el montaje.
Alinee la línea A de forma paralela al borde de
la superficie de montaje. Perfore dos orificios
piloto en las X y atornille usando esos orificios.
Coloque la placa a través de los orificios y gire
para fijarla.
* El tamaño del orificio piloto para un tornillo de
cabeza plana n.º 6 para madera debe ser de
3/32in. para madera blanda y de 9/64in. para
madera dura.
Perforar
orificio
Perforar
orificio
LUGAR HÚMEDO
Potencia máxima
deentrada (W)
No. de modelo
Uso de la ubicación
myTouchSmart
Temporizador con enchufe
para exterior/interior
Modelo #26898
De alta resistencia al uso
ylas condiciones climáticas,
con dos tomas con puesta
a tierra. Configuraciones de
temporización totalmente
personalizables.
Ajustes, preconfiguraciones
ycuenta regresiva personalizables
y de fácil programación.
Elinterruptor ON/OFF se puede
abrir para acceder a los botones
de programación.
Permite programar y controlar el
sistema de iluminación de exteriores
desde cualquier dispositivo móvil
ocontrolado por voz.
Ajustes, preconfiguraciones y cuenta
regresiva personalizables y de fácil
programación. Se ajusta automáticamente
a los horarios de salida y puesta del sol
alolargo del año. El interruptor ON/OFF
sepuede abrir para acceder a los botones
de programación.
Para obtener más estacas
yaccesorios, ingrese
a www.enbrightenme.com
ollame al 1-800-654-8483.
myTouchSmart
Temporizador digital para pared
Modelo #414311
myTouchSmart Sunsmart™
Temporizador digital para pared
Modelo #33861
myTouchSmart
Enchufe inteligente con wifi para
exterior/interior
Modelo #39845
En www.enbrightenme.com, encontrará varias longitudes y estilos disponibles.
Landscapes
Simplifique su experiencia con las bombillas Enbrighten®
automatizando los momentos
de encendido y apagado
Recomendamos los siguientes modelos, disponibles en comercios seleccionados o en www.enbrightenme.com.
WARM
VINTAGE LIGHT
2200K
LINKABLE
750ft.
UP
TO
Black cord:
35626 12' / 6 Bulbs
35629 24' / 12 Bulbs
35631 48' / 24 Bulbs
White cord:
35643 12' / 6 Bulbs
35646 24' / 12 Bulbs
35648 48' / 24 Bulbs
WARM
WHITE LIGHT
2700K
LINKABLE
750ft.
UP
TO
Black cord:
31660 12' / 6 Bulbs
33307 18' / 9 Bulbs
31662 24' / 12 Bulbs
31663 36' / 18 Bulbs
31664 48' / 24 Bulbs
White cord:
35604 12' / 6 Bulbs
36803 24' / 12 Bulbs
35608 48' / 24 Bulbs
WARM
VINTAGE LIGHT
2200K
LINKABLE
750ft.
UP
TO
ANY 2 COLOR
COMBINATIONS
DIMMABLE
PRESET
COLOR &
EFFECT
MODES
2 OR 4
HOUR
TIMERS
Black cord:
37791 24' / 12 Bulbs
37790 48' / 24 Bulbs
White cord:
39511 24' / 12 Bulbs
39092 48' / 24 Bulbs
Seasons
™
Classic
LUZ CÁLIDA
VINTAGE
2200K
CONECTABLE
228m
(750ft.)
HASTA
Cable negro:
35626 3,65m (12ft.) / 6 bombillas
35629 7,31m (24ft.) / 12 bombillas
35631 14,63m (48ft.) / 24 bombillas
Cable blanco:
35643 3,65m (12ft.) / 6 bombillas
35646 7,31m (24ft.) / 12 bombillas
35648 14,63m (48ft.) / 24 bombillas
LUZ CÁLIDA
BLANCA
2700K
CONECTABLE
228m
(750ft.)
HASTA
Cable negro:
31660 3,65m (12ft.) / 6 bombillas
33307 5,48m (18ft.) / 9 bombillas
31662 7,31m (24ft.) / 12 bombillas
31663 10,97m (36ft.) / 18 bombillas
31664 14,63m (48ft.) / 24 bombillas
Cable blanco:
35604 3,65m (12ft.) / 6 bombillas
36803 7,31m (24ft.) / 12 bombillas
35608 14,63m (48ft.) / 24 bombillas
LUZ CÁLIDA
VINTAGE
2200K
CONECTABLE
228m
(750ft.)
HASTA
COMBINACIÓN
DE 2 COLORES A
ELECCIÓN
REGULACIÓN DE
INTENSIDAD
MODOS
DE COLOR
Y EFECTO
PREESTABLECIDOS
TEMPO-
RIZADOR
DE 2 O 4
HORAS
Cable negro:
37791 7,31m (24ft.) / 12 bombillas
37790 14,63m (48ft.) / 24 bombillas
Cable blanco:
39511 7,31m (24ft.) / 12 bombillas
39092 14,63m (48ft.) / 24 bombillas