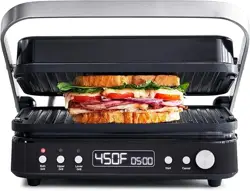
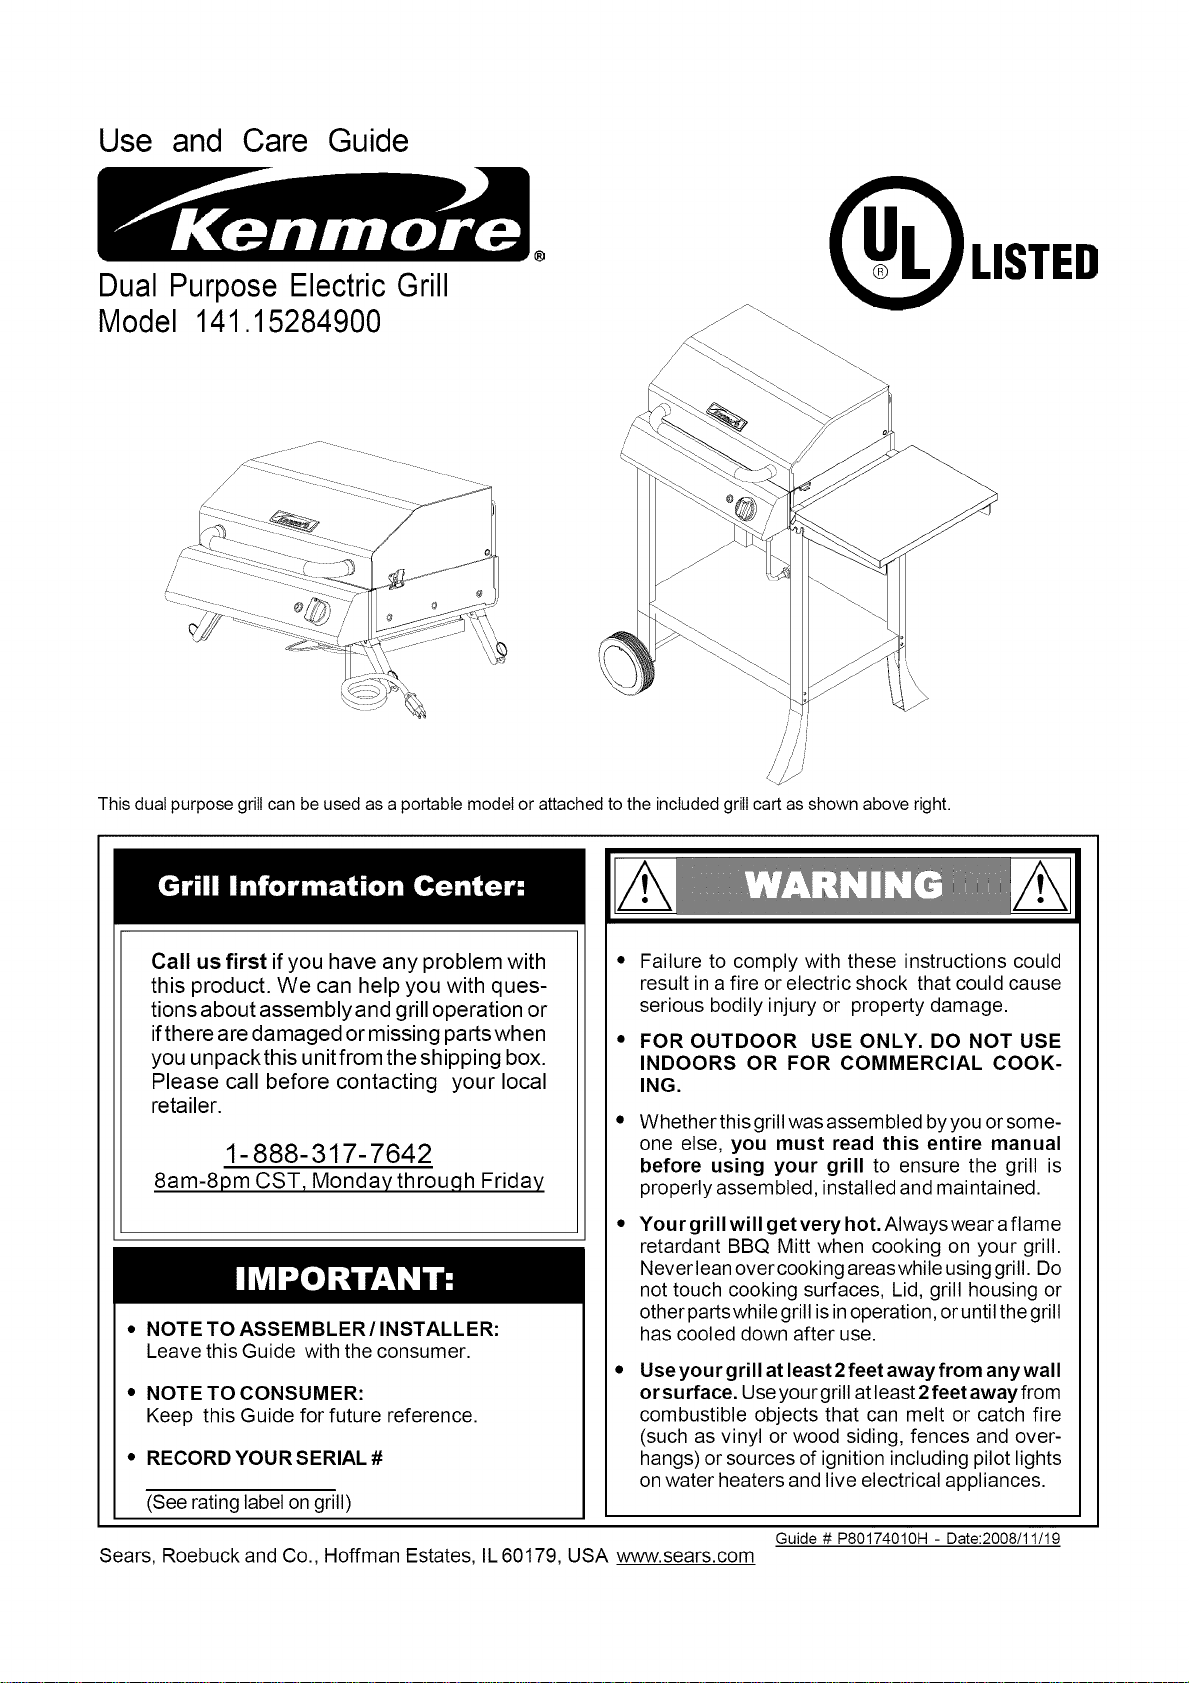
Use and Care Guide
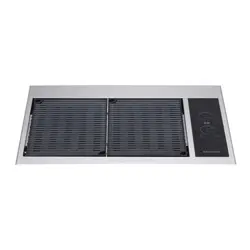
Dual Purpose Electric Grill
Model 141.15284900
QLISTED
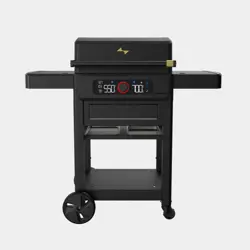
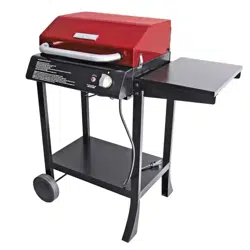
This dual purpose grill can be used as a portable model or attached to the included grill cart as shown above right.
Call us first if you have any problem with
this product. We can help you with ques-
tions about assembly and grill operation or
ifthere are damaged or missing parts when
you unpackthis unit from the shipping box.
Please call before contacting your local
retailer.
1-888-317-7642
8am-8pm CST, Monday throu,qh Friday
• NOTE TO ASSEMBLER/INSTALLER:
Leave this Guide with the consumer.
• NOTE TO CONSUMER:
Keep this Guide for future reference.
• RECORD YOUR SERIAL #
(See rating label on grill)
• Failure to comply with these instructions could
result in a fire or electric shock that could cause
serious bodily injury or property damage.
• FOR OUTDOOR USE ONLY. DO NOT USE
INDOORS OR FOR COMMERCIAL COOK-
ING.
Whether this grill was assembled by you or some-
one else, you must read this entire manual
before using your grill to ensure the grill is
properly assembled, installed and maintained.
Your grill will get very hot. Always wear aflame
retardant BBQ Mitt when cooking on your grill.
Never lean over cooking areaswhile using grill. Do
not touch cooking surfaces, Lid, grill housing or
other partswhile grill isin operation, or until the grill
has cooled down after use.
Useyour grill at least 2 feet away from any wall
or surface. Use your grill at least 2 feet away from
combustible objects that can melt or catch fire
(such as vinyl or wood siding, fences and over-
hangs) or sources of ignition including pilot lights
on water heaters and live electrical appliances.
Guide # P80174010H - Date:2008/11/19
Sears, Roebuck and Co., Hoffman Estates, IL 60179, USA www.sears.com
Primary Safety Warnings ........................... 1-3
Warranty Terms and Conditions .................. 3
Pre-Assembly Instructions ............................... 3
Part Diagrams and Lists ........................... 4-6
Assembly Instructions ................................. 7-11
Use & Care ............................................ 12-13
Troubleshooting ............................................... 13
Cleaning and Maintenance .......................... 14
Cooking Guide .............................................. 15
Repair Protection Agreements ..................... 16
When using this grill or any electrical appliances,
basic safety precautions should always be followed
including the following:
• Read all Instructions
• Do not touch hot surfaces. Use handles or knobs.
• To protect against electrical shock do not im-
merse cord, plugs, or this grill in water or other
liquid.
• Close supervision is necessary when any
applance is used by or near children.
• Unplug from outlet when not in use and before
cleaning. Allow to cool before putting on or tak-
ing off parts.
• Do not operate any appliance with a damaged
cord or plug or after the appliance malfunctions
or has been damaged in any manner. Return
appliance to the nearest authorized service fa-
cility for examination, repair, or adjustment.
• The use of accessory attachments not recom-
mended by the appliance manufacturer may
cause injuries.
• Do not let cord hang over edge of table or counter,
or touch hot surfaces.
• Do not place on or near a hot gas or electrical
burner, or in a heated oven.
• Extreme caution must be used when moving an
appliance containing hot oil or other hot liquids.
• Attach the plug of the appliance to the recep-
tacle of power supply extension cord first, then
plug cord into the wall outlet.To disconnect, turn
any control to "off", then remove plug from wall
outlet.
• Do not use appliance for other than intended
use.
• Fuel, such as charcoal briquettes, is not to be
used with appliance.
• Use only on properly grounded outlet.
• A short power-supply cord (or detachable power-
supply cord) isto be provided to reduce the risk
resulting from becoming entangled in ortripping
over a longer cord.
• Longer detachable power-supply cords or ex-
tension cords are available and may be used if
care is exercised in their use.
• If a longer detachable power-supply cord or
extension cord is used:
1) The marked electrical rating of the cord set
or extension cord should be at least as great as
the electrical rating of the appliance, and
2) The cord should be arranged so that it will
not drape over the countertop or tabletop
where it can be pulled on by children or tripped
over unintentionally.
3) The appliance is of the grounded type, the
extension cord should be a grounding-type 3-
wire cord.
• Outdoor extension cords should be used with
outdoor use products and with a tag stating
"Suitable for Use with Outdoor Appliances".
The connection to an extension cord should be
kept dry and off the ground.
• Store products indoors when not in use - out of
the reach of children.
• Do not clean this product with a water spray or
the like.
SAVE THESE
INSTRUCTIONS
Remove the Grease Receptacle BEFORE detach-
ing the Grill Head for portable or table-top use.
Reinstall the Grease Receptacle once the Grill Head
is firmly in position (with legs opened and placed
on a flat surface).
n
I Failure to read and follow the Use and Care
instructions could result in afire orexplosion that
could causeserious bodily injury, death or prop-
erty damage.
California Proposition 65
Brass components, such as the rheostat valve
stem used on this electric grill, contain lead which
is known to the State of California to cause
cancer, birth defects, or other reproductive
harm.
KenmoreFull Warranty
If this grill fails due to a defectin materialor
workmanshipwithinone year from the date of
aurchase,call 1-800-4-MY-HOME® to arrangefor
freerepair(orreplacementif repairprovesimpos-
sible).
Limited Warranty on Selected Grill Parts
From the date of purchase for the time periods listed
below, the following grill parts will be replaced free
of charge if they rust through. After the first year
from the date of purchase you must pay the labor
cost to have them installed.
• Stainless Parts 3 Years
• Painted Parts 2 Years
• Cooking Grids 2 Years
All warranty coverage excludes grill part paint loss
or surface rusting, which are either expendable parts
that can wear out from normal use in less than a
year, or are conditions that can be the result of
normal use, accident or improper maintenance.
All warranty coverage is void if this grill is ever used
for commercial or rental purposes.
All warranty coverage applies only if this grill is used
in the United States.
This warranty gives you specific legal rights, and
you may have other rights which vary from state
to state.
Sears, Roebuck and Co., Hoffman Estates, IL
© Sears Brands, LLC
PRE-ASSEMBLY
Readandperformthefollowing pre-assemblyinstructions:
[] Tools Required forAssembly include:
• protectivework gloves
• For your safety, obtain assistance from another
personwhen assemblingthis grill.
• #2 & #3 PhillipsHead Screwdriver
[] Open lid of shipping carton and remove parts box and
packing materials. Open Grill Head Lid and unpack parts
inside. Remove and discard all packing materials from
parts.
[] You may slice the carton front corners with a utility knife
to lay open the carton front panel. This allows you to raise
the grill head lid and remove the components packed in-
side, making iteasier to lift. Use the sliced off carton front
as a work surface to protect floor and grill parts from
scratches.
[] Use the Hardware and Part Diagrams to ensure all items
are included and free of damage.
[] Do not assemble or operate the grill if it appears
damaged. If there are damaged or missing parts when
you unpack the shipping box or you have questions
during the assembly process, call the GRILL INFOR-
MATION CENTER 1-888-317-7642 8am - 8pm CST,
Monday through Friday.
I
3
ELECTRIC SHOCK CAN KILL OR RESULT
IN SERIOUS INJURY.
TO PREVENT ELECTRICAL SHOCK:
• Connect cord to properly grounded GFCI
(Ground Fault Circuit Interrupter) outlet only.
• Never operate your electric grill when it is
raining.
• Always keep cord dry and off the ground.
• Never put the cord or heating element in water
or any liquid.
• To prevent your grill from being splashed by
water or falling into water, do not use grill
within 10 feet of pool, spa, pond, water faucet
or any body of water.
• Make sure the control knob is set to OFF
before plugging OR unplugging your grill.
• Unplug your grill when not in use or before
moving the grill.
• Do not unplug your grill by pulling the cord.
• Keep cord away from hot grill surfaces.
• Never operate your grill if the cord or plug
appears damaged.
• Never remove the grounding plug or use with
an adapter to two prongs.
• Unplug the cord before using water or any
liquid to clean your grill.
Since 1971 the National Electric Code (NEC)
has required Ground Fault Circuit Interrupter
devices on all outdoor circuits.
If your residence was built before 1971,
check with a qualified electrician to deter-
mine if a Ground Fault Circuit Interrupter
protector exists.
Do not use this appliance if the circuit does
not have GFCI protection.
Do not plug this grill into an indoor electrical
circuit.
Save These Instructions
for Future Reference
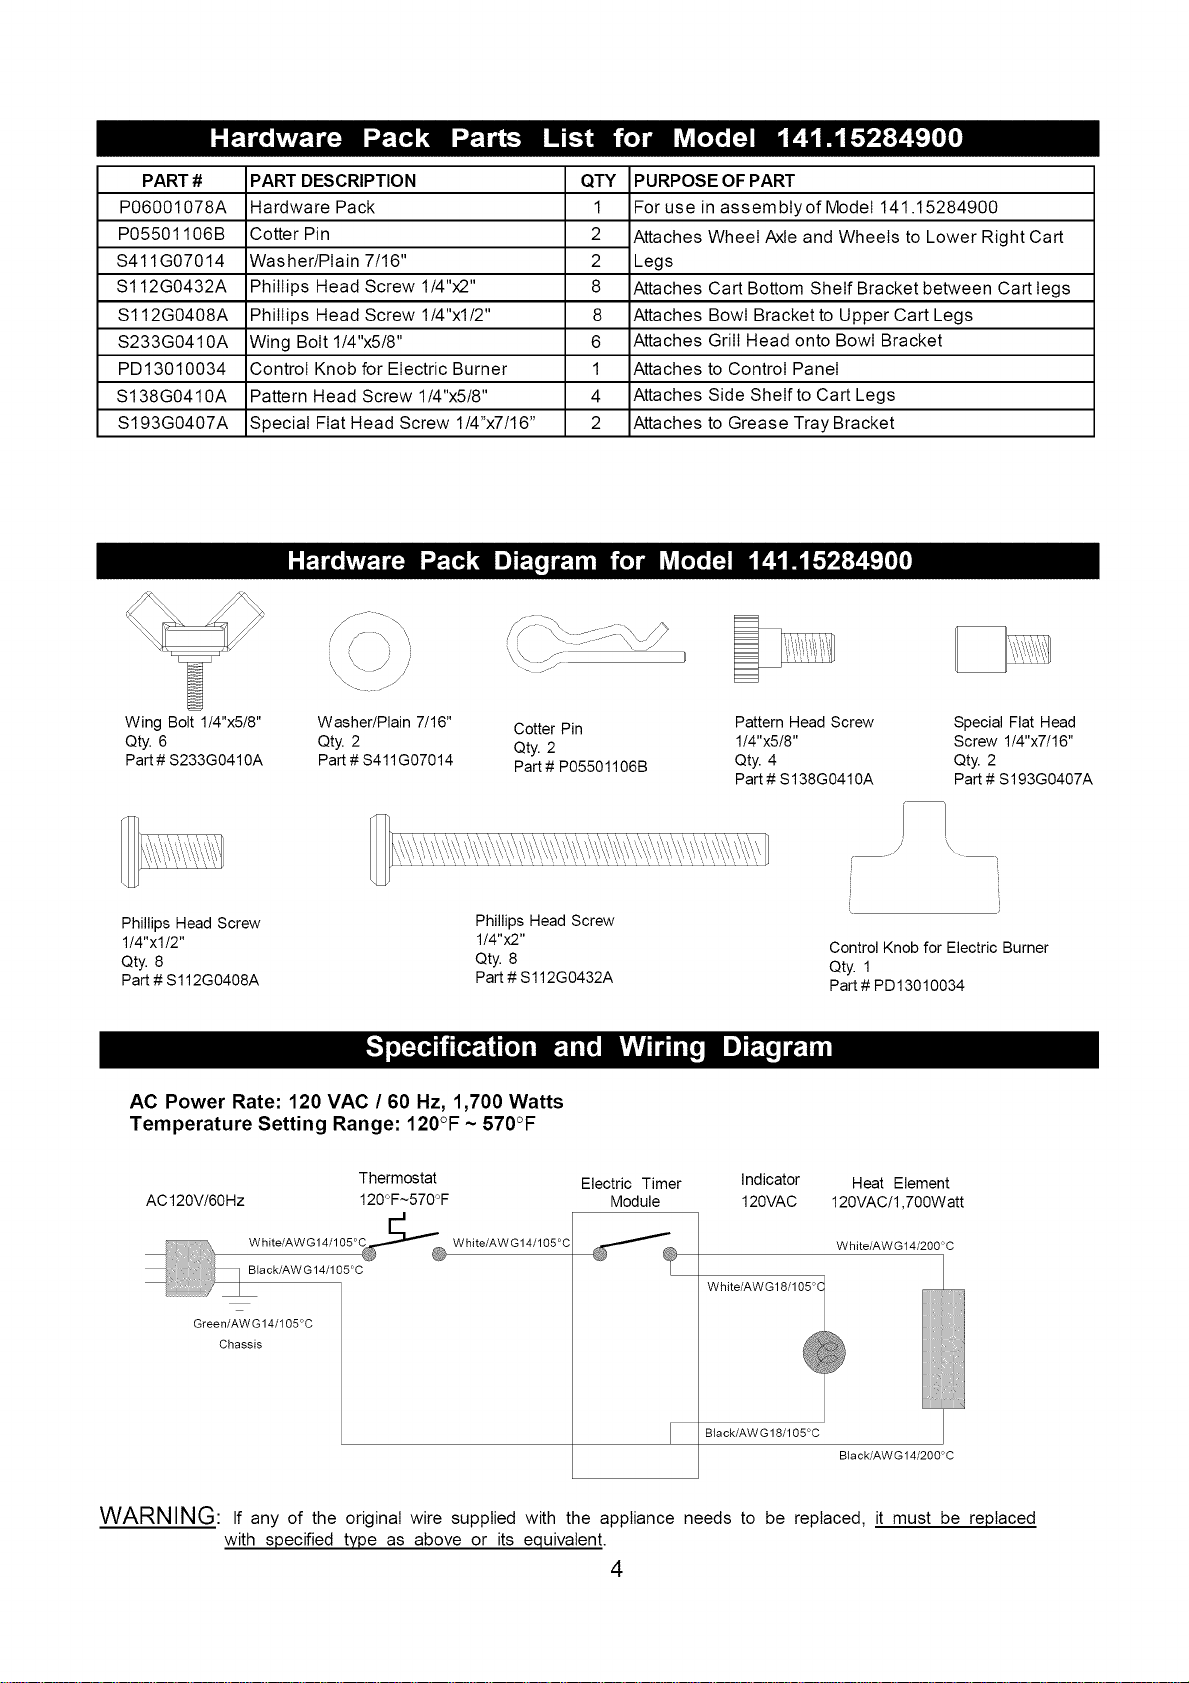
PART#
P06001078A
P05501106B
S411G07014
S112G0432A
S112G0408A
S233G0410A
PD13010034
S138G0410A
S193G0407A
PART DESCRIPTION
Hardware Pack
Cotter Pin
Washer/Plain 7/16"
Phillips Head Screw 1/4"x2"
Phillips Head Screw 1/4"xl/2"
Wing Bolt 1/4"x5/8"
Control Knob for Electric Burner
Pattern Head Screw 1/4"x5/8"
Special Fiat Head Screw 1/4"x7/16"
QTY PURPOSE OF PART
1 For use in assembtyof Mode1141.15284900
2 Attaches Wheel Axle and Wheels to Lower Right Cart
2 Legs
8 Attaches Cart Bottom Shelf Bracket between Cart legs
8 Attaches Bowl Bracket to Upper Cart Legs
6 Attaches Grill Head onto Bowl Bracket
1 Attaches to Control Panel
4 Attaches Side Shelf to Cart Legs
2 Attaches to Grease Tray Bracket
Wing Bolt 1/4"x5/8" Washer/Plain 7/16" Cotter Pin Pattern Head Screw Special Flat Head
Qty. 6 Qty. 2 Qty. 2 1/4"x5/8" Screw 1/4"x7/16"
Part # $233G0410A Part # $411G07014 Part # P05501106B Qty. 4 Qty. 2
Part # S138G0410A Part # S193G0407A
/
/
J
Phillips Head Screw Phillips Head Screw
1/4"xl/2" 1/4"x2" Control Knob for Electric Burner
Qty. 8 Qty. 8 Qty. 1
Part # S112G0408A Part # S112G0432A
Part # PD 13010034
AC Power Rate: 120 VAC / 60 Hz, 1,700 Watts
Temperature Setting Range: 120°F ~ 570°F
Thermostat Electric Timer Indicator Heat Element
AC120V/60Hz 120°F~570°F Module 120VAC 120VAC/1,700Watt
Green/AWG14/105°C
Chassis
White/AWG14/105°C
White/AW G18/105°Q
White/AW G14/200°C
Black/AW G 18/105°C
Black/AW G 14/200°C
WARNING: If any of the original wire supplied with the appliance needs to be replaced, it must be replaced
with specified type as above or its equivalent.
4
J
11 /
/
J
i
11f
"\\

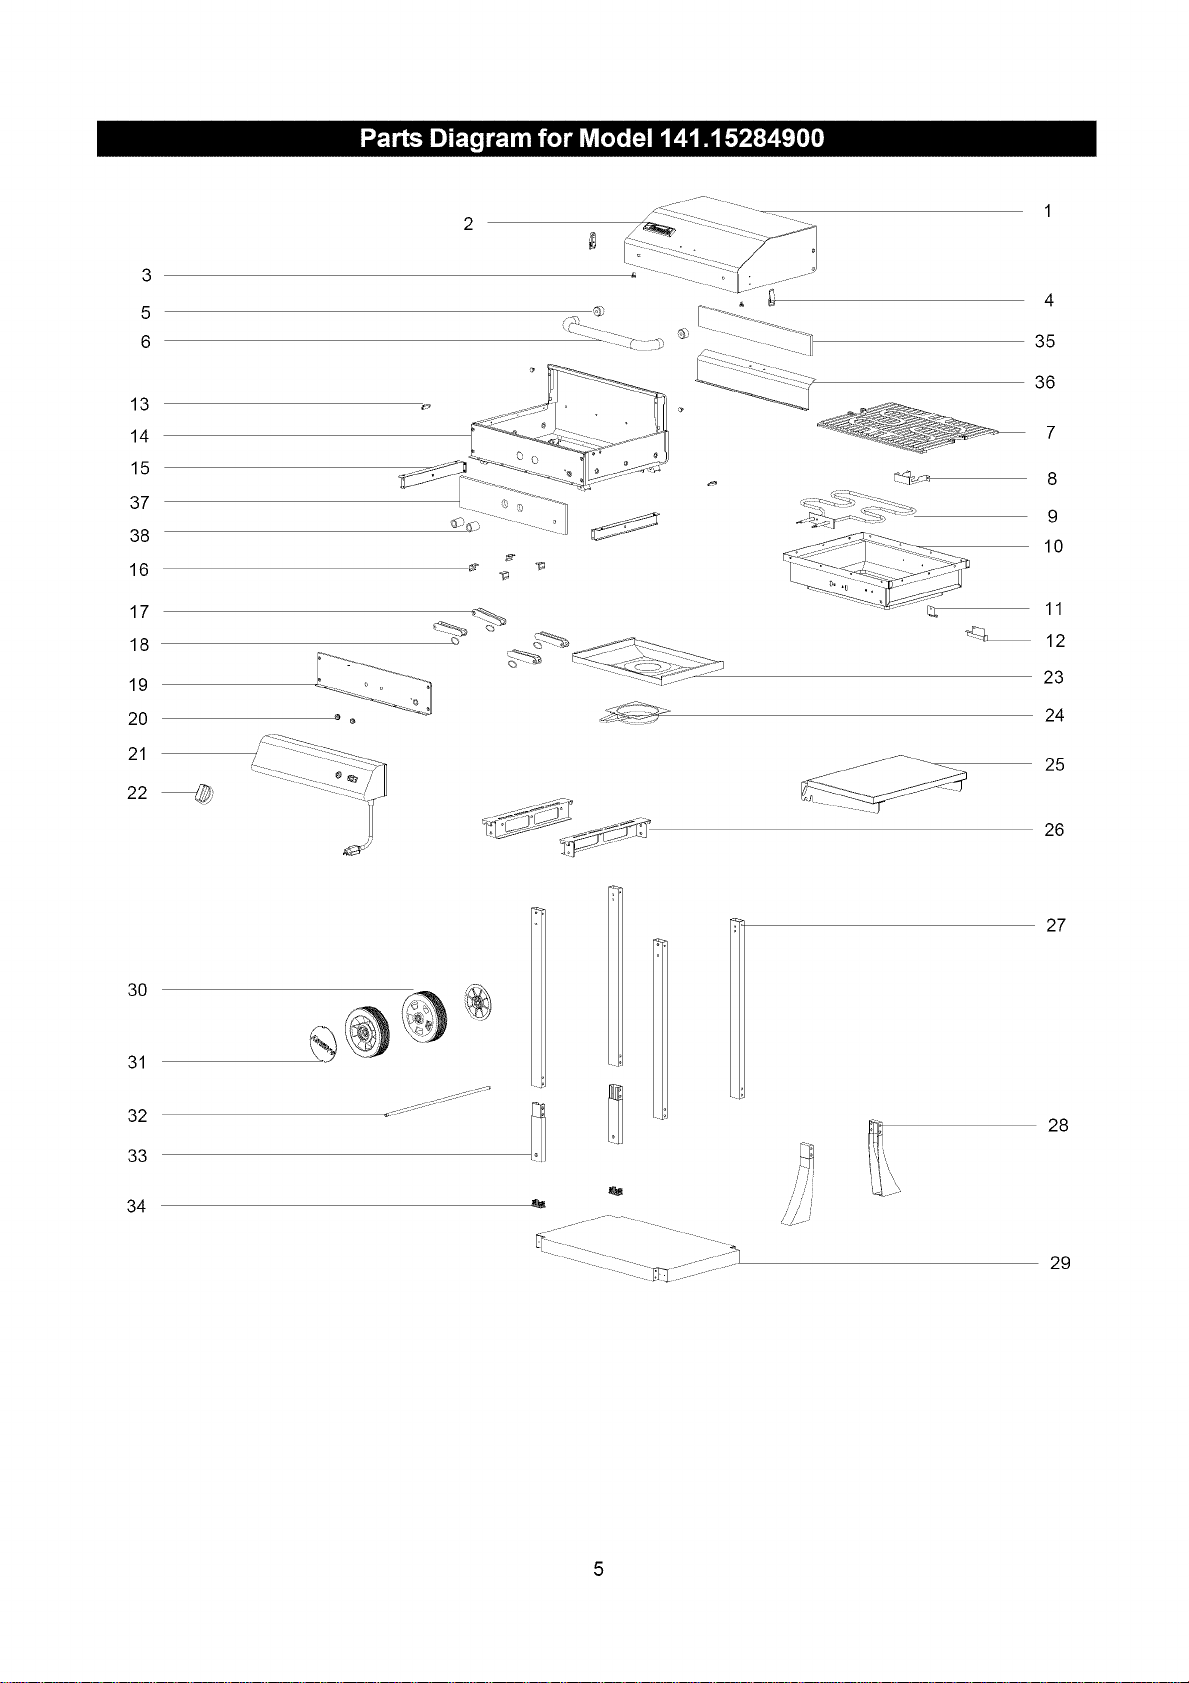
KEY DESCRIPTION PART# QTY
1 Lid PD01010013 1
2 Name Plate P00410041C 1
3 Protective Pad P055180011 4
4 Lid Latch, Upper PD03010011 2
5 Lid Handle Heat Insulating Spacer P06801030A 2
6 Lid Handle PD02010021 1
7 Cooking Grid PD07010013 1
8 Burner Bracket PD16010252 1
9 Burner, Electric PD05010010 1
10 Bowl, Inner PD04020011 1
11 Thermostat Bracket PD08010023 1
12 Thermostat Protector PD08010042 1
13 Lid Latch, Lower PD03020011 2
14 Bowl, Outer PD04010013 1
15 Grease Tray Bracket PD16040012 2
16 Bracket, Foldable Leg PD16010062 4
17 Leg, Foldable PD17030012 4
18 Leg Grip PD17040012 4
19 Control Panel Heat Shield PD08010013 1
20 Insulation Cap PD06020010 2
21 Control Panel Assembly PD09010033 1
22 Control Knob PD13010034 1
23 Grease Draining Tray PD14010012 1
24 Grease Receptacle PD14020022 1
25 Side Shelf, Right PD19020032 1
26 Bowl Bracket PD16010052 2
27 Cart Leg, Upper PD17010052 4
28 Cart Leg, Lower Left PD17020072 2
29 Cart Bottom Shelf PD20010022 1
30 Wheel P05101001A 2
31 Wheel Hub Cap P05116002C 2
32 Wheel Axle PD18010012 1
33 Cart Leg, Lower Right PD17020062 2
34 End Cap, Leg PD21010015 2
35 Lid Heat Insulator PD01020032 1
36 Lid Heat Shield PD01020040 1
37 Bowl Heat Insulator PD04010020 1
38 Electric Burner Insulating Spacer P06801031F 2
Hardware Pack P06001078A 1
Use and Care Guide P80174010H 1
Note: This grill can be assembled in approximately 30 minutes.
For the repair or replacement parts you need:
Call anytime 1-800-4-MY-HOME® (1-800-469-4663)
To obtain the correct replacement parts for your electric grill, please refer to the part numbers in this parts list.
The following information is required to ensure you receive the correct parts:
1. Model and Serial Number (see UL label on grill)
2. Part Number
3. Part Description
4. Quantity of parts needed
Important: Use only Sears replacement parts. The use of any part that is not a Sears replacement part can be danger-
ous and will also void your product warranty. Keep this Use and Care Guide for convenient referral and for part replace-
ment.
6
CAUTION•Whileitispossibleforonepersontoassemblethisgrill,obtainassistancefromanother
whenhandlingsomeofthelarger,heavierpieces.
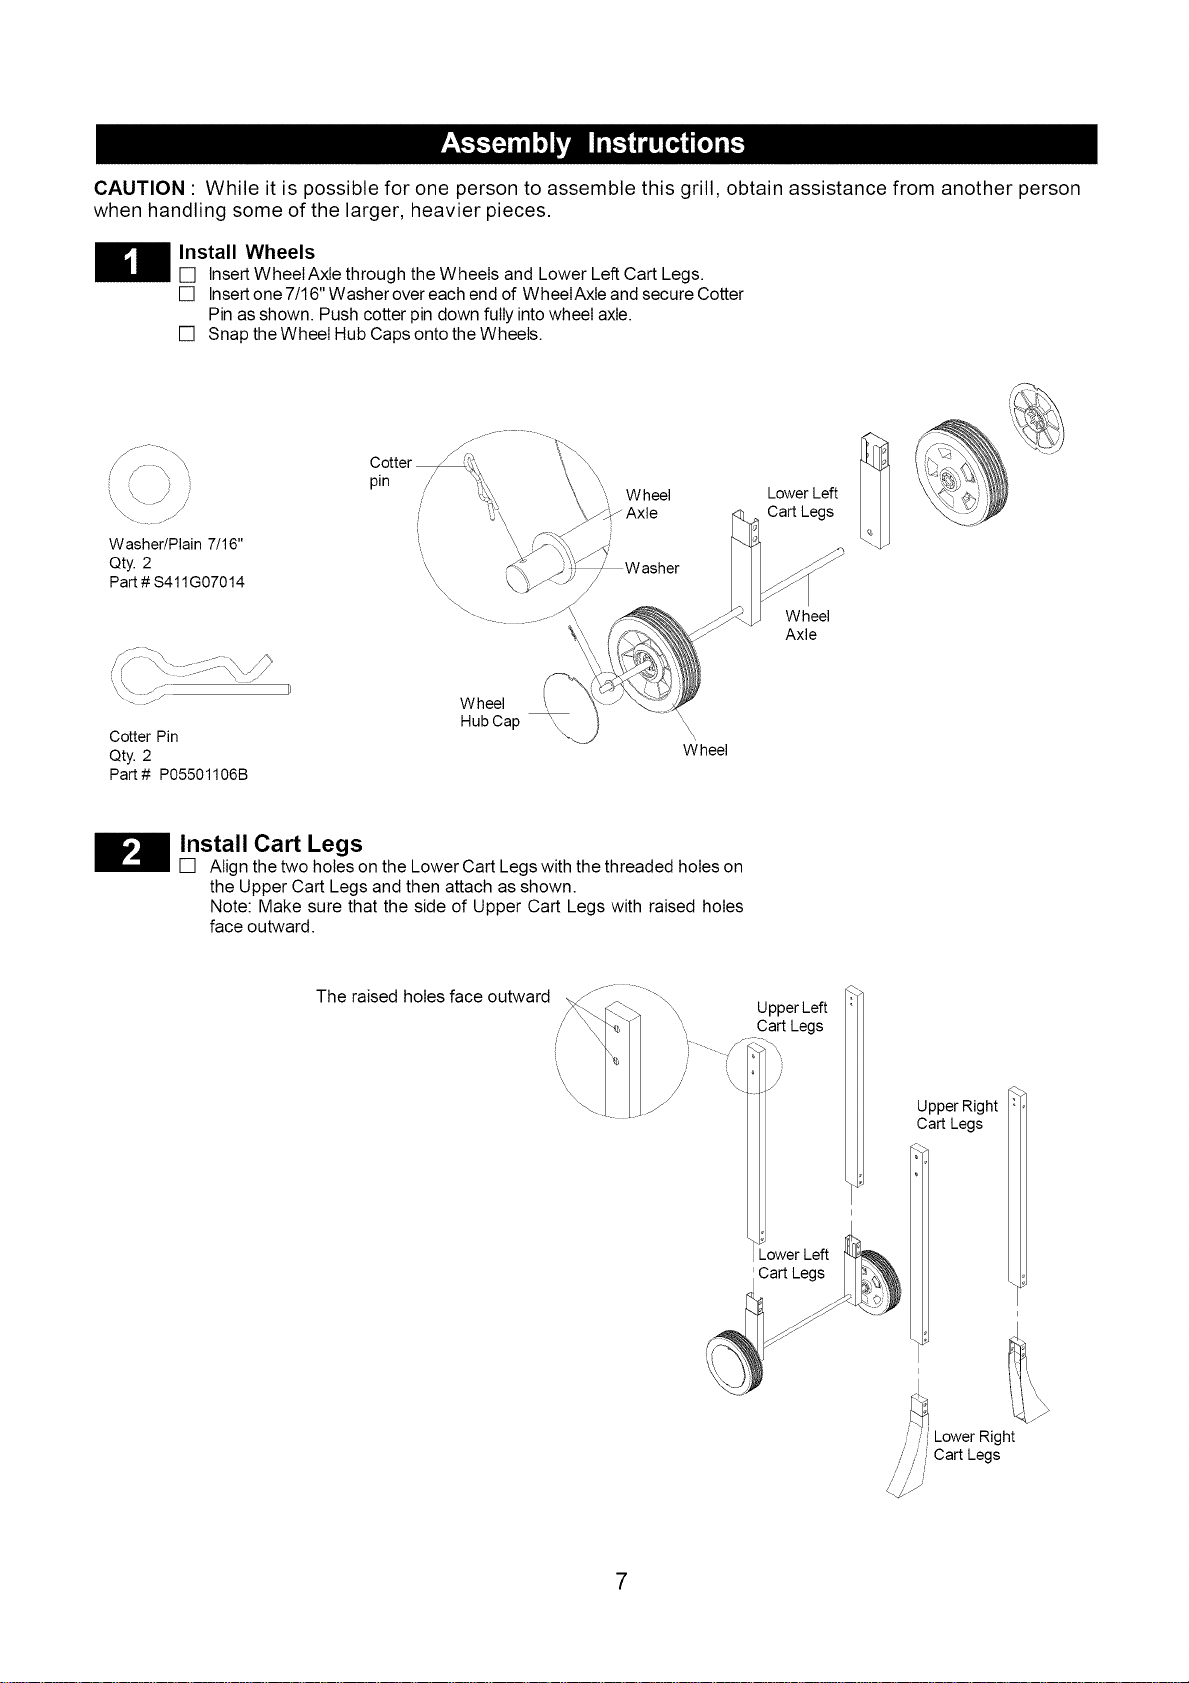
Install Wheels
[] Insert WheeIAxte through the Wheels and Lower Left Cart Legs.
[] Insert one 7/16" Washer over each end of WheeIAxte and secure Cotter
Pin as shown. Push cotter pin down fully into wheel axle.
[] Snap the Wheel Hub Caps onto the Wheels.
9erson
\
Washer/Plain 7/16" \
\ j_.
Qty. 2 ",\
Part# S411G07014 _k /
\\
\.
Lower Left
Cart Legs
Wheel
Axle
Cotter Pin
Qty. 2
Part # P05501106B
Wheel
HubCap
Wheel
Install Cart Legs
[] Align the two holes on the Lower Cart Legs with the threaded holes on
the Upper Cart Legs and then attach as shown.
Note: Make sure that the side of Upper Cart Legs with raised holes
face outward.
The raised holes face outward
s
/,
Upper Left
Cart Legs
Upper Right
Cart Legs
Lower Right
Cart Legs
7
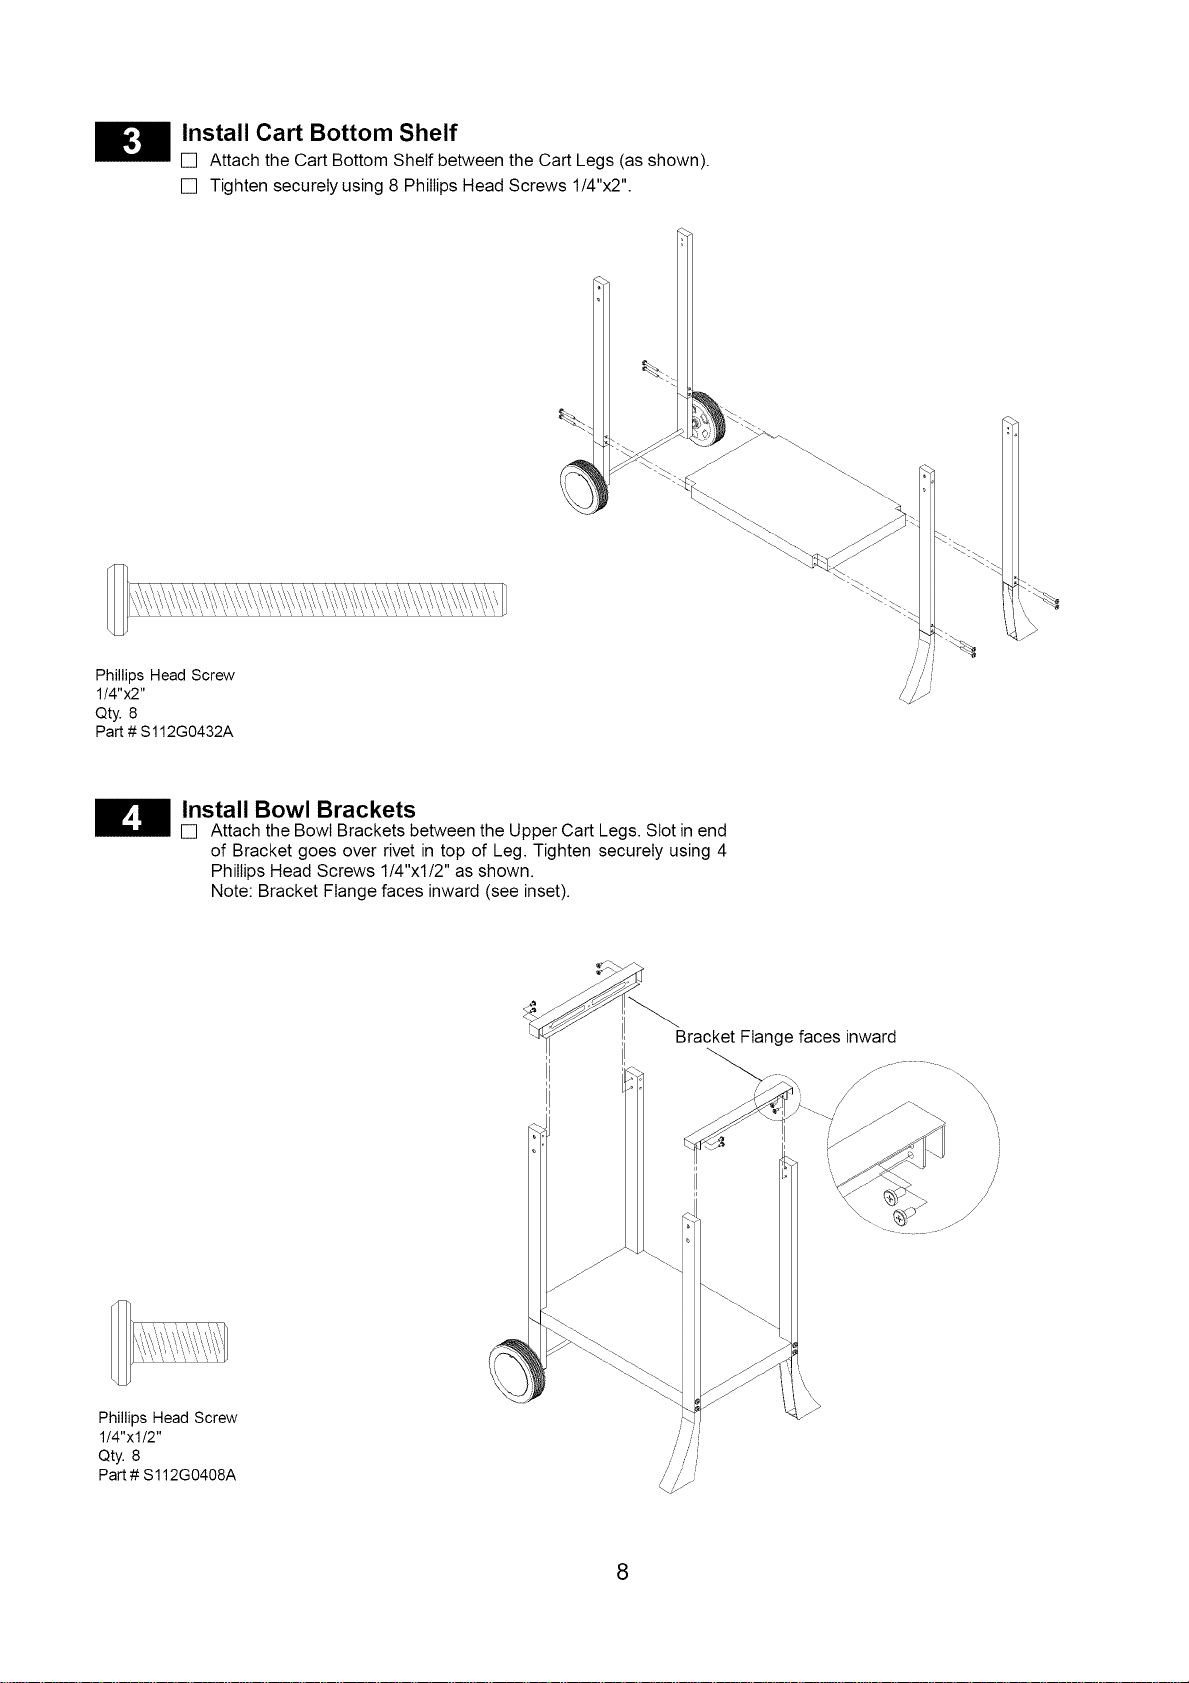
Install Cart Bottom Shelf
[] Attach the Cart Bottom Shelf between the Cart Legs (as shown).
[] Tighten securely using 8 Phillips Head Screws 1/4"x2".
Phillips Head Screw
1/4"x2"
Qty. 8
Part # S112G0432A
Install Bowl Brackets
[] Attach the Bowl Brackets between the Upper Cart Legs. Slot in end
of Bracket goes over rivet in top of Leg. Tighten securely using 4
Phillips Head Screws 1/4"x1/2" as shown.
Note: Bracket Flange faces inward (see inset).
Bracket Flange faces inward
Phillips Head Screw
1/4"xl/2"
Qty. 8
Part # S112G0408A
8
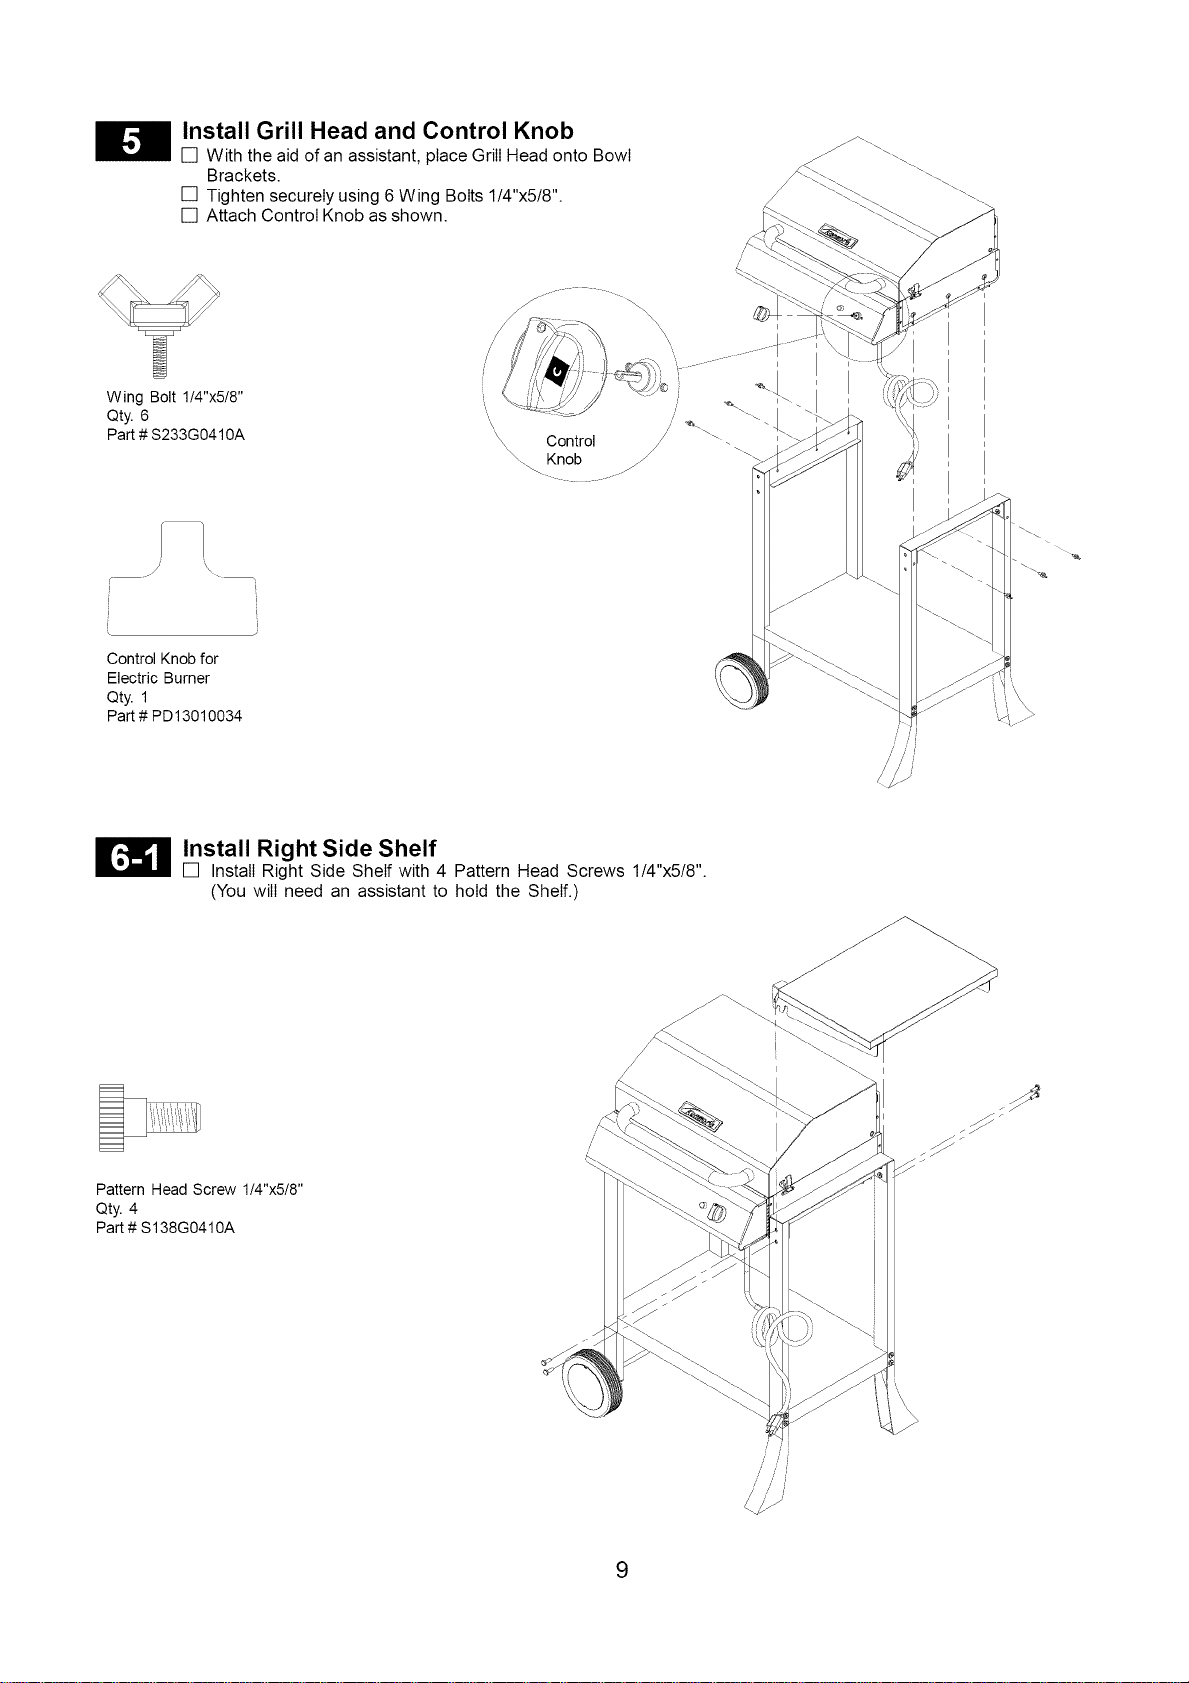
Install Grill Head and Control Knob
[] With the aid of an assistant, place Grill Head onto Bowl
Brackets.
[] Tighten securely using 6 Wing Bolts 1/4"x5/8".
[] Attach Control Knob as shown.
Wing Bolt 1/4"x5/8"
Qty. 6
Part # S233G0410A
Control Knob for
Electric Burner
Qty. 1
Part # PD13010034
Install Right Side Shelf
[] Install Right Side Shelf with 4 Pattern Head Screws 1/4"x5/8".
(You will need an assistant to hold the Shelf.)
Pattern Head Screw 1/4"x5/8"
Qty. 4
Part # S138G0410A
/ / i
/ / /
9

Fold-Away Right Side Shelf Option
[] Grasp Right Side Shelf and lift enough to dislodge Shelf
slots from fixed position.
[] Lower Shelf down until it rests next to Legs.
=- I
I _ I I )
\
RightSide
Shelf
For illustration purposes - Front View of the Right Side Shelf
/
J
/
\\\\\
\
//
\\\\\\\\
\
_'_ Install Grease Tray and Grease Receptacle
[] Slide the Grease Tray side tabs over the Grease Tray Bracket
side rails underneath the Grill Bowl.
[] Secure Special Fiat Head Screws 1/4"x7/16" to Grease Tray
Bracket. (Fig. 1).
[] The Grease Tray is required to be present and centered for your
safetE
[] Slide the Grease Receptacle over Grease Tray rails (on under-
side of Grease Tray) until it rests in place.
Special Flat Head Screw
1/4"x7/16"
Qty. 2
Part # S193G0407A
Fig. 1
Grease Tray Bracket
10
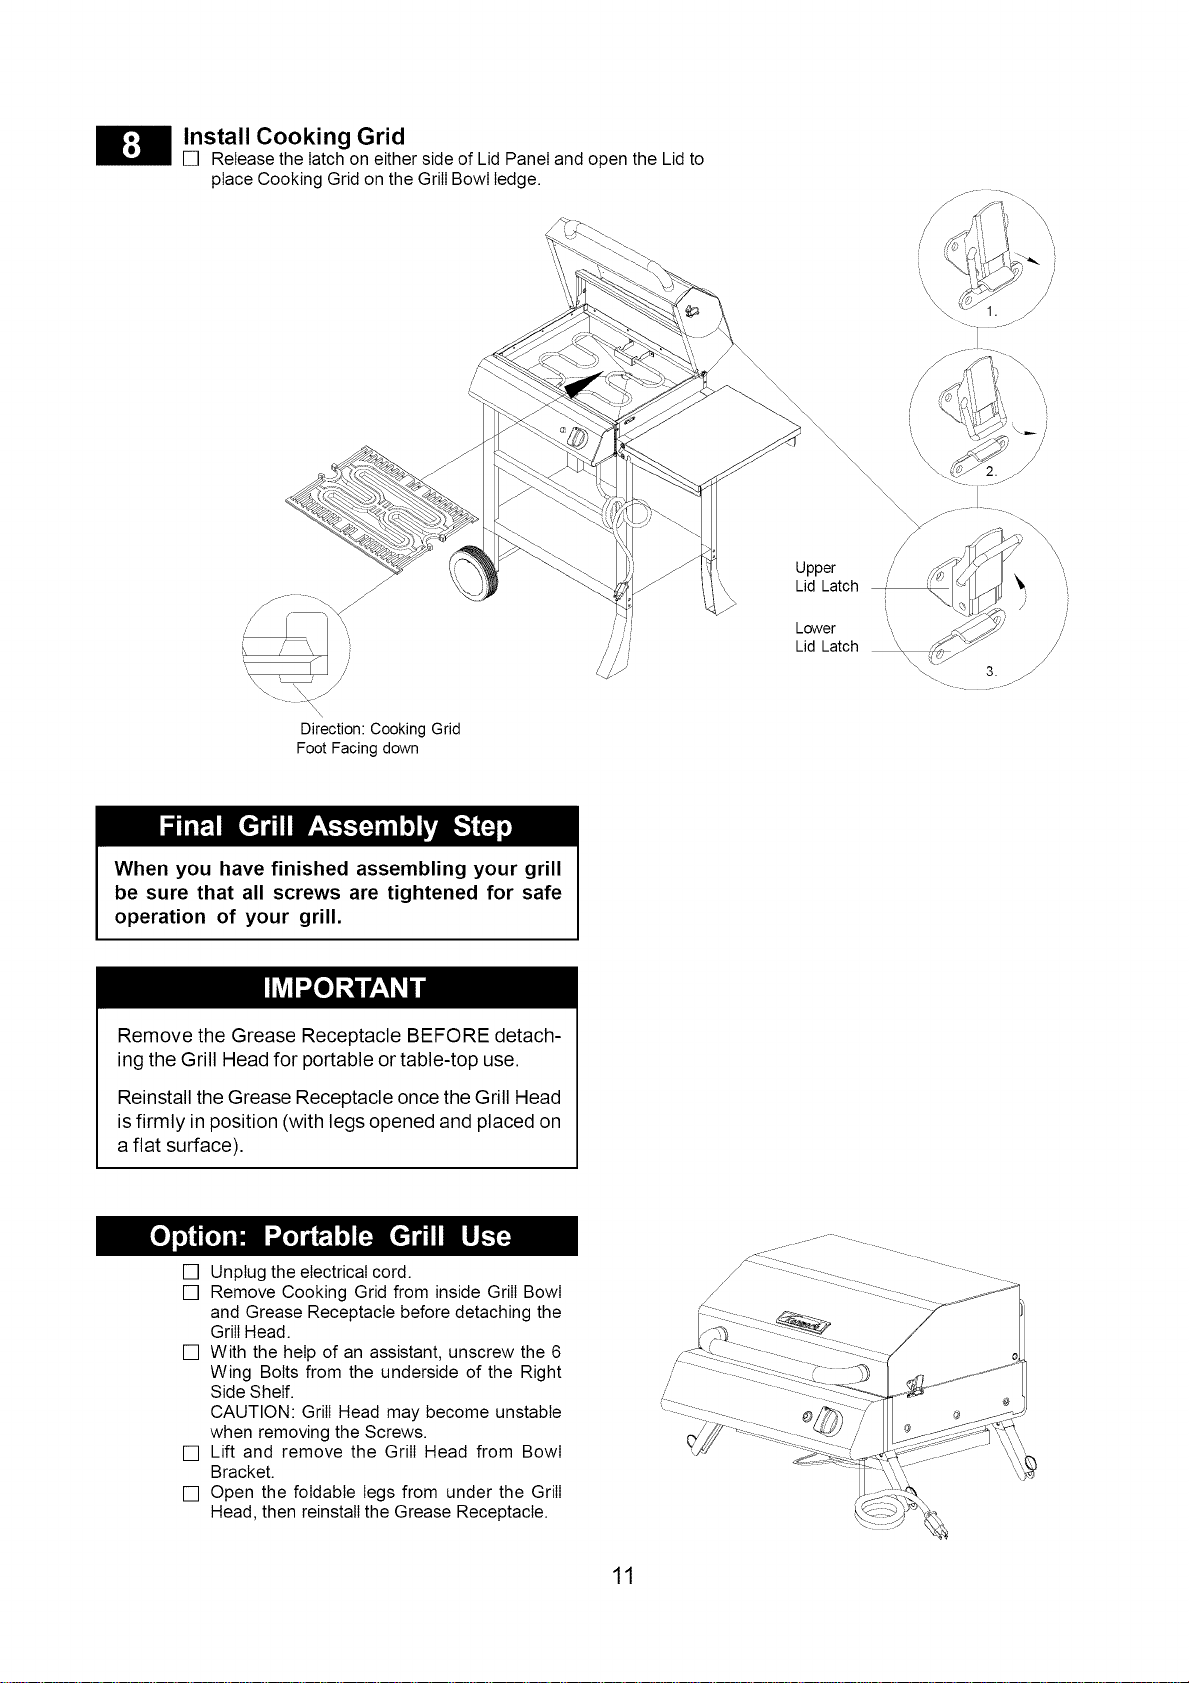
Install Cooking Grid
[] Release the latch on either side of Lid Panel and open the Lid to
place Cooking Grid on the Grill Bowl ledge.
Direction: Cooking Grid
Foot Facing down
/
// // /
Upper
Lid Latch
Lower
Lid Latch
/
--- ....... --
When you have finished assembling your grill
be sure that all screws are tightened for safe
operation of your grill.
Remove the Grease Receptacle BEFORE detach-
ing the Grill Head for portable or table-top use.
Reinstall the Grease Receptacle once the Grill Head
isfirmly in position (with legs opened and placed on
a flat surface).
[] Unplug the electrical cord.
[] Remove Cooking Grid from inside Grill Bowl
and Grease Receptacle before detaching the
Grill Head.
[] With the help of an assistant, unscrew the 6
Wing Bolts from the underside of the Right
Side Shelf.
CAUTION: Grill Head may become unstable
when removing the Screws.
[] Lift and remove the Grill Head from Bowl
Bracket.
[] Open the foldable legs from under the Grill
Head, then reinstall the Grease Receptacle.
/
/
11
Turning Grill On
1. Make sure the Control Knob is set to OFF.
2. Disconnect other appliances from the circuit before using
your grill.
3. Plug grill into propertygrounded GFCl, 120VAC, 15A outlet.
4. Turn Control Knob to the Right on the highest setting and
close Lid.
5. Allow grill to preheat 15-20 minutes then adjust to your
desired cooking temperature.
6. Heat On Light will turn off when the grill reaches desired
temperature. The grill and Heat On Light wiII cycle on and off
as needed to maintain the desired temperature.
An Important Note About Cooking Temperatures
[] The suggested heat settings and cooking times
shown on the Guide to Grilling on page 15 are
approximate. Unlike the controlled environment in-
side your kitchen, variables including outside tem-
peratures, direction and conditions of wind, aswell as
grill location will affect your grill's heat distribution.
Because these conditions vary, and no two back-
yards are alike, we offer this guide as aconvenience.
We recommend you monitor your grill closely and
rotate foods as needed to prevent over cooking and
ensure the most delicious results every time.
Heat On Light ©
Control Knob Setting
O_:F LC_W M_:D HI M_kX
Temperature 300 ~ 350 ~ 400 ~ 450°F
Range
Turning Grill Off
1. Turn Control Knob to OFF.
2. Unplug electrical cord from outlet.
IMPORTANT: AUTO SWITCH OFF MODE
The internal Electric Timer Module will automati-
cally switch the heating element to power OFF
when it is in continous operation more than
2-1/2 hours.
Toreset the internal timer, turn the Control Knob to
OFF and unplug the cord from power outlet, then
plug the cord back in and turn Control Knob
to desired cooking temperature.
Preheating
[] Always preheat the grill using the highest setting for 15-20
minutes with the Lid closed. Preheating the grill increases the
grill surface temperature and reduces the actual cooking
time.
Flare-Ups
[] The fats and juices dripping from grilIed food can cause flare-
ups. Since flare-ups impart a favorably, distinctive taste and
color to grilled foods, they should be accepted up to a point.
Failure to comptywith these instructions could result in a
fire or explosion that could cause serious bodily injury,
death or property damage.
If a grill fire occurs, turn control knob to OFF,
unplug grill from outlet and allow fire to burn out.
Do not use water to put out a fire in this or any other
electrical appliance.
Never line the bottom of the grill housing with charcoal,
aluminum foil, sand or any substance that will restrict
the flow of grease into the Grease Receptacle.
Before each use of your grill: Pull out the Grease
Receptacle and remove all grease and food debris to
prevent grease fire hazard.
Use your grill at least 2 feet away from any wall
or surface. Use your grill at least 2 feet away from
combustible objects that can melt or catch fire (such
as vinyl or wood siding, fences and overhangs) or
sources of ignition including pilot lights on water heaters
and live electrical appliances.
Never use your grill in agarage, porch, shed, breezeway
or any other enclosed area.
In windy conditions, always position the front of grill to
face oncoming wind to reduce smoke and heat blowing in
your face and prevent potential hazards to self and grill.
J WiND
DiRECTiON
12

Grounding Instructions:
This appliance shall be grounded while in use to protect
the operator from electrical shock. The appliance is
equipped with a 3-conductor cord and a 3-prong ground-
ing-type plug to fit the proper grounding-type receptacle.
Plug into a GFCI-protected outdoor receptacle, where
available
Extension Cords:
1. Use only 3-wire extension cords that have 3-prong ground-
ing-type plugs and 3-pole cord connectors that accept the
plug from the appliance. Only extension cords identified
by the marking "Suitable for use with outdoor appliances"
shall be used outdoors. Use only extension cords having
an electrical rating not tess than the rating of the appliance.
Do not use damaged extension cords. Examine extension
cord before using and replace if damaged. Do not abuse
extension cord and do not tug on any cord to disconnect.
Keep cord away from heat and sharp edges.
2. Outdoor extension cords shall be used with outdoor use
products; such cords are surface marked with suffix
letters "W-A" and with a tag stating "Suitable for use with
outdoor appliances" ; Connection to an extension cord
shall be kept dry and off the ground; Store products
indoors when not in use, out of the reach of children; and
do not clean this product with a water spray or the like.
Ifthe grill fails to produce any heat:
1. Be sure there is power to the grill.Turn the Control Knob OFF
and try the following:
[] Plug cord into propertygrounded outlet.
[] Ground Fault Circuit Interrupter (GFCl) may be tripped. Reset
or replace if needed.
[] Outlet may be faulty. Try another outlet.
2. Control Knob may be in OFF position.
[] Turn Control Knob to highest setting.
3. Heating Element may need replacing.
[] Call 1-800-4-MY-HOME®and onlyuse Sears certified replace-
ment parts.
4. The internal Electric Timer Module will automatically switch
the heating element to power OFF when it is in continous
operation more than 2-1/2 hours.
[] To reset the internal timer, turn the Control Knob to OFF and
unplug the cord from power outlet, then plug the cord back
in and turn Control Knob to desired cooking temperature.
Ifthe grill cooks too slowly:
1. Always preheat the grill 15-20 minutes with the Lid closed.
2. Keep grill Lid closed as much as possible during the cooking
process to minimize heat loss.
[] Reposition grillto reduce affect of wind.
3. Turn Control Knob to highest setting.
4. Use of an extension cord can reduce your grill performance.
[] Connect grill to outlet with no extension cord.
[] Ifyou must use an extension cord use onlyoutdoor extension
cords marked with suffix letters "W-A" and with a tag stating
"Suitable for Use with Outdoor Appliances".
If the Heat On Light is not on:
1. Be sure there is power to the grill.
2. Control Knob may be in OFF position.
3. Heat On Light will turn off when the grill reaches
desired temperature. The grill and Heat On Light
will cycle on and off as needed to maintain the exact
temperature.
4. Heat On Light or Heating Element may need
replacing.
[] Call 1-800-4-MY-HOME®and only use Sears cer-
tified replacement parts.
Circuit breaker continues to trip:
1. Caused by a power surge.
[] Make sure the Control Knob is set to OFF before
plugging OR unplugging your grill.
2. Circuit may be overloaded with appliances.
[] Disconnect other appliances from the circuit when
using your grill.
3. Electrical connections may be damp or wet.
[] Always keep cord dry and off the ground.
[] Never put the cord or heating element in water
or any liquid.
[] Never operate your electric grill when it is
raining.
[] Depending on the humidity in your area, it may
take a day or more for electrical circuits to
thoroughly dry before the breaker will reset.
This is not a defect of the product.
4. Electrical Cord may be damaged. Never operate
your grill if the cord or plug appears damaged.
[] Call 1-800-4-MY-HOME®and only use Sears cer-
tified replacement parts.
Ifyou have excessive flare-ups when cooking:
1. The fats and juices dripping from grilled food
can cause flare-ups. Since flare-ups impart a
favorably, distinctive taste and color to grilled
foods they should be accepted up to a point.
To minimize flare-ups try the following:
[] Use a cooking pan to grill foods that produce a lot
of grease.
[] Trim excess fat from meat before grilling.
[] Use a lower temperature setting.
2. Grease and food build up inside your grill and
Grease Receptacle.
[] Besureyourgrill isturned OFF, unplugged and not
hot. Then follow the Cleaning and Maintenance
steps found inthis manual to clean the cooking grid,
grease receptacle and inside of bowl and lid.
GRILL INFORMATION CENTER
Call 8am to 8pm CST 1-888-317-7642 Monday through Friday
13
Proper care and maintenance will keep your grill in top oper-
ating condition and prolong its life. Follow these cleaning
procedures on a timely basis and your grill will stay clean and
operate with minimum effort.
CAUTION: Be sure your grill is OFF and cool before cleaning.
Cleaning The Cooking Grid
[] Before initial use, and periodically, wash your Cooking Grid in a
mild soap and warm water solution. You can use awash cloth or
vegetable brush to clean your Cooking Grid.
Cleaning The Grease Receptacle
[] To reduce the chance of fire, the Grease Receptacle should be
visually inspected before each grill use. Remove any grease and
wash Grease Receptacle with a mild soap and warm water
solution.
Cleaning the Inside of the Grill Lid
[] Grease can have a tendency to build up on the inside of the Grill
Lid and could drip onto deck or patio when the lid is opened.
Visually inspect the inside of the Grill Lid before each grill use.
Remove any grease and wash with a mild soap and warm water
solution.
Routine Cleaning of The Grill Interior
[] Burning-off excess food after every cookout will keep it ready for
instant use. However,at least every 3 months you must give the
entire grill a thorough cleaning to minimize your risk ofgrease fire
and keep the grill in top shape.
Cleaning Exterior painted Surfaces:
[] Before initial use, and periodically thereafter, we suggest you
wash your grill using a mild soap and warm water solution. You
can use a wash cloth or sponge for this process. Do not use a
stiff wire or brass brush. These will scratch stainless steel and
chip painted surfaces (varies by model) during the cleaning
process.
Cleaning Exterior Stainless Steel Surfaces:
[] Routine care and maintenance is required to preserve the ap-
pearance and corrosion resistance of stainless steel. The fact is
stainless steel can corrode, rust and discolor under certain con-
ditions. Rust is caused when regular steel particles in the atmo-
sphere become attached to the stainless steel surface. Steel
particles can also become attached to your grill if you use steel
wool or stiff wire brushes to clean the grill instead of non-abrasive
cloth, sponge or nylon cleaning tools. In coastal areas rust pits
can develop on stainless surfaces that cannot be fully removed.
Bleach and other chlorine based solutions used for household
and pool cleaning can also cause corrosion to stainless steel.
Weathering, extreme heat, smoke from cooking and machine
oils used in the manufacturing process of stainless steel can
cause stainless steel to turn tan in color. Although there are many
factors which can affect thesurface appearance ofstainless steel,
they do not affect the integrity of the steel or the performance of
the grill.
[] To help maintain the finish of stainless steel follow these cleaning
procedures for the best results:
1. After every use (after your grill has cooled down), wipe stain-
less surfaces with a soft, soapy cloth or sponge then rinse
with water. Be sure to remove all food particles, sauces or
marinades from stainless steel because these can be highly
acidic and damaging to stainless surfaces.
2. Never use abrasive cleaners, scrubbers or stiff wire brushes of
any type on your grill.
3. Use a heat resistant Stainless Steel Cleaner and rub or wipe in
the direction of thestainless steel grain or polish lines NOT against
the grain.
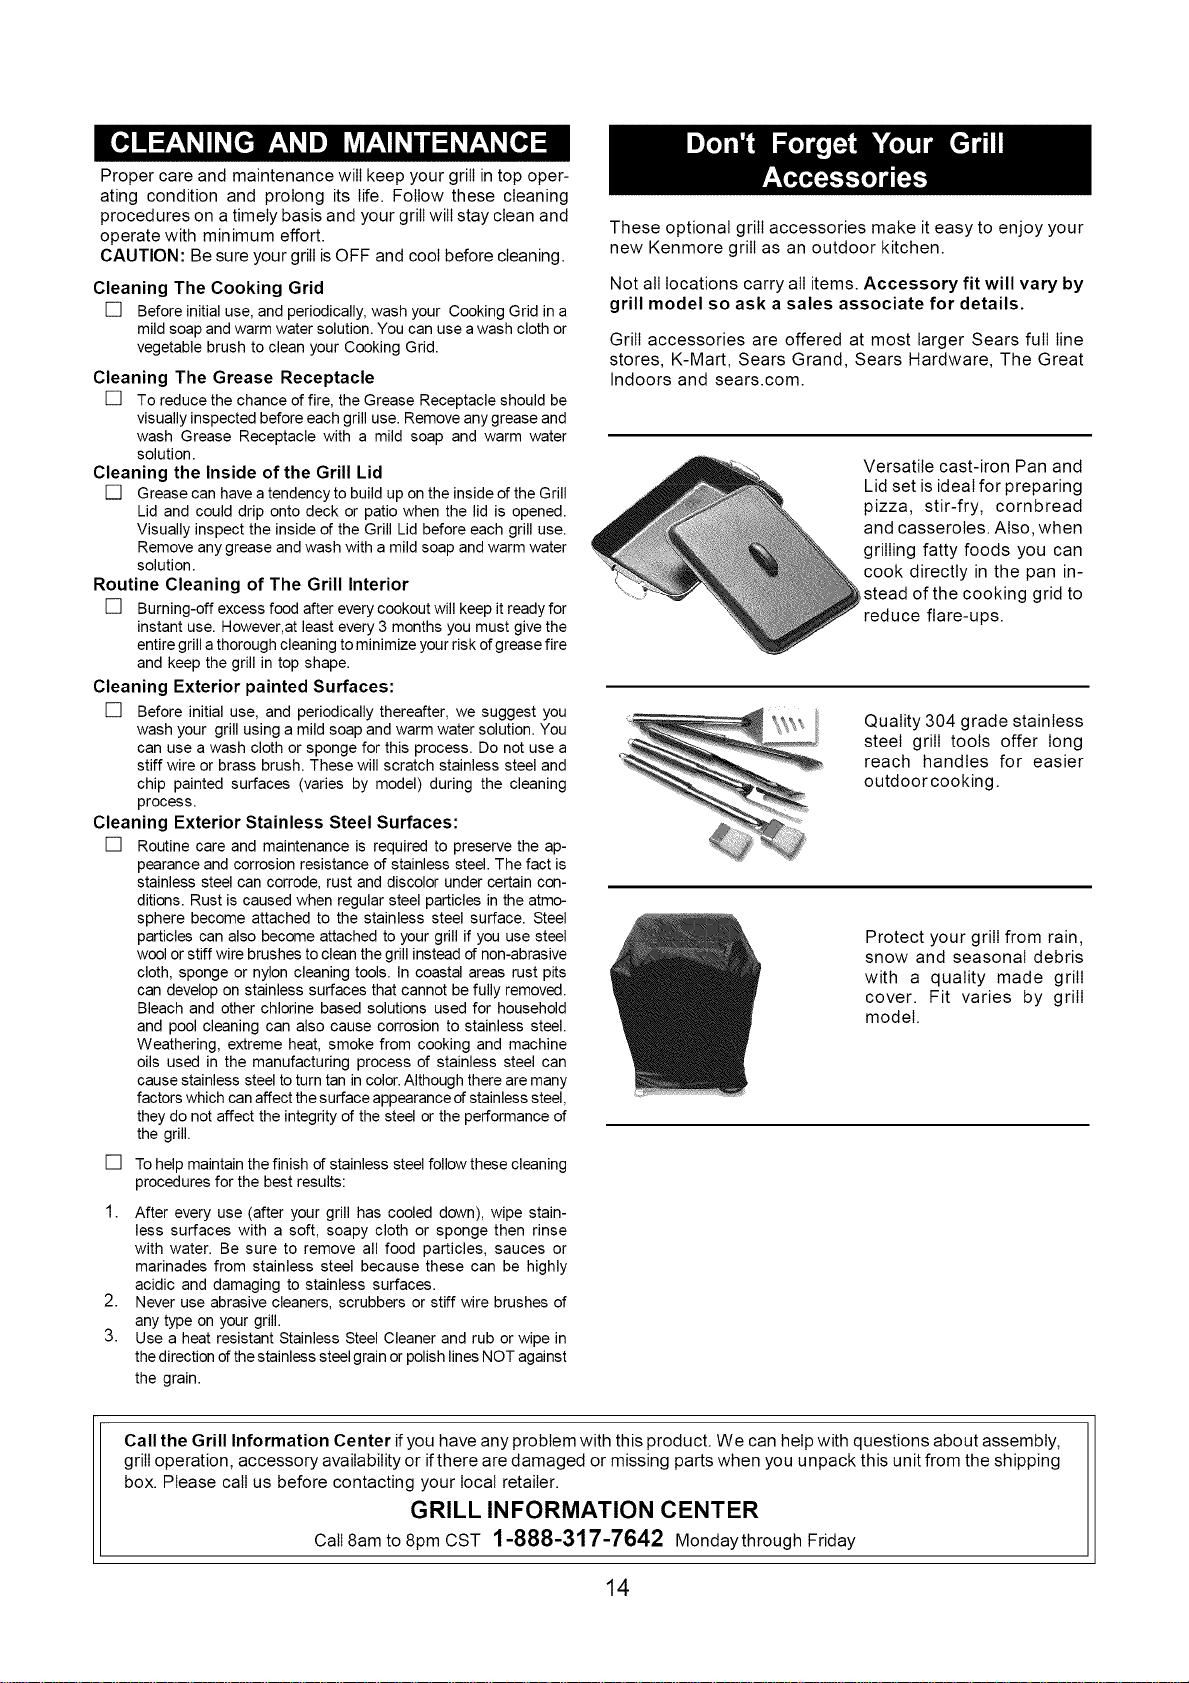
These optional grill accessories make it easy to enjoy your
new Kenmore grill as an outdoor kitchen.
Not all locations carry all items. Accessory fit will vary by
grill model so ask a sales associate for details.
Grill accessories are offered at most larger Sears full line
stores, K-MarL Sears Grand, Sears Hardware, The Great
Indoors and sears.com.
Versatile cast-iron Pan and
Lid set is ideal for preparing
pizza, stir-fry, cornbread
and casseroles. Also, when
grilling fatty foods you can
cook directly in the pan in-
,stead of the cooking grid to
reduce flare-ups.
Quality 304 grade stainless
steel grill tools offer long
reach handles for easier
outdoor cooking.
Protect your grill from rain,
snow and seasonal debris
with a quality made grill
cover. Fit varies by grill
model.
Call the Grill Information Center if you have any problem with this product. We can help with questions about assembly,
grill operation, accessory availability or ifthere are damaged or missing parts when you unpack this unit from the shipping
box. Please call us before contacting your local retailer.
GRILL INFORMATION CENTER
Call 8am to 8pm CST 1-888-317-7642 Mondaythrough Friday
14
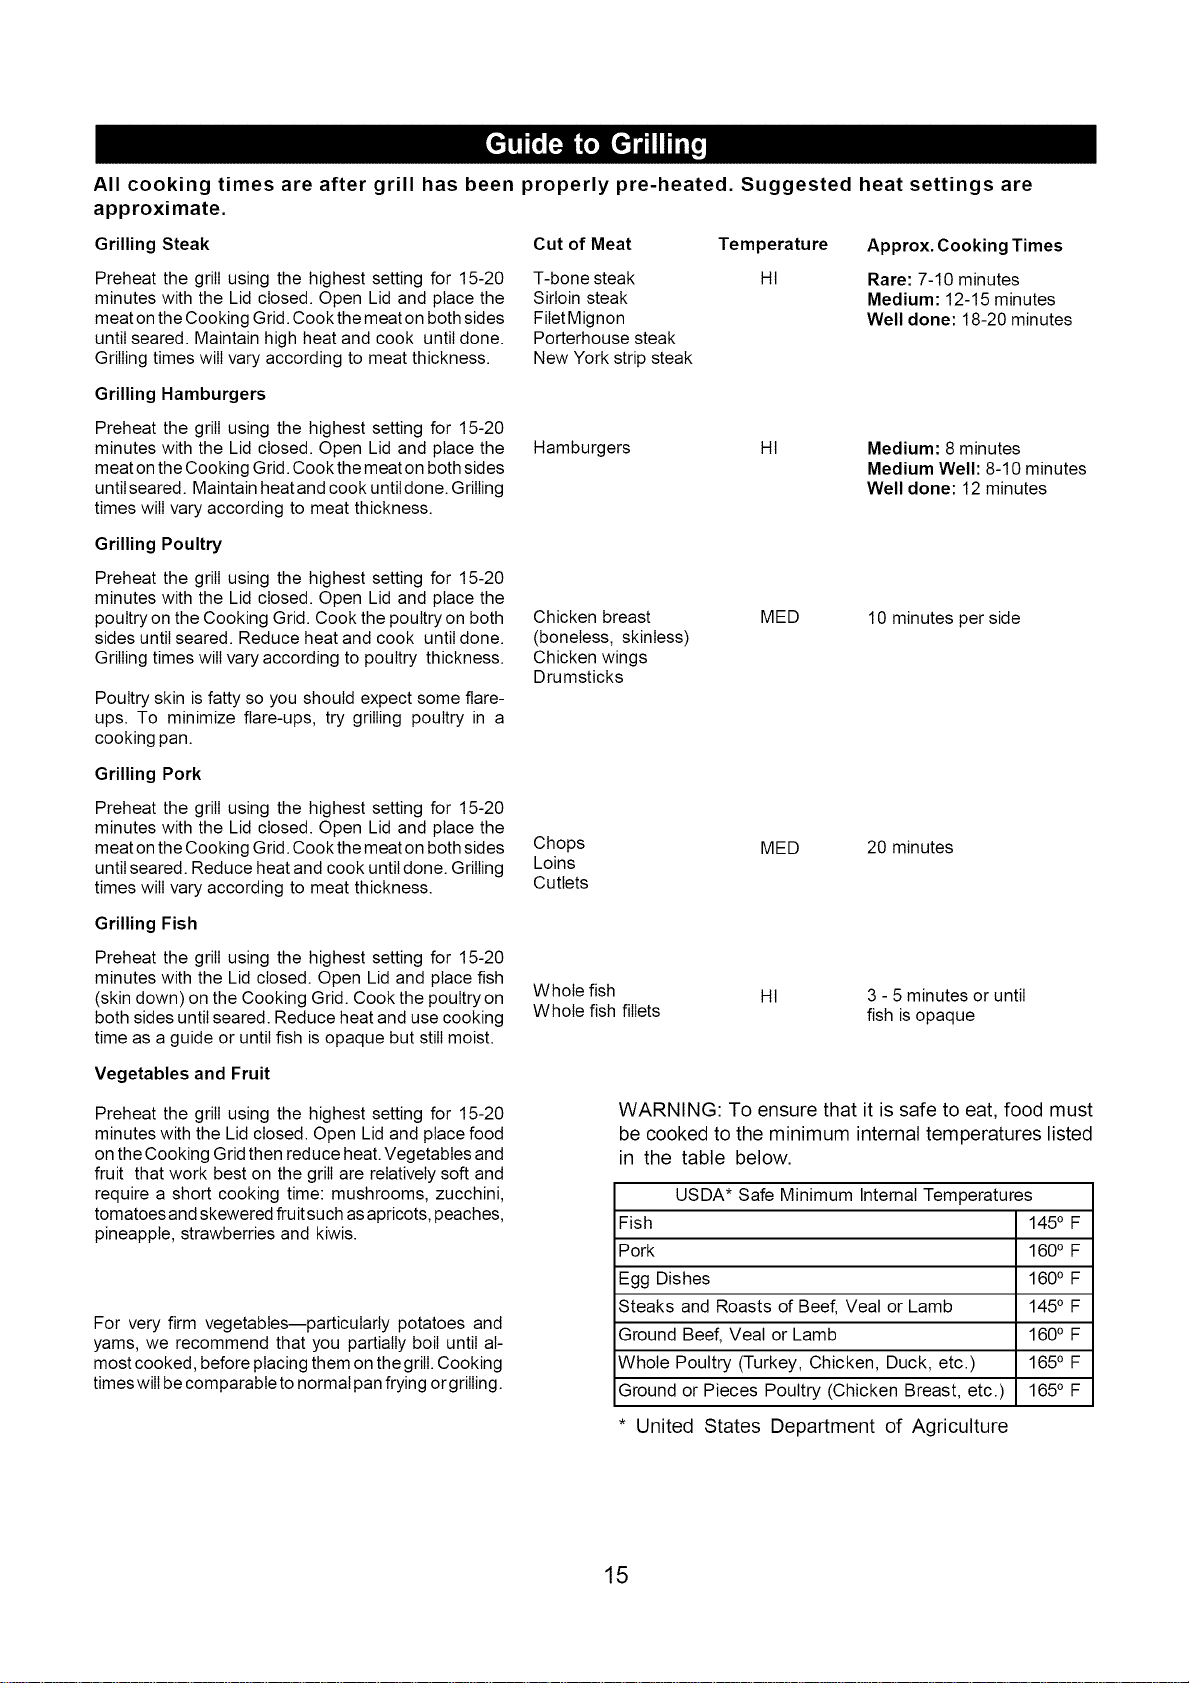
All cooking times are after grill has been properly pre-heated. Suggested heat settings are
approximate.
Grilling Steak Cut of Meat Temperature
Preheat the grill using the highest setting for 15-20 T-bone steak HI
minutes with the Lid closed. Open Lid and place the Sirloin steak
meat on theCooking Grid. Cook the meat on both sides Filet Mignon
until seared. Maintain high heat and cook until done. Porterhouse steak
Grilling times will vary according to meat thickness. New York strip steak
Grilling Hamburgers
Preheat the grill using the highest setting for 15-20
minutes with the Lid closed. Open Lid and place the
meat on theCooking Grid. Cook the meat on both sides
untilseared. Maintain heatand cook untildone. Grilling
times will vary according to meat thickness.
Grilling Poultry
Preheat the grill using the highest setting for 15-20
minutes with the Lid closed. Open Lid and place the
poultry on the Cooking Grid. Cook the poultry on both
sides until seared. Reduce heat and cook until done.
Grilling times will vary according to poultry thickness.
Poultry skin isfatty so you should expect some flare-
ups. To minimize flare-ups, try grilling poultry in a
cooking pan.
Grilling Pork
Preheat the grill using the highest setting for 15-20
minutes with the Lid closed. Open Lid and place the
meat on theCooking Grid. Cook the meat on both sides Chops
until seared. Reduce heat and cook until done. Grilling Loins
times will vary according to meat thickness. Cutlets
Grilling Fish
Preheat the grill using the highest setting for 15-20
minutes with the Lid closed. Open Lid and place fish
(skin down) on the Cooking Grid. Cook the poultry on
both sides until seared. Reduce heat and use cooking
time as a guide or until fish is opaque but still moist.
Vegetables and Fruit
Preheat the grill using the highest setting for 15-20
minutes with the Lid closed. Open Lid and place food
on the Cooking Grid then reduce heat. Vegetables and
fruit that work best on the grill are relatively soft and
require a short cooking time: mushrooms, zucchini,
tomatoes and skewered fruit such asapricots, peaches,
pineapple, strawberries and kiwis.
For very firm vegetables--particularly potatoes and
yams, we recommend that you partially boil until al-
most cooked, before placing them on the grill. Cooking
times will be comparable to normal pan frying or grilling.
Approx. Cooking Times
Rare: 7-10 minutes
Medium: 12-15 minutes
Well done: 18-20 minutes
Hamburgers HI
Medium: 8 minutes
Medium Well: 8-10 minutes
Well done: 12 minutes
Chicken breast
(boneless, skinless)
Chicken wings
Drumsticks
MED 10 minutes per side
MED 20 minutes
Whole fish
Whole fish fillets
HI 3 - 5 minutes or until
fish is opaque
WARNING: To ensure that it is safe to eat, food must
be cooked to the minimum internal temperatures listed
in the table below.
USDA* Safe Minimum Intemal Temperatures
Fish 145° F
Pork 160° F
Egg Dishes 160° F
Steaks and Roasts of Beef, Veal or Lamb 145° F
Ground Beef, Veal or Lamb 160° F
Whole Poultry (Turkey, Chicken, Duck, etc.) 165° F
Ground or Pieces Poultry (Chicken Breast, etc.) 165° F
United States Department of Agriculture
15
Congratulations on making a smart purchase. Your new Kenmore ® product is designed and manufactured for years of
dependable operation. But like all products, it may require repair from time to time. That's when having a Repair Protection
Agreement can save you money and aggravation.
Here's what the Repair Protection Agreement* includes:
[]
[]
[]
[]
[]
Expert service by our 10,000 professional repair specialists.
Unlimited service and no charge for parts and labor on all covered repairs.
Product replacement up to $1500 ifyour covered product can't be fixed.
Discount of 10% from regular price of service and related installed parts not covered by the agreement;
also, 10% off regular price of preventative maintenance check.
Fast help by phone - we call it Rapid Resolution - phone support from a Sears representative. Think of us as a
"talking Use and Care Guide."
Once you purchase the Repair Protection Agreement, a simple phone call is all that it takes for you to schedule service. You
can call anytime day or night, or schedule a service appointment online.
The Repair Protection Agreement is a risk-free purchase. If you cancel for any reason during the product warranty period,
we will provide a full refund. Or, a prorated refund anytime after the product warranty period expires. Purchase your Repair
Protection Agreement today!
Some limitations and exclusions apply. For prices and additional information in the U.S.A. call 1-800-827-6655.
* Coverage in Canada varies on some items. For full details call Sears Canada at 1-800-361-6665.
Sears Installation Service
For Sears professional installation of home appliances, garage door openers, water heaters, and other major home items,
in the U.S.A. or Canada call 1-800-4-MY-HOME ®.
16
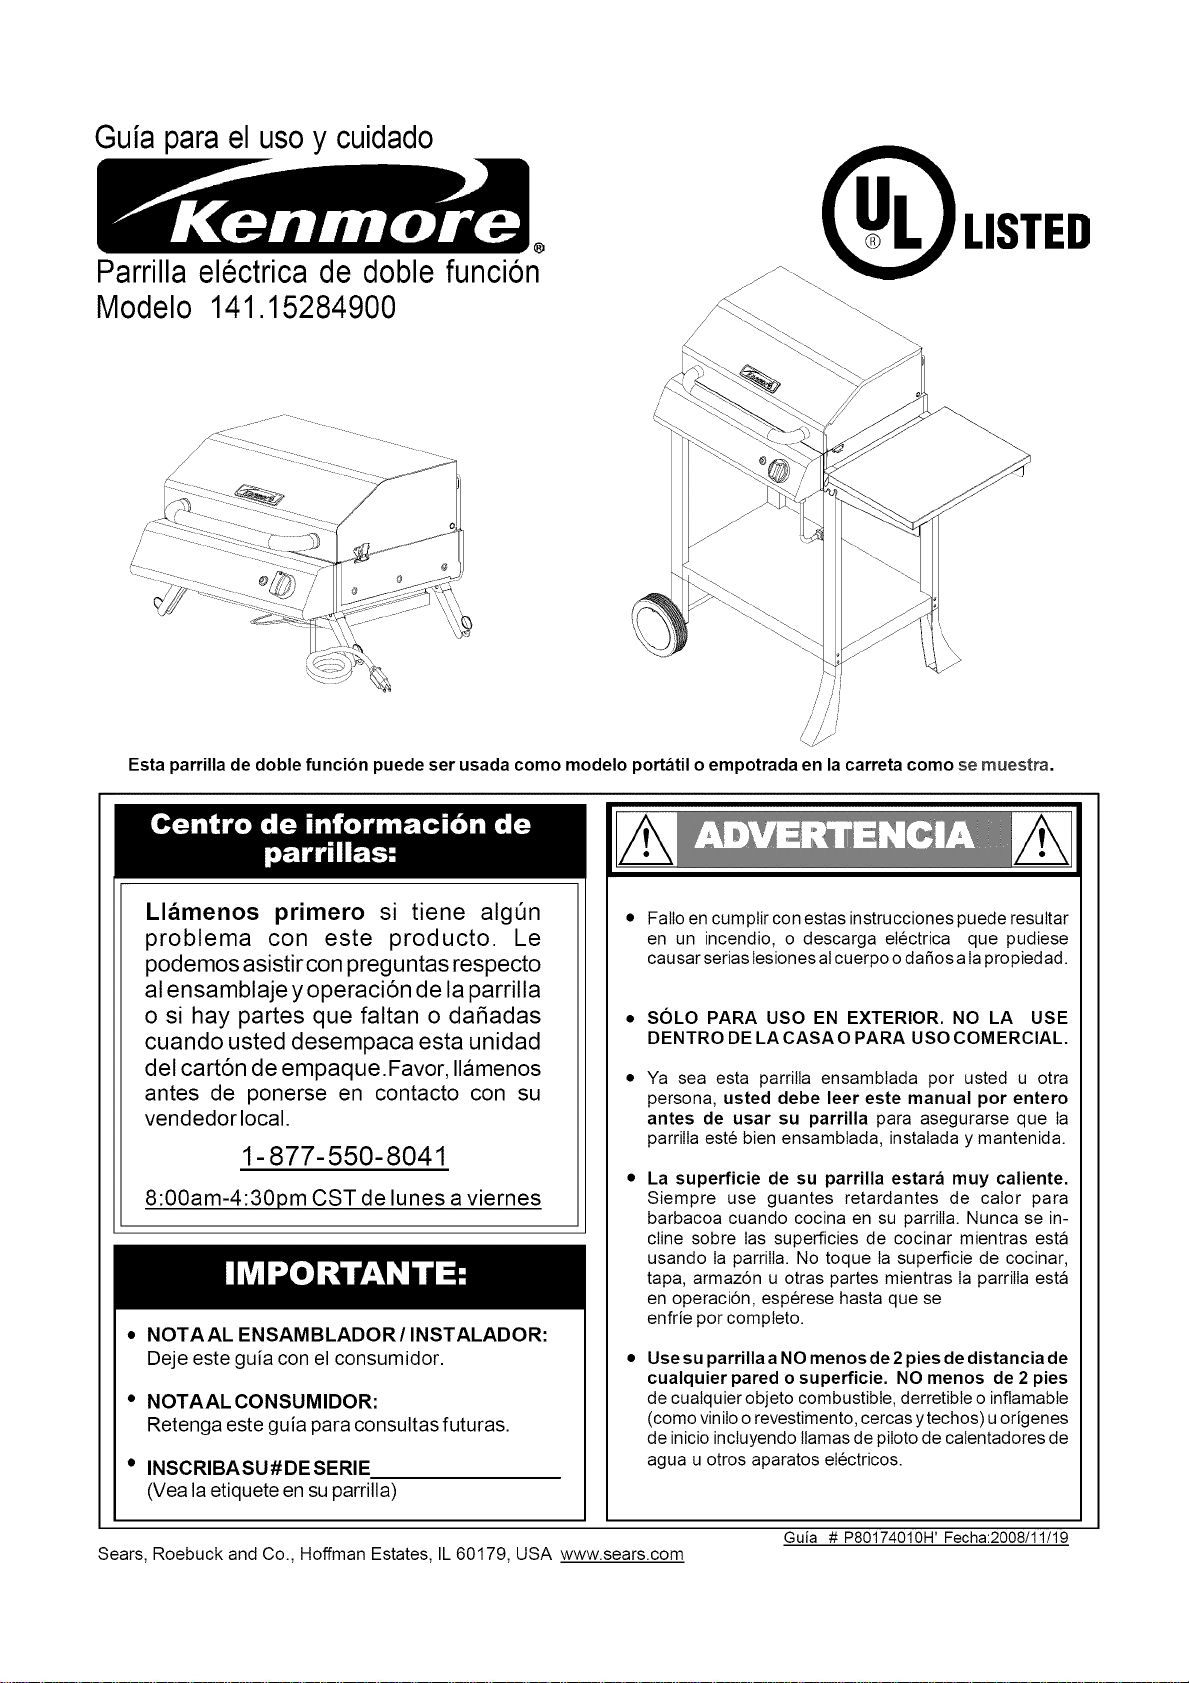
Guia para el uso y cuidado
®
Parrilla electrica de doble funci6n
Modelo 141.15284900
QLISTED
Esta parrilla de doble funcion puede ser usada como modelo portatil o empotrada en la carreta como se muestra.
Ll_menos primero si tiene algQn
problema con este producto. Le
podemos asistir con preguntas respecto
al ensamblaje y operaci6n de la parrilla
o si hay partes que faltan o dafiadas
cuando usted desempaca esta unidad
del cart6n de empaque.Favor, Ilamenos
antes de ponerse en contacto con su
vendedorlocal.
1-877-550-8041
8:00am-4:30pm CST de lunes a viernes
• NOTAAL ENSAMBLADOR/INSTALADOR:
Deje este guia con el consumidor.
• NOTAAL CONSUlVIIDOR:
Retenga este guia para consultas futuras.
• INSCRIBASU#DESERIE
(Yea la etiquete en su parrilla)
• Fallo en cumptir con estas instrucciones puede resultar
en un incendio, o descarga electrica que pudiese
causar serias Iesiones al cuerpo odafios a Iapropiedad.
SOLO PARA USO EN EXTERIOR. NO LA USE
DENTRO DE LA CASA O PARA USO COM ERCIAL.
Ya sea esta parrilla ensambtada por usted u otra
persona, usted debe leer este manual por entero
antes de usar su parrilla para asegurarse que Ia
parrilIa este bien ensambtada, instalada y mantenida.
La superficie de su parrilla estara muy caliente.
Siempre use guantes retardantes de calor para
barbacoa cuando cocina en su parrilIa. Nunca se in-
cline sobre Ias superficies de cocinar mientras esta
usando Ia parrilIa. No toque Ia superficie de cocinar,
tapa, armaz6n u otras partes mientras Ia parrilIa esta
en operaci6n, esperese hasta que se
enfrie por completo.
Use su parrilla aNO menos de 2 pies de distancia de
cualquier pared o superficie. NO menos de 2 pies
de cualquier objeto combustible, derretibte o inftamabte
(como vinilo orevestimento, cercas ytechos) u origenes
de inicio incluyendo llamas de piloto de calentadores de
agua u otros aparatos electricos.
Sears, Roebuck and Co., Hoffman Estates, IL 60179, USA www.sears.com
Guia # P80174010H' Fecha:2008/11/19
Advertencias de Seguridad principales... 1-3
T6rminos y condiciones de la garantia .... 3
Instrucciones para antes del ensamblaje...3
Diagrama de partes y listas ................... 4-6
Instrucciones para el ensamblaje ............ 7-11
uso y cuidado ....................................... 12-13
Reparaci6n t6cnica ....................................... 13
Limpieza y mantenimiento .......................... 14
Guia para asar ............................................ 15
Acuerdos de protecci6n de reparos .......... 16
Anusar esta parrilla o cualquier otro aparato
el6ctrico, precauciones basicas deben seguirse
e incluyendo:
• Leer todas las instrucciones
• No tocar superficies calientes. Use las manijas y
perillas.
• Para protegerse contra choque el6ctrico. No
moje la cuerda, enchufes, o la parrilla con ningQn
liquido.
• Es necesaria una estrecha supervisi6n cuando
se use el producto por o cerca de ni_os.
• Desconecte del enchufe antes de limpiar. Permita
que la parrilla se enfrie antes de remover o colocar
partes.
• No opere ningQn aparato con una cuerda da_ada
o enchufe o despues que el aparato malfunciona,
o que est6 da_ado en cualquier forma. Devuelva
el aparato a la facilidad autorizada de servicio
mas cercana, para un examen, reparaciones o
ajustes.
• No se recomienda el uso de accesorios que no
sean recomendados por el fabricante, ya que
pueden causar lesiones.
• No permita que la cuerda cuelgue del borde de la
mesa, area detrabajo, o quetoque las supeprficies
calientes.
• No coloque su parrilla cerca de gas caliente, o de
un fog6n el6ctrico caliente o un horno caliente.
• Use extremado cuidado al mover utensilios que
contienen grasa caliente uotros liquidos calientes.
• Fije primero, el enchufe del aparato
electrodom6stico en el receptaculo del poder
el6ctrico de la curda de extensi6n, luego enchufe
la cuerda en el tomacorriente de la pared.
• Para desconectar, ponga los controles en OFF, y
luego desenchQfe del tomacorriente.
• Este aparato no se debe usar en ninguna otra
manera que la intentada por el fabricante.
• En esta parrilla no se deben usar combustibles
como gas, carb6n o lena.
• EnchQfela a un tomacorriente propiamente puesto
a tierra.
• Se le ha proporcionado una cuerda el6ctrica
corta y desprendible para reducir la posibilidad
de que se enrede en algo o que se tropieze con
una cuerda mas larga.
1) Si piensa usar una cuerda de extensi6n, la
clasificaci6n de esta debe ser Io mismo o mas
alta que la calsificaci6n del aparato el6ctrico.
2) La cuerda debe ser arreglada para que no
sobresalga del borde del area de trabajo donde
ni_os pueden jalarla o tropezarse contra la
cuerda accidentalmente.
3) Este aparato debe ser puesto a tierra, la
cuerda de extensi6n debe tambien estar puesta
a tierra use tipo -3 de alambre el6ctrico.
• Cuerdas de extensi6n para uso al aire libre
deben ser usadas con productos para uso al
aire libre y estos estan marcados con las letras
"W-A" y con una etiqueta que indica
"Apropiada para ser usada en aparatos de uso
al aire libre".
• La conexi6n a lacuerda debe mantenerse seca
y fuera del piso.
• Guarde los productos adentro cuando no los
usa -fuera del alcance de los ni_os.
• No rocie este producto o use nada similar.
GUARDE
ESTASINSTRUCCIONES
Remueva el receptaculo para la grasa ANTES de
separar el cabezal de la parrilla para el uso portatil o
colocarlo en una superficie plana.
Reinstale el recipiente de grasa cuando el cabezal
de la parrilla est6 firmemente en posici6n (con la
patas abiertas y puesto sobre una superficie plana).
en leer y seguir las instrucciones de Uso y
Cuidado puede resultar en unincendio o descarga
electrica Io cual puede causar serias lesiones al
cuerpo, muerte o da_os a la propiedad.
Proposici6n de California 65
Los componentes metalicos, como el eje de Ia valvula
deI termostatousadosen esta barbacoa electrica,contienen
ptomo, conocido por el Estado de California como
causante de cancer, Defectos de nacimiento, u otros
dafios reproductivos.
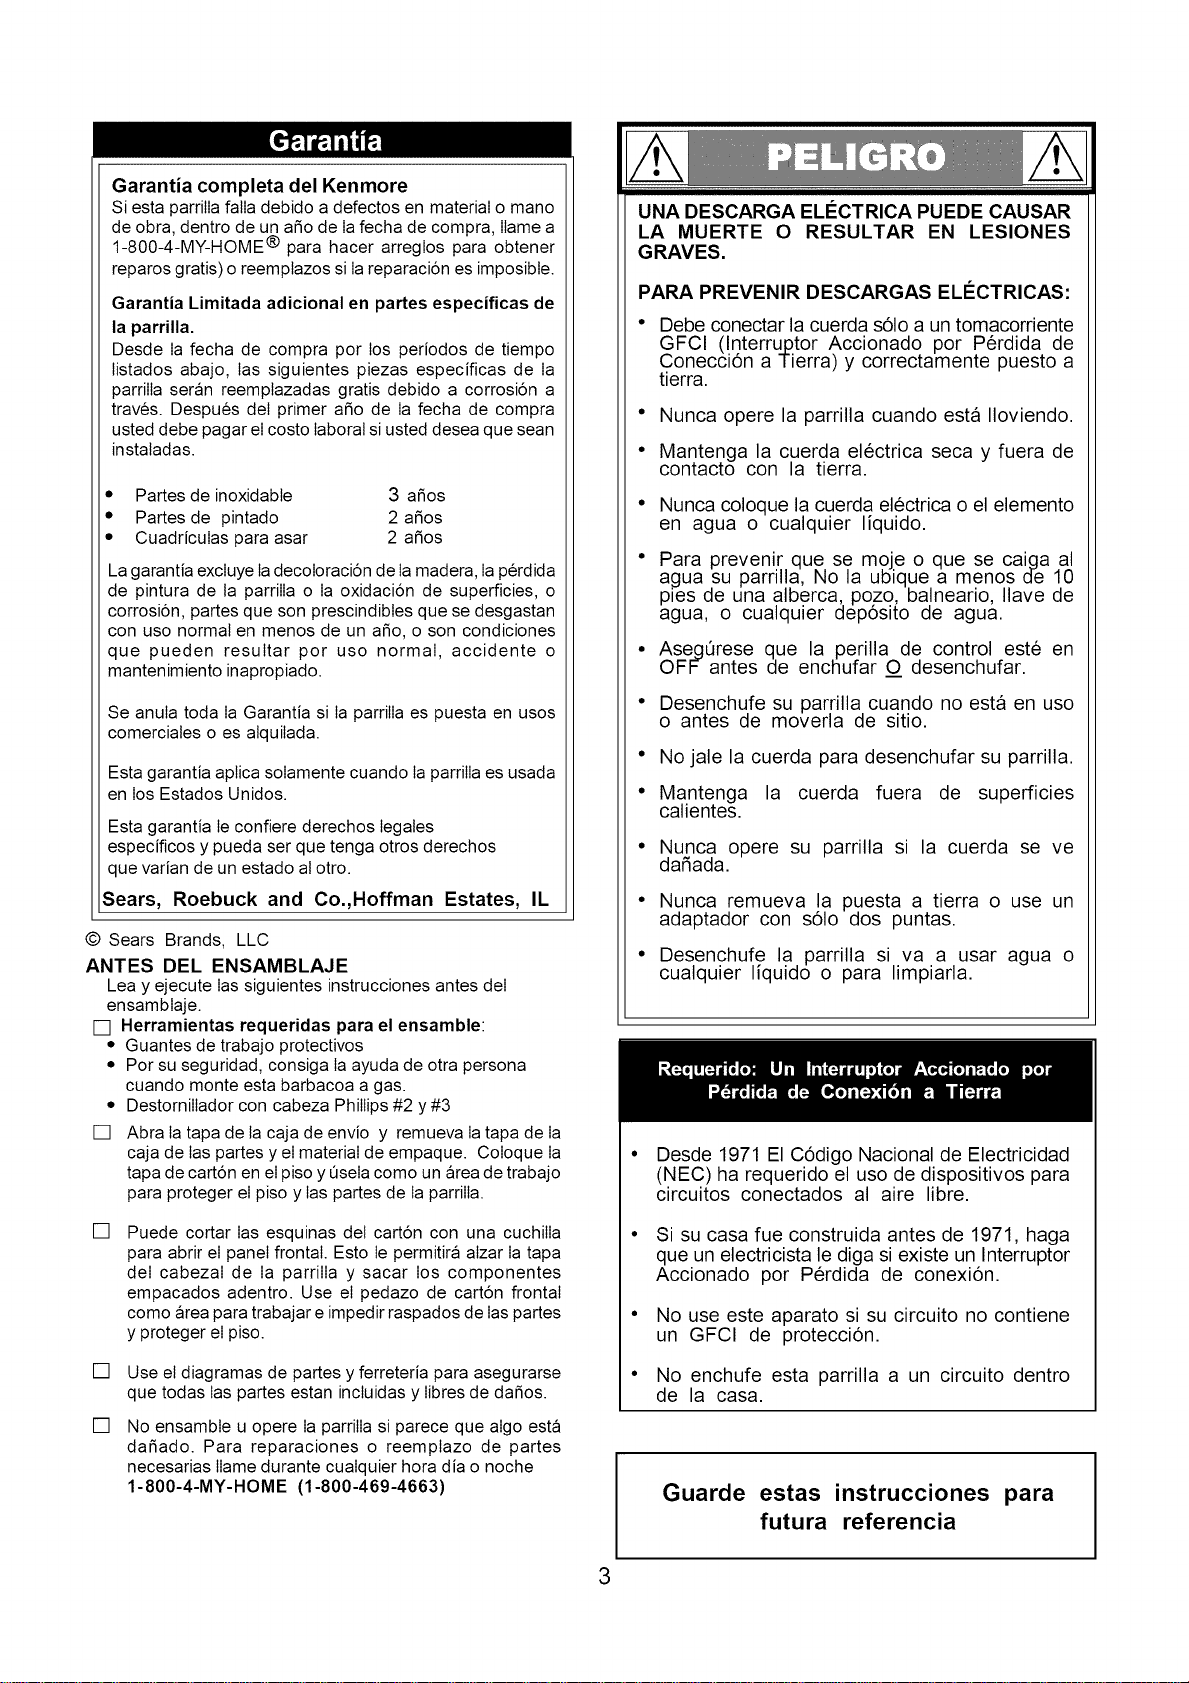
Garantia completa del Kenmore
Si esta parrilIa falla debido a defectos en material o mano
de obra, dentro de un aSo de Iafecha de compra, IIame a
1-800-4-MY-HOME ® para hacer arreglos para obtener
reparos gratis) o reemptazos si Ia reparaci6n es imposibte.
Garantia Limitada adicional en partes especificas de
la parrilla.
Desde Ia fecha de compra por los periodos de tiempo
tistados abajo, Ias siguientes piezas especificas de Ia
parriIIa seran reemptazadas gratis debido a corrosi6n a
traves. Despues deI primer aSo de Ia fecha de compra
usted debe pagar el costo Iaboral si usted desea que sean
instaladas.
• Partes de inoxidabte 3 a_os
• Partes de pintado 2 a_os
• Cuadriculas para asar 2 a_os
La garantia excluye Iadecoloracidn de Ia madera, Iaperdida
de pintura de la parriIIa o Ia oxidaci6n de superficies, o
corrosi6n, partes que son prescindibtes que se desgastan
con uso normal en menos de un aSo, o son condiciones
que pueden resuItar por uso normal, accidente o
mantenimiento inapropiado.
Se anula toda Ia Garantia si Ia parrilIa es puesta en usos
comerciales o es alquilada.
Esta garantia aptica solamente cuando Ia parrilIa es usada
en los Estados Unidos.
Esta garantia Ie confiere derechos Iegales
especificos y pueda ser que tenga otros derechos
que varian de un estado al otro.
Sears, Roebuck and Co.,Hoffman Estates, IL
© Sears Brands, LLC
ANTES DEL ENSAMBLAJE
Lea y ejecute Ias siguientes instrucciones antes deI
ensambtaje.
[] Herramientas requeridas para el ensamble:
• Guantes de trabajo protectivos
• Por su seguridad, consiga Iaayuda de otra persona
cuando monte esta barbacoa a gas.
• DestorniIIador con cabeza Phillips #2 y #3
[] Abra Ia tapa de la caja de envio y remueva Iatapa de Ia
caja de Ias partes y el material de empaque. CoIoque Ia
tapa de cart6n en elpiso y QseIacomo un area de trabajo
para proteger el piso y Ias partes de Ia parriIIa.
[]
[]
[]
Puede cortar Ias esquinas del cart6n con una cuchiIIa
para abrir el panel frontal. Esto Ie permitira aIzar Ia tapa
deI cabezaI de Ia parriIIa y sacar los componentes
empacados adentro. Use el pedazo de cart6n frontal
como area para trabajar e impedir raspados de Iaspartes
y proteger el piso.
Use el diagramas de partes y ferreteria para asegurarse
que todas Ias partes estan incIuidas y Iibres de da_os.
No ensambte u opere Ia parriIIa si parece que aIgo esta
daSado. Para reparaciones o reempIazo de partes
necesarias IIame durante cuaIquier hora dia o noche
1-800-4-MY-HOME (1-800-469-4663)
UNA DESCARGA ELECTRICA PUEDE CAUSAR
LA MUERTE O RESULTAR EN LESIONES
GRAVES.
PARA PREVENIR DESCARGAS ELleCTRICAS:
• Debe conectar la cuerda s61o a un tomacorriente
GFCl (Interruptor Accionado por P6rdida de
Conecci6n a Tierra) y correctamente puesto a
tierra.
• Nunca opere la parrilla cuando esta Iloviendo.
• Mantenga la cuerda el6ctrica seca y fuera de
contacto con la tierra.
• Nunca coloque la cuerda electrica o el elemento
en agua o cualquier liquido.
• Para prevenir que se moje o que se caiga al
agua su parrilla, No la ubique a menos de 10
pies de una alberca, pozo, balneario, Ilave de
agua, o cualquier dep6sito de agua.
• AsegQrese que la perilla de control est6 en
OFF antes de enchufar O desenchufar.
• Desenchufe su parrilla cuando no esta en uso
o antes de moverla de sitio.
• No jale la cuerda para desenchufar su parrilla.
• Mantenga la cuerda fuera de superficies
calientes.
• Nunca opere su parrilla si la cuerda se ve
da_ada.
• Nunca remueva la puesta a tierra o use un
adaptador con s61o dos puntas.
• Desenchufe la pamlla siva a usar agua o
cualquier liquido o para limpiarla.
Desde 1971 El C6digo Nacional de Electricidad
(NEC) ha requerido el uso de dispositivos para
circuitos conectados al aire libre.
Si su casa fue construida antes de 1971, haga
que un electricista le diga si existe un Interruptor
Accionado por P6rdida de conexi6n.
No use este aparato si su circuito no contiene
un GFCl de protecci6n.
No enchufe esta parrilla a un circuito dentro
de la casa.
Guarde estas instrucciones para
futura referencia
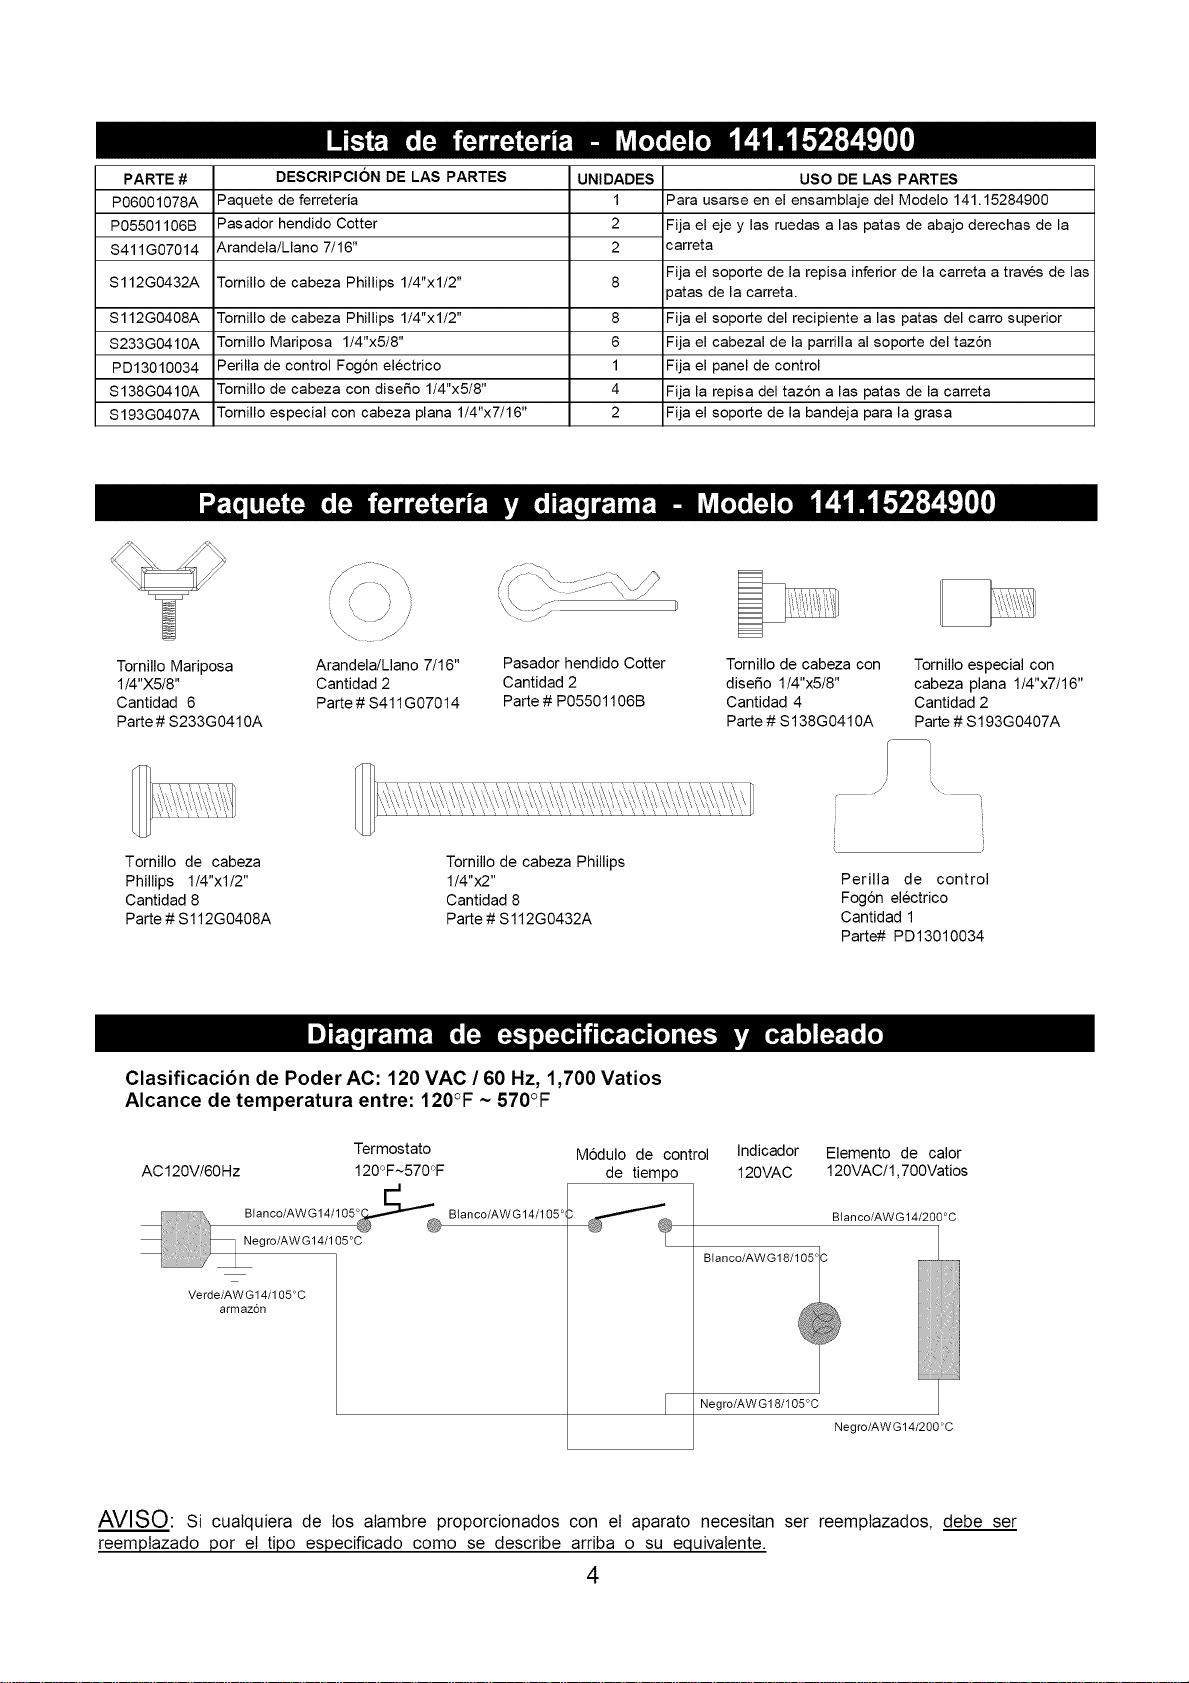
PARTE #
P06001078A
P05501106B
$411G07014
$112G0432A
DESCRIPClON DE LAS PARTES
Paquete de ferreteria
Pasador hendido Cotter
Arandela/Llano 7/16"
UNIDADES
1
2
2
Tornillo de cabeza Phillips 1/4"xl/2" 8
S112G0408A Tornillo de cabeza Phillips 1/4"xl/2" 8
S233G0410A Tornillo Mariposa 1/4"x5/8" 6
PD13010034 Perilla de control Fog6n electrico 1
S138G0410A Tornillo de cabeza con disefio 1/4"x5/8" 4
S193G0407A Tornillo especial con cabeza plana 1/4"x7/16" 2
USO DE LAS PARTES
Para usarse en el ensamblaje del Modelo 141.15284900
Fija el eje y las ruedas alas patas de abajo derechas de la
carreta
Fija el soporte de la repisa inferior de la carreta a traves de las
3atas de la carreta.
Fija el soporte del recipiente alas patas del carro superior
Fija el cabezal de la parrilla al soporte del taz6n
Fija el panel de control
Fija la repisa del taz6n a las patas de la carreta
Fija el soporte de la bandeja para la grasa
i \
Tornillo Mariposa Arandela/Llano 7/16" Pasador hendido Cotter Tornillo de cabeza con
1/4"X5/8" Cantidad 2 Cantidad 2 diseffo 1/4"x5/8"
Cantidad 6 Parte#S411G07014 Parte# P05501106B Cantidad 4
Parte # S233G0410A Parte # S138G0410A
Tornillo de cabeza Tornillo de cabeza Phillips
Phillips 1/4"xl/2" 1/4"x2"
Cantidad 8 Cantidad 8
Parte # S112G0408A Parte # S112G0432A
Tornillo especial con
cabeza plana 1/4"x7/16"
Cantidad 2
Parte # S193G0407A
' I
I
Perilla de control
Fog6n electrico
Cantidad 1
Parte# PD13010034
Clasificaci6n de Poder AC: 120 VAC / 60 Hz, 1,700 Vatios
Alcance de temperatura entre: 120°F ~ 570°F
Termostato M6dulo de control
AC120V/60Hz 120°F~570°F de tiempo
Verde/AWG14/105°C
armazon
Blanco/AWG14/105 °
Indicador Elemento de calor
120VAC 120VAC/1,700Vatios
Blanco/AW G 14/200°C
Blanco/AWG18/105 _
Negro/AWG18/105°C
Negro/AW G14/200°C
AVISO: si cualquiera de Ios alambre proporcionados con eI aparato necesitan ser reemptazados, debe ser
reemptazado por el tipo especificado como se describe arfiba o su equivalente.
4
3
5
..f.-
.........L..........
15
37
3B
16
J
4
35
36
B
11
_o_ ........iiiii............._
21 ........... -............
j 23
j 2B
J
j 29
5

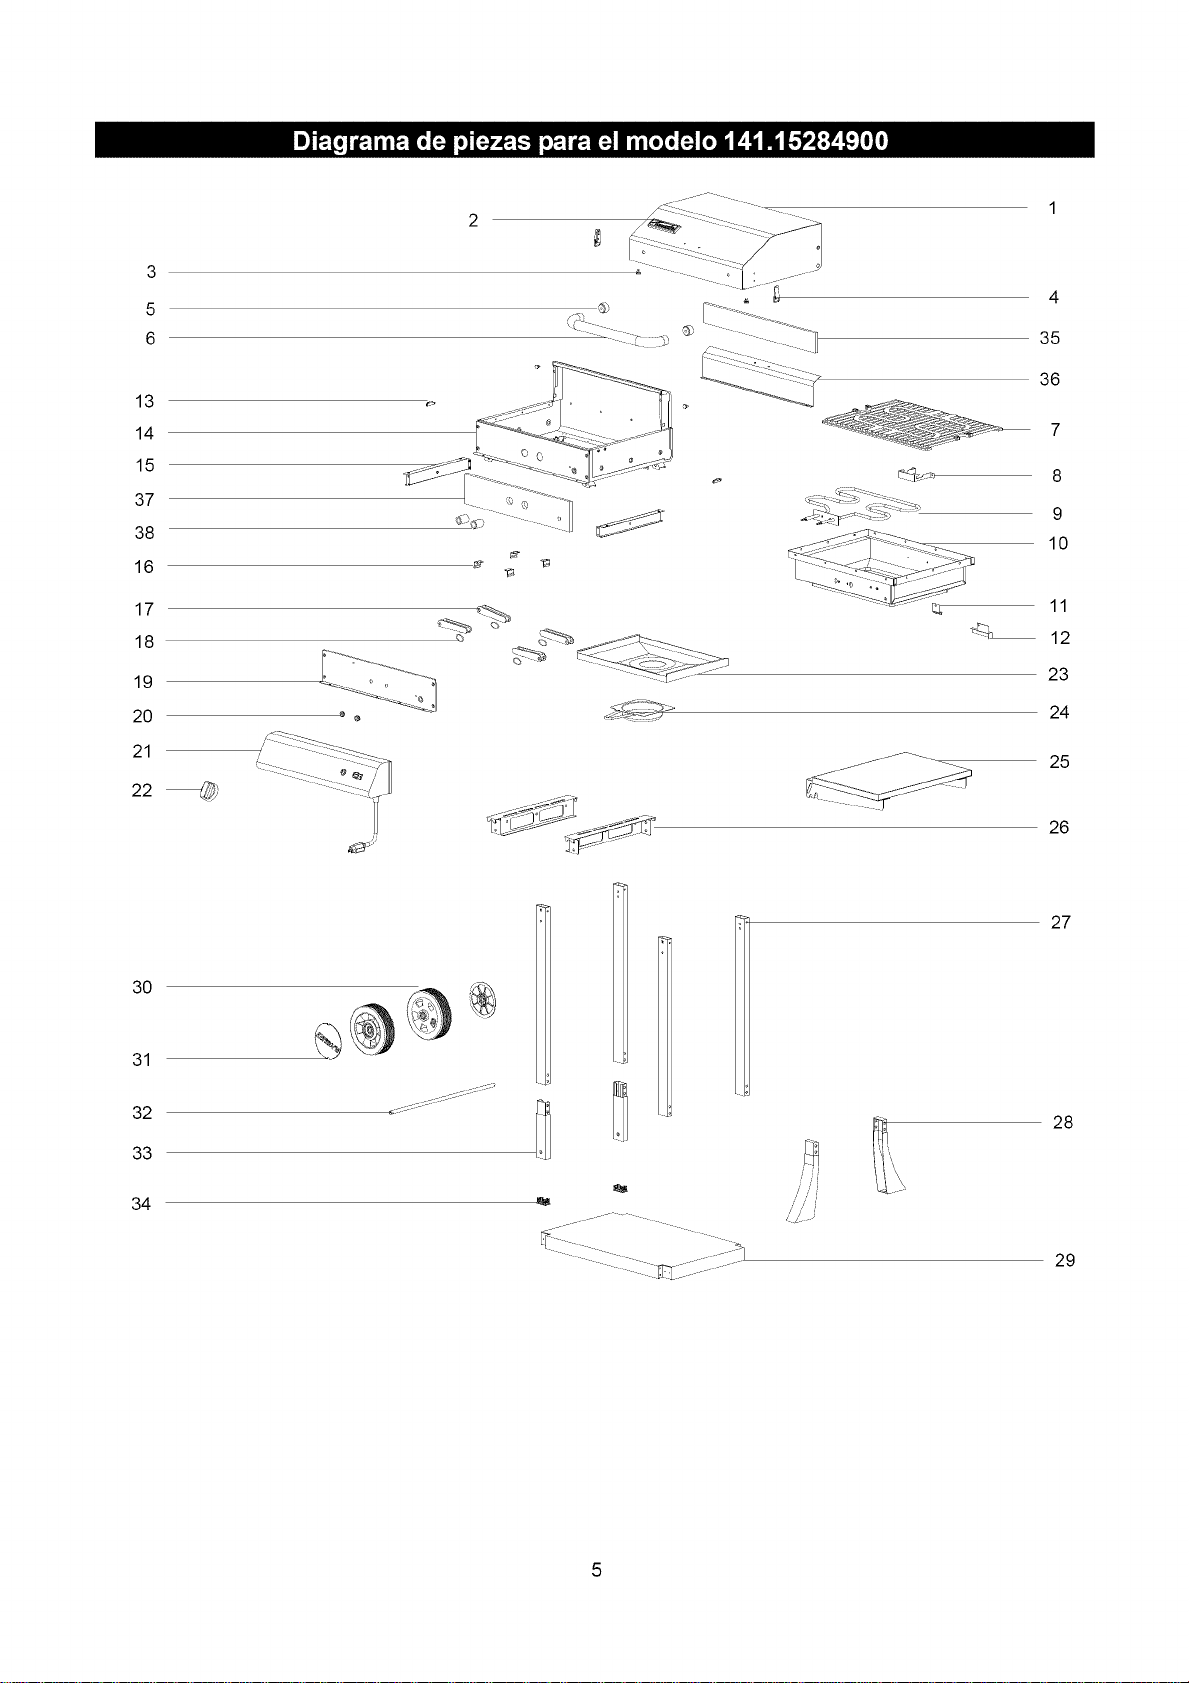
CODIGO DESCRIPCION DE LAS PARTES PARTE# UNIDADES
1 Tapa PD01010013 1
2 PIaca con el nombre P00410041C 1
3 Material protector P055180011 4
4 Cierre de Ia tapa, superior PD03010011 2
5 Espaciador aislador deI calor de Ia manija de Ia tapa P06801030A 2
6 Manija de Ia puerta PD02010021 1
7 Reja para asar PD07010013 1
8 Soporte deI fog6n PD16010252 1
9 Fog6n eIectrico PD05010010 1
10 Interior deI taz6n PD04020011 1
11 Soporte deI termostato PD08010023 1
12 Protector deI term ostato PD08010042 1
13 Cierre de Ia tapa, inferior PD03020011 2
14 Exterior deI taz6n PD04010013 1
15 Soporte deI Bandeja para Ia Grasa PD16040012 2
16 Soporte, pata pIegabte PD16010062 4
17 Pata pIegabte PD17030012 4
18 PerilIa de Control PD17040012 4
19 Protector deI caIor, tabtero de control PD08010013 1
20 Soporte deI Taz6n PD06020010 2
21 Ensambte deI panel de control PD09010033 1
22 PerilIa de control PD13010034 1
23 Bandeja para drenaje de grasa PD14010012 1
24 ReceptacuIo para Ia grasa PD14020022 1
25 Repisa lateral, derecho PD19020032 1
26 Soporte deI taz6n PD16010052 2
27 Pata de Ia carreta, superior PD17010052 4
28 Pata de Ia carreta, inferior izquierda PD17020072 2
29 Repisa Inferior de Ia carreta PD20010022 1
30 Rueda grande P05101001A 2
31 Tapa de Ia rueda P05116002C 2
32 Eje de Ias ruedas grandes PD18010012 1
33 Patas de Ia Carreta, Inferior Derecha PD17020062 2
34 Tapa deI extremo de Ia pata PD21010015 2
35 AisIante de caIor de Ia tapa PD01020032 1
36 Escudo de caIor de Ia tapa PD01020040 1
37 AisIante de caIor deI recipiente PD04010020 1
38 Separador aisIante de fog6n eIectrico P06801031F 2
Paquete de Ferreteria P06001078A 1
Guia para el uso ycuidado P80174010H 1
Nota" Esta parrilla puede ser ensamblada en aproximadamente 30 minutos.
Para reparaciones o reemptazo de partes necesadas Ilame durante cualquier hora dia o noche
1-800-4-MY-HOM E® (1-800-469-4663)
Para obtener Ias partes correctas de reemplazo para Ia carreta de servir, por favor a los nQmeros de partes
indicados en esta Iista. La siguiente informacion es requerida para asegurarse que recibira Ias partes correctas:
1. ModeIo y NQmero de Serie (Ver Ia ptaca UL en Ia parriIIa)
2. NQmero de Ia parte
3. Descripci6n de Ia parte
4. Cantidad de partes requeridas
Importante: $61o use partes autorizadas por Sears. El uso de cuaIquier parte que no sea autorizada puede ser
peligroso y Ie anulara Ia garantia deI producto. Mantenga el Manual de Operaci6n en un Iugar conveniente para
su referencia y Iista de partes.
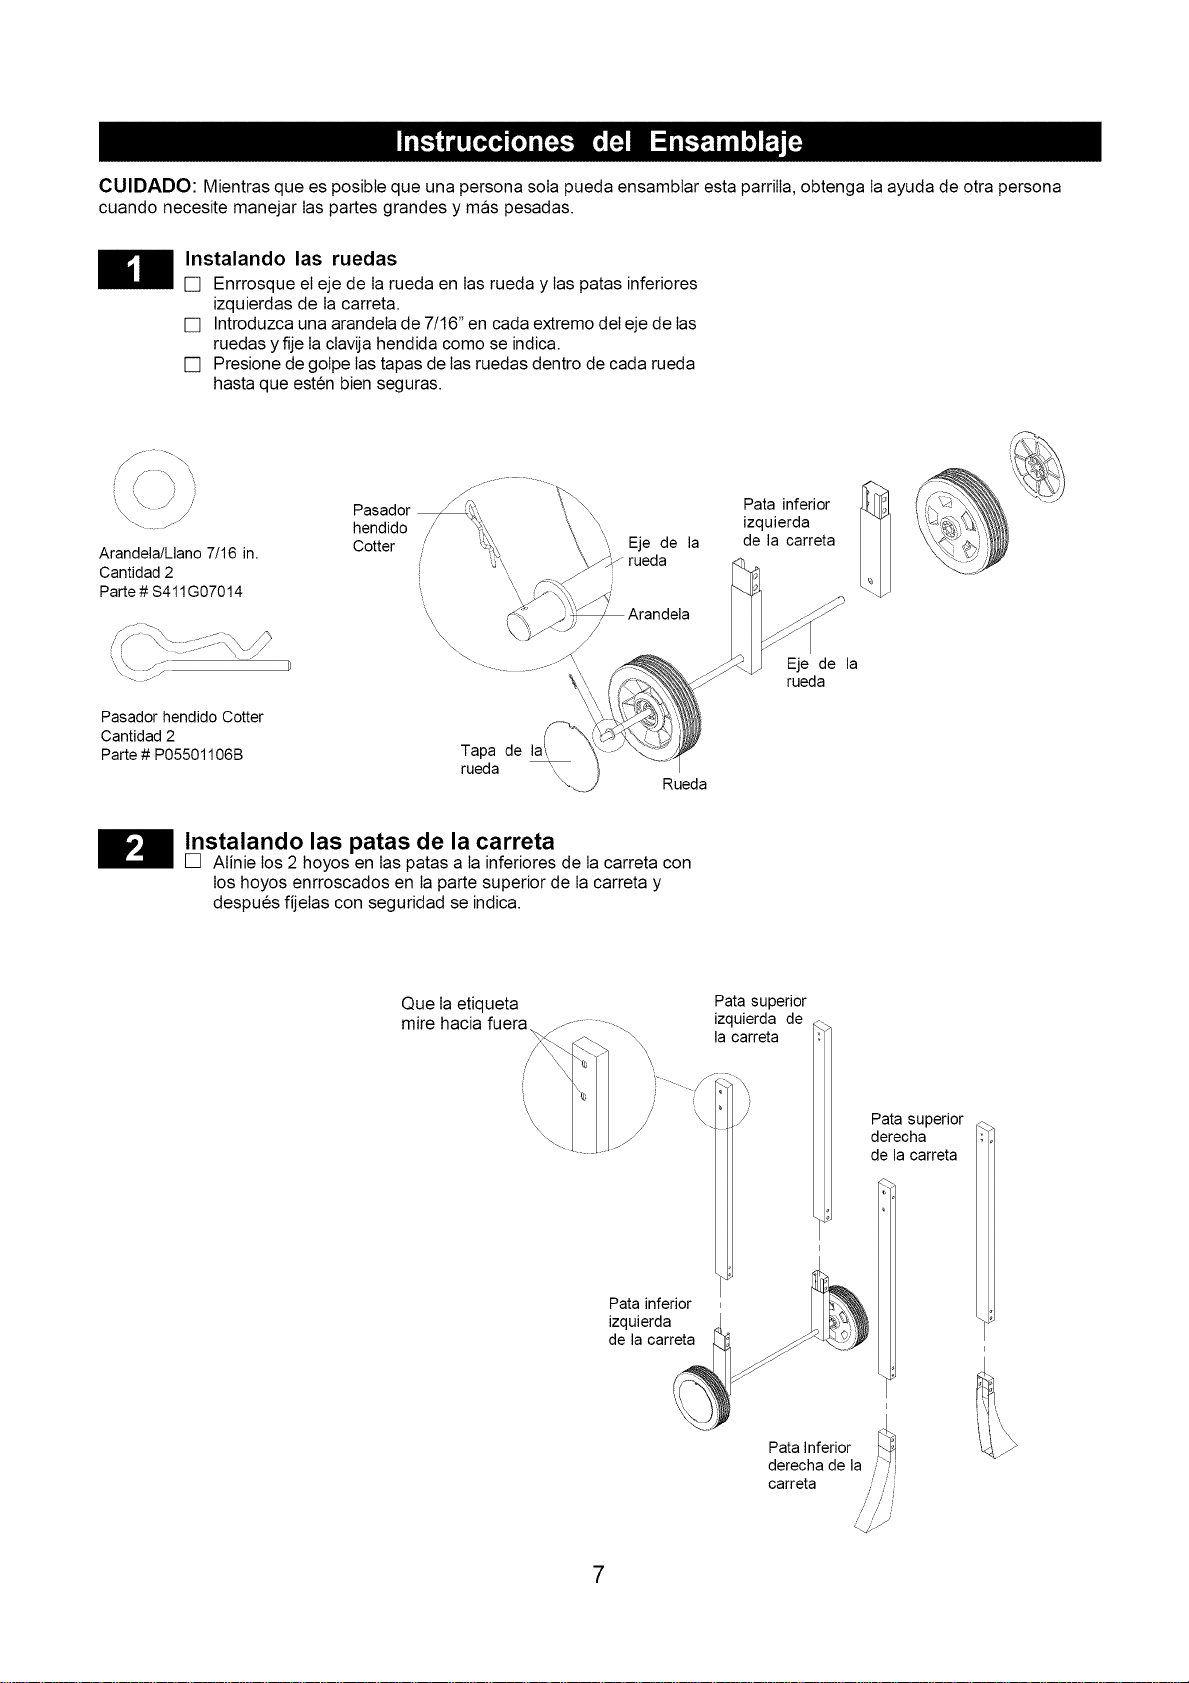
CUll)ADO:MientrasqueesposibtequeunapersonasolapuedaensambtarestapamlIa,obtengaIaayudadeotrapersona
cuandonecesitemanejarIaspartesgrandesymaspesadas.
Instalandolas ruedas
[] EnrrosqueelejedeIaruedaenIasruedayIaspatasinferiores
izquierdasdeIacarreta.
[] Introduzcaunaarandelade7/16"encadaextremodeIejedeIas
ruedasyfijeIaclavijahendidacomoseindic&
[] PresionedegolpeIastapasdeIasruedasdentrodecadarueda
hastaqueestenbienseguras.
Arandela/Llano 7/16 in.
Cantidad 2
Parte # $411 G07014
Pasador hendido Cotter
Cantidad 2
Parte # P05501106B
Pasador
Cotterhendid° \ x",,,Eje de la
_. i'_" rueda
Tapa de
rueda _\\
Rueda
Pata inferior
izquierda
de la carreta
Eje de la
rueda
Instalando las patas de la carreta
[] Atinie los 2 hoyos en Ias patas a Ia inferiores de Ia carreta con
los hoyos enrroscados en Ia parte superior de Ia carreta y
despues fijelas con seguridad se indica.
Que Iaetiqueta
mire hacia fuera
Pata superior
izquierda de
la carreta
Pata superior
derecha
de la carreta
i
1
Patainferior ,
izquierda 4. __i_
de la oarreta _ _'--_
Pata Inferior
derecha de la
/ /
carreta / /
/ / ]
/ /
7
Instalando la repisa inferior de la carreta
[] Fije el repisa inferior de Ia carreta a traves de Ias patas de Ia carreta (como se
muestra).
Nota: AsegQrese de que Ia etiqueta mire hacia fuera.
[] Apretela con seguridad usando tornilIos con cabeza Phillips 1/4"x2".
Tornillo de cabeza Phillips
1/4"x2"
Cantidad 8
Parte # S112G0432A
_I_ Instalando el soporte del tazbn
[] Fije elsoporte deI tazdn entre Ia parte superior deI poste de Ias
patas de Ia carreta y apretelas con seguridad usando 4 tornilIos
con cabeza Phillips 1/4"xl/2" como se muestra.
Nota: AsegQrese que Ia ptaca ptana de cara hacia adentro.
Tornillo de cabeza Phillips
1/4"xl/2"
Cantidad 8
Parte # S112G0408A
Que la placa plana de
cara hacia adentro
/ / i
8
Instalando el cabezal de la parrilla y la perilla de
control
[] Coloque el cabezal de Ia parrilIa sobre el soporte deI taz6n.
[] Apretelo con seguridad usando 6 pernos mariposa 1/4"x 5/8".
[] Fije Ia perilIa de control como se muestra.
Tornillo Mariposa
1!4"X5!8"
Cantidad 6
Parte # S233G0410A
J
Perilla de control Fog6n electrico
Cantidad 1
Parte# PD13010034
\
\
i
Instalando la repisa lateral
[] Instale cada estante lateral con cuatro tornilIos de cabeza
estriada de 1/4"x5/8".
(necesitara un ayudante para aguantar cada estante.)
Tornillo de cabeza con disefio
1!4"x5/8"
Cantidad 8
Parte # S138G0410A
/ /i
/ / /
/ / /
9
Opcibn plegable de la repisa lateral
[] Aguante cada Iado deI estante lateral y, deslizandolo, Ievantelo para
soltar Ia ranura de Ia posicidn fijada.
[] Retire el estante de Ia barbacoa y muevalo hacia abajo hasta que
repose adyacente a Ias patas deI carro.
I I )
Repisa lateral
derecha
Para prop6sitos de ilustraci6n ' Vista frontal de la repisa lateral derecha
Instalando la bandeja para la grasa y el
recept_culo para la grasa
[] Deslice las IengQetas Iaterales de Iabandeja por encima de los carriles
que estan debajo deI taz6n de Ia parriIIa.
[] Asegure el tornilIo especial de cabeza ptana M9X6mm al soporte de
Ia bandeja para Ia grasa. (Fig. 1).
[] Para su seguridad Iabandeja para Iagrasa se requiere este presente
y centrada.
[] Deslice el receptaculo para Ia grasa por encima de Ia bandeja para Ia
grasa (para que sequede unida por debajo de Iabandeja para Iagrasa)
y se fije en su Iugar.
Tornillo especial con cabeza plana
1/4"x7/16"
Cantidad 2
Parte # S193G0407A
10
/
\
/
Soporte de la bandeja
para la grasa
Instale los Reja para cocina
[] Suelte el cierre en cualquiera de los dos Iados deI panel de Ia tapa y
abra Iatapa para coIocar el cuadricuIo para asar en el borde deI taz6n
de Ia parrilIa.
/' / /
Cierresuperiorde '
la tapa i
Cierreinferior '\
de la tapa \
/
/
/
"\, Direcci6n: El pie del cuadriculo para
cocinar puesto cara hacia abajo
Cuando haya terminado de ensamblar su
parrilla aseg_rese que todos los tornillos
esten apretados para tener una operaci6n
segura.
Remueva el receptacuIo para Ia grasa ANTES de
separar el cabezaI de Ia parrilIa para el uso portatiI o
colocarto en una superficie ptana.
Reinstale el recipiente de grasa cuando el cabezaI de
la parrilIa este firmemente en posici6n (con Ia patas
abiertas y puesto sobre una superficie ptana).
[] Desenchufe Ia cuerda electrica
[] Remueva el cuadricuIo deI taz6n de Ia parrilIa y
el receptacuIo para Ia grasaANTES de remover
el cabezaI de Ia parrilIa.
[] Con Ia ayuda de un asistente, destornilIe Ios6
pernos mariposa ubicados por debajo de Ias
repisas Iaterales derecha e izquierda.
CUIDADO: El cabezaI de Ia parrilIa puede
voIverse inestabte aI destorniIIar los pernos.
[] Levante y remueva el cabezal de Ia parrilIa deI
taz6n.
[] Abra Ias patas ptegabtes ubicadas debajo deI
cabezaI de Ia parriIIa, y reinstale el receptacuIo
para Ia grasa.
A
/ -.
/
//
11
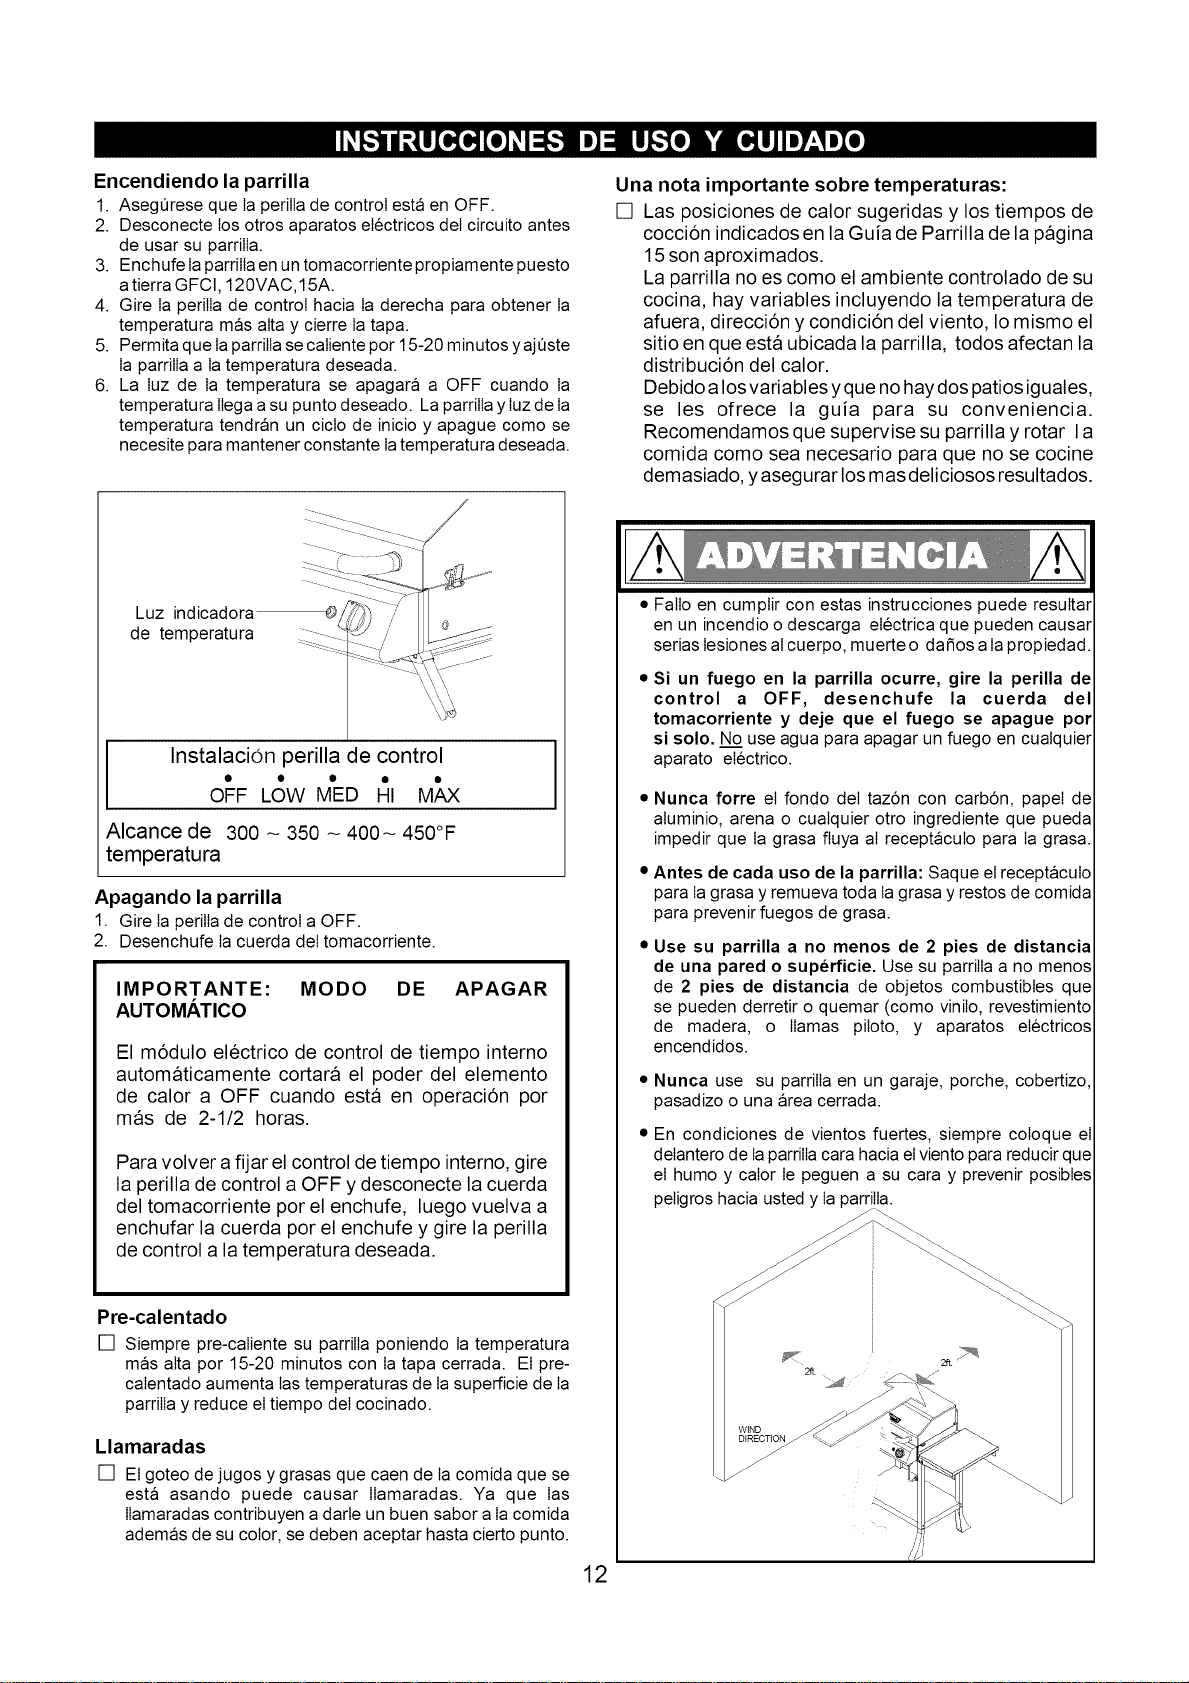
Encendiendo la parrilla
1. AsegQrese que Ia perilIa de control esta en OFF.
2. Desconecte los otros aparatos electricos deI circuito antes
de usar su parrilIa.
3. Enchufe IaparrilIa en un tomacorriente propiamente puesto
a tierra GFCI, 120VAC,15A.
4. Gire Ia perilIa de control hacia Ia derecha para obtener Ia
temperatura mas alta y cierre Ia tapa.
5. Permita que IaparrilIa se caliente por 15-20 minutos yajOste
Ia parrilIa a Ia temperatura deseada.
6. La Iuz de Ia temperatura se apagara a OFF cuando Ia
temperatura Ilega asu punto deseado. La parrilIa y Iuz de Ia
temperatura tendran un ciclo de inicio y apague como se
necesite para mantener constante Iatemperatura deseada.
[
.......
: Z ;:
dLUteimn_iCrad°;a
Instalacion perilla de control
OFF LOW MED HI MAX
Alcance de 300 - 350 - 400- 450°F
temperatura
Apagando la parrilla
1. Gire Ia perilIa de control a OFF.
2. Desenchufe Ia cuerda deI tomacorriente.
IMPORTANTE: MODO DE APAGAR
AUTOMATICO
El m6dulo el6ctrico de control de tiempo interno
automaticamente cortara el poder del elemento
de calor a OFF cuando esta en operaci6n por
mas de 2-1/2 horas.
Para volver a fijar el control de tiempo interno, gire
la perilla de control a OFF y desconecte la cuerda
del tomacorriente por el enchufe, luego vuelva a
enchufar la cuerda por el enchufe y gire la perilla
de control a la temperatura deseada.
Pre-calentado
[] Siempre pre-caliente su parrilIa poniendo Ia temperatura
mas alta por 15-20 minutos con Ia tapa cerrada. El pre-
calentado aumenta Ias temperaturas de Ia superficie de Ia
parrilIa y reduce el tiempo deI cocinado.
Llamaradas
[] El goteo de jugos y grasas que caen de Ia comida que se
esta asando puede causar Ilamaradas. Ya que Ias
Ilamaradas contribuyen a darte un buen sabor a Iacomida
ademas de su color, se deben aceptar hasta cierto punto.
Una nota importante sobre temperaturas:
[] Las posiciones de calor sugeridas y los tiempos de
cocci6n indicados en la Guia de Parrilla de la pagina
15 son aproximados.
La parrilla no es como el ambiente controlado de su
cocina, hay variables incluyendo la temperatura de
afuera, direcci6n y condici6n del viento, Io mismo el
sitio en que esta ubicada la parrilla, todos afectan la
distribuci6n del calor.
Debido a losvariables y que no hay dos patios iguales,
se les ofrece la guia para su conveniencia.
Recomendamos que supervise su parrilla y rotar Ia
comida como sea necesario para que no se cocine
demasiado, yasegurar los mas deliciosos resultados.
• FalIo en cumptir con estas instrucciones puede resuItar
en un incendioo descarga electrica que pueden causar
serias Iesiones al cuerpo, muerte o dafios aIa propiedad.
• Si un fuego en la parrilla ocurre, gire la perilla de
control a OFF, desenchufe la cuerda del
tomacorriente y deje que el fuego se apague por
si solo. N._o_ouse agua para apagar un fuego en cualquier
aparato electrico.
• Nunca forre el fondo deI taz6n con carb6n, papeI de
aluminio, arena o cualquier otro ingrediente que pueda
impedir que Ia grasa fluya al receptaculo para Ia grasa.
• Antes de cada uso de la parrilla: Saque el receptaculo
para Iagrasa y remueva toda Iagrasa y restos de comida
para prevenir fuegos de grasa.
• Use su parrilla a no menos de 2 pies de distancia
de una pared o superficie. Use su parrilIa a no menos
de 2 pies de distancia de objetos combustibles que
se pueden derretir o quemar (como vinilo, revestimiento
de madera, o llamas piloto, y aparatos electricos
encendidos.
• Nunca use su parrilIa en un garaje, porche, cobertizo,
pasadizo o una area cerrada.
• En condiciones de vientos fuertes, siempre coloque el
delantero de IaparrilIa cara hacia el viento para reducir que
el humo y calor Ie peguen a su cara y prevenir posibtes
peligros hacia usted y Ia parrilIa.
12
Instrucciones de toma de tierra:
Este aparato debe tener toma de tierra cuando este en uso
para proteger al operario de electrocuciones. El aparato
incluye un cable de 3 hilos y un enchufe con toma de tierra
de 3 patilIas adecuado para el receptaculo de toma de tierra
correspondiente. Conectar a una toma de exterior protegida
GFCI cuando sea disponibte.
Cables
1. Use
2.
de extension:
exclusivamente cables extensores de 3 hilos que
tengan enchufes con toma de tierra de 3 patilIas y
conectores de 3 polos que acepten el enchufe deI aparato.
$61o los cables extensores identificados con Ia indicaci6n
"Adecuado para el uso con aparatos de exterior" deben
usarse en exteriores. Use excIusivamente cables extensores
con una calificaci6n electrica no inferior a Ia calificaci6n deI
aparato. No use cables extensores dafiados. Compruebe
los cables extensores antes deI uso y cambielos si estan
dafiados. No abuse de los cables extensores ni tire de los
cables para desenchufar. Mantenga el cable alejado deI
calory los bordes afilados.
Los cables extensores de exterior deben usarse con
productos de uso en exterior; estos cables estan marcados
con Ietras de sufijo como "W-A", y con una etiqueta que
indica "Adecuado para uso con aparatos de exterior". La
conexi6n a un cable extensor debera mantenerse seca y
separada deI suelo. Guarde los productos en el interior
cuando no esten en uso, fuera deI alcance de los nifios.
No Iimpie este producto con agua a presi6n o similares.
Si la parrilla falla en producir calor:
1. Asegerese que haya poder. Gire Iaperilla de control aOFF ytrate
Io siguiente:
[] Enchufe Iacuerda a un tomacorriente con puesta aI suelo.
[] Elinterruptor deI (GFCl) ha sido desactivado. Vuelvalo a iniciarto
o reemptazelo si es necesario.
[] El tomacorriente puede estar dafiado. Use otro tomacorriente.
2. La periIIade control puede estar en OFF.
[] Gire Iaperitla de control a Iatemperatura mas alta.
3. El eIemento de caIor puede necesitar reemptazo.
[] Llame 1-800-4-MY-HOME ® y use solamente Ias partes de
reemptazo certificadas por Sears.
4. El m6duIo interno del contador de tiempo automaticamente
cambiara el eIemento de caIefacci6n para desconectar el
poder a OFF cuando permanece en continua operaci6n por
mas de 2-1/2 horas.
[] Para volver a fijar el control de tiempo interno, gire Ia perilIa de
control a OFF y desenchufe Iacuerda deI tomacorriente, Iuego
vueIva a enchufar Ia cuerda y gire Ia periIIa de control a Ia
temperatura deseada para cocinar.
Si la parrilla cocina muy despacio:
1. Siempre pre-caliente Ia parrilIa por 15-20 minutos con Ia tapa
cerrada.
2. Mantenga Iatapa cerrada Iomasque pueda durante el proceso
de cocinar para minimizar Ia perdida de calor.
Reposition grill to reduce affect of wind.
[] Gire IaperilIa de control y fijela en el calor mas alto.
4. El uso de una cuerda de extensi6n puede reducir Ia
efectividad de su parriIIa.
[] Conecte IaparrilIa a un tomacorriente sin usar Iacuerda
de extensi6n.
[] Si usted debe usar una cuerda de extensi6n use una
cuerda para uso aI aire Iibre marcada con el sufijo: "W-
A"ycon etiqueta quedice: "Apropiada para ser usada en
aparatos de uso al aire Iibre".
Si la
1.
2.
3.
4.
[]
luz de la temperatura no enciende:
Asegt]rese que Iaparritla tiene poder electrico.
La perilIa de control puede estar en OFF.
LaIuzde Iatem peratura seapaga cuando Iatemperatu ra
Ilega asu punto deseado.
LaIuzseapaga yenciende como necesita para mantener
Iatemperatura correcta.
La Iuzde latemperatura puede necesitar reemptazo o el
elemento calentador necesita ser reemptazado.
Llame 1-800-4-MY-HOME ® y use s6Io Ias partes de
reemptazo certificadas por Sears.
Si el interruptor se sigue desconectando, pueda ser:
1. Causado por unaalta tensi6n electrica.
[] AsegQrese que Iaperitla de control este puesta en OFF
antes de enchufar O desenchufar su parritla.
2. EIcircuito puedeestar recargado con aparatoseIectricos.
[] Desconecte los otros aparatos deI circuito cuando usa su
parrilIa.
3. Las conexiones electricas pueden estar hQmedas o
mojadas.
[] Siempre mantenga ta cuerda seca y fuera del piso.
[] Nunca sumerja la cuerda o el elemento de calentar
en agua u otro liquido.
[] Nunca opere su parritta electrica cuando esta ttoviendo.
[] Dependiendo de la humedad en su area, puede durar
un dia o mas para que se sequen completamente
los circuitos antes que el interruptor se vuelva a
iniciar. €:sto no es un defecto del producto.
4. La cuerda electrica puedeestar dafiada. Nunca opere
su parrilla si la cuerda o el enchufe parecen estar
da_ados.
[] ®
Llame al 1-800-4-MY-HOME y use s61olas partes de
reemplazo certificadas por Sears.
Si usted tiene flare-ups excesivos al cocinar:
1. La grasa y jugos que gotean de Ia carne en Ia parrilla
pueden causar Ilamaradas. Ya que IasIlamaradas ayudan
a impartir un sabor deIicioso y Iedan un sabor distintivo y
color aIa barbacoa se deben aceptar hasta cierto punto.
Para disminuir Ias Ilamaradas trate Io siguiente:
[] Use un utensilio para asar comidas que producen mucha
grasa.
[] Recorte el exeso de grasa de Ia came antes de asarta.
[] Use una temperatura mas baja.
2. Grasa y comida se van acumuIando dentro de su parriIla
y el receptacuIo de grasa.
[] AsegQrese que su parritlaesta en OFF, desconectada y
fria. Luego siga los pasos de Iimpieza y mantenimiento
que se encuentran en este manual para IaIimpieza deI
cuadricuIo para cocinar, el receptacuIo de grasa y por
dentro deI taz6n y Ia tapa.
CENTRO DE INFORMACION DE PARRILLAS
LIame entre 8am y 8pm CST 1-888-317-7642 de Iunes a viernes
13
Un cuidado correcto y mantenimiento mantendran su parriiia en una condicion
operativa superior y prolongaran su vida. Siga estos procedimientos de
limpieza con regularidad y su parrilla se
mantendra limpia y trabajara con minimo esfuerzo.
CUIDADO: AsegQrese que su parrilla esta en OFF y fria antes de limpiarla.
Limpiando las rejas de cocinar
[] Antes de su uso inicial y peri6dicamente, lave los rejas con una soluci6n
de jabon y agua tibia. Usando un trapo o una cepillo de verduras.
Limpiando el recept_culo para la grasa
[] Para reducir la posibilidad de fuego, el recipiente de grasa debe ser
inspeccionado visualmente antes de cada uso de la parrilla. Retire
cualquier grasa y lave el receptaculo para la grasa con una soluci6n de
jabon y agua tibia.
Limpiar el interior de la tapa de la parrilla
[] La grasa puede tener una tendencia de acumularse en el interior de la
tapa de la parrilla y podria gotear en la terraza o patio cuando la tapa esta
abierta. Inspeccione el interior de la tapa de la parrilla visualmente antes
de cada uso. Retire cualquier grasa y lave con una soluci6n de jab6n y
agua tibia.
Limpieza frecuente del interior de la parrilla
[] Quemando el exceso de comida despues de cada uso al aire libre dejara
la parrilla lista para otro uso. Sin embargo, por Io menos cada 3 meses
usted debe dar una limpieza minuciosa a la parrilla entera para minimizar
su riesgo de fuego por grasa y mantener la parrilla en la mejor form&
Limpiandoel exterior del pintado
[] Antes del uso inicial, y peri6dicamente de alli en adelante, sugerimos
que usted lave su parrilla usando una soluci6n enjabonada. Usted
puede usar un paso de lavado o esponja para este proceso. No use
un alambre rigido o cepillo de fibra metalica. Estos rayan la superficie
del acero inoxidable y descascara las superficies pintadas(varia por
modelo) durante el proceso de la limpieza.
Limpiando el exterior del acero inoxidable
[] Cuidado rutinario y mantenimiento es requerido para mantener la aparencia
y la resistencia a la corrosi6n del acero inoxidable. El hecho es que el acero
inoxidable puede corroerse, oxidaci6n y perdida de color pueden set causadas
bajo ciertas condiciones. El 6xido es causado cuando los particulas de acero
regulates en la atm6sfera se fijan a la superficie de acero inoxidable. Particulas
de acero tambien pueden fijarse a su parrilla con el uso de lana de acero o
cepillos de metal rigidos para limpiar la parrilla en lugar de materiales o telas
no-abrasivas, esponja o nilon los que son mejores para limpiar. En areas de
la costa descarche de 6xido pueden desarrollarse sobre superficies inoxidables
que no pueden ser removidas por completo. Blanqueadores y otras soluciones
a base de cloro usadas para la limpieza de la casa y piscinas tambien pueden
causar corrosi6n al acero inoxidable.
[] La intemperie, el calor extremo, el humo al cocinar y aceites de maquinaria
usados en el proceso de fabricar el acero inoxidable pueden causar que el
acero inoxidable se vuelva color caramelo. Aunque hay muchos factores que
pueden afectar la apariencia de la superficie del acero inoxidable, estos no
afectan la integridad del acero o el rendimiento de la parrilla.
1. Para ayudar en mantener el terminado de acero inoxidable, siga los siguientes
procedimientos para obtener los mejores resultados: Despues de cada
uso (despues de que su parrilla se ha enfriado), pase un trapo a cuberteria
de acero inoxidable que las superficies con un paso blando y jabonoso
o esponja entonceslluego enjuagan con el agua. Sea sure retirar todas
particulas de comida, salsas o escabeches de acero inoxidable porque
estos pueden ser muy acidicos y perjudicial para las superficies
inoxidables.
2. No use tintoreria abrasiva, depuradores de airees o cepillos de cable
rigidos de ning0n tipo nunca sobre su parrilla.
3. Use un calor limpiador de acero inoxidable contrario y la frotacion o la
limpieza en direccion a el grano de acero inoxidable o saque lustre a
lineas no contra el cereal.
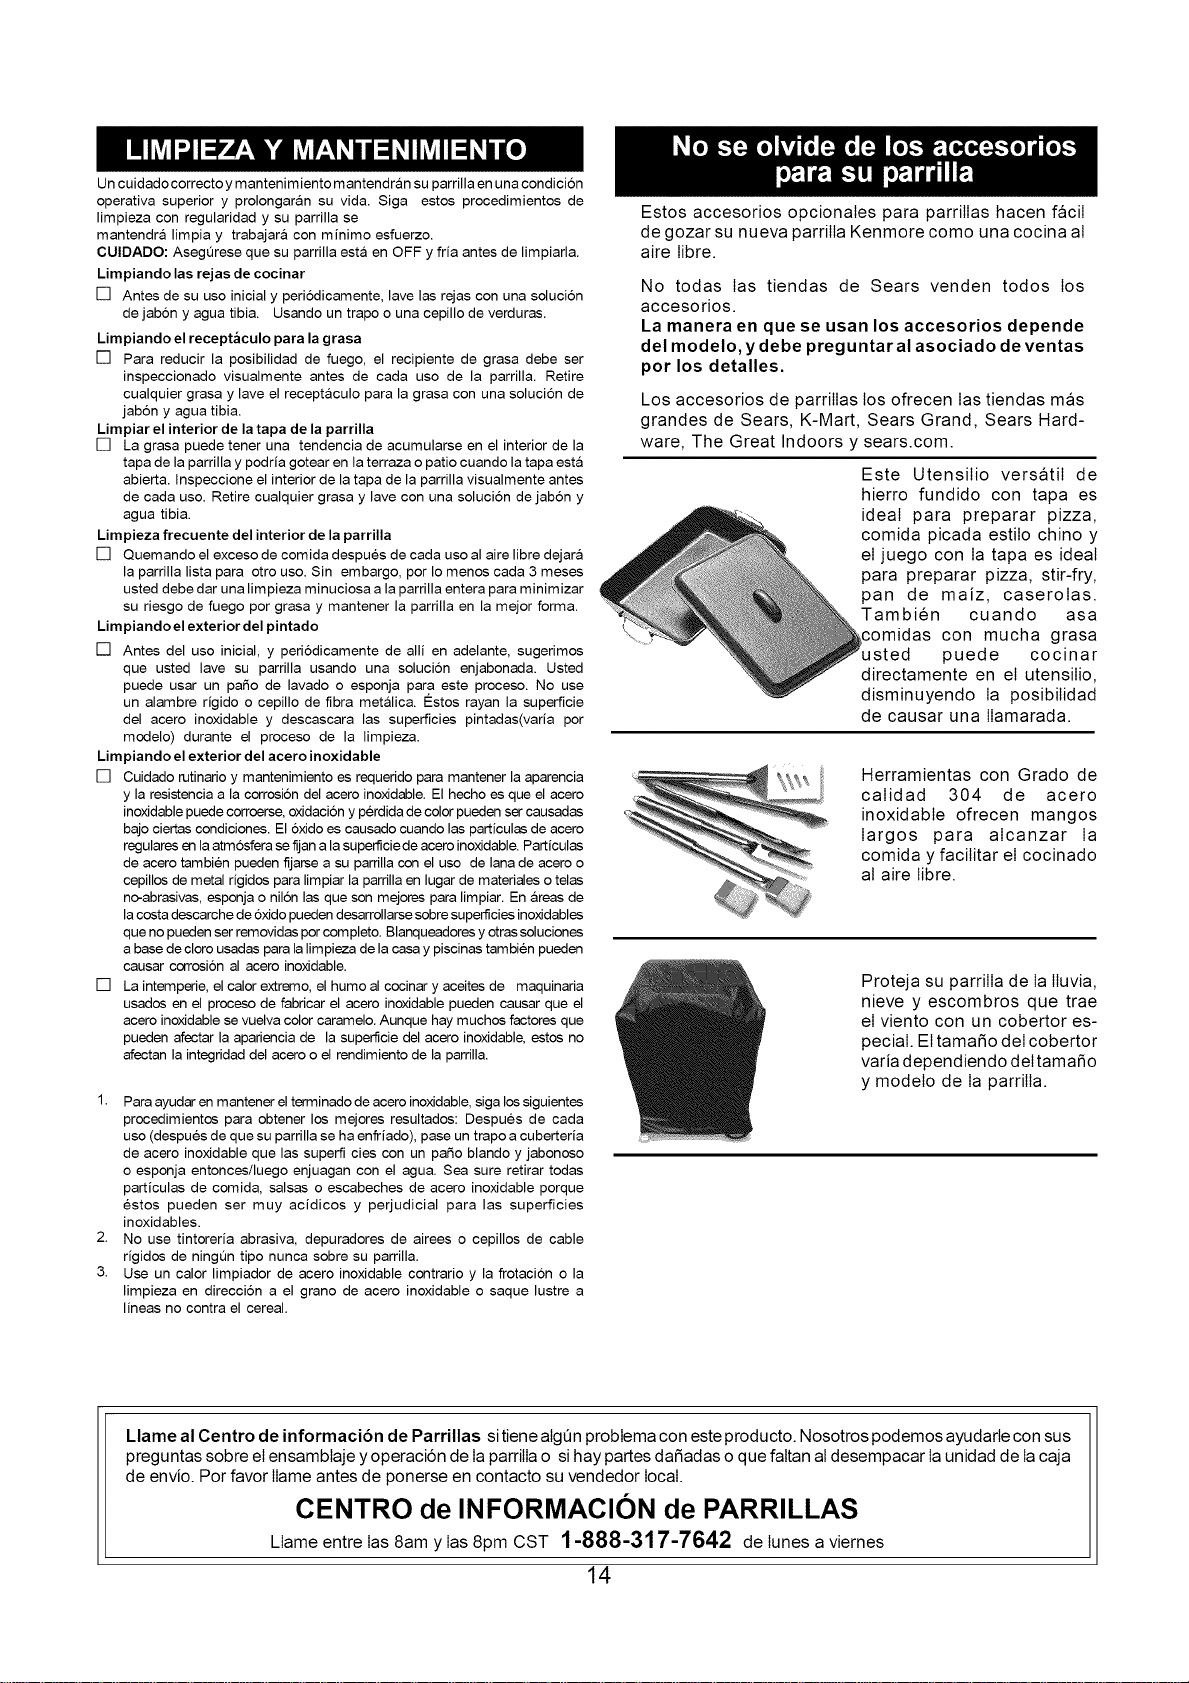
Estos accesorios opcionales para parrilIas hacen faciI
de gozar su nueva parrilIa Kenmore como una cocina al
aire Iibre.
No todas Ias tiendas de Sears venden todos los
accesorios.
La manera en que se usan los accesorios depende
del modelo, y debe preguntar al asociado de ventas
por los detalles.
Los accesorios de parrilIas los ofrecen Ias tiendas mas
grandes de Sears, K-Mart, Sears Grand, Sears Hard-
ware, The Great Indoors y sears.com.
Este Utensilio versatiI de
hierro fundido con tapa es
ideal para preparar pizza,
comida picada estilo chino y
el juego con Ia tapa es ideal
para preparar pizza, stir-fry,
pan de maiz, caserolas.
Tambien cuando asa
somidas con mucha grasa
puede cocinar
directamente en el utensilio,
disminuyendo Ia posibilidad
de causar una Ilamarada.
Herramientas con Grado de
calidad 304 de acero
inoxidable ofrecen mangos
largos para alcanzar Ia
comida y facilitar el cocinado
al aire Iibre.
Proteja su parrilIa de Ia Iluvia,
nieve y escombros que trae
el viento con un cobertor es-
pecial. El tamafio deI cobertor
varia dependiendo deI tamafio
y modelo de Ia parrilIa.
Llame al Centro de informacion de Parrillas si tienealgQn probtema con este producto. Nosotros podemos ayudarte con sus
preguntas sobre el ensambtaje y operaci6n de Iaparritlao si hay partes dafiadas o que faltan al desempacar Ia unidad de Iacaja
de envio. Por favor Ilame antes de ponerse en contacto su vendedor local.
CENTRO de INFORMACION de PARRILLAS
Llame entre Ias 8am y Ias 8pm CST 1-888-317-7642 de Iunes a viernes
14
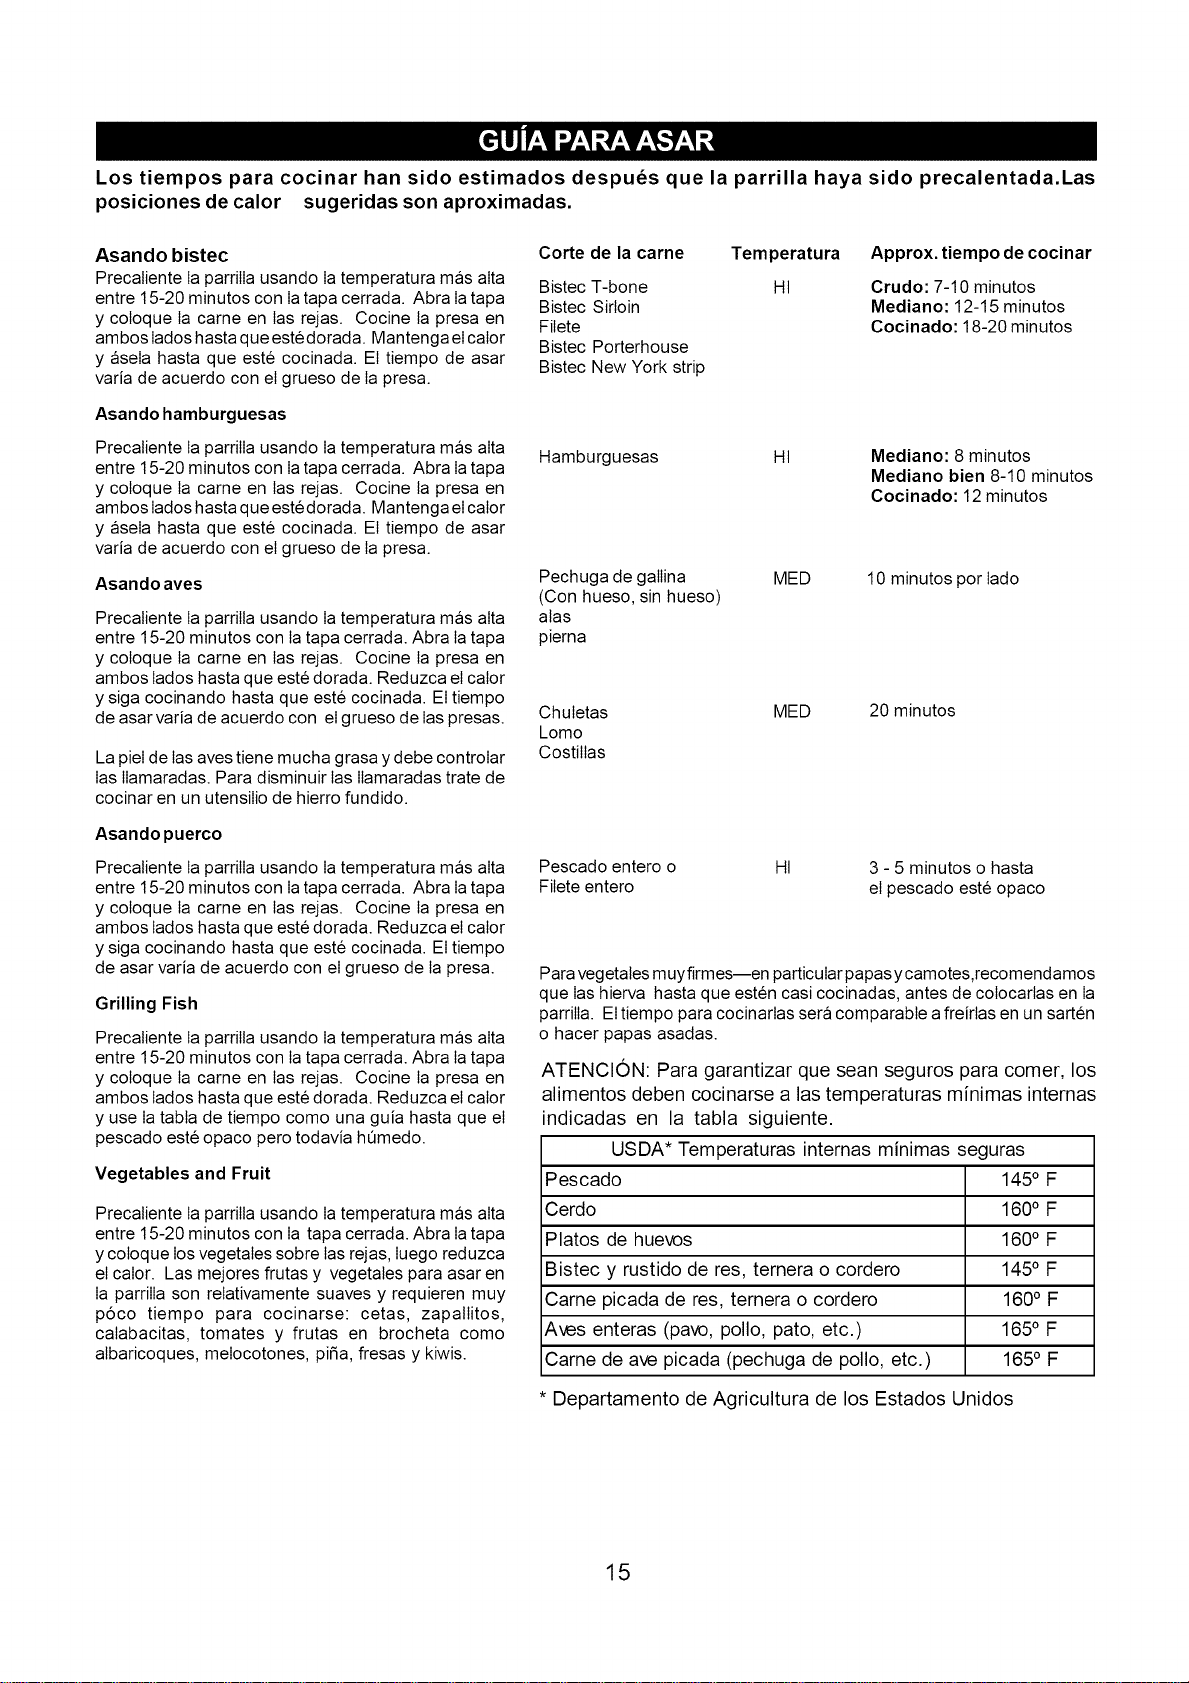
Los tiempos para cocinar han sido estimados despues que la parrilla haya sido precalentada.Las
posiciones de calor sugeridas son aproximadas.
Asando bistec
Precaliente Ia parrilIa usando Iatemperatura mas alta
entre 15-20 minutos con Iatapa cerrada. Abra Iatapa
y coloque Ia carne en Ias rejas. Cocine la presa en
ambos Iados hasta que estedorada. Mantenga el caIor
y aseIa hasta que este cocinada. El tiempo de asar
varia de acuerdo con el grueso de Ia presa.
Asando hamburguesas
Precaliente Ia parrilIa usando Iatemperatura mas alta
entre 15-20 minutos con Iatapa cerrada. Abra Iatapa
y coloque Ia carne en Ias rejas. Cocine la presa en
ambos Iados hasta que estedorada. Mantenga el caIor
y aseIa hasta que este cocinada. El tiempo de asar
varia de acuerdo con el grueso de Ia presa.
Asando aves
Precaliente Ia parriIla usando Iatemperatura mas aIta
entre 15-20 minutos con Ia tapa cerrada. Abra Iatapa
y coloque Ia carne en Ias rejas. Cocine Ia presa en
ambos Iados hasta que este dorada. Reduzca el caIor
y siga cocinando hasta que este cocinada. El tiempo
de asar varia de acuerdo con el grueso de Ias presas.
La pieI de Iasaves tiene mucha grasa y debe controIar
Ias IIamaradas. Para disminuir Ias IIamaradas trate de
cocinar en un utensiIio de hierro fundido.
Asando puerco
Precaliente Ia parrilIa usando Iatemperatura mas alta
entre 15-20 minutos con Iatapa cerrada. Abra Iatapa
y coloque Ia carne en Ias rejas. Cocine Ia presa en
ambos Iados hasta que este dorada. Reduzca el caIor
y siga cocinando hasta que este cocinada. El tiempo
de asar varia de acuerdo con el grueso de Ia presa.
Grilling Fish
Precaliente Ia parriIla usando Iatemperatura mas aIta
entre 15-20 minutos con Ia tapa cerrada. Abra Iatapa
y coloque Ia carne en Ias rejas. Cocine Ia presa en
ambos Iados hasta que este dorada. Reduzca el caIor
y use Ia tabta de tiempo como una guia hasta que el
pescado este opaco pero todavia hQmedo.
Vegetables and Fruit
Precaliente Ia parriIla usando Iatemperatura mas aIta
entre 15-20 minutos con Ia tapa cerrada. Abra Iatapa
y coIoque los vegetaIes sobre Iasrejas, Iuego reduzca
el caIor. Las mejores frutas y vegetales para asar en
Ia parriIIa son reIativamente suaves y requieren muy
p6co tiempo para cocinarse: cetas, zapalIitos,
caIabacitas, tomates y frutas en brocheta como
albaricoques, meIocotones, pifia, fresas y kiwis.
Corte de la carne
Bistec T-bone
Bistec Sirloin
Filete
Bistec Porterhouse
Bistec New York strip
Temperatura
HI
Approx. tiempo de cocinar
Crudo: 7-10 minutos
Mediano: 12-15 minutos
Cocinado: 18-20 minutos
Hamburguesas
HI
Mediano: 8 minutos
Mediano bien 8-10 minutos
Cocinado: 12 minutos
Pechuga de galIina
(Con hueso, sin hueso)
alas
pierna
MED 10 minutos por Iado
Chuletas
Lomo
CostilIas
MED 20 minutos
Pescado entero o HI
Filete entero
3 - 5 minutos o hasta
el pescado este opaco
Para vegetales muyfirmes--en particular papas ycamotes,recomendamos
que Ias hierva hasta que esten casi cocinadas, antes de coIocartas en Ia
parriIIa. El tiempo para cocinartas sera comparable a freirtas en un sarten
o hacer papas asadas.
ATENCION: Para garantizar que sean seguros para comer, los
alimentos deben cocinarse alas temperaturas minimas internas
indicadas en la tabla siguiente.
USDA* Temperaturas internas minimas seguras
Pescado 145° F
Cerdo 160° F
Platos de huevos 160° F
Bistec y rustido de res, ternera o cordero 145° F
Came picada de res, ternera o cordero 160° F
Aves enteras (pave, polio, pato, etc.) 165° F
Came de ave picada (pechuga de polio, etc.) 165° F
* Departamento de Agricultura de los Estados Unidos
15
Felicitaciones por hacer una compra tan inteligente. Su nuevo producto Kenmore ® esta diseSado y fabricado para tener
aSos de una operacidn confiabte. Pero como todo producto, puede IIegar el dia que requiera reparaciones de vez en cuando.
Eso es cuando se debe tener un Acuerdo de protecci6n de reparos para ahorrarte dinero e irritaci6n.
Esto es Io que es el Acuerdo de protecci6n de reparos* incluye:
[]
[]
[]
[]
[]
Servicio expertos por uno de nuestos 10,000 especialistas en reparos.
Servicio sin Iimites con partes y labor gratis para todas Ias reparaciones que estan cubiertas.
Reemptazo de producto hasta $1,500. d6Iares si el producto cubierto no se puede reparar.
Descuento de 10% deI precio regular de servicio y partes reIacionadas instaladas no cubiertas por el Acuerdo;
tambien, 10% deducido deI precio regular deI cheque de mantenimiento preventivo.
Ayuda rapida por teIefono- nosotros Ia IIamamos SoIuci6n rapida - Ayuda por teIefono de un representante de
Sears. Piense como si nosotros fueramos una "Guia de Uso y Cuidado habtada".
Una vez comprado el Acuerdo de protecci6n de reparos, una simple Ilamada telef6nica es todo Io que necesita hacer para
obtener una citadeI servicio. Usted puede IIamar en cualquier momento dia o noche, o programar una cita para servicio por
el internet.
ElAcuerdo de protecci6n de reparos es una compra Iibre de riesgo. Si usted canceIa por cualquier raz6n durante el periodo
de garantia deI producto, proveeremos un reemboIso compteto. Puede tambien recibir un reemboIso prorrateado en cualquier
momento despues que el periodo de garantia expira, iCompre su Acuerdo de protecci6n de reparos hoy mismo!
Algunas Iimitaciones y exclusiones son aplicable. Para precios e informaci6n adicional en U.S.A. Ilame 1-800-827-6655.
*La cobertura en Canada varia en algunos articulos. Para obtener mas detalles Ilame a Sears Canada en 1-800-361-6665.
Servicio de instalaci6n de Sears
Para una instalaci6n profesional de Sears de electrodomesticos, abridores de puertas de garajes, calentadores de agua, y
otros importantes aparatos eIectrodomesticos, en U.S.A. o Canada IIame al 1-800-4 MY- HOME®.
16

Your Home
For expert troubleshooting and home solutions advice:
anage
www.managemyhome.com
For repair - in your home - of all major brand appliances,
lawn and garden equipment, or heating and cooling systems,
no matter who made it, no matter who sold it!
For the replacement parts, accessories and
owner's manuals that you need to do-it-yourself.
For Sears professional installation of home appliances
and items like garage door openers and water heaters.
1-800-4-MY-HOME ® (1-800-469-4663)
Call anytime, day or night (U.S.A. and Canada)
www.sears.com www.sears.ca
Our Home
For repair of carry-in items like vacuums, lawn equipment,
and electronics, call anytime for the location of your nearest
Sears Parts & Repair Service Center
1-800-488-1222 (U.S.A.)
www.sears.com
1-800-469-4663 (Canada)
www.sears.ca
To purchase a protection agreement on a product serviced by Sears:
1-800-827-6655 (U.S.A.) 1-800-361-6665 (Canada)
Para pedir servicio de reparaci6n
a domicilio, y para ordenar piezas:
1-888-SU-HOGAR ®
(1-888-784-6427)
Au Canada pour service en fran(_ais:
1-800-LE-FOYER M°
(1-800-533-6937)
www.sears.ca
® Registered Trademark / TMTrademark / SMService Mark of Sears Brands, LLC
® Marca Registrada / TM Marca de F&brica / SMMarca de Servicio de Sears Brands, LLC
MCMarque de commerce / MD Marque depos6e de Sears Brands, LLC @ Sears Brands, LLC