Loading ...
Loading ...
Loading ...
23
EN
Installing the cartridge in the appliance: Screw the lter cartridge into the bottom of the water tank using the
accessory supplied with the cartridge. Fig. 4
Set the month when the cartridge is tted (position 1 on the illustration, left side gure in the opening) by turning the
grey ring located on the upper end of the lter. The month when the cartridge should be replaced is indicated in position
2 on the illustration. Fig. 5.
Put a container of 0.6 l under the steam exit. Fig. 6.
The machine must be primed whether the lter has been installed or not. This means that the water circuits have to
be lled. To do this, follow the instructions provided on the screen. The machine will begin by lling the water circuits,
preheating the circuits and then will complete an automatic rinse.
The screen will inform you when installation is complete.
Water hardness
You must set your machine depending on the hardness of your water, from 0 to 4. To do this, follow these instructions:
Before using the appliance for the rst time, check the hardness of your water so that you can set the appliance
accordingly. This operation should also be carried out when you use your machine in a place where the hardness of
the water is different or if you notice a difference in the hardness of the water. To check the water hardness, use the
test strip supplied with your machine or contact your local water authority.
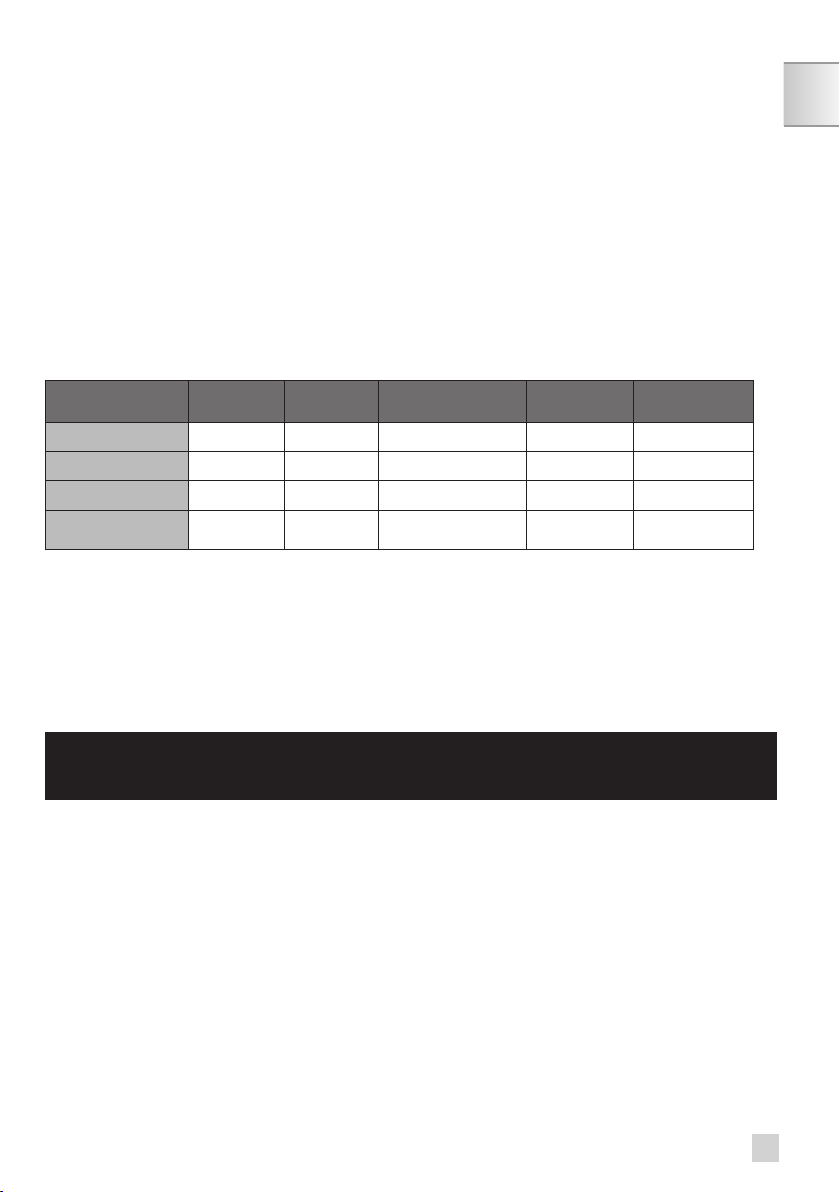
The details of the classes are given in the table below:
Degree of hardness
Class 0
Very soft
Class 1
Soft
Class 2
Average hardness
Class 3
Hard
Class 4
Very hard
° dH < 3° > 4° > 7° > 14° > 21°
° e < 3,75° > 5° > 8,75° > 17,5° > 26,25°
° f < 5,4° > 7,2° > 12,6° > 25,2° > 37,8°
Appliance setting 0 1 2 3 4
Fill a glass of water and insert a strip. Fig. 2
After 1 minute read the level of water hardness. Fig. 3
Indicate the number of red zones when conguring the appliance.
Preparing the appliance
Remove and ll the water tank. Fig. 7.
Replace the water tank. Fig. 8.
Remove the lid of the coffee bean container and add coffee beans (max. 250 g). Fig. 9.
Replace the lid of the coffee bean container. Fig. 10.
BEFORE PREPARING DRINKS
IMPORTANT INFORMATION
Depending on the drinks chosen, your Espresso Automatic EA89 will automatically adjust the quantity of ground coffee.
Preparing the grinder
You can adjust the strength of your coffee by adjusting how nely the coffee beans are ground. In general, the ner the
coffee is ground, the stronger and creamier the coffee will be. It may also vary according to the type of coffee used.
We recommend a ne setting for espressos and a coarser setting for coffees.
Adjust the neness of grinding by turning the coffee grounds neness adjustment knob (J) which is located in the
coffee bean container. This setting should be applied during grinding notch by notch. After 3 rounds, you will notice a
pronounced difference in taste.
Setting the neness of grinding is useful when you change the type of coffee or if you want to make coffee that is more
or less strong. However, it is not advised to use this setting systematically.
Adjusting the coffee outlet
For all the drinks available, you can lower or raise the coffee outlets according to the size of your cup or glass. Fig.11
Loading ...
Loading ...
Loading ...