
900 W (IEC 60705)
MICROWAVE OVEN WITH STEAM AND GRILL
OPERATION MANUAL WITH COOKBOOK
蒸、烧微波炉
使用说明书及食谱
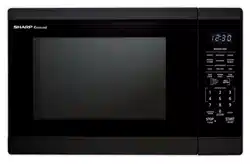
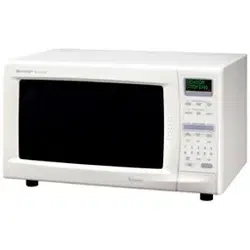
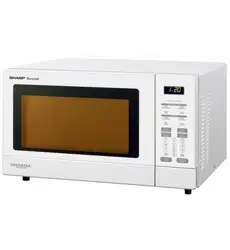
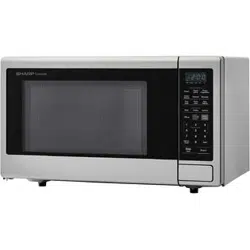
AX-1100V

Page
CONTENTS
Operation manual
IMPORTANT SAFETY INSTRUCTIONS ............. EN-1-2
INSTALLATION .................................................... EN-3
OVEN DIAGRAM ................................................. EN-4
CONTROL PANEL ............................................... EN-5
IMPORTANT INSTRUCTIONS ............................ EN-6-8
BEFORE OPERATING ........................................ EN-9
CLEAN THE OVEN BEFORE FIRST USE .......... EN-9
AUTOMATIC COOKING ...................................... EN-10-12
MANUAL COOKING ............................................ EN-13-16
使用说明书
Page
OTHER CONVENIENT FEATURES .................... EN-17-19
CLEANING AND CARE ....................................... EN-20
TROUBLESHOOTING CHART ........................... EN-21-23
SERVICE CALL CHECK ..................................... EN-24
SPECIFICATIONS ............................................... EN-24
Cookbook
COOKING GUIDES ............................................. EN-25-30
AUTOMATIC COOKING CHART ......................... EN-31-37
MANUAL COOKING CHART .............................. EN-38-43
RECIPES ............................................................. EN-44-50
食谱
1

EN – 1
IMPORTANT SAFETY INSTRUCTIONS
IMPORTANT SAFETY INSTRUCTIONS: READ CAREFULLY AND KEEP FOR FUTURE REFERENCE
This oven is designed to be used on a countertop only. It is not designed to be built-in to a wall or cabinet. See
page EN-3 for the installation.
The oven door may become hot during cooking. Place or mount the oven so that the bottom of the oven is 85
cm or more above the floor. Keep children away from the door to prevent them from burning themselves.
Ensure there is a minimum of free space above the oven of 12 cm.
This appliance is not intended for use by persons (including children) with reduced physical, sensory or mental
capabilities, or lack of experience and knowledge, unless they have been given supervision or instruction
concerning use of the appliance by a person responsible for their safety.
Children should be supervised to ensure that they do not play with the appliance.
WARNING: Only allow children to use the oven without supervision when adequate instructions have been given
so that the child is able to use the oven in a safe way and understands the hazards of improper use.
WARNING: When the appliance is operated in the GRILL, GRILL MIX, STEAM and AUTOMATIC operations
(except AUTO DEFROST MENUS), children should only use the oven under adult supervision due to the
temperature generated.
WARNING: Accessible parts may become hot during use. Young children should be kept away.
WARNING: If the door or door seals are damaged, the oven must not be operated until it has been repaired by
a qualified service technician trained by SHARP.
WARNING: Never adjust, repair or modify the oven yourself. It is hazardous for anyone other than a qualified
service technician trained by SHARP to carry out any service or repair operation which involves the removal of
a cover which gives protection against exposure to microwave energy.
If the power supply cord of this appliance is damaged, it must be replaced with a special cord. The exchange
must be made by a qualified service technician trained by SHARP.
WARNING: Liquids and other foods must not be heated in sealed containers since they are liable to explode.
Microwave heating of beverages can result in delayed eruptive boiling, therefore care must be taken when
handling the container.
Do not cook eggs in their shells, and whole hard boiled eggs should not be heated in microwave ovens since
they may explode even after microwave cooking has ended. To cook or reheat eggs which have not been
scrambled or mixed, pierce the yolks and the whites, or the eggs may explode. Shell and slice hard boiled eggs
before reheating them in the microwave oven.
Utensils should be checked to ensure that they are suitable for use in the oven. See Page EN-26. Use only
microwave safe containers and utensils on microwave modes.
The contents of feeding bottles and baby food jars must be stirred or shaken and the temperature checked
before consumption, in order to avoid burns.
The door, outer cabinet, oven cavity, dishes, accessories and especially the grill heating elements will become
very hot during operation. Care should be taken to avoid touching these areas. To prevent burns, always use
thick oven gloves. Before cleaning make sure they are not hot.
When heating food in plastic or paper containers, keep an eye on the oven due to the possibility of ignition.
If smoke is observed, switch off or unplug the oven and keep the door closed in order to stifle any flames.
The oven should be cleaned regularly and any food deposits removed.
Failure to maintain the oven in a clean condition could lead to deterioration of the surface that could adversely
affect the life of the appliance and possibly result in a hazardous situation.
Do not use harsh abrasive cleaners or sharp metal scrapers to clean the oven door glass since they can
scratch the surface, which may result in shattering of the glass.
Steam cleaner is not to be used.
See instructions for cleaning door seals, cavities and adjacent parts on page EN-20.
Other warnings
1. To reduce the risk of fire in the oven cavity:
a.
No other liquid than room temperature water suitable for drinking (filtered) can be poured into the water tank.
b. The oven should not be left unattended during operation. High oven temperature or long cooking time
may overheat foods resulting in a fire.
c. Do not overcook food.
d. Remove wire twist-ties from paper or plastic bags before placing bag in the oven.
e. Do not heat oil or fat for deep frying. The temperature of the oil cannot be controlled.
f. Do not use containers made of synthetic material for cooking. They could melt at high temperature.

EN – 2
IMPORTANT SAFETY INSTRUCTIONS
g.
Do not use plastic containers if the oven is still hot because they may melt. Plastic containers must not be used
unless the container manufacturer claims it is suitable.
h. Do not store food or any other items inside the oven.
i. When alcoholic beverages are added when roasting or cooking cakes and sweets, there is a risk that
vapours released by the alcohol may catch fire upon coming into contact with the electrical heating
element. Attend the oven closely during cooking.
2. To reduce the risk of an explosion or delayed eruptive boiling, care should be taken when handling the
container. Your oven is capable of heating food and beverages very quickly with microwave, therefore it is
very important that you select the appropriate cooking time and power level for the type and quantity of
food to be heated. If you are unsure of the cooking time and power level required, begin with low cooking
times and power levels until the food is sufficiently heated evenly throughout.
Additionally:
a. Do not place sealed containers in the oven. Babies bottles fitted with a screw cap or teat are considered
to be sealed containers.
b. Do not use excessive amount of time.
c. When boiling liquids in the oven, use a wide-mouthed container.
d. Stand at least for 20 seconds at the end of cooking to avoid delayed eruptive boiling of liquids.
e. Stir the liquid before and during cooking. Use extreme care when handling the container or inserting a
spoon or other utensil into the container.
3. This oven is for home food preparation only and should only be used for heating, cooking and defrosting
food and beverage.
It is not suitable for commercial, laboratory use, or heating therapeutic devices eg. Wheat bags.
4. Never operate the oven whilst any object is caught or jammed between the door and the oven.
5. Handle with care when removing items from the oven so that the utensil, your clothes or accessories do
not touch the latches.
6. Never poke an object, particularly a metal object, through a grille or between the door and the oven while
the oven is operating.
7. Never tamper with or deactivate the latches.
8. Always use oven gloves to prevent burns when handling utensils that are in contact with hot food. Enough
heat from the food can transfer through utensils to cause skin burns.
9. If the oven lamp fails please consult your dealer or a qualified service technician trained by SHARP.
10. Avoid steam burns by directing steam away from the face and hands. Slowly lift the furthest edge of a
dish's cover including microwave plastic wrap etc., and carefully open popcorn and oven cooking bags
away from the face.
11. Make sure that the power supply cord is undamaged, and that it does not run under the oven or over any
hot surfaces or sharp edges.
12. Use care when opening door. To avoid burns from escaping heat and steam, let hot air or steam escape
before removing or replacing food.
13. Do not place anything on the outer cabinet because the oven will become very hot during operation.
14. To avoid burns, always test the food and container temperature and stir before serving. Pay special
attention to the temperature of food and drink given to babies, children and the elderly. Do not drink
beverages or soup without checking the container's temperature. Take extra caution when handling the
container because it becomes very hot.
15. Make sure the utensil does not touch the interior walls during cooking.
16. Do not touch the oven door, outer cabinet, rear cabinet, oven cavity, air-vent openings, accessories and
dishes because the escaping steam from the ventilation cover during operation becomes hot.
17. Do not touch around the oven lamps directly. This part will become hot when the oven lamp is on.
18. When the oven is in use, ventilate a room where the oven is installed. e.g. open a window or switch a
kitchen ventilation fan on.
19. Do not operate the oven if the water tank cracks and water leaks. Please contact a SERVICE CENTRE
APPROVED BY SHARP.
20. Do not insert fingers or objects in the holes (the steam outlets or air-vent openings) as this may damage
the oven and cause an electric shock or a hazard.
21. Do not touch the electric plug with wet hands and plug into the electric wall socket securely. When
removing the plug from the socket always grip the plug, never pull the power supply cord as this may
damage the power supply cord and the connections inside the plug.
22. Never move the oven when it is operating. If the oven needs to be moved, always drain all water inside the
oven using DRAIN WATER function. After draining, empty the drip tray.
23. Do not put any water on the door or control panel intentionally.
24. If the oven falls down or drops on the floor, do not use the oven. Unplug the unit and contact a SERVICE
CENTRE APPROVED BY SHARP.

EN – 3
INSTALLATION INSTRUCTIONS
1. Remove all packing materials from the oven cavity, and the feature sticker from the outside of the door, if
there is one. Check the unit for any damage, such as a misaligned door, damaged door seals around the
door or dents inside the oven cavity or on the door. If there is any damage, please do not operate the oven
until it has been checked by a SERVICE CENTRE APPROVED BY SHARP and repaired, if necessary.
2. Accessories provided
1) Rack 2) Glass tray 3) Steam tray 4) Combined operation manual and cookbook 5) Touch guide
6) Test strip
3. Since the door may become hot during cooking, and in order to avoid its accidental touch, the oven should
be placed at least 85 cm or more above floor. You should also keep children away from the door to prevent
them burning themselves.
4. This oven is designed to be used on a countertop only. It should not be installed in any area where excessive
heat and steam are generated, for example, next to a conventional oven unit. It should not be installed near
combustible materials, for example, curtains. The oven should be installed so as not to block ventilation
openings. Allow space of at least 12 cm from top of the oven for air ventilation. This oven is not designed to
be built-in to a wall or cabinet.
5. Do not connect other appliances to the same socket using an adaptor plug.
6. Neither the manufacturer nor the distributors can accept any liability for damage to the machine or personal
injury for failure to observe the correct electrical connecting procedure. The A.C. voltage and frequency must
correspond to the one indicated on the rating label.
7. This appliance must be earthed:
IMPORTANT
The wires in power supply cord are coloured in accordance with the following code:
Green-and-yellow : Earth
Blue : Neutral
Brown : Live
As the colours of the wires in the power supply cord of this appliance may not correspond with the coloured
marking identifying the terminals in your plug, proceed as follows:
The wire which is coloured green-and-yellow must be connected to the terminal in the plug which is marked
with the letter E or by the earth symbol
or coloured green or green-and-yellow.
The wire which is coloured blue must be connected to the terminal which is marked with the letter N or
coloured blue.
The wire which is coloured brown must be connected to the terminal which is marked with the letter L or
coloured brown.
EN – 4
OVEN DIAGRAM
NOTE:
Place the rack on glass tray as shown in
Figure 1.
WARNING:
The oven cavity, door, outer cabinet,
accessories and dishes will become
v e r y h o t , u s e t h i c k d r y o v e n
gloves when removing the food or
accessories from the oven to prevent
burns.
1
Ventilation openings
Be aware that hot steam or air comes
out during steam or Grill Mix cooking,
and keep children away from the oven.
2
Door open handle
3
LCD display
4
Control panel
5
Oven lamp
6
Upper position (position 3)
7
Lower position (position 2)
8
Water tank (See page EN-6.)
9
Door seals and sealing surfaces
10
Latch
11
Oven floor (position 1)
12
Door hinges
13
Steam outlets
14
Drip tray (See page EN-6.)
15
Oven cavity
16
See through door
17
Grill heating element
(at the oven cavity ceiling)
18
Door lever
To open, grip the door lever from the
bottom and pull it towards you.
ACCESSORIES
19
Rack
For Grill and Grill Mix.
Do not use for Microwave.
Always place on glass tray.
20
Glass tray
21
Steam tray x2
For Steam only.
Always place above/on glass tray.
Do not use for Microwave, Grill and
Grill Mix.
WARNING for stacking the steam tray
and glass tray:
After cooking, take out the steam tray first.
See Figure 2. Be aware of excess water
from the steam tray, we recommend you
place it directly on a flat dish or tray to
avoid spillages.
Before taking out the glass tray, make sure
that it is cool. Be aware that there may be
water on the glass tray, so take care when
removing it.
19
21
20
Figure 1
Rack
Glass tray
14
3
1
4
2
Figure 2
Oven glove
Glass
tray
Steam
tray
6
8
9
10 1116
13 517
7
12
15 14
18
EN – 5
CONTROL PANEL
Operating keys:
1 TIME keys
2 MICRO* key
3 STEAM HIGH key
4 STEAM LOW key
5 GRILL MIX HIGH* key
6 GRILL MIX LOW* key
7 GRILL* key
8 STEAM MENUS keys
9 AUTO DEFROST MENUS* key
10 AUTO REHEAT MENUS* key
11 AUTO GRILL MENUS* key
12 WEIGHT DOWN/UP keys
13 STOP/CLEAR key
14 LESS/MORE keys
15 START/AUTO MINUTE key
16 INFO/KITCHEN TIMER key
* This mode does not use steam.
1
2
3
4
5
6
7
15
14
11
Display information:
The display shows useful information including cooking time and
cooking mode.
AUTO: Automatic cooking is selected or in progress.
MANUAL: Manual cooking is selected or in progress.
CHECK: Some action is necessary (e.g. turn over, stir).
DEF:
Auto Defrost Menus is selected or in progress.
ON: The oven is in operation.
EXTEND: Cooking time can be extended.
HOT: The oven is very hot.
(MORE): More time adjustment is selected for automatic cooking.
(LESS): Less time adjustment is selected for automatic cooking.
DESCALE: Descaling is necessary.
WATER: Water is necessary. When this indicator is appeared on the
display, the oven is operating in the menu using water.
Tray position indicators:
The position of the tray(s) for automatic cooking and
manual steam cooking.
3: Upper position
2: Lower position
1: Oven Floor
1. Cooking mode & START indicators
The indicator will flash or light up during the operation.
You can press a concerned key when the indicators are flashing.
When the indicators light up on the display, they mean that each
cooking mode is selected or the oven is operating in each cooking
mode.
8
9
10
12
13
16
1
EN – 6
IMPORTANT INSTRUCTIONS
WATER TANK
To fill the water tank with room temperature
water suitable for drinking (filtered) is a must
for cooking with steam. Be sure to follow the
directions below.
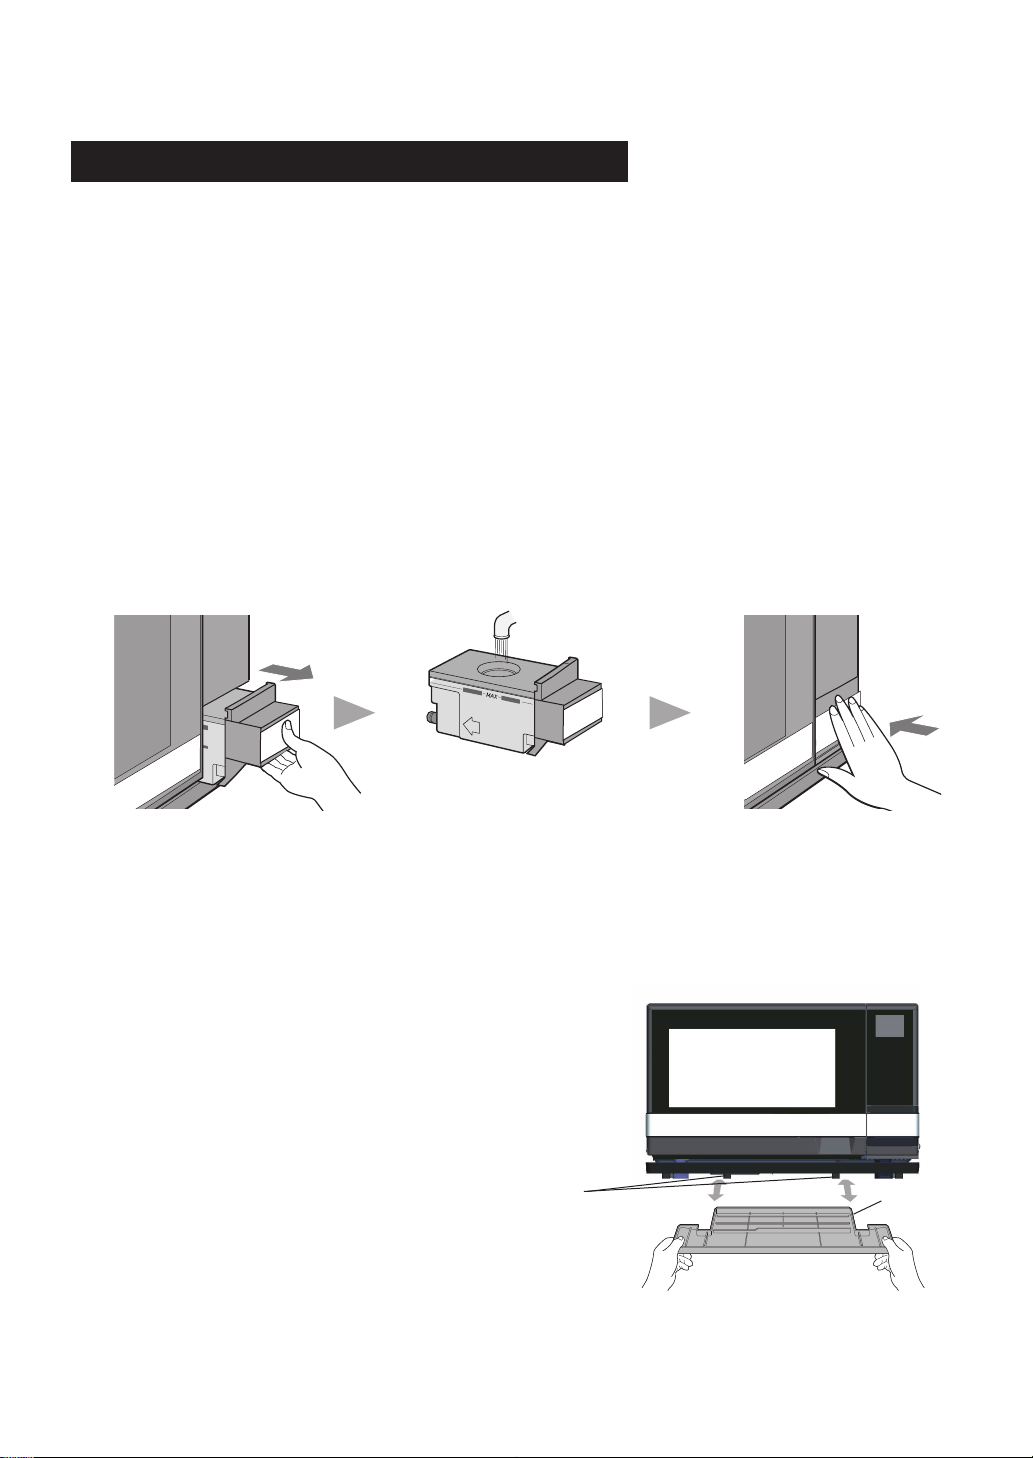
1. Pull the water tank toward you to remove. (Figure 1)
2. Wash the water tank and lid for the first time.
3. Fill the water tank with room temperature water
suitable for drinking (filtered) through the lid
to the MAX mark each time you begin to cook.
(Figure 2) Do not fill the water tank over the MAX
mark.
4. Make sure the lid is closed firmly.
5. Install the water tank by pushing firmly. (Figure 3)
6. After cooking, empty the water tank and wash the
water tank and the lid.
NOTES:
1. Do not use any other liquids like distilled water, R.O
water, mineral water and etc.
2. An insufficient amount of water in the water tank
may cause an undesired result.
3. We recommend that you empty the water tank
every time after cooking. Do not leave the water
tank filled with water in the oven over a day.
4. If "Err, WATER (flashing)" is shown in the display
during Steam cooking, refer to Troubleshooting
Char t on page EN-21. The message will not
appear in Descale function.
5. Do not drop or damage the water tank. Heat may
cause the water tank to change shape. Do not
use a damaged water tank. Consult a SERVICE
CENTRE APPROVED BY SHARP.
6.
There may be a few water drops when removing
the water tank. Wipe the oven dry with a soft cloth.
7. Do not block the air holes on the lid of the water
tank. It will cause trouble during cooking.
DRIP TRAY
Be sure to cook with drip tray in position and
follow the directions below.
The drip tray is packed with the oven. Place the drip
tray under the oven door as shown in Figure 4. This
drip tray collects the condensation from the oven
door.
To remove the drip tray: Pull the drip tray toward
you with both hands.
* Make sure water is not dripping down before
removing the drip tray.
To replace the drip tray: Place the drip tray onto the
right and left hooks under the oven and push firmly as
shown in Figure 4. Insert the drip tray horizontally when
you attach it. Improper use may cause the damage to
the hooks.
Empty the drip tray after each time you cook.
Empty, rinse thoroughly, dry and replace. Failure to
empty may cause the drip tray to overflow. Cooking
repeatedly without emptying the drip tray may cause
it to overflow.
WARNINGS:
1. The oven will become very hot after cooking and draining water function.
2. Do not open the oven with your face close to the oven. Steam from the oven may cause burns.
3.
Make sure that the oven has cooled before emptying the water tank and the drip tray and then wipe the oven
cavity.
4. Do not touch the water directly as water in the drip tray may be hot.
Figure 2 Figure 3
Figure 1
Figure 4
Read Carefully Before Cooking with Steam
Drip tray
Hooks

EN – 7
Before cooking
1. Make sure the water tank is filled with room temperature water suitable for drinking (filtered) and is installed.
(See page EN-6.)
2. Make sure the empty drip tray is installed. (See page EN-6.)
3. Place food in the oven. Make sure to place the glass tray in lower position (position 2) for cooking with steam
mode.
After Cooking
1. After the oven has cooled, remove and empty the water tank, wipe oven cavity. Be aware that the grill heating
element and steam outlets may be still hot, so take care when wiping the ceiling and cavity back plate. (The
grill heating element will turn on for a very short time intermittently during the cooking.) Empty the drip tray.
2. Perform the Drain Water function at least once a day after using Steam Menus, Steam High or Steam Low.
3. Check that water is not dripping down before removing the drip tray, as a small amount of water may drains
into the drip tray when the water tank is removed.
4. During and after cooking, condensed water may be on the door, oven walls and oven floor. Dry any liquid
residue with a soft cloth. After the last use of the day, we recommend to operate the oven with Grill for 3
minutes without food and accessories for drying the water off around grill heating element.
WARNING: Do not open the oven with your face close to the oven. Steam from the oven may cause burns.
NOTE: Keep the door closed. If opened during cooking, steam will escape and a longer cooking time will be
required.
Steam in Automatic and Manual Cooking
IMPORTANT INSTRUCTIONS

EN – 8
Perform the Drain Water function at least once a day
after cooking with steam. It takes up to 7 minutes.
Drain Water function is very useful to prevent
scale build up and the use of stale water. It causes
evaporation of the internal steam system.
PROCEDURE
1
Press START/AUTO MINUTE.
“In F1” will flash on and off in
the display during the Drain
Water function.
2
Remove the water tank. Ensure
that no food is in the oven.
Press INFO/KITCHEN TIMER
once to select “In F1”.
When the drain function has ended and the
oven is cool, wipe oven cavity.
Empty the drip tray.
3
NOTES:
1. The water tank must be removed before starting
this procedure.
2. If Drain Water Function is set, Energy Save Mode
will be cancelled temporary.
White or g ray grains, a l s o c a l l e d scale, m ay
form in the water circuit inside the oven during
steam generation, which could cause the oven to
malfunction.
When "DESCALE (flashing)" is shown in the display,
be sure to carry out Descale function immediately. It
takes about 1 hour. (The descaling using citric acid or
lemon juice is for about 30 minutes, and then rinsing
with fresh water is for about 30 minutes.)
PROCEDURE
1
3
Do not place any food in the
oven. Close the door firmly.
Press
START/AUTO MINUTE
to
begin descaling. (about 30 min.)
4
When the oven has stopped and is cool, remove
water tank, empty, rinse and refill with room
temperature water suitable for drinking (filtered)
to the MAX mark. Replace the water tank.
Empty the drip tray and replace it.
Remove glass tray, empty, rinse
and dry. Follow step 3 to replace
glass tray. Close the door firmly.
Press START/AUTO MINUTE.
Rinsing will start. (about 30 min.)
5
When rinsing has ended and the oven is cool,
remove water tank and empty. Remove glass
tray and empty. Wipe oven cavity to dry. Empty
the drip tray.
6
Place the glass tray in lower position (position 2)
closely to attach to the back side of the oven
wall.
NOTE:
If Descale Function is set, Energy Save Mode will be
cancelled temporary.
IMPORTANT INSTRUCTIONS
Descale Function
Drain Water Function
x 1
x 1
Press INFO/KITCHEN TIMER
twice to select “In F2”.
x 2
2
x 1
x 1
Pure citric acid, available at some drugstores,
or bottled 100% lemon juice with no pulp are
used for descaling. Choose one and prepare
the descaling solution.
To use pure citric acid, dissolve 1 tablespoon
of pure citric acid crystals in 500ml of water in
a non-porous container. Stir well and pour into
the water tank to the MAX mark.
To use 100% bottled lemon juice, check that
there is absolutely no pulp in it. If there is
pulp or you are not sure, strain through a fine
strainer. Measure 70ml of the strained lemon
juice and add it to 500ml of water. Stir well and
pour into the water tank to the MAX mark.
Place the water tank in the oven correctly and
push firmly into place.

EN – 9
BEFORE OPERATING
CLEAN THE OVEN
BEFORE FIRST USE
•
Before operating your oven, make sure you read
and understand this operation manual completely.
•
Before the oven can be used, follow these
procedures:
1. Place the drip tray correctly. See page EN-6.
2. See below for getting started.
3.
Follow directions on the right side for clean the
oven before first use.
Your oven has an Energy Save Mode. This facility saves
electricity when the oven is not in use.
PROCEDURE
1
Open the door. The display will show ".0".
2
Plug the oven into a power point.
Nothing will appear on the display at this time.
Close the door.
Now you can ready to use the oven.
3
CAUTION:
In Energy Save Mode, if you do not operate the oven
for 3 minutes or more (i.e. after closing the door, or
pressing STOP/CLEAR, or at the end of cooking),
you will not be able to operate the oven until you
open and close the oven door.
NOTE:
When you set Child Lock or Demonstration Mode,
Energy Save Mode will be cancelled temporary.
1. Press STOP/CLEAR if you make a mistake during
programming.
2. Stop the oven temporarily during cooking.
3. Cancel a programme during cooking, press twice.
You may detect smoke or a burning smell when using
the grill for the first time, this is normal and not a sign
that the oven is out of order. To avoid this problem,
when first using the oven, operate the grill without food
for 20 minutes.
PREPARATION
Ventilate the room.
PROCEDURE
1
Ensure that no food is in the oven.
Press GRILL.
Enter the time by pressing
TIME (20.00) and START/
AUTO MINUTE.
2
WARNING:
The oven door, outer cabinet, oven cavity and
especially the grill heating element will become hot.
Getting Started
STOP/CLEAR
x 2
x 1
x 1

EN – 10
AUTOMATIC COOKING
Automatic Operation is cooked with steam, grill and microwave function. Refer to each function for the details.
Steam Menus has 6 categories and 18 menus. Always
cook food using steam tray and glass tray. Ensure the
glass tray is on the lower position (position 2). And
see the important instructions on page EN-6-7.
* Suppose you want to cook 0.3 kg of Fresh Chicken
Fillets.
Steam Menus
Refer to the Steam Menus Guide for details on page
EN-31-35.
St11 - St14 Rice/Egg
St21 - St22 Vegetable
St31 - St34 Fish/Meat/Chicken
St41 - St42 Balanced Menu
St51 - St53 Sweets
St61 - St63 Steam Reheat
Enter the weight or quantity
by pressing WEIGHT until
the desired weight or quantity
is displayed (0.3 KG).
2
Place food in oven by following
the directions in the cooking
guide on page EN-32. Close
the door. Press START/AUTO
MINUTE.
3
4
After cooking,
EXTEND will appear.
If you wish to extend
cooking time, enter
the desired time by
pressing TIME.
Press START/AUTO MINUTE.
If not, press STOP/CLEAR.
After the oven has cooled,
remove and empty the water
tank, wipe oven cavity. Empty
the drip tray.
PROCEDURE
1
Make sure the water tank is
filled to the MAX mark with room
temperature water suitable for
drinking (filtered) and is installed.
Press FISH/MEAT/CHICKEN
until desired menu number is
displayed (St34).
x 4
x 4
x 7
WARNING for stacking the steam tray and glass
tray:
After cooking, take out the steam tray first. See
Figure 2 on page EN-4. Be aware of excess water
from the steam tray, we recommend you place it
directly on a flat dish or tray to avoid spillages.
Before taking out the glass tray, make sure that it is
cool. Be aware that there may be water on the glass
tray, so take care when removing it.
NOTES:
1. Enter the weight or amount of the food only. Do
not include the weight of the container.
2. For foods weighing more or less than weights
given in the cooking charts, cook manually.
3. The programmed cooking times are average times.
To extend cooking times preprogrammed in the
automatic cooking, see EXTENDING COOKING
TIME AT THE END OF STEAM COOKING on
page EN-17. Before extending the cooking time,
make sure the water tank is filled to the MAX mark
with room temperature water suitable for drinking
(filtered) and is installed.
4. Any Steam selection can be programmed with
More or Less Time Adjustment. See page EN-17.
5. Keep the door closed. If opened during cooking,
steam will escape and a longer cooking time will
be required.
6. During and after cooking, condensed water may
be on the door, oven walls and oven floor. Dry any
liquid residue with a soft cloth. After the last use of
the day, we recommend to operate the oven with
Grill for 3 minutes without food for drying the water
off around grill heating element.
7. After cooking, the oven will automatically cool
and you will hear the sound of the cooling fan.
The fan may continue to operate up to 10 minutes
depending on the oven and parts temperature.
WARNINGS:
1. The oven door, outer cabinet, oven cavity,
accessories, dishes and especially the grill heating
element will become hot. Use thick oven gloves
when adding or removing foods to prevent burns.
2. Do not open the oven with your face close to the
oven. Steam from the oven may cause burns.
*
* If it is not necessary to enter amount, skip the step 2.

EN – 11
AUTOMATIC COOKING
Auto Reheat Menus has 3 menus.
AR1: Reheat Dish
AR2: Reheat Soup
AR3: Reheat Beverage
Refer to the Auto Reheat Menus Guide for details on
page EN-37.
* Suppose you want to reheat 1 bowl of Soup.
PROCEDURE
1
Press AUTO REHEAT MENUS
until desired menus number is
displayed (AR2).
Enter the quantity by
pressing WEIGHT until the
desired quantity is displayed
(1 QTY).
2
NOTES:
1. Any reheat selection can be programmed with
More or Less Time Adjustment. See page EN-17.
2. To reheat other foods or foods above or below the
weights allowed on Auto Reheat Menus Guide,
reheat manually. See Microwave on page EN-16.
3. Do not use the glass tray, steam tray and metal
rack.
4. After cooking, the oven will automatically cool
and you will hear the sound of the cooling fan.
The fan may continue to operate up to 10 minutes
depending on the oven and parts temperature.
Place food in oven by following
the directions in the cooking
guide on page EN-37. Close
the door.
Press START/AUTO MINUTE.
3
Auto Reheat Menus
x 2
x 1
Auto Grill Menus has 4 menus.
* Suppose you want to cook 1.2kg of Grill Chicken.
PROCEDURE
1
Enter the weight or quantity
by pressing WEIGHT until
the desired weight or quantity
is displayed (1.2 KG).
2
Press AUTO GRILL MENUS
until desired menus number is
displayed (AG1).
Place food in the oven by
following the directions in the
cooking guide on page EN-36.
Close the door.
Press START/AUTO MINUTE.
3
Auto Grill Menus
AG3 : Grill Fish
AG4 : Steak
The oven will stop and CHECK
will flash on and off.
Open the door. Turn over the
chicken.
Close the door.
Press START/AUTO MINUTE.
4
AG1: Grill Chicken
AG2: Chicken Wings
Refer to the Auto Grill Menus Guide for details on
page EN-36.
NOTES:
1. Enter the weight of the food only. Do not include
the weight of the container.
2. For foods weighing more or less than weights
given in the cooking charts, cook manually.
3. Always follow the instructions in the cooking guide.
4. All selections can be programmed with More or
Less Time Adjustment. See page EN-17.
5. After cooking, the oven will automatically cool
and you will hear the sound of the cooling fan.
The fan may continue to operate up to 10 minutes
depending on the oven and parts temperature.
WARNING:
The ove n door, o u t e r cabi n e t , ove n c av i t y,
accessories, dishes and especially the grill heating
element will become hot. Use thick oven gloves when
adding or removing foods to prevent burns.
x 1
x 1
x 1
x 4
x 9
x 1
x 4
*
* If it is not necessary to enter amount, skip the step 2.

EN – 12
AUTOMATIC COOKING
Auto Defrost Menus has 3 menus. Do not use the
glass tray, steam tray and metal rack.
dE1: Steak/Chops
dE2: Minced Meat
dE3: Poultry
Refer to the Auto Defrost Menus Guide for details on
page EN-37.
* Suppose you want to defrost a 0.5 kg Steak.
PROCEDURE
1
Press AUTO DEFROST
MENUS until desired menus
number is displayed (dE1).
Enter the weight by
pressing WEIGHT until
the desired weight is
displayed (0.5 KG).
2
NOTES:
1. Enter the weight of the food only. Do not include
the weight of the container.
2. Any defrost selection can be programmed with
More or Less Time Adjustment. See page EN-17.
3. To defrost other foods or foods above or below the
weights allowed on Auto Defrost Menus Guide, use
time and 30% microwave power. See Microwave
on page EN-16.
4. Do not use the glass tray, steam tray and metal
rack.
5. After cooking, the oven will automatically cool
and you will hear the sound of the cooling fan.
The fan may continue to operate up to 10 minutes
depending on the oven and parts temperature.
Place food in oven by following
the directions in the cooking
guide on page EN-37. Close
the door.
Press START/AUTO MINUTE.
3
Auto Defrost Menus
The oven will stop and CHECK
will flash on and off. Open the
door. Turn over the steak and
shield the defrosted portions.
Close the door.
Press START/AUTO MINUTE.
4
x 1
x 1
x 1
x 4
x 6
EN – 13
MANUAL COOKING
Manual Cooking is an option in Steam, Grill, Grill Mix and Microwave.
Refer to the "Manual Cooking Chart" and "Food and Utensil Position Chart". The charts give information on each setting.
Manual Cooking Chart
High
Low
High
Low
100 °C
70 - 95°C *
-
Grill: 50% power
Microwave: 50% power
Grill: 90% power
Microwave: 10% power
0 - 100% power
0 - 35 min.
0 - 60 min.
0 - 99 min. 50 sec.
0 - 99 min. 50 sec.
0 - 99 min. 50 sec.
0 - 99 min. 50 sec.
Steam
Grill Mix
Microwave
Grill
Temp/power rangeCooking mode
YES
YES
NO
NO
NO
NO
Water tankTime range
* You can set the temperature from 70°C to 95°C in multiples of 5°C. (Initial setting: 90°C)
Food and Utensil Position Chart
High
Low
High
Low
1 layer
2 layers
Steam
Grill Mix
Microwave
Grill
2 layer cookingCooking mode
Steam tray
Steam tray
NO
NO
NO
NO
NO
3: Upper 2: Lower 1: Oven floor
Food and utensil position (Refer to Figure 1.)
YES
Food
Food
Food
Glass tray
Glass tray
Glass tray (No food)
Rack or dish
See NOTE 1.
Microwave safe container
Food
Glass tray
See NOTE 2.
Food
Microwave safe container
WARNING for stacking the steam tray and glass tray:
After cooking, take out the steam tray first. See Figure 2. Be aware of excess water from the steam tray, we
recommend you place it directly on a flat dish or tray to avoid spillages.
Before taking out the glass tray, make sure that it is cool. Be aware that there may be water on the glass
tray, so take care when removing it.
NOTES:
1. Select desired position depending on the food size. Position 2 or position 3 is recommended for most
recipes. Place the food and glass tray on position 1 when roasting big portions to prevent touching the
food to the oven ceiling. Smoke will occur during the cooking if the food touches the grill heating element.
2. For cooking cake or meatloaf.
3. Do not leave the steam tray and rack wet after use.
Figure 1
Shelf runners
3
2
1
Figure 2
Oven glove
Glass tray
Steam tray
EN – 14
MANUAL COOKING
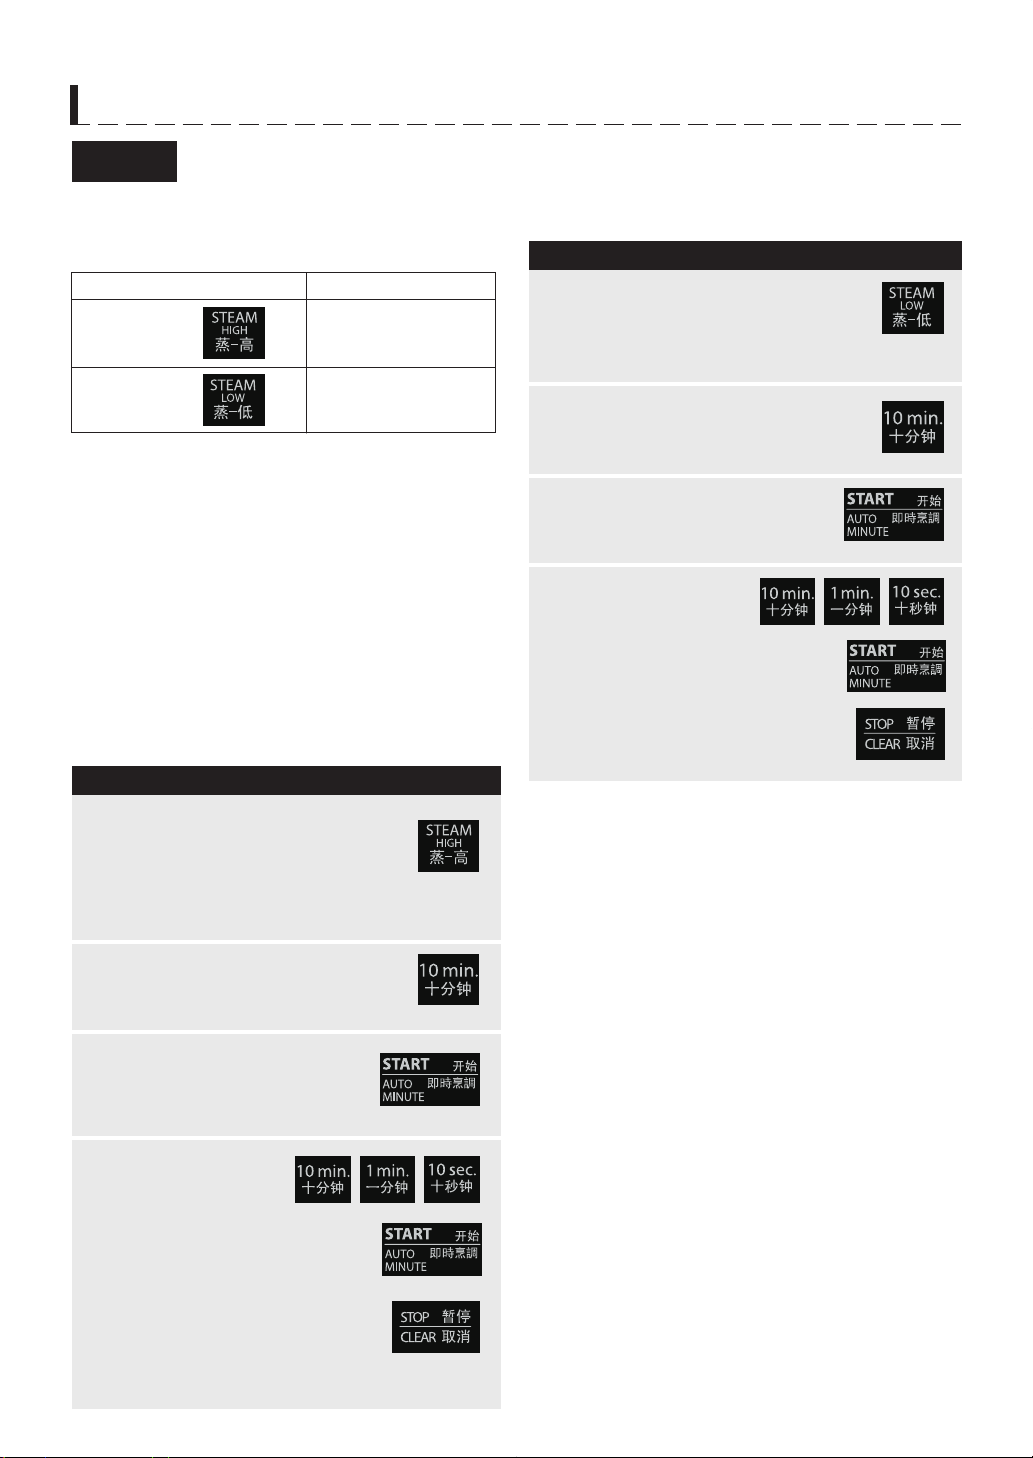
Manual Steam has 2 options, Steam High and Steam
Low. Always cook food using steam tray and glass
tray. See page EN-13 for the details. And see the
important instructions on page EN-6-7.
Use Steam High to steam foods such as chicken or
vegetables. Use Steam Low to steam fish or egg
custard gently. With Steam Low mode, cooking
time is a little longer than Steam High mode. Steam
cooks food gently without destroying shape, colour
or aroma. The Steam High can be programmed for
up to 35 minutes (35.00). The Steam Low can be
programmed for up to 60 minutes (60.00). On Steam
Low, the temperature can be set between 70°C and
95°C by 5°C step. 2 layers cooking is available for
Steam High. 1 layer cooking only is available for
Steam Low.
PROCEDURE
1
Make sure the water tank is filled to the
MAX mark with room temperature water
suitable for drinking (filtered) and is
installed. Press STEAM LOW until the
desired temperature is displayed (80°C).
Enter the desired cooking time by
pressing TIME (20.00).
2
Press START/AUTO MINUTE.
3
4
After cooking,
EXTEND will appear.
If you wish to extend
cooking time, enter the desired
time by pressing TIME and
press START/AUTO MINUTE.
If not, press STOP/CLEAR.
After the oven has cooled, remove
and empty the water tank, wipe
oven cavity. Empty the drip tray.
Steam
WARNINGS:
1. The oven door, outer cabinet, oven cavity,
accessories, dishes and especially the grill heating
element will become hot. Use thick oven gloves
when adding or removing foods to prevent burns.
2. Do not open the oven with your face close to the
oven. Steam from the oven may cause burns.
NOTES:
1.
"Err" will be displayed at step 2 if the longer time than
the maximum time for each Steam cooking mode
is entered. To clear, press STOP/CLEAR and re-
programme.
2. To extend steaming times, see EXTENDING
COOKING TIME AT THE END O F S T E AM
COOKING on page EN-17. Before extending the
cooking time, make sure the water tank is filled to
the MAX mark with room temperature water suitable
for drinking (filtered) and is installed.
3.
Keep the door closed. If opened during cooking, steam
will escape and a longer cooking time will be required.
4. During and after cooking, condensed water may
be on the door, oven walls and oven floor. Dry any
liquid residue with a soft cloth. After the last use of
the day, we recommend to operate the oven with
Grill for 3 minutes without food for drying the water
off around grill heating element.
5. After cooking, the oven will automatically cool
and you will hear the sound of the cooling fan.
The fan may continue to operate up to 10 minutes
depending on the oven and parts temperature.
100°C
70 - 95°C
Temperature
Steam High
Steam Low
Cooking mode
STEAM LOW
* Suppose you want to cook for 20 minutes on Steam Low (80°C).
PROCEDURE
1
Make sure the water tank is filled to
the MAX mark with room temperature
water suitable for drinking (filtered)
and is installed. Press STEAM
HIGH until the desired tray position
indicators are displayed (2 and 3).
Enter the desired cooking time by
pressing TIME (20.00).
2
Press START/AUTO MINUTE.
3
4
After cooking,
EXTEND will appear.
If you wish to extend
cooking time, enter
the desired time by pressing
TIME and press START/AUTO
MINUTE.
If not, press STOP/CLEAR.
After the oven has cooled,
remove and empty the water
tank, wipe oven cavity. Empty
the drip tray.
STEAM HIGH
* Suppose you want to cook for 20 minutes on Steam
High with 2 layers.
x 1
x 2
x 2
x 1
x 3
x 2
EN – 15
MANUAL COOKING
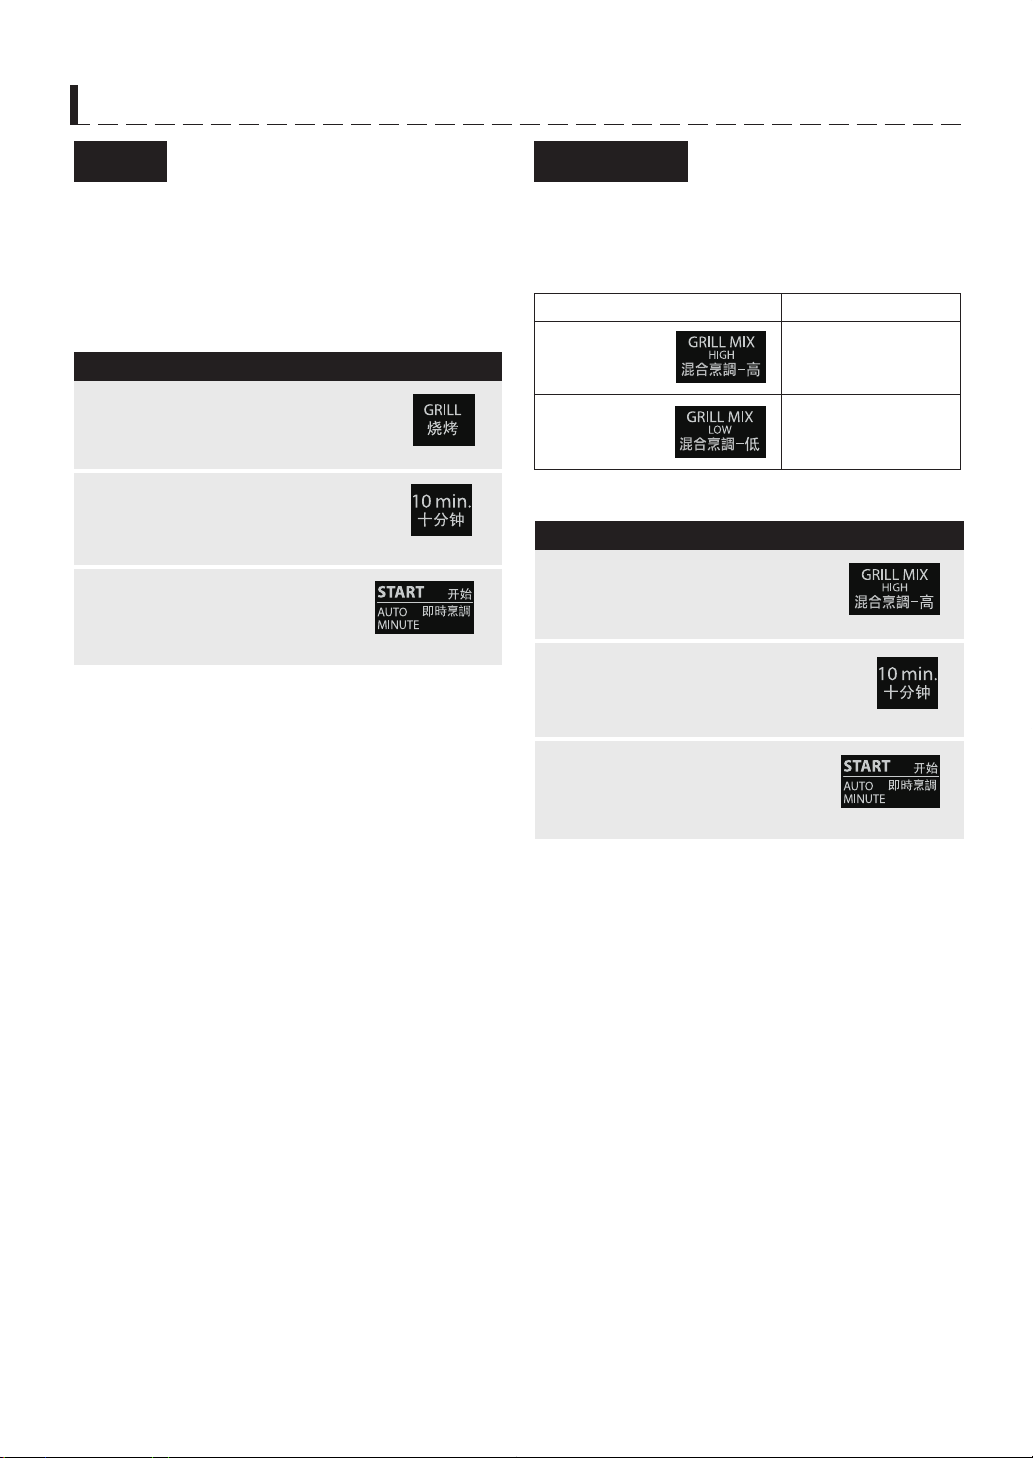
Grill
The grill heating element at the top of the oven cavity
has one power setting only. This mode does not use
steam. This mode can be programmed for up to 99
minutes 50 seconds. 1 layer cooking only. Place the
food onto the rack on glass tray and select desired
position depending on the food size.
* Suppose you want to cook for 10 minutes on Grill.
WARNING:
The o ven d o o r, ou t e r c a b i net, oven c avit y,
accessories, dishes and especially the grill heating
element will become hot. Use thick oven gloves when
adding or removing foods to prevent burns.
NOTES:
1.
Keep the door closed. If opened during cooking, heat
will escape and a longer cooking time will be required.
2. After cooking, the oven will automatically cool
and you will hear the sound of the cooling fan.
The fan may continue to operate up to 10 minutes
depending on the oven and parts temperature.
3. When you cook large quantity of food, the water
contained in food may be drained into the drip tray.
Remove and empty the drip tray after cooking.
* Suppose you want to cook for 20 minutes on Grill
Mix High.
PROCEDURE
Press GRILL.
2
Press START/AUTO MINUTE.
3
1
Enter the desired cooking time
by pressing TIME (10.00).
PROCEDURE
Press START/AUTO MINUTE.
3
2
Enter the desired cooking time
by pressing TIME (20.00).
Press GRILL MIX HIGH once.
1
WARNING:
The ove n d o o r, outer cabi n e t , ove n cav i t y,
accessories, dishes and especially the grill heating
element will become hot. Use thick oven gloves when
adding or removing foods to prevent burns.
NOTES:
1. Keep the door closed. If opened during cooking,
heat will escape and a longer cooking time will be
required.
2. After cooking, the oven will automatically cool
and you will hear the sound of the cooling fan.
The fan may continue to operate up to 10 minutes
depending on the oven and parts temperature.
Grill Mix
Grill Mix combines microwave power with grill. Grill
Mix has 2 options; Grill Mix High and Grill Mix Low.
This mode does not use steam. This mode can be
programmed for up to 99 minutes 50 seconds. 1 layer
cooking only.
Grill 50%
Microwave 50%
Grill 90%
Microwave 10%
Cooking mode
Grill Mix High
Grill Mix Low
Cooking method
x 1
x 1
x 1
x 1
x 2
x 1

EN – 16
MANUAL COOKING
Microwave is fast and convenient for cooking,
reheating and defrosting.
First enter the cooking time then the power level.
This mode does not use steam. This mode can be
programmed for up to 99 minutes 50 seconds.
There are 6 different power levels.
* Suppose you want to cook for 5 minutes on 100%.
PROCEDURE
1
Press START/AUTO MINUTE.
2
Enter the desired cooking time by
pressing TIME (5.00).
Change the power level by
pressing MICRO until the desired
microwave power level is displayed
(30P).
2
Press START/AUTO MINUTE.
3
Microwave
To change the microwave power level, press MICRO
until the desired power level is displayed.
* Suppose you want to defrost for 5 minutes on 30%.
PROCEDURE
1
Enter the desired cooking time by
pressing TIME (5.00).
NOTES:
1. After cooking, the oven will automatically cool
and you will hear the sound of the cooling fan.
The fan may continue to operate up to 10 minutes
depending on the oven and parts temperature.
2. Do not use the steam tray and metal rack.
3. When you cook large quantity of food, the water
contained in food may be drained into the drip tray.
Remove and empty the drip tray after cooking.
HINT:
For cooking cake or meatloaf, place the container on
the glass tray in lower position (position 2) .
This variable cooking control allows you to select the
rate of microwave cooking.
If a power level is not selected, then 100% is
automatically used.
1 layer cooking only.
100P
70P
50P
30P
10P
0P
Raw meat, vegetables, rice
or pasta
Delicate foods such as eggs
or seafood.
Defrost, softening butter
Keep food warm
Power level Examples
100%
70%
50%
30%
10%
0%
Display
x 5
x 1
x 5
x 4
x 1

EN – 17
OTHER CONVENIENT FEATURES
More or Less Time Adjustment
(LESS (
) / MORE (
) keys)
a) To use with automatic cooking:
You can adjust cooking results as you like.
Should you discover that you like any automatic
settings slightly more done, press MORE (
) after
entering weight and before pressing START/AUTO
MINUTE.
Should you discover that you like any automatic
settings slightly less done, press LESS (
) after
entering weight and before pressing START/AUTO
MINUTE.
b) To use with manual cooking:
During the manual cooking process, the cooking time
can be decreased or increased in 1 minute steps
each time the LESS (
) and MORE (
) are pressed.
NOTE: You can not use this function for Steam
cooking.
This function is for Steam Menus, Steam High and
Steam Low only.
Cooking results may vary depending on room
temperature, initial food temperature and other
factors. You can adjust cooking results by adding
more cooking time at the end. When cooking is
finished, the display will show "EXTEND". It is only
possible to add extra time during the 5 minutes when
"EXTEND" is in the display. The time can be extended
up to 10 minutes. Enter the desired time by pressing
TIME and then press START/AUTO MINUTE. The
same cooking mode will be continued. Carefully
check the cooking process.
NOTES:
1. Before extending Steam mode, make sure the
water tank is filled to the MAX mark with room
temperature water suitable for drinking (filtered)
and is installed. If "Err, WATER (flashing)" is
displayed during cooking, fill the water tank to
the MAX mark. Position and push firmly into
place, then press STOP/CLEAR to clear the error
message. To continue the cooking, cook manually.
Check for doneness from time to time.
2. Extend mode is cancelled when STOP/CLEAR is
pressed.
3. The Extending Cooking Time function can be
repeated until the food is cooked as you desire.
4. While the display shows "EXTEND", Energy Save
Mode will be cancelled temporary.
Extending Cooking Time at the
End of Steam Cooking
This function allows you to cook using up to 3 manual
cooking programmes; combinations of Microwave,
Grill and Grill Mix.
* Suppose you want to cook in Sequence Cooking for:
5 minutes on 70 % microwave power (Stage 1)
3 minutes on Grill (Stage 2)
3 minutes on Grill Mix High (Stage 3)
PROCEDURE
1
For 2nd stage, press
GRILL and enter the
desired cooking time by
pressing TIME (3.00).
2
For 1st stage, press MICRO until
the desired microwave power level
is displayed (70P) and enter the
desired cooking time by pressing
TIME (5.00).
For 3rd stage, press
GRILL MIX HIGH
and enter the desired
cooking time by
pressing TIME (3.00).
3
Press START/AUTO MINUTE.
4
Multiple Sequence Cooking
NOTE:
After cooking, the oven will automatically cool and you
will hear the sound of the cooling fan. The fan may
continue to operate up to 10 minutes depending on
the oven and parts temperature.
WARNING:
The oven door, outer cabinet, oven cavity,
accessories, dishes and especially the grill heating
element will become hot. Use thick oven gloves when
adding or removing foods to prevent burns.
x 1
x 5
x 2
x 3
x 1
x 1
x 3

EN – 18
OTHER CONVENIENT FEATURES
•Supposeyouwanttosetthekitchentimerfor5
minutes.
PROCEDURE
Enter the desired time by pressing
TIME (5.00).
1
Press INFO/KITCHEN TIMER
once.
2
Use the Kitchen Timer as a minute timer or to monitor
the standing time for cooked/defrosted food.
Kitchen Timer
Auto Minute
START/AUTO MINUTE allows you to operate the two
following functions:
a) Direct start
You can directly start cooking on 100% microwave
power for 1 minute by pressing START/AUTO
MINUTE.
NOTE:
To avoid the misuse by children START/AUTO
MINUTE can be used only within 3 minutes after
preceding operation, i.e., closing the door, pressing
the STOP/CLEAR key or cooking completion.
b) Extend the manual cooking time
You can extend the manual cooking time for multiples
of 1 minute if START/AUTO MINUTE is pressed while
the oven is in operation.
NOTE:
You can not use this function for Steam cooking.
The cooking time can be extended up to 99 minutes.
Info provides 5 features.
These features can be selected by pressing INFO/
KITCHEN TIMER until the desired function is
displayed and pressing START/AUTO MINUTE.
DRAIN
The remaining water inside the steam generator can
be evaporated by using the DRAIN function. See
page EN-8.
DESCALE
See page EN-8.
WATER HARDNESS
Your oven is set at the factory to water hardness
setting 3 (Very hard). You can set the oven for the
water hardness level.
You can use a test strip available at some drug stores,
to check the water hardness level.
In some areas, it is possible to ask the water supply
company for the water hardness.
When you use test strips, follow the instructions of
them.
Info
Hardness range
<120 ppm
<120 mg/l
<6.7 °dH
120 - 250 ppm
120 - 250 mg/l
6.7 - 14.0 °dH
>250 ppm
>250 mg/l
>14.0 °dH
Setting
Soft
Hard
Very hard
Hardness level
1
2
3
PROCEDURE
1
Press WEIGHT until the desired hardness
level is displayed and press START/AUTO
MINUTE.
The water hardness setting will be held in the
memory even if the oven power is off.
2
Press INFO/KITCHEN TIMER 3 times (In F3).
In F1: Drain
In F2: Descale
In F3: Water Hardness
In F4: Demo Mode
In F5: Child Lock
x 5
x 1
NOTE:
In Energy Save Mode, open and close the door to
activate Kitchen Timer before entering the desired
time.

EN – 19
OTHER CONVENIENT FEATURES
DEMONSTRATION MODE
This feature is mainly for use by retail outlets, and
also allows you to practice the key operation.
To demonstrate, press INFO/KITCHEN TIMER 4
times (In F4). And then press START/AUTO MINUTE.
"dISP" will appear in the display.
Cooking operations can now be demonstrated with
no power in the oven. The display will count down to
zero at ten times the speed faster than normal.
To cancel, press INFO/KITCHEN TIMER 4 times (In
F4). And then press START/AUTO MINUTE. The
display will show "dISP OFF". Or unplug the oven
from the electrical outlet and re-plug to cancel Demo
Mode.
NOTES:
1. "dISP" will change to " . 0" when pressing STOP/
CLEAR.
2. If you set Demo Mode, Energy Save Mode will be
cancelled.
CHILD LOCK
Child Lock prevents unwanted oven operation such
as by small children. The oven can be set so that the
control panel is deactivated and locked.
To set the Child Lock, press INFO/KITCHEN TIMER 5
times (In F5). And then press START/AUTO MINUTE.
"SAFE" will appear in the display. The control panel is
now locked, each time a key is pressed, the display
will show "SAFE".
To unlock the control panel, press INFO/KITCHEN
TIMER 5 times and START/AUTO MINUTE quickly.
The display will show "SAFE OFF" and the oven is
ready to use.
NOTES:
1. If you set Child Lock, Energy Save Mode will be
cancelled.
2. When the oven power is off, the setting returns to
OFF.

EN – 20
CLEANING AND CARE
CAUTION: DO NOT USE COMMERCIAL OVEN
CLEANERS, STEAM CLEANERS, ABRASIVE,
HARSH CLEANERS, ANY THAT CONTAIN SODIUM
HYDROXIDE OR SCOURING PADS ON ANY PART
OF YOUR MICROWAVE OVEN.
Before cleaning, make sure the oven cavity, door,
oven cabinet, accessories and especially the grill
heating element are completely cool.
CLEAN THE OVEN AT REGULAR INTERVALS AND
REMOVE ANY FOOD DEPOSITS - Keep the oven
clean, or the oven could lead to a deterioration of the
surface. This could adversely affect the life of the
appliance and possibly result in a hazardous situation.
Oven Exterior
The outside of your oven can be cleaned easily with
mild soap and water. Make sure the soap is wiped off
with a moist cloth, and dry the exterior with a soft towel.
Oven controls
Open the door before cleaning to de-activate the
oven controls. Care should be taken when cleaning
the oven control. Using a cloth dampened with water
only, gently wipe the panel until it becomes clean.
Avoid using excessive amounts of water. Do not use
any sort of chemical or abrasive cleaner.
Door
To remove all trace of dirt, regularly clean both sides
of the door, the door seals and adjacent parts with a
soft, damp cloth. Do not use harsh abrasive cleaners
or sharp metal scrapers to clean the oven door glass
since they can scratch the surface, which may result
in shattering of the glass.
Door Seals
Always keep the door seals clean to prevent any
damage. If water condenses inside the door seals,
wipe dry with a soft cloth. Polish with another soft
cloth. Do not use a chemical or abrasive cleaner
on these surfaces. Care should be taken not to rub,
damage, pull or move the seals. Before cooking,
always check that door seals is lying smooth and
flat. If not, steam will leak from the door. Do not use
the oven if it has a damaged door seals. Consult a
SERVICE CENTRE APPROVED BY SHARP.
Oven interior
IMPORTANT INFORMATION:
•Aftereveryuse:Wipethe
oven walls with a soft cloth
and warm water (or mild
soapy water) while the oven
is still warm. Using the oven
without cleaning may lead
spatters to get stuck.
•
Do not use caustic cleaners (acidic/alkaline), spray
type cleaners, abrasive or harsh cleaners or scouring
pads as it may damage the surface of oven walls.
For removal of OIL AND FOOD SPLASHES on oven walls:
1.
Fill the water tank with room temperature water suitable
for drinking (filtered) through the lid to the MAX mark.
2.
Operate the oven with Steam High for 10 minutes
without food. See page EN-14.
3.
After the steaming, wipe the dirt in the oven
interior with a dry soft cloth while the oven is still
warm.
Be aware that the grill heating element and
steam outlets may be still hot, so take care when
wiping the ceiling and cavity back plate. (The grill
heating element will turn on for a very short time
intermittently during the cooking.) And then, we
recommend to operate the oven with Grill for 3
minutes without food and accessories for drying
the water off around grill heating element.
Steam Tray / Glass Tray / Rack
Wash steam tray, glass tray and rack after cooking
with a mild soap or detergent solution, rinsing and
polishing dry. Do not use harsh cleaners, sharp
metal scrapers or stiff brushes to prevent damage to
the easy clean surface. All the accessories can be
washed in the dishwasher. Do not leave the steam
tray and rack wet.
Water Tank and Water Tank Lid
After cooking, wash in a mild soap or detergent
solution with a soft damp cloth or sponge, rinse and
polish dry. Do not wash in the dishwasher. Do not use
harsh cleaners, sharp metal scrapers or stiff brushes
on the water tank and water tank lid.
Drip Tray
Empty drip tray after cooking, wash in a mild soap or
detergent solution with a soft damp cloth or sponge,
rinse, polish dry and replace below the oven front. Do
not wash in the dishwasher.
Descaling within the Oven’s Steam Parts
During steam production, scale may form in the
steam generator. To remove scale, carry out descale
function when "DESCALE" flashes on and off in the
display. See page EN-8 for complete instructions.
Key Point for Cleaning - Immediately and
frequently!
The food splashes and oily meat juice, remaining
on the oven interior walls will get stuck and hard
to remove if it is not cleaned immediately and after
each use. The usage of the steam function will
assist in this cleaning process. They will be also
perishable by the influence of steam.

EN – 21
TROUBLESHOOTING CHART
Due to technical error, contact a SERVICE CENTRE
APPROVED BY SHARP.
The time you set is over the maximum time for Steam High
or Steam Low. Press STOP/CLEAR and re-programme.
The oven is too hot to use for Auto Defrost Menus or
Steam Low. Remove food from oven and allow to cool until
the message clears.
Remove water tank and fill with water to the MAX mark.
Replace and push firmly into place, then press STOP/
CLEAR to clear the error message.
Make sure that the water tank is filled to the MAX mark
with room temperature water suitable for drinking (filtered).
To continue the cooking, cook manually. Check for done-
ness from time to time.
NOTES:
1. Ensure you do not use any other liquids like distilled
water, R.O water, mineral water and etc.
2. When this error message appears again and again
even if you fill the water tank with water, the internal
steam system may be out of order. Contact a SERVICE
CENTRE APPROVED BY SHARP. You can use the
oven for the cooking modes which do not use steam.
The water in the internal steam system is frozen.
Operate the oven with Grill without food for 10 minutes.
See page EN-15.
Follow step-by-step instructions for descaling.
See page EN-8.
The oven cabinet and oven cavity are very hot.
Pay extra attention not to burn yourself.
If EE is displayed or you think the oven is not working properly, check the chart below before consulting a
SERVICE CENTRE APPROVED BY SHARP. This will help to prevent unnecessary service calls.
TECHNICAL ERROR MESSAGE / INFORMATION MESSAGE
TECHNICAL
ERROR MESSAGE
INFORMATION
MESSAGE
EE
Err
Err, HOT (flashing)
Err, WATER (flashing)
COLd
DESCALE (flashing)
HOT (flashing)
MESSAGE ON DISPLAY ACTION
Troubleshooting Chart
WARNING:
Never adjust, repair or modify the oven by yourself. It is hazardous for anyone other than a qualified
service technician trained by SHARP to carry out any service or repair operation. This is important
as it may involve the removal of covers that provide protection against electrical parts.
•RepairsandModications:Donotattempttooperatetheovenifitisnotworkingproperly.
•
Outer cabinet: Never remove the outer cabinet to avoid the possibility of electric shock or burns.

EN – 22
TROUBLESHOOTING CHART
The following situations are normal and are not signs that the oven is malfunctioning.
* Open the door and close.
* Check the power plug is properly connected to a
suitable wall outlet.
* Check the wall socket and fuse are functioning
properly.
* Disconnect the power cord, wait for a minute. Then
reconnect, open and close the door.
* Open the door and close. Is the oven light off? Press
START/AUTO MINUTE again.
* If the message "Err, HOT (flashing)" is displayed, wait
until the message has disappeared.
The progra mmed cook ing time and m ode will be
cancelled.
Continue to cook with manual mode.
In the following cases, Energy Save Mode
will be cancelled temporary:
- When the door is opening.
- Pause of the automatic cooking.
- When the cooking fan is working after cooking.
- Demonstration mode
- Child lock
- Extend mode
- Drain mode
- Descaling mode
- Kitchen timer mode
- When the display shows "Err, WATER (flashing)".
* Check the drip tray is installed correctly. Remove and
replace the drip tray correctly.
See page EN-6.
* Did you empty the drip tray before the cooking? You
must empty the drip tray and replace it before Steam
Cooking will start. See page EN-6.
Control panel /
power supply
Energy save
mode
Water
The display is black / blank.
The display is fine but
START/AUTO MINUTE will
not function when pressed.
Elect r ic a l power s upply is
interrupted during cooking.
The display does not change
to blank.
Leakage water from the bottom
front of the oven.
QUESTION / SITUATION ANSWER

EN – 23
TROUBLESHOOTING CHART
The following situations are normal and are not signs that the oven is malfunctioning.
Steam has condensed inside the oven. Wipe dry with a
soft cloth or a sponge after cooling.
The air ventilation openings are at the oven bottom (left
side). It is normal for used steam to come from the air
ventilation openings. Be aware that hot steam comes
out during steam cooking, and keep children away from
the oven.
This operation is normal.
Steam has condensed on the oven floor. Wipe dry with a
soft cloth or a sponge after cooling.
Check the door sealings to make sure it is lying smoothly
and flat.
When microwaving, you may hear the magnetron cycling
on and off depending on the power level.
The cooling fan will operate until the oven is cool.
The fan may continue to operate up to 10 minutes
depending on the oven and parts temperatures.
High temperatures may cause expansion of the oven’s
components. This is normal.
See page EN-9 for step-by-step instructions for cleaning
the oven before the first use.
* Did you fill the water tank with water to the MAX mark
before cooking?
* Did you take the water tank off from the oven during
the cooking? Do not remove the water tank during the
cooking except for the case instructed in the cookbook
or the operation manual.
* Did you u se th e glass tray? Se e the i mpo r ta nt
instructions on page EN-6-7.
See "For removal of OIL AND FOOD SPLASHES on
oven walls:" on page EN-20.
It is important to clean the oven interior after every use.
Check Demonstration Mode on page EN-19 and cancel.
The air ventilation openings are at the oven bottom (left
side). This is normal. Be aware that hot air comes out
during Grill Mix cooking, and keep children away from
the oven.
Steam
Noise / Sound
Smoke / Aroma
Cooking result
Food spatters
Others
Water is found inside the oven
when the door is opened.
Steam comes out from the
bottom of the oven.
Condensed water can be seen
in the oven cavity.
Steam comes from the door
during cooking.
N o i s e d u r i n g m i c r o w a v e
cooking.
Noise after cooking.
Noise when cooking with high
temperature.
When using the oven for the
first time, it may smoke o r
smell.
The menu usin g t he water
does not have a good result.
It is difficult to remove food
spatters stuck on the oven
walls.
Time appearing in the display
is counting down very rapidly.
Hot air comes out from the
bottom of the oven.
ANSWER
QUESTION / SITUATION

EN – 24
Check the following before calling service:
1. Does the display light when the door is opened and closed? Yes _______ No _______
2. When the door is opened, is the oven lamp switched on? Yes _______ No _______
3. Place one cup of water (approx. 250 ml) in a glass measure in the oven and close the door securely.
Oven lamp should go off if door is closed properly.
Programme the oven for one minute on Microwave 100%. At this moment:
A. Does the oven lamp light? Yes _______ No _______
B. Does the cooling fan work? Yes _______ No _______
You will hear the fan sound.
C. Does the Microwave indicator appear in the display? Yes _______ No _______
D. After one minute, did an audible signal sound? Yes _______ No _______
E. Is the water inside the oven hot? Yes _______ No _______
4.
Remove water from the oven and programme the oven for 5 minutes on Grill.
A. Does the Grill indicator appear in the display? Yes _______ No _______
B. After the oven stops, is inside of the oven hot? Yes _______ No _______
5. Fill the water tank with water and replace.
Operate the oven for 3 minutes on Manual Steam High.
A. After the oven stops, is the inside of the oven filled with steam? Yes _______ No _______
If “NO” is the answer to any of the above questions, please check your wall socket and the fuse in your meter
box. If both the wall socket and the fuse are functioning properly, CONTACT YOUR NEAREST SERVICE
CENTRE APPROVED BY SHARP.
IMPORTANT: If the display shows nothing even if the power supply plug is properly connected, the Energy Save
Mode may be in operation. Open and close the oven door to operate the oven. See "Getting Started" on page EN-9.
NOTES:
1. If time in the display is counting down very rapidly, check Demonstration Mode. (Please see page EN-19 for
detail.)
2. If the oven is set for more than about 20 minutes on Microwave 100%, output power will be reduced to avoid
overheating. Finally the output power will be 70% power level.
AC Line Voltage : Refer to the rating label.
AC Power Required
Microwave : 1.53 kW
Grill : 1.15 kW
Steam : 1.15 kW
Output Power
Microwave : 900 W
*
(IEC test procedure)
Grill : 1.10 kW
Steam heating element : 0.9 kW
Microwave Frequency : 2450 MHz
**
(Class B/Group 2)
Outside Dimensions : 520 mm(W) x 330 mm(H) x 474 mm(D)
***
Cavity Dimensions : 343 mm(W) x 210 mm(H) x 381 mm(D)
Oven Capacity : 27 litre
****
Weight : Approx. 19.5 kg
*
This measurement is based on the International Electrotechnical Commission’s standardised method for
measuring output power.
**
This is the classifi cation of ISM (Industrial, Scientific and Medical) equipment described in the Internation-
al Standard CISPR11.
***
The depth does not include the door opening handle.
****
Internal capacity is calculated by measuring maximum width, depth and height. Actual capacity for holding
food is less.
SERVICE CALL CHECK
SPECIFICATIONS

EN – 25
COOKING GUIDES
Points To Remember
•PleasemakereadingtheOperationManualyourveryrststepinworkingwithyournewoven.Thisimportant
booklet explains exactly how the oven works and what you need to know to operate it successfully.
•Usetheinformationinthechartsandrecipestohelpadaptyourownfavoriterecipesorconveniencefoodsfor
preparation in the oven.
•Thestatedcookingtimesinthechartsandrecipesareguidelinesandarebasedonstandardconditions.
Cooking results will vary according to the conditions of food, utensils and the oven. Please check the cooking
result and if necessary, adjust cooking times accordingly.
•Preparethefoodanduseaccessoriesasinstructed.
•Whenplacingfoodintheoven,turning,stirringoraddingsomethingtothefood,pleaseensurethedoordoes
not remain open long so as to avoid loss of heat.
•PleaserefertoFoodandUtensilPositionChartonpageEN-13beforesettingfoodintheoven.
•Alwaysdistributetheingredientsevenlyinsideapieceofovenwareorsteamtraytoachieveevencooking
results.
•ThereisnoneedtollthewatertankforMicrowave,Grill,GrillMixHighorGrillMixLowcooking.
•Ifyouwouldliketoadaptyourfavoriterecipesforthemicrowave,youshouldtakenoteofthefollowing:Shorten
cooking times by a third to a half. Follow the example of the recipes in this cook book.
EN – 26
COOKING GUIDES
About Utensils and Coverings
The chart below will help you decide what utensils and coverings should be used in each mode.
Small flat pieces of aluminum foil placed smoothly
on food can be used to shield areas from cooking or
defrosting too quickly. Keep foil at least 2 cm from walls
of oven.
Aluminium Foil
Metal, Foil Containers
China, Ceramics
Heat-resistant
Glassware
e.g. Pyrex
®
Plastic/Polystyrene
heat-resistant temp.
over 140°C
Plastic Wrap
heat-resistant temp.
over 140°C
Paper Towels,
Paper Plates
Containers made of
synthetic material
Baking paper
Roasting Bags
Silver Dishes and
Cooking Utensils or
Containers that might
rust inside the oven.
Rack
Steam trays
Glass tray
Utensils -
Coverings
Steam
YES
Grill Microwave
YESYES
Use microwave-safe plastic
containers for reheating and
defrosting. Some microwave-
safe plastics are not suitable
for cooking foods with
high sugar content. Follow
manufacturer’s directions.
Care must be taken as
some containers warp,
melt or discolour at high
temperatures.
Only use for warming or to
absorb moisture. Care must
be taken, as overheating
may cause fire. Do not use
recycled paper towels which
may contain metal filings.
Oven-proof porcelain, pottery, glazed earthenware
and bone china are usually suitable. Do not use the
container if it has a flaw.
Care should be taken if using fine glassware as it can break or crack if heated
suddenly.
Cooking
Mode
Follow manufacturer’s
directions.
They could melt at high temperature.
Grill Mix
YES
NO
YESYES NO
YESYESYES YES
In general, porcelain is suitable. Please be sure that your
porcelain does not contain any metal or gold or silver
plating. Check manufacturer’s recommendation for being
microwave safe. Do not use the container if it has a flaw.
YESYESYES YES
YESNOYES NO
YESNONO NO
YESNOYES NO
NONONO NO
NONOYES NO
YESNONO NO
NONONO NO
NOYESYES YES
The metal rack supplied have
been specially designed for Grill
Mix and will not damage the oven.
NONOYES NO
YESYESYES YES
To prevent the glass tray from breaking:
•Beforecleaningtheglasstraywithwater,leavetheglasstraytocool.
•Donotplaceanythinghotonacoldglasstray.
•Donotplaceanythingcoldonahotglasstray.

EN – 27
COOKING GUIDES
ACCESSORIES There are many microwave or heat-resistant accessories available for purchase. Evaluate
carefully before you purchase so that they meet your needs. A microwave-safe thermometer will assist you in
determining correct doneness and assure you that foods have been cooked to safe temperatures when using
microwave-only cooking. Sharp is not responsible for any damage to the oven when accessories are used.
For automatic cooking, use the recommended container in each cooking guide and recipes of the cookbook
section.
There are certain techniques for cooking with steam. It is essential that these techniques are followed to ensure
good results. Many of them are similar to those used in conventional cooking so you may be used to doing them
already. Please follow the advise given below for all cooking options which use STEAM MENUS, STEAM HIGH
and STEAM LOW.
NOTE:
•Always attend the oven when in use.
•Ensure that the utensils are suitable for STEAM cooking mode. (See About Utensils and Coverings
page EN-26)
•Ventilate the room to allow the steam to dissipate.
•After cooking and the oven has cooled, remove and empty the water tank, wipe oven cavity with a soft
cloth or sponge. Empty the drip tray.
Container
Covering
Door
Stir
Stand
Cooking Techniques
Ensure food is arranged evenly. Food which has little or no space between
will take longer to cook, please ensure food is positioned with enough space
between items to allow the steam to circulate around it. For the container, a
shallow dish is suitable. It is not recommended to use dense dishes, because
of the thickness of such dishes, recommended cooking times will have to be
extended.
Covering is not necessary in most cases. If a cover is required, aluminium
foil is recommended to keep food becoming wet from the condensed water
in the oven cavity. Covered food will take longer to cook.
For accurate cooking times, keep the door closed.
Sometimes soup or casserole reheated in a casserole without covering looks
watery after cooking. Appearance will be better by stirring well.
Standing time is recommended after cooking so it enables the heat to
disperse equally throughout the food. Do not allow to stand for a long time;
food may be overcooked or wet by the residual steam.
- Special Advice for STEAM -
Steam Cooking Advice
Utensils should be checked to ensure that they are suitable for use in each cooking mode. When
heating food in plastic containers, pay special attention to the melting temperature of the containers.
Never heat the plastic containers at over their melting temperature. Keep an eye on the oven due to
the possibility of melting and ignition.

EN – 28
Density
Quantity
Size
Shape
Temperature of food
Seasoning & flavouring
Food characteristics
Food density will affect the amount of cooking time needed. Cut the food
into thinner parts if possible, and arrange in single layer.
The cooking time must be increased as the amount of food cooked in the
oven increases.
Small foods and small pieces cook faster than large ones, as heat can
penetrate from all sides to the centre. For even cooking make all the pieces
the same size.
Foods which are irregular in shape, such as chicken breasts or drumsticks,
may take longer to cook in the thicker parts. Check these parts are cooked
thoroughly before serving.
The initial temperature of food affects the amount of cooking time needed.
Chilled foods will take longer to cook than foods at room temperature. The
temperature of the container is not the actual temperature of the food or drink.
Seasoning or flavouring are best added after cooking. If added as
marinades or rubs, their taste may become light when cooking with steam.
Add seasoning or flavouring again after cooking if necessary.
- Advice for STEAM -
NOTE:
•Ensurethefoodisthoroughly cooked / reheated before serving.
•Cookingtimewillbeaffectedbytheshape,depth,quantityandtemperatureoffoodtogetherwiththesize,
shape and material of the container.
Face & Hands: Always use thick oven gloves to remove food or cookware from the oven. Be careful
when opening the oven door to allow steam to dissipate. Do not remove the food from the oven with
your bare hand.
Check the temperature of food and drink and stir before serving. Take special care when serving to
babies, children or the elderly.
COOKING GUIDES

EN – 29
* Puncture egg yolks and whites and
oysters before cooking to prevent "ex-
plosion".
* Pierce skins of potatoes, apples,
squash, hot dogs, sausages and oys-
ters so that steam escapes.
* Use specially bagged popcorn for the
microwave oven.
* Listen while popping corn for the pop-
ping to slow to 1-2 seconds.
* Transfer baby food to small dish and
heat carefully, stirring often. Check for
suitable temperature to prevent burns.
* Remove the screw cap and nipple
before warming baby bottles. After
warming shake thoroughly. Check for
suitable temperature.
* Food with filling should be cut after
heating, to release steam and avoid
burns.
* Use a deep bowl when cooking liquids
or cereals to prevent boiling over.
* For boiling or cooking liquids see
IMPORTANT SAFETY INSTRUCTIONS
on page EN-2 to prevent explosion and
delayed eruptive boiling.
* Remove food from can.
* Cook for the recommended time. (These
foods have high sugar and/or fat con-
tents.)
* Use a microwave proof roasting rack or
plate to collect drained juices.
* Check the utensils are suitable for
MICROWAVE cooking before you use
them.
* Use to shield food to prevent over
cooking.
* Watch for sparking. Reduce foil or keep
clear of cavity walls.
* Cook eggs in shells. This prevents
"explosion", which may damage the
oven or injure yourself.
* Cook hard/soft boiled eggs.
* Overcook oysters.
* Dry nuts or seeds in shells.
* Pop popcorn in regular brown bags or
microwave safe glass bowls.
* Exceed maximum time on popcorn
package.
* Heat disposable bottles.
* Overheat baby bottles.
Only heat until warm.
* Heat bottles with nipples on.
* Heat baby food in original jars.
* Heat or cook in closed glass jars or
airtight containers.
* Deep fat fry.
* Heat or dry wood, herbs, wet papers,
clothes or flowers.
* Heat for longer than recommended
time.
* Heat or cook food in cans.
* Overcook as they may catch fire.
* Place meat directly on the ceramic
oven floor for cooking.
* Use metal utensils for MICROWAVE
cooking. Metal reflects microwave
energy and may cause an electrical
discharge known as arcing.
* Use too much.
* Shield food close to cavity walls.
Sparking can damage the oven.
- Special Notes and Warning for MICROWAVE -
DO DON’T
Eggs, fruits,
nuts, seeds,
vegetables,
sausages and
oysters
Popcorn
Baby food
General
Liquids
(Beverages)
Canned foods
Sausage rolls,
Pies, Christmas
pudding
Meats
Utensils
Aluminium foil
COOKING GUIDES
Microwave Cooking Advice

EN – 30
- Advice for defrosting -
NOTE:
•Removeallpackingandwrappingbeforedefrosting.
Arrange food carefully
Watch cooking time
Cover foods before
cooking
Shield foods
Stir foods
Turn foods
Rearrange foods
Allow standing time
Check for doneness
Condensation
Microwave safe plastic
wrap
Microwave safe plastic
cookware
Cake/Meatloaf
Cooking Techniques
Place the thickest areas toward outside of dish.
Cook for the shortest amount of time indicated and add more time as needed.
Food severely overcooked can smoke or ignite.
Check recipe for suggestions: paper towels, microwave plastic wrap or a lid.
Covers prevent spattering and help foods to cook evenly. (Helps keep oven
clean)
Use small pieces of aluminium foil to cover thin areas of meat or poultry in
order to avoid overcooking.
From outside to centre of dish once or twice during cooking, if possible.
Foods such as chicken, hamburgers or steaks should be turned over once
during cooking.
Like meatballs halfway through cooking both from top to bottom and from the
centre of the dish to the outside.
After cooking ensure adequate standing time. Remove food from oven
and stir if possible. Cover during standing time can allow the food to finish
cooking completely.
Look for signs indicating that cooking temperature has been reached.
Doneness signs include:
– Steam emits throughout the food, not just at edge;
– Joints of poultry can be torn apart easily;
– Pork and poultry show no pinkness;
– Fish is opaque and flakes easily with a fork.
A normal part of microwave cooking. The humidity and moisture in food
will influence the amount of moisture in the oven. Generally, covered foods
will not cause as much condensation as uncovered foods. Ensure that the
ventilation openings are not blocked.
For cooking food with high fat content, do not bring the wrap in contact with
the food as it may melt.
Some microwave safe plastic cookware are not suitable for cooking foods
with high fat and sugar content.
For cooking cake or meatloaf, place the container on the glass tray in lower
position (position 2).
- Advice for MICROWAVE -
COOKING GUIDES
Arrange
Separate
Stand
Defrosting Techniques
Arrange food in a single even layer on the shallow dish. This will ensure that
all parts of the food defrosts evenly.
Foods may be stuck together when removed from the freezer. It is important
to separate foods as soon as possible during defrosting.
e.g. steaks, chops
Standing time is necessary to ensure food is thoroughly defrosted. Food
must stand, covered, for a length of time to ensure the centre has completely
defrosted.

EN – 31
Steam Menus Guide
1 - 2 serves
(1 serve)
1 - 4 serves
(1 serve)
1 - 6 eggs
Servings Rice Water
1 serve (1 - 2 persons) 150 g 250 ml
2 serves (3 - 5 persons) 300 g 500 ml
•Washriceuntilwaterrunsclear.
•Placericeandwaterintoadeepcasserole(about2
litre) and soak for 30 minutes. (Stir rice a few times
during soaking.)
•Stirandplacethecasseroleonthesteamtrayon
the glass tray, uncovered.
•Placethemonthelowerposition(position2).
•
After cooking, stir lightly and stand for 5 minutes.
•SeerecipeonpageEN-33.
•SeerecipeonpageEN-33.
•Itisnotnecessarytoenterweight.
•
Place eggs with shells in the steam tray on the glass
tray.
•Placethemonthelowerposition(position2).
Menu name Procedure
Weight range
(Increasing unit)
Food
Position
2
2
2
2
St11
St12
St13
St14
Menu
number
Rice
(initial temp 20°C)
Sticky Rice
(initial temp 20°C)
Steamed Egg
(initial temp 20°C)
Boiled Egg
(initial temp 20°C)
Vegetable
0.1 - 0.6 kg (100g)
0.1 - 0.6 kg (100g)
•Washvegetables,thenremoveexcesswater.
•
Cut & trim the vegetables into florets, shreds or strips.
•Putonashallowdish(22-27cmindiameter),
sprinkle with salt & oil.
•Placetheshallowdishonthesteamtrayonthe
glass tray, uncovered.
•Placethemonthelowerposition(position2).
•Aftercooking,stirwherenecessary.
•Putfrozenvegetablesonashallowdish(22-27
cm in diameter).
•Placetheshallowdishonthesteamtrayonthe
glass tray, uncovered.
•Placethemonthelowerposition(position2).
•Aftercooking,stirandstandfor2minutes.
Menu name Procedure
Weight range
(Increasing unit)
Food
Position
2
2
St21
St22
Menu
number
eg: Broccoli (florets), Lettuce (shreds),
Asparagus (strips), White Chinese Cabbage
(whole or halves), Chinese Celery Cabbage
(Shreds), Spinach (halves), Onions (shreds),
Mange-tout (whole), Green Pepper (strips),
Pak Choi, Cauliflower florets
Fresh Vegetable
(initial temp 20°C)
Frozen
Vegetable
(initial temp -18°C)
eg: Cauliflower (florets), Sliced Carrots,
Broccoli (florets), Corn on cob
AUTOMATIC COOKING CHART
Rice/Egg
- Make sure that the water tank is filled to the MAX mark with room temperature water suitable for drinking (filtered)
and is installed.

EN – 32
Steam Menus Guide
1 - 4 serves
(1 serve)
1 - 4 serves
(1 serve)
•SeerecipeonpageEN-35.
•SeerecipeonpageEN-35.
•SeerecipeonpageEN-35.
•SeerecipeonpageEN-34.
•SeerecipeonpageEN-34.
Menu name
Menu name
Procedure
Procedure
Weight range
(Increasing unit)
Weight range
(Increasing unit)
Food
Position
Food
Position
2
2
2&3
2&3
2&3
St51
St52
St53
St41
St42
Menu
number
Menu
number
Steam Cake
(initial temp 20°C)
Steam Pumpkin
(initial temp 20°C)
Custard
Pudding
(initial temp 20°C)
Corn Butter & Steam Spring Roll
(initial temp 20°C)
Fresh Veg & Steam Chicken
Wings
(initial temp 20
°C
for veg, 5
°C
for
chicken wings)
Balanced Menu
Sweets
0.1 - 0.5 kg (100g)
0.2 - 0.5 kg (100g)
0.2 - 0.6 kg (100g)
0.15 - 0.60 kg (50g)
Recommended:
Chicken breast
(1 piece: 150 g)
•Washshthoroughlyandremovescales.
•Makeafewslitsontheskinofsh,piercetheeyesofsh.
•Putonashallowdish,22-27cmindiameter.
•Sprinklelightlywithsaltandoil.
•Putgreenonionandgingerslicesontop.
•Placetheshallowdishonthesteamtrayonthe
glass tray, uncovered.
•Placethemonthelowerposition(position2).
•Marinatethemeatandputonashallowdish,22-
27 cm in diameter.
•
For meat patty, try to make it a thin layer especially in the centre.
•
Place the shallow dish on the steam tray on the glass
tray, uncovered.
•Placethemonthelowerposition(position2).
•Putshrimponashallowdish,22-27cmin
diameter.
•Placetheshallowdishonthesteamtrayonthe
glass tray, uncovered.
•Placethemonthelowerposition(position2).
•Seasonthechickenlletswithsaltandpepper.
•
Place the chicken fillets on a shallow dish, 22 - 27
cm in diameter. Place the
shallow
dish on the steam
tray on the glass tray.
•Placethemonthelowerposition(position2).
Menu name Procedure
Weight range
(Increasing unit)
Food
Position
2
2
2
2
St31
St32
St33
St34
Menu
number
eg:
Whole fish such as Sea Bream,
Red Snapper, Carp, Pomfret,
Golden Thread, Black Mullet, Flatfish,
Garoupa etc.
eg:
Pork patty, Beef patty,
Spare rib cubes, Chicken pieces etc.
Fresh Fish
(initial temp 5°C)
Fresh Meat
(initial temp 5°C)
Fresh Shrimp
(in shells)
(initial temp 5°C)
Fresh Chicken
Fillet
(initial temp 5°C)
Fish/Meat/Chicken
AUTOMATIC COOKING CHART

EN – 33
Steam Menus Guide
0.10 - 0.25 kg (50g)
(1 piece: 10-15g)
0.1 - 0.5 kg (100g)
(1 piece: 25-50g)
1 - 4 pieces
(1 piece: 70g)
•Placeshaomaionthesteamtrayontheglasstray
uncovered.
•Placethemonthelowerposition(position2).
•Placekeawzaonthesteamtrayontheglasstray,
uncovered.
•Placethemonthelowerposition(position2).
Note:
For big keawza (1piece=50g), press MORE pad
before pressing start.
•Itisnotnecessarytoenterweight.
•Placedumplingonthesteamtray,uncovered.
•Placethesteamtrayonupperposition(position3)
and the glass tray without food on the lower position
(position 2).
Menu name Procedure
Weight range
(Increasing unit)
Food
Position
2
2
2&3
St61
St62
St63
Menu
number
Shao Mai
(initial temp -18°C)
(Frozen)
Keawza
(initial temp -18°C)
(Frozen)
Dumpling
(initial temp -18°C)
(Frozen)
Steam Reheat
RICE/EGG
[ Ingredients ]
300 g Glutinous rice
270 g Water
Salt, Soy sauce, sugar,
sesami oil to taste.
[ Method ]
1. Place rice and water in a 20cm (8") square shallow dish and soak rice
for 1 hour.
2. Place the dish on the steam tray on the glass tray.
3. Place them on the lower position (position 2) uncoverd.
4. Cook using STEAM MENUS, RICE/EGG, St12 (Sticky Rice).
5. After cooking, stir lightly and serve with some cooked meat.
Sticky Rice
[ Ingredients ]
<4 serves>
120 g Egg
240 g Water
10 g Sake
4 g Salt
Light soy sauce to taste
[ Method ]
1. Blend water, sake, salt, light soy sauce and eggs; beat lightly.
2. Strain beaten mixture from (1) into a shallow dish (approx. 1.5pint) or 4
serving bowls (4½ inches in diameter).
3. Place the dish on the steam tray on the glass tray.
4. Place them on the lower position (position 2) uncovered.
5. Cook using STEAM MENUS, RICE/EGG, St13 (Steamed Egg).
Steamed Egg
AUTOMATIC COOKING CHART
EN – 34
BALANCED MENU
Ingredients
1 serve (2 rolls) 2 serves (4 rolls) 3 serves (6 rolls) 4 serves (8 rolls)
Noodle Sheet 125 g (or 2 sheets) 250 g (or 4 sheets) 375 g (or 6 sheets) 500 g (or 8 sheets)
Bean sprouts
(cut with long shape and boiled)
50 g 100 g 150 g 200 g
Carrot
(cut with long shape and boiled)
50 g 100 g 150 g 200 g
A
Mushrooms (cut with long shape) 50 g 100 g 150 g 200 g
Chopped chicken 50 g 100 g 150 g 200 g
Dried shrimp 7 g 13 g 20 g 25 g
Hard Tohu (slice to small pieces) 50 g 100 g 150 g 200 g
Pounded Parsley and Garlic ½ tbsp 1 tbsp 1½ tbsp 2 tbsp
Pepper ¼ tsp ½ tsp ¾ tsp 1 tsp
B
Oyster sauce 1 tbsp 2 tbsp 3 tbsp 4 tbsp
Soy sauce ½ tbsp 1 tbsp 1½ tbsp 2 tbsp
Chinese herb to taste to taste to taste to taste
Sugar to taste to taste to taste to taste
Ingredients 1 serve 2 serves 3 serves 4 serves
Chicken wings (60 g/1 piece) 150 g 300 g 450 g 600 g
A
Oyster sauce ½ tbsp 1 tbsp 1½ tbsp 2 tbsp
Honey 1 tbsp 2 tbsp 3 tbsp 4 tbsp
Pepper to taste to taste to taste to taste
Salt ¼ tsp ½ tsp ¾ tsp 1 tsp
Soy sauce ¼ tsp ½ tsp ¾ tsp 1 tsp
Ingredients 1 serve 2 serves 3 serves 4 serves
Corn 50 g 100 g 150 g 200 g
Margarine 1 g 2.5 g 3 g 5 g
Sugar ¾ tbsp 1½ tbsp 2 tbsp 3 tbsp
Salt to taste to taste to taste to taste
Fresh milk ¼ tbsp ½ tbsp ¾ tbsp 1 tbsp
Ingredients 1 serve 2 serves 3 serves 4 serves
Broccoli (florets), Carrot (thin sliced), Red/yellow
peppers (strips), Asparagus (strips)
150 g 300 g 450 g 600 g
Corn Butter & Steam Spring Roll
Fresh Vegetables & Steam Chicken Wings
<Steam spring roll>
<Steam chicken wings>
<Corn butter>
<Fresh vegetables>
[Cooking]
1. Put the ingredients (A) in a bowl, place it on the oven floor (position 1) and cook with MICROWAVE 100% for
2-5 minutes. Add seasoning (B) and cook again with MICROWAVE 100% for 1-2 minutes.
2. Add boiled bean sprouts and carrots in (1).
3.
If pure noodle sheet is used, soak noodle in water and put them on the steam tray on the glass tray. Place them
in the lower position (position 2) and cook with STEAM HIGH for 20 minutes. After steaming, cut into pieces.
4. Roll tightly (3) with steamed noodle.
5. Place spring rolls on the greased steam tray on the glass tray. Put them on the lower position (position 2).
6. Place corn on another steam tray and put it on the upper position (position 3).
7. Cook using STEAM MENUS ,BALANCED MENUS, St41 (Corn Butter & Steam Spring Roll).
8. After cooking, place corn in a bowl and mix with margarine, sugar, salt and fresh milk and mix well. Mix all
the sauce ingredients for spring rolls well and serve with spring rolls.
[Cooking]
1. Mix seasoning (A) and marinate chicken wings for 1 to 2 hours.
2. Place Chicken wings on the steam tray on the glass tray. Put them on the lower position (position 2).
3. Arrgane vegatables on the steam tray and put it on the upper position (position 3)
4. Cook using STEAM MENUS ,BALANCED MENUS, St42 (Fresh Vegetables & Steam Chicken Wings).
NOTE : Sauce for spring roll
The sweet black soy sauce 3 tbsp
Water 3 tbsp
Sugar 2 tbsp
Vinegar 2 tbsp
Salt 1 pinch
Slice chilli
AUTOMATIC COOKING CHART

EN – 35
SWEETS
[ Ingredients ]
<For 10 cups>
2 Egg
100 g Sugar
2 tbsp Oil
150 ml Milk
200 g Flour
½ tbsp Baking powder
60 g raisan
[ Ingredients ]
<1 whole>
1.2 kg Whole pumpkin
¼ cup Coconut milk
1 Egg
2 Duck eggs
150 g Palm sugar
2-3 Pandanus leaves
[ Ingredients ]
<For 4 cups>
2 Egg
1 Egg yolk
300 ml Milk
2-3 drops
Vanilla essence
30 g sugar
Caramel sauce
100 g sugar
4 tbsp water
[ Method ]
1. Beat the oil, sugar and eggs together, then add milk.
2. Stir in flour and baking powder. Add raisan and mix.
3. Put cake mixuture evenly in 10 small tins (3.5cm deep, 7.5cm diameter)
with greaseproof paper.
4. Place tins on the steam tray on the glass tray.
5. Place them on the lower position (position 2) uncovered.
6. Cook using STEAM MENUS, SWEETS, St51 (Steam Cake).
Note:
Chocolate steam cake
Add 1 tbsp cocoa powder together with flour and 50 g chocolate chips
instead of raisan.
[ Method ]
1. Make a hole on the top of the pumpkin. And scoop out pumpkin seeds
up.
2. Stir both kinds of egg in the bowl, and add coconut milk.
3. After mix eggs and coconut milk then add palm sugar.
4. Add pandanus leaves then knead by hand to let smell of pandanus
come out.
5. Pour finished mixer through the filter to get rid of bubble
6. Pour egg custard into pumpkin.
7. Place the pumpkin on the steam tray on the glass tray.
8. Place them on the lower position (position 2) uncovered.
9. Cook using STEAM MENUS, SWEETS, St52 (Steam Pumpkin).
10. When the oven stops
,
the audible signals sound and WATER indicator
flashes on and off, take the water tank out and refill water to the max
mark. Place the water tank again and press start. Do not open the door
at a pause.
11. Check the doneness after cooking and extend cooking time if
necessary. Cool before cutting.
[ Method ]
1. For the caramel, dissolve the sugar in the water, stirring continuously.
Bring to the boil without sttirring until a goldyellow caramel forms.
2. Coat the base of 4 ramekin dishes (4cm deep, 8.5cm diameter) with
the caramel. Allow to cool.
3. Warm the milk for 1 minute on 100% MICROWAVE power.
4. Whisk the eggs and egg yolk with the sugar.
Pour the milk into the eggs and mix well.
5. Fill each ramekin with the milk mixture.
6. Place the dishes in the steam tray, and place the tray on the upper
position (position 3). Place the glass tray without food on the lower
position. (position 2)
7. Cook using STEAM MENUS, SWEETS, St53 (Custard Pudding).
8. After cooking, allow to cool before serving.
Steam Cake
Steam Pumpkin
Custard Pudding
AUTOMATIC COOKING CHART

EN – 36
Auto Grill Menus Guide
•Washchicken,trimawayfatandpatdry.
•Seasonwith1teaspoonofsalt,1tablespoonof
soysauce,1teaspooncornstarchand1teaspoon
sugarper500g.
•Putchickenbreastsidedownontherackinthe
glasstray.
•Placeitontheovenoor(position1).
•Whentheovenstopsandtheaudiblesignals
sound,turnthechickenover.
•Aftercooking,leavemeattostandwrappedin
aluminiumfoilfor10minutes.
•Washthechickenwings,piercetheskin,patdry
andmarinatewiththesaucemixture.Marinatewith
1teaspoonofsalt,1tablespoonofsoysauce,1
teaspoonofcornstarchand1teaspoonofsugar
per12pieces.
•Arrangechickenwingsontherackinglasstray.
•Placeitonthelowerposition(position2).
•Whentheovenstopsandtheaudiblesignals
sound,turnthechickenover.
•Aftercooking,placeonadishandserve.
•Washshthoroughlyandremovescales.
•Makeafewslitsontheskinofsh,piercetheeyes
ofsh.
•Patdry,thenbrushoilonshbody.
•Placeontherackinglasstray(brushedlightlywith
oil),uncovered.
•Placeitonthelowerposition(position2).
•Whenovenstops,turnitover.Continuetocook.
NOTE: Whencookingsmallamountorthinslices
offish,itisrecommendedtocheck
occasionallyduringcookingtoavoid
overcooking.
•Steakisrecommendedtohaveathicknessof
about1.5cmtogetgoodresult.
•Seasonasdesired.
•Placeontherackinglasstray.
•Placeitontheupperposition(position3).
•Whenovenstops,turnsteakover.
•Aftercooking,stand.
•Servewithhotsaucewherenecessary.
NOTE: Ifsteakismorethan1.5cmthick,cook
manualywithGrillandplaceitinthelower
position(position2).SeepageonEN-39.
Menu name Procedure
Weight range
(Increasing unit)
Food
Position
1
2
2
3
AG1
AG2
AG3
AG4
Menu
number
Grill Chicken
(initialtemp5°C)
Chicken Wings
(initialtemp5°C)
Grill Fish
(initialtemp
8-12°C)
Steak
(Beef Steak)
(initialtemp
8-12°C)
(1-1.5cmthick)
0.9-2.0kg(100g)
4-12pieces
(1piece:40g)
0.2-0.4kg(100g)
0.2-0.6kg(100g)
eg:Pomfret,GoldenThread,Mackerel,
Snapperetc.
AUTOMATIC COOKING CHART

EN – 37
AUTOMATIC COOKING CHART
Auto Defrost Menus Guide
•Placethefoodonaplateorandishonthecentreofthe
oven floor (position1).
•Whentheovenstopsandtheaudiblesignalssound,
turn the food over, rearrange and separate if possible.
If necessary shield thin par ts and warm spots with
aluminium foil.
•Afterdefrosting,wrapinaluminiumfoilfor10-20minutes,
until thoroughly defrosted.
•SeeNOTESbelow.
•Placetheblockofmincedmeatonaplateorinaflan
dish on the centre of the oven floor (position 1).
•Whentheovenstopsandtheaudiblesignalssound,turn
the food over. Remove the defrosted parts if possible.
•Afterdefrosting,coverwithaluminiumfoilandstandfor
5-10 minutes until thoroughly defrosted.
•SeeNOTESbelow.
•Placethepoultry,breastsidedown,onaandishora
plate on the centre of the oven floor (position 1).
•Whentheovenstopsandtheaudiblesignalssound,turn
over and shield thin parts and warm spots with small
pieces of aluminium foil.
•Whentheaudiblesignalssoundagain,turnoveragain.
•Afterdefrostingrinsewithcoldwater,coverwith
aluminium foil and stand for 30-60 minutes until
thoroughly defrosted. Finally clean the poultry under
running water.
Menu name Procedure
Weight range
(Increasing unit)
dE1
dE2
dE3
Menu
number
Steak/Chops
(initial temp -18°C)
Minced Meat
(initial temp -18°C)
Poultry
(initial temp -18°C)
0.2 - 1.0 kg (100g)
0.2 - 1.0 kg (100g)
0.9 - 2.0 kg (100g)
Foods not listed in the Guide can be defrosted manually using 30% power level setting.
NOTES:
1. Steaks and chops should be frozen in one layer.
2. Minced meat should be frozen in a thin shape.
3. If shielding is necessary for defrosted portions, use small, flat pieces of aluminium foil.
4. The poultry should be processed immediately after defrosting.
Only poultry without giblets is
recommended for this programme
Auto Reheat Menus Guide
1 serve
(approx. 200g)
1 - 4 bowls
(1 bowl: approx.
250 ml)
1 - 4 cups
(1 cup: approx.
250 ml)
•Takeoutthedishfromtherefrigerator.
•Coverwithmicrowavewraporlid.
•Noneedtoenterquantity.
•Placeoncentreofovenoor(position1).
•Afterreheating,stirandstandcoveredfor1minute.
•PlaceinaPyrexbowlorChineseceramicbowl.
•Nocover.
•Placeoncentreofovenoor(position1).
•Afterreheating,stir.
•Nocover.
•Placeoncentreofovenoor(position1).
•Afterreheating,stir.
Menu name Procedure
Weight range
(Increasing unit)
AR1
AR2
AR3
Menu
number
eg: Lunch/Dinner plate, Meat Dish,
Fried Noodles, Plate of Rice
Reheat Dish
(initial temp
4-12°C)
Reheat Soup
(initial temp
4-12°C)
Reheat
Beverage
(initial temp
20-25°C)
EN – 38
MANUAL COOKING CHART
Steam High Chart
Use glass tray and steam tray
Food Amount Oven Setting Cooking Time Food
Position
SEAFOOD Fish Fillets (½ Inch Thick) 800g Steam High 21 minutes 2
Mussels, In Shell 900g Steam High 20 minutes 2
Scallops 500g Steam High 10 minutes 2
Prawn, Large 500g Steam High 14-16 minutes 2
POULTRY Chicken Breast, Half 1kg Steam High 30 minutes 2
DUMPLINGS Frozen Dumplings 500g Steam High 16 minutes 2
VEGETABLES Asparagus Spears (halved) 500g Steam High 21 minutes 2
Beans (top and tailed) 500g Steam High 21 minutes 2
Bok Choy (chopped) 500g Steam High 7-9 minutes 2
Broccoli Florets 500g Steam High 21 minutes 2
Brussels Sprouts (halved) 500g Steam High 25 minutes 2
Cabbage (shredded) 500g Steam High 16 minutes 2
Carrots, Sliced 500g Steam High 21 minutes 2
Cauliflower Florets 500g Steam High 21 minutes 2
Corn on the Cob (4 small) 500g Steam High 21 minutes 2
Mushrooms, Button (whole) 500g Steam High 16 minutes 2
Peas (top and tailed) 500g Steam High 16 minutes 2
Snow Peas (top and tailed) 250g Steam High 8 minutes 2
Potatoes Quartered
500g Steam High 25 minutes 2
Baby Potatoes, Chat
500g Steam High 30 minutes 2
Pumpkin (2cm cubes) 500g Steam High 30 minutes 2
Spinach (shredded) 250g Steam High 10 minutes 2
Sweet Potato (20g slices) 500g Steam High 25 minutes 2
Yellow Squash (quartered) 500g Steam High 20-22 minutes 2
Zucchini (sliced or quartered) 500g Steam High 16 minutes 2
RICE
White Rice
½ Cup with ½ Cup Water
-
Steam High 25 minutes 2
1 Cup with 1 Cup Water
-
Steam High 30 minutes 2
PASTA Dry Pasta
½ Cup with ½ Cup Water
-
Steam High 25 minutes 2
1 Cup with 1 Cup Water
-
Steam High 30 minutes 2

EN – 39
MANUAL COOKING CHART
Grill Mix Cooking Chart
Use glass tray and rack
Food Amount Cooking Time and Procedure Standing
Time
Food
Position
Result
BEEF Blade Roast 1kg
Micro 70% for 8 minutes
Grill Mix High for 9 minutes
TURN OVER
Micro 70% for 3 ½ minutes
Grill Mix High for 9 minutes
10 minutes 1 Medium
Eye Fillet 1kg
Micro 70% for 8 minutes
Grill Mix High for 9 minutes
TURN OVER
Micro 70% for 3 ½ minutes
Grill Mix High for 9 minutes
10 minutes 1 Medium
Hamburger Patties*
(1cm thick)
4 Patties
(500g)
Grill for 9 minutes
TURN OVER
Grill for 7 minutes
5 minutes 3 Well Done
Steaks (T-Bone,
Rib Eye, Sirloin)
800g
Grill for 12 minutes
TURN OVER
Grill for 14 minutes
10 minutes 2 Medium/
Well Done
PORK Boneless Pork Loin
Roast **
1kg
Micro 70% for 12-15 minutes
Grill for 5-7 minutes
TURN OVER
Micro 70% for 8-10 minutes
Grill for 3-5 minutes
10 minutes 1 Well Done
POULTRY Chicken Breast
(Half)
1kg
Grill for 15 minutes
TURN OVER
Grill for 20 minutes
10 minutes 2 Well Done
Whole Chicken 900g
Micro 100% for 1 minute
Grill Mix High for 12 minutes 20 seconds
TURN OVER
Grill Mix High for 12 ½ minutes
5 minutes 1 Well Done
Chicken Legs 500g
Grill Mix High for 5 minutes
Grill for 6 ½ minutes
TURN OVER
Grill Mix High for 5 minutes
Grill for 5 minutes
7 minutes 2 Cooked
Through
SAUSAGE
Regular 600g
Grill Mix High for 3 minutes
Grill for 8 ½ minutes
TURN OVER
Grill Mix High for 2 ½ minutes
Grill for 6 minutes 10 seconds
5 minutes 2 Cooked
Through
SEAFOOD
Fish Steak
(i.e. Salmon)
1kg
Grill for 15 minutes
TURN OVER
Grill for 10 minutes
5 minutes 2
Cooked Through,
Moist, Flakes
Easily
Large Prawns
(on skewers)
500g
Grill for 10 minutes
TURN OVER
Grill for 14 minutes
2 minutes 2 Opaque,
Moist
* No more than 1cm thick to ensure that the hamburgers will not burn on the grill
**
The cooking of only 1kg of pork is allowed. No larger pieces are accepted due to the dangers of smoke and oil splatter.
For cooking fatty meat like pork or lamb, don't use Grill Mix mode to prevent from smoke and oil splatter.

EN – 40
MANUAL COOKING CHART
Reheating and Defrosting Convenience Food Chart
Food Amount Oven setting and Cooking Time Procedure Standing
Time
BEVERAGE 1 Cup Microwave 100% for 2 minutes Microwave safe mug. Stir halfway
through and after heating
-
2 Cups Microwave 100% for 4 minutes
CANNED FOOD 1 Cup Microwave 100% for 2 minutes Place food in a small microwave
safe casserole dish. Cover with
plastic wrap. Stir before serving
2 minutes
2 Cups Microwave 100% for 3 ½ minutes
CANNED SOUP 1 Cup Microwave 100% for 2 minutes Place soup in a small microwave
safe bowl. Stir after heating.
-
2 Cups Microwave 100% for 3 ½ minutes
MEAT PIE 1 Pie Microwave 50% for 2 minutes then
Grill for 4 minutes
Place pie/s between 2 pieces of
paper towel for Microwave then on
the grill rack with the glass tray in
lower position (positon 2) for Grill
3 minutes
4 Pies Microwave 50% for 6 minutes then
Grill for 6 minutes
FROZEN PASTA
DINNER
300-500g Microwave 100% for 6 minutes
then Microwave 50% for 5 minutes
then Grill for 4 minutes
Remove from foil container and
place on a small heat resistant
glassware dish (eg. Pyrex) for
Microwave, then move the dish
onto the grill rack with the glass
tray in lower position (positon 2)
for Grill
3 minutes
CROISSANTS 1 Microwave 30% for 1 minute Place between 2 pieces of paper
towel
-
2 Microwave 30% for 1 ½ minutes
FRUIT PIE
(INDIVIDUAL)
1 Microwave 50% for 1 ½ minutes
then Grill for 4 minutes
Remove from foil container and
place on the oven floor (position
1) for Microwave then on the grill
rack with the glass tray in lower
position (positon 2) for Grill
-
2 Microwave 50% for 1 ½ minutes
then Grill for 4 minutes
DANISH PASTRY 400g Microwave 70% for 4 ½ minutes
then Grill for 5 minutes
Remove from foil container and
place on a microwave safe plate
for the Microwave function then on
the grill rack with the glass tray in
lower position (positon 2) for the
Grill position
3 minutes

EN – 41
MANUAL COOKING CHART
Microwave: Frozen Vegetable Chart
1. Place vegetables in a medium/large microwave safe bowl and cover with plastic wrap. Place on the oven
floor (position1).
2. Allow to stand for 2 minutes before draining any water and serving.
Food Amount Cooking Time (100%) Procedure
Beans (green, cut) 500 g 9 minutes
Broccoli 500 g 8-8½ minutes
Break apart as soon as possible.
Arrange with flower towards the centre.
Carrots (whole) 500 g 10 minutes Stir halfway through.
(sliced) 500 g 9 minutes
Cauliflower 500 g 9 minutes
Break apart as soon as possible.
Arrange with flower towards the centre.
Corn (on the Cob) 4 Pieces/500g 8 minutes
Peas (green) 500 g 9 minutes
Spinach 250 g 6 minutes
Break apart as soon as possible.
Mixed Vegetables (i.e. carrots,
beans and corn kernals)
500 g 10-11 minutes
Break apart as soon as possible.

EN – 42
MANUAL COOKING CHART
Microwave: Fresh Vegetable Chart
1. Cover each dish with plastic wrap. Place on the oven floor (position1).
2. Drain any remaining water after standing before serving.
Food Amount Cooking Time
(100%)
Procedure
Asparagus (halved) 500g 3 ½ minutes Place in a shallow microwave safe dish. Cover. Stand for 3
minutes
Beans
(top and tailed)
500g 5 minutes Place in a shallow casserole dish with 1 tablespoon of
water. Cover. Stand for 5 minutes
Broccoli
(uniform florets)
500g 5 minutes Place in a shallow casserole dish. Cover. Stand for 3
minutes
Brussels Sprouts 500g 8 minutes Place in a shallow casserole dish. Cover. Stand for 3
minutes
Cabbage (shredded) 500g 8 minutes Place in a shallow casserole dish with 2 tablespoons of
water. Cover. Stand for 3 minutes
Carrots
(sliced)
500g 5 minutes Place in a shallow microwave safe dish. Cover. Stand for 3
minutes (cook longer for less crunch)
Cauliflower
(uniform florets)
500g 6-7 minutes Place in a shallow casserole dish with 1 tablespoon of
water. Cover. Stand for 3 minutes
Corn on the Cob 2 pieces 8 minutes Place in a shallow casserole dish with ¼ cup of water.
Cover. Stand for 3 minutes
4 pieces 16 minutes Place in a shallow casserole dish with 1/3 cup of water.
Cover. Stand for 5 minutes
Mushrooms (whole) 500g 5 minutes Place in a shallow casserole dish with 2 tablespoons of
butter. Cover. Stand for 3 minutes
Peas
(green; top and tailed)
500g 5 minutes Place in a shallow casserole dish with 1 tablespoon of
water. Cover. Stand for 2 minutes
Potatoes –
Jacket (Baby Chat)
4 small 6 minutes Pierce with a fork. Stand for 3 minutes
Pumpkin
(2cm cubes)
500g 10 minutes Place in a shallow casserole dish. Cover. Stand for 2
minutes
Spinach (shredded) 500g 8 minutes Place in a shallow casserole dish with 2 tablespoons of
water. Cover. Stand for 3 minutes
Snow Peas
(top and tailed)
500g 4 minutes Place in a shallow casserole dish with 1 tablespoon of
water. Cover. Stand for 3 minutes (cook longer for less
crunch)
Squash (whole) 500g 5 minutes Pierce with a fork. Place in a shallow casserole dish.
Cover. Stand for 3 minutes
Sweet Potato
(2cm cubes)
500g 8 minutes Place in a shallow casserole dish with ½ cup of water.
Cover. Stand for 5 minutes
Zucchini
(sliced or quartered)
500g 4 minutes Place in a shallow casserole dish with 1 tablespoon
of water and 1 tablespoon of butter. Cover. Stand for 3
minutes

EN – 43
MANUAL COOKING CHART
Microwave: Defrost Times for Meat, Poultry, Seafood and Bread
1.
Remove wrapping and place frozen item on a shallow microwave safe defrosting dish with rack (a microwave
safe defrosting rack). Shield with aluminum foil to prevent the item from cooking while defrosting.
2. Defrost by following the steps in the “Microwave Time” column.
3. When turning over, re-shield the item so it continues to defrost without cooking.
Food Oven Setting and Cooking Time Procedure
Standing Time
BEEF Roast
(1kg)
Micro 30% for 6 minutes
Micro 10% for 8 ½ minutes
TURN OVER AND SHIELD
Micro 30% for 2 ½ minutes
Micro 10% for 8 minutes
Turn over at the end of second Microwave setting
(8 ½ minutes on 10%)
30 minutes
Steak
(500g)
Micro 30% for 2 ½ minutes
Micro10% for 1 minute 50 seconds
TURN OVER AND SHIELD
Micro 30% for 1 minute 50 seconds
Micro 10% for 2 minutes
Turn over at the end of second Microwave setting
(1 minute 50 seconds on 10%)
10 minutes
Mince
(500g)
Micro 50% for 3 ½ minutes
TURN OVER AND SHIELD
Micro 30% for 4 ½ minutes
Turn over after first Microwave setting (3 ½ minutes
on 50%). Remove defrosted meat and leave aside (add
on completion of defrosting)
10 minutes
LAMB Roast
(1kg)
Micro 30% for 6 minutes
Micro 10% for 8 ½ minutes
TURN OVER AND SHIELD
Micro 30% for 2 ½ minutes
Micro 10% for 8 minutes
Turn over at the end of second Microwave setting
(8 ½ minutes on 10%)
30 minutes
Shoulder
(1kg)
Micro 30% for 6 minutes
Micro 10% for 8 ½ minutes
TURN OVER AND SHIELD
Micro 30% for 2 ½ minutes
Micro 10% for 8 minutes
Turn over at the end of second Microwave setting
(8 ½ minutes on 10%)
30 minutes
Chops
(500g)
Micro 30% for 2 ½ minutes
Micro10% for 1 minute 50 seconds
TURN OVER AND SHIELD
Micro 30% for 1 minute 50 seconds
Micro 10% for 2 minutes
Turn over at the end of second Microwave setting
(1 minute 50 seconds on 10%)
10 minutes
POULTRY Chicken
– Whole
(1kg)
Micro 30% for 5 ½ minutes
Micro10% for 4 minutes
TURN OVER AND SHIELD
Micro 30% for 4 minutes
Micro 10% for 7 minutes 10 seconds
Turn over at the end of second Microwave setting
(4 minutes on 10%)
30 minutes
Chicken
Pieces
(500g)
Micro 30% for 3 minutes
Micro10% for 4 minutes
TURN OVER AND SHIELD
Micro 30% for 1 minute 10 seconds
Micro 10% for 4 minutes
Turn over at the end of second Microwave setting
(4 minutes on 10%)
15 minutes
SEAFOOD Scallops
(500g)
Micro 30% for 3 ½ minutes
TURN OVER AND SEPARATE
Micro 30% for 3 minutes
Turn over at the end of first Microwave setting (3
½ minutes on 30%). Separate scallops
5 minutes
Prawns
– Whole
(500g)
Micro 30% for 3 minutes
TURN OVER AND SEPARATE
Micro 30% for 3 minutes
Turn over at the end of first Microwave setting (3
minutes on 30%). Separate prawns
5 minutes
BREAD Slices 2
40 seconds on Micro 30%
(defrost rack not required) Place bread between 2 pieces
of paper towel. Place directly on oven floor (position 1).
-
4
50 seconds on Micro 30%
Rolls 1
40 seconds on Micro 30%
(defrost rack not required) Place bread between 2
pieces of paper towel – additional 30 seconds for every
other roll. Place directly on oven floor (position 1).
-
2
1 minute 10 seconds on Micro 30%

EN – 44
CRABS IN GREEN ONIONS
Ingredients
1 kg Crabs
1 Chili Pepper
2 slices Ginger
1 stalk Green Onion
1 tsp Sesame Oil
GARLIC PRAWN
Ingredients
300 g Prawns
(with shells)
Garnish
4 cloves Garlic (chopped)
1 stalk Green Onion (diced)
½ tsp Salt
2 tsp Oil
STEAMED WHOLE FISH
Ingredients
200 g Fish
Ginger slices
Green Onion slices
SHRIMP DUMPLINGS
Ingredients
600 g Shrimps
30 g Bamboo Shoot
150 g Wheat Flour
3 tbsp Tapioca Flour
Seasonings
1 tsp Salt
1 tsp Sugar
2 tbsp Cornstarch
1 tsp Sesame Oil
Pepper to taste
Procedure
1. Clean crabs thoroughly and cut into pieces, then arrange on a
platter.
2. Add in sliced chili pepper, sesame oil and ginger, sprinkle water on
crabs.
3. Place the platter on the steam tray on the glass tray. Place all on the
lower position (position 2) and cook using STEAM HIGH, and for 20
minutes.
Procedure
1. Mix all the garnishes well and reserve for later use.
2. Cut the prawns from the belly into halves and lay flat on a dish.
3. Put the garnish onto the prawns, place the dish on steam tray on the
glass tray. Place all on the lower position (position 2) and cook using
STEAM HIGH, and for 14-15 minutes.
Procedure
1. Wash the fish, remove its scales and make several slits on it.
2. Place the fish on a plate and sprinkle lightly with water, salt and oil.
Scatter ginger and green onion slices on top.
3. Place the dish on the steam tray on the glass tray. Place them on
the lower position (position 2) and cook using STEAM HIGH, and for
27-28 minutes.
Note: Exact cooking time will depend on the kinds and shape of fish.
Procedure
1. Preparation -
a) Shrimps - remove shells, marinate with salt (1 tsp), then rinse and
pat dry.
b) Bamboo shoots - cut into shreds and put it in a bowl, then
marinate with salt (½ tsp) and water (120 ml). Place it on the steam
tray on the glass tray. Place them in the lower position (position 2)
and cook using STEAM HIGH, and for 8-10 minutes. Drain well.
c) Dough - pour boiling water (250 ml) into wheat and tapioca flour and
blend well with a rolling pin. Then knead the dough into rod shape
on a flour board and cut dough to around 10g each. Flatten it with a
scraper into round shape.
2. Mix the treated shrimps and bamboo shoots and seasonings well.
Gradually add in extra cornstarch until it turns gluey.
3. Take a flattened round pastry and fold in 2 tsp of mixed ingredients
from (2).
4. Gather pastries at the end and pleat it with fingers to make a nice
dumplings.
5. Make 30 dumplings. Grease the two steam trays with oil and place
dumplings on two steam trays evenly. Brush dumplings with oil and
spray with water.
6. Place the one steam tray on the upper position (position 3). Place
the other steam tray with the glass tray on the lower position
(position 2) and cook using STEAM HIGH, and for 20 minutes.
RECIPES

EN – 45
STUFFED CLAMS
Ingredients
8 Clams (in shells)
40 g Ground Chicken
1 tsp Wine
1 tsp Soya Sauce
1 tbsp Green Onion (diced)
½ Egg (beaten)
1½ tbsp Cornflour
¼ tsp Ginger Juice
¼ tsp Sugar
½ tsp Salt
BEEF DUMPLINGS
Ingredients
330 g Minced Beef
60 g Fat
4 Water Chestnut
2 Lemon Leaves
1 stalk Chinese
Parsley
Seasonings
½ tsp Baking Powder
2 tbsp Tapioca Flour
¼ tsp Lime Water
1 tsp Salt
1 tsp Sugar
½ tsp Sesame Oil
2 tbsp Oil
¼ cup Water
Pepper to taste
CHICKEN PIECES WITH MUSHROOMS
Ingredients
280 g Chicken pieces
40 g Dried Mushrooms
(soaked, drain well)
Ginger slices
Green Onion slices
Seasonings
½ tsp Salt
½ tsp Sugar
1 tsp Light Soy Sauce
½ tsp Cornstarch
½ tsp Sesame Oil
Procedure
1. Soak clams in salt water to remove sand. Clean clams thoroughly by
rubbing shells against each other.
2. Place clams on the steam tray on the glass tray. Put them in the
lower position (position 2). Cook using STEAM HIGH, and for 10
minutes or until clams open.
3. Mix other ingredients together and divide into 8 portions.
4. Stuff one portion into each empty half-shell.
5. Arrange all 16 half-shells on a platter. Place the platter with the the
steam tray on the glass tray on the lower position (position 2). Refill
the water tank to MAX mark and cook using STEAM HIGH, and for
14-16 minutes. Serve hot.
Procedure
1. Preparation -
a) Water chestnut - cut into very small dices.
b) Lemon leaves - remove veins and chop into fine shreds.
c) Chinese parsley - chop into fine shreds.
2. Marinate all ingredients with seasonings for 30 minutes, then knead
well until firm.
3. Take out around 1½ tbsp of the mixed ingredients from (2) and make
into balls.
4. Put beef balls onto a greased plate (27 cm in diameter).
Brush dumplings with oil and spray with water.
5. Place the plate on the steam tray on the glass tray. Place them on
the lower position (position 2), and cook using STEAM HIGH, and
for 25 to 28 minutes.
Procedure
1. Marinate the chicken pieces and soaked mushrooms with
seasonings for 30 minutes. Then mix together with ginger and green
onion slices and put on a plate.
2. Place it on the steam tray on the glass tray. Place them on the
lower position (position 2) and cook using STEAM HIGH, and for 25
minutes.
RECIPES

EN – 46
MIXED INGREDIENTS DUMPLINGS
Ingredients
40 g Shrimps
150 g Minced Pork
60 g Barbecued Pork
2 Mushrooms (soaked)
40 g Carrot (shredded)
4 Water Chestnuts
1 stalk Chinese
Parsley (shredded)
1¼ cup Wheat Flour
1 cup Tapioca Flour
Seasonings
½ tsp Salt
½ tsp Sugar
1 tsp Cornstarch
Pepper to taste
Wine to taste
few Sesame Oil
SHAO MAI
Ingredients
350 g Minced Chicken
200 g Shrimps
28 to 32 pcs Wanton Wrap
Seasonings
1 tsp Salt
½ tsp Sugar
2 tbsp Cornstarch
1 tsp Sesame Oil
¼ tsp Chicken Powder
Pepper to taste
THAI SPICY MINCED CHICKEN (LARB MOO)
Ingredients
300 g Minced Chicken
3 to 4 pcs Peppermint Leaves
(A)
2 tbsp Crispy Roasted Rice (ground)
3 tbsp Lime Juice
2 tbsp Fish Sauce
1 tbsp Dried Chili (crushed)
½ tsp Chili Powder
(B)
2 tbsp Shallot (chopped)
few Spring Onion (thinly sliced)
Procedure
1. Preparation -
a) Shrimps - remove shells, marinate with salt (1 tsp), then rinse
and pat dry.
b) Cut barbecued pork, mushrooms and water chestnuts into
smaller dices.
c) Dough - pour boiling water (250 to 300 ml) into wheat and tapioca
flour and blend well with a rolling pin. Then knead the dough into
rod shape on a flour board and cut dough to around 15g each.
Flatten it with a scraper into round shape.
2. Mix all the prepared ingredients with seasonings.
3. Take a flattened round pastry and fold in 1 tbsp of mixed ingredients.
Do not pleat both ends, but allow steam to escape.
4. Make 20 dumplings. Grease the two steam trays with oil and place
dumplings on two steam trays evenly. Brush dumplings with oil and
spray with water.
5. Place the one steam tray on the upper position (position 3). Place
the other steam tray with the glass tray on the lower position
(position 2) and cook using STEAM HIGH, and for 20 minutes.
Procedure
1. Remove shells from shrimps and marinate with salt (½ tsp), then
rinse and pat dry.
2. Mix treated shrimps, minced chicken with seasonings well.
Gradually add in extra cornstarch until it turns gluey.
3. Take out 2 tsp of mixed ingredients and fold into a wanton wrap.
4. Make 30 dumplings. Grease the two steam trays with oil. Place
dumplings on two steam trays evenly.
Brush dumplings with oil and spray with water.
5. Place the one steam tray on the upper position (position 3). Place
the other steam tray with the glass tray on the lower position
(position 2) and cook using STEAM HIGH, and for 20 minutes.
Procedure
1. Put the minced chicken in the casserole. Place the casserole with
the steam tray on the glass tray on the lower position (position 2),
and cook using STEAM HIGH, and for 20 minutes, then stir well.
2. Drain and add in (A), mix well together. Refill the water tank to MAX
mark and cook again using STEAM HIGH, and for 15-20 minutes.
Then add in (B) and stir well again.
3. Put the mixture on a serving plate and put the peppermint leaves on
top.
4. Serve with fresh vegetables (cabbage or string beans).
RECIPES

EN – 47
RECIPES
CHAWANMUSHI
Ingredients
7 g Mushrooms
(soaked, cut into halves)
60 g Prawns
(remove shells and veins)
20 g Fish Cake (cut at an angle)
80 g Chicken Breast (cut into cubes)
400 ml Cold Dashi Soup
4 Eggs
½ tbsp Light Soya Sauce
½ tsp Salt
2 tsp Mirin
1 stalk Chinese Parsley
DAIKON CAKE
Ingredients
175 g Daikon
175 g Rice Flour
3 Black Mushrooms
1 Chinese Sausages
14 g Dried Shrimps
350 g Hot Water
few Coriander
few Salt / few Oil
Seasonings
2
/3 tsp Salt
2 tbsp Oil
pinch of Pepper
MIXED BERRY CUSTARD
Ingredients
150 g frozen mixed berries, thawed and
pushed through a sieve to form a puree
1 cup full cream milk
1 cup condensed milk
4 eggs, lightly whisked
2 egg yolks
1
/3 cup caster sugar
2 tsp icing sugar, to garnish
100 g frozen mixed berries, thawed to garnish
Procedure
1. Blend dashi soup, light soya sauce, salt, mirin and eggs; beat lightly.
2. Arrange chicken cubes, fish cake, mushrooms and prawns into 4
serving bowls. (4 ½ inches in diameter)
3. Strain beaten mixture from (1) into prepared ingredients in (2).
4. Use a teaspoon to scoop out excess bubbles from the surface of
mixture.
5. Place the 4 bowls on the steam tray on the glass tray. Place it on the
lower position (position 2) and cook using STEAM HIGH, and for 20
minutes.
6. Let it stand for 5 minutes. Garnish with parsley and serve.
Procedure
1. Scrape the daikon into shreds and mix with seasonings in a bowl.
2. Place the bowl on the the steam tray on the glass tray. Place it on
the lower position (position 2) and cook using STEAM HIGH, and for
15-20 minutes.
3. Cut the chinese sausages into dices. Soak the dried shrimps and
black mushrooms until soften, then cut into smaller pieces.
4. Dilute the rice flour with hot water, then stir in oil (1 tbsp), salt (2 tsp)
and all prepared ingredients from above. Mix thoroughly.
5. Put the mixture into an oil-brushed 20cm(8") square tin. Place the tin
on the steam tray on the glass tray on the lower position (position 2)
and cook using STEAM HIGH, and for 35 minutes.
6. After cooking garnish with coriander on top and let stand with cover
before serve.
Note: If the centre is not well cooked, refill the water tank to MAX mark
and extend cooking for another 5-10 minutes.
Procedure
1. In a large microwave safe bowl, combine both the full
cream and condensed milk. Place in MICROWAVE 70%
for 6 minutes until milk is at a simmer.
2. In another large bowl, add eggs, egg yolks, sugar and
mixed berry puree. Add the heated milk mixture. Using a
balloon whisk, mix until well combined.
3. Divide the mixture evenly between 4 ramekins dishes
(10cm diameter). Place dishes on the steam tray. Place
the steam tray on the upper position (position 3). Place
the steam tray on the lower position (position 2) on
the glass tray. Cook using STEAM LOW, 90°C, for 35
minutes.
4. Once cooking is completed and the custard is set, stand
for 10 minutes.
5. Serve with thawed whole berries and dust with icing
sugar.

EN – 48
RECIPES
MARINATED SNAPPER
Ingredients
2 tbsp soy sauce
2 cloves garlic, crushed
1 tbsp sesame oil
1 tsp grated fresh ginger
1 ttbsp chopped fresh coriander
2 bird’s eye chillies, seeds removed,
finely chopped
500 g whole snapper, cleaned
GRILLED CHICKEN PIECES
Ingredients
1 kg chicken pieces (200 g/1 piece)
3 tbsp (corn) oil
Seasonings
3 tbsp light soy sauce
3 tbsp water
2 tbsp hoisin sauce
Salt, sugar, chopped garlic to taste
LEEK, BACON AND CHEESE QUICHE
Ingredients
80 g bacon, diced
120 g leek, washed and thinly sliced
½ cup cheddar cheese, grated
4 eggs
1
/3 cup full cream milk
1
/3 pure cream
1 tbs plain flour
Salt and pepper to season
¼ cup bread crumbs
20 g butter
Procedure
1. In a small bowl, combine soy sauce, garlic, sesame oil,
ginger, coriander and chillies. Mix until well combined.
2. Place snapper in a large shallow casserole dish and add
the marinade. Cover and refrigerate for 1-2 hours.
3. Place fish on the steam tray. If snapper is larger than the
steaming tray, remove tail.
4. Place the steam tray on the upper position (position 3).
Place glass tray on the lower position (position 2). Cook
using STEAM LOW, 90°C for 35minutes.
Procedure
1. Marinate ribs for 20 minutes with seasonings.
2. Place on the rack on the glass tray and brush with oil.
Place it on the lower position (position 2).
3. Let it cook :
4. Garnish with pickles and pineapple.
Procedure
1. In a large bowl, whisk together the eggs, milk and cream.
Add the cheese and mix together.
2. Add the bacon and leek and season with the salt and
pepper.
3. Melt the butter in a microwave safe bowl. Place it on the
oven floor (positon 1) and cook with MICROWAVE 100%
for 20 seconds.
4. Grease 4 ramekin dishes (10cm diameter) with melted
butter and coat with the breadcrumbs.
5. Evenly divide the mixture in the 4 ramekins.
6. Place the steam tray on the upper position (position 3).
Place glass tray on the lower position (position 2). Cook
using STEAM LOW, 90°C for 35 minutes.
Mode Cooking time Procedure
1st Grill Mix High 7'-9'
2nd Grill 7'-9' Turn over.
3rd Grill Mix High 7'-9'
4th Grill 4'-6'
CHINESE ROAST CHICKEN
Ingredients
0.9 kg chicken, whole
Seasonings
5 tbsp barbecue sauce
1 tsp salt
3 tbsp sugar
1 tbsp light soy sauce
1 tbsp dark soy sauce
2 tbsp corn oil
Glazing
2 tbsp honey
Procedure
1. Wash chicken clean and pat dry. Bind with thread.
2. Marinate with seasonings for 2 to 3 hours.
3. Place the chicken on the rack on the glass tray. Place it
on the oven floor (position 1).
4. Let it cook :
5. Brush with honey 2 or 3 minutes before finish.
6. After grill let stand for 10 minutes, then cut into slices and
serve.
Mode Cooking time Procedure
1st Micro 100% 1'
2nd Grill Mix High 12'-13' Turn over.
3rd Grill Mix High 9'-11'

EN – 49
CRISPY STUFFED MUSHROOMS
Ingredients
12 Black mushrooms
75g butter
2 cloves garlic, crushed
75 g fresh breadcrumbs
50 g cheese, grated
Procedure
1. Soak the mushrooms until soften, then remove and chop
mushroom stalks.
2.
Put butter with garlic in a bowl and place it on the oven floor
(position 1). Heat it on MICROWAVE 100% for 30 seconds,
stir in chopped mushroom stalks and breadcrumbs. Fill
mushrooms with mixture, sprinkle with cheese.
3. Place the mushrooms on the rack on the glass tray. Put it
on the upper position (position 3), and cook using GRILL
MIX LOW, and for 10 minutes.
RECIPES
LAMB CHOPS WITH ONION SAUCE
Ingredients
650 g (4-6 pcs) lamb chops
½ onion, sliced
1 tomato, sliced
1 tbsp oil
Black pepper, Honey to taste
Seasonings
1 tbsp light soy sauce
1 tsp dark soy sauce
2 tsp sugar
1 tsp wine
1 tsp oil
Salt and pepper to taste
Gravy
1 tbsp oyster sauce
1 tsp sugar
1 grated garlic
1 tsp oil
70 ml water
Salt to taste
2 tsp cornflour blended with 1 tbsp water
CHICKEN AND PRAWN KEBABS
Ingredients
6 bamboo sticks
300 g chicken fillet, cut into 24 square pcs.
100 g onion, cut into 12 square pcs.
80 g green pepper, cut into 12 square pcs.
80 g tomato, cut into 12 square pcs.
70 g prawns, shelled and deveined,
then cut into 3 pcs.
Seasonings
2 tbsp corn oil
1½ tsp salt
½ tsp pepper
1 tsp paprika
½ tsp garlic powder
Glazing
3 tbsp melted butter
1 tbsp lemon juice
Procedure
1. Mix all seasonings well.
2. Marinate lamb chops with seasonings for 30 minutes.
3. Place lamb on the rack on the glass tray and sprinkle
black pepper on them. Put it the lower position (position
2). Let it cook :
4. Combine onion and oil in a bowl and put it on the oven
floor (position 1). Cover, MICROWAVE 100% for 1'30" to
2'30".
5. Add gravy, except blended cornflour; MICROWAVE 100%
for 1 minute; remove, stir and continue to cook for another
1 minute. And blended cornflour.
6. Add tomato; cover and MICROWAVE 100% for 1 minutes.
Stir until cornflour is thick.
7. Top lamb with prepared gravy and garnish with spring
onion.
Procedure
1. Marinate prepared ingredients with blended seasonings
for more than 30 minutes.
2. Skewer a variety of ingredients onto bamboo sticks
alternately with chicken, tomato, prawn, onion, and green
pepper, then glaze with melted butter and lemon juice.
3. Place kebabs on the rack on the glass tray. Place in lower
position (position 2).
4. Let it cook :
Mode Cooking time Procedure
1st Grill Mix Low 4'-6'
2nd Grill 7'-9' Turn over.
3rd Grill Mix Low 4'-6'
4th Grill 5'-7'
Mode Cooking time Procedure
1st Grill Mix Low 4'-6'
2nd Grill 6'-8' Turn over.
3rd Grill Mix Low 2'-4'
4th Grill 8'-10'

EN – 50
FISH KEBABS
Ingredients
4 wooden skewers
450 g firm fleshed fish skinned and
cut into 8 cubes
2 courgettes, cut into 8 chunks
4 medium mushrooms, stalks removed
4 slices of orange
2 medium tomatoes, halved
1 tsp fresh dill, chopped
50 g butter
CHICKEN SATAY
Ingredients
4 wooden skewers
450 g chicken fillets, cubed
Seasonings
1 tbsp groundnut oil
1 tbsp lemon juice
2 tbsp satay sauce
1 clove garlic, crushed
Tabasco sauce to taste
VEGETABLE LOAF
Ingredients
(A)
175 g fresh breadcrumbs
1 large carrot, grated
2 small courgettes, sliced
1 large potato, grated
3 sticks of celery, sliced
4 rashers
bacon, chopped
125 g Cheddar cheese, grated
2 eggs, beaten
Salt and pepper to taste
(B)
75 g Cheddar cheese, grated to sprinkle
1 tbsp fresh parsley, chopped
Procedure
1. Arrange all ingredients onto each skewer in a regular
sequence. Leave no wood exposed, place the kebabs on
the rack on the glass tray.
2. Heat the dill and butter in a small bowl, place on the oven
floor (position 1) and cook with MICROWAVE 100% for
30 seconds. Brush it on the kebabs.
3. Place them on the lower position (position2).
4. Let it cook :
Note:
To remove food easily from wooden skewers, soak the
skewers in water for 30 minutes prior to using them.
Procedure
1. Place all the seasonings in a large bowl, mix well. Stir in
the chicken, refrigerate for 2 hours to marinate.
2. Thread the chicken onto skewers leaving no wood
exposed.
Place skewers on the rack on the glass tray.
3. Place them on the lower position (position2).
4. Let it cook :
Note: To remove food easily from wooden skewers, soak
the skewers in water for 30 minutes prior to using
them.
Procedure
1. Combine (A), mix well.
2. Pour mixture into a greased 1.5 litre loaf dish, cover with
(B).
3. Place it on the glass tray in the lower position (position
2).
4. Let it cook :
RECIPES
Mode Cooking time Procedure
1st Grill Mix High 4'-5'
2nd Grill 12'-14' Turn over.
3rd Grill Mix High 2'-4'
4th Grill 8'-10'
Mode Cooking time Procedure
1st Grill Mix High 7'-9' Turn over.
2nd Grill Mix High 9'-11'
Mode Cooking time Procedure
1st Micro 70% 15'
2nd Grill Mix High 25'

重要安全须知
重要安全须知:请细心阅读,并储存作将来参考之用。
警告:
警告:
警告:
警告:
警告:
警告:
其他警告

重要安全须知

安装事宜
焗
重 点
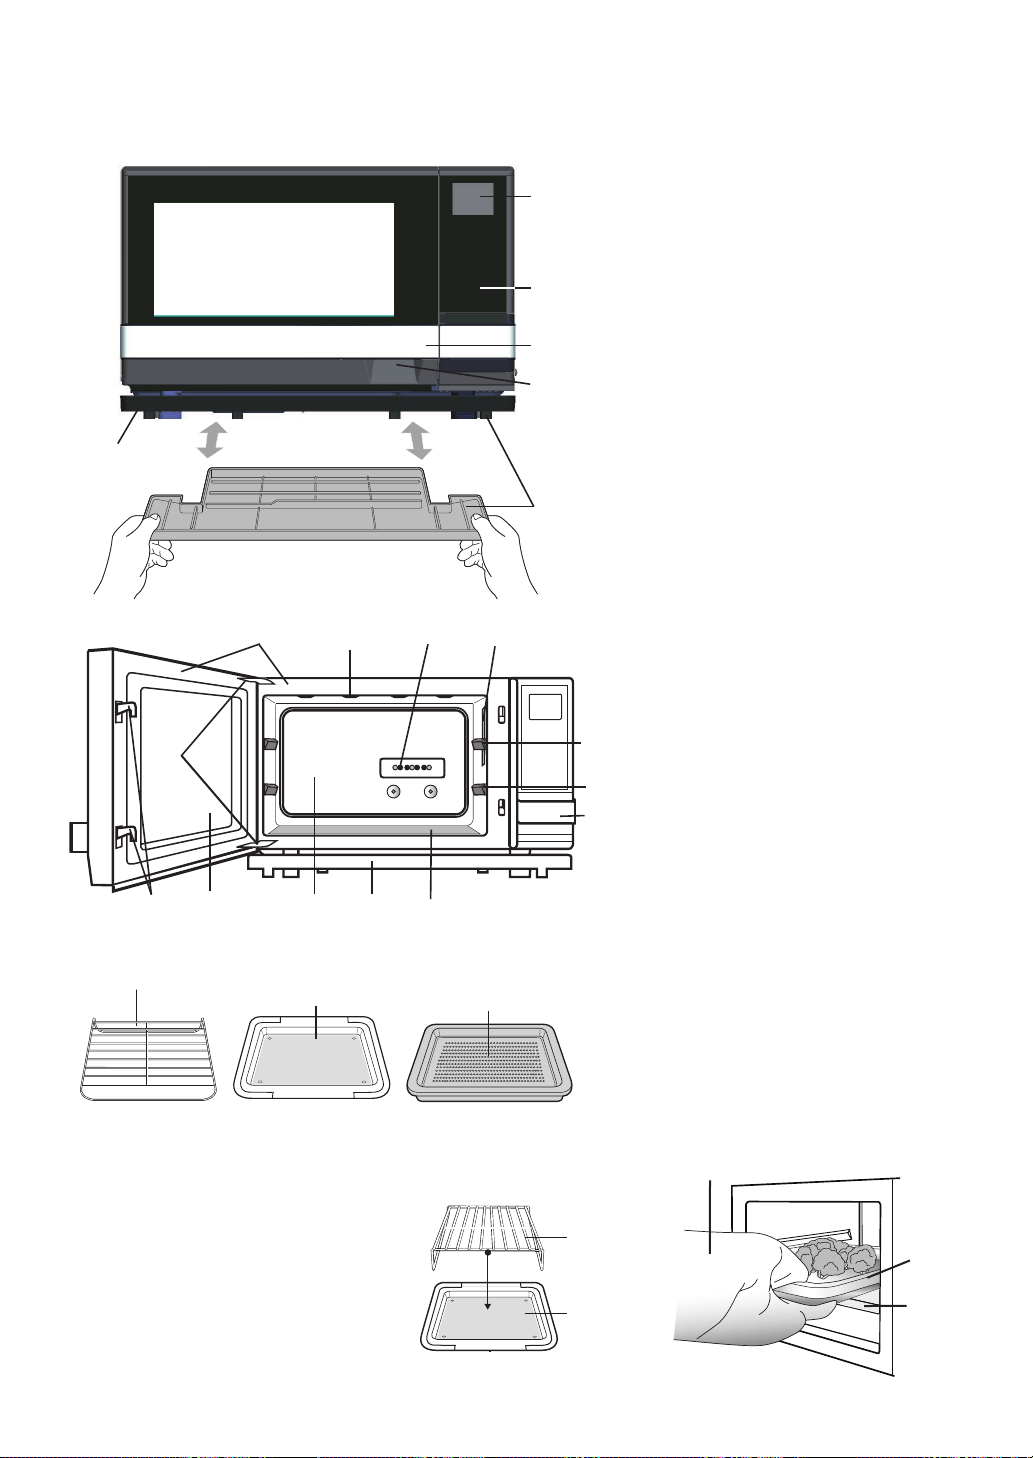
各部位名称
注意:
警告:
由于烹调结束后炉腔、炉门、外壳、附
件和盘碟将会变得非常热,所以务必 戴
上烤箱专用干及厚手套,将食物或附件
从烤箱中取出,以免灼伤。
1
2
3
4
5
6
7
8
9
10
11
12
13
14
15
16
17
18
附件
19
请勿使用微波
功能。
20
21
请勿用于微波模式、烧烤模式及混合
烹调模式。
关于放置蒸盘和玻璃盘的警告:
19
21
20
14
3
1
4
2
6
8
9
10 1116
13 517
7
12
15 14
18
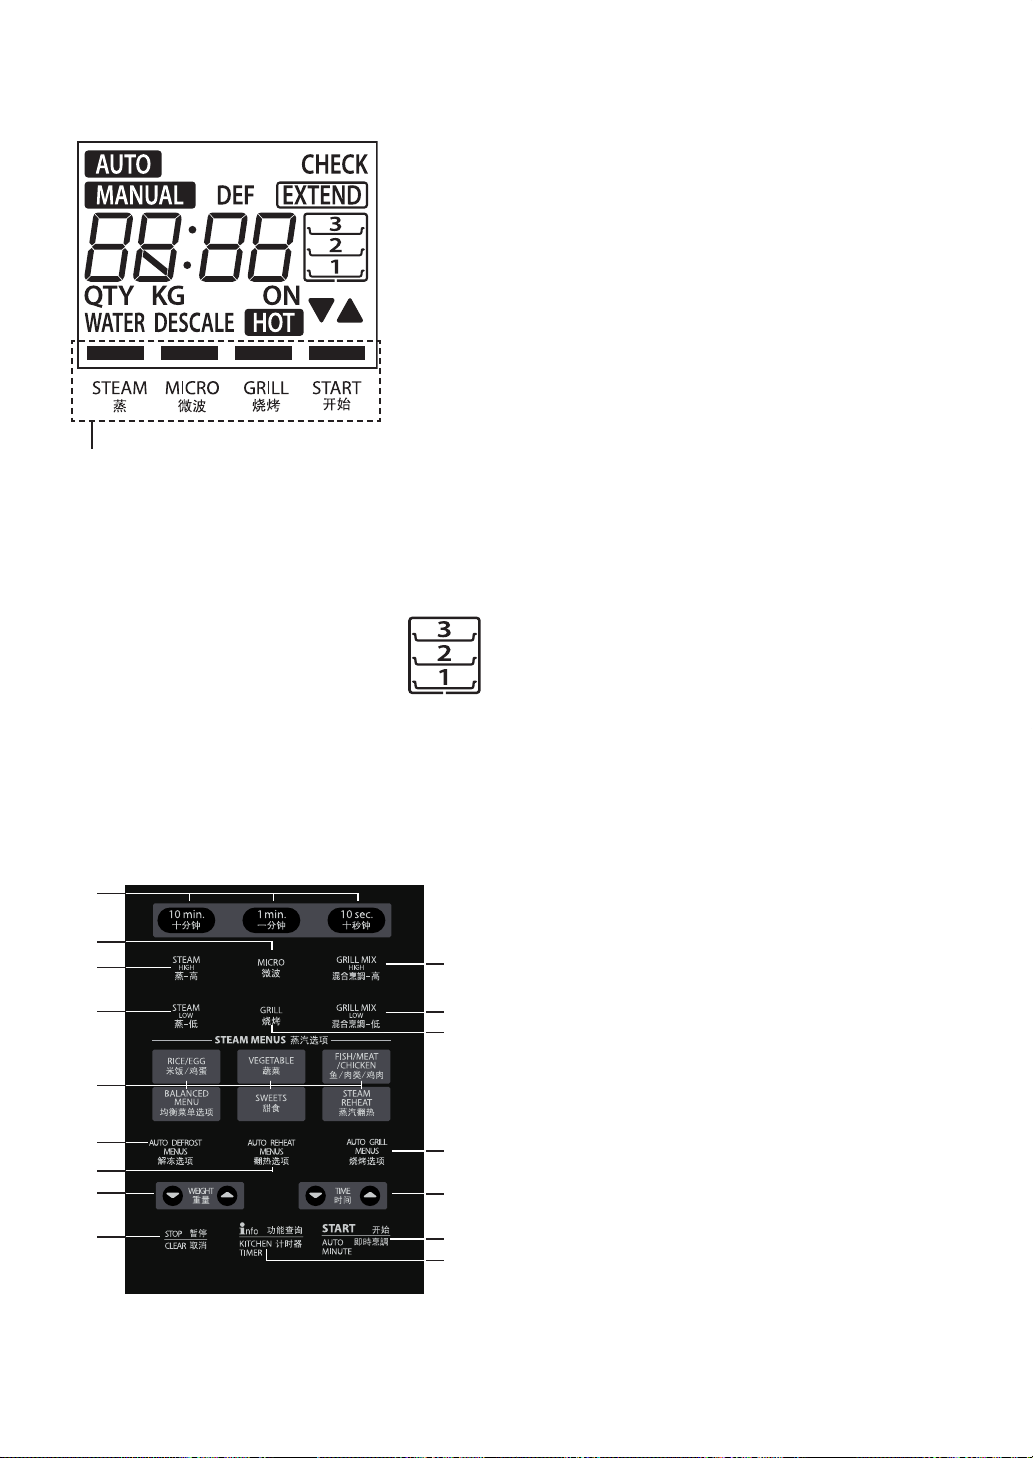
控制板操作
操作键:
1 时钟
2 微波*
3 蒸-高
4 蒸-低
5 混合烹调-高*
6 混合烹调-低*
7 烧烤*
8 蒸汽选项
9 解冻选项*
10 翻热选项*
11 烧烤选项*
12 增加/减轻重量
13 暂停/取消
14 缩短/延长
15 开始/即时烹调
16 功能查阅/计时器
1
2
3
4
5
6
7
15
14
11
显示资讯:
1.
8
9
10
12
13
16
1
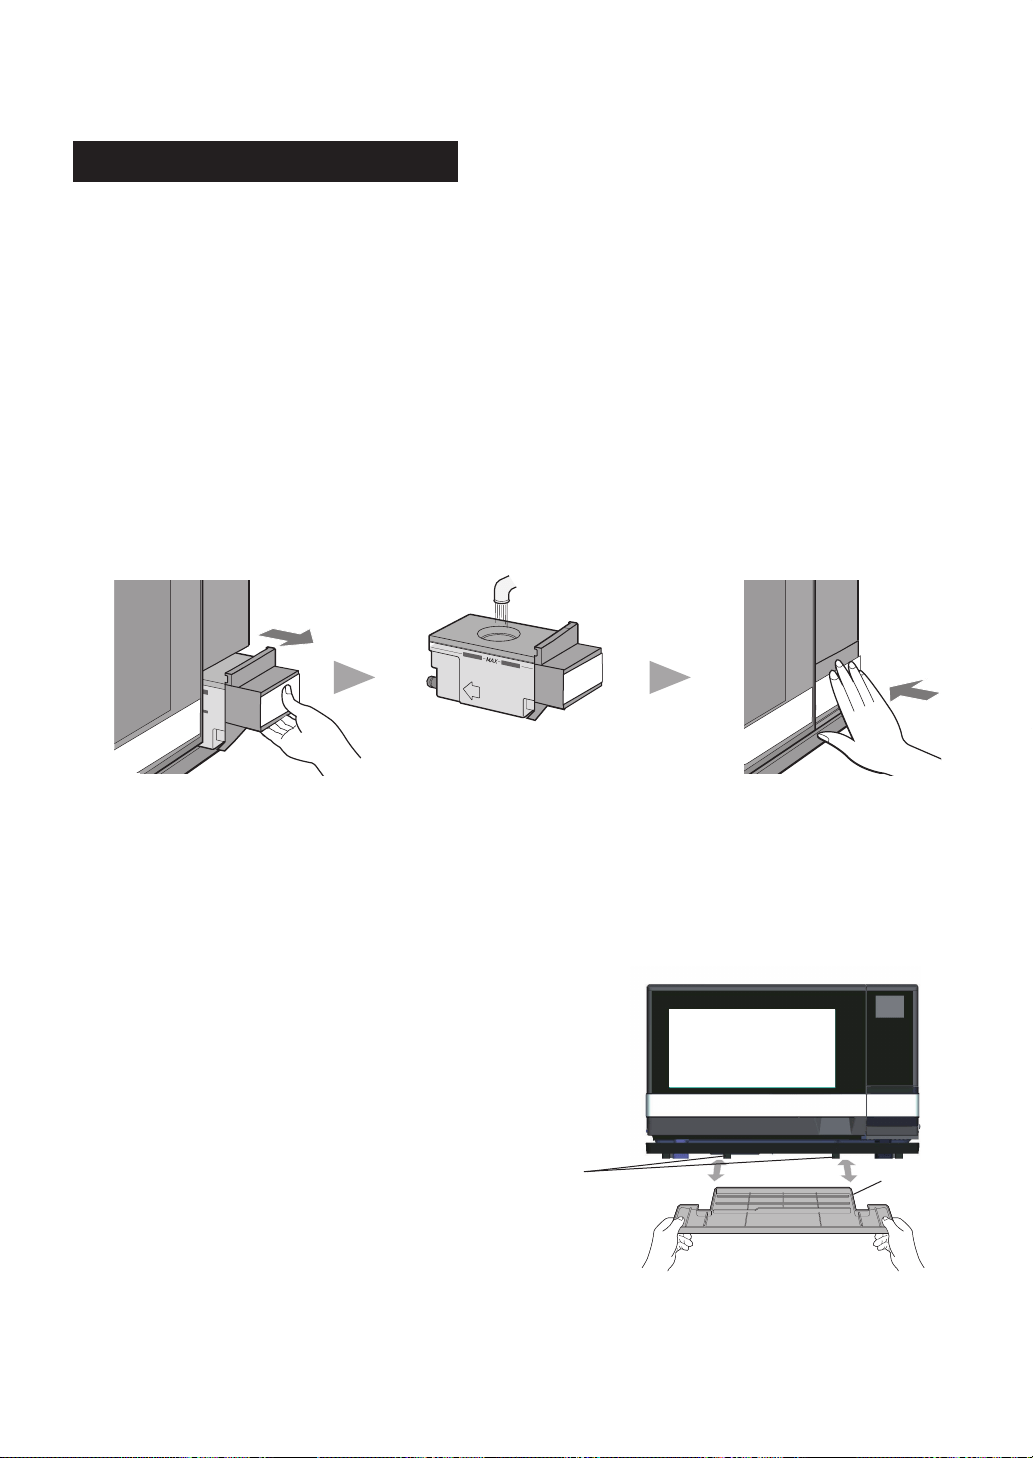
重要须知
水箱
对于所有的自动和手动烹调操作,都必须以
饮用的室温
水(被过滤)
注入水箱。请务必遵循如下指引。
饮用
的室温水(被过滤)
,直至刻度线MAX (满水) 的位置。
注意:
警告:
请在使用蒸烹调前仔细阅读
滴水托盘
请确保滴水托盘放置到位并遵循如下指引。
移除滴水托盘:
将滴水托盘放回烤炉:
每次烹调后请倒空滴水托盘。

烹调前
烹调后
警告:
注意:
自动烹调和手动烹调模式中的蒸汽
重要须知

操 作
1
开始/即时烹调
2
功能查阅/计时器
3
注意:
操 作
1
3
开始/即时烹调
4
开始/即时烹调
5
6
注意:
重要须知
除垢功能
去除主机水分功能
功能查阅/计时器
2

操作之前
首次使用之前请清洁烤炉
•
•
操 作
1
2
3
注:
暂停/取消
注意:
暂停/取消
准备工作
操 作
1
烧烤
时钟
开始/即时烹调
2
警告:
烹调开始前之须知
暂停/取消

自动烹调
蒸汽选项
重量
2
开始/即时烹调
3
4
时钟
开始/即时烹调
暂停/取消
操 作
1
鱼/肉类/鸡肉
关于放置蒸盘和玻璃盘的警告:
注意:
警告:

自动烹调
操 作
1
翻热选项
重量
2
注意:
开始/即时烹调
3
自动翻热选项
操 作
1
重量
2
烧烤选项
开始/即时烹调
3
自动烧烤选项
开始/即时烹调
4
注意:
警告:

自动烹调
操 作
1
解冻选项
重量
2
注意:
开始/即时烹调
3
自动解冻选项
开始/即时烹调
4
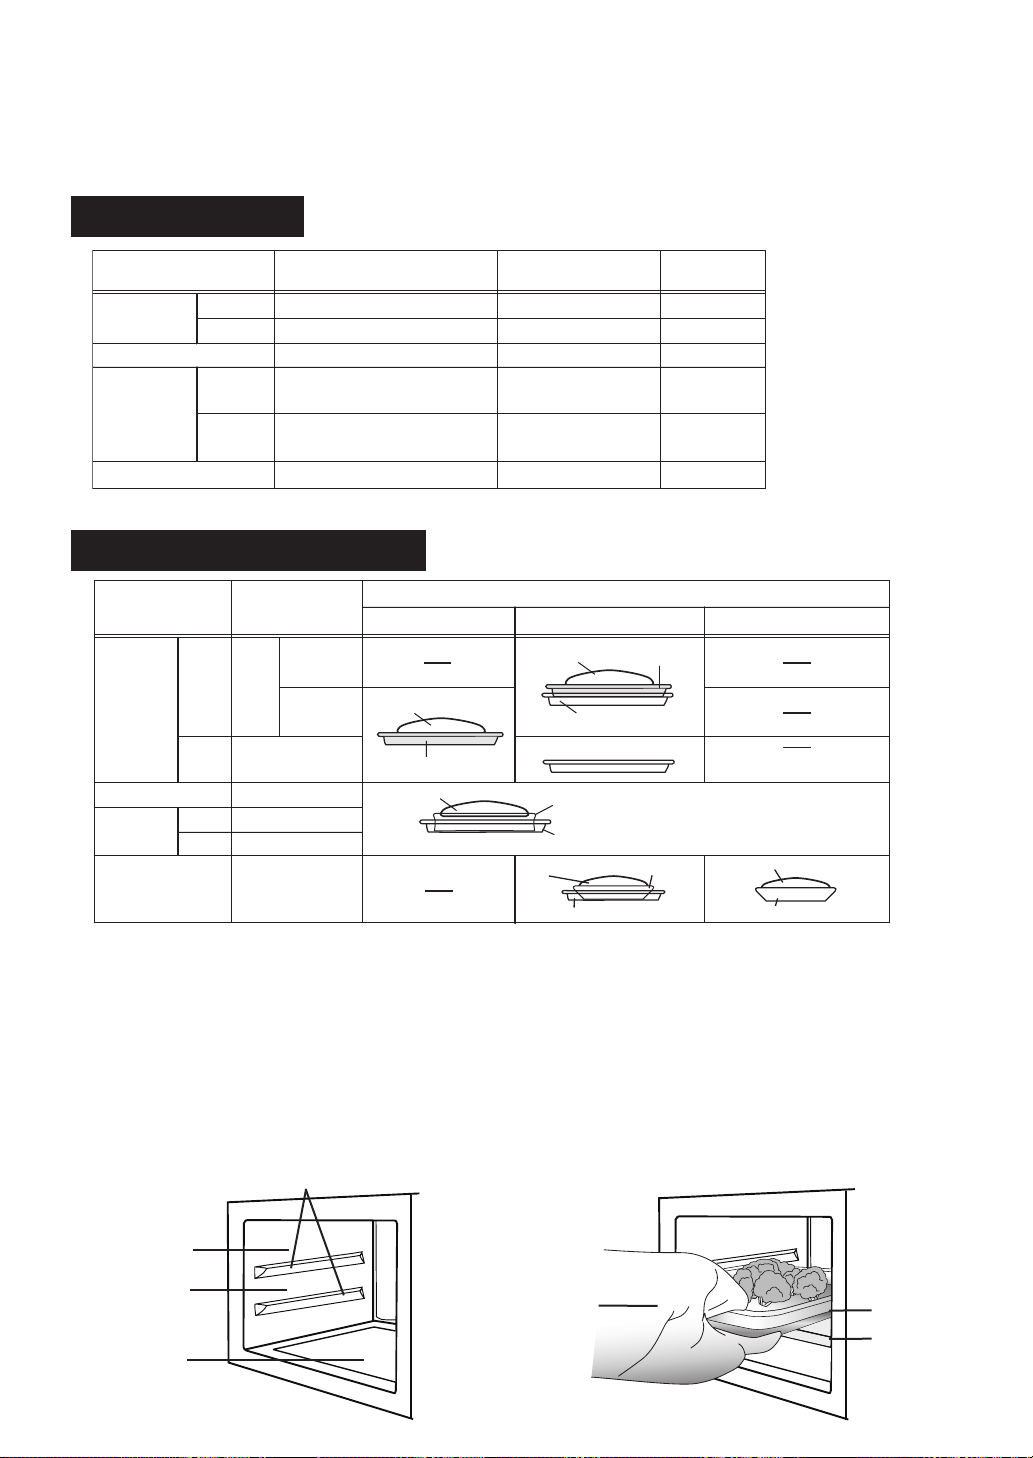
手动烹调
手动烹调指南表
高
低
高
低
100℃
70 - 95℃ *
-
烧烤: 50%功率
微波: 50%
功率
烧烤: 90%功率
微波: 10%功率
0 - 100%功率
0 - 35分钟
0 - 60分钟
0 - 99分钟 50秒钟
0 - 99分钟 50秒钟
0 - 99分钟 50秒钟
0 - 99分钟 50秒钟
温度/功率范围烹调模式
是
是
否
否
否
否
水箱时间范围
混合烹调
蒸
微波
烧烤
食物和器具摆放位置图表
高
低
高
低
单层
双层
蒸
混合烹调
微波
烧烤
双层烹调烹调模式
蒸盘
蒸盘
否
否
否
否
否
3: 上层2: 下层1: 烤炉底层
食物和器具摆放位置(参见图1)
是
食物
食物
食物
玻璃盘
玻璃盘
玻璃盘(没有食物)
烤架或盘子
参见注意1。
微波炉安全容器
食物
玻璃盘
参见注意2。
食物
微波炉安全容器
关于放置蒸盘和玻璃盘的警告:
注意:
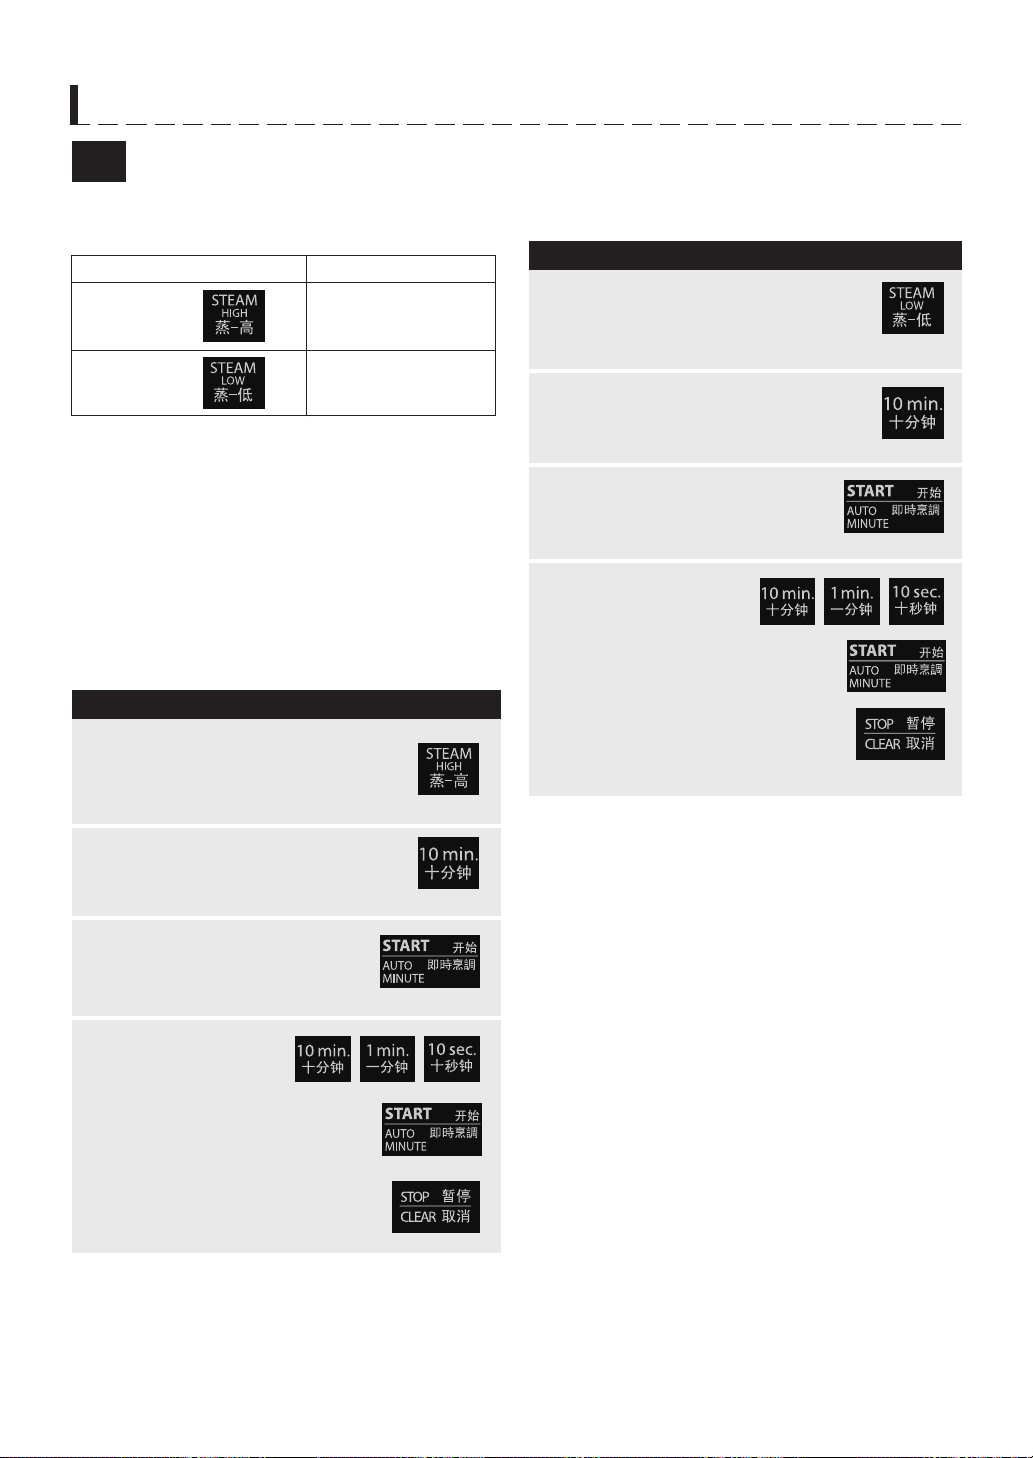
手动烹调
操 作
1
蒸-低
时钟
2
开始/即时烹调
3
4
时钟
开始/即时烹调
暂停/取消
蒸
警告:
注意:
暂停/取消
温度
烹调模式
蒸-低
操 作
1
蒸-高
时钟
2
开始/即时烹调
3
4
时钟
开始/即时烹调
暂停/取消
蒸-高
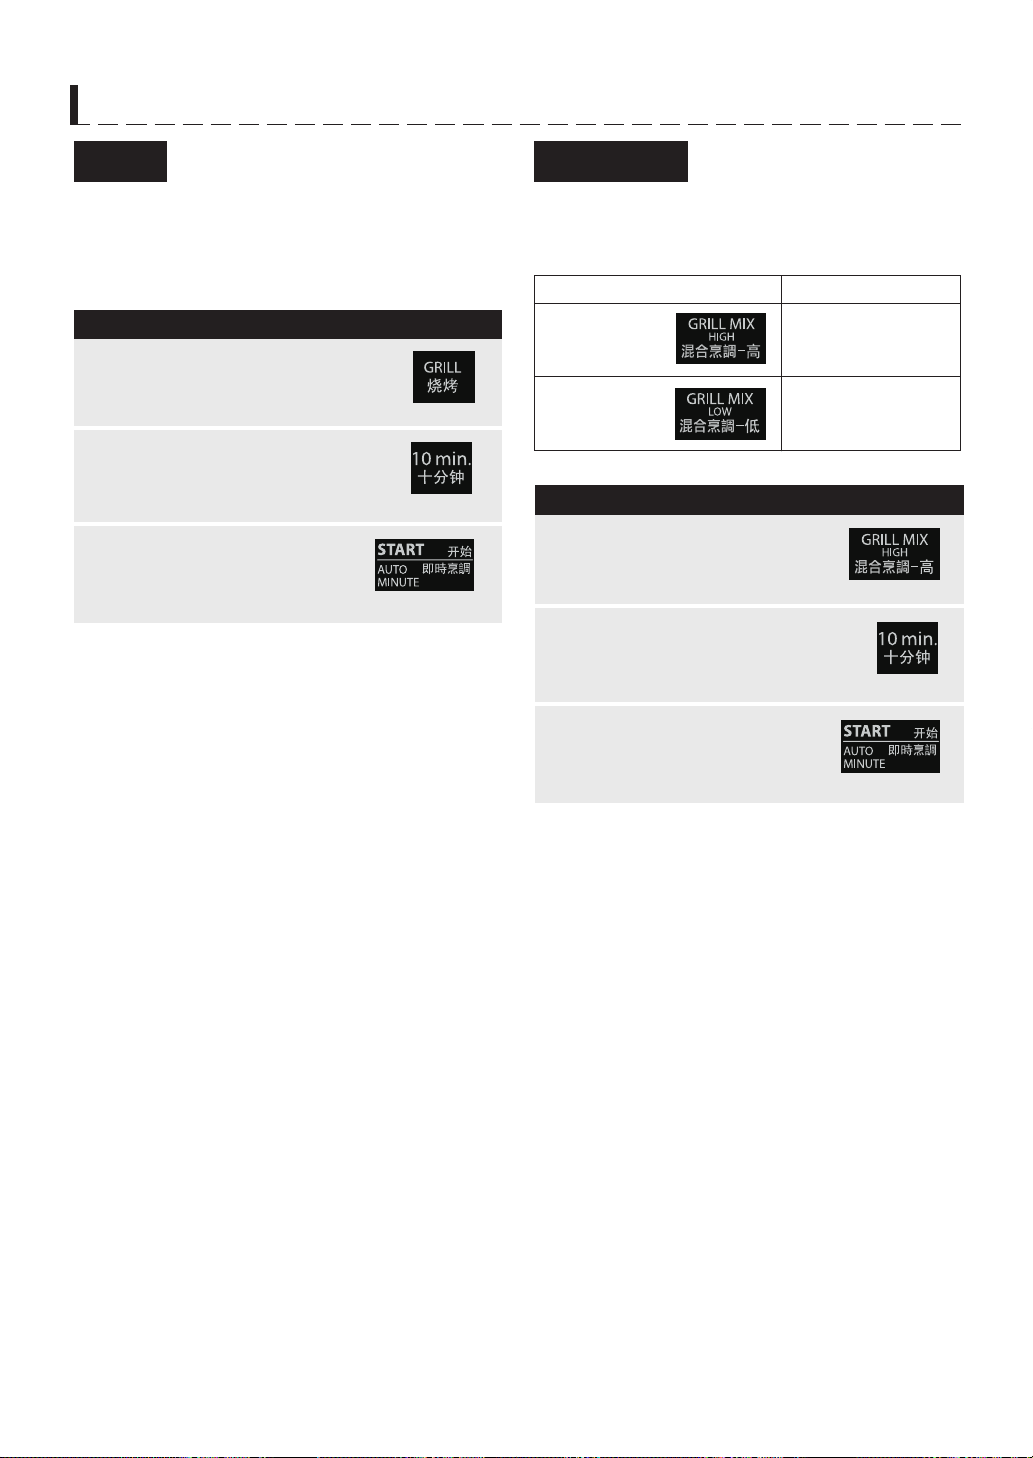
手动烹调
烧烤
警告:
注意:
操 作
烧烤
2
开始/即时烹调
3
1
时钟
操 作
开始/即时烹调
3
2
时钟
混合烹调-高
1
警告:
注意:
混合烹调
烹调模式
烹调方法

手动烹调
操 作
1
开始/即时烹调
2
时钟
微波
2
开始/即时烹调
3
微波
微波
操 作
1
时钟
注意:
提示:
微波强度举例
屏幕

其它简便功能指南
延长或缩短时间调整
(缩短 (
▲
) / 延长 (
▲
) 键)
a) 自动烹调时使用:
延长
延长
开始/即时烹调
缩短
缩短
开始/即时烹调
b) 手动烹调时使用:
缩短
延长
注意:
时钟
开始/即时烹调
注意:
暂停/
取消
暂停/取消
烹调结束后延长烹调时间
操 作
1
烧烤
时钟
2
微波
时
钟
混合烹
调-高
时钟
3
开始/即时烹调
4
多顺序烹调
注意:
警告:

其它简便功能指南
•
操 作
时钟
1
功能查阅/计时器
2
厨房计时器
即时烹调
开始/即时烹调
a) 直接开始
开始/即时烹调
注意:
开始/即时烹调
暂停/取消
b) 延长手动烹调时间
开始/即时烹调
注意:
功能查阅/计时器
开始/即
时烹调
去除主机水分
除垢
水硬度
功能查阅
硬度等级
设置
硬度范围
操 作
1
重量
开始/即时烹调
2
功能查阅/计时器
注意:

其它简便功能指南
示范模式
功能查阅/计时器
开始/即时烹调
功能查阅/计时器
开始/即时烹调
注意:
暂停/取消
儿童锁
功能查阅/计时器
开始/即时烹调
功能查阅/计时器开始
/即时烹调
注意:

清洗及注意事项
注意: 请勿将商业烤箱洗涤剂、蒸汽清洁剂、研磨剂、
粗粒状洗涤剂、任何含有氢氧化钠成份的洗涤剂或百
洁布清洗烤箱的任何部分。
在进行清洗前,请确保拭烤炉内壁、炉门、炉箱及其配
件,尤其是烧烤发热器均已经完全冷却。
定时清洗微波炉- 常保持微波炉清洁,清除残留食物,
否则会导致微波炉表面变质,更大大减低微波炉的寿
命,什致会造成危险。
烤箱外壳
烤箱控制
炉门
密封条
烤箱内壁
非常重要的资讯:
•
•
清除烤炉壁上的油污和溅出的食物残渣:
蒸盘 / 玻璃盘 / 烤架
水箱/水箱盖
滴水托盘
蒸汽发生器之除垢
清洗要点-及时清洗!
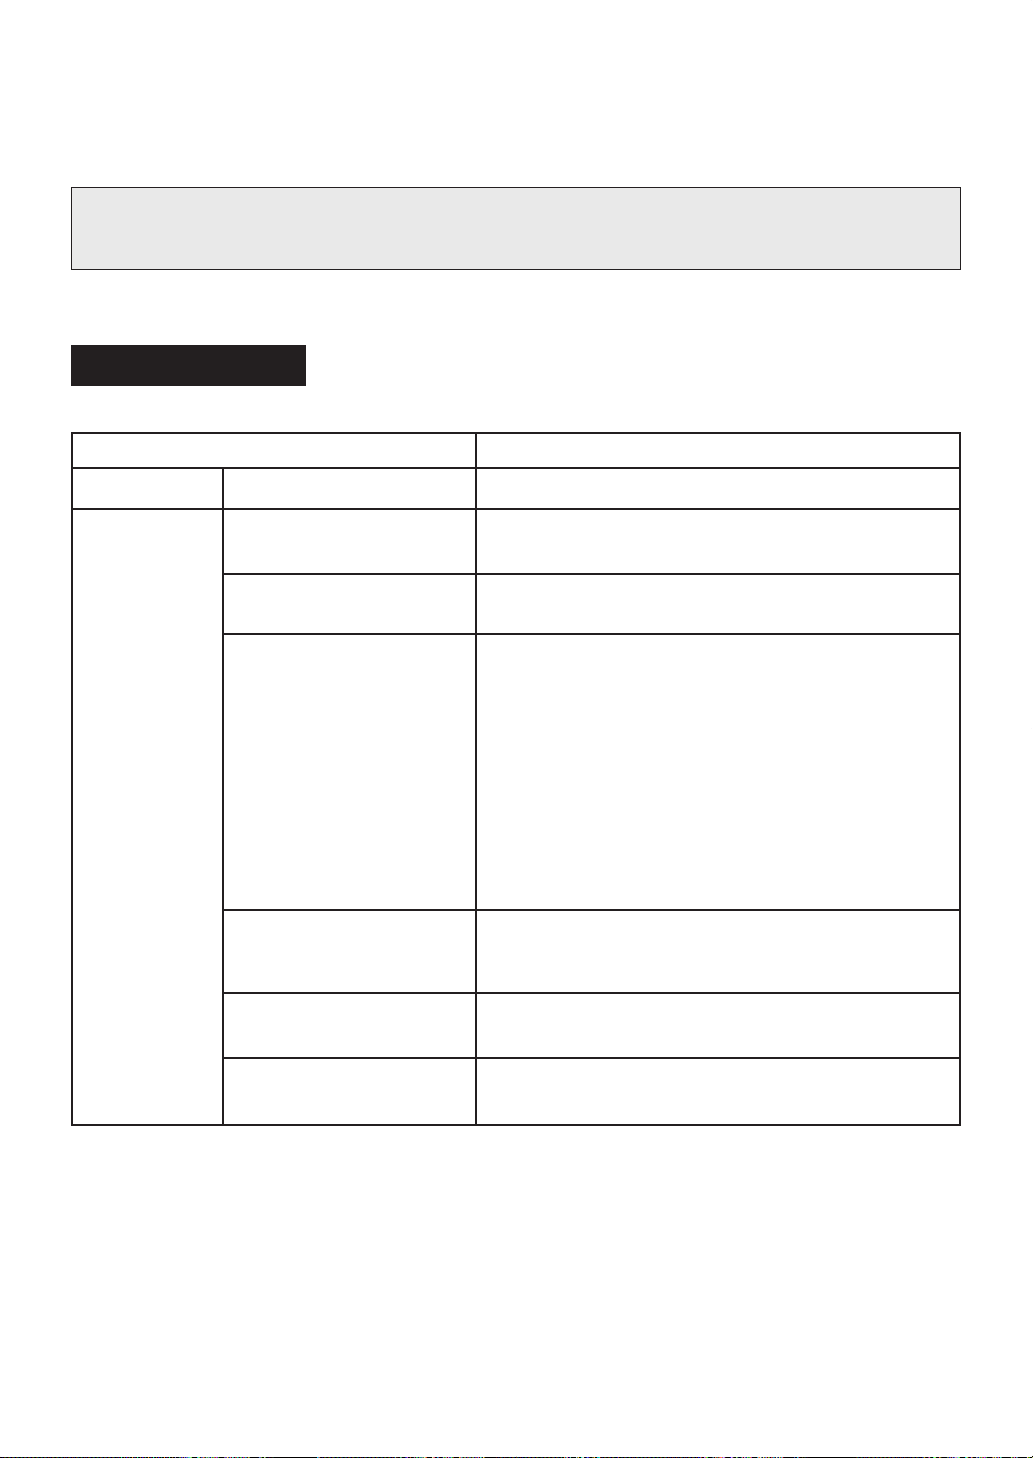
故障查阅指南表
暂
停/取消
暂停/取消
注意:
技术故障讯息/提示讯息
显示屏上的讯息采取的行动
故障查阅指南表
警告:
切勿自行调整、维修或更改烤箱。除了夏普培训的技师以外,如果由非技术人员进行任何服务或维修,则会存
在危险。由于维修可能会涉及拆卸外壳,而外壳对电气部件起着保护作用,所以由专人维修是很重要的。
•
•

故障查阅指南表
开始/即时烹调
开始
/即时烹调
问题 / 情况回答

故障查阅指南表
回答
问题 / 情况

维修前检查
规格
注意:
:

烹调指南
要点谨记
•
•
•
•
•
•
•
•
•
烹调指南
关于器具和遮盖物
®
是
是是
是
否
是是否
是是是是
是是是是
是否是否
是否否否
是否是否
否否否否
否否是否
是否否否
否否否否
否是是是
否否是否
是是是是
•
•
•

烹调指南
附件
注意:
•
使用时,务必密切关注烤箱。
•
请确保烹调器具适用于蒸烹调模式。 (请参考第C-26页“关于器具和遮盖物”)
•
加强室内通风,使蒸汽消散。
•
在烹调结束、烤炉冷却后,移除并倒空水箱,用柔软的布或海绵拭干烤炉炉腔。倒空滴水托盘。
蒸模式烹调建议
烹调时,应当检查烹调器具,确保适合用于采用的烹调模式。当在塑料容器中加热食物时,应特别注意容器的
熔化温度。切勿加热塑料容器高出它们的熔化温度。鉴于熔化和起火的可能性,应当密切关注烤箱情况。
容器
覆盖
烤箱门
搅拌
搁置
烹调技巧
- 蒸烹调模式的特别建议 -

烹调指南
密度
数量
大小
形状
食物温度
佐料和调味品
食物特征
- 蒸烹调模式的特别建议 -
注意:
脸和手:请务必戴上烤箱专用厚手套,将食物或烹调器具从烤箱中取出。在打开烤箱门使蒸汽消散时应特别小心。
切勿徒手将食物从烤箱中取出。
食用前应检查食物和饮料的温度,并加以搅拌。尤其是在让婴儿、儿童或老人食用之前,务必特别注意进行上
述操作。

烹调指南
微波模式烹调建议
- 微波模式特别注意事项和警告资讯 -
可不可

烹调指南
- 解冻模式操作建议 -
注意:
食品的放置
决定烹调时间
食品的覆盖
食品的局部遮盖
食品的搅拌
食品的翻转
食品的重新放置
食品的搁置
熟度检查
湿气的凝聚
微波适用保鲜纸
微波适用塑胶厨具
蛋糕/烘肉卷
烹调技巧
- 微波模式操作建议 -
放置
分开
搁置
解冻技巧

蒸汽选项食谱
•
•
•
•
•
•
•
•
•
•
菜单名称操作
重量范围
(增加单位)
食物摆放
位置
St11
St12
St13
St14
菜单
号码
米饭
糯米
蒸蛋
煮蛋
蔬菜
•
•
•
•
•
•
•
•
•
•
菜单名称操作
重量范围
(增加单位)
食物摆放
位置
St21
St22
菜单
号码
新鲜蔬菜
冷冻蔬菜
自动烹调食谱
米饭/鸡蛋

蒸汽选项食谱
•
•
•
•
•
菜单名称
菜单名称
操作
操作
重量范围
(增加单位)
重量范围
(增加单位)
食物摆放
位置
食物摆放
位置
St51
St52
St53
St41
St42
菜单
号码
菜单
号码
蒸蛋糕
蒸南瓜
牛乳布丁
玉米黄油和蒸春卷
新鲜蔬菜和蒸鸡翼
均衡菜单选项
甜食
•
•
•
•
•
•
•
•
•
•
•
•
•
•
•
•
•
菜单名称操作
重量范围
(增加单位)
食物摆放
位置
St31
St32
St33
St34
菜单
号码
鲜鱼
鲜肉
鲜虾仁
鲜鸡柳
鱼/肉类/鸡肉
自动烹调食谱

蒸汽选项食谱
•
•
•
•
注意:
延长
•
•
•
菜单名称操作
重量范围
(增加单位)
食物摆放
位置
St61
St62
St63
菜单
号码
烧麦
蒸饺
水饺
蒸汽翻热
米饭/鸡蛋
糯米
½
蒸蛋
自动烹调食谱
均衡菜单选项
配料1 份量 (2 卷)2 份量 (4 卷)3 份量 (6卷)4 份量 (8卷)
½
½
¼
½
¾
½
½
配料1 份量2 份量3 份量4 份量
½
½
¼
½
¾
¼
½
¾
配料1 份量2 份量3 份量4 份量
¾
½
¼
½
¾
配料1 份量2 份量3份量4份量
玉米黄油和蒸春卷
新鲜蔬菜和蒸鸡翼
注意 :
自动烹调食谱

甜食
½
¼
注意:
蒸蛋糕
蒸南瓜
牛乳布丁
自动烹调食谱

自动烧烤选项食谱
•
•
•
•
•
•
•
•
•
•
•
•
•
•
•
•
•
注意:
•
•
•
•
•
•
•
注意:
菜单名称操作
重量范围
(增加单位)
食物摆放
位置
AG1
AG2
AG3
AG4
菜单
号码
烤鸡
鸡翼
烤鱼
牛排
自动烹调食谱
自动烹调食谱
自动解冻选项食谱
•
•
•
•
•
•
•
•
•
•
•
•
菜单名称操作
重量范围
(增加单位)
dE1
dE2
dE3
菜单
号码
牛排/排骨
肉馅
家禽
注意:
自动翻热选项食谱
•
•
•
•
•
•
•
•
•
•
•
•
菜单名称操作
重量范围
(增加单位)
AR1
AR2
AR3
菜单
号码
翻热菜肴
翻热汤
翻热饮料
手动烹调食谱
蒸-高食谱
食物数量烤炉设置烹调时间食物摆放
位置
½
½
½
½
½

手动烹调食谱
混合烹调-高食谱
食物数量烹调时间和操作搁置时间
食物摆放
位置
结果
½
½
½
½
½
½

手动烹调食谱
翻热及解冻便利食品表
食物数量烤炉设置和烹调时间操作搁置时间
½
½
½
½
½
½

手动烹调食谱
微波:冷冻蔬菜指南
食物数量烹调时间 (100%)操作
½

手动烹调食谱
微波:新鲜蔬菜指南
食物数量烹调时间(100%)操作
½
¼
½

手动烹调食谱
微波:肉,家禽、海鲜和面包解冻时间
食物
烤炉设置和烹调时间
操作搁置时间
½
½
½
½
½
½
½
½
½
½
½
½
½
½
½
½
½

姜葱螃蟹
蒜茸蒸虾
½
清蒸鱼
虾饺
注意:
½
食谱

酿蚬
½
½
¼
¼
½
干蒸牛肉
½
¼
½
¼
冬菇蒸鸡
½
½
½
½
½
食谱

水晶饺
¼
½
½
烧卖
½
¼
香辣鸡肉糜
½
½
食谱

食谱
日式蛋羹
½
½
萝卜糕
贝氏混合奶油
½
注意:

食谱
腌制鲷鱼
烤鸡块
韭菜、熏肉和奶油乳蛋饼
½
¼
中式烤鸡肉

酥脆酿蘑菇
食谱
洋葱汁羊排
½
烤鸡肉和大虾肉串
½
½
½
烤鱼肉串
烤鸡肉串
蔬菜面包
注意:
注意:
食谱

Printed in ThailandTINSZA231WRRZ-V11
SHARP CORPORATION