
1
Sincreative Brands Inc
20947 Currier Rd, Unit C,
Walnut, CA 91789,
United States of America
www.sincreative.com

INSTRUCTION MANUAL
Espresso Coee Machine
Rev 1.0
HOUSEHOLD USE ONLY
Please read all instructions carefully before using the product
love · life
Model: CM5700A-UL


Contents
Scope of delivery............................................................................................................................ 1
Device parts.................................................................................................................................... 2
Scope of delivery/Device parts.................................................................................................... 3
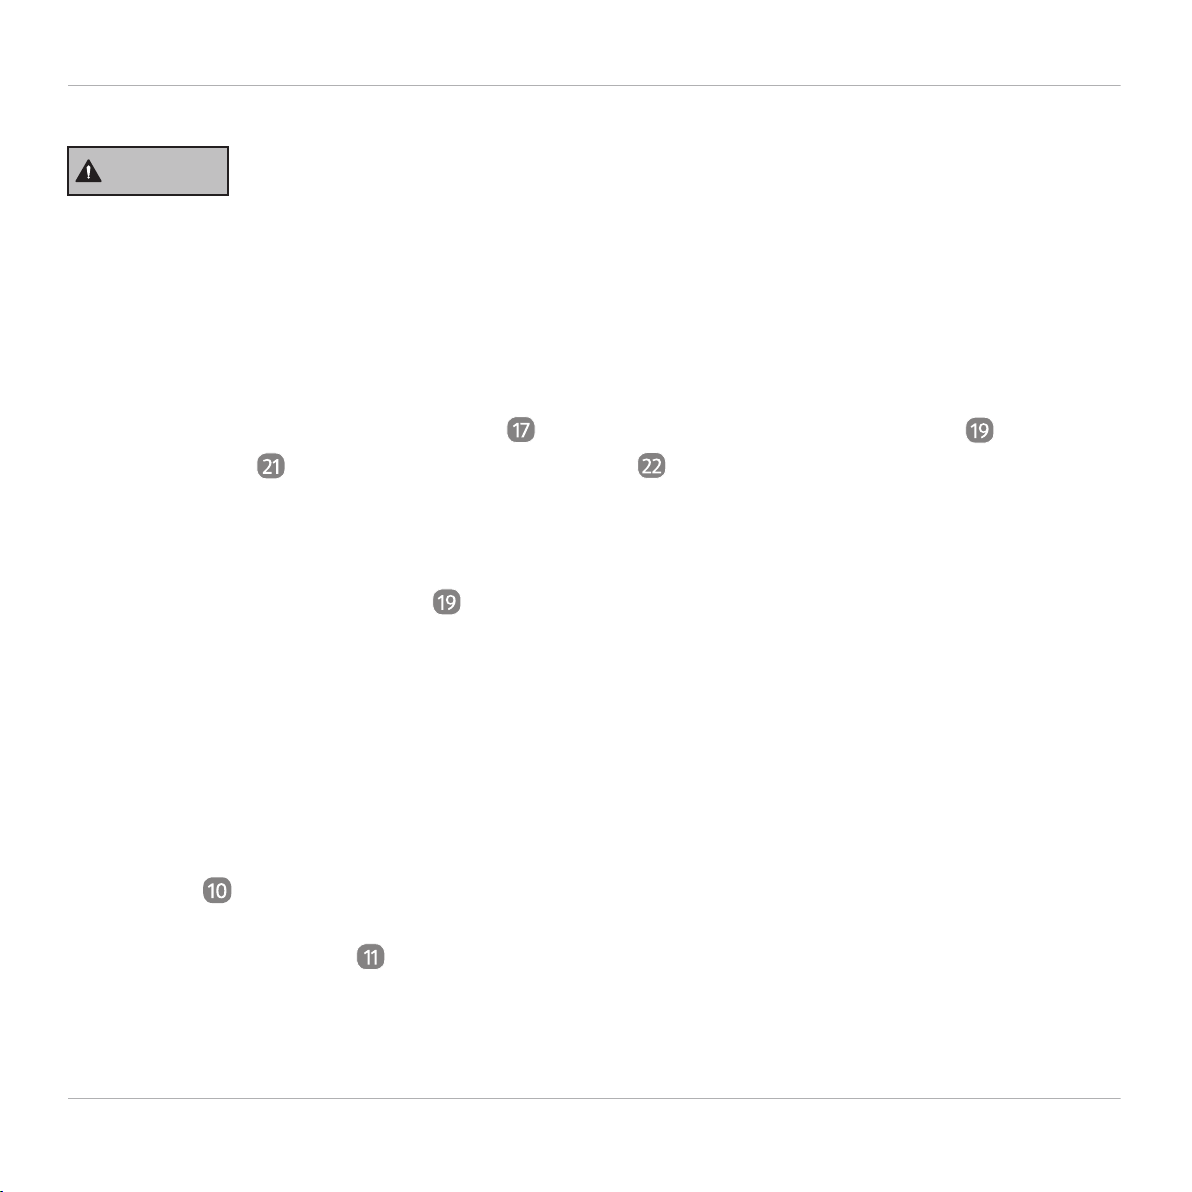
General............................................................................................................................................ 4
Read and keep operating instructions............................................................................................................................ 4
Explanation of symbols................................................................................................................. 5
Safety............................................................................................................................................... 6
Intended use.................................................................................................................................................................................... 6
Safety instructions....................................................................................................................................................................... 7
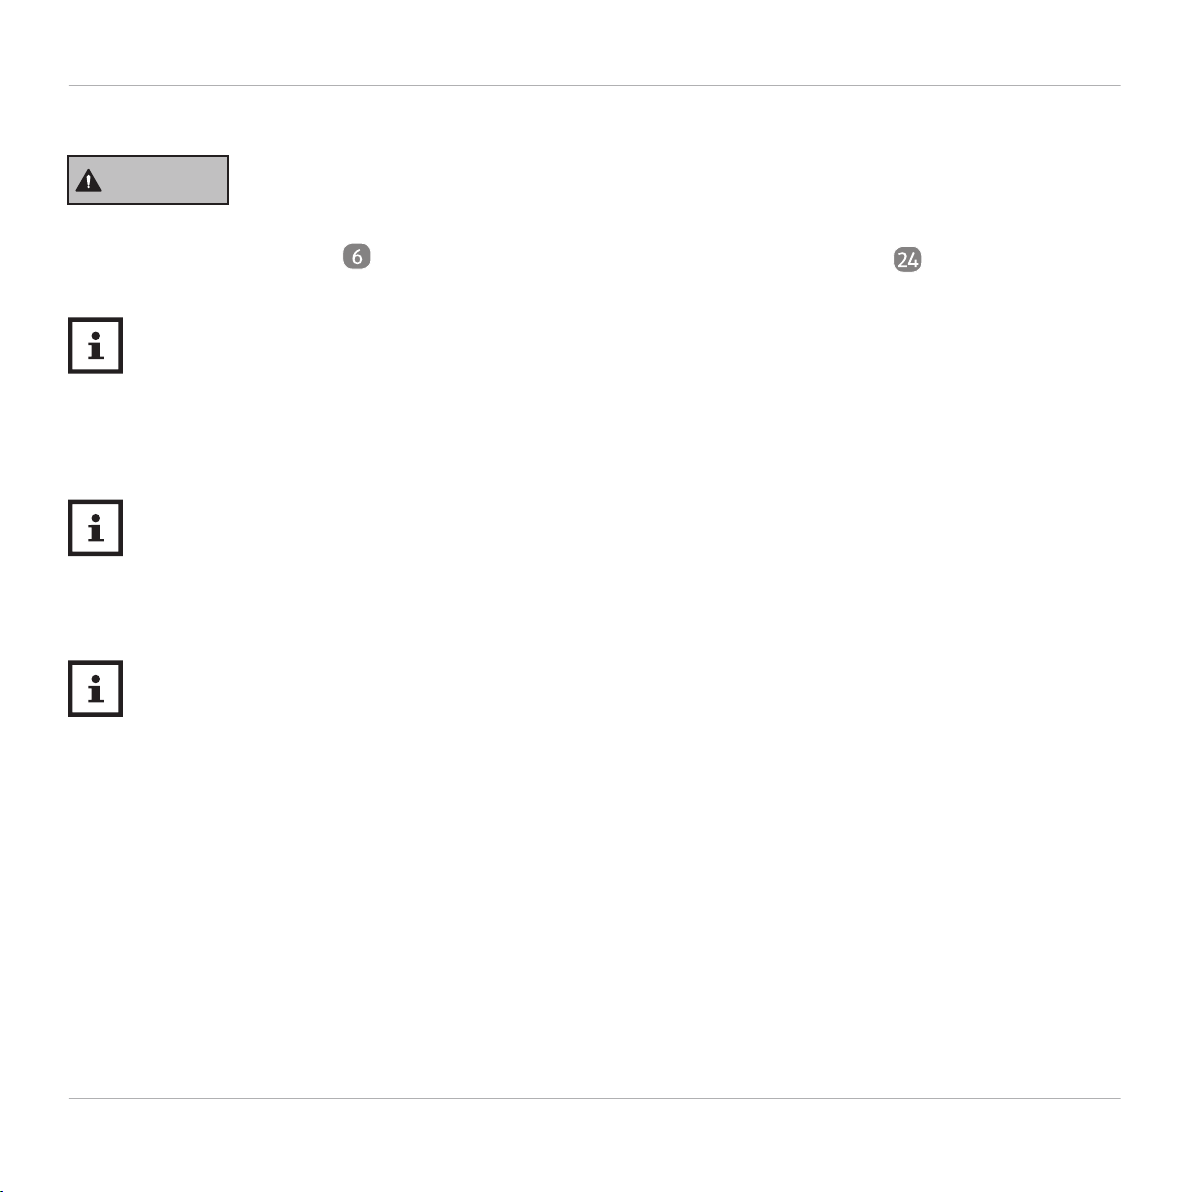
Hazard from electricity............................................................................................................................................................. 8
Scope of delivery.......................................................................................................................................................................... 11
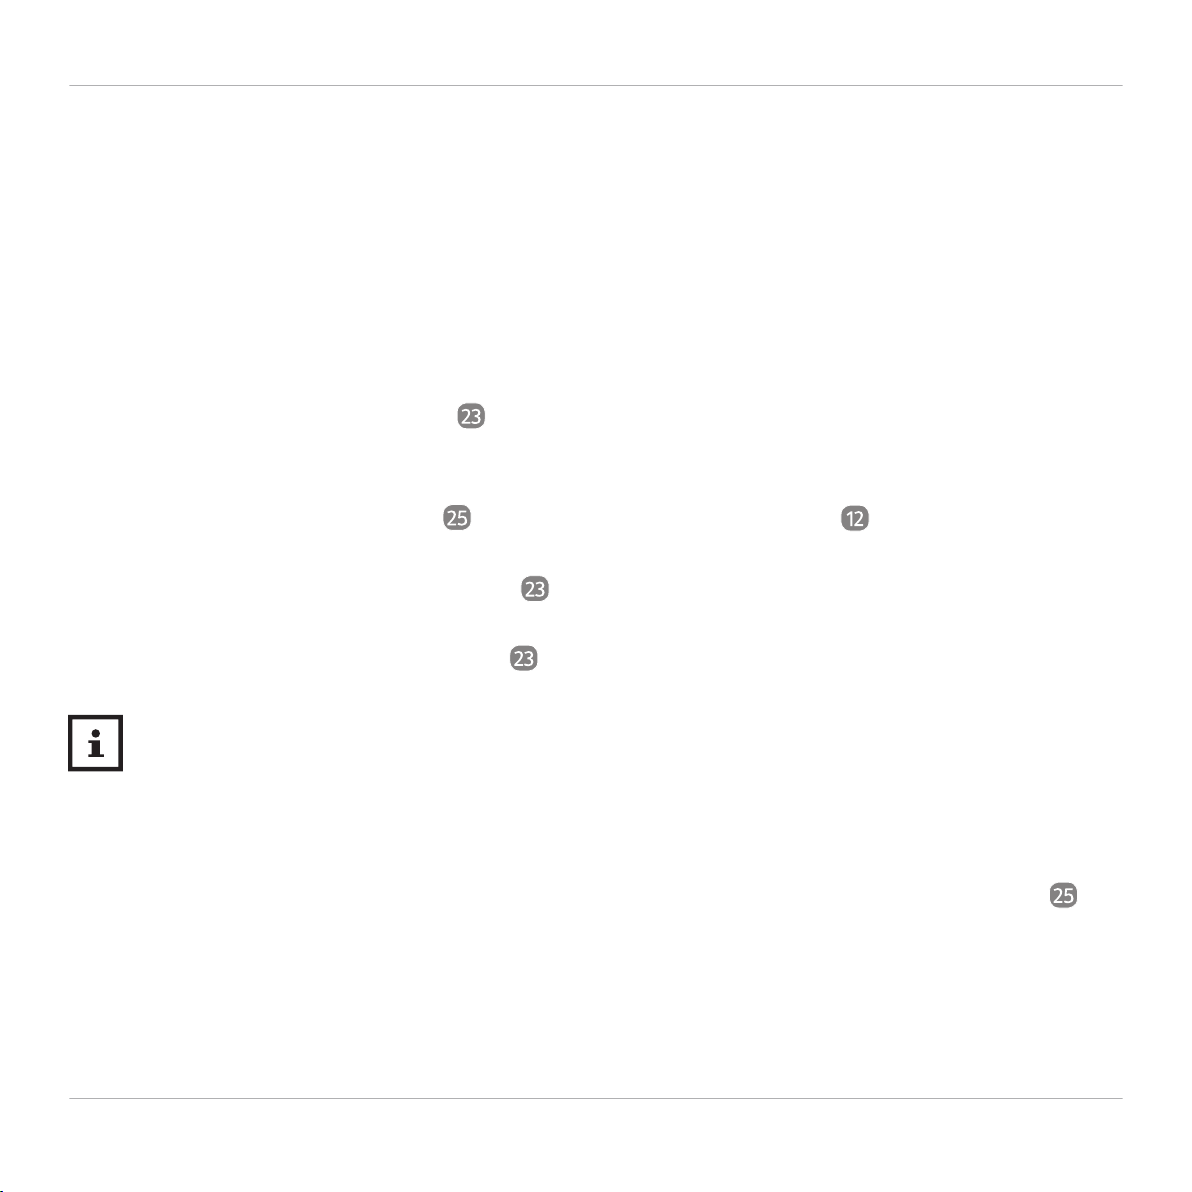
Prior to initial use......................................................................................................................... 14
Unpacking....................................................................................................................................................................................... 14
Preparing the grinding mechanism................................................................................................................................ 15
Flushing the water system ................................................................................................................................................... 17
About the grinder......................................................................................................................... 19
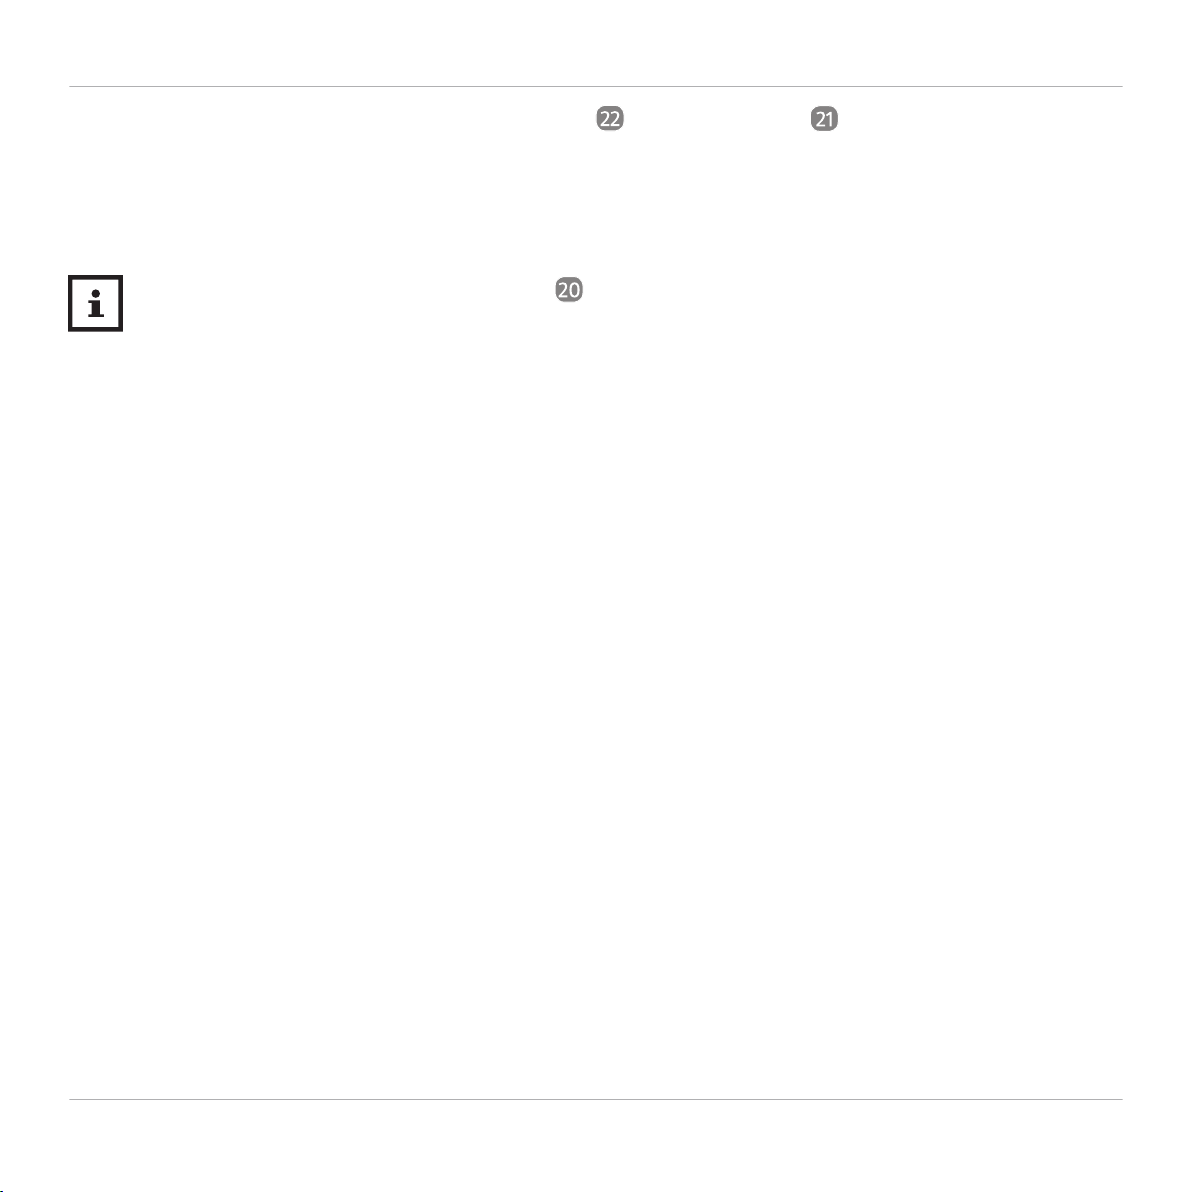
About the pressure gauge............................................................................................................ 20
Use.................................................................................................................................................. 22
Degree of grinding pre-selection.................................................................................................................................... 22
Preparing espresso.................................................................................................................................................................... 23
Emptying the brewing filter................................................................................................................................................. 27
Preparing cappuccino/frothy milk.................................................................................................................................. 27
Hot water function.................................................................................................................................................................... 30
Emptying the drip tray........................................................................................................................................................... 30
Change water quantity for coee preparation........................................................................................................ 31
Water tank empty...................................................................................................................................................................... 32
Switching o the espresso machine ..............................................................................................................................32
Cleaning........................................................................................................................................ 33
Cleaning the grinding mechanism................................................................................................................................ 34
Cleaning the brewing filter ................................................................................................................................................ 36
Daily cleaning ............................................................................................................................................................................ 36
Clean steam nozzle/hot water nozzle........................................................................................................................... 36
Descaling the espresso machine................................................................................................. 37
Storage........................................................................................................................................... 38
Descaling signal/Insucient water signal................................................................................ 39
Troubleshooting............................................................................................................................ 40
Technical data............................................................................................................................... 42
Disposal......................................................................................................................................... 42
Disposing of packaging and appliance........................................................................................................................ 42
Contact us..................................................................................................................................... 42
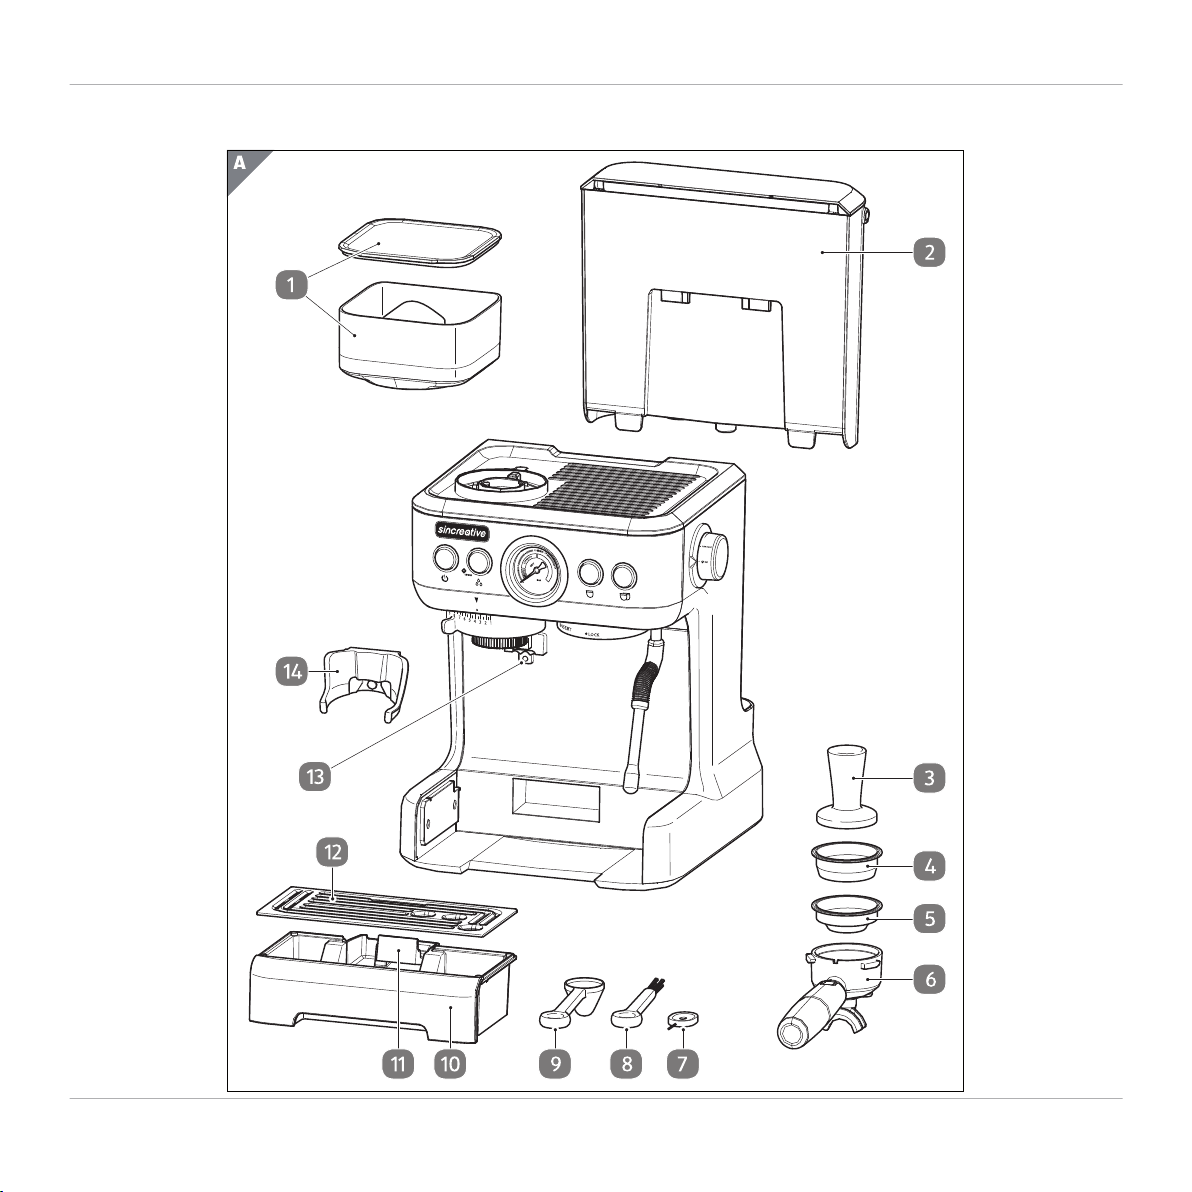
Scope of delivery
Scope of delivery
1
ON/OFF
HOT-WATER
SINGLE
DOUBLE
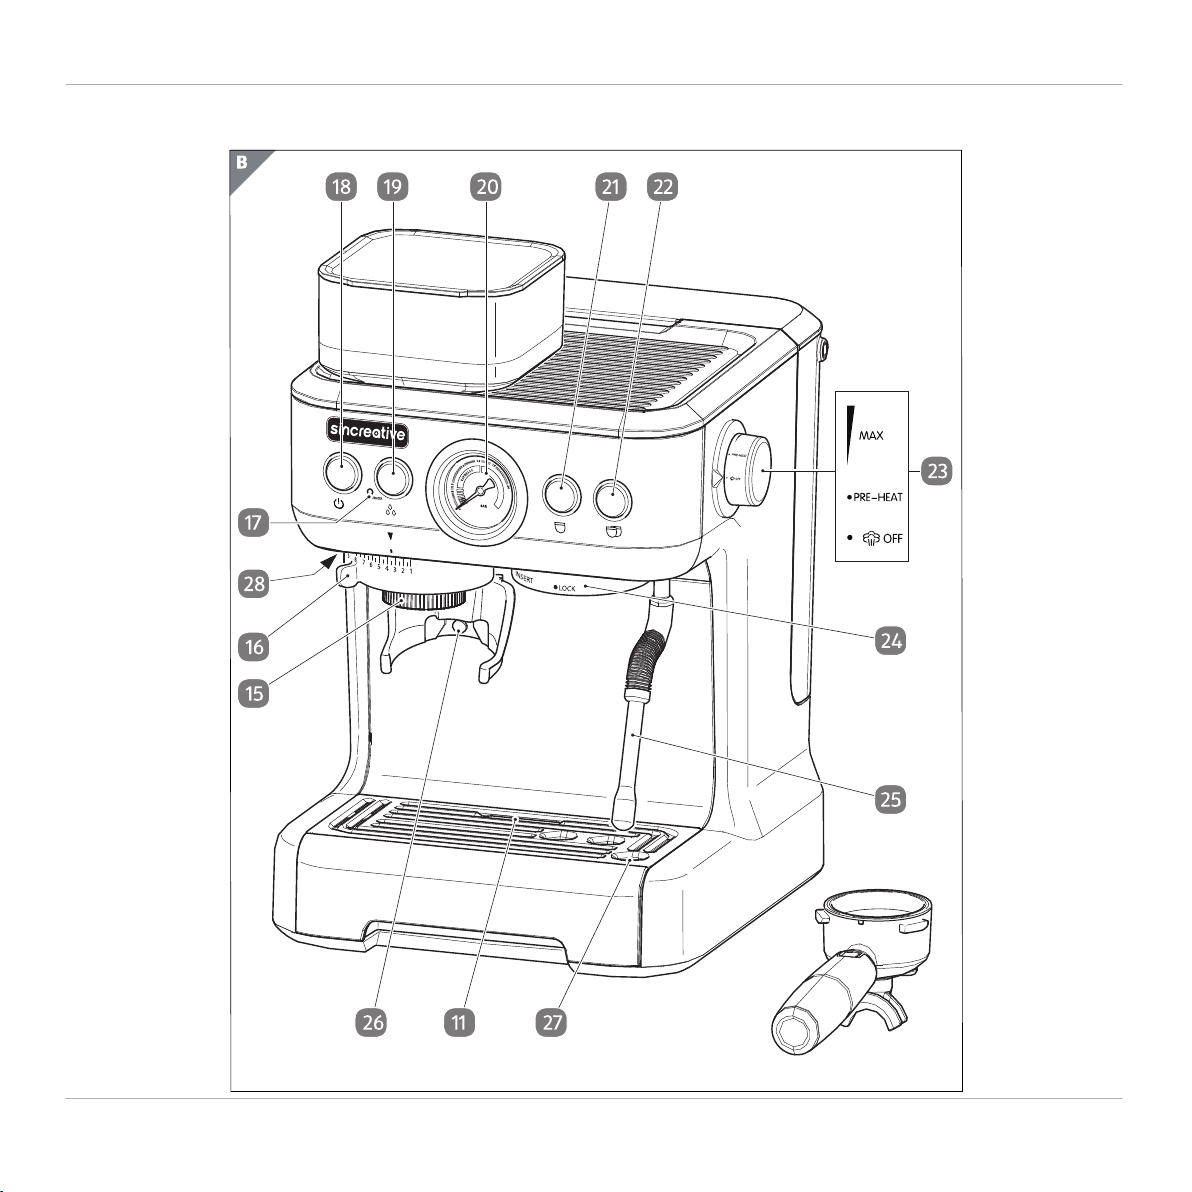
Device parts
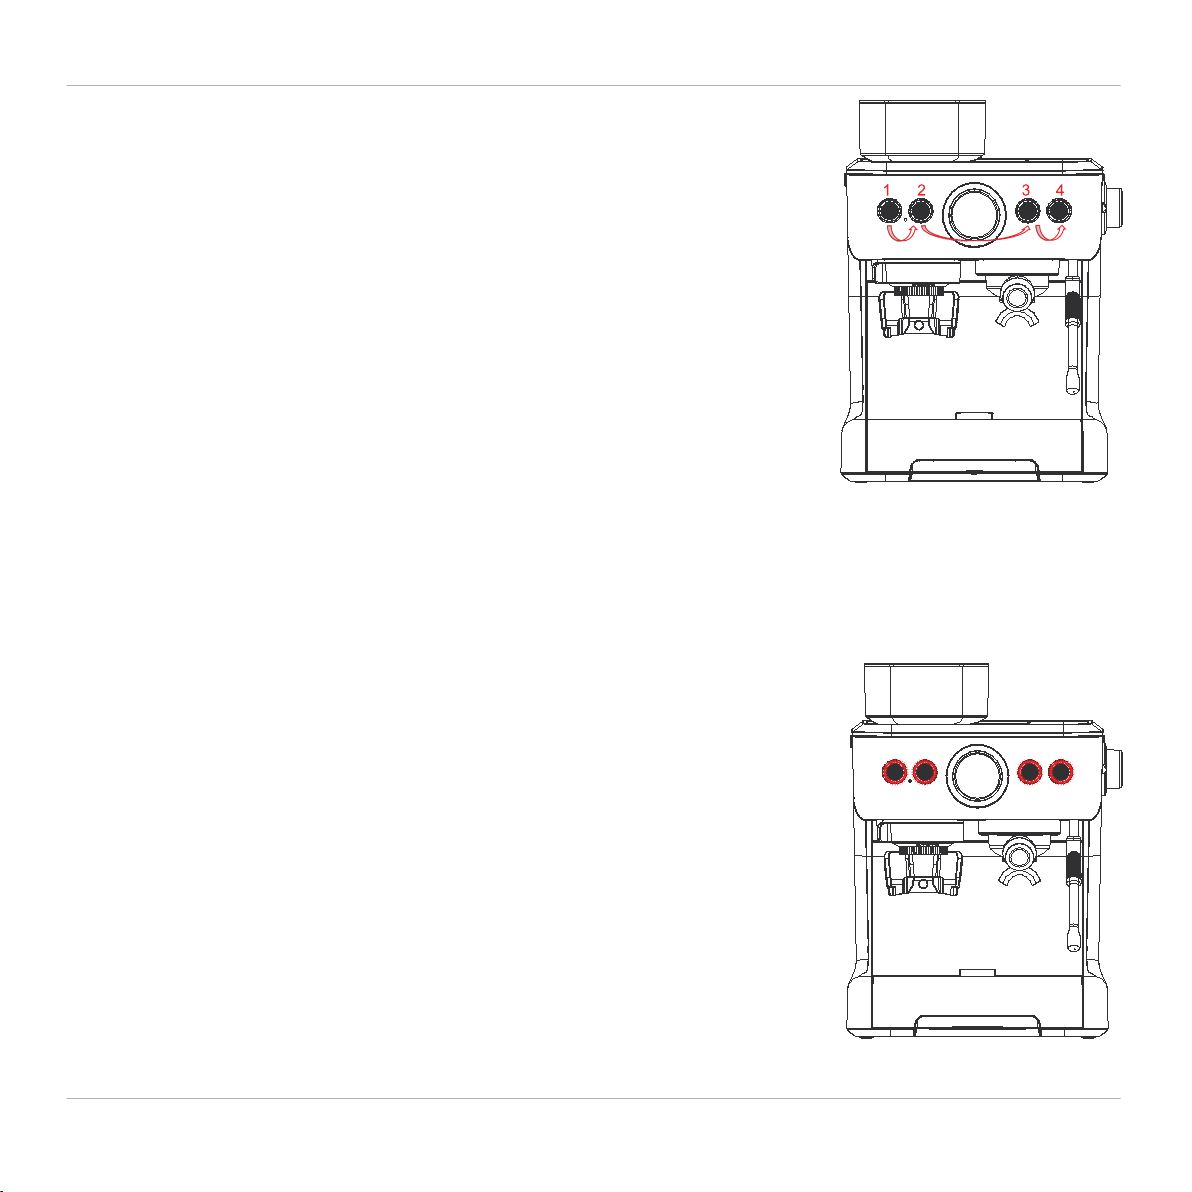
Device Parts
2
ON/OFF
HOT-WATER
SINGLE
DOUBLE

Scope of delivery/Device parts
Scope of delivery/ Device parts
3
Coee bean container with lid
Water tank
Tamper
Large brewing filter
Small brewing filter
Filter holder
Cleaning needle
Cleaning brush
Coee spoon
Drip tray
Drip tray level indicator
Draining rack
Coee grinder button
Filter holder bracket
Coee distributor
Degree of grinding pre-selection
Grinding mechanism Standby display
ON/OFF button
HOT WATER button
Pressure indicator (bar)
Button for single espresso
Button for double espresso
Steam volume regulator
Filter holder bracket
Steam nozzle / hot water nozzle
Grinding process switch
Opening in the draining rack
Release button

General
General
PLEASE READ THESE INSTRUCTIONS CAREFULLY AND KEEP THEM
FOR FUTURE REFERENCE
4
Failure to comply with these operating instructions can lead to serious injury and/or damage to the espresso
machine and the integrated grinding mechanism. Should you pass the product on to third parties, please
also ensure that you include these operating instructions.
Dear customer,
Thank you for your purchase of the SINCREATIVE Espresso Coee Machine. To ensure you get the best
use of this appliance, please take the time to read this manual and learn how to use this espresso machine
with integrated grinder, even if you are an experienced home barista – this machine may be dierent to ones
you have operated before. In these operating instructions, you will learn how to use the product optimally
and safely, and with a little experimenting you will soon find your preferred settings. We hope that you enjoy
it!
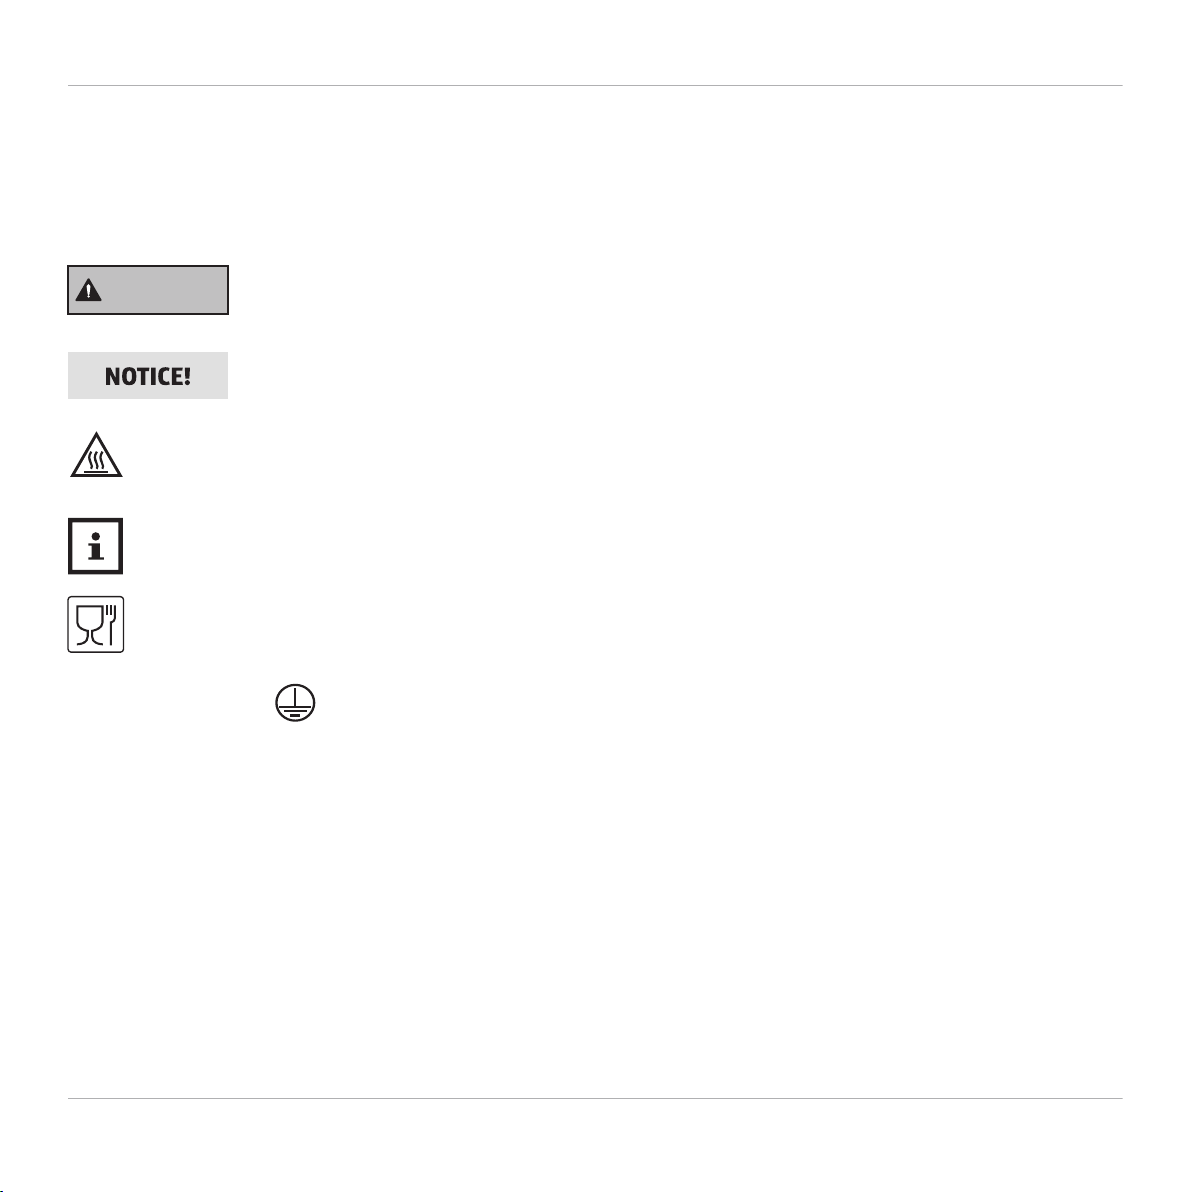
Explanation of symbols
Explanation of symbols
5
The following symbols and signal words are used in these operating instructions, on the product or on the
packaging.
WARNING!
Indicates a hazard that can lead to severe (possible fatal) injury.
Property damage can occur if not observed.
Hot surface! This symbol identifies hot surfaces in operation-do not touch with bare hands.
Indicates information and/or explanation.
Suitable for contact with food.
Protection class I / : Electrically conductive housing parts connected to protective conductor.

Safety
Safety
Intended use
6
� The espresso machine is exclusively designed for the preparation of household quantities of
coee/espresso and for frothing milk using steam. Only cold still water should be used to fill the water
tank. We recommend that you use cold still filtered water to fill the water tank, especially if you live in an
area with hard water.
The grinding mechanism is for grinding roasted whole coee beans and is only suitable for normal
household use. It can only be used for grinding coee beans, not for grinding or chopping other foods.
� The machine is exclusively intended for household use and is not suitable for commercial or
household-like use in kitchens for employees or shops, oces and other commercial areas, in agricultural
premises, by customers in hotels, motels or other residential facilities or bed-and-breakfast
establishments.
� The appliance may only be used with the included accessories.
� Any other use is regarded as inappropriate and may lead to material damage and/or personal injury.
The appliance is not a toy.
� The manufacturer and/or retailer will not be liable for losses caused by inappropriate or improper use.
Safety
Safety instructions
7
WARNING!
Hazard for children and people with impaired physical, sensory or mental
capabilities (e.g. partially disabled, elderly persons with impairment to their
physical and mental capabilities) or a lack of experience and knowledge (for example, older
children).
� This espresso machine may be used by people with reduced physical, sensory or mental abilities or
lacking experience and knowledge, provided they are under supervision or they have been properly
instructed on safe use of the espresso machine and have understood the any possible
� Keep children away from the espresso machine and the power cable.
� The grinding mechanism must not be used by children.
� Do not leave the espresso machine unattended during operation.
� Do not let children play with the packaging film. Children may become caught in it while playing and
suocate.

Electric shock hazard! The appliance operates with hazardous voltage. Faulty
installation or mains voltage that is too high may lead to electric shock.
A frequent cause of household accidents is a lack of attention during routine activities. Ensure
that your hands are always dry when connecting/disconnecting the mains plug or when
operating the appliance.
Safety
Hazard from electricity
8
WARNING!
� Only use the espresso machine in dry, interior spaces.
� Never place the espresso machine in such a way that it may fall into a tub or sink.
� Never reach for an electrical device, if it has fallen into water. In such a case, immediately disconnect the
power plug.
� Ensure that children do not insert items into the espresso machine.
� Only connect the espresso machine, if the mains voltage of the socket matches the specification on the
rating plate.
� The power cable, the power plug and the appliance must not be exposed to dripping or splashing water.
� Do not operate the appliance outdoors and do not expose it to weather influences, such as rain, snow or
frost.
� Never immerse the appliance or the power cable into water or other fluids.
� When using an adapter plug or extension cord, these must comply with the valid safety regulations.
The specified maximum voltage must not be exceeded.
WARNING!
The filling aperture must not be opened during use. The heating element surface
is subjected to residual heat after use. Care should be taken when handling the
cutting blades, emptying the coee bean container and during cleaning.
� When using an adapter plug or extension cord, these must comply with the valid safety regulations.
The specified maximum voltage must not be exceeded.
� The ON/OFF button does not disconnect the espresso machine from the power supply. Only connect the
espresso machine to an easily accessible socket, so that you can disconnect it from the power supply
quickly in case of a malfunction.
� Switch the espresso machine o before filling the water tank and remove the power plug from the socket.
� Ensure the power cable does not become a trip hazard.
� Do not kink the power cable and do not lay it over sharp edges.
� Do not use the appliance:
- if the appliance is damaged,
- if the power cable or power plug are damaged, the device has fallen.
- if the coee bean container is not inserted and engaged,
- if the grinding mechanism is not installed and engaged,
- if the complete drip tray with the rack is missing.
� Prior to each use, pull the power cable completely out of the appliance. Ensure that the power cable
cannot be trapped, crushed or damaged by sharp edges or hot items.
Safety
9

Safety
10
� Remove the power plug from the socket:
- if you are not using the appliance,
- before cleaning or putting the appliance away,
- if an obvious fault occurs during operation,
- in a thunder storm.
Always pull on the power plug, not on the power cable.
� Do not make any modifications to the appliance or the power cable.
� Only allow repairs to be carried out by a professional workshop. Also please note the warranty conditions
(see warranty card).
� If the supply cord is damaged, it must be replaced by the manufacturer, its service agent or similarly
qualified persons in order to avoid a hazard.
� Do not open the appliance casing, but leave the repair to specialists in order to avoid endangering the
user. For this, please contact a specialist workshop. Liability and warranty claims are excluded for repairs
that are carried out independently, improper connection or incorrect operation.
� Parts may only be used for repairs, which correspond to the original device data. This espresso machine
contains specific electrical and mechanical parts that are essential for protection against hazard sources.
� The appliance must not be connected to a time switch or other separate remote activation system, such
as a dimmer switch or a remote-control socket.
Scalding hazard!
Hot water/hot steam escapes from the espresso machine during use. Parts of the
espresso machine become very hot. You may get scalded.
� Each time before switching on the espresso machine, turn the steam volume regulator to OFF.
Otherwise, hot water/hot steam may unintentionally escape from the steam nozzle/hot water nozzle.
� Only hold the steam nozzle/hot water nozzle by the black plastic handle to fold it out and in. During
frothing and also afterwards, you should not touch the steam nozzle/hot water nozzle.
� After use, always align the steam nozzle/hot water nozzle in such a way that the nozzle points towards the
opening in the draining rack .
� Only use the steam nozzle/hot water nozzle very carefully and never direct it towards parts of the body.
� Do not touch the coee spout during operation and do not reach underneath it.
Injury hazard!
The grinding mechanism has sharp edges. Never insert fingers or other body
parts, parts of cutlery or other items into the grinding mechanism.
� Always disconnect the appliance from the power supply if it is unsupervised, as well as prior to assembly,
dismantling or cleaning the grinding mechanism.
� Switch o the appliance and disconnect from power supply before changing accessories or approaching
moving parts while in use.
Scope of delivery
Scope of delivery
11
WARNING!
WARNING!

Safety
12
� Do not release the filter holder while the machine is running: hot water may spray out. The filter holder
must be turned as far as it will go.
� Allow the filter holder to cool o completely before changing the inserted brewing filter.
� Please note that hot steam may also escape from the espresso machine after it has been switched o.
� Do not overfill the filter holder with ground coee, otherwise the filter holder cannot be mounted
correctly. This may cause hot steam to escape from the side.
� The drip tray and the draining rack must always be in position during operation. Depending on
the operating state, steam and hot water can end up in the drip tray. The related valve is situated invisibly
in the rear section above the drip tray.
Caution - material damage
Improper handling of the espresso machine may result in damage to the espresso
machine.
Only adjust the degree of grinding levels in the direction of "finer''(15 -> 1) during
the grinding process.
� Please do not overfill the bean container. The lid should still be able to close.
� Do not regrind ground coee.
� Never fill the water tank with hot water or carbonated water.
� Never operate the espresso machine without filling the water tank suciently, as otherwise the pump
may become damaged.
NOTICE!
NOTICE!

Safety
13
� Protect the espresso machine from frost: Water residues may freeze at temperatures below 32 °F and
damage the heater.
� Place the appliance on a sturdy and level surface. In doing so, ensure that there is a sucient distance to
strong heat sources, such as hot plates, heating pipes, etc.
� Avoid heat accumulation and position the appliance so that heat and steam can escape all around the
enclosure during use.
� Do not move the appliance while it is in operation, in order to avoid injuries. Before relocating the
appliance, leave it to cool down.
� To carry the appliance, hold it from underneath. Tilt it slightly to one side and place at least one hand
underneath the appliance. Do not hold on to the water tank, as it will release upwards.
� Rubberized feet are situated on the underside of the appliance. As furniture and/or storage surfaces are
made of various materials and are treated with various care products, it cannot be entirely ruled out that
some of these substances may contain components that damage and dissolve the rubber feet.
If necessary, place a non-slip base under the device.
� When cleaning the appliance, do not use any aggressive chemical detergents, abrasives, hard sponges etc.
� Handling the high-quality and weighty filter holder requires getting used to. Therefore, avoid releasing
the filter holder with a swinging movement.
Prepare yourself for the weight before releasing it and use slight upward pressure, so that the filter holder
does not fall out of the bayonet bracket and hit the enclosure.

Prior to initial use
Prior to initial use
Unpacking
14
NOTICE!
Risk of damage!
Opening the packaging without due care and attention, using a sharp knife or other pointed object, may result in
damage to the appliance.
01. Remove the appliance and accessories from the packaging.
02. Carefully remove all packaging material (also a cover underneath the water tank) and pull the power cable
completely out of the compartment on the back.
03. Check whether the delivery is complete (refer to Fig. A).
04. Check whether the espresso machine or individual parts are damaged. If this is the case, do not use the espresso
machine. Contact the manufacturer via the service address stated on the warranty card.
05. Before using the appliance for the first time, check whether the voltage specification on the rating plate
corresponds to that of your household.
06. Clean the appliance with a slightly dampened cloth prior to initial use, in order to remove possible packaging and
production residues.
Rinse off the following parts under flowing water prior to first-time use:
- Water tank and lid
- Filter holder and filters /
- Tamper
Wipe the parts dry and let them dry off completely.
Only wipe off the double-wall coffee bean container with a damp cloth, do not immerse in water.
The grinding mechanism does not need to be cleaned separately prior to initial use. After use, only clean the grinding
mechanism in a dry state, using a brush.
Prior to initial use
Preparing the grinding mechanism
15
01. Ensure that the steam controller is switched to OFF and disconnect the power plug, if necessary.
The grinding mechanism is removed for transport. Attach the grinding mechanism, as described on
page 34, “Cleaning the grinding mechanism”, Point 8.
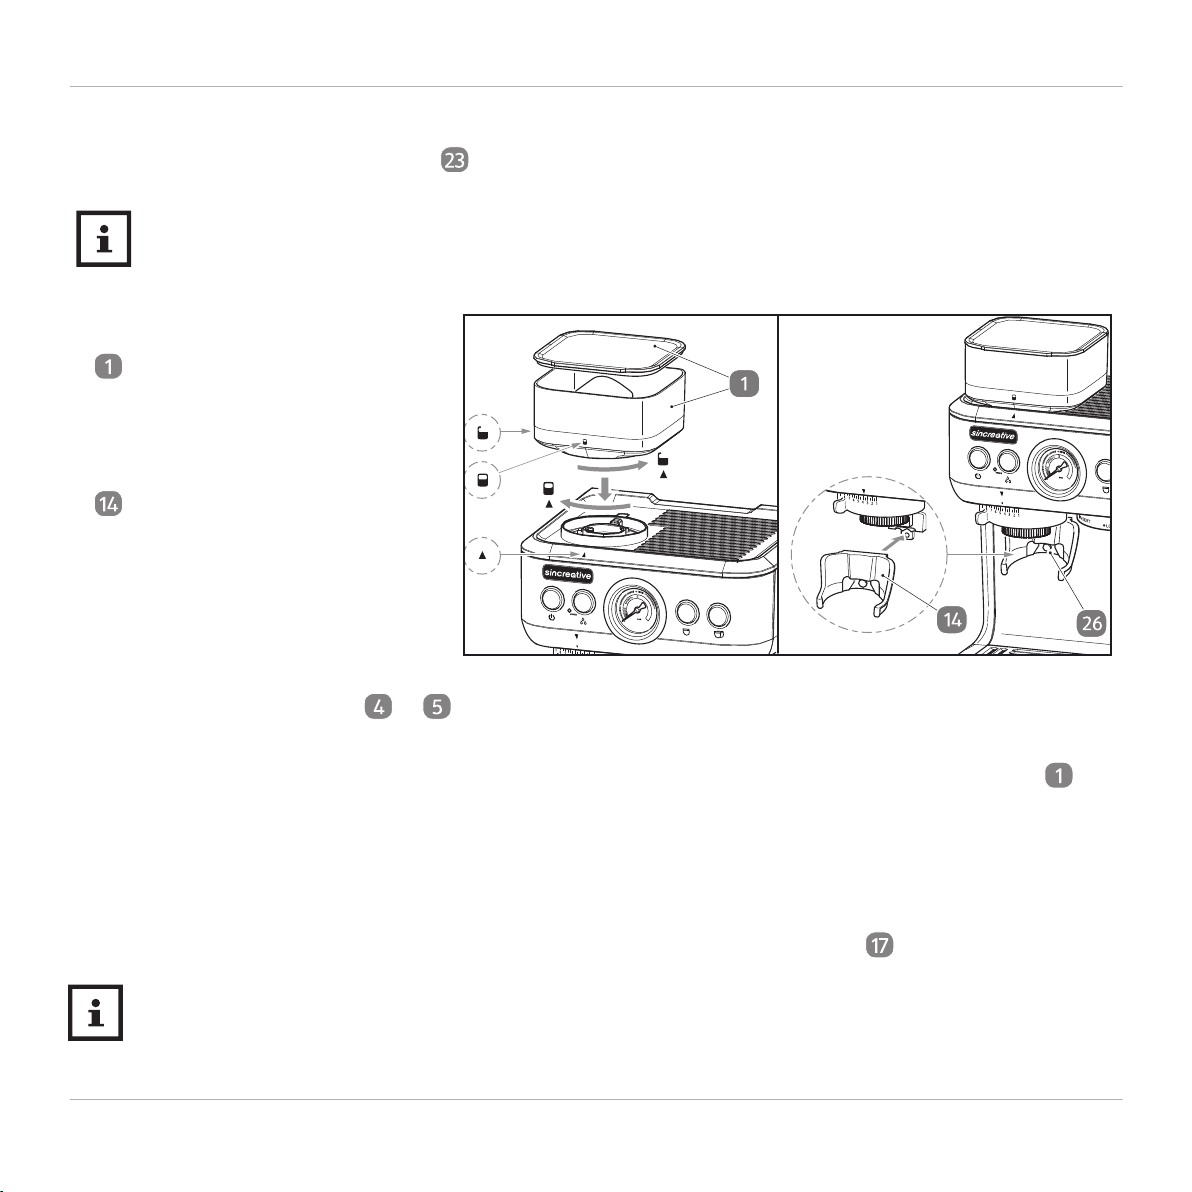
02. Turn the coee bean container
clockwise onto the mount, as
illustrated.
03. Hang the filter holder bracket
onto the mount by lifting it
slightly, then push the mount
downwards.
ON/OFF
HOT-WATER
ON/OFF
HOT-WATER
SINGLE
DOUBLE
04. Push the brewing filter ( or ) into the filter holder.
05. For the first grinding process, fill 2-3 tablespoons of coee beans into the coee bean container and
put the lid on.
06. Connect the power plug to a socket. A beep tone will sound.
07. Press the ON/OFF button. The grinding mechanism will standby indicator light up.
Initially ignore the buttons lighting up.
Prior to initial use
16
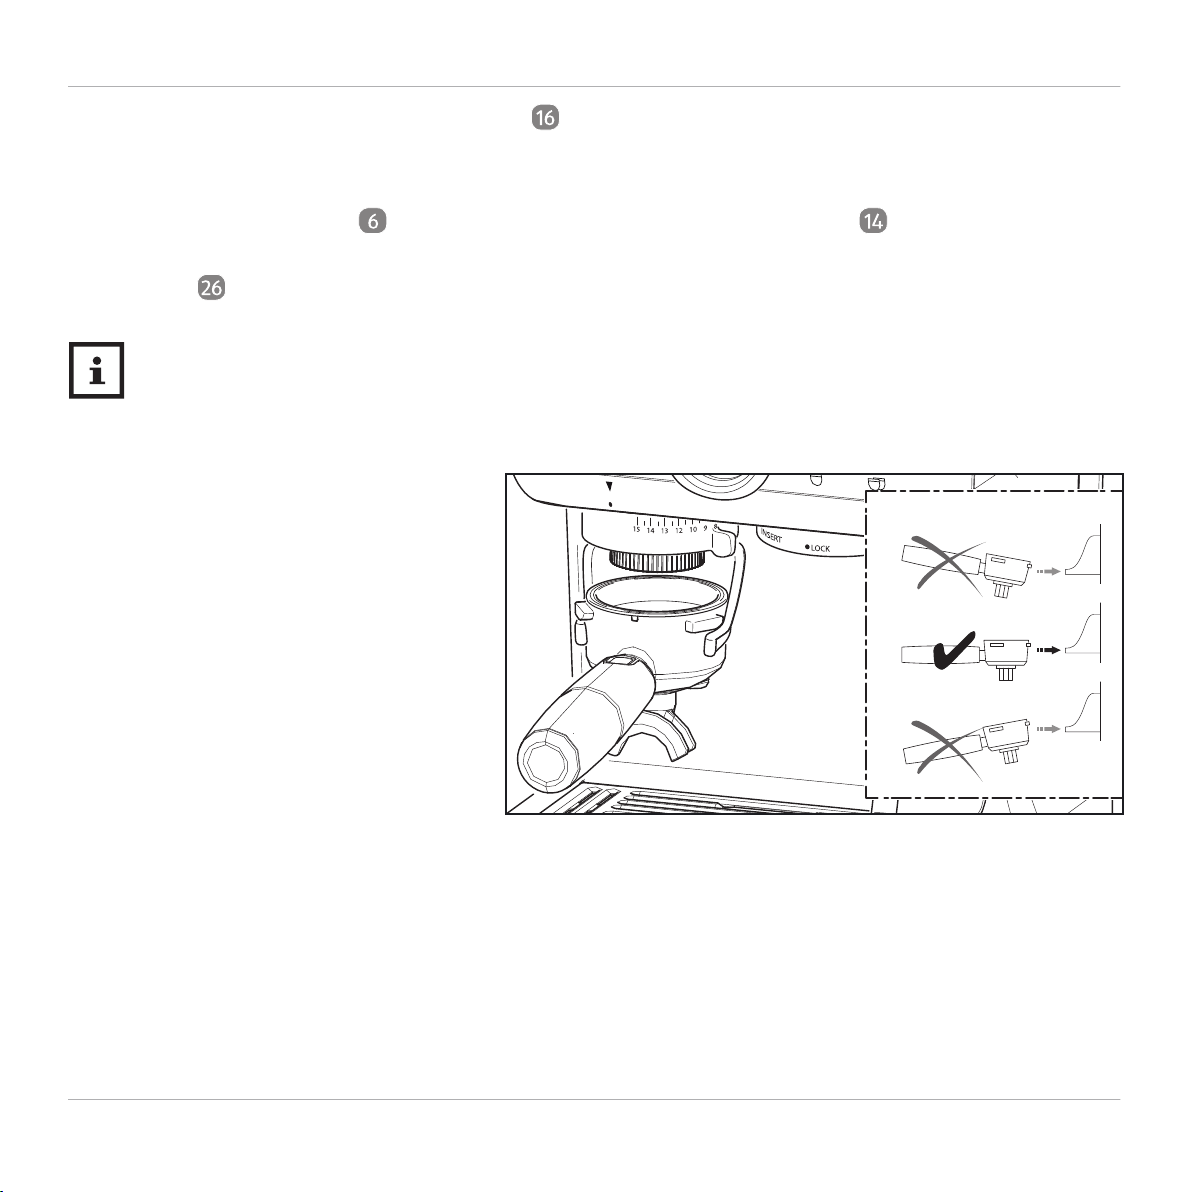
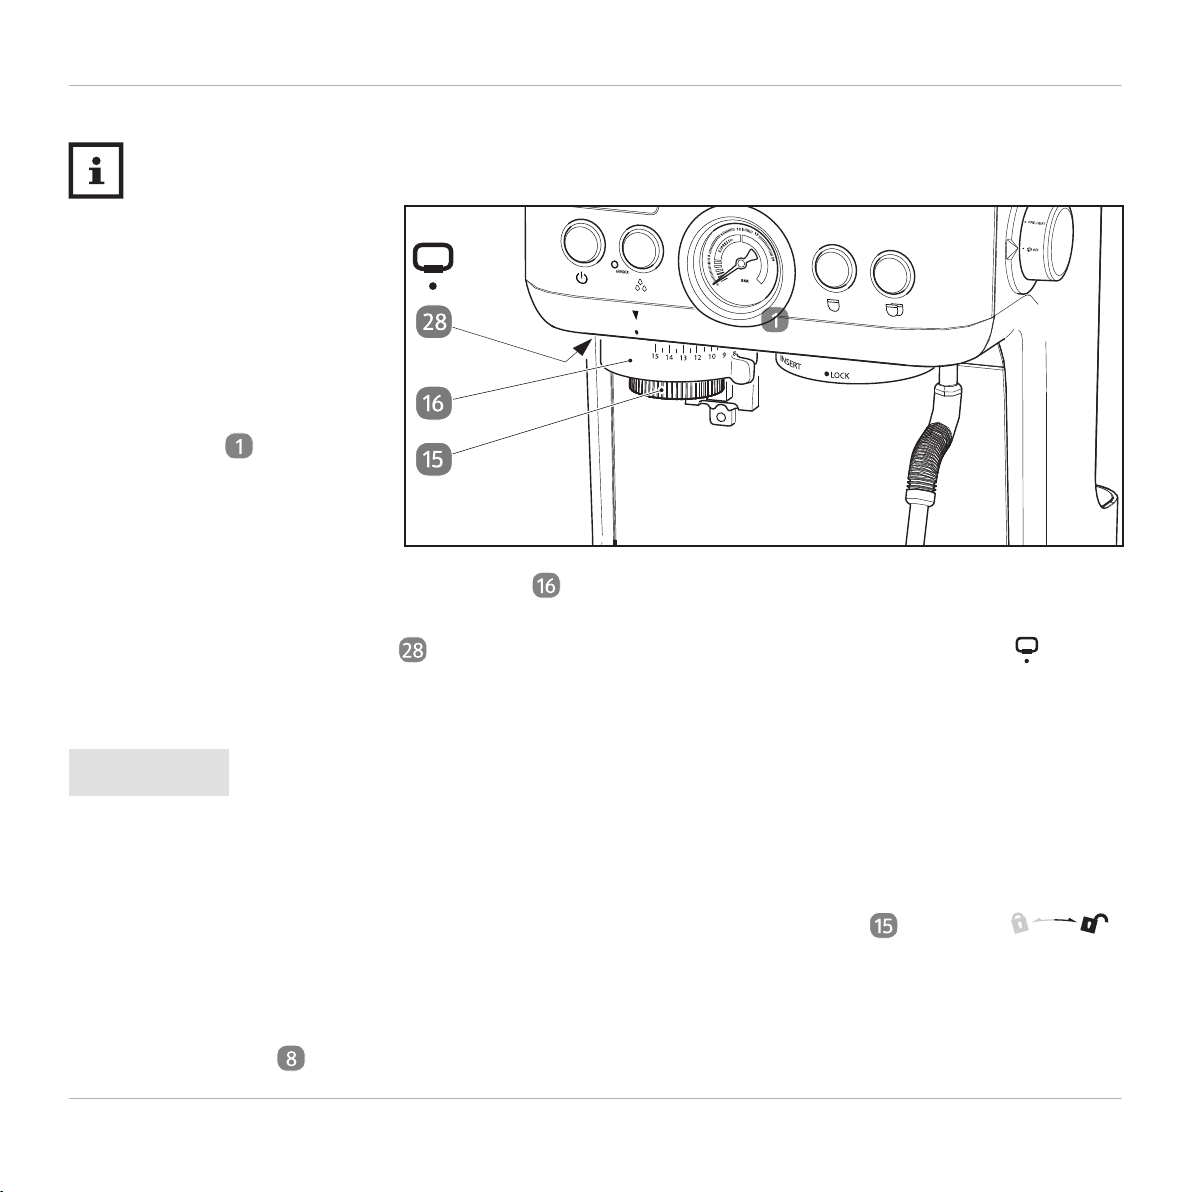
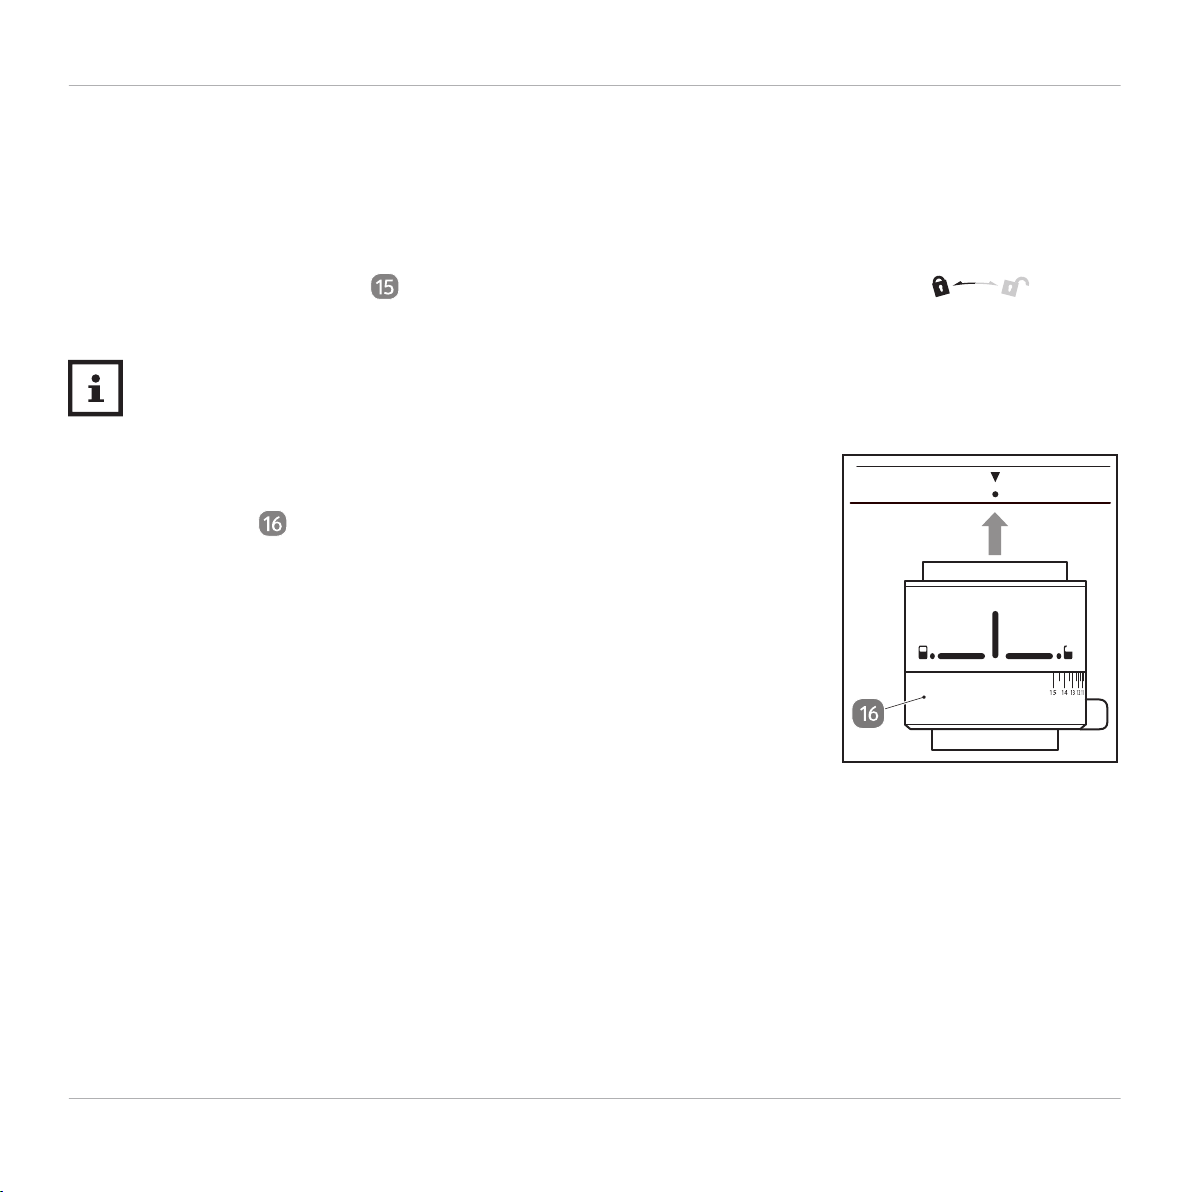
08. Turn the degree of grinding pre-selection to the right to level 15 (the setting mark is above the scale
from 1 to 15).
09. Pick up the filter holder and push it straight into the filter holder bracket .
The grinding process is activated by pushing the filter holder slightly forward horizontally against the
switch .
The grinding process can be interrupted at any time by pulling the filter holder back slightly in the
filter holder bracket.
10. Let the grinding process run
through until all of the beans are
ground, then pull the filter holder out
of the bracket. Dispose of the coee
grounds from this first grind.
11. Press the ON/OFF button and
remove the power plug from the
socket.
SINGLE
DOUBLE
Flushing the water system
Prior to initial use
17
Prior to initial use and after a longer period of disuse of the espresso machine, allow the contents of
approx. 2-3 cups of water to run through the machine. This will clean the water circuit and all parts
will be heated up.
During initial use, it may occur that the pump makes slightly louder noises. This is normal. After a short time,
the system has filled with water and the noise will diminish.
The lid of the water tank can be folded forwards and backwards, and can also be used for holding the tank
when inserted.
01. Ensure that the steam controller is switched to OFF and disconnect the power plug, if necessary.
02. Fill the tank with fresh, cold, still water. Pay attention to the MIN and MAX filling marks:
03. Insert the water tank by first holding it flush against the back of the espresso machine and then let it
slide downwards, until the contour is flush with the machine. Flip the lid down.
04. Insert the drip tray with the draining rack .
05. Install the unfilled filter holder by aligning it to the left with the handle at the front, then moving it
horizontally upwards into the filter holder bracket and turning it to the right as far as it will go.
06. Align the steam jet/hot water jet with the opening in the draining rack .
07. Connect the power plug to a socket. A beep tone will sound.

Prior to initial use
18
08. Press the ON/OFF button .
The grinding mechanism standby
indicator will light up. The
ON/OFF, HOT-WATER ,
single espresso and double
espresso buttons will slowly
dim on/o.
After approx. 20 seconds, the heating
process is completed and the buttons
will light up continuously.
09. Press the button for double espresso . The button will slowly flash on/o. The HOT-WATER and
single espresso buttons will turn o.
The defined water quantity for a double espresso will now run through the filter holder into the
draining rack. After this, all of the buttons will light up again.
10. Press the HOT-WATER button . The button will slowly flash on/o. The buttons for single and
double espresso will turn o.
Hot water at approx. 194°F will now run out of the steam/hot water nozzle into the drip tray .
The quantity of hot water is pre-set to approx. 7 OZ. To stop the HOT-WATER function, please press
the button again.
11. Let the water drain out for approx. 10 seconds and then press the HOT-WATER button again.
All buttons will illuminate again.
ON/OFF
HOT-WATER
SINGLE
DOUBLE
ON/OFF
HOT-WATER
SINGLE
DOUBLE
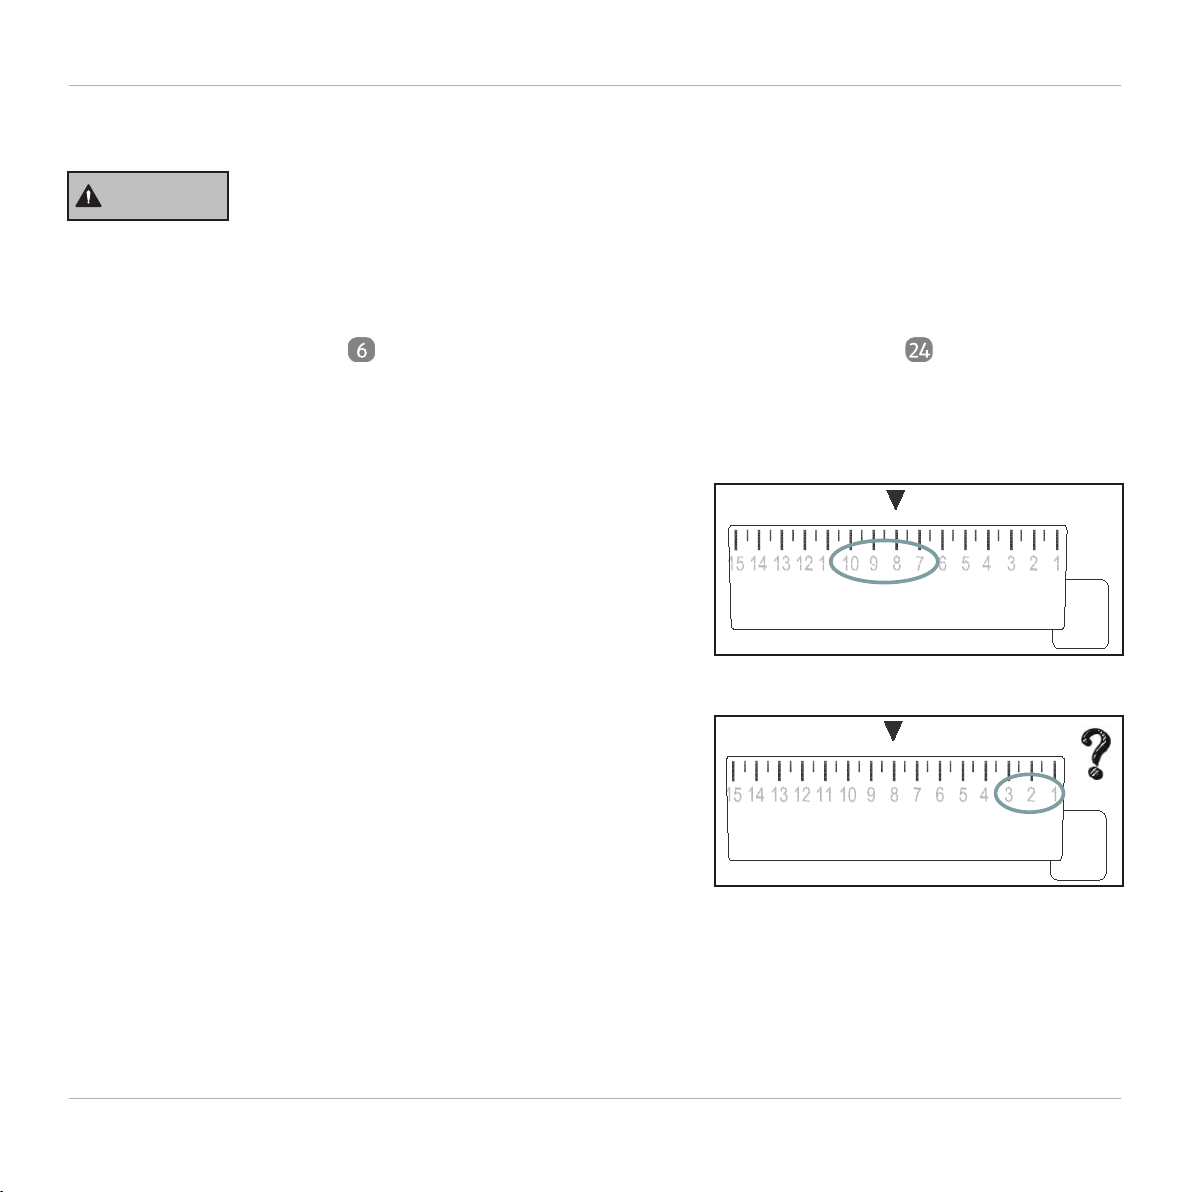
For a new user, we suggest to set the grind level to 8-10 initially,
and then make adjustments depending on the extraction of the
coee and the pressure shown by the pressure gauge.
Why is it slow to dispense ground coee at settings 1-3?
The degrees of grinding 1-3 are too fine the new grinding mecha-
nism when the machine is new. Also note that the grinder cannot
grind coee beans for a long time at settings 1-3 initially.
Scope of delivery / About the grinder
19
WARNING!
Scalding hazard!
The collected water in the drip tray is hot.
12. Press the ON/OFF button to switch the appliance o and remove the power plug from the socket.
13. Empty the drip tray carefully and reinsert it.
14. Swing the filter holder to the left and remove it from the filter holder bracket .
Your espresso machine is now ready to use.
Why is there a setting 1-3 on the machine?
With prolonged use the components of the conical grinding mechanism will settle and settings 1-3 will
become more suitable for normal use.
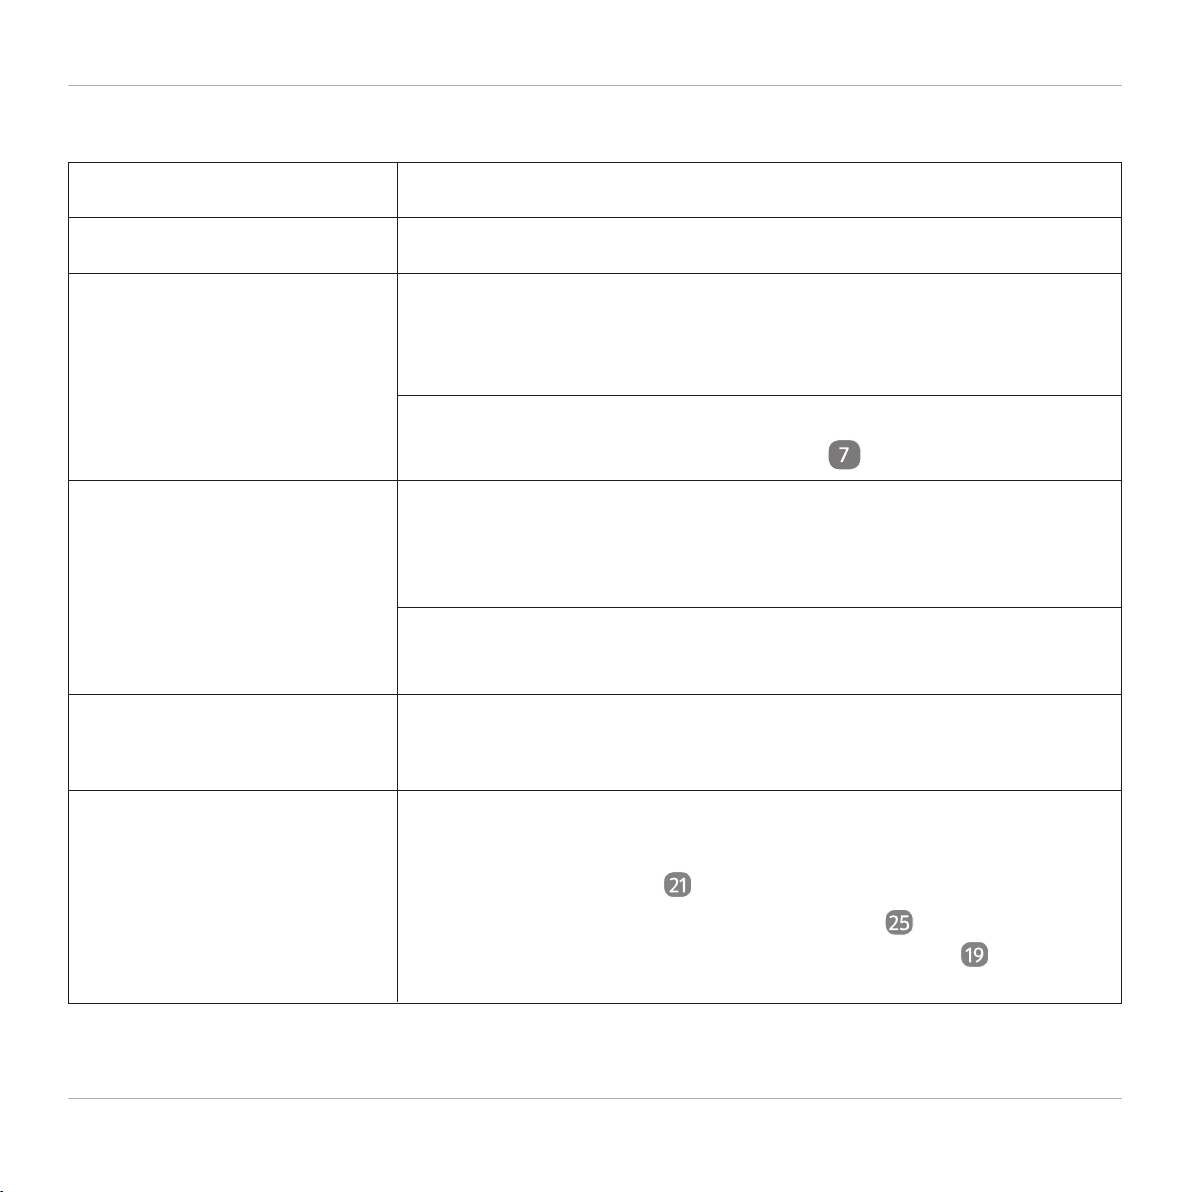
Fresh?
About the pressure gauge
20
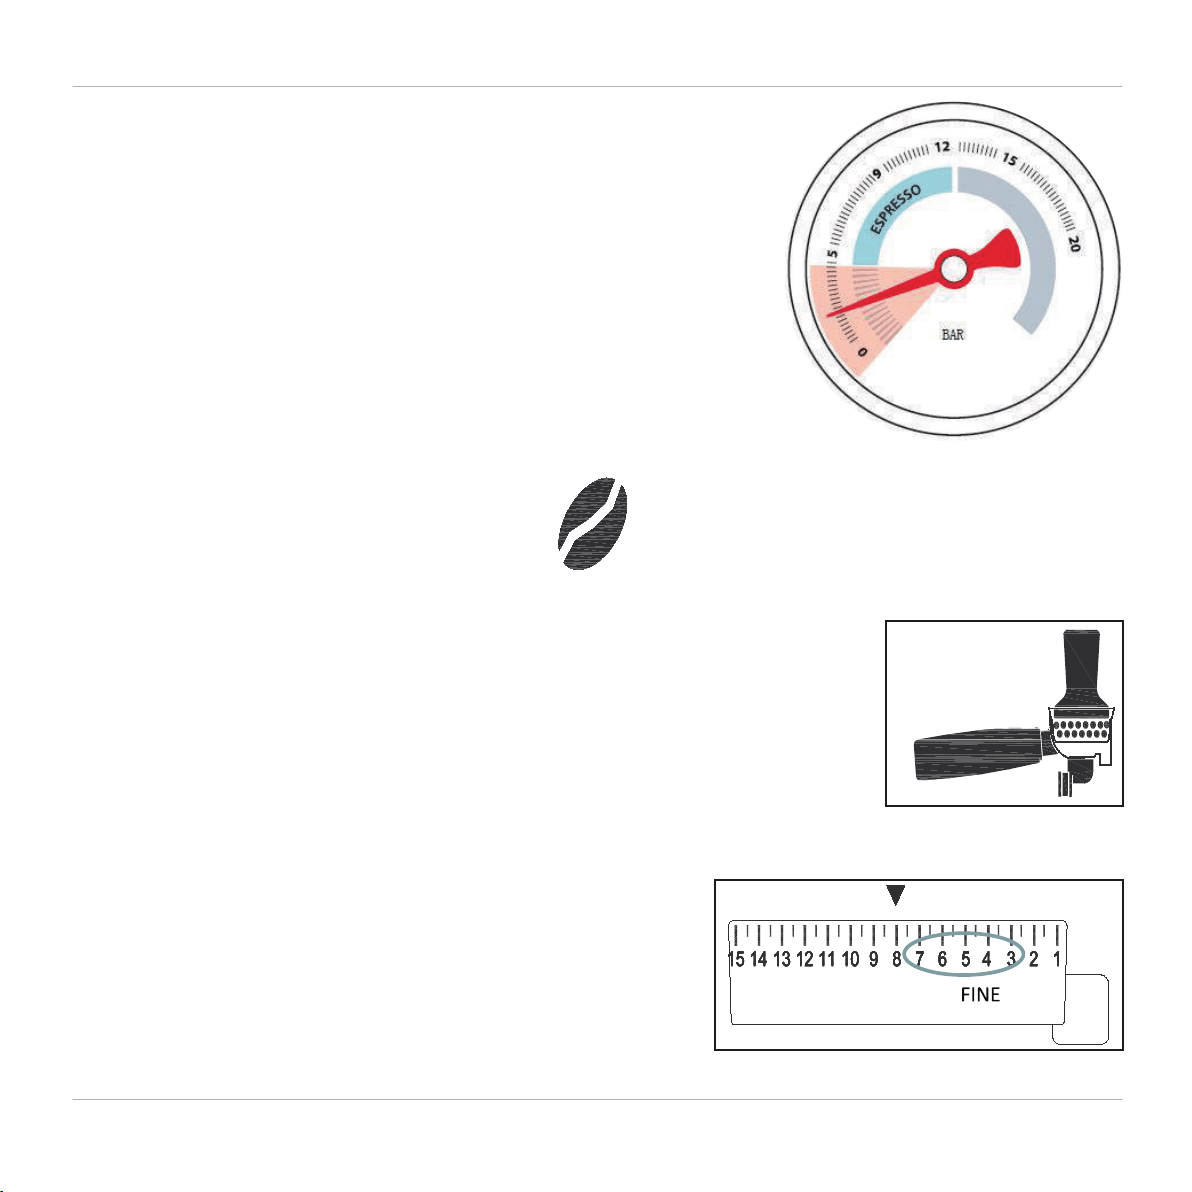
- If the pressure gauge shows a pressure at the range of 0-5bar, it means
that the pressure is too low. The following measures can be taken:
(1) Check if the coee beans used are fresh.
(2) Try increasing the force for tamping the ground coee.
(3) Select a finer grind setting.
More than 15kg
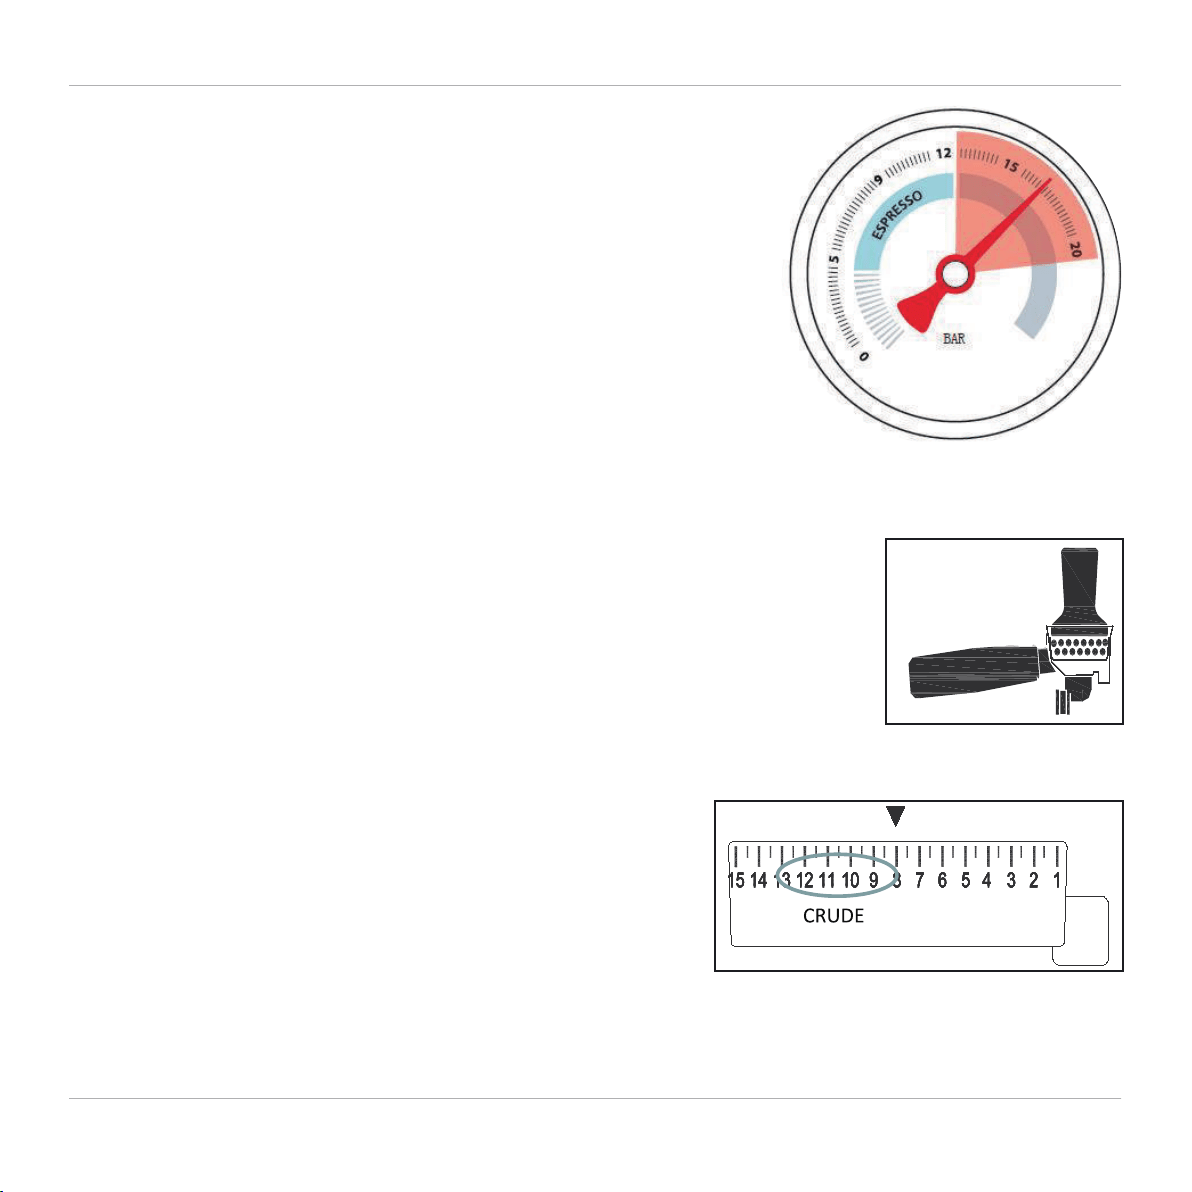
About the pressure gauge
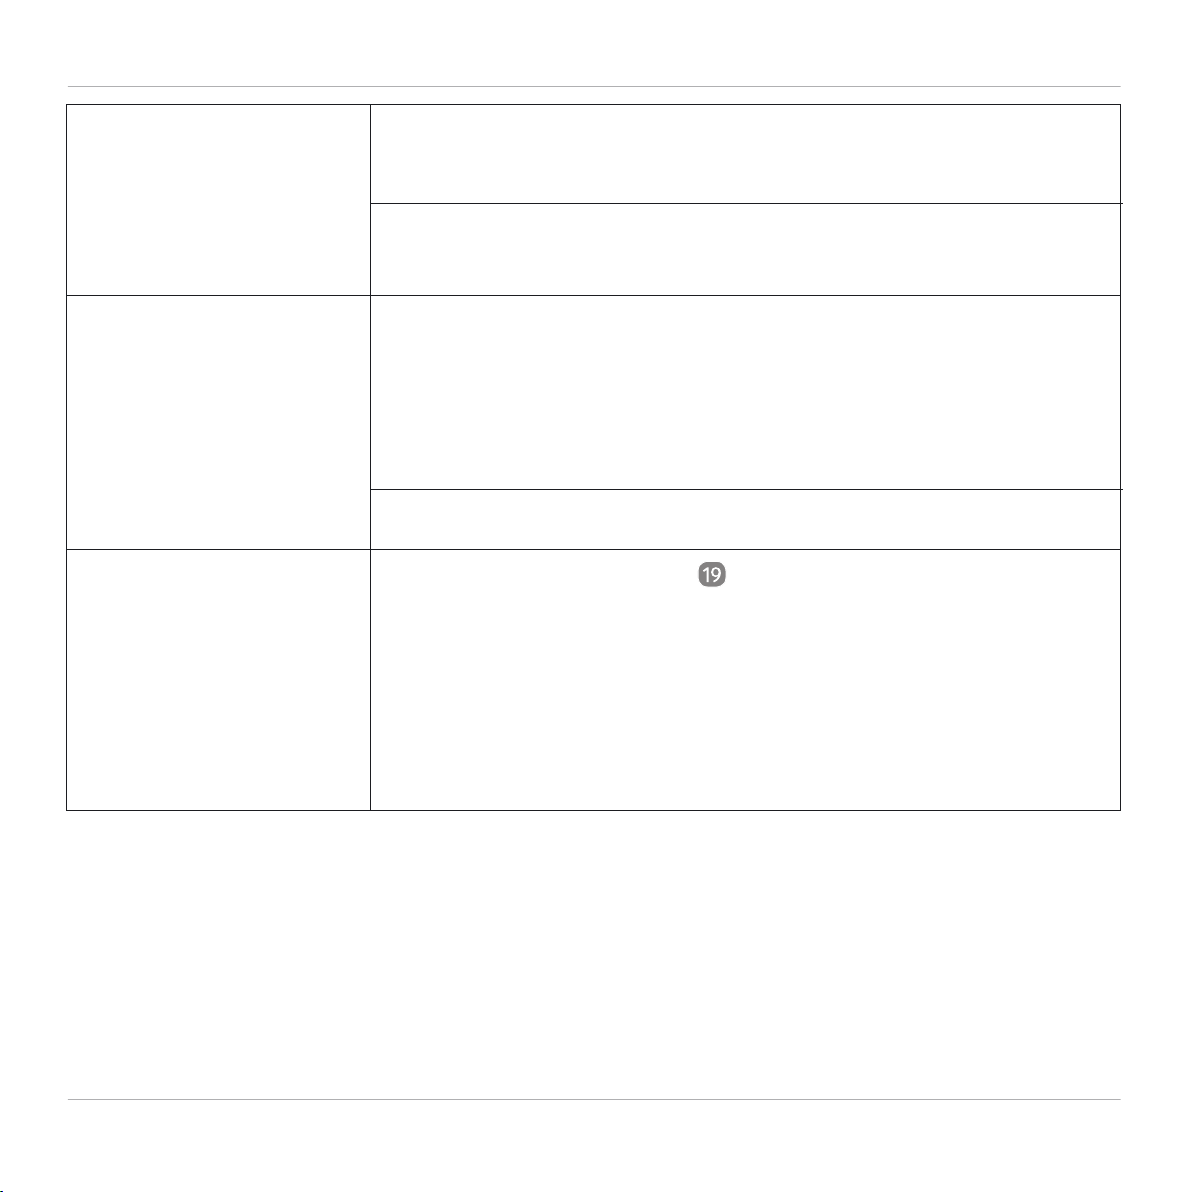
21
(1) Check if the filter is blocked.
(2) Try reducing the force for tamping the ground coee.
(3) Select a coarser grind setting.
- If the pressure gauge shows a pressure at range of 12-20bar, it means
that the pressure is too high. The following measures can be taken:
Less than 10kg

Use
Use
22
Only grind roasted coee beans in this appliance. Do not process any other foods,
such as nuts, spices or liquids, to avoid damaging the appliance.
Please do not operate the appliance when it is empty, i.e. without coee beans.
We recommend always grinding coee beans fresh, shortly before use, not for storing. Coee that is
ground for storing loses its flavor quickly.
The stated quantities and degrees of grinding can dier from your personal taste, so we recommend
that you test various settings, to match your personal taste.
Degree of grinding pre-selection
The degree of grinding is selected by turning the degree of grinding pre-selection . The degree of
grinding is set by matching it to the mark above the scale.
The details about the degree of grinding are guide values.
The coee bean variety and roast, as well as personal preference and preparation are all factors to be
considered.
The degree of grinding of the coee grounds has a significant impact on the brewing time of the espresso in
the brewing filter and on the espresso flavor.
We recommend initially working with setting 8-10 and then adjusting as required.
The degrees of grinding 1-3 are too fine the new grinding
mechanism at the beginning. They should only be used after a certain appliance running time, as the
components of the conical grinding mechanism settle slightly after longer use.
NOTICE!
WARNING!
Preparing espresso
Use
23
Scalding hazard!
If you remove the filter holder while dispensing coee, hot water droplets will spray
from the espresso machine. You may get scalded.
Always make sure that the brewing filters and as well as filter holders are clean and do not
contain any coee residue.
Before brewing espresso for the first time, we recommend that you rinse the brewing unit once, together
with the filter holder and the respective filter ( or ), with hot water. Also pre-heat your cup(s) by
placing them under the filter holder and pressing the button for single espresso . Carefully pour out the
remaining water in the filter holder.
For each subsequent espresso, we recommend only pre-heating the cups using the hot water/steam nozzle
and pressing the HOT WATER button .
01. Check whether there is sucient water in the water tank .
02. For the first grinding process, fill coee beans into the coee bean container and put the lid on.
03. Make sure that the steam volume regulator is switched to OFF.
04. For a single espresso, push the small brewing filter , and for a double, push the large brewing filter
into the filter holder.
To change the filter, it must be pulled out of the filter holder with some force. To do this, pull on the
side of the filter on the filter collar.
Use
24
Only adjust the degree of grinding levels in the direction of “finer” (15->1)during the
grinding process.
08. Turn the degree of grinding pre-selection to the required level. We recommend initially working
with setting 7-10 and then adjusting as required.
Initially, the degrees of grinding 1-3 are too fine with the new grinding mechanism at the
beginning. They should only be used after a certain appliance running time, as the components of the
conical grinding mechanism settle slightly after longer use.
09. Pick up the filter holder and push it straight into the filter holder bracket .
The grinding process is activated by pressing the switch with the filter holder - also see page 15,
“Preparing the grinding mechanism”.
10. Let the grinding process run until the required coee quantity is ground. Afterwards, Then pull the the
filter holder out of the bracket.
With the large brewing filter, you can also prepare two single espressos by placing two cups next to one
another under the filter holder. The MAX marks in both of the brewing filters are intended to assist in identi-
fying the correct quantity of compressed, ground coee more easily.
05. Push the brewing filter ( or ) into the filter holder.
06. Press the ON/OFF button. The grinding mechanism standby indicator will light up. The ON/OFF,
HOT-WATER , single espresso and double espresso buttons will slowly dim on/o.
07. After approx. 20 seconds, the heating process is completed and the buttons will light up continuously.
NOTICE!
Use
25
The grinding process can be interrupted at any time by pulling the filter holder back slightly in the
filter holder bracket.
For a single espresso, you need approx. 11-13g and for a double espresso, approx. 18-21g of ground coee.
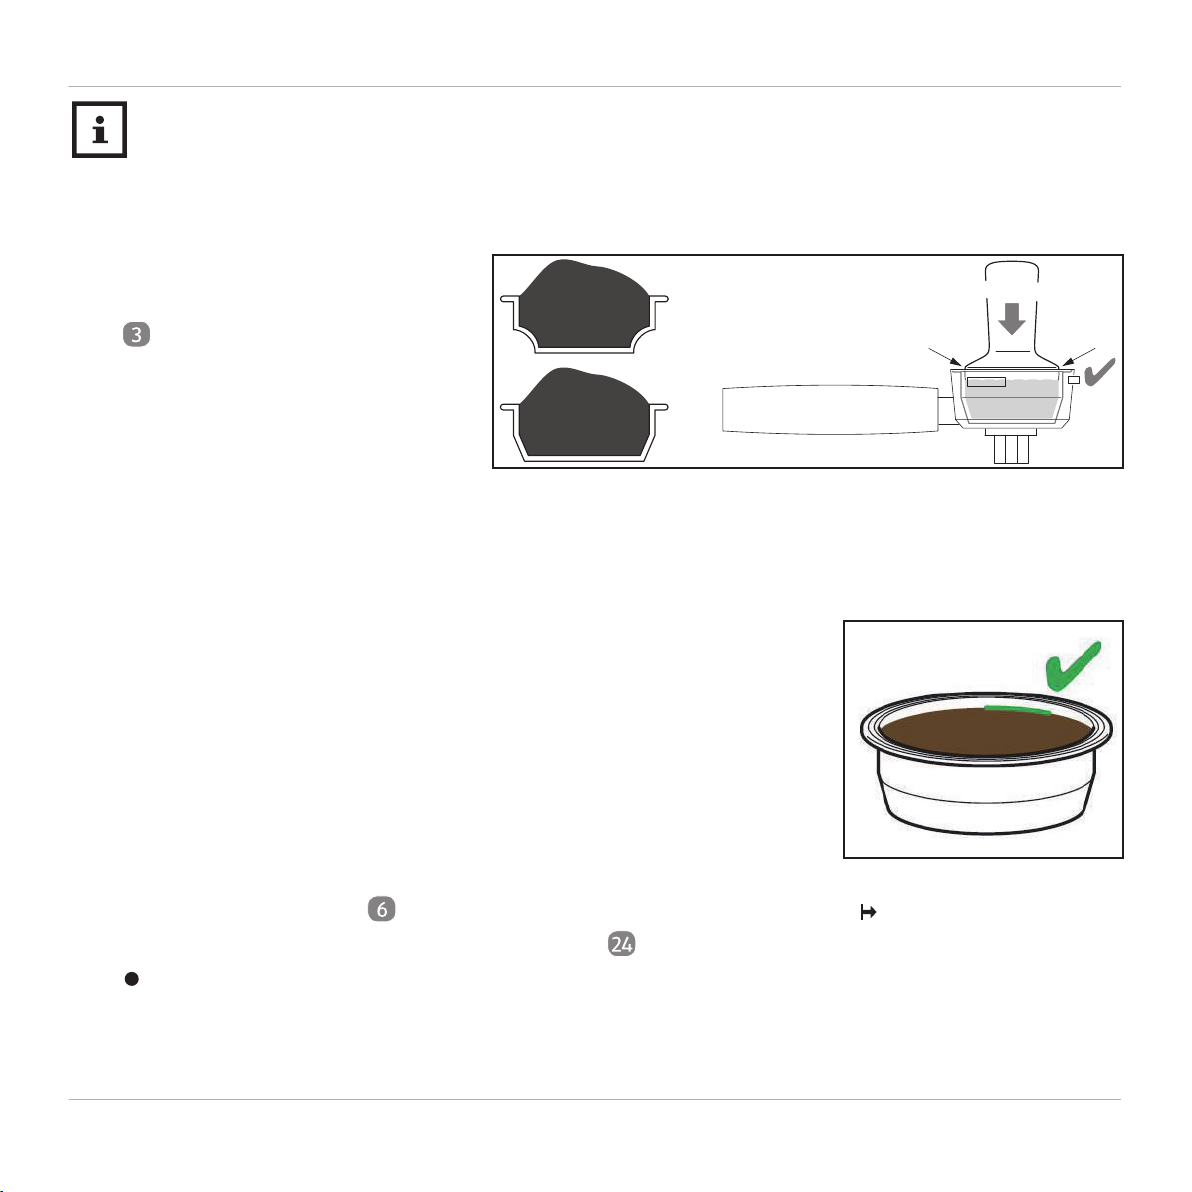
11. Compress the ground coee in
the brewing filter using the tamper
.
Press down forcefully (approx. 5-10KG).
If the top stamp edge is flush with the
brewing filter and the stamp cannot be
pushed in further, the quantity of ground coee is correct.
The MAX marks in both of the brewing filters are intended to assist in identifying the correct quantity of
compressed, ground coee more easily.
It is recommended to tamp the ground coee with a force of 5-10kg, and try
not to tamp the ground coee beyond the MAX mark of the filter, otherwise
the portafilter will not be able to be locked into the portafilter holder.
12. To insert the filter holder align it to the left with the handle at the front to INSERT, then move it
horizontally upwards into the filter holder bracket and turn it to the right as far as it will go to
LOCK.
13. Place cup(s) under the outlets of the filter holder on the draining rack.
Use
26
14. Press the appropriate button for double espresso or single espresso . The button will flash slowly
on/o. The ON/OFF buttons and the standby indicator of the grinding mechanism will light up.
After preparing the espresso, the buttons will light up continuously and you can prepare another espresso.
During preparation, the pressure indicator shows the level of pressure at which the water is being
pressed through the coee.
The best flavour is extracted from the coee when the indicator is in the ESPRESSO range during
preparation.
15. If you want to stop the preparation of the espresso, press the same button with which you started
the preparation.
The buttons light up continuously and you can prepare another espresso.
Scalding hazard!
The metal parts of the filter holder and the brewing filter used become hot during use.
Use
Emptying the brewing filter
27
01. Swing the filter holder to the left and remove it from the filter holder bracket .
Do not use excessive force to release the filter holder.
Be prepared for the weight of the filter holder before releasing it, and use slight upward pressure, so
that the filter holder does not fall out of the bayonet bracket.
02. Preferably knock out the ground coee into organic waste.
If you don't want to prepare any more espresso, clean the filter holder and filter under running water.
Preparing cappuccino/frothy milk
A cappuccino can be prepared by making a single espresso and adding frothed hot milk in a 5-7OZ
cup. Any milk can be frothed (including soya and rice milk). However, with some varieties of milk the
result will be better than with others.
Milk with lower fat content will not froth as easily as milk with a slightly higher fat content. For best results,
we recommend to use milk with a fat content of 1.5 to 3.5%.
Very cold milk is easier to froth than milk that is less cold. Due to the lower temperature, it takes a little
longer for the milk to get heated in the process and that extra time will help to create a richer foam. We
recommended the milk to be at a temperature of approx. 45°F / 8°C.
Do not try frothing milk a second time (risk of scalding).
WARNING!
Use
28
It is recommended to use a small, clean, stainless steel jug. This will allow you to estimate the temperature of
the milk by using your sense of touch. The frothed milk should not be hotter than approx. 140°F. At this
temperature, the container will feel hot but not so hot that you can’t touch it.
Allow the frothed milk to stand for approx. 30 seconds before putting the froth on the espresso. During this
time, larger bubbles will pop and milk that is still liquid will sink to the bottom. This way, the froth will
become even finer.
01. Prepare your espresso in a pre-heated cup.
02. Turn the steam volume controller to PRE-HEAT. The machine will heat up the steam and the light
on the steam volume controller flashes on/o.
03. Align the steam jet/hot water jet with the opening in the draining rack .
04. Slowly turn the steam volume controller to STEAM to let condensation drain away.
05. Then, turn the steam volume controller back to PRE-HEAT.
The control lamp will flash slowly on/o while it’s pre-heating. When the correct temperature is
reached, it will light up continuously.
06. Pour 5-7OZ of cold milk into a cold frothing jug. Ideally, use a jug made of stainless steel.
07. Pick up the frothing jug containing the cold milk and guide the steam nozzle/hot water nozzle
onto the surface of the milk. Hold the frothing jug at a slight angle.
08. Slowly turn the steam volume controller to STEAM.

Use
29
09. You will hear a hissing sound; please make sure that the milk is whirling around. The volume of the
milk will increase over time. Move the container gradually downwards, so that the nozzle is at the
surface of the milk. As soon as the frothing jug heats up, hold the nozzle in the milk and just let the milk
foam roll. The milk foam will then become finer and creamier.
10. Once you have created enough milk foam, or if the milk foam becomes too hot, turn the steam volume
controller to PRE-HEAT.
For best results, allow the frothed milk to stand for approx. 30 seconds before putting the froth on the
espresso.
11. Pour the frothed milk slowly into the prepared espresso.
12. Hold the empty jug under the steam nozzle/hot water nozzle again and turn the steam volume
controller slowly to STEAM. Hold for several seconds. The steam will clean the inside of the steam
nozzle/hot water nozzle.
13. Turn the steam volume controller to OFF and wipe the outside of the steam nozzle/hot water nozzle
with a damp cloth.
After the steam nozzle has been turned OFF, the machine will cool down automatically and is then
immediately ready for preparing another espresso. The drip tray and the draining rack must always
be in position during operation, because steam and hot water will flow into the drip tray. The discharge valve
should not be visible in the rear section above the drip tray.
If you want to repeat the steaming function, it is recommended to leave the steam volume controller on
PRE-HEAT!
Use
Hot water function
30
WARNING!
Scalding hazard!
The water discharged from the steam nozzle/hot water nozzle is extremely hot. You
may get scalded.
01. Connect the power plug to a socket. A beep tone will sound.
02. Press the ON/OFF button.
The grinding mechanism standby indicator will light up and the HOT-WATER buttons , the button
for single espresso and the button for double espresso will slowly dim on/o.
After approx. 20 seconds, the heating process is completed and the buttons will light up continuously.
03. Press the HOT-WATER button . The button flashes slowly on/o. The buttons for single and
double espresso will go out.
04. Hold an empty cup under the steam nozzle/hot water nozzle.
05. If you want to stop the preparation of hot water, press the button again.
Emptying the drip tray
The drip tray has an indicator that shows when the drip tray is full.
If the drip tray level indicator protrudes from of the drip tray, you must empty the drip tray.
Use
Change water quantity for coee preparation
31
You can adapt the quantity of water and thereby adapt the quantity of espresso for the single or
double espresso.
A minor change of the quantity is possible during preparation:
01. Switch the espresso machine on and let it heat up.
02. Press the buttons for single and double espresso simultaneously and hold for 5 seconds. The button for
hot water will turn o and the buttons for single and double espresso will flash.
03. Place your espresso cup under the filter holder that has been filled with ground coee
(see page 23 “Preparing espresso”).
04. To prepare espresso with an adjusted quantity of water, press the button for single espresso or
double espresso as appropriate.
05. As soon as your approximate target quantity is reached, press the respective button again. Wait until
no more coee is dripping into the cup before removing it.
06. Press the HOT-WATER button to save this water quantity for future use.
To restore the espresso quantity factory setting, keep the appropriate espresso button ( or )
pressed for 5 seconds. The button will flash twice for confirmation.
Use
Water tank empty
32
If the water tank is empty or if it is emptied during preparation, a beep tone will sound three times and the
buttons will light up red. In this case, fill the water tank as appropriate. Please note the MAX mark.
In this case, fill water into the water tank. Please note the MAX mark.
Switching o the espresso machine
Press the ON/OFF button .
Electric shock hazard!
The ON/OFF button does not disconnect the espresso machine from the power supply.
The espresso machine will switch to stand-by mode approx. 20 minutes after it was last used. Press any
button to activate the pre-heating.
WARNING!
WARNING!
Cleaning
Cleaning
33
NOTICE!
NOTICE!
Electric shock hazard!
Incorrect handling of the appliance can cause an electric shock.
� Do not immerse the appliance, the power cable or the power plug into water or other liquids.
� Remove the power plug from the socket before cleaning the product.
� Allow the device to cool down completely before cleaning it.
Risk of damage!
Improper handling of the article can result in damage.
� To clean the outer surfaces, only use a soft, damp cloth with a small amount of washing-up liquid. Never
use scouring agents or abrasive brushes and sponges.
� Never clean the surfaces with alcohol, petrol or similar fluids.
Risk of damage!
ALL parts of the espresso machine are NOT suitable for the dishwasher.
Cleaning
Cleaning the grinding mechanism
34
NOTICE!
The grinding mechanism must be removed from the espresso machine for cleaning.
01. Always switch the espresso
machine o and remove the
power plug. Allow it to cool
down completely.
02. Remove the coee bean
container in an
anti-clockwise and upward
motion.
03. Turn the degree of grinding pre-selection to level 15.
04. Press the unlocking button (top left next to the grinding mechanism, below the symbol ) and
turn the grinding mechanism Clockwise to release it via the engagement position, and pull it out in a
downward motion.
Risk of damage!
The grinding mechanism must not be cleaned with a damp cloth.
Never use hard objects to clean the grinding mechanism.
05. Turn the grinding mechanism upside-down and rotate the coee distributor clockwise( ),
to release it from the grinding mechanism via the locking position and remove it.
06. Clean all accessible parts of the grinding mechanism and the coee distributor carefully using the
cleaning brush .
ON/OFF
HOT-WATER
SINGLE
DOUBLE
Cleaning
35
When coee beans are ground, they release some oil which leaves a residue in the grinding chamber. This
coee oil needs to be removed on a regular basis using the brush.
You can also vacuum the grinding mechanism carefully with a vacuum cleaner.
07. Set the coee distributor on the grinding mechanism and turn it anti-clockwise( ) to lock
it in via the engagement position.
The device cannot be operated without the coee distributor.
08. Re-insert the grinding mechanism as follows:
- Hold the grinding mechanism and turn the degree of grinding
pre-selection against the grinding mechanism as shown, as far as it
will go.
- Insert the grinding mechanism into the espresso machine as illustrated.
- Now, turn the grinding mechanism anti-clockwise (seen form the top)
to let it engage.
09. Insert the coee bean container 1, also see under prepare grinding mechanism.

Cleaning
36
WARNING!
Cleaning the brewing filter
Empty the brewing filter after each use and rinse it well with water before refilling it.
Daily cleaning
01. Wash the brewing filter thoroughly with dish soap and water, then rinse all parts with clean water.
02. Empty the drip tray, rinse it out and let it dry.
Clean steam nozzle/hot water nozzle
Scalding hazard!
The water discharged from the steam nozzle/hot water nozzle is extremely hot. You may get scalded.
We recommend to soak steam nozzle/hot water nozzle in warm water before cleaning it.
The bottom end of the steam nozzle/hot water nozzle can be unscrewed anti-clockwise for cleaning.
Before cleaning, it can be soaked in water.
01. Clean the outlet aperture with the cleaning needle .
02. Clean the steam nozzle/hot water nozzle with a damp cloth.

Descaling the espresso machine
Descaling the espresso machine
37
Over time, (hard) water will deposit lime scale in dierent parts and components of the espresso
machine and aect its performance as it impairs the water flow and brewing temperature, among
others. It is therefore very important to regularly descale your machine. If you live in an area with very hard
water, you will need to descale more often than in an area with softer water.
The hardness of the mains water can be tested with the test strip included in the scope of supply or it can be
requested from the local water management authority.
To use the test strip: Hold the test strip under the flowing water of your faucet for approx. 1 second. Let test
strip dry for 15 seconds, then check the color on the test strip against the back of the test strip packet to find
out whether your water is soft, hard or very hard.
You should descale your machine at the following intervals.
- soft water: every 6 months;
- hard water: every 3 months;
- very hard water: every month.
If the machine has run 1000 cycles without having been descaled, the buttons will flash red twice with a
pause in between.
The machine must then be descaled before further use. Use a commercially available descaling product on
the basis of citric acid, or the descaling granules contained in the scope of delivery (citric acid). Please follow
the instructions on the descaling product carefully.

Descaling the espresso machine
38
01. Remove any water from the water tank and fill it with the prepared descaling product up to the MAX
mark.
02. Place an appropriate container (with the same volume as the water tank) on the draining rack under
the filter holder and under the steam nozzle/hot water nozzle.
03. Switch the espresso machine on.
04. Keep the HOT-WATER button pressed for 5 seconds and turn the steam volume controller to
STEAM. The button for hot water will turn o and the buttons for single and double espresso will flash.
The cleaning process has now started and will last for approx. 15 minutes.
05. Repeat the cleaning process with clean water, to completely remove the descaling product.
Storage
01. Empty the water tank and the drip tray and clean the espresso machine thoroughly.
02. Store the power cable in the compartment on the back of the appliance.
Store the espresso machine in a dry, frost-free and dust-free place.
Descaling signal/Insucient water signal
Descaling signal
Insucient water signal
39
If the four indicators flash red twice in consecutive order when the machine is
turned on (as illustrated), it means that the machine has been running for
1000 working cycles and this is a reminder that descaling is required. This
does not aect normal operation. The signal will be cancelled as soon as a
descaling cycle is completed (the machine will recognize the descaling cycle
from its length of operation).
When the machine has four indicators flashing red simultaneously, it means
there is insucient water in the water tank. When enough water is added, the
water level sensor will be activated and the signal stops automatically.
Troubleshooting
Troubleshooting
40
Fault ossible cause and solution
Machine is not functioning
Water is escaping from the
side of the filter holder.
Too much ground coee in the brewing filter.
Remove the filter holder, clean the rim with a small sponge and check
the coee quantity.
Espresso is not hot enough. Rinse through the brewing unit once without the filter holder. To do this,
place a wide coee cup under the filter holder bracket and press the
button for single espresso . Pre-heat the espresso cup. To do this place
the cup under the steam nozzle/hot water nozzle , fill it with hot water
and let it warm up by pressing the HOT-WATER button .
Espresso is not strong enough. Reduce the level of the degree of grinding pre-selection or compress the
ground coee in the brewing filter with more force.
There are coee grounds on the gasket of the filter holder bracket.
Remove any coee residues.
No steam;
No coee flow.
No power. Insert the power plug into a live socket
Not enough water in the water tank, or the pump is unable to pump
water from the tank. Check whether the water tank is suciently filled
and correctly attached.
The steam nozzle/hot water nozzle is blocked. Soak the steam nozzle in
water and clean it with the cleaning needle .
Troubleshooting
41
After switching on the
espresso machine, only the
ON/OFF button lights up
and not all four round
illuminated buttons.
The appliance is not heating
up.
Set the steam volume controller to “OFF” position. Otherwise, the
steam unit will only heat up the steam nozzle.
Grinding mechanism not
functioning. The standby
indicator for the grinding
mechanism is flashing red.
The grinding mechanism has a temperature protection device. Please
switch the appliance o, as soon as the grinding mechanism has become
too hot and the standby indicator for the grinding mechanism is flashing
red. Remove the power plug from the socket and allow the appliance to
cool down for at least 5-10 minutes.
The grinding mechanism has been removed or is not engaged correctly.
Water is escaping from the
side of the filter holder.
Increase the level of the degree of grinding pre-selection, or compress the
ground coee with less force in the brewing filter.
The machine is aected by lime scale. Descale the machine
(see page 37, Descaling the espresso machine).
Technical data/Disposal
Technical data
Mains voltage: 120V~ 60Hz
Power consumption: 1500W
Water pump pressure: Max.20 bar
Water tank capacity: 91OZ
Coee bean container capacity: approx. 9 OZ
Protection class:
Disposal
Disposing of packaging and appliance
Sort the packaging materials as appropriate for recycling purposes. Dispose of cardboard and card
with other waste paper, and foil materials as indicated by your local recycling collection point.
Appliances should not be disposed of with household waste!
If the appliance is no longer usable, it should be disposed of separately to normal household waste. It should
be taken to a collection center in your local authority area. This ensures that appliances are recycled correctly
and any harm to the environment is minimized.
Contact us
Should you have any questions or problems that cannot be resolved with the help of the troubleshooting
section in this user manual, our friendly customer service team is available at any time to assist you.
We won’t be happy until you are! Please contact us on:
support@sincreative.com
42