Indoor 7 Day Digital Timer
Installation and User Instructions
MODEL DT121K/DT122K
• 125 VAC, 60 Hz, 15 A, 1875 W Resistive
• 15A General Use
• 8 A, 1000 W Tungsten, 500 VA Electronic Ballast
• 1/2 HP Motor Load
• 120 VAC, 60Hz, 8.3 A Magnetic Ballast
Ratings
2. In case of a display failure, press RESET button to restart the timer.
Reset
P
r
o
g
r
a
m
+
-
T
i
m
e
e
s
R
u
m
e
M
o
d
e
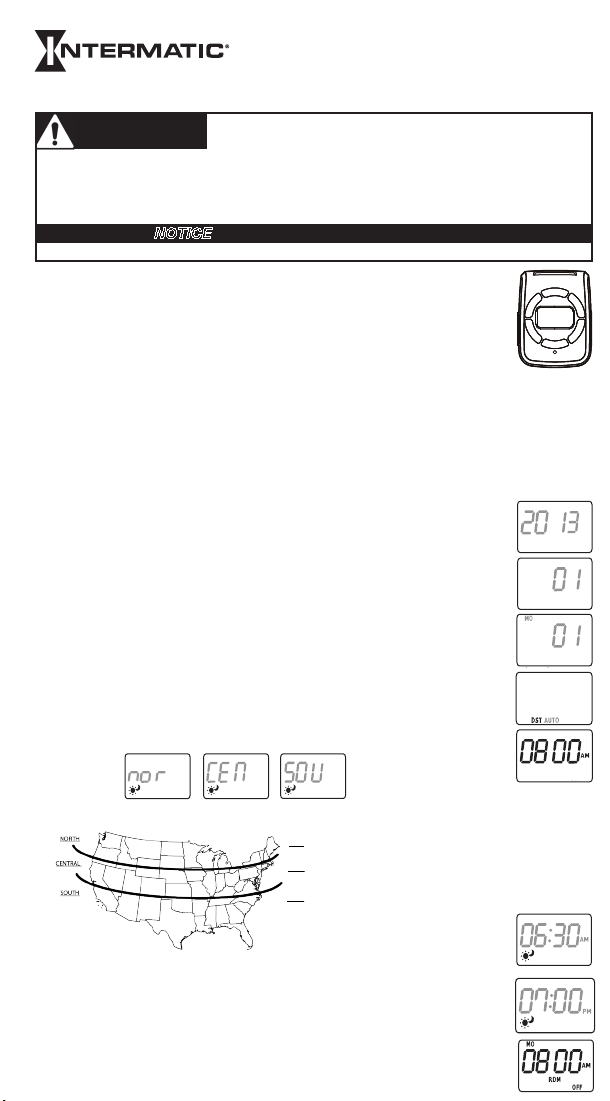
Setting Time, Date, Daylight Saving Time, and Region
NOTE: When setting the timer, if you pause for more than 30 seconds, the timer
will automatically return to normal time of day display.
1. Press TIME. A flashing 4-digit year appears.
2. Press
+ or - to set the current year and then press TIME.
3. Press
+ or - to set the month (01=Jan, 12=Dec) and then press TIME.
4. Press
+ or - to set the day of the month.
5. Press TIME to set (DST) Daylight Saving Time function.
6. Press
+ or - to select AUTO (AUTO DST adjust enabled) or OFF (DST disabled).
NOTE: DST enables the timer to automatically move ahead 1 hour on the second
Sunday in March at 02:00am and then automatically adjust back 1 hour on first
Sunday in November at 02:00am.
7. Press TIME. The hour digit flashes.
8. Press
+ or - to set the current hour, then press TIME. The minute digit
flashes.
9. Press
+ or - to set the minute, then press TIME.
10. Press
+ or - to set your current region.
Plug the timer into an AC outlet for at least 30 minutes to charge the internal battery. If the display
is not visible, press RESET to restart the timer and erase all settings and events. You may unplug the
timer from AC outlet for easier setting.
IMPORTANT: Read Before Initial Use
1. NORTH: 2. CENTRAL: 3. SOUTH:
The map below will determine what zone the timer is being used.
1. NORTH: 3. SOUTH:2. CENTRAL:
nor
CEN
SOU
The map below will determine what zone the timer is being used in.
Once the zone is
selected the timer
will automatically set
the sunrise and
sunset time.
4. Press the Time button again to set the Day Light Savings Time (DST) fuction.
Press button “+” or “-” to adjust the number from 00 to 59.
7. Press the Time button again to set the Astronomic function.
Sunday of the first week in November at 02:00am every year.
Setting the Timer Operating Mode
1. Press MODE to scroll to the desired operting mode. See below for a description of each mode.
ON - Manual ON mode is selected. The device will stay ON.
AUTO ON: AUTOMATIC mode is selected and the device is ON. The device will stay ON until the
next OFF event.
RDM ON: RANDOM mode is selected and the device is ON. The device will stay ON until the next
OFF event.
NOTE: When RDM (RANDOM MODE) is selected, the device will operate ±30 minutes from the
scheduled ON/OFF event settings to provide a lived-in look.
OFF: Manual OFF mode is selected. The device will stay OFF.
AUTO OFF: AUTOMATIC mode is selected and the device is OFF. The device will stay OFF until the
next ON event.
RDM OFF: RANDOM mode is selected and the device is OFF. The device will stay OFF until the next
ON event.
2. Plug desired device into timer.
3. Plug the timer into the electrical outlet.
Setting/Reviewing/Changing the ON/OFF Events
1. Press PROGRAM to access the ON/OFF Event Screens.
2. To set your timer the first time go to step 4. You will be setting ON event # 1.
3. To Review existing ON/OFF settings, repeatedly press PROGRAM to see up to 7 ON/OFF event
pairs. Dashes mean the displayed event is not set. To delete an unwanted event press RESUME.
To change an event, go to step 4. To exit the Event setting mode, press MODE once or press
PROGRAM repeatedly until the event number disappears or wait 30 seconds for timer to
automatically return to the main screen.
4. If dashes are displayed, press TIME to change the dashes to an event with flashing day(s). Note
that the events are numbered 1 thru 7, ON or OFF.
5. Press + or - to select the (flashing) day(s) on which the displayed event should run:
-One day only: Select “MO” or “TU” or “WE” … or “SU”, etc.
-Everyday: Select “MO TU WE TH FR SA SU”
-Weekdays only: Select “MO TU WE TH FR”
-Weekend only: Select “SA SU”
6. Press TIME to make the hour digits flash. To set this event to occur at a specific time of day, skip
to step 9. To set this event to happen at sunrise or sunset, proceed to step 7.
7. Press + or - to scroll to one of the 2 screens with moon and sun icons flashing and AM or PM
flashing. AM plus icons screen means this event will happen at Sunrise. PM plus icons means this
event will happen at Sunset.
8. Press PROGRAM to accept the Sunrise/Sunset setting and advance to the next event screen. To
add more events, go back to step 4. If all desired events have been set go to step 14.
9. Press + or - to scroll to the desired starting hour for the event.
10. Press TIME to make the minute digits flash.
11. Press + or - to scroll to the desired starting minute for the event.
12. Press PROGRAM to advance to the next event screen.
13. Repeat steps 4 thru 13 until all desired ON/OFF events have been set.
14. Repeat step 3 to check all your settings and exit the event setting mode.
Press the Time button again to adjust the Sunset time.
Press the Time button again to adjust the Sunrise time.
11. Press TIME to access the AM sunrise time screen.
12. Press
+ or - to adjust (±2 hours) the sunrise operating time to match your local
sunrise time.
NOTE: Press RESUME to return to the original sunrise time.
13. Press TIME to access the PM Sunset time screen.
14. Press
+ or - to adjust (±2 hours) the sunset operating time to match your local
sunset time.
NOTE: Press RESUME to return to the original sunset time.
15. Press TIME to return to the time (main) screen.
LIMITED ONE-YEAR WARRANTY
If within the warranty period specied, this product fails due to a defect in material or workmanship,
Intermatic Incorporated will repair or replace it, at its sole option, free of charge. This warranty is
extended to the original household purchaser only and is not transferable. This warranty does not
apply to: (a) damage to units caused by accident, dropping or abuse in handling, acts of God or
any negligent use; (b) units which have been subject to unauthorized repair, opened, taken apart or
otherwise modied; (c) units not used in accordance with instructions; (d) damages exceeding the
cost of the product; (e) sealed lamps and/or lamp bulbs, LED’s and batteries; (f) the nish on any
portion of the product, such as surface and/or weathering, as this is considered normal wear and tear;
(g) transit damage, initial installation costs, removal costs, or reinstallation costs.
INTERMATIC INCORPORATED WILL NOT BE LIABLE FOR INCIDENTAL OR CONSEQUENTIAL DAMAGES.
SOME STATES DO NOT ALLOW THE EXCLUSION OR LIMITATION OF INCIDENTAL OR CONSEQUENTIAL
DAMAGES, SO THE ABOVE LIMITATION OR EXCLUSION MAY NOT APPLY TO YOU. THIS WARRANTY IS
IN LIEU OF ALL OTHER EXPRESS OR IMPLIED WARRANTIES. ALL IMPLIED WARRANTIES, INCLUDING THE
WARRANTY OF MERCHANTABILITY AND THE WARRANTY OF FITNESS FOR A PARTICULAR PURPOSE,
ARE HEREBY MODIFIED TO EXIST ONLY AS CONTAINED IN THIS LIMITED WARRANTY, AND SHALL BE
OF THE SAME DURATION AS THE WARRANTY PERIOD STATED ABOVE. SOME STATES DO NOT ALLOW
LIMITATIONS ON THE DURATION OF AN IMPLIED WARRANTY, SO THE ABOVE LIMITATION MAY NOT
APPLY TO YOU.
This warranty service is available by either (a) returning the product to the dealer from whom the
unit was purchased or (b) completing a warranty claim online at www.intermatic.com.
This warranty is made by: Intermatic Incorporated, Customer Service 7777 Winn Rd., Spring
Grove, Illinois 60081-9698. For warranty service go to: http://www.Intermatic.com or call 815-
675-7000.
NOTICE
WARNING
Risk of Fire or Electrical Shock
• Do not plug this timer into an extension cord.
• Always plug 3-prong plug directly into a properly grounded outlet. Never attempt to defeat this safety feature.
• Do not use timer to control devices that could have dangerous consequences due to inaccurate timing, such as
sun lamps, sauna, heaters, crock pots, etc.
• Follow all local electrical codes during use.
• No user serviceable parts inside.
4. Press the Time button again to set the Day Light Savings Time (DST) fuction.
Press button “+” or “-” to adjust the number from 00 to 59.
7. Press the Time button again to set the Astronomic function.
Sunday of the first week in November at 02:00am every year.
Minuterie numérique
intérieure 7 jours
Instructions d’installation et mode d’emploi
MODÈLE DT121K/DT122K
• 125 V c.a., 60 Hz, 15 A, 1875 W résistif
• 15A usage général
• 8 A, 1000 W tungstène, 500 VA ballast électronique
• 1/2 HP moteur
• 120 V c.a., 60 Hz, 8,3 A ballast magnétique
Caractéristiques
2. In case of a display failure, press RESET button to restart the timer.
Reset
P
r
o
g
r
a
m
+
-
T
i
m
e
e
s
R
u
m
e
M
o
d
e
Régler l’heure, la date, l’heure d’été et la région
REMARQUE: Durant le réglage de la minuterie, s’il s’écoule plus de 30 secondes
d’inactivité, la minuterie retourne automatiquement à l’affichage normal de l’heure de
la journée.
1. Appuyer sur TIME. L’année à 4 chiffres s’affiche en clignotant.
2. Appuyer sur + ou - pour sélectionner l’année en cours puis appuyer sur TIME.
3. Appuyer sur + ou - pour régler le mois (01=jan, 12=déc) puis appuyer sur TIME.
4. Appuyer sur + ou - pour régler le jour du mois.
5. Appuyer sur TIME pour régler la fonction d’heure d’été (DST).
6. Appuyer sur + ou - pour sélectionner AUTO (AUTO DST activé) ou OFF (DST désactivé).
REMARQUE: Lorsque la fonction DST est activée, la minuterie avance
automatiquement de 1 heure de deuxième dimanche de mars à 2h00 du matin et
revient de 1 heure en arrière le premier dimanche de novembre à 2h00.
7. Appuyer sur TIME. Les chiffres du heures clignotent.
8. Appuyer sur + ou - pour sélectionner l’heure en cours puis appuyer sur TIME. Les
chiffres du minutes clignotent.
9. Appuyer sur + ou - pour régler les minute puis appuyer sur TIME.
10. Appuyer sur + ou - pour sélectionner la région d’installation.
Brancher la minuterie dans une prise de courant secteur pendant au moins 30 minutes pour charger la batterie
interne. Si l’affichage n’est pas visible, appuyer sur RESET pour redémarrer la minuterie et effacer tous les
réglages et événements. La minuterie peut être débranchée de la prise de courant pour faciliter les réglages.
IMPORTANT : à lire avant la première utilisation
1. NORTH: 2. CENTRAL: 3. SOUTH:
The map below will determine what zone the timer is being used.
1. NORD: 3. SUD:2. CENTRE:
4. Press the Time button again to set the Day Light Savings Time (DST) fuction.
Press button “+” or “-” to adjust the number from 00 to 59.
7. Press the Time button again to set the Astronomic function.
Sunday of the first week in November at 02:00am every year.
Configurer/examiner/modifier les événements ON/OFF
1. Appuyer sur PROGRAM pour accéder aux écrans d’événements ON/OFF.
2. Pour régler la minuterie la première fois, aller à l’étape 4. Cela configurera l’événement ON n° 1.
3. Pour examiner les réglages ON/OFF, appuyer de façon répétée sur PROGRAM pour afficher jusqu’à 7
paires d’événements ON/OFF. Les tirets signifient que l’événement n’est pas configuré. Pour supprimer un
événement, appuyer sur RESUME. Pour modifier un événement, aller à l’étape 4. Pour quitter le mode de
configuration des événements, appuyer une fois sur MODE ou appuyer de façon répétée sur PROGRAM
jusqu’à ce que le numéro d’événement disparaisse ou patienter 30 secondes que la minuterie revienne
automatiquement à l’écran principal.
4. Si des tirets s’affichent, appuyer sur TIME pour change les tirets en événement avec le(s) jour(s)
clignotant(s). On notera que les événements sont numérotés de 1 à 7, ON ou OFF.
5. Appuyer sur
+ ou - pour sélectionner le(s) jour(s) (clignotants) où l’événement affiché doit s’exécuter:
- Un seul jour: Sélectionner «MO», «TU», «WE» … ou «SU»
- Tous les jours: Sélectionner «MO TU WE TH FR SA SU»
- Jours de semaine seulement: Sélectionner «MO TU WE TH FR»
- Fins de semaine seulement: Sélectionner «SA SU»
6. Appuyer sur TIME pour faire clignoter les chiffres des heures. Pour régler l’événement sur une heure
spécifique de la journée, passer directement à l’étape 9. Pour régler l’événement sur le lever ou le
coucher du soleil, passer à l’étape 7.
7. Appuyer sur + ou - pour avancer jusqu’à l’un des 2 écrans avec les icônes de lune et de soleil
clignotantes et AM ou PM clignotant. L’écran avec AM et ces icônes signifie que l’événement se produira
au lever du soleil. L’écran avec PM et ces icônes signifie qu’il se produira au coucher du soleil.
8. Appuyer sur PROGRAM pour accepter le réglage de lever/coucher du soleil et passer à l’écran de
l’événement suivant. Pour ajouter d’autres événements, revenir à l’étape 4. Si tous les événements
souhaités sont configurés, aller à l’étape 14.
9. Appuyer sur + ou -pour avancer jusqu’à l’heure de début souhaitée pour l’évènement.
10. Appuyer sur TIME pour faire clignoter les chiffres des minutes.
11. Appuyer sur + ou - pour avancer jusqu’à la minute de début souhaitée pour l’évènement.
AVIS
AVERTISSEMENT
Risque d’incendie ou de choc électrique
•
Ne pas brancher cette minuterie sur un cordon de rallonge.
•
Toujours brancher la fiche à trois broches directement dans une prise correctement mise à la terre. Ne jamais tenter d’aller à
l’encontre de ce dispositif de sécurité.
•
Ne pas utiliser la minuterie pour contrôler des appareils qui pourraient avoir de dangereuses conséquences en raison d’un calcul
de temps inexact, tels que lampes solaires sauna, appareils de chauffage, mijoteuses, etc.
•
Respecter tous les codes d’électricité locaux pendant l’emploi.
•
Ne contient aucune pièce réparable par l’utilisateur.
nor
CEN
SOU
Une fois la zone
sélectionnée, la minuterie
définiti automatiquement
l’heure de lever et de
coucher du soleil.
Press the Time button again to adjust the Sunset time.
Press the Time button again to adjust the Sunrise time.
11. Appuyer sur TIME pour accéder à l’écran d’heure de lever du soleil.
12. Appuyer sur + ou - pour adapter (de ± 2 heures) l’heure de lever du soleil de la
minuterie sur le lever du soleil local.
REMARQUE: Appuyer sur RESUME pour retourner à l’heure originale de lever du soleil.
13. Appuyer sur TIME pour accéder à l’écran d’heure de coucher du soleil.
14. Appuyer sur + ou - pour adapter (de ± 2 heures) l’heure de coucher du soleil de la
minuterie sur le coucher du soleil local.
REMARQUE: Appuyer sur RESUME pour retourner à l’heure originale de coucher du
soleil.
15. Appuyer sur TIME pour retourner à l’écran (principal) de l’heure.
4. Press the Time button again to set the Day Light Savings Time (DST) fuction.
Press button “+” or “-” to adjust the number from 00 to 59.
7. Press the Time button again to set the Astronomic function.
Sunday of the first week in November at 02:00am every year.
La carte ci-dessous permet d’identifier la zone d’utilisation de la minuterie.
NORD
CENTRE
SUD

Indoor 7 Day Digital Timer
Installation and User Instructions
MODEL DT121K/DT122K
• 125 VAC, 60 Hz, 15 A, 1875 W Resistive
• 15A General Use
• 8 A, 1000 W Tungsten, 500 VA Electronic Ballast
• 1/2 HP Motor Load
• 120 VAC, 60Hz, 8.3 A Magnetic Ballast
Ratings
2. In case of a display failure, press RESET button to restart the timer.
Reset
P
r
o
g
r
a
m
+
-
T
i
m
e
e
s
R
u
m
e
M
o
d
e
Setting Time, Date, Daylight Saving Time, and Region
NOTE: When setting the timer, if you pause for more than 30 seconds, the timer
will automatically return to normal time of day display.
1. Press TIME. A flashing 4-digit year appears.
2. Press
+ or - to set the current year and then press TIME.
3. Press
+ or - to set the month (01=Jan, 12=Dec) and then press TIME.
4. Press
+ or - to set the day of the month.
5. Press TIME to set (DST) Daylight Saving Time function.
6. Press
+ or - to select AUTO (AUTO DST adjust enabled) or OFF (DST disabled).
NOTE: DST enables the timer to automatically move ahead 1 hour on the second
Sunday in March at 02:00am and then automatically adjust back 1 hour on first
Sunday in November at 02:00am.
7. Press TIME. The hour digit flashes.
8. Press
+ or - to set the current hour, then press TIME. The minute digit
flashes.
9. Press
+ or - to set the minute, then press TIME.
10. Press
+ or - to set your current region.
Plug the timer into an AC outlet for at least 30 minutes to charge the internal battery. If the display
is not visible, press RESET to restart the timer and erase all settings and events. You may unplug the
timer from AC outlet for easier setting.
IMPORTANT: Read Before Initial Use
1. NORTH: 2. CENTRAL: 3. SOUTH:
The map below will determine what zone the timer is being used.
1. NORTH: 3. SOUTH:2. CENTRAL:
nor
CEN
SOU
The map below will determine what zone the timer is being used in.
Once the zone is
selected the timer
will automatically set
the sunrise and
sunset time.
4. Press the Time button again to set the Day Light Savings Time (DST) fuction.
Press button “+” or “-” to adjust the number from 00 to 59.
7. Press the Time button again to set the Astronomic function.
Sunday of the first week in November at 02:00am every year.
Setting the Timer Operating Mode
1. Press MODE to scroll to the desired operting mode. See below for a description of each mode.
ON - Manual ON mode is selected. The device will stay ON.
AUTO ON: AUTOMATIC mode is selected and the device is ON. The device will stay ON until the
next OFF event.
RDM ON: RANDOM mode is selected and the device is ON. The device will stay ON until the next
OFF event.
NOTE: When RDM (RANDOM MODE) is selected, the device will operate ±30 minutes from the
scheduled ON/OFF event settings to provide a lived-in look.
OFF: Manual OFF mode is selected. The device will stay OFF.
AUTO OFF: AUTOMATIC mode is selected and the device is OFF. The device will stay OFF until the
next ON event.
RDM OFF: RANDOM mode is selected and the device is OFF. The device will stay OFF until the next
ON event.
2. Plug desired device into timer.
3. Plug the timer into the electrical outlet.
Setting/Reviewing/Changing the ON/OFF Events
1. Press PROGRAM to access the ON/OFF Event Screens.
2. To set your timer the first time go to step 4. You will be setting ON event # 1.
3. To Review existing ON/OFF settings, repeatedly press PROGRAM to see up to 7 ON/OFF event
pairs. Dashes mean the displayed event is not set. To delete an unwanted event press RESUME.
To change an event, go to step 4. To exit the Event setting mode, press MODE once or press
PROGRAM repeatedly until the event number disappears or wait 30 seconds for timer to
automatically return to the main screen.
4. If dashes are displayed, press TIME to change the dashes to an event with flashing day(s). Note
that the events are numbered 1 thru 7, ON or OFF.
5. Press + or - to select the (flashing) day(s) on which the displayed event should run:
-One day only: Select “MO” or “TU” or “WE” … or “SU”, etc.
-Everyday: Select “MO TU WE TH FR SA SU”
-Weekdays only: Select “MO TU WE TH FR”
-Weekend only: Select “SA SU”
6. Press TIME to make the hour digits flash. To set this event to occur at a specific time of day, skip
to step 9. To set this event to happen at sunrise or sunset, proceed to step 7.
7. Press + or - to scroll to one of the 2 screens with moon and sun icons flashing and AM or PM
flashing. AM plus icons screen means this event will happen at Sunrise. PM plus icons means this
event will happen at Sunset.
8. Press PROGRAM to accept the Sunrise/Sunset setting and advance to the next event screen. To
add more events, go back to step 4. If all desired events have been set go to step 14.
9. Press + or - to scroll to the desired starting hour for the event.
10. Press TIME to make the minute digits flash.
11. Press + or - to scroll to the desired starting minute for the event.
12. Press PROGRAM to advance to the next event screen.
13. Repeat steps 4 thru 13 until all desired ON/OFF events have been set.
14. Repeat step 3 to check all your settings and exit the event setting mode.
Press the Time button again to adjust the Sunset time.
Press the Time button again to adjust the Sunrise time.
11. Press TIME to access the AM sunrise time screen.
12. Press
+ or - to adjust (±2 hours) the sunrise operating time to match your local
sunrise time.
NOTE: Press RESUME to return to the original sunrise time.
13. Press TIME to access the PM Sunset time screen.
14. Press
+ or - to adjust (±2 hours) the sunset operating time to match your local
sunset time.
NOTE: Press RESUME to return to the original sunset time.
15. Press TIME to return to the time (main) screen.
LIMITED ONE-YEAR WARRANTY
If within the warranty period specied, this product fails due to a defect in material or workmanship,
Intermatic Incorporated will repair or replace it, at its sole option, free of charge. This warranty is
extended to the original household purchaser only and is not transferable. This warranty does not
apply to: (a) damage to units caused by accident, dropping or abuse in handling, acts of God or
any negligent use; (b) units which have been subject to unauthorized repair, opened, taken apart or
otherwise modied; (c) units not used in accordance with instructions; (d) damages exceeding the
cost of the product; (e) sealed lamps and/or lamp bulbs, LED’s and batteries; (f) the nish on any
portion of the product, such as surface and/or weathering, as this is considered normal wear and tear;
(g) transit damage, initial installation costs, removal costs, or reinstallation costs.
INTERMATIC INCORPORATED WILL NOT BE LIABLE FOR INCIDENTAL OR CONSEQUENTIAL DAMAGES.
SOME STATES DO NOT ALLOW THE EXCLUSION OR LIMITATION OF INCIDENTAL OR CONSEQUENTIAL
DAMAGES, SO THE ABOVE LIMITATION OR EXCLUSION MAY NOT APPLY TO YOU. THIS WARRANTY IS
IN LIEU OF ALL OTHER EXPRESS OR IMPLIED WARRANTIES. ALL IMPLIED WARRANTIES, INCLUDING THE
WARRANTY OF MERCHANTABILITY AND THE WARRANTY OF FITNESS FOR A PARTICULAR PURPOSE,
ARE HEREBY MODIFIED TO EXIST ONLY AS CONTAINED IN THIS LIMITED WARRANTY, AND SHALL BE
OF THE SAME DURATION AS THE WARRANTY PERIOD STATED ABOVE. SOME STATES DO NOT ALLOW
LIMITATIONS ON THE DURATION OF AN IMPLIED WARRANTY, SO THE ABOVE LIMITATION MAY NOT
APPLY TO YOU.
This warranty service is available by either (a) returning the product to the dealer from whom the
unit was purchased or (b) completing a warranty claim online at www.intermatic.com.
This warranty is made by: Intermatic Incorporated, Customer Service 7777 Winn Rd., Spring
Grove, Illinois 60081-9698. For warranty service go to: http://www.Intermatic.com or call 815-
675-7000.
NOTICE
WARNING
Risk of Fire or Electrical Shock
• Do not plug this timer into an extension cord.
• Always plug 3-prong plug directly into a properly grounded outlet. Never attempt to defeat this safety feature.
• Do not use timer to control devices that could have dangerous consequences due to inaccurate timing, such as
sun lamps, sauna, heaters, crock pots, etc.
• Follow all local electrical codes during use.
• No user serviceable parts inside.
4. Press the Time button again to set the Day Light Savings Time (DST) fuction.
Press button “+” or “-” to adjust the number from 00 to 59.
7. Press the Time button again to set the Astronomic function.
Sunday of the first week in November at 02:00am every year.
Minuterie numérique
intérieure 7 jours
Instructions d’installation et mode d’emploi
MODÈLE DT121K/DT122K
• 125 V c.a., 60 Hz, 15 A, 1875 W résistif
• 15A usage général
• 8 A, 1000 W tungstène, 500 VA ballast électronique
• 1/2 HP moteur
• 120 V c.a., 60 Hz, 8,3 A ballast magnétique
Caractéristiques
2. In case of a display failure, press RESET button to restart the timer.
Reset
P
r
o
g
r
a
m
+
-
T
i
m
e
e
s
R
u
m
e
M
o
d
e
Régler l’heure, la date, l’heure d’été et la région
REMARQUE: Durant le réglage de la minuterie, s’il s’écoule plus de 30 secondes
d’inactivité, la minuterie retourne automatiquement à l’affichage normal de l’heure de
la journée.
1. Appuyer sur TIME. L’année à 4 chiffres s’affiche en clignotant.
2. Appuyer sur + ou - pour sélectionner l’année en cours puis appuyer sur TIME.
3. Appuyer sur + ou - pour régler le mois (01=jan, 12=déc) puis appuyer sur TIME.
4. Appuyer sur + ou - pour régler le jour du mois.
5. Appuyer sur TIME pour régler la fonction d’heure d’été (DST).
6. Appuyer sur + ou - pour sélectionner AUTO (AUTO DST activé) ou OFF (DST désactivé).
REMARQUE: Lorsque la fonction DST est activée, la minuterie avance
automatiquement de 1 heure de deuxième dimanche de mars à 2h00 du matin et
revient de 1 heure en arrière le premier dimanche de novembre à 2h00.
7. Appuyer sur TIME. Les chiffres du heures clignotent.
8. Appuyer sur + ou - pour sélectionner l’heure en cours puis appuyer sur TIME. Les
chiffres du minutes clignotent.
9. Appuyer sur + ou - pour régler les minute puis appuyer sur TIME.
10. Appuyer sur + ou - pour sélectionner la région d’installation.
Brancher la minuterie dans une prise de courant secteur pendant au moins 30 minutes pour charger la batterie
interne. Si l’affichage n’est pas visible, appuyer sur RESET pour redémarrer la minuterie et effacer tous les
réglages et événements. La minuterie peut être débranchée de la prise de courant pour faciliter les réglages.
IMPORTANT : à lire avant la première utilisation
1. NORTH: 2. CENTRAL: 3. SOUTH:
The map below will determine what zone the timer is being used.
1. NORD: 3. SUD:2. CENTRE:
4. Press the Time button again to set the Day Light Savings Time (DST) fuction.
Press button “+” or “-” to adjust the number from 00 to 59.
7. Press the Time button again to set the Astronomic function.
Sunday of the first week in November at 02:00am every year.
Configurer/examiner/modifier les événements ON/OFF
1. Appuyer sur PROGRAM pour accéder aux écrans d’événements ON/OFF.
2. Pour régler la minuterie la première fois, aller à l’étape 4. Cela configurera l’événement ON n° 1.
3. Pour examiner les réglages ON/OFF, appuyer de façon répétée sur PROGRAM pour afficher jusqu’à 7
paires d’événements ON/OFF. Les tirets signifient que l’événement n’est pas configuré. Pour supprimer un
événement, appuyer sur RESUME. Pour modifier un événement, aller à l’étape 4. Pour quitter le mode de
configuration des événements, appuyer une fois sur MODE ou appuyer de façon répétée sur PROGRAM
jusqu’à ce que le numéro d’événement disparaisse ou patienter 30 secondes que la minuterie revienne
automatiquement à l’écran principal.
4. Si des tirets s’affichent, appuyer sur TIME pour change les tirets en événement avec le(s) jour(s)
clignotant(s). On notera que les événements sont numérotés de 1 à 7, ON ou OFF.
5. Appuyer sur
+ ou - pour sélectionner le(s) jour(s) (clignotants) où l’événement affiché doit s’exécuter:
- Un seul jour: Sélectionner «MO», «TU», «WE» … ou «SU»
- Tous les jours: Sélectionner «MO TU WE TH FR SA SU»
- Jours de semaine seulement: Sélectionner «MO TU WE TH FR»
- Fins de semaine seulement: Sélectionner «SA SU»
6. Appuyer sur TIME pour faire clignoter les chiffres des heures. Pour régler l’événement sur une heure
spécifique de la journée, passer directement à l’étape 9. Pour régler l’événement sur le lever ou le
coucher du soleil, passer à l’étape 7.
7. Appuyer sur + ou - pour avancer jusqu’à l’un des 2 écrans avec les icônes de lune et de soleil
clignotantes et AM ou PM clignotant. L’écran avec AM et ces icônes signifie que l’événement se produira
au lever du soleil. L’écran avec PM et ces icônes signifie qu’il se produira au coucher du soleil.
8. Appuyer sur PROGRAM pour accepter le réglage de lever/coucher du soleil et passer à l’écran de
l’événement suivant. Pour ajouter d’autres événements, revenir à l’étape 4. Si tous les événements
souhaités sont configurés, aller à l’étape 14.
9. Appuyer sur + ou -pour avancer jusqu’à l’heure de début souhaitée pour l’évènement.
10. Appuyer sur TIME pour faire clignoter les chiffres des minutes.
11. Appuyer sur + ou - pour avancer jusqu’à la minute de début souhaitée pour l’évènement.
AVIS
AVERTISSEMENT
Risque d’incendie ou de choc électrique
•
Ne pas brancher cette minuterie sur un cordon de rallonge.
•
Toujours brancher la fiche à trois broches directement dans une prise correctement mise à la terre. Ne jamais tenter d’aller à
l’encontre de ce dispositif de sécurité.
•
Ne pas utiliser la minuterie pour contrôler des appareils qui pourraient avoir de dangereuses conséquences en raison d’un calcul
de temps inexact, tels que lampes solaires sauna, appareils de chauffage, mijoteuses, etc.
•
Respecter tous les codes d’électricité locaux pendant l’emploi.
•
Ne contient aucune pièce réparable par l’utilisateur.
nor
CEN
SOU
Une fois la zone
sélectionnée, la minuterie
définiti automatiquement
l’heure de lever et de
coucher du soleil.
Press the Time button again to adjust the Sunset time.
Press the Time button again to adjust the Sunrise time.
11. Appuyer sur TIME pour accéder à l’écran d’heure de lever du soleil.
12. Appuyer sur + ou - pour adapter (de ± 2 heures) l’heure de lever du soleil de la
minuterie sur le lever du soleil local.
REMARQUE: Appuyer sur RESUME pour retourner à l’heure originale de lever du soleil.
13. Appuyer sur TIME pour accéder à l’écran d’heure de coucher du soleil.
14. Appuyer sur + ou - pour adapter (de ± 2 heures) l’heure de coucher du soleil de la
minuterie sur le coucher du soleil local.
REMARQUE: Appuyer sur RESUME pour retourner à l’heure originale de coucher du
soleil.
15. Appuyer sur TIME pour retourner à l’écran (principal) de l’heure.
4. Press the Time button again to set the Day Light Savings Time (DST) fuction.
Press button “+” or “-” to adjust the number from 00 to 59.
7. Press the Time button again to set the Astronomic function.
Sunday of the first week in November at 02:00am every year.
La carte ci-dessous permet d’identifier la zone d’utilisation de la minuterie.
NORD
CENTRE
SUD

158--01508
Temporizador digital de 7 días
para interiores
Instrucciones de instalación y para el usuario
MODELOS DT121K Y DT122K
• 125 V CA, 60 Hz, 15 A, 1875 W resistivo
• 15 A uso general
• 8 A, 1000 W tungsteno, 500 VA balastro electrónico
• Carga de motor de 1/2 HP
• 120 V CA, 60 Hz, 8,3 A balastro magnético
Clasificaciones
2. In case of a display failure, press RESET button to restart the timer.
Reset
P
r
o
g
r
a
m
+
-
T
i
m
e
e
s
R
u
m
e
M
o
d
e
Ajuste de hora, fecha, horario de verano y región
NOTA: Cuando ajuste el temporizador, si hace una pausa de más de 30 segundos,
este volverá automáticamente a la pantalla de hora del día normal.
1. Presione TIME (Hora). Aparecerá un año parpadeante de 4 dígitos.
2. Presione + o - para ajustar el año actual y luego presione TIME.
3. Presione + o - para ajustar el mes (01=Ene, 12=Dic) y luego presione TIME.
4. Presione + o - para ajustar el día del mes.
5. Presione TIME para ajustar la función de horario de verano (DST).
6. Presione + o - para seleccionar AUTO (ajuste AUTO DST habilitado) u OFF (DST
deshabilitado).
NOTA: La función DST habilita al temporizador para adelantar automáticamente
1 hora el segundo domingo de marzo a las 02:00 a. m. y luego atrasar
automáticamente 1 hora el primer domingo de noviembre a las 02:00 a. m.
7. Presione TIME. Los dígitos de la hora parpadean.
8. Presione + o - para ajustar la hora actual y luego presione TIME. Los dígitos de
los minutos parpadean.
9. Presione + o - para ajustar los minutos y luego presione TIME.
10. Presione + o - para ajustar su región actual.
Enchufe el temporizador a un tomacorriente de CA al menos por 30 minutos para cargar la batería
interna. Si no ve la pantalla, presione RESET para reiniciar el temporizador y borrar todos los ajustes y
eventos. Puede desenchufar el temporizador del tomacorriente de CA para ajustarlo más fácilmente.
IMPORTANTE: Lea antes de comenzar a usarlo
1. NORTH: 2. CENTRAL: 3. SOUTH:
The map below will determine what zone the timer is being used.
1. NORTE: 3. SUR:2. CENTRAL:
nor
CEN
SOU
El siguiente mapa determinará en qué zona se usará el temporizador.
Una vez que seleccione
la zona, el temporizador
ajustará automáticamente
la hora de salida y puesta
del sol.
4. Press the Time button again to set the Day Light Savings Time (DST) fuction.
Press button “+” or “-” to adjust the number from 00 to 59.
7. Press the Time button again to set the Astronomic function.
Sunday of the first week in November at 02:00am every year.
Ajuste del modo de funcionamiento del temporizador
1. Presione MODE para desplazarse al modo de funcionamiento deseado. Consulte a continuación para
obtener una descripción de cada modo.
ON: Modo ON manual seleccionado. El dispositivo permanecerá ENCENDIDO.
AUTO ON (Encendido automático): Modo AUTOMÁTICO seleccionado y el dispositivo está ENCENDIDO. El
dispositivo permanecerá ENCENDIDO hasta el siguiente evento de APAGADO.
RDM ON (Random encendido): Modo RANDOM seleccionado y el dispositivo está ENCENDIDO. El
dispositivo permanecerá ENCENDIDO hasta el siguiente evento de APAGADO.
NOTA: Cuando seleccione RDM (modo Random), el dispositivo funcionará por ±30 minutos a partir de los
ajustes de evento ON/OFF programados para proporcionar una apariencia habitada.
OFF: Modo OFF manual seleccionado. El dispositivo permanecerá APAGADO.
Auto OFF (Apagado automático): Modo AUTOMÁTICO seleccionado y el dispositivo está APAGADO. El
dispositivo permanecerá APAGADO hasta el siguiente evento de ENCENDIDO.
RDM OFF (Random apagado): Modo RANDOM seleccionado y el dispositivo está APAGADO. El dispositivo
permanecerá APAGADO hasta el siguiente evento de ENCENDIDO.
2. Enchufe el dispositivo deseado al temporizador.
3. Enchufe el temporizador en el tomacorriente.
Ajustes, revisión y cambio de los eventos ON/OFF (ENCENDIDO/APAGADO)
1. Presione PROGRAM (Programa) para acceder a las pantallas de eventos ON/OFF.
2. Para ajustar el temporizado por primera vez vaya al paso 4. Ajustará a ENCENDIDO el evento N.° 1.
3. Para revisar ajustes existente de ON/OFF, presione repetidamente PROGRAM para visualizar hasta 7 pares
de evento ON/OFF. Los guiones significan que el evento que se muestra no está ajustado. Para borrar un
evento no deseado presione RESUME (Reanudar). Para cambiar un evento, vaya al paso 4. Para salir del
modo de ajuste de evemtos, presione MODE una vez o presione PROGRAM repetidamente hasta que el
número de evento desaparezca o espere 30 segundos para que el temporizador vuelva automáticamente
a la pantalla principal.
4. Si se muestran guiones, presione TIME para cambiar los guiones a un evento con días parpadeantes.
Fíjese que los eventos están numerados del 1 al 7, ON u OFF.
5. Presione
+ o - para seleccionar los días (parpadeantes) donde se debe ejecutar el evento:
-Solo un día: Seleccione “MO”, “TU”, “WE” (“Lu”, “Ma”, “Mi”) … o “SU” (“Do”), etc.
-Todos los días: Seleccione “MO TU WE TH FR SA SU” (“Lu Ma Mi Ju Vi Sa Do”)
-Solo los días de semana: Seleccione “MO TU WE TH FR” (“Lu Ma Mi Ju Vi”)
-Solo el fin de semana: Seleccione “SA SU” (“Sa Do”)
6. Presione TIME para hacer que parpadeen los dígitos de la hora. Para ajustar que este evento ocurra a una
hora específica del día, vaya al paso 9. Para ajustar que este evento ocurra a la salida o puesta del sol,
continúe con el paso 7.
7. Presione
+ o - para desplazarse a una de las dos pantallas que tienen los íconos de la luna o el sol
parpadeantes y AM o PM parpadeantes. AM más la pantalla de íconos significa que este evento ocurrirá en la
salida del sol. PM más los íconos significa que este evento ocurrirá en la puesta del sol.
8. Presione PROGRAM para aceptar los ajustes de salida y puesta del sol y avanzar a la próxima pantalla de
evento. Para agregar más eventos, regrese al paso 4. Si ha configurado todos los eventos deseados, vaya
al paso 14.
9. Presione
+ o - para desplazarse a la hora de inicio deseada para el evento.
10. Presione TIME para hacer que parpadeen los dígitos de los minutos.
11. Presione
+ o - para desplazarse a los minutos de inicio deseados para el evento.
12. Presione PROGRAM para avanzar hasta la próxima pantalla de evento.
13. Repita las pasos del 4 al 13 hasta que haya ajustado todos los eventos ON/OFF deseados.
14. Repita el paso 3 para verificar todos los ajustes y salir del modo de ajuste de evento.
Press the Time button again to adjust the Sunset time.
Press the Time button again to adjust the Sunrise time.
11. Presione TIME para acceder a la pantalla AM de hora de salida del sol.
12. Presione + o - para ajustar la hora de funcionamiento de salida del sol
(±2horas) para que coincida con su hora local de salida del sol.
NOTA: Presione RESUME (Reanudar) para volver a la hora de salida del sol
original.
13. Presione TIME para acceder a la pantalla PM de hora de puesta del sol.
14. Presione + o - para ajustar la hora de funcionamiento de puesta del sol
(±2horas) para que coincida con su hora local de puesta del sol.
NOTA: Presione RESUME para volver a la hora de puesta del sol original.
15. Presione TIME para volver a la pantalla (principal) de la hora.
GARANTÍA LIMITADA DE UN AÑO
Si dentro del período de garantía especicado este producto falla debido a un defecto de material o de mano
de obra, Intermatic Incorporated lo reparará o reemplazará, a su entera discreción, sin cargo alguno. Esta
garantía sólo se otorga al comprador original y no es transferible. Esta garantía no se aplica en los siguientes
casos: (a) daños en las unidades causados por accidentes, caídas o manejo indebido, causas de fuerza
mayor o uso negligente; (b) unidades que hayan sido sometidas a una reparación no autorizada, abiertas,
desmontadas o modicadas de alguna manera; c) unidades no utilizadas de acuerdo con las instrucciones; (d)
daños que excedan el costo del producto; (e) lámparas y/o bombillas de lámparas selladas, diodos emisores
de luz (LED) y baterías; (f) el acabado de cualquier parte del producto, como su supercie y/o por exposición
a la intemperie, ya que esto se considera un desgaste y uso normal; g) daños durante el transporte, costos de
instalación inicial, costos de remoción o costos de reinstalación.
INTERMATIC INCORPORATED NO ASUME RESPONSABILIDAD ALGUNA POR DAÑOS INCIDENTALES O
CONSECUENCIALES. ALGUNOS ESTADOS NO PERMITEN EXCLUIR O LIMITAR LOS DAÑOS INCIDENTALES O
CONSECUENCIALES, POR LO QUE LA LIMITACIÓN O EXCLUSIÓN ANTERIOR PUDIERA NO SER VÁLIDA EN SU CASO.
ESTA GARANTÍA SUSTITUYE A CUALQUIER OTRA GARANTÍA EXPRESA O IMPLÍCITA. TODAS LAS GARANTÍAS
IMPLÍCITAS, INCLUIDA LA GARANTÍA DE IDONEIDAD COMERCIAL O DE IDONEIDAD PARA UN DETERMINADO FIN,
SE MODIFICAN PARA QUEDAR INCLUIDAS ÚNICAMENTE EN LA PRESENTE GARANTÍA LIMITADA, Y TENDRÁN LA
MISMA DURACIÓN QUE EL PERIODO DE GARANTÍA MENCIONADO ANTES. ALGUNOS ESTADOS NO PERMITEN
LIMITAR LA DURACIÓN DE UNA GARANTÍA IMPLÍCITA, POR LO QUE LA LIMITACIÓN ANTERIOR PUDIERA NO SER
APLICABLE EN SU CASO.
Este servicio de garantía está disponible (a) devolviendo el producto al distribuidor donde se compró
la unidad o (b) completando un reclamo de garantía en Internet en www.intermatic.com. Esta garantía
es concedida por: Intermatic Incorporated Customer Service/7777 Winn Rd., Spring Grove, Illinois
60081-9698/815-675-7000 http://www.intermatic.com.
AVISO
ADVERTENCIA
Riesgo de incendio o descarga eléctrica
•
No enchufe este temporizador en un cable de extensión.
•
Siempre conecte el enchufe de 3 clavijas directamente en un tomacorriente conectado adecuadamente a tierra. Nunca intente
anular esta característica de seguridad.
•
No use el temporizador para controlar dispositivos que pueden tener consecuencias peligrosas debido a la inexactitud de la
temporización, tales como lámparas de rayos ultravioleta, sauna, calefactores, ollas eléctricas, etc.
•
Cumpla con todos los códigos eléctricos locales durante el uso.
• No contiene piezas en el interior a las que le pueda realizar mantenimiento.
4. Press the Time button again to set the Day Light Savings Time (DST) fuction.
Press button “+” or “-” to adjust the number from 00 to 59.
7. Press the Time button again to set the Astronomic function.
Sunday of the first week in November at 02:00am every year.
NORTE
CENTRAL
SUR
GARANTIE LIMITÉE UN AN
Si, dans la période de garantie spéciée, ce produit tombait en panne dû à un vice de matériau
ou de fabrication, Intermatic Incorporated le réparera ou le changera, à sa seule discrétion, et ce
gratuitement. La présente garantie s’étend à l’acheteur nal initial uniquement et n’est pas transférable.
Cette garantie ne s’applique pas : (a) aux dommages au dispositif causés par un accident, une
chute ou une mauvaise manipulation, une catastrophe naturelle ou une utilisation négligente; (b) aux
dispositifs soumis à des réparations non autorisées, qui ont été ouverts, démontés ou modiés de
quelconque manière; (c) aux dispositifs qui n’ont pas été utilisés conformément aux instructions; (d)
aux dommages dépassant le coût du produit; (e) aux lampes scellées et/ou aux ampoules, aux LED
et aux piles; (f) à la nition de l’une des parties du dispositif, telle que la surface ou les caractéristiques
de résistance aux intempéries, ce qui est considéré comme de l’usure normale; (g) aux dommages
causés par le transport, aux coûts d’installation initiale, aux coûts de démontage ou de remontage.
INTERMATIC INCORPORATED NE POURRA ÊTRE TENUE RESPONSABLE DE DOMMAGES INDIRECTS OU
CONSÉCUTIFS. CERTAINES JURIDICTIONS N’AUTORISENT PAS L’EXCLUSION OU LA LIMITATION DES
DOMMAGES INDIRECTS OU CONSÉCUTIFS. DANS CE CAS, LES LIMITES CI-DESSUS NE S’APPLIQUENT
PAS. LA PRÉSENTE GARANTIE REMPLACE TOUTES LES AUTRES GARANTIES EXPRESSES OU IMPLICITES.
TOUTES LES GARANTIES IMPLICITES, NOTAMMENT GARANTIE DE QUALITÉ MARCHANDE ET GARANTIE
D’ADAPTATION À UNE FIN PARTICULIÈRE, SONT MODIFIÉES AUX PRÉSENTES POUR EXISTER UNIQUEMENT
TELLES QUE COMPRISES DANS LA GARANTIE LIMITÉE, ET AURONT LA MÊME DURÉE QUE LA PÉRIODE DE
GARANTIE INDIQUÉE CI-DESSUS. CERTAINES JURIDICTIONS N’AUTORISENT PAS LES LIMITES DE DURÉE
D’UNE GARANTIE IMPLICITE. DANS CE CAS, LES LIMITES CI-DESSUS NE S’APPLIQUENT PAS.
Le recours à la présente garantie se fait soit (a) par renvoi du produit au vendeur auprès duquel il
a été acheté, soit (b) en remplissant le formulaire de réclamation sur le site Web www.intermatic.
com. La présente garantie est offerte par : Intermatic Incorporated, Customer Service 7777 Winn
Rd., Spring Grove, Illinois 60081-9698. Pour recourir à la garantie, aller à : http://www.Intermatic.
com ou composer le 815-675-7000.
12. Appuyer sur PROGRAM pour avancer jusqu’à l’écran de l’évènement suivant.
13. Répéter les étapes 4 à 13 jusqu’à ce que tous les événements ON/OFF souhaités soient configurés.
14. Répéter l’étape 3 pour vérifier tous les réglages et quitter le mode de configuration des événements.
Configurer le mode de fonctionnement de la minuterie
1. Appuyer sur MODE pour avancer jusqu’au mode de fonctionnement souhaité. Voir la description de
chaque mode ci-dessous.
ON - Le mode ON manuel est sélectionné. L’appareil reste en marche (ON).
AUTO ON: Le mode AUTOMATIQUE est sélectionné et l’appareil est en marche (ON). L’appareil reste en
marche (ON) jusqu’à l’événement OFF suivant.
RDM ON : Le mode ALÉATOIRE est sélectionné et l’appareil est en marche (ON). L’appareil reste en
marche (ON) jusqu’à l’événement OFF suivant.
REMARQUE: Lorsque RDM (mode ALÉATOIRE) est sélectionné, l’appareil fonctionne dans une marche de
±30 minutes par rapport aux réglages des événements ON/OFF afin de créer une apparence «habitée».
OFF : Le mode OFF manuel est sélectionné. L’appareil reste à l’arrêt (OFF).
AUTO OFF: Le mode AUTOMATIQUE est sélectionné et l’appareil est à l’arrêt (OFF). L’appareil reste à
l’arrêt (OFF) jusqu’à l’événement ON suivant.
RDM OFF : Le mode ALÉATOIRE est sélectionné et l’appareil est à l’arrêt (OFF). L’appareil reste à l’arrêt
(OFF) jusqu’à l’événement ON suivant.
2. Brancher l’appareil souhaité sur la minuterie.
3. Brancher la minuterie sur une prise de courant.