Loading ...
Loading ...
Loading ...
9
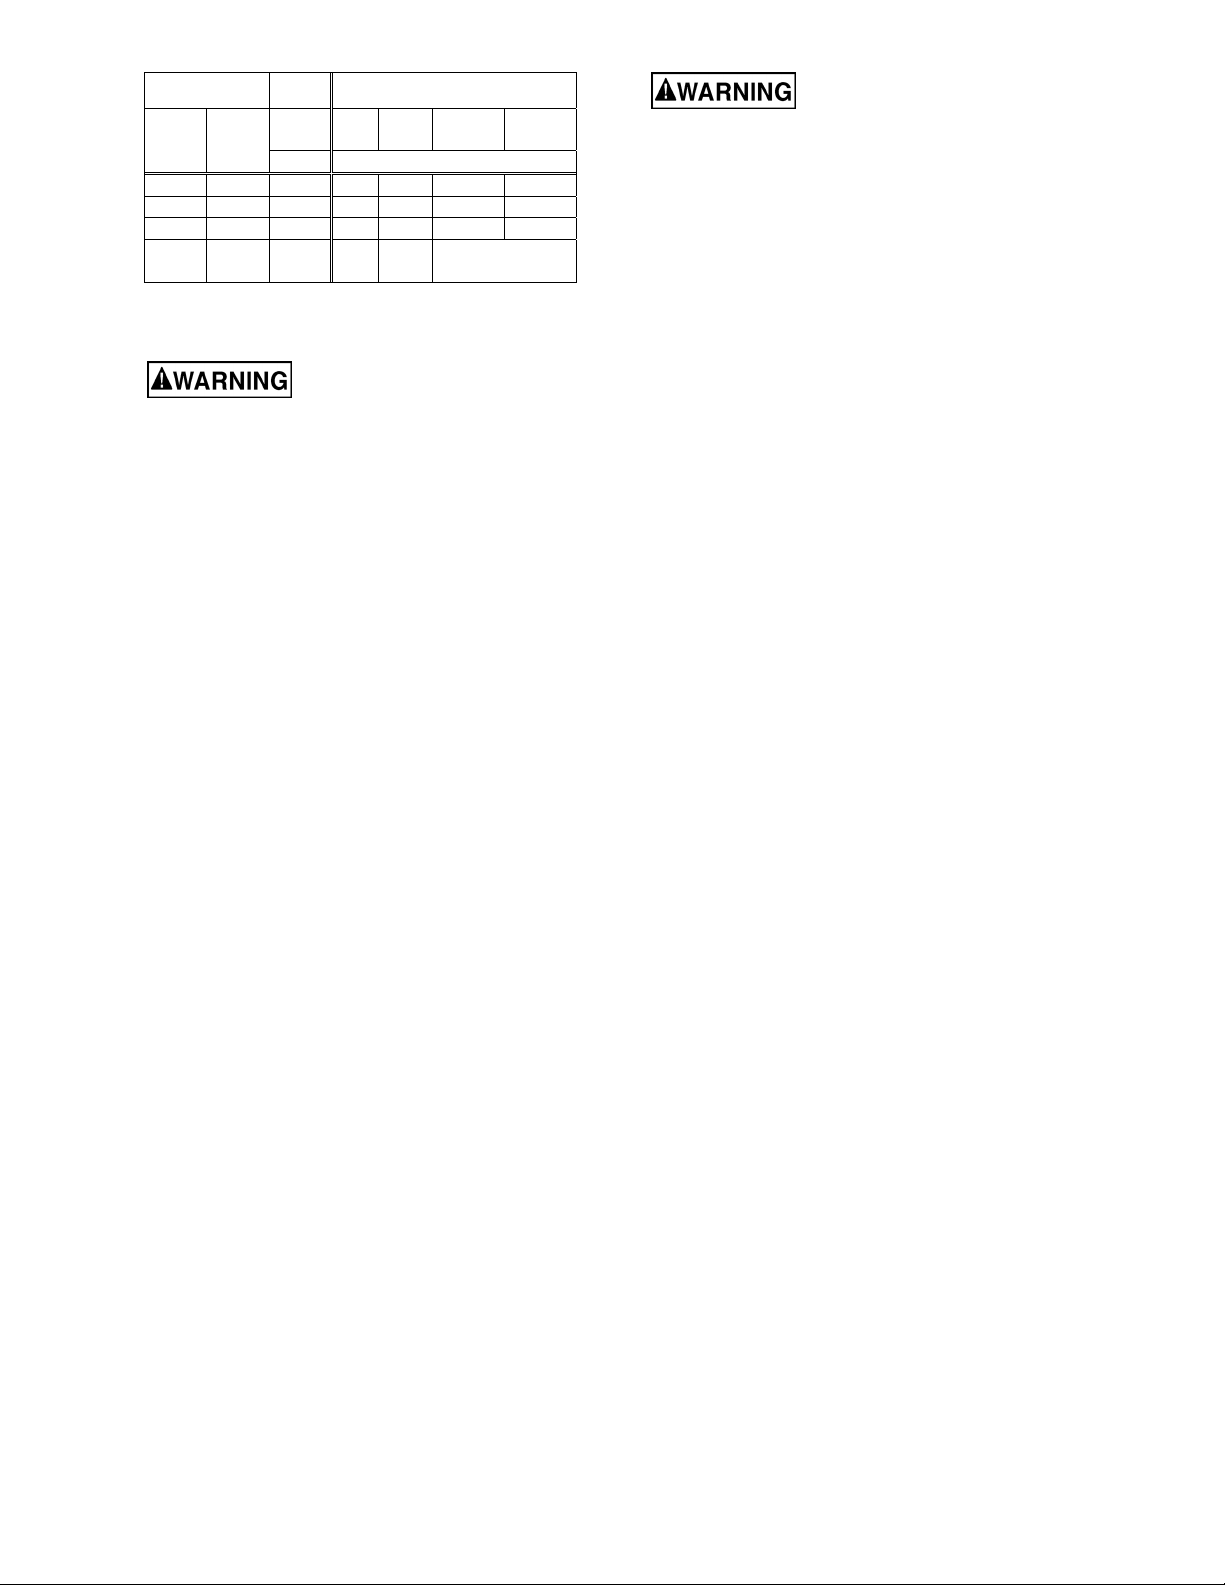
Amp Rating Volts Total length of cord in feet
More
Than
Not
More
Than
120
240
25
50
50
100
100
200
150
300
AWG
0 6 18 16 16 14
6 10 18 16 14 12
10 12 16 16 14 12
12 16 14 12
Not
Recommended
Extension Cord Recommendations
Table 1
Read and understand the
entire contents of this manual before attempting
assembly or operation. Failure to comply may
cause serious injury.
6.0 Unpacking
6.1 Carton contents
1 AFS unit
1 Remote controller with 9V battery.
1 Hardware package, containing:
4 Eye bolts
4 Foam foot pads
1 Operating Instructions and Parts Manual
1 Product registration card
Inspect contents for shipping damage or missing
parts. Report these, if discovered, to your
distributor.
IMPORTANT:
1. The hardware package and remote
controller are shipped behind the Air
Diffuser. To remove, grasp part of the lattice on
the front of the air diffuser and pull the air
diffuser toward the side opening. Then push the
clip back out of the way, and grasp the edge of
the air diffuser to slide it out enough to retrieve
the controller and package. Slide the air diffuser
back in and swing the clip back into position.
2. The styrofoam blocking must be removed
from inside the cabinet. Unscrew the two
knobs and pan head screw; remove side panel.
See Figures on page 10. Slide outer and inner
filter out of their channels. Remove styrofoam,
then return filters to position and secure side
panel.
7.0 Installation
The unit will work best if located away from corners
and heating/cooling vents.
If you will be suspending the unit from an overhead
structure, remove the 4 pan head screws on top of
the cabinet, and screw in the 4 eye bolts in their
place. Orient the eye bolts as needed.
Make sure ceiling structure will
support the weight of the unit. Do not mount to
dry wall or false ceiling grids. Failure to comply
may cause serious injury and property damage.
If setting unit on a table or bench, remove the
adhesive from the 4 foot pads and press the pads to
the bottom of the unit near the corners.
Remove back cover of remote controller and install
9-volt battery. Reinstall cover. The holder for the
remote controller can be mounted to a bench or wall
using screws (not provided).
8.0 Controls and features
See Figures 9-1 thru 9-3, page 10.
The Air Filtration Unit can be turned on and off with
the switch on the control panel. The remote
controller is preferred, however, as it offers multiple
functions and allows operation when the unit is out
of arm’s reach. The remote controller uses radio
frequency, and thus is not limited by line-of-sight
operation.
Thermal protection
The motor has a built-in cutoff switch in case of
thermal overload. If the machine shuts off, allow it to
cool down for a few moments, then restart.
Speed
The unit will always start on low speed. On the
remote controller, press the up or down button to
change speed.
Timer
Press the timer button on the remote (the timer
indicator will start flashing). Then press the up or
down button to scroll to the desired time (from 1 to
9 hours). Press the timer button again – the indicator
will stop flashing. The unit will operate for the
programmed time, at the end of which it will
automatically shut off.
Note: If the timer function is not used, the filtration
unit will continue to operate until the off button is
pressed.
9.0 Operation
NOTE: The Air Filtration Unit is designed to remove
airborne dust particles; it is not designed to take the
place of a dust collection system.
Larger particles are trapped by the outer filter;
smaller particles by the inner filter. The air is then
exhausted through the diffusion filter, which has a
fibrous composition to help diffuse the air.
Loading ...
Loading ...
Loading ...