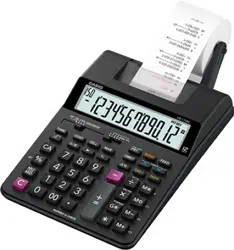
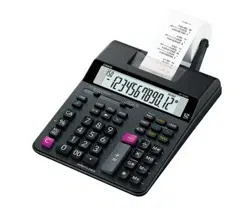
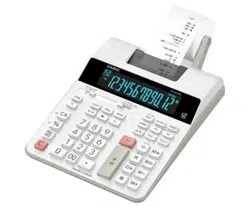
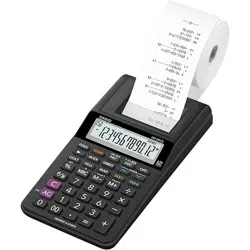
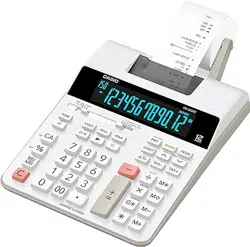
HR-170RC / HR-200RC User's Guide
English
- Be sure to keep all user documentation handy for future reference.
Important Precautions
- Paper jams are indicated by ‘P--Error’. Correct the problem as soon as possible.
- If an ongoing printing operation stops, press v or the RESET button to clear. This may result in printing of random characters.
- Wipe the calculator with a soft, dry cloth to clean it.
- Switch power off after use or if you do not plan to use the calculator. It is best to unplug from the AC outlet if you do not plan to use the calculator for a long time.
- The contents of these instructions are subject to change without notice.
- CASIO COMPUTER CO., LTD. assumes no responsibility for any loss or claims by third parties which may arise from the use of this product.
Power Supply
Your calculator can be powered by AA-size batteries or using the specified AC adaptor.
Battery Operation
- Main Batteries
Four AA-size batteries are used for normal operation.
Replace batteries as soon as possible whenever screen figures become difficult to read, or if you start to experience printing problems such as slow printing speed.
- Back-up Battery
Your calculator comes with a single built-in CR2032 lithium battery that provides power to retain values stored in memory when you leave the calculator without power (AC adapter not connected and main batteries not loaded). You will need to replace the back-up battery about once every 22 months to maintain memory contents if you leave the calculator without power.
- Never mix batteries of different types.
- Never mix old batteries and new ones.
- Keep batteries away from small children. If swallowed consult with your physician immediately.
- Dead batteries can leak and damage the calculator if left in the battery compartment for long periods.
- Even if you do not use the calculator, you should replace the main batteries at least once every year.
AC Operation
- Unplug the adaptor from the AC outlet when you are not using the calculator.
- Make sure calculator power is switched off when connecting or disconnecting the adaptor.
- Using any adaptor other than the AD-A60024 (either supplied or obtained as an option) can damage your calculator.
RESET Button
- Pressing the RESET button causes memory to be cleared. Be sure to keep separate records of all important settings and numeric data to protect against accidental loss.
- Press the RESET button on the back of the calculator to restore normal operation whenever the calculator does not operate correctly. If pressing the RESET button does not restore normal operation, contact your original retailer or nearby dealer.
About the Input Buffer
The input buffer of this calculator holds up to 16 key operations so you can continue key input even while another operation is being processed.
Specifications
- Ambient temperature range: 0°C to 40°C (32°F to 104°F)
- Operation power supply:
- AC: AC adaptor (AD-A60024)
- DC: Supported battery types: AA-size battery R6P (SUM-3), R6C (UM-3) or LR6 (alkaline battery)
- Do not use rechargeable batteries.
- Four AA-size manganese batteries (R6C (UM-3)) provide approximately 390 hours of continuous display (540 hours with type R6P (SUM-3)); or printing of approximately 3,000 consecutive lines of ‘555555M+’ with display (7,000 lines with type R6P (SUM-3)).
- Clock:
- Accuracy under normal temperatures: ±3 seconds per day
- Return to the clock display after approximately 30 minutes of non-operation while power is turned on.
- Printer Life-cycle: Approximately 200,000 lines
- Dimensions:
- HR-170RC: 64.6 (H) × 165 (W) × 295 (D) mm (2⁹⁄₁₆" H × 6½" W × 11⁵⁄₈" D) including roll holders
- HR-200RC: 64.7 (H) × 195 (W) × 313 (D) mm (2⁹⁄₁₆" H × 7¹¹⁄₁₆" W × 12⁵⁄₁₆" D) including roll holders
- Weight:
- HR-170RC: 570 g (20.1 oz) including batteries
- HR-200RC: 670 g (23.6 oz) including batteries
Before using the calculator for the first time...
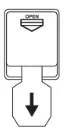
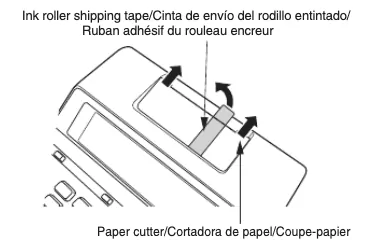
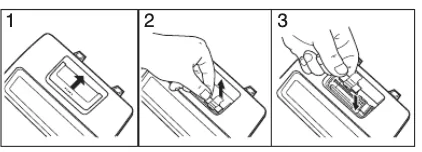
Before using the calculator for the first time, pull out the insulating sheet described below, and then load main batteries or connect the AC adaptor. Finally, press the RESET button.
Pull out the insulating sheet in the direction indicated by the arrow.
Remove the paper cutter, and then remove the ink roller shipping tape.
Loading the Main Batteries
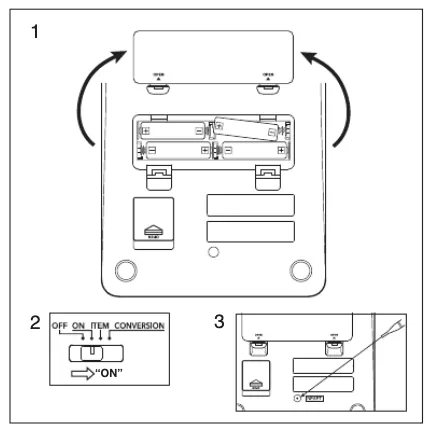
Be sure that  and
and  poles of each battery are facing in the proper direction.
Replacing the Back-up Battery
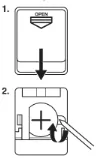 Insert a thin, pointed non-metal object (such as toothpick) into the hole and remove the old battery. Do not use a lead pencil.
 Wipe off the surface of a new battery with a soft, dry cloth.
Load it into the calculator so that its positive (+) side is facing up.

5. After confirming that main batteries are loaded or the AC adaptor is connected, press the RESET button.
AC Operation
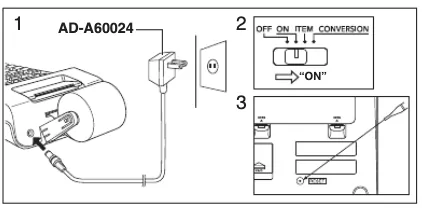
Replacing the Ink Roller
Included Item/Elemento incluido/Élément inclus: MS37901 Option/Opcional/Option: IR-40T
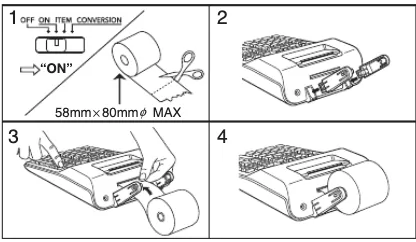
Loading the Paper Roll
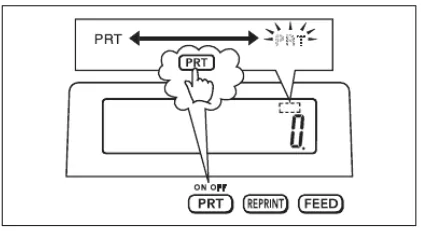
Switching between Printing and Non-Printing
Printing Calculation Results Only
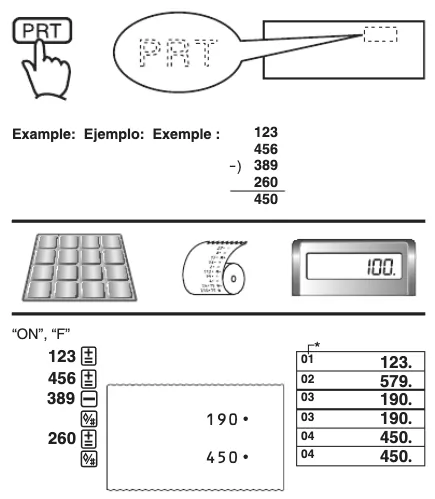
* A step indicator is also on the display.
• Indicators are not shown in some of the example displays of
this User’s Guide.
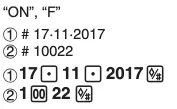
Printing Reference Numbers

About the Selectors
Function Selector 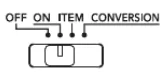
OFF: Power off.
ON: Power on.
ITEM: The total number of addition and subtraction items is printed with the result when  or
or  is pressed. The number of operations is printed with the result when
  is pressed.
CONVERSION: Enables currency conversion.
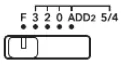 Decimal Mode Selector
F: Floating decimal.
3, 2, 0: Cuts off to the specified number of decimal places (3,
2, or 0) when the rightmost digit is 4 or less (0, 1, 2, 3, 4), and rounds up when it is 5 or greater (5, 6, 7, 8, 9).
ADD2: Always appends two decimal places to values.
Important
All input and calculations are rounded for addition and subtraction. For multiplication and division, the calculation is performed with values as input, and the result is rounded.
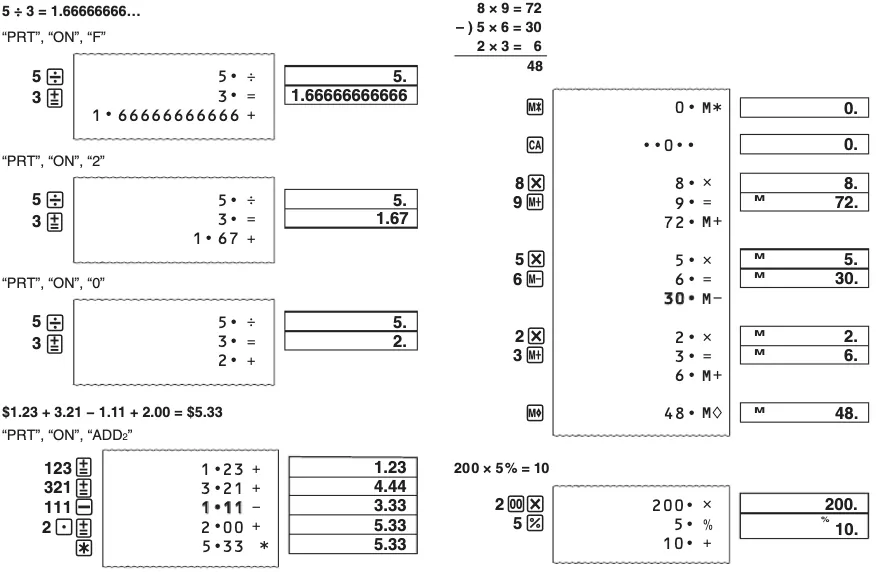 Basic Calculations
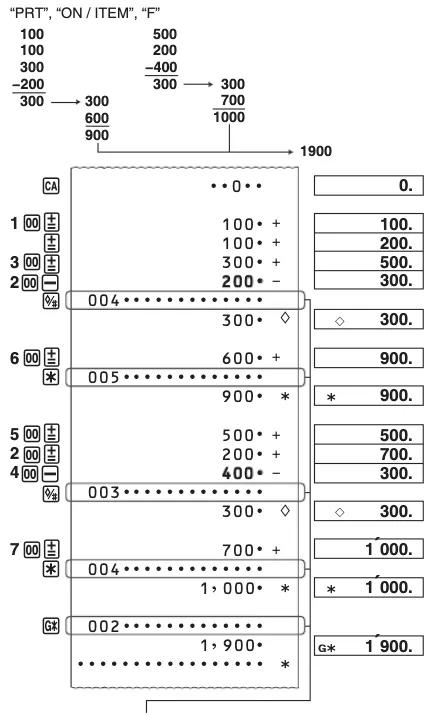
Item count (Printed in Item Mode only.)
• Before starting a new calculation, be sure to press  first.
• Pressing  during an addition or subtraction calculation prints the intermediate result up to that point.
• Pressing  prints the result (total) and adds it to grand total memory. This also automatically clears the result, so you can start the next calculation without pressing .
• Pressing  calculates the grand total. It also automatically clears grand total memory.
“PRT”, “ON”, “F”
6 ÷ 3 × 5 + 2.4 − 1 = 11.4
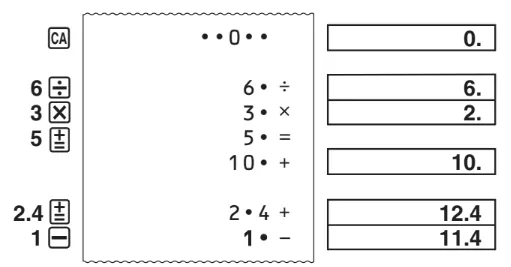
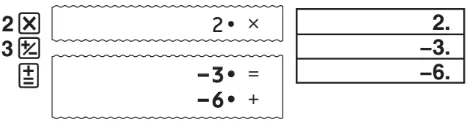
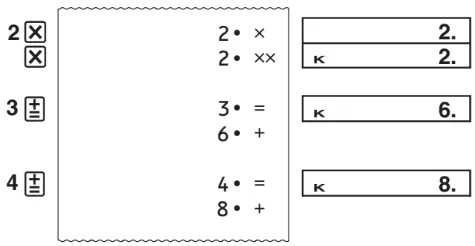
2 × (−3) = −6
3 × 2 = 6
4 × 2 = 8
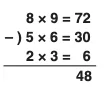
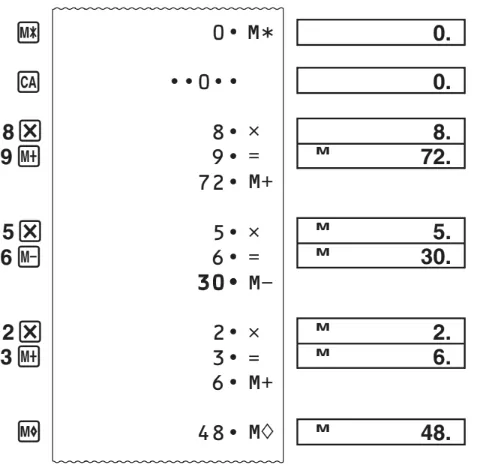
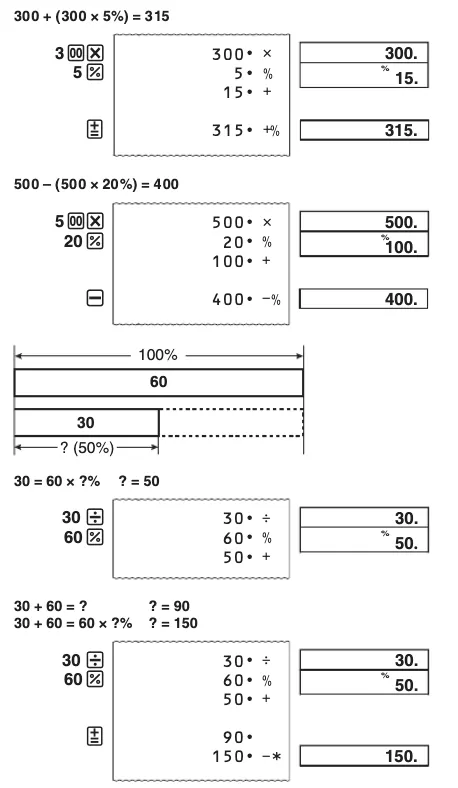
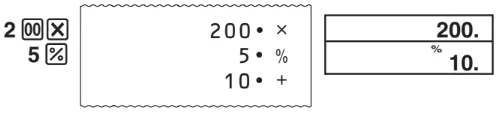
200 × 5% = 10
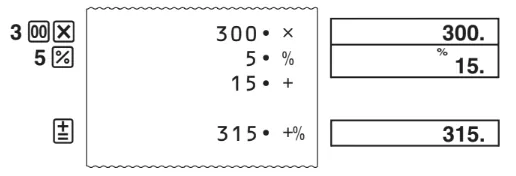
300 + (300 × 5%) = 315
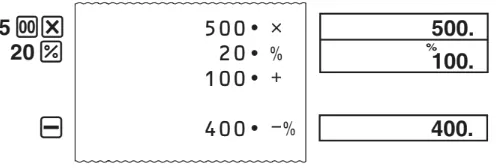
500 – (500 × 20%) = 400
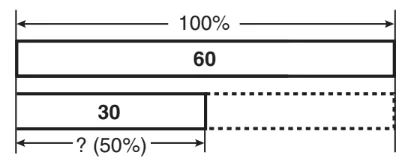
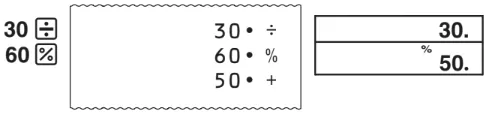
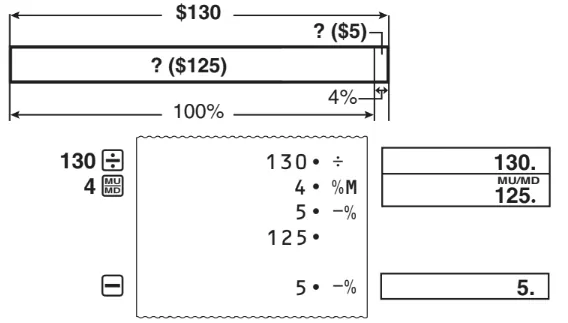
30 = 60 × ?% ? = 50
30 + 60 = ? ? = 90
30 + 60 = 60 × ?% ? = 150
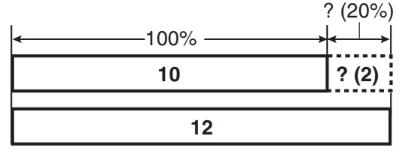
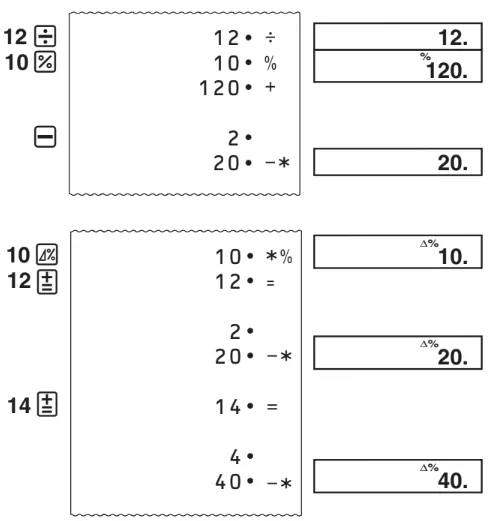
12 − 10 = ? ? = 2
12 − 10 = 10 × ?% ? = 20
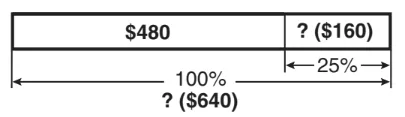
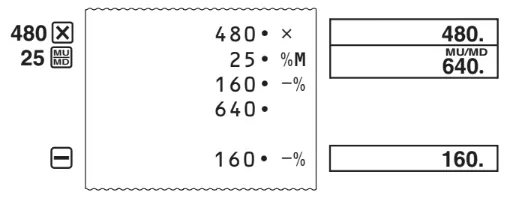
Making Changes as You Input a Calculation
“PRT”, “ON”, “F”
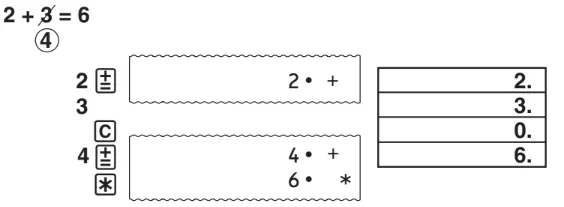
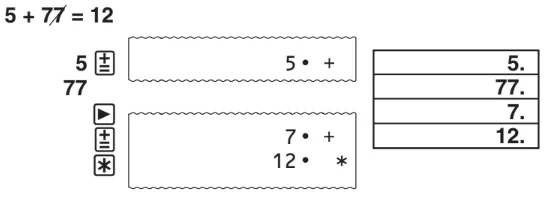
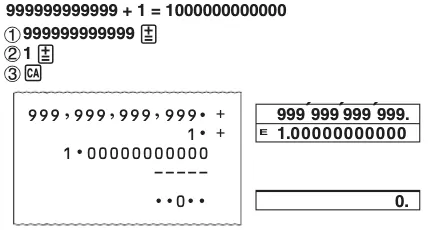
Errors
Currency Conversion
• To set conversion rates
Example: Conversion rate U.S. $1 = €0.9025 for Currency 1 (C1)
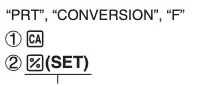

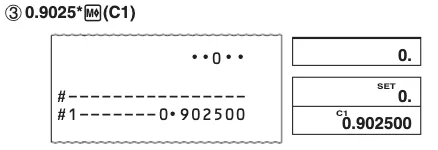
* For rates of 1 or greater, you can input up to six digits. For rates less than 1, you can input up to 8 digits, including 0 for the integer digit and leading zeros (though only six significant digits, counted from the left and starting with the first non-zero digit, can be specified).
Examples: 0.123456, 0.0123456, 0.0012345
• You can check the currently set rate by pressing  and then
  (C1).
(C1).
Conversion rate
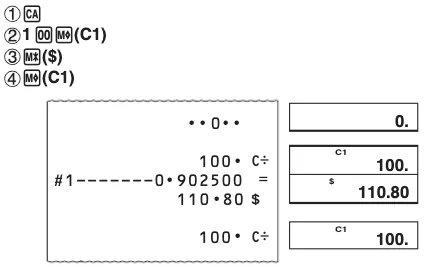
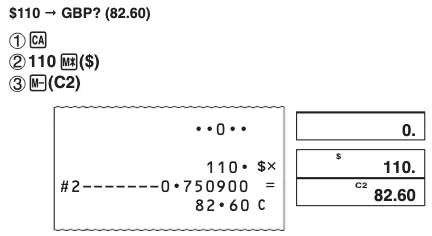
$ = 1, C1 (EUR) = 0.9025, C2 (GBP) = 0.7509
“PRT”, “CONVERSION”, “2”
100 EUR  $? (110.80)
• Specifying the Number of Decimal Places for Intermediate US Dollar Amounts
When you convert from one national currency to another, the calculator internally converts the original currency to US dollars. This conversion result is the “intermediate US dollar amount”. Next, the intermediate US dollar amount is converted to the target currency. The flow of the steps of the conversions will be shown on the printout.
You can specify the number of decimal places for the intermediate US dollar amount.
Example: To specify five decimal places for the intermediate US dollar amount.
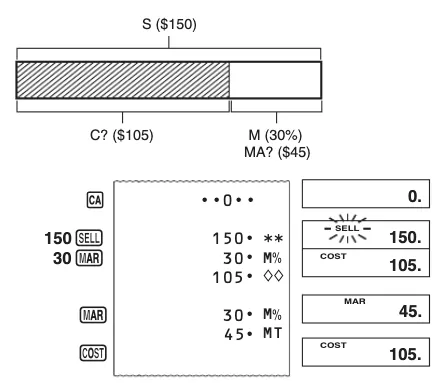
Item Count
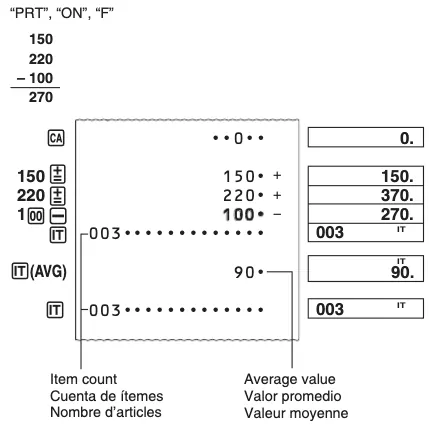
• The item number value is displayed only for addition and subtraction calculations.
• The item count restarts from 001 whenever you press  and inputting another value with
  or
or  .
.
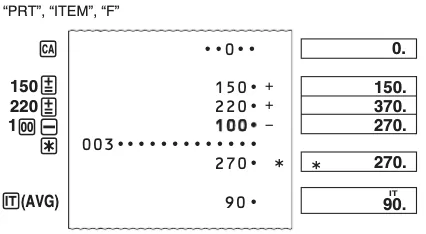
• Pressing in the Item Mode prints the total along with the item count. Now pressing  prints the average amount per item.
• Specifying the Number of Items
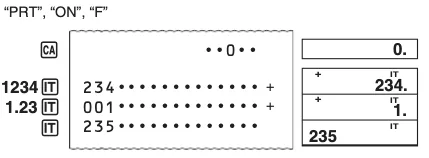
Inputting a value and pressing i adds up to the three least significant (rightmost) digits of the input value to the item count. If the input value includes a decimal part, the decimal part is cut off and only the integer is used.
Example: 1234 i ➝ Adds 234 to the item count.
1.23 ➝ Adds 1 to the item count.
• If you specified the number of items, it is printed on the left
Using the Clock
• To print the current time and date
• While the current time is displayed, you can press  (12/24) to toggle the display between 12-hour and 24-hour timekeeping.
• The following shows display and print examples when 12-hour timekeeping is selected.
Indicates AM.
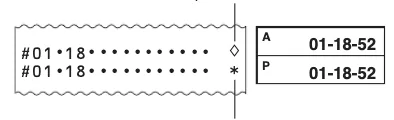
Indicates PM.
• To set the time and date
“PRT”, “ON”, “F”
March 15, 2017 10:30am
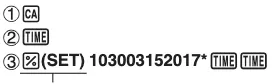
(Until SET appears.)
* When 12-hour timekeeping is being used, pressing  (AM/PM) here will switch between AM and PM.
• Input of a value that is outside the allowable range while configuring time and date settings will cause the message “Error” to appear for about 0.5 seconds.
• Specifying the Date Format
During date setting or display, press  (FORMAT) to cycle through the three available date formats.
Month Day Year MM-DD-YYYY
Day Month Year DD-MM-YYYY
Year Month Day YYYY-MM-DD
Reviewing a Calculation
• Key operations are stored in calculation memory as you input them.
• The values shown on the left side of the display in the examples shown above indicate step numbers. Calculation memory can hold up to 150 steps.
• Review can be used to view only the first 150 steps in calculation memory, even if there are more steps.
• Review cannot be performed while an error indicator is displayed.
• Pressing  clears all steps from calculation memory and restarts the step count from 1.
• To review the calculation
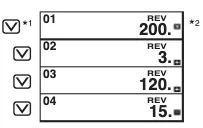
 Pressing
  reviews starting from the first step, while
  reviews from the last step. Each press of or scrolls by one step. Holding down either key scrolls until you release it.
 REV: Review operation in progress.
• Pressing  exits the review operation.
• To edit a calculation
200 × 3 + 120 – 15 = 705  200 × 4 + 120 + 25 = 945
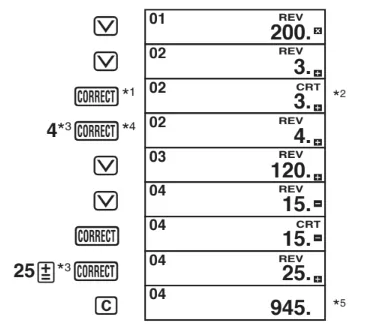
Press  while the step you want to correct is displayed.
The CRT indicator is on the display while calculation memory editing is enabled.
 You can edit values and command key operations (,,
  ,). A multiplication operation can be changed to a division operation and vice versa (× ↔ ÷), and an addition operation can be changed to a subtraction operation and vice versa (+ ↔ −). However, you cannot change a multiplication operation or division operation to an addition or subtraction operation, and vice versa.
 After you are finished making the changes you want, press again.
 The result is always produced by the calculation. You cannot change it by inputting a value.
• You can make as many changes as you want, as long as you press once to start the editing operation and then once again to end the editing operation. Do not forget to press to exit editing after making the changes you want.
• When you edit the contents of a calculation, current rounding and decimal place settings affect the new calculation result.
• If an error occurs while you are inputting a calculation or editing a calculation, all the steps are cleared from calculation memory and cannot be reviewed.
• Calculation speed depends on the number of steps in calculation memory.
Printing Calculation Memory Contents
• Press  to print operations and calculation results. The first line of a j operation will be “• • • • 0 • • • •”.
• To stop printing, press again or  .
.
GUIDELINES LAID DOWN BY FCC RULES FOR USE OF THE UNIT IN THE U.S.A. (not applicable to other areas).
NOTICE: This equipment has been tested and found to comply with the limits for a Class B digital device, pursuant to Part 15 of the FCC Rules. These limits are designed to provide reasonable protection against harmful interference in a residential installation. This equipment generates, uses and can radiate radio frequency energy and, if not installed and used in accordance with the instructions, may cause harmful interference to radio communications. However, there is no guarantee that interference will not occur in a particular installation. If this equipment does cause harmful interference to radio or television reception, which can be determined by turning the equipment off and on, the user is encouraged to try to correct the interference by one or more of the following measures:
• Reorient or relocate the receiving antenna.
• Increase the separation between the equipment and receiver.
• Connect the equipment into an outlet on a circuit different from that to which the receiver is connected.
• Consult the dealer or an experienced radio/TV technician for help.
Caution: Changes or modification to the product not expressly approved by CASIO could void the user’s authority to operate the product.