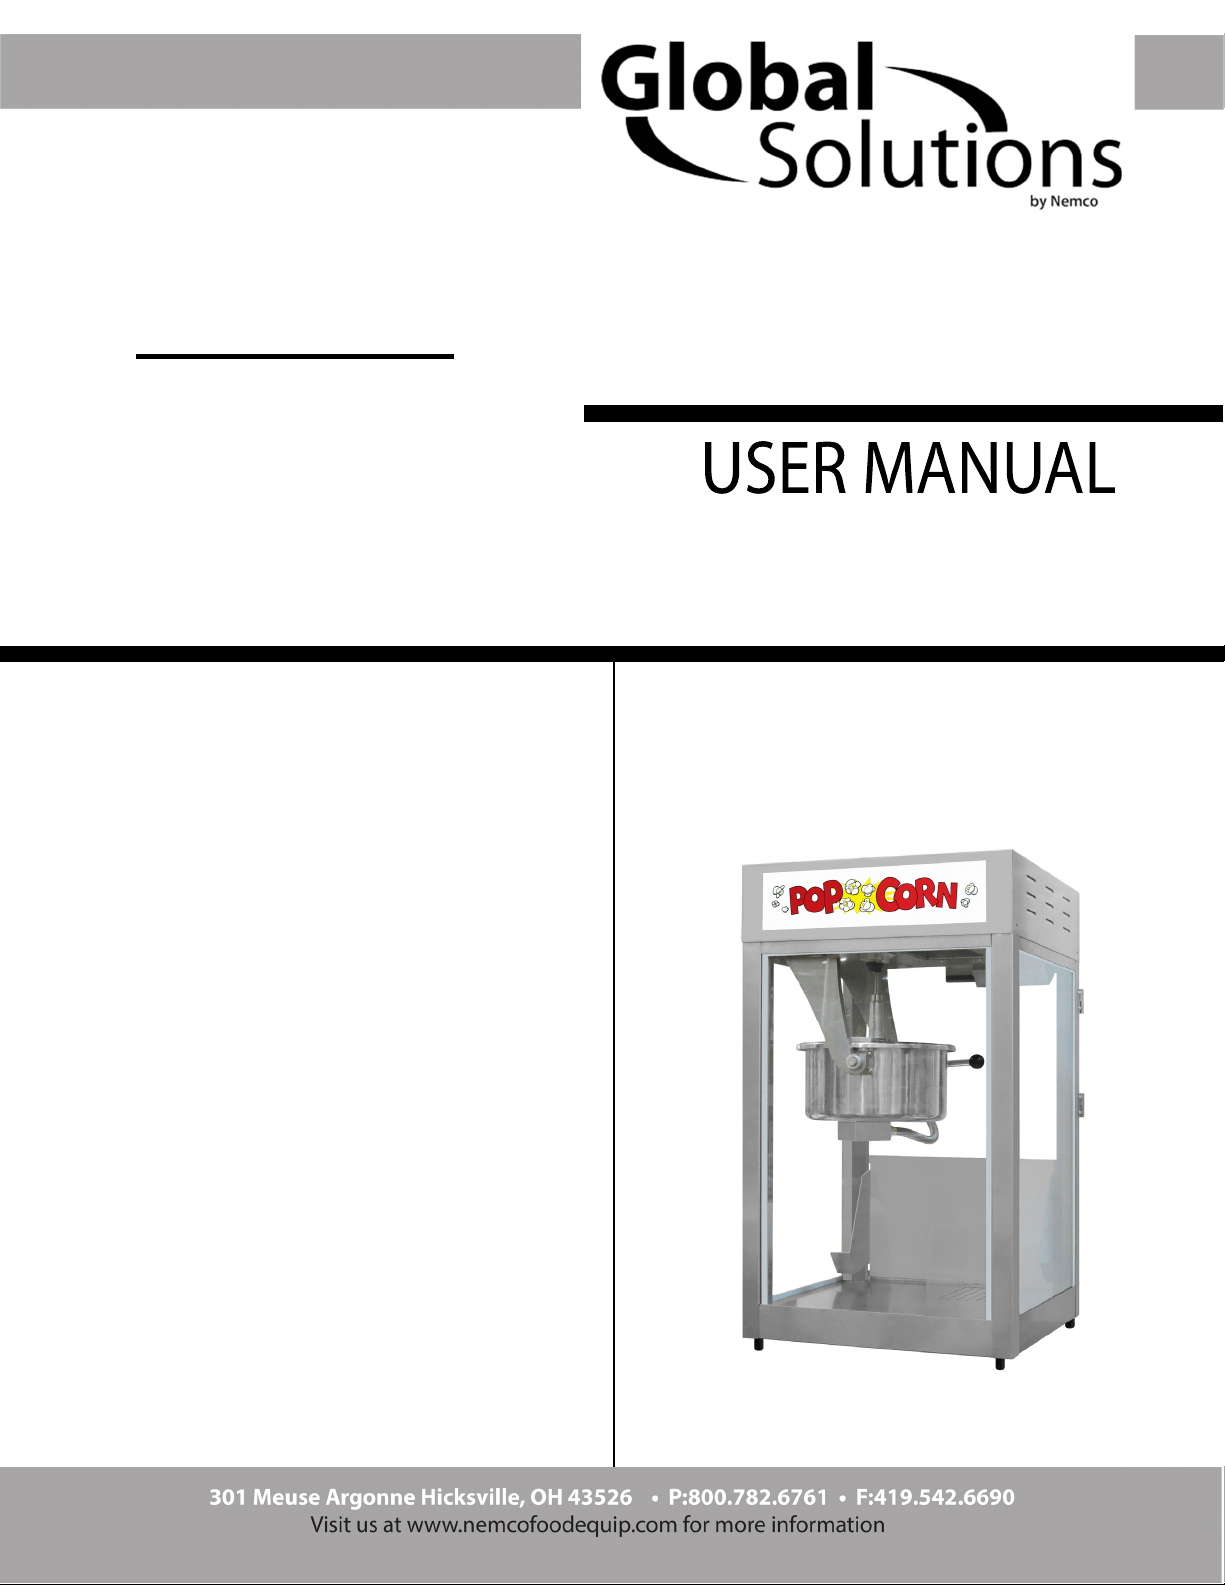
Popper Model
GS1516
GS1516

2
Table of Contents
SAFETYPRECAUTIONS...................................................................................................................................3
INSTALLATIONINSTRUCTIONS...................................................................................................................5
InspectionofShipment..........................................................................................................................................5
Manual...........................................................................................................................................................................5
ItemsIncludedwiththisUnit..............................................................................................................................5
Setup...............................................................................................................................................................................6
ElectricalRequirements........................................................................................................................................7
BeforeYouPlugInMachine.................................................................................................................................7
OPERATINGINSTRUCTIONS.........................................................................................................................8
ControlsandTheirFunctions..............................................................................................................................8
PoppingCornInstructions.......................................................................................................................9
CareandCleaning....................................................................................................................................10
DailyKettleCleaningInstructions..................................................................................................................10
DailyUnitCleaningInstructions.....................................................................................................................11
FilterCleaningInstructions...............................................................................................................................11
Troubleshooting.......................................................................................................................................12
AGITATORSETCOLLARADJUSTMENT...................................................................................................13
MAINTENANCEINSTRUCTIONS................................................................................................................14
ORDERINGSPAREPARTS............................................................................................................................15
ReplacingBrokenGlass.......................................................................................................................................16
CabinetExterior–RearView...........................................................................................................................17
WiringDiagram........................................................................................................................................18
ModelNo.GS1516.................................................................................................................................................18
PRODUCTWARRANTY.................................................................................................................................19
PRODUCTSERVICE........................................................................................................................................19
TERMS&CONDITIONS.................................................................................................................................19
3
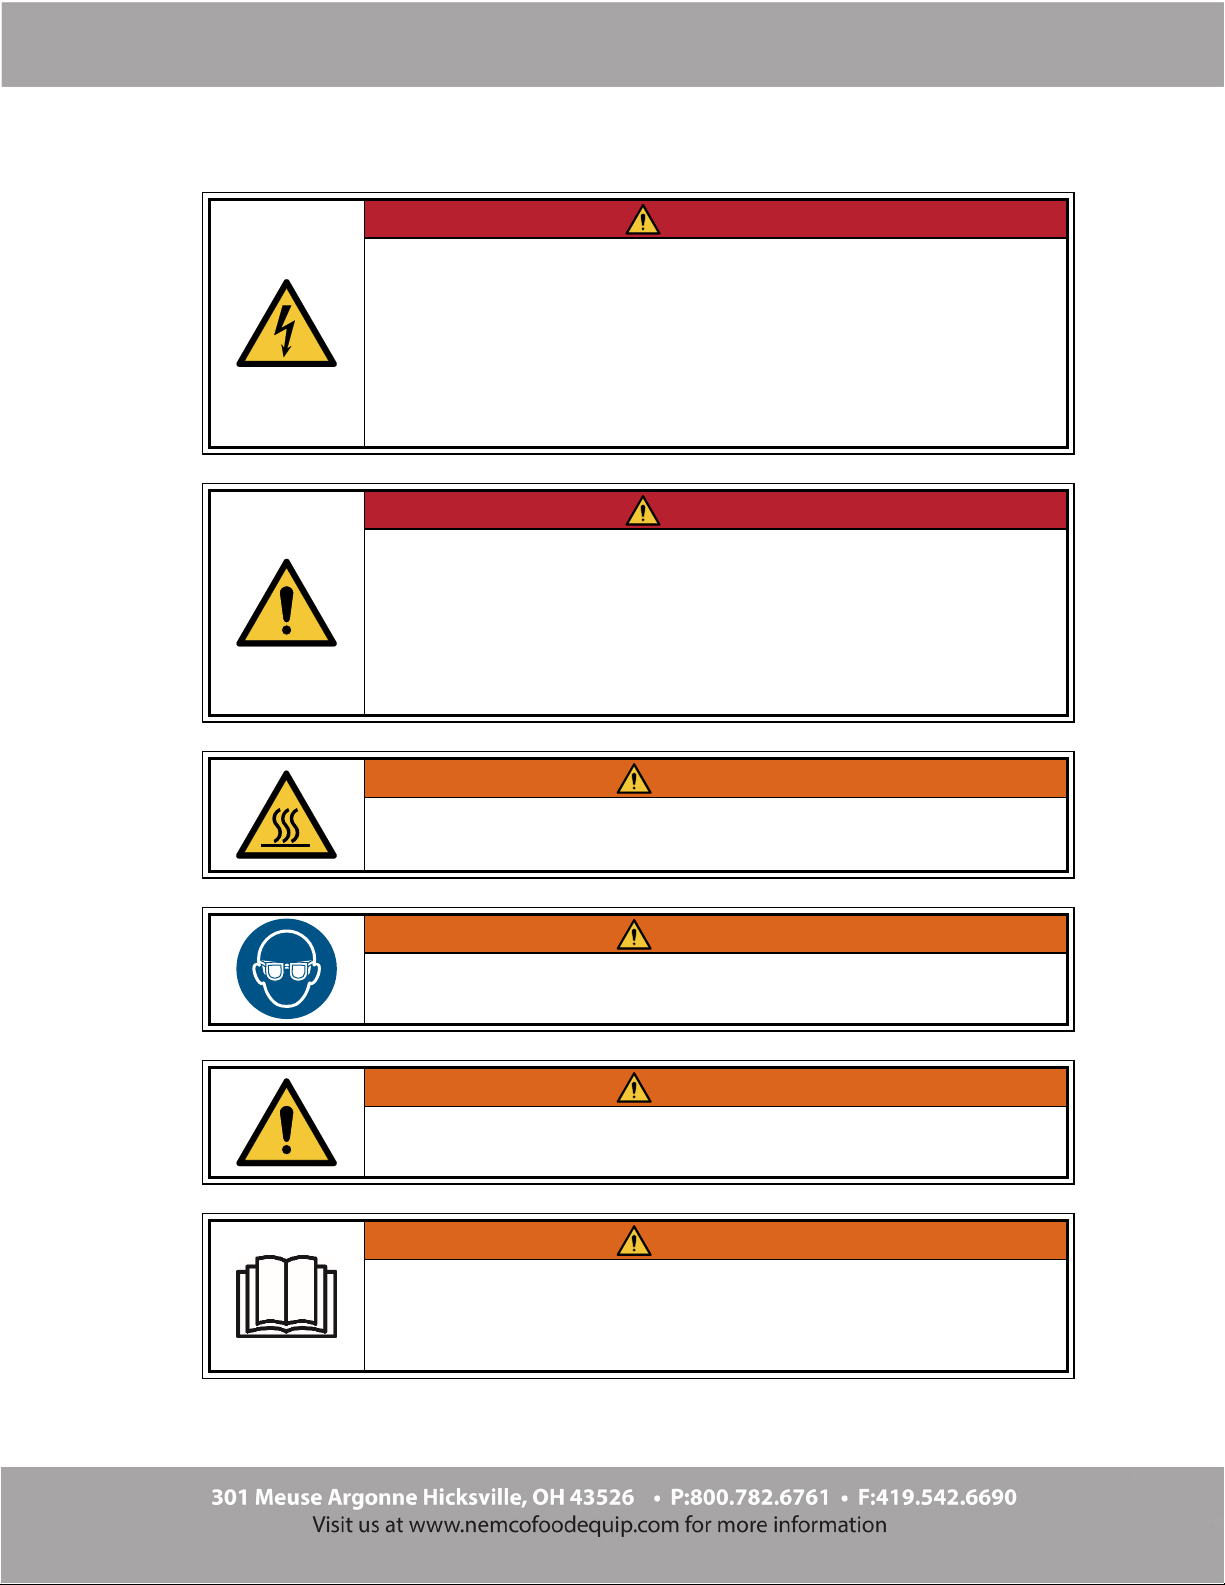
SAFETY PRECAUTIONS
DANGER
Machine must be properly grounded to prevent electrical shock to personnel.
Failure to do so could result in serious injury, or death.
DO NOT immerse any part of this equipment in water.
DO NOT use excessive water when cleaning.
Keep cord and plug off the ground and away from moisture.
Always unplug the equipment before cleaning or servicing.
Make sure all machine switches are in the OFF position before plugging the
equipment into the receptacle.
008_051514
DANGER
Improper installation, adjustment, alteration, service, or maintenance can
cause property damage, injury, or death. Any alterations to this equipment
will void the warranty and may cause a dangerous condition. This appliance
is not intended to be operated by means of an external timer or separate
remote-control system. NEVER make alterations to this equipment. Read the
Installation, Operating, and Maintenance Instructions thoroughly before
installin
g
, servicin
g
, or operatin
g
this equipment.
014
_
020416
WARNING
To avoid burns, DO NOT touch the kettle or any heated surface.
DO NOT place or leave objects in contact with heated surfaces.
013_092414
WARNING
ALWAYS wear safety glasses when servicing this equipment.
010_010914
WARNING
No user serviceable parts inside. Refer servicing to qualified service
personnel.
011_051514
WARNING
Read and understand operator’s manual and all other safety instructions
before using this equipment. To order copies of the operator’s manual go to
www.nemcofoodequip.com or call 800.782.6761.
022_060215
4
WARNING
DO NOT allow direct contact of this equipment by the public when used in
food service locations. Only personnel trained and experienced in the
equipment operation may operate this equipment.
Carefull
y
read all instructions before operation.
012_010914
WARNING
This machine is NOT to be operated by minors.
007_010914
5
INSTALLATION INSTRUCTIONS
Inspection of Shipment
Afterunpacking,checkthoroughlyforanydamagewhichmayhaveoccurredinshipment.
Purchasershouldmakeclaimdirectlytocarrierforanydamagestomerchandisethatoccurin
transit.Thewarrantydoesnotcoverdamagethatoccursintransit,ordamagecausedbyabuse,
orconsequentialdamageduetotheoperationofthismachine,sinceitisbeyondourcontrol
(referencewarrantyinbackofmanual).
Manual
Readandunderstandtheoperator’smanualandallothersafetyinstructionsbeforeusingthis
equipment.Toordercopiesoftheoperator’smanualcontactGlobalSolutions,301Meuse
ArgonneHicksville,OH43526,800.782.6761,orgotowww.nemcofoodequip.com.
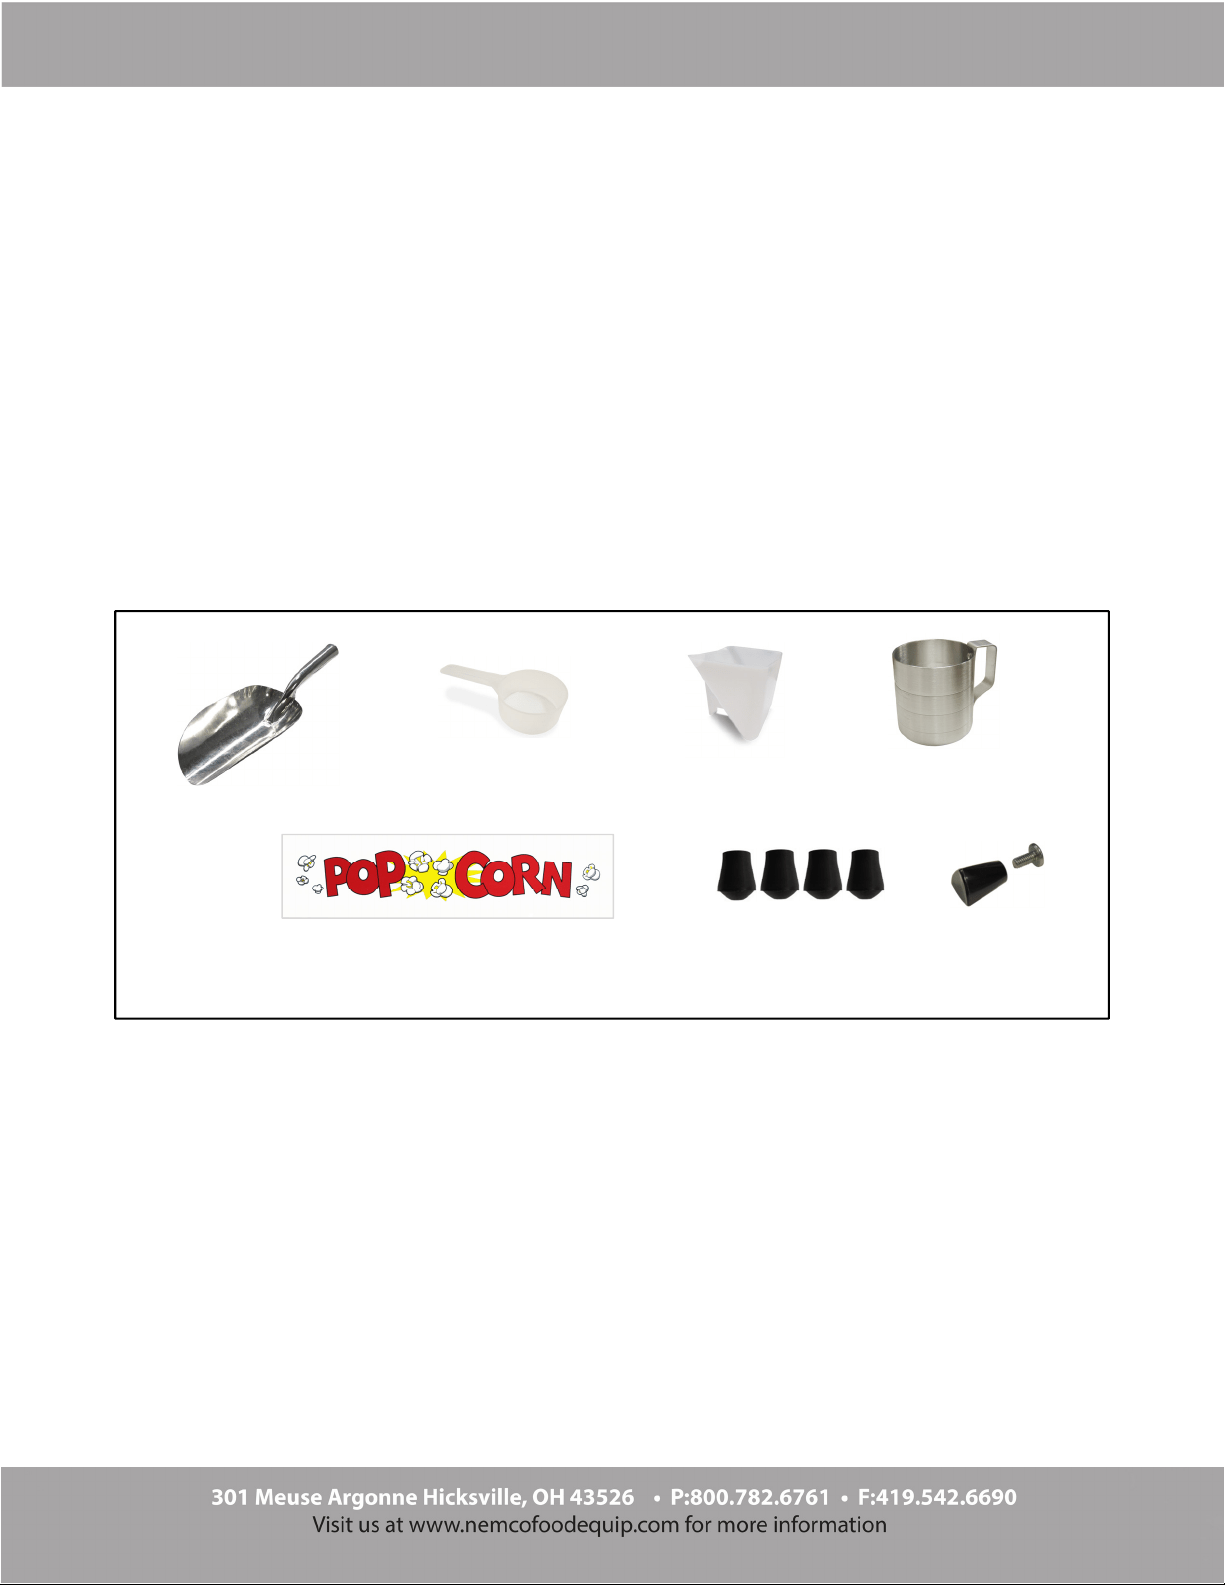
Items Included with this Unit
FlavacolMeasure
20cc
16oz.CornMeasure
A
luminum
Scoop
6oz.Oil
Measure
BlackCrutchTips
Decal
KnobandScrew
(forOldMaidPan)
6
Setup
Thisunithasbeentestedatthefactory.
1. Removeallpackagingandtapepriortooperation.
2. Placeunitonasturdy,levelbase.
3. ThePopperblowerventsouttopofunit,allowadequateclearanceforairflow.
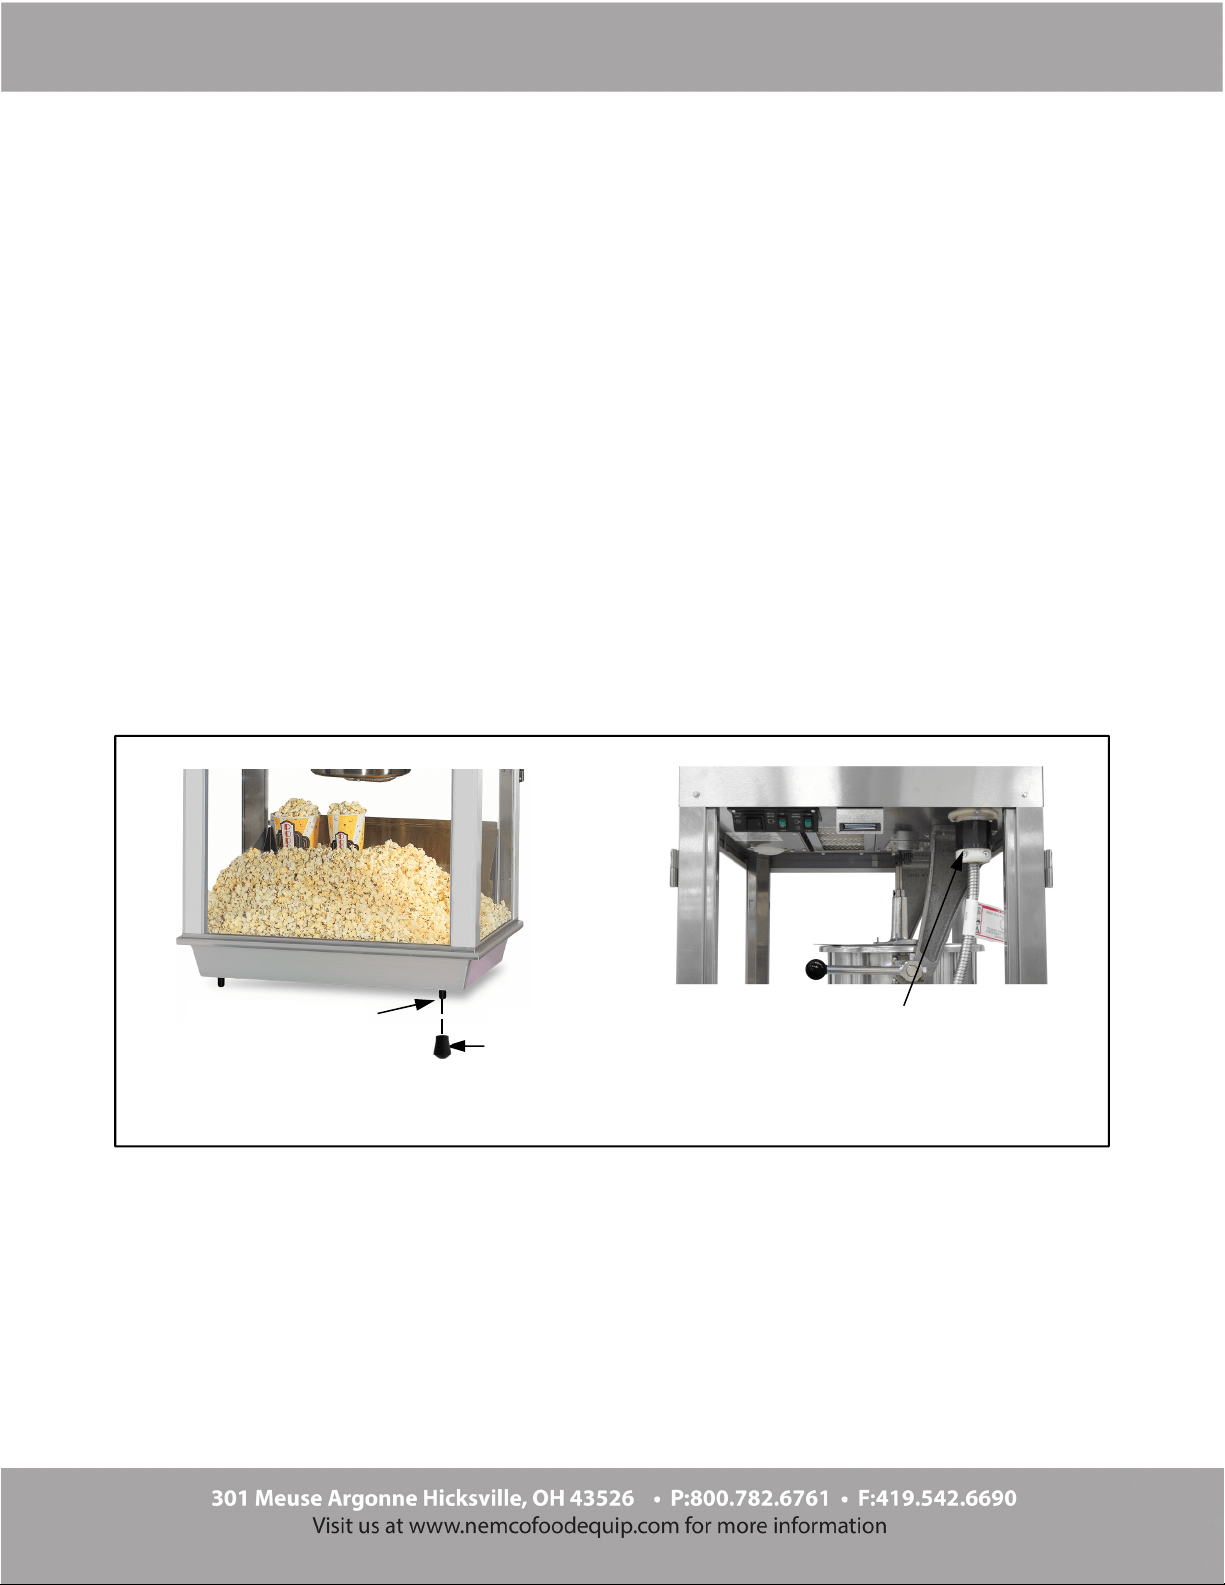
4. Unithas4glidefeetpreinstalledatthefactory(seeimagebelow).InstallaBlack
CrutchTiponeachfoot.Firmlypushcrutchtipoverglideuntilitcoversglideentirely.
5. Doorknobsareshippedfacingtheinsideofmachine.Re‐adjustknobstofacethe
outsideofmachine.
KnobforOldMaidPanisshippedinaccessoriespacklocatedinsidemachine,install
knobwithscrewontheOldMaidPan.
6. ApplyPopcornDecaltounit(ifequipped).
7. Makesurekettlelead‐incordissecurelypluggedintounit,andtwistedtolockintothe
kettlereceptacle(seeimagebelow).
8. Aftersetup,unitshouldbecleanedpriortouse(seeCareandCleaningsection).
Black
CrutchTip
Glide(pre‐installed
atthefactory)
RubberFeetInstallation
CabinetLightBulbInstallation
Generalimagesshownforreference.
Makesurekettleleadisplugged
inandtwistedtolockintokettle
receptacle.
7
Electrical Requirements
Thefollowingpowersupplymustbeprovided:
GS1516:120V~,14.3A,1710W,60Hz
DANGER
Machine must be properly grounded to prevent electrical shock to personnel.
Failure to do so could result in serious injury, or death.
DO NOT immerse any part of this equipment in water.
DO NOT use excessive water when cleaning.
Keep cord and plug off the ground and away from moisture.
Always unplug the equipment before cleaning or servicing.
Make sure all machine switches are in the OFF position before plugging the
equipment into the receptacle.
008_051514
Acertifiedelectricianmustfurnishsufficientpowerforpropermachineoperationandinstallany
suppliedreceptacle.Werecommendthisequipmentbeonadedicatedandprotectedcircuit.
Failuretowireproperlywillvoidthewarrantyandmayresultindamagetothemachine.Itis
GlobalSolutions’recommendationthatthismachinebepluggeddirectlyintoawalloutlet.Theuse
ofextensioncordsisnotrecommendedduetosafetyconcerns,andmaycausesacrificedand/or
reducedperformance.Makesurecordislocatedtopreventatriphazardorunitupset.
Before You Plug In Machine
1. MakesureallmachineswitchesareOFFbeforepluggingequipmentintoreceptacle.
2. Makesurewalloutletcanacceptthegroundedplugs(whereapplicable)onthepower
supplycord.
3. Thewalloutletmusthavetheproperpolarity.Ifindoubt,haveacompetent
electricianinspecttheoutletandcorrectifnecessary.
4. DONOTuseagroundedtoun‐groundedreceptacleadapter(whereapplicable).
5. Installunitinalevelposition.
CAUTION
If the supply cord is damaged, it must be replaced by Global Solutions, its
service a
g
ent or similarl
y
qualified persons in order to avoid a hazard.
039_080614
8
OPERATING INSTRUCTIONS
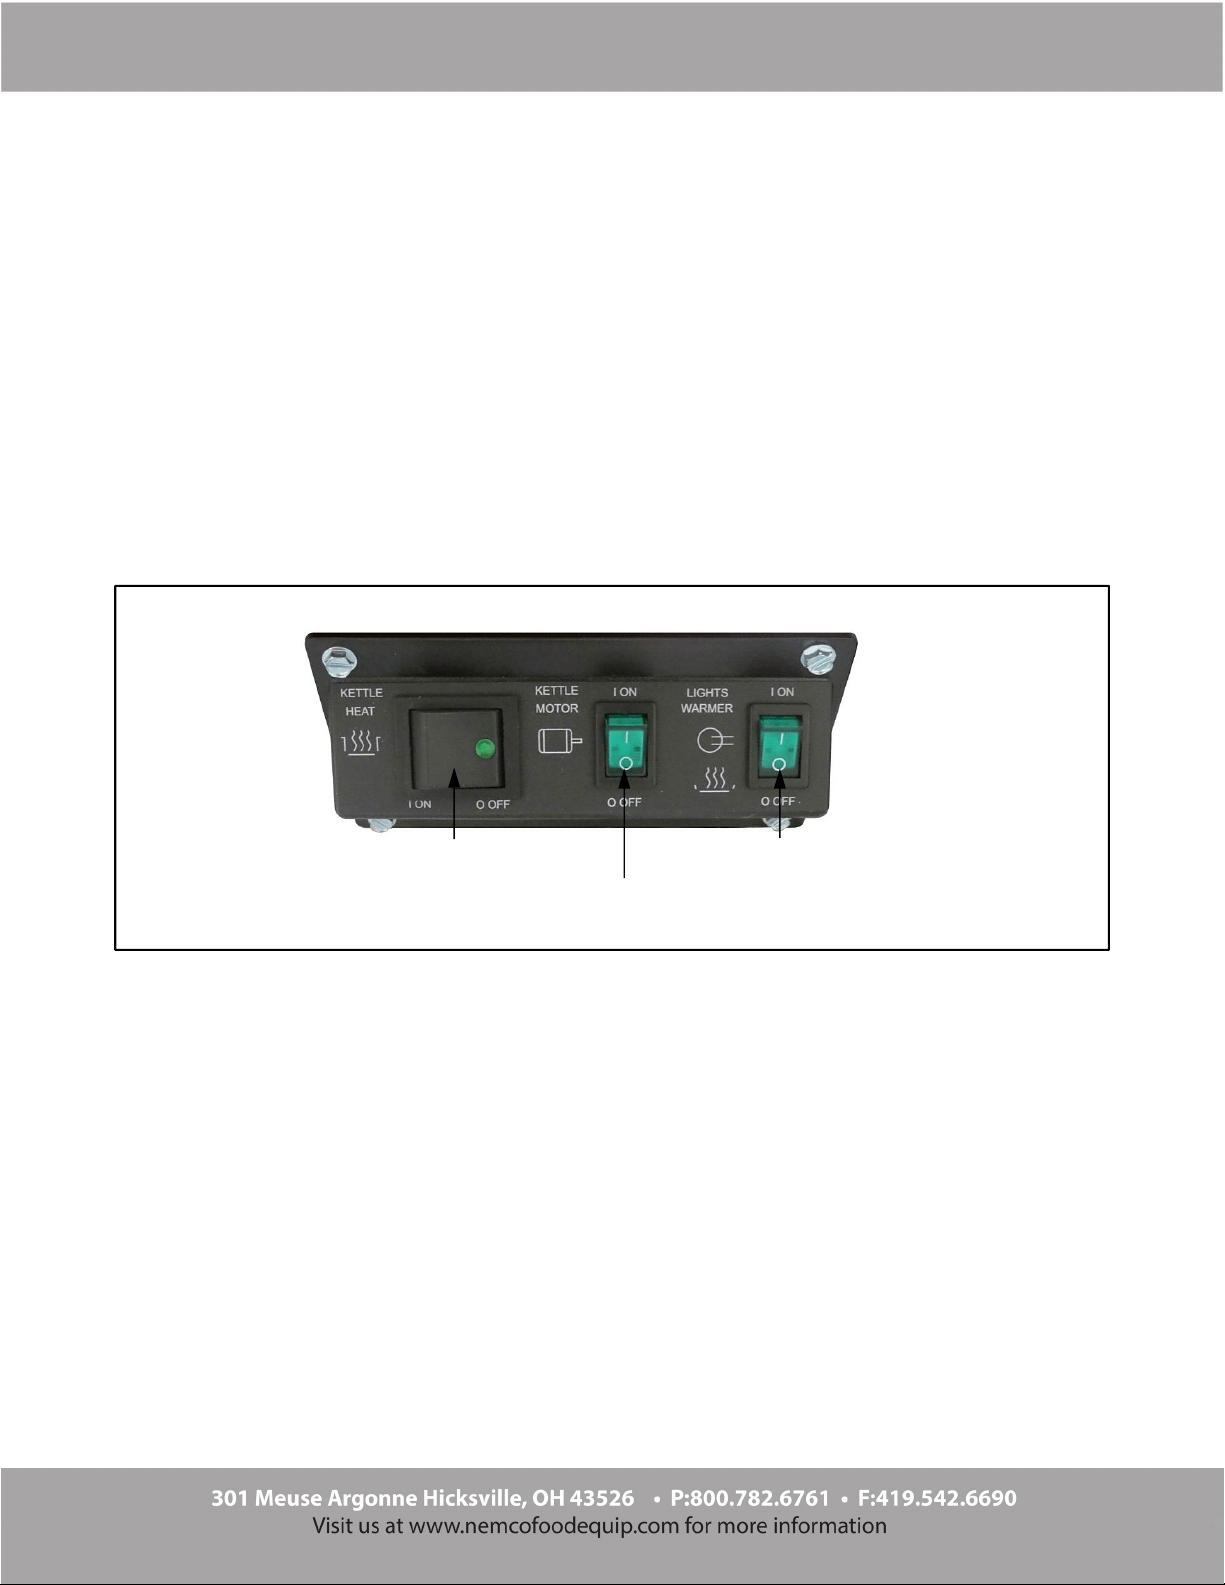
Controls and Their Functions
KETTLEHEATSWITCH
Twoposition,ON/OFFlightedrockerswitch‐suppliespowertotheheatingelementinthe
kettle.ThegreenswitchlightONindicatesthereispowertothekettleheatingelement.
KETTLEMOTORSWITCH
Twoposition,ON/OFFlightedrockerswitch‐suppliespowertothekettleagitatormotor
andexhaustblower.TheKettleMotorSwitchMUSTbeONatalltimeswhenthereis
popcorn(poppedorun‐popped)inthekettle.
LIGHTS/WARMERSWITCH
Twoposition,ON/OFFlightedrockerswitch‐suppliespowertotheinteriorcabinetlight
andcornpanheatelement.
KettleHeatSwitch
KettleMotor Switch
Lights/Warmer
Switch

9
Popping Corn Instructions
ThissectiondescribesinstructionsforpoppingSaltedPopcorn.
Thepopperisequippedwithacorn,salt,andoilmeasure.Werecommendflavoredandcolored
coconutoil.Popcornpoppedincoconutoilstaysfreshlongeranddoesnotleaveblackdepositsin
thekettlelikeotheroils.Useonlytopquality,freshpopcornfromreputablesuppliers.
Popping Salted (Standard) Popcorn
RawPopcornCharge: Usecornmeasureprovided(ex:for6oz.Kettle,use6oz.corn)
RecommendedOilVolume: Oilvolumeisapprox.30%ofcornamount(ex:for6oz.corn,use2oz.oil)
Flavacol(Salt)Amount: UsesmallFlavacolscoopprovided
Premeasureallingredients(adjustasneededfordesiredtaste),orforbestresultsuseMega‐Pop
®
premeasuredpopcornandoilpouchmadeforyourkettlesize.
1. TurnallswitchesON.
2. Todeterminewhenkettleisreadytopopcorn(about4minutes),testpopthree
kernelsofcorninoneounce(30ml)ofpoppingoil.Whenkernelspop,kettleisready.
3. Liftkettlelid,pourinpopcornandFlavacol,thenaddoil;closelid.
4. Whencornhasfinishedpopping,gentlydumpthepopcorn.
PoppingTip:Onfinalbatch,turnKettleHeatSwitchOFFjustaslidsareforcedopen
bythepoppingcorn(kettlehasplentyofheattofinishpopping).Thishelps
eliminatesmoke/odorfromanyoilresidueremaininginkettle.
5. Whenfinishedpopping,turnKETTLEHEATandKETTLEMOTORswitchesOFF.
NEVERLEAVETHEHEATONWHENYOUARENOTPOPPINGCORN!
10
Care and Cleaning
DANGER
Machine must be properly grounded to prevent electrical shock to personnel.
DO NOT immerse in water. DO NOT clean appliance with a water jet.
A
lwa
y
s unplu
g
the equipment before cleanin
g
or servicin
g
.
025_111616
WARNING
To avoid serious burns, DO NOT touch the kettle while it is hot!
028
_
082715
Goodsanitationpracticedemandsthatallfoodpreparationequipmentbecleanedregularly(only
usenon‐toxic,foodgradecleaners).Acleanlooking,well‐keptmachineisoneofthebestwaysof
advertisingyourproduct.
Note: Itisextremelyimportanttofollowallofthecleaningprocedures,otherwiseparts
damageandequipmentfailurewillresult.Thewarrantydoesnotcoverpartsthat
aredamagedduetoimpropercleaning.
Daily Kettle Cleaning Instructions
CAUTION:Ahotkettlewillcauseburnsifyoutouchitwithyourhand.Allowkettletocool
atleast1hourbeforeattemptingtoclean.DONOTuseiceorwatertocool
downahotkettle!Severekettledamagewillresult!
1. Whencool,wipetheoutsideofthekettlewithaclean,softcloth.DONOTuseoven
cleanersorabrasivematerialsastheywilldamagethekettle.
2. Everynight,mixHeat’nKleensolution,2tablespoonspergallonofwater.Itisnot
necessarytousetheentiregallonatonce;onlyuseenoughtofillthekettle1/2inch
deep.
3. TurnthekettleheatON.Whenthewaterstartstoboil,turnthekettleheatOFF.
4. Allowtocoolforatleast1hour,thendumpthesolutionintoabucketandwipethe
insideofthekettlewithacleancloth.Makesureallofthesolutiongoesintothe
bucket;donotspillanyintheinteriorofthemachine.
Forextradirtykettles,theprocessmayberepeated;or,afterturningthekettleheat
OFF,allowsolutiontositinthekettleovernight.Thenextmorning,dumpthesolution
intoabucketandwipetheinsideofthekettlewithacleancloth.
5. WiththeunitOFFandunplugged,wipethekettleleadcordwithacleanSLIGHTLYdamp
cloth.DONO Tgetmoistureintothekettlelead‐incord,severedamagewillresult.
11
Daily Unit Cleaning Instructions
1. WiththemachineOFF,unplugtheunitandallowittocoolbeforeattemptingtoclean.
2. Makesuretocleanallpans/accessoriesinordertosanitizethembeforeeachuse.
3. Takeaclean,SLIGHTLYdampclothandwipeexcessgreasefromtheglassandcabinet.
4. Wipethestainlesssteelpartswithacleanclothandcleanerdesignedforstainless
steel,suchasWatchdogStainlessCleaner.
DONOTuseovencleanersorabrasivematerialsastheywilldamagepartsofthe
machine.
5. Cleantheglasspanelswithglasscleaner.WatchdogGlassCleanerisrecommended.
Ammoniacleanerswilldamagetheplasticdoors.Useonlynon‐ammoniacleaners,
suchasWatchdogGlassCleaner.
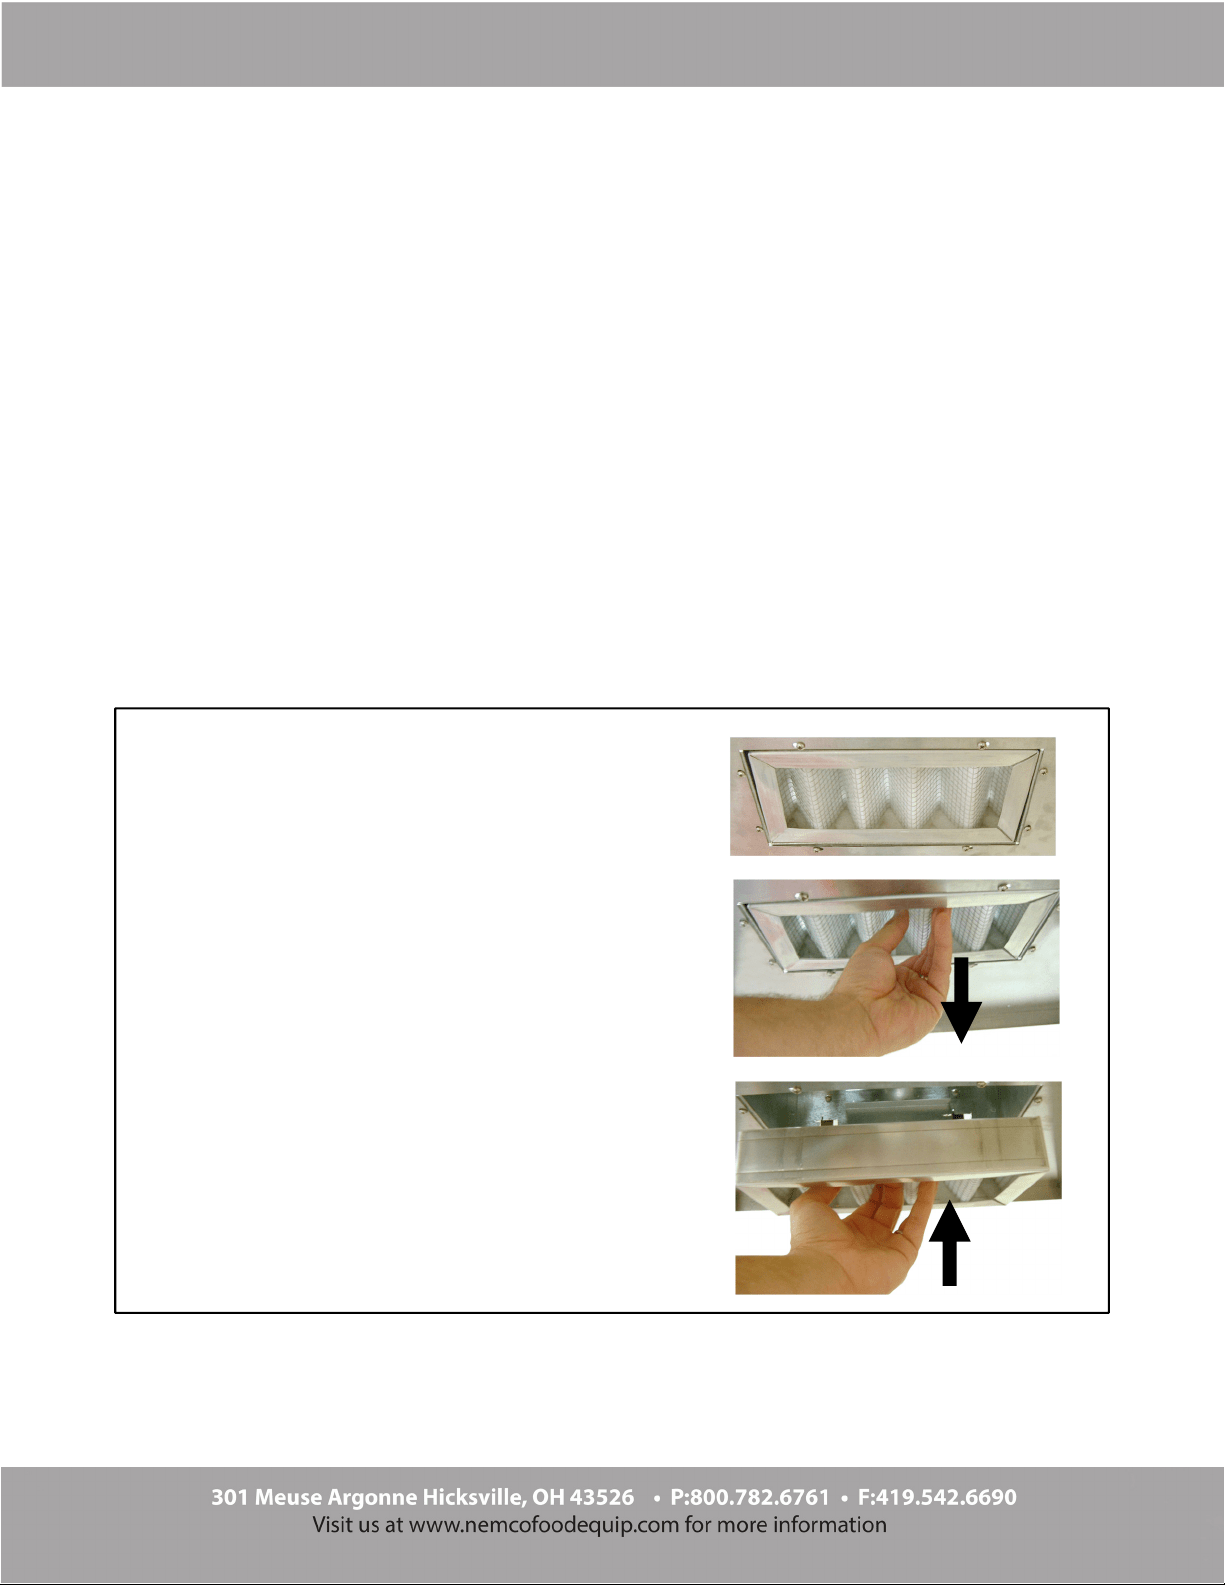
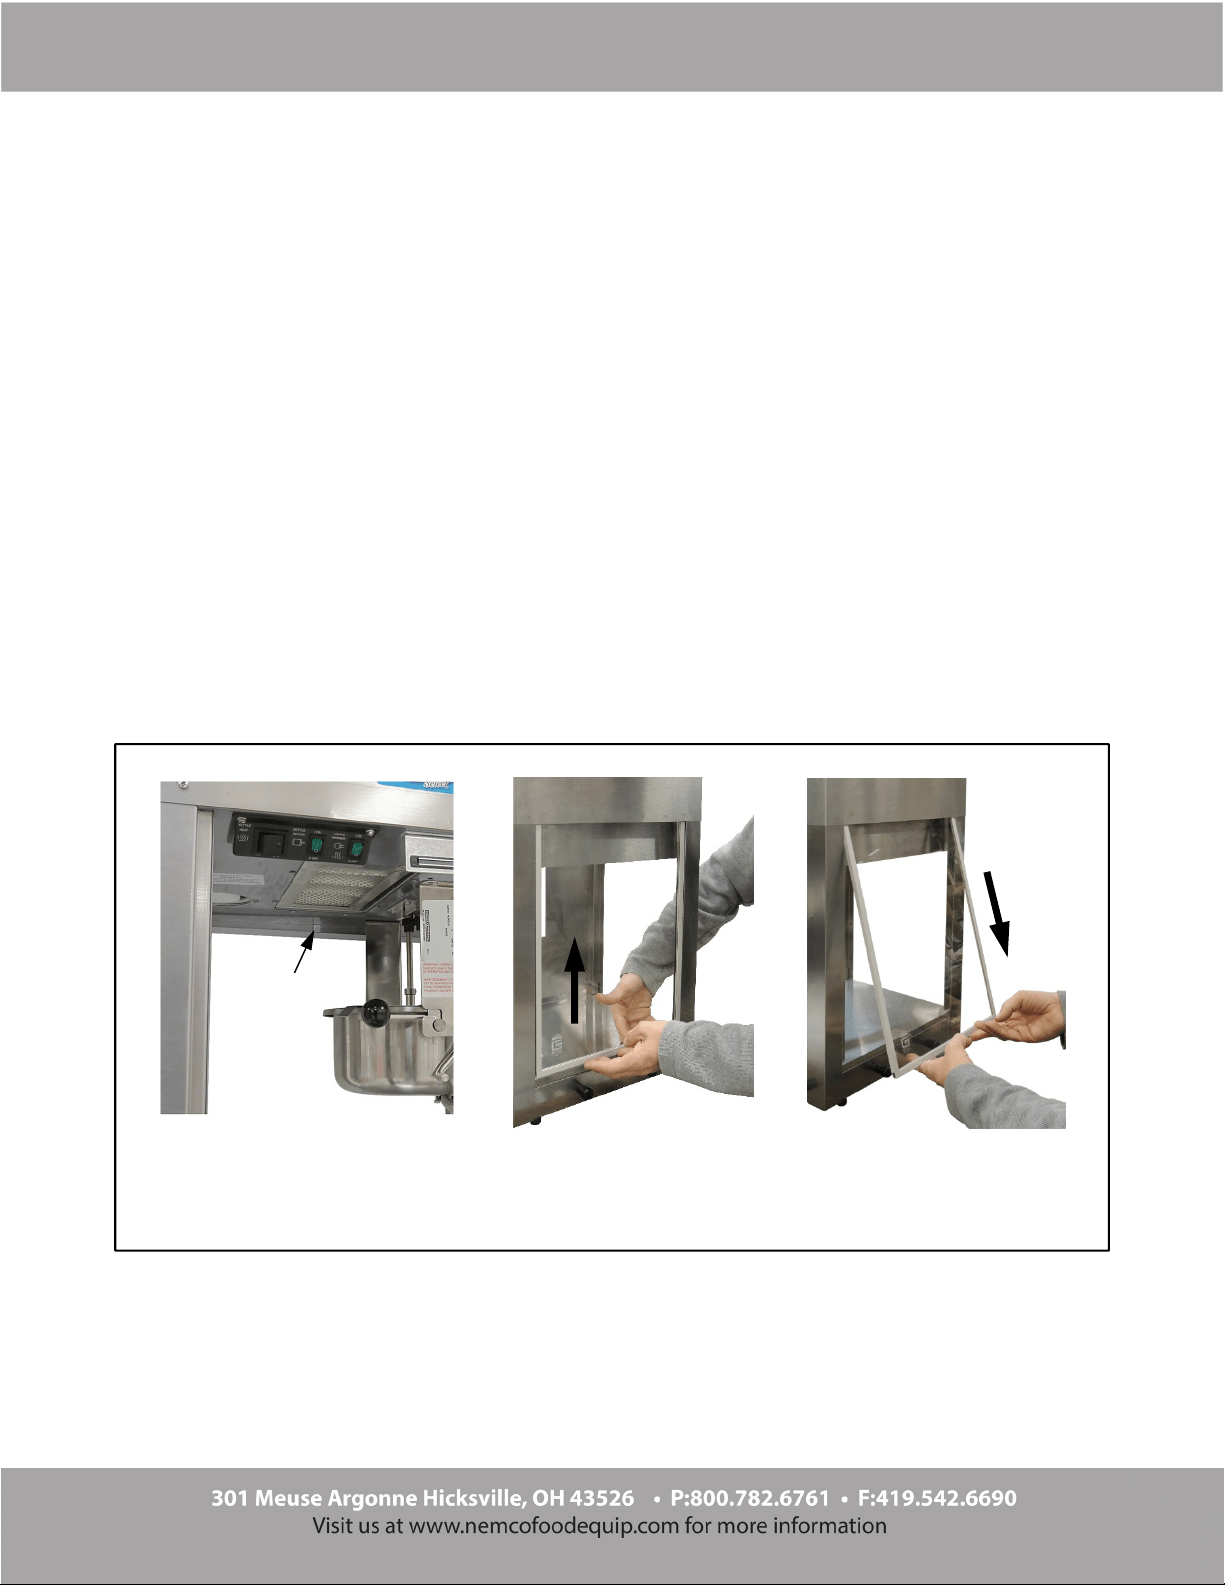
Filter Cleaning Instructions
Thepopcornmachineisequippedwithanefficientanddurablefiltrationsystem.Thefilter
shouldbecleanedevery1‐2weekstomaintainmaximumefficiency.
StepstoCleanFilter
Step1:TurnunitOFFandallowittocoolbefore
removingfilter.Filterislocatedinsidethepopcorn
machine,abovethepoppingkettle.
Step2:Removefilterbygrippingthefilteritselfand
pullingstraightdown.
Step3:Cleanfilterinwarmsoapywater,thenrinse
andallowtodryovernight.Replacefilterbyputtingit
intotheslotandpushingupward.Makesurethefilter
frameisflushwiththeceilingofthepopper(asshown
above).
12
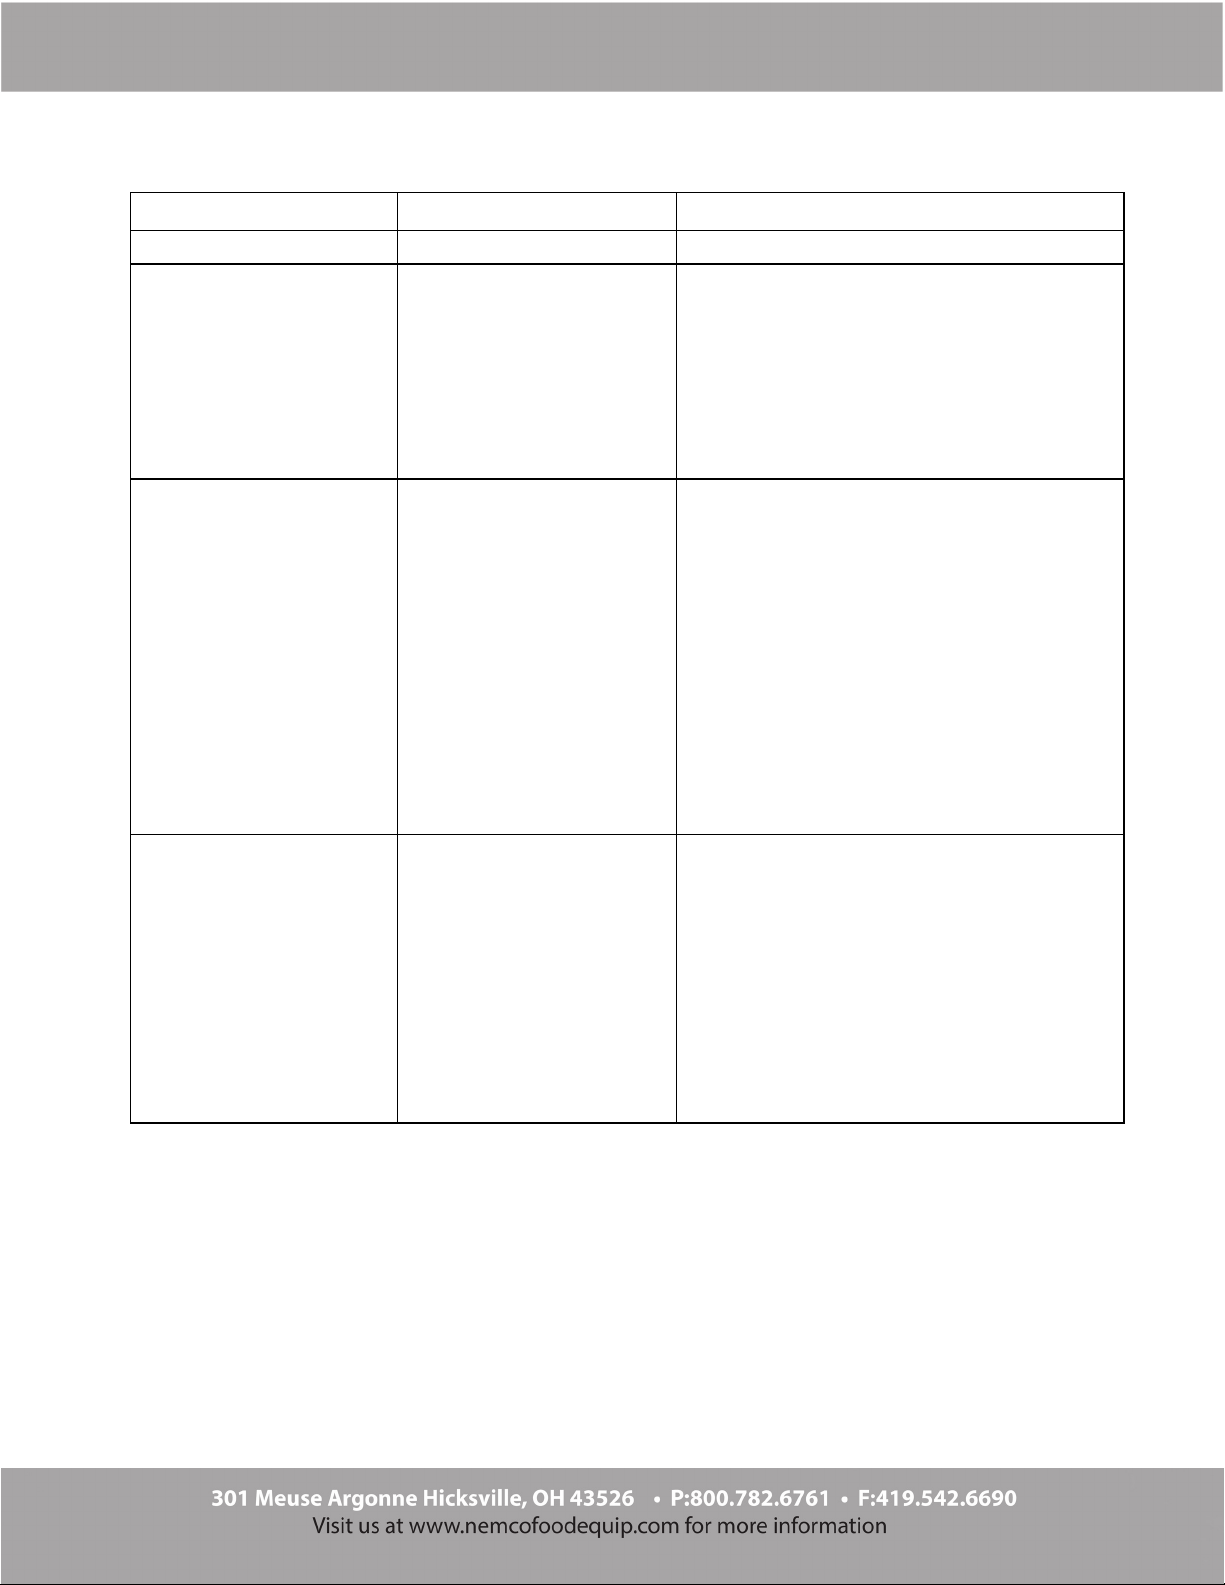
Troubleshooting
Issue PossibleCause Solution
NoPowertotheUnit A. NoPowertotheUnit A. Makesuretheunit’spowercordispluggedin.
KettleDoesNotHeat A. PowertotheKettle A. Makesurekettlelead‐incordispluggedinand
twistedtolockintothekettlereceptacle.
B. KettleHeatSwitch B. Haveaqualifiedservicepersoncheckthe
voltagetoandfromtheKettleHeatSwitch;if
switchisdefective,replaceit.
C. HeatingElement C. Heatingelementinthekettlema
y
beburned
out.Checkwithaqualifiedservicepersonfor
inspection/repair.
LongPoppingCycles
(Longerthan4minutesfor
SaltPopcorn)
A. LowVoltage A. Ifthemachineisoperatedonlowvoltage,this
couldcausethekettlenottoreachtheproper
operatingtemperature.Checkwithaqualified
electrician.
B. InadequateSupplyLines B. Inadequatelysizedelectricalsupplylines or
useofextensioncord,inadditiontobeinga
firehazard,wouldalsopreventthekettlefrom
reachingtheproperoperatingtemperature.
Checkwithaqualifiedelectrician.
C. InferiorCorn C. Inferiorqualitycornwouldresultinlonger
poppingcycles.Useonlytopqualityhybrid
popcornfromreputablesuppliers.Eventhen,
ifyouletyourcornpickupmoistureordry
out,yourpoppingcycleswillbeslow.
KettleAgitatorShaftnot
Rotating
Ifthekettleagitatorshaftis
notrotating,DONOTpop
corn.
A. KettleMotorSwitch A. MakesuretheKettleMotorSwitchisON.Ifthe
switchisON,andtheshaftisnotrotating,the
switchormotormaybefaulty,contact
qualifiedservicepersonnelfor
inspection/repair.
B. KettleAgitatorShaft/Stir
Bladenotrotating.(Unit
mustbeOFF,unplugged
andcoolpriorto
checkingoradjusting
theagitatorassembly.)
B. KettleswithaFIXEDStirRod– checkthe
clearancebetweentheshaftwithweldedstir
bladeandthekettlebottom;itshouldbea
minimumof1/32”(thicknessofadime).
Tomakeshaftadjustments,referencethe
AgitatorSetCollarAdjustmentsection.
13
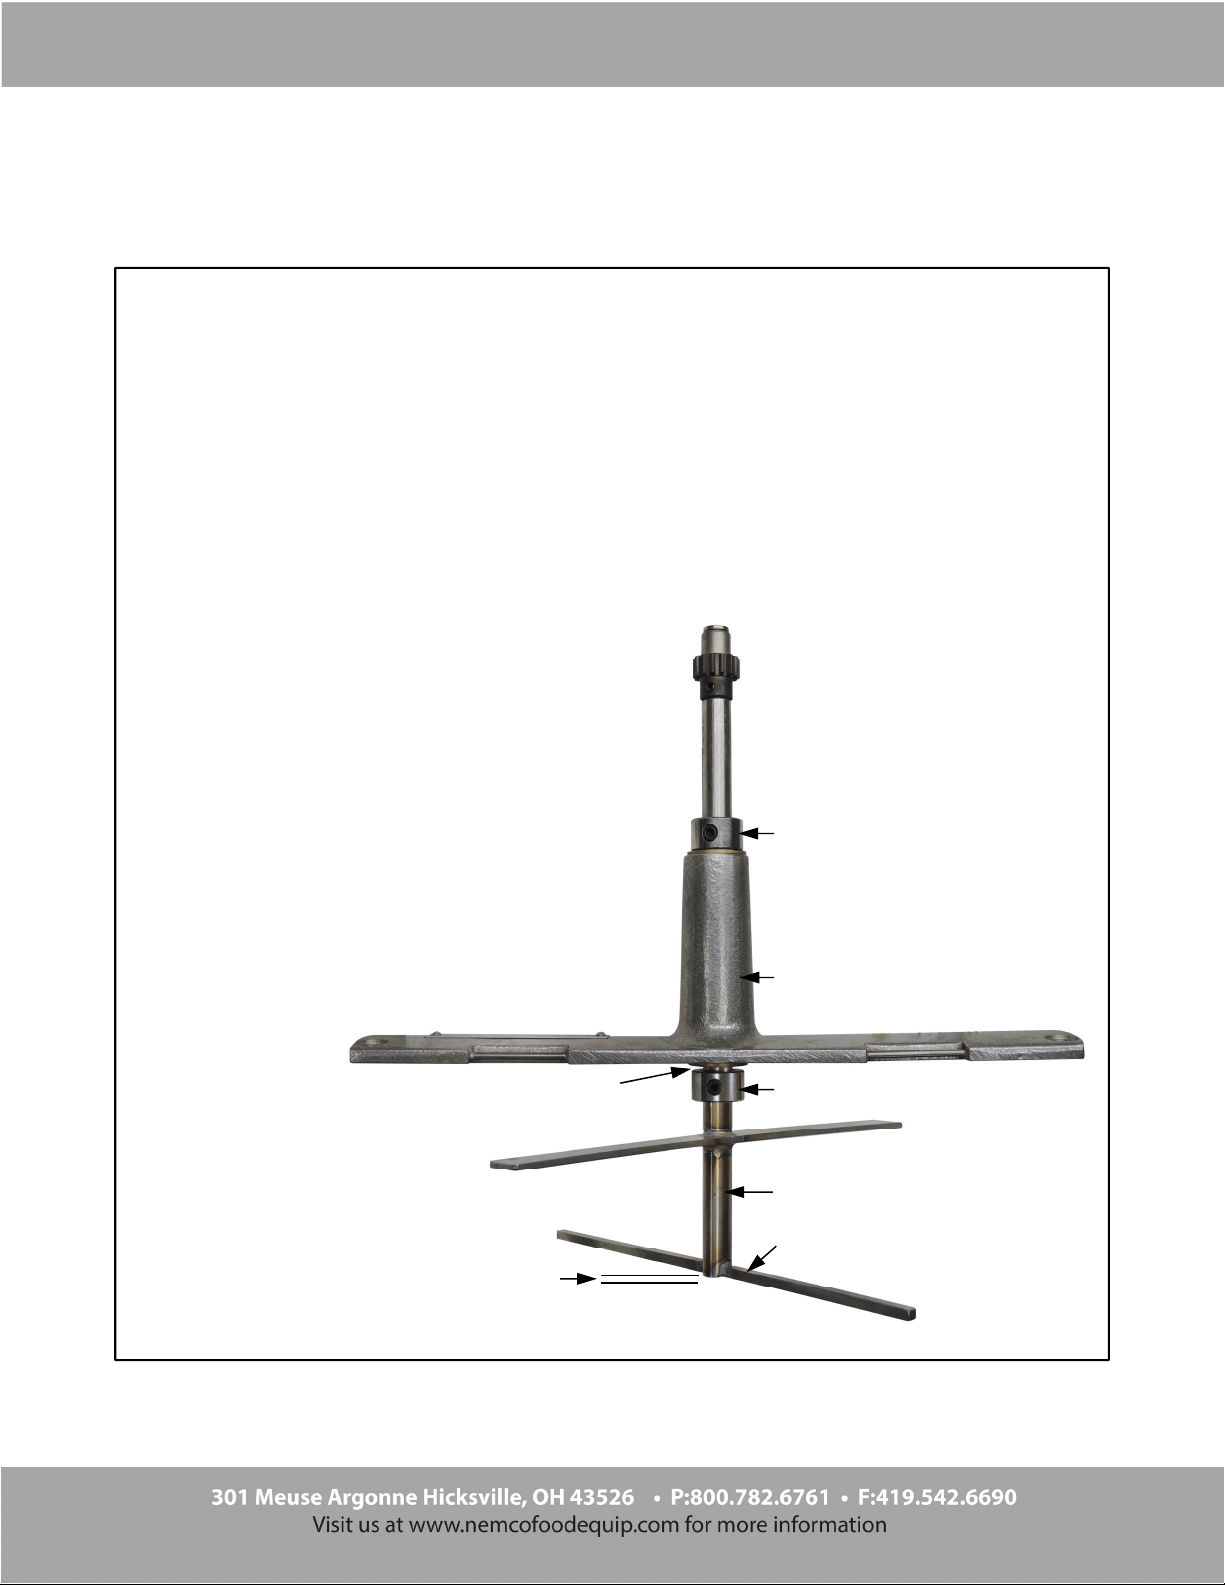
Agitator Set Collar Adjustment
Thefollowinginstructionsdescribehowtoproperlyadjustsetcollarsonanagitatorassembly
withafixedstirrod.
StepstoAdjustSetCollarsonAgitatorwithaFixedStirRod
Agitatorassemblyisadjustedwhilefastenedtothekettle(imageshownforgeneralreferenceonly).
Step1. TurnmachineOFF,unplugunit,andallowittocoolcompletelybeforeattemptingto
adjusttheagitatorheight.
Step2. Loosenthesetscrewinthesetcollarabovethecrossbarandbelowthecrossbar.
Step3. Placea1/32”gauge(thicknessofadime)underthebaseoftheagitatorshafttoadjust
clearancebetweenthekettlecooksurfaceandtheshaft;referenceimageshown.Onceadjusted,
re‐tightenthesetscrewinthesetcollarabovethecrossbartosecureshaftinplace.
Step4. Adjustclearancebetweenthebottomof
thecrossbarandthelowersetcollarto1/32”
(thicknessofadime);referenceimageshown.
Onceadjusted,re‐tightensetscrewtosecurein
place.
Step5. Tocheckforproperadjustment,make
surethestirrodisparalleltothekettlecook
surface(itshouldbeclose‐butnottouching).
Step6. Spintheagitatorshaftbyhandtoensure
itspinsfreelyandisnotdraggingthebottomof
thekettle.
Agitatorshownforgeneral
imagereferenceonly(lidsnot
shownforclarity).
Step3:Adjustclearanceto
thicknessofadime.
KettleCook
Surface
Crossbar
SetCollarw/SetScrew
aboveCrossbar
LowerSetCollar
A
gitatorShaft
Step4:Adjustclearanceto
thicknessofadime.
StirRod(weldedtoshaft)
14
MAINTENANCE INSTRUCTIONS
DANGER
Machine must be properly grounded to prevent electrical shock to personnel.
Failure to do so could result in serious injury, or death.
DO NOT immerse any part of this equipment in water.
DO NOT use excessive water when cleaning.
Keep cord and plug off the ground and away from moisture.
Always unplug the equipment before cleaning or servicing.
Make sure all machine switches are in the OFF position before plugging the
equipment into the receptacle.
008_051514
DANGER
Improper installation, adjustment, alteration, service, or maintenance can
cause property damage, injury, or death. Any alterations to this equipment
will void the warranty and may cause a dangerous condition. This appliance
is not intended to be operated by means of an external timer or separate
remote-control system. NEVER make alterations to this equipment. Read the
Installation, Operating, and Maintenance Instructions thoroughly before
installin
g
, servicin
g
, or operatin
g
this equipment.
014_020416
WARNING
No user serviceable parts inside. Refer servicing to qualified service
personnel.
011_051514
CAUTION
THE FOLLOWING SECTIONS OF THIS MANUAL ARE INTENDED ONLY
FOR QUALIFIED SERVICE PERSONNEL WHO ARE FAMILIAR WITH
ELECTRICAL EQUIPMENT. THESE ARE NOT INTENDED FOR THE
OPERATOR.
027
_
010914

15
ORDERING SPARE PARTS
1. Identifytheneededpartbycheckingitagainstthephotos,illustrations,and/or
partslist.(Generalimagesmaybeusedinmanualforreferenceonly.)
2. Useonlyapprovedreplacementpartswhenservicingthisunit.
3. Whenordering,pleaseincludepartnumber,partname,andquantityneeded.
4. Pleaseincludeyourmodelnumber,serialnumber,anddateofmanufacture(located
onthemachinenameplate/dataplate)withyourorder.
5. Placeordersbyphoneoronline:
Phone: 800.782.6761
Fax: 419.542.6690
WebPage:www.nemcofoodequip.com
16
Replacing Broken Glass
GLASSDIMENSIONS(HeightxWidthxThickness)
FrontandSideGlass:26.25”x16.875”x1/8”(3Pieces)
1. TurnmachineOFF,unplugunitandallowittocoolbeforeattemptingtoreplaceglass.
2. Carefullyremoveallloosepiecesofbrokenglass.
3. PulloutMagneticCliplocatedaboveglasspanelincabinetinterior(seeFigureA
below).
4. Slideglasspanelupundertopridge,thenswingbottomofpaneloutandloweritaway
fromunit(seeFiguresAandBbelow).
5. Carefullyremovetherestofthebrokenglass.
6. Removeallrigidglasschannelsfromaroundglasstobereplaced,setchannelsaside
forreuse.
7. Applydecals(ifdesired)tonewglasspanel.
8. Sliderigidglasschannelsoverexposededgesofnewglasspanel.
9. Carefullyslidenewglasspanelupundertopridge,thenloweritintothebottomchannel.
10. Reinstallmagneticclipabovethenewpanelincabinetinterior.
FigureA‐Removemagnetic
cliplocatedaboveglasspanel.
FigureC–Swingbottomof
glasspanelout,thenlower
itawayfromunit.
FigureB‐Slideglasspanel
upundertopridge.
Magnetic
Clip
Generalimagesshownforglassinstallationreferenceonly.
17
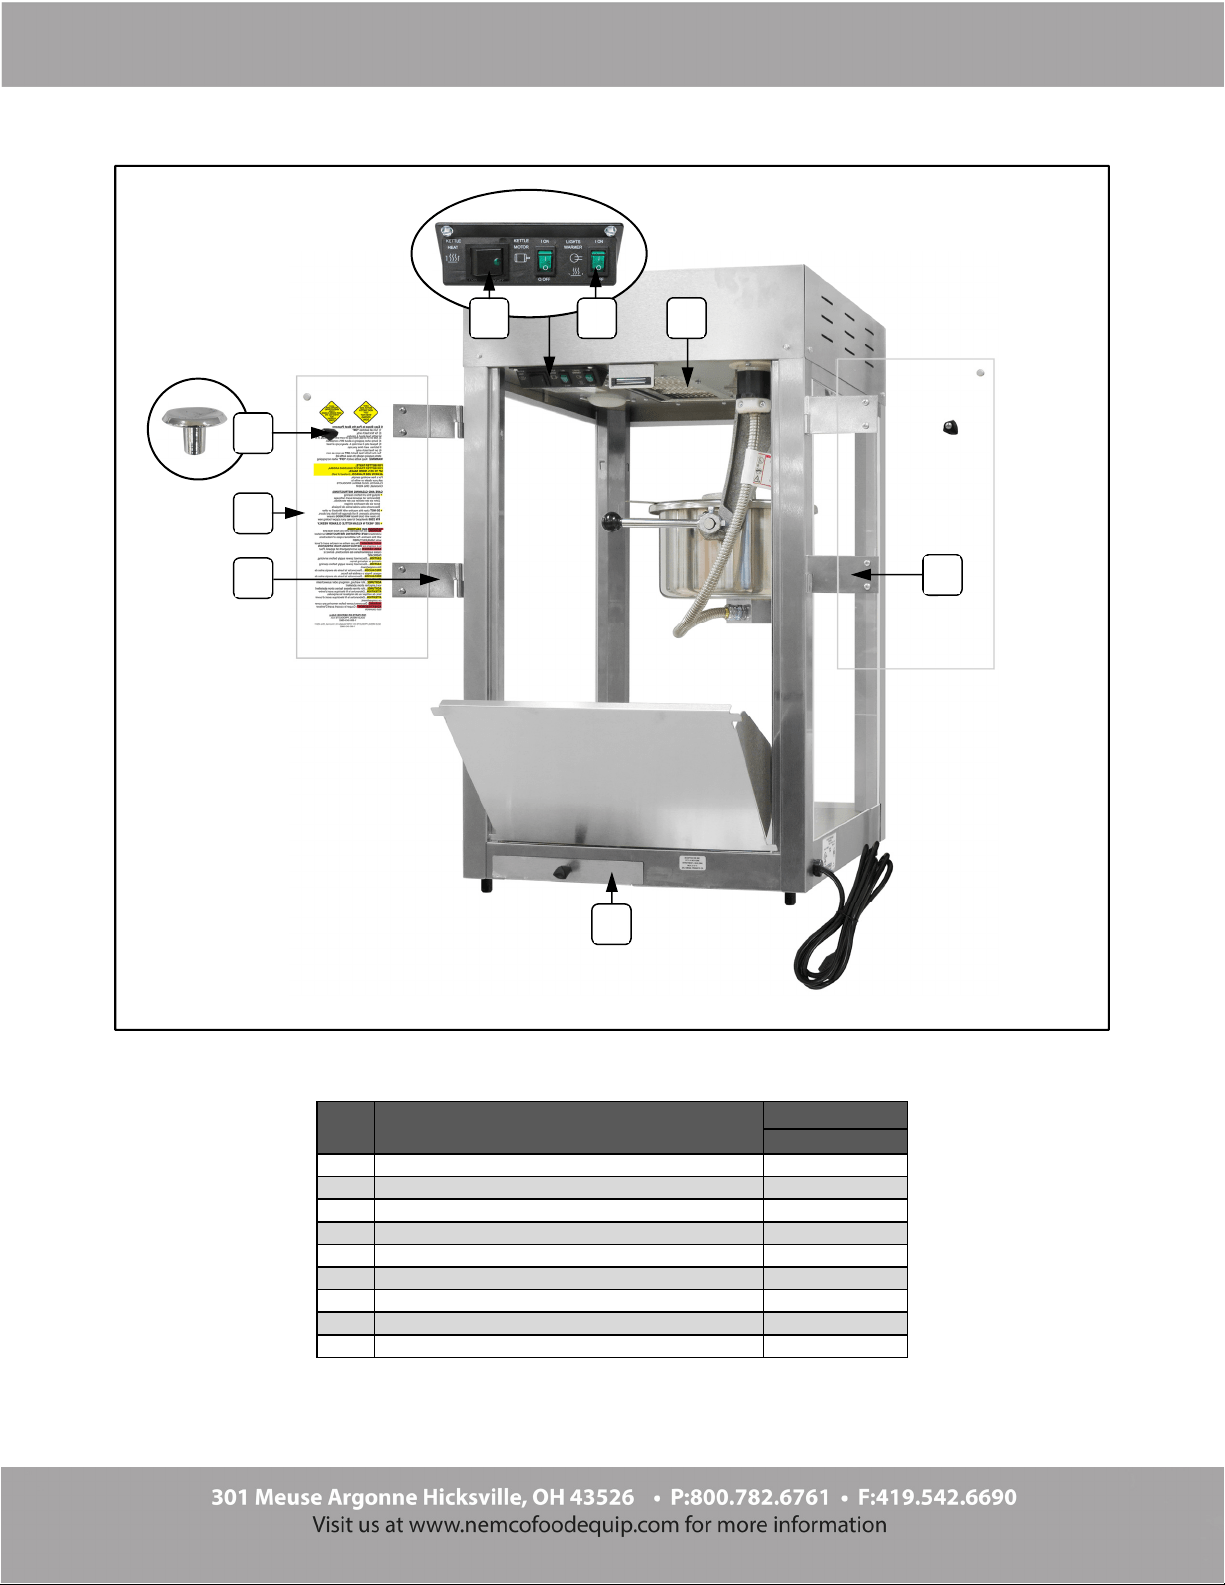
Cabinet Exterior – Rear View
Item PartDescription
PartNumber
GS1516
1 GREENLIGHTEDROCKERSWITCH 10405
2 DPSTROCKERSWITCH 10411
3 FILTER 10415
4 KNOB 10414
5 PLEXIGLASSDOOR 10416
6 FEMALEHINGELEFTHAND 10412
7 FEMALEHINGERIGHTHAND 10413
8 OLDMAIDPAN 10409
MANUAL 10428
Generalimageshownforpartsreference only.
3
5
8
6
7
4
21
18
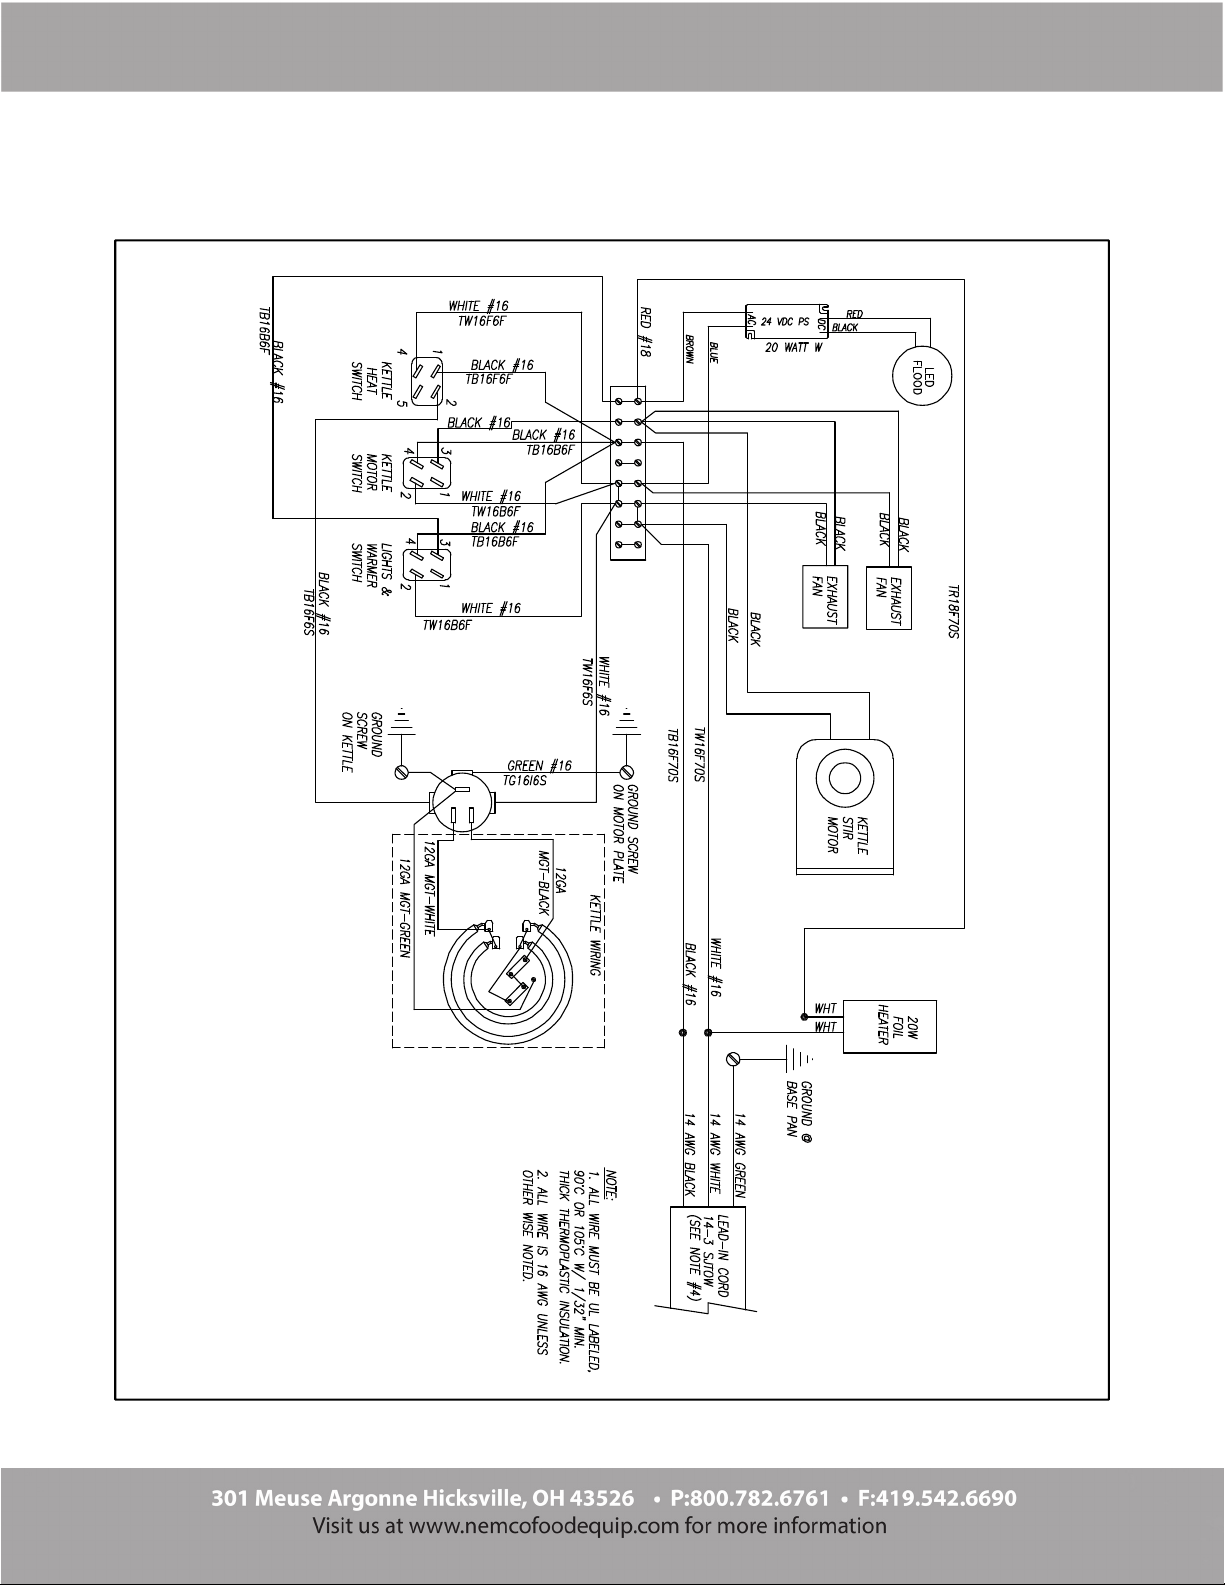
Wiring Diagram
Model No. GS1516
19
PRODUCT WARRANTY
PRODUCT SERVICE
TERMS & CONDITIONS

110193
3/28/18
20
MODEL NUMBER CROSS REFERENCE
Global Solutions Gold Medal Products Co.
GS1516 2600-00-015
Approvals / Listings for Global Solutions Poppers:
Our popcorn poppers are manufactured to Global Solutions (a Nemco Food Equipment Company)
specifications by Gold Medal Products Co., USA.
Unit is UL Listed for US and Canada, and NSF approved.
The above mentioned certifications are listed under the unit manufacturer, Gold Medal Products Co.