10
ESPAÑol
ESPAÑol
ESPAÑol
Para la secadora
Para la
lavadora/combo
Para la secadora
Para la
lavadora/combo
Tuerca
de seguro
Pie ajustable
Extienda Pata
IMPORTANTE: Lea y siga estas instrucciones.
NOTA
Quien vaya a instalar debe tener entrenamiento en electricidad, y mecánica también conocimiento
aceptable en el oficio.
La seguridad es primero --- tanto la suya como la de los
otros son muy importantes. Se han previsto muchos
mensajes de seguridad importantes en estas instrucciones
y en su aparato. Siempre lea y obedezca todos los
mensajes de seguridad.
Coloque la lavadora/combo encima del pedestal.
ADVERTENCIA
Riesgo de Peso Excesivo
Pueden solicitar ayuda de dos o más personas para
mover e instalar la lavadora, combo y secadora con los
pedestales.
No permita a los niños jugar en el tambor.
No se pare en el mango.
Un piso firme y sólido es más necesario para una Carga
Frontal que para una Carga Superior. Si su piso es de
madera o está en construcción, puede ser que necesite
reforzarlo. Las Cargas Frontales tienen mayor revolución
que las Cargas Superiores, causando más vibración.
Si el piso no es sólido, su lavadora va a vibrar.
Va a oír y sentir la vibración en toda su casa.
Despues de que la lavadora este nivelada, apretar la
tuerca de seguro hacia la base de la lavadora.
Asegurarse de que todas las tuercas esten apretadas.
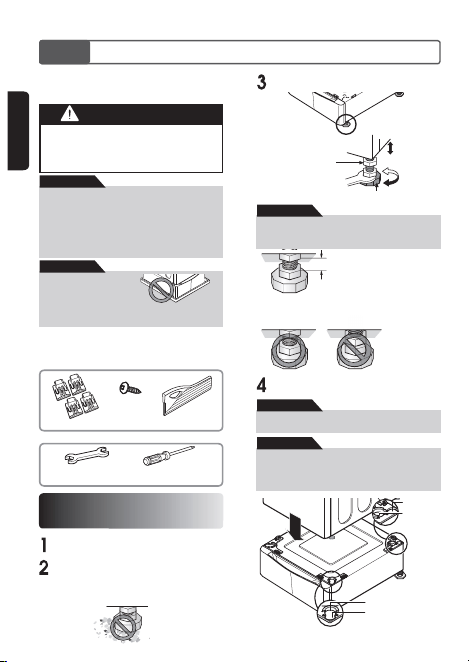
Quite el pedestal, el disco duro de instalaciÛn e
instrucciones del cartón de envio.
INSTALACION DE LA LAVADORA
& COMBO
Antes de instalar la lavadora, retire los objetos extraños
del suelo y límpielo. La presencia de polvo, agua, aceite,
detergentes, etc., podría producir vibraciones debido al
mal contacto de las patas con el suelo.
Nivele el pedestal en un lugar limpio mediante el
ajuste de sus patas.
NOTA
No se recomienda emplear
un recogegotas. Podría
ocasionar vibraciones por
causa de una mala nivelación
de la lavadora. Si debe usarse, preste especial atención
durante su instalación y asegúrese de que se realiza
correctamente.
NOTA
No extienda las patas niveladoras más de lo
necesario. Mientras más extendidas estén, más
vibración puede haber.
NOTA
Debido al peso de la lavadora/combo, puede necesitar
de dos o más personas.
NOTA
Si la lavadora o combo fueron instalados previamente,
desenchúfelo, desconecte la manguera de la
entrada(s) del grifo(s), desconecte la manguera del
desagüe, y desagüe todas las mangueras.
NOTA
4 Soporte
dieciocho
4x20 mm
truss Taptite Séparateur de tiroir
Accesorios incluidos
11/16 po o 17 mm
Abrir llave de boca
Destornillador
Phillips
Herramientas necesarias
11
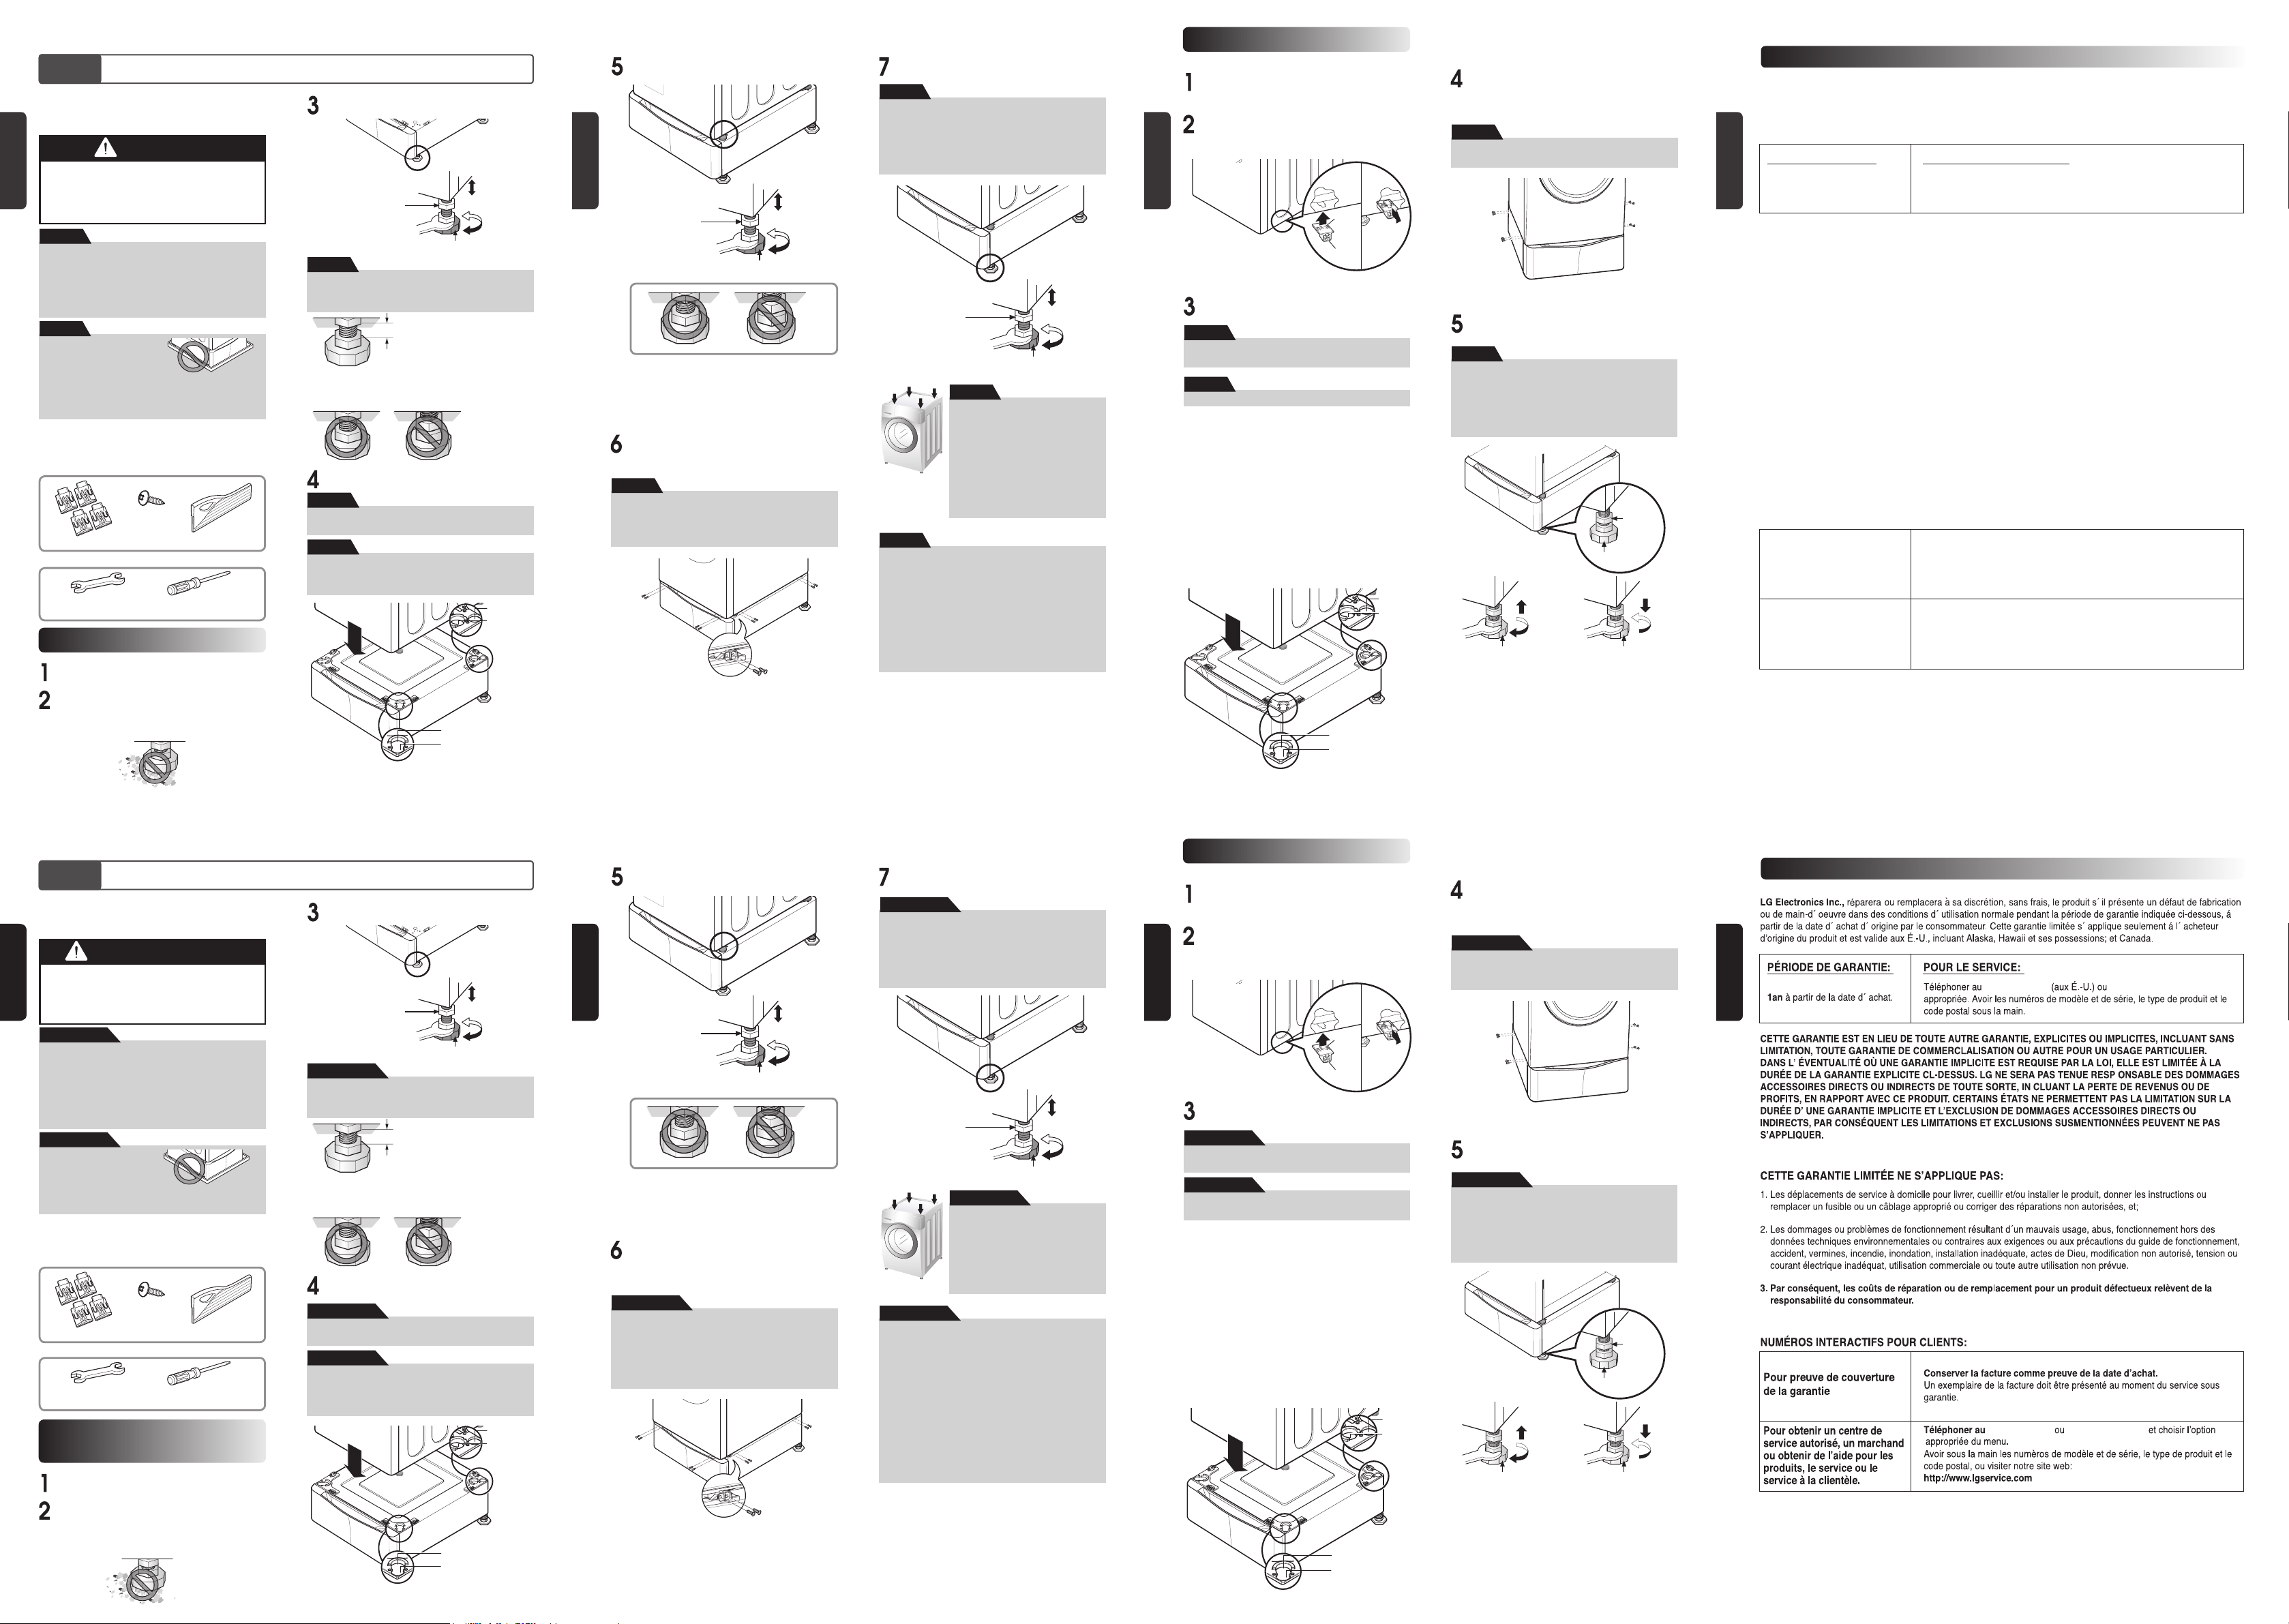
Nivelacion de la lavadora/combo sobre el pedestal
se ajusta con la pata de la lavadora.
Tuerca
de seguro
Pie ajustable
Asegúrese de que los orifi cios del pedestal se alinean
con los orifi icios del electrodoméstico, luego instale 4
tornillos en cada esquina para ajustar en forma segura
el electrodoméstico al pedestal.
si los tornillos no se instalan de manera adecuada, es
posible que se produzcan ruidos y vibraciones.
Mueva el electrodoméstico hacia la ubicación
deseada.
Para la lavadora16 tornillos
para la secadora : 8 tornillos
NOTA
Mover la lavadora/combo al lugar deseado.
Verificacion Diagonal
Al empujar hacia abajo los extremos
de la tapa superior de la lavadora
de forma diagonal, esta no debe
moverse hacia arriba y hacia abajo
para nada (Verifiquelo en ambas
direcciones).
Si la maquina se tambalea al
empujar diagonalmente los
extremos hacia abajo, ajuste las
patas nuevamente.
NOTA
Es crítico que ajuste las patas correctamente. Esto
debe hacerse mientras la lavadora esté girando con
una carga. Inicie el lavado con una prueba de lavado
para asegurarse que está bien nivelada.
Cargue aproximadamente 6 libras de ropa en la
lavadora.
Luego presione ENCENDIDO (POWER),
ENJUAGUE+GIRO (RINSE+SPIN) e INICIAR/
PAUSA (START/PAUSE), en ese orden. Cuando la
lavadora esté girando a su mayor velocidad verifique
si está estable.
Si no, ajuste nuevamente las patas.
Use la llave (abastecida) para ajustar las patas hasta
que no haya vibración. Luego asegure los tornillos
para evitar cambios en el nuevo ajuste.
NOTA
Tuerca
de seguro
Pie ajustable
El aparato y el pedestal ensamblado deben ponerse
sobre el suelo sólido y nivelado para un
funcionamiento apropiado. Ajuste las patas del
aparato y el pedestal dàndole vueltas con la llave
inglesa. Luego, ajuste el seguro de la cerradura hacia
el pedestal mientras sostiene la pata del pedestal
usando la llave inglesa.
NOTA
12
Para la
lavadora/combo
para la secadora
para la secadora
Para la
lavadora/combo
Debido al peso de la secadora, pueden necesitarse
dos o más personas.
NOTA
Coloque la secadora encima del pedestal.
Si la secadora fuera instalada previamente,
desinstalela como sigue:
NOTA
A. Desinstalando la secadora elétrica:
1) Desenchufe el cordón de suministro de energía.
2) Jale la secadora fuera de la pared lo suficiente
para aflojar la abrazadera del conducto de
ventilación. Suelte la abrazadera y quite
cuidadosamente el extractor del conducto de
ventilación del enchufe del extractor de la secadora.
B. Desinstale la secadora de gas:
1) Quite el cordón de suministro de energía.
2) Apague el suministro de gas.
3) Jale la secadora fuera de la pared lo suficiente para
aflojar la abrazadera del ventilación.
Suelte la abrazadera y cuidadosamente quite el
extractor de ventilación del enchufe del extractor de
la secadora.
Quite el pedestal, instalación del disco duro e
instrucciones del cartón del envìo.
Asegúrese de que los orifi cios del pedestal se
alinean con los orifi icios del electrodoméstico, luego
instale 2 tornillos en cada esquina para ajustar en
forma segura el electrodoméstico al pedestal.
INSTALACION DE LA SECADORA
Insert the T-clip of the 4 retainers into the dryer base
as shown. Press up on the back of the clip and pull
outward to lock into place.
si los tornillos no se instalan de manera adecuada, es
posible que se produzcan ruidos y vibraciones.
NOTA
Extremo
en T
Sujetador
Tuerca
de seguro
Pie ajustable
Pie ajustable Pie ajustable
Alto
Bajo
Mover la secadora al lugar deseado.
El aparato y el pedestal ensamblado deben ponerse
sobre suelo sólido y nivelado para un funcionamiento
apropiado. Ajuste las patas del aparato y el pedestal
dando vueltas con la llave inglesa. Entonces, ajuste el
seguro de la cerradura hacia el pedestal mientras
sosteniene la pata del pedestal usando la llave
inglesa.
NOTA
13
1-800-243-0000 1-888-LGCANADA
1-800-243-0000 1-888-LGCANADA
GARANTÍA
14
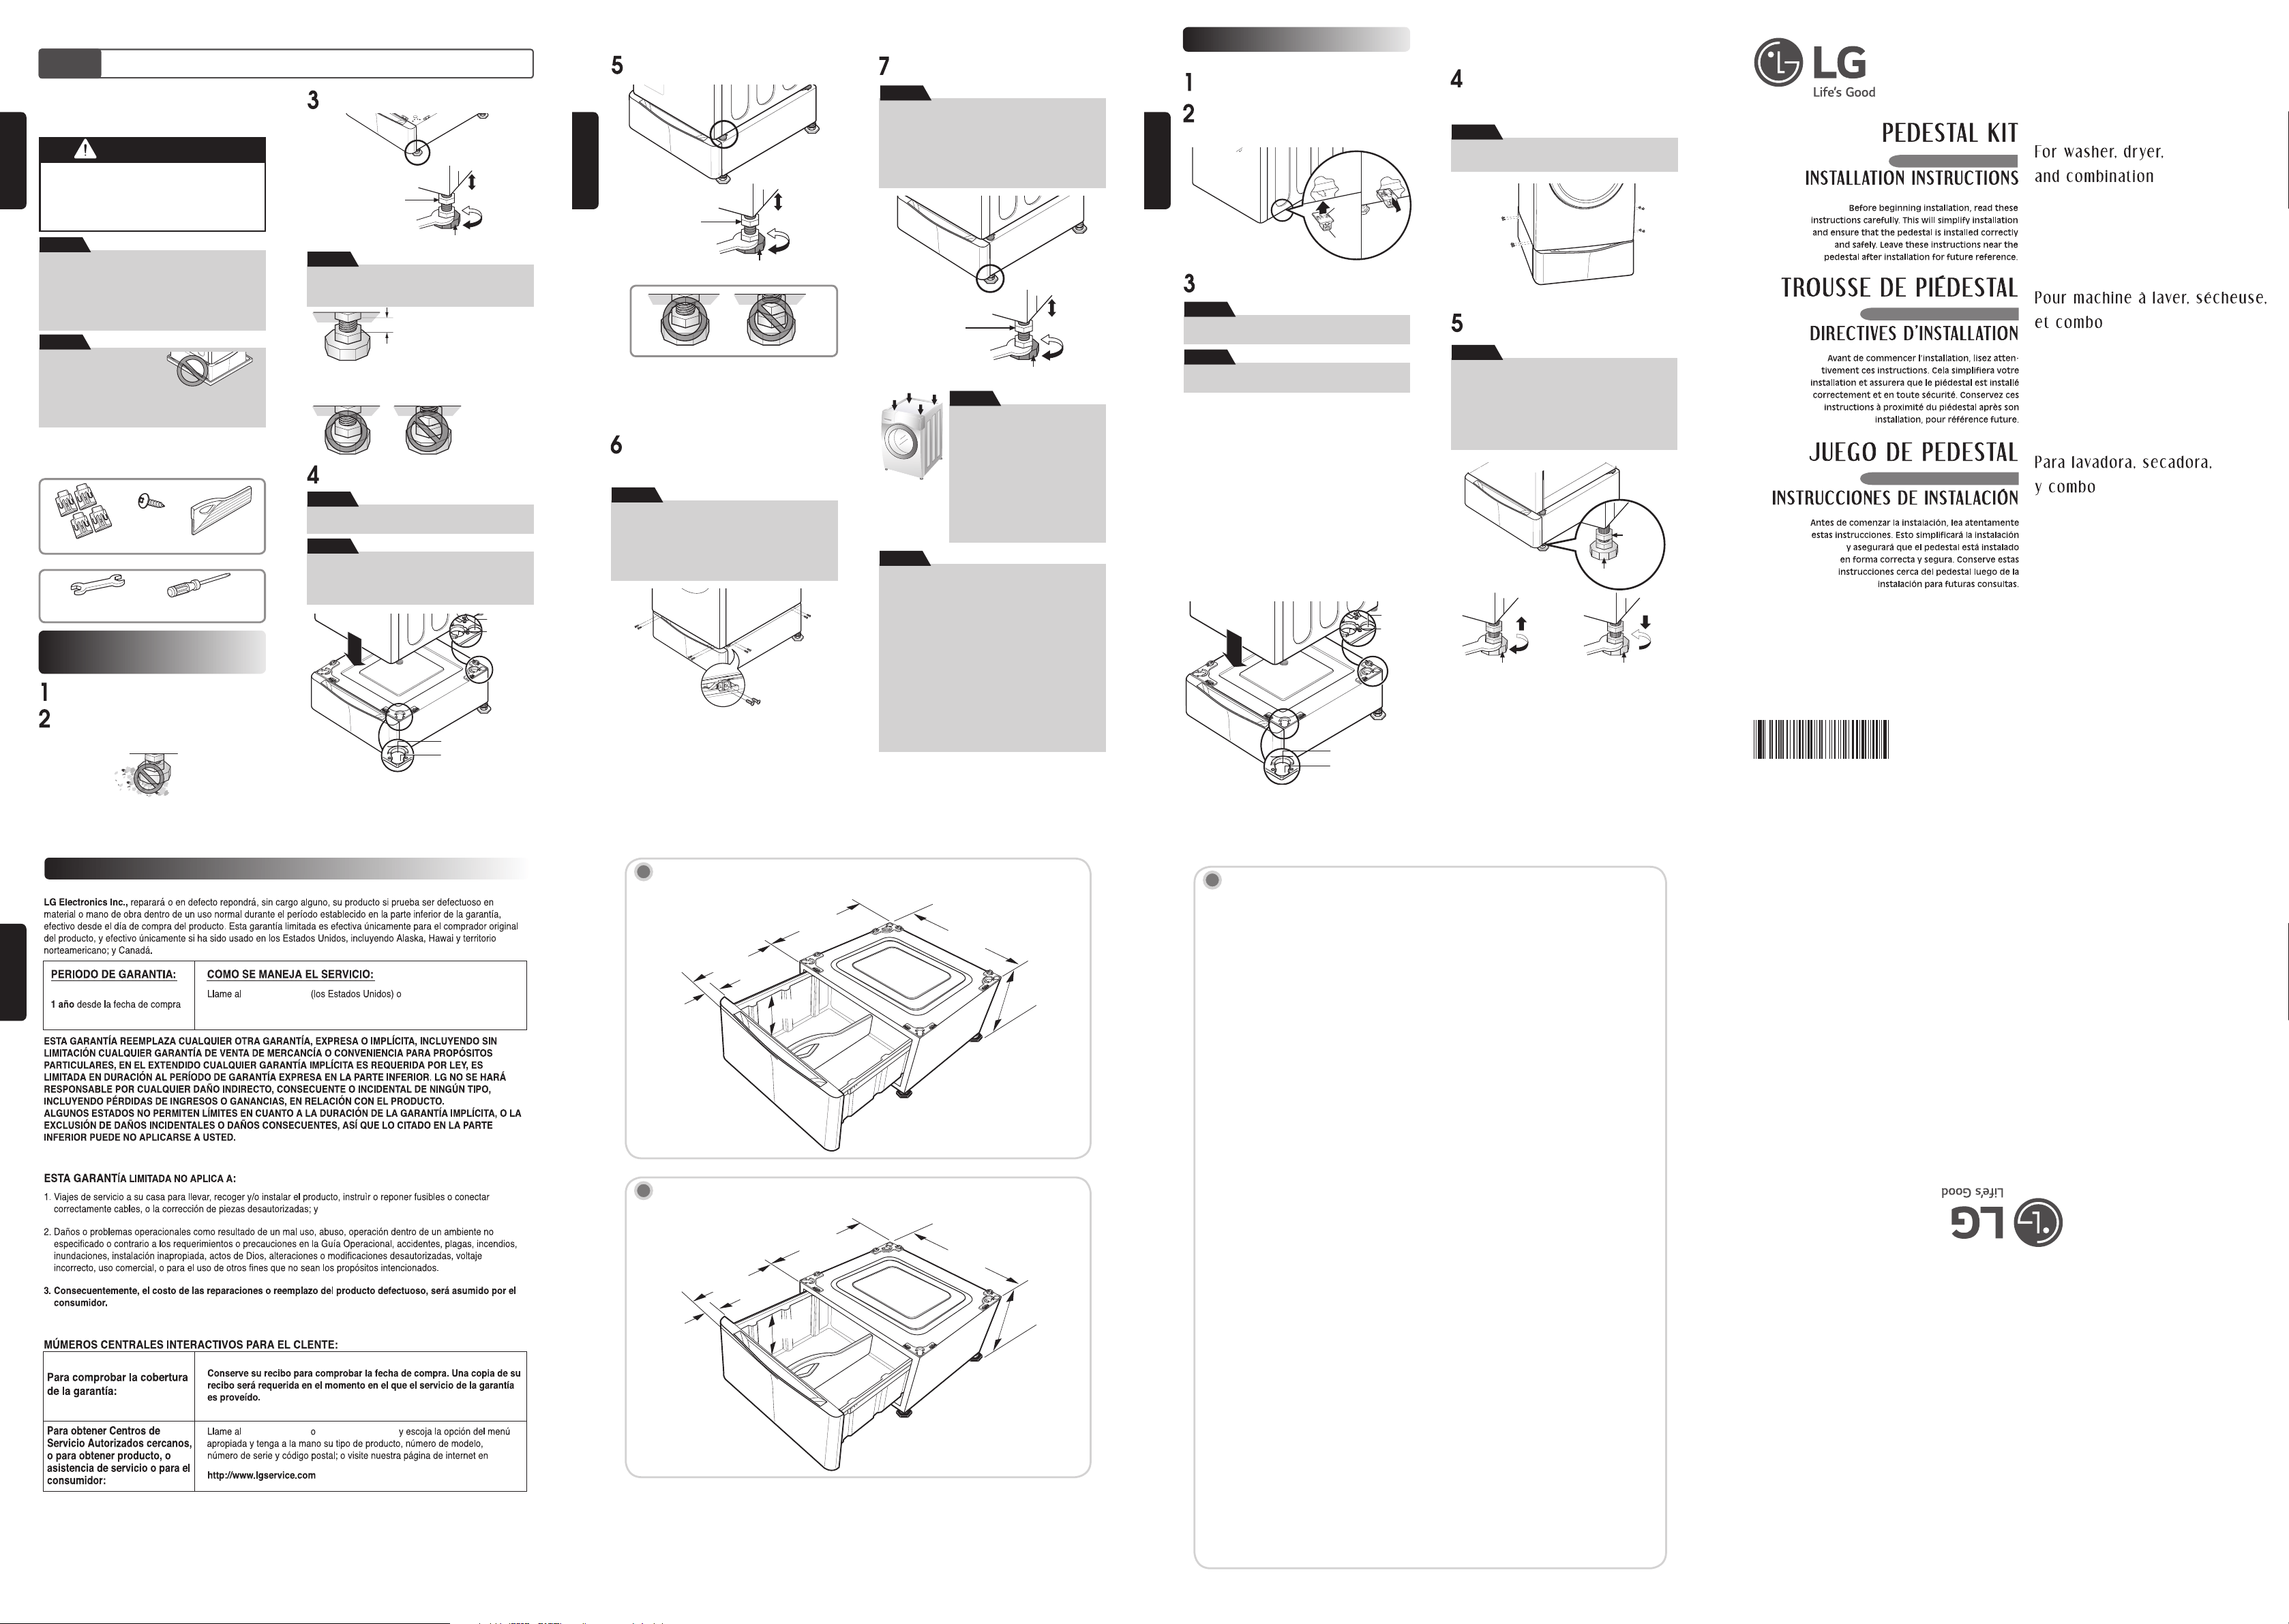
MODEL : 27” LWP-277* / WDP4*
Net weight : 52.9 lb (24 kg)
25.4"
(64.5cm)
18.4"
(46.7cm)
2.5"
(6.5 cm)
27"
(68.6cm)
13.6"
(34.5cm)
9.5"
(24 cm)
MODEL : 29” LWP-290* / WDP5*
Net weight : 57.3 lb (26 kg)
26.4"
(67.0cm)
18.4"
(46.7cm)
29"
(73.7cm)
13.6"
(34.5cm)
3.07"
(7.8 cm)
9.5"
(24 cm)
❇
Specifications are subject to change by manufacturer.
❇
Données techniques sujettes à changement sans préavis
❇
Las especificaciones son sujetas a cambio por el fabricante
15
MEMO
3828ER4001V
Rev.12_211216
ESPAÑol
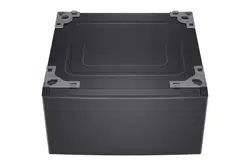
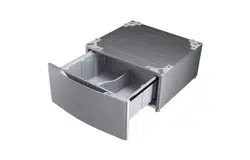
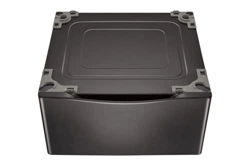
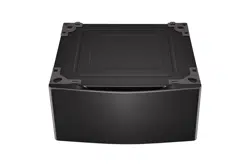
Verifique el ancho del pedestal antes de comprar para
asegurarse de que coincida el ancho de su artefacto (27"
(70 cm) o 29" (74 cm)).
2
ENGLISH
ENGLISH
for washer/combo
for dryer
for dryer
for washer/combo
Lock nut
Adjustable feet
Leg Extension
IMPORTANT: Read and follow these instructions.
NOTICE
The installer must have electrical and mechanical training and acceptable knowledge in the
required work.
Safety is foremost---both your own and that of other
people. Many important safety instructions are provided
in this instruction and your appliance. Always read and
observe all safety instructions.
Remove pedestal,installation hardware, and
instructions from the shipping carton.
Position the washer/combo on top of the pedestal.
WARNING
Excessive Weight Hazard
Two or more people may be needed to install and
move the appliance and pedestal assembly.
Do not allow children to play on the drawer.
Do not step on the handle.
A firm, solid floor is even more critical to a front-loading
washer than to a top-loader. If your floor is wooden
and /or frame construction, you may need to reinforce
it. Front-loaders have substantially faster spin speed
than top-loaders, causing greater vibration. If the floor
is not solid, your washer will vibrate.
WASHER/COMBO INSTALLATION
Before installing the pedestal, remove foreign
objects on the floor clean the floor. Dust, water, oil,
detergent and so on could cause vibration due to
bad contact of legs with floor.
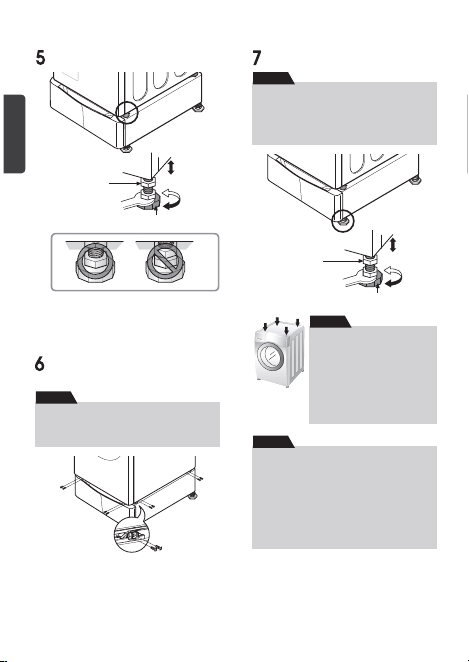
After the washer is leveled, tighten the lock nuts up
toward the base of the washer using the wrench. All
four lock nuts should be tightened.
Level the pedestal on the clean place by adjusting
the feet.
NOTE
If a drip pan must be used, take
extra care to follow the
instructions provided with the drip
pan and make sure the leveling
feet are adjusted for firm and even contact with the pan. Use
of drip pans and failure to properly level the machine may
result in increased vibration and noise during operation.
NOTE
Do not extend the legs no more than necessary to
level the washer. The more the legs are extended, the
more the washer will vibrate.
NOTE
Because of the weight of the washer/combo, two or
more people may be needed.
NOTE
If the washer or combo was previously installed,
unplug it, disconnect the inlet hose (s)from the faucet
(s), disconnect the drain hose, and drain all hoses.
NOTE
4 Holder
eighteen
4x20mm
Truss taptite Drawer Divied
Included Accessories
11/16” or 17mm
Open End Wrench
Phillips
screwdriver
Tools Needed
3
Make sure the holes on the pedestal align with the
holes in the appliance, then install 4 screws at each
corner to securely attach the appliance to the pedestal.
Level the washer/combo on the pedestal by
adjusting the feet.
Lock nut
Adjustable feet
Move the washer/combo to the desired place.
Diagonal Check
When pushing down the edges of
the washing machine top plate
diagonally, the machine should not
move up and down at all.(Please
check both directions.) If the
machine rocks when pushing the
machine top plate diagonally, adjust
the feet again.
NOTE
To make sure that the washer is properly level, run the
washer with a test load: place approximately 6 pounds
of laundry in the machine. Then press POWER, press
RINSE+SPIN, and then press the START/PAUSE
button. See the following sections for additional
information on cycle selection and operation. Verify
that the washer does not rock or vibrate excessively
during the spin cycle. If the washer vibrates or shakes,
adjust the leveling feet until the washer is stable and
retest.
NOTE
If the screws are not installed properly, noise and
vibration may result.
For WASHER: 16 SCREWS
For DRYER: 8 SCREWS
NOTE
The appliance and pedestal assembly must be placed
on a solid and level floor for proper operation. Adjust
the legs of the appliance and pedestal by turning with
a wrench. Then, adjust the lock nut toward the
pedestal while holding the pedestal leg using a
wrench.
NOTE
Lock nut
Adjustable feet
4
ENGLISH
Because of the weight of the dryer, two or more people
may be needed.
NOTE
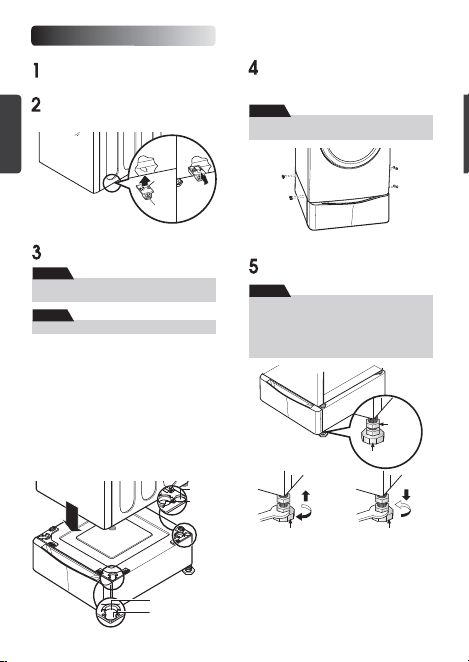
Remove pedestal,installation hardware, and
instructions from the shipping carton.
Make sure the holes on the pedestal align with the
holes in the appliance, then install 2 screws at each
corner to securely attach the appliance to the
pedestal.
DRYER INSTALLATION
Position dryer on top of the pedestal.
Insert the T-clip of the 4 retainers into the dryer base
as shown. Press up on the back of the clip and pull
outward to lock into place.
for washer/
combo
for dryer
for dryer
for washer/
combo
If dryer was previously installed, uninstall it as follows:
NOTE
A. Uninstalling an electric dryer:
1) Unplug the power supply cord,
2) Pull the dryer away from the wall enough to loosen
the vent clamp. Loosen the clamp and carefully
remove the exhaust vent from the dryer exhaust
outlet.
B. Uninstalling a gas dryer:
1) Unplug power supply cord.
2) Turn off the gas supply.
3) Pull the dryer away from the wall enough to loosen
the vent clamp. Loosen the clamp and carefully
remove the exhaust vent from the dryer exhaust
outlet.
Lock
nut
Adjustable
feet
Adjustable
feet
Adjustable
feet
Higher
Lower
Move the dryer to the desired place.
The appliance and pedestal assembly must be placed
on a solid and level floor for proper operation. Adjust
the legs of the appliance and pedestal by turning with
a wrench. Then, adjust the lock unt toward the
pedestal while holding the pedestal leg using a
wrench.
NOTE
If the screws are not installed properly, noise and
vibration may result.
NOTE
T-clip
Retainer
5
LG Electronics Inc., Will repair or at its option replace, without charge, your product if it proves to be defective material
or workmanship under normal use during the warranty period set forth below, effective from the date of original consumer
purchase of the product. This limited warranty is good only to the original purchaser of the product and effective only
when used in the United states including Alaska, Hawail, and U.S. Territories; and Canada.
WARRANTY PERIOD:
1Year from the Date of Purchase.
Call 1-800-243-0000 (USA) or 1-888-LGCANADA and choose the
appropriate prompt. Please have product type, model number, serial number,
and ZIP code ready.
HOW SERVICE IS HANDLED:
THIS WARRANTY IS IN LIEU OF ANY OTHER WARRANTIES, EXPRESS OR IMPLIED, INCLUDING WITHOUT
LIMITATION, ANY WARRANTY OF MERCHANTABILITY OR FITNESS FOR A PARTICULAR PURPOSE. TO THE
EXTENT ANY IMPLIED WARRANTY IS REQUIRED BY LAW, IT IS LIMITED IN DURATION TO THE EXPRESS
WARRANTY PERIOD ABOVE. LG WILL NOT BE LIABLE FOR ANY CONSEQUENTIAL, INDIRECT, OR
INCIDENTAL DAMAGES OF ANY KIND, INCLUDING LOST REVENUSE OR PROFITS, IN CONNECTION WITH THE
PRODUCT.
SOME STATES DO NOT ALLOW LIMITATION ON HOW LONG AN IMPLIED WARRANTY LASTS OR THE
EXCLUSION OF INCIDENTAL OR CONSEQUENTIAL DAMAGES, SO THE ABOVE LIMITATIONS OR EXCLUSIONS
MAY NOT APPLY TO YOU.
THIS LIMITED WARRANTY DOES NOT APPLY TO:
1. Service trips to your home to deliver, pick up, and/or install the product, instruct, or replace house fuses or correct
wiring, or correction of unauthorized repairs; and
2. Damages or operating problems that result from misuse, abuse, operation outside environmental specifications or
contrary to the requirements or precautions in the Operating Guide, accident, vermin, fire, flood, improper installation,
acts of God, unauthorized modification or alteration, incorrect electrical current or voltage, or commercial use, or use
for other than intended purpose.
3. Therefore, the cost of repair or replacement of such a defective product shall be borne by the consumer.
CUSTOMER INTER-ACTIVE CENTER NUMBERS:
To Prove Warranty Coverage
To Obtain Nearest Authorized
Service Center or Sales Dealer,
or to Obtain Product,Customer,
or Service Assistance
Retain your Sales Receipt to prove date of purchase.
A copy of your Sales Receipt must be submitted at the time warranty service
is provided.
Call 1-800-243-0000 or 1-888-LGCANADA and choose the appropriate prompt
from the menu, and have your product type, model number,
serial number, and ZIP Code; or visit our website at
http://www.lgservice.com
WARRANTY
6
FRANÇAIS
FRANÇAIS
FRANÇAIS
pour machine à
laver/combo
pour le séchoir
pour le séchoir
pour machine à
laver/combo
Écrou de
verrouillage
Pied réglable
Pied Allongés
IMPORTANT: Lire et suivre ces instructions à la lettre
NOTICE
L'installateur doit avoir une formation électrique et mécanique et une experience convenable pour ce
genre de travail.
La sécurité est primordiale: la vôtre et celle des autres.
D'importantes instructions de sécurité sont indiquées dans
ces instructions et sur votre appareil. Lire et observer
attentivement toutes ces instructions de sécurité.
Positioner la machine à laver/combo sur le haut du
piédestal.
AVERTISSEMENT
Risque dû au poids excessif de la machine:
Plus de deux personnes sont necessaires pour
déplacer et installer l'appareil et l'assemblage du
piédestal. Ne pas laisser les enfants jouer sur le tiroir.
Ne pas marcher sur le manche.
Apres que la laveuse est de niveau, serrer les ecrous
de verrouillage vers le haut de la base de la laveuse.
Tous les ecrous de verrouillage doivent etre serres.
Sur un emplacement propre, mettez le socle à
niveau en réglant ses pieds.
Un plancher robuste et solide est essentiel pour une laveuse
àchargementfrontalquʼunmodèleàchargementsurle
dessus. Si le plancher est en bois et/ou autre construction, il
faudra le renforcer. La laveuse à chargement frontal effectue
un essorage beaucoup plus rapide que les autres appareils,
causantainsiplusdevibrations.Sileplanchernʼestpas
robuste,lalaveusepeutvibrer.Lʼonentendraetsentira les
vibrations dans la maison.
REMARQUE
Ne pas allonger les pieds niveleurs plus que
nécessaire pour mettre la laveuse de niveau.
Plus les pieds sont allongés, plus la laveuse vibre.
REMARQUE
A cause du poids de la machine à laver/combo, plus
de deux personnes sont nécessaires pour installation.
REMARQUE
Si la machine à laver ou le combo sont déjà installés :
les débrancher, détacher le(s) tuyau(x) d'entrée
du(des) robinet(s) d'eau, détacher le tuyau
d'évacuation et vider tous les tuyaux:
REMARQUE
Lʼutilisationdʼunecuvetteest
déconseillée. Elle pourrait
empêcher la mis à niveau du
lave-linge et donc provoquer
des vibrations. Si vous devez l'utiliser, veillez à l'installer
correctement.
REMARQUE
4 Support
dix-huit
4x20mm
taraudé Truss Divisor de cajón
Accessoires inclus
11/16 po ou de 17 mm
Ouvrez Clé Fin
Tournevis Phillips
Outils nécessaires
Retirer le piédestal, les materiels d'installation et les
instructions du carton de transport.
INSTALLATION DE LA MACHINE A
LAVER &DU COMBO
Avantdʼinstallerlelave-linge,enleveztouslesobjets
se trouvant sur le sol et nettoyez-le. La présence de
poussière,dʼeau,dʼhuile,dedétergentouautrepeut
provoquer des vibrations dues à un mauvais contact
des pieds avec le sol.
7
Écrou de
verrouillage
Pied réglable
Assurez-vous que les trous du piédestal sont alignés
aveclestrousdelʼappareil.Insérezetserrez4visà
chaquecoinpourfixersolidementlʼappareilau
piédestal.
Nivelez la machine à laver/combo sur le piédestal en
ajustant les pieds.
Si les supports ne sont pas correctement installés,
vous pourriez entendre du bruit et sentir des
vibrations.
Placezlʼappareilàlʼendroitdésiré.
pour machine a laver: 16 VIS
pour le sechoir: 8 VIS
REMARQUE
Déplacer la machine à laver/combo à l'endroit
où vous voulez les disposer.
Verification diagonale
En pressant les bords du dessus de
la laveuse de facon diagonale,
lʼappareilnedevraitpasbouger
(verifier les deux sens).
Silʼappareilbascule,reglerles
pieds de nouveau.
REMARQUE
Il est essentiel que les pieds soient bien réglés. Ceci
doit être fait pendant que la laveuse essore avec une
charge.Effectueruntestdelalaveusepoursʼassurer
quʼelleestmisedeniveaudefaçonappropriée.
Mettreenviron6lbdevêtementsdanslʼappareil.
Presser POWER( alimentation), RINSE+SPIN(rinçage
+ essorage) et START/PAUSE( marche/pause), dans
cetordre.Lorsquelʼappareilessoreàhautevitesse,
sʼassurerquelalaveuseeststable.Sinon,réglerles
piedsdefaçonappropriée.Utiliserlaclé(fournie)pour
réglerlespiedsjusquʼàcequʼilnʼyaitplusde
vibration. Ensuite serrer les écrous de verrouillage
pour empêcher tout autre changement.
REMARQUE
Écrou de
verrouillage
Pied réglable
L'appareil et le piédestal doivent être placés sur un sol
solide et plat pour un fonctionnement approprié.
Ajuster les pieds de l'appareil et le piédestal en
tournant à l'aide d'une clé à vis. Ensuite ajuster le frein
d'écrou vers le piédestal en tenant le pied du piédestal
avec la clé à vis.
REMARQUE
pour le séchoir
pour machine à
laver/combo
A cause du poids du séchoir, plus de deux personnes
sont nécessaires.
REMARQUE
Positionner le séchoir sur le haut du piédestal.
Au cas où le séchoir a été installé préalablement, le
désinstaller selon les instructions suivantes:
REMARQUE
A. Désinstaller le séchoir électrique:
1) Débrancher le fil électrique.
2) Laisser assez d'espace entre le séchoir et le mur
pour permettre de desserer la bride d'évent. Desserer
la bride et enlever l'évent d'échappement(exhaust
vent) de la sortie d'air(exhaust outlet) du séchoir avec
attention.
B. Désinstaller le séchoir de gaz:
1) Débrancher le fil électrique.
2) Couper l'alimentation en gaz.
3) Laisser assez d'espace entre le séchoir et le mur pour
permettre de desserer la bride d'évent. Desserer la
bride et enlever l'évent d'échappement(de la sortie
d'air du séchoir avec attention.
Retirer le piédestal, les objets d'installation et les
instructions du carton de transport.
Assurez-vous que les trous du piédestal sont alignés
avec les trous de lʼappareil.Insérezetserrez2visà
chaquecoinpourfixersolidementlʼappareilau
piédestal.
INSTALLATION DU SECHOIR
InserezlʼéxtremitéenformedeTdes4souteneurs
dans la base de la sécheuse comme illustré. Em
appuyantsurlʼarriéredessouteneurs,tirez-lesvers
lʼexterieurpourlesfixerenplace.
Souteneur
Extremité
en form e
de T
Si les supports ne sont pas correctement installés,
vous pourriez entendre du bruit et sentir des
vibrations.
REMARQUE
Écrou de
verrouillage
Pied réglable
Pied réglable Pied réglable
Haut
Bas
Déplacer le séchoir à l'endroit où vous voulez le
disposer.
L'appareil et le piédestal doivent être placés sur un sol
solide et plat pour un fonctionnement approprié.
Ajuster les piéds de l'appareil et du piédestal en
tournant avec une clé à vis. Ensuite ajuster le frein
d'écrou vers le piédestal en tenant le pied de piédestal
avec la clé à vis.
REMARQUE
pour machine à
laver/combo
pour le séchoir
9
1-800-243-0000 1-888-LGCANADA
1-800-243-0000 1-888-LGCANADA
GARANTIE
8
ENGLISHFRANÇAIS
Check the width of the pedestal before purchasing to make
sure that it matches the width of your appliance (27" (70 cm)
or 29" (74 cm)).
Vérifiezlalargeurdupiédestalavantd’effectuervotreachat
afindevousassurerqu’ellecorrespondàlalargeurdevotre
appareil (27 po [70 cm] ou 29 po [74 cm]).
2
ENGLISH
ENGLISH
for washer/combo
for dryer
for dryer
for washer/combo
Lock nut
Adjustable feet
Leg Extension
IMPORTANT: Read and follow these instructions.
NOTICE
The installer must have electrical and mechanical training and acceptable knowledge in the
required work.
Safety is foremost---both your own and that of other
people. Many important safety instructions are provided
in this instruction and your appliance. Always read and
observe all safety instructions.
Remove pedestal,installation hardware, and
instructions from the shipping carton.
Position the washer/combo on top of the pedestal.
WARNING
Excessive Weight Hazard
Two or more people may be needed to install and
move the appliance and pedestal assembly.
Do not allow children to play on the drawer.
Do not step on the handle.
A firm, solid floor is even more critical to a front-loading
washer than to a top-loader. If your floor is wooden
and /or frame construction, you may need to reinforce
it. Front-loaders have substantially faster spin speed
than top-loaders, causing greater vibration. If the floor
is not solid, your washer will vibrate.
WASHER/COMBO INSTALLATION
Before installing the pedestal, remove foreign
objects on the floor clean the floor. Dust, water, oil,
detergent and so on could cause vibration due to
bad contact of legs with floor.
After the washer is leveled, tighten the lock nuts up
toward the base of the washer using the wrench. All
four lock nuts should be tightened.
Level the pedestal on the clean place by adjusting
the feet.
NOTE
If a drip pan must be used, take
extra care to follow the
instructions provided with the drip
pan and make sure the leveling
feet are adjusted for firm and even contact with the pan. Use
of drip pans and failure to properly level the machine may
result in increased vibration and noise during operation.
NOTE
Do not extend the legs no more than necessary to
level the washer. The more the legs are extended, the
more the washer will vibrate.
NOTE
Because of the weight of the washer/combo, two or
more people may be needed.
NOTE
If the washer or combo was previously installed,
unplug it, disconnect the inlet hose (s)from the faucet
(s), disconnect the drain hose, and drain all hoses.
NOTE
4 Holder
eighteen
4x20mm
Truss taptite Drawer Divied
Included Accessories
11/16” or 17mm
Open End Wrench
Phillips
screwdriver
Tools Needed
3
Make sure the holes on the pedestal align with the
holes in the appliance, then install 4 screws at each
corner to securely attach the appliance to the pedestal.
Level the washer/combo on the pedestal by
adjusting the feet.
Lock nut
Adjustable feet
Move the washer/combo to the desired place.
Diagonal Check
When pushing down the edges of
the washing machine top plate
diagonally, the machine should not
move up and down at all.(Please
check both directions.) If the
machine rocks when pushing the
machine top plate diagonally, adjust
the feet again.
NOTE
To make sure that the washer is properly level, run the
washer with a test load: place approximately 6 pounds
of laundry in the machine. Then press POWER, press
RINSE+SPIN, and then press the START/PAUSE
button. See the following sections for additional
information on cycle selection and operation. Verify
that the washer does not rock or vibrate excessively
during the spin cycle. If the washer vibrates or shakes,
adjust the leveling feet until the washer is stable and
retest.
NOTE
If the screws are not installed properly, noise and
vibration may result.
For WASHER: 16 SCREWS
For DRYER: 8 SCREWS
NOTE
The appliance and pedestal assembly must be placed
on a solid and level floor for proper operation. Adjust
the legs of the appliance and pedestal by turning with
a wrench. Then, adjust the lock nut toward the
pedestal while holding the pedestal leg using a
wrench.
NOTE
Lock nut
Adjustable feet
4
ENGLISH
Because of the weight of the dryer, two or more people
may be needed.
NOTE
Remove pedestal,installation hardware, and
instructions from the shipping carton.
Make sure the holes on the pedestal align with the
holes in the appliance, then install 2 screws at each
corner to securely attach the appliance to the
pedestal.
DRYER INSTALLATION
Position dryer on top of the pedestal.
Insert the T-clip of the 4 retainers into the dryer base
as shown. Press up on the back of the clip and pull
outward to lock into place.
for washer/
combo
for dryer
for dryer
for washer/
combo
If dryer was previously installed, uninstall it as follows:
NOTE
A. Uninstalling an electric dryer:
1) Unplug the power supply cord,
2) Pull the dryer away from the wall enough to loosen
the vent clamp. Loosen the clamp and carefully
remove the exhaust vent from the dryer exhaust
outlet.
B. Uninstalling a gas dryer:
1) Unplug power supply cord.
2) Turn off the gas supply.
3) Pull the dryer away from the wall enough to loosen
the vent clamp. Loosen the clamp and carefully
remove the exhaust vent from the dryer exhaust
outlet.
Lock
nut
Adjustable
feet
Adjustable
feet
Adjustable
feet
Higher
Lower
Move the dryer to the desired place.
The appliance and pedestal assembly must be placed
on a solid and level floor for proper operation. Adjust
the legs of the appliance and pedestal by turning with
a wrench. Then, adjust the lock unt toward the
pedestal while holding the pedestal leg using a
wrench.
NOTE
If the screws are not installed properly, noise and
vibration may result.
NOTE
T-clip
Retainer
5
LG Electronics Inc., Will repair or at its option replace, without charge, your product if it proves to be defective material
or workmanship under normal use during the warranty period set forth below, effective from the date of original consumer
purchase of the product. This limited warranty is good only to the original purchaser of the product and effective only
when used in the United states including Alaska, Hawail, and U.S. Territories; and Canada.
WARRANTY PERIOD:
1Year from the Date of Purchase.
Call 1-800-243-0000 (USA) or 1-888-LGCANADA and choose the
appropriate prompt. Please have product type, model number, serial number,
and ZIP code ready.
HOW SERVICE IS HANDLED:
THIS WARRANTY IS IN LIEU OF ANY OTHER WARRANTIES, EXPRESS OR IMPLIED, INCLUDING WITHOUT
LIMITATION, ANY WARRANTY OF MERCHANTABILITY OR FITNESS FOR A PARTICULAR PURPOSE. TO THE
EXTENT ANY IMPLIED WARRANTY IS REQUIRED BY LAW, IT IS LIMITED IN DURATION TO THE EXPRESS
WARRANTY PERIOD ABOVE. LG WILL NOT BE LIABLE FOR ANY CONSEQUENTIAL, INDIRECT, OR
INCIDENTAL DAMAGES OF ANY KIND, INCLUDING LOST REVENUSE OR PROFITS, IN CONNECTION WITH THE
PRODUCT.
SOME STATES DO NOT ALLOW LIMITATION ON HOW LONG AN IMPLIED WARRANTY LASTS OR THE
EXCLUSION OF INCIDENTAL OR CONSEQUENTIAL DAMAGES, SO THE ABOVE LIMITATIONS OR EXCLUSIONS
MAY NOT APPLY TO YOU.
THIS LIMITED WARRANTY DOES NOT APPLY TO:
1. Service trips to your home to deliver, pick up, and/or install the product, instruct, or replace house fuses or correct
wiring, or correction of unauthorized repairs; and
2. Damages or operating problems that result from misuse, abuse, operation outside environmental specifications or
contrary to the requirements or precautions in the Operating Guide, accident, vermin, fire, flood, improper installation,
acts of God, unauthorized modification or alteration, incorrect electrical current or voltage, or commercial use, or use
for other than intended purpose.
3. Therefore, the cost of repair or replacement of such a defective product shall be borne by the consumer.
CUSTOMER INTER-ACTIVE CENTER NUMBERS:
To Prove Warranty Coverage
To Obtain Nearest Authorized
Service Center or Sales Dealer,
or to Obtain Product,Customer,
or Service Assistance
Retain your Sales Receipt to prove date of purchase.
A copy of your Sales Receipt must be submitted at the time warranty service
is provided.
Call 1-800-243-0000 or 1-888-LGCANADA and choose the appropriate prompt
from the menu, and have your product type, model number,
serial number, and ZIP Code; or visit our website at
http://www.lgservice.com
WARRANTY
6
FRANÇAIS
FRANÇAIS
FRANÇAIS
pour machine à
laver/combo
pour le séchoir
pour le séchoir
pour machine à
laver/combo
Écrou de
verrouillage
Pied réglable
Pied Allongés
IMPORTANT: Lire et suivre ces instructions à la lettre
NOTICE
L'installateur doit avoir une formation électrique et mécanique et une experience convenable pour ce
genre de travail.
La sécurité est primordiale: la vôtre et celle des autres.
D'importantes instructions de sécurité sont indiquées dans
ces instructions et sur votre appareil. Lire et observer
attentivement toutes ces instructions de sécurité.
Positioner la machine à laver/combo sur le haut du
piédestal.
AVERTISSEMENT
Risque dû au poids excessif de la machine:
Plus de deux personnes sont necessaires pour
déplacer et installer l'appareil et l'assemblage du
piédestal. Ne pas laisser les enfants jouer sur le tiroir.
Ne pas marcher sur le manche.
Apres que la laveuse est de niveau, serrer les ecrous
de verrouillage vers le haut de la base de la laveuse.
Tous les ecrous de verrouillage doivent etre serres.
Sur un emplacement propre, mettez le socle à
niveau en réglant ses pieds.
Un plancher robuste et solide est essentiel pour une laveuse
àchargementfrontalquʼunmodèleàchargementsurle
dessus. Si le plancher est en bois et/ou autre construction, il
faudra le renforcer. La laveuse à chargement frontal effectue
un essorage beaucoup plus rapide que les autres appareils,
causantainsiplusdevibrations.Sileplanchernʼestpas
robuste,lalaveusepeutvibrer.Lʼonentendraetsentira les
vibrations dans la maison.
REMARQUE
Ne pas allonger les pieds niveleurs plus que
nécessaire pour mettre la laveuse de niveau.
Plus les pieds sont allongés, plus la laveuse vibre.
REMARQUE
A cause du poids de la machine à laver/combo, plus
de deux personnes sont nécessaires pour installation.
REMARQUE
Si la machine à laver ou le combo sont déjà installés :
les débrancher, détacher le(s) tuyau(x) d'entrée
du(des) robinet(s) d'eau, détacher le tuyau
d'évacuation et vider tous les tuyaux:
REMARQUE
Lʼutilisationdʼunecuvetteest
déconseillée. Elle pourrait
empêcher la mis à niveau du
lave-linge et donc provoquer
des vibrations. Si vous devez l'utiliser, veillez à l'installer
correctement.
REMARQUE
4 Support
dix-huit
4x20mm
taraudé Truss Divisor de cajón
Accessoires inclus
11/16 po ou de 17 mm
Ouvrez Clé Fin
Tournevis Phillips
Outils nécessaires
Retirer le piédestal, les materiels d'installation et les
instructions du carton de transport.
INSTALLATION DE LA MACHINE A
LAVER &DU COMBO
Avantdʼinstallerlelave-linge,enleveztouslesobjets
se trouvant sur le sol et nettoyez-le. La présence de
poussière,dʼeau,dʼhuile,dedétergentouautrepeut
provoquer des vibrations dues à un mauvais contact
des pieds avec le sol.
7
Écrou de
verrouillage
Pied réglable
Assurez-vous que les trous du piédestal sont alignés
aveclestrousdelʼappareil.Insérezetserrez4visà
chaquecoinpourfixersolidementlʼappareilau
piédestal.
Nivelez la machine à laver/combo sur le piédestal en
ajustant les pieds.
Si les supports ne sont pas correctement installés,
vous pourriez entendre du bruit et sentir des
vibrations.
Placezlʼappareilàlʼendroitdésiré.
pour machine a laver: 16 VIS
pour le sechoir: 8 VIS
REMARQUE
Déplacer la machine à laver/combo à l'endroit
où vous voulez les disposer.
Verification diagonale
En pressant les bords du dessus de
la laveuse de facon diagonale,
lʼappareilnedevraitpasbouger
(verifier les deux sens).
Silʼappareilbascule,reglerles
pieds de nouveau.
REMARQUE
Il est essentiel que les pieds soient bien réglés. Ceci
doit être fait pendant que la laveuse essore avec une
charge.Effectueruntestdelalaveusepoursʼassurer
quʼelleestmisedeniveaudefaçonappropriée.
Mettreenviron6lbdevêtementsdanslʼappareil.
Presser POWER( alimentation), RINSE+SPIN(rinçage
+ essorage) et START/PAUSE( marche/pause), dans
cetordre.Lorsquelʼappareilessoreàhautevitesse,
sʼassurerquelalaveuseeststable.Sinon,réglerles
piedsdefaçonappropriée.Utiliserlaclé(fournie)pour
réglerlespiedsjusquʼàcequʼilnʼyaitplusde
vibration. Ensuite serrer les écrous de verrouillage
pour empêcher tout autre changement.
REMARQUE
Écrou de
verrouillage
Pied réglable
L'appareil et le piédestal doivent être placés sur un sol
solide et plat pour un fonctionnement approprié.
Ajuster les pieds de l'appareil et le piédestal en
tournant à l'aide d'une clé à vis. Ensuite ajuster le frein
d'écrou vers le piédestal en tenant le pied du piédestal
avec la clé à vis.
REMARQUE
pour le séchoir
pour machine à
laver/combo
A cause du poids du séchoir, plus de deux personnes
sont nécessaires.
REMARQUE
Positionner le séchoir sur le haut du piédestal.
Au cas où le séchoir a été installé préalablement, le
désinstaller selon les instructions suivantes:
REMARQUE
A. Désinstaller le séchoir électrique:
1) Débrancher le fil électrique.
2) Laisser assez d'espace entre le séchoir et le mur
pour permettre de desserer la bride d'évent. Desserer
la bride et enlever l'évent d'échappement(exhaust
vent) de la sortie d'air(exhaust outlet) du séchoir avec
attention.
B. Désinstaller le séchoir de gaz:
1) Débrancher le fil électrique.
2) Couper l'alimentation en gaz.
3) Laisser assez d'espace entre le séchoir et le mur pour
permettre de desserer la bride d'évent. Desserer la
bride et enlever l'évent d'échappement(de la sortie
d'air du séchoir avec attention.
Retirer le piédestal, les objets d'installation et les
instructions du carton de transport.
Assurez-vous que les trous du piédestal sont alignés
avec les trous de lʼappareil.Insérezetserrez2visà
chaquecoinpourfixersolidementlʼappareilau
piédestal.
INSTALLATION DU SECHOIR
InserezlʼéxtremitéenformedeTdes4souteneurs
dans la base de la sécheuse comme illustré. Em
appuyantsurlʼarriéredessouteneurs,tirez-lesvers
lʼexterieurpourlesfixerenplace.
Souteneur
Extremité
en form e
de T
Si les supports ne sont pas correctement installés,
vous pourriez entendre du bruit et sentir des
vibrations.
REMARQUE
Écrou de
verrouillage
Pied réglable
Pied réglable Pied réglable
Haut
Bas
Déplacer le séchoir à l'endroit où vous voulez le
disposer.
L'appareil et le piédestal doivent être placés sur un sol
solide et plat pour un fonctionnement approprié.
Ajuster les piéds de l'appareil et du piédestal en
tournant avec une clé à vis. Ensuite ajuster le frein
d'écrou vers le piédestal en tenant le pied de piédestal
avec la clé à vis.
REMARQUE
pour machine à
laver/combo
pour le séchoir
9
1-800-243-0000 1-888-LGCANADA
1-800-243-0000 1-888-LGCANADA
GARANTIE
8
ENGLISHFRANÇAIS
Check the width of the pedestal before purchasing to make
sure that it matches the width of your appliance (27" (70 cm)
or 29" (74 cm)).
Vérifiezlalargeurdupiédestalavantd’effectuervotreachat
afindevousassurerqu’ellecorrespondàlalargeurdevotre
appareil (27 po [70 cm] ou 29 po [74 cm]).
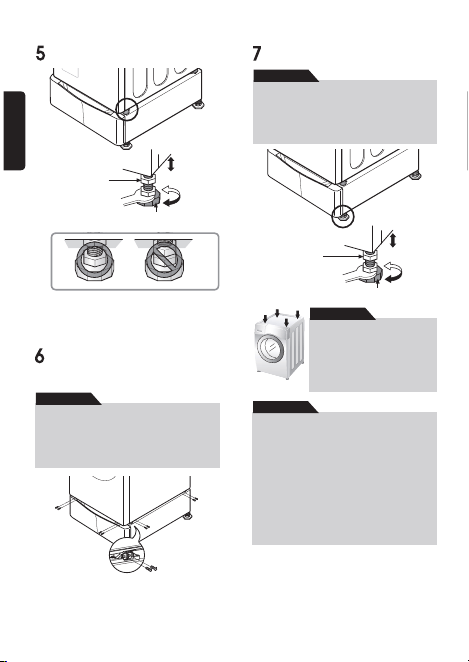
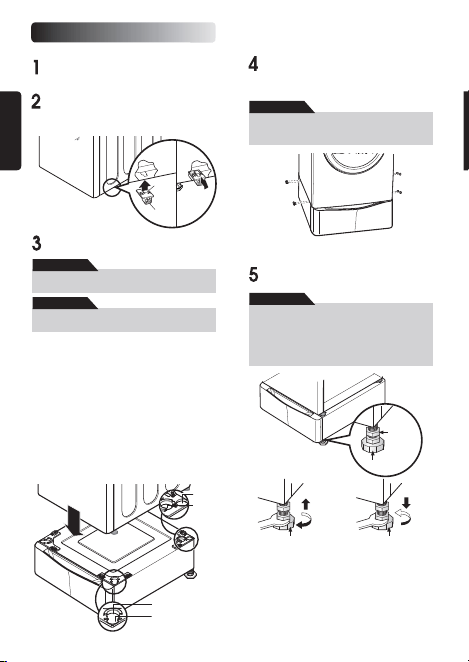
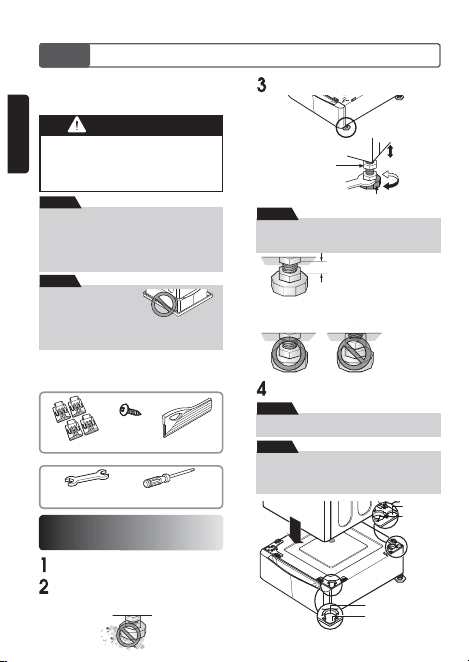
10
ESPAÑol
ESPAÑol
ESPAÑol
Para la secadora
Para la
lavadora/combo
Para la secadora
Para la
lavadora/combo
Tuerca
de seguro
Pie ajustable
Extienda Pata
IMPORTANTE: Lea y siga estas instrucciones.
NOTA
Quien vaya a instalar debe tener entrenamiento en electricidad, y mecánica también conocimiento
aceptable en el oficio.
La seguridad es primero --- tanto la suya como la de los
otros son muy importantes. Se han previsto muchos
mensajes de seguridad importantes en estas instrucciones
y en su aparato. Siempre lea y obedezca todos los
mensajes de seguridad.
Coloque la lavadora/combo encima del pedestal.
ADVERTENCIA
Riesgo de Peso Excesivo
Pueden solicitar ayuda de dos o más personas para
mover e instalar la lavadora, combo y secadora con los
pedestales.
No permita a los niños jugar en el tambor.
No se pare en el mango.
Un piso firme y sólido es más necesario para una Carga
Frontal que para una Carga Superior. Si su piso es de
madera o está en construcción, puede ser que necesite
reforzarlo. Las Cargas Frontales tienen mayor revolución
que las Cargas Superiores, causando más vibración.
Si el piso no es sólido, su lavadora va a vibrar.
Va a oír y sentir la vibración en toda su casa.
Despues de que la lavadora este nivelada, apretar la
tuerca de seguro hacia la base de la lavadora.
Asegurarse de que todas las tuercas esten apretadas.
Quite el pedestal, el disco duro de instalaciÛn e
instrucciones del cartón de envio.
INSTALACION DE LA LAVADORA
& COMBO
Antes de instalar la lavadora, retire los objetos extraños
del suelo y límpielo. La presencia de polvo, agua, aceite,
detergentes, etc., podría producir vibraciones debido al
mal contacto de las patas con el suelo.
Nivele el pedestal en un lugar limpio mediante el
ajuste de sus patas.
NOTA
No se recomienda emplear
un recogegotas. Podría
ocasionar vibraciones por
causa de una mala nivelación
de la lavadora. Si debe usarse, preste especial atención
durante su instalación y asegúrese de que se realiza
correctamente.
NOTA
No extienda las patas niveladoras más de lo
necesario. Mientras más extendidas estén, más
vibración puede haber.
NOTA
Debido al peso de la lavadora/combo, puede necesitar
de dos o más personas.
NOTA
Si la lavadora o combo fueron instalados previamente,
desenchúfelo, desconecte la manguera de la
entrada(s) del grifo(s), desconecte la manguera del
desagüe, y desagüe todas las mangueras.
NOTA
4 Soporte
dieciocho
4x20 mm
truss Taptite Séparateur de tiroir
Accesorios incluidos
11/16 po o 17 mm
Abrir llave de boca
Destornillador
Phillips
Herramientas necesarias
11
Nivelacion de la lavadora/combo sobre el pedestal
se ajusta con la pata de la lavadora.
Tuerca
de seguro
Pie ajustable
Asegúrese de que los orifi cios del pedestal se alinean
con los orifi icios del electrodoméstico, luego instale 4
tornillos en cada esquina para ajustar en forma segura
el electrodoméstico al pedestal.
si los tornillos no se instalan de manera adecuada, es
posible que se produzcan ruidos y vibraciones.
Mueva el electrodoméstico hacia la ubicación
deseada.
Para la lavadora16 tornillos
para la secadora : 8 tornillos
NOTA
Mover la lavadora/combo al lugar deseado.
Verificacion Diagonal
Al empujar hacia abajo los extremos
de la tapa superior de la lavadora
de forma diagonal, esta no debe
moverse hacia arriba y hacia abajo
para nada (Verifiquelo en ambas
direcciones).
Si la maquina se tambalea al
empujar diagonalmente los
extremos hacia abajo, ajuste las
patas nuevamente.
NOTA
Es crítico que ajuste las patas correctamente. Esto
debe hacerse mientras la lavadora esté girando con
una carga. Inicie el lavado con una prueba de lavado
para asegurarse que está bien nivelada.
Cargue aproximadamente 6 libras de ropa en la
lavadora.
Luego presione ENCENDIDO (POWER),
ENJUAGUE+GIRO (RINSE+SPIN) e INICIAR/
PAUSA (START/PAUSE), en ese orden. Cuando la
lavadora esté girando a su mayor velocidad verifique
si está estable.
Si no, ajuste nuevamente las patas.
Use la llave (abastecida) para ajustar las patas hasta
que no haya vibración. Luego asegure los tornillos
para evitar cambios en el nuevo ajuste.
NOTA
Tuerca
de seguro
Pie ajustable
El aparato y el pedestal ensamblado deben ponerse
sobre el suelo sólido y nivelado para un
funcionamiento apropiado. Ajuste las patas del
aparato y el pedestal dàndole vueltas con la llave
inglesa. Luego, ajuste el seguro de la cerradura hacia
el pedestal mientras sostiene la pata del pedestal
usando la llave inglesa.
NOTA
12
Para la
lavadora/combo
para la secadora
para la secadora
Para la
lavadora/combo
Debido al peso de la secadora, pueden necesitarse
dos o más personas.
NOTA
Coloque la secadora encima del pedestal.
Si la secadora fuera instalada previamente,
desinstalela como sigue:
NOTA
A. Desinstalando la secadora elétrica:
1) Desenchufe el cordón de suministro de energía.
2) Jale la secadora fuera de la pared lo suficiente
para aflojar la abrazadera del conducto de
ventilación. Suelte la abrazadera y quite
cuidadosamente el extractor del conducto de
ventilación del enchufe del extractor de la secadora.
B. Desinstale la secadora de gas:
1) Quite el cordón de suministro de energía.
2) Apague el suministro de gas.
3) Jale la secadora fuera de la pared lo suficiente para
aflojar la abrazadera del ventilación.
Suelte la abrazadera y cuidadosamente quite el
extractor de ventilación del enchufe del extractor de
la secadora.
Quite el pedestal, instalación del disco duro e
instrucciones del cartón del envìo.
Asegúrese de que los orifi cios del pedestal se
alinean con los orifi icios del electrodoméstico, luego
instale 2 tornillos en cada esquina para ajustar en
forma segura el electrodoméstico al pedestal.
INSTALACION DE LA SECADORA
Insert the T-clip of the 4 retainers into the dryer base
as shown. Press up on the back of the clip and pull
outward to lock into place.
si los tornillos no se instalan de manera adecuada, es
posible que se produzcan ruidos y vibraciones.
NOTA
Extremo
en T
Sujetador
Tuerca
de seguro
Pie ajustable
Pie ajustable Pie ajustable
Alto
Bajo
Mover la secadora al lugar deseado.
El aparato y el pedestal ensamblado deben ponerse
sobre suelo sólido y nivelado para un funcionamiento
apropiado. Ajuste las patas del aparato y el pedestal
dando vueltas con la llave inglesa. Entonces, ajuste el
seguro de la cerradura hacia el pedestal mientras
sosteniene la pata del pedestal usando la llave
inglesa.
NOTA
13
1-800-243-0000 1-888-LGCANADA
1-800-243-0000 1-888-LGCANADA
GARANTÍA
14
MODEL : 27” LWP-277* / WDP4*
Net weight : 52.9 lb (24 kg)
25.4"
(64.5cm)
18.4"
(46.7cm)
2.5"
(6.5 cm)
27"
(68.6cm)
13.6"
(34.5cm)
9.5"
(24 cm)
MODEL : 29” LWP-290* / WDP5*
Net weight : 57.3 lb (26 kg)
26.4"
(67.0cm)
18.4"
(46.7cm)
29"
(73.7cm)
13.6"
(34.5cm)
3.07"
(7.8 cm)
9.5"
(24 cm)
❇
Specifications are subject to change by manufacturer.
❇
Données techniques sujettes à changement sans préavis
❇
Las especificaciones son sujetas a cambio por el fabricante
15
MEMO
3828ER4001V
Rev.12_211216
ESPAÑol
Verifique el ancho del pedestal antes de comprar para
asegurarse de que coincida el ancho de su artefacto (27"
(70 cm) o 29" (74 cm)).
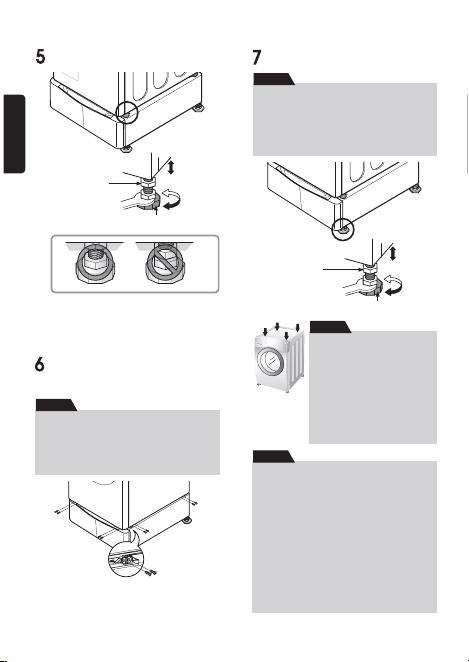
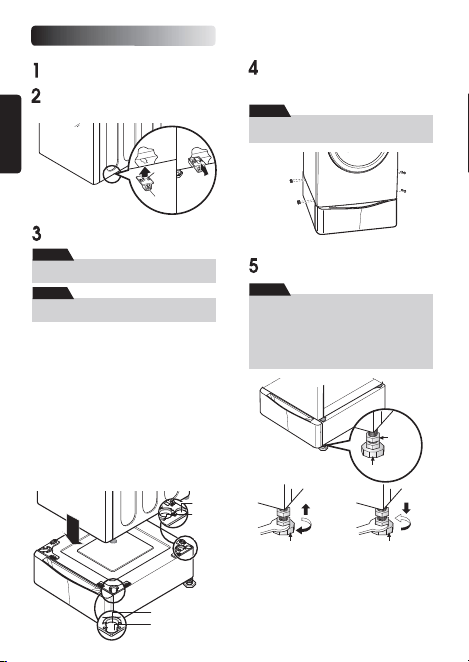