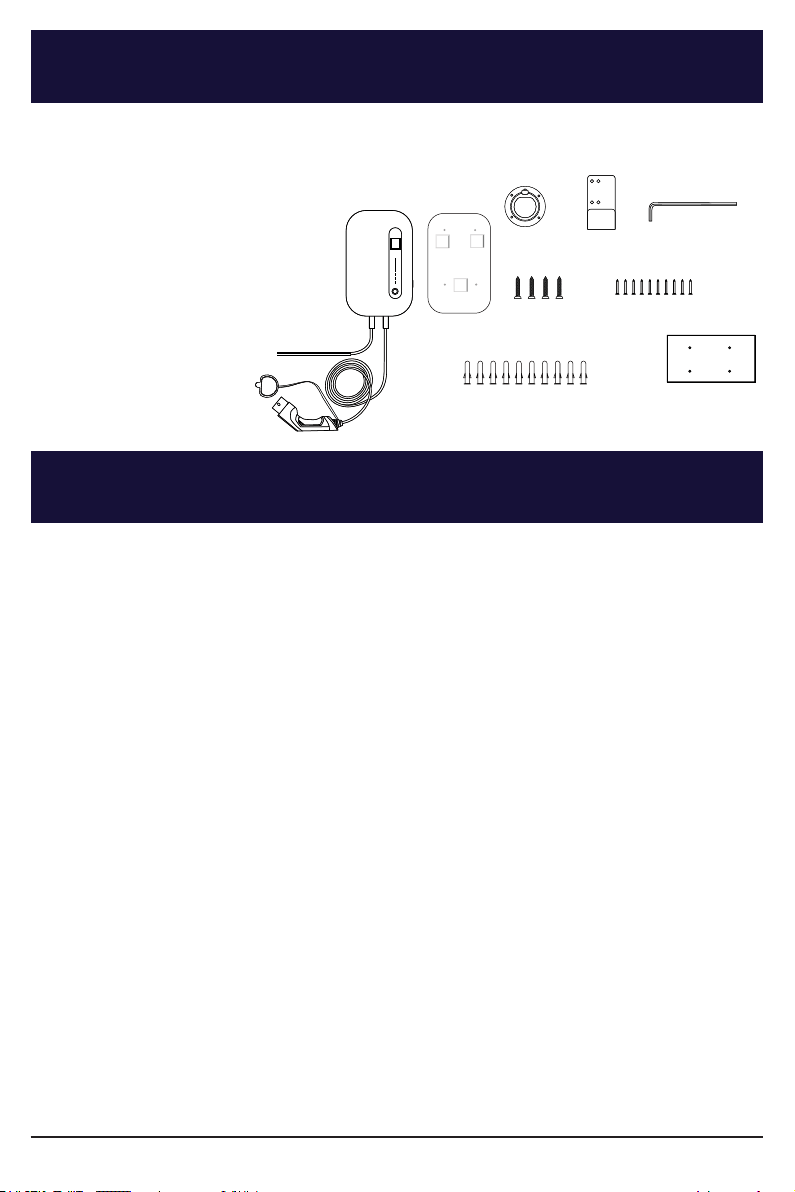
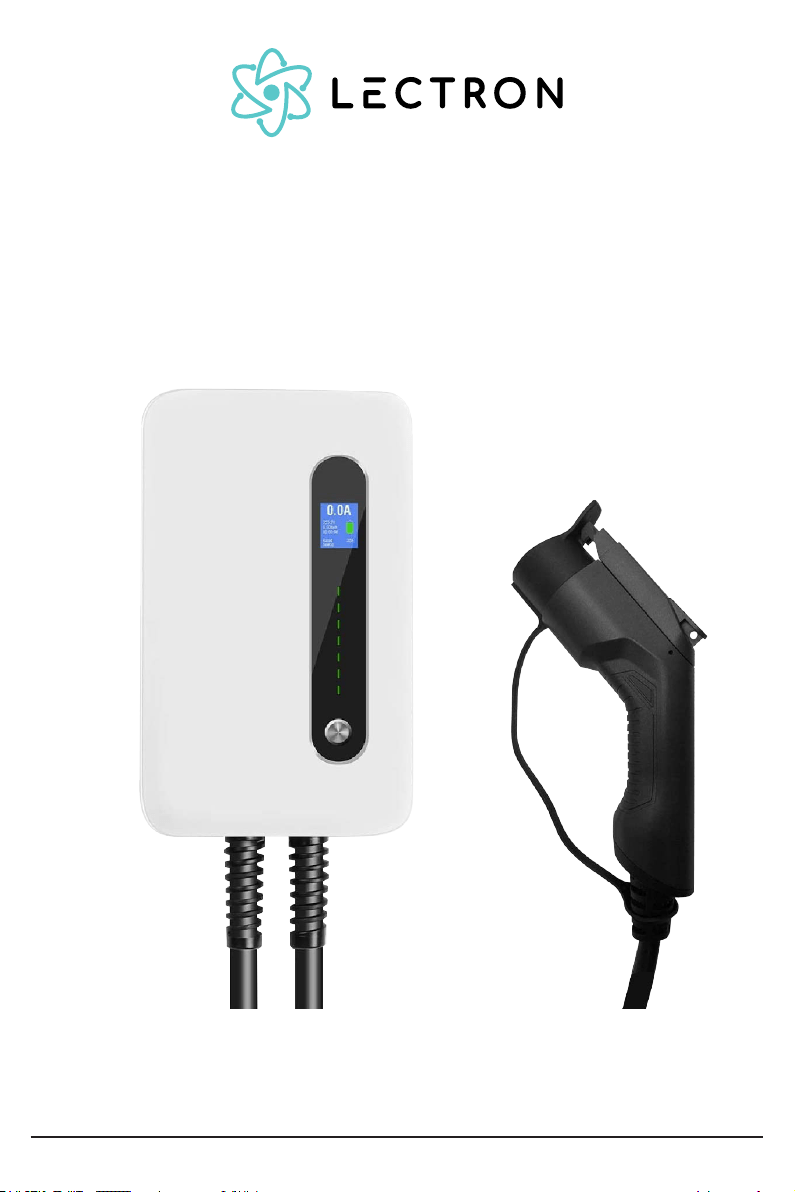
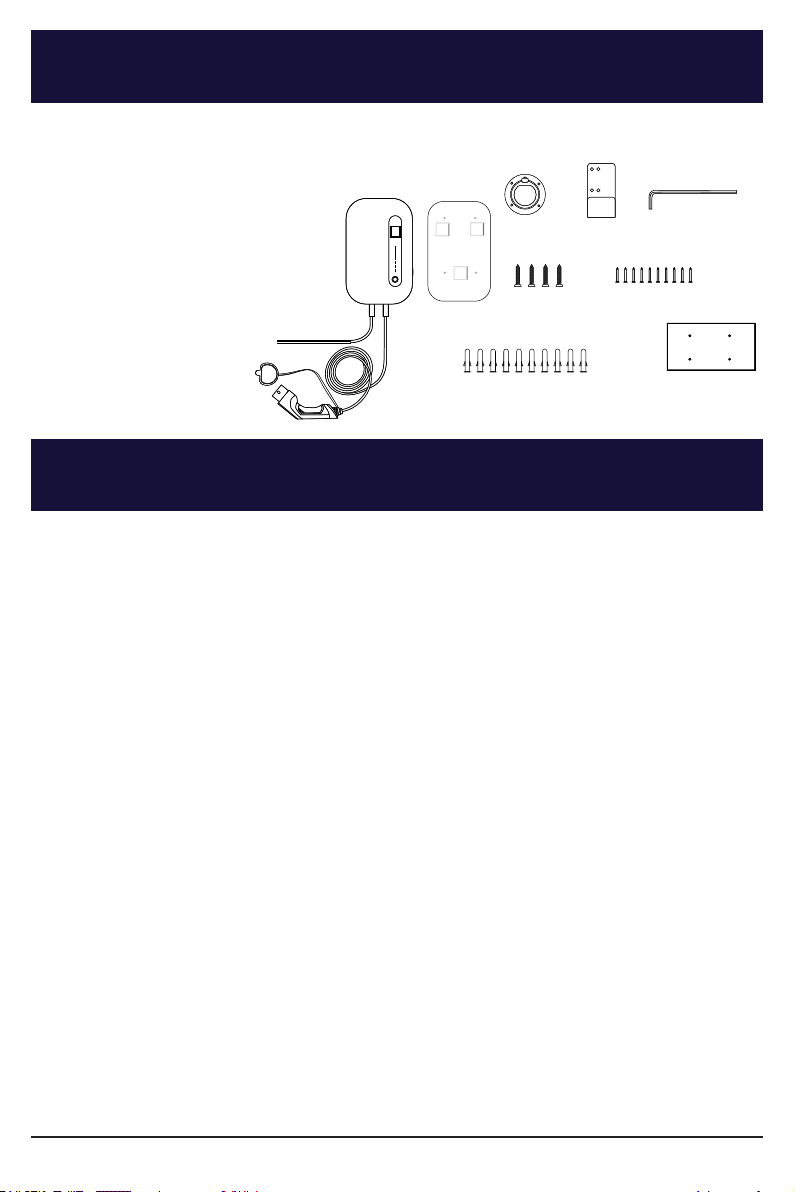
• 1 x Charging Station with attached charging plug
• 1 x Plate
• 1 x Holder
• 1 x Hook
• 1 x Allen Wrench
• 4 x Long Screws
• 10 x Short Screws
• 10 x Wall Plugs
• 1 x Reference Paper
Need help? Send us an email at: [email protected] Page 2
Package Includes
Safety Information
• Failure to follow the instructions may result in danger.
• Do not disassemble the charging station while its operating.
• Install the charging station away from pyrotechnics, dusty or corrosive
places.
• The charging station produces a high voltage output. You must pay
attention to personal safety when using it.
• If a malfunction occurs, it may cause an electric shock or even death.
• Regularly check whether the charging station has visible damage. An electric
shock may occur when operating a damaged charging station.
• If a ground fault occurs, it must be assumed that the cable carries voltage.
Please confirm that there’s no high-voltage power in the system before
inspecting the charging station.
• Before powering the charging station, please confirm that the device is
properly grounded to avoid unnecessary accidents.
• Do not modify, retrofit, or change any part by yourself under any
circumstances.
• To ensure the service life and stable operation of the charging station, the
operating environment should be kept as clean as possible with a relatively
stable temperature and humidity. The charging station must not be used in
a flammable environment.
• Be sure to confirm that the input voltage, frequency, circuit breakers and
other conditions of the charging station meet the specifications before it is
powered on.
Charging Station
with attached
charging plug
Plate
Holder Hook Allen Wrench
Long Screws
Short Screws
Wall Plugs Reference Paper

Need help? Send us an email at: [email protected] Page 3
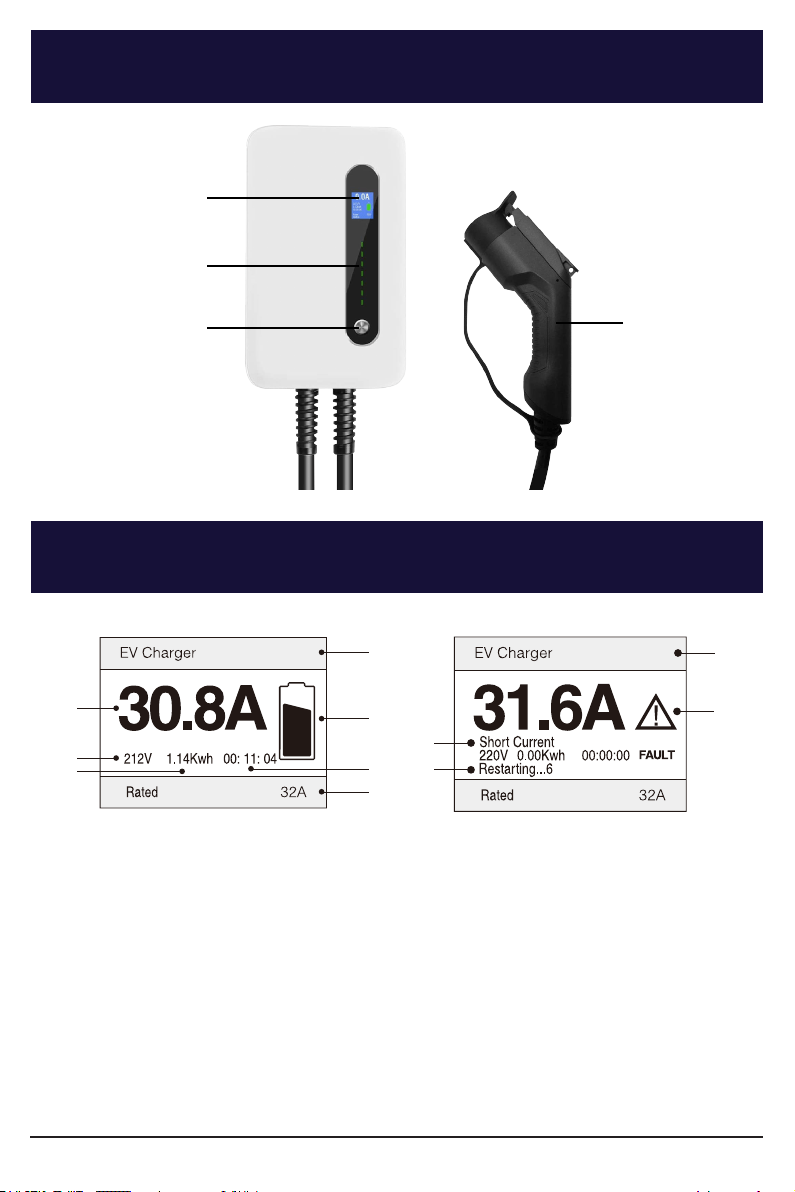
Charging Station Components
Display Components
1. Real-time current
2. Real-time voltage
3. Power consumed
4. Temperature
5. Charging icon
6. Charging time
7. Rated current
8. Cause of fault
9. Automatic restart
10. Temperature
11. Fault icon
Note:
When small problems like short current occurs, the charging station will
automatically restart to repair and continue charging.
Display Screen
Charging Plug
On/O Button
LED Indicators
1
2
3
4
8
10
11
9
5
6
7
111.74 °F 105.44 °F

Need help? Send us an email at: [email protected] Page 4
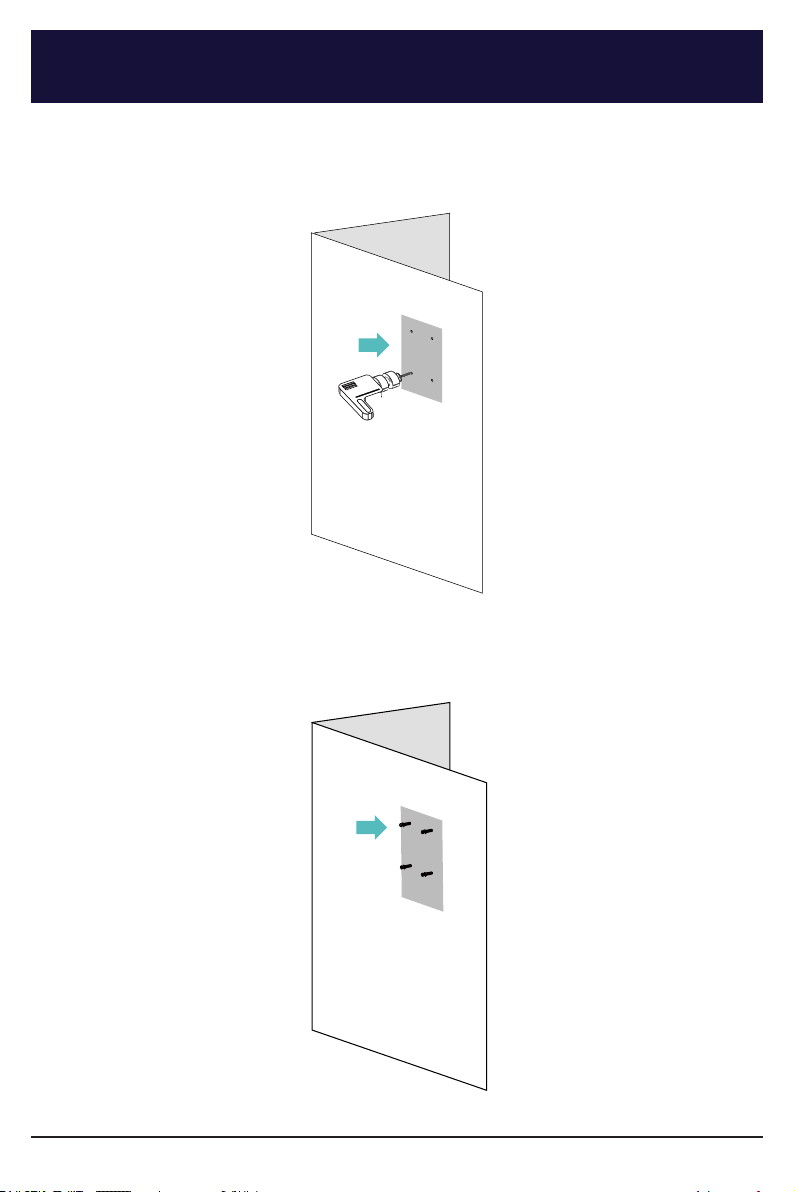
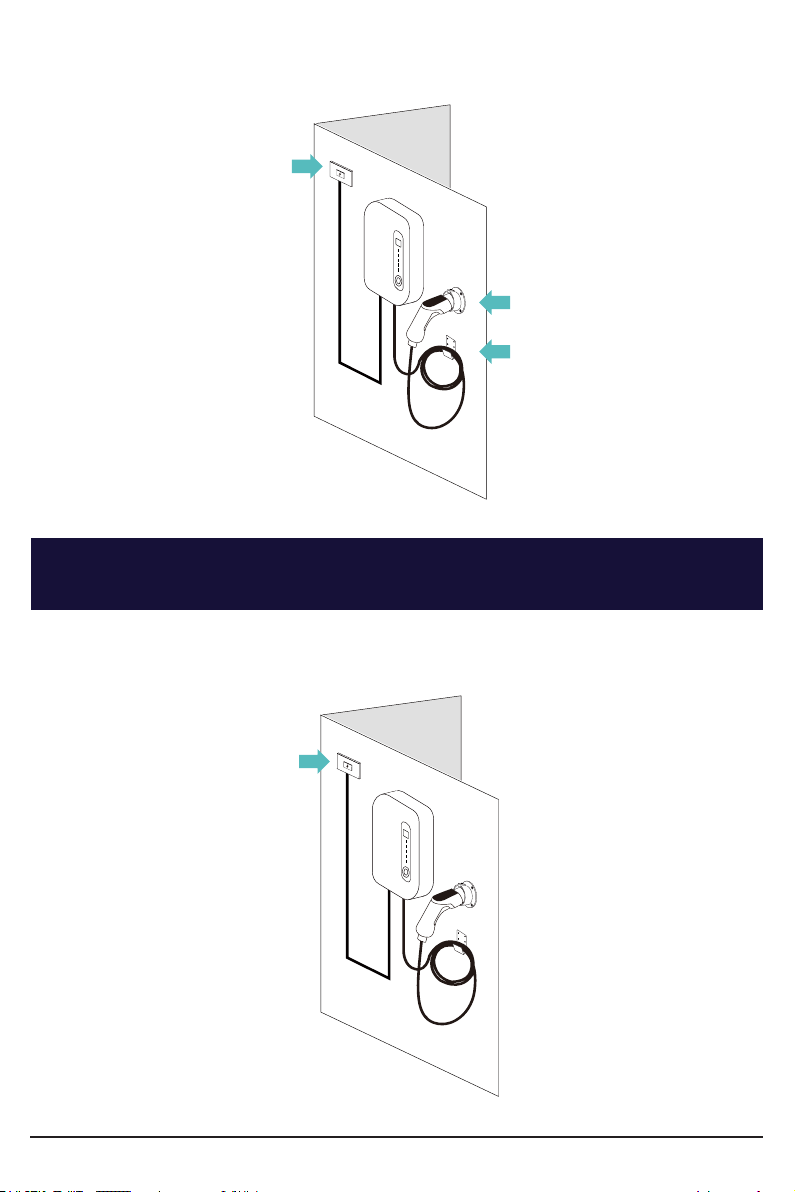
Installation
1. Drill holes according to the reference paper.
2. Insert the wall plugs on the holes. Remove the reference paper afterwards.

Need help? Send us an email at: [email protected] Page 5
3. Attach the plate onto the wall using the long screws provided.
4. Attach the charging station onto the plate on the wall.
Need help? Send us an email at: [email protected] Page 6
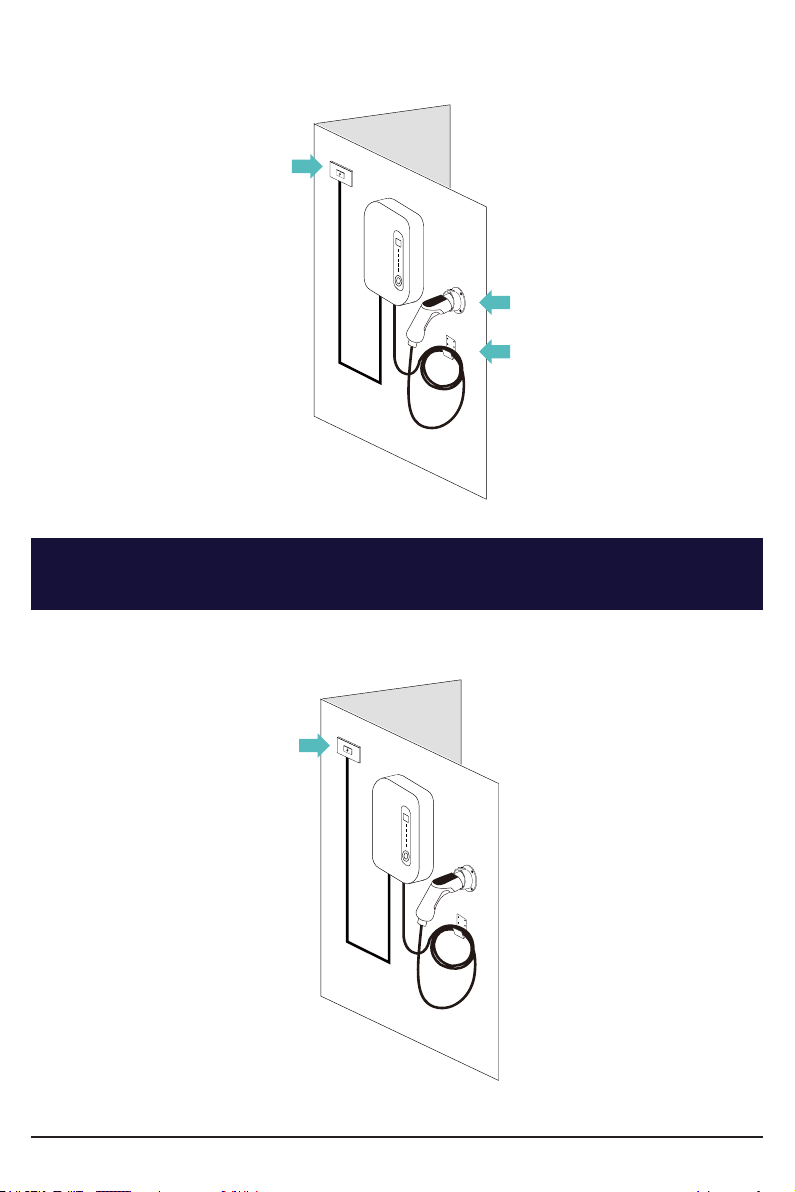
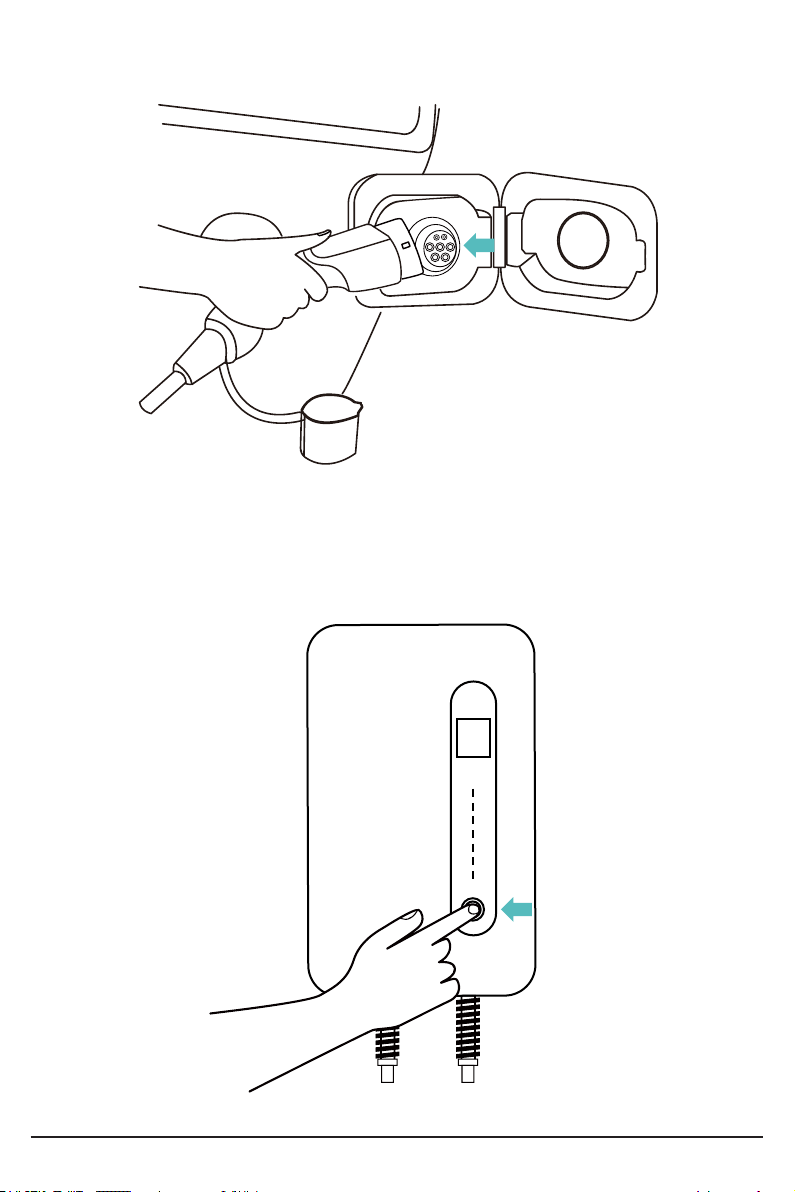
How to Use
1. Ensure that the charging station is connected to a power source.
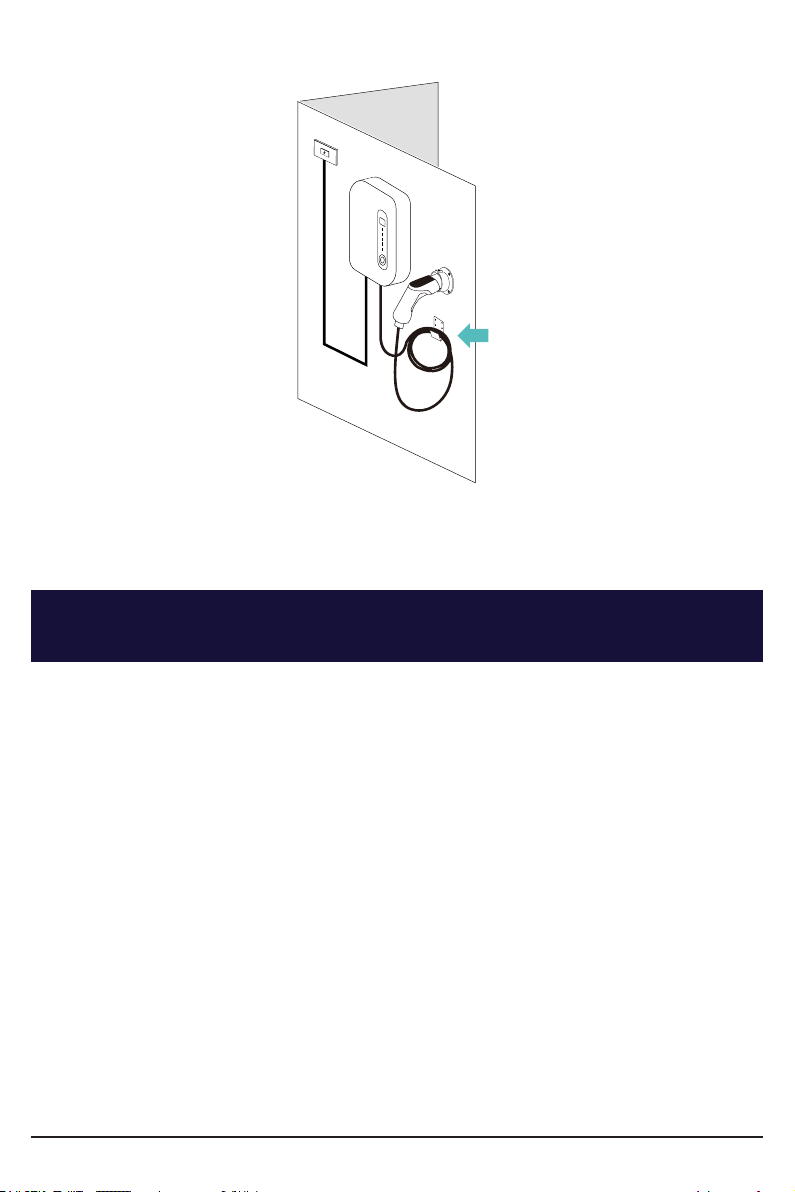
5. Connect the charging station onto a power source, and install the holder
and the hook.

Need help? Send us an email at: [email protected] Page 7
2. Connect your electric vehicle and the charging station with the charging
plug.
3. Press the button on the right side of the charging station to start/stop
charging.

Need help? Send us an email at: [email protected] Page 8
Specification
Installation Method : Wall/Stand
Certificate : TUV,CE
IP Rating : IP66
Rated Voltage : 230VAC±10%
Rated Current : 32A/40A
Plug : NEMA 6-50/14-50
Maximum Power : 7.36kw/9.2kw
Phase Mode : Single Phase
Operating Temperature : -40°C to +55°C (-40°F to +131°F)
Enclosed Material : ABS+PC alloy
4. Hang the cable on the hook when it is not in use.


Necesitas ayuda? Contáctenos en: [email protected] Página 2
Contenido del Paquete
Información de Seguridad
• 1 x Estación de Carga con enchufe de carga incorporado
• 1 x Placa
• 1 x Soporte
• 1 x Gancho
• 1 x Llave Allen
• 4 x Tornillos Largos
• 10 x Tornillos Cortos
• 10 x Tapones de Pared
• 1 x Papel de Referencia
• El incumplimiento de las instrucciones puede resultar peligroso.
• No desmontes la estación de carga mientras esté en funcionamiento.
• Instala la estación de carga lejos de lugares pirotécnicos, polvorientos o
corrosivos.
• La estación de carga produce una salida de alto voltaje. Debes prestar
atención a la seguridad personal cuando la utilices.
• Si se produce una avería, puede provocar una descarga eléctrica o incluso la
muerte.
• Comprueba regularmente si la estación de carga presenta daños visibles.
Puede producirse una descarga eléctrica al utilizar una estación de carga
dañada.
• Si se produce un fallo en la toma de tierra, se debe asumir que el cable lleva
tensión. Confirma que no hay energía de alta tensión en el sistema antes de
inspeccionar la estación de carga.
• Antes de alimentar la estación de carga, confirma que el dispositivo está
correctamente conectado a tierra para evitar accidentes innecesarios.
• No modifiques, adaptes o cambies ninguna pieza por ti mismo bajo ninguna
circunstancia.
• Para garantizar la vida útil y el funcionamiento estable de la estación de
recarga, el entorno de funcionamiento debe mantenerse lo más limpio
posible, con una temperatura y humedad relativamente estables. La
estación de carga no debe utilizarse en un entorno inflamable.
• Asegúrate de confirmar que la tensión de entrada, la frecuencia, los disyun-
tores y otras condiciones de la estación de carga cumplen las especifica-
ciones antes de encenderla.
Estación de Carga
con enchufe de
carga incorporado
Placa
Soporte Gancho Llave Allen
Tornillos Largos
Tornillos Cortos
Tapones de Pared papel de Referencia

Necesitas ayuda? Contáctenos en: [email protected] Página 3
Componentes de la Estación de Carga
Componentes de la Pantalla
1. Corriente en Tiempo Real
2. Tensión en Tiempo Real
3. Potencia consumida
4. Temperatura
5. Ícono de carga
6. Tiempo de carga
7. Corriente nominal
8. Causa de la avería
9. Reinicio automático
10. Temperatura
11. Ícono de fallo
Nota:
Cuando se produzcan pequeños problemas como un cortocircuito, la estación
de carga se reiniciará automáticamente para reparar y continuar la carga.
Pantalla de
Visualización
Enchufe de Carga
Botón de
Encendido/
Apagado
Indicadores LED
1
2
3
4
8
10
11
9
5
6
7
111.74 °F 105.44 °F
Necesitas ayuda? Contáctenos en: [email protected] Página 4
Instalación
1. Perforar los agujeros de acuerdo con el papel de referencia.
2. Introduce los tapones de pared en los agujeros. Luego, retira el papel de
referencia.

Necesitas ayuda? Contáctenos en: [email protected] Página 5
3. Fija la placa a la pared con los tornillos largos provistos.
4. Coloca la estación de carga en la placa de la pared.

Necesitas ayuda? Contáctenos en: [email protected] Página 6
Cómo Utilizar
1. Asegúrate de que la estación de carga esté conectada a una fuente de
alimentación.
5. Conecta la estación de carga a una fuente de alimentación e instala el
soporte y el gancho.
Necesitas ayuda? Contáctenos en: [email protected] Página 7
2. Conecta tu vehículo eléctrico y la estación de carga con el enchufe de carga.
3. Pulsa el botón situado en el lado derecho de la estación de carga para
iniciar/detener la carga.
Necesitas ayuda? Contáctenos en: [email protected] Página 8
Especificaciones
Método de Instalación : Pared/soporte
Certificado : TUV, CE
Clasificación IP : IP66
Tensión Nominal : 230VAC±10%
Corriente Nominal : 32A/40A
Enchufe : NEMA 6-50/14-50
Potencia Máxima : 7,36kw/9,2kw
Modo de Fase : Monofásico
Temperatura de Funcionamiento : -40°C a +55°C (-40°F a +131°F)
Material de la Carcasa : ABS+aleación de PC
4. Cuelga el cable en el gancho cuando no lo utilices.

Para más información, visita:
www.ev-lectron.com
o contacta con nosotros en
Fabricado en China
Chargeur électrique portable pour
voiture (Niveau 2, 40A)
Manuel d'utilisation
Besoin d'aide? Contactez-nous à : [email protected]
• 1 x Station de charge avec prise de charge attachée
• 1 x Plaque
• 1 x Titulaire
• 1 x Accrocher
• 1 x Clé Allen
• 4 x Vis longues
• 10 x Vis courtes
• 10 x Prises murales
• 1 x Document de référence
L’emballage comprend
Informations relatives à la sécurité
Station de charge
avec prise de charge
attachée
Plaque
Titulaire Accrocher Clé Allen
Vis longues
Vis courtes
Prises murales Document de
référence
• Le non-respect des instructions peut entraîner un danger.
• Ne démontez pas la station de charge pendant son fonctionnement.
• Installez la station de charge à l'écart d'objets pyrotechniques, d'endroits
poussiéreux ou corrosifs.
• La station de charge produit une sortie haute tension. Vous devez faire
attention à votre sécurité personnelle lorsque vous l'utilisez.
• Si un dysfonctionnement se produit, cela peut causer un choc électrique ou
même la mort.
• Vérifiez régulièrement si la station de charge présente des dommages
visibles. Un choc électrique peut se produire lors de l'utilisation d'une
station de charge endommagée.
• Si un défaut de terre se produit, il faut supposer que le câble est sous
tension. Veuillez confirmer qu'il n'y a pas de courant haute tension dans le
système avant d'inspecter la station de charge.
• Avant de mettre la station de charge sous tension, veuillez vérifier que
l'appareil est correctement mis à la terre afin d'éviter tout accident inutile.
• Ne modifiez pas, ne réadaptez pas ou ne changez pas une pièce par
vous-même, quelles que soient les circonstances.
• Afin de garantir la durée de vie et le fonctionnement stable de la station de
charge, l'environnement de fonctionnement doit être aussi propre que
possible, avec des températures relativement stables. La station de charge
ne doit pas être utilisée dans un environnement inflammable.
• Assurez-vous de confirmer que la tension d'entrée, la fréquence, les
disjoncteurs et les autres conditions de la station de charge sont conformes
aux spécifications avant de la mettre sous tension.
Besoin d'aide? Contactez-nous à : [email protected] Page 2
Besoin d'aide? Contactez-nous à : [email protected] Page 3
Composants de la station de charge
Composants de l'affichage
1. Courant en temps réel
2. Tension en temps réel
3. Puissance consommée
4. Température
5. Icône de charge
6. Temps de charge
7. Courant nominal
8. Cause du défaut
9. Redémarrage automatique
10. Température
11. Icône d'erreur
Note:
En cas de problèmes mineurs, comme un court-circuit, la station de charge
redémarre automatiquement pour réparer et poursuivre la charge.
Écran d'achage
Plug de charge
On/O Button
Indicateurs LED
4
8
9
5
6
7
111.74 °F 105.44 °F

Besoin d'aide? Contactez-nous à : [email protected] Page 4
Installation
1. Percez les trous selon le document de référence.
2. Insérez les fiches murales dans les trous. Retirez ensuite le papier de
référence.

Besoin d'aide? Contactez-nous à : [email protected] Page 5
3. Fixez la plaque au mur à l'aide des longues vis fournies.
4. Fixez la station de charge sur la plaque du mur.
Besoin d'aide? Contactez-nous à : [email protected] Page 6
Mode d'emploi
1. Assurez-vous que la station de charge soit connectée à une source
d'alimentation.
5. Connectez la station de charge à une source d'alimentation, puis installez le
support et le crochet.

Besoin d'aide? Contactez-nous à : [email protected] Page 7
2. Connectez votre véhicule électrique et la station de charge à l'aide du plug
de charge.
3. Appuyez sur le bouton situé sur le côté droit de la station de charge pour
démarrer/arrêter la charge.

Besoin d'aide? Contactez-nous à : [email protected] Page 8
Caractéristiques techniques
Méthode d'installation : Mur/Support
Certificat : TUV, CE
Indice IP : IP66
Tension nominale : 230VCA±10%.
Intensité nominale : 32A/40A
Plug : NEMA 6-50/14-50
Puissance maximale : 7.36kw/9.2kw
Mode de phase : Monophasé
Température de fonctionnement : -40°C à +55°C (-40°F à +131°F)
Matériau du boîtier : ABS + alliage PC
4. Accrochez le câble au crochet lorsqu'il n'est pas utilisé.

Pour plus d'informations, consultez le site
www.ev-lectron.com
ou contactez-nous à
Fabriqué en Chine