001-6902.081518.F
The Bowflex
®
Blaze
®
Home Gym
Owner’s Manual
WWWBOWFLEXCOM

To validate warranty support, keep the original proof of purchase and record the following information:
Serial Number ___________________________
Date of Purchase ____________________
To register your product warranty, go to: www.bowflex.com/register
or call 1 (800) 605–3369.
If you have questions or problems with your product, please call 1 (800) 605–3369
Or go to: www.bowflex.com
Nautilus, Inc., 5415 Centerpoint Parkway, Groveport, OH 43125 USA, www.NautilusInc.com - Customer Service: North America (800) 605-3369,
FVQOV#QDXWLOXVFRP_RXWVLGH86ZZZQDXWLOXVLQWHUQDWLRQDOFRP_3ULQWHGLQ&KLQD_1DXWLOXV,QF_%RZÀH[WKH%ORJR%OD]H3RZHU
5RGDQG1DXWLOXVDUHWUDGHPDUNVRZQHGE\RUOLFHQVHGWR1DXWLOXV,QFZKLFKDUHUHJLVWHUHGRURWKHUZLVHSURWHFWHGE\FRPPRQODZLQWKH
United States and other countries. Nut Thins® is a trademark of its owner.

3
Table of Contents
Important Safety Instructions 5
Safety Warning Labels/Serial Number 7
Get to Know Your Machine 10
How to Use Your Machine 11
Power Rod® Resistance 11
Adjusting/Understanding The Resistance 11
Hooking Power Rod® Unit to Cables 11
Safety 11
When You Are Not Using Your Gym 11
The Workout Bench 12
Removing the Bench 12
Flat Bench 12
45° Incline Bench 12
Leg Extension 12
Free-Sliding Seat 12
Storing Your Bowflex® Blaze® Home Gym 12
Maintenance and Care 12
How to Use Your Machine 13
Accessories and Equipment 13
Using Your Leg Press Belt and
Squat Bar Pulleys 14
Define Your Goals 16
Warm Up / Cool Down 17
Chest Exercises 18
Shoulder Horizontal Adduction 18
Bench Press 18
Decline Bench Press 19
Incline Bench Press 19
Decline Chest Fly 20
Incline Chest Fly 20
Resisted Punch 21
Lying Cable Crossover 21
Shoulder Exercises 22
Rear Deltoid Rows 22
Standing Lateral Shoulder Raise 22
Seated Shoulder Press 23
Front Shoulder Raise 23
Shoulder Extension 24
Shoulder Shrug 24
Scapular Protraction 25
Scapular Depression 25
Lying Front Shoulder Raise 26
Reverse Fly 26
Shoulder Rotator Cuff 27
Shoulder Rotator Cuff 27
Seated Lateral Shoulder Raise 28
Scapular Retraction 28
Back Exercises 29
Lying Lat Pulldowns 29
Low Back Extension 29
Pulldowns 30
Narrow Pulldowns with Handgrips 30
Lying Lat Fly 31
Lying Narrow Lat Pulldowns 31
Seated Lat Rows 32
Stiff-Arm Pulldown 32
Bent Over Row 33
Arm Exercises 34
Triceps Pushdown 34
Single Arm Pushdown 34
French Press 35
Lying Triceps Extension 35
Cross Triceps Extension 36
Lying 45
o
Triceps Extension 36
Seated Triceps Extension 37
Standing Biceps Curl 37
Seated Biceps Curl 38
Lying Biceps Curl 38
Seated Wrist Extension 39
Standing Wrist Curl 39
Reverse Curl 40
Seated Wrist Curl 40
Standing Wrist Extension 41
“Rope” Pushdown 41
Abdominal Exercises 42
Reverse Crunch 42
Resisted Reverse Crunch 42
Seated (Resisted) Ab Crunch 43
Seated (Resisted) Oblique Ab Crunch 43
Trunk Rotation 44
Leg Exercises 45
Leg Extension 45
Squat 45
Lying Leg Extension 46
Ankle Eversion 46
Ankle Inversion 47
Standing Hip Extension 47
Standing Hip Extension 48
Standing Hip Abduction 48
Seated Hip Adduction 49
Seated Hip Abduction 49
Standing Leg Kickback 50
Leg Press 51
Prone Leg Curl 52
Muscle Chart 53
The Workouts 54
Bowflex™ Body Weight Loss Guide 56

4
Regulatory Approvals:
Product Weight
191 lbs. (86.5 kg)
Product Dimensions
90" L x 38" W x 83" H (229 cm L x 97 cm W x 211 cm H)
Folded Footprint
52" L x 38" W x 83" H (132 cm L x 97 cm W x 211 cm H)
Workout Area
100" L x 78" W (254 cm L x 198 cm W)
Number of Exercises
Over 60
Power Rod
®
Resistance
210 lbs. (95 kg)
Power Rod
®
Upgradability
310 lbs. (141 kg.)
410 lbs. (186 kg.)
User Weight Limit
300 lbs. (136 kg)
ASTM Fitness standards compliant
Product Specifications:

5
Important Safety Instructions
Indicates a potentially hazardous situation which, if not avoided, could result in death or serious
injury.
Read and understand the complete Owner’s Manual. Keep Owner’s Manual for future reference.
Read and understand all warnings on this machine. If at any time the Warning stickers become loose,
unreadable or dislodged, contact Nautilus Customer Service for replacement stickers.
Before using this equipment, obey the following warnings:
• Children must not be let on or near to this machine. Moving parts and other features of the machine
can be dangerous to children.
• Not intended for use by anyone under 14 years of age.
• Consult a physician before you start an exercise program. Stop exercising if you feel pain or tightness
in your chest, become short of breath, or feel faint. Contact your doctor before you use the machine
again.
• Before each use, examine this machine for loose parts or signs of wear. Inspect all cables, pulleys and
their connections, making sure they are properly secured and attached, and show no signs of visible
wear or damage. Contact Nautilus Customer Service for repair information.
• Maximum user weight limit
: 300 lb. (136 kg). Do not use if you are over this weight.
• This machine is for home use only.
• Do not wear loose clothing or jewelry. This machine contains moving parts. Do not put fingers or other
objects into moving parts of the exercise equipment.
• Always wear rubber soled athletic shoes when you use this machine. Do not use the machine with
bare feet or only wearing socks.
• Set up and operate this machine on a solid, level, horizontal surface.
• Do not operate this machine outdoors or in moist or wet locations.
• Keep at least 6” (15 cm) clear behind the rod box, and 36” (91 cm) in front of the machine. Keep 15”
(38 cm)on the sides of the machine clear. This is the recommended safe distance for access and
passage around and emergency dismounts from the machine. Keep third parties out of this space
when machine is in use.
• Do not over exert yourself during exercise. Operate the machine in the manner described in this
manual.
• Do not use Dumbbells or other weight equipment to incrementally increase the weight resistance. Use
only the weight resistance designed for use with this gym.

6
• Correctly engage the Selector Hook to the Rod End.
• Correctly adjust and safely engage all Positional Adjustment Devices. Make sure that the
Adjustment Devices do not hit the user.
• Keep clear of Power Rod
®
movement path during operation. Keep any bystanders clear of
machine and Power Rod
®
movement path during operation.
• Do not move the machine without aid. Injury to you or damage to the machine can occur.
• Children should be supervised to ensure that they do not play with the appliance.
Important Safety Instructions
7
Label 2
Label 1
Label 3
Label 5
Label 4
Label 6
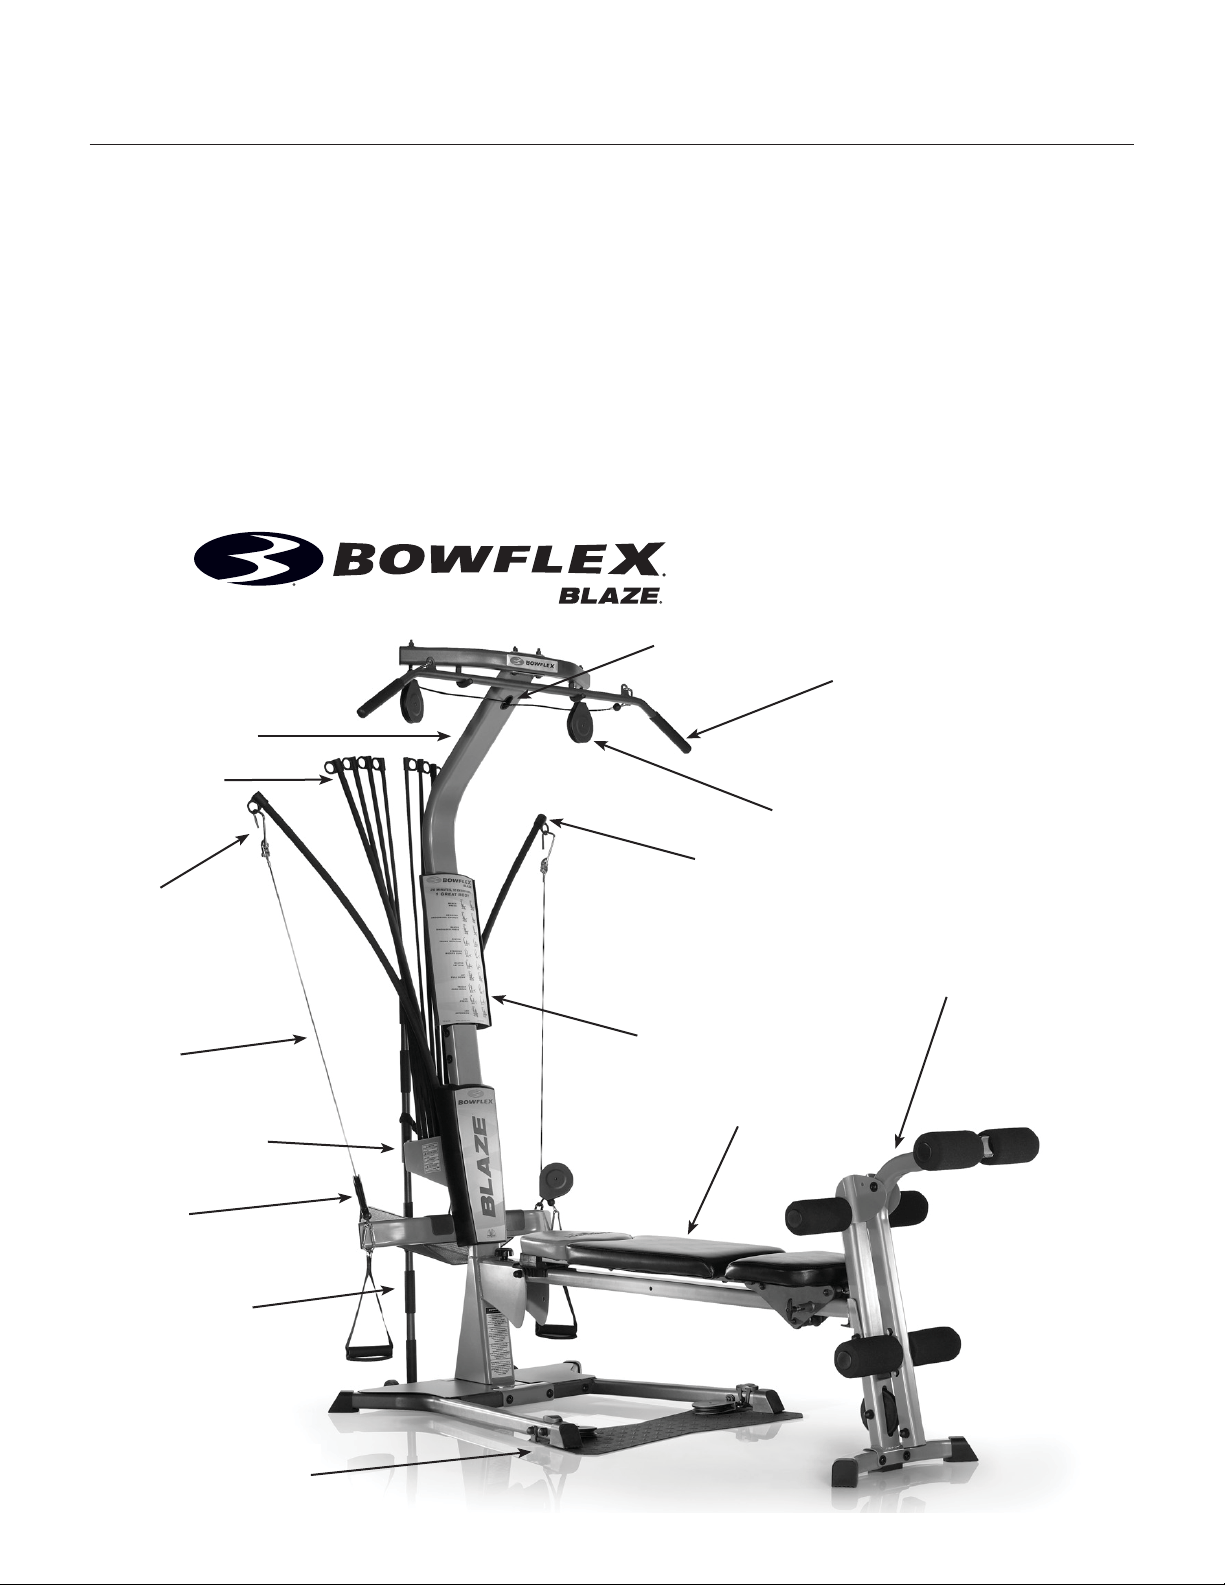
Safety Warning Labels and Serial Number
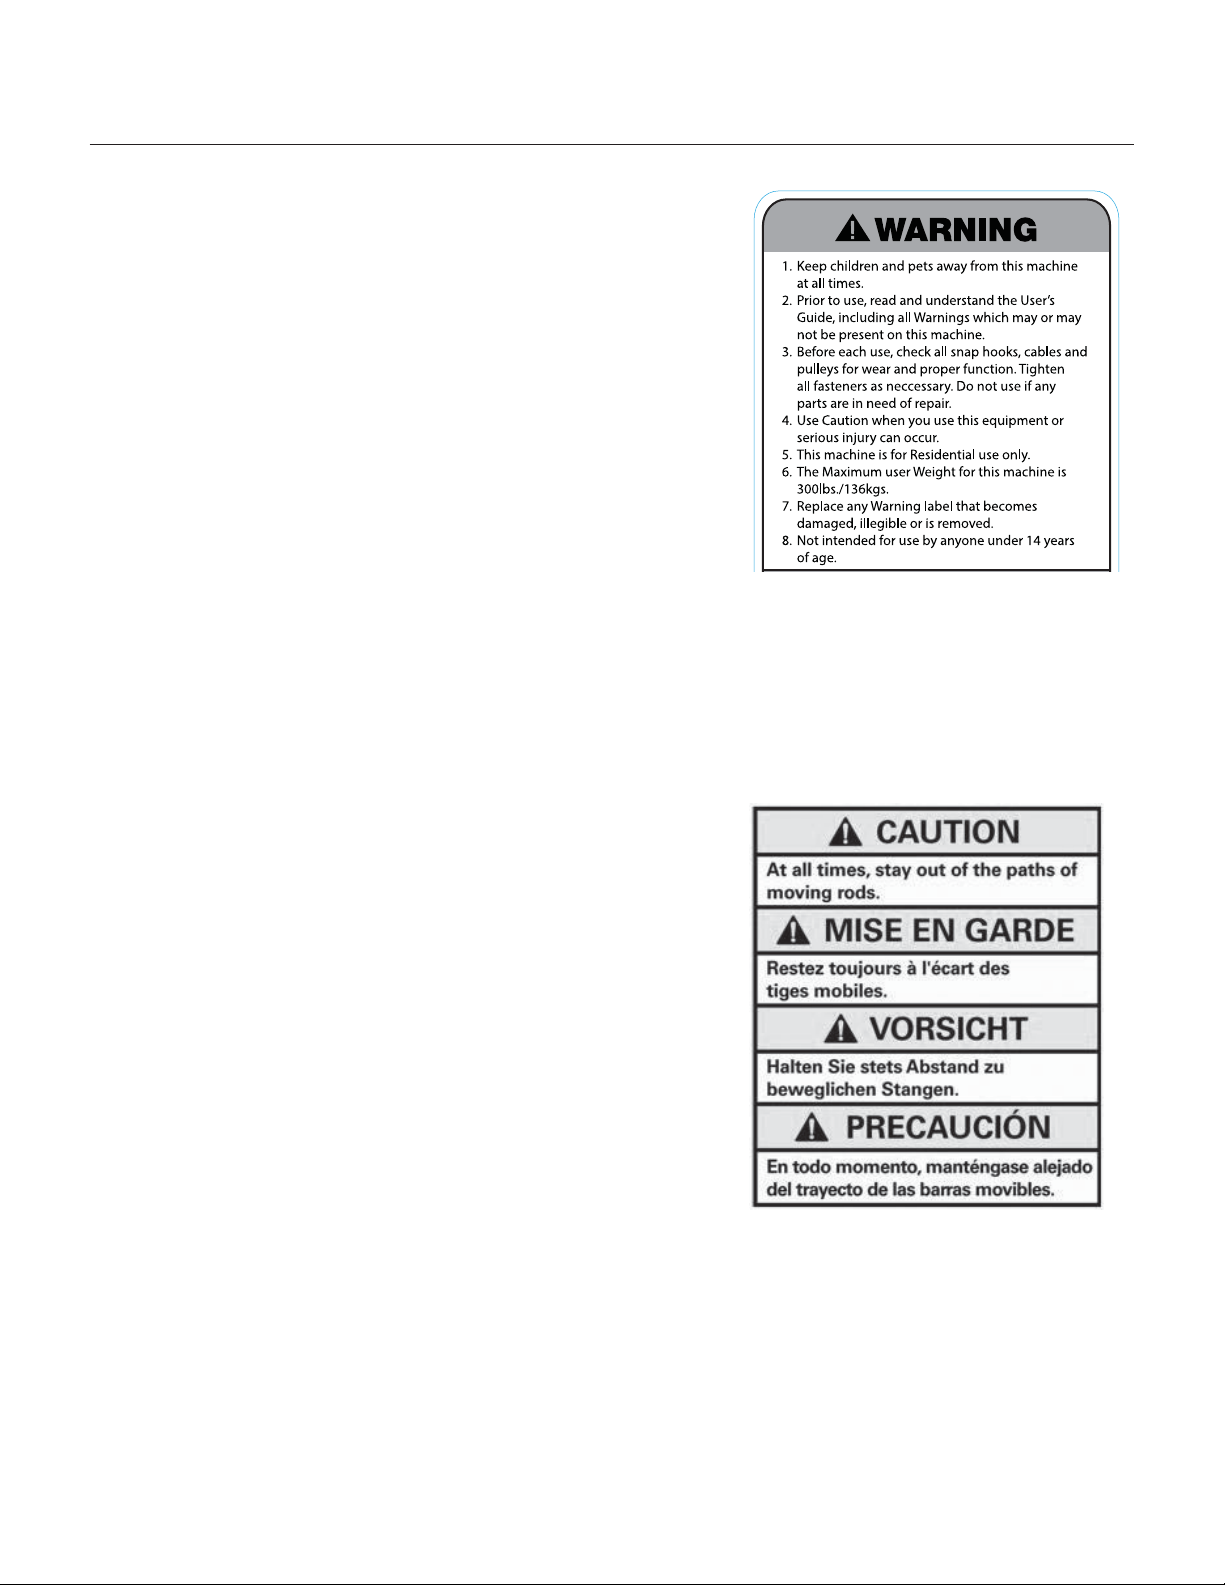
8
Label 1: Please make sure all users read, understand, and follow
the warning labels on the home gym. See Figure 1 for
general use safety label.
Location: The warning label in Figure 1 is located on the back of the
lat tower.
Label 2: See figure 2 for “Caution” safety label.
Location: Left and right side of rod box.
Figure 2
Figure 1
Safety Warning Labels and Serial Number
9
Label 3: See Figure 3 for “Caution” safety label. Avoid crush hazard
when folding the bench.
Location: Top of the seat rail bracket.
Label 4: See Figure 4 for “Caution” safety label. Stay clear
of the leg when folding the leg extension.
Location: Back of rear leg of leg extension.
Label 5: Product specifications and regulatory information.
Location: Back of the lower lat tower, below chest bar.
Label 6: Serial number.
Location: Back of the lower lat tower, below chest bar.
Record this number in the Serial Number field at the beginning of this manual.
Figure 3
Figure 4
Safety Warning Labels and Serial Number
10
CONGRATULATIONS on your commitment to improving your
health and fitness! With the Bowflex® Blaze® home gym,
you have everything you need to exceed all of your physical
fitness, strength and health expectations!
The Bowflex® Blaze® home gym’s exceptional resistance and
quality is unmatched by any other single piece of home fitness
equipment available. You will not believe the amazing results
your body will get with the Bowflex® Blaze® home gym!
Please take your time to read through the entire manual and
follow it carefully before attempting to use your Bowflex®
Blaze® home gym. Also locate and read all warning labels
that are posted on the machine. It’s important to understand
how to properly perform each exercise before you do so using
Power Rod® Resistance.
With all of the fitness choices available today, finding the
best workout equipment for your needs can be very confusing.
Everyone at Nautilus would like to thank you for selecting the
Bowflex® Blaze® home gym.
Bowflex® Blaze® home gym is the finest home fitness
product available, and you’re just about to prove it to yourself.
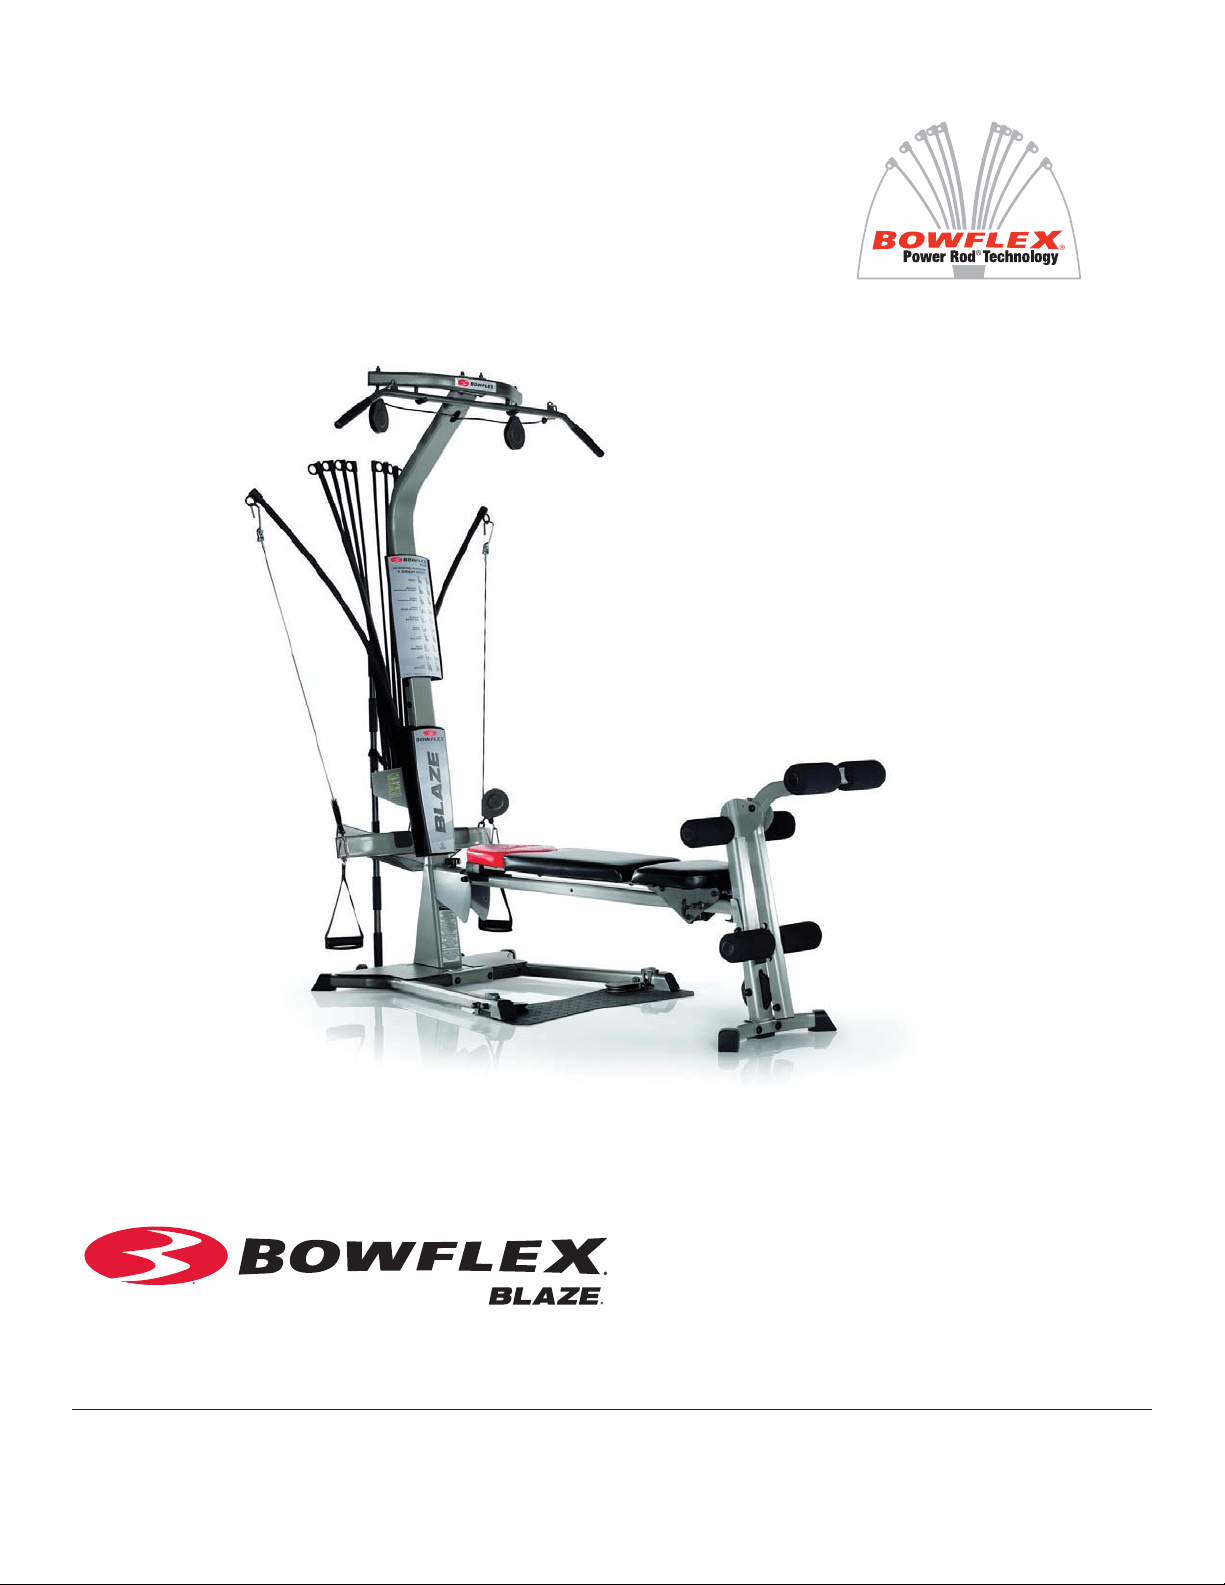
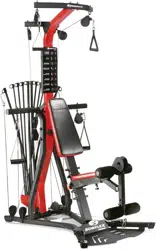
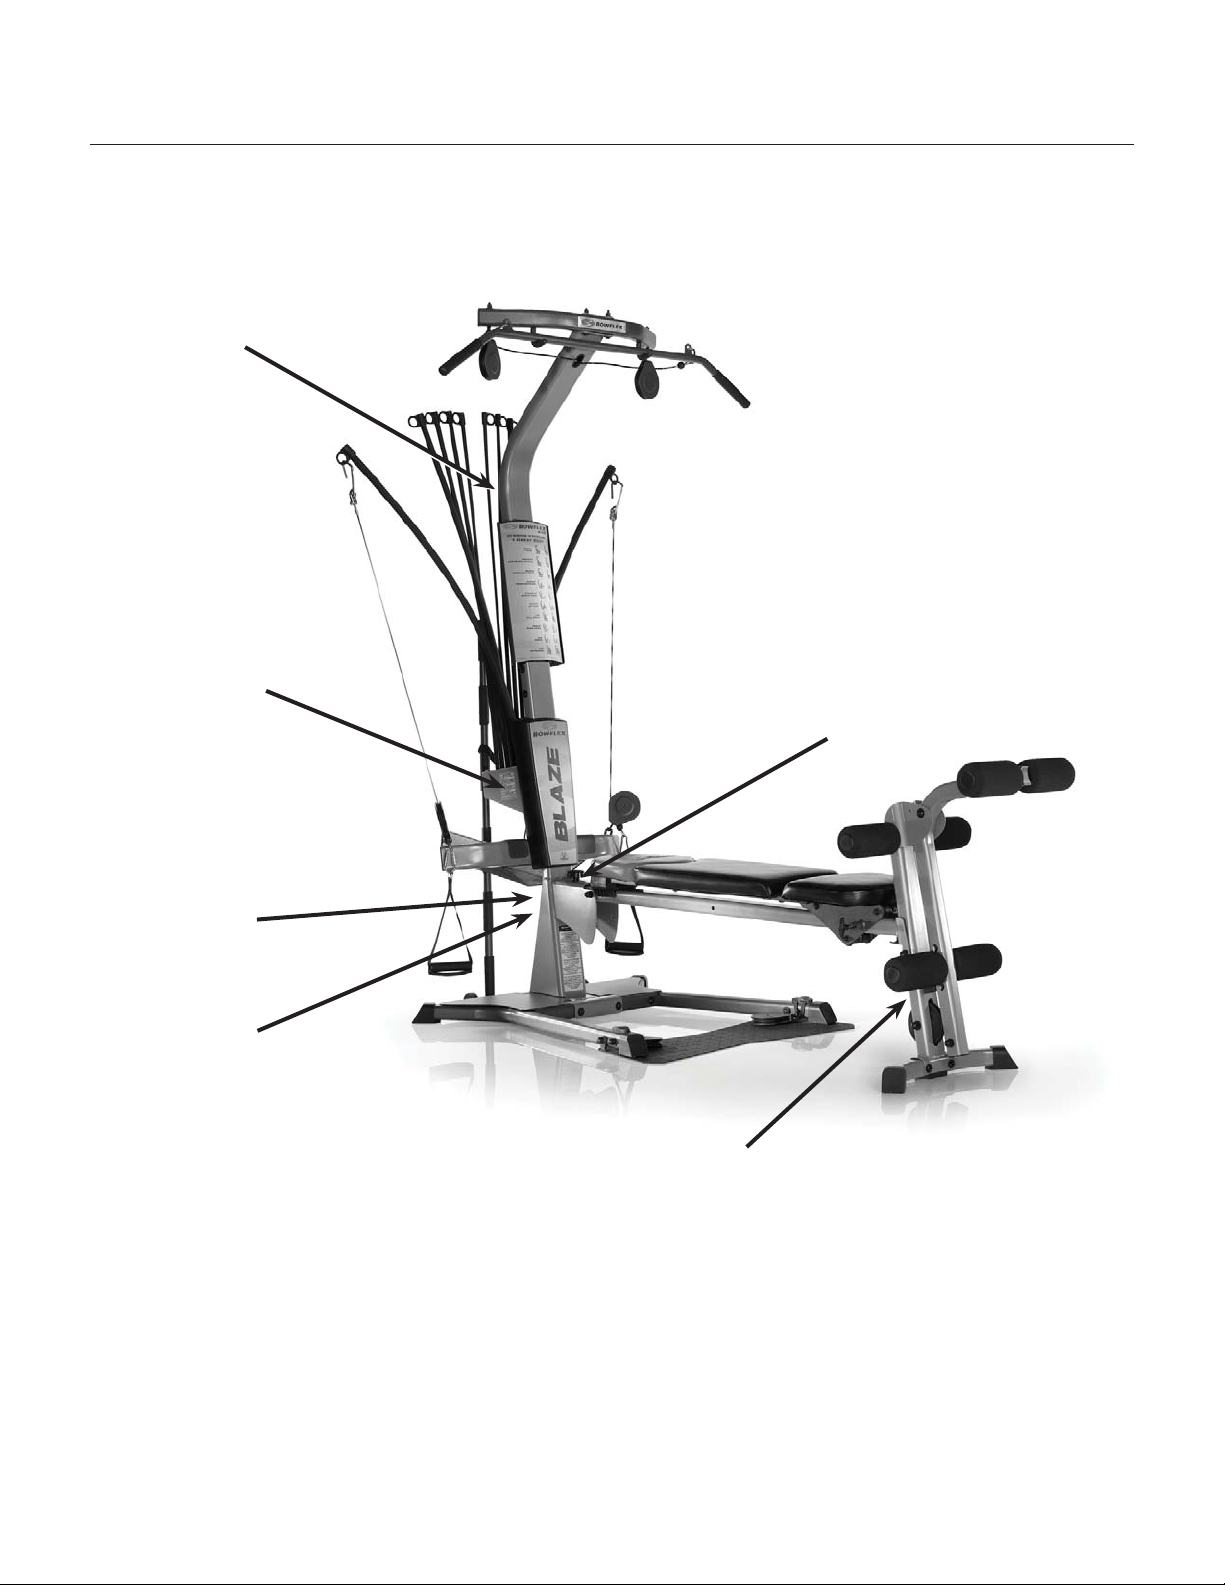
Get to Know Your Machine
Power Rod
®
Unit
Rod Hook
Upper
Lat Tower
Bench
Rod Caps
Cable
Rod Box
Leg Attachment
Bent Lat Bar
Lat Bar Pulley
Chest Bar
Pulley
Squat Platform
and Pulleys
Home Gym
Lat Cable Storage
Workout Placard
Squat Bar
(optional)
11
How to Use Your Machine
Power Rod
®
Resistance
Power Rod
®
resistance rods are made from a special composite material. Your rods are
sheathed with a protective black rubber coating. Each rod is marked with its weight rating on
the “Rod Cap.”
Adjusting and Understanding the Resistance
The standard Bowflex
®
Blaze® home gym comes with 210 pounds
of nominal resistance (one pair of 5 lb. (2.25 kg) rods, two pairs of 10 lb. (4.5 kg) rods, one pair
of 30 lb. (13.5 kg) rods, and one pair of 50 lb. (22.5 kg) rods.
Note: Power Rod
®
Resistance Rods are manufactured using nylon composite material.
The weight resistance measurements are estimates and resistance can vary based on
environmental and usage patterns and other factors. Rod resistance will normally degrade
over time and after extensive usage. If you have any questions regarding the resistance
of your Power Rod
®
Resistance Rods, contact our Bowflex
Customer Service department for assistance.
If you upgraded to a 310 (140 kg) or 410 pound (186 kg) capacity
you will have an additional one or two pair of 50 lb. (22.5 kg) rods,
respectively.
Connecting the Power Rod
®
Unit to the Cables
When hooking the Power Rod
®
resistance rods to the
cable hooks, do not stand directly over the tops or in the
path of the rods. Stand off to one side when connecting
and disconnecting the Power Rod
®
resistance rods from the cables. Be sure to
securely grip the resistance rod with dry hands before attempting to connect.
You may use one rod or several rods in combination, to create your desired resistance level.
To hook multiple rods up to one cable, bend the closest rod toward the cable and place the
cable hook through that rod cap. You can then hook up the next closest rod through the same
cable hook.
Hooking up the closest rod first prevents rods from crossing over the top of one another.
When You Are Not Using Your Home Gym
Disconnect the cables from the Power Rod
®
resistance rods when you are not using your
Bowflex
®
Blaze
® home gym.
Be sure your hands are dry and free of perspiration before attempting to disconnect
the resistance rods. Be sure not to be above or in the path of the resistance rods.
Keep the cables and Power Rod
®
units bound with the rod binding strap when not in
operation, and be sure and remove the binding strap before beginning any exercises
using the rods.
To Order Additional Sets
of 50 lb. (22.5 kg) Power Rod
®
Resistance Rods, Please Call (800) 605-3369.
12
The Workout Bench
Your Bowflex
®
Blaze
®
home gym has a number of seat
and bench positions: flat bench forward, flat bench back, 45°
incline and free-sliding seat extension.
To adjust the seat, pull out the Seat Rail Knob, then slide the
seat to one of the three locking holes on the Seat Rail.
Release the Seat Rail Knob to secure when finished.
Removing the Bench:
The Bench easily attaches and releases from the Seat. To
attach the Bench, insert the half hinge on the end of the
Bench into the half hinge on the seat. To remove the Bench,
lift up on the long portion and pull away from seat.
Flat Bench:
The Flat bench position is used for most exercises. You may
lock the bench into a Back (closest to Power Rod
®
unit) or
Forward (farthest from Power Rod
®
unit)
position to accommodate height/reach
needs.
45° Incline Bench:
Start with a flat bench, following the above
instructions to release and move the seat
and bench. Lift the bench while sliding the
seat toward the Power Rod
®
unit until
the bench back is resting against the Lat
Tower.
Leg Extension:
Refer to page A-14 of the Assembly
Manual for instructions on installing the
Leg Extension Seat.
Free-Sliding Seat:
Remove the Bench, pull out the Seat Rail
Knob, give it half a turn and release to
place the Seat in a “free sliding” position
for Aerobic Rowing.
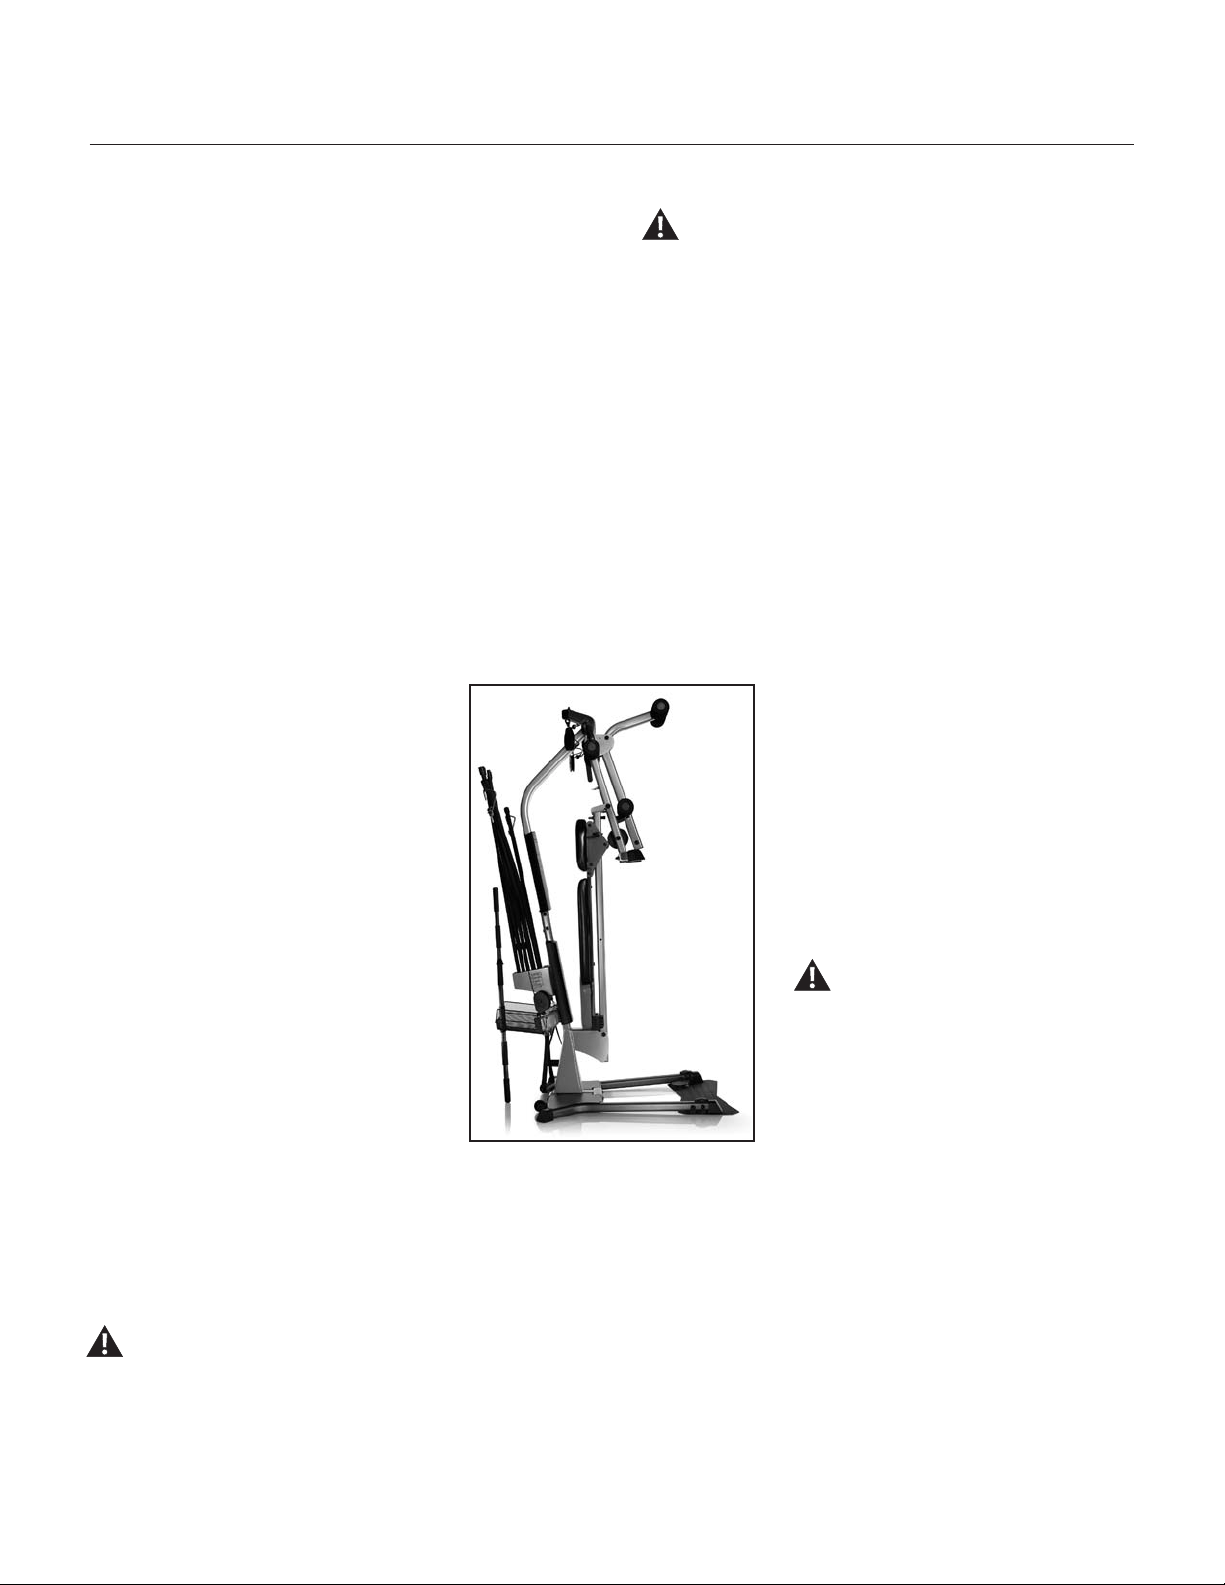
Storing Your Bowflex
®
Blaze
®
Home Gym
Folding your Bowflex
®
Blaze
®
home gym for storage is
easy.
Do not move the machine without aid. Injury to you
or damage to the machine can occur.
Failure to attach the Seat Rail Securing Device into
the seat rail can cause injury.
Do not stand on the base below the Seat Rail when
you lift or lower it. This can cause injury.
Always use two hands to lift and lower the Seat Rail.
Bend at the knees when you lift or lower the Seat
Rail. Failure to use correct lifting procedure can
cause injury.
1) Lock the Seat and Bench into the flat position.
2) Remove all Power Rod
®
resistance and then
bind the Power Rod
®
unit with the rod binding strap.
3) Ensure that the Leg Extension Lock-out Pin is installed.
(Refer to page A-11 for instructions.)
4) Remove the Seat Rail Knob from the seat rail.
5) Tilt the bench toward the Power Rod
®
unit.
6) While holding the Rear Leg with one hand, disengage
the seat Rail Pull Pin to allow the Rear Leg to fold
against the Seat Rail. (See figure 8b on page A-9.)
7) Secure the bench by inserting the Seat Rail
Knob into the hole in the side of the Seat
Rail Bracket.
Maintenance and Care of Your
Bowflex
®
Blaze
®
Home Gym
Inspect your machine for any worn or
loose components prior to use. Tighten or
replace any worn or loose components
prior to use. Pay close attention to cables,
or belts and their connections.
Review all warning notices.
The safety and integrity designed
into a machine can only be
maintained when the equipment is
regularly examined for damage and
repaired. It is the sole responsibility of the
owner to ensure that regular maintenance
is performed. Worn or damaged
components shall be replaced
immediately or the equipment removed
from service until the repair is made. Only manufacturer
supplied components shall be used to maintain/repair the
equipment.
Clean the bench with a non-abrasive household cleanser
after each use. This will keep it looking new. Do not use
automotive cleaner, which can make the bench too “slick.”
How to Use Your Machine
13
Accessories and Equipment
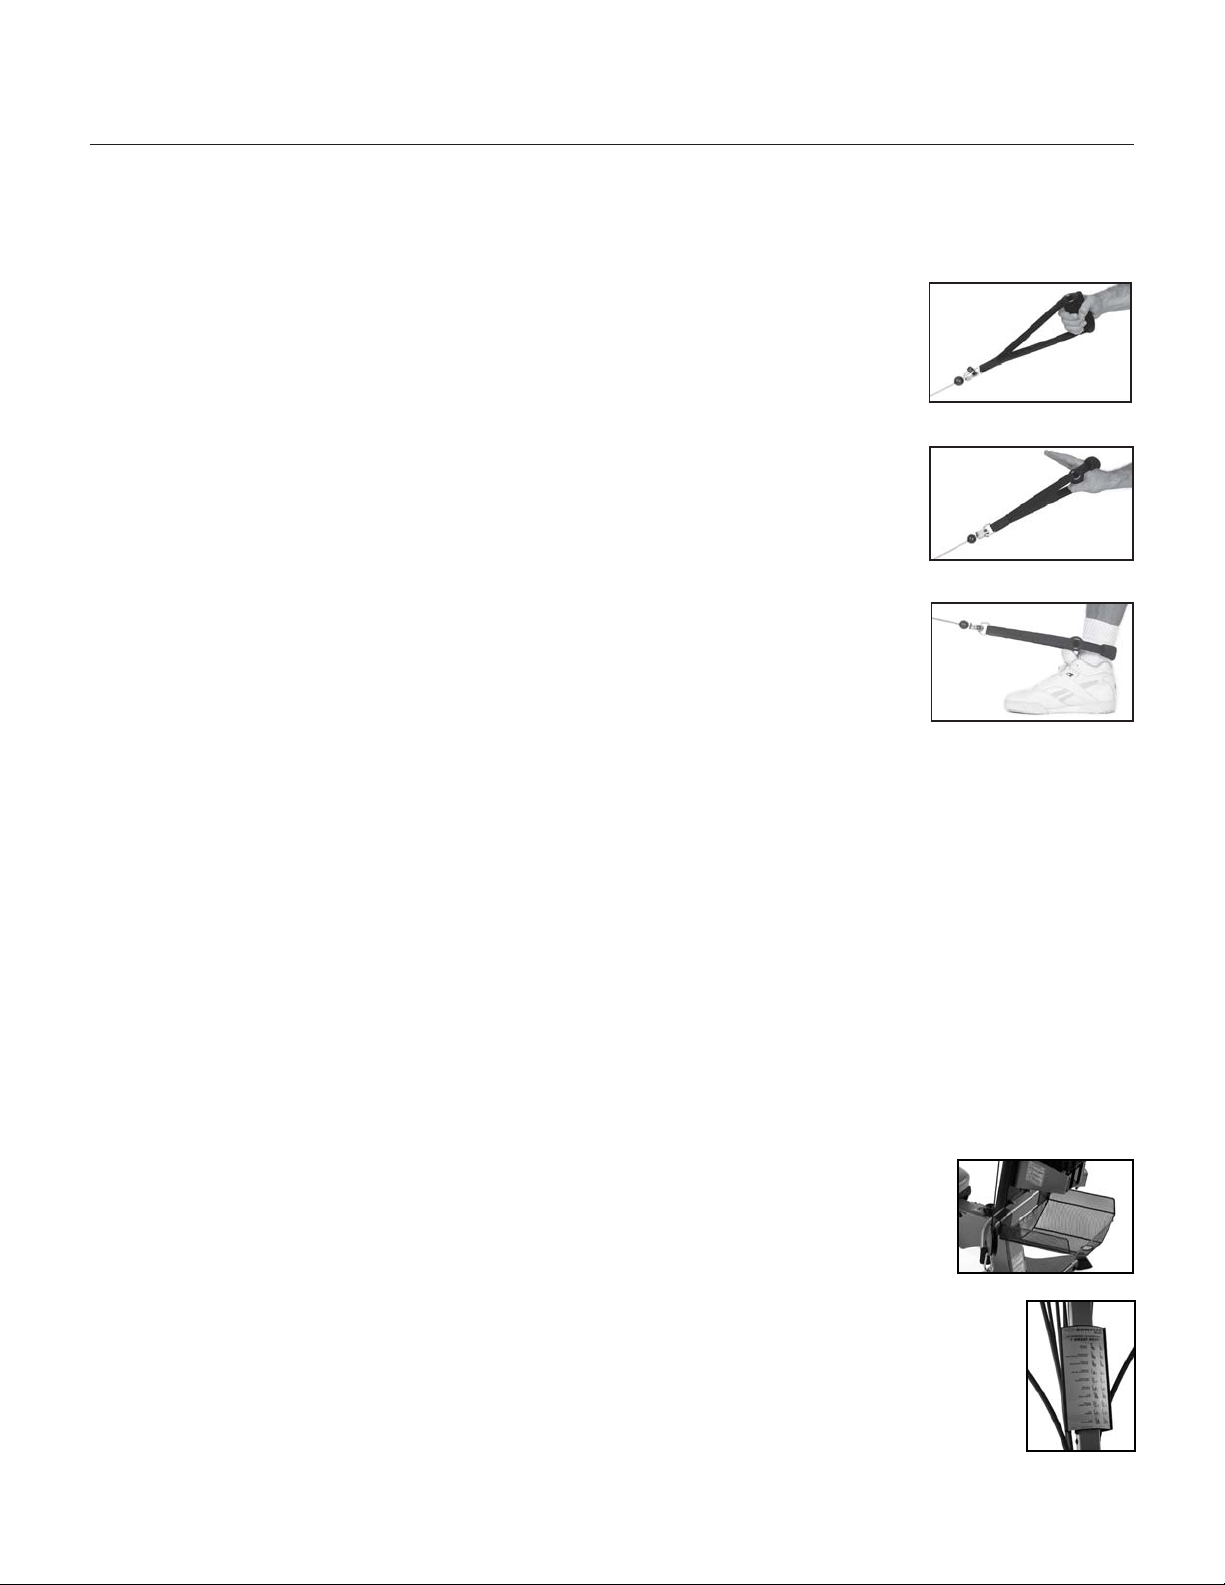
Hand Grips:
The Hand Grips fit snugly around your hand, ankle, or wrist. Attach the pulley cable clips to the
D-Rings on the Hand Grips to attach them to the cables.
Standard Grip: Grasp the grip and cuff together to form a grip without
inserting your hand through the cuff portion. Most of the exercises you
perform utilize this grip. The Standard Grip also is used for Hammer Grip
exercises, when you need to hold the Hand Grip vertically for greater
wrist support.
Hand Cuff Grip: Slip your hand through the cuff portion of the grip so that
the foam pad rests on the back of your hand. Then grasp the remainder
of the grip that is sitting in your palm. This method of gripping is great for
exercises like front shoulder raises or any exercise where your palm is
facing down.
Ankle Cuff Grip: The cuff opening can be made larger to accommodate
the ankle. Place your hand in the cuff and slide it away from the grip.
Insert your foot or ankle and tighten by sliding the grip back toward the
cuff.
Lat Cross Bar:
The Lat Cross Bar enhances exercises that work back, shoulders and
triceps muscles.
Safety : • Before using the Lat Cross Bar, make sure that all fasteners are in place and tightened.
• Make sure that the Lat Tower cables are securely fastened to the regular Bowflex® cables and
the Bent Lat Bar, Squat Bar or Hand Grips.
• Always use the Bent Lat Bar holders to support the Bent Lat Bar, or remove the bar when not in
use.
• Do not hang from or attempt to perform “chin ups” from the Lat Cross Bar.
• Never pull on the Bent Lat Bar unless there is resistance attached to it.
Leg Extension:
Designed to add more effective exercises that target your legs, thighs, calves, etc.
Safety: • Before using the Leg Extension, make sure that all fasteners are in place and tightened.
• Make sure that the Extension’s cables are securely fastened to the regular cables.
• When installing the Leg Extension Seat always ensure that the Support Tube Bracket Hooks fully
engage with the Roller Tube Spacers.
• Always use the supplied Lockout Pin to secure the Leg Extension Pivot Tube to the Rear Leg when
not in use.
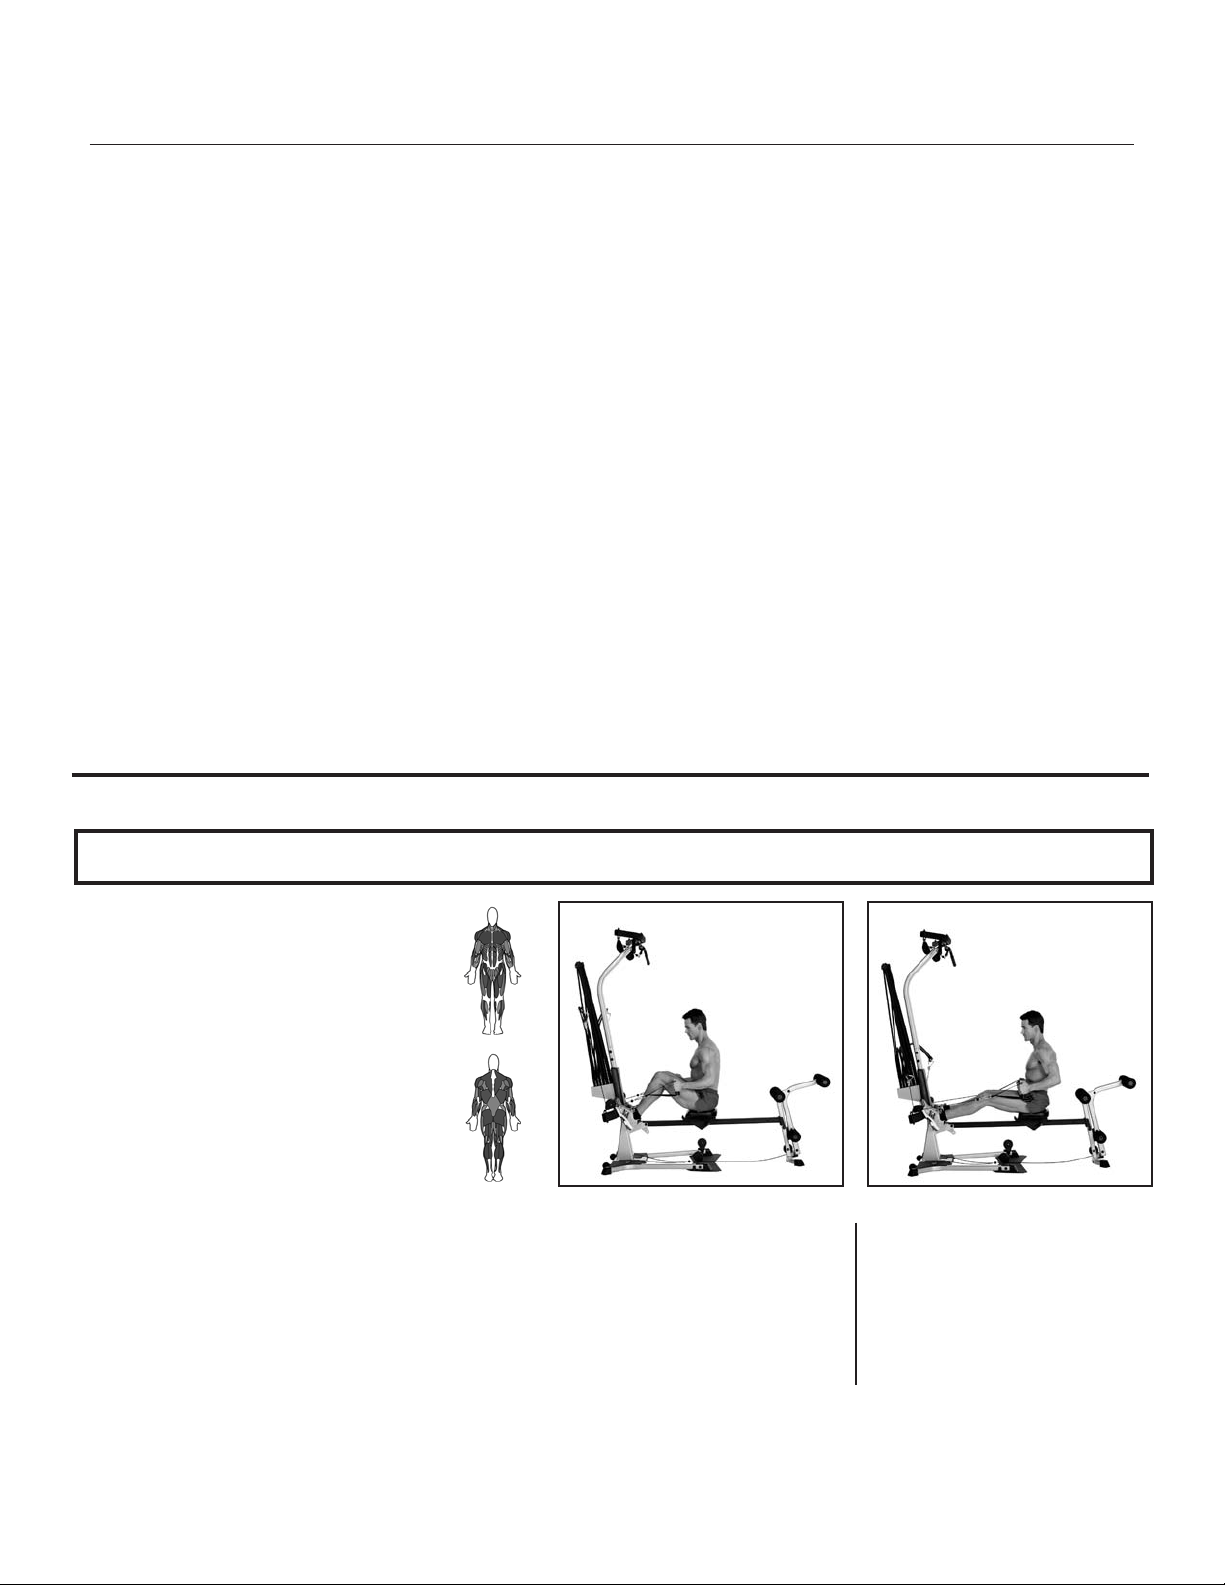
Accessory Basket: Accessory Basket, which hooks onto the Chest Bar, provides
convenient storage for the Squat Bar and small accessories.
Workout Placard: The Workout Placard, which snaps onto the Lat Tower, displays workout
descriptions for easy reference while you’re exercising.
How to Use Your Machine

14
Using Your Leg Press Belt and Squat Bar Pulleys
How to Use Your Machine
Leg Press Belt:
The Leg Press Belt is used for the Leg Press exercise.
• With the Bowflex® seat adjusted to the “free sliding” position (spring lock
seat pin unlocked), the hand grips removed, and the desired amount of
resistance hooked up, sit on the seat and position the leg press belt around
your hips.
• Slide forward to the pulleys and place your feet through the right and left
openings under the rod cables.
• Attach the rod cables to the D-rings on the Leg Press Belt so that the belt
is taut.
• Place hands on vertical main frame and push yourself back while placing
feet, one at a time, onto the pulley frame.
• Grasp belt near where it’s attached to the cables and begin to press back.
Squat Bar Pulleys:
Used with Hand Grips to perform Squat, Bent Rows and other exercises.
Safety:
• Always check fasteners, hooks, cables and each workout to functioning.
• Remove workout bench and lock seat into closest position to the
Power
Rod
®
unit.
• Always wear shoes with non-skid soles when using the Squat Bar Pulleys.
• Fasten each squat cable to a D-ring on each squat harness to the
corresponding D-ring on the squat bar using a snap hook.
• You can now add Power Rod® resistance and adjust the squat straps to
your height using adjuster buckles.
• Always adjust tension of the squat harness in such a manner that it will not
cause a hazard.
Keep your body weight centered on the machine, seat or base frame platform while exercising.
When using the machine for standing leg exercises, always hold the Lat Tower of the machine for
stability.
Do not make any adjustments to the seat while sitting on it. Do not stand on the seat.
All exercises in this manual are based on the calibrated resistance and capacity levels of this
machine. Only exercises included in this manual or in written materials authorized and supplied by
Bowflex® are recommended for operation with this machine.
Do not try to exercise when the seat rail is in the folded position.

15
Your body will do what you train it to do. That’s why it’s important to define your goals and focus them. Here are some
fitness components that will help you define your goals and choose your fitness program.
Muscle Strength is the maximum force that you can
exert against resistance at one time. Your muscle
strength comes into play when you pick up a heavy bag
of groceries or lift a small child. It is developed when a
localized muscle is worked both positively (concentric)
and negatively (eccentric) at a resistance—great enough
so you can perform only five to eight repetitions of the
exercise before the muscle fails. Each set of repetitions
is followed by a rest interval that typically runs three
times longer than the set. Later, between exercise
sessions, the muscle overcompensates for the stress and
usually increases in both strength and size.
Muscle Endurance is the ability to perform repeated
contractions. It comes into play when you cross-country
ski or work on your feet all day. Endurance training
addresses the slow twitch, endurance muscle fibers,
which depend on oxygen for energy. To develop muscle
endurance, use low resistance and high repetitions about
15-20 repetitions in each set, three sets to each exercise,
working the muscle only to fatigue.
Muscle Power is the combination of strength and speed
of the muscular contraction. This is often misinterpreted
as a) being directly associated with certain skill or
sport and/or b) meaning that you must move fast. Load
is actually a more important factor than speed when
attempting to improve power. When training to achieve
muscular power, pick a resistance that fatigues you in the
3-5 repetition range. When performing these reps, it is
more important to think of contracting the muscles faster
rather than attempting to move faster. Performing sport
simulation exercises usually results in a deterioration
of the motor pattern or skill. The biomechanically sound
method of improving power in your sport is to train for
power using the correct joint movements, as described in
this manual. Then practice the skill associated with your
sport, learning to apply this newly achieved power.
Body Composition is the ratio of fat weight (fat) to lean
weight (muscles, bones and tissue). As you age, the
ratio shifts. The fat weight increases and the lean weight
decreases. Training for muscle strength will generally
increase muscle size and aerobic conditioning will help
burn extra calories. Performing these two forms of
exercise, either at different times or together, will create
the greatest changes in body fat weight.
Balanced Strength and alignment are the result of equal
strength developed in all parts of the body. It comes
into play in your standing and sitting posture, and in
your ability to perform just about any activity safely and
effectively. An over-development of the back will round
the shoulders; weak or stretched abdominals can cause
lower back pain. You want a balance of muscle strength
in front and back. In addition, you need a balance of
strength between your middle, lower, and upper body.
Flexibility is the ability of a muscle or group of muscles
to move the joint through a full range of motion. Flexibility
comes into play when you execute an overhand serve or
stretch for the top shelf in the kitchen. It is a cooperative
movement of opposite muscle groups. When a muscle
contracts, its opposite muscle group must relax for the
action to occur. Increased flexibility means an increased
range of motion, made possibly by this simultaneous
contracting and relaxing. Good flexibility is important
in protecting the body from injury and can be achieved
through the balanced strength training programs that are
included in this manual.
Cardiovascular Endurance is the ability of the heart
and lungs to supply oxygen and nutrients to exercising
muscles over an extended period of time. It comes into
play when you jog a mile or ride a bike. It is a critical
component of overall fitness and health.
Define Your Goals

16
You may want to design your own personal program
specifically geared to your goals and lifestyle.
Designing a program is easy, as long as you follow
the guidelines below.
Understand fitness and its components: Improperly
designed programs can be dangerous. Take some
time to review this manual as well as other fitness
guides.
Know your current fitness level: Before you start
any fitness program you should consult a physician
who will help you determine your current abilities.
Identify your goals: Goals are critical to choosing
and designing an exercise program that fits and
enhances your lifestyle, but so is strategy. It’s
important not to rush the process and try to
accomplish too much too soon. That will lead to
setbacks and discouragement. Instead, set a series
of smaller achievable goals.
Select complementary exercises: Be sure to pair
exercises that address compound joint movements
and single joint movements. In addition, select
exercises that address complementary muscle
groups.
Put first things first: During each session, first work
muscle groups that need the most training.
Remember your cardiovascular component: Any
fitness program must contain a cardiovascular
fitness component to be complete. So complement
your resistance training with aerobic exercise such
as walking, running, or bicycling.
Training variables: When designing your own
program there are several variables that, when
mixed properly, will equal the right fitness formula
for you. In order to find out the best formula, you
must experiment with several combinations of
variables.
The variables are as follows:
• Training Frequency: The number of times you
train per week. We recommend daily activity
but not daily training of the same muscle
group.
• Training Intensity: The amount of resistance
used during your repetition.
• Training Volume: The number of repetitions
and sets performed.
• Rest intervals: The time you rest between
sets and the time you rest between workouts.
Once you’ve established a base of fitness, follow
these basic principles:
• Isolate muscle groups: Focus work on specific
muscle groups.
• Progressive Loading: The gradual systematic
increase of repetitions, resistance and
exercise period.
Design Your Own Program
Define Your Goals
17
Define Your Goals
Warm Up / Cool Down
Working Out
A workout begins in your mind’s eye. With concentra-
tion and visualization, you can approach your workout
with a positive, constructive attitude. A good pre-
workout mental routine is to sit and relax so that you
can focus on what you are about to do and think about
achieving your end goal.
Warming Up
We recommend that you warm up by doing
light stretching and performing light exercises
on the Bowflex
®
Blaze® home gym.
Cooling Down
An essential part of the exercise routine is the cool
down. Gradually reduce the level of exercise intensity
so that blood does not accumulate in one muscle
group but continues to circulate at a decreasing rate.
Remember to gradually move yourself into a relaxed
state.
Breathing
The most important part of breathing during exercise
is, quite simply, that you do it. Breathing in or out
during the actual performance is not dependent upon
the direction of air flow relative to exertion. It is, in
fact, a mechanical process that changes the position
of your spine as your rib cage moves. Here are some
tips for breathing:
1) Be cautious when you are concentrating or
exerting effort. This is when you will probably
hold your breath. DO NOT hold your breath. Do
not exaggerate breathing. Depth of inhalation and
exhalation should be natural for the situation.
2) Allow breathing to occur naturally; don’t force it.
Aerobic Rowing—Warm Up or Cool Down
Muscles Worked:
Pectoralis Major, Latissimus Dorsi, Anterior
Deltoids, Quadriceps, and Hamstrings
Bench Position:
Removed, Free Sliding Seat
Accessory:
Handgrips
Pulleys:
Chest Bar
Success Tips
• Maintain good spinal alignment. Keep
chest lifted.
• Bend from the hip during movement, not
from the waist.
START
FINISH
Start
• Remove the Bench, and place
the Seat in the free-sliding
position.
• Attach resistance, and sit facing
the Power Rod
®
unit.
• Brace your feet against the
Chest Bar.
Action
• Initiate movement by extending
your knees while simultaneously
bending your arms and pinching
your shoulder blades together.
• Control the return to the Start
position by slowly bending
your legs.
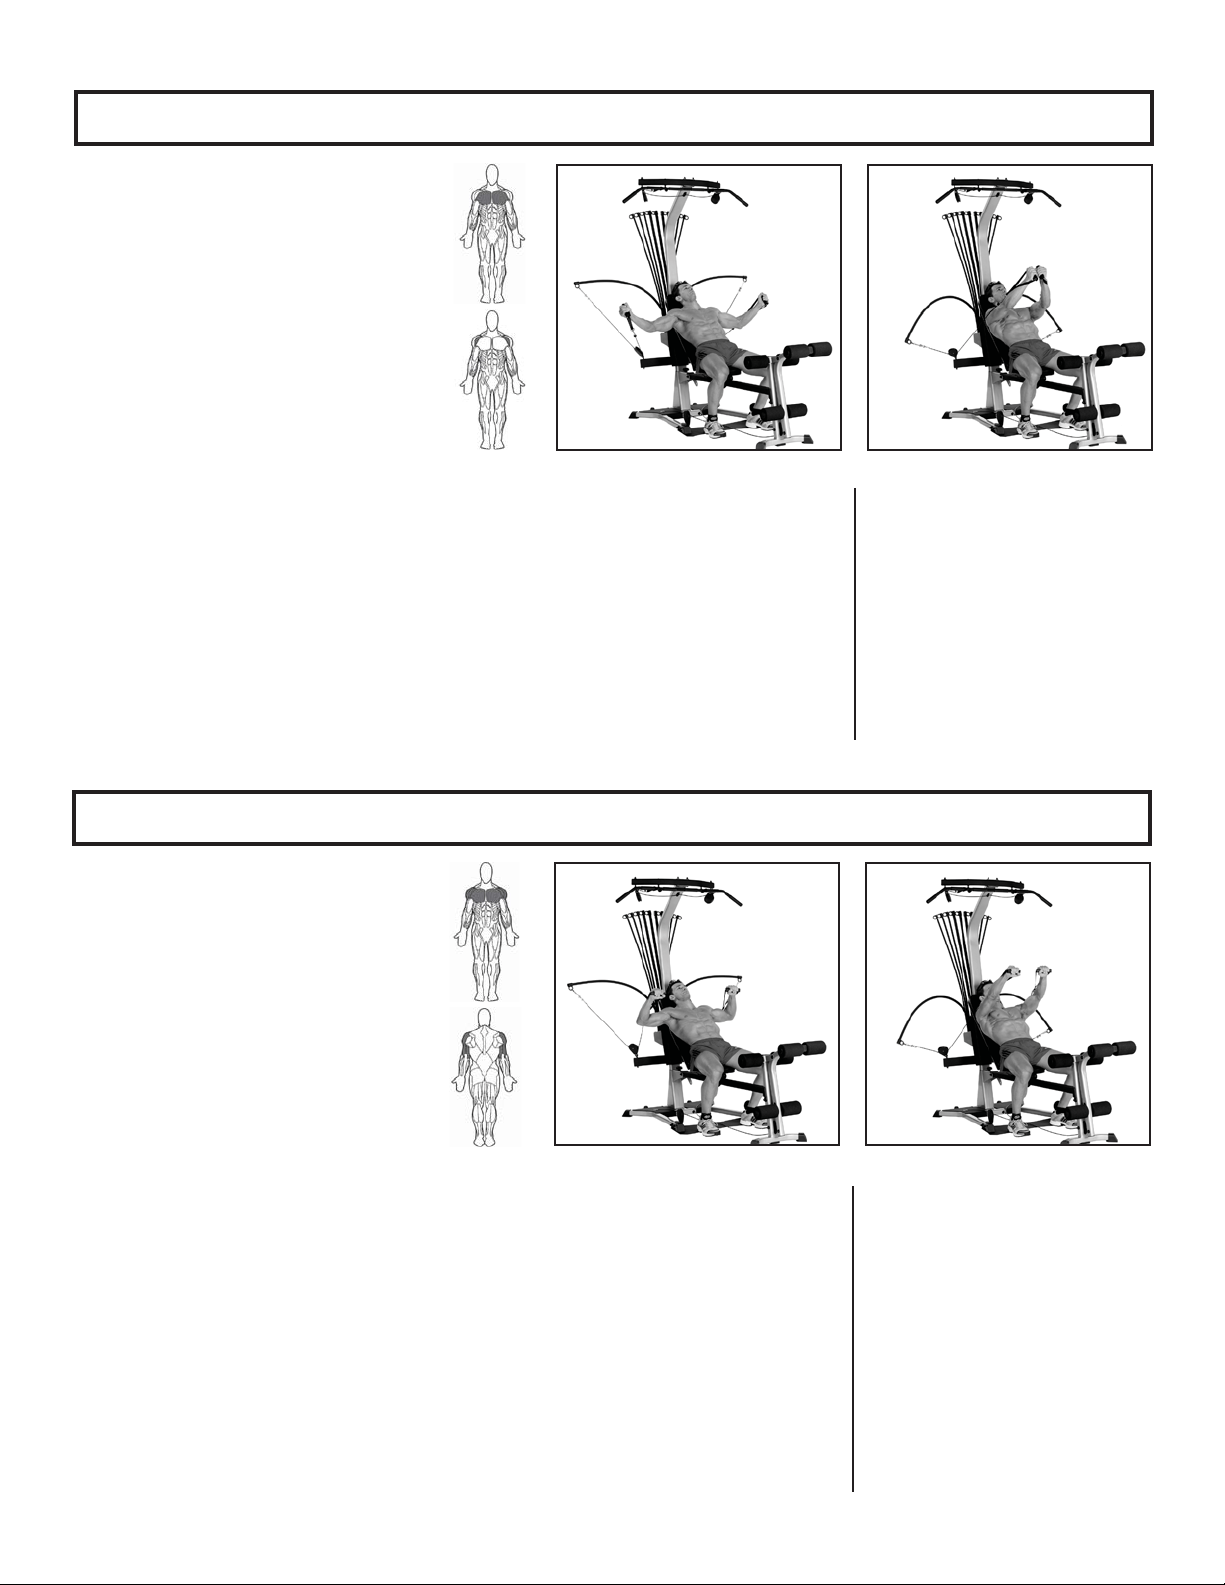
18
Chest Exercises
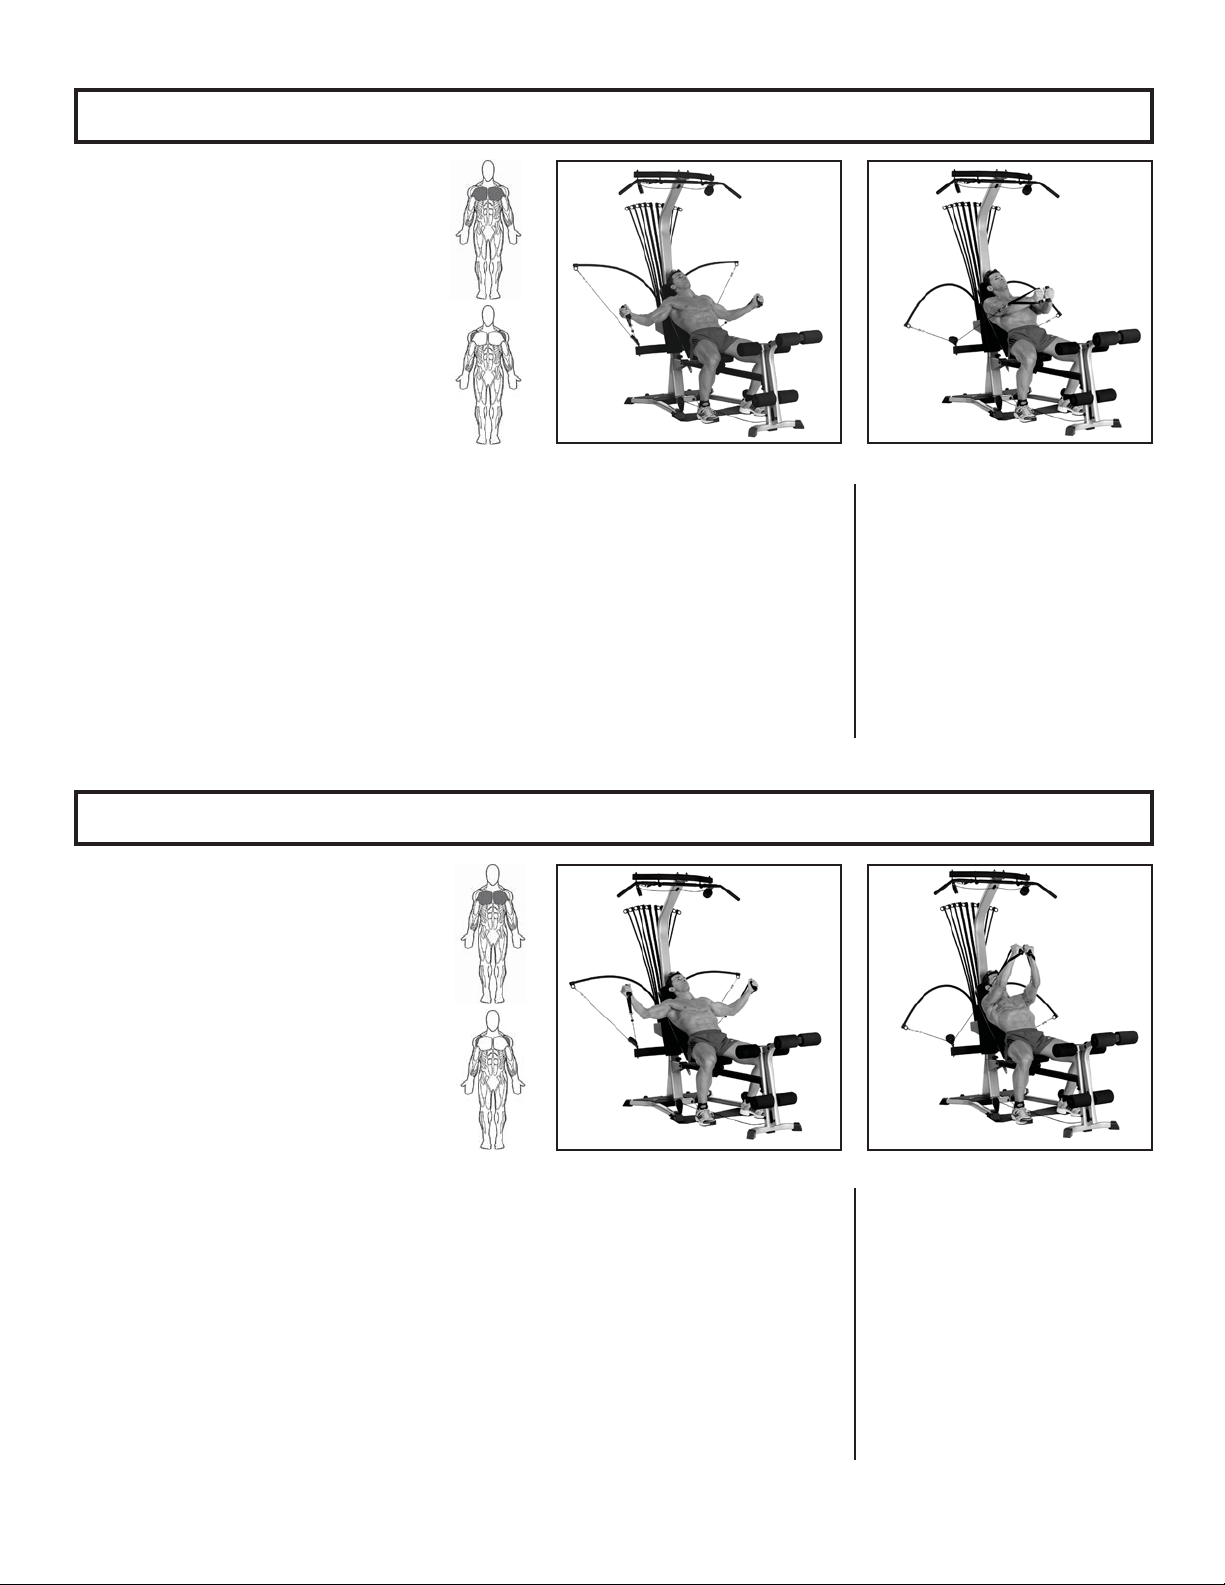
Bench Press—Shoulder Horizontal Adduction (and elbow extension)
Chest Fly—Shoulder Horizontal Adduction (elbow stablized)
Muscles Worked:
Pectoralis Major, Deltoids, and Triceps
Bench Position:
45
o
incline
Accessory:
Handgrips
Pulleys:
Chest Bar
Success Tips
• Maintain a 90
o
angle between your upper
arms and torso throughout the motion.
• Keep your chest muscles tightened. Limit
and control your range of motion.
• Keep your knees bent, feet on floor, and
your head back against the bench.
• Keep your shoulder blades pinched
together, and maintain good spinal align-
ment.
Muscles Worked:
Pectoralis Major and Anterior Deltoid
Bench Position:
45
o
incline
Accessory:
Handgrips
Pulleys:
Chest Bar
Success Tips
• Maintain a 90-180
o
angle between your
arms and torso during the exercise.
• Keep your chest muscles tightened. Limit
and control your range of motion.
• Keep your knees bent, feet on floor, and
your head back against the Bench.
• To improve your pectoralis involvement,
keep your shoulder blades pinched
together throughout the upward and
downward movements.
START FINISH
START FINISH
Start
• Grasp the Handgrips in both
hands.
• Raise your upper arms until they
are in line with your shoulders.
• Bend your elbows until your
forearms are in line with the
cables. Keep your wrists straight.
• Raise your chest, pinch shoulder
blades together, and maintain a
slight, comfortable arch in lower
back.
Start
• Grasp the Handgrips in both
hands.
• Open your arms into a wide posi-
tion while maintaining a bend
in your elbows. Start with your
elbows and forearms below
chest level, palms forward.
• Raise your chest, pinch shoulder
blades together, and maintain a
slight, comfortable arch in lower
back.
Action
• Press your hands forward,
straightening your arms while
moving your hands together.
• Return to the Start position,
keeping your wrists at shoulder
width and in line with the cables,
stopping before the upper arms/
elbows move behind the bench.
Action
• Maintaining the slight bend in
your elbow, slowly bring your
arms together.
• Rotate your wrists and forearms
upward.
• Slowly return to the Start
position, stopping before the
upper arms/elbows move behind
the bench.

19
Chest Exercises
Decline Bench Press—Shoulder Horizontal Adduction (and elbow extension)
Incline Bench Press—Shoulder Horizontal Adduction (and elbow extension)
Muscles worked:
Pectoralis Major, Deltoids, and Triceps
Bench Position:
45
o
incline
Accessory:
Handgrips
Pulleys:
Chest Bar
Success Tips
• Maintain a 90
o
angle between your upper
arms and torso at the start of the motion
and slightly less than 90
o
at the finish.
• Keep your knees bent, feet on floor, and
your head back against Bench.
• Do not let your elbows travel behind your
shoulders.
• Keep your shoulder blades pinched
together, and maintain good spinal align-
ment.
Muscles worked:
Pectoralis Major, Deltoids, and Triceps
Bench Position:
45
o
incline
Accessory:
Handgrips
Pulleys:
Chest Bar
Success Tips
• Maintain a 90
o
angle between your upper
arms and torso at the start of the motion
and slightly less than 90
o
at the finish.
• Keep your knees bent, feet on floor, and
your head back against bench.
• Do not let your elbows travel behind your
shoulders.
• Keep your shoulder blades pinched
together, and maintain good spinal align-
ment.
START FINISH
START FINISH
Start
• Grasp the Handgrips in both hands,
cables travel beneath your arms,
forearms aligned with cables.
• Bend your elbows back, keeping
your forearms at a 90
o
angle from
your torso. Elbows should be 10
o
(5-6" or 13-15 cm) lower than the
standard Bench Press position.
• Raise your chest, pinch shoulder
blades together, and maintain a
comfortable arch in lower back.
Start
• Grasp the Handgrips in both
hands.
• Cables travel above your
fore-arms. Keep your forearms in
line with the cables at all times.
• Bend your elbows back, keeping
your forearms at a 90
o
angle from
your torso and forearms 10-15
o
(6-8" or 13-20 cm) higher than the
Bench Press position.
• Raise your chest, pinch shoulder
blades together, and maintain a
slight arch in lower back.
Action
• Slowly press your hands
forward, straightening your arms
while moving your hands to the
center and downward, at least
10
o
below your shoulders. Do not
lock your elbows.
• Slowly return to the starting
position, keeping your wrists
steady and your movements slow
and controlled.
Action
• Slowly press your hands for-
ward, straightening your arms
and moving your hands to the
center and downward at least
10
o
above your shoulders.
• Slowly return to the Start
position, keeping your wrists
steady and your movements slow
and controlled.
20
Chest Exercises
Decline Chest Fly—Shoulder Horizontal Adduction (elbow stabilized)
Incline Chest Fly—Shoulder Horizontal Adduction (elbow stabilized)
Muscles Worked:
Pectoralis Major and Anterior Deltoid
Bench Position:
45
o
incline
Accessory:
Handgrips
Pulleys:
Chest Bar
Success Tips
• Maintain a 60-90
o
angle between your
upper arms and torso during exercise.
• Keep your chest muscles tightened. Limit
and control your range of motion.
• Keep your knees bent, feet on floor, and
your head back against bench.
• To improve your pectoralis involvement,
keep your shoulder blades pinched
together throughout the upward and
downward movements.
Muscles Worked:
Pectoralis Major and Anterior Deltoid
Bench Position:
45
o
incline
Accessory:
Handgrips
Pulleys:
Chest Bar
Success Tips
• Maintain a 60-90
o
angle between your
upper arms and torso during exercise.
• Keep your chest muscles tightened. Limit
and control your range of motion.
• Keep your knees bent, feet on floor, and
your head back against the bench.
• To improve your pectoralis involvement,
keep your shoulder blades pinched
together throughout the upward and
downward movements.
START FINISH
START FINISH
Start
• Grasp the Handgrips in both
hands.
• Open your arms into a wide posi-
tion while maintaining a bend in
your elbows.
• Press your forearms downward.
At full extension, your hands
should be level with your hips.
• Raise your chest, pinch shoulder
blades together, and maintain a
slight, comfortable arch in lower
back.
Start
• Grasp the Handgrips in both
hands.
• Open your arms into a wide posi-
tion while maintaining a bend in
your elbows
• Press your forearms upward.
At full extension, your elbows
should be level with your ears.
• Raise your chest, pinch shoulder
blades together, and maintain a
slight, comfortable arch in lower
back.
Action
• Press your arms forward and
upward, straightening your arms
and moving your hands together.
• Return to the Start position,
slowly returning your arms in
front of you just below chest
level.
Action
• Press your arms forward and
upward, straightening your arms
and moving your hands together.
• Return to the Start position,
slowly returning your arms in
front of you just below chest
level.

21
Chest Exercises
Resisted Punch—Shoulder Flexion, Elbow Extension, Scapular Protraction
Lying Cable Crossover—Shoulder Extension/Adduction (elbow stabilized)
Muscles worked:
Anterior Deltoid and Triceps
Bench Position:
Horizontal
Accessory:
Handgrips
Pulleys:
Chest Bar
Success Tips
• Maintain an upright, erect posture as your
trunk rotates with the punch.
• Keep knees bent and feet on floor.
• Maintain good spinal alignment.
Muscles worked:
Pectoralis Major
Bench Position:
Horizontal
Accessory:
Handgrips
Pulleys:
Chest Bar
Success Tips
• Keep chest lifted throughout exercise.
• Keep knees bent, feet on floor, and your
head back against bench.
START FINISH
START FINISH
Start
• Sit on the bench, facing away
from the Power Rod
®
unit.
• Reach behind your body and
grasp the Handgrips with an
overhand grip, as shown above.
• Bend your elbows until your
hands are level with your waist.
Start
• Lie flat on your back with your
head toward the Power Rod
®
unit.
• Position yourself far enough
down the Bench to grasp the
Handgrips over your head with
your arms straight.
• Grasp the Handgrips, palms
facing up.
• Tighten your abdominals to
stabilize your spine. Maintain a
slight, comfortable arch in lower
back.
Action
• Using moderate speed, press
your arm forward to full exten-
sion, allowing your shoulder
blade to move forward at the end
of the punch.
• Slowly return to the Start
position without relaxing the
tension in your arms.
• You may vary this exercise by
using bilateral movement with
both arms or punching upward
or downward.
Action
• Keeping your arms straight,
move your hands in an arc
upward and across your torso
toward the opposite thigh.
• Control the return to the Start
position by slowly moving your
arms back overhead, releasing
the shoulder blades and keeping
your arms straight.
22
Shoulder Exercises
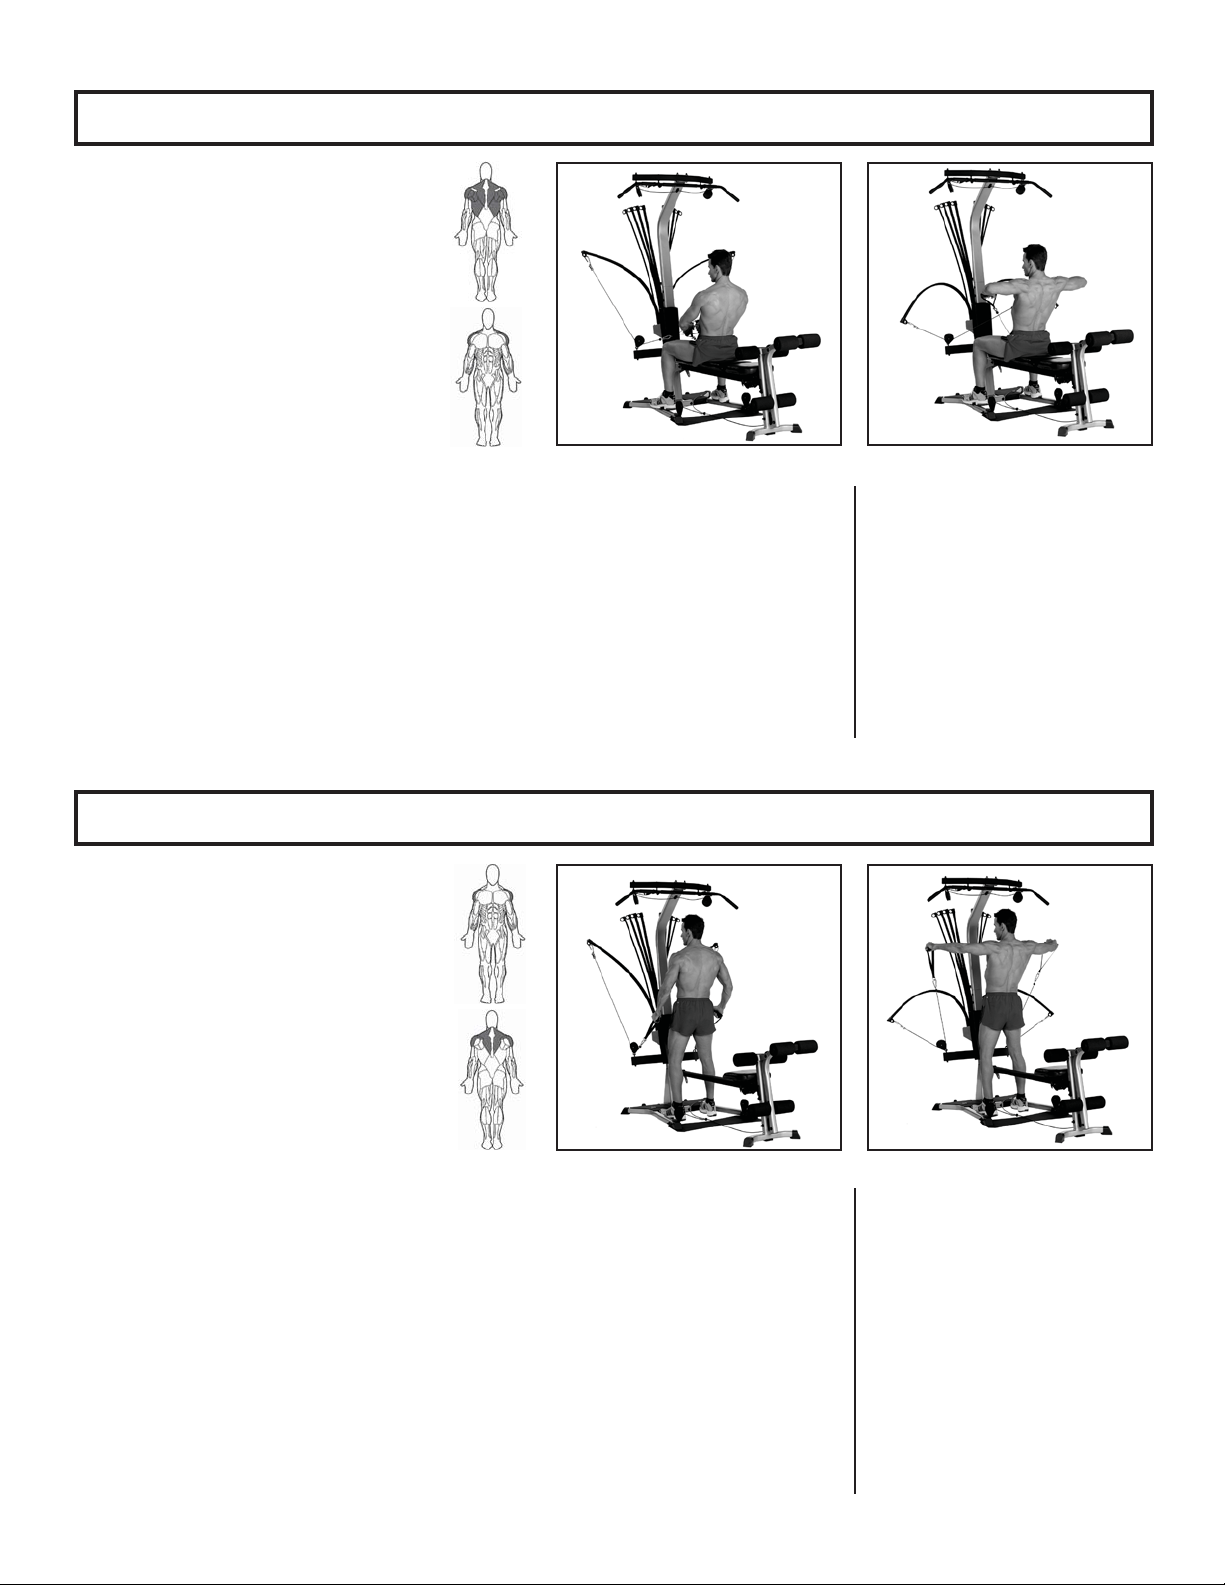
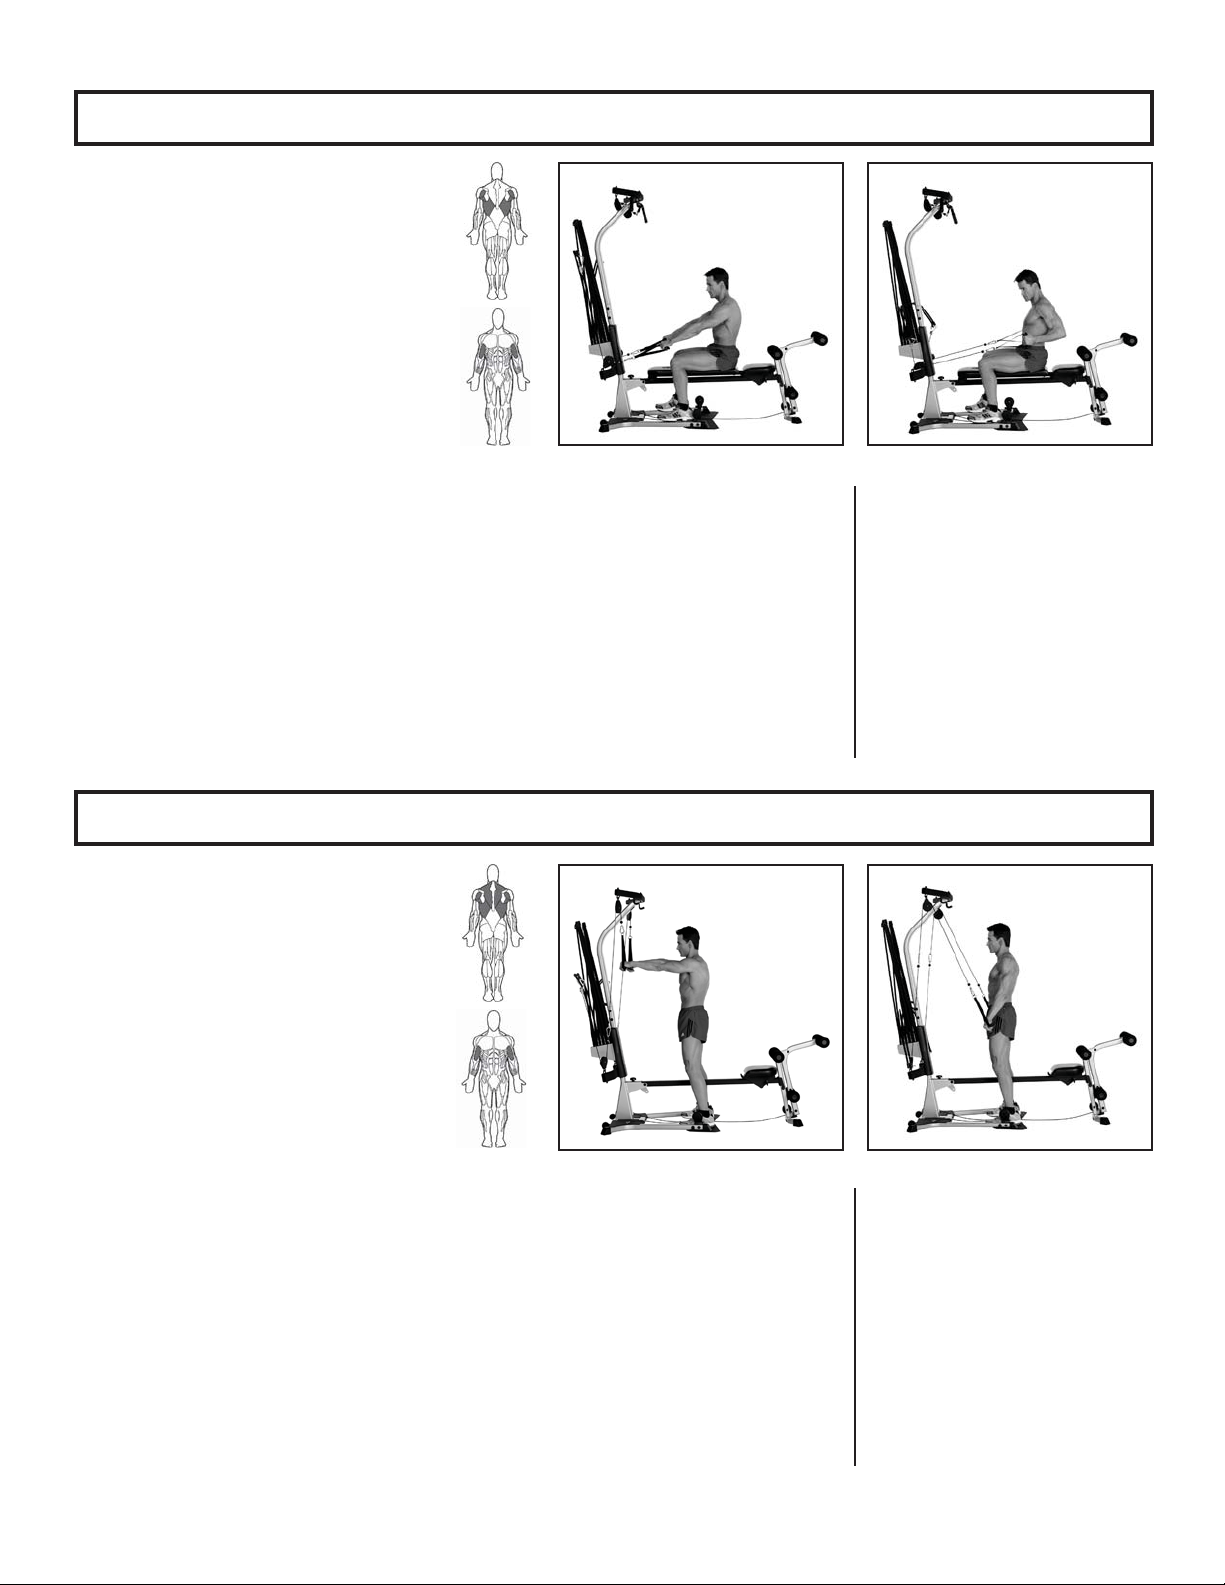
Rear Deltoid Rows—Shoulder Horizontal Abduction (and elbow flexion)
Standing Lateral Shoulder Raise—Shoulder Extension (elbow stabilized)
Muscles Worked:
Rear and Middle Deltoids, Posterior
Rotator Cuff, Upper Latissimus, Teres Major,
Trapezius, and Rhomboids
Bench Position:
Horizontal
Accessory:
Handgrips
Pulleys:
Chest Bar
Success Tips
• Keep your knees bent and feet on floor.
• To work one arm at a time, place non-
working hand on the Bench to stabilize.
• Keep your shoulder blades pinched
together and maintain good spinal align-
ment.
Muscles Worked:
Middle Deltoids and Upper Trapezius
Bench Position:
Removed
Accessory:
Handgrips
Pulleys:
Chest Bar
Success Tips
• Do not swing your arms upward or move
your trunk during the motion.
• Keep your feet on floor.
START FINISH
START FINISH
Start
• Sit on the Bench, facing the
Power Rod
®
unit.
• Grasp the Handgrips with your
opposite hands. Keep your palms
down and arms straight.
• Sit up straight.
• Lift your chest, and keep your
shoulder blades together.
• Keep your forearms in line with
the cables.
Start
• Remove the Bench, straddle the
Seat Rail, and face the Power
Rod
®
unit.
• Grasp the Handgrips, palms
facing each other.
• Align your spine, and bend
forward slightly at your hips (15-
20
o
).
• Let your arms hang in line with
the cables.
• Elevate your shoulders slightly
toward the back of your head,
keeping your spine aligned.
Action
• Allowing your arms to bend
slowly, move your elbows out-
wards and backwards, keeping a
70-90
o
angle between your fore-
arms and torso.
• Move until your elbows are
slightly behind your shoulders,
then slowly reverse back to the
Start position.
• Keep your shoulder blades tight-
ened throughout the motion.
Action
• Slowly raise your arms out to
your sides at a 90
o
angle from
your body.
• Keep your forearms facing
outward throughout the move-
ment.
• Slowly return to the Start
position without relaxing muscle
tension.
23
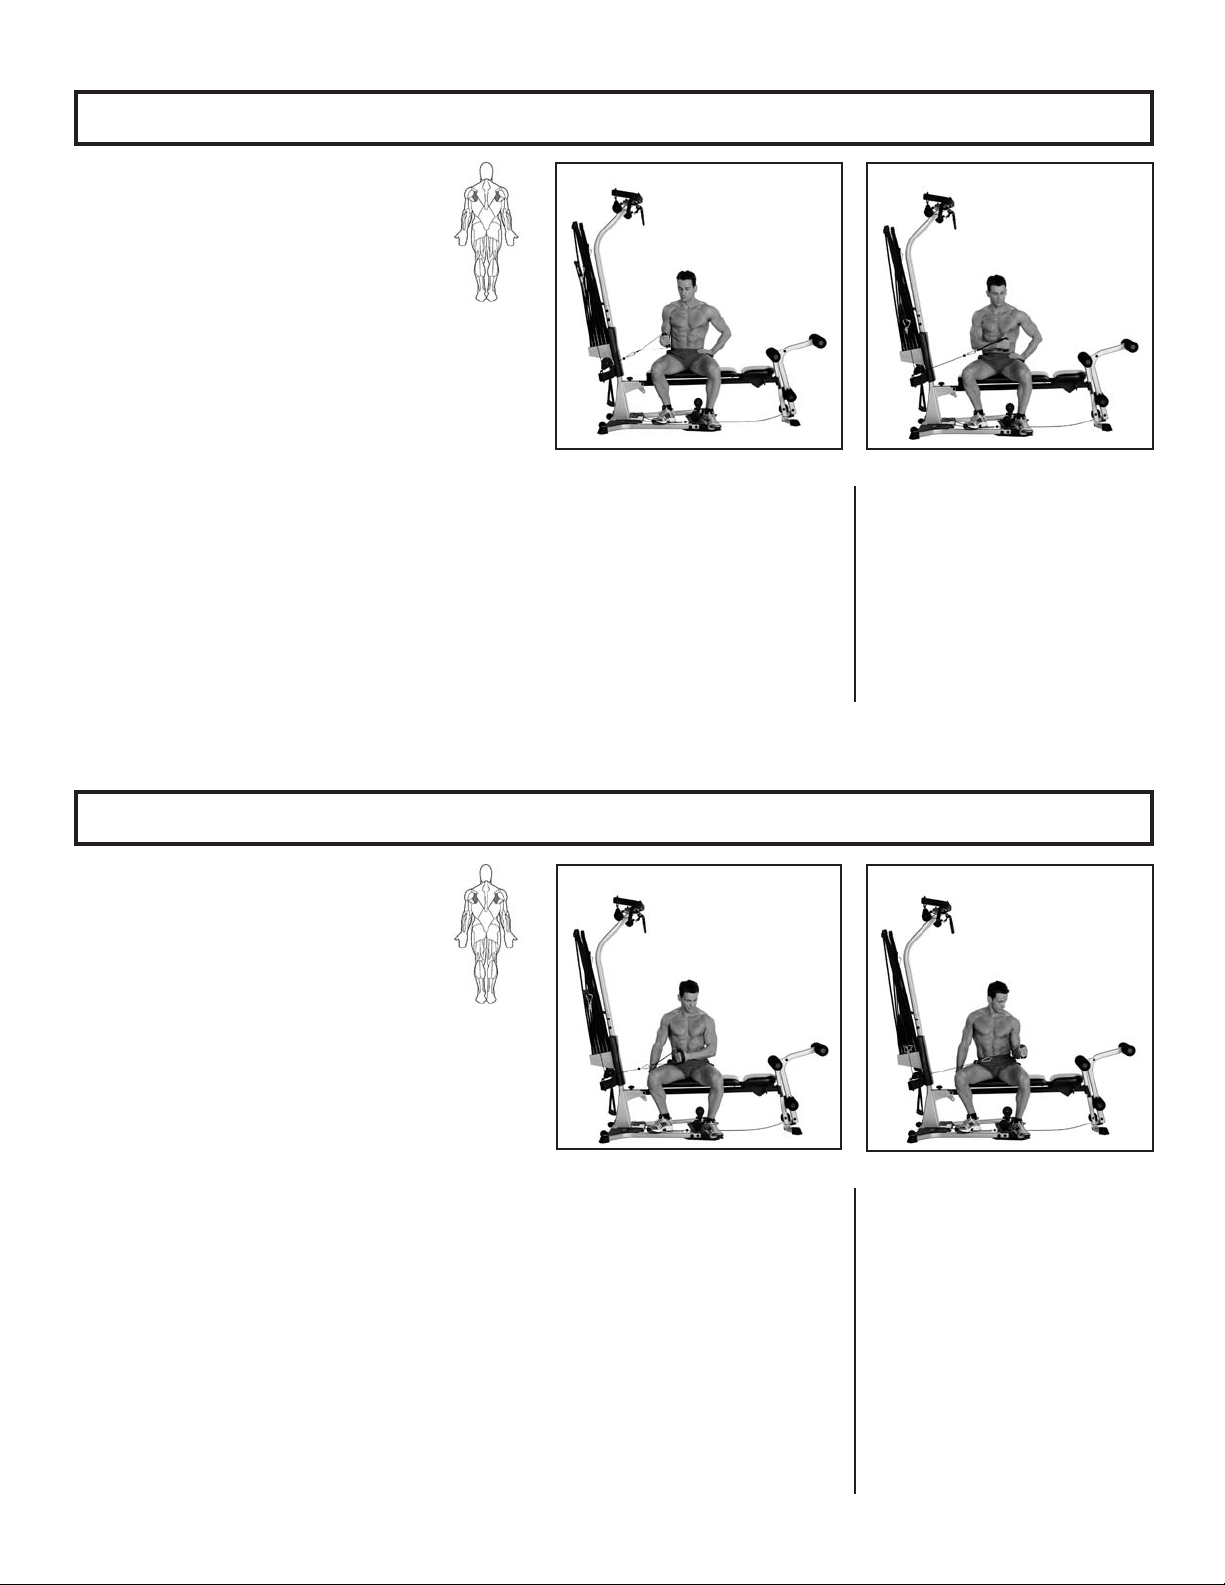
Shoulder Exercises
Seated Shoulder Press—Shoulder Adduction (and elbow extension)
Front Shoulder Raise—Shoulder Flexion (elbow stabilized)
Muscles worked:
Front Deltoids, Upper Trapezius, and Triceps
Bench Position:
Horizontal
Accessory:
Handgrips
Pulleys:
Chest Bar
Success Tips
• Keep your knees bent and feet on the
floor.
• Do not increase the arch in your lower
back as you raise your arms, but keep
your spine steady and tight.
• Keep your abdominals tight, and maintain
good spinal alignment.
Muscles worked:
Front and Middle Deltoids
Bench Position:
Horizontal
Accessory:
Handgrips
Pulleys:
Chest Bar
Success Tips
• Keep your abdominals tight, and maintain
good spinal alignment.
• Keep your knees bent and feet on floor.
• Do not increase the arch in your lower
back as you raise your arms, but keep
your spine steady and tight.
START FINISH
START FINISH
Start
• Sit on the Bench, facing away
from the Power Rod
®
unit.
• Keep your chest up, abs tight,
and maintain a slight arch in your
lower back.
• Grasp the Handgrips, palms
facing out.
• Raise the Handgrips to shoulder
level, keeping your palms facing
forward.
Start
• Sit on the Bench, facing away
from the Power Rod
®
unit.
• Keep your chest up, abs tight,
and maintain a slight arch in your
lower back.
• Grasp the Handgrips, palms
facing back and arms straight at
your sides.
Action
• Straighten your arms slowly over
your head, focusing on moving
your elbows up and inward
toward your ears.
• Slowly return to the Start
position, keeping tension in your
front shoulder muscles.
Action
• Keeping your arms straight,
move them forward, leading with
your forearms, until your arms
are extended in front of you at
shoulder height.
• Arms may be moved alternately
or together.
• Slowly return to the Start
position.
24
Shoulder Exercises
Shoulder Extension—(elbows stabilized)
Shoulder Shrug—Scapular Elevation
Muscles Worked:
Latissimus Dorsi, Teres Major, Rear Deltoid,
Middle Trapezius, Rhomboids, and Triceps
Bench Position:
Horizontal
Accessory:
Handgrips
Pulleys:
Chest Bar
Success Tips
• Keep your knees bent and feet flat on the
floor.
• Keep your lats tightened throughout the
motion.
• Keep your abdominals tight, and maintain
good spinal alignment.
• Release your shoulder blades at the
end of each rep, and initiate new rep by
retracting your shoulder blades.
Muscles Worked:
Upper Trapezius
Bench Position:
Removed
Accessory:
Handgrips
Pulleys:
Chest Bar
Success Tips
• Keep your abdominals tight, and maintain
good spinal alignment.
• Do not bend your neck or slouch during
this exercise.
• Raise your shoulders evenly.
• For variation, try this exercise bent
forward slightly from the hips.
START FINISH
START FINISH
Start
• Sit on the Bench, facing the
Power Rod
®
unit.
• Grasp the Handgrips, palms
facing down, arms straight and
at approximately a 45
o
angle
from your torso.
• Tighten your trunk muscles to
stabilize your spine while main-
taining a slight arch in your
lower back.
Start
• Straddle the Seat Rail, facing the
Power Rod
®
unit.
• Reach down and grasp the
Handgrips, palms facing each
other.
• Let your arms hang at your sides.
Action
• Initiate movement by pinching
your shoulder blades together.
• Continue the movement by
moving your hands in an arc
downward along your sides until
your hands are level with your
hips.
• With controlled movement,
slowly return to the Start
position.
Action
• Slowly raise your shoulders
toward the back of your head,
keeping your neck and head still.
• Slowly reverse back to the Start
position, keeping your upper tra-
pezius muscles tight throughout
the motion.

25
Shoulder Exercises
Scapular Protraction—(elbows stabilized)
Scapular Depression
Muscles worked:
Serratus Anteriors
Bench Position:
45
o
incline
Accessory:
Handgrips
Pulleys:
Chest Bar
Success Tips
• Keep your knees bent and feet flat on
floor. Lean your head back against the
Bench.
• Keep your spine aligned and a slight arch
in your lower back.
• Maintain a 90
o
angle between your upper
arms and torso throughout this exercise.
• Do not slouch forward or use your arm
muscles to assist this motion. Keep this
motion only in your shoulder blades.
Muscles worked:
Lower Trapezius
Bench Position:
Horizontal
Accessory:
Handgrips
Pulleys:
Chest Bar
Success Tips
• Do not lose spinal alignment—keep your
chest lifted and head on the Bench.
• Keep your knees bent and feet flat on the
floor.
START FINISH
START FINISH
Start
• Sit on the Bench, facing away
from the Power Rod
®
unit.
• Reach behind your body and
grasp the Handgrips. Straighten
your arms in front of you at a 90
o
angle from your torso.
• Keep your arms in line with the
cables, palms facing down and
wrists straight.
Start
• Lie on the bench with your head
toward the Power Rod
®
unit.
• Grasp the Handgrips, and bring
your arms straight down your
sides along your trunk.
• Tighten your trunk muscles
to stabilize your spine while
maintaining a slight arch in your
lower back.
Action
• Keeping your arms straight and
in line with the cables, slowly
move your shoulder blades
forward off the bench. Bring your
hands together using only your
shoulder muscles.
• Slowly return to the Start
position, keeping tension in your
shoulder blades.
Action
• Keeping your arms straight, slide
your shoulder blades downward
toward your hips.
• When your shoulder blades have
fully depressed, slowly return to
the Start position.
26
Shoulder Exercises
Lying Front Shoulder Raise—Shoulder Flexion (elbows stabilized)
Reverse Fly—Shoulder Horizontal Abduction (elbows stabilized in slight flexion)
Muscles Worked:
Front and Middle Deltoids
Bench Position:
Horizontal
Accessory:
Handgrips
Pulleys:
Chest Bar
Success Tips
• Keep your knees bent and feet flat on the
floor.
• Keep your abdominals tight, and maintain
good spinal alignment.
• Do not increase the arch in your lower
back while you are lifting your arms.
Muscles Worked:
Rear Deltoids, Middle Deltoids,
Trapezius, and Rhomboids
Bench Position:
Horizontal
Accessory:
Handgrips
Pulleys:
Chest Bar
Success Tips
• Do not lose spinal alignment—keep your
chest lifted.
• Keep your knees bent and feet flat on the
floor.
• Keep your spine aligned and a slight arch
in your lower back.
START FINISH
START FINISH
Start
• Sit on the Bench, facing the
Power Rod
®
unit.
• Grasp the Handgrips, palms
facing down, arms straight.
• Lie back slowly, supporting your
head on the Bench.
• Keep your chest lifted, main-
taining a slight arch in your
lower back.
Start
• Sit on the Bench, facing the
Power Rod
®
unit.
• Grasp the Handgrips, palms
facing floor, arms nearly straight.
• Sit up straight, and bend slightly
forward from the hips until your
arms and the cables are in front
of your body at a 90
o
angle from
your torso.
Action
• Keeping your arms straight,
move them in an arc upward
until they are directly over your
shoulders.
• You may perform this move with
both arms simultaneously or one
at a time.
• With controlled movement,
slowly return to the Start
position.
Action
• Maintaining the bend in your
arms, move your arms outward
and backward.
• When your elbows are slightly
behind your shoulders, slowly
return to the Start position,
keeping your rear shoulder
muscles tightened throughout
movement.
27
Shoulder Exercises
Shoulder Rotator Cuff—Internal Rotation
Shoulder Rotator Cuff—External Rotation
Muscles worked:
Subscapularis
Bench Position:
Flat Bench Forward
Accessory:
Handgrips
Pulleys:
Chest Bar
Success Tips
• Keep your knees bent and feet flat on the
floor.
• Keep your spine aligned and a slight arch
in your lower back.
• Keep your upper arm alongside your
torso.
• Do not rotate the spine to get additional
range of motion.
Muscles worked:
Infraspinatus and Teres Minor
Bench Position:
Flat Bench Forward
Accessory:
Handgrips
Pulleys:
Chest Bar
Success Tips
• Keep your knees bent and feet flat on the
floor.
• Keep your spine aligned and a slight arch
in your lower back.
• Maintain a 90
o
angle between your
forearm and upper arm throughout the
exercise.
• Do not rotate the spine to get additional
range of motion.
START FINISH
START FINISH
Start
• Sit on the Bench, one side
toward the Power Rod
®
unit.
• Grasp the Handgrip nearest you,
and draw your upper arm into
your torso, keeping your forearm
at a 90
o
angle from torso.
• Give yourself enough distance to
eliminate slack in the cable.
• Use a light resistance.
Start
• Sit on the Bench, one side
toward the Power Rod
®
unit.
• Using the arm farthest from
the Power Rod
®
unit, grasp the
Handgrip nearest you, and draw
that upper arm into your torso,
keeping your forearm at a 90
o
angle from torso.
• Allow your forearm to rest
against your abdomen, elbow
at your side to remove cable
tension
• Use a light resistance.
Action
• Rotate your forearm toward your
abdomen, keeping your elbow at
your side throughout motion.
• Slowly return to the Start
position, maintaining controlled
motion.
Action
• Rotate your forearm away from
your abdomen, keeping your
elbow at your side throughout
motion.
• Slowly return to the Start
position, maintaining controlled
motion.
28
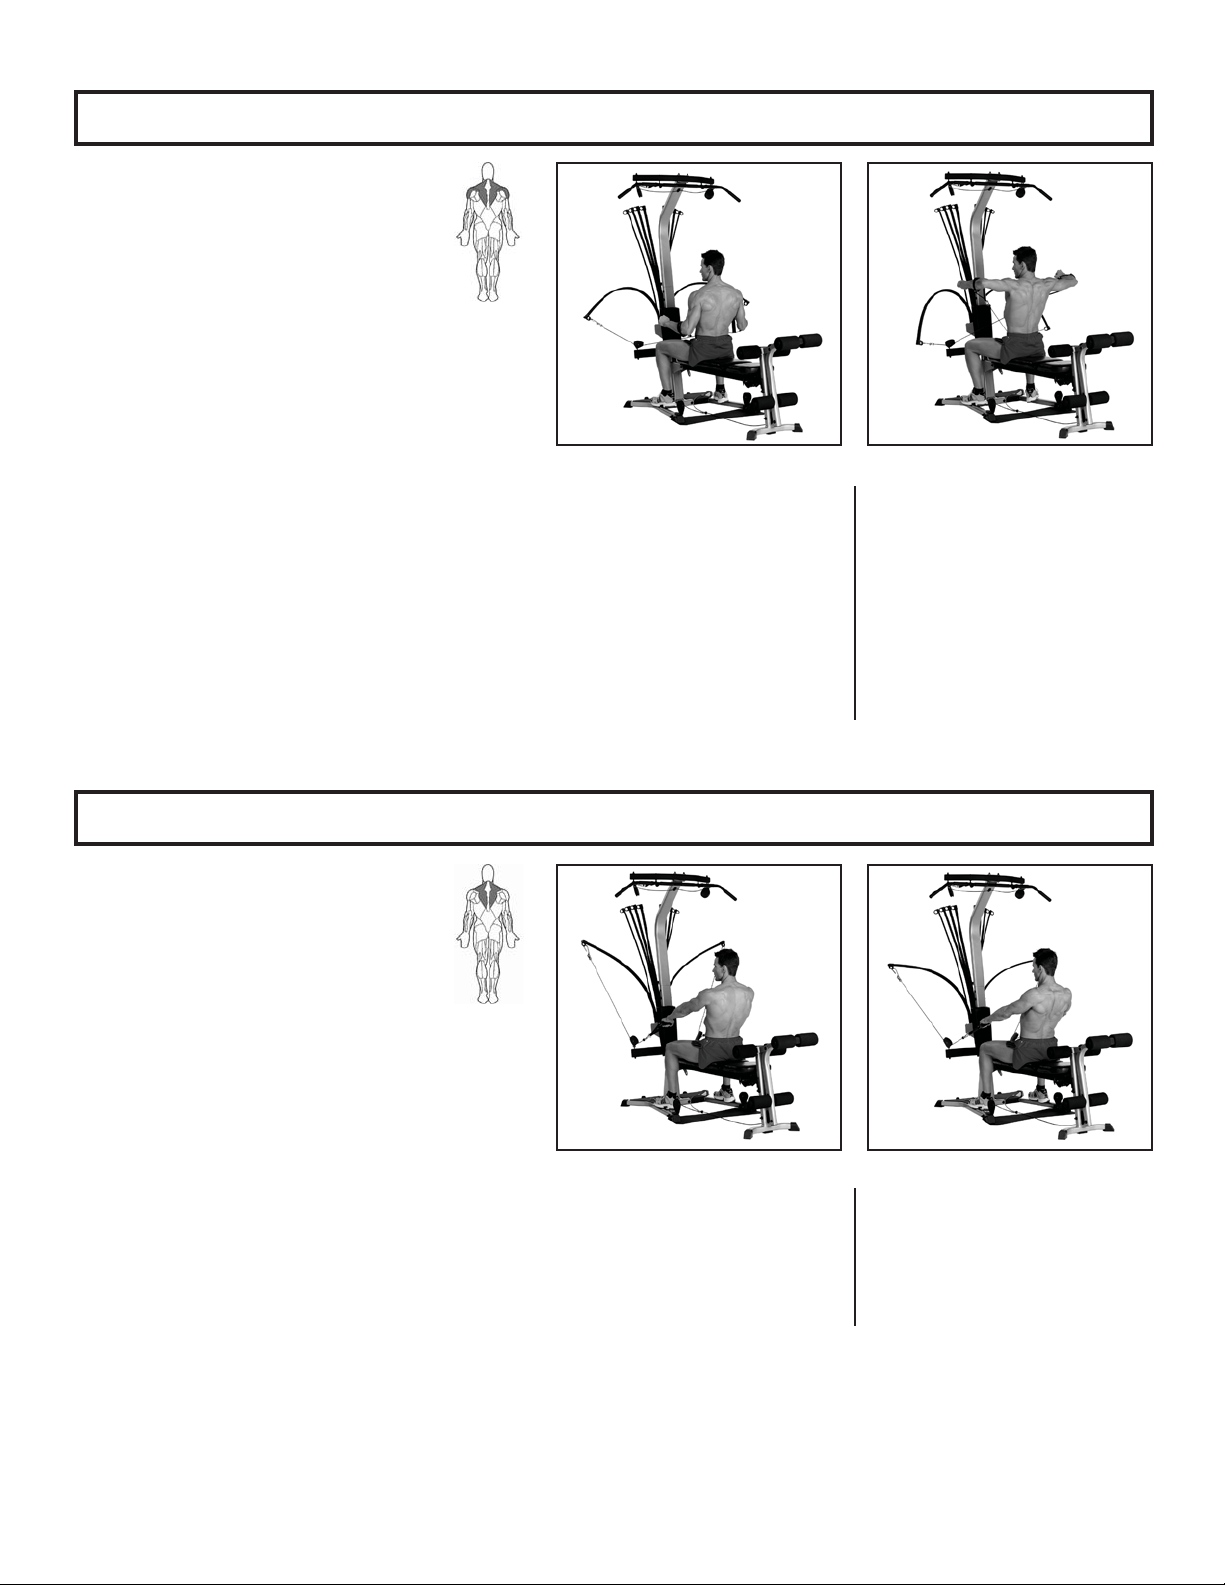
Shoulder Exercises
Seated Lateral Shoulder Raise—Shoulder Flexion (elbows stabilized)
Scapular Retraction
Muscles Worked:
Supraspinatus, Middle Deltoids, and
Trapezius
Bench Position:
Flat Bench Forward
Accessory:
Handgrips
Pulleys:
Chest Bar
Success Tips
• Keep your knees bent and feet flat on the
floor.
• Keep your abdominals tight, and maintain
good spinal alignment.
• Do not swing arms upward or move trunk
during movement.
Muscles Worked:
Middle Trapezius and Rhomboids
Bench Position:
Horizontal
Accessory:
Handgrips
Pulleys:
Chest Bar
Success Tips
• Do not lose your spinal alignment—keep
your chest lifted.
• Keep your knees bent and feet flat on the
floor.
• Keep your spine aligned and a slight arch
in your lower back.
• Do not use your arm muscles for this
movement.
START FINISH
START FINISH
Start
• Sit on the bench, facing the
Power Rod
®
unit.
• Spread the cuff on the Handgrips
• Slide the cuffs onto the opposite
forearms and place them near
the elbows so that the cables
cross each another.
• Keep your chest lifted, main-
taining a slight arch in your
lower back.
Start
• Sit on the Bench, facing the
Power Rod
®
unit.
• Grasp the Handgrips, arms
straight, palms facing down.
Action
• Raise your arms directly out to
your sides, nearly shoulder level.
• At the top of the movement you
may need to rotate your hands
slowly to prevent the cuff from
sliding off.
• With controlled movement,
slowly return to the Start
position.
Action
• Keeping your arms straight,
slowly pinch your shoulder
blades together.
• When shoulder blades are fully
retracted, slowly return to the
Start position.
29
Back Exercises
Lying Lat Pulldowns
Low Back Extension—Seated (with hip extension)
Muscles worked:
Latissimus Dorsi, Teres Major, and
Rear Deltoids
Bench Position:
Flat Bench Forward
Accessory:
Handgrips
Pulleys:
Chest Bar
Success Tips
• Keep your knees bent and feet flat on the
floor. Lean your head back against the
Bench.
• Keep your spine aligned, abs tight, and a
slight arch in your lower back.
• Keep your lats tightened throughout this
exercise.
• Release your shoulder blades at the top
of each rep. Initiate each new rep by
depressing your shoulder blades.
Muscles worked:
Lower Trapezius
Bench Position:
Horizontal
Accessory:
Handgrips
Pulleys:
Chest Bar
Success Tips
• Keep your knees bent and feet flat on the
floor.
• Keep your spine aligned, abs tight, and a
slight arch in your lower back.
• Keep your lats tightened throughout this
exercise.
• Release your shoulder blades at the top
of each rep. Initiate each new rep by
depressing your shoulder blades.
START FINISH
START FINISH
Start
• Lie on your back on the Bench
with your head near the Power
Rod
®
unit.
• Slip your arms through the
Handgrips, slide the cuffs past
your elbows, and tighten them
enough to stabilize.
• With your palms facing inward,
slide your body down the Bench
far enough that your arms are
fully extended.
Start
• Sit on the bench, facing the
Power Rod
®
unit.
• Grasp the Handgrips and slide
them over your forearms, tight-
ening near your elbows.
• Brace your heels on the plat-
form, knees bent comfortably,
and arms crossed in front of your
chest. Pull the Handgrips into
your chest.
• Pinch shoulder blades together,
and lean forward from the hips
only.
Action
• Initiate the movement by pulling
your shoulder blades downward.
• Slowly start bending your
elbows, pulling them down
toward your hips and then
inward into your trunk.
• Slowly return to the Start
position, allowing your arms and
shoulder blades to move back
without relaxing the tension in
your shoulders.
Action
• Keeping your chest lifted, move
your entire torso backwards by
pivoting at the hips.
• Slowly return to the Start
position without slouching or
changing spinal alignment.
30
Back Exercises
Pulldowns—Shoulder Adduction (with elbow flexion)
Narrow Pulldowns with Handgrips—Shoulder Extension (with elbow flexion)
Muscles Worked:
Latissimus Dorsi, Teres Major,
Rear Deltoids, and Biceps
Bench Position:
Flat Bench Forward
Accessory:
Bent Lat Bar
Pulleys:
Lat Tower
Success Tips
• Keep your knees bent and feet flat on the
floor.
• To determine the appropriate grip width
for you, hold your arms straight out to
your sides at shoulder height. Bend your
elbows approximately 90
o
. Hands should
be no wider apart than your elbows
(beginners may narrow their grip to
increase comfort).
• Keep your spine aligned, abs tight, and a
slight arch in your lower back.
Muscles Worked:
Latissimus Dorsi, Teres Major,
Rear Deltoids, and Biceps
Bench Position:
Flat Bench Forward
Accessory:
Handgrips
Pulleys:
Lat Tower
Success Tips
• Keep your chest lifted, abs tight, and a
very slight arch in your lower back.
• Keep your knees bent and feet flat on the
floor.
• Keep the lats tightened throughout the
entire motion.
START FINISH
START FINISH
Start
• Grasp the Bent Lat Bar using
the wide grip determined by
following the directions in the
Success Tips, then sit on the
bench and face the Power Rod
®
unit.
• Position your thighs directly
under the Lat Tower Pulleys.
• Sit upright.
• Keep your arms extended and
straight.
Start
• Attach a Handgrip to each cable
on the Lat Tower Pulleys.
• Straddle the bench, facing the
Power Rod
®
unit.
• Grasp a Handgrip in each hand,
palms facing each other, and sit
down on the bench.
• Position your thighs directly
under the Lat Tower Pulleys.
• Sit upright.
Action
• Initiate movement by pulling
shoulder blades together while
simultaneously drawing elbows
down and inward.
• Bent Lat Bar may not touch your
chest. At the end of the motion,
arms should be near your
sides and shoulder blades fully
depressed.
• Keep forearms facing upward.
• Slowly return to Start position.
Action
• Keep your hands at shoulder
width, arms straight. Initiate
movement by pulling your
shoulder blades down and
together while simultaneously
bending your elbows, drawing
them down and inward toward
your sides.
• At the end of the motion, arms
should be near your sides,
shoulder blades depressed, and
forearms facing upward.
• Slowly return to Start position.

31
Back Exercises
Lying Lat Fly—Shoulder Adduction
Lying Narrow Lat Pulldowns
Muscles worked:
Latissimus Dorsi, Teres Major,
Rear Deltoids, and Biceps
Bench Position:
Horizontal
Accessory:
Handgrips
Pulleys:
Chest Bar
Success Tips
• Keep your knees bent and feet flat on the
floor.
• Keep your lats tightened throughout the
entire motion.
• Keep your spine aligned, abs tight, and a
slight arch in your lower back.
• Release your shoulder blades at the end
of each rep. Initiate each new rep by
depressing your shoulder blades.
Muscles worked:
Latissimus Dorsi, Teres Major,
Rear Deltoids, and Biceps
Bench Position:
Flat Bench Forward
Accessory:
Handgrips
Pulleys:
Chest Bar
Success Tips
• Keep your knees bent and feet flat on the
floor. Lean your head back against the
Bench.
• Keep your spine aligned, abs tight, and a
slight arch in your lower back.
• Keep your lats tightened throughout this
exercise.
• Release your shoulder blades at the top
of each rep. Initiate each new rep by
depressing your shoulder blades.
START FINISH
START FINISH
Start
• Lie on your back with your head
toward the Power Rod
®
unit,
knees at the edge of Bench.
• Grasp the Handgrips, then
straighten your arms out to your
sides, hands slightly above your
head and palms facing away from
the Pulleys.
• Tighten your abs to stabilize your
spine while maintaining a slight
arch in your lower back.
Start
• Lie on your back on the Bench
with your head near the Power
Rod
®
unit.
• Slip your arms through the
Handgrips, slide the cuffs past
your elbows and tighten them
enough to stabilize.
• With your palms facing inward,
slide your body down the Bench
far enough that your arms are
fully extended.
Action
• Initiate the movement by moving
your arms in an arch down
toward your hips, using slow,
controlled movement. Keep your
forearms in line with the cables.
• Slowly return to the Start
position, allowing your arms to
move back upward in an arch
toward the Power Rod
®
unit.
Action
• Initiate the movement by pulling
your shoulder blades downward.
• Slowly start bending your
elbows, pulling them down
toward your hips and then
inward to your torso.
• Slowly return to the Start posi-
tion, allowing your arms and
shoulder blades to move back
without relaxing the tension in
your shoulders.
32
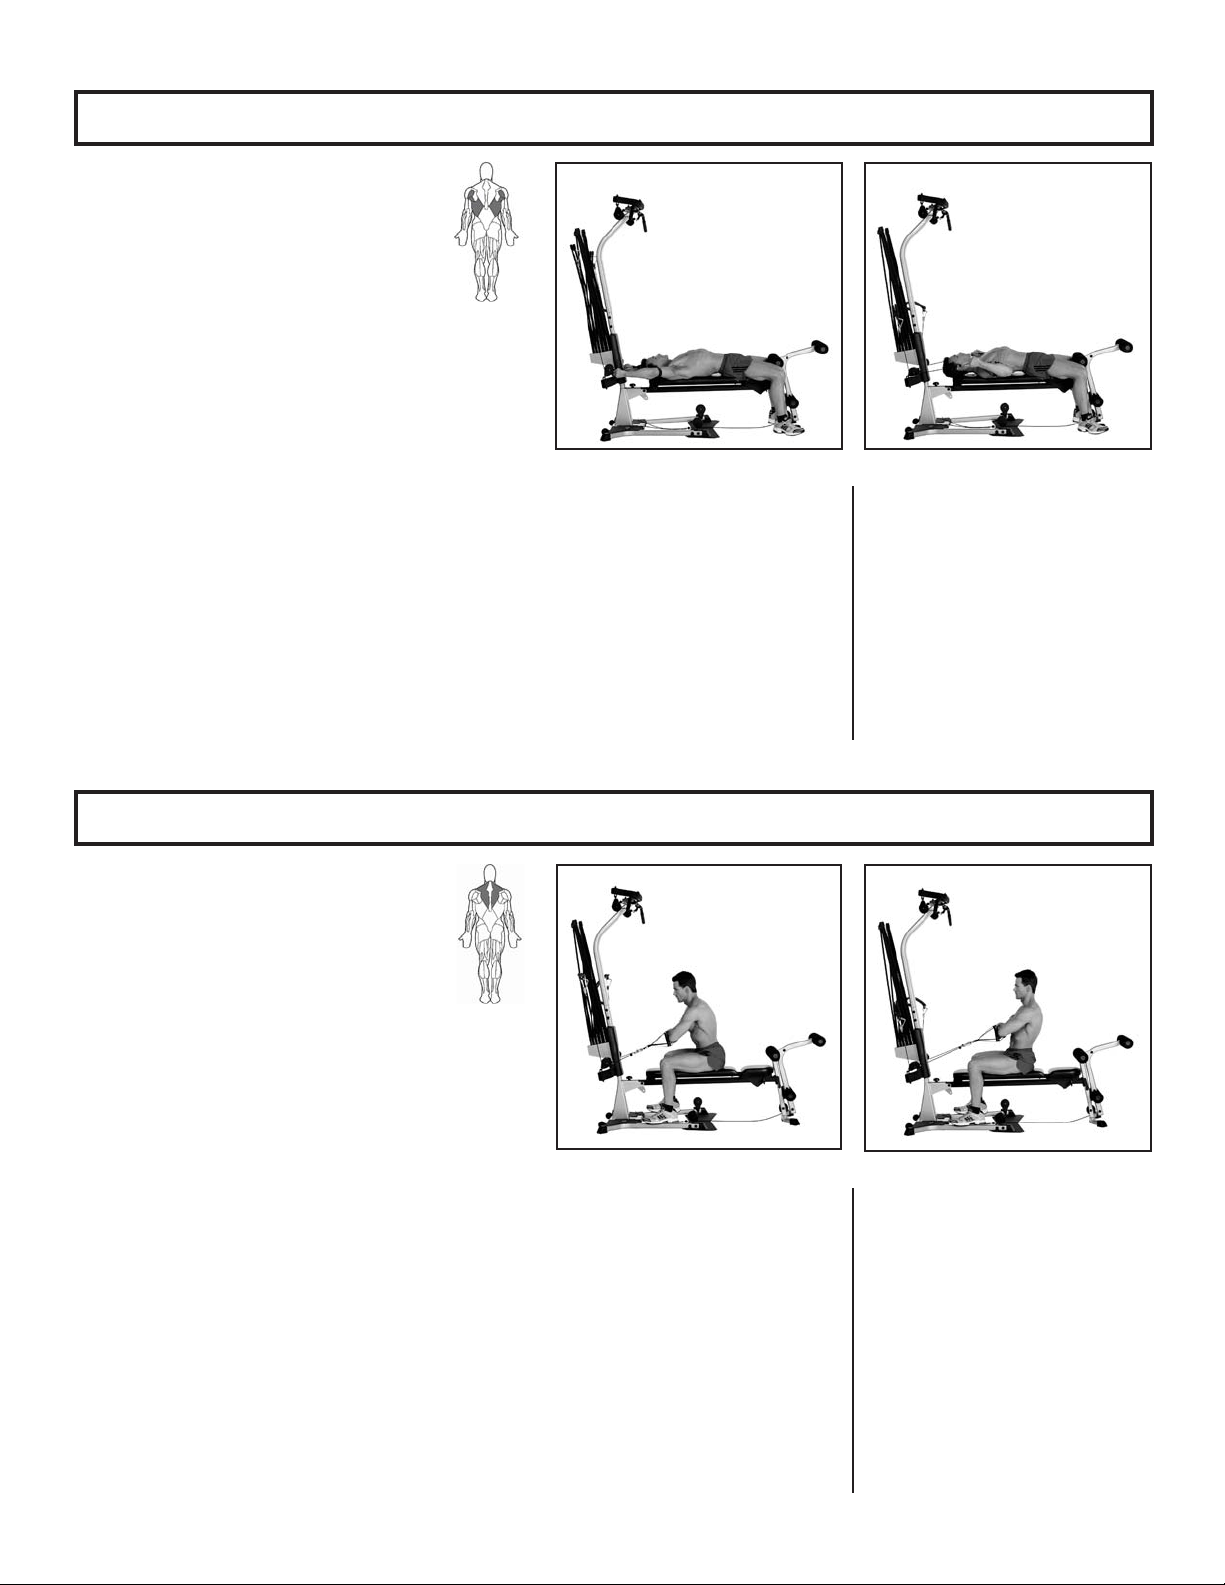
Back Exercises
Seated Lat Rows—Shoulder Extension (and elbow flexion)
Stiff-Arm Pulldown—Shoulder Extension (elbow stabilized)
Muscles Worked:
Latissimus Dorsi, Teres Major,
Rear Deltoids, and Biceps
Bench Position:
Horizontal
Accessory:
Handgrips
Pulleys:
Chest Bar
Success Tips
• Keep your knees bent and feet flat on the
floor.
• Do not bend your torso forward.
• Keep your chest lifted, and maintain spinal
alignment.
• Release your shoulder blades at the end
of each rep. Initiate each new rep by
pinching your shoulder blades.
Muscles Worked:
Latissimus Dorsi, Teres Major, Rear
Deltoids, Lower Trapezius, and Biceps
Bench Position:
Removed
Accessory:
Handgrips
Pulleys:
Lat Tower
Success Tips
• Keep your lats tightened throughout the
entire motion.
• Keep your chest lifted, and maintain spinal
alignment, keeping a very slight arch in
your lower back.
• Release your shoulder blades at the end
of each rep. Initiate each new rep by
depressing your shoulder blades.
• Keep your elbows nearly straight (do not
lock elbows) throughout the exercise.
START FINISH
START FINISH
Start
• Sit on the Bench, facing the
Power Rod
®
unit, with your pos-
terior near the back (leg exten-
sion) end of the Bench.
• Grasp the Handgrips, palms
facing each other.
• Place your heels on the edge of
the Standing Platform, and bend
your knees comfortably.
Start
• Straddle the Seat Rail, facing the
Power Rod
®
unit.
• Grasp the Handgrips with your
palms facing down.
• Step back slightly, making sure
there is enough movement in the
cable to complete your full range
of motion with this exercise.
• Bend slightly at the hips, lift your
chest, and tighten your abs to
stabilize spine.
Action
• Initiate the movement by
pinching your shoulder blades
together.
• Pull your upper arms downward
and backward while rotating
your palms inward, brushing
past the sides of your body while
keeping your forearms pointing
in the direction of the cable.
• Slowly return to the Start
position.
Action
• Initiate the movement by low-
ering your shoulder blades,
bringing them down and
together.
• Keep your arms straight, moving
your hands downward in an arc
and slowly in toward your thighs.
• Slowly return to the Start
position without relaxing muscle
tension.
33
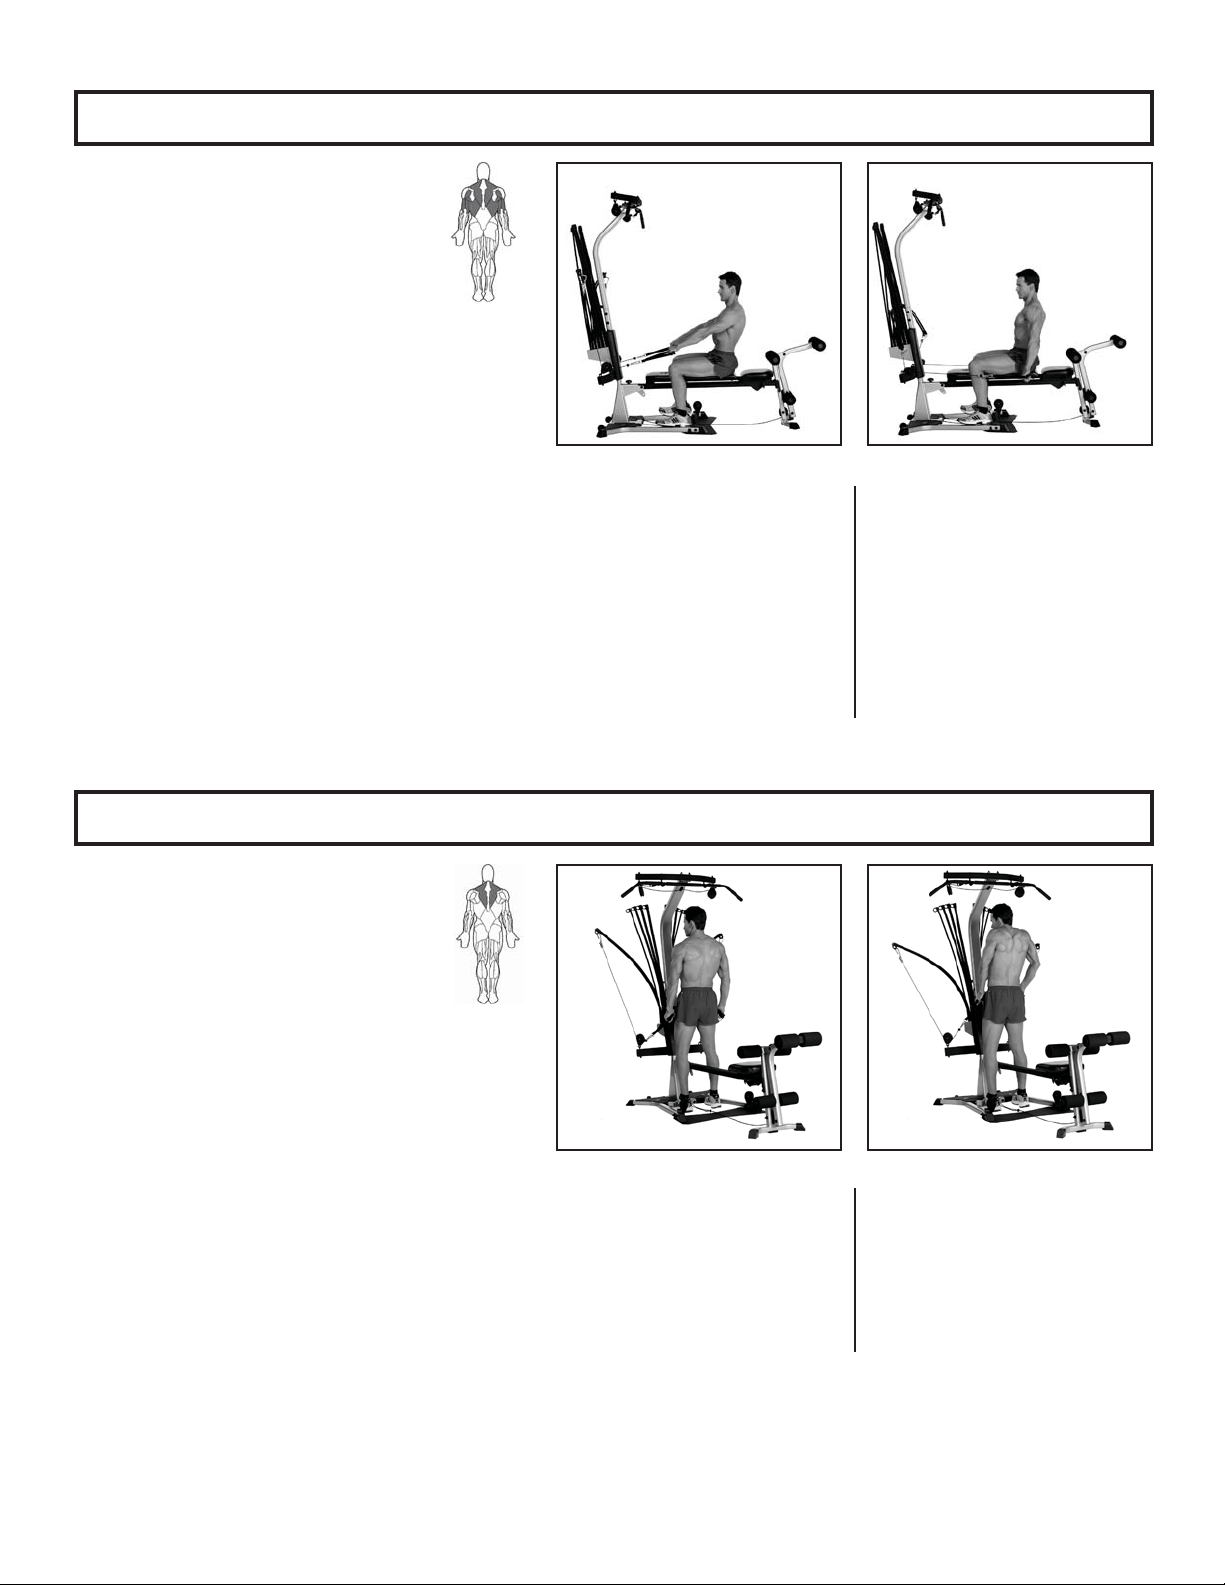
Back Exercises
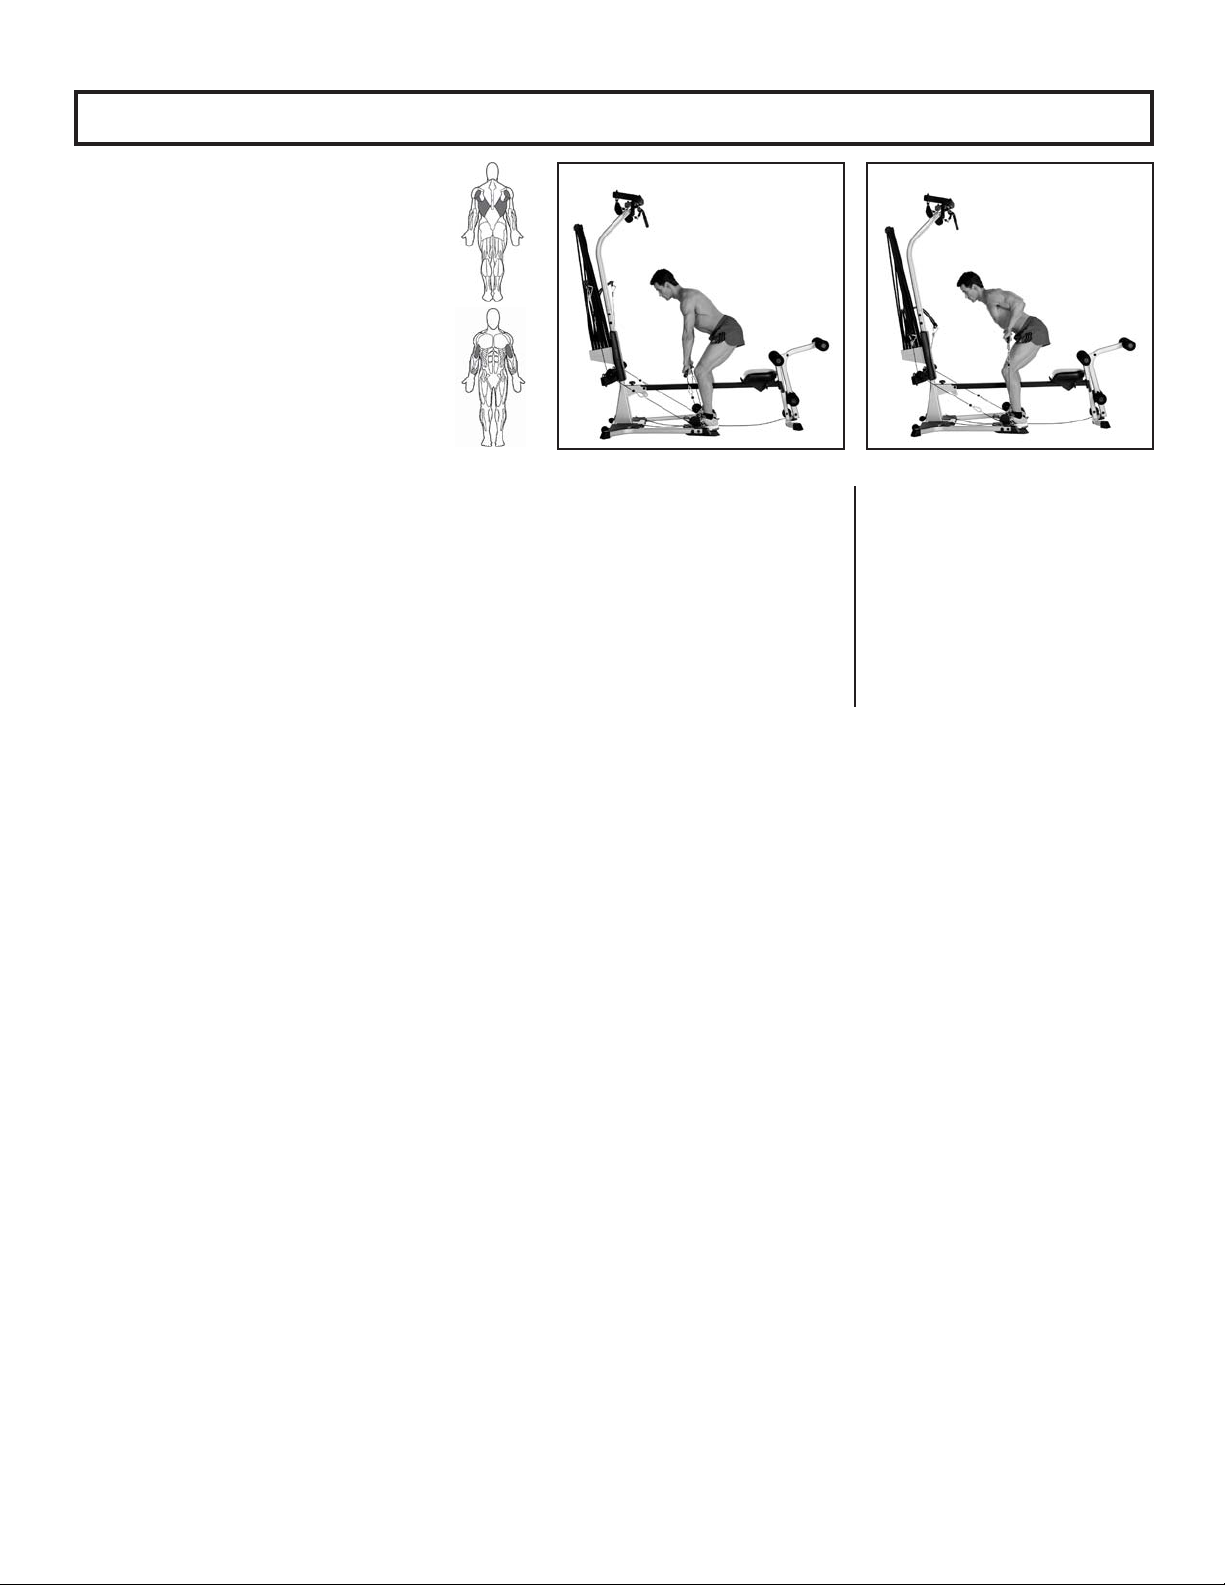
Bent Over Row
Muscles worked:
Latissimus Dorsi, Teres Major,
Rear Deltoids, and Biceps
Bench Position:
Removed
Accessory:
Handgrips
Pulleys:
Squat Pulley Frame
Success Tips
• Keep your knees bent and feet flat on the
floor.
• Do not bend your torso forward. Bend at
your hips.
• Keep your chest lifted, and maintain spinal
alignment.
• Release your shoulder blades at the end
of each rep. Initiate each new rep by
pinching your shoulder blades.
START FINISH
Start
• Stand on platform.
• Reach down and grasp the hand-
grips, with palms facing back-
ward.
• Let your arms hang, extending in
the direction of the pulleys
• Keep your back flat and knees
bent.
Action
• Begin your motion by moving
your elbows back as you bring
the handgrips to a point below
your chest line.
• Slowly reverse the motion,
keeping your knees bent and
back flat

34
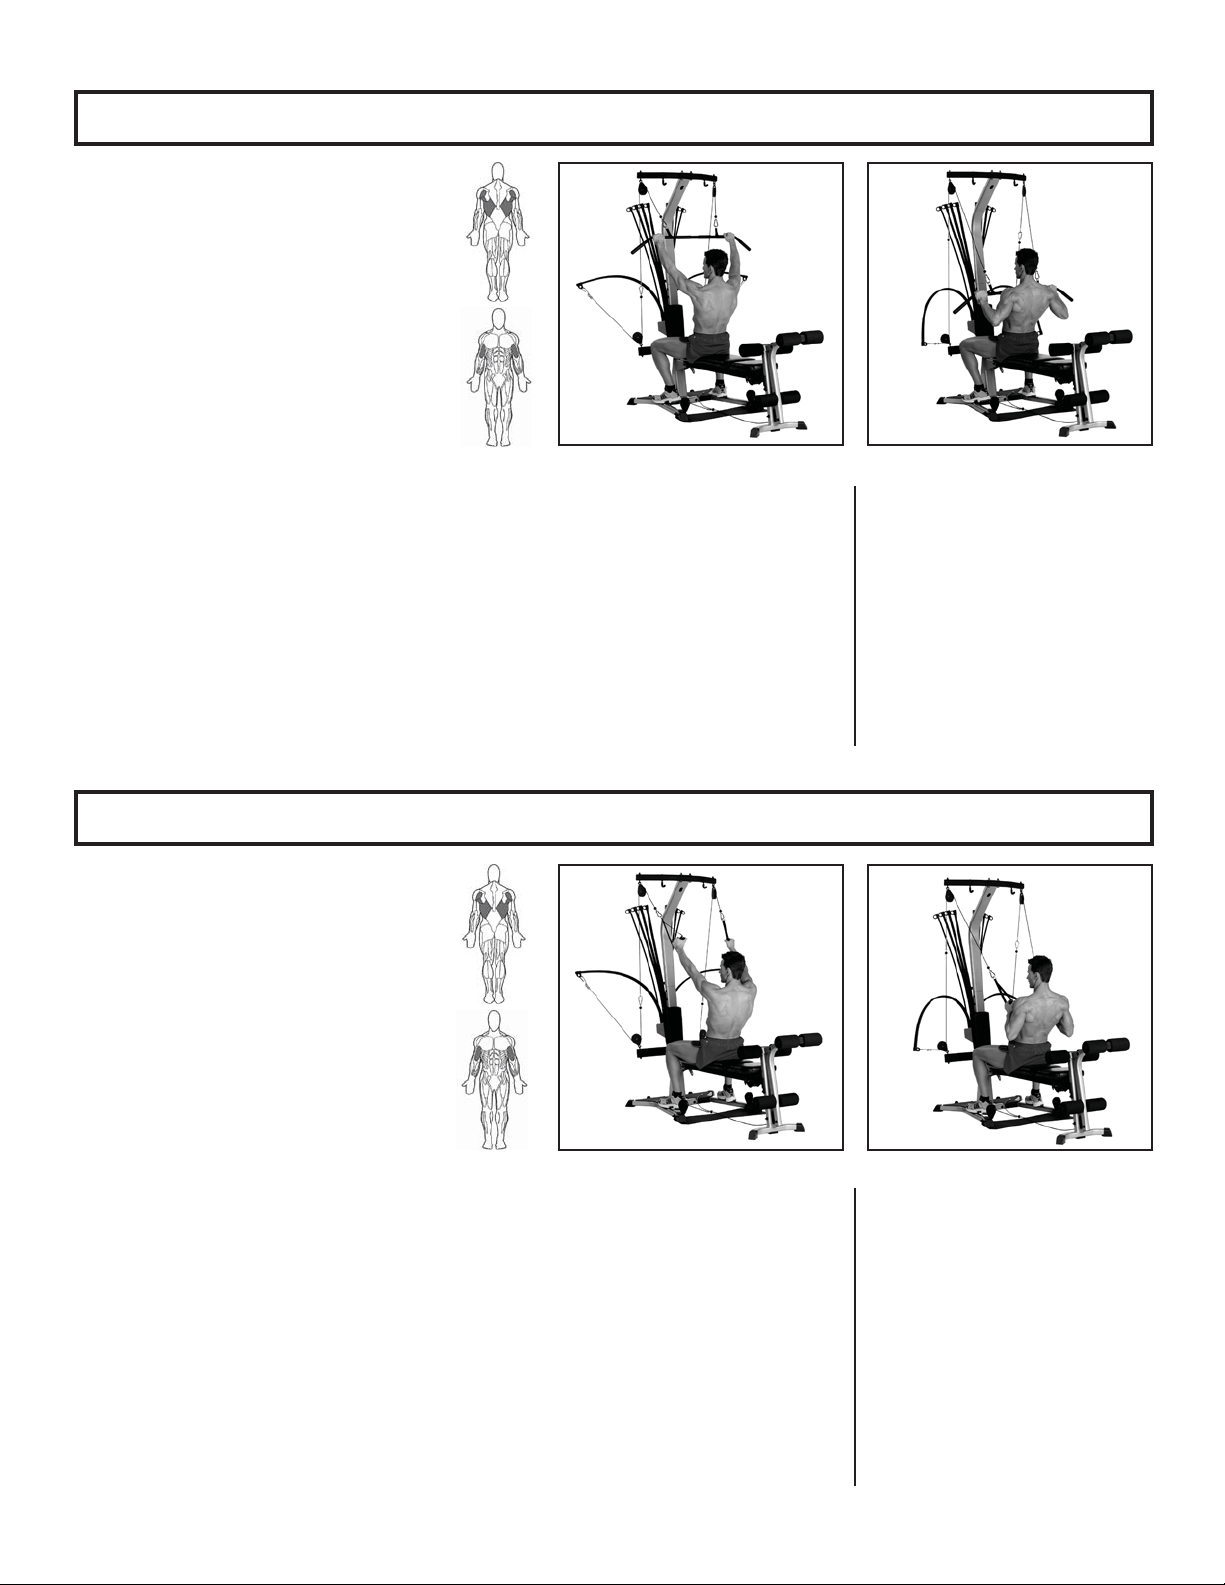
Arm Exercises
Triceps Pushdown—Elbow Extension
Single Arm Pushdown—Elbow Extension
Muscles Worked:
Triceps
Bench Position:
Removed
Accessory:
Handgrips
Pulleys:
Lat Tower
Success Tips
• Keep your upper arms motionless and
your wrists straight.
• Keep your chest lifted, abs tight, and
maintain a slight arch in lower back.
• Tighten the triceps throughout the exer-
cise, using controlled motion.
START FINISH
START FINISH
Start
• Straddle the Seat Rail, facing the
Power Rod
®
unit.
• Grasp the Handgrips, palms
facing down.
• Stand approximately 2–3 feet
(.6–.9 meters) from the Lat Tower
(adjust for comfort).
• Bring your hands in front of you,
keeping the Lat Bar approxi-
mately at rib level.
• Bend over slightly at the hips,
shoulders directly over hands.
Start
• Straddle the Seat Rail, facing the
Power Rod
®
unit.
• Grasp one Handgrip, palm facing
down.
• Stand approximately 1–2 feet
(.3–.6 meters) from the Lat Tower
(adjust for comfort).
• Bring your arm in front of you,
keeping the Handgrip at chest
level.
• Bend over slightly at the hips
so that your shoulder is directly
over your hand.
Action
• Keeping your upper arms sta-
tionary, elbows next to your
trunk, slowly push your arms
downward in a gentle arc until
your hands are near the tops of
your thighs.
• Keeping your triceps tightened,
slowly reverse the arcing motion
and bring the Bent Lat Bar back
to the Start position.
Action
• Keeping your upper arm sta-
tionary and your elbow next to
your trunk, slowly push your arm
downward in a gentle arc until
your hand is near the top of the
your thigh.
• Keeping your triceps tightened,
slowly reverse the arcing motion,
bringing the Handgrip back to
the Start position.
35
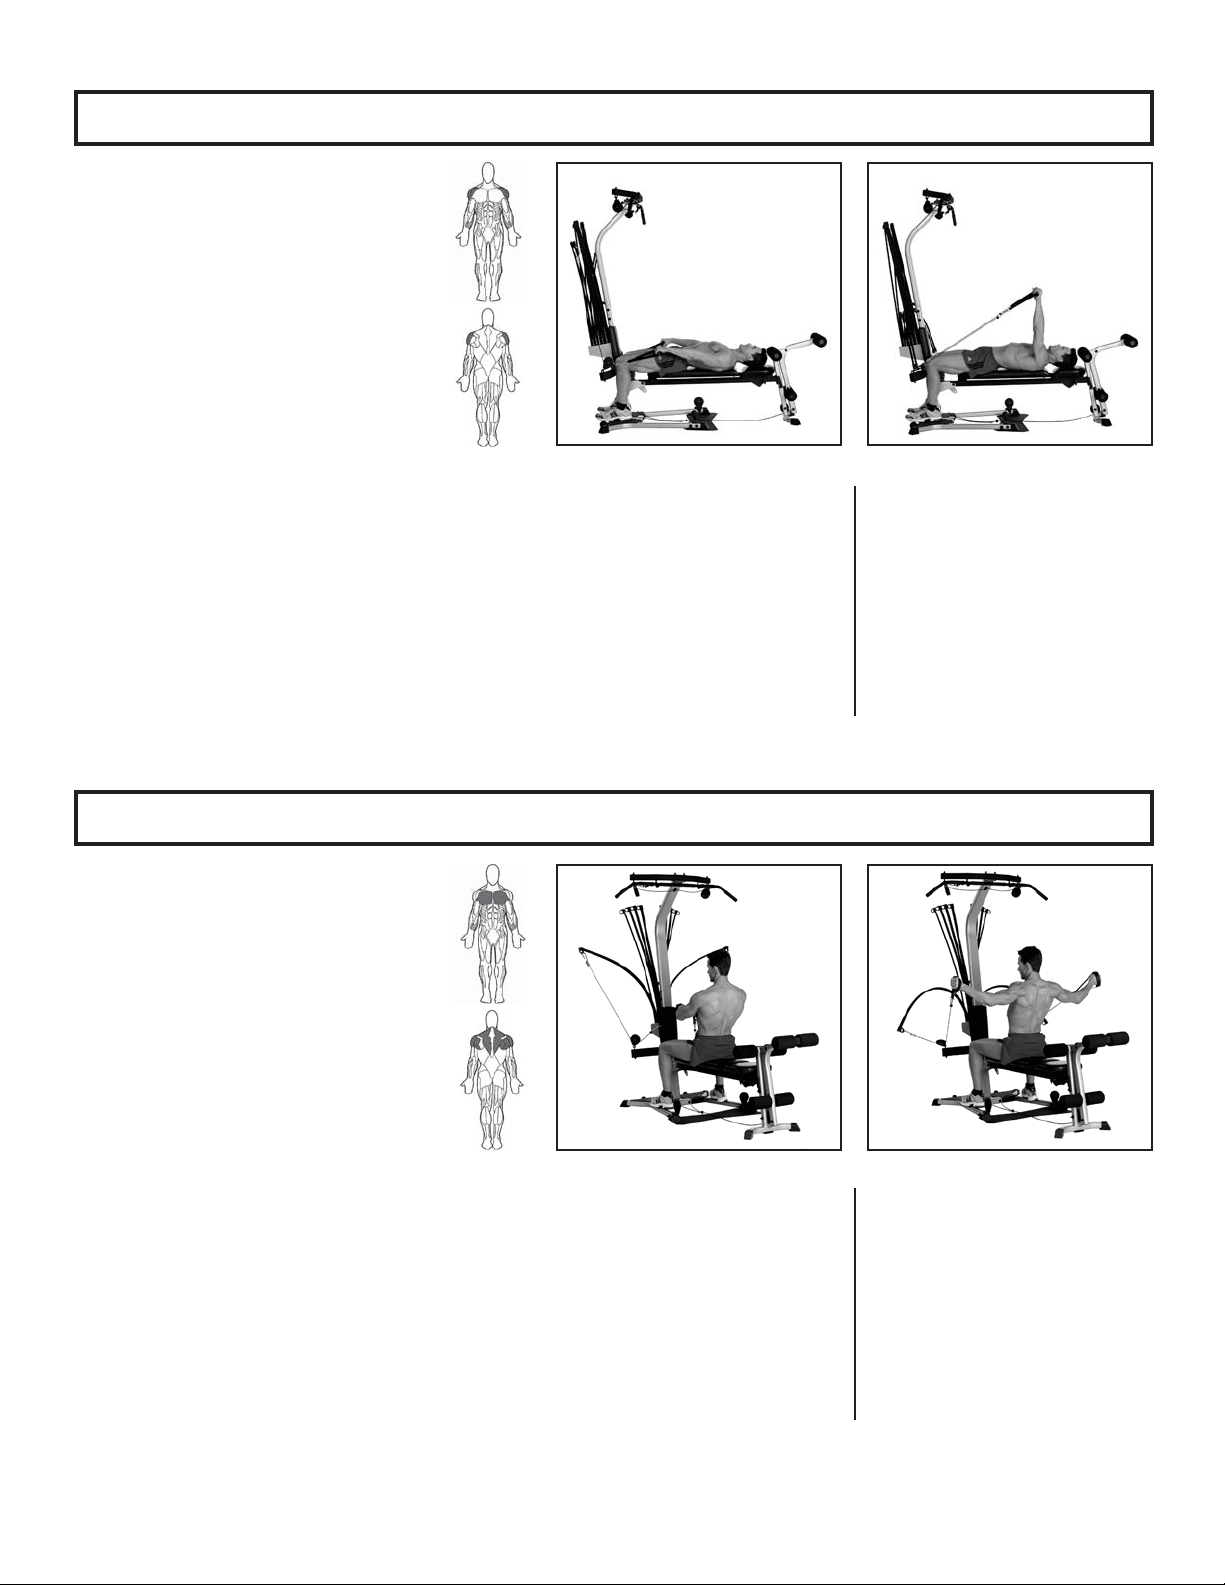
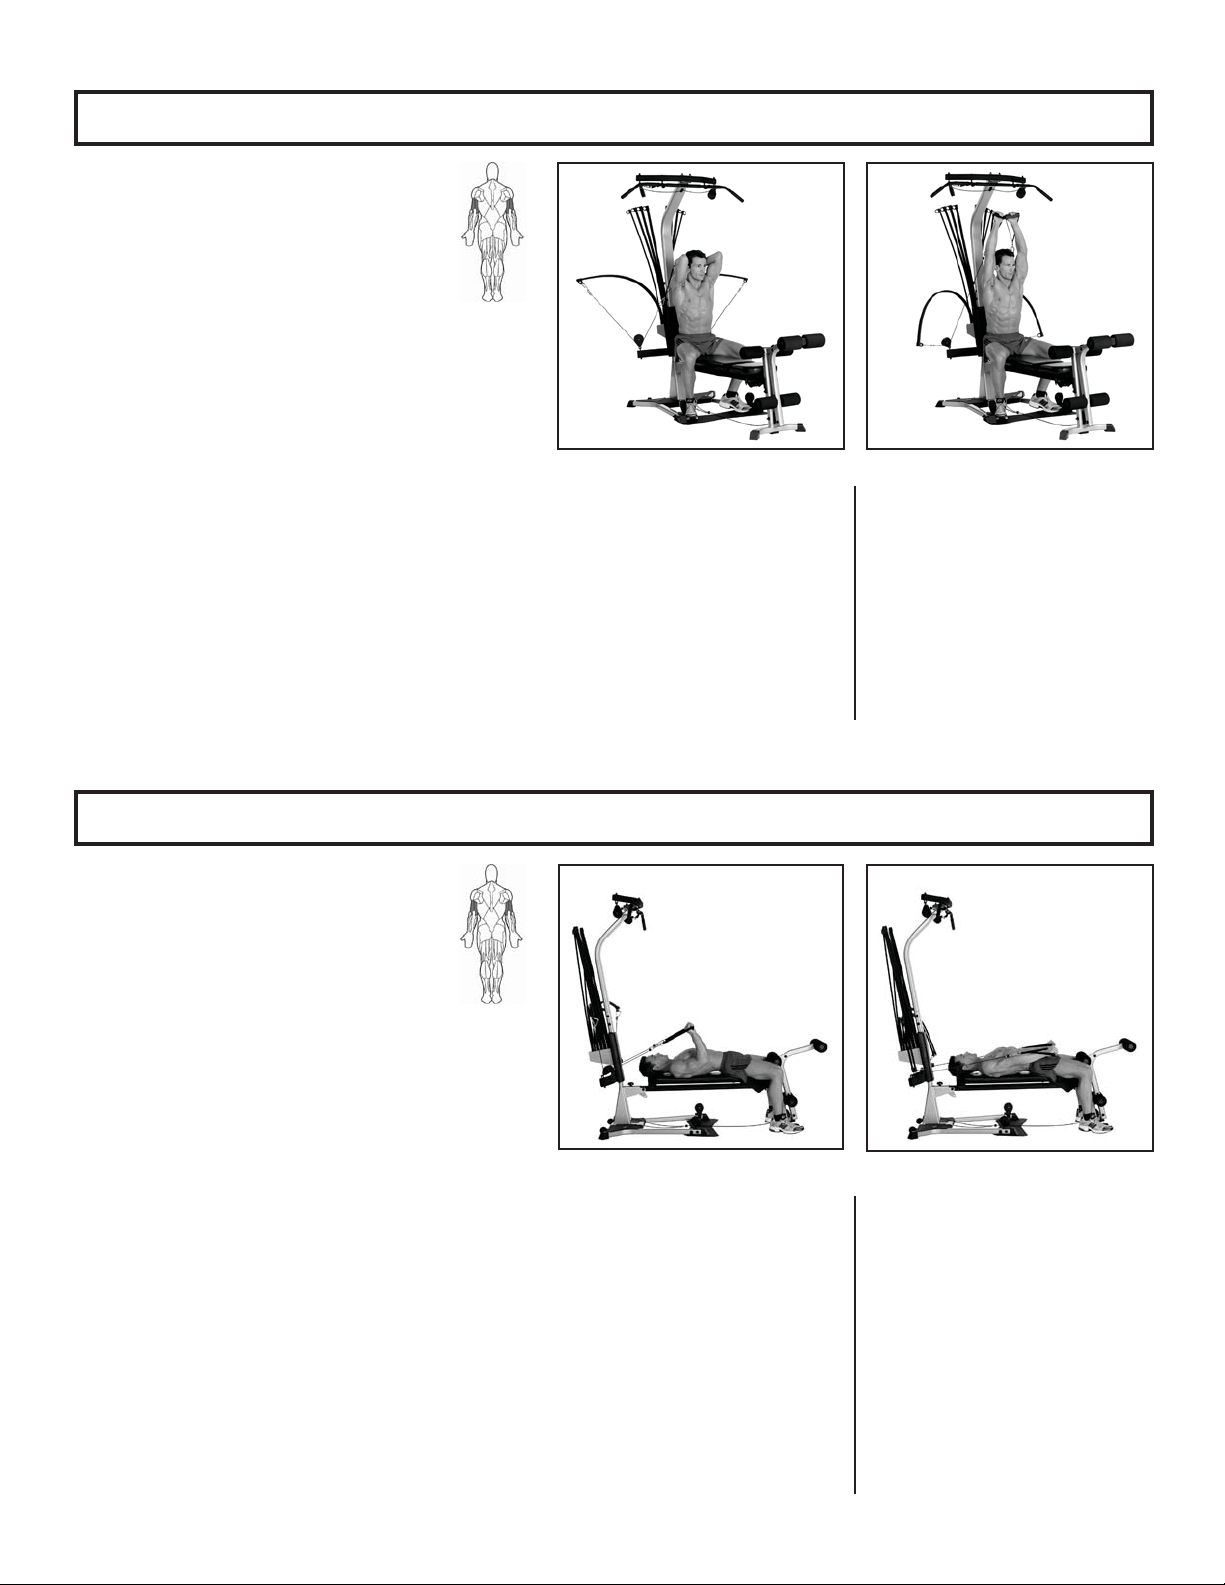
Arm Exercises
French Press—Elbow Extension (overhead)
Lying Triceps Extension—Elbow Extension
Muscles worked:
Triceps
Bench Position:
Horizontal
Accessory:
Handgrips
Pulleys:
Chest Bar
Success Tips
• Keep your upper arms motionless and
your wrists straight.
• Keep your chest lifted, and maintain spinal
alignment, keeping a very slight arch in
your lower back.
• Tighten the triceps throughout the exer-
cise, using controlled motion.
Muscles worked:
Triceps
Bench Position:
Horizontal
Accessory:
Handgrips
Pulleys:
Chest Bar
Success Tips
• Keep your chest lifted, and maintain a
very slight arch in your lower back.
• Keep your knees bent and feet flat on the
floor.
• Keep your upper arms motionless and
your wrists straight.
• Tighten the triceps throughout the exer-
cise, using controlled motion.
START FINISH
START FINISH
Start
• Sit on the Bench, facing away
from the Power Rod
®
unit,
keeping your knees bent and feet
flat on the floor.
• Reach behind and grasp one
or both of the Handgrips, palms
facing inward.
• Draw your arms up until elbows
are pointing forward, hands
behind head.
Start
• Lie on the Bench with your head
toward the Power Rod
®
unit,
knees bent, and feet flat on the
floor.
• Reach overhead and grasp the
Handgrips, palms facing upward.
• Keep your hands up near your
shoulders, spreading your back
and shoulders into the Bench.
• Raise your chest, and pinch your
shoulder blades together.
Action
• Keeping your upper arms sta-
tionary, straighten your elbows,
bringing your hands overhead,
palms facing out.
• Stop your motion before your
elbows are completely straight,
and then reverse your motion,
slowly returning to the Start
position without relaxing muscle
tension.
Action
• Keeping your arms stationary,
slowly straighten your elbows,
bringing your hands in an arcing
motion until they are approxi-
mately 1 foot (.3 meters) above
your thighs.
• Slowly reverse the arcing
motion, bringing your hands back
to the Start position.

36
Arm Exercises
Cross Triceps Extension
Lying 45
o
Triceps Extension—Elbow Extension
Muscles Worked:
Triceps
Bench Position:
45
o
incline
Accessory:
Handgrips
Pulleys:
Chest Bar
Success Tips
• Keep your upper arm motionless and your
wrists straight.
• Keep your chest lifted, pinch your
shoulder blades together, and maintain a
slight arch in lower back.
• Tighten the triceps throughout the exer-
cise, using controlled motion.
Muscles Worked:
Triceps
Bench Position:
Horizontal
Accessory:
Handgrips
Pulleys:
Chest Bar
Success Tips
• Keep your upper arms motionless and
your wrists straight throughout the entire
exercise.
• Keep your chest lifted, spine aligned, and
a slight arch in your lower back.
• Tighten the triceps throughout the exer-
cise, using controlled motion.
START FINISH
START FINISH
Start
• Sit facing away from the Power
Rod
®
unit.
• Reach one hand over the oppo-
site shoulder (right hand over
left and vice versa) and grasp a
Handgrip.
• Bend your elbow until your hand
is above your chest, palm facing
up.
Start
• Lie flat on the Bench with your
head toward the Power Rod
®
unit. Keep your knees bent and
your feet flat on the floor.
• Reach overhead and grasp the
Handgrips, palms facing up.
• Keep your elbows bent, bringing
your upper arms to the front at
approximately a 45
o
angle from
the front of your torso.
Action
• Keeping your upper arm sta-
tionary, straighten your elbow,
slowly extending your arm
outward using an arcing motion
and stopping approximately 90
o
from your chest.
• Keeping your triceps tightened,
slowly reverse the arcing motion,
and bring your arm back to the
Start position.
Action
• Keeping your upper arms sta-
tionary and next to your torso,
straighten your arms in an arcing
motion down toward your legs.
• Fully straighten your arms. Then,
with a controlled motion, slowly
bring your arms back to the Start
position without moving your
upper arms.
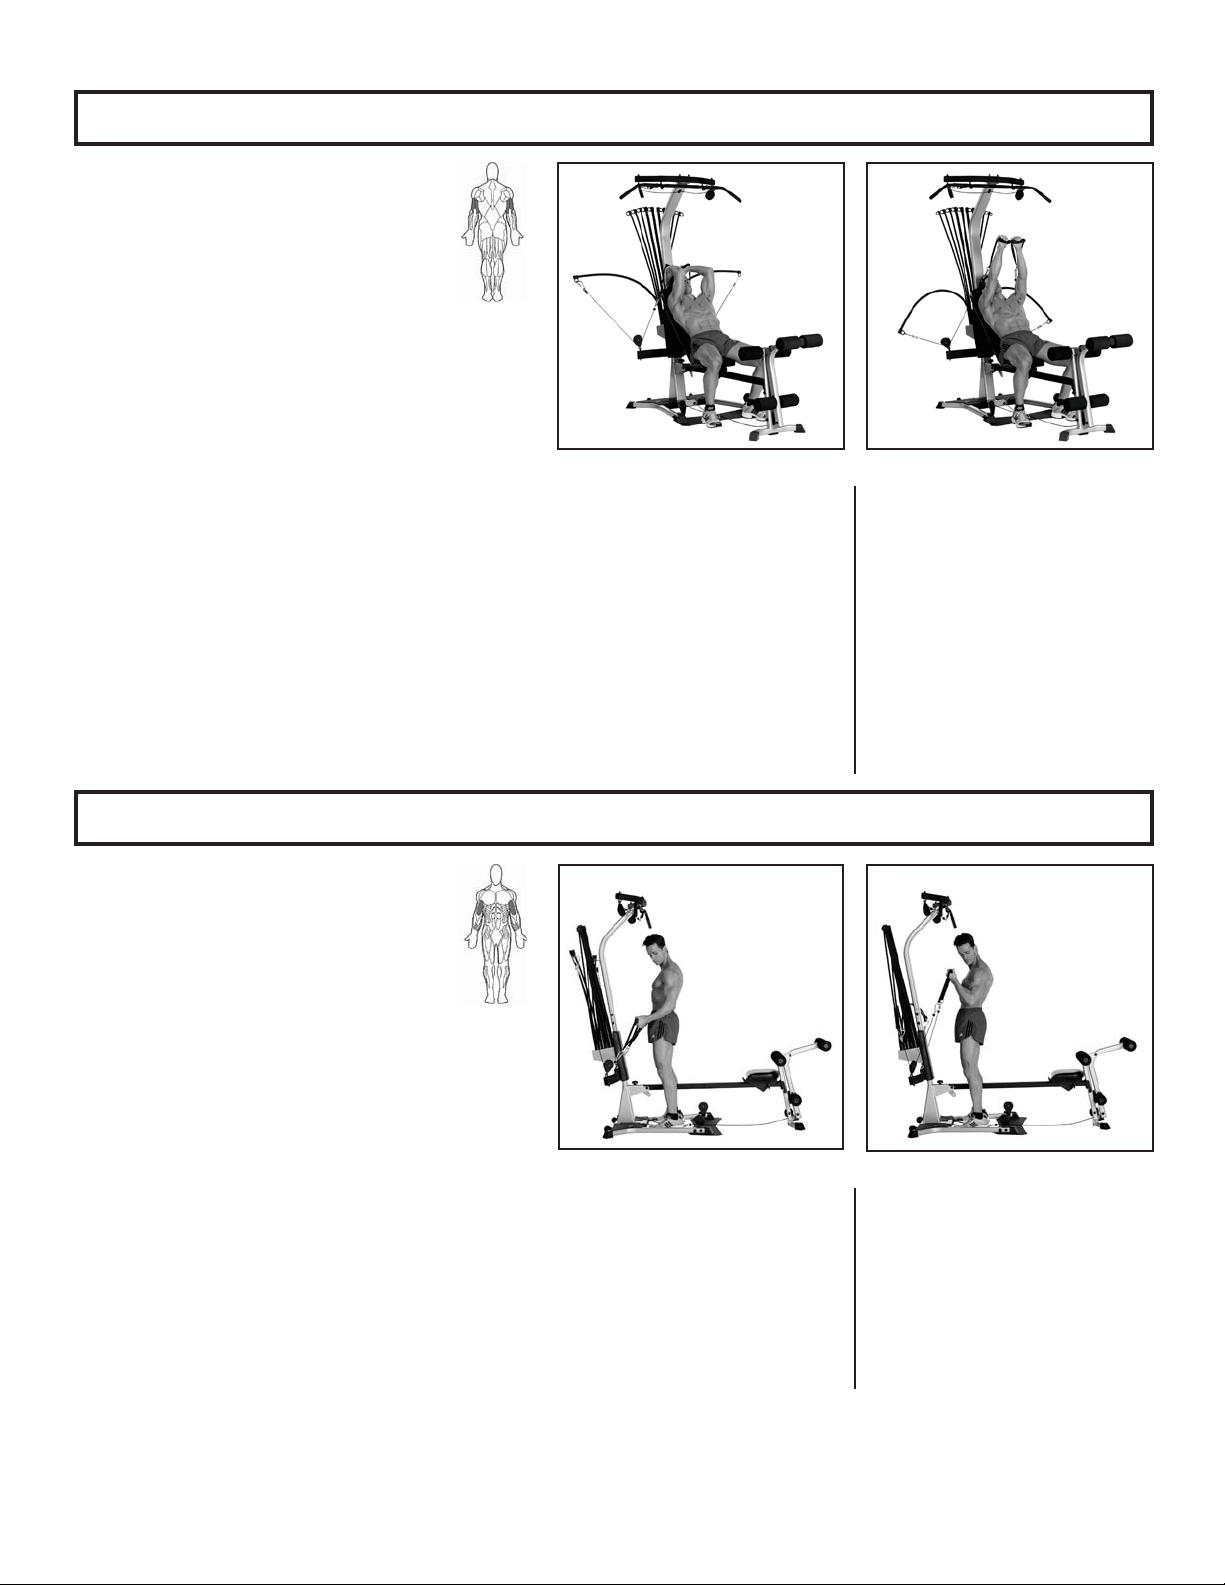
37
Arm Exercises
Seated Triceps Extension—Elbow Extension
Standing Biceps Curl—Elbow Flexion (in supination)
Muscles worked:
Triceps
Bench Position:
Horizontal
Accessory:
Handgrips
Pulleys:
Chest Bar
Success Tips
• Keep your knees bent, feet flat on the
floor.
• Lay your head back against the bench.
• Keep your chest lifted, shoulders pinched
together, and a very slight arch in your
lower back.
• Keep your upper arms and shoulders
motionless and your wrists straight.
• Tighten the triceps throughout the exer-
cise, using controlled motion.
Muscles worked:
Biceps
Bench Position:
Removed
Accessory:
Handgrips
Pulleys:
Chest Bar
Success Tips
• Keep your chest lifted, abs tight, and a
very slight arch in your lower back.
• Keep your elbows at your sides and your
wrists straight.
START FINISH
START FINISH
Start
• Sit facing away from the Power
Rod
®
unit.
• Using an overhand grip, reach
behind you and grasp the
Handgrips, bending your elbows
until your hands are near the top
of your head, palms facing up.
• Keep your arms in line with the
cables.
Start
• Straddle the Seat Rail, facing the
Power Rod
®
unit.
• Reach down and grasp the
Handgrips, palms facing forward.
• Straighten, keeping your arms by
your sides, elbows loose.
Action
• Keeping your upper arms sta-
tionary, slowly straighten your
elbows, moving your arms in an
arcing motion upward over your
head until they are approximately
90
o
from your torso.
• Stop the motion before your
elbows are completely straight,
and then reverse your motion,
slowly returning to the Start
position without relaxing muscle
tension.
Action
• Keeping your upper arms sta-
tionary and your elbows at your
sides, slowly curl the Handgrips
forward, then upward and in
toward your shoulders.
• Slowly reverse the arcing
motion, bringing your hands back
to the Start position.
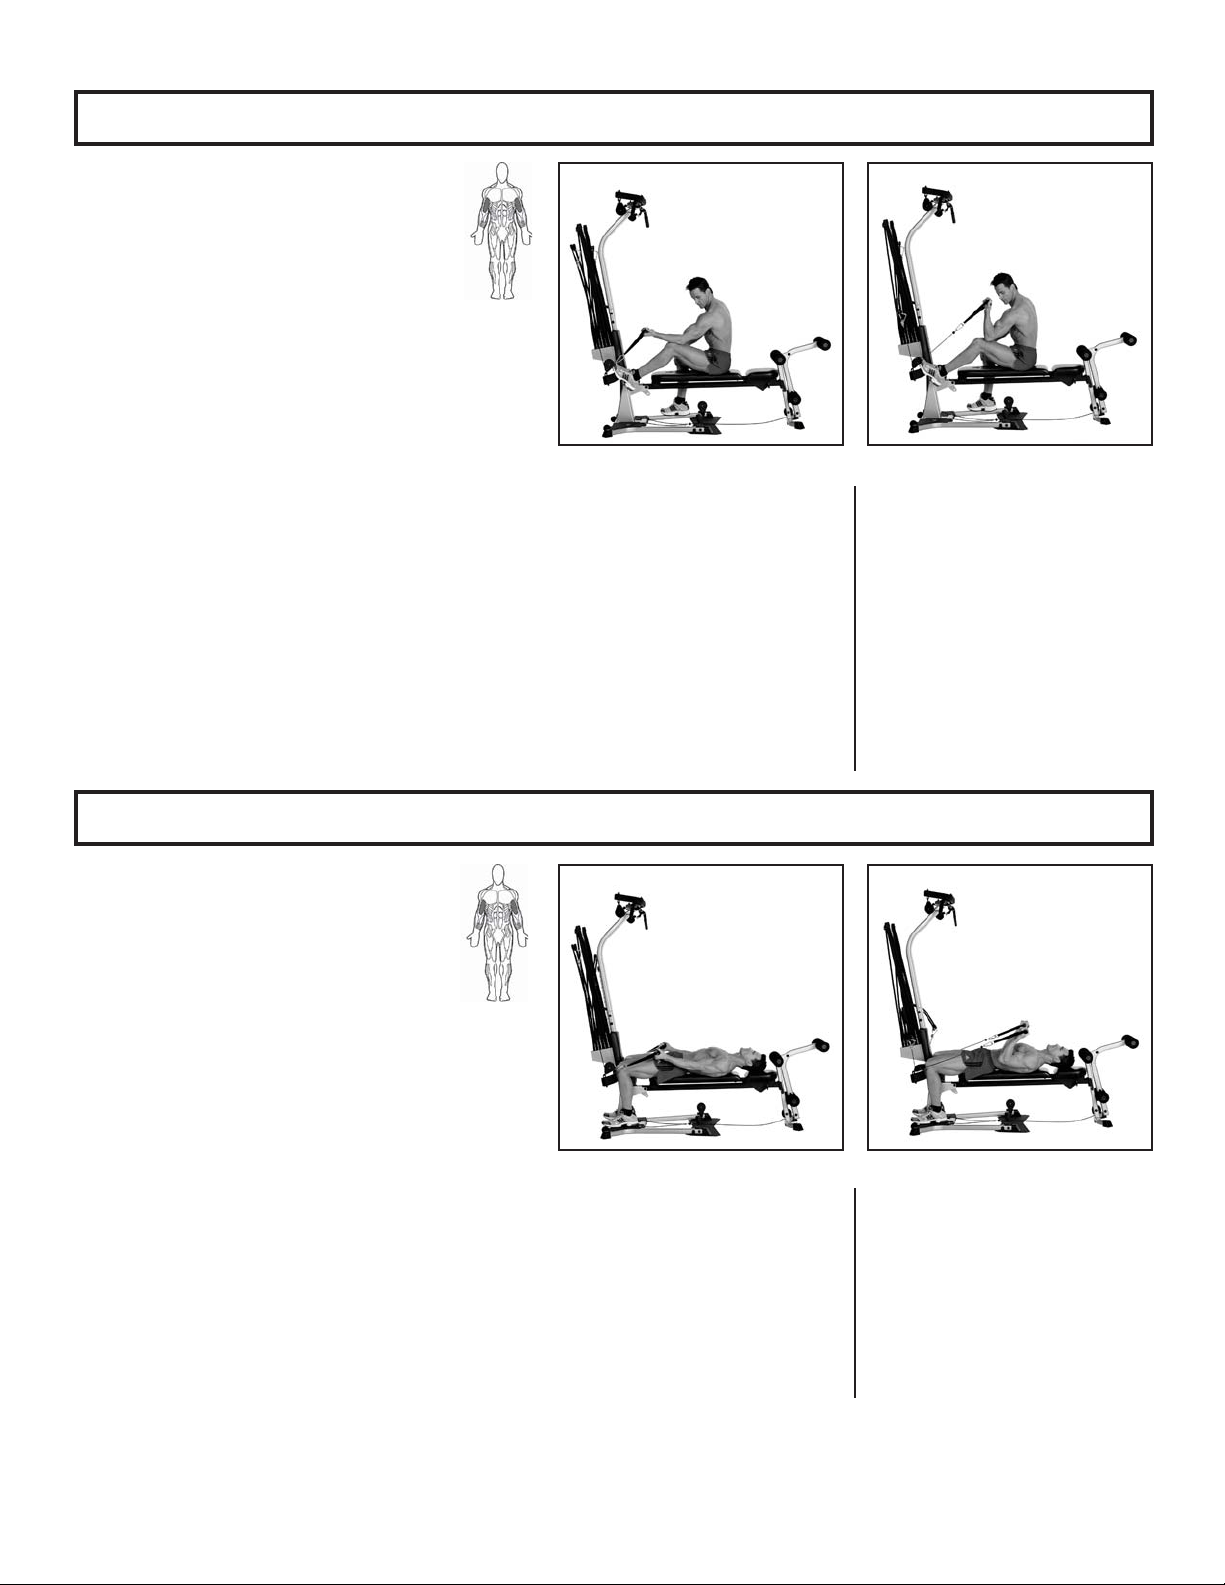
38
Arm Exercises
Seated Biceps Curl—Flexion (in supination)
Lying Biceps Curl—Elbow Flexion (in supination)
Muscles Worked:
Biceps
Bench Position:
Horizontal
Accessory:
Handgrips
Pulleys:
Chest Bar
Success Tips
• Keep your upper body motionless and
your wrists straight.
• Keep your chest lifted, trunk muscles
tight, and maintain a slight arch in lower
back.
• Keep your spine aligned throughout move-
ment
Muscles Worked:
Biceps, Brachialis, and Brachioradialis
Bench Position:
Flat Bench Forward
Accessory:
Handgrips
Pulleys:
Chest Bar
Success Tips
• Keep your upper arms motionless and
your wrists straight throughout the entire
exercise.
• Keep your chest lifted, spine straight, and
a slight arch in your lower back.
START FINISH
START FINISH
Start
• Sit on the Bench, facing the Power
Rod
®
unit. Keep one foot flat on
the floor, and bend the other leg,
bringing your foot up onto the
Chest Bar with your knee turned
slightly outward.
• With the arm on the same side as
your lifted leg, reach forward and
grasp a Handgrip, keeping your
elbow bent. Allow your forearm
(not elbow) to rest on the elevated
knee.
Start
• Sit on the Bench, facing the
Power Rod
®
unit. Keep your
knees bent and feet flat on the
floor.
• Grasp the Handgrips, keeping
your arms straight and palms up.
• Lie back completely with your
head supported by the Bench.
Action
• Slowly curl your forearm up
toward your shoulder, keeping
the upper arm completely still.
• Keeping your biceps tightened,
slowly reverse the curling motion
and bring your arm back to the
Start position.
Action
• Curl the Handgrips forward
and up toward your shoulders,
making sure to keep your upper
arms completely motionless and
your elbows at your sides.
• Slowly bring your arms back to
the Start position, maintaining
the same arc of motion.
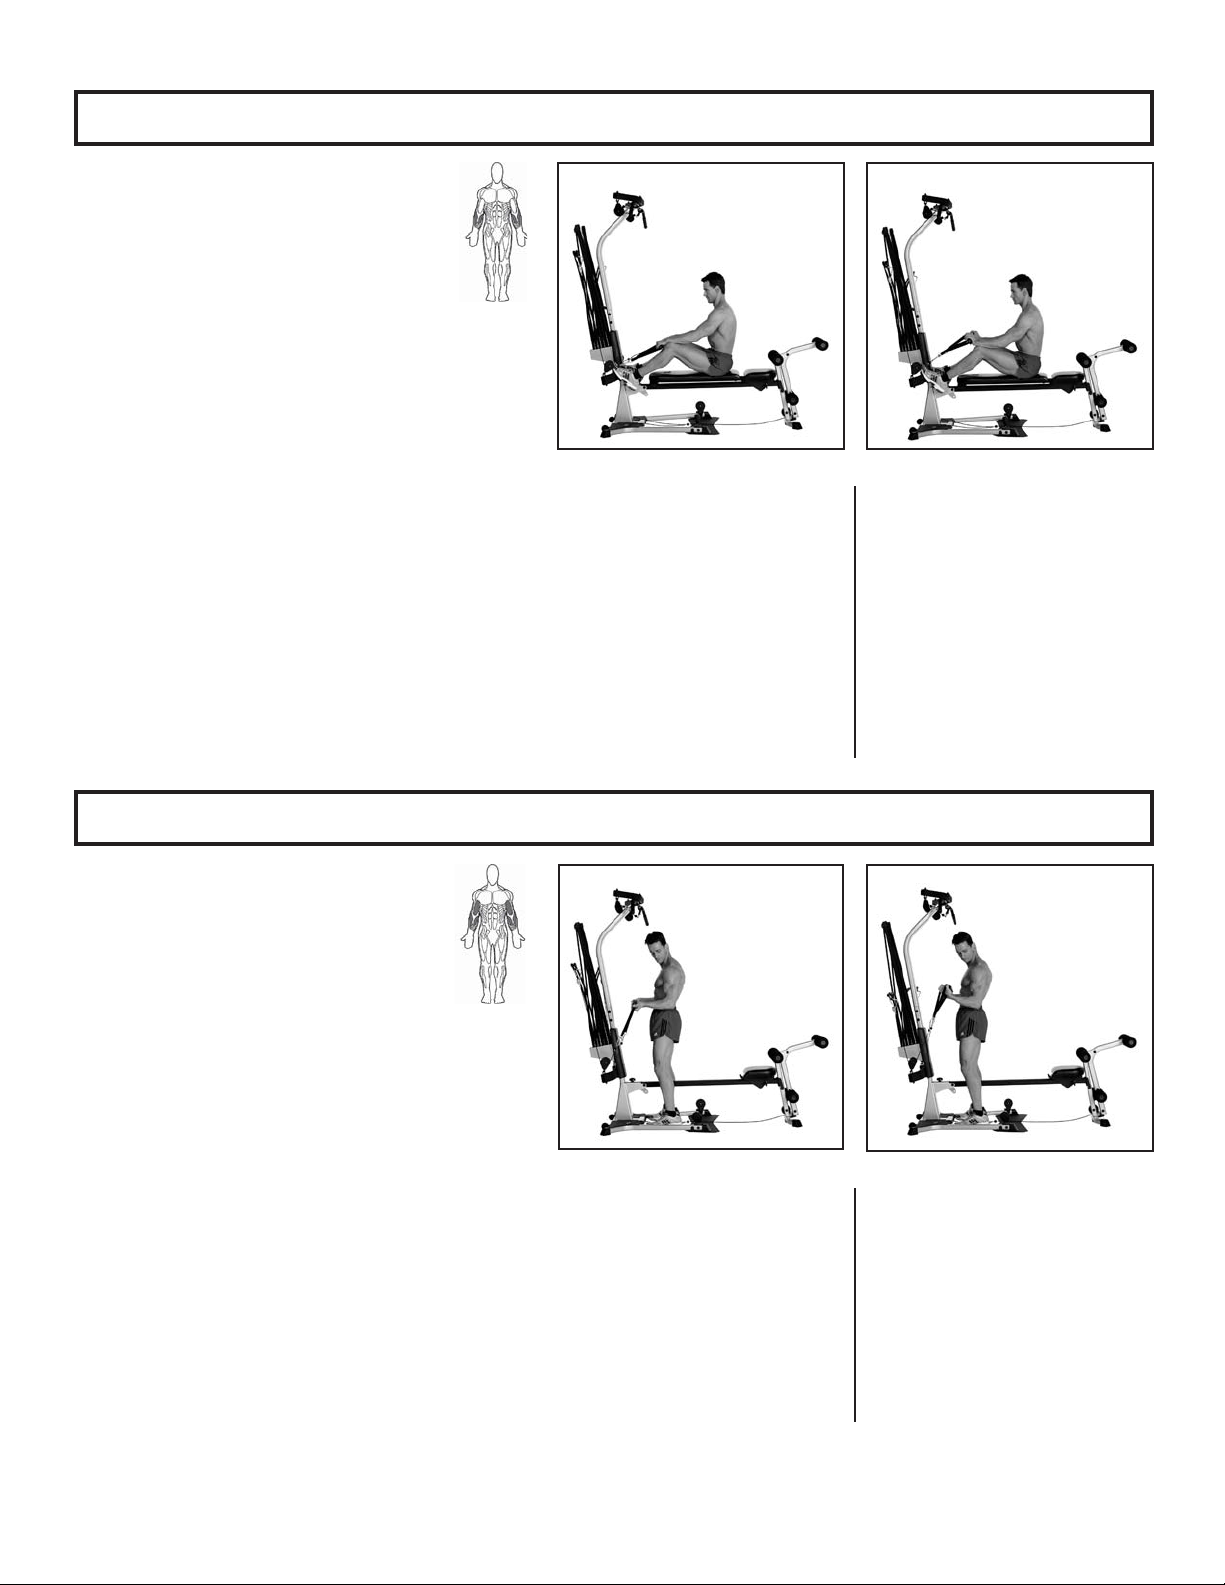
39
Arm Exercises
Seated Wrist Extension
Standing Wrist Curl
Muscles worked:
Forearms
Bench Position:
Horizontal
Accessory:
Handgrips
Pulleys:
Chest Bar
Success Tips
• Move slowly, and keep tension in the back
of the forearms at all times.
• Keep your chest lifted, trunk muscles
tightened, and a very slight arch in your
lower back.
• You may perform this exercise one arm
at a time to make it easier to focus and
isolate the back of your forearms, or you
can perform it with both arms simultane-
ously to save time.
Muscles worked:
Biceps and Forearms
Bench Position:
Removed
Accessory:
Handgrips
Pulleys:
Chest Bar
Success Tips
• Keep your chest lifted, trunk muscles
tight, and a very slight arch in your lower
back.
• Move slowly, keeping tension in the front
of your forearms at all times.
• Do not increase or decrease the bend in
your elbow during this exercise—keep all
motion in the wrist.
• Do not rock your body back and forth
during wrist motion.
START FINISH
START FINISH
Start
• Sit on the Bench, facing the
Power Rod
®
unit, knees bent,
and feet together and flat on the
Bench. Sit far enough back on
the Bench to maintain physical
and cable tension throughout the
exercise.
• Grasp the Handgrips, palm
facing down, and rest your mid-
forearms on your lower thighs,
keeping your elbows flared
slightly to the side.
Start
• Straddle the Seat Rail, facing the
Power Rod
®
unit.
• Reach down and grasp the
Handgrips.
• Straighten, keeping your upper
arms and elbows by your sides,
elbows loose.
• Bend your elbows 90
o
, palms
up, and maintain that position
throughout the entire exercise.
Action
• Slowly curl the back of your fists
backward toward your forearms.
• Stop when wrists are 90
o
from
forearms or when you experi-
ence discomfort.
• Slowly return to the Start
position.
Action
• With your upper arms stationary
and your elbows at your sides,
slowly curl your fists toward the
front of your forearms.
• Keeping your forearms still,
slowly let your fists return to the
Start position.
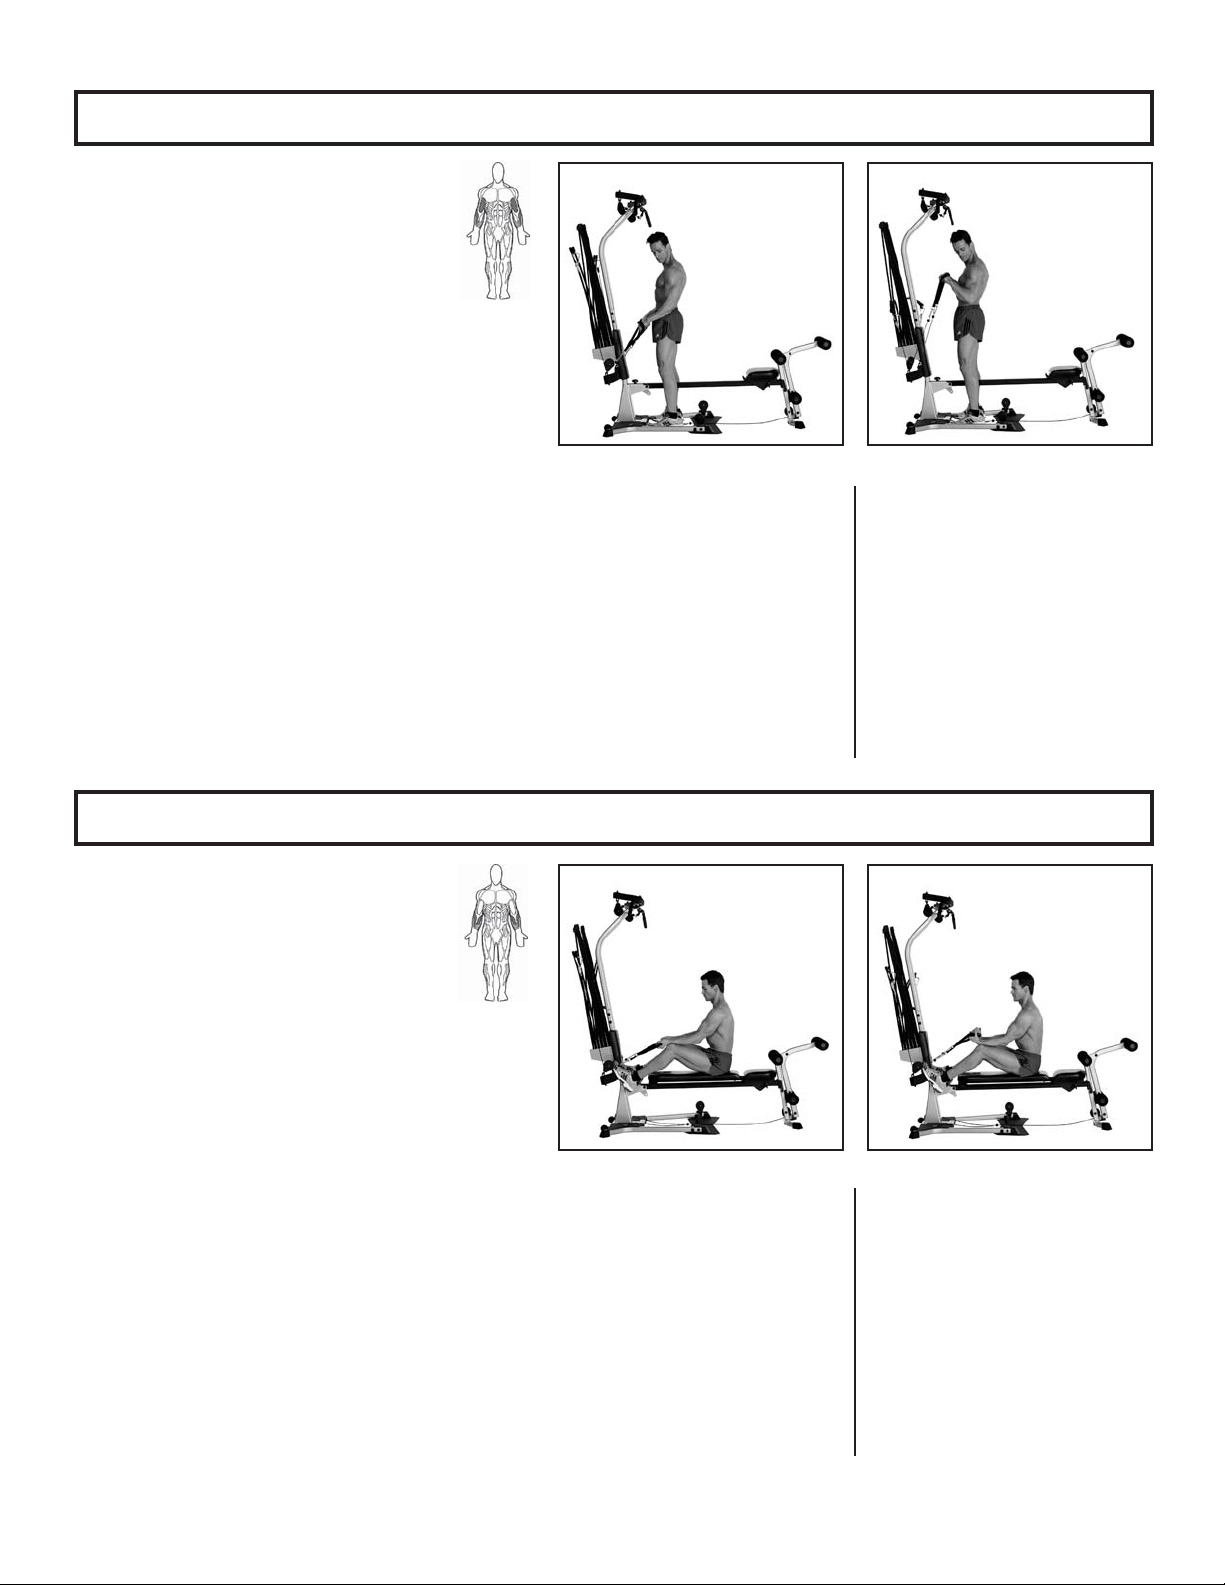
40
Arm Exercises
Reverse Curl—Elbow Flexion (in pronation)
Seated Wrist Curl — Wrist Flexion
Muscles Worked:
Brachialis, Brachioradialis, and Biceps
Bench Position:
Removed
Accessory:
Handgrips
Pulleys:
Chest Bar
Success Tips
• Keep your upper body motionless, elbows
at your sides, and your wrists straight.
• Keep your trunk muscles tight, and main-
tain a slight arch in lower back.
Muscles Worked:
Forearms
Bench Position:
Horizontal
Accessory:
Handgrips
Pulleys:
Chest Bar
Success Tips
• Move slowly, keeping tension in the front
of your forearms at all times.
• Keep your chest lifted, trunk muscles
tightened, and a slight arch in your lower
back.
• You can perform this exercise one arm
at a time to make it easier to focus and
isolate the front of your forearms, or you
can perform it with both arms simultane-
ously to save time.
START FINISH
START FINISH
Start
• Straddle the Seat Rail, facing the
Power Rod
®
unit.
• Reach down and grasp the
Handgrips, palms facing back-
ward.
• Straighten, keeping your upper
arms and elbows by your sides,
elbows loose.
Start
• Sit on the Bench, facing the
Power Rod
®
unit, knees bent,
feet together and flat on the
Chest Bar. Sit far enough
back on the bench to maintain
physical and cable tension
throughout exercise.
• Grasp the Handgrips, palm facing
up, and rest your mid-forearms
on your lower thighs, allowing
the wrists to bend downward.
Action
• Keeping your palms facing down,
use your forearms to slowly
bend your elbows, curling the
Handgrips forward, then upward
and in toward your shoulders.
• Keep your elbows at your sides
and your upper arms completely
still.
• Slowly reverse the curling
motion and bring your arms back
to Start position.
Action
• Slowly curl your fists toward the
front of your forearms.
• Slowly return to the Start
position without relaxing the
muscle tension in your wrists.
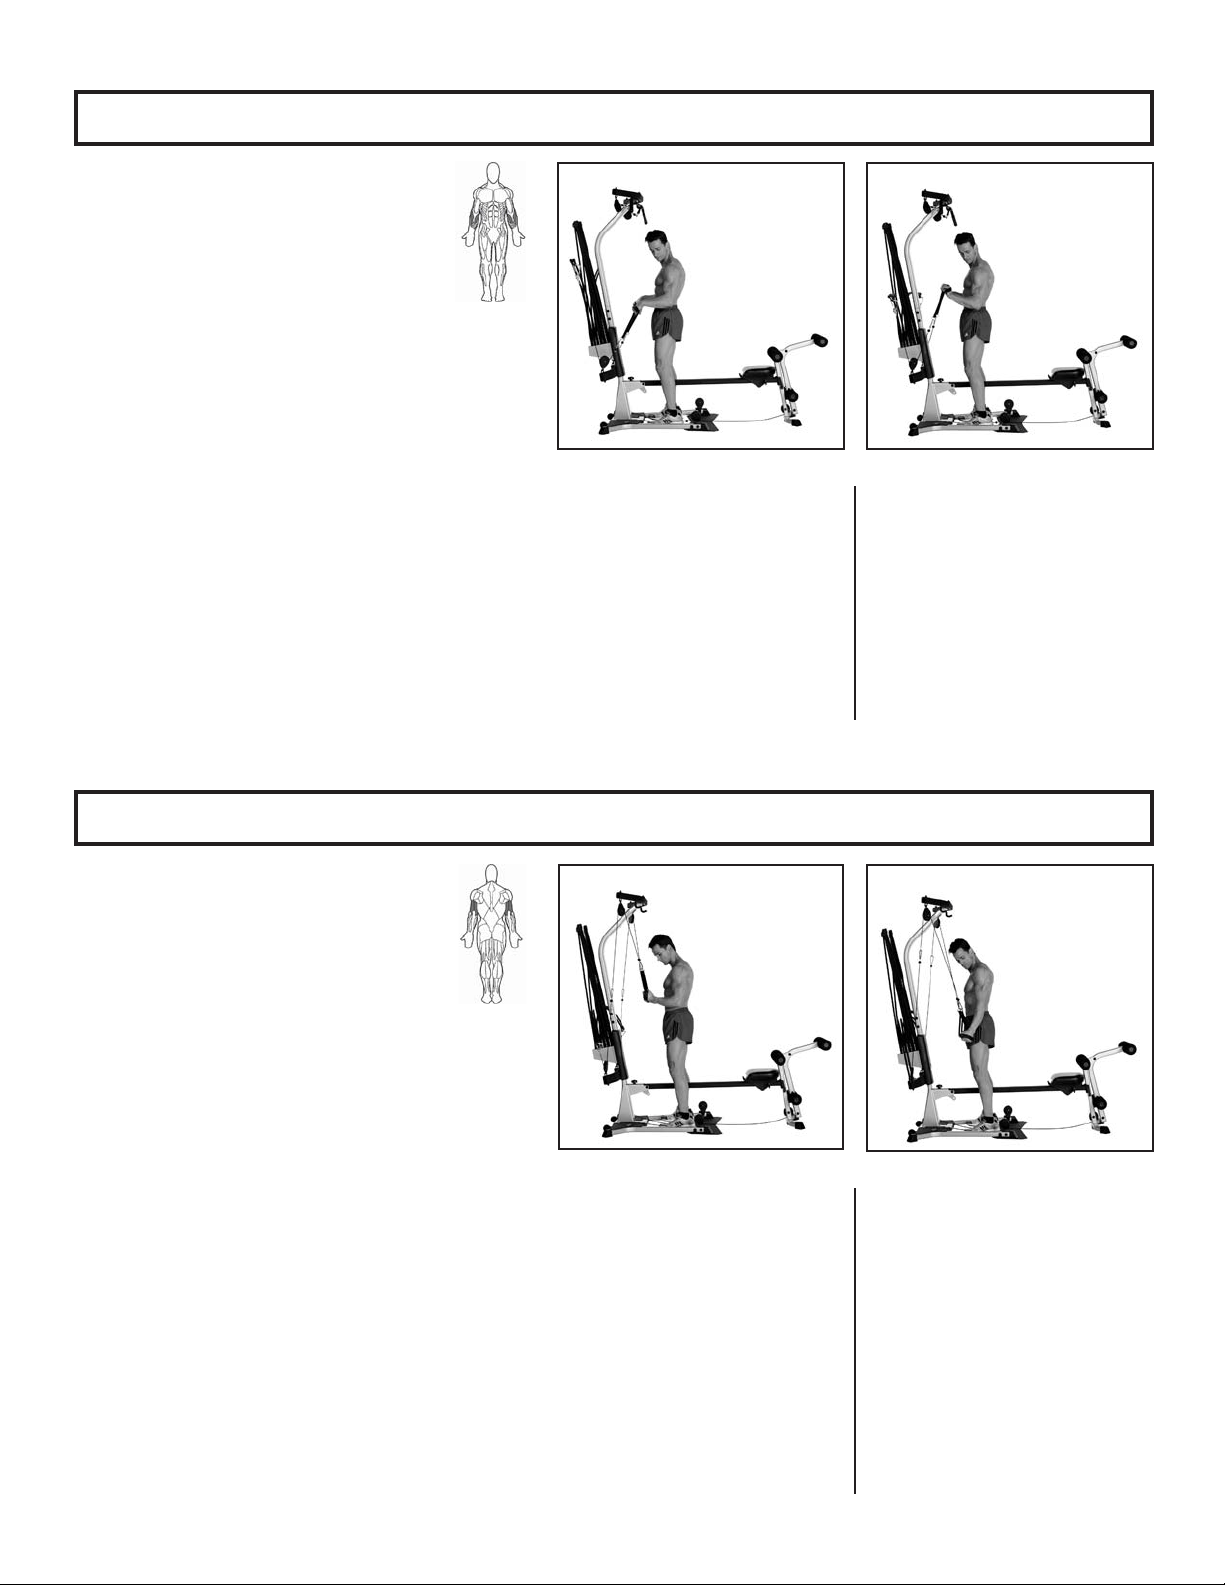
41
Arm Exercises
Standing Wrist Extension
“Rope” Pushdown—Elbow Extension
Muscles worked:
Forearms; Brachialis
Bench Position:
Removed
Accessory:
Handgrips
Pulleys:
Chest Bar
Success Tips
• Move slowly, and keep tension in the
wrists at all times.
• Keep your chest lifted, trunk muscles
tightened, and a very slight arch in your
lower back.
• Do not increase or decrease the bend in
your elbow—perform the entire motion at
your wrist.
• Do not rock your body during this exer-
cise.
Muscles worked:
Triceps
Bench Position:
Removed
Accessory:
Handgrips
Pulleys:
Lat Tower
Success Tips
• Keep your upper arms motionless and
your wrists straight.
• Keep your chest lifted, abs tight, and
maintain a slight arch in lower back.
• Tighten the triceps throughout the exer-
cise, using controlled motion.
• Keep your chest lifted, trunk muscles
tightened, and a very slight arch in your
lower back.
START FINISH
START FINISH
Start
• Straddle the Seat Rail, facing the
Power Rod
®
unit.
• Reach down and grasp the
Handgrips, palms facing back-
ward.
• Straighten, keeping your upper
arms and elbows by your sides.
• Bend your elbows 90
o
, and hold
that position for the duration of
this exercise.
Start
• Straddle the Seat Rail, facing the
Power Rod
®
unit.
• With each hand, grasp the oppo-
site Handgrip (right to left, etc.),
palms facing down.
• Stand approximately 2–3 feet
(.6–.9 meters) from Lat Tower
(adjust for comfort).
• Cross the cables, palms facing
each other, as if grabbing a rope.
• Keep your elbows bent and
upper arms at your sides.
Action
• Slowly curl the back of your fists
backward toward your forearms.
• Stop when wrists are 90
o
from
forearms or when you experi-
ence discomfort.
• Keeping your forearms still,
slowly return to the Start
position.
Action
• Keeping your upper arms sta-
tionary, elbows next to trunk,
slowly straighten your arms
downward in a gentle arc until
your hands are near the tops of
your thighs, hands and elbows
straightened and directly in line
with shoulders.
• Keeping your triceps tightened,
slowly reverse the arcing motion
and bring the Handgrips back to
the Start position.
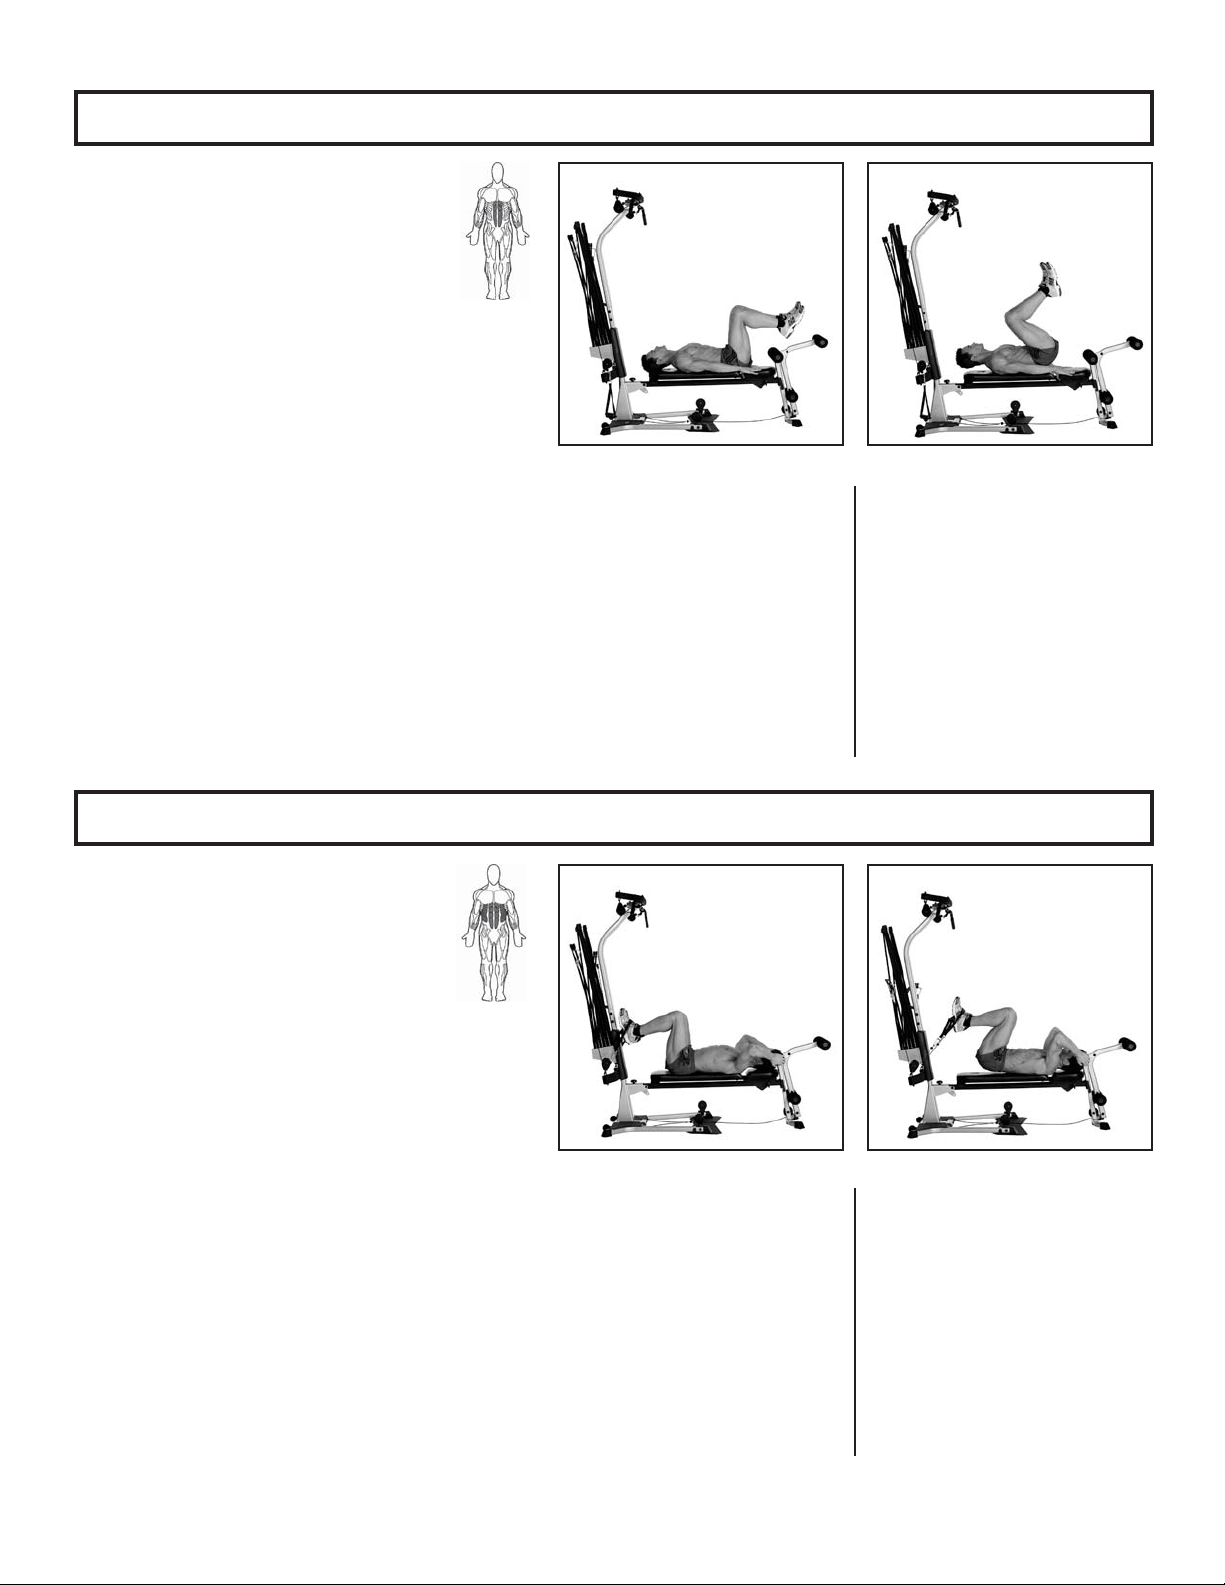
42
Abdominal Exercises
Reverse Crunch—Spinal Flexion
Resisted Reverse Crunch—Spinal Flexion
Muscles Worked:
Rectus Abdominus
Bench Position:
Horizontal
Accessory:
None
Pulleys:
None
Success Tips
• Keep your upper body, knees, and hips
stationary. Relax your neck.
• Tighten your abs before you move.
• Allow exhalation up and inhalation down
without exaggerating breathing.
• Contract as far into the movement as pos-
sible. Lower under control. Keep your abs
tight during entire motion.
Muscles Worked:
Rectus Abdominus and Obliques
Bench Position:
Flat Bench Forward
Accessory:
Ankle Cuffs
Pulleys:
Chest Bar
Success Tips
• Allow exhalation up and inhalation down
without exaggerating breathing.
• Do not “kick” into the motion, but allow
body to slowly initiate movement.
• Tighten your abs throughout the entire
exercise, relaxing only at the end of each
set. Keep your hips and knees motionless.
• Move slowly to eliminate momentum.
START FINISH
START FINISH
Start
• Lie on the Bench with your head
toward the Power Rod
®
unit, and
grasp the Bench for support.
• Bend your hips and knees until
your legs are in a “seated”
position, as shown above, your
knees and hips at 90
o
angles.
• If maintaining this position is
difficult, adjust to one you can
maintain for the duration of this
exercise. As you strengthen, this
position will become easier.
Start
• Face the Power Rod
®
unit, and
attach an Ankle Cuff to each
foot.
• Lie back on the Bench with your
head away from the Power Rod
®
unit.
• Bend your hips and knees at 90
o
angles, as shown.
• Reach behind your head and
grasp the Seat.
• Relax your neck.
Action
• Tighten your abs, and then
slowly curly your hips toward
your rib cage. Move as far as
you can without using your legs
to get momentum.
• Do not curl up onto your
shoulder blades.
• Slowly reverse the motion,
returning to the Start position
without relaxing.
Action
• Tighten your abs, and slowly curl
your hips toward your rib cage.
Move as far as you can without
using your legs or curling onto
your shoulder blades.
• Slowly reverse the motion,
returning to the Start position
without relaxing your abs.
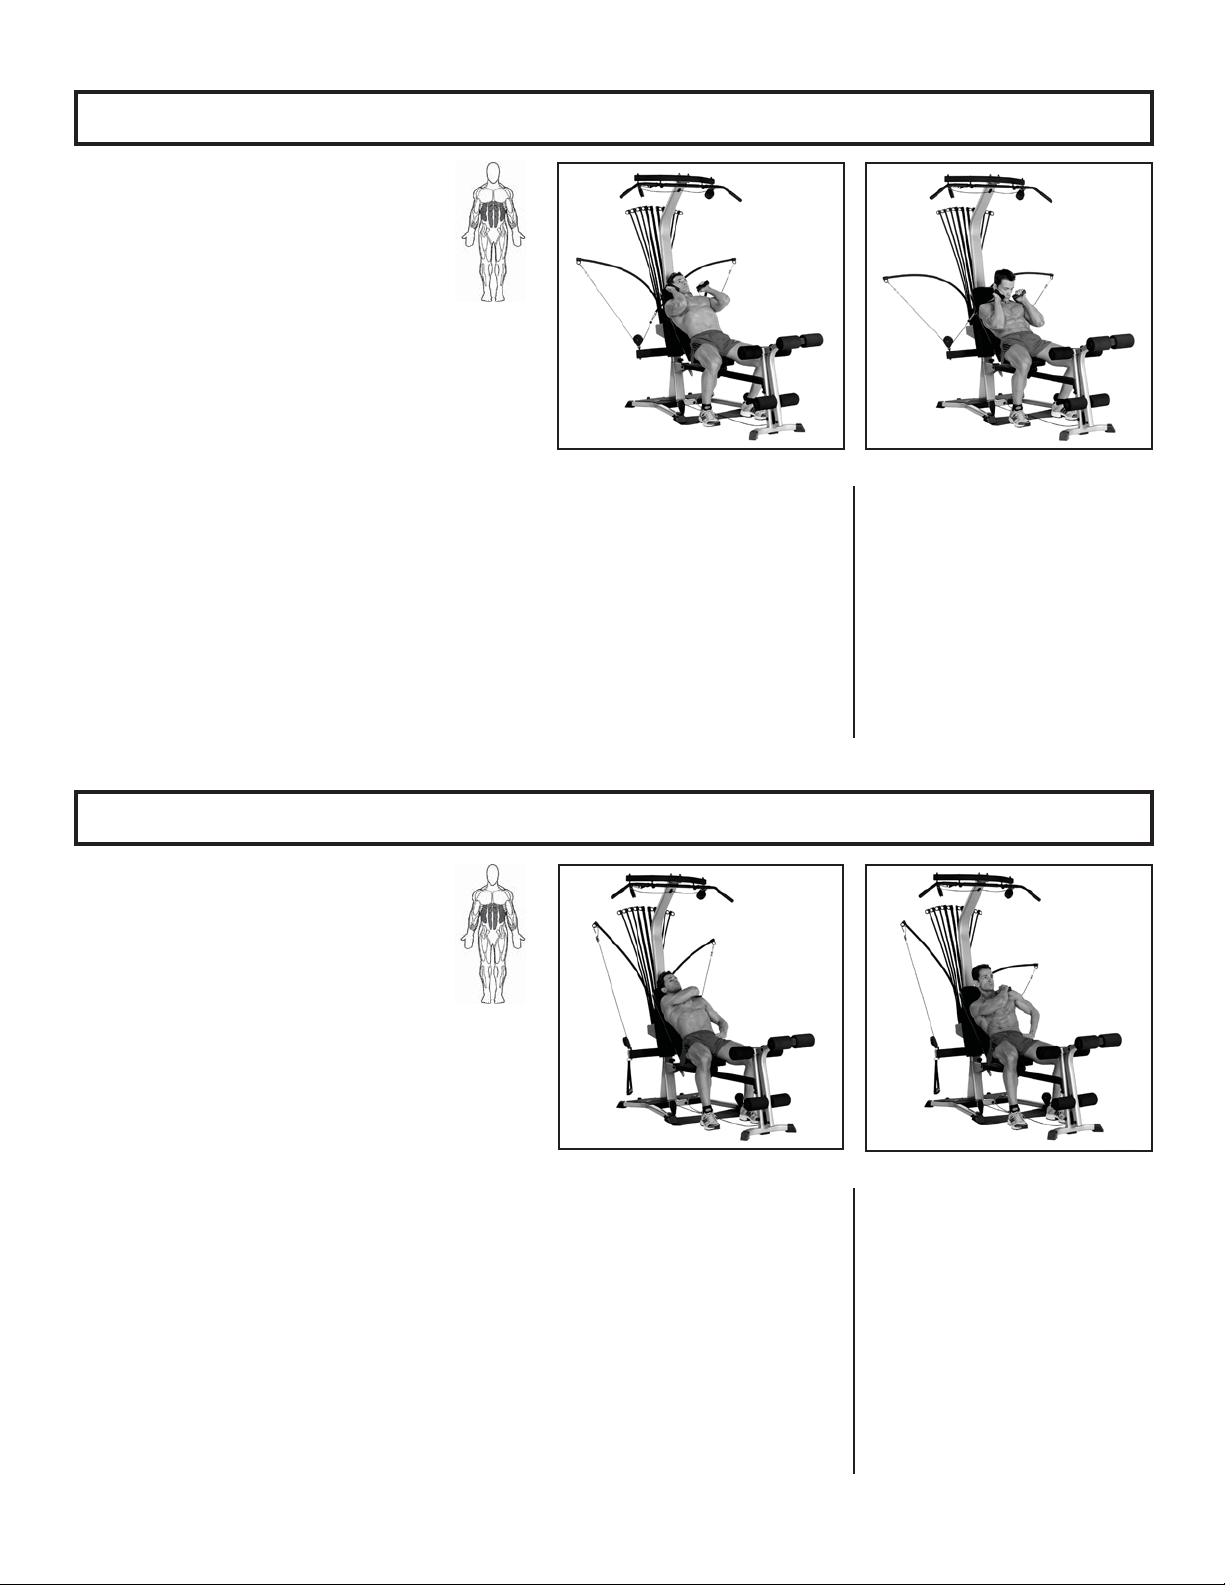
43
Abdominal Exercises
Seated (Resisted) Abdominal Crunch—Spinal Flexion
Seated (Resisted) Oblique Abdominal Crunch—Spinal Flexion/Rotation
Muscles worked:
Rectus Abdominus and Obliques
Bench Position:
45
o
incline
Accessory:
Handgrips
Pulleys:
Chest Bar
Success Tips
• Do not lift your head or chin—your head
should follow the rib motion rather than
lead it. Maintain normal neck posture.
• Tighten your abs throughout the entire
exercise, relaxing only at the end of each
set.
• Move slowly to eliminate momentum.
• Allow exhalation up and inhalation down
without exaggerating breathing.
START FINISH
START FINISH
Start
• Grasp the Handgrips in both
hands, drawing them over your
shoulders. Rest the back of your
fists on your chest or shoulders,
palms facing up.
• Lower back can start out flat
or in a normal arch. Keep your
knees and hips bent and your
feet flat on the floor.
Start
• Cross one arm over the opposite
shoulder and grasp a Handgrip.
Rest the hand on your shoulder
or chest, palm facing down.
• Lower back can start out flat
or in a normal arch. Keep your
knees and hips bent and your
feet flat on the floor.
Action
• Tighten your abs, and curl only
your torso, slowly moving your
ribs toward your hips. Move as
far as you can without moving
your hips or neck.
• Do not allow your lower back
to lose contact with the Bench
during this entire exercise.
• Slowly reverse the motion,
returning to the Start position
without relaxing your abs.
Action
• Tighten your abs on the side with
the active arm, focusing on the
side of your ribs to the front of
your pelvis on that side.
• Slowly move diagonally, rotating
torso away from the side holding
the Handgrip, ribs turned toward
the front of your pelvis.
• Crunch as deeply as you can,
keeping lower back on bench.
• Slowly reverse to the Start
position without resting.
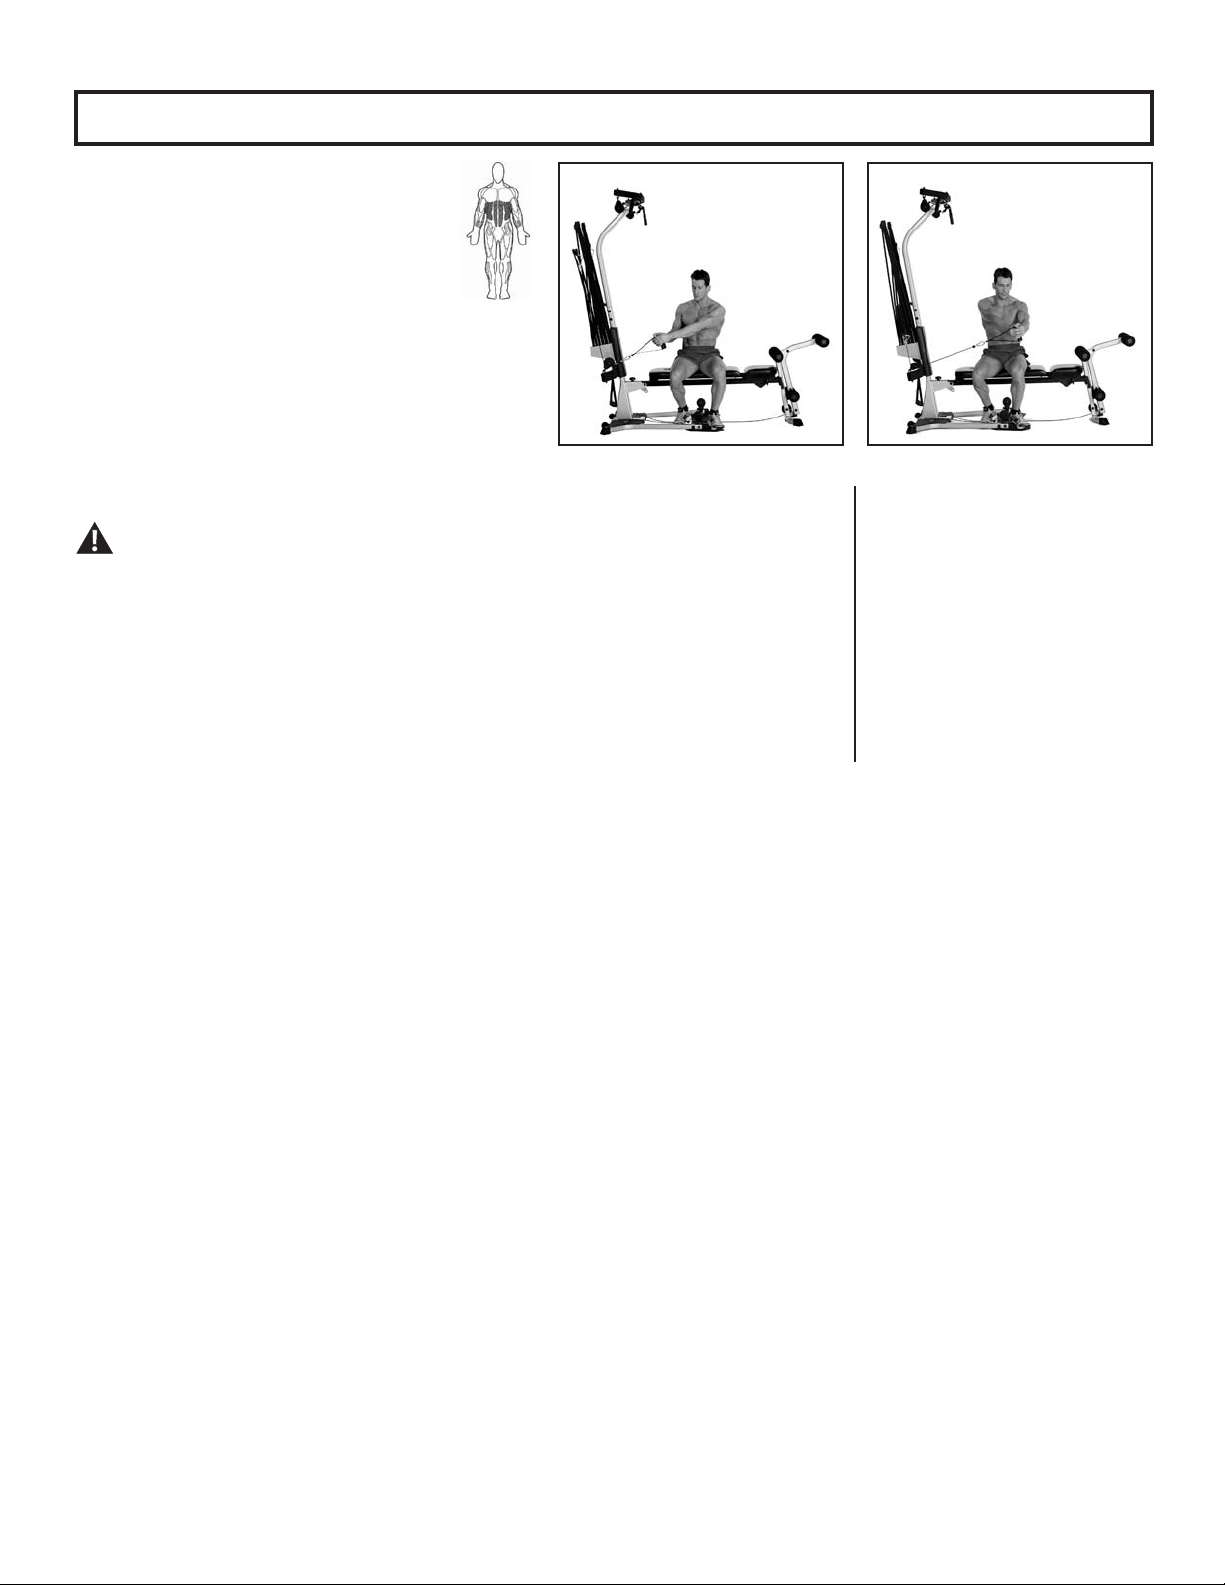
44
Abdominal Exercises
Trunk Rotation
Muscles Worked:
Rectus Abdominus, Obliques, and Serratus
Anterior
Bench Position:
Horizontal
Accessory:
Handgrips
Pulleys:
Chest Bar
Success Tips
Failure to perform this exercise cor-
rectly could result in injury. Use only
low resistance rods.
• Keep your chest lifted, shoulders pinched,
abs tight, and a slight arch in your lower
back.
• Keep all motion in your torso.
• Move only as far as your muscles will take
you—do not use momentum to increase
your range of motion.
START FINISH
Start
• Sit sideways on the Bench, one
side toward the Power Rod
®
unit.
• Grasp the Handgrip closest to
you with both hands.
• Raise both arms up near
shoulder level, hands extended
over the leg closest to the Power
Rod
®
unit.
• Keep your elbows slightly bent.
Action
• Tighten your entire abdominal
area, and slowly rotate your rib
cage and arms away from the
Power Rod
®
unit 30-40
o
, as if you
were rotating with a rod through
the middle of your spine.
• Slowly reverse the motion,
returning to the Start position
without relaxing muscle tension.
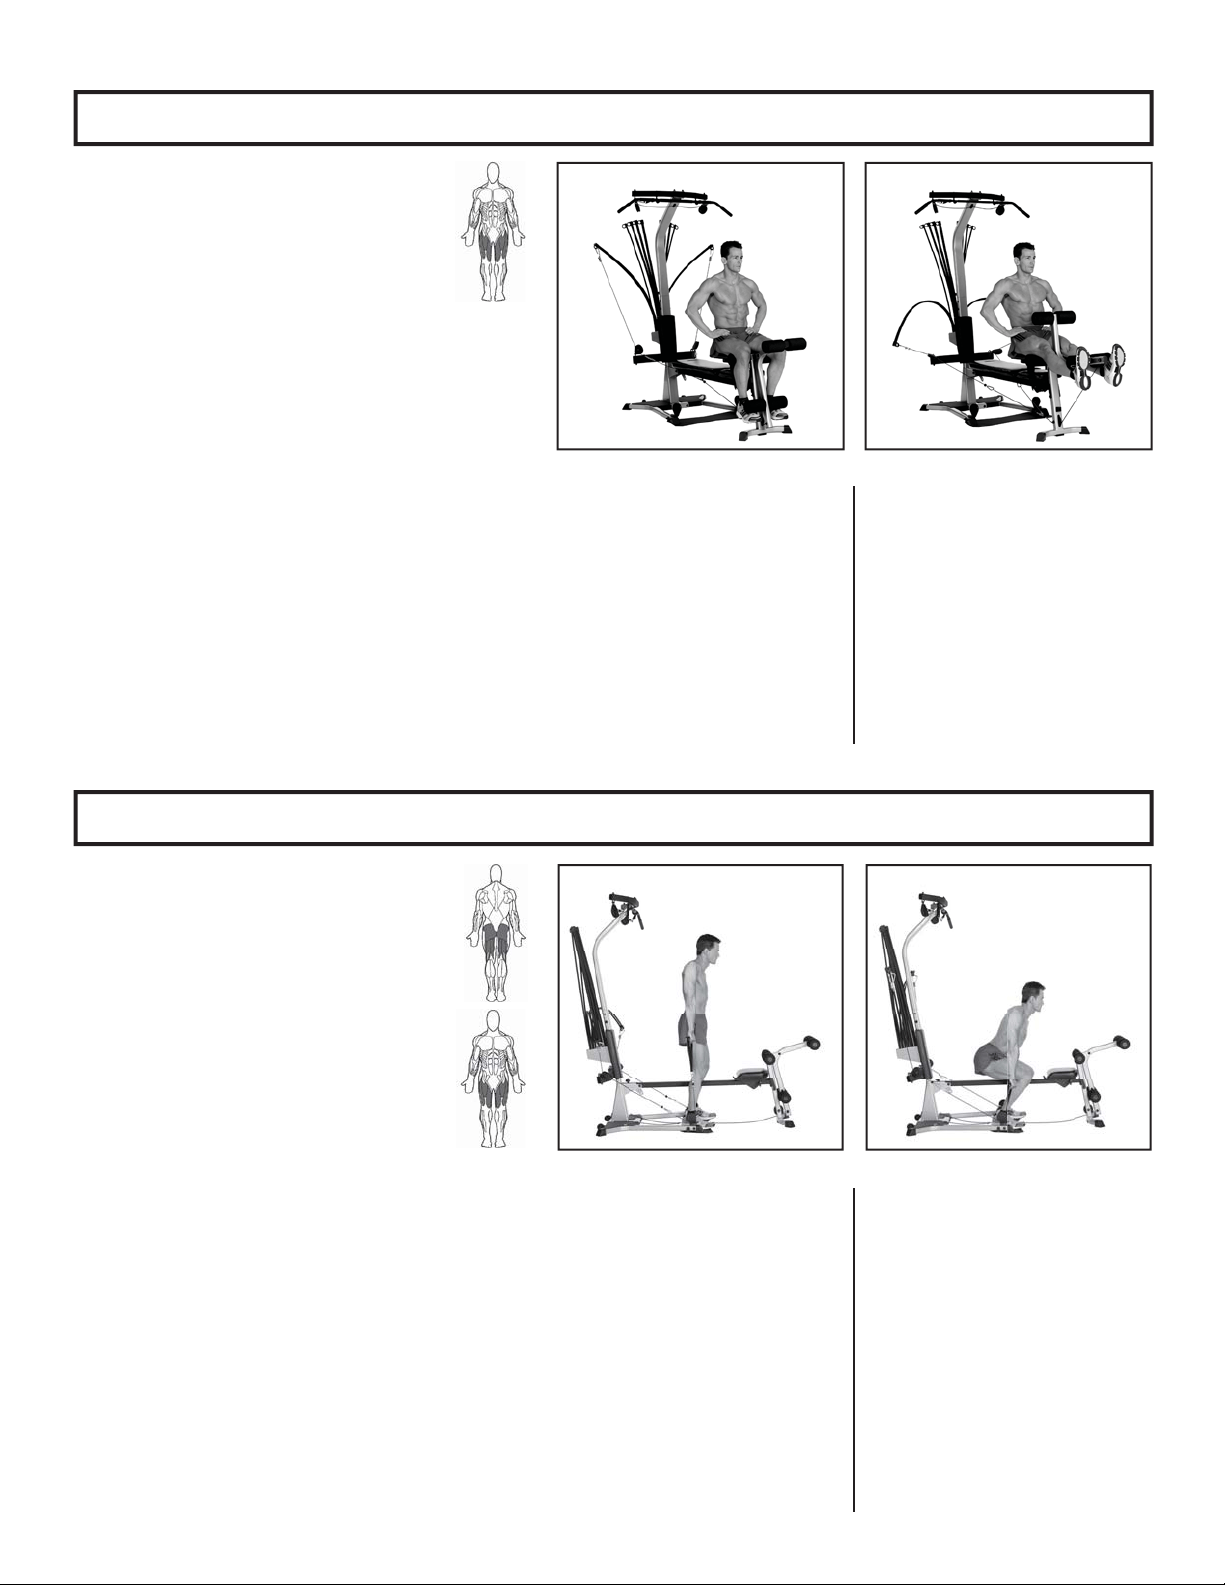
45
Leg Extension
Muscles worked:
Quadriceps
Bench Position:
Leg Extension Seat
Accessory:
None
Pulleys:
Leg Extension
Leg Extension:
Engaged
Success Tips
• Use slow, controlled motion—do not
“kick” into the extension.
• Do not let your knees rotate outward
during the exercise. Keep kneecaps
pointing up and straight forward.
START FINISH
Start
• Sit on the Leg Extension Seat
with your knees near the pivot
point and the lower roller pads in
front of your shins.
• Adjust your thighs to hip width,
pointing your knee caps forward.
• Grasp the sides of the Seat to
stabilize yourself.
• Sit up straight, chest lifted, abs
tight, and a slight arch in your
lower back.
Action
• Tighten your quads.
• Slowly straighten your legs,
moving your feet forward then
upward until your legs are com-
pletely straight and your knee-
caps point toward the ceiling.
• Slowly reverse the motion,
returning to the Start position
without relaxing your quads.
Leg Exercises
Squat—Knee Extension, Hip Extension, Ankle Plantarfl exion
Muscles Worked:
Although the squat is often considered a
total body exercise, the glutes, adductors,
hamstrings, and quads are primary
movers, and the spinal erectors are key
to stabilization.
Bench Position:
Removed
Accessory:
Handgrips
Pulleys:
Base
Success Tips
• Keep your knees pointed in the same
direction as your toes.
• Keep your head and neck in line with your
trunk.
• Never attempt to exercise with more
resistance than you are physically able to
handle.
START FINISH
Start
• Remove the Bench, and straddle
the Seat Rail, facing away from
the Power Rod
®
unit.
• Grasp the handgrips and stand.
• Flatten your back, keep your chest
up, and position your feet in line
with the Cable/Pulley.
• Place you feet wider than hip
width, and point your toes out-
ward slightly. Direct the thighs to
the same outward angle as the
feet.
Action
• While keeping your back
straight, tighten your abs, and
move to a standing position.
• Keep the pressure through the
middle of the arches in your feet.
• Using control, slowly squat down
by sticking the hips out as the
knees start to bend. Keep the
chest up and back flat as the
hips continue to move backward.
• Lower to approximately 90
o
at
your knees.
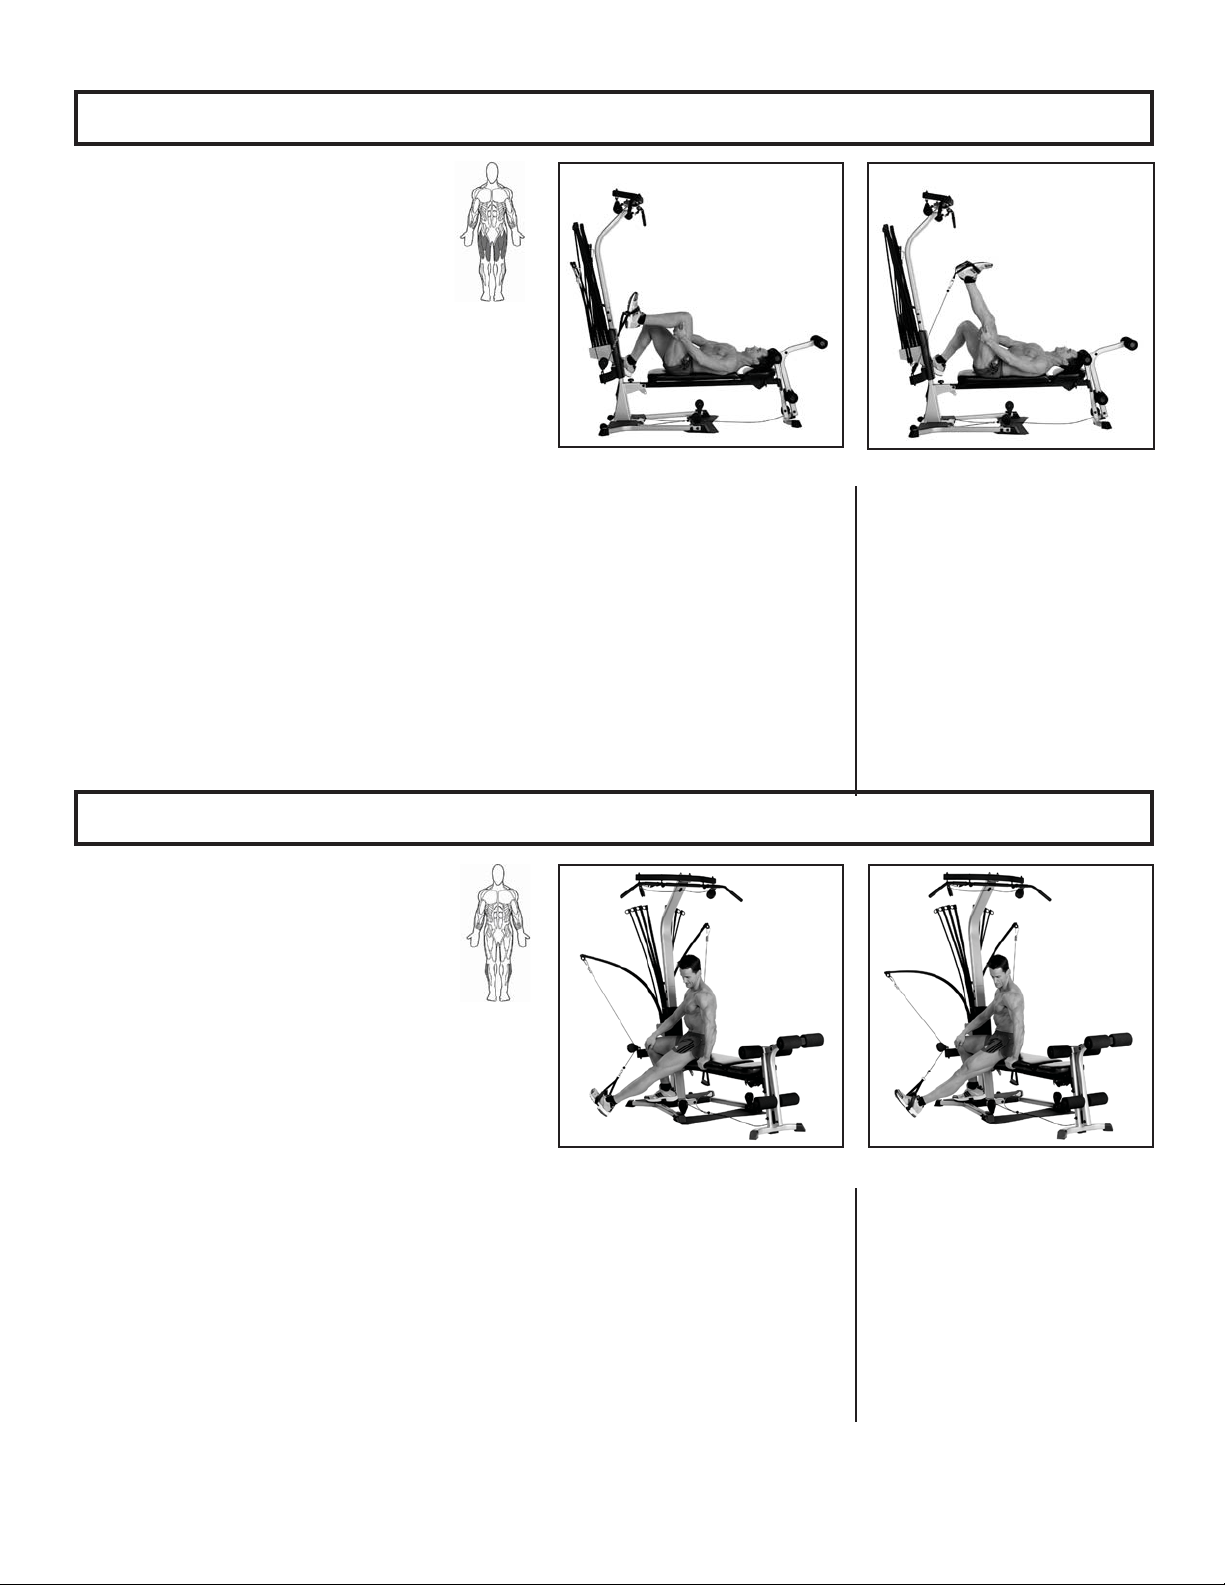
46
Leg Exercises
Lying Leg Extension
Ankle Eversion
Muscles worked:
Quadriceps
Bench Position:
Flat Bench Forward
Accessory:
Ankle Cuff
Pulleys:
Chest Bar
Success Tips
• Keep your chest lifted, spine aligned, abs
tight, and a very slight arch in your lower
back.
• Keep your upper thigh motionless
throughout this exercise.
Muscles Worked:
Peroneals
Bench Position:
Flat Bench Forward
Accessory:
Ankle Cuff
Pulleys:
Chest Bar
Success Tips
• Movement should occur only at your
ankle—keep the rest of your body motion-
less.
• Keep your abs tight, and do not lift your
hips or excessively arch your back.
• You should feel tension in the outside of
your calf throughout the entire motion.
START FINISH
START FINISH
Start
• Sit on the Bench, facing the
Power Rod
®
unit.
• Secure the Ankle Cuff around the
ball of one foot.
• Lie back on the Bench with your
head supported.
• Bend the active leg approxi-
mately 90
o
.
• Clasp your hands around the
active thigh behind the knee,
and brace the inactive leg on the
Bench or the floor.
Start
• Sit on the Bench, with one side
toward the Power Rod
®
unit.
• Attach an Ankle Cuff around the
ball of your outside foot (farthest
from the Pulley).
• Straighten your cuffed leg, and
sit up straight.
• Allow your foot to rotate toward
the Power Rod
®
unit, keeping
tension in the cables.
Action
• Slowly straighten your leg,
moving only your knee and lower
leg. Do not lock your knee.
• Slowly return to the Start
position without relaxing your
quadriceps.
Action
• Slowly rotate your foot outward
away from Power Rod
®
unit.
• While maintaining tension,
slowly return to the Start
position.
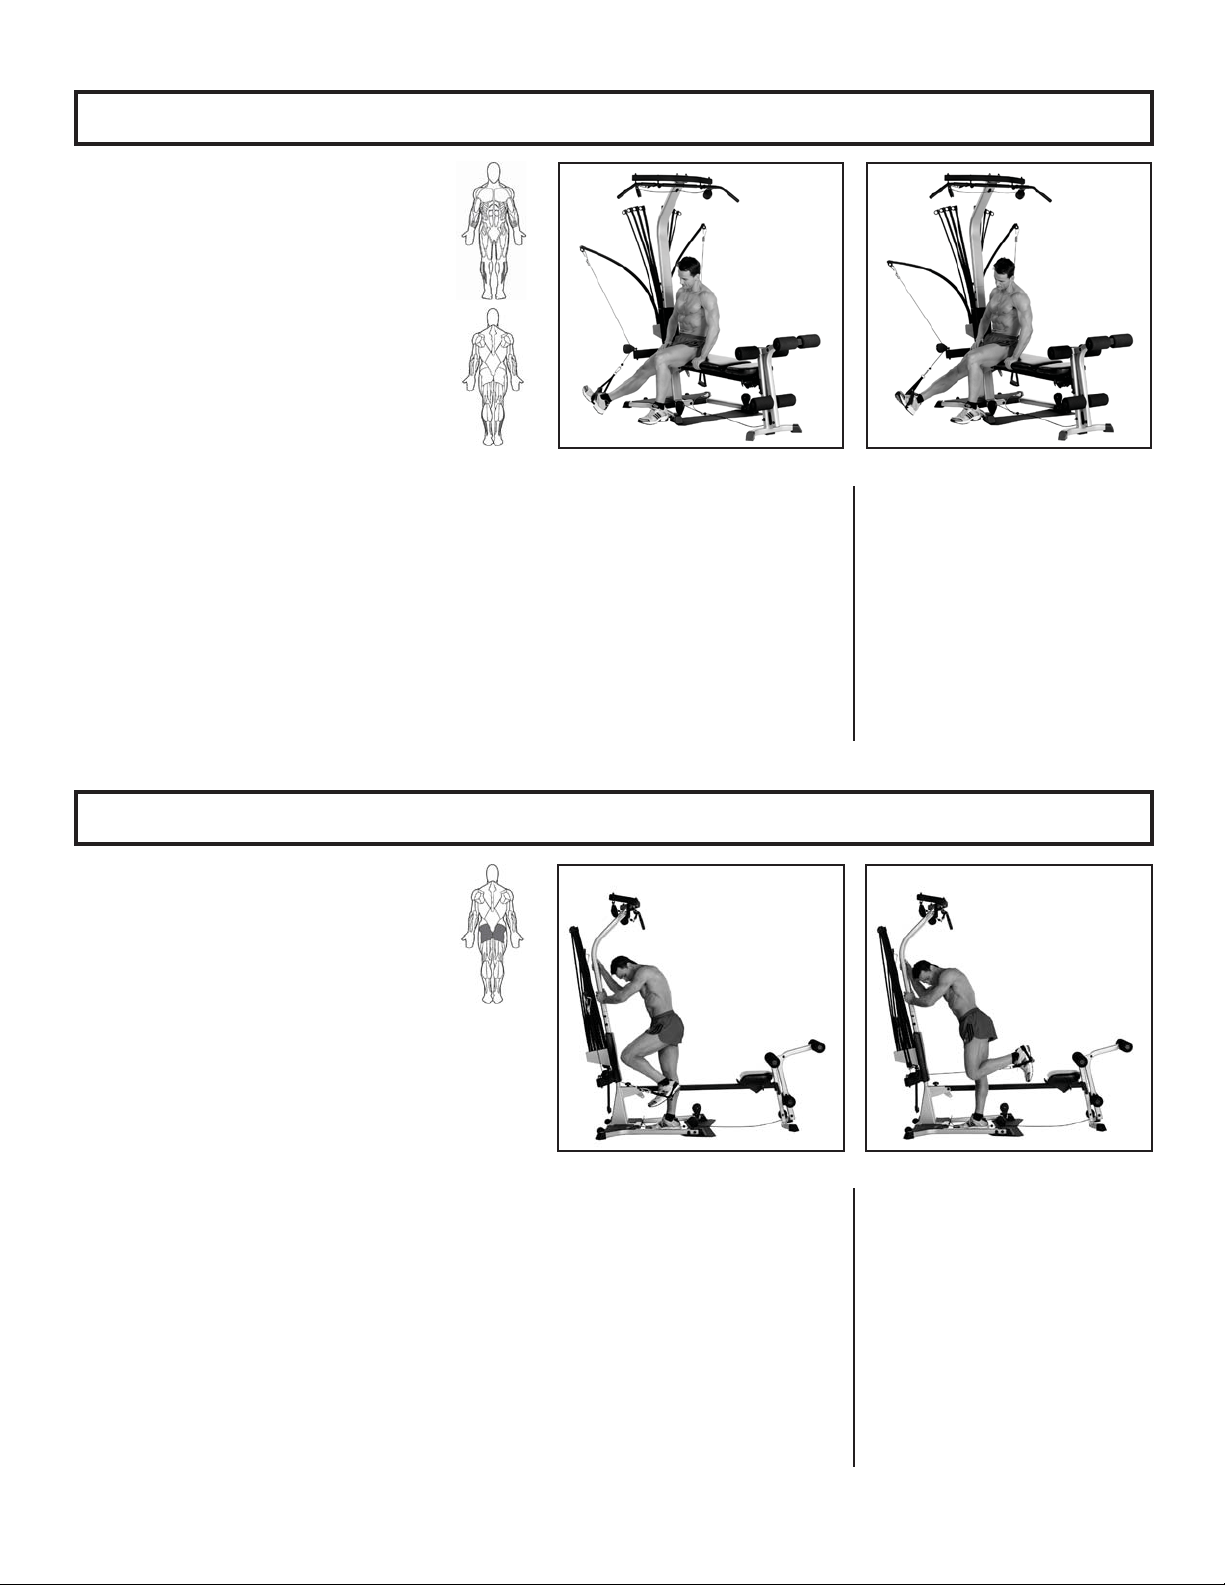
47
Leg Exercises
Ankle Inversion
Standing Hip Extension—(knee flexed)
Muscles Worked:
Tibialis Anterior and Posterior
Bench Position:
Flat Bench Forward
Accessory:
Ankle Cuff
Pulleys:
Chest Bar
Success Tips
• Movement should occur only at your
ankle—keep the rest of your body motion-
less.
• Keep your abs tight, and do not lift your
hips or excessively arch your back.
• You should feel tension in the inside of
your calf throughout the entire motion.
Muscles worked:
Gluteus Maximus
Bench Position:
Removed
Accessory:
Ankle Cuff
Pulleys:
Chest Bar
Success Tips
• Keep your chest lifted, spine aligned, abs
tight, and a very slight arch in your lower
back.
• Do not bend from your waist or lower
back.
START FINISH
START FINISH
Start
• Sit on the Bench with one side
toward the Power Rod
®
unit.
• Attach an Ankle Cuff around the
ball of your inside foot (closest to
the Pulley).
• Straighten your cuffed leg, and
sit up straight.
• Allow your foot to rotate toward
the Power Rod
®
unit, keeping
tension in the cables.
Start
• Stand to one side of the Seat
Rail, facing the Power Rod
®
unit.
• Secure the Ankle Cuff around
your outside ankle (farthest from
the Rail).
• Bend your outside leg approxi-
mately 90
o
.
• Bend forward 30-40
o
from your
hips (not your waist), and very
slightly bend the knee of your
supporting leg.
Action
• Slowly rotate your foot outward
away from Power Rod
®
unit.
• While maintaining tension,
slowly return to the Start
position.
Action
• Initiate the movement by tight-
ening your glutes, and slowly
pivot your leg from your hip.
Move your entire leg backward
to a straight position.
• Slowly move your leg as far as
you can without allowing any
movement at the waist or lower
back.
• Slowly return to the Start
position.
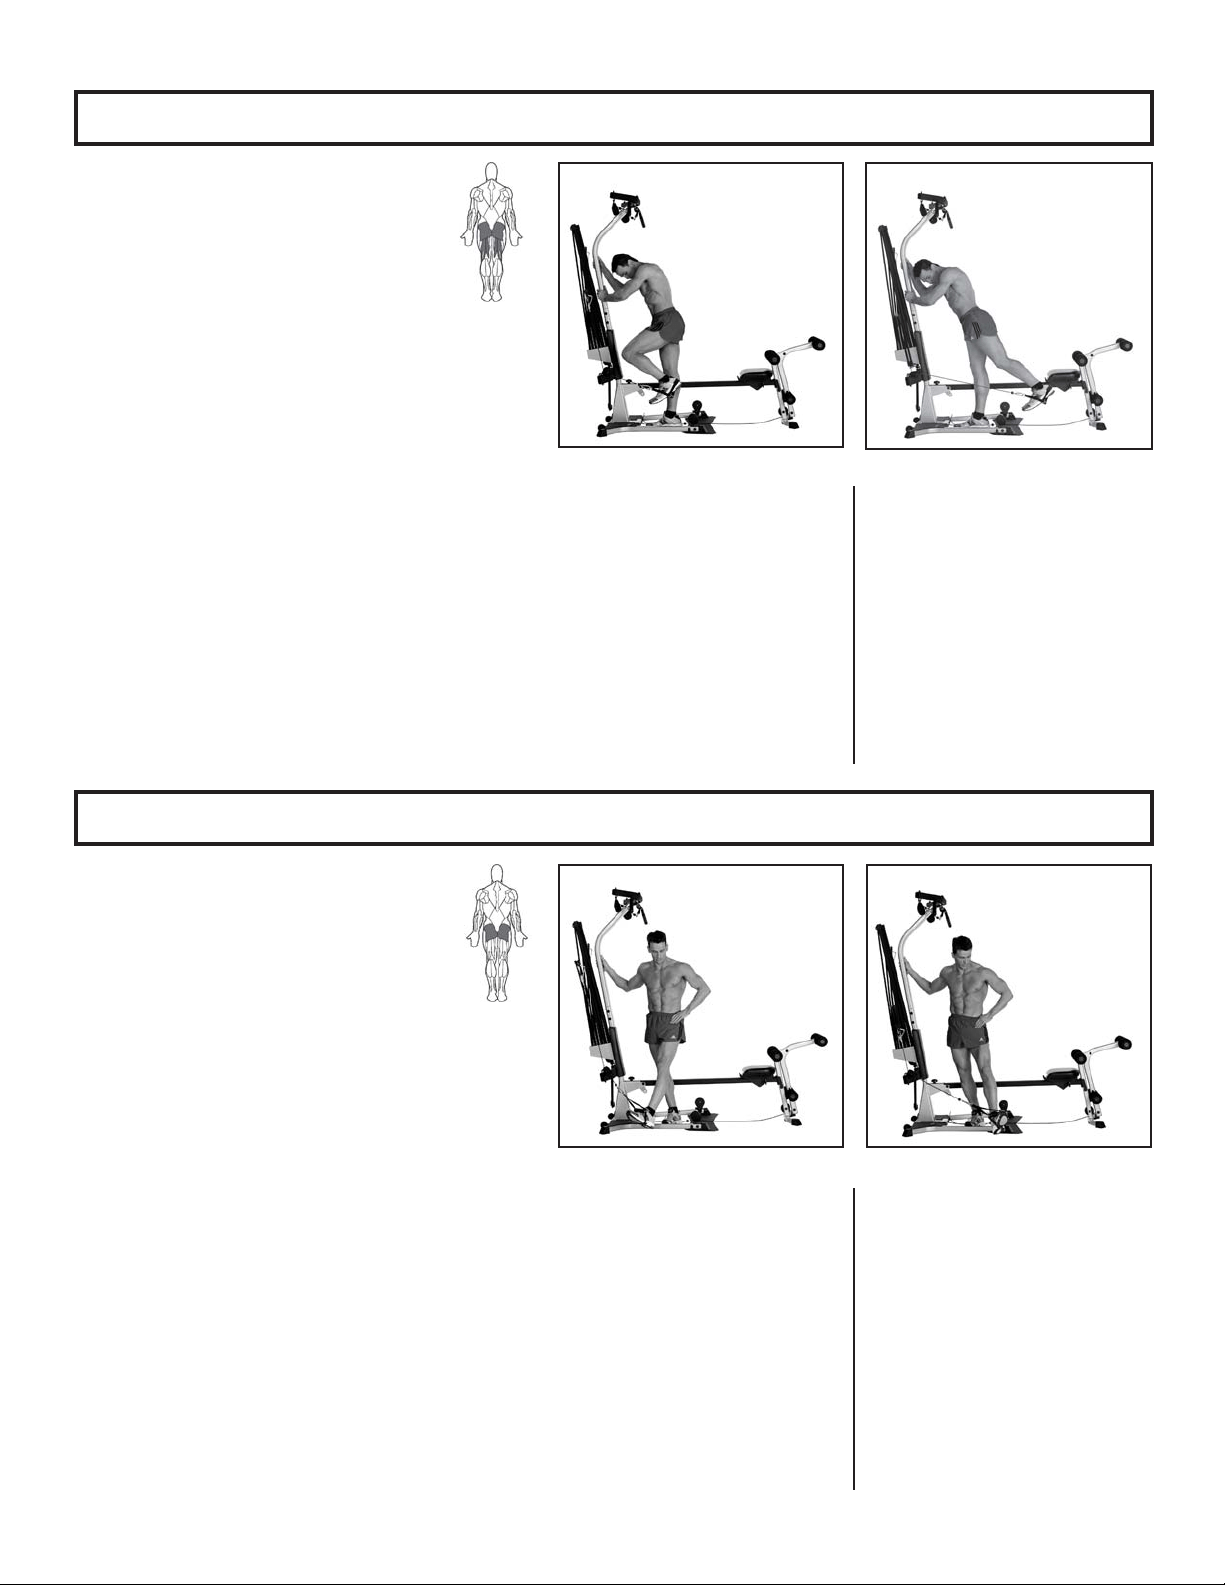
48
Leg Exercises
Standing Hip Extension—(knee stabilized)
Standing Hip Abduction
Muscles worked:
Gluteus Maximus; Biceps Femoris;
Semimembranosus; Semitendinosus
Bench Position:
Removed
Accessory:
Ankle Cuff
Pulleys:
Chest Bar
Success Tips
• Keep your chest lifted, spine aligned, abs
tight, and a very slight arch in your lower
back.
• Do not bend from your waist or lower
back.
• Keep your knee stabilized in the 90
o
angle
position.
Muscles Worked:
Gluteus Maximus
Bench Position:
Removed
Accessory:
Ankle Cuff
Pulleys:
Chest Bar
Success Tips
• Movement should occur only at your
hip—keep the rest of your body motion-
less.
• Keep your abs tight, and do not lift your
hips or excessively arch your back.
• You should feel tension in the outside of
your glutes throughout the entire motion.
START FINISH
START FINISH
Start
• Stand to one side of the Seat
Rail, facing the Power Rod
®
unit.
• Secure the Ankle Cuff around
your outside ankle (farthest from
the rail).
• Bend forward 30-40
o
from your
hips (not your waist), and very
slightly bend the knee of your
supporting leg.
Start
• Stand to one side of the Seat
Rail, one side next to the Power
Rod
®
unit.
• Secure the Ankle Cuff around
your ankle farthest from the
Power Rod
®
unit. Keep your leg
straight but your knee loose.
• Adjust your position so that there
is some tension in the Cables at
the start of this exercise.
• Grasp the Upper Lat Tower to
stabilize your movement.
Action
• Initiate the movement by tight-
ening your glutes, and slowly
pivot your leg from your hip.
Move your entire leg backward,
and then lift it slightly behind
you.
• Slowly move your leg as far as
you can without allowing any
movement at the waist, knee, or
lower back.
• Slowly return to the Start
position.
Action
• Slowly move your leg with the
Ankle Cuff outward away from
the Power Rod
®
unit at a 30-45
o
angle, keeping your hips and
spine motionless.
• Slowly return to the Start
position without relaxing tension
in your leg.
• Keep your hips level during
movement.
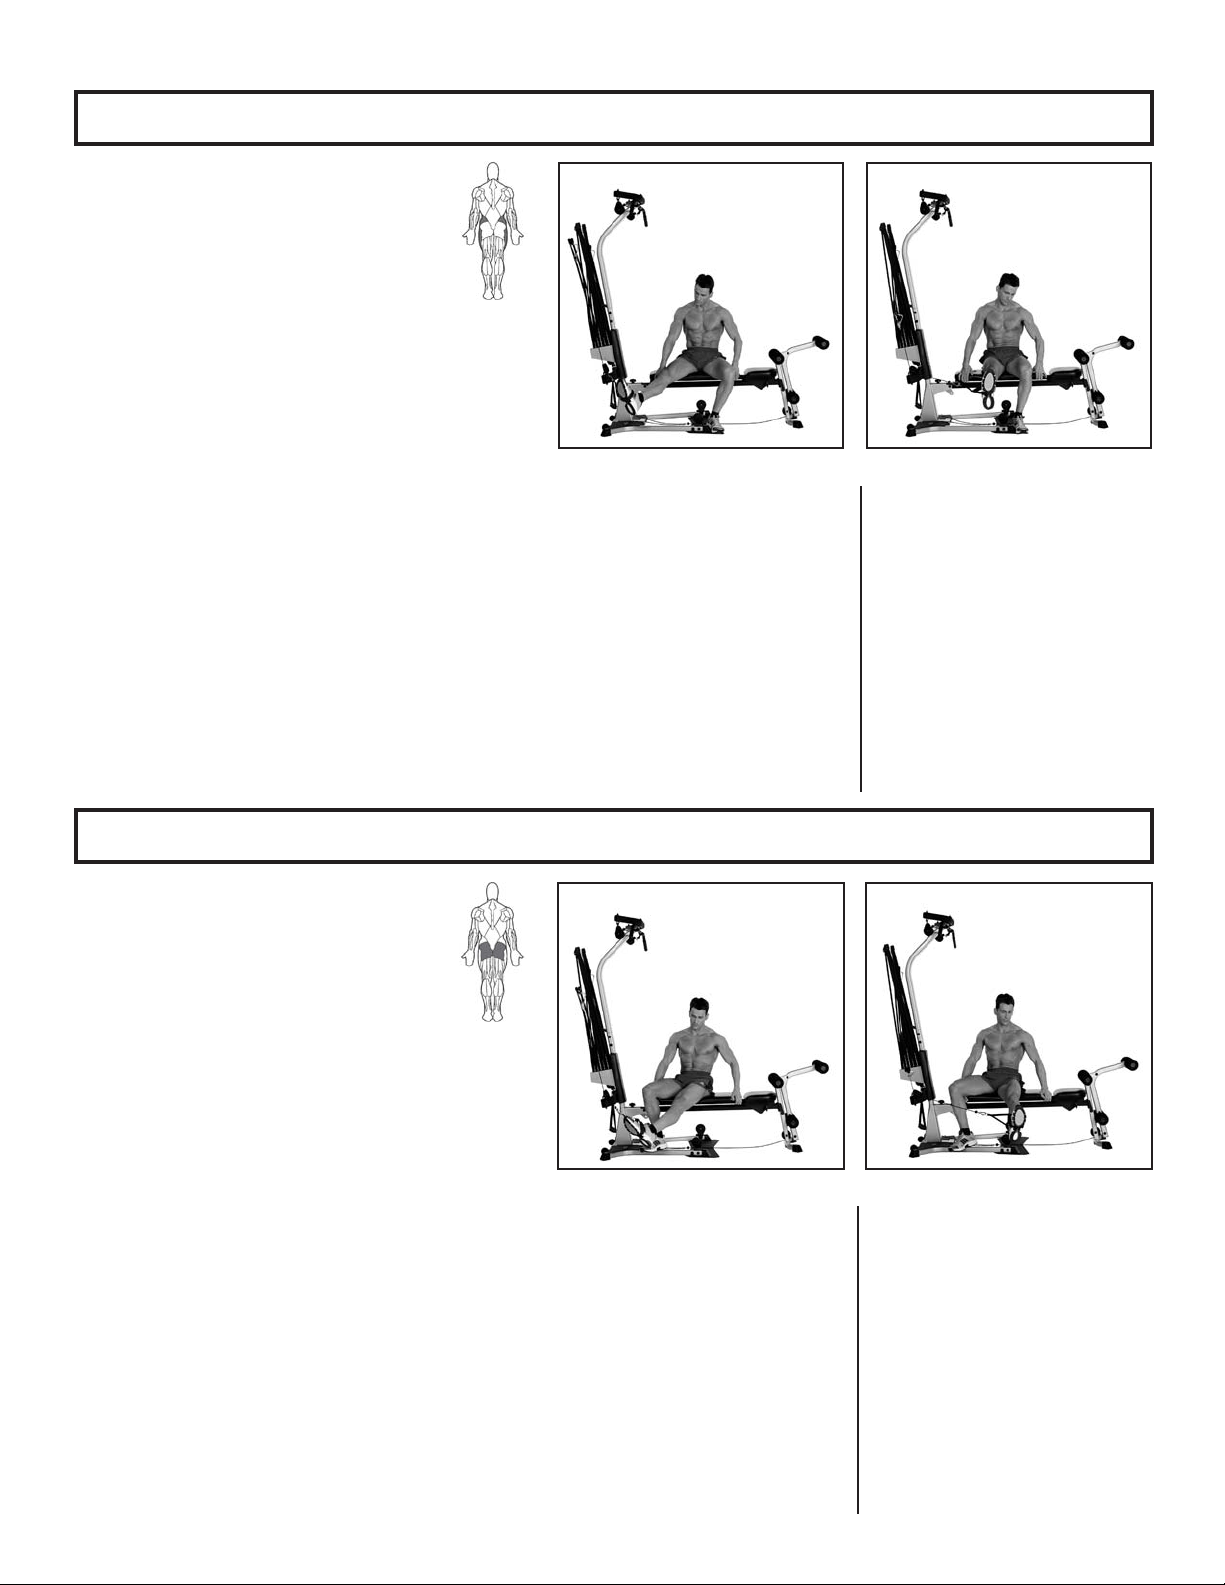
49
Leg Exercises
Seated Hip Adduction
Seated Hip Abduction
Muscles Worked:
Adductor Longus and Gluteus Medius
Bench Position:
Horizontal
Accessory:
Ankle Cuff
Pulleys:
Chest Bar
Success Tips
• Do not cross your leg with the attached
Cuff in front of your stabilized leg.
• Keep your abs tight, and do not lift your
hips or excessively arch your back.
• Keep your spine straight and your
hips level—do not raise your hips during
motion.
• Use only a small range of motion.
Muscles worked:
Piriformis and Gluteus Maximus
Bench Position:
Flat Bench Forward
Accessory:
Ankle Cuff
Pulleys:
Chest Bar
Success Tips
• Keep your spine straight and your hips
level—do not raise your hips during the
motion.
• Use only a small range of motion.
• Keep your hips motionless throughout this
exercise.
FINISH
START FINISH
Start
• Sit sideways on the Bench, and
attach an Ankle Cuff to your ankle
closest to the Power Rod
®
unit.
• Sit far enough from the Power Rod
®
unit to maintain tension in the cable
at the start of the exercise.
• Lift your cuffed leg in front of you at a
45
o
angle from your trunk (toward the
Power Rod
®
unit)—do not lock your
knee.
• You may hold onto the Bench for
added stability.
Start
• Sit sideways on the Bench, and
secure an Ankle Cuff to your ankle
farthest from the Power Rod
®
unit.
• Sit far enough from the Power
Rod
®
unit to maintain tension in
the cable at the start of the exer-
cise.
• Lift your cuffed leg in front of you
at a 45
o
angle from your trunk
(toward Power Rod
®
unit)—do not
lock your knee.
• You may hold onto the Bench for
added stability.
Action
• Slowly allow your leg with the
attached Cuff to move inward
toward the center, as you face
forward, keeping your hips and
spine perfectly still.
• Keeping your leg still, slowly
move it back to the Start
position.
Action
• Slowly allow your cuffed leg to
move outward away from the
Power Rod
®
unit, keeping your
hips and spine perfectly still.
• Keeping your leg still, slowly
move it back to the Start
position.
START
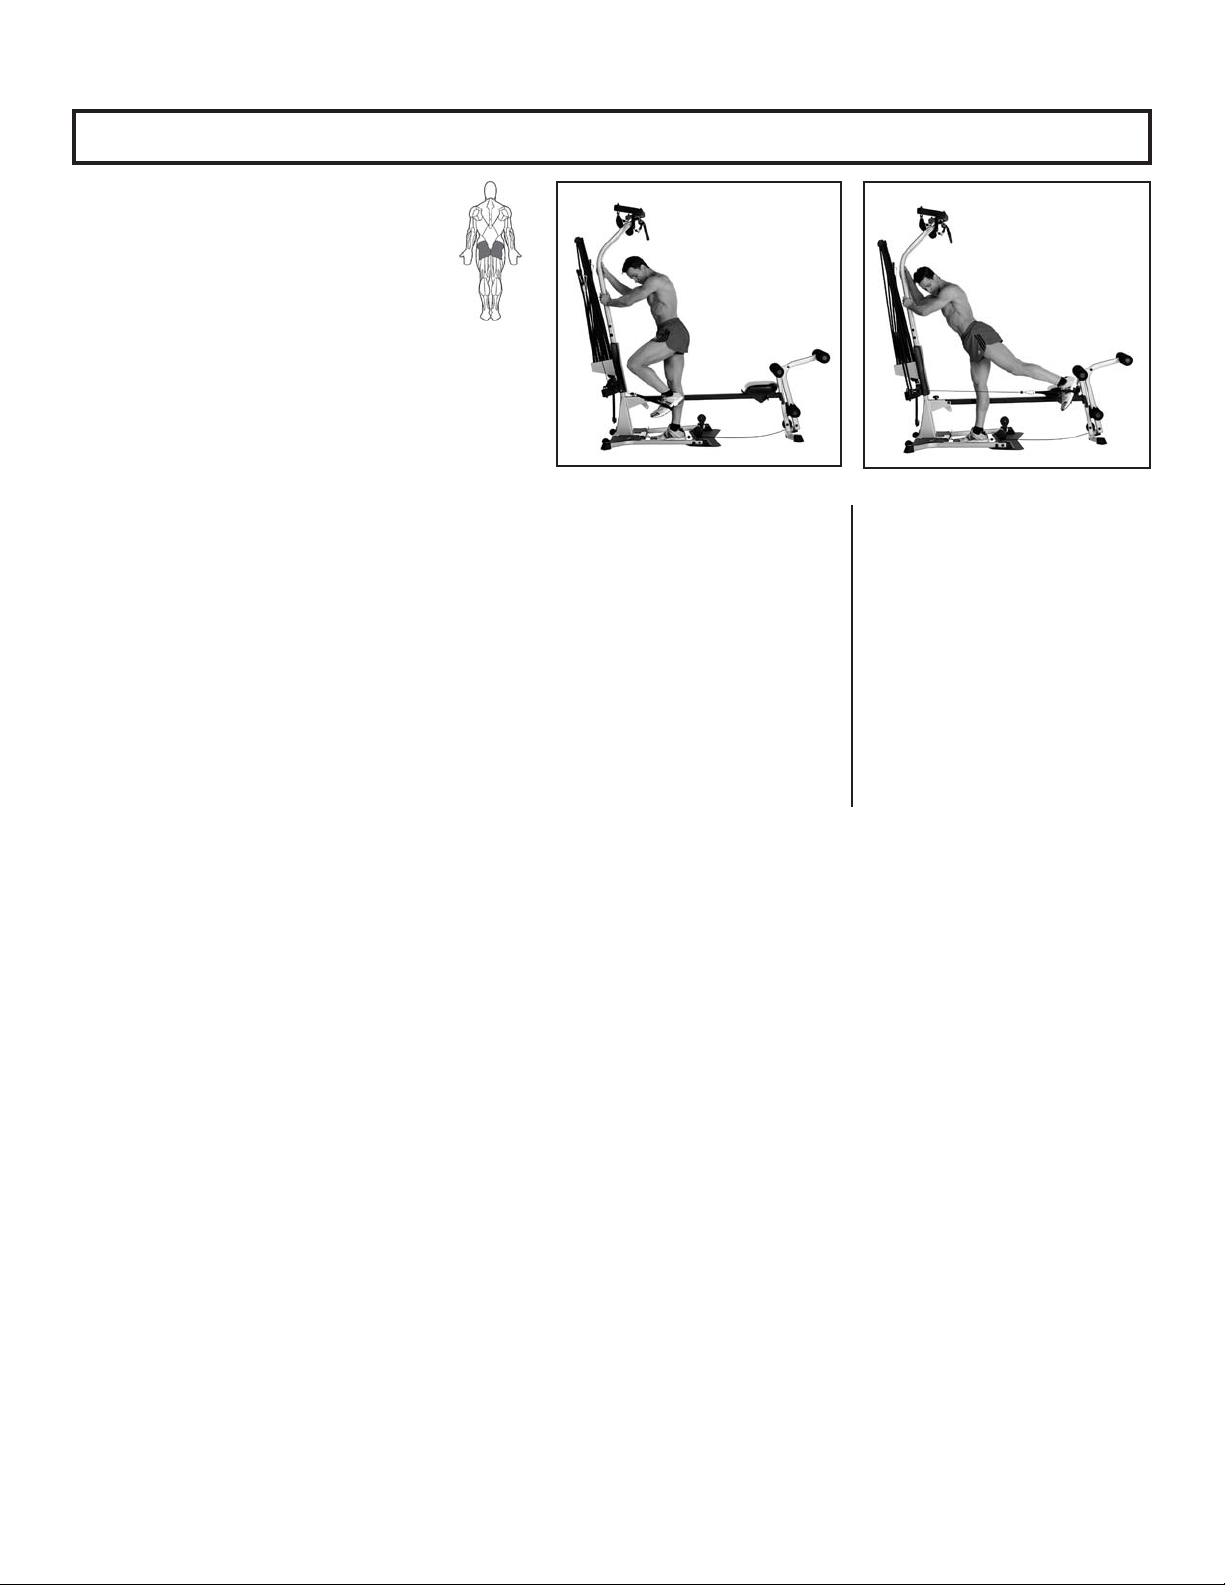
50
Leg Exercises
Standing Leg Kickback—Hip and Knee Extension
Muscles worked:
Gluteus Maximus
Bench Position:
Removed
Accessory:
Ankle Cuff
Pulleys:
Chest Bar
Success Tips
• Keep your chest lifted, spine aligned, abs
tight, and a very slight arch in your lower
back.
• Do not bend from your waist or lower
back.
START FINISH
Start
• Stand to one side of the Seat
Rail, facing the Power Rod
®
unit.
• Secure the Ankle Cuff around
your foot farthest from the Rail.
Bend this leg approximately 90
o
.
• Bend forward 30-40
o
from your
hips (not your waist), and very
slightly bend the knee of your
supporting leg.
• Grasp the Upper Lat Tower to
stabilize your movement.
Action
• Extend your leg with the Ankle
Cuff attached backwards,
straightening your knee.
• Slowly move your leg as far as
you can without allowing any
movement at your waist, knee, or
lower back.
• Slowly return to the Start
position.

51
Leg Press—Hip and Knee Extension
Muscles Worked:
Quadriceps, Gluteus Maximus and
Adductor muscle groups
Bench Position:
Removed
Accessory:
Leg Press Belt
Pulleys:
Chest Bar
Success Tips
• Generate the force for the leg press by
mentally directing your pushing/pressing
effort through the lower leg and squarely
into the frame of the machine. In other
words, push in the direction the calf bone
is pointing throughout the motion, rather
than just pushing your body backward.
This will decrease the shearing forces at
the knee.
• Keep your knees pointed in the same
direction as your feet. DO NOT let the
knees travel inward/closer during the
motion.
• Keep your spine in good posture.
• Straighten but do not “lock out” your
knees. Keep your quads tightened
throughout the entire motion.
• Do not use momentum. MOVE SLOWLY!
Do not “launch” yourself when you
straighten your knees.
START FINISH
Start
• Remove the bench and unlock the
rowing seat.
• Sit on the seat facing the Power
Rod
®
unit with the leg press belt
attached and adjusted. Support
your feet on the upright pulley
frame or foot rests as shown. The
belt should be placed around the
pelvis, NOT the low back/spine.
• Lift your chest, tighten your abs
and maintain a very slight arch in
your lower back.
• Slowly straighten your legs, but do
not lock your knees.
• You may rest your hands around
the sides of the belt, on the sides of
the seat, or you may fold your arms
across your chest, whichever is
more comfortable.
Action
• Bend your knees and hips slowly
allowing yourself to slide toward
thePower Rod
®
unit.
• Limit your slide to a position that
allows you to still maintain good
spinal posture, with your chest
lifted, abs tight and a slight arch
in your lower back.
• Slowly return to the starting
position.
Leg Exercises
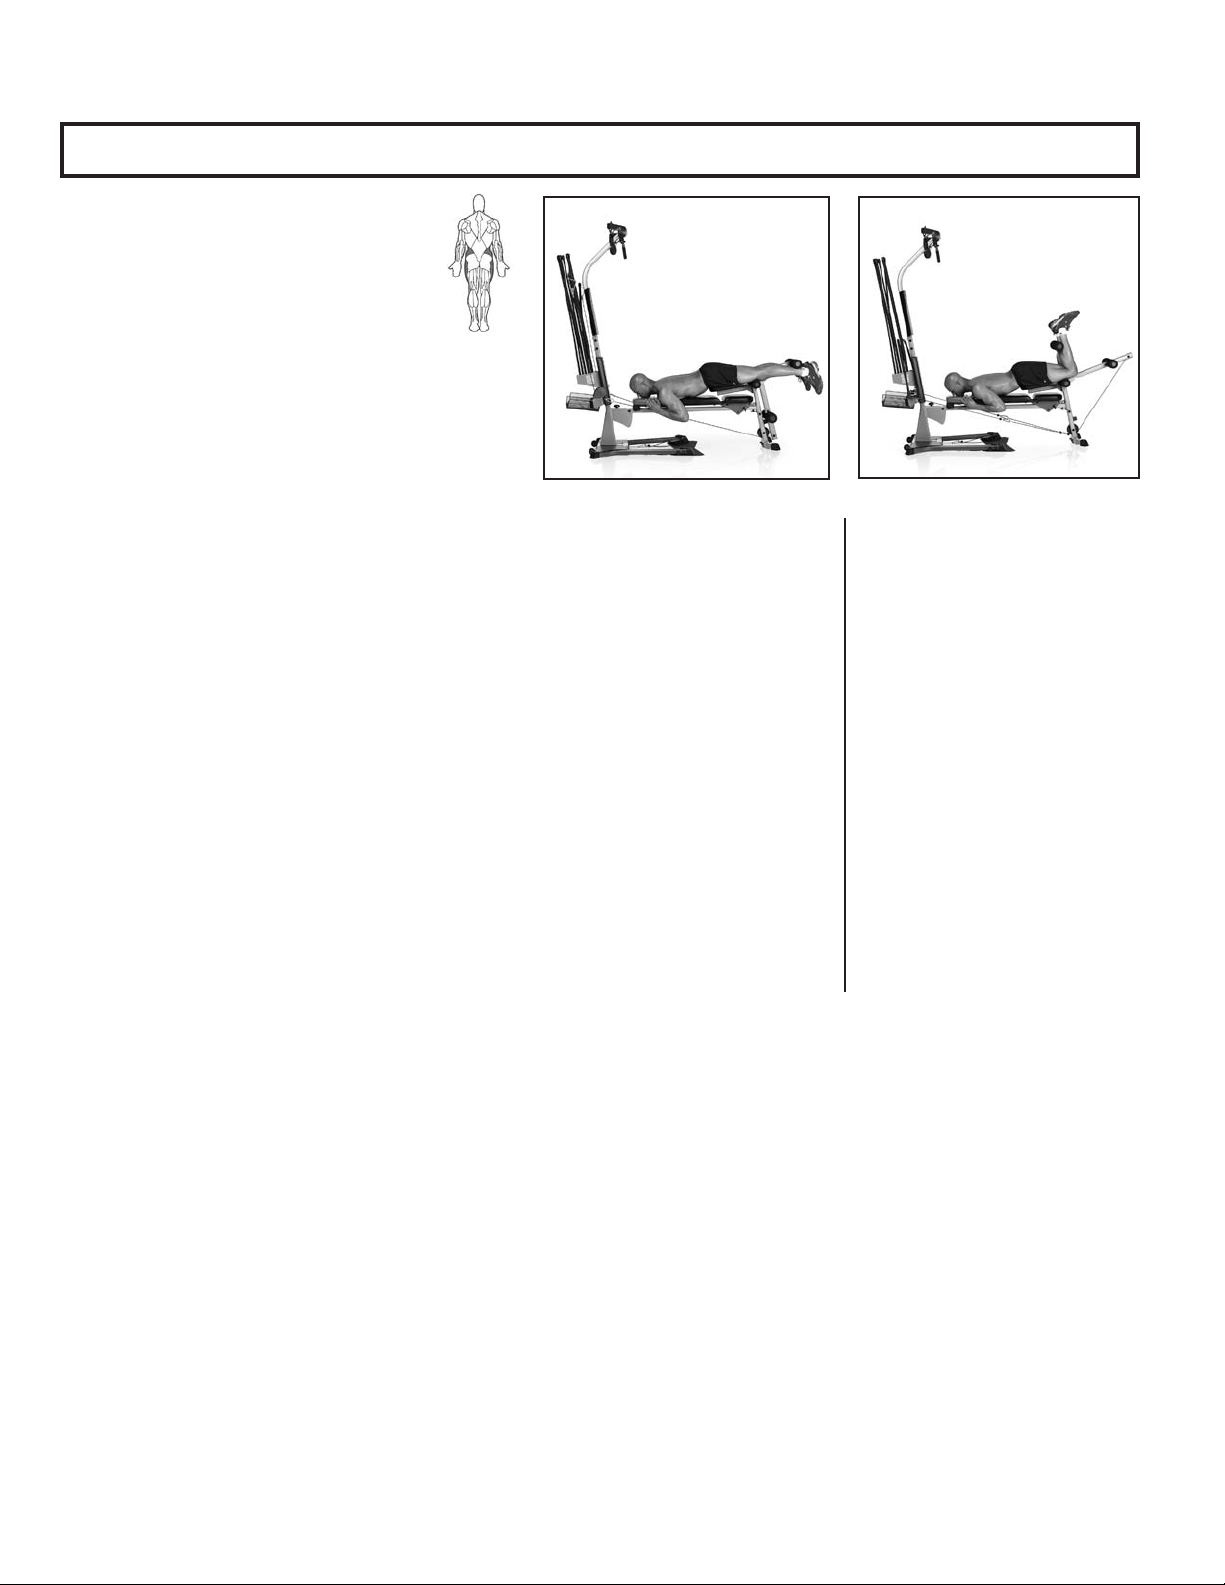
52
Prone Leg Curl—Knee Flexion
Muscles Worked:
Hamstring muscle group (biceps femoris,
semimembranosus, semitendinosus) and
Gastrocnemius
Bench Position:
Leg Extension Seat
Accessory:
None
Pulleys:
Leg Extension
Leg Extension:
Engaged
Success Tips
• Make sure you straighten your legs under
control, do not allow your knees to hyper-
extend.
• Keep your chest lifted, abs tight and
maintain a very slight arch in your lower
back.
• Try to relax your calf and foot muscles.
START
FINISH
Start
• Lie face down on the bench with
your lower thighs on the leg
extension seat, the knees near the
pivot point and ankles under the
upper roller pads .
• Point your knees and feet straight
down and tighten your inner thigh
muscles (as if squeezing your
knees together) to stabilize.
• Place your hands on the floor or
grasp the rail or bench for stability.
• Place your forehead on the bench
or look to the side, but do not look
up, hyper-extending your neck.
• Tighten your abs to prevent spinal
motion and very slightly lift your
knees (approximately 1 inch),
placing the pressure on your
thighs.
Action
• Slowly bend your knees, upward
and then toward your hips
without moving your spine and
without your hips lifting from the
bench.
• Keeping the hamstrings tight,
slowly allow your legs to
straighten and return near the
starting position. Do not fully
extend your legs.
Leg Exercises
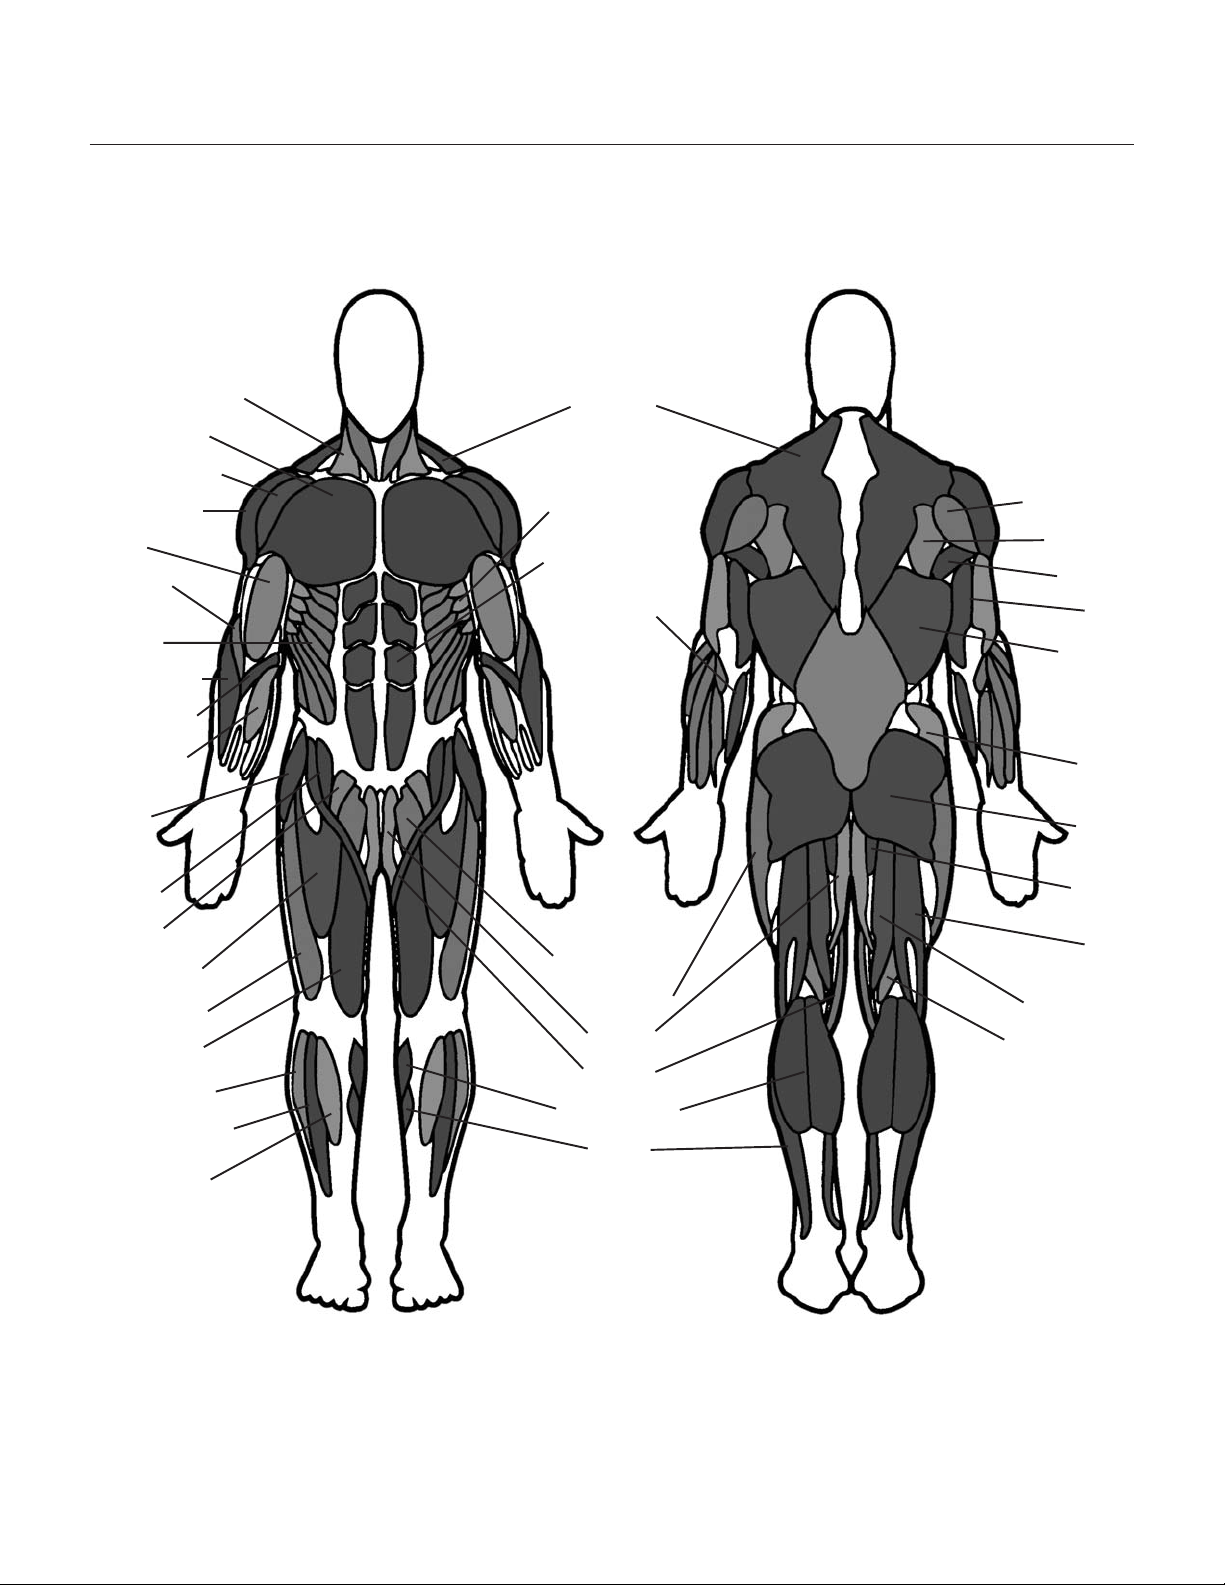
53
Sternocleidomastoid
Pectoralis Major
Anterior Deltoid
Medial Deltoid
Biceps
Brachialis
External
Obliques
Brachioradialis
Pronator Teres
Flexor Carpi
Radialis
Tensor
Fasciae
Latae
Iliopsoas
Pectineus
Rectus Femoris
Vastus Lateralis
Vastus Medialis
Peroneus Longus
Extensor Digitorum
Longus
Tibialis Anterior
Posterior Deltoid
Infraspinatus
Teres Major
Triceps
Latissimus
Dorsi
Gluteus
Medius
Gluteus
Maximus
Adductor
Magnus
Biceps
Femoris
Semitendinosus
Semimembranosus
Trapezius
Serratus Anterior
Rectus Abdominus
Flexor Digitorum
Superficials
Adductor Longus
Iliotibial Tract
Gracilis
Sartorius
Gastrocnemius
Soleus
Muscle Chart

54
GUIDELINES Week 1&2
All exercises should be practiced with one set of 8 to 12 repetitions. The style of performance is very important.
The movement for each repetition should be 4 seconds in the positive phase and 4 seconds in the negative. Keep
the motion slow and smooth. When 12 repetitions are accomplished, increase the resistance by approximately 5
percent. Keep the time between exercises to a minimum, no longer than 60 seconds. No workout should take more
than 30 minutes to complete. Perform each workout three days a week.
GUIDELINES Week 3&4
All exercises should be practiced with one set of 8 to 12 repetitions. The style of performance is very important.
The movement for each repetition should be 4 seconds in the positive phase and 4 seconds in the negative. Keep
the motion slow and smooth. When 12 repetitions are accomplished, increase the resistance by approximately 5
percent. Keep the time between exercises to a minimum, no longer than 45 seconds. No workout should take more
than 30 minutes to complete. Perform each workout three days a week.
GUIDELINES Week 5&6
All exercises should be practiced with one set of 8 to 12 repetitions. The style of performance is very important.
The movement for each repetition should be 4 seconds in the positive phase and 4 seconds in the negative. Keep
the motion slow and smooth. When 12 repetitions are accomplished, increase the resistance by approximately 5
percent. Keep the time between exercises to a minimum, no longer than 30 seconds. No workout should take more
than 30 minutes to complete. Perform each workout three days a week.
Exercise
Leg Curl
Leg Extension
Bench Press
Lying Biceps Curl
Seated Shoulder Press
Seated Abdominal Crunch
Sets
1
1
1
1
1
1
Reps
8-12
8-12
8-12
8-12
8-12
8-12
Exercise
Leg Curl
Leg Extension
Bench Press
Lying Biceps Curl
Seated Shoulder Press
Rear Deltoid Rows
Seated Triceps Extension
Seated Abdominal Crunch
Sets
1
1
1
1
1
1
1
1
Reps
8-12
8-12
8-12
8-12
8-12
8-12
8-12
8-12
Exercise
Leg Curl
Leg Extension
Leg Press
Bench Press
Lying Biceps Curl
Lying Shoulder Pullover
Reverse Fly
Rear Deltoid Rows
Seated Triceps Extension
Seated Abdominal Crunch
Sets
1
1
1
1
1
1
1
1
1
1
Reps
8-12
8-12
8-12
8-12
8-12
8-12
8-12
8-12
8-12
8-12
The Workouts

55
Exercise Log
Please feel free to make copies of this chart to continue your exercise log.
EXERCISE
DATE DATE DATE DATE DATE DATE
Sets
Reps
Resistance
Sets
Reps
Resistance
Sets
Reps
Resistance
Sets
Reps
Resistance
Sets
Reps
Resistance
Sets
Reps
Resistance
Sets
Reps
Resistance
Sets
Reps
Resistance
Sets
Reps
Resistance
Sets
Reps
Resistance
Sets
Reps
Resistance
Sets
Reps
Resistance
Sets
Reps
Resistance
Bench Press
2
10, 9
120, 130

56
Introduction and Overview
:HOFRPHWRWKH%RZÀH[
™
%RG\:HLJKW/RVV*XLGH7KLVJXLGHLV
GHVLJQHGWREHXVHGZLWK\RXU%RZÀH[
®
equipment and will help you:
• /RVHZHLJKWDQGJHWOHDQ
• Improve your health and wellness
• ,QFUHDVH\RXUHQHUJ\DQGYLWDOLW\
Consult a physician before you start an exercise program or
a new health and diet plan. Stop exercising if you feel pain
or tightness in your chest, become short of breath, or feel
faint. Contact your doctor before you use the machine
again.
%\IRFXVLQJRQWKHPDLQWKUHHHOHPHQWVRIWKH%RZÀH[
™
%RG\:HLJKW
/RVV*XLGHTXDOLW\EDODQFHDQGFRQVLVWHQF\\RX¶OOEHDEOHWRUHDFK
DQGPDLQWDLQ\RXUZHLJKWORVVDQG¿WQHVVJRDOVIRUWKHQH[WVL[ZHHNV
and beyond.
• Quality±7KHHPSKDVLVRIWKLVSODQLVRQHDWLQJPRUHZKROH
IRRGVDQGJHWWLQJWKHPRVWQXWULHQWVIURP\RXUFDORULHVDVSRVVL-
EOH0DNLQJWKHPDMRULW\RI\RXUGLHWIURPIRRGVWKDWKDYHDVLQJOH
LQJUHGLHQWIRUH[DPSOHIUXLWVYHJHWDEOHV¿VKOHDQSURWHLQHJJV
EHDQVQXWVDQGZKROHJUDLQVSURYLGHVWKHYLWDPLQVPLQHUDOV
¿EHUSURWHLQDQGKHDOWK\IDWV\RXUERG\QHHGV
• Balance±(DFKRIWKHPHDOVDQGVQDFNVLQWKLVJXLGHKDYHD
VRXUFHRI¿EHURUVPDUWFDUERK\GUDWHSURWHLQDQGKHDOWK\IDW
WRNHHS\RXUHQHUJ\OHYHOVFRQVLVWHQWWKURXJKRXWWKHGD\WRIXHO
\RXUZRUNRXWV%\KDYLQJWKLVEDODQFH\RX¶OOIHHOIXOOHUORQJHU
ZKLFKLVFULWLFDOWRZHLJKWORVVVXFFHVV
• Consistency±*HWWLQJDERXWWKHVDPHQXPEHURIFDORULHVHDFK
day is important for your metabolism and your mindset. If you
RYHUGRLWRQHGD\GRQ¶WWU\WRPDNHXSIRULWWKHQH[WGD\E\QRW
HDWLQJRUFXWWLQJ\RXUFDORULHVGUDVWLFDOO\*HWULJKWEDFNRQWUDFN
E\IROORZLQJWKLVJXLGH
Results & Expectations
5HVXOWVZLOOYDU\GHSHQGLQJRQ\RXUDJHVWDUWLQJZHLJKWDQGH[HUFLVH
OHYHOEXWRQDYHUDJH\RXFDQH[SHFWWRORVHOEVSHUZHHNDQGH[SH-
ULHQFHLQFUHDVHGHQHUJ\OHYHOV
5 Tips for Long-Term Success
1. Keep a food logLQFOXGLQJKXQJHUOHYHOVDQGZDWHULQWDNH)UHH
RQOLQHIRRGORJVDQGPRELOHDSSVDUHDYDLODEOHDWZZZP\¿WQHVV-
pal.com and www.loseit.com
2. Weigh and/or take measurements weekly – no more and no
OHVV:HLJKLQJZHHNO\UDWKHUWKDQGDLO\RUHYHU\RWKHUGD\LVEHVW
<RX¶OOWUDFN\RXUSURJUHVVDQGNHHS\RXUVHOILQFKHFNZLWKRXW
JHWWLQJGLVFRXUDJHGLIWKHVFDOHGRHVQ¶WPRYHIRUDIHZGD\V$QG
UHPHPEHUZHLJKWLVMXVWDQXPEHUDQGLW¶VLQÀXHQFHGE\PXVFOH
JDLQDVZHOODVIDWORVV)HHOLQJKRZ\RXUFORWKHV¿WFDQRIWHQEH
DEHWWHULQGLFDWRURISURJUHVVDV\RXUERG\DGDSWVWRH[HUFLVHDQG
QXWULWLRQFKDQJHV
3. Measure portions±7RDYRLGSRUWLRQFUHHSXVHPHDVXULQJFXSV
DQGVSRRQVIRUJUDLQVULFHSDVWDFHUHDOEHDQVQXWVRLOVDQG
GDLU\8VHWKH3RUWLRQ6L]HV*XLGHIRURWKHUIRRGV
4. Plan ahead±0DNHDPHDOSODQIRUWKHZHHNRUORJ\RXUIRRGD
GD\LQDGYDQFH3ODQQLQJVHWV\RXXSIRUVXFFHVVHVSHFLDOO\IRU
VRFLDOHYHQWVDQGHDWLQJRXW
5. Practice your desired long-term habits±,W¶VHDV\WRMXVWLI\
SRRUHDWLQJFKRLFHVZKHQ\RX¶UHRQO\IRFXVHGRQWKHVKRUWWHUP
)RFXVRQWKHORQJWHUPVDWLVIDFWLRQRIDVOLPPHUKHDOWKLHU\RX
UDWKHUWKDQWKHWHPSRUDU\JUDWL¿FDWLRQ\RX¶OOJHWIURPVSOXUJLQJ
How to Use this Guide
• Eat breakfast within 90 minutes of waking up and balance
your meals and snacks throughout the day
±'RQ¶WJRORQJHUWKDQKRXUVZLWKRXWHDWLQJ
±,I\RX¶UHQRWXVHGWRHDWLQJEUHDNIDVWVWDUWRXWVPDOOZLWKD
SLHFHRIIUXLWDQGKDYHVRPHWKLQJHOVHKRXUVODWHU<RXU
ERG\DGDSWVWRQRWHDWLQJEUHDNIDVWEXWDVVRRQDV\RXVWDUW
HDWLQJHDUO\LQWKHGD\DQGFXWWLQJEDFNRQGLQQHUSRUWLRQV
\RX¶OOQRWLFH\RXUKXQJHUZLOOLQFUHDVH7KLVLVDJRRGVLJQ
\RXUPHWDEROLVPLVZRUNLQJ
• Mix and match meal options
– Select 1 option from the appropriate meal plan (male or
IHPDOHIRUEUHDNIDVWOXQFKDQGGLQQHUSD\LQJFORVHDWWHQ-
WLRQWRSRUWLRQVL]HV
– Select 1-2 snack options per day
– You have the option to substitute one snack for one treat
under 150 calories
±8VHWKHPHDOSODQVDPSOHRSWLRQVDQGJURFHU\OLVWWRFUH-
ate your own meals for more variety
Bowflex™ Body Weight Loss Guide

57
±<RXFDQVZDSRXWDQ\W\SHRISURWHLQYHJHWDEOHVRUVPDUW
FDUEVIRUWKHVXJJHVWHGPHDORSWLRQV)RUH[DPSOH
• Turkey for tuna
• $Q\¿VKRUVHDIRRGIRUFKLFNHQ
• &RRNHGYHJHWDEOHVLQVWHDGRIVDODG
• Eat your calories
±&XWRXWKLJKFDORULHEHYHUDJHVOLNHVRGDMXLFHVFRIIHH
drinks, and alcohol
– Stick with water, unsweetened tea, and coffee. Aim for a
PLQLPXPRIR]OLWHUVRIZDWHUSHUGD\WRVWD\ZHOO
hydrated
• If you’re still hungry after or in between meals:
±+DYHDJODVVRIZDWHUDQGZDLWPLQXWHV0DQ\WLPHV
ZHPLVWDNHWKLUVWRUHYHQERUHGRPIRUKXQJHU:DLWRXWWKH
LQLWLDOXUJHWRHDWDQGVRPHWLPHVLWZLOOSDVV
±,I\RX¶UHVWLOOKXQJU\DIWHUZDLWLQJPLQXWHVKDYHD
VQDFNRUPLQLPHDOZLWKIUXLWYHJHWDEOHVDQGSURWHLQ
If your goal is muscle gain or strength:
• 8VHWKHVDPHPHDOSODQEXWLQFUHDVHSRUWLRQVL]HVLQWKHVDPH
ratios to increase the total number of calories you eat every day.
)RUH[DPSOHLQFUHDVHSRUWLRQVL]HVRISURWHLQDQGVPDUWFDUEV
DWPHDOVE\$GGLQJDVQDFNLVDQRWKHURSWLRQWRPHHW\RXU
ERG\¶VLQFUHDVHGFDORULHQHHGVLQRUGHUWRJDLQPXVFOHDQG
VWUHQJWK
• )RFXVRQSRVWZRUNRXWQXWULWLRQE\KDYLQJRQHRI\RXUVQDFNV
within 30 minutes after you complete your workout. Make sure to
have a combination of carbohydrates such as fruit with protein
\RJXUWPLONRUSURWHLQSRZGHUWRSURPRWHPXVFOHJURZWKDQG
UHFRYHU\&KRFRODWHPLONLVDOVRDJUHDWRSWLRQ
Meal Plan Overview
The female meal plan provides about 1400 calories, and the male plan
SURYLGHVDERXWFDORULHVRIKLJKTXDOLW\QXWULWLRQWRQRWRQO\KHOS
\RXORVHZHLJKWDQGIHHOJUHDWEXWJHWWKHPRVWRXWRI\RXUFDORULHV7KH
YLWDPLQVPLQHUDOVDQGDQWLR[LGDQWVIURPHDWLQJPRVWO\ZKROHIRRGV
help support optimal health. These calorie levels will result in healthy
ZHLJKWORVVIRUWKHPDMRULW\RISHRSOH.HHSLQPLQGWKDWHYHU\RQH¶V
PHWDEROLVPLVYHU\GLIIHUHQWGHSHQGLQJRQDJHKHLJKWZHLJKWDFWLYLW\
OHYHODQGJHQHWLFV3D\FORVHDWWHQWLRQWR\RXUZHLJKWKXQJHUOHYHOV
DQGHQHUJ\DQGDGMXVW\RXUFDORULHVLIQHHGHG
Follow these guidelines if you’re over 55:
• ,I\RX¶UHRYHU\RXQHHGIHZHUFDORULHVEHFDXVH\RXUPHWDER-
OLVPVORZVDV\RXDJH6WLFNZLWKWKUHHPHDOVZLWKRQHRSWLRQDO
snack per day.
Follow these guidelines if you’re under 25:
• ,I\RX¶UHXQGHU\RXPD\QHHGPRUHFDORULHV$GGDQRWKHU
VQDFNLI\RXIHHOORZRQHQHUJ\RUDUHH[WUHPHO\KXQJU\
Breakfast
Breakfast includes a smart carb, fruit, and a source of protein, which will
DOVRKDYHIDW:LWKDEDODQFHRIFDUERK\GUDWHVDQG¿EHUIURPWKHVPDUW
FDUEDQGIUXLWFRPELQHGZLWKSURWHLQDQGIDW\RX¶OOHQHUJL]H\RXUGD\
DQGKHOSFRQWUROKXQJHUOHYHOVWKURXJKRXWWKHGD\
Snacks
Each snack is a balance of carbohydrates and protein to keep your
EORRGVXJDUPRUHFRQVLVWHQWZKLFKPHDQV\RXZRQ¶WH[SHULHQFHKXQ-
JHUDQGHQHUJ\OHYHOVSLNHVDQGGURSV
7KLVKDSSHQVZKHQ\RXKDYHDKLJKFDUERQO\VQDFNOLNHFKLSVFDQG\
VRGDFUDFNHUVRUSUHW]HOV
Lunch and Dinner
/XQFKFRPELQHV¿OOLQJ¿EHUIURPYHJHWDEOHVDQGVPDUWFDUEVZLWKD
lean, or low-fat, protein. The healthy fat can come either from the pro-
WHLQDGGHGGXULQJFRRNLQJQXWVRQDVDODGRUDVDGUHVVLQJRUVDXFH
VXFKDVRLODQGYLQHJDUVDODGGUHVVLQJ
58
protein
veggies
rich
carbs
+HUH¶VDQRYHUYLHZRIZKDWDQLGHDOGD\ORRNVOLNH
6HH3RUWLRQ6L]H*XLGHIRUSURSHUVHUYLQJVL]HV
smart
carb
protein/fat
Breakfast
Lunch
Dinner
Snack #1
Snack #2
fruit
smart
carb
protein
healthy
fat
smart
carb
protein
veggies
smart
carb
protein
healthy
fat
smart
carb
protein
veggies

59
Breakfast Options Fruit Smart Carb Protein/Fat
Fruit and Nut Oatmeal Cook
plain oats in water. Top with fruit,
nuts, milk, cinnamon, and honey.
Berries or banana Plain oats
5HJXODURUTXLFNFRRN
Nuts and milk
(JJ0XIÀQ&RRNHJJV7RDVW
bread and top with 1 slice of
cheese, 1 slice of ham, and
tomato.
Tomato (QJOLVKPXI¿QRUVDQGZLFKWKLQ (JJKDPDQGFKHHVH
Yogurt Power Parfait7RS\RJXUW
ZLWKIUXLW6SULQNOHZLWKVHUYLQJ
RIQXWVWEVSZKHDWJHUPRU
JURXQGÀD[VHHGWEVSRDWVDQG
cinnamon.
Chopped fruit of your choice 2DWVZKHDWJHUPDQGJURXQG
ÀD[VHHG
3ODLQQRQIDW*UHHN\RJXUWDQG
nuts
On the Go PB & Apple Sand-
wich Toast bread. Spread on
peanut butter, thin slices of ½ an
apple, and 1 teaspoon of honey.
Sliced apple 6DQGZLFKWKLQEUHDGRUEDJHO
thin
Peanut butter
Lunch & Dinner Options Lean Protein Smart Carb Veggies
Pork Loin, Sweet Potato &
Green Beans
Grilled or baked pork loin Baked Sweet Potato Green Beans
Chicken Stir Fry
)ODYRUZLWKWDEOHVSRRQWHUL\DNL
sauce
Chicken breast or boneless skin-
OHVVWKLJK
Brown or wild rice 0L[HGVWLUIU\YHJHWDEOHV
IUHVKRUIUR]HQ
Steak Tacos with Side Salad (3
for males, 2 for females) Top with
salsa, cilantro, and sprinkle of
shredded cheese
)ODQNRUVLUORLQVWHDN Corn tortillas Salad
Whole Wheat Pasta with
Shrimp or Cannellini Beans &
Marinara Sauce
6KULPSIUR]HQRUIUHVKRUFDQ-
nellini beans
Whole wheat pasta Steamed broccoli
Bunless Burgers with Oven
Fries, Corn, & Salad
*ULOOEXUJHUV%DNHVOLFHGSRWD-
toes on sprayed cookie sheet for
25-30 minutes @ 425°)
OHDQJURXQGEHHIRUWXUNH\ Oven baked fries Corn on the cob + side salad
Tuna & Avocado Wrap with
Vegetable Soup
8VHR]RIWXQDFDQ7RSZLWK
lettuce, tomato, avocado, and
mustard.
Tuna +LJK¿EHUZUDS 9HJHWDEOHVRXS
(homemade or low-sodium
canned)

60
Snack Options
Smart Carb Protein
1 medium apple 10-15 almonds
Baby carrots 2 tbsp hummus
VHUYLQJRIFUDFNHUV VWULQJFKHHVH
(QHUJ\RUSURWHLQEDUZLWKFDORULHV
6HHZZZ%RZÀH[FRP5HVRXUFHVIRUEUDQGUHFRPPHQGDWLRQV
Optional Treats
<RXKDYHWKHFKRLFHRIUHSODFLQJ6QDFNZLWKDFDORULHWUHDW<RXFDQKDYHDQRSWLRQDOWUHDWHYHU\GD\EXWIRURSWLPDOKHDOWKLWLVUHFRP-
PHQGHGWROLPLWVPDOOVSOXUJHVWRWLPHVSHUZHHN8VHWKHDSSURDFKWKDWZRUNVEHVWIRU\RX+HUHDUHDIHZH[DPSOHV
• ½ cup lowfat ice cream
• VPDOOEDJRIEDNHGSRWDWRFKLSV
• R]RIZLQHRUR]OLJKWEHHU
• FXSVRIDLUSRSSHGRUOLJKWSRSFRUQ
Sample 3 Day Plan
Based on each of the meal options listed above, a typical 3 day plan could look like this:
Day 1 Day 2 Day 3
Breakfast (JJPXI¿Q 3RZHU\RJXUWSDUIDLW )UXLWQXWRDWPHDO
Snack 1 Apple with almonds Nut Thins
®
VWULQJFKHHVH Baby carrots and hummus
Lunch Tuna & avocado wrap with soup /HIWRYHUVIURPGLQQHUGD\ /HIWRYHUVIURPGLQQHUGD\
Optional Snack 2 or Treat ½ cup ice cream bar (QHUJ\EDU FDORULHEDJRIOLJKWSRSFRUQ
Dinner Shrimp pasta Chicken stir fry %XQOHVVEXUJHUV
61
1 cup = baseball
1/2 cup = lightbulb
1 oz or 2 tbsp
= golf ball
1/4 cup nuts
= Altoids tin
3 oz chicken or meat
= deck of cards
1 medium potato
= computer mouse
1 medium piece of
fruit = tennis ball
1 -1/2 oz cheese
= 3 dice
Portion Size Guide
(DFKRIWKHLWHPVOLVWHGDUHIRURQHVHUYLQJ
MALE FEMALE
PROTEIN
HJJV
R]FKLFNHQ¿VKOHDQPHDWRUWRIX
FXSEHDQVRUOHQWLOV
FXSJUHHN\RJXUW
R]FKHHVH
HJJ
R]FKLFNHQ¿VKRUOHDQPHDW
FXSEHDQVRUOHQWLOV
FXSJUHHN\RJXUW
R]FKHHVH
HEALTHY FAT
7EOVSQSHDQXWRUQXWEXWWHU
WVSQROLYHÀD[RUZDOQXWRLO
FXSRIQXWV
PHGLXPDYRFDGR
WEOVSQSHDQXWRUQXWEXWWHU
WVSQROLYHÀD[RUZDOQXWRLO
FXSRUWDEOHVSRRQVRIQXWVDSSUR[DOPRQGV
PHGLXPDYRFDGR
SMART CARB
FXSFRRNHGJUDLQVFXSUDZRDWVEURZQULFH
quinoa, pasta
PHGLXPVZHHWRUUHJXODUSRWDWR
2 corn tortillas
VOLFHRIEUHDGRUOLJKWVOLFHVHTXDOLQJFDORULHV
or less)
HQJOLVKPXI¿QVDQGZLFKWKLQRUKLJK¿EHUZUDS
FXSFRRNHGFXSUDZJUDLQV
PHGLXPVZHHWSRWDWRRU
UHJXODUSRWDWR
2 corn tortillas
VOLFHRIEUHDGRUOLJKWVOLFHVHTXDOLQJFDORULHVRU
less)
HQJOLVKPXI¿QVDQGZLFKWKLQRUKLJK¿EHUZUDS
FRUIT
PHGLXPDSSOHRUDQJHRUSHDU
VPDOOEDQDQDOHQJWKRI\RXUKDQG
1 cup berries or chopped fruit
FXSGULHGIUXLWIUHVKRUIUR]HQLVRSWLPDO
9HJHWDEOHV<RXFDQKDYHXQOLPLWHGYHJHWDEOHVH[FHSWIRUSHDVDQGFRUQVWLFNZLWKFXSVHUYLQJ
2 cups spinach or lettuce = 2 cupped hands
FXSUDZYHJHWDEOHV
FXSFRRNHGYHJHWDEOHV
R]ORZVRGLXPYHJHWDEOHMXLFH
OPTIONAL TREATS
FXSORZIDWLFHFUHDP
VPDOOEDJRIEDNHGSRWDWRFKLSV
R]GDUNFKRFRODWH
R]RIZLQHRUR]OLJKWEHHU
FXSVDLUSRSSHGRUOLJKWSRSFRUQ
* some foods are a combination of protein and carbs or protein and fat

62
Grocery List
BREAD & GRAINS
100% whole wheat bread
6SURXWHGJUDLQEUHDGV
/LJKWRUZKROHZKHDWHQJOLVKPXI¿QV
6DQGZLFKRUEDJHOWKLQV
Corn or low-carb whole wheat tortillas
+LJK¿EHUZUDSV
Plain oats: 1 minute or old fashioned
:KROHJUDLQVEURZQULFHEXOJDUEDUOH\TXLQRDFRXVFRXV
7LSV/RRNIRUZKROHZKHDWDVWKH¿UVWLQJUHGLHQW/RRNIRUJRI
¿EHUSHUVOLFHRUJSHUVOLFHVRIOLJKWRUGLHWEUHDG$LPIRUEUHDGZLWK
less than 100 calories per slice.
DAIRY & DAIRY ALTERNATIVES
3ODLQQRQIDWJUHHN\RJXUW
.H¿U\RJXUWOLNHGULQN
2UJDQLFORZIDWPLON
Enriched almond or soy milk
&KHHVHIHWDSDUPHVDQPR]]DUHOODOLJKWKDYDUWLSURYRORQHVZLVV
VWULQJFKHHVHRUVLQJOHVHUYLQJSDFNDJHV
MEAT, FISH, POULTRY & PROTEIN
:LOGJDPH
Salmon, halibut, tuna, tilapia, shrimp,
FDW¿VKVFDOORSVRUFUDE
Pork loin, pork chops, or pork roast
&KLFNHQRUWXUNH\EUHDVWRUWKLJKVQRVNLQ
(JJVDQGHJJZKLWHV
/HDQEHHIVLUORLQFKXFNURXQGWHQGHUORLQOHDQRUJDQLFDQG
JUDVVIHGLVEHVW
Canned salmon or tuna (in water)
Nitrate-free, reduced sodium ham, turkey, chicken, or roast beef lunch-
meat
Any type of bean, dry or canned low-sodium varieties
Tofu and tempeh
7LSV/RRNIRU³&KRLFH´RU³6HOHFW´FXWVRIPHDWUDWKHUWKDQ³3ULPH´
3ULPHFXWVDUHIDWWLHU/LPLWLQWDNHRIKLJKO\SURFHVVHGPHDWDQG
LPLWDWLRQPHDWSURGXFWVOLNHVDXVDJHEDFRQSHSSHURQLDQGKRWGRJVWR
once a week or less.
FROZEN FOODS
$OOYHJHWDEOHVZLWKRXWVDXFH
All fruit
*UDLQVDQGJUDLQPHGOH\V
CRACKERS, SNACKS & ENERGY BARS
Any unsalted nuts or seeds
$LUSRSSHGRUOLJKWSRSFRUQ
Edamame in the pod
(QHUJ\EDUV
Crackers
Hummus
7LSV/LPLWFUDFNHUVSUHW]HOVDQGFKLSVWRVHUYLQJVSHUZHHN
$OZD\VSDLUZLWKSURWHLQVXFKDVKXPPXVFKHHVHRUQXWV/RRNIRU
HQHUJ\EDUVZLWKOHVVWKDQFDORULHVDQGJRIVXJDUDQGDWOHDVWJ
RISURWHLQDQGJRI¿EHU/RRNIRUFUDFNHUVZLWKOHVVWKDQFDORULHV
DQGJRUOHVVRIIDWSHUVHUYLQJ
FATS & OILS
Avocado
2OLYHJUDSHVHHGZDOQXWVHVDPHRUÀD[VHHGRLO
%XWWHUVSUHDGVORRNIRUSURGXFWVIUHHRIWUDQVIDWVDQGSDUWLDOO\
K\GURJHQDWHGRLOVRQWKHLQJUHGLHQWOLVW
7LSV/LJKWROLYHRLOUHIHUVWRWKHÀDYRUQRWWKHFDORULHFRQWHQW$OZD\V
PHDVXUHRLODQGEXWWHU(YHQLIDIDWLVFRQVLGHUHGKHDOWK\LW¶VVWLOOYHU\
KLJKLQFDORULHVDQGSRUWLRQVQHHGWREHFRQWUROOHG
DRESSINGS, CONDIMENTS & SAUCES
9LQHJDUVULFHZLQHEDOVDPLF
All fresh or dried herbs and spices
Mustard
Salsa and chili sauce
0DULQDUDVDXFHZLWKQRKLJKIUXFWRVHFRUQV\UXS
/HPRQDQGOLPHMXLFH
%RWWOHGPLQFHGJDUOLFDQGJLQJHU
/RZVRGLXPVR\VDXFH
7LSV/RRNIRUSURGXFWVIUHHRI06*DGGHGFRORUVDQGKLJKIUXFWRVH
FRUQV\UXS/RRNIRUVDXFHVXQGHUFDORULHVSHUVHUYLQJ$YRLGFUHDP
EDVHGVDXFHVDQGGUHVVLQJVOLNHUDQFKEOHXFKHHVHDQGDOIUHGR
$OOIUXLWVDQGYHJHWDEOHVIUHVKDQGIUR]HQDUHJUHDWFKRLFHV6LQFHHYHU\PHDOKDVRQHRUERWK\RXUVKRSSLQJFDUWVKRXOGUHÀHFWWKLV

63
Keep It Going
Tips for continued weight loss and maintaining changes
• Keep weighing yourself weeklyHYHQDIWHU\RX¶YHUHDFKHG\RXUJRDOZHLJKW
• Continue keeping a food log.,I\RXKDYH\RXUPHDOSODQZHOOHVWDEOLVKHGORJ\RXUIRRGHYHU\RWKHUZHHNWRNHHS\RXUVHOIRQWUDFN'RQ¶W
feel like you have to do it every day.
• Prepare for plateaus.7KHVFDOHPLJKWQRWEXGJHIRUDIHZZHHNVRUHYHQPRQWKVDIWHUVRPHLQLWLDOZHLJKWORVV7KLVLVQRUPDODQGWREHH[-
SHFWHG,W¶VWKHERG\¶VQDWXUDOSURFHVVIRUDGMXVWLQJWR\RXUQHZORZHUZHLJKW6WD\IRFXVHGRQ\RXUORQJWHUPJRDOFHOHEUDWH\RXUVXFFHVVHV
DQGFKDQJHVDQGPL[XS\RXUZRUNRXWVWRKHOSRYHUFRPHWKHSODWHDX
• Calorie adjustments for maintaining weight loss.2QFH\RX¶YHUHDFKHG\RXUJRDOZHLJKW\RXFDQLQFUHDVH\RXUFDORULHVSHUGD\
DVORQJDV\RXUDFWLYLW\OHYHOVWD\VWKHVDPH
• Treat yourself.+DYHDQRQIRRGUHZDUGIRUHDFKJRDO\RXKLWVXFKDVDPDVVDJHDQHZRXW¿WRUDQRXWLQJZLWKIULHQGVDQGIDPLO\
• Use the resources belowWR¿QGQHZUHFLSHVJHWH[SHUWDGYLFHDQGVXSSRUWWRVWD\PRWLYDWHG
Resources
'RZQORDGDEOH5HVRXUFHVIURP%RZÁH[
®
WebsiteZZZ%RZÀH[FRP5HVRXUFHV
• *URFHU\6KRSSLQJ/LVWIRU)ULGJH%ODQN)RUP
• 'D\0HDO3ODQQLQJ)RUP
• Additional Dinner Options
• 3UHDQG3RVW:RUNRXW)XHOLQJ*XLGH
Questions & Support
• $VNTXHVWLRQVSRVWVXJJHVWLRQVDQGFRQQHFWZLWKRXURQOLQH%RZÀH['LHWLWLDQRQWKH%RZÀH[)DFHERRNSDJH
Recipes
• ZZZZKROHOLYLQJFRP
• ZZZHDWLQJZHOOFRP
• ZZZZKIRRGVRUJ
• ZZZOLYHEHWWHUDPHULFDRUJ
Online food logs
• ZZZP\¿WQHVVSDOFRP
• www.loseit.com