Loading ...
Loading ...
Loading ...
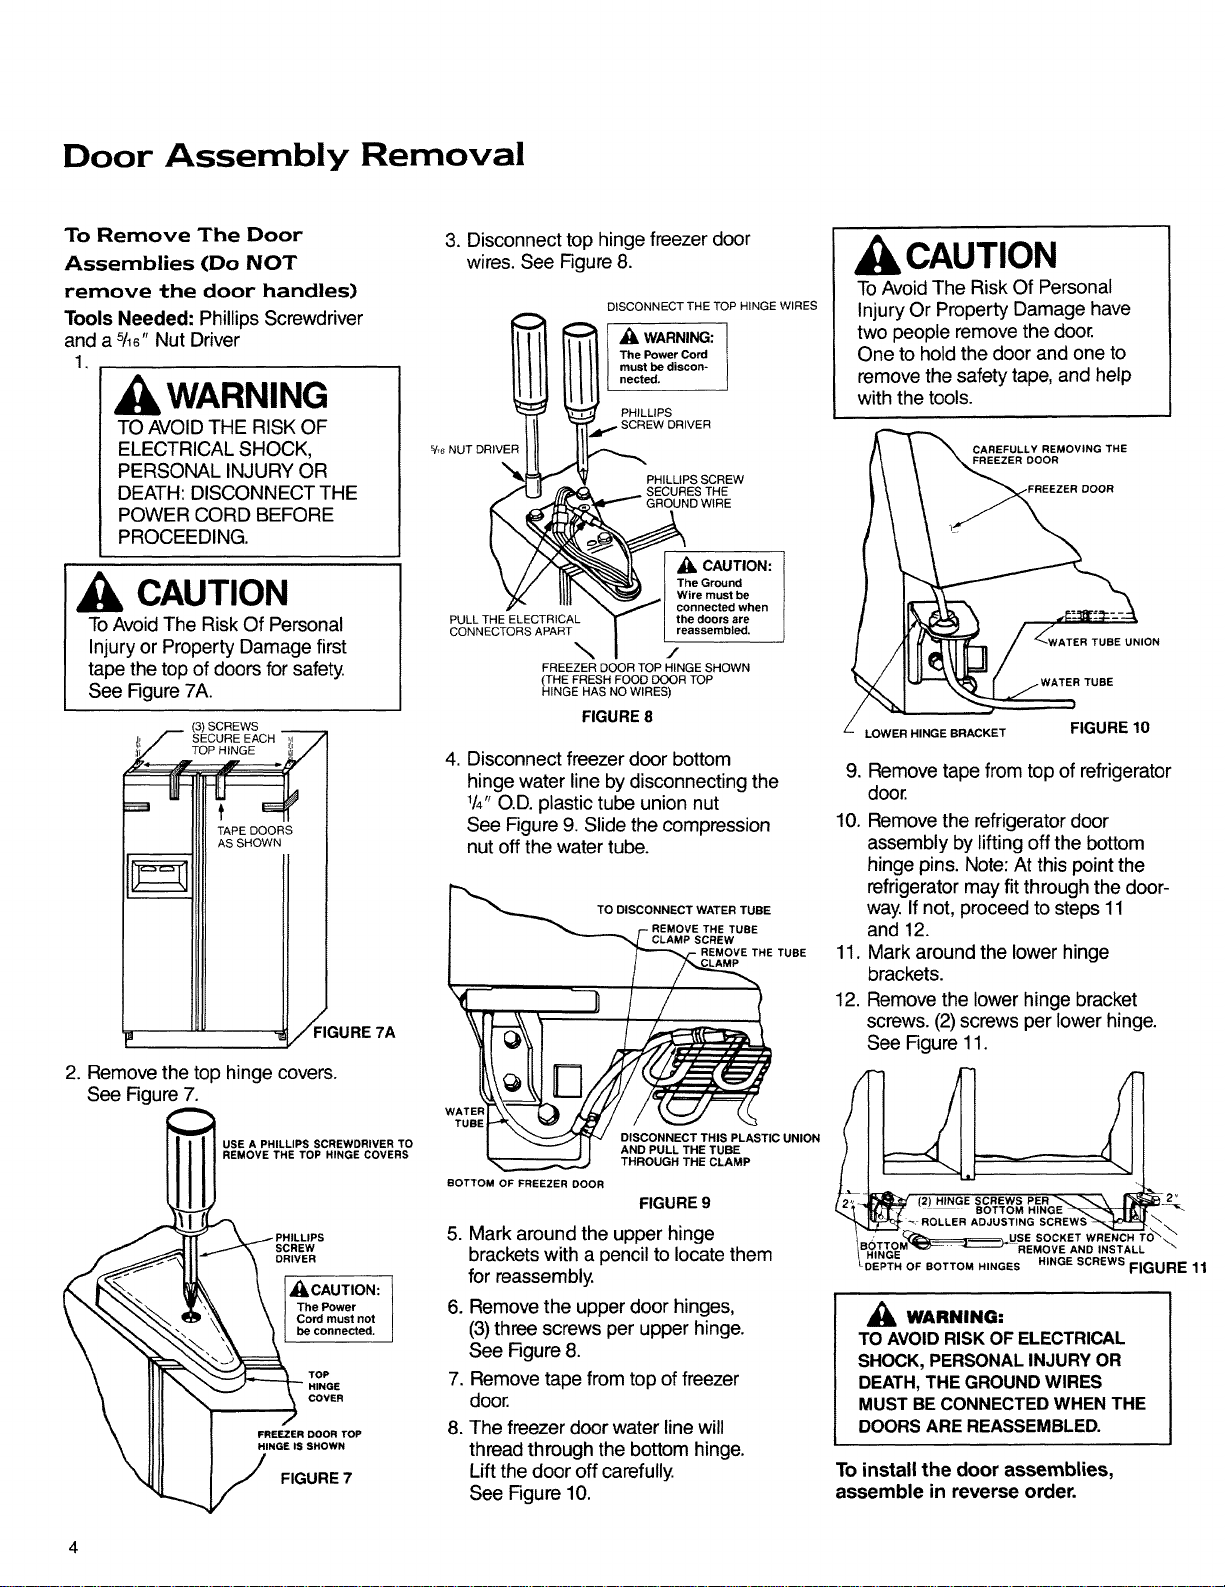
Door Assembly Removal
To Remove The Door
Assemblies (Do NOT
remove the door handles)
Tools Needed: Phillips Screwdriver
and a 5118"Nut Driver
1.
WARNING
TO AVOID THE RISK OF
ELECTRICAL SHOCK,
PERSONAL INJURY OR
DEATH: DISCONNECT THE
POWER CORD BEFORE
PROCEEDING.
CAUTION
ToAvoid The Risk Of Personal
Injury or Property Damage first
tape the top of doors for safety
See Figure 7A.
(3) SCREWS
t!' / SECURE EACH ,,i /
IGURE 7A
2. Remove the top hinge covers.
See Figure 7.
3. Disconnect top hinge freezer door
wires. See Figure 8.
DISCONNECT THE TOP HINGE WIRES
WARNING: j
The Power Cord
must be discon-
nected.
PHILLIPS
sheNUT DRIVER
PHILLIPS SCREW
SECURES THE
GROUND WIRE
_lh CAUTION:
The Ground
Wire must be
connected when
PULL THE ELECTRICAL the doors are
CONNECTORS APART reassembled.
\ /
FREEZER DOOR TOP HINGE SHOWN
(THE FRESH FOOD DOOR TOP
HINGE HAS NO WIRES)
FIGURE 8
4. Disconnect freezer door bottom
hinge water line by disconnecting the
tl4" O.D. plastic tube union nut
See Figure 9. Slide the compression
nut off the water tube.
TO DISCONNECT WATER TUBE
- REMOVE THE TUBE
CLAMP SCREW
REMOVE THE TUBE
BOTTOM OF FREEZER DOOR
DISCONNECT THIS PLASTIC UNION
AND PULL THE TUBE
THROUGH THE CLAMP
FIGURE 9
5. Mark around the upper hinge
brackets with a pencil to locate them
for reassembly
6. Remove the upper door hinges,
(3)three screws per upper hinge.
See Figure 8.
Remove tape from top of freezer
door.
The freezer door water line will
threadthrough the bottom hinge.
Lift the door off carefully
See Figure 10.
CAUTION
ToAvoid The Risk Of Personal
Injury Or Property Damage have
two people remove the door.
One to hold the door and one to
remove the safety tape, and help
with the tools.
REMOVING THE
FREEZER DOOR
TUBE UNION
WATER TUBE
LOWER HINGE BRACKET
FIGURE 10
9. Remove tape from top of refrigerator
door.
10. Remove the refrigerator door
assembly by lifting off the bottom
hinge pins. Note: At this point the
refrigerator may fit through the door-
way. If not, proceed to steps 11
and 12.
11. Mark around the lower hinge
brackets.
12. Remove the lower hinge bracket
screws. (2)screws per lower hinge.
See Figure 11.
(2) HINGE SCREWS PER_ _\
t_ "_,_t_" ....................... BOTTOM HINGE _-_--1_ _
_'_1_ ROLLER ADJUSTING SCREWS _
I _--_-__ USE SOCKET WRENCH TO_. _
IBOTTOM_------J_-REMOVE AND INSTALL
HINGE
_,"_"_9_, .,NGESCREWS
DEPTHOFBOTTOMHINGES FIGURE 11
,_ WARNING:
TO AVOID RISK OF ELECTRICAL
SHOCK, PERSONAL INJURY OR
DEATH, THE GROUND WIRES
MUST BE CONNECTED WHEN THE
DOORS ARE REASSEMBLED.
To install the door assemblies,
assemble in reverse order.
4
Loading ...
Loading ...
Loading ...