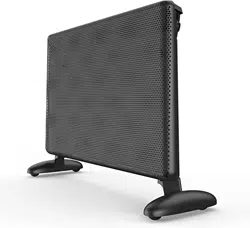
NCA2-15-EF3.0

CONTENTS
IMPORTANT SAFETY INSTRUCTIONS 01-02
04
COMPONENTS 03
WALL MOUNTING INSTRUCTIONS 05-06
OPERATING YOUR HEATER 07-10
TROUBLESHOOTING 11-13
CARE AND CLEANING 14
WARRANTY AND SERCIVE 15
FOOT INSTRUCTIONS

IMPORTANT SAFETY INSTRUCTIONS
Thank your for choosing Ballu heater.Please read all instruc�ons before using the
appliance.When using any electrical appliance,some basic safety precau�ons
should be observed to reduce the risk of fire,electric shock,and/or any injury to
persons.
CAUTION: To avoid danger due to inadvertent restar�ng, this equipment must not be
powered through an external switching device (such as a �mer) or connected to a circuit
that is periodically switched on and off by a u�lity.
WARNING: You must not cover this heater. Covering this appliance is a fire hazard and
will trip the safety fuse, permanently disabling the heater.
WARNING: Extreme cau�on is necessary when any heater is used by or near children or
those in need of assistance, especially whenever the heater is le� opera�ng and
una�ended.
WARNING: To reduce the risk of fire keep tex�les, curtains, or any flammable
material a minimum distance of 1 metre from the air outlet.
• This equipment is not intended for use by persons (including children) with reduced
physical, sensory or mental capabili�es or lack of experience and knowledge, unless they
are supervised or instructed in the use of the equipment by a person responsible for their
safety.
• If the power cord is damaged, it must be replaced by the manufacturer, its service
facility, or similarly qualified personnel to avoid a hazard.
• Use only the voltage specified on the ra�ng label of the appliance.
• This appliance is intended for household use only and not for commercial or
industrial use.
• Indoor use only.
• Use this appliance only as described in this manual.
• Do not use the appliance if it has been dropped or damaged.
• The common cause of overhea�ng is deposits of dust or fluff in the appliance. Ensure
these deposits are removed regularly by unplugging the appliance and vacuum
cleaning the air vents and grills.
• Do not operate in areas where petrol, paint or other flammable liquids are used or
stored.
01

IMPORTANT SAFETY INSTRUCTIONS
• Never use the appliance to dry clothes.
• Always unplug appliance when not in use.
• When the appliance has been unpacked, check it for transport damage and
ensure all parts have been delivered. If parts are missing or the appliance has been
damaged, contact the Customer Services Team.
• Do not use if there are visible signs of damage to the heater and contact the
customer to replace a new one.
• Do not connect the heater to the power supply un�l it is fully assembled and
adjusted.
• Ensure hands are dry before handling the plug or main unit.
• Ensure appliance is on a flat, stable, heat- resistant surface.
• Do not operate with cord set coiled up as a heat build up is likely, which could be
sufficient to become a hazard.
• Carry out regular checks of the supply cord to ensure no damage is evident
• Do not operate this appliance with a damaged cord, plug or a�er the appliance
malfun�ons or has been dropped or damaged in any manner. Take to a
gualified electrical person for examina�on, electrical service or repair.
• Do not twist, kink or wrap the cord around the appliance, as this may cause the
insula�on to weaken and split. Always ensure that all cord has been removed from
any cord storage area and is unrolled before use.
• It is recommended that this appliance is plugged directly into the wall socket. Power
boards are not rated to supply power to high wa�age appliances.
• Do not remove plug from power socket un�l the appliance has been switched off.
• Do not remove plug from power socket by pulling cord; always grip plug.
• Do not place cord under carpet or cover with rugs or furniture. Arrange the cord so it
cannot be tripped over.
• Don’t place appliance on bedding or on thick & long carpet where the openings may
get blocked.
• Switch off and use handle provided when moving
• Do not place appliance close to radiant heat source.
• Do not insert or allow foreign objects to enter any ventla�on or exhaust
opening, as this may cause an electric shock, fire or damage to the appliance.
• Do not use this appliance in the immediate surrounds of a bath, a shower, or a
swimming pool or other liquids.
• The appliance must not be immersed in any liquids.
• This unit is not supposed to be used in or around loca�ons where foodstuffs,
works of art or delicate ar�cles of science, etc. are stored.
• If your appliance does not work, or is not working properly, contact the Ballu
Customer Services Team.
02
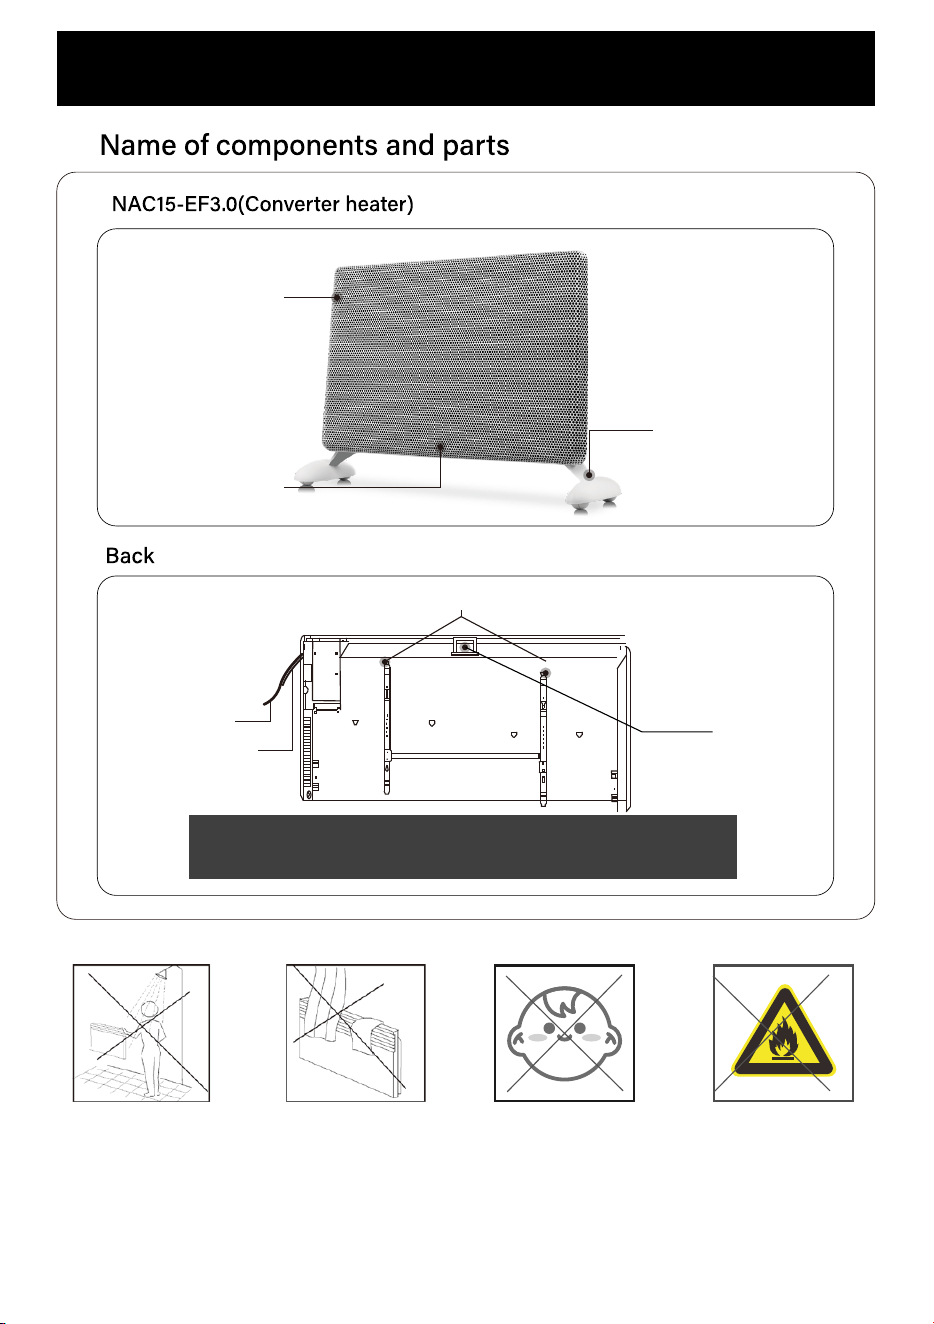
Temperature
probe
Power line
Wall-mounted bracket
handle
*The wall bracket is already installed. You can pull out and detach the
bracket by pressing on the protruding part above the bracket
Do not place or cover
items or clothing on
top of the product!
Do not use in wet
environments, and not
touch the product case,
power cord, plug, etc.
with wet hands!
Do not let children with
delicate skin touch or
trip over the product!
Please keep a distance of
more than 1 meter from
flammable objects such as
curtains, quilts, newspapers,
and fibers.
03
Feet
Heat outlet
Air intake
COMPONENTS
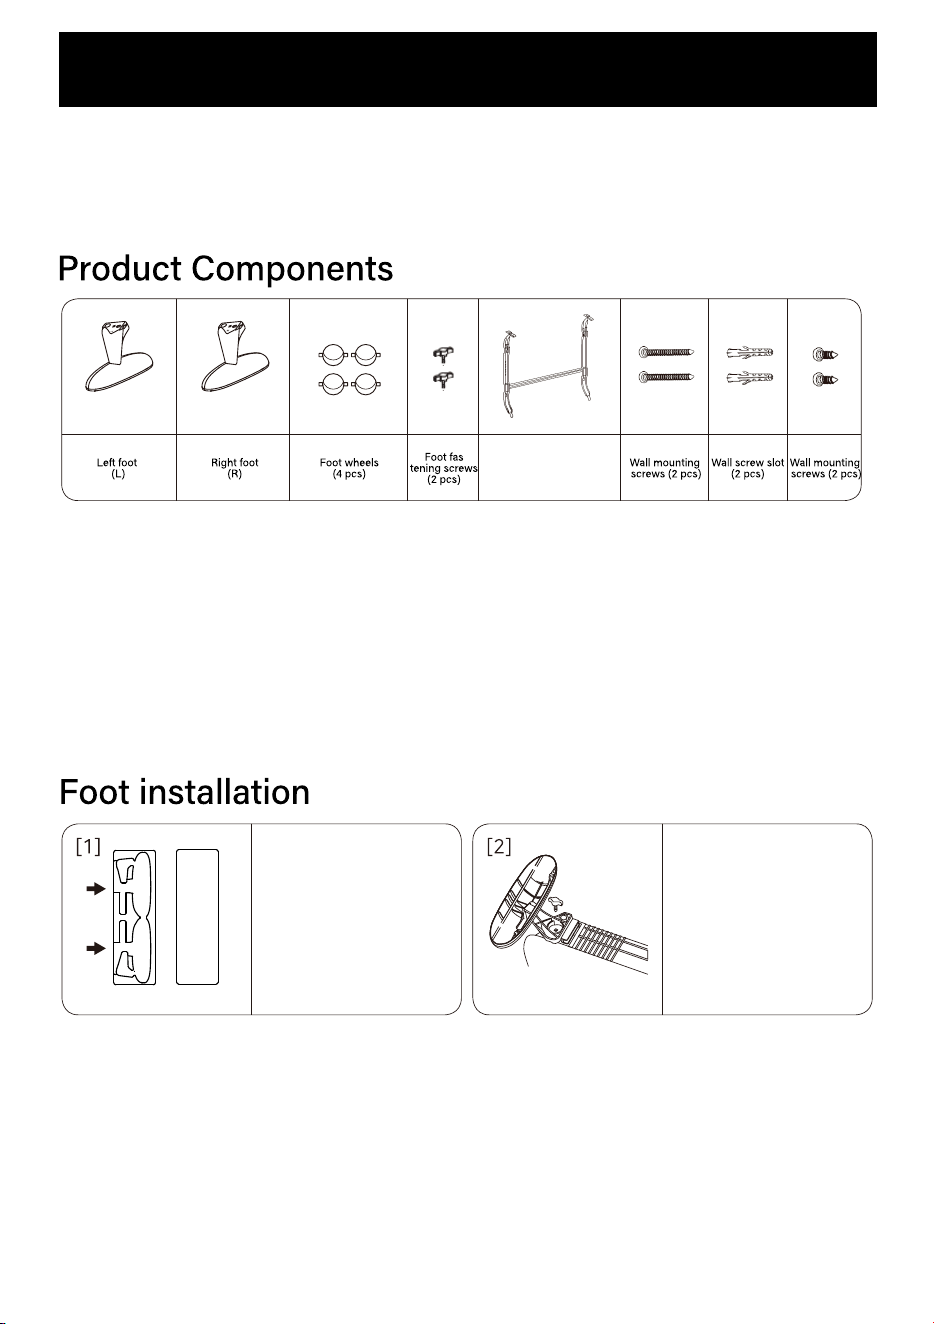
FOOT INSTRUCTIONS
Wall-mounted
bracket
Before using this heater,it must either be wall mounted or have the feet fi�ed.The device
has provided special screw knobs for moun�ng the feet, which can be installed manually
without using a screwdriver.
1. Make sure the heater is unplugged and power switches are off
2. Carefully turn the main body upside-down on a scratch-free and stable surface. Be
careful to prevent damage to the cosme�c finish or your floor surfacing.
Note:The wall bracket edges may be sharp.It is recommended that if using as a free
standing appliance please remove the wall bracket from the back of the heater
Before you install:
Remove the foot and
thumb screws from the
foam on the side of the
product package
Align the foot with the
groove on the bo�om
of the main body and
turn the included thumb
screw to fix it as firmly
as possible.
04
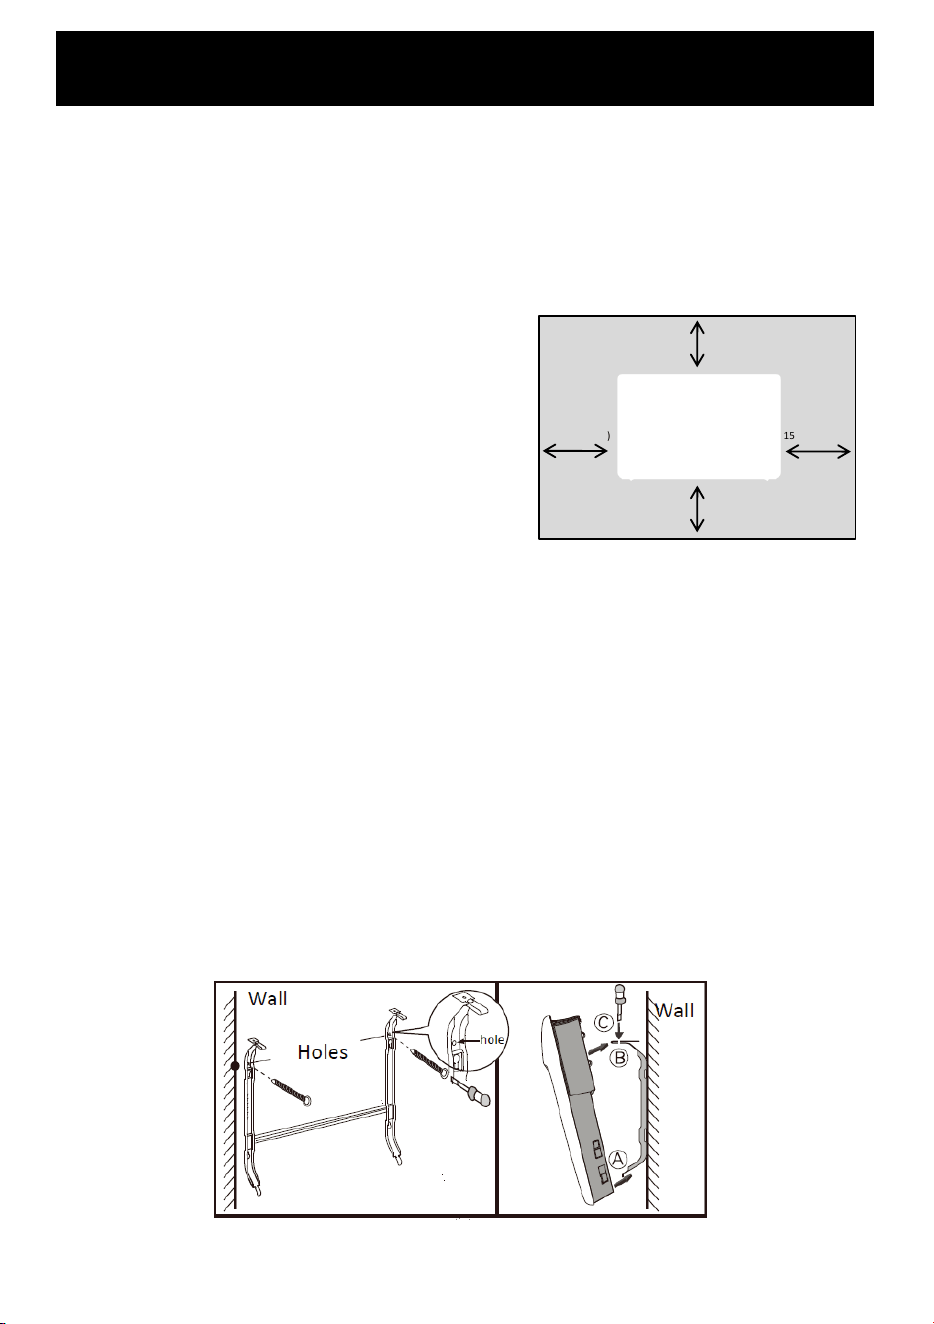
WALL MOUNTING INSTRUCTIONS
300mm(12inch)
150mm(6inch) 150mm(6inch)
150mm(6inch)
Note:
1.The appliance must not be located inmediately below a socket outlet.
2.Your Panel Heater should be installed with at least 150mm clearance from the floor
and any other surrounding parts including other appliances and side walls.At least
300mm clearance from ceilings, shelves and so� furnishings.
3.Do not run the power cord behind the heater.
05
WALL MOUNTED HEATERS
AREONLY TO BE MOUNTED ON
HEATRESISTANT WALLS THAT
COMPLYWITH CURRENT
SPECIFICATIONS & BUILDING
REGULATIONS
WALL MOUNTED
1. Make sure the appliance is unplugged and power switches are off.
2. Posi�on the panel appliance within one metre of wall socket. Do not mount in
front of orbelow the wall socket. Ensure there is at least 150mm clearance on all
sides of the appliance.
3. Posi�on the moun�ng bracket in the wall and mark the hole posi�ons with a pen
or pencil and check they are horizontal with a spirit level. Ensure the two bo�om
mount holes are at least 150mm from the floor and drill holes as required.
4. Secure the moun�ng bracket to the wall with the moun�ng screws. (For masonry
walls use the plas�c sheaths).
5. Insert the back of the device into the moun�ng bracket. First find the bo�om plug,
align and insert it, then align the upper hole and push it toward the wall. You can
press down on the protruding part above the bracket so that the bracket slot can
be�er enter the hole posi�on.
6. Plug appliance into a standard 120 volt AC electrical outlet.
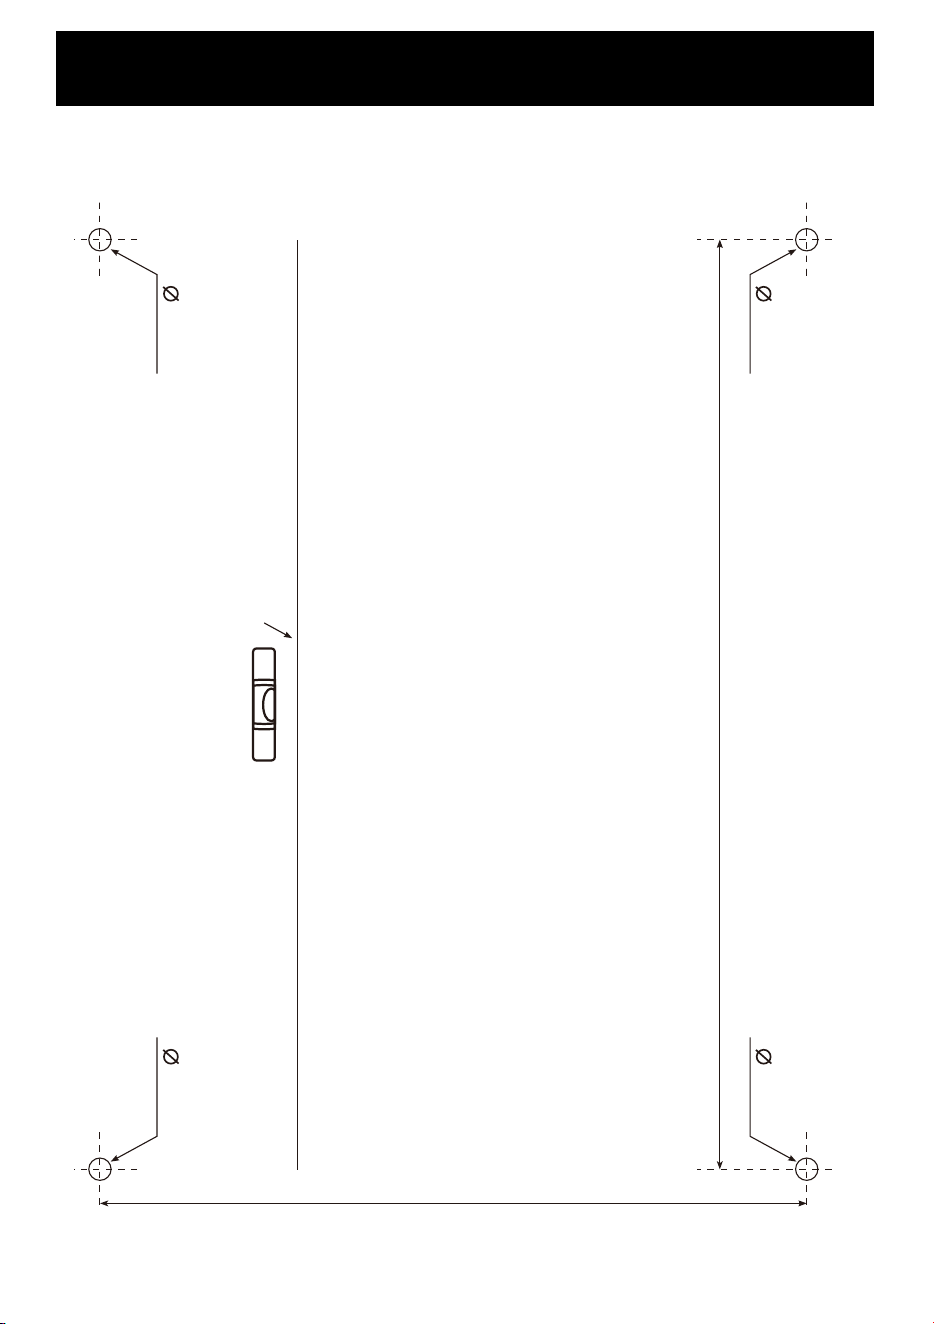
WALL MOUNTING INSTRUCTIONS
250 mm
6.0 mm6.0 mm
6.0 mm6.0 mm
190 mm
Wall Moun�ng template for electric convec�on
heater: Please refer to this moun�ng template for
hole size and distance
06
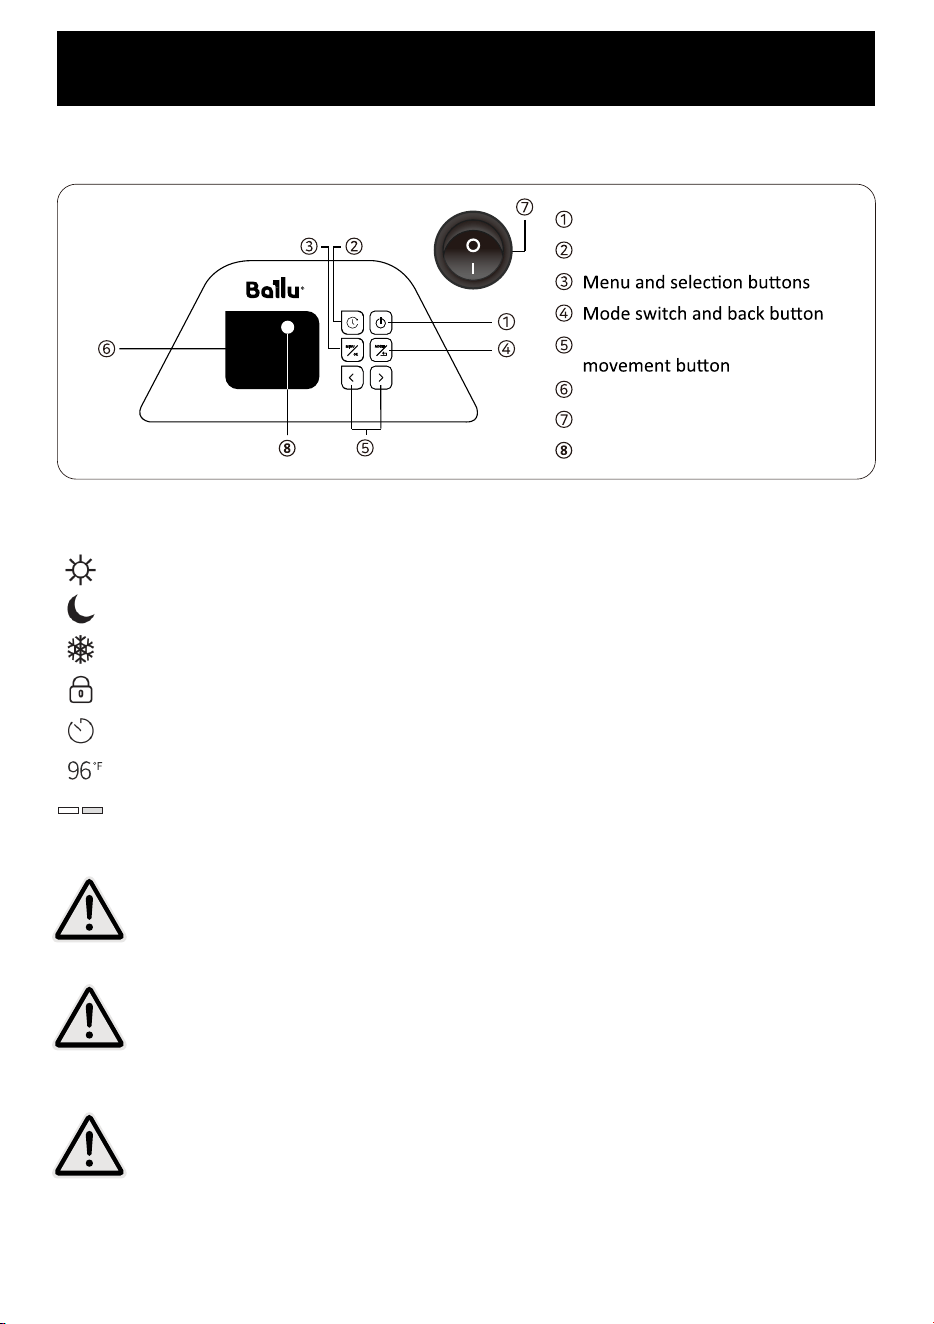
OPERATING YOUR HEATER
ON/OFF Bu�on
Timer se�ng bu�on
Temperature control and screen
Display screen
Main power bu�on
Power Indicator light
Screen indica�on
Indica�on of temperature mode – Comfort(76-96℉)
Indica�on of temperature mode – Eco(55-96℉)
Indica�on of temperature mode – An�-Forst(34-54℉)
Control lock indica�on
Indica�on of “�mer OFF” Func�on (to turn OFF)
Display target temperature
Indica�on of hea�ng power levels
• It is normal and harmless for a new product to smell when it is first used. It is
recommended to heat for 2 hours at the maximum power in a ven�lated
environment, and then it can be used without smell
• The set temperature may deviate from the room temperature by 2-6℉,
depending on the volume and insula�on of the room. In large rooms that are
easy to cool quickly, we recommend se�ng the temperature 2-6℉ higher
than the desired temperature, which will help improve hea�ng efficiency.
• If the product triggers overhea�ng protec�on due to misuse, it will not work
properly, you need to unplug the power outlet and wait at least 30 minutes
for the product to cool down completely, so that the product can resume
hea�ng
Control Panel
07
OPERATING YOUR HEATER
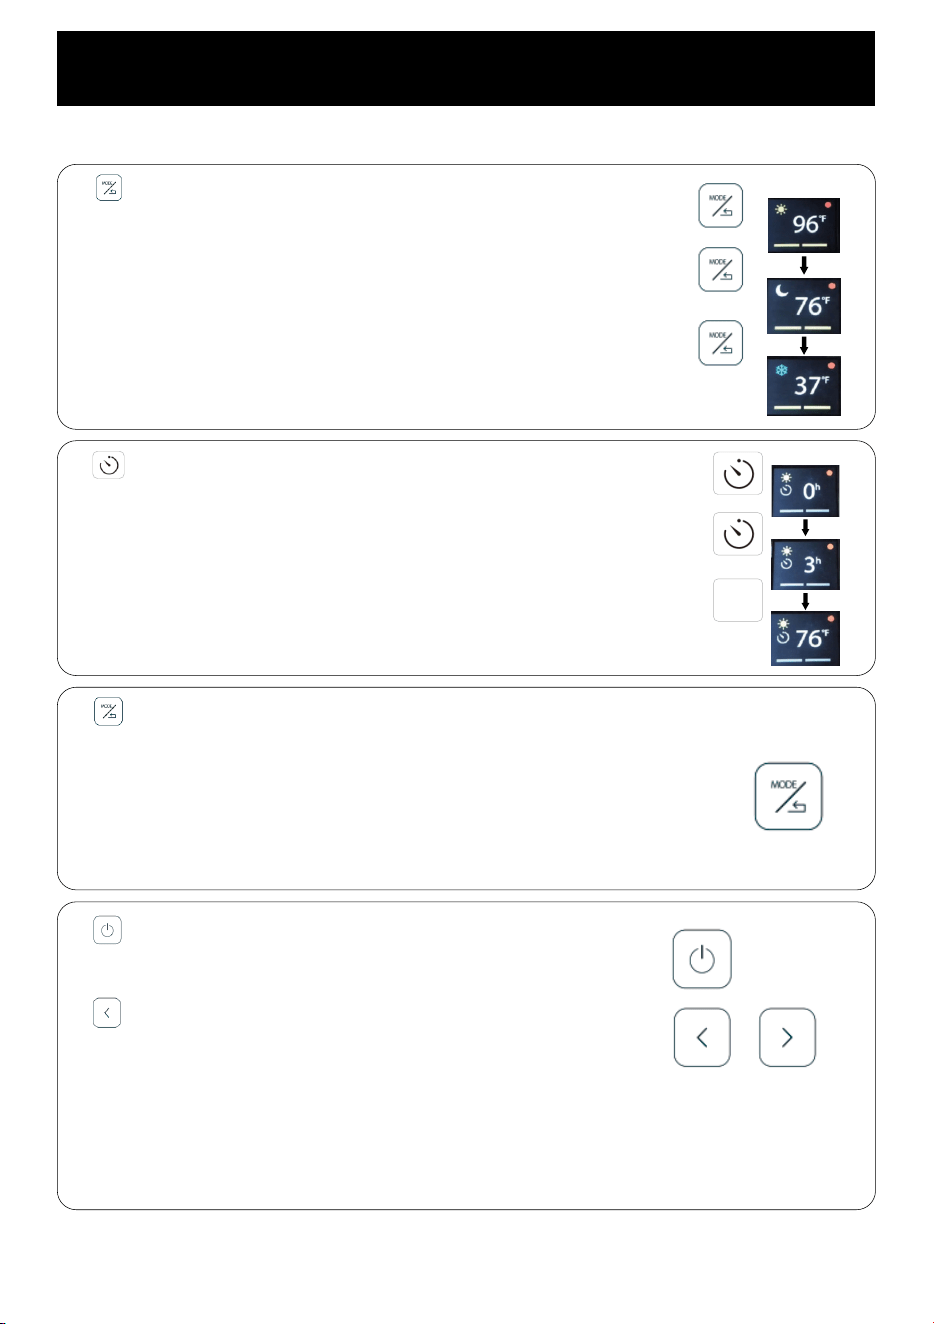
Main func�on
Mode & back bu�on
1. Click to switch between 3 different modes
2. Comfort mod
e range from 76 to 96℉, the default value is 96℉
3. ECO mod
e range from 55 to 96℉ , the default value is 76℉
4. An
�-Forst mode range from 34 to 54℉, the default value is 37℉
5. Th
e temperature values you set in different modes will b
e
au
toma�cally saved.
6. Even
at the same temperature se�ng, ECO mod
e will save
ab
out 2°F of energy than Comfort mode
Timer bu�on
1. Click the bu�on to enter the �mer shutdown se�ng.
2.
Click or lo
ng press to increase the countdown hours.
3.
No op
era�on for 3 seconds to turn on the func�on.
4.
A�er tu
rning on the �mer, if you click the bu�on again
,
you
can check the remaining �me
5.
Set to 0 h
ours to turn off the func�on.
Menu & select bu�on
1. Click to enter the menu, you can choose the “Power Mode”,
“Se�ngs”.
2. Click to enter "Power Mode", you can adjust the first level
(750W) / the second level (1500W).
3. Click the Move bu�on and select to enter "Se�ngs", you can adjust the
sound, brightness, and reset the program
On/off bu�on
Click to turn the product on or off. Turn off the product
to enter standby mode.
Move bu�on
Click to increase or decrease the temperature setpoint.
Or move the menu screen
Child lock func�on:
1.Press "<" and ">“ simultaneously for 3 seconds to ac�vate the lock func�on.
2.When the lock func�on is on, press the "<" and ">" bu�ons simultaneously for 3 seconds to
turn off the lock func�on
3.The lock func�on can also be turned on and off in standby mode.
08
OPERATING YOUR HEATER
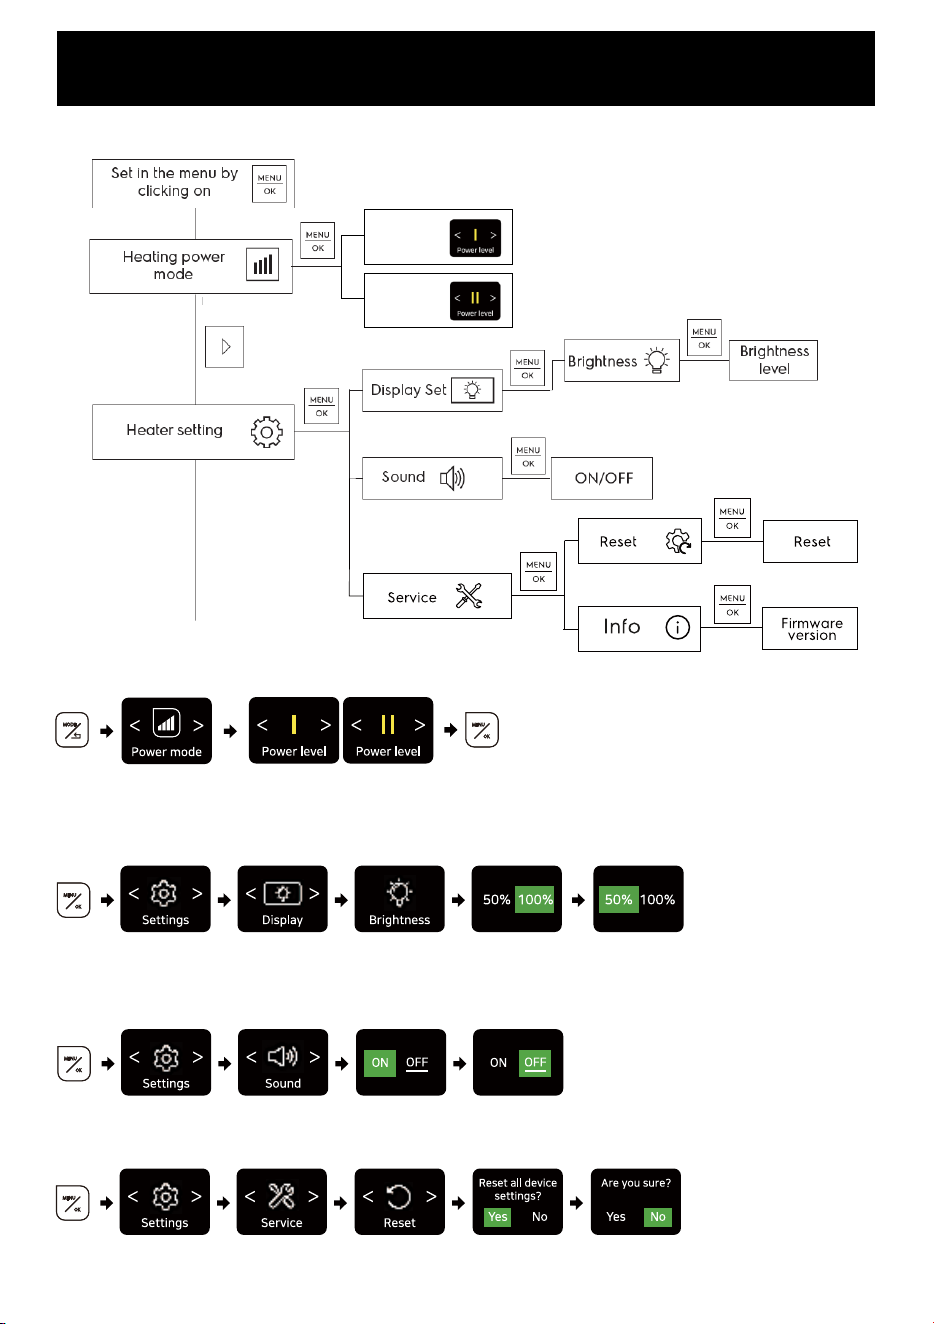
Press the menu bu�on and select "Power mode" to adjust the level 1 (750W) / level 2 (1500W).
SETTINGS MENU DIAGRAM
Power level 2
1500W
Power level 1
750W
Power se�ngs
Press the menu bu�on and select "Se�ngs", select “Display", select "Brightness", you can choose the
brightness level
Brightness se�ng
Press the menu bu�on and select "Se�ngs", select "Sound", you can choose to switch the sound on
and off
Sound se�ngs
Press the menu bu�on and select “Se�ngs”, select “Service”, select "Reset" to restore default se�ngs
Reset program
09
09

OPERATING YOUR HEATER
Other func�on
10
Overheat
protec�on
For safety in use, the heater will stop hea�ng
when the ambient temperature is above 122°F.
If the product triggers overhea�ng protec�on,
you need to unplug from power and wait for
30 minutes for the heater to cool down before
plugging back in, a�er that the product will
resume hea�ng
Tip-over
protec�on
When the heater is moved or knocked over, it
will power off and stop all fun�ons.
Dismiss Tip-over and Mo�on Protec�on: Place
the heater on a at, level, and sturdy surface,
and while keeping it upright, try using it again.
Memory
Func�on
This heater will memorize the previous se�ngs
(power level, mode, temperature value) when
it is powered off. The se�ngs will be ac�ve
again when this heater is turned on.
Thermosta�c
func�on
When the room temperature reaches the
heater's set temperature, it automa�cally
shuts off or reduces power to save energy.
Subsequently, it will automa�cally restart the
hea�ng when the room temperature falls
below the set temperature.

TROUBLESHOOTING
Note:
The troubleshoo�ng sec�on below is for solving frequently asked ques�ons for the
heater unit. If your problem persists, please contact customer support.
11
Problem Possible causes Solu�on
Error Codes
on Display
The heater
suddenly
shuts down
Product does
not heat
E1-Temperature sensor
malfunc�on.
The overhea�ng protec�on
has been triggered.
Unplug from power and wait for 30
minutes for the heater to cool down
before plugging back in.
The Tip-over Protec�on has
been triggered.
Ensure your heater is placed on a flat and
even surface. Keep it upright and turn it
on again.
Connect the plug to a powered electrical
outlet.
Power cord is not properly
plugged in.
No power is passing through
the unit.
Ensure that your circuit breaker or fuse is
working properly./Ensure your heater is
placed on a flat and even surface.
Make sure the thermostat is set at a
higher temperature than the ambient
temperature.
Turn off the unit and unplug it from the
power outlet. Allow it to cool, and then
plug it into the electrical outlet again.
The temperature value set by
the heater is too low
The temperature exceeds the
threshold of the thermal
cutoff.
E3-overhea�ng of
temperature sensor
(exceeded +118 degrees).
E4-ambient temperature has
dropped too low(below -78
degrees)
E2-Short circuit on
temperature sensor channel.
contact the customer services.
Turn off the heater to allow it to cool
dowm.
Turn off the heater to allow the ambient
temperature to rise

TROUBLESHOOTING
Ques�ons and Answers
12
1. Why does it smell when I use it?
A: To protect the metal of new products, we add a layer of protec�ve oil to the surface. It is normal and
harmless to have a certain odor when first used. For first use, we recommend turning on the product at
maximum power (96°F) for approximately 2 hours in a ven�lated environment to evaporate the
protec�ve oil. Then open the window and let the odor in the room dissipate in a ven�lated environment,
and then it can be used without odor.It is also important to avoid inhaling or dropping flammable and
odorous substances such as hair and lint inside the product
2. Why is there a slight ra�le when the heater heats up?
A: This is the sound of the program automa�cally adjus�ng the hea�ng on and off. The program
automa�cally adjusts the hea�ng power and hea�ng temperature by turning on and off, so that the
temperature of the room is close to the programmed temperature value.
Due to the thermal expansion and contrac�on of the metal the productwill also cause a slight ringing
sound
Device:
It is recommended to set a higher temperature value, which can reduce the sound of repeated
program adjustment.
3. Why is the room slow to warm up?
A: Convec�on hea�ng process is so� and comfortable, generally need at least 1 hour to heat the full
room, the specific �me spent on hea�ng is affected by the use of the area, house warming effect, the
surrounding environment and other factors.
Device:During use it is recommended to close doors and windows to prevent heat loss and to keep the
heater temperature set at a maximum of 96°F and wait for the room to warm before se�ng to your
desired temperature. This helps to warm up the room faster and reduces energy consump�on as the
room enters a state of insula�on.
4. Why does the heater suddenly stop hea�ng and then suddenly start again?
A: Heater with intelligent thermostat func�on, when the room temperature reaches the set
temperature, the electric heater will reduce the power to run or stop to achieve energy-saving effect.
When the room temperature drops below the set temperature, the machine will runs again.
5. How do I reset the program se�ngs if the product does not heat up?
A: Step 1: Unplug the power outlet and wait at least 30 minutes for the product to cool down completely.
Step 2: Turn on the device, Open "Menu" - select and enter "Se�ngs" - select and enter "Services" - select
and enter "Reset "- Select "OK".
6. What is the difference between this Ballu convec�on heater and other oil heater ?
A: Oil heaters heat the medium (oil) and then heat the air, which will cause too much heat to be wasted
in the medium (oil), resul�ng in low thermal efficiency. Because the heat loss rate of the room is fast, the
thermal efficiency of the oil heater is low and there is no con�nuous hea�ng effect, so the room
temperature will be lower.
Ballu convec�on electric heater directly heats the air through special alloy hea�ng material, without
intermediate medium, with high thermal efficiency, rapid room temperature rise, and by virtue of natural
air convec�on, the indoor temperature is very uniform.

TROUBLESHOOTING
13
7. What is the difference between Ballu convec�on heater and air condi�oner ?
A: The air condi�oner will cause the indoor air to flow sharply, which will make people feel dry and lack
of oxygen, and because the installa�on posi�on of the air condi�oner is high, it will cause the experience
of hot head and cold feet. In addi�on, the air exchange principle of the air condi�oner determines its
hea�ng effect. When the outdoor temperature is very low, the air condi�oner loses its hea�ng effect.
The ballu convec�on heater is based on the physical principle of hot air rising and cold air falling to
achieve natural air convec�on without direct blowing, and can make the temperature of the upper and
lower posi�ons of the room the same, and the hea�ng feels very comfortable.
8. How to save on electricity bills ?
A: Power consump�on depends on the size of the room, the insula�on of the room, and the temperature
you expect.It is recommended to use in a space of 160-220 square feet (Can be used up to 300 square
feet, but requires longer hea�ng �me), close doors and windows to reduce heat loss, and adjust the
heater to the highest temperature and power for faster hea�ng. When the room enters the thermal
insula�on state, the temperature will be stable, and the power consump�on per hour will be reduced.
At this �me, a lower temperature value can be set.You can also save on electricity bills with different
mode temperatures, which are used at different �mes of the day and in different situa�ons.

CARE AND CLEANING
Care and cleaning
• The heater requires regular cleaning to ensure trouble free.
• Ensure the heater is dry before plugging back into the mains
supply.
• Never use solu�ons such as petrol, thinners or polishing
agents.
• Use a so� cloth (not wet) to wipe the exterior of the heater
to remove dust and dirt.
• The common cause of overhea�ng is deposits of dust or
fluff in the appliance. Ensure these deposits are removed
regularly by unplugging the appliance and vacuum cleaning
the air vents and grills.
• Ensure that the heater has been allowed to cool down
completely before cleaning.
• Unplug the heater from the mains supply before cleaning.
14

WARRANTY AND SERCIVE
15
24-month warranty
A�er Sales Service
This product is covered with ballu product and labor warranty for 24 month
from the date of its original purchase.Please feel free to contact us for any
problems about the maintenance and use of products.
The warranty will not apply in cases of:
• Accident, misuse, or repairs performed by unauthorized personnel.
• Any unit that has been tampered with or used for commercial purposes.
• Use of force,damage caused by external influences.
• Damage caused by non-compliance with user guidelines, e.g., connec�on to an
unsuitable power source or non-compliance with instruc�ons. Par�al or complete
disassembly of the appliance.
If any problem occurs, you can check the manual for troubleshoo�ng in detail, or
reach out to our customer service, or through the Ballu stores you used to
purchase your item on Amazon.
To contact authorized Amazon seller, please following steps:
Step 1: Log into your Amazon Account.
Step 2: Go to the product lis�ng on Amazon.com and click the seller name.
Step 3: Click "Ask a Ques�on" or "Contact the Seller (Depending on Your Loca�on)
Step 4: Now ask any ques�ons you may have concerning the product.
We always work hard to serve you and provide you a be�er customer experience.
Customer service:amaz[email protected]