
© 2022 by Snow Joe
®
, LLC
All rights reserved. Original instructions.
SAVE THESE INSTRUCTIONS
A Division of Snow Joe
®
, LLC
OPERATOR’S MANUAL
Model 24V-HCS-LTE-P1 Form No. SJ-24V-HCS-LTE-P1-880E-M
R
CORDLESS PRUNING SAW
24V MAX* | 2.0 Ah | 5-INCH
1
EN
IMPORTANT!
Safety Instructions
All Operators Must Read These
Instructions Before Use
Read all safety warnings and all instructions. Failure to follow
the warnings and instructions may result in electric shock, re
and/or serious injury. Save all warnings and instructions for
future reference.
mDANGER! This indicates a hazardous situation, which,
if not followed, will result in serious injury or death.
mWARNING! This indicates a hazardous situation, which,
if not avoided, could result in serious injury or death.
mCAUTION! This indicates a hazardous situation, which,
if not avoided, could result in minor or moderate injury.
Intended Use
This cordless prunning saw was designed and manufactured
for trimming and pruning tree limbs and branches and for
cutting smaller logs up to recommended 4.5 inch
(11.4 cm), not to exceed a max. cut of 5.5 in. (14 cm) in
diameter depending on type of wood. All of the wooden
objects intended to be cut with this pruning saw should be no
thicker than the guide bar's maximum cutting capabilities.
Any other use diering from the above mentioned applications
poses a serious hazard to the user and may damage both the
tool and your personal property. Improper use of the machine
will invalidate the warranty, relieve the manufacturer from all
liabilities. The user will consequently be liable for all and any
damage or injury to himself/herself or others.
General Power Tool Safety
Warnings
mWARNING! Read all safety warnings, instructions,
illustrations and specications provided with this power tool.
Failure to follow all instructions listed below may result in
electric shock, re and/or serious injury. Save all warnings and
instructions for future reference.
Work Area Safety
1. Keep work area clean and well lit – Cluttered or dark
areas invite accidents.
2. Do not operate power tools in explosive atmospheres,
such as in the presence of ammable liquids, gases
or dust – Power tools create sparks which may ignite the
dust or fumes.
3. Keep children and bystanders away while operating a
power tool – Distractions can cause you to lose control.
Electric Safety
1. Power tool plugs must match the outlet. Never modify
the plug in any way. Do not use any adapter plugs with
earthed (grounded) power tools – Unmodied plugs and
matching outlets will reduce risk of electric shock.
2. Avoid body contact with earthed or grounded
surfaces, such as pipes, radiators, ranges and
refrigerators – There is an increased risk of electric shock
if your body is earthed or grounded.
3. Do not abuse the cord. Never use the cord for
carrying, pulling or unplugging the power tool. Keep
cord away from heat, oil, sharp edges or moving parts
– Damaged or entangled cords increase the risk of electric
shock
4. When operating a power tool outdoors, use an
extension cord suitable for outdoor use – Use of a cord
suitable for outdoor use reduces the risk of electric shock.
5. If operating a power tool in a damp location is
unavoidable, use a RESIDUAL CURRENT DEVICE
(RCD) protected supply – Use of an RCD reduces the
risk of electric shock
Personal Safety
1. Stay alert, watch what you are doing and use common
sense when operating a power tool. Do not use a
power tool while you are tired or under the inuence
of drugs, alcohol or medication – A moment of
inattention while operating power tools may result in
serious personal injury.
2. Use personal protective equipment. Always wear
eye protection – Protective equipment such as dust
mask, non-skid safety shoes, hard hat, or hearing
protection used for appropriate conditions will
reduce personal injuries.
3. Prevent unintentional starting. Ensure the switch is
in the o-position before connecting battery pack,

2
picking up or carrying the tool – Carrying power tools
with your nger on the switch or energising power tools
that have the switch on invites accidents.
4. Remove any adjusting key or wrench before
turning the power tool on – A wrench or a key left
attached to a rotating part of the power tool may result
in personal injury.
5. Do not overreach. Keep proper footing and balance at
all times – This enables better control of the power tool in
unexpected situations.
6. Dress properly. Do not wear loose clothing or jewelry.
Keep your hair, clothing and gloves away from moving
parts – Loose clothes, jewellery or long hair can be
caught in moving parts.
7. If devices are provided for the connection of dust
extraction and collection facilities, ensure these are
connected and properly used – Use of dust collection
can reduce dust-related hazards.
8. Do not let familiarity gained from frequent use of tools
allow you to become complacent and ignore tool
safety principles. A careless action can cause severe
injury within a fraction of a second.
Power Tool Use and Care
1. Do not force the power tool. Use the correct power
tool for your application – The correct power tool will
do the job better and safer at the rate for which it was
designed.
2. Do not use the power tool if the switch does not turn
it on and o – Any power tool that cannot be controlled
with the switch is dangerous and must be repaired.
3. Disconnect the battery pack from the power
tool before making any adjustments, changing
accessories, or storing power tools – Such
preventive safety measures reduce the risk of starting
the power tool accidentally.
4. Store idle power tools out of the reach of children and
do not allow persons unfamiliar with the power tool or
these instructions to operate the power tool – Power
tools are dangerous in the hands of untrained users.
5. Maintain power tools. Check for misalignment or
binding of moving parts, breakage of parts and any
other condition that may aect the power tool’s
operation. If damaged, have the power tool repaired
before use – Many accidents are caused by poorly
maintained power tools.
6. Keep cutting tools sharp and clean – Properly
maintained cutting tools with sharp cutting edges are less
likely to bind and are easier to control.
7. Use the power tool, accessories etc. in accordance
with these instructions, taking into account the
working conditions and the work to be performed –
Use of the power tool for operations dierent from those
intended could result in a hazardous situation.
8. Keep handles and grasping surfaces dry, clean and
free from oil and grease. Slippery handles and grasping
surfaces do not allow for safe handling and control of the
tool in unexpected situations.
Battery Tool Use and Care
mWARNING! Read all safety warnings and instructions.
Failure to follow the warnings and instructions may result in
electric shock, re and/or serious injury.
1. Recharge only with the charger specied by the
manufacturer. A charger that is suitable for one type of
battery pack may create a risk of re when used with
another battery pack.
2. Use appliances only with specically designated battery
packs. Use of any other battery packs may create a risk of
injury and re.
3. When the battery pack is not in use, keep it away from
other metal objects, like paper clips, coins, keys, nails,
screws or other small metal objects, that can make a
connection from one terminal to another. Shorting the
battery terminals together may cause burns or a re.
4. Under abusive conditions, liquid may be ejected from
the battery; avoid contact. If contact accidentally occurs,
ush with water. If liquid contacts eyes, additionally seek
medical help. Liquid ejected from the battery may cause
irritation or burns.
5. Do not use a battery pack or appliance that is damaged
or modied. Damaged or modied batteries may exhibit
unpredictable behavior resulting in re, explosion or risk of
injury.
6. Do not expose a battery pack or appliance to re or
excessive temperature. Exposure to re or temperature
above 104°F(40.5°C) may cause explosion.
7. Follow all charging instructions and do not charge the
battery pack or appliance outside of the temperature
range specied in the instructions. Charging improperly
or at temperatures outside of the specied range may
damage the battery and increase the risk of re.
8. Do not modify or attempt to repair the appliance or the
battery pack (as applicable) except as indicated in the
instructions for use and care.
Service
1. Have your power tool serviced by a qualied repair
person using only identical replacement parts. This will
ensure that the safety of the power tool is maintained.
2. Never service damaged battery packs. Service
of battery packs should only be performed by the
manufacturer or authorized service providers.

3
Safety Instructions for
Pruning Saws
General Pruning Saw Safety Warnings
• Keep all parts of the body away from the saw chain
when the pruning saw is operating. Before you start
the pruning saw, make sure the saw chain is not
contacting anything. A moment of inattention while
operating the pruning saw may cause entanglement of
your clothing or body with the saw chain.
• Hold the power tool by insulated gripping surfaces
only, because the saw chain may contact hidden
wiring. Saw chains contacting a "live" wire may make
exposed metal part of the power tool "live" and give the
operator a electric shock.
• Wear safety glasses and hearing protection. Further
protective equipment for head, hands, legs and feet is
recommended. Adequate protective clothing will reduce
personal injury by ying debris or accidental contact with
the saw chain.
• Always keep proper footing and operate the pruning
saw only when standing on a xed, secured and level
surface. Slippery or unstable surfaces such as ladders
may cause a loss of balance or control of the saw.
• When cutting a limb that is under tension, be cautious
of spring back. When the tension in the wood bers is
released, the spring-loaded limb may strike the operator
and/or throw the pruning saw out of control.
• Use extreme caution when cutting brush and saplings.
The slender material may catch the saw chain and be
whipped toward you or pull you o balance.
• Carry the saw by the handle with the saw switched
o and away from your body. When transporting or
storing the saw, always t the guide bar cover. Proper
handling of the saw will reduce the likelihood of accidental
contact with the moving saw chain.
• Follow instructions for lubricating, chain tensioning
and changing accessories. An improperly tensioned or
poorly lubricated chain may either break or increase the
chance for kickback.
• Cut wood only. Do not use the pruning saw for any
other purpose. For example, do not use the pruning
saw to cut plastic, masonry or non-wood building
materials. Using the pruning saw in these incorrect ways
could result in serious damage to you and your tool.
• Keep guards in place. Protective guards should be
checked periodically to ensure they are properly tted and
in correct working order.
• Do not grasp the exposed cutting blade or cutting edges
when picking up or holding the saw. Be sure to encase the
cutting bar in its protective sheath when not in use.
• This saw is not intended for tree felling. Use of the
saw for operations dierent than intended could result in
serious injury to the operator or bystanders.
Causes and operator prevention of
kickback
Kickback may occur when the nose or tip of the guide bar
touches an object, or when the wood closes in and pinches
the saw chain in the cut.
Tip contact in some cases may cause a sudden reverse
reaction, kicking the guide bar up and back towards the
operator.
Pinching the saw chain along the top of the guide bar may
push the guide bar rapidly back towards the operator.
Either of these reactions may cause you to lose control of the
saw which could result in serious personal injury. Do not rely
exclusively upon the safety devices built into your saw. As a
pruning saw user, you should take several steps to keep your
cutting jobs free from accident or injury.
Kickback is the result of tool misuse and/or incorrect operating
procedures or conditions and can be avoided by taking proper
precautions as given below:
• Maintain a rm grip, with thumb and ngers encircling
the saw handle and position your body and arm to
allow you to resist kick-back forces. Kick-back forces
can be controlled by the operator, if proper precautions
are taken. Do not let go of the saw.
• Do not overreach and do not cut above shoulder
height. This helps prevent unintended tip contact and
enables better control of the unit in unexpected situations.
• Only use replacement bars and chains specied by the
manufacturer. Incorrect replacement of bars and chains
may cause chain breakage and/or kickback.
• Never use a dull or loose chain. Keep the chain sharp and
properly tensioned.
• Follow the manufacturer’s sharpening and
maintenance instructions for the saw chain. Decreasing
the depth gauge height can lead to increased kickback.
Additional safety instructions
for Pruning Saw
• The pruning saw is designed for cutting branches. Only
use the pruning saw as indicated in this manual for
cutting wood. The machine has not been designed for
continuous, professional use.
• Keep the pruning saw out of reach of children. It is not a
toy.
• Persons with limited physical, sensorial or mental abilities
are not allowed to use the pruning saw, unless they
are supervised for their safety by a qualied person or
are briefed by the responsible person how to use the
machine.
• Children and adolescents are not allowed to use the
pruning saw. Excluded from this prohibition are young
people over 16 years of age under the supervision of an
expert for the purpose of training.

4
• Please note the warning symbols. They mark all those
instructions which are important for safety reasons.
Observe these instructions as failure to do so could result
in serious injury!
• The pruning saw must be used only by one person at a
time. Make sure bystanders do not stay in the vicinity of
the pruning saw’s work area.
• Check the safe operating condition of the pruning saw, in
particular the guide bar and the saw chain, before each
operation.
• Always have a safe stand when working with the saw.
• Hold the machine rmly and securely when switching on.
• Make sure the guide bar and the saw chain must be free
when switched on and must not come into contact with
the workpiece to be cut.
• Keep your hands away from the sawing area. Do not reach
under the workpiece. Contact with the saw chain may
result in injury.
• Guide the pruning saw onto the workpiece only when
switched on. Otherwise there is a risk of kick-back if the
saw chain gets caught in the workpiece.
• When sawing, the base plate must always face against the
workpiece. The saw chain can become jammed and lead
to loss of control over the machine.
• When the cut is completed, switch o the machine and
then pull the saw chain out of the cut only after it has
come to a standstill. This way you can avoid kick-back.
• Clamp the material to be processed well. Do not support
the workpiece with your hand or foot. Do not touch
objects or the oor with the saw running. Danger of kick-
back.
• When sawing converted timber and thin branches always
use a strong support, such as a sawing trestle. Do not
stack timber pieces.
• Before cutting logs, secure the logs in position.
• When working on sloping ground, make sure to work
facing upwards.
• Be particularly careful when cutting splintered wood.
Splinters of wood can be torn along by the saw chain and
increase the risk of injury!
• Foreign objects such as nails, screws, metal parts, sand,
etc. lead to increased wear on the guide bar and saw
chain.
• A blunt saw chain can cause overheating and damage to
the motor.
• Always remove the battery when checking the chain
tension, to re-tighten it, to mount the saw chain and to
eliminate faults! Also remove the battery if you do not use
the machine temporarily.
Battery & Charger
Safety Instructions
We pay a great deal of attention to the design of every battery
pack to ensure that we supply you with batteries that are safe,
durable and have a high energy density. The battery cells have
a wide range of safety devices. Each individual cell is initially
formatted and its electrical characteristic curves are recorded.
This data is then used exclusively to be able to assemble the
best possible battery packs.
Despite all the safety precautions, caution must always be
exercised when handling batteries. The following points must
be obeyed at all times to ensure safe use. Safe use can only
be guaranteed if undamaged cells are used. Incorrect handling
of the battery pack can cause cell damage.
IMPORTANT! Analyses conrm that incorrect use and poor
care of high-performance batteries are the main factors
responsible for personal and/or product damage.
mWARNING! Use only approved replacement batteries;
other batteries may damage the cordless pruning saw and
cause it to malfunction, which can lead to serious personal
injury.
mWARNING! Do not use a battery pack or appliance that
is damaged or modied. Damaged or modied batteries may
exhibit unpredictable behavior resulting in re, explosion or
risk of injury.
Do not modify or attempt to repair the appliance or the battery
pack except as indicated in the instructions for use and care.
Have your battery pack serviced by a qualied repair person
using only identical replacement parts. This will ensure that the
safety of the battery pack is maintained.
mCAUTION! To reduce the risk of injury, charge the 24V
iON+ lithium-ion battery pack only in its designated 24V iON+
lithium-ion charger. Other types of chargers present risk of re,
personal injury and damage. Do not wire a battery pack to a
power supply plug or car cigarette lighter. Such misuse will
permanently disable or damage the battery pack.
• Avoid dangerous environments – Do not charge the
battery pack in rain, snow or in damp or wet locations.
Do not use the battery pack or charger in the presence of
explosive atmospheres (gaseous fumes, dust or ammable
materials) because sparks may be generated when inserting
or removing the battery pack, which could lead to a re.
• Charge in a well-ventilated area – Do not block the
charger vents. Keep them clear to allow for proper
ventilation. Do not allow smoking or open ames near a
charging battery pack. Vented gases may explode.
NOTE: The safe temperature range for the battery is 41°F –
105ºF (5°C – 40.5°C). Do not charge the battery outside in
freezing weather; charge it at room temperature.

5
• Maintain charger cord – When unplugging the charger, pull
the plug, not the cord, from the receptacle to reduce the
risk of damage to the electrical plug and cord. Never carry
the charger by its cord or yank it by the cord to disconnect
it from the receptacle. Keep the cord away from heat, oil
and sharp edges. Make sure the cord will not be stepped
on, tripped over or subjected to damage or stress when the
charger is in use. Do not use the charger with a damaged
cord or plug. Replace a damaged charger immediately.
• Do not use an extension cord unless it is absolutely
necessary – Using the wrong, damaged or improperly
wired extension cord poses a risk of re and electric shock.
If an extension cord must be used, plug the charger into a
properly wired 16 gauge or larger extension cord with the
female plug matching the male plug on the charger. Make
sure that the extension cord is in good electrical condition.
• Charger XZ2600-0450 is rated for 100 – 240 volt AC
only – The charger must be plugged into an appropriate
receptacle.
• Use only recommended attachments – Use of an
attachment not recommended or sold by the battery
charger or battery pack manufacturer may result in risk of
re, electric shock or personal injury.
• Unplug charger when not in use – Make sure to
disconnect battery pack from unplugged charger.
mWARNING! To reduce the risk of electric shock,
always unplug the charger before performing any cleaning or
maintenance. Do not allow water to ow into the charger.
Use a Ground Fault Circuit Interrupter (GFCI) to reduce
shock hazards.
• Do not burn or incinerate the battery pack – The battery
pack may explode, causing personal injury or damage.
Toxic fumes and materials are created when battery pack is
burned.
• Do not crush, drop or damage battery pack – Do not use
the battery pack or charger if they have sustained a sharp
blow, been dropped, run over or have been damaged in any
way (i.e. pierced with a nail, hit with a hammer, stepped on,
etc.).
• Do not disassemble – Incorrect reassembly may pose
a serious risk of electric shock, re or exposure to toxic
battery chemicals. If the battery or charger are damaged,
contact an authorized Snow Joe
®
+ Sun Joe
®
dealer or
call the Snow Joe
®
+ Sun Joe
®
customer service center at
1-866-SNOWJOE (1-866-766-9563) for assistance.
• Battery chemicals cause serious burns – Never let a
damaged battery pack contact the skin, eyes or mouth.
If a damaged battery pack leaks battery chemicals, use
rubber or neoprene gloves to safely dispose of it. If skin
is exposed to battery uids, wash the aected area with
soap and water and rinse with vinegar. If eyes are exposed
to battery chemicals, immediately ush with water for 20
minutes and seek medical attention. Remove and dispose
of contaminated clothing.
• Do not short circuit – A battery pack will short circuit if
a metal object makes a connection between the positive
and negative contacts on the battery pack. Do not place a
battery pack near anything that may cause a short circuit,
such as paper clips, coins, keys, screws, nails and other
metallic objects. A short-circuited battery pack poses a risk
of re and severe personal injury.
• Store your battery pack and charger in a cool, dry
place – Do not store the battery pack or charger where
temperatures may exceed 105ºF (40.5ºC), such as in
direct sunlight or inside a vehicle or metal building during
the summer.
Information about the battery
1. The battery pack supplied with your cordless pruning
saw is only partially charged. The battery pack has to be
charged completely before you use the tool for the rst
time.
2. For optimum battery performance, avoid low discharge
cycles by charging the battery pack frequently.
3. Store the battery pack in a cool place, ideally at 77°F
(25°C) and charged to at least 40%.
4. Lithium-ion batteries are subject to a natural aging
process. The battery pack must be replaced at the latest
when its capacity falls to just 80% of its capacity when
new. Weakened cells in an aged battery pack are no
longer capable of meeting the high power requirements
needed for the proper operation of your pruning saw, and
therefore pose a safety risk.
5. Do not throw battery pack into an open re as this poses
a risk of explosion.
6. Do not ignite the battery pack or expose it to re.
7. Do not exhaustively discharge the battery. Exhaustive
discharge will damage the battery cells. The most
common cause of exhaustive discharge is lengthy storage
or non-use of partially discharged batteries. Stop working
as soon as the performance of the battery falls noticeably
or the electronic protection system triggers. Place the
battery pack in storage only after they have been fully
charged.
8. Protect the battery and the tool from overloads. Overloads
will quickly result in overheating and cell damage inside
the battery housing even if this overheating is not
apparent externally.
9. Avoid damage and shocks. Immediately replace batteries
that have been dropped from a height of more than one
meter or those that have been exposed to violent shocks,
even if the housing of the battery pack appears to be
undamaged. The battery cells inside the battery may have
suered serious damage. In such instances, please read
the waste disposal information for proper battery disposal.
10. If the battery pack suers overloading and overheating,
the integrated protective cuto will switch o the
equipment for safety reasons.
IMPORTANT! Do not press the ON/OFF switch any more
if the protective cut-o has been activated. This may
damage to the battery packs.
11. Use only original battery packs. The use of other batteries
poses a re risk and may result in injuries or an explosion.

6
Information about the charger and the
charging process
1. Please check the data marked on the rating plate of the
battery charger. Be sure to connect the battery charger
to a power supply with the voltage marked on the rating
plate. Never connect it to a dierent mains voltage.
2. Protect the battery charger and its cord from damage.
Keep the charger and its cord away from heat, oil and
sharp edges. Have damaged cords repaired without delay
by a qualied technician at an authorized Snow Joe
®
+
Sun Joe
®
dealer or call the Snow Joe
®
+ Sun Joe
®
customer service center at 1-866-SNOWJOE
(1-866-766-9563).
3. Electrical plugs must match the outlet. Never modify
the plug in any way. Do not use any adapter plugs with
grounded appliances. Unmodied plugs and matching
outlets will reduce the risk of electric shock.
4. Keep the battery charger, battery pack and the cordless
tool out of the reach of children.
5. Do not use the supplied battery charger to charge other
cordless tools.
6. During periods of heavy use, the battery pack will become
warm. Allow the battery pack to cool to room temperature
before connecting it to the charger to recharge.
7. Do not overcharge the battery. Do not exceed the
maximum charging times. These charging times only apply
to discharged battery. Frequent insertion of a charged or
partially charged battery pack will result in overcharging
and cell damage. Do not leave the battery in the charger
for days on end.
8. Never use or charge the battery if you suspect that it
has been more than 12 months since the last time it was
charged. There is a high probability that the battery
pack has already suered dangerous damage
(exhaustive discharge).
9. Charging the battery at a temperature below 41°F (5°C)
will cause chemical damage to the cells and may cause a
re.
10. Do not use battery that have been exposed to heat during
the charging process, as the battery cells may have
suered dangerous damage.
11. Do not use batteries that have suered curvature or
deformation during the charging process or those that
exhibit other atypical symptoms (gassing, hissing,
cracking, etc.).
12. Never fully discharge the battery pack (maximum
recommended depth of discharge is 80%). A complete
discharge of the battery pack will lead to premature aging
of the battery cells.
Protection from environmental inuences
1. Wear suitable work clothes. Wear safety goggles.
2. Protect your cordless tool and the battery charger from
moisture and rain. Moisture and rain can cause dangerous
cell damage.
3. Do not use the cordless tool or the battery charger near
vapors and ammable liquids.
4. Use the battery charger and cordless tools only in dry
conditions and at an ambient temperature of 41ºF – 105°F
(5°C – 40.5°C).
5. Do not keep the battery charger in places where the
temperature is liable to reach over 105°F (40.5°C). In
particular, do not leave the battery charger in a car that is
parked in the sunshine.
6. Protect the battery from overheating. Overloads,
overcharging and exposure to direct sunlight will result
in overheating and cell damage. Never charge or work
with battery that have been overheated – replace it
immediately, if possible.
7. Store the charger and your cordless tool only in dry
locations with an ambient temperature of 41ºF – 105°F
(5°C – 40.5°C). Store your lithium-ion battery pack in a
cool, dry place at a temperature of 77°F (25°C). Protect
the battery pack, charger and cordless tool from humidity
and direct sunlight. Only place fully charged battery in
storage (charged to at least 40%).
8. Prevent the lithium-ion battery pack from freezing. Battery
pack that was stored below 32°F (0°C) for more than 60
minutes must be discarded.
9. When handling batteries, be wary of electrostatic charge.
Electrostatic discharges can damage the electronic
protection system and the battery cells. Avoid electrostatic
charging and never touch the battery poles.
7
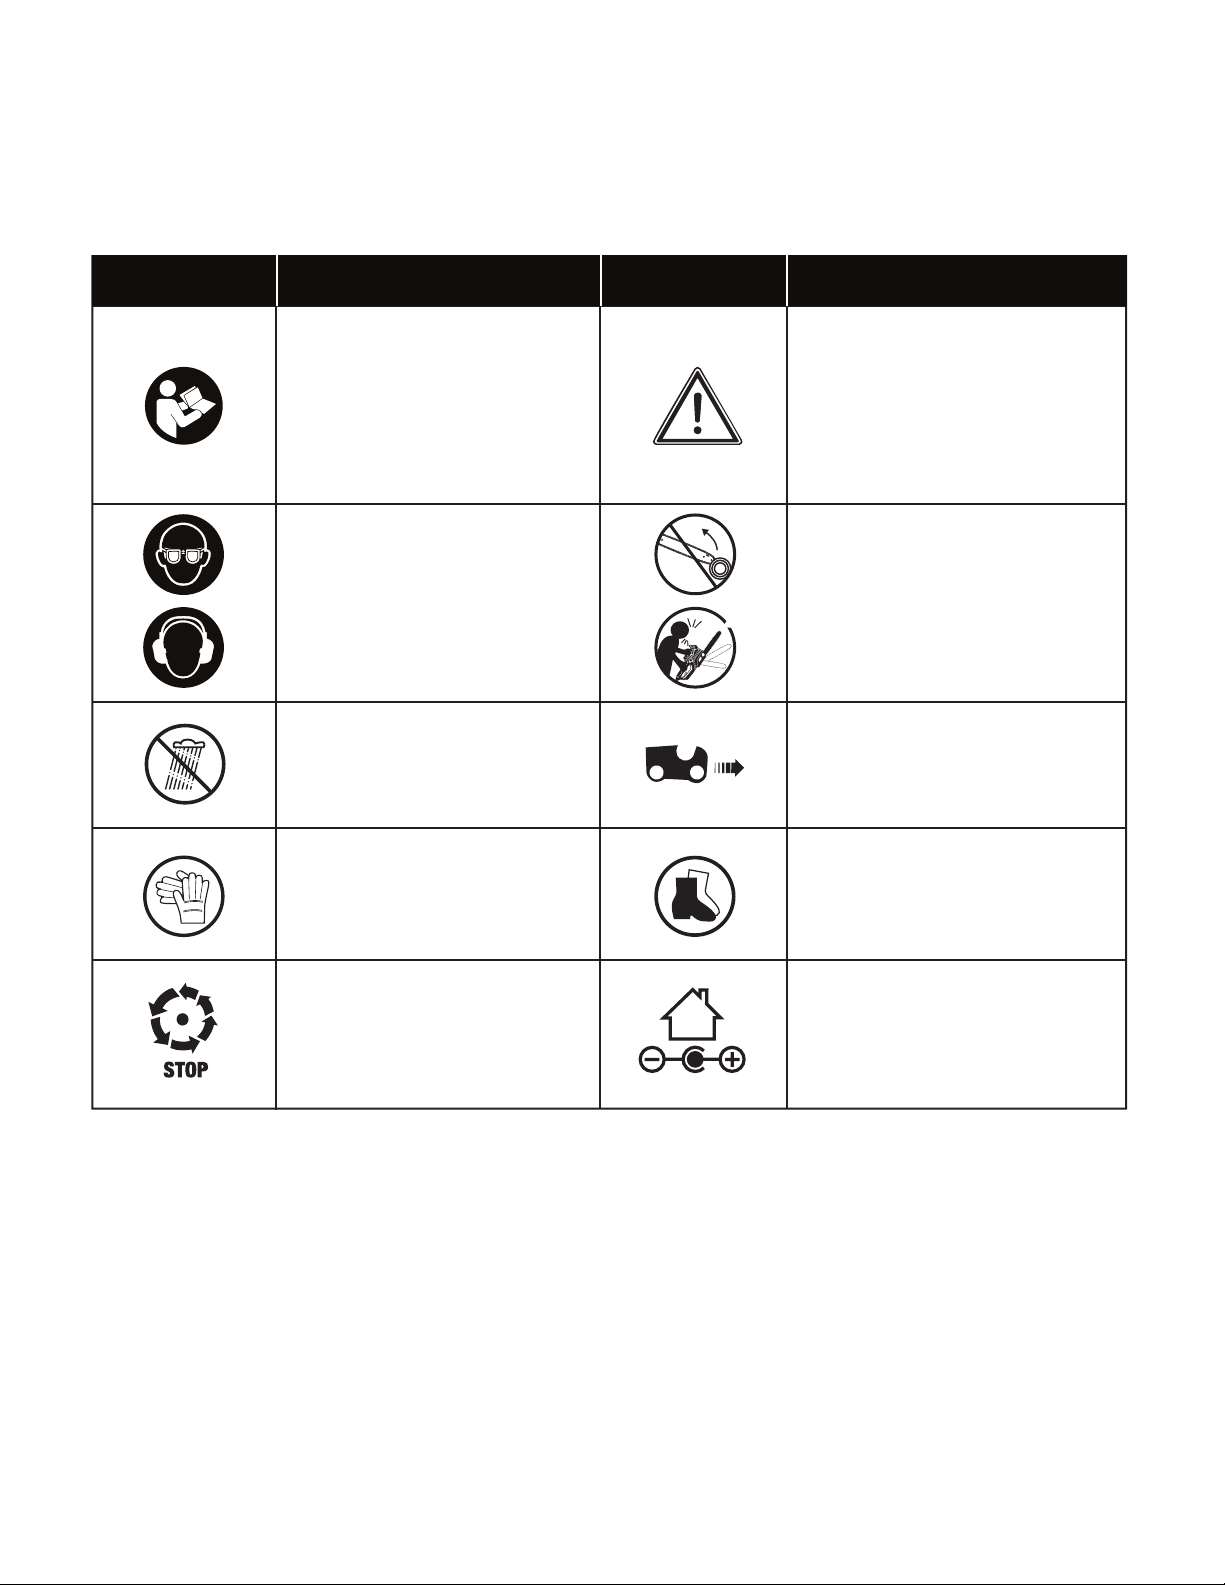
Safety Symbols
The following table depicts and describes safety symbols that may appear on this product. Read, understand, and follow all
instructions on the machine before attempting to assemble and operate.
READ THE OPERATOR'S
MANUAL(S) – Read, understand
and follow all instructions in the
user manual(s) before attempting
to assemble and operate.
SAFETY ALERT – Indicates a
precaution, a warning or a danger.
The moving part will continuously
run for several seconds after you
turn o the machine.
WARNING! Do not expose the unit
to rain or wet conditions.
CAUTION! Avoid contacting the
guide bar tip with any object. Tip
contact may cause the guide bar
to move suddenly upward and
backwards, which may cause
serious injury to the user.
WEAR EYE AND HEARING
PROTECTION – For protection
against injury, wear ear defenders,
safety goggles, and head protection.
Correct direction of cutting teeth.
Symbols Symbols
Descriptions
Descriptions
Indoor use only. Only use battery
charger indoors.
m
Wear safety footwear at all times to
provide protection against objects
that may accidentally fall on feet.
Wear safety gloves during use to
protect hands.

8
Know Your Cordless Pruning Saw
Read the owner’s manual and safety instructions carefully before operating cordless pruning saw. Compare the illustration below
to the cordless pruning saw in order to familiarize yourself with the location of the various controls and adjustments. Save this
manual for future reference.
1. Chain/sprocket end cover
2. End cover knob
3. Riving knife
4. 5-inch (12.7 cm) guide bar
5. 5-inch (12.7 cm) cutting chain
6. Cutting bar sheath
7. Base plate
8. 24V iON+ lithium-ion battery
(24VBAT-LTE) featuring exclusive
EcoSharp
®
technology
3
2 1
4
5
6
7
8 9 1110
12 13
14
15
16 17
18
19
20
21
22
9. Charge socket
10. Push lock button (2)
11. Push button for battery
indicator
12. Battery indicator
13. 24V iON+ lithium-ion charger
(XZ2600-0450)
14. Charger plug
15. Lubricating oil
16. Hex key wrench
17. Hex key wrench slot
18. Battery compartment
19. Handle grip
20. On/O switch
21. Safety lock button
22. Ventilation slots
9
Technical Data
Motor ............................................................................. 230 W
Battery Voltage Max* .................................................. 24V D.C
Battery Capacity ............................................................ 2.0 Ah
Charger Input .................................................. 100 – 240V AC,
50 – 60 Hz, 0.4A
Charger Output ...................................... 26V DC
450 mA
Charge Time Max .............................................................. 5 hr
Bar/Chain Length .......................................... 5 inch (12.7 cm)
Cutting Thickness Max ......................... Max: 4.5 in. (11.4 cm)
Oil Bottle Capacity .......................................... 0.7 oz (20 ml)
Net Weight ........................................................... 4 lbs (1.8 kg)
* Initial no-load voltage, when fully charged, peaks at 24 volts; nominal voltage
under typical load is 21.6 volts.
Unpacking
Carton Contents
• Cordless pruning saw with chain and bar
pre-assembled
• Cutting bar sheath (assembled on the chain and bar)
• Hex key wrench (in the storage slot)
• 0.7 Fl oz (20 ml) lubrication oil
• 24V iON+ lithium-ion battery
• 24V iON+ lithium-ion battery charger
• Manual with registration card
1. Carefully remove the cordless pruning saw and check to
see that all of the above items are supplied.
2. Inspect the product carefully to make sure no breakage or
damage occurred during shipping. If you nd damaged or
missing parts, DO NOT return the unit to the store. Please
call the Snow Joe
®
+ Sun Joe
®
customer service center at
1-866-SNOWJOE (1-866-766-9563).
NOTE: Do not discard the shipping carton and packaging
material until you are ready to use your new cordless
pruning saw. The packaging is made of recyclable
materials. Properly dispose of these materials in
accordance with local regulations.
IMPORTANT! The equipment and packaging material are
not toys. Do not let children play with plastic bags, foils,
or small parts. These items can be swallowed and pose a
suocation risk!
Battery Pack Operation
The equipment is powered by a lithium-ion battery. The battery
pack is completely sealed and maintenance free.
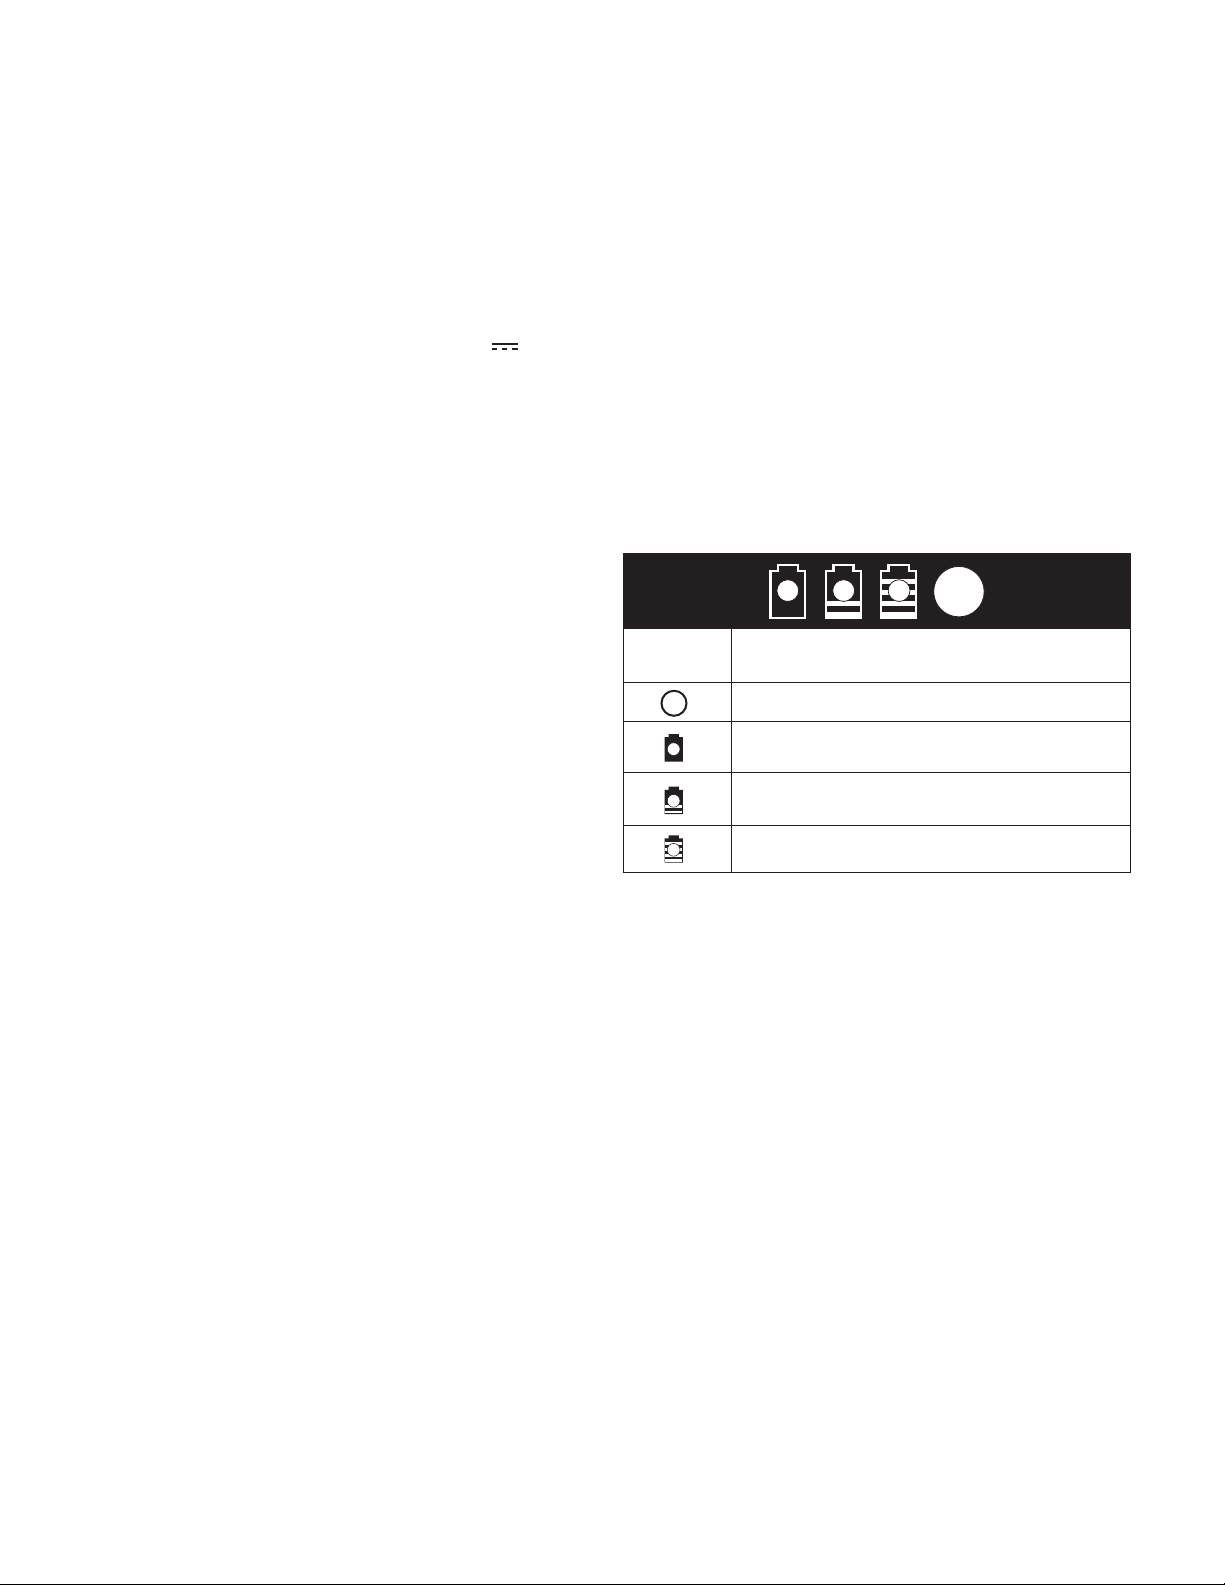
Battery Charge Level Indicator
The battery pack is equipped with a push button for checking
the charge level. Simply press the push button to read o the
battery charge level from the LEDs of the battery indicator:
• All 3 level monitoring LEDs are lit: Battery charge level
is high.
• 2 level monitoring LEDs are lit: Battery charge level is
decreasing. Stop work as soon as possible.
• 1 level monitoring LED is lit: Battery is at. Stop work
IMMEDIATELY and charge the battery. Otherwise the
battery’s service life will be greatly shortened.
NOTE: If the charge level button does not appear to be
working, connect to the charger and charge as needed.
NOTE: Immediately after using the battery pack, the charge
level button may display a lower charge than it will if checked
a few minutes later. The battery cells “recover” some of their
charge after resting.
Charger Operation
m
WARNING! Charge only 24V iON+ lithium-ion battery
pack with its compatible 24V iON+ lithium-ion charger. Other
types of batteries may cause personal injury and damage.
To reduce the risk of electric shock, do not allow water to ow
into the charger's AC/DC plug.
When to Charge the iON+ 24VBAT-LTE
Lithium-iON Battery
NOTE: The iON+ 24VBAT-LTE lithium-iON battery pack does
not develop a "memory" when charged after only a partial
discharge. Therefore, it is not necessary to run down the
battery pack before inserting the charger plug.
Charge level button
The battery is at 30% capacity
and requires charging
The battery is at 60% capacity
and requires charging soon
The battery is at full capacity
Light IndicatorsLights
10
• Use the battery indicator lights to determine when to charge
your iON+ 24VBAT-LTE lithium-iON battery pack.
• You can "top-o" your battery pack's charge before starting
a big job or after a long day of use.
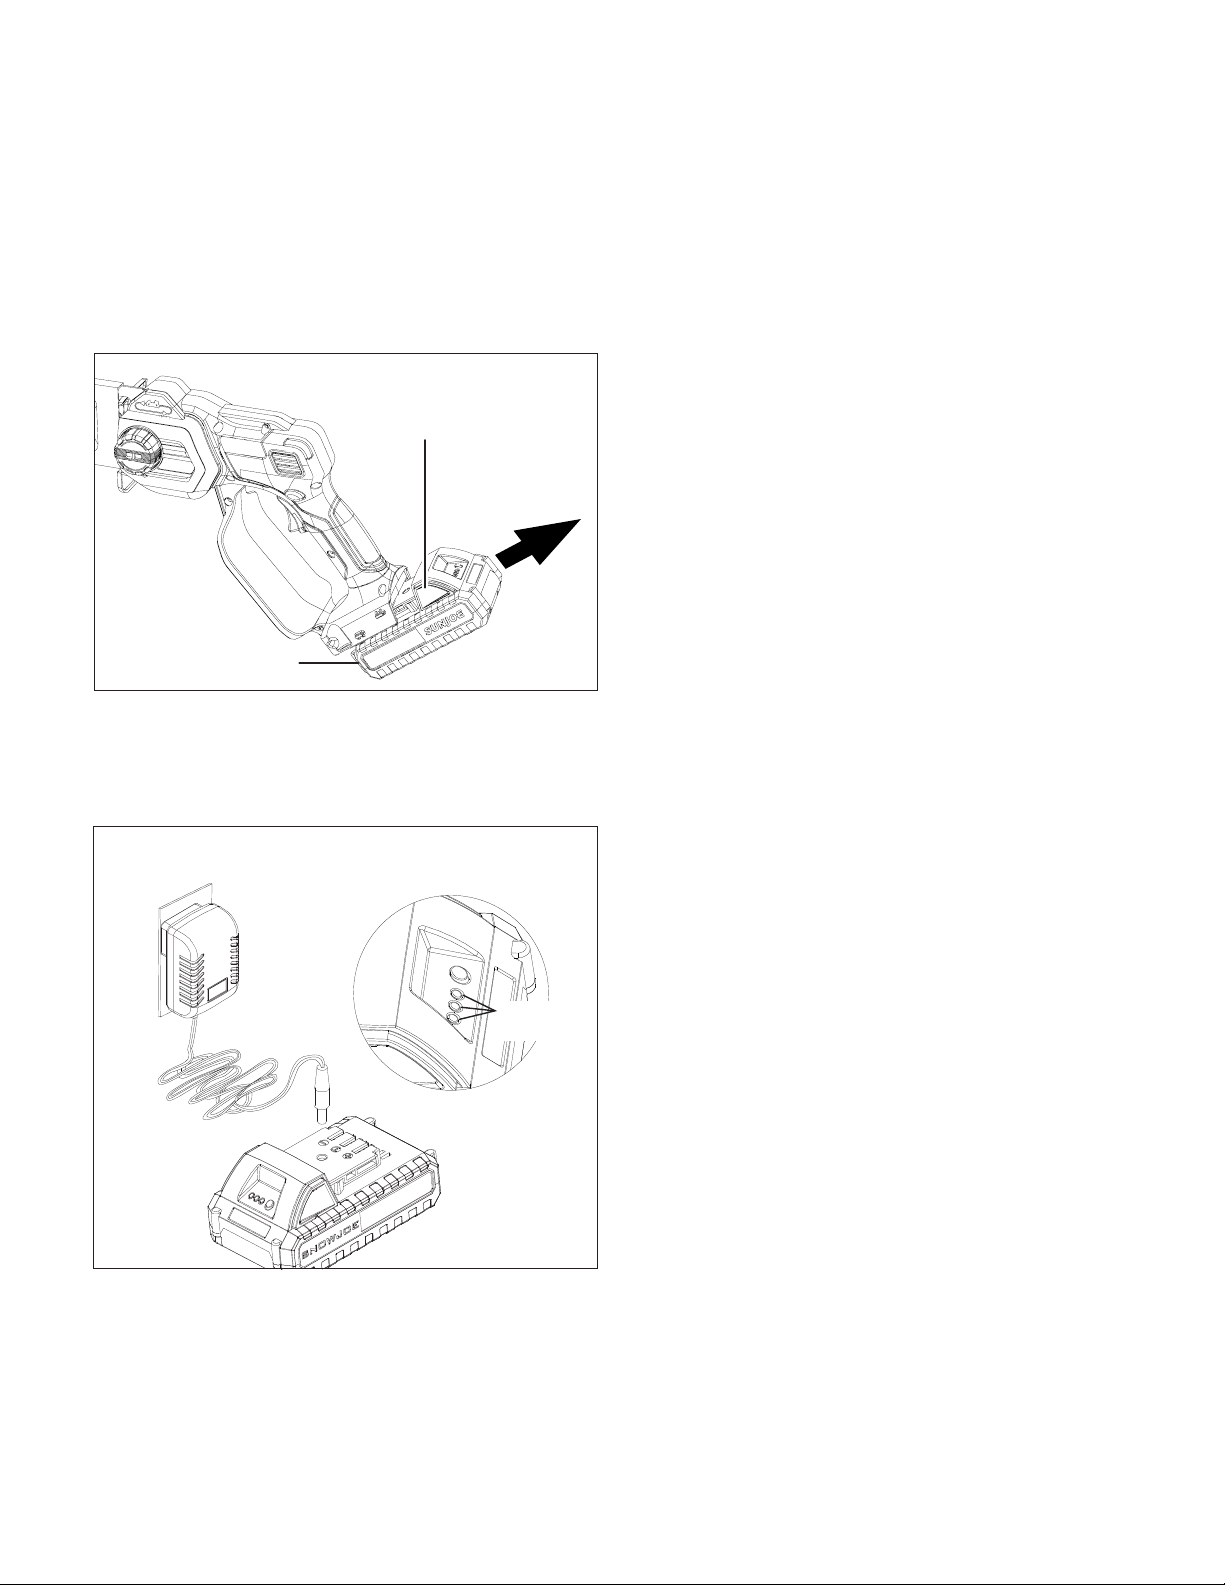
Charging the Battery
1. Press the push lock buttons on the battery to pull it out of
the equipment (Fig. 1).
2. Check that the mains voltage is the same as that marked
on the rating plate of the battery charger. Then, plug the
charger adapter into an appropriate AC power outlet.
Connect the charger plug into the charge socket of the
battery to start charging (Fig. 2).
3. The battery will take approximately 5 hours to charge.
The battery indicator LEDs will twinkle and illuminate one
by one during the charging process. Unplug the charger
immediately when the 3 LEDs are all illuminated.
mCAUTION! FIRE HAZARD. When disconnecting the
charger from the battery, be sure to unplug the charger from
the outlet rst, then disconnect the charger from the battery.
mWARNING! This charger does not automatically
turn o when the battery is fully charged. Please take care
not to leave the battery plugged into the charger. Switch
o or unplug the charger at the mains when charging is
complete.
4. Timely recharging of the battery will help prolong the
battery's life. You must recharge the battery pack when
you notice a drop in the equipment's power.
IMPORTANT! Never allow the battery pack to become fully
discharged as this will cause irreversible damage to the
battery.
Preparing To Work
Checking the Machine
mWARNING! Before performing any checks,
adjustments, repairs or maintenance on the machine, make
sure the battery is not inserted in the compartment.
Before starting work please:
• Check that all the screws on the machine and the guide
bar are tightly fastened;
• Check that the chain is tensioned correctly, sharp and
there are no signs of any damage;
• Check that hand grip and protection devices are clean
and dry, correctly mounted and securely fastened to the
machine;
• Check that the On/O switch and the safety lock button
move freely without forcing and return automatically and
rapidly back to their neutral positions;
• Check that the On/O switch remains locked until the
safety lock button is pressed;
• Make sure the ventilation slots are not clogged with
sawdust or debris;
Break-in Time for New Chains
For safety operation, it's recommended to run through the
below break-in tips every time a new chain is installed.
1. Remove the battery and adjust the chain tension.
2. Insert the battery and switch on the pruning saw and leave
the motor running idle for approx. 5 minutes.
3. Remove the battery and check the chain tension again. If
necessary, re-tighten the chain.
4. Afterwards make only easy cuts for approx. 30 minutes.
Always ensure sucient lubrication of the saw chain! Only
use the pruning saw for heavier cuts and greater cutting
depths after the break-in period.
Battery pack
Fig. 1
Push lock button
Fig. 2
Battery
indicators
11
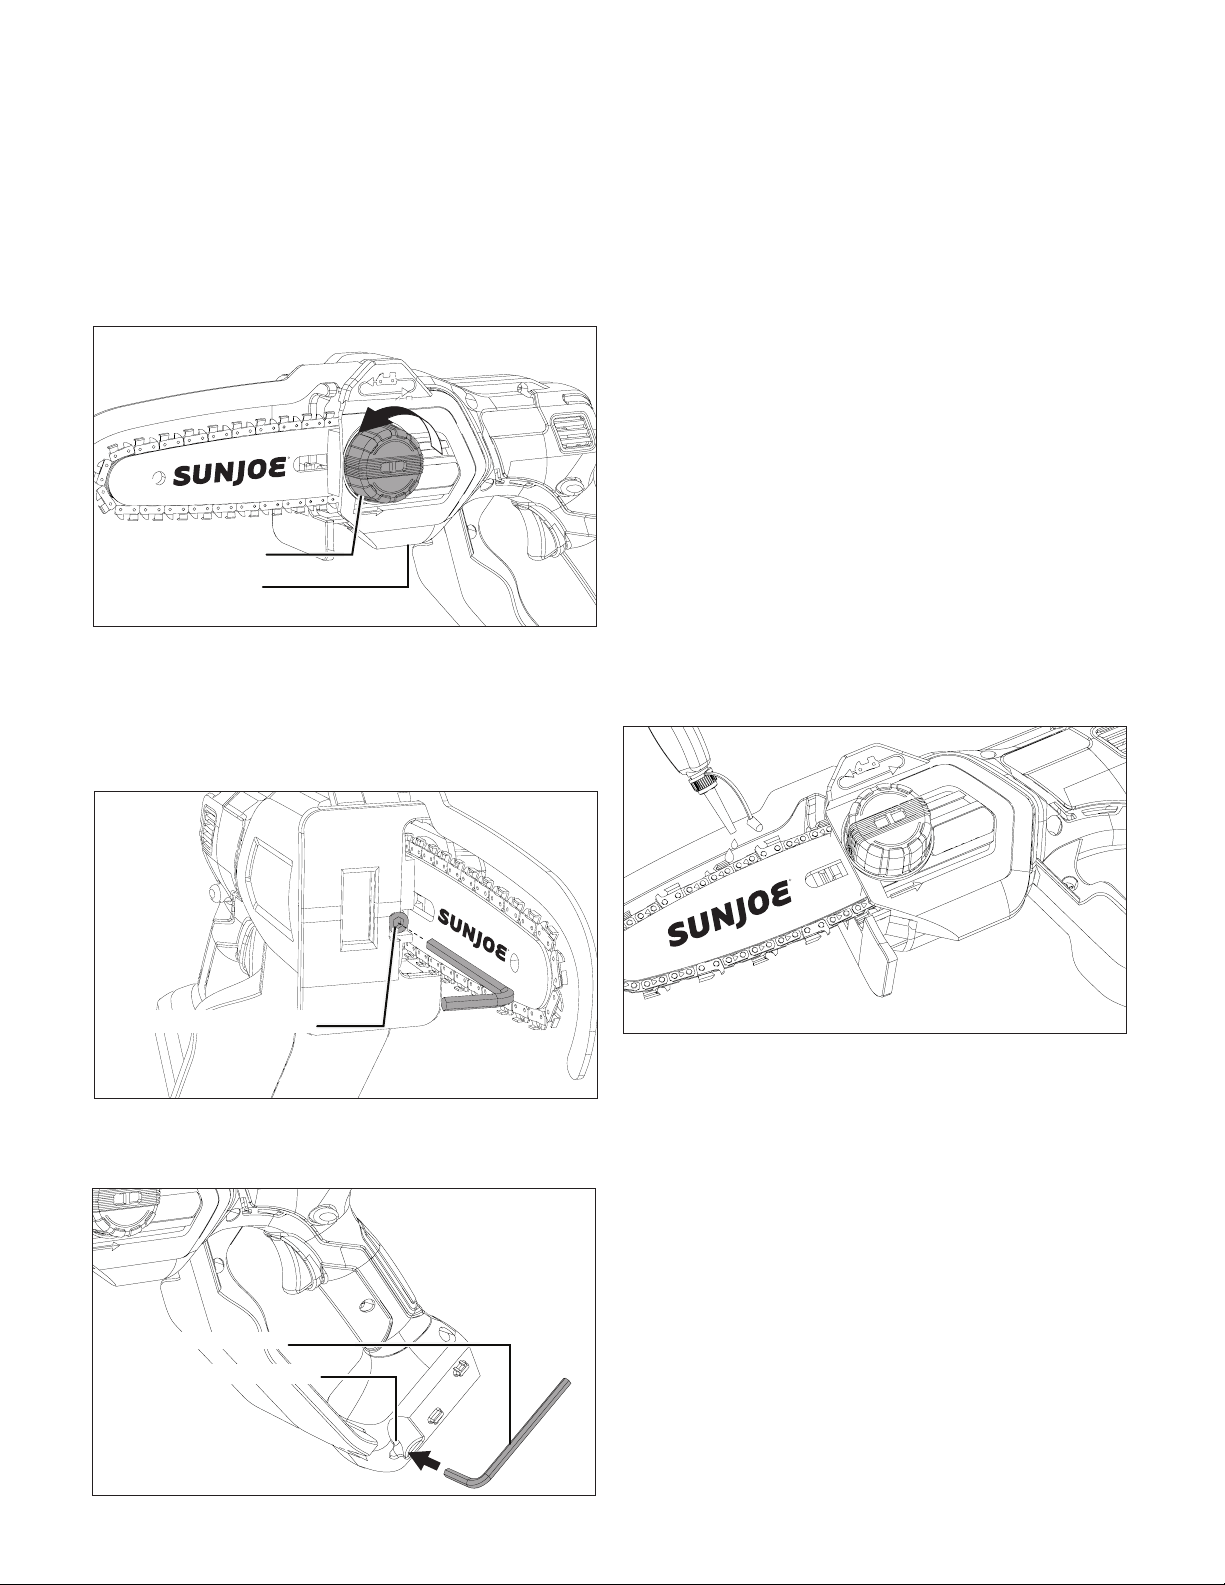
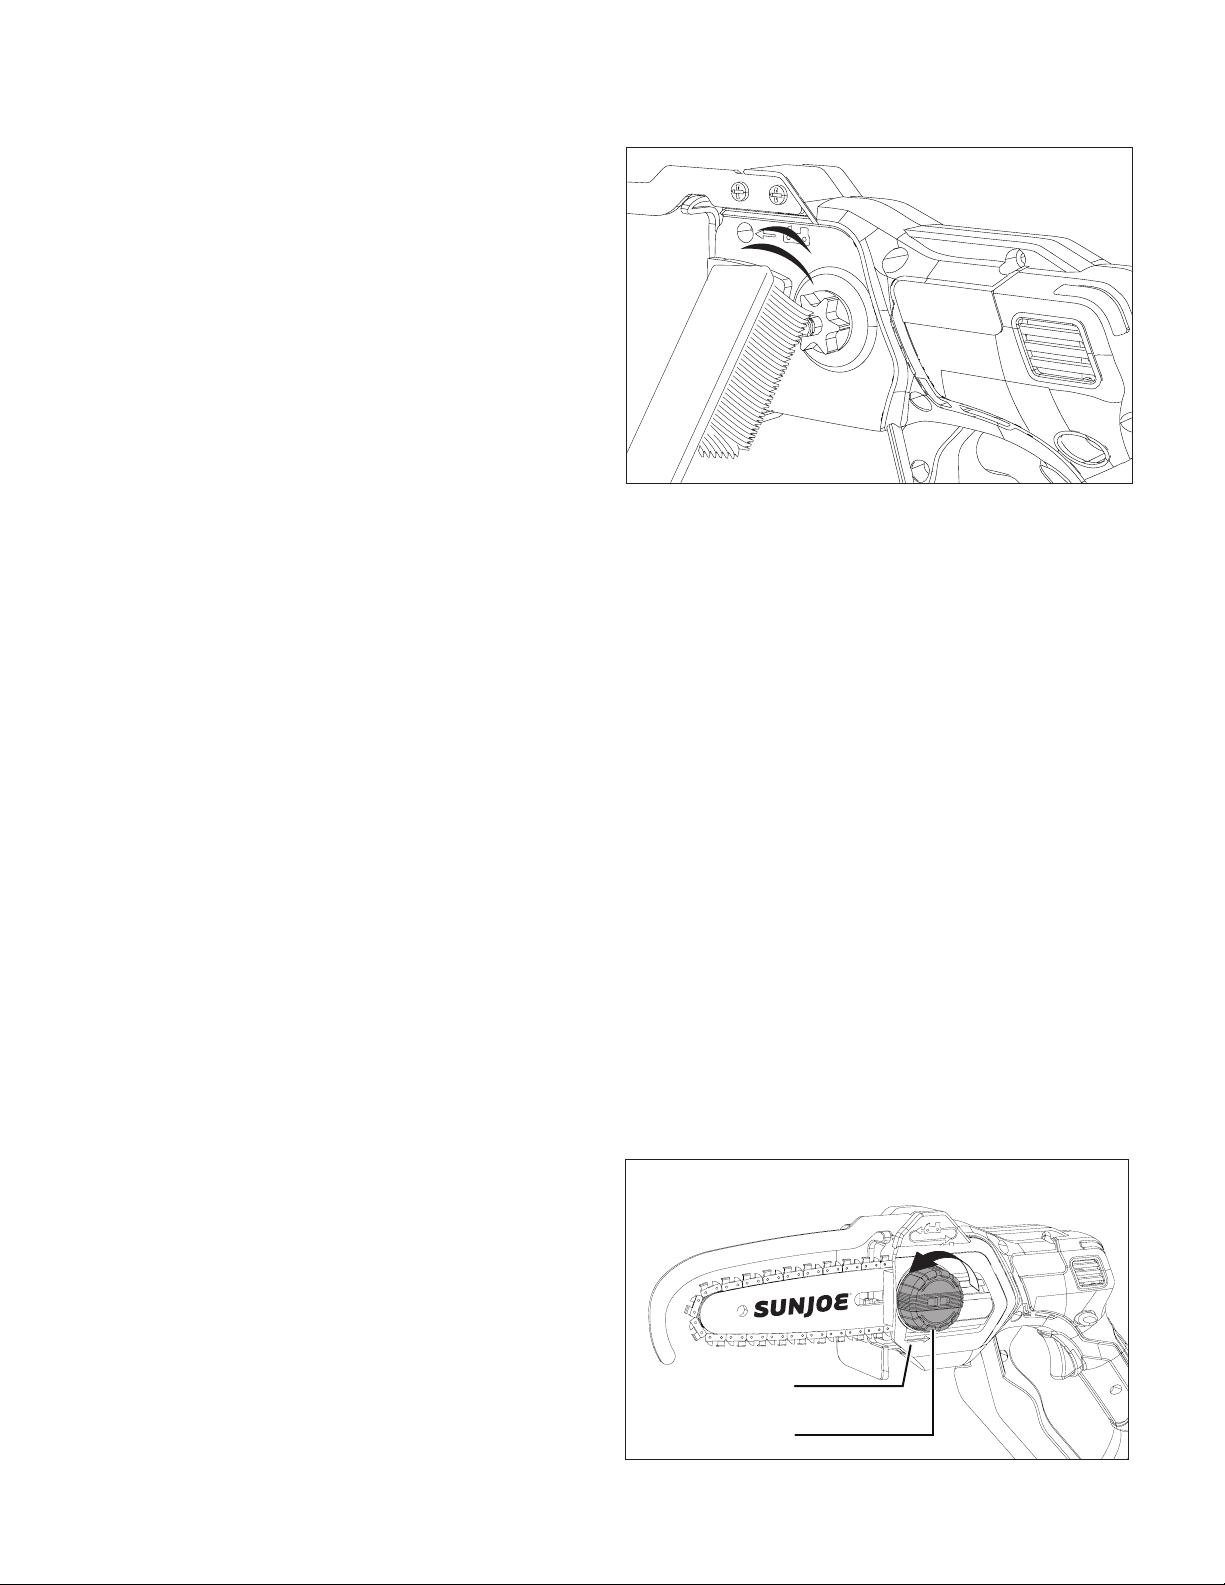
Adjusting the Chain Tension
mWARNING! Use protective gloves when handling the
bar and chain.
1. Make sure the pruning saw is shut o and the battery is
removed. Loosen the sprocket/chain end cover a little by
turning the end cover knob counterclockwise (Fig. 3).
2. Use the equipped hex key wrench to turn the
chain adjusting screw clockwise to tighten, turn it
counterclockwise to loosen. A cold chain will be correctly
tensioned when there is no slack on the underside of the
guide bar; the chain is snug, but it can be turned by hand
without binding (Fig. 4).
NOTE: When not in use, the hex key wrench can be
stored in the hex key wrench slot located on the bottom of
the pruning saw (Fig. 5).
3. Retighten the end cover knob. Using a screwdriver, run
the chain along the guide bar to check that it moves
smoothly.
Chain Lubricant
IMPORTANT! Only use a good quality bar and chain oil
designed specically for use with chain saws to ensure optimal
lubrication of the cutting parts. Do not use oil containing
impurities.
IMPORTANT! The chain lubricating oil is bio-degradable. The
use of mineral oil or engine oil can have a serious impact on
the environment. It is essential that you use good quality oil to
lubricate the cutting parts eectively. Used or poor quality oil
does not guarantee good lubrication and reduces the lifespan
of the chain and bar.
Before lubricate the pruning saw, clean the guide bar and saw
chain with a soft brush. Then drop the oil between the chain
and the bar. Insert the battery and switch on the pruning saw.
The oil will be evenly distributed over the chain. For optimal
cutting result, lubricate the saw every 30 minutes during
operation. When storing the unit for a long period of time (3
months or longer), be sure the chain is lightly lubricated; this
will prevent rust on the chain and bar sprocket (Fig. 6).
Operation
Starting and Stopping
mCAUTION! Starting, stopping, and restarting an electric
motor repeatedly within a few seconds can generate a great
deal of heat and damage the motor. To protect the life of your
cordless pruning saw, always wait at least ve seconds after
stopping before restarting the saw.
mWARNING! Be sure that the chain is not in contact with
any object when you start the motor.
mWARNING! Keep hands away from chain. Keep hand
on handle. Do not overreach.
R
Fig. 3
Chain/sprocket
end cover
End cover knob
R
Fig. 4
Chain adjusting screw
Fig. 5
Hex key wrench
Hex key wrench slot
R
Fig. 6
12
A good, rm grip on the tool will help you maintain control.
Maintain a rm grip by place your hand on the handle with
thumb and ngers encircling the grip. A rm grip combined
with proper positioning of the saw will help you maintain
control of the saw. Do not let go of the saw while it is in
operation.
mWARNING! Do not operate the cordless pruning saw in
a tree, on a ladder, or on a scaold. Using the tool under such
circumstances is extremely dangerous.
mCAUTION! The chain will continue to run for several
seconds after turning o the tool.
Do not use the pruning saw under wet conditions. Use extreme
caution when cutting small brush, saplings, or limbs under
tension because slender and tense material may catch the saw
and be whipped toward you, pull you o balance, or spring
back.
Do not use the saw to cut vines and/or small underbrush.
mWARNING! Do not let familiarity with this type of tool
prevent you from taking all necessary precautions. Remember
that a careless fraction of a second is sucient to inict
serious injury.
mWARNING! Do not cut branches near electrical wires.
mWARNING! Failure to lubricate the chain will cause
damage to the bar and chain. Use only a good quality bar
and chain oil designed specically for use with chain saws.
1. Prior to each cutting session, run through the daily
checklist (see pg. 17).
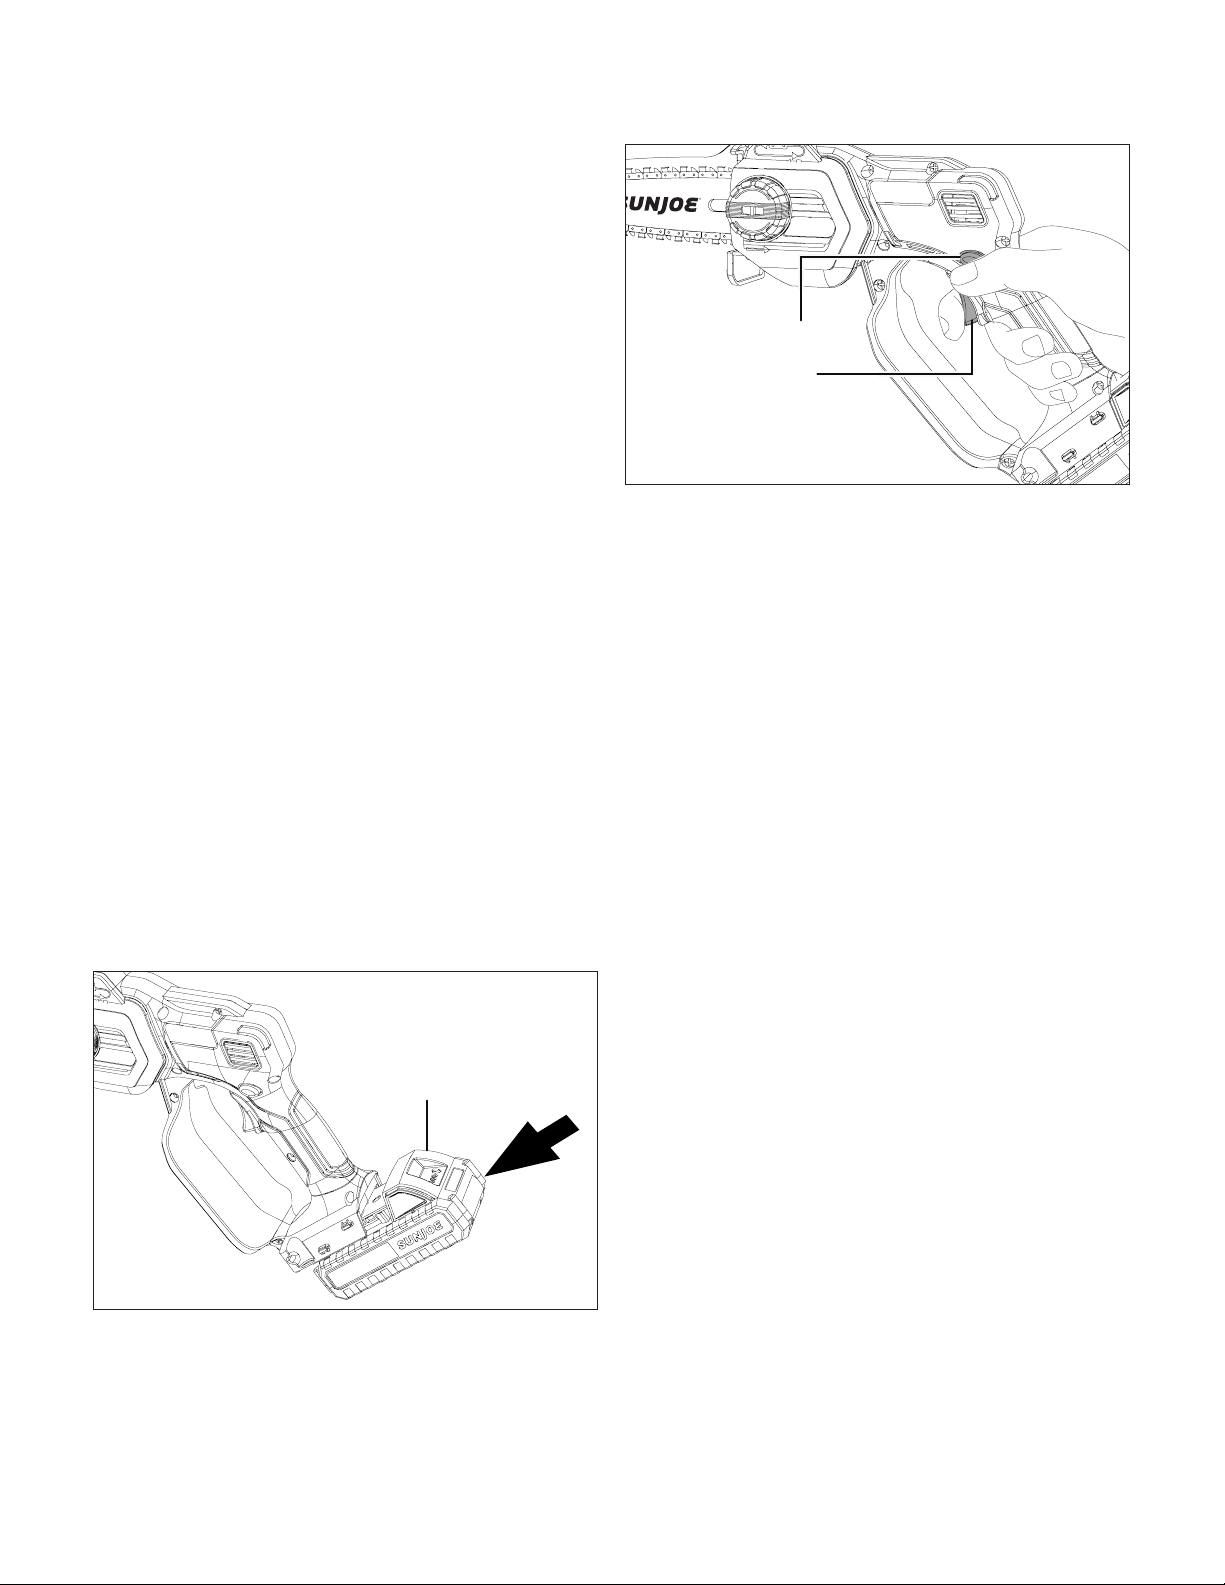
2. Insert the battery in the battery compartment. Push to
make sure it is locked in place (Fig. 7).
3. To turn the tool on, hold the pruning saw rmly on the
handle grip. Press the safety lock button, and squeeze the
ON/O switch. When the pruning saw is running, you can
release the safety lock button (Fig. 8).
4. To turn the tool o, simply release the On/O switch.
NOTE: Do not squeeze the On/O switch until you are
ready to make a cut.
Operating Tips
m
WARNING! For your safety and that of others:
1. Do not use the machine without reading the instructions
carefully. Become acquainted with the controls and
the proper use of the machine. Learn how to stop the
machine quickly.
2. Keep in mind that the operator or user is responsible
for accidents or hazards occurring to other people or
their property.
3. Always wear suitable clothing when using the machine.
Wear anti-vibration gloves and other personal
protective equipment.
All the above-mentioned precautions do not, however,
guarantee the prevention of certain risks – i.e. Raynaud’s
phenomenon or Carpal tunnel syndrome. For operators
who use this machine for prolonged periods, it is
therefore recommended to have periodic checkups on
their hands and ngers. If any of the above mentioned
symptoms should appear, please contact a physician
immediately.
4. Work only in daylight or good articial light.
5. Take utmost care when working near metal fences.
6. Take care not to hit the bar hard against foreign objects or
ying debris caused by the movement of the chain.
7. Never reach over the riving knife or under the base plate.
There is a risk of injury!
8. Do not start the saw if the saw chain is in contact with any
object, is in the workpiece or may hit an object. This can
lead to serious injuries.
9. Clamp loose workpieces before cutting them. Remove
foreign objects such as nails, screws, etc.
10. When cutting a branch that is under tension, be alert
for spring back. When the tension in the wood bers is
released, the spring-loaded limb may strike the operator
and/or throw the saw out of control.
Battery pack
Fig. 7
R
Safety lock button
Fig. 8
On/O switch
13
11. Use extreme caution when cutting brush and saplings.
The slender material may catch the saw chain and be
whipped toward you or pull you o balance.
12. When the saw chain is running, place the base plate on
the surface of the workpiece and let the saw cut on its
own. Apply only light pressure to the saw.
NOTE: The base plate helps to stabilize the saw and even
the material that being cut. It can also reduce the vibration
of the saw signicantly. The base plate also acts like the
fulcrum for deep cuts because it raises the back end of
the saw. Using the base plate like a pivot point allows you
to go deep in the material with precise control.
13. Stop the motor and remove the battery from
the compartment:
– Whenever you leave the machine unattended;
– Before cleaning, checking or servicing the machine;
– After striking a foreign object. Inspect the machine
for any damage and make repairs before restarting
it again;
– If the machine begins to vibrate abnormally,
immediately look for the cause of the vibrations
and have the machine inspected at an authorized
Snow Joe
®
+ Sun Joe
®
dealer or call the Snow Joe
®
+ Sun Joe
®
customer service center at
1-866-SNOWJOE (1-866-766-9563) for assistance;
– When the machine is not in use.
IMPORTANT! Always remember that an incorrectly used
pruning saw may disturb others and have a serious impact on
the environment.
To respect people and the environment:
• Avoid using the machine in environments or at times of the
day when it may disturb others.
• Scrupulously comply with local regulations and provisions
for the disposal of waste materials after sawing.
• Scrupulously comply with local regulations and provisions
for the disposal of oils, damaged parts or any elements
which have a strong impact on the environment.
• A certain amount of chain lubricating oil is released into
the environment when the machine is running, so only use
biodegradable oils made specically for this use.
• To avoid the risk of re, do not leave the machine with the
motor hot on leaves or dry grass.
mWARNING! It takes specic training to use this tool.
Checks During Work
• Checking the chain tension
The chain tends to stretch gradually as you work, so you need
to check its tension frequently.
IMPORTANT! During the rst period of use (or after replacing
the chain), the chain tension must be checked more frequently
due to settling of the chain.
mWARNING! Never work with the chain loose, as it can
be hazardous if the chain slips out of its guide.
To adjust the chain tension, follow the instructions in
“Adjust Chain Tension” on pages 11.
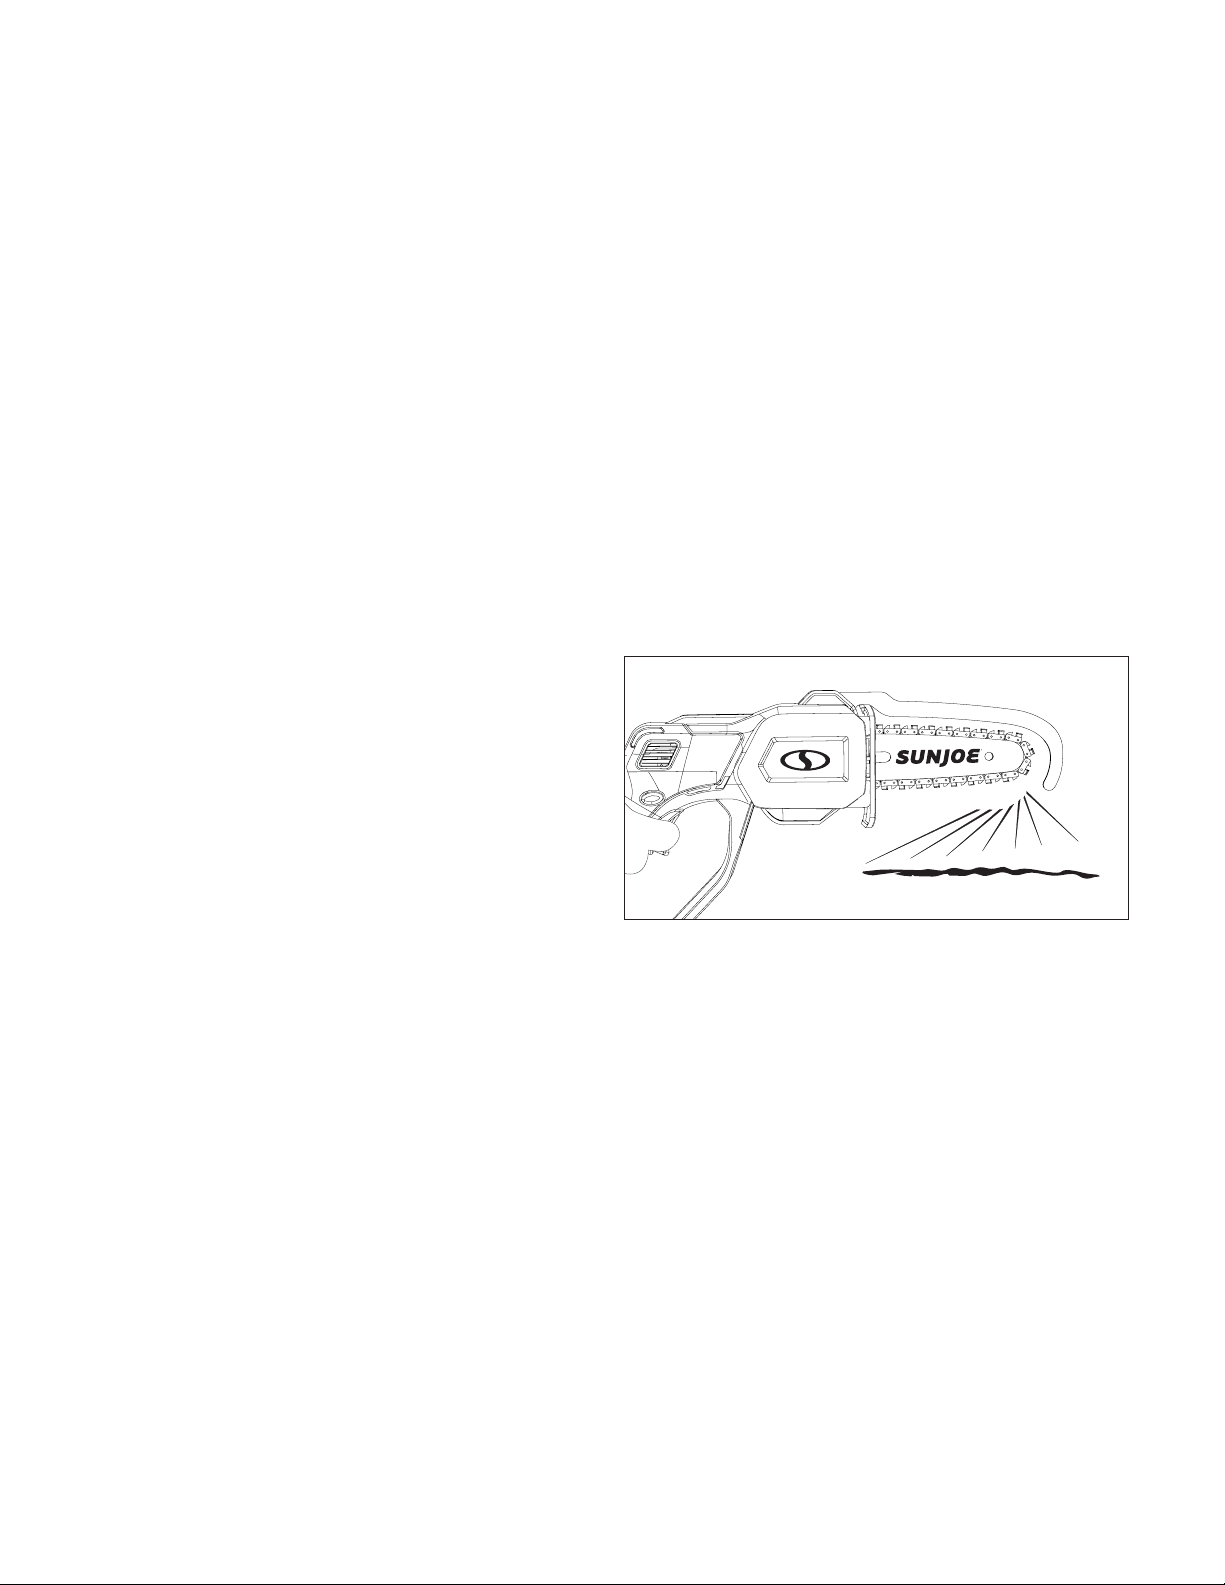
• Checking the oil delivery
IMPORTANT! Never use the machine without lubrication!
Make sure you lubricate the cutting area before and after
using, and every 30 minutes during operation. For best results,
use only a good quality bar and chain oil designed specically
for use with chain saws. Check the oil delivery as described
below everytime after lubricate the chain.
mWARNING! Make sure the bar and the chain are in
place when you check the oil delivery.
Start the motor and check if the chain oil is delivered as shown
below (Fig. 9).
Basic Cutting Procedures
mWARNING! This unit is designed for trimming branches
and limbs up to 4.5 in. (11.4 cm), not to exceed a max.
cut of 4.5 in. (11.4 cm) in diameter depending on type of
wood. Practice cutting a few small limbs using the following
technique to get the “feel” of using the saw before you begin a
major sawing operation.
• Grip the saw rmly on the handle grip.
• Squeeze the trigger switch and let the chain accelerate to
full speed before entering the cut.
• Keep the unit running the entire time you are cutting,
maintaining a steady speed.
• Let the chain do the work; exert only light downward
pressure. If you force the cut, damage to the bar, chain,
or unit can result.
• Do not put the pressure on the saw at the end of the cut.
• Always cut with both feet on solid ground to prevent falling.
• Do not cut above chest height since it is dicult to
control kickback forces with a saw held high.
R
Fig. 9
14
Maintenance
Please contact an authorized Snow Joe
®
+ Sun Joe
®
dealer
or call the Snow Joe
®
+ Sun Joe
®
customer service center
at 1-866-SNOWJOE (1-866-766-9563) for all maintenance
operations not foreseen in this manual. Any operation
performed in an unauthorized service center or by unqualied
personnel will completely invalidate the warranty.
mWARNING! For your safety and that of others:
• Correct maintenance is essential to maintain the original
eciency and safety of the machine over time.
• Keep all nuts, bolts, and screws tight to be sure the
equipment is in safe working condition.
• Never use the machine with worn or damaged parts.
Damaged parts are to be replaced and never repaired.
• Only use original Snow Joe
®
+ Sun Joe
®
replacement
parts. Parts that are not of the same quality can seriously
damage the equipment, compromise safety, and invalidate
the warranty.
mWARNING! Always remove the battery before
performing any adjustments, maintenance, or repairs to your
cordless pruning saw.
• Use protective gloves when handling the bar and chain.
• Keep the bar encased in its sheath, except when working
directly on the bar or the chain.
• Never dispose of oils or other polluting materials in
unauthorized places.
Motor Cooling
To avoid overheating and damage to the motor, always keep
the ventilation slots clean and free of sawdust and debris.
General Cleaning
It's recommended to clean the pruning saw immediately after
each use for best performance. Use a cloth, a paintbrush
or a brush to remove dust and wood splinters. Always keep
the ventilation slots clean and free from obstructions. Clean
the housing of the pruning saw regularly with a damp cloth
and somewhat soft soap. Do not use any cleaning or solvent
materials. Make sure that no water or any other liquid can get
inside the cordless power tool.
Clean the sprocket area with a brush or compressed air
(Fig. 10).
Replacing the Guide Bar and Chain
NOTE: When replacing the guide bar and chain, use only
identical replacement parts. Make sure the battery is not
inserted in the compartment before proceeding with operation.
mWARNING! Always wear heavy-duty gloves when
handling the bar and chain. Mount the bar and chain very
carefully so as not to impair the safety and eciency of the
machine. If in doubt, contact an authorized Snow Joe
®
+
Sun Joe
®
dealer or call the Snow Joe
®
+ Sun Joe
®
customer
service center at 1-866-SNOWJOE (1-866-766-9563).
mWARNING! The operation should be completed on a
at and stable surface, with adequate space for moving the
machine and its components.
mDANGER! Never start the motor before installing the
guide bar, chain, and sprocket cover. Without all these parts in
place, the clutch can y o or explode, exposing the user to
potentially serious injuries.
When you rst purchase your pruning saw, the chain and bar
will come pre-assembled on the saw. Should you need to
replace the chain in the future, follow the steps below.
1. Screw the chain/sprocket end cover knob
counterclockwise to release chain/sprocket end cover
(Fig. 11).
Fig. 10
R
Fig. 11
End cover knob
Chain/sprocket
end cover
15
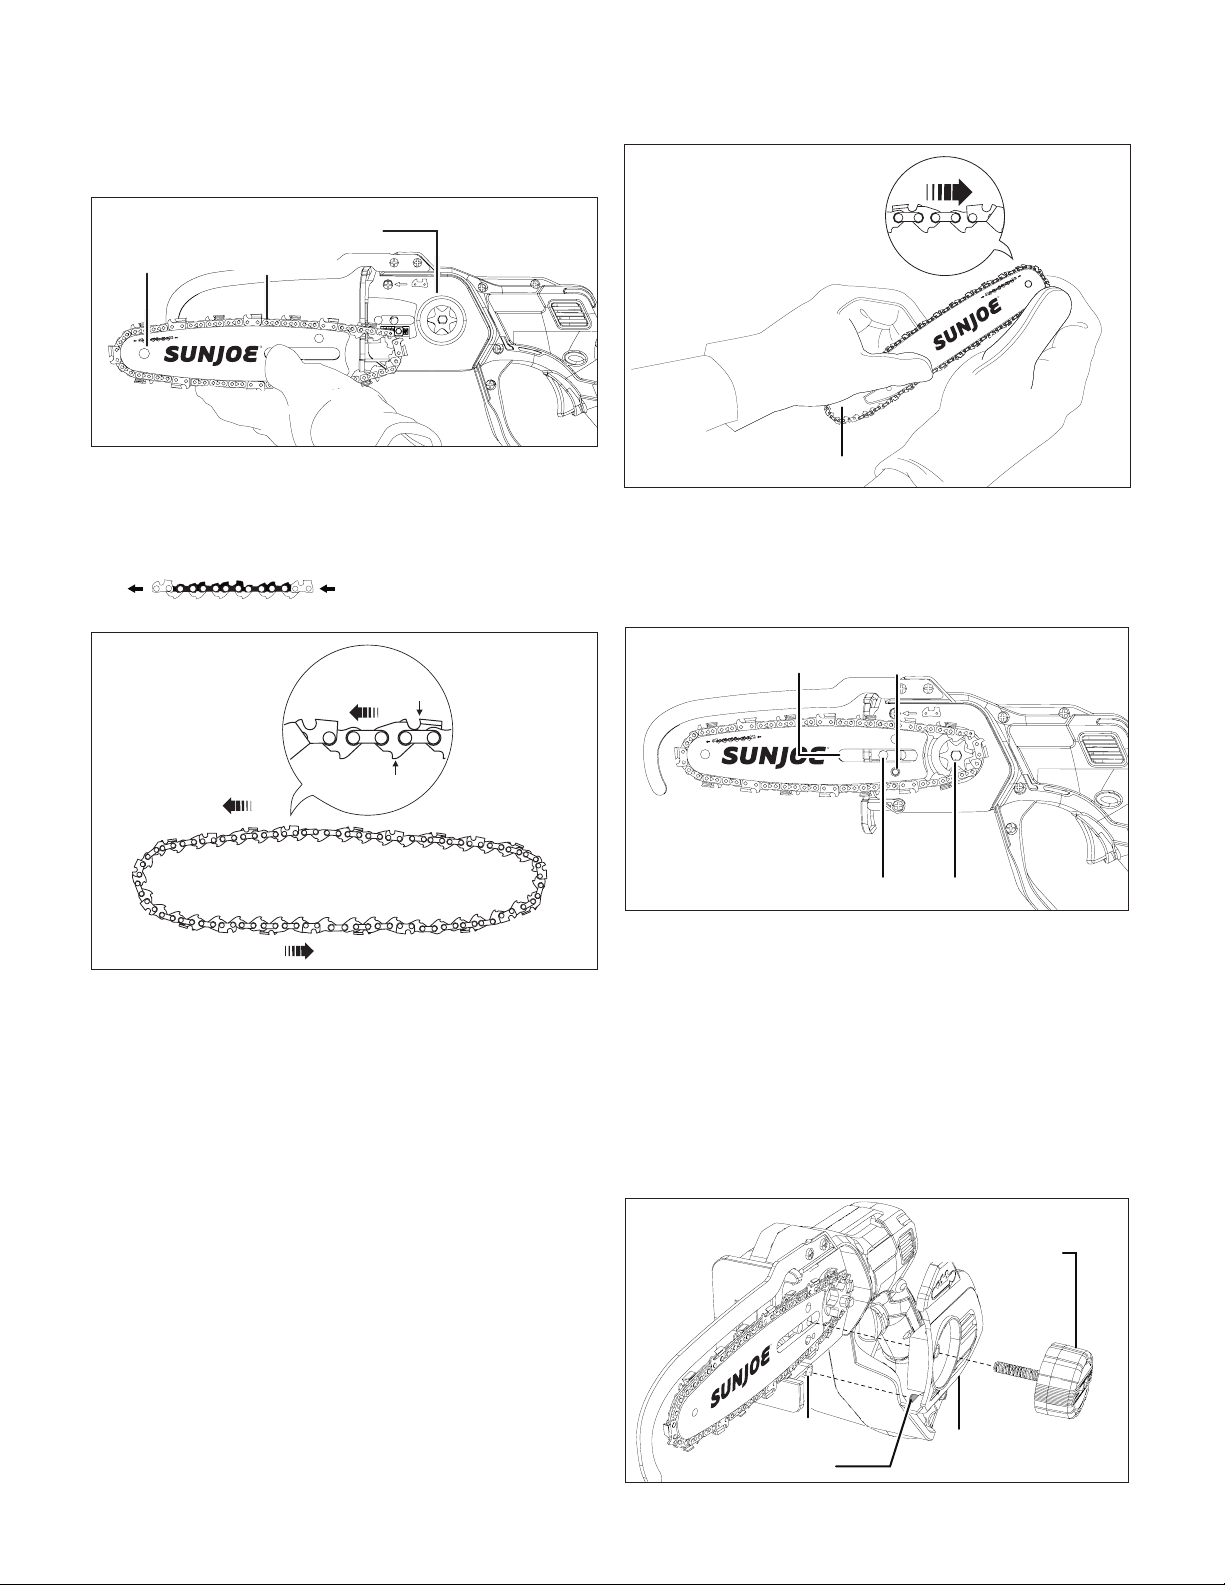
2. Remove the cutting bar and chain from the mounting
surface (Fig. 12).
3. Remove the old chain from the bar.
4. Lay out the new saw chain in a loop and straighten
any kinks. THE SHARP SIDE OF THE TEETH MUST
FACE AWAY FROM YOU IN THE DIRECTION OF THE
CHAIN ROTATION INDICATED ON THE GUIDE BAR
. If the teeth face backwards,
turn the loop over (Fig. 13).
5. Starting at the tip, mount the chain drive links into the
bar groove, leaving a loop at the back of the bar. The chain
will loosely t until it is placed on the sprocket
(Fig. 14).
NOTE: Make certain of the direction of the chain. If
the chain is mounted backwards, the saw will vibrate
abnormally and will not cut.
6. Hold the chain in position on the bar and place the loop
around the sprocket. Fit the bar against the mounting
surface so that the extruded piece on the mounting
surface is in the long slot of the bar and the adjusting pin
is in the chain tension pin hole (Fig. 15).
7. While keeping the bar and chain against the mounting
surface, adjust the chain tension as needed by adjusting
the chain tensioner screw with the supplied hex key
wrench. Turn the chain tensioner screw clockwise to
tightening the chain, or counter-clockwise to loosen the
chain (Fig. 4).
8. Replace the chain/sprocket end cover by inserting the
tab located on the bottom rst into the slot and position
the cover over the bar end. Tighten the end cover knob;
leave the bar loose enough to move slightly for tension
adjustment (Fig. 16).
R
Fig. 12
Guide bar
Cutting chain
Mounting surface
Fig. 13
Chain rotation
Sharp cutting edge
Chain drive link
R
Fig. 14
Loop
R
Fig. 15
Adjusting pin
SprocketExtruded piece
Slot
R
Fig. 16
Chain/sprocket
end coverTab
Slot
End cover knob
16
Chain Tension
Check the chain tension before using the saw when the chain
is cold. The correct tension of a cold chain is when there is no
slack on the underside of the guide bar; the chain is snug, but
you can rotate it by hand without binding.
During normal saw operation, the temperature of the chain will
increase. The drive links of a correctly tensioned warm chain
will hang approximately 0.050 in. (1.25 mm) out of the bar
groove (Fig. 17). Be aware that a chain tensioned while warm,
may be too tight upon cooling. Check the “cold tension” before
next use. The chain must be re-tensioned whenever the ats
on the drive links hang out of the bar groove (Fig. 17).
Chain Sharpening
mWARNING! To ensure that the saw works safely and
eciently, it is essential that the cutting components are
well-sharpened. It is highly recommended to replace the
chain once it loses its ability to cut cleanly and safely.
It is possible, however, to sharpen the existing chain if the
sharpening is carefully performed. Any work on the chain and
bar requires specic experience and special tools. For safety
purposes, we recommend you contact an authorized
Snow Joe
®
+ Sun Joe
®
dealer or call the Snow Joe
®
+
Sun Joe
®
customer service center at 1-866-SNOWJOE
(1-866-766-9563).
Sharpening is necessary when:
• The sawdust looks like dust;
• Cutting becomes more dicult;
• The cut is not straight;
• Vibrations increase.
An authorized service center will sharpen the chain using the
right tools to ensure minimum removal of material and even
sharpness on all the cutting edges.
If you sharpen the chain by yourself, it's recommended to
purchase Sun Joe
®
24V-CSSHRP-LTE chain saw sharpener,
which can be powered by the same 24V iON+ battery with this
cordless pruning saw. Visit sunjoe.com or call the
Snow Joe
®
+ Sun Joe
®
customer service center at
1-866-SNOWJOE (1-866-766-9563) to order.
Otherwise, use special round-section les with the right diameter
depending on the type of chain (see “Chain Maintenance Table”
pg. 20). You need a certain amount of skill and experience to
avoid damaging the cutting edges.
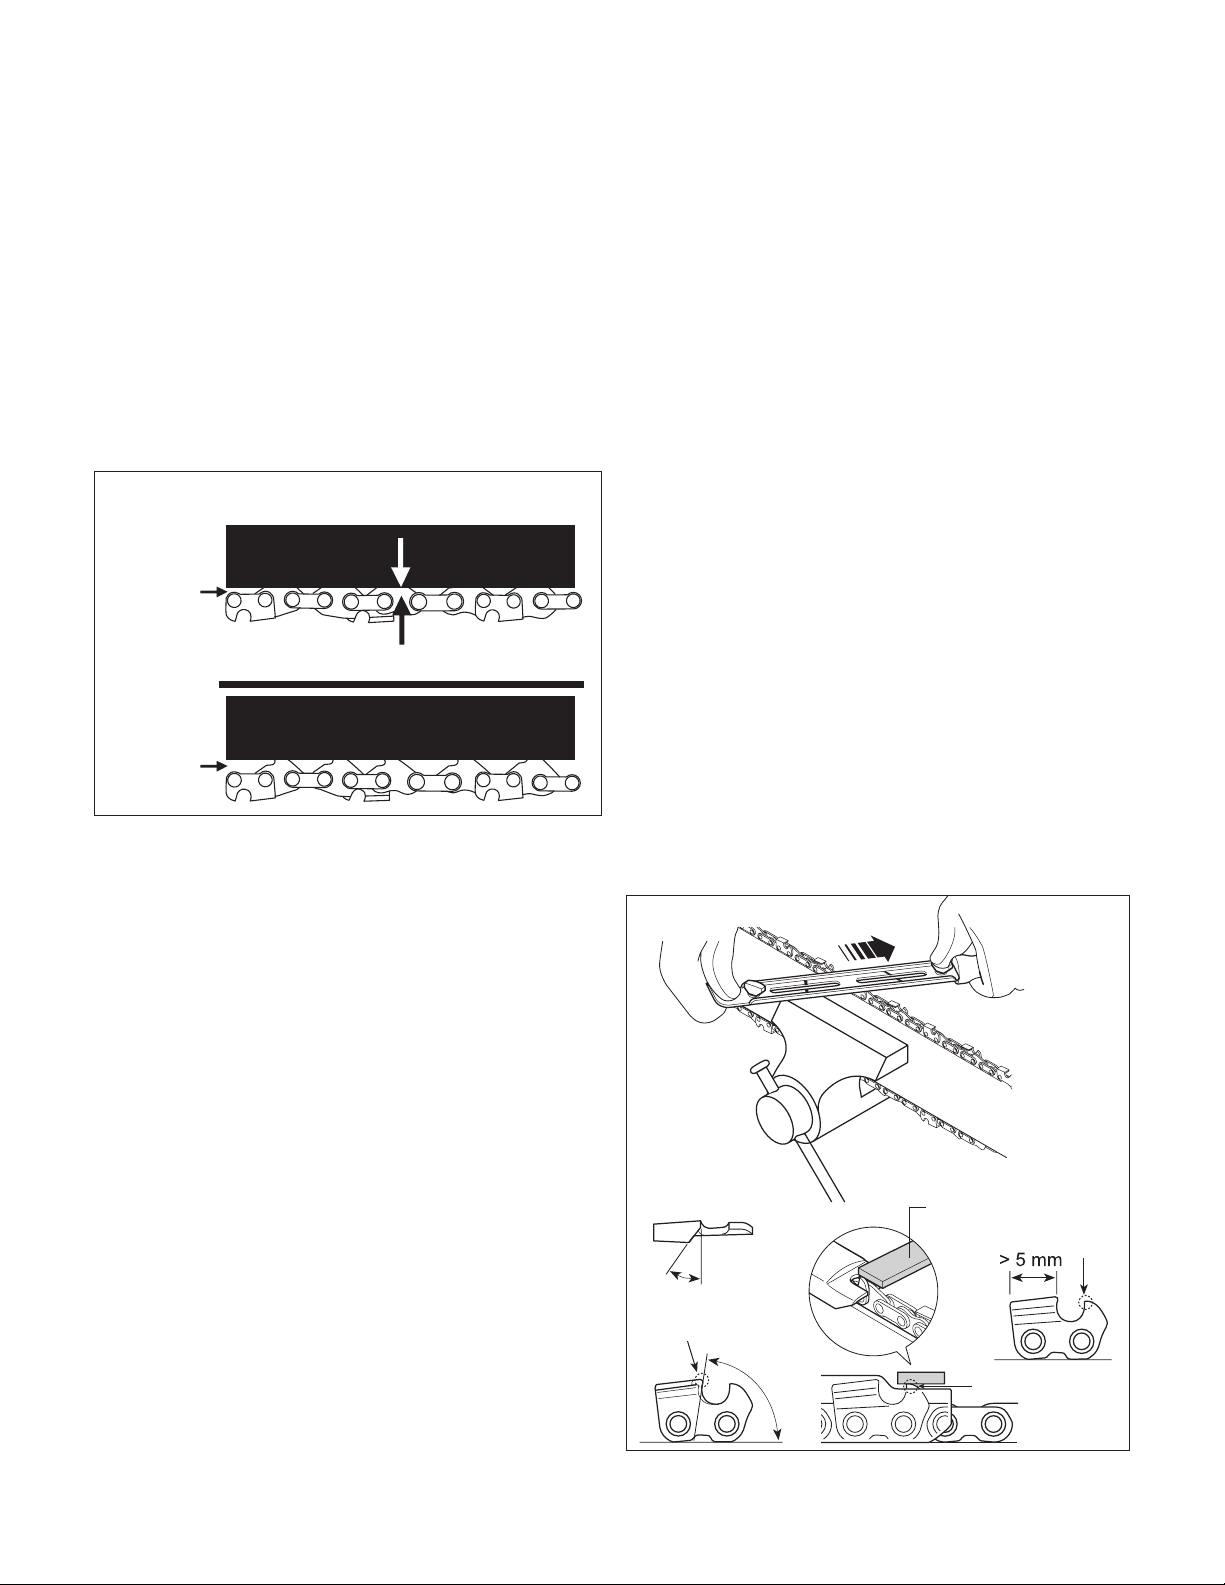
Sharpen the chain as follows (Fig. 18):
• Secure the bar rmly, with the chain mounted, in a
suitable vise.
• Tighten the chain if it is loose.
• Mount the le in the guide and then insert it in the tooth at
a constant angle from the cutting edge.
• Sharpen in a forward motion a few times and repeat this
on all the cutting edges facing the same way (right or left).
• To move the chain forward, use a screwdriver.
• Turn the bar over in the vise and repeat on all the other
cutting edges.
• Check that the depth limiter tooth does not stick out
farther than the inspection tool and le any projecting
parts with a at le, rounding o the edges (Fig. 18).
• After sharpening, remove all traces of ling and dust
and lubricate the chain in an oil bath. Replace the
chain whenever:
– The length of the cutting edges decreases to 5 mm
or less;
– There is too much play between the links and the rivets.
Fig. 17
Properly Adjusted Warm Chain
Approximately .050 in. (1.25 mm)
Flats are
visible here
Flats are not
visible here
Chain Needs Tensioning
Fig. 18
Inspection tool
Depth limiter tooth
Cutting edge
Depth
limiter
tooth
17
Guide Bar Maintenance
When the guide bar shows signs of wear, turn it over on the
saw to distribute the wear for maximum bar life. Feathering or
burring of the bar rails is a normal process of bar wear. You
should smooth such faults with a le as soon as they occur.
Replace a bar with any of the following faults:
• wear inside the bar rails permitting the chain to
lay over sideways
• bent guide bar
• cracked or broken rails
• spread rails
Turn the saw over, check the underside of the guide bar, and
make sure that the lubrication holes and chain groove are free
from impurities.
You can purchase replacement parts for your Sun Joe
®
24V-HCS-LTE-P1 cordless pruning saw by ordering online at
sunjoe.com or, to order by phone, contact Snow Joe
®
+
Sun Joe
®
customer service at 1-866-SNOWJOE
(1-866-766-9563).
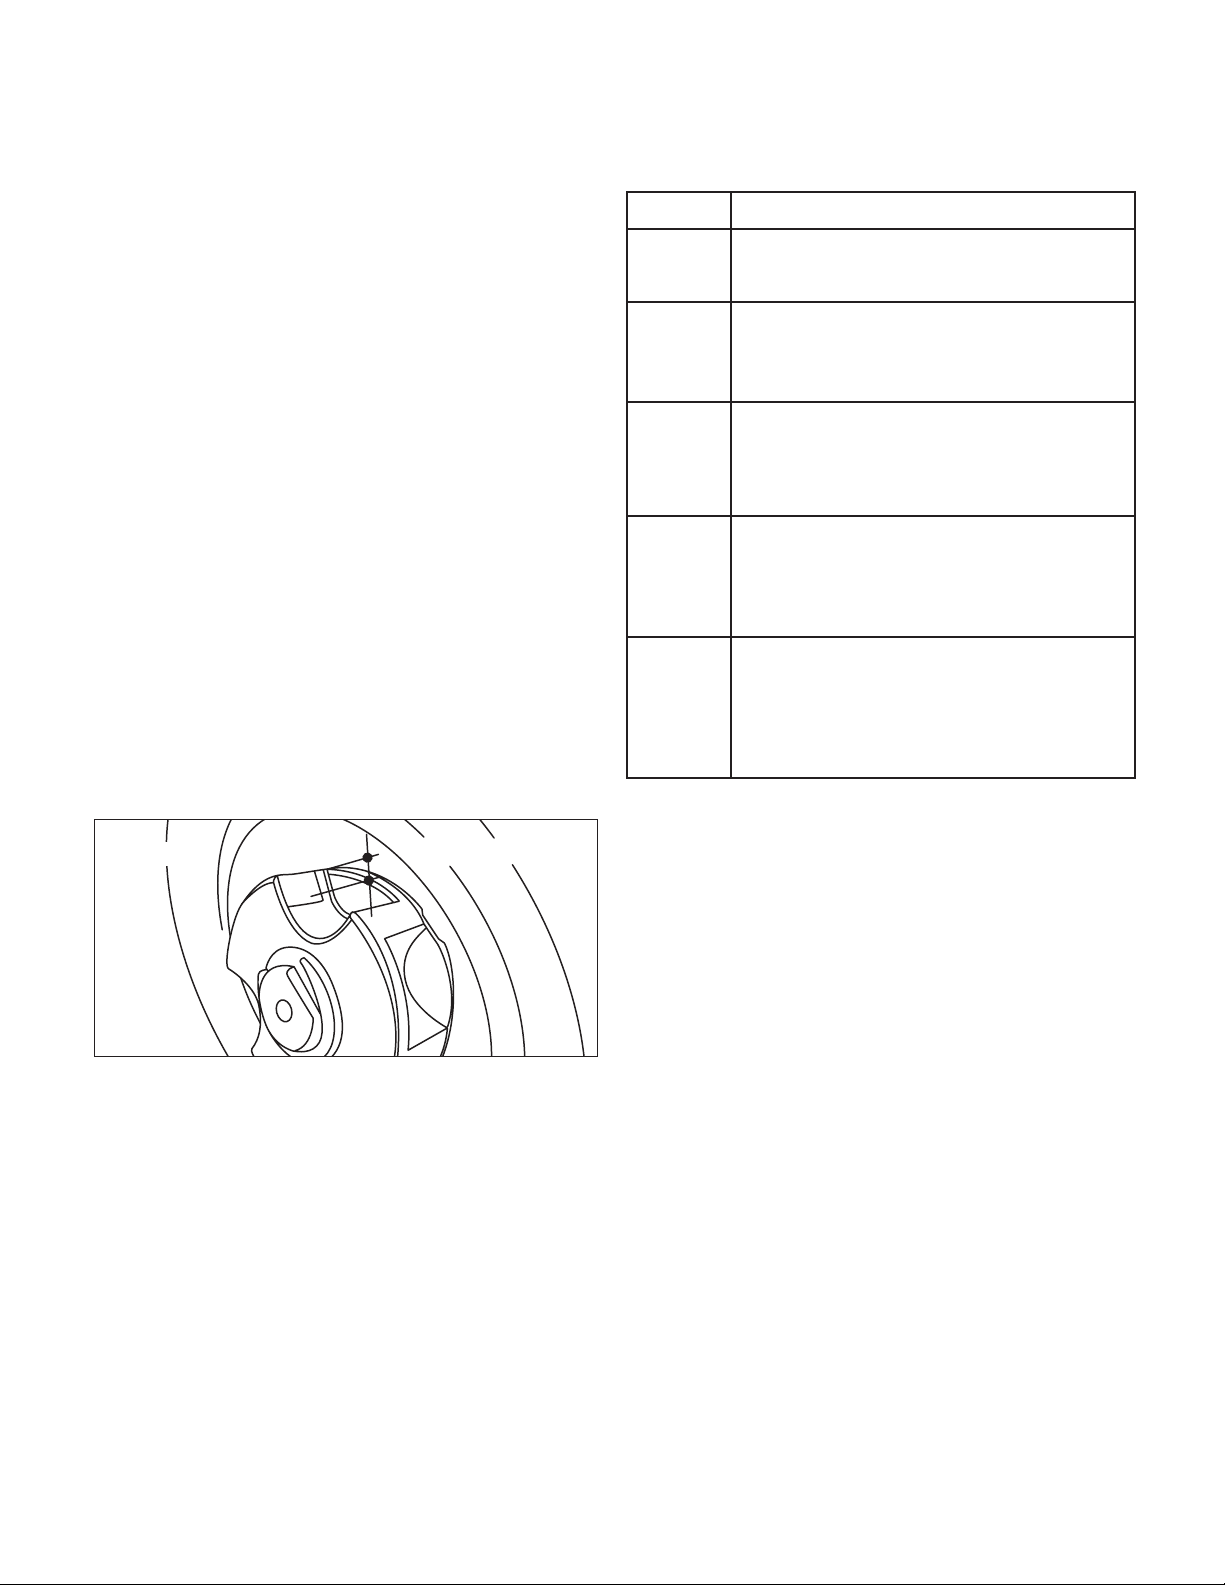
Chain Sprocket
Regularly check the condition of the sprocket and replace it
when wear exceeds 0.5 mm (Fig. 19).
Do not mount a new chain with a worn sprocket or vice-versa.
Troubleshooting
Troubleshooting Tips
Most diculties are easy to x. Consult the troubleshooting
table for common problems and their solutions. If you continue
to experience problems or need repairs beyond these minor
adjustments, please call 1-866-SNOWJOE (1-866-766-9563)
for assistance.
mWARNING! Always remove the battery before
performing any adjustments, maintenance, or repairs to your
cordless pruning saw.
Troubleshooting Table
Daily Checklist, Cleaning
and Storage
Daily Checklist
To help maintain your cordless pruning saw for optimum
performance, we recommend you complete this checklist prior
to each work session.
mWARNING! Do not insert the battery until you have
completed all of the daily checks.
• Inspect for any visible damage to the chain, guide bar, or
motor housing.
• Inspect the guide bar rails and clean them to remove any
debris.
• Check the chain tension.
• Check the chain teeth for sharpness.
NOTE: If you notice anything unusual, such as a vibration or
odd sound, shut the saw OFF immediately. Remove the battery
and check the saw for any damage.
If you cannot nd the cause of the problem or are uncertain
what to do, then have the saw inspected by an authorized
Snow Joe
®
+ Sun Joe
®
dealer or call the Snow Joe
®
+
Sun Joe
®
customer service center at 1-866-SNOWJOE
(1-866-766-9563) before using it.
< 0.5 mm
Fig. 19
Problems Corrective Action
The saw
motor fails
to start
• Make sure that the battery is inserted correctly
• Check charge status and recharge the battery
• The chain is too tight; re-tension.
• The chain tension is too tight; re-tension.
• The chain need to be lubricated: lubricate the
chain with the oil.
• The chain tension is too tight; re-tension.
• The guide bar or chain is damaged; inspect
and replace the damaged part.
The saw
runs, but
the chain
speed is
low
Bar and
chain
running
hot and
smoking
The saw
motor
runs, but
the chain
is not
turning
The saw
stops during
operation
• Make sure that the battery is inserted correctly
• Check charge status and recharge the battery
• The machine is overloaded

18
mCAUTION!
• Remove the battery and wait at least ve minutes for the
saw to cool before servicing or storing your unit.
• If you drop the saw, carefully inspect it for damage. If the
guide bar is bent, the housing is cracked, the handle is
broken, or if you see any other condition that may aect
the saw’s operation, DO NOT USE the tool. Instead, have
it serviced at an authorized Snow Joe
®
+ Sun Joe
®
dealer or call the Snow Joe
®
+ Sun Joe
®
customer service
center at 1-866-SNOWJOE (1-866-766-9563).
Cleaning
Use only mild soap and a damp cloth to clean the cordless
pruning saw. Never let any liquid get inside the motor housing
and NEVER immerse any part of the saw housing in liquid.
Storage
• Ensure that the guide bar cover is in place when storing.
• Do not store cordless pruning saw near chemicals, such
as fertilizers or other harsh solvents. Do not expose
the plastic parts of the unit to brake uids, gasoline,
petroleum-based products, penetrating oils, or the like.
These products are often highly corrosive and may cause
permanent damage, weaken, or destroy the plastic parts
of your unit.
• When not in use, your machine should be stored
indoors in a dry and high or locked-up place, out of
the reach of children.
Battery Caution + Disposal
Always dispose of your battery pack according to federal,
state, and local regulations. Contact a recycling agency in your
area for recycling locations.
mCAUTION! Even discharged battery packs contain
some energy. Before disposing, use electrical tape to cover
the terminals to prevent the battery pack from shorting, which
could cause a re or explosion.
mWARNING! To reduce the risk of injury or explosion,
never burn or incinerate a battery pack even if it is damaged,
dead, or completely discharged. When burned, toxic fumes
and materials are emitted into the surrounding atmosphere.
1. Batteries vary according to device. Consult your manual
for specic information.
2. Install only new batteries of the same type in your product
(where applicable).
3. Failure to insert batteries in the correct polarity, as
indicated in the battery compartment or manual, may
shorten the life of the batteries or cause batteries to leak.
4. Do not mix old and new batteries.
5. Do not mix Alkaline, Standard (Carbon-Zinc), or
Rechargeable (Nickel Cadmium, Nickel Metal Hydride, or
Lithium-Ion) batteries.
6. Do not dispose of batteries in re.
7. Batteries should be recycled or disposed of as per state
and local guidelines.
Service and Support
If your Sun Joe
®
24V-HCS-LTE-P1 cordless pruning saw
requires service or maintenance, please call 1-866-SNOWJOE
(1-866-766-9563) for assistance.
Model and Serial Numbers
When contacting the company, reordering parts, or arranging
service from an authorized dealer, you will need to provide the
model and serial numbers, which can be found on the decal
located on the housing of the unit. Copy these numbers into
the space provided below.
Record the following numbers from the housing or handle of your
new product:
Model #:
Serial #:
24V-HCS-LTE-P1

19
Optional Accessories
m
WARNING! ALWAYS use only authorized Snow Joe
®
+ Sun Joe
®
replacement parts and accessories. NEVER use
replacement parts or accessories that are not intended for use with this saw. Contact Snow Joe
®
+ Sun Joe
®
if you are unsure
whether it is safe to use a particular replacement part or accessory with your saw. The use of any other attachment or accessory
can be dangerous and could cause injury or mechanical damage.
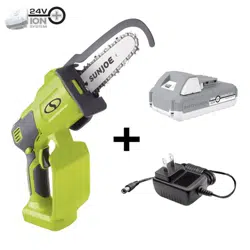
24V iON+ Lithium-Ion Battery Quick Charger 24VCHRG-QC
ModelAccessories Item
1
2
3
iON+ 24V 2.0 Ah Lithium-Ion Battery 24VBAT-LTE
iON+ 24V 2.5 Ah Lithium-Ion Battery 24VBAT-LT
iON+ 24V 4.0 Ah Lithium-Ion Battery 24VBAT
4
iON+ 24V 5.0 Ah Lithium-Ion Battery 24VBAT-XR
5
iON+ 24V Lithium-Ion Dual Port Charger 24VCHRG-DPC
6

20
NOTE: Accessories are subject to change without any obligation on the part of Snow Joe
®
+ Sun Joe
®
to provide notice of such
changes. Accessories can be ordered online at sunjoe.com or via phone by contacting the Snow Joe
®
+ Sun Joe
®
customer
service center at 1-866-SNOWJOE (1-866-766-9563).
ModelAccessories Item
7
8
Sun Joe
®
5-inch replacement bar SWJ-5BAR
Sun Joe
®
5-inch replacement chain SWJ-5CHAIN
Bar and chain oil
SWJ-OIL
Sold online at sunjoe.com or
you can purchase equivalent
bar and chain oil at your local
hardware store
9
10
R
Sun Joe
®
24V iON+ Cordless Chain
Saw Sharpener
24V-CSSHRP-LTE
R
Chain Maintenance Table
27
0.3
inches mm
Drive Links Chain Pitch Chain Gauge
File Diameter
inches
mm inches mm
7.62 0.043 1.1 3.50.138

R4_01282020
SNOW JOE
®
+ SUN JOE
®
CUSTOMER PROMISE
OUR WARRANTY:
Snow Joe
warrants new, genuine, powered and non-powered Products to be free from defects in material or workmanship when used
for ordinary household use for a period of two years from the date of purchase by the original, end-user purchaser when purchased
from Snow Joe or from one of Snow Joe’s authorized sellers with proof of purchase. Because Snow Joe is unable to control the quality
of its Products sold by unauthorized sellers, unless otherwise prohibited by law, this Warranty does not cover Products purchased from
unauthorized sellers. If your Product does not work or there’s an issue with a specic part that is covered by the terms of this Warranty,
Snow Joe will elect to either (1) send you a free replacement part, (2) replace the Product with a new or comparable product at no
charge, or (3) repair the Product. How cool is that!
This Warranty gives you specific legal rights, and you may also have other rights which vary from State to State.
PRODUCT REGISTRATION:
Snow Joe strongly encourages you to register your Product. You can register online at snowjoe.com/register, or by printing and
mailing in a registration card available online from our website, or calling our Customer Service Department at 1-866-SNOWJOE
(1-866-766-9563), or by e-mailing us at [email protected]. Failure to register your Product will not diminish your warranty
rights. However, registering your Product will allow Snow Joe to better serve you with any of your customer service needs.
WHO CAN SEEK LIMITED WARRANTY COVERAGE:
This Warranty is extended by Snow Joe to the original purchaser and original owner of the Product.
WHAT IS NOT COVERED?
This Warranty does not apply if the Product has been used commercially or for non-household or rental applications. This Warranty also
does not apply if the Product was purchased from an unauthorized seller. This Warranty also does not cover cosmetic changes that do
not aect performance. Wearing parts like belts, augers, chains and tines are not covered under this Warranty, and can be purchased
at snowjoe.com or by calling 1-866-SNOWJOE (1-866-766-9563).
ABOVE ALL ELSE, Snow Joe, LLC (“Snow Joe”) is dedicated to you, our customer. We strive to make your experience as pleasant as
possible. Unfortunately, there are times when a Snow Joe
®
, Sun Joe
®
, or Aqua Joe
®
product (“Product”) does not work or breaks under
normal operating conditions. We think it’s important that you know what you can expect from us. That’s why we have a Limited Warranty
(“Warranty”) for our Products.
21
EN


23
ES
© 2022 Snow Joe
®
, LLC
Derechos reservados. Instrucciones originales.
GUARDE ESTAS INSTRUCCIONES
Una división de Snow Joe
®
, LLC
MANUAL DEL OPERADOR
Modelo 24V-HCS-LTE-P1 Forma N° SJ-24V-HCS-LTE-P1-880S-M
R
MOTOSIERRA PODADORA
INALÁMBRICA
24 V MÁX*. | 2.0 Ah | 12.7 CM
¡IMPORTANTE!
Instrucciones de seguridad
Todos los operadores deberán leer
estas instrucciones antes del uso
Lea todas las advertencias de seguridad y todas las
instrucciones. No seguir las advertencias e instrucciones
puede causar un choque eléctrico, incendio y/o lesiones
personales graves. Guarde todas las advertencias e
instrucciones para futuras referencias.
m ¡PELIGRO! Esto indica una situación peligrosa que,
de no ser evitada, causará lesiones personales severas o la
muerte.
m ¡ADVERTENCIA! Esto indica una situación peligrosa
que, de no ser evitada, puede causar lesiones personales
severas o la muerte.
m ¡PRECAUCIÓN! Esto indica una situación peligrosa
que, de no ser evitada, puede causar lesiones personales
menores o moderadas.
Uso indicado
Esta motosierra podadora inalámbrica ha sido diseñada y
fabricada para el corte y podado de ramas de árboles y tallos,
y para el corte de troncos pequeños de hasta un diámetro
recomendado de 4.5 plg (11.4 cm), sin exceder un diámetro
máximo de corte de 5.5 plg (14 cm), según el tipo de madera.
Toda la madera a ser cortada con esta motosierra podadora
inalámbrica no deberá ser más gruesa que el máximo grosor
que su barra-guía pueda cortar.
Cualquier otro uso distinto a los mencionados anteriormente
representa un peligro severo para el usuario y puede dañar
tanto la herramienta como su propiedad privada. El uso
incorrecto de la máquina invalidará la garantía, exonerando
al fabricante de todas sus responsabilidades. El usuario será,
consecuentemente, responsable de todos y cada uno de los
daños o lesiones personales a sí mismo o a los demás.
Advertencias de seguridad
para herramientas
motorizadas en general
m
¡ADVERTENCIA! Lea todas las advertencias de
seguridad, instrucciones, ilustraciones y especicaciones
suministradas con esta herramienta motorizada. No seguir
las instrucciones indicadas a continuación puede resultar en
un choque eléctrico, incendio y/o lesiones personales graves.
Guarde todas las advertencias e instrucciones para futuras
referencias.
Seguridad de área de trabajo
1. Mantenga el área de trabajo limpia y bien iluminada:
las áreas abarrotadas y oscuras provocan accidentes.
2. No opere herramientas motorizadas en atmósferas
explosivas, tales como en presencia de líquidos, gases
o polvos inamables: las herramientas motorizadas
crean chispas que pueden encender líquidos, gases o
polvos.
3. Mantenga a los niños y transeúntes alejados mientras
opera una herramienta motorizada: las distracciones
pueden hacer que usted pierda el control.
Seguridad eléctrica
1. El enchufe de la herramienta motorizada debe encajar
en el tomacorriente. Nunca modique el enchufe de
ninguna manera. No use ningún enchufe adaptador
con herramientas motorizadas puestas a tierra (que
tengan conexión a tierra): los enchufes no modicados
y tomacorrientes equivalentes reducirán el riesgo de un
choque eléctrico.
2. Evite el contacto de su cuerpo con supercies puestas
a tierra tales como tuberías, radiadores, cocinas
eléctricas y refrigeradoras: hay un mayor riesgo de un
choque eléctrico si su cuerpo está puesto a tierra.
3. No maltrate el cable. Nunca use el cable para
transportar, jalar o desenchufar esta herramienta
motorizada. Mantenga el cable alejado del calor,
aceite, bordes alados o partes en movimiento: los
cables dañados o enredados aumentan el riesgo de un
choque eléctrico.
4. Cuando opere una herramienta motorizada en
exteriores, utilice un cable de extensión adecuado
para su uso en exteriores: usar un cable adecuado para
exteriores reduce el riesgo de un choque eléctrico.

24
5. Si es inevitable operar una herramienta motorizada en
un entorno mojado, utilice una fuente de alimentación
protegida por un DISPOSITIVO DE CORRIENTE
RESIDUAL (RCD por sus siglas en inglés): el uso de un
RCD reduce el peligro de un choque eléctrico.
Seguridad personal
1. Manténgase alerta, preste atención a lo que está
haciendo y utilice su sentido común al operar una
herramienta motorizada. No use una herramienta
motorizada si siente cansancio o se encuentra bajo
la inuencia del alcohol, drogas o medicamentos: un
momento de distracción durante el uso de herramientas
motorizadas podría ocasionar lesiones personales
severas.
2. Utilice equipos de protección personal. Use siempre
protección ocular: los equipos protectores tales como
máscaras anti-polvo, zapatos antideslizantes, cascos o
protección auditiva, usados bajo condiciones apropiadas,
reducirán el riesgo de lesiones personales.
3. Evite encendidos accidentales. Asegúrese de que el
interruptor esté en la posición de apagado antes de
conectar la batería al artefacto, levantar el artefacto o
transportar el artefacto: llevar herramientas motorizadas
con el dedo sobre el interruptor, o conectarlas a una
fuente de alimentación con el interruptor en la posición de
encendido puede causar un accidente.
4. Retire cualquier destornillador o llave hexagonal antes
de encender la herramienta motorizada: una llave
inglesa o de otro tipo conectada a una parte giratoria
de la herramienta motorizada podría causar lesiones
personales.
5. No se extralimite. Mantenga una posición de pie
adecuada y equilibrada en todo momento: esto permite
un mejor control de la herramienta motorizada ante
situaciones inesperadas.
6. Utilice ropa adecuada. No lleve prendas holgadas
ni joyas. Mantenga su cabello, ropa y guantes lejos
de las partes móviles: la ropa holgada, las joyas o
los cabellos largos se pueden enganchar en las partes
móviles.
7. Si hay dispositivos suministrados para la conexión
de instalaciones de recojo y extracción de polvo,
asegúrese de que estén correctamente conectados
y usados adecuadamente: el recojo y la extracción de
polvo reducen los peligros relacionados al polvo.
8. No permita que la familiaridad obtenida con el uso
frecuente de herramientas le haga complaciente e
ignore los principios de seguridad de la herramienta:
una acción imprudente puede causar lesiones severas en
una fracción de segundo.
Uso y cuidado de la herramienta motorizada
1. No fuerce la herramienta motorizada. Use la
herramienta motorizada apropiada para lo que
necesite: la herramienta motorizada correcta hará el
trabajo mejor y de forma más segura a la intensidad para
la cual fue diseñada.
2. No use la herramienta motorizada si su interruptor no
la enciende ni apaga: cualquier herramienta motorizada
que no pueda ser controlada por el interruptor es
considerada peligrosa y debe ser reparada.
3. Antes de realizar en la herramienta motorizada
cualquier tarea de ajuste o cambio de accesorios, o
antes de guardarla, su batería deberá ser retirada:
dichas medidas de seguridad preventiva reducen el
riesgo de encender la herramienta motorizada de forma
accidental.
4. Guarde la herramienta motorizada inactiva lejos del
alcance de los niños, y no permita que personas no
familiarizadas con esta herramienta motorizada ni
con estas instrucciones la operen: las herramientas
motorizadas son peligrosas en manos de usuarios no
capacitados.
5. Cuide su herramienta motorizada. Verique que no
haya partes rotas, desalineamientos o atascamientos
de partes móviles, o cualquier otra condición
que pueda afectar la operación de la herramienta
motorizada. Si la herramienta motorizada está dañada,
hágala reparar antes de su uso: muchos accidentes son
causados por herramientas motorizadas mal mantenidas.
6. Mantenga las herramientas de corte aladas y limpias:
las herramientas de corte mantenidas adecuadamente,
con sus bordes alados, tienen menos probabilidades de
atascarse y son más fáciles de controlar.
7. Use la herramienta motorizada, sus accesorios, etc.
de acuerdo con estas instrucciones y tomando en
cuenta las condiciones de trabajo y la labor a ser
realizada: el uso de esta herramienta motorizada en
operaciones distintas a las destinadas puede causar una
situación peligrosa.
8. Mantenga la empuñadura y supercies de agarre
secas, limpias y sin aceite ni grasa: la empuñadura
y supercies de agarre resbaladizas no permiten una
manipulación y control seguros de la herramienta en
situaciones inesperadas.
Uso y cuidado de la batería
m ¡ADVERTENCIA! Lea todas las advertencias de
seguridad e instrucciones. No seguir las advertencias e
instrucciones puede causar un choque eléctrico, incendio y/o
lesiones personales graves.
1. Recargue solo con el cargador especicado por el
fabricante. Un cargador adecuado para un tipo de batería
puede causar un incendio al ser usado con una batería de
otro tipo.

25
2. Use artefactos a baterías solo con baterías
especícamente diseñadas para éstos. El uso de
cualquier otra batería puede causar un incendio o lesiones
personales.
3. Cuando la batería no esté siendo usada, manténgala
alejada de objetos metálicos tales como monedas,
sujetapapeles, clavos, tornillos, alleres u otros objetos
metálicos pequeños que puedan causar el contacto de
un terminal de la batería con el otro. Cortocircuitar los
terminales de una batería puede causar quemaduras o un
incendio.
4. Bajo condiciones extremas, las baterías pueden expulsar
un líquido. Evite el contacto con este líquido. Si usted
accidentalmente hace contacto con este líquido,
enjuáguese con agua. Si el líquido hace contacto con
los ojos, adicionalmente busque atención médica. El
líquido que sale de las baterías puede causar irritación o
quemaduras.
5. No use baterías o artefactos que hayan sido dañados o
modicados. Las baterías dañadas o modicadas pueden
reaccionar impredeciblemente, causando un incendio,
explosión o lesiones personales.
6. No exponga una batería o artefacto al fuego o a
temperaturas extremas. Una exposición al fuego o a
temperaturas por encima de los 104°F (40.5°C) puede
causar una explosión.
7. Siga todas las instrucciones de carga, y no cargue la
batería o artefacto fuera del rango de temperaturas
especicado en las instrucciones. Cargar de forma
incorrecta o a temperaturas fuera del rango especicado
puede dañar la batería e incrementar el riesgo de
incendio.
8. No modique ni intente reparar el artefacto o la batería (de
ser aplicable), a menos que lo haga según lo indicado en
las instrucciones de uso y cuidado.
Servicio
1. Su herramienta motorizada deberá ser reparada por
una persona calicada usando únicamente partes de
repuesto originales: esto mantendrá la seguridad de la
herramienta motorizada.
2. Nunca repare baterías dañadas: la reparación de
baterías solo debe ser realizada por el fabricante o
proveedores de servicio autorizados.
Instrucciones de seguridad
para la motosierra podadora
Advertencias generales de seguridad para
la motosierra podadora
• Mantenga todas las partes de su cuerpo alejadas de
la cadena de podado cuando esté funcionando. Antes
de encender la motosierra podadora, asegúrese de
que la cadena no haga contacto con ningún objeto.
Un momento de distracción durante la operación de la
motosierra podadora puede causar que su cuerpo o ropa
se enganchen en la motosierra podadora.
• Sujete la motosierra podadora solamente por
supercies de agarre aisladas, debido a que la cadena
de corte puede hacer contacto con alambres ocultos.
Las motosierras que hagan contacto con un alambre
con corriente eléctrica pueden exponer las partes de
la motosierra podadora a la electricidad y provocar un
choque eléctrico al operador.
• Use gafas protectoras y protección auditiva. Se
recomiendan equipos de protección adicionales para
la cabeza, manos, piernas y pies. La ropa protectora
adecuada reducirá las probabilidades de lesiones
personales debido a escombros lanzados o contacto
accidental con la motosierra podadora.
• Mantenga siempre con sus pies una posición y un
equilibrio adecuados, y solo opere la motosierra
podadora estando de pie en una supercie ja, segura
y nivelada. Las supercies resbaladizas o inestables tales
como escaleras pueden causar una pérdida de equilibrio
o de control sobre la motosierra.
• Al cortar una rama que se encuentra bajo tensión,
tenga cuidado con la recuperación elástica de la
madera. Cuando se libera la tensión en las bras de la
madera, la reacción de la rama como un resorte puede
golpear al operador y/o lanzar la motosierra podadora
fuera de control.
• Tenga extremo cuidado al cortar arbustos y brinzales.
El material angosto puede atrapar la motosierra podadora
y ser azotado hacia usted, haciéndole perder el equilibrio.
• Lleve la motosierra podadora por la empuñadura,
apagada y lejos de su cuerpo. Al transportar o guardar
la motosierra podadora, siempre coloque la cubierta
sobre la barra-guía. Una manipulación correcta de la
motosierra podadora reducirá las probabilidades de un
contacto accidental con la cadena en movimiento.
• Siga las instrucciones para la lubricación de la cadena,
tensionamiento de cadena y cambio de accesorios.
Una cadena tensionada incorrectamente o mal lubricada
puede romperse o incrementar las probabilidades de
contragolpe.
• Solo corte madera. No use la motosierra podadora
para ningún otro propósito. Por ejemplo, no utilice la
motosierra podadora para cortar plástico, concreto o
materiales de construcción que no sean de madera.
Usar la motosierra podadora en dichas formas incorrectas

26
puede resultar en severas lesiones personales y serios
daños a su herramienta.
• Mantenga el protector en su lugar. Los dispositivos
de seguridad deben ser inspeccionados periódicamente
para garantizar que estén apropiadamente colocados y
funcionando correctamente.
• No sujete esta motosierra por su cadena de corte o
bordes alados al levantarla o transportarla. Asegúrese
de cubrir la barra-guía en su funda protectora cuando no
esté siendo usada.
• Esta motosierra no ha sido diseñada para la tala de
árboles. El uso de la motosierra en tareas no adecuadas
puede resultar en lesiones severas al operador o
transeúntes.
Causas y prevención de contragolpes
El contragolpe puede ocurrir cuando la nariz o la punta de la
barra-guía tocan un objeto, o cuando la abertura de corte de la
madera se cierra apretando la motosierra durante el corte.
El contacto de la punta en algunos casos puede causar una
súbita reacción en reversa, lanzando la barra-guía hacia arriba
y hacia atrás, en dirección del operador.
Cuando la cadena de la motosierra es aprisionada a lo largo
de la parte superior de la barra-guía, esta última puede ser
lanzada rápidamente hacia el operador.
Cualquiera de estas reacciones puede hacer que usted pierda
el control de la motosierra y sufra graves lesiones. No se fíe
exclusivamente de los dispositivos de seguridad incorporados
a su motosierra. Como usuario de esta motosierra podadora,
usted deberá seguir varios pasos para mantener sus trabajos
de corte libres de accidentes o lesiones personales.
El contragolpe es el resultado del mal uso de la herramienta
y/o condiciones o procedimientos incorrectos para su
operación, y puede ser evitado tomando precauciones
apropiadas tales como las siguientes:
• Mantenga una sujeción rme, con el pulgar y los
dedos rodeando la empuñadura de la motosierra, y
posicionando su cuerpo y brazo para permitirle resistir
fuerzas de contragolpe. Las fuerzas de contragolpe
pueden ser controladas por el operador si se toman
precauciones apropiadas. No suelte la motosierra.
• No se extralimite y no corte por encima de la altura
del hombro. Esto evitará un contacto no intencional con
la punta y permite un mejor control de la unidad ante
situaciones inesperadas.
• Utilice solo las barras y cadenas de repuesto
especicadas por el fabricante. Un remplazo incorrecto
de la barra-guía y cadena puede causar la ruptura de la
cadena y/o contragolpes.
• Nunca use una cadena gastada o suelta. Mantenga la
cadena alada, con una tensión adecuada.
• Siga las instrucciones del fabricante sobre alado
y mantenimiento de la motosierra. Reducir la altura
del calibre de profundidad puede aumentar el riesgo de
contragolpes.
Instrucciones de seguridad adicionales para
la motosierra podadora inalámbrica
• La motosierra podadora inalámbrica ha sido diseñada
para cortar ramas. Solo use la motosierra podadora
inalámbrica según lo indicado en este manual para cortar
madera. Esta máquina no ha sido diseñada para un uso
continuo y profesional.
• Mantenga la motosierra podadora inalámbrica lejos del
alcance de los niños. La motosierra no es un juguete.
• La motosierra podadora inalámbrica no debe ser usada
por personas con capacidades físicas, sensoriales o
mentales limitadas, a menos que estén por su seguridad
supervisadas por una persona calicada o sean instruidas
para usarla por la persona responsable.
• Los niños y adolescentes no están permitidos de usar
la motosierra podadora inalámbrica. Esta prohibición
excluye personas jóvenes mayores de 16 años bajo
la supervisión de un experto para propósitos de
capacitación.
• Esté atento a los símbolos de seguridad. Estos indican
todas las instrucciones importantes por motivos de
seguridad. ¡Obedezca estas instrucciones ya que no
hacerlo puede resultar en lesiones personales graves!
• La motosierra podadora inalámbrica debe ser usada
solo por una persona a la vez Asegúrese de que los
transeúntes no permanezcan en las proximidades del área
de trabajo de la motosierra podadora inalámbrica.
• Inspeccione las condiciones de operación de la
motosierra podadora inalámbrica, en particular las de la
barra-guía y la cadena de corte, antes de cada operación.
• Siempre permanezca de pie de forma segura al trabajar
con la motosierra.
• Sujete la máquina de forma rme y segura al encenderla.
• Asegúrese de que la barra-guía y la cadena estén libres
al momento de encender la máquina y que no hagan
contacto con el material a ser cortado.
• Mantenga sus manos alejadas del área de aserrado.
No toque la supercie debajo del área de aserrado. El
contacto con la cadena puede resultar en lesiones.
• Guíe la motosierra podadora inalámbrica hacia el material
solo cuando esté encendida. De otro modo habrá un
riesgo de contragolpe si la cadena se queda atrapada en
el material.
• Durante el aserrado, la placa base debe siempre encarar
el material siendo aserrado. La cadena puede atascarse y
causar una pérdida de control de la máquina.
• Cuando el corte haya sido completado, apague la
máquina y jale la cadena fuera del corte únicamente
cuando se haya detenido por completo. De este modo
usted puede evitar el contragolpe.
• Sujete bien el material a ser cortado. No lo sujete con su
mano o pie. No toque objetos, ni el piso, con la motosierra
funcionando. Hay un peligro de contragolpe.

27
• Al serrar madera convertida y ramas delgadas, siempre
use un soporte fuerte, tal como un caballete de aserrado.
No apile piezas de madera.
• Antes de cortar leños, asegúrelos en su posición.
• Al trabajar en terreno inclinado, asegúrese de trabajar
encarando hacia arriba.
• Tenga particular cuidado al cortar madera astillada. ¡La
cadena puede desgarrar astillas de madera e incrementar
el riesgo de lesiones!
• Objetos extraños como clavos, tornillos, partes de metal,
arena, etc. causan un mayor desgaste en la barra-guía y
cadena.
• Una cadena de corte desalada puede causar
sobrecalentamiento y daños al motor.
• ¡Siempre retire la batería al inspeccionar la tensión de
cadena, al re-ajustar la cadena, al montar la cadena de
corte y al eliminar fallas! También retire la batería si no va
a usar la máquina por un tiempo.
Instrucciones de seguridad
para las baterías y el
cargador
Prestamos mucha atención al diseño de cada batería para
garantizar la producción de baterías seguras y durables, con
una alta densidad de energía. Las celdas de las baterías tienen
varios dispositivos de seguridad. Cada celda individual es
inicialmente formateada y sus curvas eléctricas características
son registradas. Estos datos son luego usados exclusivamente
para ensamblar las mejores baterías posibles.
Independientemente de todas las precauciones de seguridad,
se debe tener mucho cuidado al manipular las baterías.
Las siguientes instrucciones deben ser obedecidas en todo
momento para garantizar un uso seguro. Un uso seguro solo
puede ser garantizado si se usan celdas libres de daños. Una
manipulación incorrecta de las baterías puede causar daños
en sus celdas.
¡IMPORTANTE! Los análisis han conrmado que el uso
incorrecto y el cuidado deciente de baterías de alto
rendimiento son las causas principales de lesiones personales
y/o daños al producto.
m ¡ADVERTENCIA! Use solo baterías de repuesto
aprobadas. Otras baterías pueden dañar la motosierra
podadora inalámbrica y provocarle un desperfecto que pueda
causar lesiones personales severas.
m ¡ADVERTENCIA! No use baterías o artefactos que
hayan sido dañados o modicados. Las baterías dañadas o
modicadas pueden reaccionar impredeciblemente, causando
un incendio, explosión o lesiones personales.
No modique ni intente reparar el artefacto o la batería, a
menos que lo haga según lo indicado en las instrucciones de
uso y cuidado.
Haga reparar su batería por un técnico calicado empleando
solo partes de repuesto idénticas. Esto garantizará que se
mantenga intacta la seguridad de las baterías.
m ¡PRECAUCIÓN! Para reducir el riesgo de lesiones
personales, cargue las baterías de iones de litio iON+ de 24 V
solo con su cargador de baterías de iones de litio designado,
el iON+ de 24 V. Otros tipos de cargadores presentan
riesgos de incendio, lesiones personales y daños materiales.
No conecte una batería a un tomacorriente doméstico ni
encendedor de cigarrillos en su vehículo. Dicho uso indebido
dañará o deshabilitará permanentemente la batería.
• Evite entornos peligrosos: no cargue la batería bajo la
lluvia o nieve, ni en lugares húmedos o mojados. No use
la batería ni el cargador en atmósferas explosivas (gases,
polvo o materiales inamables), ya que al insertar o retirar la
batería se pueden generar chispas que causen un incendio.
• Cargue las baterías en un área bien ventilada: no
obstruya los conductos de ventilación del cargador.
Manténgalos despejados para permitir una ventilación
adecuada. No permita que se fume o haya fuego abierto
cerca de una batería siendo cargada. Los gases presentes
pueden explotar.
NOTA: el rango seguro de temperaturas para la batería
es de 41°F (5°C) a 105°F (40.5°C). No cargue la batería
en exteriores a temperaturas congelantes. Cárguela a
temperatura ambiente en interiores.
• Cuide el cable de alimentación del cargador: al
desenchufar el cargador tire del enchufe, no del cable
de alimentación, para desconectarlo del tomacorriente
y así evitar daños al enchufe y cable. Nunca transporte
el cargador colgado de su cable, ni tire del cable para
desconectarlo del tomacorriente. Mantenga el cable
alejado del calor, grasas y bordes alados. Asegúrese de
que el cable no sea pisado, que la gente no se tropiece
con éste, ni que esté sujeto a daños o tensiones mientras
el cargador esté siendo usado. No use el cargador con un
cable o enchufe dañado. Reemplace un cargador dañado
inmediatamente.
• No use un cable de extensión a menos que sea
absolutamente necesario: usar un cable de extensión
incorrecto, dañado o conectado de forma inapropiada
puede causar un incendio o choque eléctrico. Si se
debe usar un cable de extensión, conecte el cargador a
un cable de extensión de calibre 16 (o más grueso) de
alambrado adecuado, con el enchufe macho del cargador
encajando perfectamente en el enchufe hembra del cable
de extensión. Verique que el cable de extensión esté en
buenas condiciones.
• El cargador (XZ2600-0450) está clasicado solo para
voltajes de 100 V a 240 V CA: el cargador debe estar
enchufado a un tomacorriente apropiado.
• Use solo accesorios recomendados: el uso de un
accesorio no recomendado ni vendido por el fabricante de
la batería o cargador puede causar un choque eléctrico,
incendio o lesiones personales.
• Desenchufe el cargador cuando no esté siendo usado:
asegúrese de retirar la batería del cargador desenchufado.

28
m ¡ADVERTENCIA! Para reducir el riesgo de un choque
eléctrico, desenchufe siempre el cargador antes de llevar a
cabo cualquier tarea de limpieza o mantenimiento. No permita
que entre agua dentro del cargador. Use un interruptor de
circuito por falla a tierra (GFCI) para reducir el riesgo de un
choque eléctrico.
• No queme ni incinere baterías: las baterías pueden
explotar, causando lesiones personales o daños. Cuando
las baterías son quemadas se generan sustancias y humos
tóxicos.
• No triture, deje caer ni dañe la batería: no use la batería
ni el cargador si han sido severamente golpeados, se
han dejado caer, se han aplastado o se han dañado de
cualquier forma como por ejemplo perforados con un clavo,
golpeados con un martillo, pisados, etc.
• No desarme las baterías ni el cargador: el reensamblado
incorrecto puede presentar un riesgo severo de choque
eléctrico, fuego o exposición a químicos tóxicos de la
batería. Si la batería o el cargador están dañados, contacte
a un concesionario autorizado Snow Joe
®
+ Sun Joe
®
, o
comuníquese con la central de servicio al cliente Snow Joe
®
+ Sun Joe
®
llamando al 1-866-SNOWJOE (1-866-766-9563)
para obtener ayuda.
• Los químicos de la batería causan quemaduras severas:
nunca deje que una batería dañada haga contacto con
la piel, ojos o boca. Si una batería dañada deja escapar
químicos, use guantes de hule o neopreno para deshacerse
de ella de forma segura. Si la piel es expuesta a los
químicos de la batería, lave el área afectada con jabón y
agua, y enjuague con vinagre. Si los ojos son expuestos
a los químicos, inmediatamente enjuáguelos con agua
durante 20 minutos y busque atención médica. Quítese y
deshágase de las vestimentas contaminadas.
• No provoque un cortocircuito: una batería puede hacer
cortocircuito si un objeto metálico hace conexión entre los
contactos positivo y negativo de la batería. No coloque
una batería cerca de objetos que puedan causar un
cortocircuito tales como monedas, sujetapapeles, tornillos,
clavos, llaves u otros objetos metálicos. Una batería
cortocircuitada representa un riesgo de incendio y lesiones
personales graves.
• Guarde su batería y cargador en un lugar fresco y seco:
no guarde la batería o cargador donde las temperaturas
puedan exceder los 105°F (40.5°C), como bajo la luz directa
del sol o dentro de un vehículo o construcción metálica
durante el verano.
Información sobre la batería
1. La batería suministrada con su motosierra podadora
inalámbrica está cargada solo parcialmente. La batería
tiene que ser cargada por completo antes de que usted
use la herramienta por primera vez.
2. Para un óptimo rendimiento de la batería, evite ciclos de
descarga baja cargándola frecuentemente.
3. Guarde la batería en un lugar fresco, de preferencia a 77°F
(25°C) y cargada al menos a un 40%.
4. Las baterías de iones de litio están sujetas a un proceso
natural de desgaste. Una batería debe ser reemplazada
a más tardar cuando su capacidad caiga a un 80% de
su capacidad inicial, cuando estaba nueva. Las celdas
debilitadas en una batería gastada no son capaces de
cumplir con los requisitos de alta potencia necesarios
para la operación adecuada de su motosierra podadora
inalámbrica, y por tanto representan un riesgo de
seguridad.
5. No arroje la batería al fuego abierto ya que puede explotar.
6. No queme la batería ni la exponga al fuego.
7. No descargue la batería exhaustivamente. Una descarga
exhaustiva dañará las celdas de la batería. La causa más
común de descarga exhaustiva es el almacenamiento
prolongado o la falta de uso de baterías parcialmente
descargadas. Deje de trabajar tan pronto como el
rendimiento de la batería caiga considerablemente o se
active el sistema de protección electrónico. Almacene
la batería únicamente luego de haberla cargado por
completo.
8. Proteja la batería y la motosierra podadora contra
sobrecargas. Las sobrecargas causarán rápidamente un
sobrecalentamiento y daños a las celdas dentro de la
batería, incluso si este sobrecalentamiento no es aparente
por fuera.
9. Evite daños y golpes. Reemplace inmediatamente una
batería que se haya caído desde una altura de más de
un metro o que haya sido expuesta a golpes violentos,
incluso si el exterior de la batería aparenta no tener daños.
Las celdas dentro de la batería pueden haber sufrido
daños severos. En dichos casos, lea la información
de eliminación para deshacerse apropiadamente de la
batería.
10. Si la batería sufre una sobrecarga y sobrecalentamiento,
el sistema interruptor de corte de protección integrado
apagará el equipo por motivos de seguridad.
¡IMPORTANTE! No presione más el gatillo interruptor si el
sistema interruptor de corte de protección se ha activado.
Esto puede dañar las baterías.
11. Use únicamente baterías originales. El uso de otras
baterías puede causar lesiones personales o una
explosión.

29
Información sobre el cargador y el proceso
de carga
1. Verique la información indicada en la placa de
especicaciones del cargador de baterías. Asegúrese
de conectar el cargador de baterías a una fuente de
alimentación que tenga el voltaje indicado en su placa
de especicaciones. Nunca lo conecte a una fuente de
alimentación con un voltaje distinto al indicado.
2. Proteja el cargador de baterías y su cable contra
daños. Mantenga el cargador y su cable alejados del
calor, grasa, aceite y bordes alados. Haga reparar sin
demora los cables dañados por un técnico calicado en
un concesionario autorizado Snow Joe
®
+ Sun Joe
®
o
comuníquese con la central de servicio al cliente
Snow Joe
®
+ Sun Joe
®
llamando al 1-866-SNOWJOE
(1-866-766-9563).
3. Los enchufes eléctricos deben encajar en los
tomacorrientes. Nunca modique el enchufe de ninguna
manera. No use ningún adaptador de enchufe con
artefactos que tengan conexión a tierra. El uso de
enchufes no modicados y tomacorrientes equivalentes
reducirá el riesgo de un choque eléctrico.
4. Mantenga el cargador de baterías, la batería y la
herramienta inalámbrica lejos del alcance de los niños.
5. No use el cargador de baterías suministrado para cargar
baterías de otras herramientas inalámbricas.
6. Durante periodos de trabajo pesado, la batería se
calentará. Deje que la batería se enfríe a temperatura
ambiente antes de conectarla al cargador para su recarga.
7. No sobrecargue la batería. No exceda los tiempos
máximos de carga. Estos tiempos de carga solo se aplican
a una batería descargada. La inserción frecuente de una
batería cargada o parcialmente cargada resultará en una
sobrecarga y daños a las celdas. No deje la batería en el
cargador por días enteros.
8. Nunca use o cargue la batería si sospecha que han
pasado más de doce (12) meses desde la última vez que
fue cargada. Existe una alta probabilidad de que la batería
ya haya sufrido un daño severo (descarga exhaustiva).
9. Cargar la batería a una temperatura menor de 41°F (5°C)
causará daños químicos a las celdas y puede provocar un
incendio.
10. No use una batería que haya sido expuesta al calor
durante el proceso de carga, ya que sus celdas pueden
haber sufrido daños severos.
11. No use baterías que se hayan curvado o deformado
durante el proceso de carga, ni aquellas que muestren
otros síntomas atípicos tales como liberación de gases,
zumbidos, grietas, etc.
12. Nunca descargue por completo la batería (se recomienda
una profundidad de descarga de un 80%). Una descarga
completa de la batería causará un envejecimiento
prematuro de las celdas de la batería.
Protección contra inuencias del entorno
1. Use ropa de trabajo adecuada. Use gafas protectoras.
2. Proteja su herramienta inalámbrica y el cargador de
baterías contra la humedad y la lluvia. La humedad y la
lluvia pueden causar graves daños a las celdas.
3. No use la herramienta inalámbrica ni el cargador de
baterías cerca de vapores o líquidos inamables.
4. Use el cargador de baterías y la herramienta inalámbrica
solo en entornos secos y a una temperatura ambiente de
entre 41°F (5°C) y 105°F (40.5°C).
5. No coloque el cargador de baterías en lugares donde la
temperatura pueda sobrepasar los 105°F (40.5°C). En
particular, no deje el cargador de baterías en un auto
estacionado bajo la luz directa del sol.
6. Proteja la batería contra el sobrecalentamiento. Las
sobrecargas, exceso de carga y exposición a la luz directa
del sol darán como resultado un sobrecalentamiento
y daños a las celdas. Nunca cargue ni trabaje con una
batería que haya estado sobrecalentada. De ser posible,
reemplácela inmediatamente.
7. Guarde el cargador de baterías y su herramienta
inalámbrica solo en entornos secos y a una temperatura
ambiente de entre 41°F (5°C) y 105°F (40.5°C). Guarde su
batería de iones de litio en un lugar fresco y seco, a una
temperatura ambiente de 77°F (25°C). Proteja la batería, el
cargador y la herramienta inalámbrica contra la humedad y
la luz directa del sol. Solo almacene la batería cargada por
completo (cargada al menos a un 40%).
8. Evite que la batería de iones de litio se congele. Las
baterías almacenadas a una temperatura menor de 32°F
(0°C) por más de 60 minutos deberán ser desechadas.
9. Al manipular una batería, tenga cuidado con las descargas
electrostáticas. Las descargas electrostáticas pueden
dañar el sistema electrónico de protección y las celdas
de la batería. Evite las descargas electrostáticas y nunca
toque los polos de la batería.

30
Símbolos de seguridad
La siguiente tabla muestra y describe los símbolos de seguridad que pueden aparecer en este producto. Lea, comprenda y siga
todas las instrucciones relacionadas con esta máquina antes de intentar ensamblarla y operarla.
LEA EL(LOS) MANUAL(ES) DEL
OPERADOR: lea, comprenda y
siga todas las instrucciones en
el(los) manual(es) antes de intentar
ensamblar y operar la unidad.
ALERTA DE SEGURIDAD: indica
una precaución, advertencia o
peligro.
La parte móvil seguirá moviéndose
durante varios segundos después
de que usted haya apagado la
máquina.
¡ADVERTENCIA! No exponga la
unidad a la lluvia ni a entornos
mojados.
¡PRECAUCIÓN! Evite el contacto
de la punta de la barra-guía con
cualquier objeto. El contacto con la
punta puede causar que la barra-
guía se mueva repentinamente
hacia arriba y hacia atrás, lo cual
puede causar lesiones personales
severas al usuario.
USE PROTECCIÓN OCULAR,
AUDITIVA Y PARA LA CABEZA:
para evitar lesiones personales,
use protección auditiva, gafas
protectoras y protección para su
cabeza.
Dirección correcta de las cuchillas.
Símbolo Símbolo
Descripción
Descripción
Solo para uso en interiores. Utilice
el cargador de baterías solamente
en interiores.
m
Use todo el tiempo calzado protector
para evitar que sus pies sean
golpeados por objetos que puedan
caerles accidentalmente.
Use guantes de seguridad durante
la operación para proteger sus
manos.

31
Conozca su motosierra podadora inalámbrica
Lea detenidamente el manual del operador y las instrucciones de seguridad antes de operar la motosierra podadora inalámbrica.
Compare la ilustración debajo con la motosierra podadora inalámbrica para familiarizarse con las ubicaciones de sus diversos
controles y ajustes. Conserve este manual para futuras referencias.
3
2 1
4
5
6
7
8 9 1110
12 13
14
15
16 17
18
19
20
21
22
1. Cubierta de extremo de cadena/piñón
2. Perilla de cubierta de extremo
3. Cuña de separación
4. Barra-guía de 5 plg (12.7 cm)
5. Cadena de corte de 5 plg (12.7 cm)
6. Funda para barra-guía y cadena
7. Placa base
8. Batería de iones de litio iON+ de
24 V (24VBAT-LTE) con exclusiva
tecnología EcoSharp
®
.
9. Receptáculo de carga
10. Botón de trabado (×2)
11. Botón para indicador de
batería
12. Indicador de batería
13. Cargador de baterías de iones
de litio iON+ de 24 V
(XZ2600-0450)
14. Conector de cargador
15. Aceite lubricante
16. Llave hexagonal
17. Ranura de llave hexagonal
18. Compartimiento de batería
19. Empuñadura
20. Gatillo interruptor
21. Botón de trabado de
seguridad
22. Ranuras de ventilación
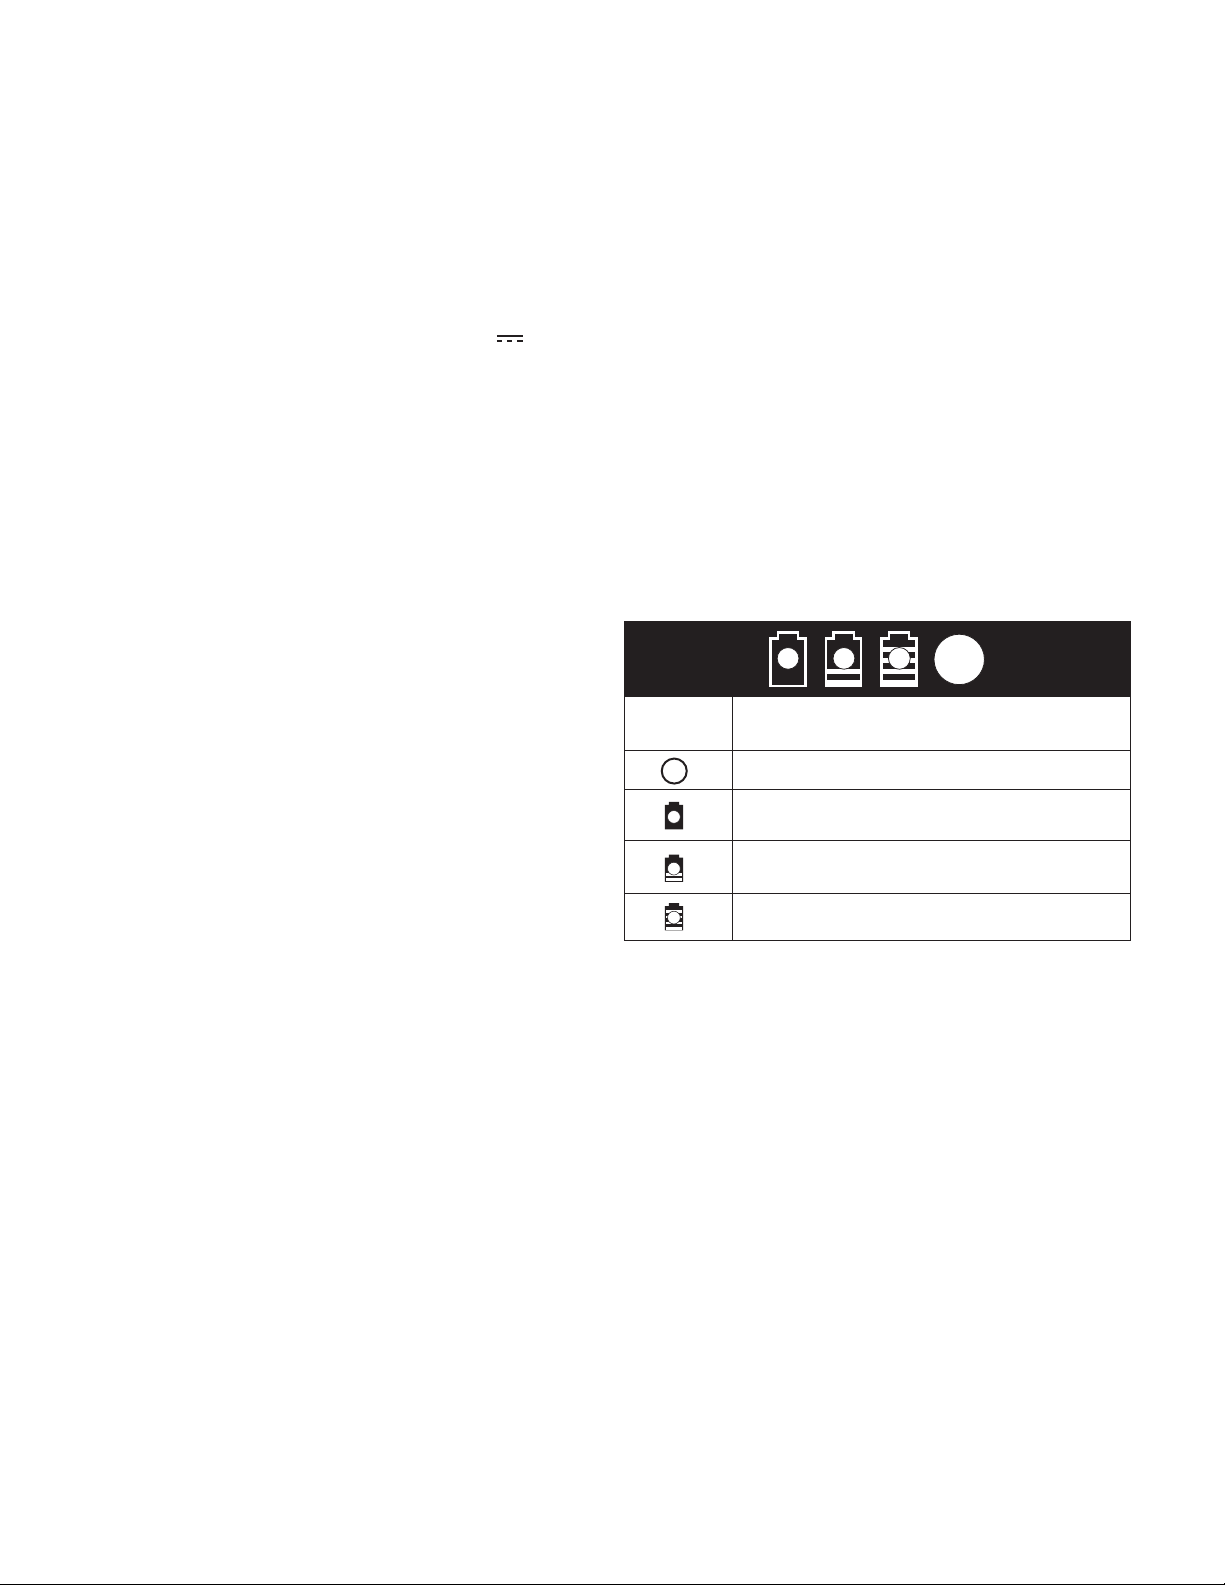
32
Datos técnicos
Motor ............................................................................. 230 W
Voltaje máximo* de batería ......................................... 24 V CC
Capacidad de la batería ................................................ 2.0 Ah
Entrada del cargador ............................ De 100 V a 240 V CA;
de 50 Hz a 60 Hz, 0.4 A
Salida del cargador ................................ 26 V CC
450 mA
Tiempo máximo de carga de batería ................................. 5 hr
Longitud de barra-guía/cadena ....................... 5 plg (12.7 cm)
Grosor de corte ............................. Máximo: 4.5 plg (11.4 cm)
Capacidad de tanque de aceite ....................... 0.7 oz (20 mL)
Peso neto ............................................................. 4 lb (1.8 kg)
* El voltaje inicial sin carga, cuando la batería está cargada por completo, alcanza
un máximo de 24 V. El voltaje nominal bajo una carga típica es de 21.6 V.
Desembalaje
Contenido del paquete:
• Motosierra podadora inalámbrica con cadena y barra-guía
pre-instaladas
• Funda de barra-guía (instalada sobre la cadena y barra-
guía)
• Llave hexagonal (en la ranura de almacenamiento)
• Aceite lubricante (20 ml)
• Batería de iones de litio iON+ de 24 V
• Cargador de baterías de iones de litio iON+ de 24 V
• Manual y tarjeta de registro
1. Retire cuidadosamente la motosierra podadora
inalámbrica y compruebe que todos los artículos
anteriores estén suministrados.
2. Inspeccione cuidadosamente el producto para asegurarse
de que no haya ocurrido ningún daño o ruptura durante
el transporte. Si alguna parte está dañada o extraviada,
NO DEVUELVA el producto a la tienda. Comuníquese con
la central de servicio al cliente Snow Joe
®
+ Sun Joe
®
llamando al 1-866-SNOWJOE (1-866-766-9563).
NOTA: no se deshaga de la caja de transporte ni de los
materiales de embalaje hasta que usted esté listo para
usar su motosierra podadora inalámbrica. El empaquetado
está hecho de materiales reciclables. Deseche estos
materiales de acuerdo con los reglamentos de su
localidad.
¡IMPORTANTE! El equipo y los materiales de embalaje no
son juguetes. No permita que los niños jueguen con bolsas
plásticas, láminas o partes pequeñas. ¡Estos objetos pueden
ser tragados y causar asxia!
Operación de la batería
La unidad es alimentada por una batería de iones de litio.
La batería está completamente sellada y no requiere de
mantenimiento.
Indicadores de nivel de carga de batería
La batería tiene un botón para comprobar su nivel de carga.
Simplemente presione el botón para leer el nivel de carga de la
batería en los LED indicadores de la batería:
• Los tres LED indicadores de nivel están encendidos: el
nivel de carga de la batería es elevado.
• Dos LED indicadores de nivel están encendidos: el nivel
de carga de la batería está disminuyendo. Deje de trabajar
tan pronto como sea posible.
• Un LED indicador de nivel está encendido: la batería está
agotada. Deje de trabajar INMEDIATAMENTE y cargue la
batería, de otro modo, la vida útil de la batería se reducirá
en gran medida.
NOTA: si el botón indicador de nivel de carga no parece
funcionar, conecte al cargador y cargue según se requiera.
NOTA: inmediatamente luego del uso de la batería, el Botón
indicador de nivel de carga puede mostrar una carga más
baja que la que se mostrará algunos minutos después. Las
celdas de las baterías “recuperan” parte de su carga luego de
permanecer inactivas.
Operación del cargador
m
¡ADVERTENCIA! Cargue la batería de iones de litio
iON+ de 24 V solo con su cargador de baterías de iones de
litio compatible iON+ de 24 V. Otros tipos de baterías pueden
causar lesiones personales y daños materiales.
Para reducir el riesgo de un choque eléctrico, no permita que
entre agua a la conexión CA/CC del cargador.
Botón indicador de nivel de carga.
La batería está cargada a un 30% y requiere
ser cargada de inmediato.
La batería está cargada a un 60% y requiere
ser cargada pronto.
La batería está cargada por completo.
SignicadoLuz
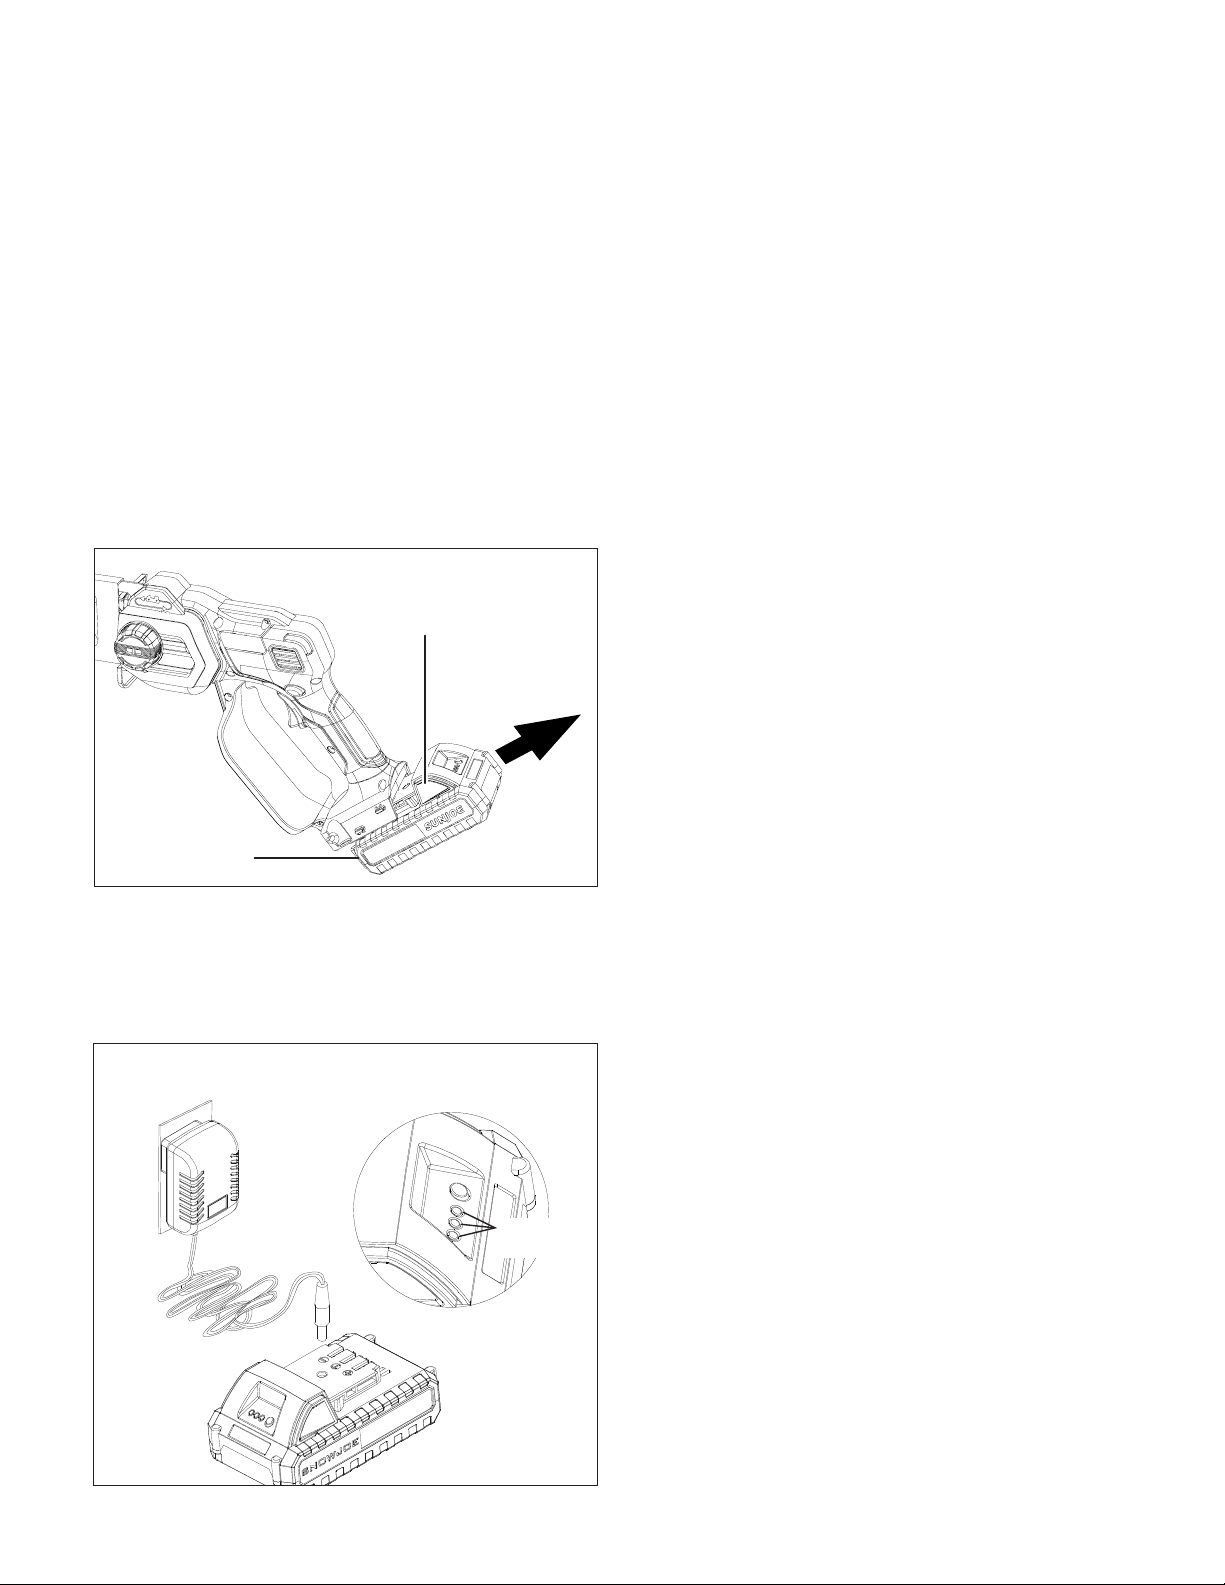
33
Cuándo cargar la batería de iones de
litio iON+ 24VBAT-LTE
NOTA: la batería de iones de litio iON+ 24VBAT-LTE no crea
una “memoria” al ser cargada luego de una descarga parcial.
Por tanto, no hay necesidad de agotar la batería antes de
insertar el conector del cargador.
• Use las luces indicadoras de carga de batería para
determinar cuándo cargar su batería de iones de litio iON+
24VBAT-LTE.
• Usted puede cargar por completo su batería antes de
empezar un trabajo grande o luego de un uso prolongado.
Carga de la batería
1. Presione los botones de trabado en la batería para poder
extraerla fuera del equipo (Fig. 1).
2. Compruebe que el voltaje de la red eléctrica sea el
mismo que el indicado en la placa de especicaciones
del cargador de baterías. Luego, enchufe el adaptador
del cargador en un tomacorriente CA apropiado. Conecte
el conector del cargador en el receptáculo de carga de la
batería para empezar a cargarla (Fig. 2).
3. La batería tomará aproximadamente cinco horas en
cargarse. Las luces LED indicadoras de la batería
parpadearán y se iluminarán una a una durante el proceso
de carga. Desconecte el cargador inmediatamente cuando
las tres luces LED estén encendidas.
m ¡PRECAUCIÓN! PELIGRO DE INCENDIO.
Al desconectar el cargador de baterías, asegúrese de
desenchufar primero el cargador del tomacorriente, y luego
desconectar el cargador de baterías.
m ¡ADVERTENCIA! Este cargador no se apaga de
forma automática cuando la batería está completamente
cargada. Tenga cuidado de no dejar la batería conectada
al cargador. Apague o desenchufe el cargador del
tomacorriente cuando la carga haya sido completada.
4. Una recarga oportuna de la batería ayudará a prolongar
su vida útil. Usted debe recargar la batería cuando note
una caída en la potencia del equipo.
¡IMPORTANTE! Nunca permita que la batería se descargue
por completo ya que esto le causará un daño irreversible.
Preparación para el trabajo
Inspección de la máquina
m ¡ADVERTENCIA! Antes de realizar cualquier
inspección, ajuste, reparación o mantenimiento en la
máquina, asegúrese de que la batería no esté insertada en su
compartimiento.
Antes de empezar a trabajar:
• Compruebe que todos los tornillos en la motosierra, así
como su barra-guía, estén ajustados rmemente.
• Compruebe que la cadena esté correctamente tensionada
y alada y que no haya señales de daños;
• Compruebe que la empuñadura y los dispositivos
de protección estén limpios y secos, montados
correctamente, y ajustados de forma segura a la máquina.
• Compruebe que el gatillo interruptor y el botón de trabado
de seguridad se muevan libremente sin necesidad de
forcejeo y que regresen de forma rápida y automática a
sus posiciones neutrales;
• Compruebe que el gatillo interruptor se mantenga
trabado hasta que el botón de trabado de seguridad sea
presionado;
• Asegúrese de que las ranuras de ventilación no estén
obstruidas con aserrín o residuos;
Periodo de asentamiento para cadenas
nuevas
Para una operación segura, se recomienda seguir los
siguientes consejos de periodo de asentamiento cada vez que
una nueva cadena sea instalada.
Batería
Fig. 1
Botón de trabado
Fig. 2
Indicador
de batería
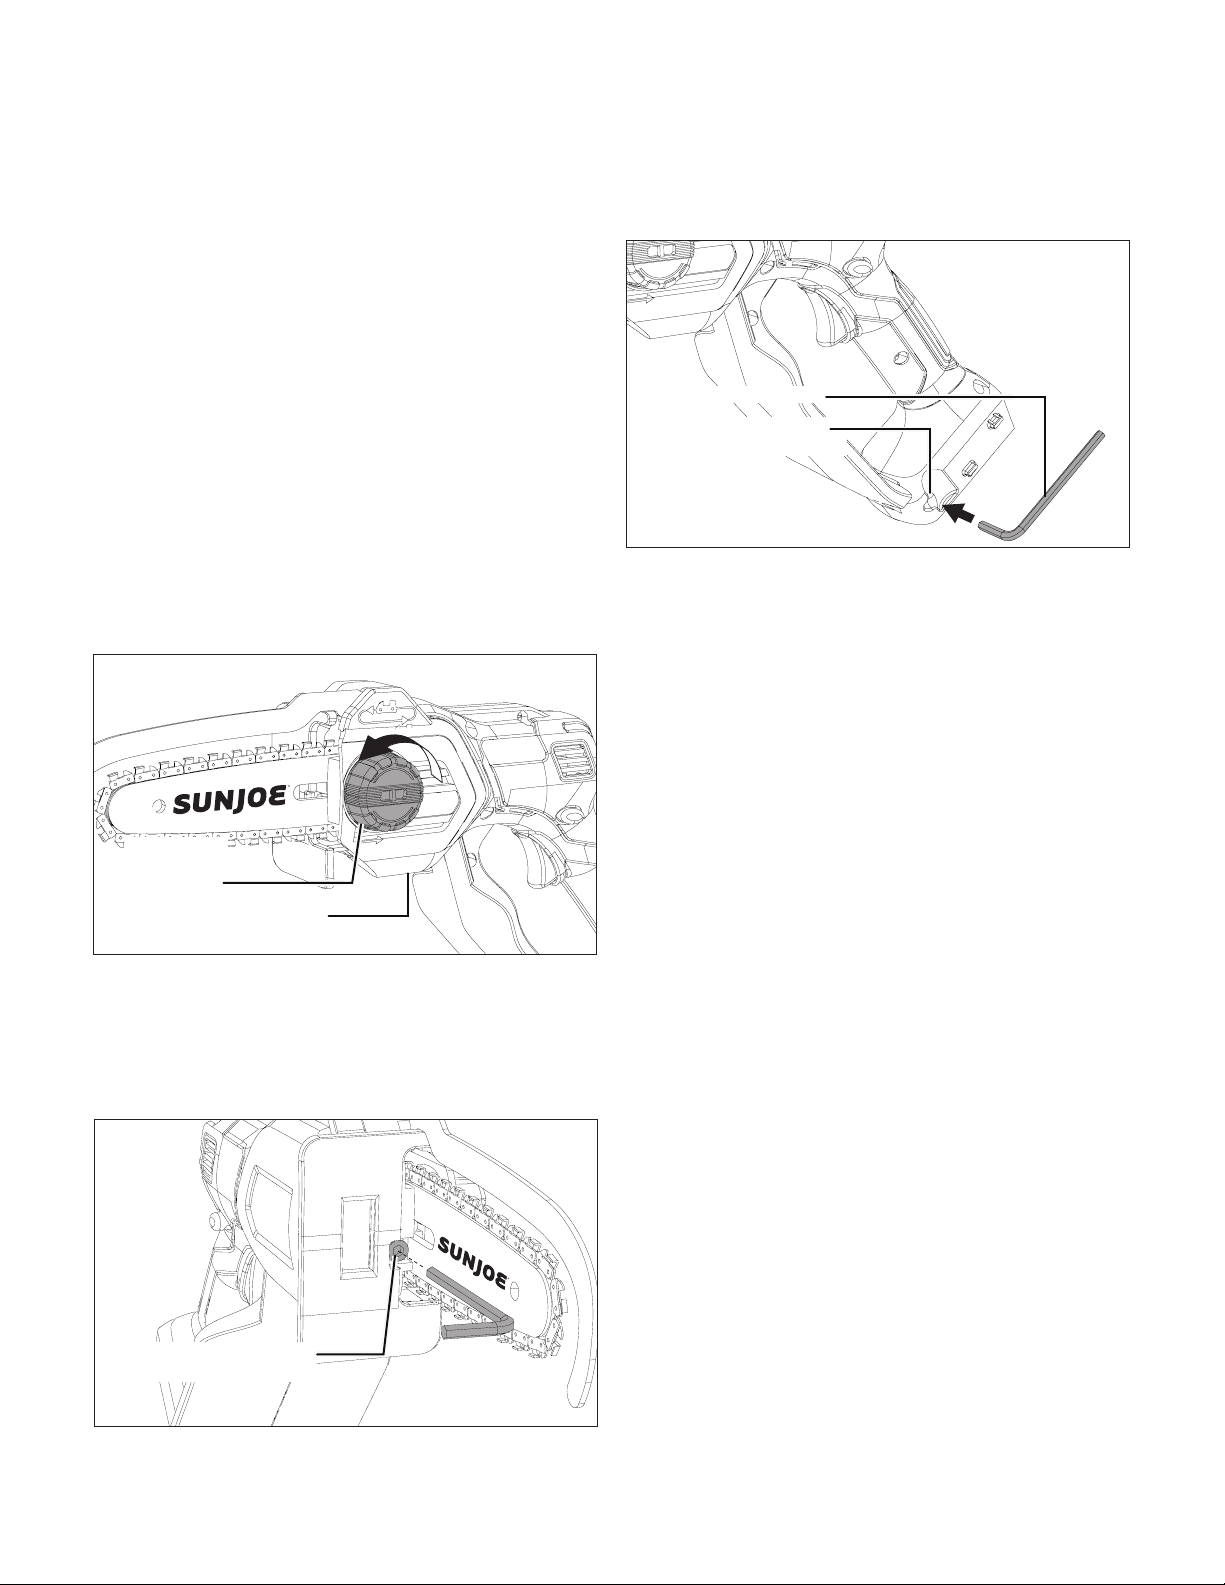
34
1. Retire la batería y ajuste la tensión de cadena.
2. Inserte la batería y encienda la motosierra podadora
inalámbrica, dejándola funcionar al vacío por
aproximadamente cinco minutos.
3. Retire la batería y compruebe la tensión de la cadena
nuevamente. De ser necesario, vuelva a ajustar la cadena.
4. Luego, solo haga cortes fáciles por aproximadamente
30 minutos. ¡Asegúrese de que la cadena esté siempre
lubricada lo suciente! Solo use la motosierra podadora
inalámbrica para cortes más grandes y de mayor
profundidad luego del periodo de asentamiento.
Ajuste de tensión de cadena
m ¡ADVERTENCIA! Use guantes protectores al
manipular la barra-guía y la cadena.
1. Asegúrese de que la motosierra podadora inalámbrica
esté apagada y que su batería haya sido retirada. Aoje
un poco la cubierta de extremo de cadena/ piñón girando
la perilla de cubierta de extremo en sentido antihorario
(Fig. 3).
2. Use la llave hexagonal incluida para girar el tornillo de
ajuste de cadena en sentido horario para apretar, y en
sentido antihorario para aojar. Una cadena en frío estará
tensionada correctamente cuando no haya una holgura en
el lado inferior de la barra-guía, y la cadena esté ajustada
pero pueda ser girada a mano sin esfuerzo (Fig. 4).
NOTA: cuando no esté en uso, la llave hexagonal puede
ser almacenada en la ranura para llave hexagonal ubicada
en la parte inferior de la motosierra podadora inalámbrica
(Fig. 5).
3. Vuelva a apretar perilla de cubierta de extremo. Usando
un destornillador, haga avanzar la cadena a lo largo de la
barra-guía para comprobar que se mueva con facilidad.
Lubricante de cadena
¡IMPORTANTE! Solo use un aceite de barra-guía y cadena de
buena calidad, formulado especícamente para motosierras,
con el n de garantizar una lubricación óptima de las partes de
corte. No use aceite que contenga impurezas.
¡IMPORTANTE! El aceite lubricante de la cadena es
biodegradable. El uso de aceite mineral o de motor puede
perjudicar severamente al medioambiente. Es importante
que usted use un aceite de buena calidad para lubricar
efectivamente las partes de corte. El aceite usado o de mala
calidad no garantiza una buena lubricación y reduce el ciclo
de vida útil de la barra-guía y la cadena.
Antes de lubricar la motosierra podadora inalámbrica, limpie
la barra-guía y cadena con un cepillo suave. Luego aplique
el aceite entre la cadena y la barra-guía. Inserte la batería y
encienda la motosierra podadora inalámbrica. El aceite se
distribuirá de forma pareja sobre la cadena. Para un óptimo
resultado de corte, lubrique la motosierra cada 30 minutos
durante la operación. Al guardar la unidad por un periodo
prolongado (como de tres meses o más), asegúrese de que la
cadena esté ligeramente lubricada para evitar óxido en esta y
en el piñón de barra-guía (Fig. 6).
R
Fig. 3
Cubierta de extremo de
cadena/piñón
Perilla de
cubierta de
extremo
R
Fig. 4
Tornillo de ajuste de
cadena
Fig. 5
Llave hexagonal
Ranura para llave
hexagonal
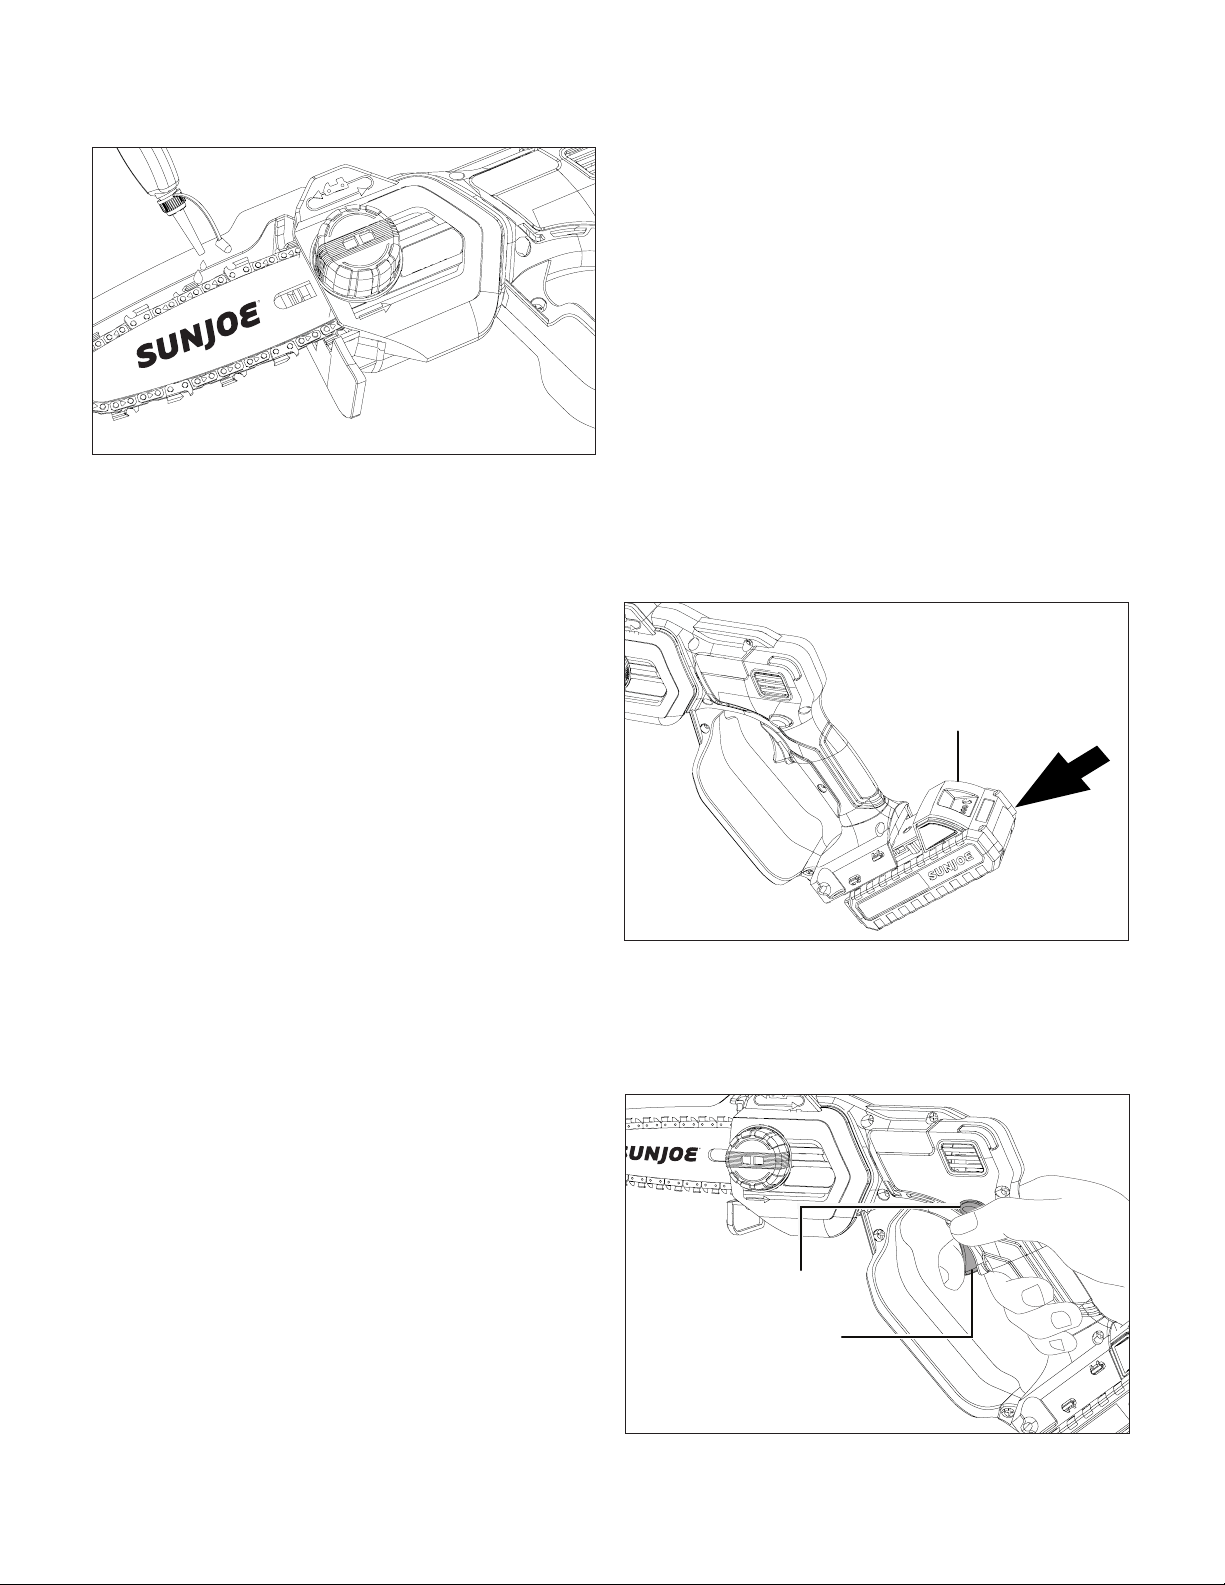
35
Operación
Puesta en marcha y parada
m ¡PRECAUCIÓN! El inicio, parada y reinicio de un
motor eléctrico de forma repetida en intervalos de pocos
segundos puede generar una gran cantidad de calor y dañar
el motor. Para proteger el ciclo de vida útil de su motosierra
podadora inalámbrica, espere al menos cinco segundos, luego
de detenerla, para volverla a encender.
m ¡ADVERTENCIA! Asegúrese de que la cadena no
esté en contacto con ningún objeto cuando usted arranque el
motor.
m ¡ADVERTENCIA! Mantenga las manos alejadas de la
cadena. Mantenga su mano sujetando la empuñadura. No se
extralimite.
Una sujeción buena y rme de la herramienta le ayudará
a mantenerla controlada. Mantenga una sujeción rme
colocando su mano en la empuñadura, con el pulgar y los
dedos rodeándola. Una sujeción rme, combinada con
el posicionamiento apropiado de la motosierra podadora
inalámbrica, le ayudará a mantener el control de esta. No
suelte la motosierra mientras esté funcionando.
m ¡ADVERTENCIA! No opere la motosierra podadora
inalámbrica trepado en un árbol, sobre una escalera o en un
andamio. Usar la herramienta en dichas circunstancias es
extremadamente peligroso.
m ¡PRECAUCIÓN! La cadena continuará girando por
varios segundos luego de haber apagado la herramienta.
No use la motosierra podadora inalámbrica en entornos
mojados. Tenga extremo cuidado al cortar arbustos pequeños,
brinzales o ramas bajo tensión ya que el material tenso y
angosto puede ser atrapado por la motosierra y, al recuperarse
elásticamente, ser azotado contra usted, haciéndole perder el
equilibrio.
No use la motosierra para cortar plantas trepadoras y/o maleza.
m ¡ADVERTENCIA! No permita que la familiaridad
con este tipo de herramientas le impida tomar todas las
precauciones necesarias. Recuerde que una fracción de
segundo de descuido es suciente para que ocurran graves
lesiones personales.
m ¡ADVERTENCIA! No corte ramas cerca de cables
eléctricos.
m ¡ADVERTENCIA! No lubricar la cadena causará
daños a la barra-guía y a la cadena. Use solo aceite
para barra-guía y cadena de buena calidad y formulado
especícamente para motosierras.
1. Antes de cada sesión de corte, revise minuciosamente la
lista de inspección diaria (ver página 41).
2. Inserte la batería en su compartimiento. Empújela para
asegurarse de que esté trabada en su lugar (Fig. 7).
3. Para arrancar la motosierra podadora inalámbrica,
sujétela rmemente desde la empuñadura. Presione el
botón de trabado de seguridad y, sin soltarlo, apriete el
gatillo interruptor. Una vez que la motosierra podadora
inalámbrica esté funcionando, usted puede soltar el botón
de trabado de seguridad (Fig. 8).
R
Fig. 6
Batería
Fig. 7
R
Botón de trabado de
seguridad
Fig. 8
Gatillo interruptor

36
4. Para apagar la herramienta, simplemente suelte el gatillo
interruptor.
NOTA: no apriete el gatillo interruptor hasta que usted
esté listo para hacer un corte.
Consejos de operación
m
¡ADVERTENCIA! Para su seguridad y la de los
demás:
1. No use la motosierra podadora sin antes leer las
instrucciones cuidadosamente. Familiarícese con los
controles y el uso apropiado de la motosierra. Aprenda a
detener rápidamente la motosierra.
2. Tenga en cuenta que el operador o usuario es
responsable por accidentes o peligros que le ocurran a
otras personas o sus propiedades.
3. Use siempre vestimenta adecuada al usar la máquina.
Use guantes anti-vibración y otros equipos de protección
personal.
Sin embargo, todas las precauciones mencionadas
anteriormente no garantizan la prevención de ciertos
riesgos, tales como el fenómeno de Raynaud o el
síndrome del túnel carpiano. A los operadores que
usen esta máquina por periodos prolongados se les
recomienda revisiones médicas periódicas de sus
manos y dedos. Si alguno de los síntomas anteriormente
mencionados aparece, contacte inmediatamente a un
médico.
4. Trabaje solo bajo luz diurna o buena luz articial.
5. Tenga el mayor cuidado al trabajar cerca de vallas de
metal.
6. Tenga cuidado de no golpear la barra-guía duramente
contra objetos extraños o escombros volando causados
por el movimiento de la cadena.
7. Nunca toque la cuña de separación o debajo de la placa
base. ¡Hay un riesgo de lesiones personales!
8. No encienda la motosierra si la cadena está haciendo
contacto con cualquier objeto, está dentro del material,
o pueda golpear un objeto. Esto puede causar graves
lesiones.
9. Fije materiales sueltos antes de cortarlos. Retire objetos
extraños como clavos, tornillos, etc.
10. Al cortar una rama que se encuentra bajo tensión, esté
alerta ante la recuperación elástica de la madera. Cuando
se libera la tensión en las bras de la madera, la reacción
de la rama como un resorte puede golpear al operador y/o
lanzar la motosierra fuera de control.
11. Tenga extremo cuidado al cortar arbustos y brinzales.
El material angosto puede atrapar la motosierra y ser
azotado hacia usted, haciéndole perder el equilibrio.
12. Cuando la motosierra esté funcionando, coloque la placa
base en la supercie del material y deje que la motosierra
corte por su cuenta. Solo aplique una ligera presión sobre
la motosierra.
NOTA: la placa base ayuda a estabilizar la motosierra
y emparejar el material siendo cortado. Puede también
reducir signicativamente la vibración de la motosierra. La
placa base también hace de punto de apoyo para cortes
profundos debido a que levanta el extremo posterior de
la motosierra. Usar la placa base como punto de pivote
le permite entrar de forma profunda en el material con un
control preciso.
13. Detenga el motor y retire la batería del compartimiento:
– Cuando deje la máquina sin atender;
– Antes de limpiar, revisar o reparar la máquina;
– Luego de golpear un objeto extraño: inspeccione la
máquina en busca de cualquier daño y repárela antes
de volver a usarla;
– Cuando la máquina empiece a vibrar de forma
anormal: inmediatamente busque la causa de las
vibraciones y haga inspeccionar la máquina en un
concesionario autorizado Snow Joe
®
+ Sun Joe
®
, o
comuníquese con la central de servicio al cliente Snow
Joe
®
+ Sun Joe
®
llamando al 1-866-SNOWJOE
(1-866-766-9563) para obtener ayuda; o
– Cuando la máquina no esté siendo usada.
¡IMPORTANTE! Recuerde siempre que una motosierra
podadora inalámbrica usada incorrectamente puede perturbar
a los demás y afectar severamente al medioambiente.
Para respetar a las personas y al medioambiente:
• Evite usar la máquina en entornos o momentos del día en
que se pueda perturbar a los demás.
• Obedezca a conciencia las reglas y disposiciones locales
respecto a la eliminación de materiales de desecho luego
del aserrado.
• Obedezca a conciencia las reglas y disposiciones locales
respecto a la eliminación del aceite, partes dañadas u
otros elementos que puedan afectar severamente el
medioambiente.
• Una cierta cantidad de aceite lubricante de cadena es
liberada al medioambiente cuando la máquina está
funcionando, por tanto solo use aceites biodegradables
fabricados especícamente para máquinas de este tipo.
• Para evitar el riesgo de incendio, no deje la máquina con
el motor caliente sobre hojas o césped seco.
m ¡ADVERTENCIA! Se requiere de una capacitación
especial para usar esta herramienta.
Inspecciones durante el trabajo
• Vericación de la tensión de la cadena
La cadena tiende a extenderse gradualmente mientras trabaja,
así que usted debe vericar su tensión frecuentemente.
¡IMPORTANTE! Durante el primer periodo de uso (o luego
de reemplazar la cadena), la tensión de cadena debe ser
vericada con mayor frecuencia debido al proceso de
estabilización de la cadena.
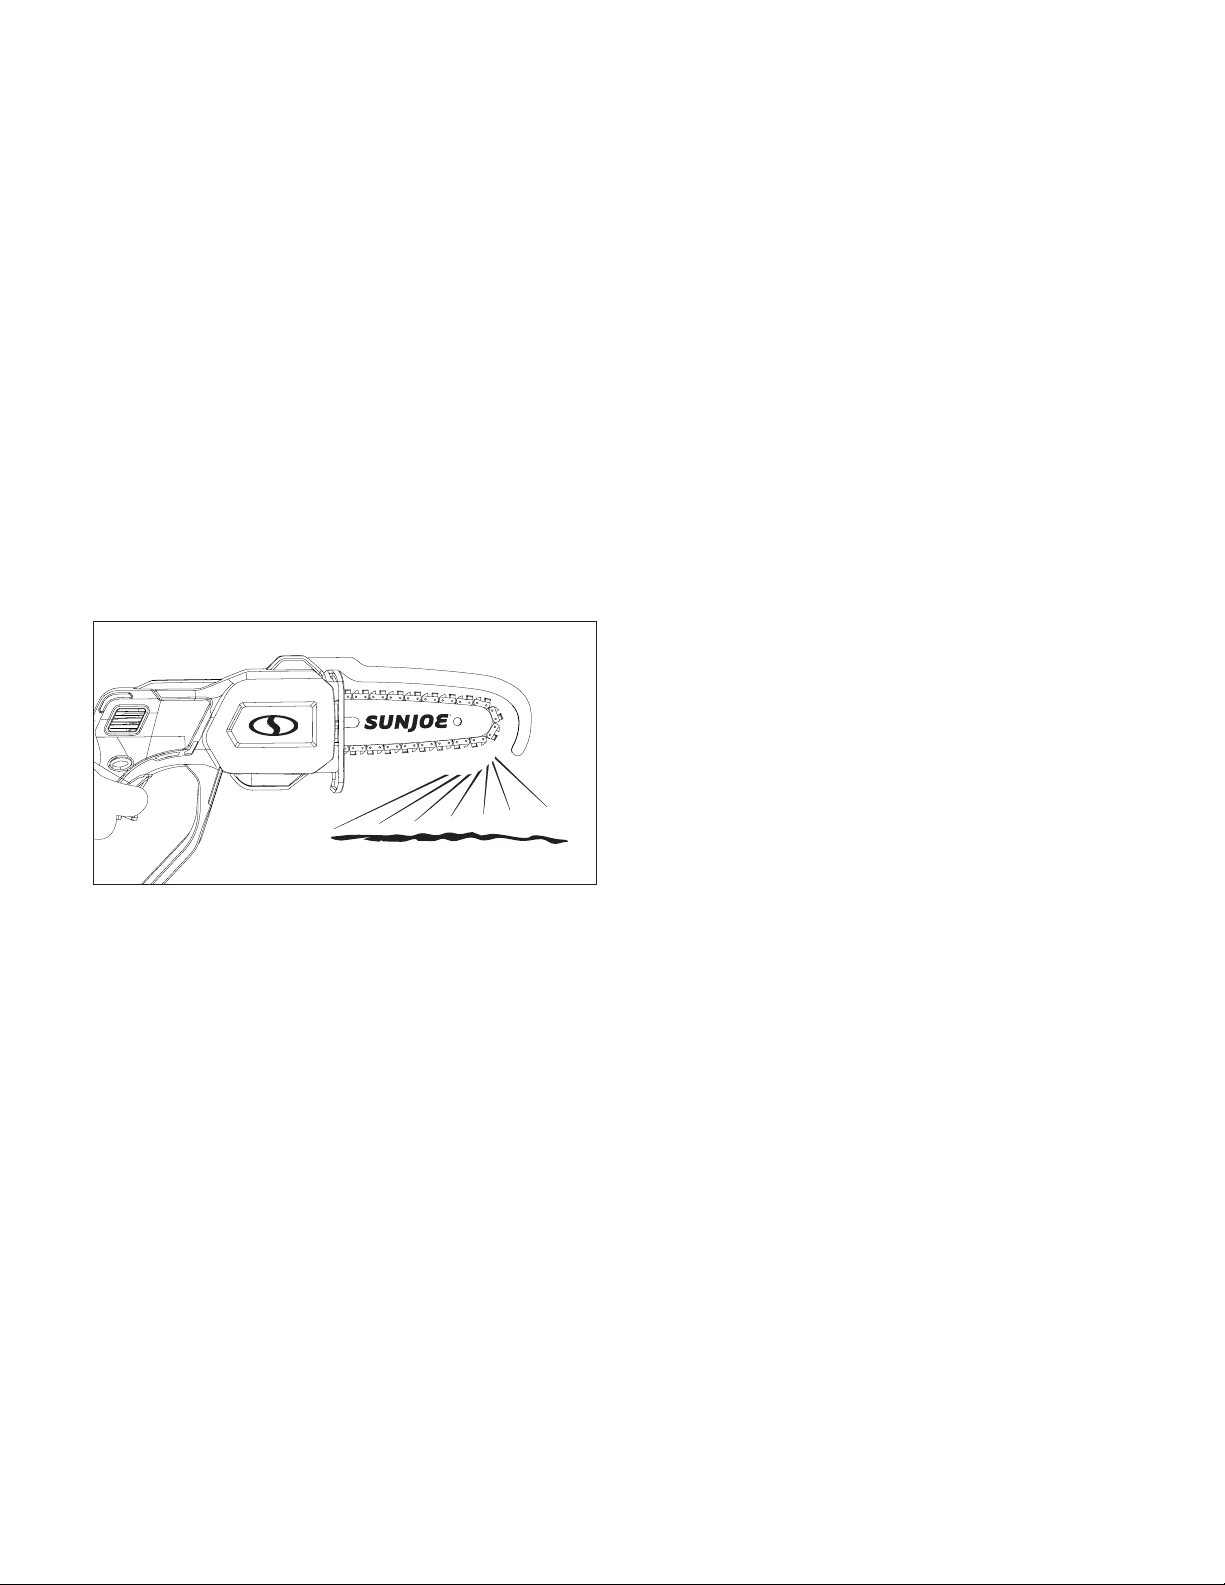
37
m ¡ADVERTENCIA! Nunca trabaje con la cadena suelta,
ya que esta puede ser peligrosa si se suelta de su barra-guía.
Para ajustar la tensión de cadena, siga las instrucciones en
“ajuste de tensión de cadena” en la página 34.
• Vericación de la entrega de aceite
¡IMPORTANTE! ¡Nunca use la máquina sin lubricación!
Asegúrese de lubricar el área de corte antes y después del
uso, y cada 30 minutos durante la operación. Para mejores
resultados, use solo aceite para barra-guía y cadena de
buena calidad y formulado especícamente para motosierras.
Compruebe la entrega de aceite tal como se describe debajo,
después de cada lubricación de cadena.
m ¡ADVERTENCIA! Asegúrese de que la barra-guía
y la cadena estén en su lugar cuando verique la entrega de
aceite.
Encienda el motor y compruebe que el aceite de cadena sea
entregado tal como se muestra a continuación (Fig. 9).
Procedimientos básicos de corte
m ¡ADVERTENCIA! Esta unidad está diseñada para
podar ramas y tallos de hasta 4.5 plg (11.4 cm) de diámetro,
sin exceder un diámetro máximo de 4.5 plg (11.4 cm)
dependiendo del tipo de madera. Practique cortando algunas
ramas pequeñas empleando la siguiente técnica para tener
una idea de cómo usar la motosierra antes de empezar una
operación mayor de aserrado.
• Sujete la motosierra rmemente desde su empuñadura.
• Apriete el gatillo interruptor y deje que la cadena acelere
a su máxima velocidad antes de proceder a cortar.
• Mantenga la unidad funcionando todo el tiempo de corte,
a una velocidad constante.
• Deje que la cadena haga el trabajo, solo aplique una leve
presión hacia abajo. Si fuerza el corte puede dañar la
barra-guía, la cadena o la unidad.
• No aplique presión en la motosierra, hacia el nal del
corte.
• Corte siempre de pie con sus dos pies sobre terreno sólido
para evitar caerse.
• No corte por sobre la altura del pecho ya que es difícil
controlar fuerzas de contragolpe con una motosierra
sostenida en alto.
Mantenimiento
Comuníquese con un concesionario autorizado Snow Joe
®
+
Sun Joe
®
o comuníquese con la central de servicio al cliente
Snow Joe
®
+ Sun Joe
®
llamando al 1-866-SNOWJOE
(1-866-766-9563) para cualquier operación de mantenimiento
no descrita en este manual. Cualquier operación llevada a
cabo en un centro no autorizado o por personal no calicado
invalidará por completo la garantía.
m ¡ADVERTENCIA! Para su seguridad y la de los
demás:
• Un mantenimiento correcto es esencial para conservar
la eciencia y seguridad originales de la máquina con el
tiempo.
• Mantenga todos los pernos, tuercas y tornillos ajustados
para garantizar que el equipo esté en una condición
segura de funcionamiento.
• Nunca use la máquina con partes gastadas o dañadas.
Las partes dañadas deben ser reemplazadas, nunca
reparadas.
• Solo use partes de repuesto originales Snow Joe
®
+ Sun
Joe
®
. Las partes que no son de la misma calidad pueden
dañar severamente el equipo, comprometer la seguridad e
invalidar la garantía.
m ¡ADVERTENCIA! Siempre retire la batería antes
de llevar a cabo cualquier ajuste, reparación o tarea de
mantenimiento en su motosierra podadora inalámbrica.
• Use guantes protectores al manipular la barra-guía y la
cadena.
• Mantenga la barra-guía insertada en su funda, excepto al
intervenir directamente en la barra-guía o la cadena.
• Nunca se deshaga de aceites u otros materiales
contaminantes en lugares no autorizados.
Enfriamiento del motor
Para evitar el sobrecalentamiento y daños al motor, mantenga
siempre las ranuras de ventilación limpias y libres de aserrín y
residuos.
Limpieza general
Para un máximo rendimiento, se recomienda limpiar la
motosierra podadora inalámbrica inmediatamente luego de
cada uso. Use un paño, un pincel o un cepillo para retirar
polvo y astillas. Siempre mantenga las ranuras de ventilación
limpias y libres de obstrucciones. Limpie la carcasa de la
motosierra podadora inalámbrica de forma regular con un
paño húmedo y jabón muy suave. No use agentes de limpieza
ni solventes. Asegúrese de que no entre agua ni cualquier otro
líquido dentro de la herramienta motorizada.
R
Fig. 9
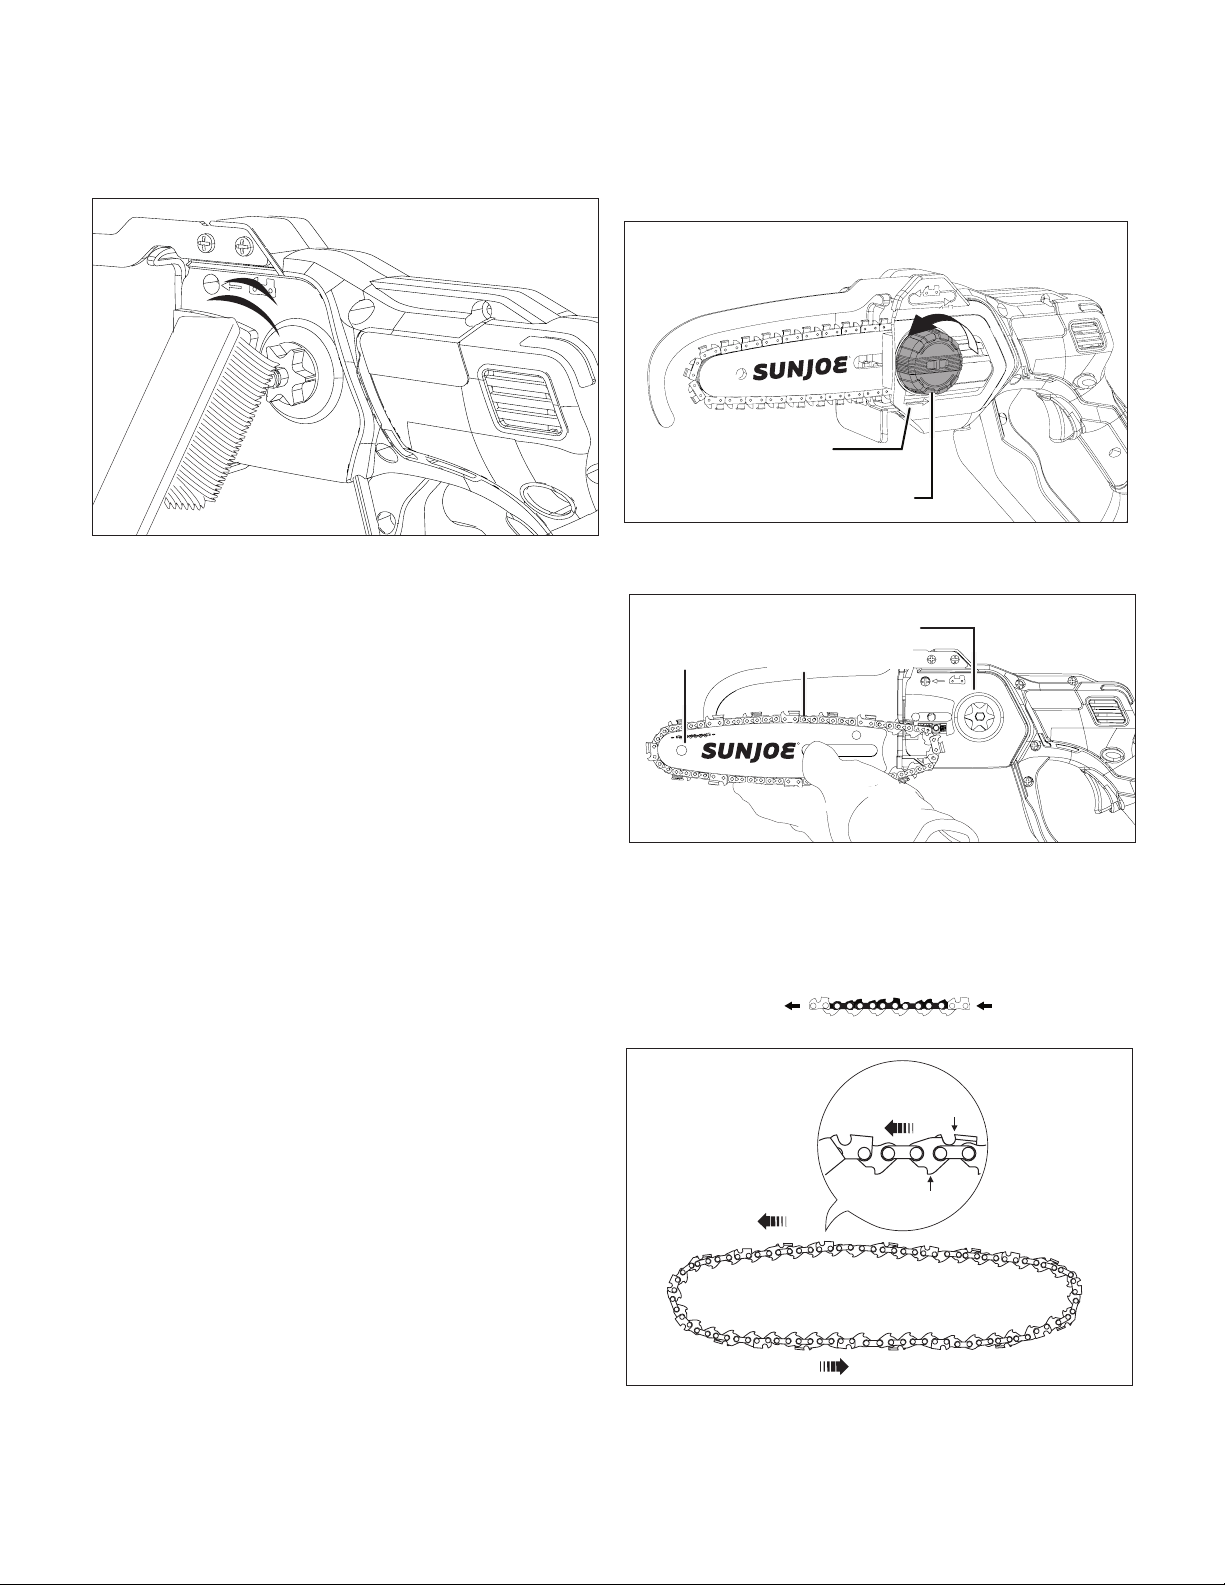
38
Limpie el área del piñón con un cepillo o aire comprimido
(Fig. 10).
Reemplazo de la barra-guía y cadena
NOTA: al reemplazar la barra-guía y la cadena, use solo partes
de repuesto idénticas. Asegúrese de que la batería no esté
insertada en el compartimiento antes de proceder con la
operación.
m ¡ADVERTENCIA! Use siempre guantes resistentes
al manipular la barra-guía y la cadena. Monte la barra-guía
y cadena de corte con mucho cuidado para no perjudicar
la seguridad y eciencia de la máquina. Si no está seguro,
contacte a un concesionario autorizado Snow Joe
®
+ Sun Joe
®
o comuníquese con la central de servicio al cliente Snow Joe
®
+ Sun Joe
®
llamando al 1-866-SNOWJOE (1-866-766-9563).
m ¡ADVERTENCIA! La operación debe ser hecha en
una supercie plana y estable, con un espacio adecuado para
mover la máquina y sus componentes.
m ¡ADVERTENCIA! Nunca arranque el motor antes de
instalar la barra-guía, cadena y cubierta de piñón. Sin todas
estas partes en su lugar, el embrague puede explotar o salir
volando, causando severas lesiones personales al usuario.
Cuando usted compre su motosierra podadora inalámbrica, la
cadena y la barra-guía llegarán pre-ensambladas a la carcasa.
En caso necesite reemplazar la cadena en el futuro, siga todos
los pasos a continuación.
1. Desenrosque la perilla de cubierta de extremo de cadena/
piñón en sentido antihorario para liberar la cubierta de
extremo de cadena/piñón (Fig. 11).
2. Retire la barra-guía y cadena de la supercie de montura
(Fig. 12).
3. Retire la cadena antigua de la barra-guía.
4. Coloque la nueva cadena de la motosierra en un
bucle, enderezando cualquier posible pliegue. EL
BORDE AFILADO DE LAS CUCHILLAS DEBE ESTAR
ORIENTADO EN LA DIRECCIÓN OPUESTA A USTED,
SIGUIENDO LA ROTACIÓN DE CADENA INDICADA EN
LA Barra-guía
. Si las cuchillas
están en sentido opuesto, dé vuelta al bucle (Fig. 13).
Fig. 10
R
Fig. 11
Perilla de cubierta de extremo
Cubierta de extremo
de cadena/piñón
R
Fig. 12
Barra-guía
Cadena de corte
Supercie de montura
Fig. 13
Rotación de
cadena
Borde de corte alado
Eslabón de impulso
de cadena

39
5. Empezando en la punta, monte los eslabones de impulso
de la cadena en la ranura de la barra-guía, dejando un
bucle en la parte posterior de la barra-guía. La cadena
encajará suelta hasta que sea colocada alrededor del
piñón (Fig. 14).
NOTA: compruebe la dirección correcta de la cadena. Si
la cadena es montada al revés, la motosierra vibrará de
forma anormal y no cortará.
6. Sostenga la cadena en su lugar sobre la barra-guía y
coloque el bucle alrededor del piñón. Coloque la barra-
guía contra la supercie de montura de manera que la
pieza extruida en la supercie de montura esté en la
ranura larga de la barra-guía y la clavija de ajuste esté en
el oricio de clavija de tensión de cadena (Fig. 15).
7. Mientras mantiene la barra-guía y la cadena contra la
supercie de montura, ajuste la tensión de cadena según
se necesite apretando el tornillo tensionador de cadena
con la llave hexagonal suministrada. Gire el tornillo
tensionador de cadena en sentido horario para ajustar la
cadena, o en sentido antihorario para aojar la cadena
(Fig. 4).
8. Vuelva a colocar la cubierta de extremo de cadena/piñón
insertando la lengüeta ubicada en la parte inferior, primero
en la ranura, y colocando la cubierta sobre el extremo de
la barra-guía. Apriete la perilla de cubierta de extremo, y
deje la barra-guía lo sucientemente suelta de manera que
se mueva un poco para el ajuste de tensión (Fig. 16).
Tensión de la cadena
Verique la tensión de la cadena antes de usar la motosierra,
cuando la cadena esté fría. Una cadena fría está tensionada
correctamente cuando no hay una holgura en el lado inferior
de la barra-guía: la cadena está ajustada pero usted puede
lograr girarla a mano sin esfuerzo.
Durante la operación normal de la motosierra, la temperatura
de la cadena se incrementará. Los eslabones de impulso
de una cadena caliente correctamente tensionada colgarán
aproximadamente a 0.05 plg (1.25 mm) de la ranura de
la barra-guía (Fig. 17). Tenga en cuenta que una cadena
tensionada cuando está caliente puede terminar demasiado
ajustada al enfriarse. Verique la “tensión en frío” antes del
próximo uso. La cadena deberá ser re-tensionada cuando
las partes planas en los eslabones de impulso cuelguen de la
ranura de la barra-guía (Fig. 17).
R
Fig. 14
Bucle
R
Fig. 15
Clavija de ajuste
PiñónPieza extruida
Ranura
R
Fig. 16
Cubierta de extremo
de cadena/piñón
Lengüeta
Ranura
Perilla de cubierta
de extremo
Fig. 17
Cadena caliente ajustada apropiadamente
Aproximadamente 0.05 plg (1.25 mm)
Las partes
planas son
visibles
aquí
Las partes
planas no son
visibles aquí
La cadena necesita ser tensionada
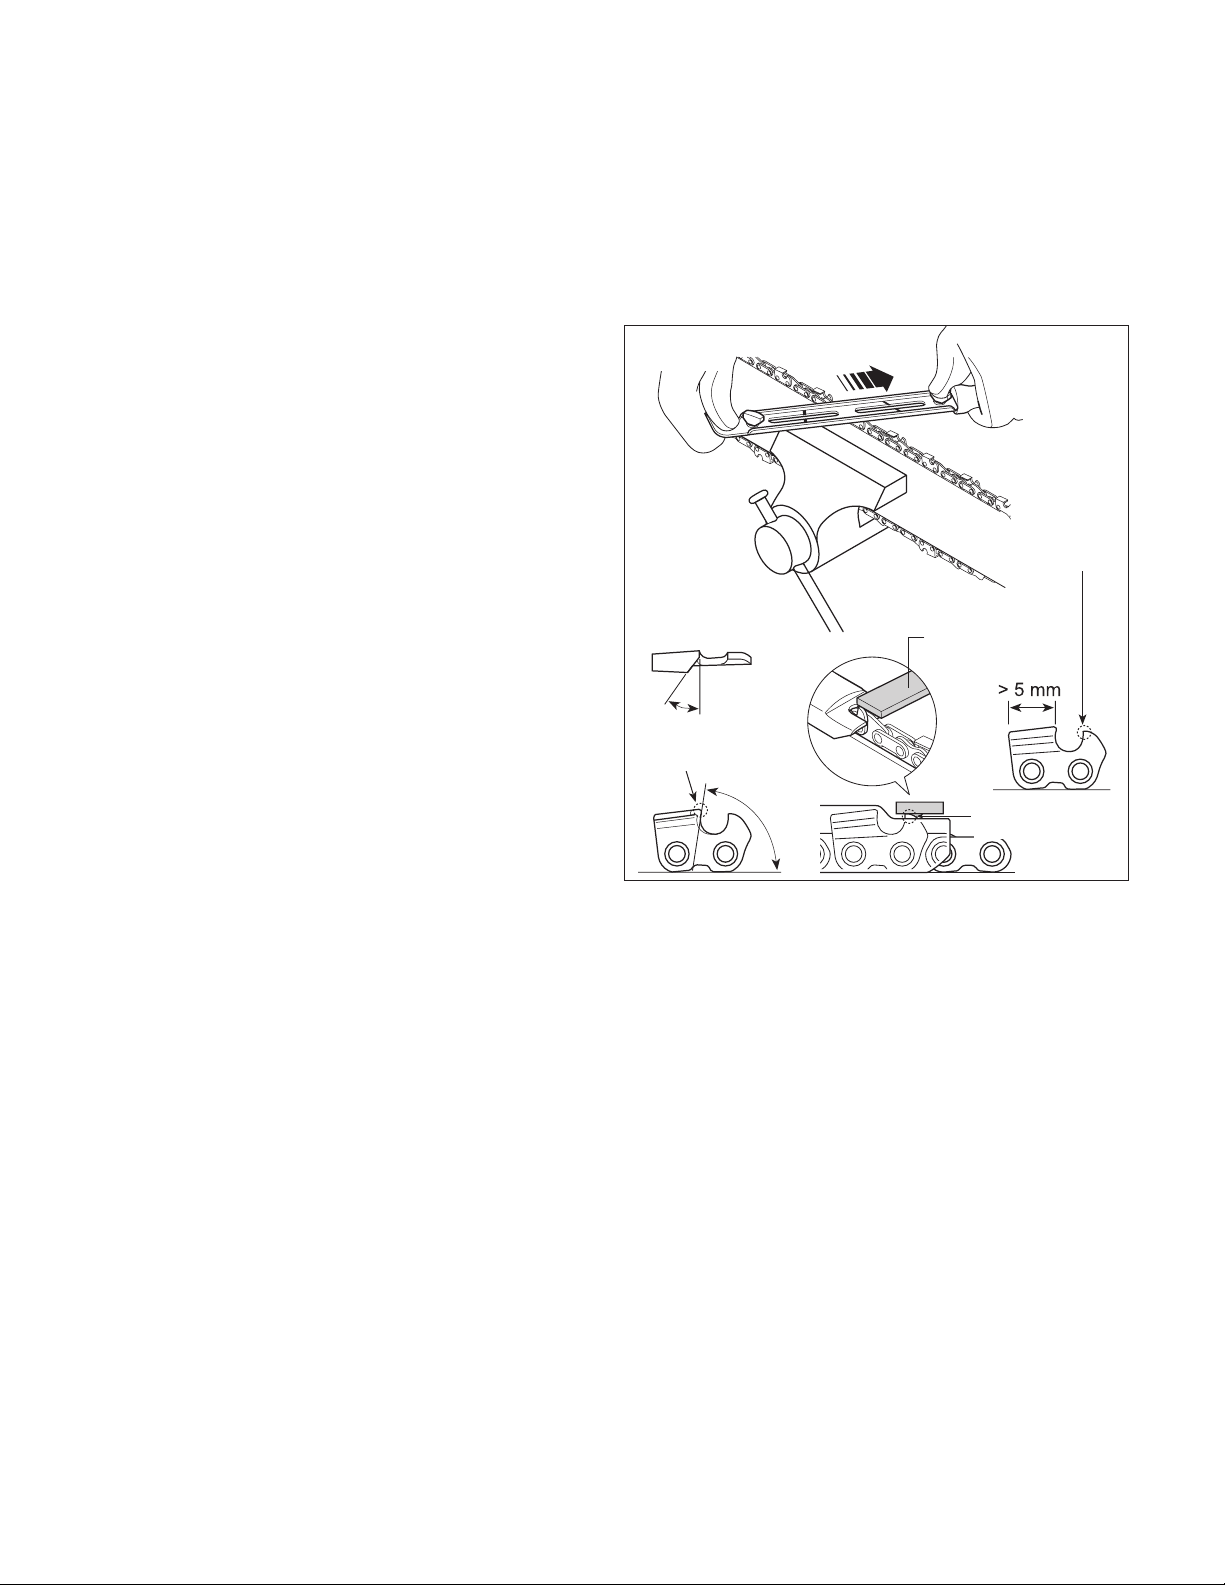
40
Alamiento de la cadena
m ¡ADVERTENCIA! Para asegurarse de que la
motosierra funcione de forma segura y eciente, es esencial
que los componentes de corte estén bien alados. Se
recomienda enfáticamente reemplazar la cadena una vez
que haya perdido su habilidad de cortar de forma limpia y
segura. Es posible, sin embargo, alar la cadena existente si
se hace con cuidado. Cualquier trabajo en la cadena y barra-
guía requiere de una experiencia especíca y herramientas
especiales. Por motivos de seguridad le recomendamos
contactar a un concesionario autorizado Snow Joe
®
+
Sun Joe
®
o comunicarse con la central de servicio al cliente
Snow Joe
®
+ Sun Joe
®
llamando al 1-866-SNOWJOE
(1-866-766-9563).
El alamiento es necesario cuando:
• El aserrín parece polvo;
• El corte se vuelve más difícil;
• El corte no es recto; o
• Las vibraciones aumentan.
La cadena se puede alar en un centro de servicio autorizado
empleando las herramientas correctas para asegurar un
mínimo retiro de material y un alado parejo en todos los
bordes de corte.
Si usted va a alar la cadena por su cuenta, le recomendamos
comprar el alador de cadena de motosierra 24V-CSSHRP-
LTE de Sun Joe
®
, el cual funciona con una batería iON+ de
24 V igual a las que alimentan esta motosierra podadora
inalámbrica. Visite sunjoe.com o comuníquese con la central
de servicio al cliente Snow Joe
®
+ Sun Joe
®
llamando al
1-866-SNOWJOE (1-866-766-9563) para hacer su pedido.
De otro modo, use limas especiales de secciones redondeadas
con el diámetro correcto, dependiendo del tipo de cadena (ver
“tabla de mantenimiento de cadena” en la página 44). Usted
necesita un cierto nivel de destreza y experiencia para evitar
dañar los bordes de corte.
Ale la cadena como se indica (Fig. 18):
• Asegure la barra-guía rmemente, con la cadena
montada, en un tornillo de banco adecuado.
• Tensione la cadena si está suelta.
• Monte la lima en la guía y luego insértela en el diente, a un
ángulo constante del borde de corte.
• Ale en un movimiento hacia adelante unas cuantas
veces, y repita en todos los bordes de corte en la misma
dirección (izquierda o derecha).
• Para hacer avanzar la cadena, use un destornillador.
• Voltee la barra-guía en el tornillo de banco y repita en los
demás bordes de corte.
• Compruebe que el diente limitador no sobresalga más
que el instrumento de inspección, y lime cualquier parte
saliente con una lima plana, redondeando los bordes
(Fig. 18).
• Luego del alado, retire todos los residuos de alado
y polvo, y proceda a lubricar la cadena en un baño de
aceite. Reemplace la cadena cuando:
– La longitud de los bordes de corte se reduzca a 5 mm o
menos; o
– Haya demasiada holgura entre los eslabones y los
remaches.
Mantenimiento de la barra-guía
Cuando la barra-guía muestre señales de desgaste, voltéela
en la motosierra para distribuir el desgaste y lograr un máximo
ciclo de vida útil. El desecado y desbarbado de los rieles
de la barra-guía son fenómenos normales del desgaste de la
barra-guía. Usted debe corregir dichas fallas con una lima tan
pronto como ocurran.
Reemplace una barra-guía con cualquiera de las siguientes
fallas:
• Desgaste dentro de los rieles de la barra-guía, dejando que
la cadena yazca de costado;
• Barra-guía doblada;
• Rieles resquebrajados o rotos; o
• Rieles partidos.
Voltee la motosierra, inspeccione el lado inferior de la barra-
guía, y asegúrese de que los oricios de lubricación y la ranura
de la cadena estén libres de impurezas.
Usted puede adquirir partes de repuesto para su motosierra
podadora inalámbrica 24V-HCS-LTE-P1 de Sun Joe
®
visitando
snowjoe.com. Para hacer pedidos por teléfono, comuníquese
con la central de servicio al cliente Snow Joe
®
+ Sun Joe
®
llamando al 1-866-SNOWJOE (1-866-766-9563).
Fig. 18
Instrumento de
inspección
Diente limitador de
profundidad
Borde de corte
Diente
limitador de
profundidad
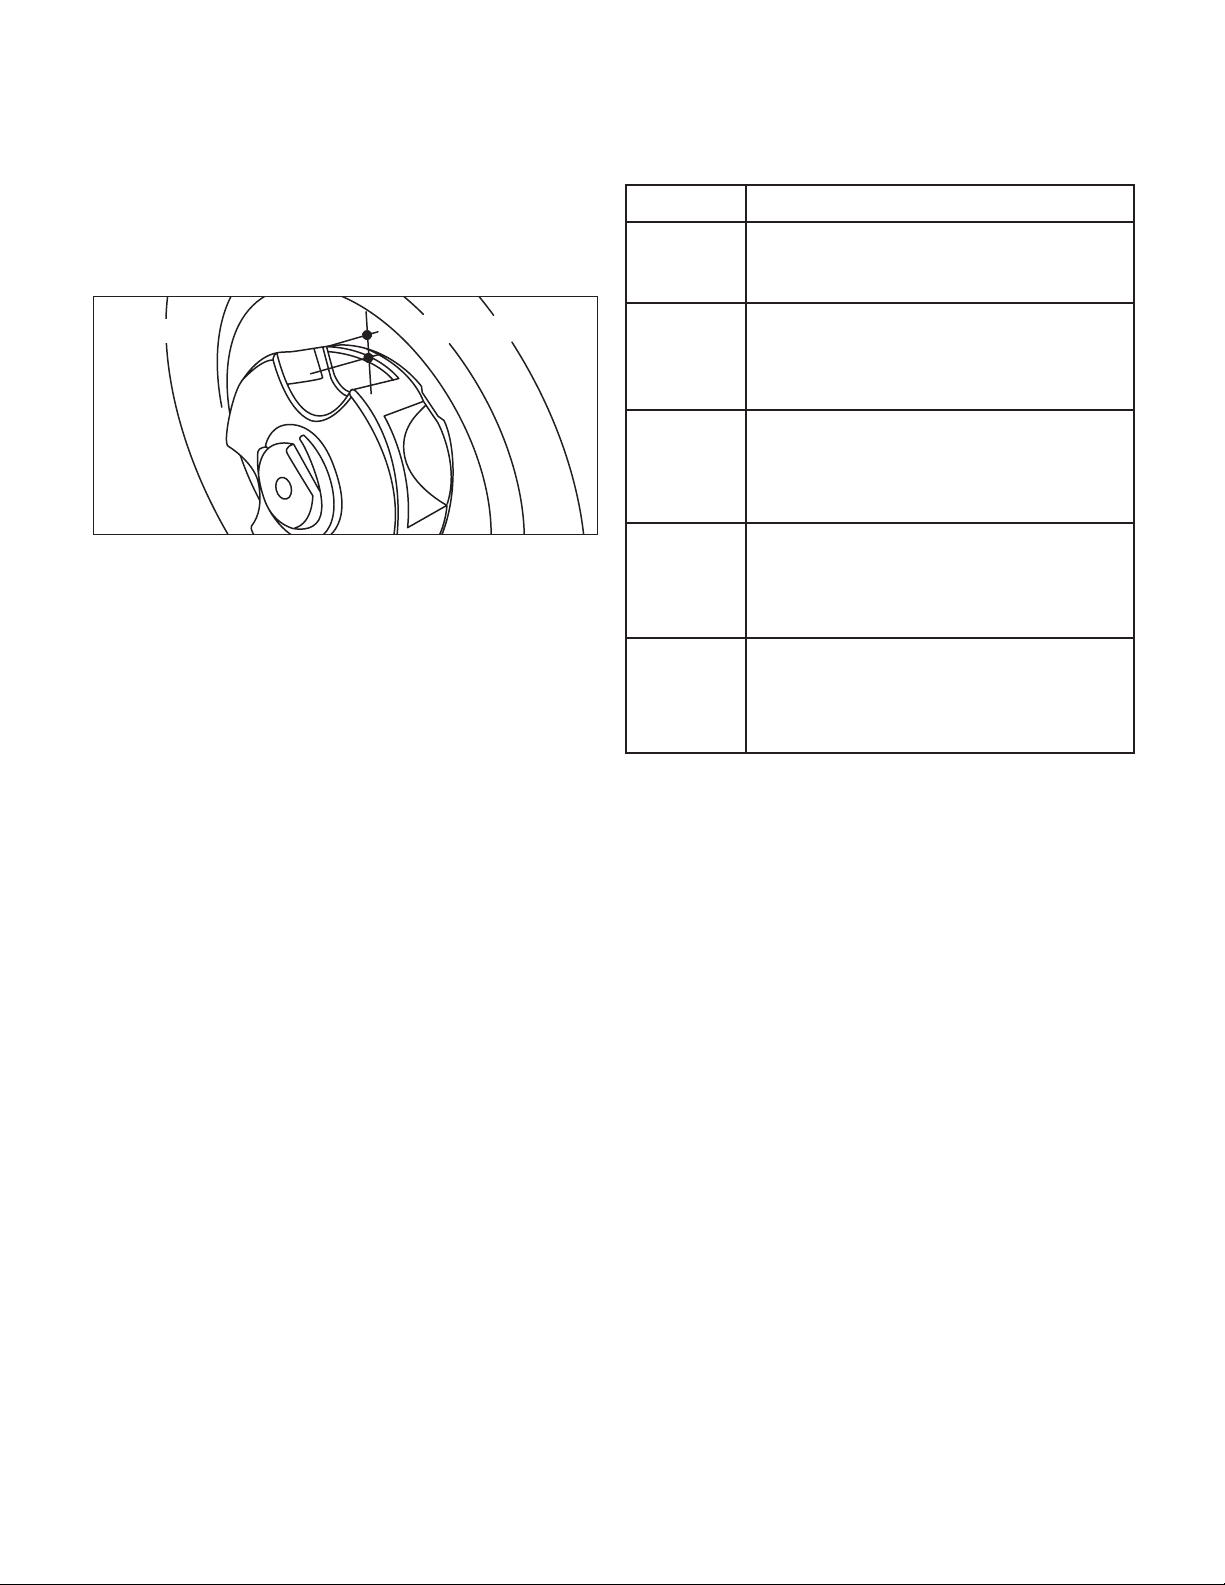
41
Piñón de cadena
Compruebe regularmente la condición del piñón y reemplácelo
cuando el desgaste exceda los 0.5 mm (Fig. 19).
No instale una cadena nueva con un piñón gastado o
viceversa.
Solución de problemas
Consejos para la solución de problemas
La mayoría de problemas son fáciles de resolver. Consulte
la tabla de solución de problemas para problemas comunes
y sus soluciones. Si usted continúa teniendo problemas o
necesita reparaciones más allá de estos ajustes menores,
llame al 1-866-SNOWJOE (1-866-766-9563) para obtener
asistencia.
m ¡ADVERTENCIA! Siempre retire la batería antes
de llevar a cabo cualquier ajuste, tarea de mantenimiento o
reparación en su motosierra podadora inalámbrica.
Tabla de solución de problemas
Lista de inspección diaria,
limpieza y almacenamiento
Lista de inspección diaria
Para mantener su motosierra podadora inalámbrica
funcionando de forma óptima, le recomendamos completar
esta lista de inspección antes de cada sesión de trabajo.
m ¡ADVERTENCIA! No inserte la batería hasta que
usted haya realizado todas las inspecciones diarias.
• Inspeccione en busca de cualquier daño a la cadena,
barra-guía o carcasa de motor.
• Inspeccione los rieles de la barra-guía y límpielos para
retirar toda suciedad.
• Inspeccione la tensión de la cadena.
• Verique que las cuchillas de la cadena estén aladas.
NOTA: si se percata de algo inusual, tal como una vibración o
sonido extraño, apague la motosierra inmediatamente. Retire
la batería y revise la motosierra, buscando el daño.
Si no puede encontrar la causa del problema o no sabe qué
hacer, haga que un concesionario autorizado Snow Joe
®
+
Sun Joe
®
inspeccione la motosierra, o comuníquese con la
central de servicio al cliente Snow Joe
®
+ Sun Joe
®
llamando
al 1-866-SNOWJOE (1-866-766-9563) antes de usarla.
< 0.5 mm
Fig. 19
Problema Acción correctiva
El motor de
la motosierra
no enciende.
• Asegúrese de que la batería esté insertada
correctamente.
• Verique el estado de carga y recargue la batería.
• La cadena está demasiado ajustada; vuélvala a
tensionar.
• La cadena está demasiado ajustada; vuélvala a
tensionar.
• La cadena necesita ser lubricada: lubrique la
cadena con aceite.
• La cadena está demasiado ajustada; vuélvala a
tensionar.
• La barra-guía o la cadena están dañadas;
inspeccione y reemplace la parte dañada.
La motosierra
funciona, pero
la velocidad
de la cadena
es baja.
La barra-guía
y la cadena
funcionan muy
calientes y
echan humo.
El motor de
la motosierra
funciona, pero
la cadena no
está girando.
La motosierra
se detiene
durante la
operación.
• Asegúrese de que la batería esté insertada
correctamente.
• Verique el estado de carga y recargue la batería.
• La máquina está sobrecargada.

42
m ¡PRECAUCIÓN!
• Retire la batería y espere por lo menos cinco minutos para
que la motosierra se enfríe antes de guardarla o repararla.
• Si usted deja caer la motosierra, inspecciónela
cuidadosamente para comprobar que no se hayan
producido daños. Si la barra-guía está doblada, la carcasa
está quebrada, la empuñadura está rota, o si usted nota
cualquier otra condición que pueda afectar la operación
de la motosierra, NO USE LA HERRAMIENTA. Más
bien, hágala reparar en un distribuidor Snow Joe
®
+
Sun Joe
®
autorizado o comuníquese con la central de
servicio al cliente Snow Joe
®
+ Sun Joe
®
llamando al
1-866-SNOWJOE (1-866-766-9563).
Limpieza
Use solo detergente suave y un paño mojado para limpiar
la motosierra podadora inalámbrica. No permita que ningún
líquido se meta dentro de la carcasa del motor y NUNCA
sumerja ninguna parte de la carcasa de la motosierra en
ningún líquido.
Almacenamiento
• Asegúrese de que la cubierta de la barra-guía esté puesta
sobre esta al momento de almacenar la herramienta.
• No guarde la motosierra podadora inalámbrica cerca
de químicos tales como fertilizantes u otros solventes
agresivos. No exponga las partes plásticas de la unidad
a líquidos de frenos, gasolina, productos a base de
petróleo, aceites penetrantes o sustancias similares.
Estos productos son en su mayoría altamente corrosivos
y pueden dañar permanentemente, debilitar o destruir las
partes plásticas de su producto.
• Cuando no esté siendo usada, su máquina deberá ser
guardada en interiores, en lugares secos y altos o bajo
llave, lejos del alcance de los niños.
Precaución y eliminación de
la batería
Deshágase de su batería de acuerdo con los reglamentos
federales, estatales y locales. Para encontrar lugares de
reciclaje, comuníquese con un servicio de reciclaje en su
localidad.
m ¡PRECAUCIÓN! Incluso las baterías descargadas
contienen algo de energía. Antes de deshacerse de estas, use
cinta aislante para cubrir los terminales y evitar que la batería
haga cortocircuito, lo cual puede causar una explosión o
incendio.
m ¡ADVERTENCIA! Para reducir el riesgo de lesiones
personales o explosión, nunca queme ni incinere una
batería incluso si está dañada, inservible o completamente
descargada. Al ser quemada, los humos y materiales tóxicos
son lanzados a la atmósfera circundante.
1. Las baterías varían de acuerdo al dispositivo. Consulte su
manual para obtener la información especíca.
2. Instale solo nuevas baterías del mismo tipo en su
producto (donde corresponda).
3. No insertar las baterías con la polaridad correcta, tal
como se indica en el compartimiento de la batería o en el
manual, puede reducir el ciclo de vida útil de las baterías
o causar fugas en estas.
4. No combine baterías nuevas con antiguas.
5. No combine baterías alcalinas, estándar (de zinc-carbono)
o recargables (de níquel-cadmio, de níquel-hidruro
metálico o de iones de litio).
6. No arroje las baterías al fuego.
7. Las baterías deben ser recicladas o desechadas según los
reglamentos locales y estatales.
Servicio y soporte
Si su motosierra podadora inalámbrica 24V-HCS-LTE-P1
de Sun Joe
®
requiere servicio o mantenimiento, llame al
1-866-SNOWJOE (1-866-766-9563) para obtener ayuda.
Modelo y número de serie
Al comunicarse con la empresa, ordenar partes de repuesto
o programar una reparación en un centro autorizado, usted
necesitará proporcionar el modelo y número de serie, los
cuales se encuentran en la etiqueta ubicada en la carcasa de
la unidad. Copie estos números en el espacio proporcionado a
continuación.
Registre los siguientes números que se encuentran en la carcasa
o empuñadura de su nuevo producto:
Modelo:
N° de serie:
24V-HCS-LTE-P1
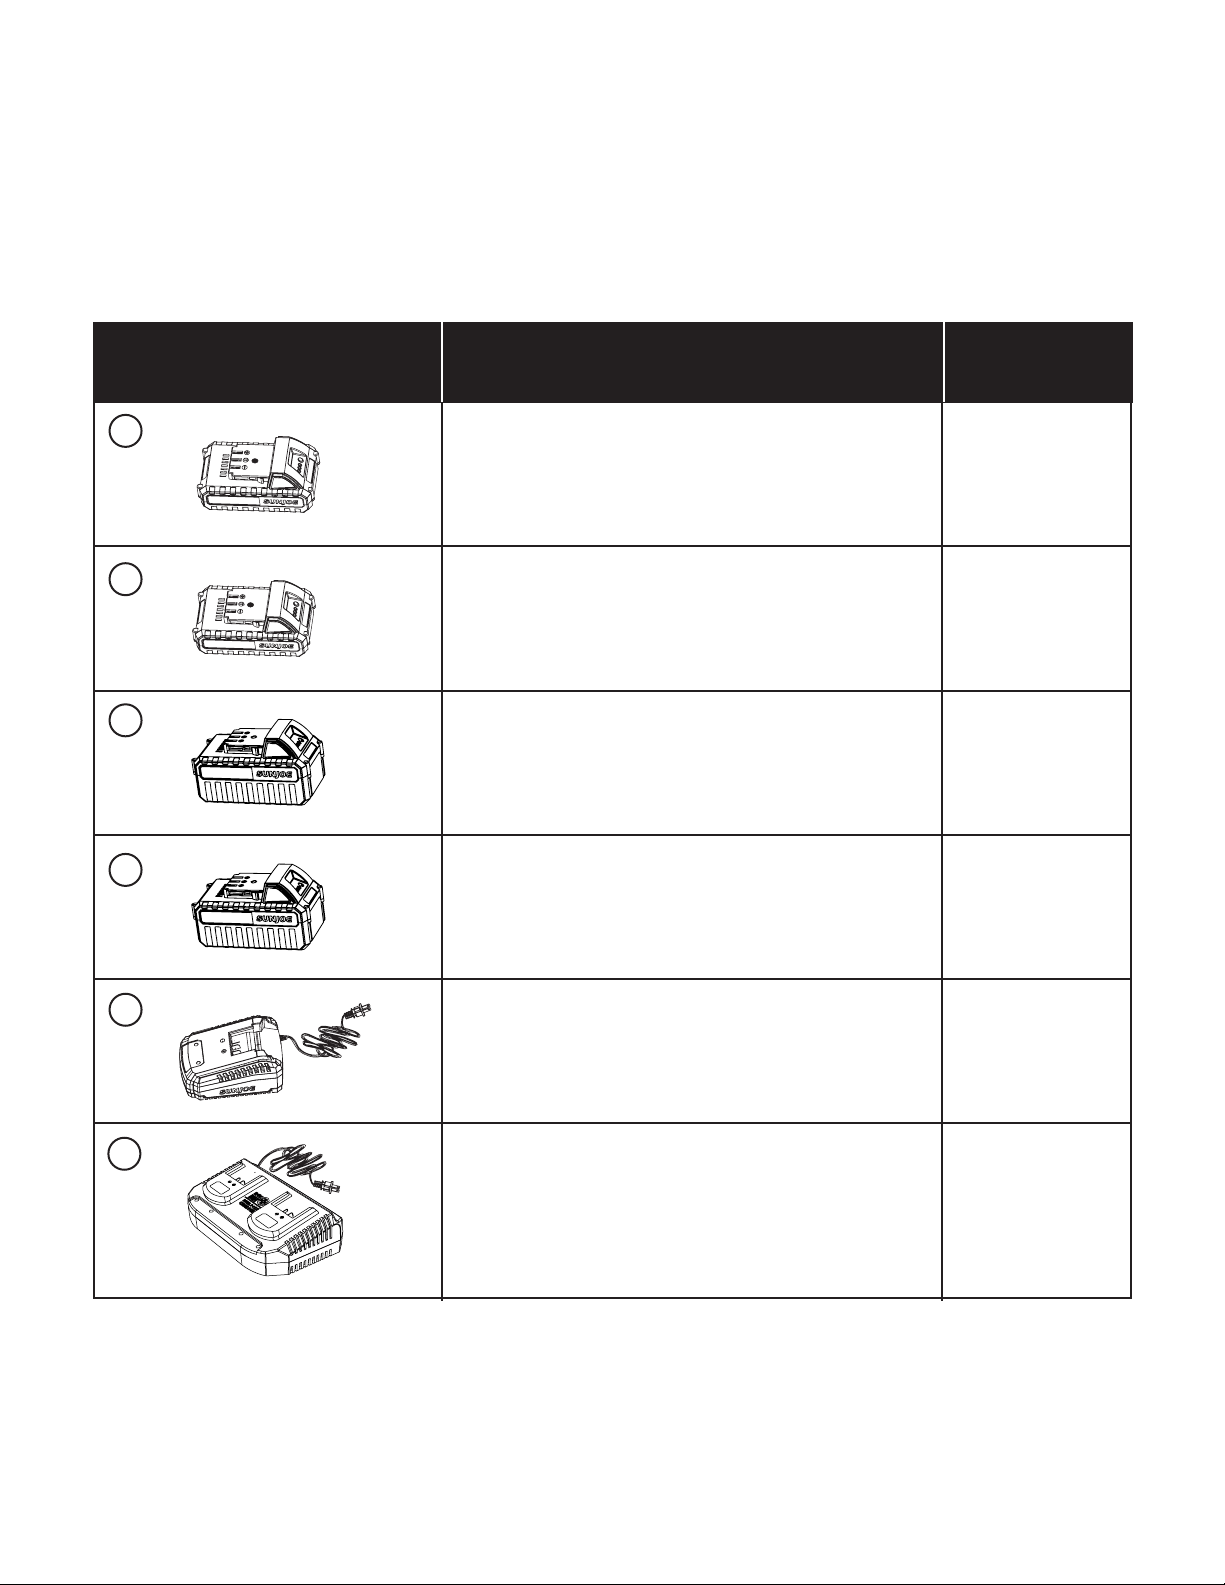
43
Accesorios opcionales
m
¡ADVERTENCIA! USE SIEMPRE solo partes de repuesto y accesorios Snow Joe
®
+ Sun Joe
®
. NUNCA use partes de
repuesto o accesorios que no estén destinados para su uso con esta motosierra. Comuníquese con Snow Joe
®
+ Sun Joe
®
si
tiene dudas sobre si es seguro usar una parte de repuesto o accesorio en particular con su herramienta. El uso de cualquier otro
accesorio o parte puede ser peligroso y causar lesiones personales o daños mecánicos.
Cargador rápido de batería de iones de litio iON+ de 24 V 24VCHRG-QC
ModeloAccesorio Descripción
1
2
3
Batería de iones de litio iON+ de 24 V y 2.0 Ah 24VBAT-LTE
Batería de iones de litio iON+ de 24 V y 2.5 Ah 24VBAT-LT
Batería de iones de litio iON+ de 24 V y 4.0 Ah 24VBAT
4
Batería de iones de litio iON+ de 24 V y 5.0 Ah 24VBAT-XR
5
Cargador de doble puerto baterías de iones
de litio iON+ de 24 V
24VCHRG-DPC
6
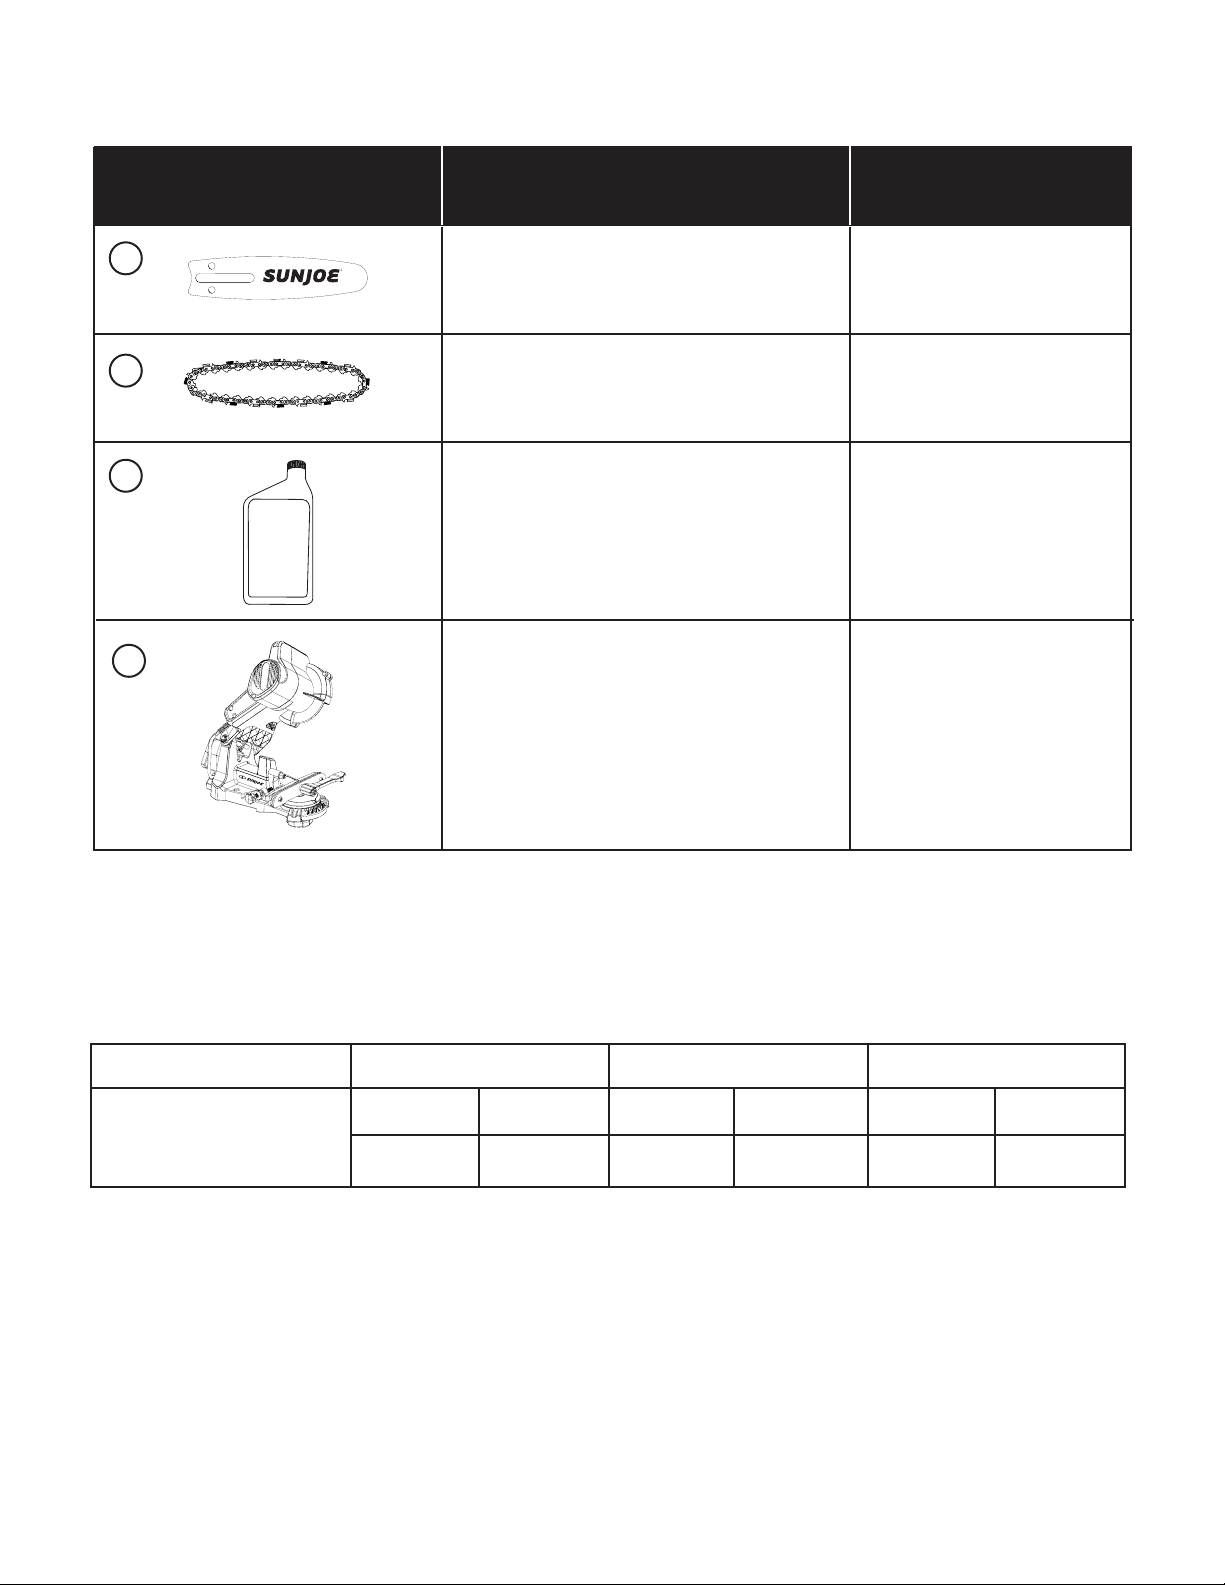
44
NOTA: los accesorios están sujetos a cambios sin obligación alguna por parte de Snow Joe
®
+ Sun Joe
®
de noticar sobre
dichos cambios. Los accesorios pueden ser pedidos en línea en sunjoe.com o vía telefónica llamando a la central de servicio al
cliente Snow Joe
®
+ Sun Joe
®
al 1-866-SNOWJOE (1-866-766-9563).
ModeloAccesorio Descripción
7
8
Barra-guía de repuesto de 5 plg de Sun Joe
®
SWJ-5BAR
Cadena de repuesto de 5 plg de Sun Joe
®
SWJ-5CHAIN
Aceite para barra-guía y cadena
SWJ-OIL
De venta en sunjoe.com, o
puede comprar un aceite
equivalente para barra-guía y
cadena en su ferretería local.
9
10
R
Alador inalámbrico de cadena de
motosierra iON+ de 24 V de Sun Joe
®
24V-CSSHRP-LTE
R
Tableau d’entretien de chaîne
27
0,3
pouces mm
Maillons d’entraînement Pas de chaîne Calibre de chaîne
Diamètre de lime
pouces
mm pouces mm
7,62 0,043 1,1 3,50,138

LA PROMESA DE SNOW JOE
®
+ SUN JOE
®
AL CLIENTE
NUESTRA GARANTÍA:
Snow Joe
garantiza que sus Productos motorizados y no motorizados, nuevos y genuinos, están libres de defectos materiales o de
mano de obra al ser usados en tareas domésticas normales durante un periodo de dos (2) años a partir de la fecha de compra por parte
del comprador original y usuario nal, cuando este último los compra a través de Snow Joe o un vendedor autorizado por Snow Joe y
ha obtenido un comprobante de compra. Ya que Snow Joe no puede controlar la calidad de sus Productos vendidos por vendedores
no autorizados, a menos que la ley lo prohíba esta Garantía no cubre Productos adquiridos a través de vendedores no autorizados.
Si su Producto no funciona, o hay un problema con una parte especíca que está cubierta por los términos de esta Garantía, Snow
Joe elegirá entre: (1) enviarle una parte de repuesto gratuita; (2) reemplazar el Producto con uno nuevo o similar sin costo alguno; o (3)
reparar el Producto. ¡Un excelente soporte!
Esta Garantía le da derechos legales específicos, y usted puede también tener otros derechos según el Estado.
REGISTRO DEL PRODUCTO:
Snow Joe le recomienda enfáticamente registrar su Producto. Usted puede registrar su Producto en línea visitando
snowjoe.com/register, imprimiendo y enviando por correo una tarjeta de registro disponible en línea en nuestro sitio
Web, llamando a nuestra central de servicio al cliente al 1-866-SNOWJOE (1-866-766-9563), o enviándonos un e-mail a
[email protected]. Si usted no registra su Producto sus derechos de garantía no disminuirán; sin embargo, registrar su Producto
permitirá que Snow Joe le pueda atender mejor si usted tiene alguna necesidad como cliente.
¿QUIÉN PUEDE SOLICITAR COBERTURA DE GARANTÍA LIMITADA?
Esta Garantía es otorgada por Snow Joe al comprador original y propietario original del Producto.
¿QUÉ NO ESTÁ CUBIERTO?
Esta Garantía no se aplica si el Producto ha sido usado de forma comercial o en aplicaciones no domésticas o de alquiler. Esta Garantía
tampoco se aplica si el Producto fue adquirido desde un vendedor no autorizado. Esta garantía tampoco cubre cambios cosméticos
que no afecten el funcionamiento del Producto. Las partes desgastables como correas, brocas y cuchillas no están cubiertas por esta
Garantía, y pueden ser compradas visitando snowjoe.com o llamando al 1-866-SNOWJOE (1-866-766-9563).
POR SOBRE TODO, en Snow Joe, LLC (“Snow Joe”) estamos dedicados a usted, nuestro cliente. Nos esforzamos por hacer
que su experiencia sea lo más placentera posible. Desafortunadamente, hay veces en que un producto Snow Joe
®
, Sun Joe
®
,
o Aqua Joe
®
(el “Producto”) no funciona o sufre un desperfecto bajo condiciones normales de operación. Creemos que es importante
que usted sepa que puede conar en nosotros. Es por eso que tenemos esta Garantía Limitada (la “Garantía”) para nuestros Productos.
R4_01282020
45
ES

46

47

sunjoe.com