Loading ...
Loading ...
Loading ...
8 CUSTOMER SUPPORT TEAM: +44 (0) 333 220 6056
ASSEMBLY INSTRUCTIONS:
Install your appliance in accordance with the installation
& safety instructions.
1. Turn the product upside down so that the base
end is pointing upwards. It is advisable to place
soft cushioning on the oor to avoid scratching the
appliance surface.
2. Connect the two base plate parts together. Two
click sounds will be audible as the parts lock
together.
3. Route the electrical wire through the wire slot. The
tilt switch will t through the hole.
4. Align the base plate to the pedestal base screw
holes and x the base plate and heater together
with the 2 x screws. DO NOT overtighten.
5. Turn the heater back upright and ensure that
the tip over switch on the bottom of the heater
operates freely. A click sound will be audible as the
heater is lifted and as it is put back on the oor.
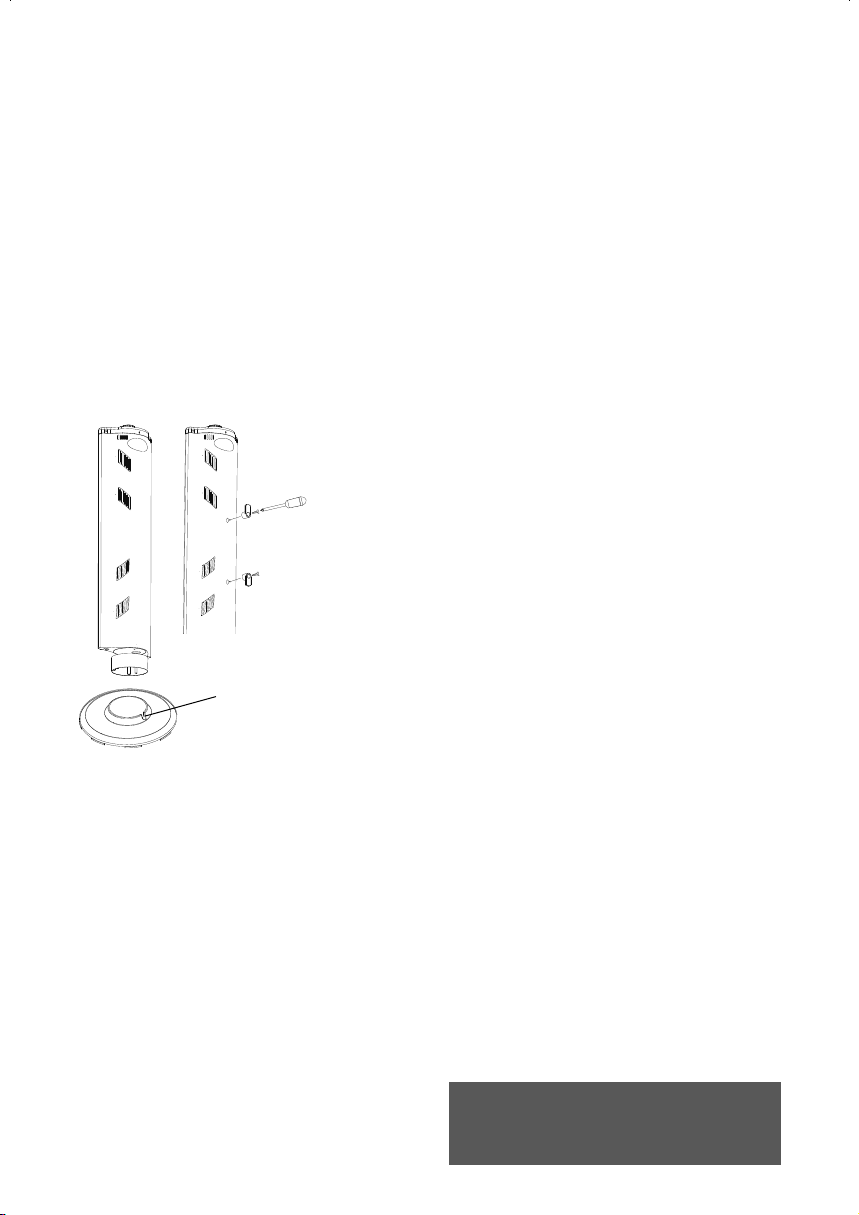
6. Insert both plastic hooks in to the rear of the
heater. The hooks will only t as shown due to the
shape of the insert.
7. Screw each hook into the rear of the heater with
the screws provided.
8. Wrap the cable around the hooks to keep the
cable tidy when in use or when storing the
appliance.
USING YOUR APPLIANCE:
Note: It is normal when using the heater for the rst time,
or when it is turned on after having not been used for a
long period of time, that it may emit some odour. This will
disappear when the heater has been on for a short while.
1. Plug the appliance in to a mains outlet.
2. Use the function control to select the desired
function. There are 2 OFF positions and 4 active
settings:
• Low Heat without oscillation
• High Heat without oscillation
• Low Heat with oscillation
• High Heat with oscillation
Note: The oscillation range is approximately 70°
horizontally.
WARNING! DO NOT move or store the heater
immediately after switching o, until it has completely
cooled down. This is to avoid damage to the tube and
prolong its life as well as to prevent accidentally injury.
Safety Tip Over Switch:
• This appliance is tted with a safety cut-out which
will operate if the appliance tips over. For safety
reasons, the heater will NOT automatically reset.
• To reset the appliance, disconnect the appliance
from the mains supply for at least 15 minutes.
Then reconnect the supply to the mains and
switch on the appliance.
CAUTION! Do not touch the heater as it will be hot. Set
the heater control to OFF and leave to cool down fully.
Once completely cool, set upright, reconnect the heater
to the mains and switch it on.
CHECK THAT YOU HAVE NOTED ALL THE
FOLLOWING INSTRUCTIONS:
• Never leave children unsupervised in a room where
the heater is ON and unguarded.
• Never obstruct or cover the heat outlet or force
items into the heater openings.
• Never install or use the heater anywhere where
water is in use, i.e. bathrooms, kitchens, shower
rooms, swimming pools etc.
• Never use aerosols or steam cleaners on or
around the re.
• Never route the mains supply cable under carpet
etc.
• Never install the heater close to curtains or
combustible materials.
• Never use the heater to dry clothes etc.
• Never cut the o the plug and hard wire into a
xed fused spur.
CLEANING AND CARE
• Always disconnect the appliance from mains
supply and allow to cool before cleaning.
• Clean the outside of the heater with a clean, damp
cloth and then dry with a dry cloth.
• Do not use chemicals, detergents or abrasive
cleaners.
• Do not allow water or other liquids to enter the
product.
• Always store in a clean, dry place, protected from
dust. Wrap the cord around the hooks at the rear
of the appliance.
Wire Slot
WARNING:
DO NOT IMMERSE ANY ELECTRICAL PART OF THE APPLIANCE IN
WATER SUCH AS MOTOR UNITS OR PLUGS.
PLEASE SEE CLEANING SECTION FOR FURTHER INSTRUCTIONS.
Loading ...
Loading ...