

MENU
ON/OFF
UPDOWN
LOCKTIMER
The product is quiet without fan, using high power relay motherboard without heat
output. When the heating temperature reaches the upper limit of the program set value,
the ceramic plate stops working, and starts working again when it is lower than the
lower limit, so as to ensure that the constant temperature on the furnace surface is at
the set temperature, saving energy and high efficiency
1. Power: when connected to the power supply, there is a sound of dripping, and all
the displays shine at the same time.
2. Power button: press the key for 0.5 seconds to drop a sound into standby, power
indicator light, five furnace area display -. (In standby state, when there is no operation
for 10 seconds, five furnace areas - no display. When there is no operation within 2
minutes, one sound will automatically exit standby and return to shutdown state.
Standby state is shown as follows:
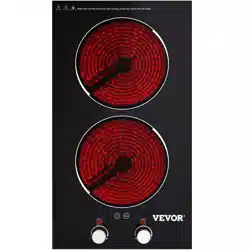
3.3. Heating: For example, if you want to use the middle furnace area for heating, press
there is a sound and digital display 0, it indicates that the furnace area is selected
successfully, and then press the sliding area below to adjust the desired firepower
gear, heating opening is completed. This furnace area is double ring heating. Ring is
turned on by default. When heating, press the button of furnace area again to switch
single/double ring heating. When the double ring is heated, the indicator lights on the
side Note The simultaneous heating of the two rings is enabled.

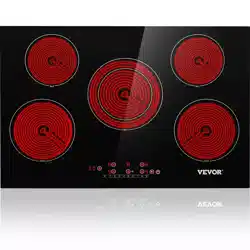
3
4
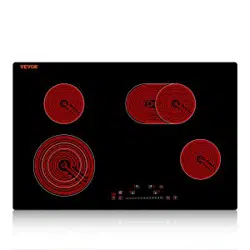
1. ø 165 heating area of upper left furnace : single ring heating, power 240V/
1200W □ / 1600W □
2. ø 230 heating area of lower left furnace: double ring heating, power 240V/
2200W □ / 2000W □
3. ø 165*270 Intermediate furnace heating area: double ring heating, power
240V/2000W □ / 2200W □
4. ø 200 Right upper furnace heating area: single ring heating, power 240V/
2000W □ / 2200W.
5. ø 165 Heating area of lower right furnace: single-ring heating, power 240V/
1200W □ / 1600W.
4. Firepower adjustment: select furnace area, slide or click the number below, 1 to 9
sections can be adjusted. Press 0 to stop heating for the selected burner
5. Child lock: long press the child lock button for 2 seconds to make a sound to
lock or unlock the child lock. The child lock indicator lights up and displays Lo. The
child lock can be operated in shutdown, standby and heating state. Can not operate
when locked furnace area with fire timing adjustment, but can press the power off button.
Locked successfully as shown in figure:
6. Timing: This function is to set the shutdown time. In the heating mode, select
the furnace area and press the timing button to enter the timing preset, and the
corresponding timing indicator will be prompted. Then adjust the sliding area to set the
shutdown time, you can also directly press the number, such as: first press the number
3 and then press the number 8 is 38 minutes. Multiple heating furnace areas can set
different shutdown time at the same time.
7. Panel high temperature warning: there is still residual temperature on the furnace
panel after use, warning display H, be careful of scalding hands.
As shown in the figure, timing upper left furnace area:
8. Product dimensions and precautions:
8.1. The product size is 900*520*78mm(35.4*20.47*3.07 in.) and the product thickness
is 55mm(2.16 in.) if the foot is not included.
8.2. Opening roar size 880*500*150mm (34.6*19.68*5.9 inches)

Note: if the product is used on the table, because the bottom of the use process
will produce temperature, please use high temperature resistant flame retardant
material for the table such as marble....... And so on.
5
6
9. Code:
E1------- To open the temperature sensor on the lamp board
E2------- The temperature sensor on the indicator board is short-circuiled or the
temperature around the indicator board is too high
H-------- Panel still has residual temperature warning (which is explained in article
7 of normal warning)
H-------- thermocouple open (standby and shutdown state will always flash and the
corresponding furnace area is not heated)
Lo------- Locked state (explained in article 5)
10. Simple faults and troubleshooting: the furnace head is always
heated at any gear, and the relay does not jump (thermocouple short circuit or
motherboard fault)
15

7
8

10
9
POWER SUPPLY INSTALLATION DRAWING
Electrical diagram of the beautiful line (black, white, green E)
This figure is only for three-phase power in the United States, and the voltage
between two live lines is 240VAC
Three core cable machine connection drawing
2 4 0 V 5 0 A
L 1
L 2
E
L2L 1
The leakage switch
Ground wire
Leakage switch of power supply box
Ground wire
L 1
L 2
2 2 0 - 2 4 0 V A C
Electric ceramic oven power cord
black
white
green
black
white
green
10
2 2 0 V 5 0 A
L
N
E
NL
The leakage switch
Ground wire
Leakage switch of power supply box
Ground wire
L
N
2 2 0 V A C
Electric ceramic oven power cord
black
white
green
black
white
green
Electrical diagram of the beautiful line (black, white, green E)
This chart is only applicable to 220 V single-phase power countries in
Europe and China
Three core cable machine connection drawing