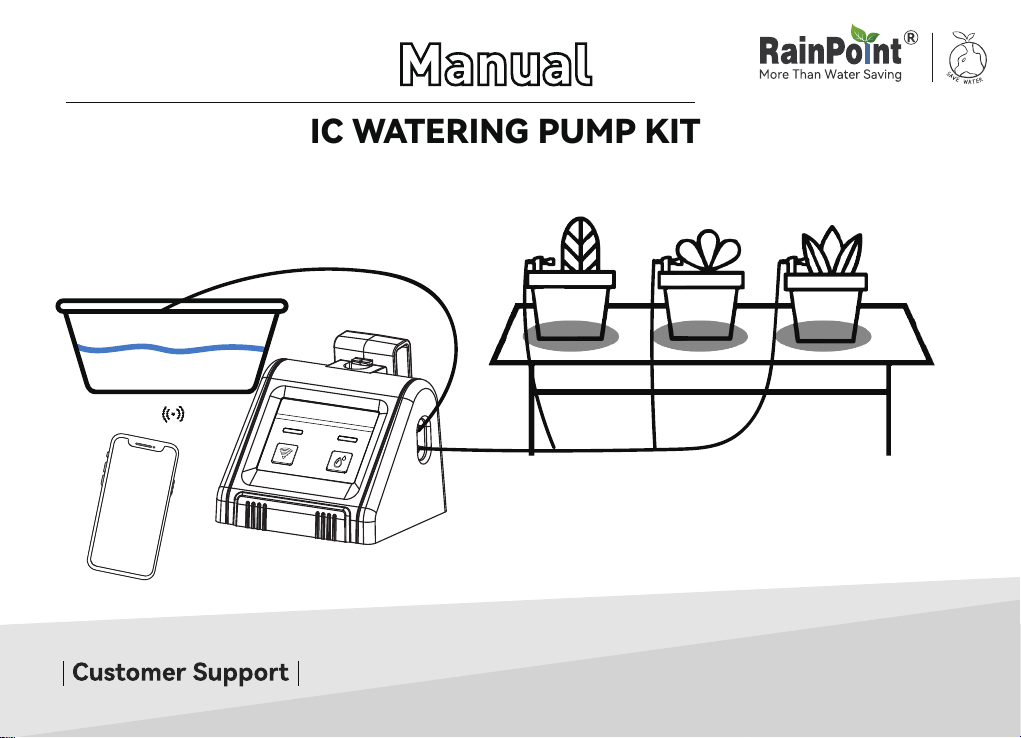
Instruction
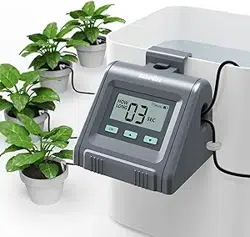
WIFI AUTOMATIC WATERING PUMP KIT
Model: IK10PW
Web: www.rainpointonline.com
Email: se[email protected]
WhatsApp: +1 626-780-5952
Free Hotline
US: +1 833-381-5659
(MON-FRI 9:30 AM-5:30 PM PST)
EU: +44 800-808-5337
(MON-FRI 9:00 AM-5:00 PM CET )
Dear friend,
Thanks for choosing RAINPOINT WiFi automatic watering system!
Your satisfaction as a RAINPOINT customer means evething to us.
Before using this unit, please read these operating instructions carefullys, take special care to
follow the warning and safety suggestions. If you have any questions or problems during using
our product, please contact our customer seice and your problem will be solved within 24hrs.
Contact on Amazon: Click on “ Ask a question”
WELCOME TO RAINPOINT
Web: www.rainpointonline.com
WhatsApp: +1 626-780-5952
US Free Hotline(English):
+1 833-381-5659(MON-FRI 9:30 AM-5:30 PM PST)
UK Free Hotline(English Deutsch):
+44 800-808-5337(MON-FRI 9:00 AM-5:00 PM CET )

TABLE OF CONTENTS
PRODUCT OVERVIEW
1. PRODUCT APPEARANCE
2. PACKAGE INCLUDES
3. SPECIFICATION
FCC NOTICE
SIMPLE TO PAIR WIFI
1. INITIAL RAINPOINT APP SETUP
2. PAIR THE WATER PUMP
EASY TO INSTALL
1. TWO POWER SUPPLY METHODS
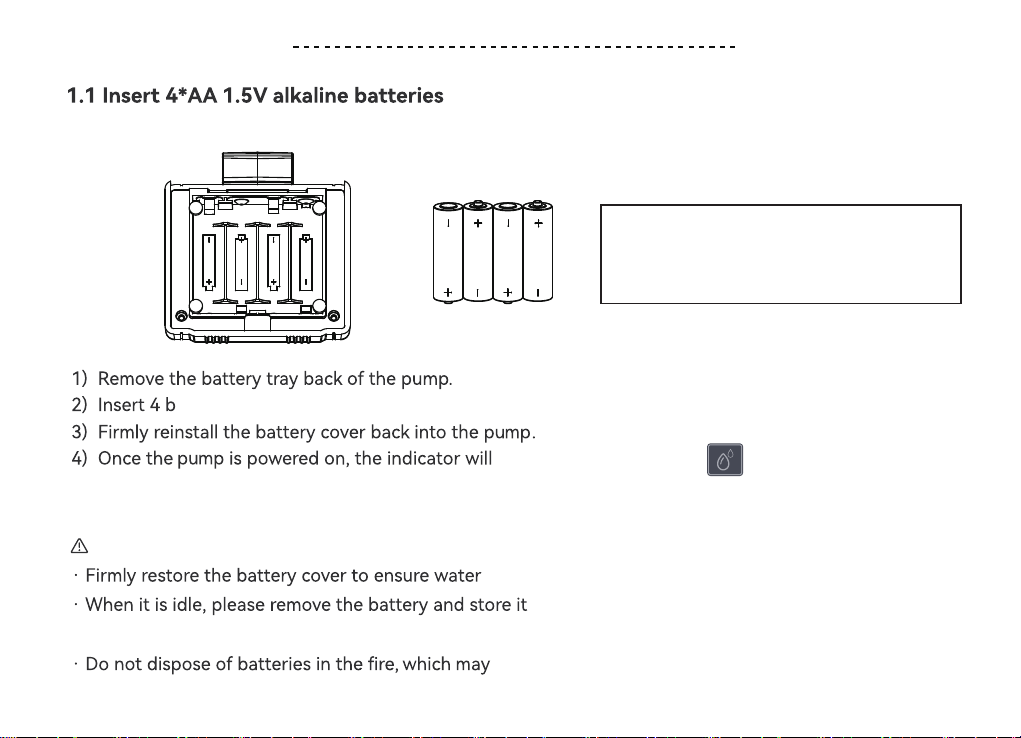
1.1 Install 4*AA 1.5V alkaline batteries for power
1.2 Plug in the USB cable for power
2. DETERMINE THE CORRECT PLACEMENT
3. CONNECT THE HOSE CORRECTLY
4. INSTALLATION COMPLETED AND TESTED
01-03
01
02-03
03
04
05-11
05
06-11
12-16
12-13
12
13
14
15-16
16

APP INTERFACE OVERVIEW
1. HOME INTERFACE
2. IRRIGATION SCHEDULE SETTINGS
3. DEVICE INFORMATION
4. SMART FUNCTIONS INTERFACE
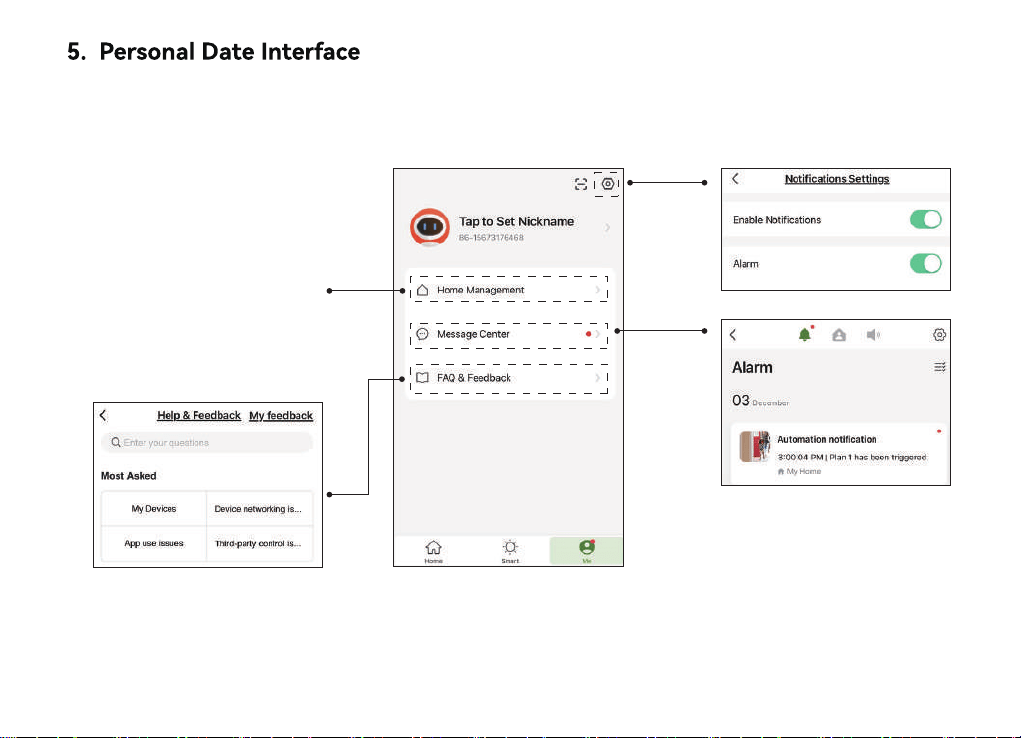
5. PERSONAL DATE INTERFACE
AUTOMATIC WATERING MODE
MANUAL WATERING MODE
RESET THE DEVICE
TROUBLESHOOTING
WARRANTY
CUSTOMER SUPPORT
17-22
17
18
19
20-22
23
24
25
26
26-27
28
28

PRODUCT OVERVIEW
1. Product Appearance
15 43 7 862
- 01 -
No. Name Function
WiFi Button
Manual Button
1
2
Pair WiFi or reset
Manual or pause watering
3 Pow
6
Water conveying from container to pump
7
Water conveying from pump to plants
8
Power supply
Pair WiFi or power supply
4
Indicates the status of
Watering Indicator Light
5
Indicates the status of watering
- 01 -
Pair WiFi or power supply
Filtering impurities from water
Len: 10m/32.8 Ft
Inner diameter of pipe:0.17”(>1/6”)
Outside diameter of pipe: 1/4”
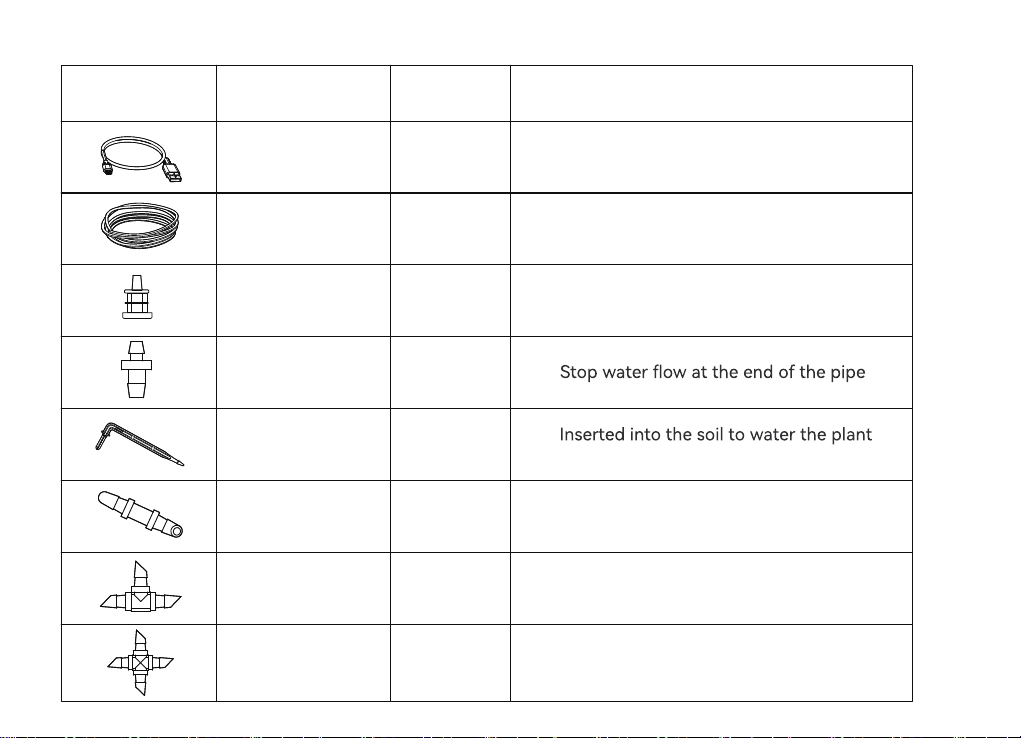
2. Package Includes
Accessories
Included
Name
USB Cable 1
Tubing
Filter
1
1
Tubing End
Caps
3
3
root directly
Micro Drip
Emitters
10
Conne cting water pipes
Straight Barb
Fitting
3
Split water and connect pipes T Barb Fitting 10
Split water and connect pipes
Cross Barb
Fitting
PCS Function
- 02 -
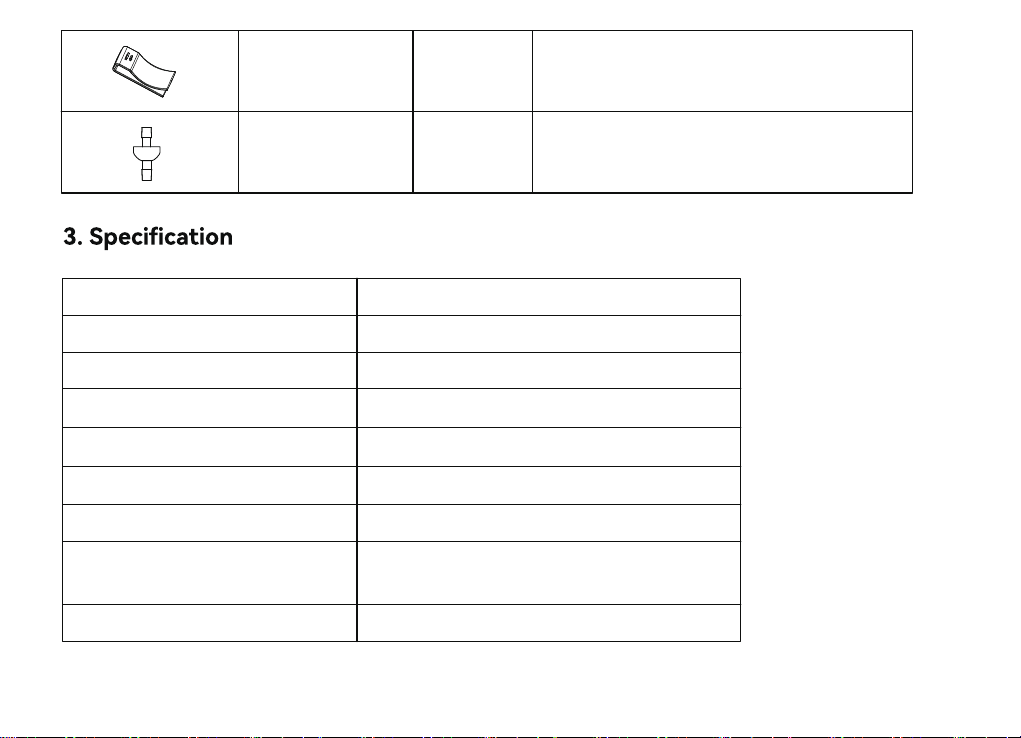
1
1
Put it on the timer to make the timer
hangable
Prevents water from backing up in the
pipes back to the pump
Detachable
Hook
Check Valve
Working Pressure 0.3Bar
30L/H
IPX2
2-3m
2-3m
≥200kPa
3°C to 50°C(37°F-122°F)
USB cable (included)or
4*AA batteries(excluded)
Water Flow
Water Proof
Pumping Head
Pumping Distance
Maximum Water Pressure
Working Temperature
ABSMaterial
Power By
- 03 -
- 04 -
FCC STATEMENT: (FCC ID:2AWDBTTP106W)
This device complies with Pa 15 of the FCC Rules. Operation is subject to the following two conditions:
(1) This device may not cause harmful inteerence, and
(2) this device must accept any inteerence received, including inteerence that may cause undesired
operation.
FCC Warning: Any changes or modications not expressly approved by the pay responsible for
compliance could void the user’s authority to operate this equipment.
Note: This equipment has been tested and found to comply with the limits for a Class B digital device, pursuant
to Pa 15 of the FCC Rules. These limits are designed to provide reasonable protection against harmful
inteerence in a residential installation. This equipment generates, uses, and can radiate radio frequency
energy and, if not installed and used in accordance with the instructions, may cause harmful inteerence to
radio communications. However, there is no guarantee that inteerence will not occur in a paicular installa-
tion. If this equipment does cause harmful inteerence to radio or television reception, which can be deter-
mined by turning the equipment o and on, the user is encouraged to t to correct the inteerence by one of
the following measures:
• Reorient or relocate the receiving antenna.
• Increase the separation between the equipment and the receiver.
• Connect the equipment into an outlet on a circuit dierent from that to which the receiver is connected.
• Consult the dealer or an experienced radio/TV technician for help.
Note: The manufacturer is not responsible for any radio or TV inteerence caused by unauthorized modica-
tions to this equipment. Such modications could void the user’s authority to operate the equipment.
ECREP
NAME:VIAJEELECTRONICCOMPANYLIMITED
ADDRESS:E588,13ADELAIDEROAD,DUBLIN,D02P950,IRELAND
Email:[email protected]
SIMPLE TO PAIR WIFI
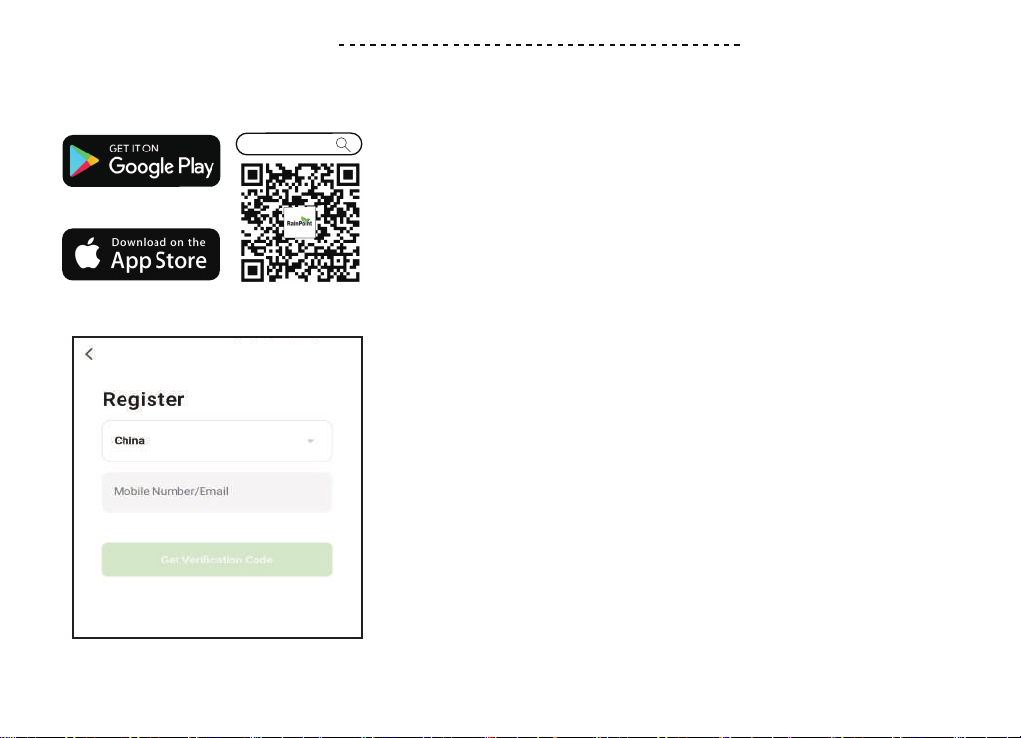
1. Initial RainPoint App Setup
1.1 Search for "RainPoint"and download Android version
or iOS version App for free. Or scan the QR code to
download Rainpoint APP.
Rainpoint
1.2 Create an account and login or login with an existing
account to begin pairing with Wi- water pump
- 05 -
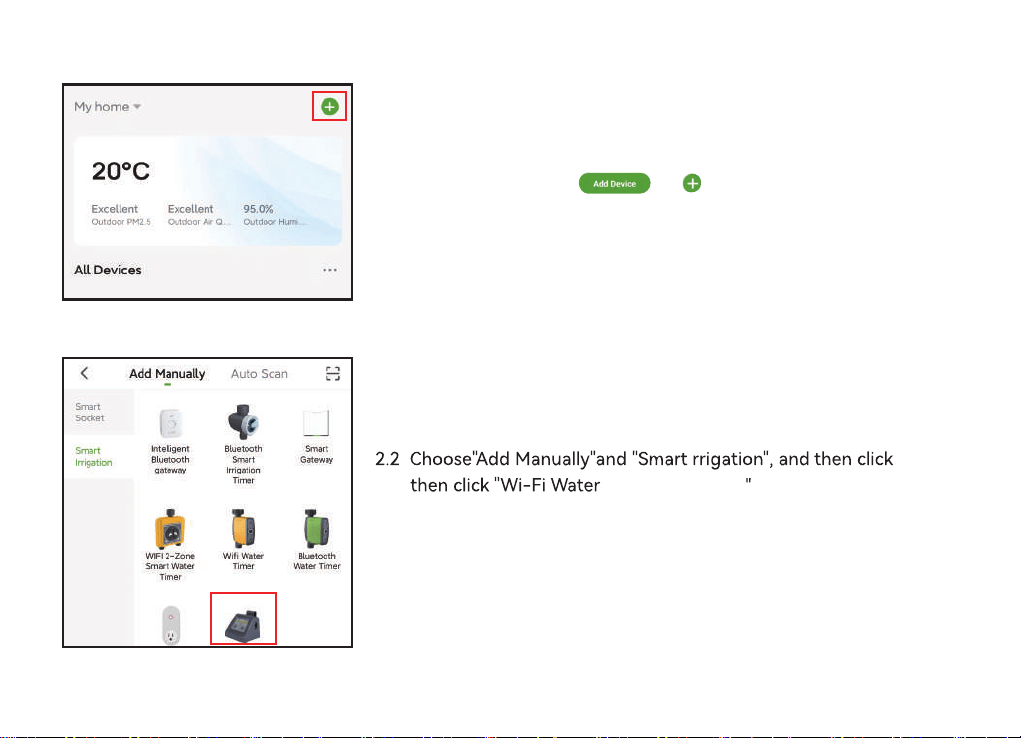
2. Pair the water pump
Timer with Pump
2.1 Click the button or on the home page of the APP
- 06 -
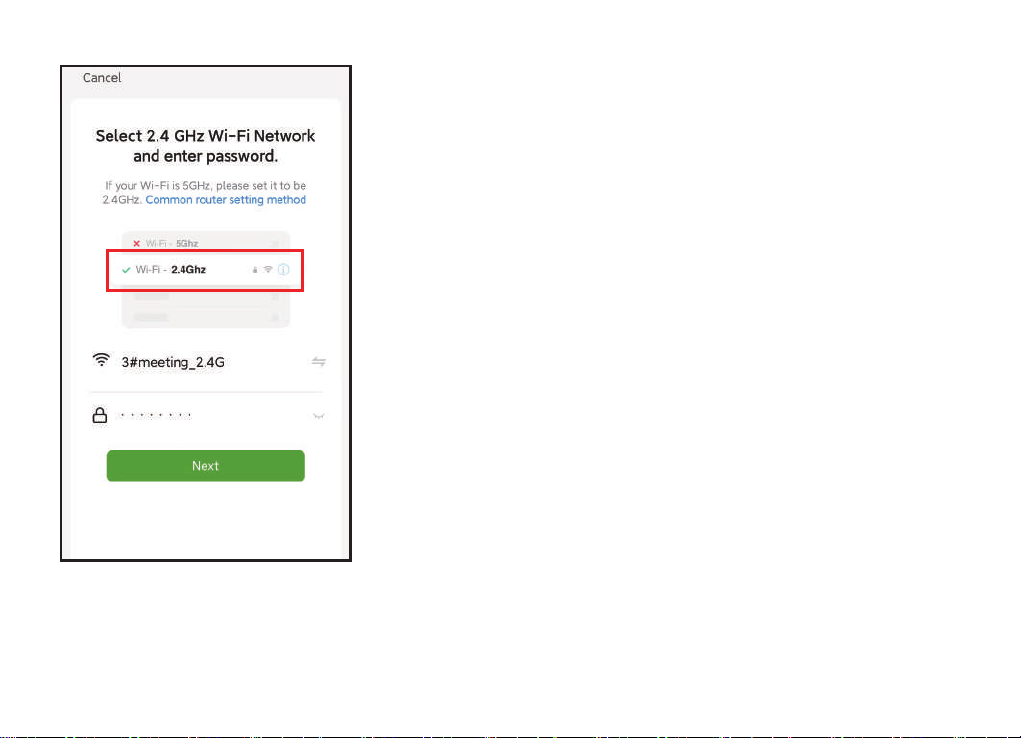
2.3 Select 2.4GHZ Wi- Network and enter password.
Then click "next".
Note:
Rainpoint Wi- water pump only pairing with a 2.4GHz Wi,
for a dual-band router, please independently enable 2.4GHz
WiFi band and name it dierently from 5GHz WiFi band.
Please click and follow the "Common Router" Setup Methods
to separate them .
- 07 -
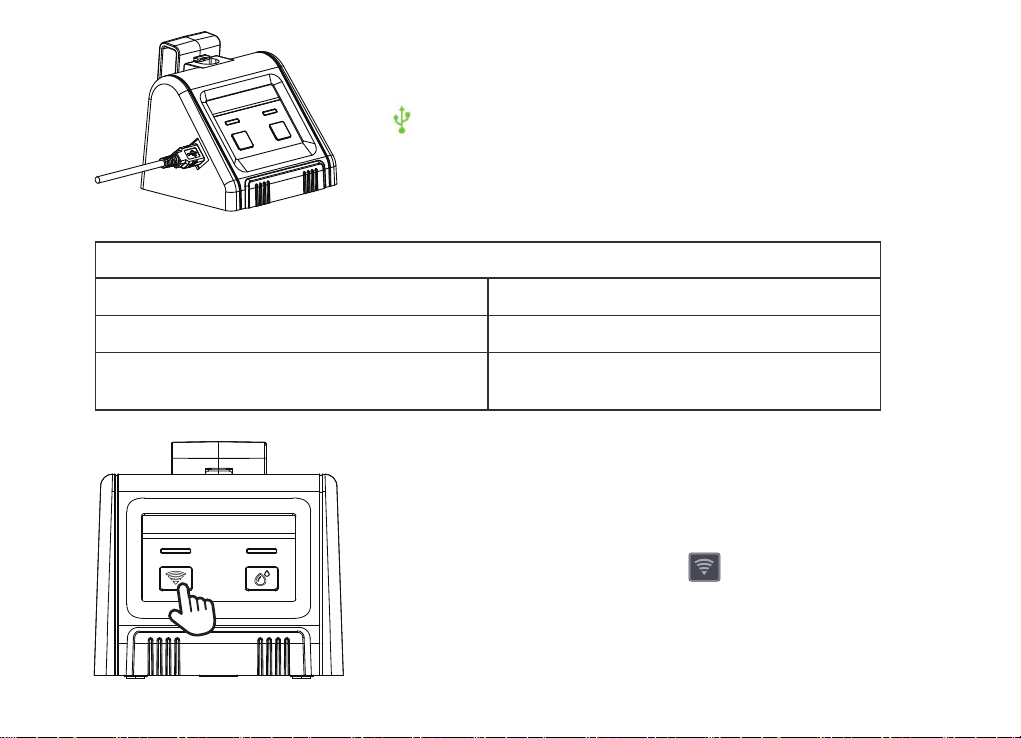
2.4 Always powered by USB cable (Included) for wi
connection and remote control.
2.5 Press and hold 5 seconds of WIFI button until the
indicator light blinks once per second.
Light ashing guide
Powered up and not paired Flashes quickly(once a second)
- 08 -
Porwered on and no network
Powered on and paired
(Network connected)
Falshes slowly (once eve 2 seconds)
Flashes always on
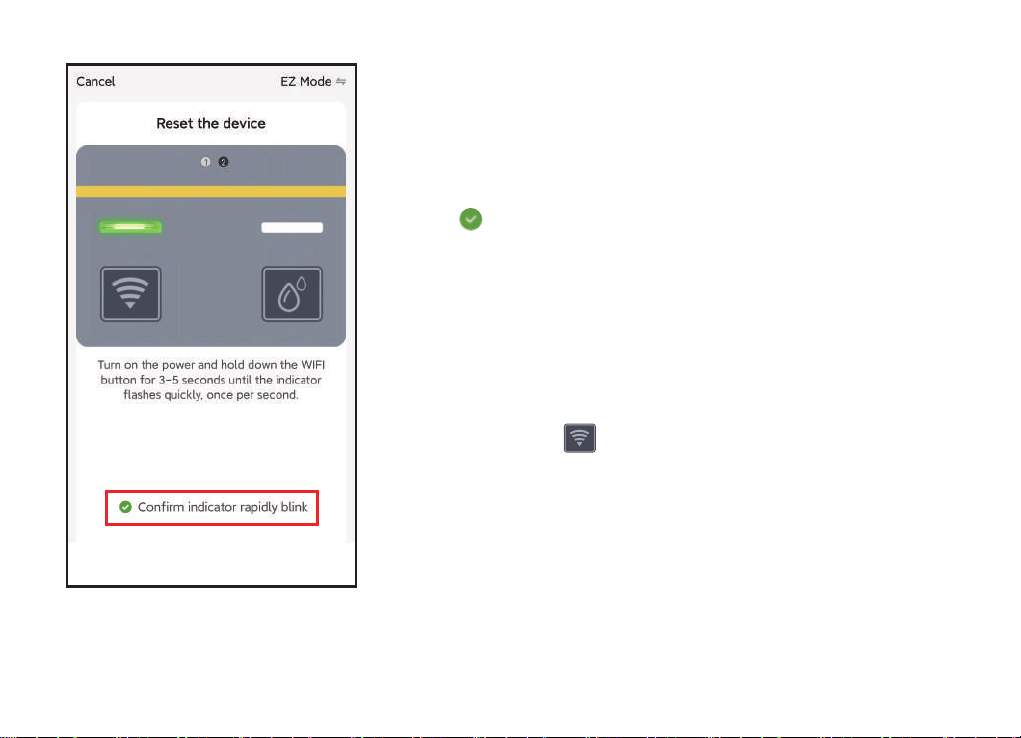
2.5 Powered the pump with USB cable and follow
the instructions on the APP to reset rst . Then
click" "to conrm indicator rapidly blink and click
"Next" to enter the pair mode.
Note:
• Pairing Wi and accessing APP requires high current
suppo , so make sure the USB cable is powered on
before pairing
• Press and hold button until the indicator light
blinks quickly .
- 09 -
Note :
• You can customize the name of the device as required.
• If you have not been able to pair for over 2 mins, please
go to page 16 and follow the instructions to fully reset the
device and sta pairing again from the beginning.
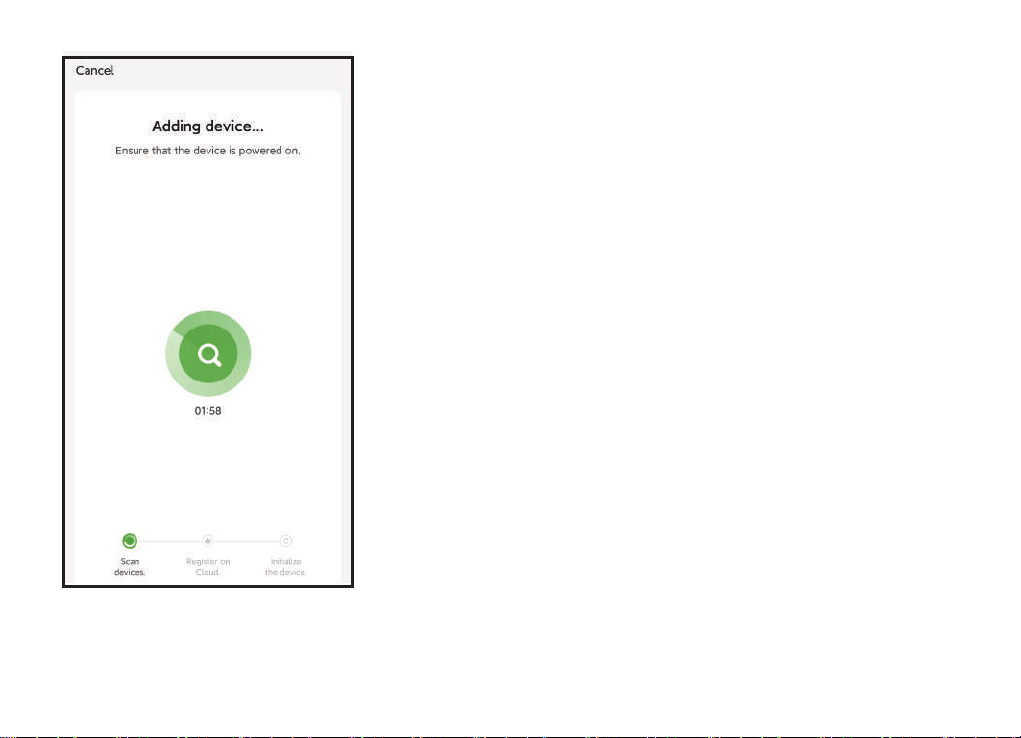
2.6 Wi-Fi pairing requires about 1-2 mins,once the device
is paired successfully, the APP will show "Device added
successfully".
- 10 -
After paring, you can remotely manage multi-watering plans,
notications will be sent to APP when "Automatic" watering
plans are active or pump is out of water. it's peect to take
care of your potted plants when busy with chores or away
on vacation.
We recommend using USB cable for power supply when a plug
is available. If there is no plug at the place where you need to use
the water pump, please take the water pump to the place where
there is a plug to match the APP rst, and then take it to the use
position to use the batte power supply.
- 11 -
Note:
EASY TO INSTALL
rand new AA (1.5V) alkaline batteries
(not included) as the marked "-", "+" direction.
light up when you press button.
resistance.
properly.
· Used up batteries must be removed from the pump.
cause explode or leak.
- 12 -
Batte power supply is only suitable for
timed watering and manual watering
that have been set to run, and cannot be
remotely controlled.
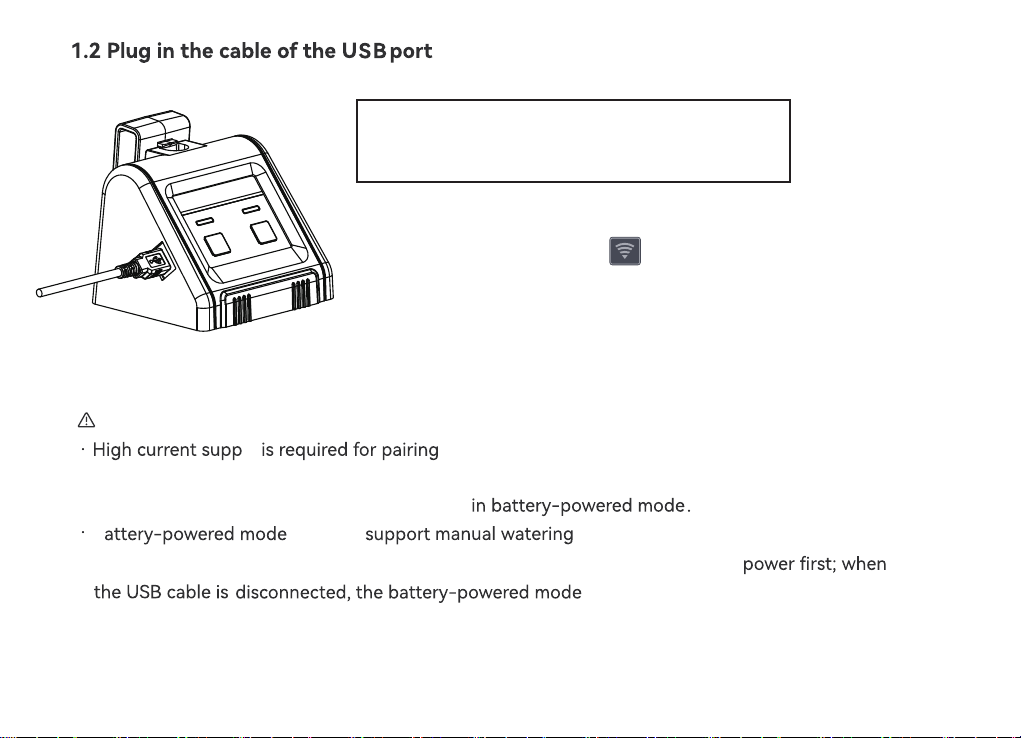
1) Plug in the USB cable (included)
2) When the power is on, the indicator will light up.
Note:
WiFi and accessing APP, so it is only available
cable-powered mode.
ly
in USB
B
can only
· WiFi pairing and APP access are not available
· When both power modes are used simultaneously, it will match the USB cable
will
.
be activated.
- 13 -
WiFi connection and remote control must keep
the USB connection powered, otherwise the WiFi
function will not work.
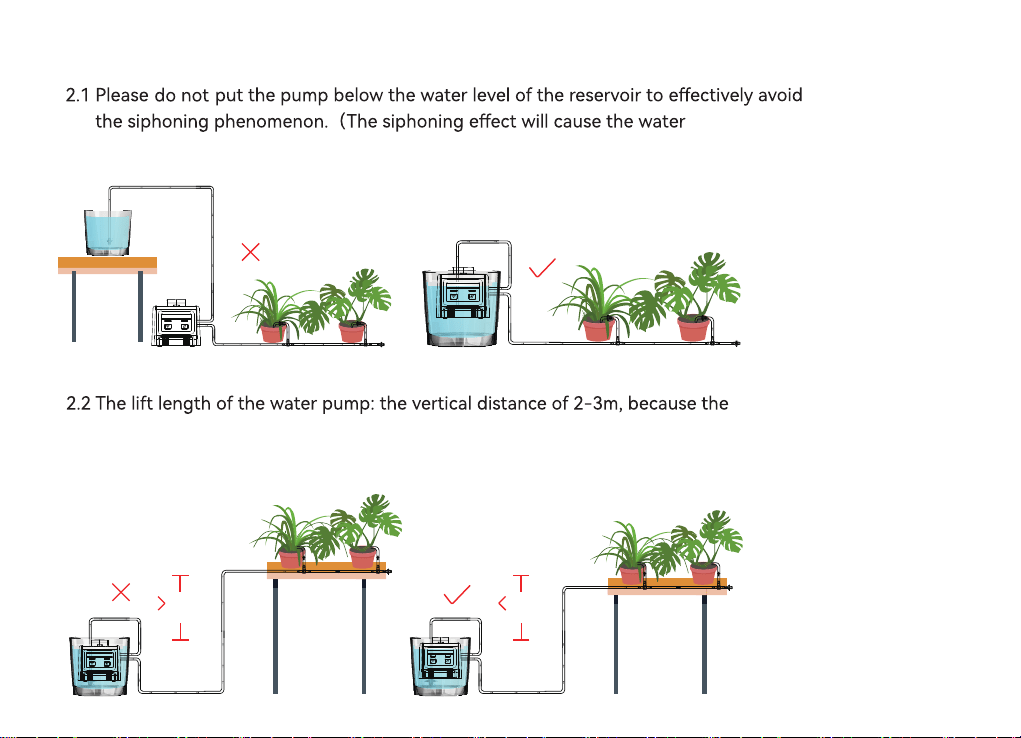
2. Determine the correct placemen
over-watering problem)
leaking and
2.5m2.5m
water pipe
can not be placed 100% straight, we recommend that the height
pump should n
between the plants and
ot exceed 2.5m.
- 14 -
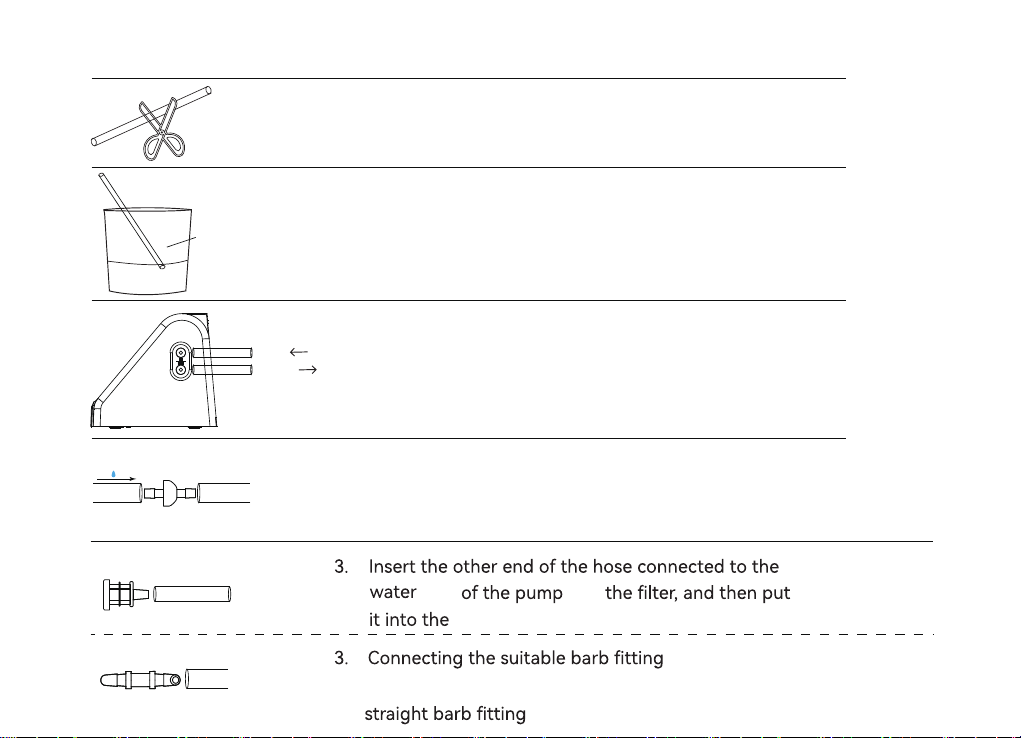
3. Connect the hose correctly
3.1 Cut the hose according to the distance of the device,
the plant or you need
3.2 Put the head of hose into hot water for 10s or Put a
little veggie oil on the end of the hose before
connecting
3.3 Connect the hose to water inlet and outlet
veggie
oil
Inlet
Outlet
- 15 -
3.4 Connect the check valve to the water outlet near the pump. Using a
check valve may reduce water pressure. (The check valve must be
installed correctly in accordance with the ow direction)
1) If only the hose needs
to be
connected, you can use
6
container.
inlet with
5
4. Installation completed and tested
4.1 Press the button to activate the pump, then the water will pumped
to your plants.
no tightening, please keep tightening until no leakage.
4.3 After testing with no usage problems, go to the next step: WiFi pairing
and programming plans.
- 16 -
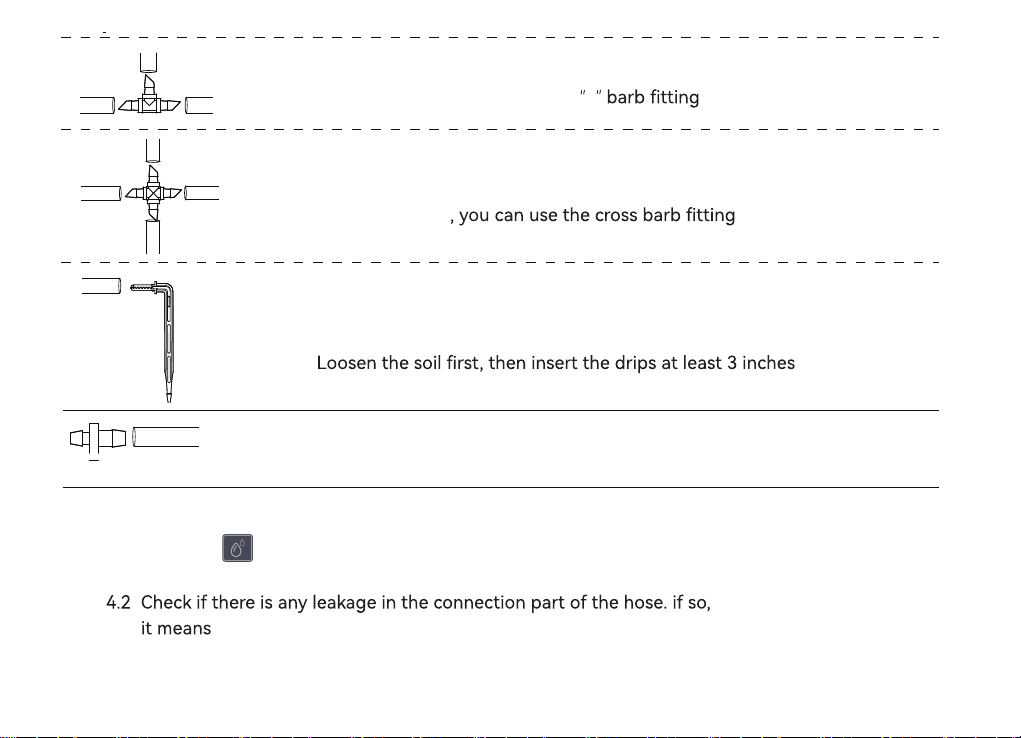
2) When you need to connect the hose while splitting
to twoways, you can use the
T
3) When you need to connect a hose while splitting to
other 3 ways
3.7 When water needs to be delivered to the soil, you
need to use the micro drip emitters
Tips:
deep, which will help water enter the plant roots.
3.8 Please install Tubing End Caps after water ows out from the end of
the pipe to avoid air in the pipe so that the water cannot ow
smoothly to the end of the pipe.
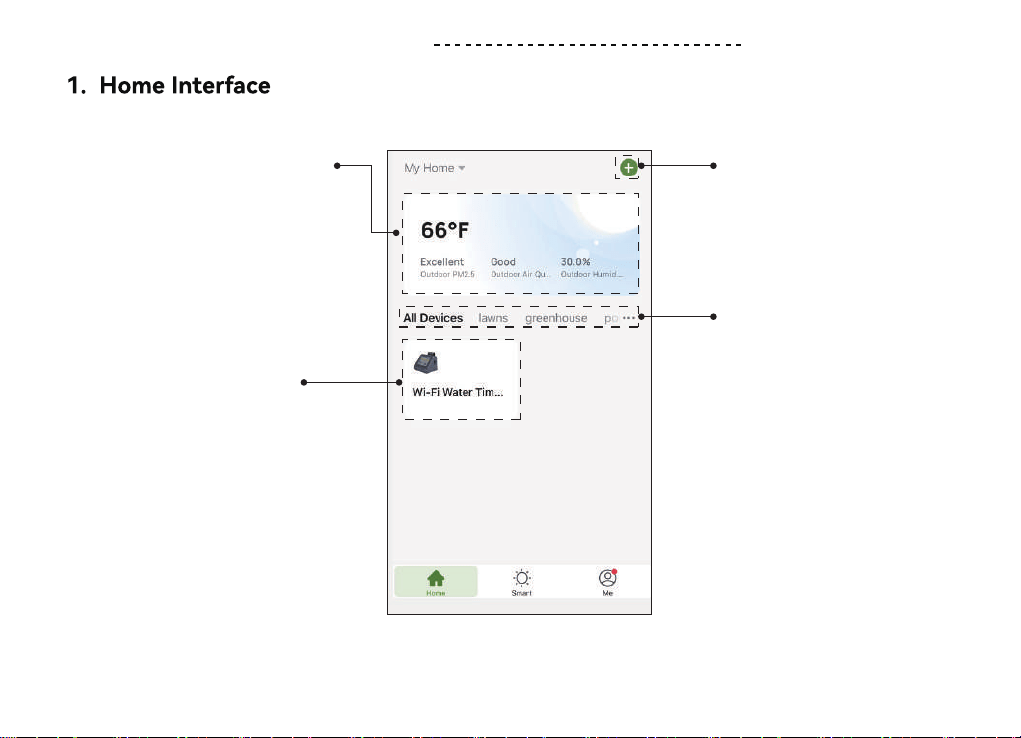
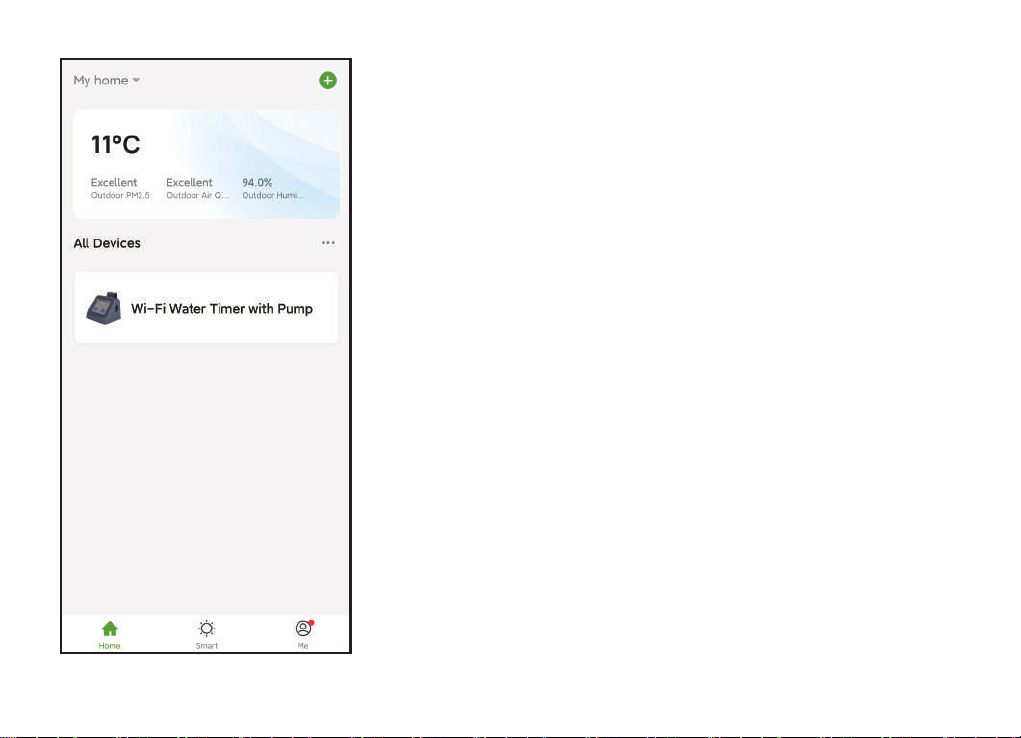
APP INTERFACE OVERVIEW
Weather Forecast
Added device(s):
Add Device
Created Home
Get the weather data for
the town you selected.
To add multiple
Rainpoint sma devices.
Customize home names
of the dierent irrigation
areas by entering
"My Home".
Click on your device then
sta your irrigation settings.
- 17 -
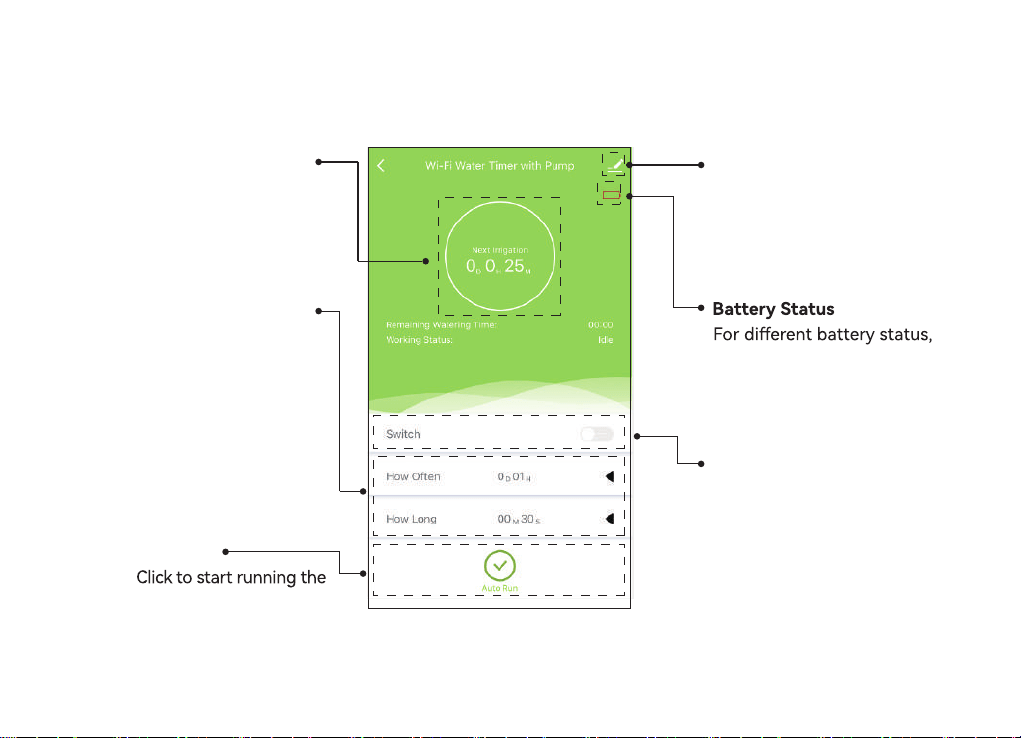
Device Information
According to your needs
to set, please refer to
Page.
refer to Page to view.
Manual Watering
Switch
Turn ON/OFF manual
irrigation as needed, refer
to Page to view setting tips.
Next Irrigation
Countdown for the
next irrigation
Automatic Watering
Mode
Watering Frequency:
1 hr to 7 days
Watering Duration:
20s to 30 mins
Auto Run
schedule you setup.
2. Irrigation Schedule Settings
- 18 -
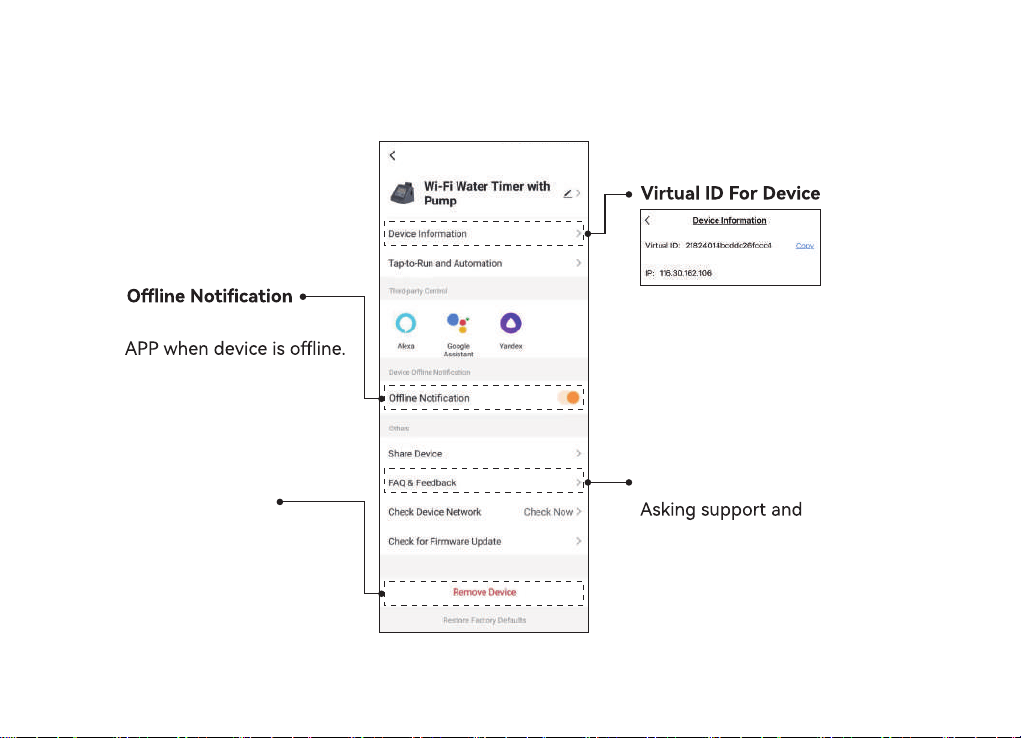
3. Device Information
Open:send a message to
Remove Device
Remove the device before
resetting it, refer to Page
to view.
FAQ & Feedback
feedback questions.
- 19 -
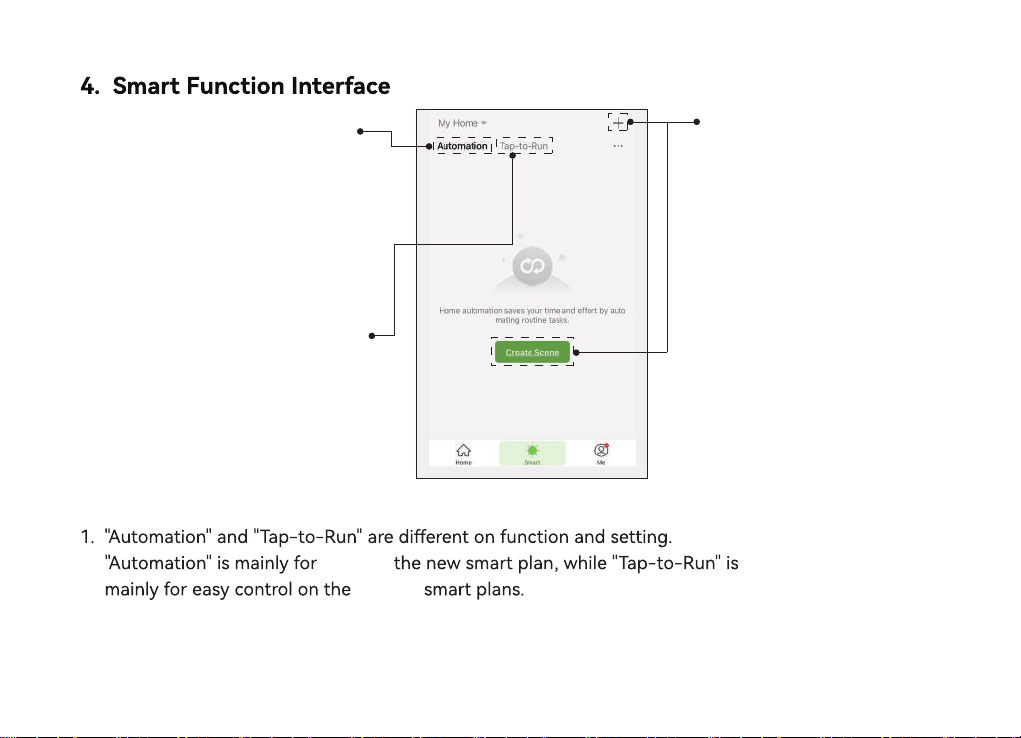
Automation Fun
Tap-to-Run Function.
ction.
Add Watering Plan.
Click to set the
Customize multi-irrigation
plans with Meteorological
changes.
Set and control multiple
devices and plans.
conditions
and tasks for your plan.
Notice:
2. Make sure your device is always connecting and staying online to run
Automation as normal. please keep the usb cable connecting on the device
to keep the timer online.
3. The "notice" function in Automation is ON only if you set it up in task.
creating
existing
- 20 -

4.1 Condition Settings
Setup arguments and add conditions as your required.
- 21 -
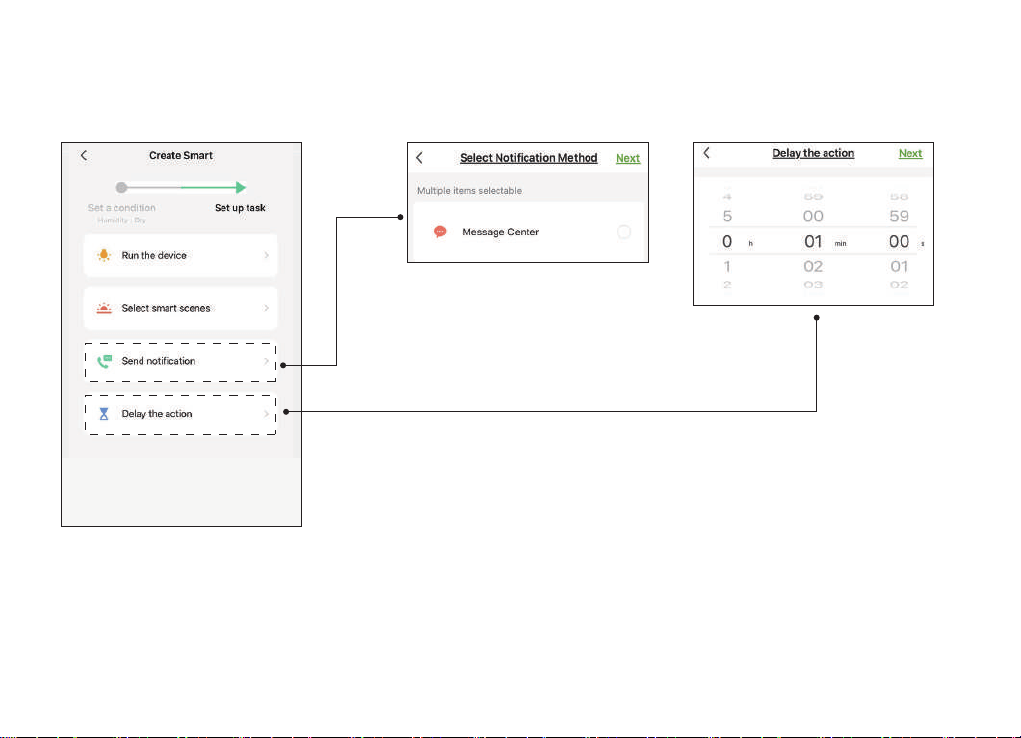
4.2 Task Settings
Set up tasks as your required, then trigger task if conditions are met.
- 22 -
Setup arguments and add conditions as your required.
Add or remove Home
(group) as your need.
- 23 -
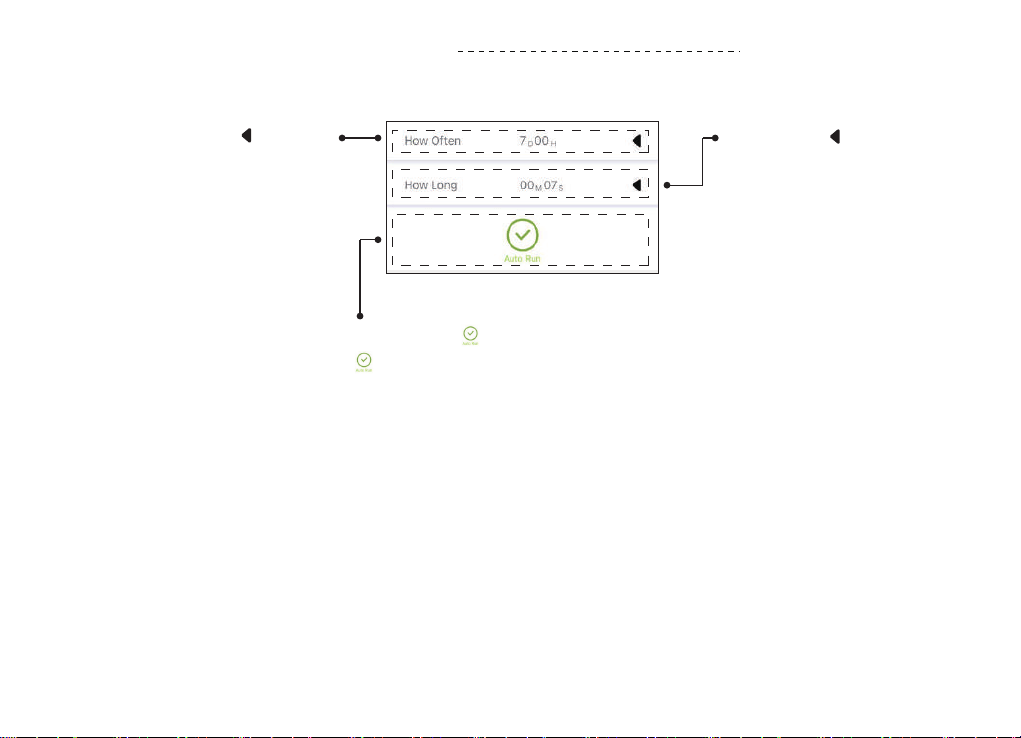
AUTOMATIC WATERING MODE
Step2: Click to setup
watering duration as your
required and "done" it.
Step3: Click and change
it to green .Means that your
schedule is running.
Note:
Please remember to activate step 3 after the setup is completed, otherwise the
program won't run.
Step1: Click to setup
watering frequency as your
required and "done" it.
- 24 -
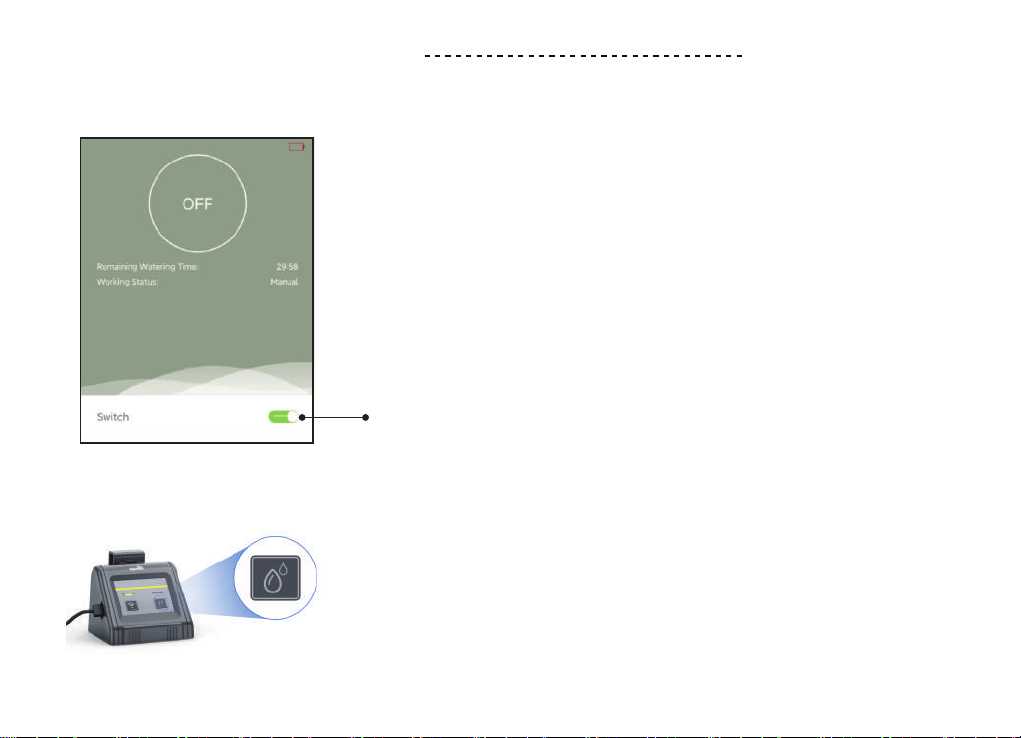
MANUAL WATERING MODE
1. Manual Operation Via App
2. Manual Operation Via Device
Click the switch to turn ON / OFF manual watering.
Click the watering button to turn ON / OFF
manual watering.
- 25 -
RESET THE DEVICE
2. Leave the device for about 30-60s.
3. Plug in the USB cable, press and hold the WiFi button until the indicator turns to a fast blinking
green light, then open the APP to connect.
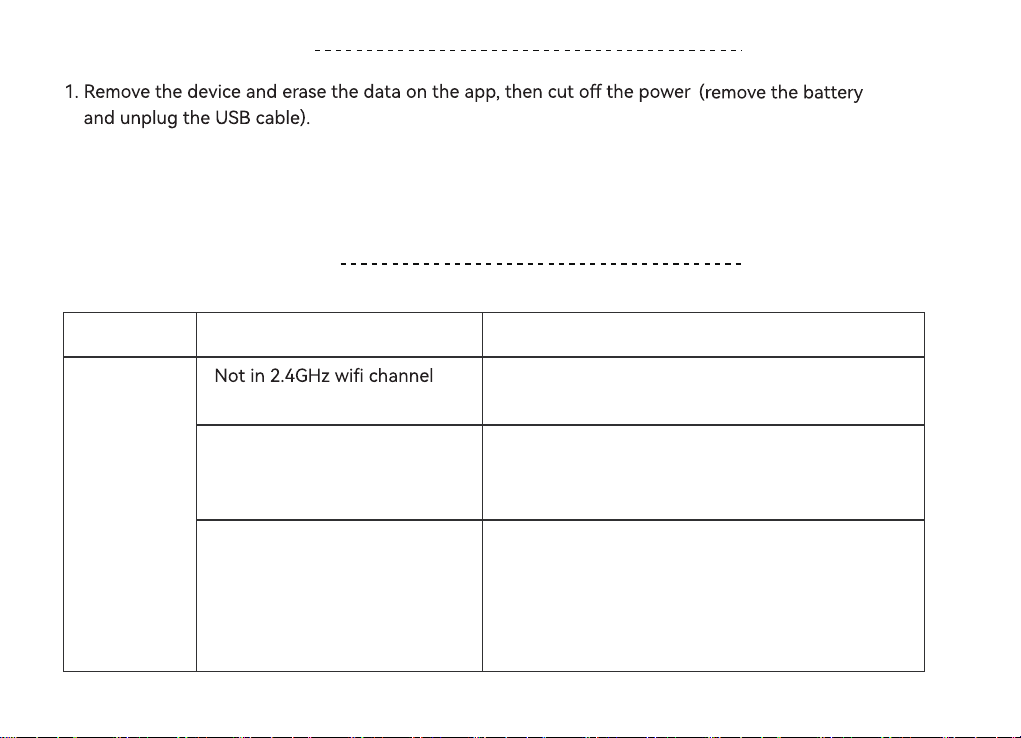
TROUBLESHOOTING
Problem Possible Cause Possible Solution
WiFi can’t be
connected
connection
Too far between the pump
and router, causing the
signal unstable
Not in the correct
connecting mode
Reset the router for a 2.4G
channel and reconnect.
Unplug the USB cable and batte rst and wait
10 Sec. Charge the pump with USB cable again,
then hold down WiFi button until the indicator
light ashes rapidly and enter pairing mode.
Move the pump to a closer socket near the router
and reconnect.
- 26 -
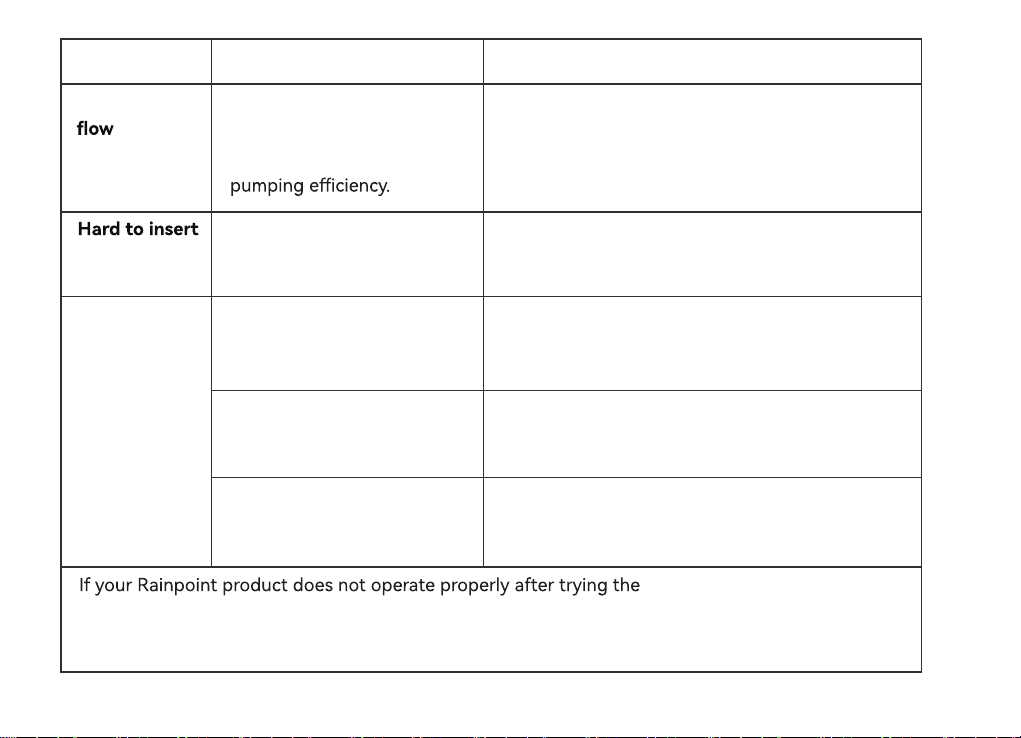
Uneven water Too far away from pots and
water containers or too long
pipes can reduce the pump's
The fuher away from the pump the potted plant
is, the weaker the water ow will become. Please
use some clamps to hold the rst few branches so
that the mainstream water can be delivered
quickly and for a long time.
Problem Possible Cause Possible Solution
and remove
water pipes
Watering
schedule not
on time
Because of the material, in
order to make the pipe more
durable.
The lack of water at the inlet
resulted in the plan not
being implemented on time.
There is no auto-run schedule
set up on the APP side.
The water pump unexpectedly
lost power and the plan was
emptied.
Put the head of hose into hot water for 10s or Put
a little veggie oil on the end of the hose before
connecting.
Check if there is a lack of water in the container
at the inlet.
(If there is a leakage the schedule will not running)
Once the plan parameters have been set, the plan
will be executed automatically according to the
parameters set by checking "Auto Run".
The watering schedule needs
to be reset.
troubleshooting steps, please
contact us by phone or email : US: 1-833-381-5659 (EN)(MON-FRI9:30AM-5:30PMPST)
EU: +44 800-808-5337 (EN DE)(MON-FRI9:00AM-5:00PMCET)
Email:se[email protected]
- 27 -
Rainpoint provides a 1-year limited warranty on this product against manufacturing
defects in materials and workmanship.
WARRANTY
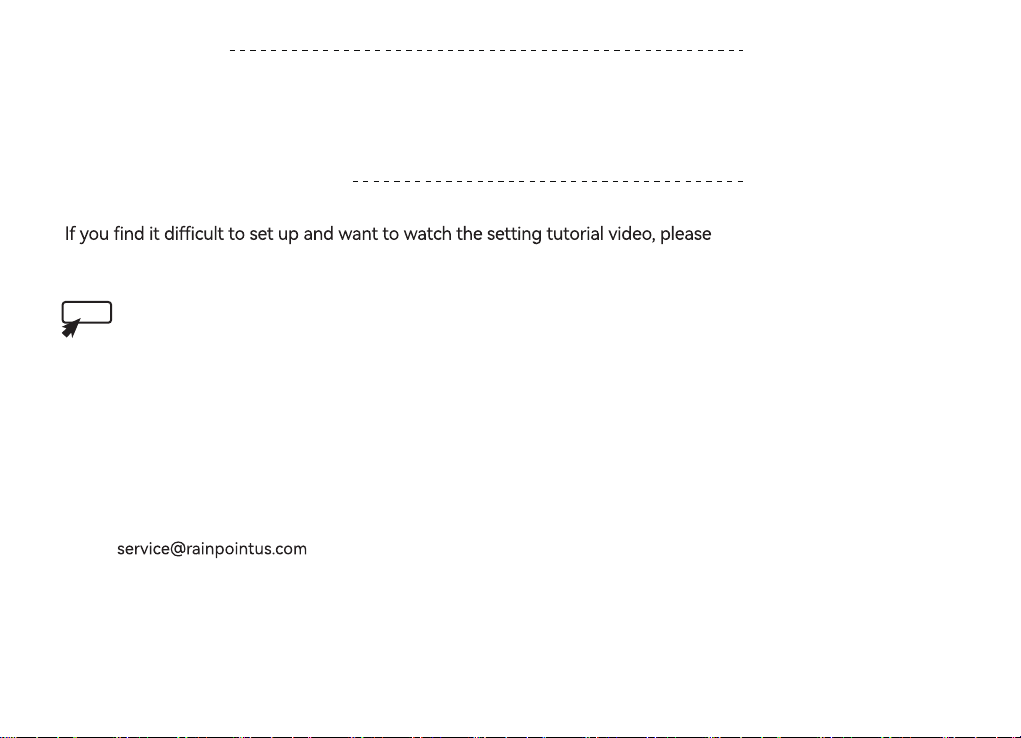
CUSTOMER SUPPORT
subscribe to our channel: RainPoint on YouTube.
If you can not solve the problem of this time with this manual, please contact us with
the LOT NO. of your device. There will be a private seice for you.
- 28 -
LOT NO.: XXXXX (on the back of the timer)
US Free Hotline(English): +1 833-381-5659
(MON-FRI 9:30 AM-5:30 PM PST)
UK Free Hotline(English Deutsch): +44 800-808-5337
(MON-FRI 9:00 AM-5:00 PM CET )
Email:
WhatsApp: +1 626-780-5952
Suppo:https://www.rainpointonline.com/pages/suppo
www.