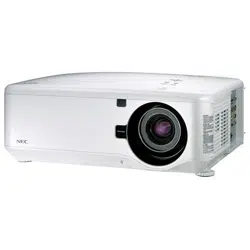
Projector
PA721X/PA621X/PA671W
PA621U/PA571W/PA521U
PA722X/PA622X/PA672W
PA622U/PA572W/PA522U
User’s Manual
Model No.
NP-PA721X/NP-PA621X/NP-PA671W/NP-PA621U/NP-PA571W/
NP-PA521U/NP-PA722X/NP-PA622X/NP-PA672W/NP-PA622U/NP-
PA572W/NP-PA522U

Ver. 1 08/2013
•Macintosh,MacOSXandPowerBookaretrademarksofAppleInc.registeredintheU.S.andothercountries.
•Microsoft,Windows,WindowsVista,InternetExplorer,.NETFrameworkandPowerPointareeitheraregistered
trademarkortrademarkofMicrosoftCorporationintheUnitedStatesand/orothercountries.
•MicroSaverisaregisteredtrademarkofKensingtonComputerProductsGroup,adivisionofACCOBrands.
•Adobe,AdobePDF,AdobeReader,andAcrobatareeitherregisteredtrademarksortrademarksofAdobeSystems
IncorporatedintheUnitedStatesand/orothercountries.
•VirtualRemoteToolusesWinI2C/DDClibrary,©NicomsoftLtd.
•HDMI,theHDMILogoandHigh-DenitionMultimediaInterfacearetrademarksorregisteredtrademarksofHDMI
LicensingLLC.
•DisplayPortandDisplayPortComplianceLogoaretrademarksownedbytheVideoElectronicsStandardsAssocia-
tion.
•TrademarkPJLinkisatrademarkappliedfortrademarkrightsinJapan,theUnitedStatesofAmericaandother
countriesandareas.
•Wi-Fi
®
,Wi-FiAlliance
®
,andWi-FiProtectedAccess(WPA,WPA2)
®
areregisteredtrademarksoftheWi-FiAlli-
ance.
•Blu-rayisatrademarkofBlu-rayDiscAssociation
•CRESTRONandROOMVIEWareregisteredtrademarksofCrestronElectronics,Inc.intheUnitedStatesandother
countries.
•Otherproductandcompanynamesmentionedinthisuser’smanualmaybethetrademarksorregisteredtrademarks
oftheirrespectiveholders.
NOTES
(1)Thecontentsofthisuser’smanualmaynotbereprintedinpartorwholewithoutpermission.
(2)Thecontentsofthisuser’smanualaresubjecttochangewithoutnotice.
(3)Greatcarehasbeentakeninthepreparationofthisuser’smanual;however,shouldyounoticeanyquestionable
points,errorsoromissions,pleasecontactus.
(4)Notwithstandingarticle(3),NECwillnotberesponsibleforanyclaimsonlossofprotorothermattersdeemed
toresultfromusingtheProjector.
i
Important Information
Safety Cautions
Precautions
PleasereadthismanualcarefullybeforeusingyourNECprojectorandkeepthemanualhandyforfuturereference.
CAUTION
Toturnoffmainpower,besuretoremovetheplugfrompoweroutlet.
Thepoweroutletsocketshouldbeinstalledasneartotheequipmentaspossible,andshouldbeeasily
accessible.
CAUTION
TOPREVENTSHOCK,DONOTOPENTHECABINET.
THEREAREHIGH-VOLTAGECOMPONENTSINSIDE.
REFERSERVICINGTOQUALIFIEDSERVICEPERSONNEL.
Thissymbolwarnstheuserthatuninsulatedvoltagewithintheunitmaybesufcienttocauseelectrical
shock.Therefore,itisdangeroustomakeanykindofcontactwithanypartinsideoftheunit.
Thissymbolalertstheuserthatimportantinformationconcerningtheoperationandmaintenanceofthis
unithasbeenprovided.
Theinformationshouldbereadcarefullytoavoidproblems.
WARNING: TOPREVENTFIREORSHOCK,DONOTEXPOSETHISUNITTORAINORMOISTURE.
DONOTUSETHISUNIT’SPLUGWITHANEXTENSIONCORDORINANOUTLETUNLESSALLTHEPRONGS
CANBEFULLYINSERTED.
DOC Compliance Notice (for Canada only)
ThisClassBdigitalapparatuscomplieswithCanadianICES-003.
Machine Noise Information Regulation - 3. GPSGV,
Thehighestsoundpressurelevelislessthan70dB(A)inaccordancewithENISO7779.
CAUTION
Avoiddisplayingstationaryimagesforaprolongedperiodoftime.
DoingsocanresultintheseimagesbeingtemporarilysustainedonthesurfaceoftheLCDpanel.
Ifthisshouldhappen,continuetouseyourprojector.Thestaticbackgroundfrompreviousimageswill
disappear.
Disposing of your used product
EU-widelegislationasimplementedineachMemberStaterequiresthatusedelectricalandelectronic
productscarryingthemark(left)mustbedisposedofseparatelyfromnormalhouseholdwaste.Thisin-
cludesprojectorsandtheirelectricalaccessoriesorlamps.Whenyoudisposeofsuchproducts,please
followtheguidanceofyourlocalauthorityand/orasktheshopwhereyoupurchasedtheproduct.
Aftercollectingtheusedproducts,theyarereusedandrecycledinaproperway.Thiseffortwillhelpus
reducethewastesaswellasthenegativeimpactsuchasmercurycontainedinalamptothehuman
healthandtheenvironmentattheminimumlevel.
ThemarkontheelectricalandelectronicproductsonlyappliestothecurrentEuropeanUnionMember
States.

ii
Important Information
WARNING TO CALIFORNIA RESIDENTS:
Handlingthecablessuppliedwiththisproductwillexposeyoutolead,achemicalknowntotheStateofCalifornia
tocausebirthdefectsorotherreproductiveharm.
WASH HANDS AFTER HANDLING.
RF Interference (for USA only)
WARNING
TheFederalCommunicationsCommissiondoesnotallowanymodicationsorchangestotheunitEXCEPTthose
speciedbyNECDisplaySolutionsofAmerica,Inc.inthismanual.Failuretocomplywiththisgovernmentregu-
lationcouldvoidyourrighttooperatethisequipment.Thisequipmenthasbeentestedandfoundtocomplywith
thelimitsforaClassBdigitaldevice,pursuanttoPart15oftheFCCRules.Theselimitsaredesignedtoprovide
reasonableprotectionagainstharmfulinterferenceinaresidentialinstallation.Thisequipmentgenerates,uses,and
canradiateradiofrequencyenergyand,ifnotinstalledandusedinaccordancewiththeinstructions,maycause
harmfulinterferencetoradiocommunications.However,thereisnoguaranteethatinterferencewillnotoccurina
particularinstallation.
Ifthisequipmentdoescauseharmfulinterferencetoradioortelevisionreception,whichcanbedeterminedby
turningtheequipmentoffandon,theuserisencouragedtotrytocorrecttheinterferencebyoneormoreofthe
followingmeasures:
•Reorientorrelocatethereceivingantenna.
•Increasetheseparationbetweentheequipmentandreceiver.
•Connecttheequipmentintoanoutletonacircuitdifferentfromthattowhichthereceiverisconnected.
•Consultthedealeroranexperiencedradio/TVtechnicianforhelp.
ForUKonly:InUK,aBSapprovedpowercordwithmouldedplughasaBlack(veAmps)fuseinstalledforusewith
thisequipment.Ifapowercordisnotsuppliedwiththisequipmentpleasecontactyoursupplier.
Important Safeguards
Thesesafetyinstructionsaretoensurethelonglifeofyourprojectorandtopreventreandshock.Pleasereadthem
carefullyandheedallwarnings.
Installation
•Donotplacetheprojectorinthefollowingconditions:
-onanunstablecart,stand,ortable.
-nearwater,baths,ordamprooms.
-indirectsunlight,nearheaters,orheatradiatingappliances.
-inadusty,smokyorsteamyenvironment.
-onasheetofpaperorcloth,rugsorcarpets.
•Ifyouwishtohavetheprojectorinstalledontheceiling:
-Donotattempttoinstalltheprojectoryourself.
-Theprojectormustbeinstalledbyqualiedtechniciansinordertoensureproperoperationandreducetherisk
ofbodilyinjury.
-Inaddition,theceilingmustbestrongenoughtosupporttheprojectorandtheinstallationmustbeinaccordance
withanylocalbuildingcodes.
-Pleaseconsultyourdealerformoreinformation.
iii
Important Information
Fire and Shock Precautions
•Ensurethatthereissufcientventilationandthatventsareunobstructedtopreventthebuild-upofheatinsideyour
projector.Allowatleast4inches(10cm)ofspacebetweenyourprojectorandawall.
•Donottrytotouchtheventilationoutletontheleftfront(whenseenfromthefront)asitcanbecomeheatedwhile
theprojectoristurnedonandimmediatelyaftertheprojectoristurnedoff.Partsoftheprojectormaybecometem-
porarilyheatediftheprojectoristurnedoffwiththePOWERbuttonoriftheACpowersupplyisdisconnectedduring
normalprojectoroperation.
Usecautionwhenpickinguptheprojector.
•Preventforeignobjectssuchaspaperclipsandbitsofpaperfromfallingintoyourprojector.Donotattempttoretrieve
anyobjectsthatmightfallintoyourprojector.Donotinsertanymetalobjectssuchasawireorscrewdriverintoyour
projector.Ifsomethingshouldfallintoyourprojector,disconnectitimmediatelyandhavetheobjectremovedbya
qualiedservicepersonnel.
•Donotplaceanyobjectsontopoftheprojector.
•Donottouchthepowerplugduringathunderstorm.Doingsocancauseelectricalshockorre.
•Theprojectorisdesignedtooperateonapowersupplyof100-240VAC50/60Hz.Ensurethatyourpowersupply
tsthisrequirementbeforeattemptingtouseyourprojector.
•Donotlookintothelenswhiletheprojectorison.Seriousdamagetoyoureyescouldresult.
•Keepanyitems(magnifyingglassetc.)outofthelightpathoftheprojector.Thelightpathbeingprojectedfromthe
lensisextensive,thereforeanykindofabnormalobjectsthatcanredirectlightcomingoutofthelens,cancause
anunpredictableoutcomesuchasareorinjurytotheeyes.
•Donotplaceanyobjects,whichareeasilyaffectedbyheat,infrontofaprojectorexhaustvent.
Doingsocouldleadtotheobjectmeltingorgettingyourhandsburnedfromtheheatthatisemittedfromtheex-
haust.
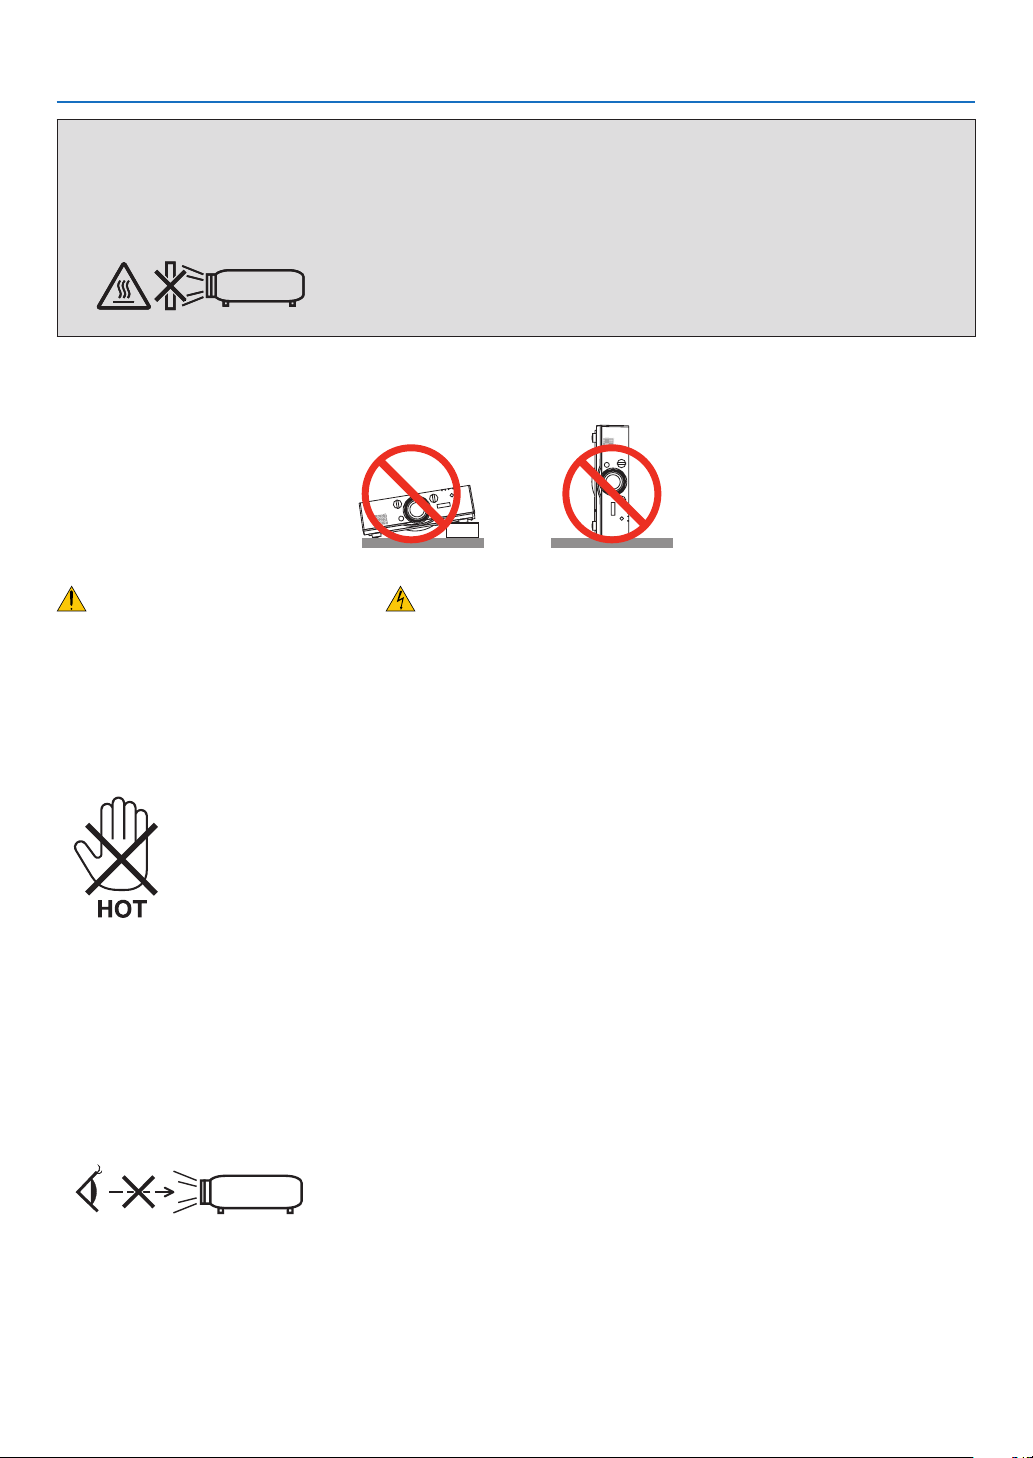
WARNING
•Donotcoverthelenswiththelenscaporequivalentwhiletheprojectorison.Doingsocanleadtomeltingof
thecapduetotheheatemittedfromthelightoutput.
•Donotplaceanyobjects,whichareeasilyaffectedbyheat,infrontoftheprojectorlens.Doingsocouldlead
totheobjectmeltingfromtheheatthatisemittedfromthelightoutput.
Donottilttheprojectortotheleftorright.Doingsomayresultinmalfunction.Thereisnolimitonthetiltangleupward
ordownward.Selectanappropriateoptionfor[FANMODE]accordingtotheinstallationangle.

iv
Important Information
•Handlethepowercordcarefully.Adamagedorfrayedpowercordcancauseelectricshockorre.
-Donotuseanypowercordotherthantheonesuppliedwiththeprojector.
-Donotbendortugthepowercordexcessively.
-Donotplacethepowercordundertheprojector,oranyheavyobject.
-Donotcoverthepowercordwithothersoftmaterialssuchasrugs.
-Donotheatthepowercord.
-Donothandlethepowerplugwithwethands.
•Turnofftheprojector,unplugthepowercordandhavetheprojectorservicedbyaqualiedservicepersonnelunder
thefollowingconditions:
-Whenthepowercordorplugisdamagedorfrayed.
-Ifliquidhasbeenspilledintotheprojector,orifithasbeenexposedtorainorwater.
-Iftheprojectordoesnotoperatenormallywhenyoufollowtheinstructionsdescribedinthisuser’smanual.
-Iftheprojectorhasbeendroppedorthecabinethasbeendamaged.
-Iftheprojectorexhibitsadistinctchangeinperformance,indicatinganeedforservice.
•Disconnectthepowercordandanyothercablesbeforecarryingtheprojector.
•Turnofftheprojectorandunplugthepowercordbeforecleaningthecabinetorreplacingthelamp.
•Turnofftheprojectorandunplugthepowercordiftheprojectorisnottobeusedforanextendedperiodoftime.
•WhenusingaLANcable:
Forsafety,donotconnecttotheconnectorforperipheraldevicewiringthatmighthaveexcessivevoltage.
CAUTION
•Donotusethetilt-footforpurposesotherthanoriginallyintended.Misusessuchasgrippingthetilt-footor
hangingonthewallcancausedamagetotheprojector.
•Donotsendtheprojectorinthesoftcasebyparceldeliveryserviceorcargoshipment.Theprojectorinside
thesoftcasecouldbedamaged.
•Select[HIGH]inFanmodeifyoucontinuetousetheprojectorforconsecutivedays.(Fromthemenu,select
[SETUP]→[OPTIONS(1)]→[FANMODE]→[MODE]→[HIGH].)
•Donotmovetheprojectorbyholdingthecablecover.Doingsomayresultintheprojectorfallingorcausing
injury.
•BeforeusingDirectPowerOff,besuretoallowatleast20minutesimmediatelyafterturningontheprojector
andstartingtodisplayanimage.
•Donotunplugthepowercablefromthewalloutletorprojectorwhentheprojectorispoweredon.Doingso
cancausedamagetotheACINconnectoroftheprojectorand(or)theprongplugofthepowercable.
ToturnofftheACpowersupplywhentheprojectorispoweredon,useapowerstripequippedwithaswitch
andabreaker.
•DonotturnofftheACpowerfor60secondsafterthelampisturnedonandwhilethePOWERindicatoris
blinkingblue.Doingsocouldcauseprematurelampfailure.
Caution on Handling the Optional Lens
Whenshippingtheprojectorwiththelens,removethelensbeforeshippingtheprojector.Alwaysattachthedustcap
tothelenswheneveritisnotmountedontheprojector.Thelensandthelensshiftmechanismmayencounterdamage
causedbyimproperhandlingduringtransportation.
Donotholdthelenspartwhencarryingtheprojector.
Doingsocouldcausethefocusringtorotate,resultinginaccidentaldroppingoftheprojector.
Remote Control Precautions
•Handletheremotecontrolcarefully.
•Iftheremotecontrolgetswet,wipeitdryimmediately.
•Avoidexcessiveheatandhumidity.
•Donotshort,heat,ortakeapartbatteries.

v
Important Information
•Donotthrowbatteriesintore.
•Ifyouwillnotbeusingtheremotecontrolforalongtime,removethebatteries.
•Ensurethatyouhavethebatteries’polarity(+/−)alignedcorrectly.
•Donotusenewandoldbatteriestogether,orusedifferenttypesofbatteriestogether.
•Disposeofusedbatteriesaccordingtoyourlocalregulations.
Note for US Residents
Thelampinthisproductcontainsmercury.PleasedisposeaccordingtoLocal,StateorFederalLaws.
Lamp Replacement
•Usethespeciedlampforsafetyandperformance.
•Toreplacethelamp,followallinstructionsprovidedonpage
159.
•Besuretoreplacethelampandlterwhenthemessage[THE LAMP HAS REACHED THE END OF ITS US-
ABLE LIFE. PLEASE REPLACE THE LAMP AND FILTER. USE THE SPECIFIED LAMP FOR SAFETY AND
PERFORMANCE.]appears.Ifyoucontinuetousethelampafterthelamphasreachedtheendofitsusablelife,
thelampbulbmayshatter,andpiecesofglassmaybescatteredinthelampcase.Donottouchthemasthepieces
ofglassmaycauseinjury.
Ifthishappens,contactyourdealerforlampreplacement.
A Lamp Characteristic
Theprojectorhasahigh-pressuremercurylampasalightsource.
Alamphasacharacteristicthatitsbrightnessgraduallydecreaseswithage.Alsorepeatedlyturningthelampon
andoffwillincreasethepossibilityofitslowerbrightness.
CAUTION:
•DONOTTOUCHTHELAMPimmediatelyafterithasbeenused.Itwillbeextremelyhot.Turntheprojectoroff
andthendisconnectthepowercord.Allowatleastonehourforthelamptocoolbeforehandling.
•Whenremovingthelampfromaceiling-mountedprojector,makesurethatnooneisundertheprojector.Glass
fragmentscouldfallifthelamphasbeenburnedout.
About High Altitude mode
•
Set[FANMODE]to[HIGHALTITUDE]whenusingtheprojectorataltitudesapproximately5500feet/1600metersor
higher.
Usingtheprojectorataltitudesapproximately5500feet/1600metersorhigherwithoutsettingto[HIGHALTITUDE]
cancausetheprojectortooverheatandtheprotectorcouldshutdown.Ifthishappens,waitacoupleminutesand
turnontheprojector.
•Usingtheprojectorataltitudeslessthanapproximately5500feet/1600metersandsettingto[HIGHALTITUDE]
cancausethelamptoovercool,causingtheimagetoicker.Switch[FANMODE]to[AUTO].
•Usingtheprojectorataltitudesapproximately5500feet/1600metersorhighercanshortenthelifeofopticalcom-
ponentssuchasthelamp.
About Copyright of original projected pictures:
Pleasenotethatusingthisprojectorforthepurposeofcommercialgainortheattractionofpublicattentioninavenue
suchasacoffeeshoporhotelandemployingcompressionorexpansionofthescreenimagewiththefollowingfunc-
tionsmayraiseconcernabouttheinfringementofcopyrightswhichareprotectedbycopyrightlaw.
[ASPECTRATIO],[KEYSTONE],Magnifyingfeatureandothersimilarfeatures.
Turkish RoHS information relevant for Turkish market
EEE Yönetmeliğine Uygundur.
Thisdeviceisnotintendedforuseinthedirecteldofviewatvisualdisplayworkplaces.Toavoidincommodingreec-
tionsatvisualdisplayworkplacesthisdevicemustnotbeplacedinthedirecteldofview.

vi
Important Information
Health precautions to users viewing 3D images
Beforeviewing,besuretoreadhealthcareprecautionsthatmaybefoundintheuser’smanualincludedwithyour
LCDshuttereyeglassesoryour3DcompatiblecontentsuchasDVDs,videogames,computer’svideolesand
thelike.
Toavoidanyadversesymptoms,heedthefollowing:
•DonotuseLCDshuttereyeglassesforviewinganymaterialotherthan3Dimages.
•Allowadistanceof2m/7feetorgreaterbetweenthescreenandauser.Viewing3Dimagesfromtooclosea
distancecanstrainyoureyes.
•Avoidviewing3Dimagesforaprolongedperiodoftime.Takeabreakof15minutesorlongeraftereveryhour
ofviewing.
•Ifyouoranymemberofyourfamilyhasahistoryoflight-sensitiveseizures,consultadoctorbeforeviewing3D
images.
•Whileviewing3Dimages,ifyougetsicksuchasnausea,dizziness,queasiness,headache,eyestrain,blurry
vision,convulsions,andnumbness,stopviewingthem.Ifsymptomsstillpersist,consultadoctor.
•View3Dimagesfromthefrontofthescreen.Viewingfromananglemaycausefatigueoreyestrain.
Power management function
Theprojectorhaspowermanagementfunctions.Toreducepowerconsumption,thepowermanagementfunctions(1
and2)arefactorypresetasshownbelow.TocontroltheprojectorfromanexternaldeviceviaaLANorserialcable
connection,usetheon-screenmenutochangethesettingsfor1and2.
1. STANDBY MODE (Factory preset: NORMAL)
To control the projector from an external device, select [NETWORK STANDBY] for [STANDBY MODE].
NOTE:
•When[NORMAL]isselectedfor[STANDBYMODE],thefollowingconnectorsandfunctionswillnotwork:
PCCONTROLport,MONITOROUTconnector,AUDIOOUTconnector,LANfunctions,MailAlertfunction,DDC/CI(VirtualRemote
Tool)
2. AUTO POWER OFF (Factory preset: 30 minutes)
To control the projector from an external device, select [OFF] for [AUTO POWER OFF].
NOTE:
•When[0:30]isselectedfor[AUTOPOWEROFF],youcanenabletheprojectortoautomaticallyturnoffin30minutesifthereis
nosignalreceivedbyanyinputorifnooperationisperformed.

vii
Table of Contents
Important Information ............................................................................................i
1. Introduction .......................................................................................................... 1
1What’sintheBox? ......................................................................................................... 1
IntroductiontotheProjector .......................................................................................... 2
CongratulationsonYourPurchaseoftheProjector ................................................. 2
Featuresyou’llenjoy: ............................................................................................... 2
Aboutthisuser’smanual .......................................................................................... 3
PartNamesoftheProjector .......................................................................................... 4
Front/Top .................................................................................................................. 4
Rear ......................................................................................................................... 5
ControlPanel/IndicatorSection ............................................................................... 6
TerminalPanelFeatures .......................................................................................... 7
PartNamesoftheRemoteControl ............................................................................... 8
BatteryInstallation ................................................................................................... 9
RemoteControlPrecautions .................................................................................... 9
OperatingRangeforWirelessRemoteControl ........................................................ 9
OperatingEnvironmentforSoftwareIncludedonCD-ROM ........................................ 10
OperatingEnvironment .......................................................................................... 11
2. Projecting an Image (Basic Operation) .............................................. 12
1FlowofProjectinganImage ........................................................................................ 12
ConnectingYourComputer/ConnectingthePowerCord ............................................. 13
TurningontheProjector .............................................................................................. 14
NoteonStartupscreen(MenuLanguageSelectscreen) ...................................... 15
SelectingaSource ...................................................................................................... 16
Selectingthecomputerorvideosource................................................................. 16
AdjustingthePictureSizeandPosition ....................................................................... 17
Adjustingtheverticalpositionofaprojectedimage(Lensshift) ............................ 18
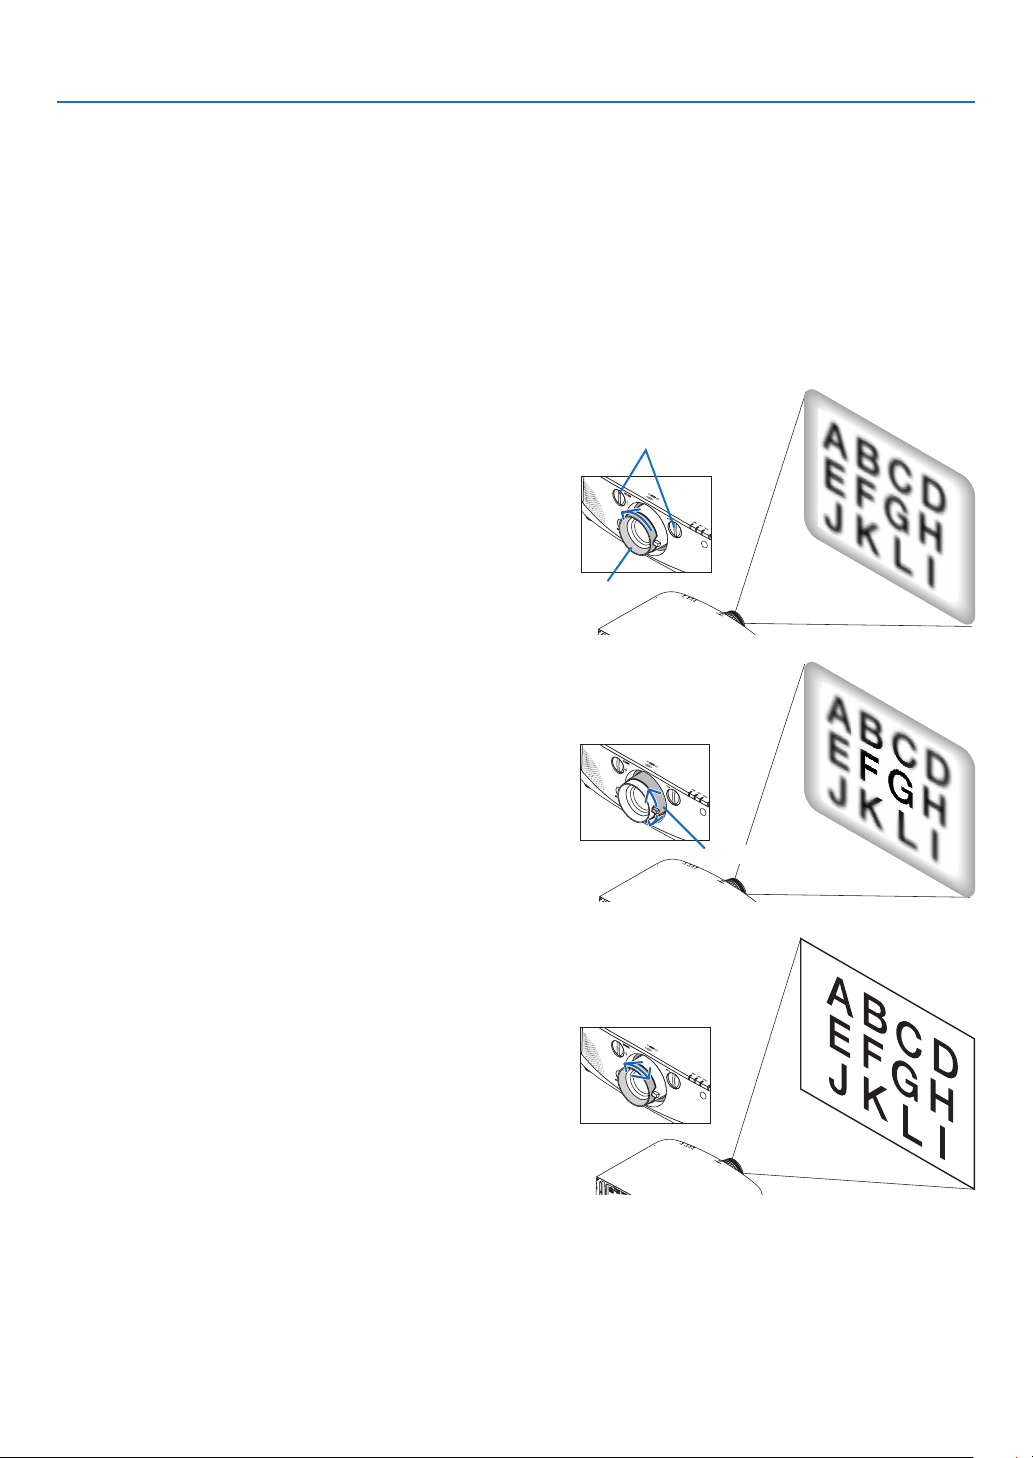
Focus ..................................................................................................................... 19
Applicablelens:NP11FL ........................................................................................ 20
Zoom ...................................................................................................................... 21
AdjustingtheTiltFeet ............................................................................................ 21
CorrectingKeystoneDistortion .................................................................................... 22
OptimizingComputerSignalAutomatically ................................................................. 24
AdjustingtheImageUsingAutoAdjust .................................................................. 24
TurningUporDownVolume ........................................................................................ 24
TurningofftheProjector .............................................................................................. 25
AfterUse...................................................................................................................... 26
3. Convenient Features ..................................................................................... 27
1TurningofftheImageandSound ................................................................................ 27
FreezingaPicture ....................................................................................................... 27
EnlargingaPicture ...................................................................................................... 27
ChangingEcoMode/CheckingEnergy-SavingEffectUsingEcoMode[ECO
MODE] ................................................................................................................... 28
CheckingEnergy-SavingEffect[CARBONMETER] ............................................. 29

viii
Table of Contents
UsingtheOptionalRemoteMouseReceiver(NP01MR) ............................................ 30
CorrectingHorizontalandVerticalKeystoneDistortion[CORNERSTONE] ................ 32
Cornerstone ........................................................................................................... 32
DisplayingTwoPicturesattheSameTime .................................................................. 35
SelectingthePIPorPICTUREBYPICTUREMode[MODE] ................................ 35
[POSITION] ............................................................................................................ 36
PreventingtheUnauthorizedUseoftheProjector[SECURITY] ................................. 37
ControllingtheProjectorbyUsinganHTTPBrowser ................................................. 40
ProjectingYourComputer’sScreenImagefromtheProjectorviaaNetwork
[NETWORKPROJECTOR] .................................................................................... 47
UsingtheProjectortoOperateYourComputerviaaNetwork[REMOTE
DESKTOP] ............................................................................................................. 51
4. Using the Viewer ............................................................................................. 56
❶WhatyoucandowiththeViewer ................................................................................. 56
❷Preparingpresentationmaterials ................................................................................ 59
❸ProjectingimagesstoredinaUSBmemorydevice .................................................... 60
StartingtheViewer ................................................................................................. 60
ExitingtheViewer .................................................................................................. 63
NamesandfunctionsofViewerscreen .................................................................. 64
Vieweroptionsettings ............................................................................................ 69
❹Projectingdatafromsharedfolder .............................................................................. 72
Connectingtheprojectortothesharedfolder ....................................................... 72
Disconnectingthesharedfolderfromtheprojector ............................................... 75
❺Projectingdatafrommediaserver............................................................................... 76
Settingup“MediaSharing”inWindowsMediaPlayer11 ...................................... 76
Settingup“MediaSharing”inWindowsMediaPlayer12 ...................................... 78
Connectingtheprojectortothemediaserver ........................................................ 79
Disconnectingtheprojectorfromthemediaserver ............................................... 80
❻Restrictionsondisplayingles .................................................................................... 81
SomerestrictionsonPowerPointles .................................................................... 81
SomerestrictionsonPDFles .............................................................................. 81
5. Using On-Screen Menu ................................................................................ 82
1UsingtheMenus .......................................................................................................... 82
MenuElements ............................................................................................................ 83
ListofMenuItems ....................................................................................................... 84
MenuDescriptions&Functions[SOURCE] ................................................................ 87
COMPUTER1,2,and3 ........................................................................................ 87
HDMI ...................................................................................................................... 87
DisplayPort ............................................................................................................. 87
VIDEO .................................................................................................................... 87
VIEWER ................................................................................................................. 87
NETWORK ............................................................................................................. 87
ENTRYLIST .......................................................................................................... 87
TESTPATTERN ..................................................................................................... 87
MenuDescriptions&Functions[ADJUST] .................................................................. 91
[PICTURE] ............................................................................................................. 91

ix
Table of Contents
[IMAGEOPTIONS] ................................................................................................ 94
[VIDEO] .................................................................................................................. 98
MenuDescriptions&Functions[SETUP] .................................................................. 100
[BASIC] ................................................................................................................ 100
[MENU] ................................................................................................................ 102
[INSTALLATION(1)] .............................................................................................. 103
[INSTALLATION(2)] .............................................................................................. 106
[OPTIONS(1)] ...................................................................................................... 108
[OPTIONS(2)] ...................................................................................................... 110
MenuDescriptions&Functions[INFO.] .................................................................... 112
[USAGETIME] ..................................................................................................... 112
[SOURCE(1)] ....................................................................................................... 113
[SOURCE(2)] ....................................................................................................... 113
[WIREDLAN] ....................................................................................................... 113
[WIRELESSLAN(1)] ............................................................................................ 114
[WIRELESSLAN(2)] ............................................................................................ 114
[VERSION(1)] ...................................................................................................... 114
[VERSION(2)] ...................................................................................................... 115
[OTHERS] ............................................................................................................ 115
MenuDescriptions&Functions[RESET] .................................................................. 116
ReturningtoFactoryDefault[RESET] ................................................................. 116
❾ApplicationMenu ....................................................................................................... 118
IMAGEEXPRESSUTILITY ................................................................................. 118
DESKTOPCONTROLUTILITY ........................................................................... 118
NETWORKPROJECTOR .................................................................................... 119
REMOTEDESKTOPCONNECTION .................................................................. 119
NETWORKSETTINGS ........................................................................................ 120
TOOLS ................................................................................................................. 136
6. Connecting to Other Equipment .......................................................... 141
Mountingalens(soldseparately) .............................................................................. 141
Mountingthelens................................................................................................. 141
Removingthelens ............................................................................................... 142
MakingConnections .................................................................................................. 143
AnalogRGBsignalconnection ............................................................................ 143
DigitalRGBsignalconnection ............................................................................. 144
ConnectinganExternalMonitor .......................................................................... 146
ConnectingYourDVDPlayerorOtherAVEquipment .......................................... 147
ConnectingComponentInput .............................................................................. 148
ConnectingHDMIInput........................................................................................ 149
ConnectingtoaWiredLAN ................................................................................. 150
ConnectingtoaWirelessLAN(soldseparately).................................................. 151
MountingawirelessLANunit .............................................................................. 151
ToremovethewirelessLANunit.......................................................................... 153
ProjectingPortraitImages .................................................................................... 155
7. Maintenance .................................................................................................... 158
1CleaningtheFilters.................................................................................................... 158
CleaningtheLens...................................................................................................... 161
CleaningtheCabinet ................................................................................................. 161

x
Table of Contents
ReplacingtheLampandtheFilters ........................................................................... 162
8. User Supportware ......................................................................................... 167
InstallingSoftwareProgram ...................................................................................... 167
InstallationforWindowssoftware ......................................................................... 167
InstallationforMacintoshsoftware ....................................................................... 169
OperatingtheProjectorViatheLAN(VirtualRemoteTool) ....................................... 170
ProjectingYourComputer’sScreenImagefromtheProjectoroveraLAN(Image
ExpressUtilityLite) .............................................................................................. 173
ProjectinganImagefromanAngle(GeometricCorrectionToolinImageExpress
UtilityLite) ............................................................................................................ 175
WhatyoucandowithGCT .................................................................................. 175
UsingtheProjectortoOperateYourComputeroveraLAN(DesktopControlUtility
1.0) ....................................................................................................................... 177
WhatyoucandowithDesktopControlUtility1.0 ................................................ 177
ConnectingtheprojectortoaLAN ....................................................................... 177
Usingtheprojectortooperateyourcomputer’sdesktopscreen .......................... 178
ControllingtheProjectoroveraLAN(PCControlUtilityPro4) ................................. 186
9. Appendix ............................................................................................................. 187
Throwdistanceandscreensize ................................................................................ 187
Lenstypesandthrowdistance ............................................................................ 187
Tablesofscreensizesanddimensions ............................................................... 190
Lensshiftingrange ............................................................................................... 191
CompatibleInputSignalList ...................................................................................... 193
Specications ............................................................................................................ 196
CabinetDimensions .................................................................................................. 198
Mountingthecablecover(soldseparately) ............................................................... 199
PinAssignmentsofD-SubCOMPUTERInputConnector ........................................ 200
Troubleshooting ......................................................................................................... 201
IndicatorMessages .............................................................................................. 201
CommonProblems&Solutions ........................................................................... 203
Ifthereisnopicture,orthepictureisnotdisplayedcorrectly. .............................. 205
PCControlCodesandCableConnection ................................................................. 206
TroubleshootingCheckList ........................................................................................ 207
1
Projector
1. Introduction
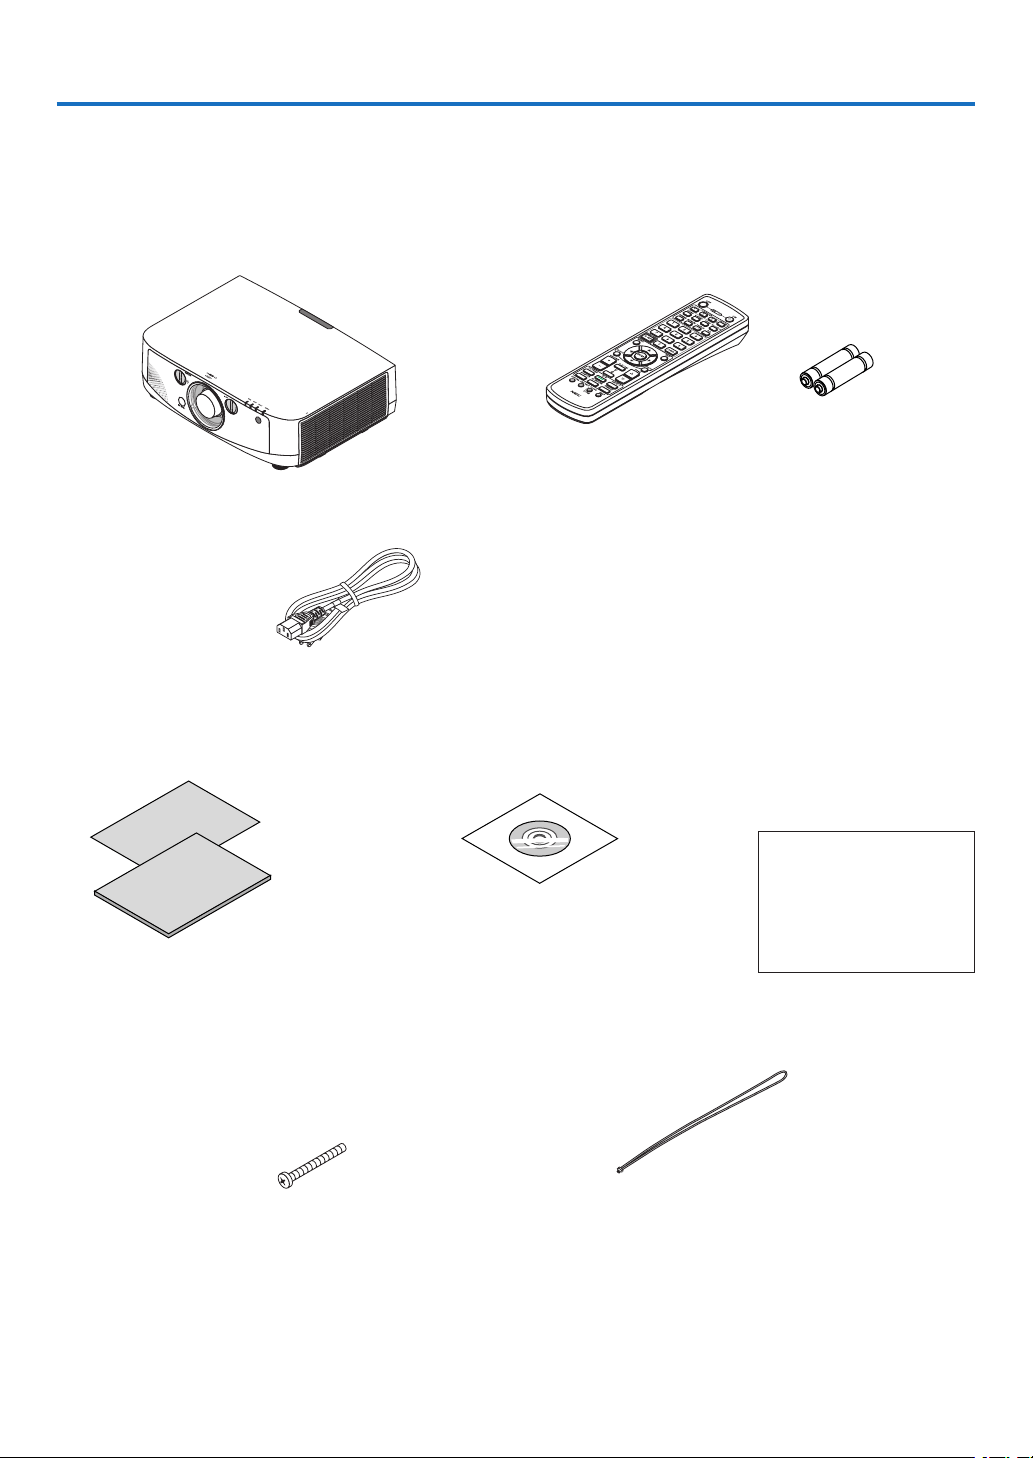
1 What’s in the Box?
Makesureyourboxcontainseverythinglisted.Ifanypiecesaremissing,contactyourdealer.
Pleasesavetheoriginalboxandpackingmaterialsifyoueverneedtoshipyourprojector.
Power cord
(US: 7N080241)
(EU: 7N080022)
Lens theft prevention screw (24V00841)
This screw makes it difficult to remove the
lens mounted on the projector. (→ page 142)
Straps (24J23901) (for preventing lamp and filter covers from
falling) (x2)
Attaching the straps to the lamp and filter covers prevents
them from falling when the projector is suspended from the
ceiling.
NEC Projector CD-ROM
User’s manual (PDF) and the utility
software
(7N951971)
For North America only
Registrationcard
Limitedwarranty
For customers in Europe:
YouwillndourcurrentvalidGuar-
anteePolicyonourWebSite:
www.nec-display-solutions.com
•ImportantInfomation(ForNorthAmerica:
7N8N1551) (For Other countries than North
America: 7N8N1551 and 7N8N1562)
•QuickSetupGuide(ForNorthAmerica:
7N8N1571) (For Other countries than North
America: 7N8N1571 and 7N8N1581)
Remote control
(7N900961)
AA alkaline batteries
(x2)
Dust cap for lens
* The projector is shipped without a
lens. For the types of lens and throw
distances, see page 201.

2
1. Introduction
Introduction to the Projector
Thissectionintroducesyoutoyournewprojectoranddescribesthefeaturesandcontrols.
Congratulations on Your Purchase of the Projector
Thisprojectorisoneoftheverybestprojectorsavailabletoday.Theprojectorenablesyoutoprojectpreciseimages
upto500inchesacross(measureddiagonally)fromyourPCorMacintoshcomputer(desktopornotebook),VCR,
DVDplayer,ordocumentcamera.
Youcanusetheprojectoronatabletoporcart,youcanusetheprojectortoprojectimagesfrombehindthescreen,
andtheprojectorcanbepermanentlymountedonaceiling*
1
.Theremotecontrolcanbeusedwirelessly.
*
1
Donotattempttomounttheprojectoronaceilingyourself.
Theprojectormustbeinstalledbyqualiedtechniciansinordertoensureproperoperationandreducetherisk
ofbodilyinjury.
Inaddition,theceilingmustbestrongenoughtosupporttheprojectorandtheinstallationmustbeinaccordance
withanylocalbuildingcodes.Pleaseconsultyourdealerformoreinformation.
Features you’ll enjoy:
•Liquidcrystaltypehighbrightness/highresolutionprojector
Model LCDpanelResolutionAspectRatio
PA722X/PA721X/PA622X/
PA621X
0.79"(withMLA)1024×768dots4:3
PA672W/PA671W/
PA572W/PA571W
0.76"(withMLA)1280×800dots16:10
PA622U/PA621U/PA522U/
PA521U
0.76"(withMLA)1920×1200dots16:10
ThePA722X/PA721X/PA622X/PA621X/PA672W/PA671W/PA572W/PA571Wprojectorscoverinputsignalsupto
WUXGA(1920×1200dots)thankstotheAdvancedAccuBlendfunction.
•Widerangeofoptionallensesselectableaccordingtotheplaceofinstallation
Thisprojectorsupports5typesofoptionallenses,providingaselectionoflensesadaptedtoavarietyofplaces
ofinstallationandprojectionmethods.
Inaddition,thelensescanbemountedandremovedinonetouch.
Notethatnolensismounteduponshipmentfromthefactory.Pleasepurchaseoptionallensesseparately.
•Lensshiftfunctionforeasilyadjustingthepositionoftheprojectedimage
Thepositionoftheprojectedimageismovedbyturningthetwodialsontheprojector’sfront,oneforthevertical
direction,oneforthehorizontaldirection.
•360°installationangle(tilt-free)
Theprojectorcanbeinstalledatanyangle(360°).
Note,however,thatthe“fanmode”settingmustbechangedaccordingtotheangleofinstallation.
Also,theprojectorcannotbeinstalledtiltedtotheleftorright.
•Widerangeofinput/outputconnectors(HDMI,DisplayPort,BNC,etc.)andbuilt-inmonauralspeaker
Theprojectorisequippedwithavarietyofinput/outputconnectors:computer(analog),5-coreBNC,HDMI,
DisplayPort,etc.(Thecomputer(analog)andBNCconnectorsalsosupportcomponentinputs.)
Theprojector’sHDMIandDisplayPortinputconnectorssupportHDCP.
Theprojectorisalsoequippedwithabuilt-in10Wmonauralspeaker.
•Highpicturequalityprocessingcircuit
TheReon-VXvideoprocessorisusedtoprojecthighqualityimages.
•Energy-savingdesignwithastandbypowerconsumptionof0.2watts
Whentheon-screenmenu’sstandbymodeissetto“PowerSaving”,thepowerconsumptioninthestandbymode

3
1. Introduction
is0.2watts.
•“Ecomode”forlowpowerconsumptionand“CarbonMeter”display
Theprojectorisequippedwithan“ecomode”forreducingpowerconsumptionduringuse.Furthermore,the
power-savingeffectwhentheecomodeissetisconvertedintotheamountofreductionsofCO
2
emissionsand
thisisindicatedontheconrmationmessagedisplayedwhenthepoweristurnedoffandat“Information”onthe
on-screenmenu(CARBONMETER).
•Maximumlampreplacementtimeof4000hours(3000hoursinNormalmode)andnoneedtocleanthe
filters
Whenusedintheecomode,thelampreplacementtime*isextendedtoamaximumof4000hours.
*Thistimeisnotguaranteed.
Furthermore,thisprojectoruseslarge2-layerlters.Whentheseltersarereplacedwithnewoneswhenchanging
thelamp,thereisnoneedforregularltercleaning.
•Seamlessswitchfunctionforsmootherscreenchangeswhenswitchingthesignal
Whentheinputconnectorisswitched,theimagedisplayedbeforeswitchingisheldsothatthatthenewimage
canbeswitchedtowithoutabreakduetoabsenceofasignal.
•Simultaneousdisplayof2images(PIP/PICTUREBYPICTURE)
Twoimagescanbeprojectedsimultaneouslywithasingleprojector.
Therearetwotypesoflayoutsforthetwoimages:“picture-in-picture”inwhichasub-pictureisdisplayedonthe
mainpicture,and“picture-by-picture”inwhichthemainandsubpicturesaredisplayednexttoeachother.
•Securityfunctionforpreventingunauthorizeduse
Thisprojectorisequippedwiththefollowingsecurityfunctions:
-Passwordsecurity:Whenapasswordissetintheon-screenmenu,ascreentoinputthepasswordappears
whentheprojector’spoweristurnedon.
-Theftpreventionlock:AsecuritycablecompatiblewithKensingtonlockscanbeconnectedtotheprojector.
-Securitybar:Theprojectorhasamechanismallowingaregularsecuritycable(orwire)tobeinstalled.
•Wired/wirelessLANcompatibility(wirelessLANunitsoldseparately)
TheprojectorisequippedwithaLANport(RJ-45)forconnectiontoawiredLANfortransferringimagesfroma
computertotheprojector,controllingtheprojectorfromacomputer,etc.
Furthermore,theprojectorcanbeusedinawirelessLANbymountingtheseparatelysoldwirelessLANunit
(NP02LM).
•Convenientutilitysoftware(UserSupportware)providedasstandard
Sevenutilitysoftwareprograms(VirtualRemoteTool,ImageExpressUtilityLite,DesktopControlUtility1.0,PC
ControlUtilityPro4)areprovidedontheincludedNECProjectorCD-ROM.
•LAN-compatibleviewerfunction
StillandmovingimagesinsharedfoldersonacomputerconnectedbywiredorwirelessLANcanbeprojected
withtheprojector’sviewer.
-TheviewersupportstheWindowsMediaPlayer11’s“mediasharing”function.
•CRESTRONROOMVIEWcompatibility
TheprojectorsupportsCRESTRONROOMVIEW,allowingmultipledevicesconnectedinthenetworktobemanaged
andcontrolledfromacomputer.
About this user’s manual
Thefastestwaytogetstartedistotakeyourtimeanddoeverythingrightthersttime.Takeafewminutesnowto
reviewtheuser’smanual.Thismaysaveyoutimelateron.Atthebeginningofeachsectionofthemanualyou’llnd
anoverview.Ifthesectiondoesn’tapply,youcanskipit.

4
1. Introduction
Part Names of the Projector
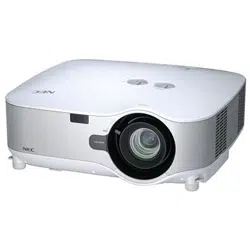
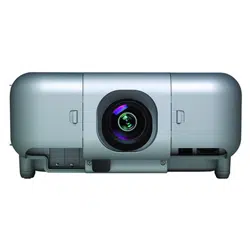
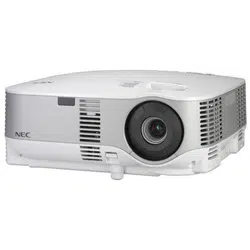
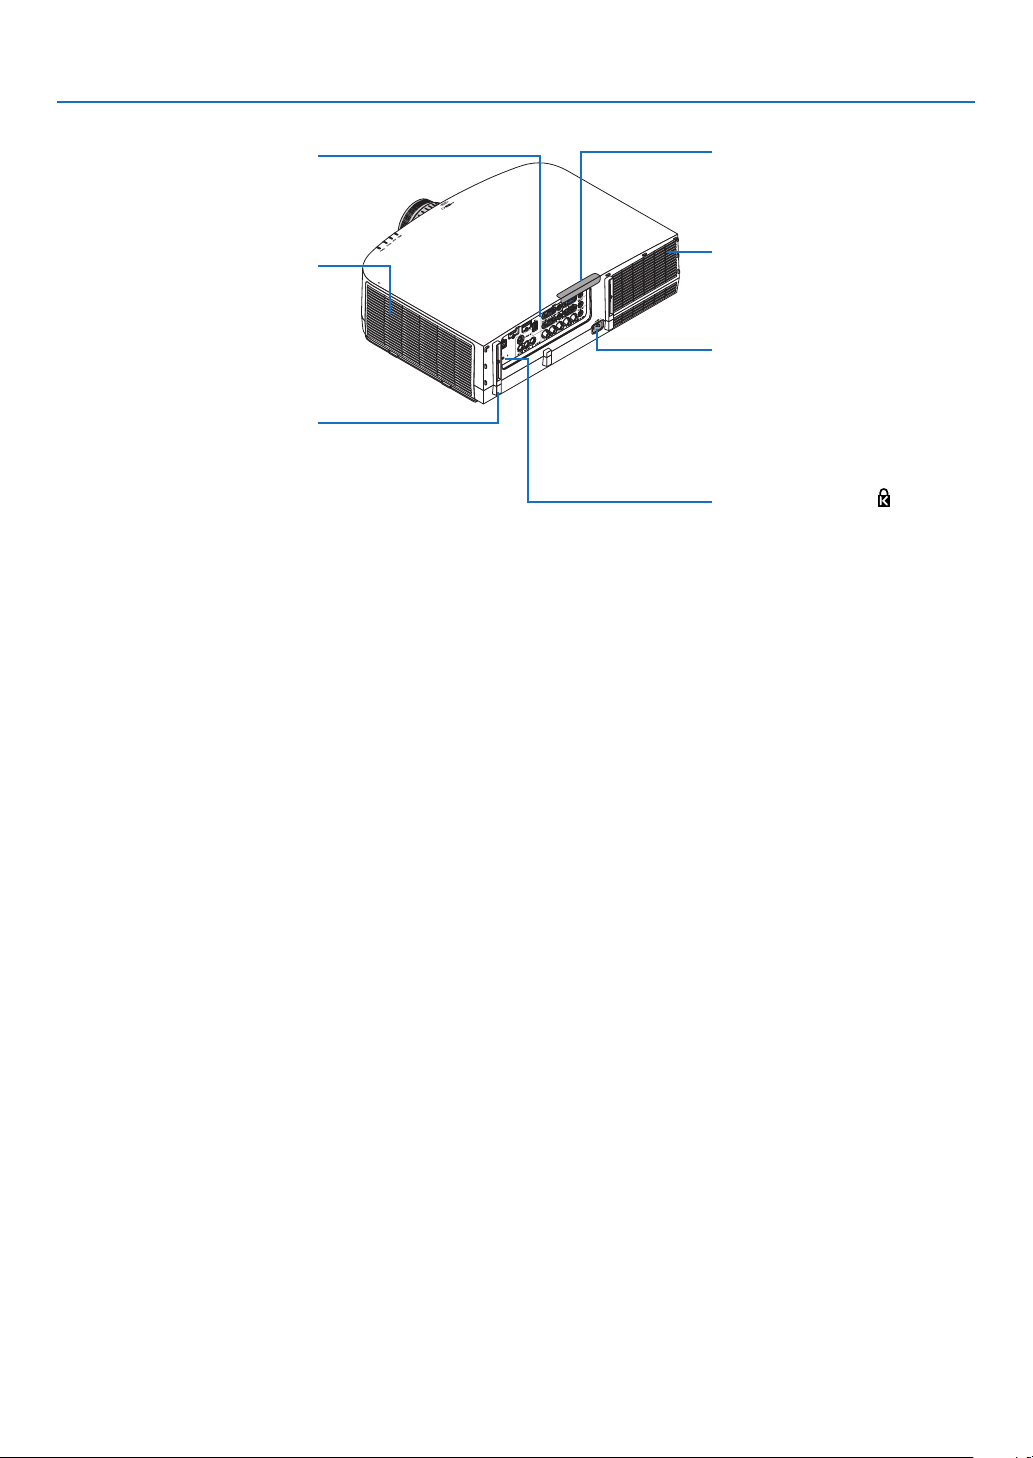
Front/Top
Thelensissoldseparately.ThedescriptionbelowisforwhentheNP13ZLlensismounted.
Control Panel
(→ page 6)
Lens Shift Dial (vertical/horizontal)
(
→ page 18)
Lens
Remote Sensor (located on the
front and the rear)
(
→ page 9)
Remote Sensor
(
→ page 9)
Zoom Lever/Zoom Ring
(→ page 21)
Lens Cap
(The optional lens is shipped with
the lens cap.)
Focus Ring
(
→ page 19)
Adjustable Tilt Foot
(
→ page 21)
Indicator Section
(→ page 6)
Lens Release Button
(
→ page 142)
Adjustable Tilt Foot
(
→ page 21)
Ventilation (outlet)
Heated air is exhausted from here.
Mounting the straps
1. Mount the straps to the lamp cover as shown on the diagram below.
2. Insert the knot in the strap into the hole on the bottom of the projector and pull in the direction of the arrow
to fasten.
a
b
Lamp Cover (→ page 160)
Security Bar
Attach an anti-theft device.
The security bar accepts security
wires or chains up to 0.18 inch/4.6
mm in diameter.
Monaural Speaker (10 W)
Lamp cover strap insertion hole
5
1. Introduction
Terminal Panel
(→ page 7)
Rear
Remote Sensor (located on the
front and the rear)
(→ page 9)
AC Input
Connect the supplied power cord’s
three-pin plug here, and plug the
other end into an active wall outlet.
(
→ page 13)
*ThissecurityslotsupportstheMicroSaver
®
SecuritySystem.
Built-in Security Slot ( )*
Cable cover connection
(right and left)
Screw holes and grooves for the
optional cable cover
(
→ page 212)
Ventilation (inlet) / Filter Cover
The wireless LAN unit’s USB (LAN)
port is located inside here.
(→ page 151, 155)
Ventilation (outlet)
Heated air is exhausted from here.
6
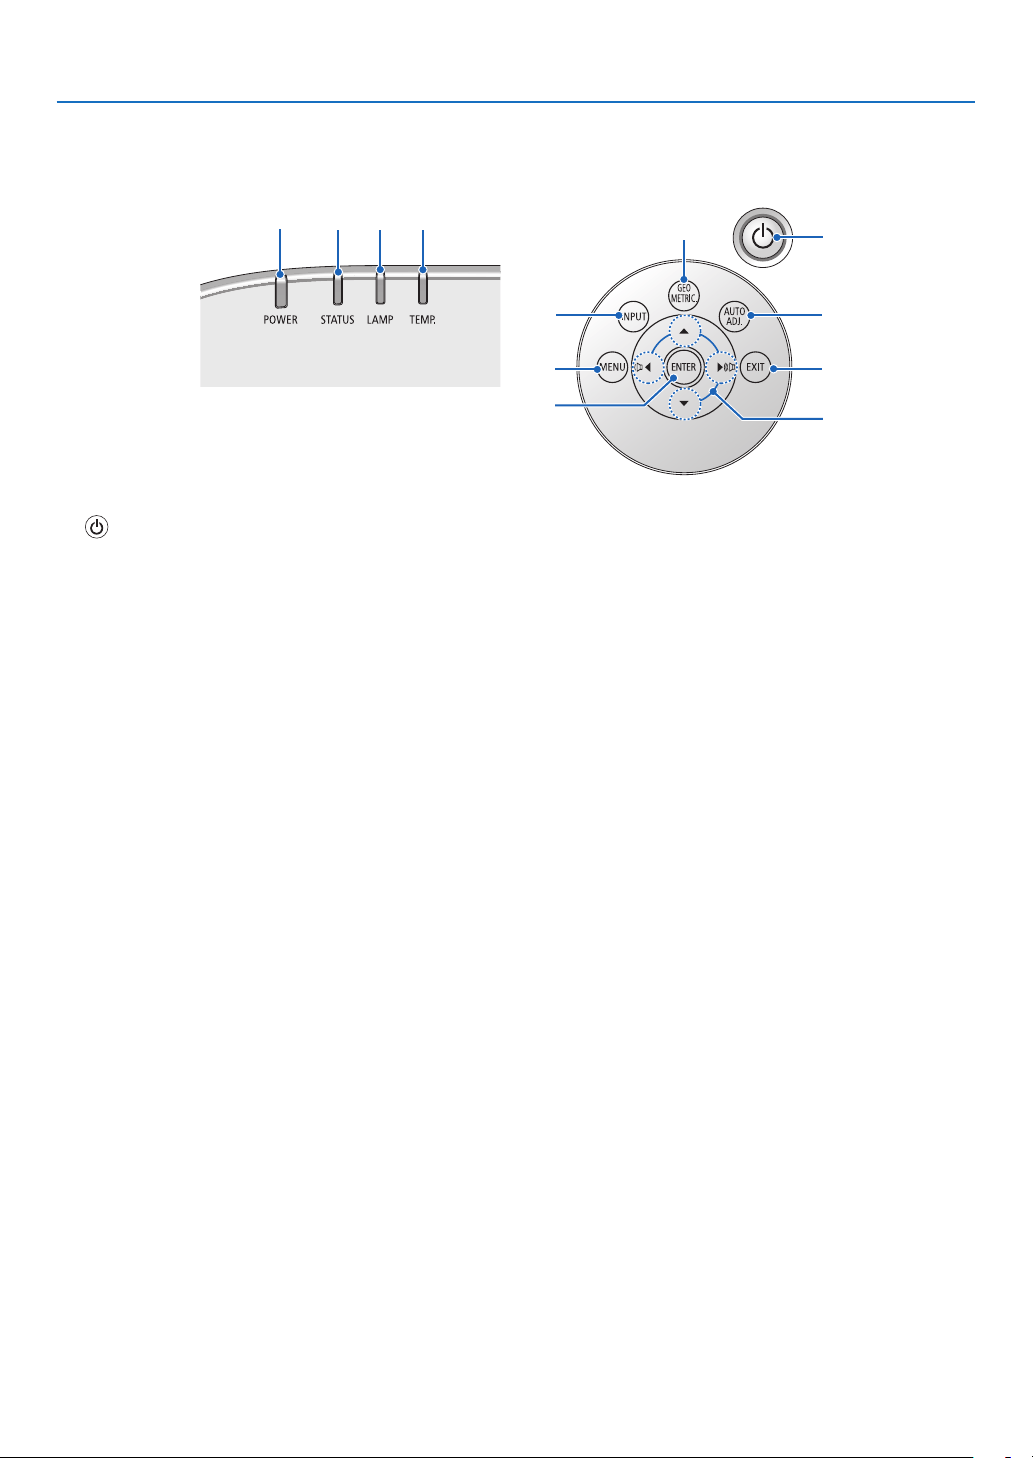
1. Introduction
Control Panel/Indicator Section
1. (POWER)Button(→page14,25)
2. POWER Indicator (→page
13,14,25,214)
3. STATUS Indicator (→page
214)
4.LAMPIndicator(→page
159,215)
5. TEMP. Indicator (→page
215)
6.SOURCEButton(→page
16)
7. AUTO ADJ. Button (→page
24)
8. GEOMETRIC. Button (→page
32)
9. MENU Button (→page
82)
10./VolumeButtons (→page
24)
11. ENTER Button (→page
82)
12. EXIT Button (→page
82)
11
10
7
2
3
4
5
8
1
6
12
9
7
1. Introduction
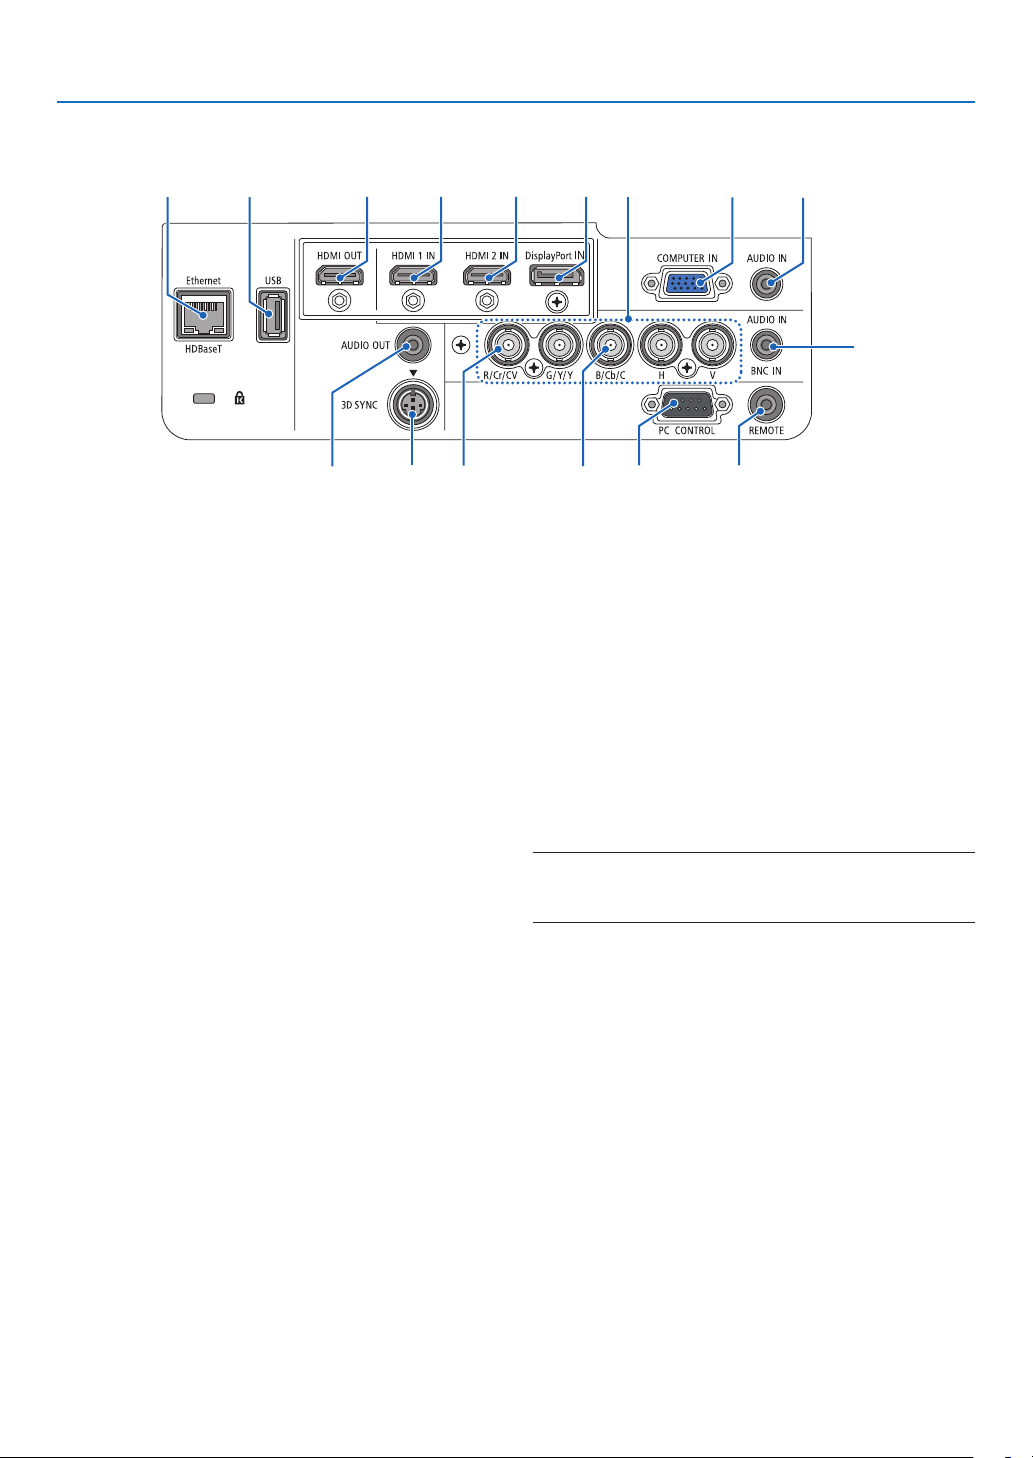
Terminal Panel Features
1.HDMI1INConnector(TypeA)
(→page144,145,149)
2.HDMI2INConnector(TypeA)
(→page
144,145,149)
3. DisplayPort IN Connector
(→page
144)
4.BNCIN[R/Cr/CV,G/Y/Y,B/Cb/C,H,V]Connec-
tors(BNC×5)
(→page
143,148)
5.BNC(CV)InputConnector(BNC×1)
(→page
143,148)
6.BNC(Y/C)InputConnector(BNC×2)
(→page
143,148)
7.BNCAUDIOINMiniJack(StereoMini)
(→page
143,148)
8.COMPUTERIN/ComponentInputConnector
(MiniD-Sub15Pin)
(→page
13,143,148)
9.COMPUTERAUDIOINMiniJack(StereoMini)
(→page
143,148)
10.Ethernet/HDBaseTPort(RJ-45)
(→page
150)
11.USB-APort(TypeA)
(→page
60)
(NotavailableonPA722X/PA622X/PA672W/PA572W/
PA622U/PA522U)
12.HDMIOUTConnector(TypeA)
(→page
144,145,149)
13.AUDIOOUTMiniJack(StereoMini)
(→page146)
14.3DSYNCConnector(MiniDIN4Pin)
(→page
147)
2 3112
8
9
10
11
7
4
5
15 16
13
14
6
15.PCCONTROLPort(D-Sub9Pin)
(→page219)
UsethisporttoconnectaPCorcontrolsystem.
Thisenablesyoutocontroltheprojectorusingserial
communicationprotocol.Ifyouarewritingyourown
program,typicalPCcontrolcodesareonpage219.
16.REMOTEConnector(StereoMini)
Usethisconnectorforwiredremotecontrolofthe
projectorusingtheNECoptionalremotecontrol.
Connecttheprojectorandoptionalremotecontrol
usingacommerciallyavailablewiredremotecontrol
cable.
NOTE:WhenaremotecontrolcableisconnectedtotheRE
-
MOTEconnector,infraredremotecontroloperationscannot
beperformed.
8
1. Introduction
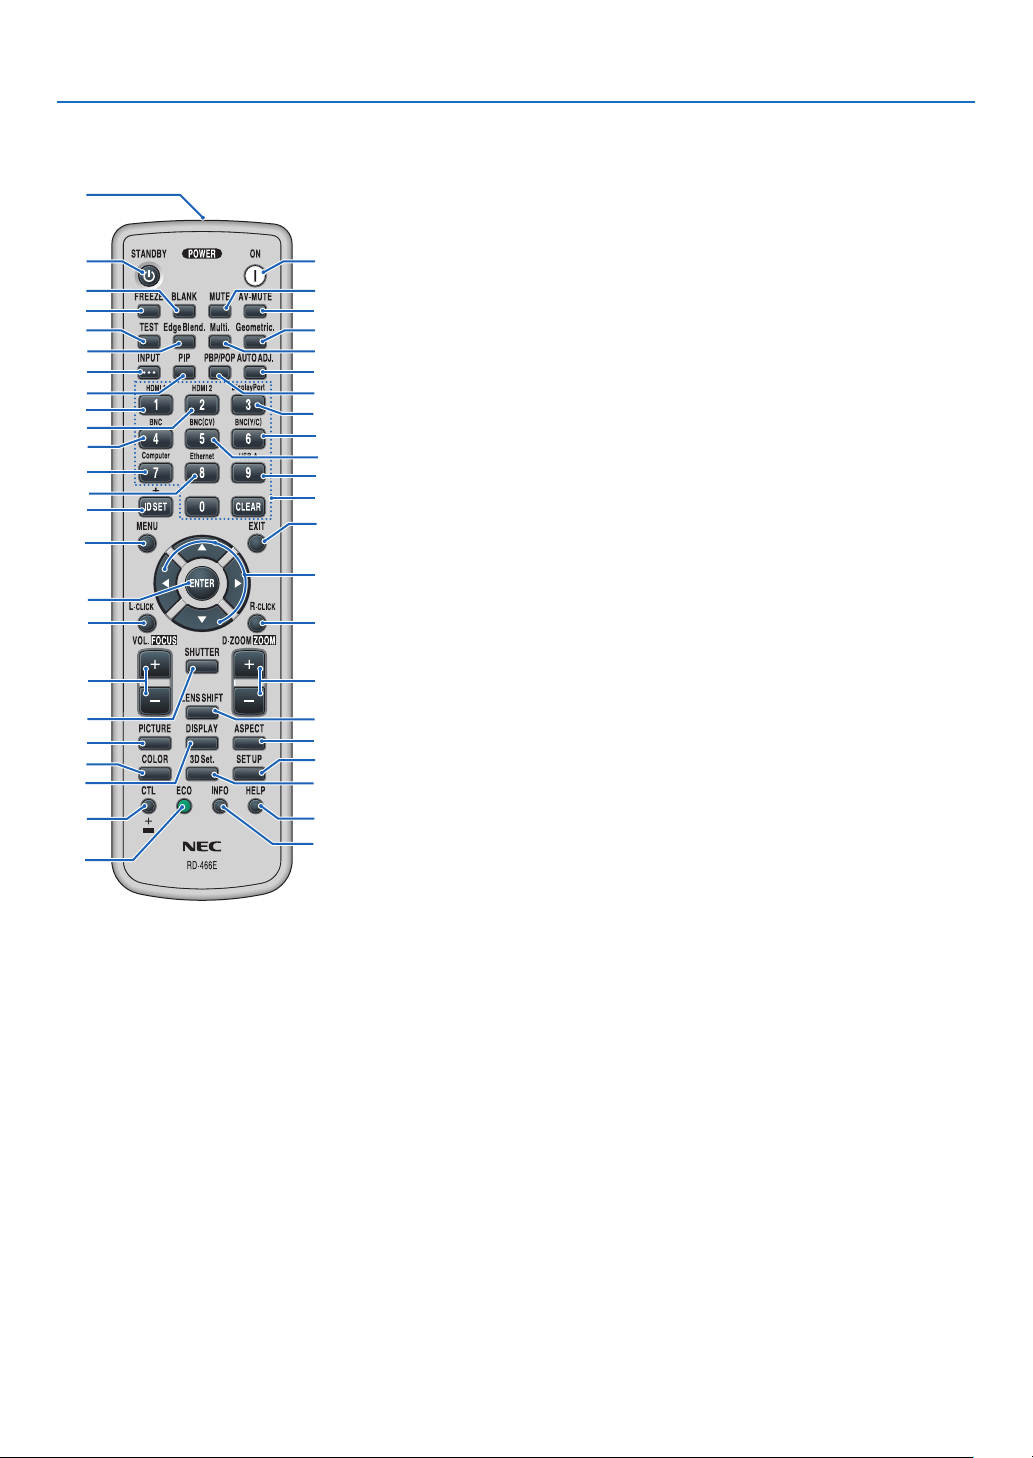
Part Names of the Remote Control
9. Edge Blend. Button
(→page
XXX)
10.Multi.Button
(→page
XXX)
11. Geometric. Button
(→page
32)
12. INPUT Button
(→page
XXX)
13. PIP Button
(→page
16,35)
14.PBP/POPButton
(→page
XXX)
15. AUTO ADJ. Button
(→page
24)
16.1(HDMI1)Button
(→page
16)
17.2(HDMI2)Button
(→page
16)
18.3(DisplayPort)Button
(→page
16)
19.4(BNC)Button
(→page
XXX)
20.5(BNC(CV))Button
(→page
XXX)
21.6(BNC(Y/C))Button
(→page
XXX)
22.7(Computer)Button
(→page
16)
23.8(Ethernet)Button
(→page
XXX)
24.9(USB-A)Button
(→page
XXX)
25. ID SET Button
(→page
107)
26.NumericKeypadButton/
CLEAR Button
(→page
107)
27. MENU Button
(→page
82)
28. EXIT Button
(→page
82)
29. Button
(→page82)
30.ENTERButton
(→page82)
1. Infrared Transmitter
(→page
9)
2. POWER ON Button
(→page
14)
3. STANDBY Button
(→page
25)
4.FREEZEButton
(→page
27)
5.BLANKButton
(→page
XXX)
6.MUTEButton
(→page
XXX)
7.AV-MUTEButton
(→page
27)
8. TEST Button
(→pageXXX)
31.L-CLICKButton*
(→page
31)
(notavailableonthisseriesof
projectors)
32.R-CLICKButton*
(→page
31)
(notavailableonthisseriesof
projectors)
33.VOL./FOCUS(+)(−)Button
(→page
24)
34.D-ZOOM/ZOOM(+)(−)Button
(→page
27)
(“ZOOM”Buttondoesnotworkon
thisseriesofprojectors)
35. SHUTTER Button
(notavailableonthisseriesof
projectors)
36.LENSSHIFTButton
(notavailableonthisseriesof
projectors)
37. PICTURE Button
(→page91,93)
38. DISPLAY Button
(→page
XXX)
39. ASPECT Button
(→page
96)
40.COLORButton
(→page
XXX)
41.3DSet.Button
(→page
XXX)
42.SETUPButton
(→page
XXX)
43.CTLButton
(→page
XXX)
44.ECOButton
(→page
28)
45.INFOButton
(→page
XXX)
46.HELPButton
(→page
112)
1
3
5
4
8
9
12
13
2
6
7
11
10
15
14
16
19
22
25
23
17
27
31
33
35
30
21
28
29
20
32
24
26
18
34
36
43
44
46
45
37
40
38
42
41
39
9
1. Introduction
Remote Control Precautions
•Handletheremotecontrolcarefully.
•Iftheremotecontrolgetswet,wipeitdryimmediately.
•Avoidexcessiveheatandhumidity.
•Donotshort,heat,ortakeapartbatteries.
•Donotthrowbatteriesintore.
•Ifyouwillnotbeusingtheremotecontrolforalongtime,removethebatteries.
•Ensurethatyouhavethebatteries’polarity(+/−)alignedcorrectly.
•Donotusenewandoldbatteriestogether,orusedifferenttypesofbatteriestogether.
•Disposeofusedbatteriesaccordingtoyourlocalregulations.
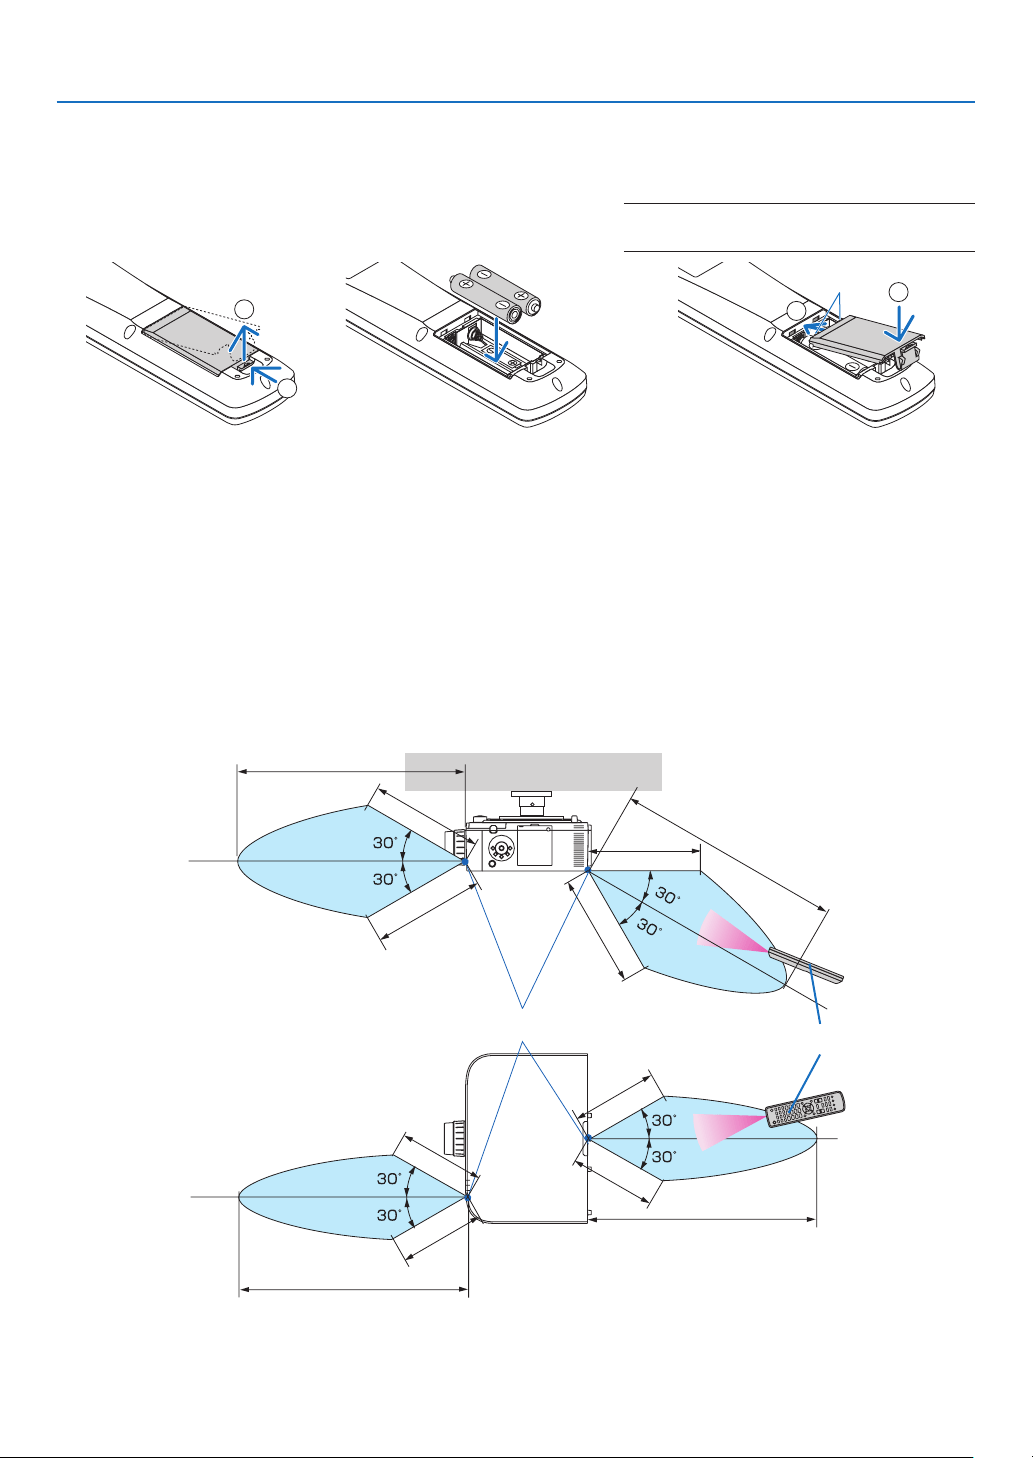
Operating Range for Wireless Remote Control
•Theinfraredsignaloperatesbyline-of-sightuptoadistanceofabout22feet/7mandwithina60-degreeangleof
theremotesensorontheprojectorcabinet.
•Theprojectorwillnotrespondifthereareobjectsbetweentheremotecontrolandthesensor,orifstronglightfalls
onthesensor.Weakbatterieswillalsopreventtheremotecontrolfromproperlyoperatingtheprojector.
Battery Installation
40 m/131.2 feet
40 m/131.2 feet
Remote control
Remote sensor on projector cabinet
1
Pressthecatchandremove
thebatterycover.
2
Installnewones(AA).Ensure
thatyouhavethebatteries’polar-
ity(+/−)alignedcorrectly.
3
Slipthecoverbackoverthebatteriesuntilit
snapsintoplace.
NOTE:Donotmixdifferenttypesofbatteriesor
newandoldbatteries.
1
2
1
2
40 m/131.2 feet
40 m/131.2 feet
20 m/65.6 feet
20 m/65.6 feet
20 m/65.6 feet
20 m/65.6 feet
15 m/49.2 feet
15 m/49.2 feet
15 m/49.2 feet
15 m/49.2 feet

10
1. Introduction
Operating Environment for Software Included on CD-ROM
NamesandFeaturesofBundledSoftwarePrograms
NameofsoftwareprogramFeatures
VirtualRemoteToolWhenthecomputerandprojectorareconnectedusinganetwork(wired/wireless
LAN),suchoperationsasturningtheprojector’spoweronandoffandswitching
thesignalcanbeperformed.Itisalsopossibletosendanimagetotheprojector
andregisteritasthebackgroundlogo.Oncetheimageisregistered,itcanbe
lockedtopreventthelogofrombeingoverwritten.(→page
167)
ImageExpressUtilityLite•Whenthecomputerandprojectorareconnectedusinganetwork(wired/
wirelessLAN),thecomputerscreencanbesenttotheprojectorandprojected.
Thereisnoneedforacomputercable.(→page
150,page170)
•ThissoftwareprogramcanbeusedtocontrolthepowerON/OFFandsource
selectionoftheprojectorfromyourcomputer.
•TheGeometricCorrectionTool(GCT)functionallowsyoutocorrectdistortion
ofimagesprojectedonacurvedwall.(→page172)
DesktopControlUtility1.0•Thisisasoftwareprogramusedtooperatethedesktopscreenofapersonal
computerataremotelocationbyusingaprojectorviawired/wirelessLAN.
(→page
185)
PCControlUtilityPro4Thisisasoftwareprogramusedtooperatetheprojectorfromthecomputerwhen
thecomputerandtheprojectorareconnectedwithLAN(wiredorwireless)or
aserialcable.(→page
194)
*AseparatelysoldwirelessLANunitisrequiredtouseawirelessLAN.
NOTE:
•ImageExpressUtilityLiteandImageExpressUtilityforMacdonotsupport“MeetingMode”whichisprovidedinImageExpress
Utility2.0.
Download service
Fortheupdateinformationaboutthesesoftwareprograms,visitourwebsite:
URL:
http://www.nec-display.com/dl/en/index.html

11
1. Introduction
Operating Environment
ThefollowingistheoperatingenvironmentforImageExpressUtilityLite.Fortheoperatingenvironmentofothersoft-
wareprogram,refertothehelpfunctionofeachsoftwareprogram.
SupportedOSWindows7HomeBasic
Windows7HomePremium
Windows7Professional
Windows7Ultimate
Windows7Enterprise
WindowsVistaHomeBasic
WindowsVistaHomePremium
WindowsVistaBusiness
WindowsVistaUltimate
WindowsVistaEnterprise
WindowsXPHomeEditionServicePack3orlater
WindowsXPProfessionalServicePack3orlater
•Only32-bitversion
•Windowspower-savingfunctionisnotsupported.
Processor•Windows7/WindowsVista
PentiumM1.2GHzequivalentorhigherrequired
Dualcore1.5GHzorhigherrecommended
•WindowsXP
PentiumM1.0GHzequivalentorhigherrequired
Dualcore1.0GHzorhigherrecommended
Memory•Windows7/WindowsVista
512MBormorerequired
1GBormorerecommended
•WindowsXP
256MBormorerequired
512MBormorerecommended
*Morememorymayberequiredtorunadditionalapplicationssimultaneously.
Graphicprocessor•Windows7/WindowsVista
The“Graphics”score3.0ormoreof“WindowsExperienceIndex”recommended.
NetworkenvironmentTCP/IP-compatiblewiredLANorwirelessLAN
(*UseawirelessLANunitcomplyingwiththeWi-Fistandard.)
Resolution•Windows7/WindowsVista
SVGA(800×600)orhigherrequired
XGA(1024×768)recommended
•WindowsXP
VGA(640×480)orhigherrequired
XGA(1024×768)recommended
1024dots×768lines-1280dots×800linesrecommended(PA672W/PA671W/
PA572W/PA571W/PA622U/PA621U/PA522U/PA521U)
ScreenColorsHighColor(15bits,16bits)
TrueColor(24bits,32bits)(recommended)
•256orfewercolorsarenotsupported.

12
Thissectiondescribeshowtoturnontheprojectorandtoprojectapictureontothescreen.
1 Flow of Projecting an Image
Step 1
•Connectingyourcomputer/Connectingthepowercord(→ page 13)
Step 2
•Turningontheprojector(→ page 14)
Step 3
•Selectingasource(→ page 16)
Step 4
•Adjustingthepicturesizeandposition(→ page 17)
•Correctingkeystonedistortion[KEYSTONE](→ page 22)
Step 5
•Adjustingapictureandsound
- Optimizing a computer signal automatically (→ page 24)
- Turning up or down volume (
→ page 24)
Step 6
•Makingapresentation
Step 7
•Turningofftheprojector(→ page 25)
Step 8
•Afteruse(→ page 26)
2. Projecting an Image (Basic Operation)
13
2. Projecting an Image (Basic Operation)
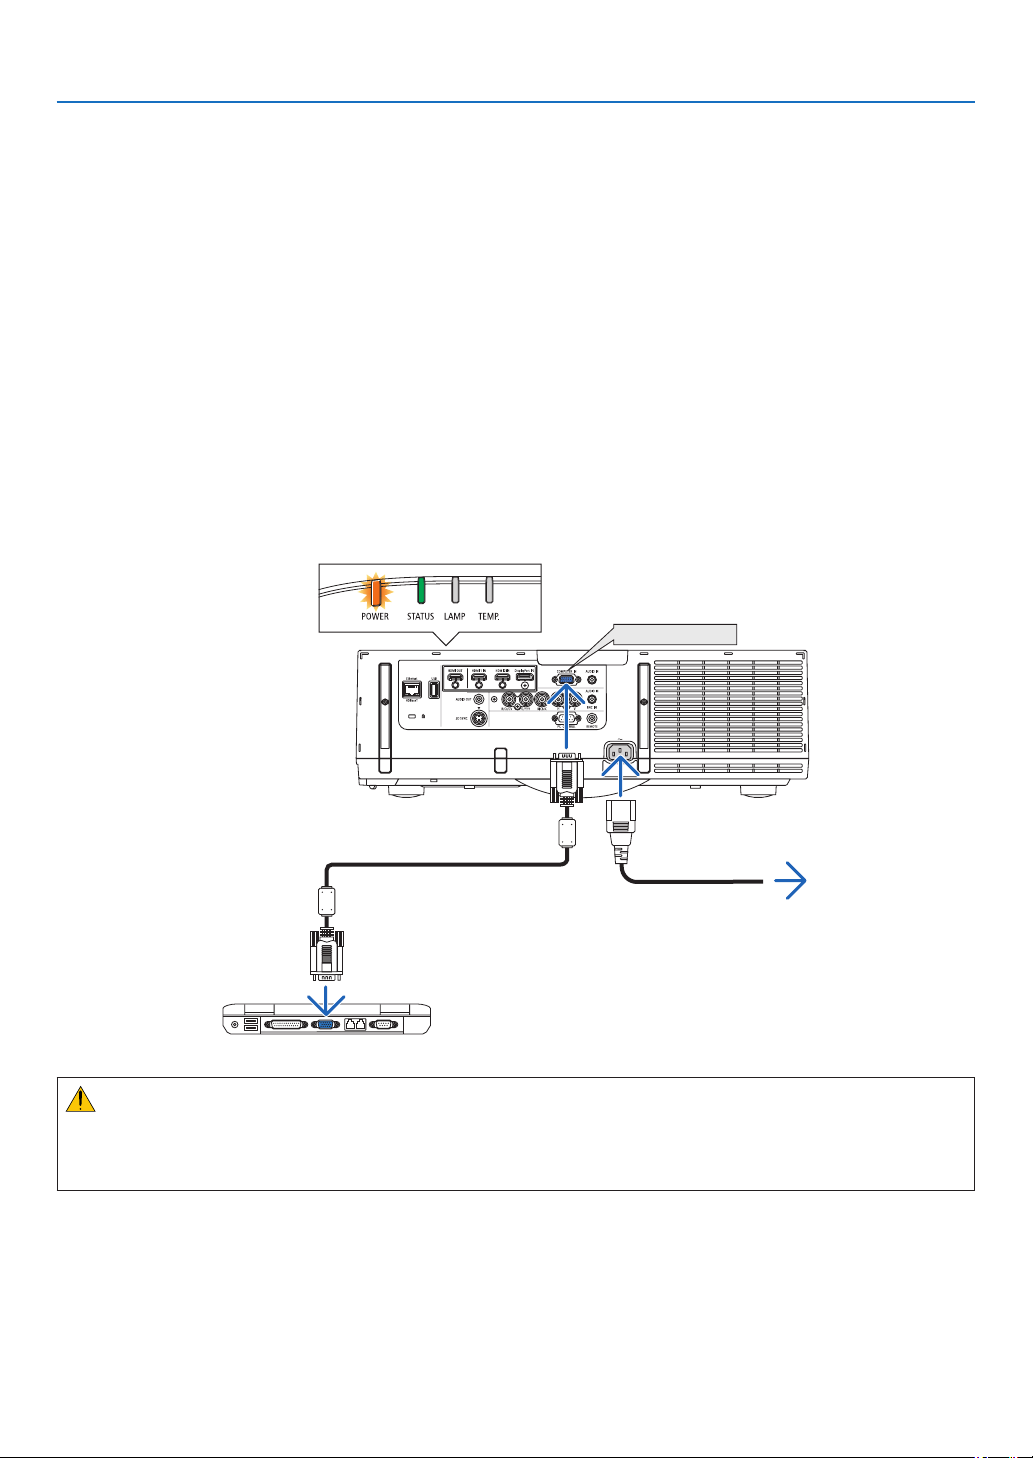
Connecting Your Computer/Connecting the Power Cord
1.Connectyourcomputertotheprojector.
This section will show you a basic connection to a computer. For information about other connections, see “(2)
Making Connections” on page 143.
Connect the computer cable (VGA) between the projector’s COMPUTER IN connector and the computer’s port
(mini D-Sub 15 Pin). Turn two thumb screws of both connectors to fix the computer cable (VGA).
2.Connectthesuppliedpowercordtotheprojector.
First connect the supplied power cord’s three-pin plug to the AC IN of the projector, and then connect the other
plug of the supplied power cord in the wall outlet.
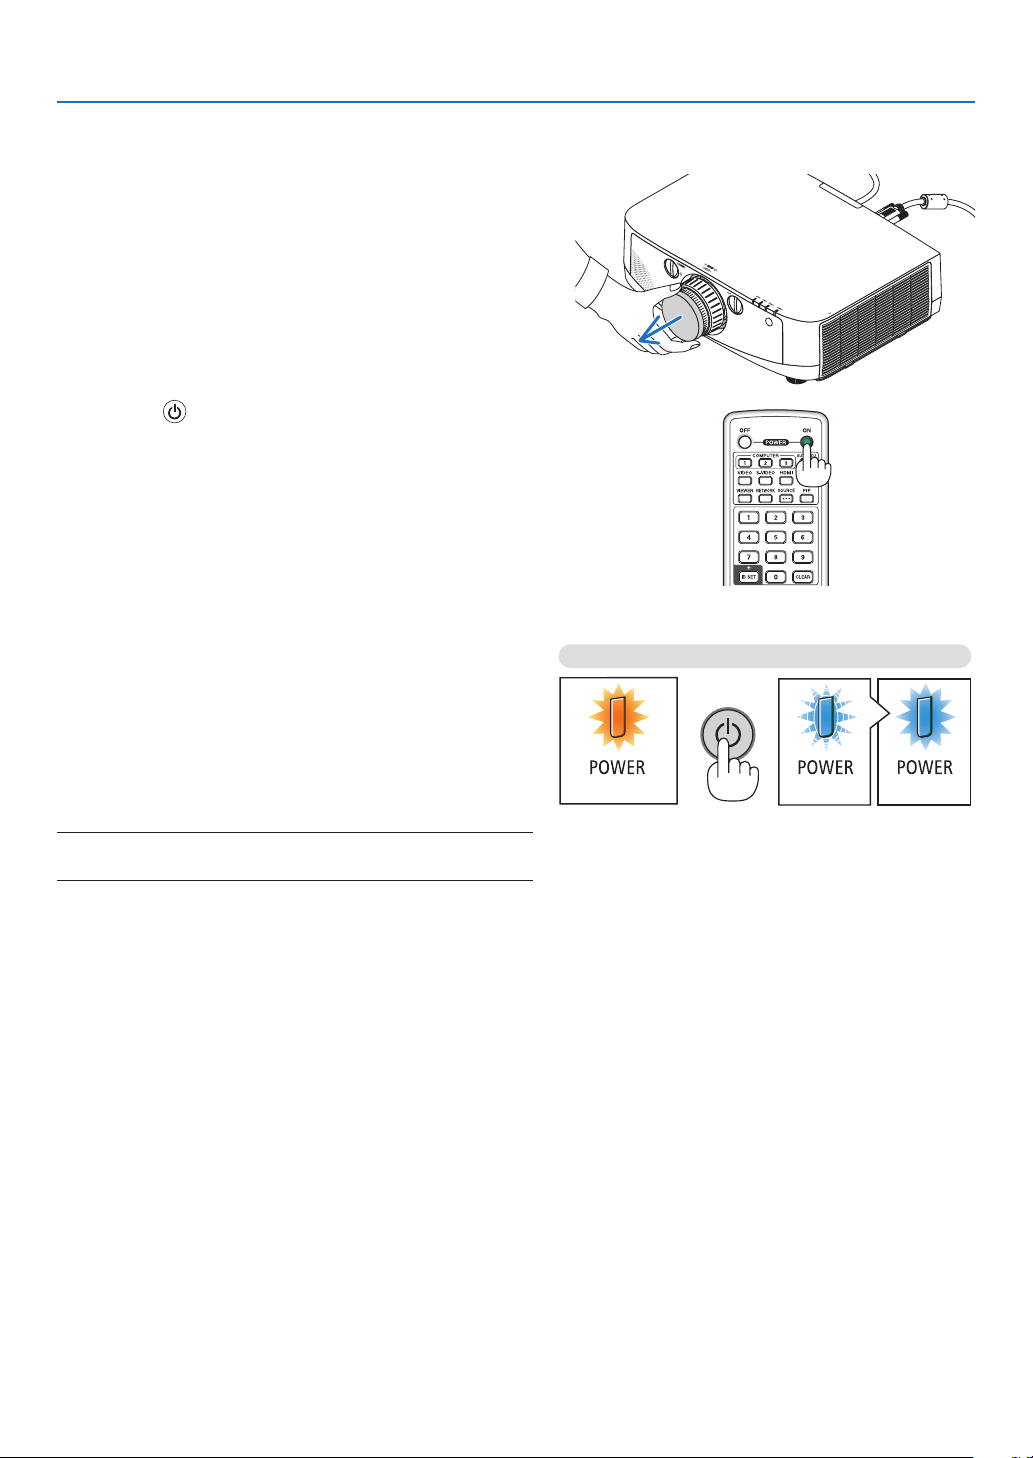
The projector’s power indicator will light orange* (standby mode).
The STATUS indicator will also light green*.
* This will apply for both indicators when [NORMAL] is selected for [STANDBY MODE]. See the Power Indicator
section.(→ page 214)
COMPUTER IN
Make sure that the prongs are fully inserted into
both the AC IN and the wall outlet.
To wall outlet
CAUTION:
PartsoftheprojectormaybecometemporarilyheatediftheprojectoristurnedoffwiththePOWERbuttonorifthe
ACpowersupplyisdisconnectedduringnormalprojectoroperation.
Usecautionwhenpickinguptheprojector.
14
2. Projecting an Image (Basic Operation)
StandbyBlinkingPowerOn
Steady orange light Blinking blue light Steady blue light
Turning on the Projector
1. Remove the lens cap.
2. Press the
(POWER) button on the projector cabinet
or the POWER ON button on the remote control.
The POWER indicator will turn to blue and the projector
will become ready to use.
TIP:
•Whenthemessage“PROJECTORISLOCKED!ENTERYOUR
PASSWORD.”isdisplayed,itmeansthatthe[SECURITY]
featureisturnedon.(→page37)
•WhentheECOmessageisdisplayed,itmeansthat[ON]is
selectedfor[ECOMESSAGE].(→page102)
•PressingbuttonssuchaspowerbuttonandMENUbuttonwill
makesound.Toturnoffthebeepsound,select[OFF]for[BEEP]
fromthemenu.(→page109)
After you turn on your projector, ensure that the computer
or video source is turned on.
NOTE:Abluescreen(bluebackground)isdisplayedwhennosignal
isbeinginput(byfactorydefaultmenusettings).
(→page214)
15
2. Projecting an Image (Basic Operation)
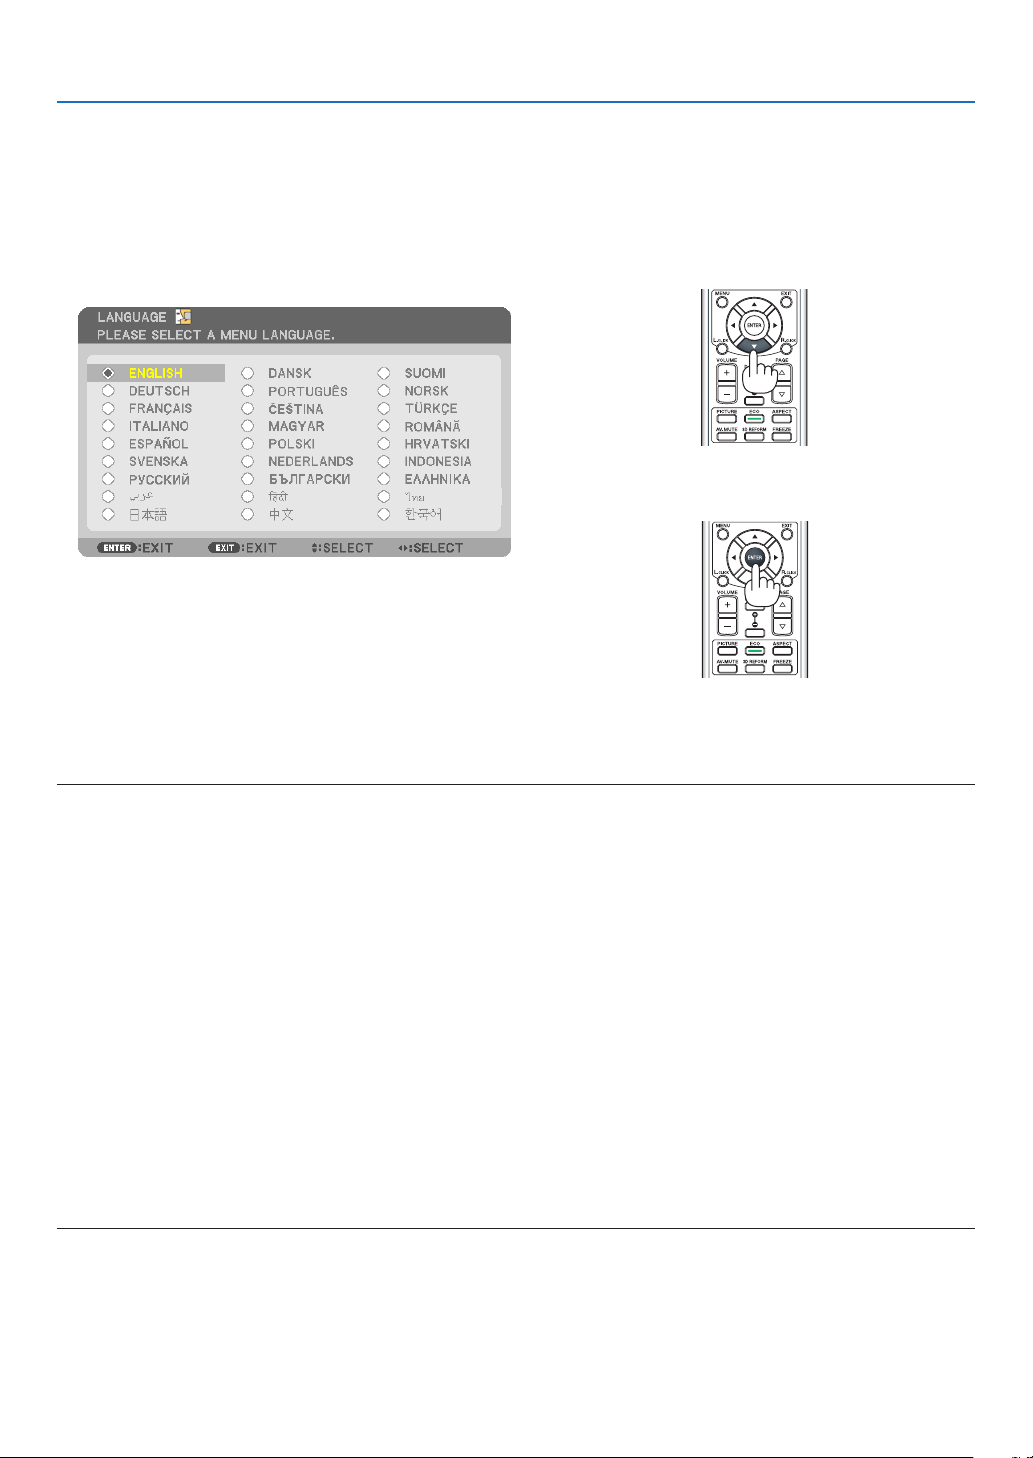
Note on Startup screen (Menu Language Select screen)
Whenyourstturnontheprojector,youwillgettheStartupmenu.Thismenugivesyoutheopportunitytoselectone
ofthe27menulanguages.
Toselectamenulanguage,followthesesteps:
1. Use the , , or button to select one of the 27
languages from the menu.
2. Press the ENTER button to execute the selection.
Afterthishasbeendone,youcanproceedtothemenu
operation.
Ifyouwant,youcanselectthemenulanguagelater.
(→[LANGUAGE]onpage85and101)
NOTE:
•Turningthepowerbackondirectlyafteritisturnedoff(bydirectpoweroff)whileanimageisbeingprojectedcanresultin
malfunction.Besuretowaitatleast1secondbeforeturningthepowerbackon.
•Keepthelenscapoffthelenswhiletheprojector’spowerison.
Ifthelenscapison,itcouldbewarpedduetohightemperature.
•Ifoneofthefollowingthingshappens,theprojectorwillnotturnon.
-Iftheinternaltemperatureoftheprojectoristoohigh,theprojectordetectsabnormalhightemperature.Inthisconditionthe
projectorwillnotturnontoprotecttheinternalsystem.Ifthishappens,waitfortheprojector’sinternalcomponentstocool
down.
-Whenthelampreachesitsendofusablelife,theprojectorwillnotturnon.Ifthishappens,replacethelamp.
-IftheSTATUSindicatorlightsorangewiththepowerbuttonpressed,itmeansthatthe[CONTROLPANELLOCK]isturnedon.
Cancelthelockbyturningitoff.(→page106)
-Ifthelampfailstolight,andiftheSTATUSindicatorashesonandoffinacycleofsixtimes,waitafullminuteandthenturn
onthepower.
•WhilethePOWERindicatorisblinkingblueinshortcycles,thepowercannotbeturnedoffbyusingthepowerbutton.
•Immediatelyafterturningontheprojector,screenickermayoccur.Thisisnormal.Wait3to5minutesuntilthelamplightingis
stabilized.
•Whentheprojectoristurnedon,itmaytakesometimebeforethelamplightbecomesbright.
•Ifyouturnontheprojectorimmediatelyafterthelampisturnedofforwhenthetemperatureishigh,thefansrunwithoutdisplay-
inganimageforsometimeandthentheprojectorwilldisplaytheimage.
16
2. Projecting an Image (Basic Operation)
Selecting a Source
Selecting the computer or video source
NOTE:Turnonthecomputerorvideosourceequipmentconnectedtotheprojector.
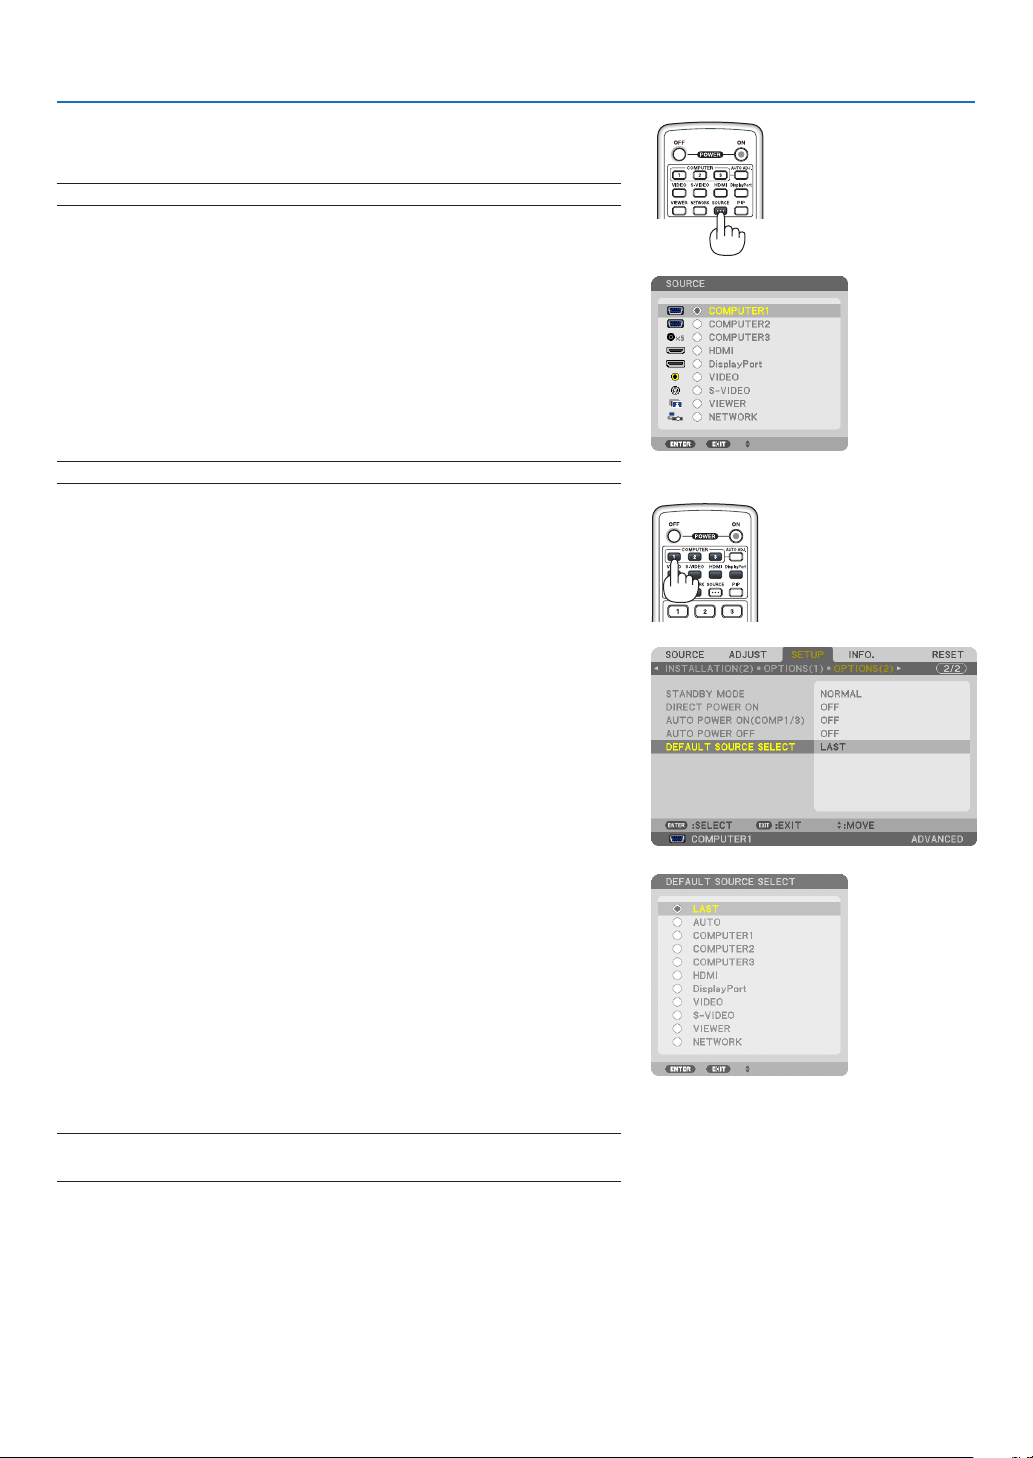
Detecting the Signal Automatically
PresstheSOURCEbuttononce.Theprojectorwillsearchfortheavailable
inputsourceanddisplayit.Theinputsourcewillchangeasfollows:
HDMI1→HDMI2→DisplayPort→BNC→BNC(CV)→BNC(Y/C)→
COMUPTER→ ...
•WiththeSOURCEscreendisplayed,youcanpresstheSOURCE
buttonafewtimestoselecttheinputsource.
TIP:Ifnoinputsignalispresent,theinputwillbeskipped.
Using the Remote Control
Pressanyoneofthe1(HDMI1),2(HDMI2),3(DisplayPort),4(BNC),
5(BNC(CV)),6(NBC(Y/C)),7(Computer),or8(Ethernet)buttons.
Selecting Default Source
Youcansetasourceasthedefaultsourcesothatitwillbedisplayed
eachtimetheprojectoristurnedon.
1. Press the MENU button.
The menu will be displayed.
2. Press the
buttontwicetoselect[SETUP]andpressthe but-
tonortheENTERbuttontoselect[BASIC].
3.
Press the
buttonvetimestoselect[OPTIONS(2)].
4. Press the buttonvetimestoselect[DEFAULTSOURCE
SELECT]andpresstheENTERbutton.
The [DEFAULT SOURCE SELECT] screen will be displayed.
(
→ page 111)
5. Select a source as the default source, and press the ENTER but-
ton.
6. Press the EXIT button a few times to close the menu.
7. Restart the projector.
The source you selected in step 5 will be projected.
NOTE:Evenwhen[AUTO]isturnedon,the[NETWORK]willnotbeautomatically
selected.Tosetyournetworkasthedefaultsource,select[NETWORK].
TIP:
•WhentheprojectorisinStandbymode,applyingacomputersignalfroma
computerconnectedtotheCOMPUTERINinputwillpowerontheprojector
andsimultaneouslyprojectthecomputer’simage.
([AUTOPOWERON(COMP)]→page111)
•OntheWindows7keyboard,acombinationoftheWindowsandPkeysallows
youtosetupexternaldisplayeasilyandquickly.
17
2. Projecting an Image (Basic Operation)
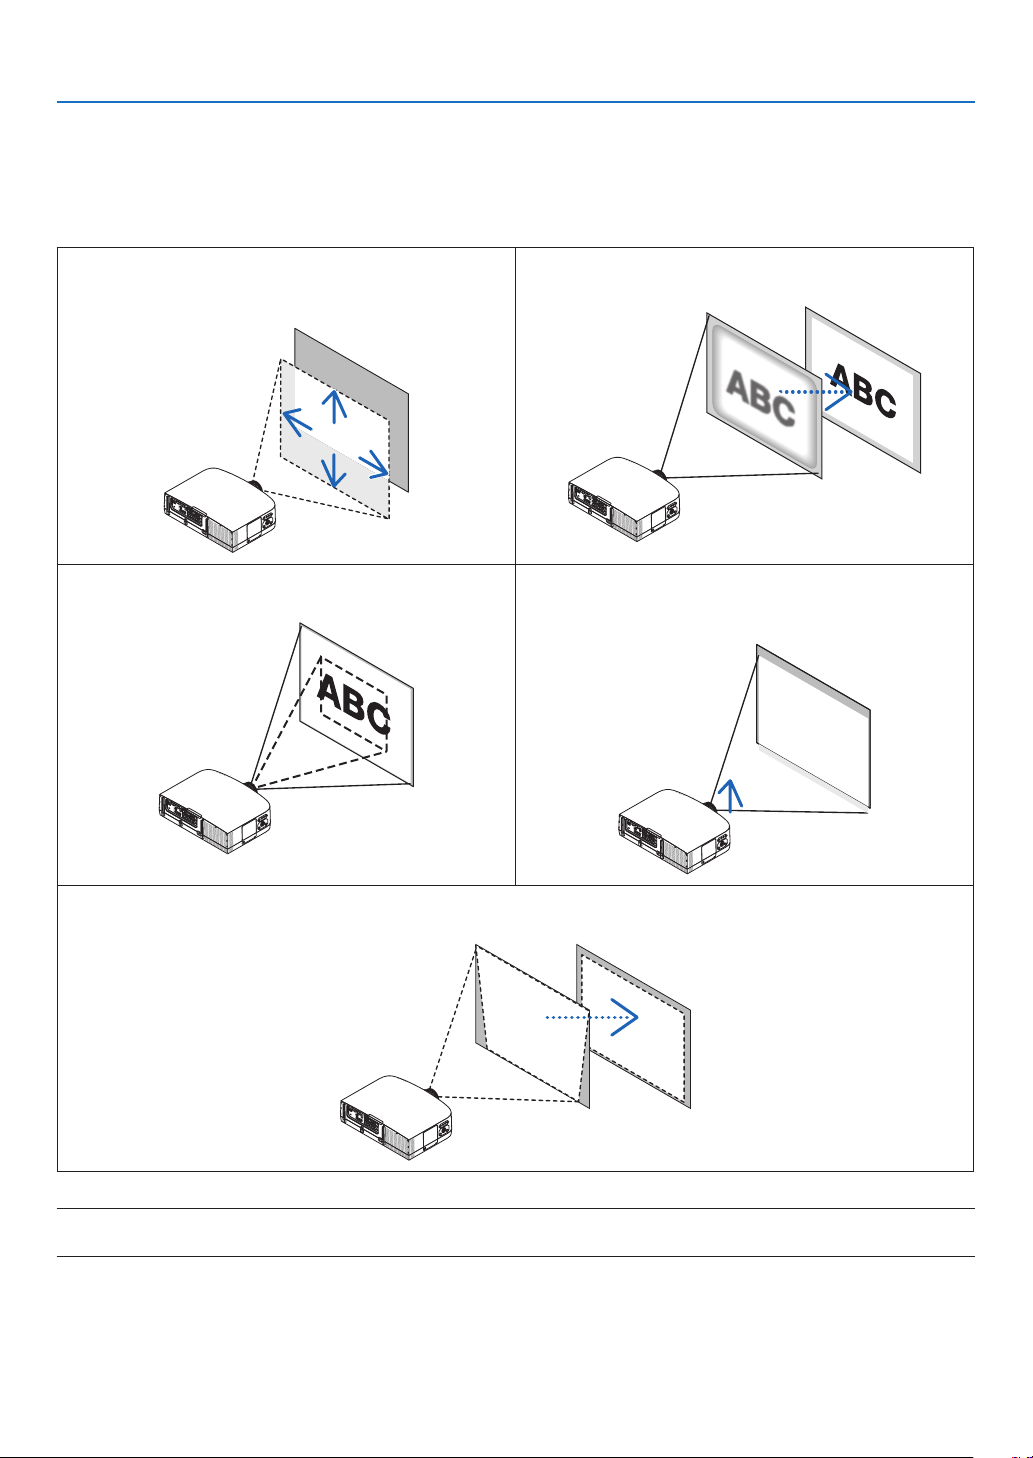
Adjusting the Picture Size and Position
Usethelensshiftdial,theadjustabletiltfootlever,thezoomlever/zoomringandthefocusringtoadjustthepicture
sizeandposition.
In this chapter drawings and cables are omitted for clarity.
Adjustingtheprojectedimage’sverticalandhorizontal
position
[Lensshift]
Adjustingthefocus
[Focusring]
Finelyadjustingthesizeofanimage
[Zoomlever/Zoomring]
Adjustingtheprojectedimage’sheightandhorizontal
tilt
[Tiltfoot]*¹
Adjustingthekeystonecorrection
[Keystone]
NOTE*1:Adjusttheprojectedimage’sheightusingthetiltfeetwhenyouwanttoprojecttheimageatapositionhigherthanthe
lensshiftadjustmentrange.
(→ page 18)
(→ page 21)
(→ page 19)
(→ page 21)
(→ page 22)
18
2. Projecting an Image (Basic Operation)
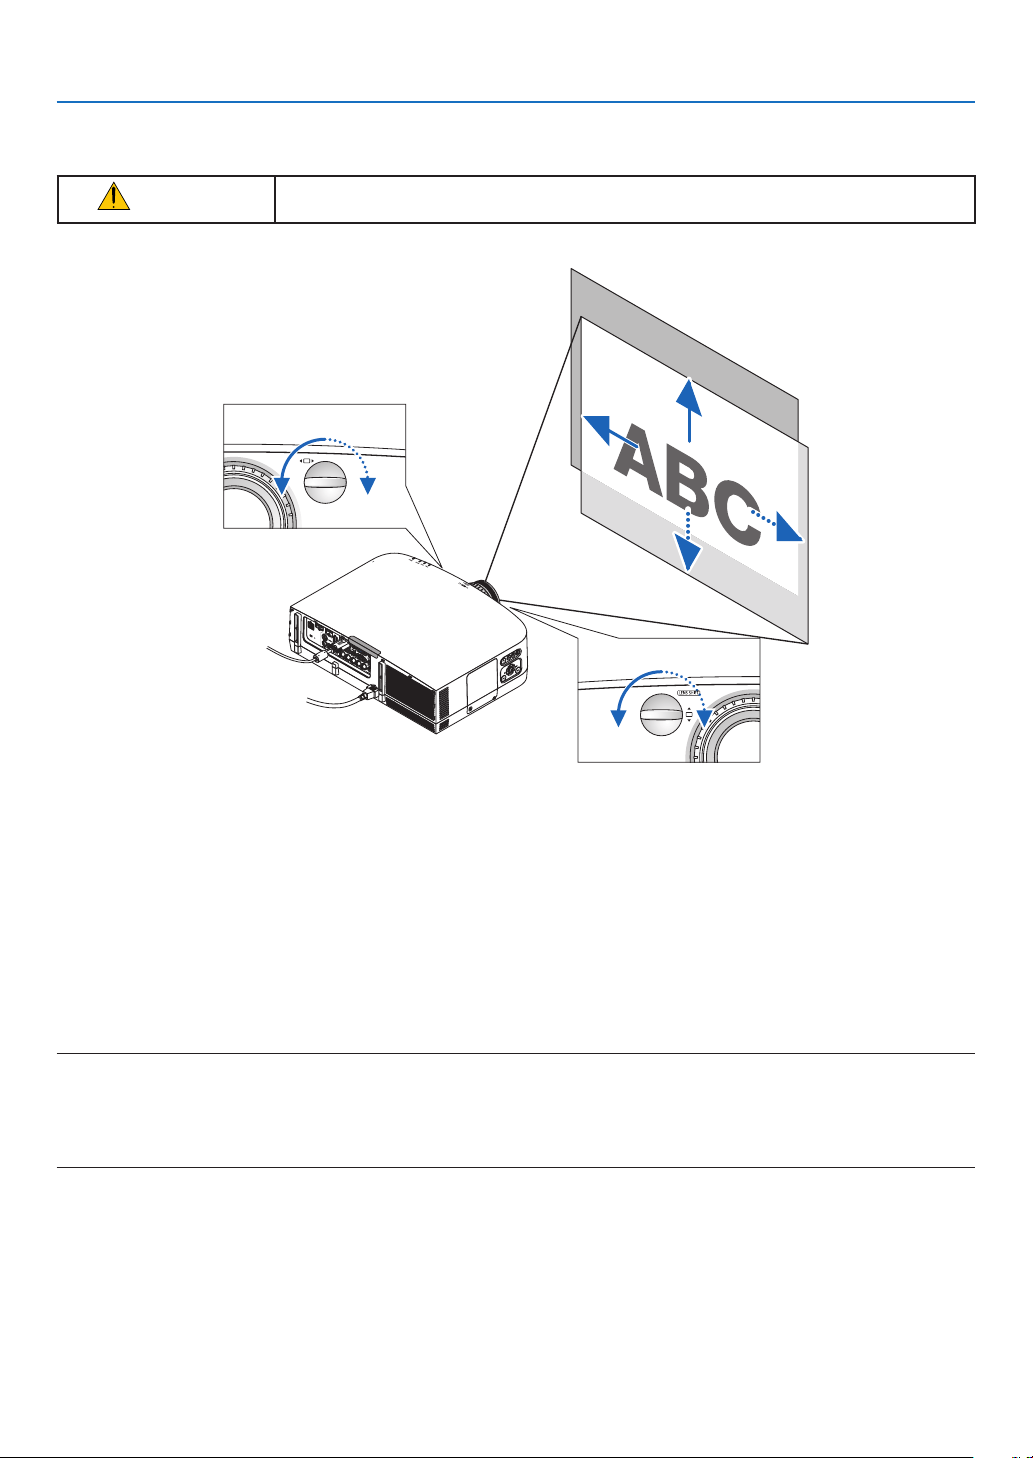
Adjusting the vertical position of a projected image (Lens shift)
CAUTION
Performtheadjustmentfrombehindorfromthesideoftheprojector.Adjustingfromthe
frontcouldexposeyoureyestostronglightwhichcouldinjurethem.
Turn the lens shift dials clockwise or counterclockwise.
Verticaldial
Turnthisclockwiseorcounterclockwisetoadjusttheprojectionpositionintheverticaldirection.
Approximateturningrange:About6turnscounterclockwise,about2turnsclockwisewhenthelensisatthecenter
position.
Horizontaldial
Turnthisclockwiseorcounterclockwisetoadjusttheprojectionpositioninthehorizontaldirection.
Approximateturningrange:About1turncounterclockwise,about1turnclockwisewhenthelensisatthecenter
position.
NOTE:
•Thedialscanbeturnedmorethanonefullturn,buttheprojectionpositioncannotbemovedmorethantherangeindicatedon
thefollowingpage.
•Ifthelensisshiftedtothemaximuminthediagonaldirection,theedgesofthescreenwillbedarkorshaded.
•ThelensshiftfunctioncannotbeusedwhenusingtheseparatelysoldNP11FLlens.
Downward
Upward
Lens shift dial (Horizontal)
Lens shift dial (Vertical)
Rightward
Leftward
19
2. Projecting an Image (Basic Operation)
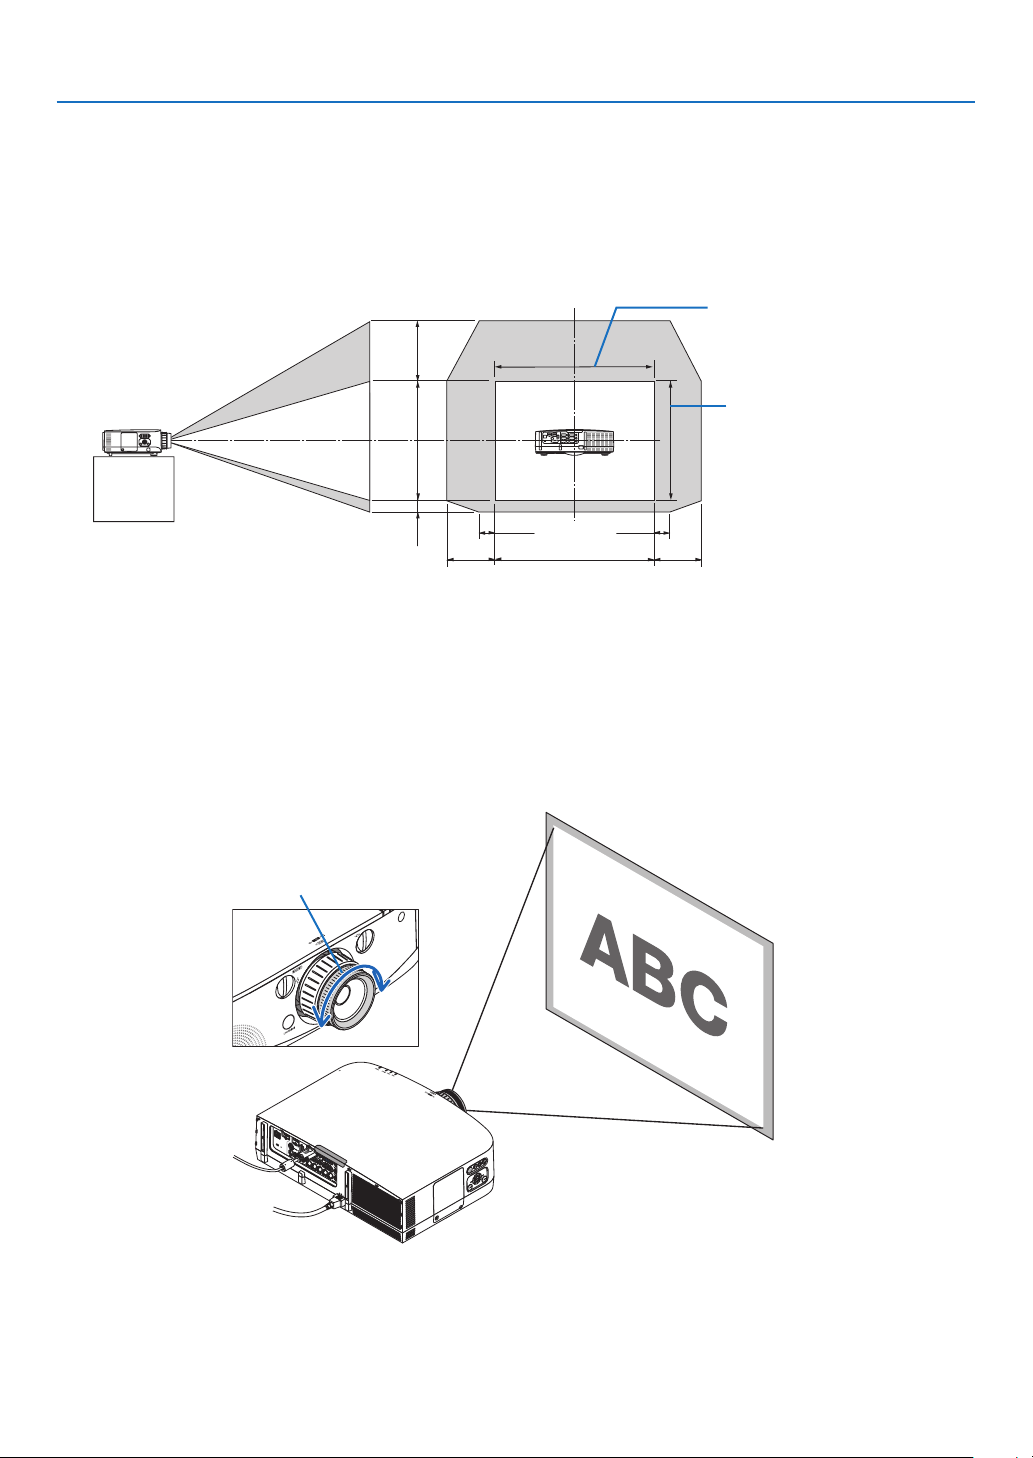
TIP:
•ThediagrambelowshowsthelensshiftadjustmentrangeforthePA722X/PA721X/PA622X/PA621X(projectionmode:desktop
front).Toraisetheprojectionpositionhigherthanthis,usethetiltfeet.(→page21)
•ForthePA672W/PA671W/PA572W/PA571W/PA622U/PA621U/PA522U/PA521Uandtheceilingmount/frontprojectionlensshift
adjustmentrange,seepage205,206.
1V
1H
0.5V
0.1V
0.1H 0.1H
PA600X/PA500X
0.3H 0.3H
Vertical shift range (0 to 0.5V)
Height of projected image
Focus
Applicablelens:NP12ZL/NP13ZL/NP14ZL/NP15ZL
UsetheFOCUSringtoobtainthebestfocus.
Focus ring
20
2. Projecting an Image (Basic Operation)
Applicable lens: NP11FL
WiththeNP11FLlens,adjustthefocusandpicturedistortion.
Preparations:
Turnthelensshiftdials(verticalandhorizontal)ontheprojectortoreturnthelensshifttothecenter.
Approximatelenscenterposition(explainedhereforthedesktopfrontprojectionmode)
Horizontaldial:Firstturnthedialtotheleftedge,thenturnitfurthersothattheknobishorizontal.Fromthis
position,turnthedial1fullturnclockwise.
Verticaldial:Firstturnthedialtothebottomedge,thenturnitfurthersothattheknobishorizontal.
Fromthisposition,turnthedial2fullturnscounterclockwise.
1. Turn the distortion ring to the left edge.
2. Turn the focus lever clockwise and counterclockwise to
adjust the focus at the center of the screen.
3. Use the distortion ring to correct the screen’s distortion.
(This also brings the edges of the screen into focus.)
4. Use the focus lever to adjust the screen’s overall focus.
* If the focus at the center of the screen is off, turn the distortion
ring a little counterclockwise. The focus at the center of the
screen can now be adjusted with the focus lever.
Distortion
ring
Lens shift dials
Focus lever
21
2. Projecting an Image (Basic Operation)
Adjusting the Tilt Feet
1. Turn the left and right tilt feet to adjust.
The tilt feet lengthen and shorten when turned.
The height of the projected image is adjusted by turning the left
and right tilt feet.
If the projected image is tilted, turn one of the tilt feet to adjust
the image so that it is level.
- If the projected image is distorted, see “2-6 Correcting Keystone
Distortion” (
→ page 22).
- The tilt feet can be lengthened by a maximum of 20 mm.
- The tilt feet can be used to tilt the projector by a maximum of 4º.
NOTE:
•Donotlengthenthetiltfeetanymorethan20mm/0.8".Doingsowillmakethe
tiltfeet’smountsectionunstableandcouldcausethetiltfeettocomeoffthe
projector.
•Donotusethetiltfeetforanypurposeotherthanadjustingtheprojector’s
projectionangle.
Handlingthetiltfeetimproperly,suchascarryingtheprojectorbygraspingthetilt
feetorhookingitontoawallusingthetiltfeet,coulddamagetheprojector.
Zoom
Turnthezoomleverorzoomringclockwiseandcounterclockwise.
-TheseparatelysoldNP11FLlensdoesnothaveazoomring.
Zoom ring
Up
Tilt foot
Down
22
2. Projecting an Image (Basic Operation)
Correcting Keystone Distortion
Whentheprojectorisnotexactlyperpendiculartothescreen,keystonedistortionoccurs.Toovercomeit,youcanuse
the“Keystone”function,adigitaltechnologythatcanadjustforkeystone-typedistortion,resultinginacrisp,square
image.
Thefollowingprocedureexplainshowtousethe[KEYSTONE]screenfromthemenutocorrecttrapezoidaldistor-
tions.
Whentheprojectorisplaceddiagonallytothescreen,
Whentheprojectorissetupatanangleinrelationtothescreen,adjusttheHorizontaloptionoftheKeystonemenu
sothatthetopandbottomofsidesoftheprojectedimageareparallel.
1.PresstheGEOMETRIC.buttonontheremotecontrolortheprojec
-
tor cabinet.
The Keystone screen will be displayed on the screen.
2. Press the
buttontoselect[VERTICAL]andthenusethe
or
so that the left and right sides of the projected image are parallel.
* Adjust the vertical keystone distortion.
3. Align the left (or right) side of the screen with the left (or right) side
of the projected image.
•Usetheshortersideoftheprojectedimageasthebase.
•Intherightexample,usetheleftsideasthebase.
4. Press the
buttontoselect[HORIZONTAL]andthenusethe
or
so that the top and bottom sides of the projected image are par-
allel.
•Adjustthehorizontalkeystonedistortion.
Screen frame
Projected area
Align left side

23
2. Projecting an Image (Basic Operation)
NOTE:
•Iftheprojectionangleisthesameasinthelastuse,thepreviouscorrectionsettingvaluesareretainedinthememory.
•WhendoingStep2,adjustthepositionofimagesothatthescreenissmallerthantheareaoftheprojectedarea.
•Toresetthe3DReformcorrectionsettingvalues,pressandholdtheGEOMETRIC.buttonforaminimumof2seconds.
•EachtimetheGEOMETRIC.buttonispressed,theitemwillchangeasfollows:KEYSTONE→CORNERSTONE→None→KEY-
STONE→...
Forinformationon[CORNERSTONE],see“CorrectingHorizontalandVerticalKeystoneDistortion(Cornerstone)”onpage32.
•TheCornerstoneadjustmentwillnotbeavailableduringtheKeystoneadjustment.ToperformtheCornerstoneadjustment,press
andholdtheGEOMETRIC.buttonforaminimumof2secondstoresettheKeystonecorrectionsettingvalues.TheKeystone
adjustmentwillnotbeavailableduringtheCornerstoneadjustment.ToperformtheKeystoneadjustment,pressandholdthe
GEOMETRIC.buttonforaminimumof2secondstoresettheCornerstonecorrectionsettingvalues.
•The3DReformfeaturecancauseanimagetobeslightlyblurredbecausethecorrectionismadeelectronically.
5. Repeat steps 2 and 4 to correct keystone distortion.
6.AftercompletingKeystonecorrection,presstheEXITbutton.
The Keystone screen will disappear.
•ToperformKeystonecorrectionagain,presstheGEOMETRIC.but-
ton to display the Keystone screen and repeat above steps 1 to 6.
24
2. Projecting an Image (Basic Operation)
Optimizing Computer Signal Automatically
Adjusting the Image Using Auto Adjust
Optimizingacomputerimageautomatically.(COMPUTER1/COMPUTER2/COMPUTER3)
PresstheAUTOADJ.buttontooptimizeacomputerimageautomatically.
Thisadjustmentmaybenecessarywhenyouconnectyourcomputerforthersttime.
[Poor picture]
[Normal picture]
NOTE:
Somesignalsmaytaketimetodisplayormaynotbedisplayedcorrectly.
•IftheAutoAdjustoperationcannotoptimizethecomputersignal,trytoadjust[HORIZONTAL],[VERTICAL],[CLOCK],and[PHASE]
manually.(→page94,95)
Turning Up or Down Volume
Soundlevelfromthespeakercanbeadjusted.
TIP:Whennomenusappear,theandbuttonsontheprojectorcabinetwork
asavolumecontrol.
NOTE:
•Volumecontrolisnotavailablewiththeorbuttonwhenanimageisenlarged
byusingtheD-ZOOM(+)buttonorwhenthemenuisdisplayed.
•VolumecontrolisnotavailablewiththeorbuttonwhenVIEWERorNET-
WORKisused.
Increase volume
Decrease volume
25
2. Projecting an Image (Basic Operation)
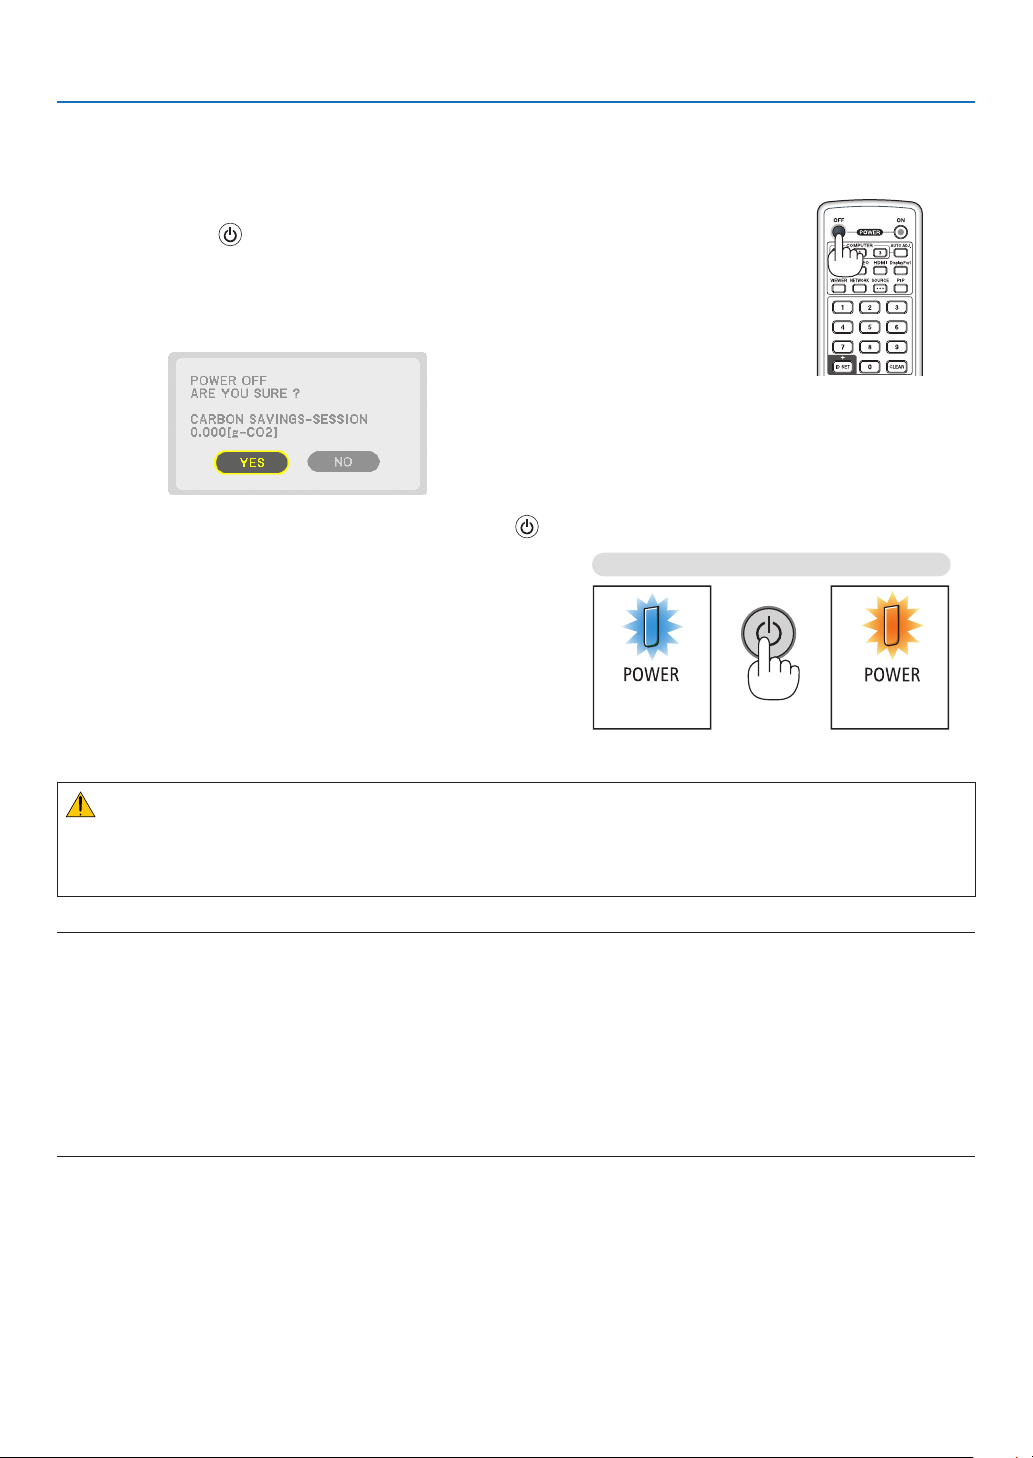
Turning off the Projector
Toturnofftheprojector:
1. First, press the (POWER) button on the projector
cabinet or the POWER OFF button on the remote con-
trol.
The [POWER OFF / ARE YOU SURE ? / CARBON SAV-
INGS- SESSION 0.000[g-CO2]] message will appear.
2. Secondly, press the ENTER button or press the
(POWER) or the POWER OFF button again.
The lamp will turn off and the projector will go into standby
mode. When in standby mode, the POWER indicator will
light orange and the STATUS indicator will light green when
[NORMAL] is selected for [STANDBY MODE].
PowerOn
Steady blue light
Standby
Steady
orange light
Press twice
CAUTION:
PartsoftheprojectormaybecometemporarilyheatediftheprojectoristurnedoffwiththePOWERbuttonorifthe
ACpowersupplyisdisconnectedduringnormalprojectoroperation.
Usecautionwhenpickinguptheprojector.
NOTE:
•WhilethePOWERindicatorisblinkingblueinshortcycles,thepowercannotbeturnedoff.
•Youcannotturnoffthepowerfor60secondsimmediatelyafterturningitonanddisplayinganimage.
•Waitatleast20minutesafterthepoweristurnedon(afterstartingtoproject)beforeturningtheACpoweroffwhileanimageis
beingprojectedorwhilethecoolingfanisrunning.
•Donotunplugthepowercordfromtheprojectororfromthepoweroutletwhileanimageisbeingprojected.Doingsocould
deterioratetheprojector’sACinputconnectororthepowerplug’scontact.ToturnofftheACpowerwhileanimageisbeing
projected,usethepowerstrip’sswitch,thebreaker,etc.
•DonotdisconnecttheACpowersupplytotheprojectorwithin10secondsofmakingadjustmentorsettingchangesandclosing
themenu.Doingsocancauselossofadjustmentsandsettings.

26
2. Projecting an Image (Basic Operation)
After Use
Preparation:Makesurethattheprojectoristurnedoff.
1. Unplug the power cord.
2. Disconnect any other cables.
•RemovetheUSBmemoryifitisinsertedintotheprojector.
3. Mount the lens cap on the lens.
4. Before moving the projector, screw in the tilt feet if they have been lengthened.
27
1 Turning off the Image and Sound
PresstheAV-MUTEbuttontoturnofftheimage,sound,beepsoundfor
ashortperiodoftime.Pressagaintorestoretheimageandsound.
Theprojector’spower-savingfunctionwillwork10secondsaftertheimage
isturnedoff.Asaresult,thelamppowerwillbereduced.
NOTE:
•Torestoretheimage,evenifyoupresstheAV-MUTEbuttonimmediatelyafter
thestartofthepower-savingfunction,thelampbrightnessmaynotberestored
toitsoriginallevel.
Freezing a Picture
PresstheFREEZEbuttontofreezeapicture.Pressagaintoresume
motion.
NOTE:Theimageisfrozenbuttheoriginalvideoisstillplayingback.
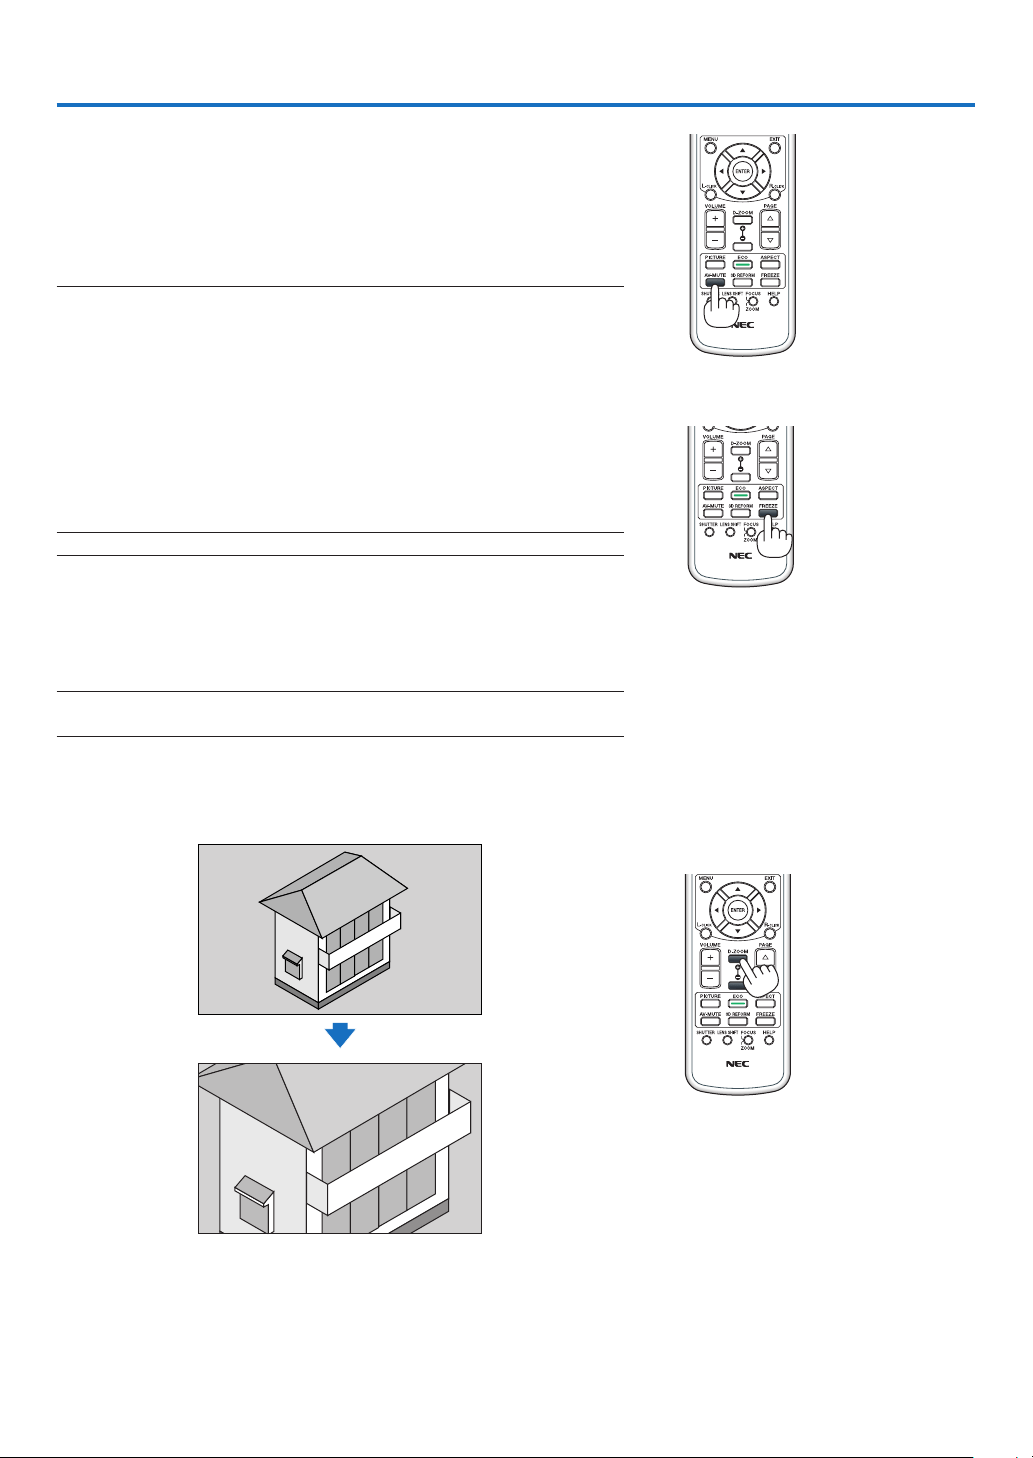
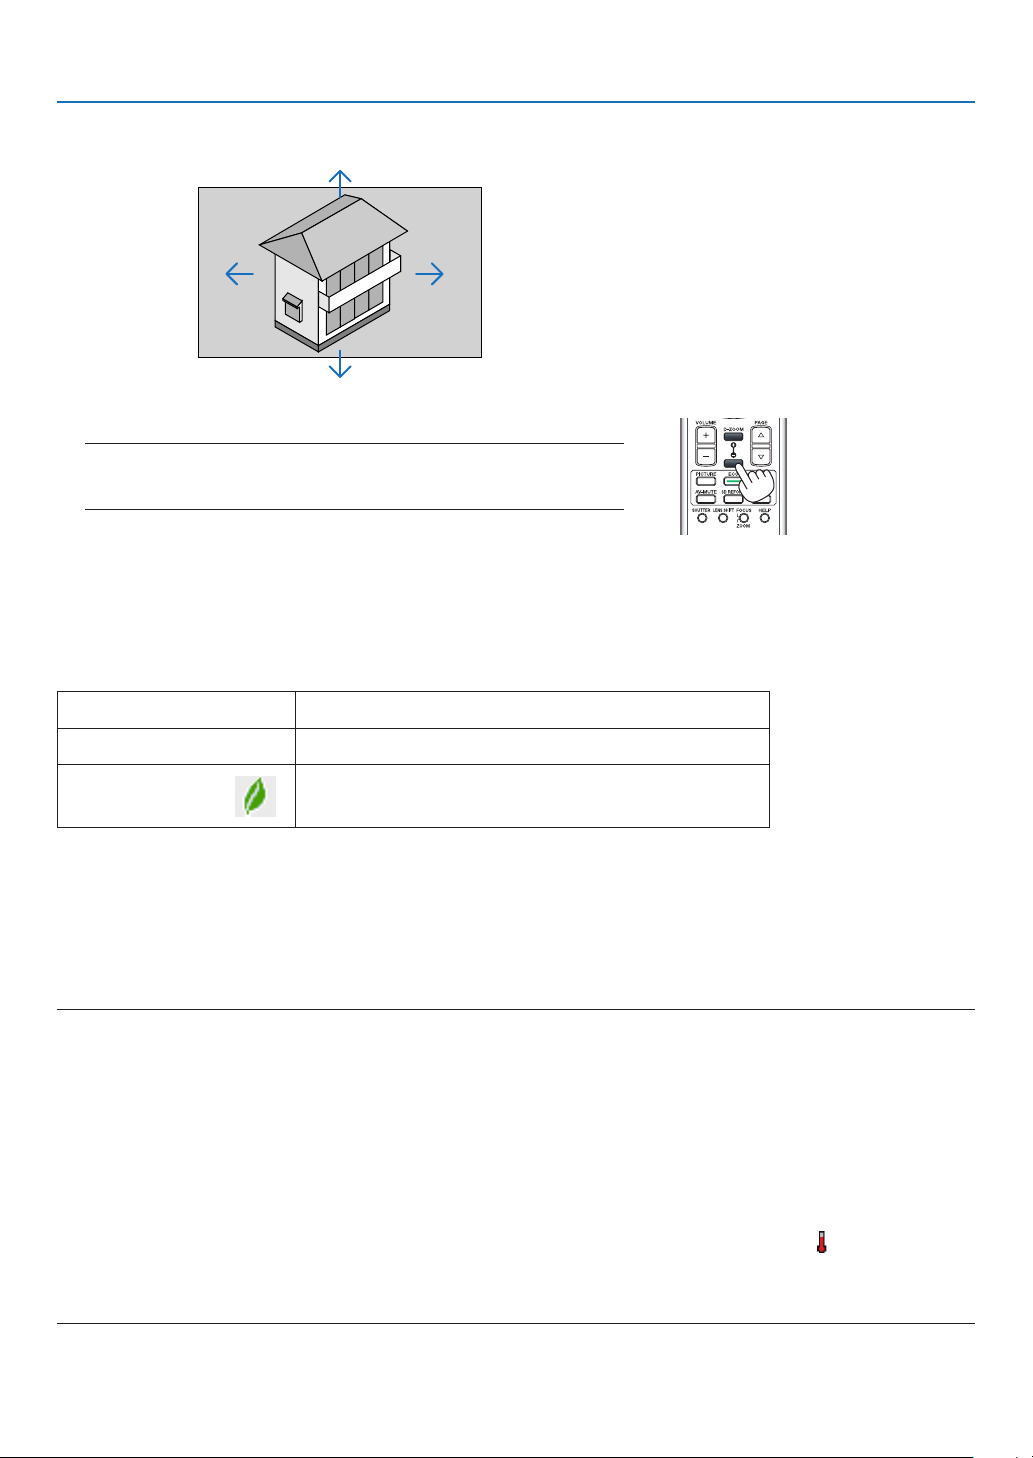
Enlarging a Picture
Youcanenlargethepictureuptofourtimes.
NOTE:Themaximummagnicationmaybelessthanfourtimesdependingon
thesignal.
Todoso:
1.PresstheD-ZOOM(+)buttontomagnifythepicture.
3. Convenient Features
28
3. Convenient Features
Changing Eco Mode/Checking Energy-Saving Effect Using Eco
Mode [ECO MODE]
Thisfeatureenablesyoutoselecttwobrightnessmodesofthelamp:
OFFandONmodes.Thelamplifecanbeextendedbyturningonthe[ECOMODE].
[ECOMODE]Description
[OFF]Thisisthedefaultsetting(100%Brightness).
[ON]
Lowlamppowerconsumption(approx.80%Brightness).
Toturnonthe[ECOMODE],dothefollowing:
1.PresstheECObuttonontheremotecontroltodisplay[ECOMODE]screen.
2. Use the
or
buttontoselect[ON].
3. Press the ENTER button.
To change from [ON] to [OFF], Go back to Step 2 and select [OFF]. Repeat Step 3.
NOTE:
•The[ECOMODE]canbechangedbyusingthemenu.
Select[SETUP]→[BASIC]→[ECOMODE].
•Thelampliferemainingandlamphoursusedcanbecheckedin[USAGETIME].Select[INFO.]→[USAGETIME].
•[ECOMODE]isalwayssetto[OFF]for1minuteimmediatelyafterthelampisturnedon.Thelampconditionwillnotbeaffected
evenwhen[ECOMODE]ischanged.
•Afteralapseof1minutefromwhentheprojectordisplaysablue,blackorlogoscreen,[ECOMODE]willautomaticallyswitchto
[ON].
•Iftheprojectorisoverheatedin[OFF]mode,theremaybeacasewherethe[ECOMODE]automaticallychangesto[ON]mode
toprotecttheprojector.Thisiscalled“ForcedECOMode”.WhentheprojectorisintheForcedEcoMode,thepicturebrightness
decreasesslightlyandtheTEMP.indicatorlightsorange.AtthesametimetheThermometersymbol[]isdisplayedatthe
bottomrightofthescreen.
Whentheprojectorcomesbacktonormaltemperature,theForcedEcoModeiscancelledandthe[ECOMODE]returnsto[OFF]
mode.
2. Press the button.
The area of the magnified image will be moved
3.PresstheD-ZOOM(−)button.
Each time the D-ZOOM (−) button is pressed, the image is reduced.
NOTE:
•Theimagewillbeenlargedorreducedatthecenterofthescreen.
•Displayingthemenuwillcancelthecurrentmagnication.
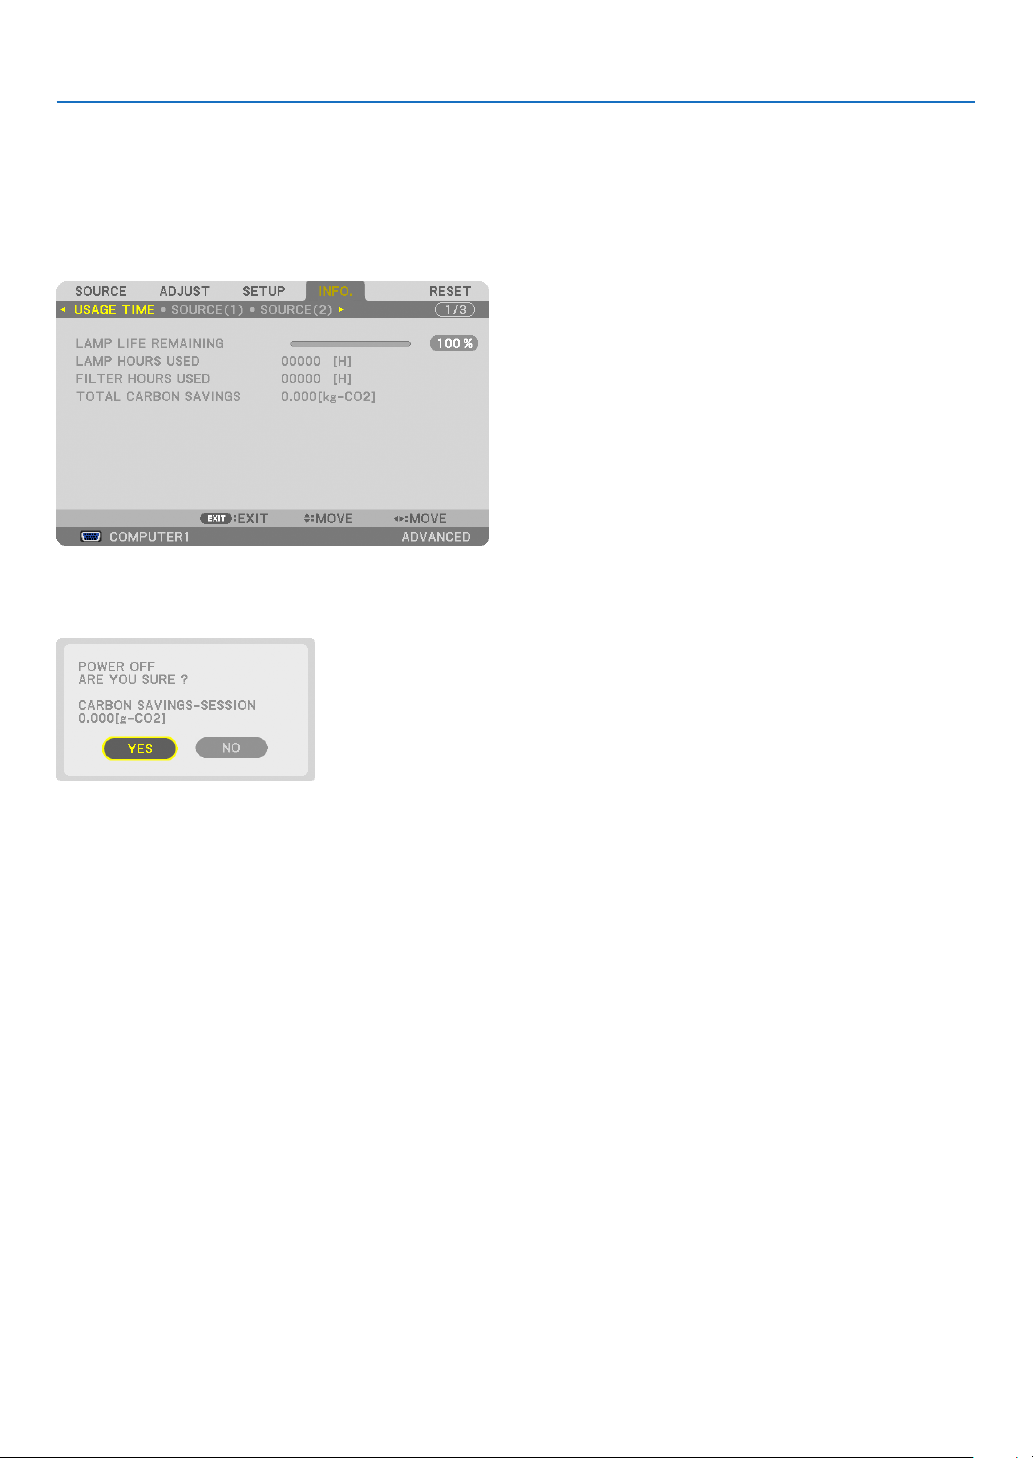
29
3. Convenient Features
Checking Energy-Saving Effect [CARBON METER]
Thisfeaturewillshowenergy-savingeffectintermsofCO
2
emissionreduction(kg)whentheprojector’s[ECOMODE]
issetto[OFF],or[ON].Thisfeatureiscalledas[CARBONMETER].
Therearetwomessages:[TOTALCARBONSAVINGS]and[CARBONSAVINGS-SESSION].The[TOTALCARBON
SAVINGS]messageshowsthetotalamountofCO
2
emissionreductionfromthetimeofshipmentuptonow.Youcan
checktheinformationon[USAGETIME]from[INFO.]ofthemenu.(→page
112)
The[CARBONSAVINGS-SESSION]messageshowstheamountofCO
2
emissionreductionbetweenthetimeof
changingtoECOMODEimmediatelyafterthetimeofpower-onandthetimeofpower-off.The[CARBONSAVINGS-
SESSION]messagewillbedisplayedinthe[POWEROFF/AREYOUSURE?]messageatthetimeofpower-off.
TIP:
•TheformulaasshownbelowisusedtocalculatetheamountofCO
2
emissionreduction.
AmountofCO
2
emissionreduction=(PowerconsumptioninOFFforECOMODE−PowerconsumptioninONforECOMODE)×
CO
2
conversionfactor.*WhentheimageisturnedoffwiththeAV-MUTEbuttontheamountofCO
2
emmissionreductionwillalso
increase.
*CalculationforamountofCO
2
emissionreductionisbasedonanOECDpublication“CO
2
EmissionsfromFuelCombustion,2008
Edition”.
•The[TOTALCARBONSAVINGS]iscalculatedbasedonsavingsrecordedin15minutesintervals.
•Thisformulawillnotapplytothepowerconsumptionwhichisnotaffectedbywhether[ECOMODE]isturnedonoroff.
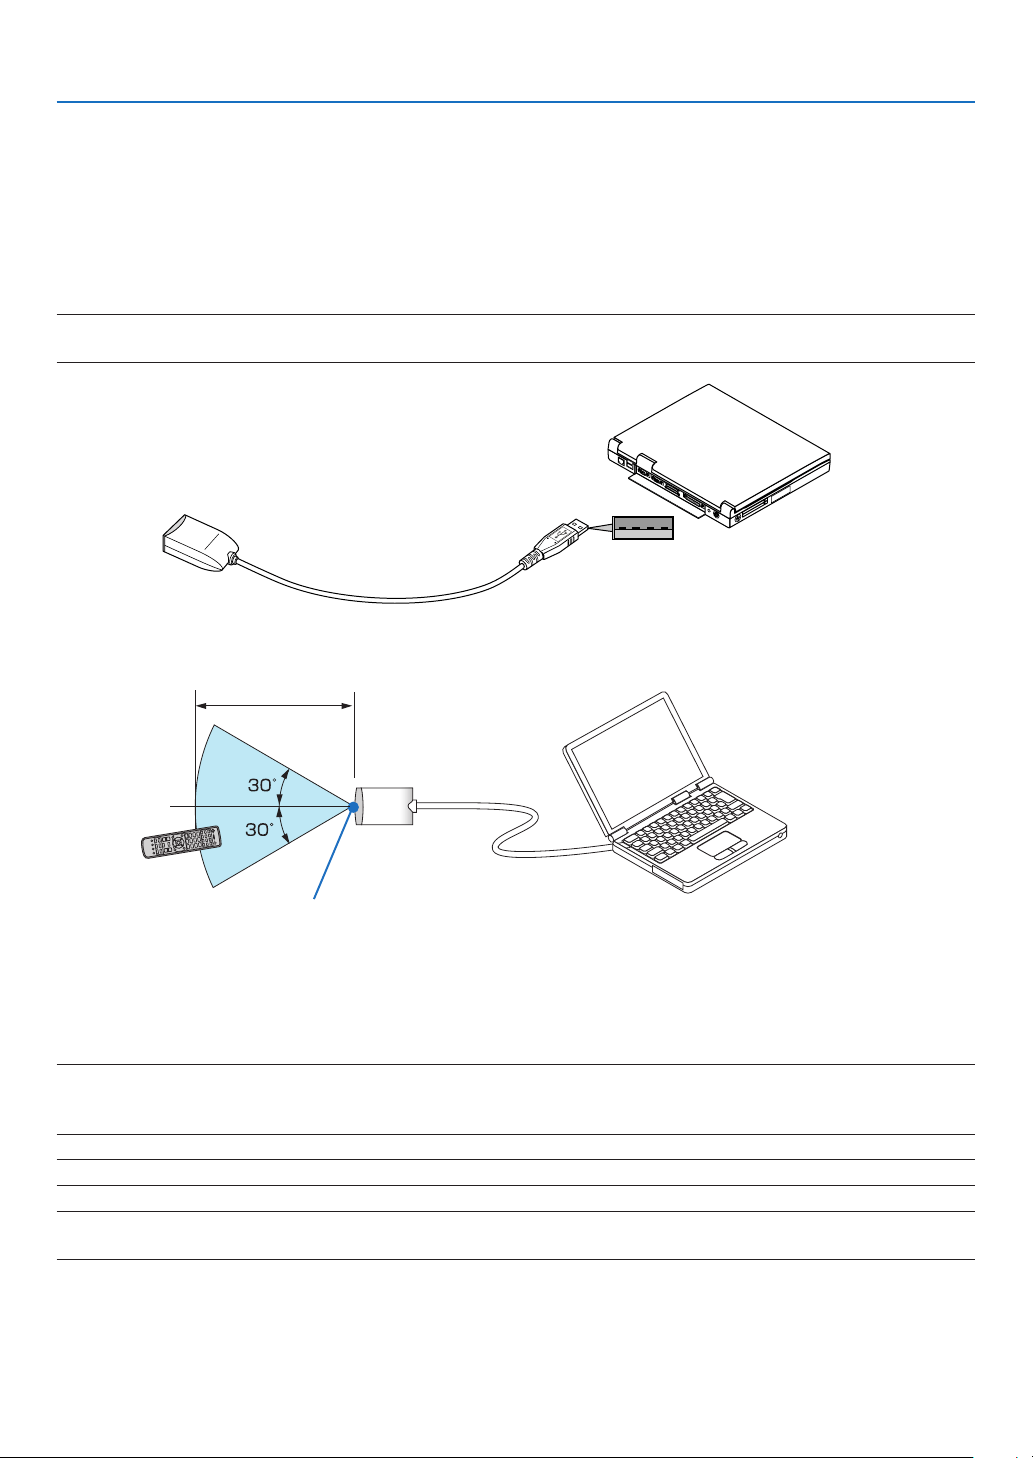
30
3. Convenient Features
Using the Optional Remote Mouse Receiver (NP01MR)
Theoptionalremotemousereceiverenablesyoutooperateyourcomputer’smousefunctionsfromtheremotecontrol.
Itisagreatconvenienceforclickingthroughyourcomputer-generatedpresentations.
Connecting the remote mouse receiver to your computer
Ifyouwishtousetheremotemousefunction,connectthemousereceiverandcomputer.
Themousereceivercanbeconnecteddirectlytothecomputer’sUSBport(typeA).
NOTE:DependingonthetypeofconnectionorOSinstalledonyourcomputer,youmayhavetorestartyourcomputerorchange
yourcomputersettings.
When operating a computer via the remote mouse receiver
When connecting using the USB terminal
ForPC,themousereceivercanonlybeusedwithaWindowsXP*,WindowsVista,Windows7,orMacOSX10.0.0
orlateroperatingsystem.
*NOTE:InSP1orolderversionofWindowsXP,ifthemousecursorwillnotmovecorrectly,dothefollowing:
CleartheEnhancepointerprecisioncheckboxunderneaththemousespeedsliderintheMousePropertiesdialogbox[Pointer
Optionstab].
NOTE:ThePAGEandbuttonsdonotworkwithPowerPointforMacintosh.
NOTE:Waitatleast5secondsafterdisconnectingthemousereceiverbeforereconnectingitandviceversa.Thecomputermaynot
identifythemousereceiverifitisrepeatedlyconnectedanddisconnectedinrapidintervals.
Remote mouse receiver
Computer
To USB port of PC or Macintosh
Remote sensor on the
remote mouse receiver
7 m/22 feet

31
3. Convenient Features
Operating your computer’s mouse from the remote control
Youcanoperateyourcomputer’smousefromtheremotecontrol.
PAGE/Button:scrollstheviewingareaofthewindowortomovetothepreviousornextslidein
PowerPointonyourcomputer.
Buttons:movesthemousecursoronyourcomputer.
L-CLICKButton:worksasthemouseleftbutton.
R-CLICKButton:worksasthemouserightbutton.
NOTE:
•Whenyouoperatethecomputerusingtheorbuttonwiththemenudisplayed,boththemenuandthemousepointer
willbeaffected.Closethemenuandperformthemouseoperation.
•ThePAGEandbuttonsdonotworkwithPowerPointforMacintosh.
AboutDragMode:
BypressingtheL-CLICKorR-CLICKbuttonfor2or3secondsthenreleasing,thedragmodeissetandthedrag
operationcanbeperformedsimplybypressingthebutton.Todroptheitem,presstheL-CLICK(orR-CLICK)
button.Tocancelit,presstheR-CLICK(orL-CLICK)button.
TIP:YoucanchangethePointerspeedontheMousePropertiesdialogboxontheWindows.Formoreinformation,seetheuser
documentationoronlinehelpsuppliedwithyourcomputer.
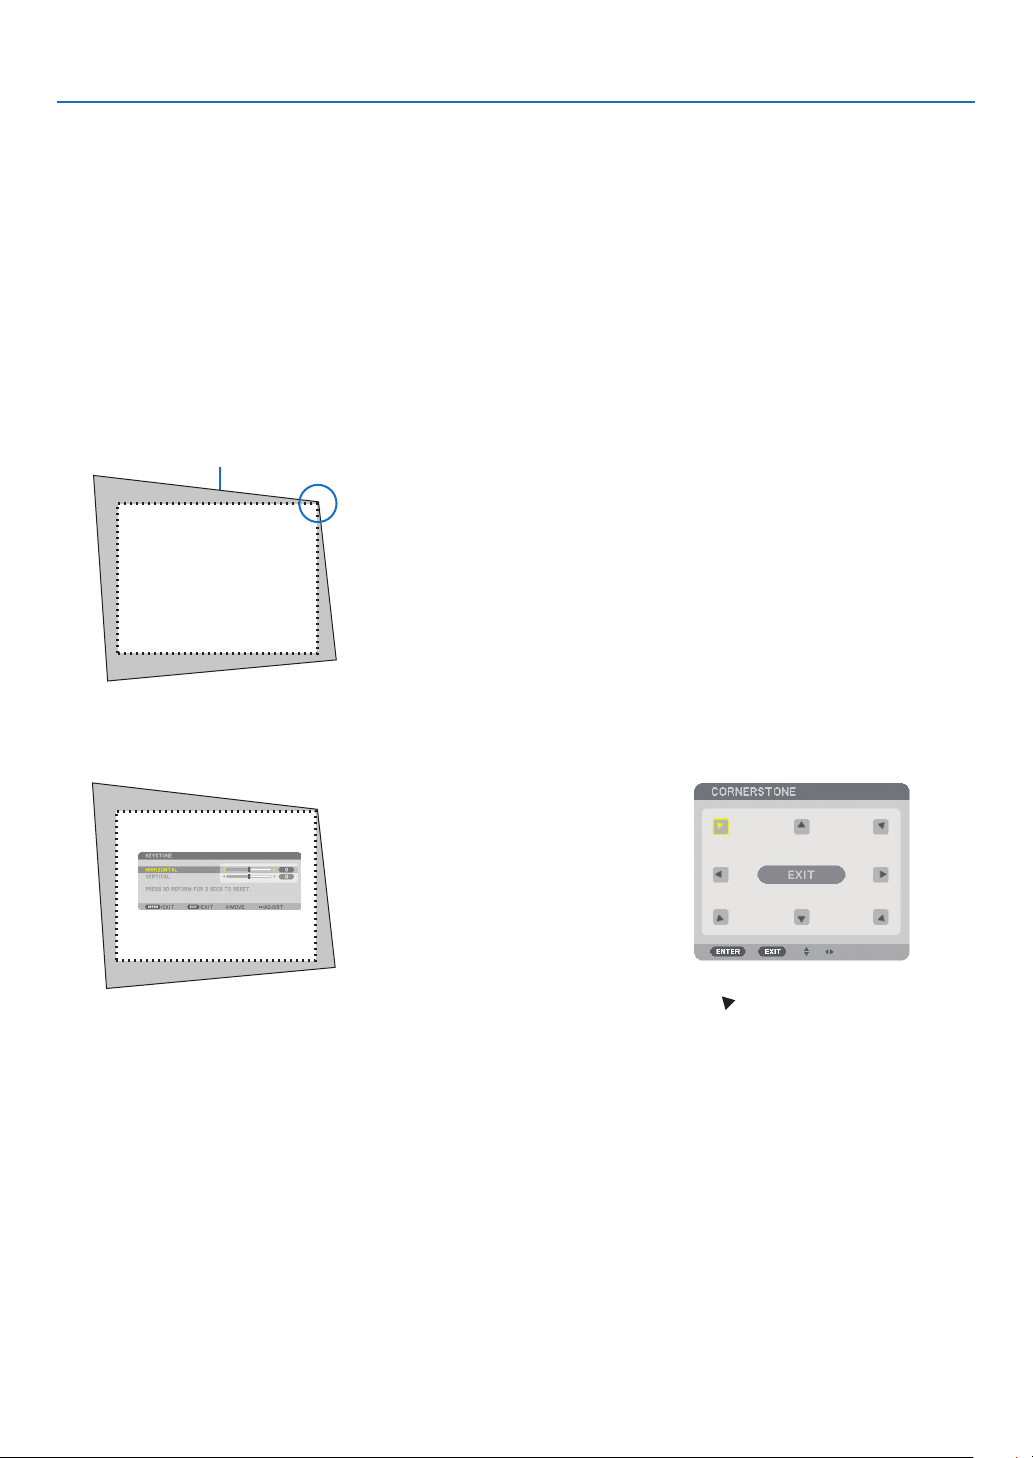
32
3. Convenient Features
Correcting Horizontal and Vertical Keystone Distortion [COR-
NERSTONE]
Usethe3DReformfeaturetocorrectkeystone(trapezoidal)distortiontomakethetoporbottomandtheleftorright
sideofthescreenlongerorshortersothattheprojectedimageisrectangular.
Cornerstone
1.PressandholdtheGEOMETRIC.buttonforaminimumof2secondstoresetcurrentadjustments.
Current adjustments for [KEYSTONE] or [CORNERSTONE] will be cleared.
2. Project an image so that the screen is smaller than the area of the raster.
3. Pick up any one of the corners and align the corner of the image with a corner of the screen.
Projected image
The drawing shows the up-
per right corner.
4.PresstheGEOMETRIC.buttontwice.
The Cornerstone adjustment screen is displayed.
5. Use the button to select one icon () which points in the direction you wish to move the projected
image frame.
6. Press the ENTER button.
TIP:Ifyouareadjusting[KEYSTONE],[CORNERSTONE]willnotbe
available.Ifthishappens,pressandholdtheGEOMETRIC.buttonfora
minimumof2secondstoresetthe[KEYSTONE]adjustments.
The drawing shows the upper left
icon ( ) is selected.
TIP:PA722X/PA721X/PA622X/PA621X:When[WIDESCREEN]isselectedfrom[SCREEN
TYPE],linesthatshow“16:9”or“16:10”willbedisplayed.Clicktheoutercorners.
PA672W/PA671W/PA572W/PA571W/PA622U/PA621U/PA522U/PA521U:When[4:3
SCREEN]isselectedfrom[SCREENTYPE],linesthatshow“4:3”willbedisplayed.
Clicktheoutercorners.
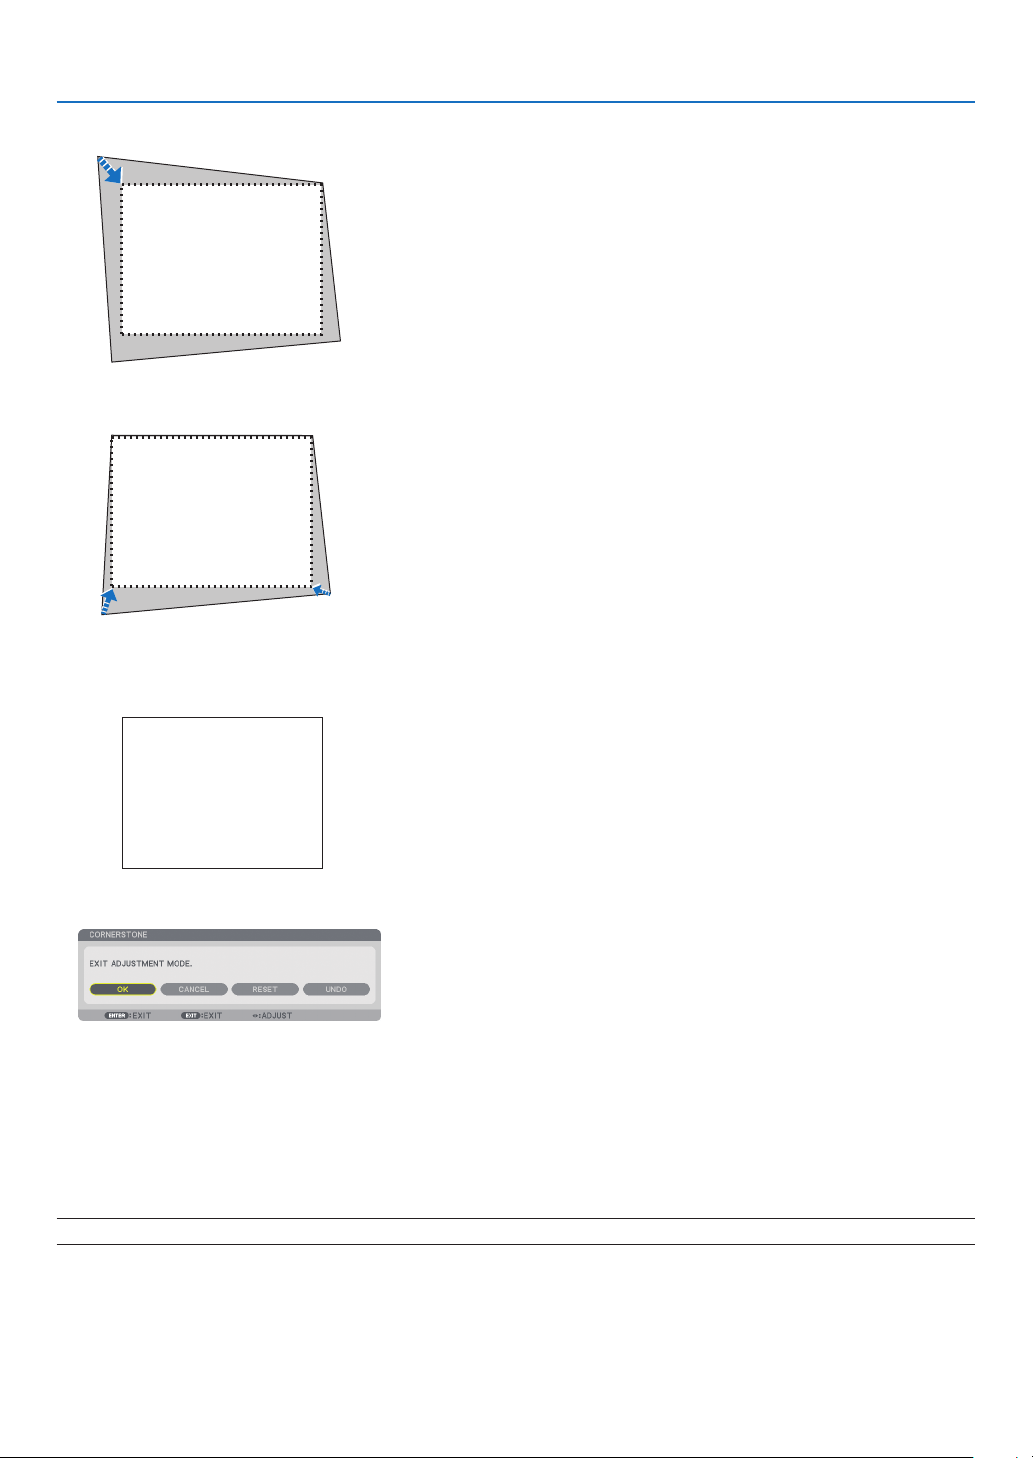
33
3. Convenient Features
8. Press the ENTER button.
10
. Press the or buttontohighlightthe[OK]andpresstheENTERbutton.
ThiscompletestheCornerstonecorrection.
Selecting[CANCEL]willreturntotheadjustmentscreenwithoutsavingchanges(Step3).
Selecting[RESET]willreturntothefactorydefault.
Selecting[UNDO]willexitwithoutsavingchanges.
NOTE:Toresetthe3DReformcorrectionsettingvalues,pressandholdtheGEOMETRIC.buttonforaminimumof2seconds.
9. Use the button to select another icon which points in the direction.
On the Cornerstone adjustment screen, select [EXIT] or press the EXIT button on the remote control.
The confirmation screen is displayed.
7. Use the
button to move the projected image frame as shown on the example.

34
3. Convenient Features
Theadjustablerangesfor3DReformareasfollows:
PA722X/PA721X/PA622X/PA621X/PA672W/PA671W/PA572W/PA571W
HORIZONTALVERTICAL
CORNERSTONE
Max.+/−40°approx.Max.+/−30°approx.
KEYSTONE
PA622U/PA621U/PA522U/PA521U
HORIZONTALVERTICAL
CORNERSTONE
Max.+/−35°approx.Max.+/−30°approx.
KEYSTONE
*Thefollowingareconditionsunderwhichthemaximumangleisachieved:
•WhenthelensNP13ZLisused
•Whenthelensshiftissettothecenter
Whenthelensshiftisusedandyettheimageisnotdisplayedinthecenterofthescreen,theadjustablerange
willbeincreasedordecreased.
•Imageisprojectedinmaximumwidewiththezoomring
NOTE:
•Evenwhentheprojectoristurnedon,thelastusedcorrectionvaluesareapplied.
•IftheCornerstonescreenisunavailable(grayed),pressandholdtheGEOMETRIC.buttonforaminimumof2secondstoreset
thecurrentcorrectiondata.TheCornerstonefunctionbecomesavailable.
•Turningontheprojectorwillresetthepreviouscorrectionsettingvaluesandcorrectdistortionanewiftheprojectionangleis
changedfromthelastuse.
Iftheprojectionangleisthesameasinthelastuse,thepreviouscorrectionsettingvaluesareretainedinthememory.
•Therangeofkeystonecorrectionisnotthemaximumtiltangleofprojector.
NOTE:Using3DReformcorrectioncancausetheimagetobeslightlyblurredbecausethecorrectionismadeelectronically.
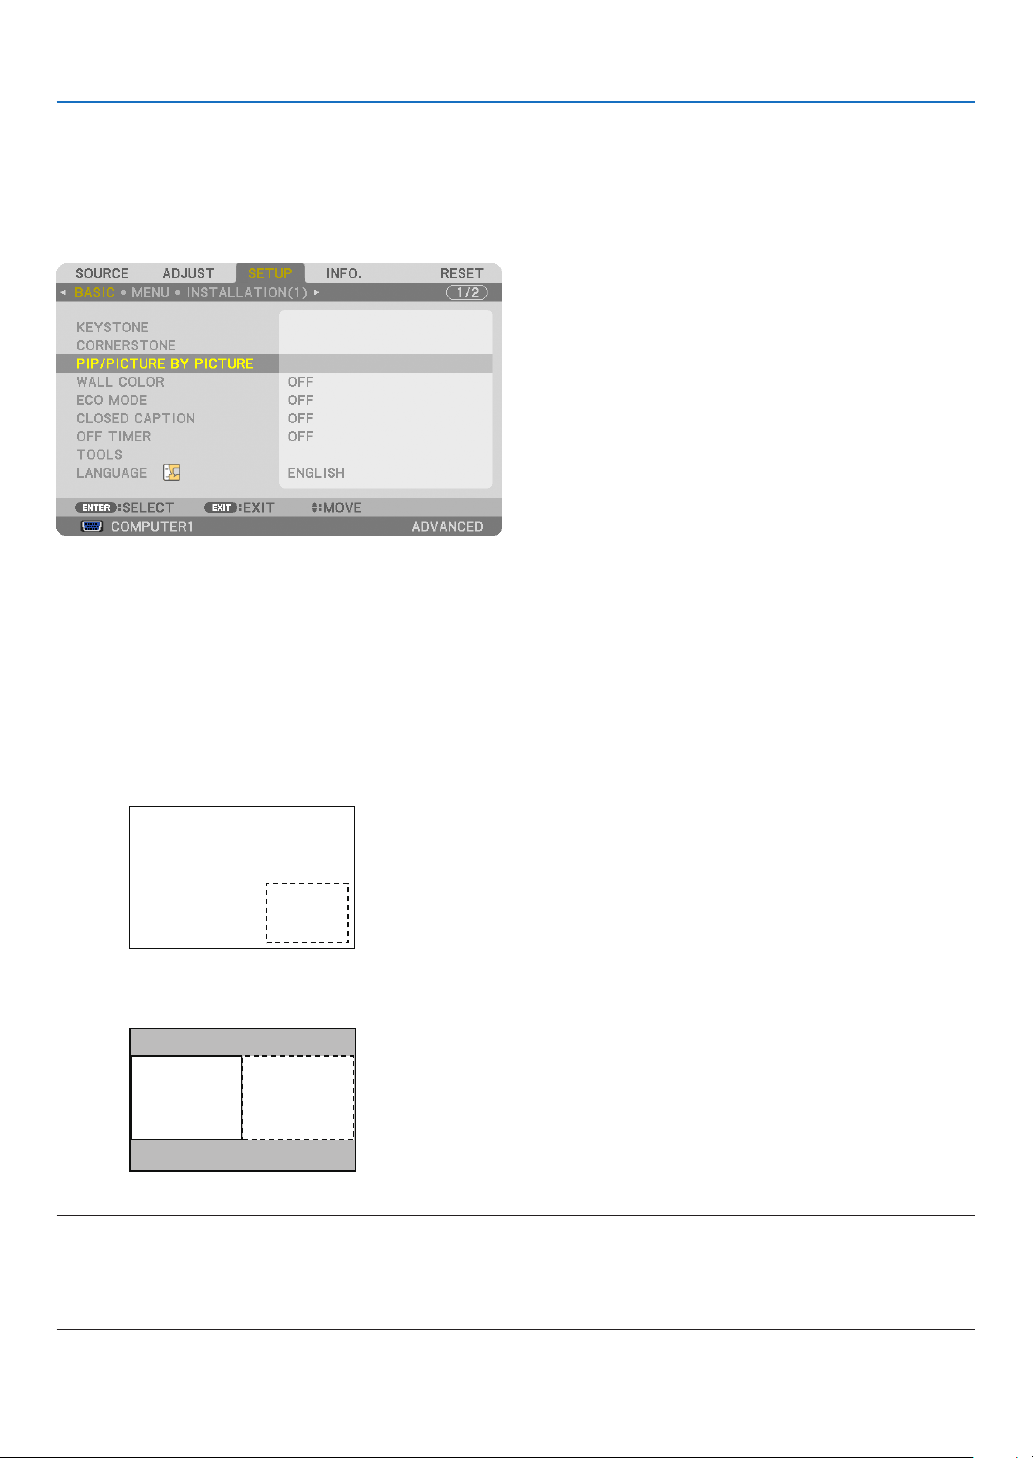
35
3. Convenient Features
Displaying Two Pictures at the Same Time
Theprojectorhasafeaturethatallowsyoutoviewtwodifferentsignalssimultaneously.Youhavetwomodes:PIP
modeandPICTUREBYPICTUREmode.
Fromthemenuyoucanselect[SETUP]→[BASIC]→[PIP/PICTUREBYPICTURE].
The[PIP/PICTUREBYPICTURE]menuitemhasthefollowingthreeoptions:MODE,POSITION,andSOURCE.
Usethe or buttontoselect[MODE],[POSITION]or[SOURCE]andpresstheENTERbutton.
Selecting the PIP or PICTURE BY PICTURE Mode [MODE]
Thisoptionallowsyoutoselecttwomodes:PIPandSIDEBYSIDE.
Usethe or buttontoselect[PIP]or[PICTUREBYPICTURE]andpresstheENTERbutton.
PIP:Thisoptionallowsyoutoviewasubpictureinthemainpicture.
Main picture
Sub
picture
PICTUREBYPICTURE:Thisallowsyoutoviewtwopicturessidebyside.
Main picture Sub picture
NOTE:
•Themainpicturewillbedisplayedontheleftsideandthesubpictureontherightside.
•ThemainpicturesignalsupportstheCOMPUTER1,COMPUTER2,andCOMPUTER3connectors.
ThesubpicturesignalsupportstheVIDEOINandS-VIDEOINconnectors.
•ThemainpicturesupportsanRGBsignalwitharesolutionof1280×1024pixelsorless.
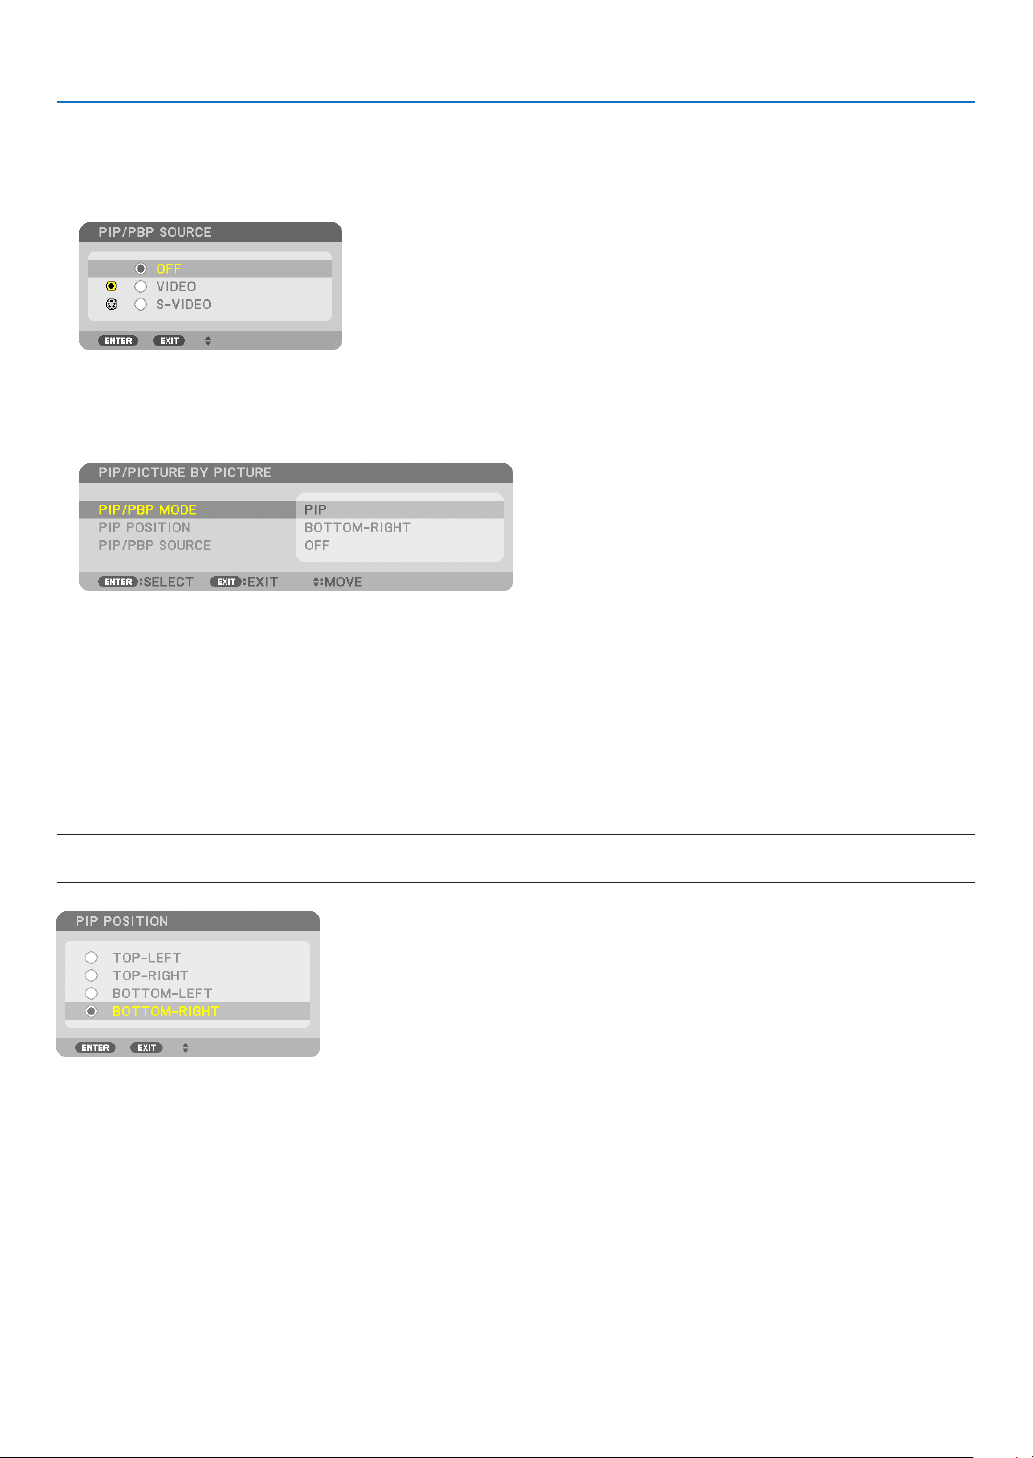
36
3. Convenient Features
ViewingTwoPictures
1. Press the PIP button on the remote control.
The PIP/PICTURE BY PICTURE SOURCE screen will be displayed.
2. Use the or button to select the source and press the ENTER button.
The PIP screen or PICTURE BY PICTURE screen will be displayed, depending on which was selected in the
[MODE] setting screen.
3. Press the PIP button again to return to the normal screen (single picture).
TIP:
•Selectinganothersourcewillreturntothenormalscreen.
•Selectingasourcenotsupportedforthemainpictureorthesubpicturewillreturntothenormalscreen.
[POSITION]
Thisoptionallowsyoutoselectthepositionofasubpictureinthemainpicture.
NOTE:
•Thedefaultsettingis[BOTTOM-RIGHT].
Usethe or buttontoselectthesubpicture’spositionandpresstheENTERbutton.
Theoptionsare:TOP-LEFT,TOP-RIGHT,BOTTOM-LEFT,andBOTTOM-RIGHT.
Thefollowingadjustmentsandsettingsareavailableforthemainpictureonly.
-Adjustingpictureandsound
-Magnifyingapicture
Thefollowingoperationsareavailableforboththemainandsubpictures.
-Pictureandaudiomute
-Freezingamovingpicture
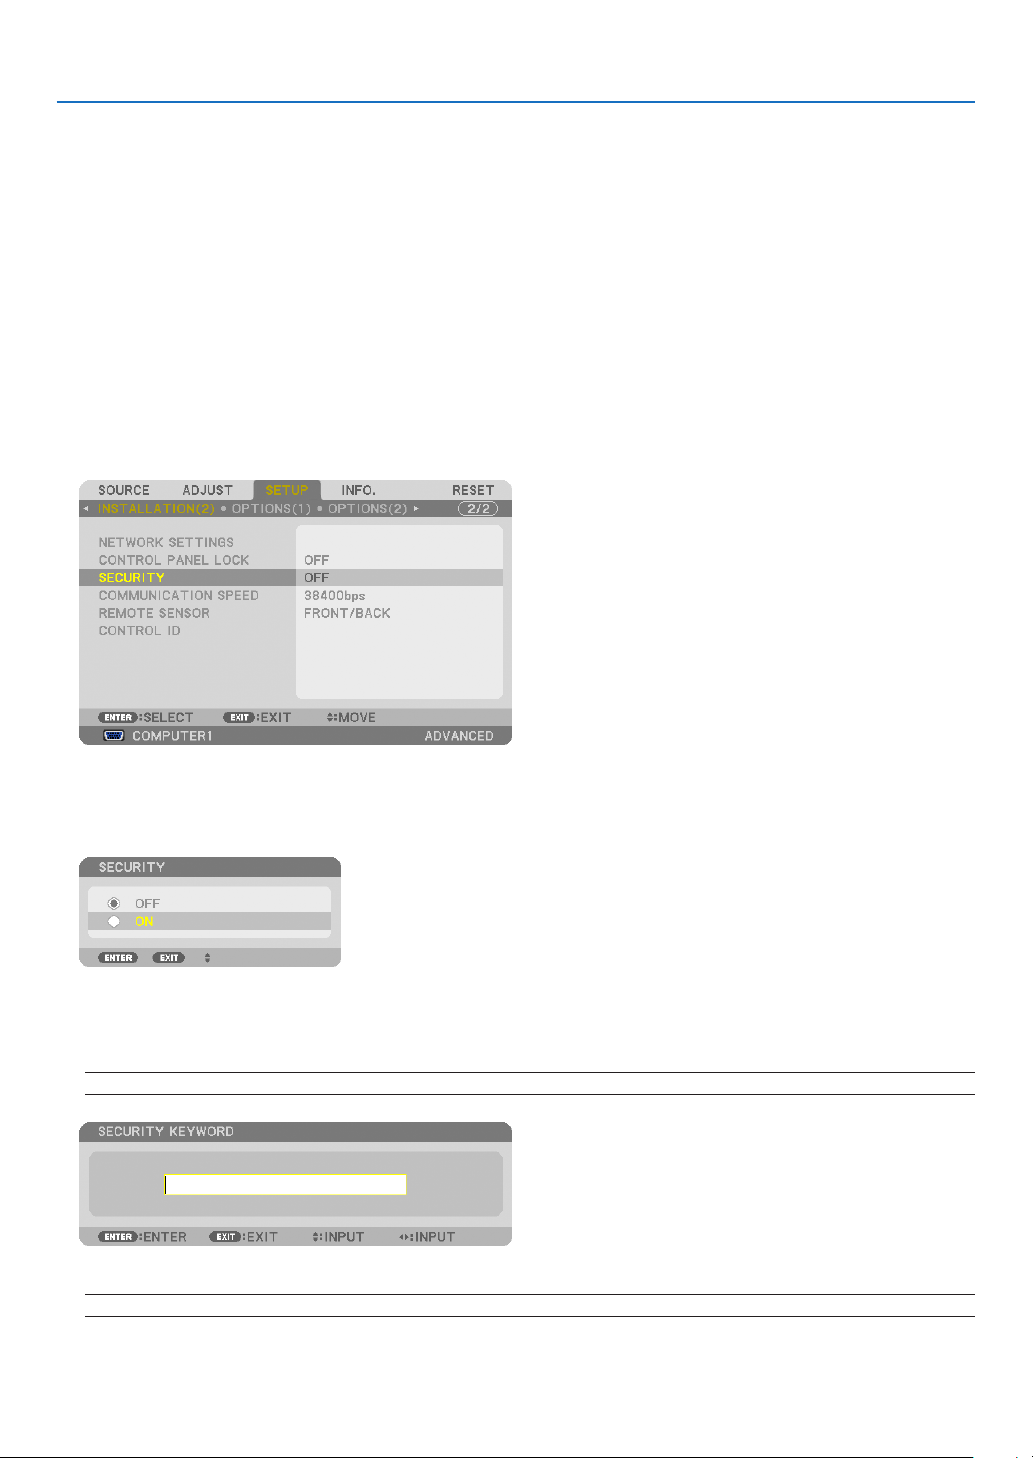
37
3. Convenient Features
Preventing the Unauthorized Use of the Projector [SECURITY]
AkeywordcanbesetforyourprojectorusingtheMenutoavoidoperationbyanunauthorizeduser.Whenakeyword
isset,turningontheprojectorwilldisplaytheKeywordinputscreen.Unlessthecorrectkeywordisentered,thepro-
jectorcannotprojectanimage.
•The[SECURITY]settingcannotbecancelledbyusingthe[RESET]ofthemenu.
ToenabletheSecurityfunction:
1. Press the MENU button.
The menu will be displayed.
2. Press the
buttontwicetoselect[SETUP]andpressthebuttonortheENTERbuttontoselect[BA-
SIC].
3. Press the buttontoselect[INSTALLATION(2)].
4. Press the buttonthreetimestoselect[SECURITY]andpresstheENTERbutton.
The OFF/ON menu will be displayed.
5. Press the
buttontoselect[ON]andpresstheENTERbutton.
The [SECURITY KEYWORD] screen will be displayed.
6. Type in a combination of the four
buttons and press the ENTER button.
NOTE:Akeywordmustbe4to10digitsinlength.
The [CONFIRM KEYWORD] screen will be displayed.
NOTE:Makeanoteofyourpasswordandstoreitinasafeplace.
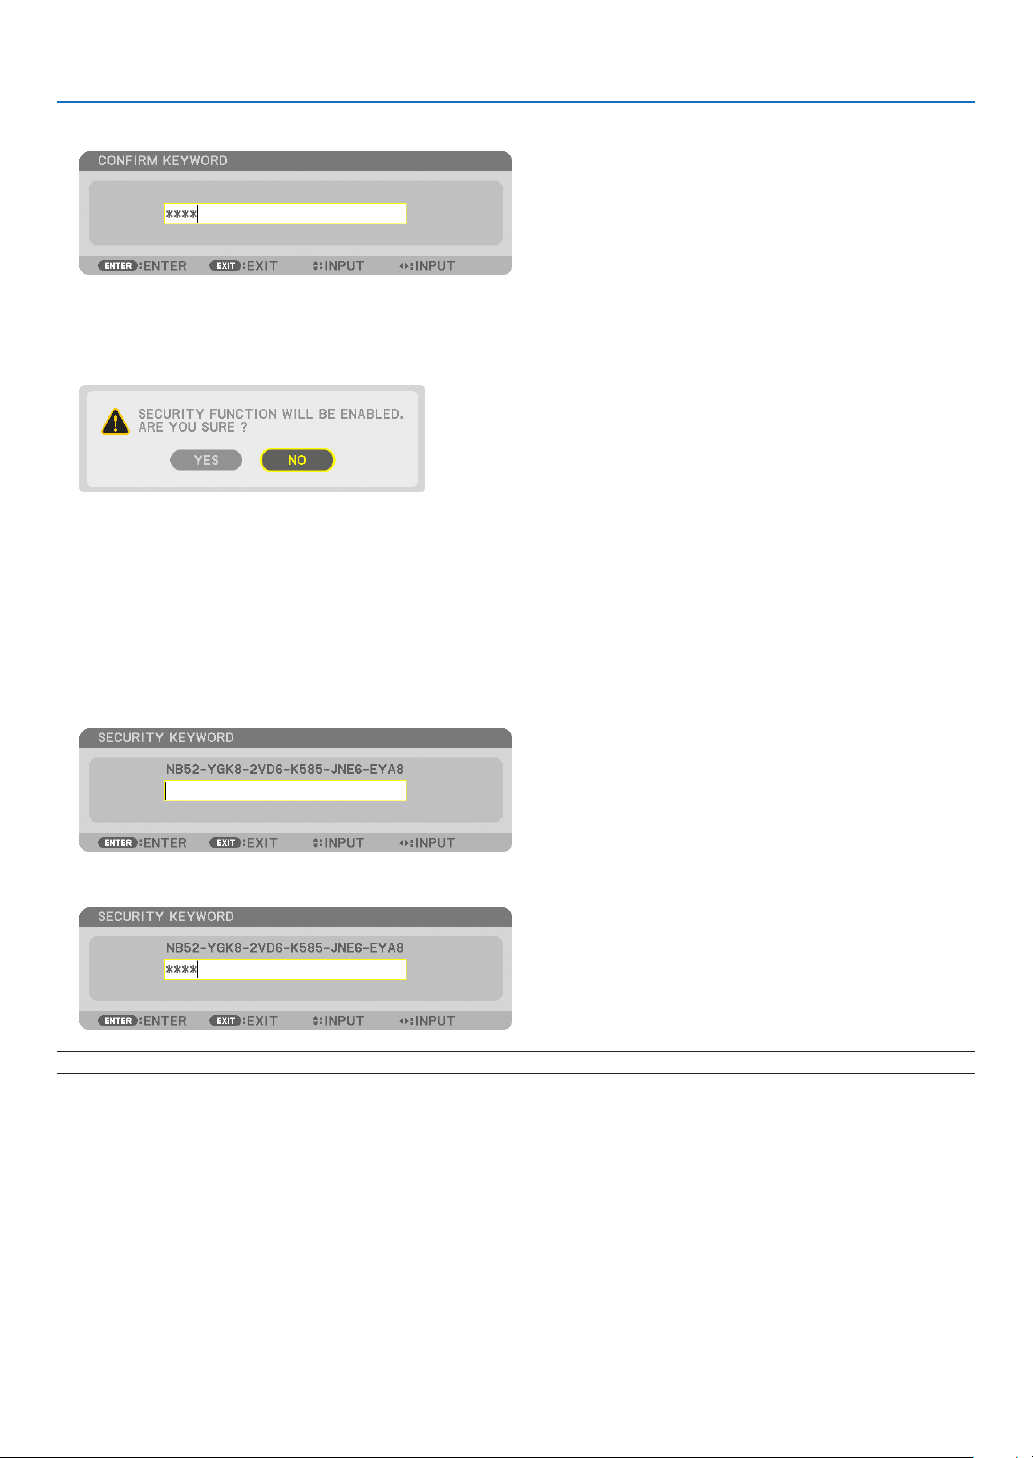
38
3. Convenient Features
7. Type in the same combination of buttons and press the ENTER button.
The confirmation screen will be displayed.
8.Select[YES]andpresstheENTERbutton.
The SECURITY function has been enabled.
Toturnontheprojectorwhen[SECURITY]isenabled:
1. Press the POWER button.
The projector will be turned on and display a message to the effect that the projector is locked.
2. Press the MENU button.
3. Type in the correct keyword and press the ENTER button. The projector will display an image.
NOTE:Thesecuritydisablemodeismaintaineduntilthemainpoweristurnedofforunpluggingthepowercord.
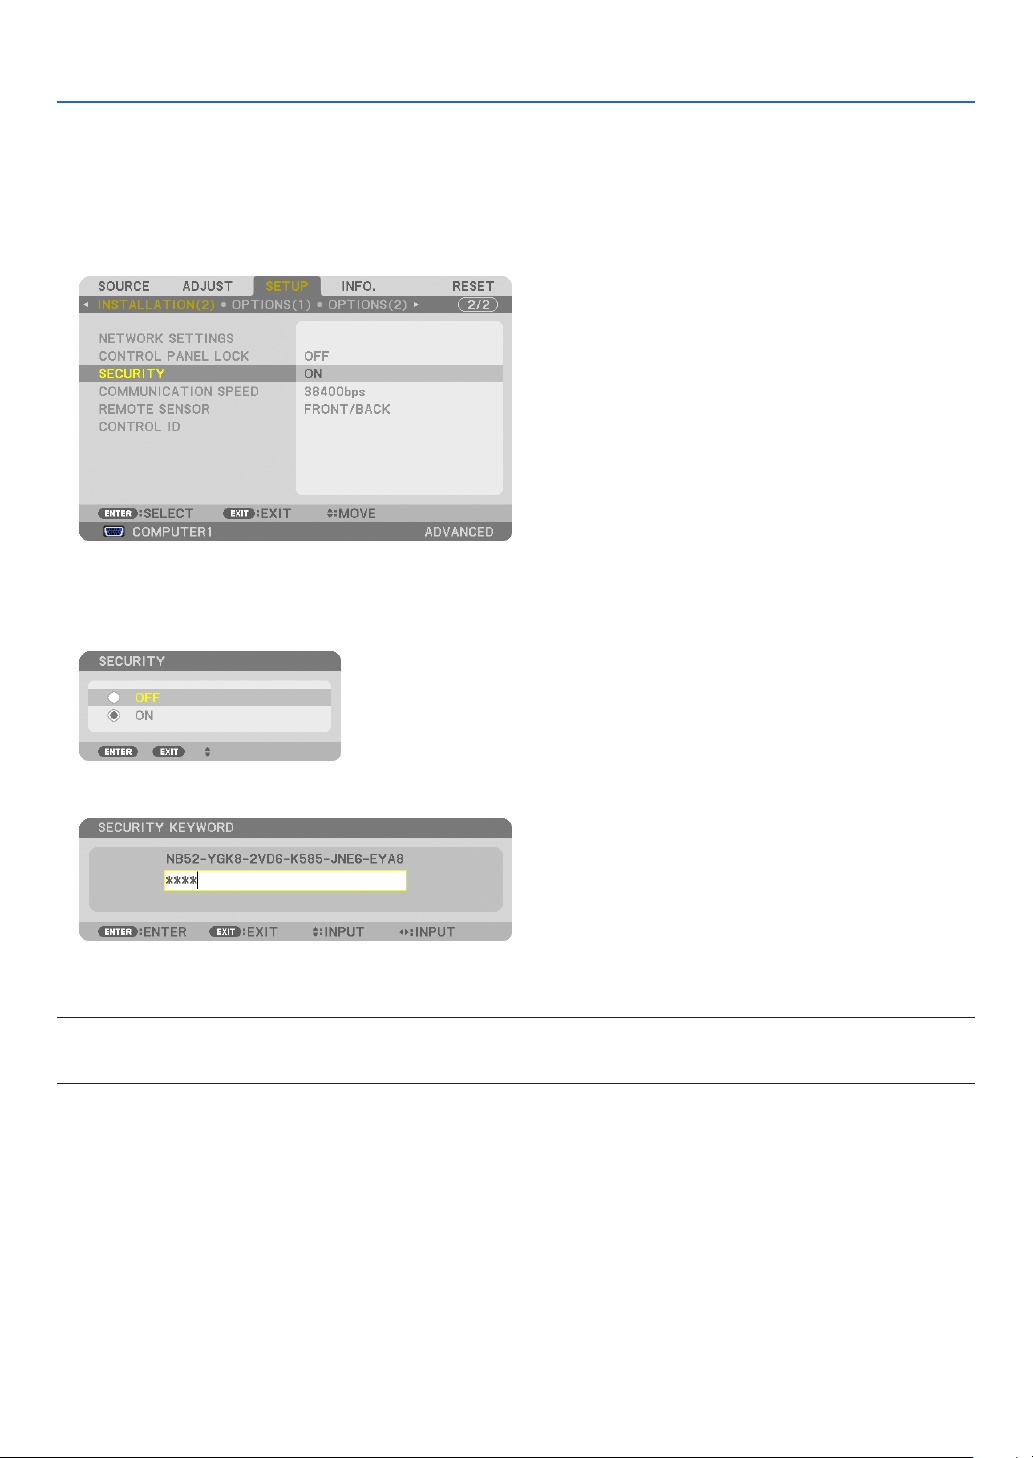
39
3. Convenient Features
TodisabletheSECURITYfunction:
1. Press the MENU button.
The menu will be displayed.
2.Select[SETUP]→[INSTALLATION(2)]→[SECURITY]andpresstheENTERbutton.
The OFF/ON menu will be displayed.
3.Select[OFF]andpresstheENTERbutton.
The SECURITY KEYWORD screen will be displayed.
4. Type in your keyword and press the ENTER button.
When the correct keyword is entered, the SECURITY function will be disabled.
NOTE:Ifyouforgetyourkeyword,contactyourdealer.Yourdealerwillprovideyouwithyourkeywordinexchangeforyourrequest
code.YourrequestcodeisdisplayedintheKeywordConrmationscreen.Inthisexample[NB52-YGK8-2VD6-K585-JNE6-EYA8]
isarequestcode.

40
3. Convenient Features
Controlling the Projector by Using an HTTP Browser
Overview
TheHTTPServerfunctionprovidessettingsandoperationsfor:
1.Settingforwired/wirelessnetwork(NETWORKSETTINGS)
To use wireless LAN connection, the optional USB Wireless LAN Unit is required. (→ page 151)
To use wired/wireless LAN connection, connect the projector to the computer with a commercially available LAN
cable. (
→ page 150)
2. Setting Alert Mail (ALERT MAIL)
When the projector is connected to a wired/wireless network, lamp replace time or error messages will be sent via
e-mail.
3. Operating the projector
Power on/off, selecting input, volume control and picture adjustments are possible.
4.SettingPJLinkPASSWORDandAMXBEACON
TwowaysofaccesstotheHTTPserverfunctionareavailable:
•StarttheWebbrowseronthecomputerviathenetworkconnectedtotheprojectorandenterthefollowing
URL :
http://<theprojector’sIPaddress>/index.html
•UseImageExpressUtilityLiteorImageExpressUtility2.0containedonthesuppliedNECProjectorCD-
ROM.
TIP:ThefactorysettingIPaddressis[DHCPON].
NOTE:
•Tousetheprojectorinanetwork,consultwithyournetworkadministratoraboutnetworksettings.
•Thedisplay’sorbutton’sresponsecanbesloweddownoroperationmaynotbeaccepteddependingthesettingsofyournet-
work.
Shouldthishappen,consultyournetworkadministrator.Theprojectormaynotrespondifitsbuttonsarerepeatedlypressedin
rapidintervals.Shouldthishappen,waitamomentandrepeat.Ifyoustillcan’tgetanyresponse,turnoffandbackontheprojec-
tor.
•IfthePROJECTORNETWORKSETTINGSscreendoesnotappearinthewebbrowser,presstheCtrl+F5keystorefreshyourweb
browser(orclearthecache).
•Thisdeviceuses“JavaScript”and“Cookies”andthebrowsershouldbesettoacceptthesefunctions.Thesettingmethodwill
varydependingontheversionofbrowser.Pleaserefertothehelplesandtheotherinformationprovidedinyoursoftware.
Preparation before Use
ConnecttheprojectortoacommerciallyavailableLANcablebeforeengaginginbrowseroperations.(→page
150)
Operationwithabrowserthatusesaproxyservermaynotbepossibledependingonthetypeofproxyserverandthe
settingmethod.Althoughthetypeofproxyserverwillbeafactor,itispossiblethatitemsthathaveactuallybeenset
willnotbedisplayeddependingontheeffectivenessofthecache,andthecontentssetfromthebrowsermaynotbe
reectedinoperation.Itisrecommendedthataproxyservernotbeusedunlessitisunavoidable.
41
3. Convenient Features
Handling of the Address for Operation via a Browser
RegardingtheactualaddressthatisenteredfortheaddressorenteredtotheURLcolumnwhenoperationofthepro-
jectorisviaabrowser,thehostnamecanbeusedasitiswhenthehostnamecorrespondingtotheIPaddressofthe
projectorhasbeenregisteredtothedomainnameserverbyanetworkadministrator,orthehostnamecorresponding
totheIPaddressoftheprojectorhasbeensetinthe“HOSTS”leofthecomputerbeingused.
Example1:Whenthehostnameoftheprojectorhasbeensetto“pj.nec.co.jp”,accessisgainedtothenetwork
settingbyspecifying
http://pj.nec.co.jp/index.html
fortheaddressortheentrycolumnoftheURL.
Example2:WhentheIPaddressoftheprojectoris“192.168.73.1”,accessisgainedtothenetworksettingby
specifying
http://192.168.73.1/index.html
fortheaddressortheentrycolumnoftheURL.
PROJECTOR ADJUSTMENT
POWER:Thiscontrolsthepoweroftheprojector.
ON ......................... Power is switched on.
OFF ........................ Power is switched off.
VOLUME:Thiscontrolsthevolumeoftheprojector.
........................... Increases the volume adjustment value.
........................... Decreases the volume adjustment value.
AV-MUTE:Thiscontrolsthemutefunctionoftheprojector.
PICTURE ON .......... Mutes the video.
PICTURE OFF ......... Cancels the video muting.
SOUND ON ............ Mutes the audio.
SOUND OFF ........... Cancels the audio muting.
ALL ON .................. Mutes each of the video, and audio functions.
ALL OFF ................. Cancels the muting of each of the video, and audio functions.

42
3. Convenient Features
PICTURE:Controlsthevideoadjustmentoftheprojector.
BRIGHTNESS .... Increases the brightness adjustment value.
BRIGHTNESS .... Decreases the brightness adjustment value.
CONTRAST ........ Increases the contrast adjustment value.
CONTRAST ........ Decreases the contrast adjustment value.
COLOR .............. Increases the color adjustment value.
COLOR .............. Decreases the color adjustment value.
HUE ................... Increases the hue adjustment value.
HUE ................... Decreases the hue adjustment value.
SHARPNESS ..... Increases the sharpness adjustment value.
SHARPNESS ..... Decreases the sharpness adjustment value.
•Thefunctionsthatcanbecontrolledwillvarydependingonthesignalbeinginputtotheprojector.(→page
93)
SOURCESELECT:Thisswitchestheinputconnectoroftheprojector.
COMPUTER 1 ........ Switches to the COMPUTER IN connector.
COMPUTER 2 ........ Switches to the COMPUTER 2 IN connector.
COMPUTER 3 ........ Switches to the COMPUTER 3 IN connector.
HDMI ..................... Switches to the HDMI IN connector.
DisplayPort ............ Switches to the DisplayPort.
VIDEO .................... Switches to the VIDEO IN connector.
S-VIDEO ................ Switches to the S-VIDEO IN connector.
VIEWER ................. Switches to the data on the USB memory device.
NETWORK ............. Switches to a LAN signal.
PROJECTORSTATUS:Thisdisplaystheconditionoftheprojector.
LAMP LIFE REMAINING .....Displays the remaining life of the lamp as a percentage.
LAMP HOURS USED ...........Displays how many hours the lamp has been used.
FILTER HOURS USED ......... Displays how many hours the filter has been used.
ERROR STATUS .................. Displays the status of errors occurring within the projector.
LOGOFF:Loggingoffyourprojectorandreturningtotheauthenticationscreen(LOGONscreen).

43
3. Convenient Features
NETWORK SETTINGS
•SETTINGS
WIRED or WIRELESS
SETTINGSetforwiredLANorforwirelessLAN.
APPLYApplyyoursettingstowiredLANorwirelessLAN.
DHCPONAutomaticallyassignIPaddress,subnetmask,andgatewaytotheprojectorfromyour
DHCPserver.
DHCPOFFSetIPaddress,subnetmask,andgatewaytotheprojectorassignedbyyournetwork
administrator.
IPADDRESSSetyourIPaddressofthenetworkconnectedtotheprojector.
SUBNETMASKSetyoursubnetmasknumberofthenetworkconnectedtotheprojector.
GATEWAYSetthedefaultgatewayofthenetworkconnectedtotheprojector.
WINSSettheIPaddressofyourWINSserverofthenetworkconnectedtotheprojectorwhen
[DHCP]isturnedon,thisoptionisnotavailable.
AUTODNSONDHCPserverwillautomaticallyassignIPaddressofDNSserverconnectedtothe
projector.
AUTODNSOFFSetyourIPaddressofDNSserverconnectedtotheprojector.
Setting for WIRED LAN
PROFILE1/PROFILE2TwosettingscanbesetforwiredLANconnection.SelectPROFILE1orPROFILE2.
DISABLETurnoffwiredLANconnection
SettingforWIRELESSLAN(theoptionalWirelessLANUnitrequiredforEurope,Australia,andAsiancoun-
tries)
EASYCONNECTIONExecuteawirelessLANusingEASYCONNECTION.
SIMPLEACCESPOINTSettheprojectorforsimpleaccesspoint.
WPSUseWPS(Wi-FiProtectedSetup™)tosetupthewirelessLANfortheprojector.
NOTE:Usetheprojector’smenustomakeWPSconnectionsandchangetheWPS
prolesettings.
CHANNELSelectachannel.Availablechannelsvarydependingonthecountryandregion.When
youselect[INFRASTRUCTURE],makesurethattheprojectorandyouraccesspoint
areonthesamechannel;whenyouselect[ADHOC],makesurethattheprojectorand
yourcomputerareonthesamechannel.
PROFILE1/PROFILE2TwosettingscanbesetforwirelessLANconnection.SelectPROFILE1orPROFILE
2.
44
3. Convenient Features
SSIDEnteranidentier(SSID)forwirelessLAN.Communicationcanbedoneonlywith
equipmentwhoseSSIDmatchesSSIDforyourwirelessLAN.
SITESURVEYDisplaysalistofavailableSSIDsforwirelessLANonsite.SelectanSSIDwhichyou
canaccess.
NETWORKTYPESelectcommunicationmethodwhenusingwirelessLAN.
INFRASTRUCTURE:Selectthisoptionwhencommunicatingwithoneormoreequip-
mentconnectedtothewirelessLANnetworkviaawirelessaccesspoint.
ADHOC:SelectthisoptionwhenusingthewirelessLANtodirectlycommunicatewith
acomputerinpeer-to-peermode.
SECURITYTYPE
Turnonorofftheencryptionmodeforsecuretransmission.Whenturnontheencryp-
tionmode,setWEPkeyorencryptedkey.
DISABLEWillnotturnontheencryptionfeature.Yourcommunicationsmay
bemonitoredbysomeone.
WEP64bitUses64-bitdatalengthforsecuretransmission.
WEP128bitUses128-bitdatalengthforsecuretransmission.Thisoptionwill
increaseprivacyandsecuritywhencomparedtouseof64-bit
datalengthencryption.
WPA-PSKTKIP/WPA-PSKAES/
WPA2-PSKTKIP/WPA2-PSKAES/
WPA-EAPTKIPEAP-TLS/
WPA-EAPAESEAP-TLS/
WPA-EAPTKIPPEAP-MSCHAPv2/
WPA-EAPAESPEAP-MSCHAPv2/
WPA2-EAPTKIPEAP-TLS/
WPA2-EAPAESEAP-TLS/
WPA2-EAPTKIPPEAP-MSCHAPv2/
WPA2-EAPAESPEAP-MSCHAPv2
Theseoptionsparovidestrongersecurity
thanWEP.
NOTE:
•TheWEPsettingsmustbethesameascommunicationdevicessuchasPCoraccesspointin
yourwirelessnetwork.
•WhenyouuseWEP,yourimagetransmissionspeedwillslowdown.
•OtherencryptionkeysthanWEP64bitandWEP128bitarenotavailablewhen[ADHOC]is
selectedfrom[NETWORKTYPE].
•Toinstalladigitalcerticate,usetheprojector’smenu.(→page125)
INDEXSelectencryptionkeywhenselecting[WEP64bit]or[WEP128bit]in[SECURITY
TYPE].
KEYWhenselecting[WEP64bit]or[WEP128bit]in[SECURITYTYPE]:
EnterWEPkey.
SelectCharacters(ASCII)Hexadecimaldigit(HEX)
WEP64bitUpto5charactersUpto10characters
WEP128bitUpto13charactersUpto26characters
Whenselecting[WPAPSK-TKIP],[WPAPSK-AES],[WPA2PSK-TKIP]or[WPA2
PSK-AES]:
Enterencryptionkey.Keylengthmustbe8orgreaterand63orless.
USERNAMESetausernameforWPA-EAP/WPA2-EAP.
PASSWORDSetapasswordforWPA-EAPTKIPPEAP-MSCHAPv2/WPA-EAPAESPEAP-MSCHAP
v2/WPA2-EAPTKIPPEAP-MSCHAPv2/WPA2-EAPAESPEAP-MSCHAPv2.

45
3. Convenient Features
USEDIGITALCERTIFI-
CATE
SelectthisifyouuseadigitalcerticateforWPA-EAPTKIPPEAP-MSCHAPv2/WPA-
EAPAESPEAP-MSCHAPv2/WPA2-EAPTKIPPEAP-MSCHAPv2/WPA2-EAPAES
PEAP-MSCHAPv2.
•NAME
PROJECTORNAMEEnteranameforyourprojectorsothatyourcomputercanidentifytheprojector.A
projectornamemustbe16charactersorless.
TIP:Projectornamewillnotbeaffectedevenwhen[RESET]isdonefromthemenu.
HOSTNAMEEnterthehostnameofthenetworkconnectedtotheprojector.Ahostnamemustbe
15orless.
DOMAINNAMEEnterthedomainnameofthenetworkconnectedtotheprojector.Adomainname
mustbe60charactersorless.
•ALERTMAIL
ALERTMAILThisoptionwillnotifyyourcomputeroflampreplacetimeorerrormessagesviae-mail
whenusingwirelessorwiredLAN.
PlacingacheckmarkwillturnontheAlertMailfeature.
ClearingacheckmarkwillturnofftheAlertMailfeature.
Sampleofamessagetobesentfromtheprojector:
Thelampandltersareattheendofitsusablelife.Pleasereplacethelampand
lters.
ProjectorName:NECProjector
LampHoursUsed:100[H]
SENDER’SADDRESSEntersender’saddress.
SMTPSERVERNAMEEntertheSMTPservernametobeconnectedtotheprojector.
RECIPIENT’SADDRESS
1,2,3
Enteryourrecipient’saddress.Uptothreeaddressescanbeentered.
TESTMAIL
Sendatestmailtocheckwhetheryoursettingsarecorrectornot
NOTE:
•Ifyouexecuteatest,youmaynotreceiveanAlertmail.Shouldthishappen,checkifnetwork
settingsarecorrect.
•Ifyouenteredanincorrectaddressinatest,youmaynotreceiveanAlertmail.Shouldthis
happen,checkiftheRecipient’sAddressiscorrect.
SAVEClickthisbuttontosaveyoursettingstotheprojector’smemory.

46
3. Convenient Features
•NETWORKSERVICE
PJLinkPASSWORDSetapasswordforPJLink*.Apasswordmustbe32charactersorless.Donotforget
yourpassword.However,ifyouforgetyourpassword,consultwithyourdealer.
HTTPPASSWORDSetapasswordforHTTPserver.Apasswordmustbe10charactersorless.
AMXBEACONTurnonorofffordetectionfromAMXDeviceDiscoverywhenconnectingtothenetwork
supportedbyAMX’sNetLinxcontrolsystem.
TIP:
WhenusingadevicethatsupportsAMXDeviceDiscovery,allAMXNetLinxcontrolsystemwillrec
-
ognizethedeviceanddownloadtheappropriateDeviceDiscoveryModulefromanAMXserver.
PlacingacheckmarkwillenabledetectingtheprojectorfromAMXDeviceDiscovery.
ClearingacheckmarkwilldisabledetectingtheprojectorfromAMXDeviceDiscovery.
NOTE:Ifyouforgetyourpassword,contactyourdealer.
*WhatisPJLink?
PJLinkisastandardizationofprotocolusedforcontrollingprojectorsofdifferentmanufacturers.Thisstandardproto-
colisestablishedbyJapanBusinessMachineandInformationSystemIndustriesAssociation(JBMIA)in2005.
TheprojectorsupportsallthecommandsofPJLinkClass1.
SettingofPJLinkwillnotbeaffectedevenwhen[RESET]isdonefromthemenu.
•CRESTRON
DISABLEDisablesCRESTRONCONTROL.
ENABLEEnablesCRESTRONCONTROL.
IPADDRESSSetyourIPaddressofCRESTRONSERVER.
IPIDSetyourIPIDofCRESTRONSERVER.
•INFORMATION
WIREDLANDisplayalistofsettingsofwiredLANconnection.
WIRELESSLANDisplayalistofsettingsofwirelessLANconnection.
UPDATEReectsettingswhentheyarechanged.
47
3. Convenient Features
Projecting Your Computer’s Screen Image from the Projector
via a Network [NETWORK PROJECTOR]
ByselectingtheprojectorconnectedtothesamenetworkasthatofyourPC,thePCscreenimagecanbeprojected
tothescreenvianetwork.Thereisnoneedofconnectionusingthecomputercable(VGA).
Operation Environment
ApplicableOSWindows7Professional
Windows7Ultimate
Windows7Enterprise
WindowsVistaHomePremium
WindowsVistaBusiness
WindowsVistaUltimate
WindowsVistaEnterprise
HardwarespecicationsThespecicationsrecommendedbyMicrosoftastheoperationenvironmentfor
Windows7/WindowsVistashouldbesatised.
NetworkEnvironmentWiredLANorwirelessLANenvironmentthatsupportsTCP/IPisrequired.
ScreencolorHighColor(16bits)
TrueColor(24bitsand32bits)
*Settingwith256colorsorlessisnotavailable.
SettingtheProjectortoNetworkProjectorInputMode
1.Withtheprojectorturnedon,presstheSOURCEbutton.
The input selection window appears.
Another way to display the input selection window is to press the NETWORK button on the remote control. The
APPLICATION MENU screen will be displayed. Go to step 3.
48
3. Convenient Features
2. Press the or buttontoselect[NETWORK]andpresstheENTERbutton.
In the screen, the [APPLICATION MENU] menu is displayed.
3.Fromthe[APPLICATIONMENU]menu,select[NETWORKPROJECTOR].
The [PROJECTOR NAME/DISPLAY RESOLUTION/PASSWORD/URL] will be displayed.

49
3. Convenient Features
ProjectingtheImagewithNetworkProjector
1.Click[Start]fromthedesktopofWindows7.
2.Click[AllPrograms].
3.Click[Accessories].
4.Click[ConnecttoaNetworkProjector].
When the [Permission Connect to a Network Projector] window appears, click [Yes.].
The “Connect to a Network Projector” window appears.
5.Click[→Searchforaprojector(recommended)].
In the “Available projectors” box, “PA600 Series” is displayed.
6.Click[PA600Series].
The message “Enter the password for the projector that you selected.” is displayed at the bottom of the window.
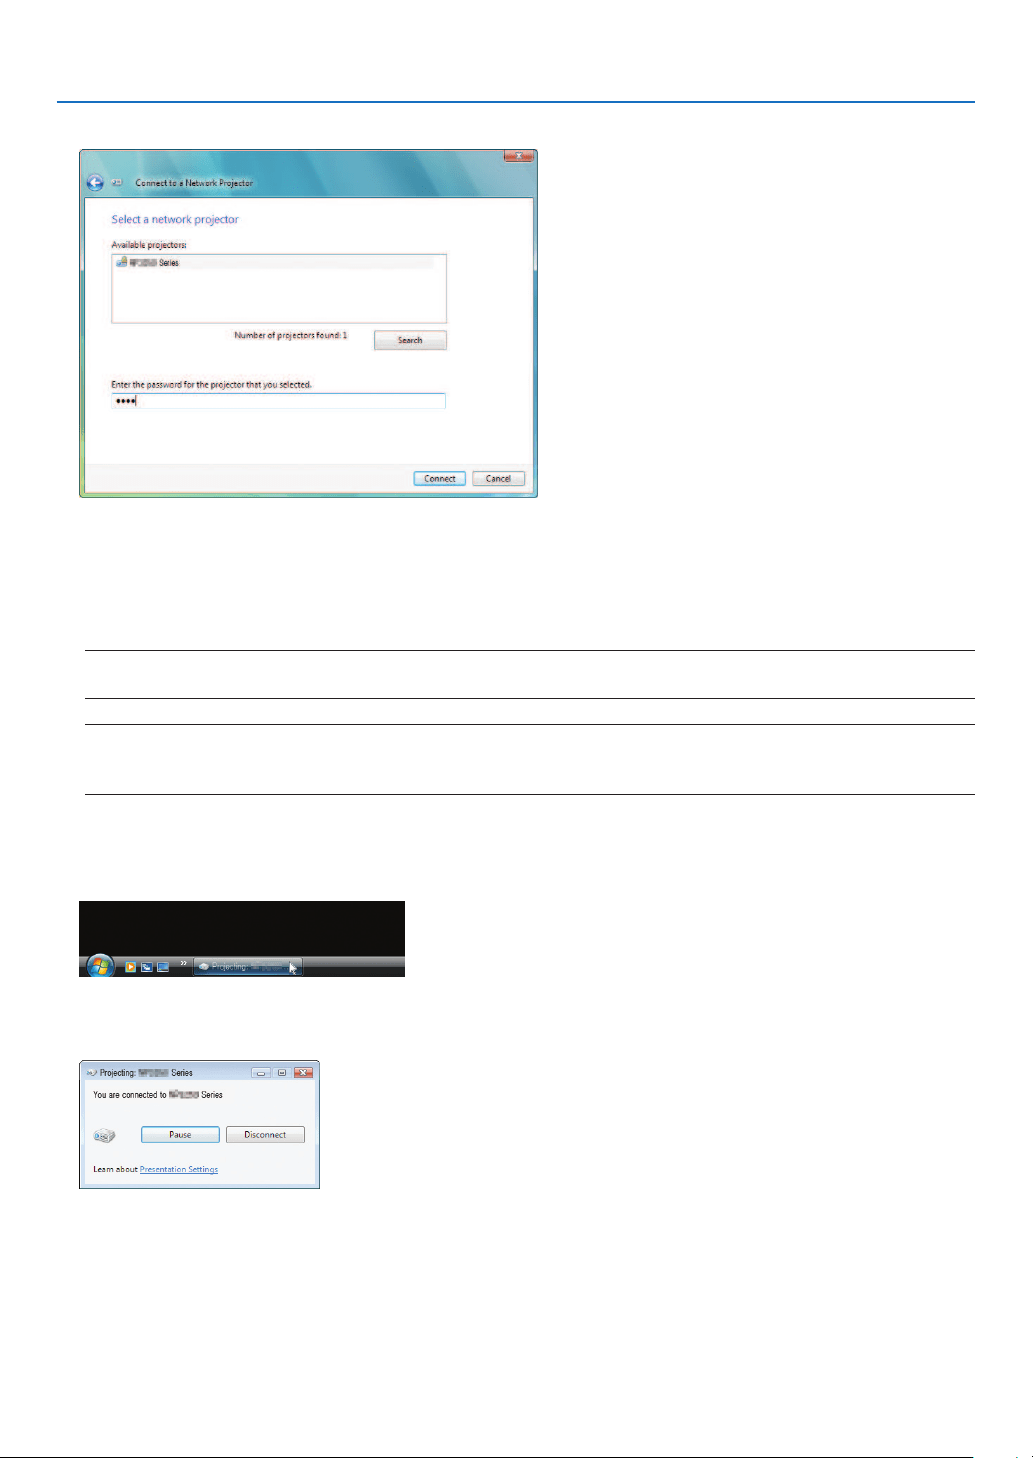
50
3. Convenient Features
7. Input the password to the password input box displayed by the operation at step 3 on page 44.
8.Click[Connect].
The network projector function works and the screen of Windows 7 is projected from the projector.
•Iftheresolutionofyourcomputer’sscreenisdifferentfromtheprojector’sscreenresolution,theNETWORK
PROJECTOR function may not work. If this happens, change the resolution of the computer’s screen to lower
resolution than the one displayed at Step 3 on page 48.
NOTE:Whenthenetworkprojectorfunctionworks,thebackgroundcolorofthedesktopchangestosolidcolor.Whenthenetwork
projectorfunctionisstopped,theoriginalbackgroundcolorisrestored.
Reference:IftheprojectorcannotbefoundatStep5,click[→Entertheprojectoraddress].Then,inputthe“Networkaddress”
(Inputexample:http://10.32.97.61/lan)and“Projectorpassword”(Inputexample:82291627)displayedinthescreenprojected
fromtheprojector.
ExitingtheNetworkProjectorOperation
1.Click[Projecting:PA600Series]intheWindowsVistataskbar.
2.Click[Disconnect].
The Network Projector function is stopped.
3.PresstheSOURCEbuttonoftheprojectortoselectaninputterminalotherthan[NETWORK].
When using the remote control, press a button other than the NETWORK button.

51
3. Convenient Features
Using the Projector to Operate Your Computer via a Network
[REMOTE DESKTOP]
•ByselectingthePCconnectedtothesamenetworkasthatoftheprojector,thePCscreenimagecanbeprojected
tothescreenvianetwork.
Then,byoperatingthekeyboard,youcanoperateWindows7,WindowsVistaorWindowsXPonthePCconnected
withthenetwork.
•WiththeRemoteDesktopfunction,youcanremotelyoperatethePCplacedatadistancefromtheprojector.
Meetingroom
Ofce
NOTE:
•The[REMOTEDESKTOP]functionwillworkonthefollowingWindowseditions.
Windows7Professional
Windows7Ultimate
Windows7Enterprise
WindowsVistaBusiness
WindowsVistaUltimate
WindowsVistaEnterprise
WindowsXPProfessionalwithServicePack3
(Note)
•Inthisuser’smanualthisfeatureisdescribedusingWindows7asanexample,butWindowsVistaandWindowsXPProfessional
ServicePack2orlaterwillalsoworkwiththisfeature.
•AkeyboardisrequiredtousetheRemoteDesktopfunction.
•TheRemoteDesktopfunctioncanbeoperatedwithakeyboard.Usingawirelessmousewithawirelesskeyboardismoreuseful
foroperating.
Useacommerciallyavailablewirelesskeyboard,awirelessmouse,andaUSBwirelessreceiver.
UseacommerciallyavailableUSBkeyboardandUSBmouse.
•AUSBkeyboardwithabuilt-inUSBhubcannotbeusedwiththeprojector.
•AwirelesskeyboardormousethatsupportsBluetoothcannotbeusedwiththeprojector.
•WedonotwarrantthattheUSBportoftheprojectorwillsupportallUSBdevicesinthemarket.
Prepareacommerciallyavailablewirelesskeyboard(USlayoutversion).
ConnecttheUSBwirelessreceivertotheUSBport(TypeA)oftheprojector.Makeallnecessarysettingsforyour
wirelesskeyboardandmouse.
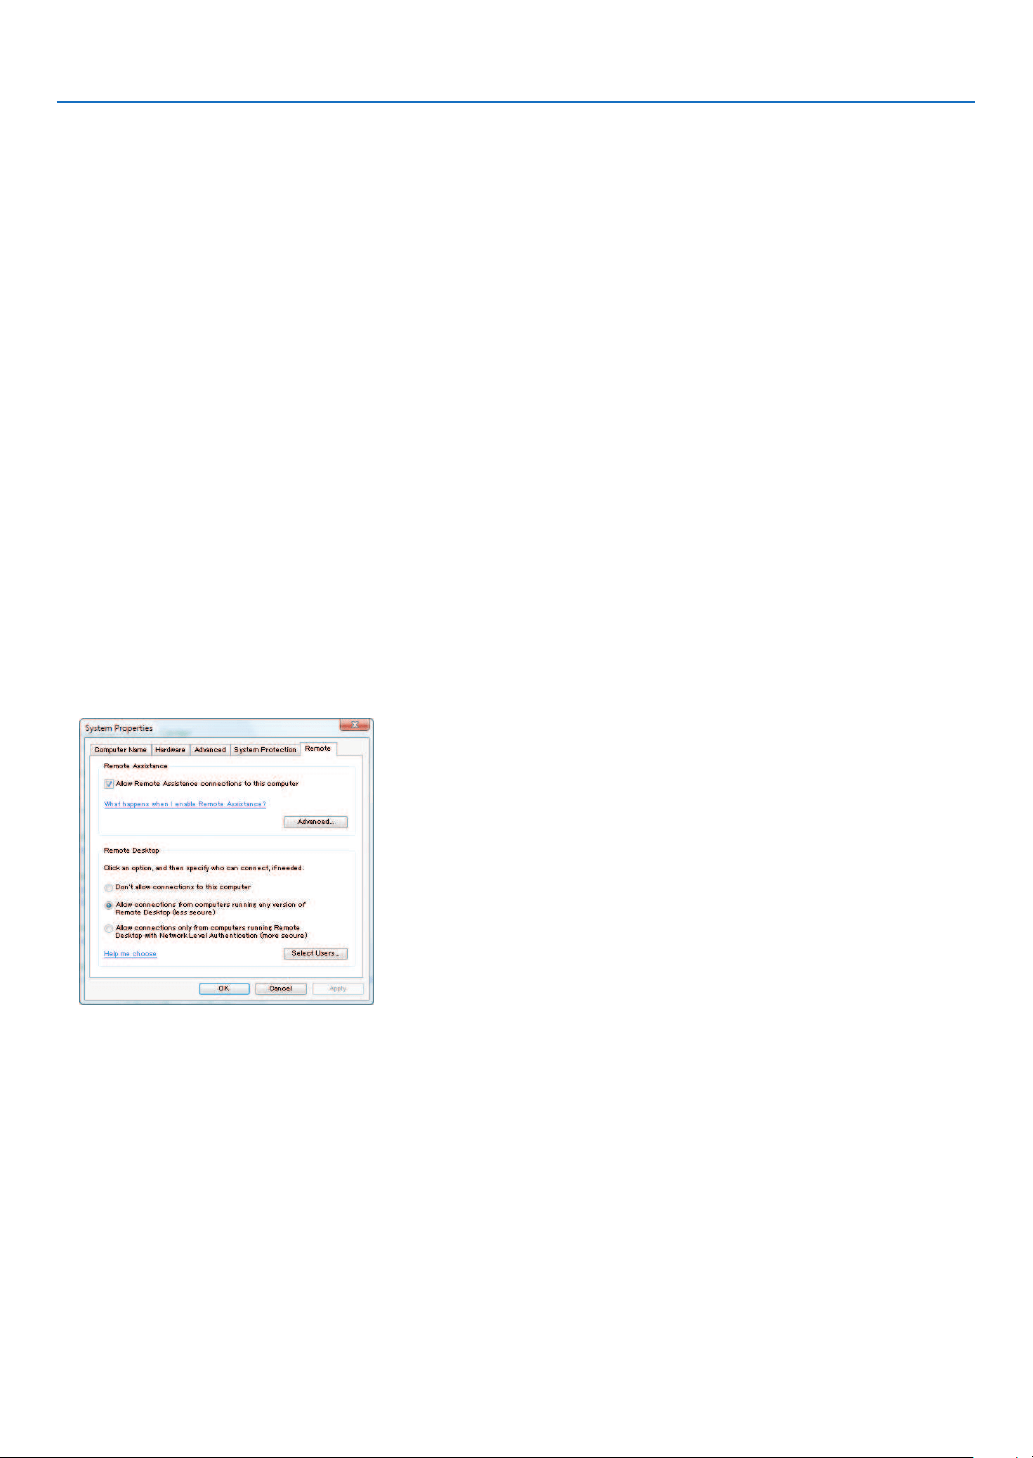
52
3. Convenient Features
Setting the password to the user account of Windows 7
TIP:Ifapasswordhasbeensetforanaccount,thesteps1to9canbeskipped.
1.Click[Start]fromthedesktopofWindows7.
2.Click[ControlPanel].
3.Click[Addorremoveuseraccounts]displayedunder[UserAccounts].
4.Whenthe[UserAccountControl]conrmationwindowappears,click[Continue].
5.Click[Administrator].
6.Click[Createapassword].
7.Inputthepasswordtothe[Newpassword]box.
8.InputthesamepasswordasthatatStep7tothe[Conrmnewpassword]box.
9.Click[Createapassword].
The Administrator is changed to [Password Protection].
Setting the Remote Access
1.Click[Start]fromthedesktopofWindows7.
2.Click[ControlPanel].
3.Click[SystemandSecurity].
4.Click[Allowremoteaccess]displayedunder[System].
5.Whenthe[UserAccountControl]conrmationwindowappears,click[Continue].
The [System Properties] window appears.
6.Click[AllowconnectionsfromcomputersrunninganyversionofRemoteDesktop(lesssecure)]inthe
RemoteDesktopboxandclick[OK].
CheckingtheIPaddressonWindows7
1.Click[Start]fromthedesktopofWindows7.
2.Click[ControlPanel].
3.Click[Viewnetworkstatusandtasks]displayedunder[NetworkandInternet].
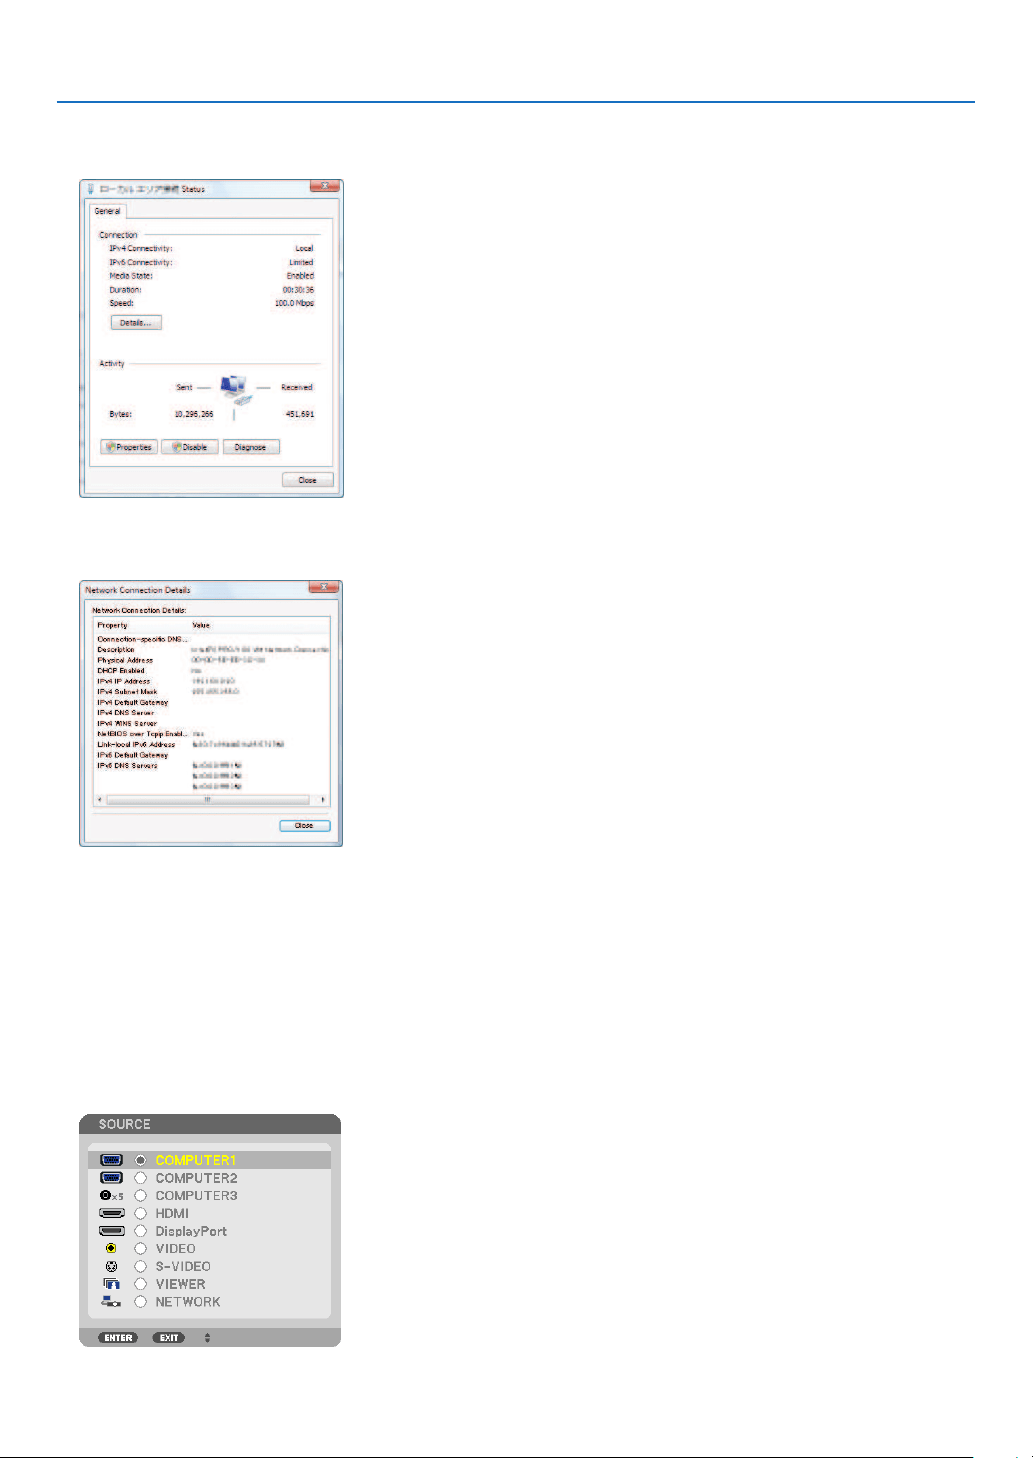
53
3. Convenient Features
4.Click[Viewstatus]displayedinblueontherightof[LocalAreaConnection]inthewindow.
The [Local Area Connection Status] window appears.
5.Click[Details...].
Write down the value for “IPv4 IP Address” (xxx.xxx.xxx.xxx) displayed.
6.Click[Close].
7.Click[X]attheupperrightofthewindow.
The system goes back to the desktop.
StartingtheRemoteDesktop
1.Withtheprojectorturnedon,presstheSOURCEbutton.
The input selection window appears.
Another way to display the input selection window is to press the NETWORK button on the remote control. The
NETWORK screen will be displayed. Go to step 3.
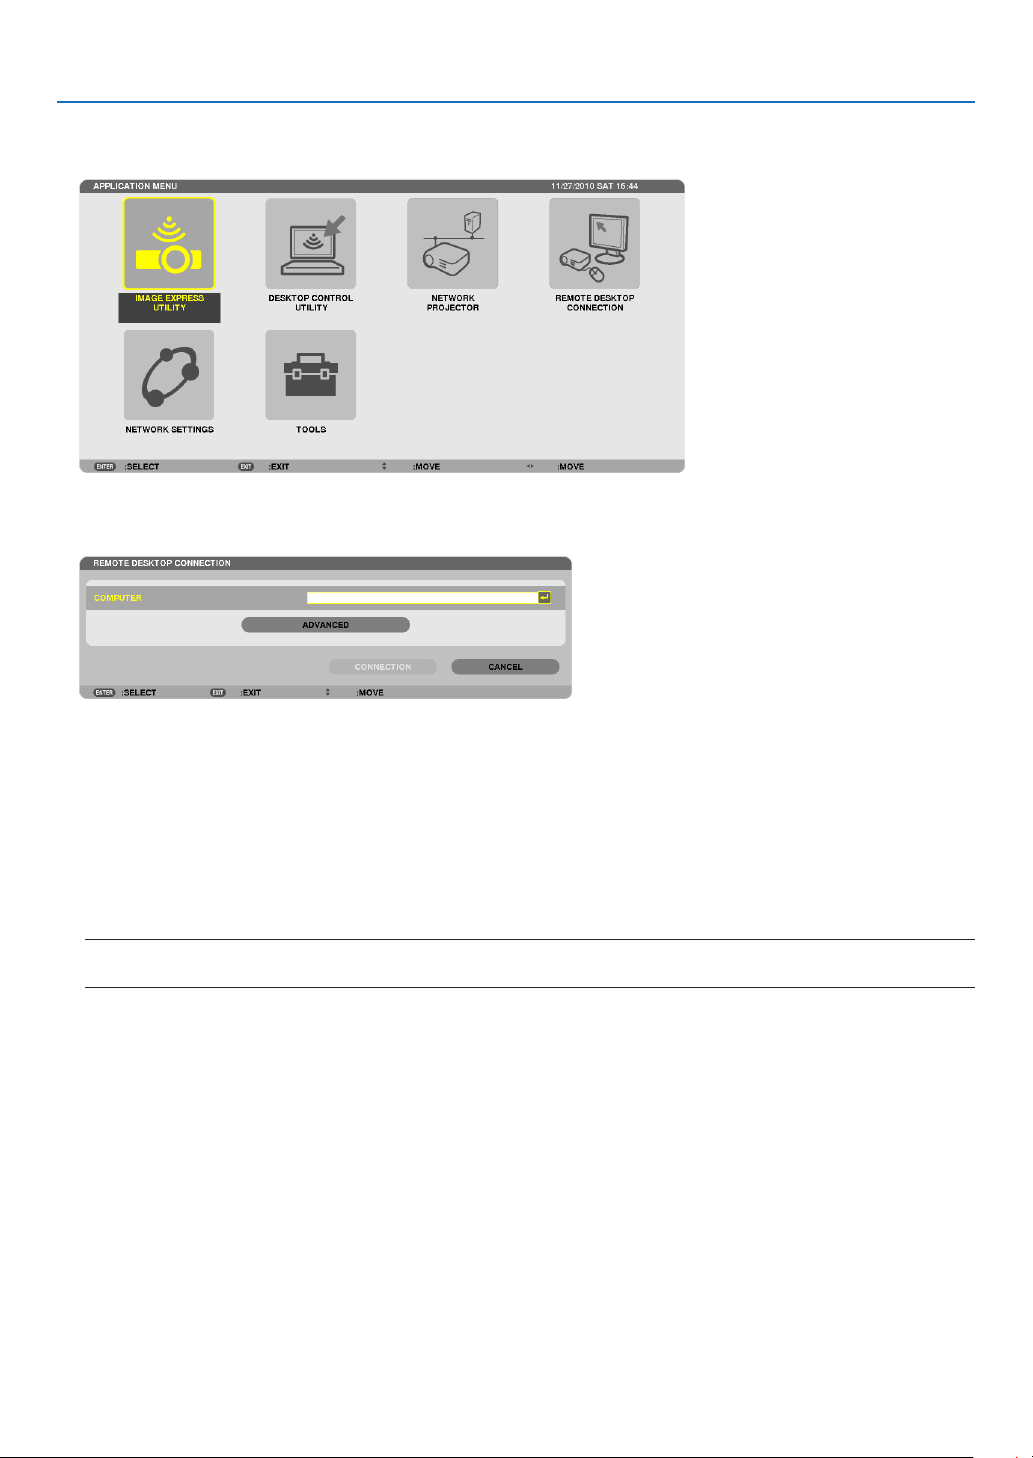
54
3. Convenient Features
2. Press the or buttontoselect[NETWORK]andpresstheENTERbutton.
The [NETWORK] menu will be displayed.
3.Fromthe[NETWORK]menu,usethewirelesskeyboardtoselect[REMOTEDESKTOPCONNECTION].
The [REMOTE DESKTOP CONNECTION] window appears.
4.OperatethewirelesskeyboardtoinputtheIPaddressofWindows7andclick“Connect”.
The log-on screen of Windows 7 is displayed in the screen projected by the projector.
5.Operatethewirelesskeyboardtoinputtheuser’spasswordandpress“Enter”.
The remote desktop function is started.
Windows 7 desktop is displayed in the screen projected by the projector.
Log out the computer.
Use the wireless keyboard connected to the projector to operate Windows 7.
NOTE:Whentheprojectionismadewiththeremotedesktopfunction,thebackgroundcolorofthedesktopischangedtosolid
color.

55
3. Convenient Features
ExitingtheRemoteDesktop
1.Operatethewirelesskeyboardtoclick[Start]fromthedesktopscreenprojectedbytheprojector.
2.Click[X]ontherightofthestartmenu.
The remote desktop function is stopped.
3.PresstheSOURCEbuttonoftheprojectortoselectaninputterminalotherthan[NETWORK].
When using the remote control, press a button other than the NETWORK button.
TIP:
Setting[OPTIONS]inREMOTEDESKTOP
Clicking[OPTIONS]displaysthe[PERFORMANCE]screen.
Makingsettingsto[OPTIONS]willallowyoutodisplaythedesktopbackground,ortoenablethewindowanimationfunctionduring
theRemoteDesktopoperation.However,doingthiswillcausethedisplay’sormouse’sresponsetoslowdown.
Ifthedisplay’sormouse’sresponseissloweddown,tryoneormoreofthefollowing:
DESKTOPBACKGROUND:Clearthecheckmarktodisplaythedesktopbackgroundinsolidcolor.
MENUANDWINDOWANIMATION:Clearthecheckmarktodisablemenuandwindowanimation.
THEMES:ClearthecheckmarknottouseThemes.
SHOWCONTENTSOFWINDOWWHILEDRAGGING:Clearthecheckmarktoshowonlythewindowpanewhile
dragging.

56
4. Using the Viewer
❶ What you can do with the Viewer
TheViewerfeatureallowsyoutoviewslidesormovielesstoredonaUSBmemoryontheprojector,orashared
folderinacomputerconnectedtothenetwork.
TheViewerhasthefollowingfeatures.
•WhenacommerciallyavailableUSBmemorythatstoresimagelesisinsertedintotheUSBport(TypeA)ofthe
projector,theViewerallowsyoutoviewtheimagelesontheUSBmemory.
Evenifnocomputerisavailable,presentationscanbeconductedsimplywiththeprojector.
•Movielewithaudiocanbeplayedback.
•AMicrosoftPowerPointleorAdobePDFlecanbesimplyprojectedonthescreenwithoutconnectingacom-
puter.
•Imageandmovielesstoredinasharedfolderinacomputerconnectedtoanetworkcanbeprojected.
Thecomputerwith“MediaSharing”ofWindowsMediaPlayer11turnedoncanbeusedasamediaserver.
Supported graphic formats
FormatFilenameextension
JPEG.jpg,.jpe,.jpeg(CMYKisnotsupported.)
BMP.bmp(biteldnotsupported)
PNG
.png(InterlacedPNGandαchannelPNGarenotsupported.)
GIF.gif(InterlacedGIF,transparationGIF,andanimationGIFarenotsupported.)
*ByusingPPTConverter3.0,PowerPointleisconvertedintoindexle(withextension“.idx”)
*Ifanunsupportedimageisselected,theicon
willbedisplayed.
NOTE:
Maximumnumberofpixelsofimagewhichcanbedisplayedare:
•BaselineJPEG:10000×10000
•ProgressiveJPEG:1280×1280
•GIF:1280×1280
•Others:4000×4000
•Somelessupportedbytheaboverequirementsmaynotbedisplayed.
Supported movie files
FilenameextensionVideocompression/expansionmethodAudiocompression/expansionmethod
.mpg,.mpeg.MPEG2MPEGAudioLayer2
MPEGAudioLayer3
.wmvVC-1/WMV9WMA9Standard
.mp4H.264/AVCAAC-LC
Playbackrequirements:
Resolution:320×240to1280×720
Videoframerate:upto30fps
Bitrate:upto15Mbps
Audiosamplingrate:upto48kHz
Channel:upto2chstereo
Audiobitrate:upto256Kbps
Max.lesize:upto2GB

57
4. Using the Viewer
NOTE:
•Movielesconvertedbyusingthevideo/audioformatwhichisnotsupportedbythisprojectorcannotbeplayedback.
Inthiscase,therewillbenoicontoshowthatplaybackisnotpossible.
•FileswithDigitalRightsManagement(DRM)protectioncannotbeplayedback.
•Someofthemovielesthatmeettheaboverequirementsmaynotbeplayedback.
•WMVformatvideolewillbedisplayedinanaspectratioof1to1independentlyofitsoriginalaspectratio.
•Filesthatcanbeplayedbackonthemediaserveraregraphicsandmovieles.InWindowsMediaPlayer11(WindowsXP/
WindowsVista)mp4lescannotbeplayedback.
Supported PDF files
FilenameextensionSupportedleformat
.pdfAdobeAcrobatPDF
NOTE:
•FontsnotembeddedinPDFmaynotbedisplayed
•FunctionsaddedtoPDFleaftercreatedwillnotworkordisplay.Functionsaddedarebookmarks,boxesinformtool,andnotes
willnotbedisplayed.
AutoiporAutotransitionwillnotwork.
•SomePDFlesmaynotbedisplayed.
Supported PowerPoint files
FilenameextensionSupportedleformat
.ppt,.pptxMicrosoftPowerPoint97–2007
NOTE:
•Playablefonts,colors,fontornament,placement,objectinsertionoranimationarerestricted.
•SomeMicrosoftPowerPoint97–2007lesmaynotbedisplayed.
Supported USB memory devices
-BesuretouseaUSBmemorydeviceformattedwiththeFAT,exFAT,FAT32orFAT16lesystem.
TheprojectordoesnotsupportNTFSformattedUSBmemory.
IftheprojectordoesnotrecognizeyourUSBmemory,checkiftheformatissupported.
ToformatyourUSBmemoryinyourcomputer,refertothedocumentorhelplethatcomeswithyourWin-
dows.
-WedonotwarrantthattheUSBportoftheprojectorwillsupportallUSBmemoriesinthemarket.
-Waitatleast5secondsafterdisconnectingaUSBmemorydevicebeforereconnectingitandviceversa.
TheprojectormaynotidentifytheUSBmemorydeviceifitisrepeatedlyconnectedanddisconnectedinrapid
intervals.

58
4. Using the Viewer
Notices on shared folder and media server
•Filesfromasharedfolderormediaservermaynotbeprojectedifsecurityorantivirussoftwareisinstalledonyour
computer.
•Openthefollowingrewallports:
-Mediaserver
PortnumberProtocol
1900UDP
2869TCP
10243TCP
10280-10284UDP
-Sharedfolder
PortnumberProtocol
137 UDP/TCP
138 UDP/TCP
139UDP/TCP
445UDP/TCP
•Setyourcomputerforsharingandsecuritytograntaccesstolesinthesharedfolderandsetyoursecurityor
antivirussoftwaretograntaccesstolesinthesharedfolder.Consultyournetworkadministratorformoreinforma-
tion.
•Movielesinthesharedfolderorthemediaservermaynotbeplayedbackcorrectlydependingonyournetwork
environmentorthebitrateofyourle.
NOTE:
DonotdisconnectbetweentheprojectorandyourcomputerbyremovingtheLANcableorturningofftheprojectorwhenaPow-
erPointleorPDFleisdisplayedfromasharedfolder.
DoingsowillmakeViewerinoperable.
NOTE
•ThefollowingoperationsbyusingthebuttonsontheprojectorarenotpossiblewhentheVIEWERscreensuchastheslidescreen
andthethumbnailscreenisdisplayed.
-AutoAdjustmentbyusingtheAUTOADJ.button
-Volumecontrolwiththe◀or▶button
•FreezingpicturebyusingtheFREEZE,ASPECT,orAUTOADJ.buttonontheremotecontrolisnotpossiblewhentheVIEWER
screensuchastheslidescreenandthethumbnailscreenisdisplayed.
•Executing[RESET]→[ALLDATA]fromthemenuwillreturnthesettingsfortheViewertoolbartothefactorydefault.
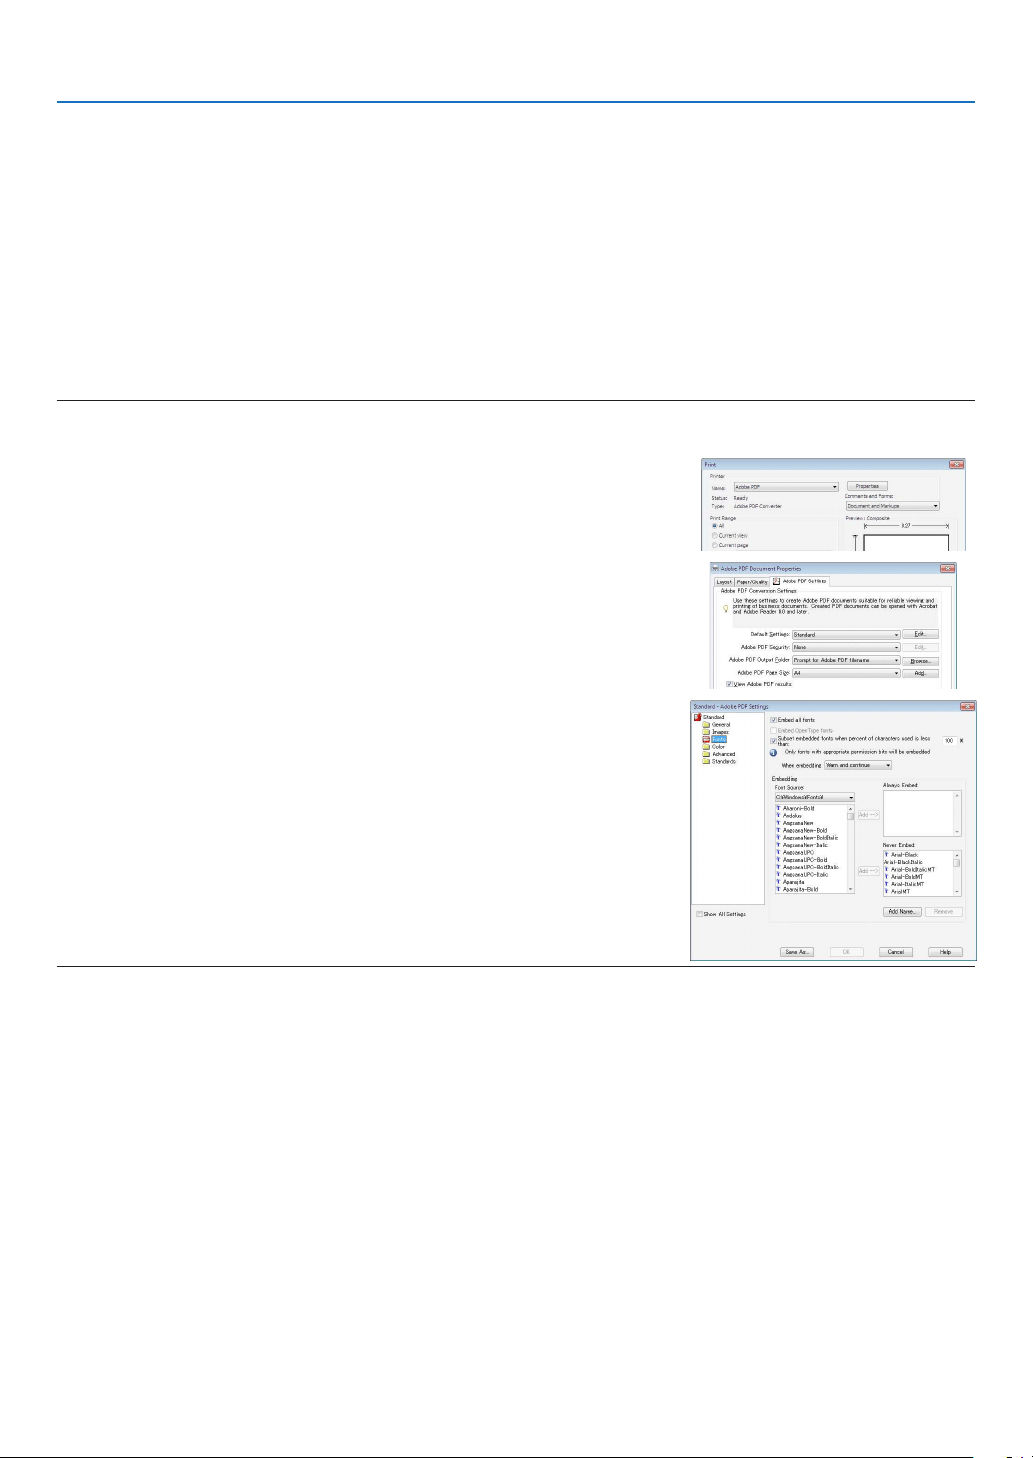
59
4. Using the Viewer
❷ Preparing presentation materials
1.Createyourpresentationmaterialsandsavetheminasupportedleformattoyourcomputer.
•Seepage
81 for supported file formats.
•MakesurethatPowerPointleisdisplayedontheViewerbeforegivingyourrealpresentation.
With Viewer PPT Converter 3.0 contained the supplied CD-ROM, you can convert your PowerPoint files to index
files that can be displayed on the Viewer.
•WhencreatingaPDFle,embedyourfontsinyourPDFle.EmbeddingfontsrequiresAdobeAcrobat.This
cannot be done in Adobe Reader.
TIP:
•UsingPrintCommand
ExampleforfontembeddingusingPrintCommand.SeethehelpofAdobeAcrobatformoreinformation.
1.Select“Print”fromthe“File”menu.
2.Select“AdobePDF”from“Printername”andclickthe“Properties”but
-
ton.
3.Clickthe“Edit”buttoninthe“AdobePDFSettings”tab.
4.ClickthefonttabintheEditwindowtoselectthefontembedwindow.
5.Placeacheckmarkfor“Embedallfonts”.
Click “OK” to return to the Print window, and click “OK” to start creating a
PDF file.
2. Save a file to your drive.
To save a file to your USB memory:
Use the Windows Explore to copy the file to your USB memory.
To place a file in a shared folder you create in your computer, see page
72.
To use “Media Sharing” in Windows Media Player 11, see page
76.
60
4. Using the Viewer
❸ Projecting images stored in a USB memory device
ThissectionexplainsthebasicoperationoftheViewer.
TheexplanationprovidestheoperationalprocedurewhentheViewertoolbarissettothefactorydefault.
Preparation:BeforestartingtheViewer,storeimagestotheUSBmemoryusingyourcomputer.
Starting the Viewer
1. Turn on the projector. (→ page 14)
2. Insert the USB memory into the USB port of the projec-
tor.
NOTE:
•DonotremovetheUSBmemoryfromtheprojectorwhileit’sLED
ashes.Doingsomaycorruptthedata.
TIP:
YoucanaUSBmemoryinserttheprojectorwhenthedrivelistscreen
isdisplayed.
3.PresstheSOURCEbuttontoselect[VIEWER].
A press of the SOURCE button will display the source select
screen.
A few more presses of the SOURCE button will display the
drive list screen.
Another way to select [VIEWER] is to press the VIEWER
button on the remote control.
TIP:
•Formoreinformationaboutthedrivelistscreen,seepage64.
•Todisplaygraphicsinasharedfolder,seepage72;todisplaystill
imagesormovielesinamediaserver,seepage76.

61
4. Using the Viewer
4. Press the ▶buttontoselect“USB1”andpressthe
ENTER button.
The “USB1” thumbnail screen will be displayed.
TIP:
•Formoreinformationaboutthumbnailscreen,seepage66.
5. Use the ▲▼◀ or ▶ button to select an icon.
•The→ (arrow) symbol on the right indicates there are
more pages. pressing the PAGE ▽ (page down) button
will show the next page: pressing the PAGE △ (page up)
will show the previous page.
6. Press the ENTER button.
Operation varies depending on the selected file.
•Stillimage
The selected slide will be displayed.
The
◀ or ▶ button can be used to select the next (right)
slide or the previous (left) slide in the thumbnail screen.
•PressingtheENTERbuttonwilldisplaythecontrolbar
with which is used to select or rotate an slide.(→ page
67)
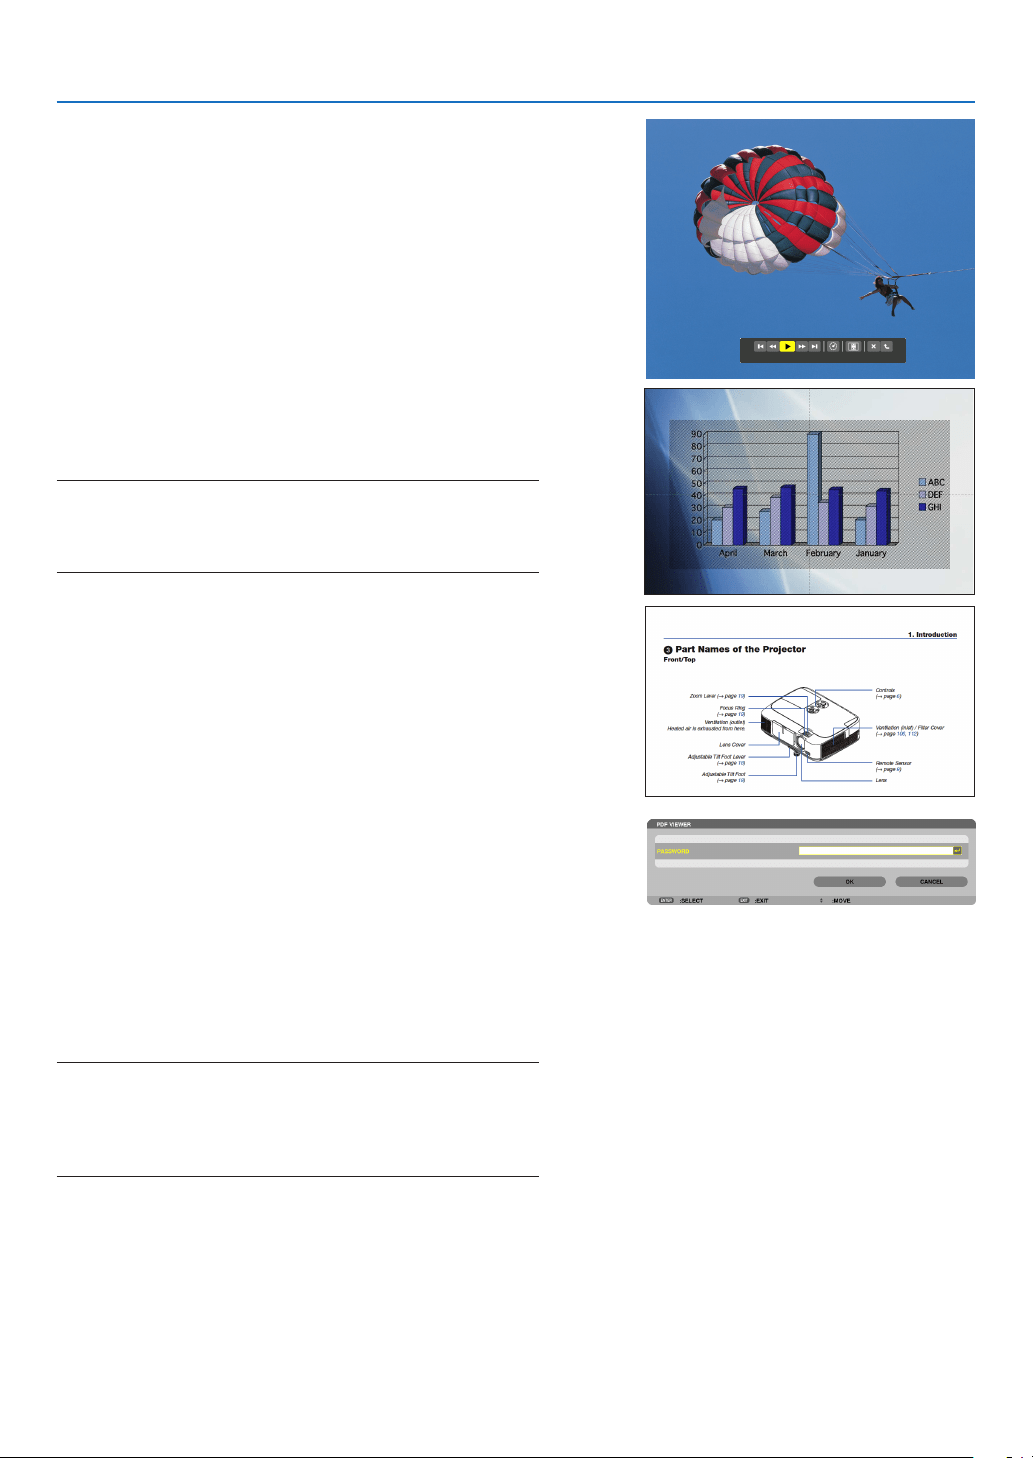
62
4. Using the Viewer
•Moviele
The movie file will start playing.
After finishing the playback, the screen will turn to black.
Press the EXIT button to return to the thumbnail screen.
•PressingtheENTERbuttonwilldisplaythemovie’s
control bar with which you can pause or fastforward and
some other operations.
•MicrosoftPowerPointle
The slide on the first page will be displayed.
Press
▶ to select the next slide; press ◀ to select the previ-
ous slide.
•Youcanalsousethe▼ or ▲ button to select a page. To
return to the thumbnail screen, press the EXIT button.
NOTE:
•Fileswithslideshoworanimationeffectsmaynotbecorrectly
displayedontheViewer.
See“SupportedPowerPointles”onpage57,81.
•AdobePDFle
The first page will be displayed.
•ThePDFlewillllthewidthofthescreen.
Pressing the ▼ or ▲ button will scroll the screen down or
up.
The PAGE
▽ or PAGE △ button will move the screen one
page down or up.
To return to the thumbnail screen, press the EXIT button.
•Whenapassowordinputwindowisdisplayed,itmeans
that the PDF file is password-protected.
Pressing the ENTER button will show the software
keyboard. Use the software keyboard to enter your
password.
Select [OK] and press the ENTER button. The PDF file
will be displayed.
•Formoreinformationonthesoftwarekeyboard,seepage
131.
NOTE:
BookmarksandnotesthatwereaddedafterPDFconversionwillnot
bedisplayed.
IffontswerenotembeddedatthetimeofPDFconversion,thosefonts
willnotbedisplayed.
TIP:
Ittakessometime(about30secondstotwominutes)todisplaya
largesizeleortoturnpagesofaPDFlethathasmanypages.
63
4. Using the Viewer
•Indexle(extension:.idx)
•Indexles,whichisconvertedbyusingViewerPPT
Converter 3.0, will appear in the Thumbnail screen.
Only folders and JPEG files converted by using
Viewer PPT Converter 3.0 will appear in the Thumbnail
screen.
•Toselectslideshowofindexles,openthe[PRESENTA-
TION] folder in the DRIVE LIST screen.
However, index files will not appear. Only folders and
JPEG files will appear.
•UptofourindexfoldersinyourUSBandsharedfolder
are displayed. The four folders will be displayed in reverse
chronological order
•WhenyouinserttheUSBmemorydevicestoringindex
with the Viewer in operation, the content of the index files
will be displayed.
NOTE:
•Theplaymode(MANUAL/AUTO)forslidesofindexleworksin
thefollowingway:
Incaseof[MANUAL]for[PLAYMODE]
Whenyouselect[OPTIONS]→[SLIDESETTING]→[PLAYMODE]
→[MANUAL],indexleswillbesetformanualplaybackinregard-
lessofwhether[INTERVAL]isset.
Incaseof[AUTO]selectedfor[PLAYMODE]
Whenyouselect[OPTIONS]→[SLIDESETTING]→[PLAYMODE]
→[AUTO],indexleswillbesetforautoplaybackatintervals
speciedbyusing[INTERVAL].
When,however,[-1]isselectedfor[INTERVAL],theplaymodewill
besetforautoplaybackaccordingtothesettingfor[OPTIONS]→
[SLIDESETTING]→[INTERVAL].
7. Remove the USB memory from the projector.
Return to the drive list screen. Make sure that the LED on
the USB memory is not flashing before removing the USB
memory.
NOTE:IfyouremovetheUSBmemoryfromtheprojectorwithaslide
displayed,theprojectormaynotoperatecorrectly.Ifthishappens,
turnofftheprojectorandunplugthepowercord.Wait3minutes,then
connectthepowercord,andturnontheprojector.
Exiting the Viewer
1.PresstheSOURCEbuttontoselectasourceotherthan
[VIEWER].
A press of the SOURCE button will display the source select
screen.
A few more presses of the SOURCE button will display
another source.
•ToexittheViewerusingtheremotecontrol,selecta
source other than [VIEWER].
XXXX Motors
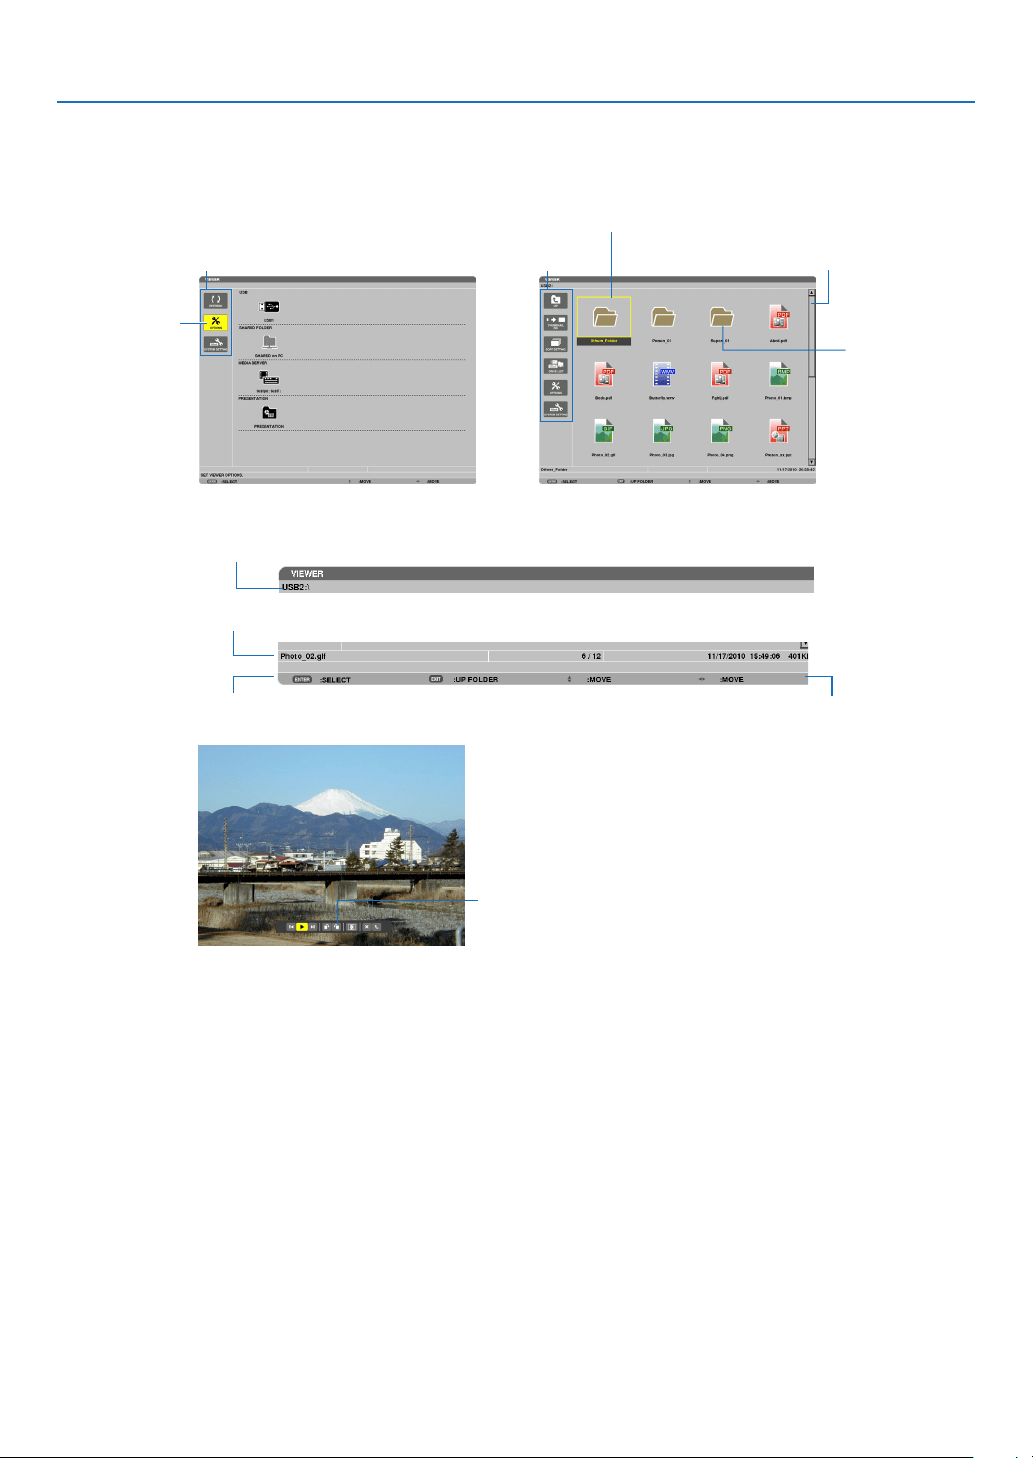
64
4. Using the Viewer
Names and functions of Viewer screen
TheViewerhasthreescreens:Drivelistscreen,Thumbnailscreen,andSlidescreen.
•Drivelistscreen
Displaysalistofdrivesconnectedtotheprojector.
Menu operation
•Usethe▼
or ▲ button to move the cursor up or down. Select the menu item and press the ENTER button
to display the submenu.
Operation for Drive list screen
1. Press the ▶ button to move the cursor to the drive list.
(Use the
◀ or ▶ button to switch between the menu and the drive list.)
Press the
▼ or ▲ button to select a type of drive; press the ◀ or ▶ button to select the drive connected to the
projector.
2. Select the drive and press the ENTER button to switch to the thumbnail screen of the selected drive.
Cursor (yellow)
Cursor (yellow)
Menu Menu
Scroll bar
[Drive list screen] [Thumbnail screen]
Folder icon
Path information
Drive information/File information
Menu guide
Operation button guide
Control bar
* The operation for still image differs from that for movie.
[Slide screen]
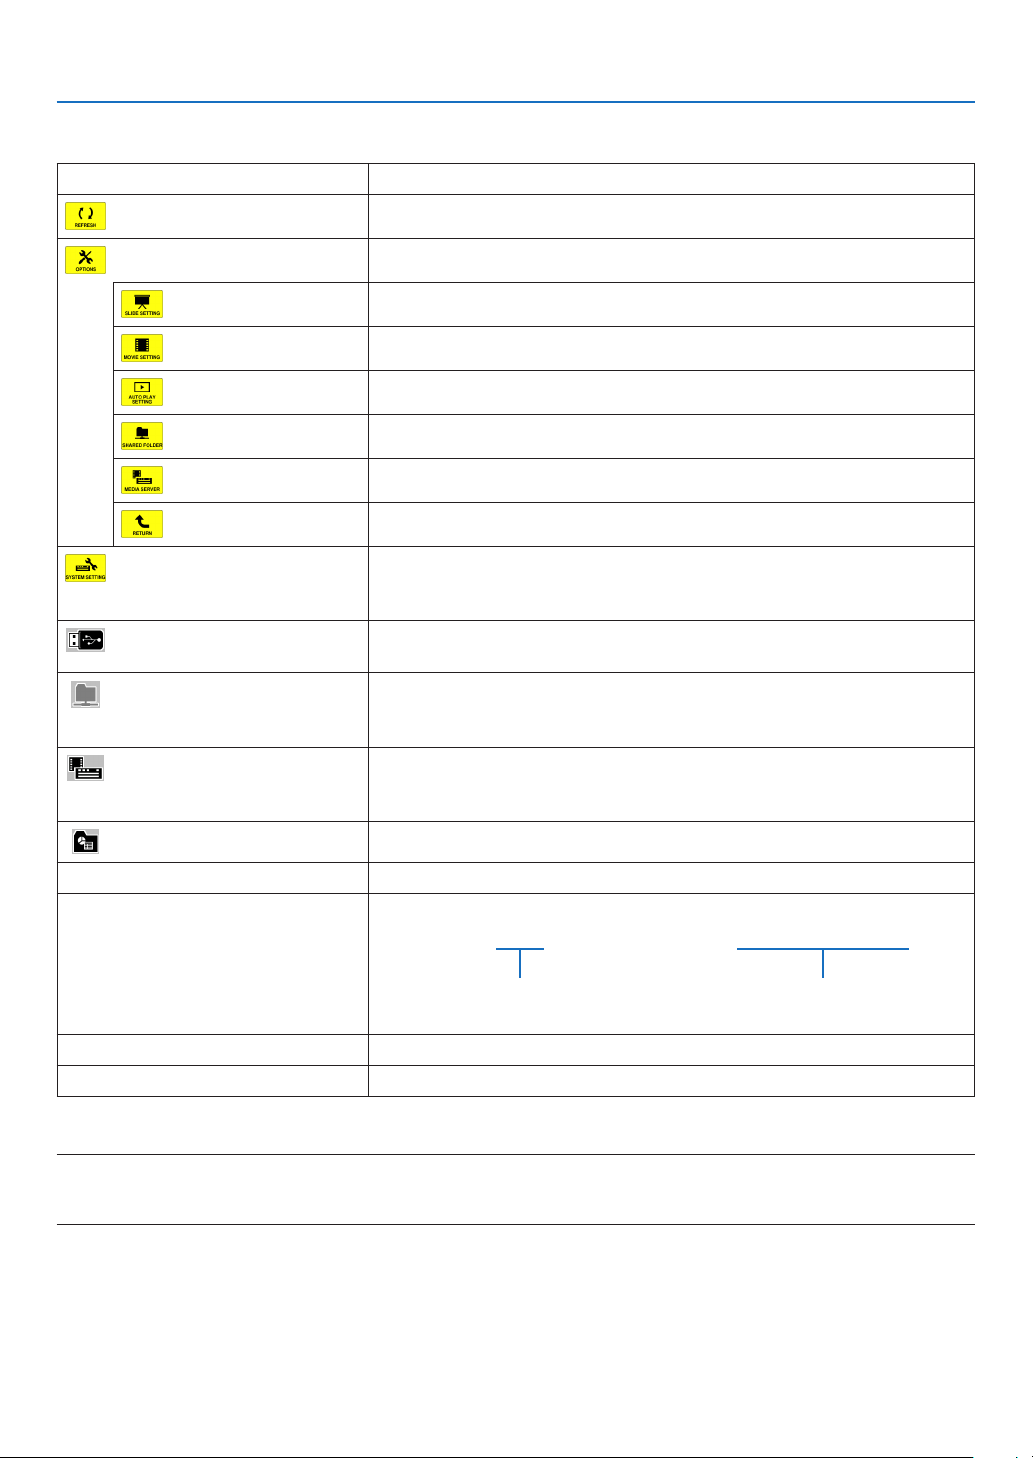
65
4. Using the Viewer
Functions
NameDescription
REFRESHDisplaysadditionalmediaserversinthedrivelistscreen.
OPTIONSOpenstheOPTIONSmenu.
SLIDESETTING
Setsupslides.(→page
69)
MOVIESETTING
Setsupmovieles.(→page
70)
AUTOPLAYSETTING
Setsupautoplay.(→page
70)
SHAREEDFOLDER
Setsupasharedfolder.(→page
72)
MEDIASERVER
Setsupamediaserver.(→page
76)
RETURNClosestheOPTIONSmenu.
SYSTEMSETTINGSwitchestothesystemsettingmenu.SeewiredLAN,wirelessLAN,WPS,
networkinformation,mouse,andkeyboardin“9.ApplicationMenu”.(→
page118)
USBDisplaystheiconforaUSBmemoryinsertedintotheUSBportofthe
projector.
SHAREDFOLDERDisplaysuptofourdrivesofacomputerconnectedtoaLAN(setforcon-
nectingasharedfolder).
*Seepage72forsettingupforconnectingasharedfoleroftheprojector.
MEDIASERVERDisplaysuptofourdrivesofacomputerconnectedtoaLAN(setforcon-
nectingamediaserver).
*Seepage76forsettingupforconnectingamediaserveroftheprojector
PRESENTATIONDisplaystheiconwhenaUSBmemoryorsharedfolerstoresindexles.
PathinformationDisplaysthelocationofafolderorle.
Driveinformation[Example]
USB1314MBFREE/492MB
Displaysthedrive.Displaysfreespaceandcapcityof
adrive.(USBonly)
MenuguideDisplaysthedescriptionofaselectedmenu.
OperationbuttonguideDisplaysinformationaboutoperationbuttons.
*Itisdisplayedinthree-digitnumber(roundingup)
NOTE:
WhentheOPTIONSmenuisdisplayed,thedrivelistscreenorthumbnailscreenisnotdisplayed.Todisplayit,selectthe[RETURN]
iconandpresstheENTERbutton.
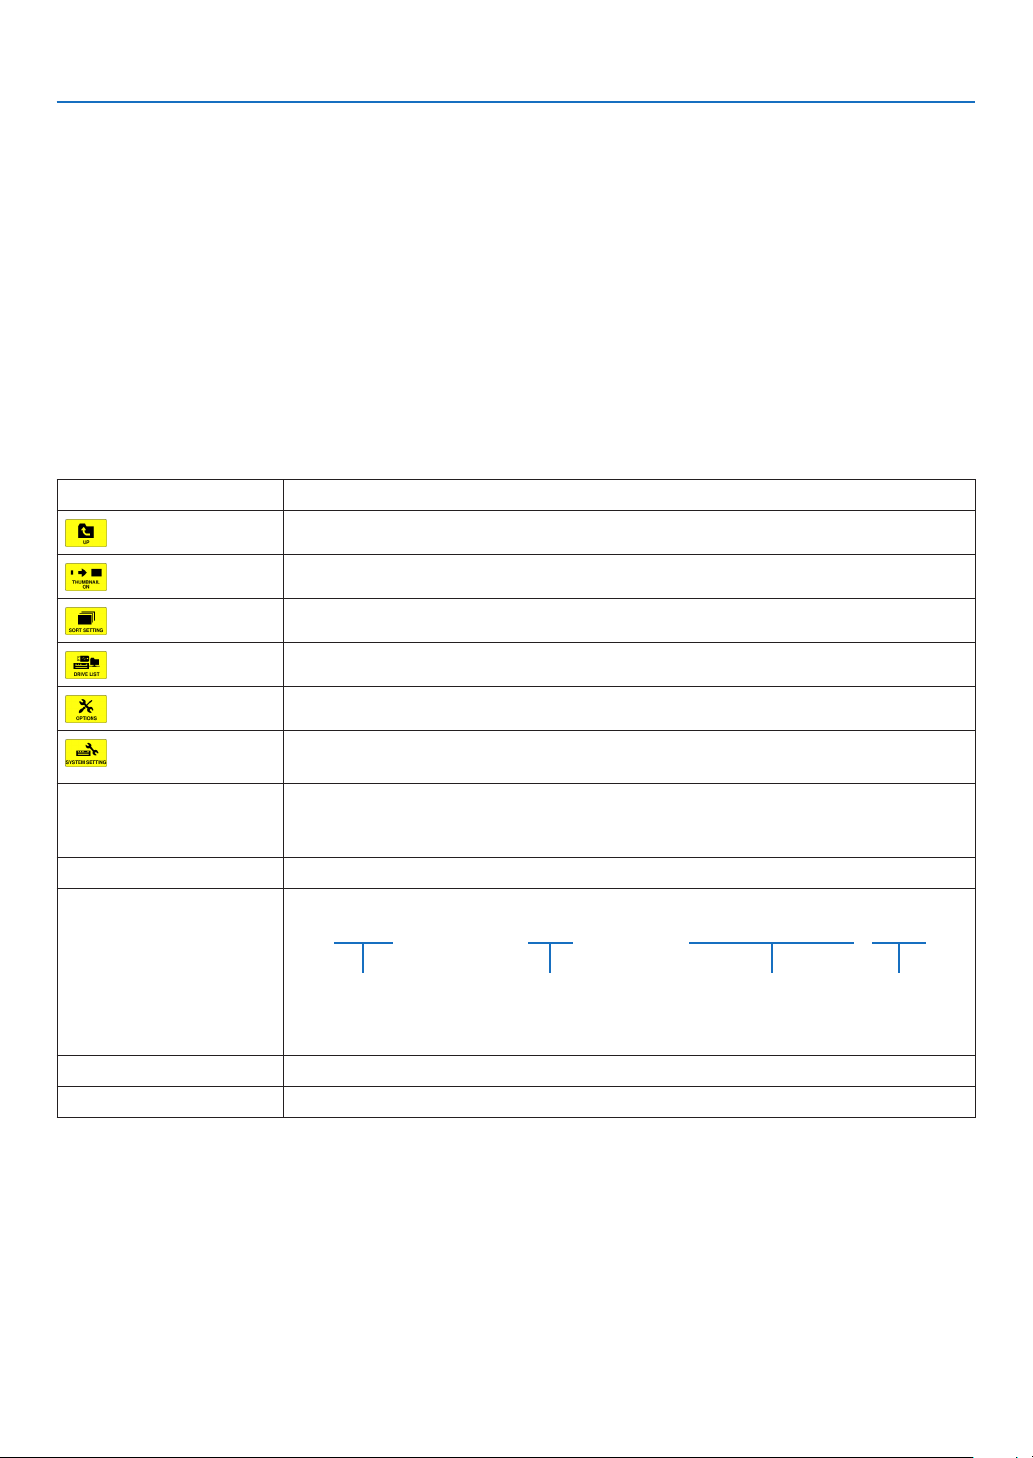
66
4. Using the Viewer
•Thumbnailscreen
Displaysalistoffolders,thumbnails,andiconsinthedriveselectedonthedrivelistscreen.
Menu operation
•Usethe▼
or ▲ button to move the cursor up or down. Select the menu item and press the ENTER button
to display the menu or setting screen.
OperationforThumbnailscreen
1. Press the ▶ button to move the cursor to the thumbnail screen when the OPTIONS menu is not dis-
played.
2. Press the
▼, ▲, ◀, or ▶ button to select a file or folder.
3. Press the ENTER button to start slideshow or playback of the selected file. Selecting a folder will display
its thumbnail screen.
Functions
NameDescription
UP Goestooneupperlevelmenu.
THUMBNAILSwitchestwodisplaysbetweenthumbnailandicon.
SORTSETTINGRearrangesfoldersorles.
DRIVELISTReturnstothedrivelistscreen.
OPTIONSChangestotheOPTIONSmenu.
SYSTEMSET-
TING
Opensthesystemsettingmenu.
ScrollbarThumbnailscreenwilldisplay12leswith4by3.Ifthethumbnailscreenhastwelveor
morelesorfolders,thescrollbarwillbedisplayedattherightside.UsingthePAGE
▽orPAGE△buttonwillscrollthewholescreendownorup.
PathinformationDisplaysthelocationofafolderorle.
Thumbnailinformation[Example]
005.jpg5/200 11/03/201013:25:12502KB
Selectedfolder
nameorle
name
Numbersandorderof
lesinafolder(only
whenfolderselected)
Create/Changedate:
M/D/Y/H/M/B
Displaysle
capacity
MenuguideDisplaysthedescriptionofaselectedmenu.
OperationbuttonguideDisplaysinformationaboutoperationbuttons.
TIP:
•Ifanunsupportedimageisselected,theicon[?]willbedisplayed,
•Themaximumdisplayablenumberofimagesis300inthethumbnailscreenincludingthenumberoffolders.
•Ifalenameorpathofafolderislongerthanspecied,itwillbedisplayedwithcentercharactersorpathskipped.
Example:“123456789.jpg”willbedisplayedin“123..789.jpg”.
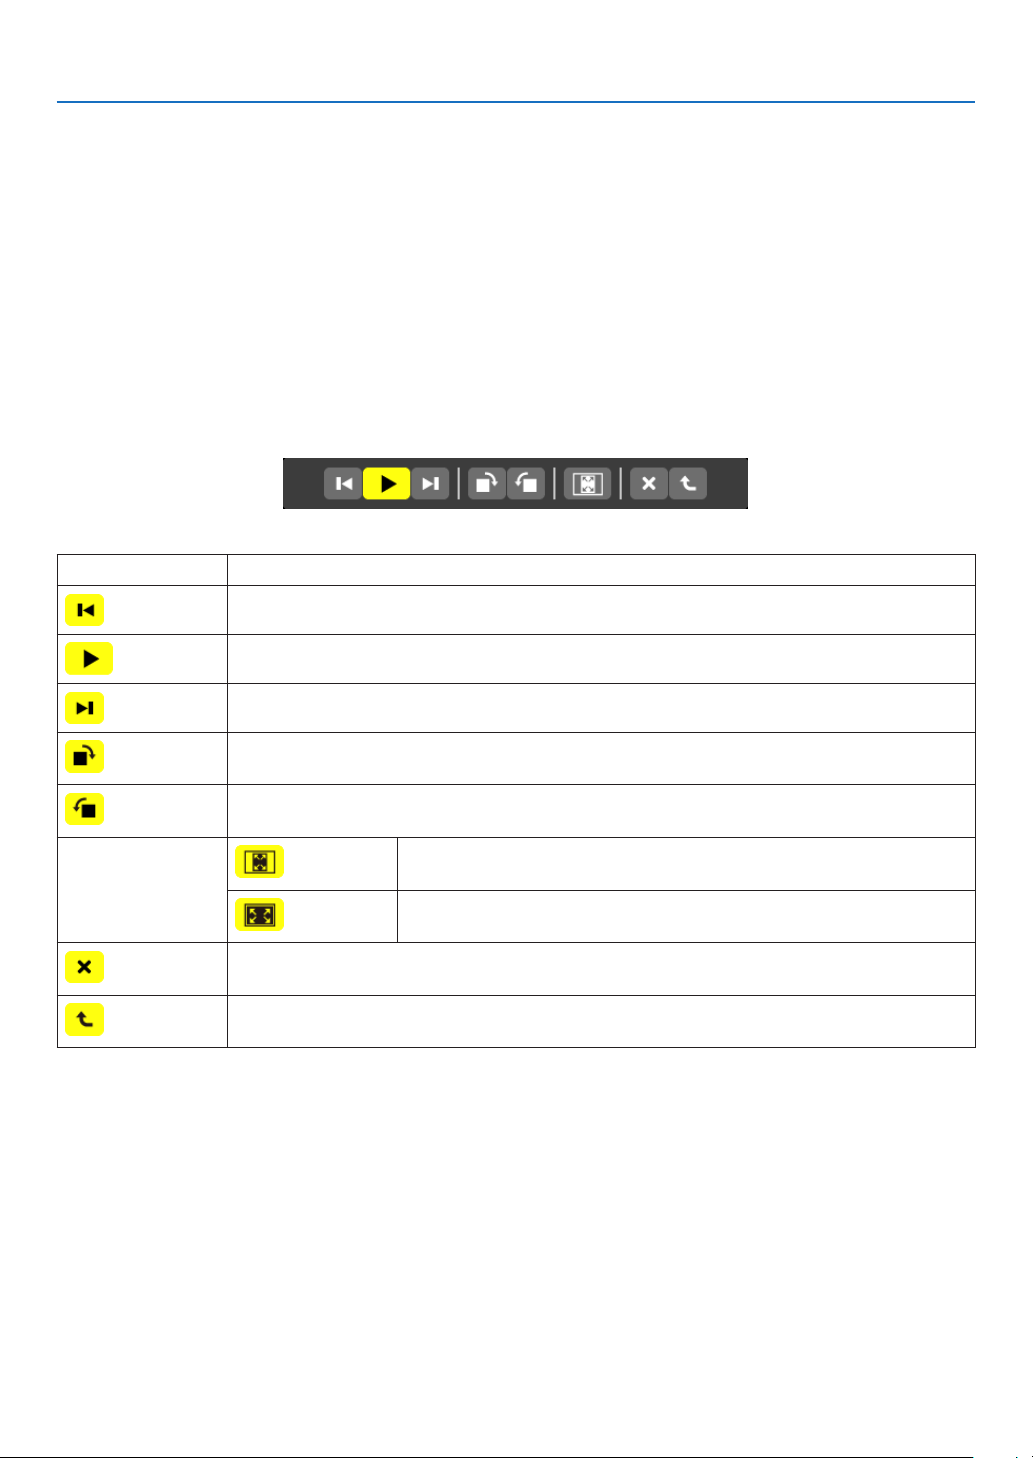
67
4. Using the Viewer
•Slidescreen(stillimage/movie)
Playsaleselectedfromalistofthumbnailsoricons.
•ForoperatingaMicrosoftPowerPointleandAdobePDFle,seepage
62.
Controlbaroperation
•Thecontrolbarwillbedisplayedonlywhenastillimage(orindexle)andamovieleisselected.
•Thecontrolbarforstillimagesdiffersfromthatformovieles.
1. Pressing the ENTER button in Slide screen will display the control bar at the bottom of the screen.
2. Use the
◀ or ▶ button to select a file and press the ENTER button.
•Theselectedfunctionwillbeexecuted.
Functionsofstillimagecontrolbar
NameDescription
PREVGoesbacktothepreviousimage
PLAYPlaystheimage.Thisbuttonalsoisusedtostoporstartplayinganimage.
NEXTGoestothenextimage.
RIGHTRotatestheimage90°clockwise.
•Tocancel,selectanotherfolder.
LEFTRotatestheimage90°counterclockwise.
•Tocancel,selectanotherfolder.
SIZE
BESTFITDisplaystheimagewithitsaspectratiointheprojector’sdisplayable
maximumresolution.
ACTUAL
SIZE
Displaystheimageinitsactualsize.
CLOSEClosesthecontrolbar.
•YoucanalsopresstheEXITbuttontoclosethecontrolbar.
ENDStopsplayingslidesorslideshow,andclosesthecontrolbartoreturntothethumbnail
screen.
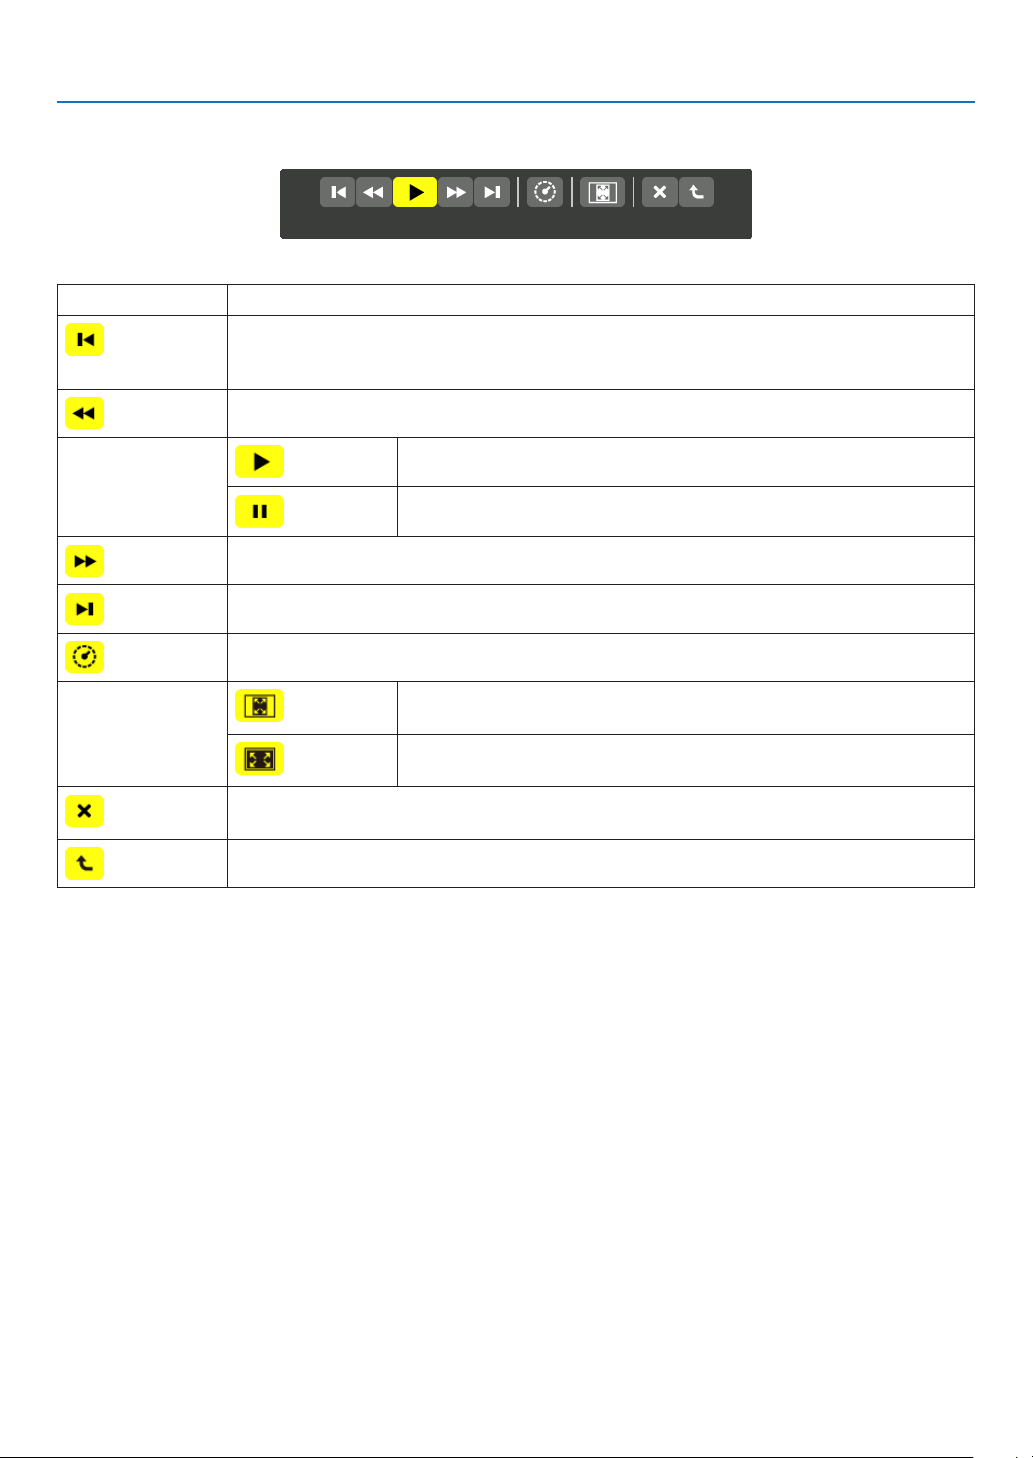
68
4. Using the Viewer
Functionsofmoviecontrolbar
NameDescription
PREVGoesbacktothebeginningofamoviele.
•Goesbacktothebeginningofthepreviousmovieleifexecutedimmediatelyafterbeing
startedplaying.
FRFast-rewindsamovieleforabout7seconds.
PLAY/PAUSE
PLAYPlaysamoviele.
PAUSEStopsplayingamoviele.
FFFast-forwardsamovieleforabout7seconds.
NEXTGoestothebeginningofanextmoviele.
TIMEDisplaysanelapsedtimeforplaybackorpause.
SIZE
BESTFITDisplaystheimagewithitsaspectratiointheprojector’sdisplayable
maximumresolution.
ACTUAL
SIZE
Displaystheimageinitsactualsize.
CLOSEClosesthecontrolbar.
•YoucanalsopresstheEXITbuttontoclosethecontrolbar.
ENDStopsplayingamovie,andclosesthecontrolbartoreturntothethumbnailscreen.

69
4. Using the Viewer
Viewer option settings
•SLIDESETTING
Setsstillimagesorslides.
NameOptionsDescription
SCREENSIZEBESTFITDisplaystheimagewithitsaspectratiointheprojector’sdisplay-
ablemaximumresolution.
ACTUALSIZEDisplaystheimageinitsactualsize.
PLAYMODEMANUALSelectsmanualplay.
AUTOSelectsautoplay.
INTERVAL5-300secondsSpecifiesintervaltimewhen[AUTO]isselectedforPLAY
MODE.
REPEATCheckmarkTurnsonorofftherepeatfunction.
TIP
•Toplayoneormoreslides,placethoselesintoafolder.
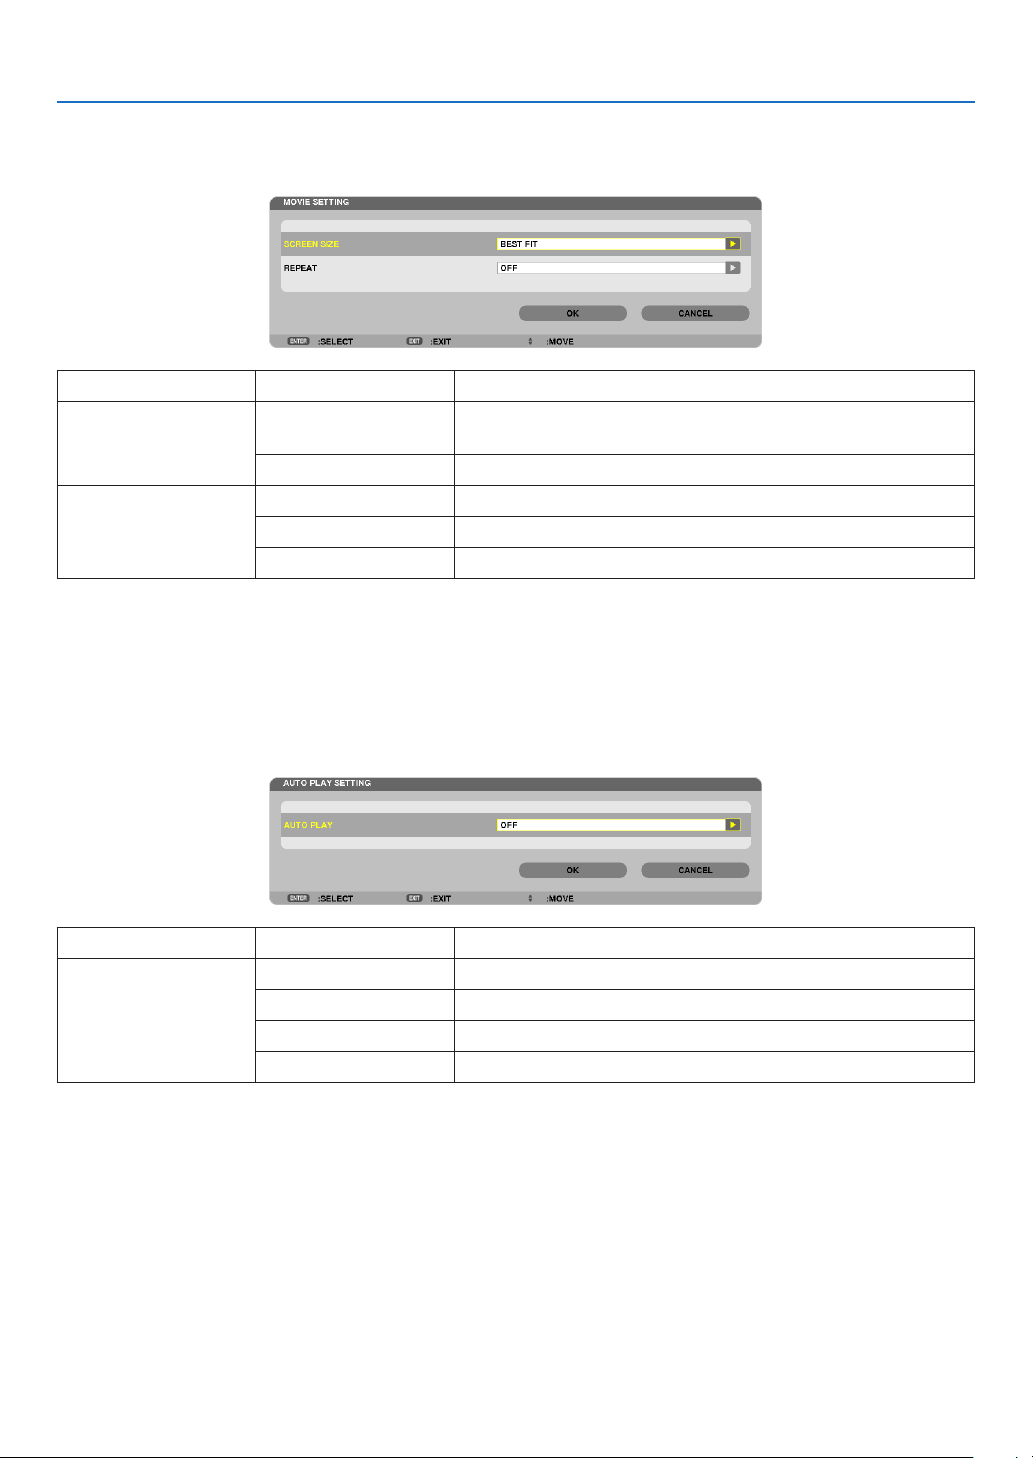
70
4. Using the Viewer
•MOVIESETTING
Setsthefunctionsforamoviele.
NameOptionsDescription
SCREENSIZEBESTFITDisplaystheimagewithitsaspectratiointheprojector’sdisplay-
ablemaximumresolution.
ACTUALSIZEDisplaystheimageinitsactualsize.
REPEATOFFTurnsonorofftherepeatfunction.
ONEREPEATRepeatsoneleonly.
ALLREPEATRepeatsalllesinthecurrentfolder.
TIP
•Turningon[REPEAT]willdisplayblackscreenduringintermissionbetweenmovies.
•AUTOPLAYSETTING
SetsautoplayforslideshowwhenaUSBmemorydeviceisinsertedintotheUSBportoftheprojector,orwhen
[VIEWER]isselectedfor[SOURCE].
NameOptionsDescription
AUTOPLAYOFF—
PICTUREPlaystherststillimagefoundinadrive.
MOVIEPlaystherstmoviefoundinadrive.
PowerPointPlaystherstPowerPointlefoundinadrive.
TIP
•AutoplaybehaviorisdifferentbetweenwhenaUSBmemorydeviceisinsertedintotheUSBportoftheprojectorandwhen
[VIEWER]isselectedfor[SOURCE].
•AutoplaystartsfortherstfoundlesupportingtheletypesetupforAutoPlay.Thelewillbesearchedinthedriverootor
lowerlevel.
•When[VIEWER]isselectedfor[SOURCE],thelastselectedlewillbeautomaticallyplayedifitisfound,orthelastselectedfolder
willbesearchedandtherstfoundlewillbeautomaticallyplayed.
ToautomaticallyplayamovieleinaUSBmemory,storeonemovieleorchangeitslenamesothatitcanbesearchedrst.

71
4. Using the Viewer
•SORTSETTING
Setstheorderofdisplayingthumbnailsorslides.
NameOptionsDescription
SORTNAME(ABC..)Displaysthelesalphabeticallybynameinascendingorder.
NAME(ZYX..)Displaysthelesalphabeticallybynameindescendingorder.
EXT.(ABC..)Displaysthelesalphabeticallybyextensioninascendingor-
der.
EXT.(ZYX..)Displaysthelesalphabeticallybyextensionindescending
order.
DATE(NEW)Displaysthelesinreversechronologicalorder.
DATE(OLD)Displaysthelesinchronologicalorder.
SIZE(BIG)Displaysthelesindescendingorderofitslesize.
SIZE(SMALL)Displaysthelesinascendingorderofitslesize.
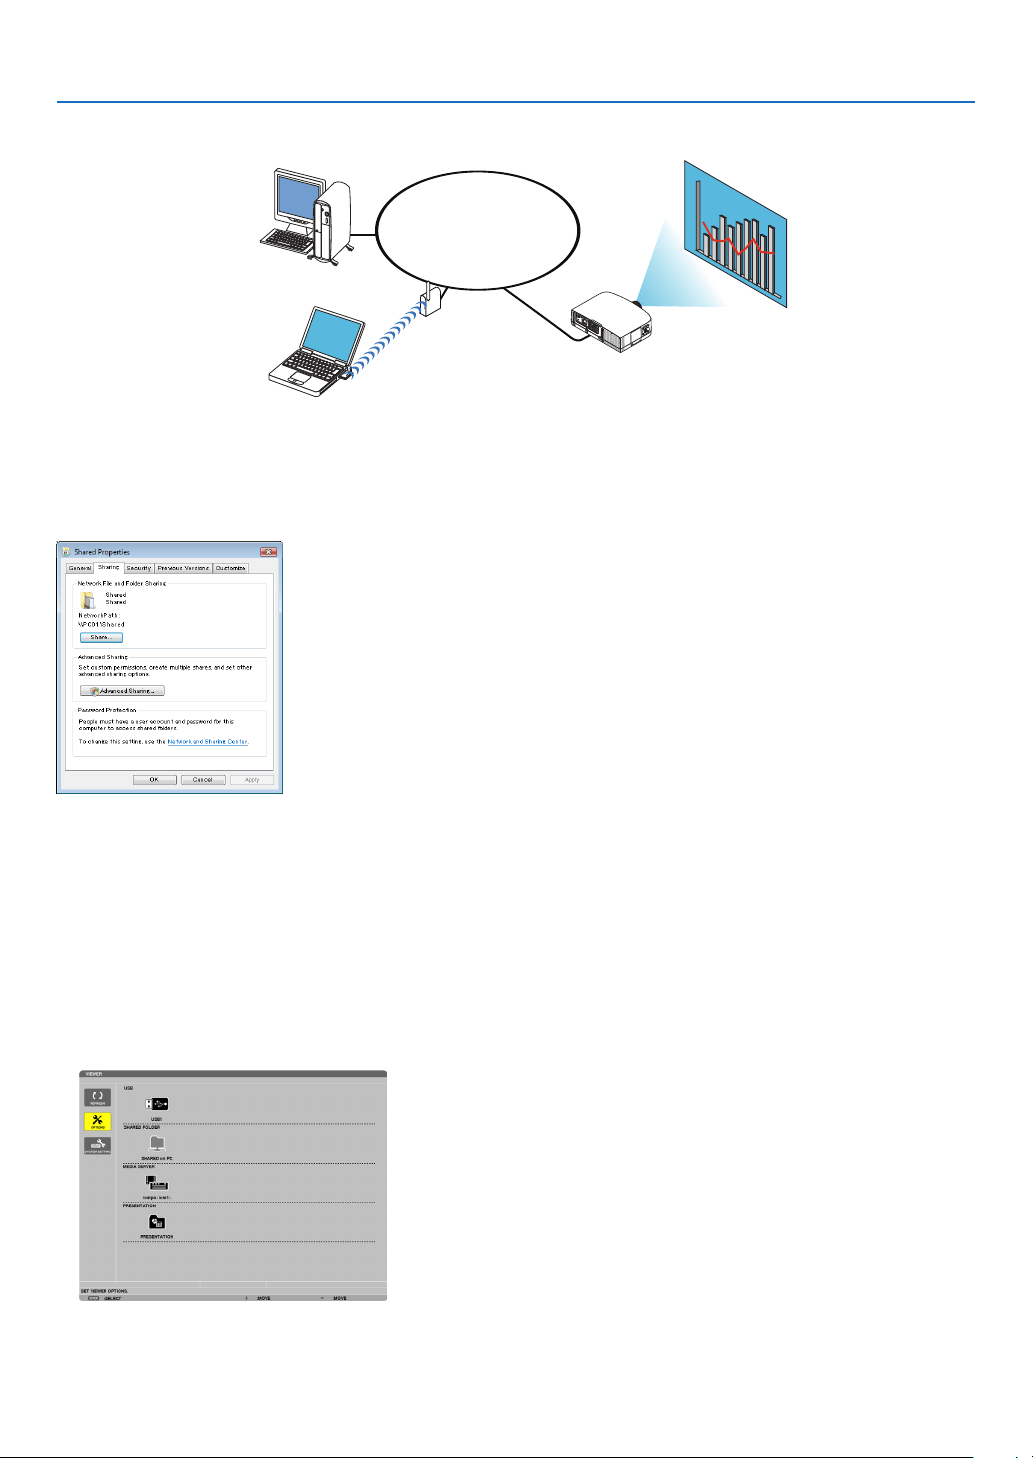
72
4. Using the Viewer
❹ Projecting data from shared folder
LAN
Shared folder
Wireless LAN
Projector
Shared folder
Preparation
Forprojector:Connecttheprojectortothenetwork.
Forcomputer:Placelestobeprojectedinasharedfolderandnotethefolder’spath.Memorizeorwritedownthe
pathforlateruse.
•Forsharingafolder,refertoyouruserguideorhelpleaccompaniedwithyourWindowscomputer.
•Useakeyboardtogiveanametothesharedfolderinalphanumericcharacters.
•Toconnectthesharedfolderbeyondthesubnet,set[WINSCONFIGURATION]in[NETWORKSETTINGS]from
themenu.
•Digitalsignature(SMBsignature)isnotsupported.
Connecting the projector to the shared folder
1.PresstheVIEWERbuttonontheremotecontrol.
The drive list window will be displayed.
•AnotherwaytostarttheVIEWERistopresstheSOURCEbuttonafewtimesontheprojectorcabinet.(→ page
16)
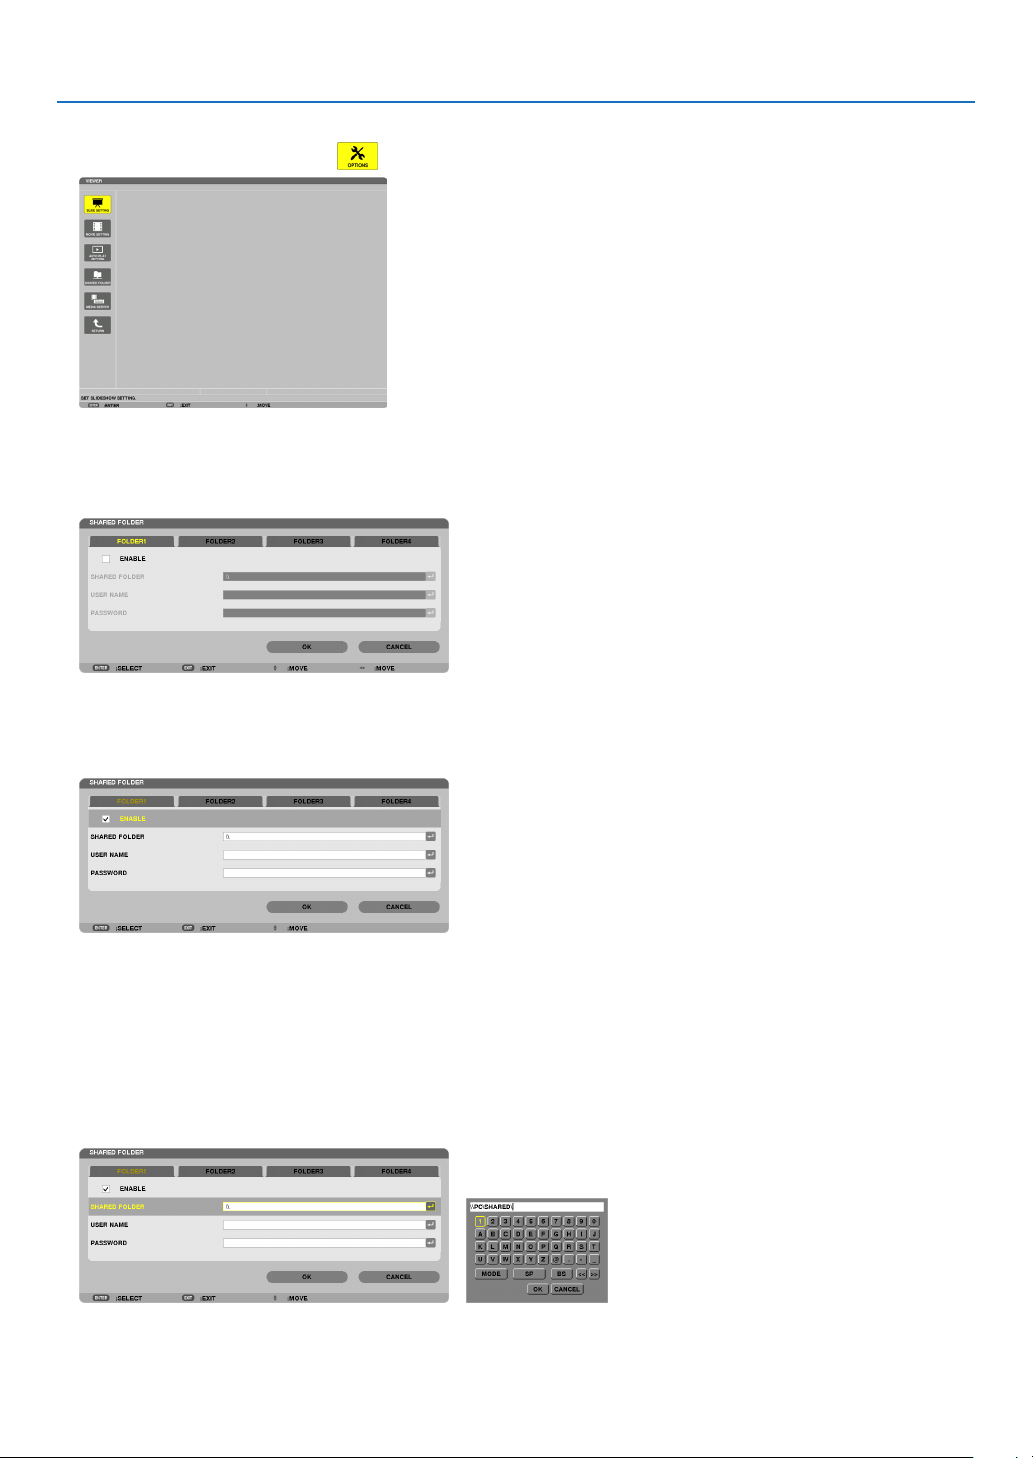
73
4. Using the Viewer
2.Displaysthe[OPTIONS]menu.
Press the ▼ button to select the (OPTIONS) icon and press the ENTER button.
•WhentheOPTIONSmenuisdisplayed,thedrivelistwillnotbedisplayed.
3.Displaythe[SHAREDFOLDERSETTING]screen.
Press the ▼ button to select the (SHARED FOLDER SETTING) icon and press the ENETR button.
4. Select a folder number and place to enable it.
Press the
◀ or ▶ button to a shared folder number and press the ▼ button to select [ENABLE] , and then press
the ENTER button.
5. Enter the path, user name, and password for the shared folder.
Press the
▼ button to select the [SHARED FOLDER] field. The software keyboard will be displayed.
For using the software keyboard, see page
131.
•Ifyourcomputerisnotpasswordprotected,enteringapasswordisnotrequired.
•Uptofoursharedfolderscanbeadded.
•Themaximumlengthofapathofthesharedfoldermustbe15alphanumericcharactersforcomputernameand
23 alphanumeric characters for folder name.

74
4. Using the Viewer
6. Exit the setting.
Press the
▼ button to select [OK] and press the ENTER button.
This will close the [SHARED FOLDER] screen.
•Ifanerrormessageappear,yoursettingsarenotcorrect.Tryagain.

75
4. Using the Viewer
Disconnecting the shared folder from the projector
•Disablethenumberofasharedfolderyouwishtodisconnect
Press the ▼ button to select [ENABLE] and press the ENTER button to clear it.
NOTE:
•WhenaPowerPointleorPDFleisdisplayed,donotdisconnectyourLANcable.Ifdoingso,theViewerwillnotwork.
TIP:
•ConnectingsettingsforSharedfolder
Settingsofuptofourfolderscanbesaved.
Restartingtheprojectorwilldisplaysetting-savedsharedfoldersingreyfoldericononthedrivelistscreen.
Selectingthegreyiconfolderwillskipentryforafolderpath.
•Failingtoconnectwithasharedfolderwilldisplaythefoldericonwith“x”mark.Ifthishappen,checkyourfoldersetting.
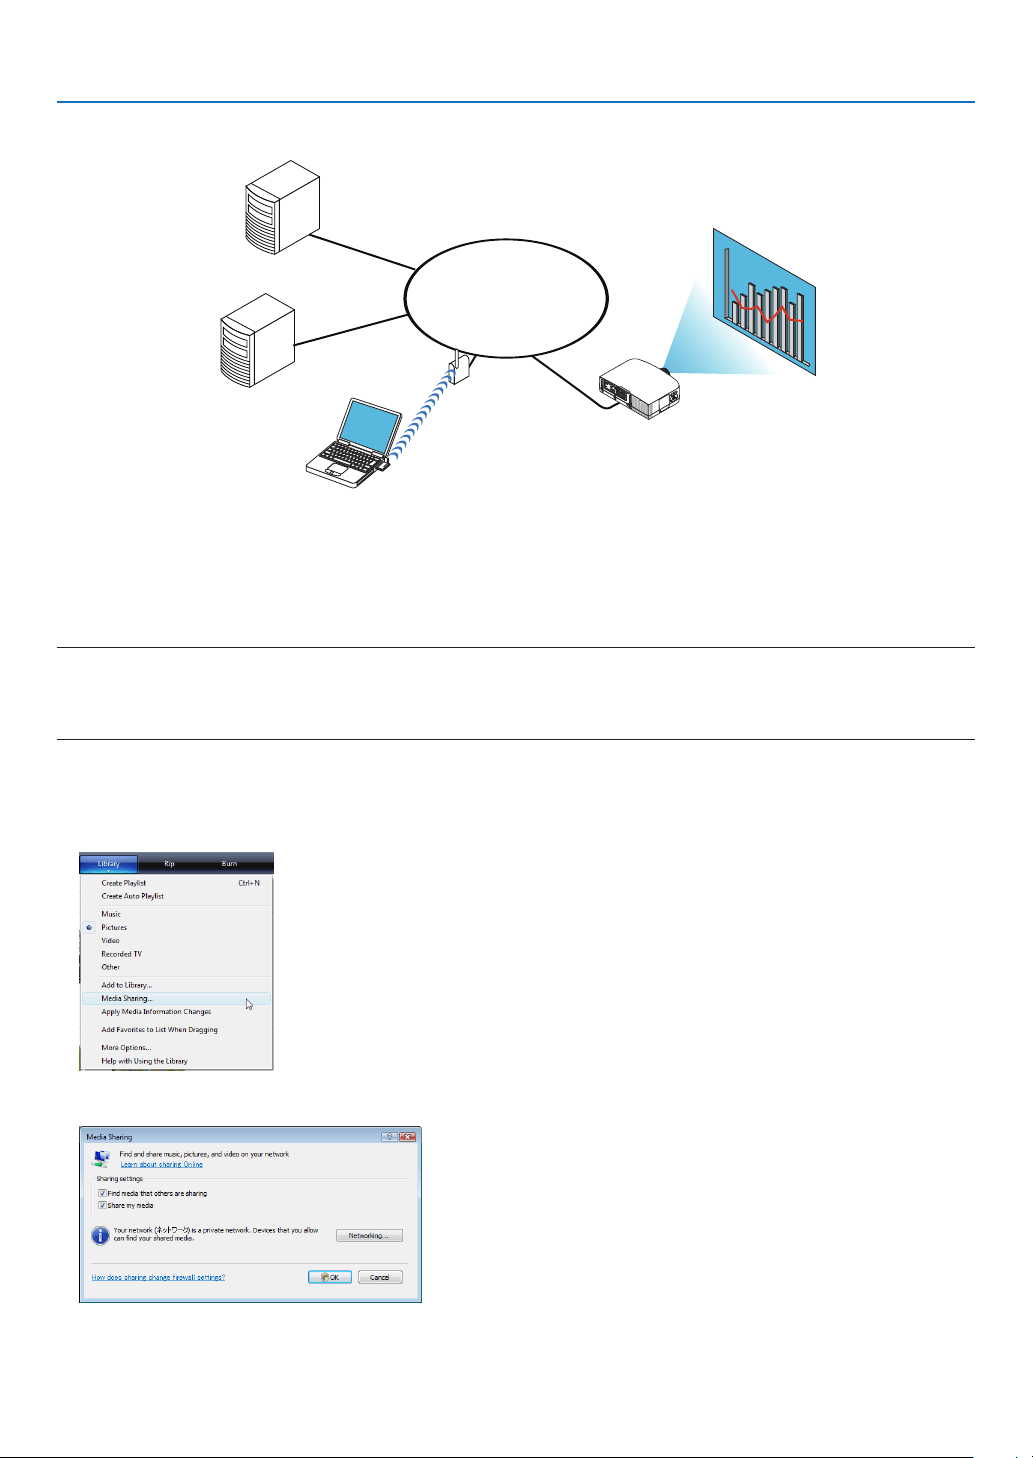
76
4. Using the Viewer
❺ Projecting data from media server
LAN
Media server
Media server
Wireless LAN
Media server
Projector
Preparation
Forprojector:Connecttheprojectortothenetwork.
Forcomputer:Prepareimagelesormovielestobeprojected,andsetup“MediaSharing”inWindowsMediaPlayer
11orWindowsMediaPlayer12.
NOTE:
•Boththeprojectorandthemediaservermustbeonthesamesubnet.Connectingtothemediaserverbeyondthesubnetisnot
possible.
•TypesofimagesandmovieswhichcanbesharedmayvarydependingonWindowsversion.
Setting up “Media Sharing” in Windows Media Player 11
1. Start Windows Media Player 11.
2.Select“MediaSharing”from“Library”.
The “Media Sharing” dialog box will be displayed.
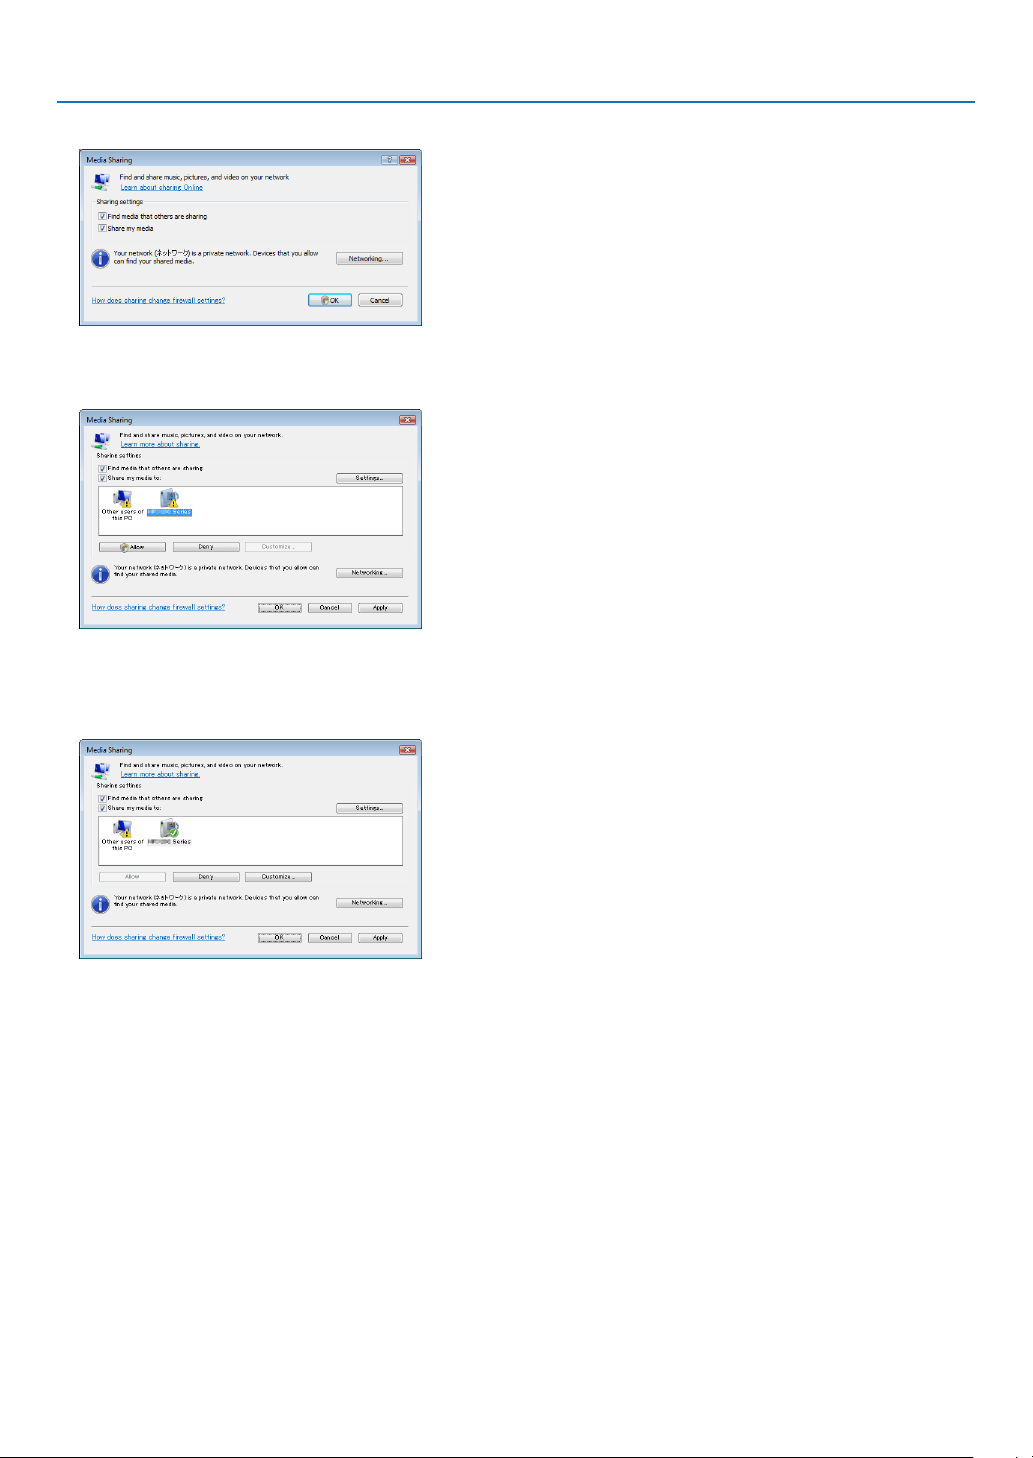
77
4. Using the Viewer
3.Select“Sharemymedia”checkbox,andthenselectOK.
A list of accessible devices will be displayed.
4.Select“PA600Series”andthen“Allow”.
A check mark will be added to the “PA600 Series” icon.
•The“PA600Series”isaprojectornamespeciedin[NETWORKSETTINGS].
5.Select“OK”.
This will make pictures and video in “Library” available from the projector.
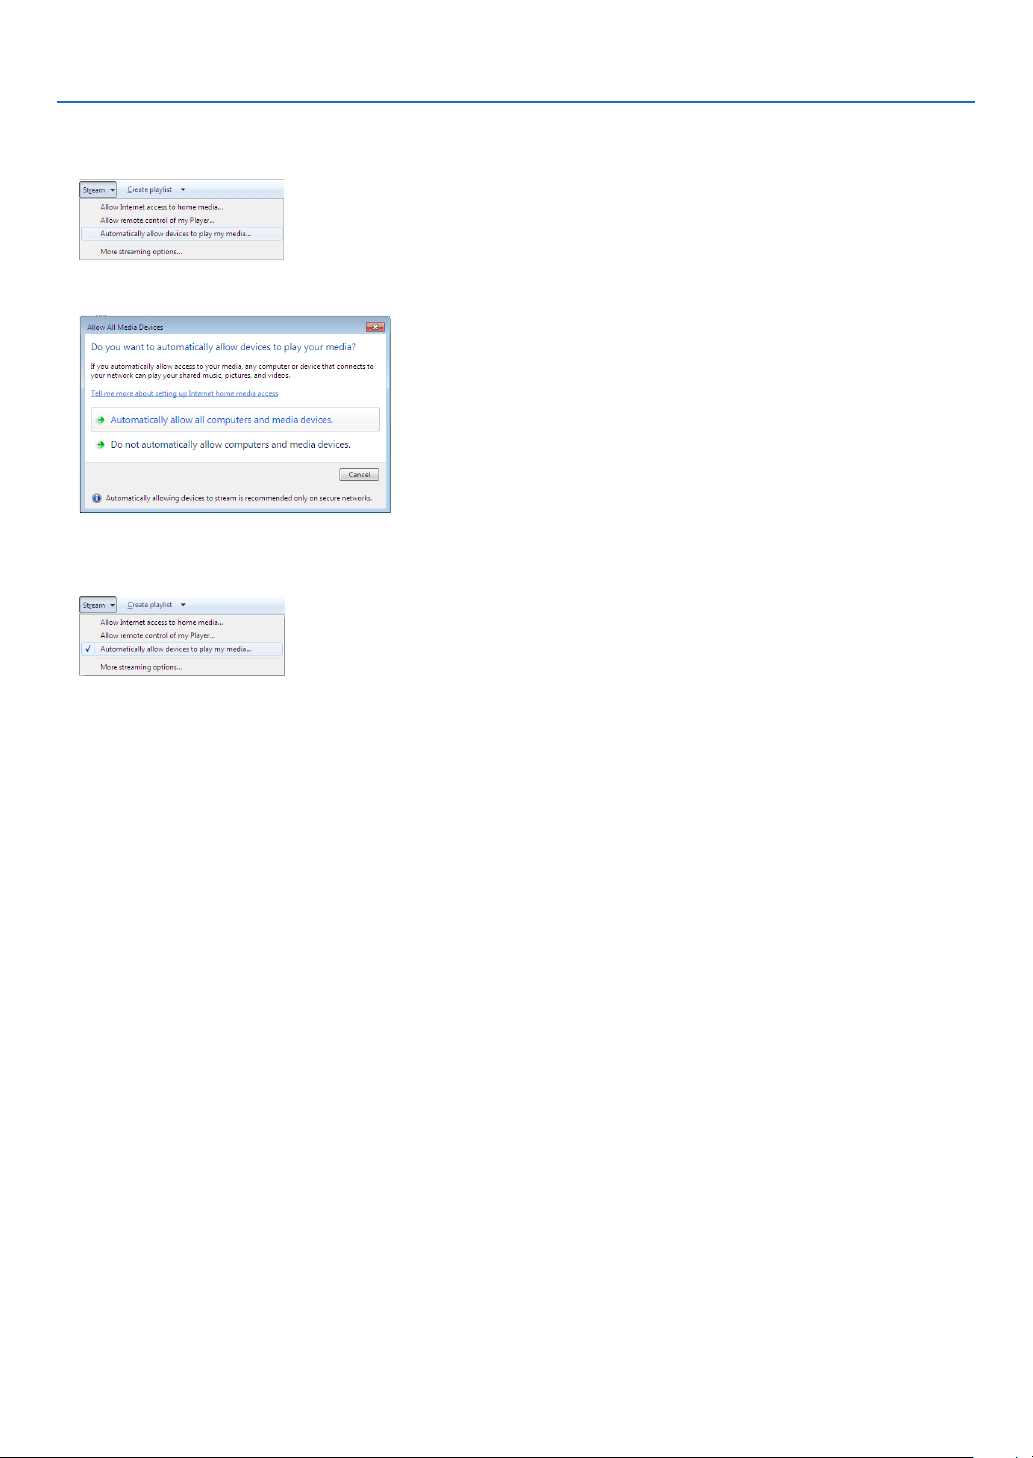
78
4. Using the Viewer
Setting up “Media Sharing” in Windows Media Player 12
1. Start Windows Media Player 12.
2.Select“Stream”,andthenselect“Automaticallyallowdevicestoplaymymedia”.
The “Allow All Media Devices” windows will be displayed.
3.Select“Automaticallyallowallcomputersandmediadevices”.
Graphics and movie files in “Library” can be used from the projector.
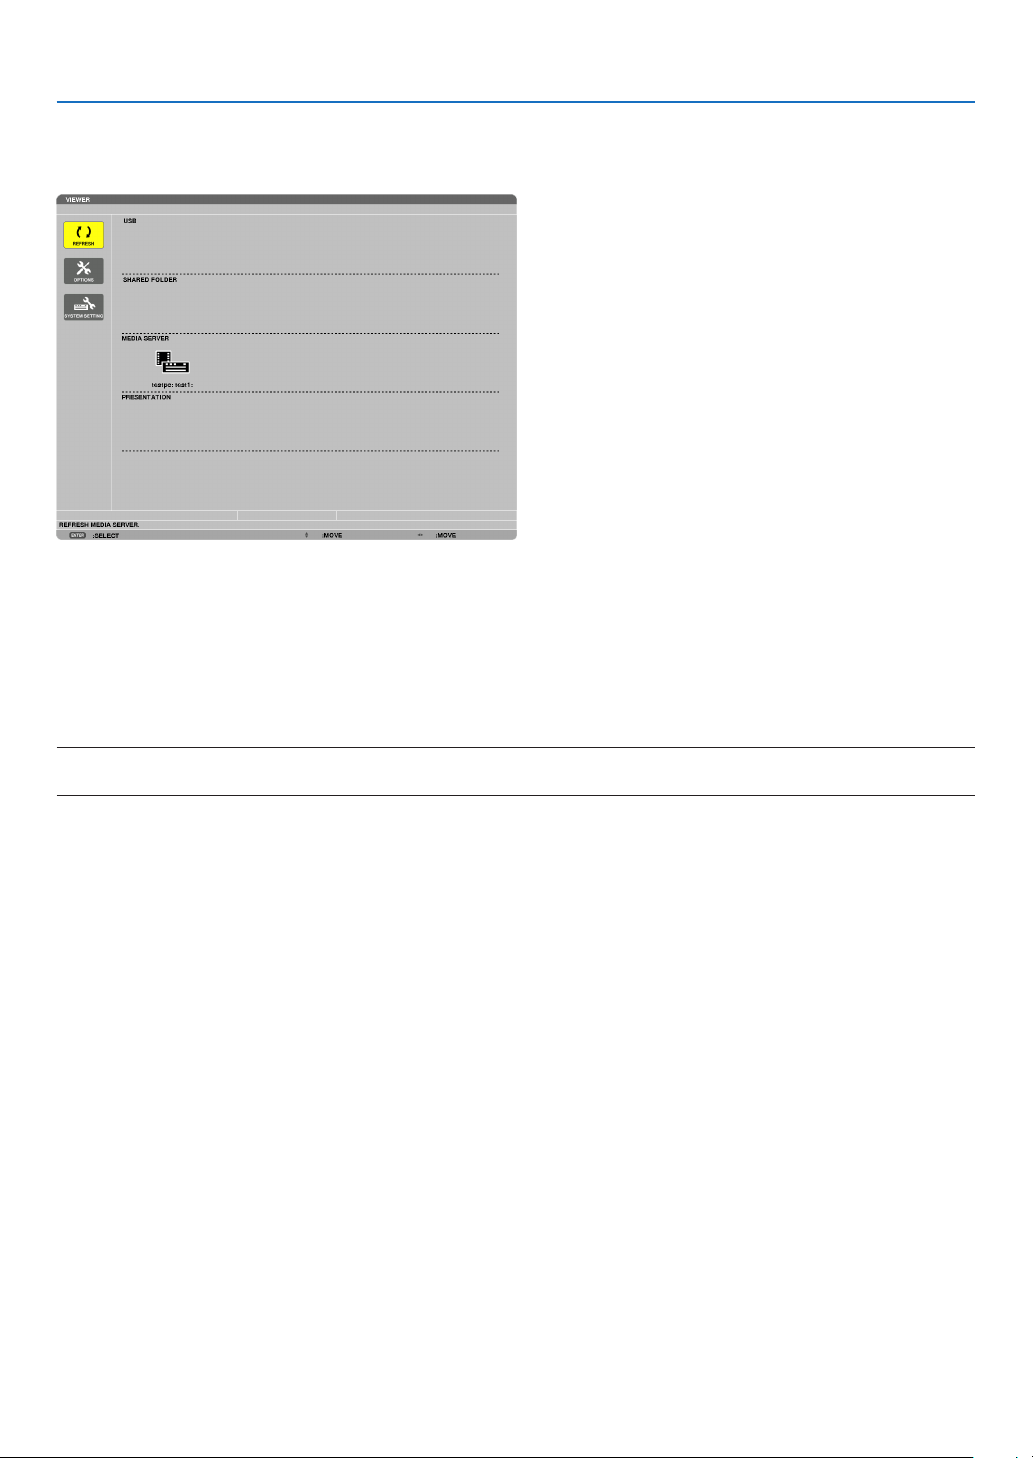
79
4. Using the Viewer
Connecting the projector to the media server
PresstheVIEWERbuttonontheremotecontrol.
TheVIEWERwillstart.
•AnotherwaytostarttheVIEWERistopresstheSOURCEbuttonafewtimesontheprojectorcabinet.(→page
16)
•Thiswillstartsearchingforacomputerwith“mediasharing”enabledinthenetworkandaddittothe“Mediaserver”
ofthethumbnailscreen.
Anotherwaytodothisistopointthecursorto“Mediaserver”andselect[REFRESH]fromthethumbnailmenu
andpresstheENTERbutton.
NOTE:
•Uptofouraccessiblemediaserverscanbeautomaticallysearchedanddisplayed.Thefthdeviceorlatercannotbedisplayed.
(→page60)
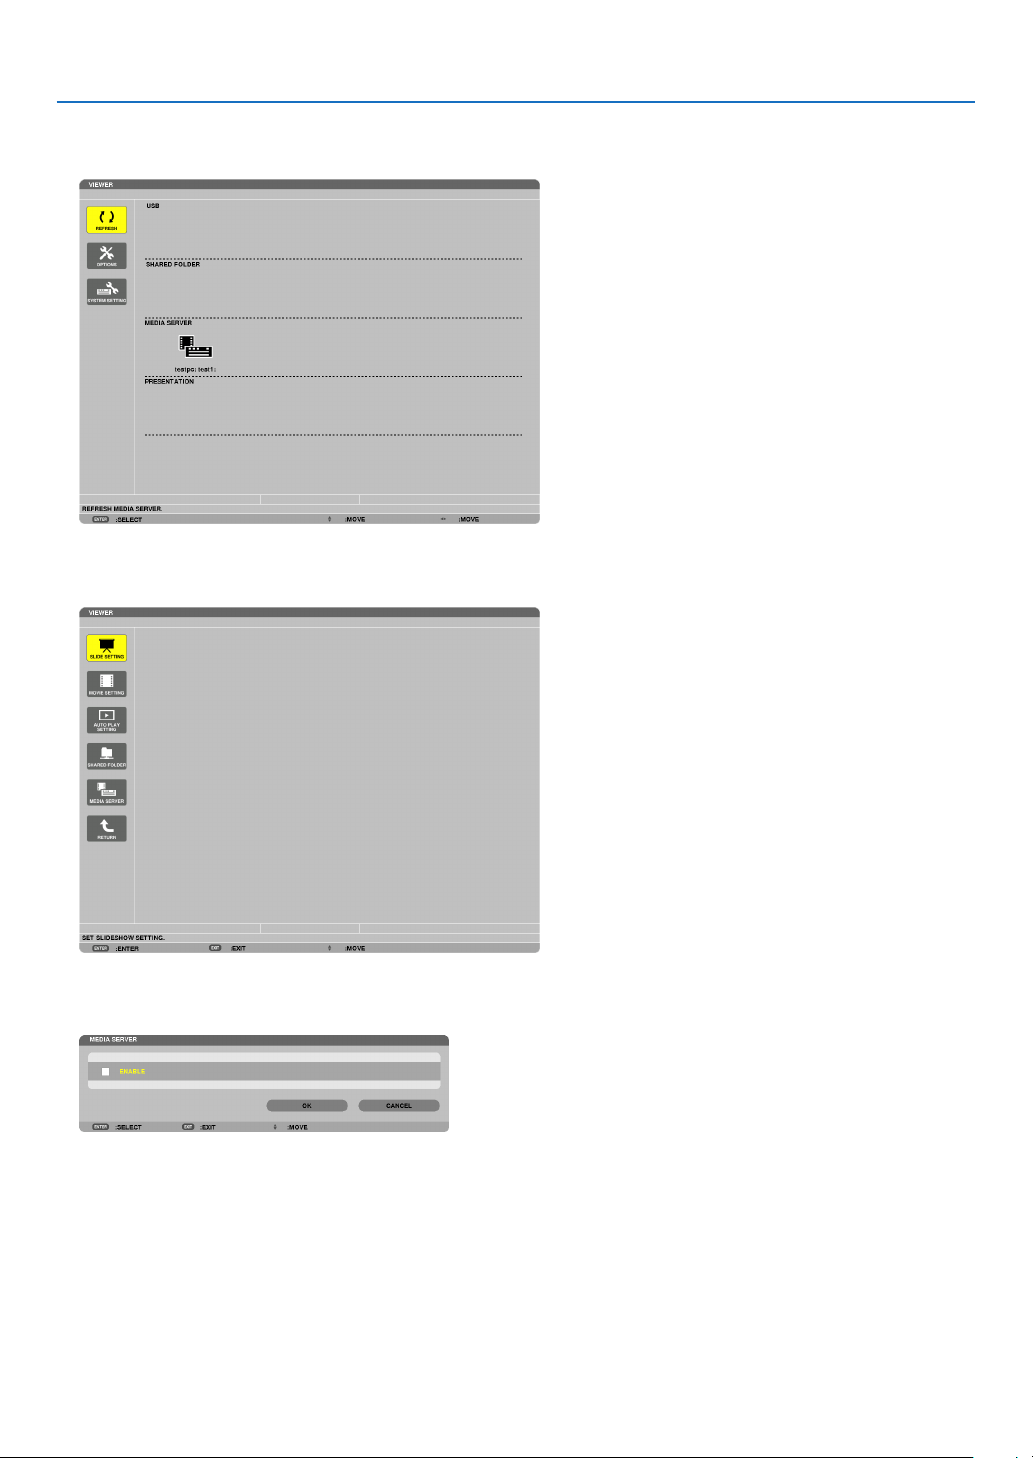
80
4. Using the Viewer
Disconnecting the projector from the media server
1. Display the OPTIONS menu.
Press the ▼ button to select the [OPTIONS] icon and select the ENTER button.
2.DisplaytheMEDIASERVERsettingscreen.
Press the ▼ button to select the MEDIA SERVER icon and press the ENTER button.
3. Disable the connection.
Press the ENTER button to clear the checkmark to disable the connection.
Press the
▼ button to select [OK] and press the ENTER button to close the MEDIA SERVER setting screen.

81
4. Using the Viewer
❻ Restrictions on displaying files
TheViewerallowsyoutogiveasimplieddisplayofaPowerPointleorPDFle.
Duetosimplieddisplay,however,actualdisplaymaybedifferentfromtheoneonyourcomputerapplicationpro-
gram.
Some restrictions on PowerPoint files
•Fontswillbeautomaticallyconvertedtothefontsinstalledintheprojector.Fontscanvaryinsizeorwidth,causing
layoutcorruption
Somecharactersorfontsmaynotbedisplayed.
•Somefunctionsincludedinfontarenotsupported.
Example:Therearesomerestrictionsonanimation,selection,orhyperlink.
•Itmaytakelongertimetofeedpagescomparedwithacomputer
•InsomecasesMicrosoftPowerPoint97-2007formatlesmaynotbedisplayed.
Some restrictions on PDF files
•FontsnotembeddedatthetimeofPDFcreationmaynotbedisplayed.
•Somefunctionsincludedinfontarenotsupported.
Example:Therearesomerestrictionsonannotations,selection,form,orcolorspace.
•Itmaytakelongertimetofeedpagescomparedwithacomputer
•InsomecasesAdobeAcrobatformatlesmaynotbedisplayed.
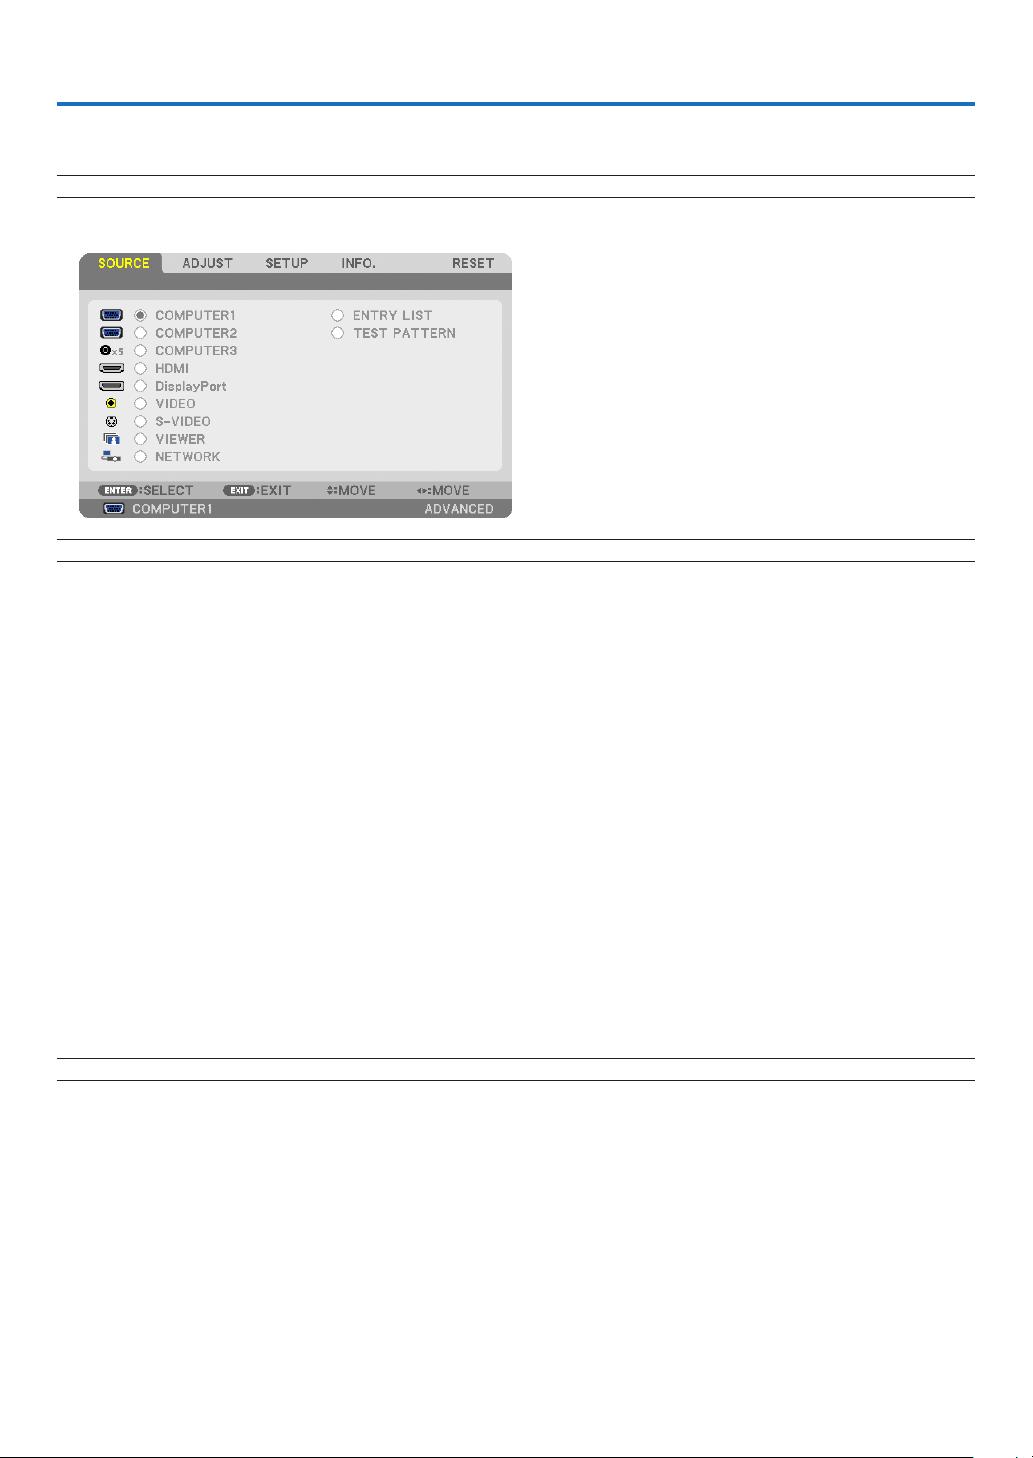
82
5. Using On-Screen Menu
1 Using the Menus
NOTE:Theon-screenmenumaynotbedisplayedcorrectlywhileinterlacedmotionvideoimageisprojected.
1. Press the MENU button on the remote control or the projector cabinet to display the menu.
NOTE:ThecommandssuchasENTER,EXIT,,inthebottomshowavailablebuttonsforyouroperation.
2. Press the buttons on the remote control or the projector cabinet to display the submenu.
3. Press the ENTER button on the remote control or the projector cabinet to highlight the top item or the first
tab.
4. Use the
buttons on the remote control or the projector cabinet to select the item you want to adjust or
set.
You can use the
buttons on the remote control or the projector cabinet to select the tab you want.
5. Press the ENTER button on the remote control or the projector cabinet to display the submenu window.
6. Adjust the level or turn the selected item on or off by using the
buttons on the remote control or
the projector cabinet.
Changesarestoreduntiladjustedagain.
7. Repeat steps 2 -6 to adjust an additional item, or press the EXIT button on the remote control or the projec-
tor cabinet to quit the menu display.
NOTE:Whenamenuormessageisdisplayed,severallinesofinformationmaybelost,dependingonthesignalorsettings.
8. Press the MENU button to close the menu.
To return to the previous menu, press the EXIT button.
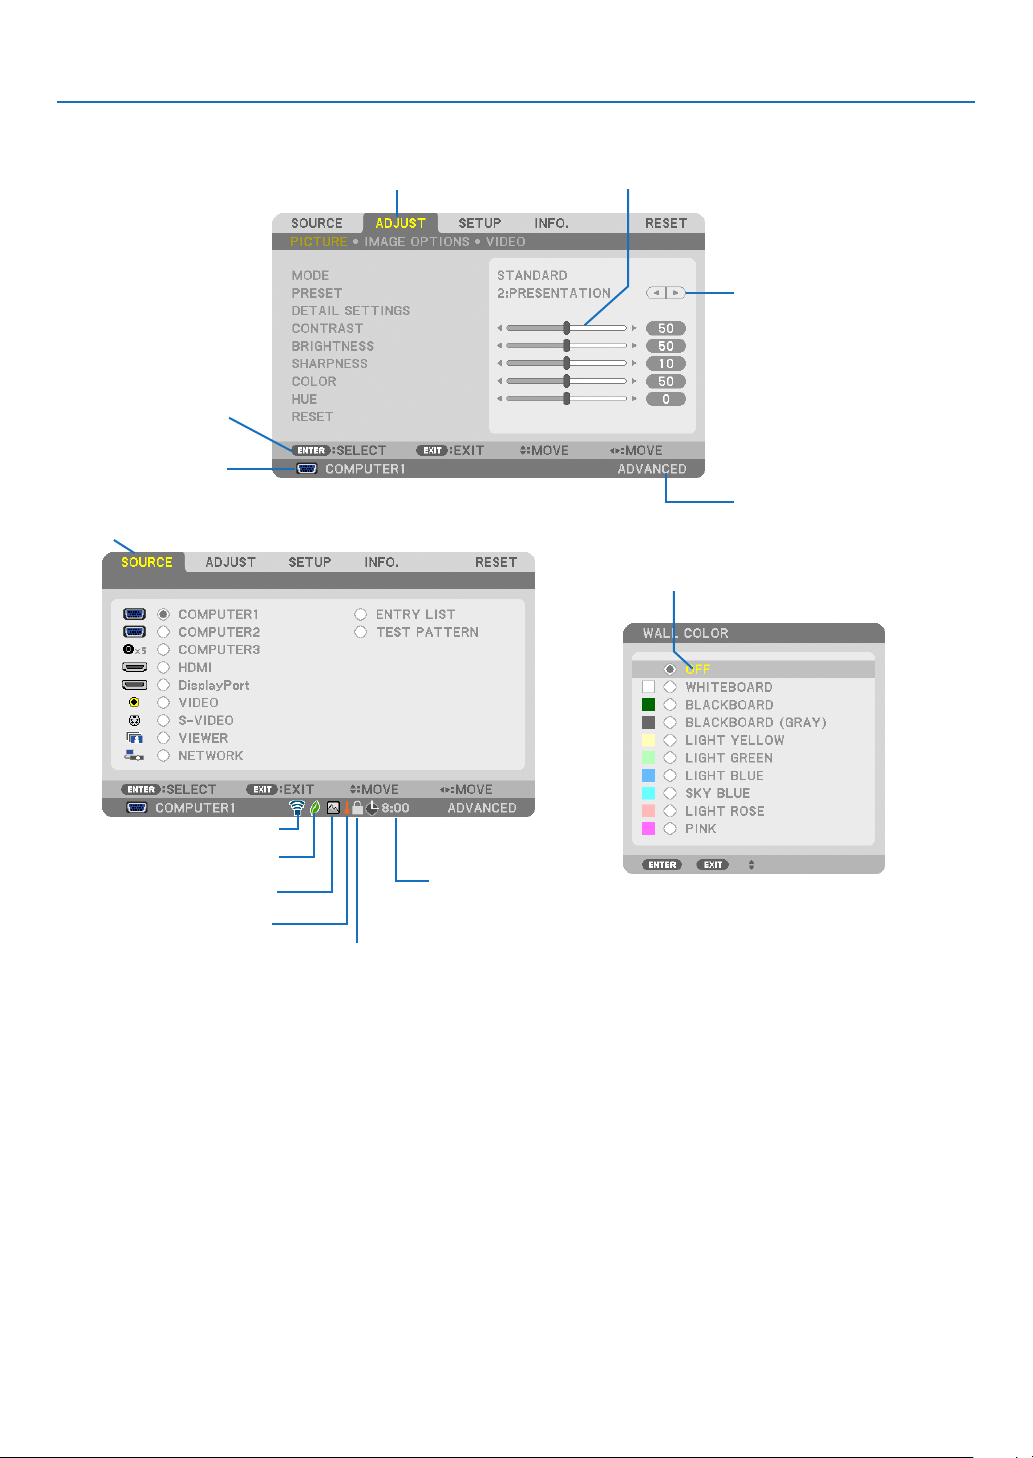
83
5. Using On-Screen Menu
Menu Elements
Slide bar
Solid triangle
Menu mode
Tab
Radio button
High Altitude symbol
ECO mode symbol
Wireless symbol
Menuwindowsordialogboxestypicallyhavethefollowingelements:
Highlight .............................Indicates the selected menu or item.
Solid triangle ......................Indicates further choices are available. A highlighted triangle indicates the item is active.
Tab ......................................Indicates a group of features in a dialog box. Selecting on any tab brings its page to the front.
Radio button .......................Use this round button to select an option in a dialog box.
Source ................................Indicates the currently selected source.
Menu mode ........................Indicates the current menu mode: BASIC or ADVANCED.
Off Timer remaining time ....Indicates the remaining countdown time when the [OFF TIMER] is preset.
Slide bar .............................Indicates settings or the direction of adjustment.
ECO mode symbol ..............Indicates [ECO MODE] is set.
Key Lock symbol ................Indicates the [CONTROL PANEL LOCK] is enabled.
Thermometer symbol .........Indicates the [ECO MODE] is forcibly set to [ON] mode because the internal temperature is too
high.
High Altitude symbol ..........Indicates the [FAN MODE] is set to [HIGH ALTITUDE] mode.
Wireless symbol .................Indicate the wireless LAN connection is enabled.
Source
Available buttons
Thermometer symbol
Key Lock symbol
Off Timer remaining
time
Highlight
84
5. Using On-Screen Menu
List of Menu Items
Somemenuitemsarenotavailabledependingontheinputsource.
MenuItemDefaultOptions
SOURCE
COMPUTER1*
COMPUTER2*
COMPUTER3(BNC)*
HDMI*
DisplayPort*
VIDEO*
S-VIDEO*
VIEWER*
NETWORK*
ENTRYLIST
TESTPATTERN
ADJUST
PICTURE
MODESTANDARDSTANDARD,PROFESSIONAL
PRESET*
HIGH-BRIGHT,PRESENTATION,VIDEO,MOVIE,GRAPHIC,
sRGB,DICOMSIM.
DETAIL
SETTINGS
GENERAL
REFERENCE*
HIGH-BRIGHT,PRESENTATION,VIDEO,MOVIE,GRAPHIC,
sRGB,DICOMSIM.
GAMMA
CORRECTION*
1
DYNAMIC,NATURAL,BLACKDETAIL
SCREENSIZE*
2
*LARGE,MEDIUM,SMALL
COLOR
TEMPERATURE*
3
*5000,6500,7800,8500,9300,10500
DYNAMIC
CONTRAST
*OFF,ON
WHITEBALANCE
CONTRASTR0
CONTRASTG0
CONTRASTB0
BRIGHTNESSR0
BRIGHTNESSG0
BRIGHTNESSB0
COLOR
CORRECTION
RED0
GREEN0
BLUE0
YELLOW0
MAGENTA0
CYAN0
CONTRAST50
BRIGHTNESS50
SHARPNESS10
COLOR50
HUE0
RESET
IMAGE
OPTIONS
CLOCK*
PHASE*
HORIZONTAL*
VERTICAL*
OVERSCAN*AUTO,0[%],5[%],10[%]
ASPECTRATIO
*
(COMPUTER1/2/3)AUTO,4:3,5:4,16:9,15:9,16:10,
NATIVE
*
(COMPONENT/VIDEO/S-VIDEO)AUTO,4:3,LETTERBOX,
WIDESCREEN,ZOOM
*
(COMPONENT/VIDEO/S-VIDEO)AUTO,4:3WINDOW,
LETTERBOX,WIDESCREEN,4:3FILL
RESOLUTION*–
VIDEO
NOISE
REDUCTION
RANDOMNR*OFF,LOW,MEDIUM,HIGH
MOSQUITONROFFOFF,LOW,MEDIUM,HIGH
BLOCKNROFFOFF,ON
DEINTERLACEAUTOAUTO,VIDEO,FILM
3DY/CSEPARATIONONOFF,ON
DETAILENHANCEMENT*
SIGNALTYPERGBRGB,COMPONENT
VIDEOLEVELAUTOAUTO,NORMAL,ENHANCED
*Theasterisk(*)indicatesthatthedefaultsettingvariesdependingonthesignal.
*1The[GAMMACORRECTION]itemisavailablewhenanitemotherthan[DICOMSIM.]isselectedfor[REFERENCE].
*2The[SCREENSIZE]itemisavailablewhen[DICOMSIM.]isselectedfor[REFERENCE].
*3When[PRESENTATION]or[HIGH-BRIGHT]isselectedin[REFERENCE],the[COLORTEMPERATURE]isnotavailable.
•Basicmenuitemsareindicatedbyshadedarea.
85
5. Using On-Screen Menu
SETUP
BASIC
KEYSTONE
HORIZONTAL0
VERTICAL0
CORNERSTONE
PIP/PICTUREBY
PICTURE
PIP/PBPMODEPIPPIP,PICTUREBYPICTURE
PIPPOSITIONBOTTOM-RIGHTTOP-LEFT,TOP-RIGHT,BOTTOM-LEFT,BOTTOM-RIGHT
PIP/PBPSOURCEOFFOFF,VIDEO,S-VIDEO
WALLCOLOROFF
OFF,WHITEBOARD,BLACKBOARD,BLACKBOARD
(GRAY),LIGHTYELLOW,LIGHTGREEN,LIGHTBLUE,
SKYBLUE,LIGHTROSE,PINK
ECOMODEOFFOFF,ON
CLOSEDCAPTIONOFF
OFF,CAPTION1,CAPTION2,CAPTION3,CAPTION4,
TEXT1,TEXT2,TEXT3,TEXT4
OFFTIMEROFFOFF,0:30,1:00,2:00,4:00,8:00,12:00,16:00
TOOLS
ADMINISTRATORMODE,PROGRAMTIMER,TIME,
MOUSE
LANGUAGEENGLISH
ENGLISH,DEUTSCH,FRANÇAIS,ITALIANO,ESPAÑOL,
SVENSKA,日本語
DANSK,PORTUGUÊS,ČEŠTINA,MAGYAR,POLSKI,
NEDERLANDS,SUOMI
NORSK,TÜRKÇE,РУССКИЙ,
, Ελληνικά, 中文, 한국어
ROMÂNĂ, HRVATSKA, БЪЛГАРСКИ, INDONESIA, ,
ไทย
MENU
COLORSELECTCOLORCOLOR,MONOCHROME
SOURCEDISPLAYONOFF,ON
MESSAGEDISPLAYONOFF,ON
IDDISPLAYONOFF,ON
ECOMESSAGEOFFOFF,ON
DISPLAYTIMEAUTO45SECMANUAL,AUTO5SEC,AUTO15SEC,AUTO45SEC
BACKGROUNDBLUEBLUE,BLACK,LOGO
FILTERMESSAGEOFFOFF,100[H],500[H],1000[H],2000[H]
INSTALLATION
(1)
ORIENTATION
DESKTOP
FRONT
DESKTOPFRONT,CEILINGREAR,DESKTOPREAR,
CEILINGFRONT
SCREEN
SCREENTYPE4:3SCREEN4:3SCREEN,16:9SCREEN,16:10SCREEN
POSITION0
GEOMETRICCORRECTIONOFFOFF,1,2,3
MULTI-SCREEN
COMP.
MODEOFFOFF,ON
CONTRAST0
BRIGHTNESS0
REF.WHITE
BALANCE
CONTRASTR0
CONTRASTG0
CONTRASTB0
BRIGHTNESSR0
BRIGHTNESSG0
BRIGHTNESSB0
UNIFORMITYR0
UNIFORMITYB0
STATIC
CONVERGENCE
HORIZONTALR0
HORIZONTALG0
HORIZONTALB0
VERTICALR0
VERTICALR0
VERTICALB0
INSTALLATION
(2)
NETWORKSETTINGS
WIREDLAN,WIRELESSLAN,WPS,NETWORK
INFORMATION,PROJECTORNAME,DOMAIN,ALERT
MAIL,NETWORKSERVICE
CONTROLPANELLOCKOFFOFF,ON
SECURITYOFFOFF,ON
COMMUNICATIONSPEED38400bps4800bps,9600bps,19200bps,38400bps,115200bps
REMOTESENSORFRONT/BACKFRONT/BACK,FRONT,BACK
CONTROLID
CONTROLIDNUMBER
1 1–254
CONTROLIDOFFOFF,ON
OPTIONS(1)
AUTOADJUSTNORMALOFF,NORMAL,FINE
FANMODE
AUTOMODE:AUTO,HIGH,HIGHALTITUDE
NORMALSETTING:NORMAL,VERTICALTILTUP
SIGNALSELECT(COMP3)
RGB/
COMPONENT
RGB/COMPONENT,VIDEO
SEAMLESSSWITCHINGOFFOFF,ON
COLORSYSTEM
VIDEOAUTO
AUTO,NTSC3.58,NTSC4.43,PAL,PAL-M,PAL-N,PAL60,
SECAM
S-VIDEOAUTO
AUTO,NTSC3.58,NTSC4.43,PAL,PAL-M,PAL-N,PAL60,
SECAM
COMPUTER3
(VIDEO)
AUTO
AUTO,NTSC3.58,NTSC4.43,PAL,PAL-M,PAL-N,PAL60,
SECAM
DIGITALAUDIO
SELECT
HDMIHDMIHDMI,COMPUTER2
DisplayPortDisplayPortDisplayPort,COMPUTER2
BEEPONOFF,ON
*Theasterisk(*)indicatesthatthedefaultsettingvariesdependingonthesignal.

86
5. Using On-Screen Menu
SETUPOPTIONS(2)
STANDBYMODENORMALNORMAL,POWER-SAVING,NETWORKSTANDBY
DIRECTPOWERONOFFOFF,ON
AUTOPOWERON(COMP1/3)OFFOFF,COMPUTER1,COMPUTER3
AUTOPOWEROFFOFFOFF,0:05,0:10,0:20,0:30
DEFAULTSOURCESELECTLAST
LAST,AUTO,COMPUTER1,COMPUTER2,COMPUTER3,
HDMI,DisplayPort,VIDEO,S-VIDEO,VIEWER,NETWORK
INFO.
USAGETIME
LAMPLIFEREMAINING
LAMPHOURSUSED
FILTERHOURSUSED
TOTALCARBONSAVINGS
SOURCE(1)
INPUTTERMINAL
RESOLUTION
HORIZONTALFREQUENCY
VERTICALFREQUENCY
SYNCTYPE
SYNCPOLARITY
SCANTYPE
SOURCENAME
ENTRYNO.
SOURCE(2)
SIGNALTYPE
VIDEOTYPE
BITDEPTH
VIDEOLEVEL
LINKRATE
LINKLANE
WIREDLAN
IPADDRESS
SUBNETMASK
GATEWAY
MACADDRESS
WIRELESS
LAN(1)
IPADDRESS
SUBNETMASK
GATEWAY
MACADDRESS
WIRELESS
LAN(2)
SSID
NETWORKTYPE
WEP/WPA
CHANNEL
SIGNALLEVEL
VERSION(1)
FIRMWARE
DATA
FIRMWARE2
SUB-CPU
VERSION(2)FIRMWARE3
OTHERS
PROJECTORNAME
MODELNO.
SERIALNUMBER
LANUNITTYPE
CONTROLID(when[CONTROLID]
isset)
RESET
CURRENTSIGNAL
ALLDATA
ALLDATA(INCLUDINGENTRYLIST)
CLEARLAMPHOURS
CLEARFILTERHOURS

87
5. Using On-Screen Menu
Menu Descriptions & Functions [SOURCE]
COMPUTER 1, 2, and 3
SelectsthecomputerconnectedtoyourCOMPUTER1,2,orCOMPUTER3inputconnectorsignal.
NOTE:WhenthecomponentinputsignalisconnectedtotheCOMPUTERIN,COMPUTER2IN,orCOMPUTER3INconnector,select
[COMPUTER1],[COMPUTER2]or[COMPUTER3]respectively.TheprojectorautomaticallydetermineswhethertheCOMPUTER1,
2,or3inputsignalisanRGBorcomponentsignal.
HDMI
SelectstheHDMIcompatibleequipmentconnectedtoyourHDMIINconnector.
DisplayPort
ProjectstheimageofthedeviceconnectedtotheDisplayPortinputconnector.
VIDEO
SelectswhatisconnectedtoyourVIDEOinput-VCR,DVDplayerordocumentcamera.
VIEWER
ThisfeatureenablesyoutomakepresentationsusingaUSBmemorythatcontainsslides.
(→page
56“4.UsingtheViewer”)
NETWORK
SelectsasignalfromtheLANport(RJ-45)ortheinstalledUSBwirelessLANunit(optionalformodelsforEurope,
Australia,AsiaandothercountriesthanNorthAmerica).
ENTRY LIST
Displaysalistofsignals.Seethefollowingpages.
TEST PATTERN
Closesthemenuandswitchestothetestpatternscreen.ThepreviousscreenreappearswhentheEXITbuttonis
pressed.
88
5. Using On-Screen Menu
Using the Entry List
Whenanysourceadjustmentsaremade,theadjustmentsareautomaticallyregisteredintheEntryList.The(adjustment
valuesof)registeredsignalscanbeloadedfromtheEntryListwhenevernecessary.
However,onlyupto100patternscanberegisteredintheEntryList.When100patternshavebeenregisteredinthe
EntryList,anerrormessageisthendisplayedandnoadditionalpatternscanberegistered.Youshouldthusdelete
(adjustmentvaluesof)signalsthatarenolongerneeded.
Displaying the Entry list
1. Press the MENU button.
The menu will be displayed.
2. Press the
or buttontoselect[SOURCE].
The SOURCE list will be displayed.
3. Use the , , , or toselect[ENTRYLIST]andpresstheENTERbutton.
The ENTRY LIST windows will be displayed.
If the ENTRY LIST window is not displayed, switch the menu to [ADVANCED].
To switch the menu between [ADVANCED] and [BASIC], select [APPLICATION MENU]
→ [TOOLS] →
[ADMINISTRATOR MODE]. (→ page 136)
89
5. Using On-Screen Menu
EnteringthecurrentlyprojectedsignalintotheEntryList[STORE]
1. Press the or button to select any number.
2. Press the
or buttontoselect[STORE]andpresstheENTERbutton.
Calling up a signal from the Entry List [LOAD]
Pressthe or buttontoselectasignalandpresstheENTERbutton.
Editing a signal from the Entry List [EDIT]
1. Press the or button to select a signal you wish to edit.
2. Press the
, , , or buttontoselect[EDIT]andpresstheENTERbutton.
The Edit window will be displayed.
SOURCENAMEEnterasignalname.Upto18alphanumericcharacterscanbeused.
INPUTTERMINALSelecttheinputsource.
LOCKSetsothattheselectedsignalcannotbedeletedwhen[ALLDELETE]isexecuted.The
changesmadeafterLOCKexecutioncannotbesaved.
SKIPSetsothattheselectedsignalwillbeskippedduringautosearch.
3.Settheaboveitemsandselect[OK]andpresstheENTERbutton.
NOTE:Theinputterminalcannotbechangedtothecurrentlyprojectedsignal.

90
5. Using On-Screen Menu
Cutting a signal from the Entry List [CUT]
1. Press the or button to select a signal you wish to delete.
2. Press the
, , , or buttontoselect[CUT]andpresstheENTERbutton.
The signal will be deleted from the Entry List and the deleted signal will be displayed on the clipboard at the bottom
of the Entry List.
NOTE:
•Thecurrentlyprojectedsignalcannotbedeleted.
•Whenthelockedsignalisselected,itwillbedisplayedingraywhichindicatesitisnotavailable.
TIP:
•DataontheclipboardcanbepassedontotheEntryList.
•DataontheclipboardwillnotbelostaftertheEntryListisclosed.
CopyingandpastingasignalfromtheEntryList[COPY]/[PASTE]
1. Press the or button to select a signal you wish to copy.
2. Press the
, , , or buttontoselect[COPY]andpresstheENTERbutton.
The copied signal will be displayed on the clipboard at the bottom of the Entry List.
3. Press the
or button to move to the list.
4. Press the
or button to select a signal.
5. Press the
, , , or buttontoselect[PASTE]andpresstheENTERbutton.
Data on the clipboard will be pasted to the signal.
Deleting all the signals from the Entry List [ALL DELTE]
1. Press the , , , or buttontoselect[ALLDELETE]andpresstheENTERbutton.
The confirmation message will be displayed.
2. Press the
or buttontoselect[YES]andpresstheENTERbutton.
NOTE:Thelockedsignalcannotbedeleted.
91
5. Using On-Screen Menu
Menu Descriptions & Functions [ADJUST]
[PICTURE]
[MODE]
Thisfunctionallowsyoutodeterminehowtosavesettingsfor[DETAILSETTINGS]of[PRESET]foreachinput.
STANDARD ............ Saves settings for each item of [PRESET] (Preset 1 through 7)
PROFESSIONAL ..... Saves all the settings of [PICTURE] for each input.
[PRESET]
Thisfunctionallowsyoutoselectoptimizedsettingsforyourprojectedimage.
Youcanadjustneutraltintforyellow,cyanormagenta.
Therearesevenfactorypresetsoptimizedforvarioustypesofimages.Youcanalsouse[DETAILSETTINGS]toset
useradjustablesettingstocustomizeeachgammaorcolor.
Yoursettingscanbestoredin[PRESET1]to[PRESET7].
HIGH-BRIGHT ........ Recommended for use in a brightly lit room.
PRESENTATION ..... Recommended for making a presentation using a PowerPoint file.
VIDEO .................... Recommended for typical TV program viewing.
MOVIE ................... Recommended for movies.
GRAPHIC ............... Recommended for graphics.
sRGB ..................... Standard color values
DICOM SIM. .......... Recommended for DICOM simulation format.
NOTE:
•The[DICOMSIM.]optionisfortraining/referenceonlyandshouldnotbeusedforactualdiagnosis.
•DICOMstandsforDigitalImagingandCommunicationsinMedicine.ItisastandarddevelopedbytheAmericanCollegeofRadiol
-
ogy(ACR)andtheNationalElectricalManufacturersAssociation(NEMA).
Thestandardspecieshowdigitalimagedatacanbemovedfromsystemtosystem.
[DETAIL SETTINGS]

92
5. Using On-Screen Menu
[GENERAL]
StoringYourCustomizedSettings[REFERENCE]
Thisfunctionallowsyoutostoreyourcustomizedsettingsin[PRESET1]to[PRESET7].
First,selectabasepresetmodefrom[REFERENCE],thenset[GAMMACORRECTION]and[COLORTEMPERA-
TURE].
HIGH-BRIGHT ........ Recommended for use in a brightly lit room.
PRESENTATION ..... Recommended for making a presentation using a PowerPoint file.
VIDEO .................... Recommended for typical TV program viewing.
MOVIE ................... Recommended for movies.
GRAPHIC ............... Recommended for graphics.
sRGB ..................... Standard color values.
DICOM SIM. .......... Recommended for DICOM simulation format.
Selecting Gamma Correction Mode [GAMMA CORRECTION]
Eachmodeisrecommendedfor:
DYNAMIC .............. Creates a high-contrast picture.
NATURAL ............... Natural reproduction of the picture.
BLACK DETAIL ....... Emphasizes detail in dark areas of the picture.
NOTE:Thisfunctionisnotavailablewhen[DICOMSIM.]isselectedfor[DETAILSETTINGS].
SelectingScreenSizeforDICOMSIM[SCREENSIZE]
Thisfunctionwillperformgammacorrectionappropriateforthescreensize.
LARGE ................... For screen size of 150"
MEDIUM ................ For screen size of 100"
SMALL ................... For screen size of 50"
NOTE:Thisfunctionisavailableonlywhen[DICOMSIM.]isselectedfor[DETAILSETTINGS].
AdjustingColorTemperature[COLORTEMPERATURE]
Thisoptionallowsyoutoselectthecolortemperatureofyourchoice.
NOTE:When[PRESENTATION]or[HIGH-BRIGHT]isselectedin[REFERENCE],thisfunctionisnotavailable.
AdjustingBrightnessandContrast[DYNAMICCONTRAST]
Thisfunctionallowsyoutoadjustthecontrastratioopticallyusingthebuilt-iniris.
Toincreasethecontrastratio,select[ON].
AdjustingWhiteBalance[WHITEBALANCE]
Thisallowsyoutoadjustthewhitebalance.Contrastforeachcolor(RGB)toadjustthewhitelevelofthescreen;
Brightnessforeachcolor(RGB)isusedtoadjusttheblacklevelofthescreen.

93
5. Using On-Screen Menu
[COLOR CORRECTION]
Correctsthecolorforallsignals.
Adjuststhetoneforthecolorsred,green,blue,yellow,magentaandcyan.
RED ....................... Adjusts the color in red areas, centered around the red.
This can be used to adjust to a yellow- or magenta-tinged red.
GREEN ................... Adjusts the color in green areas, centered around the green.
This can be used to adjust to a yellow- or cyan-tinged green.
BLUE ...................... Adjusts the color in blue areas, centered around the blue.
This can be used to adjust to a violet- or cyan-tinged blue.
YELLOW ................ Adjusts the color in yellow areas, centered around the yellow.
This can be used to adjust to a red- or green-tinged yellow.
MAGENTA .............. Adjusts the color in magenta areas, centered around the magenta.
This can be used to adjust to a red- or blue-tinged magenta.
CYAN ..................... Adjusts the color in cyan areas, centered around the cyan.
This can be used to adjust to a green- or blue-tinged cyan.
[CONTRAST]
Adjuststheintensityoftheimageaccordingtotheincomingsignal.
[BRIGHTNESS]
Adjuststhebrightnesslevelorthebackrasterintensity.
[SHARPNESS]
Controlsthedetailoftheimage.
[COLOR]
Increasesordecreasesthecolorsaturationlevel.
[HUE]
Variesthecolorlevelfrom+/−greento+/−blue.Theredlevelisusedasreference.
InputsignalCONTRASTBRIGHTNESSSHARPNESSCOLORHUE
COMPUTER/DisplayPort/HDMI(RGB)YesYesYesNo No
COMPUTER/DisplayPort/HDMI
(COMPONENT)
YesYesYesYesYes
VIDEO/S-VIDEO/COMPONENTYesYesYesYesYes
VIEWER/NETWORKYesYesYesNo No
Yes=Adjustable,No=Notadjustable
[RESET]
Thesettingsandadjustmentsfor[PICTURE]willbereturnedtothefactorysettingswiththeexceptionofthefollowing;
Presetnumbersand[REFERENCE]withinthe[PRESET]screen.
Thesettingsandadjustmentsunder[DETAILSETTINGS]withinthe[PRESET]screenthatarenotcurrentlyselected
willnotbereset.
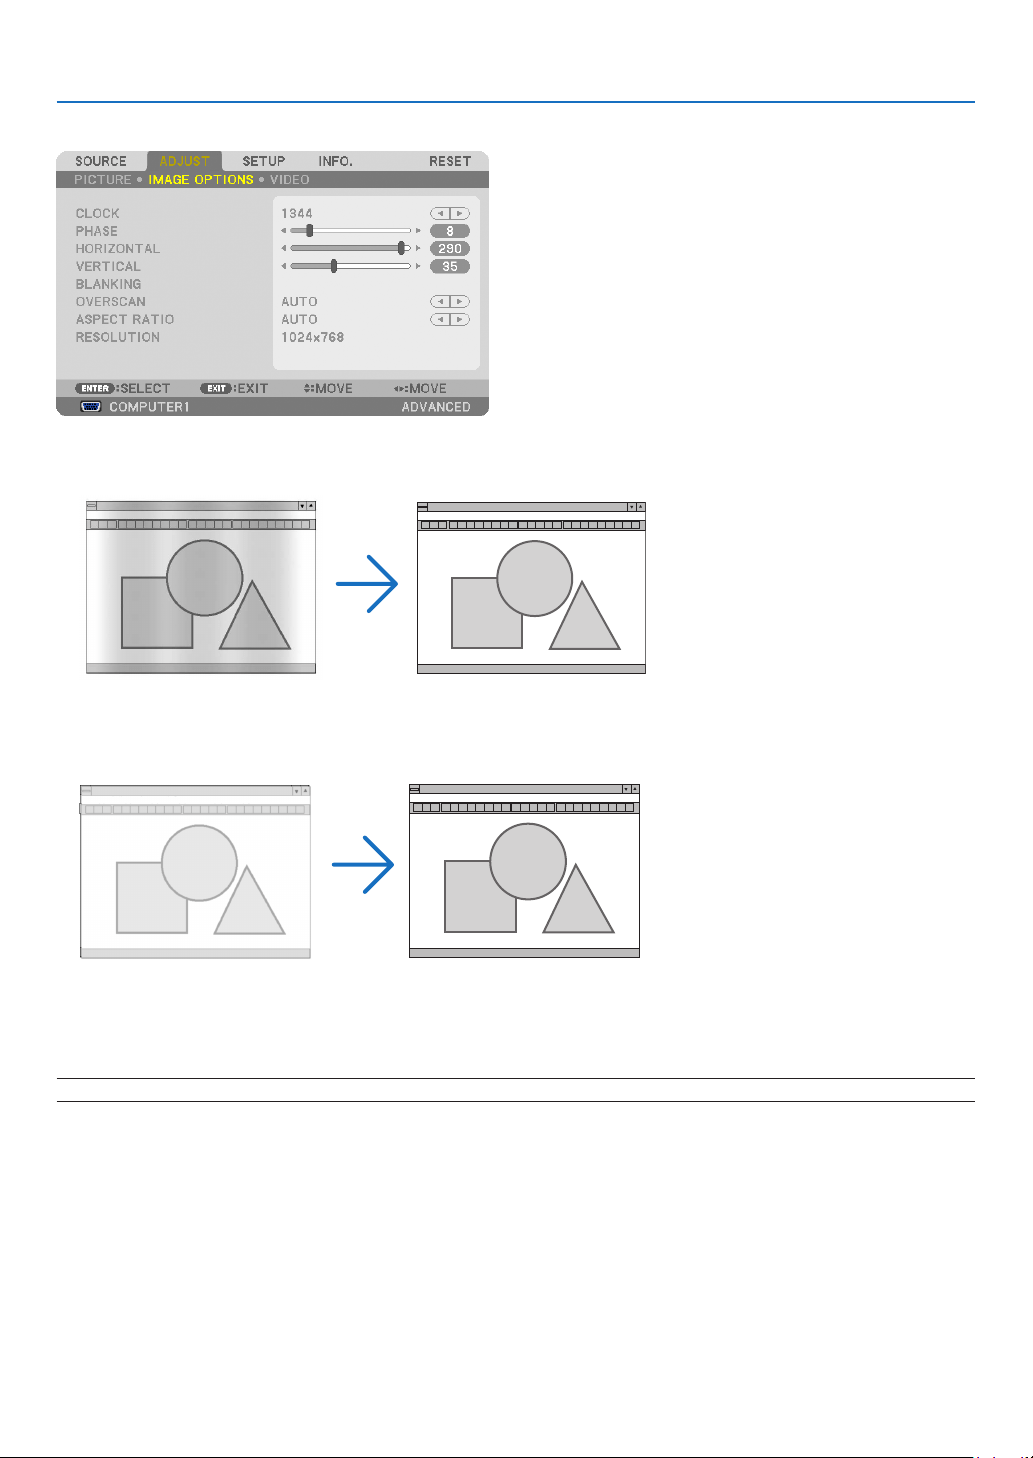
94
5. Using On-Screen Menu
[IMAGE OPTIONS]
AdjustingClockandPhase[CLOCK/PHASE]
ThisallowsyoutomanuallyadjustCLOCKandPHASE.
CLOCK ................... Use this item to fine tune the computer image or to remove any vertical banding that might appear. This
function adjusts the clock frequencies that eliminate the horizontal banding in the image.
This adjustment may be necessary when you connect your computer for the first time.
PHASE ................... Use this item to adjust the clock phase or to reduce video noise, dot interference or cross talk. (This is
evident when part of your image appears to be shimmering.)
Use [PHASE] only after the [CLOCK] is complete.
NOTE:The[CLOCK]and[PHASE]itemsareavailableforRGBsignalsonly.
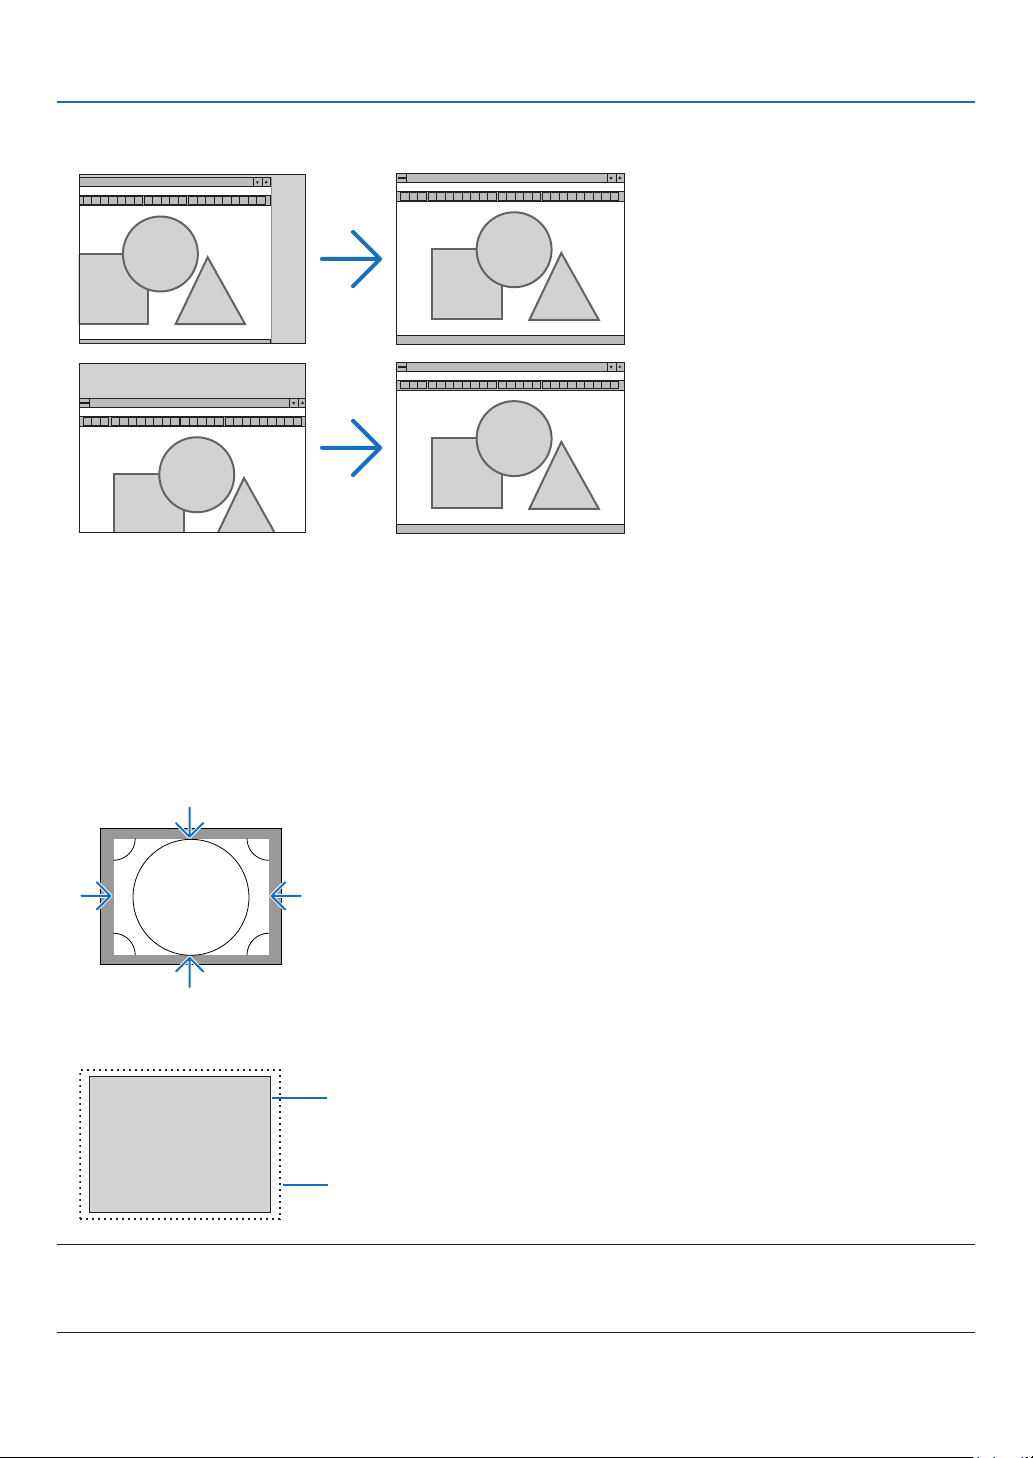
95
5. Using On-Screen Menu
AdjustingHorizontal/VerticalPosition[HORIZONTAL/VERTICAL]
Adjuststheimagelocationhorizontallyandvertically.
-Animagecanbedistortedduringtheadjustmentof[CLOCK]and[PHASE].Thisisnotmalfunction.
-Theadjustmentsfor[CLOCK],[PHASE],[HORIZONTAL],and[VERTICAL]willbestoredinmemoryforthe
currentsignal.Thenexttimeyouprojectthesignalwiththesameresolution,horizontalandverticalfrequency,
itsadjustmentswillbecalledupandapplied.
Todeleteadjustmentsstoredinmemory,fromthemenu,youselect[RESET]→[CURRENTSIGNAL]andreset
theadjustments.
[BLANKING]
Adjuststhedisplayrange(blanking)atthetop,bottom,leftandrightedgesoftheinputsignal.
SelectingOverscanPercentage[OVERSCAN]
Selectoverscanpercentage(Auto,0%,5%and10%)forsignal.
Projected image
Overscaned by 10%
NOTE:
•The[OVERSCAN]itemisnotavailable:
-when[NATIVE]isselectedfor[ASPECTRATIO].
-when[VIEWER]or[NETWORK]isselectedfor[SOURCE]
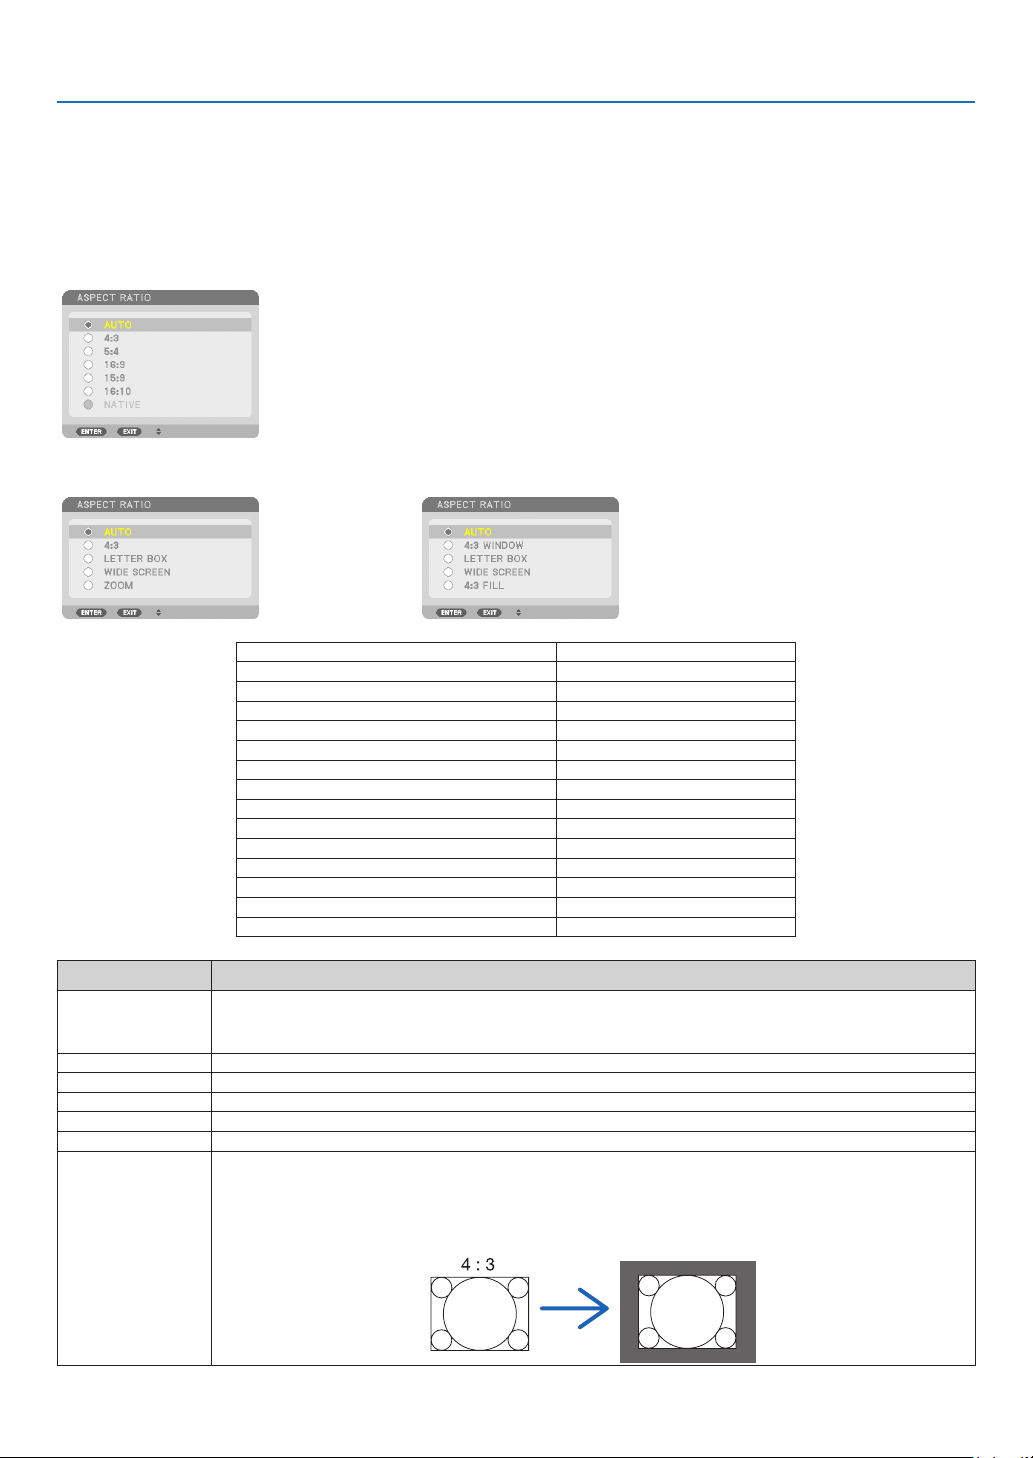
96
5. Using On-Screen Menu
Selecting the Aspect Ratio [ASPECT RATIO]
Usethisfunctiontoselectthescreen’svertical:horizontalaspectratio.
Selectthescreentype(4:3screen,16:9screenor16:10screen)atthescreensettingbeforesettingtheaspectratio.
(→page
104)
Theprojectorautomaticallyidentiesthesignalbeinginputandsetstheoptimumaspectratio.
For Computer signal
ForComponent/Video/S-Videosignals
Whenthescreentypeissetto4:3
Whenthescreentypeissetto16:9or16:10
ResolutionAspectRatio
VGA640×4804:3
SVGA800×6004:3
XGA1024×7684:3
WXGA1280×76815:9
WXGA1280×80016:10
HD(FWXGA)1366×768approx.16:9
WXGA+1440×90016:10
SXGA1280×10245:4
SXGA+1400×10504:3
WXGA+1600×90016:9
UXGA1600×12004:3
WSXGA+ 1680×105016:9
FHD(1080P) 1920×108016:9
WUXGA1920×120016:10
OptionsFunction
AUTOTheprojectorwillautomaticallydeterminetheincomingsignalanddisplayitinitsaspectratio.
Theprojectormayerroneouslydeterminetheaspectratiodependingonitssignal.Ifthisoccurs,
selecttheappropriateaspectratiofromthefollowing.
4:3Theimageisdisplayedin4:3aspectratio.
5:4Theimageisdisplayedin5:4aspectratio
16:9Theimageisdisplayedin16:9aspectratio
15:9Theimageisdisplayedin15:9aspectratio
16:10Theimageisdisplayedin16:10aspectratio
NATIVETheprojectordisplaysthecurrentimageinitstrueresolutionwhentheincomingcomputersignal
hasalowerorhigherresolutionthantheprojector’snativeresolution.(→page
2)
Whentheincomingcomputersignalhasahigherresolutionthantheprojector'snativeresolution,
thecenterofanimagewillbedisplayed.
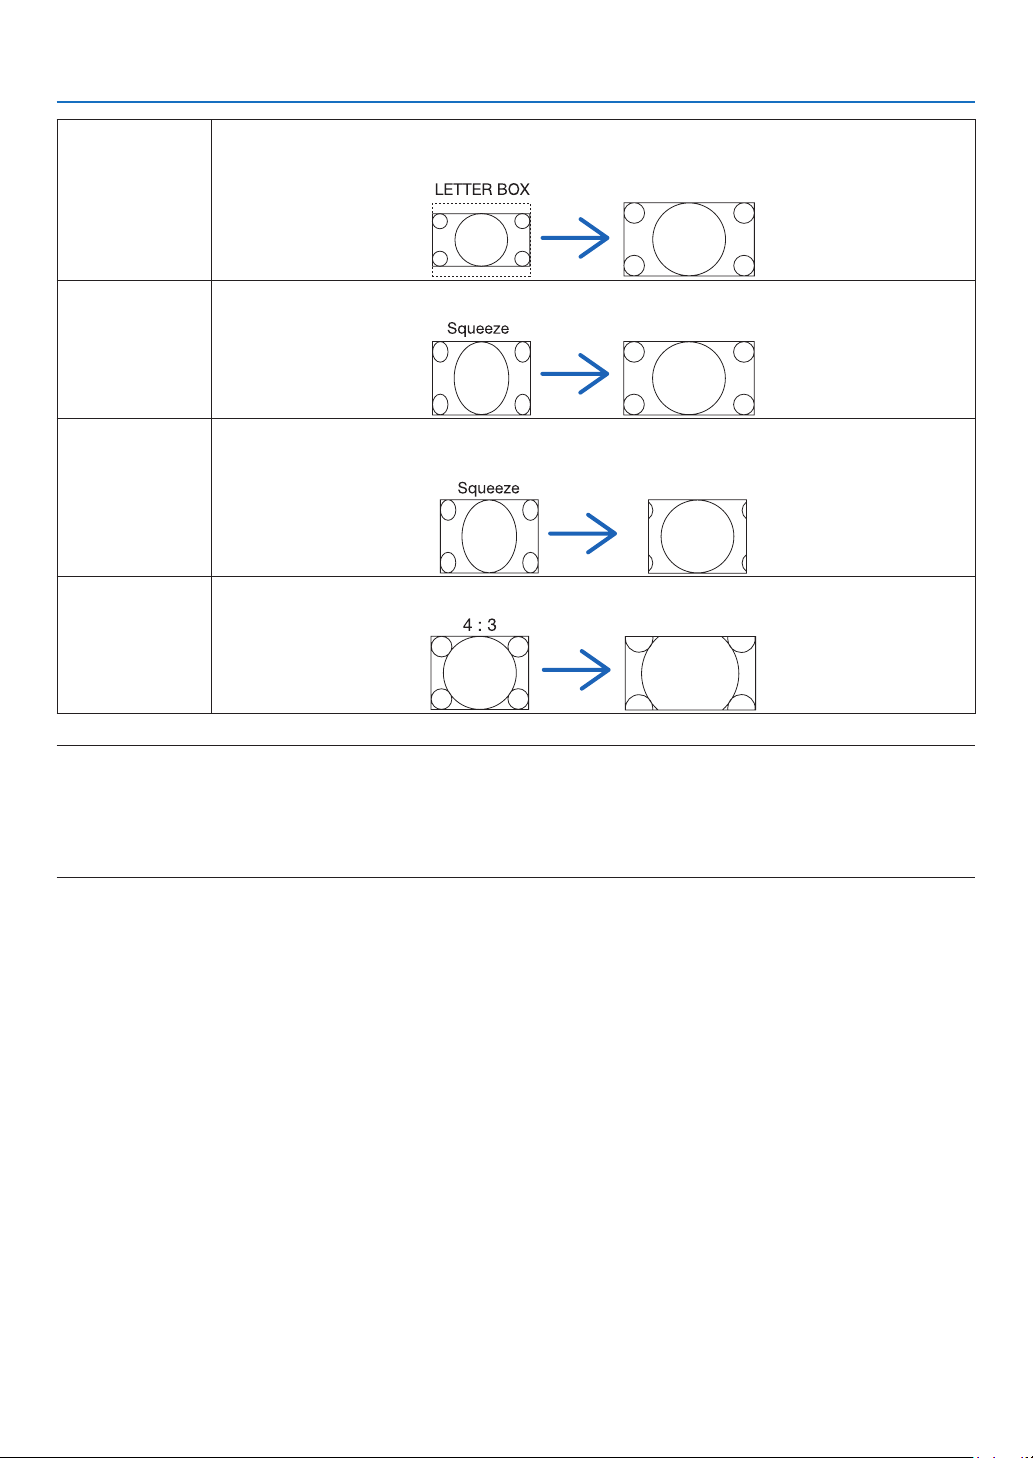
97
5. Using On-Screen Menu
LETTERBOXTheimageofaletterboxsignal(16:9)isstretchedequallyinthehorizontalandverticaldirections
totthescreen.
WIDESCREENTheimageofasqueezesignal(16:9)isstretchedleftandrightin16:9.
ZOOMTheimageofasqueezesignal(16:9)isstretchedleftandrightin4:3.
Partsofthedisplayedimagearecroppedattheleftandrightedgesandthereforenotvisible.
4:3FILLTheimageofasignal(4:3)isstretchedleftandrightin16:9.
TIP:
•Imagepositioncanbeadjustedverticallyusing[POSITION]whenthe[16:9],[15:9],or[16:10]aspectratiosareselected.
•Theterm“letterbox”referstoamorelandscape-orientedimagewhencomparedtoa4:3image,whichisthestandardaspect
ratioforavidesource.
Theletterboxsignalhasaspectratioswiththevistasize“1.85:1”orcinemascopesize“2.35:1”formovielm.
•Theterm“squeeze”referstothecompressedimageofwhichaspectratioisconvertedfrom16:9to4:3.
[RESOLUTION]
Thisfunctionsetstheresolutionofaprojectedimageifauto-detectfailstoworkwell.

98
5. Using On-Screen Menu
[VIDEO]
Using Noise Reduction [NOISE REDUCTION]
Thisfunctionisusedtoreducevideonoise.
RANDOM NR ......... Reduces flickering random noise in an image.
MOSQUITO NR ...... Reduces mosquito noise that appears around the edges of an image during DVD playback.
BLOCK NR ............. Reduces block noise or mosaic-like patterns by selecting ON.
Selecting Interlaced Progressive Conversion Process Mode [DEINTERLACE]
Thisfunctionallowsyoutoselectaninterlaced-to-progressiveconversionprocessforvideosignals.
AUTO ..................... Determines an appropriate interlaced-to-progressive conversion process automatically.
VIDEO .................... Applies a normal interlaced-to-progressive conversion process.
FILM ...................... Applies the automatic detection mode for telecine signals. This option is recommended for a movie pic-
ture.
NOTE:ThisfunctionisnotavailablewithRGBsignals.
TurningOnorOffthe3DDimensionalSeparation[3DY/CSEPARATION]
WhenprojectinganimagefromaVIDEOinput,settoONtoprojectthehighestqualityimage.
OFF ........................ Turns off the 3 dimensional separation feature.
ON ......................... Turns on the 3 dimensional separation feature.
NOTE:OnlyavailableforNTSC3.58videosignals.
[DETAIL ENHANCEMENT]
Thisfunctionenhancesthecontoursoftheimagewhenprojectingcomponentsignals.
[SIGNAL TYPE]
TheprojectorautomaticallyidentieswhethertheCOMPUTER1,COMPUTER2orCOMPUTER3*inputsignalsare
RGBorcomponentsignalstoprojecttheimage.Ifthecolorsareunnatural,however,tryswitchingthesetting.
*ForCOMPUTER3,thecomputersignalandvideosignalcanbeselectedatSIGNALSELECT(COMP3).
RGB ....................... Switches to the RGB input.
COMPONENT ......... Switches to the component signal input.

99
5. Using On-Screen Menu
[VIDEOLEVEL]
Thisfunctionselectsvideosignallevelwhentheprojector’sHDMIandDisplayPortinputconnectorsandanexternal
deviceareconnected.
AUTO ..................... The video level is switched automatically based on the information from the device outputting the signal.
Depending on the connected device, this setting may not be made properly. In this case, switch to “NORMAL”
or “ENHANCED” from the menu and view with the optimum setting.
NORMAL ................ This disables the enhanced mode.
ENHANCED ............ This improves the image’s contrast, expressing the dark and light sections more dynamically.
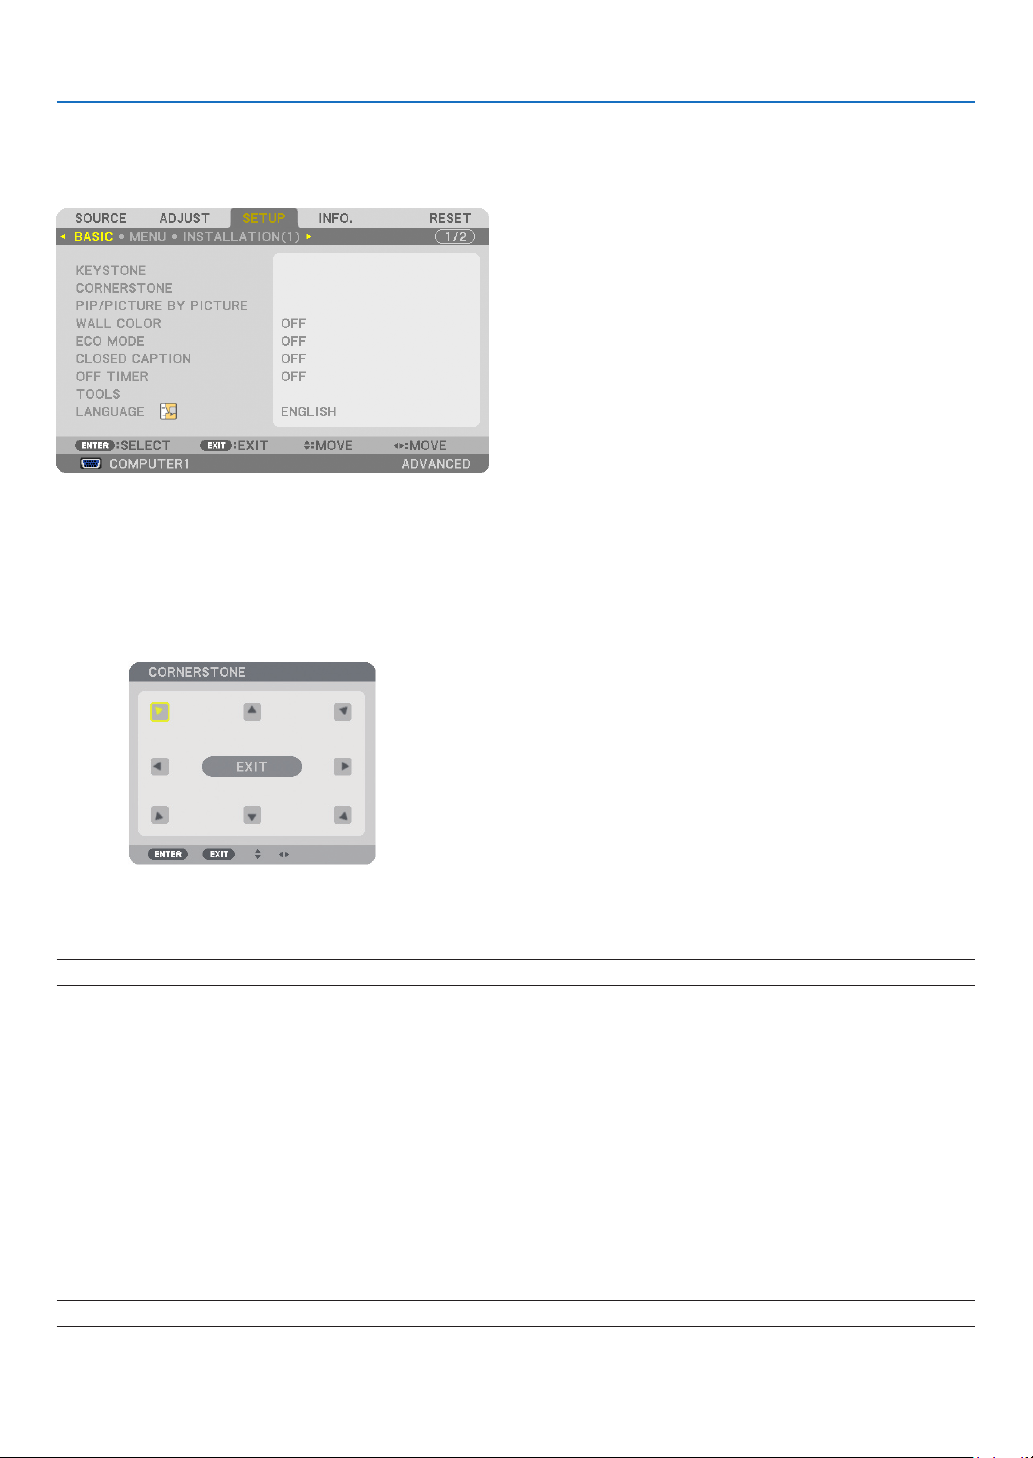
100
5. Using On-Screen Menu
Menu Descriptions & Functions [SETUP]
[BASIC]
CorrectingVerticalKeystoneDistortionManually[KEYSTONE]
Youcancorrectverticaldistortionmanually.(→page
22)
TIP:Whenthisoptionishighlighted,pressingtheENTERbuttonwilldisplayitsslidebarforadjustment.
Selecting Cornerstone Mode [CORNERSTONE]
Thisoptionallowsyoutocorrecttrapezoidaldistortion.
SelectingthisitemwilldisplaytheCornerstoneadjustmentscreen.(→page32)
NOTE:The[CORNERSTONE]itemisnotavailablewhen[KEYSTONE]or[GEOMETRICCORRECTION]isselected.
UsingthePIP/PICTUREBYPICTUREFunction[PIP/PICTUREBYPICTURE]
Thisfunctionallowsyoutoviewtwodifferentsignalssimultaneously.(→page
35)
MODE:
Thisoptionallowsyoutoselecttwomodes:PIPandPICTUREBYPICTURE.
PIP:Thisoptionallowsyoutoviewasubpictureinthemainpicture.
PICTUREBYPICTURE:Thisallowsyoutoviewtwopicturessidebyside.
POSITION:
When[PIP]isselectedfor[MODE],thisoptionallowsyoutoselectthepositionofasubpictureinthemainpic-
ture.
Theoptionsare:TOP-LEFT,TOP-RIGHT,BOTTOMLEFT,andBOTTOMRIGHT.
NOTE:The[POSITION]cannotbeselectedwhen[PICTUREBYPICTURE]isselected.
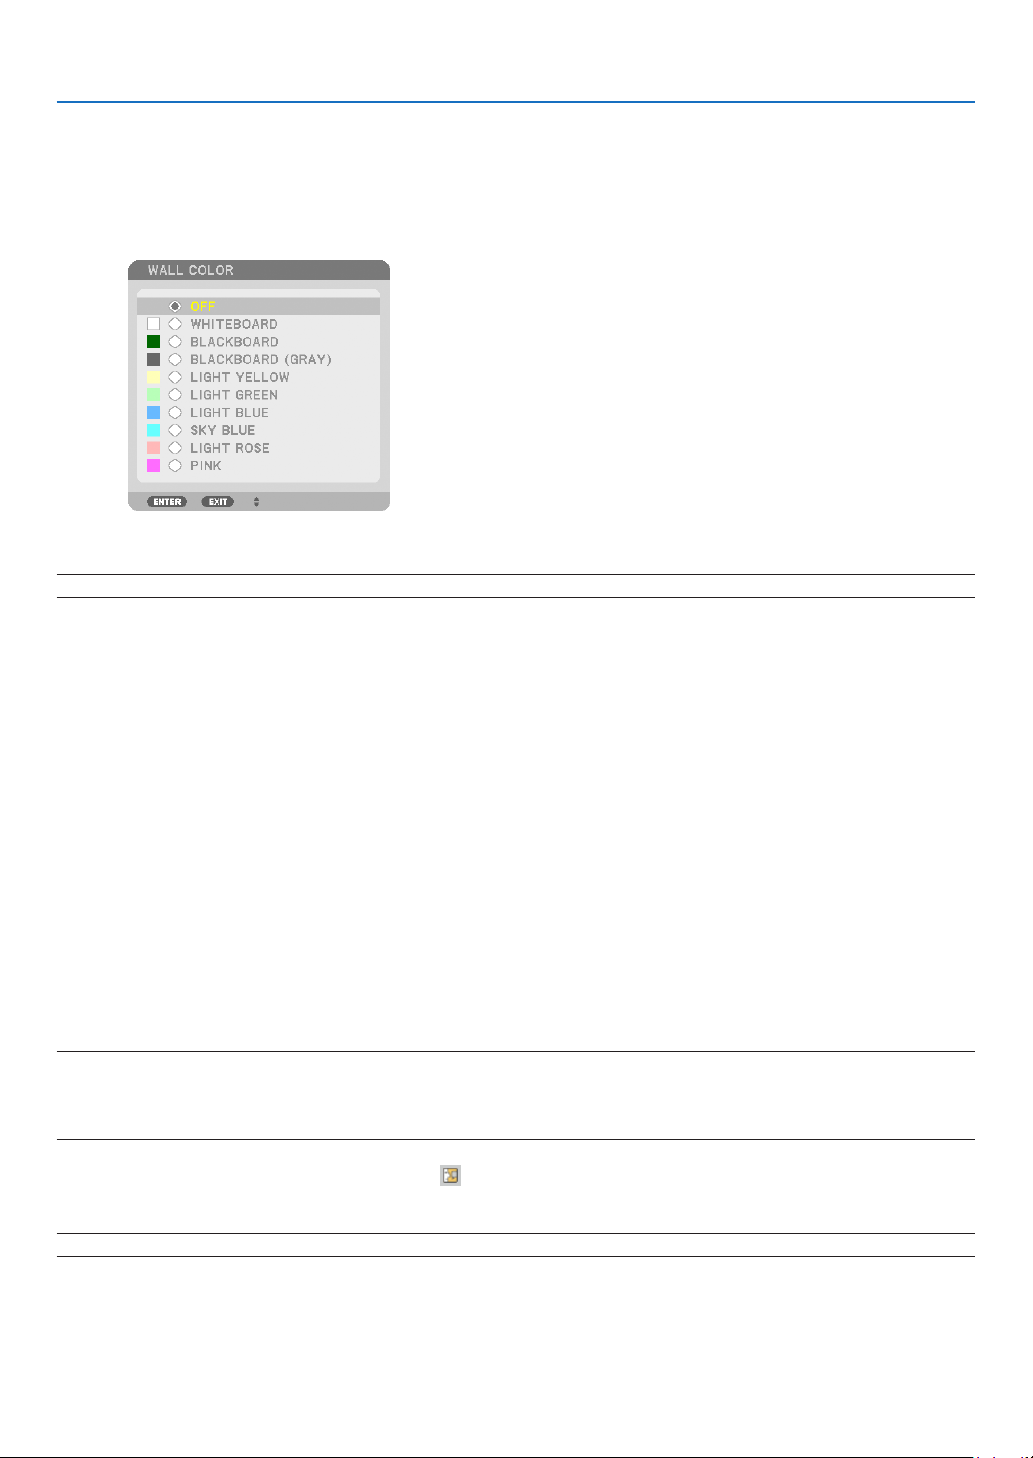
101
5. Using On-Screen Menu
SOURCE:
Thisoptionallowsyoutoselectasubpicturesignal.
Theoptionsare:OFF,VIDEOandS-VIDEO.
Selecting[OFF]willcancelthePIP/PICTUREBYPICTUREmodeandreturntothenormalscreen.
Using the Wall Color Correction [WALL COLOR]
Thisfunctionallowsforquickadaptivecolorcorrectioninapplicationswherethescreenmaterialisnotwhite.
NOTE:Selecting[WHITEBOARD]reduceslampbrightness.
Setting Eco Mode [ECO MODE]
TheECOMODEincreaseslamplife,whileloweringpowerconsumptionandcuttingdownonCO
2
emissions.
Twobrightnessmodesofthelampcanbeselected:[OFF]and[ON]modes.
(→page
28)
Setting Closed Caption [CLOSED CAPTION]
ThisoptionsetsseveralclosedcaptionmodesthatallowtexttobesuperimposedontheprojectedimageofVideo
orS-Video.
OFF ........................ This exits the closed caption mode.
CAPTION 1-4 ......... Text is superimposed.
TEXT 1-4 ................ Text is displayed.
Using Off Timer [OFF TIMER]
1. Select your desired time between 30 minutes and 16 hours: OFF, 0:30, 1:00, 2:00, 4:00, 8:00, 12:00, 16:00.
2. Press the ENTER button on the remote control.
3. The remaining time starts counting down.
4. The projector will turn off after the countdown is complete.
NOTE:
•Tocancelthepresettime,set[OFF]forthepresettimeorturnoffthepower.
•Whentheremainingtimereaches3minutesbeforetheprojectoristurnedoff,the[THEPROJECTORWILLTURNOFFWITHIN3
MINUTES]messagewillbedisplayedonthebottomofthescreen.
Selecting Menu Language [LANGUAGE]
Youcanchooseoneof27languagesforon-screeninstructions.
NOTE:Yoursettingwillnotbeaffectedevenwhen[RESET]isdonefromthemenu.
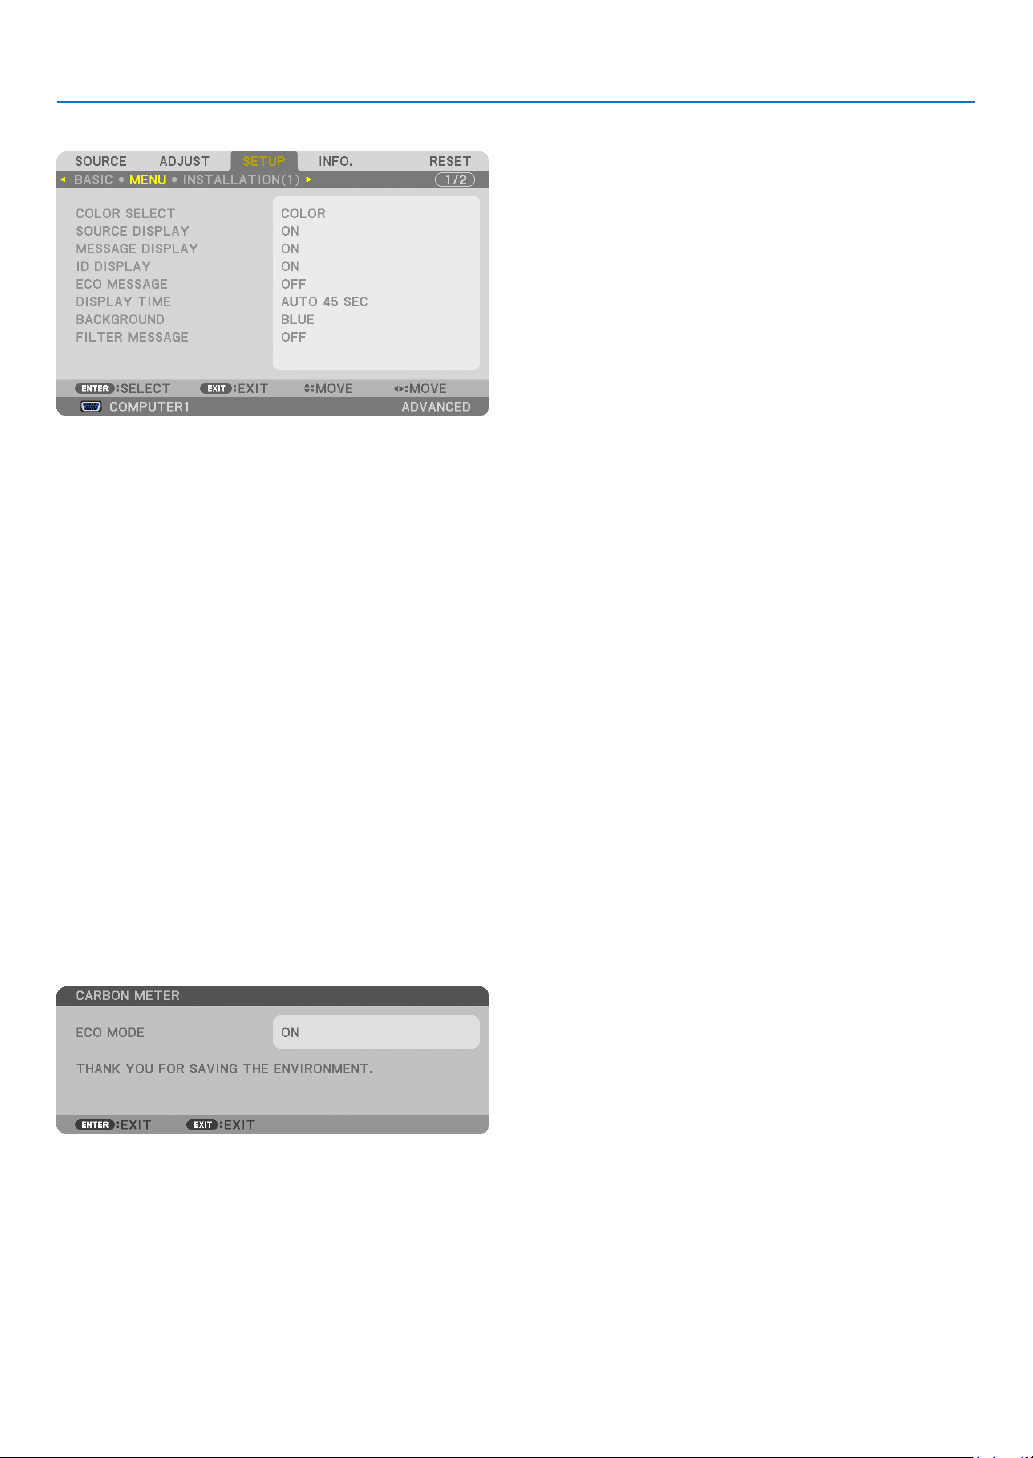
102
5. Using On-Screen Menu
[MENU]
Selecting Menu Color [COLOR SELECT]
Youcanchoosebetweentwooptionsformenucolor:COLORandMONOCHROME.
TurningOn/OffSourceDisplay[SOURCEDISPLAY]
ThisoptionturnsonoroffinputnamedisplaysuchasCOMPUTER1,COMPUTER2,COMPUTER3,HDMI,Display-
Port,VIDEO,S-VIDEO,VIEWER,NETWORKtobedisplayedonthetoprightofthescreen.
Turning messages on and off [MESSAGE DISPLAY]
Thisoptionselectswhetherornottodisplayprojectormessagesatthebottomoftheprojectedimage.
Evenwhen“OFF”isselected,thesecuritylockwarningisdisplayed.Thesecuritylockwarningturnsoffwhenthe
securitylockiscanceled.
TurningON/OFFControlID[IDDISPLAY]
ID DISPLAY ........... This option turns on or off the ID number which is displayed when the ID SET button on the remote control
is pressed. (→ page
106)
TurningOn/OffEcoMessage[ECOMESSAGE]
Thisoptionturnsonoroffthefollowingmessageswhentheprojectoristurnedon.
TheEcoMessagepromptstheusertosaveenergy.When[OFF]isselectedfor[ECOMODE],youwillgetamessage
topromptyoutoselect[ON]for[ECOMODE].
When[ON]isselectedfor[ECOMODE]
Toclosethemessage,pressanyoneofthebuttons.Themessagewilldisappearifnobuttonoperationisdonefor
30seconds.
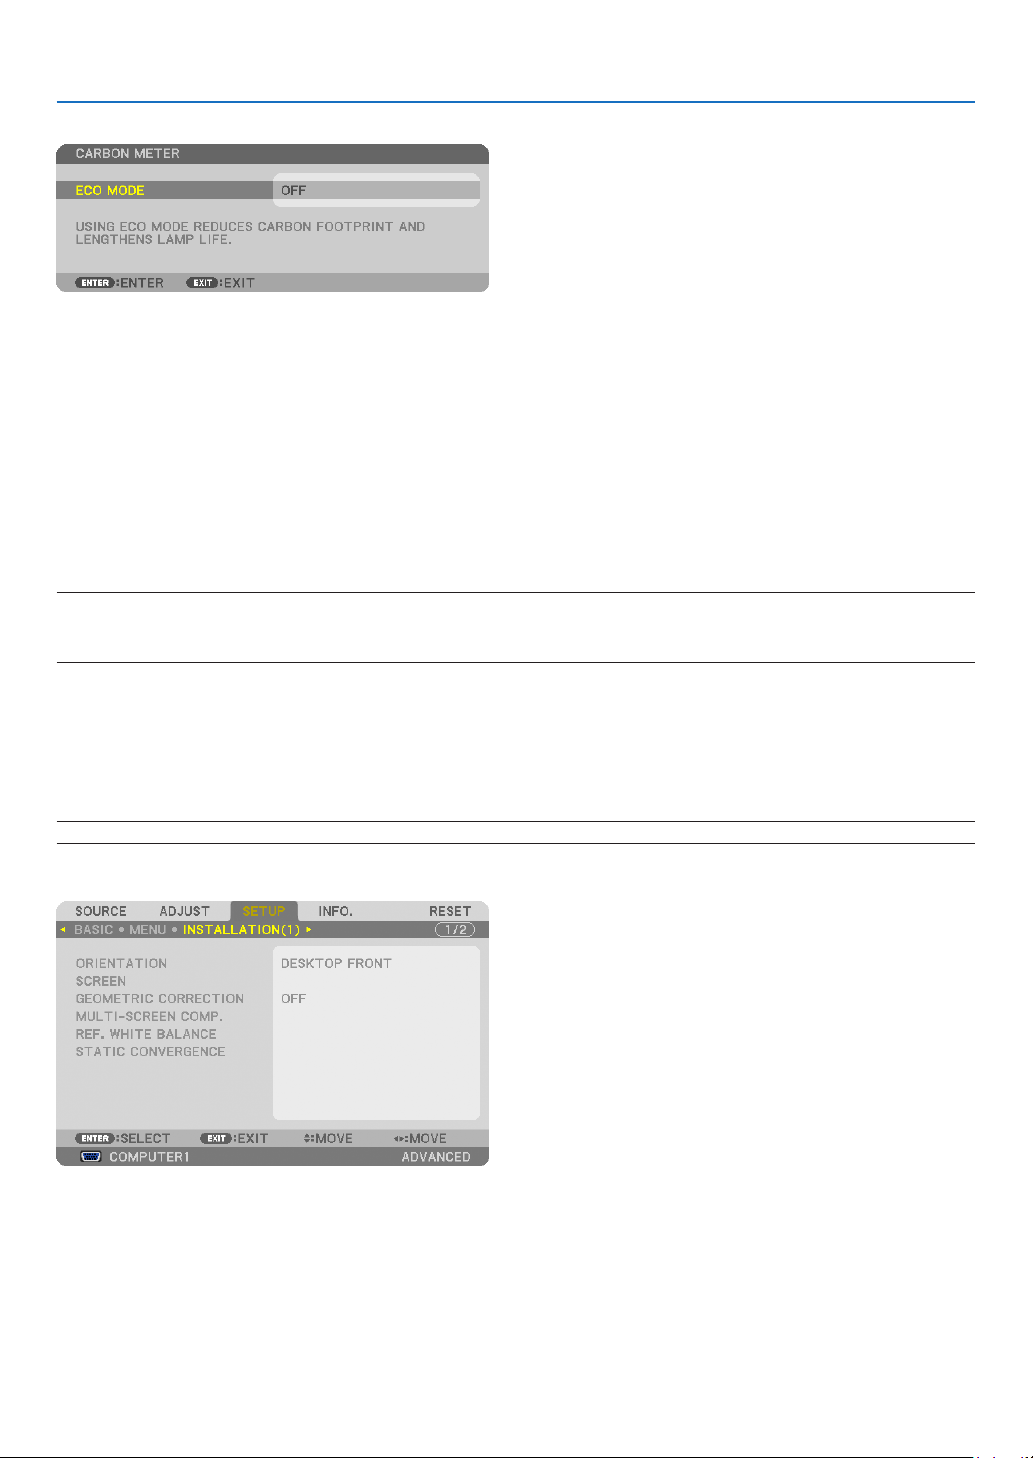
103
5. Using On-Screen Menu
When[OFF]isselectedfor[ECOMODE]
PressingtheENTERbuttonwilldisplaythe[ECOMODE]screen.(→page28)
Toclosethemessage,presstheEXITbutton.
Selecting Menu Display Time [DISPLAY TIME]
Thisoptionallowsyoutoselecthowlongtheprojectorwaitsafterthelasttouchofabuttontoturnoffthemenu.The
presetchoicesare[MANUAL],[AUTO5SEC],[AUTO15SEC],and[AUTO45SEC].The[AUTO45SEC]isthefac-
torypreset.
SelectingaColororLogoforBackground[BACKGROUND]
Usethisfeaturetodisplayablue/blackscreenorlogowhennosignalisavailable.Thedefaultbackgroundis
[BLUE].
NOTE:
•Evenwhenthebackgroundlogoisselected,iftwopicturesaredisplayedin[PIP/PICTUREBYPICTURE]mode,thebluebackground
isdisplayedwithoutthelogowhenthereisnosignal.
Selecting Interval Time for Filter Message [FILTER MESSAGE]
Thisoptionallowsyoutoselectthetimepreferencebetweendisplayingthemessageforcleaningthelters.Clean
thelterwhenyougetthemessage“PLEASECLEANFILTER.”(→page
155)
Fiveoptionsareavailable:OFF,100[H],500[H],1000[H],2000[H]
Thedefaultsettingis[OFF].
NOTE:Yoursettingwillnotbeaffectedevenwhen[RESET]isdonefromthemenu.
[INSTALLATION(1)]
SelectingProjectorOrientation[ORIENTATION]
Thisreorientsyourimageforyourtypeofprojection.Theoptionsare:desktopfrontprojection,ceilingrearprojection,
desktoprearprojection,andceilingfrontprojection.
Thisprojectorisafree-tiltprojectorwithwhichitispossibletoprojectimagesontheceiling(upward)oroor(downward).
Wheninstalledintheverticaldirection,setthe[FANMODE]installationorientation.(→page
108)
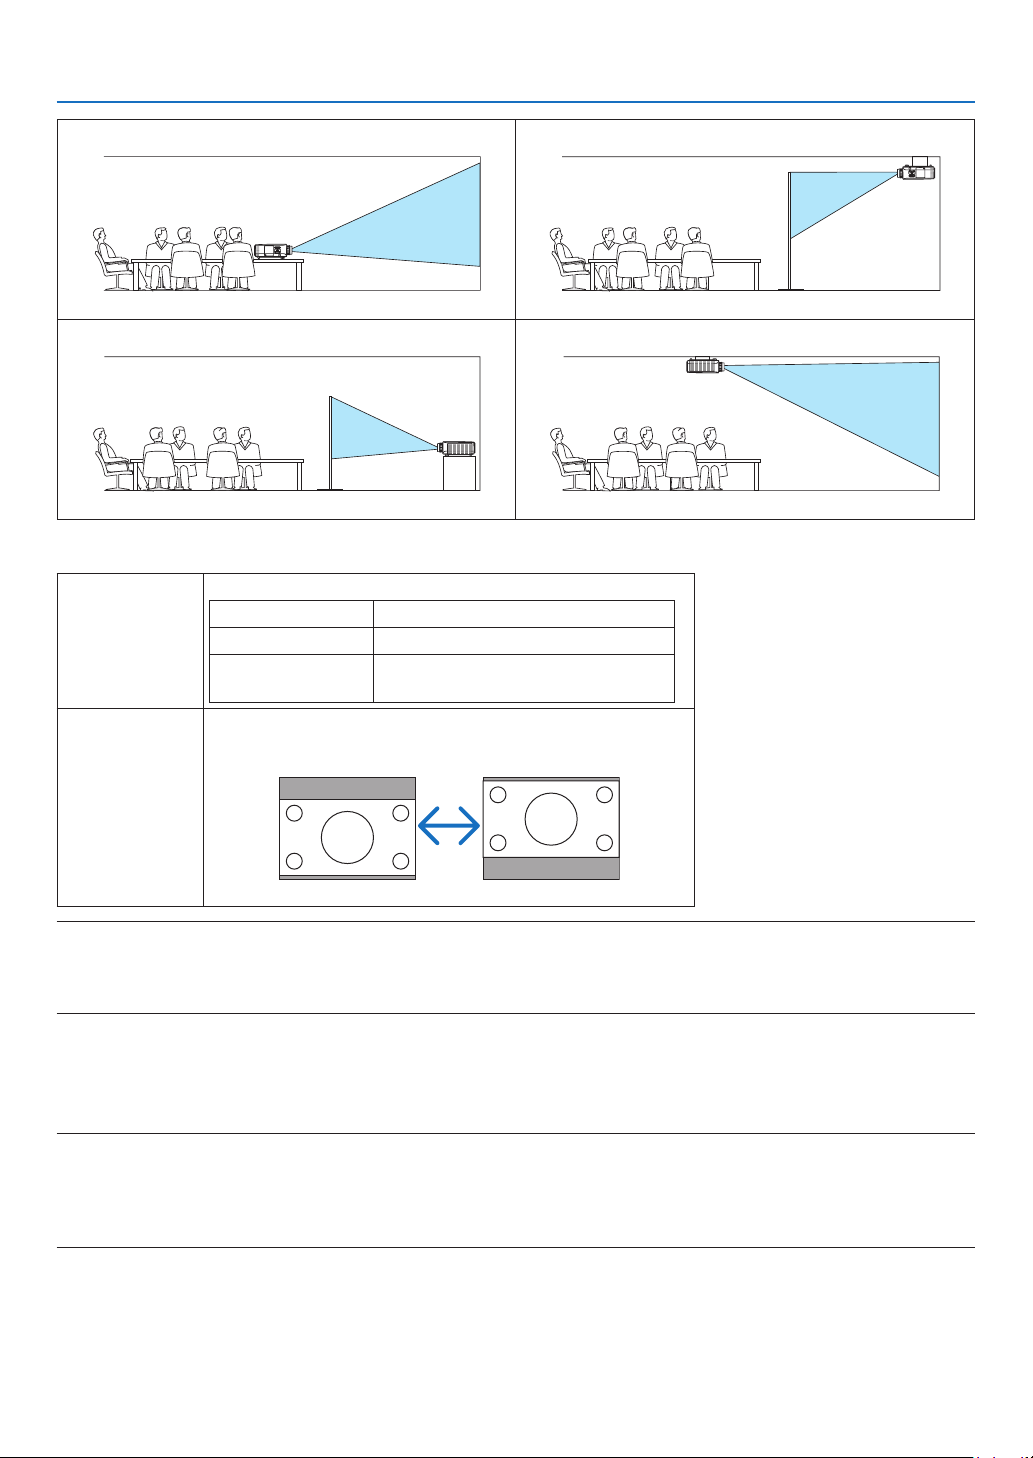
104
5. Using On-Screen Menu
DESKTOPFRONT
CEILINGREAR
DESKTOPREAR
CEILINGFRONT
Selecting Aspect Ratio and Position for Screen [SCREEN]
ScreentypeSetstheaspectratiooftheprojectionscreen.
4:3screenForascreenwitha4:3aspectratio
16:9screenForascreenwitha16:9aspectratio
16:10screenForascreenwitha16:10aspect
ratio
DisplaypositionWhenthescreentypeissetto16:9or16:10,adjuststhe
verticalpositionofthedisplayrange.
Downward
Upward
NOTE:
•Afterchangingthescreentype,checkthesettingof[ASPECTRATIO]inthemenu.
(→page96)
•Whenthescreentypeissetto“4:3screen”,thisisdisplayedinlightcharactersandcannotbeselected.
Using Geometric Correction [GEOMETRIC CORRECTION]
Thisfeatureretrievesgeometricdataregisteredintheprojectormemory.
Threepresetsofgeometricdatahavebeenregistered.Toturnoffthisfeature,select[OFF].
NOTE:
•The[KEYSTONE]and[CORNERSTONE]adjustmentsarenotavailablewhengeometricdataisapplied.
•Toclearyourgeometricdata,presstheGEOMETRIC.buttonforaminimumof2seconds.
•The[GEOMETRICCORRECTION]featurecancauseanimagetobeslightlyblurredbecausethecorrectionismadeelectroni-
cally.
Using Multi-Screen Compensation [MULTI-SCREEN COMP.]
Thisfeatureallowsyoutomatchhueofimagesprojectedfrommultipleprojectorsthatareplacedinparallel.
MODE .................... OFF: Turns off this function to return to the normal brightness.

105
5. Using On-Screen Menu
ON: Turns on this function to make the screen darker. The [BRIGHTNESS] and the [CONTRAST] can be
adjusted.
CONTRAST ............ Adjusts the bright part of the picture.
BRIGHTNESS ......... Adjusts the dark part of the picture.
Adjusting
1. Prepare black and white images so that the images can be displayed on the computer screen.
2. Display the black image on the computer screen, and project the image from the projector.
3. Select [MULTI-SCREEN COMP.]
→ [MODE] → [ON].
4. Adjust the dark part of the images.
Press the
button to select [BRIGHTNESS] and use the or to match the black part of another projector.
5. Display the white screen on the computer screen.
Project the image from two or more projectors.
6. Adjust the bright part of the images.
Press the
button to select [CONTRAST] and use the or to match the white part of another projector.
Moving the slide bar toward [+] (plus) can change the white part of the image. Should this happen, move the
slide bar toward [−] (minus) to adjust the brightness.
TIP:
•Whenyouusemultipleprojectors,youcanusethe[CONTROLID]functiontooperateasingleprojectororalltheprojectorsfrom
theremotecontrol.(→page106)
•Yoursettingwillnotbeaffectedevenwhen[RESET]isdonefromthemenu.
[REF. WHITE BALANCE]
Thisfeatureallowsyoutoadjustthewhitebalanceforallsignals.
Thewhiteandblacklevelsofthesignalareadjustedforoptimumcolorreproduction.
Uniformityisalsoadjustedwhentheredness(R)andblueness(B)ofthewhitecolorinthescreen’shorizontal(left/
right)directionareuneven.
BRIGHTNESS R/BRIGHTNESS G/BRIGHTNESS B
.............................. These adjust the picture’s black color.
CONTRAST R/CONTRAST G/CONTRAST B
.............................. These adjust the picture’s white color.
UNIFORMITY R ...... The further this is set to the + side, the stronger the redness on the left side of the picture (increasing
towards the left edge) and the weaker the redness on the right side of the picture (decreasing towards the
right edge).
This is reversed when set to the – side.
UNIFORMITY B ...... The further this is set to the + side, the stronger the blueness on the left side of the picture (increasing
towards the left edge) and the weaker the blueness on the right side of the picture (decreasing towards the
right edge).
This is reversed when set to the – side.
[STATICCONVERGENCE]
Thisfeaturesallowsyoutoadjustforcolordeviationinthepicture.
Thiscanbeadjustedinunitsof±1pixelinthehorizontaldirectionforHORIZONTALR,GandB,intheverticaldirec-
tionforVERTICALR,GandB.
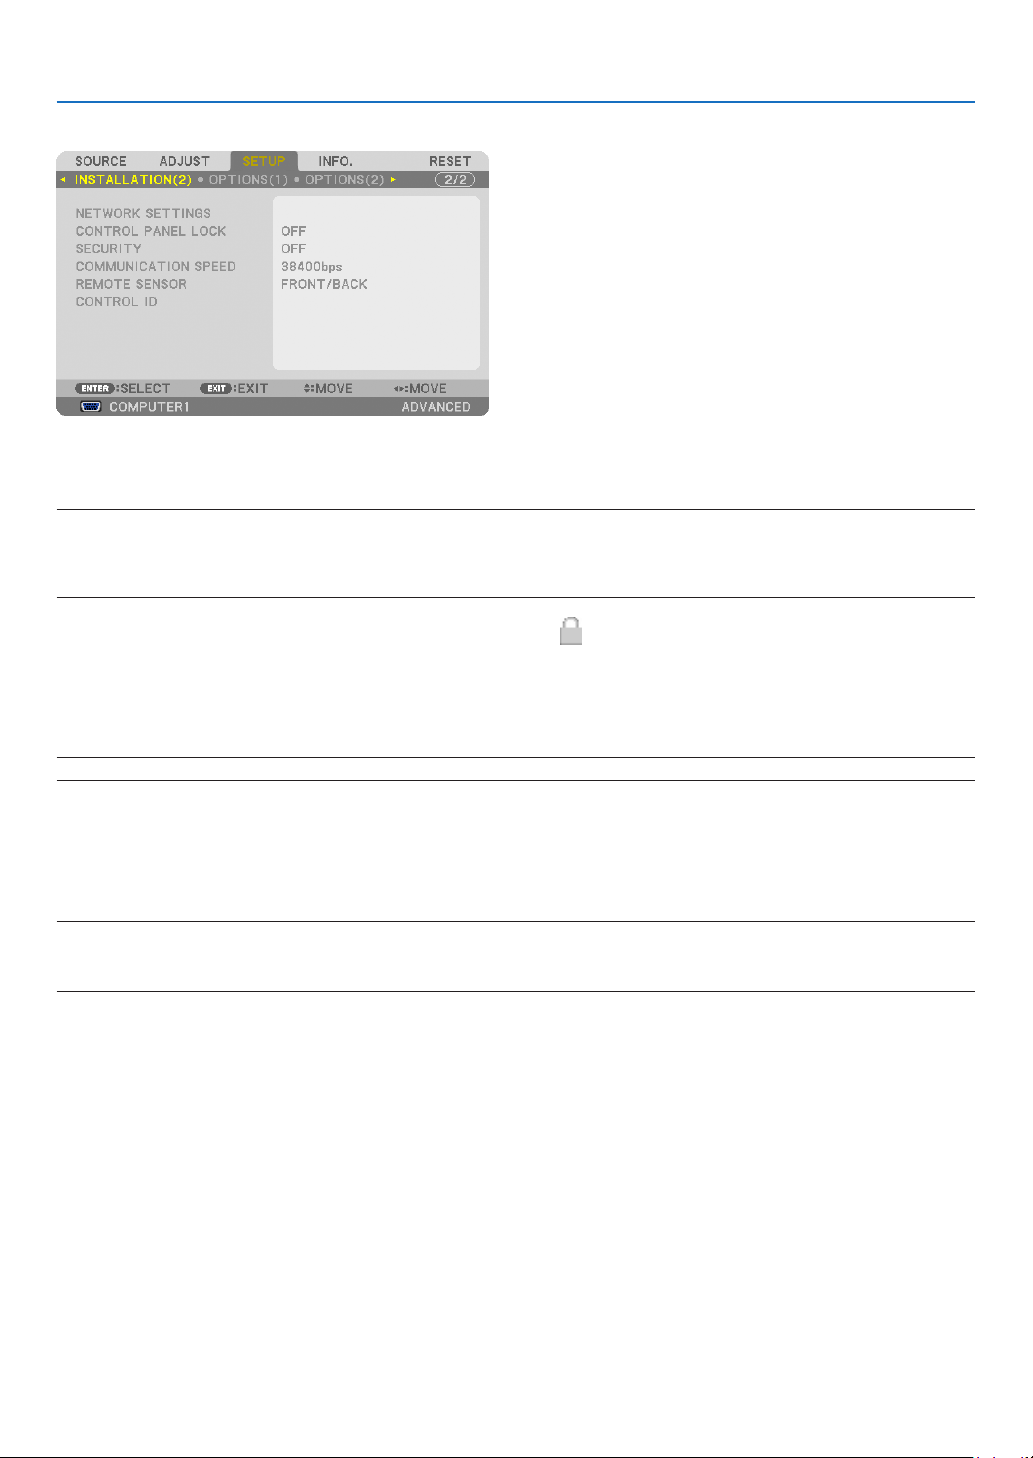
106
5. Using On-Screen Menu
[INSTALLATION(2)]
DisablingtheCabinetButtons[CONTROLPANELLOCK]
ThisoptionturnsonorofftheCONTROLPANELLOCKfunction.
NOTE:
•ThisCONTROLPANELLOCKdoesnotaffecttheremotecontrolfunctions.
•Whenthecontrolpanelislocked,pressingandholdingtheEXITbuttonontheprojectorcabinetforabout10secondswillchange
thesettingto[OFF].
TIP:Whenthe[CONTROLPANELLOCK]isturnedon,akeylockicon[]willbedisplayedatthebottomrightofthemenu.
EnablingSecurity[SECURITY]
ThisfeatureturnsonorofftheSECURITYfunction.
Unlessthecorrectkeywordisentered,theprojectorcannotprojectanimage.(→page
37)
NOTE:Yoursettingwillnotbeaffectedevenwhen[RESET]isdonefromthemenu.
Selecting Communication Speed [COMMUNICATION SPEED]
ThisfeaturesetsthebaudrateofthePCControlport(D-Sub9P).Itsupportsdataratesfrom4800to115200bps.
Thedefaultis38400bps.Selecttheappropriatebaudrateforyourequipmenttobeconnected(dependingonthe
equipment,alowerbaudratemayberecommendedforlongcableruns).
NOTE:
•Select[38400bps]orlesswhenusingthesuppliedsoftwareprograms.
•Yourselectedcommunicationspeedwillnotbeaffectedevenwhen[RESET]isdonefromthemenu.
Turning On or Off Remote Sensor [REMOTE SENSOR]
Thisoptiondetermineswhichremotesensorontheprojectorisenabledinwirelessmode.
Theoptionsare:FRONT/BACK,FRONT,andBACK.
Iftheremotecontrolsystemdoesnotfunctionwhendirectsunlightor
strongilluminationstrikestheremotecontrolsensoroftheprojector,changeanotheroption.
SettingIDtotheProjector[CONTROLID]
YoucanoperatemultipleprojectorsseparatelyandindependentlywiththesingleremotecontrolthathastheCONTROL
IDfunction.IfyouassignthesameIDtoalltheprojectors,youcanconvenientlyoperatealltheprojectorstogether
usingthesingleremotecontrol.Todoso,youhavetoassignanIDnumbertoeachprojector.
CONTROL ID NUMBER .......Select a number from 1 to 254 you wish to assign to your projector.
CONTROL ID .......................Select [OFF] to turn off the CONTROL ID setting and select [ON] to turn on the CONTROL ID set-
ting.
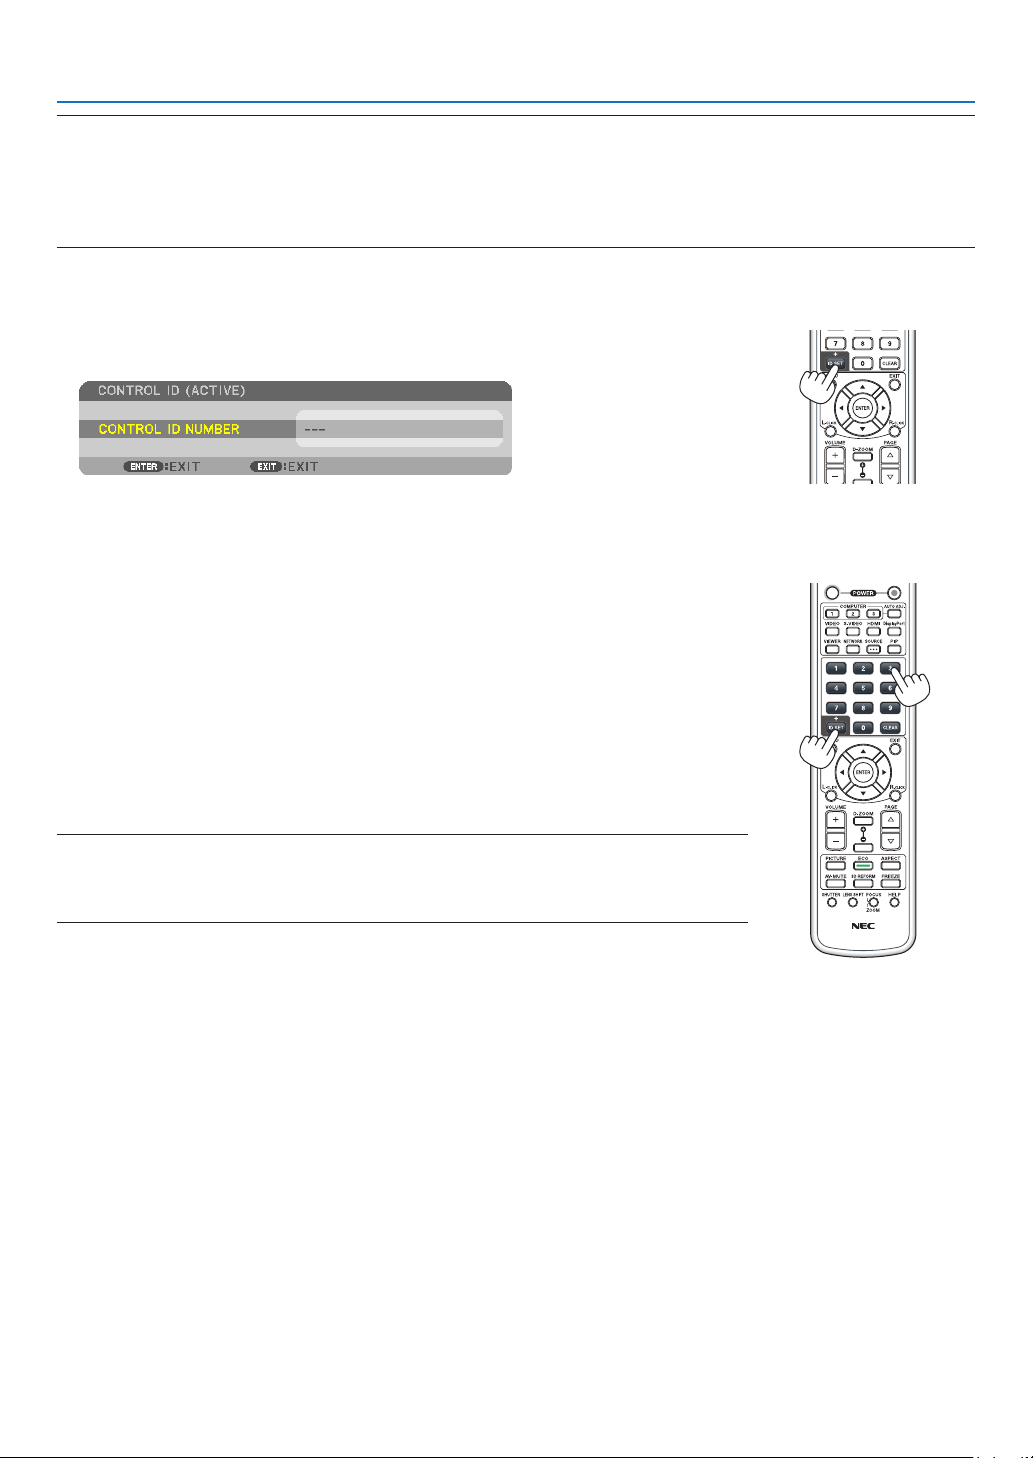
107
5. Using On-Screen Menu
NOTE:
•When[ON]isselectedfor[CONTROLID],theprojectorcannotbeoperatedbyusingtheremotecontrolthatdoesnotsupport
theCONTROLIDfunction.(Inthiscasethebuttonsontheprojectorcabinetcanbeused.)
•Yoursettingwillnotbeaffectedevenwhen[RESET]isdonefromthemenu.
•PressingandholdingtheENTERbuttonontheprojectorcabinetfor10secondswilldisplaythemenuforcancelingtheControl
ID.
Assigning or Changing the Control ID
1. Turn on the projector.
2. Press the ID SET button on the remote control.
The CONTROL ID screen will be displayed.
If the projector can be operated with the current remote control ID, the [ACTIVE]
will be displayed. If the projector cannot be operated with the current remote control
ID, the [INACTIVE] will be displayed. To operate the inactive projector, assign the
control ID used for the projector by using the following procedure (Step 3).
3. Press one of numeric keypad buttons while pressing and holding the ID SET
button on the remote control.
Example:
To assign “3”, press the “3” button on the remote control.
No ID means that all the projectors can be operated together with a single remote
control. To set “No ID”, enter “000” or press the CLEAR button.
TIP:TherangeofIDsisfrom1to254.
4. Release the ID SET button.
The updated CONTROL ID screen will be displayed.
NOTE:
•TheIDscanbeclearedinafewdaysafterthebatteriesarerundownorremoved.
•Accidentallypressinganyoneofthebuttonsoftheremotecontrolwillclearcurrentlyspecied
IDwithbatteriesremoved.
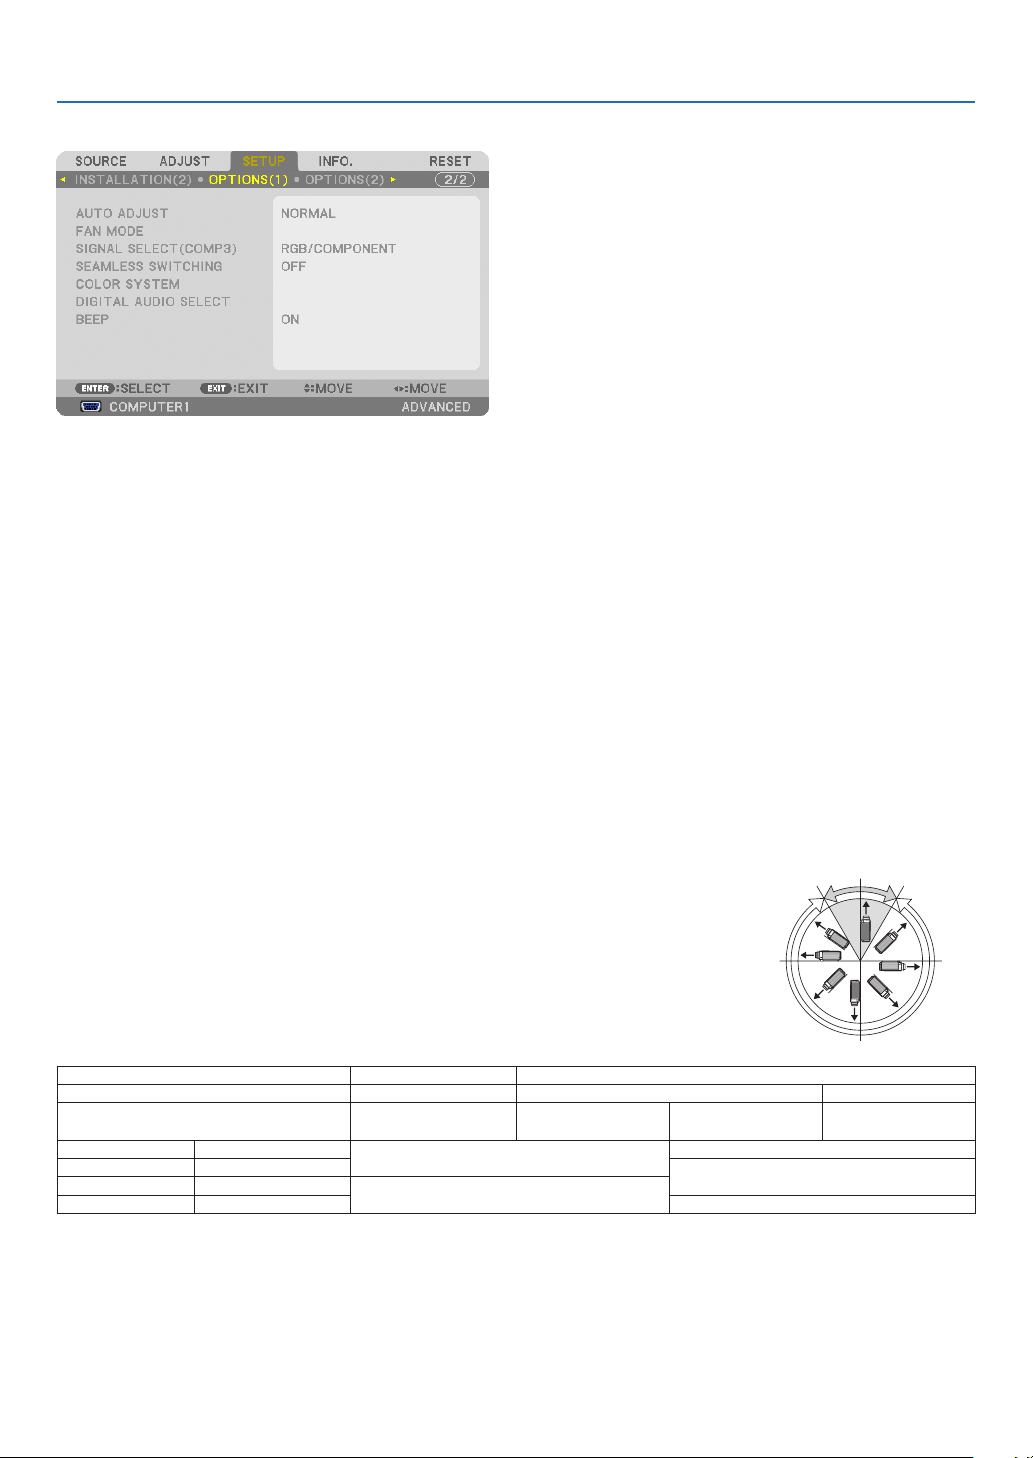
108
5. Using On-Screen Menu
[OPTIONS(1)]
SettingAutoAdjust[AUTOADJUST]
ThisfeaturesetstheAutoAdjustmodesothatthecomputersignalcanbeautomaticallyormanuallyadjustedfor
noiseandstability.Youcanautomaticallymakeadjustmentintwoways:[NORMAL]and[FINE].
OFF ........................ The computer signal will not be automatically adjusted. You can manually optimize the computer signal.
NORMAL ................ Default setting. The computer signal will be automatically adjusted. Normally select this option.
FINE ....................... Select this option if fine adjustment is needed. It takes more time to switch to the source than when [NOR-
MAL]is selected.
Selecting Fan Mode [FAN MODE]
FanModeisusedtosetthespeedoftheinternalcoolingfan.
MODE .................... Select three modes for fan speed: AUTO, HIGH, and HIGH ALTITUDE.
AUTO: The built-in fans automatically run at a variable speed according to the internal temperature.
HIGH: The built-in fans run at high speed
HIGH ALTITUDE: The built-in fans run at a high speed. Select this option when using the projector at altitudes
approximately 5500 feet/1600 meters or higher. To use the projector with ECO MODE ON in other installed
conditions than desktop/ceiling with +/-20°, heed the following:
(1) Select [HIGH ALTITUDE] for [MODE] at altitude 3200 feet/1000 meters.
(2) Select [OFF] for [ECO MODE] at altitude 6800 feet/2100 meters or higher.
SETTING ................ Select either [NORMAL] or [VERTICAL TILT UP] according to the installa-
tion angle of the projector. Select [VERTICAL TILT UP] for angles of range
from 60° to 120° indicated in gray. Select [NORMAL] for the other angle
ranges.
RestrictionsforusingtheprojectorinECOMODEathighaltitudes:
Theprojectorshouldnotbeinstalledinanywayotherthanthesettingdescribedinthe
table,otherwiselamplifecoulddecreasedramatically.
ECO MODE OFF ON
SETTING NORMAL/VERTICAL TILT UP NORMAL VERTICAL TILT UP
Orientation All orientations
DESKTOP/CEILING
+/− 20°
DESKTOP/CEILING other
than +/− 20°
Upward 90°(+/− 30°)
1000 m or lower 3200 ft or lower
AUTO
AUTO
1000 to 1600 m 3200 to 5200 ft
HIGH ALTITUDE
1600 to 2100 m 5200 to 6800 ft
HIGH ALTITUDE
2100 to 2600 m 6800 to 8500 ft Not available
Whenyouwishtocooldownthetemperatureinsidetheprojectorquickly,select[HIGH].
90°
120°
180°
270°
60°
0°

109
5. Using On-Screen Menu
NOTE:
•When[HIGHALTITUDE]isselectedfor[FANMODE],asymboliconwillbedisplayedatthebottomofthemenu.
•ItisrecommendedthatyouselectHighspeedmodeifyouusetheprojectornon-stopforconsecutivedays.
•Set[FANMODE]to[HIGHALTITUDE]whenusingtheprojectorataltitudesapproximately5500feet/1600metersorhigher.
•Usingtheprojectorataltitudesapproximately5500feet/1600metersorhigherwithoutsettingto[HIGHALTITUDE]cancause
theprojectortooverheatandtheprotectorcouldshutdown.Ifthishappens,waitacoupleminutesandturnontheprojector.
•Usingtheprojectorataltitudeslessthanapproximately5500feet/1600metersandsettingto[HIGHALTITUDE]cancausethe
lamptoovercool,causingtheimagetoicker.Switch[FANMODE]to[AUTO].
•Usingtheprojectorataltitudesapproximately5500feet/1600metersorhighercanshortenthelifeofopticalcomponentssuch
asthelamp.
•Yoursettingwillnotbeaffectedevenwhen[RESET]isdonefromthemenu.
SelectingtheSignalFormat[SIGNALSELECT(COMP3)]
WhenanoutputdeviceisconnectedtotheCOMPUTER3videoinputconnectors,thissetstheinputsignal.
RGB/COMPONENT . RGB and component signals are identified automatically.
VIDEO .................... This switches to the video signal.
NOTE:Whenavideocable(commerciallyavailable)isconnectedtotheCOMPUTER3videoinputconnectors’G/Yconnector,video
signalscanbeprojected.Inthiscase,setto“VIDEO”.
[SEAMLESS SWITCHING]
Whentheinputconnectorisswitched,theimagedisplayedbeforeswitchingisheldtoswitchtothenewimagewithout
abreakduetoabsenceofasignal.
[COLOR SYSTEM]
ThisfeatureallowsyoutoselecttheTVvideosignal,whichdiffersfromcountrytocountry(NTSC,PAL,etc.).
Thisissetto[AUTO]byfactorydefault.Setthisiftheprojectorcannotidentifythesignalautomatically.
[DIGITAL AUDIO SELECT]
Thisfeatureallowsyoutoselecttheaudioinputsfortheprojector’sHDMIandDisplayPortinputconnectors.
HDMI ..................... HDMI: Selects the HDMI input connector’s digital audio.
COMPUTER2: Selects the COMPUTER2 audio input connector.
DisplayPort ............ DisplayPort: Selects the DisplayPort input connector’s digital audio.
COMPUTER2: Selects the COMPUTER2 audio input connector.
EnablingKeySoundandErrorSound[BEEP]
Thisfeatureturnsonoroffthebuttonsoundoralarmwhenanerroroccursorthefollowingoperationsareper-
formed.
-Displayingthemainmenu
-Switchingsources
-Resettingdatabyusing[RESET]
-PressingPOWERONorPOWEROFFbutton

110
5. Using On-Screen Menu
[OPTIONS(2)]
Selecting Power-saving in [STANDBY MODE]
Theprojectorhasthreestandbymodes:[NORMAL],[POWER-SAVING]and[NETWORKSTANDBY].
ThePOWER-SAVINGmodeisthemodethatallowsyoutoputtheprojectorinthepower-savingconditionwhich
consumeslesspowerthantheNORMALmode.TheprojectorispresetforNORMALmodeatthefactory.
NORMAL .............................Power indicator: Orange light/STATUS indicator: Green light
POWER-SAVING .................Power indicator: Red light/STATUS indicator: Off
The following connectors, buttons or functions will not work during this mode.
- MONITOR OUT (COMP. 1) connector, and AUDIO OUT connector
- LAN and Mail Alert functions
- Buttons other than POWER button on the cabinet
- Buttons other than POWER ON button on the remote control
- Virtual Remote Tool fucntion
NETWORK STANDBY ..........When in the standby mode, the POWER indicator will light orange and the STATUS indicator will
not light. This shows that the projector’s power can be turned on by wired LAN.
When in the standby mode, the following connectors, buttons or functions will not work:
- MONITOR OUT (COMP. 1) connector, and AUDIO OUT mini jack
- Wireless LAN Unit
- [AUTO POWER ON (COMP1/3)]
- Buttons other than POWER button on the cabinet
- Buttons other than POWER ON button on the remote control
- PC control commands for other than power-on
Important:
•When[CONTROLPANELLOCK]or[CONTROLID]isturnedon,orwhen[COMPUTER1]or[COMPUTER3]isselectedfor[AUTO
POWERON(COMP1/3)],the[STANDBYMODE]settingbecomesinvalid.
Thismeansthattheprojectorisinthesameconditionwhenthe[NORMAL]isselectedfor[STANDBYMODE].
NOTE:
•Evenwhen[POWER-SAVING]isselectedfor[STANDBYMODE],poweronoroffcanbedonebyusingthePCCONTROLport.
•ThepowerconsumptioninthestandbymodewillnotbeincludedincalculatingCO
2
emissionreduction.
•Yoursettingwillnotbeaffectedevenwhen[RESET]isdonefromthemenu.
EnablingDirectPowerOn[DIRECTPOWERON]
Turnstheprojectoronautomaticallywhenthepowercordisinsertedintoanactivepoweroutlet.Thiseliminatesthe
needtoalwaysusethePOWERbuttonontheremotecontrolorprojectorcabinet.

111
5. Using On-Screen Menu
TurningOntheProjectorByApplyingComputerSignal[AUTOPOWERON(COMP1/3)]
WhentheprojectorisinStandbymode,applyingacomputersignalfromacomputerconnectedtotheCOMPUTER1
INorCOMPUTER3INinputwillpowerontheprojectorandsimultaneouslyprojectthecomputer’simage.
ThisfunctionalityeliminatestheneedtoalwaysusethePOWERbuttonontheremotecontrolortheprojectorcabinet
topowerontheprojector.
Tousethisfunction,rstconnectacomputertotheprojectorandtheprojectortoanactiveACinput.
NOTE:
•Disconnectingacomputersignalfromthecomputerwillnotpowerofftheprojector.Werecommendusingthisfunctionincom
-
binationoftheAUTOPOWEROFFfunction.
•Thisfunctionwillnotbeavailableunderthefollowingconditions:
-whenacomponentsignalisappliedtotheCOMPUTER1INorCOMPUTER3INconnector
-whenaSynconGreenRGBsignalorcompositesyncsignalisapplied
•When[AUTOPOWERON(COMP1/3]isset,the[STANDBYMODE]settingbecomesinvalid. Thismeansthattheprojectorisin
thesameconditionwhenthe[NORMAL]isselectedfor[STANDBYMODE].
•ToenabletheAUTOPOWERON(COMP1/3)afterturningofftheprojector,wait3secondsandinputacomputersignal.
Ifacomputersignalisstillpresentwhentheprojectoristurnedoff,theAUTOPOWERON(COMP1/3)willnotworkandthe
projectorremainsinstandbymode.
EnablingPowerManagement[AUTOPOWEROFF]
Whenthisoptionisselectedyoucanenabletheprojectortoautomaticallyturnoff(attheselectedtime:5min.,10min.,
20min.,30min.)ifthereisnosignalreceivedbyanyinputorifnooperationisperformed.
NOTE:
•The[AUTOPOWEROFF]functionwillnotworkwhen[VIEWER]or[NETWORK]isselectedfor[SOURCE].
Selecting Default Source [DEFAULT SOURCE SELECT]
Youcansettheprojectortodefaulttoanyoneofitsinputseachtimetheprojectoristurnedon.
LAST ...................... Sets the projector to default to the previous or last active input each time the projector is turned on.
AUTO ..................... Searches for an active source in order of COMPUTER1 → COMPUTER2 → COMPUTER3 → HDMI →
DisplayPort → VIDEO → VIEWER → COMPUTER1 and displays the first found source.
COMPUTER1 ......... Displays the computer signal from the COMPUTER IN connector every time the projector is turned on.
COMPUTER2 ......... Displays the computer signal from the COMPUTER 2 IN connector every time the projector is turned on.
COMPUTER3 ......... Displays the computer signal from the COMPUTER 3 IN connector every time the projector is turned on.
HDMI ..................... Displays the digital source from the HDMI IN connector every time the projector is turned on.
DisplayPort ............ Displays the digital source from the DisplayPort every time the projector is turned on.
VIDEO .................... Displays the Video source from the VIDEO IN connector every time the projector is turned on.
VIEWER ................. Displays slides or plays back movie files from the USB memory device every time the projector is turned
on.
NETWORK ............. Displays the data sent from the computer via the LAN port (RJ-45) or the wireless LAN unit (sold separately)
mounted on the projector is projected.
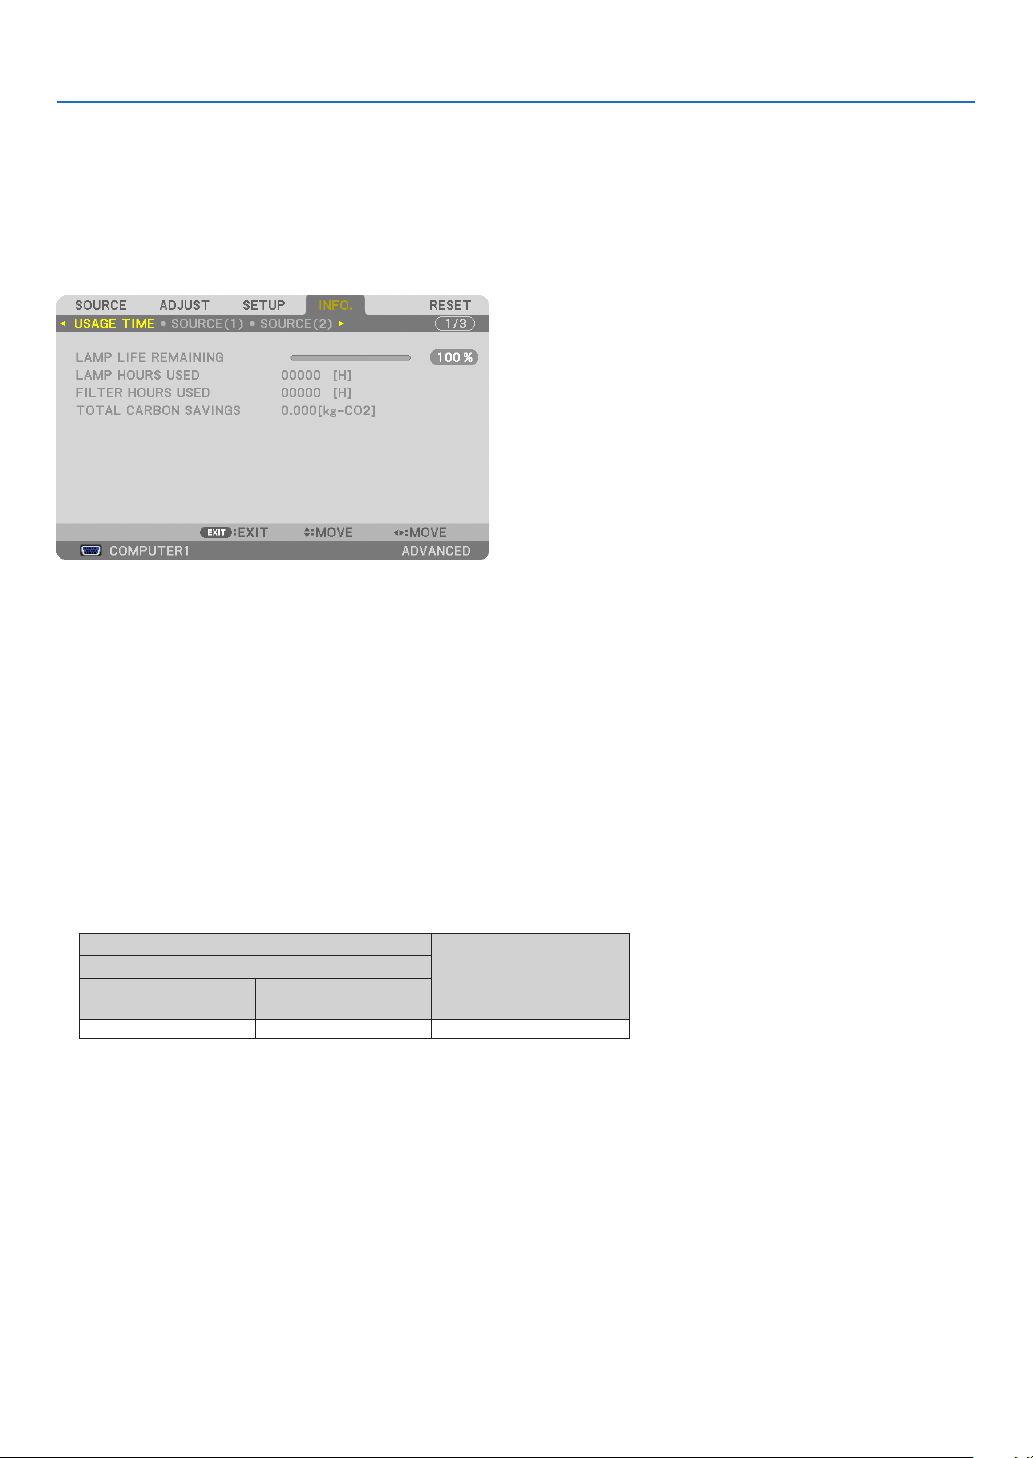
112
5. Using On-Screen Menu
Menu Descriptions & Functions [INFO.]
Displaysthestatusofthecurrentsignalandlampusage.Thisitemhasninepages.Theinformationincludedisas
follows:
TIP:PressingtheHELPbuttonontheremotecontrolwillshowthe[INFO.]menuitems.
[USAGE TIME]
[LAMPLIFEREMAINING](%)*
[LAMPHOURSUSED](H)
[FILTERHOURSUSED](H)
[TOTALCARBONSAVINGS](kg-CO2)
*Theprogressindicatorshowsthepercentageofremainingbulblife.
Thevalueinformsyouoftheamountoflampusage.Whentheremaininglamptimereaches0,theLAMPLIFE
REMAININGbarindicatorchangesfrom0%to100Hoursandstartscountingdown.
Iftheremaininglamptimereaches0hours,theprojectorwillnotturnon.
•Themessagetotheeffectthatthelamportheltersshouldbereplacedwillbedisplayedforoneminutewhen
theprojectoristurnedonandwhenthePOWERbuttonontheprojectorortheremotecontrolispressed.
Todismissthismessage,pressanybuttonontheprojectorortheremotecontrol.
Lamplife(H)
Replacement lamp
ECO MODE
NORMAL
(OFF)
ECO
(ON)
3000 4000NP26LP
•[TOTALCARBONSAVINGS]
Thisdisplaystheestimatedcarbonsavinginformationinkg.Thecarbonfootprintfactorinthecarbonsavingcal-
culationisbasedontheOECD(2008Edition).(→page
29)
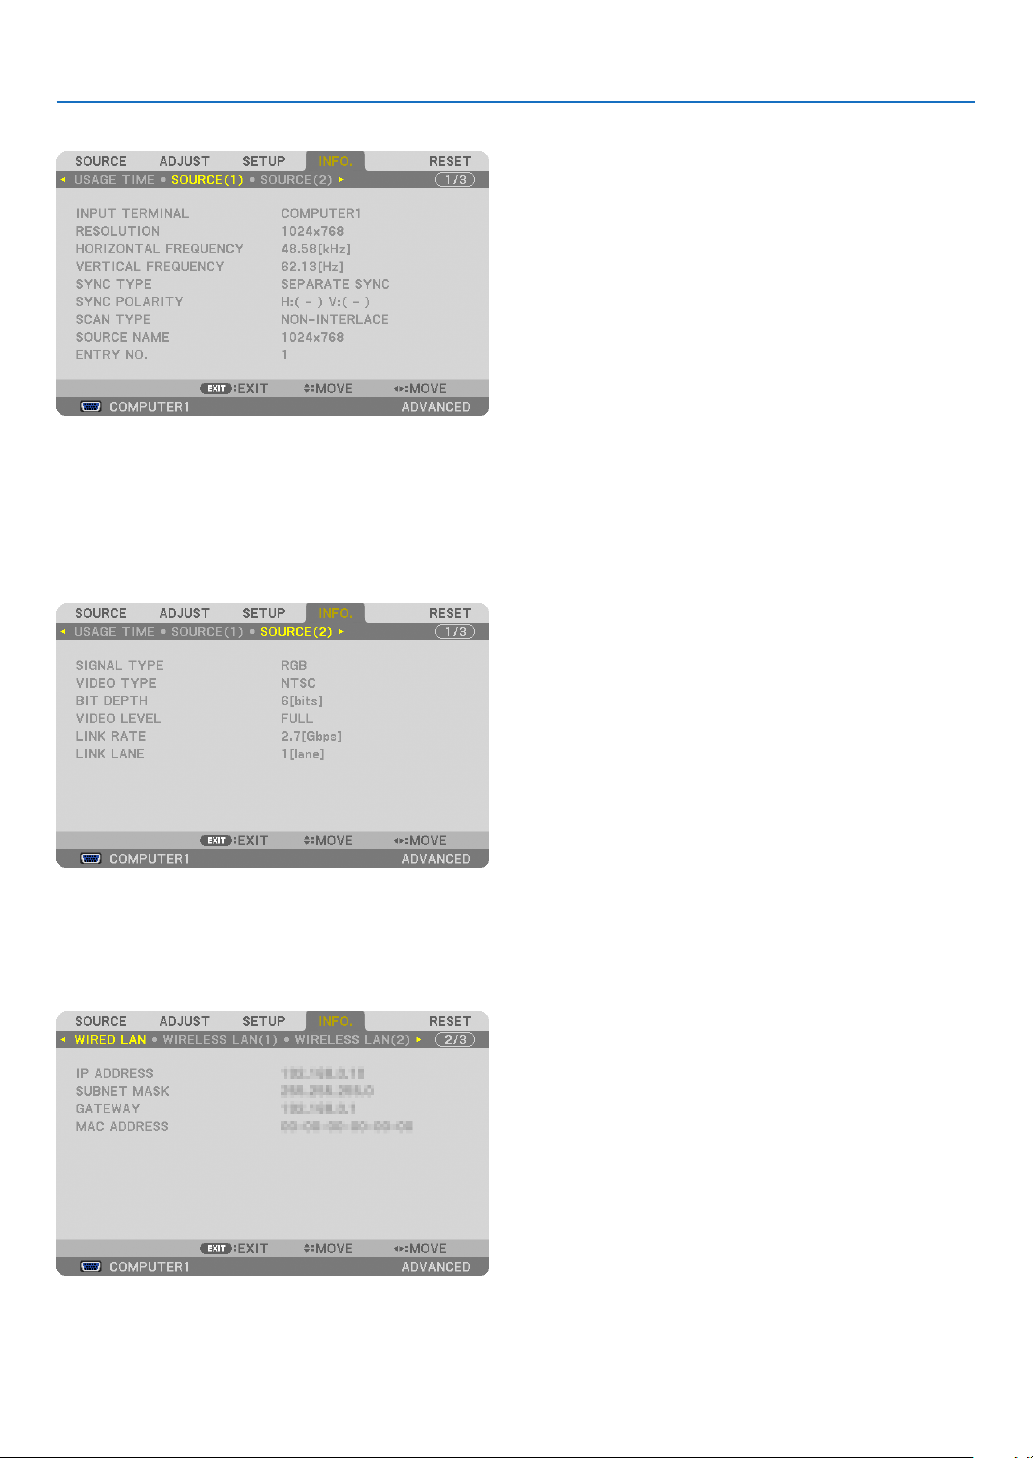
113
5. Using On-Screen Menu
[SOURCE(1)]
INPUTTERMINALRESOLUTION
HORIZONTALFREQUENCYVERTICALFREQUENCY
SYNCTYPESYNCPOLARITY
SCANTYPESOURCENAME
ENTRYNO.
[SOURCE(2)]
SIGNALTYPEVIDEOTYPE
BITDEPTHVIDEOLEVEL
LINKRATELINKLANE
[WIRED LAN]
IPADDRESSSUBNETMASK
GATEWAYMACADDRESS

114
5. Using On-Screen Menu
[WIRELESS LAN(1)]
IPADDRESSSUBNETMASK
GATEWAYMACADDRESS
[WIRELESS LAN(2)]
SSIDNETWORKTYPE
WEP/WPACHANNEL
SIGNALLEVEL
[VERSION(1)]
FIRMWAREDATA
FIRMWARE2SUB-CPU
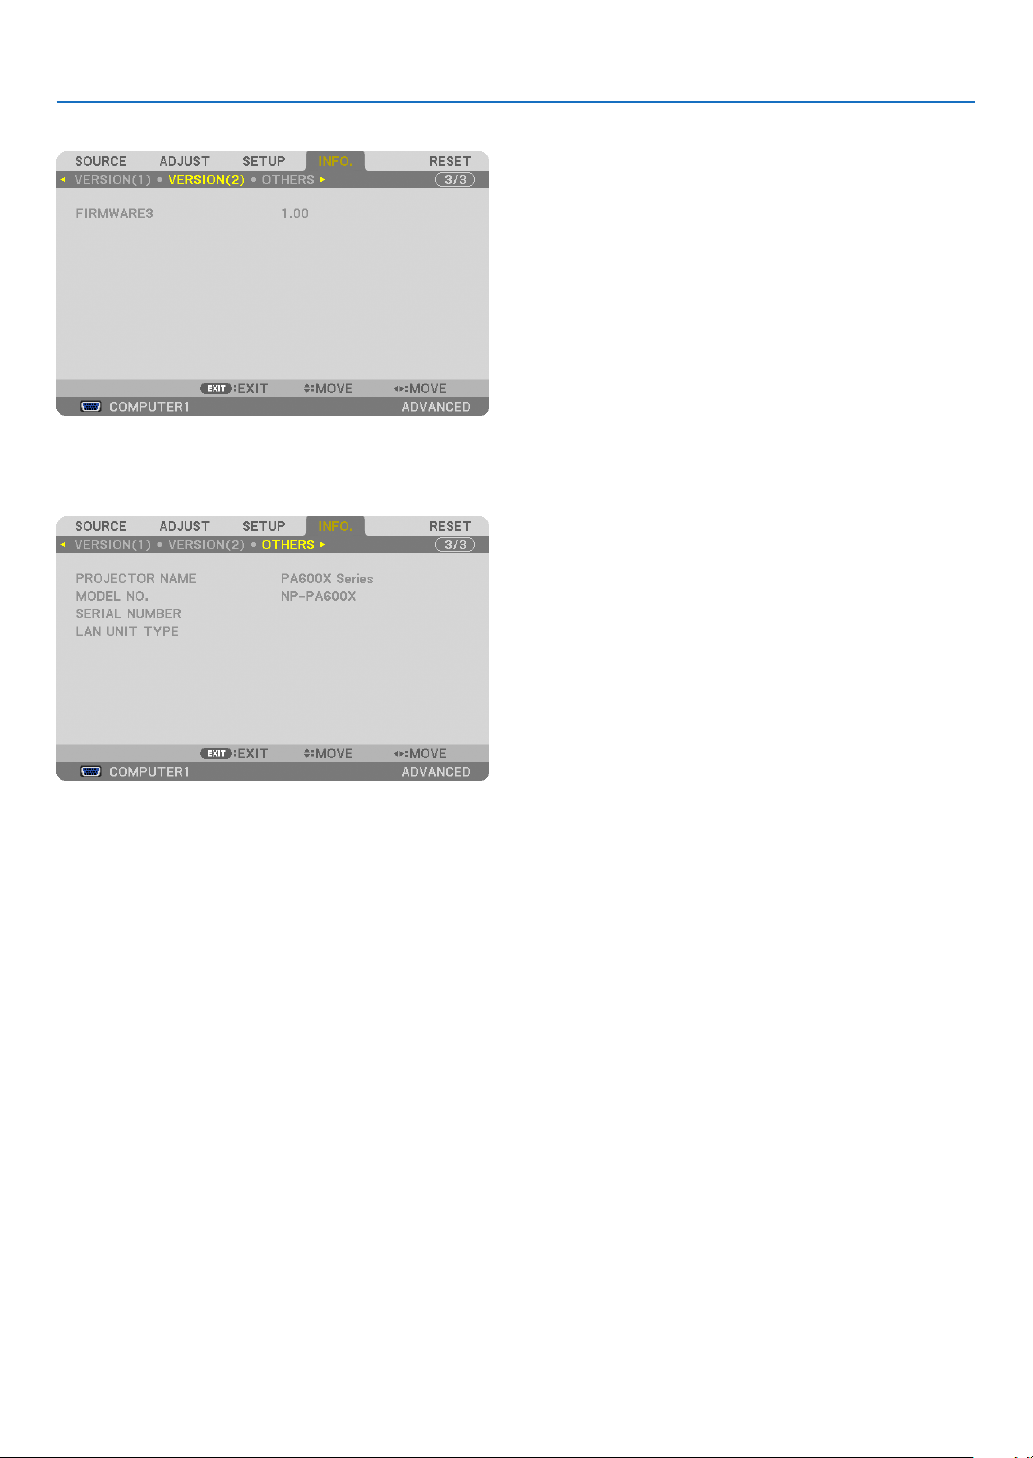
115
5. Using On-Screen Menu
[VERSION(2)]
FIRMWARE3
[OTHERS]
PROJECTORNAMEMODELNO.
SERIALNUMBERLANUNITTYPE
CONTROLID(when[CONTROLID]isset)

116
5. Using On-Screen Menu
Menu Descriptions & Functions [RESET]
Returning to Factory Default [RESET]
TheRESETfeatureallowsyoutochangeadjustmentsandsettingstothefactorypresetfora(all)source(s)except
thefollowing:
[CURRENTSIGNAL]
Resetstheadjustmentsforthecurrentsignaltothefactorypresetlevels.
Theitemsthatcanberesetare:[PRESET],[CONTRAST],[BRIGHTNESS],[COLOR],[HUE],[SHARPNESS],
[ASPECTRATIO],[HORIZONTAL],[VERTICAL],[CLOCK],[PHASE],and[OVERSCAN].
[ALLDATA]
Resetalltheadjustmentsandsettingsforallthesignalstothefactorypreset.
AllitemscanberesetEXCEPT[LANGUAGE],[BACKGROUND],[FILTERMESSAGE],[SCREEN],[GEOMETRIC
CORRECTION],[MULTI-SCREENCOMP.],[REF.WHITEBALANCE],[STATICCONVERGENCE],[CONTROL
PANELLOCK],[SECURITY],[COMMUNICATIONSPEED],[CONTROLID],[SEAMLESSSWITCHING],[STANDBY
MODE],[FANMODE],[LAMPLIFEREMAINING],[LAMPHOURSUSED],[FILTERHOURSUSED],[TOTAL
CARBONSAVINGS],[WIREDLAN],and[WIRELESSLAN].
Toresetthelampusagetime,see“ClearingLampHourMeter[CLEARLAMPHOURS]”below.
[ALLDATA(INCLUDINGENTRYLIST)]
Resetalltheadjustmentsandsettingsforallthesignalstothefactorypresetexcept[LANGUAGE],[BACKGROUND],
[FILTERMESSAGE],[SCREEN],[MULTI-SCREENCOMP.],[REF.WHITEBALANCE],[STATICCONVERGENCE],
[CONTROLPANELLOCK],[SEAMLESSSWITCHING],[SECURITYSETTINGS],[COMMUNICATIONSPEED],
[CONTROLID],[FANMODE],[LAMPLIFEREMAINING],[LAMPHOURSUSED],[FILTERHOURSUSED],[TOTAL
CARBONSAVINGS],[WIREDLAN],and[WIRELESSLAN].
Alsodeletesallthesignalsinthe[ENTRYLIST]andreturnstothefactorypreset.
NOTE:LockedsignalsinEntryListcannotbereset.
Clearing Lamp Hour Meter [CLEAR LAMP HOURS]
Resetsthelampclockbacktozero.Selectingthisoptiondisplayssubmenuforaconrmation.Select[YES]andpress
theENTERbutton.
NOTE:Elapsedtimeofthelampusewillnotbeaffectedevenwhen[RESET]isdonefromthemenu.
NOTE:Theprojectorwillturnoffandgointostandbymodewhenyoucontinuetousetheprojectorforanother100hoursafterthe
lamphasreachedtheendofitslife.Inthisconditionyoucannotclearthelamphourmeteronthemenu.Ifthishappens,pressthe
HELPbuttonontheremotecontrolfor10secondstoresetthelampclockbacktozero.Dothisonlyafterreplacingthelamp.

117
5. Using On-Screen Menu
Clearing the Filter Usage Hours [CLEAR FILTER HOURS]
Resetsthelterusagebacktozero.Selectingthisoptiondisplayssubmenuforaconrmation.Select[YES]andpress
theENTERbutton.
The[OFF]itemisselectedfor[FILTERMESSAGE]atthetimeofshipment.When[OFF]isselected,youdonotneed
toclearthelterusagehour.
NOTE:Elapsedtimeofthelterusewillnotbeaffectedevenwhen[RESET]isdonefromthemenu.
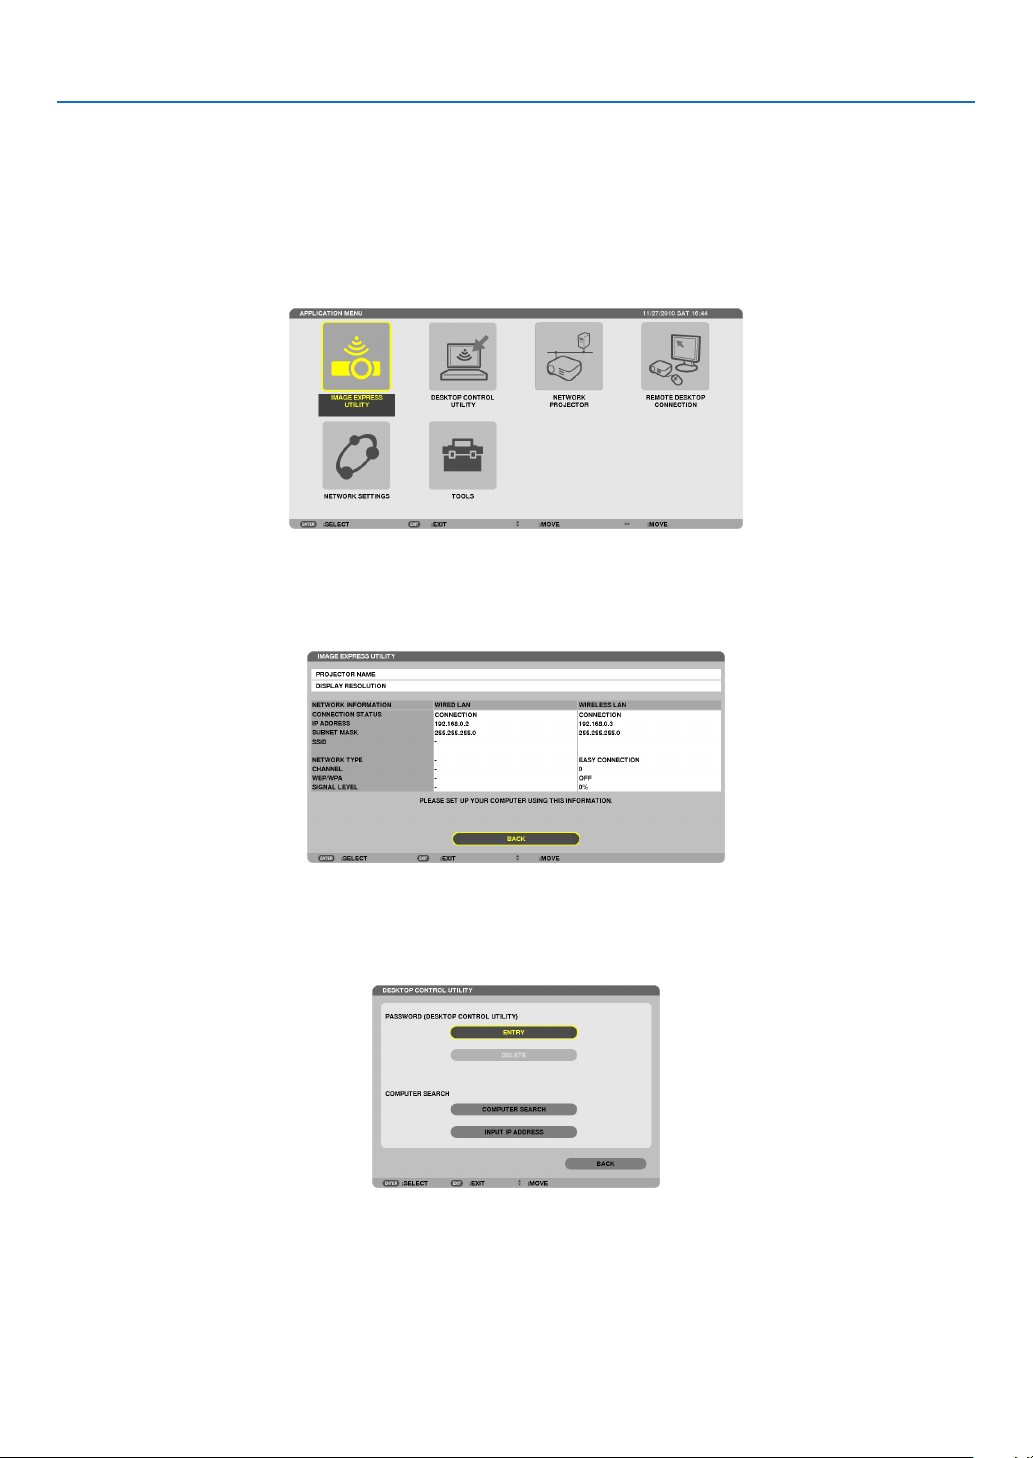
118
5. Using On-Screen Menu
❾ Application Menu
When[NETWORK]isselectedfromthe[SOURCE]menu,theapplicationmenu[APPLICATIONMENU]willbedis-
played.
TheapplicationmenuallowsyoutosetuptheUserSupportware,NetworkSettings(NETWORKSETTINGS)and
Tools(TOOLS).
TheUserSupportwareiscontainedonthesuppliedNECProjectorCD-ROM.
In[ADMINISTRATORMODE],either[ADVANCED]menuor[BASIC]menucanbeselected.(→page
136)
The[BASIC]menucontainsminimumessentialsofmenusandcommands.
IMAGE EXPRESS UTILITY
Thisshowsinformationforprojectorname,resolution,andnetwork(wired/wireless)whicharerequiredtouseImage
ExpressUtility.
Usethisinformationtosetupforyourcomputer.
DESKTOP CONTROL UTILITY
Thisallowsyoutosetupforpasswordentry/deletion,computersearchingandIPaddressonnetwork(wired/wireless)
whicharerequiredtouseDesktopControlUtility.
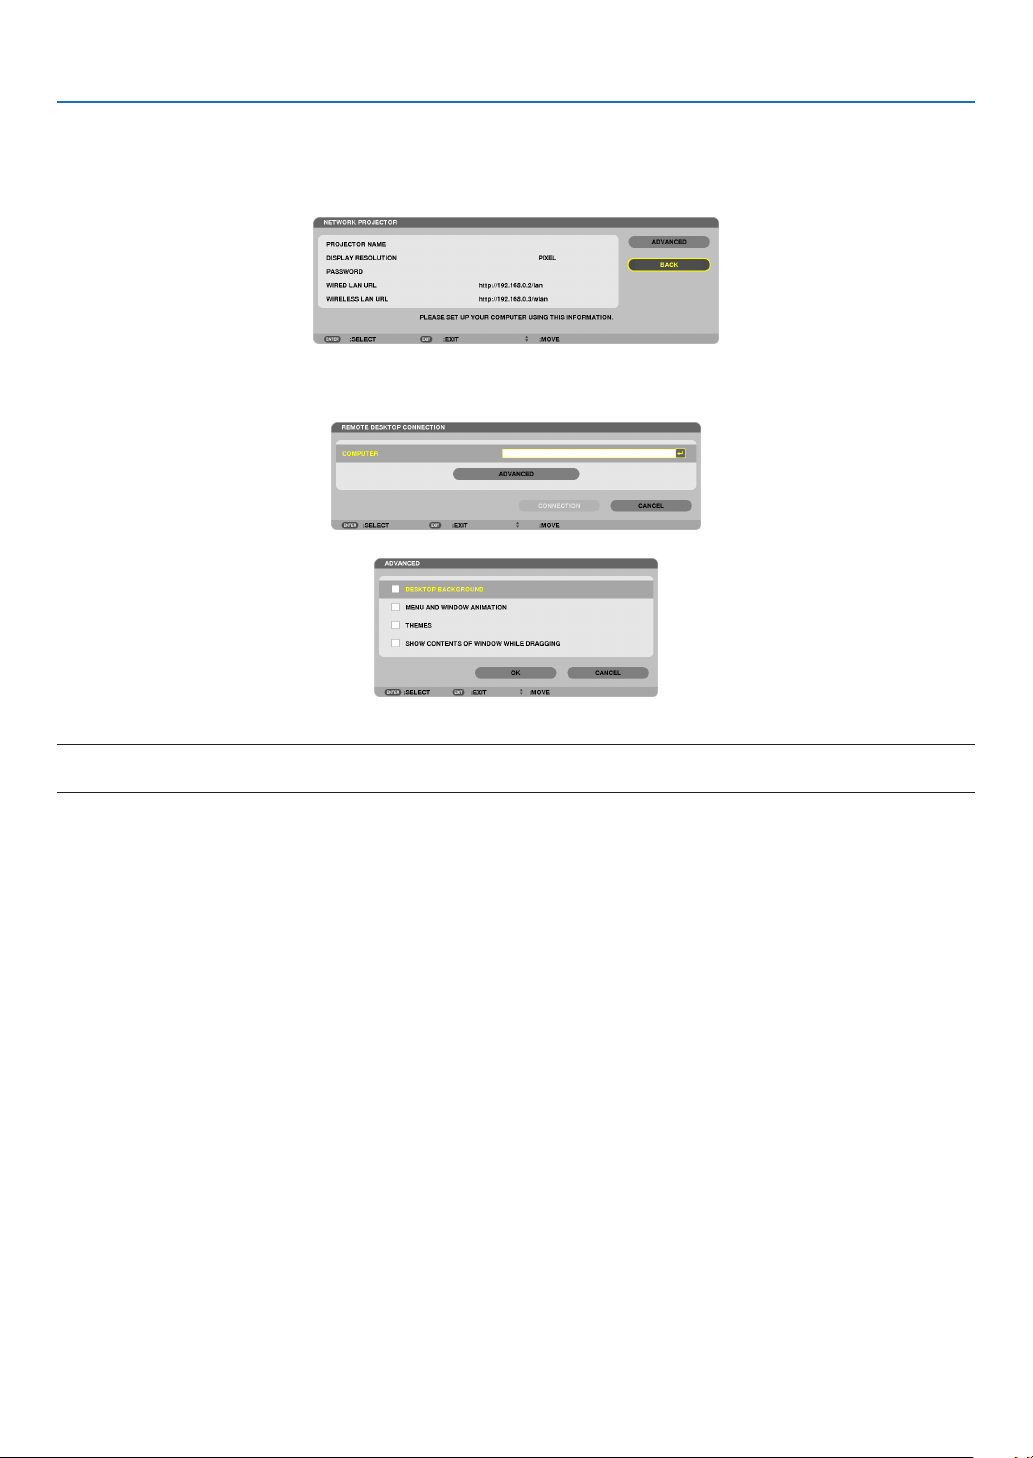
119
5. Using On-Screen Menu
NETWORK PROJECTOR
Thisshowsinformationforprojectorname,resolution,andnetwork(wired/wireless)whicharerequiredtouseNetwork
Projector.
Usethisinformationtosetupforyourcomputer.
REMOTE DESKTOP CONNECTION
ThisallowsyoutosetupforcomputernameentryandeffectsforRemoteDesktop.
NOTE:
•AUSBkeyboardisrequiredtosetuptheRemoteDesktopConnection.
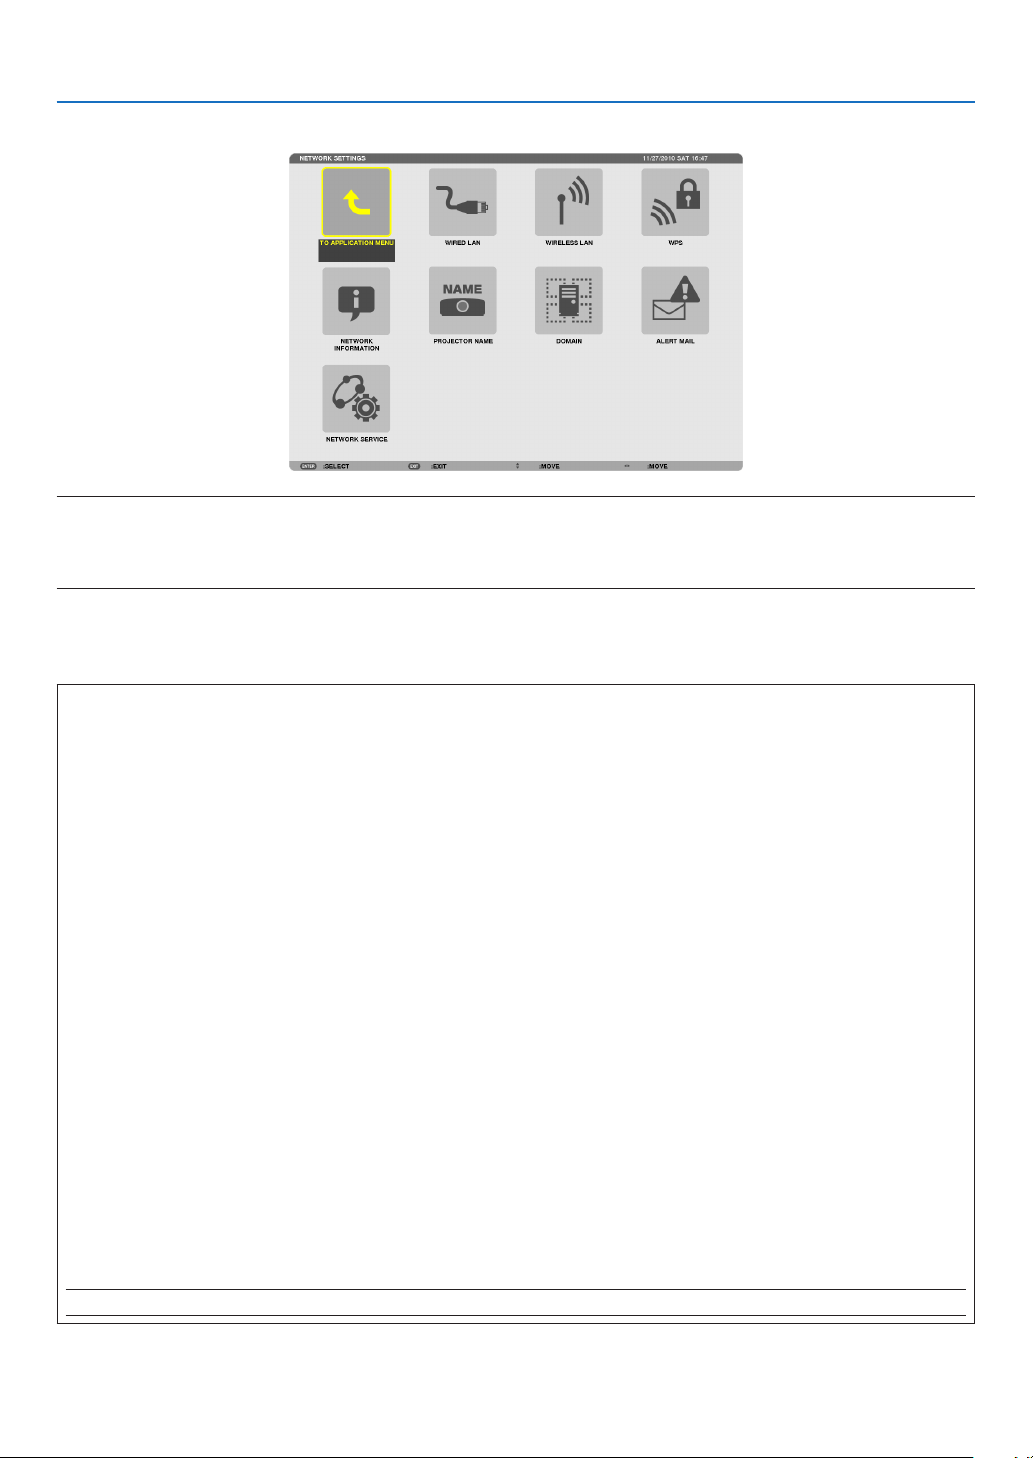
120
5. Using On-Screen Menu
NETWORK SETTINGS
Important:
•Consultwithyournetworkadministratoraboutthesesettings.
•WhenusingawiredLANconnection,connectaLANcable(Ethernetcable)totheLANport(RJ-45)oftheprojector.(→page
150)
TIP:Thenetworksettingsyoumakewillnotbeaffectedevenwhen[RESET]isdonefromthemenu.
Hints on How to Set Up LAN Connection
TosetuptheprojectorforaLANconnection:
Select[WIREDLAN]or[WIRELESSLAN]→[PROFILES]→[PROFILE1]or[PROFILE2].
TwosettingscanbesetforwiredorwirelessLAN.
Nextturnonorofffor[DHCP],[IPADDRESS],[SUBNETMASK],and[GATEWAY]andselect[OK]andpressthe
ENTERbutton.(→page121)
TorecallLANsettingsstoredintheprolenumber:
Select[PROFILE1]or[PROFILE2]forwiredorwirelessLAN,andthenselect[OK]andpresstheENTERbutton.
(→page121)
To connect a DHCP server:
Turnon[DHCP]forwiredorwirelessLAN.Select[ON]andpresstheENTERbutton.TospecifyIPaddresswithout
usingtheDHCPserver,turnoff[DHCP].(→page122)
TosetonlyforwirelessLAN(NETWORKTYPEandWEP/WPA):
Select[PROFILE1]or[PROFILE2]forwirelessLAN,andthenselect[ADVANCED]and[OK]andpresstheENTER
button.TheAdvancedmenuwillbedisplayed.(→page123)
To select an SSID:
Select[ADVANCED]→[SITESURVEY]andpresstheENTERbutton.
SelectanSSIDandpressthe>buttontoselect[OK]andpresstheENTERbutton.
Ifyoudonotuse[SITESURVEY],typetheSSIDandselect[INFRASTRUCTURE]or[ADHOC].(→page123)
To receive lamp replacement time or error messages via e-mail:
Select[ALERTMAIL],andset[SENDER'SADDRESS],[SMTPSERVERNAME],and[RECIPIENT'SADDRESS].
Last,select[OK]andpresstheENTERbutton.(→page134)
Toexecute[EASYCONNECTION]usingImageExpressUtility2.0orImageExpressUtility2forMac:
The[EASYCONNECTION]isamodethatcanabbreviatethetroublesomeLANsettingswhenusingtheImage
ExpressUtilityandconnectingthePCandprojectorviaawirelessLAN.
TheImageExpressUtilityLite,ImageExpressUtility2.0,andImageExpressUtility2forMacarecontainedonthe
suppliedNECProjectorCD-ROM.
Touse[EASYCONNECTION],select[WIRELESSLAN]→[PROFILES]→[EASYCONNECTION].
NOTE:The[EASYCONNECTION]functionisavailableonWindows7,WindowsVistaorWindowsXPSP3.
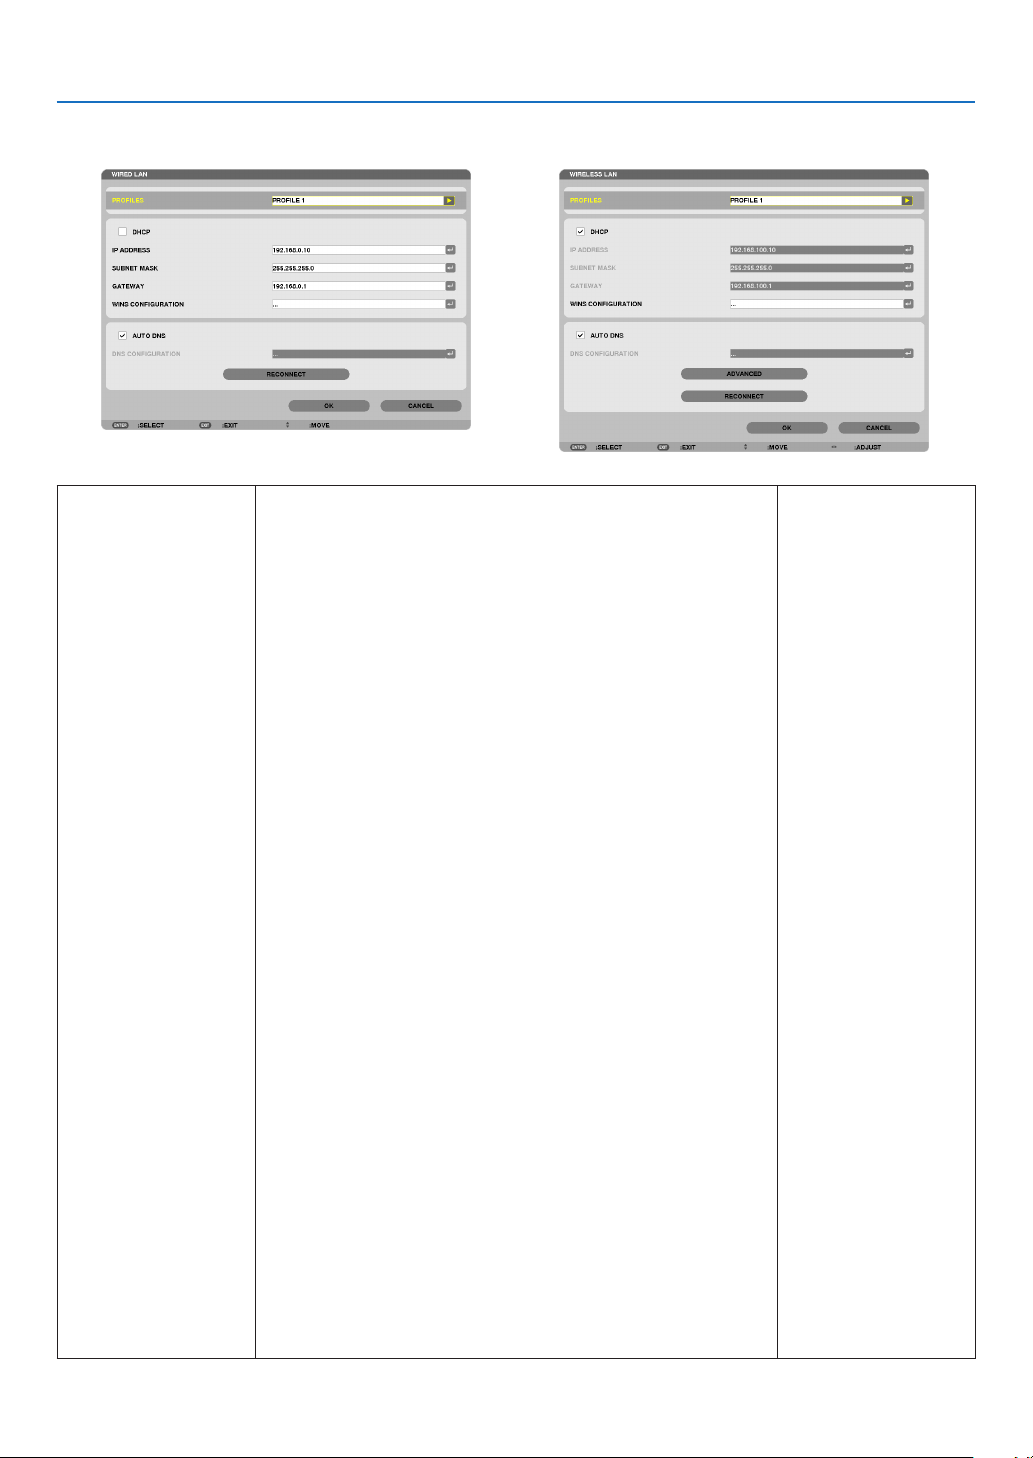
121
5. Using On-Screen Menu
WIREDLANorWIRELESSLAN(ADVANCEDmenuonly)
*TousethewirelessLANfunctions,connectaseparatelysoldwirelessLANunittotheprojector.(→page151)
PROFILES•UptotwosettingsfortheLANportorUSBwirelessLANunit
canbestoredinmemoryoftheprojector.Totaloffoursettings
canbestored.
Fivesettingscanbestored:twoforthebuilt-inLANport,two
forwirelessLANandoneforWPS.
•Select[PROFILE1]or[PROFILE2]andthendosettingsfor
[DHCP]andtheotheroptions.
Afterdoingthis,select[OK]andpresstheENTERbutton.This
willstoreyoursettingsinmemory.
•Torecallthesettingsfrommemory:
Afterselecting[PROFILE1]or[PROFILE2]fromthe[PRO-
FILES]list.
Select[OK]andpresstheENTERbutton.
•Toexecute[EASYCONNECTION]usingImageExpressUtility
2.0orImageExpressUtility2forMac,select[WIRELESSLAN]
→[PROFILES]→[EASYCONNECTION].
•TostopemittingradiowavesfromtheUSBWirelessLANUnit,
select[DISABLE]fromthe[PROFILES]list.
•Selecting[SIMPLEACCESSPOINT]willallowtheprojectorto
createaninfrastructurenetwork.
AnSSIDwillbeautomaticallycreated.
WhentheIPaddressoftheprojectorischanged,itwillauto-
maticallytakeeffectinoneortwominutes.
Select“ObtainanIPAddressAutomatically”tosettheIPad-
dressofaconnectedcomputer.
Ittakesafewsecondsforachangeofyourcomputer’sIPad-
dresstocomeintoeffectinWindows7/WindowsVistawhileit
takesoneortwominutesinWindowXP.
Whenyouconnectwithyourcomputertosaveyourprole
andselect“Automaticallyconnectwhenwithinrange”fromthe
PropertiestabofWirelessNetworkinWindowsforyourselected
prole,yourwirelessLANwillbeaccessedunderthefollowing
conditions:
•atthetimeofturningonthecomputerortheprojector
•whenthenotebooktypeiswithintherangeoftheprojector’s
wirelessLANcanbeachieved.
DatatransmissionbetweenwirelessLANandwiredLANisnot
possible.
Whenthe[SIMPLEACCESSPOINT]modeisusedtosend
images,itisrecommendedtoconnecttoonlyonecomputer.
—

122
5. Using On-Screen Menu
•Whenselecting[WPS],thenetworkwillbeconnectedbyusing
settingsstoredautomaticallywiththeWPSfunction.
Selecting[WPS]willallowtheprojectortoaccessthenetwork
byusingthesettingstheWPSfunctionautomaticallystored.
DHCPPlaceacheckmarktoautomaticallyassignanIPaddresstothe
projectorfromyourDHCPserver.
ClearthischeckboxtoregistertheIPaddressorsubnetmask
numberobtainedfromyournetworkadministrator.
—
IPADDRESSSetyourIPaddressofthenetworkconnectedtotheprojector
when[DHCP]isturnedoff.
Upto12numeric
characters
SUBNETMASKSetyoursubnetmasknumberofthenetworkconnectedtothe
projectorwhen[DHCP]isturnedoff.
Upto12numeric
characters
GATEWAYSetthedefaultgatewayofthenetworkconnectedtotheprojector
when[DHCP]isturnedoff.
Upto12numeric
characters
WNSCONFIGURA-
TION
SettheIPaddressofyourWINSserverofthenetworkconnected
totheprojectorwhen[DHCP]isturnedoff.
Upto12numeric
characters
AUTODNSPlaceacheckmarktoautomaticallyassigntheIPaddressofyour
DNSserverconnectedtotheprojectorfromyourDHCPserver.
ClearthischeckboxtosettheIPaddressofyourDNSserver
connectedtotheprojector.
Upto12numeric
characters
DNSCONFIGURA-
TION
SettheIPaddressofyourDNSserveronthenetworkconnected
totheprojectorwhen[AUTODNS]iscleared.
Upto12numeric
characters
ADVANCED*ThismenuallowsyoutosetvariousitemsforyourwirelessLAN
connection(networktype,security).
—
RECONNECTRetrytoconnecttheprojectortoanetwork.Trythisifyouhave
changed[PROFILES].
—
*The[ADVANCED]settingscreenisavailablefor[WIRELESSLAN]only.
NOTE:
•Ifyouselect[EASYCONNECTION]from[PROFILES],youcannotmakesettingstoDHCPanditsfollowingitemsexcept[CHAN-
NEL]in[ADVANCED].
AdvancedSettings(settingsonlyrequiredwhenusingaseparatelysoldwirelessLANunit)(AD-(AD-
VANCEDmenuonly)

123
5. Using On-Screen Menu
SITESURVEYDisplaysalistofavailableSSIDsforwirelessLANonsite.Select
anSSIDwhichyoucanaccess.
ToselectanSSID,highlight[SSID]andusethetoselect[OK]
andpresstheENTERbutton.
....................... Wireless access point
....................... Ad Hoc PC
....................... WEP or WPA enabled
—
SECURITYThiswillturnonorofftheencryptionmodeforsecuretransmis-
sion.
Touseencryption,specifyaWEPkeyorencryptionkey.Select
yoursecuritytypeappropriateforyourcomputerandthewire-
lessLANunit.
DISABLE ................ Will not turn on the encryption feature. Your com-
munications may be monitored by someone.
WEP(64bit) ............ Uses 64-bit datalength for secure transmis-
sion.
WEP(128bit) .......... Uses 128-bit datalength for secure transmission.
This option will increase privacy and security
when compared to use of 64-bit datalength en-
cryption.
WPA-PSK/WPA2-PSK/WPA-EAP/WPA2-EAP
.............................. These options provide stronger security than
WEP.
NOTE:
•Thesecuritytype,WEPkey,andencryptionkeysettingsmustbethe
sameascommunicationdevicessuchasPCoraccesspointinyour
wirelessnetwork.
•Whenyouuse[SECURITY],yourimagetransmissionspeedwillslow
down.
•[WPA-PSK],[WPA-EAP],[WPA2-PSK]and[WPA2-EAP]arenotavail-
ablewhen[ADHOC]isselectedfrom[NETWORKTYPE].
—
SSIDEnteranidentier(SSID)forwirelessLAN.Communicationcan
bedoneonlywithequipmentwhoseSSIDmatchesSSIDforyour
wirelessLAN.
Upto32alphanumeric
characters(case
sensitive).
NETWORKTYPESelectcommunicationmethodwhenusingwirelessLAN.
INFRASTRUCTURE ...Select this option when communicating with
one or more equipment connected to the wire-
less or wired LAN network via a wireless access
point.
AD HOC ....................Select this option when using the wireless LAN
to directly communicate with a computer in
peer-to-peer mode.
—
CHANNELSelectachannel.Availablechannelsvarydependingonthe
countryandregion.Whenyouselect[INFRASTRUCTURE],make
surethattheprojectorandyouraccesspointareonthesame
channel;whenyouselect[ADHOC],makesurethattheprojector
andyourcomputerareonthesamechannel.
—

124
5. Using On-Screen Menu
When[WEP(64bit)]or[WEP(128bit)]isselectedfor[SECURITYTYPE]
KEYSELECTSelectsoneWEPkeyfromthefourkeysbelow.
KEY1,KEY2,KEY3,
KEY4
EnteraWEPkey.
•Maximumnumberofcharacters
OptionAlphanumeric(ASCII)Hexadecimal(HEX)
WEP64bit5 10
WEP128bit13 26
When[WPA-PSK],[WPA-EAP],[WPA2-PSK],or[WPA2-EAP]isselectedfor[SECURITYTYPE]
ENCRYPTIONTYPESelect[TKIP]or[AES].
KEYEnterencryptionkey.Keylengthmustbe8orgreaterand63orless.
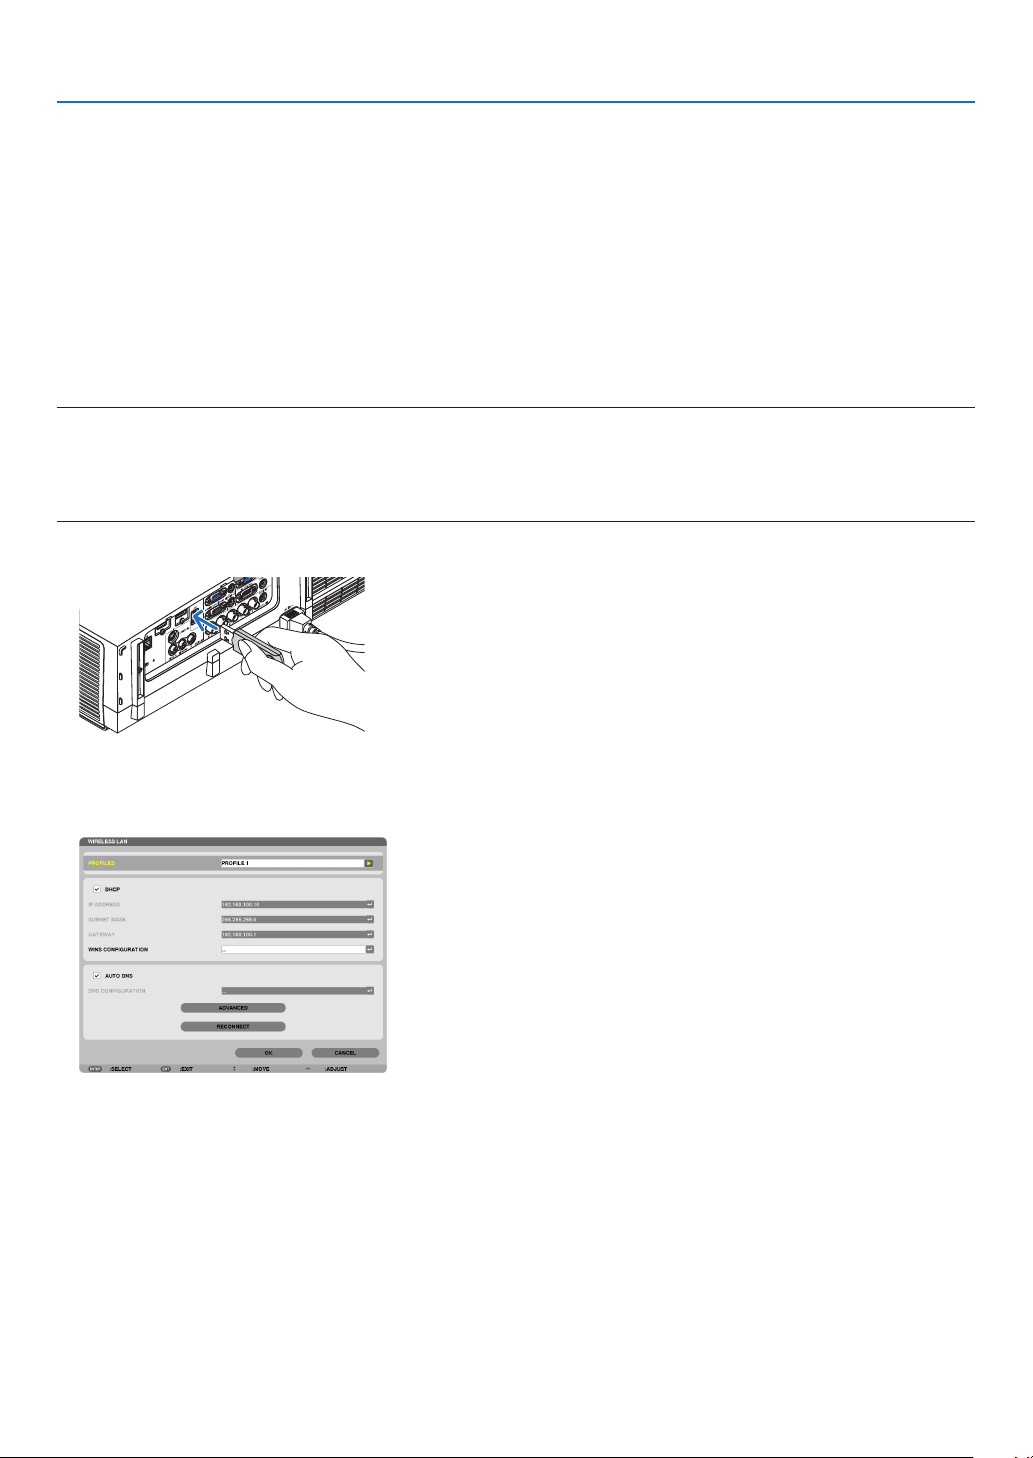
125
5. Using On-Screen Menu
[AUTHENTICATION](requiredforwirelessonly)
SettingisrequiredforusingWPA-EAPorWPA2-EAP.
Preparationbeforesetting
SelectawirelessLANcompliantWPA-EAPorWPA2-EAPauthenticationandinstalladigitalcerticateontheprojec-
tor.
1.Set[DATEANDTIME]ontheprojector.(→
page 140)
2. Use a computer to save digital certificates (files) for WPA-EAP or WPA2-EAP setting to your USB memory
device.
After completing saving the file, remove the USB memory device from the computer.
Important:
•TheleformatsofdigitalcerticatethataresupportedbytheprojectorareDERandPKCS#12only.
•Theprojectorcannothandleanydigitalcerticatewhoselesizeexceeds8KB.
•CRL(CerticateRelocationList)isnotsupported.
•Clientcerticatechainisnotsupported.
3. Plug the USB memory device into the USB port of the projector.
Setting Procedures
1.Select[NETWORKSETTINGS]→[WIRELESSSLAN].
2.SetitemssuchasPROFILES,DHCP,IPADDRESS,SUBNETMASKandothersasrequired.
•Select[PROFILE1]or[PROFILE2]for[PROFILES].If[EASYCONNECTION]isselected,WPA-PSK,WPA2-
PSK, WPA-EAP, or WPA2-EAP is not available.
3.Select[ADVANCED]andpresstheENTERbutton.
The [ADVANCED] setting screen will be displayed.
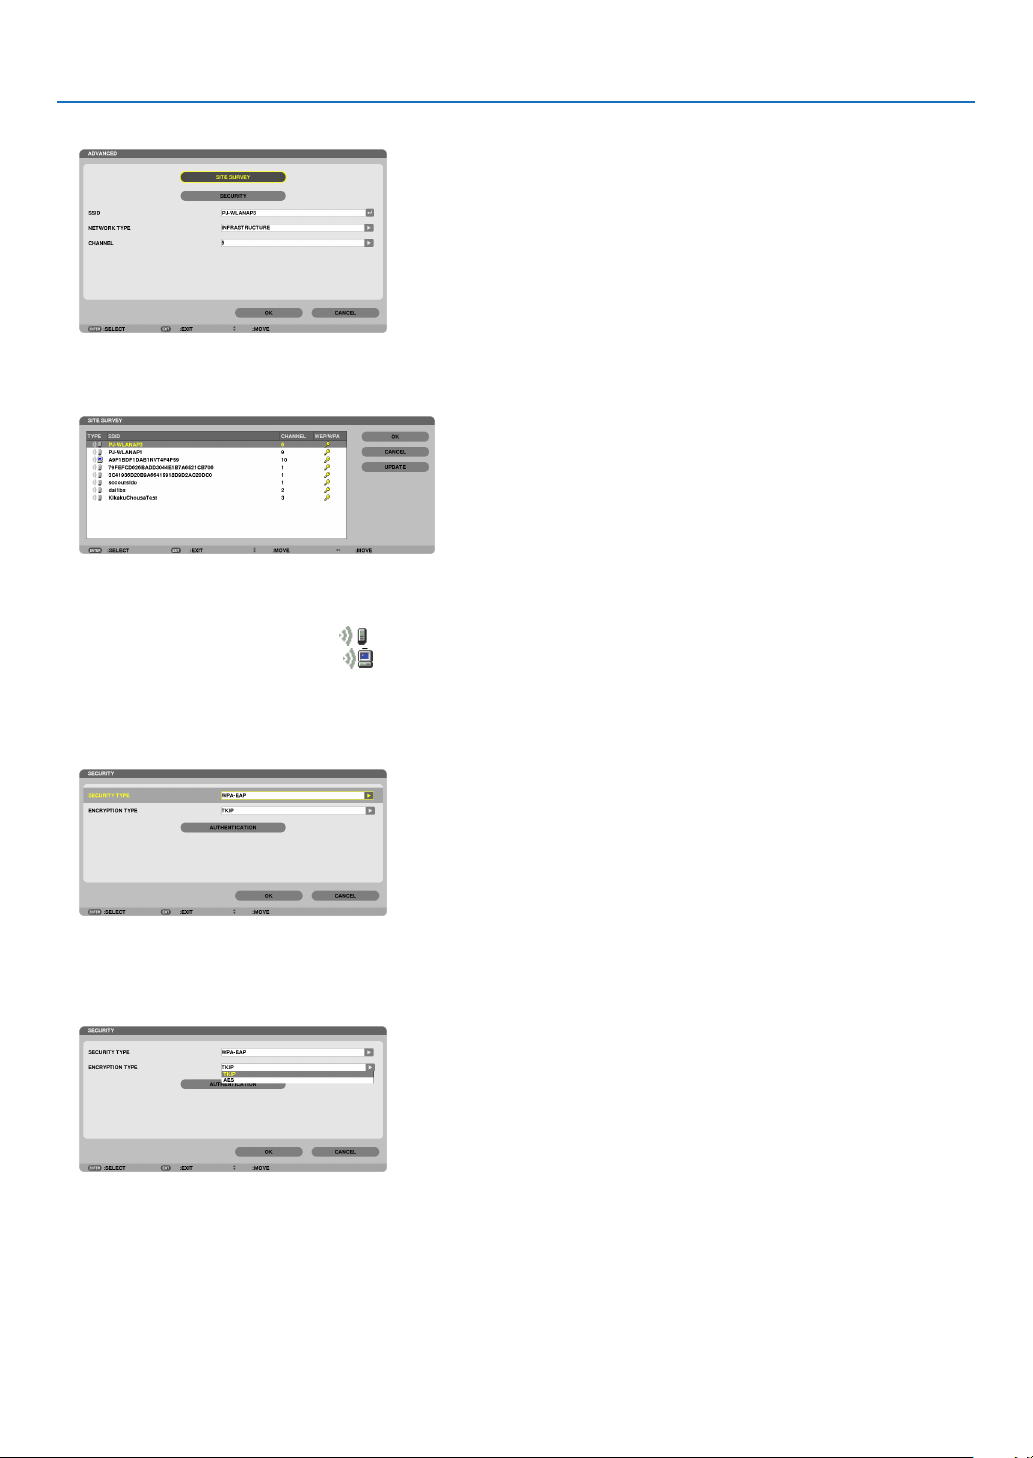
126
5. Using On-Screen Menu
4.Select[SITESURVEY]andpresstheENTERbutton.
The “SSID” list will be displayed.
5.SelectaconnectingSSID,andthenselect[OK].
Finally press the ENTER button.
•SelecttheSSIDforwhichWPA-PSKorWPA2-PSKisset.
•Select[INFRASTRUCTURE(
)] for [NETWORK TYPE]. WPA-PSK, WPA2-PSK, WPA-EAP, or WPA2-EAP is
not available when [AD HOC ( )] is selected.
6.Selectthe[SECURITY]tab.
The [SECURITY] page will be displayed.
7.Selectthe[SECURITYTYPE]eldandpresstheENTERbutton.
The pull-down list will be displayed.
8.Select[WPA-EAP]or[WPA2-EAP]andpresstheENTERbutton.
9.Selectthe[TKIP/AES]eldandpresstheENTERbutton.
The pull-down list will be displayed.
10
.Select[TKIP]or[AES]andpresstheENTERbutton.
Select [TKIP] or [AES] according to the setting for your access point.
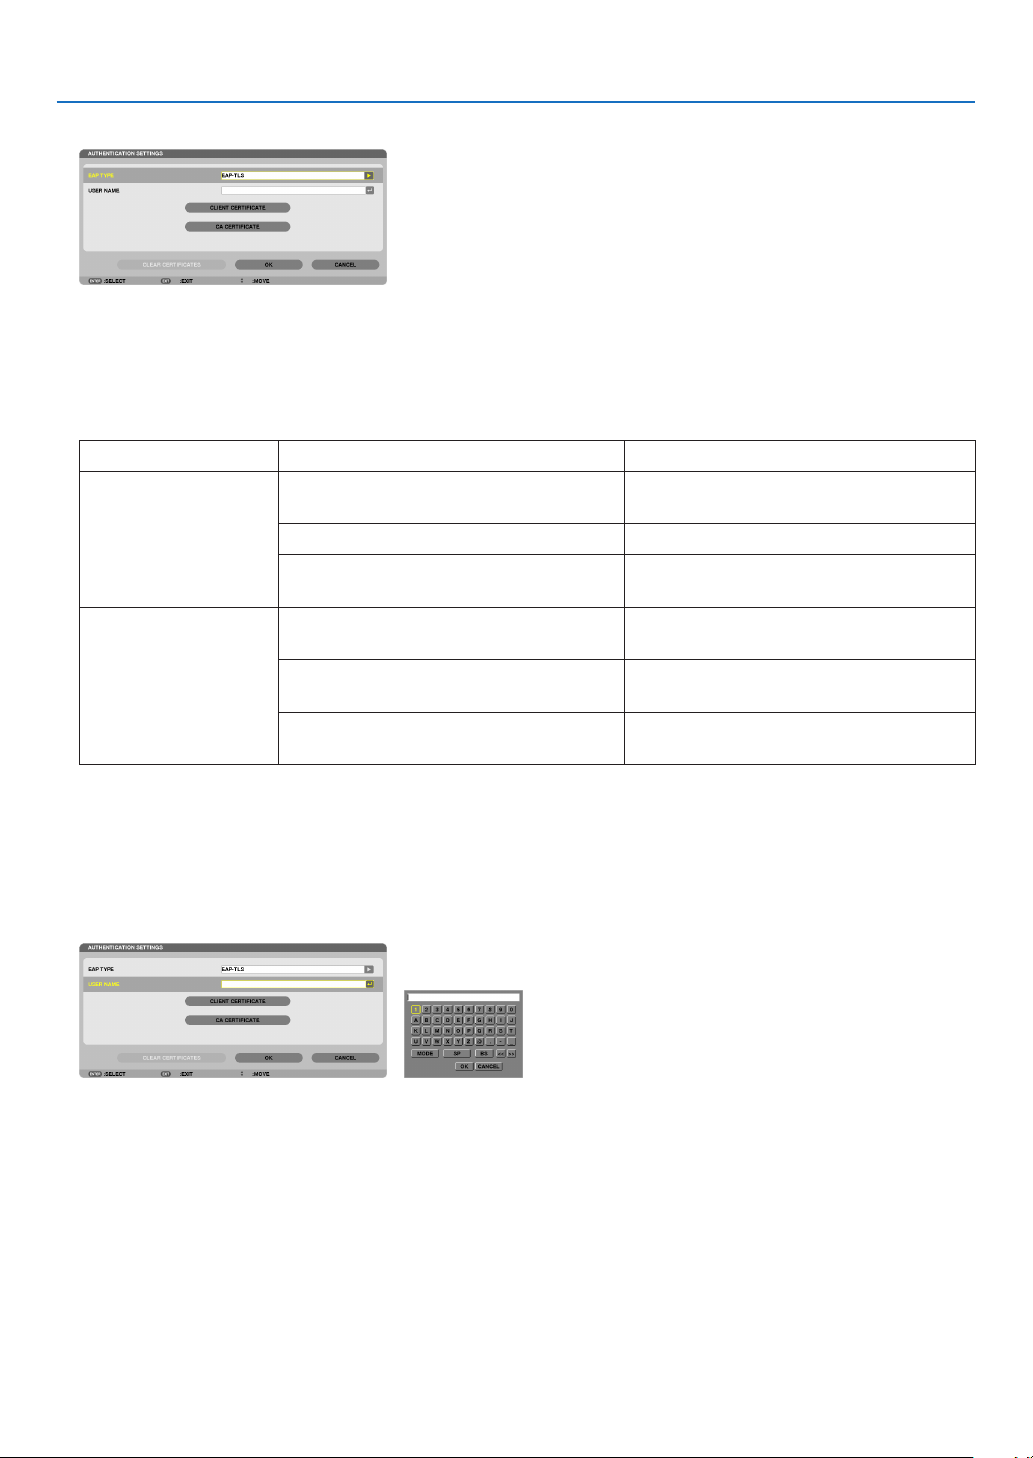
127
5. Using On-Screen Menu
11
.Selectthe[AUTHENTICATION]tab.
The [AUTHENTICATION] page will be displayed.
Select either [EAP-TLS] or [PEAP-MSCHAPv2] for [EAP TYPE]. The setting items vary depending on the EAP
type.
See the table below.
EAPTypeSettingItemNote
EAP-TLSUserName1characterormoreand32charactersor
less
ClientCerticatePKCS#12formatle
CACerticate
(Certicateauthority’scerticate)
DERformatle
PEAP-MSCHAPv2UserName1characterormoreand32charactersor
less
Password1characterormoreand32charactersor
less
CACerticate
(Certicateauthority’scerticate)
DERformatle
① Selecting [EAP-TLS] for [EAP TYPE]:
The following section explains the operation for selecting [EAP-TLS].
For selecting [PEAP-MSCHAPv2], go on to Step 12 on page
129.
12.
Selectthe[USERNAME]eldandpresstheENTERbutton.
The character entry screen (software keyboard) will be displayed. Set a user name.
•Ausernamemustbe1characterormoreand32charactersorless.
(→ page 131)
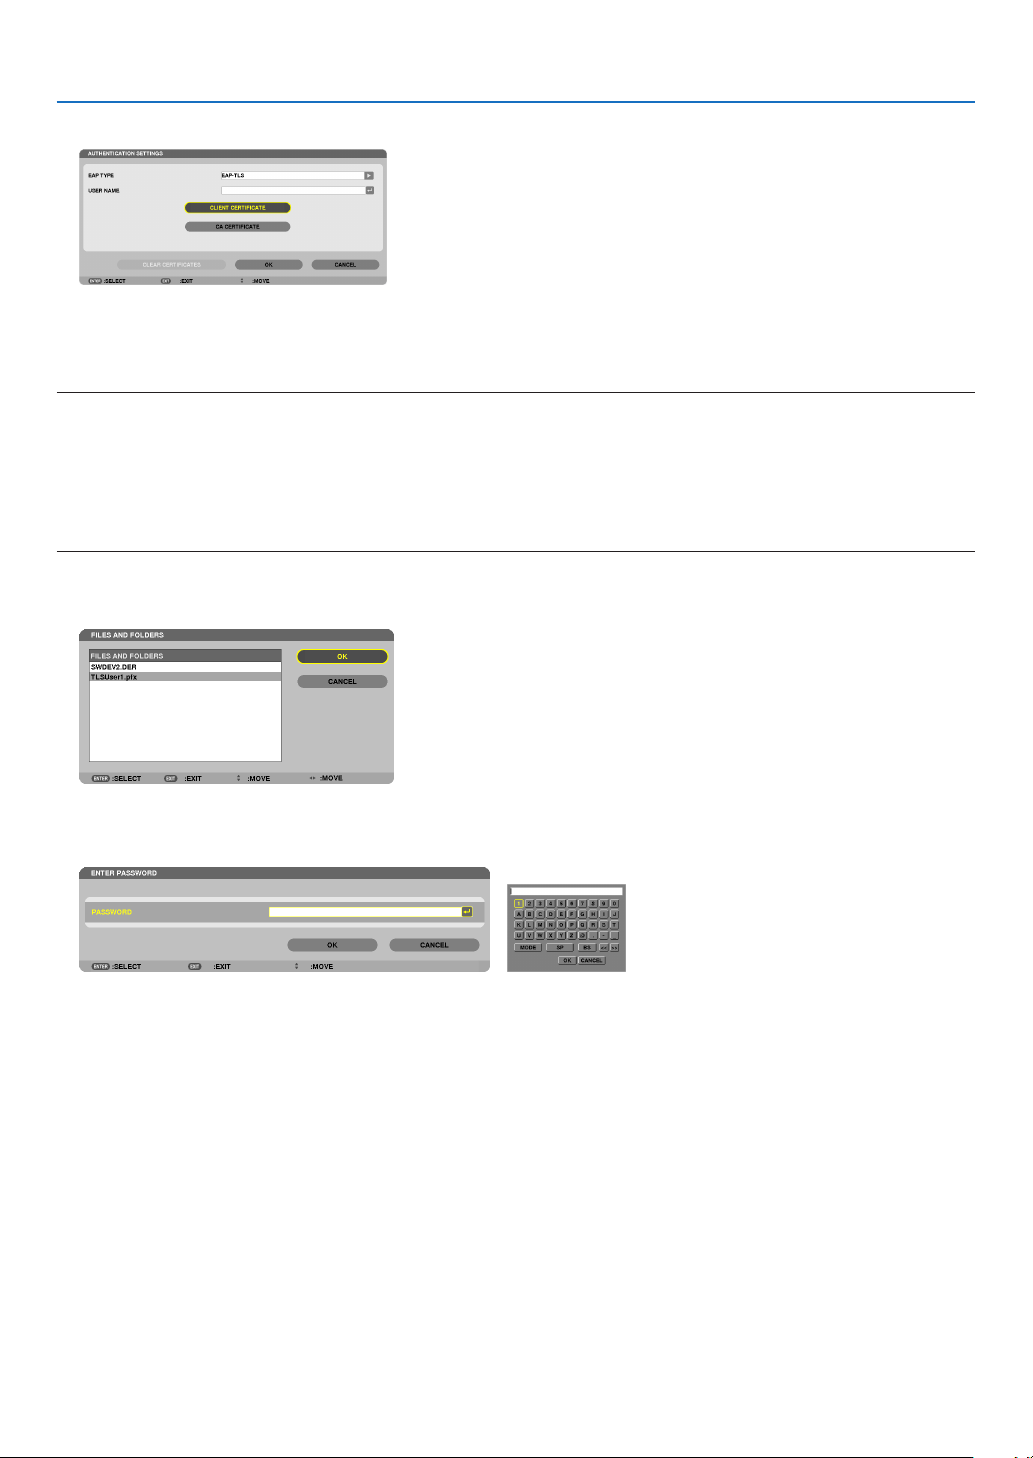
128
5. Using On-Screen Menu
13.
Select[CLIENTCERTIFICATE]andpresstheENTERbutton.
A list of files (thumbnail screen) will be displayed.
•Foroperatingthethumbnailscreen,see“4.UsingtheViewer”inthe“User’sManual”(PDF).
•Toreturntothe[AUTHENTICATION]page,presstheEXITbutton.
NOTE:
Installing a digital certificate
Youcaninstalleachdigitalcerticate(clientcerticateandCAcerticate)for[PROFILE1(or2)]onale-by-lebasis.
•InstallarootCAcerticateforaCAcerticate.
•Ifyouinstalladigitalcerticateoveryourexistingdigitalcerticate,theexistingdigitalcerticatewillbeoverwrittenwiththenew
digitalcerticate.
•Onceadigitalcerticatehasbeeninstalled,itsinformationcannotbedeletedevenifyoustopsettingWPA-EAPorWPA2-EAP.
14.
Onthethumbnailscreen,selectadigitalcerticate(PKCS#12formatle)savedinyourUSBmemorydevice
and press the ENTER button.
The password screen will be displayed.
15.
Select[PASSWORD]eldandpresstheENTERbutton.
The character entry screen (software keyboard) will be displayed. Set the password of the private key. A password
must be 1 character or more and 32 characters or less.
The selected digital certificate file will be installed on the projector.
•WhentherootCAcerticateisnotincludedinthelethatwasselectedinStep14,proceedtoStep16.When
the root certification authority certificate is included, proceed to Step 18.
16.Select[CACERTIFICATE]andpresstheENTERbutton.
The drive list screen will be displayed.
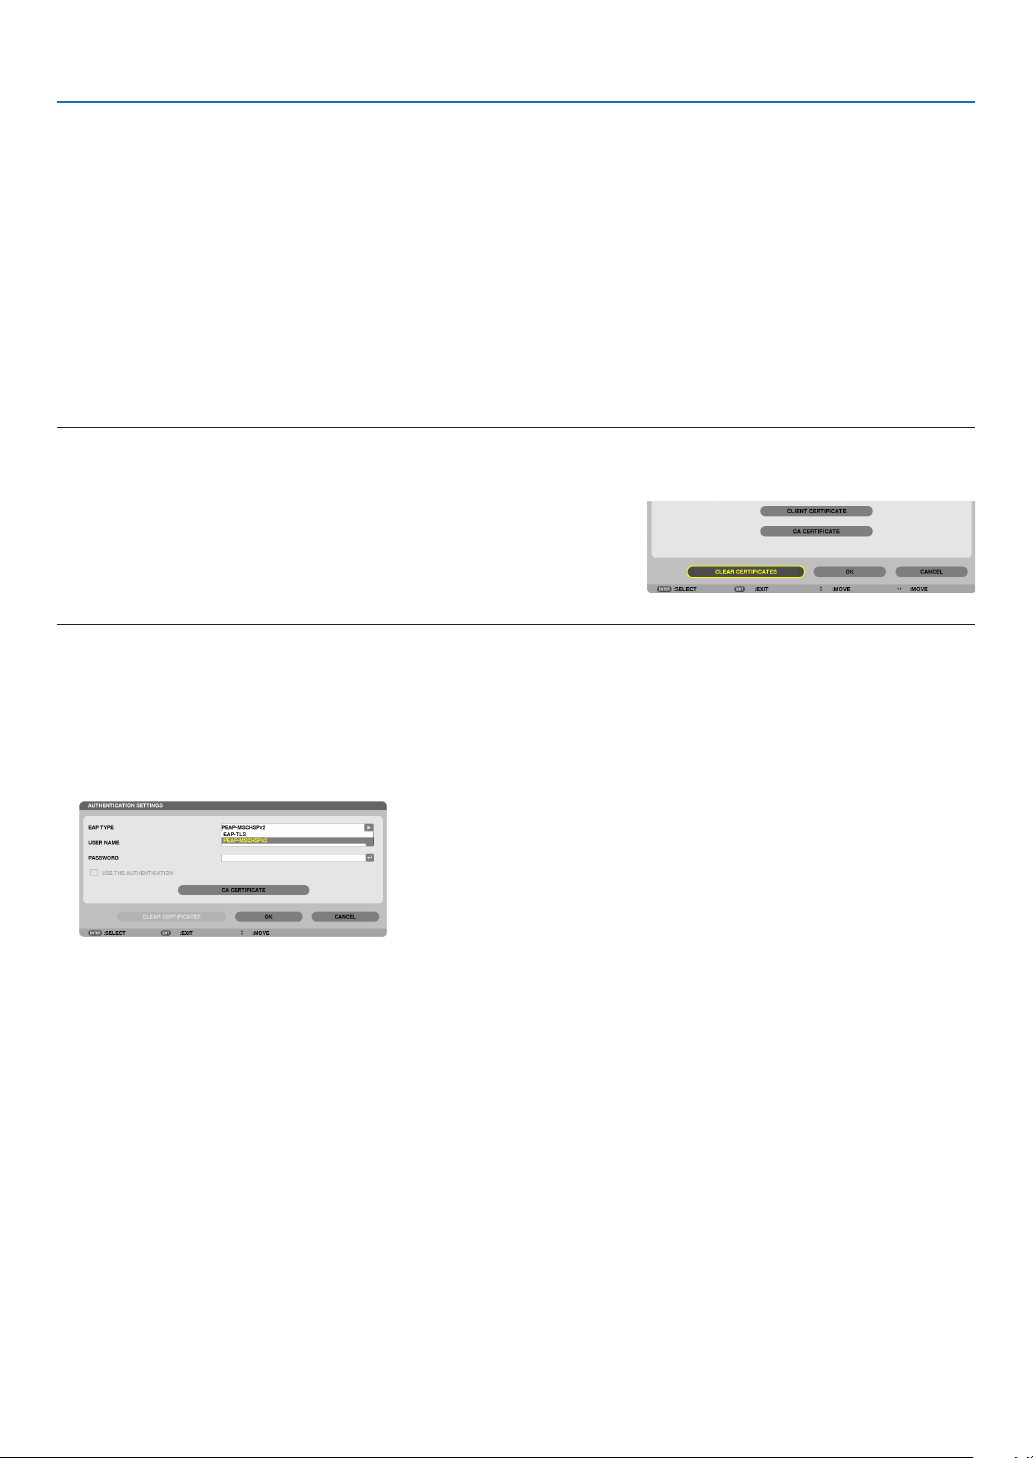
129
5. Using On-Screen Menu
17.
On the thumbnail screen, select a digital certificate (DER format file) saved in your USB memory device
and press the ENTER button.
•SelectyourrootCAcerticatehere.
The selected digital certificate will be installed on the projector.
18.
Aftercompletingrequiredsettings,select[OK]andpresstheENTERbutton.
The [WIRELESS] page will be returned.
19.
Select[RECONNECT]andpresstheENTERbutton.
20.
Select[OK]andpresstheENTERbutton.
Thiswillcompletesetting[EAP-TLS]for[EAPTYPE]in[WPA-EAP]or[WPA2-EAP].
TIP:
Clearingthedigitalcerticatethatisinstalledontheprojector
Toclearthedigitalcerticateinstalledontheprojector,followthestepsbelow.
Bydoingthefollowingprocedure,allthedigitalcerticatesforthecurrentlydisplayedprolewillbecleared.
1.Select[CLEARCERTIFICATES]inthebottomleftofthe[AD
-
VANCED]settingscreenandpresstheENTERbutton.
A message for confirmation will be displayed.
2.Select[YES]andpresstheENTERbutton.
The digital certificates will be cleared.
TIP:
•ThePKCS#12formatdigitalcerticateincludingaCAcerticatewillbeinstalledasarootCAcerticate.
② Selecting [PEAP-MSCHAPv2] for [EAP TYPE]:
12.
Fromthe[AUTHENTICATION]page,select[EAPTYPE]eldandpresstheENTERbutton.
The pull-down list will be displayed.
13.
Select[PEAP-MSCHAPv2]andpresstheENTERbutton.
14.
Select[USERNAME]eldandpresstheENTERbutton.
The character entry screen (software keyboard) will be displayed. Set a user name.
•Ausernamemustbe32charactersorless.
(→ page 131)
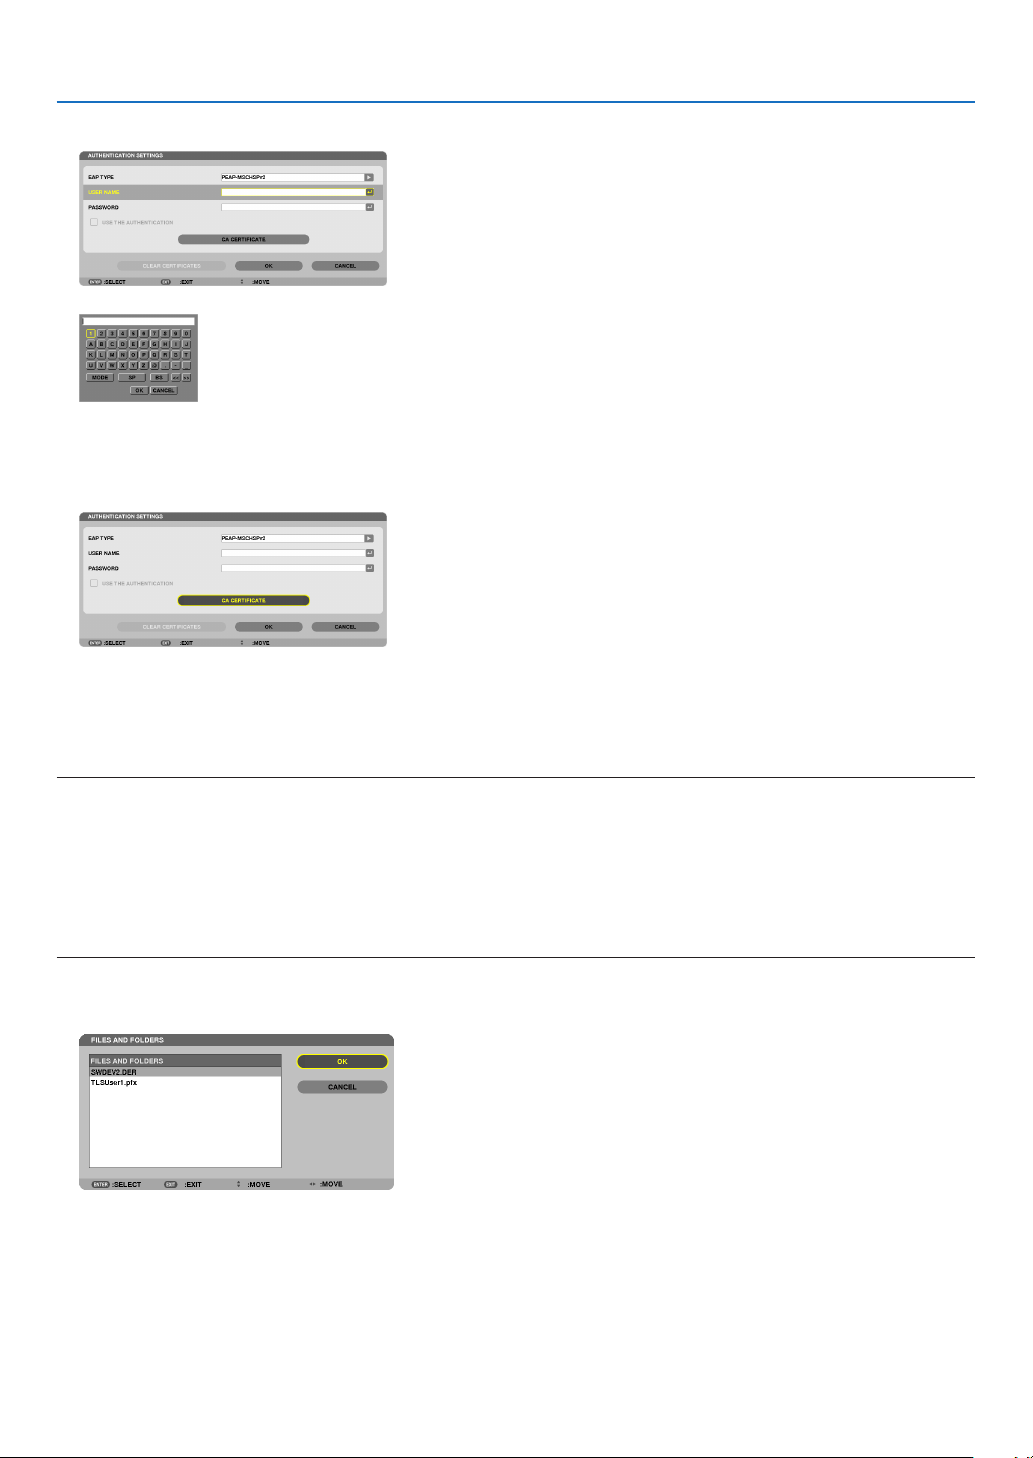
130
5. Using On-Screen Menu
15.
Aftercompletingsettingausername,selectthe[PASSWORD]eldandpresstheENTERbutton.
The character entry screen (software keyboard) will be displayed. Set a password.
•Apasswordmustbe32charactersorless.
16.
Aftercompletingsettingthepassword,select[CACERTIFICATE]eldandpresstheENTERbutton.
The drive list screen will be displayed.
•Foroperatingthethumbnailscreen,see“4.UsingtheViewer”inthe“User’sManual”(PDF).
•Toreturntothe[AUTHENTICATION]page,presstheEXITbutton.
NOTE:
Installing a digital certificate
Youcaninstalleachdigitalcerticate(clientcerticateandCAcerticate)for[PROFILE1(or2)]onale-by-le
basis.
•InstallarootCAcerticateforaCAcerticate.
•Ifyouinstalladigitalcerticateoveryourexistingdigitalcerticate,theexistingdigitalcerticatewillbeoverwrittenwiththenew
digitalcerticate.
•Onceadigitalcerticatehasbeeninstalled,itsinformationcannotbedeletedevenifyoustopsettingWPA-EAPorWPA2-EAP.
17.
On the thumbnail screen, select a digital certificate (DER format file) saved in your USB memory device
and press the ENTER button.
•SelectyourrootCAcerticatehere.
The selected digital certificate will be installed on the projector.
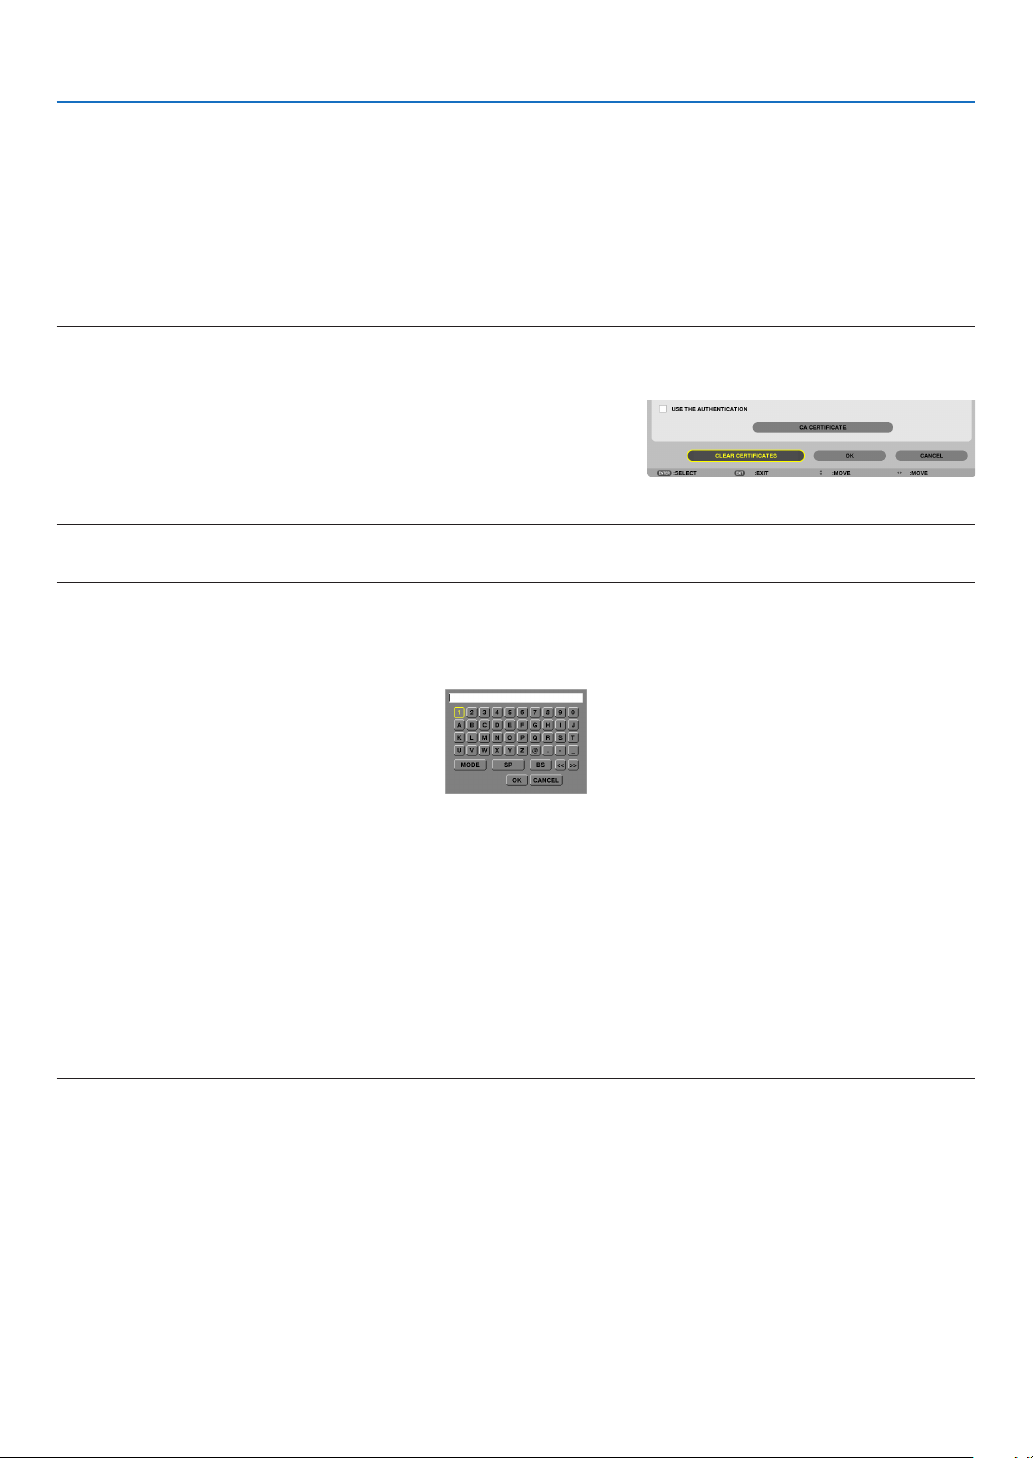
131
5. Using On-Screen Menu
18.
Aftercompletingrequiredsettings,select[OK]andpresstheENTERbutton.
The [WIRELESS] page will be returned.
19.
Select[RECONNECT]andpresstheENTERbutton.
20.
Select[OK]andpresstheENTERbutton.
Thiswillcompletesetting[PEAP-MSCHAPv2]for[EAPTYPE]in[WPA-EAP]or[WPA2-EAP].
TIP:
Clearingthedigitalcerticatethatisinstalledontheprojector
Toclearthedigitalcerticateinstalledontheprojector,followthestepsbelow.
Bydoingthefollowingprocedure,allthedigitalcerticatesforthecurrentlydisplayedprolewillbecleared.
1.Select[CLEARCERTIFICATES]inthebottomleftofthe[AD
-
VANCED]settingscreenandpresstheENTERbutton.
A message for confirmation will be displayed.
2.Select[YES]andpresstheENTERbutton.
The digital certificates will be cleared.
TIP:
EnteringWEPkeys(SwitchingbetweenAlphanumericcharactersandhexadecimal)
Toenterfrom[KEY1]to[KEY4],dothefollowing:
1.Selectoneof[KEY1],[KEY2],[KEY3]and[KEY4]andpresstheENTERbutton.
The character entry screen (software keyboard) will be displayed.
2. Use the ▼, ▲, ◀, or ▶ button to select a character and press the ENTER button.
•ToenteraWEPkeyorpassphrase,usealphanumericcharacters(ASCII)orhexadecimal(HEX).ToenteraPSK
key, use alphanumeric characters (ASCII).
•Pressthe[HEX]buttontochangeto[ASCII]tosetthekeyinASCIIdigit.Youcantogglethisbuttonbetween
[ASCII] and [HEX].
•Enter0x(numeralandalphabetrespectively)rightinfrontofyourkeycode.
•Hexadecimaluses0to9andAtoF.
3. After entering your WEP key or passphrase, use the ▼, ▲, ◀, or ▶buttontoselect[OK]andpresstheENTER
button.
The character entry screen (software keyboard) will be closed.
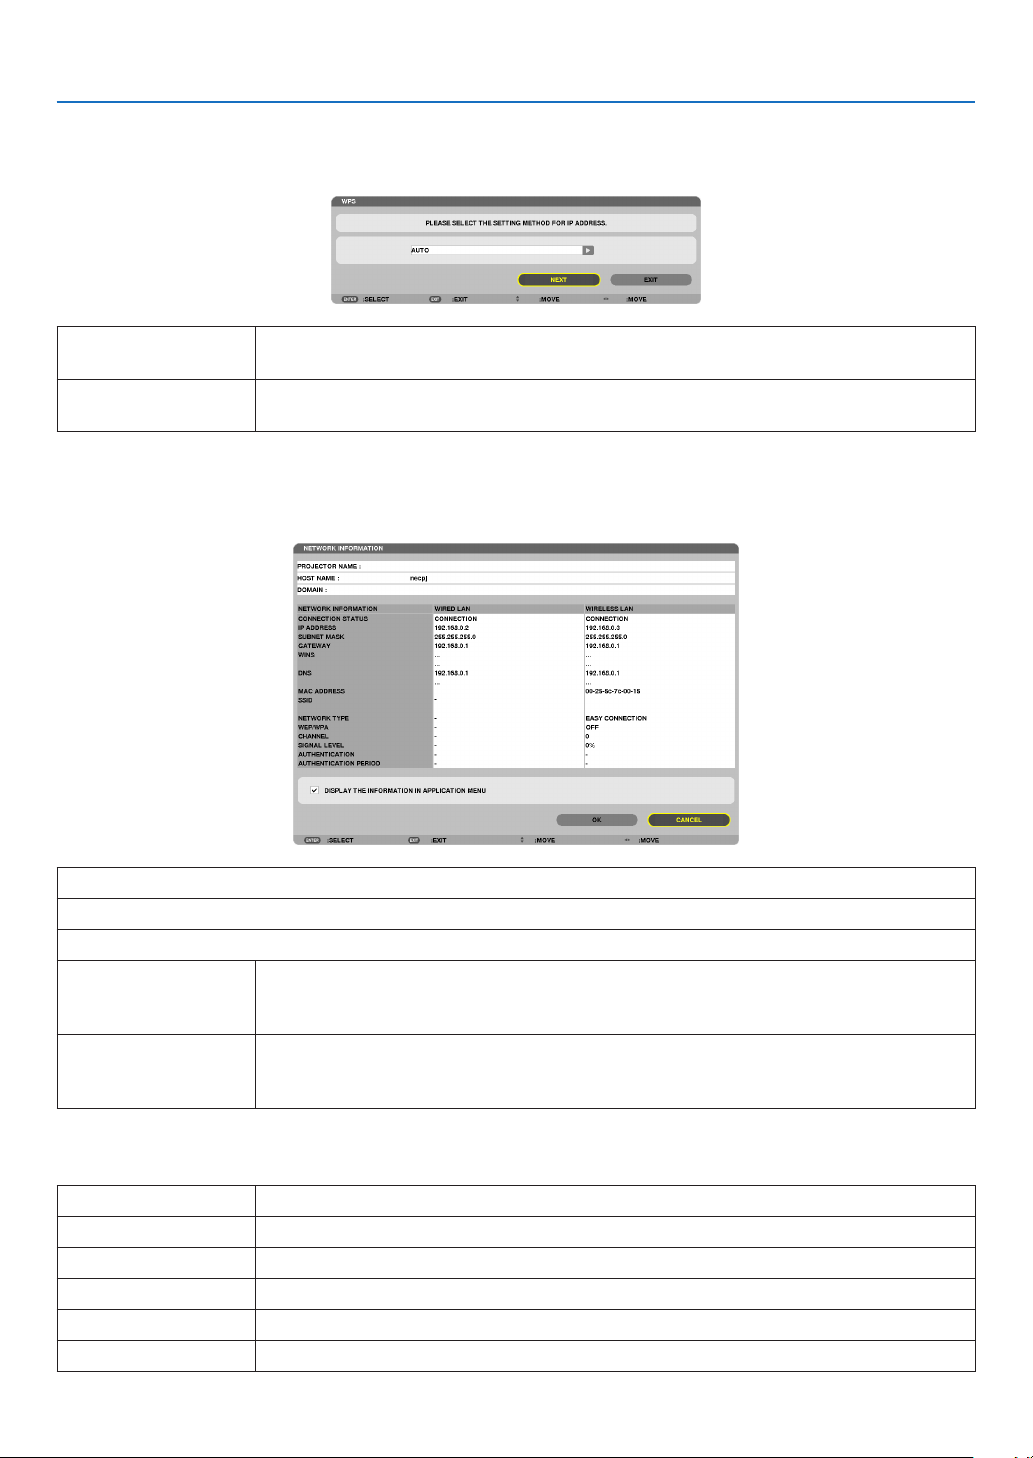
132
5. Using On-Screen Menu
WPS
WhenthewirelessLANaccesspointconnectedtotheprojectorsupportsWPS(Wi-FiProtectedSetupTM),youcan
usePINmethodorpushbuttonmethodtosetupthewirelessLANfortheprojector.
PINTYPESeta4-digitor8digit-PINcodeofWPSforyouraccesspointtocompletesettingforthe
SSIDsecurity.
PUSHBUTTONTYPEPressthededicatedbuttonoftheaccesspointandtheprojector’swirelessLANunitto
completesettingfortheSSIDsecurity.
NETWORKINFORMATION
Thefollowinginformationwillbedisplayedwhentheprojectorisconnectedtoanetwork(wiredLANorwireless
LAN).
PROJECTORNAME
HOSTNAME
DOMAIN
NETWORKINFOR-
MATION(WIRED
LAN/WIRELESSLAN)
CONNECTIONSTATUS,IPADDRESS,SUBNETMASK,GATEWAY,WINS,DNS,MAC
ADDRESS,SSID,NETWORKTYPE,WEP/WPA,CHANNEL,SIGNALLEVEL,AU-
THENTICATION,AUTHENTICATIONPERIOD
DISPLAYTHEINFOR-
MATIONINAPPLICA-
TIONMENU
Turnonoroffthedisplayofthenetworkinformation.
Themeaningsofthesestatusstatementsaredescribedbelow.
StatementAuthenticationstatus
AuthenticatedAuthenticationisdonecorrectly.
FailureAuthenticationfailed.
Authenticating…Authenticationisinprocess.
ExpiredThedigitalcerticateisexpired.Or[DATE,TIMEPRESET]isnotsetcorrectly.
TimeErrorThe[DATE,TIMEPRESET]hasbeencleared.Setthecorrectdateandtime.
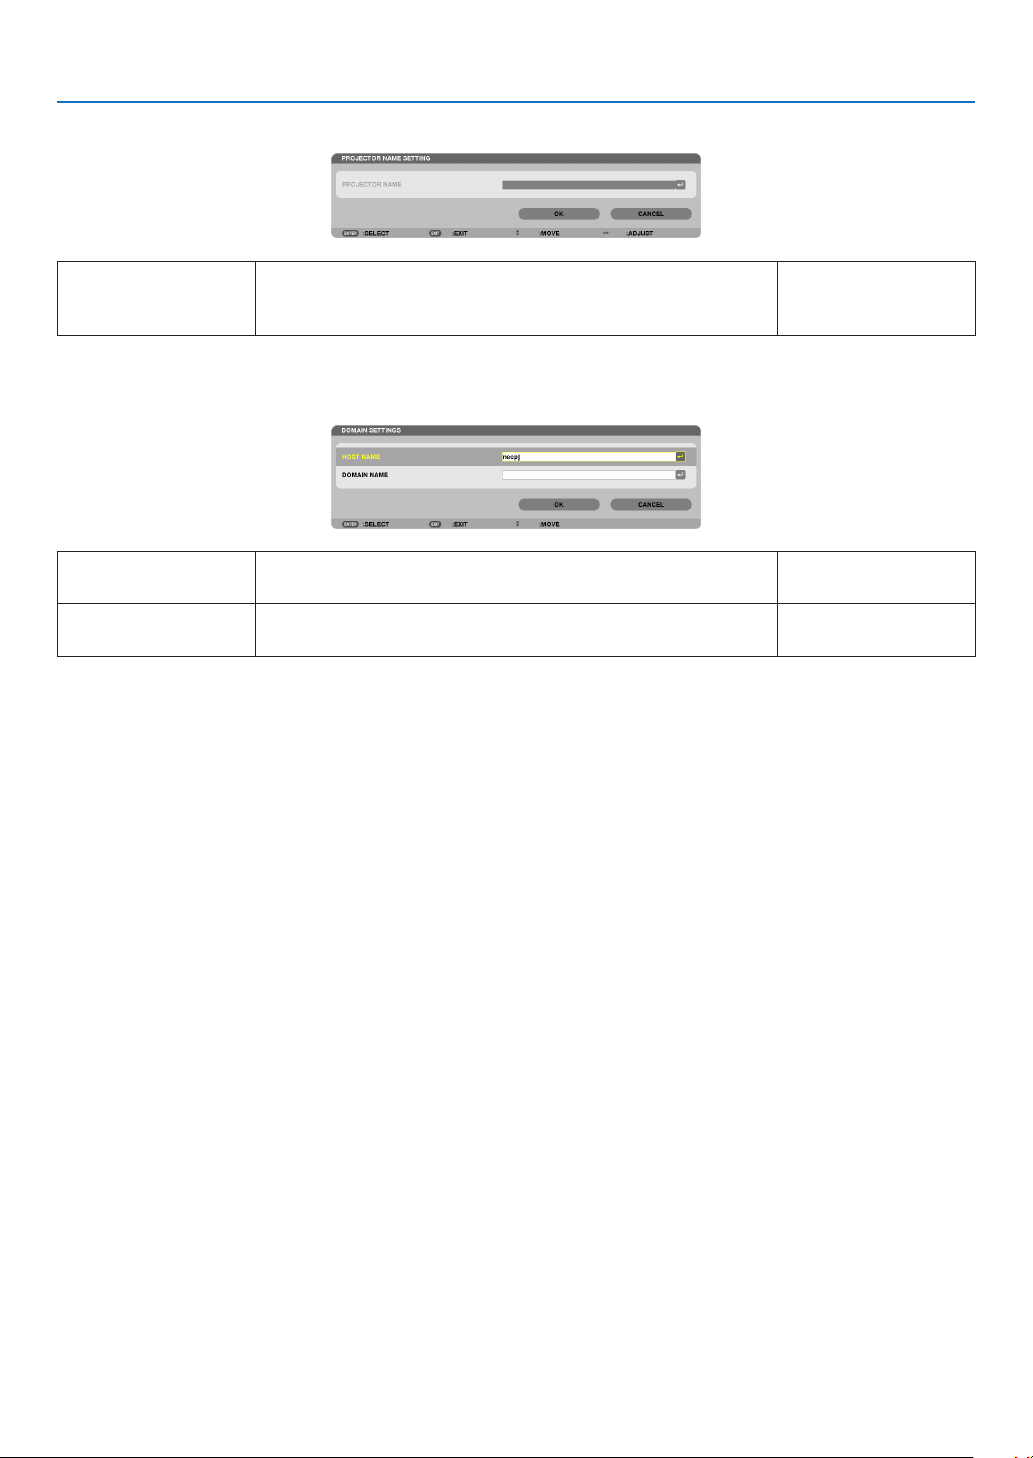
133
5. Using On-Screen Menu
PROJECTORNAME(ADVANCEDmenuonly)
PROJECTORNAMESetauniqueprojectorname.Upto16alphanu-
mericcharactersand
symbols
DOMAIN(ADVANCEDmenuonly)
Setahostnameanddomainnameoftheprojector.
HOSTNAMESetahostnameoftheprojector.Upto15alphanumeric
characters
DOMAINNAMESetadomainnameoftheprojector.Upto60alphanumeric
characters

134
5. Using On-Screen Menu
ALERTMAIL(ADVANCEDmenuonly)
ALERTMAILThisoptionwillnotifyyourcomputeroflampreplacetimeorerror
messagesviae-mailwhenusingwirelessorwiredLAN.
Placing a checkmark will turn on the Alert Mail feature.
Clearing a checkmark will turn off the Alert Mail feature.
Sampleofamessagetobesentfromtheprojector:
Thelampandltersareattheendofitsusablelife.Please
replacethelampandlters.
ProjectorName:NECProjector
LampHoursUsed:100[H]
—
HOSTNAMETypeinahostname.Upto15alphanumeric
characters
DOMAINNAMETypeinadomainnameofthenetworkconnectedtotheprojec-
tor.
Upto60alphanumeric
characters
SENDER'SAD-
DRESS
Specifythesender’saddress.Upto60alphanu-
mericcharactersand
symbols
SMTPSERVER
NAME
TypeintheSMTPservernametobeconnectedtotheprojec-
tor.
Upto60alphanumeric
characters
RECIPIENT'SAD-
DRESS1,2,3
Typeinyourrecipient’saddress.Upto60alphanu-
mericcharactersand
symbols
TESTMAIL
Sendatestmailtocheckifyoursettingsarecorrect.
NOTE:
•Ifyouenteredanincorrectaddressinatest,youmaynotreceivean
Alertmail.Shouldthishappen,checkiftheRecipient’sAddressis
correctlyset.
•Unlessanyoneofthe[SENDER'SADDRESS],[SMTPSERVER'S
NAME]or[RECIPIENT'SADDRESS1-3]isselected,[TESTMAIL]is
notavailable.
•Besuretohighlight[OK]andpresstheENTERbuttonbeforeexecuting
[TESTMAIL].
—
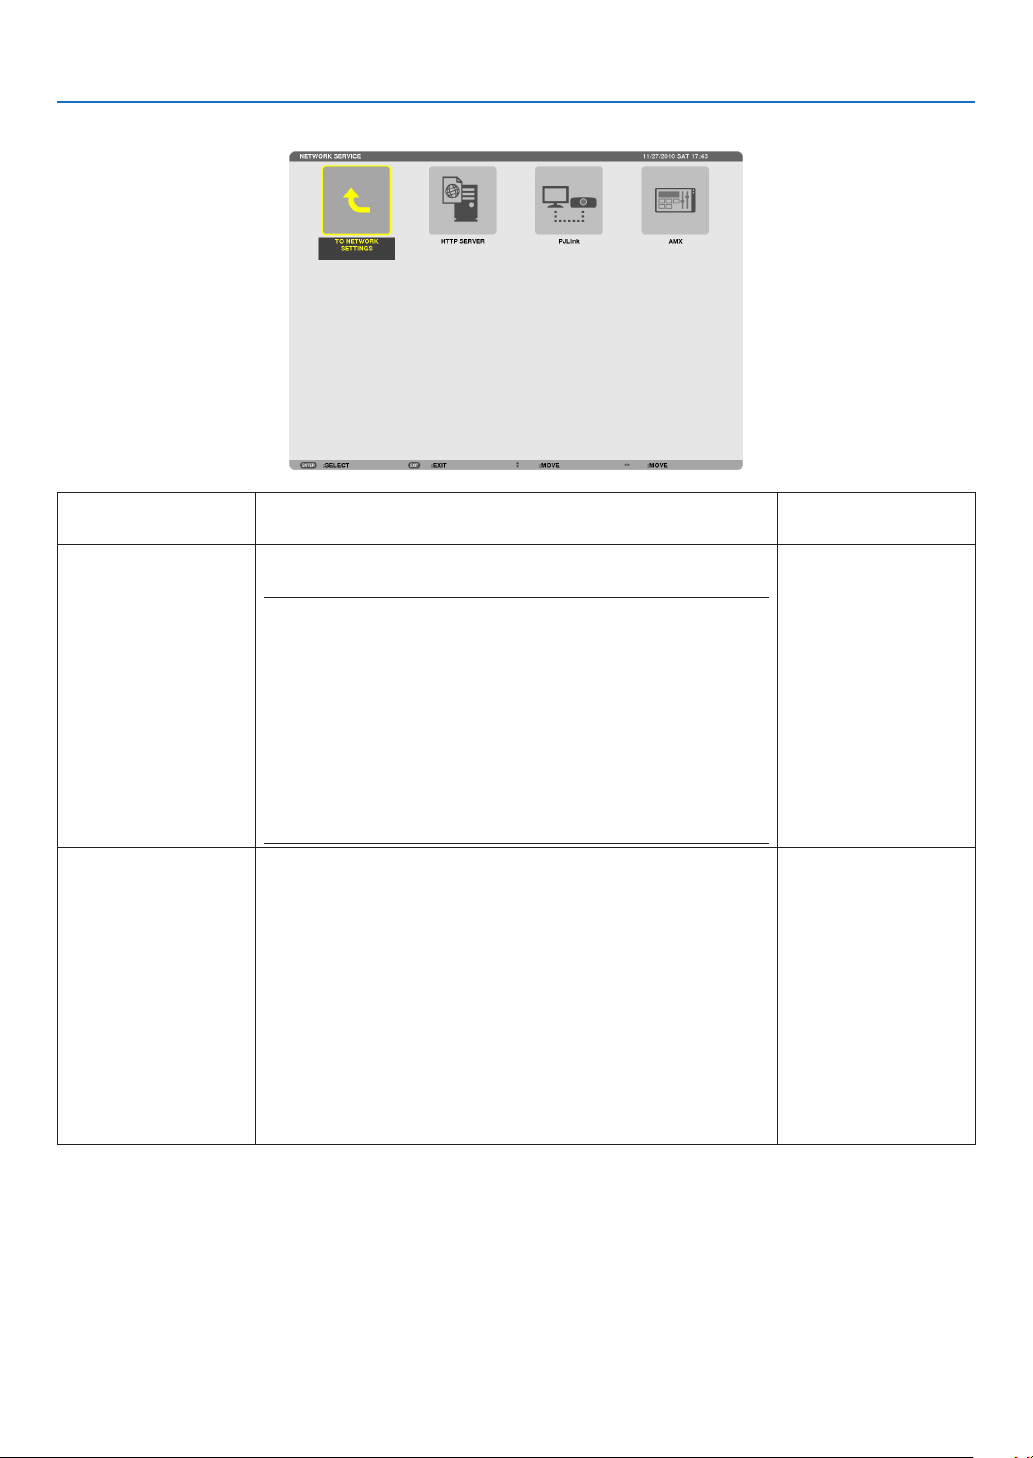
135
5. Using On-Screen Menu
NETWORKSERVICE(ADVANCEDmenuonly)
HTTPSERVERSetapasswordforyourHTTPserver.Upto10alphanumeric
characters
PJLink
Thisoptionallowsyoutosetapasswordwhenyouusethe
PJLinkfeature.
NOTE:
•Donotforgetyourpassword.However,ifyouforgetyourpassword,
consultwithyourdealer.
•WhatisPJLink?
PJLinkisastandardizationofprotocolusedforcontrollingprojectors
ofdifferentmanufacturers.Thisstandardprotocolisestablishedby
JapanBusinessMachineandInformationSystemIndustriesAssocia-
tion(JBMIA)in2005.
TheprojectorsupportsallthecommandsofPJLinkClass1.
•SettingofPJLinkwillnotbeaffectedevenwhen[RESET]isdonefrom
themenu.
Upto32alphanumeric
characters
AMX TurnonorofffordetectionfromAMXDeviceDiscoverywhen
connectingtothenetworksupportedbyAMX’sNetLinxcontrol
system.
TIP:
WhenusingadevicethatsupportsAMXDeviceDiscovery,allAMXNetLinx
controlsystemwillrecognizethedeviceanddownloadtheappropriate
DeviceDiscoveryModulefromanAMXserver.
Placing a checkmark will enable detecting the projector from AMX Device
Discovery.
Clearing a checkmark will disable detecting the projector from AMX
Device Discovery.
—
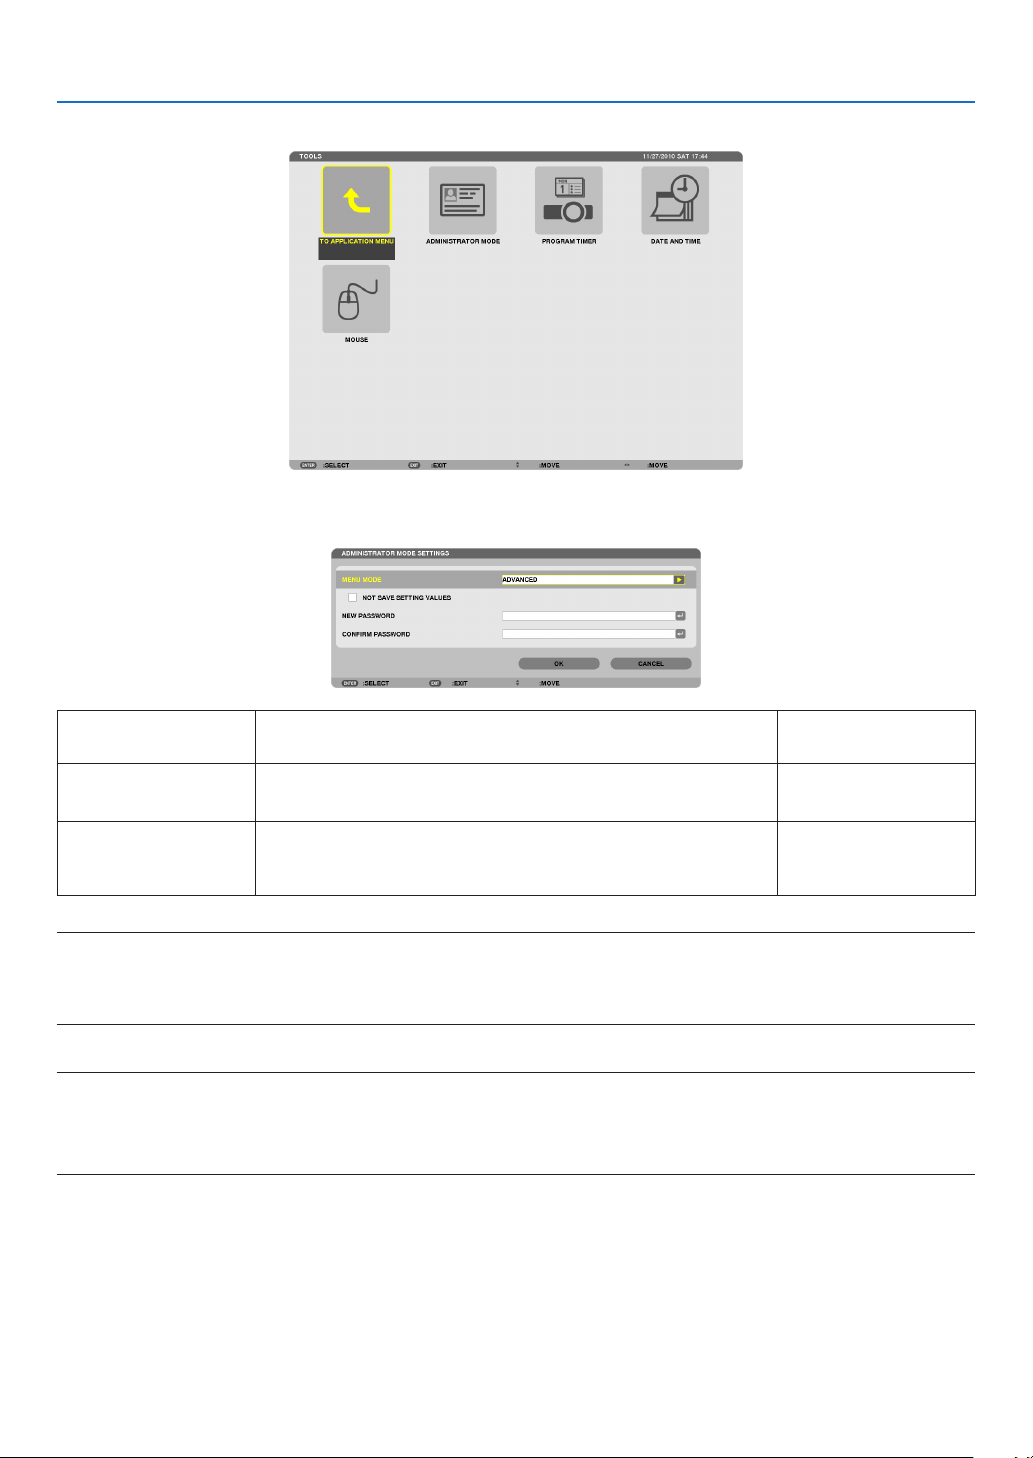
136
5. Using On-Screen Menu
TOOLS
ADMINISTRATOR MODE
ThisallowsyoutoselectMENUMODE,savesettings,andsetapasswordfortheadministratormode.
MENUMODESelecteither[BASIC]or[ADVANCED]menu.
(→page84)
—
NOTSAVESETTING
VALUES
Placing a check mark will not save your projector settings.
Clear this check box to save your projector settings.
—
NEWPASSWORD/
CONFIRMPASS-
WORD
Assignapasswordfortheadministratormode.Upto10alphanumeric
characters
NOTE:
When[LAST]isselectedfor[DEFAULTSOURCESELECT],placingacheckmarkfor[NOTSAVESETTINGVALUES]willforcibly
selectNETWORKforsourceateverypower-ontime.
Toavoidthis,select[AUTO]for[DEFAULTSOURCESELECT].
TIP:
ToreturntotheADVANCEDmenufromtheBASICmenu,dothefollowing:
1.UsetheSOURCEbuttononthecabinetorpresstheNETWORKbuttonontheremotecontroltoselect
[NETWORK]todisplaytheAPPLICATIONMENU.
2.Select[TOOLS]→[ADMINISTRATORMODE]→[MENUMODE]→[ADVANCEDMODE].

137
5. Using On-Screen Menu
PROGRAM TIMER
Thisoptionturnson/offtheprojectorandchangesvideosignals,andselectsECOmodeautomaticallyataspecied
time.
NOTE:
•Beforeusing[PROGRAMTIMER],makesurethatthe[DATEANDTIME]featureisset.(→page140)
•MakesurethattheprojectorisinthestandbyconditionwiththePOWERcordconnected.
•Theprojectorhasabuilt-inclock.Theclockwillkeepworkingforabouttwoweeksafterthemainpoweristurnedoff.Ifthemain
powerisnotsuppliedtotheprojectorfortwoweeksormore,thebuilt-inclockstopsworking.
•When[PROGRAMTIMER]isenabled,the[STANDBYMODE]settingbecomesinvalid.
Thismeansthattheprojectorisinthesameconditionwhenthe[NORMAL]isselectedfor[STANDBYMODE].
Setting a new program timer
1. On the PROGRAM TIMER screen, use the ▲ or ▼buttontoselect[SETTINGS]andpresstheENTERbut-
ton.
The [PROGRAM LIST] screen will be displayed.
2. Select a blank program number and press the ENTER button.
The [EDIT] screen will be displayed.
3. Make settings for each item as required.
ACTIVE .................. Place a check mark to enable the program.

138
5. Using On-Screen Menu
DAY ........................ Select days of the week for the program timer. To execute the program from Monday to Friday, select [MON-
FRI].To execute the program in everyday basis, select [EVERYDAY].
TIME ...................... Set the time to execute the program. Enter time in 24-hour format.
FUNCTION ............. Select a function to be executed. Selecting [POWER] will allow you to turn on or off the projector by setting
[ADVANCED SETTINGS]. Selecting [SOURCE] will allow you to select a video source by setting [ADVANCED
SETTINGS]. Selecting [ECO MODE] will allow you to select [ECO MODE] by setting [ADVANCED SET-
TINGS].
ADVANCED SETTINGS
.............................. Select power on/off, a type of video source, or ECO MODE for the selected item in [FUNCTION].
REPEAT .................. Place a check mark to repeat the program continuing basis. To use the program this week only, clear the
check mark.
4.Select[OK]andpresstheENTERbutton.
This will complete the settings.
You will be returned to the [PROGRAM LIST] screen.
5.Select[BACK]andpresstheENTERbutton.
You will be returned to the [PROGRAM TIMER] screen.
6.Select[OK]andpresstheENTERbutton.
You will be returned to the [TOOLS] screen.
NOTE:
•Upto30differenttimersettingscanbeprogrammed.
•When[PROGRAMTIMER]isturnedon,the[STANDBYMODE]settingisignored.
•TheProgramTimerisexecutedonasettimebasis,notinaprogrambasis.
•Oncetheprogramnotmarkedwithacheckin[REPEAT]hasbeenexecuted,thecheckmarkinthe[ACTIVE]checkboxwillbe
clearedautomaticallyandtheprogramwillbedisabled.
•Whentheon-timeandtheoff-timesetforthesametime,theoff-timesettingwilltakepreference.
•Twodifferentsourcesaresetforthesametime,thelargerprogramnumberwilltakepreference.
•Theon-timesettingwillnotbeexecutedwhilethecoolingfansarerunningoranerrorisoccurring.
•Iftheoff-timesettingisexpiredundertheconditioninwhichthepoweroffisnotpossible,theoff-timersettingwillnotbeexecuted
untilthepoweroffbecomespossible.
•Programsnotmarkedwithacheckmarkin[ACTIVE]ofthe[EDIT]screenwillnotbeexecutedeveniftheProgramTimeris
enabled.
•Whentheprojectoristurnedonbyusingtheprogramtimerandifyouwanttoturnofftheprojector,settheoff-timeordoit
manuallysoasnottoleavetheprojectoronforalongperiodoftime.

139
5. Using On-Screen Menu
Activating the program timer
1.Select[ENABLE]onthe[PROGRAMTIMER]screenandpresstheENTERbutton.
The [ENABLE] will be activated.
2.Select[OK]andpresstheENTERbutton.
The [PROGRAM TIMER] screen will be changed to the [TOOL] screen.
NOTE:
•Clearing[ENABLE]willdisabletheProgramTimerevenwhenaprogramismarkedwithacheckmarkon[PROGRAMLIST]
screen.
•When[ENABLE]isselected,the[PROGRAMLIST]cannotbeedited.Toedittheprograms,select[ENABLE]toturnofftheProgram
Timer.
Changing the programmed settings
1.Onthe[PROGRAMLIST]screen,selectaprogramyouwanttoeditandpresstheENTERbutton.
2.Changethesettingsonthe[EDIT]screen.
3.Select[OK]andpresstheENTERbutton.
The programmed settings will be changed.
You will be returned to the [PROGRAM LIST] screen.
Changing the order of programs
1.Onthe[PROGRAMLIST]screen,selectaprogramwhoseorderyouwanttochangeandpressthe▶ but-
ton.
2. Press the
▼ button to select ▲ or ▼.
3. Press the ENTER button a few times to select a row to which you wish to move the program.
The order of the programs will be changed.
Deleting the programs
1.Onthe[PROGRAMLIST]screen,selectaprogramnumberyouwanttodeleteandpressthe▶ button.
2. Press the
▼buttontoselect[DELETE].
3. Press the ENTER button.
The confirmation screen will be displayed.
4.Select[YES]andpresstheENTERbutton.
The program will be deleted.
This will complete deleting the program.

140
5. Using On-Screen Menu
DATE ANDTIME
Youcansetthecurrenttime,month,date,andyear.
NOTE:Theprojectorhasabuilt-inclock.Theclockwillkeepworkingforabout2weeksafterthemainpoweristurnedoff.Ifthe
mainpowerisofffor2weeksormore,thebuilt-inclockwillcease.Ifthebuilt-inclockceases,setthedateandtimeagain.The
built-inclockwillnotceasewhileinthestandbymode.
TIME ZONE SETTINGS .............. Select your time zone.
DATE AND TIME SETTINGS ...... Set your current date (MM/DD/YYYY) and time (HH:MM).
INTERNET TIME SERVER ......... If you place a check mark, the projector’s built-in clock will be synchronized with an Internet
time server in every 24 hours and at the time of projector’s startup.
UPDATE .................................... Synchronizes the projector’s built-in clock immediately. The UPDATE button is not available
unless the INTERNET TIME SERVER check box is turned on.
SUMMER TIME SETTINGS ....... If you place a check mark, the clock for daylight saving will be enabled.
MOUSE
ThisoptionletsyoutochangeyourUSBmousesettings.ThemousesettingsfeatureisavailableforUSBmouseonly.
Choosethesettingsyouwant:
MOUSE BUTTON ...................... [RIGHT HAND] or [LEFT HAND]
MOUSE SENSITIVITY ............... [FAST], [MEDIUM] or [SLOW]
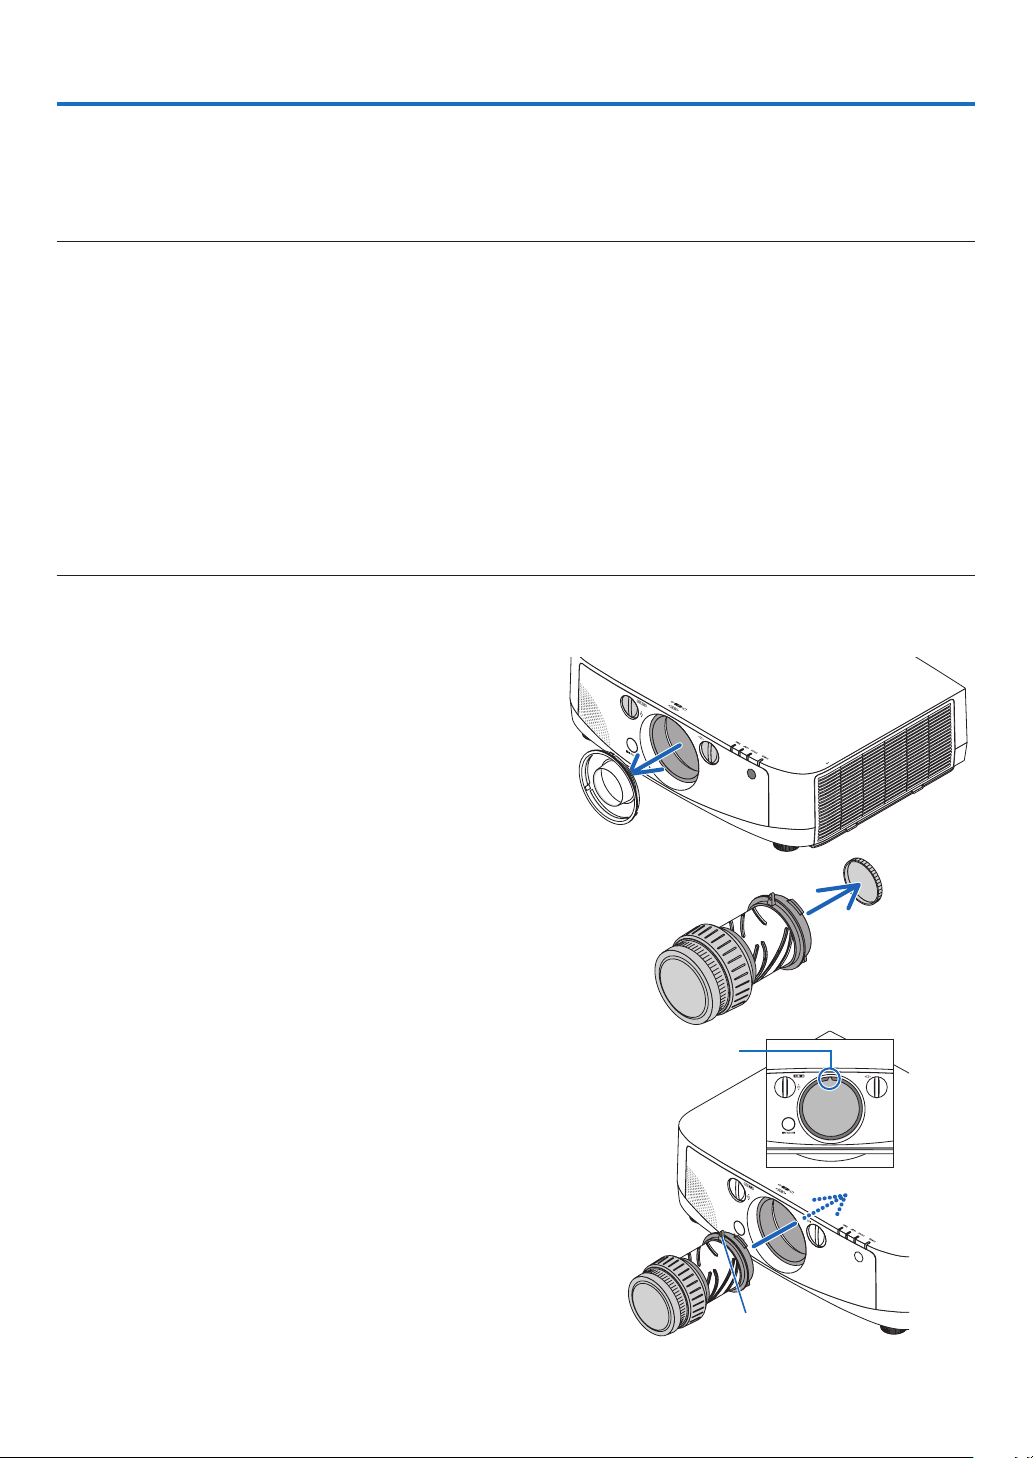
141
6. Connecting to Other Equipment
Mounting a lens (sold separately)
Fiveseparatebayonetstylelensescanbeusedwiththisprojector.ThedescriptionsherearefortheNP13ZL(2x
zoom)lens.Mountotherlensesinthesamemanner.
NOTE:
•Theprojectorandlensesaremadeofprecisionparts.Donotsubjectthemtoshockorexcessiveforces.
•Removetheseparatelysoldlenswhenmovingtheprojector.Ifnot,thelenscouldbesubjecttoshockwhiletheprojectorisbeing
moved,damagingthelensandthelensshiftmechanism.
•Turnoffthepowerandwaitforthecoolingfantostopbeforemountingorremovingthelens.
•Nevertouchthelenssurfacewhiletheprojectorisoperating.
•Beverycarefulnottoletdirt,grease,etc.,onthelenssurfaceandnottoscratchthelenssurface.
•Performtheseoperationsonaatsurfaceoverapieceofcloth,etc.,topreventthelensfromgettingscratched.
•Whenleavingthelensofftheprojectorforlongperiodsoftime,mountthedustcapontheprojectortopreventdustordirtfrom
gettinginside.
•Ifyouhavemultipleprojectors,becarefulofthefollowing:
-WhenmountingalensdesignedexclusivelyforthisprojectorontoanotherprojectorintheNPseries,besuretoremovethe
lensattachmentbeforemountingthelensontheprojector.Thelenscannotbemountedifitsattachmentison.Forthetypes
oflensesthatcanbemountedandinstructionsonremovingthem,seethelense’soperatinginstructions.
-Othertypesoflensescannotbemountedonthisprojector.
Mounting the lens
1. Remove the dust cap from the projector.
2. Remove the lens cap on the back of the lens.
3. Insert the lens onto the projector with the yellow-marked
protrusion on the lens facing upwards.
There is a positioning slit on the projector’s lens insertion slot.
Insert the lens slowly all the way in, keeping the positioning
slit at the same angle.
Guiding notch
Yellow mark
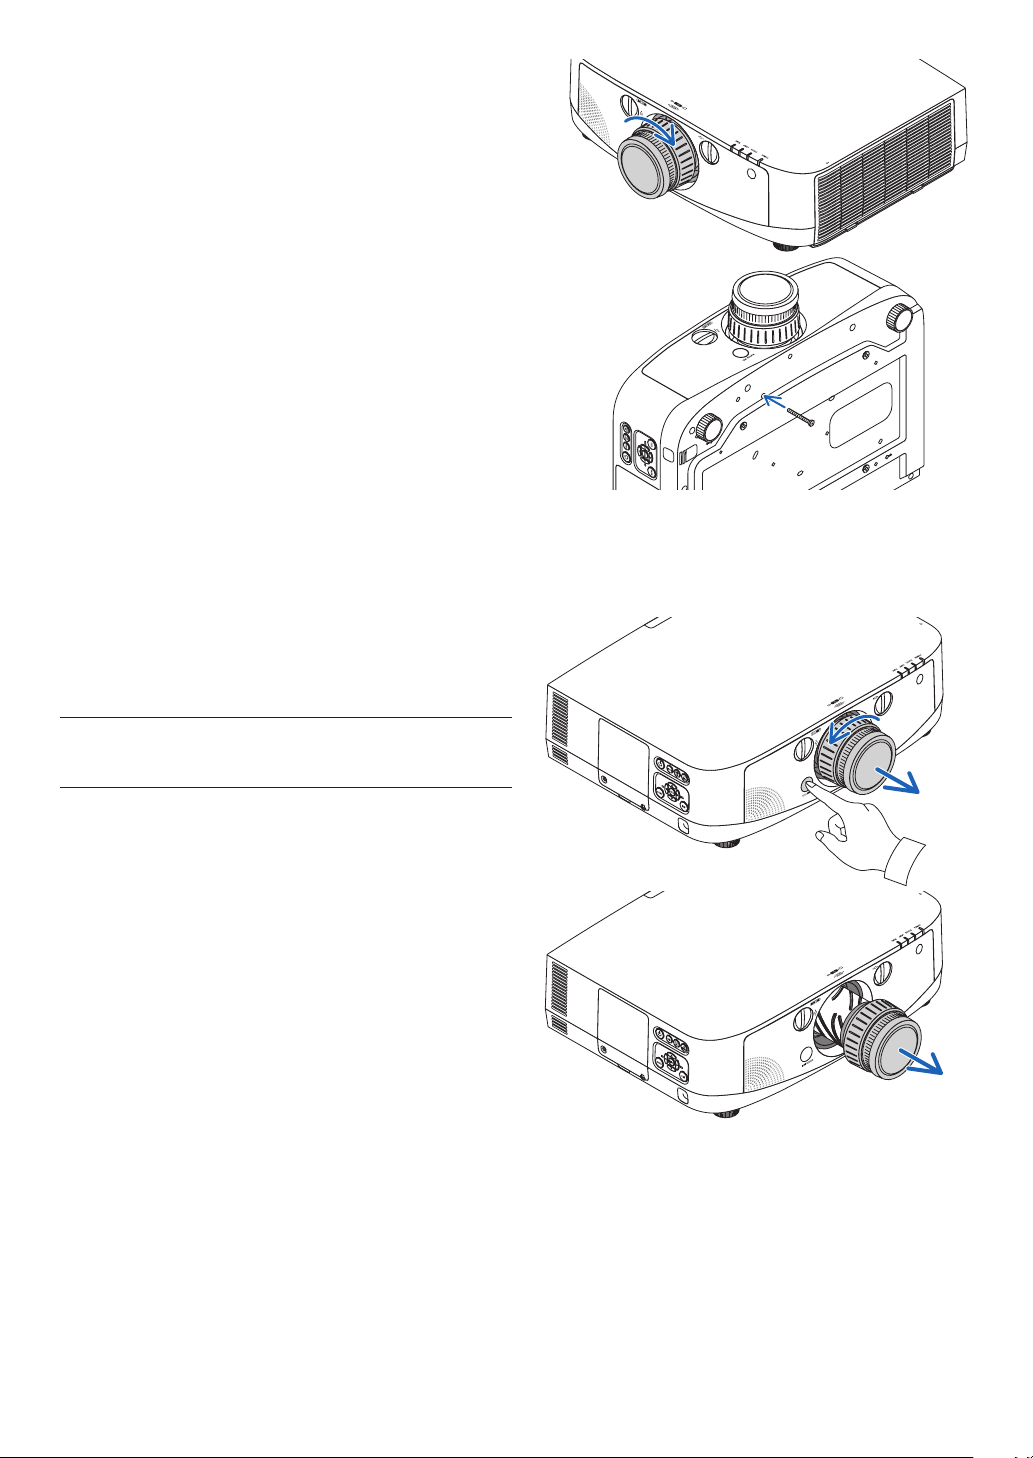
142
4. Turn the lens clockwise.
Turn until a click is heard.
The lens is now fastened onto the projector.
TIP:Mountingthelenstheftpreventionscrew
Fastenthelenstheftpreventionscrewincludedwiththeprojectortothe
bottomoftheprojectorsothatthelenscannotberemovedeasily.
Removing the lens
1. While pressing the lens release button on the
projector’s front panel fully in, turn the lens
counterclockwise.
The lens comes off.
NOTE:Ifthelenscannotberemovedwhenthelensrelease
buttonispressed,checkwhetherthelenstheftpreventionscrew
ismounted.
2. Slowly pull the lens off the projector.
- After removing the lens, mount the lens caps (front
and back) included with the lens before storing the
lens.
- If no lens is going to be mounted on the projector,
mount the dust cap included with the projector.
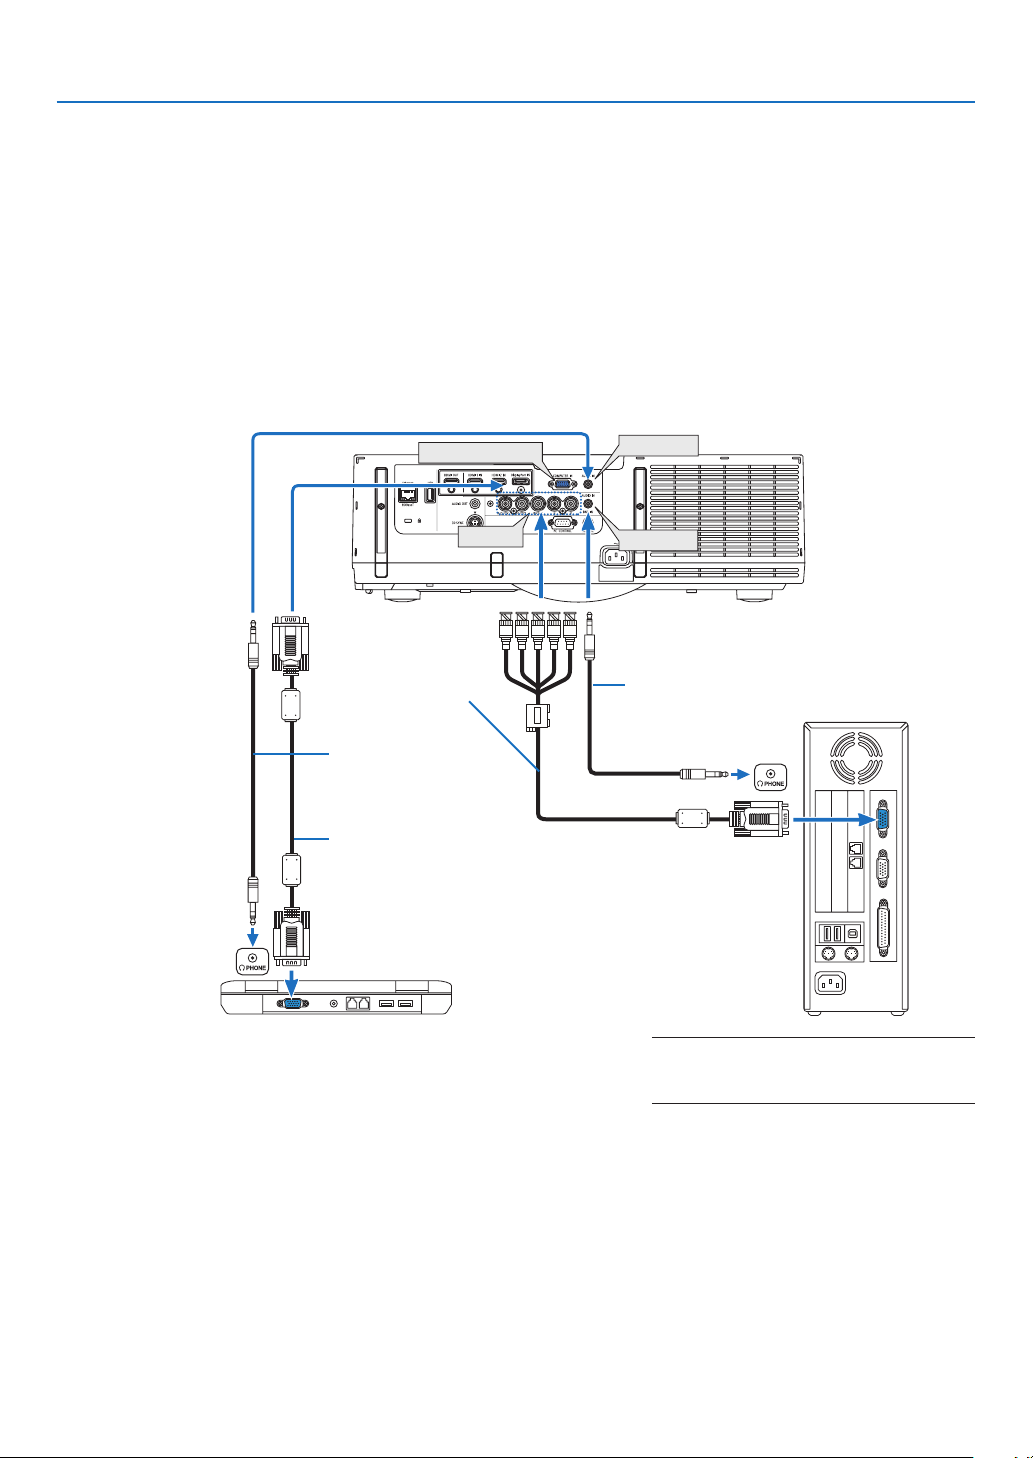
143
6. Installation and Connections
COMPUTER IN
BNC IN
AUDIO IN
AUDIO IN
Computer cable (VGA) (supplied)
To mini D-Sub 15-pin connector on the
projector. It is recommended that you use a
commercially available distribution amplifier
if connecting a signal cable longer than the
cable supplied.
NOTE:ForMacintosh,useacommerciallyavail-
ablepinadapter(notsupplied)toconnectto
yourMac’svideoport.
Stereo mini-plug
audio cable (not
supplied)
RGB - to - BNC cable
(not supplied)
Stereo mini-plug
audio cable (not
supplied)
Making Connections
Theprojectorcanbeconnectedtoacomputerusingthecomputercable(included),aBNCcable(5-coretype)
(commerciallyavailable),HDMIcable(commerciallyavailable)orDisplayPortcable(commerciallyavailable).
Analog RGB signal connection
•Connecttheincludedcomputercablebetweenthecomputer’sdisplayoutputconnector(miniD-Sub15-pin)and
theprojector’sComputer1orComputer2videoinputconnector.
•Whenconnectingthecomputer’sdisplayoutputconnector(miniD-Sub15-pin)andtheprojector’sComputer3
videoinputconnector,useaBNCcable(5-core)→miniD-Sub15-pinconvertercable.
•Selectthesourcenameforitsappropriateinputconnectorafterturningontheprojector.
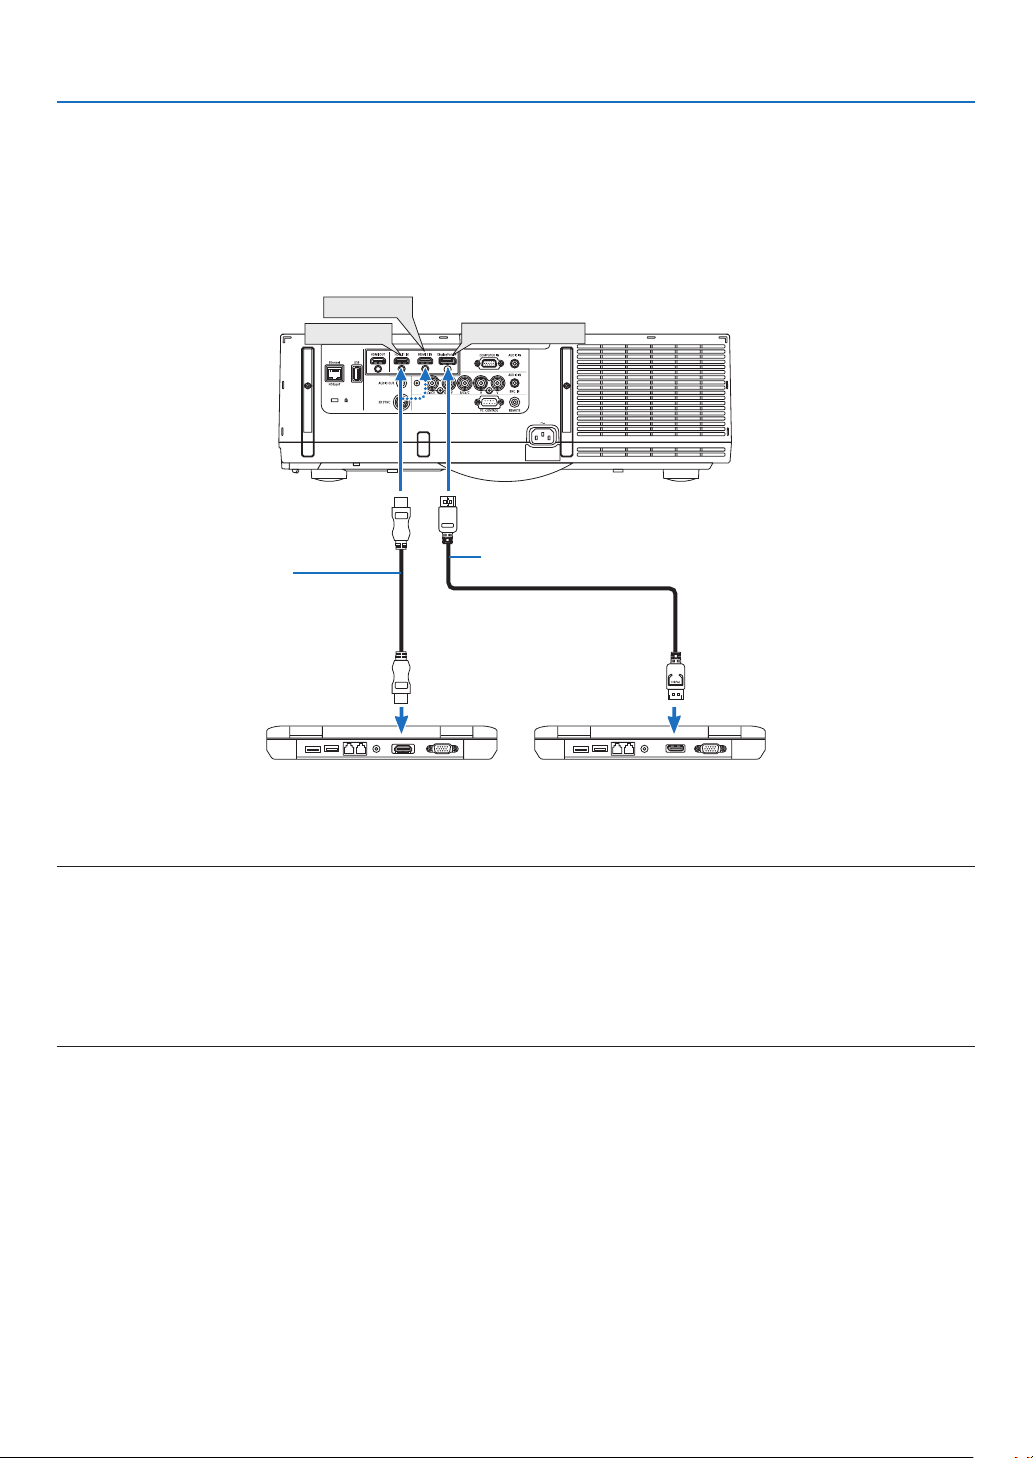
144
6. Installation and Connections
DisplayPort IN
HDMI 1 IN
HDMI 2 IN
Digital RGB signal connection
•ConnectacommerciallyavailableHDMIcablebetweenthecomputer’sHDMIoutputconnectorandtheprojector’s
HDMIinputconnector.
•ConnectacommerciallyavailableDisplayPortcablebetweenthecomputer’sDisplayPortoutputconnectorand
theprojector’sDisplayPortinputconnector.
•Selectthesourcenameforitsappropriateinputconnectorafterturningontheprojector.
NOTE:
•Turnoffthepowerofthecomputerandprojectorbeforeconnecting.
•Lowerthecomputer’svolumesettingbeforeconnectinganaudiocabletotheheadphonesconnector.Whenusingwithacomputer
connectedtotheprojector,adjustthevolumeofboththeprojectorandcomputertosettheappropriatevolumelevel.
•Ifthecomputerhasamini-jacktypeaudiooutputconnector,werecommendconnectingtheaudiocabletothatconnector.
•ThisprojectordoesnotsupportNECvideounit(modelISS-6020)videodecodedoutputs.
•Whenavideodeckisconnectedviaascanconverter,etc.,thedisplaymaynotbecorrectduringfast-forwardingand
rewinding.
TIP
•TheComputer1andComputer2videoinputconnectorssupportWindowsPlugandPlay.TheComputer3videoinputconnector
doesnotsupportWindowsPlugandPlay.
•AMacintoshsignaladapter(commerciallyavailable)mayberequiredtoconnectaMacintoshcomputer.
ToconnectaMacintoshcomputerequippedwithaMiniDisplayPorttotheprojector,useacommerciallyavailableMiniDisplayPort
→DisplayPortconvertercable.
HDMI cable (not supplied)
DisplayPort cable (not supplied)
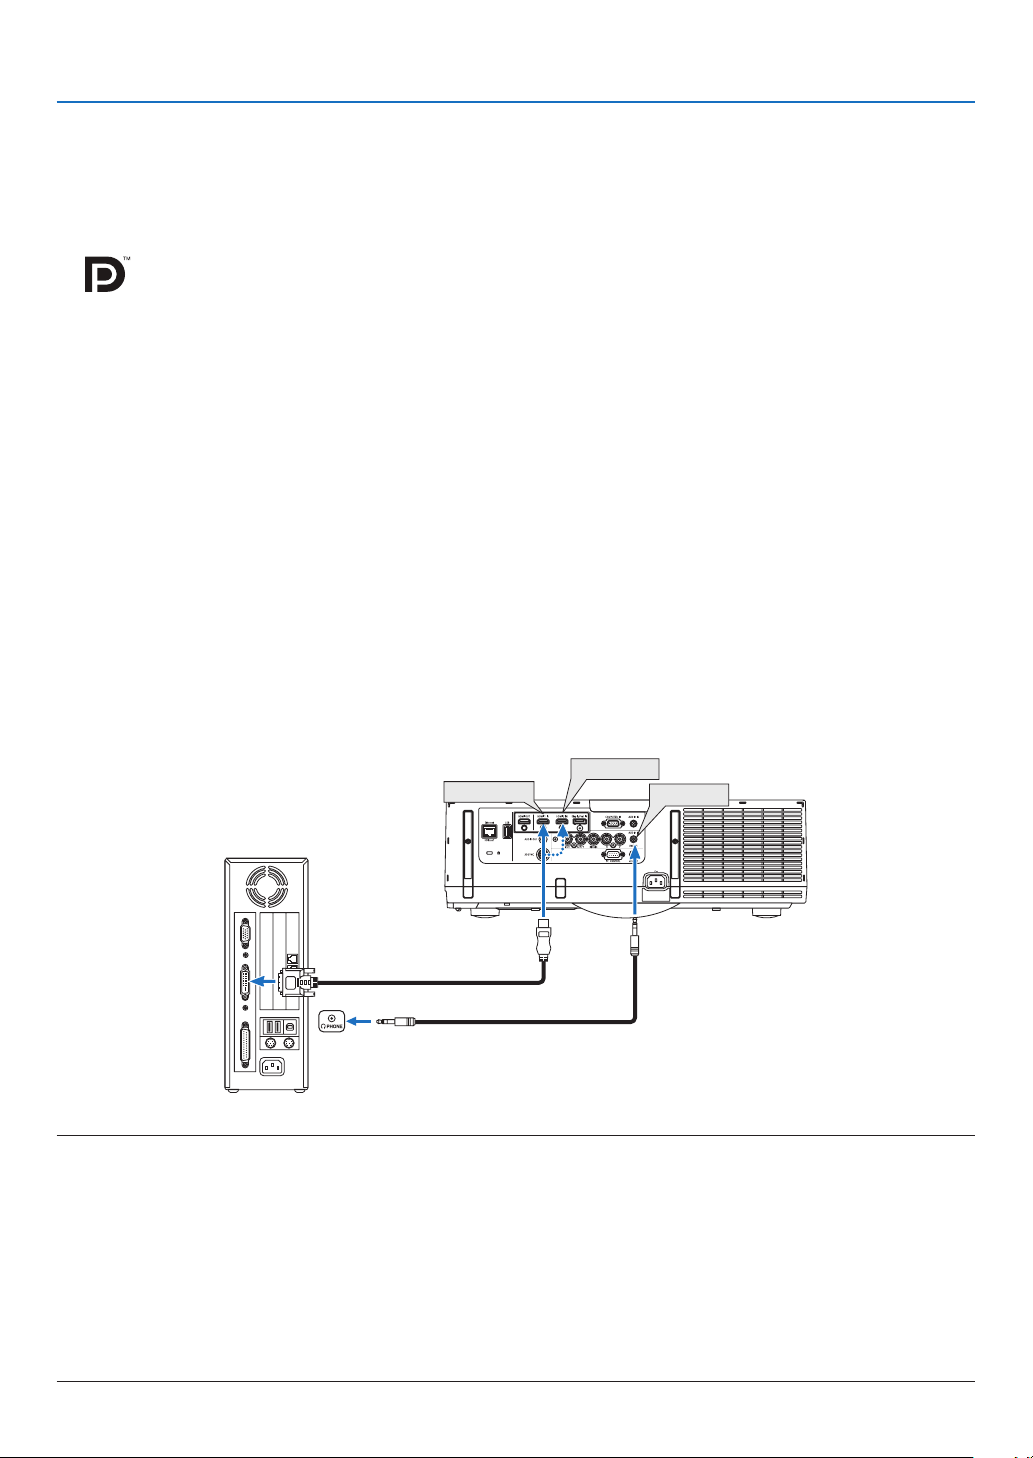
145
6. Installation and Connections
CautionswhenconnectinganHDMIcable
•UseacertiedHighSpeedHDMI
®
Cable or HighSpeedHDMI
®
CablewithEthernet.
CautionswhenconnectingaDisplayPortcable
•UseacertiedDisplayPortcable.
•Dependingonthecomputer,sometimemayberequireduntiltheimageisdisplayed.
•SomeDisplayPortcables(commerciallyavailable)havelocks.
•Todisconnectthecable,pressthebuttononthetopofthecable’sconnector,thenpullthecableout.
•NopowerissuppliedfromtheDisplayPortinputconnectortotheconnecteddevice.
•WhensignalsfromadevicethatusesasignalconverteradapterareconnectedtotheDisplayPortinputconnector,
insomecasestheimagemaynotbedisplayed.
•WhentheHDMIoutputofacomputerisconnectedtotheDisplayPortinputconnector,useaconverter(commercially
available).
CautionswhenusingaDVIsignal
•WhenthecomputerhasaDVIoutputconnector,useacommerciallyavailableconvertercabletoconnectthe
computertotheprojector’sHDMIinputconnector(onlydigitalvideosignalscanbeinput).Also,connectthe
computer’saudiooutputtotheprojector’sComputer2audioinputconnector.Inthiscase,switchtheHDMIsetting
aton-screenmenu’saudioselectionontheprojectorto[BNC].(→page
109)
Toconnectthecomputer’sDVIoutputconnectortotheprojector’sDisplayPortinputconnector,useacommercially
availableconverter.
HDMI 1 IN
HDMI 2 IN
AUDIO IN
NOTE:WhenViewingaDVIDigitalSignal
•UseaDVI-to-HDMIcablecompliantwithDDWG(DigitalDisplayWorkingGroup)DVI(DigitalVisualInterface)revision1.0stan-
dard.Thecableshouldbewithin197"/5mlong.
•TurnofftheprojectorandthePCbeforeconnectingtheDVI-to-HDMIcable.
•ToprojectaDVIdigitalsignal:Connectthecables,turntheprojectoron,thenselecttheHDMIinput.Finally,turnonyourPC.
Failuretodosomaynotactivatethedigitaloutputofthegraphicscardresultinginnopicturebeingdisplayed.Shouldthishappen,
restartyourPC.
•SomegraphicscardshavebothanalogRGB(15-pinD-Sub)andDVI(orDFP)outputs.Useofthe15-pinD-Subconnectormay
resultinnopicturebeingdisplayedfromthedigitaloutputofthegraphicscard.
•DonotdisconnecttheDVI-to-HDMIcablewhiletheprojectorisrunning.Ifthesignalcablehasbeendisconnectedandthen
reconnected,animagemaynotbecorrectlydisplayed.Shouldthishappen,restartyourPC.
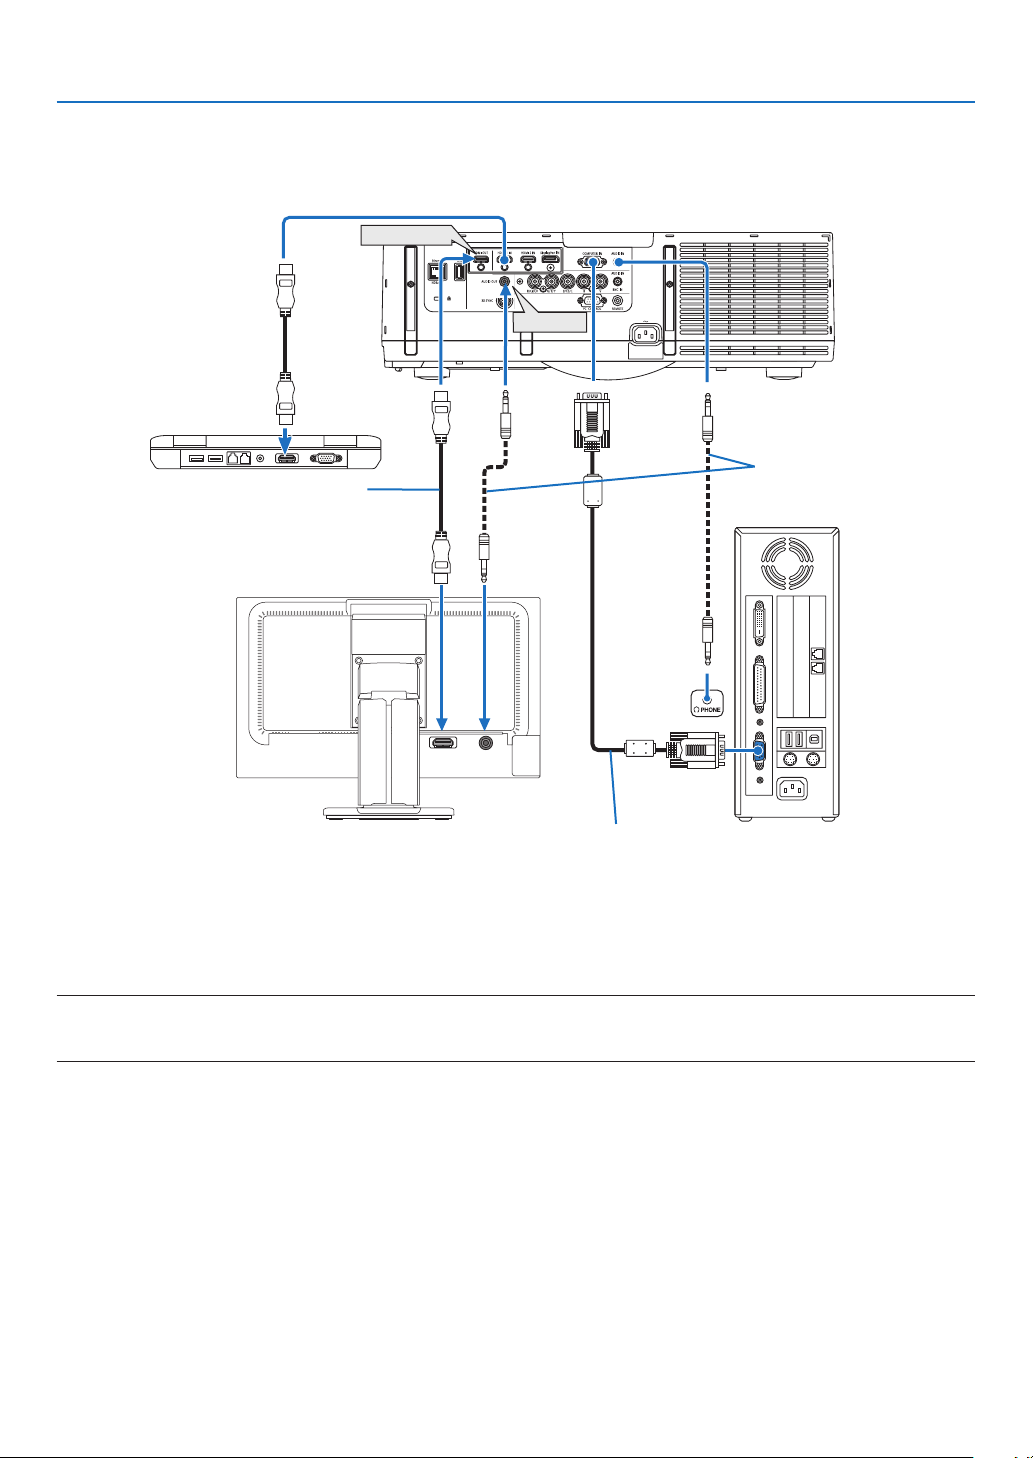
146
6. Installation and Connections
HDMI IN
AUDIO IN
HDMI OUT
AUDIO OUT
Connecting an External Monitor
Youcanconnectaseparate,externalmonitortoyourprojectortosimultaneouslyviewonamonitorthecomputer
analogimageyou’reprojecting.
NOTE:
•Daisychainconnectionisnotpossible.
•Whenaudioequipmentisconnected,theprojectorspeakerisdisabled.
Computer cable (VGA) (supplied)
Stereo mini-plug audio cable
(not supplied)
HDMI cable (not supplied)

147
6. Installation and Connections
Connecting Your DVD Player or Other AV Equipment
ConnectingBNCInput
•Selectthesourcenameforitsappropriateinputconnectorafterturningontheprojector.
NOTE:TheAUDIOINLandRjacks(RCA)aresharedbetweentheVideoandS-Videoinputs.
NOTE:RefertoyourVCRowner’smanualformoreinformationaboutyourequipment’svideooutputrequirements.
NOTE:
•AnimagemaynotbedisplayedcorrectlywhenaVideoorS-Videosourceisplayedbackinfast-forwardorfast-rewindviaascan
converter.
•Videosignalscanbeprojectedwhenavideocable(commerciallyavailable)isconnectedtotheComputer3videoinputconnector’s
G/Yconnector.
Inthiscase,settheon-screenmenu’sSETUP→OPTION(1)→SIGNALSELECT(COMP3)to[VIDEO]andselectComputer3for
theinputselection.
CV YC
BNC
(
C
)
IN
AUDIO IN
BNC
(
CV
)
IN
BNC
(
Y
)
IN
Audio cable (not supplied)
BNC cable (not supplied)
Audio equipment
Audio cable (not supplied)
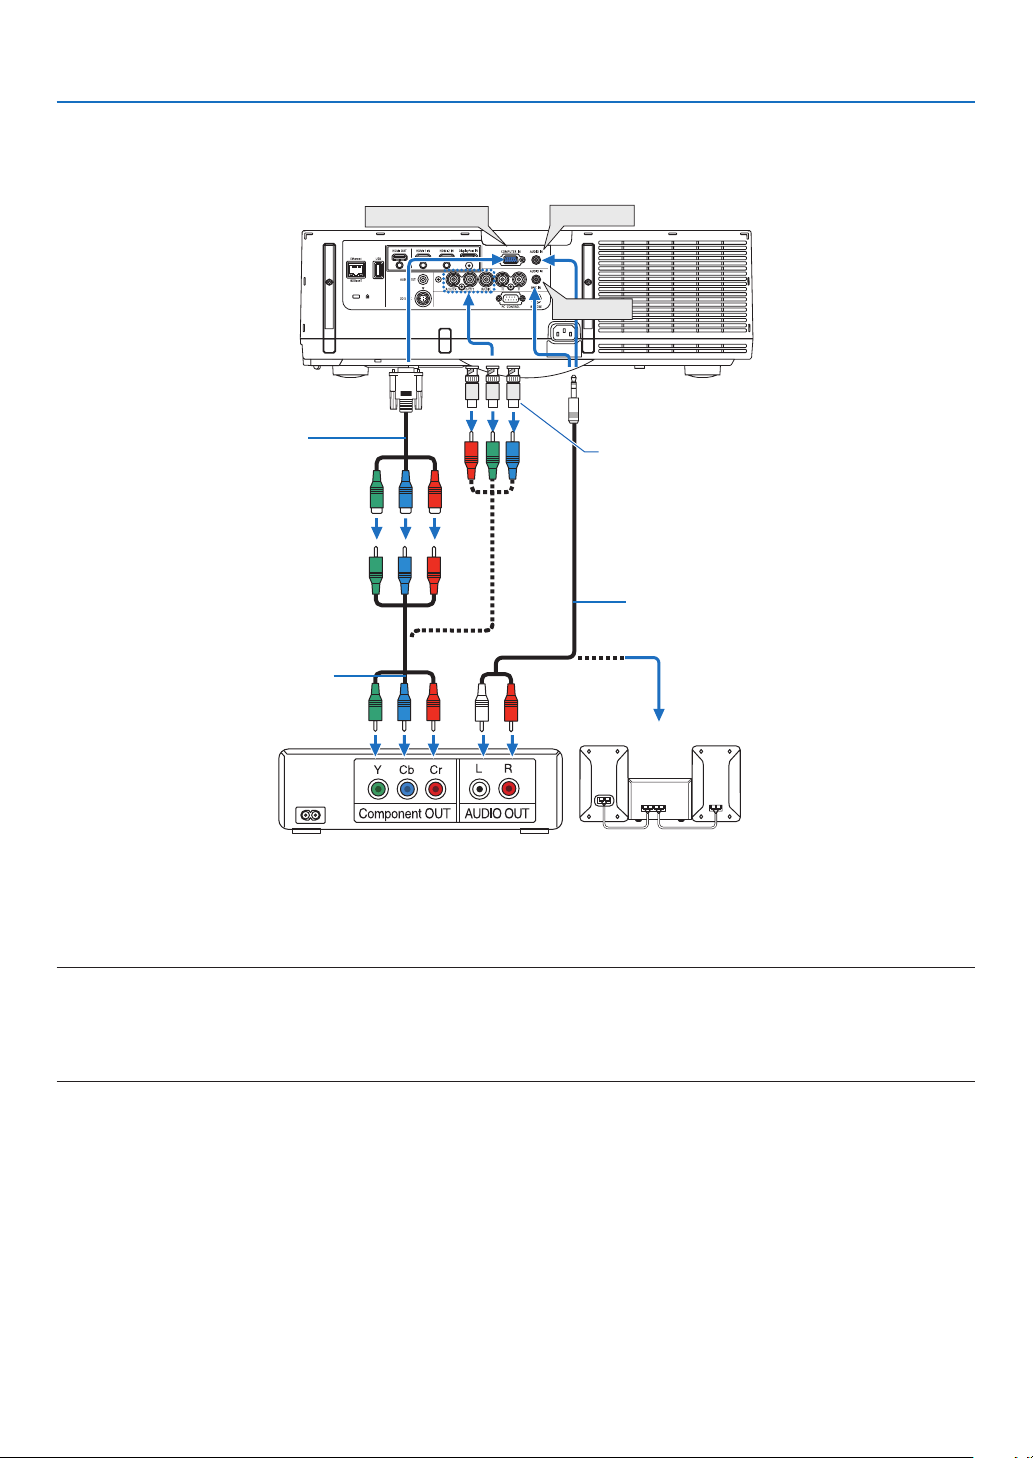
148
6. Installation and Connections
Connecting Component Input
•Selectthesourcenameforitsappropriateinputconnectorafterturningontheprojector.
NOTE:
•Normallythecomputersignalandcomponentsignalareidentiedandswitchedautomatically.Ifthesignalcannotbeidentied,
however,selectthesignalat[ADJUST]→[VIDEO]→[SIGNALTYPE]ontheprojector’son-screenmenu.Select“COMPUTER”or
“VIDEO”fortheComputer3videoinputconnectorat[SETUP]→[OPTION(1)]→[SIGNALSELECT(COMP)](→page109).
•ToconnecttoavideodevicewithaDconnector,usethesoldseparatelyDconnectorconverteradapter(modelADP-DT1E).
AUDIO IN
COMPUTER IN
AUDIO IN
15-pin - to - RCA (female) × 3
cable adapter (ADP-CV1E)
RCA (female) - to - BNC (male)
connector (not supplied)
Stereo mini plug - to - RCA audio
cable (not supplied)
Component video RCA × 3 cable
(not supplied)
DVD player
Audio Equipment

149
6. Installation and Connections
HDMI 1 IN
HDMI 2 IN
Connecting HDMI Input
YoucanconnecttheHDMIoutputofyourDVDplayer,harddiskplayer,Blu-rayplayer,ornotebooktypePCtothe
HDMIINconnectorofyourprojector.
NOTE:TheHDMIINconnectorsupportsPlug&Play(DDC2B).
Audio cable (not supplied)
HDMI cable (not supplied)
Use High Speed HDMI
®
Cable.
TIP:ForusersofaudiovideoequipmentwithanHDMIconnector:
Select“Enhanced”ratherthan“Normal”ifHDMIoutputisswitchablebetween“Enhanced”and“Normal”.
Thiswillprovideimprovedimagecontrastandmoredetaileddarkareas.
Formoreinformationonsettings,refertotheinstructionmanualoftheaudiovideoequipmenttobeconnected.
•WhenconnectingtheHDMIINconnectoroftheprojectortotheDVDplayer,theprojector’svideolevelcanbe
madesettingsinaccordancewiththeDVDplayer’svideolevel.Inthemenuselect[HDMISETTINGS]→[VIDEO
LEVEL]andmakenecessarysettings.
•IftheHDMIinputsoundcannotbeheard,inthemenuselect[AUDIOSELECT]→[HDMI].
•IftheHDMIinput’ssoundisnotoutput,checkthat[OPTIONS(1)] →[DIGITALAUDIOSELECT]→[HDMI]onthe
projector’son-screenmenuissetto“HDMI”.(→page
109)
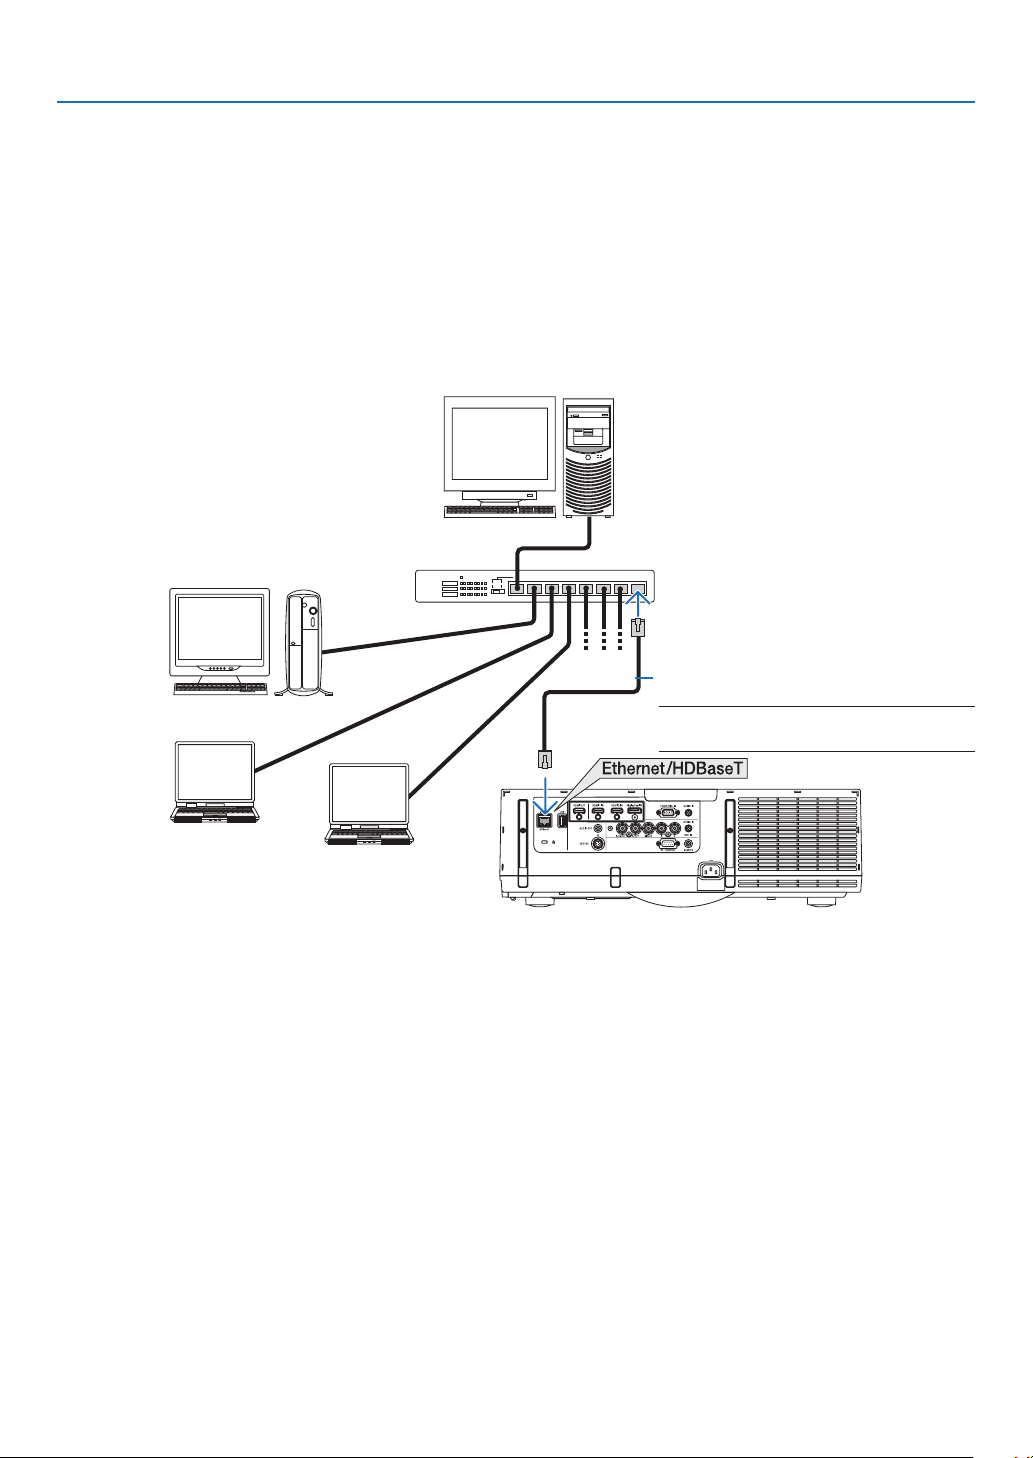
150
6. Installation and Connections
Connecting to a Wired LAN
TheprojectorcomesstandardwithaLANport(RJ-45)whichprovidesaLANconnectionusingaLANcable.
TouseaLANconnection,youarerequiredtosettheLANontheprojectormenu.Select[APPLICATIONMENU]→
[NETWORKSETTINGS]→[WIREDLAN].(→page
121).
Example of LAN connection
ExampleofwiredLANconnection
Server
Hub
LAN cable (not supplied)
NOTE:UseaCategory5orhigherLAN
cable.

151
6. Installation and Connections
Connecting to a Wireless LAN (sold separately)
TheseparatelysoldwirelessLANunitallowsyoutouseawirelessLANenvironment.Whenusingtheprojectorina
wirelessLANenvironment,theIPaddressandothersettingsmustbemadeontheprojector.
Important:
•IfyouusetheprojectorwiththeUSBWirelessLANUnitintheareawheretheuseofwirelessLANequipmentis
prohibited,removetheUSBWirelessLANUnitfromtheprojector.
•BuytheappropriateUSBWirelessLANUnitforyourcountryorarea.
NOTE:
•ThegreenLEDontheUSBWirelessLANUnitashestoshowthattheUSBWirelessLANUnitisworking.
•Yourcomputer’swirelessLANadapter(orunit)mustbecompliedwithWi-Fi(IEEE802.11b/g/n)standard.
Flow of Setting Wireless LAN
Step 1: Attach the USB Wireless LAN Unit to the projector if required.
Step 2:
Display[NETWORKSETTINGS]from[APPLICATIONMENU].(→ page 120)
Step 3:
Select[NETWORKSETTINGS]→[WIRELESSLAN]→[PROFILES]andset[EASYCONNECTION],
[PROFILE1],or[PROFILE2].(→ page 121)
TIP:
AccesstheHTTPserverfunctiontoset[NETWORKSETTINGS]→[SETTINGS]→[WIRELESS]→[EASYCONNECTION],[PRO-
FILE1],[PROFILE2].
Mounting a wireless LAN unit
CAUTION:
•ThewirelessLANunitismountedinsidetheprojector.Beforemountingit,turnoffthepower,unplugthepower
cordandlettheprojectorcooldowncompletely.Removingthelterunitwhiletheprojectorisrunningcouldresult
inburnsorelectricshocksfromtouchinginternalparts.
NOTE:
•ThewirelessLANunithasafrontandabackandmustbemountedinthewirelessLANportinaspecicdirection.Theportis
designedsothattheunitcannotbemountedintheoppositedirection,buttryingtopushitinbyforcecoulddamagethewireless
LANunitport.
•Topreventdamageduetostaticelectricity,touchanearbymetalobject(adoorknob,aluminumsash,etc.)beforetouchingthe
wirelessLANunittoeliminatethestaticelectricityfromyourbody.
•DisconnectthepowercordwhenmountingandremovingthewirelessLANunit.
MountingandremovingthewirelessLANunitwhiletheprojector’spowerisoncoulddamagethewirelessLANunitorresultin
malfunctionontheprojector.Iftheprojectorshouldmalfunction,turnofftheprojector’spower,unplugthepowercord,thenplug
thepowercordbackin.
•DonotconnectanyUSBdeviceotherthanthewirelessLANunittotheUSB(LAN)port.Also,donotconnectthewirelessLAN
unittotheUSBportintheconnectorsection.
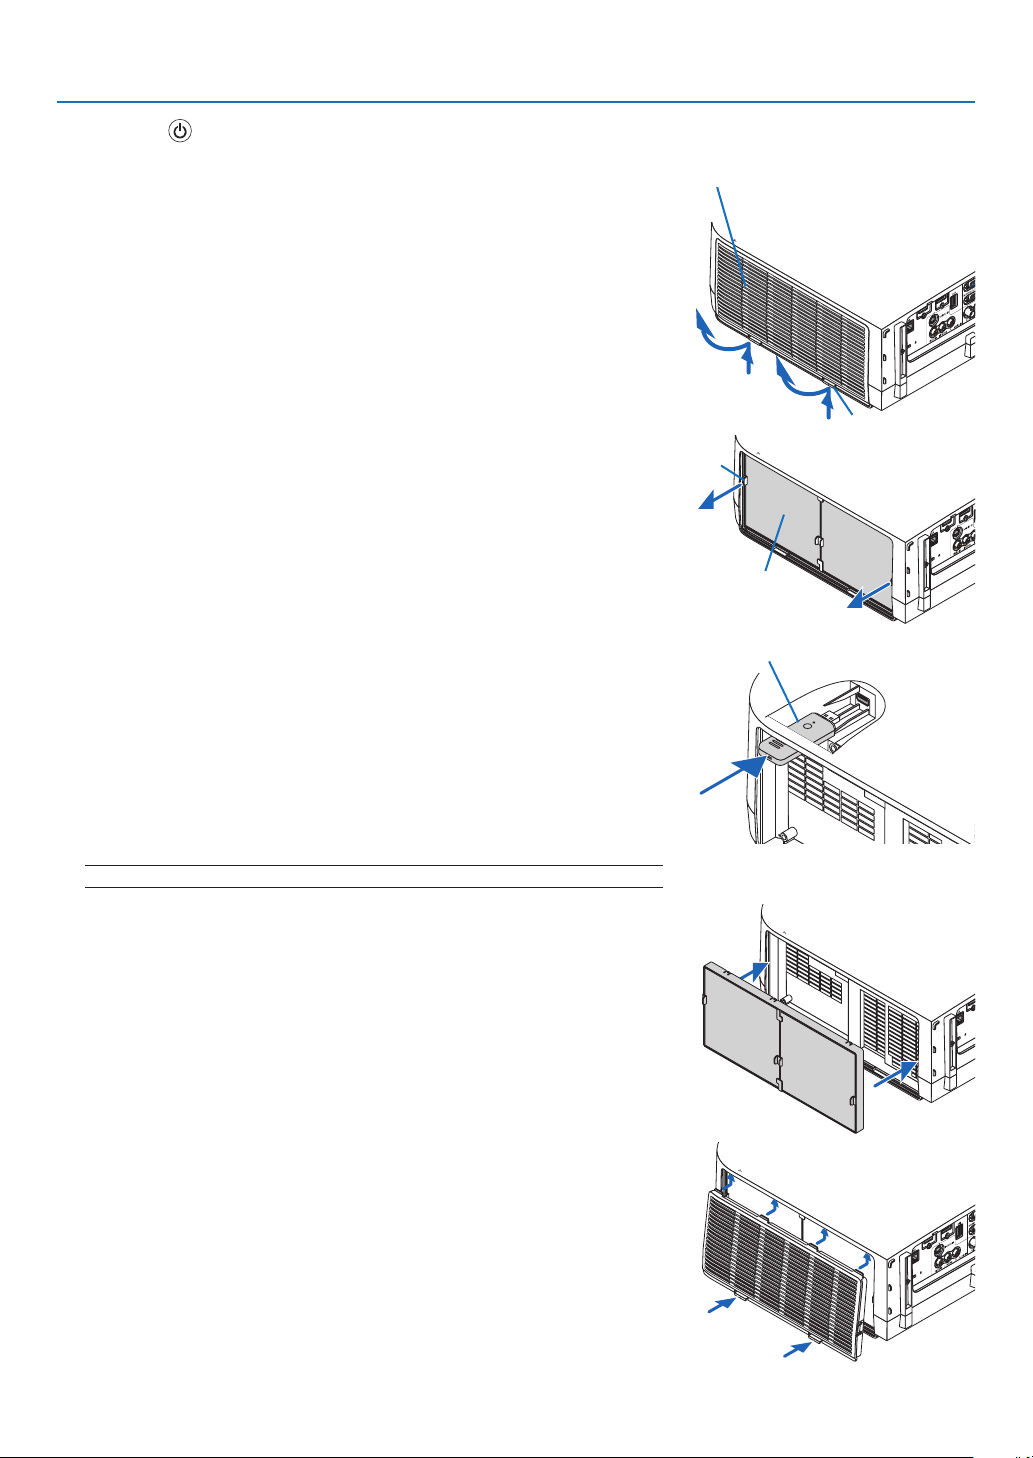
152
6. Installation and Connections
1. Press the button to set the projector to the standby mode, then
disconnect the power cord.
Wait for the projector to fully cool off.
2. Remove the filter cover.
Pressing the buttons on the left and right sides of the filter cover upwards,
pull the filter cover towards you to remove it.
3. Remove the filter unit.
Pull the hooks on the left and right sides of the filter unit towards you to
remove the filter unit.
4. Slowly insert the wireless LAN unit into the USB (LAN) port.
- Remove the wireless LAN unit’s cap, set the unit with the front (the side
with the indicator) facing upwards, hold the back edge and insert the unit
gently.
Next, press the wireless LAN unit in with a finger.
- The cap you have removed will be used when the wireless LAN unit is
removed, so store it in a safe place.
NOTE:IfthewirelessLANunitishardtoinsert,donotpushitinbyforce.
5. Mount the filter unit.
Insert the filter unit onto the projector with the sides on which the left and
right hooks are located on the outside.
6. Mount the filter cover.
Insert the 4 catches on the top of the filter cover into the grooves in the
projector, then press the left and right buttons to close.
- A click is heard and the filter cover is fastened in place.
WIRELESS
WIRELESS
Filter cover
Filter unit
Button
Hook
Wireless LAN unit

153
6. Installation and Connections
To remove the wireless LAN unit
1. Remove the filter unit following steps 1 to 3 above.
2. Remove the wireless LAN unit.
If the wireless LAN unit is hard to remove, place a cloth, etc., over needle-
nose pliers to grasp the wireless LAN unit and pull it out.
NOTE:DonotgraspthewirelessLANunitwithexcessiveforce.Doingsowilldamage
it.
3. Mount the filter unit and filter cover as described in steps 5 and 6
above.
WIRELESS
WIRELESS
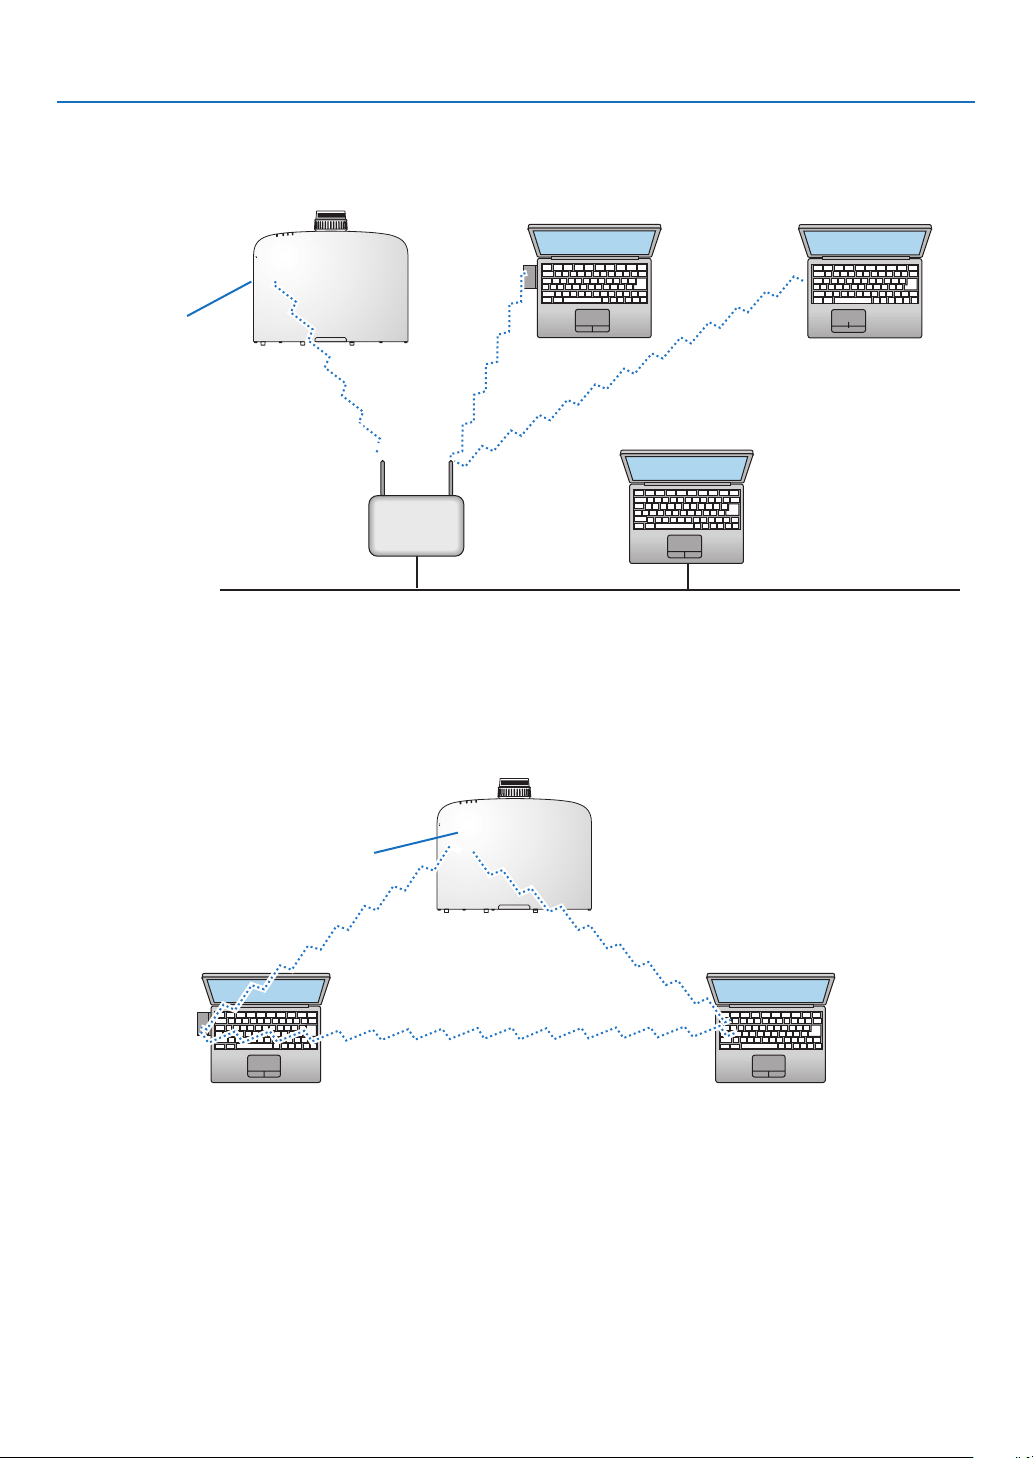
154
6. Installation and Connections
ExampleofwirelessLANconnection
(NetworkType→Infrastructure)
(→page
123)
PC with wireless
LAN card inserted
PC with built-in wireless
LAN function
Wired LAN
Wireless access point
USB Wireless LAN Unit
Toenabledirectcommunication(i.e.,peer-to-peer)betweencomputersandprojectors,youneedtoselecttheAd
Hocmode.(→page123)
PC with wireless
LAN card inserted
PC with built-in wireless
LAN function
ExampleofwirelessLANconnection(NetworkType→AdHoc)
USB Wireless LAN Unit
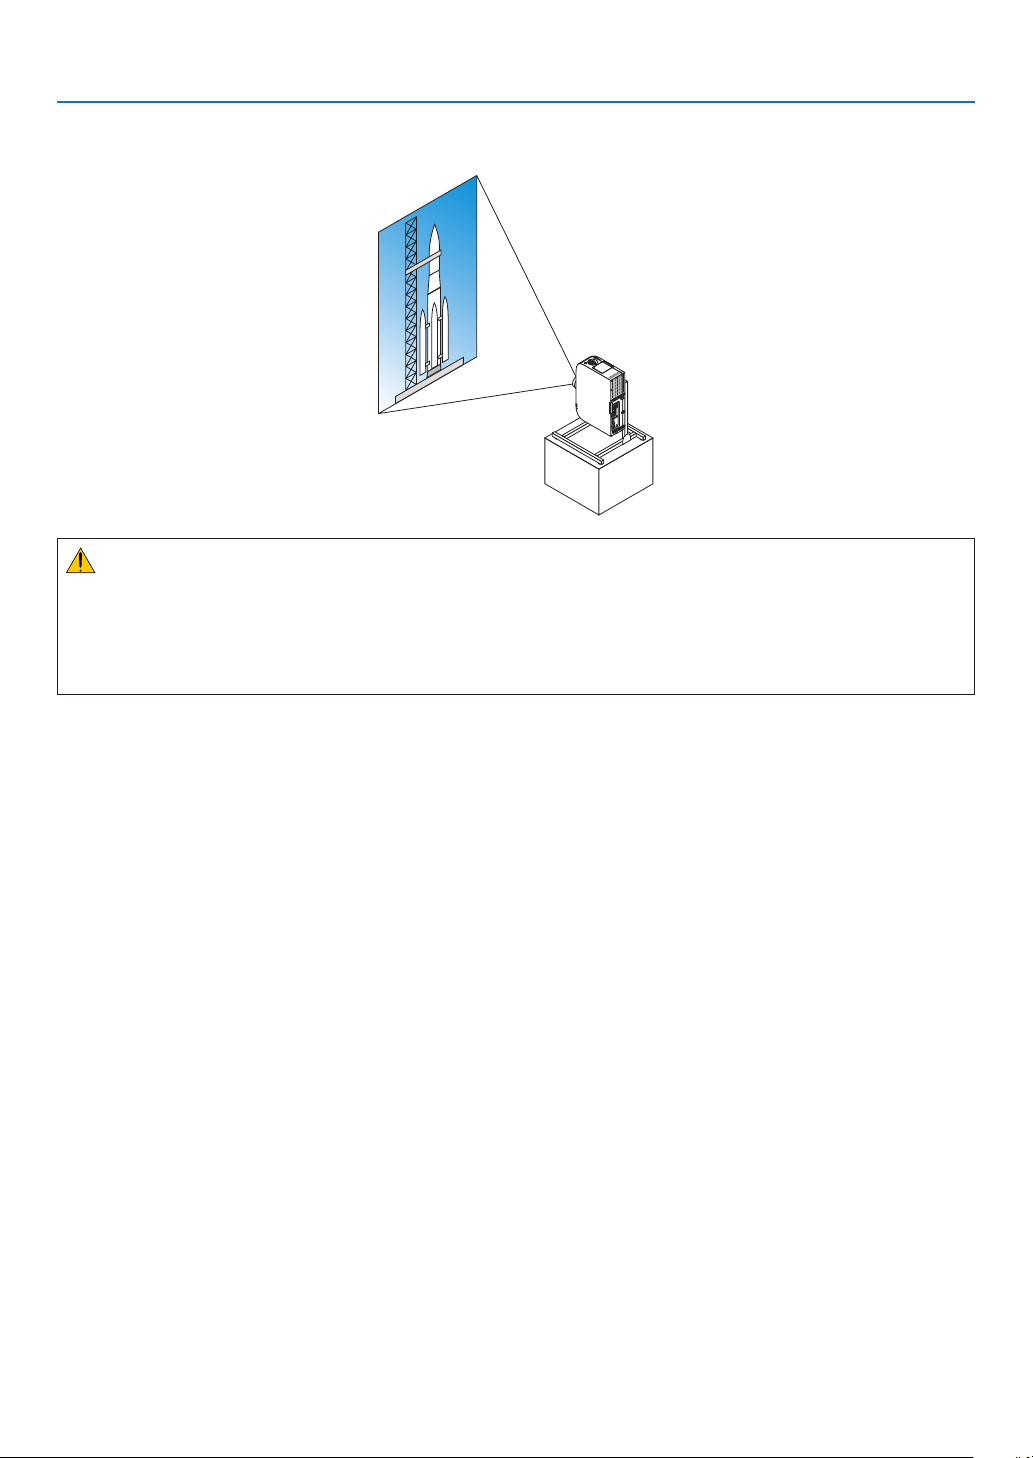
155
6. Installation and Connections
Projecting Portrait Images
Theprojectorcanbeusedonitsleftside(whenviewedfromthefront)toprojectportraitimages.
Caution on placing in portrait orientation
•Whenusingtheprojectoronitsleftside,donotblocktheintakevents.Doingsowillcausebuild-upheatinside
theprojector.
•Whenusingtheprojectoronitsleftside,attachastandsupportingtheprojector.
•Lockthelensshiftaftercompletinglensshiftadjustment.
Specicationsofstandforprojectingportraitimages
Fordesigningastandforprojectingportraitimages,consultyourdealer.
1. Allow310x170mmofspacefortheintakevents.
2. Allow130mmorlongerforopeningtheltercover(intakevent).
3. Usethe4screwsonthebottomoftheprojector.
Locationof4screws:200x250mm
Screw:M4x8mm
•Designthestandsothatitwillnotcontacttherearfeetoftheprojector.
•Designthestandinsuchawaythatitwillnotfalldowneasily.
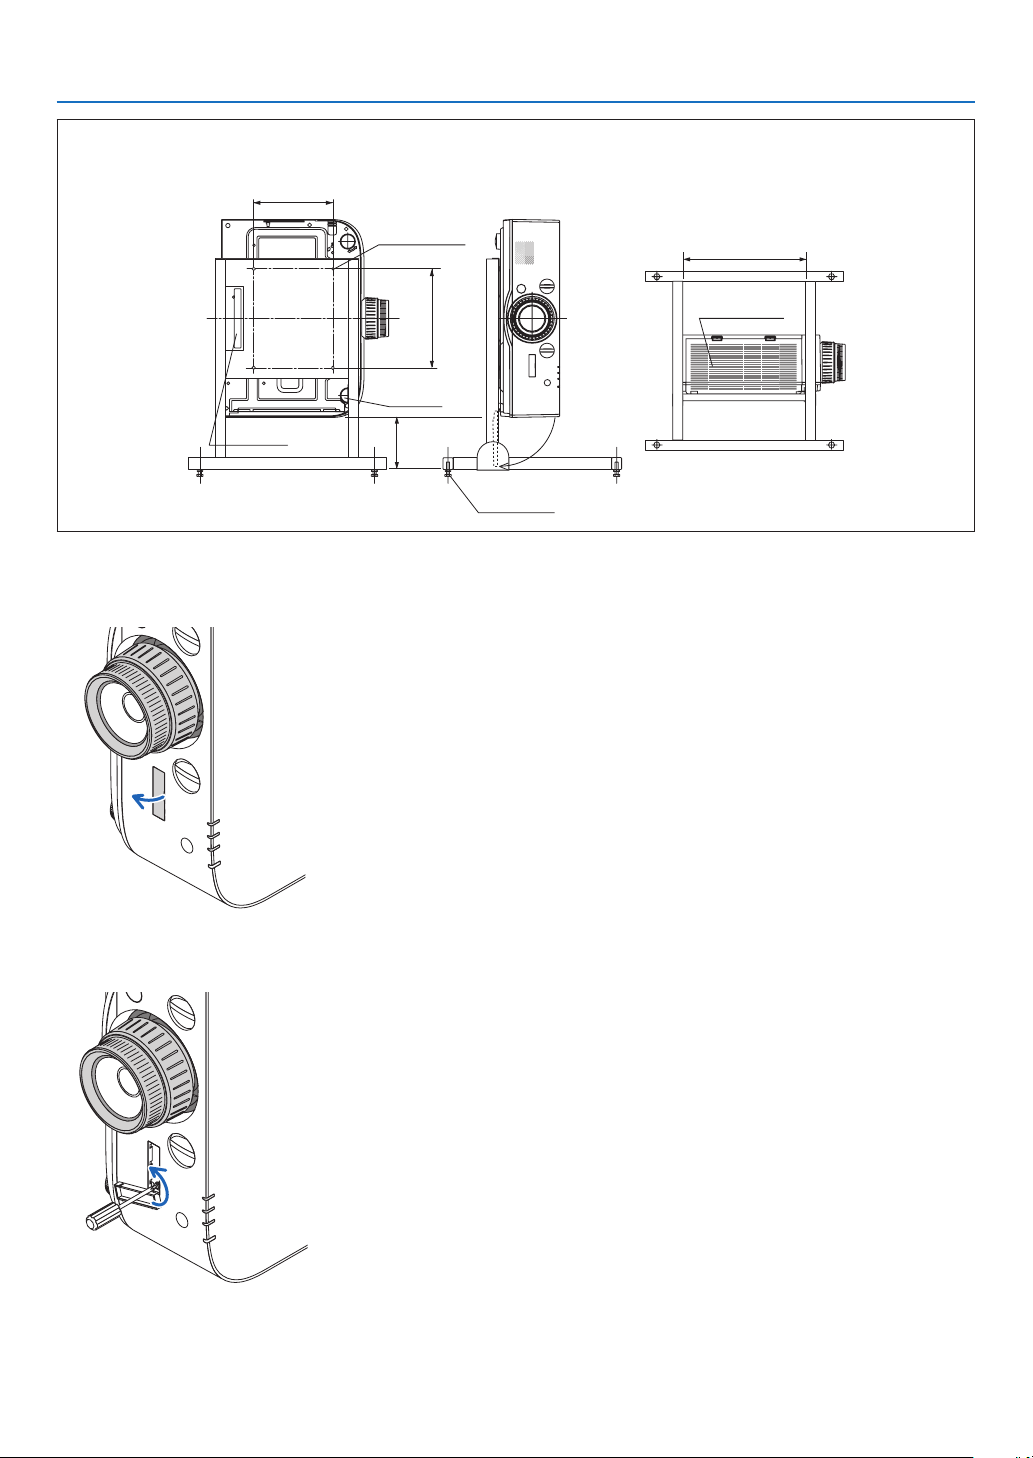
156
6. Installation and Connections
Reference drawing
[Side View] [Front View]
4-M4 screw hole
Remove tilt foot
130 or longer
Filter cover (open)
Horizontal adjuster
[Bottom View]
Filter cover
310 mm or longer
Rear foot
LockingLensShift
1. Pull and remove the lever cover.
2. Loosen the screw.
•Thescrewcannotberemoved.
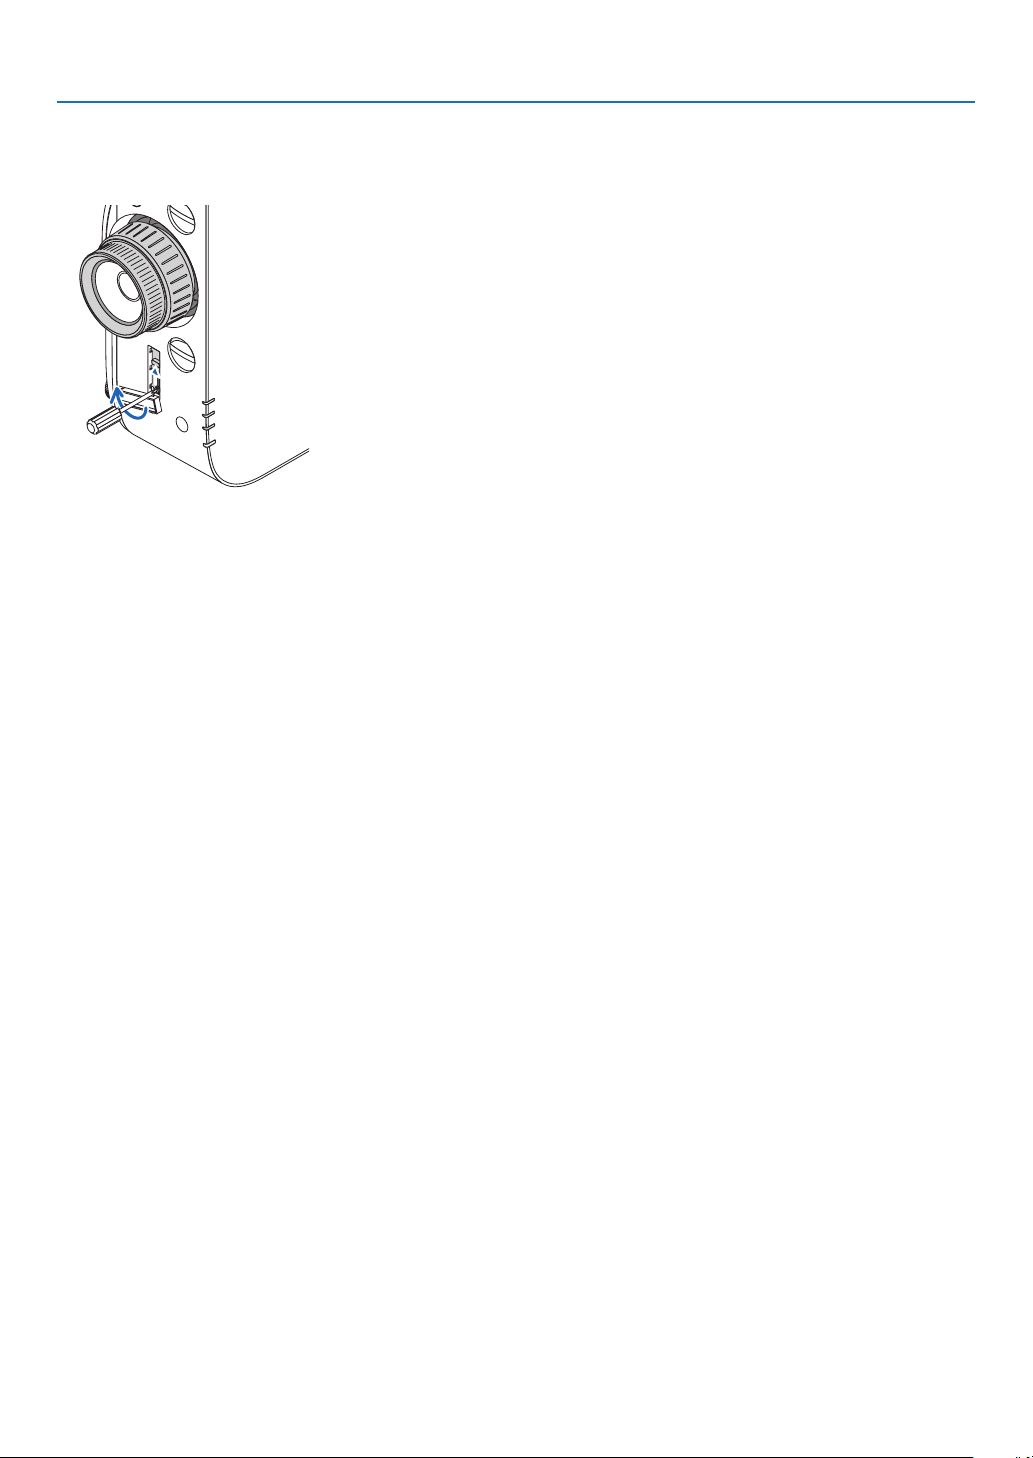
157
6. Installation and Connections
3. Move the lever upward until it stops and then secure the screw.
•Whileholdingtheleverupward,tightenthescrew.
•Toadjustthelensshiftagain,loosenthescrewanddothis.
4. Put the lever cover back.
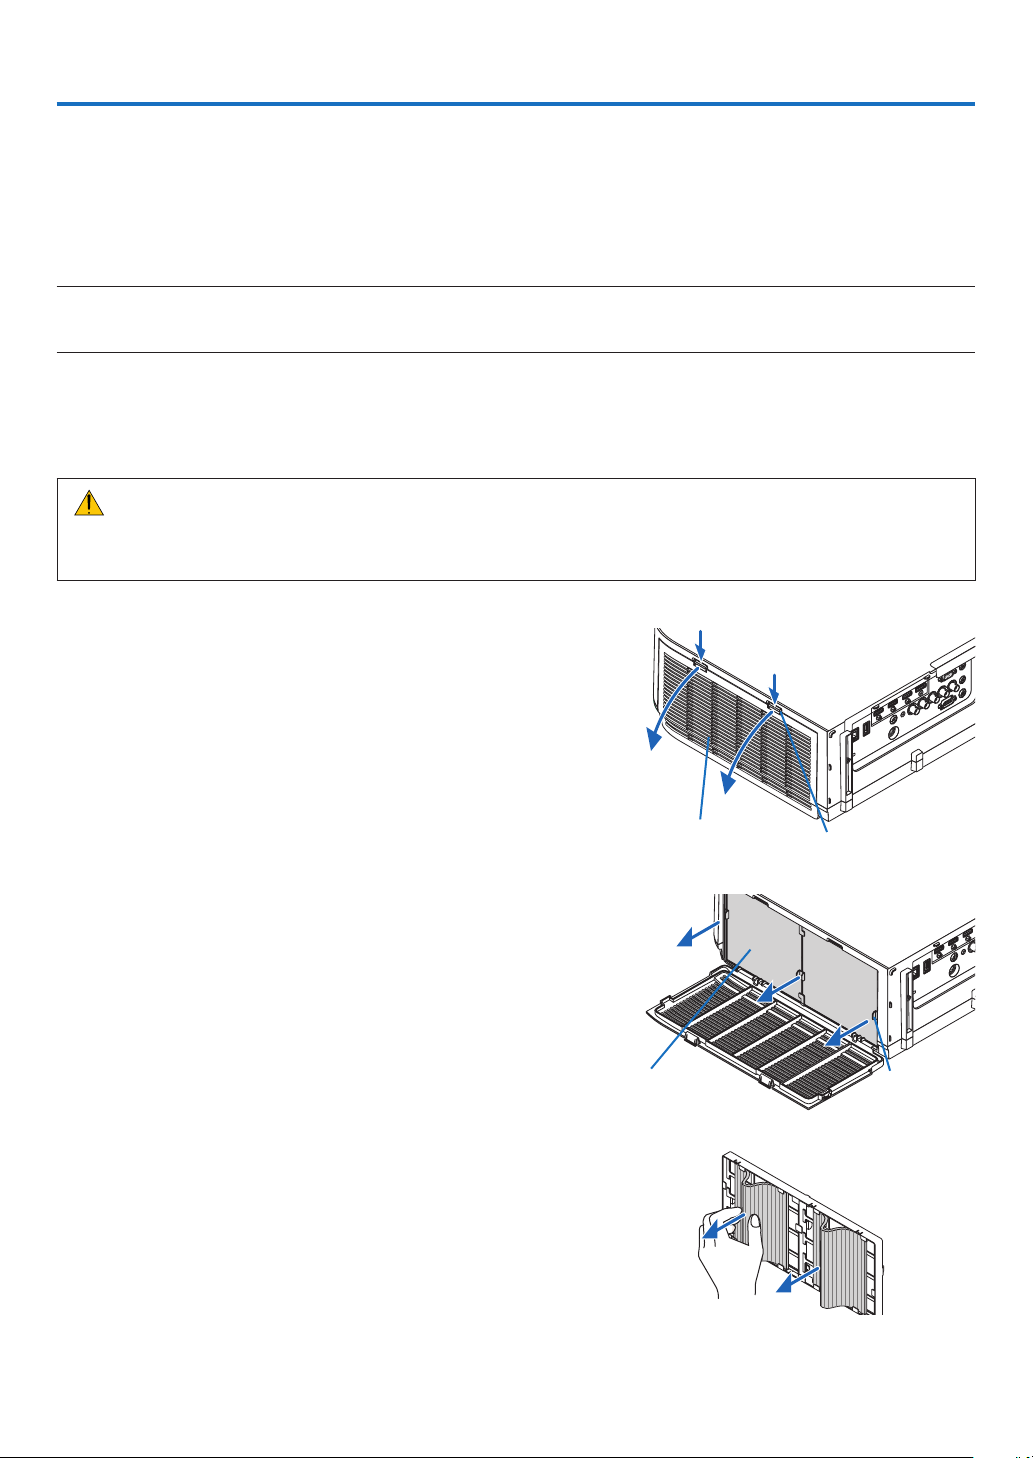
158
7. Maintenance
Thissectiondescribesthesimplemaintenanceproceduresyoushouldfollowtocleanthelters,thelens,thecabinet,
andtoreplacethelampandthelters.
1 Cleaning the Filters
Theair-lterspongekeepsdustanddirtfromgettinginsidetheprojectorandshouldbefrequentlycleaned.Ifthelter
isdirtyorclogged,yourprojectormayoverheat.
NOTE:Themessageforltercleaningwillbedisplayedforoneminuteaftertheprojectoristurnedonoroff.Whenthemessageis
displayed,cleanthelters.Thetimetocleantheltersissetto[OFF]attimeofshipment.(→page
103)
Tocancelthemessage,pressanybuttonontheprojectorcabinetortheremotecontrol.
Thetwo-layerlterontheprojectorimprovescoolinganddust-proofcapabilitiescomparedwiththeconventional
models.
Theoutsides(intakeside)oftherstandsecondlayerltersremovedust.
Tocleanthelter,detachthelterunitandtheltercover.
CAUTION
•Beforecleaningthelters,turnofftheprojector,disconnectthepowercordandthenallowthecabinettocool.
Failuretodosocanresultinelectricshockorburninjuries.
1. Push up the buttons on the left and right to release the
filter unit and pull it out.
2. Remove the filter unit by pulling out the tab.
3. Remove the four filters.
(1) Turn the filter unit over and pull out the two soft accordion
filters.
Filter cover Button
Filter unit
Tab
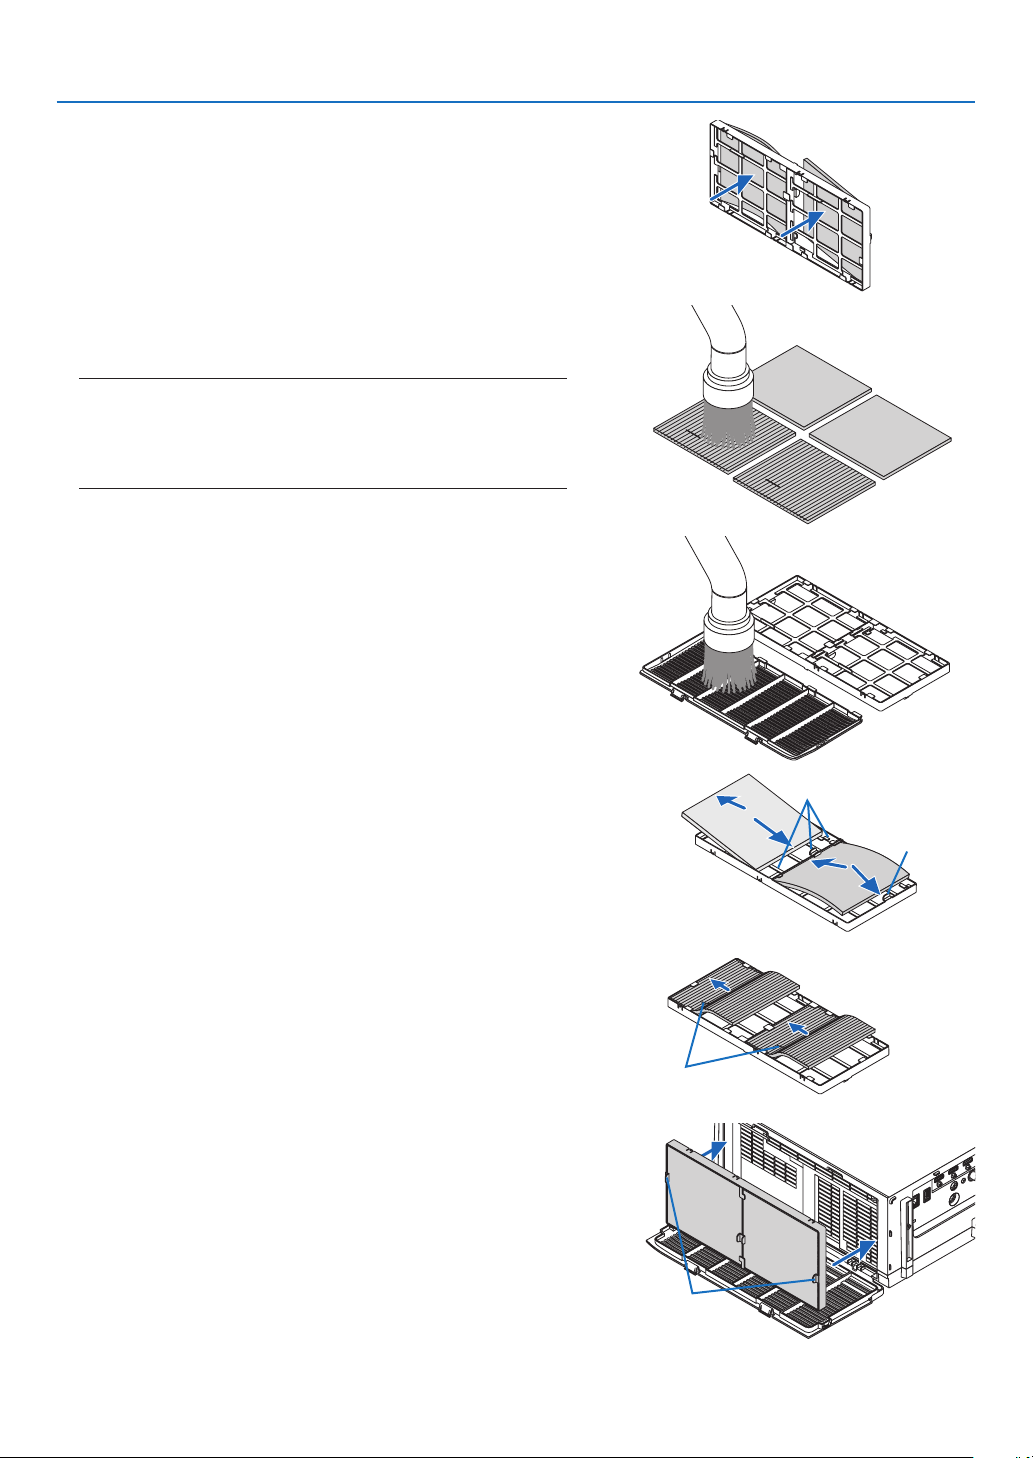
159
7. Maintenance
(2) Push the left edges of the filters and remove the two hard
honeycomb filters.
- The filters cannot be removed by pressing the left and
right edges.
4. Use a vacuum cleaner to vacuum all the dust inside.
Get rid of dust in the accordion filter
NOTE:
•Wheneveryouvacuumthelter,usethesoftbrushattachmentto
vacuum.Thisistoavoiddamagetothelter.
•Donotwashthelterwithwater.Doingsocanresultinlterclog-
ging.
5. Remove dust from the filter unit and the filter cover.
Clean both outside and inside.
6. Attach the four filters to the filter unit.
(1) Insert the hard honeycomb filters into the tips of the flanges
at the center, then bend the filters and push them in under
the hooks.
- The filters cannot be inserted from the outside.
(2) Turn the filter unit over.
Mount the accordion filters under the flanges along the outer
edges.
•Eachaccordionlterhasslitsinit.Aligntheslitswiththe
protrusions on the filter unit.
7. Mount the filter unit back onto the projector cabinet.
Insert the filter unit onto the projector with the sides on which
the left and right hooks are located on the outside.
Slit
Flange
Hook
Hook

160
7. Maintenance
8. Put the filter cover back to the projector cabinet.
Insert the 4 catches on the top of the filter cover into the grooves
in the projector, then press the left and right buttons to close.
•Pushtheltercoveruntilitclicksintoplace.
9.Clearthelterusagehours.
Plug the power cord into the wall outlet, and then turn on the
projector.
From the menu, select [RESET]
→ [CLEAR FILTER HOURS].
(→ page 117)
The interval time to clean the filters is set to [OFF] at time of
shipment. When using the projector as it is, you do not clear
the filter usage
Catch
Button
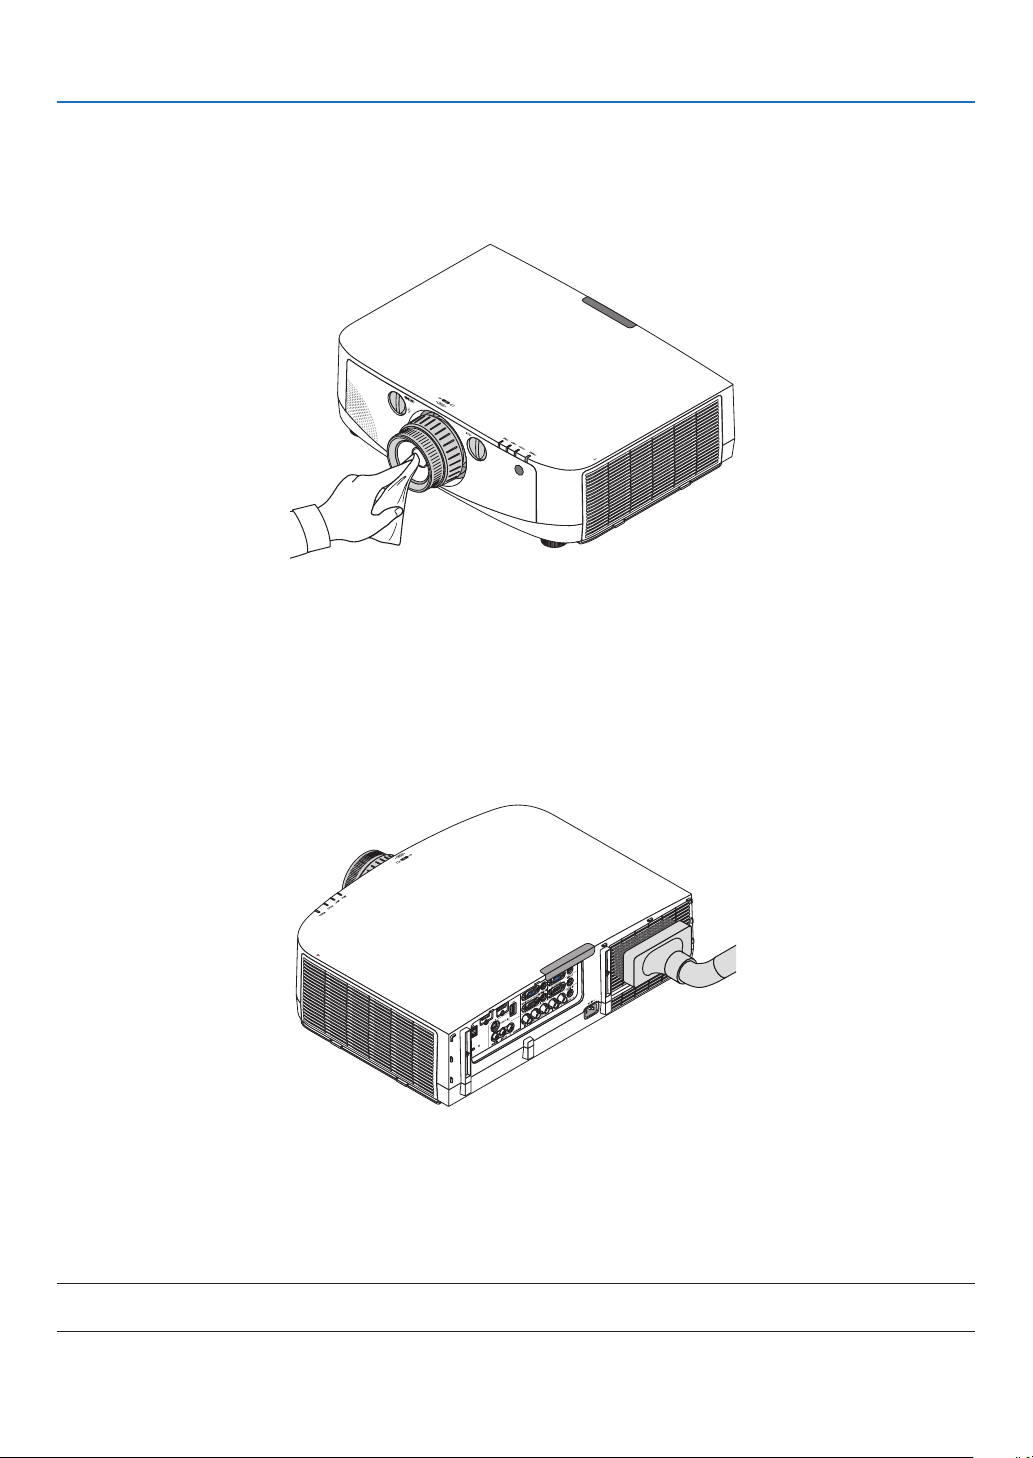
161
7. Maintenance
Cleaning the Lens
•Turnofftheprojectorbeforecleaning.
•Theprojectorhasaplasticlens.Useacommerciallyavailableplasticlenscleaner.
•Donotscratchormarthelenssurfaceasaplasticlensiseasilyscratched.
•Neverusealcoholorglasslenscleanerasdoingsowillcausedamagetotheplasticlenssurface.
Cleaning the Cabinet
Turnofftheprojector,andunplugtheprojectorbeforecleaning.
•Useadrysoftclothtowipedustoffthecabinet.
Ifheavilysoiled,useamilddetergent.
•Neverusestrongdetergentsorsolventssuchasalcoholorthinner.
•Whencleaningtheventilationslitsorthespeakerusingavacuumcleaner,donotforcethebrushofthevacuum
cleanerintotheslitsofthecabinet.
Vacuum the dust off the ventilation slits.
•Cloggedventilationslitsmaycauseariseintheinternaltemperatureoftheprojector,resultinginmalfunction.
•Donotscratchorhitthecabinetwithyourngersoranyhardobjects
•Contactyourdealerforcleaningtheinsideoftheprojector.
NOTE:Donotapplyvolatileagentsuchasinsecticideonthecabinet,thelens,orthescreen.Donotleavearubberorvinylproduct
inprolongedcontactwithit.Otherwisethesurfacenishwillbedeterioratedorthecoatingmaybestrippedoff.

162
7. Maintenance
Replacing the Lamp and the Filters
Whenthelampreachestheendofitslife,theLAMPindicatorinthecabinetwillblinkredandthemessage“THE
LAMPHASREACHEDTHEENDOFITSUSABLELIFE.PLEASEREPLACETHELAMPANDFILTER.USETHE
SPECIFIEDLAMPFORSAFETYANDPERFORMANCE.”willappear(*).Eventhoughthelampmaystillbeworking,
replacethelamptomaintaintheoptimalprojectorperformance.Afterreplacingthelamp,besuretoclearthelamp
hourmeter.(→page
116)
CAUTION
•DONOTTOUCHTHELAMPimmediatelyafterithasbeenused.Itwillbeextremelyhot.Turntheprojector
offandthendisconnectthepowercord.Allowatleastonehourforthelamptocoolbeforehandling.
•Usethespeciedlampforsafetyandperformance.
•DONOTREMOVEANYSCREWSexceptonelampcoverscrewandtwolamphousingscrews.Youcouldreceive
anelectricshock.
•Donotbreaktheglassonthelamphousing.
Keepngerprintsofftheglasssurfaceonthelamphousing.Leavingngerprintsontheglasssurfacemightcause
anunwantedshadowandpoorpicturequality.
•Theprojectorwillturnoffandgointostandbymodewhenyoucontinuetousetheprojectorforanother100hours
afterthelamphasreachedtheendofitslife.Ifthishappens,besuretoreplacethelamp.Ifyoucontinuetouse
thelampafterthelampreachestheendofitslife,thelampbulbmayshatter,andpiecesofglassmaybescattered
inthelampcase.Donottouchthemasthepiecesofglassmaycauseinjury.Ifthishappens,contactyourNEC
dealerforlampreplacement.
*NOTE:Thismessagewillbedisplayedunderthefollowingconditions:
•foroneminuteaftertheprojectorhasbeenpoweredon
•whenthe
(POWER)buttonontheprojectorcabinetorthePOWEROFFbuttonontheremotecontrolispressed
Toturnoffthemessage,pressanybuttonontheprojectorcabinetortheremotecontrol.
Optionallampandtoolsneededforreplacement:
•Phillipsscrewdriver(plus-head)
•Replacementlamp:
NP26LP
Flow of Replacing the Lamp and the Filters
Step 1. Replace the lamp
Step 2. Replace the filters (
→ page 162)
Step 3.
Clearthelampusagehoursandthelterusagehours(→ page 116, 117)
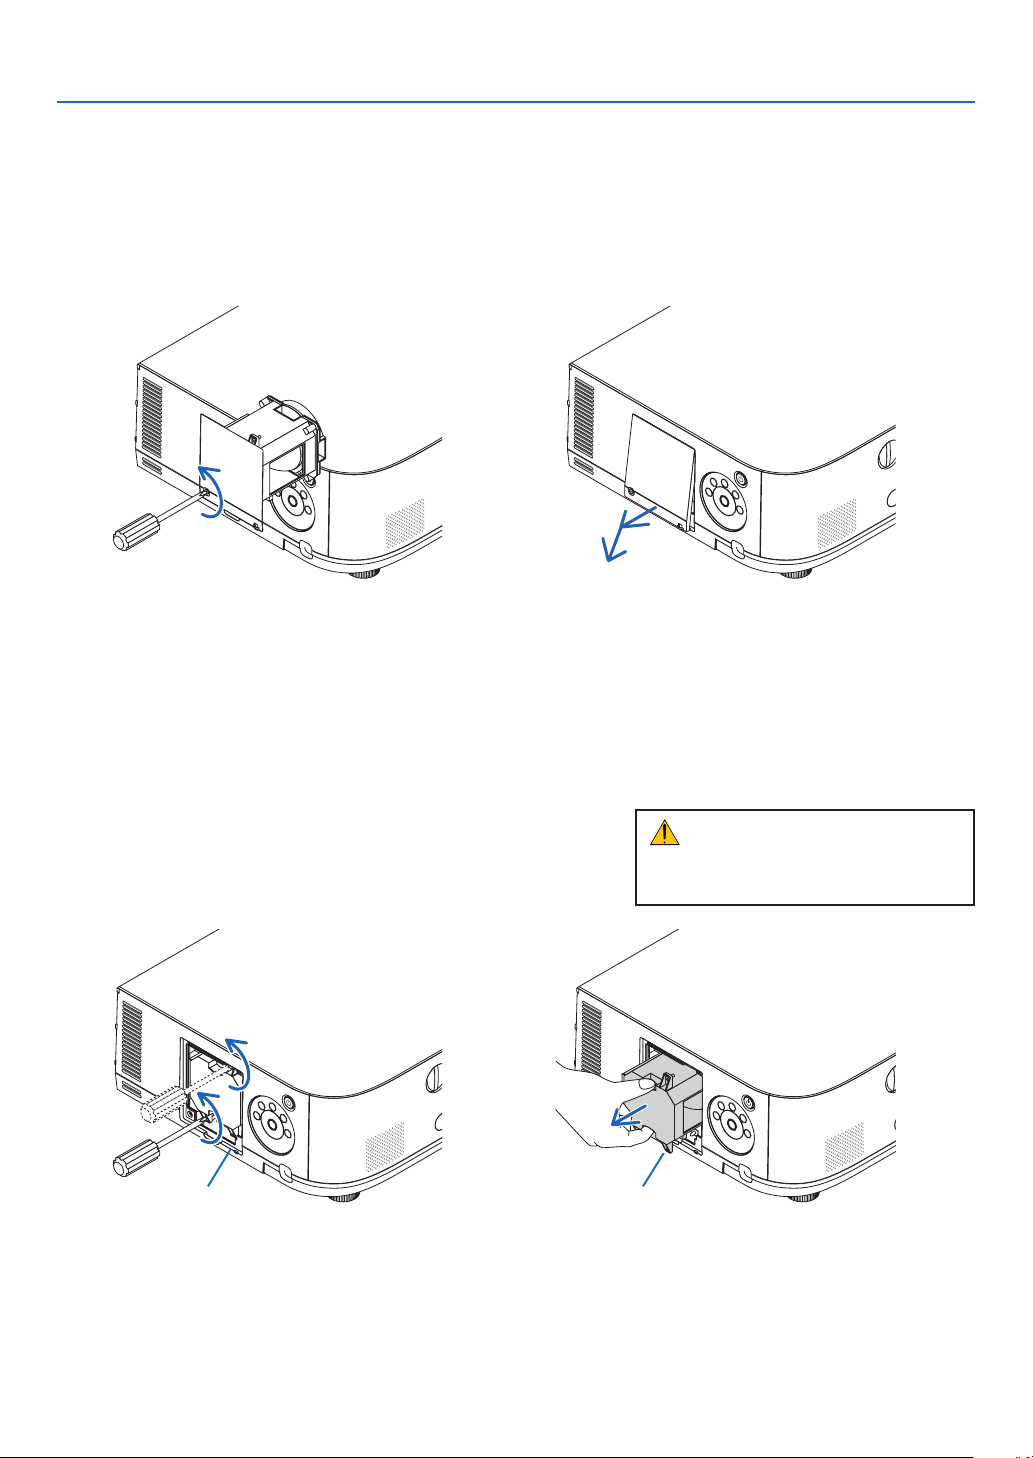
163
7. Maintenance
2. Remove the lamp housing.
(1)Loosenthetwoscrewssecuringthelamphousinguntilthephillipsscrewdrivergoesintoafreewheelingcondi-
tion.
•Thetwoscrewsarenotremovable.
•Thereisaninterlockonthiscasetopreventtheriskofelectricalshock.Donotattempttocircumventthis
interlock.
(2)Removethelamphousingbyholdingit.
Interlock Guide hole
To replace the lamp:
1. Remove the lamp cover.
(1)Loosenthelampcoverscrew
•Thelampcoverscrewisnotremovable.
(2)Pullthebottomofthelampcovertowardsyouandremoveit.
CAUTION:
Makesurethatthelamphousingiscool
enoughtobeforeremovingit.
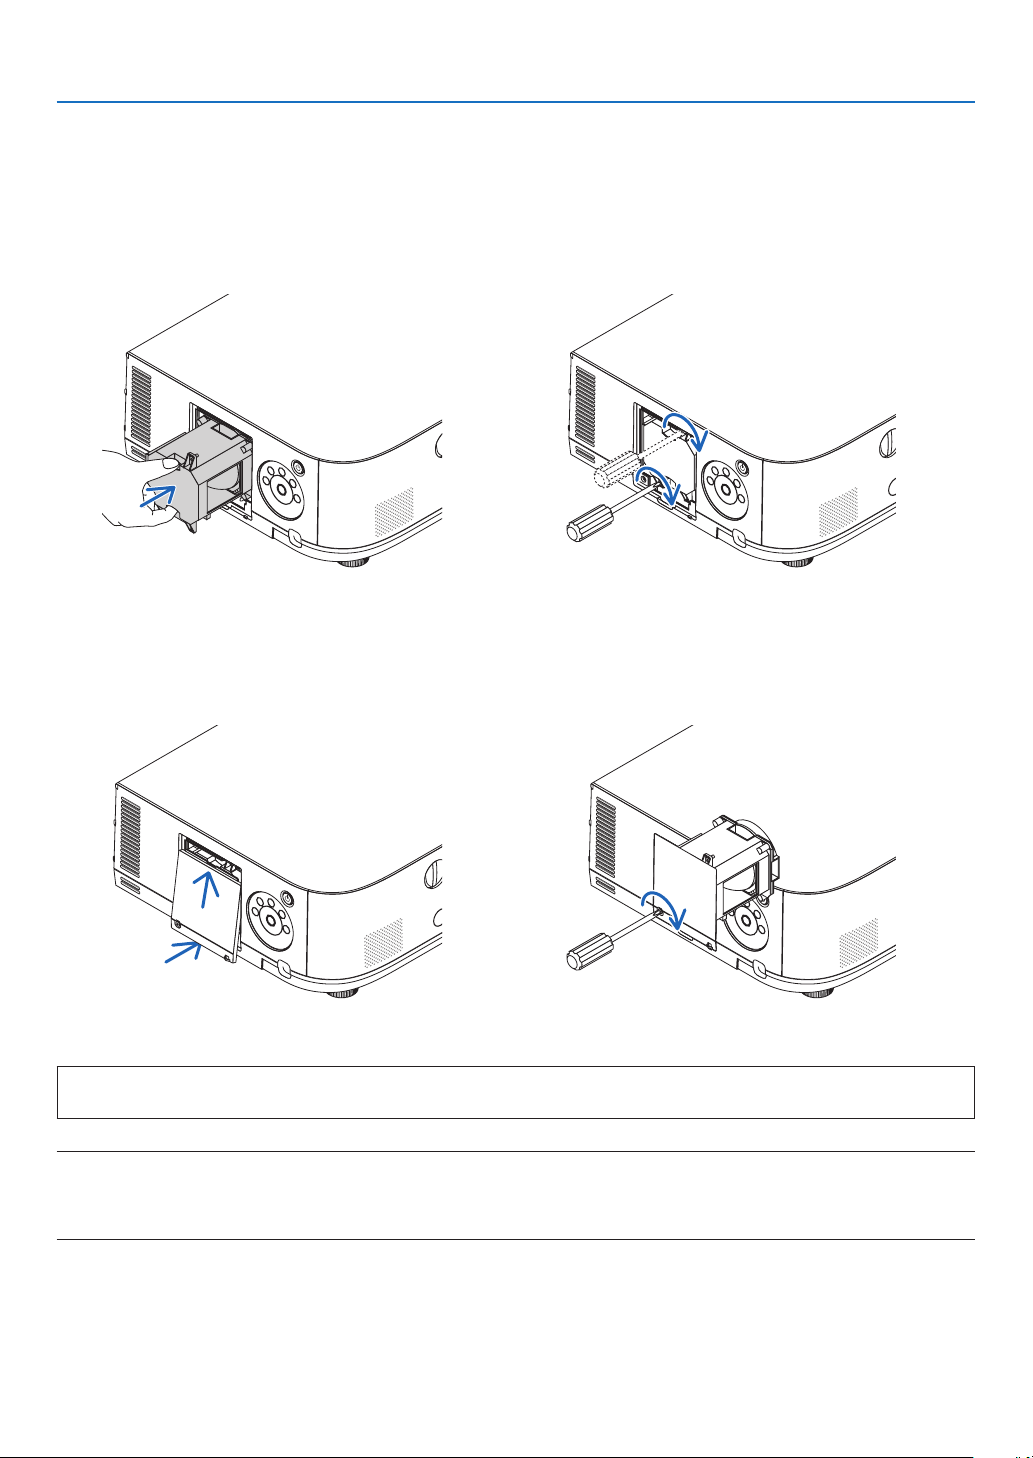
164
7. Maintenance
This completes the lamp replacement.
Go on to the filter replacement.
NOTE:Whenyoucontinuetousetheprojectorforanother100hoursafterthelamphasreachedtheendofitslife,theprojector
cannotturnonandthemenuisnotdisplayed.
Ifthishappens,presstheHELPbuttonontheremotecontrolfor10secondstoresetthelampclockbacktozero.
Whenthelamptimeclockisresettozero,theLAMPindicatorgoesout.
4. Reattach the lamp cover.
(1)Insertthetopedgeofthelampcoverintothegrooveintheprojectorandclosethelampcover.
(2)Tightenthescrewtosecurethelampcover.
•Besuretotightenthescrew.
3. Install a new lamp housing.
(1)Insertanewlamphousinguntilthelamphousingispluggedintothesocket.
(2)Positionsothattheguideholeinthebottomrightofthelamphouseisovertheprotrusionontheprojectorthen
pressallthewayin.
(3)Secureitinplacewiththetwoscrews.
•Besuretotightenthescrews.
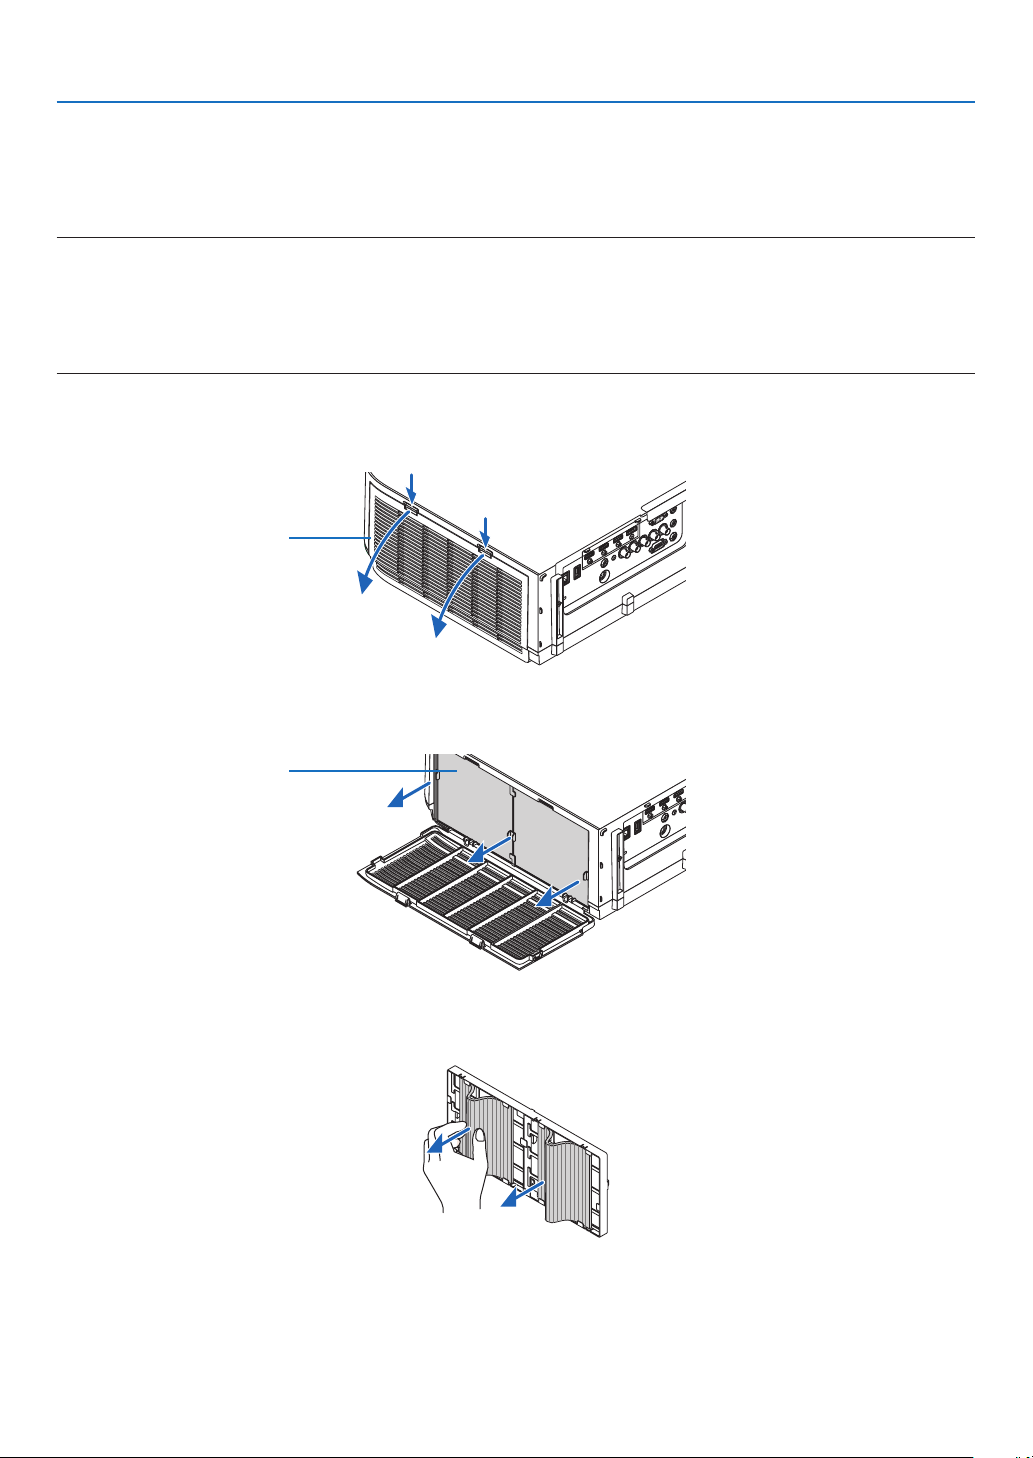
165
7. Maintenance
To replace the filters:
Fourltersarepackagedwiththereplacementlamp.
Honeycomblter(coarsemesh):Largeandsmallsizes(attachedtotheoutsideofthelterunit)
Accordionlter(nemesh):Largeandsmallsizes(attachedtotheinsideofthelterunit)
NOTE:
•Replaceallfourltersatthesametime.
•Beforereplacingthelters,wipeoffdustanddirtfromtheprojectorcabinet.
•Theprojectorisprecisionequipment.Keepoutdustanddirtduringlterreplacement.
•Donotwashthelterswithsoapandwater.Soapandwaterwilldamagetheltermembrane.
•Putltersintoplace.Incorrectattachmentofaltermaycausedustanddirttogetintotheinsideoftheprojector.
Beforereplacingthelters,replacethelamp.(→page
159)
1. Push up the buttons on the left and right to release the filter unit and pull it out.
2. Remove the filter unit by pulling out the tab.
3. Remove the four filters.
(1) Turn the filter unit over and pull out the two soft accordion filters (large and small).
Filter cover
Filter unit

166
7. Maintenance
(2) Push the left edges of the filters and remove the two hard honeycomb filters (large and small).
•The filters cannot be removed by pressing the left and right edges.
4. Remove dust from the filter unit and the filter cover.
Clean both outside and inside.
5. Attach four new filters to the filter unit.
(1) Insert the hard honeycomb filters into the tips of the flanges at the center, then bend the filters and push them
in under the hooks.
- The filters cannot be inserted from the outside.
(2) Turn the filter unit over.
Mount the accordion filters under the flanges along the outer edges.
•Eachaccordionlterhasslitsinit.Aligntheslitswiththeprotrusionsonthelterunit.
6. Mount the filter unit back onto the projector cabinet.
Insert the filter unit onto the projector with the sides on which the left and right hooks are located on the outside.
7. Mount the filter cover back onto the projector cabinet.
Insert the 4 catches on the top of the filter cover into the grooves in the projector, then press the left and right
buttons to close.
This completes the filter replacement.
Go on to the clearing lamp and filter hour meters.
To clear the lamp usage hours and the filter usage hours:
1. Place the projector where you use it.
2. Plug the power cord into the wall outlet, and then turn on the projector.
3.Clearthelampusagehoursandthelterusagehours.
1. From the menu, select [RESET] → [CLEAR LAMP HOURS] and reset the lamp usage hours.
2. Select [CLEAR FILTER HOURS].and reset the filter usage hours. (
→ page 117)

167
8. User Supportware
Installing Software Program
Installation for Windows software
ThesoftwareprogramsexceptImageExpressUtility2forMacsupportWindows7,WindowsVista,andWindows
XP.
NOTE:
•Toinstalloruninstalleachsoftwareprogram,theWindowsuseraccountmusthave“Administrator”privilege(Windows7,Win-
dowsVista)or“ComputerAdministrator”privilege(WindowsXP).
•Exitallrunningprogramsbeforeinstallation.Ifanotherprogramisrunning,theinstallationmaynotbecompleted.
•TorunVirtualRemoteToolorPCControlUtilityPro4onWindowsXPHomeEditionandWindowsXPProfessional,“Microsoft
.NETFrameworkVersion2.0orlater”isrequired.TheMicrosoft.NETFrameworkVersion2.0orlaterisavailablefromMicrosoft’s
webpage.Downloadandinstallitonyourcomputer
•ImageExpressUtilityLitewillbeinstalledtothesystemdriveofyourcomputer.
Ifthemessage“Thereisnotenoughfreespaceondestination”isdisplayed,freeupenoughspace(about100MB)toinstallthe
program.
1InserttheaccompanyingNECProjectorCD-ROMintoyourCD-ROMdrive.
The menu window will be displayed.
TIP:
Ifthemenuwindowwillnotbedisplayed,trythefollowingprocedure.
ForWindows7
1.Click“start”onWindows.
2.Click“AllPrograms”→“Accessories”→“Run”.
3.TypeyourCD-ROMdrivename(example:“Q:\”)and“LAUNCHER.EXE”in“Name”.(example:Q:\
LAUNCHER.EXE)
4.Click“OK”.
the menu window will be displayed.

168
8. User Supportware
2Clickasoftwareprogramyouwishtoinstallonthemenuwindow.
The installation will start.
•Followtheinstructionsontheinstallerscreenstocompletetheinstallation.
TIP:
Uninstalling a Software Program
Preparation:
Exitthesoftwareprogrambeforeuninstalling.Touninstallthesoftwareprogram,theWindowsuseraccountmusthave
“Administrator”privilege(Windows7andWindowsVista)or“ComputerAdministrator”privilege(WindowsXP).
•ForWindows7/WindowsVista
1Click“Start”andthen“ControlPanel”.
The Control Panel window will be displayed.
2Click“Uninstallaprogram”under“Programs”
The “Programs and Features” window will be displayed.
3 Select the software program and click it.
4Click“Uninstall/Change”or“Uninstall”.
•Whenthe“UserAccountControl”windowsisdisplayed,click“Continue”.
Follow the instructions on the screens to complete the uninstallation.
•ForWindowsXP
1Click“Start”andthen“ControlPanel”.
The Control Panel window will be displayed.
2Double-click“Add/RemovePrograms”.
The Add / Remove Programs window will be displayed.
3Clickthesoftwareprogramfromthelistandthenclick“Remove”.
Follow the instructions on the screens to complete the uninstallation.
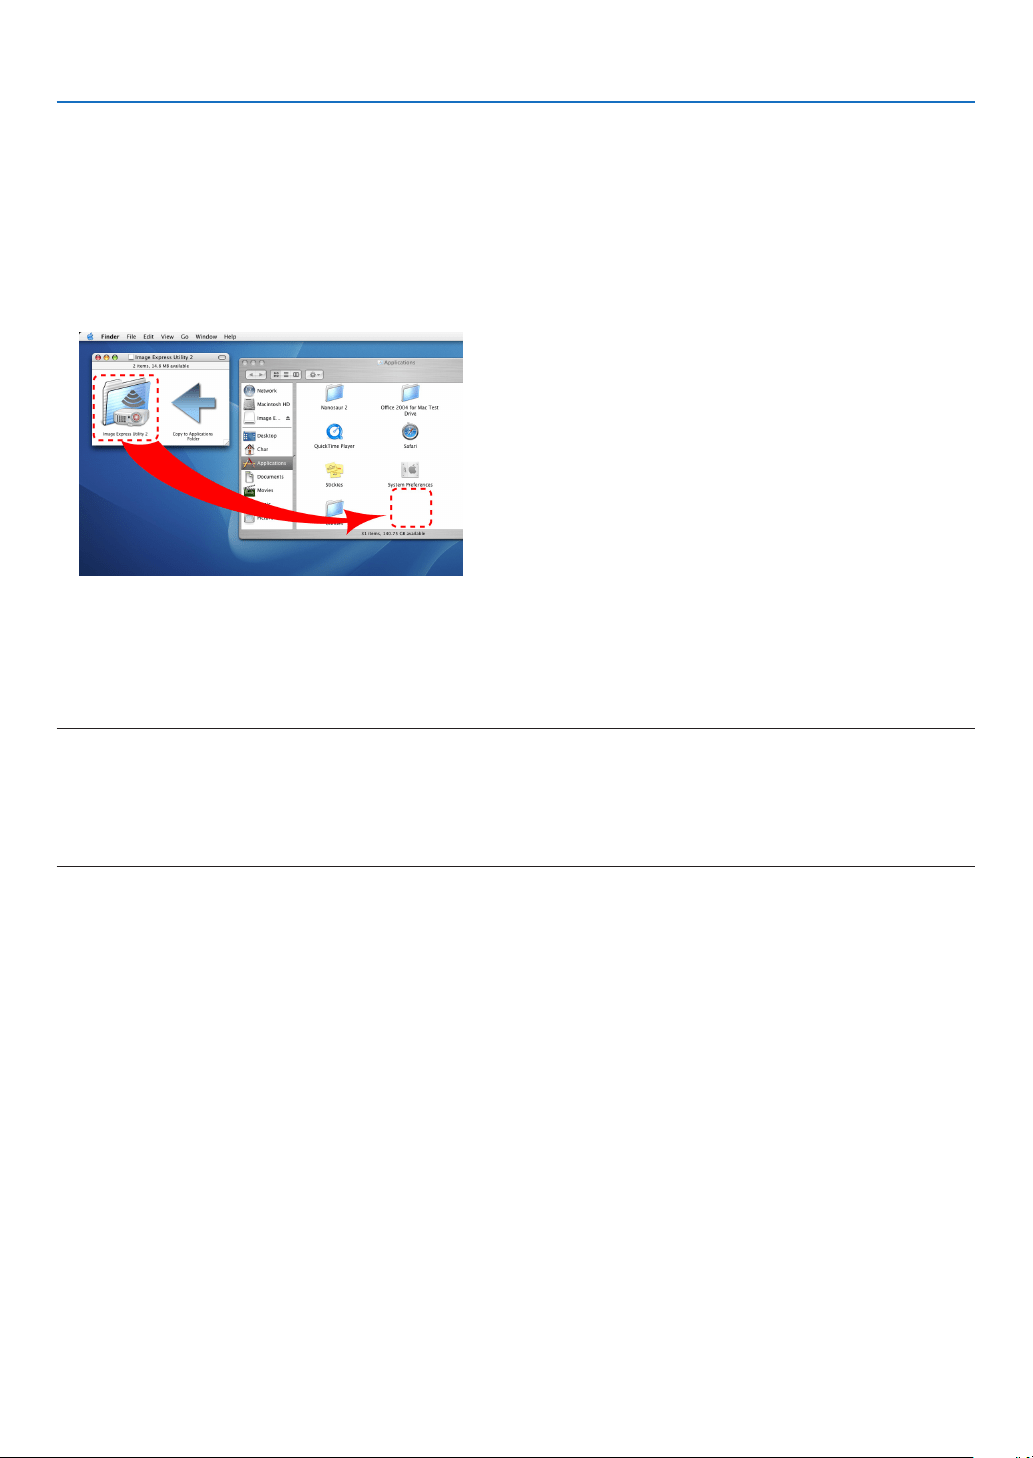
169
8. User Supportware
Installation for Macintosh software
ImageExpressUtility2forMacsupportsMacOSX.
1InserttheaccompanyingNECProjectorCD-ROMintoyourCD-ROMdrive.
The menu window will be displayed.
2Double-clicktheCD-ROMicon.
3Double-clickthe“MacOSX”folder.
4Double-click“ImageExpressUtility2(Intel).dmg”.
The “Image Express Utility 2” folder will be displayed.
•IfyourMacisPowerPC-based,double-click“ImageExpressUtility2.dmg”.
5Movethe“ImageExpressUtility2”folderto“Applications”folderusingadrag-and-dropoperation.
TIP:
•Uninstallingasoftwareprogram
1.Putthe“ImageExpressUtility2”foldertotheTrashicon.
2. Put the configuration file of Image Express Utility 2 to the Trash icon.
•ThecongurationleofImageExpressUtility2islocatedin“/user/yourusername/library/Preferences/jp.co.
nec.nevt. ImageExpressUtility.plist”.
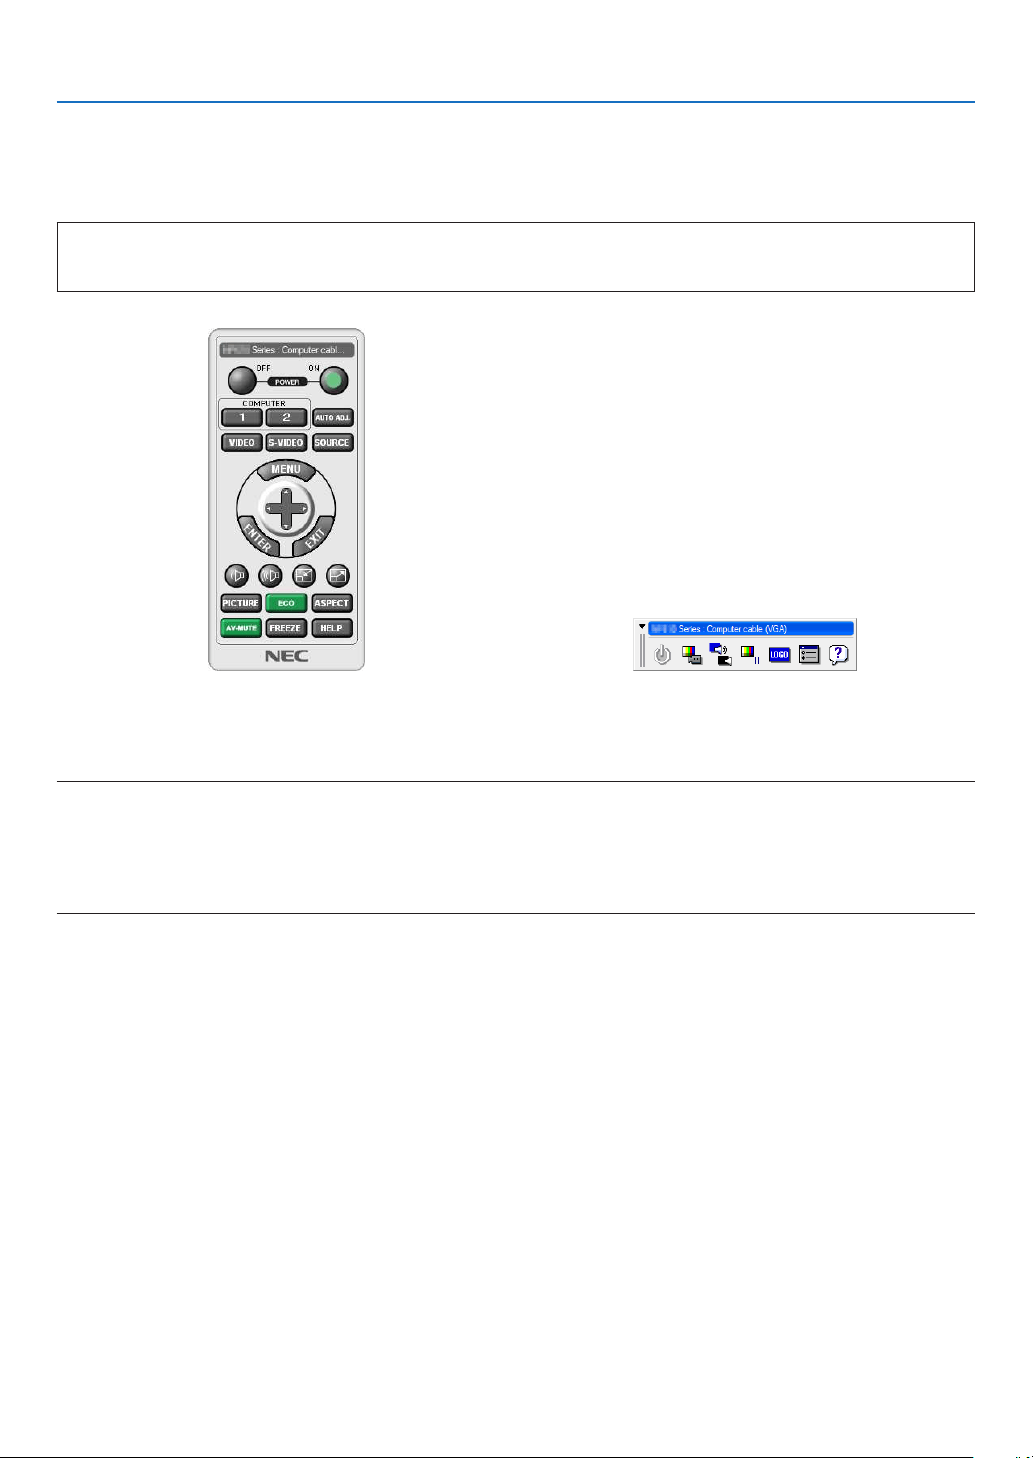
170
8. User Supportware
Operating the Projector Via the LAN (Virtual Remote Tool)
Thiswillhelpyouperformoperationssuchasprojector’spoweronoroffandsignalselectionviaaLANconnection.It
isalsousedtosendanimagetotheprojectorandregisteritasthelogodataoftheprojector.Afterregisteringit,you
canlockthelogotopreventitfromchanging.
Control Functions
PowerOn/Off,signalselection,picturefreeze,picturemute,audiomute,Logotransfertotheprojector,andremote
controloperationonyourPC.
VirtualRemotescreen
RemoteControlWindowToolbar
ThissectionprovidesanoutlineofpreparationforuseofVirtualRemoteTool.
ForinformationonhowtouseVirtualRemoteTool,seeHelpofVirtualRemoteTool.(→page
169)
NOTE:
•Logodata(graphics)thatcanbesenttotheprojectorwithVirtualRemoteToolhasthefollowingrestrictions:
-Filesize:256KBorless
-Imagesize(resolution):thenativeresolutionoftheprojector
•ThelogodatathatissentwithVirtualRemoteToolwillbedisplayedatthecenterofthescreen.Itssurroundingwillbepainted
outinblack.
TIP:
•VirtualRemoteToolcanbeusedalsowithaserialconnection.
Connect the projector to a LAN.
ConnecttheprojectortotheLANbyfollowingtheinstructionsin“ConnectingtoaWiredLAN”(→page
150),“Con-
nectingtoaWirelessLAN(soldseparately)”(→page151)and“9ApplicationMenus-NETWORKSETTINGS”(→
page120)
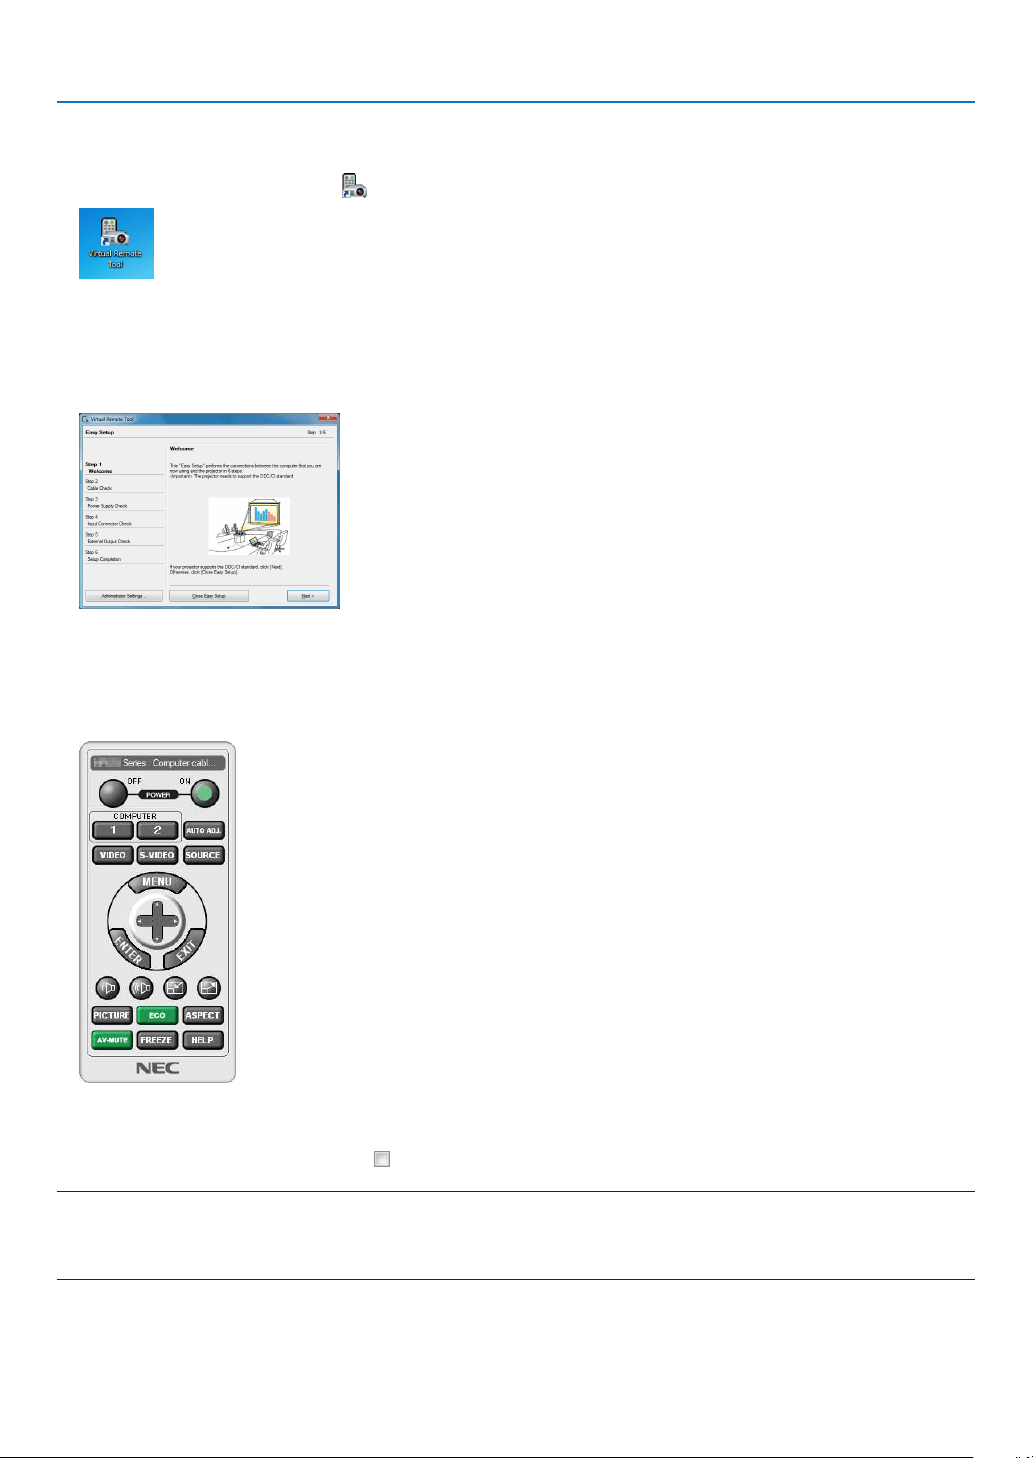
171
8. User Supportware
Start Virtual Remote Tool
Start using the shortcut icon
•Double-clicktheshortcuticon
on the Windows Desktop.
Start from the Start menu
•Click[Start]→[AllPrograms]or[Programs]→[NECProjectorUserSupportware]→[VirtualRemoteTool]
→[VirtualRemoteTool].
When Virtual Remote Tool starts for the first time, “Easy Setup” window will be displayed.
The “Easy Setup” feature is not available on this model. Click “Close Easy Setup”.
Closing the “Easy Setup” window will display the “Projector List” window.
Select your projector you wish to connect. This will display the Virtual Remote screen.
TIP:
•TheVirtualRemoteToolscreen(orToolbar)canbedisplayedwithoutdisplaying“EasySetup”window.
Todoso,clicktoplaceacheckmarkfor“DonotuseEasySetupnexttime”onthescreen.
NOTE:
•When[POWER-SAVING]isselectedfor[STANDBYMODE]fromthemenu,theprojectorcannotbeturnedonviathenetwork
(wiredLAN/wirelessLAN)connection.When[NETWORKSTANDBY]isselectedfor[STANDBYMODE],theprojectorcannotbe
turnedonviawirelessLANconnection.
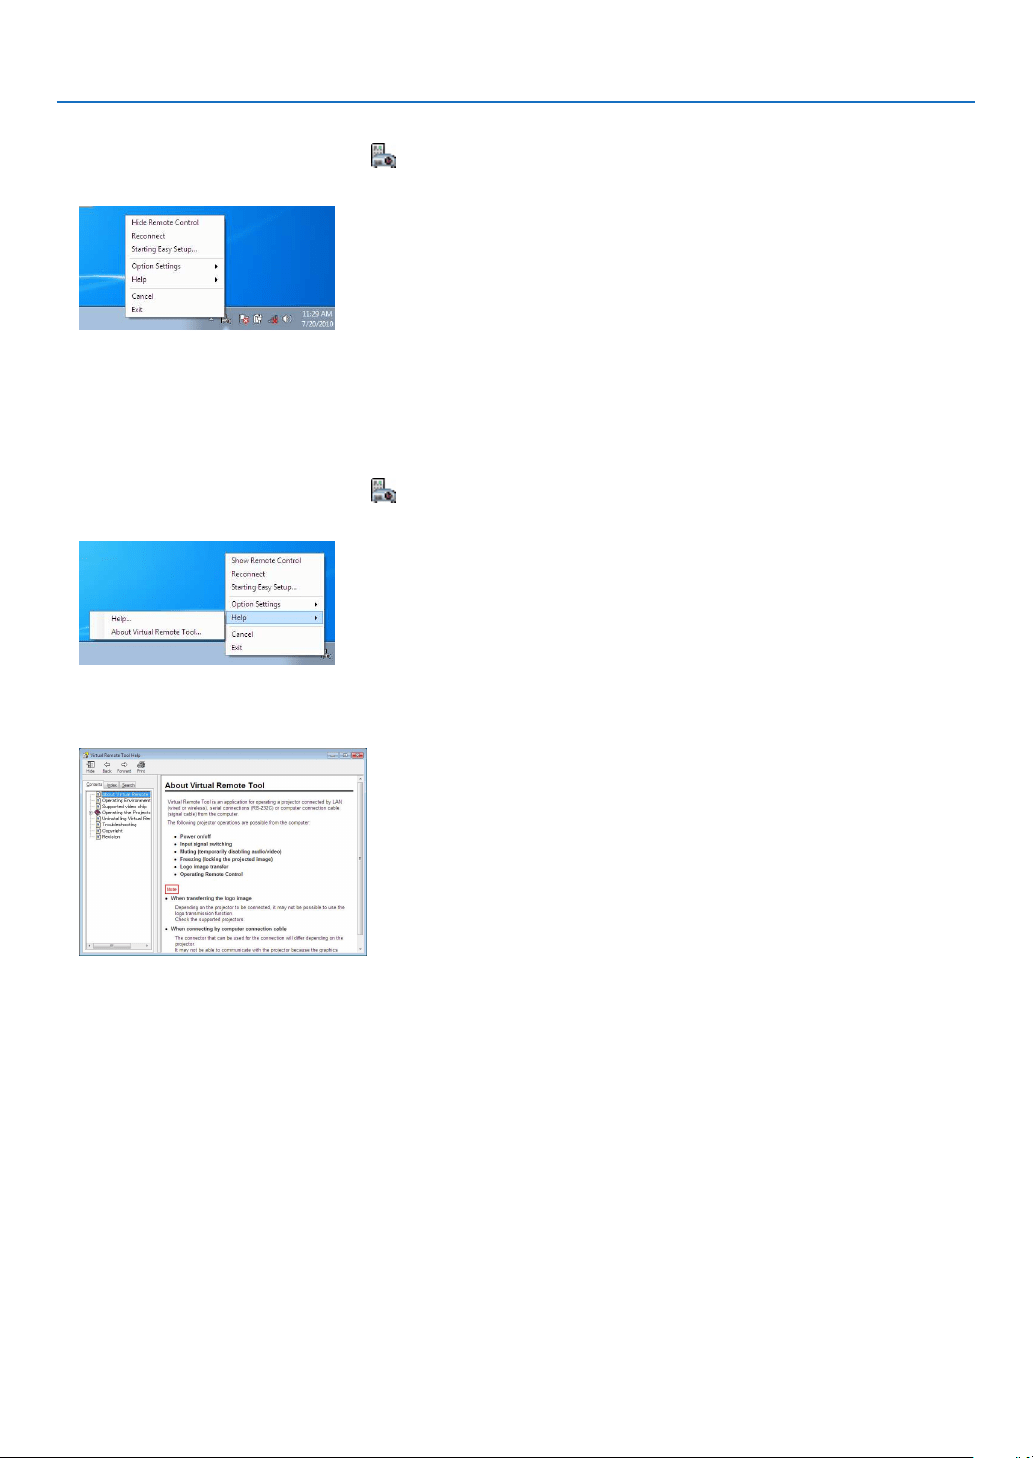
172
8. User Supportware
ExitingVirtualRemoteTool
1ClicktheVirtualRemoteToolicon
on the Taskbar.
The pop-up menu will be displayed.
2Click“Exit”.
The Virtual Remote Tool will be closed.
ViewingthehelpleofVirtualRemoteTool
•Displayingthehelpleusingthetaskbar
1ClicktheVirtualRemoteToolicon
onthetaskbarwhenVirtualRemoteToolisrunning.
The pop-up menu will be displayed.
2.Click“Help”.
The Help screen will be displayed.
•DisplayingthehelpleusingtheStartMenu.
1.Click“Start”.“Allprograms”or“Programs”.“NECProjectorUserSupportware”.“VirtualRemoteTool”.and
then“VirtualRemoteToolHelp”inthisorder.
The Help screen will be displayed.

173
8. User Supportware
Projecting Your Computer’s Screen Image from the Projector
over a LAN (Image Express Utility Lite)
UsingImageExpressUtilityLiteallowsyoutosendthecomputer’sscreenimagetotheprojectoroverawiredor
wirelessLAN.
ThissectionwillshowyouanoutlineabouthowtoconnecttheprojectortoaLANandtouseImageExpressUtility
Lite.FortheoperationofImageExpressUtilityLite,seethehelpofImageExpressUtilityLite.
What you can do with Image Express Utility Lite
•Imagetransmission
•Thescreenofyourcomputercanbesenttotheprojectorviaawiredorwirelessnetworkwithoutacomputercable
(VGA).
•Byusing“EASYCONNECTION”function,thecomplicatednetworksettingscanbesimpliedandthecomputer
willautomaticallyconnecttotheprojector.
•Thescreenofyourcomputercanbesenttouptofourprojectorsatthesametime.
•GeometricCorrectionTool(GCT)
See“❹ProjectinganImagefromanAngle(GeometricCorrectionToolinImageExpressUtilityLite)”.
Connect the projector to a LAN.
ConnecttheprojectortotheLANbyfollowingtheinstructionsin“ConnectingtoaWiredLAN”(→page150),“Con-
nectingtoaWirelessLAN(soldseparately)”(→page
151)and“9ApplicationMenus-NETWORKSETTINGS”(→
page120)
Start Image Express Utility Lite.
1.OnWindows,click“Start”→“Allprograms”→“NECProjectorUserSupportware”→
“Image Express Utility
Lite”→“ImageExpressUtilityLite”.
Image Express Utility Lite will start.
The select window for network connection will be displayed
2.SelectNetworkandclick“OK”.
The select window for destination will show a list of connectable projectors.
•Whenconnectingthecomputerdirectlytotheprojectorbyone-to-one,“EasyConnection”isrecommended.
•Whenoneormorenetworksfor“EASYCONNECTION”arefound,the“EasyConnectionSelectionScreen”
window will be displayed.
•Tocheckforthenetworkavailableforconnectedprojectors,fromthemenu,select[INFO.]→[WIRELESS
LAN]→[SSID].
3.Select“EasyConnection”networkyouwishtoconnect,andclick“Select”.
The target selection window will be displayed.
4.Placeacheckmarkforprojectorstobeconnected,andthenclick“Connect”.
•Whenoneormoreprojectorsaredisplayed,fromthemenuontheprojector,select[INFO.]→ [WIRELESS LAN]
→ [IP ADDRESS].
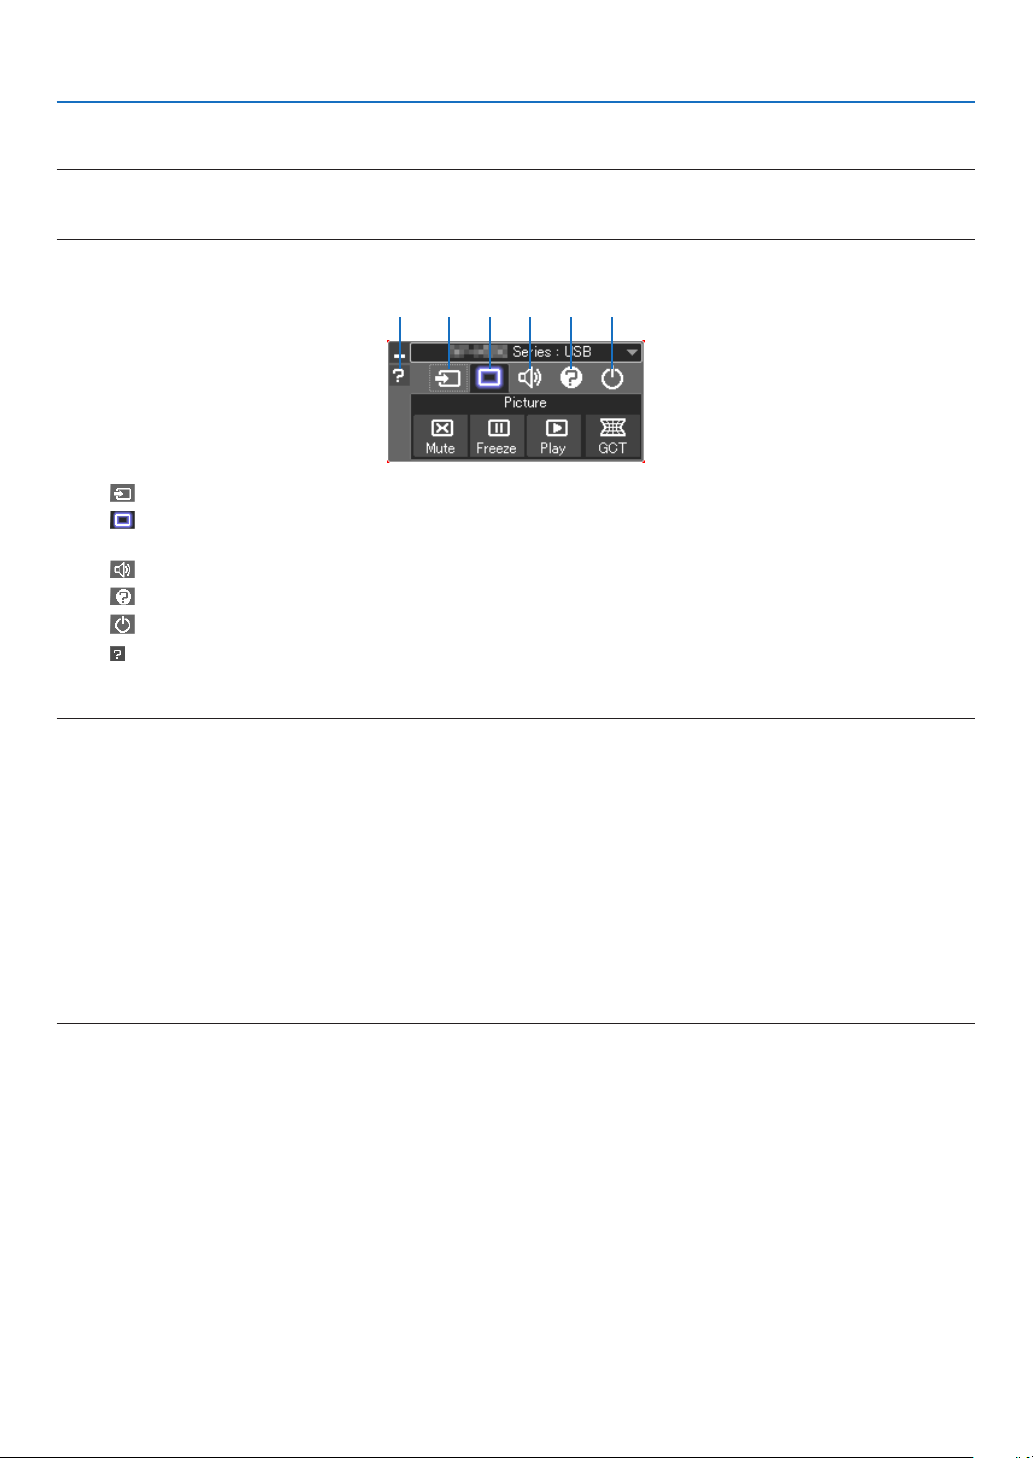
174
8. User Supportware
When connecting with the projector is establised, you can operate the control window to control the projector.
NOTE:
•When[POWER-SAVING]or[NETWORKSTANDBY]isselectedfor[STANDBYMODE]fromthemenu,theprojectorthatisturned
offwillnotbedisplayedintheselectwindowfordestination
Control Window Operations
(1) (2) (3) (4) (5)(6)
(1) (Source) ..... Selects an input source of the projector.
(2)
(Picture) .... Turns on or off the Mute (Picture mute), Freeze (Freeze a picture), Play, and Geometric Correction Tool (GCT)
functions.
(3)
(Sound) ..... Turns on or off Mute (Sound mute), play the sound and turns up or down the volume.
(4)
(Etc) ........... Uses “Update”, “HTTP Server”*, “Settings” and “Information”.
(5)
(Exit) .......... Exit Image Express Utility Lite. You can also turn off the projector at the same time.
(6)
(Help) ........... Displays the help of Image Express Utility Lite.
TIP:
ViewingtheHelpofImageExpressUtilityLite
•DisplayingtheHelpleofImageExpressUtilityLitewhileitisrunning.
Click the [?] (help) icon on the control window.
The Help screen will be displayed.
•DisplayingtheHelpleofGCTwhileitisrunning.
Click “Help (C)” → “Help” on the Cornerstone Edit screen.
The Help screen will be displayed.
•DisplayingthehelpleusingtheStartMenu.
Click “Start” → “All programs” or “Programs” → “NEC Projector User Supportware” → “Image Express Utility Lite”
→ “Image Express Utility Lite Help”.
The Help screen will be displayed.
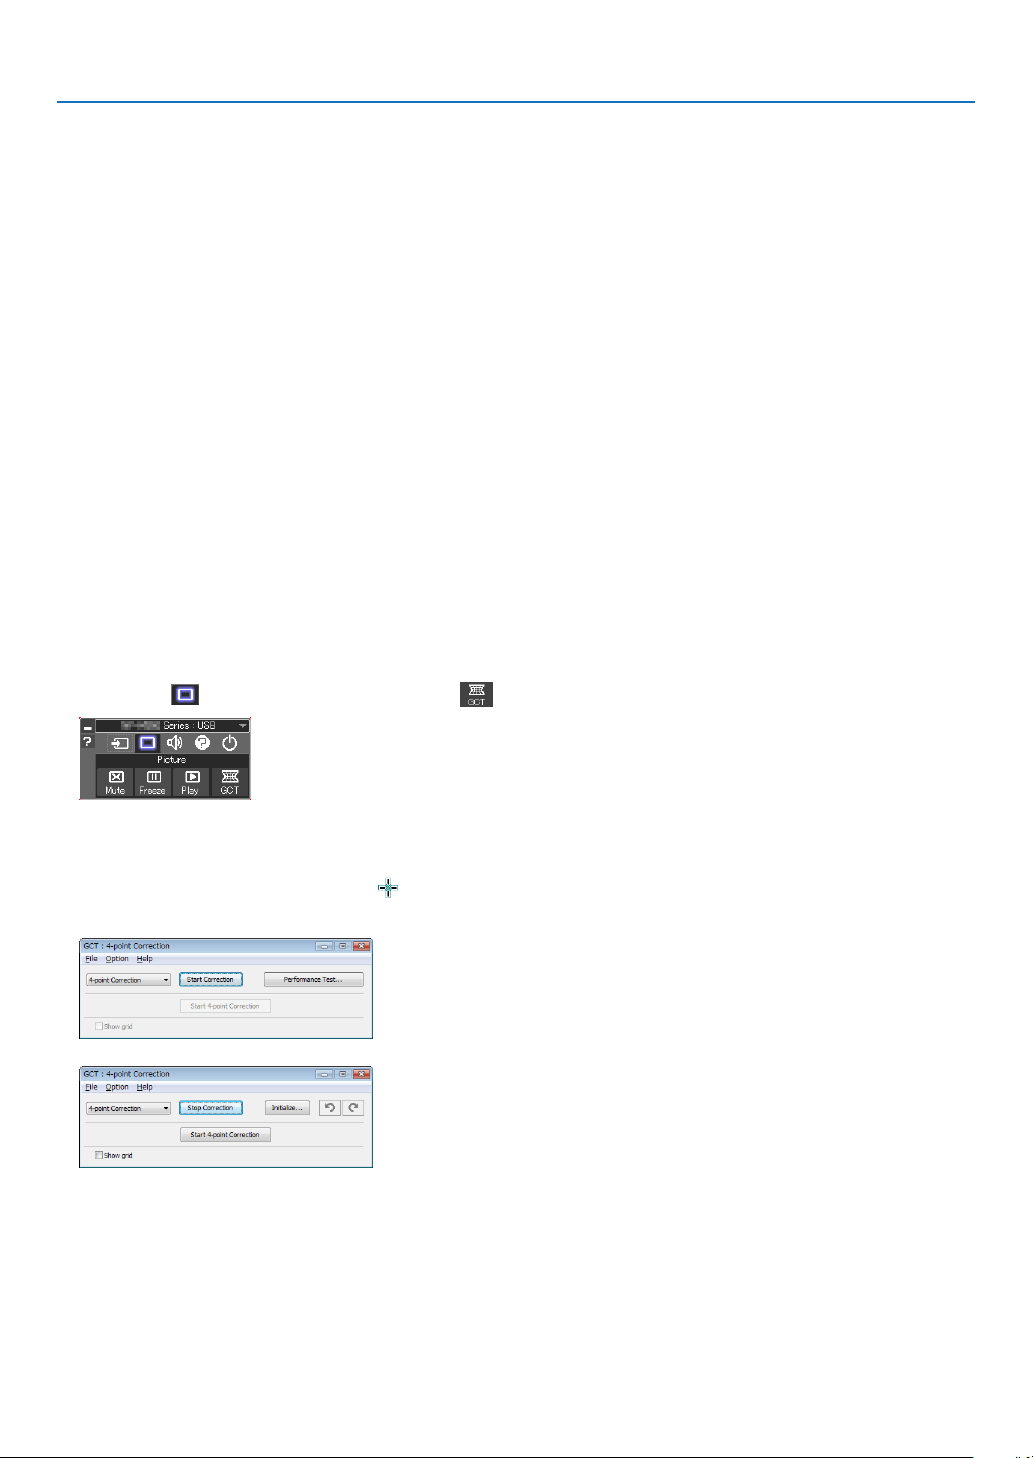
175
8. User Supportware
Projecting an Image from an Angle (Geometric Correction Tool
in Image Express Utility Lite)
TheGeometricCorrectionTool(GCT)functionallowsyoutocorrectdistortionofimagesprojectedevenfroman
angle.
What you can do with GCT
•TheGCTfeatureincludesthefollowingthreefunctions
•4-pointCorrection:Youcantaprojectedimagewithintheborderofthescreeneasilybyalignthefourcorners
ofanimagetotheonesofthescreen.
•Multi-point Correction:Youcancorrectadistortedimageonthecornerofawallorirregularshapedscreen
byusingmanyseparatedscreenstocorrecttheimageaswellas4-pointCorrection.
•Parameters Correction:Youcancorrectadistortedimagebyusingacombinationoftransformationalrules
preparedinadvance.
Thissectionwillshowanexampleforusewith4-pointCorrection.
Forinformationabout“Multi-pointCorrection”and“ParametersCorrection”,seethehelpleofImageExpress
UtilityLite.(→page
171)
•Yourcorrectiondatacanbestoredintheprojectororyourcomputerwhichcanberestoredwhennecessary.
•Geometriccorrectioncanbeusedwhenconnectedtothenetwork(bywiredorwirelessLAN)orbyvideocable.
Preparation:Adjusttheprojectorpositionorthezoomsothattheprojectedimagecancoverthewholescreenarea.
1.Clickthe“
”(Picture)iconandthenthe“”button.
The “4-point Correction” window will be displayed.
2.Clickthe“StartCorrection”buttonandthen“Start4-pointCorrection”button.
A green frame and a mouse pointer ( ) will be displayed.
•Four[• ] marks will be appeared at four corners of the green frame
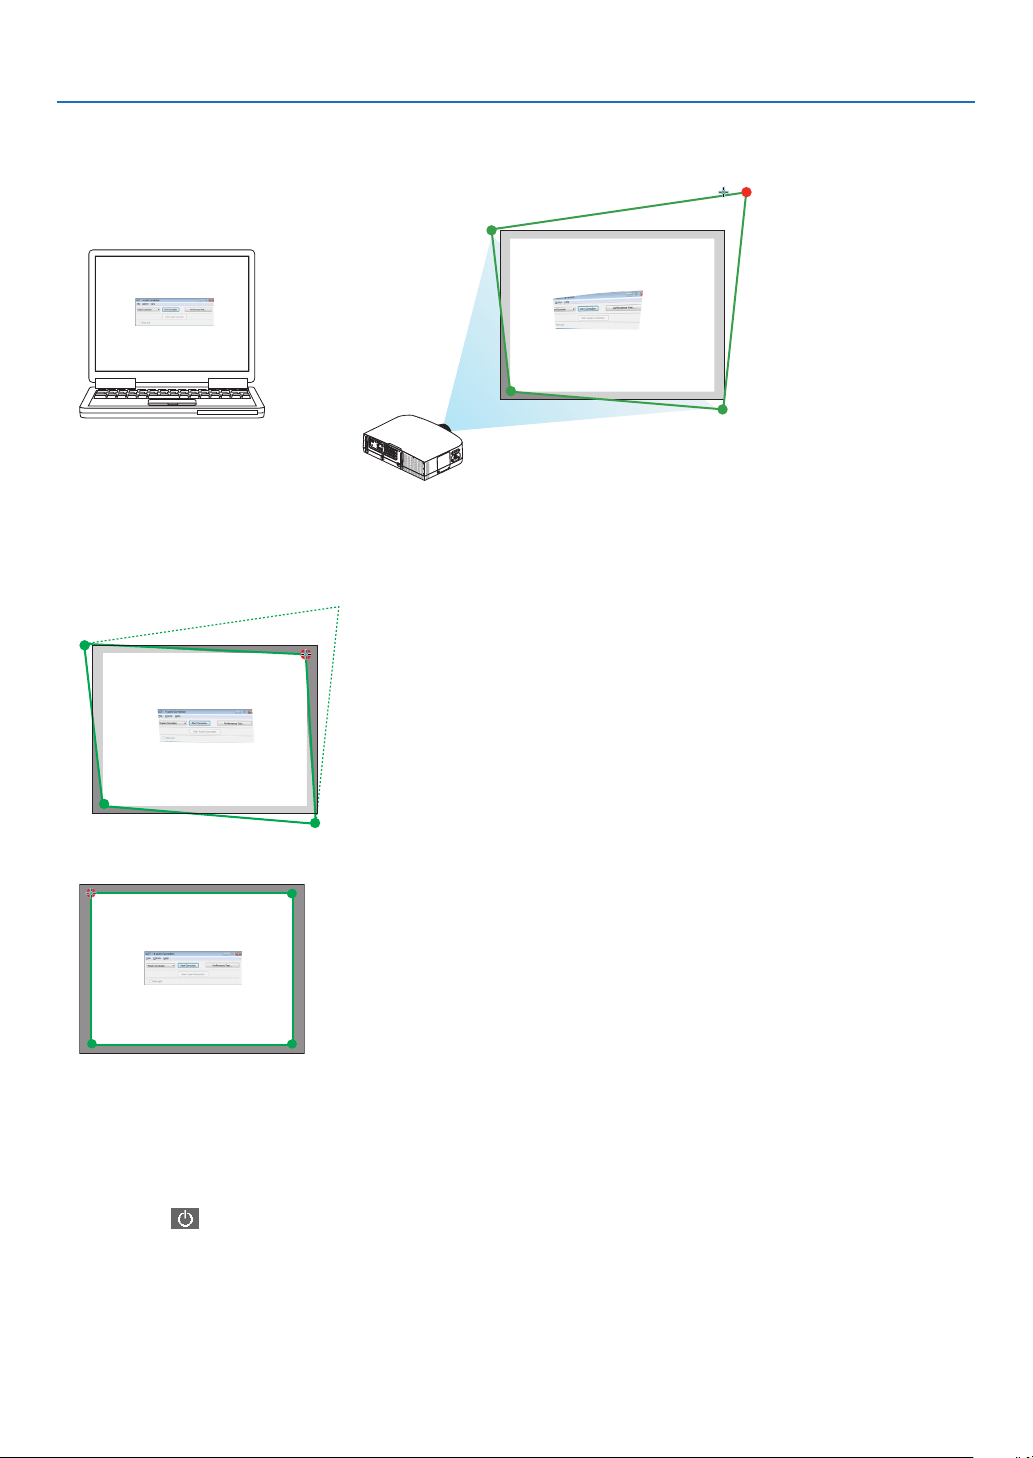
176
8. User Supportware
3.Usethemousetoclickthe[
• ]markofwhichcorneryouwishtomove.
The currently selected [ • ] mark will turn red.
(In the above example, Windows screens are omitted for clarification.)
4.Dragtheselected[ • ]marktothepointyouwishtocorrectanddropit.
•Whenyouclicksomewherewithintheprojectimagearea,thenearest[•
] mark will go to the position where
the mouse cursor is.
5. Repeat Step 3 and 4 to correct the distortion of the projected image.
6. After completing, right-click the mouse.
The green frame and the mouse pointer will disappear from the projected image area. This will complete the cor-
rection.
7.Clickthe“X”(close)buttononthe“4-pointCorrection”window.
The “4-point Correction” window will disappear and the 4-point correction will take effect.
8.Clickthe“”buttononthecontrolwindowtoexittheGCT.
TIP:
•Afterperformingthe4-pointcorrection,youcansavethe4-pointcorrectiondatatotheprojectorbyclicking“File”→“Writingto
theprojector…”onthe“4-pointCorrection”window.
•SeetheHelpofImageExpressUtilityLiteforoperating“4-pointCorrection”windowandotherfunctionsthanGCT.(→page
171)
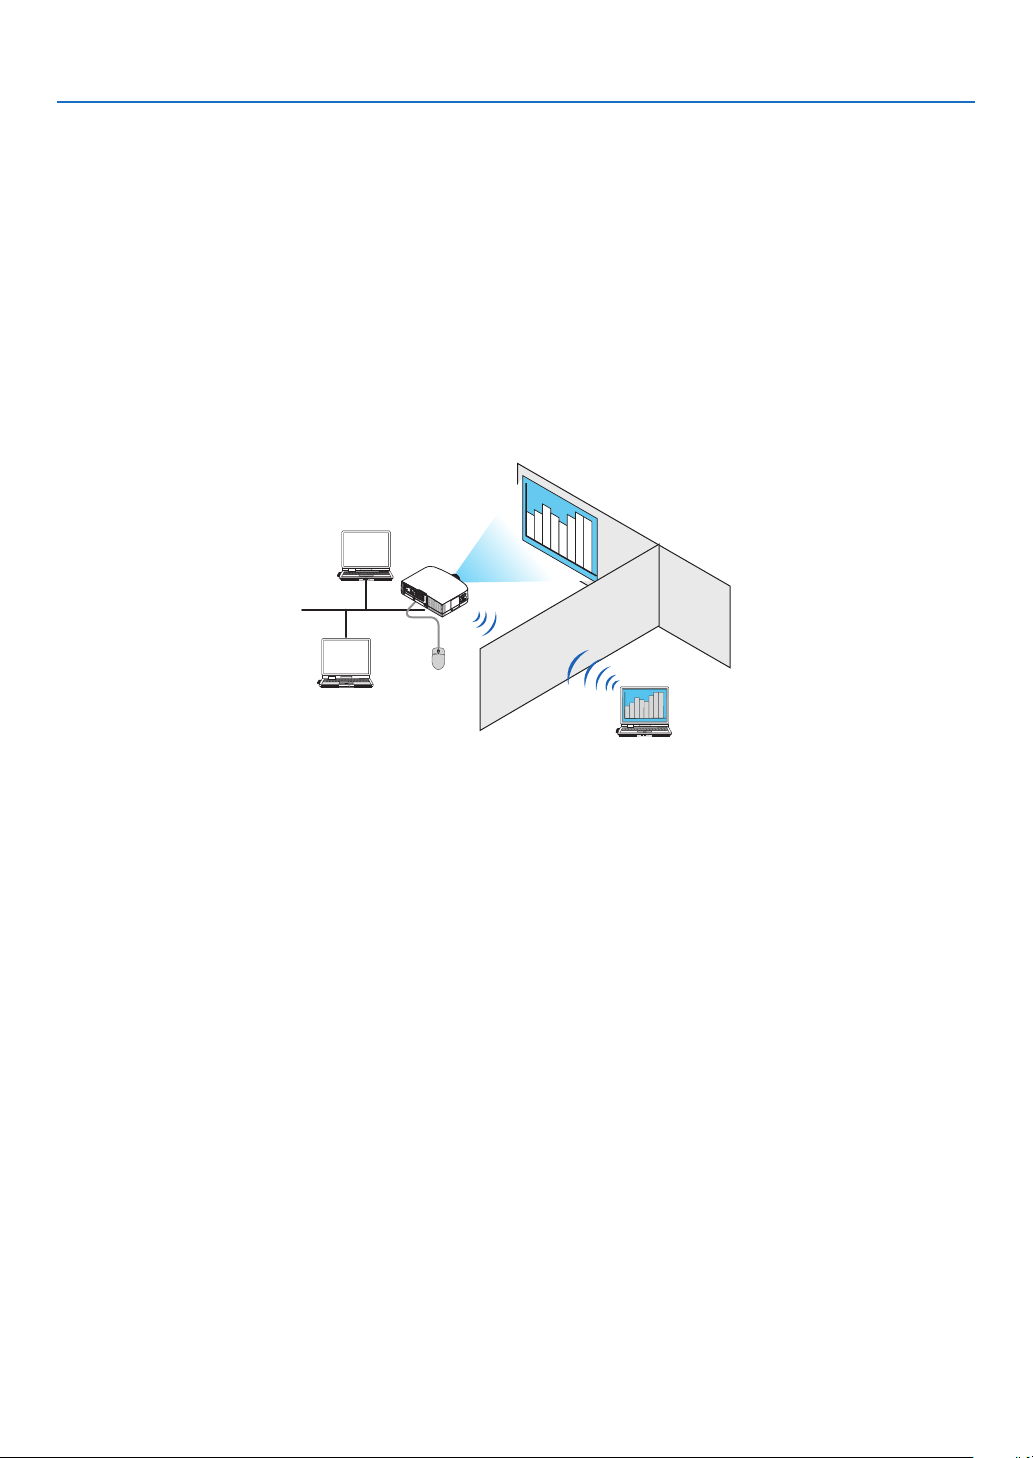
177
8. User Supportware
Using the Projector to Operate Your Computer over a LAN
(Desktop Control Utility 1.0)
UsingDesktopControlUtility1.0allowsyoutoremotelyoperateyourcomputerplacedatadistancefromtheprojector
overanetwork(wiredLANorwirelessLAN).
What you can do with Desktop Control Utility 1.0
•AcommerciallyavailableUSBmouseisconnectedtotheprojectortooperatethecomputer.
•Suppose,forexample,aPowerPointletobepresentedinaconferenceissavedtoacomputerinyourofce.
IfthiscomputerisconnectedtotheprojectorintheconferenceroomwithLANwhentheconferenceisheld,the
desktopscreenofthecomputerinyourofce(Windows7/WindowsVista/WindowsXP)canbeprojectedandthe
Power-Pointlecanbepresentedbyoperatingtheprojector.Inotherwordsthecomputerdoesnotneedtobe
broughtintotheconferenceroom.
IMPORTANT:
•YoucanusetheDesktopControlUtility1.0tooperateacomputerlocatedinaseparateroomfromtheprojectoroveranetwork.
Therefore,caremustbeexercisedtopreventanythirdpartyfromviewingthescreenofyourcomputer(importantdocuments),
copyingles,orturningoffthepower.
NECassumesnoliabilityforanylossordamagesarisingfrominformationleakorsystemfailurewhileyouareusingDesktop
ControlUtility1.0.
•ThiswilldisconnectLANconnectionwhenthecomputergoesinthestandbymodewhiletheDesktopControlUtility1.0isbeing
used.
IntheWindows7/WindowsVista,select[ControlPanel]→[HardwareandSound]→[PowerOptions].Set[Changewhenthe
computersleeps]to[Never].
IntheWindowsXP,click[ControlPanel]→[PerformanceandMaintenance]→[PowerOptions]→[SystemStandby]→
[Never].
•ThescreensaverfunctionisoffwhileDesktopControlUtility1.0isrunning.
Connecting the projector to a LAN
ConnecttheprojectortotheLANbyfollowingtheinstructionsin“ConnectingtoaWiredLAN”(→page
150),“Con-
nectingtoaWirelessLAN”(→page151)and“9ApplicationMenus-NETWORKSETTINGS”(→page120)

178
8. User Supportware
Using the projector to operate your computer’s desktop screen
IMPORTANT:
•IncaseofWindows7/WindowsVista,disabletheuseraccountcontrolbeforeusingDesktopControlUtility1.0.
WindowsVistahas“UserAccountControl”functiontoprotectthecomputer.Theuseraccountconrmationwindowmaybe
displayed.
SinceDesktopControlUtility1.0cannottransfertheuseraccountconrmationwindow,thiswindowmakestheoperationunavail
-
able.BeforeusingDesktopControlUtility1.0,itisnecessarytodisabletheuseraccountcontrolofWindows7/WindowsVista.
Afterloggingonwiththeadministratoraccount,followtheprocedurebelowtochangethesetting:
[Change Procedure]
<For Windows 7>
1Click[ControlPanel]fromtheStartManu.
2Click[UserAccountsandFamilySafety].
3Click[UserAccounts].
4Click[ChangeUserAccountControlsettings].
5Change[Choosewhentobenotiedaboutchangestoyourcomputer]to[Nevernotify]andclick[OK].
•Ifrestartingisrequested,click[Restartnow].
<ForWindowsVista>
1Click[ControlPanel]fromtheStartMenu.
2Click[UserAccountsandFamilySafety].
3Click[UserAccount].
4Click[Enable/DisableUserAccountControl].
5Removethecheckmarkfor[UseUserAccountControl(UAC)toHelpComputerProtection]andclick
[OK].
•Ifrebootingisrequested,click[RebootNow].
UponcompletionofDesktopControlUtility,itisrecommendedtoenabletheuseraccountcontrol.
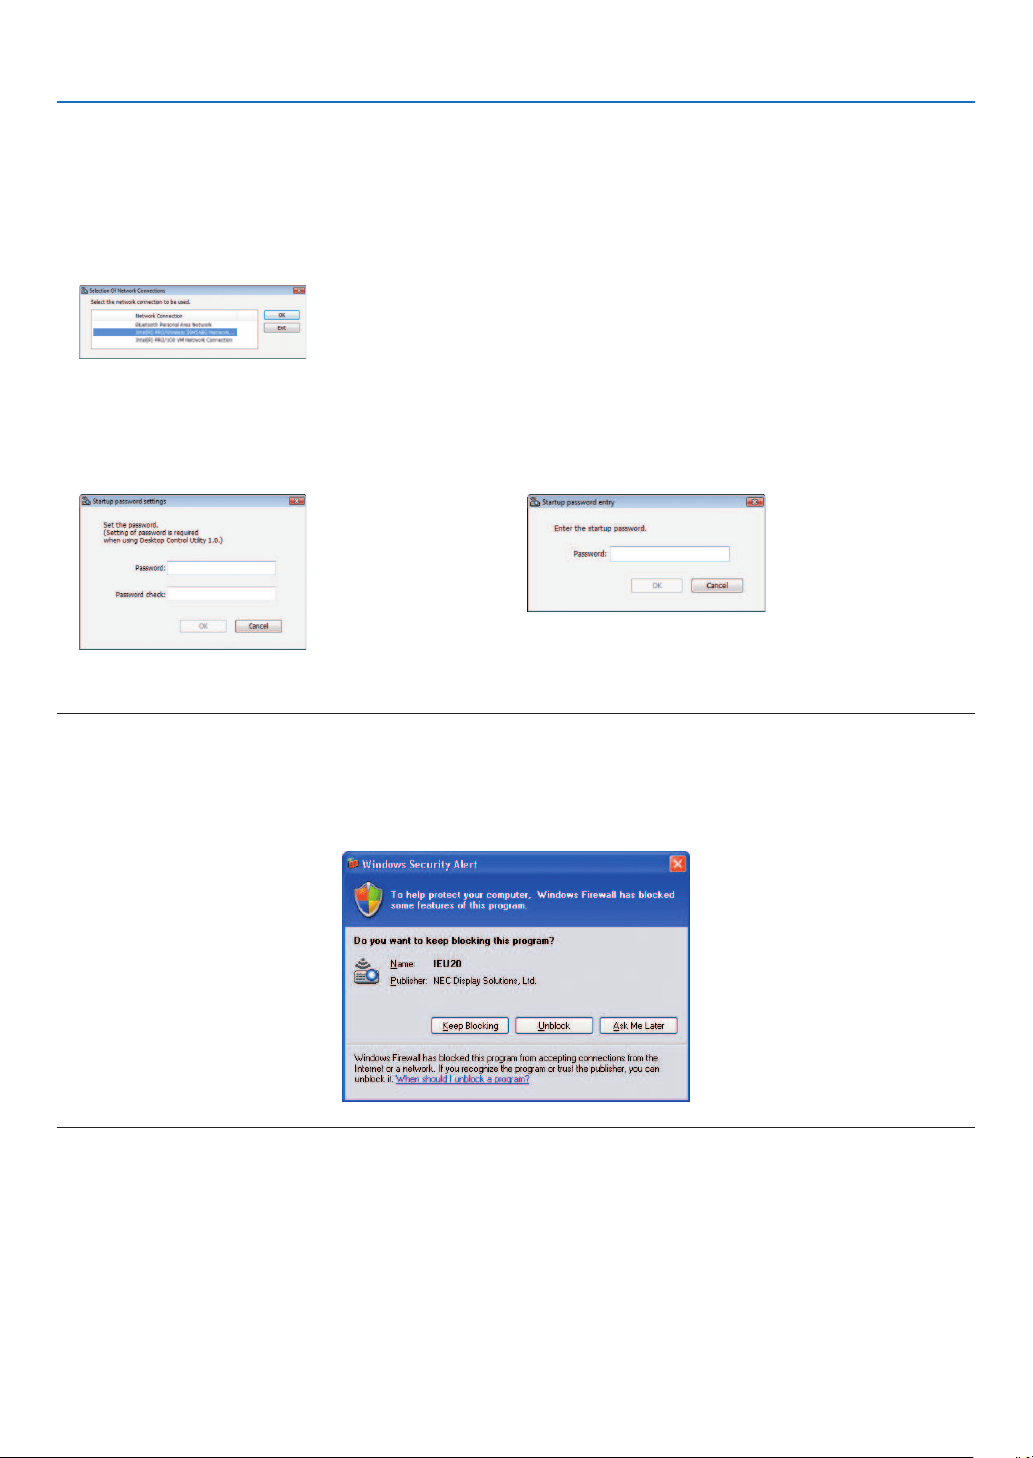
179
8. User Supportware
•Operationoncomputer
1ClickWindows[Start]→[AllPrograms]→[NECProjectorUserSupportware]→[DesktopControlUtility
1.0]→[DesktopControl],inthatorder.
The “Selection Of Network Connections” window is displayed.
This displays a list of the network devices connected to the computer you are using.
2Selectthenetworkdevicetouseandclick[OK].
The “Startup password settings” window will be displayed.
•IncaseofWindows7/WindowsVista,theUserAccountControlWindowisdisplayed.Click[OK]orinputthe
administrator password.
Screen when Desktop Control Utility 1.0 is started first time
already
Screen if starting password has been set
IMPORTANT:
•Besuretowritedownthestartingpasswordincaseyouforgetit.
•ThestartingpasswordmustbeinputeachtimeDesktopControlUtility1.0isstarted.
•Shouldyouforgetthestartingpassword,reinstalltheDesktopControlUtility1.0.
AscreenliketheonebelowisdisplayedwhenthesoftwareisstartedonaPCinstalledwithWindowsXPServicePack2(SP2)(or
later).
Click“Unblock”ifthisisdisplayed.

180
8. User Supportware
3InputthestartingpasswordofDesktopControlUtility1.0,andclick[OK].
The “Current password” window will be displayed.
NOTE:
ThecharacterstringdisplayedinthepasswordeldvarieseachtimeDesktopControlUtility1.0isstarted.
4 Write down the character string displayed in the password field.
Write down “PMHN” in the screen example of step 3.
5Click[OK].
Desktop Control Utility 1.0 will be started.
Move to the room where the projector is installed, with the paper on which you have written down the password in
step 4.
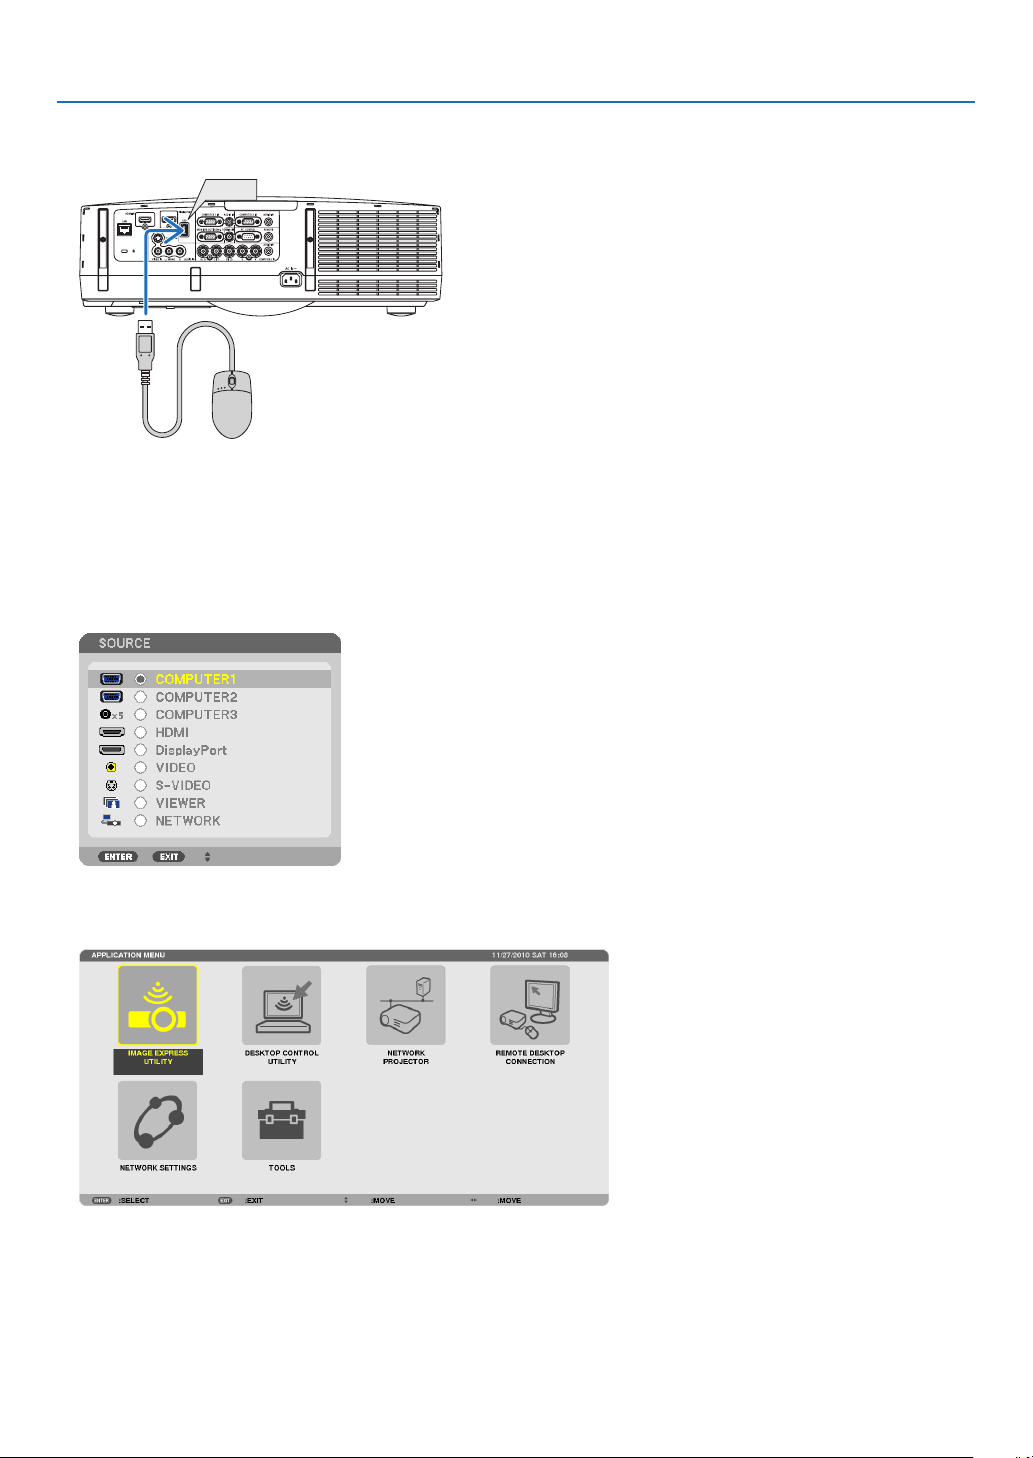
181
8. User Supportware
•Operatingtheprojector(connectingcomputer)
1ConnectaUSBmousethatiscommerciallyavailabletotheprojector.
USB
2 Turn on the power to the projector.
Set the LAN setting of the projector in advance.
3PresstheSOURCEbuttonontheprojectorunit.
The Source list will be displayed.
In case of the remote control, press the NETWORK button.
The “network menu” screen will be displayed, proceed to step 5.
4 Press the /buttonstoselect[NETWORK],andthenpresstheENTERbutton.
The “network menu” screen will be displayed.
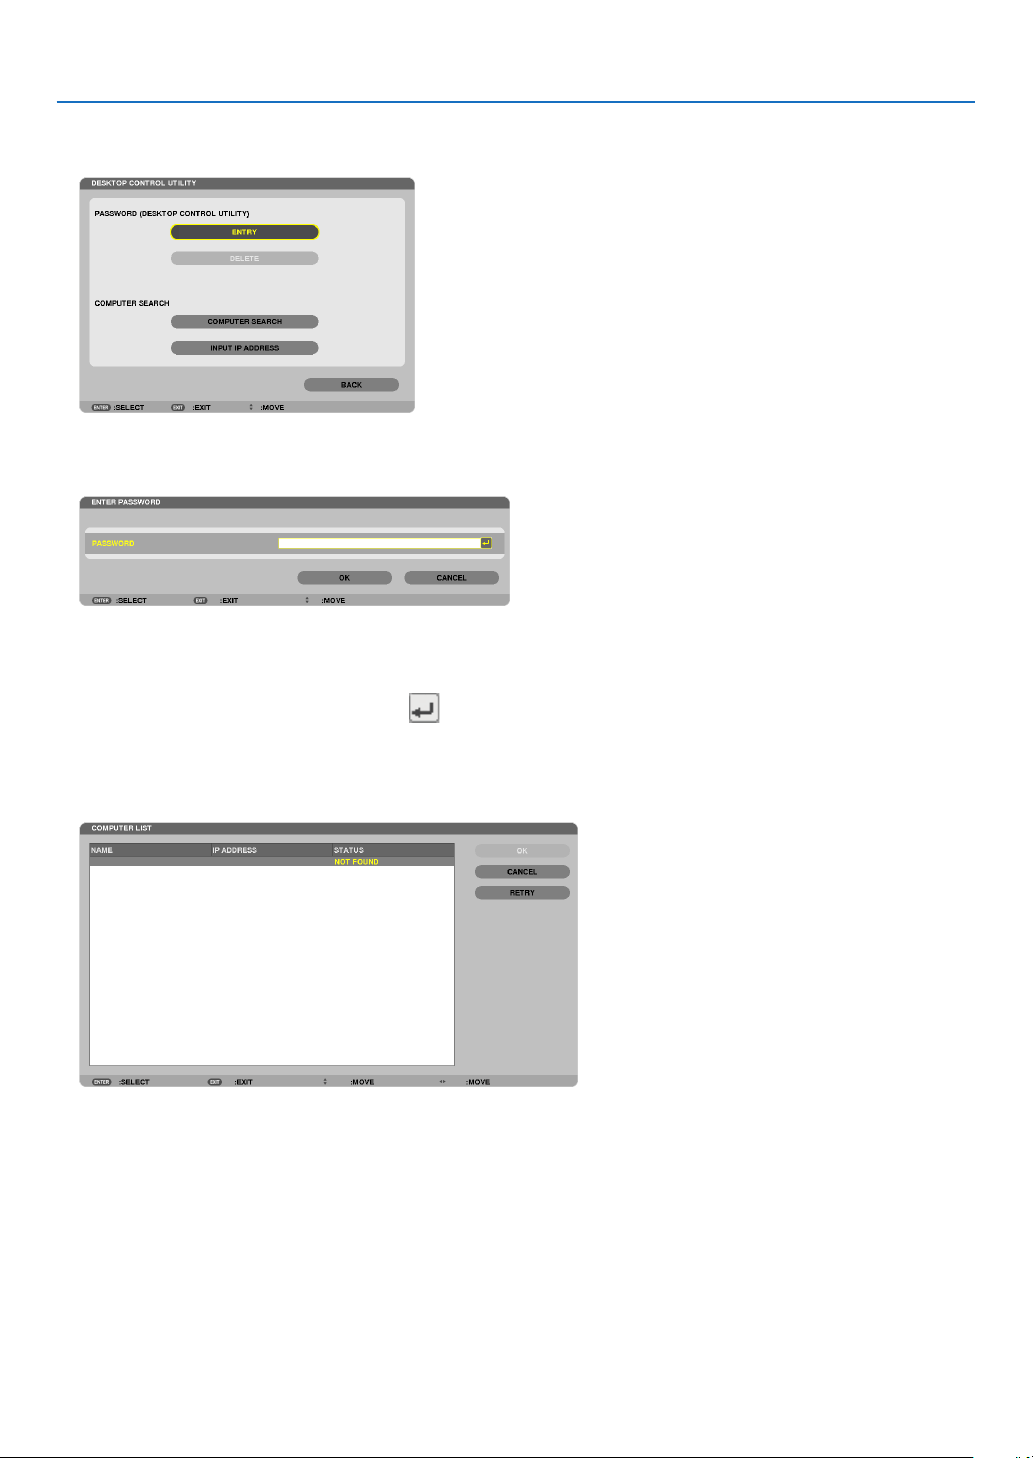
182
8. User Supportware
5Click[DESKTOPCONTROLUTILITY].
The “DESKTOP CONTROL UTILITY menu” screen will be displayed.
6Click“ENTRY”.
A password input screen will be displayed.
7Inputthepasswordyouhavewrittendowninstep4of“Operationoncomputer”.
•Clickthe[BS]buttonontherightsideofthe[PASSWORD]eldtodeletethecharactertotheleftofthecharacter
insertion point.
8 After inputting the password, click the
buttonontherightsideofthe[PASSWORD]eld.
You are returned to the “DESKTOP CONTROL UTILITY” menu screen.
9Click[COMPUTERSEARCH].
The “COMPUTER LIST” screen will be displayed.
If the connection destination has not been found as a result of a COMPUTER SEARCH, search for the connection
destination by inputting the IP address of the computer at the connection destination, click “Input IP Address”.

183
8. User Supportware
10Clickthecomputerattheconnectiondestinationandthen[OK].
The desktop screen of the computer at the connection destination will be displayed.
•Operatingtheprojector(manipulatingdesktopscreen)
ThedisplayeddesktopscreencanbemanipulatedbyusingtheUSBmouseconnectedtotheprojector.IftheEXIT
buttonoftheprojectororremotecontrolispressedwhilethedesktopscreenisdisplayed,anauxiliaryoperationbar
isdisplayedatthelowerleftofthescreen.
Manipulatetheauxiliaryoperationbarbyusingthebuttonsoftheprojectororremotecontrol.
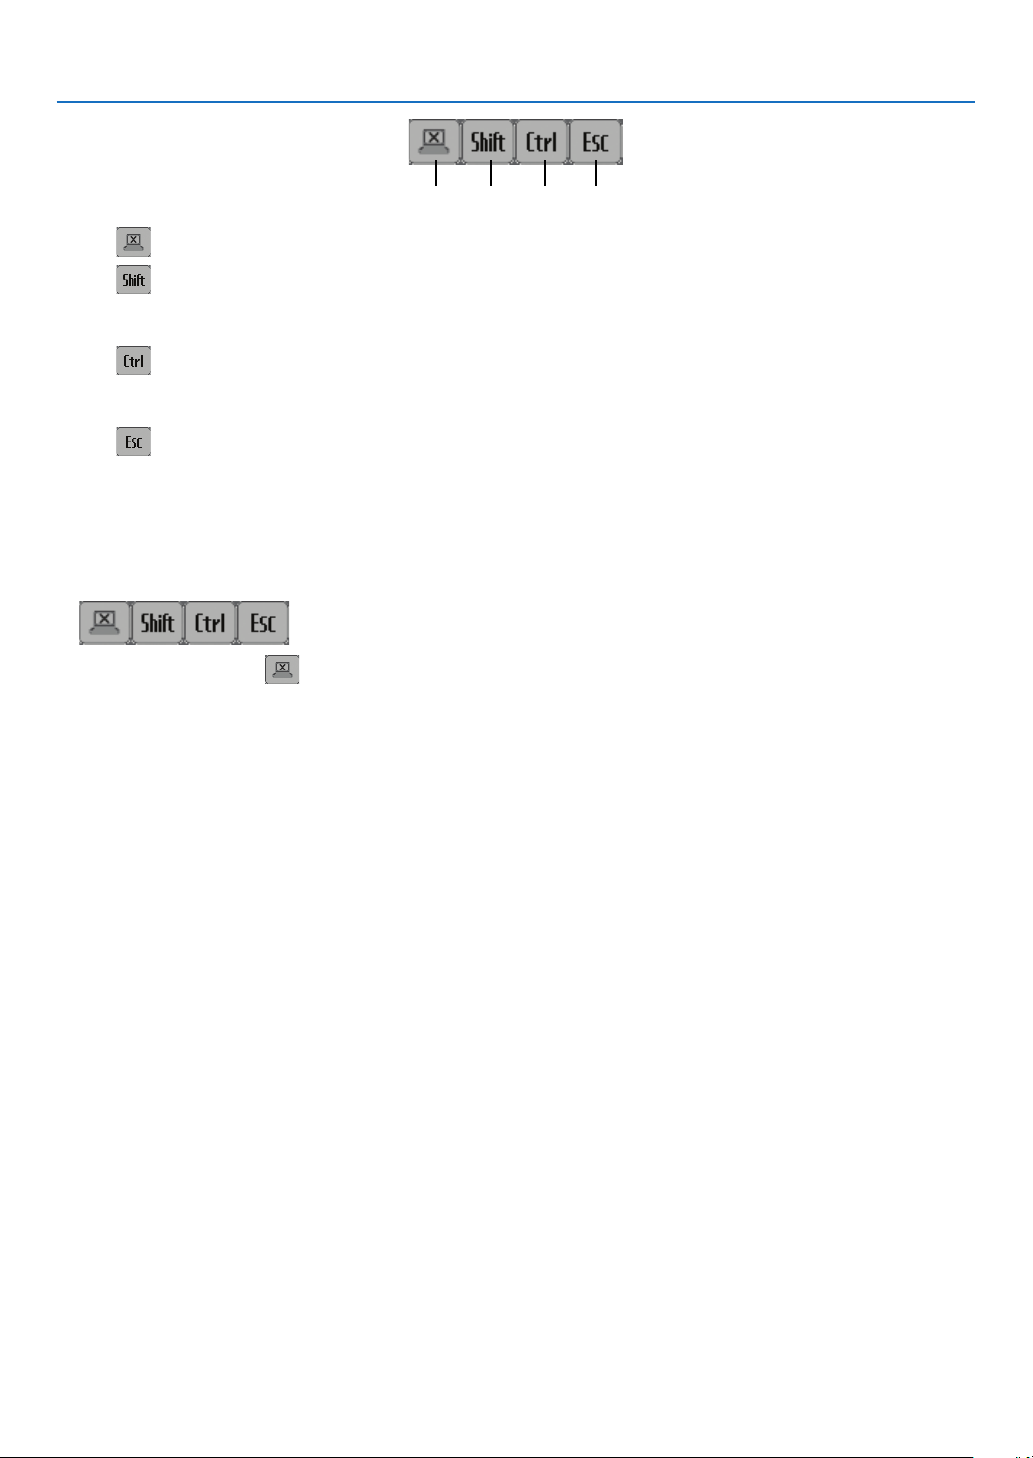
184
8. User Supportware
<1> <2> <3> <4>
<1> (cut-off icon) .......Disconnects communication with the computer.
<2>
(Shift icon) ..........When the highlight is moved to this icon and the ENTER button is pressed, shift lock status is set.
The shift lock is canceled if the highlight is moved to this icon and the ENTER button is pressed
again.
<3>
(Ctrl icon) ............When the highlight is moved to this icon and the ENTER button is pressed, control lock status is set.
The control lock is canceled if the highlight is moved to this icon and the ENTER button is pressed
again.
<4>
(ESC icon) ...........The same operation as when the [ESC] key of the computer is pressed is performed. This icon is
used, for example, to stop a slideshow of PowerPoint.
•Operatingtheprojector(disconnectingcommunications)
1 Press the EXIT button while the desktop screen is displayed.
An auxiliary operation bar will be displayed at the lower left of the screen.
2 Move the highlight to (cut-off icon) and press the ENTER button.
Communication will be disconnected and you are returned to the “DESKTOP CONTROL UTILITY” menu screen.
To resume communication, click [COMPUTER SEARCH].
After that, follow step 10 on the preceding page.
REFERENCE:
Communicationcanalsobedisconnectedbyclickingtheprojectoricononthetaskbarandthenclicking“Disconnect”whilethe
desktopscreenisdisplayed.
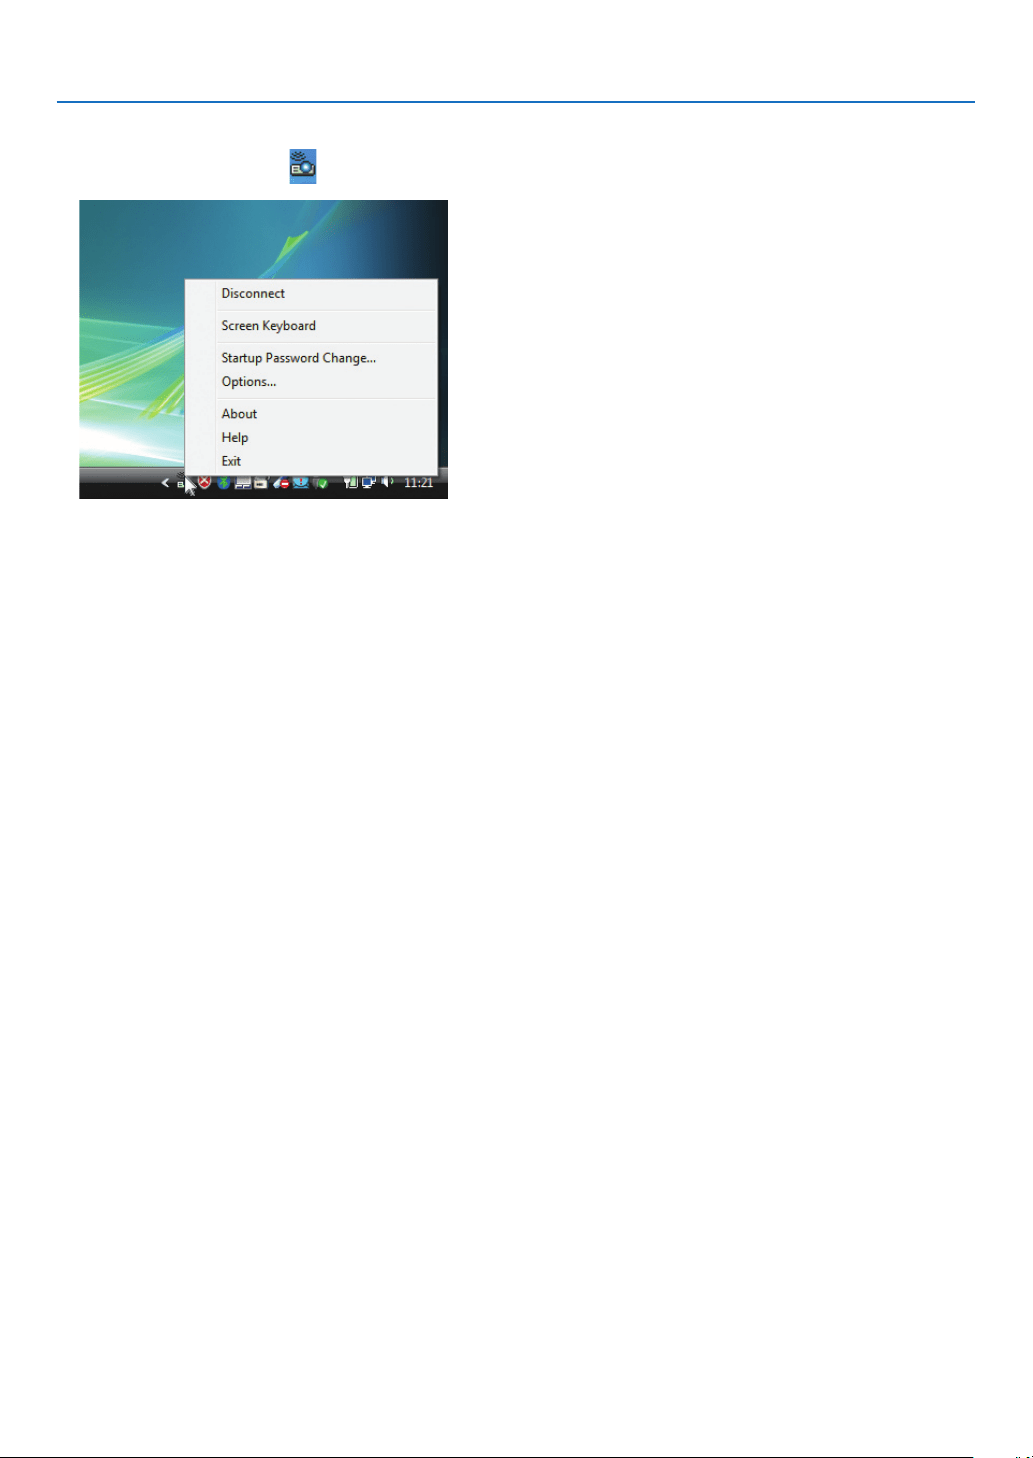
185
8. User Supportware
•Operatingtheprojector(exitingDesktopControlUtility1.0)
1Clicktheprojectoricon[
]onthetaskbarwhilethedesktopscreenisdisplayed.
2Click[Exit].
Desktop Control Utility 1.0 will be terminated.
3 Press the EXIT button on the projector unit or on the remote control.
The “network menu” screen will be displayed.
4 Press the MENU button on the projector unit or on the remote control.
The on-screen menu will be displayed.
5Selectaninputsourceotherthan[NETWORK].

186
8. User Supportware
Controlling the Projector over a LAN (PC Control Utility Pro 4)
Usingtheutilitysoftware“PCControlUtilityPro4”,theprojectorcanbecontrolledfromacomputeroveraLAN.
Control Functions
PowerOn/Off,signalselection,picturefreeze,picturemute,audiomute,adjusting,errormessagenotication,event
schedule.
ScreenofPCControlUtilityPro4
ThissectionprovidesanoutlineofpreparationforuseofPCControlUtilityPro4.ForinformationonhowtousePC
ControlUtilityPro4,seeHelpofPCControlUtilityPro4.
TIP:
•PCControlUtilityPro4canbeusedwithaserialconnection.
Connect the projector to a LAN.
ConnecttheprojectortotheLANbyfollowingtheinstructionsin“ConnectingtoaWiredLAN”(→page
150),“Con-
nectingtoaWirelessLAN(soldseparately)”(→page151)and“9ApplicationMenus-NETWORKSETTINGS”(→
page120)
Start PC Control Utility Pro 4
Click“Start”→“Allprograms”or“Programs”→“NECProjectorUserSupportware”→“PCControlUtilityPro4”→
“PCControlUtilityPro4”.
NOTE:
•FortheSchedulefunctionofthePCControlutilityPro4towork,youmusthaveyourcomputerrunningandnotinstandby/
sleepmode.Select“PowerOptions”fromthe“ControlPanel”inWindowsanddisableitsstandby/sleepmodebeforerunningthe
scheduler.
[Example]ForWindows7:
Select“ControlPanel”→“SystemandSecurity”→“PowerOptions”→“Changewhenthecomputersleeps”→“Putthecomputer
tosleep”→“Never”.
NOTE:
•When[POWER-SAVING]isselectedfor[STANDBYMODE]fromthemenu,theprojectorcannotbeturnedonviathenetwork
(wiredLAN/wirelessLAN)connection.
When[NETWORKSTANDBY]isselectedfor[STANDBYMODE],theprojectorcannotbeturnedonviawirelessLANconnection.
TIP:
ViewingtheHelpofPCControlUtilityPro4
•DisplayingtheHelpleofPCControlUtilityPro4whileitisrunning.
Click “Help (H)” → “Help (H) …” of window of PC Control Utility Pro 4 in this order.
The pop-up menu will be displayed.
•DisplayingthehelpleusingtheStartMenu.
Click “Start” → “All programs” or “Programs” → “NEC Projector User Supportware” → “PC Control Utility Pro 4” →
“PC Control Utility Pro 4 Help”.
The Help screen will be displayed.

187
9. Appendix
Throw distance and screen size
Fiveseparatebayonetstylelensescanbeusedonthisprojector.Refertotheinformationonthispageandusea
lenssuitedfortheinstallationenvironment(screensizeandthrowdistance).Forinstructionsonmountingthelens,
seepage
141.
Lens types and throw distance
PA722X/PA721X/PA622X/PA621X
ScreensizeLensmodelname
NP11FLNP12ZLNP13ZLNP14ZLNP15ZL
30"0.7-0.9
40"0.6 0.9-1.21.2-2.4
60"1.0 1.4-1.91.8 - 3.7 3.6 - 5.8 5.7 - 8.7
80"1.3 1.9-2.52.4-4.94.8-7.87.6 - 11.6
100"1.6 2.4-3.23.0 - 6.1 6.0-9.79.6-14.6
120"2.0 2.9-3.83.7-7.47.3 - 11.7 11.5 - 17.6
150"2.5 3.7-4.84.6-9.29.1-14.714.4-22.0
200"4.9-6.46.1 - 12.3 12.2-19.619.3-29.4
240"5.9-7.77.4-14.814.7-23.623.2 - 35.3
300"7.4-9.69.2-18.518.4-29.529.1-44.2
400"9.8-12.812.3-24.724.6-39.438.8-59.0
500"12.3 - 16.0 15.4-30.830.7-49.248.6-73.8
TIP
Calculationofthethrowdistancefromthescreensize
NP11FLlensthrowdistance(m)=H×0.8:0.6m(min.)to2.5m(max.)
NP12ZLlensthrowdistance(m)=H×1.2toH×1.6:0.7m(min.)to16.0m(max.)
NP13ZLlensthrowdistance(m)=H×1.5toH×3.0:1.2m(min.)to30.8m(max.)
NP14ZLlensthrowdistance(m)=H×3.0toH×4.8:3.6m(min.)to49.2m(max.)
NP15ZLlensthrowdistance(m)=H×4.7toH×7.3:5.7m(min.)to73.8m(max.)
“H”(Horizontal)referstothescreenwidth.
*Figuresdifferbyseveral%withthetableabovebecausethecalculationisapproximate.
Ex.:Throwdistancewhenprojectingona150"screenwiththePA722X/PA721X/PA622X/PA621XusingtheNP13ZLlens:
Accordingtothe“ScreenSize(forreference)”table(→page
204),H(screenwidth)=304.8cm.
Thethrowdistanceis304.8cm×1.5to304.8cm×3.0=457.2cmto914.4cm(becauseofthezoomlens).

188
9. Appendix
PA672W/PA671W/PA572W/PA571W
ScreensizeLensmodelname
NP11FLNP12ZLNP13ZLNP14ZLNP15ZL
30"0.7 - 1.0
40"0.7 1.0 - 1.3 1.3 - 2.5
60"1.0 1.5 - 2.0 1.9-3.83.8 - 6.1 5.9-9.1
80"1.42.0 - 2.6 2.6 - 5.1 5.1 - 8.2 8.0 - 12.2
100"1.7 2.5 - 3.3 3.2-6.46.3 - 10.2 10.0-15.4
120"2.1 3.1-4.03.9-7.77.6 - 12.3 12.1 - 18.5
150"2.6 3.8 - 5.0 4.8-9.79.6-15.415.2 - 23.1
200"5.1 - 6.7 6.5-12.912.8 - 20.6 20.3-30.9
240"6.2 - 8.0 7.8 - 15.5 15.4-24.724.4-37.1
300"7.7 - 10.1 9.7-19.419.3-30.930.5-46.5
400"10.3-13.413.0-25.925.8-41.340.7-62.0
500"12.9-16.816.2-32.432.2 - 51.7 51.0 - 77.6
TIP
Calculationofthethrowdistancefromthescreensize
NP11FLlensthrowdistance(m)=H×0.8:0.7m(min.)to2.6m(max.)
NP12ZLlensthrowdistance(m)=H×1.2toH×1.6:0.7m(min.)to16.8m(max.)
NP13ZLlensthrowdistance(m)=H×1.5toH×3.0:1.3m(min.)to32.4m(max.)
NP14ZLlensthrowdistance(m)=H×3.0toH×4.8:3.8m(min.)to51.7m(max.)
NP15ZLlensthrowdistance(m)=H×4.7toH×7.2:5.9m(min.)to77.6m(max.)
“H”(Horizontal)referstothescreenwidth.
*Figuresdifferbyseveral%withthetableabovebecausethecalculationisapproximate.
Ex.:Throwdistancewhenprojectingona150"screenwiththePA672W/PA671W/PA572W/PA571WusingtheNP13ZLlens:
Accordingtothe“ScreenSize(forreference)”table(→page
204),H(screenwidth)=323.1cm.
Thethrowdistanceis323.1cm×1.5to323.1cm×3.0=484.7cmto969.3cm(becauseofthezoomlens).
PA622U/PA621U/PA522U/PA521U
ScreensizeLensmodelname
NP11FLNP12ZLNP13ZLNP14ZLNP15ZL
30"0.7-0.9
40"0.7 1.0 - 1.3 1.2 - 2.5
60"1.0 1.5-1.91.9-3.83.7 - 6.0 5.9-9.0
80"1.42.0 - 2.6 2.5 - 5.1 5.0 - 8.0 7.9-12.1
100"1.7 2.5 - 3.3 3.2 - 6.3 6.3 - 10.1 9.9-15.1
120"2.1 3.0-3.93.4-7.67.5 - 12.1 11.9-18.2
150"2.6 3.8-4.94.8-9.59.4-15.214.9-22.8
200"5.1 - 6.6 6.6 - 12.7 12.6 - 20.3 20.0 - 30.5
240"6.1-7.97.6 - 15.3 15.2-24.424.0-36.6
300"7.6-9.99.6-19.119.0-31.530.1-45.8
400"10.2 - 13.2 12.8 - 25.5 25.4-40.740.1-61.1
500"12.7 - 16.5 16.0-31.931.8-50.950.2-76.4
TIP
Calculationofthethrowdistancefromthescreensize
NP11FLlensthrowdistance(m)=H×0.8:0.5m(min.)to2.6m(max.)
NP12ZLlensthrowdistance(m)=H×1.2toH×1.5:0.7m(min.)to16.5m(max.)
NP13ZLlensthrowdistance(m)=H×1.5toH×3.0:1.2m(min.)to31.9m(max.)
NP14ZLlensthrowdistance(m)=H×2.9toH×4.7:3.7m(min.)to50.9m(max.)
NP15ZLlensthrowdistance(m)=H×4.6toH×7.1:5.9m(min.)to76.4m(max.)
“H”(Horizontal)referstothescreenwidth.
*Figuresdifferbyseveral%withthetableabovebecausethecalculationisapproximate.
Ex.:Throwdistancewhenprojectingona150"screenwiththePA622U/PA621U/PA522U/PA521UusingtheNP13ZLlens:
Accordingtothe“ScreenSize(forreference)”table(→page
204),H(screenwidth)=323.1cm.
Thethrowdistanceis323.1cm×1.5to323.1cm×3.0=484.7cmto969.3cm(becauseofthezoomlens).
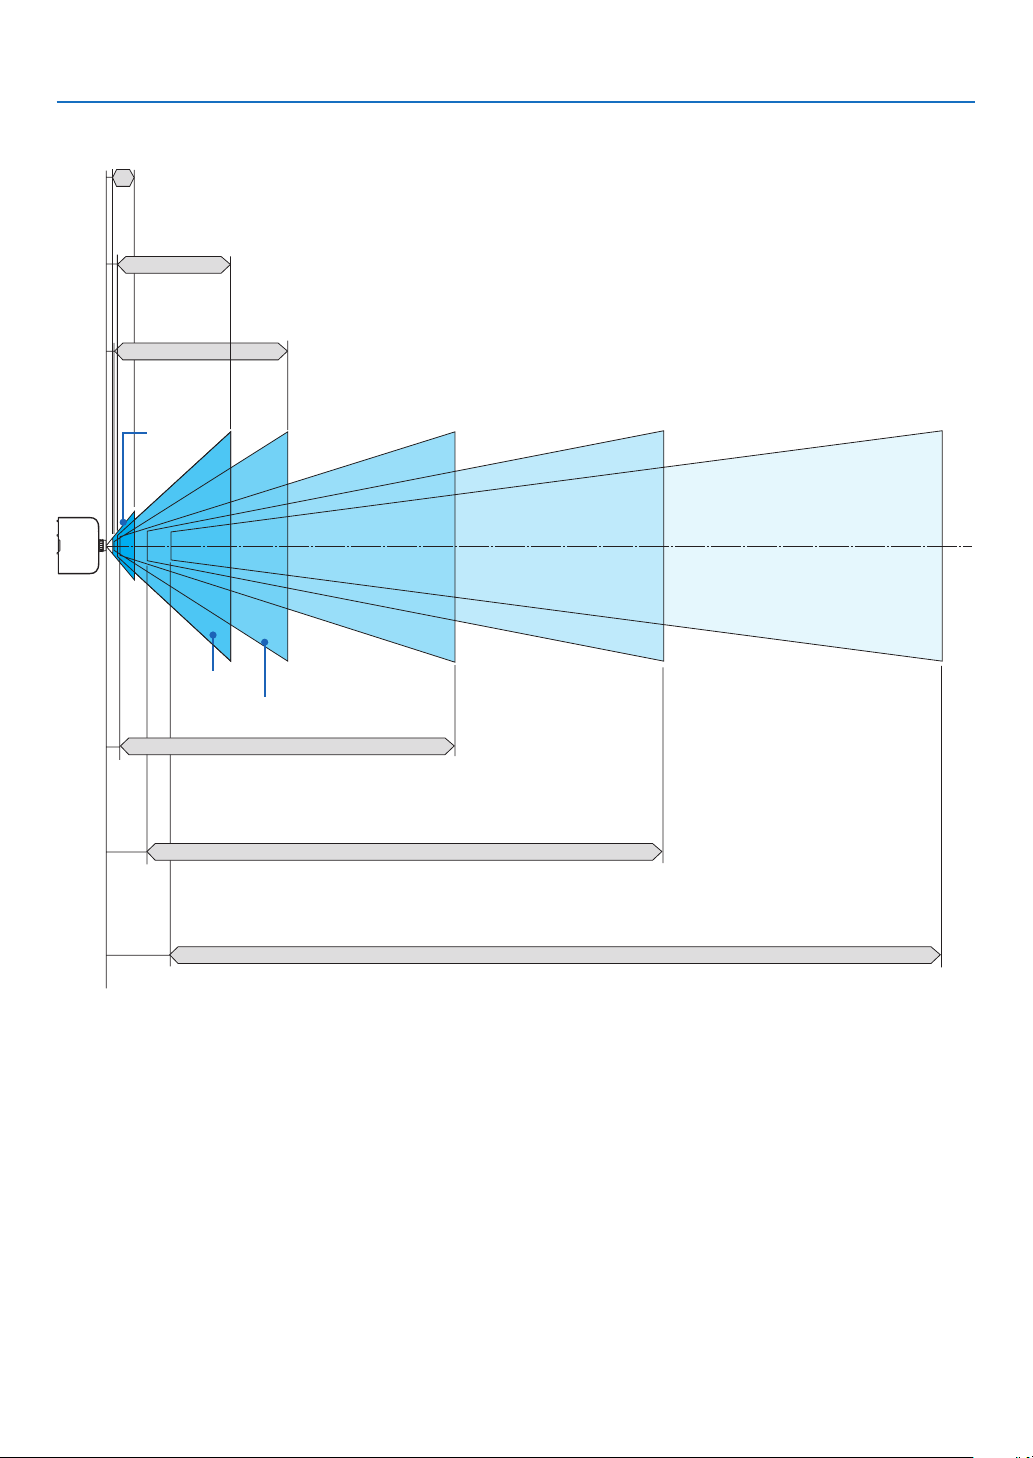
189
9. Appendix
Projectionrangeforthedifferentlenses
40-150"
30-500"
40-500"
60-500"
60-500"
60-500"
NP12ZL
NP14ZL
NP11FL
NP30ZL
PA622U/PA621U/PA522U/PA521U: 0.7–2.6 m
PA672W/PA671W/PA572W/PA571W: 0.7–2.6 m
PA722X/PA721X/PA622X/PA621X: 0.6–2.5 m
PA622U/PA621U/PA522U/PA521U: 1.0–11.3 m
PA672W/PA671W/PA572W/PA571W: 1.0–11.3 m
PA722X/PA721X/PA622X/PA621X: 1.0–10.9 m
PA622U/PA621U/PA522U/PA521U: 1.0–11.3 m
PA672W/PA671W/PA572W/PA571W: 1.0–11.3 m
PA722X/PA721X/PA622X/PA621X: 1.0–10.9 m
NP13ZL
PA622U/PA621U/PA522U/PA521U: 1.2–31.9 m
PA672W/PA671W/PA572W/PA571W: 1.2–32.1 m
PA722X/PA721X/PA622X/PA621X: 1.2–30.8 m
PA622U/PA621U/PA522U/PA521U: 3.7–50.9 m
PA672W/PA671W/PA572W/PA571W: 3.7–51.2 m
PA722X/PA721X/PA622X/PA621X: 3.6–49.2 m
NP14ZL
PA622U/PA621U/PA522U/PA521U: 5.9–76.4 m
PA672W/PA671W/PA572W/PA571W: 5.9–76.9 m
PA722X/PA721X/PA622X/PA621X: 5.7–73.8 m
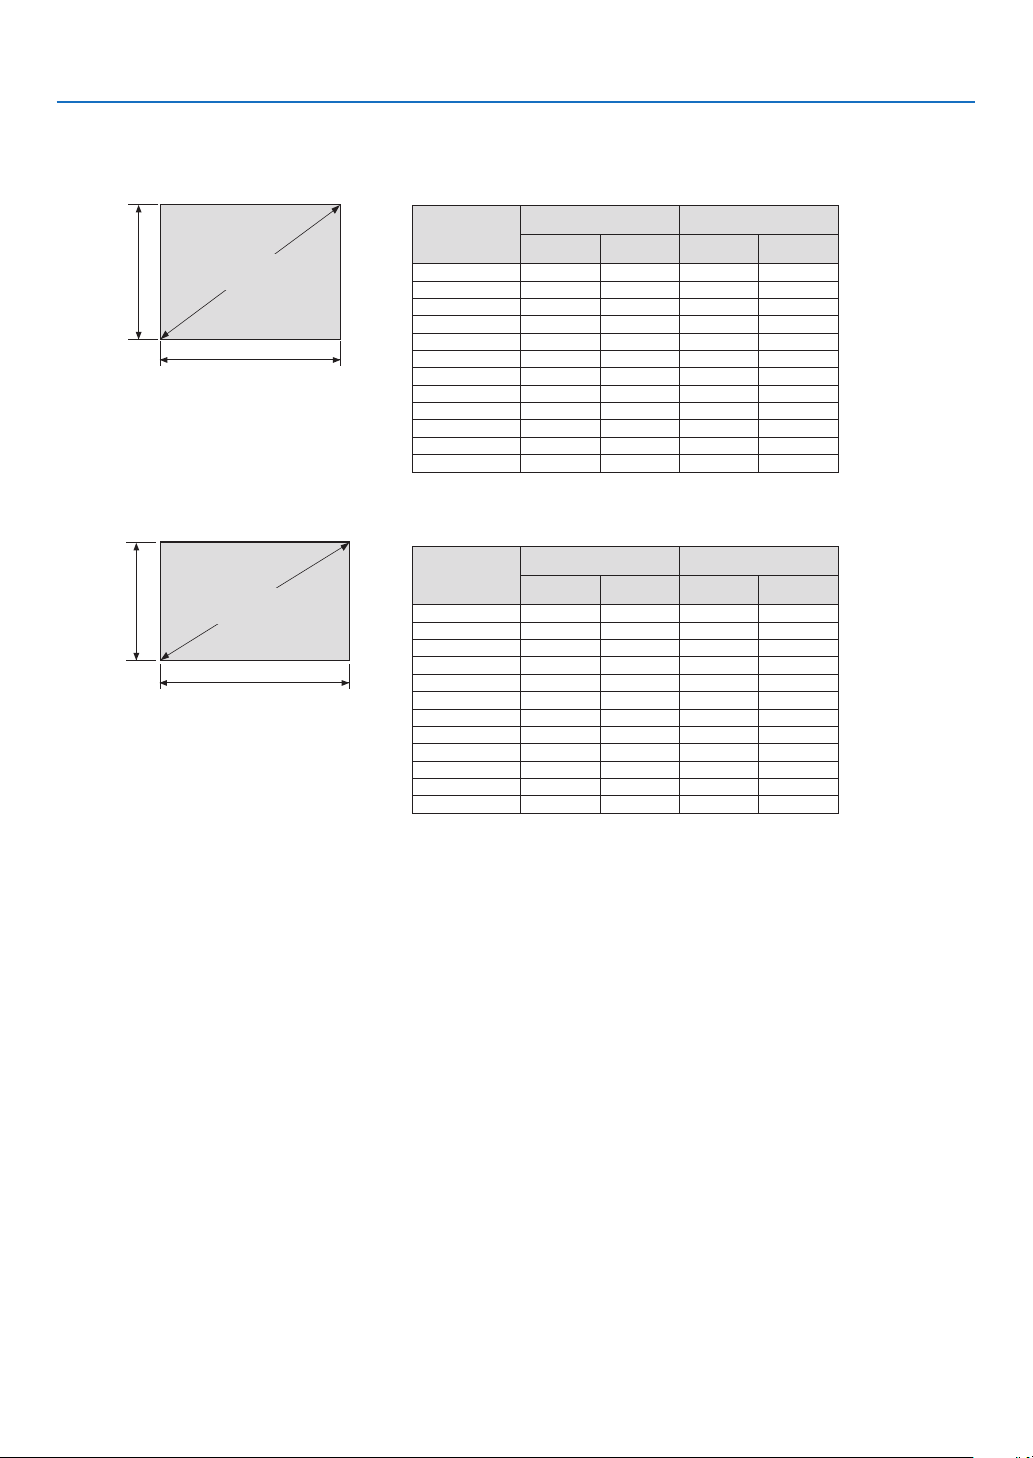
190
9. Appendix
Tables of screen sizes and dimensions
PA722X/PA721X/PA622X/PA621X
PA672W/PA671W/PA572W/PA571W/PA622U/PA621U/PA522U/PA521U
Screen
height
Screen
height
Screen width
Screen width
4:3 screen size
(diagonal)
16:10 screen size
(diagonal)
Size
(inches)
ScreenwidthScreenheight
(inches)(cm)(inches)(cm)
30 2461.0 18 45.7
4032 81.3 2461.0
60 48121.936 91.4
80 64162.6 48121.9
100 80 203.2 60 152.4
120 96243.872 182.9
150 120 304.890228.6
200 160 406.4120 304.8
240192487.7144365.8
300 240609.6180 457.2
400320 812.8 240609.6
500 4001016.0 300 762.0
Size
(inches)
ScreenwidthScreenheight
(inches)(cm)(inches)(cm)
30 25.464.615.940.4
4033.986.2 21.2 53.8
60 50.9129.231.8 80.8
80 67.8 172.3 42.4107.7
100 84.8215.453.0 134.6
120 101.8 258.5 63.6 161.5
150 127.2 323.1 79.5201.9
200 169.6430.8106.0 269.2
240203.5 516.9127.2 323.1
300 254.4646.2159.0403.9
400339.2861.6 212.0 538.5
500 424.01077.0 265.0 673.1
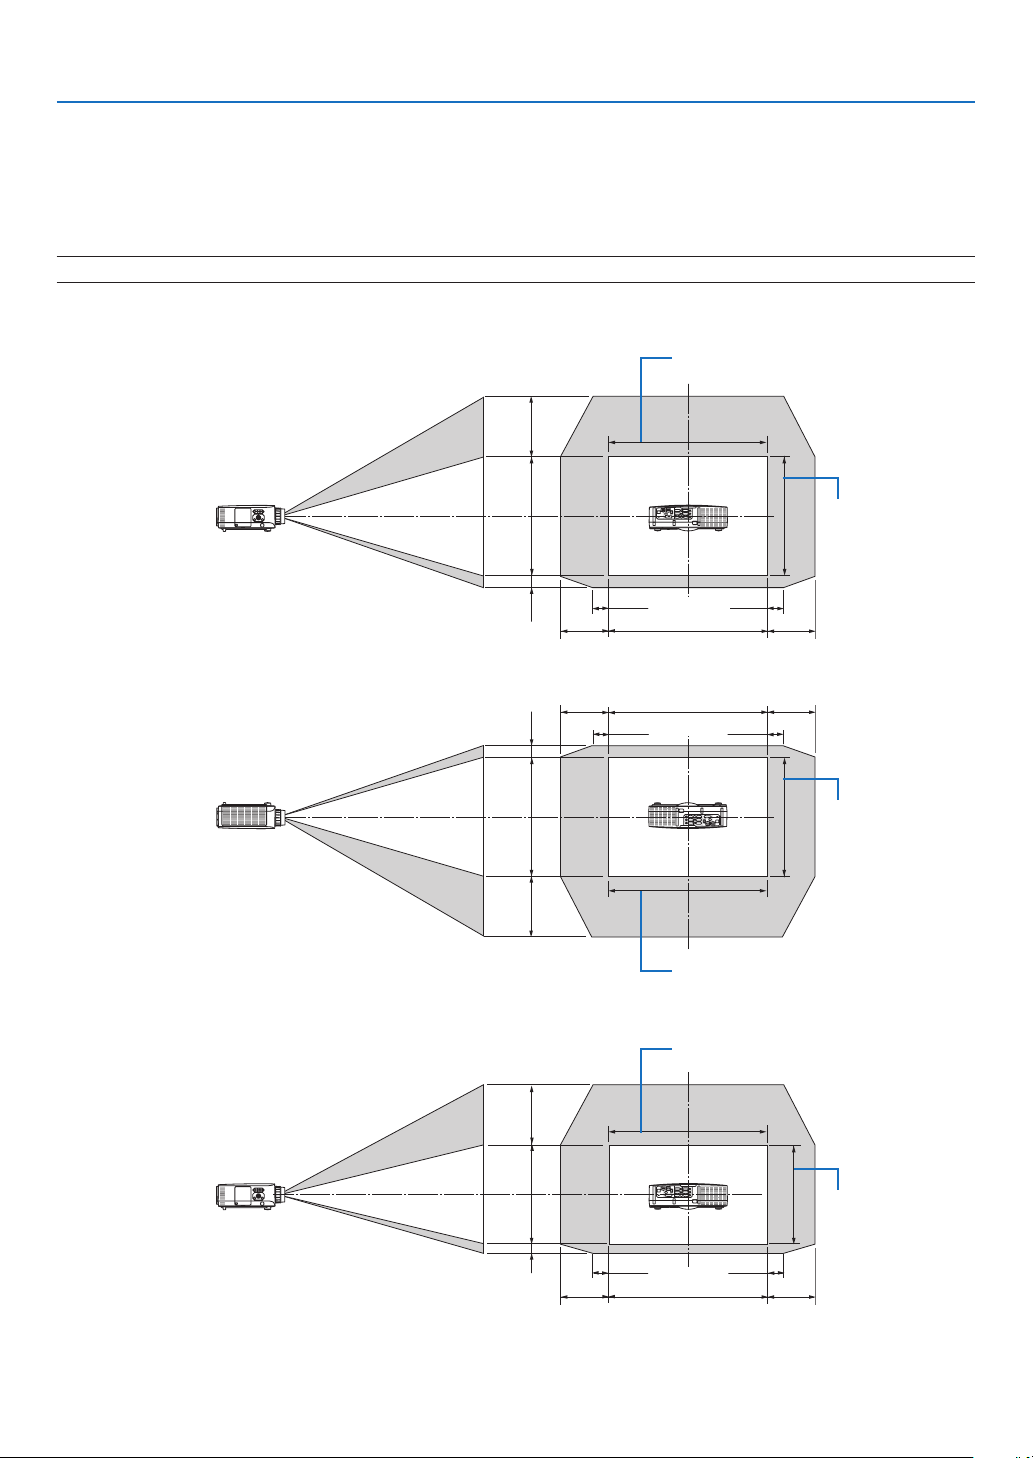
191
9. Appendix
Lens shifting range
Thisprojectorisequippedwithalensshiftfunctionforadjustingthepositionoftheprojectedimagebyturningthelens
shiftdials.Thelenscanbeshiftedwithintherangeshownbelow.
Descriptionofsymbols:Vindicatesvertical(heightoftheprojectedimage),Hindicateshorizontal(widthofthe
projectedimage).
NOTE:ThelensshiftfunctioncannotbeusedwhenusingtheNP11FLlens.
PA722X/PA721X/PA622X/PA621X
Desk/frontprojection
1V
1H
0.3H 0.3H
0.5V
0.1V
0.1H 0.1H
Ceiling/frontprojector
1V
1H
0.3H
0.1H 0.1H
0.3H
0.5V
0.1V
PA672W/PA671W/PA572W/PA571W
Desk/frontprojection
1V
1H
0.3H 0.3H
0.6V
0.1V
0.1H 0.1H
Height of projected
image
Width of projected image
Height of projected
image
Width of projected image
Height of projected
image
Width of projected image
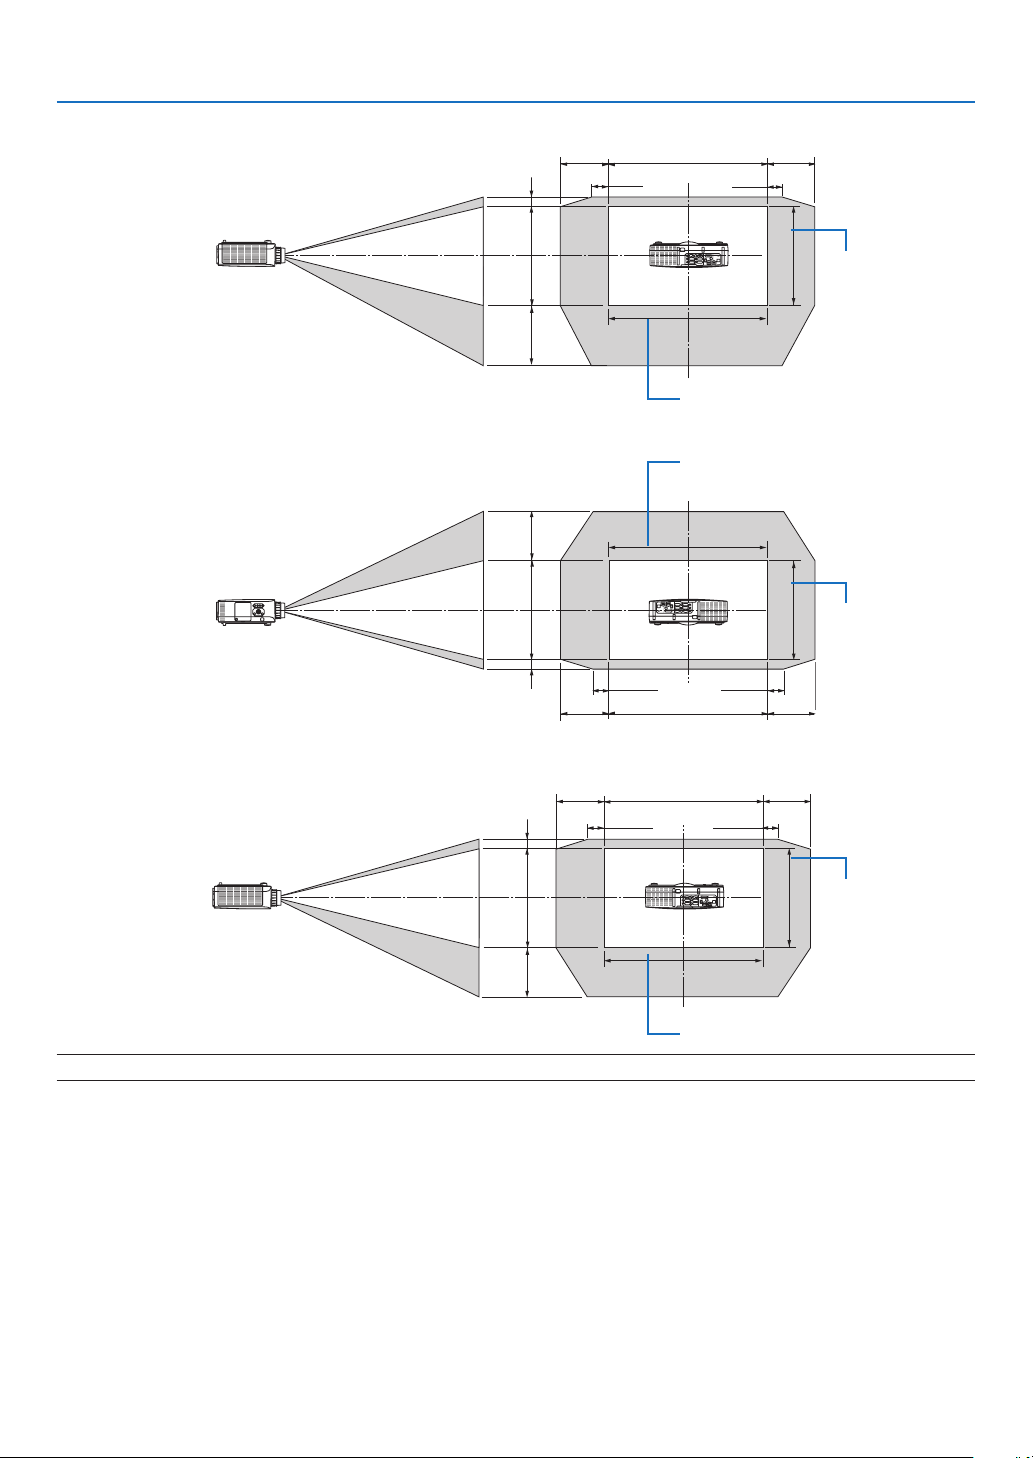
192
9. Appendix
Ceiling/frontprojector
1V
1H
0.3H
0.1H 0.1H
0.3H
0.6V
0.1V
PA622U/PA621U/PA522U/PA521U
Desk/frontprojection
1V
1H
0.3H
*
1
0.1H
0.3H
*
1
0.5V
0.1V
0.1H
Ceiling/frontprojector
1V
1H
0.3H*
1
0.3H*
1
0.1H
0.5V
0.1V
0.1H
NOTE*
1
:Horizontallensshiftrangeis0.15Hatmorethan150"projectedimagewiththelensNP13ZL.
Ex.:Whenprojectingona150"screen
ThissectionisillustratedintheexampleforPA722X/PA721X/PA622X/PA621X(4:3)
•ThefollowingdescriptioncanapplytothePA672W/PA671W/PA572W/PA571W/PA622U/PA621U/PA522U/PA521U
(16:10).Tocalculate,usescreensizesandthemaximumvalueforthelensshiftforPA672W/PA671W/PA572W/
PA571W/PA622U/PA621U/PA522U/PA521U.
Accordingtothetablesofscreensizesanddimensions(→page204),H=304.8cm,V=228.6cm.
Adjustmentrangeintheverticaldirection:Theprojectedimagecanbemovedupwards0.5×228.6cm=114cm,
downwards0.1×228.6cm=22cm(whenthelensisatthecenterposition).Foraceiling/frontinstallation,theabove
guresareinverted.
Adjustmentrangeinthehorizontaldirection:Theprojectedimagecanbemovedtotheleft0.3×304.8cm=91cm,
totheright0.3×304.8cm=91cm.
*Figuresdifferbyseveral%becausethecalculationisapproximate.
Height of projected
image
Width of projected image
Height of projected
image
Width of projected image
Height of projected
image
Width of projected image

193
9. Appendix
Compatible Input Signal List
Analog Computer Signal
SignalResolution(dots)AspectRatioRefreshRate(Hz)
VGA640×4804:3 60/72/75/85/iMac
SVGA800 ×600 4:3 56/60/72/75/85/iMac
XGA1024×768 *
1
4:3 60/70/75/85/iMac
XGA+1152 ×8644:3 60/70/75/85
WXGA
1280 ×768 *
2
15 :960
1280 ×800 *
2
16 :10 60
1360 ×768 *
5
16 :9*
4
60
1366 ×768 *
5
16 :9*
4
60
Quad-VGA1280 ×9604:3 60/75/85
SXGA1280 ×10245 :460/75/85
SXGA+1400×1050 4:3 60/75
WXGA+1440×90016 :10 60
WXGA++1600 ×90016 :960
UXGA1600 ×1200 *
3
4:3 60/65/70/75
WSXGA+1680 ×1050 16 :10 60
WUXGA1920×1200 *
3
16 :10 60(ReducedBlanking)
2K2048×1080 17 :960
FullHD1920×1080 *
3
16 :960
MAC13"640×4804:3 67
MAC16"832 ×6244:3 75
MAC19"1024×768 4:3 75
MAC21"1152 ×870 *
6
4:3 *
4
75
MAC23"1280 ×10245 :465
Component
SignalResolution(dots)AspectRatioRefreshRate(Hz)
HDTV(1080p)1920×1080 16 :950/60
HDTV(1080i)1920×1080 16 :948/50/60
HDTV(720p)1280 ×720 16 :950/60
SDTV(480p)720 ×4804:3/16:960
SDTV(576p)720 ×576 4:3/16:950
SDTV(480i)720 ×4804:3/16:960
SDTV(576i)720 ×576 4:3/16:950
CompositeVideo/S-Video
SignalAspectRatioRefreshRate(Hz)
NTSC4:3 60
PAL4:3 50
PAL604:3 60
SECAM4:3 50

194
9. Appendix
HDMI
SignalResolution(dots)AspectRatioRefreshRate(Hz)
VGA640×4804:3 60
SVGA800 ×600 4:3 60
XGA1024×768 *
1
4:3 60
HD1280 ×720 *
2
16 :960
WXGA
1280 ×768 *
2
15 :960
1280 ×800 *
2
16 :10 60
1366 ×768 *
5
16 :9*
4
60
Quad-VGA1280 ×9604:3 60
SXGA1280 ×10245 :460
SXGA+1400×1050 4:3 60
WXGA+1440×90016 :10 60
WXGA++1600 ×90016 :960
WSXGA+1680 ×1050 16 :10 60
UXGA1600 ×1200 *
3
4:3 60
FullHD1920×1080 *
3
16 :960
WUXGA1920×1200 *
3
16 :10 60
2K2048×1080 17 :960
QXGA
iPad9.7"
2048×1536 4:3 60
4M2304×1728 4:3 60
WQHD
iMac27"
2560 ×144016 :960
WQXGA2560 ×1600 16 :10 60(ReducedBlanking)
4K
3840×2160 16 :923.98/24/25/29.97/30
4096×2160 17 :924
HDTV(1080p)1920×1080 16 :924/25/30/50/60
HDTV(1080i)1920×1080 16 :948/50/60
HDTV(720p)1280 ×720 16 :950/60
SDTV(480p)720 ×4804:3/16:960
SDTV(576p)720 ×576 4:3/16:950
SDTV(480i)1440×4804:3/16:960
SDTV(576i)1440×576 4:3/16:950
HDMI 3D
SignalResolution(dots)RefreshRate(Hz)AspectRatio3DFormat
1920×1080p
23.98/24
16 :9
FramPaking
SideBySide
TopandBottom
25
SideBySide
TopandBottom
50
SideBySide
TopandBottom
59.94/60
SideBySide
TopandBottom
1920×1080i
50
TopandBottom
SideBySide
59.94/60
TopandBottom
SideBySide
1920×720p
50
FramPaking
SideBySide
TopandBottom
59.94/60
FramPaking
SideBySide
TopandBottom

195
9. Appendix
DisplayPort
SignalResolution(dots)AspectRatioRefreshRate(Hz)
VGA640×4804:3 60
SVGA800 ×600 4:3 60
XGA1024×768 *
1
4:3 60
HD1280 ×720 *
2
16 :960
WXGA
1280 ×768 *
2
15 :960
1280 ×800 *
2
16 :10 60
1366 ×768 *
5
16 :9*
4
60
Quad-VGA1280 ×9604:3 60
SXGA1280 ×10245 :460
SXGA+1400×1050 4:3 60
WXGA+1440×90016 :10 60
WXGA++1600 ×90016 :960
WSXGA+1680 ×1050 16 :10 60
UXGA1600 ×1200 *
3
4:3 60
FullHD1920×1080 *
3
16 :960
WUXGA1920×1200 *
3
16 :10 60(ReducedBlanking)
2K2048×1080 17 :960
QXGA
iPad9.7"
2048×1536 4:3 60
4M2304×1728 4:3 60
WQHD
iMac27"
2560 ×144016 :960
WQXGA2560 ×1600 16 :10 60(ReducedBlanking)
4K
3840×2160 16 :923.98/24/25/29.97/30
4096×2160 17 :924
HDTV(1080p)1920×1080 16 :924/25/30/50/60
HDTV(720p)1280 ×720 16 :950/60
SDTV(480p)720 ×4804:3/16:960
SDTV(576p)720 ×576 4:3/16:950
DisplayPort 3D
SignalResolution(dots)RefreshRate(Hz)AspectRatio3DFormat
1920×1080p
23.98/24
16 :9
FramPaking
SideBySide
TopandBottom
25
SideBySide
TopandBottom
50
SideBySide
TopandBottom
59.94/60
SideBySide
TopandBottom
100 FrameSequential
120 FrameSequential
1920×1080i
50
TopandBottom
SideBySide
59.94/60
TopandBottom
SideBySide
1920×720p
50
FramPaking
SideBySide
TopandBottom
100 FrameSequential
59.94/60
FramPaking
SideBySide
TopandBottom
120 FrameSequential
*1NativeresolutiononXGAmodel(PA722X/PA721X/PA622X/PA621X)
*2NativeresolutiononWXGAmodel(PA672W/PA671W/PA572W/PA571W)
*3NativeresolutiononWUXGAmodel(PA622U/PA621U/PA522U/PA521U)
*4ApproximateValue
*5Theprojectormayfailtodisplaythesesignalscorrectlywhen[AUTO]isselectedfor[ASPECTRATIO]intheon-screenmenu.
Thefactorydefaultis[AUTO]for[ASPECTRATIO].Todisplaythesesignals,select[16:9]for[ASPECTRATIO].
*6Theprojectormayfailtodisplaythesesignalscorrectlywhen[AUTO]isselectedfor[ASPECTRATIO]intheon-screenmenu.
Thefactorydefaultis[AUTO]for[ASPECTRATIO].Todisplaythesesignals,select[4:3]for[ASPECTRATIO].
•Signalsexceedingtheprojector’sresolutionarehandledwithAdvancedAccuBlend.
•WithAdvancedAccuBlend,thesizeofcharactersandruledlinesmaybeunevenandcolorsmaybeblurred.
•Uponshipment,theprojectorissetforsignalswithstandarddisplayresolutionsandfrequencies,butadjustmentsmayberequired
dependingonthetypeofcomputer.

196
9. Appendix
Specifications
ModelnamePA722X/PA721X/PA622X/PA621X/PA672W/PA671W/PA572W/PA571W/PA622U/
PA621U/PA522U/PA521U
MethodThreeprimarycolorliquidcrystalshutterprojectionmethod
Specicationsofmainparts
Liquidcrystal
panel
SizePA722X/PA721X/PA622X/PA621X:0.79"(withMLA)×3(aspectratio:4:3)
PA672W/PA671W/PA572W/PA571W:0.76"(withMLA)×3(aspectratio:16:10)
PA622U/PA621U/PA522U/PA521U:0.76"(withMLA)×3(aspectratio:16:10)
Pixels(*1)PA722X/PA721X/PA622X/PA621X:786,432(1024dots×768lines)
PA672W/PA671W/PA572W/PA571W:1,024,000(1280dots×800lines)
PA622U/PA621U/PA522U/PA521U:2,304,000(1920dots×1200lines)
ProjectionlensesZoomManual(zoomrangedependsonlens)
FocusManual
LensshiftingManual
LightsourcePA722X/PA721X/PA672W/PA671W/PA622U/PA621U:355W
PA622X/PA621X/PA572W/PA571W/PA522U/PA521U:330W
(264WwhenEcomodeison)
OpticaldeviceOpticalisolationbydichroicmirror,combiningbydichroicprism
Lightoutput(*2)
(*3)
ECOOFFPA722X/PA721X:7200lm
PA672W/PA671W/:6700lm
PA622U/PA621U/PA622X/PA621X:6200lm
PA572W/PA571W/PA522U/PA521U:5200lm
ECOON(80%)PA722X/PA721X:5790lm
PA672W/PA671W/:5360lm
PA622U/PA621U/PA622X/PA621X:4960lm
PA572W/PA571W/PA522U/PA521U:4160lm
Contrastratio(*2)(allwhite/allblack)5000:1withIris
(4000:1withIrisonPA622X/PA572W/PA522U)
Screensize(throwdistance)40"to500"(throwdistancedependsonlens)
Colorreproducibility10-bitcolorprocessing(approx.1.07billioncolors)(*4)
AudiooutputBuilt-in10Wmonauralspeaker
ScanningfrequencyHorizontal15to153kHzorless(24kHzorgreaterforRGBinputs),conformingtoVESA
standards
Vertical48to120Hz(50to85HzforHDMIinputs),conformingtoVESAstandards
MainadjustmentfunctionsManualzoom,manualfocus,manuallensshift,inputsignalswitching(Computer/
HDMI/DisplayPort/Video/S-Video/Viewer/Network),autoimageadjustment,picture
enlarging,picturepositionadjustment,muting(bothvideoandaudio),poweron/off,
on-screendisplay/selection,etc.
Max.displayresolution(horizontal×
vertical)
Analog:1920×1200(handledwithAdvancedAccuBlend)
Digital:2560×1600(handledwithAdvancedAccuBlend)
Inputsignals
R,G,B,H,V
RGB:0.7Vp-p/75Ω
Y:1.0Vp-p/75Ω(withNegativePolaritySync)
Cb,Cr(Pb,Pr):0.7Vp-p/75Ω
H/VSync:4.0Vp-p/TTL
CompositeSync:4.0Vp-p/TTL
SynconG:1.0Vp-p/75Ω(withSync)
Compositevideo
1.0Vp-p/75Ω
S-Video
Y:1.0Vp-p/75Ω
C:286Vp-p/75Ω
Component
Y:1.0Vp-p/75Ω(withSync)
Cb,Cr(Pb,Pr):0.7Vp-p/75Ω
DTV:480i,480p,720p,1080i,1080p(60Hz)
576i,576p,720p,1080i(50Hz)
DVD:Progressivesignal(50/60Hz)
Audio
0.5Vrms/22kΩorgreater
Input/outputconnectors

197
9. Appendix
ModelnamePA722X/PA721X/PA622X/PA621X/PA672W/PA671W/PA572W/PA571W/PA622U/
PA621U/PA522U/PA521U
Computer/
Component
VideoinputMiniD-Sub15-pin×1,BNCconnector×5
VideooutputMiniD-Sub15-pin×1
AudioinputStereominijack×3
AudiooutputStereominijack×1(commonforallsignals)
HDMIVideoinputHDMI
®
ConnectortypeA×2
DeepColor(colordepth):8-/10-/12-bitcompatible
Colorimetry:RGB,YcbCr444andYcbCr422compatible
LipSynccompatible,HDCPcompatible(*5)
AudioinputHDMI:Samplingfrequency–32/44.1/48kHz
Samplingbits–16/20/24bits
DisplayPortVideoinputDisplayPort×1
Datarate:2.7Gbps/1.62Gbps
No.lanes:1lane/2lanes/4lanes
Colordepth:6-bit,8-bit,10-bit
Colorimetry:RGB,YcbCr444andYcbCr422compatible
HDCPcompatible(*5)
AudioinputDisplayPort:Samplingfrequency–32/44.1/48kHz
Samplingbits–16/20/24bits
BNC(CV)VideoinputBNC×5
AudioinputRCA(RCAL/R)×1
BNC(Y/C)VideoinputBNC×2
Audioinput(Commonwithvideoaudioinputconnector)
PCcontrolconnectorD-Sub9-pin×1
USBportUSBtypeA×1
USBportforwirelessLANUSBtypeA×1
Ethernet/HDBaseTportRJ-45×1,10BASE-T/100BASE-TX
RemoteconnectorStereominijack×1
UsageenvironmentOperatingtemperature:5to40ºC(*6)
Operatinghumidity:20to80%(withnocondensation)
Storagetemperature:-10to50ºC(*6)
Storagehumidity:20to80%(withnocondensation)
Powersupply100-240VAC,50/60Hz
Power
consumption
EcomodeoffPA722X/PA721X/PA622X/PA621X/PA672W/PA671W/PA572W/PA571W:464W
(100-130V)/443W(200-240V)
PA622U/PA621U/PA522U/PA521U:477W(100-130V)/455W(200-240V)
EcomodeonPA722X/PA721X/PA622X/PA621X/PA672W/PA671W/PA572W/PA571W:372W
(100-130V)/356W(200-240V)
PA622U/PA621U/PA522U/PA521U:384W(100-130V)/369W(200-240V)
Standby16W(100-130V)/18W(200-240V)
(6WinNetworkstandbymode)
Power-savingmode0.2W
RatedinputcurrentPA722X/PA721X/PA672W/PA671W/PA622U/PA621U:5.5-2.2A
PA622X/PA621X/PA522U/PA521U/PA572W/PA571W:5.1-2.1A
Externaldimensions19.7"(width)×5.7"(height)×14.1"(depth)/499(width)×144(height)×359(depth)
mm(notincludingprotrudingparts)
Weight18.3lbs/8.3kg
(notincludinglens)
*1Effectivepixelsaremorethan99.99%.
*2Thisisthelightoutputvalue(lumens)whenthe[PRESET]modeissetto[HIGH-BRIGHT].Ifanyothermodeisselectedasthe
[PRESET]mode,thelightoutputvaluemaydropslightly.
*3CompliancewithISO21118-2005
*4Fullcolor(approx.16.77millioncolorsorgreater)whentheHDMI,DisplayPort,viewerornetworkinputconnectorisselected.
*5HDMI
®
(DeepColor,LipSync)withHDCP
WhatisHDCP/HDCPtechnology?
HDCPisanacronymforHigh-bandwidthDigitalContentProtection.HighbandwidthDigitalContentProtection(HDCP)isasystem
forpreventingillegalcopyingofvideodatasentoveraHigh-DenitionMultimediaInterface(HDMI).
IfyouareunabletoviewmaterialviatheHDMIinput,thisdoesnotnecessarilymeantheprojectorisnotfunctioningproperly.With
theimplementationofHDCP,theremaybecasesinwhichcertaincontentisprotectedwithHDCPandmightnotbedisplayed
duetothedecision/intentionoftheHDCPcommunity(DigitalContentProtection,LLC).
Video:DeepColor;8/10/12-bit,LipSync
Audio:LPCM;upto2ch,samplerate32/44.1/48KHz,samplebit;16/20/24-bit
*635to40ºC–“Forcedecomode”
-Thesespecicationsandtheproduct’sdesignaresubjecttochangewithoutnotice.
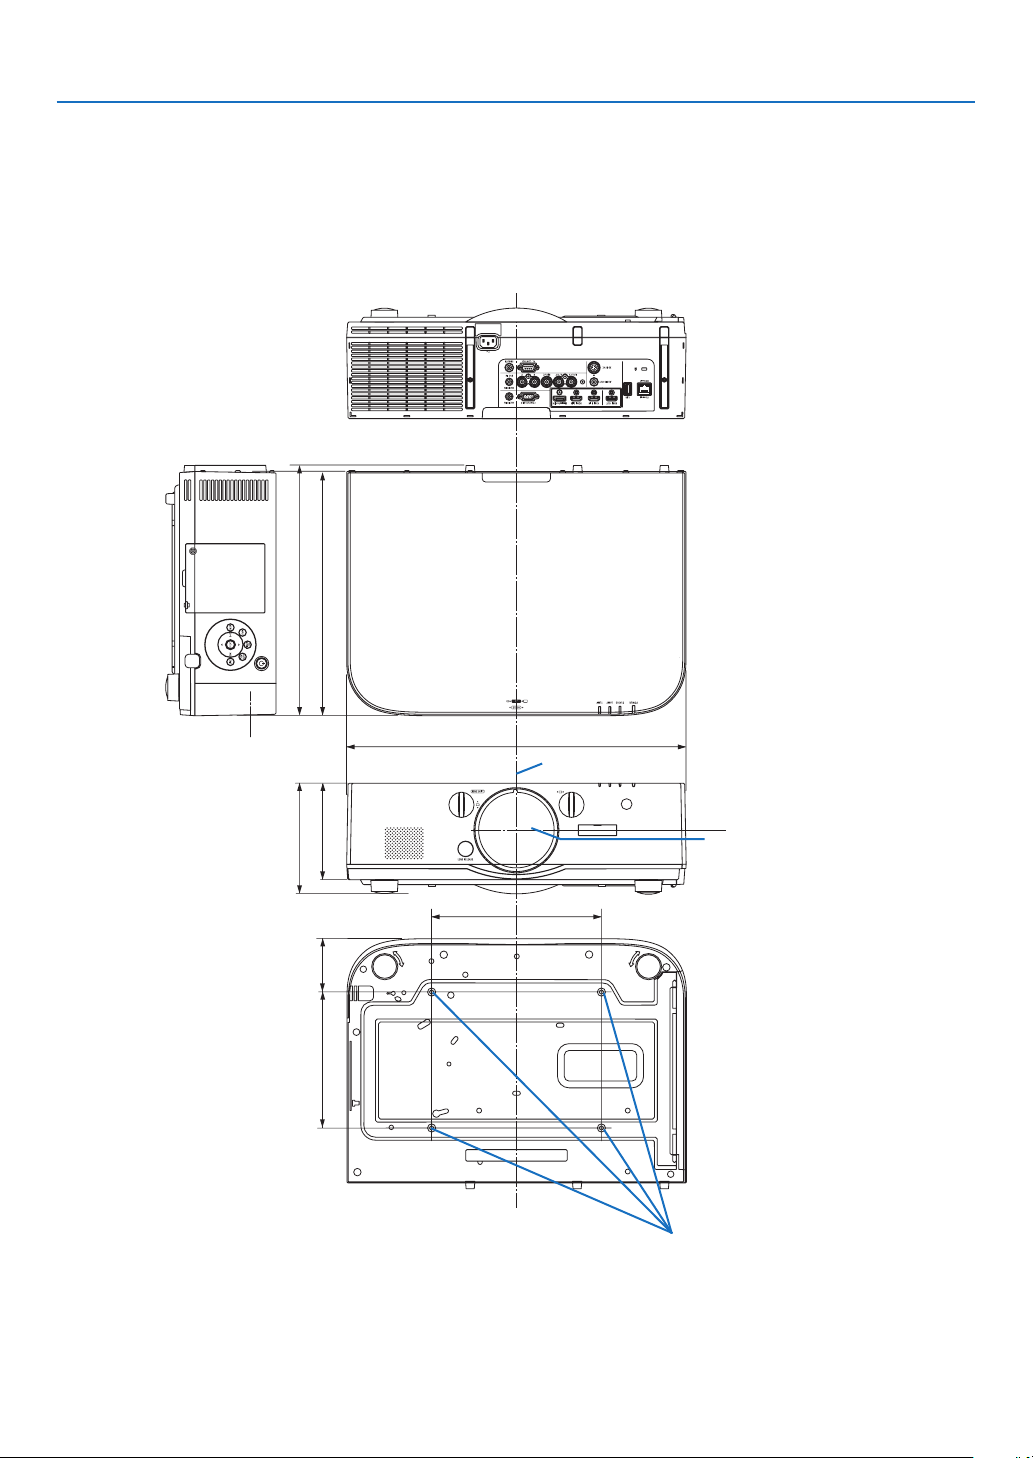
198
9. Appendix
250 (9.8)
162 (6.4)
359 (14.1)
368.1 (14.5)
78.5 (3.1)
142 (5.6)
200 (7.9)
499 (19.6)
Cabinet Dimensions
Lens center
Lens center
Holes for ceiling mount
Unit:mm(inch)
Unit:mm(inch)
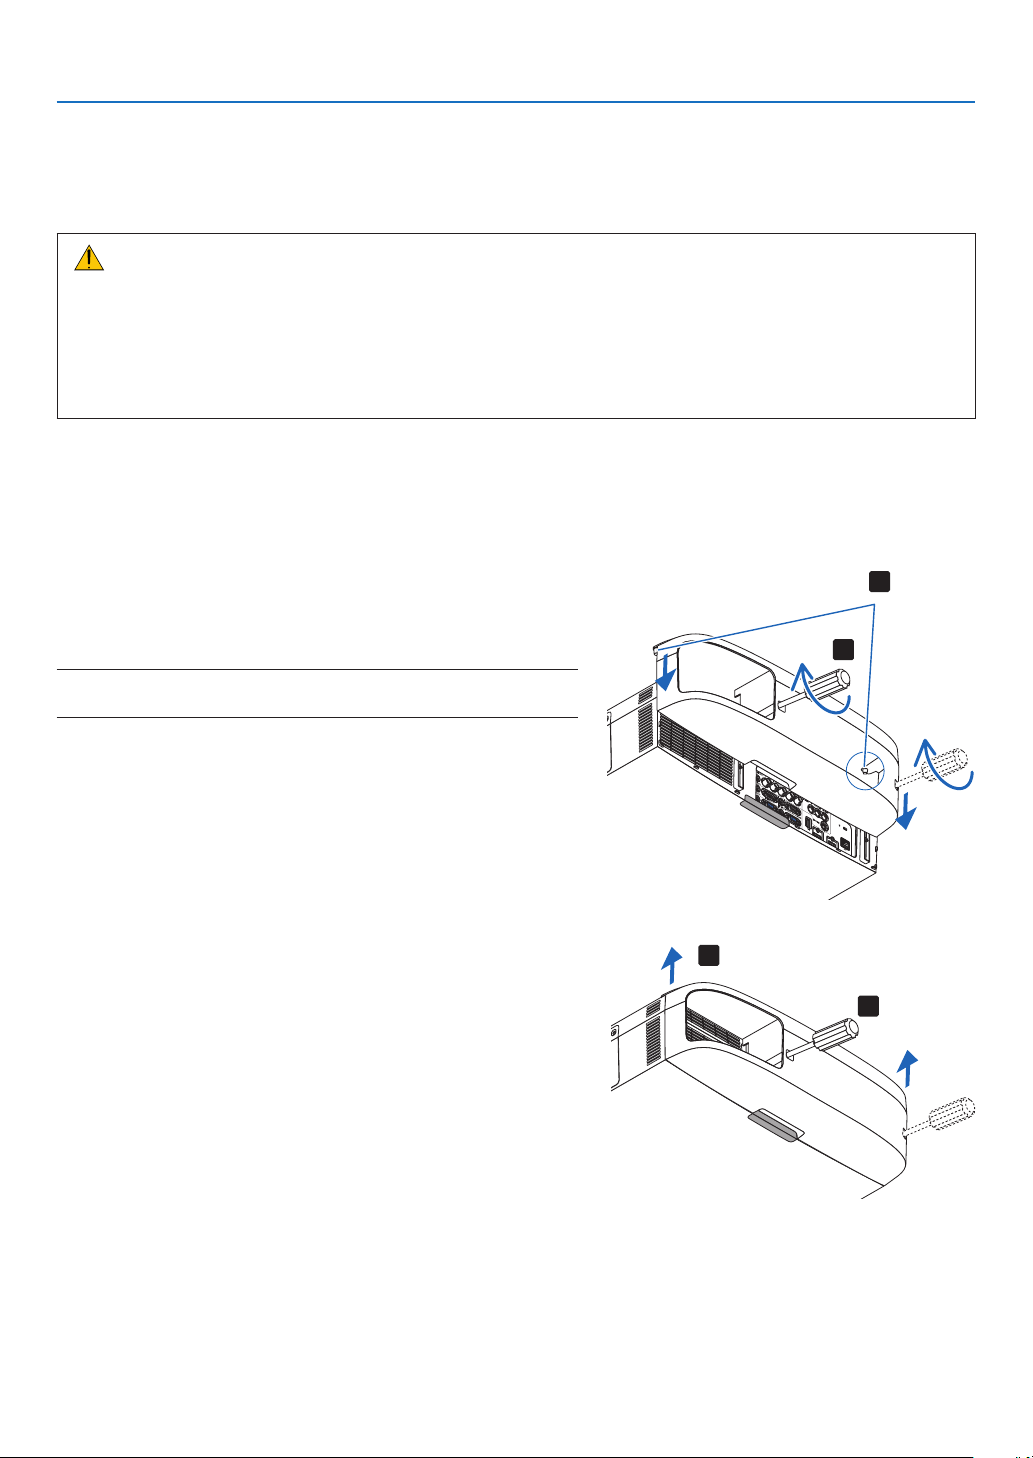
199
9. Appendix
Mounting the cable cover (sold separately)
Mountingtheseparatelysoldcablecoverontheprojectorallowsyouhidethecablesforacleaner
appearance.
CAUTION
•Aftermountingthecablecover,besuretofastenusingthescrewsprovided.Ifnot,thecablecovercouldfall,
damagingthecablecoverandpossiblyresultingininjury.
•Donotbundlethepowercordandplaceitunderthecablecover.Doingsocouldleadtore.
•Donotapplyexcessiveforcetothecablecover.Doingsocoulddamagethecablecover,resultinginthe
projectorfallingorcausinginjury.
Mounting
Preparations:
1. Connect the power cord and cables to the projector (the connection cords are omitted from the diagrams).
2. Prepare a Phillips screwdriver.
1. Insert the two round protrusions on the left and right edges
of the cable cover into the grooves in the bottom of the
projector to line it up.
NOTE:Becarefulnottoletthepowercordandcablesgetpinchedbythe
cablecover.
2. Turn the cable cover screw clockwise.
- Tighten the screw securely.
Removing
1. Turn the cable cover screw counterclockwise until it turns
loosely.
- Hold the cable cover while doing this to prevent it from
falling.
- The screw does not come completely off.
2. Remove the cable cover.
- Turn the cable cover a little, then lift it off.
1
2
1
2
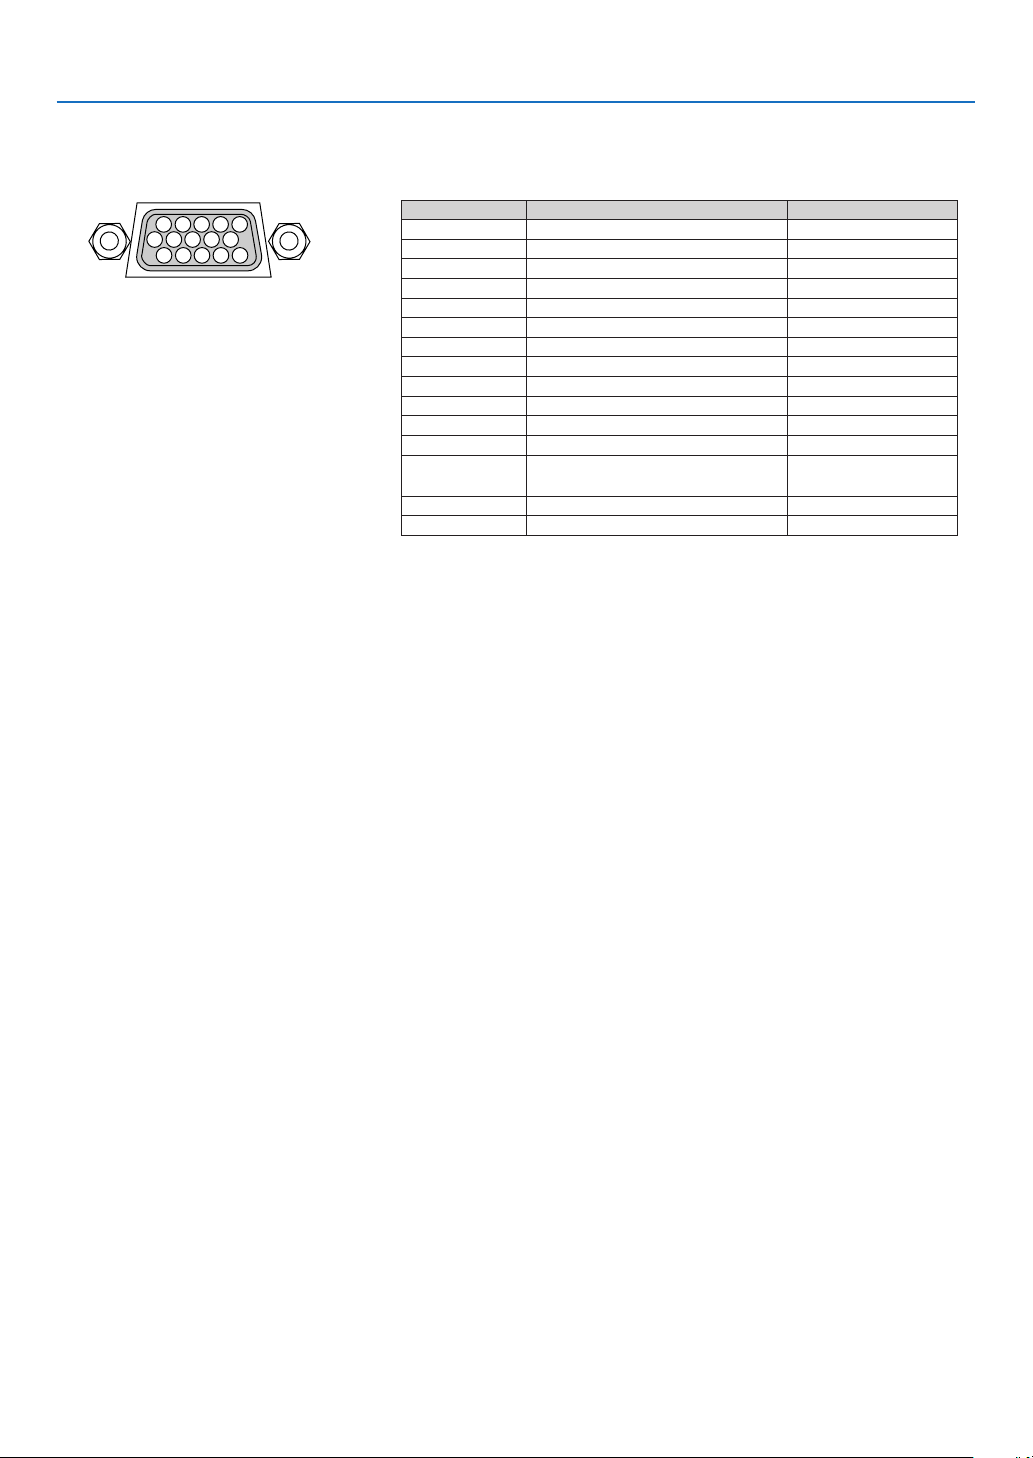
200
9. Appendix
Pin Assignments of D-Sub COMPUTER Input Connector
Mini D-Sub 15 Pin Connector
SignalLevel
Videosignal:0.7Vp-p(Analog)
Syncsignal:TTLlevel
51423
10
11 12 13 14 15
6978
Pin No. RGBSignal(Analog)YCbCrSignal
1 RedCr
2 GreenorSynconGreenY
3 BlueCb
4Ground
5 Ground
6 RedGroundCrGround
7 GreenGroundYGround
8 BlueGroundCbGround
9NoConnection
10 SyncSignalGround
11 NoConnection
12 Bi-directionalDATA(SDA)
13 HorizontalSyncorComposite
Sync
14VerticalSync
15 DataClock

201
9. Appendix
Troubleshooting
Thissectionhelpsyouresolveproblemsyoumayencounterwhilesettinguporusingtheprojector.
Indicator Messages
Power Indicator
IndicatordisplayProjectorstatusProcedure
OffPowerisoff.–
FlashingBlue(shortashes)PreparingtoturnpoweronWaitawhile.
Blue(longashes)Offtimer(enabled)
Programtimer(offtimeenabled)
–
Orange(short
ashes)
ProjectorcoolingWaitawhile.
Orange(longashes)Programtimer(ontimeenabled)
LitBluePoweron–
RedStandbymode(NORMAL)–
OrangeStandbymode(NETWORKSTANDBY)–
Status Indicator
IndicatordisplayProjectorstatusProcedure
OffNoproblem,or
standbymode
(POWER-SAVINGor
NETWORKSTAND-
BY)
–
FlashingRed(cycles
of1)
Coverproblem
Thelampcoverisnotproperlymounted.Mountitproperly.(→
Page
161)
Red(cycles
of4)
FanproblemThecoolingfanhasstoppedturning.ContactanNECprojector
customersupportcenterforrepairs.
Red(cycles
of9)
IriserrorTheirisisnotoperatingproperly.ContactanNECprojector
customersupportcenterforrepairs.
FlashingOrangeNetworkconictItisnotpossibletoconnecttheprojector’sbuilt-inLANand
wirelessLANsimultaneouslytothesamenetwork.Toconnect
theprojector’sbuilt-inLANandwirelessLANsimultaneously,
connectthemtodifferentnetworks.
LitGreenStandbymode
(NORMAL)
–
OrangeButtonhasbeen
pressedwhile
projectorisinkeylock
mode
Theprojector’skeysarelocked.Thesettingmustbecanceled
tooperatetheprojector.(→Page
106)
Projector’sIDnumber
andremotecontrol’s
IDnumberdonot
match
CheckthecontrolIDs.(→Pages
106and107)

202
9. Appendix
Lamp Indicator
IndicatordisplayProjectorstatusProcedure
OffThelampisturnedoff.–
FlashingGreenPreparingtorelightlampafter
lightinghasfailed
Waitawhile.
RedLampreplacementgrace
period
Thelamphasreachedtheendofitsservicelifeand
isnowinthereplacementgraceperiod(100hours).
Replacethelampassoonaspossible.(→page
159)
Red(cycles
of6)
LampdoesnotlightThelamphasnotturnedon.Waitatleast1minute,then
turnthepowerbackon.Ifthelampstilldoesnotlight,
contactanNECprojectorcustomersupportcenter.
LitRedLampusagetimeexceededThelamphasexceededitsusagetime.Theprojector’s
powercannotbeturnedonuntilthelampisreplaced.
(→page
159)
GreenLamplit–
Temp. Indicator
IndicatordisplayProjectorstatusProcedure
OffNoproblem
FlashingRed(cyclesof2)TemperatureproblemThetemperatureprotectorhasbeenactivated.Ifthe
roomtemperatureishigh,movetheprojectortoacool
place.Iftheproblemstillpersists,contactanNEC
projectorcustomersupportcenter.
LitOrangeHighsurroundingtemperatureThesurroundingtemperatureishigh.Lowertheroom
temperature.
If the temperature protector is activated
Iftheprojector’sinternaltemperaturerisesabnormally,thelampturnsoffandthetemperatureindicatorashes
(repeatedlyincyclesof2).
Itmayhappenthattheprojector’stemperatureprotectorissimultaneouslyactivatedandtheprojector’spowerturns
off.
Ifthishappens,dothefollowing:
-Unplugthepowercordfromthepoweroutlet.
-Ifusinginaplacewherethesurroundingtemperatureishigh,movetheprojectortoadifferent,coolplace.
-Ifthereisdustintheventilationholes,clean.(→ pages
155and158)
-Waitassuchabout1hourfortheprojector’sinternaltemperaturetolower.

203
9. Appendix
Common Problems & Solutions
(→“Power/Status/LampIndicator”onpage214.)
ProblemCheckTheseItems
Does not turn on
or shut down
•Checkthatthepowercordispluggedinandthatthepowerbuttonontheprojectorcabinetortheremote
control is on. (→ pages
13, 14)
•Ensurethatthelampcoverisinstalledcorrectly.(→ page 161)
•Checktoseeiftheprojectorhasoverheated.Ifthereisinsufcientventilationaroundtheprojectororifthe
room where you are presenting is particularly warm, move the projector to a cooler location.
•Checktoseeifyoucontinuetousetheprojectorforanother100hoursafterthelamphasreachedtheend
of its life. If so, replace the lamp. After replacing the lamp, reset the lamp hours used. (→ page 116)
•Thelampmayfailtolight.Waitafullminuteandthenturnonthepoweragain.
•Set[FANMODE]to[HIGHALTITUDE]whenusingtheprojectorataltitudesapproximately5500feet/1600
meters or higher. Using the projector at altitudes approximately 5500 feet/1600 meters or higher without
setting to [HIGH ALTITUDE] can cause the projector to overheat and the projector could shut down. If this
happens, wait a couple minutes and turn on the projector. (→ page 108)
If you turn on the projector immediately after the lamp is turned off, the fans run without displaying an image
for some time and then the projector will display the image. Wait for a moment.
Will turn off
•Ensurethatthe[OFFTIMER],[AUTOPOWEROFF]or[PROGRAMTIMER]isoff.(→ page
101, 111)
No picture
•Check if the appropriate input is selected. (→ page
16) If there is still no picture, press the SOURCE button
or one of the input buttons again.
•Ensureyourcablesareconnectedproperly.
•Usemenustoadjustthebrightnessandcontrast.(→ page 93)
•Ensurethatthelenscoverisopen.(→ page 14)
•Resetthesettingsoradjustmentstofactorypresetlevelsusingthe[RESET]intheMenu.(→ page 116)
•EnteryourregisteredkeywordiftheSecurityfunctionisenabled.(→ page 37)
•If the HDMI input or the DisplayPort signal cannot be displayed, try the following.
- Reinstall your driver for the graphics card built in your computer, or use the updated driver.
For reinstalling or updating your driver, refer to the user guide accompanied with your computer or graphics
card, or contact the support center for your computer manufacturer.
Install the updated driver or OS on your own responsibility.
We are not liable for any trouble and failure caused by this installation.
•BesuretoconnecttheprojectorandnotebookPCwhiletheprojectorisinstandbymodeandbeforeturning
on the power to the notebook PC.
In most cases the output signal from the notebook PC is not turned on unless connected to the projector
before being powered up.
* If the screen goes blank while using your remote control, it may be the result of the computer’s screen-saver
or power management software.
•Seealsothepage218.
Picture suddenly
becomes dark
•CheckiftheprojectorisintheForcedECOmodebecauseoftoohighambienttemperature.Ifthisisthecase,
lower the internal temperature of the projector by selecting [HIGH] for [FAN MODE]. (→ page 108)
Color tone or hue is
unusual
•Checkifanappropriatecolorisselectedin[WALLCOLOR].Ifso,selectanappropriateoption.(→ page
101)
•Adjust[HUE]in[PICTURE].(→ page 93)
Image isn’t square to
the screen
•Repositiontheprojectortoimproveitsangletothescreen.(→ page 17)
•UsetheKeystonecorrectionfunctiontocorrectthetrapezoiddistortion.(→ page 22)
Picture is blurred •Adjustthefocus.(→ page
19)
•Repositiontheprojectortoimproveitsangletothescreen.(→ page 17)
•Ensurethatthedistancebetweentheprojectorandscreeniswithintheadjustmentrangeofthelens.
(→ page
201)
•Has the lens been shifted by an amount exceeding the guaranteed range? (→ page 205)
•Condensationmayformonthelensiftheprojectoriscold,broughtintoawarmplaceandisthenturnedon.
Should this happen, let the projector stand until there is no condensation on the lens.

204
9. Appendix
Flicker appears on
screen
•
Set [FAN MODE] to other than [HIGH ALTITUDE] mode when using the projector at altitudes approximately 5500
feet/1600 meters or lower. Using the projector at altitudes less than approximately 5500 feet/1600 meters and setting
to [HIGH ALTITUDE] can cause the lamp to overcool, causing the image to flicker. Switch [FAN MODE] to [AUTO]. (→
page 108)
Image is scrolling
vertically, horizontally
or both
•Checkthecomputer’sresolutionandfrequency.Makesurethattheresolutionyouaretryingtodisplayis
supported by the projector. (→ page 207)
•AdjustthecomputerimagemanuallywiththeHorizontal/Verticalinthe[IMAGEOPTIONS].(→ page 95)
Remote control does
not work
•Installnewbatteries.(→ page
9)
•Makesuretherearenoobstaclesbetweenyouandtheprojector.
•Standwithin22feet(7m)oftheprojector.(→ page
9)
•To perform computer mouse operations using the projector’s remote control, connect the optional mouse
receiver to the computer. (→ page
30)
Indicator is lit or
blinking
•SeethePOWER/STATUS/LAMPIndicator.(→ page 214)
Cross color in RGB
mode
•PresstheAUTOADJ.buttonontheprojectorcabinetortheremotecontrol.(→ page
24)
•Adjustthecomputerimagemanuallywith[CLOCK]/[PHASE]in[IMAGEOPTIONS]inthemenu.(→ page
94)
Formoreinformationcontactyourdealer.

205
9. Appendix
If there is no picture, or the picture is not displayed correctly.
•PoweronprocessfortheprojectorandthePC.
BesuretoconnecttheprojectorandnotebookPCwhiletheprojectorisinstandbymodeandbeforeturningon
thepowertothenotebookPC.
InmostcasestheoutputsignalfromthenotebookPCisnotturnedonunlessconnectedtotheprojectorbefore
beingpoweredup.
NOTE:Youcancheckthehorizontalfrequencyofthecurrentsignalintheprojector’smenuunderInformation.Ifitreads“0kHz”,
thismeansthereisnosignalbeingoutputfromthecomputer.(→page
113orgotonextstep)
•Enablingthecomputer’sexternaldisplay.
DisplayinganimageonthenotebookPC’sscreendoesnotnecessarilymeanitoutputsasignaltotheprojector.
WhenusingaPCcompatiblelaptop,acombinationoffunctionkeyswillenable/disabletheexternaldisplay.Usu-
ally,thecombinationofthe“Fn”keyalongwithoneofthe12functionkeysgetstheexternaldisplaytocomeon
oroff.Forexample,NEClaptopsuseFn+F3,whileDelllaptopsuseFn+F8keycombinationstotogglethrough
externaldisplayselections.
•Non-standardsignaloutputfromthecomputer
IftheoutputsignalfromanotebookPCisnotanindustrystandard,theprojectedimagemaynotbedisplayed
correctly.Shouldthishappen,deactivatethenotebookPC’sLCDscreenwhentheprojectordisplayisinuse.Each
notebookPChasadifferentwayofdeactivate/reactivatethelocalLCDscreensasdescribedinthepreviousstep.
Refertoyourcomputer’sdocumentationfordetailedinformation.
•ImagedisplayedisincorrectwhenusingaMacintosh
WhenusingaMacintoshwiththeprojector,settheDIPswitchoftheMacadapter(notsuppliedwiththeprojector)
accordingtoyourresolution.Aftersetting,restartyourMacintoshforthechangestotakeaffect.
ForsettingdisplaymodesotherthanthosesupportedbyyourMacintoshandtheprojector,changingtheDIPswitch
onaMacadaptermaybounceanimageslightlyormaydisplaynothing.Shouldthishappen,settheDIPswitch
tothe13"xedmodeandthenrestartyourMacintosh.Afterthat,restoretheDIPswitchestoadisplayablemode
andthenrestarttheMacintoshagain.
NOTE:AVideoAdaptercablemanufacturedbyAppleComputerisneededforaPowerBookwhichdoesnothaveaminiD-Sub
15-pinconnector.
•MirroringonaPowerBook
*WhenusingtheprojectorwithaMacintoshPowerBook,outputmaynotbesetto1024×768unless“mirroring”
isoffonyourPowerBook.Refertoowner’smanualsuppliedwithyourMacintoshcomputerformirroring.
•FoldersoriconsarehiddenontheMacintoshscreen
Foldersoriconsmaynotbeseenonthescreen.Shouldthishappen,select[View]→[Arrange]fromtheApple
menuandarrangeicons.
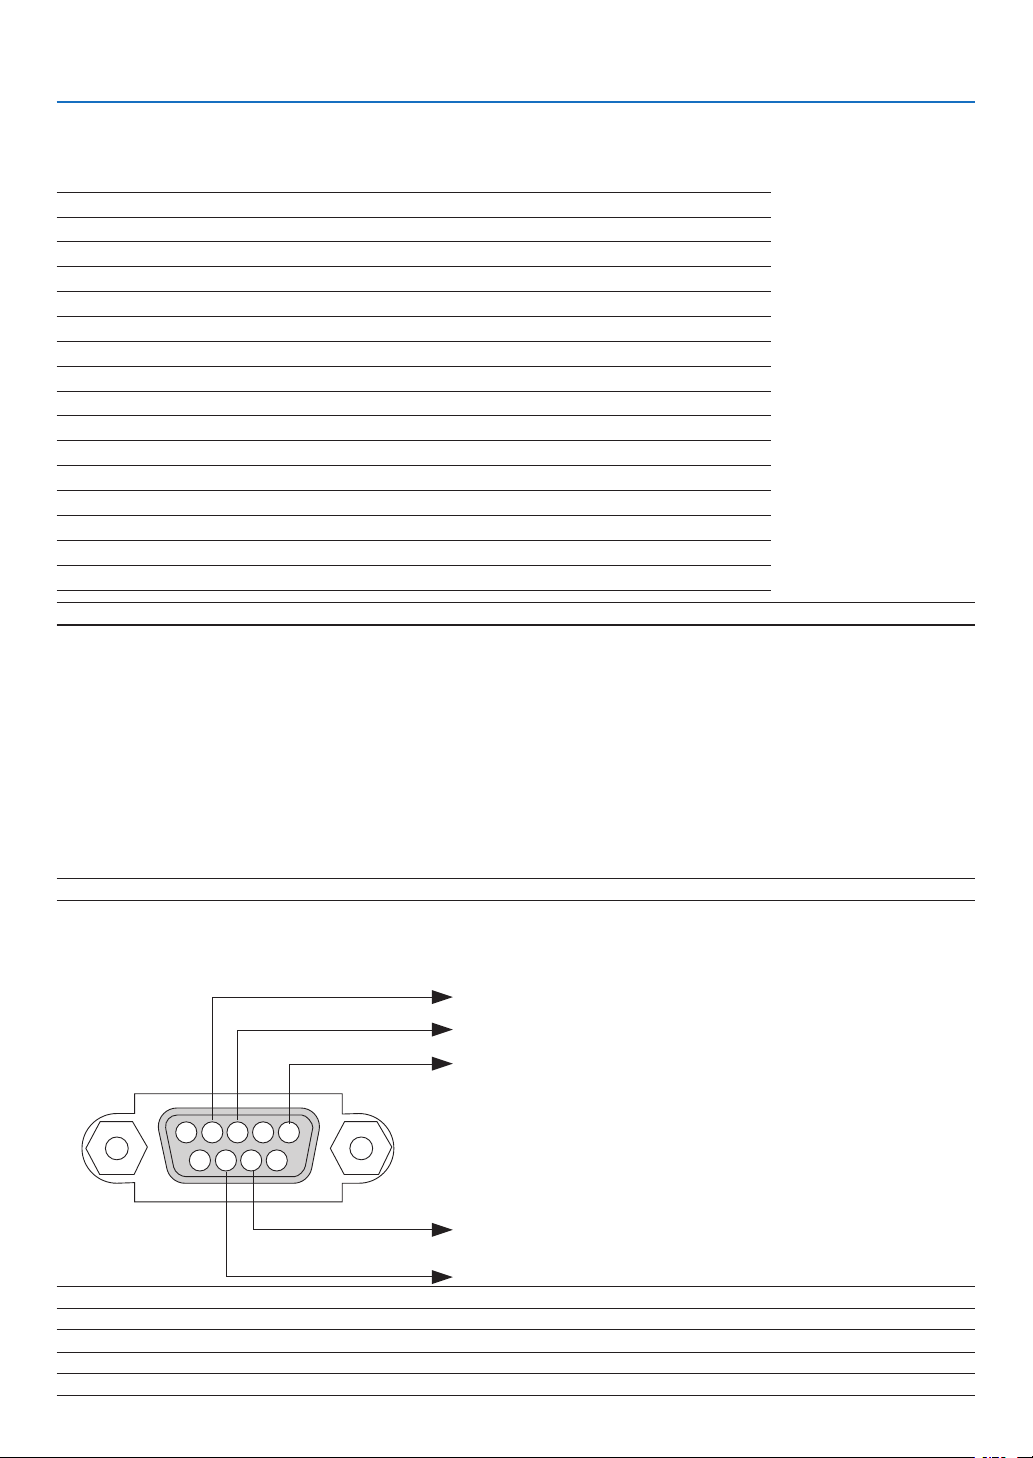
206
9. Appendix
NOTE:ContactyourlocaldealerforafulllistofthePCControlCodesifneeded.
Cable Connection
CommunicationProtocol
Baud rate .........................................38400 bps
Data length ......................................8 bits
Parity ...............................................No parity
Stop bit ............................................One bit
X on/off ............................................None
Communications procedure .............Full duplex
NOTE:Dependingontheequipment,alowerbaudratemayberecommendedforlongcableruns.
PC Control Connector (D-SUB 9P)
PC Control Codes and Cable Connection
PC Control Codes
Function Code Data
POWER ON 02H 00H 00H 00H 00H 02H
POWER OFF 02H 01H 00H 00H 00H 03H
INPUT SELECT COMPUTER 1 02H 03H 00H 00H 02H 01H 01H 09H
INPUT SELECT COMPUTER 2 02H 03H 00H 00H 02H 01H 02H 0AH
INPUT SELECT COMPUTER 3 02H 03H 00H 00H 02H 01H 03H 0BH
INPUT SELECT HDMI 02H 03H 00H 00H 02H 01H 1AH 22H
INPUT SELECT DisplayPort 02H 03H 00H 00H 02H 01H 1BH 23H
INPUT SELECT VIDEO 02H 03H 00H 00H 02H 01H 06H 0EH
INPUT SELECT S-VIDEO 02H 03H 00H 00H 02H 01H 0BH 13H
INPUT SELECT VIEWER 02H 03H 00H 00H 02H 01H 1FH 27H
INPUT SELECT NETWORK 02H 03H 00H 00H 02H 01H 20H 28H
PICTURE MUTE ON 02H 10H 00H 00H 00H 12H
PICTURE MUTE OFF 02H 11H 00H 00H 00H 13H
SOUND MUTE ON 02H 12H 00H 00H 00H 14H
SOUND MUTE OFF 02H 13H 00H 00H 00H 15H
NOTE1:Pins1,4,6and9arenoused.
NOTE2:Jumper“RequesttoSend”and“CleartoSend”togetheronbothendsofthecabletosimplifycableconnection.
NOTE3:Forlongcablerunsitisrecommendedtosetcommunicationspeedwithinprojectormenusto9600bps.
15243
67 98
To GND of PC
To RxD of PC
To TxD of PC
To RTS of PC
To CTS of PC

207
9. Appendix
Troubleshooting Check List
Beforecontactingyourdealerorservicepersonnel,checkthefollowinglisttobesurerepairsareneededalsoby
referringtothe“Troubleshooting”sectioninyouruser’smanual.Thischecklistbelowwillhelpussolveyourproblem
moreefciently.
*Printthispageandthenextpageforyourcheck.
Frequency of occurrence always sometimes (How often?_____________________) other (__________________)
No image is displayed from your PC or video equipment to the
projector.
Still no image even though you connect the projector to the PC
first, then start the PC.
Enabling your notebook PC’s signal output to the projector.
• Acombinationoffunctionkeyswillenable/disabletheexter-
naldisplay.Usually,thecombinationofthe“Fn”keyalong
withoneofthe12functionkeysturnstheexternaldisplay
onoroff.
No image (blue or black background, no display).
Still no image even though you press the AUTO ADJUST
button.
Still no image even though you carry out [RESET] in the
projector’s menu.
Signal cable’s plug is fully inserted into the input connector
A message appears on the screen.
( _____________________________________________ )
The source connected to the projector is active and available.
Still no image even though you adjust the brightness and/or
the contrast.
Input source’s resolution and frequency are supported by the
projector.
Power
No power (POWER indicator does not light blue) See also “Status
Indicator (STATUS)”.
Power cord’s plug is fully inserted into the wall outlet.
Lamp cover is installed correctly.
Lamp Hours Used (lamp operation hours) was cleared after
lamp replacement.
No power even though you press and hold the POWER but-
ton.
Shut down during operation.
Power cord’s plug is fully inserted into the wall outlet.
Lamp cover is installed correctly.
[AUTO POWER OFF] is turned off (only models with the [AUTO
POWER OFF] function).
[OFF TIMER] is turned off (only models with the [OFF TIMER]
function).
Video and Audio
Image is too dark.
Remains unchanged even though you adjust the brightness
and/or the contrast.
Image is distorted.
Image appears to be trapezoidal (unchanged even though you
carry out the [KEYSTONE] adjustment).
Parts of the image are lost.
Still unchanged even though you press the AUTO ADJUST
button.
Still unchanged even though you carry out [RESET] in the
projector’s menu.
Image is shifted in the vertical or horizontal direction.
Horizontal and vertical positions are correctly adjusted on a
computer signal.
Input source’s resolution and frequency are supported by the
projector.
Some pixels are lost.
Image is flickering.
Still unchanged even though you press the AUTO ADJUST
button.
Still unchanged even though you carry out [RESET] in the
projector’s menu.
Image shows flickering or color drift on a computer signal.
Still unchanged even though you change [FAN MODE] from
[HIGH ALTITUDE] to [AUTO].
Image appears blurry or out of focus.
Still unchanged even though you checked the signal’s resolution
on PC and changed it to projector’s native resolution.
Still unchanged even though you adjusted the focus.
No sound.
Audio cable is correctly connected to the audio input of the
projector.
Still unchanged even though you adjusted the volume level.
AUDIO OUT is connected to your audio equipment (only models
with the AUDIO OUT connector).
Other
Remote control does not work.
No obstacles between the sensor of the projector and the
remote control.
Projector is placed near a fluorescent light that can disturb the
infrared remote controls.
Batteries are new and are not reversed in installation.
Buttons on the projector cabinet do not work (only models with the
[CONTROL PANEL LOCK] function)
[CONTROL PANEL LOCK] is not turned on or is disabled in
the menu.
Still unchanged even though you press and hold the EXIT button
for a minimum of 10 seconds.
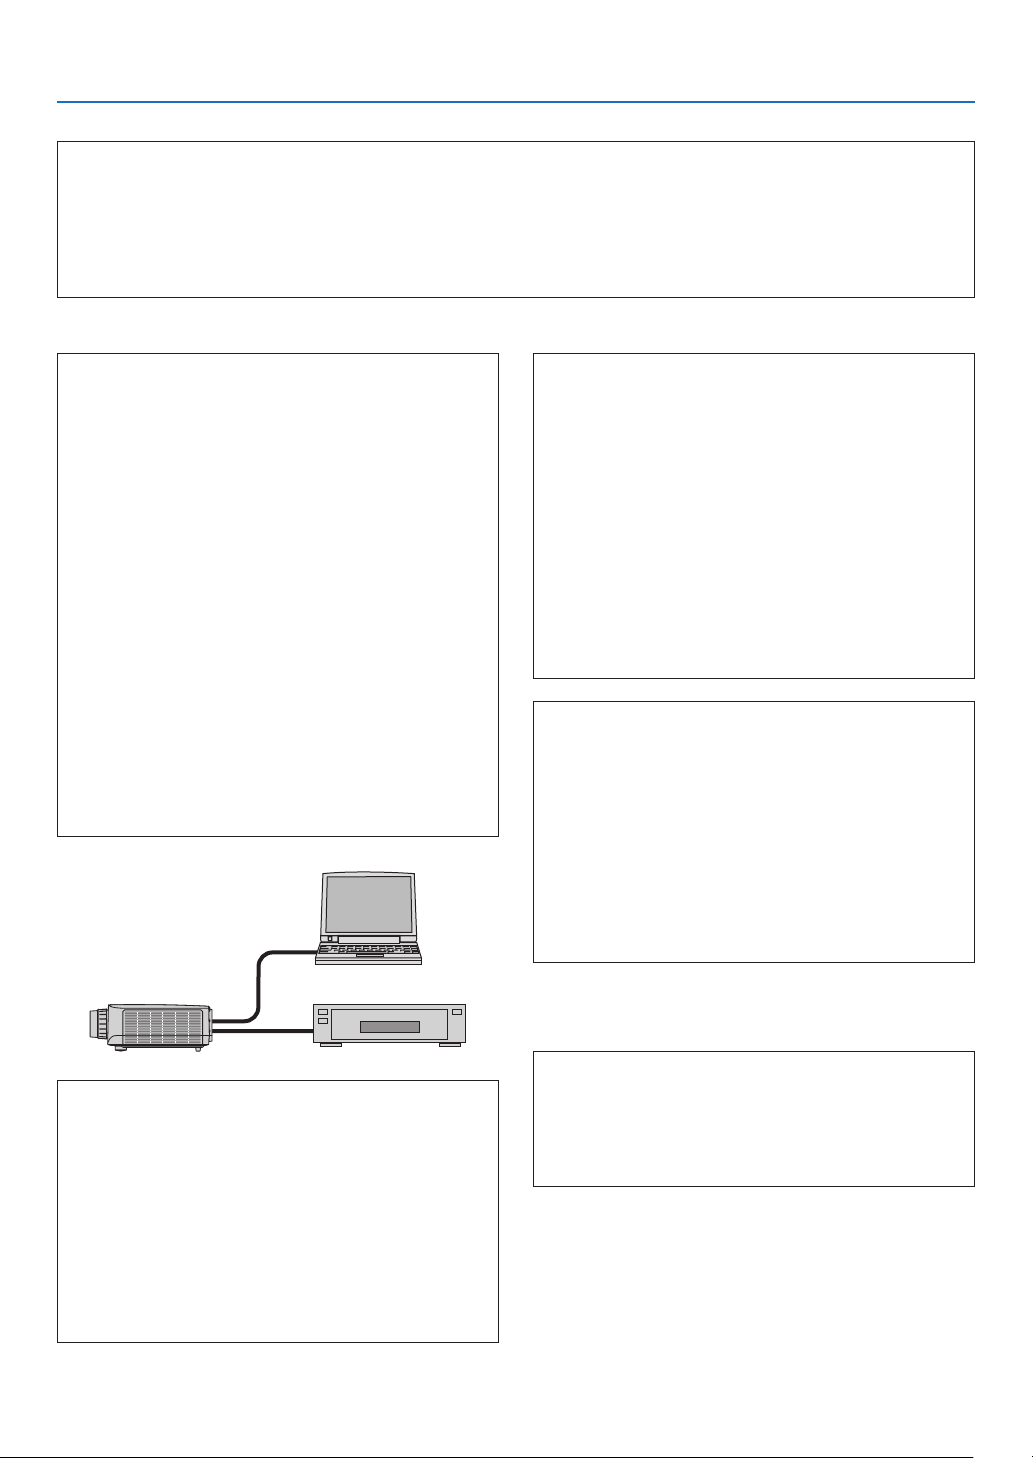
208
9. Appendix
In the space below please describe your problem in detail.
Information on application and environment where your projector is used
Projector
Model number:
Serial No.:
Date of purchase:
Lamp operating time (hours):
Eco Mode: OFF ON
Information on input signal:
Horizontal synch frequency [ ] kHz
Vertical synch frequency [ ] Hz
Synch polarity H (+) (−)
V (+) (−)
Synch type Separate Composite
Sync on Green
STATUS Indicator:
Steady light Orange Green
Flashing light [ ] cycles
Remote control model number:
Signalcable
NEC standard or other manufacturer’s cable?
Model number: Length: inch/m
Distribution amplifier
Model number:
Switcher
Model number:
Adapter
Model number:
Projector
PC
DVD player
Installation environment
Screen size: inch
Screen type: White matte Beads Polarization
Wide angle High contrast
Throw distance: feet/inch/m
Orientation: Ceiling mount Desktop
Power outlet connection:
Connected directly to wall outlet
Connected to power cord extender or other (the
number of connected equipment______________)
Connected to a power cord reel or other (the number
of connected equipment______________)
Computer
Manufacturer:
Model number:
Notebook PC / Desktop
Native resolution:
Refresh rate:
Video adapter:
Other:
Videoequipment
VCR, DVD player, Video camera, Video game or other
Manufacturer:
Model number:

©NECDisplaySolutions,Ltd.20137N951971