en Safety
2
Table of contents
INFORMATION FOR USE
1 Safety.....................................................................2
2 Preventing material damage ................................4
3 Environmental protection and saving energy.....5
4 Familiarising yourself with your appliance .........6
5 Accessories...........................................................8
6 Before using for the first time ..............................9
7 Basic operation .....................................................9
8 Rotary spit ...........................................................10
9 Time-setting options...........................................11
10 Cleaning and servicing.......................................11
11 Rails .....................................................................14
12 Appliance door....................................................14
13 Troubleshooting..................................................16
14 Disposal...............................................................17
15 Customer Service................................................17
16 How it works........................................................17
17 INSTALLATION INSTRUCTIONS ........................20
17.1 Safe installation ..............................................
..20
1 Safety
Observe the following safety instructions.
1.1 General information
¡ Read this instruction manual carefully.
¡ Keep the instruction manual and the
product information safe for future refer-
ence or for the next owner.
¡ Do not connect the appliance if it has been
damaged in transit.
1.2 Intended use
This appliance is designed only to be built
into kitchen units. Read the special installation
instructions.
Only a licensed professional may connect ap-
pliances without plugs. Damage caused by in-
correct connection is not covered under the
warranty.
Only use this appliance:
¡ To prepare meals and drinks.
¡ in private households and in enclosed
spaces in a domestic environment.
¡ up to an altitude of max. 2000m above
sea level.
Do not use the appliance:
¡ with an external timer or a remote control.
Call the after-sales service if you want to con-
vert your appliance to a different type of gas.
1.3 Restriction on user group
This appliance may be used by children aged
8 or over and by people who have reduced
physical, sensory or mental abilities or inad-
equate experience and/or knowledge,
provided that they are supervised or have
been instructed on how to use the appliance
safely and have understood the resulting
dangers.
Do not let children play with the appliance.
Children must not perform cleaning or user
maintenance unless they are at least 15 years
old and are being supervised.
Keep children under the age of 8 years away
from the appliance and power cable.
1.4 Safe use
Always place accessories in the cooking com-
partment the right way round.
→"Accessories", Page8
WARNING‒Risk of explosion!
Escaping gas may cause an explosion. WHAT
TO DO IF YOU SMELL GAS OR IF THERE
ARE FAULTS IN THE GAS INSTALLATION
▶ Immediately shut off the gas supply or
close the gas cylinder valve.
▶ Immediately extinguish all naked flames
and cigarettes.
▶ Do not operate any light switches or appli-
ance switches.
▶ Do not pull any plugs out of any sockets.
▶ Do not use any telephones or mobile
phones within the building.
▶ Open windows and ventilate the room.
▶ Call the after sales service or the gas sup-
plier.
Escaping gas may cause an explosion. Small
amounts of gas can collect over a longer
period of time and ignite.

Safety en
3
▶ Close the safety valve for the gas supply
when the appliance is out of use for pro-
longed periods.
WARNING‒Risk of fire!
Combustible objects that are left in the cook-
ing compartment may catch fire.
▶ Never store combustible objects in the
cooking compartment.
▶ If smoke is emitted, the appliance must be
switched off or the fuse must be switched
off and the door must be held closed in or-
der to stifle any flames.
Loose food remnants, fat and meat juices
may catch fire.
▶ Before using the appliance, remove the
worst of the food residues and remnants
from the cooking compartment, heating ele-
ments and accessories.
Opening the appliance door creates a
draught. Greaseproof paper may come into
contact with the heating element and catch
fire.
▶ Never place greaseproof paper loosely
over accessories when preheating the ap-
pliance and while cooking.
▶ Always cut greaseproof paper to size and
use a plate or baking tin to hold it down.
WARNING‒Risk of burns!
The appliance and its parts that can be
touched become hot during use.
▶ Caution should be exercised here in order
to avoid touching heating elements.
▶ Young children under 8 years of age must
be kept away from the appliance.
Accessories and cookware get very hot.
▶ Always use oven gloves to remove ac-
cessories or cookware from the cooking
compartment.
When the cooking compartment is hot, any al-
coholic vapours inside may catch fire. The ap-
pliance door may spring open. Hot steam and
jets of flame may escape.
▶ Only use small quantities of drinks with a
high alcohol content in food.
▶ Do not heat spirits (≥ 15% vol.) when undi-
luted (e.g. for marinating or pouring over
food).
▶ Open the appliance door carefully.
The telescopic shelves become hot when the
appliance is in use.
▶ Allow hot telescopic shelves to cool down
before touching them.
▶ Only touch hot telescopic shelves with
oven gloves.
WARNING‒Risk of scalding!
The accessible parts of the appliance become
hot during operation.
▶ Never touch these hot parts.
▶ Keep children at a safe distance.
Hot steam may escape when you open the
appliance door. Steam may not be visible, de-
pending on the temperature.
▶ Open the appliance door carefully.
▶ Keep children at a safe distance.
If there is water in the cooking compartment
when it is hot, this may create hot steam.
▶ Never pour water into the cooking compart-
ment when the cooking compartment is
hot.
The fan does not work without power. The ap-
pliance may overheat.
▶ Never operate the appliance without power.
Using an incorrect pressure regulator that per-
mits too much pressure leads to high output
and temperature, particularly in the oven. The
appliance may overheat.
▶ When using liquefied petroleum gas, al-
ways operate the appliance with a pressure
reducer.
▶ The pressure specifications are provided
on the rating plate. →Page17
WARNING‒Risk of injury!
Scratched glass in the appliance door may
develop into a crack.
▶ Do not use any harsh or abrasive cleaners
or sharp metal scrapers to clean the glass
on the oven door, as they may scratch the
surface.
The appliance and its parts that can be
touched may have sharp edges.
▶ Take care when handling and cleaning
them.
▶ If possible, wear protective gloves.
The hinges on the appliance door move when
the door is opened and closed, which could
trap your fingers.
▶ Keep your hands away from the hinges.
Components inside the appliance door may
have sharp edges.
▶ Wear protective gloves.

en Preventing material damage
4
WARNING‒Risk of electric shock!
Improper repairs are dangerous.
▶ Repairs to the appliance should only be
carried out by trained specialist staff.
▶ Only use genuine spare parts when repair-
ing the appliance.
▶ If the power cord of this appliance is dam-
aged, it must be replaced by the manufac-
turer, the manufacturer's Customer Service
or a similarly qualified person in order to
prevent any risk.
If the insulation of the power cord is dam-
aged, this is dangerous.
▶ Never let the power cord come into contact
with hot appliance parts or heat sources.
▶ Never let the power cord come into contact
with sharp points or edges.
▶ Never kink, crush or modify the power
cord.
An ingress of moisture can cause an electric
shock.
▶ Do not use steam- or high-pressure clean-
ers to clean the appliance.
If the appliance or the power cord is dam-
aged, this is dangerous.
▶ Never operate a damaged appliance.
▶ Call customer services. →Page17
WARNING‒Risk of suffocation!
Children may put packaging material over
their heads or wrap themselves up in it and
suffocate.
▶ Keep packaging material away from chil-
dren.
▶ Do not let children play with packaging ma-
terial.
Children may breathe in or swallow small
parts, causing them to suffocate.
▶ Keep small parts away from children.
▶ Do not let children play with small parts.
WARNING‒Risk of poisoning!
Using the gas cooking appliance leads to a
build-up of heat, moisture and combustion
products in the room where the appliance is
installed.
▶ Ensure that the kitchen is sufficiently ventil-
ated, in particular when operating the gas
cooking appliance.
▶ If the appliance is used intensively and for
prolonged periods, ensure that there is ad-
ditional ventilation so that the combustion
products are safely fed to the outside, e.g.
if using existing ventilation equipment, set a
higher performance level and, at the same
time, ensure that the air is replaced with
fresh air in the room where the appliance is
installed.
▶ Consult specialist personnel when installing
additional ventilation equipment.
1.5 Halogen bulb
WARNING‒Risk of burns!
The bulbs in the cooking compartment get
very hot. There is still a risk of burning for
some time after they have been switched off.
▶ Do not touch the glass cover.
▶ Avoid contact with your skin when cleaning.
WARNING‒Risk of electric shock!
When changing the bulb, the bulb socket con-
tacts are live.
▶ Before replacing the bulb, ensure that the
appliance is switched off in order to pre-
vent a potential electric shock.
▶ Also switch off the fuse in the fuse box.
2 Preventing material damage
2.1 General
ATTENTION!
Alcoholic vapours may catch fire in the hot cooking
compartment and cause permanent damage to the ap-
pliance. The appliance door may spring open due to
an explosion and it may fall off. The door panels may
shatter and fragment. Due to the resulting negative
pressure, the cooking compartment may become con-
siderably deformed inwards.
▶ Do not heat spirits (≥ 15% vol.) when undiluted (e.g.
for marinating or pouring over food).
Objects on the cooking compartment floor at over
50°C will cause heat to build up. The baking and
roasting times will no longer be correct and the enamel
will be damaged.
▶ Do not place any accessories, greaseproof paper or
foil of any kind on the cooking compartment floor.
▶ Only place cookware on the cooking compartment
floor if a temperature under 50°C has been set.
When the cooking compartment is hot, any water in-
side it will create steam. The change in temperature
may cause damage.
▶ Never pour water into the cooking compartment
when it is still hot.

Environmental protection and saving energy en
5
▶ Never place cookware containing water on the
cooking compartment floor.
The prolonged presence of moisture in the cooking
compartment leads to corrosion.
▶ Always wipe away the condensation after cooking.
Always allow the cooking compartment to cool
down with the door closed after cooking at high
temperatures.
▶ Do not keep moist food in the cooking compartment
for a long time with the door closed.
▶ Do not store food in the cooking compartment.
▶ Take care not to trap anything in the appliance
door.
Fruit juice dripping from the baking tray leaves stains
that cannot be removed.
▶ When baking very juicy fruit flans, do not pack too
much on the baking tray.
▶ If possible, use the deeper universal pan.
Using oven cleaner in a hot cooking compartment
damages the enamel.
▶ Never use oven cleaner in the cooking compartment
when it is still warm.
▶ Remove all food remnants from the cooking com-
partment and the appliance door before you next
heat up the appliance.
If the seal is very dirty, the appliance door will no
longer close properly during operation. This may dam-
age the front of adjacent kitchen units.
▶ Keep the seal clean at all times.
▶ Never operate the appliance if the seal is damaged
or missing.
Sitting or placing objects on the appliance door may
damage it.
▶ Do not place, hang or support objects on the appli-
ance door.
▶ Do not place cookware or accessories on the appli-
ance door.
With certain models, accessories may scratch the door
pane when closing the appliance door.
▶ Always push accessories fully into the cooking com-
partment.
If aluminium foil comes into contact with the door pane,
it could cause permanent discolouration.
▶ Do not allow aluminium foil in the cooking compart-
ment to come into contact with the door pane.
3 Environmental protection and saving energy
3.1 Disposing of packaging
The packaging materials are environmentally compat-
ible and can be recycled.
▶
Sort the individual components by type and dispose
of them separately.
3.2 Saving energy
If you follow these instructions, your appliance will use
less energy.
Only preheat the appliance if the recipe or the recom-
mended settings tell you to do so.
→"How it works", Page17
¡
Not preheating the appliance can reduce the en-
ergy used by up to 20%.
Use dark-coloured, black-coated or enamelled baking
tins.
¡
These types of baking tin absorb the heat particu-
larly well.
Open the appliance door as little as possible during
operation.
¡
This maintains the temperature in the cooking com-
partment and eliminates the need for the appliance
to reheat.
When baking multiple dishes, do so in succession or
in parallel.
¡
The cooking compartment is heated after baking
the first dish. This reduces the baking time for the
subsequent cakes.
For longer cooking times, you can switch the appli-
ance off 10minutes before the cooking time ends.
¡
There is sufficient residual heat to finish cooking
the dish.
Remove any accessories that are not being used from
the cooking compartment.
¡
Accessories that are not being used do not need to
be heated.
Allow frozen food to defrost before cooking.
¡
This saves the energy that would otherwise be re-
quired to defrost it.
en Familiarising yourself with your appliance
6
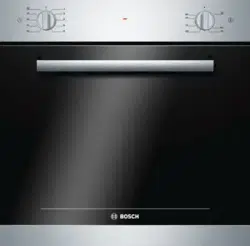
4 Familiarising yourself with your appliance
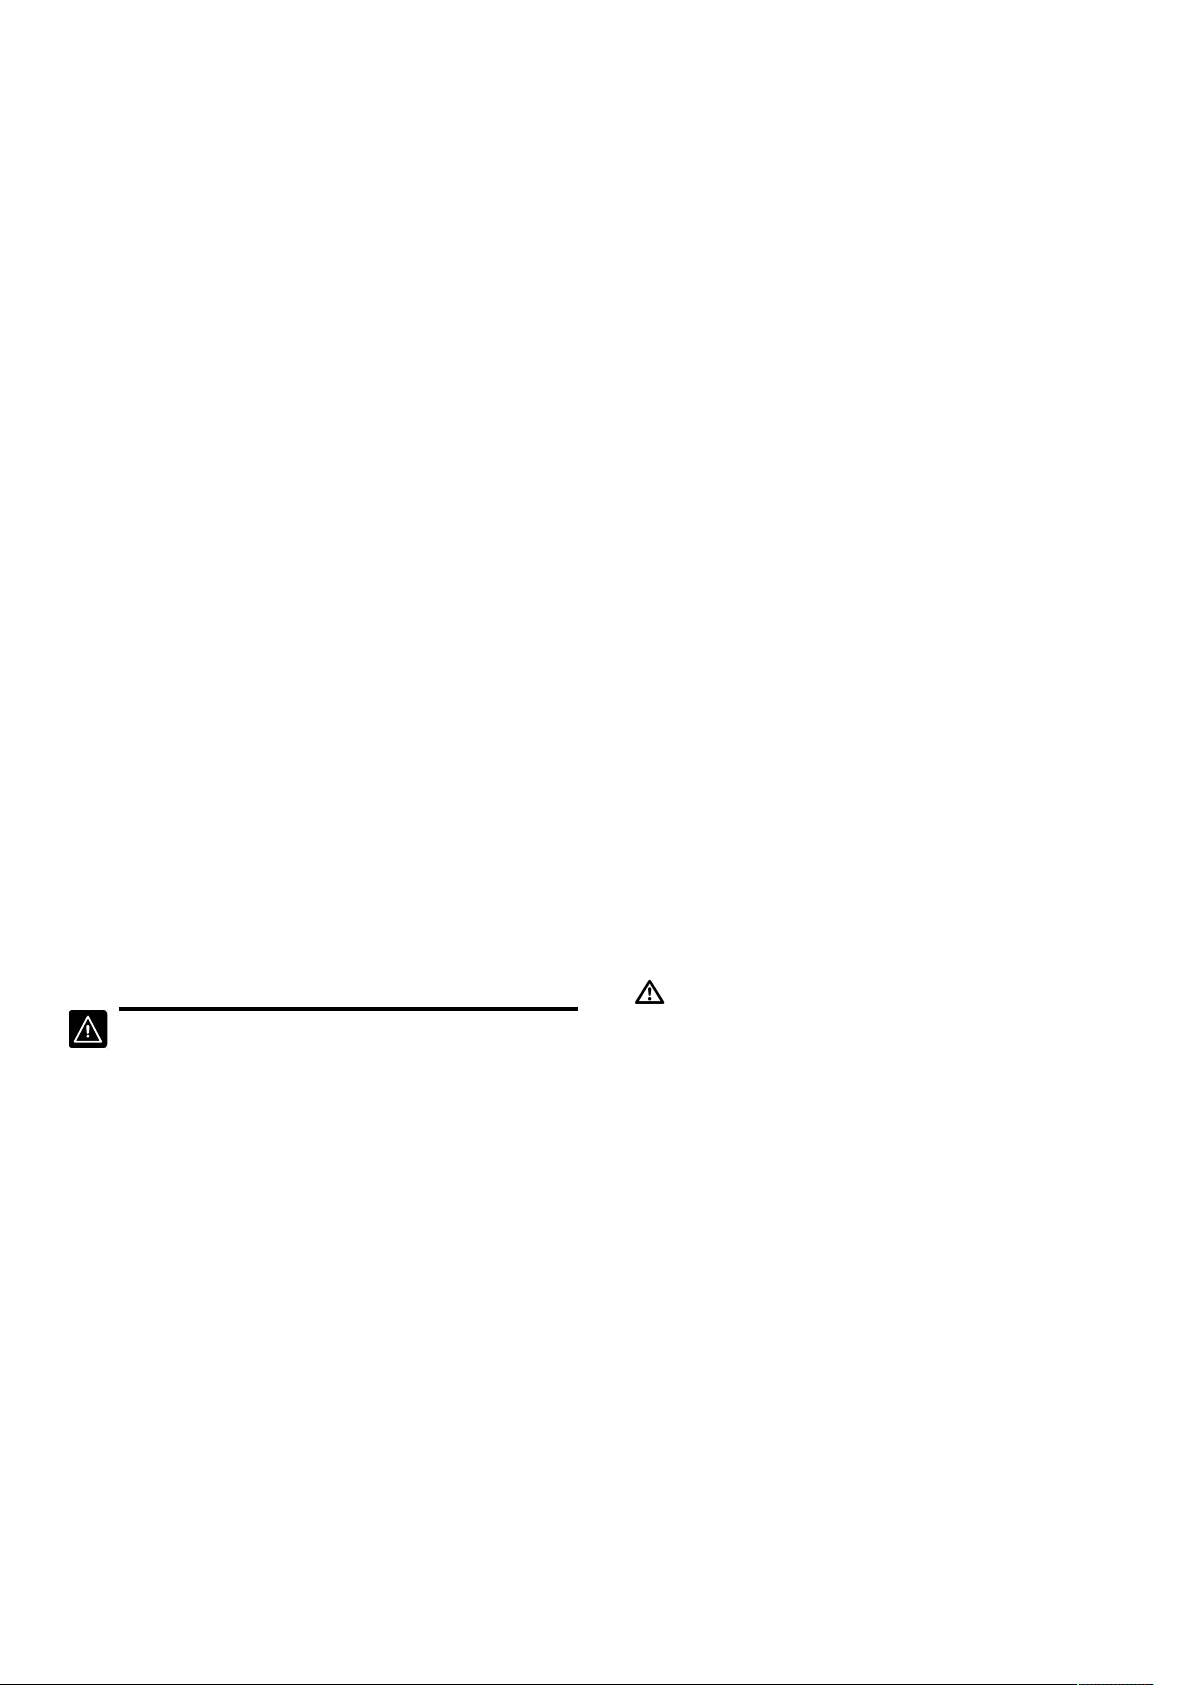
4.1 Control panel
You can use the control panel to configure all functions of your appliance and to obtain information about the operat-
ing status.
Note:On certain models, specific details such as col-
our and shape may differ from those pictured.
1 2 3
4
1
Function selector Use the function selector to set the type of heating or other functions. You can
turn the function selector clockwise or anti-clockwise from the zero setting.
2
Display The display shows symbols for active functions and the time-setting options.
3
Temperature selector Use the temperature selector to set the temperature for the type of heating.
4
Touch fields You can use the touch fields to set various functions directly.
Buttons
You can use the buttons to directly select various functions.
Note:If a button is not operational, a signal tone sounds.
Symbol Button Explanation
Time-setting options Setting the timer and time
Minus Decrease the setting value
Plus Increase the setting value
Display
You can see the current setting values or options in the
display.
The value that you can currently set is in focus. The
value is displayed in white lettering with a dark back-
ground.
Symbol Explanation
Timer
: Time indicator
Temperature selector
Use the temperature selector to set the temperature or the grill.
Familiarising yourself with your appliance en
7
Symbol Name Explanation
Min. - max. Temperature The appliance is on. The cooking compartment temper-
ature is set in °C.
Grill, large area The grill is on.
4.2 Types of heating and functions
To ensure that you always use the right type of heating to cook your food, we have explained the differences and ap-
plications below.
Symbol Type of heating or
function
Temperature or setting Use
5
Air recirculation 130-260°C For adding extra baking time (e.g. for moist fruit flans),
for boiling down, for dishes in a bain marie. The fan cir-
culates the hot air around the food.
Bottom heating 130-260°C Prepare cakes and baked items, bakes, poultry and lean
joints. To switch on the bottom heating, set the temperat-
ure. The heat is emitted from below.
Full-surface grill Grill flat items, such as steak, sausages or toast and
gratinate. The entire area below the grill element be-
comes hot.
+
5
Circulated air grill 50-220°C Bake or roast meat, poultry and whole fish. The fan cir-
culates the hot air around the food.
Note:When using the air recirculation grill, set a max-
imum temperature of 220°C.
Rotary spit Roasts, rolled roasting joints and poultry
Rotary spit with air
recirculation
Roasts, rolled roasting joints and poultry. The fan circu-
lates the hot air around the food.
Interior lighting - Switch the interior lighting on.
4.3 Cooking compartment
The functions in the cooking compartment make your
appliance easier to use.
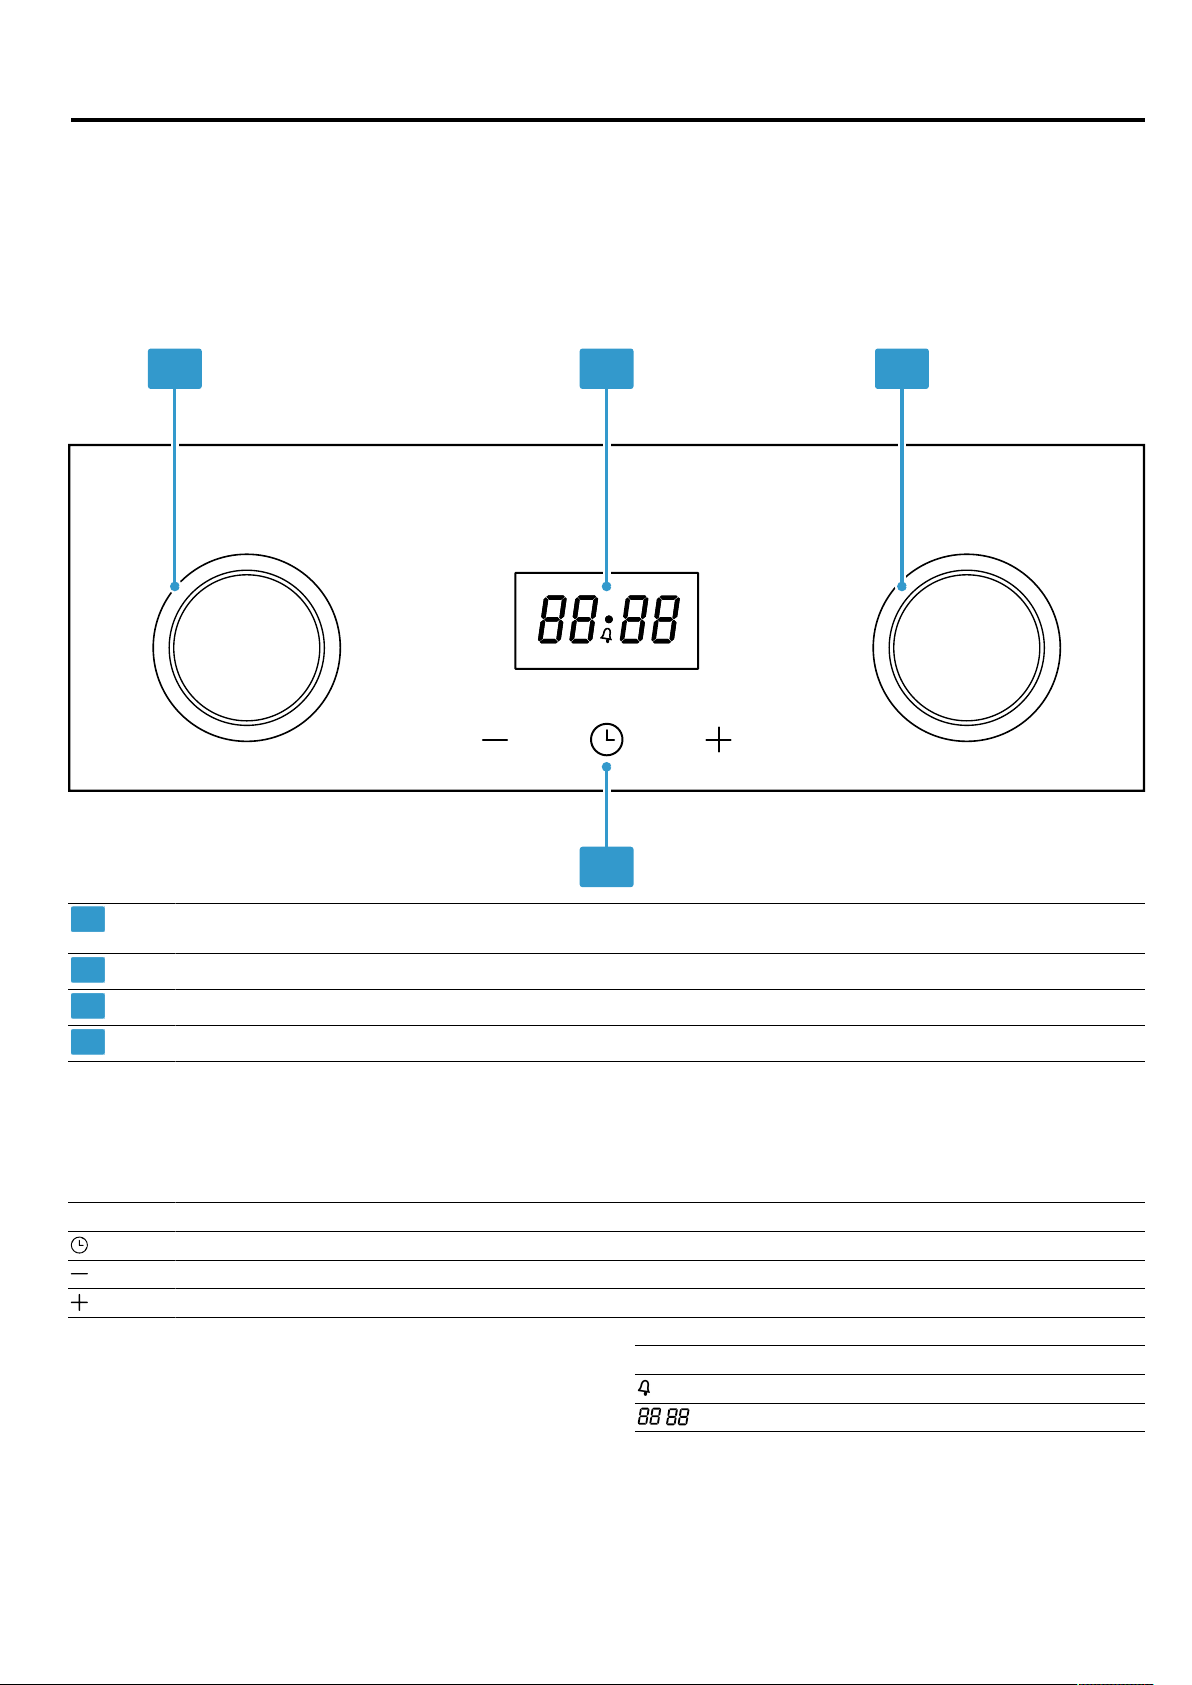
Shelf positions
The cooking compartment has 5 shelf positions.
Always insert the accessory as far as it will go so that
the accessory does not touch the door panel. Slide the
accessory into the cooking compartment correctly.
Self-cleaning surfaces
The back wall and side panels of the cooking compart-
ment are self-cleaning. The self-cleaning surfaces in the
cooking compartment are coated with a porous, matt
ceramic layer and have a rough surface. When the ap-
pliance is in operation, the self-cleaning surfaces ab-
sorb splashes from roasting or grilling and break them
down.
Interior lighting
When you open the appliance door, the interior lighting
switches on.
In most operating modes, the interior lighting switches
on as soon as operation starts. The interior lighting
switches off again when operation stops.
Cooling fan
The cooling fan switches on and off as required. The
hot air escapes via the appliance door.
ATTENTION!
Covering the ventilation slots will cause the appliance
to overheat.
▶ Do not cover the ventilation slots.
To cool the cooking compartment more quickly after
operation, the cooling fan continues to run for a certain
period afterwards.
Condensation
This section tells you how condensation is formed, how
you can prevent damage, and how you can prevent
condensation from forming.
When you are cooking food in the cooking compart-
ment, a lot of steam may form in the cooking compart-
ment. Since your appliance is extremely energy-effi-
cient, only a small amount of heat escapes during op-
eration. Due to the significant differences in temperat-
en Accessories
8
ure between the appliance interior and the external
parts of the appliance, condensation may build up on
the appliance door, the control panel or the front pan-
els of adjacent kitchen units. The formation of condens-
ation is a normal physical phenomenon.
In order to prevent damage, wipe away the condensa-
tion. If condensation collects in the drip trough, remove
the condensation with a sponge. An overflowing drip
trough may damage the fitted unit. Leave the appliance
to dry with the door open.
When you preheat the appliance, you reduce the build-
up of condensation.
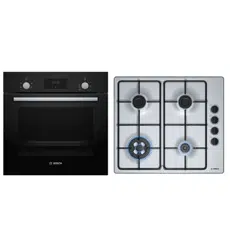
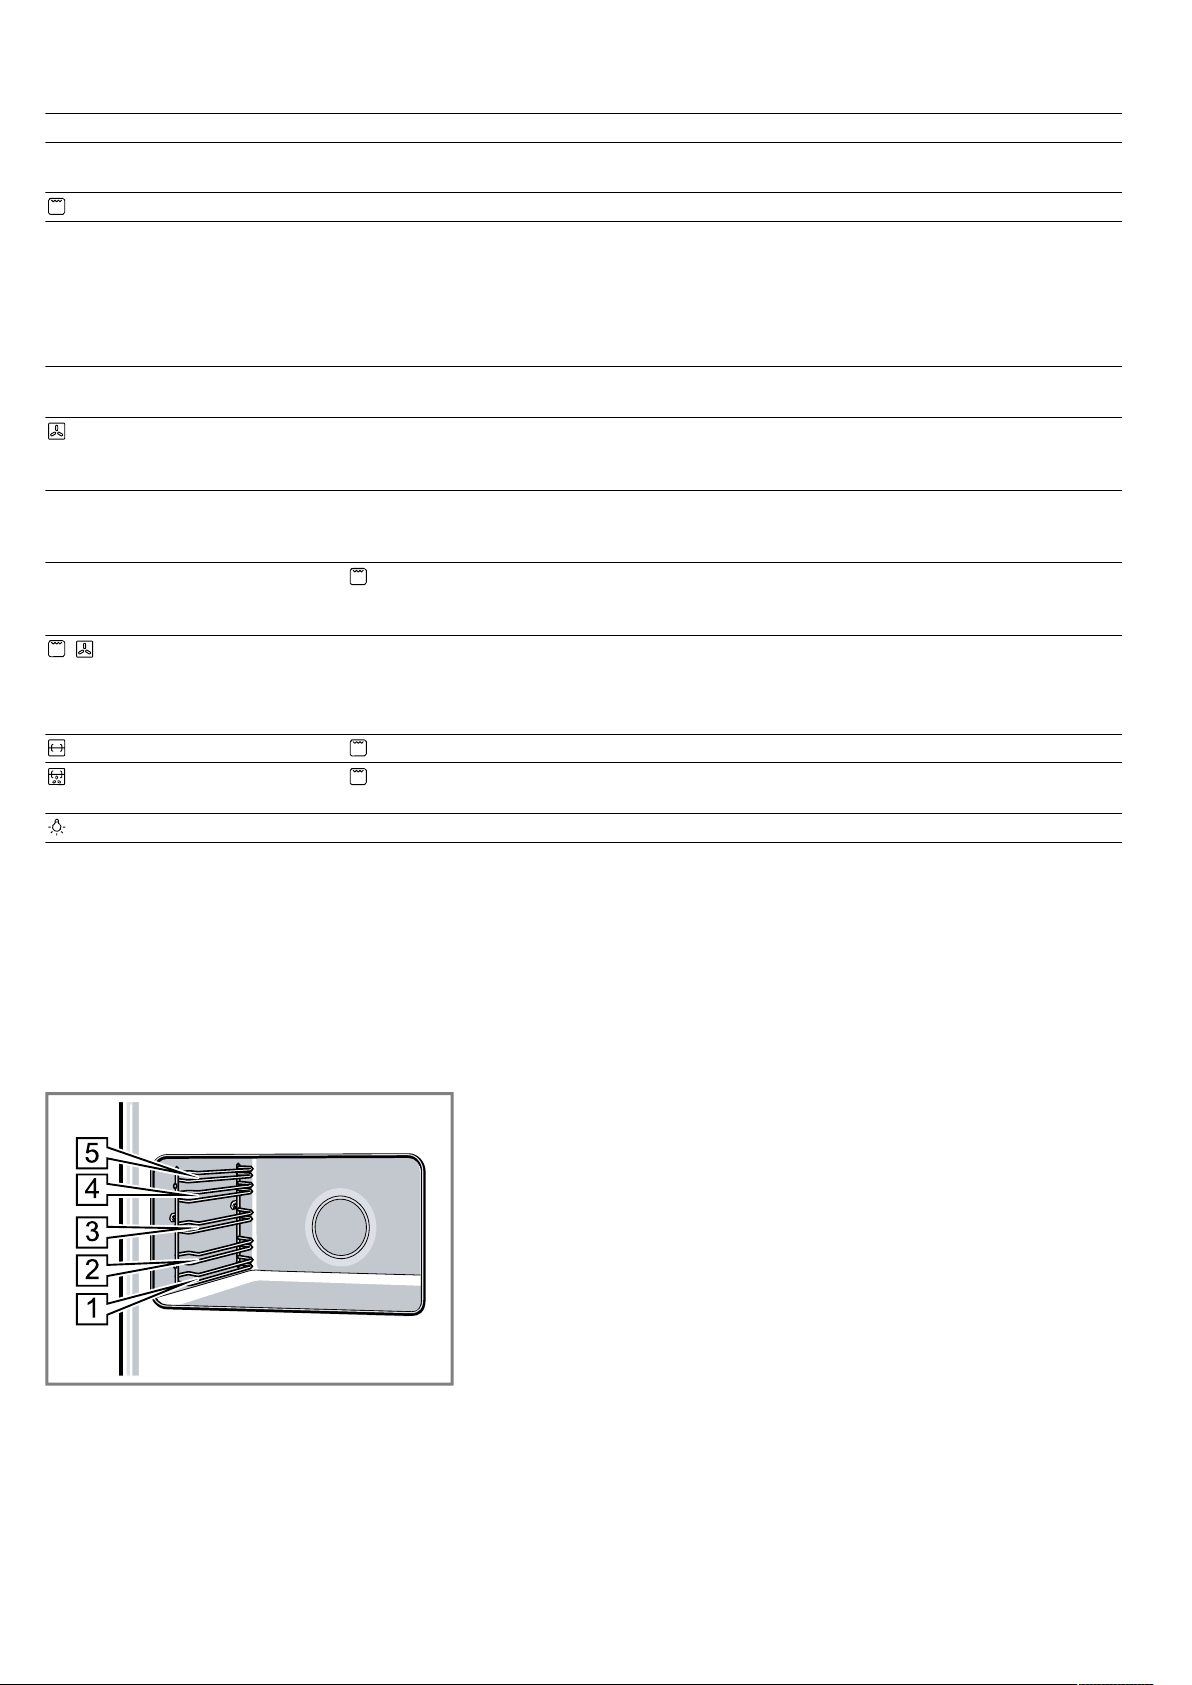
5 Accessories
Use original accessories. These have been made especially for your appliance.
Accessories Use
Wire rack ¡ Cookware
¡ Cake tins
¡ Meat, e.g. roasting joints or steak
¡ Frozen meals
Baking tray ¡ Tray bakes
¡ Small baked items
Telescopic rail set Use the pull-out rails to pull the accessory
out further.
Rotary spit ¡ For roasting pieces of meat
¡ For roasting large items of poultry
Note:Use only in combination with the
enamelled baking tray.
Locking pins Lock hinges.
Note:Do not throw away the locking pins.
Store the locking pins in a secure location.
You always require the locking pins when
you remove the door or door panels from the
appliance.
5.1 Other accessories
You can purchase other accessories from our after-
sales service, specialist retailers or online.
You will find a comprehensive range of products for
your appliance in our brochures and online:
www.bosch-home.com
Accessories vary from one appliance to another. When
purchasing accessories, always quote the exact
product number (E no.) of your appliance.
You can find out which accessories are available for
your appliance in our online shop or from our after-
sales service.
Other accessories Use
Telescopic rail set Telescopic rail set for one
level
Pressure regulator Pressure regulator for li-
quid gas
5.2 Locking function
The locking function prevents the accessories from tilt-
ing when they are pulled out.
You can pull out the accessory approximately halfway
without them tipping. The accessory must always be in-
serted into the cooking compartment the right way
round for the tilt protection to work properly.
5.3 Sliding accessories into the cooking
compartment
1.
Turn the accessory in such a way that the notch
is at the rear and is facing downwards.
2.
Insert the accessory between the two guide rods for
a shelf position.
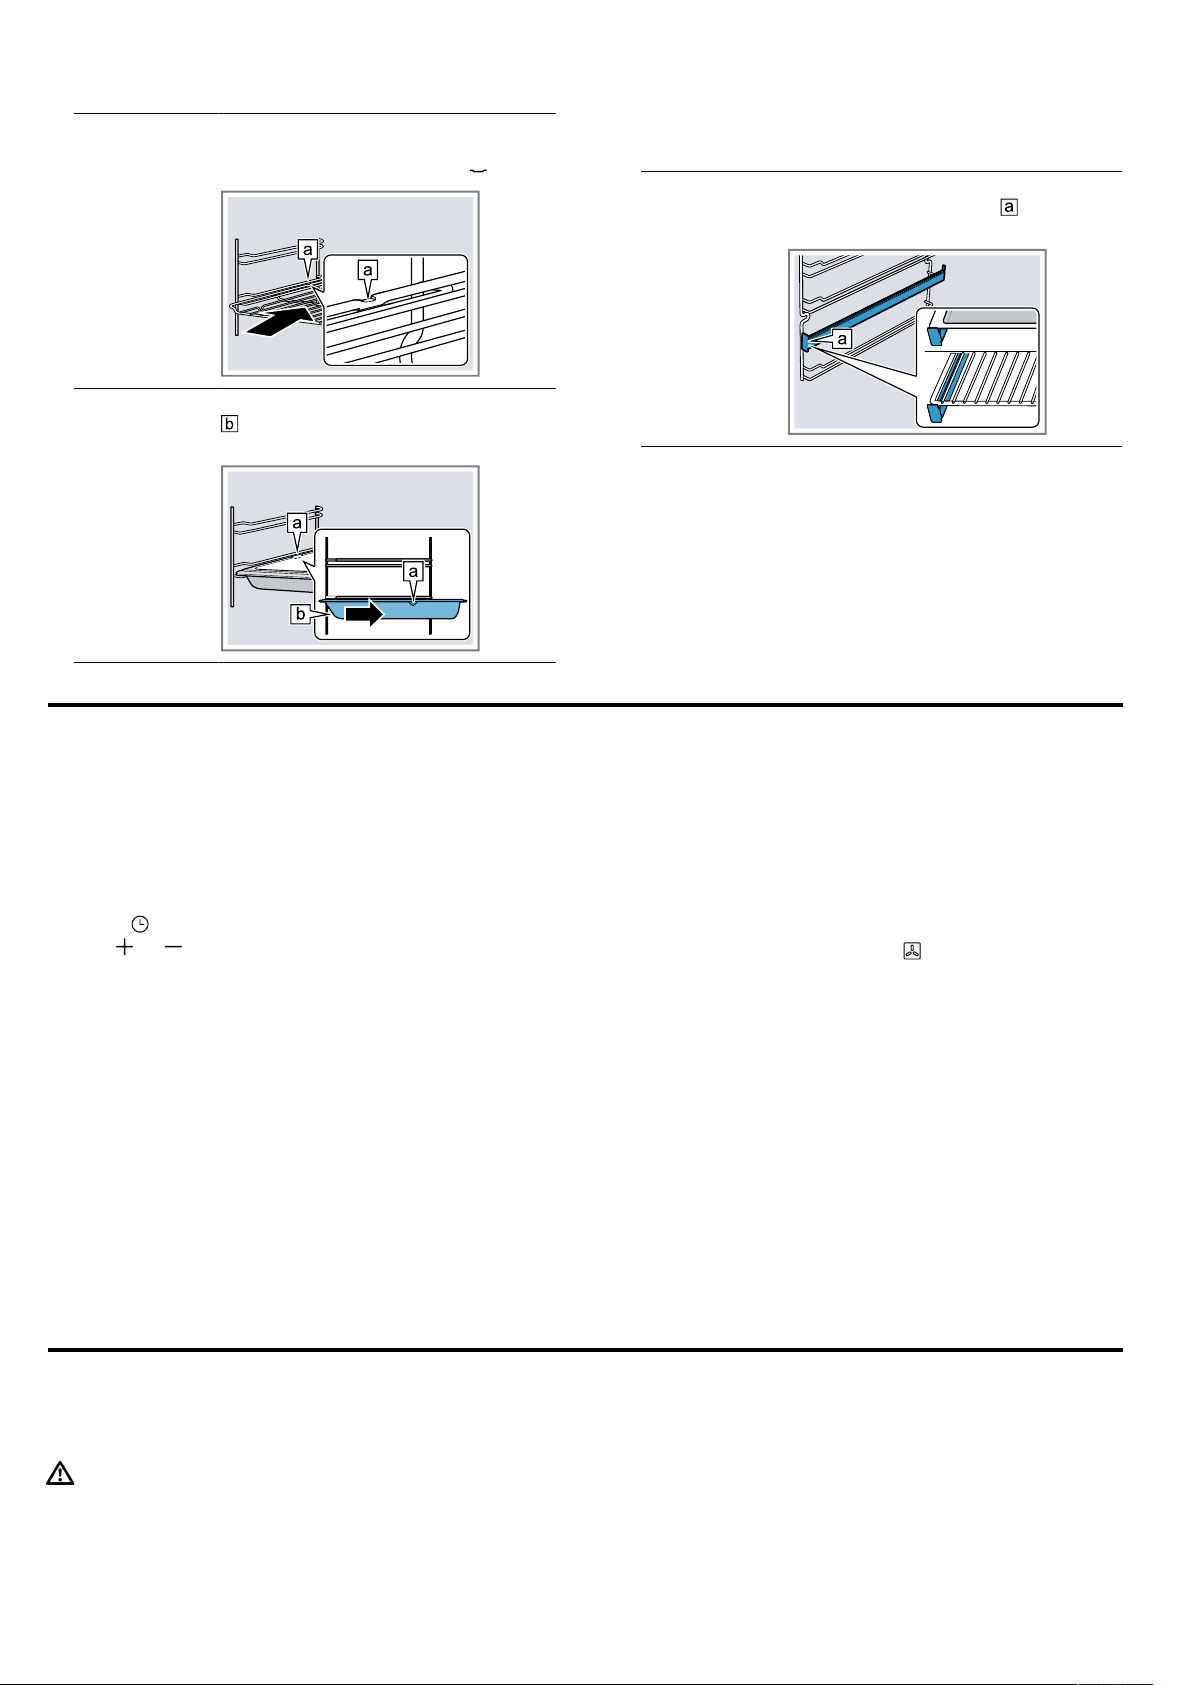
Before using for the first time en
9
Wire rack The open side must be facing the
appliance door and the curvature
must be at the bottom (i.e. ).
Tray, e.g. uni-
versal pan or
baking tray
The sloping edge of the accessory
must be facing towards the ap-
pliance door.
3.
To place the accessory at shelf positions with pull-
out rails, pull out the pull-out rails.
Wire rack or
baking tray
Position the accessory so that its
edge is behind the lug on the
pull-out rail.
Note:The pull-out rails lock in place when they are
fully pulled out. Gently push the pull-out rails back
into the cooking compartment.
4.
Push the accessory all the way in, making sure that
it does not touch the appliance door.
Note:Take any accessories that you will not be using
out of the cooking compartment while the appliance is
in operation.
6 Before using for the first time
Configure the settings for initial start-up. Clean the ap-
pliance and accessories.
6.1 Setting the time
Once the appliance has been connected to the power
supply, three zeros flash on the display. Set the time.
1.
Press .
2.
Use or to set the time.
Note:Once the set time has elapsed, the time is auto-
matically saved.
6.2 Cleaning the appliance before using it
for the first time
Clean the cooking compartment and accessories be-
fore using the appliance to prepare food for the first
time.
1.
Remove the accessories from the cooking compart-
ment and remove the shelves. →Page14
2.
Completely remove any leftover packaging, e.g.
small pieces of polystyrene, from the cooking com-
partment.
3.
Some parts are covered with a protective film. Re-
move this scratch protection film.
4.
Clean the outside of the appliance with a soft, damp
cloth.
5.
Clean the cooking compartment with hot soapy wa-
ter.
6.
To eliminate the new-appliance smell, heat up the
empty appliance with the door closed.
7.
Turn the function selector to
5
.
8.
Set the maximum temperature.
If you are heating up the appliance for the first time,
you may hear crackling noises from the cooking
compartment.
9.
Ventilate the kitchen while the appliance is heating.
10.
Switch off the appliance after 1hour.
11.
Allow the appliance to cool down.
12.
Once the cooking compartment has cooled down,
clean the smooth surfaces with soapy water.
13.
Install the rails. →Page14
14.
If necessary, clean the door panels. →Page14
6.3 Cleaning the accessories
▶
Clean the accessory thoroughly with soapy water
and a soft dish cloth.
7 Basic operation
7.1 Switching on the appliance
WARNING‒Risk of explosion!
If gas is collecting in the cooking compartment, this
may cause an explosion in the cooking compartment
during ignition.
▶ If the burner does not ignite after 15 seconds,
switch off the appliance and open the door or a win-
dow in the room.
▶ Wait at least 1minute before igniting the burner
again.
1.
Open the appliance door.
en Rotary spit
10
2.
Press the temperature selector and set it to the
maximum setting.
3.
Press and hold the temperature selector for a few
seconds until the flame stabilises.
4.
Close the appliance door carefully.
5.
Use the temperature selector to set the temperature.
Do not turn the temperature selector beyond the
minimum setting.
a The appliance starts heating.
Note:Use the function selector to set the additional
functions.
7.2 Changing the type of heating and
temperature
▶
Use the temperature selector to change the temper-
ature.
7.3 Switching off the appliance
▶
Turn the temperature selector to the off position.
7.4 Setting the grill
▶
Press the temperature selector and set it to .
Note:You can use the function selector to set addi-
tional functions.
7.5 Switching off the grill
▶
Set the temperature selector to the off position.
8 Rotary spit
8.1 Preparing the rotary spit
1.
Slide a retaining clip onto the rotary spit and screw
on the handle.
2.
Place the roasting joint into the centre of the rotary
spit.
3.
Secure the roasting joint using the retaining clips.
4.
Secure the retaining clips using the knurled screws.
8.2 Inserting the rotary spit
WARNING‒Risk of burns!
The appliance and its parts that can be touched be-
come hot during use.
▶ Caution should be exercised here in order to avoid
touching heating elements.
▶ Young children under 8 years of age must be kept
away from the appliance.
1.
Insert the rotary split frame into the threaded
bushes.
2.
Place the rotary spit onto the rotary spit frame and
unscrew the handle.
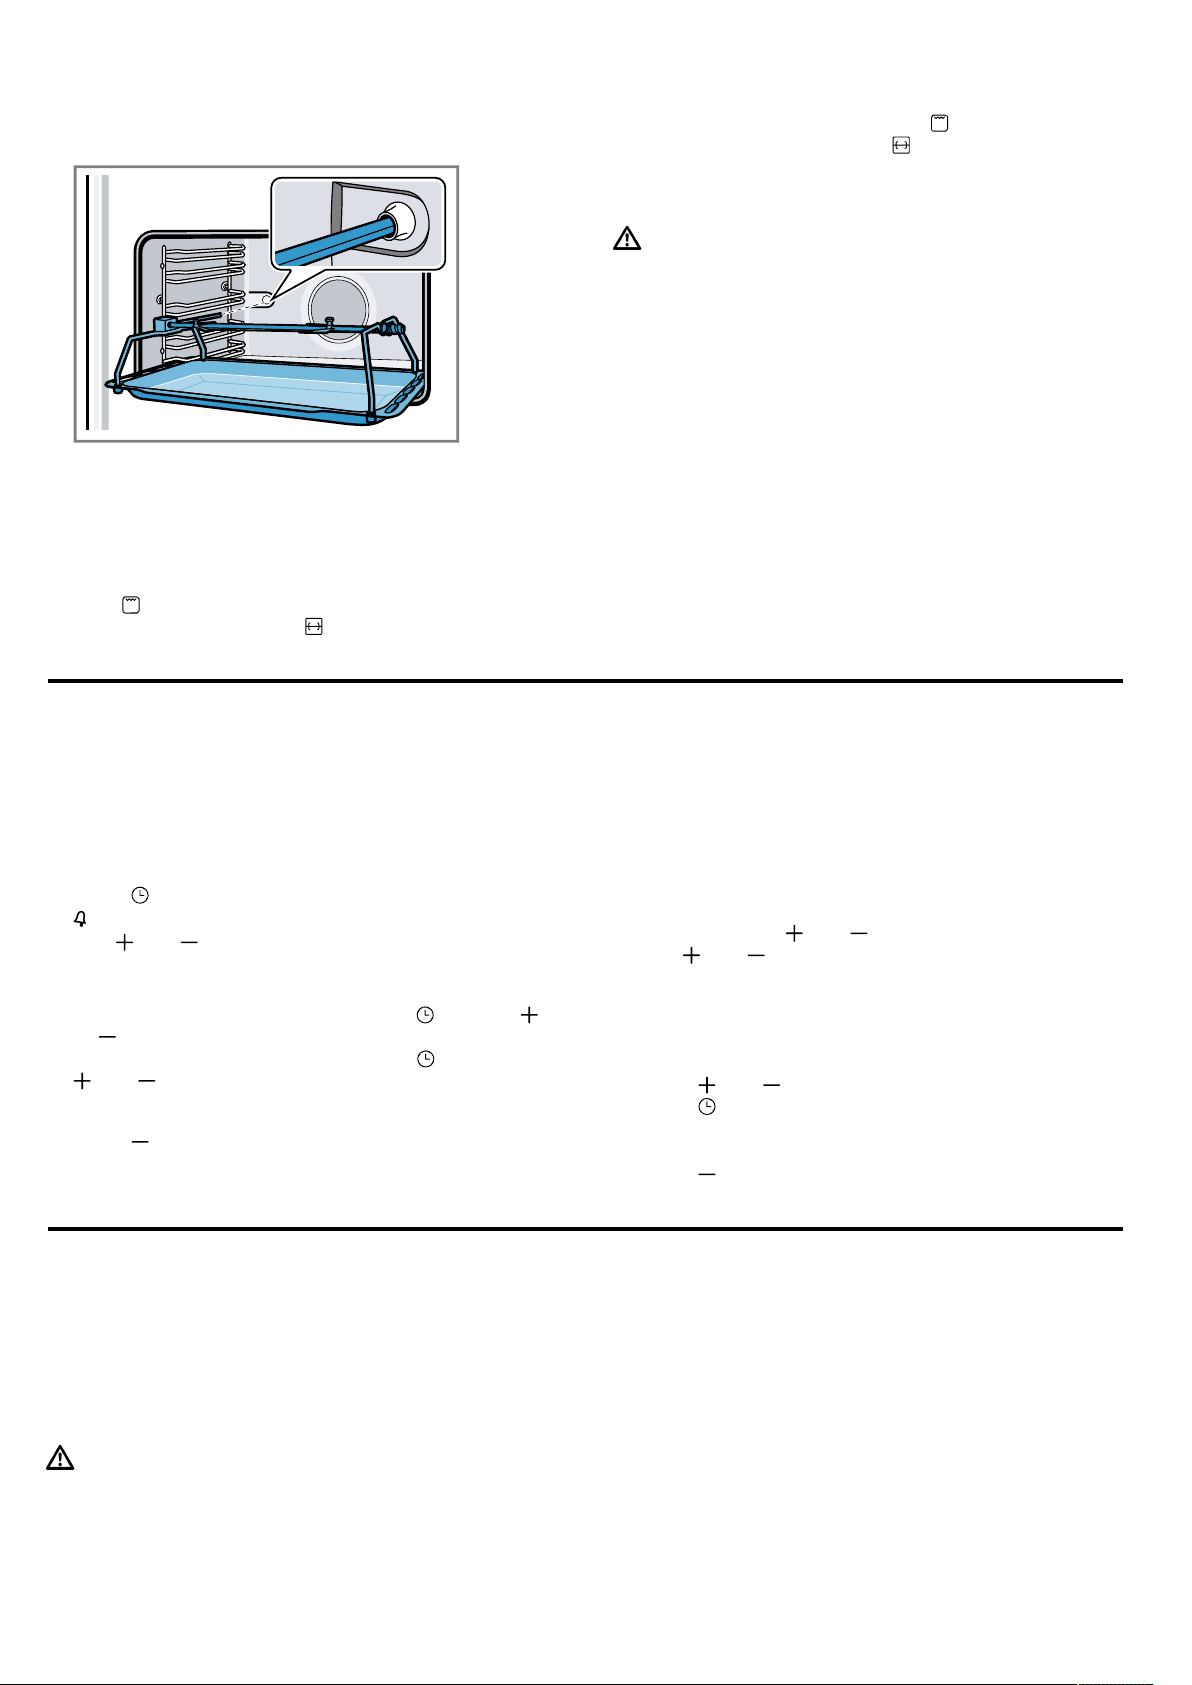
Time-setting options en
11
3.
Slide the universal pan into shelf position 1 and
place the rotary spit into the motor bracket.
4.
Pour some water into the universal pan to better
catch any fat that drips out.
5.
Close the appliance door.
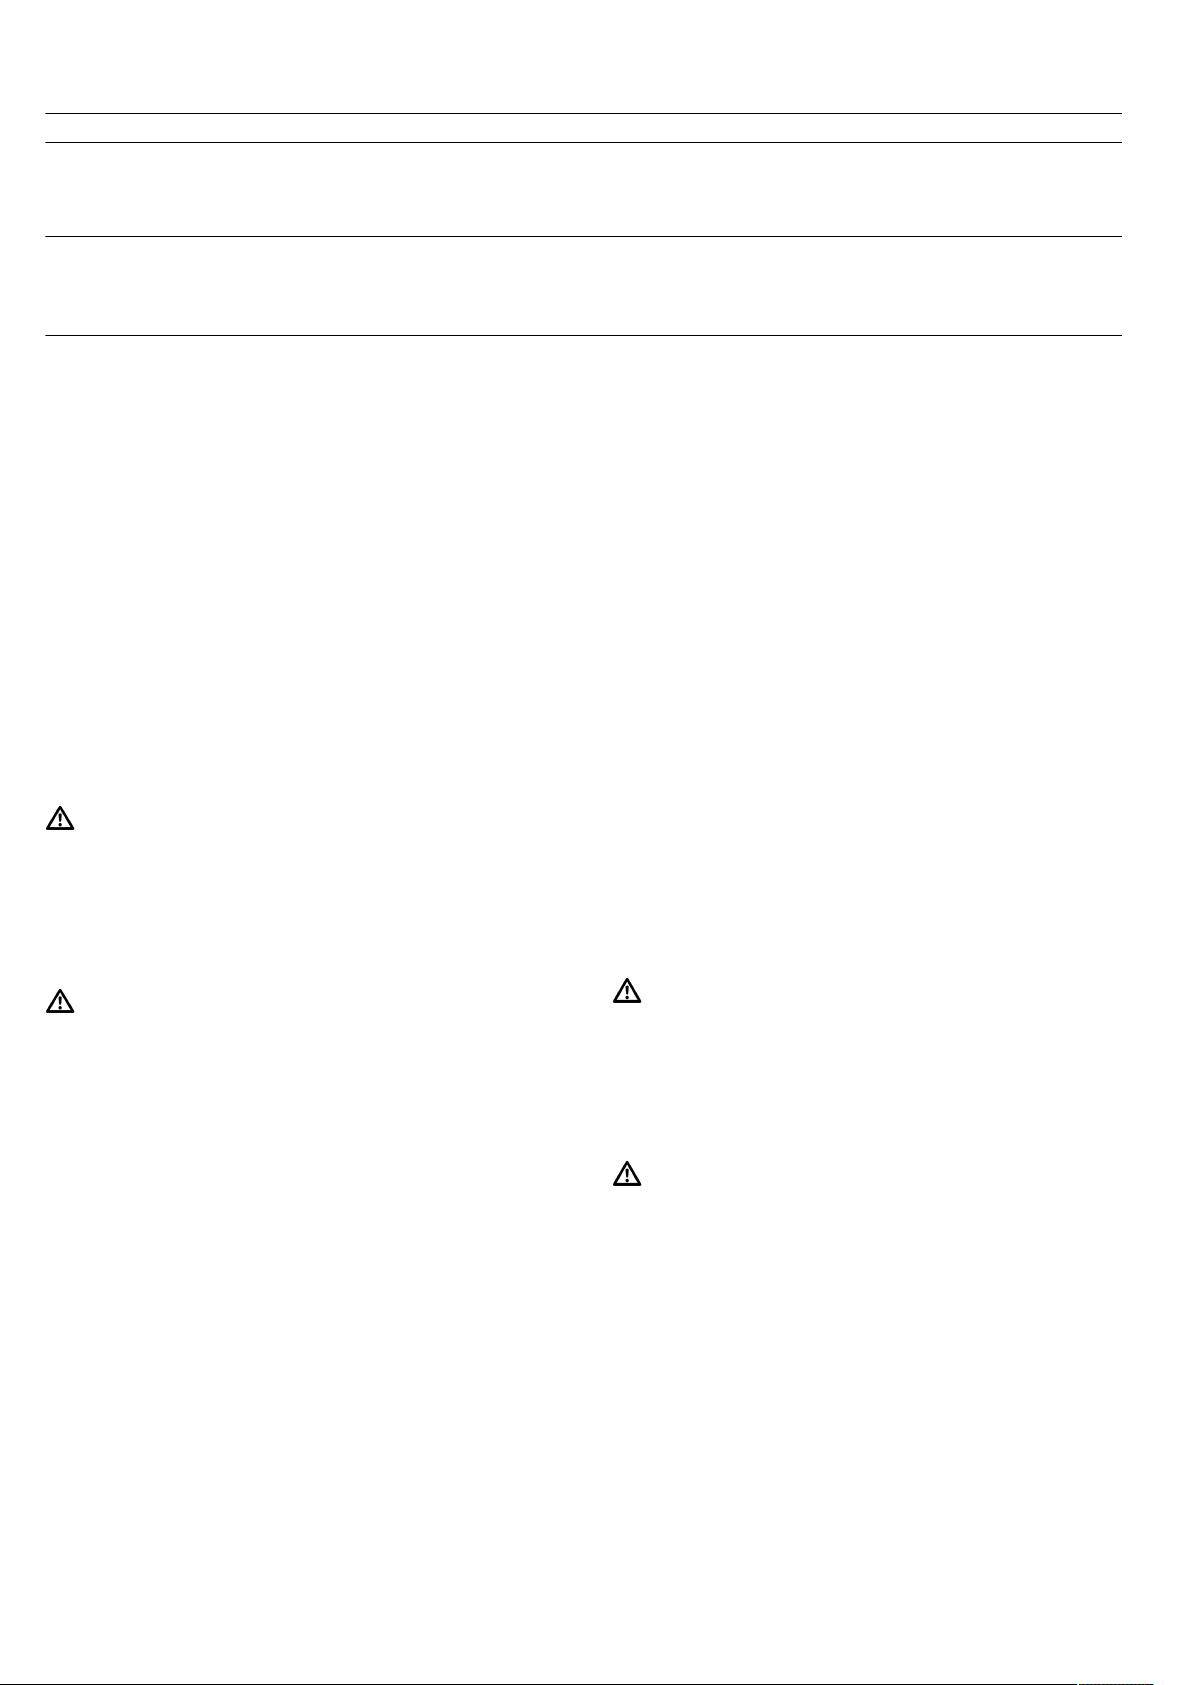
8.3 Switch on the rotary spit
Note:If you are using the rotary spit, preheat the oven
with the type of heating. Insert the rotary spit before
you set the heating function .
1.
Set the temperature selector to .
2.
Set the function selector to .
8.4 Removing the rotary spit
WARNING‒Risk of burns!
The appliance and its parts that can be touched be-
come hot during use.
▶ Caution should be exercised here in order to avoid
touching heating elements.
▶ Young children under 8 years of age must be kept
away from the appliance.
1.
Open the appliance door.
2.
Slowly pull out the universal pan until this protrudes
halfway out of the cooking compartment.
3.
Pull the universal pan fully out of the cooking com-
partment and place it on the worktop.
4.
Screw the handle onto the rotary spit.
5.
Remove the rotary spit from the rotary spit frame by
the handle.
9 Time-setting options
9.1 Setting the short-term timer
The timer has no influence on the functions of the
oven.
Note:You can set the time on the short-term timer from
1minute up to 23hours and 59minutes.
1.
Press .
a flashes and three zeros are displayed.
2.
Use and to set the required duration.
a A signal tone sounds once the time has elapsed.
Notes
¡ To change the remaining time, press and use
or to change the remaining time.
¡ To cancel the short-term timer, press . Then press
and at the same time.
Switching off the signal tone
▶
Press to switch off the signal tone.
Note:After a few minutes, the signal tone stops auto-
matically.
9.2 Setting the time
If required, you can change the time, e.g. from summer
time to winter time.
Requirement:The appliance is switched off.
1.
Press and hold and at the same time.
2.
Use and to set the time.
a After a few seconds, the set time is displayed.
9.3 Changing the signal tone
You can choose from 3 different signal tones.
1.
Press and at the same time.
2.
Press .
a The signal tone that is currently selected is shown
on the display, e.g. "Tone1".
3.
Press to select another signal tone.
10 Cleaning and servicing
To keep your appliance working efficiently for a long
time, it is important to clean and maintain it carefully.
10.1 Cleaning products
To avoid damaging the various surfaces on the appli-
ance, do not use any unsuitable cleaning agents.
WARNING‒Risk of electric shock!
An ingress of moisture can cause an electric shock.
▶ Do not use steam- or high-pressure cleaners to
clean the appliance.
ATTENTION!
Unsuitable cleaning agents damage the surfaces of the
appliance.
▶ Do not use harsh or abrasive cleaning products.
▶ Do not use cleaning products with a high alcohol
content.
▶ Do not use hard scouring pads or cleaning
sponges.
▶ Do not use any special cleaners for cleaning the ap-
pliance while it is hot.

en Cleaning and servicing
12
▶ Only use glass cleaners, glass scrapers or stainless
steel care products if recommended in the cleaning
instructions for the relevant part.
Using oven cleaner in a hot cooking compartment
damages the enamel.
▶ Never use oven cleaner in the cooking compartment
when it is still warm.
▶ Remove all food remnants from the cooking com-
partment and the appliance door before you next
heat up the appliance.
Salt contained in new sponge cloths may damage sur-
faces.
▶ Wash new sponge cloths thoroughly before use.
10.2 Suitable cleaning agents
Only use cleaning agents that are suitable for the differ-
ent surfaces on your appliance.
Appliance exterior
Follow the instructions on cleaning the appliance.
Area Suitable cleaning agents Information
Stainless steel front ¡ Hot soapy water
¡ Special stainless steel clean-
ing products suitable for hot
surfaces
To prevent corrosion on stainless steel fronts, remove
any limescale, grease, starch and albumin (e.g. egg
white) stains immediately.
Apply a thin layer of the stainless steel cleaning product.
Control panel Hot soapy water Clean with a dishcloth and dry with a soft cloth.
Do not use glass cleaner or a glass scraper.
Door panels Hot soapy water Clean with a dishcloth and dry with a soft cloth.
Do not use a glass scraper or steel wool.
Door handle Hot soapy water Clean with a dishcloth and dry with a soft cloth.
To avoid permanent stains, remove descaling agents
from the door handle immediately.
Appliance interior
Area Suitable cleaning agents Information
Enamel surfaces ¡ Hot soapy water
¡ Vinegar solution
¡ Oven cleaner
Clean with a dishcloth and dry with a soft cloth.
Soften burnt-on food residues with a damp cloth and
soapy water.
If there are heavy deposits of dirt, use a stainless steel
scouring pad or oven cleaner.
Leave the cooking compartment open to dry after clean-
ing.
Note:Food residues may cause white deposits to form.
The deposits are not a risk to health and do not affect
how the appliance works. You can remove the deposits
with lemon juice.
Self-cleaning surfaces Observe the instructions for the surfaces of the cooking
compartment that follow the table.
→"Cleaning self-cleaning surfaces", Page13
Glass cover for the
interior lighting
¡ Hot soapy water
¡ Oven cleaner
Clean with a dishcloth and dry with a soft cloth.
Use oven cleaner to remove very heavy soiling.
Door panels Hot soapy water Clean with a dishcloth and dry with a soft cloth.
Do not use a glass scraper or steel wool.
Door seal Hot soapy water Clean with a dishcloth.
Do not remove or scrub the door seal.
Stainless steel door
cover
Stainless steel cleaner Follow the manufacturers' instructions.
Do not use glass cleaner or a glass scraper.
Do not use stainless steel care products.
Tip:It is best to remove the door cover.
Plastic door cover Hot soapy water Do not use glass cleaner or a glass scraper.
Do not use stainless steel care products.
Tip:It is best to remove the door cover.
Rails Hot soapy water Soak and clean using a dishcloth or brush.
Cleaning and servicing en
13
Area Suitable cleaning agents Information
Pull-out system Hot soapy water Clean with a dishcloth or brush.
Clean the pull-out rails while they are pushed in so that
you do not remove the lubricant.
Do not clean in the dishwasher.
Accessories Hot soapy water Soak and clean using a dishcloth or brush.
If the accessory is heavily soiled, clean it with steel wool.
Tip:You can clean enamelled accessories in the dish-
washer.
Notes
¡ Slight differences in colour on the front of the appli-
ance are caused by the use of different materials,
such as glass, plastic and metal.
¡ Shadows on the door panels, which look like
streaks, are caused by reflections made by the in-
terior lighting.
¡ Enamel is baked on at very high temperatures. This
may cause some slight colour variation. The colour
differences are normal and do not affect the func-
tionality. The edges of thin trays cannot be com-
pletely enamelled and may therefore be rough. This
does not impair the corrosion protection.
10.3 Cleaning the appliance
Clean the appliance as specified. This will ensure that
the different parts and surfaces of the appliance are
not damaged by incorrect cleaning or unsuitable clean-
ing products.
WARNING‒Risk of burns!
The appliance and its parts that can be touched be-
come hot during use.
▶ Caution should be exercised here in order to avoid
touching heating elements.
▶ Young children under 8 years of age must be kept
away from the appliance.
WARNING‒Risk of fire!
Loose food remnants, fat and meat juices may catch
fire.
▶ Before using the appliance, remove the worst of the
food residues and remnants from the cooking com-
partment, heating elements and accessories.
Requirement:Read the information on cleaning
products.
→"Cleaning products", Page11
1.
Clean the appliance using hot soapy water and a
dish cloth.
For some surfaces, you can use alternative cleaning
agents.
→"Suitable cleaning agents", Page12
2.
Dry with a soft cloth.
Tips
¡ If you clean the cooking compartment after each
use, dirt cannot burn on.
¡ Always remove limescale, grease, starch or albumin
stains immediately.
¡ To keep the cooking compartment clean, use suit-
able ovenware for roasting, e.g. a roasting dish.
10.4 Cleaning self-cleaning surfaces
The self-cleaning surfaces are coated with a porous,
matte ceramic layer. This coating absorbs and dispels
splashes from baking and roasting while the appliance
is in operation.
Requirement:The cooking compartment has cooled
down.
▶
Brownish or whitish residues can be removed with
water and a soft sponge.
Note:Marks may appear on the self-cleaning surfaces.
Residues of sugars and proteins in the food are not re-
moved and stick to the surfaces. Red stains are
residues from salty food – they are not rust. The marks
are not hazardous to health. These marks do not im-
pair the cleaning ability of the self-cleaning surfaces.
10.5 Replacing the cooking compartment
bulb
If the cooking compartment light has failed, replace the
cooking compartment bulb.
Note:Heat-resistant, 230V, 40W, G9 halogen bulbs
are available from customer service or specialist retail-
ers. Only use these bulbs. Hold the new halogen bulbs
only with a clean, dry towel. This increases the service
life of the bulb.
WARNING‒Risk of burns!
The appliance and its parts that can be touched be-
come hot during use.
▶ Caution should be exercised here in order to avoid
touching heating elements.
▶ Young children under 8 years of age must be kept
away from the appliance.
WARNING‒Risk of electric shock!
When changing the bulb, the bulb socket contacts are
live.
▶ Before replacing the bulb, ensure that the appliance
is switched off in order to prevent a potential electric
shock.
▶ Also unplug the appliance from the mains or switch
off the circuit breaker in the fuse box.
Requirements
¡ The fuse has been switched off.
¡ The cooking compartment has cooled down.
¡ You must have a new halogen lamp to replace the
old one.
1.
Open the appliance door.
2.
Place a tea towel in the cooking compartment to
prevent damage.
3.
Remove the accessories from the cooking compart-
ment and remove the shelves. →Page14
en Rails
14
4.
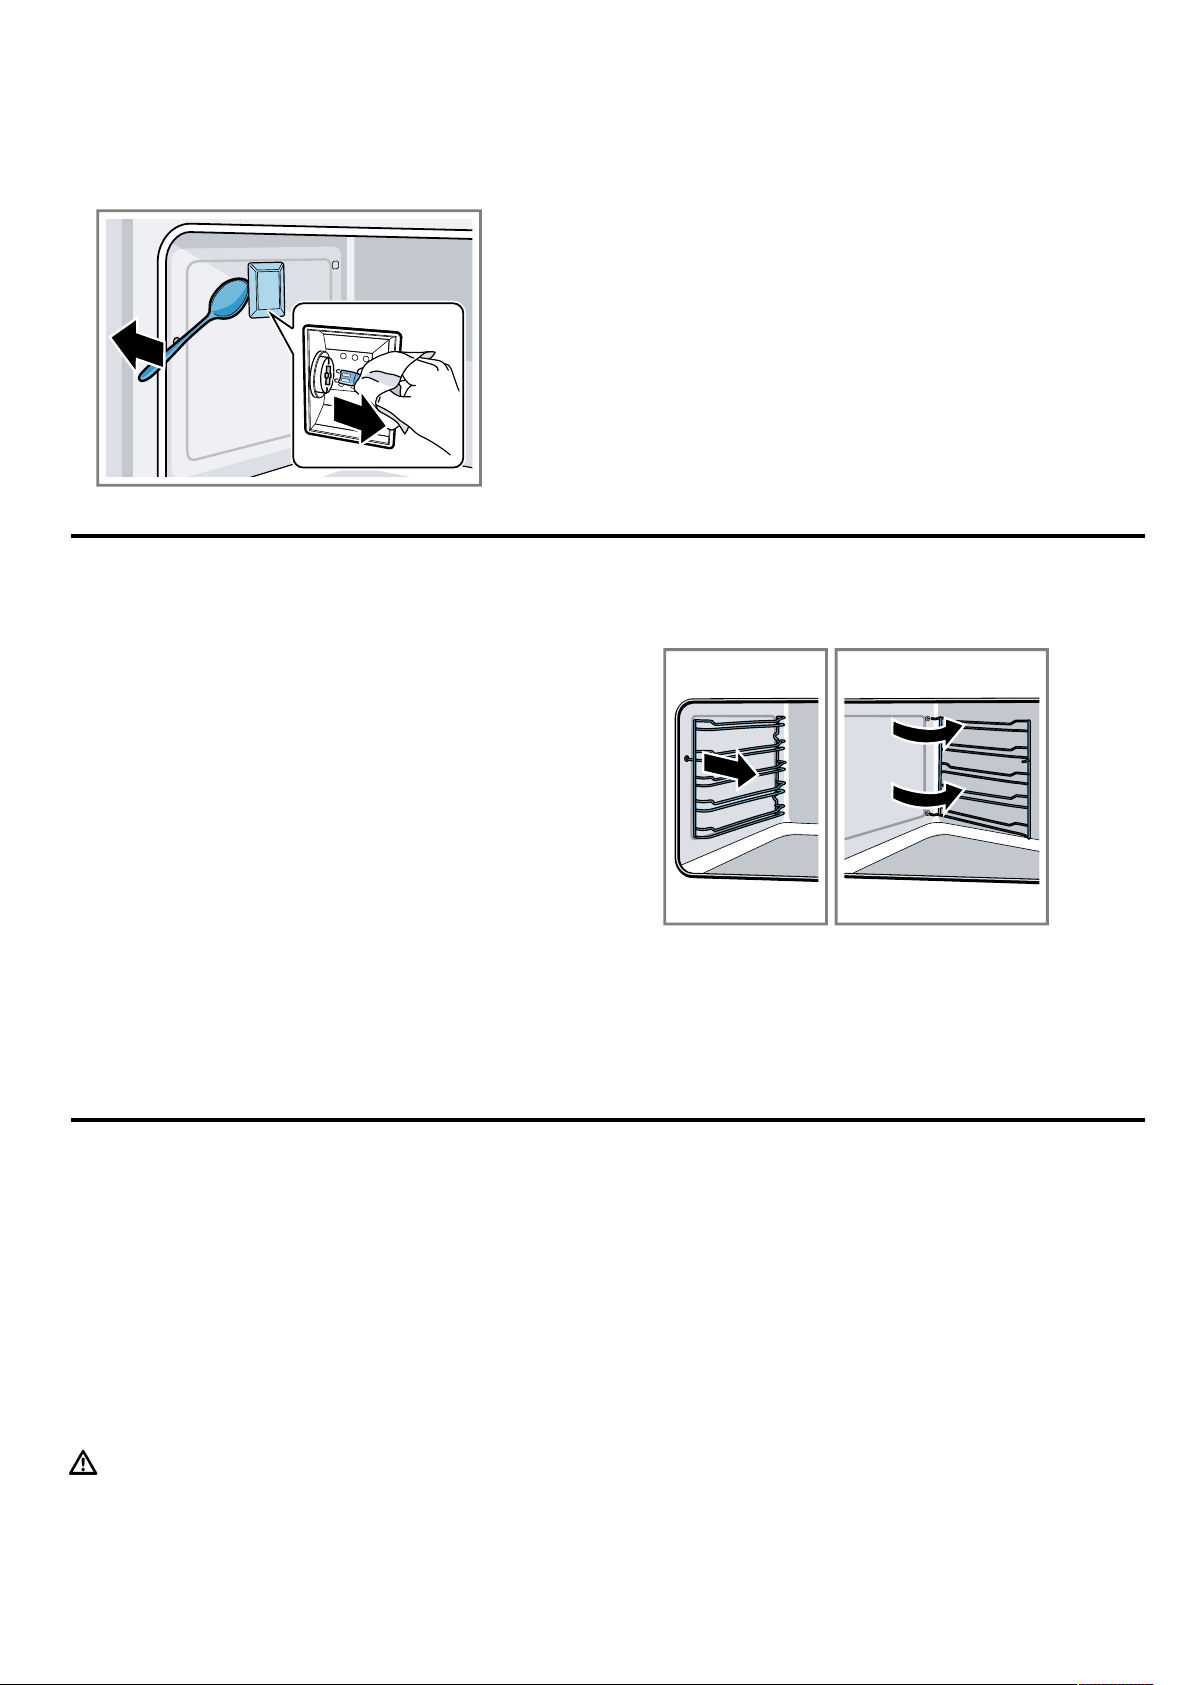
Remove the glass cover.
If the glass cover is difficult to remove by hand, use
a spoon to help you.
5.
Pull out the cooking compartment bulb.
6.
Replace the cooking compartment bulb with one of
the same type.
7.
Refit the glass cover for the oven light bulb.
8.
Install the rails. →Page14
9.
Remove the tea towel again.
10.
Switch on the fuse again.
11.
Check that the oven lighting is working again.
11 Rails
To thoroughly clean the rails and the cooking compart-
ment, or to replace the rails, you can remove the rails.
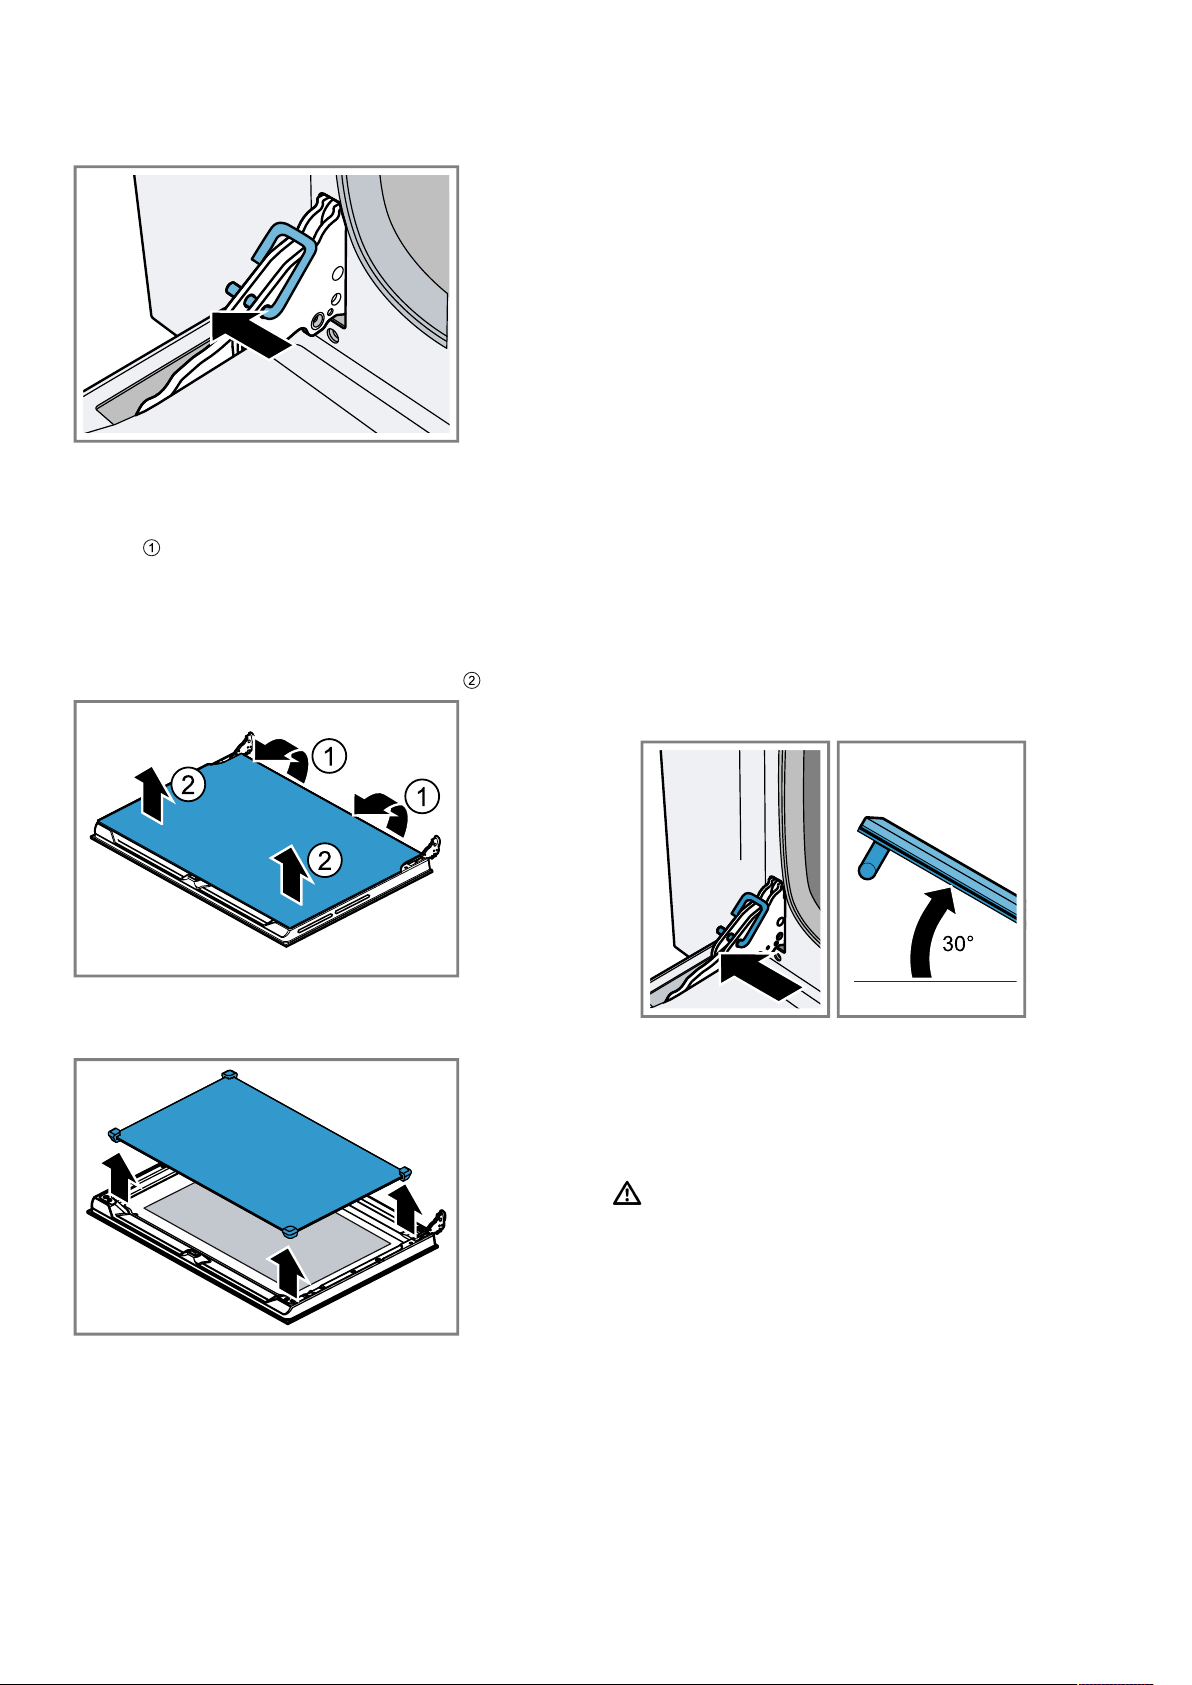
11.1 Detaching the rails
The rails are each fixed to the side panels of the cook-
ing compartment at 3 points.
1.
Grip the front of the rail and pull it round to the
middle of the cooking compartment.
a The front hook of the rail comes out of the hole.
2.
Swing the rail round further and pull it out of the rear
holes in the side panel.
3.
Remove the rail from the cooking compartment.
11.2 Attaching the rails
1.
Insert the hooks of the rail into the rear holes in the
side panel.
2.
Push the front hook of the rail into the hole.
12 Appliance door
With good care and cleaning, your appliance retains its
appearance and remains fully functioning for a long
time to come. This will tell you how to clean the appli-
ance door.
Note:To ensure that the appliance door does not
come into contact with the fitted unit, the appliance
door opens slightly less than 90°.
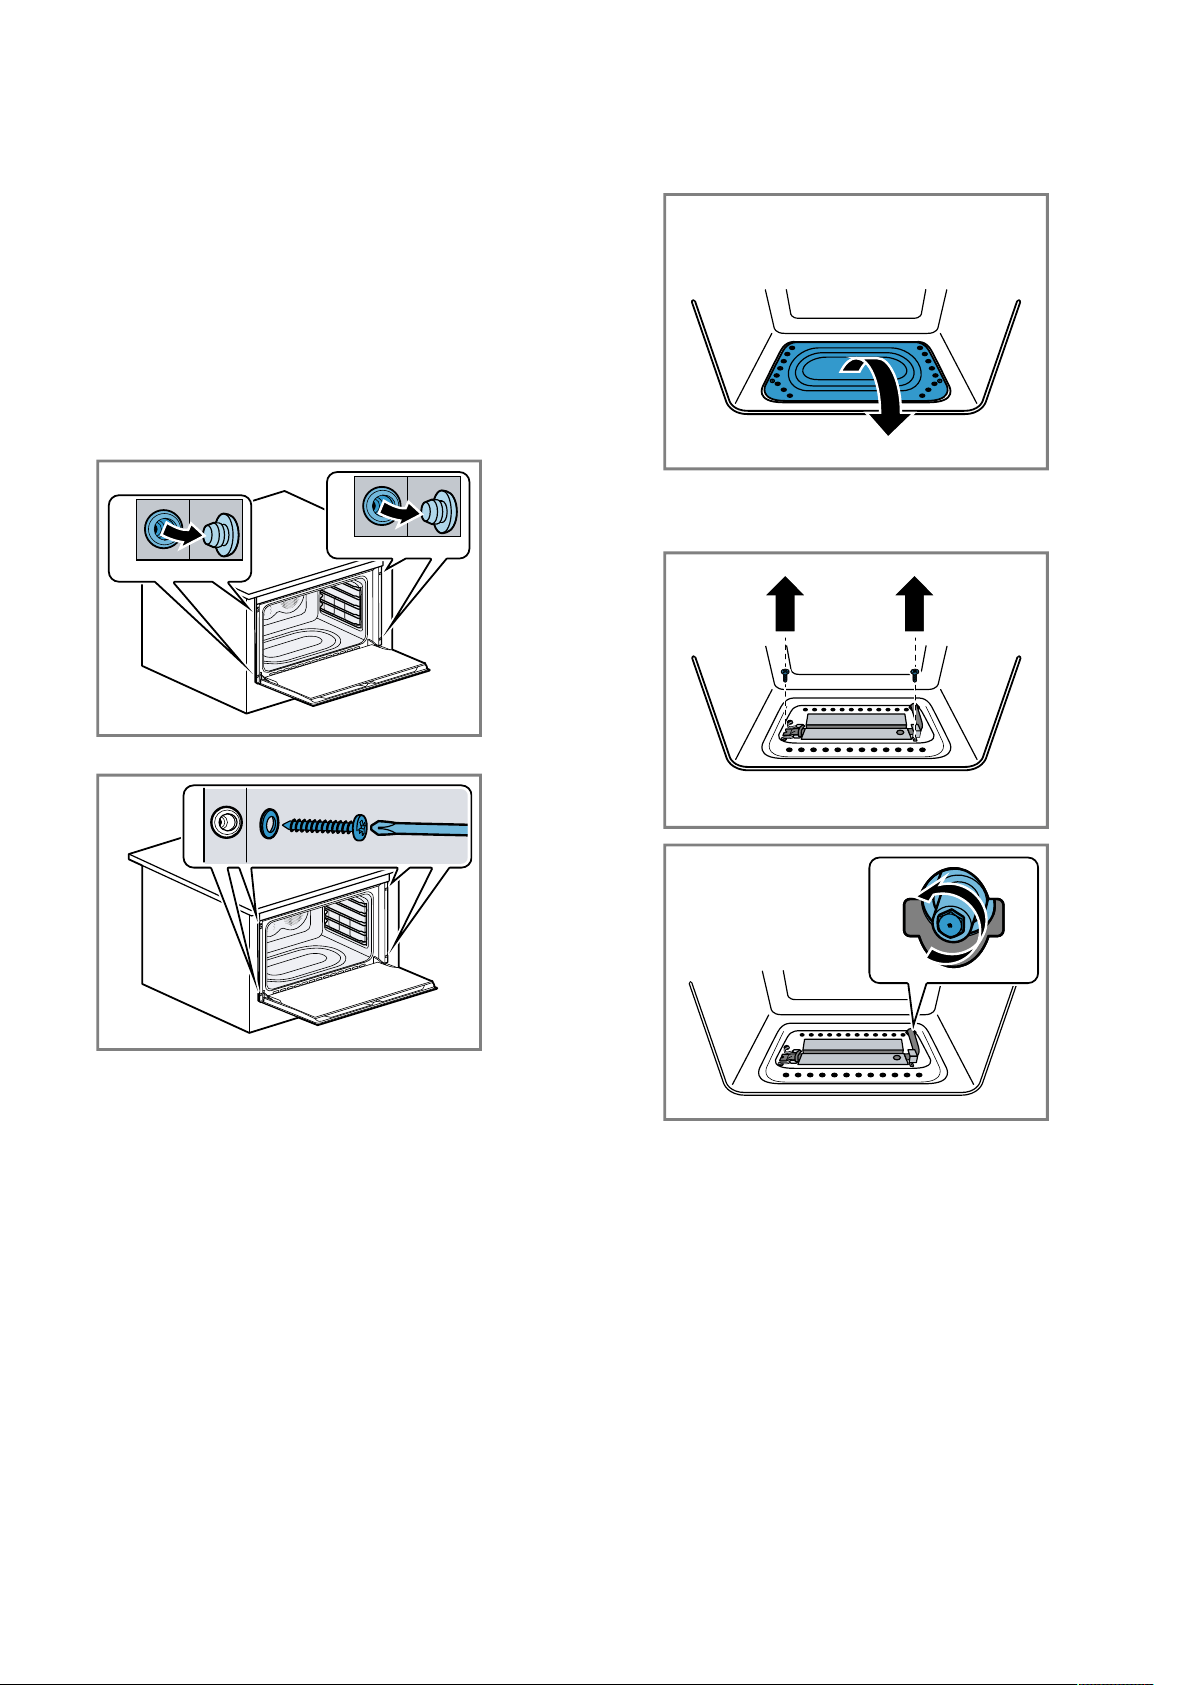
12.1 Removing the door panels
To facilitate cleaning, you can remove the glass panels
from the appliance door.
WARNING‒Risk of injury!
Scratched glass in the appliance door may develop
into a crack.
▶ Do not use any harsh or abrasive cleaners or sharp
metal scrapers to clean the glass on the oven door,
as they may scratch the surface.
1.
Open the appliance door fully.
Appliance door en
15
2.
Use the security pins to lock the left- and right-hand
hinges.
The locking pins must be fully inserted into the
holes in the hinges.
3.
Use both hands to lift the lower section of the inner
panel until the fastening pins come out of the
holder.
4.
ATTENTION!
When lifting the inner panel, the intermediate panel
may stick to the inner panel.
▶ Ensure that the intermediate panel does not fall.
Carefully lift the top section of the inner panel until
the fastening pins come out of the holder.
5.
Lift out the inner panel and set it down carefully on a
flat surface.
6.
Remove the intermediate panel and its holders.
The intermediate panel is not secured using retain-
ing pins but rather using rubber mounts.
7.
Clean the door panels with glass cleaner and a soft
cloth.
12.2 Fitting the door panels
1.
Insert the intermediate panel.
Make sure that the intermediate panel is seated cor-
rectly.
a All holders must lay flat against the outer panel.
a If the Low E symbol can be read on the intermediate
panel, the intermediate panel has been inserted cor-
rectly.
2.
Insert the inner panel.
All four fastening pins must engage in the holders
provided for them.
3.
Remove the locking pins and close the appliance
door.
Note:Do not throw away the locking pins. Store the
locking pins in a secure location. You always require
the locking pins when you remove the door or door
panels from the appliance. If you do not have any lock-
ing pins, you can order these from customer service.
12.3 Detaching the appliance door
If it is particularly dirty, you can remove the appliance
door to clean it more thoroughly.
1.
Open the appliance door fully.
2.
Use the security pins to lock the left- and right-hand
hinges.
The locking pins must be fully inserted into the
holes in the hinges.
3.
Grip the appliance door on either side with both
hands and close it by approx.30degrees.
Do not close the appliance door fully. The hinges
could become bent and the enamel could be dam-
aged.
4.
Lift the appliance slightly and pull it out completely.
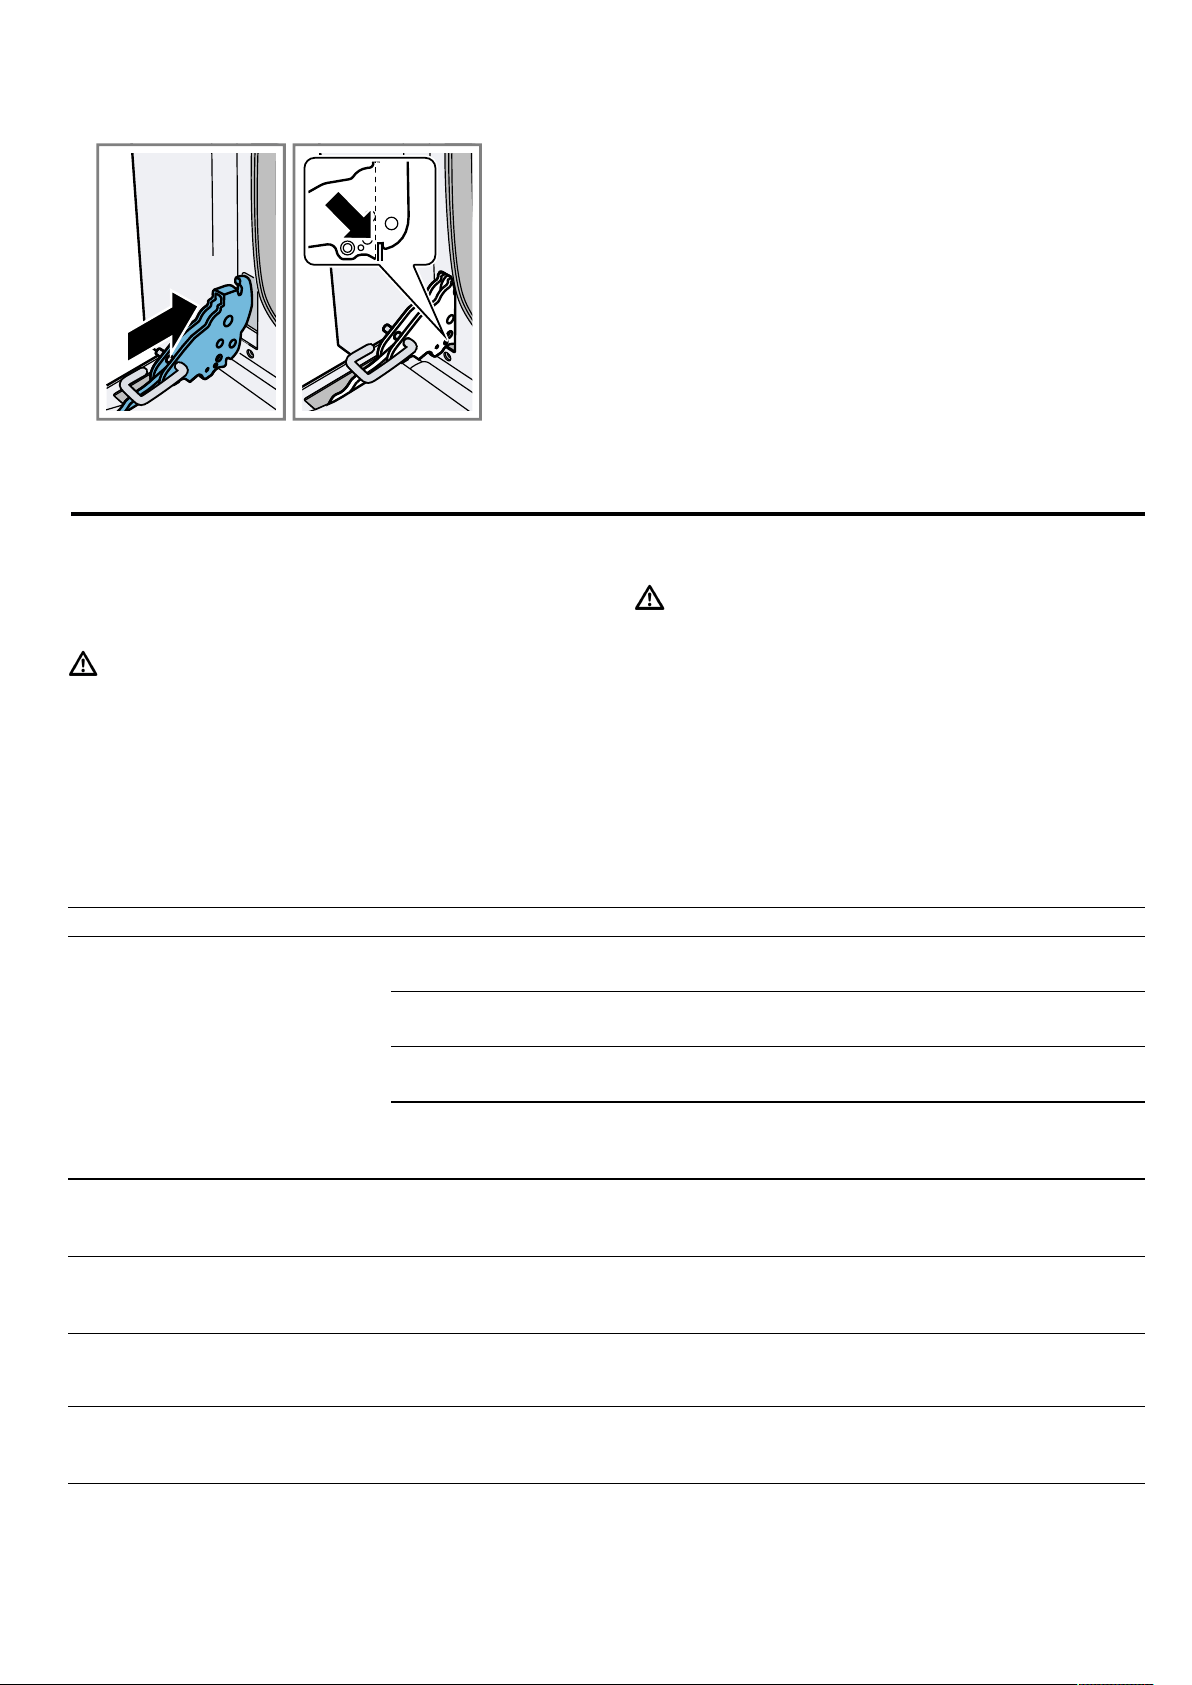
12.4 Attaching the appliance door
WARNING‒Risk of injury!
If the hinges are not secured due to an incomplete
lock, they can snap shut with great force.
▶ If the hinge snaps shut when detaching or attaching
the appliance door, do not reach into the hinge.
▶ Call customer service.
If a door pane or appliance door has not been installed
correctly, this is dangerous.
▶ Make sure that all of the door panes and the appli-
ance door have been correctly fitted before you
switch the appliance back on again.
1.
Grip the appliance door on either side with both
hands.
en Troubleshooting
16
2.
Slide the hinges into the slots in the appliance.
The notch below the hinges must engage into the
frame of the appliance.
3.
Lower the appliance door downwards.
4.
Remove the locking pins.
Note:Do not throw away the locking pins. Store the
locking pins in a secure location. You always require
the locking pins when you remove the door or door
panels from the appliance. If you do not have any lock-
ing pins, you can order these from customer service.
13 Troubleshooting
You can rectify minor faults on your appliance yourself.
Read the troubleshooting information before contacting
after-sales service. This will avoid unnecessary costs.
WARNING‒Risk of injury!
Improper repairs are dangerous.
▶ Repairs to the appliance should only be carried out
by trained specialist staff.
▶ If the appliance is defective, call Customer Service.
→"Customer Service", Page17
WARNING‒Risk of electric shock!
Improper repairs are dangerous.
▶ Repairs to the appliance should only be carried out
by trained specialist staff.
▶ Only use genuine spare parts when repairing the
appliance.
▶ If the power cord of this appliance is damaged, it
must be replaced by the manufacturer, the manufac-
turer's Customer Service or a similarly qualified per-
son in order to prevent any risk.
13.1 Malfunctions
Fault Cause and troubleshooting
The appliance is not working. The mains plug of the power cord is not plugged in.
▶
Connect the appliance to the power supply.
There has been a power cut.
▶
Check whether the lighting in your room or other appliances are working.
The circuit breaker in the fuse box has tripped.
▶
Check the circuit breaker in the fuse box.
The safety shut-off is activated.
1.
Allow the appliance to cool down.
2.
Check the gas supply.
The interior lighting does not
work.
The cooking compartment bulb is defective.
▶
Change the cooking compartment bulb.
→"Replacing the cooking compartment bulb", Page13
Dishes that are cooked in the
oven burn in a short time.
The thermostat is faulty.
▶
Call
→"Customer Service", Page17.
The burner flame does not burn
through all of the discharge
openings.
Normal dirt deposits.
▶
Clean the burner professionally.
Door panels are steamed up. Normal occurrence caused by temperature differences.
▶
Heat the appliance up to 100°C and switch the appliance off after
5minutes.
Disposal en
17
Fault Cause and troubleshooting
The display has frozen or does
not respond.
Malfunction
1.
Switch off the fuse in the fuse box.
2.
Switch the fuse on after appox. 10seconds.
3.
If the malfunction occurs again, call customer service.
The door panels feel warmer
than before after the door panels
have been removed for cleaning.
The door panels have been inserted the wrong way round.
▶
Check whether the door panels have been inserted correctly.
→"Fitting the door panels", Page15
Condensation water on the appli-
ance door or condensation water
is dripping.
The appliance door does not close correctly.
▶
Check whether the appliance door is installed correctly and closes correctly.
→"Appliance door", Page14
Dirt on the seal.
1.
Check whether the seal is dirty, damaged or seated incorrectly.
2.
Clean or replace the seal, or ensure that it is seated correctly.
Normal condensation.
→"Condensation", Page7
14 Disposal
14.1 Disposing of old appliance
Valuable raw materials can be reused by recycling.
▶
Dispose of the appliance in an environmentally
friendly manner.
Information about current disposal methods are
available from your specialist dealer or local author-
ity.
This appliance is labelled in accord-
ance with European Directive
2012/19/EU concerning used elec-
trical and electronic appliances
(waste electrical and electronic equip-
ment - WEEE).
The guideline determines the frame-
work for the return and recycling of
used appliances as applicable
throughout the EU.
15 Customer Service
Detailed information on the warranty period and terms
of warranty in your country is available from our after-
sales service, your retailer or on our website.
If you contact Customer Service, you will require the
product number (E-Nr.) and the production number
(FD) of your appliance.
The contact details for Customer Service can be found
in the enclosed Customer Service directory or on our
website.
15.1 Product number (E-Nr.) and production
number (FD)
You can find the product number (E-Nr.) and the pro-
duction number (FD) on the appliance's rating plate.
You will see the rating plate with these numbers if you
open the appliance door.
Make a note of your appliance's details and the Cus-
tomer Service telephone number to find them again
quickly.
16 How it works
You can find a selection of tips about cookware and
preparing meals here.
16.1 What is the best way to proceed?
ATTENTION!
Acidic food may damage the grid
▶ Do not place acidic food, such as fruit or food with
an acidic marinade directly on the pan support.
Note:Information for those allergic to nickel
In rare cases, small amounts of nickel may pass into
the food.
1.
Before using the appliance, remove all unnecessary
cookware from the cooking compartment.
2.
Select the desired food from the recommended set-
tings.
3.
Place the food in suitable cookware.
en How it works
18
Use the accessory provided.
4.
Only preheat the appliance if the recipe or the re-
commended settings tell you to do so. Do not line
the accessory with greaseproof paper until after it
has been preheated.
5.
Set the appliance in accordance with the recom-
mended settings.
Set the shorter cooking time first. If required, in-
crease the duration.
6.
Always keep the appliance door closed when cook-
ing.
16.2 Baking tips
We have compiled a few tips to help you achieve a
good baking result.
Issue Tip
You want your cake to
rise evenly.
¡ Only grease the base
of the springform cake
tin.
¡ After baking, use a
knife to carefully
loosen the cake from
the baking tin.
Issue Tip
You do not want small
baked items to stick to
each other when baking.
Leave a minimum clear-
ance of 2cm around
each item to be baked.
This allows enough space
for the baked items to ex-
pand and brown on all
sides.
Determine whether the
cake is ready.
Push a cocktail stick into
the highest point on the
cake. If no dough sticks
to the wood, the cake is
ready.
You want to bake using
your own recipe.
Use similar items in the
baking tables as a guide.
Use bakeware made of
silicone, glass, plastic or
ceramic.
¡ The bakeware must be
heat-resistant up to
250 °C.
¡ Cakes in this bake-
ware brown less.
16.3 Food table
You can find an overview of the food here.
Note:For an even grilling result, place the food in the centre of the wire rack.
Food Weight in
kg
Shelf position Type of heating Temperature in
°C
Duration in
mins
Lasagne 3 2 Gas burner 210
1
55 – 60
Joint of veal 2.5 2 Gas burner 190 – 200
1
140 – 150
Pork loin 1.5 3 Gas burner +
5
190 – 200
1
100 – 120
Lamb 1.5 2 Gas burner 200 – 210
1
130 – 140
Roast potatoes 2 3 Gas burner +
5
190 – 200
1
40 – 45
Pork shoulder 2 2 Gas burner 190 – 200
1
150 – 160
Chicken 1.5 3 Gas burner 190 – 200
1
90 – 95
Fillet of beef 1 5 -
1
1st side: 10
2nd side: 7
Bacon 0.7 5 -
1
1st side: 10
2nd side: 8
Sausages 1.5 5 + -
1
1st side: 10
2nd side: 5
Roast chicken 1 Rotary spit + -
1
90 – 95
Joint of veal 1.5 Rotary spit + -
1
80 – 90
Rainbow trout 1 2 Gas burner 190 – 200
1
40 – 45
Monkfish 1 2 Gas burner +
5
190 – 200
1
55 – 60
Sea bass 1 2 Gas burner 200 – 210
1
45 – 50
Short-crust pastry 1 2 Gas burner 170 – 180
1
40 – 45
Apple cake 1 3 Gas burner +
5
170 – 180
1
70 – 75
Cream puffs 0.8 3 Gas burner 170
1
70 – 75
Parfait cake 1 3 Gas burner 160 – 170
1
55 – 60
Bundt cake 1 3 Gas burner 160 – 170
1
55 – 60
1
Preheat the appliance for at least 8minutes.

How it works en
19
Food Weight in
kg
Shelf position Type of heating Temperature in
°C
Duration in
mins
Sponge cake 1 2 Gas burner +
5
160 – 170
1
60 – 65
Muffins 0.03 each 2 Gas burner +
5
160 – 170
1
25 – 30
1
Preheat the appliance for at least 8minutes.
16.4 Tips for next time you bake
If something goes wrong when baking, you can find
some tips here.
Issue Tip
Your cake collapses. ¡ Note the ingredients
and preparation in-
structions that are
given in the recipe.
¡ Use less liquid.
Or:
¡ Reduce the baking
temperature by 10°C
and increase the bak-
ing time.
Your cake is too dry. Increase the baking tem-
perature by 10°C and
shorten the baking time.
Your cake is generally too
light in colour.
¡ Check the shelf posi-
tion and accessory.
¡ Increase the baking
temperature by 10°C.
Or:
¡ Increase the baking
time.
Your whole cake is too
dark.
Reduce the baking tem-
perature and increase the
baking time.
Your cake is too light on
top and too dark under-
neath.
Place the cake one level
higher in the cooking
compartment.
Your cake is too dark on
top and too light under-
neath.
¡ Place the cake one
level lower in the cook-
ing compartment.
¡ Reduce the baking
temperature and in-
crease the baking time
Your cake is unevenly
browned.
¡ Reduce the baking
temperature.
¡ Cut the greaseproof
paper to a suitable
size.
¡ Position the baking tin
in the centre.
¡ Shape small baked
goods to be the same
size and thickness.
Issue Tip
Your cake is cooked on
the outside but is not fully
baked through on the in-
side.
¡ Reduce the baking
temperature and in-
crease the baking
time.
¡ Add less liquid.
For cakes with a moist
topping:
¡ Pre-bake the base.
¡ Sprinkle the baked
base with almonds or
breadcrumbs.
¡ Place the topping on
the base.
The cake will not come
out of the tin when turned
upside down.
¡ Allow the cake to cool
for 5-10minutes after
baking.
¡ Use a knife to carefully
loosen the edge of the
cake.
¡ Turn the cake tin up-
side down again and
cover it several times
with a cold, wet cloth.
¡ Next time you bake,
grease the baking tin/
dish and sprinkle it
with breadcrumbs.
16.5 Tips for next time you roast
If roasting is not successful the first time, you can find
some tips here.
Issue Tip
Your roast is too dark and
the crackling is partly
burnt.
¡ Select a lower temper-
ature.
¡ Reduce the roasting
time.
Your roast is too dry. ¡ Select a lower temper-
ature.
¡ Reduce the roasting
time.
The crackling on your
roast is too thin.
¡ Increase the temperat-
ure.
Or:
¡ Switch on the grill
briefly at the end of the
roasting time.
Your roasting juices are
burnt.
¡ Select a smaller item
of cookware.
¡ When roasting, add
more liquid.
en Installation instructions
20
Issue Tip
Your roasting juices are
too clear and watery.
¡ Use a larger item of
cookware so that more
liquid evaporates.
¡ When roasting, add
less liquid.
Issue Tip
The meat catches during
braising.
¡ Check whether the
roasting dish and lid fit
together and close
properly.
¡ Reduce the temperat-
ure.
¡ Add liquid when brais-
ing.
Your roast is not well-
done enough.
¡ Carve the meat into
portions.
¡ Prepare the juices in
the roasting dish.
¡ Place the sliced meat
in the juices.
¡ Place the slices of
meat in the microwave
to finish cooking.
17 Installation instructions
Observe this information when installing the appliance.
17.1 Safe installation
Follow these instructions before you start in-
stalling the appliance.
WARNING‒Risk of fire!
It is dangerous to use an extended power
cord and non-approved adapters.
▶ Do not use multiple socket strips.
▶ Only use extension cables that are certified,
have a minimum cross section of 1.5mm²
and comply with the applicable national
safety requirements.
▶ If the power cord is too short and a longer
one is not available, please contact an
electrician to have the domestic installation
adapted.
▶ Only use adapters and power cords ap-
proved by the manufacturer.
ATTENTION!
Carrying the appliance by the door handle could break
it. The door handle cannot support the weight of the
appliance.
▶ Do not carry or hold the appliance by the
door handle.
¡ The safe operation of this appliance can
only be guaranteed if it has been installed
to a professional standard in accordance
with these installation instructions. The in-
staller shall be liable for damages incurred
as a result of incorrect installation.
¡ Check the appliance for damage after un-
packing it. Do not connect the appliance if
it has been damaged in transit.
¡ Before starting up the appliance, remove
any packaging material and adhesive film
from the cooking compartment and the
door.
¡ Proceed in accordance with the installation
sheets for installing accessories.
¡ Fitted units must be heat-resistant up to
90°C, and adjacent unit fronts up to
70°C.
¡ Do not install the appliance behind a decor-
ative panel or unit door. There is a risk of
overheating.
¡ Cut-out work on the units should be carried
out before installing the appliance. Remove
any shavings. Otherwise, the correct opera-
tion of electrical components may be ad-
versely affected.
¡ The mains socket for the appliance must
be located outside of the area where the
appliance is installed.
¡ Always earth electrical appliances.
¡ If you install the appliance, you must ob-
serve the currently valid installation regula-
tions as well as the regulations of the local
electricity and gas suppliers. In Germany
DVGW TRGI/TRGF applies, for example,
and in Austria ÖVGW-TR.
Installation instructions en
21
¡ Switch off the power supply and the gas
supply before you start the work. Ensure
that the information on the rating plate re-
garding voltage, gas type and gas pressure
comply with the local connection condi-
tions.
¡ Wear protective gloves so that you do not
cut yourself. Parts that are accessible dur-
ing installation may have sharp edges.
¡ Dimensions of the figures in mm.
17.2 Appliance dimensions
You will find the dimensions of the appliance here
17.3 Installation below a worktop
Observe the installation dimensions and the safety
clearances when installing below a worktop.
To ventilate the appliance, the intermediate floor must
have a ventilation cut-out.
17.4 Installing below a hob
If the appliance is installed below a hob, the following
minimum dimensions must be adhered to (including
substructure, if applicable).
The minimum worktop thickness is determined by
the required minimum clearance .
Hob type raised in mm flush in mm in mm
Induction hob 37 38 5
Full-surface induction hob 58 58 5
Gas hob 27 38 5
Electric hob 27 30 2
Secure the worktop to the built-in unit. Observe the in-
stallation instructions for the hob.
en Installation instructions
22
17.5 Installation in a tall unit
Observe the installation dimensions and the safety clearances in a tall unit.
¡ Ensure that the intermediate floor has a gap to the
installation wall in order to ventilate the appliance.
¡ If the tall unit has another back panel in addition to
the element back panels, this must be removed.
¡ Only fit the appliance up to a height which allows
accessories to be easily removed.
17.6 Installing two appliances on top of
each other
Your appliance can also be installed above another ap-
pliance.
17.7 Guidelines for the ventilation
Only install this appliance in a room that has sufficient
ventilation.
¡ If the total power of all gas appliances is below
11kW, this requirement is met if the installation
room has a volume of more than 15m³ and at least
one door leads outdoors or one window leads out-
doors.
¡ If the total power of all gas appliances is above
11kW, this requirement is met if the installation
room has a volume of more than 2m³ per kW and
at least one door leads outdoors or one window
leads outdoors.
Furthermore, an extractor hood or controlled do-
mestic ventilation without air recirculation is present
and a minimum flow rate of 15m³/h per kW total
power is possible for all gas appliances.
Ensure that suitable ventilation openings are avail-
able.
Note:In some countries, the requirements for minimum
room volume vary. Find out information on this from
customer service.
17.8 Electrical connection
In order to safely connect the appliance to the elec-
trical system, follow these instructions.
¡ The fuse protection must correspond to the power
rating specified on the appliance's rating plate and
to local regulations.
¡ The appliance corresponds to protection class I and
must only be operated with a protective earth con-
nection.
¡ The appliance must be disconnected from the
power supply whenever installation work is being
carried out.

Installation instructions en
23
¡ Contact protection must be ensured by the installa-
tion.
¡ Only a licensed professional may connect appli-
ances without plugs. They are subject to the require-
ments of the local electricity provider.
Electrically connecting an appliance without a
protective contact plug
Note:Only licensed specialists may connect the appli-
ance. Damage caused by incorrect connection is not
covered under the warranty.
An isolating switch must be integrated into the perman-
ent electrical installation according to the installation
regulations.
1.
Identify the phase and neutral conductors in the
socket.
The appliance may be damaged if it is not connec-
ted correctly.
2.
Only connect the appliance to a mains voltage
between 220 und 240V.
3.
Connect the wires of the mains power cable accord-
ing to the colour coding:
‒ Green/yellow = Conductor
‒ Blue = Neutral conductor
‒ Brown = Phase (external conductor)
17.9 Gas connection
Connect the appliance in accordance with the currently
applicable regulations.
Before installing the appliance, check whether the local
conditions with regard to the gas type and the gas
pressure are compatible with the appliance settings.
You can find the permissible appliance settings on the
rating plate. Only licensed specialists may connect the
appliance to the gas pipes and seals in accordance
with the currently applicable standards.
Connecting the gas to the appliance
The gas connection is located on the rear side of the
appliance. A connection angle in accordance with EN
ISO 228 G1/2 male is pre-installed.
An adapter for natural gas in accordance with EN ISO
228 G1/2 - EN 10226 R1/2 and a hose connection in
accordance with EN ISO 228 G1/2 - liquid gas is sup-
plied with the appliance.
Standard settings for the burner
The burners have been preset for liquid gas G30/31
with 28-30/37mbar.
A nozzle set for G20 natural gas with 20mbar is sup-
plied with the appliance.
Connecting to natural gas
Notes
¡ Only use connector cables or flexible hoses that
comply with the applicable regulations and that are
approved for this purpose.
¡ Only use permitted sealant to seal the thread.
1.
Screw the adapter piece and the seal to the connec-
tion elbow.
2.
Use a spanner to hold the adapter piece and screw
this to a fixed power cable or a flexible gas connec-
tion hose.
Connecting to liquid gas
Notes
¡ Only use connector cables or flexible hoses that
comply with the applicable regulations and that are
approved for this purpose.
¡ Only use permitted sealant to seal the thread.
Requirement:If you connect the appliance to liquid
gas, you must always install a suitable gas pressure
regulator. To select a suitable gas pressure regulator,
observe the appliance's total gas consumption that is
specified on the rating plate.
1.
Screw the hose connection and the seal to the con-
nection elbow.
2.
Slide the flexible gas connection hose onto the hose
nozzle.
3.
Tighten the clamp.
Flexible hoses
For flexible hoses, observe the following points.
¡ Do not pinch or squeeze hoses.
¡ Do not subject the hoses to pulling or twisting
forces.
¡ Keep the hoses away from sharp edges.
¡ Do not allow the hoses to come into contact with
parts that may reach a temperature higher than
70°C above room temperature.
¡ The entire length of the hoses must be accessible
for inspection.
Installing the safety valve
You must install a safety valve for opening and closing
the gas supply.
1.
The safety valve between the gas supply line to the
corresponding room and the appliance.
en Installation instructions
24
2.
Ensure that there is unhindered access to this valve.
Checking the leak-tightness and burner behaviour
1.
After connecting the gas pipe, use soapy water to
check the connections for leak-tightness.
2.
Switch on the appliance in accordance with the user
manual.
3.
Ignite all burners and check whether the flames re-
main stable for both high and low settings.
17.10 Installing the appliance
1.
Slide the appliance and centre it.
Do not kink the connection cable.
2.
Open the oven door completely.
3.
Remove the cover.
4.
Screw the appliance tightly onto the unit.
5.
Put the protective cover on.
Note:Never close the gap between the worktop and
the appliance using additional battens.
17.11 Changing the gas type
If the appliance has not already been set up for the ex-
isting gas type, the appliance must be converted. Only
a licensed professional may connect the appliance to
another gas type in accordance with the applicable
regulations.
The gas type and gas pressure that are preset at the
factory are specified on the rating plate.
→"Product number (E-Nr.) and production number
(FD)", Page17
To convert the appliance to another gas type, replace
the nozzles and set the minimum gas flow.
Replacing the oven burner nozzles
1.
Slightly raise the base plate forwards and then pull
this out towards the front.
2.
Unscrew the nozzle and replace it with a nozzle that
is suitable for the new gas type.
→"General nozzle table", Page25
3.
Replace the gas label with the new label that is in-
cludes with the nozzle set.
4.
To assemble the oven burner and the base plate,
proceed in reverse order.
Setting the minimum gas flow
1.
Open the appliance door.
2.
Press and hold the control knob for the oven and
turn the control knob to the maximum position.
a The gas burner ignites.
3.
Press and hold the knob for 15seconds.
4.
Close the appliance door.
5.
Remove the control knob.
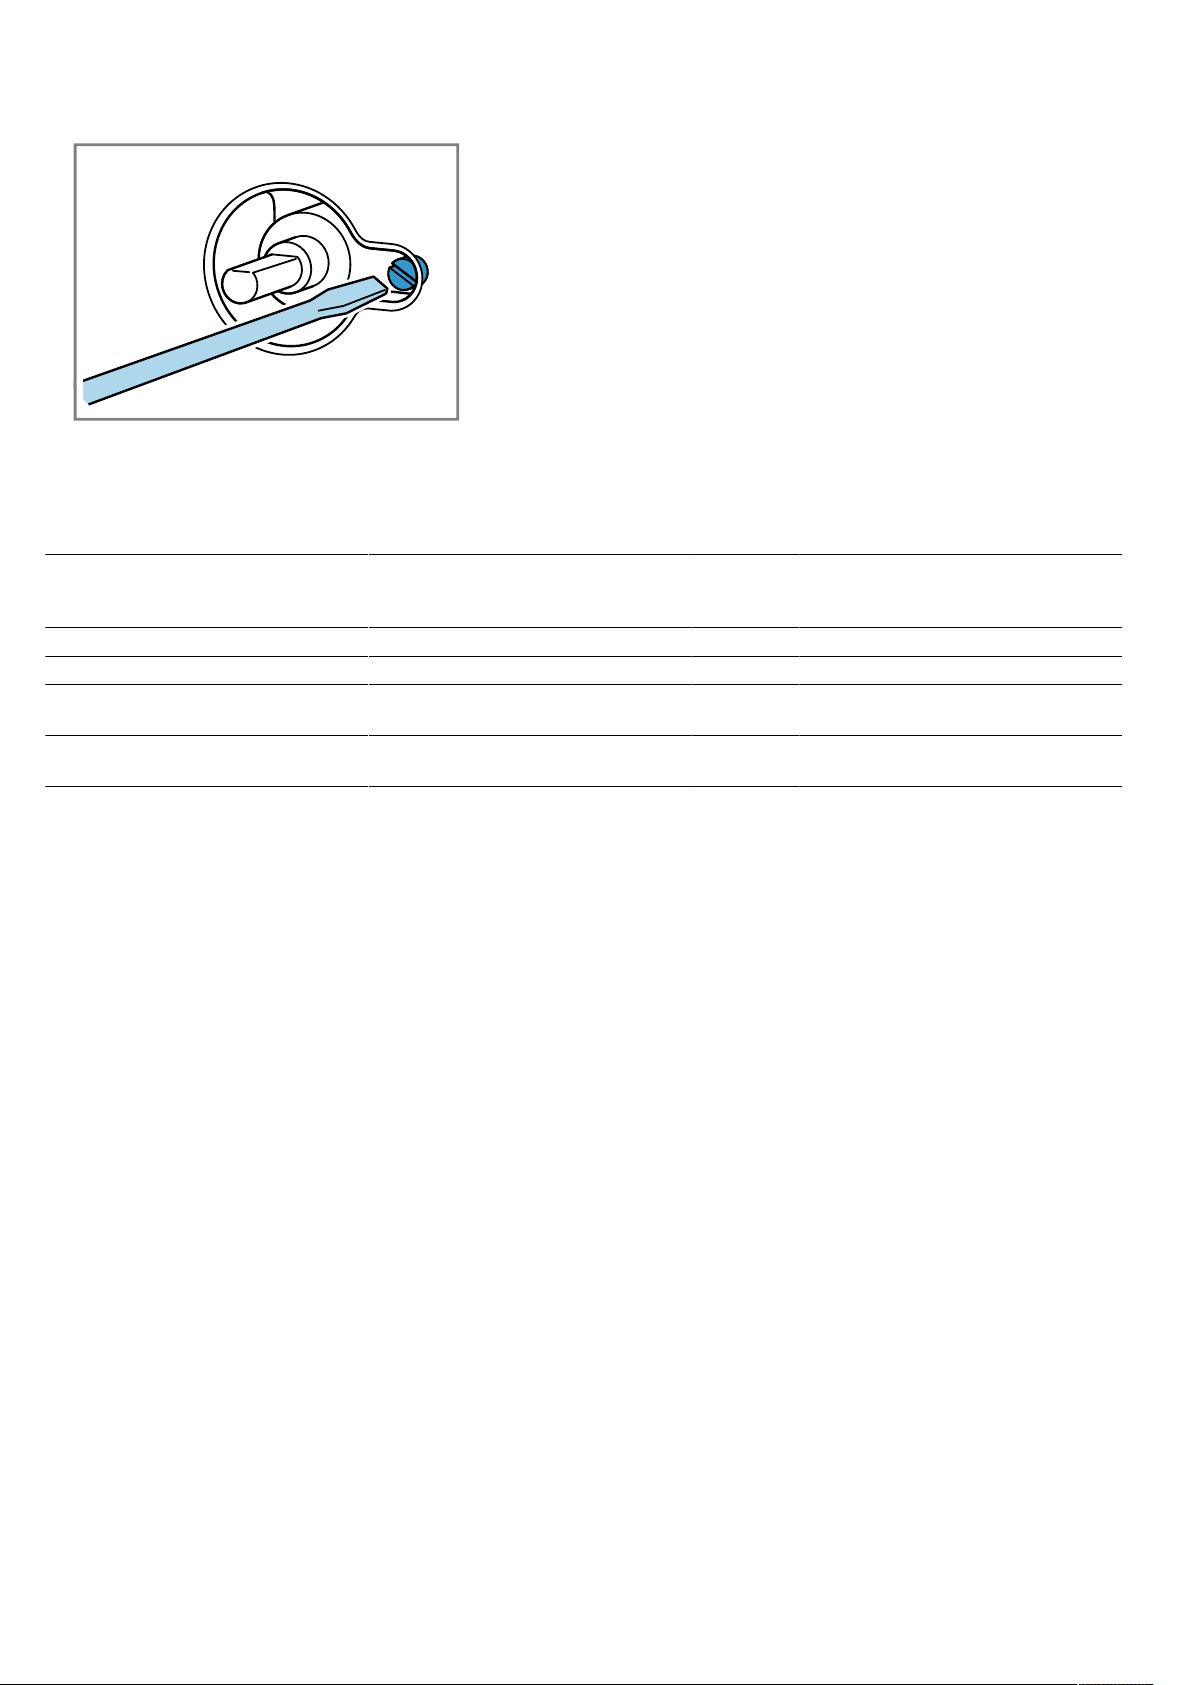
Installation instructions en
25
6.
Undo the internal setting screw.
7.
Fit the control knob and heat up the oven for 15
minutes.
8.
Turn the controller to the minimum position.
9.
Remove the control knob.
10.
Adjust the internal adjustment screw until a stable
flame is burning correctly.
If required, loosen the adjustment screw to increase
the gas flow. Tighten the adjustment screw to re-
duce the gas flow. The setting is correct when the
height of the small flame is approx.3 to 4mm.
Tighten the adjustment screw in the case of a liquid
connection.
11.
Attach the control knob.
12.
Ensure that the flame does not go out if you quickly
change the gas flow from maximum to minimum
and vice versa, and if you open and close the appli-
ance door.
General nozzle table
Gas type/burner mbar Nozzle
number
Bypass Power in
watts
Minimum
power in
watts
Maximum consump-
tion
Natural gas G20/oven burner 20 135 (H1) Gap 3600 1200 G20: 352l/h
Natural gas G20/grill burner 20 130 (H3) 3000 G20: 298l/h
Liquid gas butane/propane G30/
G31/oven burner
28 -
30/37
90 (H1) 58 3600 1200 G30: 269g/h
G31: 264g/h
Liquid gas butane/propane G30/
G31/grill burner
28 -
30/37
83 (S) 3000 G30: 218g/h
G31: 214g/h
Nominal operating pressure
Your appliance's nominal operating pressure is:
¡ For natural gas – NG (G20) 20mbar/2.0kPa
¡ For liquid gas – LPG (G30) 30mbar/3.0kPa
¡ For liquid gas – LPG (G31) 37mbar/3.7kPa
You must operate your appliance with these pressure
values. All information on your appliance's rating plate
relates to these pressure values. The manufacturer
shall accept no liability for the functionality and power
of your appliance or for other risks id you operate your
appliance with pressure values that differ from those
specified for your appliance.
Note:If you are operating your appliance with liquid
gas, use a gas pressure regulator. The pressure regu-
lator must be connected and maintained by a licensed
expert.
17.12 Removing the appliance
1.
Disconnect the appliance from the power supply.
2.
Undo the fastening screws.
3.
Lift the appliance slightly and pull it out completely.
fr Sécurité
26
Table des matières
MANUEL D'UTILISATION
1 Sécurité................................................................26
2 Prévention des dégâts matériels .......................29
3 Protection de l'environnement et économies
d'énergie..............................................................29
4 Description de l'appareil.....................................31
5 Accessoires.........................................................33
6 Avant la première utilisation ..............................34
7 Utilisation ............................................................35
8 Tournebroche......................................................36
9 Fonctions de temps ............................................37
10 Nettoyage et entretien ........................................37
11 Supports ..............................................................40
12 Porte de l’appareil...............................................40
13 Dépannage ..........................................................42
14 Mise au rebut.......................................................43
15 Service après-vente ............................................43
16 Comment faire.....................................................44
17 INSTRUCTIONS DE MONTAGE ..........................46
17.1 Installation en toute sécurité..........................
..46
1 Sécurité
Respectez les consignes de sécurité sui-
vantes.
1.1 Indications générales
¡ Lisez attentivement cette notice.
¡ Conservez la notice ainsi que les informa-
tions produit en vue d’une réutilisation ulté-
rieure ou pour un futur nouveau proprié-
taire.
¡ Ne branchez pas l’appareil si ce dernier a
été endommagé durant le transport.
1.2 Utilisation conforme
Cet appareil est conçu pour être encastré uni-
quement. Respecter les instructions de mon-
tage spécifiques.
Seul un personnel qualifié et agréé peut rac-
corder l'appareil sans fiche. En cas de dom-
mages dus à un raccordement incorrect, il n'y
a aucun droit à la garantie.
Utilisez l‘appareil uniquement:
¡ pour préparer des aliments et des bois-
sons.
¡ pour un usage privé et dans les pièces fer-
mées d’un domicile.
¡ jusqu'à une altitude maximale de 2000m
au-dessus du niveau de la mer.
N’utilisez pas l’appareil:
¡ avec une minuterie externe ou une télé-
commande.
Pour changer de type de gaz, appelez le ser-
vice après-vente.
1.3 Restrictions du périmètre utilisateurs
Les enfants de 8 ans et plus, les personnes
souffrant d’un handicap physique, sensoriel
ou mental ou ne détenant pas l’expérience et/
ou les connaissances nécessaires pourront
utiliser cet appareil à condition de le faire
sous surveillance, ou que son utilisation sûre
leur ait été enseignée et qu’ils aient compris
les dangers qui en émanent.
Les enfants ne sont pas autorisés à jouer
avec l'appareil.
Les enfants ne doivent en aucun cas s’occu-
per du nettoyage et de la maintenance utilisa-
teur, sauf s’ils sont âgés de 15ans et plus et
agissent sous surveillance.
Les enfants de moins de 8ans doivent être
tenus à distance de l’appareil et du cordon
d’alimentation secteur.
1.4 Utilisation sûre
Insérez toujours correctement les accessoires
dans le four.
→"Accessoires", Page33
AVERTISSEMENT‒Risque d'explosion!
Du gaz qui s’échappe peut conduire à une ex-
plosion. COMPORTEMENT À ADOPTER EN
CAS D’ODEUR DE GAZ OU DE DÉRANGE-
MENT SUR L’INSTALLATION DE GAZ
▶ Fermer immédiatement l’arrivée du gaz ou
le robinet de la bouteille de gaz.

Sécurité fr
27
▶ Éteindre immédiatement tout feu nu et ciga-
rettes.
▶ Interrupteur éclairage et ne plus actionner
les interrupteurs de l'appareil.
▶ Ne pas débrancher de fiche secteur de la
prise de courant.
▶ Ne pas utiliser le téléphone ou le portable
dans la maison.
▶ Ouvrir les fenêtres et aérer en grand la
pièce.
▶ Appeler le service après-vente ou la socié-
té de distribution de gaz.
Du gaz qui s’échappe peut conduire à une ex-
plosion. De faibles quantités de gaz peuvent
s’accumuler sur une période prolongée et
s’enflammer.
▶ Si l’appareil n’est pas utilisé pendant une
longue période, fermer la vanne de sécurité
de l’arrivée de gaz.
AVERTISSEMENT‒Risque d'incendie!
Les objets inflammables stockés dans le com-
partiment de cuisson peuvent prendre feu.
▶ N'entreposez jamais d'objets inflammables
dans le compartiment de cuisson.
▶ En cas d'émission de fumée, éteignez l'ap-
pareil ou désactivez le fusible et gardez la
porte fermée pour éteindre les éventuelles
flammes.
Les résidus alimentaires, la graisse et le jus
de rôti peuvent s'enflammer.
▶ Avant utilisation, retirer les grosses salis-
sures présentes dans le compartiment de
cuisson, sur les résistances de chauffe et
sur les accessoires.
Vous risquez de créer un courant d'air si vous
ouvrez la porte de l'appareil. Le papier sulfuri-
sé peut toucher les résistances chauffantes et
s'enflammer.
▶ Ne posez jamais de papier sulfurisé non
fixé sur un accessoire lors du préchauffage
et pendant la cuisson.
▶ Coupez toujours le papier sulfurisé à la
bonne taille et lestez-le avec un plat ou un
moule de cuisson.
AVERTISSEMENT‒Risque de brûlures!
Pendant leur utilisation, l'appareil et ses
pièces accessibles deviennent très chauds.
▶ Il convient d'être prudent afin d'éviter tout
contact avec les résistances chauffantes.
▶ Veuillez tenir à l'écart les enfants âgés de
moins de 8 ans.
Les récipients ou les accessoires deviennent
très chauds.
▶ Toujours utiliser des maniques pour retirer
le récipient ou l'accessoire chaud du com-
partiment de cuisson.
Les vapeurs d'alcool peuvent s'enflammer
dans un compartiment de cuisson chaud. La
porte de l'appareil peut s'ouvrir violemment.
Des vapeurs chaudes et des flammes
peuvent s'échapper.
▶ Si votre plat contient de l'alcool fort, dosez-
le uniquement en petite quantité.
▶ Ne faites pas chauffer de spiritueux (≥ 15
% vol.) à l'état non dilué (par ex. pour arro-
ser des aliments).
▶ Ouvrez la porte de l’appareil avec précau-
tion.
Les rails télescopiques deviennent chauds
lors du fonctionnement de l'appareil.
▶ Laissez refroidir les rails télescopiques
chauds avant de les toucher.
▶ Ne touchez les rails télescopiques chauds
qu'avec des maniques.
AVERTISSEMENT‒Risque de brûlure!
Les éléments accessibles deviennent chauds
pendant le fonctionnement.
▶ Ne jamais toucher les éléments chauds.
▶ Éloigner les enfants.
De la vapeur chaude peut s'échapper lors de
l'ouverture de la porte de l'appareil. La vapeur
n'est pas visible selon sa température.
▶ Ouvrir la porte de l'appareil avec précau-
tion.
▶ Éloignez les enfants.
La présence d'eau dans un compartiment de
cuisson chaud peut générer de la vapeur
d'eau chaude.
▶ Ne jamais verser d'eau dans le comparti-
ment de cuisson chaud.
Le ventilateur ne fonctionne pas sans courant
électrique. L'appareil peut surchauffer.
▶ Ne faites jamais fonctionner l'appareil sans
courant électrique.
L'utilisation d'un détendeur de pression in-
adapté, qui autorise une pression trop impor-
tante, entraîne une puissance et une tempéra-
ture trop élevées, notamment dans le four.
L'appareil peut surchauffer.
▶ Si vous utilisez du gaz butane/propane,
faites toujours fonctionner l'appareil avec
un réducteur de pression.

fr Sécurité
28
▶ Les données de pression sont indiquées
sur la plaque signalétique. →Page43
AVERTISSEMENT‒Risque de
blessure!
Un verre de porte d'appareil rayé peut se
fendre.
▶ N'utilisez pas de nettoyants abrasifs ni de
racloirs métalliques tranchants pour net-
toyer la vitre de la porte du four, car ils
peuvent rayer la surface.
L'appareil et ses pièces accessibles peuvent
présenter des arêtes coupantes.
▶ Prudence lors de la manipulation et du net-
toyage.
▶ Si possible, portez des gants de protection.
Les charnières de la porte de l'appareil
bougent à l'ouverture et à la fermeture de la
porte et vous pouvez vous pincer.
▶ Ne jamais mettre les doigts dans la zone
des charnières.
Certaines pièces situées à l'intérieur de la
porte de l'appareil peuvent présenter des
arêtes coupantes.
▶ Portez des gants de protection.
AVERTISSEMENT‒Risque
d'électrocution!
Les réparations non conformes sont dange-
reuses.
▶ Seul un personnel dûment qualifié peut en-
treprendre des réparations sur l'appareil.
▶ Seules des pièces de rechange d'origine
peuvent être utilisées pour réparer l'appa-
reil.
▶ Afin d’écarter tout danger quand le cordon
d’alimentation secteur de cet appareil est
endommagé, seul le fabricant ou son ser-
vice après-vente ou toute autre personne
de qualification équivalente est habilité à le
remplacer.
Le cordon d'alimentation pose un danger si
sa gaine de protection est endommagée.
▶ Ne mettez jamais en contact le cordon
d'alimentation avec des sources de chaleur
et des pièces chaudes de l'appareil.
▶ Ne mettez jamais en contact le cordon
d'alimentation avec des pointes acérées ou
arêtes tranchantes.
▶ Ne pliez, n'écrasez ou ne modifiez jamais
le cordon d'alimentation.
L’infiltration d’humidité peut occasionner un
choc électrique.
▶ Ne pas utiliser de nettoyeur vapeur ou
haute pression pour nettoyer l’appareil.
Un appareil endommagé ou un cordon d’ali-
mentation secteur endommagé est dange-
reux.
▶ N'utilisez jamais un appareil endommagé.
▶ Appelez le service après-vente.
→Page43
AVERTISSEMENT‒Risque d'asphyxie!
Les enfants risquent de s’envelopper dans les
matériaux d’emballage ou de les mettre sur la
tête et de s’étouffer.
▶ Conserver les matériaux d’emballage hors
de portée des enfants.
▶ Ne jamais laisser les enfants jouer avec les
emballages.
Les enfants risquent d'inhaler ou d'avaler des
petits morceaux et s'étouffer.
▶ Conserver les petites pièces hors de por-
tée des enfants.
▶ Ne pas laisser les enfants jouer avec les
petites pièces.
AVERTISSEMENT‒Risque
d'empoisonnement!
L’utilisation de l’appareil de cuisson au gaz
conduit à la formation de chaleur, d’humidité
et de produits de combustion dans la pièce
où l’appareil est installé.
▶ Veillez à une ventilation suffisante de la cui-
sine, notamment lorsque vous utilisez l’ap-
pareil de cuisson au gaz.
▶ Lors d’une utilisation intensive et prolongée
de l’appareil, assurez une ventilation sup-
plémentaire afin d’évacuer en toute sécuri-
té les produits de combustion vers l’exté-
rieur, par exemple en réglant le dispositif
de ventilation mécanique existant sur une
puissance plus élevée et en assurant en
même temps un échange d’air avec de l’air
frais dans le lieu d’installation.
▶ Consultez un personnel qualifié pour l'ins-
tallation du système de ventilation supplé-
mentaire.
1.5 Ampoule halogène
AVERTISSEMENT‒Risque de brûlures!
Les ampoules du compartiment de cuisson
deviennent très chaudes. Le risque de brûlure
persiste encore un certain temps après les
avoir éteintes.
▶ Ne touchez pas à l'ampoule en verre.

Prévention des dégâts matériels fr
29
▶ Évitez tout contact avec la peau lors du net-
toyage.
AVERTISSEMENT‒Risque
d'électrocution!
Lors du remplacement de la lampe, les
contacts de la douille d'ampoule sont sous
tension.
▶ Avant de changer la lampe, assurez-vous
que l'appareil est éteint pour éviter tout
risque de choc électrique.
▶ En outre, coupez le fusible dans la boîte à
fusibles.
2 Prévention des dégâts matériels
2.1 De manière générale
ATTENTION!
Les vapeurs d'alcool peuvent s'enflammer dans le
compartiment de cuisson chaud et entraîner des dom-
mages durables sur l'appareil. En cas de déflagration,
la porte de l'appareil peut s'ouvrir et, le cas échéant,
tomber. Les vitres des portes peuvent se briser et se
fendre. La dépression qui en résulte peut entraîner une
forte déformation du compartiment de cuisson vers l'in-
térieur.
▶ Ne faites pas chauffer de spiritueux (≥ 15 % vol.) à
l'état non dilué (par ex. pour arroser des aliments).
Si vous placez des objets sur le fond du compartiment
de cuisson au-delà de 50°C, cela risque de provoquer
une accumulation de chaleur. Les temps de cuisson ne
correspondent alors plus et l'émail est endommagé.
▶ Ne placez pas d'accessoires, de papier sulfurisé ni
de papier d'aluminium de quelque nature que ce
soit sur le fond du compartiment de cuisson.
▶ Placez un récipient sur le fond du compartiment de
cuisson uniquement lorsqu'une température infé-
rieure à 50°C est réglée.
La présence d'eau dans le compartiment de cuisson
chaud peut générer de la vapeur d'eau. Le change-
ment de température peut endommager le fond du
compartiment de cuisson.
▶ Ne jamais verser d'eau dans le compartiment de
cuisson chaud.
▶ Ne jamais placer de plat avec de l'eau sur le fond
du compartiment de cuisson.
Une humidité prolongée dans le compartiment de cuis-
son favorise la formation de corrosion.
▶ Essuyer l'eau de condensation après chaque cuis-
son. Après un mode de fonctionnement à haute
température, laissez refroidir le compartiment de
cuisson uniquement avec la porte fermée.
▶ Ne conservez pas d'aliments humides dans le com-
partiment de cuisson pendant une longue durée.
▶ Ne stockez pas de plats dans le compartiment de
cuisson.
▶ Ne coincez rien dans la porte de l'appareil.
Le jus de fruits qui goutte de la plaque laisse des
taches définitives.
▶ Ne pas garnir trop la plaque à pâtisserie en cas de
gâteaux aux fruits très juteux.
▶ Utiliser de préférence la lèchefrite à bords hauts.
Du produit de nettoyage pour four dans le comparti-
ment de cuisson chaud endommage l'émail.
▶ Ne jamais utiliser de produit de nettoyage pour four
dans un compartiment de cuisson chaud.
▶ Avant le réchauffement suivant, éliminer complète-
ment les résidus du compartiment de cuisson et de
la porte de l'appareil.
Si le joint est fortement encrassé, la porte de l'appareil
ne se ferme plus correctement pendant le fonctionne-
ment. Les façades des meubles adjacents peuvent être
endommagées.
▶ Veillez à ce que le joint soit toujours propre.
▶ N'utilisez jamais l'appareil avec un joint endommagé
ou sans joint.
L'utilisation de la porte de l'appareil comme surface
d'assise ou de support peut endommager la porte de
l'appareil.
▶ Ne montez pas, ne vous asseyez pas, ne vous sus-
pendez pas et ne vous appuyez pas sur la porte de
l'appareil.
▶ Ne pas déposer de récipients ou des accessoires
sur la porte de l'appareil.
En fonction du modèle d'appareil, les accessoires
risquent de griffer la vitre de la porte en refermant la
porte de l'appareil.
▶ Toujours veiller à insérer les accessoires jusqu'à la
butée dans le compartiment de cuisson.
Du film d'aluminium sur la vitre de la porte peut
conduire à des décolorations définitives.
▶ Une feuille d'aluminium placée dans le comparti-
ment de cuisson ne doit pas entrer en contact avec
la vitre de la porte.
3 Protection de l'environnement et économies d'énergie
3.1 Élimination de l'emballage
Les emballages sont écologiques et recyclables.
▶
Veuillez éliminer les pièces détachées après les
avoir triées par matière.
Eliminez l'emballage en respectant
l'environnement.

fr Protection de l'environnement et économies d'énergie
30
3.2 Économies d’énergie
Si vous respectez ces consignes, votre appareil
consommera encore moins d’énergie.
Préchauffez l'appareil uniquement si la recette ou les
recommandations de réglage le préconisent.
→"Comment faire", Page44
¡
Ne pas préchauffer l'appareil vous permet d'écono-
miser jusqu'à 20% d'énergie.
Utilisez des moules de couleur foncée, laqués noirs
ou émaillés.
¡
Ces types de moule absorbent particulièrement
bien la chaleur.
Ouvrez le moins possible la porte de l'appareil pen-
dant son fonctionnement.
¡
La température du compartiment de cuisson est
maintenue et l'appareil n'a pas besoin de chauffer.
Faites cuire plusieurs mets directement l'un après
l'autre ou simultanément.
¡
Le compartiment de cuisson est chauffé après la
première cuisson. Le temps de cuisson diminue
ainsi pour le gâteau suivant.
Si les temps de cuisson sont longs, éteignez l'appareil
10minutes avant la fin du temps de cuisson.
¡
La chaleur résiduelle est suffisante pour terminer
de cuire le plat.
Retirez les accessoires non utilisés du compartiment
de cuisson.
¡
Les accessoires inutiles ne doivent pas être chauf-
fés.
Laissez décongeler les plats surgelés avant de les
préparer.
¡
Vous économisez ainsi l'énergie nécessaire pour
décongeler les plats.
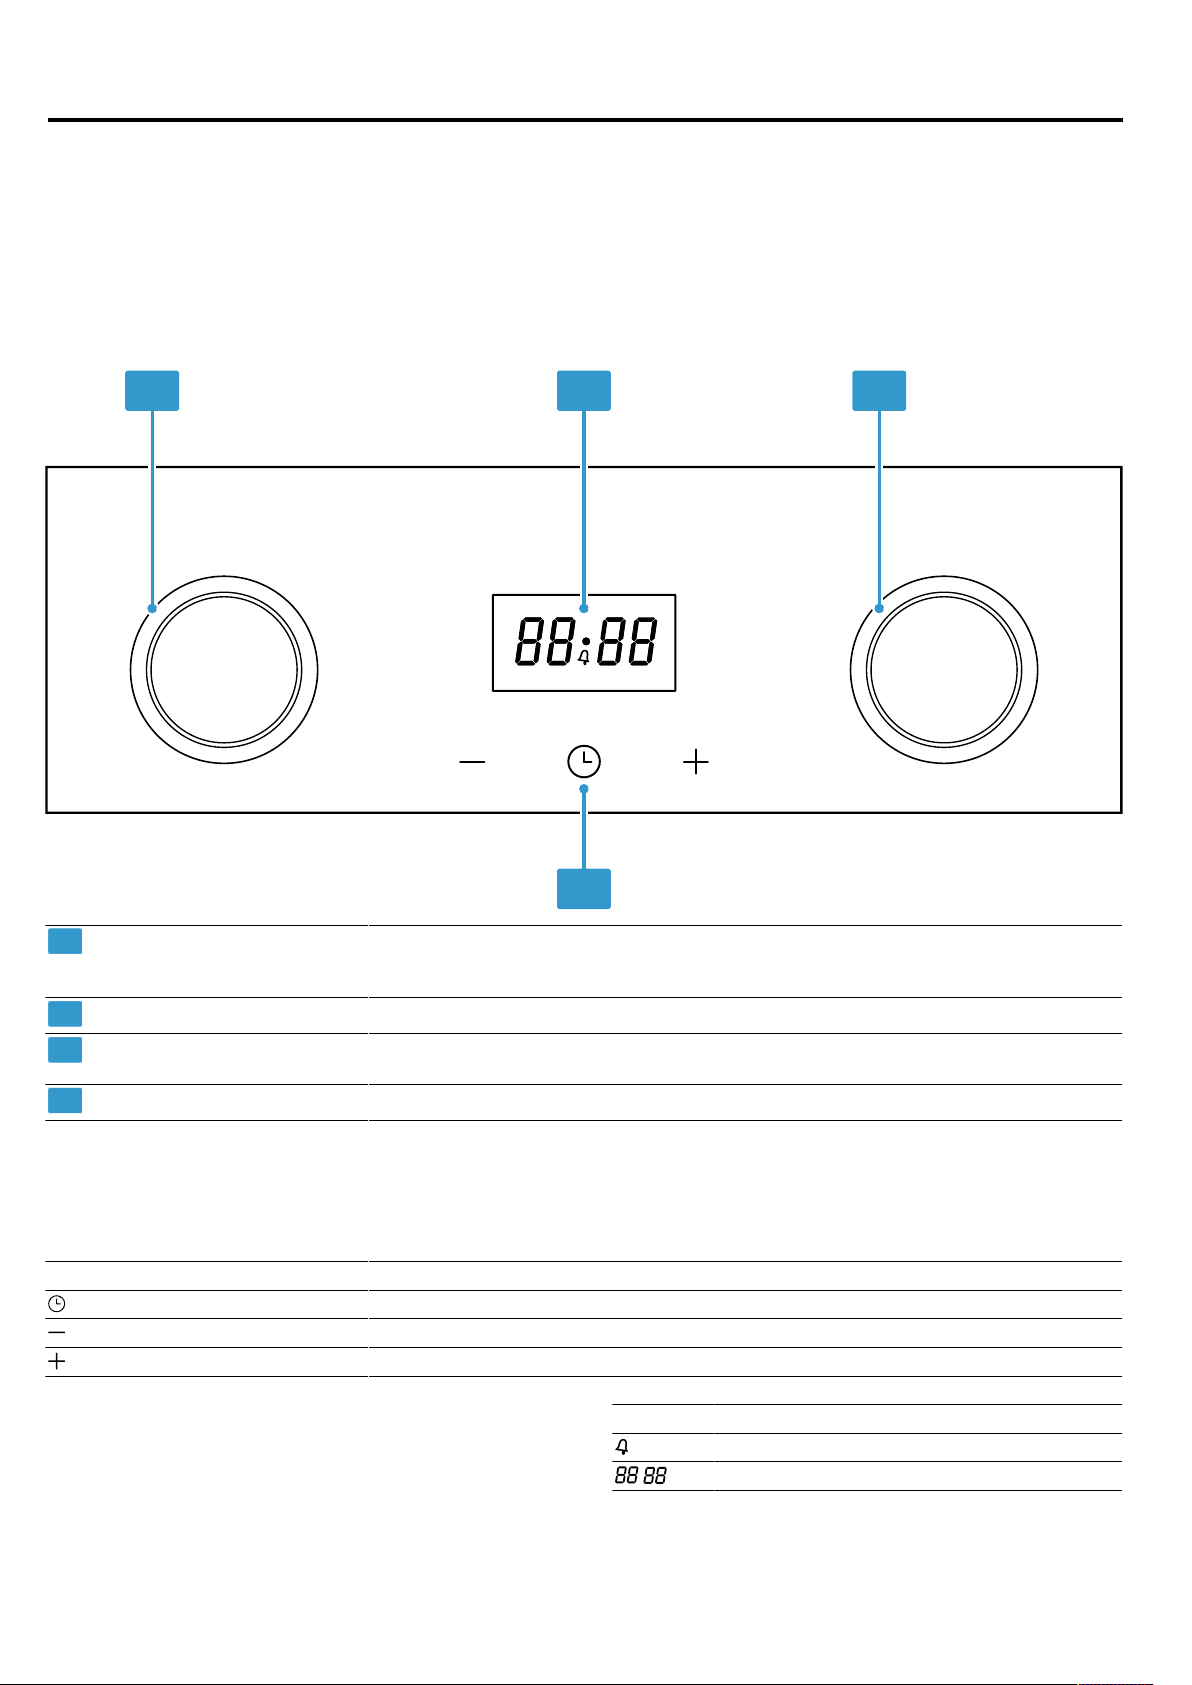
Description de l'appareil fr
31
4 Description de l'appareil
4.1 Bandeau de commande
Le champ de commande vous permet de configurer toutes les fonctions de votre appareil et vous donne des infor-
mations sur l’état de fonctionnement.
Remarque:Selon le type d’appareil, les détails repré-
sentés sur la photo peuvent différer, p.ex. par sa cou-
leur et sa forme.
1 2 3
4
1
Sélecteur de fonction Le sélecteur de fonction vous permet de régler le mode de cuisson ou d'autres
fonctionnalités. Vous pouvez tourner le sélecteur de fonction vers la gauche ou
la droite à partir de la position zéro.
2
Affichage L'affichage indique le symbole des fonctions actives et les fonctions de temps.
3
Sélecteur de tempé-
rature
Le sélecteur de température vous permet de régler la température pour le mode
de cuisson.
4
Champs tactiles Les champs tactiles vous permettent de régler directement différentes fonctions.
Touches
Les touches vous permettent de sélectionner directement différentes fonctions.
Remarque:Si une touche n'a aucune fonction, un signal retentit.
Symbole Touche Explication
Fonctions de temps Régler la minuterie et l'heure
Moins Réduire la valeur de réglage
Plus Augmenter la valeur de réglage
Affichage
L'écran affiche les valeurs de réglage actuelles ou les
options de sélection.
La valeur que vous pouvez actuellement régler est
mise en évidence. Elle apparaît en caractères blancs
sur un fond foncé.
Symbole Explication
Minuterie
: Affichage de l'heure
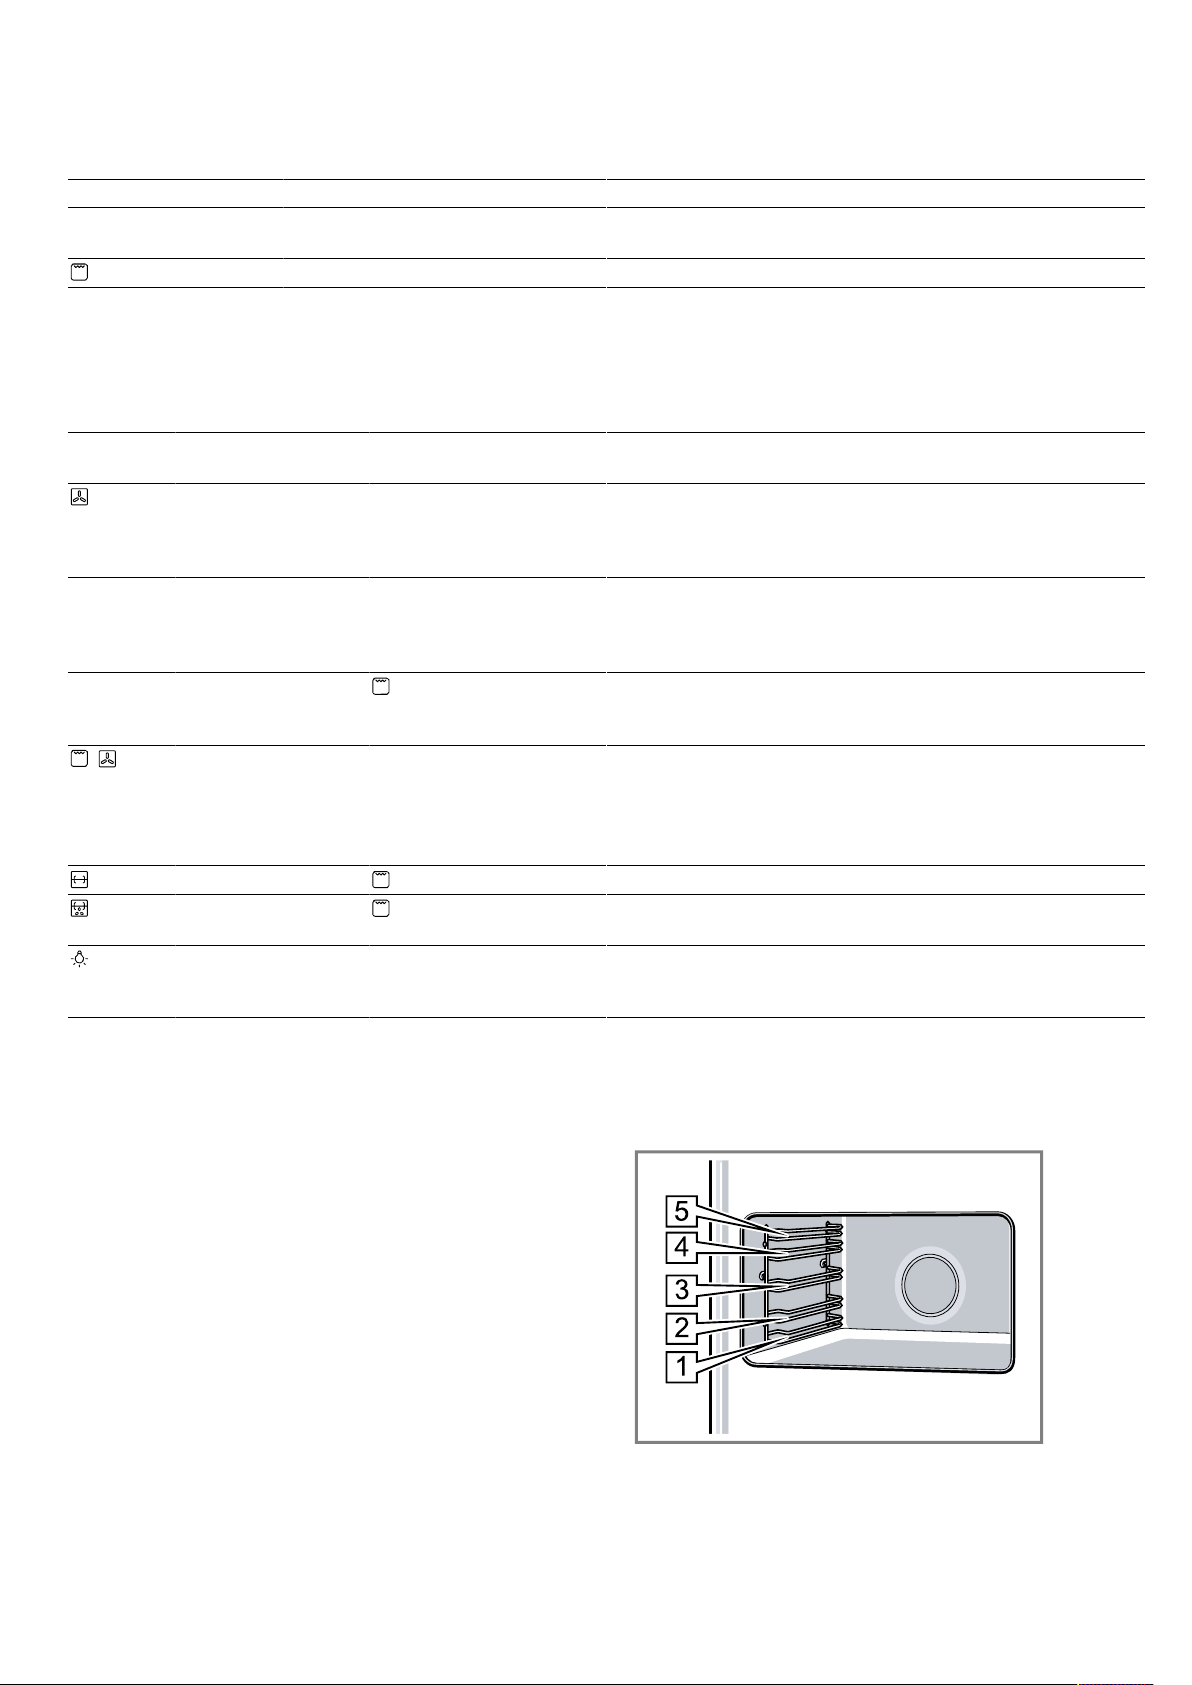
fr Description de l'appareil
32
Sélecteur de température
Le sélecteur de température vous permet de régler la température ou le gril.
Symbole Nom Explication
Min - Max Température L'appareil est allumé. La température du compartiment
de cuisson est réglée en °C.
Gril, grande surface Le gril est allumé.
4.2 Modes de cuisson et fonctions
Afin de vous permettre de toujours trouver le mode de cuisson adapté à vos plats, nous vous expliquons ici les diffé-
rences et les utilisations.
Symbole Mode de cuisson
ou fonction
Température ou niveau Utilisation
5
Chaleur ventilée 130-260°C Pour poursuivre la cuisson, par exemple pour des gâ-
teaux aux fruits humides, pour mettre en conserve, pour
des mets au bain-marie. Le ventilateur fait circuler l'air
chaud autour des aliments.
Chaleur de sole 130-260°C Préparer des gâteaux et des pâtisseries, des soufflés, de
la volaille, des morceaux de viande maigre. Pour enclen-
cher la chaleur de sole, réglez la température. La cha-
leur est diffusée par la sole.
Gril, grande sur-
face
Griller des mets peu épais, par exemple steaks, sau-
cisses ou toasts ou pour gratiner. Toute la surface située
sous la résistance chauffante du gril est chauffée.
+
5
Gril chaleur venti-
lée
50-220°C Cuire ou rôtir de la viande, de la volaille et du poisson
entier. Le ventilateur répartit l'air chaud autour des ali-
ments.
Remarque:Si vous utilisez le gril à convection, réglez la
température à 220°C maximum.
Tournebroche Rôtis, rôtis roulés et volailles
Tournebroche avec
chaleur ventilée
Rôtis, rôtis roulés et volailles. Le ventilateur répartit l'air
chaud autour des aliments.
Éclairage du com-
partiment de cuis-
son
- Allume l'éclairage du compartiment de cuisson.
4.3 Compartiment de cuisson
Les fonctions du compartiment de cuisson facilitent
l'utilisation de votre appareil.
Niveaux d'enfournement
Le compartiment de cuisson possède 5niveaux d'en-
fournement.
Introduisez toujours l'accessoire jusqu'en butée, afin
qu'il ne touche pas la vitre de la porte. Introduisez les
accessoires dans le bon sens dans le compartiment de
cuisson.
Surfaces autonettoyantes
La paroi arrière et les parois latérales du compartiment
de cuisson sont autonettoyants. Les surfaces autonet-
toyantes du compartiment de cuisson sont revêtues
d'une céramique mate et poreuse, et leur surface est
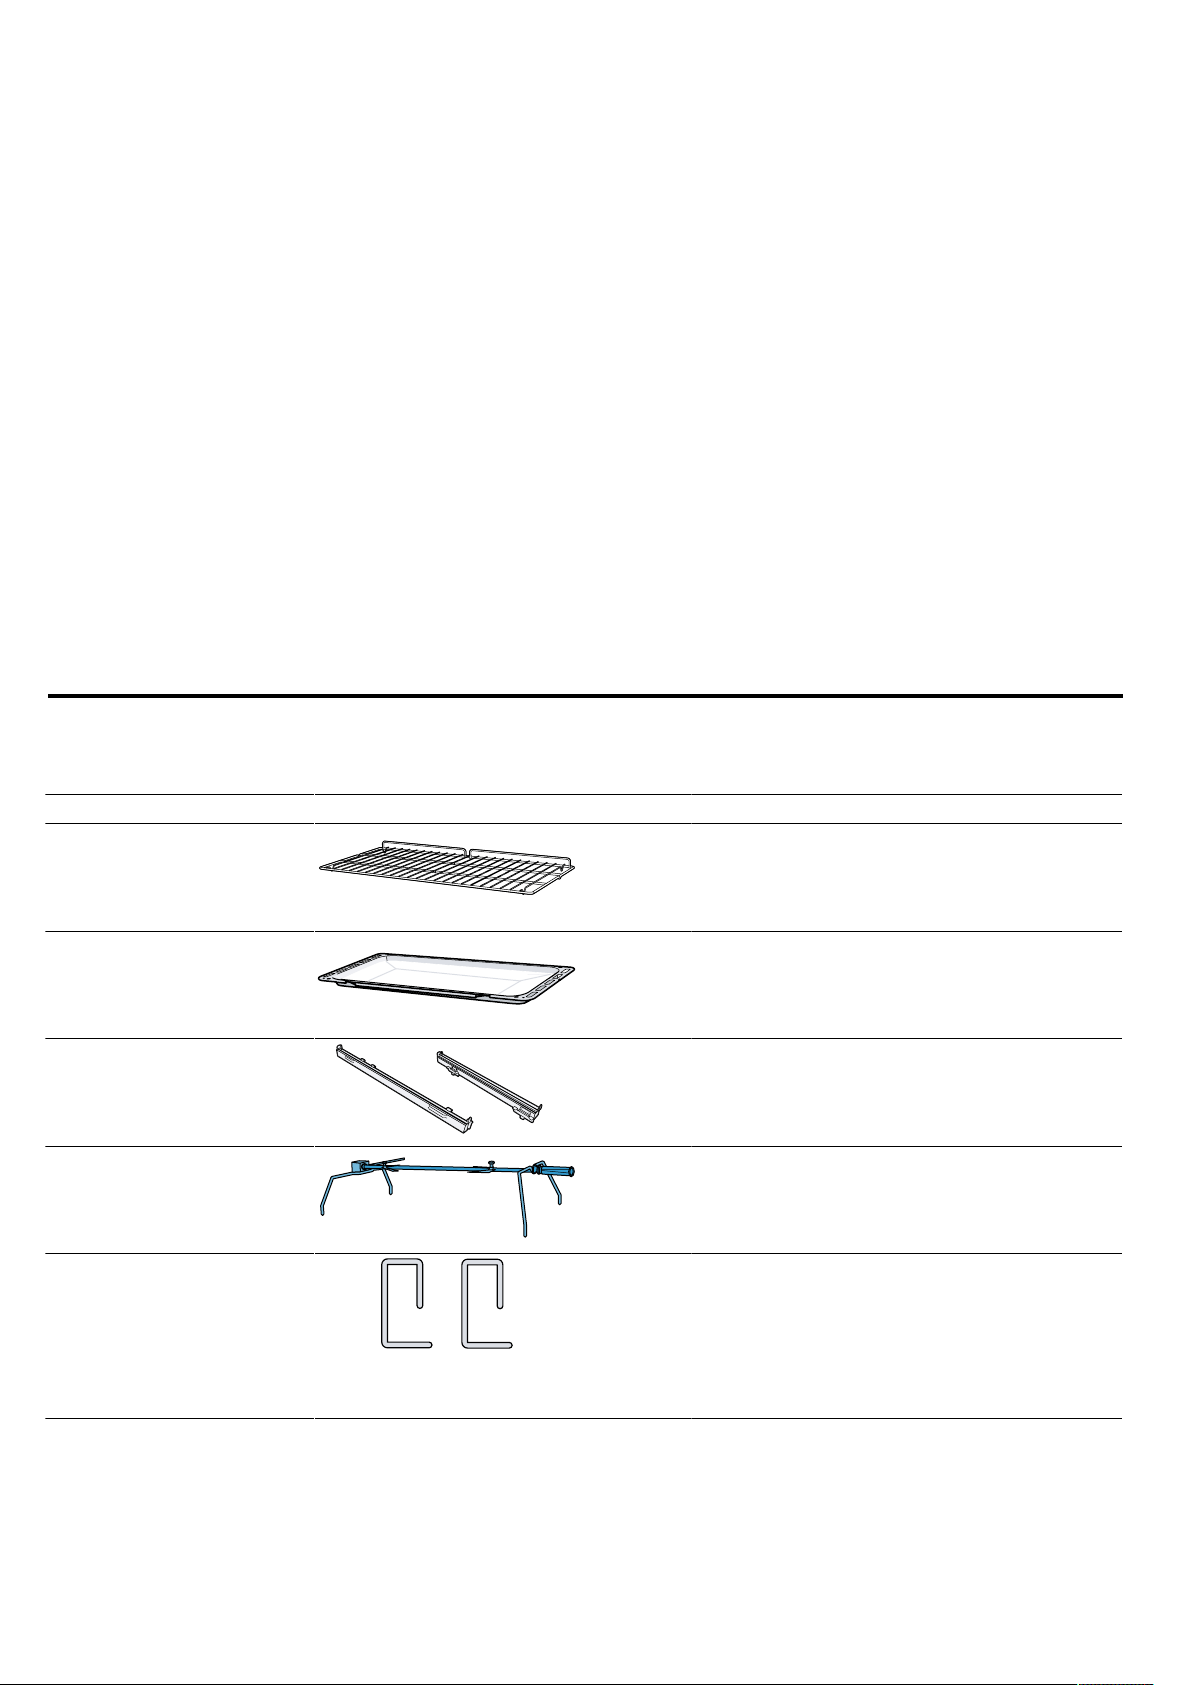
Accessoires fr
33
rugueuse. Lorsque l'appareil est en marche, les sur-
faces autonettoyantes absorbent les éclaboussures de
graisse provenant du rôtissage ou de la cuisson au
gril, et les décomposent.
Éclairage du compartiment de cuisson
Lorsque vous ouvrez la porte de l'appareil, l'éclairage
du compartiment de cuisson s'allume.
Dans la plupart des modes de fonctionnement, l'éclai-
rage du compartiment de cuisson s'allume dès le dé-
marrage du mode de fonctionnement. Il s'éteint lorsque
l'appareil cesse de fonctionner .
Ventilateur de refroidissement
Le ventilateur de refroidissement se met en marche et
se coupe selon les besoins. L'air chaud s'échappe au-
dessus de la porte de l'appareil.
ATTENTION!
La couverture des fentes d'aération entraîne une sur-
chauffe de l'appareil.
▶ Ne pas couvrir les fentes d'aération.
Afin que le compartiment de cuisson refroidisse plus
vite après un fonctionnement, le ventilateur continue de
fonctionner pendant un certain temps.
Formation de condensation
Vous apprendrez ici comment la condensation se
forme, comment éviter les dommages et comment ré-
duire la formation de condensation.
La préparation d'aliments dans le compartiment de
cuisson peut générer une importante quantité de va-
peur d'eau dans le compartiment de cuisson. Votre ap-
pareil étant très économe en énergie, il laisse très peu
de chaleur s'échapper pendant son fonctionnement. En
raison des grandes différences de température entre
l'intérieur de l'appareil et les parties extérieures de l'ap-
pareil, de l'eau de condensation peut se déposer sur la
porte de l'appareil, le bandeau de commande ou les
habillages de porte meuble avoisinants. La formation
d'eau de condensation est un phénomène physique
normal.
Afin d'éviter tout dommage, essuyez l'eau de conden-
sation. Si de l'eau de condensation s'accumule dans la
gouttière, retirez-la à l'aide d'une éponge. Un trop-plein
de gouttière peut endommager le meuble encastré.
Laissez sécher l'appareil avec la porte ouverte.
Si vous préchauffez l'appareil, vous réduisez la forma-
tion de condensation.
5 Accessoires
Utilisez uniquement des accessoires d'origine. Ils ont été spécialement conçus pour votre appareil.
Accessoires Utilisation
Grille combinée ¡ Vaisselle
¡ Moules à gâteau
¡ Viande, par ex. rôtis ou pièces à griller
¡ Plats surgelés
Plaque à pâtisserie ¡ Gâteau cuit sur une plaque
¡ Petites pâtisseries
Jeu de rails télescopiques Les rails télescopiques permettent d'extraire
davantage les accessoires.
Tournebroche ¡ Rôtissage de morceaux de viande
¡ Rôtissage de grosses volailles
Remarque:À utiliser uniquement avec la
plaque à pâtisserie émaillée.
Tiges de sécurité Verrouiller les charnières.
Remarque:Ne jetez pas les tiges de sécuri-
té. Conservez les tiges de sécurité dans un
endroit sûr. Vous avez toujours besoin des
tiges de sécurité lorsque vous retirez la porte
de l'appareil ou lorsque vous nettoyez les
vitres de la porte.
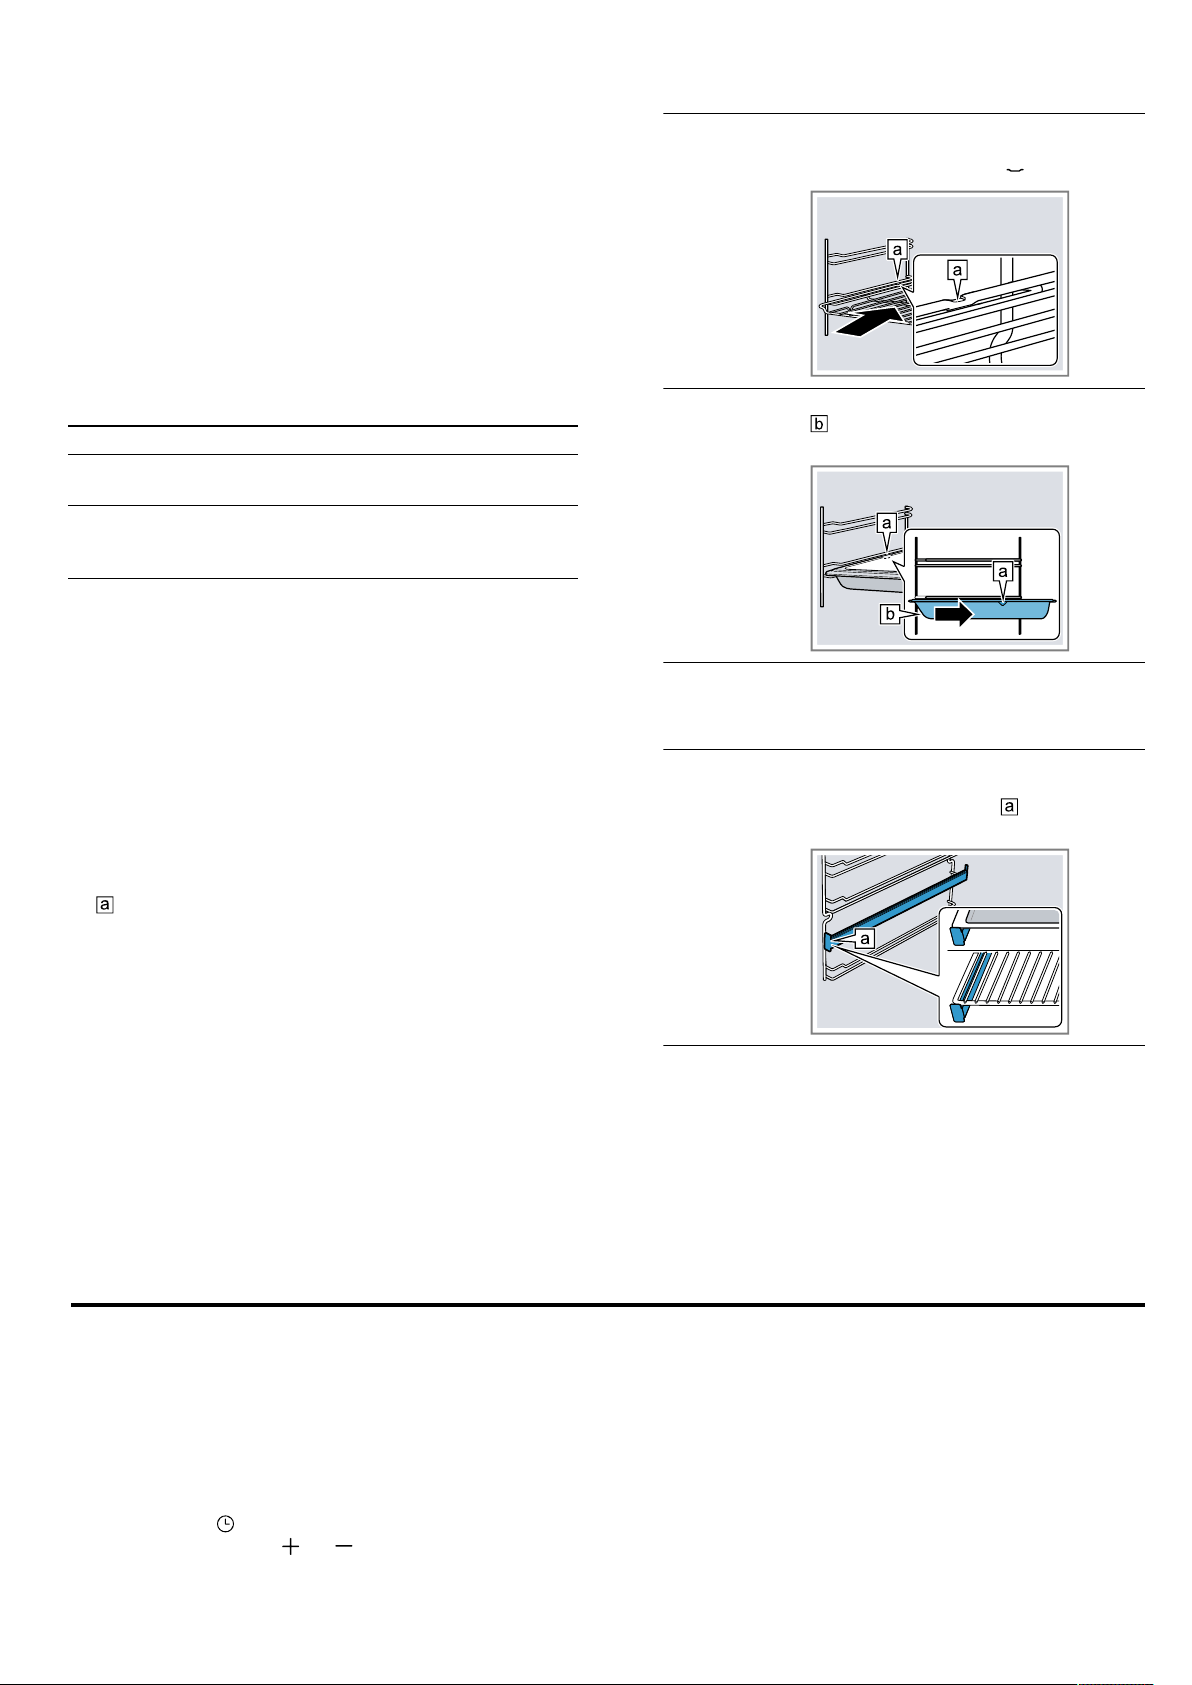
fr Avant la première utilisation
34
5.1 Autres accessoires
Vous pouvez acheter des accessoires auprès du ser-
vice après-vente, dans les commerces spécialisés ou
sur Internet.
Vous trouverez un large choix d'accessoires pour votre
appareil sur Internet ou dans nos brochures:
www.bosch-home.com
Les accessoires sont spécifiques à l'appareil. Lors de
l'achat, indiquez toujours la désignation exacte de votre
appareil (E-Nr.).
Pour connaître les accessoires disponibles pour votre
appareil, consultez notre boutique en ligne ou le ser-
vice après-vente.
Autres accessoires Utilisation
Jeu de rails télescopiques Jeu de rails télescopiques
pour un niveau
Régulateur de pression Régulateur de pression
pour le gaz butane/pro-
pane
5.2 Fonction d'arrêt
La fonction d'arrêt empêche le basculement de l'acces-
soire lors de son extraction.
Vous pouvez retirer l'accessoire à peu près à mi-che-
min jusqu'à ce qu'il s'enclenche en place. Insérez l'ac-
cessoire dans le bon sens dans le compartiment de
cuisson pour que la sécurité anti-basculement fonc-
tionne.
5.3 Insérer les accessoires dans le
compartiment de cuisson
1.
Tournez l'accessoire de manière à ce que l'encoche
se trouve à l'arrière et pointe vers le bas.
2.
Introduisez l'accessoire entre les deux barres de
guidage d'un niveau d'enfournement.
Grille combi-
née
Le côté ouvert doit être orienté
vers la porte de l'appareil et la
courbure vers le bas .
Plaque, par
ex. lèchefrite
ou plaque à
pâtisserie
La partie inclinée de l'accessoire
doit être orientée vers l'avant en
direction de la porte de l'appareil.
3.
Pour poser les accessoires à des niveaux d'enfour-
nement avec les rails télescopiques, sortez ces der-
niers.
Grille ou tôle Positionnez l'accessoire de ma-
nière à ce que son bord se trouve
derrière la languette du rail té-
lescopique.
Remarque:Lorsqu'ils sont complètement sortis, les
rails télescopiques s'enclenchent en place. Repous-
sez les rails télescopiques dans le compartiment de
cuisson en exerçant une légère pression.
4.
Introduisez complètement l'accessoire pour qu'il ne
touche pas la porte de l'appareil.
Remarque:Retirez du compartiment de cuisson les
accessoires dont vous n'avez pas besoin pendant le
fonctionnement.
6 Avant la première utilisation
Effectuez les réglages pour la première mise en ser-
vice. Nettoyez l’appareil et les accessoires.
6.1 Régler l'heure
Après le raccordement, trois zéros clignotent dans l'affi-
chage. Réglez l'heure.
1.
Appuyez sur .
2.
Réglez l'heure avec ou .
Remarque:Après écoulement du délai de réglage,
l'heure est automatiquement mémorisée.

Utilisation fr
35
6.2 Nettoyer l'appareil avant la première
utilisation
Avant de préparer des mets pour la première fois avec
l'appareil, nettoyez le compartiment de cuisson et les
accessoires.
1.
Retirez les accessoires et les supports du comparti-
ment de cuisson. →Page40
2.
Retirez tous les éléments de l'emballage, par ex.
pièces de polystyrène, du compartiment de cuisson.
3.
Certaines parties sont recouvertes d'un film protec-
teur. Retirez le film protecteur.
4.
Nettoyez l'extérieur de l'appareil avec un chiffon
doux et humide.
5.
Nettoyez le compartiment de cuisson avec du pro-
duit de nettoyage.
6.
Pour éliminer l'odeur du neuf, faites chauffer l'appa-
reil à vide et fermé.
7.
Tournez le sélecteur de fonction sur
5
.
8.
Réglez la température maximale.
Si vous faites chauffer l'appareil pour la première
fois, il se peut que vous entendiez des crépitements
provenant du compartiment de cuisson.
9.
Aérez la cuisine tant que l'appareil chauffe.
10.
Éteignez l'appareil au bout d'1heure.
11.
Laissez refroidir l'appareil.
12.
Lorsque le compartiment de cuisson est refroidi,
nettoyez les surfaces lisses avec du produit de net-
toyage.
13.
Installez les supports. →Page40
14.
Si nécessaire, nettoyez les vitres de la porte.
→Page40
6.3 Nettoyagedesaccessoires
▶
Nettoyer soigneusement les accessoires avec du
produit de nettoyage et une lavette douce.
7 Utilisation
7.1 Mettre l’appareil sous tension
AVERTISSEMENT‒Risque d'explosion!
Si du gaz s'accumule dans le compartiment de cuis-
son, une explosion peut se produire dans ce dernier
lors de l'allumage.
▶ Si le brûleur ne s'allume pas au bout de 15se-
condes, éteignez l'appareil et ouvrez la porte de la
pièce ou une fenêtre.
▶ Attendez au moins 1minute avant de rallumer le
brûleur.
1.
Ouvrez la porte de l’appareil.
2.
Appuyez sur le sélecteur de température et réglez-le
sur la position maximale.
3.
Maintenez le sélecteur de température enfoncé pen-
dant quelques secondes, le temps que la flamme
se stabilise.
4.
Fermez la porte de l'appareil avec précaution.
5.
Réglez la température à l'aide du sélecteur de tem-
pérature.
Ne tournez pas le sélecteur de température au-delà
de la position minimale.
a L'appareil commence à chauffer.
Remarque:Le sélecteur de fonction vous permet de
régler les fonctions supplémentaires.
7.2 Modifier le mode de cuisson et la
température
▶
Modifiez la température à l'aide du sélecteur de
température.
7.3 Éteindre l'appareil
▶
Tournez le sélecteur de température sur la position
zéro.
7.4 Régler le gril
▶
Appuyez sur le sélecteur de température et réglez-le
sur .
Remarque:Le sélecteur de fonction permet de régler
des fonctions supplémentaires.
7.5 Éteindre le gril
▶
Tournez le sélecteur de température sur la position
zéro.
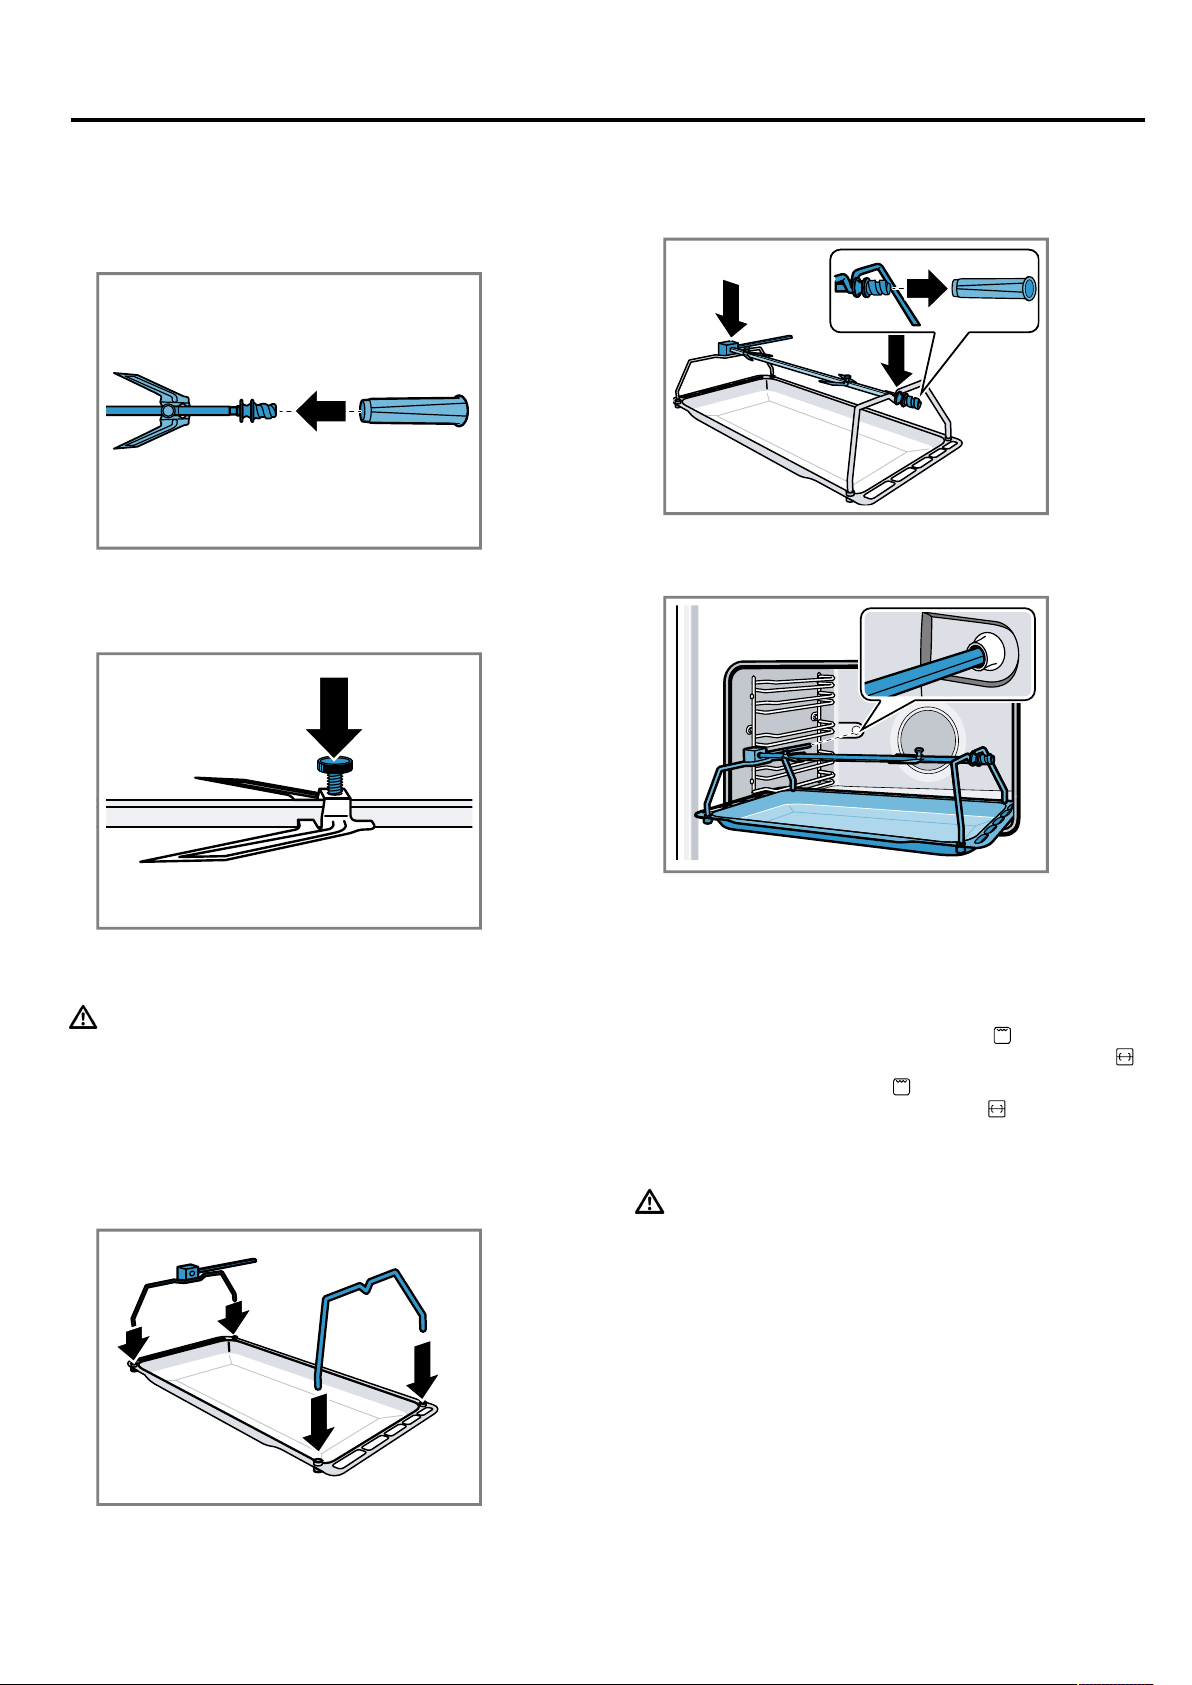
fr Tournebroche
36
8 Tournebroche
8.1 Préparer le tournebroche
1.
Glissez un crochet de maintien sur le tournebroche
et vissez la poignée.
2.
Faites glisser le rôti au centre du tournebroche.
3.
Fixez le rôti à l'aide des crochets de maintien.
4.
Bloquez les crochets de maintien avec des vis mo-
letées.
8.2 Mettre en place le tournebroche
AVERTISSEMENT‒Risque de brûlures!
Pendant leur utilisation, l'appareil et ses pièces acces-
sibles deviennent très chauds.
▶ Il convient d'être prudent afin d'éviter tout contact
avec les résistances chauffantes.
▶ Veuillez tenir à l'écart les enfants âgés de moins de
8 ans.
1.
Insérez le cadre du tournebroche dans les douilles
filetées.
2.
Placez le tournebroche sur le cadre du tourne-
broche et dévissez la poignée.
3.
Insérez la lèchefrite au niveau d'enfournement 1 et
insérez le tournebroche dans le logement du mo-
teur.
4.
Pour mieux récupérer la graisse qui s'égoutte, ver-
sez un peu d'eau dans la lèchefrite.
5.
Fermez la porte de l’appareil.
8.3 Activer le tournebroche
Remarque:Si vous utilisez le tournebroche, préchauf-
fez l'appareil avec le mode de cuisson . Insérez le
tournebroche avant de régler la fonction de cuisson .
1.
Réglez le thermostat sur .
2.
Réglez le sélecteur de fonction sur .
8.4 Retirer le tournebroche
AVERTISSEMENT‒Risque de brûlures!
Pendant leur utilisation, l'appareil et ses pièces acces-
sibles deviennent très chauds.
▶ Il convient d'être prudent afin d'éviter tout contact
avec les résistances chauffantes.
▶ Veuillez tenir à l'écart les enfants âgés de moins de
8 ans.
1.
Ouvrez la porte de l’appareil.
2.
Retirez lentement la lèchefrite jusqu'à ce qu'elle dé-
passe à moitié du compartiment de cuisson.
3.
Retirez complètement la lèchefrite du compartiment
de cuisson et posez-la sur le plan de travail.
4.
Vissez la poignée sur le tournebroche.
5.
Retirez le tournebroche du cadre du tournebroche
en le tenant par la poignée.
Fonctions de temps fr
37
9 Fonctions de temps
9.1 Régler la minuterie courte durée
La minuterie courte durée n'a pas d'influence sur les
fonctions du four.
Remarque:Vous pouvez régler la durée de la minute-
rie courte durée de 1minute à 23heures et 59mi-
nutes.
1.
Appuyez sur .
a clignote et trois zéros sont affichés.
2.
Réglez la durée souhaitée avec et .
a Un signal retentit après écoulement de la durée.
Remarques
¡ Pour modifier la durée restante, appuyez sur et
modifiez la durée restante avec ou .
¡ Pour annuler la minuterie courte durée, appuyez sur
. Ensuite, appuyez simultanément sur et .
Désactiver le signal sonore
▶
Pour arrêter le signal sonore, appuyez sur .
Remarque:Le signal s'arrête automatiquement au
bout de quelques minutes.
9.2 Régler l'heure
Si nécessaire, vous pouvez changer l'heure, par
exemple passer de l'heure d'été à l'heure d'hiver.
Condition:L'appareil est éteint.
1.
Appuyez simultanément sur et .
2.
Réglez l'heure avec et .
a Après quelques secondes, l'heure réglée est affi-
chée.
9.3 Modifier le signal sonore
Vous pouvez choisir parmi 3signaux sonores diffé-
rents.
1.
Appuyez simultanément sur et .
2.
Appuyez sur .
a Le signal sonore actuellement sélectionné s'affiche,
par exemple «Tone 1».
3.
Pour sélectionner un autre signal sonore, appuyez
sur .
10 Nettoyage et entretien
Pour que votre appareil reste longtemps opérationnel,
nettoyez-le et entretenez-le avec soin.
10.1 Produits de nettoyage
Afin d'éviter d'endommager les différentes surfaces de
l'appareil, n'utilisez pas de produits de nettoyage inap-
propriés.
AVERTISSEMENT‒Risque d'électrocution!
L’infiltration d’humidité peut occasionner un choc élec-
trique.
▶ Ne pas utiliser de nettoyeur vapeur ou haute pres-
sion pour nettoyer l’appareil.
ATTENTION!
Les produits de nettoyage inappropriés endommagent
les surfaces de l'appareil.
▶ N'utilisez pas de produits de nettoyage agressifs ou
abrasifs.
▶ N'utilisez pas de produits de nettoyage fortement al-
coolisés.
▶ N'utilisez pas de tampon abrasif ni d'éponge en
laine d'acier.
▶ N'utilisez pas de nettoyant spécial pour le nettoyage
à chaud.
▶ Utilisez uniquement des nettoyants pour vitres, des
racloirs à verre ou des produits d'entretien pour
acier inox si ceux-ci sont recommandés dans les
instructions de nettoyage de la pièce correspon-
dante.
Du produit de nettoyage pour four dans le comparti-
ment de cuisson chaud endommage l'émail.
▶ Ne jamais utiliser de produit de nettoyage pour four
dans un compartiment de cuisson chaud.
▶ Avant le réchauffement suivant, éliminer complète-
ment les résidus du compartiment de cuisson et de
la porte de l'appareil.
Le sel présent dans les lavettes éponges neuves peut
endommager les surfaces.
▶ Lavez soigneusement les lavettes éponges neuves
avant de les utiliser.
10.2 Produits de nettoyage appropriés
Utilisez uniquement des produits de nettoyage adaptés
pour les différentes surfaces de votre appareil.
Extérieur de l'appareil
Respectez les instructions de nettoyage de l'appareil.

fr Nettoyage et entretien
38
Surface Produits de nettoyage appro-
priés
Remarques
Façade en acier inox ¡ Produit de nettoyage chaud
¡ Produits de nettoyage spé-
ciaux pour les surfaces
chaudes en acier inox
Pour éviter la corrosion sur les façades en acier inoxy-
dable, enlevez immédiatement les taches de calcaire, de
graisse, de fécules et de protéines.
Appliquez une fine pellicule de produit d'entretien pour
acier inox.
Bandeau de com-
mande
Produit de nettoyage chaud Nettoyez avec une lavette et séchez avec un chiffon
doux.
N'utilisez pas de nettoyant pour vitres ni de racloir à
verre.
Vitres de la porte Produit de nettoyage chaud Nettoyez avec une lavette et séchez avec un chiffon
doux.
N'utilisez pas de racloir à verre ni d'éponge spirale inox.
Poignée de la porte Produit de nettoyage chaud Nettoyez avec une lavette et séchez avec un chiffon
doux.
Pour éviter les taches indélébiles, retirez immédiatement
le détartrant de la poignée de la porte.
Intérieur de l'appareil
Surface Produits de nettoyage appro-
priés
Remarques
Surfaces émaillées ¡ Produit de nettoyage chaud
¡ Eau vinaigrée
¡ Nettoyants pour four
Nettoyez avec une lavette et séchez avec un chiffon
doux.
Faites ramollir les restes d'aliments carbonisés à l'aide
d'un chiffon humide et d'un produit de nettoyage.
En cas d'encrassement important, utilisez une spirale à
récurer en inox ou un produit de nettoyage pour four.
Après le nettoyage, laissez le compartiment de cuisson
ouvert afin qu'il sèche.
Remarque:Des dépôts blancs peuvent se former à
cause des résidus d'aliments. Ces dépôts ne présentent
aucun risque pour la santé et n'influencent pas le fonc-
tionnement de l'appareil. Vous pouvez éliminer les dé-
pôts avec de l'acide citrique.
Surfaces autonet-
toyantes
Veuillez tenir compte des consignes concernant les sur-
faces du compartiment de cuisson figurant à la suite du
tableau.
→"Nettoyer les surfaces autonettoyantes", Page39
Couvercle en verre
de l'éclairage du
compartiment de
cuisson
¡ Produit de nettoyage chaud
¡ Nettoyants pour four
Nettoyez avec une lavette et séchez avec un chiffon
doux.
En cas de fort encrassement, utilisez un nettoyant pour
four.
Vitres de la porte Produit de nettoyage chaud Nettoyez avec une lavette et séchez avec un chiffon
doux.
N'utilisez pas de racloir à verre ni d'éponge spirale inox.
Joint de porte Produit de nettoyage chaud Nettoyez avec une lavette.
Ne retirez pas le joint de porte et ne le récurez pas.
Recouvrement de la
porte en inox
Nettoyant pour acier inoxydable Respectez les indications des fabricants.
N'utilisez pas de nettoyant pour vitres ni de racloir à
verre.
N'utilisez pas de produit d'entretien pour inox.
Conseil:Retirez de préférence le recouvrement de la
porte.
Recouvrement de la
porte en plastique
Produit de nettoyage chaud N'utilisez pas de nettoyant pour vitres ni de racloir à
verre.
N'utilisez pas de produit d'entretien pour inox.
Conseil:Retirez de préférence le recouvrement de la
porte.

Nettoyage et entretien fr
39
Surface Produits de nettoyage appro-
priés
Remarques
Supports Produit de nettoyage chaud Mettez à tremper et nettoyez avec une lavette ou une
brosse.
Système télescopique Produit de nettoyage chaud Nettoyez avec une lavette ou une brosse.
Afin de ne pas éliminer la graisse de lubrification, net-
toyez les rails télescopiques en position rentrée.
Ne les passez pas au lave-vaisselle.
Accessoires Produit de nettoyage chaud Mettez à tremper et nettoyez avec une lavette ou une
brosse.
Si l'accessoire est très sale, nettoyez-le avec une spirale
en acier inoxydable.
Conseil:Vous pouvez nettoyer les accessoires émaillés
au lave-vaisselle.
Remarques
¡ De légères différences de teintes apparaissent sur
la face avant de l'appareil en raison des différents
matériaux tels que le verre, le plastique ou le métal.
¡ Les ombres ressemblant à des stries sur les vitres
de la porte sont des reflets de l'éclairage du com-
partiment de cuisson.
¡ L'émail est cuit à des températures très élevées. Ce-
ci peut engendrer des différences de teintes. Les
différences de couleur sont normales et ne nuisent
pas au fonctionnement. Les bords de plaques
minces ne peuvent pas être émaillés complètement
et peuvent par conséquent être rugueux. Cela n'af-
fecte pas la protection contre la corrosion.
10.3 Nettoyer l’appareil
Nettoyez l'appareil comme indiqué, afin de ne pas en-
dommager les différentes surfaces et pièces par un
nettoyage incorrect ou par des produits de nettoyage
non appropriés.
AVERTISSEMENT‒Risque de brûlures!
Pendant leur utilisation, l'appareil et ses pièces acces-
sibles deviennent très chauds.
▶ Il convient d'être prudent afin d'éviter tout contact
avec les résistances chauffantes.
▶ Veuillez tenir à l'écart les enfants âgés de moins de
8 ans.
AVERTISSEMENT‒Risque d'incendie!
Les résidus alimentaires, la graisse et le jus de rôti
peuvent s'enflammer.
▶ Avant utilisation, retirer les grosses salissures pré-
sentes dans le compartiment de cuisson, sur les ré-
sistances de chauffe et sur les accessoires.
Condition:Respectez les instructions concernant les
produits de nettoyage.
→"Produits de nettoyage", Page37
1.
Nettoyez l'appareil avec du produit de nettoyage
chaud et une lavette.
Pour certaines surfaces, vous pouvez utiliser des
produits de nettoyage alternatifs.
→"Produits de nettoyage appropriés", Page37
2.
Séchez avec un chiffon doux.
Conseils
¡ Si vous nettoyez le compartiment de cuisson après
chaque utilisation, les salissures ne peuvent pas
brûler.
¡ Retirez toujours immédiatement les taches de cal-
caire, de graisse, d'amidon et de blanc d'œuf.
¡ Pour maintenir propre le compartiment de cuisson,
utilisez un récipient approprié, par ex. une cocotte.
10.4 Nettoyer les surfaces autonettoyantes
Les surfaces autonettoyantes sont revêtues d'une céra-
mique mate, hautement poreuse. Les projections de la
cuisson et du rôtissage sont absorbées et décompo-
sées par cette couche pendant le fonctionnement de
l'appareil.
Condition:Le compartiment de cuisson est refroidi.
▶
Nettoyez les résidus de couleur brun ou blanc avec
de l'eau et une éponge douce.
Remarque:Des taches peuvent se former sur les sur-
faces autonettoyantes. Les résidus de sucre et de pro-
téines des aliments ne sont pas décomposés et restent
sur les surfaces. Les taches rougeâtres sont des rési-
dus d'aliments salés, et non de la rouille. Ces taches
ne sont pas dangereuses pour la santé. Ces taches ne
compromettent pas la capacité de nettoyage des sur-
faces autonettoyantes.
10.5 Changer l'ampoule du compartiment de
cuisson
Si l'éclairage du compartiment de cuisson est défec-
tueux, changez-en.
Remarque:Des ampoules halogènes de 230V, 40W,
G9 sont en vente dans le commerce spécialisé ou au-
près du service après-vente. Utilisez exclusivement ces
ampoules. Utilisez uniquement un chiffon propre et sec
pour toucher les nouvelles ampoules halogènes. Cela
prolonge la durée de vie de l'ampoule.
AVERTISSEMENT‒Risque de brûlures!
Pendant leur utilisation, l'appareil et ses pièces acces-
sibles deviennent très chauds.
▶ Il convient d'être prudent afin d'éviter tout contact
avec les résistances chauffantes.
▶ Veuillez tenir à l'écart les enfants âgés de moins de
8 ans.
AVERTISSEMENT‒Risque d'électrocution!
Lors du remplacement de la lampe, les contacts de la
douille d'ampoule sont sous tension.
fr Supports
40
▶ Avant de changer la lampe, assurez-vous que l'ap-
pareil est éteint pour éviter tout risque de choc élec-
trique.
▶ De plus, débranchez la fiche secteur ou coupez le
fusible dans le boîtier à fusibles.
Conditions
¡ Le fusible / disjoncteur a été retiré / se trouve en po-
sition éteinte.
¡ Le compartiment de cuisson est refroidi.
¡ Une nouvelle ampoule halogène est disponible pour
le remplacement.
1.
Ouvrez la porte de l’appareil.
2.
Pour éviter tout endommagement, placez un tor-
chon dans le compartiment de cuisson.
3.
Retirez les accessoires et les supports du comparti-
ment de cuisson. →Page40
4.
Retirez le couvercle en verre.
S'il est difficile d'ouvrir le couvercle en verre de face
avec la main, utilisez une cuillère comme aide.
5.
Retirez l'ampoule du compartiment de cuisson.
6.
Remplacez l'ampoule du compartiment de cuisson
par une ampoule du même type.
7.
Remettez en place le cache en verre de l'ampoule
du four.
8.
Installez les supports. →Page40
9.
Retirez le torchon à vaisselle.
10.
Réarmez le fusible.
11.
Vérifiez que l'éclairage du four refonctionne.
11 Supports
Pour nettoyer soigneusement les supports et le com-
partiment de cuisson ou pour changer les supports,
vous pouvez décrocher ceux-ci.
11.1 Décrocher les supports
Les supports sont fixés respectivement à 3points aux
parois latérales dans le compartiment de cuisson.
1.
Saisissez les supports sur le devant et tirez-les vers
le milieu du compartiment de cuisson.
a Le crochet avant du support se détache du trou.
2.
Ouvrez davantage les supports et retirez-les des
trous arrière de la paroi latérale.
3.
Retirez les supports du compartiment de cuisson.
11.2 Accrocher les supports
1.
Engagez les crochets du support dans les trous ar-
rière de la paroi latérale.
2.
Poussez le crochet avant du support dans le trou.
12 Porte de l’appareil
Si vous entretenez et nettoyez soigneusement votre ap-
pareil il gardera longtemps l'aspect du neuf et restera
opérationnel. Vous apprendrez ici comment nettoyer la
porte de l'appareil.
Remarque:Pour que la porte de l'appareil ne touche
pas le meuble encastré, la porte de l'appareil s'ouvre à
un peu moins de 90°.
12.1 Démonter les vitres de la porte
Pour faciliter le nettoyage, vous pouvez démonter les
vitres de la porte de l'appareil.
AVERTISSEMENT‒Risque de blessure!
Un verre de porte d'appareil rayé peut se fendre.
▶ N'utilisez pas de nettoyants abrasifs ni de racloirs
métalliques tranchants pour nettoyer la vitre de la
porte du four, car ils peuvent rayer la surface.
1.
Ouvrez complètement la porte de l'appareil.
Porte de l’appareil fr
41
2.
Bloquez les deux charnières à gauche et à droite
avec les tiges de sécurité.
Les tiges de sécurité doivent être complètement in-
troduites dans les trous des charnières.
3.
Levez la partie inférieure de la vitre intérieure avec
les deux mains jusqu'à ce que les tiges de fixation
sortent de la fixation.
4.
ATTENTION!
En levant la vitre intérieure, il se peut que la vitre du
milieu reste collée à la vitre intérieure.
▶ Veillez à ce que la vitre du milieu ne tombe pas.
Levez délicatement la partie supérieure de la vitre
intérieure, jusqu'à ce que les tiges de fixation
sortent de la fixation.
5.
Déposez la vitre intérieure et placez-la avec précau-
tion sur une surface plane.
6.
Retirez la vitre intermédiaire avec ses fixations.
La vitre intermédiaire n'est pas fixée avec des gou-
pilles de retenue, mais est fixée par des paliers en
caoutchouc.
7.
Nettoyez les vitres de porte avec un nettoyant pour
vitres et un chiffon doux.
12.2 Monter les vitres de la porte
1.
Introduisez la vitre intermédiaire.
Veillez à ce que la vitre intermédiaire soit correcte-
ment en place.
a Toutes les fixations doivent reposer à plat sur la
vitre extérieure.
a Si le symbole Low-E est lisible sur la vitre intermé-
diaire, cela signifie que cette dernière est correcte-
ment installée.
2.
Insérez la vitre intérieure.
Les quatre tiges de fixation doivent s'enclencher
dans les fixations prévues à cet effet.
3.
Enlevez les tiges de sécurité et fermez la porte de
l'appareil.
Remarque:Ne jetez pas les tiges de sécurité. Conser-
vez les tiges de sécurité dans un endroit sûr. Vous
avez toujours besoin des tiges de sécurité lorsque
vous retirez la porte de l'appareil ou lorsque vous net-
toyez les vitres de la porte. Si vous n'avez pas de tiges
de sécurité, vous pouvez en commander auprès du
service après-vente.
12.3 Décrocher la porte de l'appareil
En cas d'encrassement particulièrement important,
vous pouvez décrocher la porte de l'appareil pour faci-
liter le nettoyage.
1.
Ouvrez complètement la porte de l'appareil.
2.
Bloquez les deux charnières à gauche et à droite
avec les tiges de sécurité.
Les tiges de sécurité doivent être complètement in-
troduites dans les trous des charnières.
3.
Saisissez la porte de l'appareil latéralement avec les
deux mains et fermez-la à environ 30degrés.
Ne fermez pas complètement la porte de l’appareil.
Cela risque de tordre les charnières et d'endomma-
ger l'émail.
4.
Soulevez légèrement la porte de l'appareil et retirez-
la complètement.
12.4 Accrocher la porte de l'appareil
AVERTISSEMENT‒Risque de blessure!
Si les charnières ne sont pas bloquées à cause d'un
loquet incomplet, elles peuvent se fermer violemment.
▶ Si la charnière se referme lors du décrochage ou de
l'accrochage de la porte de l'appareil, ne mettez
pas la main dans la charnière.
▶ Appelez le service après-vente.
Une vitre de porte ou une porte d'appareil mal installée
est dangereuse.
▶ Assurez-vous que toutes les vitres de porte et la
porte de l'appareil sont correctement posées avant
de remettre l'appareil en service.
fr Dépannage
42
1.
Saisissez la porte de l'appareil latéralement avec les
deux mains.
2.
Glissez les charnières dans les évidements de l'ap-
pareil.
L'encoche en bas aux charnières doit s'encranter
dans le cadre de l'appareil.
3.
Abaissez la porte de l'appareil.
4.
Retirez les tiges de sécurité.
Remarque:Ne jetez pas les tiges de sécurité. Conser-
vez les tiges de sécurité dans un endroit sûr. Vous
avez toujours besoin des tiges de sécurité lorsque
vous retirez la porte de l'appareil ou lorsque vous net-
toyez les vitres de la porte. Si vous n'avez pas de tiges
de sécurité, vous pouvez en commander auprès du
service après-vente.
13 Dépannage
Vous pouvez corriger par vous-même les petits défauts
de votre appareil. Lisez les renseignements de dépan-
nage avant de contacter le service consommateurs.
Vous vous épargnerez ainsi des dépenses inutiles.
AVERTISSEMENT‒Risque de blessure!
Les réparations non conformes sont dangereuses.
▶ Seul un personnel qualifié est en droit d’effectuer
des réparations sur l’appareil.
▶ Si l'appareil est défectueux, appeler le service
après-vente.
→"Service après-vente", Page43
AVERTISSEMENT‒Risque d'électrocution!
Les réparations non conformes sont dangereuses.
▶ Seul un personnel dûment qualifié peut entre-
prendre des réparations sur l'appareil.
▶ Seules des pièces de rechange d'origine peuvent
être utilisées pour réparer l'appareil.
▶ Afin d’écarter tout danger quand le cordon d’alimen-
tation secteur de cet appareil est endommagé, seul
le fabricant ou son service après-vente ou toute
autre personne de qualification équivalente est habi-
lité à le remplacer.
13.1 Dysfonctionnements
Défaut Cause et dépannage
L'appareil ne fonctionne pas. La fiche secteur du cordon d'alimentation secteur n'est pas branchée.
▶
Branchez l’appareil au réseau électrique.
L’alimentation électrique est tombée en panne.
▶
Vérifiez si l’éclairage du compartiment ou d’autres appareils dans la pièce.
Le fusible dans le coffret à fusibles s'est déclenché.
▶
Vérifiez le fusible dans le boîtier à fusibles.
L'interrupteur de sécurité est activé.
1.
Laissez l'appareil refroidir.
2.
Vérifiez l'alimentation en gaz.
L'éclairage du compartiment de
cuisson ne fonctionne pas.
L'ampoule du compartiment de cuisson est défectueuse.
▶
Changez l'ampoule du compartiment de cuisson.
→"Changer l'ampoule du compartiment de cuisson", Page39
Les plats préparés au four
brûlent en très peu de temps.
Le thermostat est défectueux.
▶
Appelez le
→"Service après-vente", Page43.
Les flammes du brûleur ne
sortent pas de tous les orifices.
Dépôt normal de saleté.
▶
Nettoyez les brûleurs de manière professionnelle.
Buée sur les vitres de la porte. C'est un phénomène normal dû aux variations de température.
▶
Chauffez l'appareil à 100C° et éteignez l'appareil après 5minutes.
Mise au rebut fr
43
Défaut Cause et dépannage
L'écran est figé ou ne réagit pas. Dysfonctionnement
1.
Coupez le fusible se trouvant dans le boîtier à fusibles.
2.
Enclenchez le fusible après environ 10secondes.
3.
Si le dysfonctionnement réapparaît, appelez le service après-vente.
Les vitres de porte sont plus
chaudes au toucher qu'aupara-
vant, après avoir été démontées
pour être nettoyées.
Les vitres des portes sont placées à l'envers.
▶
Vérifiez que les vitres de la porte sont bien en place.
→"Monter les vitres de la porte", Page41
De la condensation se forme sur
la porte de l'appareil ou de l'eau
de condensation goutte.
La porte de l’appareil ne se ferme pas correctement.
▶
Vérifiez que la porte de l'appareil est correctement installée et qu'elle se
ferme correctement.
→"Porte de l’appareil", Page40
Encrassement du joint.
1.
Vérifiez que le joint n'est pas sale, endommagé ou mal positionné.
2.
Nettoyez ou remplacez le joint ou assurez-vous qu'il est correctement posi-
tionné.
Formation normale de condensation.
→"Formation de condensation", Page33
14 Mise au rebut
14.1 Mettre au rebut un appareil usagé
La destruction dans le respect de l’environnement per-
met de récupérer de précieuses matières premières.
▶
Éliminez l’appareil dans le respect de l’environne-
ment.
Vous trouverez des informations sur les circuits ac-
tuels d'élimination auprès de votre revendeur spé-
cialisé ou de l’administration de votre commune/
ville.
Cet appareil est marqué selon la di-
rective européenne 2012/19/UE rela-
tive aux appareils électriques et élec-
troniques usagés (waste electrical
and electronic equipment - WEEE).
La directive définit le cadre pour une
reprise et une récupération des appa-
reils usagés applicables dans les
pays de la CE.
15 Service après-vente
Pour plus d'informations sur ladurée etles conditions
de la garantie dans votre pays, adressez-vous à notre
service après-vente, à votre revendeur ou consul-
teznotre site Web.
Lorsque vous contactez le service après-vente, vous
avez besoin du numéro de produit (E-Nr.) et du numéro
de fabrication (FD) de votre appareil.
Vous trouverez les données de contact du service
après-vente dans la liste ci-jointe ou sur notre site Web.
15.1 Numéro de produit (E-Nr) et numéro de
fabrication (FD)
Le numéro de série (E-Nr.) et le numéro de fabrication
(FD) sont indiqués sur la plaque signalétique de l’appa-
reil.
Vous trouverez la plaque signalétique avec les numé-
ros en ouvrant la porte de l’appareil.
Pour retrouver rapidement les données de votre appa-
reil et le numéro de téléphone du service consomma-
teurs, n'hésitez pas à les recopier ailleurs.
fr Comment faire
44
16 Comment faire
Vous trouverez ici des conseils concernant les réci-
pients et la préparation de plats.
16.1 La meilleure façon de procéder
ATTENTION!
Les aliments acides peuvent endommager la grille
▶ Ne placez pas d'aliments acides, tels que des fruits
ou des grillades assaisonnées avec de la marinade
acide, directement sur la grille.
Remarque:Remarque pour les personnes aller-
giques au nickel
Dans de rares cas, de faibles traces de nickel peuvent
se retrouver dans les aliments.
1.
Avant toute utilisation, retirez du compartiment de
cuisson les récipients dont vous n'avez pas besoin.
2.
Sélectionnez les plats de votre choix dans les re-
commandations de réglage.
3.
Placez les plats dans un récipient adapté.
Utilisez les accessoires livrés avec l'appareil.
4.
Préchauffez l'appareil uniquement si la recette ou
les recommandations de réglage le préconisent. Ta-
pissez l'accessoire de papier cuisson uniquement
après le préchauffage.
5.
Réglez l’appareil selon les réglages recommandés.
Réglez d'abord la durée plus courte. Prolongez la
durée si nécessaire.
6.
Laissez la porte de l'appareil fermée pendant la
cuisson.
16.2 Conseils pour la pâtisserie
Pour obtenir un bon résultat de cuisson, voici quelques
conseils.
Questions Conseil
Votre gâteau doit lever de
manière uniforme.
¡ Graisser uniquement
le fond du moule dé-
montable.
¡ Après la cuisson, déta-
cher soigneusement le
gâteau du moule à
l'aide d'un couteau.
Lors de la cuisson, les
petites pâtisseries ne
doivent pas coller les
unes aux autres.
Laisser une distance mini-
male de 2cm autour de
chaque pièce de pâtisse-
rie. Les pâtisseries auront
ainsi suffisamment de
place pour lever et dorer
de tous les côtés.
Vérifier si le gâteau est
bien cuit.
Piquer dans le gâteau
avec un bâtonnet de bois
à l’endroit le plus élevé.
Le gâteau est cuit si la
pâte n'adhère plus au bâ-
tonnet de bois.
Vous voulez utiliser votre
propre recette.
Se baser sur une pâtisse-
rie similaire dans les ta-
bleaux de cuisson.
Utiliser des moules en sili-
cone, verre, plastique ou
céramique.
¡ Le moule doit résister
à des températures al-
lant jusqu'à 250°C.
¡ Dans ces moules, les
gâteaux seront moins
dorés.
16.3 Tableau des plats
Vous trouverez ici un aperçu des plats.
Remarque:Pour obtenir un résultat de cuisson uniforme, placez l'aliment au centre de la grille.
Plat Poids en
kg
Niveau d'en-
fournement
Mode de cuisson Température
en°C
Durée enmin.
Lasagnes 3 2 Brûleur 210
1
55 – 60
Rôti de veau 2,5 2 Brûleur 190 – 200
1
140 – 150
Filet de porc 1,5 3 Brûleur +
5
190 – 200
1
100 – 120
Agneau 1,5 2 Brûleur 200 – 210
1
130 – 140
Pommes de terre au four 2 3 Brûleur +
5
190 – 200
1
40 – 45
Épaule de porc 2 2 Brûleur 190 – 200
1
150 – 160R
Poulet 1,5 3 Brûleur 190 – 200
1
90 – 95
Filet de bœuf 1 5 -
1
1er côté: 10
2e côté: 7
Lard 0,7 5 -
1
1er côté: 10
2e côté: 8
Saucisses 1,5 5 + -
1
1er côté: 10
2e côté: 5
1
Préchauffez l'appareil au moins 8minutes.
Comment faire fr
45
Plat Poids en
kg
Niveau d'en-
fournement
Mode de cuisson Température
en°C
Durée enmin.
Poulet rôti 1 Tournebroche + -
1
90 – 95
Rôti de veau 1,5 Tournebroche + -
1
80 – 90
Truite saumonée 1 2 Brûleur 190 – 200
1
40 – 45
Lotte 1 2 Brûleur +
5
190 – 200
1
55 – 60
Bar 1 2 Brûleur 200 – 210
1
45 – 50
Gâteau en pâte brisée 1 2 Brûleur 170 – 180
1
40 – 45
Tarte aux pommes 1 3 Brûleur +
5
170 – 180
1
70 – 75
Choux 0,8 3 Brûleur 170
1
70 – 75
Gâteau à la crème dessert 1 3 Brûleur 160 – 170
1
55 – 60
Kouglof 1 3 Brûleur 160 – 170
1
55 – 60
Génoise 1 2 Brûleur +
5
160 – 170
1
60 – 65
Muffins par 0,03 2 Brûleur +
5
160 – 170
1
25 – 30
1
Préchauffez l'appareil au moins 8minutes.
16.4 Conseils pour la cuisson suivante
Si la cuisson ne donne pas les résultats escomptés,
voici quelques conseils.
Problème Conseil
Votre gâteau s'affaisse. ¡ Vérifiez les ingrédients
ajoutés et suivez les
conseils de prépara-
tion figurant dans la re-
cette.
¡ Utilisez moins de li-
quide.
Ou:
¡ Réduisez la tempéra-
ture de cuisson de
10°C et prolongez le
temps de cuisson.
Votre gâteau est trop sec. Augmentez la tempéra-
ture de cuisson de 10°C
et raccourcissez le temps
de cuisson.
Votre gâteau est trop clair
dans l'ensemble.
¡ Vérifiez le niveau d'en-
fournement et l'acces-
soire.
¡ Augmentez la tempé-
rature de cuisson de
10°C.
Ou:
¡ Prolongez le temps de
cuisson.
Le gâteau est trop foncé
dans l'ensemble.
Réduisez la température
de cuisson et prolongez
le temps de cuisson.
Votre gâteau est trop clair
sur le dessus mais trop
foncé en dessous.
Enfournez le gâteau à un
niveau supérieur.
Votre gâteau est trop fon-
cé sur le dessus mais
trop clair en dessous.
¡ Enfournez le gâteau à
un niveau inférieur.
¡ Réduisez la tempéra-
ture de cuisson et ral-
longez le temps de
cuisson
Problème Conseil
Vôtre gâteau a doré de
manière irrégulière.
¡ Réduisez la tempéra-
ture de cuisson.
¡ Découpez le papier de
cuisson aux bonnes di-
mensions.
¡ Placez le moule au
centre.
¡ Formez des petites pâ-
tisseries de même
taille et de même
épaisseur.
Votre gâteau est cuit à
l'extérieur mais pas à l'in-
térieur.
¡ Réduisez la tempéra-
ture de cuisson et pro-
longez le temps de
cuisson.
¡ Ajoutez moins de li-
quide.
Pour un gâteau avec une
garniture fondante:
¡ Précuisez le fond.
¡ Parsemez le fond cuit
d'amandes ou de cha-
pelure.
¡ Placez la garniture sur
le fond.
Votre gâteau ne se dé-
moule pas une fois ren-
versé.
¡ Après la cuisson, lais-
sez refroidir le gâteau
pendant
5 - 10minutes.
¡ Détachez les bords du
gâteau avec précau-
tion à l'aide d'un cou-
teau.
¡ Renversez à nouveau
le gâteau et couvrez le
moule plusieurs fois
d'une serviette humide
et froide.
¡ La prochaine fois,
graissez le moule et
saupoudrez de chape-
lure.
fr Instructions de montage
46
16.5 Conseils pour le rôtissage suivant
Si le rôtissage ne réussit pas tout de suite, voici
quelques conseils.
Questions Conseil
Votre rôti est trop cuit et
la croûte est brûlée par
endroits.
¡ Sélectionner une tem-
pérature inférieure.
¡ Réduire la durée de
cuisson.
Votre rôti est trop sec. ¡ Sélectionner une tem-
pérature inférieure.
¡ Réduire la durée de
cuisson.
La croûte de votre rôti est
trop fine.
¡ Augmenter la tempéra-
ture.
Ou:
¡ Après la fin de la du-
rée de cuisson, allu-
mer brièvement le gril.
Votre de sauce pour rôti
est brûlée.
¡ Choisir un récipient
plus petit.
¡ Ajouter plus de liquide
lors de la cuisson.
Questions Conseil
Votre sauce du rôti est
trop claire et aqueuse.
¡ Choisir un récipient
plus grand pour une
évaporation plus im-
portante de liquide.
¡ Ajouter moins de li-
quide lors de la cuis-
son.
Lorsque vous braisez de
la viande, celle-ci brûle.
¡ Vérifier si le plat à rôti
et le couvercle sont
compatibles et se
ferment bien.
¡ Réduire la tempéra-
ture.
¡ Ajouter du liquide pen-
dant le braisage.
Votre rôti n'est pas entiè-
rement cuit.
¡ Découper le rôti.
¡ Préparer la sauce
dans le plat à rôtir.
¡ Disposer les tranches
de rôti dans la sauce.
¡ Terminer la cuisson
des tranches de rôti
avec le micro-ondes.
17 Instructions de montage
Respectez ces informations lors du montage de l'appa-
reil.
17.1 Installation en toute sécurité
Respectez ces consignes avant de commen-
cer à installer l'appareil.
AVERTISSEMENT‒Risque d'incendie!
Il est dangereux d’utiliser un cordon d’alimen-
tation secteur avec une rallonge ou un adap-
tateur non autorisé.
▶ N’utilisez pas de bloc multiprise.
▶ Utilisez uniquement une rallonge certifiée,
d'une section minimale de 1,5mm² et
conforme aux exigences de sécurité natio-
nales en vigueur.
▶ Si le cordon d’alimentation secteur est trop
court et qu’aucun cordon d’alimentation
plus long n’est disponible, contacter un
électricien spécialisé pour adapter l’installa-
tion domestique.
▶ Utiliser uniquement des adaptateurs et cor-
dons d’alimentation secteur agréés par le
fabricant.
ATTENTION!
Le fait de porter l'appareil par la poignée risque de
casser celle-ci. La poignée de porte ne résiste pas au
poids de l'appareil.
▶ Ne jamais transporter ni porter l'appareil
par la poignée de la porte.
¡ Seule une installation effectuée selon les
présentes instructions de montage garantit
une utilisation en toute sécurité. L'installa-
teur est responsable des dommages résul-
tant d'une installation incorrecte.
¡ Contrôlez l'état de l'appareil après l'avoir
déballé. Ne le raccordez pas s'il présente
une avarie en raison du transport.
¡ Avant la mise en service, retirez le matériau
d'emballage et les films adhésifs du com-
partiment de cuisson et de la porte.
¡ Respectez la notice de montage pour l'ins-
tallation des accessoires.
¡ Les meubles d'encastrement doivent résis-
ter à une température jusqu'à 90 °C, la fa-
çade des meubles voisins jusqu'à 70 °C.
¡ N'installez pas l'appareil derrière une
plaque décorative ou une porte de meuble.
Il existe un risque de surchauffe.
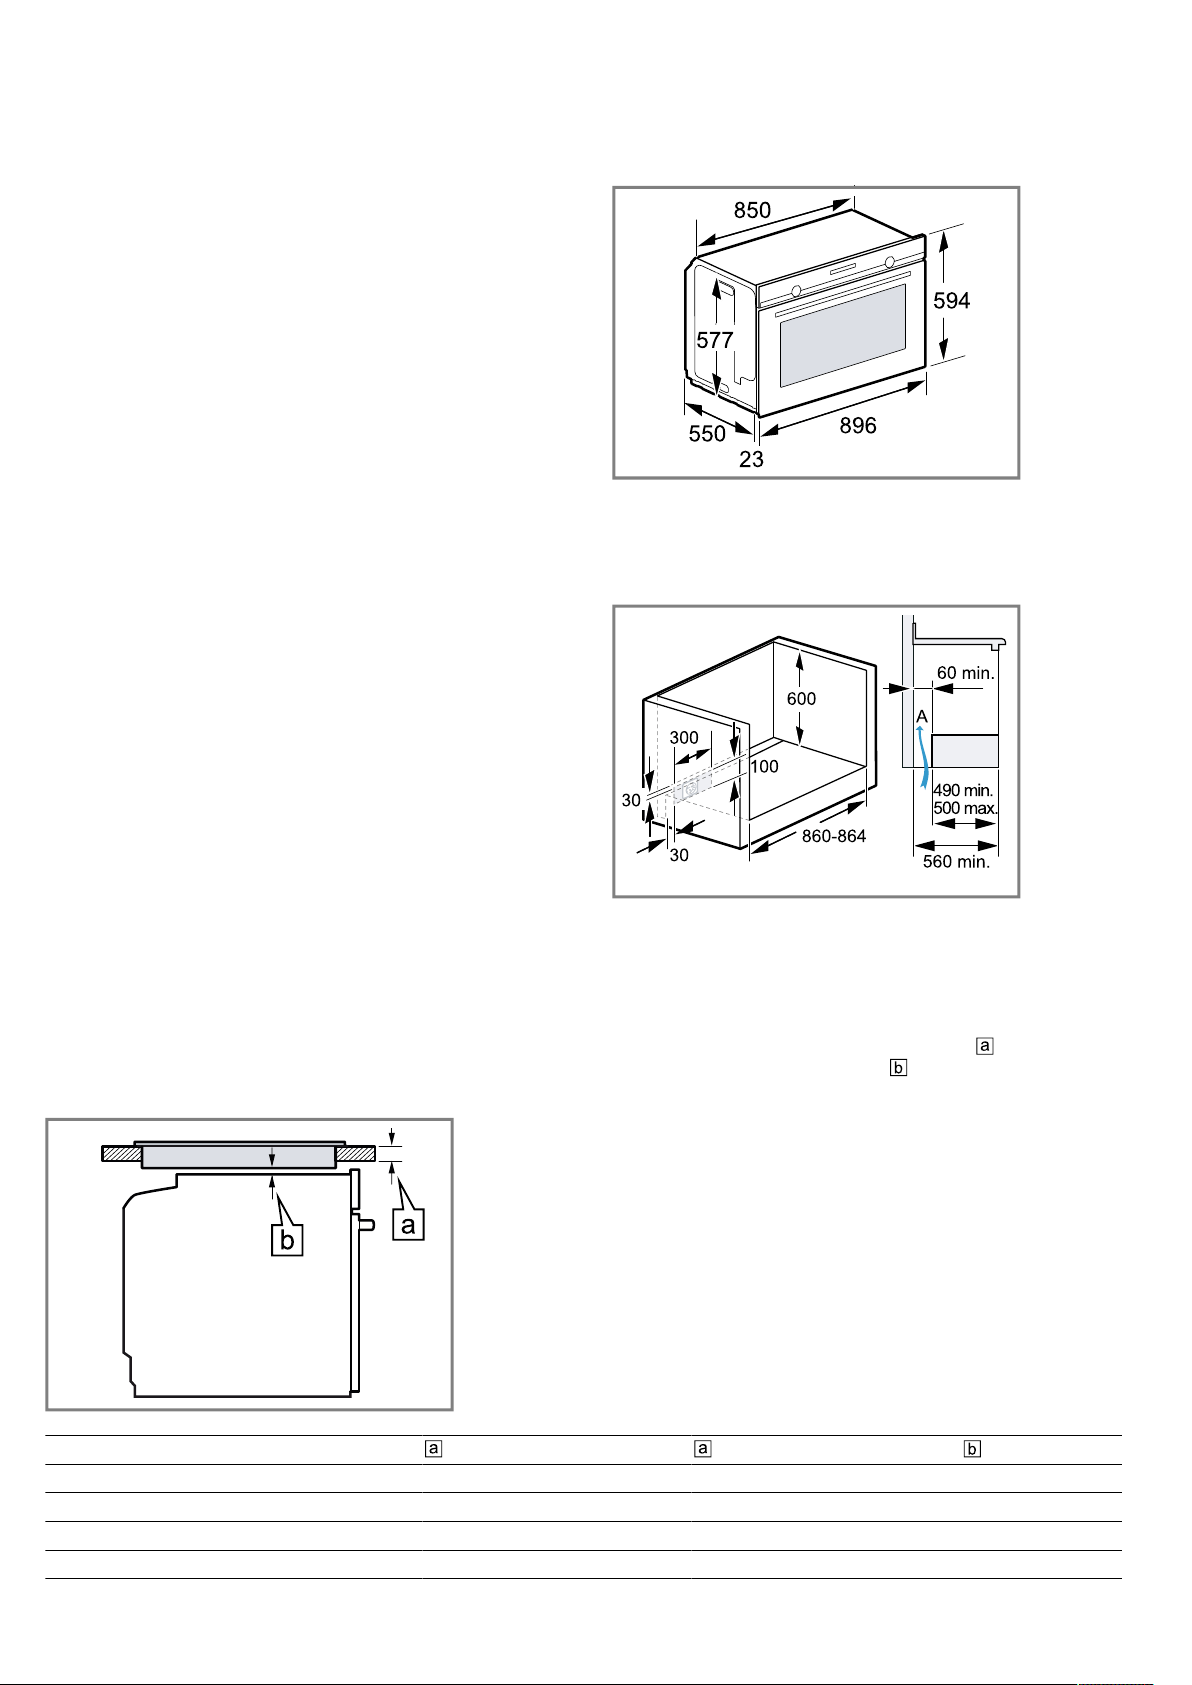
Instructions de montage fr
47
¡ Réalisez des travaux de découpe sur le
meuble avant la mise en place de l'appa-
reil. Enlevez les copeaux. Le fonctionne-
ment des composants électriques peut être
compromis.
¡ La prise de raccordement de l'appareil doit
donc être disposée à l'extérieur de l'espace
d'encastrement.
¡ Mettez toujours à la terre les appareils élec-
triques.
¡ Lorsque vous montez l'appareil, vous devez
respecter les directives d'installation actuel-
lement en vigueur ainsi que les prescrip-
tions des fournisseurs locaux d'électricité et
de gaz. En Allemagne, par exemple, les
normes en vigueur sont: DVGW-TRGI/
TRGF et en Autriche ÖVGW-TR.
¡ Coupez l'alimentation électrique et l'alimen-
tation en gaz avant de commencer les tra-
vaux. Assurez-vous que les indications de
la plaque signalétique concernant la ten-
sion, le type de gaz et la pression du gaz
correspondent aux prescriptions locales de
raccordement.
¡ Portez des gants de protection pour éviter
des coupures. Certaines pièces acces-
sibles lors du montage peuvent posséder
des arêtes coupantes.
¡ Dimensions indiquées dans les illustrations
en mm.
17.2 Dimensions de l’appareil
Vous trouverez ici les dimensions de l'appareil
17.3 Installation sous un plan de travail
Observez les cotes d'encastrement et les distances de
sécurité lors de l'installation sous un plan de travail.
Pour la ventilation de l'appareil, le plancher intermé-
diaire doit présenter une découpe de ventilation.
17.4 Installation sous une table de cuisson
Si l'appareil est encastré sous une table de cuisson,
les dimensions minimales doivent être respectées, y
compris la sous-structure si nécessaire.
L'épaisseur minimale du plan de travail résulte de la
distance minimale nécessaire .
Type de table de cuisson monté en mm affleurant en mm en mm
Table de cuisson induction 37 38 5
Table de cuisson induction Full Zone 58 58 5
Table de cuisson gaz 27 38 5
Table de cuisson électrique 27 30 2
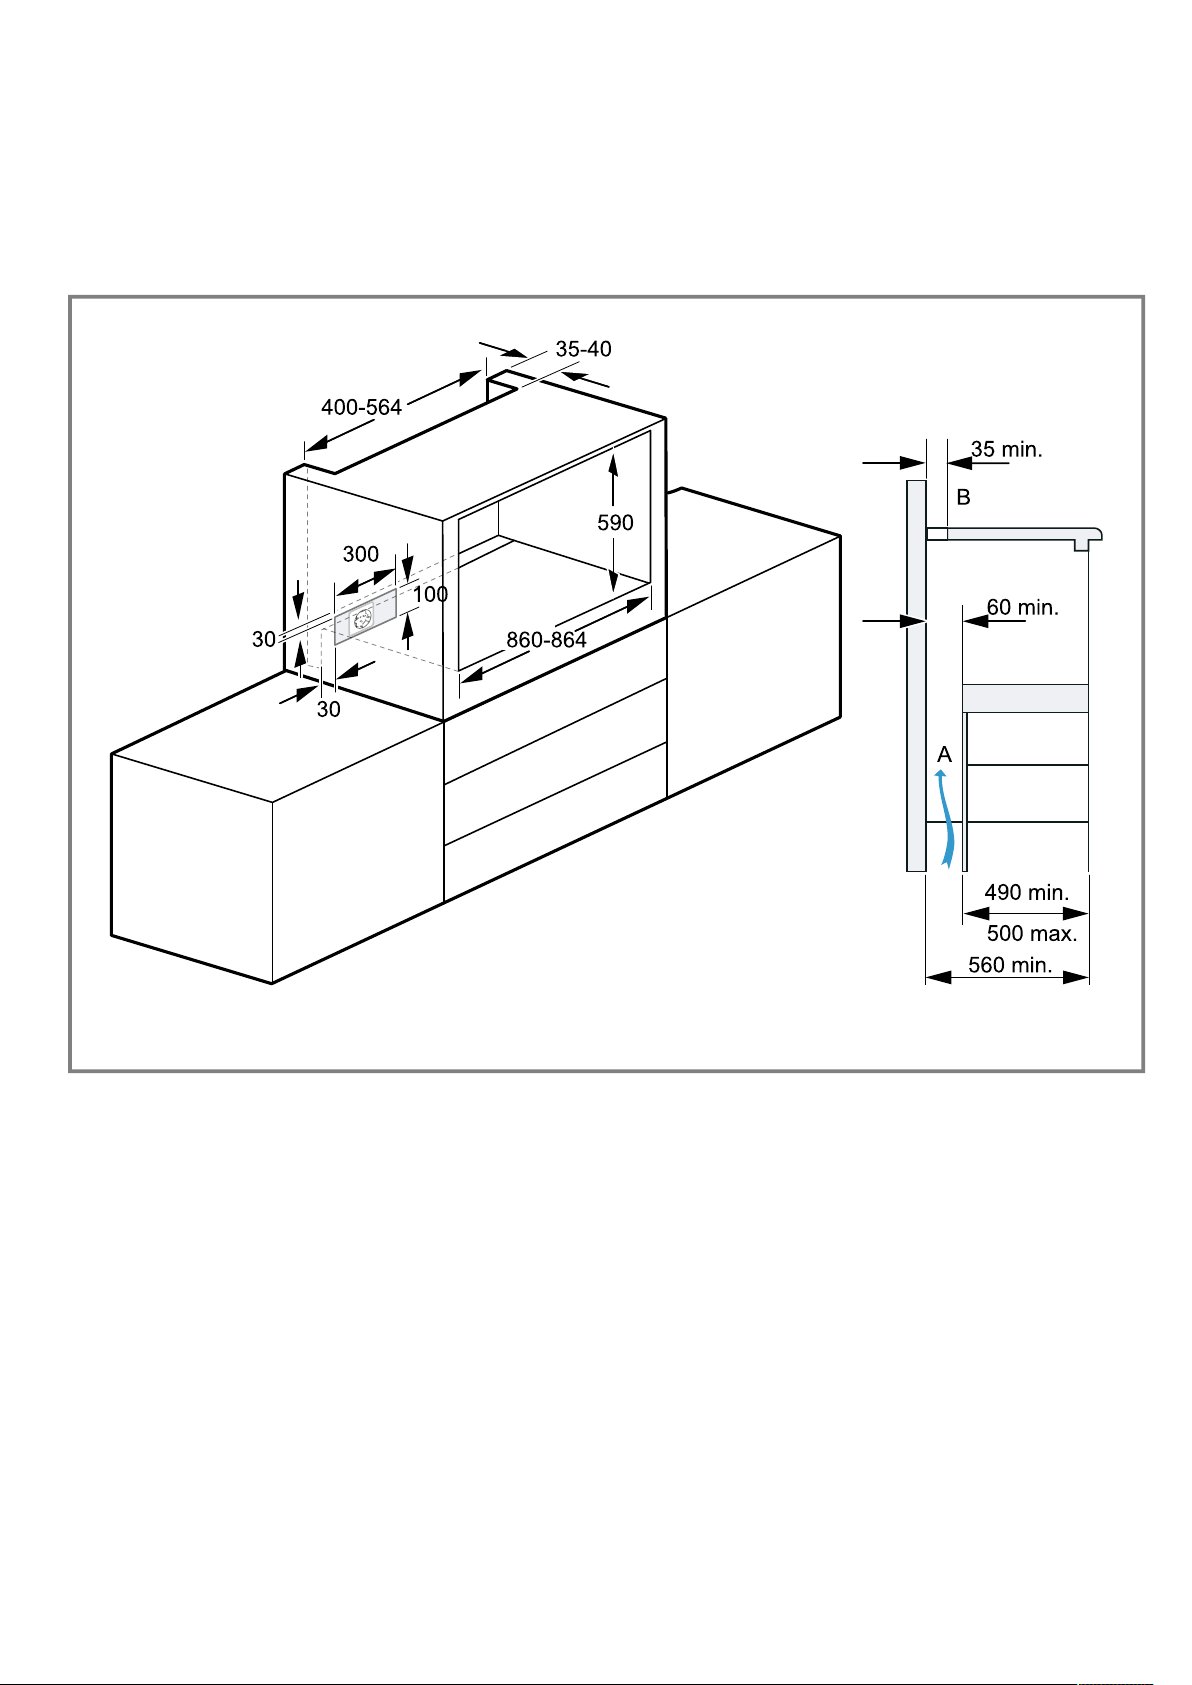
fr Instructions de montage
48
Fixez le plan de travail sur le meuble d'encastrement.
Respectez les instructions de montage de la table de
cuisson.
17.5 Installation dans un meuble haut
Respectez les cotes d'encastrement et les distances de sécurité dans le placard vertical.
¡ Assurez-vous que le plancher intermédiaire pré-
sente un espace par rapport au mur d'installation
afin d'aérer l'appareil.
¡ Si le meuble haut possède une paroi arrière en plus
des parois arrières préfabriquées, celle-ci doit être
retirée.
¡ Encastrez l'appareil à une hauteur qui permette de
retirer sans problème les accessoires.
17.6 Installation de deux appareils
superposés
Votre appareil peut également être installé sur un autre
appareil.
17.7 Directives pour la ventilation
Installez cet appareil uniquement dans une pièce suffi-
samment aérée.
¡ Si la puissance totale de tous les appareils à gaz
est inférieure à 11kW, cette condition est remplie si
la pièce d'installation présente un volume de plus
de 15m³ et possède au moins une porte donnant
sur l'extérieur ou une fenêtre ouvrable.
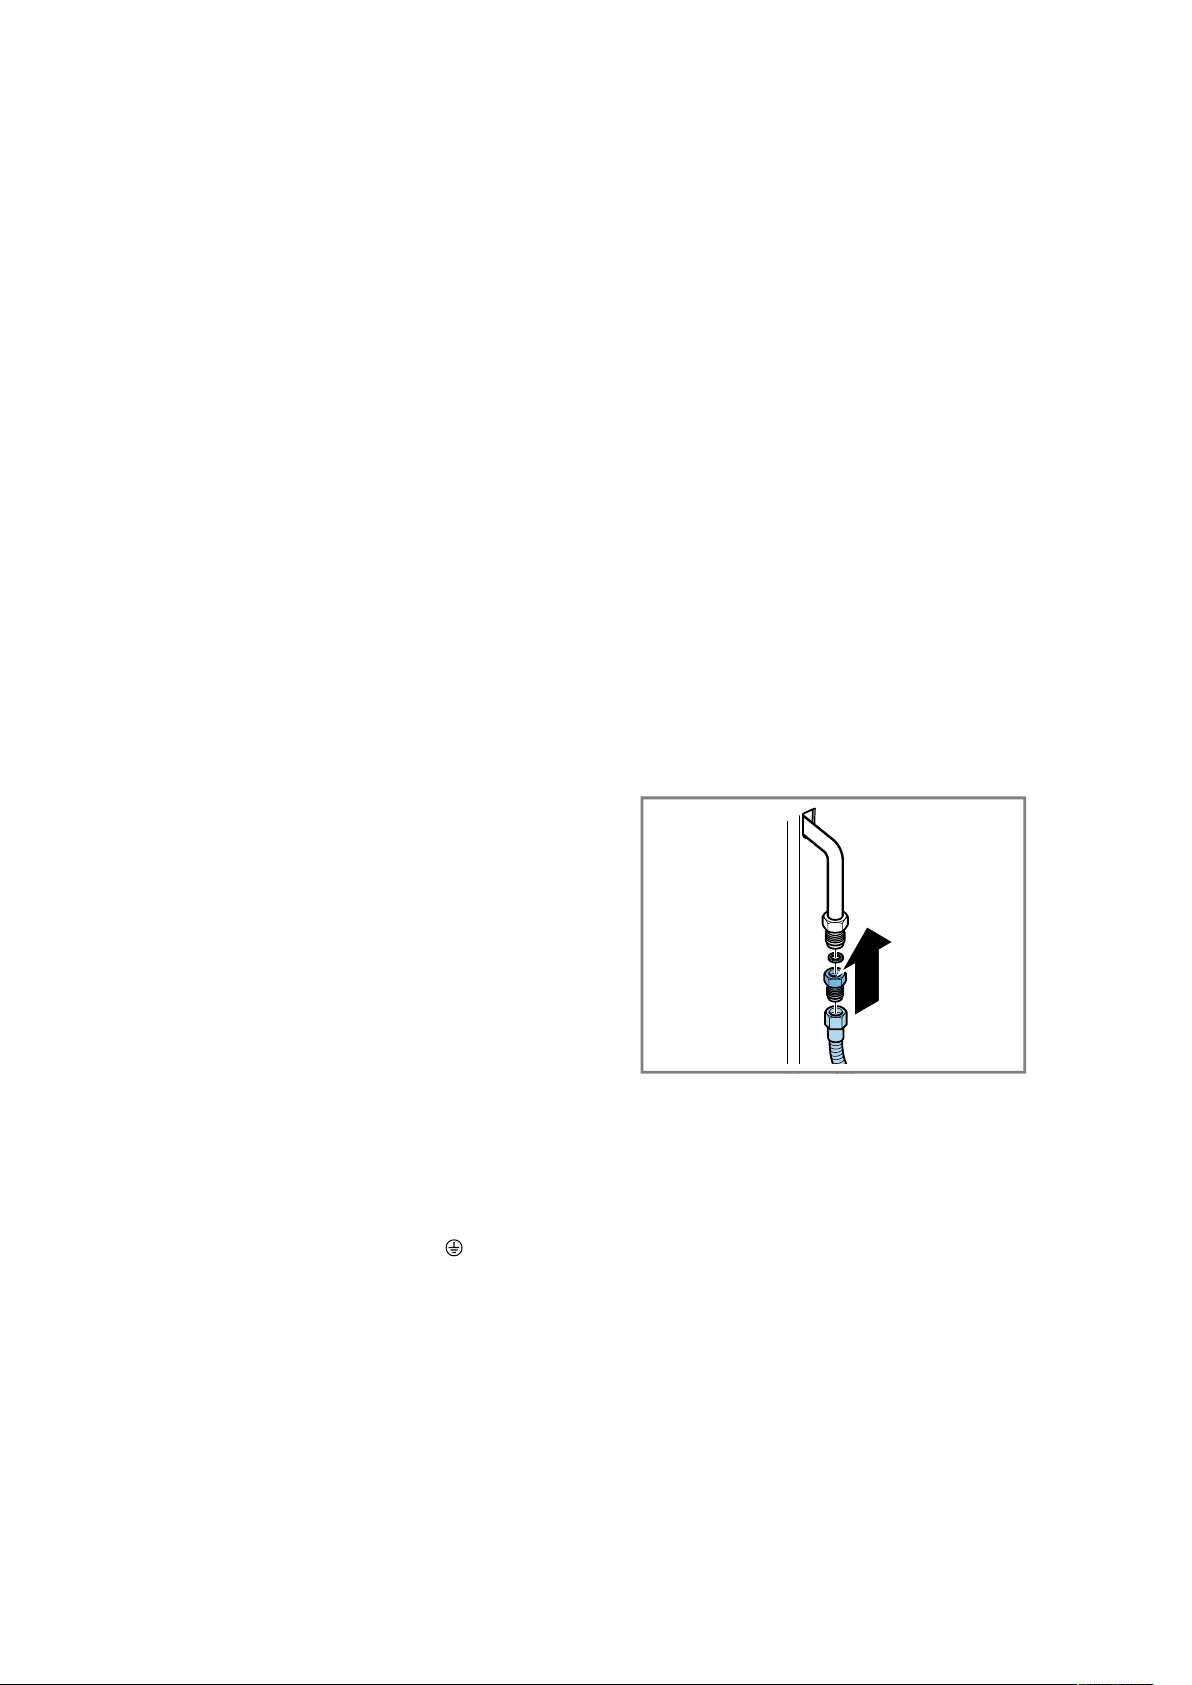
Instructions de montage fr
49
¡ Si la puissance totale de tous les appareils à gaz
est supérieure à 11 kW, cette condition est remplie
si la pièce d'installation présente un volume de plus
de 2m³ par kW et possède au moins une porte
donnant sur l'extérieur ou une fenêtre ouvrable.
Par ailleurs, il doit y avoir une hotte aspirante ou
une ventilation contrôlée sans mode recyclage qui
dispose d'un débit minimal de 15m³/h par kW de
puissance totale pour tous les appareils à gaz.
Assurez-vous que des ouvertures d'aération appro-
priées sont disponibles.
Remarque:Dans certains pays, les conditions rela-
tives au volume minimal de la pièce varient. Rensei-
gnez-vous auprès du service après-vente.
17.8 Branchement électrique
Respectez les présentes consignes pour pouvoir effec-
tuer le branchement électrique de l'appareil en toute
sécurité.
¡ La protection par fusible doit s'effectuer conformé-
ment à l'indication de puissance figurant sur la
plaque signalétique et aux prescriptions locales.
¡ L'appareil est conforme à la classe de protection I
et ne peut utilisé qu'avec une prise à conducteur de
protection.
¡ Pour tous les travaux de montage, l'appareil doit
être hors tension.
¡ L'encastrement doit garantir la protection contre les
contacts accidentels.
¡ Seul un personnel qualifié et agréé peut raccorder
l'appareil sans fiche. Il doit appliquer les réglemen-
tations du fournisseur d'électricité régional.
Raccordement électrique de l'appareil sans
connecteur à fiche de contact de sécurité
Remarque:Seul du personnel qualifié et agréé peut
raccorder l'appareil. En cas de dommages dus à un
raccordement incorrect, il n'y a aucun droit à la garan-
tie.
Un dispositif de sectionnement doit être intégré dans
l’installation électrique fixe, conformément aux prescrip-
tions d’installation.
1.
Identifiez le conducteur de phase et le conducteur
neutre dans la prise de raccordement.
L'appareil risque d'être endommagé en cas de rac-
cordement incorrect.
2.
Branchez l'appareil uniquement sur une tension de
réseau comprise entre 220et 240V.
3.
Raccordez les fils du cordon d'alimentation secteur
conformément au code de couleur:
‒ vert-jaune: conducteur de protection
‒ bleu = (neutre) conducteur neutre
‒ marron = phase (conducteur externe)
17.9 Raccordement au gaz
Raccordez l'appareil conformément aux prescriptions
actuellement en vigueur.
Avant d'installer l'appareil, vérifiez que les conditions lo-
cales concernant le type de gaz et la pression du gaz
sont compatibles avec les réglages de l'appareil. Vous
trouverez les réglages autorisés de l'appareil sur la
plaque signalétique. Seul un personnel qualifié et
agréé est autorisé à raccorder l'appareil aux conduites
de gaz et aux joints d'étanchéité conformément aux
normes actuellement en vigueur.
Raccorder le gaz à l'appareil
Le raccordement au gaz s'effectue à l'arrière de l'appa-
reil. Un coude de raccordement conforme à la norme
EN ISO 228 G1/2 mâle est prémonté.
Un adaptateur pour gaz naturel conforme à la norme
EN ISO 228 G1/2 - EN 10226 R1/2 et un raccord de
tuyau conforme à la norme EN ISO 228 G1/2 - gaz bu-
tane/propane sont fournis avec l'appareil.
Réglages standard des brûleurs
Les brûleurs sont préréglés pour du gaz liquéfié
G30/31 à 28-30/37 mbar.
Un jeu d'injecteurs pour du gaz naturel G20 de 20
mbar est fourni avec l'appareil.
Raccordement au gaz naturel
Remarques
¡ Utilisez exclusivement des conduites de raccorde-
ment ou des tuyaux flexibles qui répondent aux
prescriptions en vigueur et qui sont agréés pour cet
usage.
¡ Pour étancher le filetage, utilisez uniquement un
mastic d'étanchéité homologué.
1.
Vissez l'adaptateur et le joint au coude de raccorde-
ment.
2.
Tenez la pièce d'adaptation à l'aide d'une clé et vis-
sez-la à une conduite de raccordement fixe ou à un
tuyau flexible de raccordement au gaz.
Raccordement au gaz butane/propane
Remarques
¡ Utilisez exclusivement des conduites de raccorde-
ment ou des tuyaux flexibles qui répondent aux
prescriptions en vigueur et qui sont agréés pour cet
usage.
¡ Pour étancher le filetage, utilisez uniquement un
mastic d'étanchéité homologué.
Condition:Si vous raccordez l'appareil à du gaz bu-
tane/propane, vous devez toujours installer un déten-
deur de pression de gaz approprié. Pour choisir un dé-
tendeur de pression de gaz approprié, tenez compte
de la consommation totale de gaz de l'appareil indi-
quée sur la plaque signalétique.
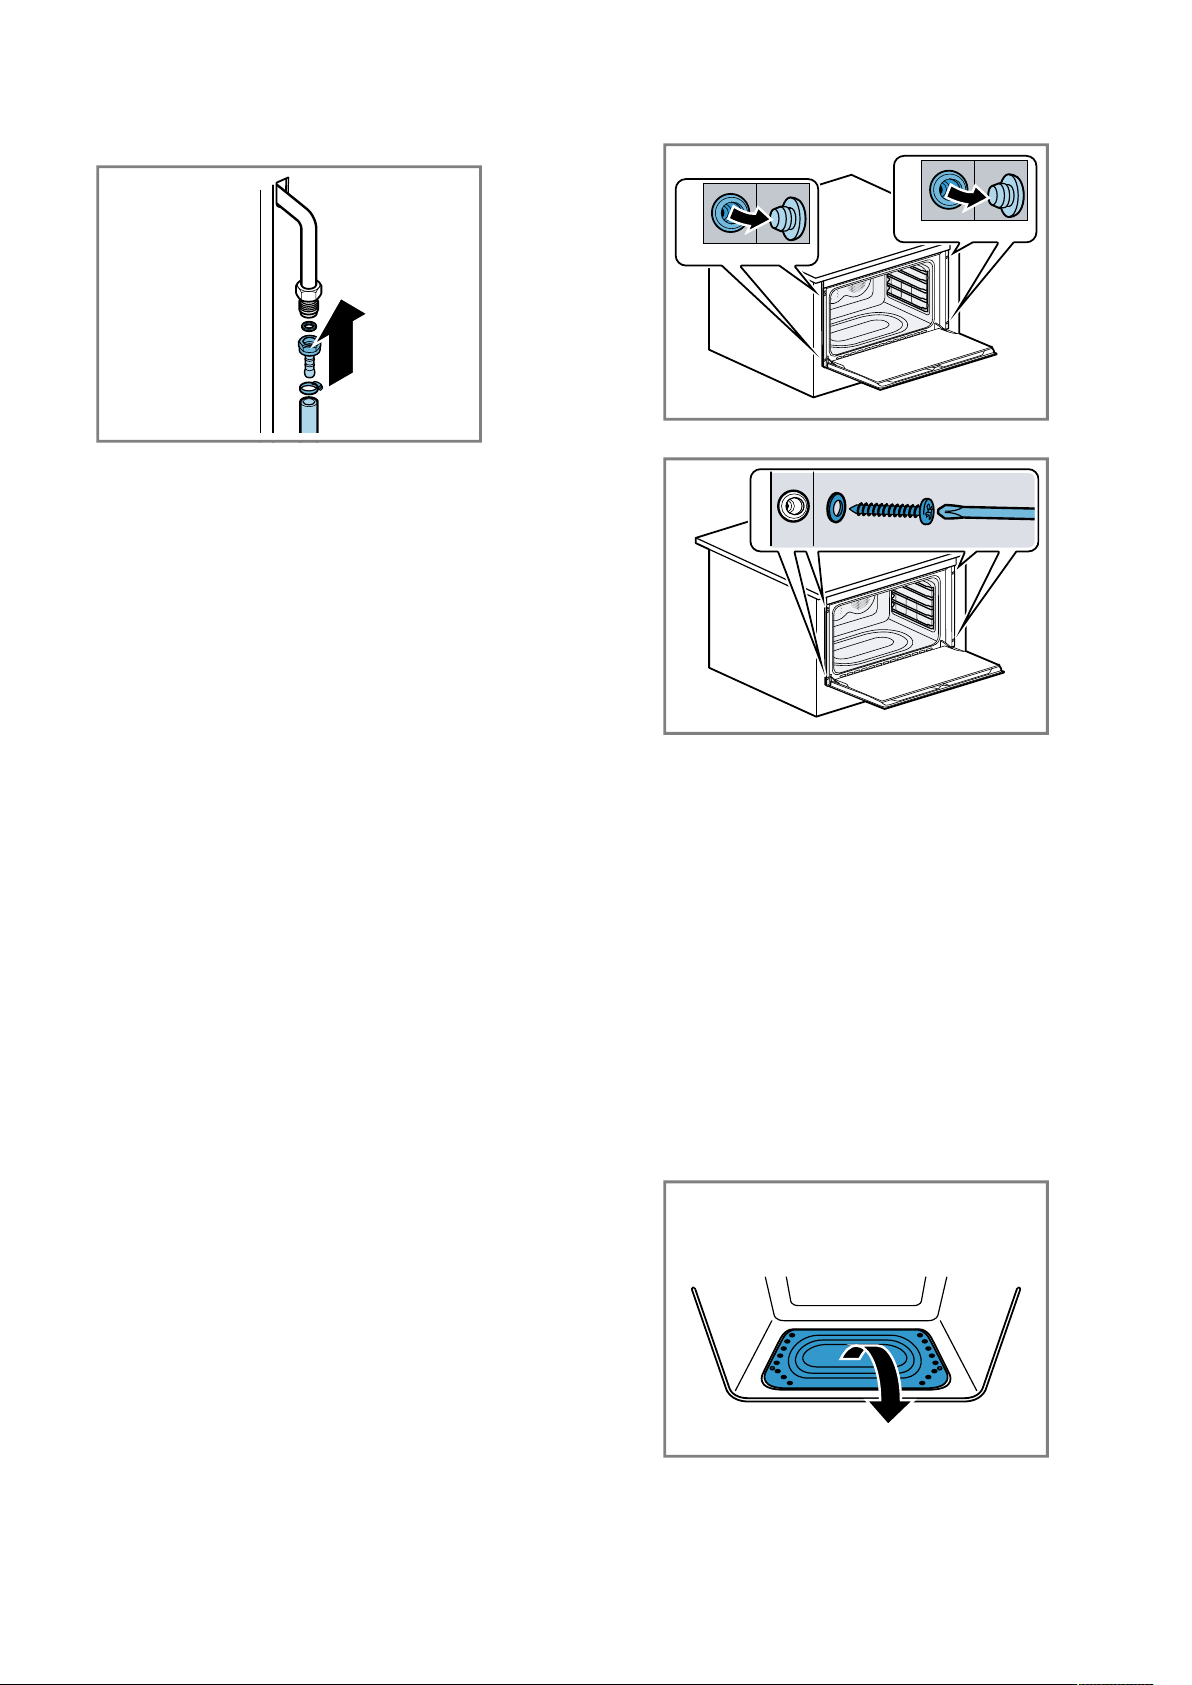
fr Instructions de montage
50
1.
Fixez le raccord de tuyau et le joint sur le coude de
raccordement.
2.
Poussez le tuyau de gaz flexible sur la douille de
flexible.
3.
Serrez le collier de serrage.
Tuyaux flexibles
En cas de tuyaux flexibles, respectez les points sui-
vants.
¡ Ne pincez pas et n'écrasez pas les flexibles.
¡ N'exposez pas les flexibles à des forces de traction
ou de torsion.
¡ Éloignez les flexibles d'arêtes coupantes.
¡ Ne laissez pas les tuyaux entrer en contact avec
des pièces dont la température peut dépasser la
température ambiante de plus de 70°C.
¡ Toute la longueur des flexibles doit être accessible
pour l'inspection.
Installer une vanne de sécurité
Vous devez installer une vanne de sécurité pour ouvrir
et fermer l'arrivée de gaz.
1.
Installez la vanne de sécurité entre la conduite d'ar-
rivée de gaz de la pièce concernée et l'appareil.
2.
Veillez à ce qu'il soit possible d'accéder à tout ins-
tant à cette vanne.
Contrôler le bon comportement de combustion et
l'étanchéité
1.
Après le raccordement de la conduite de gaz, véri-
fiez l'étanchéité des raccordements avec une solu-
tion savonneuse.
2.
Allumez l'appareil en procédant selon la notice d'uti-
lisation.
3.
Allumez tous les brûleurs et vérifiez que les
flammes restent stables, tant aux réglages élevés
qu'aux réglages bas.
17.10 Encastrer l'appareil
1.
Poussez l'appareil et centrez-le.
Ne pliez pas le câble de raccordement.
2.
Ouvrez la porte du four en grand.
3.
Retirez le couvercle de protection.
4.
Vissez l'appareil au meuble.
5.
Mettez le couvercle de protection en place.
Remarque:N'obstruez jamais l'écart entre le plan de
travail et l'appareil par des baguettes supplémentaires.
17.11 Changer le type de gaz
Si l'appareil n'est pas déjà équipé pour le type de gaz
existant, il doit être modifié. Seul un spécialiste agréé
est habilité à convertir l'appareil à un autre type de gaz
conformément à la réglementation en vigueur.
La plaque signalétique indique le type de gaz préréglé
en usine et la pression de gaz.
→"Numéro de produit (E-Nr) et numéro de fabrication
(FD)", Page43
Pour convertir l'appareil à un autre type de gaz, rempla-
cez les injecteurs et réglez le débit de gaz minimal.
Remplacement des injecteurs des brûleurs du four
1.
Soulevez légèrement la plaque de fond vers l'avant,
puis retirez-la vers l'avant.
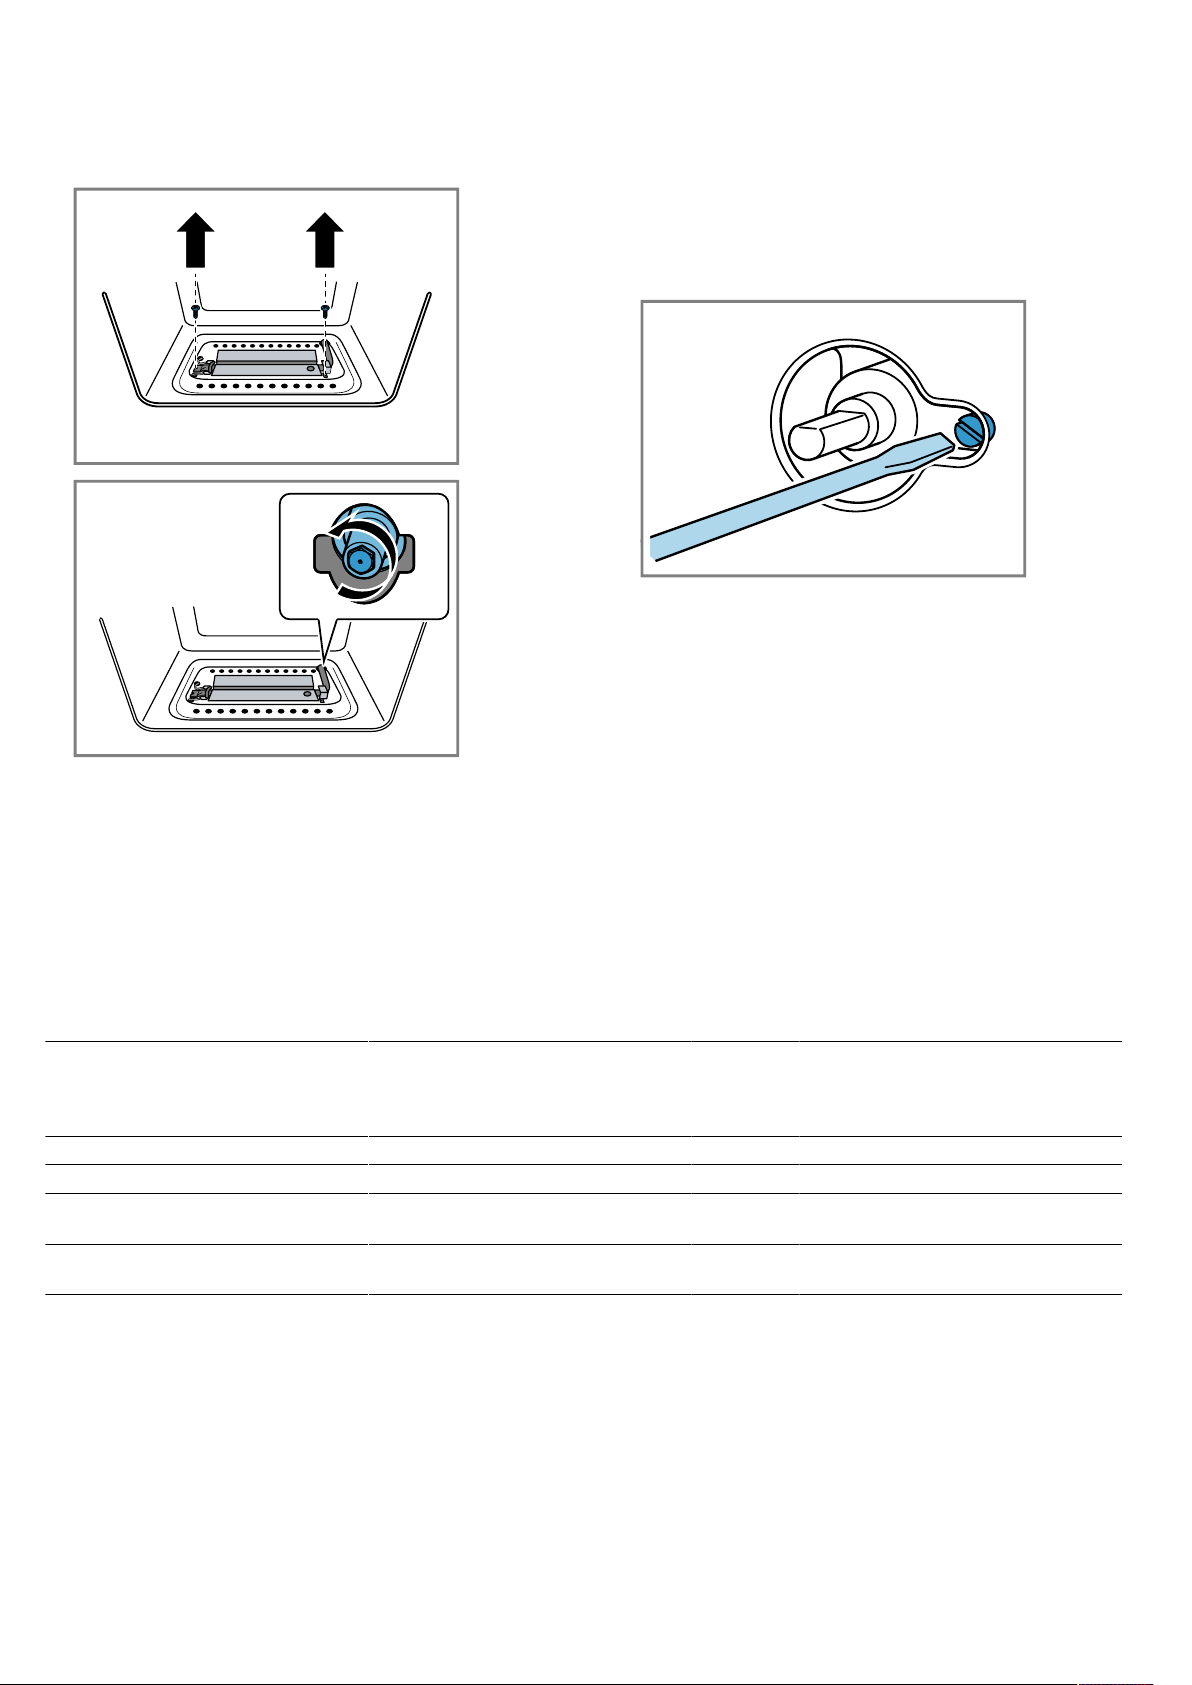
Instructions de montage fr
51
2.
Dévissez l'injecteur et remplacez-le par un injecteur
adapté au nouveau type de gaz.
→"Tableau général des injecteurs", Page51
3.
Remplacez l'étiquette de gaz par la nouvelle éti-
quette fournie avec le jeu d'injecteurs.
4.
Pour assembler le brûleur du four et la plaque de
base, procédez dans l'ordre inverse.
Régler le débit de gaz minimal
1.
Ouvrez la porte de l’appareil.
2.
Maintenez enfoncée le bouton de commande du
four, puis tournez le bouton de commande en posi-
tion maximale.
a Le brûleur à gaz s'allume.
3.
Maintenez le bouton enfoncé pendant 15secondes.
4.
Fermez la porte de l’appareil.
5.
Retirez le bouton de commande.
6.
Desserrez la vis d'ajustage intérieure.
7.
Refixez le bouton de commande et faites chauffer le
four pendant 15 minutes.
8.
Tournez le régulateur sur la position minimale.
9.
Retirez le bouton de commande.
10.
Réglez la vis d'ajustage intérieure jusqu'à ce que la
flamme soit correcte et stable.
Pour augmenter le débit de gaz, desserrez la vis
d'ajustage. Pour réduire le débit de gaz, resserrez la
vis d'ajustage. Le réglage est correct lorsque la pe-
tite flamme atteint une taille d'environ 3 à 4 mm.
Dans le cas d'un raccordement au gaz liquide, ser-
rez la vis d'ajustage.
11.
Refixez le bouton de commande.
12.
Assurez-vous que la flamme ne s'éteigne pas
lorsque vous modifiez rapidement le débit de gaz
de maximum à minimum et inversement, et lorsque
vous ouvrez et fermez la porte de l'appareil.
Tableau général des injecteurs
Type de gaz/brûleur mbar Numéro
d'injec-
teur
Bypass Puis-
sance en
Watt
Puis-
sance mi-
nimum en
Watt
Consommation maxi-
male
Gaz naturel G20/brûleur du four 20 135 (H1) Espace 3600 1200 G20: 352l/h
Gaz naturel G20/brûleur du gril 20 130 (H3) 3000 G20: 298l/h
Gaz butane propane G30/G31/
brûleur du four
28 -
30/37
90 (H1) 58 3600 1200 G30: 269g/h
G31: 264g/h
Gaz butane propane G30/G31/
brûleur du gril
28 -
30/37
83 (S) 3000 G30: 218g/h
G31: 214g/h
Pression de service nominale
La pression de service nominale de votre appareil est
de :
¡ pour du gaz naturel - NG (G20) 20 mbar/2,0kPa
¡ pour du gaz butane/propane - LPG (G30) 30mbar/
3,0kPa
¡ pour du gaz butane/propane - LPG (G31) 37mbar/
3,7kPa
Vous devez utiliser votre appareil avec ces valeurs de
pression. Toutes les données figurant sur la plaque si-
gnalétique de votre appareil se rapportent à ces ni-
veaux de pression. Le fabricant décline toute responsa-
bilité quant au fonctionnement, aux performances de
l'appareil ou à tout autre risque si vous utilisez l'appa-
reil à des pressions différentes de celles indiquées
pour l'appareil.
Remarque:Si vous utilisez l'appareil avec du gaz bu-
tane/propane, utilisez un détendeur de pression de
gaz. Le détendeur de pression doit être raccordé et en-
tretenu par un spécialiste agréé.

fr Instructions de montage
52
17.12 Démonter l'appareil
1.
Mettez l'appareil hors tension.
2.
Desserrez les vis de fixation.
3.
Soulevez légèrement l'appareil et retirez-le complè-
tement.


Thank you for buying a
Bosch Home Appliance!
Register your new device on MyBosch now and profit directly from:
• Expert tips & tricks for your appliance
• Warranty extension options
• Discounts for accessories & spare-parts
• Digital manual and all appliance data at hand
• Easy access to Bosch Home Appliances Service
Free and easy registration – also on mobile phones:
www.bosch-home.com/welcome
Looking for help?
You'll find it here.
Expert advice for your Bosch home appliances, help with problems
or a repair from Bosch experts.
Find out everything about the many ways Bosch can support you:
www.bosch-home.com/service
Contact data of all countries are listed in the attached service directory.
BSH Hausgeräte GmbH
Carl-Wery-Straße 34
81739 München, GERMANY
www.bosch-home.com
A Bosch Company
*9001867564*
9001867564 (030714)
en, fr