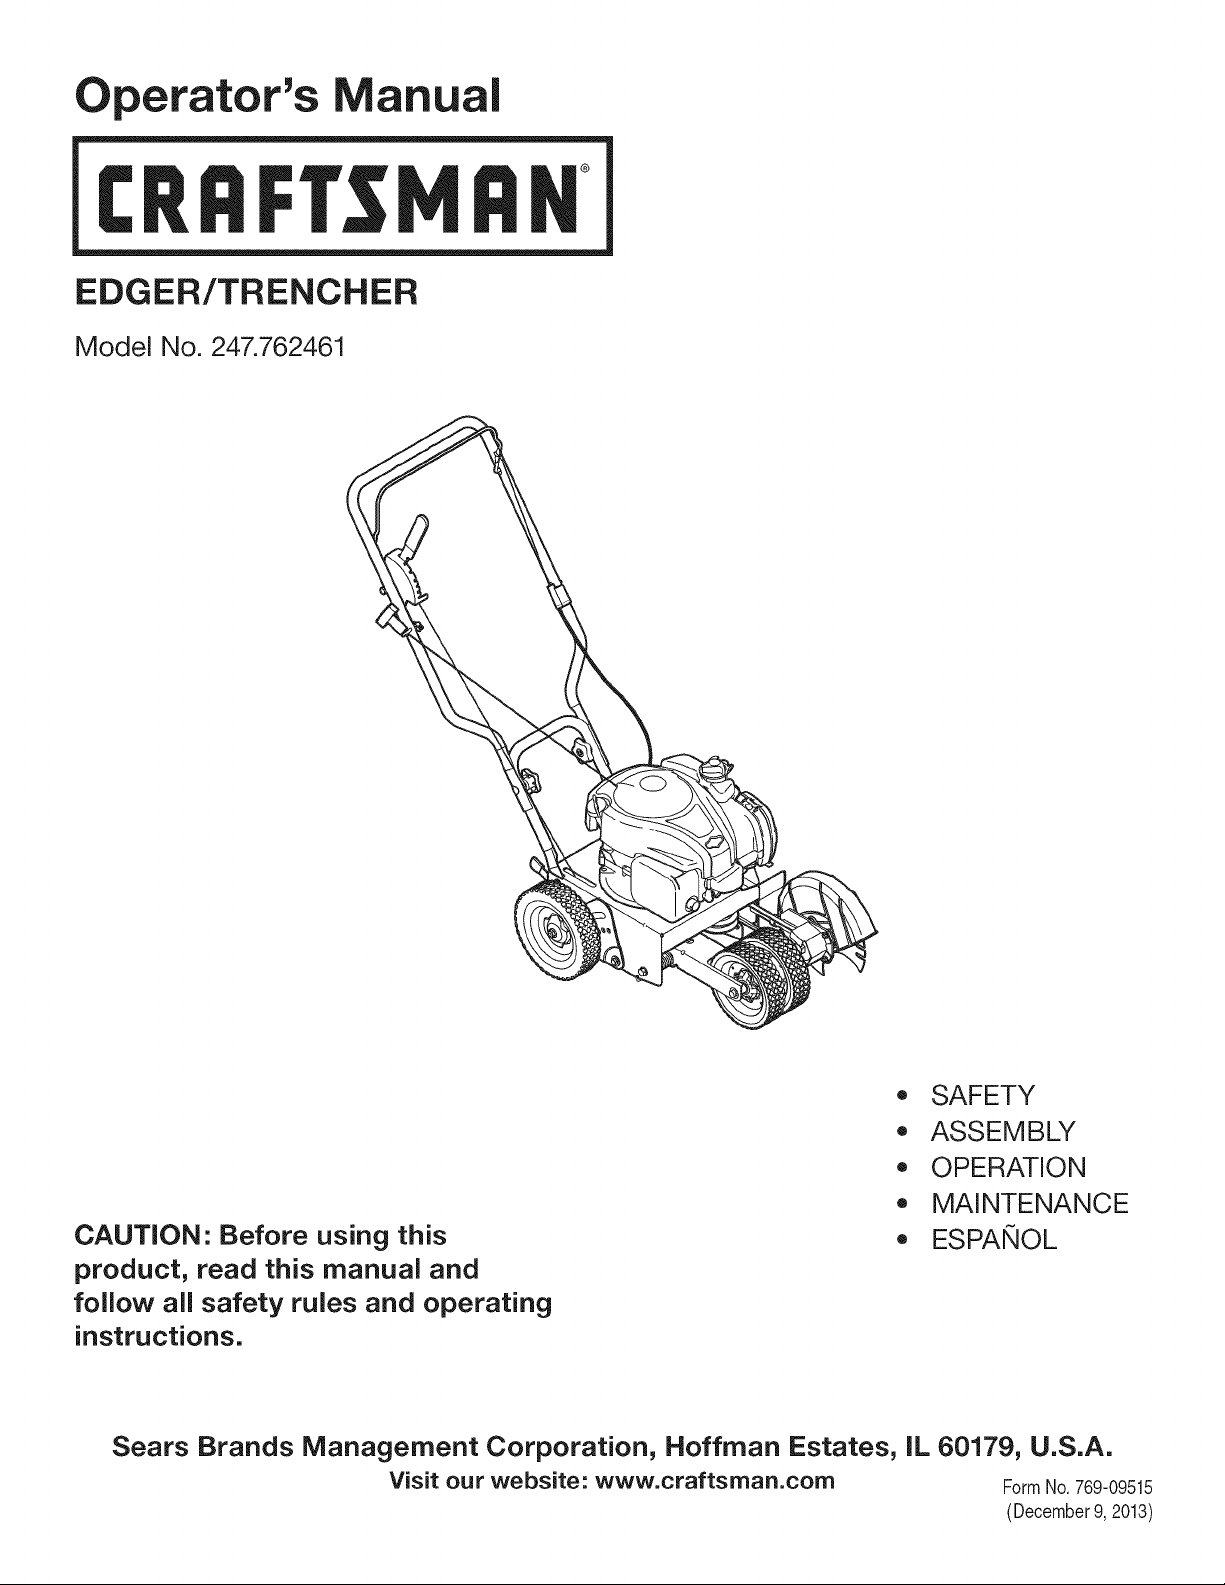
Operator's Manual
CRRFr MRN
EDGER/TRENCHER
Model No. 247.762461
CAUTION" Before using this
product, read this manual and
follow all safety rules and operating
instructions.
o SAFETY
o ASSEMBLY
o OPERATION
o MAINTENANCE
o ESPANOL
Sears Brands Management Corporation, Hoffman Estates, IL 60179, U.S.A.
Visit our website: www.craftsman.com FormNo. 769-09515
(December9, 2013)
WarrantyStatement.............................. Page2
SafetyInstructions............................ Pages3-5
Assembly..................................... Pages6-8
Operation................................... Pages9-10
ServiceandMaintenance.................... Pages11-13
Off-SeasonStorage.............................. Page14
Troubleshooting................................ Page15
Espa_ol......................................... Page18
ServiceNumber............................. BackCover
CraftsmanTwoYearFullWarranty
FORTWOYEARSfromthedateofpurchase,thisproductiswarrantedagainstanydefectsinmaterialorworkmanship.Defectiveproductwillreceivefree
repairorfreereplacementifrepairisunavailable.
Forwarrantycoveragedetailstoobtainrepairorreplacement,visitthewebsite:www.craftsman.com.
ThiswarrantycoversONLYdefectsinmaterialandworkmanship.WarrantycoveragedoesNOTinclude:
• Expendableitemswhichcanwearoutfromnormalusewithin thewarrantyperiod,suchasbelts,filters,sparkplugsoredgingblades.
• Productdamageresultingfrom userattemptsat productmodificationorrepairorcausedbyproductaccessories.
• Repairsnecessarybecauseofaccidentorfailureto operateormaintainthe productaccordingto allsuppliedinstructions.
• Preventativemaintenanceor repairsnecessarydueto improperfuelmixture,contaminatedorstalefuel.
Thiswarrantyisvoidif thisproductiseverusedwhileprovidingcommercialservicesor if rentedto anotherperson.
Thiswarrantygivesyouspecificlegalrights,andyoumayalsohaveotherrightswhichvaryfromstateto state.
SearsBrandsManagementCorporation,HoffmanEstates,IL60179
Engine Oil: SAE 30
Fuel: Unleaded Gasoline
Engine: Briggs & Stratton
Model Number
Serial Number
Date of Purchase
Record the model number, serial number,
and date of purchase above.
© Sears Brands, LLC 2
Thissymbolpointsout importantsafety instructionswhich, if not
followed, couldendangerthe personalsafetyand/or property of
yourself and others.Readandfollow all instructions in this manual
beforeattempting to operatethis machine.Failureto complywith these
instructionsmay resultinpersonalinjury.Whenyou seethis symbol, HEED
ITSWARNING!
CALIFORNIA PROPOSITION 65
EngineExhaust,someof its constituents,and certainvehiclecomponents
containor emit chemicalsknownto Stateof Californiato causecancerand
birth defectsorother reproductiveharm.
Thismachinewasbuilt to beoperatedaccordingto the safeoperation
practicesinthis manual.Aswith anytype of powerequipment,
carelessnessorerror onthe part of the operatorcanresultin seriousinjury.
Thismachineiscapableof amputating fingers, hands,toesandfeet and
throwingdebris. Failureto observethefollowing safety instructionscould
resultin seriousinjuryor death.
Your Responsibility--Restrict the useof this powermachineto
personswho read,understandandfollow the warningsand instructionsin
this manualandon the machine.
SAVETHESEINSTRUCTIONS!
GENERAL OPERATION
Readthisoperator'smanualcarefullyinitsentiretybeforeattemptingto
assemblethis machine.Read,understand,andfollowall instructionson the
machineandinthemanual(s)beforeoperation.Keepthismanualinasafe
placefor futureandregularreferenceandfororderingreplacementparts.
Becompletelyfamiliarwith thecontrolsandtheproperuseofthismachine
beforeoperatingit.
Thismachineisa precisionpieceof powerequipment,nota plaything.
Therefore,exerciseextremecautionat alltimes.Yourmachinehasbeen
designedto performonejob:to edgelawn.Donotuseit foranyother
purpose.
Neverallowchildrenunder14yearsof ageto operatethis machine.Children
14andovershouldreadandunderstandtheinstructionsandsafeoperation
practicesinthis manualandonthe machineandbetrainedandsupervised
byanadult.
Onlyresponsibleindividualswhoarefamiliarwith theserulesof safe
operationshouldbeallowedto usethis machine.
Tohelpavoidbladecontactora thrownobjectinjury,stayin operatorzone
behindhandlesandkeepchildren,bystanders,helpersandpetsat least75
feetfromlawnedgerwhileit isinoperation.Stopmachineifanyoneenters
area.
Thoroughlyinspectthe areawheretheequipmentisto beused.Removeall
stones,sticks,wire, bones,toysandotherforeignobjectswhichcouldbe
trippedoverorpickedupandthrownbythe blade.Thrownobjectscancause
seriouspersonalinjury.
Alwayswearsafetyglassesorsafetygogglesduringoperationandwhile
performinganadjustmentor repairto protectyoureyes.Thrownobjects
whichricochetcancauseseriousinjury to theeyes.
Wearsturdy,rough-soledworkshoesandclose-fittingslacksandshirts.
Shirtsandpantsthatcoverthe armsandlegsandsteel-toedshoesare
recommended.Neveroperatethis machineinbarefeet,sandals,slipperyor
light weight(e.g.canvas)shoes.
Neverattemptto makeanyadjustmentswhile theengineisrunning,except
wherespecificallyrecommendedinthe operator'smanual.
Donotput handsorfeetnearrotatingparts.Contactwith therotatingblade
canamputatehandsandfeet.
Thebladecontrolhandleisasafetydevice.Neverbypassits operation.Doing
so,makesthemachineunsafeandmaycausepersonalinjury.
Neveroperatewithout bladeguard,debrisshieldandbladecontrolhandlein
placeandworking.
Neveroperatewith damagedsafetydevices.Failureto doso,canresultin
personalinjury.
Neverrunanengineindoorsorina poorlyventilatedarea.Engineexhaust
containscarbonmonoxide,anodorlessanddeadlygas.
Donotoperatemachinewhileunderthe influenceof alcoholordrugs.
Mufflerandenginebecomehot andcancausea burn.Donottouch.
Neveroperatethismachinewithout goodvisibilityorlight. Alwaysbesureof
yourfootingandkeepafirm holdon the handles.Walk,neverrun.
Donotoperatethismachineif it hasbeendroppedordamaged.Return
machineto yournearestauthorizedservicingdealerforexaminationand
repair.
Donotoperatethismachinewith adamagedor excessivelyworncutting
blade.
Neverattemptto clearmaterialfromthebladeguardwhiletheengineis
running.Shutthe engineoff,disconnectthesparkplugwireandground
againstthe engineto preventunintendedstarting.
Donotoverloadmachinecapacitybyattemptingto edgeat toofastof arate.
Stayalertfor unevensidewalks,terrainetc.Alwayspushslowlyoverrough
surfaces.Donotusethismachineongravelsurfaces.
Donotoperatemachinein rainorwetsoil conditions.
Alwaysoperatemachinefrom behindthe handlesandpositionyourself
wherethedirectlineof sightto cuttingbladeisblockedbyguards.
Alwaysstopenginewhenedgingortrimmingisdelayedorwhen
transportingmachinefromonelocationtoanother.
Neverleavearunningmachineunattended.Stoptheengine,disconnect
sparkplugwireandgroundagainsttheenginetopreventunintended
starting.
Onlyusepartsandaccessoriesmadeforthismachinebythemanufacturer.
Failuretodoso,canresultinpersonalinjury.
Ifsituationsoccurwhicharenotcoveredinthismanual,usecareandgood
judgment.
CHILDREN
Tragicaccidentscanoccuriftheoperatorisnotalertto thepresenceof children.
Childrenareoftenattractedto powerequipmentsuchaslawnedgers.Theydonot
understandthedangers.Neverassumethatchildrenwill remainwhereyoulastsaw
them.
Keepchildrenoutoftheedgingareaandunderwatchfulcareof a
responsibleadultotherthantheoperator.
Bealertandturn lawnedgeroff if achildentersthearea.
Beforeandwhilemovingbackwards,lookbehindanddownfor small
children.
Useextremecarewhenapproachingblindcorners,doorways,shrubs,trees,
orotherobjectsthatmayobscureyourvisionofachildwhomayrunintothe
lawnedger.
Keepchildrenawayfromhotorrunningengines.Theycansufferburnsfrom
ahotmuffler.
Neverallowchildrenunder14yearsof ageto operatethismachine.Children
14andovershouldreadandunderstandthe instructionsandsafeoperation
practicesinthis manualandonthe machineandbetrainedandsupervised
byanadult.
SERVICE
Safe Handling of Gasoline:
Toavoid personalinjuryorpropertydamageuseextremecarein handling
gasoline.Gasolineis extremelyflammable andthevaporsareexplosive.
Seriouspersonalinjury canoccurwhen gasolineisspilled on yourself or your
clotheswhich canignite. Washyourskin andchangeclothesimmediately.
Useonlyan approvedgasolinecontainer.
Neverfill containersinsideavehicleor on atruckortrailer bedwith aplastic
liner.Alwaysplacecontainerson thegroundawayfromyourvehiclebefore
filling.
Removegas-poweredequipmentfrom the truckortrailerandrefuelit on
theground.If thisisnotpossible,thenrefuelsuchequipmentona trailer
with aportablecontainer,ratherthanfrom agasolinedispensernozzle.
Keepthenozzleincontactwith the rim of thefueltank orcontaineropening
at alltimesuntilfuelingiscomplete.Donotuseanozzlelock-opendevice.
Extinguishall cigarettes,cigars,pipesandothersources
of ignition.
Neverfuel machineindoorsbecauseflammablevaporswill accumulatein
thearea.
Neverremovegascapor addfuelwhile engineishot or running. Allow
engineto coolat leasttwo minutesbeforerefueling.
Neverover-fillfuel tank.Toallowforexpansionof thefuel,do not fill above
thebottomof thefueltankneck.
Replacegasolinecapandtightensecurely.
Ifgasolineisspilled,wipeit offthe engineandequipment.Movemachineto
anotherarea.Wait5 minutesbeforestartingengine.
Neverstorethemachineorfuelcontainernearanopenflame,sparkor pilot
lightason awaterheater,spaceheater,furnace,clothesdryerorothergas
appliances.
Toreducefire hazard,keepmachinefreeofgrass,leaves,orotherdebris
build-up.Cleanup oil or fuelspillageandremoveanyfuel-soakeddebris.
Allowmachinetocoolat least5 minutesbeforestoring.
General Service:
Neverrunanengineindoorsorina poorlyventilatedarea.Engineexhaust
containscarbonmonoxide,an odorlessanddeadlygas.
Beforecleaning,repairing,orinspecting,makecertainthebladeandall
movingpartshavestopped.Disconnectthe sparkplugwire andground
againstthe engineto preventunintendedstarting.
Checkthebladeandenginemountingboltsat frequentintervalsfor proper
tightness.Also,visuallyinspectbladefordamage(e.g.,bent,cracked,
worn) Replacebladewiththe originalequipmentmanufacture's(O.E.M.)
bladeonly,listedinthismanual."Useof partswhichdo notmeetthe
originalequipmentspecificationsmayleadto improperperformanceand
compromisesafety!"
Lawnedgerbladesaresharpandcancut.Wrapthebladeorweargloves,
anduseextracautionwhenservicingthem.
Keepallnuts,bolts,andscrewstight to besuretheequipmentis insafe
workingcondition.
Nevertamperwith safetydevices.Checktheirproperoperationregularly.
Afterstrikingaforeignobject,stoptheengine,disconnectthesparkplug
wire andgroundagainstthe engine.Thoroughlyinspectthelawnedgerfor
anydamage.Repairthedamagebeforestartingandoperatingthelawn
edger.
Neverattemptto makea wheeladjustmentwhiletheengineis running.
Manycomponentsonyournewedgercanwearwithcontinueduse.For
safetyprotection,frequentlycheckall edgercomponentsandreplace
immediatelywith originalequipmentmanufacturer's(O.E.M.)parts
only,listedinthismanual."Useof partswhichdonot meettheoriginal
equipmentspecificationsmayleadto improperperformanceand
compromisesafety!"
Donotchangethe enginegovernorsettingoroverspeedtheengine.The
governorcontrolsthe maximumsafeoperatingspeedof theengine.
Maintainorreplacesafetyandinstructionlabels,asnecessary.
Observeproperdisposallawsandregulationsforusedgas,oil,etc..Improper
disposalof fluidsandmaterialscanharmtheenvironment.
4
Accordingto theConsumerProductsSafetyCommission(CPSC)andthe U.S.
EnvironmentalProtectionAgency(EPA),thisproducthasanAverageUseful
Lifeofseven(7)years,or 70hoursof operation.Attheendof theAverage
UsefulLifehavethemachineinspectedannuallybyanauthorizedservice
dealerto ensurethatall mechanicalandsafetysystemsareworkingproperly
andnotwornexcessively.Failureto dosocanresultinaccidents,injuriesor
death.
DO NOT MODIFY ENGINE
Toavoidseriousinjuryor death,do not modify engine in anyway. Tampering
with the governorsetting canlead to arunawayengine andcauseit to
operateat unsafespeeds.Nevertamperwith factory setting of engine
governor.
NOTICE REGARDING EMiSSiONS
Engineswhich are certifiedto complywith Californiaandfederal EPA
emissionregulationsfor SORE(Sinai[Off RoadEquipment)arecertified
tooperate on regularunleadedgasoline,and mayincludethe following
emissioncontrol systems:EngineModification (EM),OxidizingCatalyst(0C),
SecondaryAir injection(SAI)andThreeWayCatalyst(TWC)if soequipped.
SPARK ARRESTOR
Thismachineisequippedwith an internalcombustionengineandshould
not be usedonor nearany unimprovedforest-covered,brushcoveredor
grass-coveredlandunlesstheengine'sexhaustsystemisequippedwith a
sparkarrestormeeting applicablelocalor statelaws (if any).
If asparkarrestor isused,it shouldbe maintained ineffective working order
bythe operator.In the Stateof Californiathe aboveisrequiredby law (Section
4442 of the CaliforniaPublicResourcesCode).Otherstatesmayhavesimilar
laws.Federallawsapply on federallands.
Asparkarrestorfor the muffler isavailablethrough your nearestSearsParts
and RepairServiceCenter.Call1-800-469-4663for ServiceCenterlocations.
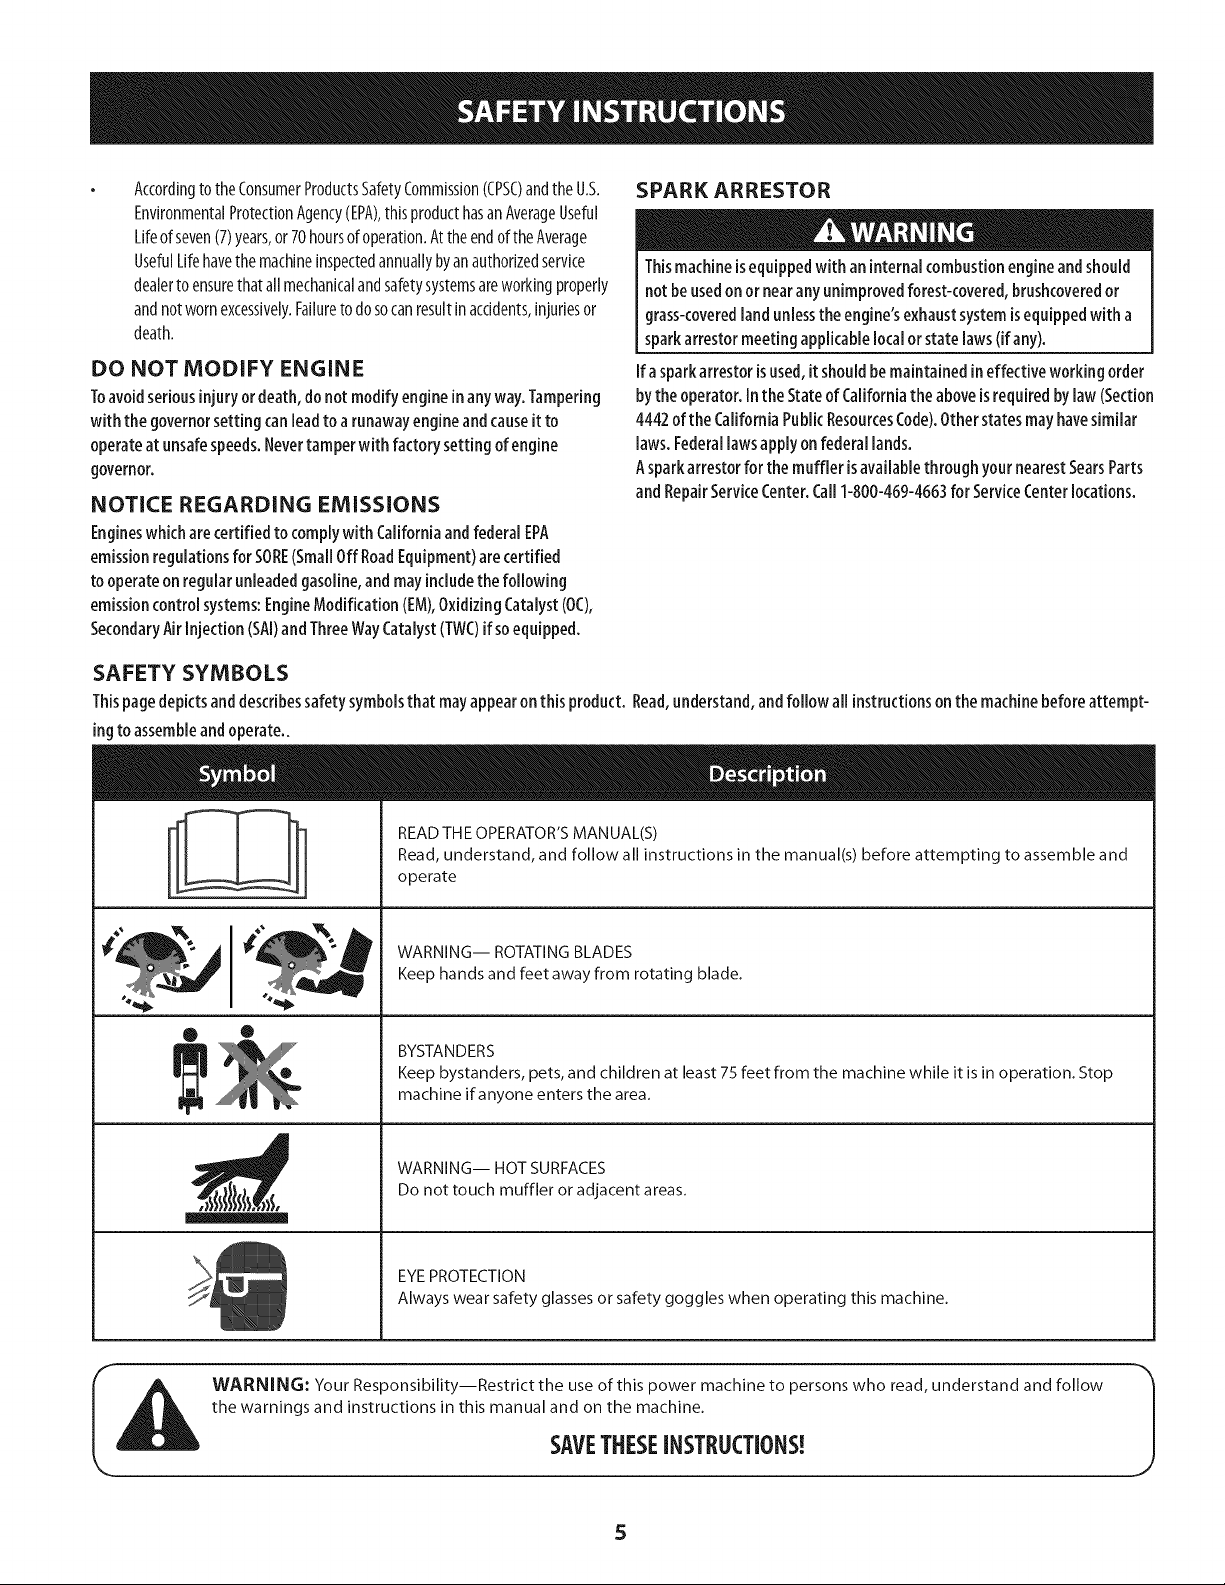
SAFETY SYMBOLS
Thispagedepictsanddescribessafetysymbolsthat mayappearon this product. Read,understand,andfollow all instructionson the machinebefore attempt-
ing to assembleandoperate..
® O
I!I
READ THE OPERATOR'S MANUAL(S)
Read, understand, and follow all instructions in the manual(s) before attempting to assemble and
operate
WARNING-- ROTATINGBLADES
Keep hands and feet away from rotating blade.
BYSTANDERS
Keep bystanders, pets, and children at least 75 feet from the machine while it is in operation. Stop
machine if anyone enters the area.
WARNING-- HOT SURFACES
Do not touch muffler or adjacent areas.
EYEPROTECTION
Always wear safety glassesor safety goggles when operating this machine.
WARNING: Your Responsibility--Restrict the use of this power machine to persons who read, understand and follow
the warnings and instructions in this manual and on the machine.
SAVETHESEINSTRUCTIONS!
IMPORTANT:Thisunitisshippedwithout gasolineoroil intheengine.Becertainto
serviceenginewithgasolineandoil asinstructedin theOperationsectionbefore
startingorrunningyourmachine.
NOTE:Referenceto right andleft handsideof theedgerisobservedfrom the
operatingposition.
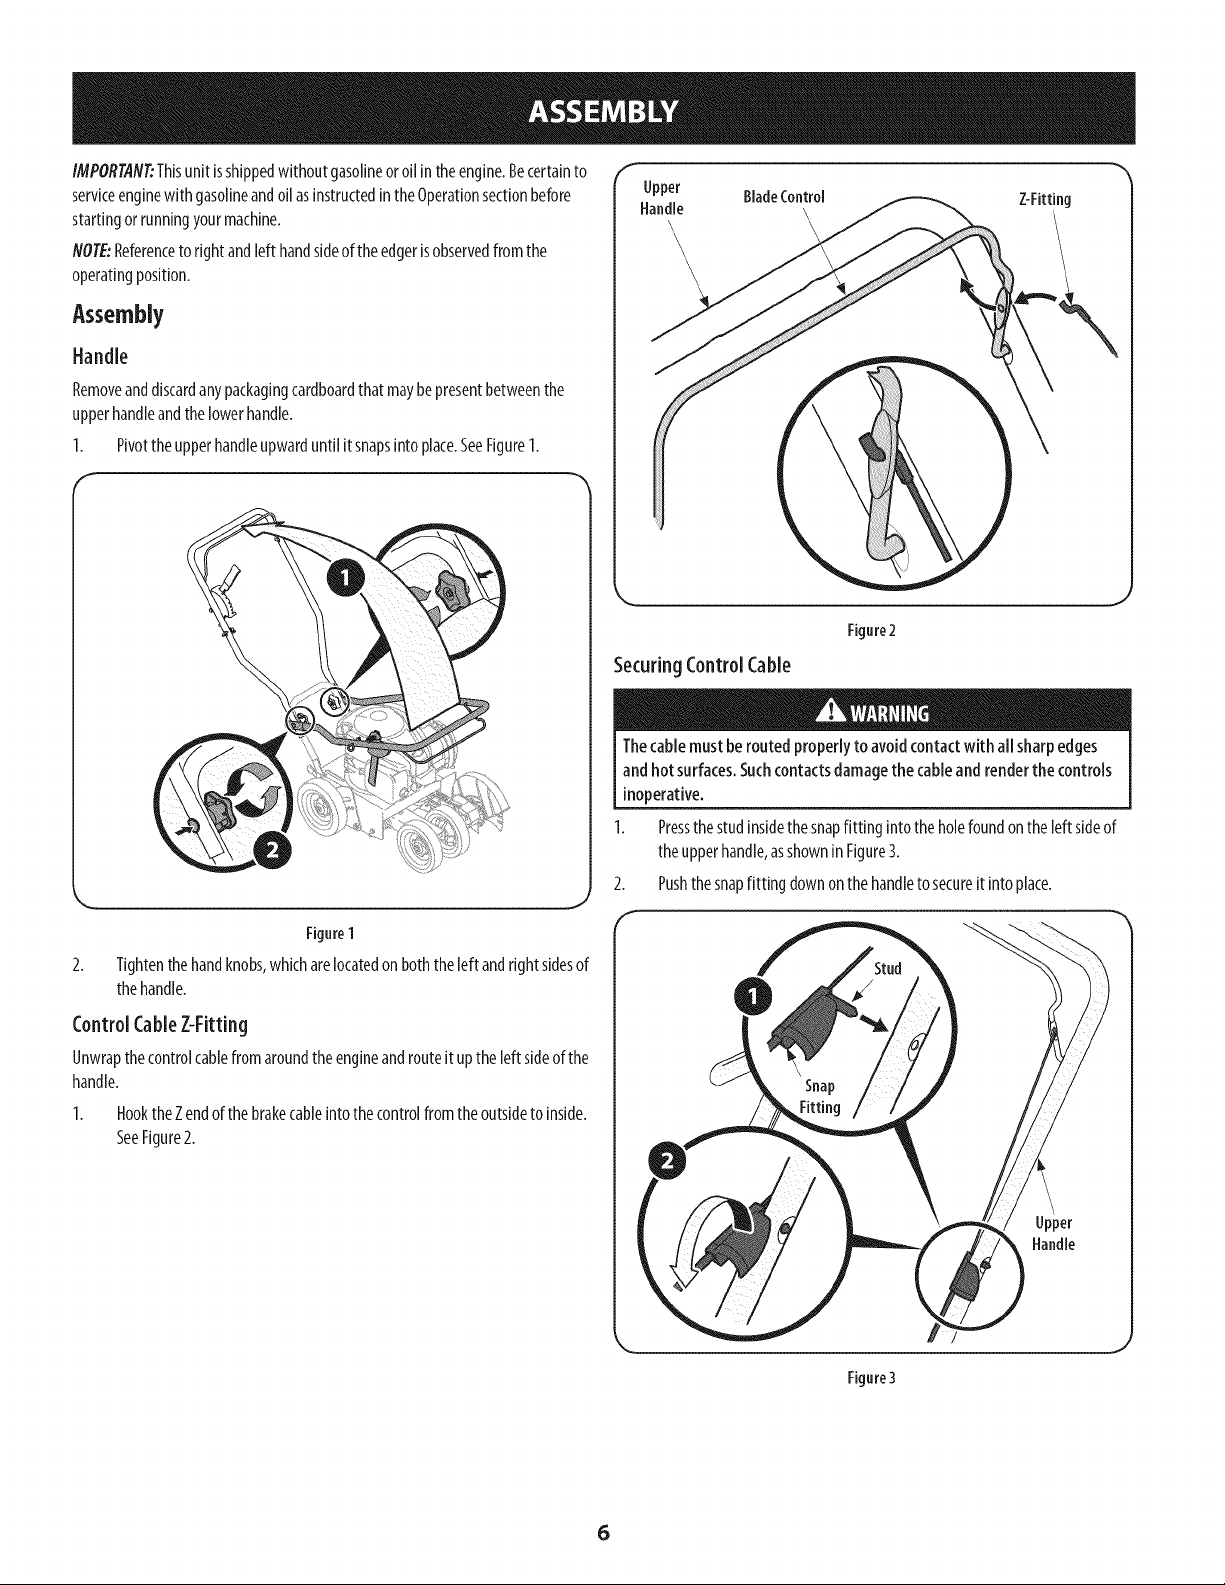
Assembly
Handle
Removeanddiscardanypackagingcardboardthatmaybepresentbetweenthe
upperhandleandthelowerhandle.
1. Pivottheupperhandleupwarduntil it snapsintoplace.SeeFigure1.
f
Upper BladeControl
Handle
Z-Fitting
\
Securing ControlCable
Figure2
Figure1
2. Tightenthe handknobs,whicharelocatedonboththe left andrightsidesof
thehandle.
Control CableZ-Fitting
Unwrapthe controlcablefromaroundtheengineandrouteit upthe left sideofthe
handle.
I. HooktheZendofthe brakecableinto the controlfrom theoutsideto inside.
SeeFigure2.
Thecable must berouted properlyto avoidcontactwith all sharpedges
andhot surfaces.Suchcontactsdamagethe cableand renderthe controls
inoperative.
1. Pressthestudinsidethe snapfitting intotheholefoundontheleft sideof
theupperhandle,asshownin Figure3.
2. Pushthe snapfitting downonthe handleto secureit into place.
Upper
Handle
Figure3
6
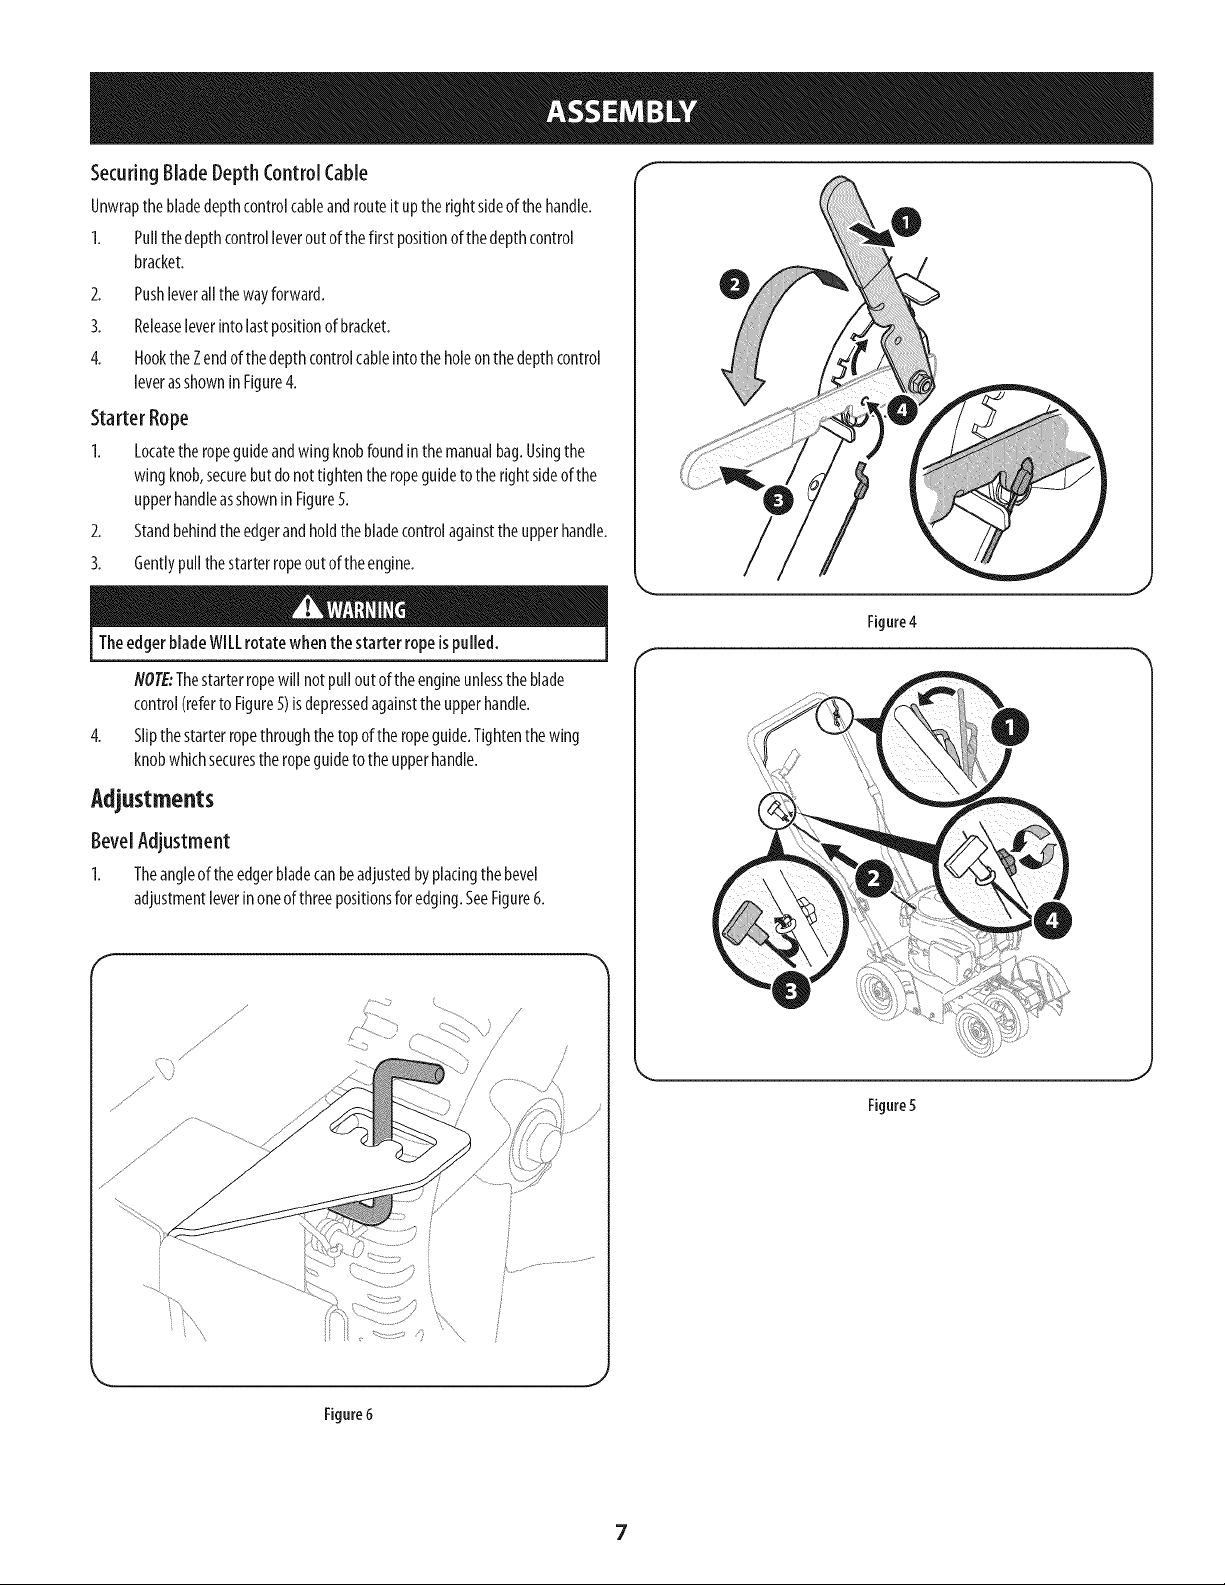
SecuringBladeDepthControlCable
Unwrapthe bladedepthcontrolcableandrouteit uptherightsideof thehandle.
1. Pullthedepthcontrolleverout of thefirst positionof thedepthcontrol
bracket.
2. Pushleverall thewayforward.
3. Releaseleverintolastpositionof bracket.
4. Hookthe Zendofthe depthcontrolcableinto theholeonthedepthcontrol
leverasshownin Figure4.
Starter Rope
1. Locatethe ropeguideandwingknobfoundinthe manualbag.Usingthe
wingknob,securebutdonottightenthe ropeguideto theright sideof the
upperhandleasshownin Figure5.
2. Standbehindthe edgerandholdthe bladecontrolagainstthe upperhandle.
3. Gentlypullthe starterropeoutof theengine.
TheedgerbladeWiLLrotatewhen thestarter ropeis pulled.
flOTE:Thestarterropewill not pullout of theengineunlessthe blade
control(referto Figure5)isdepressedagainsttheupperhandle.
4. Slipthestarterropethroughthetopof theropeguide.Tightenthewing
knobwhichsecuresthe ropeguideto the upperhandle.
Adjustments
BevelAdjustment
1. Theangleof theedgerbladecanbeadjustedbyplacingthebevel
adjustmentleverinoneof threepositionsforedging.SeeFigure6.
\ J
Figure4
Figure5
Figure6
7
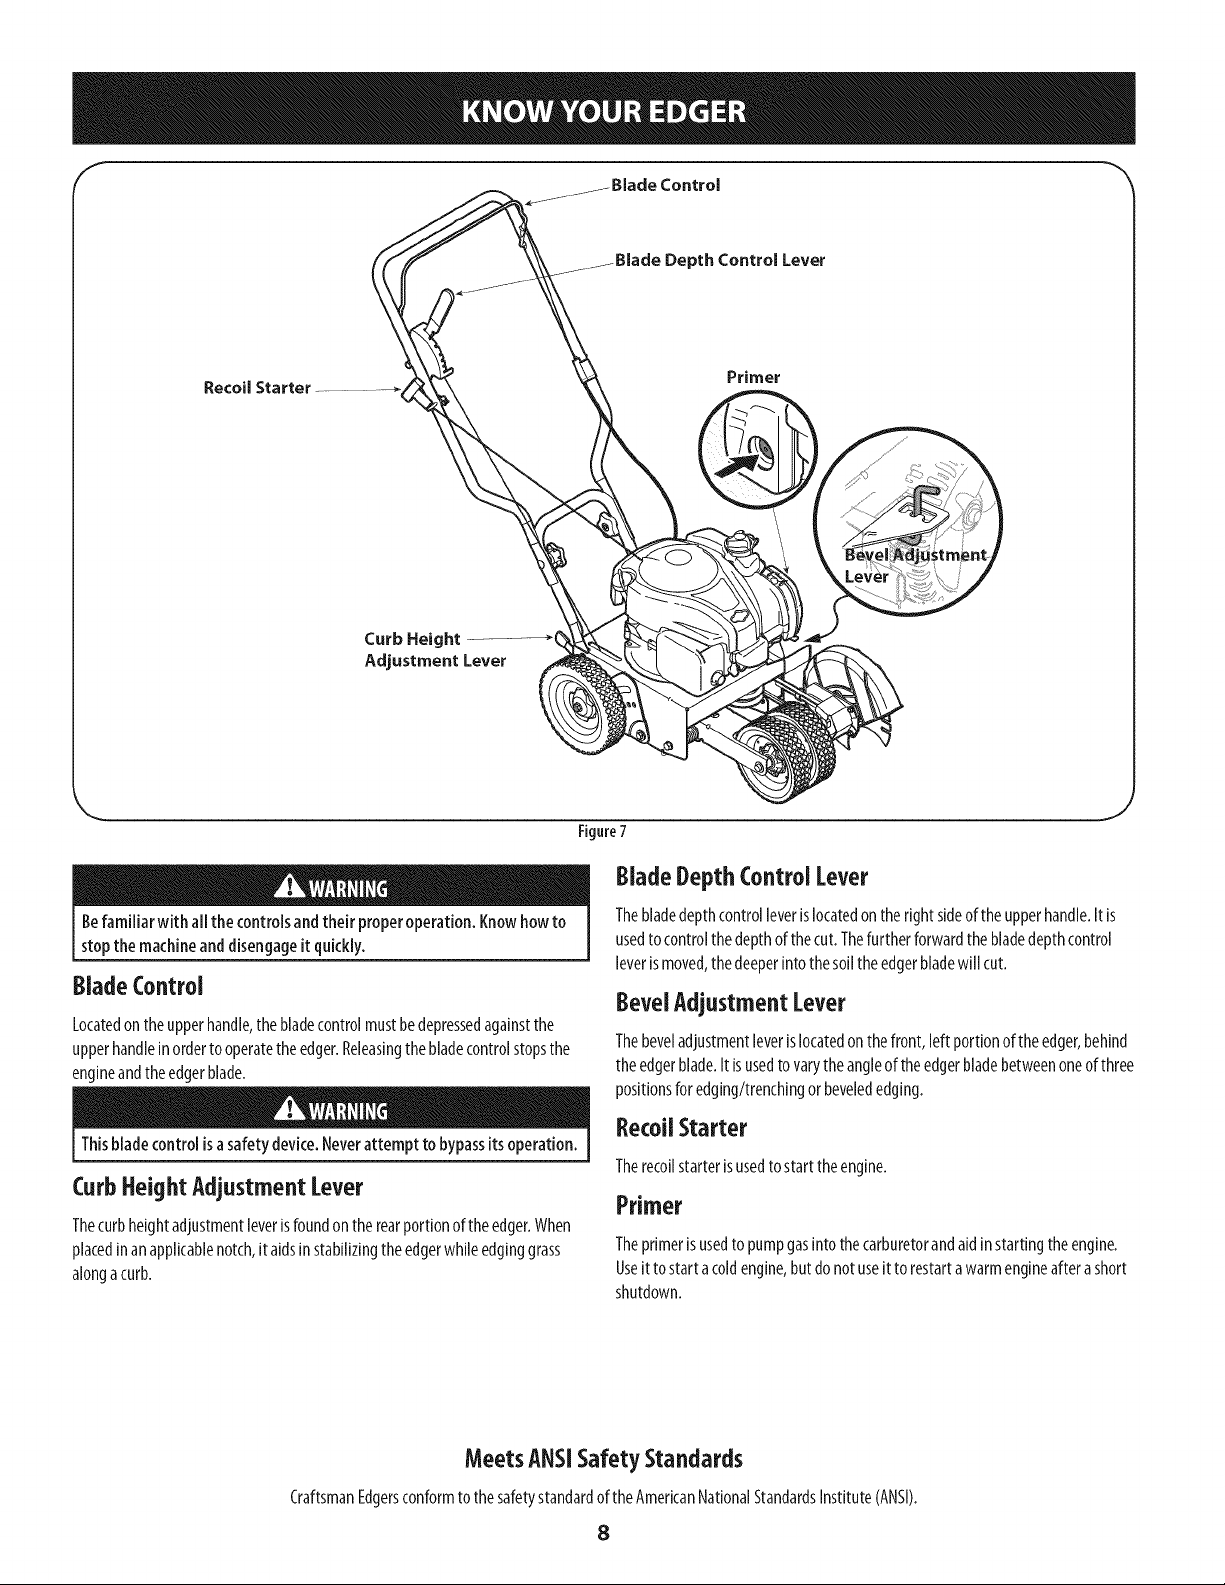
Depth Control Lever
Recoil Starter
Primer
Curb Height
Adjustment Lever
Figure7
J
Befamiliarwithallthecontrolsandtheirproperoperation.Knowhowto
stopthemachineanddisengageit quickly.
Blade Control
Locatedontheupperhandle,thebladecontrolmustbedepressedagainstthe
upperhandleinorderto operatetheedger.Releasingthe bladecontrolstopsthe
engineandtheedgerblade.
Thisblade controlisasafety device.Neverattempt to bypassitsoperation.
CurbHeightAdjustmentLever
Thecurbheightadjustmentleverisfoundonthe rearportionof theedger.When
placedinanapplicablenotch,it aidsinstabilizingtheedgerwhileedginggrass
alongacurb.
BladeDepthControl Lever
Thebladedepthcontrolleverislocatedonthe right sideof theupperhandle.It is
usedtocontrolthedepthof thecut. Thefurtherforwardthe bladedepthcontrol
leverismoved,thedeeperinto the soiltheedgerbladewill cut.
BevelAdjustmentLever
Thebeveladjustmentleverislocatedon thefront, left portionoftheedger,behind
theedgerblade.It isusedto varytheangleof theedgerbladebetweenoneof three
positionsforedging/trenchingor bevelededging.
RecoilStarter
Therecoilstarterisusedtostart theengine.
Primer
Theprimerisusedto pumpgasinto thecarburetorandaid instartingtheengine.
Useit to startacoldengine,but donot useit to restartawarmengineafterashort
shutdown.
Meets ANSISafety Standards
CraftsmanEdgersconformto thesafetystandardof theAmericanNationalStandardsInstitute(ANSI).
8

Besurenooneotherthan theoperator isstanding nearthe lawnmower
while starting engineor operating mower.Neverrunengineindoorsor
inenclosed,poorlyventilated areas.Engineexhaustcontainscarbon
monoxide,an odorlessanddeadlygas.Keephands,feet, hairand loose
clothing away fromany moving parts on engineandJawnmower.
ToStart Engine
1. Movethebladedepthcontrolleverbackto theSTARTpositioninthe
adjacent(top)notch.
2. Pushthe primerthreetimes.SeeFigure8. Donotprimeto restartawarm
engine.
NOTE:Ifyou pushtheprimertoomanytimes,excessivefuelwill floodthe
carburetorandtheenginewill bedifficultto start.
3. Standingbehindthe edger,depressthebladecontrolandholdit againstthe
upperhandlewithyourleft hand.
Thisbladecontrol mechanismis asafety device.Neverattempt to bypass
itsoperation.
4. Withyourright hand,grasprecoilstarterhandleandpullropeslowlyuntil
resistanceisfelt, thenpullwith arapid,continuous,full armstroke.See
Figure8. Keepingafirm gripon thestartercordhandle,letthe roperewind
slowly.Repeatuntil enginecranks.Lettheroperewindeachtimeslowly.
Keepa firm grip on the cordhandleandmaintain sufficient backward
tension on the cordat all timesto prevent rapidstarter cordretraction
(kickback).Rapidretraction canpull arm and handtoward the engine
faster than you can let go, and result in brokenbones,fractures,bruisesor
sprains.
ToStop Engine
1. Releasebladecontrolto stoptheengineandblade.
Edging
Rotatingcutting blademay throw objectscausingpersonalinjury.Keep
area clearof bystandersanddo notoperatewithout guardsinplace.
Donot lower blade if bladeis overconcrete,asphalt, rocksorthe like. Blade
can strike supportingsurface,resultingin personalinjury or property
damage.
Tobeginedging,proceedasfollows:
1. Moveedgerto anareato beedged,makingsurethattheleft rearwheelison
ahardsurfaceandthebladeisovertheareato becut. SeeFigure9.
f
Figure8
Figure9
2. With thebladecontrolsqueezedagainstthe handlein the operating
position,makea passalongareato beedgedbeforeproceedingto thenext
notch.Thefurtherforwardthat the bladedepthcontrolleverismoved,the
deeperor lowerthebladewill cut intotheground.Severalpassesmaybe
necessaryto obtainthedesireddepthof cut.Donotlowerblademorethan
onedepthnotchat atime without makingapass.
3. Forbestresults,proceedslowlyalongthe pathbeingedged.Slowlymove
edgerbackandforththroughcuttingarea,againmakingsureto keepthe
left rearwheelon the hardsurfaceandthe bladeinthecuttingpath,closeto
butnot touchingthe edgeof thehardsurface.
4. Onceyouhavefinishededgingselectedarea,raisethebladedepthcontrol
leverbackinto theSTARTposition,moveto thenext areato beedged,and
proceedagainfrom step1.
9
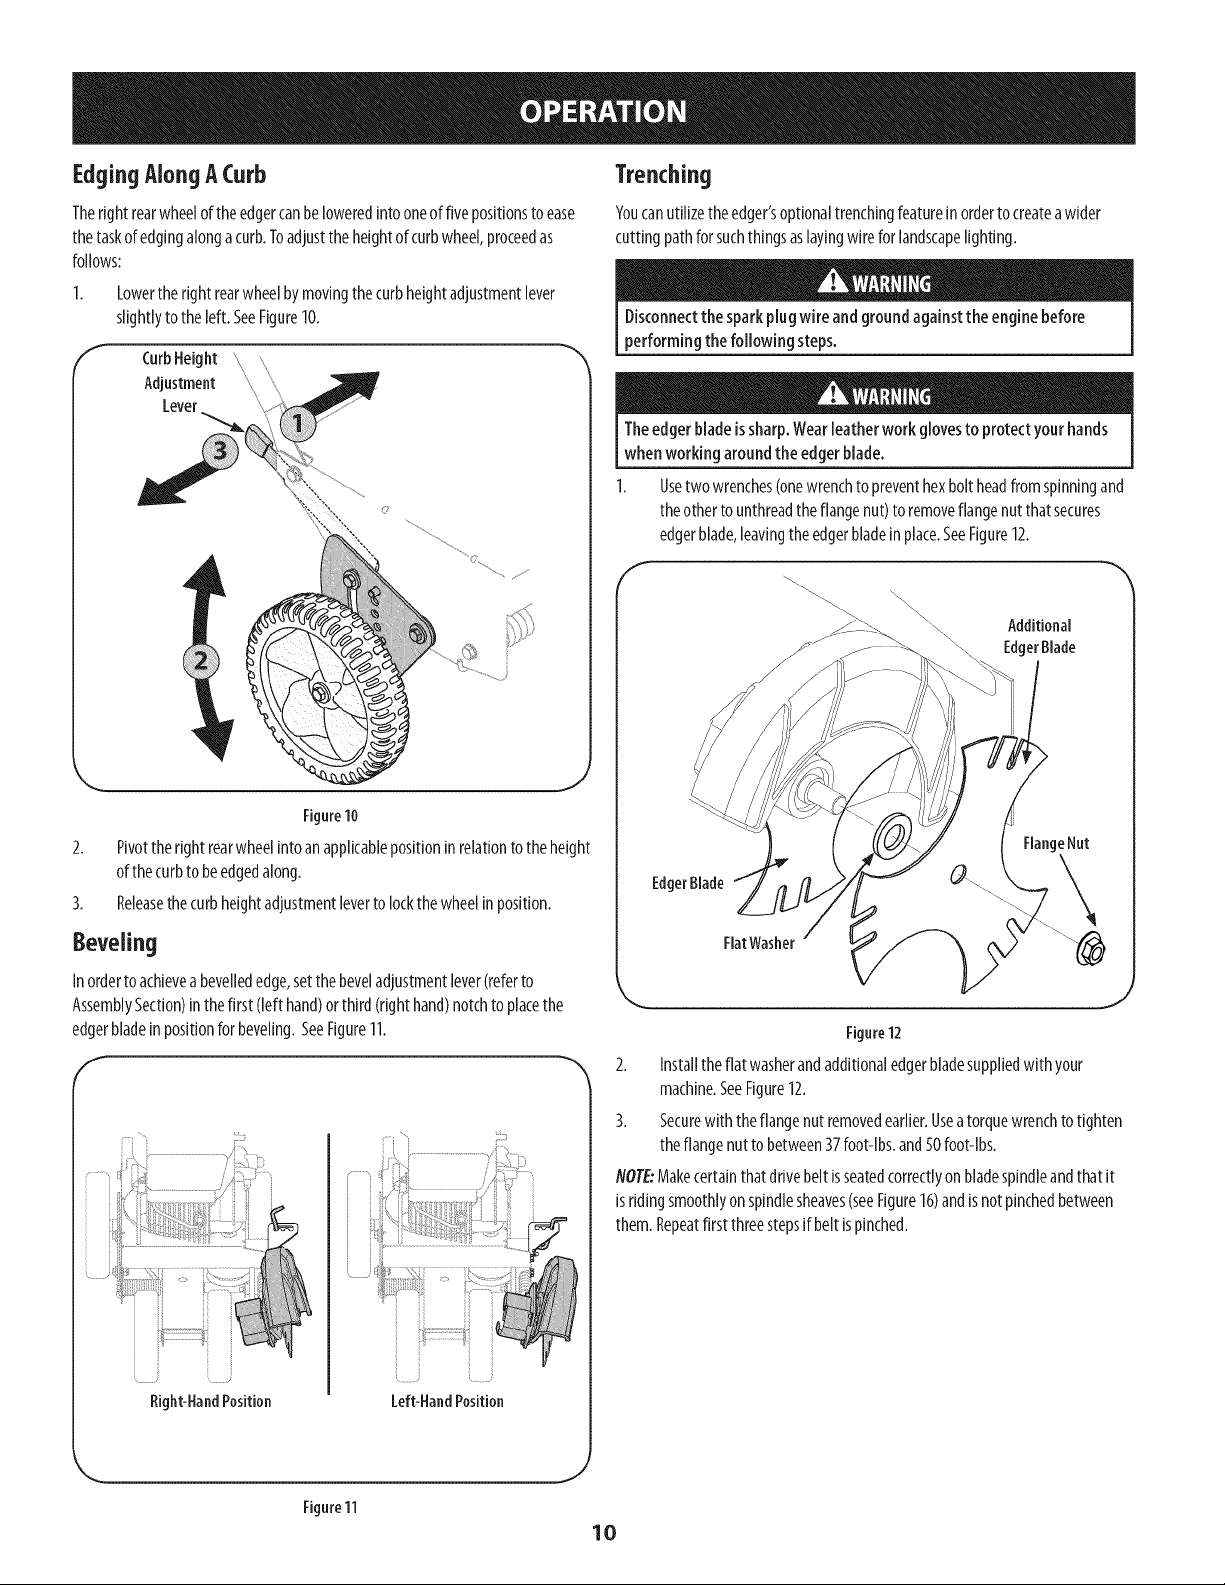
EdgingAlongACurb
Theright rearwheelof theedgercanbe loweredintooneof fivepositionsto ease
thetaskof edgingalongacurb.Toadjustthe heightof curbwheel,proceedas
follows:
Lowertherightrearwheelbymovingthecurbheightadjustmentlever
slightlytotheleft.SeeFigure10.
f
CurbHeight ",,
Adjustment "
Lever
Figure10
2. Pivottheright rearwheelinto anapplicablepositioninrelationto theheight
of thecurbto beedgedalong.
3. Releasethe curbheightadjustmentleverto lockthewheelinposition.
Beveling
Inorderto achievea bevellededge,setthe beveladjustmentlever(referto
AssemblySection)in thefirst (left hand)orthird (righthand)notchto placethe
edgerbladein positionfor beveling.SeeFigure11.
Right-HandPosition
; .....
Left-HandPosition
Trenching
Youcanutilizetheedger'soptionaltrenchingfeaturein orderto createawider
cutting pathfor suchthingsaslayingwirefor landscapelighting.
Disconnectthe sparkplugwire andground againstthe engine before
performing the following steps.
Theedger bladeissharp.Wearleatherwork glovesto protectyour hands
whenworking around the edgerblade.
Usetwo wrenches(onewrenchto preventhexbolt headfrom spinningand
theother to unthreadtheflangenut)to removeflangenut thatsecures
edgerblade,leavingthe edgerbladeinplace.SeeFigure12.
f
Additional
EdgerBlade
EdgerBlade
FlangeNut
Flat Washer
Figure12
2. Installtheflat washerandadditionaledgerbladesuppliedwith your
machine.SeeFigure12.
3. Securewiththeflangenut removedearlier.Useatorquewrenchto tighten
theflangenut to between37foot-lbs,and50foot-lbs.
NOTE:Makecertainthatdrivebeltisseatedcorrectlyonbladespindleandthatit
is ridingsmoothlyon spindlesheaves(seeFigure16)andisnotpinchedbetween
them. Repeatfirst threestepsif beltis pinched.
Figure11
J
10
MAINTENANCESCHEDULE
EachUse
Beforeperformingany type of maintenance/service,disengageall controls
and stop theengine.Wait until all moving parts havecometo acomplete
stop. Disconnectsparkplug wire and ground it againstthe engineto
prevent unintended starting.
1stMonthor5hours
Annuallyor25hours
Annuallyor50hours
Annually
BeforeStorage
1. Engineoillevel
2. Looseormissinghardware
3. Aircleaner
4. Unitandengine
1. Engineoil
1. Aircleanerf
2. Controllinkages/pivotsandwheels
1. Engineoilff
1. Sparkplug
2. AirCleaner
1. Fuelsystem
Followthe maintenanceschedulegivenbelow.Thischartdescribesservice
guidelinesonly.UsetheServiceLogcolumnto keeptrackofcompleted
maintenancetasks.TolocatethenearestSearsServiceCenteror toscheduleservice,
callthefollowing tollfreenumber:l-888-331-4569.
1. Check
2. Tightenor replace
3. Check
4. Clean
1. Change
1. Clean
2. Lubewith lightoil
1. Change
1. Replace
2. Replace
1. Runengineuntil it stopsfromlackoffuel,or
addstabilizerto afull tankof freshfuel prior
to storage.
Cleanmoreoftenunderdustyconditionsor whenairbornedebrisispresent.Replaceaircleanerifverydirty.
ff Changeoil every25hourswhenoperatingthe engineunderheavyloadorinhigh temperatures.
Alwaysstopengine, allow engineto cool, disconnectsparkplugwire, and
ground against enginebeforeperforming any type of maintenanceon your
machine.
6enerai Recommendations
Alwaysobservesafetyruleswhenperforminganymaintenance.
Thewarrantyonthisedger/trencherdoesnotcoveritemsthat havebeen
subjectedto operatorabuseornegligence.Toreceivefull valuefrom
warranty,operatormustmaintaintheequipmentas
instructedhere.
Changingof engine-governedspeedwill voidenginewarranty.
All adjustmentsshouldbe checkedat leastonceeachseason.
Periodicallycheckall fastenersandmakesurethesearetight.
EngineCare
Referto theEngineOperator'sManualpackedwithyourmowerfor adetailed
descriptionofall engine-relatedservicespecifications.
CleanEngine
Dailyor beforeeveryuse,deangrass,chafforaccumulateddebrisfrom
engine.Keeplinkage,spring,andcontrolsclean.Keepareaaroundand
behindmufflerfreeofanycombustibledebris.
Keepingenginecleanallowsair movementaroundengine.
Enginepartsshouldbe keptcleanto reducethe riskof overheatingand
ignitionof accumulateddebris.
Donotusewater to cleanengine parts.Watercouldcontaminate fuel
system.Useabrush or dry cloth.
11
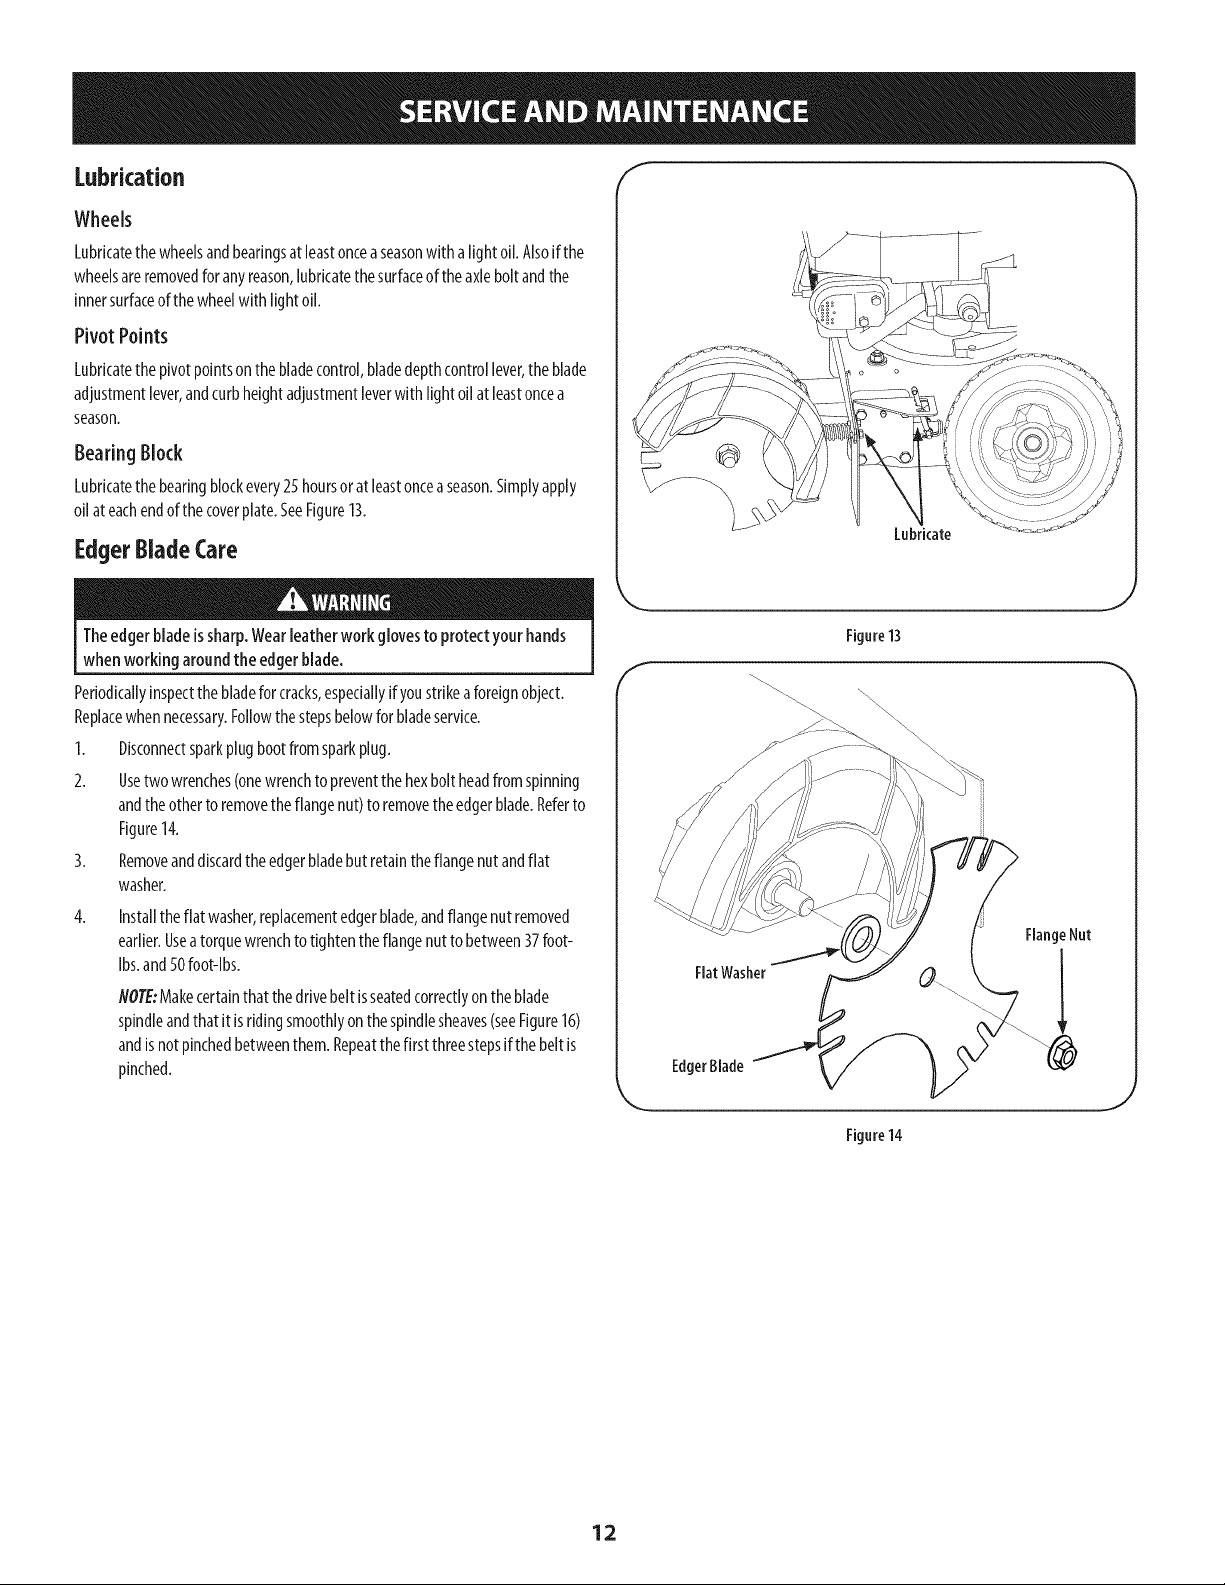
Lubrication f
Wheels
Lubricatethe wheelsandbearingsat leastonceaseasonwith a light oil.Alsoifthe
wheelsareremovedforanyreason,lubricatethesurfaceof theaxleboltandthe
innersurfaceof thewheelwith lightoil.
PivotPoints
Lubricatethe pivot pointsonthe bladecontrol,bladedepthcontrollever,the blade
adjustmentlever,andcurbheightadjustmentleverwith lightoil at leastoncea
season.
Bearing Block
Lubricatethe bearingblockevery25 hoursor at leastonceaseason.Simplyapply
oil at eachendof the coverplate.SeeFigure13.
EdgerBladeCare
Theedgerbladeissharp.Wearleather workglovesto protectyour hands
whenworkingaroundthe edgerblade.
Periodicallyinspectthe bladeforcracks,especiallyifyoustrikeaforeignobject.
Replacewhennecessary.Followthe stepsbelowfor bladeservice.
1. Disconnectsparkplugbootfromsparkplug.
2. Usetwowrenches(onewrenchto preventthehexbolt headfromspinning
andtheotherto removetheflangenut) to removetheedgerblade.Referto
Figure14.
3. Removeanddiscardthe edgerbladebutretaintheflangenut andflat
washer.
Installthe flat washer,replacementedgerblade,andflangenutremoved
earlier.Usea torquewrenchto tightentheflangenutto between37foot-
Ibs.and50foot-lbs.
NOTE:Makecertainthat thedrivebelt isseatedcorrectlyon theblade
spindleandthat it isridingsmoothlyon thespindlesheaves(seeFigure16)
andisnotpinchedbetweenthem. Repeatthe first threestepsifthebelt is
pinched.
Lubricate
J
Figure13
f
Flat Washer
FlangeNut
Figure14
12
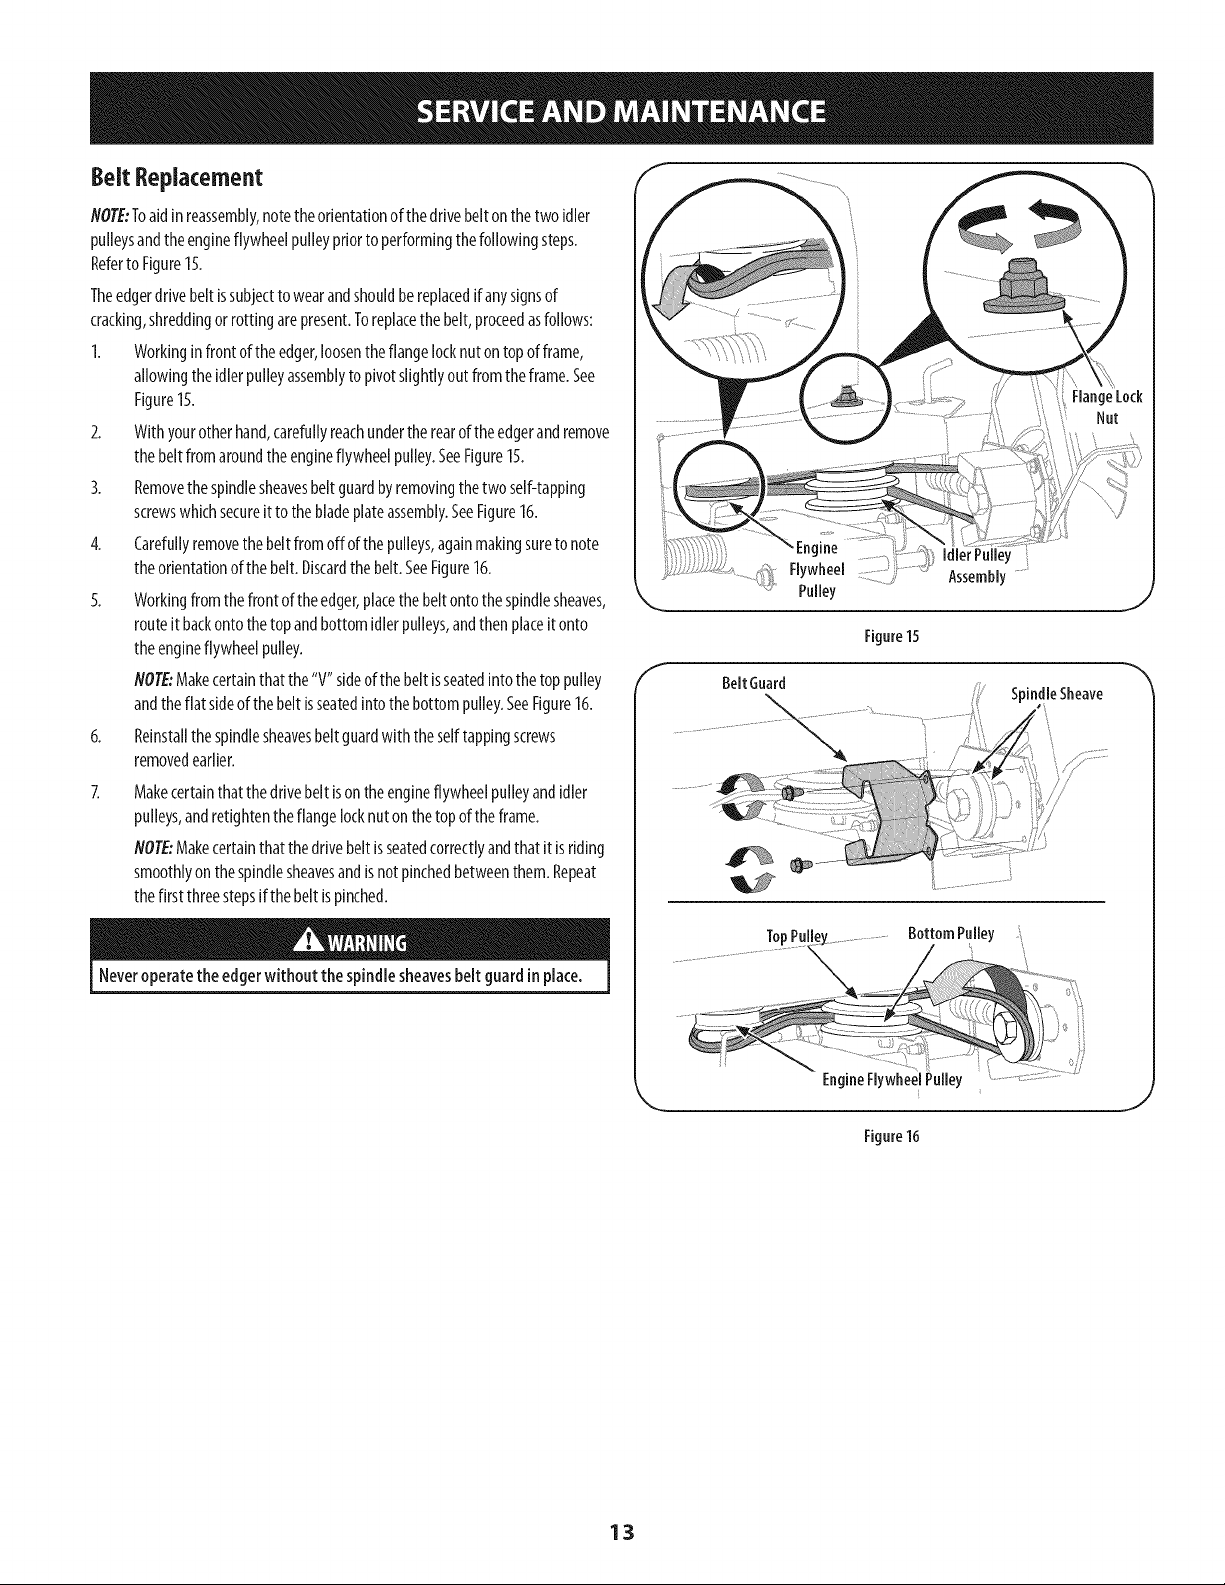
BeltReplacement
NOTE:Toaidin reassembly,notetheorientationof thedrivebelton the two idler
pulleysandtheengineflywheelpulleypriorto performingthefollowingsteps.
Referto Figure15.
Theedgerdrivebeltissubjectto wearandshouldbereplacedif anysignsof
cracking,shreddingorrottingarepresent.Toreplacethe belt,proceedasfollows:
1. Workinginfront of theedger,loosenthe flangelocknut on top of frame,
allowingthe idlerpulleyassemblyto pivotslightlyoutfromtheframe.See
Figure15.
2. With yourotherhand,carefullyreachundertherearoftheedgerandremove
thebeltfrom aroundthe engineflywheelpulley.SeeFigure15.
3. Removethespindlesheavesbelt guardbyremovingthetwo self-tapping
screwswhichsecureit to the bladeplateassembly.SeeFigure16.
4. Carefullyremovethebeltfrom offof the pulleys,againmakingsureto note
theorientationof the belt.Discardthe belt.SeeFigure16.
5. Workingfromthefront of theedger,placethebeltontothe spindlesheaves,
routeit backontothe topandbottomidler pulleys,andthenplaceit onto
theengineflywheelpulley.
NOTE:Makecertainthat the"V" sideofthe beltisseatedintothe top pulley
andtheflat sideof thebelt isseatedinto the bottompulley.SeeFigure16.
6. Reinstallthespindlesheavesbelt guardwith theselftappingscrews
removedearlier.
Makecertainthat thedrivebelt isontheengineflywheelpulleyandidler
pulleys,andretightentheflangelocknutonthetopof theframe.
NOTE:Makecertainthat thedrivebeltis seatedcorrectlyandthatit is riding
smoothlyon the spindlesheavesandisnotpinchedbetweenthem.Repeat
thefirst threestepsif thebelt ispinched.
Neveroperatethe edgerwithout the spindlesheavesbelt guardinplace.
Belt 6uard
Figure15
/:7 SpindleSheave
..............................................TopP#_ .......................Bottom Pulley
EngineFlywheelPulley
J
Figure16
13
Neverstore edgerwith fuel in tank indoorsor in poorlyventilated areas
where fuel fumes mayreachan openflame, spark,or pilot light ason a
furnace,water heater, clothesdryer,or gasappliance.
PreparingThe Engine
Forenginesstoredover30 days:
Topreventgumfromforminginfuel systemor on carburetorparts,run
engineuntil it stopsfromlackof fueloraddagasolineadditiveto thegas
inthe tank.If youuseagasadditive,runtheenginefor severalminutesto
circulatetheadditivethroughthecarburetor--after whichtheengineand
fuelcanbestoredupto 24months.
Whileengineisstill warm,changethe oil.
Cleanengineof surfacedebris.
PreparingTheEdger
Cleanandlubricateedgerthoroughlyasdescribedinthelubrication
instructions.
Donotusea pressurewasherorgardenhoseto cleanyourunit.
Coatedgerbladewith chassisgreaseto preventrusting.
Referto Preparingthe Engineforcorrectenginestorageinstructions.
Storeedgerinadry,cleanarea.Donotstorenextto corrosivematerials,such
asfertilizer.
Whenstoringanytype of powerequipmentinapoorlyventilatedormetalstorage
shed,careshouldbetakento rust-prooftheequipment.Usinga lightoil orsilicone,
coattheequipment,especiallycablesandall movingpartsof youredgerbefore
storage.
14
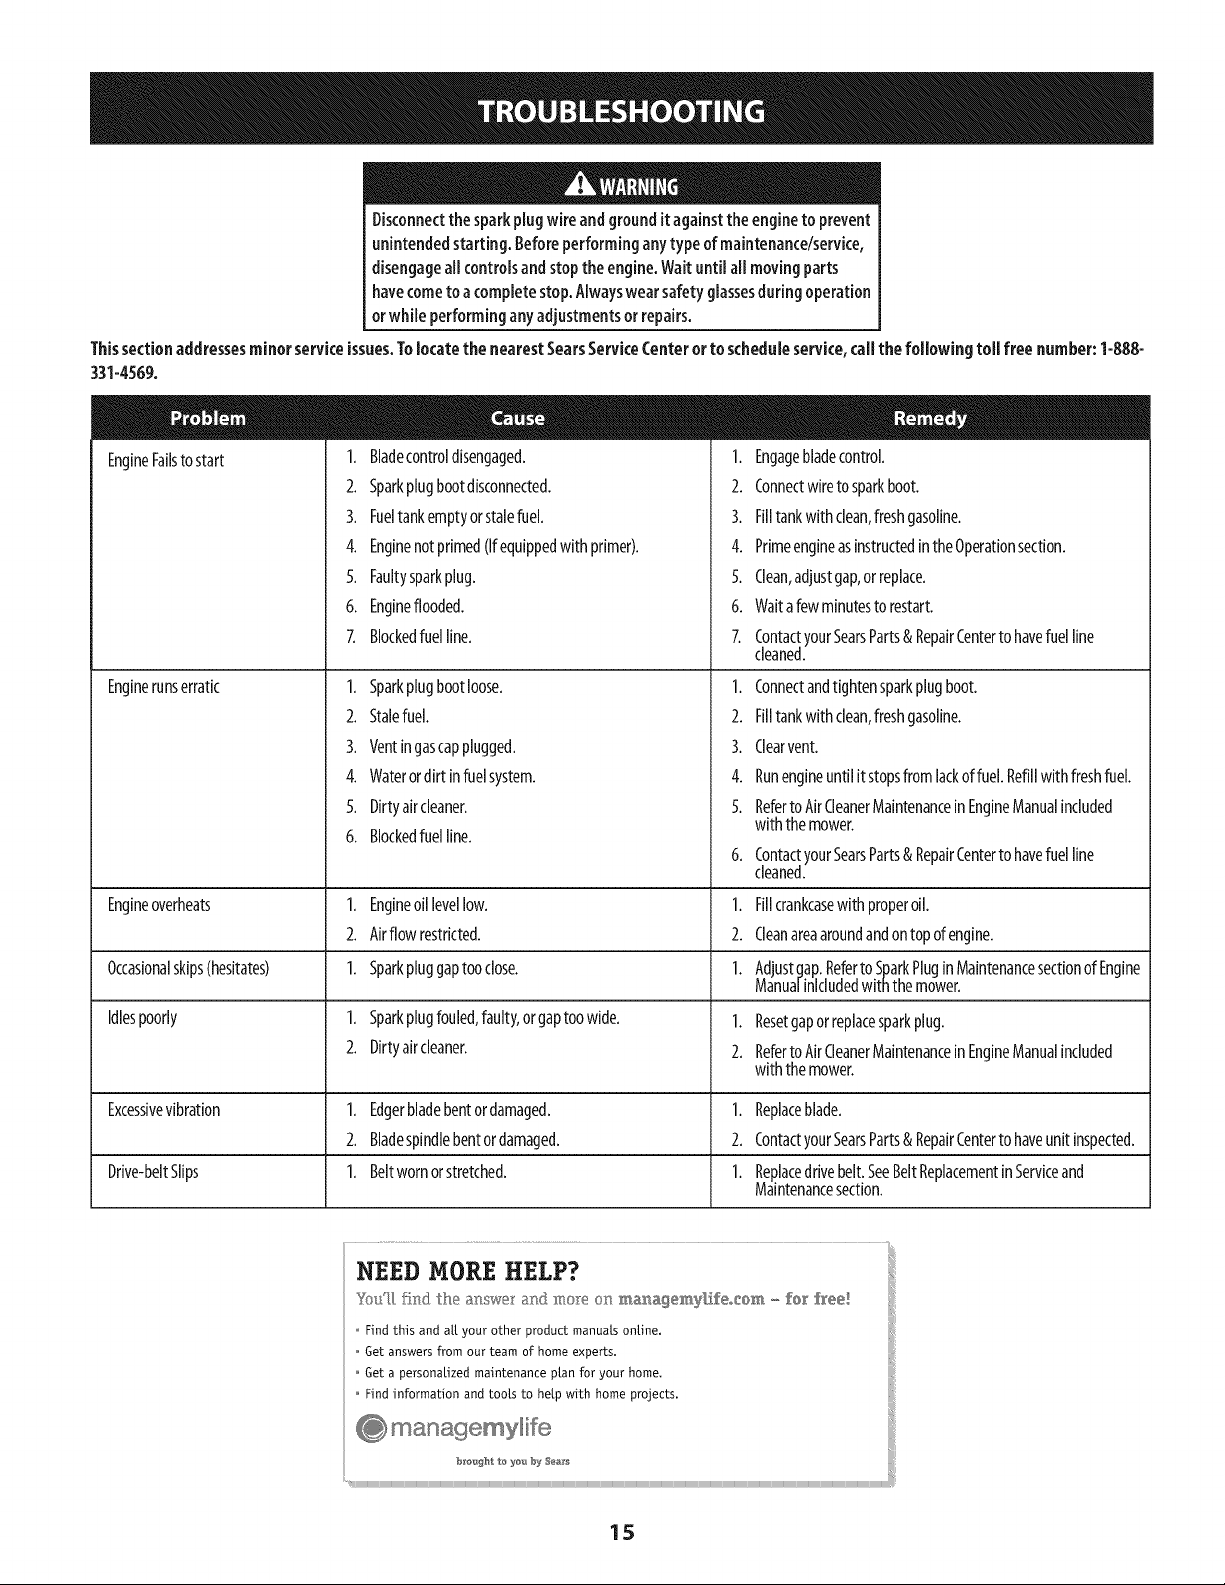
Disconnectthe sparkplug wireand groundit againstthe engine to prevent
unintendedstarting. Beforeperforminganytypeof maintenance/service,
disengageall controlsandstopthe engine.Waituntil aHmovingparts
havecometo acompletestop.Alwayswearsafety glassesduring operation
orwhineperformingany adjustmentsorrepairs.
Thissectionaddressesminorserviceissues.Tolocatethe nearestSearsServiceCenterorto scheduleservice,call the following toll free number:1-888-
331-4569.
EngineFailstostart
Enginerunserratic
1. Bladecontroldisengaged.
2. Sparkplugbootdisconnected.
3. Fueltankemptyor stalefuel.
4. Enginenotprimed@equippedwith primer).
5. Faultysparkplug.
6. Engineflooded.
7. Blockedfuel line.
1. Sparkplugbootloose.
2. Stalefuel.
3. Ventingascapplugged.
4. Waterordirt infuelsystem.
5. Dirtyaircleaner.
6. Blockedfuel line.
Engineoverheats 1. Engineoillevellow.
2. Airflow restricted.
Occasionalskips(hesitates) 1. Sparkpluggaptoo close.
Idlespoorly 1. Sparkplugfouled,faulty,orgaptoowide.
2. Dirtyaircleaner.
1. Engagebladecontrol.
2. Connectwireto sparkboot.
3. Filltankwithdean,freshgasoline.
4. PrimeengineasinstructedintheOperationsection.
5. Clean,adjustgap,orreplace.
6. Waitafewminutesto restart.
7. ContactyourSearsParts&RepairCenterto havefuelline
cleaned.
1. Connectandtightensparkplugboot.
2. Filltankwithdean,freshgasoline.
3. Clearvent.
4. Runengineuntilitstopsfrom lackoffuel. Refillwithfreshfuel.
5. RefertoAirCleanerMaintenancein EngineManualincluded
withthe mower.
6. ContactyourSearsParts&RepairCenterto havefuelline
cleaned.
1. Fillcrankcasewithproperoil.
2. Cleanareaaroundandontopof engine.
1. Adjustgap.Referto SparkPluginMaintenancesectionof Engine
Manua/inlcludedwiththe mower.
1. Resetgaporreplacesparkplug.
2. Referto AirCleanerMaintenanceinEngineManualincluded
withthe mower.
Excessivevibration 1. Edgerbladebentordamaged. 1. Replaceblade.
2. Bladespindlebentordamaged. 2. ContactyourSearsParts&RepairCenterto haveunit inspected.
Drive-beltSlips 1. Beltwornorstretched. 1. Replacedrivebelt.SeeBeltReplacementinServiceand
Maintenancesection.
NEED MORE HELP?
You'_f_Rdthe am_werand more o:_ma_agemy_fe_com - forf_ee!
Find this and al.[ your other product manuals ontine.
6et answers from our team of home experts.
Get a personalized maintenance pl.an for your home.
Find information and tools to hel.p with home projects.
b_m_h[ to yeu By Sea_
15
(ThispageapplicableintheU.S.A.andCanadaonly.)
Sears Brands Management Corporation (Sears), the California Air ResourcesBoard (CARB)
and the United States Environmental Protection Agency (U,S, EPA)
EmissionControl System Warranty Statement (Owner's Defect Warranty Rights and Obligations)
EMISSIONCONTROLWARRANTYCOVERAGEISAPPLICABLETOCERTIFIEDENGINES ANDTOCERTIFIEDMODELYEAR1997ANDLATERENGINESWHICHAREPURCHASEDAND
PURCHASEDINCALIFORNIAIN19%ANDTHEREAFTER,WHICHAREUSEDINCALIFORNIA,USEDELSEWHEREINTHEUNITEDSTATES(ANDAFTERJANUARY1,2001INCANADA).
California and United States Emission Control Defects Warranty Statement
TheCaliforniaAir ResourcesBoard(CARB),U.S.EPAandSearsarepleasedto explainthe
EmissionControlSystemWarrantyonyourmodelyear2000andlatersmalloff-road
engine(SORE).InCalifornia,newsmalloff-roadenginesmustbedesigned,builtand
equippedto meetthe State'sstringentanti-smogstandards.Elsewhereinthe United
States,newnon-road,spark-ignitionenginescertifiedfor modelyear1997andlater
mustmeetsimilarstandardssetforth bythe U.S.EPA.Searsmustwarrantthe emission
controlsystemon yourengineforthe periodsoftime listedbelow,providedtherehas
beenno abuse,neglector impropermaintenanceofyoursmalloff-roadengine.Your
emissioncontrolsystemincludespartssuchasthecarburetor,air cleaner,ignition
system,mufflerandcatalyticconverter.Alsoincludedmaybeconnectorsandother
emissionrelatedassemblies.Whereawarrantableconditionexists,Searswill repair
yoursmalloff-roadengineat nocostto youincludingdiagnosis,partsandlabor.
Sears Emission Control Defects Warranty Coverage
Smalloff-roadenginesarewarrantedrelativeto emissioncontrolpartsdefectsfora
periodof oneyear,subjectto provisionssetforth below.Ifanycoveredpartonyour
Owner's Warranty
Asthesmalloff-roadengineowner,youareresponsiblefortheperformanceof the
requiredmaintenancelistedinyourOperatingandMaintenanceInstructions.Sears
recommendsthatyou retainall yourreceiptscoveringmaintenanceonyoursmall
off-roadengine,butSearscannotdenywarrantysolelyforthelackof receiptsorfor
yourfailureto ensurethe performanceof allscheduledmaintenance.Asthesmall
off-roadengineowner,youshouldhoweverbeawarethatSearsmaydenyyouwarranty
coverageifyoursmalloff-roadengineor apart hasfaileddueto abuse,neglect,
Sears Emission Control Defects
Thefollowingarespecificprovisionsrelativeto yourEmissionControlDefectsWarranty
Coverage.Itis in additionto theSearsenginewarrantyfor non-regulatedenginesfound
inthe OperatingandMaintenanceInstructions.
1. WarrantedParts
Coverageunderthiswarrantyextendsonlyto thepartslistedbelow(the
emissioncontrolsystemsparts)to theextentthesepartswerepresentonthe
enginepurchased.
a. FueIMeteringSystem
• Coldstartenrichmentsystem
• Carburetorandinternalparts
• FuelPump
b. AirlnductionSystem
• Aircleaner
• Intakemanifold
c. IgnitionSystem
• Sparkplug(s)
• Magnetoignitionsystem
d. CatalystSystem
• Catalyticconverter
• Exhaustmanifold
• Airinjectionsystemorpulsevalve
e. MiscellaneousItemsUsedin AboveSystems
• Vacuum,temperature,position,time sensitivevalvesandswitches
• Connectorsandassemblies
2. Lengthof Coverage
Searswarrantsto theinitialownerandeachsubsequentpurchaserthat the
WarrantedPartsshallbefreefromdefectsin materialsandworkmanshipwhich
causedthe failureoftheWarrantedPartsforaperiodofoneyearfrom the date
theengineisdeliveredto aretailpurchaser.
engineisdefective,thepartwill berepairedorreplacedbySears.
Responsibilities
impropermaintenanceor unapprovedmodifications.Youareresponsibleforpresenting
yoursmalloff-roadengineto anAuthorizedSearsServiceDealerassoonasaproblem
exists.Theundisputedwarrantyrepairsshouldbecompletedinareasonableamount
of time,not to exceed30days.Ifyouhaveanyquestionsregardingyourwarrantyrights
andresponsibilities,youshouldcontactaSearsServiceRepresentativeat 1-800-469-
4663.Theemissionwarrantyisa defectswarranty.Defectsarejudgedon normalengine
performance.Thewarrantyisnotrelatedto an in-useemissiontest.
Warranty Provisions
3. NoCharge
Repairor replacementof anyWarrantedPartwill beperformedat nochargeto
theowner,includingdiagnosticlaborwhichleadsto thedeterminationthata
WarrantedPartisdefective,if thediagnosticwork isperformedatan Authorized
SearsServiceDealer.Foremissionswarrantyservicecontactyournearest
AuthorizedSearsServiceDealeraslistedinthe"YellowPages"under"Engines,
Gasoline,""GasolineEngines,""LawnMowers,"orsimilarcategory.
4. ClaimsandCoverageExclusions
Warrantyclaimsshallbefiled in accordancewith theprovisionsof theSears
EngineWarrantyPolicy.Warrantycoverageshallbe excludedforfailuresof
WarrantedPartswhicharenotoriginalSearspartsor becauseof abuse,neglect
orimpropermaintenanceassetforth intheSearsEngineWarrantyPolicy.Sears
isnot liableto coverfailuresofWarrantedPartscausedbytheuseofadd-on,
non-original,ormodifiedparts.
5. Maintenance
AnyWarrantedPartwhichis notscheduledforreplacementasrequired
maintenanceor whichisscheduledonlyforregularinspectionto theeffectof
"repairorreplaceasnecessary"shallbewarrantedasto defectsforthe warranty
period.AnyWarrantedPartwhichisscheduledfor replacementasrequired
maintenanceshallbewarrantedasto defectsonlyforthe periodof time up
to thefirst scheduledreplacementforthat part.Anyreplacementpart thatis
equivalentin performanceanddurabilitymaybeusedin theperformanceof
anymaintenanceorrepairs.Theownerisresponsibleforthe performanceof
all requiredmaintenance,asdefinedinthe SearsOperatingandMaintenance
Instructions.
ConsequentialCoverage
Coveragehereundershallextendto thefailureofanyenginecomponentscaused
bythe failureofanyWarrantedPartstill underwarranty.
In theUSAandCanada,a24hourhotline,1-800-469-4663,hasamenuof pre-recordedmessagesofferingyouenginemaintenanceinformation.
16
GDOC-100188Rev.B
Congratulationsonmakingasmartpurchase.YournewCraftsman®productisdesignedandmanufacturedforyearsof
dependableoperation.Butlikeall products,it mayrequirerepairfromtimeto time.That'swhenhavinga RepairProtection
Agreementcansaveyoumoneyandaggravation.
Here'swhat the Repair ProtectionAgreement_ includes:
[] Expertservice byour10,000professionalrepairspecialists
[] Unlimitedserviceand nocharge forpartsandlaboronallcoveredrepairs
[] Productreplacementupto $1500ifyourcoveredproductcan'tbefixed
[] Discountof 25%from regularpriceof serviceandrelatedinstalledpartsnot coveredbythe agreement;also,25%off
regularpriceof preventivemaintenancecheck
[] Fasthelp by phone- wecallit RapidResolution- phonesupportfromaSearsrepresentative.Thinkof usasa"talking
owner'smanual."
Onceyoupurchasethe RepairProtectionAgreement,a simplephonecallisallthat it takesforyouto scheduleservice.You
cancallanytimedayornight,orscheduleaserviceappointmentonline.
TheRepairProtectionAgreementisa risk-freepurchase.If youcancelfor anyreasonduringthe productwarrantyperiod,
wewill provideafull refund.Or,a proratedrefundanytimeafterthe productwarrantyperiodexpires.PurchaseyourRepair
ProtectionAgreementtoday!
Somelimitations and exclusionsapply. Forpricesand additional informationin the U.S.A.call 1-800-827-6655.
_Coveragein Canadavarieson someitems. Forfull detailscall SearsCanadaat 1-800-361-6665.
SearsInstallationService
ForSearsprofessionalinstallationof homeappliances,garagedooropeners,waterheaters,andothermajorhomeitems,in
the U.S.A.orCanadacall1-800-4-MY-HOME®.
17
Declaraci6n de garantia .............................. 18
Instrucciones de seguridad ........................ 19-22
Montaje .......................................... 23-25
Operaci6n ........................................ 26-27
Servicio y Mantenimiento ......................... 28-30
Almacenamiento fuera de temporada ................ 31
Solud6n de problemas ............................ 32-33
Numero de servicio .................. Cubierta posterior
GARANT[ACOMPLETACRAFTSMANPORDOSANOS
PORDOSANOSa partirdelafechadelacompra,esteproductoest_garantizadopordefectosenlosmaterialesy lamanodeobra.
Losproductosdefectuososser_nreparadossincostoo reemplazadossincostosila reparaci6nnoest_disponible.
Paraobtenerinformaci6nsobreelalcancedela garantiay solicitarlareparaci6noelreemplazo,visiteelsitioWeb:www.craftsman.com.
EstagarantiacubreONICAMENTElosdefectosenlosmaterialesyen la manodeobra.EstagarantiaNOcubre:
• Articulosde duraci6nlimitadaquepuedendesgastarsebajocondicionesnormalesdeusoduranteelperiododegarantia,talescomo,correas,filtrosde
aire,bujiasdeencendido,y lascuchillasdelabordeadora.
• Productodahosresultantesdelosintentosdel usuariodemodificaci6ndelproducto,reparaci6no causadosporaccesoriosdeproductos.
• Reparacionesnecesariasdebidoalaccidenteo porno operaro mantenerel productosegOnlasinstruccionesprovistas.
• Mantenimientopreventivoo reparacionesnecesariasdebidoamezcladecombustibleimpropia,combustiblecontaminadoo ahejo.
LapresentegarantiaseanulasiseutilizaesteproductoalgunavezparaprestarservicioscomercialesosiseIoalquilaa otrapersona.
Estagarantiale otorgaderechoslegalesespecificos,peroustedpodriagozardeotrosderechosen raz6ndesulugarderesidencia.
SearsBrandsManagementCorporation,HoffmanEstates,IL60179
Aceite del motor: SAE 30
Combustible: Gasolina sin plomo
Motor: Briggs & Stratton
Numero de modelo
Numero de serie
Fecha de compra
Registre el numero de modelo, numero de serie y fecha
de compra m_s arriba.
© Sears Brands, LLC 18
Lapresendadeeste simboloindicaquesetrata deinstrucdones
importantesde seguridadquesedebenrespetarparaevitar poneren
peligro suseguridadpersonaly/o materialy lade otras personas.Leay siga
todaslasinstrucdonesde este manualantesde poneren fundonamiento
estam_quina.Sino respetaestasinstrucdonespodriaprovocarlesiones
personales.Cuandoyea estesimbolo, ipresteatend6n a laadvertenda!
PROPOSICION 65 DE CALiFORNiA
Elescapede[ motorde este producto,algunosde suscomponentesy
algunoscomponentesdelvehkulo contieneno liberan sustandasquimkas
queelestado de Californiaconsideraquepuedenprodudr c_ncer,defectos
de nadmiento u otros problemasreproductivos.
Estam_quinafue construidapara setoperadadeacuerdoconlasreglas
de seguridadcontenidasen estemanual.AI igualqueconcualquiertipo
de equipo motorizado,un descuidoo error por partedel operadorpuede
produdr lesionesgraves.Estam_quinaescapazde amputar manosy pies
y dearrojar objetoscon gran fuerza.Deno respetarlasinstruccionesde
seguridadsiguientesse puedenproducir lesionesgraveso la muerte.
Su responsabilidad--Restrinja e[ usode estam_quina motorizada
alas personasquelean,comprendany respetenlasadvertendase
instrucdonesqueaparecenen estemanualyen lam_quina.
iGUARDEESTASINSTRUCCIONES!
CAPACITACI(SN
Leaconatenci6ntodaslasinstruccionescontenidasenestemanualantes
de intentarensamblarestam_quina.Lea,comprenday respetetodaslas
instrucdonesquefiguranenlam_quinay en elolosmanualesantesde
hacerlafundonar.Guardeestemanualen unlugarseguroparaconsultas
futurasy peri6dicas,asicomoparasolicitarrepuestos.
Antesdeoperaresteequipo,familiarkesetotalmenteconloscontrolesy el
usocorrectodel mismo.
Estam_quinaesunaunidaddeequipomotorizadodepredsi6n,noun
juguete.PorIo tanto,tengamuchocuidadoentodomomento.Estam_quina
fuediseffadapararealizarunatarea:bordearel c6sped.Nolautilicepara
ningunotrofin.
Nopermitanuncaquelosnifiosmenoresde 14afiosutilicenestam_quina.
Losnifiosde 14afiosenadelantedebenleery entenderlasinstrucciones
deoperad6ny normasde seguridadcontenidasen estemanual,yen la
m_quinay debenserentrenadosy supervisadosporun adulto.
S61osedebepermitirusarestam_quinaa individuosresponsablesy
familiarizadosconsusreglasde seguridad.
Paraayudaraevitarelcontactoconlacuchillao unalesi6nporunobjeto
arrojado,mant_ngaseen lazonadeloperadordetr_sdelasmanijasy
mantengaa losnifios,observadores,ayudantesy mascotasapartadosal
menos25metrosde labordeadoradec_spedmientrasest_enoperaci6n.
Detengalam_quinasialguienentraenlazona.
PREPARATWOS
inspecdoneminuciosamenteel_readondeutiJizar_elequipo.Retiretodas
Jaspiedras,palos,JJantas,huesos,juguetesyotrosobjetosextrafiosque
podrianhacertropezary caero serrecogidosy arrojadosporJaacci6ndeJas
cuchillas.Losobjetosarrojadosporlam_quinapuedenproducirlesiones
graves.
Paraprotegerselosojosutilicesiempreanteojosoantiparrasde seguridad
mientrasoperaJam_quinaomientrasJaajustaorepara.Losobjetos
arrojadosquerebotanpuedenproducirlesionesocularesgraves.
UtiJicezapatosde trabajoresistentes,desueJafuerte,asicomopantaJones
y camisasajustados.Serecomiendavestircamisay pantaJ6nparacubrir
brazosy piernasy usarzapatosconpunteradeacero.Nuncaopereesta
m_quinadescaJzo,consandaJias,zapatosresbaJososo Jivianos(porej.de
Jona).
Nuncaintenterealizarajustesmientrasel motorest_en marchaexceptoen
loscasosespedficamenterecomendadosenelmanualdeloperador.
Manejo seguro de la gasolina
Paraevitarlesionespersonaleso dafiosmaterialesseasumamentecuidadosoal
manipularlagasolina.Lagasolinaessumamenteinflamabley susvaporespueden
causarexplosiones.Sisederramagasolinaendmao sobrelaropasepuedelesionar
gravementeyaquesepuedeincendiar.L_veselapiely c_mNesede ropade
inmediato.
Utilices61orecipientesparagasolinaautorizados.
NuncaIlenelosreciplentesenelinteriordeunvehkuloocami6nocajade
remolqueconrecubrimientopl_stico.Coloquesiemprelosrecipientesenel
pisoy lejosdelvehkuloantesde realizarlacarga.
Retireelequipoagasolinadelcami6no remolquey II_neloenel piso.Siesto
no esposible,Ileneelequipoen unremolqueconuncontenedorport_til,en
vezdehacerloconunaboquilladispensadoradegasolina.
MantengalaboquilladeIlenadoencontactoconel bordedeldep6sito
decombustibleoconlaaberturadelredpienteentodomomento,hasta
terminarlacarga.Noutiliceundispositivode boquillade apertura/cierre.
19
Apaguetodoslosdgarrillos,dgarros,pipasy otrasfuentesdecombusti6n.
Nuncacarguecombustibleen la m_iquinaeninterioresporquelosvapores
inflamablespodrianacumularseenel_irea.
Nuncasaquela tapade lagasolinaniagreguecombustiblemientraselmotor
est_icalienteo enmarcha.Dejequeel motorseenfrieporIomenosdos
minutosantesde volveracargarcombustible.
Nuncalleneenexcesoeldep6sitode combustible.Lleneeltanqueano
m_isdeI/2pulgadapordebajode labasedelcuellodeltap6ndecarga,para
permitirlaexpansi6ndelcombustible.
Vuelvaacolocarlatapadelagasolinay ajustelabien.
Limpieel combustiblequesehayaderramadosobreelmotory elequipo.
Trasladela m_iquinaaotrazona.Espere5minutosantesdeencenderel
motor.
Nuncaalmacenela m_quinao elrecipientedecombustiblecercade llama
expuesta,chispasoaparatosconpilotocomopot ejemplo,calentadoresde
agua,calefactores,hornos,secadoresde ropau otrosaparatosagas.
Parareducirel riesgodeincendiomantengalabordeadoradecdsped
limpiadepasto,hojasy delaacumulad6ndeotrosdesechos.Limpielos
derramesdeaceiteocombustibley saquetodoslosresiduosembebidosde
combustible.
Dejequela bordeadoradec6spedseenfriednco(5)minutosporIomenos
antesdealmacenarla.
FUNCIONAMIENTO
Nocoloquelasmanosni lospiescercade laspiezasgiratorJas.Elcontactocon
lacuchillagiratoriapuedeprodudrlaamputad6nde manosy pies.
Elmecanismodecontroldela cuchillaesundispositivodeseguridad.Nunca
evitesufundonamiento.SiIohace,lam_quinasetornapeligrosay puede
causarlesionespersonales.
Nuncahagafundonarlabordeadorasinusarelprotectorde lacuchilla,el
escudocontraescombrosy la manijadecontroldelacuchillaenel lugar
correspondienteyen fundonamiento.
Nuncaoperela bordeadorasilosdispositivosdeseguridadest_ndaffados.Si
noIo hace,puedenprodudrselesionespersonales.
Nuncaenciendael motorenespacioscerradosoen unazonaconpoca
ventilad6n.Elescapedel motorcontienemon6xidodecarbono,ungas
inodoroyletal.
Noutilicelam_quinabajolainfluenciadelalcoholo lasdrogas.
Elsilendadory elmotorsecalientanypuedencausarquemaduras.Nolos
toque.
Nuncaopereestam_quinasinbuenavisibilidado fluminad6n.Siempredebe
estarsegurode queest_bienafirmadoysujetandofirmementelasmanijas.
Camine,nuncacorra.
Noopereestam_quinasiseha caidooest_da_ada.Regreselam_quina
alserviciot_cnicodesudistribuidorautorizadom_scercanoparaquela
examiney larepare.
Nohagafundonarlam_quinasi lacuchilladecorteest_da_adao
excesivamentedesgastada.
Nuncaintentesacarmaterialdel protectordelacuchillasielmotorest_en
funcionamiento.Apagueel motor,desconecteelcablede labujiay p6ngalo
de maneraquehagamasacontrael motorparaevitarqueseencienda
accidentalmente.
Nosobrecarguelacapacidaddelam_quinatratandodebordearauna
velocidaddemasiador_pida.
Mantdngasealertaparaadvertirlaexistendadeaceraso terrenodesparejos,
etc.Siempreempujelentamentesobrelassuperficies_speras.Noutiliceesta
m_quinasobrepedregullo.
Nooperelam_quinabajolaIluviao encondicionesdesueloht_medo.
Siemprehagafuncionarlam_quinadesdedetr_sde lasmanijasy col6quese
de modoquelalineadevistadirectahacialacuchilladecortequede
bloqueadaporlosprotectores.
Siempredetengaelmotorcuandoelbordeadoo recorteseveandemorados
o cuandoest_trasladandolam_quinadeun lugaraotro.
Nuncadejelam_quinaen funcionamientosinvigilanda.Detengael motor,
desconecteelcabledela bujiay p6ngalode maneraquehagamasacontrael
motorparaevitarqueseenciendaaccidentalmente.
Utilicesolamentepiezasy accesoriosmanufacturadosparaestam_quinapor
elfabricante.SinoIo hace,puedenprodudrselesionespersonales.
Sisepresentansituadonesquenoest_nprevistasenestemanual,sea
cuidadosoy useel sentidocomt_n.P6ngaseen contactoconAsistendaal
Clienteparasolicitarayudao elnombredeldistribuidordeserviciom_s
cercanoasudomicilio.
NINOS
Puedenocurriraccidentestr_gicossieloperadornoest_atentoala
presenciade ni_os.PotIogeneral,losni_ossesientenatraidosporequipos
motorizadostalescomolasbordeadorasdec_sped.Noentiendenlosriesgos
nilospeligros.Nuncaasumaquelosni_ospermanecer_nenelmismolugar
dondelosvioporultimavez.
Mantengaa losni_osfueradel_reade bordeadoy bajoestrictavigilanciade
unadultoresponsableadem_sdeloperador.
Est_alertay apaguelabordeadoradec_spedsi unni_o ingresaal_rea.
Antesde moversehaciaatr_sy mientrasIoest_haciendo,mirehaciaatr_sy
cuidequeno hayani_os.
Tengaextremaprecauci6ncuandoseaproximeaesquinasciegas,entradas
de puertas,arbustos,_rbolesu otrosobjetosquepuedanobstaculizarlela
vistadeun ni_oquepudiesetoparseconlabordeadoradecdsped.
Mantengaa losni_osalejadosde losmotoresen marchao calientes.Pueden
sufrirquemadurasconun silenciadorcaliente.
Nopermitanuncaquelosni_osmenoresde 14a_osutilicenestam_quina.
Losni_osde 14a_osenadelantedebenleery entenderlasinstruccionesde
operaci6ny normasde seguridadcontenidasen estemanualyen lam_quina
y debenserentrenadosysupervisadosporunadulto.
2O
MANTENIMIENTO Y ALMACENAMIENTO
Nuncaenciendaelmotoren espacioscerradosoen unazonaconpoca
ventiladdn.Elescapedelmotorcontienemondxidodecarbono,ungas
inodoroy fetal.
Antesdelimpiar,repararo inspeccionarlam_quina,compruebequela
cuchillay todaslaspartesmdvilessehayandetenido.Desconecteel cablede
labujiay p6ngalohaciendomasacontraelmotorparaevitarqueseencienda
accidentalmente.
Reviselospernosde montajedelacuchillay del motoraintervalos
frecuentesparaverificarqueest_nbienapretados.Inspecdoneadem_s
visualmentelacuchillaen buscadedaffos(abolladuras,desgaste,roturas,
etc).Reemplacelacuchillatinicamenteconequipooriginaldelfabricante
(OEM)listadoenestemanual."El usodepiezasquenocumplencon
lasespecificadonesdel equipooriginalpodfiatenercomoresultadoun
rendimientoincorrectoy adem_sporterenriesgolaseguridad".
Lascuchillasdelasbordeadorasdec_spedsonmuyafiladasy pueden
produdrcortaduras.Envuelvala cuchillao utiliceguantesy extremelas
precaucionescuandoefecttiemantenimiento.
Mantengatodoslospernos,tuercasy tornillosbienajustadospara
asegurarsedequelam_quinaseencuentraencondicionessegurasde
operacidn.
Nuncaalterelosdispositivosdeseguridad.Controleperi6dicamenteque
funcionencorrectamente.
Despu_sdegolpearconalgtinobjetoextrafio,detengael motor,desconecte
elcabledelabujiay conecteelmotoramasa.Inspeccioneminuciosamente
labordeadoradec_spedparaversiest_daffada.Repareeldaffoantesde
arrancary operarlabordeadora.
Nuncaintenteajustarunaruedamientraselmotorest_enmarcha.
Muchoscomponentesdelanuevabordeadorasedesgastanenraz6ndel
usocontinuo.Paraprotegersuseguridad,vefifiquefrecuentementetodos
loscomponentesde labordeadoray reempl_celosinmediatamentes61o
conpiezasde losfabricantesdeequiposoriginales(0.E.M.)listadasen
estemanual."El usodepiezasqueno cumplenconlasespecificacionesdel
equipooriginalpodfiatenercomoresultadoun rendimientoincorrectoy
adem_sponerenriesgolasegufidad".
Nocambielaconfiguraci6ndel reguladordel motorniaceleredemasiado
elmismo.Elreguladordel motorcontrolala velocidadm_ximasegurade
funcionamientodelmotor.
Mantengao reemplacelasetiquetasdeseguridadeinstruccionessegtinsea
necesario.
Respetelasleyesy regulacionesdeeliminad6ncorrespondientespara
desecharlagasolina,el aceite,etc.,usados.Laeliminad6ninapropiadade
I[quidosomatefialespuededaffarelmedioambiente.
NO MODIFIQUE EL MOTOR
Paraevitarlesionesgraveso lamuerte,no modifiqueel motorbajoninguna
circunstancia.Sicambiala configuraci6ndelreguladorelmotorpuede
descontrolarsey operara velocidadesinseguras.Nuncacambielaconfiguraci6nde
f_bricadel reguladordel motor.
AVISO REFERIDO A EMISIONES
Losmotoresqueest_ncertificadosy cumplenconlasreguladonesdeemisiones
federalesEPAyde CaliforniaparaSORE(Equipospequeffostodoterreno)est_n
certificadosparaoperarcongasolinacomtinsinplomoy puedenincMr los
siguientessistemasdecontrolde emisiones:Modificaci6ndemotor(EM)y
catalizadordetresv[as(TWC)siestSnequipadosdeesamanera.
AMORTIGUADOR DE CHISPAS
Estam_quinaest_equipadacon un motor de combusti6nintemayno
debeset utilizadaen o cercade un terrenoagrestecubierto pot bosque,
malezaso hierbaexceptosi el sistemade escapedel motorest_equipado
conun amortiguador dechispasquecumplaconlasleyeslocaleso
estatalescorrespondientes,en casode haberlas.
SiseutilizaunamortiguadordechispaseloperadorIodebemanteneren
condicionesde usoadecuadas.Enel EstadodeCalifornialasmedidasanteriormente
mendonadassonexigidasporley(Artkulo 4442delC6digode RecursosPtiblicos
de California).Esposiblequeexistanleyessimilaresen otrosestados.Lasleyes
federalesseaplicanen territoriosfedexrales.
Puedeconseguirelamortiguadorde chispasparael silendadora trav_sdesu
distribuidorautofizadode motoresoponi_ndoseen contactoconeldepartamento
deservicios.Llameal 1-800-469-4663paraServiceCenter.
21
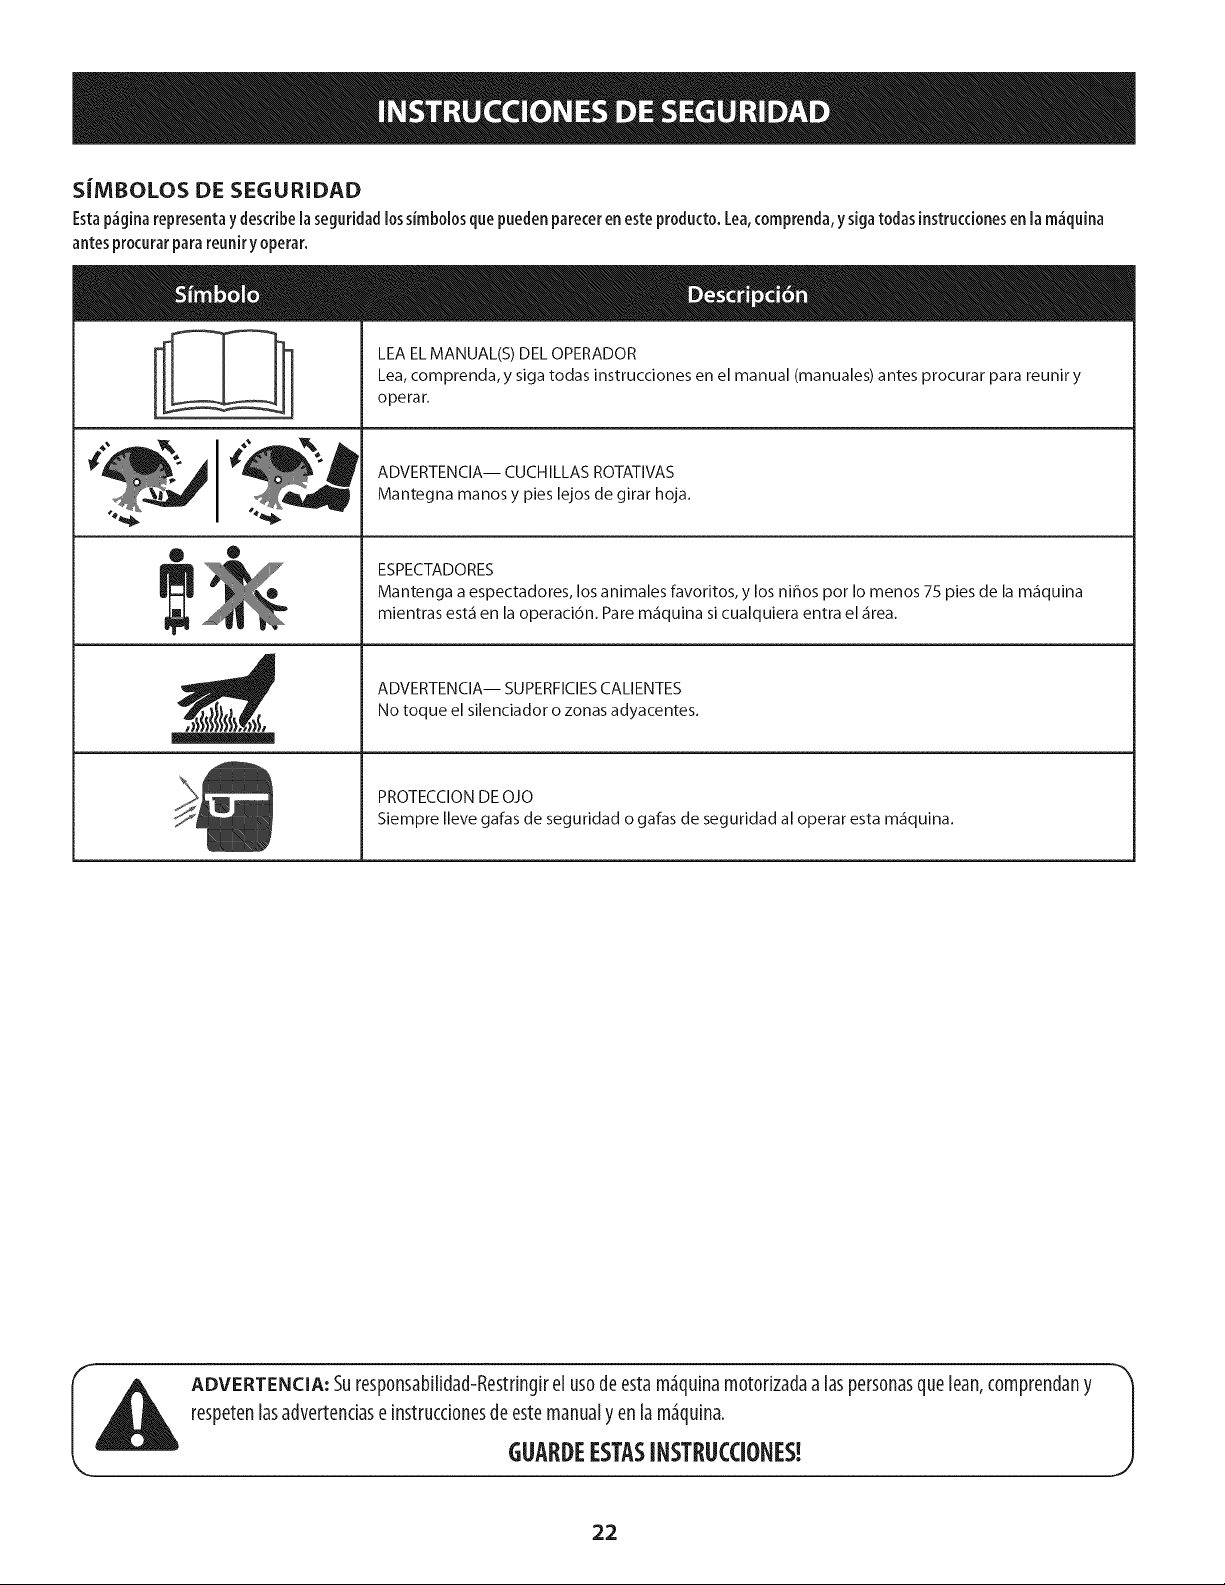
S|MBOLOS DE SEGURIDAD
Estap_ginarepresentay describela seguridadlossimbolosquepuedenpareceren esteproducto.Lea,comprenda,ysigatodas instruccionesen la m_quina
antesprocurarpara reuniry operar.
LEA EL MANUAL(S) DEL OPERADOR
Lea, comprenda, y siga todas instrucciones en el manual (manuales) antes procurar para reuniry
operar.
ADVERTENCIA-- CUCHILLAS ROTATIVAS
Mantegna manos y pies lejos de girar hoja.
• •
ESPECTADORES
Mantenga a espectadores, los animales favoritos, y los ni_os pot Io menos 75 pies de la m_quina
mientras est_ en la operaci6n. Pare m_quina si cualquiera entra el _rea.
ADVERTENClA-- SUPERFICIES CALIENTES
No toque el silenciador o zonas adyacentes.
PROTECCIONDEOJO
Siempre Ileve gafas de seguridad o gafas de seguridad al operar esta m_quina.
ADVERTENCIA: Suresponsabilidad-Restringirel usodeestam_quinamotorizadaa laspersonasquelean,comprendany
respetenlasadvertenciase instruccionesdeestemanualy en lam_quina.
J
GUARDEESTASINSTRUCCIONES!
22
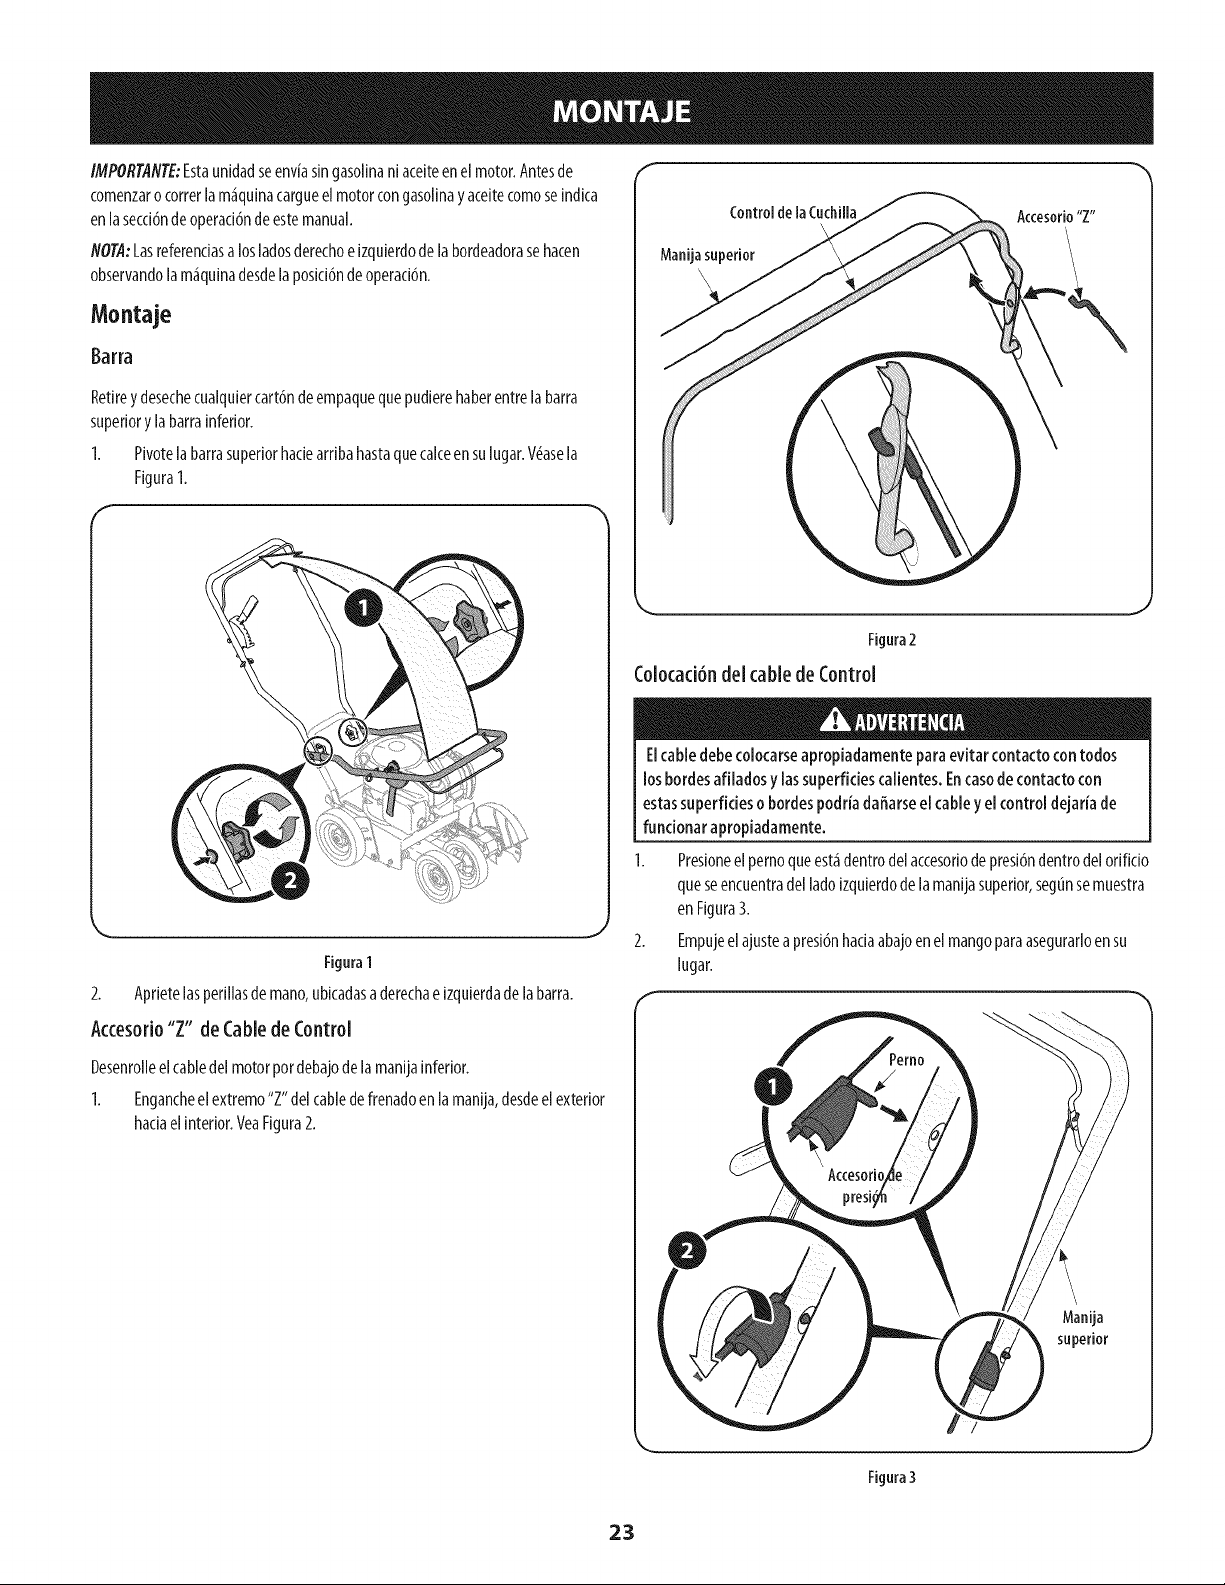
IMPORT,4NTE:Estaunidadseenviasingasolinani aceiteenelmotor.Antesde
comenzarocorrerla m_quinacargueelmotorcongasolinay aceitecomoseindica
enlaseccidnde operacidndeestemanual.
NOTII:Lasreferenciasa losladosderechoe izquierdodela bordeadorasehacen
observandola m_quinadesdelaposicidndeoperacidn.
Montaje
Ba rra
Retirey desechecualquiercart6ndeempaquequepudierehaberentrelabarra
superiory labarrainferior.
I. Pivotelabarrasuperiorhaciearribahastaquecalceen sulugar.V_asela
FiguraI.
f
Figura1
2. Aprietelasperillasdemano,ubicadasa derechaeizquierdade labarra.
Accesorio"Z" deCablede Control
Desenrolleelcabledel motorpordebajodela manijainferior.
1.
Engancheel extremo"Z"delcabledefrenadoenlamanija,desdeelexterior
haciaelinterior.VeaFigura2.
Control de la Cuchilla
Manijasuperior
/
Figura 2
Colocad6ndel cable de Control
Elcabledebecolocarseapropiadamentepara evitar contactocontodos
losbordesafiladosy lassuperficiescalientes. Encasode contactocon
estassuperficieso hordespodria daffarseel cabley elcontrol dejariade
fundonar apropiadamente.
1. Presioneelpernoqueest_identrodelaccesoriodepresi6ndentrodelorifido
queseencuentradelladoizquierdodelamanijasuperior,segunsemuestra
enFigura3.
2. Empujeelajusteapresi6nhadaabajoenel mangoparaasegurarloensu
lugar.
Mauija
superior
Figura 3
23
Co[ocaci6nde[cabledeControlde Profundidad CuchiJJa
Desenvolverelcabledecontroldeprofundidadcuchillay larutahaciaarribaellado
derechodel mango.
1. Tirarde lapalancade controldeprofundidaddelaprimeraposici6ndel
soportedecontroldeprofundidad.
2. Empujelapalancacompletamentehaciaadelante.
3. Soltarla palancaen latiltima posid6ndelsoporte.
4. EngancheelextremoZdelcabledecontroldelaprofundidadenelagujero
enlapalancadecontroldeprofundidad,comosemuestraenla Figura4.
Cuerdade Arranque
1. Busquelaguiadelcabley elpomode mariposaseencuentraen labolsa
manual.Medianteelmandode ala,seguro,perono aprietelagu[adela
cuerdaparaelladoderechodelamanijasuperiorcomosemuestraenla
Figura5.
2. P_resedetr_sdelaunidady sostengaelcontrolde la cuchillacontrala barra
superior.
3. Jalesuavementede lacuerdadearranquefueradelmotor.
J
Figura4
Lacuchilla de [a bordeadoragirar_cuando[acuerdade arranque.
NOTA:Lacuerdade arranquenoseseparadelmotoramenosqueel control
delacuchilla(consultela Figura5)est_presionadocontralabarrasuperior.
Deslicelacuerdade arranqueatrav_sde la partesuperiordelaguiadela
cuerda.Vuelvaaajustarlaperilladealetasqueaseguralaguiaala barra
superior.
Ajuste
Ajuste Bisel
1. El_ngulodelacuchillade labordeadorasepuedeajustarcolocandoelajuste
delbiseladoenunadetresposicionesde recorte.YealaFigura6.
!
ii
Figura6
J
24
Figura5
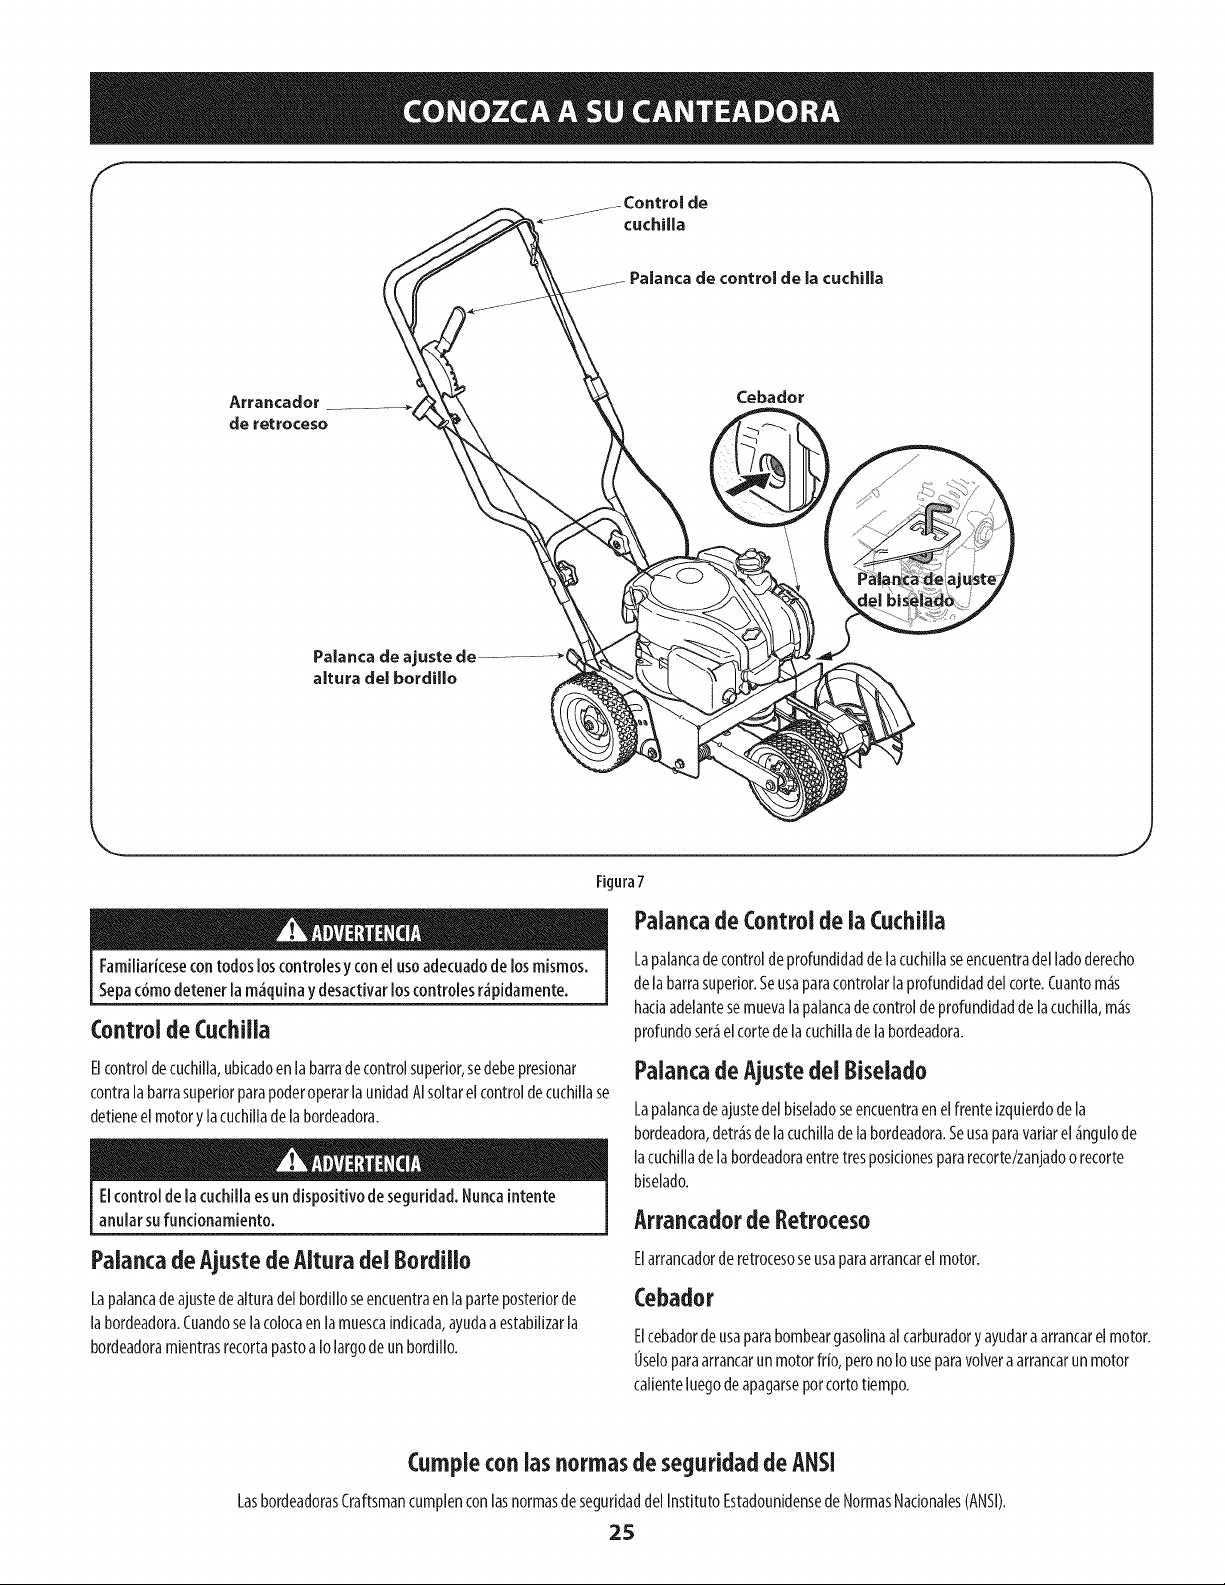
Cebador
Palanca de ajuste de ..................... (
aitura del bordillo
Figura7
Familiarkesecontodosloscontrolesy conel usoadecuadodelosmismos.
Sepac6modetenerlam_quinay desactivarloscontrolesr,_pidamente.
Control de Cuchiila
Palancade Control de ia Cuchilla
Lapalancadecontroldeprofundidaddela cucHllaseencuentradel ladoderecho
de labarn superior.Seusaparacontrolarlaprofundidaddelcorte.Cuantom_s
hadaadelantesemuevala palancade controldeprofundidadde lacuchllla,m_s
profundoser_elcortedela cuchlllade labordeadora.
ElcontroldecucMla,ubicadoenla barn decontrolsuperior,sedebepresionar
contralabarn superiorparapoderoperarla unldadAIsoltarelcontroldecuchlllase
detieneelmotory lacuchllladelabordeadora.
Elcontrol de la cuchillaesun dispositivode seguridad.Nuncaintente
anularsufundonamiento.
Palancade Ajustedel Biselado
Lapalancadeajustedel biseladoseencuentraenelfrenteizquierdodela
bordeadora,detr_sdelacuchlllade labordeadora.Seusaparavarlarel_ngulode
lacuchillade la bordeadoraentretresposidonespararecorte/zanjadoorecorte
blselado.
Arrancadorde Retroceso
Palancade Ajustede Alturadel Bordillo
Lapaiancade ajustedealturadelbordilloseencuentraenla parteposteriorde
labordeadora.Cuandoselacolocaen lamuescaindicada,ayudaaestabilizarla
bordeadoramlentrasrecortapastoaIo largodeun bord[llo.
Elarrancadorderetrocesoseusaparaarrancarel motor.
Cebador
Elcebadordeusaparabombeargasollnaal carburadory ayudara arrancarelmotor.
Useloparaarrancarunmotorfrio,peronoIo useparavolvera arrancarun motor
callenteluegode apagarseporcortotiempo.
Cumplecon iasnormasde seguridad de ANSI
LasbordeadorasCraftsmancumplenconlasnormasdeseguridaddelInstitutoEstadounidensedeNormasNacionales(ANSI).
25
Aseguresede que ningunapersonaaparte del operador permanezca
cercade la cortadoramientrasarrancael motor u operala misma.Nunca
enciendael motor en espacioscerradosoen una zonacon pocaventilaci6n.
Elescapedel motor contienemon6xidode carbono,un gasinodoroy letal.
Mantengalasmanos,lospies,el cabelloy la ropasueltaalejadosde las
partesm6vilesdel motor yde la cortadora.
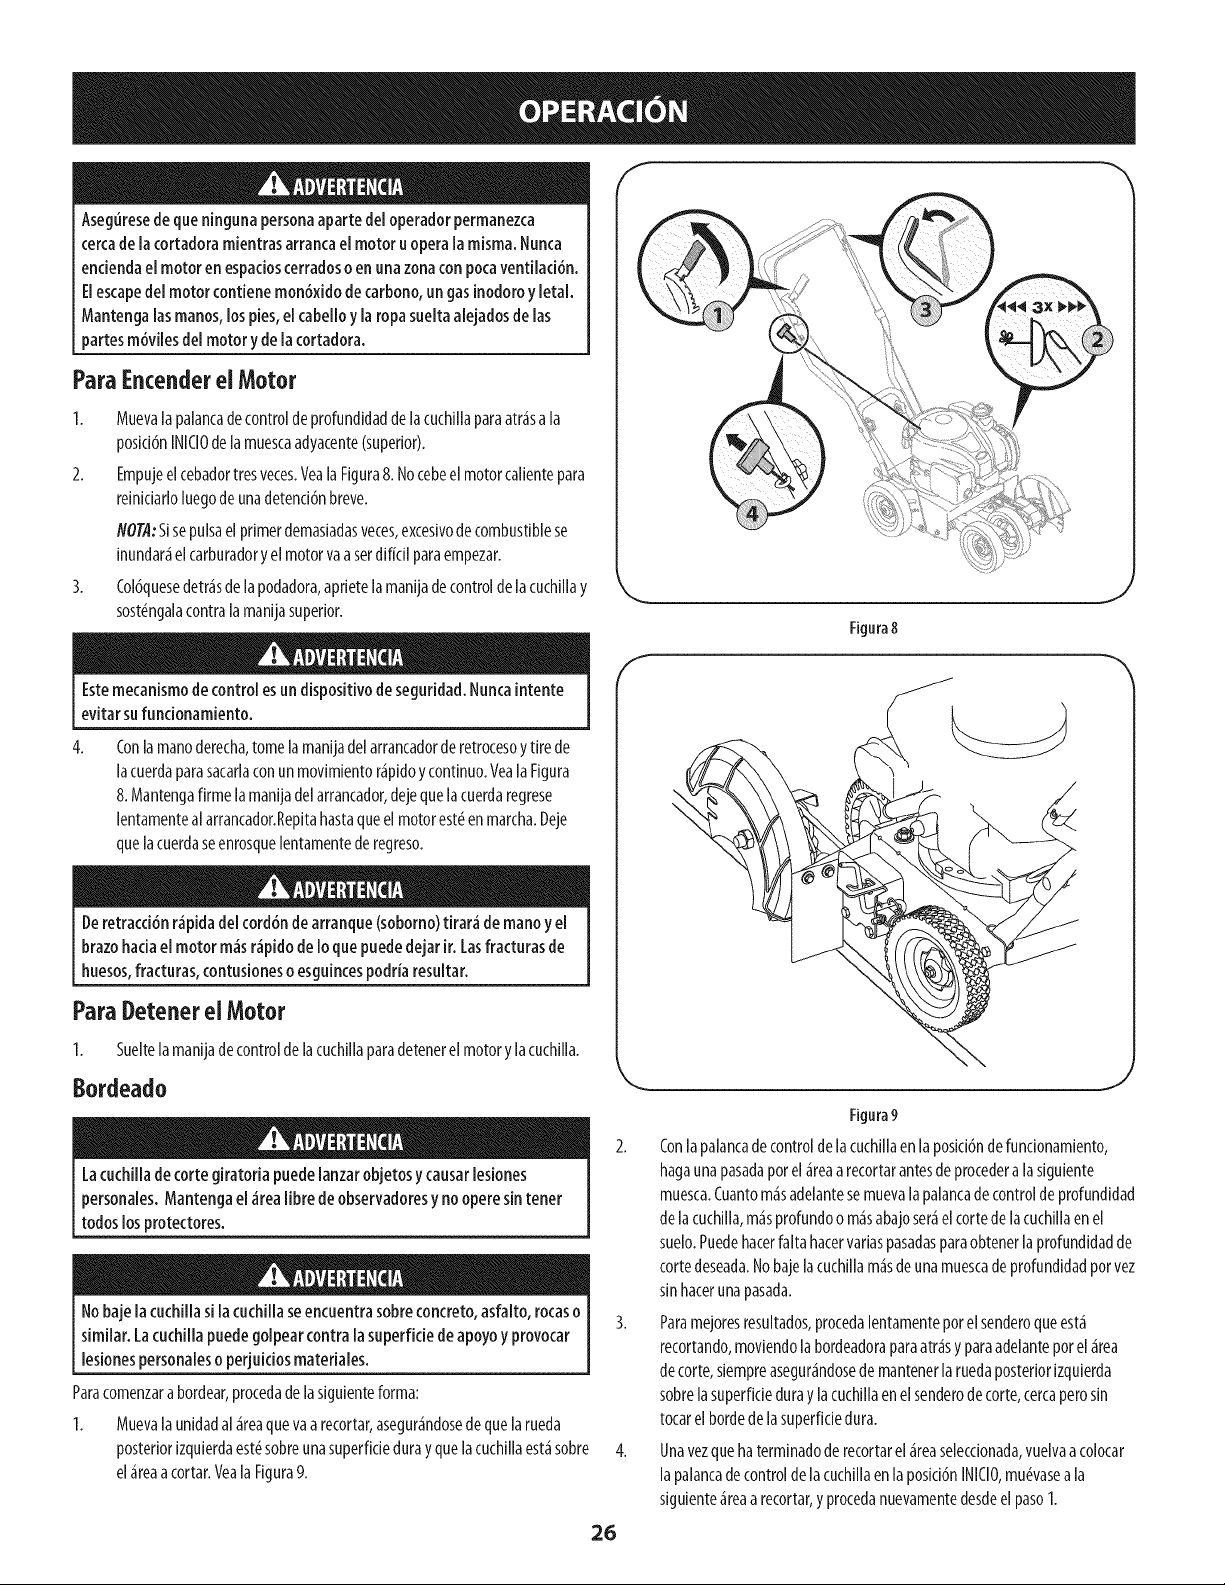
ParaEncenderel Motor
1. Muevala palancadecontroldeprofundidaddelacuchillaparaatr_sala
posid6nINICIOde lamuescaadyacente(superior).
2. Empujeelcebadortresveces.VealaFigura8.Nocebeel motorcalientepara
reinkiarloluegode unadetend6nbreve.
NO@:Sisepulsael primerdemasiadasveces,excesivodecombustiblese
inundar_el carburadory elmotorvaa serdifidl paraempezar.
3. Col6quesedetr_sde lapodadora,aprietelamanijadecontroldelacucNIlay
sost_ngalacontrala manijasuperior.
Estemecanismodecontrol esun dispositivodeseguridad.Nuncaintente
evitar sufuncionamiento.
4.
Conlamanoderecha,tomelamanijadel arrancadorderetrocesoytire de
lacuerdaparasacarlaconunmovimientor_pidoycontinuo.YealaFigura
8.Mantengafirme lamanijadelarrancador,dejequelacuerdaregrese
lentamentealarrancador.Repitahastaqueel motorest_enmarcha.Deje
quelacuerdaseenrosquelentamentederegreso.
Deretracci6nr_pidade[ cord6nde arranque (soborno)tirar_ de manoy el
brazohaciael motor m_sr_pidode 1oquepuededejar ir. Lasfracturas de
huesos,fracturas,contusionesoesguincespodriaresuitar.
Para Detener ei Motor
1. Sueltelamanijadecontrolde lacuchillaparadetenerelmotorylacuchilla.
Bordeado
Lacuchiiiade corte giratoria puede[anzarobjetosycausar[esiones
personaies.Mantengael_rea [ibredeobservadoresy nooperesintener
todos losprotectores.
Nobaje[a cuchiiiasi [acuchiiiaseencuentrasobreconcreto,asfaito, rocaso
similar. Lacuchiliapuedegoipearcontra[a superfide de apoyoy provocar
[esionespersonaleso perjuidos materiales.
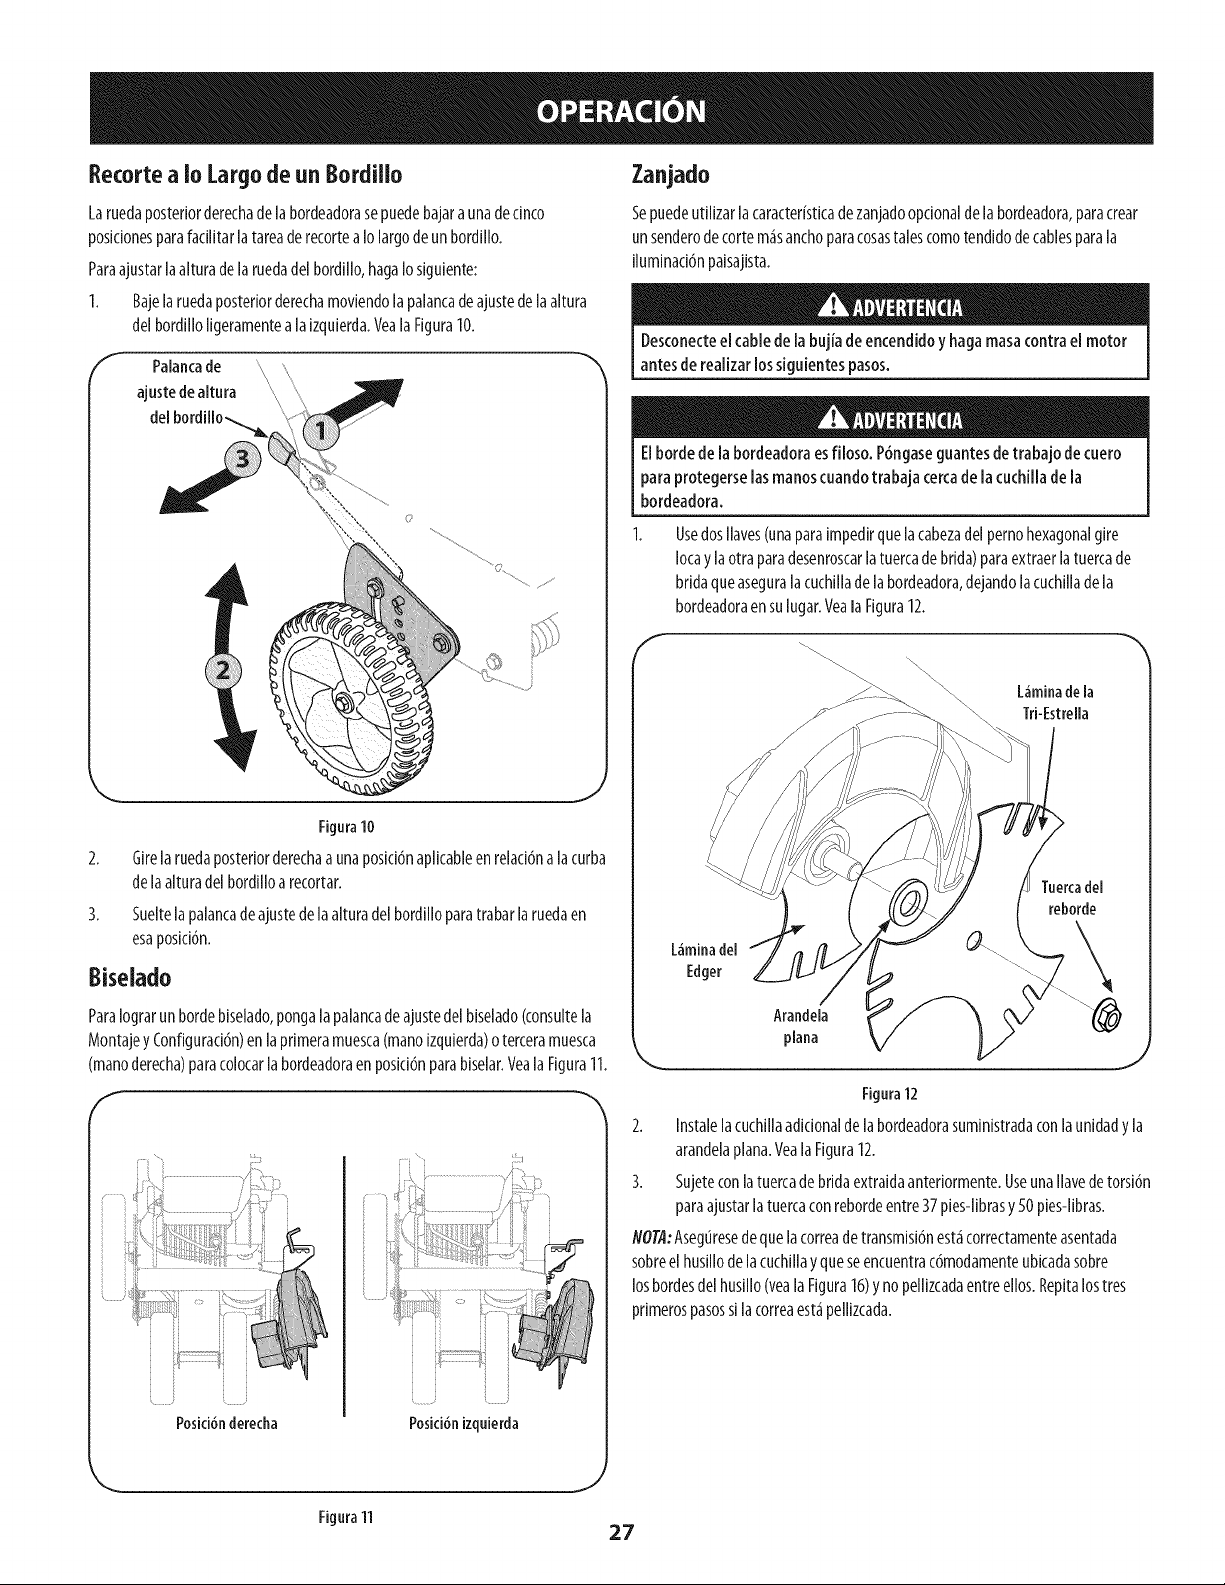
Paracomenzarabordear,procedadelasiguienteforma:
1. Muevala unidadal _reaquevaarecortar,asegur_ndosede quelarueda
posteriorizquierdaest_sobreunasuperfideduray quelacuchillaest_sobre
el_reaacortar.VealaFigura9.
f
Figura 8
J
J
Figura9
2. Conlapaiancadecontroldelacuchillaen laposici6ndefundonamiento,
hagaunapasadaporel_reaa recortarantesde procedera [asiguiente
muesca.Cuantom_sadeiantesemueva[apalancade controldeprofundidad
de [acuchilla,m_sprofundoo m_sabajoser_eltorte de[acuchHlaen el
suelo.Puedehaterfaltahatervariaspasadasparaobtener[a profundidadde
torte deseada.Nobaje[acucMlam_sdeunamuescadeprofundidadporvez
sinhaterunapasada.
3. Paramejoresresultados,proceda[entamenteporelsenderoqueest_
recortando,moviendo[abordeadoraparaatr_sy paraadelanteporel_rea
detorte, siempreasegur_ndosedemantener[aruedaposteriorizquierda
sobre[asuperfideduray [acuchiilaenelsenderodetorte,cercaperosin
tocarel bordede [asuperfidedura.
4. Unavezqueha terminadode recortarel_reaselecdonada,vuelvaacolocar
[apaiancadecontrolde[acuchiiiaen laposid6nINICIO,mu_vasea[a
siguiente_reaa recortar,y procedanuevamentedesdeel paso1.
26
Recorte a io Largo de un Bordilio
Laruedaposteriorderechadelabordeadorasepuedebajara unadednco
posidonesparafadlitar latareaderecorteaIo largodeun bordillo.
Paraajustarlaalturade laruedadelbordillo,hagaIosiguiente:
1. Bajelaruedaposteriorderechamoviendola palancadeajustedela altura
delbordilloligeramentealaizquierda.Veala Figura10.
f Palancade
\
ajuste de altura
del
Figura10
Girelaruedaposteriorderechaa unaposicidnaplicableen relacidnalacurba
delaalturadel bordilloarecortar.
Sueltelapalancadeajustedelaalturadel bordilloparatrabarla ruedaen
esaposkidn.
Biselado
ParaIograrun bordebiselado,pongalapalancadeajustedel biselado(consultela
Montajey Conflgurad6n)en la Irimeramuesca(manoizquierda)o terceramuesca
(manoderecha)paracolocarlabordeadoraenposid6nparabiselar.Yeala Figura11.
Zanjado
Sepuedeutilizarla caracteristicadezanjadooptionalde labordeadora,paracrear
unsenderodecortem&sanchoparacosastalescomotendidodecablesparala
iluminacidnpaisajista.
Desconecteel cablede la bujia de encendidoy hagamasacontrael motor
antesde realizarlossiguientespasos.
Elbordede labordeadoraesfiloso. P6ngaseguantesdetrabajo de cuero
para protegerselasmanoscuandotrabaja cercade la cuchillade la
bordeadora.
UsedosIlaves(unaparaJmpedirquelacabezadel pernohexagonalgire
Iocay laotraparadesenroscarlatuercade brida)paraextraerlatuercade
bridaqueaseguralacuchillade la bordeadora,dejandolacuchillade la
bordeadoraensulugar.VealaFigura12.
_" _ Figura12
Posici6nizquierda
Posid6nderecha
L_mina de la
Tri-Estrella
2. Instalelacuchillaadicionalde labordeadorasuministradaconlaunidadyla
arandelaplana.VealaFigura12.
3. Sujeteconlatuercadebridaextraidaanteriormente.UseunaIlavedetorsidn
paraajustarlatuercaconrebordeentre37pies-librasy 50 pies-libras.
NOTA:Aseguresedequelacorreade transmisidnest_correctamenteasentada
sobreelhusillodela cuchillay queseencuentrac6modamenteubicadasobre
losbordesdel husillo(yeala Figura16)y nopellizcadaentreellos.Repitalostres
primerospasossilacorreaest_pellizcada.
Figura 11
ProgramaDeMantenimiento
Antesderealizarcualquiertipo demantenimiento o servicio,desenganche
todos loscontrolesy detengael motor.Espereaquesedetengan
completamentetodaslaspiezasm6viles.Desconecteelcane de labujia
y p6ngalohaciendomasacontrael motor para evitar queseencienda
acddentalmente.
Sigaelcronogramade mantenimientoquesepresentaacontinuaci6n.Estatabla
s61odescribepautasdeservicio.UtilicelacolumnaRegistrodeServicioparahacerel
seguimientodelastareasde mantenimientocompletadas.ParaubicarelCentrode
ServicioSearsm_scercanoo paraprogramarunservicio,simplementecomuniquese
conSearsal tel_fono1-888-331-4569.
Cadauso
lrasmeso5 horas
Anualmenteo25 horas
Anualmenteo50 horas
Anualmente
Antesdealmacenar
1. Niveldeaceitedelmotor
2. Piezassueltasofaltantes
3. Depuradordeaire
4. Unidady motor
1. Aceitedel motor
1. Depuradordeairef
2. Varillajes/pivotesde controly ruedas
1. Aceitedel motorff
1. Bujiadeencendido
2. Depuradordeaire
1. Sistemadecombustible
1. Verificar
2. Ajustaro reemplazar
3. Verificar
4. Limpie
1. Cambiar
1. Limpiaroreemplazar
2. Lubricarconaceiteligero
1. Cambiar
1. Reemplazar
2. Reemplazar
1. Haterfuncionarelmotorhastaquesedetenga
porfaltadecombustibleoaffadirestaNlizador
deuntanqueIlenodecombustiblenuevo
antesdesualmacenamiento.
f Limpiom_sa menudoencondidonespolvorientaso cuandolosescombrosaerotransportadosest_npresentes.Sustituyaelfiltro deairedesermuysudo.
ff Cambieelpetr61eocada25horaswhemfuncionamientodelmotorbajolacargapesadaoentemperaturasaltas.
Detengasiempreel motor,dejequeel motor seenfrie,desconecteel cable
de la buj[ay hagamasacontrael motor antesde reaiizarcuaiquiertarea de
mantenimientoa sum_quina.
Ee¢omenda¢ionesGenerales
Respetesiemprelasreglasdeseguridadcuandorealicetareasde
mantenimiento.
Lagarant[adeestacortadoranocubreelementosquehanestadosujetos
almalusoola negligendadeloperador.Pararedbirelreembolsototal de
lagarant[a,el operadordeber_darmantenimientoalequipotal y comose
indicaenestemanual.
Elcambiodelavelocidadcontroladadelmotorinvalidar_lagarantiadel
motor.
TodoslosajustesdebensetverificadosporIomenosunavezen cada
estad6n.
Reviseperi6dicamentetodoslossujetadoresy compruebequeest_nbien
ajustados.
Motor
Consulteelmanualdelmotorentregadoconsubordeadoraparaobteneruna
descripci6ndetalladadetodaslasespecificacionesde serviciorelacionadasconel
motor.
Limpieel Motor
Diariamenteoantesdecadauso,limpieel c_sped,lagrasaolosresiduos
acumuladosdel motor.Mantengalimpioselvarillaje,losresortesy los
controles.Mantengael_reaquerodeaal silenciadory detr_sdel mismolibre
decualquierresiduocombustible.
Elmantenimientodelmotorencondidoneslimpiaspermiteelmovimiento
deairealrededordel mismo.
Laspartesdel motorsedebenmantenerlimpiaspararedudrelriesgode
sobrecalentamientoy combusti6ndelosresiduosacumulados.
Nouseaguapara limpiar laspiezasdel motor. Elaguapuedecontaminarel
sistemade combustible. Useun cepilloo un trapo se(o.
28
Lubrkad6n
Ruedas
Lubriquelasruedasy cojinetesporIomenosunavezportemporadaconunaceite
liviano.Adem_s,sisequitanlasruedasporcualquiermotivo,lubriquelasuperfide
delpernodelejey lasuperfideinternadelaruedaconaceiteliviano.
Puntosde giro
Lubriquelospuntosdegirodelganchopalancadecontrolde lacuchilla,lapalanca
decontroldeprofundidaddelacuchilla,la palancadeajuste,y lapalancadeajuste
dealturadelbordilloconaceitelivianoporIomenosunavezportemporada.
Pedestal
Lubriqueel pedestalcada25horaso porIomenosunavezportemporada.
Simplementeapliqueaceiteen ambosextremosdelaplacadecubierta.Veala
Figura13.
Cuidadode ia Cuchiilade ia Bordeadora
Lubricar
Lacuchillade labordeadoraesfiloso. P6ngaseguantesde trabajo de
cuero paraprotegerselasmanoscuandotrabajacercade lacuchillade la
bordeadora.
Inspecdoneperi6dicamentelacuchillaen buscaderajaduras,espedalmente
cuandogolpeeun objetoextraffo.Realicelosreemplazosqueresultennecesarios.
Sigalospasosqueaparecendebajopararealizarelmantenimientodelacuchilla.
1. Desconecteelcapuch6ndelcabledelabujia.
2. UsedosIlaves(unaparaimpedirquela cabezadelpernohexagonalgireIoca
y laotraparadesenroscarlatuercade brida)paraextraerlacuchillade la
bordeadora.ConsultelaFigura14.
3. Retireydesechela cuchilladelabordeadoraperoconservelatuercacon
rebordey laarandelaplana.
4. Instalelaarandelaplana,lacuchilladereemplazodelabordeadoray la
tuercaconreborderetiradaantes.UseunaIlavedetorsi6nparaajustarla
tuercaconrebordeentre37pies-librasy 50 pies-libras.
NOTA:Aseguresedequelacorreadetransmisi6nest_correctamente
asentadasobreel husillode la cuchillay queseencuentrac6modamente
ubicadasobrelosbordesdel husillo(veala Figura16)y nopellizcadaentre
ellos.Repitalostresprimerospasossi lacorreaest_pellizcada.
Figura13
Arandela"_
plana
Tuercadel
reborde
Cuchillade la
bordeadora
Figura14
J
29
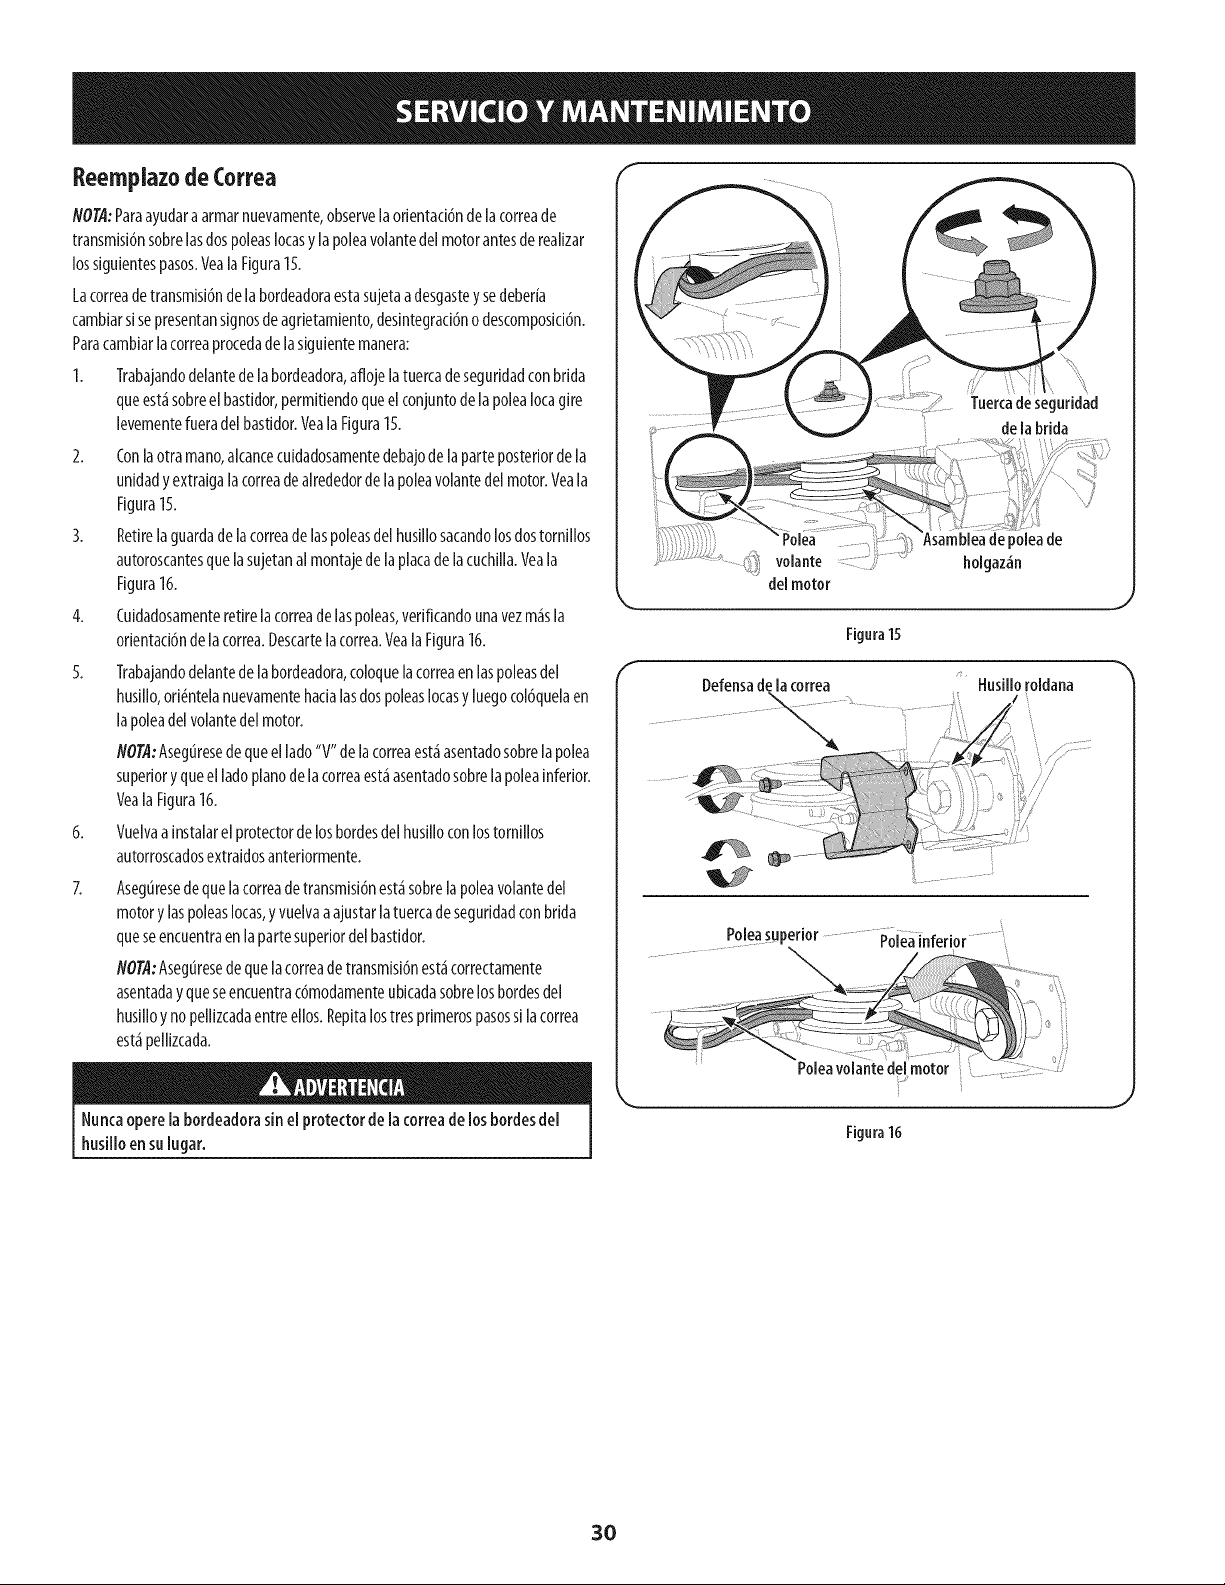
ReemplazodeCorrea
NOTA:Paraayudaraarmarnuevamente,observelaorientaci6ndelacorreade
transmisi6nsobrelasdospoleasIotasyla poleavolantedel motorantesde realizar
lossiguientespasos.VealaFigura15.
Lacorreadetransmisi6ndelabordeadoraestasujetaadesgastey sedeberia
cambiars[ sepresentansignosdeagrietamiento,desintegraci6no descomposici6n.
Paracambiarlacorreaprocedade lasiguientemanera:
1. Trabajandodelantedelabordeadora,afloje latuercadeseguridadconbrida
queest_sobreel bastidor,permitiendoqueel conjuntode la poleaIotagire
levementefueradelbastidor.VealaFigura15.
2. Conlaotramano,alcancecuidadosamentedebajodelaparteposteriordela
unidady extraigalacorreadealrededorde lapoleavolantedelmotor.Veala
Figura15.
3. Retirelaguardade lacorreade laspoleasdel husillosacandolosdostornillos
autoroscantesquelasujetanalmontajedela platade lacuchilla.Veala
Figura16.
4. Cuidadosamenteretirelacorreadelaspoleas,verificandounavezm_sla
orientaci6ndelacorrea.Descartelacorrea.VealaFigura16.
5. Trabajandodelantedelabordeadora,coloquela correaen laspoleasdel
husillo,ori_ntelanuevamentehacialasdospoleasIotasy luegocol6quelaen
lapoleadelvolantedel motor.
NO@:Aseguresedequeellado"V" de lacorreaest_asentadosobrelapolea
superiory queellado pianode lacorreaest_asentadosobrelapoleainferior.
VealaFigura16.
6. Vuelvaa instalarel protectordelosbordesdelhusilloconlostornillos
autorroscadosextraidosanteriormente.
Asegt_resede quelacorreadetransmisi6nest_sobrelapoieavoiantedel
motory laspoleasIocas,y vuelvaaajustarlatuercade seguridadconbrida
queseencuentraen lapartesuperiordelbastidor.
NO@:Aseguresedequelacorreadetransmisi6nest_correctamente
asentaday queseencuentrac6modamenteubicadasobrelosbordesdel
husilloy no pellizcadaentreellos.Repitalostresprimerospasossi lacorrea
est_pellizcada.
Nuncaoperela bordeadorasinel protector delacorreadelosbordesde[
husilloen sulugar.
Tuercadeseguridad
i de labrida
volante
delmotor
_,sambleadepoleade
holgaz_n
Defensadela correa
Figura15
Husilloroldana
Poleasuperior Poleainferior..........
..... ii')
Poleavolantedel motor
Figura16
30
Nuncaalmacenelabordeadoraconcombustibleen eltanque en un espacio
cerradooen _reasconpocaventilaci6n,donde losgasesdelcombustible
puedanalcanzarelfuego,chispaso unaluz piloto comolaquetienen
algunoshomos,calentadoresdeagua, secadoresde ropao algunotro
dispositivoagas.
Preparad6ndel Motor
Yaquelosmotoresalmacenaronm_sde30dias:
Paraimpedira lagomaformarseenel sistemadecombustibleoen partes
decarburador,dirijasel motorhastaqueestoseparea faltadel combustible
oaffadirunaditivodegasolinaalgaseneltanque.Siustedusaun aditivo
degas,dirigeelmotordurantevariosminutosparaponerencirculaci6nel
aditivoporelcarburador-- despu_squeel motory elcombustiblepueden
seralmacenadoshasta24meses.
Mientraselmotorestodaviacaliente,cambioel petr61eo.
Limpieelmotordeescombrossuperficiales.
Preparad6nde la Bordeadora
Limpiey lubriquelabordeadoracomosedescribeen lasinstruccionesde
lubricad6n.
NoutJiiceunalavadoraa presi6nni unamangueradejardinparalimpiarsu
unidad.
Cubrala cuchilladela bordeadoracongrasaparachasisparaimpedirla
oxidaci6n.
Refi_rasealaPreparaci6ndelMotorparainstruccionesdealmacenajede
motorcorrectas.
Almaceneiaunidadenunazonalimpiay seca.Nolaalmacenecercade
materialescorrosivoscomoporejemplofertilizantes.
Cuandoalmacenecualquiertipo deequipomotorizadoen ungaip6nde dep6sito
met_licooconpocaventilaci6n,tengaespecialcuidadode realizarleuntratamiento
antioxidanteal equipo.Useaceiteligeroosiliconapararecubrirelequipo,
especialmenteloscablesy partesm6vilesdesubordeadoraantesdealmacenarla.
31
Antesderealizarcualquiertipo de[mantenimiento/servicio,sueite
todos losmandosypareel motor. Esperehastaquetodaslaspartesde
movimiento hayanvenido a unaparadacompleta.Desconecteel alambre
de bujia y b_selocontrael motor paraprevenir el comienzoinvoluntario.
Siemprellevepuestoscristalesinastillablesdurante laoperad6n o
realizandocualquierajusteo reparadones.
Estasecci6nseocupa de cuestlones de menor importanda del servido.ParaIocalizar el m_s cercanoCentrode Servido Sears,o para programar un
servido,simplementepdngase en contacto con Searsal 1-888-331-4569.
Elmotornoarranca I. ControldelacucNlladesenganchado.
2. Sehadesconectadoel capuchdndelabujia.
3. Eldep6sitodecombustibleest_vadooelcombustible
sehaechadoa perder.
4. Elmotornoest_cebado.(S[Iotiene)
5. Labujianofuncionacorrectamente.
6. Elmotorsedesbord6.
7. Lineadecombustiblebloqueada.
Elmotorfundonademanera I. Elcapuch6ndelabujiaest_flojo.
err_tica 2. Elcombustiblesehaechadoaperder.
3. Laventilad6ndelatapadelcombustibleest_
obstruida.
4. Aguao sudedadenelsistemadelcombustible.
5. Elfiltrodeaireest_sucio.
6. Lineadecombustiblebloqueada.
I. Engraneelcontroldelacuchilla.
2. Conecteel cablealcapuch6ndelabujia.
3. Lleneeltanquecongasolinalimpiay nueva.
4. Cebeelmotortalcomoseexplicaen lasecd6nde
Fundonamiento.
5. LimNe,ajuste[aseparaddn,ocamNelabujia.
6. Esperarunosminutosparareactivarse,peronocebe.
7. Contacteconsucentrodepartesy reparadonesSears.
I. Conecteyajusteelcapuchdnde[abujia.
2. Lleneeltanquecongasolinalimpiay nueva.
3. Destapelaventllad6n.
4.
5.
6.
Vadeeltanquedecombustible.Carguecombustiblenuevoen
eldep6sito.
Consultelasecd6nMantenimientoelmanualdelmotor.
Contacteconsucentrodepartesy reparadonesSears.
32
Elmotorrecalienta 1. Elniveldeaceitedelmotorest_bajo. 1. Lleneelmotorconlacantidady tJpodeaceiteadecuado.
2. Flujodeairerestringido. 2. Limpielosresiduosdealrededorde lasaletasde refrigeraci6n
delmotorydelalojamientodelsoplador.
Elmotorvadlaaaltasrevoludones 1. Pocaseparad6ndeloselectrodosdelabujia. 1. Ajustelaseparad6n.Consultelasecd6nMantenimientoel
manualdelmotor.
Elmotorfuncionamalenmarcha I. Bujiaatorada,averiadaoexcesodeseparaci6n. I. Limpie,reemplaceo reajustela separaci6n.
lenta 2. Elfiltrodeaireest_sucio. 2. Consultelasecci6nMantenimientoel manualdelmotor.
Demasiadavibraci6n I. Lacuchilladelabordeadoraest_dobladaodafiada. I. Reemplacelacuchilladelabordeadora.
2. Elhusillode labordeadoraest_dobladoodafiado. 2. Contacteconsucentrodepartesy reparacionesSearspara
enviarla unidadinspeccionada.
Lacorreadetransmisi6nseresbala I. Lacorreaest_gastadao estirada. I. Reemplacelacorreadetransmisi6n.ConsulteCambiodela
correaenelservicioyen la secci6nMantenimiento.
33
(Estap_iginaseaplicas6loen EE.UU.y Cana&i).
Sears Brands Management Corporation, el Consejo de Recursos Ambientales de California (CARB) y la Agencia de Protecci6n
Ambiental de los Estados Unidos (EPA) Declaraci6n de garantia del sistema de control de emisiones (derechos y obligaciones
de la garantia de defectos del propietario)
LACOBERTNRADELAGARANTIADECONTROLDEEMISIONESESAPLICABLEALOSMOTORES YNTILICENENCNALQUIERPARTEDELOSESTADOSNNIDOS(YAPARTIRDEL1DEENERODE2001EN
CERTIFICADOSCOMPRADOSENCALIFORNIAEN1995YPOSTERIORMENTEQUESENTILIZANEN CANADA).
CALIFORNIA,YPARALOSMODELOSCERTIFICADOSDELANO1997YPOSTERIORES,QUESECOMPREN
Dedaraci6n de garantia sobre defectos en el control
ElConsejodeRecursosAmbientalesde California(CARB),laEPA(AgendadeProtecci6n
Ambientalde losEENU.)ySearstienen elgustode explkar lagarantiadelsistemadecontrol
de emisionespara motoresdelafro2000yparael futuro conrelaciona motorespequeffostodo
terreno(SORE).EnCalifornia,losnuevosmotorespequeffostodo terrenodebenestardiseiiados,
construidosy equipadosparacumplirconlasrigurosasnormasanti-smogdel estado.Enel resto
de losEstadosNnidos,losmotoresnuevostodoterrenodeencendidoporcNspacertificadospara
el afro1997debencumplkest_ndaressimilaresestableddospor laEPA.Searsdebegarantizar
de emisiones para California y los Estados Unidos
el sistemadecontrolde emisionesde sumotorparalos periodosde tiempoenumeradosa
continuacion,siemprequeno hayaabuso,negligenciao mantenimientoindebidodesumotor
todo terrenopeque_o.Susistemade controldeemisionespuedeincluirpiezastalescomoel
carburador,el filtro deaire,elsistemade encendido,el silenciadoryelconversorcatalitico.
Tambi_npuedeincluirconectoresyotrasunidadesrelacionadasconlasemisiones.Dondeexista
unacondicioncubiertapor lagarantia,Searsreparar;_supequeiiomotortodo terrenosincosto
alguno incluyendodiagnostico,piezasy manodeobra
Cobertura de la garantia Sears para defectos en el control de emisiones
Losmotorestodoterrenopeque_osest_ngarantizadosen Io relativoal controlde disposicionesquese indiquena continuaci6n.Si unapartede su motorcubierta
emisionesparadefectosen piezas duranteun per[odode dos afios, sujetoa las por la garanfiaes defectuosa,Searsreparar_o sustituir_dicha parte.
Responsabilidades del propietario en relaci6n con la garantia
Comopropietariodelmotor todoterrenopequeiio,Nd.esresponsabledela realizaciondel
mantenimientorequeridoqueseincluyeen lasinstruccionesde operaciony mantenimiento.
Searsrecomiendaqueseconserventodoslos recibosrelativosal mantenimientodesumotor
todo terrenopequeiio,perono pudedenegarlagarantiasimplementepor lafalta delos mismos,
o por suincumplimientodel mantenimientoprogramado.Comopropietariodelmotor pequeiio
todoterrenodebesaberque,sin embargo,Searslepuedenegarlacoberturade lagarantiasi
sumotortodoterrenopequeffoo unapiezadelmismohanfalladodebidoa abuso,negligencia,
mantenimientoindebidoo a modificacionesnoaprobadas.Nd.esresponsabledepresentarsu
motor todoterrenopequeiioaun distribuidorde serviciosSearsautorizadotan pronto como
aparezcaun problema.Lasreparadonesdela garantiasinconflictodebencompletarseen
un plazode tiemporazonable,nosuperiora 30dias.Sitienealgunapreguntarespectoa sus
derechosy responsabilidadesreferentesa lagarantia,debecontactarconun representantede
serviciosSearsal 1--800--469--4663.Lagarantiade emisionesesunagarantiapordefectos.Los
defectossejuzgande acuerdoconel funcionamientonormaldeun motor.Lagarantianoest_
relacionadacon unapruebade emisionesen uso.
Disposiciones de la garantia Sears para defectos en el control de emisiones
Lassiguientessondisposicionesespedficasrelacionadasconlacoberturade lagarantiapara
defectosenel controldeemisiones.Esun a_adidoa lagarantiade motorSearsparamotoresno
reguladosqueseencuentraenlas instruccionesdefuncionamientoy mantenimiento.
I. Piezascongarantia
Lacoberturade estagarantiaseextiendefinicamentealas piezasqueaparecena
continuacion(las partesdelossistemasdecontrol deemisiones),siemprequedichas
piezasestuvieranyaen el motorenel momentodesucompra.
a. Sistemademediciondecombustible
• Sistemade enriquecimientoparaarranqueenffio
• Carburadorypartesinternas
• Bombadecombustible
b. Sistemade inducci6ndeaire
• Filtrodeaire
• Colectorde admision
c. Sistemadeencendido
• Bujia(s)deencendido
• Sistemadeencendidomagneto
d. Sistemadelcatalizador
• Convertidorcatalitko
• Colectorde escape
• Sistemade inyecciondeaireo v_lvulade impulsos
e. Elementosvariadosusadosen lossistemasanteriores
• V;ilvulasdevacJo,sensiblesa temperatura,posicionytiempo e interruptores
• Conectoresymontajes
2. Alcancede lacobertura
Searsgarantizaal poseedorinicialya loscompradoressubsiguientesquelaspiezascon
garantianotendr;indefectosen matefialesni manodeobra queprovoquenlafallade las
mismasduranteun periododedosa_osa partir dela fechaen queelmotor seentregaa
un compradorparticular.
Sincargo
Lareparationo reemplazodecualquierpartecongarantiaserealizar;_sincargoalguno
parael poseedor,incluyendotareasdediagn6sticoque permitandeterminarsi unaparte
congarantiaesdefectuosa,siemprequedichodiagn6sticoserealiceenun distribuidor
de serviciosSearsautorizado.Paraelservidode lagarantiadeemisiones,contacteal
distribuidordeservidosSearsautorizadom;_scercanoincluidoen las"P_ginasamarillas"
en lascategofias"Motores,gasolina","Motoresde gasolina","Podadorasdec_sped",o
similares.
4. Reclamadonesy exclusionesala cobertura
Lasreclamacionesdelagarantiadebenenviarsedeacuerdoconlasdisposicionesde [a
politka degarantiaparamotoresSears.Lacoberturadela garantiaexcluk;_defectos
en piezascongarantiaqueno seanpartesofiginalesSears,oabuso,negligendao
mantenimientoincorrecto,tal y comoseestableceenla politka degarantiaparamotores
Sears.Searsnoesresponsablede lasfallasen piezascongarantiaprovocadasporel uso
de partesaffadidas,que noseanodginalesoquesehayanmodificado.
5. Mantenimiento
Cualquierpartecongarantiaqueno est_programadaparaserreemplazadacomo
mantenimientorequefido,o ques61odebainspecdonarseregularmenteal efectode
"inspecdoneo reemplacesegunseanecesado",estar;_garantizadacontradefectos
duranteel pefiododelagarantia.Todaslaspiezasgarantizadasqueest_nprogramadas
parasureemplazoparacumplk con losrequisitosdemantenimientoestar;_n
garantizadass6lopor elperiodoanterioral primerreemplazoprogramadoparadicha
pieza.Cualquierpiezade recambioqueseaequivalenteenfundonamientoy durabilidad
puedeusarsepararealizarmantenimientoo reparadones.Elpropietadoesresponsable
de realizartodoel mantenimientorequefido,tal ycomosedefine enlas instruccionesde
fundonamientoymantenimientoSears
6. Coberturaindkecta
Porla presente,la coberturaseextiendea lafalla decualquiercomponentedemotor
provocadapor lafalla de unapiezacongarantiaqueest_todaviaenperiodode garantia.
EnlosEstadosUnidosy Cana&ihayunalineadeatenci6nde 24horas,1-800-469--4663,quecuentaconun menticonmensajespre-grabadosquecontieneninformaci6nparael
mantenimientodemotores.
34
GDOC-100188Rev.B
Felicitacionespor haberrealizadouna adquisicidninteligente.EIproductoCraftsman®que haadquiridoestddise#adoy fabricado
parabrindarmuchosa#os de funcionamientoconfiable.Perocomotodoslosproductosa vecespuederequerirde reparaciones.Es
en esemomento cuandoel disponerde un Acuerdodeproteccidnpara reparacioneslepuede ahorrardineroy problemas.
Acontinuad6nse detailanlospuntosinduidosenel Acuerdo:
[] Servido expertoprestadopornuestros10,000espedalistasenreparadonesprofesionales
[] Servido Uimitado sincargo paralaspiezasy la manodeobraentodaslasreparadonescubiertas
[] Reemplazodel producto hasta1500d6laressinoesposiblerepararel productocubierto
[] Descuentode 25%del predonormaldelservkioy delaspiezasreladonadasconel mismoquenoest_ncubiertaspor
el acuerdo;adem_s,25%delpredonormaldelavefificaci6ndemantenimientopreventivo
[] Ayudar_pidapot tei_fono- IoIlamamosResolud6nR_pida- el apoyotelef6nicodeun Chamuscaal representante.
Pienseennosotroscomoel manual"deundueffohablador."
UnavezadquiridoelAcuerdo,puedeprogramarelservidocontan s61orealizarunaIlamadatelef6nica.PuedeIlamaren
cualquiermomentodeldfao dela nocheoprogramarunservk[oen Ifnea.
ElAcuerdodeProtecd6ndeReparad6nesunacomprasinfiesgo.Siustedanulaporalgunaraz6nduranteelpeffodode
garantfadeproducto,propordonaremosunreembolsoIleno.O,unreembolsoprorrateadoencualquiermomentodespu_s
delpeffododegarantfadeproductoexpira,iAdquierahoysuacuerdodeprotecd6nparareparadones[
Seaplican determinadas iimitacionesy exclusiones.Para obtener informaci6nadicionai y preciosen los
EstadosUnidosiiameai 1-800-827-6655.
El*Coverageen Canad_varia en algunos artkulos. Paradetalles llenos la llamada ChamuscaCanad_en 1-800-
361-6665.
Servidode instalad6ndeSears
Sideseasolidtarla instalad6nprofesionaldeSearsdeaparatosdom_sticos,dispositivosparaabfirportones,calentadoresde
aguay otrosartkulosdom_sticosimportantes,enlosEstadosUnidoso Canad_Ilameal 1-800-4-MY-HOME®.
35

il/!it:_l ________;_W__;_j__________
I RFIFT$1qFI
Customer Care Hot Line i_l
Get answers to questions, troubleshoot problems,
order parts, or schedule repair service.
Para respu estas a preguntas o problemas, y ordenar
1-888 31 569
ustom Hot
piezas o pedir servicio para la reparaci6n de su equipo.
To help us help you, register your product at www.craftsman.com/registration
Para poderte ayudar mejor, registra tu producto en www.craftsman.com/registration
Join the Craftsman Club today!
@
www.craftsman.com/signup
Receive exclusive member benefits including special pricing and offers,
project sharing, expert advice, and SHOP YOUR WAY REWARDS!
Como miembro exclusivo, recibe diversos beneficios como ofertas, precios especiales, proyectos
nuevos, consejos de expertos y nuestro programa de puntos SHOP YOUR WAY REWARDS!
® Registered Trademark / TMTrademark of KCD IP, LLC in the United States, or Sears Brands, LLC in other countries
® Marca Registrada / TMMarca de Fabrica de KCD IP, LLC en Estados Unidos, o Sears Brands, LLC in otros paises

