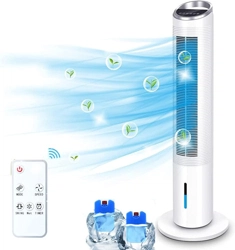
AIR COOLER
JH-320Y
USER MANUAL
MIN
CONTACT US
If you encounter any problems when using AIR CHOICE products,
please feel free to contact us through the following methods or scan the
QR code to get a quick response and a 100% satisfactory solution.
Amazon Platform: “Contact Seller”
Official Website: https://airchoice.afterservice.vip
Email Address: airchoice@afterservice.vip
@

Thank you for choosing our fan.
This owner's manual will provide you with valuable
information necessary for the proper care and
maintenance of your new product.
Please take a few minutes to read it.
INTRODUCTION
TABLE OF CONTENTS
SECTION 1
INTRODUCTION
IMPORTANT INSTRUCTIONS
SECTION 2
TECHNICAL PARAMETERS
PRODUCT DIAGRAM
PACKAGE INCLUDES
SECTION 3
ASSEMBLY INSTRUCTIONS
OPERATION INSTRUCTIONS
SECTION 4
PANEL CONTROL
REMOTE CONTROL
SECTION 5
CLEANING AND MAINTENANCE
STORAGE & MAINTENANCE GUIDELINES
FAULT AND MAINTENANCE
PAGE 1
PAGES 3-4
PAGE 5
PAGE 5
PAGE 6
PAGE 6
PAGES 7-8
PAGES 10-11
PAGES 9-10
PAGE 12
PAGE 12
PAGE 13
SECTION 6
WARRANTY
PAGE 14

SECTION 1
INTRODUCTION
IMPORTANT INSTRUCTIONS
SECTION 2
TECHNICAL PARAMETERS
PRODUCT DIAGRAM
PACKAGE INCLUDES
SECTION 3
ASSEMBLY INSTRUCTIONS
OPERATION INSTRUCTIONS
SECTION 4
PANEL CONTROL
REMOTE CONTROL
SECTION 5
CLEANING AND MAINTENANCE
STORAGE & MAINTENANCE GUIDELINES
FAULT AND MAINTENANCE
IMPORTANT INSTRUCTIONS
!
- 3 - - 4 -
15. Avoid placing the cord in walking areas or areas with a lot of movement in order to
avoid tripping.
16. The appliance is not to be used by children or persons with reduced physical,
sensory or mental capabilities, or lack of experience and knowledge unless they have
been given supervision or instruction.
17. Close supervision is necessary when any appliance is used by or near children.
Children should not play with the appliance.
18. Do not leave the fan running unattended.
19. Disconnect from the power supply before removing the protective cover.
1. To reduce the risk of fire or electric shock, do not use this product with other speed
control devices.
2. Do not soak the main body of the motor in water or rinse under the tap tap.
3. Use this fan only as described in this manual, other uses are not recommended, as it
may cause fire or electric shock.
4. To prevent electric shock, do not immerse the plug or cord in water, and do not spray
liquid to it.
5. When the fan is not in use, unplug the fan from the socket, move the fan to another
location, and then clean it.
6. After the machine adds water, do not tilt or collide. Push it slowly so as to prevent water
overflow. It is strictly forbidden to place it on the inclined ground to prevent accidents.
7. This machine should not be placed at high temperatures or ultra-low temperatures. The
water in the water thank is likely to deteriorate during the summer season and hot
weather. Please make sure you change the water.
8. When packing and storing are required, the fan should be run with normal air for a
period of time so that the evaporator is fully dried. This is to prevent any humidity odors
caused by a wet surface.
9. This machine has a strong humidification effect, do not use it in a closed environment, if
used in a closed environment, please turn off the cold air function.
10. Add water promptly when the water level is below the lowest water line.
11. Do not operate the fan in the presence of explosive or flammable fumes.
12. Avoid contact with moving parts of the fan.
13. To disconnect, grip the plug and pull it away from the wall outlet. Never pull on the
cord, and always use it on a dry surface.
14. Do not operate any fan with a damaged cord or plug. If the product is damaged,
please discard the fan or return it to an authorized service facility for examination or repair.
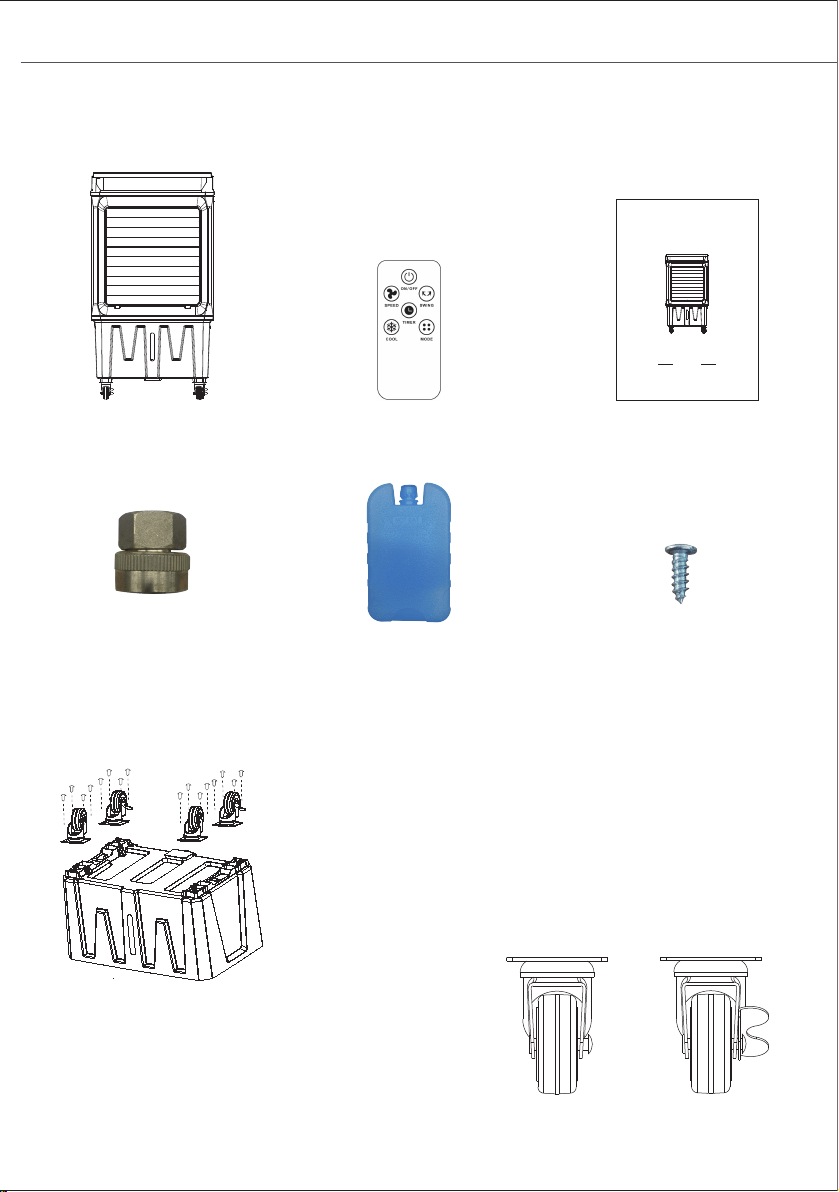
PACKAGE INCLUDES
ASSEMBLY INSTRUCTIONS
TECHNICAL PARAMETERS
PRODUCT DIAGRAM
Model No.
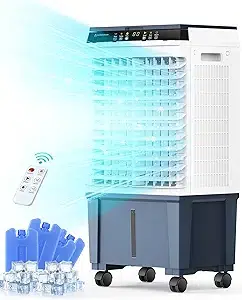
Item Name 7.9 Gal AIR COOLER
JH-320Y
Rated Voltage
Rated Power 120W
3 Mode Fan Speeds Low / Medium / High
Swing Vertical and Horizontal
Net Weight 20.4 LBS
18.9×12.99×34.64 Inch
- 5 - - 6 -
1X Adapter
Product Size
1X Air Cooler Fan 1X Remote Control
4X Ice BOXES
Align the locating holes in the base with the
locating holes above the wheels, and tighten
the screws.
NOTE:
The wheel with a lock is the rear wheel, and
the wheel without a lock is the front wheel.
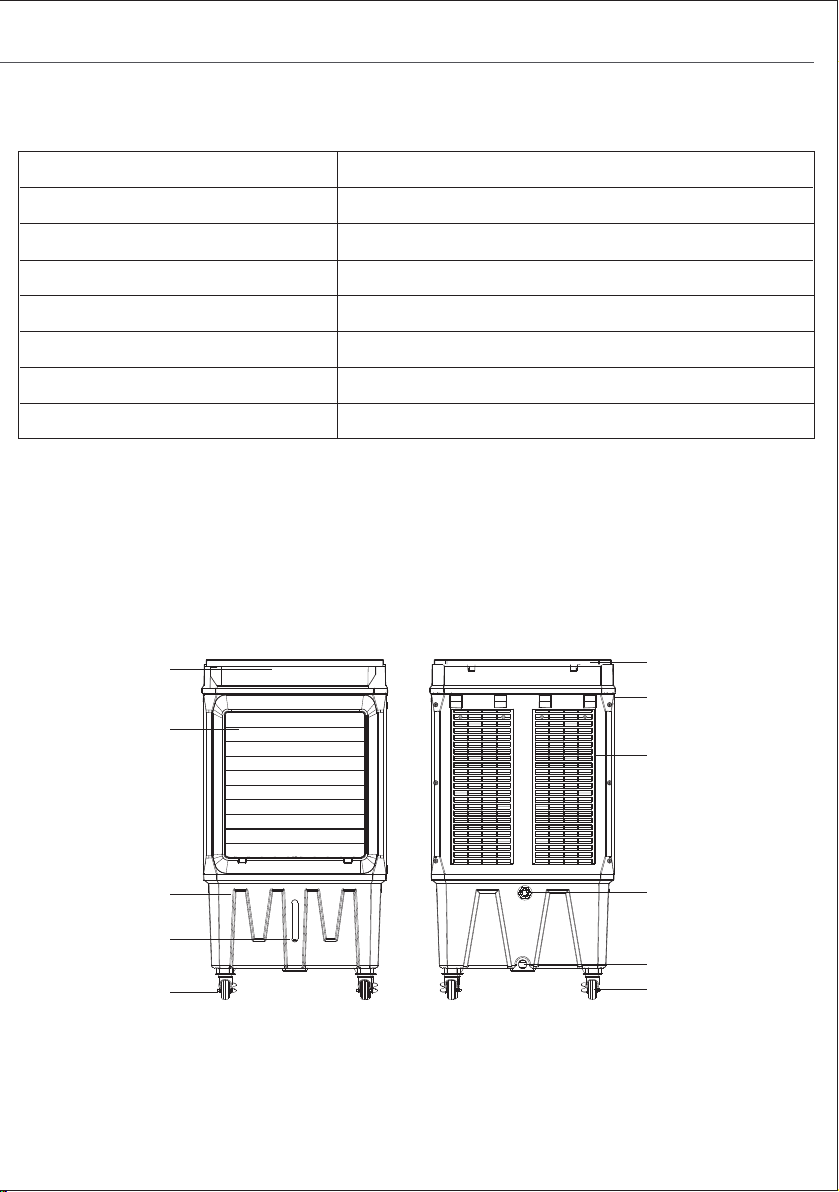
Front Wheel
Rear Wheel
Side Handle
Water Level
Window
Front Wheel
Water Tank
Swing Leaf
Control And
Display Panel
Upper Water Tank
Cover
Wet Curtain
Support
Auto Water
Inlet
Water Outlet
Rear Wheel
MIN
MIN
16X Screws
7.9 GAL AIR COOLER
PRODUCT USE GUIDE
JH-320Y
MIN
120V (60Hz)
1X Owner's
86(5
0$18$/
PACKAGE INCLUDES
ASSEMBLY INSTRUCTIONS
TECHNICAL PARAMETERS
PRODUCT DIAGRAM
Model No.
Item Name 7.9 Gal AIR COOLER
JH-320Y
Rated Voltage
Rated Power 120W
3 Mode Fan Speeds Low / Medium / High
Swing Vertical and Horizontal
Net Weight 20.4 LBS
18.9×12.99×34.64 Inch
- 5 - - 6 -
1X Adapter
Product Size
1X Air Cooler Fan 1X Remote Control
4X Ice BOXES
Align the locating holes in the base with the
locating holes above the wheels, and tighten
the screws.
NOTE:
The wheel with a lock is the rear wheel, and
the wheel without a lock is the front wheel.
Front Wheel
Rear Wheel
Side Handle
Water Level
Window
Front Wheel
Water Tank
Swing Leaf
Control And
Display Panel
Upper Water Tank
Cover
Wet Curtain
Support
Auto Water
Inlet
Water Outlet
Rear Wheel
MIN
MIN
16X Screws
7.9 GAL AIR COOLER
PRODUCT USE GUIDE
JH-320Y
MIN
120V (60Hz)
1X Owner's
86(5
0$18$/
- 7 - - 8 -
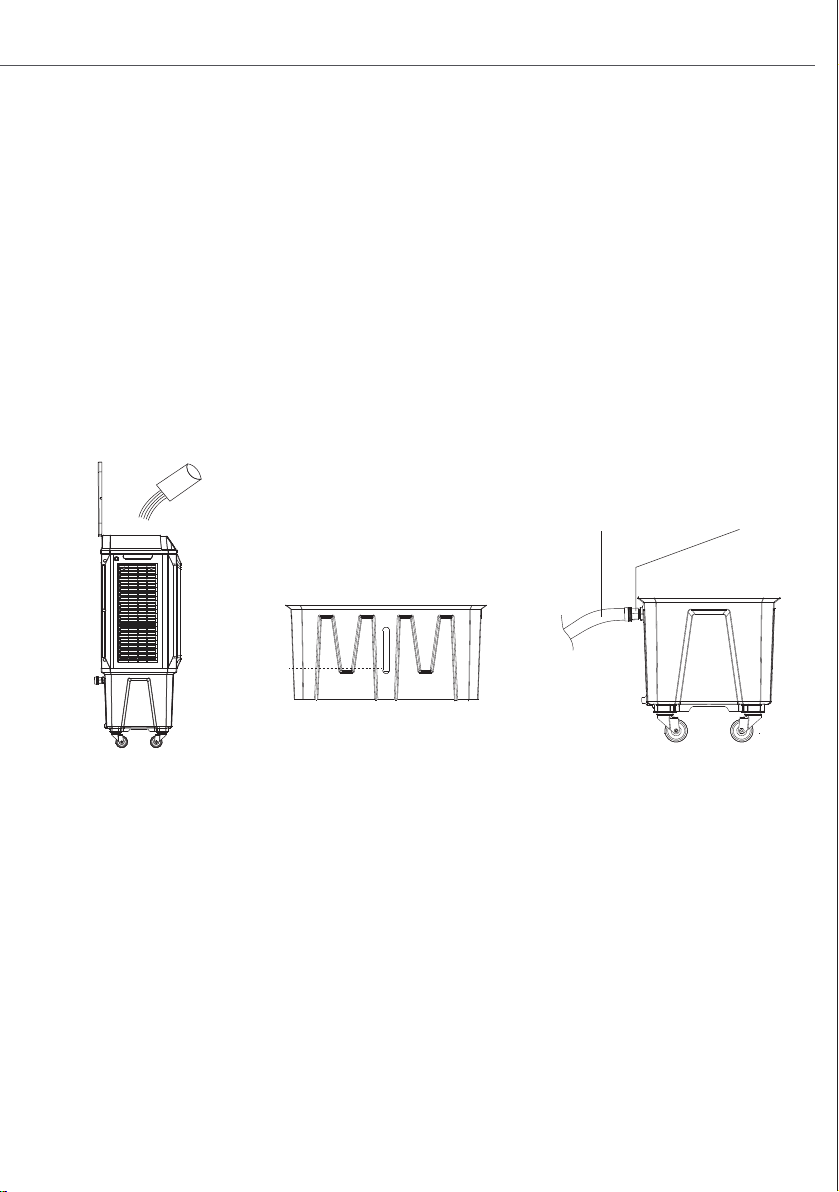
Figure A
MIN
MIN
Figure D
Figure B
2. CONTINUOUS FILL
● Install the adapter to the automatic water inlet on the back of the product.
● Screw the garden hose into the other end of the adapter.
● Open the faucet and add water to the tank (Figure C).
● Adapter specifications: 3/4" GHT Female to 1/2" NPT Female.
● There is no need to close the faucet. The control device inside the water tank will
control the water level all the time, to keep it at the maximum.
● If there is a water leak, put some water pipe sealing tape on the connections on both
sides of the adapter.
Figure C
Adapter
Garden Hose
OPERATION INSTRUCTIONS
1. ADD WATER MANUALLY:
● Open the upper flip cover and add water slowly (Figure A).
● Observe the water level through the water level window, control the water increase.
● For your
health and the health of your family, you should use clean tap water. Unplug
before adding water.
● Do not splash water into the motor and surrounding parts to avoid leakage accidents.
● Make sure that the water level in the water tank exceeds the minimum level (Indicated
by "Min") (Figure B).
3. THE USAGE OF THE ICE-BOX:
● If you use the ice box for the first time: open the lid, inject water up to the scale, then
tighten the lid.
● Set aside for 30-40minutes, till the water and crystal ice are completely mixed.
● Put the ice box in the freezer of the refrigerator for two hours.
● Take
out the ice box out and put it into the air cooler's ice container to cool down the
water temperature.
● After using it for a long time, the ice crystal turns into jelly, please put it back in the
refrigerator again. It can be recycled and reused.
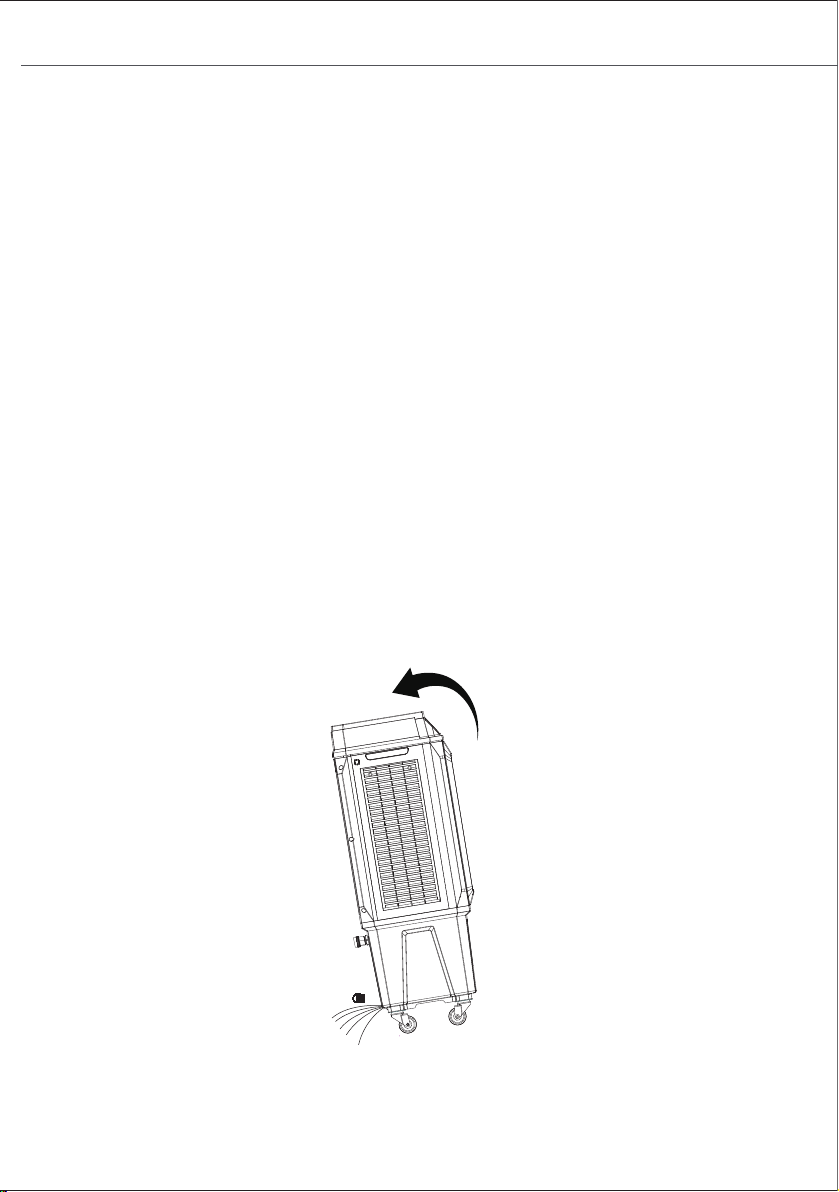
● The drain is at the bottom, as shown in Figure D.
● Rotate and pull out the silicone plug of the water outlet, the body is tilted, and the water
tank can be completely emptied. The machine should be drained and cleaned regularly.
Note: Please empty the water tank if it will not be used for a long time.
- 7 - - 8 -
Figure A
MIN
MIN
Figure D
Figure B
2. CONTINUOUS FILL
● Install the adapter to the automatic water inlet on the back of the product.
● Screw the garden hose into the other end of the adapter.
● Open the faucet and add water to the tank (Figure C).
● Adapter specifications: 3/4" GHT Female to 1/2" NPT Female.
● There is no need to close the faucet. The control device inside the water tank will
control the water level all the time, to keep it at the maximum.
● If there is a water leak, put some water pipe sealing tape on the connections on both
sides of the adapter.
Figure C
Adapter
Garden Hose
OPERATION INSTRUCTIONS
1. ADD WATER MANUALLY:
● Open the upper flip cover and add water slowly (Figure A).
● Observe the water level through the water level window, control the water increase.
● For your
health and the health of your family, you should use clean tap water. Unplug
before adding water.
● Do not splash water into the motor and surrounding parts to avoid leakage accidents.
● Make sure that the water level in the water tank exceeds the minimum level (Indicated
by "Min") (Figure B).
3. THE USAGE OF THE ICE-BOX:
● If you use the ice box for the first time: open the lid, inject water up to the scale, then
tighten the lid.
● Set aside for 30-40minutes, till the water and crystal ice are completely mixed.
● Put the ice box in the freezer of the refrigerator for two hours.
● Take
out the ice box out and put it into the air cooler's ice container to cool down the
water temperature.
● After using it for a long time, the ice crystal turns into jelly, please put it back in the
refrigerator again. It can be recycled and reused.
● The drain is at the bottom, as shown in Figure D.
● Rotate and pull out the silicone plug of the water outlet, the body is tilted, and the water
tank can be completely emptied. The machine should be drained and cleaned regularly.
Note: Please empty the water tank if it will not be used for a long time.
- 9 - - 10 -
SWING
ON/OFF
TIMER
MODE
SPEED
COOL
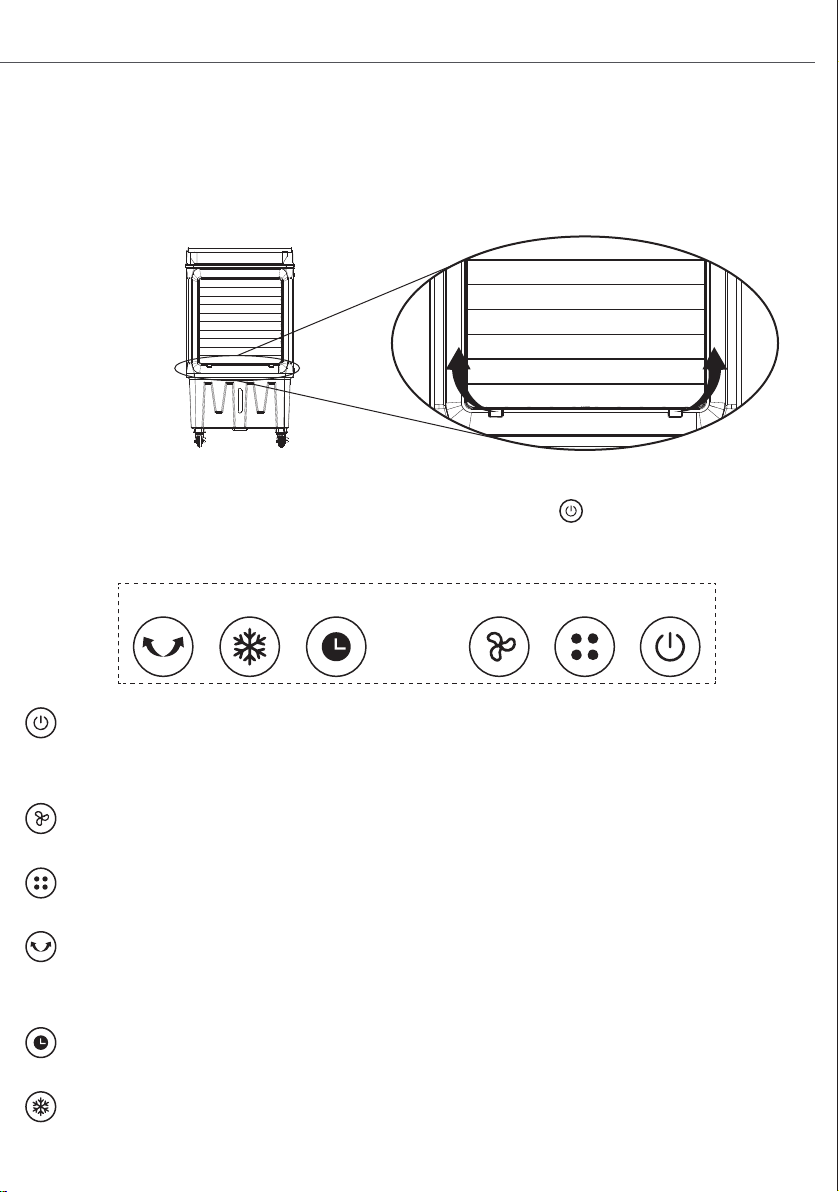
PANEL CONTROL
Place the unit on a firm-level surface and plug it into a socket. The power indicator
light reminding this product is in standby mode. Turn on the button, the default
is low speed. Press it again, and the machine will be in standby.
ON/OFF Button:
Press this button to open the air cooler. Press this button at any state to stop the
operation.
Speed Button:
Press this button to change the speed between low / medium / high.
Mode Button:
Press this button to change the fan mode between normal mode and natural mode.
Swing Button:
Press this button to control the left and right movements, and press it again to stop
swinging.
Timer Button:
Press this button to set the timer, maximum 12 hours.
Cooling Button:
Press this button to open or close the cooling system.
NOTE:
Before using this product, please lift up the swing leaf.
NOTE:
Do not open the cooling system when the water tank is empty. If the water tank is
empty, the icon shines and the buzzer indicates about 10 seconds, the pump switch is
cut off automatically.
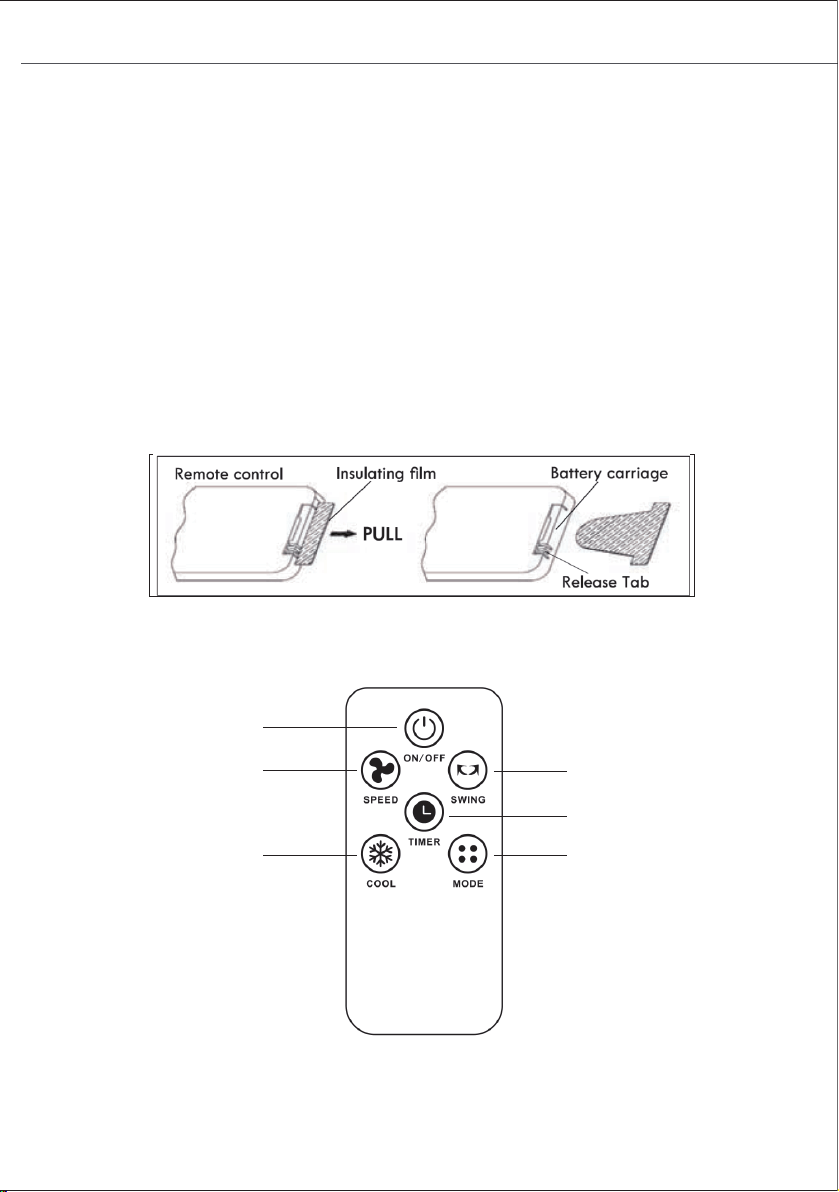
REMOTE CONTROL
NOTE:
B
efore using the remote control, remove the plastic insulation film located under the battery.
Swing Cooling Timer Speed Mode ON/OFF
- 9 - - 10 -
SWING
ON/OFF
TIMER
MODE
SPEED
COOL
PANEL CONTROL
Place the unit on a firm-level surface and plug it into a socket. The power indicator
light reminding this product is in standby mode. Turn on the button, the default
is low speed. Press it again, and the machine will be in standby.
ON/OFF Button:
Press this button to open the air cooler. Press this button at any state to stop the
operation.
Speed Button:
Press this button to change the speed between low / medium / high.
Mode Button:
Press this button to change the fan mode between normal mode and natural mode.
Swing Button:
Press this button to control the left and right movements, and press it again to stop
swinging.
Timer Button:
Press this button to set the timer, maximum 12 hours.
Cooling Button:
Press this button to open or close the cooling system.
NOTE:
Before using this product, please lift up the swing leaf.
NOTE:
Do not open the cooling system when the water tank is empty. If the water tank is
empty, the icon shines and the buzzer indicates about 10 seconds, the pump switch is
cut off automatically.
REMOTE CONTROL
NOTE:
B
efore using the remote control, remove the plastic insulation film located under the battery.
Swing Cooling Timer Speed Mode ON/OFF

- 11 -
STORAGE & MAINTENANCE GUIDELINES
1. Be sure to unplug the power cord from the outlet before cleaning.
2. Plastic parts should be cleaned with a mild soap and a damp cloth or sponge. Do not
submerge the unit in water to clean it. Thoroughly remove soap with clean water.
3. Be sure that no water or other liquid gets inside the fan motor.
4. Dry all parts completely before reassembling and reconnecting to a power source.
5. Store the fan in a cool, dry location when not in use. To prevent the accumulation of dust and
dirt, use the original packaging to repack the unit.
Guidelines for use of batteries
● Before first use:
Pull the protective film to remove it. The remote control is now ready to use.
● To replace the battery:
Open the battery compartment on the back of the remote control and replace the used
battery with a new one. Battery type: CR2025.
Dispose of the battery
● The battery must be taken to a household hazardous waste collection site for proper
handling.
- 12 -
CLEANING AND MAINTENANCE
NOTE:
After a long-time operation, dust accumulation on the wet curtain would affect the airflow
and air purification. Please clean the machine regularly.
1. Clean the wet curtain
Turn off the power, loose the screws in the back-cover plate, and take out the back-cover
plate.
Loosen the plastic nut on the wet curtain to remove the back wet curtain. Clean it with a
soft brush and mild detergent, rinse it with water, and dry it in the sun, then install it back
into the machine.
If the dirt is hard to remove after long-term use, please change to a new wet curtain.
2. Clean the surface
Turn off the power, and clean it with a mild detergent and a soft cloth.
NOTE:
The control panel must not be touched by water.
● The remote control must be pointed directly at the receiver on the fan when using. If
the remote control is not pointed directly at the receiver, the range will decrease.
● The remote control may not operate in a room where heavy machinery is operating.
● Do not block the line of sight between the remote control and the receiver.
● Handle the remote control with care. Do not drop the remote control on the floor or
bang it against hard objects.
- 13 - - 14 -
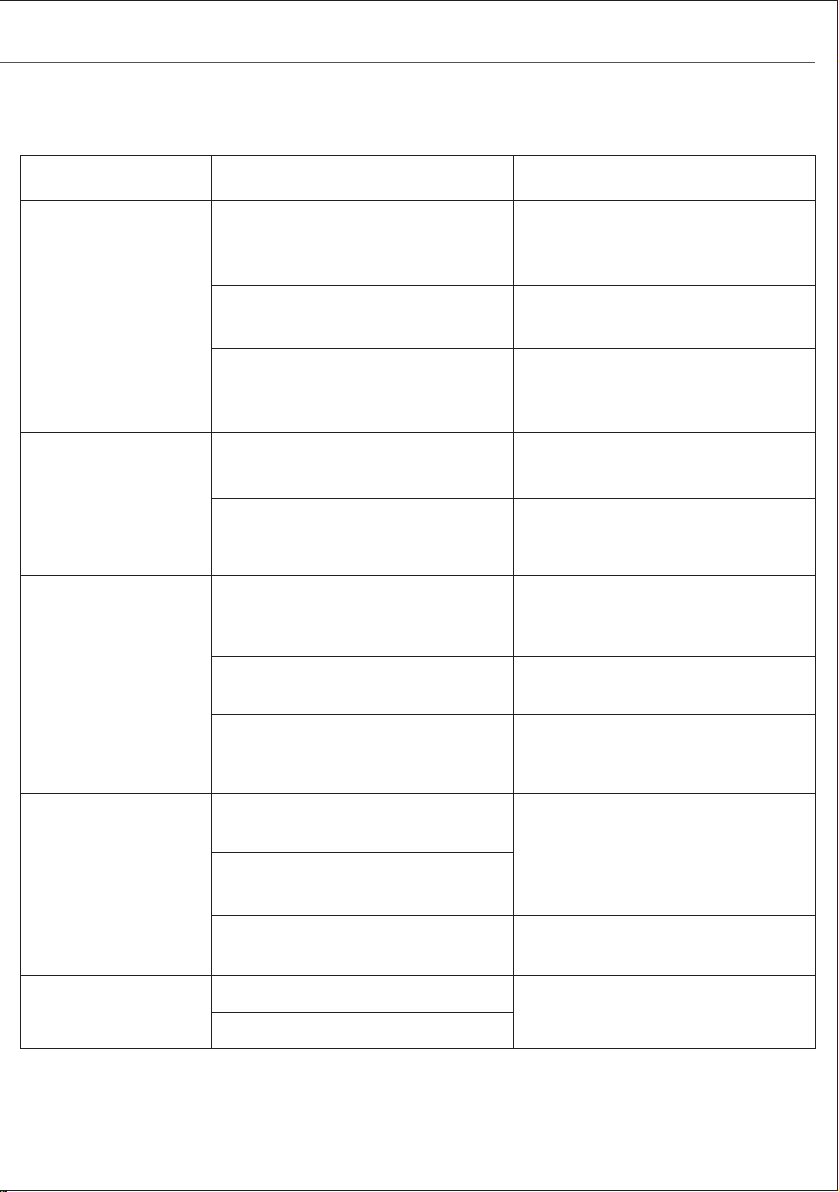
FAULT AND MAINTENANCE
Trouble
The product does
not work
Bad cooling
effects
The water pump
does not work
The remote control
does not work
Lack of
accessories
Cause Solution
1. The power cord is unplugged or
in poor contact.
2. The LED screen is damaged.
3. Not working after a while or for
other reasons.
1. Plug the power back in firmly or
try plugging it into a different outlet
to connect the power.
2. Contact customer service &
repair center.
3. Please provide the video and
contact customer service & repair
center.
1. Obstructed air inlet or outlet or
other sources of heat.
2. Other reasons.
1. Remove the obstruction or
remove other sources of heat .
2. Please provide the unusable
video, and contact customer
service & repair center.
1. The water level in the water
tank is lower than the minimum
water level scale.
1. The addition of water
exceeds the minimum water
level scale.
2. The cooling mode is not
activated.
2. Turn on the cooling mode.
3. Other reasons.
3. Please provide the unusable
video, and contact customer
service & repair center.
1. Exceeding the control range of
the remote control (16ft).
1. Bring the remote control close
to the Air conditioner and make
sure it is pointed at the product.
2. The remote control was not
pointed at the signal receiver of th
unit.
3. The batteries have no electricity
it.
2. Replace the batteries.
1. Lack of ice box.
1. Contact customer service &
repair center.
2. Missing wheel or screw.
WARRANTY
AIR CHOICE warrants this product against defects in materials and/or workmanship under
normal use for a period of ONE (1) YEAR from the date of purchase by the original purchaser
(“Warranty Period”). If a defect arises and a valid claim is received within the Warranty Period,
at its option, AIR CHOICE will 1) repair the defect free of charge, using new or reconditioned
replacement parts, or 2) replace the product with a new product that is at least functionally
equivalent to the original product, or provide a store credit in the amount of the purchase price
of the original product. A replacement product or part, including a user-installable part installed
in accordance with the instructions provided by AIR CHOICE, assumes the remaining warranty of
the original product. When a product or part is exchanged, any replacement item becomes your
property and the replaced item becomes AIR CHOICE’ s property. When a store credit is
granted, the original product must be returned to AIR CHOICE and becomes AIR CHOICE’ s
property. To obtain warranty service, e-mail AIR CHOICE Limited Warranty Service at
airchoice@afterservice.vip. Please be prepared to describe the product that needs service and
the nature of the problem.
This warranty does not apply to:
a) damage caused by failure to follow instructions relating the product’s use or the installation of
components; b) damage caused by accident, abuse, misuse, fire, floods, earthquake or other
external causes; c) damage caused by service performed by anyone who is not a representative
of AIR CHOICE; d) accessories used in conjunction with a covered product; e) a product or part
that has been modified to alter functionality or capability; f) items intended to be replaced
periodically by the purchaser during the normal life of the product including, but not limited to,
batteries or light bulbs; g) any product sold “as is” including, but not limited to, floor
demonstration models and refurbished items; or h) a product that is used commercially or for a
commercial purpose.

- 13 - - 14 -
FAULT AND MAINTENANCE
Trouble
The product does
not work
Bad cooling
effects
The water pump
does not work
The remote control
does not work
Lack of
accessories
Cause Solution
1. The power cord is unplugged or
in poor contact.
2. The LED screen is damaged.
3. Not working after a while or for
other reasons.
1. Plug the power back in firmly or
try plugging it into a different outlet
to connect the power.
2. Contact customer service &
repair center.
3. Please provide the video and
contact customer service & repair
center.
1. Obstructed air inlet or outlet or
other sources of heat.
2. Other reasons.
1. Remove the obstruction or
remove other sources of heat .
2. Please provide the unusable
video, and contact customer
service & repair center.
1. The water level in the water
tank is lower than the minimum
water level scale.
1. The addition of water
exceeds the minimum water
level scale.
2. The cooling mode is not
activated.
2. Turn on the cooling mode.
3. Other reasons.
3. Please provide the unusable
video, and contact customer
service & repair center.
1. Exceeding the control range of
the remote control (16ft).
1. Bring the remote control close
to the Air conditioner and make
sure it is pointed at the product.
2. The remote control was not
pointed at the signal receiver of th
unit.
3. The batteries have no electricity
it.
2. Replace the batteries.
1. Lack of ice box.
1. Contact customer service &
repair center.
2. Missing wheel or screw.
WARRANTY
AIR CHOICE warrants this product against defects in materials and/or workmanship under
normal use for a period of ONE (1) YEAR from the date of purchase by the original purchaser
(“Warranty Period”). If a defect arises and a valid claim is received within the Warranty Period,
at its option, AIR CHOICE will 1) repair the defect free of charge, using new or reconditioned
replacement parts, or 2) replace the product with a new product that is at least functionally
equivalent to the original product, or provide a store credit in the amount of the purchase price
of the original product. A replacement product or part, including a user-installable part installed
in accordance with the instructions provided by AIR CHOICE, assumes the remaining warranty of
the original product. When a product or part is exchanged, any replacement item becomes your
property and the replaced item becomes AIR CHOICE’ s property. When a store credit is
granted, the original product must be returned to AIR CHOICE and becomes AIR CHOICE’ s
property. To obtain warranty service, e-mail AIR CHOICE Limited Warranty Service at
airchoice@afterservice.vip. Please be prepared to describe the product that needs service and
the nature of the problem.
This warranty does not apply to:
a) damage caused by failure to follow instructions relating the product’s use or the installation of
components; b) damage caused by accident, abuse, misuse, fire, floods, earthquake or other
external causes; c) damage caused by service performed by anyone who is not a representative
of AIR CHOICE; d) accessories used in conjunction with a covered product; e) a product or part
that has been modified to alter functionality or capability; f) items intended to be replaced
periodically by the purchaser during the normal life of the product including, but not limited to,
batteries or light bulbs; g) any product sold “as is” including, but not limited to, floor
demonstration models and refurbished items; or h) a product that is used commercially or for a
commercial purpose.

AIR COOLER
JH-320Y
USER MANUAL
MIN
CONTACT US
If you encounter any problems when using AIR CHOICE products,
please feel free to contact us through the following methods or scan the
QR code to get a quick response and a 100% satisfactory solution.
Amazon Platform: “Contact Seller”
Official Website: https://airchoice.afterservice.vip
Email Address: airchoice@afterservice.vip
@