www.dolce-gusto.com
USER MANUAL
1. SAFETYPRECAUTIONS 4
2. MACHINE OVERVIEW 6
3. KEY FEATURES 7
3. 1 TOUCH INTERFACE 7
3. 2 HOWTOSTARTTHEMACHINE 7
3. 3 ESPRESSOBOOST 8
3. 4 TEMPERATURESELECTION 9
3. 5 COLD MODE 10
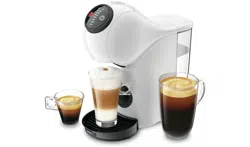
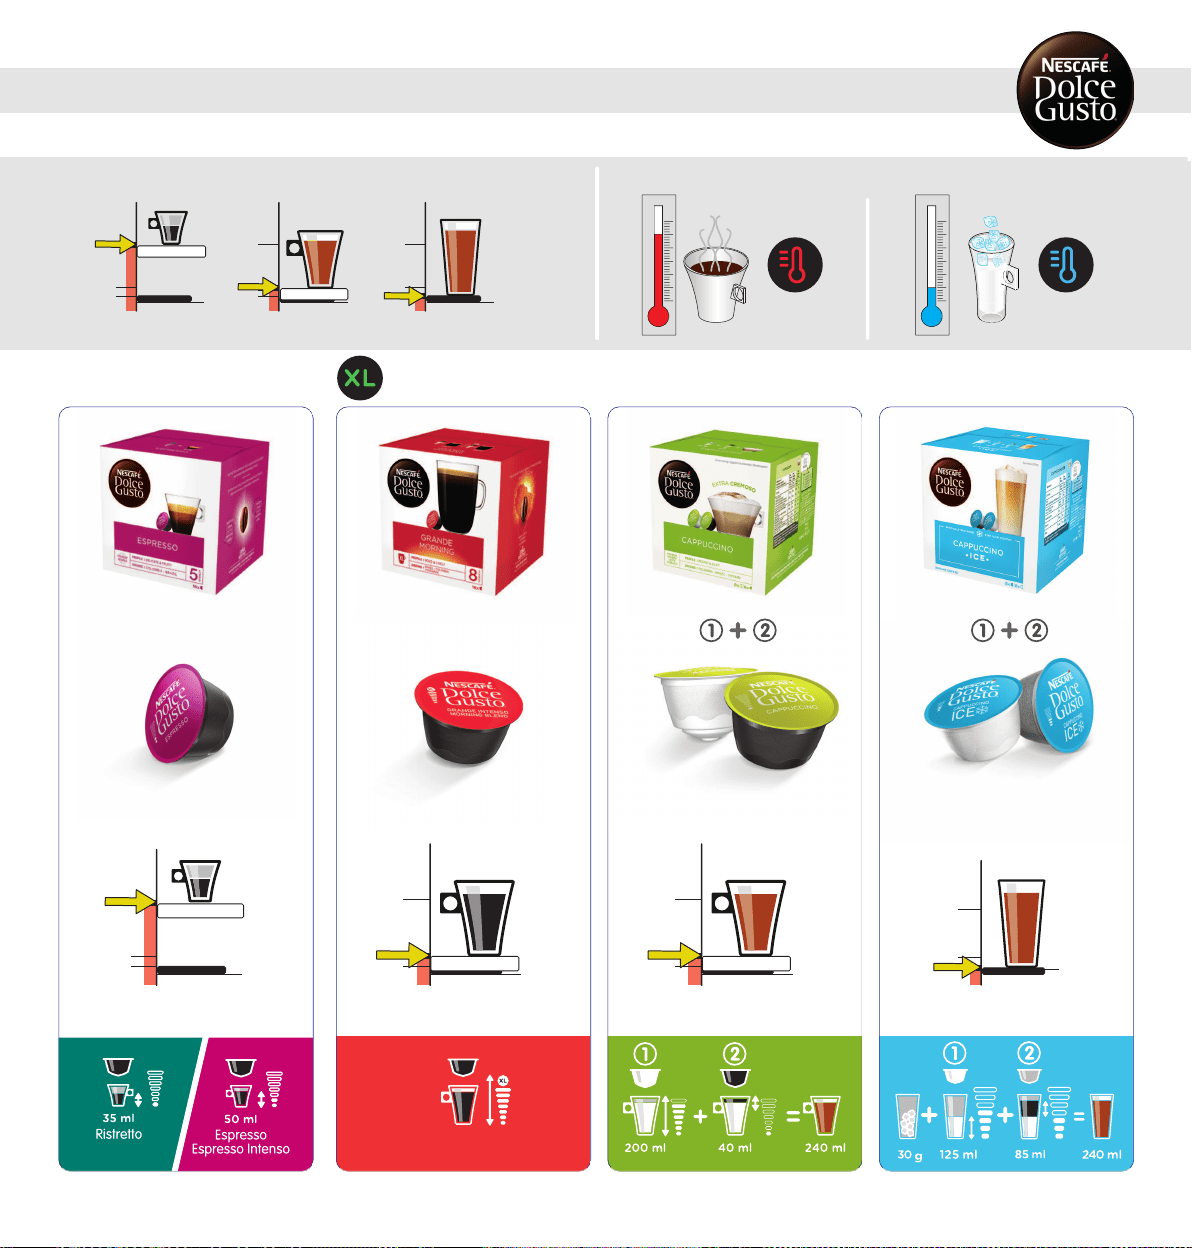
4. BEVERAGE EXAMPLES 11
5. RECOMMENDATIONSFORSAFEUSE 12
6. FIRSTUSERINSING 13
7. PREPARINGABEVERAGE 14
7. 1 ONE CAPSULE (E. G. LUNGO) 14
7. 2 TWO CAPSULES (E. G. CAPPUCCINO) 15
8. CLEANING 17
9. DESCALINGATLEASTEVERY3–4 MONTHS 18
10. TROUBLESHOOTING
20
10. 1 ORANGEDESCALINGINDICATORLIGHTTURNSON 20
2
TABLE OF CONTENTS

4
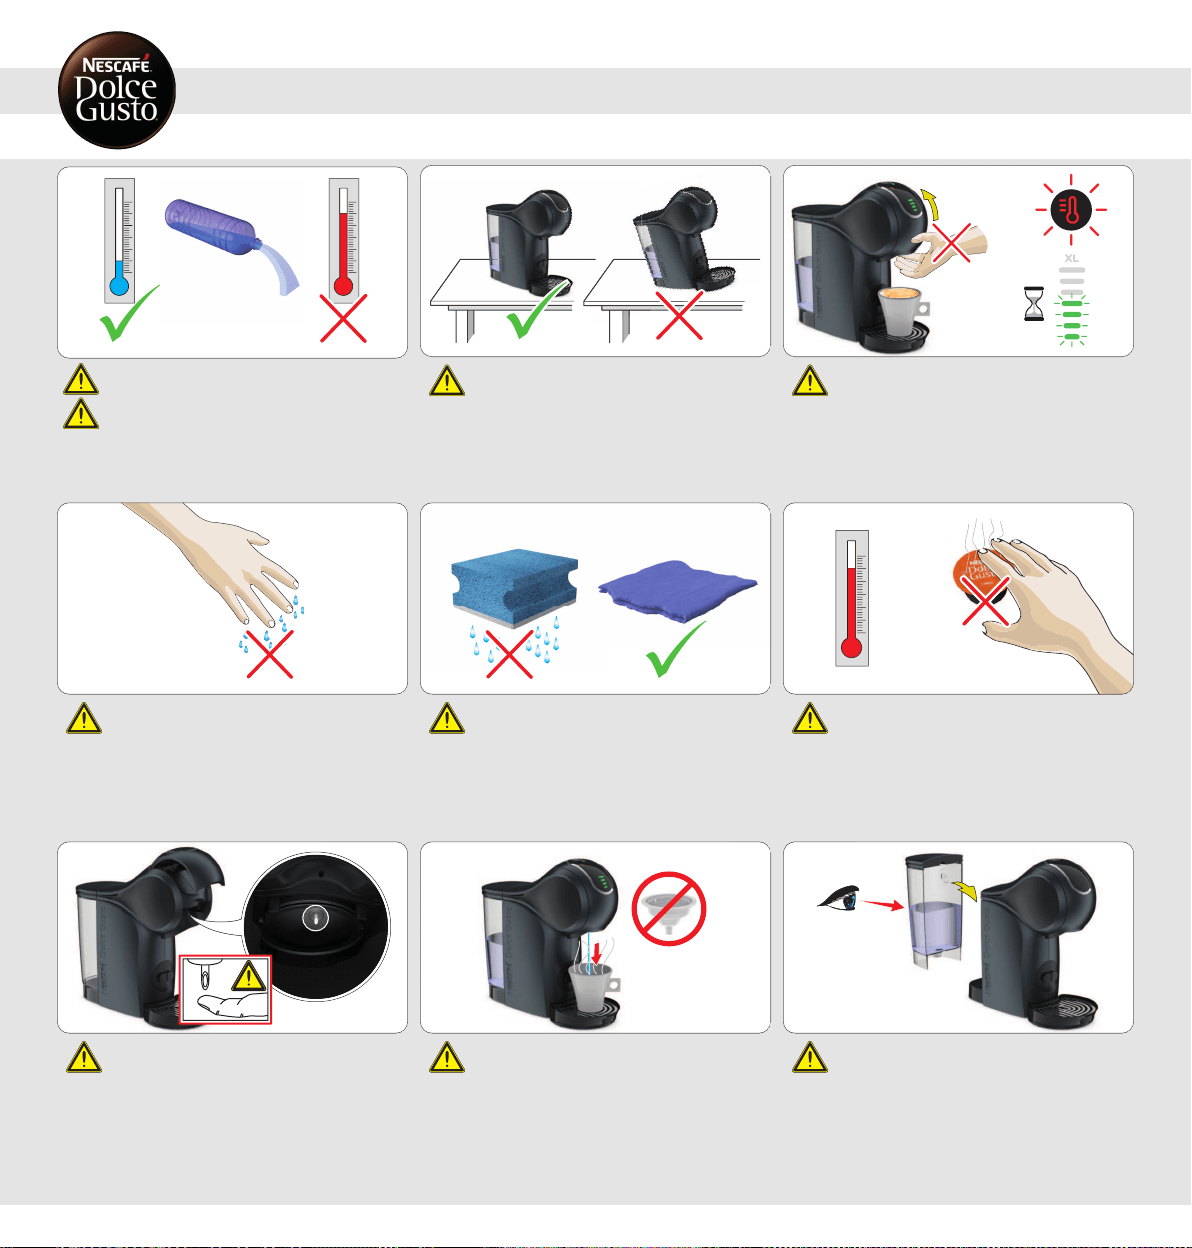
1. SAFETYPRECAUTIONS
Read all instructions and keep these safety instructions. Any type of
misuse of the appliance may result in a potential injury.
In case of any inappropriate use or failure to comply with the
instructions, the manufacturer accepts no responsibility and the
guarantee may not apply.
The guarantee does not cover appliances that do not work or do not
work properly because they have not been maintained and/or descaled.
INTENDED USE
1.
This appliance is intended to be used in household only. Itis not
intended to be used in following applications, and the guarantee will
not apply for:
– staff kitchen areas in shops, offices and other working
environments;
– farm houses;
– by clients in hotels, motels and other residential type
environments;
– bed and breakfast type environments;
2.
Your appliance is intended for domestic use inside the home only at
an altitude below 3400 m.
ELECTRICAL POWER SUPPLY
3.
Connect the appliance to a mains power socket with an earth
connection only. Mains voltage must be the same as the details on
the rating plate. The use of incorrect connection will negate the
guarantee and may be hazardous.
4.
To protect against fire, electric shock and injury to persons do not
immerse the power cord, plugs or the appliance in water or other
liquid. Avoid spillage on the plug. Never touch the power cord with
wet hands. Do not overfill the water tank.
5.
In case of an emergency remove the plug from the mains power
socket immediately.
6.
Unplug from the mains power socket when not in use.
7.
To disconnect, remove the plug from the mains power socket. Do not
unplug by pulling the cord.
8.
Do not let the cord hang over the edge of a table or counter, or touch
hot surfaces or sharp edges. Do not allow the cord to dangle (risk of
tripping up). Never touch the cord with wet hands.
9.
Do not operate any appliance with a damaged cord or plug. If the
power cord is damaged, itmust be replaced by the manufacturer, its
service agent or similarly qualified persons in order to avoid a
hazard. Do not operate any appliance that malfunctions or has been
damaged in any manner. Unplug cord immediately. Return the
damaged appliance to the nearest authorised service facility
designated by the NESCAFÉ
®
DolceGusto
®
hotline.
10.
If the mains power socket does not match the plug on the appliance,
have the plug replaced with a suitable type by aftersales service
centres designated by the NESCAFÉ
®
DolceGusto
®
hotline.
CONDITIONSOFUSE
11.
Always use the appliance on a flat, stable, heat resistant
surface away from sources of heat or water splashes.
12.
Do not use the appliance without the drip tray and drip grid,
except when a very tall mug is used. Do not use the appliance
for hot water preparation.
13.
Never turn the machine upside down.
14.
The use of accessory attachments not recommended by the
appliance manufacturer may result in fire, electric shock or
injury to persons.
15.
Do not place on or near a hot gas or electric burner, or in a
heated oven.
16.
Do not put fingers under the outlet during beverage
preparation.
17.
Do not touch the injector of the machine head.
18.
Never carry the appliance by the extraction head.
19.
The capsule holder is equipped with a permanent magnet.
Avoid placing the capsule holder near appliances and objects
that can be damaged by magnetism, e.g. credit cards, USB
drives and other data devices, video tapes, television and
computer monitors with picture tubes, mechanical clocks,
hearing aids and loud speakers.
20.
Do not turn off the appliance during the descaling process.
Rinse the water tank and clean the appliance to avoid any
residual descaling agent.
21.
If away for prolonged periods, on holiday, etc. the appliance
must be emptied, cleaned and unplugged. Rinse before reuse.
Operate the rinse cycle before re-using your appliance.
22.
We recommend using the NESCAFÉ
®
DolceGusto
®
capsules
designed and tested for the NESCAFÉ
®
DolceGusto
®
machine.
They were designed to interact together – the interaction
provides the in-cup quality that NESCAFÉ
®
DolceGusto
®
is
known for. Each capsule is designed to prepare a perfect cup,
and cannot be reused.
23.
Do not remove hot capsules by hand. Always use capsule
holder handle to dispose of used capsules.
24.
Always insert the capsule holder in the machine to prepare a
beverage. The appliance will not work if the capsule holder is
not inserted. Do not pull out the capsule holder before the
indicator stops blinking.
25.
Machines equipped with a locking handle: Scalding may occur
if the locking handle is opened during the brewing cycles. Do
not pull up the locking handle before the lights on the machine
stop flashing.
26.
For health reasons, always fill the water tank with fresh
drinking water.
27.
After use of the appliance always remove the capsule and
clean the capsule holder. Empty and clean the drip tray and
capsule bin daily. Food allergy sufferers must rinse the
appliance according to cleaning procedure.
28.
The heating element surface is subject to residual heat after use and
plastic housings may feel warm to touch several minutes upon use.
29.
Patients with pacemakers or defibrillators: Do not hold the capsule
holder directly over the pacemaker or defibrillator.
30.
The appliance shall not be placed in a cabinet when in use.
CHILDREN
31.
Keep the appliance and its cord out of reach of children aged less
than 8 years. Children shall not play with the appliance.
32.
This appliance can be used by children aged from 8 years and above
and persons with reduced physical, sensory or mental capabilities or
lack of experience and knowledge if they have been given
supervision or instruction concerning use of the appliance in a safe
way and if they understand the hazards involved.
33.
This appliance is not intended for use by children or persons with
reduced physical, sensory or mental capabilities, or lack of
experience and knowledge, unless they have been given supervision
or instruction concerning use of the appliance by a person
responsible for their safety. Persons who have a limited or no
understanding of the operation and use of this appliance must first
read and fully understand the contents of the user manual, and
where appropriate seek additional guidance on its operation and use
from the person responsible for their safety.
34.
Children should be supervised to ensure that they do not play with
the appliance.
35.
Cleaning and user maintenance shall not be made by children
unless they are older than 8 and supervised by an adult.
36.
Children should not use the appliance as a toy.
MAINTENANCE
37.
Unplug from the mains power socket before cleaning. Allow to cool
before putting on or taking off parts, before cleaning the appliance.
Never clean wet or immerse appliance in any fluid. Never clean the
appliance with running water. Never use detergents to clean the
appliance. Clean the appliance only using soft sponges/brushes. The
water tank should be cleaned with a clean food-safe brush.
38.
Any operation, cleaning and care other than normal use must be
undertaken by after-sales service centres designated by the
NESCAFÉ
®
DolceGusto
®
hotline. Do not dismantle appliance and do
not put anything into openings.
39.
To reduce the risk of fire or electric shock, do not remove the cover.
No user serviceable parts inside. Repair should be done by
authorized service personnel only!
40.
For additional guidance on how to use the appliance, refer to the
user manual on www.dolce-gusto.com or call the
NESCAFÉ
®
DolceGusto
®
hotline number.
RECYCLING
41.
Packaging is made of recyclable materials. Contact your local
council / authority for further information on recycling
programs. Your appliance contains valuable materials which
can be recovered or recycled.
EUROPEAN MARKETS ONLY: Think of the environment!
Your appliance contains valuable materials which
can be recovered or recycled.
Leave it at a local civic waste collection point or at
an approved service centre, where it will be
disposed of properly. European Directive 2012/19/EU
on Waste Electrical and Electronic Equipment
(WEEE), stipulates that used household appliances
must not be disposed of in normal unsorted
municipal waste. Old appliances must be collected
separately to optimise the sorting and recycling of
their parts and to reduce the impact on human
health and the environment.
5
1 2 6
9
4 5
3
7 8
1.
Water tank
2.
Water tank cover
3.
Touch interface
4.
Locking handle
5.
Rinsing tool
6.
Capsule holder
7.
Cleaning needle
8.
Injector
9.
Drip tray
ECONOMY MODE:
After 1 minute of non-usage upon an extraction.
5 minutes upon switch-on if no extraction.
Please be aware that the appliance is still using
electricity whilst in eco-mode (0.2 Wh).
TECHNICAL DATA
GB / IE
220–240 V, 50/60 Hz, 1340–1600 W
max. 15 bar
0.8 L
~2 kg
5–45°C
41–113°F
A = 11.21 cm
B = 27.20 cm
C = 28.81 cm
2. MACHINE OVERVIEW
6
7
3. KEY FEATURES
3. 1 TOUCH INTERFACE
3
5
6
1
4
2
1.
Start/Stop icon
Start/Stop the beverage preparation
2.
ESPRESSOBOOST
Boost the taste intensity of your Espressos
3.
Descaling indicator
The machine needs to be descaled after 300
extractions
4.
Touch the volume selector / Bar display
Allows to select the volume and shows the extraction
progress by moving down from the selected volume
until completion
5.
XL function
Prepare an extra large cup
6.
TEMPERATURESELECTION
The beverage temperature can be set (4 predefined
settings):
Cold Low Mid High
Cold, but the water temperature is still too high
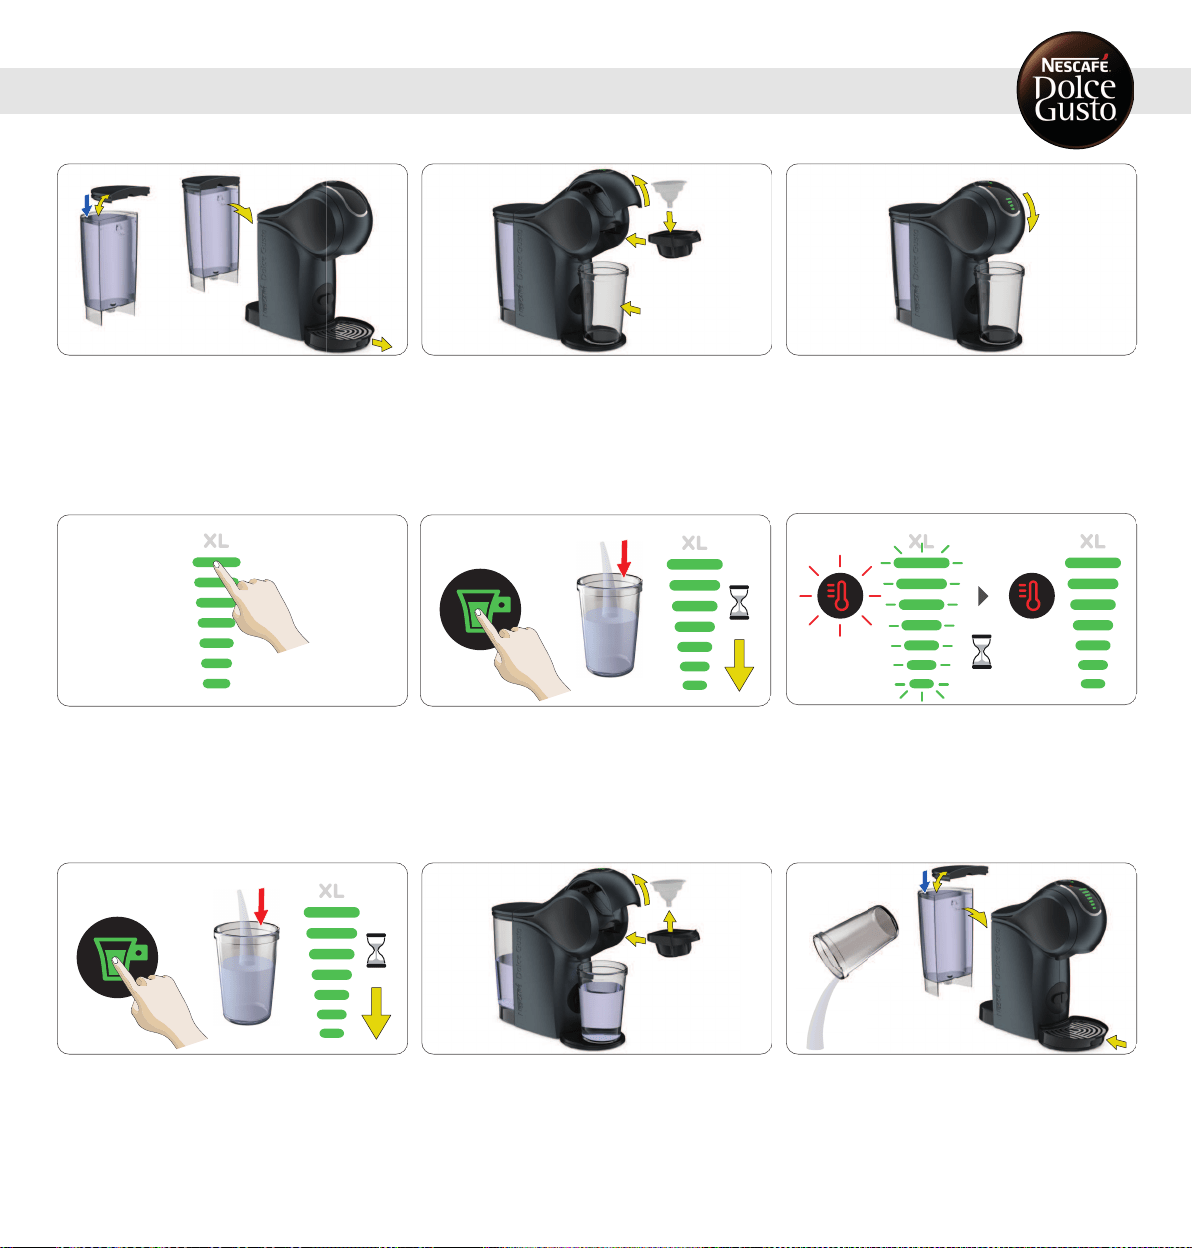
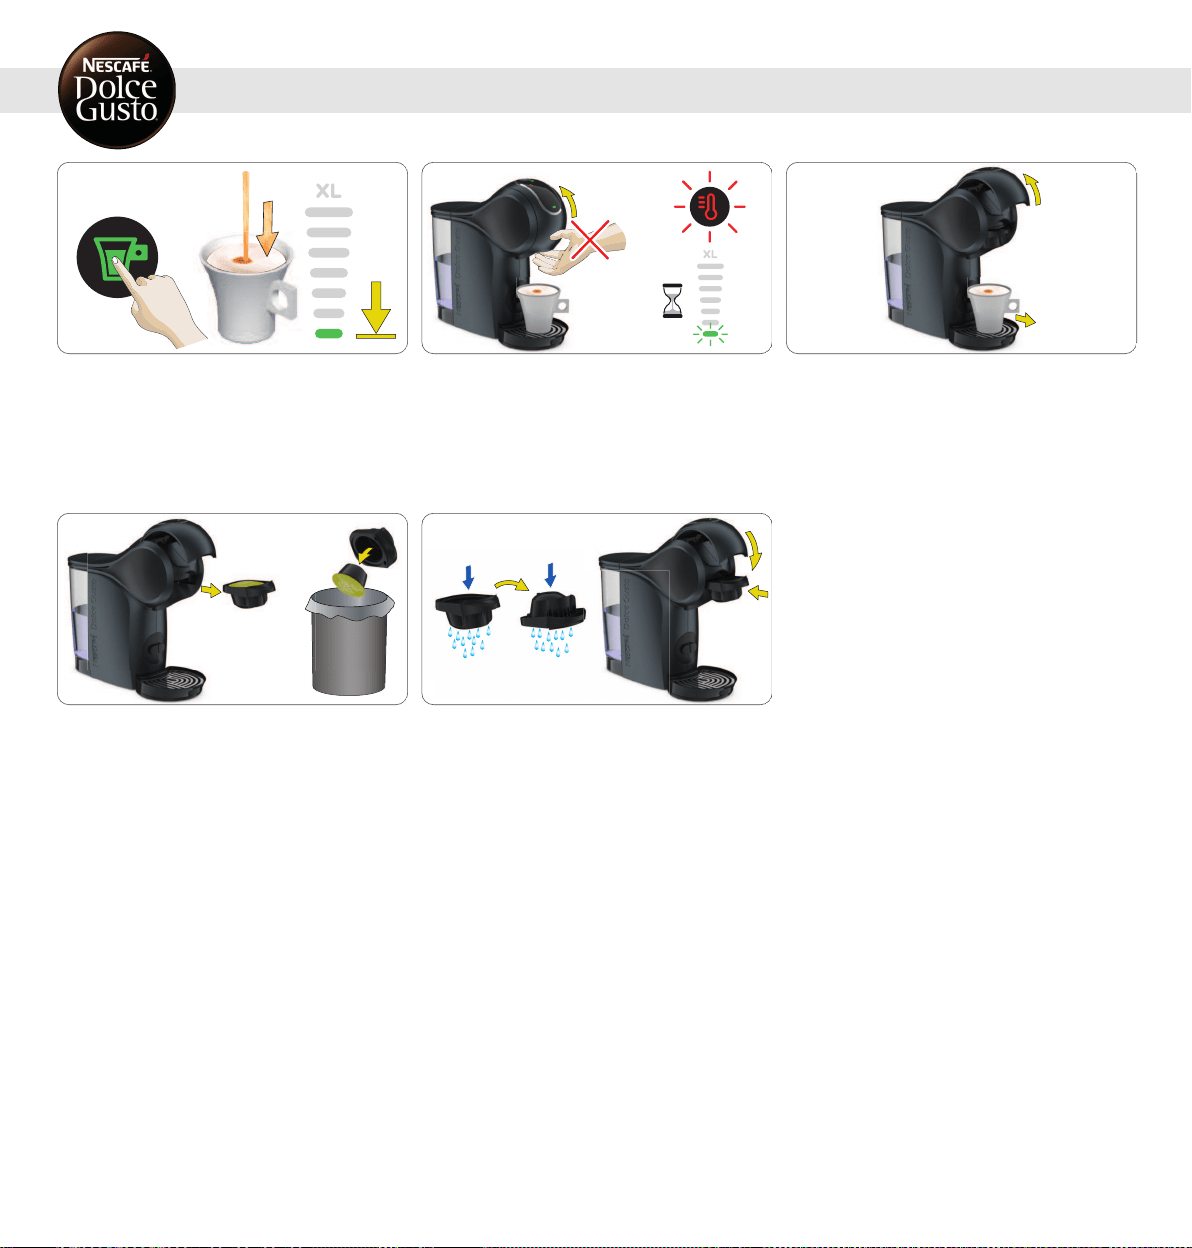
3. 2 HOWTOSTARTTHEMACHINE
1
Ensure to use the correctmains voltage as givenin 2.
"MACHINE OVERVIEW" onpage6. Connect the power plug to
the mains power socket.
2
Touch the interface to start the machine.
3
The machine can also be switched onby opening the
locking handle.
8
3. KEY FEATURES
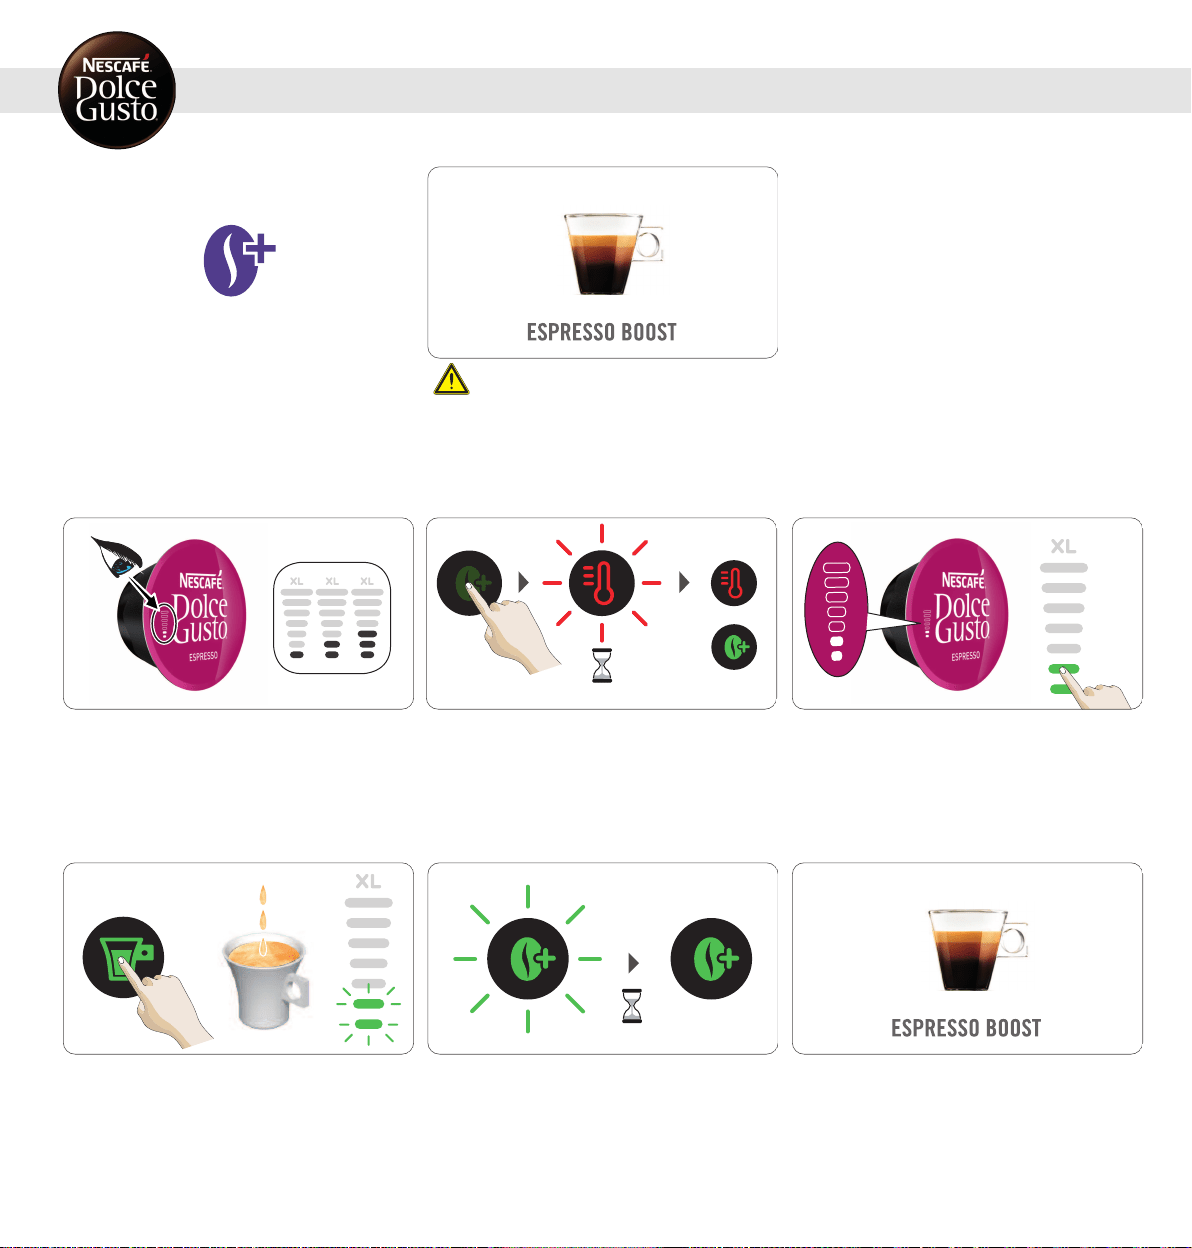
3. 3 ESPRESSOBOOST
Boost the taste intensity ofyour Espressos.
ESPRESSO BOOST cannot be selected incold mode.
Do not use ESPRESSO BOOST with milk, chocolate
and tea capsules.
1
Check the number of bars shown on the capsule. Prepare
ESPRESSO BOOST for capsules identifiedwith level 1, 2 & 3
only.
~5
–
10 s
2
Touch the ESPRESSO BOOST icon to switch to
ESPRESSOBOOST. The temperature selectioniconblinks
while the machine is heating up for approximately 5–10
seconds. Afterwards, the temperature selection icon lights
steady red. The machine is ready to be used.
3
Use the touch volume selector to illuminate the amount of
bars in accordance with the number of bars shown onthe
capsule, or select the amount of bars to your owntaste
(max level 3).
4
Touch the start/stop icon. The beverage preparationstarts.
Do not open the locking handle during the extraction.
~10 s
5
Pre-wetting:The preparation pauses and the ESPRESSO
BOOST iconstarts blinking. After approx. 10 seconds the
preparationcontinues and the ESPRESSO BOOSTicon is
steady green. Waituntil the machine stops automatically.
The extraction can be stopped at any time manually by
pressing the start/stop icon.
6
Enjoy your beverage!
9
3. KEY FEATURES
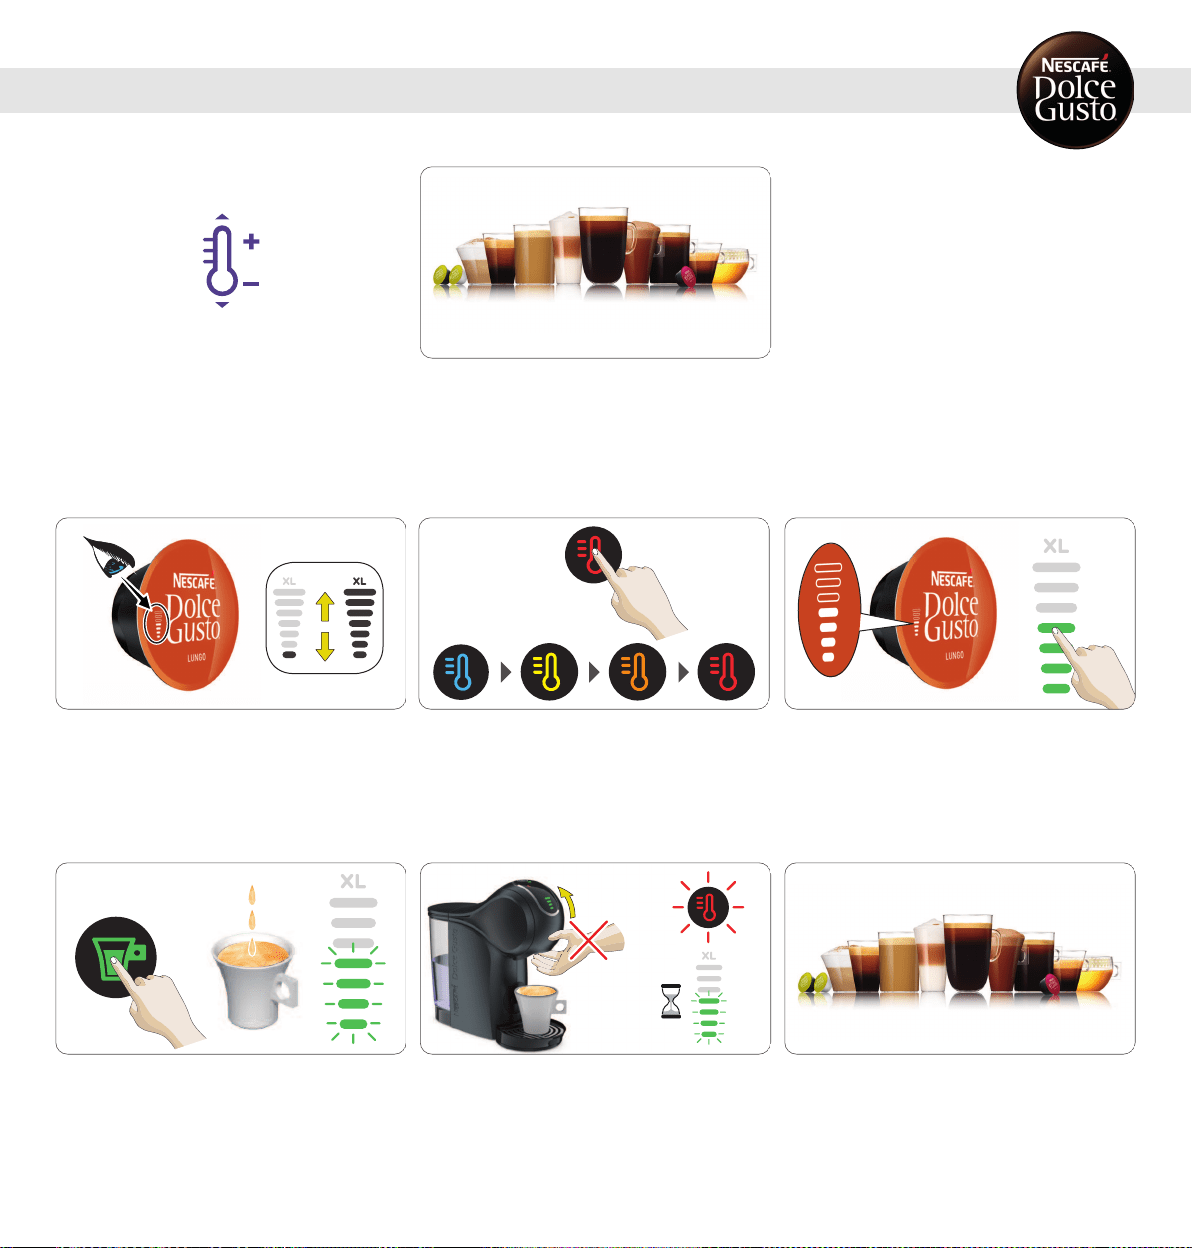
3. 4 TEMPERATURESELECTION
Customise the temperature of your coffees to your personal
taste. The machine provides you with four predefined
settings: cold, low, medium and high.
TEMPERATURE SELECTION
1
Check the number of bars shown on the capsule.
2
Touch the temperature selection icon to choose the desired
temperature of your beverage.
3
Use the touch volume selector to illuminate the amount of
bars in accordance with the number of bars shown onthe
capsule, or select the amount of bars to your owntaste.
4
Touch the start/stop icon. The beverage preparationstarts.
Do not open the locking handle during the extraction. Wait
until the extractionstops. The machine stops the
preparationautomatically. The extractioncan be stoppedat
any time manually by pressing the start/stop icon.
5
After finishing the preparation, the temperature selection
icon and the bar display light blink for up to 8 seconds.
During that time do not open the locking handle!
6
Enjoy your beverage!
10
3. KEY FEATURES
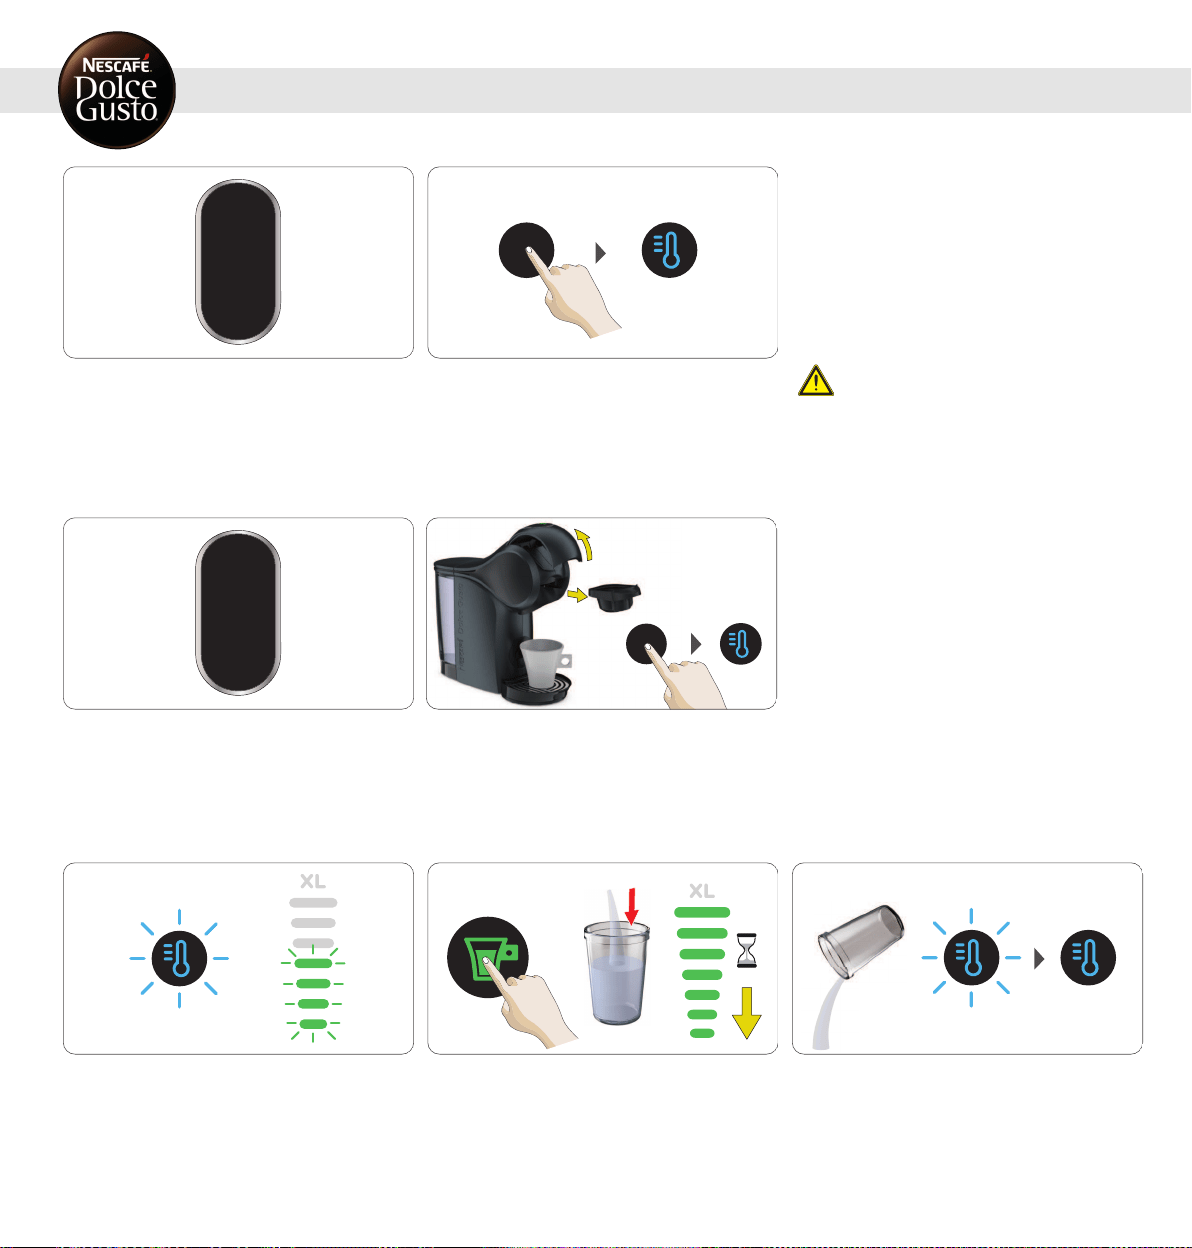
3. 5 COLD MODE
Option A: The machine is switched off.
1
Touch the temperature selection icon to start the machine
in cold mode. A cold beverage can be prepared
immediately.
The cold mode must only be usedwith dedicated
cold products, e. g. Cappuccino Ice.
Option B: The machine is switched off.
10 s
1
Open the locking handle. The machine switches on
automatically. Touch the temperature selectioniconwithin
10 seconds after starting the machine to change to cold
mode (blue). A coldbeverage can be prepared immediately.
1
Option C: A hot beverage has been prepared or the cold
mode was notselectedwithin 10 seconds after starting the
machine. Touch the temperature selectionicon to go into
cold mode. The temperature selection icon will blink blue to
indicate that the machine needs to cool down.
2
To accelerate the cooling, select level 7 on the bar display.
Touch the start/stop icon. Machine starts rinsing. The bar
display lights vanishprogressively.
3
Empty the container. The temperature selection icon is
steady blue to indicate that the machine is cooled down and
a cold beverage can be prepared.
Never add hot water to the water tank!
For rinsing and beverage preparationuse only
drinking water.
Always keep the machine upright! After finishing the preparation, the temperature
selection icon and the bar display light blink for
up to 8 seconds. During that time do not open the
locking handle! After that, the temperature
selection icon lights steadily.
Do not touch the plug with wet hands. Do not touch
the machine with wethands!
Never use a wet sponge. Only use a soft damp
cloth to clean the top of the machine.
Do not touch the usedcapsule after the beverage
preparation!Hotsurface, risk ofburns!
Never touch the injector with the finger! Do not use the rinsing tool for tea or hot water
preparation.
IF LEFT UNUSED FOR MORE THAN 2DAYS: Empty
the water tank, rinse it, refill itwith fresh drinking
water and insert it into the machine. Before reuse
rinse machine according to instructions in 8.
"CLEANING" on page17, beginning with step 4 to
step 8.
12
5. RECOMMENDATIONSFORSAFEUSE
1
Fill the water tank with freshdrinking water. Insert it back
into the machine. Remove the drip tray.
2
Open the locking handle. Put the rinsing tool into the
capsule holder. Insert the capsule holder into the machine.
Place a large empty container underneath the coffee outlet.
3
Close the locking handle.
4
Setthe bar display to the maximum level with the touch
volume selector.
5
Touch the start/stop icon. Machine starts rinsing.
6
The temperature selectionbuttonand the volume display
light blink for up to 8 seconds.
7
Touch the start/stop icon. Machine starts rinsing. Wait until
the machine stops automatically. The temperature selection
button and the volume display light blink for up to 8
seconds.
8
Open the locking handle. Pull out the capsule holder.
Remove the rinsing tool. Reinsert the capsule holder.
9
Empty the container. Fill the water tank with freshdrinking
water. Insert the water tank into the machine. Reinsert the
drip tray. The machine is ready to be used.
13
6. FIRSTUSERINSING
7. PREPARINGABEVERAGE
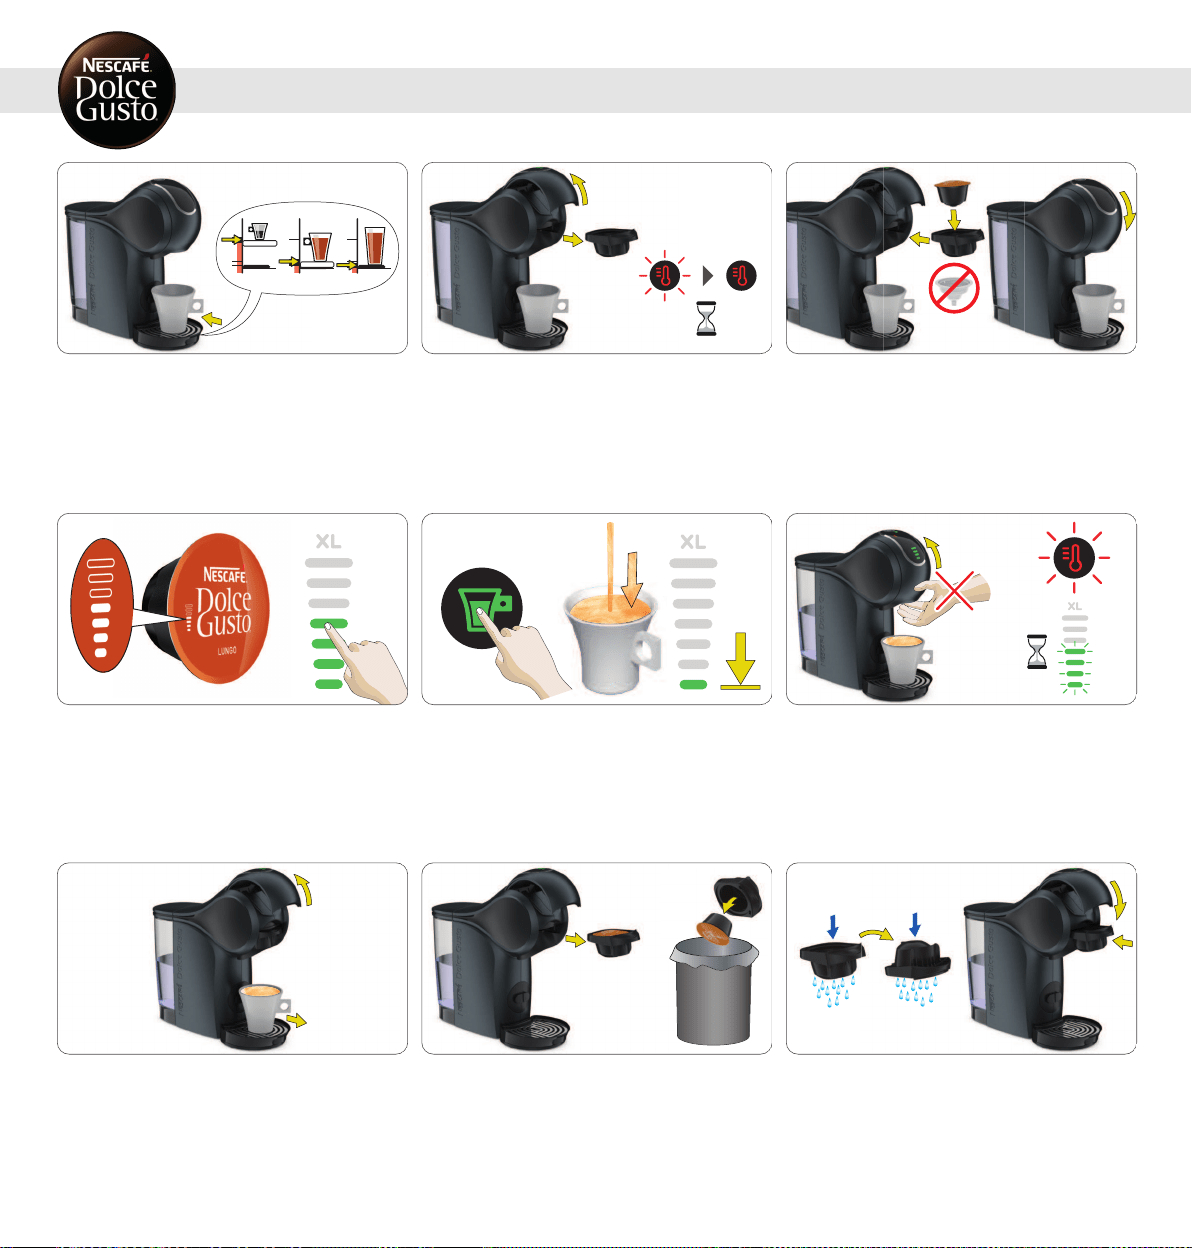
7. 1 ONE CAPSULE (E. G. LUNGO)
1
Adjust the drip tray position. Place the cup with the correct
cup size on the drip tray. See "BEVERAGE EXAMPLES" or
package. Check ifthe water tank contains enough fresh
drinking water.
2
Open the locking handle. The machine switches on
automatically. The temperature selection icon blinks while
the machine is heating up for approximately 40 seconds.
Afterwards, the temperature selection icon lights steady
red. The machine is ready to be used.
3
Make sure the rinsing tool is notinside. Insert the capsule
in the capsule holder. Insert it back into the machine. Close
the locking handle.
4
Use the touch volume selector to illuminate the amount of
bars in accordance with the number of bars shown onthe
capsule, or select the amount of bars to your owntaste.
Choose XL beverage for an extra big cup. Wait around 1.5
min if you want to prepare a second extra bigcup.
5
Touch the start/stop icon. The beverage preparationstarts.
Do not open the locking handle during the extraction. Wait
until the extractionstops. The machine stops the
preparationautomatically. The extractioncan be stoppedat
any time manually by pressing the start/stop icon.
6
After finishing the preparation, the temperature selection
icon and the bar display light blink for up to 8 seconds.
During that time do not open the locking handle!
7
After the extraction is finished openthe locking handle.
Remove the cup from the drip tray.
8
Pull out the capsule holder. Remove the used capsule. Put
the used capsule in the dustbin.
9
Rinse both sides ofthe capsule holder with freshdrinking
water. Dry the capsule holder. Insert it back into the
machine. Enjoy your beverage!
14
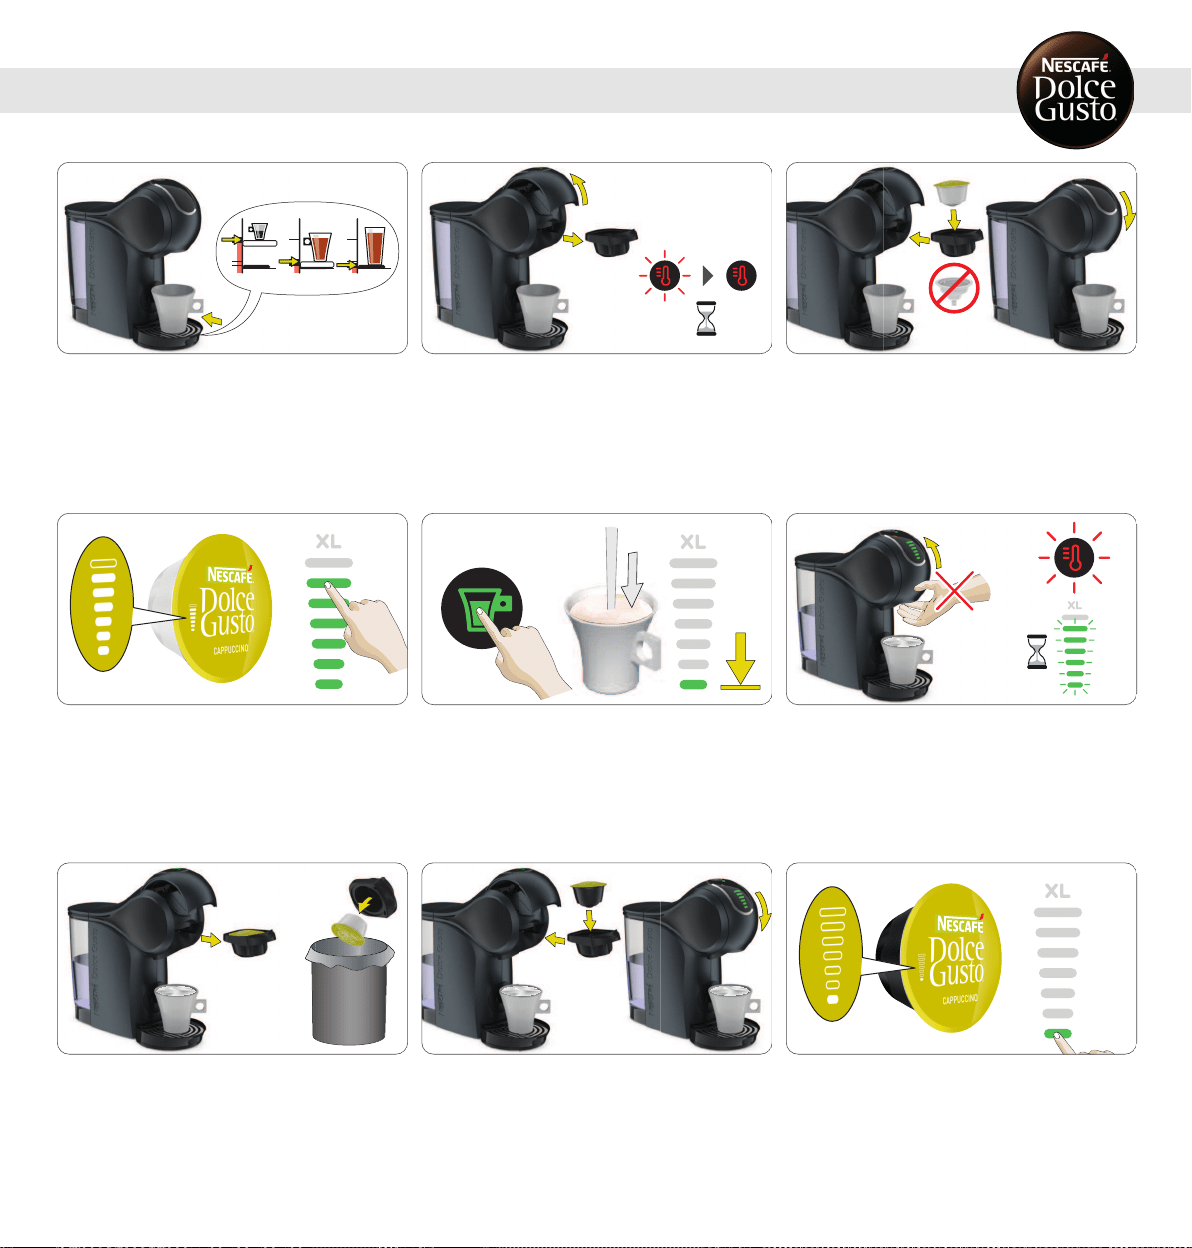
1
Adjust the drip tray position. Place the cup with the correct
cup size on the drip tray. See "BEVERAGE EXAMPLES" or
package. Check ifthe water tank contains enough fresh
drinking water.
2
Open the locking handle. The machine switches on
automatically. The temperature selection icon blinks while
the machine is heating up for approximately 40 seconds.
Afterwards, the temperature selection icon lights steady
red. The machine is ready to be used.
3
Make sure the rinsing tool is notinside. Insert the first
capsule in the capsule holder. Insert it back into the
machine. Close the locking handle.
4
Use the touch volume selector to illuminate the amount of
bars in accordance with the number of bars shown onthe
capsule, or select the amount of bars to your owntaste.
Choose XL beverage for an extra big cup. Wait around 1.5
min if you want to prepare a second extra bigcup.
5
Touch the start/stop icon. The beverage preparationstarts.
Do not open the locking handle during the extraction. Wait
until the extractionstops. The machine stops the
preparationautomatically. The extractioncan be stoppedat
any time manually by pressing the start/stop icon.
6
After finishing the preparation, the temperature selection
icon and the bar display light blink for up to 8 seconds.
During that time do not open the locking handle!
7
Open the locking handle. Pull out the capsule holder. Remove
the used capsule. Put the used capsule in the dustbin.
8
Insert the second capsule inthe capsule holder. Insert it
back into the machine. Close the locking handle.
9
Use the touch volume selector to illuminate the amount of
bars in accordance with the number of bars shown onthe
capsule, or select the amount of bars to your owntaste.
15
7. PREPARINGABEVERAGE
7. 2 TWO CAPSULES (E. G. CAPPUCCINO)
7. PREPARINGABEVERAGE
7. 2 TWO CAPSULES (E. G. CAPPUCCINO)
10
Touch the start/stop icon. The beverage preparationstarts.
Do not open the locking handle during the extraction. Wait
until the extractionstops. The machine stops the
preparationautomatically. The extractioncan be stoppedat
any time manually by pressing the start/stop icon.
11
After finishing the preparation, the temperature selection
icon and the bar display light blink for up to 8 seconds.
During that time do not open the locking handle!
12
When the indicator light is steady greenopen the locking
handle. Remove the cup from the driptray.
13
Pull out the capsule holder. Remove the used capsule. Put
the used capsule in the dustbin.
14
Rinse both sides ofthe capsule holder with freshdrinking
water. Dry the capsule holder. Insert it back into the
machine. Enjoy your beverage!
16
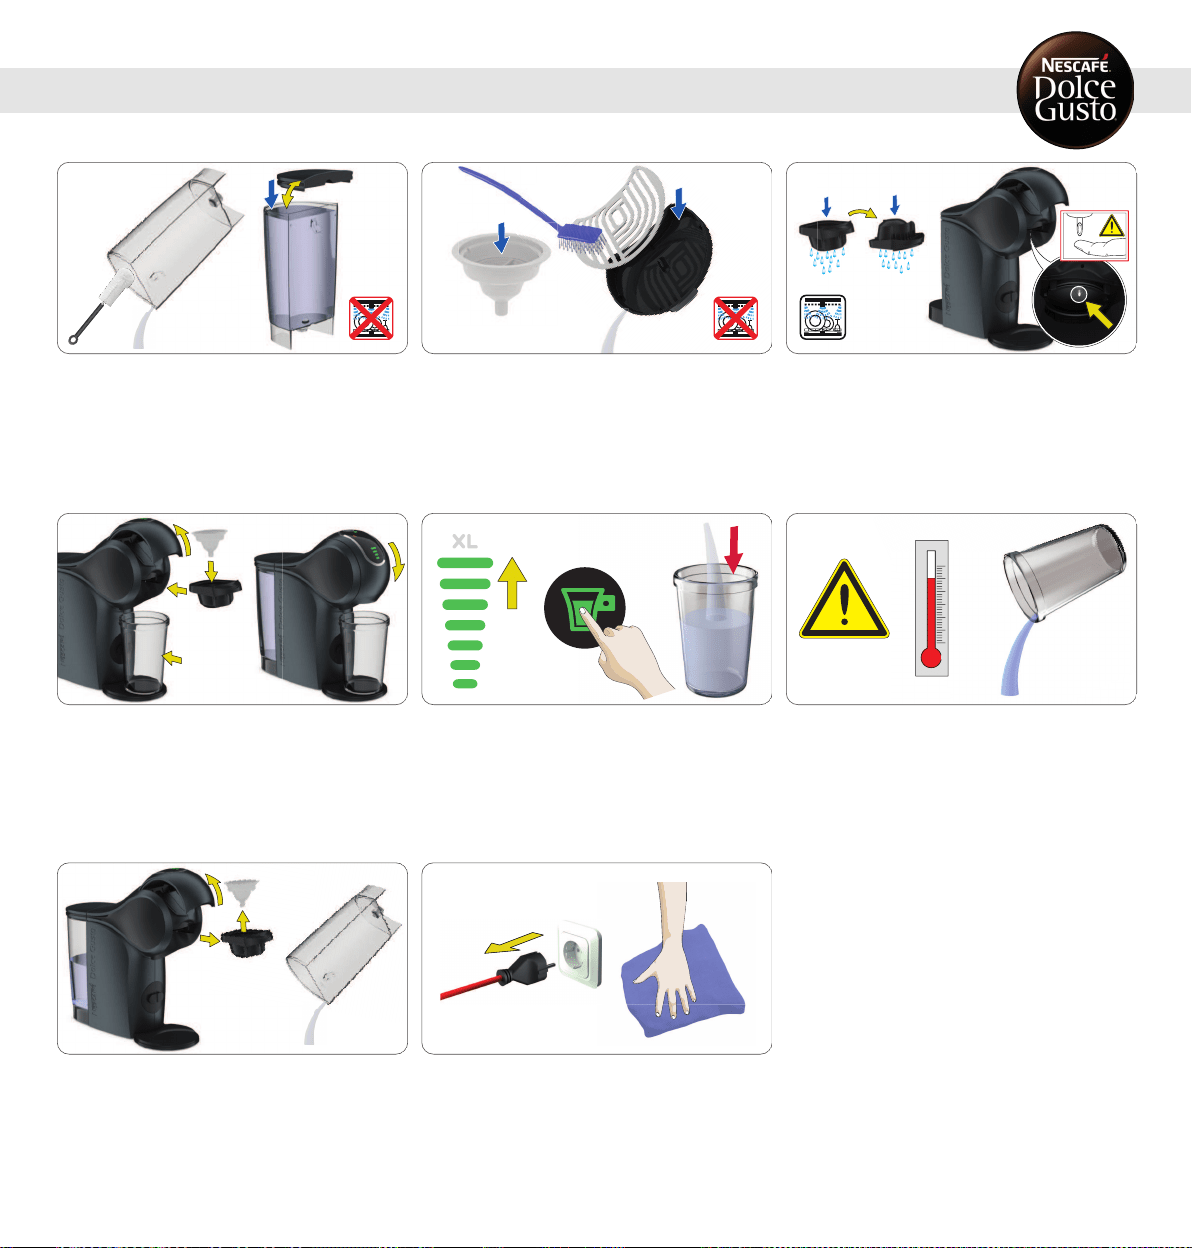
1
Rinse and clean the water tank. Use a clean food-safe brush
and washing-up liquid as needed. Afterwards refill with
fresh drinking water and insert it into the machine. The
water tank is not dishwasher safe!
2
Rinse the drip tray and the rinsing tool with fresh drinking
water. Clean the driptray with a clean food-safe brush. The
drip tray is not dishwasher safe!
3
Clean both sides of the capsule holder with washing-up
liquid and freshdrinking water. Alternatively wash in the
dishwasher. Dry it afterwards. Clean the head of the
machine around the injector with a clean soft dampcloth.
4
Open the locking handle. Put the rinsing tool into the
capsule holder. Insert the capsule holder into the machine.
Close the locking handle. Remove the drip tray. Place a
large empty container underneath the coffee outlet.
5
Setthe bar display to the maximum level with the touch
volume selector. Touch the start/stop icon. Machine starts
rinsing.
6
Empty and clean the container. Warning: Hot water! Handle
with care!
7
Open the locking handle. Pull out the capsule holder.
Remove the rinsing tool. Keep itin a safe place for later
cleaning or descaling. Ifany, remove the water from the
water tank.
8
Switch off the machine. Unplug the power plug!Clean the
machine with a soft damp cloth. Dry it afterwards with a
soft dry cloth.
8. CLEANING
17
www.dolce-gusto.com
Use NESCAFÉ
®
DolceGusto
®
liquid
descaler. To order, call the
NESCAFÉ
®
DolceGusto
®
hotline or go on
the NESCAFÉ
®
DolceGusto
®
website.
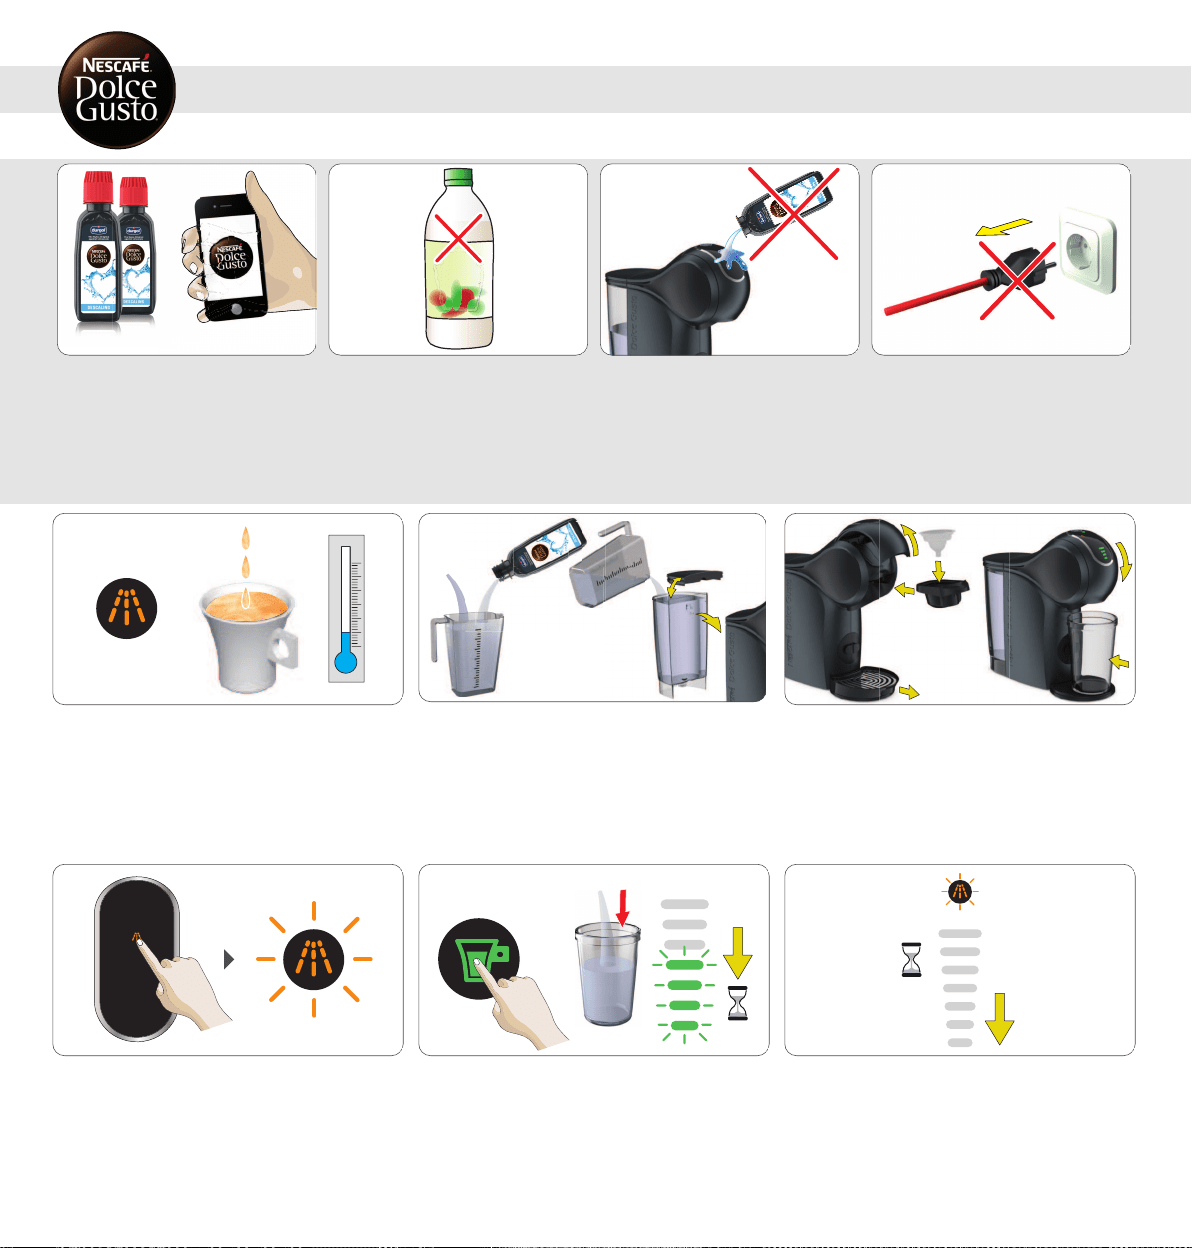
Do not use vinegar for descaling! Avoid contact of the descaling liquid with
any part of the machine.
Do not unplug the machine during descaling!
1
If the orange descaling indicator light turns on, or the
beverage comes out slower than usual (evenin droplets), or
if it is cooler than usual, the machine has to be descaled.
0.5 L
L
2
If any, remove the water from the water tank. Mix 0.5 liter
of freshdrinking water with the descaler in a measuring
cup. Pour the descaling solution into the water tank and
insert the water tank into the machine.
3
Open the locking handle. Put the rinsing tool into the
capsule holder. Insert the capsule holder into the machine.
Close the locking handle. Place a large empty container
underneath the coffee outlet.
4
Touch the descaling icon for 5 seconds until the descaling
LED starts blinking. The machine enters the descaling
mode.
5
Touch the start/stop icon. The machine starts descaling.
The bar display moves from the top down to the 4
th
level.
The machine descales with hot water in start-stop
operation. The machine stops descaling once the water tank
is empty.
18
6
To allow a better descaling efficiency, the machine is on
holdapproximately 2 minutes. The bar display lights vanish
progressively.
9. DESCALINGATLEASTEVERY3–4 MONTHS
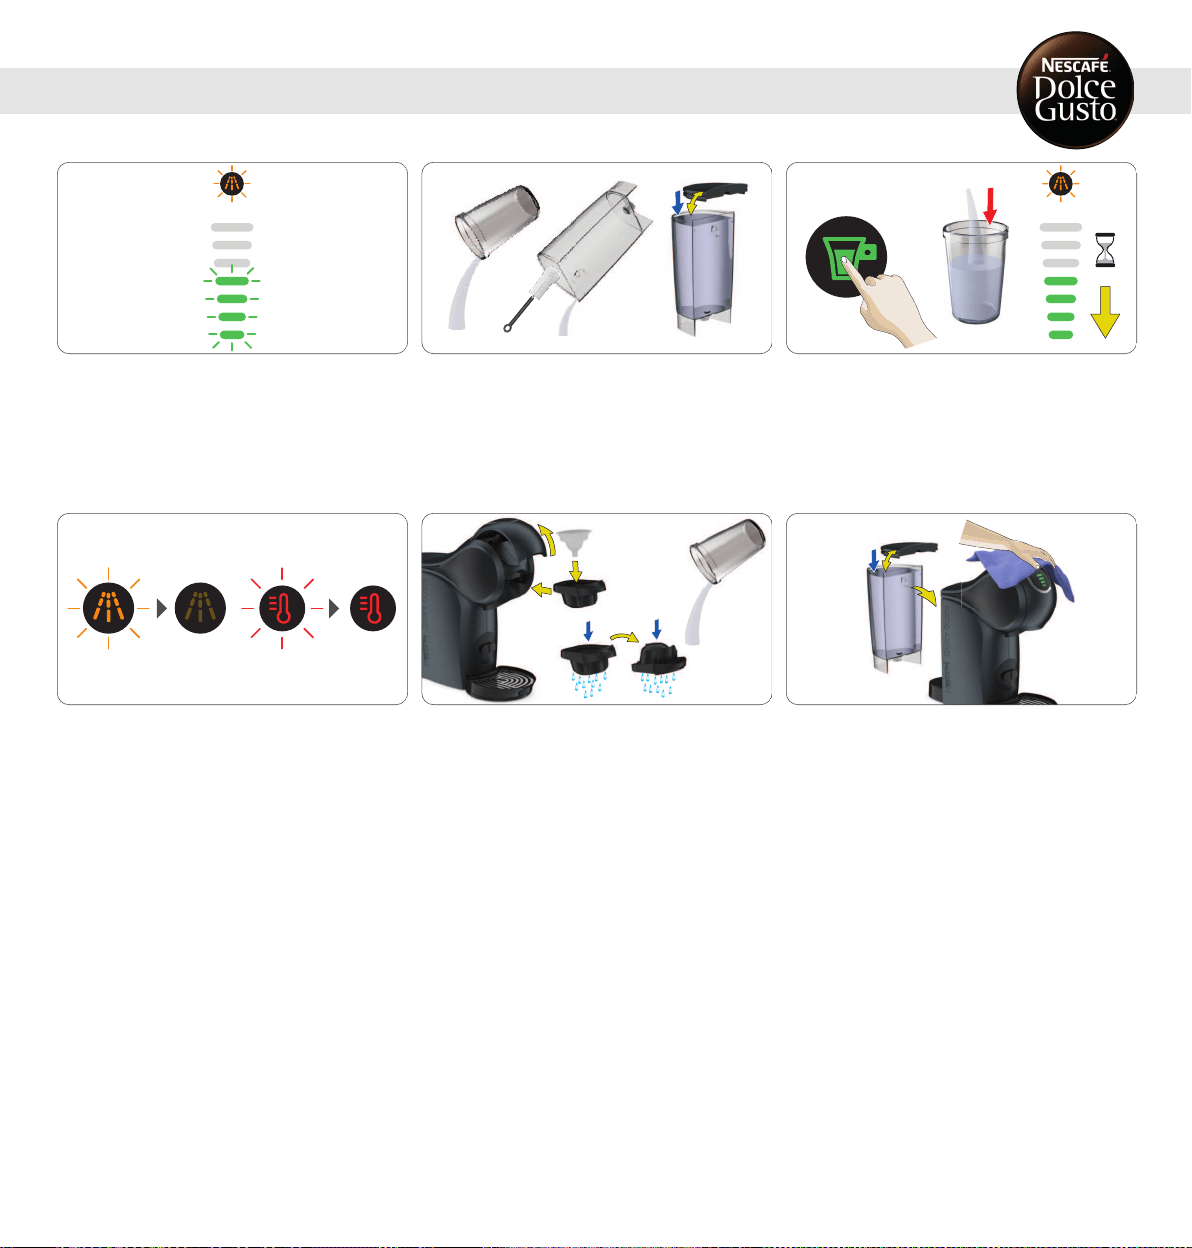
7
The bar display flashes (4
th
level).
8
Empty and clean the container. Rinse and clean the water
tank. Use a clean food-safe brush and washing-up liquid as
needed. Refill the water tank with freshdrinking water and
insert it into the machine. Place the container underneath
the beverage outlet.
9
Touch the start/stop icon. The machine rinses continuously
with hot water. The bar display lights vanish progressively.
The machine stops rinsing once the water tank is empty.
10
The descaling indicator turns off, the temperature selection
blinks and turns steady red once the machine is ready to
use.
11
Remove the container. Empty and clean the container. Pull
out the capsule holder. Remove the rinsing tool. Keep itin a
safe place for later cleaning or descaling. Rinse both sides
of the capsule holder with fresh drinking water. Reinsert
the capsule holder.
12
Clean the machine with a soft damp cloth. Dry it afterwards
with a soft dry cloth.
19
9. DESCALINGATLEASTEVERY3–4 MONTHS
20
10. TROUBLESHOOTING
10. 1 ORANGEDESCALINGINDICATORLIGHTTURNSON
The orange descaling indicator light turns on.
1
This means that the machine needs to be descaled. To do
so, please follow the descaling instructions. See 9.
"DESCALINGATLEASTEVERY3–4 MONTHS" onpage18.
The beverage preparation stops part way during the
delivery or does notstart at all. The bar display flashes at
the current level. No liquid comes out: The water tank may
be empty.
1
Check if the water tank contains enough fresh drinking
water. Ifnot, refill with fresh drinking water and touch the
start/stop icon to continue the preparation. Incase there is
still no liquid coming out check 10.3 "NO LIQUID COMES
OUT – CAPSULEBLOCKED?".
10. 2 NO LIQUID COMES OUT – NO WATER?
No liquid comes out: The capsule may be blocked and under
pressure.
1
Always keep the machine upright! To stop the preparation,
touch the start/stop icon again. Do not unplug the machine!
2
Do not drink the coffee!Open the locking handle. The
machine releases pressure. Remove the capsule holder.
Put the usedcapsule in the dustbin.
3
Try to operate the machine without capsule. If the water
flows, it shows that the issue was with the capsule. Just
use a different capsule. If not, follow with 10.4 "NOLIQUID
COMESOUT- INJECTORBLOCKED?".
No liquid comes out: The injector may be blockedand under
pressure.
1
Ensure the drip tray is empty. Take out the cleaning needle.
Keep the needle out of reach of children!
2
Remove the capsule holder. Open the locking handle. Clean
the injector with the cleaning needle. Follow instructions in
9. "DESCALINGATLEASTEVERY3–4 MONTHS" onpage18.
21
10. TROUBLESHOOTING
10. 3 NOLIQUIDCOMESOUT – CAPSULEBLOCKED?
10. 4 NOLIQUIDCOMESOUT– INJECTORBLOCKED?
10. TROUBLESHOOTING
10. 5 VARIOUS
The machine cannot be switched on.
1
Check if the power plug is correctly plugged into a mains
power socket. Ifyes, check your electricity supply.
2
If the machine still cannot be switched on, call the
NESCAFÉ
®
DolceGusto
®
hotline. For the hotline numbers
see "Machine Hotlines".
The beverage is splashing out ofthe coffee outlet.
1
Touch the start/stop icon to stop the preparation. Pull out
the capsule holder. Put the used capsule inthe dustbin.
2
Clean the capsule holder. Insert a new capsule inthe
capsule holder and insert itback into machine.
If the beverage comes out slower than usual (evenin
droplets), or if it is cooler than usual the machine has to be
descaled.
www.dolce-gusto.com
1
To do so, please follow the descaling instructions. See 9.
"DESCALINGATLEASTEVERY3–4 MONTHS" onpage18.
22
The temperature selectioniconblinks fast.
1
Check if capsule is blocked, see 10.3.
"NOLIQUIDCOMESOUT – CAPSULEBLOCKED?" onpage21.
Unplug the power plug and wait 20 minutes. Afterwards,
insert the power plug into the mains power socketand
switchthe machine on.
2
If the temperature selection icon still flashes fast call the
NESCAFÉ
®
DolceGusto
®
hotline. For the hotline numbers
see last page.
Water accumulates underneath or around the machine.
Clear water leaks around the capsule holder during the
beverage preparation.
1
Unplug the power plug!
2
Call the NESCAFÉ
®
DolceGusto
®
hotline or go on the
NESCAFÉ
®
DolceGusto
®
website. For the hotline numbers
see last page.
Water is splashing out of the coffee outlet during rinsing or
descaling.
1
Put the rinsing tool into the capsule holder. Insert the
capsule holder into the machine.
23
10. TROUBLESHOOTING
10. 5 VARIOUS

0800 999 81 00
AR
0800 7762233
BR
1 888 809 9267
CA
0800 86 00 85
CH
800 213 006
CL
01800-05-15566
CO
0-800-542-5444
CR
(809) 508-5100
DO
1800 637-853 (1800 NESTLE)
EC
1-800-299-0019
GT
800-2220-6666
HN
800 365 2348
MX
1-800-4000
NI
800-0000
PA
80010210
PE
0800-112121
PY
(868) 663-6832
TT
1-800-745-3391
US
0800-2122
UY
0800 365 23 48
AT
0800 93217
BE
0 700 10 330
BG
800 135 135
CZ
0800 365 23 48
DE
80 300 100
DK
6 177 441
EE
900 10 21 21
ES
0800 0 6161
FI
0 800 97 07 80
FR
0800 707 6066
GB
210 6371000
GR
0800 600 604
HR
06 40 214 200
HU
00800 6378 5385
IE
800365234
IT
8-800-080-2880
KZ
8 700 55 200
LT
8002 3183
LU
67508056
LV
080 100 52 54
MA
0800 00 200
MK
80074114
MT
0800-3652348
NL
800 80 730
NO
0800 174 902
PL
800 200 153
PT
0 800 8 637 853
RO
0800 135 135
SK
0800 000 100
SR
020-299200
SV
0800 211 02 18
TR
4 44 31 60
0 800 50 30 10
UA
0842 640 10
AL
1800 466 975
AU
0800 365 234
NZ
800348786
AE
0800 202 42
BA
4006304868
CN
(852) 21798999
HK
0800 182 1028
ID
1-700-50-20-54
IL
+96265902997
JO
0120-879-816
JP
080-234-0070
KR
+965 22286847
KW
+9614548593
LB
020 269 902
ME
Middle East: +97143634100
1800 88 3633
MY
898-0061
PH
0800-62282
PK
+97444587615
QA
8-800-700-79-79
RU
8008971971
SA
1 800 836 7009
SG
080 45 05
SI
1-800-295588
TH
0-2657-8601
0800-000-338
TW
1800 6699
VN
086 009 6116
ZA
+27 11 514 6116
HOTLINES
UMDL-GST-EN 2020/02
www.dolce-gusto.com