Loading ...
Loading ...
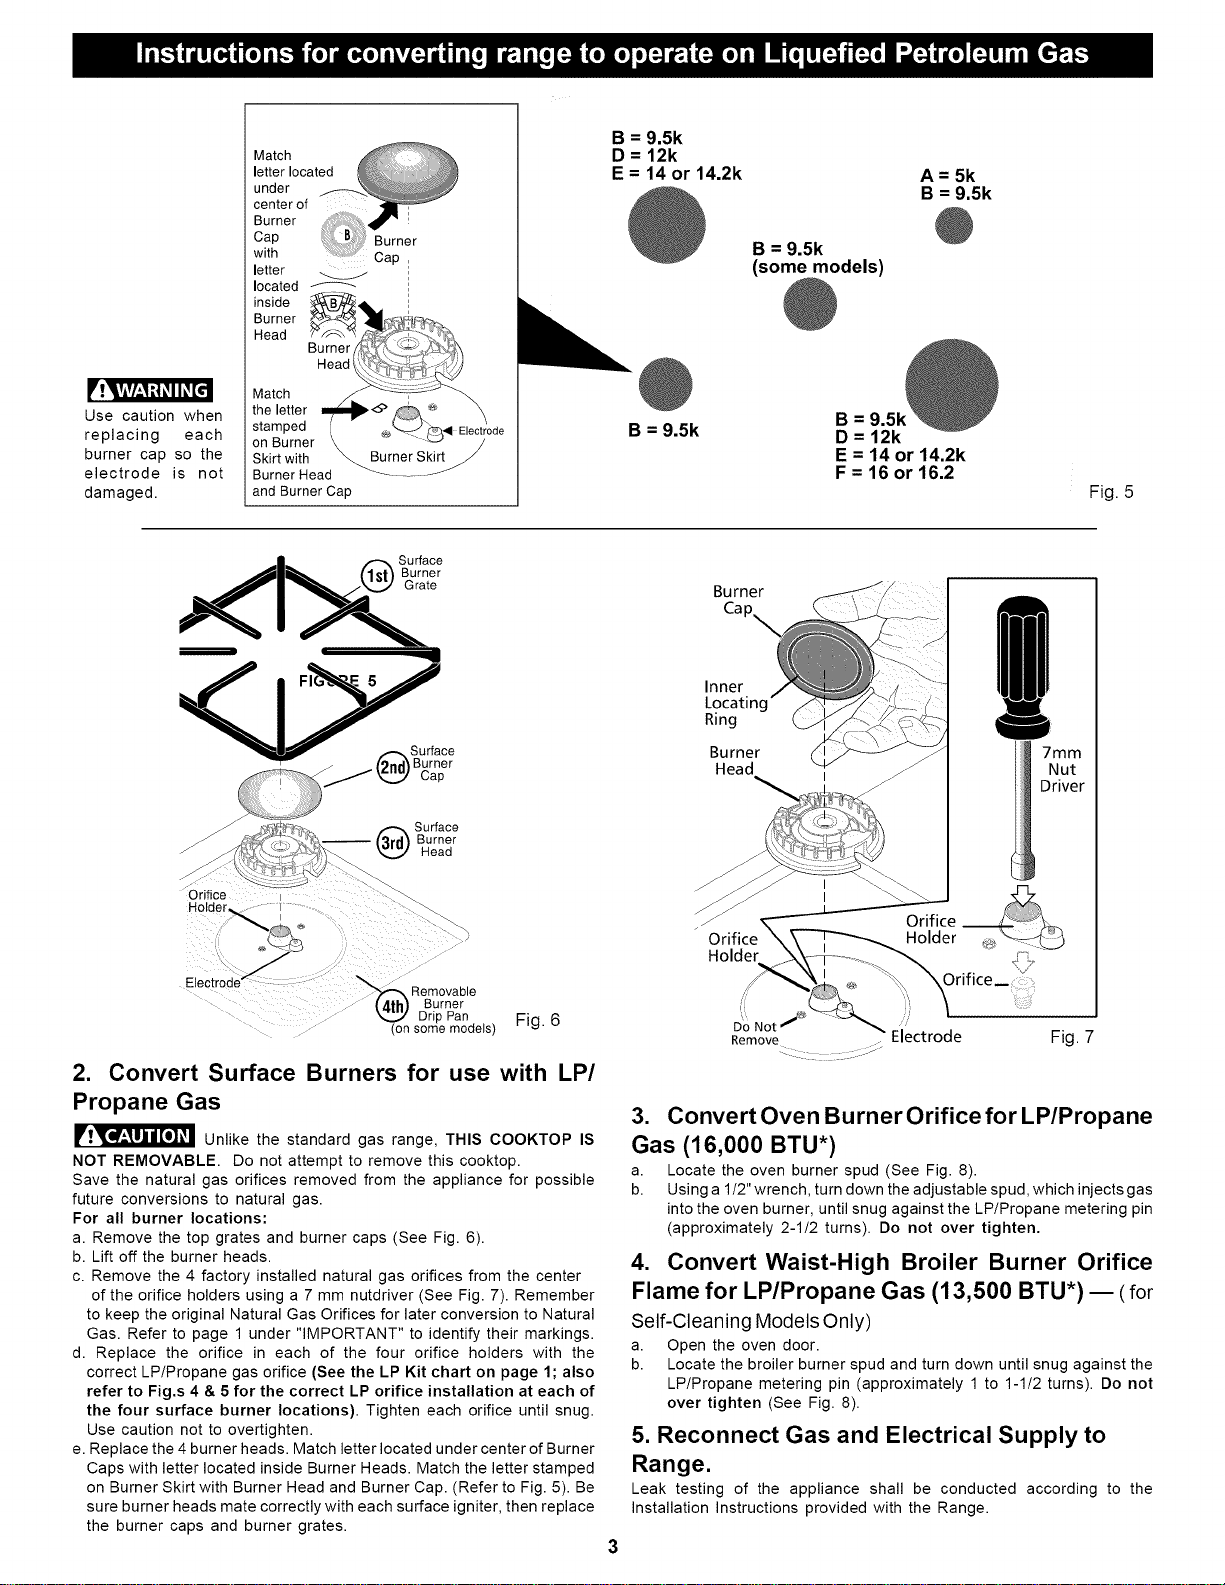
Use caution when
replacing each
burner cap so the
electrode is not
damaged.
Match
letter located
under
center of
Burner i
Cap Burner
with Cap
letter
located
inside _L,J i
Burner _,_,._<._.!_::_;_¢_>,.
Head _'_'_
Burner/_/_,_, .....
Head
Match
the letter
stamped [ ___ _4 Electrode
on Burner \ _--' /
Skirt with _Burner Skirt _
Burner Head -_-_
and BurnerCap
B = 9.5k
D=12k
E = 14 or 14.2k
B = 9.5k
A= 5k
B = 9.5k
B = 9.5k
(some models)
@
B = 9.5k
D=12k
E = 14 or 14.2k
F = 16 or 16.2
Fig. 5
• _ Surface
_1_,_ (l__t_Burner
@soo e
Surface
Burner
/" Head
Orifice i
Burner
Cap_
Inner
Locatinc
Ring
Burner
Head
7mm
Nut
Driver
Fig. 6
2. Convert Surface Burners for use with LP/
Propane Gas
[_r__ Unlike the standard gas range, THIS COOKTOP IS
NOT REMOVABLE. Do not attempt to remove this cooktop.
Save the natural gas orifices removed from the appliance for possible
future conversions to natural gas.
For all burner locations:
a. Remove the top grates and burner caps (See Fig. 6).
b. Lift off the burner heads.
c. Remove the 4 factory installed natural gas orifices from the center
of the orifice holders using a 7 mm nutdriver (See Fig. 7). Remember
to keep the original Natural Gas Orifices for later conversion to Natural
Gas. Refer to page 1 under "IMPORTANT" to identify their markings.
d. Replace the orifice in each of the four orifice holders with the
correct LP/Propane gas orifice (See the LP Kit chart on page 1; also
refer to Fig,s 4 & 5 for the correct LP orifice installation at each of
the four surface burner locations). Tighten each orifice until snug.
Use caution not to overtighten.
e. Replace the 4 burner heads. Match letter located under center of Burner
Caps with letter located inside Burner Heads. Match the letter stamped
on Burner Skirt with Burner Head and Burner Cap. (Refer to Fig. 5). Be
sure burner heads mate correctly with each surface igniter, then replace
the burner caps and burner grates.
Holder
Not /
Remove Electrode Fig. 7
3. Convert Oven Burner Orifice for LP/Propane
Gas (16,000 BTU*)
a. Locate the oven burner spud (See Fig. 8).
b. Using a 1/2" wrench, turn down the adjustable spud, which injects gas
into the oven burner, until snug against the LP/Propane metering pin
(approximately 2-1/2 turns). Do not over tighten.
4. Convert Waist-High Broiler Burner Orifice
Flame for LP/Propane Gas (13,500 BTU*) -- (for
Self-Cleaning Models Only)
a. Open the oven door.
b. Locate the broiler burner spud and turn down until snug against the
LP/Propane metering pin (approximately 1 to 1-1/2 turns). Do not
over tighten (See Fig. 8).
5. Reconnect Gas and Electrical Supply to
Range.
Leak testing of the appliance shall be conducted according to the
Installation Instructions provided with the Range.
Loading ...
Loading ...